RunCache is a next-generation WordPress caching solution that connects page, object, and edge caching into a single, powerful dashboard.
It also integrates directly with your RunCloud server, allowing you to control high-performance, server-level technologies such as NGINX, FastCGI, or Redis from your WordPress admin area.
This guide will walk you through installing, activating, and configuring the RunCache plugin for optimal performance.
Try RunCache Without Installing
Want to see how it works first? You can explore a live demo and test the RunCache dashboard on a pre-configured site without any installation.
Explore the RunCache Live Dashboard
Installation
Unlike other performance plugins that lock you into a specific hosting provider or ecosystem, RunCache is truly vendor-neutral.
While it offers unparalleled integration for users on a RunCloud-managed server, its core features work in any hosting environment.
This means you can use RunCache’s powerful dashboard, PHP caching, and CDN integrations on your existing site, regardless of where it’s hosted, giving you the freedom to choose the best infrastructure for your needs without sacrificing performance.
You can install RunCache using the following steps:
Method 1: Create a Sandbox Site
This method is ideal if you want to experience RunCache in a pre-configured environment before making any changes to your active sites. It allows you to test server-level caching without manual configuration.
- Visit the Sandbox Portal: Go to runcloud.io/runcache to access the RunCache deployment page.
- Launch a Test Instance: Enter your email addresses to spin up a new test site for free. This provisions a temporary, fully functional WordPress sandbox.
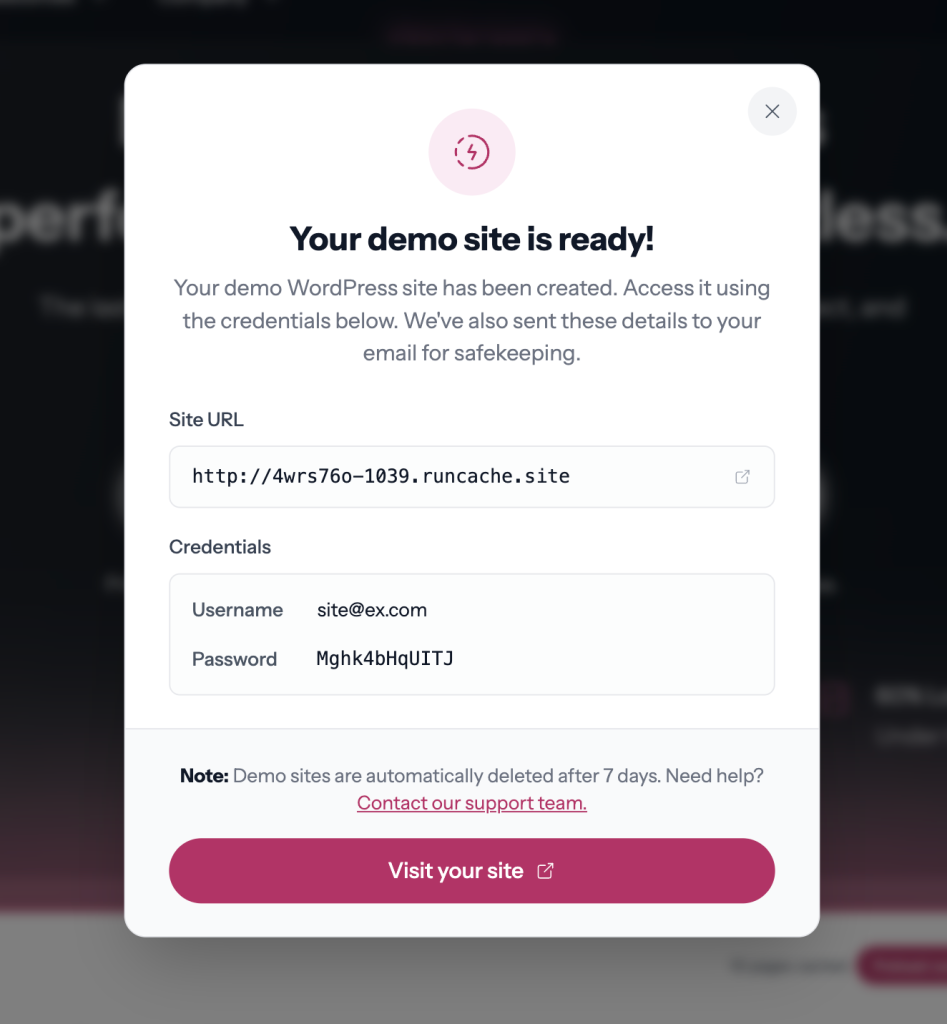
That’s it! Now you can navigate the site’s front end to test RunCache with different settings. Observe how the site’s responsiveness across virtual devices (mobile vs. desktop) to verify that the cache consistently serves optimized pages without device-specific layout issues.
Method 2: Install on Your Staging Site Directly via the RunCloud Dashboard
This is the recommended path for RunCloud users. Installing RunCache on a staging site ensures that your server configuration and database are fully optimized before going live.
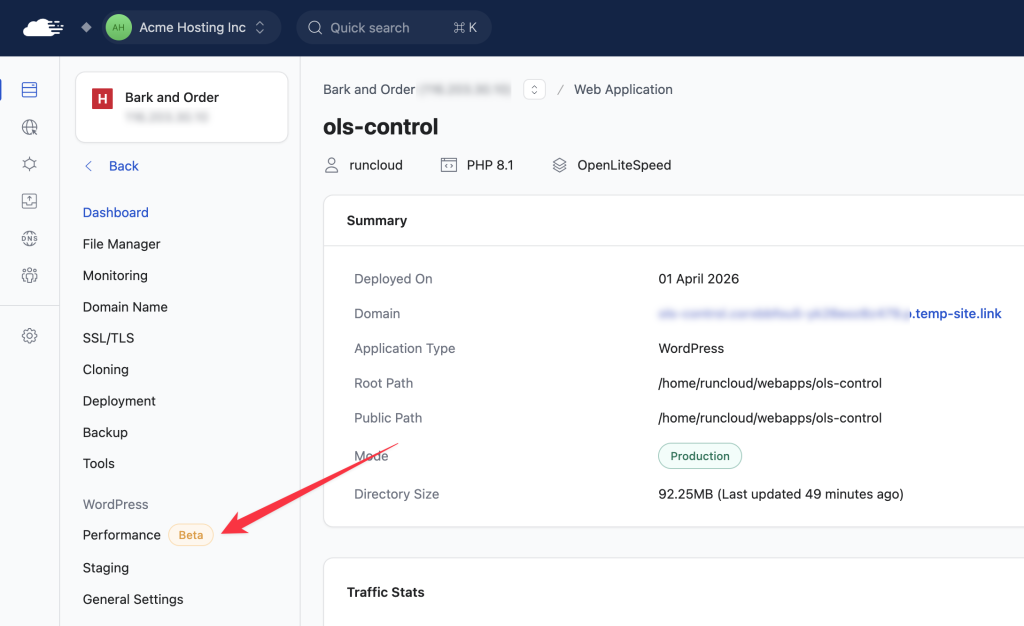
- Log in to your RunCloud Dashboard and select your server, then click on your staging Web Application.
- Navigate to the Performance tab in the left-hand navigation menu.
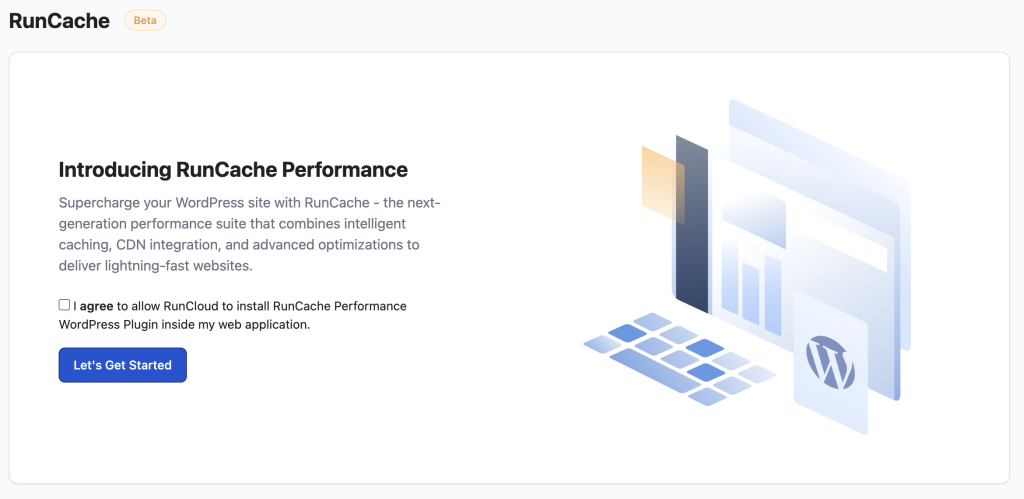
- Click I agree to the terms and conditions then click “Let’s Get Started” to start the installation. RunCloud will automatically configure optimized NGINX or OLS server-level configurations behind the scenes.
Method 3: Wait for Release on the WP.org Plugin Repository
If you are not currently using RunCloud, or if you prefer to use the platform-agnostic version of the plugin, we recommend waiting for the official release on the WordPress.org repository.
The RunCloud team is actively developing this platform-agnostic version to ensure it integrates cleanly across diverse hosting environments. However, if you are a plugin developer or want to test your software’s compatibility with RunCache, you can reach out to our team to request an early-access copy of the plugin.
Configuring RunCache Dashboard
After setup, you can access the main dashboard by clicking on the RunCache menu item in your WordPress admin sidebar. From here, you can perform three key actions with a single click:
- Preload cache: Proactively generate cached versions of your pages.
- Purge cache: Clear all stored cache instantly.
- Enable/Disable Cache: Toggle the primary caching status on or off.
The dashboard provides a quick overview of your cache statistics and allows you to select your preferred caching method.
Navigating the RunCache Dashboard
When you open the RunCache dashboard, you will see caching options organized into four distinct tabs to give you granular control over your site’s performance:
- Full Page Cache: The primary caching layer for your website’s HTML pages. Includes options like LiteSpeed Page Cache (OLS servers), NGINX FastCGI Cache (NGINX servers), and Redis Page Cache.
- CDN Edge Cache: For caching your pages directly on a Content Delivery Network’s edge nodes. Includes options for Cloudflare Page Cache and Cloudflare APO.
- Assets CDN: For offloading static assets (images, CSS, JS) to a CDN. Supports BunnyCDN and Custom CDN configurations.
- Object Cache: Database caching to speed up dynamic content generation. Allows you to enable Redis Object Cache.
Choosing Your Full-Page Cache Option
RunCloud supports a wide range of architectures, including pure NGINX, NGINX + Apache hybrid, OpenLiteSpeed (OLS), and LiteSpeed Enterprise.
Since caching operates at the server level rather than relying on brittle browser-side hacks, the caching options visible in your RunCloud dashboard will only show if your server supports them:
- OpenLiteSpeed and LiteSpeed Enterprise: RunCache supports LiteSpeed Page Cache (LSCache), LiteSpeed’s native server-level caching engine. When you install RunCache via the RunCloud dashboard on an OpenLiteSpeed server, RunCloud automatically configures the required server-level caching settings.
- NGINX & NGINX + Apache: RunCache uses the native NGINX FastCGI Cache to store PHP-rendered pages directly to disk. It uses advanced configuration templates that keep sites fast even when visitors have stale browser caches.
- Redis Full-Page Cache: This option is available across stacks as an ultra-fast, in-memory caching layer to eliminate cross-device caching inconsistencies.
You can verify your server stack from the RunCloud dashboard. For OpenLiteSpeed deployment instructions, see How to Deploy an OpenLiteSpeed Server.
Enable LiteSpeed Page Cache
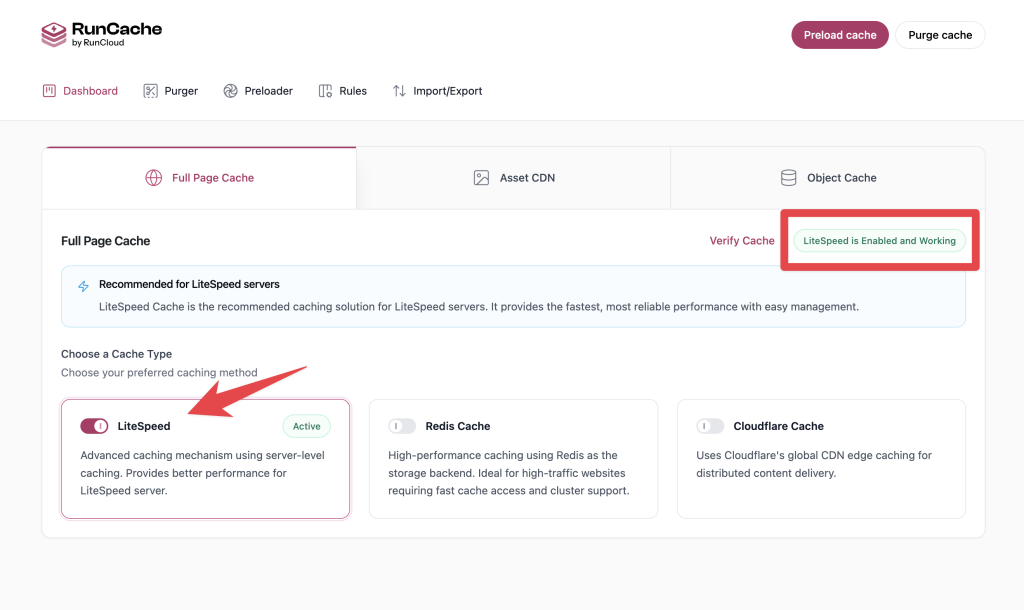
To use LSCache as your RunCache full-page cache:
- Open your WordPress dashboard and navigate to the RunCache tab.
- In the Page Cache tab, select “LS Cache” as the cache type.
- Enable LiteSpeed Full Page Cache by clicking the toggle next to it.
Note: The LiteSpeed Page Cache option is shown only when RunCache detects a compatible LiteSpeed server.
Asset CDN Configuration
After selecting your preferred full page cache type, you can configure the Asset CDN to speed up the delivery of your static files.
The Asset CDN feature offloads static assets (images, CSS, JavaScript, and fonts) to a global Content Delivery Network. This ensures files are served from a location geographically closer to your visitors, drastically reducing latency and improving overall load times.
You can choose from the following two options:
- BunnyCDN: Accelerate your media file delivery using BunnyCDN’s high-performance global network. RunCache provides deep integration for easy setup and management.
- Custom CDN: Use this option to bring your own CDN provider. RunCache will rewrite your static asset URLs to use the custom CDN hostname you provide.
Object Cache Configuration
Full Page Caching speeds up the delivery of your HTML, but we also recommend enabling Object Caching for a complete performance boost. Object caching significantly reduces database load, leading to a much faster WordPress admin dashboard and quicker processing for dynamic, data-intensive operations.
RunCache integrates with Redis, a powerful in-memory data store, to provide a high-performance, persistent object caching solution.
How to Enable Redis Object Cache
Enabling Redis Object Cache is straightforward, especially on a server managed by RunCloud. Before you begin, you must have Redis installed and running on your server. For RunCloud users, this is a simple one-click process:
- Navigate to your server in the RunCloud dashboard.
- Go to Services.
- Click Install next to Redis if it is not already running.
Once Redis is installed, you just need to connect RunCache to it.
- In your RunCloud dashboard, navigate to your Server > Settings.
- Find the Redis Password tab and copy your Redis password.
- In your WordPress dashboard, go to RunCache > Object Cache.
- Click the toggle to enable Object Cache, then enter the password you just copied.
FastCGI Cache vs. Redis Page Cache (SRCache) on NGINX
A common question when configuring RunCache on NGINX is whether to use NGINX FastCGI Cache or Redis Page Cache (SRCache).
Both are full-page caches that run at the NGINX level. On a cache hit, NGINX serves the cached HTML directly, and PHP never runs. That’s where nearly all of the speedup comes from, and both types deliver it.
The real difference lies in where the cached page is stored:
| Feature | NGINX FastCGI Cache | Redis Page Cache (SRCache) |
|---|---|---|
| Cache generated by | NGINX | NGINX |
| Stored in | Disk (NGINX cache directory) | Redis (memory) |
| Served by | NGINX | NGINX |
| Requires Redis | No | Yes |
| Main resource used | Disk space | RAM |
Performance Implications
In our benchmarks (Redis Full-Page Cache vs NGINX FastCGI Caching), SRCache came out slightly ahead of FastCGI in both response time and requests served per second.
Both methods roughly doubled the requests served compared to an uncached site and made response times far more consistent. For the vast majority of sites, the performance difference between the two will be imperceptible; what matters most is having a full-page cache enabled at all.
What We Recommend for RunCloud-hosted Sites
- Go with SRCache (Redis) if you are already running Redis on your server (for example, for object caching on dynamic sites like WooCommerce). The same Redis instance can power both your full-page cache and your object cache, and memory-based storage keeps latency very consistent under load.
- Go with FastCGI Cache if you are not using Redis or you’re working with limited server RAM. It has no additional dependencies, and page caching uses disk space rather than memory.
You can switch between the two at any time from your web application’s caching settings, making it easy to test both against your real traffic and see which works best for your specific workload.
Go Beyond the Basics
What you’ve seen here is just the beginning of what RunCache can do. The plugin also offers powerful automated features, including intelligent cache preloading to warm up your pages and automatic purging that clears relevant content when you make updates.
For a deep dive into these advanced settings, fine-tuning your configuration, and getting the absolute most out of your setup, you should explore other pages in the official RunCache documentation.
If you have any other questions or need help, please feel free to get in touch with our 24/7 support team. We’re here to help!