Author: Ahmad Fikrizaman

  • NGINX Caching for WordPress – Complete Guide & Tutorial

    NGINX Caching for WordPress – Complete Guide & Tutorial

    “NGINX cache on WordPress“ is one of the hottest search terms on the internet, but what does it mean? If you are wondering the same thing, you are in the right place!

    In this comprehensive guide, we will cover everything you need to know about NGINX caching for WordPress, from understanding the basics to implementing advanced caching strategies using RunCloud’s intuitive server management platform.

    Whether you run a high-traffic blog, an e-commerce store, or a business website, you’ll learn how NGINX caching can transform your site’s performance and user experience with minimal technical overhead.

    Let’s get started!

    What is NGINX?

    NGINX is a powerful, open-source web server software that also functions as a reverse proxy, load balancer, and HTTP cache.

    Over the years, NGINX has become one of the most popular web servers globally due to its event-driven, asynchronous architecture. Unlike traditional servers that create new processes for each request, NGINX uses an event-driven approach to handle multiple connections within a single process, which makes it exceptionally efficient and resource-friendly.

    📖 Suggested read: Everything You Need To Know About WordPress Object Caching

    What is NGINX Caching?

    NGINX caching is a process where the server temporarily stores copies of server responses – such as HTML pages, images, and other media files in a dedicated storage space. When properly configured, NGINX cache intercepts requests to your WordPress site and serves cached copies of previously requested content.

    Using a cache eliminates the need to process the same requests repeatedly through PHP and MySQL. This significantly reduces your server’s load and improves your visitors’ response times.

    📖 Suggested read: How to Install & Set Up Ghost (NGINX and OpenLiteSpeed)

    Additionally, caching helps maintain site stability during traffic spikes by serving cached content instead of generating new responses for each visitor. This improved performance also positively impacts SEO rankings, as search engines favor faster-loading websites.

    There are multiple ways to implement Nginx caching on a WordPress website:

    • FastCGI cache stores the results of PHP processing, making it ideal for WordPress sites as it caches the dynamic content generated by PHP scripts.
    • Proxy cache stores responses from upstream servers, which is beneficial when NGINX acts as a reverse proxy.
    • Microcache implements short-term caching (typically seconds or minutes) for frequently accessed content, while static file cache helps serve unchanging assets like images and CSS files more efficiently.

    📖 Suggested read: How To Use Nginx FastCGI Cache (RunCache) To Speed Up Your WordPress Performance

    How Does NGINX Caching for WordPress Work?

    When NGINX cache is implemented for WordPress, it creates a sophisticated caching layer that intercepts and processes requests before they reach WordPress. When a user first requests a page, NGINX forwards the request to PHP-FPM to process the WordPress application.

    The generated response is then stored in the cache (typically in memory or on disk) with a unique key based on factors such as the URL and query parameters. NGINX then checks all subsequent requests for the same content to see if a valid cached version exists. If found and not expired, NGINX serves the cached content directly, bypassing WordPress completely.

    The caching process can be implemented using careful configuration of cache zones, keys, and invalidation rules to ensure optimal performance while maintaining content freshness. The cache can be selectively bypassed for dynamic content such as shopping carts or user-specific pages to serve time-sensitive and private content.

    📖 Suggested read: Which is Better: Redis Full-Page Cache or NGINX FastCGI Caching?

    How to Use NGINX Cache for WordPress Websites

    Installing and enabling Nginx Caching on WordPress websites is quick and simple. Follow the steps below to get started:

    1. Log in to your RunCloud dashboard and select your WordPress application from the main dashboard interface. Once inside your application dashboard, navigate to the left-side menu panel, where you’ll find the ‘RunCloud Hub’ option.
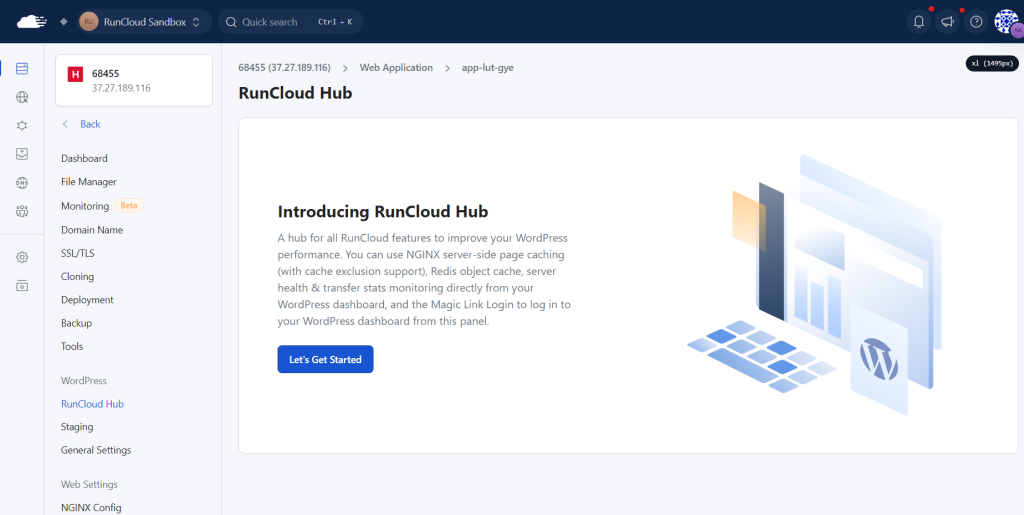
    1. When you open the RunCloud Hub for the first time, you’ll be greeted with an “Introducing RunCloud Hub” screen. Click on the ‘Let’s Get Started’ button to initiate the caching setup process for your WordPress site.
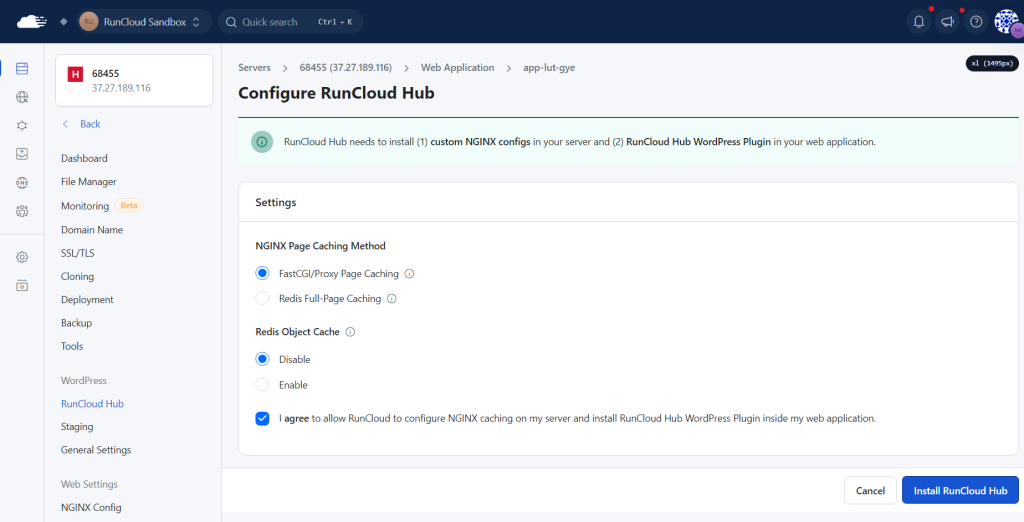
    2. On the next screen, you’ll see different options for configuring your Nginx cache. Select the ‘FastCGI Proxy’ caching option and mark the checkbox to acknowledge your agreement with RunCloud’s terms and conditions. After this, you can click on the ‘Install RunCloud Hub’ button to activate the caching service on your website.
    Enabling Nginx Caching via RunCloud Hub
    1. On the next screen, you can edit and modify several configuration options:
      • For the NGINX Page Caching Method, you can choose between FastCGI/Proxy Page Caching or Redis Full-Page Caching – FastCGI is generally recommended for most WordPress installations due to its efficient performance characteristics.
      • When selecting the Cache Folder Type, you can choose between Disk (/var/cache/nginx-rc) for standard storage or RAMDisk (/var/run) for enhanced performance. You should consider your server’s resources when making this decision.
      • After this, you can set an appropriate Cache Lifespan in minutes based on how frequently your content updates and establish a Cache Folder Size Limit in MB according to your available server resources and traffic patterns.

    After making changes, click the ‘Update RunCache Settings’ button to ensure your new configuration is properly saved and implemented. Additionally, you can use the ‘Purge all cache’ option to clear both NGINX Page Cache and Redis Object Cache, particularly after making significant content updates or configuration changes.
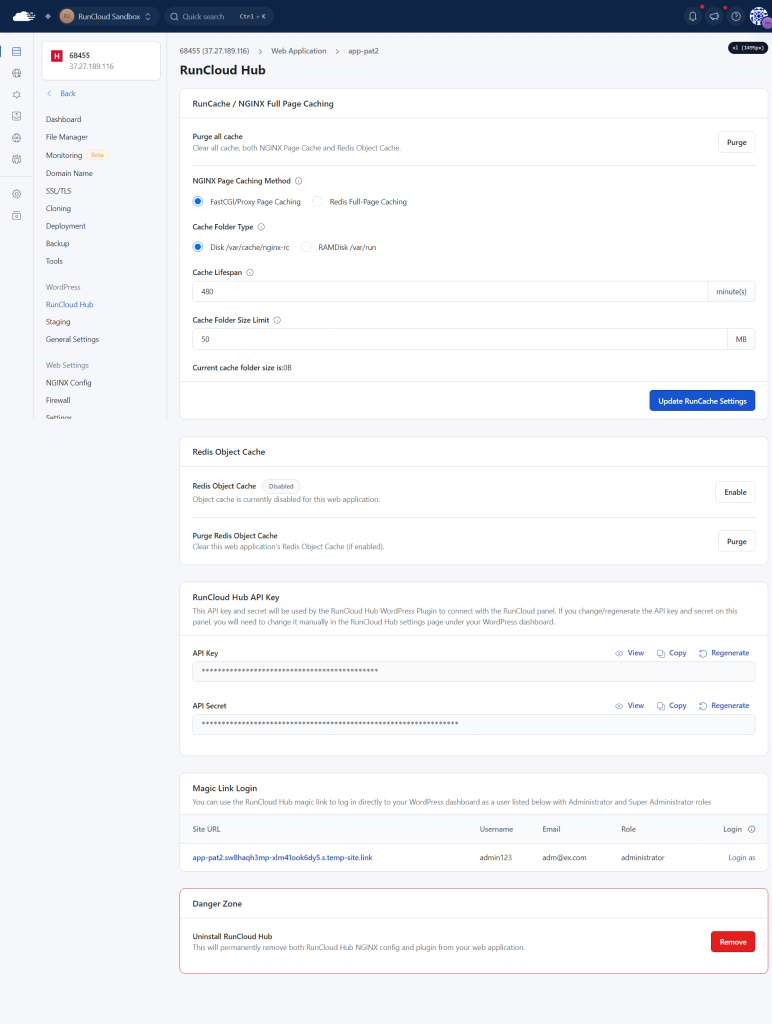
    Nginx Caching for WordPress on RunCloud

    📖 Suggested read: How To Create Custom NGINX Configuration Easily Using RunCloud

    Wrapping Up: Who Should Use NGINX Cache on Their WordPress Websites?

    NGINX caching is particularly valuable for WordPress websites with moderate to high traffic. It’s an excellent choice for business websites, e-commerce stores, membership sites, and content-heavy blogs that need consistent performance under varying load conditions.

    Small personal blogs or low-traffic sites might not see dramatic benefits from NGINX caching, but implementing it early provides scalability for future growth and protection against unanticipated traffic spikes.

    Implementing caching has benefits regardless of your website’s size. This is where RunCloud comes in.

    Unlike traditional server management, which requires complex configuration and deep technical knowledge, RunCloud makes enterprise-level caching accessible to everyone through an intuitive dashboard interface.

    Ready to supercharge your WordPress site? Sign up for RunCloud and enjoy:

    • One-click NGINX FastCGI caching setup
    • Built-in Redis object caching
    • Visual cache configuration interface
    • Automatic cache optimization
    • Professional support team

    Join thousands of WordPress developers and site owners who have discovered the simplest way to implement professional-grade web caching.

    ➡️ Start Your Free Trial of RunCloud

    FAQs on NGINX Cache for WordPress

    Do I need a cache plugin for WordPress?

    With RunCloud’s built-in caching functionality for WordPress, you may not need an additional cache plugin for basic caching needs. However, advanced caching plugins can provide extra features such as minification, lazy loading, and CDN integration that complement server-level caching for enhanced performance.

    Is NGINX faster than Apache for PHP?

    NGINX sometimes performs better than Apache for PHP applications due to its event-driven architecture and efficient handling of concurrent connections, but the performance gains are minuscule. 

    What is the best NGINX cache?

    FastCGI cache is generally considered one of the best caching solutions for NGINX with WordPress, as it directly caches the output of PHP processing. RunCloud implements this efficient caching mechanism by default, providing optimal performance for WordPress sites without requiring complex configuration.

    What is the difference between Apache and NGINX?

    NGINX uses an event-driven, asynchronous architecture that handles multiple connections within a single thread, while Apache uses a process-per-connection model. 

    Which cache plugin works best with Nginx?

    RunCloud Hub is particularly well-suited for NGINX servers as it can integrate with NGINX’s FastCGI caching and provide additional optimization features. 

    Is Nginx suitable for high-traffic sites?

    NGINX is exceptionally well-suited for high-traffic sites due to its event-driven architecture and efficient resource utilization. Its ability to handle thousands of concurrent connections with minimal resource overhead makes it an ideal choice for busy WordPress sites.

    What is FastCGI cache?

    FastCGI cache is an NGINX caching mechanism that stores the processed results of PHP scripts and effectively saves the complete output of WordPress pages. This eliminates the need to process PHP and query the database for repeated requests, significantly improving response times.

  • How To Install Magento

    How To Install Magento

    Magento 2 is a popular e-commerce platform that powers thousands of online stores around the world.

    If you’re planning to set up an online store using Magento 2, you can do this easily on RunCloud.

    In this article, we’ll guide you through the process of installing Magento 2, along with all of the necessary dependencies.

    Let’s get started!

    System Requirements

    Before we start the installation process, it’s important to ensure that the system meets the minimum requirements for running Magento. This section will provide a list of requirements, and instructions for checking your system’s compatibility.

    Magento 2.4.6 has the following requirements:

    1. Operating System: 64-bit Linux
    2. Web Server: Apache 2.4, Nginx 1.8
    3. PHP: 8.1 or 8.2 (along with the necessary PHP extensions)
    4. MySQL: 8.0
    5. Composer: 2.2
    6. Search and Analytics Engine: Elasticsearch 8.4, 7.17 or AWS OpenSearch 1.2

    Installing The Necessary PHP Extensions

    If you don’t have all of the necessary extensions, you can install them on your server by running the following command. Simply log in via SSH, copy the following command, and paste it into your terminal:

    sudo apt-get install php-intl php-gd php-zip php-bcmath php-curl php-mysqlnd php-soap php-ctype php-dom php-fileinfo php-iconv php-json php-mbstring

    Make sure you run the above command with superuser permissions. After running the command you will be asked whether you want to install the listed extensions – press ‘Y’ to continue with the installation.

    Once done, you will need to reload the PHP-FPM service. You can do this by running the following commands:

    systemctl reload php81rc-fpm
    systemctl reload php82rc-fpm
    

    Installing Elasticsearch

    Magento 2 needs a search engine installed on your machine to work properly. Some popular choices are Elasticsearch and OpenSearch.

    We have covered this topic in more detail on our blog in a post titled How To Install Elasticsearch. However, if you are in a hurry, you can use the following commands to quickly install it. Just log into your server with the necessary privileges and run these commands:

    wget -qO - https://artifacts.elastic.co/GPG-KEY-elasticsearch | sudo gpg --dearmor -o /usr/share/keyrings/elasticsearch-keyring.gpg
    sudo apt-get install apt-transport-https
    echo "deb [signed-by=/usr/share/keyrings/elasticsearch-keyring.gpg] https://artifacts.elastic.co/packages/8.x/apt stable main" | sudo tee /etc/apt/sources.list.d/elastic-8.x.list
    sudo apt-get update && sudo apt-get install elasticsearch
    sudo systemctl daemon-reload
    sudo systemctl enable elasticsearch.service
    sudo systemctl start elasticsearch.service
    

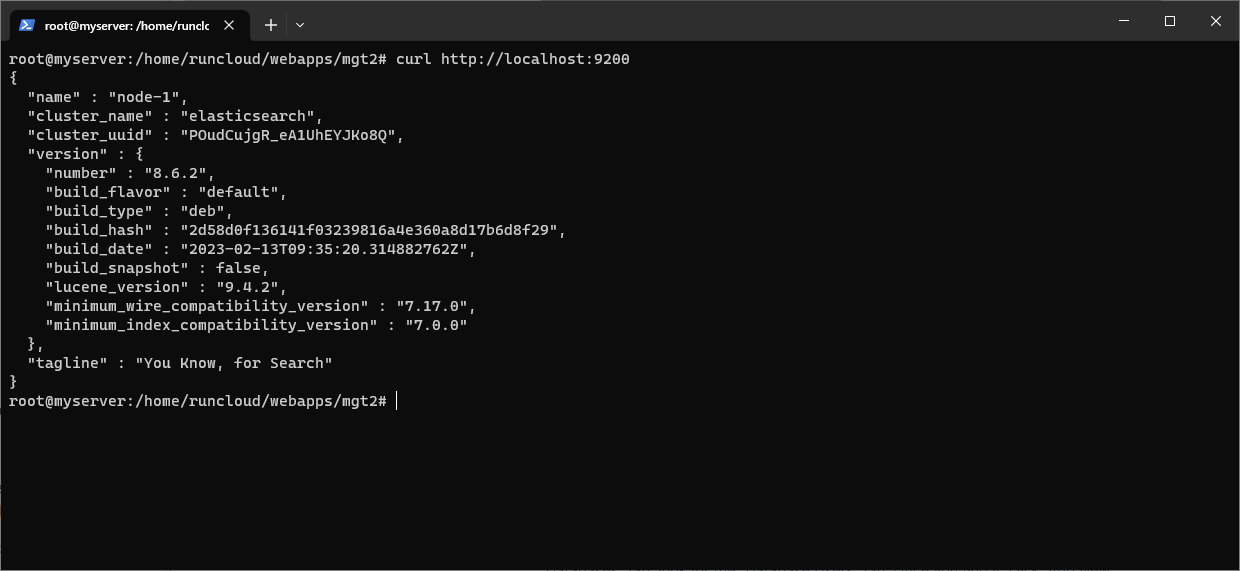
    After the installation is complete, you can check if Elasticsearch is working as expected by running the following command:

    curl http://localhost:9200

    You should get an output similar to the screenshot shown below:

    curl request to Elasticsearch on localhost in terminal

    Creating A Database

    We recommend creating a separate database and user for Magento 2. RunCloud makes it easy to add and manage database users on your server. In this section, we’ll walk you through the process of creating a new database for your Magento 2 installation.

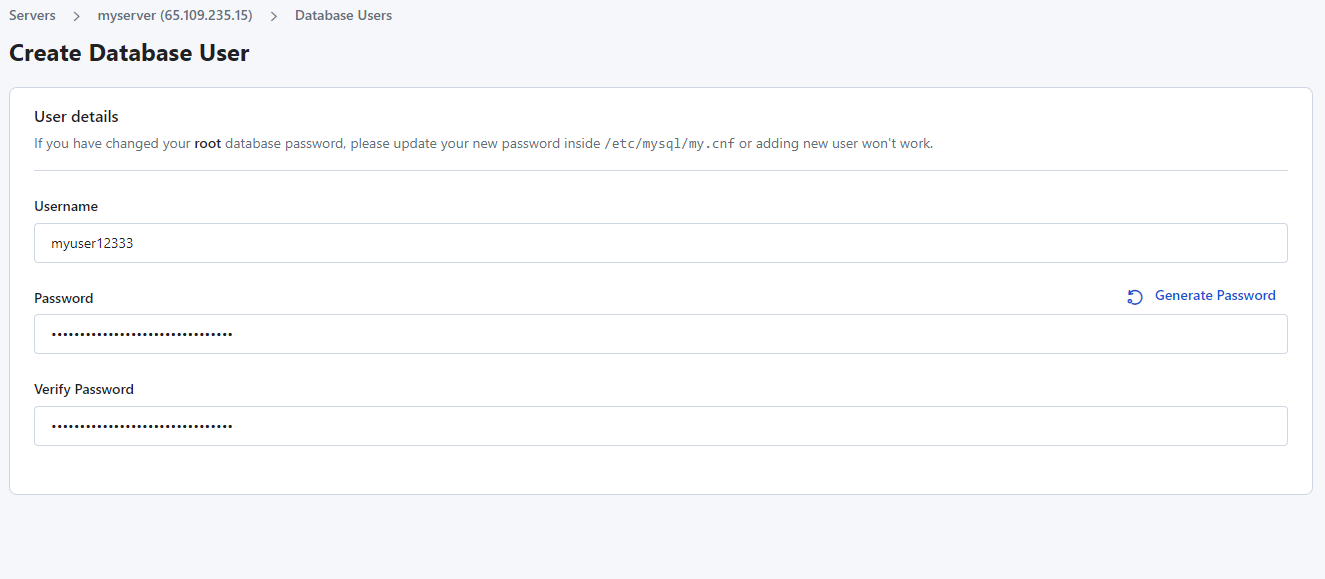
    Open your RunCloud dashboard and locate the server that you want to use. In the “Databases” tab, look for the “Database Users” tab. Once you find it, click “Add New Database User” to create a new account. Provide the necessary login credentials, and then make sure you save it.

    Creating database user in RunCloud dashboard

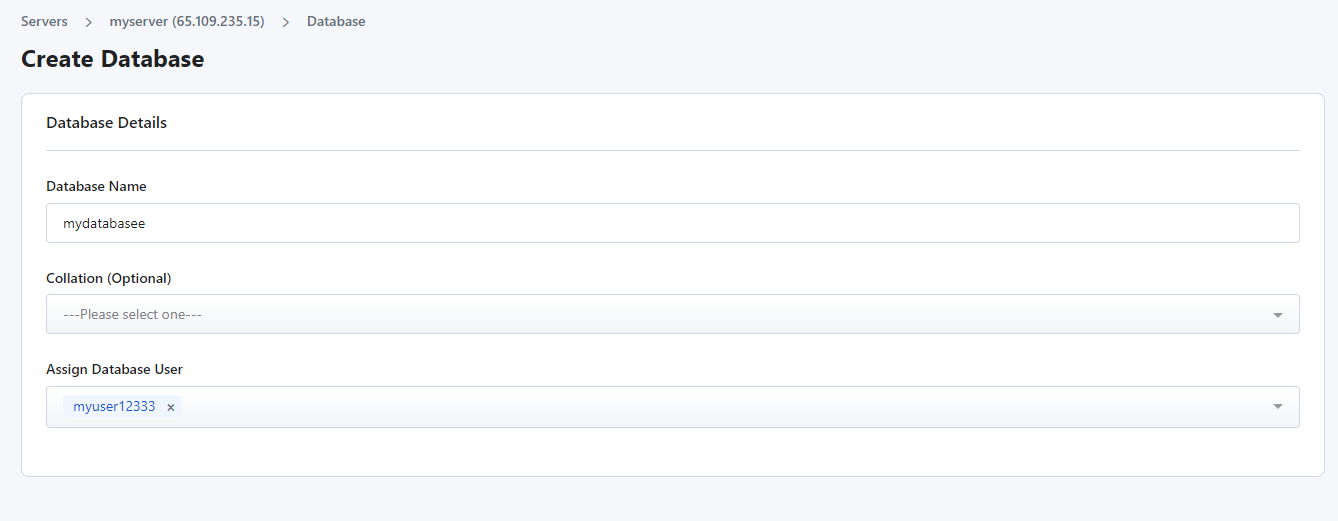
    After creating the database user, go back to the “Databases” tab. Click on “Add New Database” and give it a suitable name. Don’t forget to grant access to the user that we just created.

    After you have created the database, save it – and continue with the installation.

    creating database in RunCloud dashboard

    Downloading Magento 2

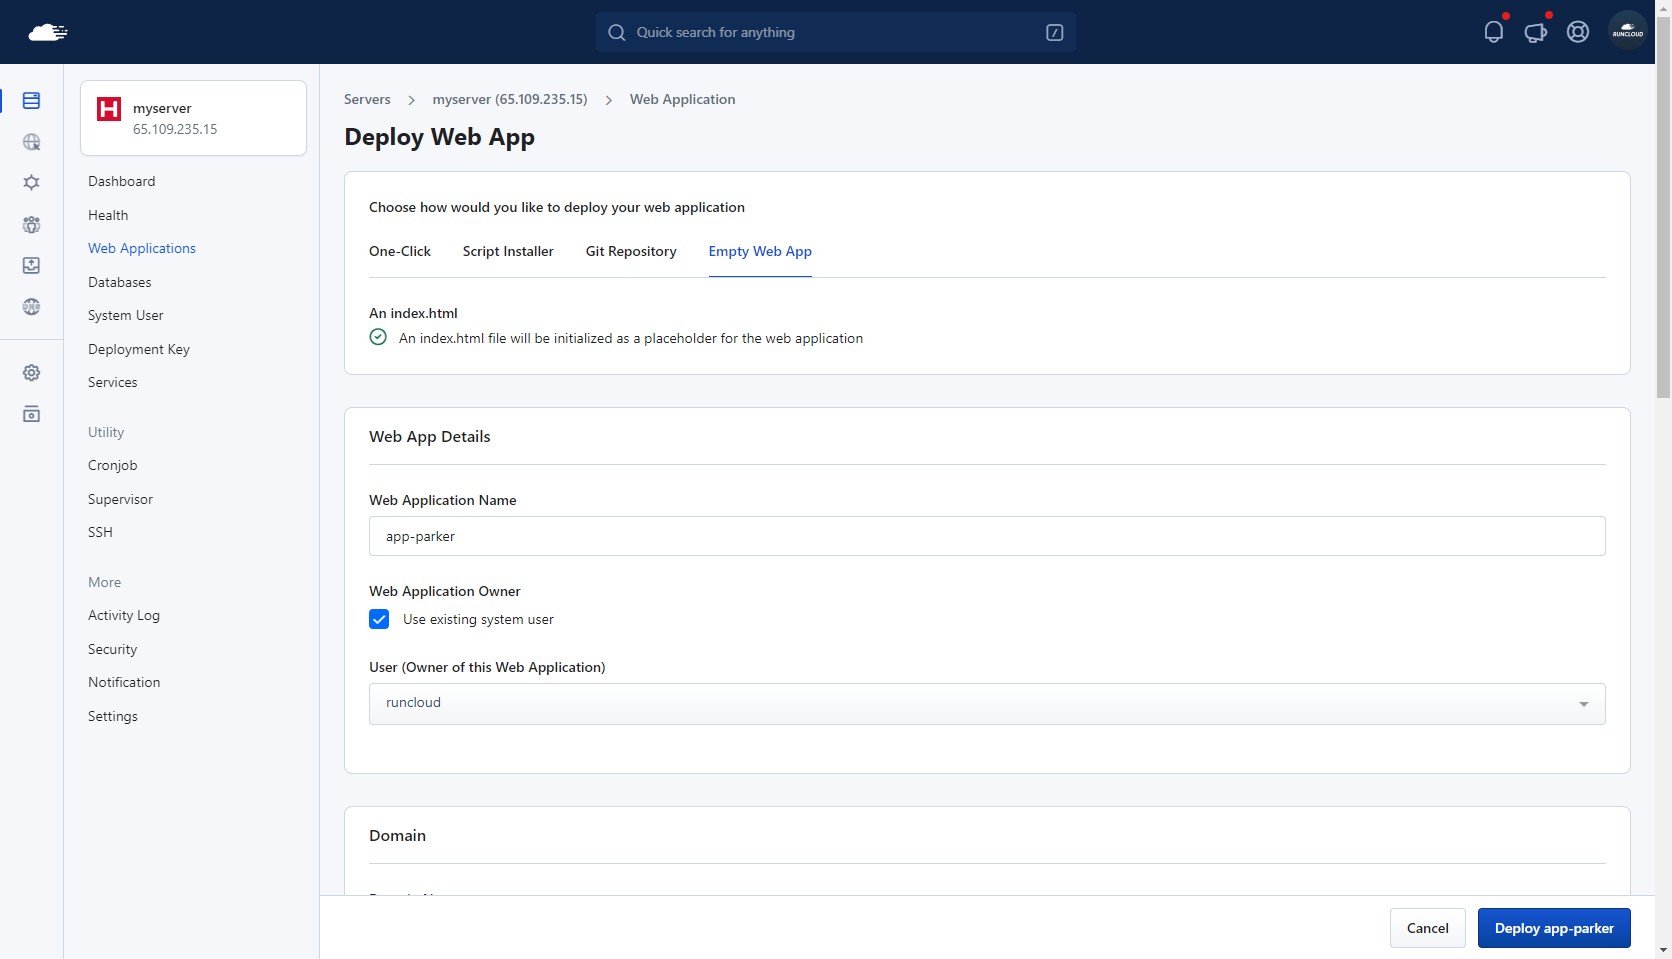
    After you have completed all the prerequisites for Magento 2 we can proceed with the installation. Go to your RunCloud dashboard and create a new application. Pick an “Empty Web App”, and then fill in all the necessary details.

    Creating Web Aplication on RunCloud

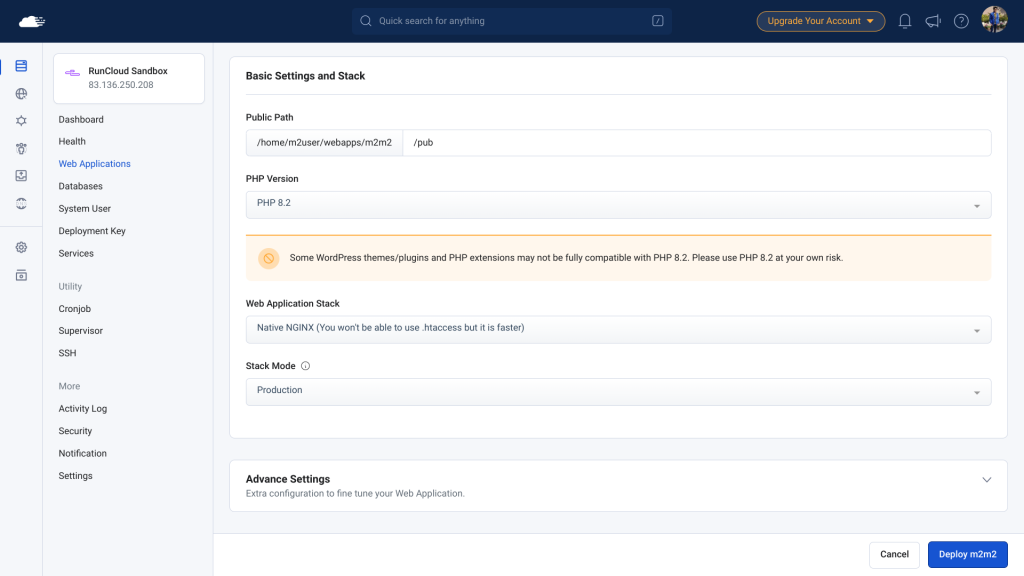
    In the Basic settings and Stack section, add /pub in the public path and don’t forget to use a supported version of PHP. At the time of writing, the latest version of Magento (2.4.6) supports only PHP 8.1 and PHP 8.2.

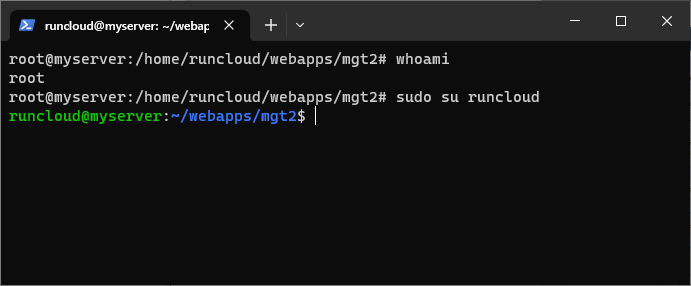
    After your application has been created, you will need to log into your server to start the installation. The following commands need to be executed as the “Owner of the web application”, so make sure you are logged in as the correct user. In the above screenshot, the owner of the application is “runcloud”.

    You can use the “whoami” command to find out the name of the current user. If you are logged in as a different user, you can use the “sudo su” command, followed by the name of the desired user to log into their account.

    check current user in Linux

    Once you have logged in successfully, use the “cd” command to navigate to the root directory of your project. If you are not sure what your root directory is, you can find it in the RunCloud dashboard.

    In the project directory, you can use the following commands to remove the default index.html file and download the installation files for the Magento Community Edition.

    rm -rf pub/
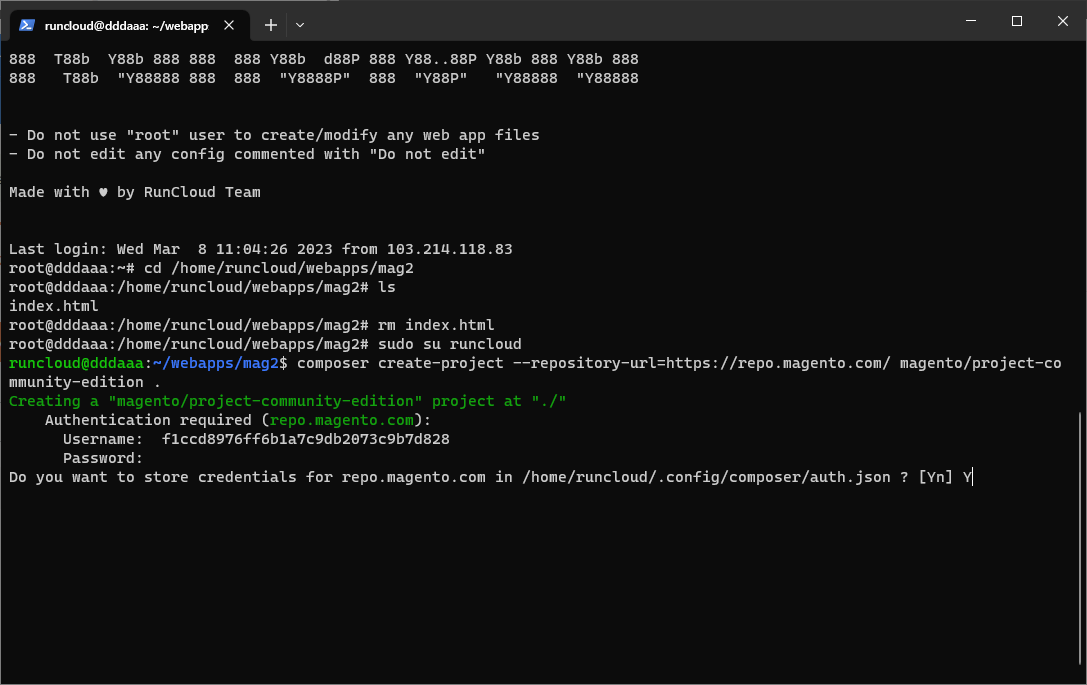
    composer create-project --repository-url=https://repo.magento.com/ magento/project-community-edition .

    During the installation, you will be asked to provide a username and password for downloading the files. Although Magento is free, it was acquired by Adobe, and so you will now be required to have an Adobe account.

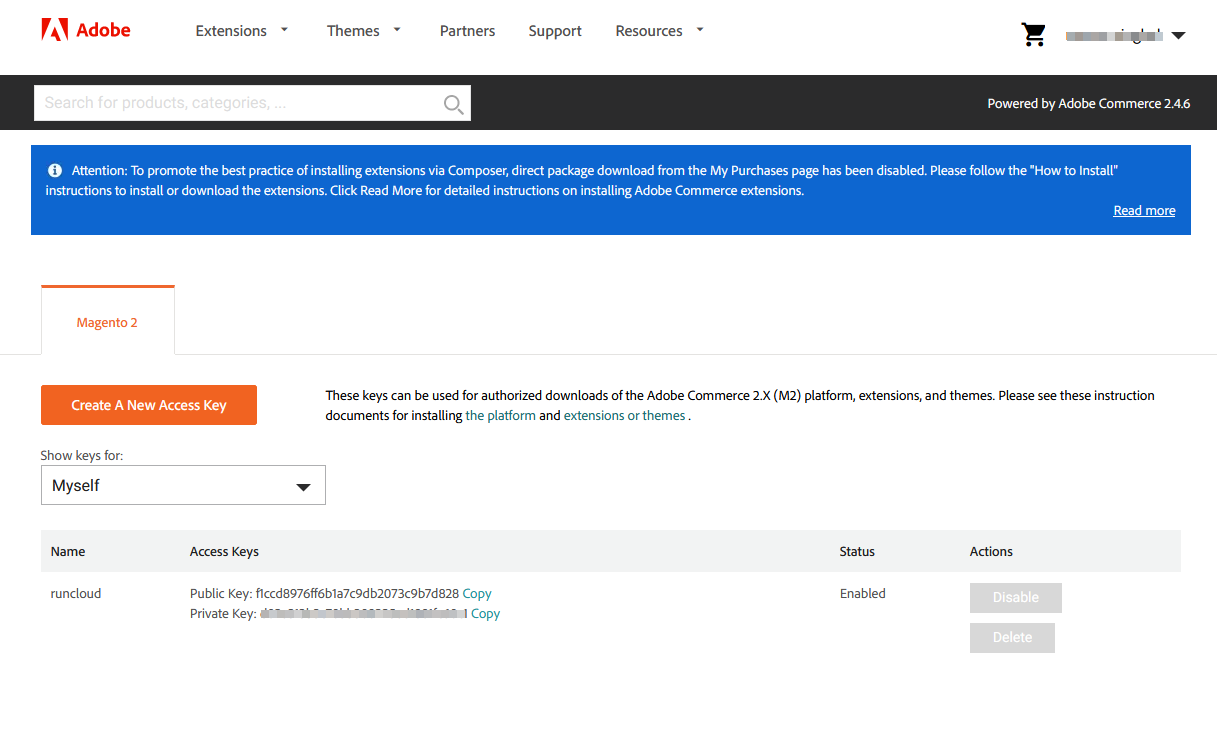
    In this tutorial, we will only be using Magento, which is the free version of Adobe Commerce. To get your username and password, go to the Adobe Commerce Dashboard and log in with your Adobe credentials.

    obtaining API keys from Adobe Commerce dashboard

    In the dashboard you can create a new access key free of charge. Once you have generated the key, enter the “Public Key” in the username field, and the “Private Key” in the password field. You should note that text entered in the password field is not displayed for security purposes, but all keystrokes are being recorded.

    Configuring API keys Magento2

    Installing Magento 2

    With the system requirements met, files extracted, and database created, it’s time to start the Magento 2 installation process. To begin the installation, copy and paste the command below into a text editor and make the following changes:

    1. Add the base URL with the URL of your website
    2. Add the name of the database using the database that we created
    3. Add the username and password of the database user
    4. Configure the login information of the administrator user
    5. Set your preferred currency and timezone.
    bin/magento setup:install \
    --base-url=http://www.example.com/ \
    --db-host=localhost \
    --db-name=<database-name> \
    --db-user=<username> \
    --db-password=<database_password> \
    --admin-firstname=admin \
    --admin-last name=admin \
    --admin-email=admin@example.com \
    --admin-user=admin \
    --admin-password=admin123 \
    --language=en_US \
    --currency=USD \
    --timezone=America/Chicago \
    --use-rewrites=1 \
    --search-engine=elasticsearch8 \
    --elasticsearch-host=localhost \
    --elasticsearch-port=9200 \
    --elasticsearch-index-prefix=magento2 \
    --elasticsearch-timeout=15
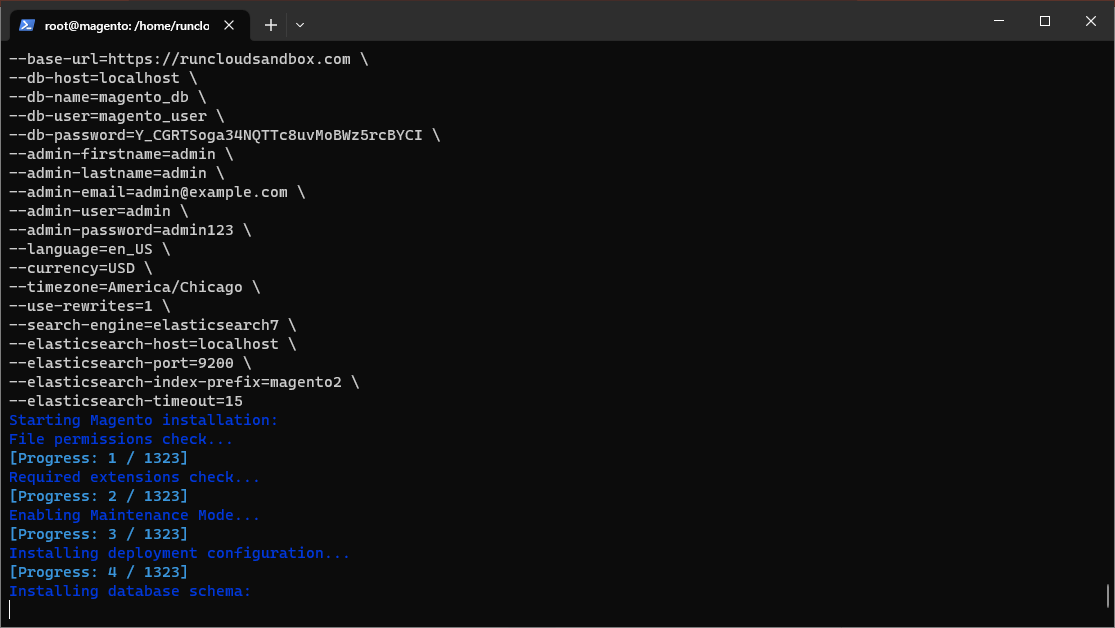
    Magento2 installation on Linux

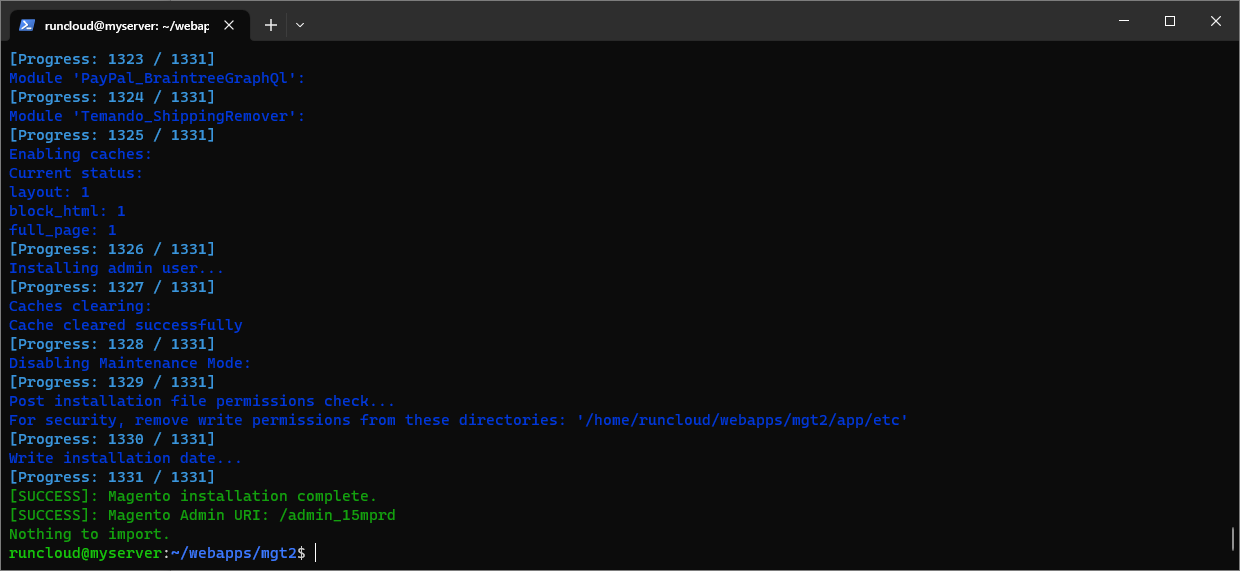
    After making the changes, you can run the above command in your terminal to begin the installation, which should take 5-6 minutes. If you follow all the steps correctly you will be greeted with the message below. You can then go to the URL of your website to visit your Magento store.

    Successful installation of Magento 2

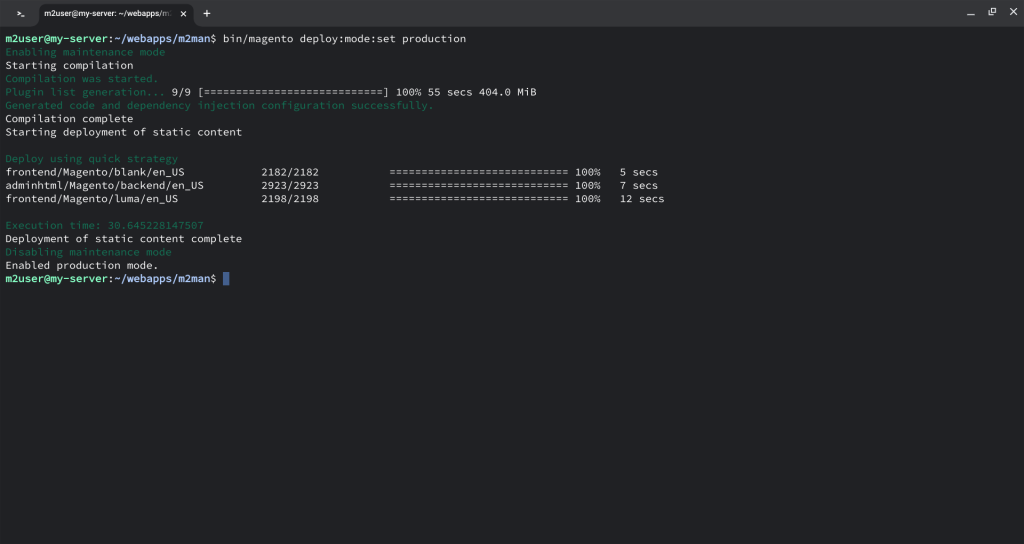
    After the installation is finished, you can enable production mode using the following command.

    bin/magento deploy:mode:set production

    The above command will generate necessary static content for your website and enable several optimizations to serve content faster.

    After Action Report

    Installing Magento 2 might seem like a daunting task, but with this step-by-step guide you can set up your online store on RunCloud in no time. Once Magento 2 is installed, there are still a few post-installation steps you’ll need to take, such as verifying the installation, setting up the admin account, and configuring payment methods before you can start using your new online store. Refer to Adobe’s documentation to learn how to do this.

    If you’re ready to take your server management to the next level, sign up for RunCloud today. RunCloud is the perfect solution for you if you’re looking to make managing your servers easier. So why wait? Sign up now and start enjoying the benefits of RunCloud today!

  • Using Mailgun To Send Transactional Email From WordPress

    Using Mailgun To Send Transactional Email From WordPress

    What is Transactional Email

    Transactional email is the email sent when something triggered from your Web Application such as resetting the user password.

    My WordPress didn’t send email

    This is a common problem if you didn’t configure your server to relay email. Configuring the server to send email is hard. How hard it is? You need to pass 6 marks in MailTester to send an email to Gmail. And your email must be sent using SSL/TLS. Instead of sending email using secure communication, a perfect Simple Mail Transfer Protocol (SMTP) server would require you to set DomainKeys Identification Mail (DKIM), Sender Rewriting Scheme (SRS) (If you are sending email from multiple domains), Sender Policy Framework (SPF), Pointer Record (PTR) and also Domain Message Authentication Reporting (DMARC). Apart from that, you have to deal with messy Postfix configuration which you can’t understand at first look of its configuration files. You read it right, files, not file.

    What is MailGun

    MailGun is a transactional email service. It is a good third party email service which you can use to send your email to any available email without dealing with messy configuration. MailGun can send up to 10,000 emails per month for free and that is why we are suggesting MailGun for your transactional email service. We are not affiliated to MailGun in any way and we are recommending it because it is the best transactional email service we have tried so far. If you don’t want to use MailGun and insisted on sending email from your own server, take a look at our post on how to send email via PHP.

    Registering to MailGun

    When you are registered to MailGun, you need to add your Credit Card. They won’t charge you if you didn’t reach 10,000 emails per month. If you didn’t add your Credit Card, your email is limited to only whitelisted emails (we won’t discuss what it is).

    Adding A New Domain To MailGun

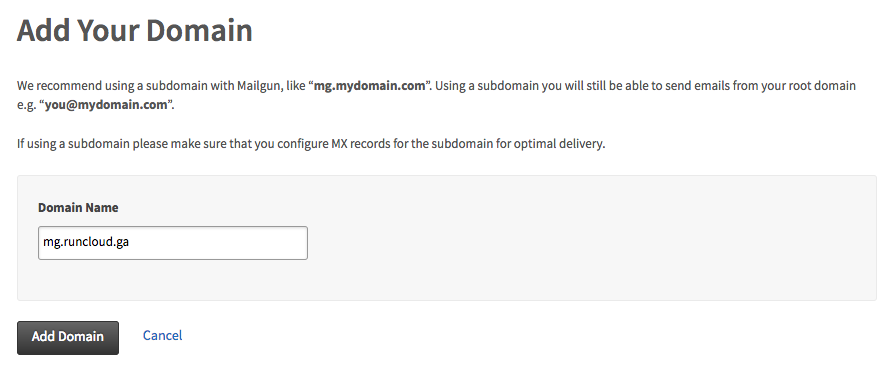
    To add a new domain, MailGun will ask you to use a subdomain instead of the root domain. In this tutorial, I will show you how to configure MailGun for runcloud.ga domain. As suggested by MailGun, I will be using mg.runcloud.ga.

    Configuring DNS Records

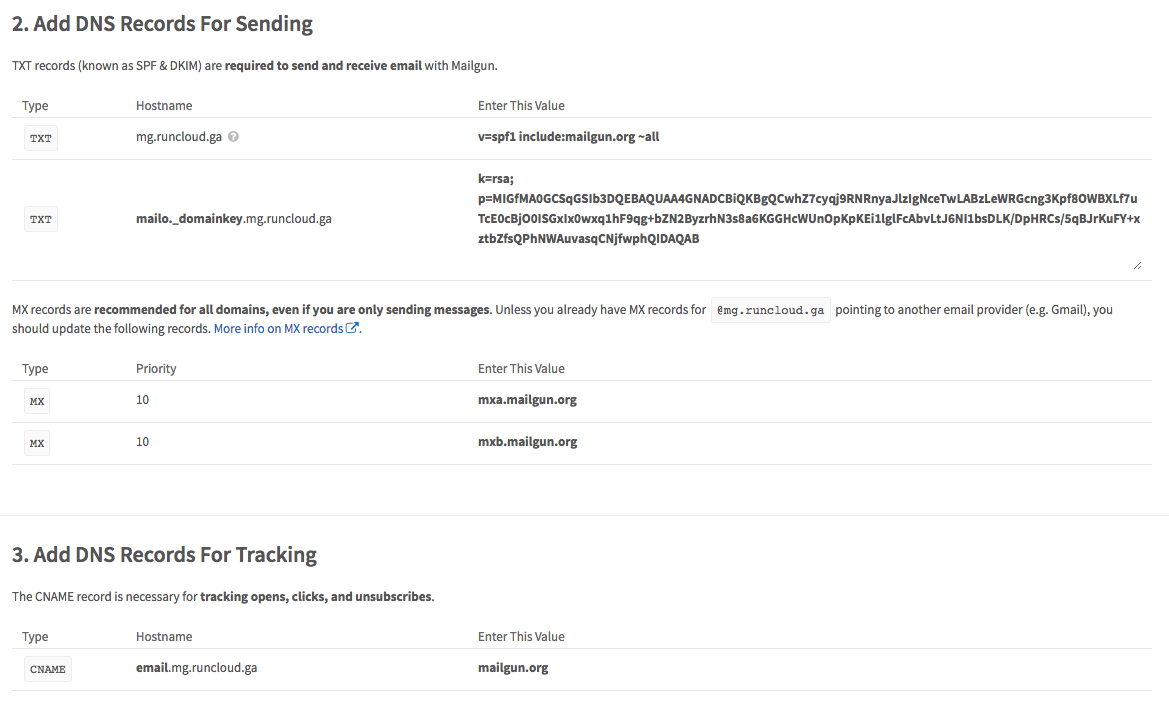
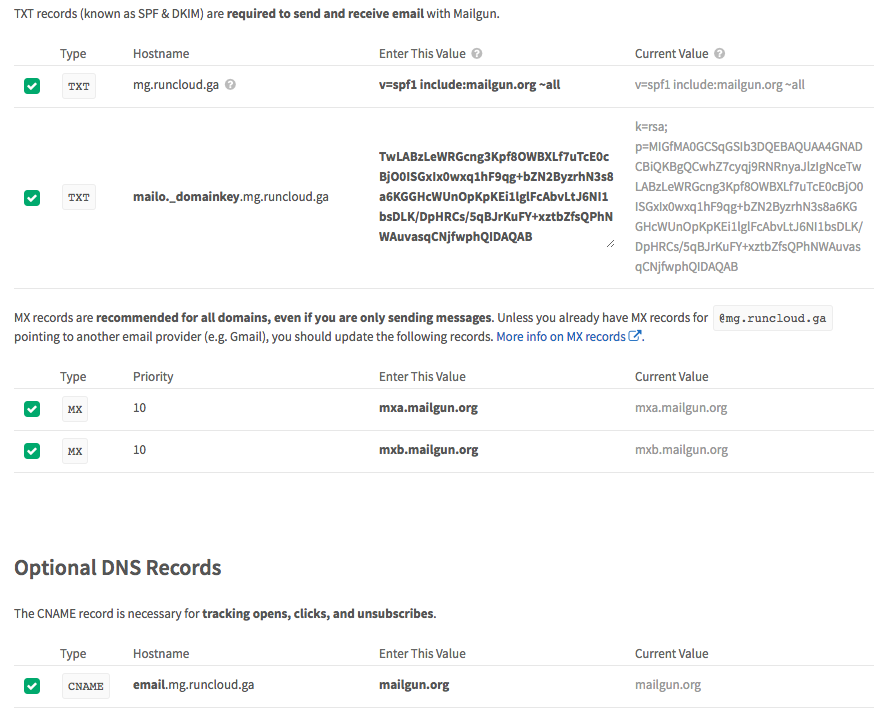
    After that, you will receive configuration options like the image below.

    Mailgun DNS records

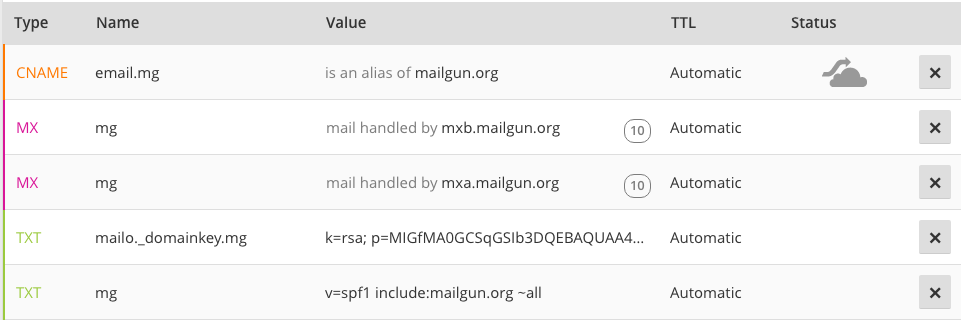
    Don’t freak out! It is an easy setup. MailGun will ask you to add DNS record as shown above. I am a fan of Cloudflare DNS (only the DNS), and I am using their DNS service to manage my runcloud.ga domain. If you are using other DNS Service such as DNSMadeEasy, Digital Ocean DNS, or Linode DNS, this configuration won’t be any different.

    After filling out the DNS Records inside Cloudflare, we will get the settings like the image below.

    Check DNS Records

    After filling in the DNS records, wait for at least 1 minutes (if you are using Cloudflare) and go back to MailGun. You will see a button to check DNS Records. By clicking that button, you should get all green check marks if you do everything right.

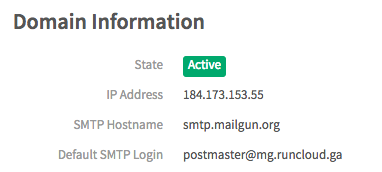
    Besides that, you can see your domain is active inside MailGun

    Creating MailGun Sender Account

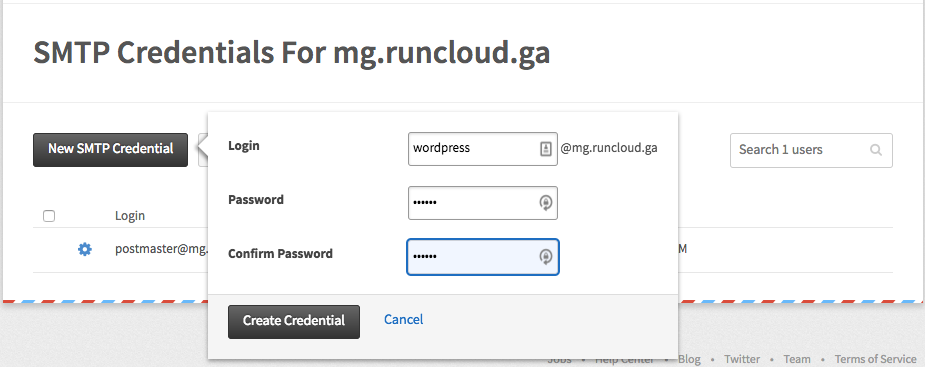
    To add a sender account, click Manage SMTP Credentials inside MailGun. Fill in the data like the image below.

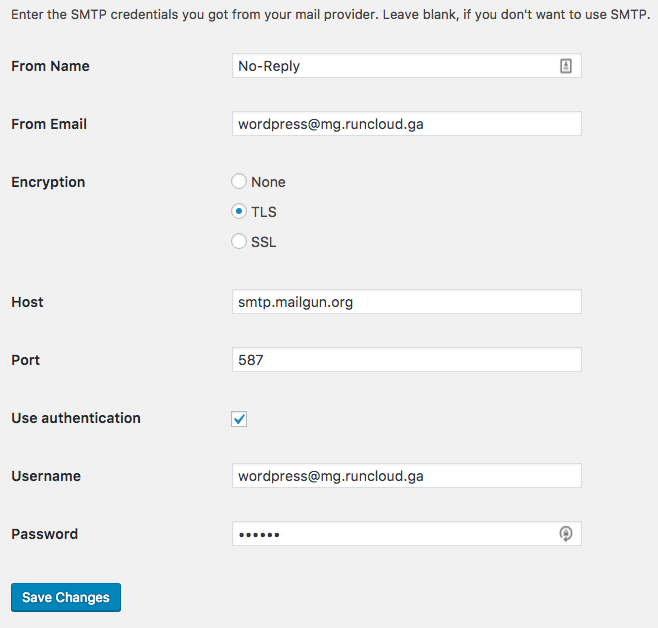
    You can use any username that you want. For me, I simply choose wordpress@mg.runcloud.ga. And don’t forget the password. We will use this account in the next step.

    WordPress SMTP Plugin

    There are plenty of WordPress plugins for SMTP and my suggestion is Easy WP SMTP and SMTP Mailing Queue. What is the different between both plugins? Easy WP SMTP just a plugin to replace default WordPress email sending method. While SMTP Mailing Queue will queue the email and send the email using cronjob. Check out our post on how to enable true cron job and make WordPress faster.

    SMTP Settings

    Inside any SMTP plugins that you are using, every plugin won’t differ much in configuration. All of them will ask for SMTP host, encryption, port, and credential. Now fill in the data with the same credential that you have created inside MailGun.

    For the host, MailGun uses smtp.mailgun.org. For the port, you can use either 25, 587 or 465.

    Testing

    Some of the plugins that you are using may have a function to test sending email. But if your plugin doesn’t have it, just request a forgot password from WordPress.

    Wrapping Up

    RunCloud is a powerful and easy-to-use platform that helps you manage your websites on any cloud server. With RunCloud, you don’t need to be a Linux expert to set up, secure, and optimize your web applications. You can do everything from a simple and intuitive dashboard, saving you time and hassle.

    RunCloud supports various web servers, PHP versions, databases, and frameworks. You can also monitor your server performance, back up your data, and automate your tasks with RunCloud. Whether you are a developer, a freelancer, or a business owner, RunCloud can help you run your websites faster and smoother.

    What are you waiting for? Join RunCloud today and enjoy the best web hosting solution for your websites. It’s free for 7 days, no strings attached!

  • Redirect to HTTPS Using htaccess Behind NGINX Proxy

    Redirect to HTTPS Using htaccess Behind NGINX Proxy

    Sometimes when building your own web application from scratch, you might want to force your web application to redirect to HTTPS. You can achieve that with HSTS, but you are thinking it is better to add the redirection rules to the .htaccess too. So how to redirect to HTTPS using .htaccess behind NGINX Proxy?

    The rewrite rules

    RewriteEngine On
    RewriteCond %{HTTP:X-Forwarded-Proto} !https
    RewriteRule ^(.*)$ https://%{SERVER_NAME}/$1 [R,L]

    Explanation

    The first line is to tell Apache to enable rewrite engine. The second line is to tell Apache to run the third line if X-Forwarded-Proto is not https. And the third lines is to simply tell Apache to rewrite every HTTP request to HTTPS. The R and L flags are to tell Apache to rewrite the URL and stop rewrite if the URL is matched.

    Why we are using %{HTTP:X-Forwarded-Proto} instead of %{HTTPS}? The Apache is behind NGINX and doesn’t know we are requesting our site using https protocol. Thus, NGINX will have to send X-Forwarded-Proto header for the backend to know about protocol we are using. X-Forwarded-Proto will only have two values, http or https.