Author: RunCloud Team

  • Cron Jobs – The Complete Guide & How To Schedule Tasks

    Cron Jobs – The Complete Guide & How To Schedule Tasks

    Cron jobs are a type of scheduling system that can be used to automate your business processes. A cron job is a command or program that runs at a specified time or period. The purpose of these jobs is to run tasks automatically, meaning you don’t need to log into the system every time you want something done. This article will cover everything from what cron jobs are and how can they help your business, all the way through setting up and using them.

    What Are Cron Jobs?

    Cron jobs are built into Unix-like operating systems and are used to schedule system tasks that need to be performed at a specific time. While they’re not something most users will ever have to configure or manage directly, they’re a valuable tool for administrators and software developers who need to automate routine tasks.

    They can be used to automate repetitive tasks, like sending out a daily newsletter or running commands on a server. Cron jobs can be scheduled to run once every minute, or once an hour – or even once every day.

    ‘Cron’ is an abbreviation of chronometer, and it basically means “timekeeper”. A cron job runs at pre-defined times or intervals. For example, you can schedule a database backup to run every day at 5 pm.

    What Can Cron Jobs Be Used For?

    Cron jobs are used to schedule tasks on a periodic basis. For example, you may have a cron job that runs every day to carry out a data backup, archive old files, or have a cron job that runs every day at 7:30 PM that emails reports to your clients.

    What Are The Benefits Of Using A Cron Job Scheduler?

    Cron jobs are a great way to free up your time and save money. Instead of having to spend your time manually scheduling tasks, cron jobs can be set up to automatically run at specific times or intervals. This means that you don’t have to worry about missing an important task, such as sending out marketing emails or updating an image on your website.

    Cron jobs also save you money by reducing the amount of time spent on tedious tasks like updating social media, performing backups, or monitoring websites for changes in traffic. With a cron job scheduler, all this work will be done for you automatically when scheduled so that it doesn’t eat up any more of your precious development time!

    How To Set Up A Cron Job Scheduler

    A cron job scheduler is a tool that allows you to schedule tasks to be performed at specified times or intervals. You can even use them on your own computer or on other computers. They are incredibly useful for automating many different kinds of tasks, including updating your website and backing up files from other devices in your network.

    There are two operating systems that support cron job scheduling: Linux and Unix-like systems (such as Mac OS X), which have the more traditional root access method; and Windows 10 Pro (which has an added feature called Task Scheduler). There will be some slight differences between these methods depending on what operating system you use, but all of them will allow you to set up automated tasks!

    The process for creating a basic Cron Job is pretty simple: Open up the terminal window by clicking ‘Show Hidden Icons’ → ‘View’ → ‘All View Options’ → Click on “Show Developer Tools” and finally click on “CMD Prompt(Admin).” Once inside this new window type in “crontab -e” without quotes at the command prompt then hit Enter! This will open up Nano – the default text editor.

    How To Schedule Tasks On Windows

    • Firstly, make sure that you are logged on as an administrator, or that you have the same access as an administrator.
    • Go to Start->Control Panel->System and Security->Administrative Tools->Task Scheduler

    Action->Create Basic Task->Type a name for the scheduled job, and click ‘Next’

    • Follow through the wizard to select the tasks and times you wish.

    Your cron jobs will now run automatically at their specified intervals as per your settings, just like any other Windows task or scheduled event

    How To Schedule Tasks On Mac OSX

    To schedule tasks on Mac OSX:

    • Click on the Applications folder in Finder and search for the Terminal app.
    • Open the app by double-clicking it, or by pressing Command + Spacebar and typing ‘Terminal’ into Spotlight Search (which will open a new tab in Safari).
    • Type in the following command: sudo crontab -e
    • In the “Cron” window that opens up, type in your desired command to schedule a task (see example above). You can also add multiple commands here if you prefer!
    • Hit Enter when finished typing out your command(s), then close out of Terminal by clicking File > Close tab at the top left corner of the window or hitting Command + Q

    How To Schedule Tasks On Linux

    When it comes to configuring Linux cron jobs, there are a few things you need to know. First, you can create and schedule tasks with the help of the crontab utility. The syntax for this command is as follows:

    [user]@[hostname]:~$ sudo crontab -e

    Where user is your username on the host machine and the hostname is either the IP address or hostname of your server (you don’t have to enter both). The tilde symbol (~) represents your home directory on Linux systems, so if your username is “John Doe” then ~ would refer to /home/john/. When running this command on Ubuntu 18.04 Bionic Beaver (which comes with Python 3) you’ll see:

    ```python2
    John Doe's Desktop 2 [21/08/2018 09:54]$ sudo crontab -e
    ```

    Crontabs are stored in /var/spool/cron/. You can edit them with any text editor like vim or nano.

    10 Examples Of Cron Jobs To Improve Business Efficiency

    In a business setting, there are many tasks that need to be done routinely. These tasks can be done manually, but they’re often repetitive or time-sensitive. For example, you might want to run a report every month or send an email reminder to your employees every week. In these cases, using cron jobs to automate these processes will save time and make them more efficient. Here are 10 examples of how you can use cron jobs in your business:

    1. Email Reminders

    Email reminders are a great way to remind customers of upcoming events or deadlines. For example, you could schedule an email to be sent when a customer’s event is coming up so that they know what to expect and can prepare accordingly.

    The following code will send an email reminder one week before your birthday:

    crontab -e * * * 2 # 0 0 1 * – name: Send Birthday Reminder email: me@example.com

    If you want to only receive the reminder on specific days of the week, use one of the following lines in place for “0 0 1 *” above:

    • Sunday (Sun) at 12am
    • Monday (Mon) at 12am
    • Tuesday (Tue) at 12am
    • Wednesday (Wed) at 12am
    • Thursday (Thu) at 12am
    • Friday (Fri) at 12am
    • Saturday (Sat) at 12am

    2. Database Backups

    You can set up a cron job to run database backups – and restore them. You can also automate database backups with a cron job, so that they’re run at night or on weekends when there are fewer users on the system.

    3. Archiving Old Data

    If your business is like most, you have lots of data that gets stored and forgotten about. This is a problem because as time goes on, the older files are more likely to become lost if something happens to your hard drives or server.

    To ensure that this doesn’t happen, you should set up a schedule for archiving old data. Cron jobs are the perfect tool for scheduling archiving because they’re easy to set up and run automatically in the background without any intervention from users.

    4. Monitoring And Alerting

    Alerting is a process that monitors the status of a system or application, and notifies the appropriate personnel when an event occurs that requires attention. Alerts can be triggered by events such as a change in CPU usage, file modification, or a network connection.

    The most common type of alert is an email message sent to someone (or multiple people) who must attend to it immediately. This is useful for ensuring security breaches are detected as soon as possible so they can be stopped before causing more damage or being noticed by others outside your company. There are many different types of alerts available – some examples include:

    • Email notifications
    • SMS/text messages
    • Phone calls

    5. Data Analytics Or Reporting

    If you’re looking for examples of analytics or reporting tasks that can be run from cron jobs, there are many out there. The most popular one is probably Google Analytics, which allows users to import their site’s traffic data into an app and then schedule reports in the time they want them sent on any given day.

    If you have employees working remotely (or even if they’re not), it’s important that they know what their daily tasks are and when they need to complete them before setting up a cron job with email alerts. This will ensure that all employees follow through with their responsibilities and get work done on time without having to ask anyone else where they should start or what exactly needs doing today!

    Knowing that every team member understands what tasks need completing can help eliminate any confusion about how much time is left before an important deadline arrives – which could mean less stress for everyone involved at work!

    6. Running Inventory Scripts

    Inventory scripts are used to track the inventory of a product. For example, if you have a product that is sold in stores and warehouses, you can use an inventory script to ensure that your store has enough products for customers. You can also use this type of script to track how much stock is in each warehouse location and determine which locations are running out faster than others.

    7. Syncing Files Between Systems

    It’s possible to create a cron job that will sync files between systems.

    For example, if you are using a file synchronization tool like https://www.rsync.net and have both the source and destination servers set up correctly, then it’s possible to use the rsync command line utility to perform this task automatically.

    8. Checking For Software Updates

    You can check for software updates using the following command:

    apt-get update

    To install an update, run this command:

    apt-get upgrade -y

    To schedule a software update to happen automatically at a specific time, add the following cron job to your system’s crontab file (which you can find by typing “sudo nano /etc/cron.d/”):

    * */5 * * * root apt-get upgrade -y

    If you want to rollback an installed update, run this command:

    apt-update && apt-full dist-upgrade -reinstall --auto-remove && reboot

    9. Calling APIs At Regular Intervals

    There are a number of popular APIs that you can use to automate some tasks within your business. For example, you could make a cron job that calls the Google Calendar API every hour, and creates events based on whether or not there are any meetings scheduled for the next day. This would ensure that the calendar stays up-to-date at all times, and it would also prevent employees from having to manually update their calendars after meetings have been canceled or rescheduled.

    For example:

    • Google Calendar API – A “personal” type of web service where users can maintain their own calendars as well as share them with other people.
    • Upwork API – An “enterprise” type of web service where companies can hire freelancers with different skillsets at reasonable rates (compared to what they would pay in-house).

    10. Running Security Scans Or Vulnerability Assessment Tools.

    Security scanning tools scan your network for vulnerabilities and can be used to identify weaknesses in your software, operating systems, and applications that are open to hackers. Vulnerability assessment tools help you test the security of your hardware devices (such as printers) by checking whether they have been configured correctly. These tools allow you to improve business efficiency by ensuring that all of your devices are protected against cyber attacks. Setting up cron jobs to automate these scans, and send email alerts or reports if necessary offers another great advantage.

    Cron Job Terminology

    Cron

    Cron is a time-based job scheduler that runs in the background on a server. Cron jobs are scripts or programs which are automatically executed at specific intervals for routine tasks such as sending out email notifications, refreshing analytics data, etc.

    Cron jobs can be set up to run once, daily, weekly, and monthly. Most cron implementations allow users to set up jobs to run at any particular time of day or day of the week (or week). A cron job will be queued until its scheduled execution time arrives then executed at that time.

    Cron Jobs

    The actual events that are scheduled using Cron with a specific time interval and command.

    Cron jobs can be scheduled to run at a specific time, or at a specific time of day.

    • *At a specific time.* The cron job will run at the specified date and time.
    • *At a specific time of day.* The cron job will run during the specified hour (0-23).

    A cron job has three parts: an interval, a command, and the name of a user who will run the command.

    The cron daemon is a time-based job scheduler that runs on Unix and Unix-like operating systems that allows you to schedule commands to run at specific times or intervals.

    Crontab

    A configuration file containing all the scheduled cron jobs.

    Crontab is a configuration file that contains the list of jobs to be run at specified times. It usually resides in /etc/cron.d and is edited using the crontab editor.

    Crontab Editor

    A tool that allows you to edit your crontab file easily, without having to use any coding.

    Conclusion

    Hopefully, by now you’re convinced that cron jobs are a useful tool to help automate your business processes. They have many benefits and can save you time in the long run. However, they do require some setting up before they work properly so make sure that you know what your needs are before getting started!
  • Docker Security — Best Practices to Secure a Docker Container

    Docker Security — Best Practices to Secure a Docker Container

    Docker has quickly become one of the most popular platforms for software developers and teams that wish to streamline software development, shipping, and execution. However, most developers don’t secure their containers properly.

    According to security analysis by Prevasio, of around 4 million Docker images, more than 2 million had critical vulnerabilities. That’s a damning statistic, and really underscores the importance of security for your Docker containers. 

    In the following article, we discuss the 14 best practices that you can follow to secure your Docker containers.

    Understanding Docker Concepts and Containerization

    Docker containers are essentially software units that isolate each instance of an application and all dependencies to allow the application to run faster and without any hiccups. Container images are simply standalone executables that package everything needed to run an application.

    All software in Docker containers runs exactly the same, regardless of changes in infrastructure. The reason why software developers prefer Docker containers is because they help isolate software from the environment, and ensures uniform performance even if differences exist, such as between the development or staging environments.

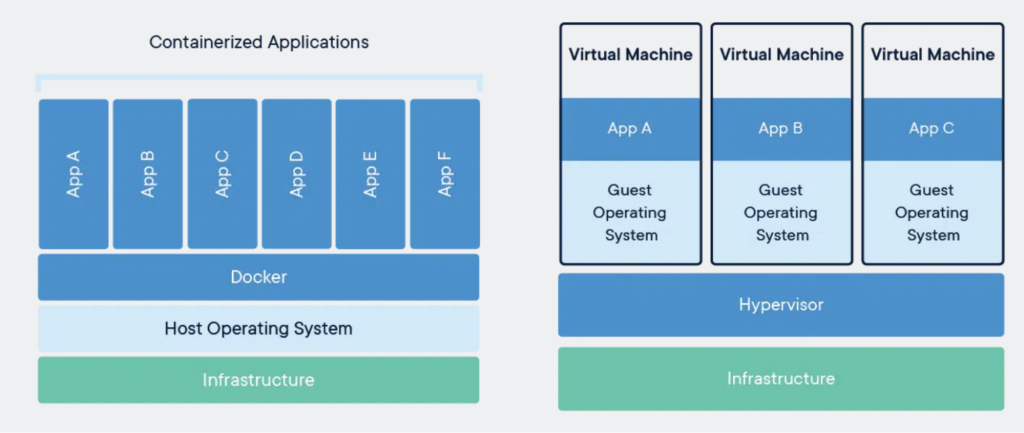
    While you may be tempted to compare Docker containers with VMs (virtual machines), there’s an important difference: the former simply virtualize the operating system, and pay no attention to the hardware. As a result, they’re more efficient and portable.

    docker concept
    Source: Docker.com

    What Is Docker Container Security?

    Since containerized environments are considerably more complex than traditional development environments, securing them is critically important. It is typical that in every production environment, a significant number of Docker containers are deployed.

    More importantly, it’s imperative that security experts reevaluate their approach, as containerized environments often have more moving parts (such as resource quotas, container registries, firewall rules, etc.) that need to be secured than a conventional deployment environment.

    Docker container security simply refers to the use of different practices and the implementation of effective security controls to protect the components within a Docker container, including the code, any system tools, libraries, or custom settings.

    The 14 Best Ways To Secure a Docker Container

    Container security should be taken seriously, as vulnerabilities could cause significant delays and lead to cost overruns throughout the development process. More importantly, traditional security methods are not always viable when securing Docker containers, as containerized environments aren’t as visible as traditional development environments.

    Here are 14 best practices we highly recommend you follow to secure Docker containers.

    1. Regularly Update Docker and the Host OS

    Security breaches in obsolete versions of Docker often pose the biggest risk for developers. Updating your Docker version regularly is very important, as these updates often include bug fixes, and patches to improve performance and fix vulnerabilities.

    But, that’s not all. You also need to update the host operating system. Should an attacker exploit a vulnerability within the host operating system, your container safeguards won’t be of much use.

    That’s because containers generally run on top of the kernel as it’s more efficient. Make sure you update the base system as well as keeping Docker up to date. You can also subscribe to security updates or news, so you’re always in the know when a new security patch is released.

    2. Reduce Default Privileges for Docker Containers

    One of the many security threats that you need to be wary of is a “container breakout.” This occurs when the Docker container fails to abide by isolation checks and ends up accessing privileged information from the host.

    The best way to mitigate the chances of this happening is to limit the default privileges granted to your containers. For instance, the daemon generally has root access, but you can always change that, or create another namespace with specific privileges.

    You can drop any access control capabilities that you feel are not required by the application. Ideally, it’s best to revoke access to CAP_SYS_ADMIN, since it grants access to a range of root-level permissions that can be exploited by malicious actors.

    And, more importantly, be very careful when running a sensitive container that requires root-level access. You can verify the Container image authenticity first before you run it. 

    3. Reduce Your Attack Surface with Lean Containers

    By default, Docker containers are generally quite lightweight. However, in some cases, developers tend to treat them like servers. When you start adding files constantly to the containers, or stop updating them on a regular basis, you’re essentially increasing your attack surface.

    A good practice is to try to reduce the number of components within each container as much as you can. Aim to keep the containers as lightweight as possible, so the attack surface is relatively narrow.

    And, in case a vulnerability is detected in any Docker image, you should resolve the problem as quickly as possible and deploy a new container, instead of leaving it for later.

    4. Monitor Container Activity

    Since there are often multiple instances running in each Docker container image, it’s important that you take a viable approach to monitoring container activity. The dynamic nature of Docker containers often makes this difficult.

    New versions and images are often launched at breakneck speeds, making tracking complicated. Another downside to this fast-paced approach is that should an issue arise, it can spread relatively quickly across different applications and containers.

    That’s one of the main reasons why tracking container activity is crucial. It’s also essential to create internal controls that help you identify images that may contain vulnerabilities or faults. This way, administrators can quickly fix the issue and deploy new containers instead.

    Ideally, you’d want to monitor activity across master nodes, workloads, and container engines. Third-party tools like Calico are an excellent choice for tracking container activity.

    5. Set Volumes and File System Permissions to Read-Only

    Instead of giving write access to containers, it might be a wise idea to run containers with a read-only file system. This can prevent malware from causing harm, such as propagating across the network or modifying the internal configuration of your network.

    To set Docker containers to read-only, run the code below:

    
    docker run -read-only alpine sh -c 'echo "running as read only" > /tmp'
    

    6. Regularly Scan and Verify Each Container Image Before Use

    Before you start using container images, it’s imperative that you scan and verify each image to detect vulnerabilities. This is all the more important if you’ve pulled an image from a public repository.

    Should a vulnerability exist in a single component of your image, it’s going to propagate to all other containers that are created using that image. The vulnerability in the base image will likely spread to all other images, which could lead to harmful consequences.

    Scanning container images is an excellent practice that can help you identify security issues and vulnerabilities. Unsafe images should never be added to the container registry that production systems can tap.

    Most tools that focus on container scanning rely on the CVE (Common Vulnerability and Exposure) database, and test images to identify any CVEs. Regular scanning is a great way to ensure that threat levels remain low.

    7. Tighten Security with Container Registries

    Container registries are commonly used by development teams as they allow them to quickly download container images with a single click. This is great when they have to work with multiple images. You can also configure registry access management permissions.

    While it saves a lot of time, it leads to an elevated security risk. How can you be confident about whether the image you’re pulling is trustworthy and free from malware or other vulnerabilities?

    To prevent any issues, it’s best if you use a private registry that’s protected by your own firewall. Also, implement RBAC (Role Based Access Control) so that only authorized users are able to access and download images from the registry.

    8. Avoid Exposing the Docker Daemon Socket

    The Docker daemon socket is a Unix network socket that is used by the Docker API to allow for seamless communication. The root user has ownership of the Docker daemon socket, but if someone else is given access to the daemon socket, they’ll also have root-level permissions.

    To avoid such an issue, it’s best that you avoid making the daemon socket available for remote connectivity. If you absolutely have to, always make sure that you use the encrypted HTTPS socket that Docker has.

    9. Reduce Resources Available to Containers

    If an attacker gains access to a container, they may try to use the host resources to perform malicious operations. A simple way to protect against this problem is to reduce CPU usage limits and Docker memory consumption so that breaches don’t lead to serious harm.

    By default, Docker containers are given full access to all the underlying CPU and RAM resources available on the host. You can, however, set quotas so that each container only has a specific number of resources available to them. This ensures that other services running on the host aren’t affected.

    10. Prevent Direct Access to Core Container Files

    Because containers are regularly upgraded and bug fixes are implemented, files are often exposed every time they’re accessed by a user. Ideally, you don’t want to maintain container logs within the container itself.

    If you keep the logs outside, it prevents users from accessing the container files directly. This means that team members can troubleshoot problems, if any arise, without directly accessing the container directory.

    11. Only Use Base Images That You Trust

    Supply chain attacks pose a serious risk, so it’s important that you avoid using base images that you can’t trust. Untrusted base images pose a serious issue, so it’s important that you avoid using them.

    Thankfully, you can find a host of Docker Official Images for most operating systems. Ideally, you will want to avoid using unofficial and untrusted base images as much as possible.

    12. Avoid Upgrading System Packages

    There’s always a risk that things might go sideways when you upgrade your system packages since you’ll end up upgrading the latest version of all your software dependencies.

    It’s best to pin them so you can cut down on the unpredictability as much as possible.

    13. Avoid Using the ADD Command Unless Necessary

    The ADD can be used when you want to copy files into a Docker image. However, you can also point it to a remote URL to allow it to fetch content when you’re building an image.

    Ideally, you’d want to get the content first and inspect it carefully before you copy it instead of copying data remotely.

    14. Steer Clear of Curl Bashing

    Curl is a popular command line tool that’s used to copy content to and from a server. As you can imagine, it carries a significant amount of risk, especially if you aren’t copying data from a trusted source, or can’t authenticate the content that you’ve downloaded.

    Frequently Asked Questions

    Is Docker a Security Risk?

    Docker doesn’t have to be a security risk as long as you update the platform and the host operating system and make sure you take proper steps to secure your containers.

    Does Docker Help Security?

    If used correctly, Docker can significantly improve security performance, especially since containerization greatly improves security when running isolated applications.

    Can Docker Images Be Encrypted?

    Yes, Docker images can be encrypted using containers or other tools. However, encrypting Docker images is not a straightforward process; it requires considerable expertise.

    Can You Password Protect a Docker Container?

    Since Docker containers don’t generally have conventional users, and you can’t log into a container, there’s no way to set passwords. Users simply run a command instead of accessing a container the conventional way.

    What Is Docker Bench Security?

    The Docker Bench for Security is simply a script that inspects for different best practices that focus on deploying Docker containers that are currently in production. All of the inspections are fully automated.

    After Action Report – Secure Your Docker Containers

    It’s very important for organizations to take security seriously, especially within a cloud-native development framework.

    From taking simple steps such as enforcing encrypted communication, and using TLS Certificates to restricting container capabilities, it’s important that you review security practices regularly.

    Always factor in vulnerabilities and discuss with your security experts how to mitigate the risk as much as possible. By creating a security policy that focuses mainly on container integrity and the infrastructure, organizations can reduce their threat levels by a significant margin.

  • What Are Docker Images And How To Use Them

    What Are Docker Images And How To Use Them

    When Solomon Hykes founded dotCloud in 2008, his ambitions were quite different. The company, a Y Combinator Summer 2010 graduate, eventually pivoted in 2013, relaunching as Docker.

    Hykes took to the stage at PyCon in 2013, releasing the first demo for Docker. During that first talk, Hykes explained that Docker was simply the underlying technology that powered dotCloud and that the company was pivoting towards an open-source model.

    It didn’t take long for Docker to attract attention from industry heavyweights like IBM, Red Hat, and Microsoft. With a Docker container, you could develop software in a portable environment.

    Docker allowed developers to deploy, replicate, and easily port images to simplify workflows and introduce a level of flexibility that was simply not possible at the time.

    There are several key components that combine to help you perform functions using Docker, and the image is just one of them. Apart from that, there’s the basic Docker client and the Docker daemon, both of which are required to make images work.

    But, what is a Docker image? How do you use it? Here’s everything you need to know.

    What is a Docker Image?

    A Docker image is simply a read-only file that’s used to run code within a Docker container. Think of it as a template that contains all the instructions needed to run the code. All of the code and dependencies are packaged in one file.

    The Docker image contains all of the tools, packages, libraries, and source code required to run the software. These instructions can be used to build Docker containers, often containing multiple layers, with each one originating from the previous layer.

    Docker images can be deployed on any host, and they are reusable, allowing developers to take images from one project and use them in another, saving them considerable time and effort. 

    Related: What is Docker And How Does it Work

    Anatomy of a Docker Image

    Layers are offshoots of instructions from the Dockerfiles stored in your local image cache. The local image cache forms the base for subsequent images you want to create. In general, some of the components of Docker images are listed below.

    1. Base image

    This helps you build Docker images from scratch. Base images give you control of all other Docker images. You can build a base image using the FROM scratch directive in the Dockerfile. Some examples of base images include Debian, Ubuntu, Redhat, and Alpine.

    1. Parent image 

    They’re the building block of Docker images. The FROM directive in the Dockerfile is used to create the parent image. In most cases, Dockerfiles are built from a parent image.

    1. Layers

    Also called “image layers”, these are the intermediate images that form Docker images. Through the layers, you can cache every step you take while creating Docker images. Layers also increase the reusability and the speed of creating Docker images.

    Layers are set in a hierarchical form, and each layer depends on the one preceding it. This is why it’s essential to keep layers susceptible to changes as high as possible in the stack list. Because should you change any layer, Docker will rebuild the specific layer and the preceding layers around it.

    1. Container layer

    This is the modifiable layer of a Docker image. It saves the changes you make to containers during operations.

    1. Docker manifest

    This provides information about Docker images in JSON format. To perform actions on manifest, you need to use either the “single manifest” or “manifest list” commands. Specifically, the single manifest describes the size, layers, operating system (OS), and architecture of a Docker image.

    A manifest list – also called “multi-arch image” or “fat manifest” – helps you group multiple images. After creating the list, you can use the group name of your list instead of the individual name of your image. This means you can use the docker pull or docker run command to pull desired Docker images.

    Docker Images vs. Containers

    Before we proceed further, it’s important to understand the differences between a Docker image and a container. A container is a self-contained space that lets you run an application.

    Docker containers are completely isolated, so they don’t affect the system, and the environment they run in can’t affect the software either. A Docker image, on the other hand, runs the code within a container.

    A Docker image can exist outside of a container, but a container will need to execute an image for it to have something to “contain”. Therefore, a container is fully dependent on a Docker image to execute an application.

    Think of an image as a template, so while it can exist independently, you can’t execute it. It’s important to mention that a container is just an executed image. As you build a container, it automatically creates another layer on top of the image, letting you modify the container layer (images are read-only).

    This also means that with the help of a single image base, you can easily create multiple Docker images. Over time, you’ll have images that contain different layers, with each iteration slightly similar to the previous one.

    How to Build Docker Images

    Primarily, Dockerfiles are used to build Docker images. Dockerfiles contain the commands you need to build and customize Docker images. Every instruction you execute with Dockerfiles creates an intermediate layer.

    To create a Docker image, your first step would be to create a Dockerfile. Docker uses the Dockerfile to build images, so all instructions must be stored there. It’s a simple text file where you can add all the commands needed to create an image.

    To write one, you can use the simple Express application generator. Creating a basic Node.js app is a good way to start. Express application generator is a CLI (command-line interface) that lets you create basic app skeletons.

    If you’re on Linux, just fire up the Terminal, and install the generator using the following commands:

    $ npm install express-generator -g
    $ express docker-app
    $ npm install
    $ npm start

    Once installed, head to the root directory (where you saved the application) and create a simple text file. You can name it whatever you want, but let’s go with “Dockerfile”.

    Now, to create an image using this file, run the following commands:

    # Filename: Dockerfile
    FROM node:14-alpine
    WORKDIR /usr/src/app
    COPY package*.json ./
    RUN npm install
    COPY . .
    $ docker build .

    Docker will now build the image. To check whether the image was created, you can run the docker images command.

    Once you build a Dockerfile, you don’t need to rebuild an image manually. The table below contains the basic Dockerfile commands you need to build images.

    CommandFunctions
    FROMSpecifies the base image.
    RUNSpecifies the shell command you want to execute in your image.
    COPYUsed to import external files from a specified location.
    ENVUsed to define environment variables.
    EXPOSEDefines the port to access your container application.
    LABELUsed to describe your image.
    CMDUsed to execute a specific command within a container.

    To build Docker images from Dockerfiles, follow these steps:

    • Create your Dockerfiles: Here, you need to create a new file and directory for your Docker image. 
    • Run Docker build to build your Docker image. The build command uses instructions from specific files in a directory to build a Docker image. 
    • After creating the Docker image, use the Docker run command to create your container. 

    Alternatively, you can use the interactive method to manually build Docker images from preexisting images. To do this, follow these steps:

    • Open a terminal session after installing Docker. 
    • Use the Docker run command image_name:tag_name to start an interactive shell session with the container specified by the command. But there’s a caveat: Docker will automatically pull the most recent image version if you omit the tag name. If the images aren’t on any local file, Docker will build the container using resources from the Docker hub.

    The interactive method is fast and easy to use, especially if you’re a newbie developer. But it can make you create unnecessary layers and multiple unoptimized images.

    In contrast, the Dockerfile approach is more flexible and easily integrates the continuous integration/continuous delivery (CI/CD) process. The Dockerfile approach is your go-to method if you’re looking to build enterprise-grade containers.

    You also have the option of exporting or loading your images through the save command. To download the image you just exported on another machine, you can then use the load command.

    And, if you want to run your Docker image, you can use the following command:

    $ docker run -i -t Dockerfile /bin/bash

    You can replace the name with that of your image if you’ve renamed it.

    How to Use Docker Images

    Docker containers are the main use of Docker images. Images contain everything you need to create, deploy, and run your applications in a container. By extension, containers fly applications in different environments efficiently, especially microservice-based apps,.

    Improved CI/CD efficiency is another major use of Docker images. CI/CD is an automation principle used to integrate software changes. It uses a single repository to automate software development processes (building, testing, and deployment).

    Docker uses caching, the process of storing Docker image layers, to improve the CI/CD process. By storing every layer, caching increases the speed of creating lightweight Docker images. Lightweight images with a short build time make it fast and easy to deploy applications in different environments.

    While you can build a Docker image from scratch, as shown above, most developers prefer to pull images from different repositories. The Docker Hub has an extensive range of images available.

    You can then use the image base to create different Docker images too. But, it’s important to understand that there’s also the parent image, which is different from the base image.

    A base image is the empty container image, which you can use to eventually build an image from the ground up if you want. Parent images are pre-built images that offer some core functionality.

    For instance, a basic Linux system image or an image of WordPress might be considered a parent image. All the images that you find on Docker Hub are also parent images.

    How to Maximize Docker Image Security

    The images that you use to build the container obviously play an important role in ensuring the overall safety of the container itself. In case the image is infected, the container will be too.

    It’s important to take certain security precautions when using Docker images. Here are some key points to keep in mind.

    Only Use Verified and Signed Images

    There are numerous third-party image repositories available, but ideally, you should steer clear of them. Instead, always use verified images from the Docker Hub to maintain project integrity.

    Furthermore, it’s important that you only use signed images to mitigate your risk. In case someone tampered with the image, you’ll know right away.

    Use Minimal Images with No Unnecessary Libraries

    Instead of using images that have several layers and contain various components that you won’t need, try to avoid downloading images that install additional system libraries that you won’t require. This can help you reduce your overall exposure.

    Define a Privileged User

    It’s important that you specify a USER for each Dockerfile. If you don’t, the container will run with root privileges on the host machine. That exposes your container to severe security issues and can lead to hackers eventually hacking into the host machine.

    Regularly Check Images for Vulnerabilities

    It’s important to note that vulnerabilities might be introduced as you continue to build new layers. While you may have checked the image originally, and verified it, make it a habit to check it regularly to identify issues and fix them at the earliest.

    After Action Report – Working with Docker Images

    Docker images are great because they are so lightweight and flexible. Interested in learning more? Join the conversation by commenting below, or send us a Tweet about how Docker has simplified software development for you!

  • 20 Essential Docker Commands You Should Know

    20 Essential Docker Commands You Should Know

    Docker is commonly used by software developers and engineers to develop, test, and control the conditions in which they test their software. It allows software developers to create portable containers, making it easy to collaborate with others remotely.

    If you’re new to Docker, learning all of the commands may seem a bit daunting at first. The sheer amount of documentation available for Docker can be overwhelming to review. However, there are some commands which are more commonly used than others.

    What is Docker?

    Docker is a free, open-source platform that lets developers create, manage, and run containers in the cloud or on servers. It’s considered a PaaS (platform-as-a-service) product that lets developers use virtualization to run software in containers.

    Docker makes it easy for developers to use system resources more efficiently, as containerized apps generally use less memory when compared with virtual machines. Docker also makes applications portable, since a container includes everything the application requires to work.

    You just need Docker runtime on a host to easily execute a Docker container. Now that you know the basics, let’s look at 20 essential Docker commands.

    20 Essential Docker Commands and What They Do

    Here are 20 essential Docker commands, including their intended functions. 

    1. Docker run

    The Docker run command is used to create and start containers. When you run this command, it’s going to first look for a container image.

    If one is not found, it will create a new one and run it.

    Docker run[OPTIONS] IMAGE [COMMAND] [ARG...]

    Here’s an example of running a Nginx container from Docker’s repository.

    docker run —-name nginx-root -p 8080:80 -d nginx

    The -d means that the container will run in the background detached, while you can also customize the name flag and map the container port to the host port.

    2. Docker search

    You can use this command to search for different images from the main Docker hub. It will show you information about the image, including its name, description, and other specifications.

    Here’s an example:

    docker search nginx

    3. Docker stop

    This command is used to stop containers that you’re running. Unlike the docker kill command, this one stops the container in its own time. Here’s how to use it:

    docker stop [container name or ID]

    4. Docker rename

    This one’s fairly self-explanatory. If you want to rename a container, you can use this command. Here’s the syntax:

    docker rename [current_name] [new_name]

    5. Docker restart

    If you’ve stopped a container, you can restart it using this command. The syntax is as follows:

    docker restart [container name]

    6. Docker pause or unpause

    This command lets you pause or suspend all processes running within a container. Here’s the syntax that you use:

    docker pause [container name]

    You can also unpause containers using the unpause command:

    docker unpause [container name]

    7. Docker kill

    This command can be used to send the “KILL” signal to a container. It sends a SIGKILL signal without sending a request for termination.

    Generally, this command is in typical emergency situations, which is why it’s generally a wise idea to use the docker stop command before trying this.

    docker kill [container name]

    8. Docker pull

    The docker pull command can be used to pull an image from the Docker Hub. Here’s the basic syntax:

    docker pull [container name]

    You can also use tags to identify images, including the -all-tags- command to pull all images from a repository.

    9. Docker ps

    If you want to list all containers that are running in the background, you can use this command. Here’s the syntax:

    docker ps—-all

    10. Docker login

    If you want to log into the Docker hub, you can use this command. When you use this command, you’ll have to enter your Docker hub credentials.

    docker login

    11. Docker commit

    You can use this command to save an image of a container or create one on a localized system.

    docker commit [container name]

    12. Docker exec

    You can use this to execute new commands in a container that is already running.

    docker run --name ubuntu_1 --rm -i -t ubuntu bash
    

    This will create a new container entitled ubuntu_1 and launch a Bash session.

    13. Docker rmi

    If you want to remove an image from the host node and free up some space you can use this command. You will have to add the image ID to run this command.

    docker rmi [add image ID]

    14. Docker cp

    This command is used to copy files and directories from the container to the host and vice versa.

    docker cp test-container:/1/2/random.conf ./test

    This command is going to copy the random.conf file from the test-container and then paste it into the test directory, which would ideally be present in the same directory.

    15. Docker logs

    If you want to check the logs for all Docker containers, you can use this command. This is great when you want to review errors and then resolve problems. Here’s the syntax for it:

    docker logs [container name or ID]

    16. Docker info

    This is a fairly simple command that will show you information about the localhost, or the host on which Docker is running. The syntax is fairly simple:

    docker info

    17. Docker logout

    As you can imagine, this command will log you out of the Docker hub. The syntax is straightforward:

    docker logout

    18. Docker inspect

    If you want some basic information about the images and the containers, such as the checksum, layers, or the container’s IP address, you can use this command.

    The syntax for this is as follows:

    docker inspect [image name]

    19. Docker history

    If you want to go through the history of any image on your Docker system, you can use this command to get all the information you require.

    This can help you identify any changes made to the image, as well as any commits, starting from the most recent one. Here’s the syntax:

    docker history [container name]

    20. Docker push

    This command is used to upload a Docker image to a particular repository or the Docker hub. Here’s the syntax for it:

    docker push [image ID]

    After Action Report – Which Commands Do You Use Most Frequently?

    There are hundreds of different Docker commands and thousands of variations in total. Which Docker commands do you use most frequently? Let us know & join the conversation in the comments (or by Tweeting @RunCloud_io) what your preferred server file management process currently looks like! 💬

  • Laravel Octane – What It Is, Why It Matters & How To Take Advantage Of It

    Laravel Octane – What It Is, Why It Matters & How To Take Advantage Of It

    Laravel Octane is the latest Laravel open-source package, introduced by Taylor Otwell during his Laracon Online Talk last May 12th, 2021.

    The new Laravel package is a bigger and better version of Laravel. It’s powered by Roadrunner and Swoole, where you can store your Laravel server and website to let it handle all requests and boot-up processes. It’s faster, has a bunch of new features, and might be the future of Laravel web development.

    This guide will go over everything you need to know about Laravel Octane. What it is, why it matters, and how you can get started.

    What is Laravel Octane?

    Laravel Octane is an open-source package that boosts your Laravel application performance through stateful PHP programming.

    The package itself comes with dependencies and libraries for new features (mentioned below) and compatibility with high-performance servers such as RoadRunner and Swoole.

    Laravel VS Laravel Octane

    Laravel Octane runs on top of Laravel and PHP version 8.0 and above. It’s an addition to standard Laravel and is not a separate language.

    When comparing performance, standard Laravel apps can process up to 500 requests per second at best, while Laravel Octane easily passes 2,000 requests alone. While the data across numerous sources for this will vary somewhat, the consensus is that Laravel Octane performs at least 10x better than traditional Laravel – and that’s based on conservative estimates.

    Laravel Octane operates differently from traditional Laravel apps when it comes to servers as well. Octane has its own server through Swoole and RoadRunner, which Nginx and Apache should redirect to for incoming traffic.

    However, another key difference between standard Laravel and Laravel Octane is in PHP usage. Laravel Octane changes your PHP stack into a semi-stateful PHP framework.

    NOTE: Some sources will outright say that Laravel Octane uses a stateful PHP framework. But, since PHP is naturally stateless and most PHP developers are used to programming stateless frameworks, the Laravel Team made Laravel Octane only partially stateful. PHP libraries are also not ready to program Laravel in a completely stateful framework.

    Before proceeding with the article, one of the biggest factors you’ll need to consider before trying out Laravel Octane is the fact that you’ll have to learn stateful programming.

    Stateful PHP vs Stateless PHP

    Let’s try to break down the difference between stateful and stateless PHP without being too technical.

    Stateless PHP has servers that can act independently from a user or client’s request. The servers store user information and open the info file, send the requested query to the user or server, and then close the info file. This simplifies the design process because the info files are only opened when needed and will always be up to date for every new request.

    On the other hand, Stateful PHP utilizes servers that act together with a client or user. The servers store user information and actively remembers this data as if the info file is open throughout the entire session. This makes the user-side process faster since operations like opening and closing information files no longer need to happen.

    Real-life Example of Stateful vs Stateless PHP

    It’s easier to understand the differences between these two with a real-life example. So, here’s a simple analogy:

    You’re logging into your RunCloud account to access your personal dashboard. This dashboard contains personal information that only your account has access to. How does RunCloud know that you have access to the dashboard?

    Stateless ServersStateful Servers
    The server stores a record signifying that you just logged into your RunCloud account. When you open your dashboard, the RunCloud server opens the record and sees that you logged in with the correct credentials, then closes the record again. This process repeats every time you go from page to page.The server recognizes that you just logged into your RunCloud account and will keep this information open until you logout or end your session. During your entire session, even as you move from page to page, the RunCloud server will remember that you logged in correctly and won’t have to open and close the records to verify this.

    Aside from the contrasts in how these two work, the way of coding and thinking of stateful vs stateless PHP is also different. If you’re thinking of picking up Laravel Octane, you’ll have to dedicate some time to adapting and learning this new framework.

    Why is Laravel Octane Stateful and Why Is It Faster?

    Laravel Octane needed to adapt a stateful framework because it’s faster. Traditionally, the standard Laravel process creates a PHP worker for every incoming request (like opening a page). This means starting up an individual PHP process that needs to boot and prepare the framework before serving that one request.

    To put that into context, that PHP worker would need to boot the framework and all of the service providers it uses. It would have to register those services within that container and then boot the providers. After that, the request goes through a list of middleware classes, hitting your controller, then finally rendering a view that opens up on your computer (opening a page).

    With Laravel Octane, all the HTTP requests share the same booted framework. This means that once the framework is booted (when the website is opened for the first time), any request after that will make use of the framework that’s already been booted. Laravel Octane will not have to boot a new framework for every request, thereby decreasing the workload. This is why Laravel Octane is so much faster than traditional Laravel.

    The reason why Laravel Octane can do this effectively is because of high-performance servers like Swoole and RoadRunner.

    Swoole VS RoadRunner

    Swoole and RoadRunner are two high-performance PHP servers that can manage PHP processes across strenuous and large-traffic scenarios.

    Laravel Octane lets you choose between running Swoole or RoadRunner for your website.

    Swoole is firstly a PHP extension, which means you’ll need to compile it on top of your PHP build during the setup. If you can get past that, Swoole is faster than RoadRunner and adds some custom PHP Laravel-related features for development. On the downside though, Swoole does not work with Xdebug, the most popular debugging tool for PHP. There are also cases where monitoring tools like New Relic and Datadog don’t work reliably with Swoole because it’s incompatible with Swoole’s co-routine and CLI environment.

    RoadRunner, alternatively, works as a replacement for PHP-FPM. It doesn’t need to be compiled with your PHP files, making it easier to deploy and install on your Laravel website from the start. The only downside to RoadRunner is that it’s not as fast as Swoole and doesn’t come with Swoole’s PHP features. Other than that, it works right out of the box, and really well, if you want immediate performance improvements without modifying your PHP files.

    Should You Use Laravel Octane?

    So, since speed is the number one key metric for a better-performing website, should you update your PHP version and start installing Laravel Octane?

    The short answer is that it will depend on your needs. ‘Yes’ if your website is struggling with performance, and ‘No’ if you can help it.

    Laravel Octane requires PHP version 8.0 and the adoption of a stateful programming convention.

    • There are tons of websites that run on older versions of PHP that will have to update their system just to use Laravel Octane.
    • If your development team isn’t familiar with using a stateful framework, they will also have to dedicate some time to figuring that out before adopting Laravel Octane.

    If these two issues are not a problem, then we can wholeheartedly recommend the improvement. Outside of that, unless your site is crawling and struggling from the magnitude of processes your server is handling, you may not need to upgrade to Laravel Octane.

    Laravel Octane Key Features

    To help you weigh your choices better, we’ve listed some key features from Laravel Octane, besides the obvious performance benefits. Most of these features will only apply to Laravel Octane that’s running with Swoole, so keep that in mind while reading through the list.

    Octane Workers

    PHP workers are traditionally created every time an incoming request is received. With Laravel Octane, multiple workers are created from the start making it faster for the server to immediately service requests as they are received.

    You can even specify how many workers you want to begin with, as well as the number of workers you want to initialize per CPU core. Having multiple workers helps because if one worker is busy with a task, the other worker can start servicing other requests from the user without any delays. This is how Swoole and RoadRunner increase performance by large margins.

    Here’s the code for that through Artisan:

    php artisan octane:start --workers=4

    If you’re using Swoole, you can also specify the number of task workers with this command. We’ll talk more about task workers below.

    php artisan octane:start --workers=4 --task-workers=6

    Be careful about how many workers you’ll initialize per CPU core though. The use case for this will vary from site to site and will depend on how intensive your processes are. We don’t recommend reconfiguring the Octane worker settings unless you know what you’re doing.

    Concurrent Tasks

    Laravel Octane also allows you to perform concurrent tasks, meaning these tasks will be done at the same time and not after each other. You can do this through task workers, which will only be available depending on the number you set with the octane:start command.

    php artisan octane:start --workers=4 --task-workers=6

    These task workers are separate from the web workers that receive web requests. If you want to process a task and keep a web worker busy, you can defer the task to a task worker instead.

    This feature is only available for Swoole.

    Ticks or Intervals

    Ticks make operations execute repeatedly after a specific number of seconds. These are also referred to as internals just like the setInterval method in JavaScript. Here’s what the command looks like.

    Octane::tick('simple-ticker', fn () => ray('Ticking...'))
           ->seconds(10);

    Where:

    • ‘simple-ticker’ represents the name of the ticker as a string
    • fn () => ray(‘Ticking…’) is the callable that is executed after every interval

    As of writing, there is no command to stop these ticks from running, so keep that in mind when using this feature.

    This feature is only available for Swoole.

    Octane Cache

    The Laravel Octane cache driver is powered by Swoole tables, which we’ll also talk about below.

    The cache driver reads and writes up to 2 million operations per second, making it a fast and excellent upgrade from your current caching system. It’s an in-memory cache, meaning the data will flush out when the server is restarted, so keep that in mind. This is the command you’ll need to activate the cache:

    Cache::store('octane')->put('framework', 'Laravel', 30);

    Another feature that’s related to Octane caching is being able to set a cache interval. This means you can refresh the data in the octane cache at given intervals. Here’s how you can do that.

    use Illuminate\Support\Str;
     
    Cache::store('octane')->interval('random', function () {
       return Str::random(10);
    }, seconds: 5);

    This feature is only available for Swoole.

    Octane Tables

    Swoole tables are extremely fast and provide a huge boost of performance to your server. This is because Swoole tables can be accessed by all the workers on the server, making operations and data retrieval all the faster. The only caveat to this is that all the data in the tables will be lost when the server restarts.

    Tables are defined within the table configuration array inside your application’s octane config file. The file will have a default table of 1,000 rows, but you can reconfigure that to your needs. It should look something like this:

    'tables' => [
       'example:1000' => [
           'name' => 'string:1000',
           'votes' => 'int',
       ],
    ],

    The code for accessing a table goes through the Octane::table method.

    use Laravel\Octane\Facades\Octane;
     
    Octane::table('example')->set('uuid', [
       'name' => 'Nuno Maduro',
       'votes' => 1000,
    ]);
     
    return Octane::table('example')->get('uuid');

    The Swoole table only supports string, int, and float for the column types.

    This feature is only available for Swoole.

    How to Install Laravel Octane

    Now that you know the benefits of using Laravel Octane as well as its key features, it’s time to teach you how to install it. Thankfully, since Laravel Octane is just a package, the installation process is the same as installing a dependency.

    NOTE: Laravel Octane needs PHP version 8.0+ to work.

    You can install Laravel Octane using the following command through the Composer package manager:

    composer require Laravel/octane

    This will download the Laravel Octane package. Once that’s done, install it with the help of the following command.

    php artisan octane:install

    The command will generate a configuration file config/octane.php. When you’re done installing Octane, it’s time to choose between RoadRunner and Swoole. Remember, RoadRunner is the easiest one to install as it works on top of your Laravel site, but it’s less powerful than Swoole. On the other hand, Swoole is a PHP extension which means you’ll have to compile it together with your PHP files and have it run with them.

    RoadRunner

    You can choose Roadrunner if you don’t want to install any other application packages and don’t need the extra features that come with Swoole.

    1. To start with RoadRunner, open up the config file that was generated when we installed Laravel Octane.
    2. In the file, replace the ‘server’ key into ‘roadrunner’.

    After that, run this command through composer:

    composer require spiral/roadrunner

    This will install RoadRunner to your server.

    Swoole

    As mentioned before, Swoole is much more powerful than RoadRunner and comes with some extra PHP features. Here’s how you can install Swoole:

    1. Open your PECL and run the command: pecl install swoole
    2. While the installation is happening, you’ll be asked if you have support for certain technologies within Swoole. You can safely stick to default values here and proceed.

    Once Swoole is done installing, we can proceed with the next step and run the server.

    Running Laravel Octane

    With either Swoole and RoadRunner installed, you can now launch Laravel Octane with the following command:

    php artisan octane:start

    After Action Report — Install Laravel Octane on RunCloud

    Laravel Octane can be a game changer for your website, or it can be completely unnecessary — in the end, it all depends on your needs.

    There is a learning curve to mastering Laravel Octane, but the benefits of implementing Laravel Octane can be tremendous.

    Thinking about installing Laravel Octane on your RunCloud server? Follow our full step-by-step guide here!

    What are your thoughts on Laravel Octane? Did you try to implement it? Let’s talk in the comments below! 💬

  • Cheat Sheet To All Bash Shortcuts You Should Know

    Cheat Sheet To All Bash Shortcuts You Should Know

    The Linux Bash is commonly used by developers, though it may seem fairly difficult to navigate at first. The use of arrow keys to navigate between commands is obviously a hassle and often becomes a major challenge.

    However, in general, Bash is quite easy to use. If you’re going to use it on a VPS, it’s important that you know about the different shortcuts that Bash has to offer. Here’s a full list of different Bash shortcuts that you can use, divided in separate categories.

    Editing

    The following list of shortcuts will allow you to easily edit commands. 

    ShortcutAction
    CTRL + x, CTRL + eEdit the current command in $EDITOR
    CTRL + _Undo
    ALT + DELDelete word before the cursor
    ALT + dDelete word after the cursor
    CTRL+ yPaste the last item
    CTRL + dDelete character below the cursor
    CTRL + hDelete character before the cursor
    CTRL + wCut the word just before the cursor to clipboard
    CTRL + dCut the word after the cursor to clipboard
    CTRL + uCut the line before the cursor to clipboard
    CTRL + kCut the line after the cursor to clipboard

    Navigation

    These are the shortcuts that you can use to navigate Bash.

    ShortcutAction
    CTRL + eGo to the end of the line
    CTRL + aGo to the start of the line
    CTRL + xToggle between the current position of the cursor or to the start of the line
    CTRL + fMove cursor forward by one character
    CTRL + bMove cursor back by one character
    ALT + fMove cursor forward by one word
    ALT + bMove cursor back by one word

    History

    You can use these shortcuts to check your history or bring up a history search.

    ShortcutAction
    CTRL + gExit history search
    CTRL + rOpen history search
    CTRL + pSee previous commands
    CTRL + nSee the next commands in history

    Control

    These are commands that you can use to control processes in Bash.

    ShortcutAction
    CTRL + lClear your entire screen
    CTRL + zSuspend currently running processes and move them in the background
    CTRL + cKill currently running processes
    CTRL + dExit current shell
    EnterExit a suspended SSH session

    After Action Report – Use These Commands to Simplify Bash

    These are some of the many commands that you can use to simplify your use of Bash and move between commands more easily.

    Already using Bash on your VPS? Let us know if you have any other commands to add, and join the conversation by leaving a comment below! 💬

  • The Best Email Marketing Plugins For WordPress

    The Best Email Marketing Plugins For WordPress

    Email marketing is one of the most effective ways to connect with your customers. Whether you’re a small business trying to grow or an established brand, the right email marketing software can help you build relationships with your audience and increase revenue. But not all email marketing plugins are created equal, so we’ve put together this list of our favorite WordPress plugins.

    Constant Contact for WordPress

    constant contact for WordPress

    Constant Contact for WordPress is a tool that will allow you to create email opt-ins and capture leads within your WordPress website. It’s an excellent choice for small businesses, bloggers, churches, and nonprofits.

    The app allows you to set up forms in minutes and then send them out in email blasts or via social media. It also provides analytics so that you can see how many people have clicked on the link in their emails or opened it on social media.

    Pros

    There are a lot of great features that make Constant Contact an effective and successful marketing tool. It is easy to use, has a lot of features and functionality, and integrates well with WordPress.

    You can create newsletters in minutes with their drag-and-drop editor, or you can choose from the thousands of templates available on their website. Their platform comes packed with features like autoresponders (which send automatic email responses when someone subscribes or unsubscribes) and social media management tools so you can easily share your newsletters on Facebook and Twitter.

    Cons

    The integration between Constant Contact for WordPress and your site involves several steps that are not necessarily intuitive or easy to navigate through. For beginners, this might be frustrating when trying to set up the plugin in the first place.

    Because Constant Contact for WordPress integrates directly with your WordPress installation (and therefore requires access to certain files), it can slow down other areas of your website while it is running in the background or even cause certain pages on your site not to load properly due to conflicts between plugins or code errors during installation/setup process which may require some technical knowledge before implementing them into a production environment.

    MailChimp for WordPress

    mailchimp homepage

    The MailChimp for WordPress plugin is a free and easy way to add sign-up forms to your website. This integration allows you to create a form anywhere on your site – in content areas or in the header or footer. You can also add it directly into a post, page, or widget on a per-page basis as well.

    The features MailChimp for WordPress provides are among the most robust in the industry, making it one of our top picks for anyone looking for an easy way to get started with email marketing automation without breaking the bank.

    Pros

    MailChimp for WordPress is a freemium plugin that offers a free version and an upgraded premium version, which comes with additional features. The free version is great for getting started and the interface is simple enough to be used by beginners.

    The integration with other plugins, apps, and services is one of MailChimp’s strongest points: it has an API (Application Programming Interface) that allows you to connect your site with other software or services such as Zapier or Google Analytics, so you can send analytics data directly from those platforms into your email marketing campaigns without having to manually enter them into MailChimp.

    You can also use third-party integrations like Easy Digital Downloads or WooCommerce if you want to automate your eCommerce sales funnel using MailChimp’s powerful automation features

    Cons

    The biggest con is that you can’t customize the exit popups. There are only two available options: one that shows an email signup form, and another that redirects users to a thank you page.

    Another drawback of MailChimp for WordPress is the lack of custom fields. While you can add custom fields to your forms in order to collect more information from your subscribers, there’s no option to do so with Exit Popups or Exit Intent Popups.

    Sendinblue – Newsletter & SMTP Plugin

    sendinblue homepage

    Sending emails with Sendinblue is an excellent way to improve your email marketing strategy. The plugin has the same features as Mailchimp, and it’s easy to use. However, some users have reported issues with the plugin, especially when sending large volumes of emails. In addition, there are no templates available for this plugin like there are with Mailchimp.

    Sendinblue offers a lot of features that you would expect from a plugin like this. It offers a wide range of templates and a drag-and-drop editor that allows users to build their own newsletter design quickly and easily. Users can also customize their newsletter by changing colors, fonts, and images within the Sendinblue interface.

    Pros

    Sendinblue is a great alternative to Mailchimp. It has a lot of features and integrations, which might make it seem like an intimidating option at first. But once you get used to Sendinblue’s interface, it becomes easy to use and you will be able to take advantage of all the options available.

    It has a lot of pricing options as well, so there’s something for everyone: from free accounts with limited features up to enterprise solutions that include additional support options. And last but not least, if you ever have any questions or need help using our plugin they have great customer service available 24/7 via live chat or email.

    Cons

    SendinBlue has no tracking. This means that you’ll have to rely on your inbox to see how many clicks you’re receiving and if people are reading your emails.

    SendinBlue also doesn’t have any automation or drip campaign capabilities, so if you want to automate the sending of future newsletters or track the performance of certain campaigns over time, SendinBlue won’t help much with this.

    There are also no integrations with other services such as Zapier for automating tasks like adding subscribers into an email marketing service (like MailChimp), or Mandrill for sending transactional emails from Shopify stores. The lack of automation tools is particularly frustrating given how many options there are out there for managing these sorts of tasks.

    Campaign Monitor for WordPress

    campaign monitor for wordpress

    Campaign Monitor for WordPress is a popular email marketing service that lets you design and send newsletters, sales updates, and other messages to subscribers. It has a number of advantages over other services like Mailchimp and Constant Contact – such as its integration with WordPress – but it also costs more than similar services.

    Pros

    Campaign Monitor for WordPress is a straightforward email marketing solution that doesn’t require any coding skills, so you can set up an effective newsletter without hiring a developer or designer.

    The documentation on the plugin’s website is clear and easy to understand, and there’s also an active community forum where users can get help from other people who have used Campaign Monitor for WordPress before them. Additionally, the company offers email support for paid plans as well as free trials of their software.

    This plugin integrates with popular WordPress plugins such as WooCommerce (for eCommerce), Yoast SEO (for search engine optimization), Jetpack (for social media integrations), and Google Analytics For WordPress Users

    Cons

    Campaign Monitor for WordPress costs up to $175 per month. That’s the same price as an annual subscription to MailChimp, which has more features and offers a better user interface than Campaign Monitor.

    Also, the user interface is not as intuitive as it could be. While Campaign Monitor does include some helpful tutorials, they’re not very comprehensive—the plugin often doesn’t do what you think it should do until after reading through a few pages of instructions (and sometimes even then). Additionally, there aren’t any interactive walkthroughs available for users who want to learn how to use the plugin by doing rather than by reading about what they can do beforehand.

    OptinMonster

    optin monster homepage

    OptinMonster for WordPress is a popular email capture tool for WordPress. It offers a variety of email templates, email popups, exit-intent popups, and more. It’s a great tool for increasing email subscribers on your website or blog as it allows you to create engaging opt-ins that convert traffic into leads by using powerful lead generation tools like Opt-in Forms, Exit Popups or Slide-ins.

    Pros

    OptinMonster’s drag-and-drop interface makes it easy to add forms and campaigns to your website. You won’t need to be a developer or a designer to create beautiful, successful email marketing campaigns with the help of this plugin.

    OptinMonster integrates seamlessly with all major email marketing platforms including MailChimp, Campaign Monitor, ConvertKit, ActiveCampaign, and more! This integration also allows you to import contacts from these top third-party providers as well as directly from WordPress itself – making it super simple for you to get started building your list on day one.

    Because OptinMonster is built specifically for WordPress users who want better control over their site design than traditional webmail services like Gmail or Yahoo Mail offer (no matter what theme they’re using), there are almost no compatibility issues when using this plugin across various themes out there today – which means no more messing around trying figure out why things aren’t working right when they’re supposed too… just install/update/go!

    Cons

    There are a few drawbacks to OptinMonster for WordPress. First and foremost, the plugin has limited use. It’s best for blogs or websites that already have an email list and want to grow it further. If you don’t have an email list yet, then this isn’t the right tool for you – you’ll need something more robust like MailChimp instead.

    Another drawback is that there aren’t many templates available in OptinMonster’s library of templates (though they’re working on increasing this). This means you won’t be able to create a lot of different kinds of forms quickly; instead, you’ll need to hire someone who can build them from scratch using their own code (or purchase another plugin) in order to get more options out there.

    Lastly, while there are plenty of widgets available with OptinMonster for WordPress, not all of them will fit into your theme perfectly – so again: if you want complete control over how everything looks and works together on your site, then this may not be the best choice for your needs because it doesn’t have as much flexibility as some other plugins do!

    FluentCRM

    fluentcrm homepage

    The FluentCRM is a self hosted email marketing plugin for WordPress that allows you to send newsletter to your audience directly from the WordPress dashboard.

    Pros

    The software is easy to use, and everything happens within Gutenberg editor. Basically, everything you can do with blog post or page in Gutenberg, you can do with your email newsletter.

    It offers incredible sorting features where you can create multiple categories, lists, and tags, all in your WordPress dashboard.

    None of their plans have a limitation to how many emails you want/need to send.

    Also, their reporting tool is amazing and very simplistic which makes tracking data super easy.

    Cons

    Even though self-hosted solutions are usually less expensive, FluentCRM pricing isn’t the most affordable option there, esspecially if you have multiple websites. Another downside is that they do not offer monthly subscription, but annual only.

    Even though they offer 14-day refund, it’s still a con that they don’t offer a free trial.

    WP Email Capture

    wp email capture homepage

    WP Email Capture is a free and easy-to-use email marketing plugin for WordPress. It allows you to create and send email newsletters, email autoresponders, and campaigns.

    WP Email Capture can be used by anyone with even a passing interest in digital marketing – from the business owner who wants to gain more customers through their website or blog, to the marketer who needs something simple yet effective for sending automated emails on behalf of their clients, all the way down to someone who wants an off-the-shelf solution so they can get started quickly.

    Some of the most popular features of WP Email Capture include:

    • Autoresponder – Create autoresponders & email marketing campaigns in minutes, not weeks. WP Email Capture includes pre-made templates that you can edit to create your own unique emails.
    • Capture – Add an email capture form to any page or post on your website using the easy-to-use shortcode builder tool. Once someone fills out the form, their information is automatically added to your email list for future contact and follow-up.
    • Conversion – Monitor how many people visit your site, where they come from, what pages they visit and more with Google Analytics integration built right into WP Email Capture.
    • Segmentation – Create segments of your email list based on specific criteria like geographic location or browser type so you can send targeted emails only when it makes sense for them (i.e., don’t bother sending a discount code for shoes if someone has already bought a pair).
    • Email Builder – Create beautiful-looking emails using a drag & drop editor which comes with dozens of ready-made templates covering everything from abandoned cart reminders to end-of-year newsletters.
    • Email Marketing – Send personalized messages without having to touch code once thanks to its advanced autoresponder functionality which allows you to target specific users based on their actions within the past 6 months (or longer if needed).

    Pros

    The WP Email Capture interface is clean and intuitive, even for those who are new to the world of lead generation.

    A large part of the success of any business is determined by its ability to provide excellent customer service, and this plugin doesn’t disappoint in this area. If you have any questions about using it or need assistance setting up your form, their team will help you out as quickly as possible (often within minutes).

    Even if you’re not an experienced developer or designer, using this plugin will be a breeze since it has a simple drag-and-drop interface that makes building forms easy for anyone who knows how to use WordPress’ customizer feature. In fact, we were able to set up our first form with just one instruction because all we had to do was choose where we wanted the button on the page and select which fields should appear in our form (namely email address). The rest was handled automatically by WP Email Capture so all we had left was importing some HTML into our post editor via shortcodes before publishing.

    Cons

    The plugin only comes with one template to choose from, which may not suit your needs. There are no other templates available and there is no option to customize the template.

    Also, while some of the features of this plugin can be customized, it’s important to note that there is no option for customization of the thank you page or confirmation page. The same applies to both the thank you email and confirmation email as well.

    MailPoet

    mailpoet homepage

    MailPoet, the popular WordPress plugin that is used to send newsletters and other transactional emails, has received mixed reviews from users. There are many positive aspects of MailPoet, including its ease of use and great features. However, some users have reported problems with MailPoet’s performance and scalability.

    Pros

    MailPoet is a WordPress email plugin with a drag-and-drop editor, so you can create beautiful emails without having to write code.

    The plugin integrates seamlessly with WordPress and lets you manage your email campaigns easily.

    It is easy to use, as it has an intuitive interface that allows even beginners to start creating their first newsletter right away.

    You can also use its responsive design for mobile devices, which makes sure that your newsletter looks great no matter how the recipient accesses it.

    Cons

    As with any product, there are users that say MailPoet is not a good fit for their business. Some users report that the plugin is not very intuitive, while others say that it does not deliver emails as efficiently as they would like.

    A few people also complain about how difficult it is to track email opens and clicks.

    Icegram

    icegram homepage

    Icegram for WordPress is a free, easy-to-use plugin that can be used to create pop-ups, lead generation forms, and opt-in boxes.

    There are a few features that make Icegram different from other pop-up plugins. For one, it has multiple templates for you to choose from – you can create your own template, or choose one of the five that are included in the plugin. The second is its unique “targeting” feature, which allows you to target different users depending on their behavior on your site. For example, if someone visits a page without leaving any comments they may receive a different message than someone who leaves comments often.

    This makes Icegram special because it gives you more control over how your popups appear and how they work in relation to how people interact with your website and content. You can use this feature by choosing what kind of action or interaction triggers an Icegram popup (like submitting contact info or filling out forms) and then creating rules that determine when a certain condition has been met (for example: when someone submits contact info).

    Pros

    Icegram for WordPress is a free plugin.

    There are numerous options that you can use to customize your site, but the process of setting up this theme and adding it to your site takes just a few minutes.

    Icegram for WordPress is responsive, which means that it’ll automatically adjust its layout based on what device is viewing it (desktop computer or mobile phone). This makes it easy for visitors from all devices to see the same things when they visit your website, regardless of how they’re accessing it – and no matter where they’re located in the world.

    Cons

    It is not a standalone plugin and requires the use of other plugins, such as WooCommerce or Easy Digital Downloads, to function properly. If you don’t plan on using either of these services, then you won’t be able to utilize Icegram’s full capabilities.

    It can also be difficult to set up because it requires additional plugins and files that need to be installed manually in order for Icegram to work properly. This can make things confusing for users who aren’t familiar with WordPress or installing plugins on their site.

    Additionally, once installed there may still be problems with ensuring that everything runs smoothly together; occasionally users have reported having trouble with integrating different aspects of their site (i.e.: their blog vs product pages).

    After Action Report — Choose The Email Marketing Plugin That Fits Your Needs

    These email marketing plugins represent a great choice, and a wide range, so not all will be suitable for everyone’s needs. But everyone should find at least one plugin which meets their needs perfectly.

    When choosing which email marketing plugin to use, you’ll also want to consider a few other factors, including:

    • The email marketing plugin’s design. Does it fit in with your website’s current theme? Will it be easy for you to use and customize?
    • The quality of the support provided by the plugin creator. Is there live chat or phone support available? How often is the developer updating their product and adding new features?
    • How many active users are on that particular plugin? This isn’t necessarily an indicator of quality, but it will help you determine if there are any bugs in the code that might cause problems down the road.

    It’s hard to narrow down the best email marketing plugins for WordPress, but these are some of the most popular options you should consider.

    Which email marketing plugin have you used before? Anything that you believe we missed that’s worth mentioning? Let’s talk in the comments! 💬

  • Understanding Linux File Permissions – Read, Write & Change

    Understanding Linux File Permissions – Read, Write & Change

    Linux permissions allow you to set security levels for different users. Linux allows you to define access levels for individual files, specify attributes, and tighten security. This way you can provide granular permission levels and improve file security.

    Linux lets you choose from different file permissions for each type of user, but they can generally include a combination of:

    • Read
    • Write
    • Execute

    Before we talk about Linux file permissions, let’s talk about the different types of users.

    Linux Users

    The three types of users include:

    • Owners
    • Groups
    • Others

    Owner

    The owners include those who create the file.

    Group

    Groups generally include different users with the same Linux permissions. For instance, the owner can provide read information to a specific group instead of manually granting permission to each user.

    Others

    This includes any other user who can access the file. These are generally users who haven’t created the file, nor are part of a group with specific permissions. So, if you’ve set permissions for “others”, they will apply to this group.

    Understanding Linux Permissions

    Now, as mentioned above, each file or directory can be assigned any of the three permissions discussed below.

    Read (r)

    The Read permission gives users the ability to open and read a file. If the Read permission is assigned to a directory, users will be able to list all of its contents.

    Write (w)

    The Write permission lets users modify the contents of a directory or a file. This allows a user to add, remove, rename, or modify the file however they see fit.

    For instance, if you have to write permissions for a file, but not for the directory, you won’t be able to rename or remove the file from the directory. You’ll only be able to make changes to the contents of the file itself.

    Execute (x)

    This allows the user to execute the file. Essentially, with this permission, you can run the file.

    Example of Linux Permissions

    For instance, if the file name is:

    Ls -l example_file

    The first character tells you about the type of file. It could either be a directory (d), a regular file (-), or a symbolic link (l). The output of this file provides the following permissions:

    -rw-w-r- 

    In the first part, you can see that the file owner has both the read and write permissions. Then, the group only has write permission, and all others have just read permission.

    How to Change Linux File Permissions

    The chmod command is commonly used to change Linux file permissions. Any user with sudo privileges, the root, and the file owner are capable of changing the file permissions. When using the symbolic format, here’s the format that you can use to change the file permission:

    chmod [OPTIONS] [ugoa] [-+=] perms...[,...] filename...

    In this format, the first set of flags simply denotes the user classes for which you want to change the permissions. These include:

    • The owner (u)
    • Group (g)
    • Other users (o)
    • All users (a)

    The next set of flags defines whether to add (+), remove (-), or change the existing permissions to specific permissions (=).

    For example, if the command is:

    chmod -r o-x example_file  

    It will remove the execute permission for all other users.

    Absolute Mode

    Also known as the numeric mode, file permissions in this mode are represented by a three-digit number instead of a series of characters. Here are the numerical values for your understanding:

    0 = No permission

    1 = Execute

    2 = Write

    3 = Execute and Write

    4 = Read

    5 = Read + Execute

    6 = Read + Write

    7 = Read + Write + Execute

    So, if you were to use the following command:

    chmod 754 example_file

    You’ll essentially be changing the file permissions to the following:

    • Owner: Read, write, and execute (7)
    • Group: Read and execute) (5)
    • All others: Can read) (4)

    Conclusion

    We hope you find this simple guide for Linux permissions helpful. Keep in mind that the chmod command lets you change permissions, as long as you’ve sudo privileges or are the file owner. Any questions about Linux you’d like to see us cover in a future guide? Feel free to join the conversation by dropping a comment below or Tweeting at us! 💬

  • The Best WordPress Caching Plugins To Speed Up Your Site

    The Best WordPress Caching Plugins To Speed Up Your Site

    WordPress caching is one of the most important ways in which you can significantly improve your website’s performance and speeds. Caching plugins simply store data that’s frequently accessed in temporary storage for more rapid retrieval.

    This improves loading times whenever a person visits your site, as these elements can load up quicker straight from the cache. This works because in most cases, the posts or pages on your site aren’t going to change much after they’re published.

    WordPress caching significantly reduces data transmissions from the user’s browser to the WordPress database and the server, which ultimately results in faster page load times.

    If you aren’t already using a WordPress caching plugin, installing one could significantly improve your website’s performance, and result in a slew of other benefits.

    Why Use a WordPress Caching Plugin?

    Keep in mind that most browsers store a cache of your website’s page, so some form of caching is still active, even if you don’t use a plugin. However, with a caching plugin, you can significantly improve the process.

    A WordPress caching plugin offers the following advantages:

    • Greater control over types of server-side caching, including an object or page caching
    • Additional features such as minifying JavaScript or CSS files
    • Improved SEO performance
    • Greater visitor engagement, which can result in a significantly reduced bounce rate
    • Improvement in your site’s Core Web Vitals and PageSpeed scores

    The 8 Best WordPress Caching Plugins

    Now, here are the eight best WordPress caching plugins that you can use to speed up your website’s performance.

    1. WP Rocket

    WP Rocket caching plugin homepage

    WP Rocket is widely regarded as one of the best plugins for improving your website’s performance, and for good reason.

    WP Rocket offers control over both page caching and browser-side caching, and you can even set up Gzip compression so that web pages can be compressed on the server, and decompressed in the user’s browser.

    What makes WP Rocket the top pick is simply the fact that, right after installation, many of the settings are preconfigured. This means that you will notice a significant uptick in performance without even tinkering with any key settings.

    From delaying JavaScript scripts to lazy-loading media files, WP Rocket offers everything in a nifty, lightweight plugin. You can even integrate your CDN into WP Rocket’s dashboard or use their proprietary RocketCDN.

    Key Features

    • WP Rocket supports a range of add-ons, such as Cloudflare, Varnish Cache, and Sucuri
    • Compatible with all the popular themes and plugins
    • Automatic eCommerce customization that removes sensitive pages from being cached
    • Extensive range of settings and options that offer granular control over how your website performs

    2. Autoptimize

    autoptimize caching plugin homepage

    Autoptimize isn’t really a caching plugin, per se, but it does the job exceptionally well. Most caching plugins even recommend that you use Autoptimize along with them!

    At its core, Autoptimize is a plugin that’s designed for minifying and aggregating scripts to improve your website’s performance. You can determine which scripts to load or completely ban, which results in a significant performance boost.

    Another reason why Autoptimize is so popular is that it’s incredibly easy to use; the interface is very simple and presents you with all the options you need with brief descriptions.

    The plugin itself is free to use, though the team charges an amount for setting it up and customizing it for your site, which is definitely worth it.

    Key Features

    • Helps you fully optimize all scripts on your site
    • Has a free version
    • Quite simple for beginners, but also has advanced features that make it a suitable choice for technical professionals

    3. W3 Total Cache

    w3 total cache caching plugin homepage

    Third on the list is W3 Total Cache, a lightweight plugin that offers plenty of caching options. It offers optimized progressive rendering, which improves page load times and allows visitors to interact with them much faster.

    W3 Total Cache offers support for the Secure Socket Layer and also lets you minify your HTML, CSS, and JS files, reducing bandwidth consumption significantly. More importantly, it also lets you cache feeds, on CDN, or on the disk.

    Apart from that, you can choose to cache database objects, fragments in memory, search result pages, and a lot more. With this plugin, you can easily defer non-critical JS or CSS scripts to render pages faster.

    It also offers comprehensive stats to help users better understand the impact of each setting they change.

    Key Features

    • Offers reverse proxy integration using Varnish or Nginx
    • Lets you minify virtually all JavaScript, CSS, and other elements
    • Offers WP-CLI support for purging the cache

    4. WP Super Cache

    wp super cache caching plugin homepage

    Automattic, the company behind WordPress itself, offers WP Super Cache as a fairly simple caching plugin. It generates static HTML files to reduce load times significantly, serving these instead of loading data dynamically.

    It uses the Apache mod_rewrite module to bypass PHP, improving speeds dramatically. There are three options available:

    • Expert
    • Simple
    • WP-Cache caching

    Each of these differs in terms of speed, with Expert being the fastest. If you need a reliable caching plugin that’s designed for optimizing website performance, you can’t go wrong with WP Super Cache.

    Key Features

    • Has a Preload Mode that lets you preload as many posts as you want
    • Automatically deletes old files from the cache directory
    • Comes pre-configured with recommended settings

    5. WP Fastest Cache

    wp fastest cache caching plugin homepage

    Popular amongst developers, WP Fastest Cache offers all the features that you need to quickly set up caching on your site. When you install it, the plugin automatically modifies your .htaccess file, so you don’t have to do much.

    It deletes cache files when posts or pages are published, which keeps things running smoothly. Like WP Total Cache, it also lets you purge your cache using the command line interface.

    You can easily enable or disable the cache option for users that have already logged in, or those on mobile devices. It also lets you disable emoji inline CSS, and lets you combine your CSS and JS scripts.

    Key Features

    • Has both a free and a paid version
    • Lets you optimize all images on your site to reduce data consumption, while also offering an in-built WebP image converter
    • Lets you select elements to lazy load to further boost page load times

    6. Swift Performance

    swift performance caching plugin homepage

    Swift Performance has both a free and a pro version (with the former known as Swift Performance Lite). It’s a fairly comprehensive WordPress caching plugin that automatically optimizes page caching once you activate the plugin.

    It works seamlessly with WooCommerce, bbPress, Varnish Cache, Cloudflare, and several others. Furthermore, it lets you minify JS and CSS scripts, combining them to load simultaneously.

    It also offers Gzip compression and has a built-in optimizer for cleaning databases. It automatically detects duplicate metadata and removes it. The Pro version also lets you schedule a time for optimizing your database.

    Key Features

    • Supports WP Multisite for optimizing several sites
    • Offers browser caching right out of the box
    • Can automatically generate critical CSS to prioritize content in specific folds

    7. WP-Optimize

    wp-optimize caching plugin homepage

    WP-Optimize was originally developed as a database optimizer, but since then the team behind the tool has added lots of new features to turn it into a plugin that offers full-scale caching.

    It lets you cache, optimize, and significantly compress elements such as images on your site to improve loading times. There’s a free version, but to fully unlock all of its features, you’ll probably want to invest in the Pro plan.

    That unlocks additional features such as Multisite support and more caching options. But, if you run a simple site and need a plugin to minify JS and CSS files and improve page load times, WP-Optimize is a good choice.

    Key Features

    • Includes database optimization, image compression, and caching options
    • Improves website performance once you activate it automatically by optimizing common settings
    • Very responsive team of developers

    8. LiteSpeed Cache

    litespeed cache caching plugin homepage

    If you need a reliable caching solution, LiteSpeed Cache is a great choice. LiteSpeed Cache works well with web servers like (unsurprisingly) LiteSpeed, Nginx, Apache, and others.

    If your website’s hosting stack features LiteSpeed, this is a good plugin to use. It offers object caching support, HTTP/2 push for both CSS and JS files, Cloudflare API, and multisite support.

    The interface is intuitive, letting you choose whether to lazy load images, optimize PageSpeed scores, support for WP-CLI, schedule cache purges, and more.

    Support for LiteSpeed Cache is excellent, with a dedicated Slack community, detailed documentation, and a huge support community. There’s an API for the themes and plugins that aren’t directly compatible with LSCache, making it a great choice all around.

    Key Features

    • Has a built-in database optimizer
    • Supports both basic and advanced setting views
    • Multisite support is available

    Using a WordPress Caching Plugin is Essential to Boost Performance

    WordPress caching plugins aren’t just an “added bonus”. If your website has a lot of content and you intend to scale it in the future, you should use a caching plugin.

    Without a caching plugin, you’d have to tweak every setting manually, which is obviously quite complicated. While there are quite a few caching plugins out there, these are some of the best choices, and most others usually offer similar features.

    Let us know in the comments below if you have any questions or any recommendations for plugins that aren’t on the list, or the ones you prefer using!

  • How To Create a Docker Image For Your Application

    How To Create a Docker Image For Your Application

    Docker is an incredibly popular platform & framework that lets users build, run, and manage different “containers” on cloud servers. For app developers, Docker is an excellent option as it significantly accelerates their workflow, while offering them a comprehensive array of tools and environments to seamlessly execute each project.

    In this article, we aren’t going to discuss what Docker is or how it really works, since if you want to create a Docker image for an application, you already know the basics. Instead, we’re going to look at the steps that you can take to create a Docker image for an application.

    So, without further ado – let’s dive right in…

    What Does It Mean To Build A Docker Image?

    Building an image in Docker simply means creating a Dockerfile, hosting your Docker image on a registry, and then pulling and running the image on the same or another machine.

    How To Create Docker Image for Your Application

    Here is the recommended workflow that you should follow if you want to create a Docker image for your application.

    1. Write Your Dockerfile

    Docker usually takes instructions from the Dockerfile in order to build images. It automatically reads the instructions to build the file. Essentially, a Dockerfile is a text file that includes all relevant commands required to create an image.

    For the purposes of this tutorial, we’ll just create a simple Node.js app through the Express application generator. The first step is to use the Express generator, a command-line interface that’s used for creating Express application skeletons.

    This guide is written for users on a Linux machine, and those who are adept at using a command-line interface. Open the Terminal, and install the Express app generator with the following code:

    $ npm install express-generator -g
    $ express docker-app
    $ npm install
    $ npm start

    For Windows users, use the Command Prompt:

    > set DEBUG=myapp:* & npm start

    And, if you’re on Mac, just do the following:

    $ DEBUG=myapp:* npm start

    After having installed the package dependencies, then go ahead and launch the application. If you type http://localhost:3000, you’ll see the original “Welcome to Express” text on your screen, indicating confirmation. 

    So, you have an application running already, but the Dockerfile is still missing. Open your application’s root directory, and create a file. Name it “Dockerfile”.

    The Dockerfile usually begins through a base image. This is the part where your image is based. To create one, here’s what you do:

    # Filename: Docker
    FROM node: 14-alpineges

    2. Building Your Docker Image

    Now, you need to send instructions to Docker to copy the source when you run the docker build command. For this, use the following command:

    # Filename: Dockerfile
    FROM node:14-alpine
    WORKDIR /usr/src/app
    COPY package*.json ./
    RUN npm install
    COPY . .

    Now that you have the Dockerfile ready, it’s time to build the image. Run the following command:

    $ docker build .

    Docker will build the image, and you can also view the image you built using the docker images command:

    $ docker images
    REPOSITORY TAG IMAGE ID CREATED SIZE
    <none> <none> 7y312abd0bf2 1 minute ago 80.2MB

    3. Host Your Docker Image

    Once you have created the image, the next step is to share it on a registry so that it can be downloaded and used on any machine. The DockerHub registry is free to use, and you can easily push or pull images through there very easily.

    But, if you don’t want your images to be publicly available, you can also host them on a private cloud server. Private repos are available from Docker, or you can just sign up for a cloud server through any IaaS provider like DigitalOcean, Linode, or AWS.

    4. Save and Load Images from Files

    Now, you can easily export and load Docker images as files using a simple command:

    $ docker save Dockerfile 

    If you want to download your Docker image on any destination machine, use the following code:

    $ docker load Dockerfile

    You can also use any other name except “Dockerfile” to save your images.

    How To Run a Docker Image

    If you’ve given the Docker image a name, you can just launch it using the code below:

    $ docker run -i -t Dockerfile /bin/bash

    After Action Report — Is Docker Useful?

    In essence, it really depends. After this, you should be able to create your own Docker image for a simple Node.js app.

    As you can see, Docker is generally a wise option if you need to port your applications quite often and access them from multiple machines. If your software development is generally restricted, Docker might not be a suitable choice.

    But, for distributed software teams, there’s hardly a better choice than Docker since it speeds up development and helps in containerizing different versions of the same application.