Tag: Linux

  • How to Kill a Process in Linux From the Command Line

    How to Kill a Process in Linux From the Command Line

    Are you tired of unresponsive programs, resource-hogging applications, or rogue processes slowing your Linux system down? While knowing how to kill a process on Linux from the command line is a fundamental skill for any Linux user, the story doesn’t end with a simple kill command.

    What if you can’t find the process ID (PID)?

    What’s the difference between a “job” and a “process” – and how do you manage them?

    If you’ve ever found yourself searching for answers to these follow-up questions, you’re in the right place. This article will move past the basic ps aux | grep command and discuss more efficient tools like pgrep and pidof to find exactly what you’re looking for.

    We will learn how to manage foreground and background jobs – an essential skill for multitasking in the terminal.

    We’ll also tackle common points of confusion, such as the difference between jobs and processes, and how to find resource-hungry processes without relying on top.

    But before we kill processes, let’s first refresh our knowledge of what processes are!

    What is a Process in Linux?

    In Linux, a process is an instance of a running program. Each process has its own memory space, system resources, and a unique Process ID (PID) that the kernel assigns.

    Processes can be applications, system services, or background tasks essential for the operating system’s functionality.

    Suggested read: Introduction to Bash For Loops: A Beginner’s Guide

    What is Meant by Killing a Process in Linux?

    Killing a process in Linux means terminating or stopping a program forcefully. This action is often necessary when a process becomes unresponsive, consumes too many system resources, or needs to be stopped for maintenance or security reasons.

    Linux provides several methods to kill processes, ranging from graceful termination signals to forceful stops.

    When you kill a process, you’re essentially sending a signal to that process, instructing it to terminate. The most common signal used for this purpose is SIGTERM (signal 15), which allows the process to perform cleanup operations before exiting.

    In cases where a process doesn’t respond to SIGTERM, users can employ stronger signals such as SIGKILL (signal 9), which forces immediate termination without allowing for cleanup.

    Suggested read: How MailHog Can Transform Your Local Email Testing Process

    Reasons to Kill or Terminate a Process on Linux

    There are various scenarios where killing a process becomes necessary:

    • Unresponsive Applications: When a program freezes or becomes unresponsive, terminating it can free up system resources and allow for a restart.
    • Resource Management: Processes consuming excessive CPU or memory can be killed to maintain system stability and performance.
    • Security Concerns: Suspicious or potentially malicious processes should be terminated to prevent security breaches.
    • System Maintenance: During system updates or reconfigurations, certain processes may need to be stopped.
    • Debugging: Developers often need to terminate processes during software testing and debugging.
    • Freeing Up Ports: Killing a process can release network ports that are being held, allowing other applications to use them.
    • Clearing File Locks: Terminating a process can release file locks, enabling access to previously locked files or directories.
    • Stopping Runaway Processes: Accidental infinite loops or other programming errors can create runaway processes that need to be stopped.

    Suggested read: What is Docker and How Does it Work

    How to Find a Process ID in Linux

    Before you can stop a process, you need to find it, but multiple processes with similar names can run simultaneously. In Linux, every process running on your system has a unique Process ID (PID).

    While many users are already familiar with the ps aux | grep command, there are often faster and more precise tools for the job.

    Let’s explore the best ways to locate processes.

    Using the ps command in Linux

    The ps (process status) command gives you a snapshot of the currently running processes. It has many options, but a few combinations are incredibly useful.

    1. ps aux: This is one of the most common commands for tracking processes, as it shows all processes running for all users. You should use ps aux when you need to identify which user owns a process and how much CPU or memory it’s using.

      The ‘aux’ in this case comprises the following three parameters:
      • a = show processes for all users
      • u = display the process’s user/owner
      • x = also shows processes not attached to a terminal
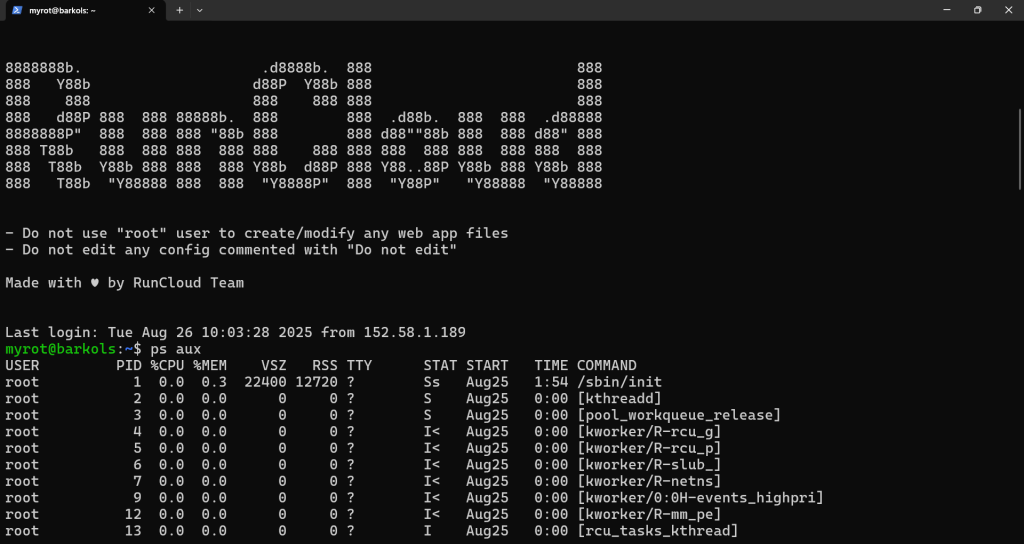
    Example: To find the process ID of the RunCloud agent, you could type:

    ps aux | grep runcloud

    The second column in the output is the PID you need. You’ll notice that the output presented here is quite complex because of the number of columns, and it can be hard to locate what you need.

    Let’s look at some of the better alternatives below, which provide us with the Process ID without any other complex information.

    1. ps -ef: This command is similar to ps aux and shows every process on the system in a different format. You should use this command if you also need to find a process’s Parent Process ID (PPID).
      • -e = select every process
      • -f = display full-format listing

    Example:

    ps -ef | grep runcloud

    This command returns cleaner output; the process ID is in the second column. However, some users might still find it hard to read. Let’s look at some of the better options below, which produce even simpler output in human-readable format.

    1. ps -C <process_name>: In the previous commands, the ps utility returned a very long list of processes, and we used a different tool (grep) to extract only what we needed and discard everything else. This command provides a much cleaner way to find a process by its name without needing grep.
      • -C = select by the command name

    Example:

    ps -C runcloud

    This will list only the processes named “runcloud” with a clean output showing the PID and how long this process has been running. This command displays the information in a presentable format that is easy to read. However, it can still be cumbersome to extract the process ID of a particular process in an automated manner.

    Using the pgrep Command in Linux

    The pgrep (process grep) command is a modern and efficient tool for finding PIDs. It’s faster and less cumbersome than piping ps to grep. If you want to learn more about Linux pipes, we recommend reading our recent blog post on pipes vs xargs.

    1. Basic pgrep: Simply type pgrep followed by the process name.
    pgrep runcloud

    This command will return only the PIDs of the sshd process, nothing more.

    1. pgrep -l: If you want to see the process name alongside the PID, then you can use the -l (list-name) option
    pgrep -l runcloud

    1. pgrep -u <username>: If you need to find all processes run by a specific user, you can use the -u (user) option.
    pgrep -l -u root
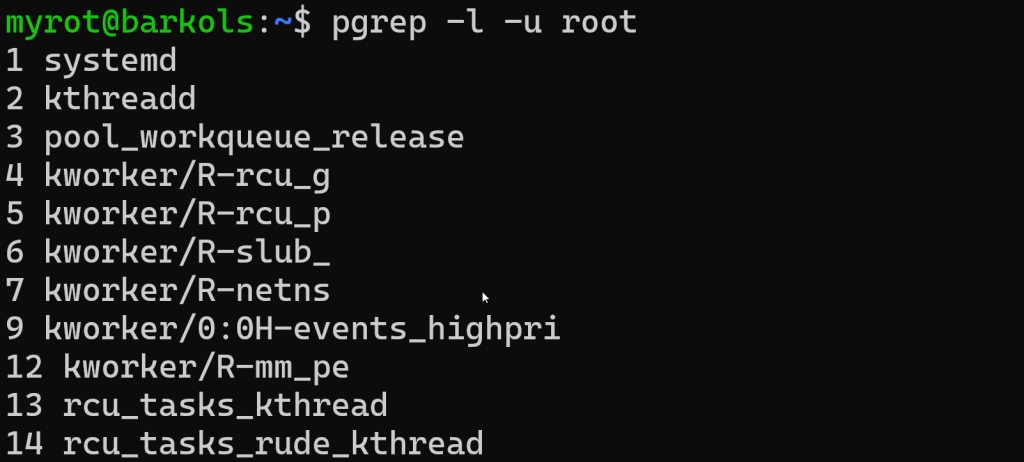
    This will list the PID and name of every process owned by the user “root.”

    Using the pidof Command in Linux

    All the commands we discussed have returned some extra information. If you just want to see the process ID and nothing else, you can use the pidof command with the process name. This command is simple, fast, and doesn’t require data processing to extract the necessary information. This makes it extremely easy to integrate into bash scripts.

    Example:

    pidof runcloud

    In the above example, if any process named ‘runcloud’ is running, this command will output its PID.

    Using the top Command to find the Process ID

    The top command provides a real-time, interactive view of your system’s running processes. Just type top to launch it, and you’ll see a constantly updated list of processes, sorted by CPU usage by default. The PID is in the first column, and the command is in the last column. Once you have found what you are looking for, press the ‘q’ key to exit.
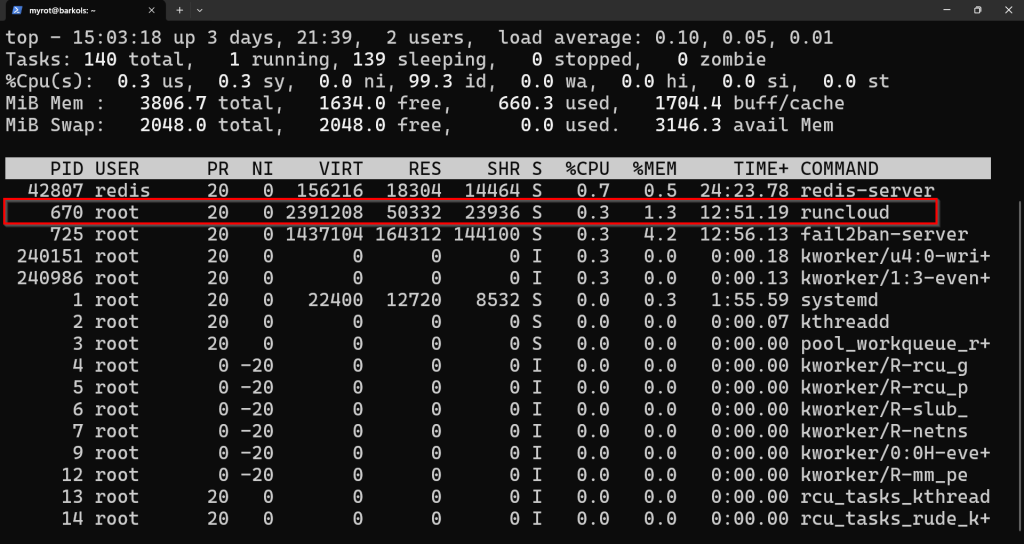
    The above example shows that the ‘runcloud’ process has the process ID 670.

    Managing Background and Foreground Tasks in Linux

    When you run a command in your terminal, it typically runs in the foreground. This means it occupies your terminal, and you must wait for it to finish before entering another command. But what if you need to run a time-consuming task and continue using your terminal?

    This can be done using the built-in job control functionality. A job is a wrapper around one or more processes, allowing you to manage them within your current terminal session.

    Sending a Job to the Background in Linux Shell

    You can start a process directly in the background by adding an ampersand (&) at the end of the command.

    Example: Let’s say you’re running a script that takes a long time.

    ./my-long-script.sh &

    The script will start, and the terminal will immediately return you to the command prompt. You’ll see output similar to [1] 12345, where [1] is the job ID and 12345 is the PID.

    The above example shows that the ls command was launched in the background and assigned the PID 241370.

    Viewing and Managing Jobs with jobs

    It is easy to forget once you have sent a job to the background. The jobs command lists all jobs associated with your current terminal session.

    jobs -l

    The -l option also shows the PID, which is very useful.

    The above example shows that the current terminal session has two jobs running in the background.

    Bringing Jobs to the Foreground and Background

    • fg (Foreground): If you need to interact with a background job again, you can bring it to the foreground with the fg command followed by its Job ID.
    fg %1

    This command brings job ID 1 back to the foreground and makes it the active process in your terminal.

    • bg (Background): If you’ve stopped a foreground process (using Ctrl+Z), you can send it to the background to continue running with bg.
    bg %1

    How to Kill a Process in Linux

    There are several ways to kill a process in Linux, but the first step is always to identify the process you want to kill. Once you identify the process, you can choose the following method based on your needs:

    How to Kill a Process Using the kill Command With a PID

    1. Using the kill command: Once you have the PID, you can use the kill command to terminate the process:
    kill PID

    Replace “PID” with the actual number you found. For instance:

    kill 1234
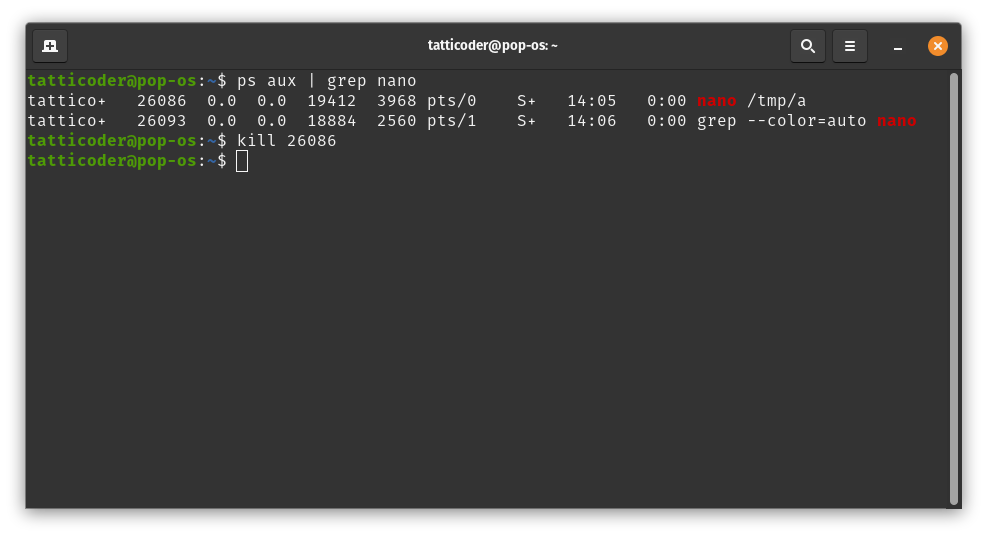
    kill linux process

    This sends a SIGTERM signal, asking the process to shut down gracefully.

    1. Forceful termination: If the process doesn’t respond to the regular kill command, you can use a stronger signal, SIGKILL (9), which forces immediate termination:
    kill -9 PID

    Be cautious with SIGKILL as it doesn’t allow the process to clean up, potentially leading to data loss or corruption.

    How to Kill Multiple Processes

    Sometimes, you need to terminate multiple processes simultaneously. Linux provides efficient ways to do this:

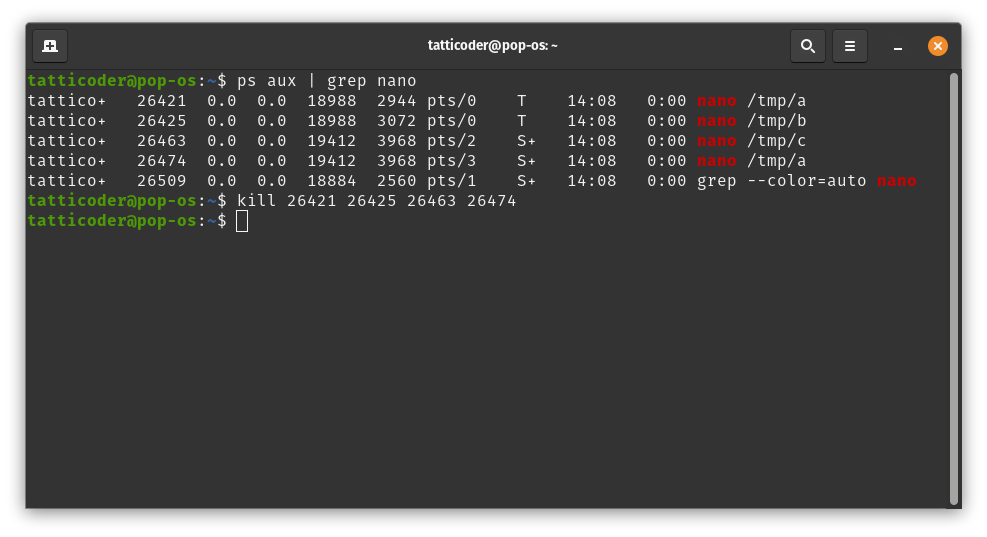
    1. Using kill with multiple PIDs: If you know the PIDs of all processes you want to terminate, you can list them after the kill command:
    kill PID1 PID2 PID3

    For example:

    kill 1234 5678 9101
    kill multiple linux process via command line
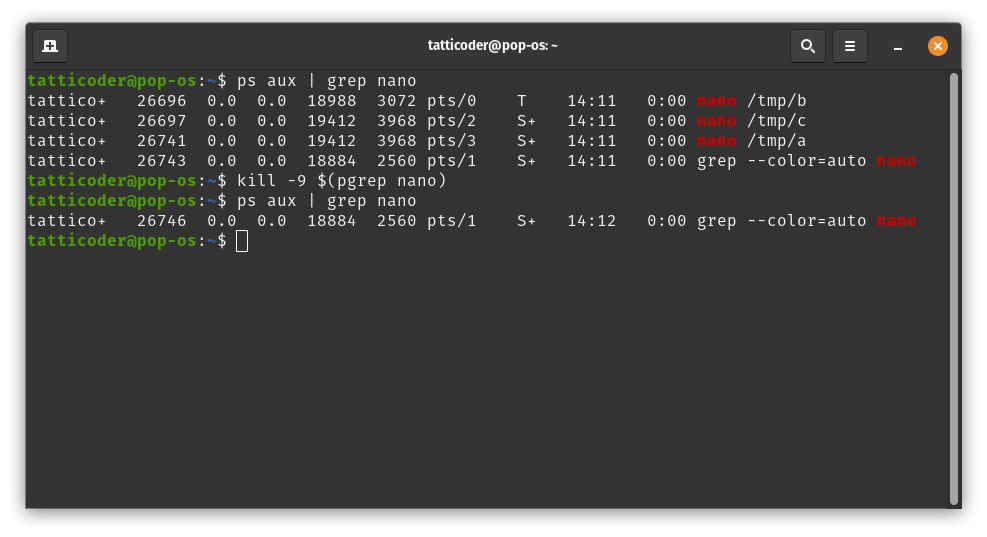
    1. Using command substitution: A more dynamic approach is to use command substitution with pgrep. This method kills all processes matching a name:
    kill $(pgrep process_name)

    For instance, to kill all Firefox processes:

    kill $(pgrep firefox)

    This command first uses pgrep to find all PIDs associated with Firefox, then passes these PIDs to the kill command.
    Suggested read: Everything You Need To Know About wp-config.php File

    How to Kill a Process Using the pkill Command

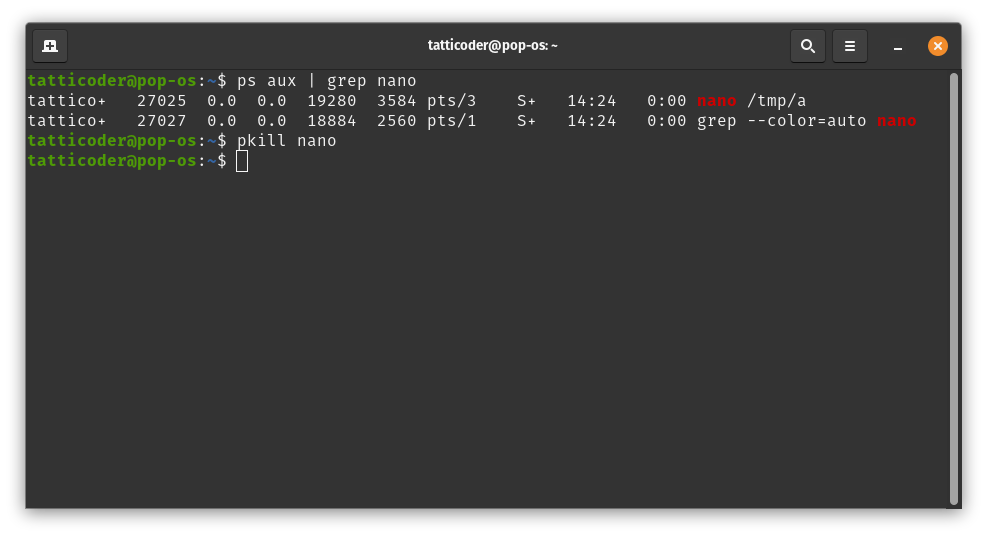
    The pkill command simplifies process termination by allowing you to kill processes based on their names rather than PIDs:

    1. Basic usage: To kill a process by name, simply type: pkill process_name
      This will terminate all processes with “process_name” in their names.
    2. Case-insensitive matching: If you need clarification on the exact capitalization of the process name, use the -i option. For instance: pkill -i firefox will match “Firefox”, “firefox”, or any other case variation.
    How to Kill a Process Using the killall Command

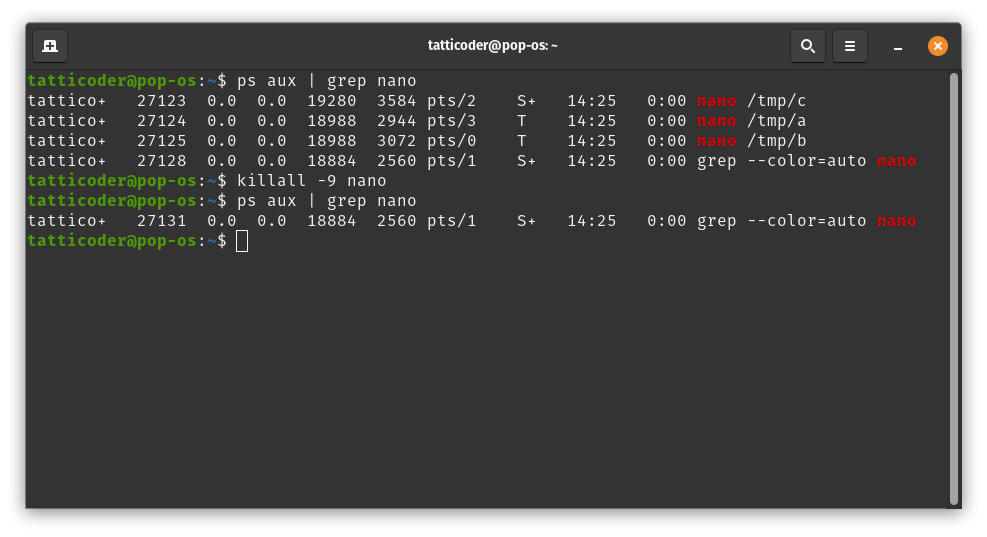
    The killall command is similar to pkill but requires an exact match of the process name:

    1. Basic usage: To kill all processes with an exact name match: killall process_name
    2. Forceful termination: For stubborn processes use the -9 option (equivalent to SIGKILL): killall -9 process_name

    Suggested read: Mastering the Echo Command in Linux (with Practical Examples)

    How to Kill Process in Linux by User

    Sometimes, you need to terminate all processes owned by a specific user:

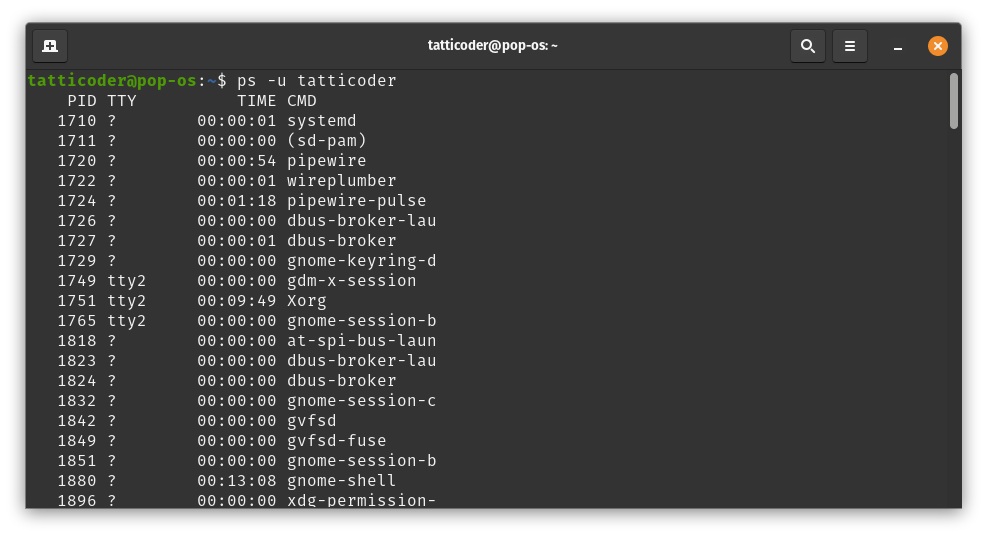
    1. Listing user processes: First, you can list all processes for a user: ps -u username
      Replace “username” with the actual username.
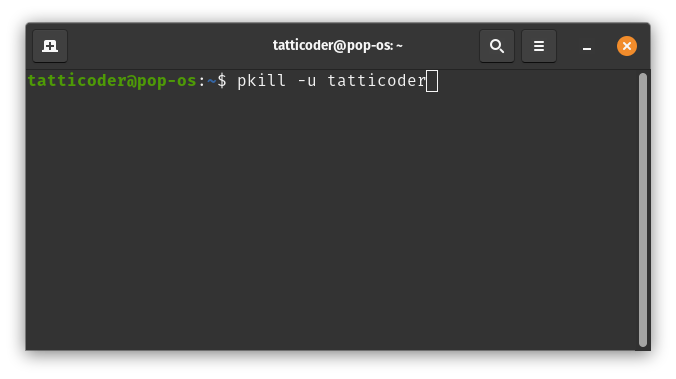
    1. Killing user processes: To kill all processes for a user, use pkill with the -u option:
      pkill -u username. For example: pkill -u john
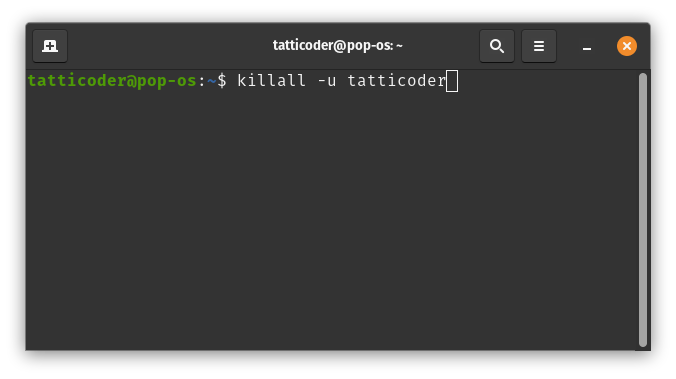
    1. Using killall for user processes: Alternatively, you can use the killall command to kill a particular user’s processes, as shown below.
    killall -u username
    Suggested read: What are Linux Logs? What Are They & How To Use Them

    How to Kill a Process in Linux by Name

    Killing processes by name is often more convenient than using PIDs. There are several ways to do this:

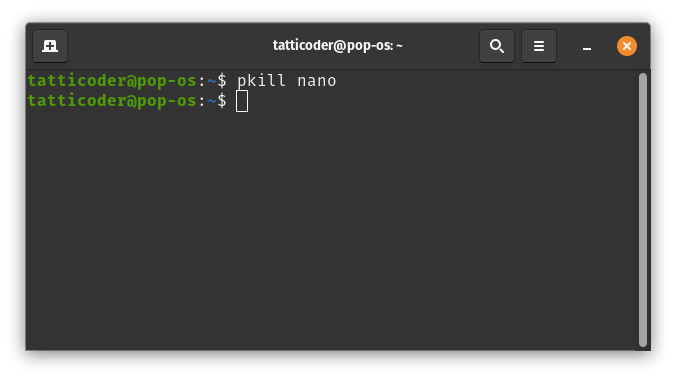
    1. Using pkill: The simplest method is by running the following command:
      pkill process_name. Don’t forget to replace process_name with the name of the process you are trying to kill.
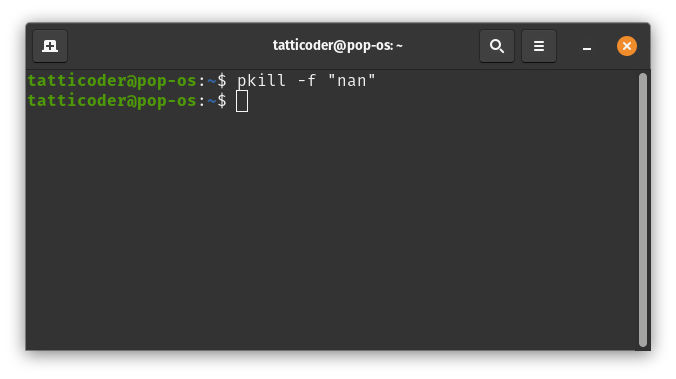
    1. Partial name matching: Use the -f option to match a substring in the process name for more flexible matching. This is useful for processes with long or complex names. The syntax of this command is as follows:
    pkill -f "partial_process_name"

    For example, pkill -f "firefox" would match any process with “firefox” anywhere in its command line.
    How to Kill a Process in Linux with Bash Script

    Creating a bash script for process termination can be helpful for repetitive tasks. Follow the steps below to avoid typing the long and complex commands:

    1. Create the script: Use a text editor to create a file named kill_process.sh. For example, you can use the nano editor to create the file using the following command:
      nano kill_process.sh.
    2. Add the script content: After creating the file, paste the following content into it:
    #!/bin/bash
    process_name=$1
    pid=$(pgrep -f "$process_name")
    if [ -z "$pid" ]; then
        echo "Process not found."
    else
        kill $pid
        echo "Process $process_name (PID: $pid) killed."
    fi
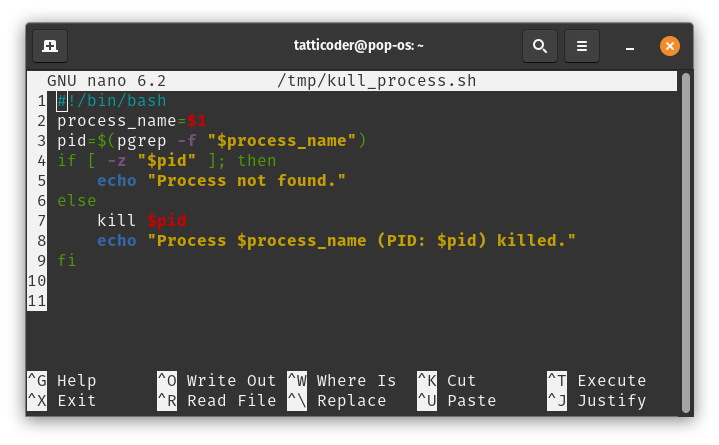
    Once you add the content, you can save it and exit it from the file editor. This script takes a process name as an argument, finds its PID, and terminates it.

    Before you can execute the script, you need to make it executable. Change the file permissions by executing the following command to make it executable:

    chmod +x kill_process.sh

    After changing the file permissions, you can run the script by simply typing its name in the command line, followed by the name of the process you want to kill. For example:

    ./kill_process.sh firefox

    The above command will attempt to kill a process named “firefox” on your computer.

    Linux Process Management: At a Glance

    This table provides a quick reference for common commands used to manage processes directly from the command line.

    Action / GoalBash Command ExampleWhen to Use It
    Kill a process by its PIDkill 1234The standard way to terminate a process when you know its exact PID. This sends a graceful shutdown signal (SIGTERM).
    Force-kill a process by PIDkill -9 1234A last resort to forcibly terminate a non-responsive process. This sends a SIGKILL signal that cannot be ignored.
    Kill multiple specific processeskill 1234 5678When you have a specific list of PIDs, you need to terminate all at once.
    Kill a process by partial namepkill 'node'To conveniently kill a process that matches a name or pattern, without needing to find the PID first.
    Kill all processes with an exact namekillall 'firefox'To terminate all instances of a specific program (e.g., all open Firefox windows). It’s safer than pkill if other processes have similar names.
    Kill all processes owned by a userpkill -u 'Alex'To terminate all processes running under a specific user account, often for administrative or security reasons.

    Wrapping Up

    In this post, we’ve explored various methods for killing processes in Linux from the command line. From using the kill command with a process ID to tools such as pkill and killall, you should now understand how to terminate unwanted or misbehaving processes on your Linux system.

    While a good understanding of the Linux command line helps manage your website, it is not a requirement.

    With the help of a hosting platform like RunCloud, you can easily manage your Linux server without getting bogged down in the technical details.

    RunCloud provides a user-friendly interface that simplifies server management, allowing you to focus on building and growing your online presence.

    Whether you’re a seasoned Linux user or just getting started, RunCloud makes it easy to deploy, monitor, and handle mundane tasks like performing regular backups.

    Ready to take your website to the next level? Sign up for RunCloud today and let us handle the Linux management so you can spend more time on what matters most – your business.

    FAQs on Killing Linux Processes

    How do you kill unnecessary processes in Linux?

    To kill unnecessary processes in Linux, you can use commands such as kill, pkill, or killall to terminate the unwanted processes based on their process ID (PID) or name.

    What command can you use to kill a process?

    The kill -9 PID command, which sends the SIGKILL signal, can be used to forcefully terminate a process that is not responding to a regular termination signal.

    How do you find the killed process in Linux?

    To find a killed process in Linux, you can use the ps command to list all running processes or the pgrep command to search for processes by name.

    How do I gracefully shut down a process in Linux?

    To gracefully shut down a process in Linux, you can use the kill command without any signal options, which will send the SIGTERM signal and allow the process to perform cleanup operations before exiting.

    How do you end a process by keystroke?

    In Linux, you can use the Ctrl+C keyboard shortcut to interrupt and terminate the currently running foreground process.

    How do you abort a run in Linux?

    To abort a running process in Linux, you can use the Ctrl+C keyboard shortcut. This will send the SIGINT signal and interrupt the process’s execution.

    Which key is used to cancel a process?

    The Ctrl+C keyboard shortcut is commonly used to cancel or interrupt the currently running process in Linux.

    How do I kill a high CPU process in Linux?

    In Linux, you can use the top command to identify a process that consumes a large amount of CPU resources and then use the kill command to terminate it.

    What’s the difference between a “job” and a “process” in Linux

    A process is any program that is currently running on the operating system. The Linux kernel manages all processes.
    A job is a shell-level concept that manages one or more processes within a single terminal session. Think of it as a label for a task you’re running. You can move a job to the background or foreground, but the kernel still manages it as a process.

    How can I see processes in a tree-like view?

    It’s useful to see which processes were started by other processes (parent-child relationships). The pstree command is perfect for this, as it gives you a visual map of everything running on your system, which can be very helpful for troubleshooting.

  • How to Find Most Used Disk Space Directories and Files in Linux

    How to Find Most Used Disk Space Directories and Files in Linux

    On Linux, disk space can disappear fast. This guide shows you how to spot the biggest files and directories quickly, understand size mismatches, and free up space safely.

    How Do You Check Disk Usage With Built-In Linux Tools?

    In Linux Bash, you have several built-in utilities and commands that you can use to check and monitor disk usage. These utilities are readily available and don’t require any additional installations.

    Here are some of the commonly used built-in utilities for checking disk usage in Linux:

    How Do You Find Large Files in Linux?

    Most Linux systems include the du tool. Use it to see which files and folders use the most space.

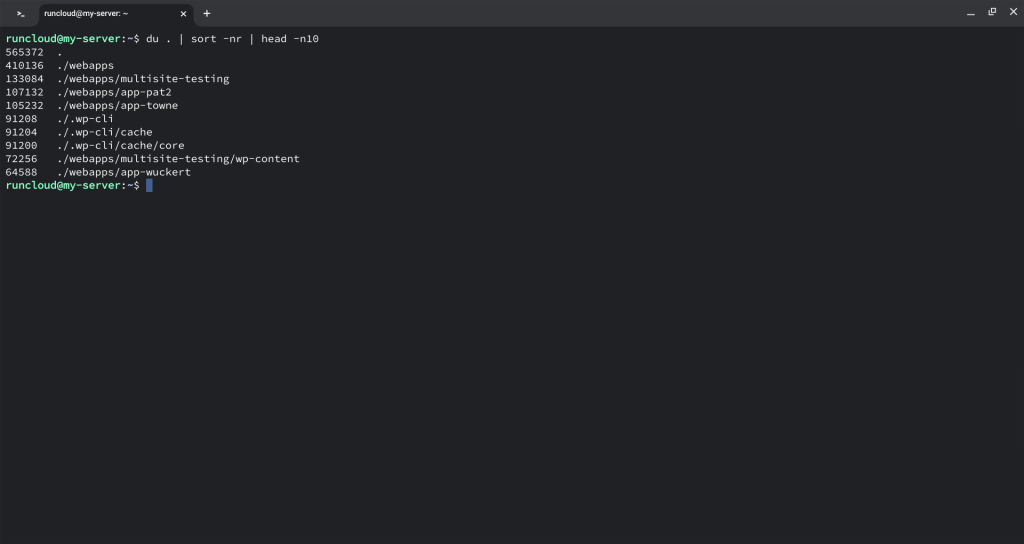
    To find the top 10 largest files from the current directory, run the following command in your Linux terminal:

    du . | sort -nr | head -n10
    Disk space in linux

    This command utilizes the du command to display disk usage, sort to sort the results in descending order, and head to display the top 10 largest files.

    How Do You Check the Largest Directories in Linux?

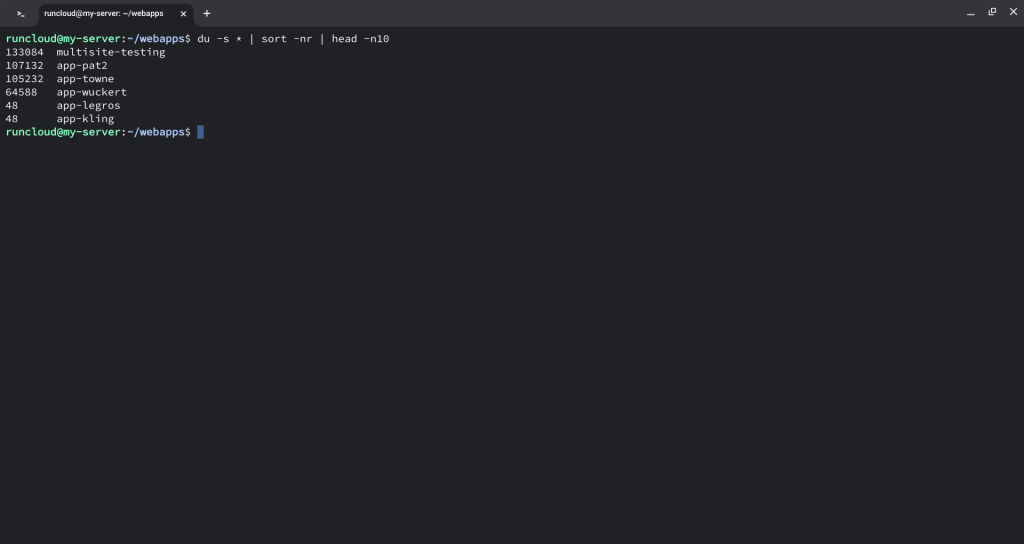
    Sometimes thousands of small files fill a disk faster than a few large ones. To list the largest directories in the current directory, you can run the following command in your terminal:

    du -s * | sort -nr | head -n10
    bask disk usage

    This command summarizes directory sizes, sorts them, and shows the top 10 largest directories in the current working directory.

    How Do You Find Large Files With GNU Tools in Linux?

    You can also use clever bash scripting with the find command to list the biggest files and directories.

    Method 1 – Identify Large Files With find

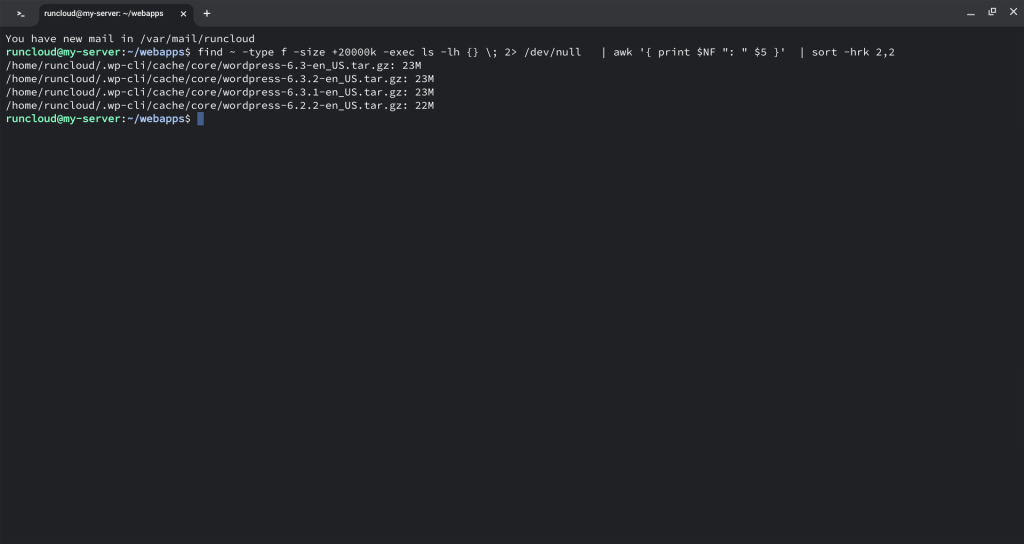
    The following command can be used to find and list files larger than 20,000 kilobytes (20 megabytes) in the user’s home directory (~). It then sorts these files by size in reverse order and displays the file names along with their respective sizes:

    find ~ -type f -size +20000k -exec ls -lh {} \; 2> /dev/null   | awk '{ print $NF ": " $5 }'  | sort -hrk 2,2

    Here’s a step-by-step explanation of how this command works:

    1. find ~ -type f -size +20000k: This part of the command initiates the search for files in the home directory (~). If you want to use a different directory, replace ~ with the path of your directory. The -type f option specifies that we are looking for regular files, and the -size +20000k option filters files larger than 20,000 kilobytes.
    2. -exec ls -lh {} \;: For each file that matches the criteria, the find command executes the ls -lh command, which lists detailed information about the file. The {} placeholder is replaced with the current file’s name during execution.
    3. 2> /dev/null: This part redirects any error messages (specifically, standard error) to /dev/null, effectively suppressing them. This is done to prevent error messages from being displayed in the terminal.
    4. | awk '{ print $NF ": " $5 }': The awk command processes the output from the previous command. It extracts the file name (represented as $NF) and the file size (represented as $5) and prints them in the format “filename: size”.
    5. | sort -hrk 2,2: The final part of the command uses sort to arrange the file entries. The options used are as follows:
      1. -h: This tells sort to perform a human-readable sort, which is useful for sizes with suffixes like “K” or “M”.
      2. -r: This specifies a reverse order sort, listing the largest files first.
      3. -k 2,2: This instructs sort to use the second field (the size) as the key for sorting.

    Method 2 – List the Biggest Files in Size Order

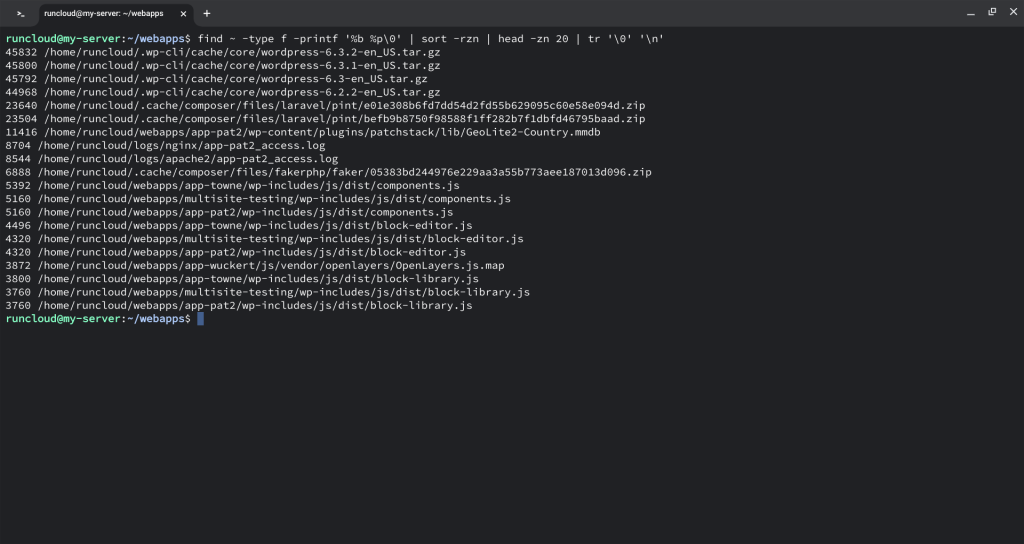
    Alternatively, you can use the following command to find and display information about the top 20 largest regular files in the user’s home directory (~). It reports the size of each file and its path, sorted in reverse order by size.

    find ~ -type f -printf '%b %p\0' | sort -rzn | head -zn 20 | tr '\0' '\n'

    Here’s a step-by-step explanation of how this command works:

    1. find ~ -type f -printf '%b %p\0': This part of the command initiates a search for regular files (-type f) in the home directory (~). For each file found, it uses the -printf option to format the output as follows:
      1. %b: Represents the number of 512-byte blocks allocated for the file.
      2. %p: Represents the file’s path.
      3. \0: Terminates each output entry with a null character (\0). The null character is used to separate file entries, and is especially important when dealing with file paths that contain spaces or special characters.
    2. | sort -rzn: The output from the find command is then piped (|) to the sort command for sorting. The following options are used with sort:
      1. -r: Performs a reverse order sort, arranging the entries from largest to smallest.
      2. -z: Informs sort that the input entries are null-terminated, which is why the null character (\0) was added at the end of each entry by the find command.
      3. -n: Specifies a numerical sort, ensuring that file sizes are sorted based on their numeric values rather than lexicographically.
    3. | head -zn 20: After the sorted list is generated by sort, the output is piped to the head command.
      1. -z: Informs head that the input entries are null-terminated.
      2. -n 20: Limits the output to the first 20 entries, which are the 20 largest files based on size.
    4. | tr '\0' '\n': Finally, the tr (translate) command is used to replace the null characters (\0) in the output with newline characters (\n). This is done to format the output in a more human-readable way, with each file and its size on a separate line.

    Note: You can also use the above bash script in conjunction with other bash commands such as numfmt to convert file sizes into human-readable formats. For example, you can do something like this:

    find ~ -type f -printf '%b %p\0' | sort -rzn | head -zn 20 | numfmt -z --from-unit=512 --to=iec | tr '\0' '\n'

    How Do You Check Directory Usage in Linux?

    To check how much storage memory each directory occupies, use the following commands:

    cd /
    du -sh * | grep G

    The above command shows memory usage by directories that occupy a volume measured in Gigabytes. It helps you decide which directories or files you may want to consider for deletion or optimization.

    Best Third-Party Tools for Disk Usage on Linux

    In addition to built-in utilities, there are many third party tools that you can use to assess disk usage in Linux Bash.

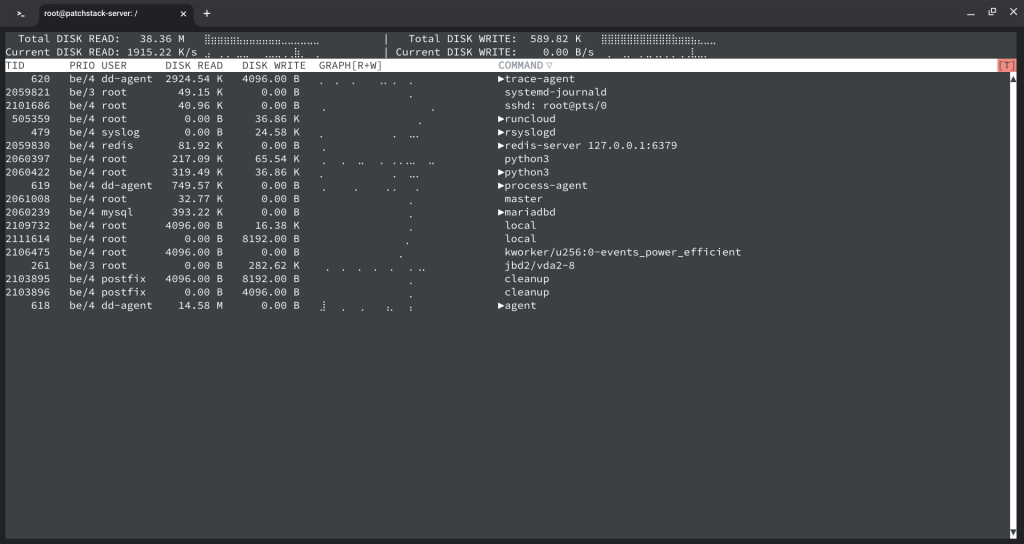
    How to Use iotop to Inspect Disk I/O

    iotop shows which processes are reading and writing to disk right now. It helps you spot I/O bottlenecks and noisy neighbours.

    Installation: You can use the apt package manager to install iotop-c:

    sudo apt update
    sudo apt install iotop-c

    Usage: After installation, you can run iotop to monitor and assess disk I/O usage. The -o option sorts the output by disk read or write, and -P displays paths. The -a option shows accumulated values, which can be useful for identifying processes with high disk I/O over time.

    Here’s an example of how to run iotop:

    iotop -oPa

    How to Use gdu to Scan Disk Usage

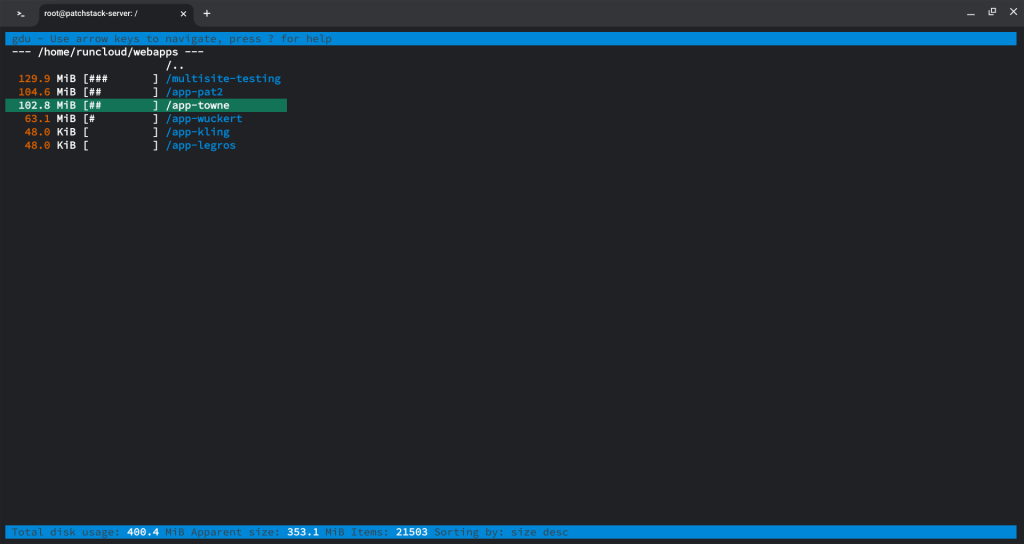
    gdu is a fast, terminal-based disk usage analyzer. Use it to scan a path and navigate heavy folders.

    Installation: You can download the binary from its GitHub repository and follow the installation steps in the official repository. For Debian/Ubuntu systems, you can run the following command to install the gdu utility:

    apt install gdu

    Usage: To analyze disk usage, run gdu with the desired directory as an argument. Use arrow keys on your keyboard to navigate different folders.

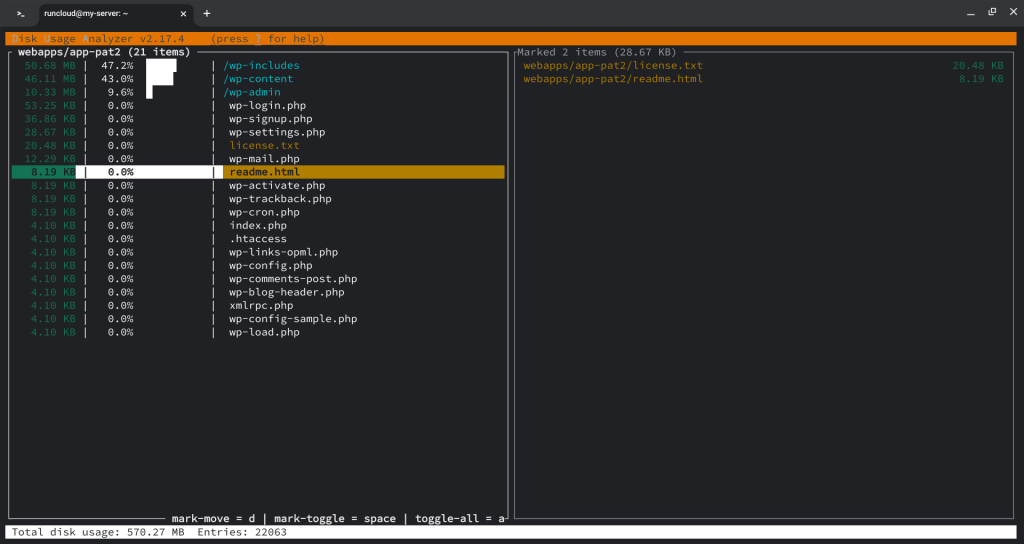
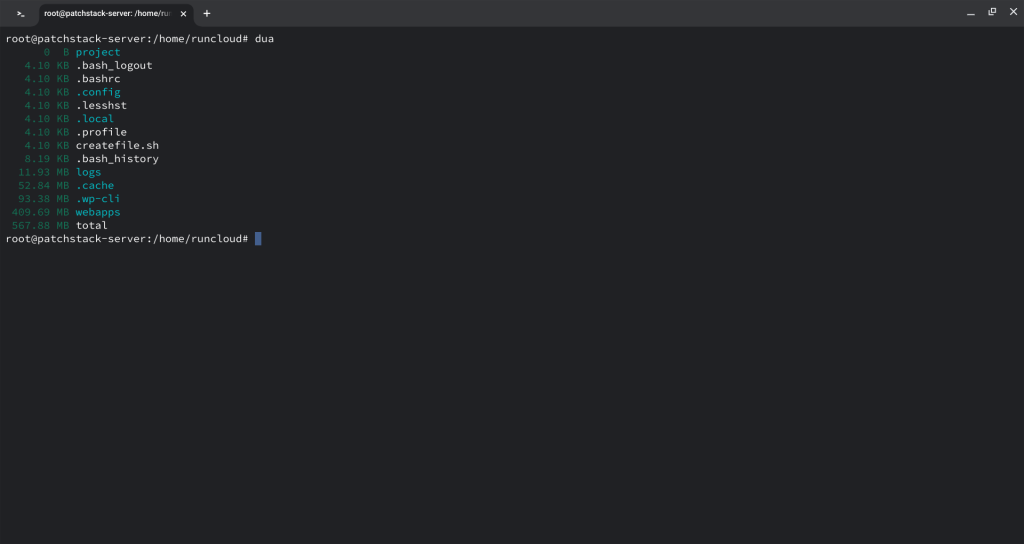
    How to Use dua for Disk Usage

    dua helps you assess disk usage quickly and offers an interactive mode for safe cleanup.The dua command features an interactive mode in which you can explore your file system and choose to delete files and directories to free up disk space. It is designed to minimize the risk of accidental deletions by using a multi-stage process, making it safe for exploration.

    Installation: Dua can be installed by using the binary release for your specific system from the Dua repository.

    Usage:

    • Run dua to count the space used in the current working directory.
    • Execute dua * to count the space used in all directories that are not hidden.
    • To learn about additional functionality such as the aggregate feature, use the dua aggregate --help command.
    • To launch into interactive mode, run dua i

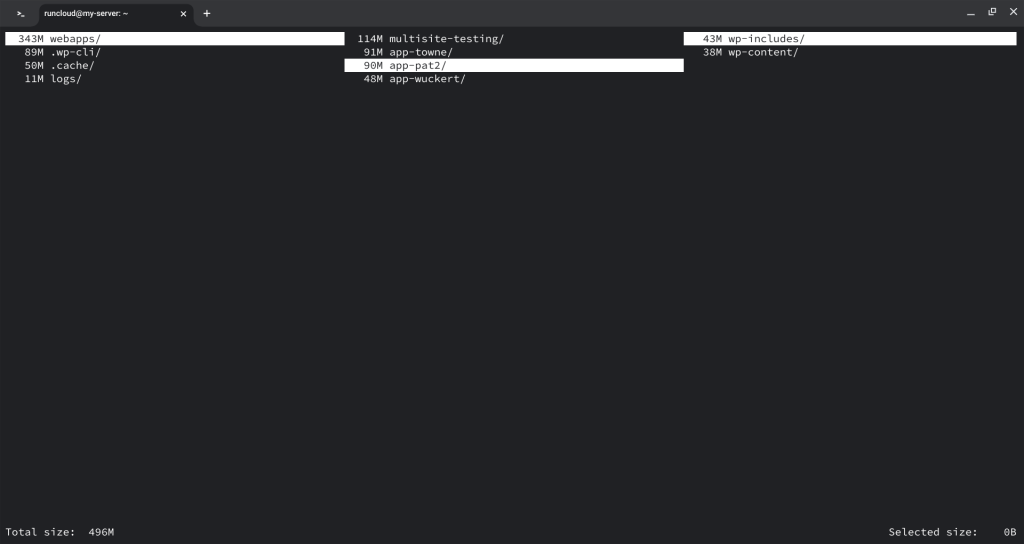
    How to Use godu to Analyse Disk Usage

    godu identifies space-hungry files and directories with an interactive view.

    Installation: godu is another Go-based disk usage tool. You can download the binary from its GitHub repository, make it executable, and move it to a directory in your PATH.

    Usage: Run godu to analyze disk usage for a specific directory. Use the arrow keys on the keyboard to navigate through the file system.

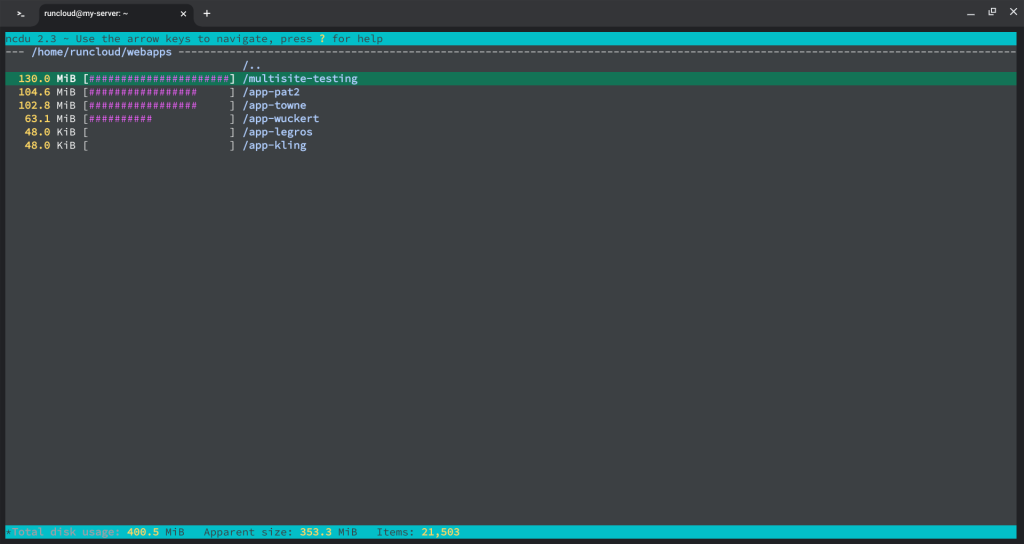
    How to Use ncdu to Explore Disk Usage

    ncdu is a terminal disk usage explorer. It scans quickly and lets you drill down and delete from the same screen.

    Installation: ncdu is an interactive disk usage analyzer that is available to most package managers. You can install it using apt on Debian-based systems:

    sudo apt update
    sudo apt install ncdu

    Usage: Run ncdu to analyze disk usage in an interactive text-based interface:

    These tools provide various ways to assess disk usage, and you can choose the one that best suits your needs and preferences. Some offer graphical interfaces, while others provide command-line-based analyses.

    Why Do ls and du Show Different Sizes?

    ls -l and du report different things, so sizes can look mismatched. Here’s what each one shows:

    Apparent Size

    This is the number of bytes that an application would read if it went from the beginning of the file to the end. It’s the “logical” size of the file. This is the value you see in the output of ls -l.

    Actual Disk Usage (Blocks)

    This is the amount of physical space the file actually occupies on the disk. Filesystems allocate space in fixed-size chunks called blocks (e.g., 4 Kilobytes). Even a file containing a single character will consume one full 4KB block. The du and quota commands report on this actual block usage.

    This difference is most dramatically illustrated with sparse files. A sparse file is a file with “holes” where data has never been written. The filesystem is smart and does not allocate any physical disk blocks for these empty holes.

    Compare Apparent vs. Actual Size on the CLI

    Let’s create a 1 Gigabyte sparse file using the following command.

    # Create a 1GB file instantly without writing any data to it
    truncate -s 1G /tmp/sparse-file.img

    Now, let’s measure it in two different ways:

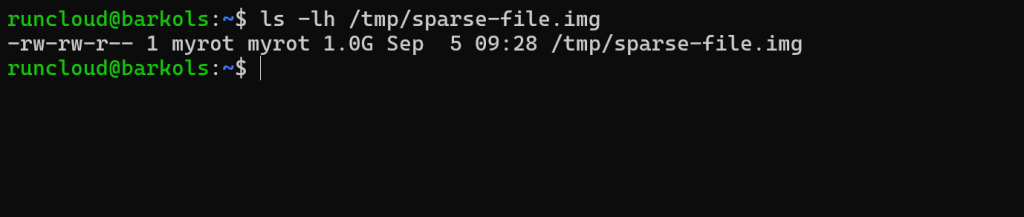
    Check the Apparent Size with ls:

    ls -lh /tmp/sparse-file.img

    The ls command reads the file’s metadata and reports its logical size: a full Gigabyte.

    Check the Actual Disk Usage with du:

    du -h /tmp/sparse-file.img

    The du command inspects the blocks allocated by the filesystem and reports that it is using zero blocks of physical disk space.

    This is an extreme example, but it perfectly illustrates that a file can appear to be very large while consuming very little of your quota. This is used heavily in virtual machine disk images, database files, and other applications that pre-allocate large files.

    How Do You Find Deleted but Open Files With lsof?

    In Linux, when you delete a file with rm, you are only removing its name from the directory. The actual data on the disk is not freed until every process that has the file open finally closes it. This is the most likely cause of the large discrepancy in your case.

    • The du utility can’t see the file because its name is gone from the directory tree.
    • However, its data blocks are still allocated to your user ID.

    The lsof (List Open Files) command is the perfect tool for finding these “phantom” files.

    How to Use lsof to Locate Deleted Files

    To find deleted files that are still open, use lsof with the link-count filter. The output is noisy, so filter by your user.

    # The +L1 flag filters for files with a link count less than 1 (i.e., deleted)
    # The grep command filters this system-wide list to only show your files
    lsof +L1 | grep 'runcloud'

    Replace runcloud with your actual username before running the above command.

    In the above example, we can clearly see that some files are still being identified by the lsof command even though they have been deleted and can not be accessed using the ls command.

    How to Free Space From Deleted Files in Linux

    If a deleted file is still open, stop the process holding it to release the space. Before you terminate the process, make sure you understand why it’s open.

    kill <process ID>

    After you run the kill command, the operating system will clean up the process, close the open file descriptor, and the filesystem will finally be able to free the data blocks.

    Linux Disk Usage Tools – At a Glance

    Tool Name CLI Command to RunWhat it Displays
    Disk Freedf -hOverall usage and free space for all mounted filesystems.
    Disk Usagedu -sh *Summarized disk usage for each file and directory in the current location.
    Find Command (for large files)find . -type f -size +1GA list of all files larger than a specified size (e.g., 1 Gigabyte).
    Find and Sort Pipelinefind . -type f -exec du -h {} + | sort -rhA sorted list of all files by size, from largest to smallest.
    NCurses Disk UsagencduA very popular, interactive text-based analyzer to explore disk usage.
    Go Disk Usage (gdu)gduA fast, modern, and interactive disk usage analyzer.
    Disk Usage Analyzer (dua)dua interactive .An interactive tool to view disk usage and delete files from its interface.
    Go Disk Usage (godu)goduAn interactive disk usage tool that can display a treemap in the terminal.
    I/O Topsudo iotopReal-time disk read/write activity shows which processes are using the disk now.

    Key Takeaways

    You now know several ways to find which files and directories are using the most space in Linux — from built-in commands like du and find to interactive tools like ncdu and gdu. These methods help you act fast when disk space runs low, prevent downtime, and keep your systems healthy.

    But constantly logging in and running these commands isn’t always practical. That’s where RunCloud helps.

    With RunCloud, you get:

    • A clear dashboard showing disk usage, CPU, and memory in real time
    • Alerts before space runs out, so you can act early
    • A secure, browser-based file manager to clean up files without needing command-line access

    By combining Linux’s flexibility with RunCloud’s visibility, you can keep your servers lean and reliable.

    Start with RunCloud today and make disk management effortless.

  • ARM64 vs X64 – Everything you need to know

    ARM64 vs X64 – Everything you need to know

    In the rapidly changing world of technology, choosing the right processor architecture can significantly affect performance, efficiency, and cost.

    At RunCloud, we’ve witnessed the impact of CPU architecture choices, particularly in server environments where performance and efficiency directly affect business costs. While consumers might be exploring ARM processors for personal computing, our focus is on the server-side revolution: how different CPU architectures are affecting cloud infrastructure, application performance, and operational efficiency.

    In this comprehensive RunCloud guide, we explore the differences between ARM and x86 architecture. Whether you’re looking to optimize your server fleet or understand the latest computing trends, we’ll provide the insights you need to make informed decisions.

    From performance benchmarks to practical implications, we’ll break down everything you need to know about ARM and x86 architectures in the context of modern computing and cloud infrastructure.

    Let’s get started!

    What is CPU Architecture?

    CPU architecture is the fundamental design and operational blueprint of a computer’s central processing unit. It defines how it processes, manages, and executes instructions at the most elemental hardware level. It dictates the core structural elements that determine how a processor:

    • Interprets machine instructions
    • Manages data flow
    • Handles computational tasks
    • Allocates and uses registers
    • Manages memory interactions

    To understand this, you can think of CPU architecture as the engine design in a car, software as the driver’s instructions, and the operating system as the dashboard and control mechanisms that coordinate everything.

    How is CPU Architecture Different from Software?

    Software operates as an abstract layer on top of the CPU architecture. It is basically a set of instructions translated into machine-level commands. It depends on the underlying architecture for execution and can be compiled or interpreted to match specific CPU instructions.

    How is CPU Architecture Different From The Operating System?

    Operating systems manage hardware resources and provide an interface between other software and the computer’s hardware. Through specialized kernels and drivers, an operating system can support multiple CPU architectures.

    However, this is only possible if the developer creates a specialized version of the operating system for a particular architecture. For example, Windows has a special version of its operating system for Windows on ARM devices.

    Aspect

    CPU Architecture

    Software/OS

    Level of Operation

    Hardware-level

    Logical/Functional level

    Modification Complexity

    Requires physical redesign

    Can be updated/replaced easily

    Dependence

    Direct hardware capabilities

    Dependent on an underlying architecture

    ARM Server Architecture

    ARM64 refers to the 64-bit ARM processor architecture, also known as ARMv8-A. It is a RISC (Reduced Instruction Set Computer) design that provides significant improvements over the previous 32-bit ARM architecture.

    ARM64 processors are widely used in various devices, including smartphones, tablets, laptops, and servers. They are also used in nearly all modern mobile devices, where power efficiency is crucial. Although it still has some rough edges, ARM64 is gaining traction in the embedded system design and cloud computing domains, where its performance and scalability are valuable assets.

    There are two primary reasons why people use the ARM CPUs:

    1. Improved performance: Compared to 32-bit ARM processors, ARM64 processors have a more efficient instruction pipeline and can execute more instructions per clock cycle.
    2. Power efficiency: The ARM64 architecture is designed for low power consumption, making it well-suited for mobile, embedded, and IoT (Internet of Things) applications.

    X86 Server Architecture

    The X64 architecture, also known as AMD64 or Intel 64, is a 64-bit extension of the x86 architecture. It was developed by AMD and later adopted by Intel to develop CPUs. Now, it has become the predominant 64-bit processor architecture for desktop and server computers.

    X86 architecture was predominantly used in the early days of computing, but it was later replaced by X64 architecture for several reasons:

    1. 64-bit registers and address space: X64 processors support 64-bit integer and floating-point data types, allowing them to access significantly more memory (up to 16 exabytes) compared to the 32-bit x86 architecture.
    2. Expanded instruction set: X64 introduces additional instructions and registers that enhance performance for 64-bit applications. This includes support for more general-purpose registers, which can improve the efficiency of arithmetic and logical operations.
    3. Backward compatibility: X64 processors maintain compatibility with the 32-bit x86 instruction set, ensuring that existing software designed for 32-bit systems can run seamlessly on 64-bit platforms.

    ARM vs x64(x86) Server Architecture Comparison Guide

    RunCloud supports both ARM and AMD64 CPU architecture for your servers, but if you are looking to pick between ARM and x86 architecture, then there are several things that you should know:

    Core Architectural Comparison

    The ARM and x86 architectures are two fundamentally different approaches to CPU design, primarily distinguished by their instruction set architectures (ISA).

    • ARM follows a Reduced Instruction Set Computing (RISC) model, which is a simpler, more streamlined instruction that can be executed quickly and with lower power consumption.
    • In contrast, x86 uses a Complex Instruction Set Computing (CISC) approach, which supports more complex, multi-step instructions that can perform sophisticated operations with fewer lines of code.

    While these architectures cannot directly run each other’s machine-level code due to their distinct instruction sets, modern programming languages provide a critical abstraction layer. Compilers can translate high-level code into architecture-specific machine instructions, allowing the same source code to be compiled for both ARM and x86 processors.

    This means a Python, Java, or C++ program can be compiled to generate native instructions specific to ARM or x86 architectures, enabling software portability across different CPU types while maintaining optimal performance for each platform.

    Feature

    ARM Architecture

    x86 Architecture

    Instruction Set

    RISC (Reduced Instruction Set Computing)

    CISC (Complex Instruction Set Computing)

    Power Efficiency

    Typically 30-50% better power efficiency

    Higher power consumption but improving with newer generations

    Cost Structure

    Lower licensing costs, emerging ecosystem

    Mature ecosystem, competitive pricing due to scale

    Market Maturity

    Growing rapidly, especially with AWS Graviton

    Dominant market position, extensive vendor support

    Software Compatibility

    Software compatibility between ARM and x86 architectures has significantly improved, with most modern programming languages and frameworks offering native support for both platforms through cross-compilation techniques.

    Major platforms such as Linux, Windows, and macOS now provide robust toolchains that enable developers to build applications that can be easily recompiled for different CPU architectures.

    While some specialized software and low-level system utilities may still require architecture-specific modifications, the vast majority of high-level applications can now be seamlessly adapted between ARM and x86 with minimal additional engineering effort.

    Software Type

    ARM Support

    x86 Support

    Linux Distributions

    Full support in major distros (Ubuntu, RHEL, etc.)

    Universal support

    Container Support

    Native Docker support, growing ecosystem

    Comprehensive support

    Web Servers

    nginx, Apache, Lighttpd

    All web servers supported

    Databases

    MySQL, PostgreSQL, MongoDB

    All major databases

    Programming Languages

    Most languages supported natively

    Universal support

    Cost Considerations

    ARM-based server architecture is considered a cost-effective alternative to traditional x86 systems, primarily due to its inherently lower power consumption and more efficient chip design. The fundamental energy efficiency of ARM processors allows data centers to significantly reduce electricity costs.

    This reduction in operational expenses is why major cloud providers and enterprise data centers are gradually shifting their infrastructure towards ARM-based solutions.

    But the cost advantages extend beyond just power consumption.

    ARM’s design allows for more compact and thermally efficient chip manufacturing, resulting in lower hardware production costs and the ability to create denser server configurations. This economic incentive is particularly compelling for hyperscale cloud providers and large-scale computing environments that operate thousands of servers simultaneously.

    Factor

    ARM

    x86

    Hardware Costs

    Lower initial investment

    Variable, competitive at scale

    Operating Costs

    Lower power consumption

    Higher power costs

    Support Costs

    It may require specialized knowledge

    Widely available expertise

    Benchmarks: ARM vs x86 Server Performance

    We designed a controlled testing environment that minimized variables and provided a fair assessment of ARM versus x86 server performance.

    We deployed two identical server configurations within the same cloud provider and region, carefully matching specifications including vCPU count, memory allocation, and network parameters.

    After that, we created a standard WordPress installation with 20 blog posts for our performance evaluation.

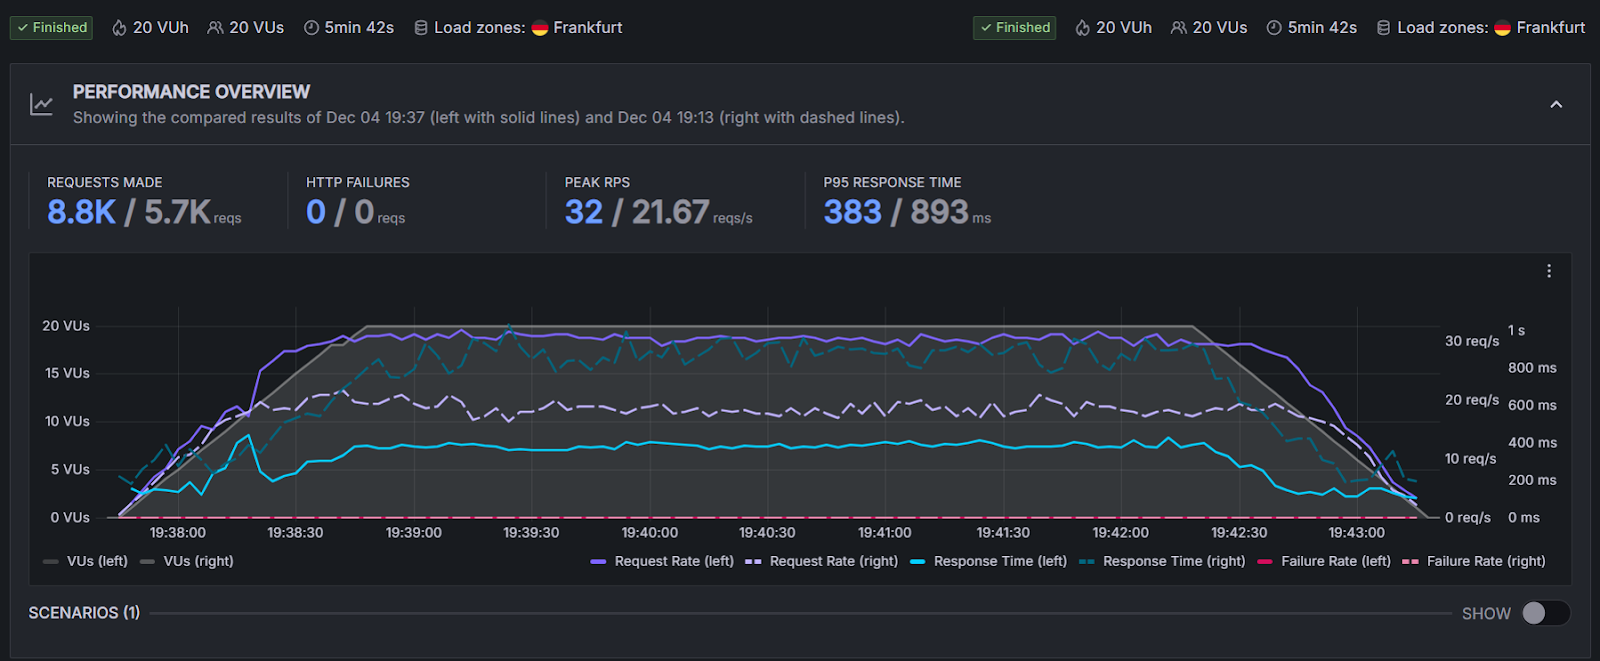
    We used k6 for load testing and Grafana for performance visualization to execute a 5-minute load test with 20 concurrent virtual users. During our tests, we tracked critical performance metrics, including requests per second, response times, and HTTP failure rates.

    Metric

    ARM

    x86

    Requests Made

    8.8k

    5.7k

    HTTP Failures

    0

    0

    Peak Requests per Second (RPS)

    32

    21.67

    P95 Response Time

    383ms

    893ms

    arm64 vs x64 benchmarks

    The benchmark results show notable performance advantages for ARM-based servers in this specific test scenario. Key observations include:

    1. Request Volume: ARM servers processed approximately 54% more requests compared to x86 servers, indicating a significant throughput improvement.
    2. Request Efficiency: The peak requests per second for ARM servers (32 RPS) substantially outperform x86 servers (21.67 RPS), which shows enhanced computational efficiency.
    3. Latency Performance: The P95 response time for ARM servers (383ms) is markedly lower than that for x86 servers (893ms), representing a dramatic reduction in latency that could improve user experience.

    By maintaining strict control over testing variables and using industry-standard performance analysis tools, we created a transparent and reproducible benchmark methodology. Our goal was not to declare a definitive winner but to provide an objective, data-driven perspective on the current performance capabilities of ARM and x86 server architectures.

    While these benchmarks highlight ARM’s impressive performance, it’s important to understand that server architecture selection is nuanced. x86 server architecture is a robust, mature technology with:

    • Extensive ecosystem support
    • Proven reliability
    • Widespread enterprise adoption
    • Significant ongoing development and optimization

    The results should be interpreted as a demonstration of ARM’s emerging capabilities rather than a wholesale replacement recommendation. When considering architectural transitions, you should evaluate their specific workload requirements, existing infrastructure, compatibility needs, and total cost of ownership.

    Final Thoughts: Navigating Server Architectures with Flexibility

    Throughout this article, we have discussed the different nuances of ARM and x86 architectures, as well as each platform’s strengths and considerations.

    However, the choice between ARM and x86 is no longer a binary decision but a strategic consideration dependent on specific workload requirements, cost structures, and performance needs.

    If you manage a fleet of servers, balancing ARM and x86 environments can quickly become a logistical nightmare. Deployment, optimization, and consistent performance management across different server types demand significant technical expertise – RunCloud is designed to eliminate these complexities.

    RunCloud provides comprehensive support for both ARM and x86 server environments. Whether you’re exploring performance optimizations or scaling your infrastructure, RunCloud ensures seamless deployment, monitoring, and control across different server architectures.

    Learn more about how RunCloud can help you manage your servers.

  • CentOS vs Ubuntu – Which One Should You Choose in 2025?

    CentOS vs Ubuntu – Which One Should You Choose in 2025?

    For many people getting started with Linux there’s an important debate to settle about which Linux distribution is best – it’s the battle of CentOS vs Ubuntu, and which one to go for.

    Let me save you some time – they are all best… it just depends on which distro is best for what!

    Many Linux users get stuck in the eternal loop of trying out new Linux distributions, distro-hopping from one distribution to another like a caffeinated kangaroo, unable to settle on one Linux flavor. If that’s you, then happy hopping!

    But if you’re just looking for a good and stable operating system that gives you flexibility and the freedom to do what you want (without asking you for a piece of your soul in exchange for monthly subscriptions and microservices), then you’re in the right place.

    In this post, we will take a look at two of the most well-known and renowned Linux distributions that you can find on the internet – CentOS and Ubuntu.

    Without spoiling too much! Let’s get started!

    What is CentOS?

    CentOS (short for Community Enterprise Operating System) was a free and open-source distribution based on Red Hat Enterprise Linux (RHEL) which aimed to provide a stable, reliable, and secure platform for servers and workstations.

    It should not be confused with CentOS Stream which serves as the upstream development platform for upcoming RHEL releases.

    CentOS Linux is derived from the source code released by RedHat and it was recently discontinued by Red Hat in favor of its paid offering, Red Hat Enterprise Linux operating system.

    System Requirements for CentOS

    CentOS, a popular Linux distribution, has specific system requirements to ensure optimal performance. Here are the key requirements:

    • Architecture: CentOS supports AMD64, Intel 64, and 64-bit ARM systems.
    • Memory: The recommended minimum RAM varies depending on the installation type. For HTTP, HTTPS or FTP network installation, it’s 1.5 GiB.
    • Storage: The minimum available disk space should be 10 GiB.

    Recommended: What Are Linux Logs? What Are They & How to Use Them

    Advantages of CentOS

    There were many Advantages of CentOS over other Linux operating systems:

    1. Free and Open Source: CentOS was available at no cost, and used to come with full source code that can be modified, distributed, or reused under the terms of the GNU General Public License.
    2. Enterprise-Level Stability: It maintained binary compatibility with RHEL, which means software that runs on RHEL can typically run on CentOS without modification – this stability made it a popular choice for business applications.
    3. Community-Supported: While Red Hat offers official support for RHEL, CentOS relies on community support and contributions. This includes updates, security patches, and new features, all of which are provided by a dedicated and skilled community.
    4. Security: CentOS inherits the robust security features of RHEL, including SELinux (Security-Enhanced Linux), which provides various security policies, and a strong defense against vulnerabilities and exploits.
    5. Use Cases: As it was a robust and well-tested operating system, it was widely used in servers, hosting, and workstations where stability and reliability are critical. It’s also favored for development environments due to its compatibility with RHEL.

    Disadvantages of CentOS

    We have discussed the advantages, now let’s take a look at some of the disadvantages of CentOS:

    1. Outdated Packages: CentOS is based on the stable releases of Red Hat Enterprise Linux (RHEL), which means it often does not have the latest versions of software packages.
    2. Limited Desktop Environment: While CentOS is a robust choice for server environments, it may not be the best option for desktop use. It lacks the variety of desktop environments and user-friendly applications compared to other distributions like Ubuntu or Fedora.
    3. Less Software in Official Repositories: CentOS does not have as extensive software availability in its official repositories compared to other distributions. Users may need to add third-party repositories or compile software from source, which can be complex and time-consuming.
    4. Delayed Security Updates: Although CentOS is known for its stability and long-term support, there can be delays in receiving security updates. This is because updates are first applied to RHEL and then ported to CentOS, which can lead to potential security risks.
    5. Lack of Commercial Support: Unlike RHEL, CentOS does not offer any official commercial support. While there is a community of users who can provide assistance, this may not be sufficient for businesses or users requiring immediate or professional support.

    What is Ubuntu?

    Ubuntu is a widely used Linux distribution known for its user-friendly interface, regular release cycles, and strong community support. It’s based on the Debian distribution and comes in different editions, including Desktop, Server, and Core (for IoT devices and robots).

    Ubuntu is maintained and developed by Canonical Ltd., a British company that invests resources into keeping the operating system secure, updated, and user-friendly. Similar to CentOS, Ubuntu is also considered very stable; however, if you encounter a bug in Ubuntu, you can report it using the ubuntu-bug command. The bug report is logged locally and then uploaded to a central database by a separate program called whoopsie – Canonical uses this data to identify overarching issues and improve the system.

    The first official release of Ubuntu was Ubuntu 4.10 (Warty Warthog), which occurred on October 20, 2004. Since then, Ubuntu has followed a predictable release cycle, with new versions every six months.

    System Requirements for Ubuntu

    Ubuntu is designed to provide a minimalist base that can run on a wide range of hardware, from IoT devices and PC-style platforms to industrial computing. The system requirements are flexible but generally constrained by the following minimum values:

    • Architecture: Ubuntu Core supports various 64-bit architectures and 32-bit Arm, including amd64 (Intel/AMD 64-bit), arm64 (64-bit Arm), armhf (32-bit Arm), and riscv64 (64-bit RISC-V).
    • Memory: The minimum RAM required for Ubuntu Core is 512MB. However, devices with more on-board RAM can take full advantage of Ubuntu Core’s capabilities.
    • Storage: Ubuntu Core requires a minimum storage of 1GB.

    If you want to handle your Ubuntu Servers without dealing with technical stuff, take a look at RunCloud Server Management Tool. With RunCloud, you can focus on building apps instead of worrying about server issues – it helps you manage and deploy web applications securely without the hassle.

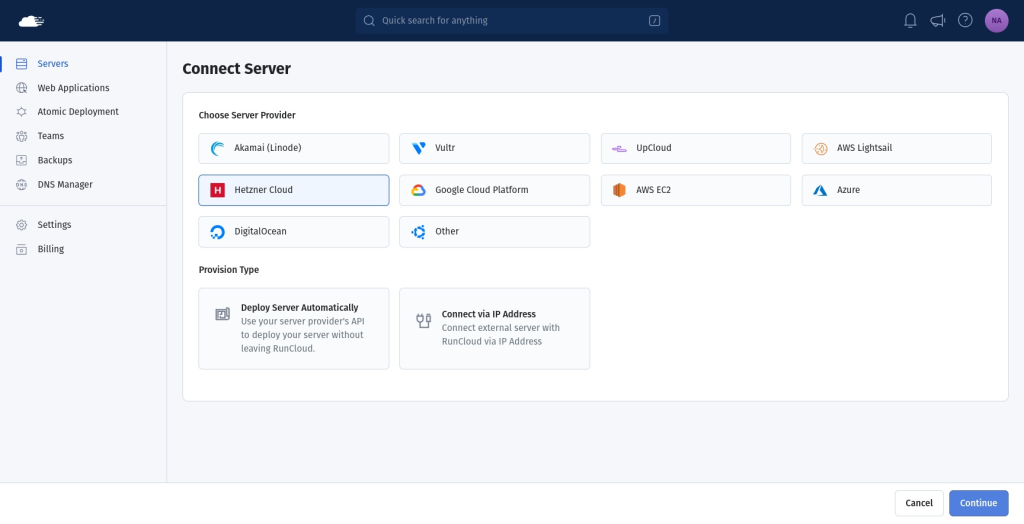
    An image from RunCloud Dashboard, where you can connect any Cloud or VPS Server.

    Also Read: How to Install WordPress with Apache on Ubuntu

    Advantages of Ubuntu

    If you’re planning to use Ubuntu, there are plenty of good things for you to look forward to:

    1. Desktop and Server Options: Ubuntu offers both desktop and server editions, making it versatile for various use cases. This allows you to run the same software on both your server and desktop, reducing complexities and ensuring consistency across your infrastructure.
    2. Community Support: Sooner or later, you will hit a snag; Ubuntu has a vibrant and active community of users, developers, and enthusiasts who contribute to forums, blogs, and social media, providing help, tips, and solutions.
    3. Software Availability: One of the best things about Ubuntu is that its package repositories contain a vast selection of software applications. You can easily find and install software using package managers like apt or the graphical Ubuntu Software Center.
    4. Long-Term Support: Ubuntu releases special build versions tagged with LTS. These releases are designed for stability, predictability, and extended support. A new release occurs every two years and is supported for five years on the desktop version and ten years on the server version using Extended Security Maintenance (ESM) service. This makes it ideal for large-scale deployments, enterprises, and critical systems where updating frequently is not possible.

    Disadvantages of Ubuntu

    Let’s take a look at some reasons why you shouldn’t pick Ubuntu:

    1. Privacy Concerns: Some versions of Ubuntu have been criticized for privacy reasons due to the inclusion of Amazon web app.
    2. Frequency of Releases: Ubuntu’s frequent release cycle can be a disadvantage for users who prefer stability over new features. While LTS (Long Term Support) versions are released every two years, non-LTS versions are released every six months and are supported for only nine months.
    3. Less Control Over the System: Compared to other distributions like Arch or Gentoo, Ubuntu does not offer as much control over the system. This can be a disadvantage for advanced users who prefer to customize their operating system at a deeper level.

    Suggested Read: How to Find Most Used Disk Space Directories and Files in Linux

    Difference Between CentOS vs Ubuntu [With Comparison Table]

    FeatureCentOSUbuntu
    OriginCentOS was a free version of the Red Hat Enterprise Linux (RHEL).Ubuntu is based on Debian.
    User FriendlinessCentOS was mainly used by server administrators due to its robustness and stability. It’s less user-friendly compared to Ubuntu.Ubuntu is known for its user-friendliness and is often recommended for beginners.
    Software UpdatesCentOS had a longer release cycle, providing a more stable platform. It was ideal for servers.Ubuntu has a faster release cycle, providing newer software and features.
    System AdministrationCentOS uses YUM (Yellowdog Updater, Modified) as its package management system.Ubuntu uses APT (Advanced Package Tool) for package management.
    SecurityCentOS is considered to have strong security, largely due to its enterprise-grade development.Ubuntu also has robust security measures in place and offers easy-to-use security updates.
    Under DevelopmentCentOS has reached end of life and new versions or security updates will not be released.Ubuntu is actively being developed and will continue to receive updates.

    CentOS was a solid choice for those who need an enterprise-grade operating system without the associated costs, and who can manage without the dedicated commercial support provided by Red Hat for RHEL.

    If you were previously using CentOS and are considering an alternative, both Rocky Linux and AlmaLinux are excellent choices.

    Rocky Linux aims to be a community-driven, open-source enterprise operating system that is 100% bug-for-bug compatible with Red Hat Enterprise Linux (RHEL). Similarly, AlmaLinux OS fills the gap left by the discontinuation of CentOS Linux stable releases – it is binary compatible with RHEL and has FIPS 140-3 certification, ensuring strong cryptographic security.

    Recommended: How To Flush DNS Cache — A Full Guide

    Wrapping Up: CentOS vs Ubuntu – Which Is Better?

    CentOS used to be an excellent choice for servers, especially when stability and compatibility with RHEL (Red Hat Enterprise Linux) are crucial. Unfortunately, CentOS has been discontinued, which means it won’t receive further updates or security patches.

    Ubuntu on the other hand has an active development cycle and is versatile, which makes it suitable for both servers and desktops. Ubuntu releases new versions predictably every six months, with free support for nine months, but you can pick Ubuntu LTS releases to get extended support for large-scale deployments.

    If you need an RHEL-compatible Linux distribution, consider Rocky Linux or Alma Linux as alternatives to CentOS. However, if you’re not tied to RHEL compatibility, we recommend using Ubuntu Server with RunCloud to simplify server management and deployment.

    RunCloud makes it easy to manage and deploy applications to the web, allowing you to focus on your projects without worrying about server administration.

    Sign up for RunCloud today to streamline your server management and deployment tasks!

    FAQ on CentOS vs Ubuntu

    What is the main difference between Linux and Ubuntu?

    Linux refers to the kernel, which is the core component of an operating system – it manages hardware resources, provides essential services, and allows software applications to communicate with the hardware.
    Ubuntu Is a complete operating system based on the Linux kernel – it includes not only the kernel but also essential system utilities, libraries, and software applications. Many different operating systems can be built using the same kernel, but one operating system can only have a single kernel.

    Is CentOS good for beginners?

    CentOS was discontinued, but when it was actively developed it focused on stability and security rather than providing the latest features. As a result, beginners find it less user-friendly compared with other distributions.

    Why is CentOS so popular?

    CentOS was known for its stability, making it a reliable choice for servers and critical systems, but as it is no longer being developed, new bugs or vulnerabilities will not be patched in the future – which is almost ironic.

    What is the difference between CentOS, Ubuntu, and Debian?

    CentOS, Ubuntu and Debian are all Linux distributions. To better understand the relationship between them, let’s consider an analogy:
    Ubuntu is a friendly kid who plays with everyone on the playground, while Debian can be considered as the parent of Ubuntu who is good friends with all the Ubuntu’s friends. CentOS, on the other hand, can be considered a foreign exchange student who doesn’t speak the same language as either Ubunu or Debian.

    Do all Linux OSes use the same commands?

    Most Linux distributions share common commands, but there can be variations due to package managers, system configurations, and default utilities.

    Can I run CentOS Docker on Ubuntu?

    Yes, Docker containers are platform-independent, which means you can run CentOS-based Docker containers on Ubuntu or any other Linux distribution.

    Do you need Ubuntu to run Docker?

    No, Docker runs on various operating systems, including Ubuntu, Windows, macOS, and many more.