Author: RunCloud Team

  • What is WHMCS and How Is It Used?

    What is WHMCS and How Is It Used?

    If you’re running a web hosting business, you know how challenging and time-consuming it can be to manage your clients, billing, support, domains, and more.

    You need a solution that can automate your tasks and make your life easier.

    That’s where WHMCS comes in.

    WHMCS is a powerful and popular web hosting automation platform that can help you run your business smoothly and effectively. But how do you install WHMCS on RunCloud, the best cloud server management platform?

    In this article, we will explain what WHMCS is and how it works, and then we will guide you through the quick and simple steps of installing it on RunCloud. You’ll also learn about some of the best alternatives to WHMCS that can offer you more features and benefits for your web hosting business. Read on to find out more!

    What Is WHMCS

    WHMCS is short for Web Host Manager Complete Solution. It’s a management platform that simplifies the process of selling domain names and hosting services online. WHMCS provides a suite of tools that can automate daily operations such as billing, invoicing, client management, and support requests.

    WHMCS was first introduced back in 2005, and since then it has become a popular choice for web hosting companies to manage their online business. It’s an invaluable tool for such hosting companies, as it helps them to manage their businesses more efficiently and effectively.

    If you’re looking for alternatives to WHMCS, you might want to check out this article: The Best WHMCS Alternatives (Free, Open Source & Premium). It will give you an overview of some of the most popular and promising options for web hosting automation. You might find a solution that suits your needs and budget better than WHMCS.

    Key Features Of WHMCS

    1. Billing and Invoicing: WHMCS can automate the process of generating invoices, and allows users to manage their finances and payments easily. You can also configure recurring billing, payment reminders and promotional discounts to boost your sales.
      There are mechanisms set in place to handle multi-currency transactions, as well as initiating refunds in case of a dispute.
    2. Client Management: It provides a centralized location to manage client data and information such as order history, support tickets, and billing information. Having a unified dashboard which tracks everything streamlines the operations process, and improves productivity.
    3. Product and Service Management: WHMCS allows you to manage your products and services quickly and easily. You can add new products, set up pricing, packages, and use custom options to provide additional offerings to your customers.
    4. Support Ticket System: There is a built-in support ticket system for managing customer support requests and inquiries. This system can be organized to replicate the hierarchy of support staff, and organize them in departments to segregate responsibilities.
      It’s possible to open and communicate in a ticket via email or directly from the web interface. The ticketing system also supports attachments, and you can set up additional escalation rules to perform automated actions and enforce SLAs.
    5. Integrations: WHMCS has built-in support for various payment gateways such as PayPal, Stripe, Skrill, eWay, etc. It can integrate with various domain registrars, including GoDaddy, ResellerClub, NameCheap, and more.
      It can send notifications via Slack and Hipchat, which makes it easier for users to manage all aspects of their business.
    6. Customizable: One of the key features of WHMCS is its modular architecture which allows for unlimited customizations. It offers a powerful API that supports both XML and JSON to execute actions within WHMCS from third party code. There are themes and templates available, which can be used to create a professional and branded experience for clients.

    Benefits of using WHMCS

    1. Improved Efficiency: WHMCS can automate various business operations, thereby reducing manual work, saving time and improving efficiency. This will free up time for businesses to focus on growth and improving overall efficiency.
    2. Streamlined Financial Management: The platform facilitates billing and invoicing automatically for a large number of clients, allowing businesses to manage their finances and maximize their revenue.
    3. Improves Customer Experience: With WHMCS, you get a centralized location to manage your client accounts and manage support tickets. Having a user friendly interface that makes it easy to perform the desired actions, and ask questions from support staff, leads to improved customer satisfaction.
    4. Easy to Use: WHMCS consolidates multiple tools and features into a single platform. This eliminates the need to switch between multiple tools to manage business operations. It also provides tutorials, guides, and support resources to help users quickly get up to speed with the platform.

    How Install WHMCS on RunCloud

    Creating an Empty Web app

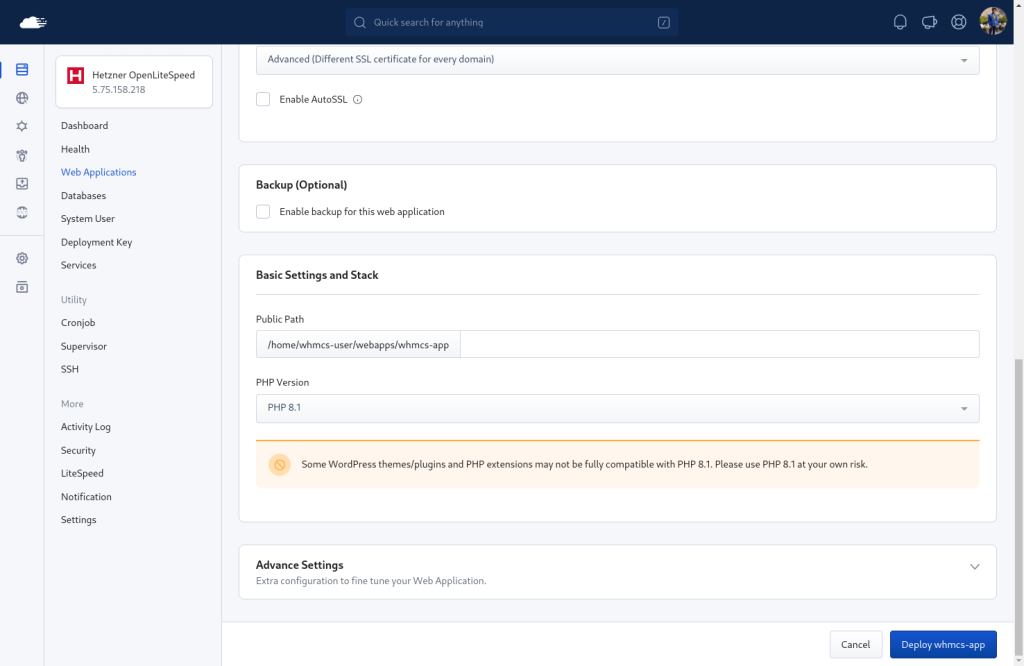
    Log in to your RunCloud dashboard, and select the server you want to use. Click on the Web Application tab and then click on the “Deploy New Web Application” button.

    Choose a name for your web app, such as whmcs-app, and then select the web application owner. We recommend creating a new owner for each web application.
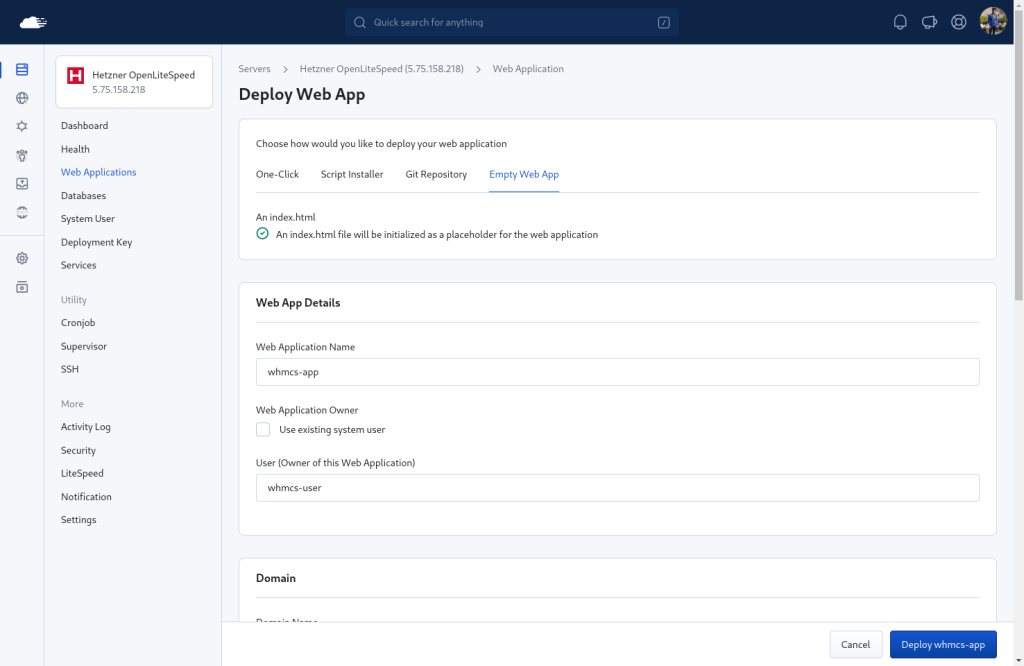
    Next, choose a domain name for your web app, such as whmcs.example.com, and make sure you have pointed it to your server’s IP address or hostname.

    Select the PHP version that you want to use. At the time of writing, WHMCS recommends using PHP 8.1. Finally, click on the Create Web Application button, and wait until your web app is created and ready to use.
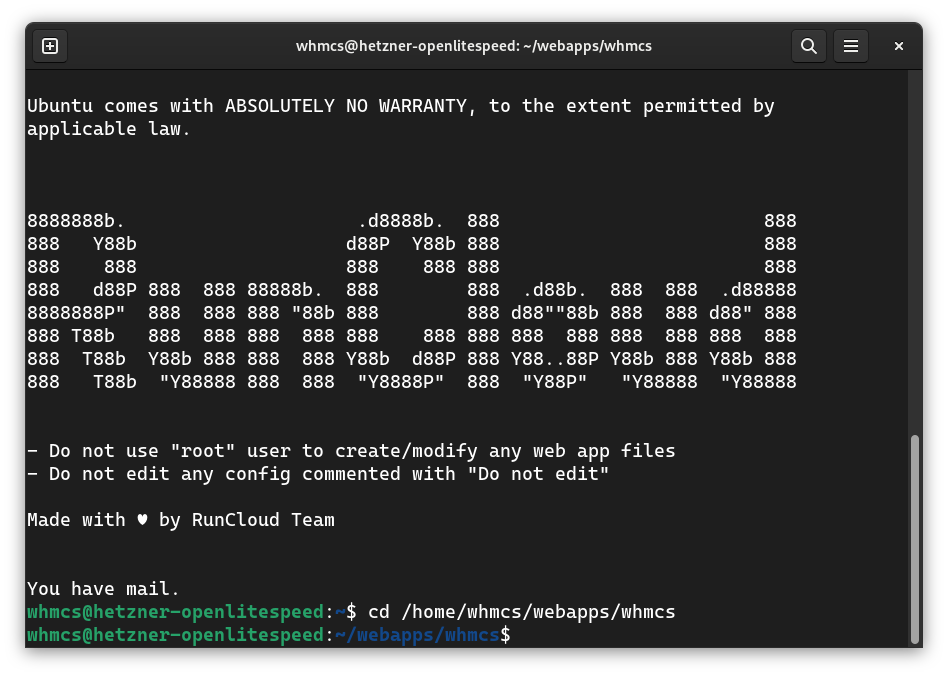
    After creating the web application, you need to log into your server as the owner of the application via SSH, and navigate to the root directory of your web application. If you are not sure how to do this, we recommend reading How To Add a SSH Key and How To Use SSH Keys with PuTTY.
    Download WHMCS Binaries

    Prerequisite: You need to install and enable ionCube first. Follow our tutorial on installing ionCube Loader and confirm that you have it installed.

    After installing the ionCube Loader, you need to download and extract the WHMCS installation archive on your server. You can either download it to your personal computer and then move it to your server via FileZilla, or you can follow the instructions below to download it directly to your server if you’re feeling adventurous!

    To download the binary directly to your server, we will use the curl command. First, go to https://download.whmcs.com/ and open the DevTools page in your browser.

    In the DevTools windows, switch to the “Network” tab – any web requests that you make on download.whmcs.com will be recorded here.

    Next, go back to the download page and download the latest available binary – you need to have a valid license key to access this page.

    Choose the Full Release option, and click on the Download button. This will start downloading the zip file to your local computer. You can cancel the download if you like as we won’t be using the downloaded file.In the network tab, you should see a single request – this is the request that was made to download the zip file. Right click on the request, and go to Copy > Copy as Curl. If you are using Windows, you might see two options – select the “Copy as Curl (bash)”.
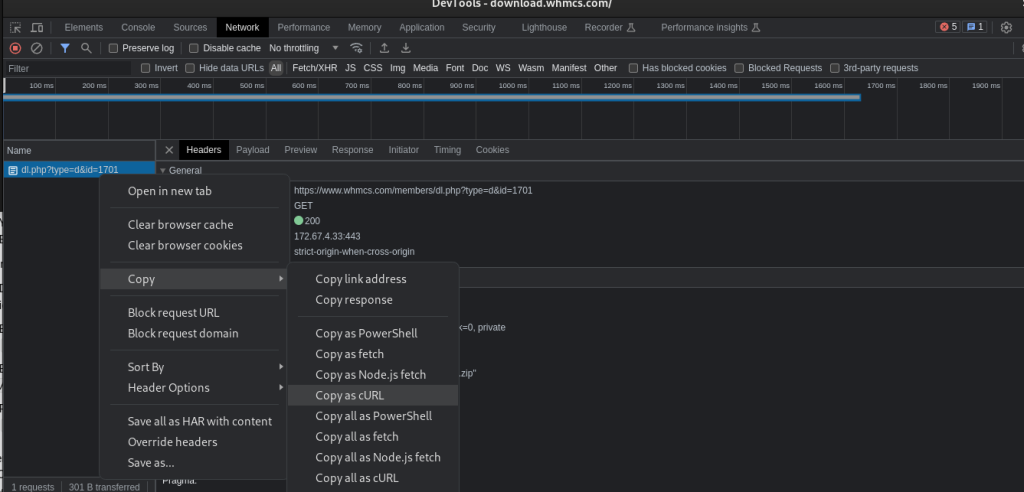
    If you followed the instructions correctly, you will have copied the curl request that contains the necessary cookies and request headers that are specific to your license key. We can paste this into your server terminal to make the same request again (i.e. download the file). After pasting it in the terminal, we need to specify the name of the file that will be downloaded. To do this, write -o whmcs_87.zip at the end of the command. The resulting command should look something like this:
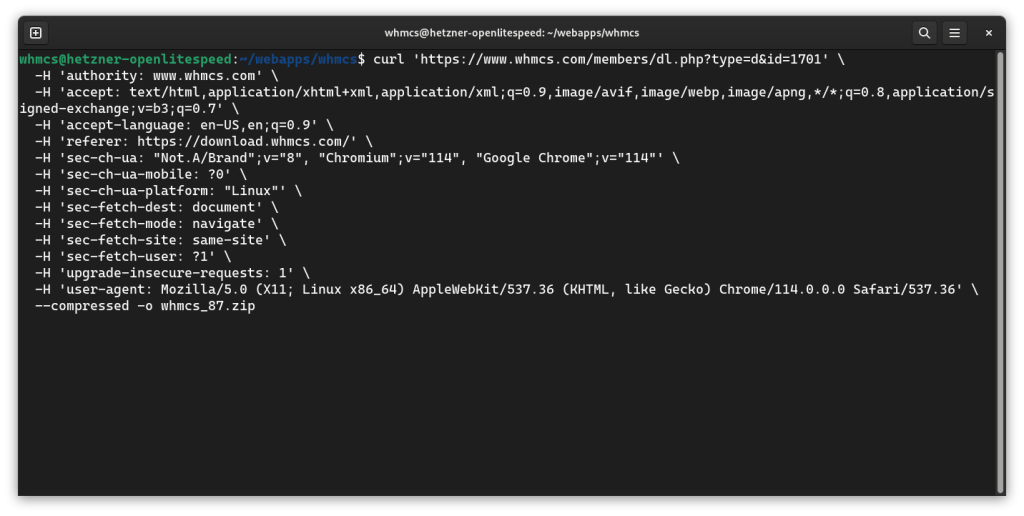
    The above command will download the file to your server and save it as whmcs_87.zip. You can use the ll command to list all the files in the current directory.
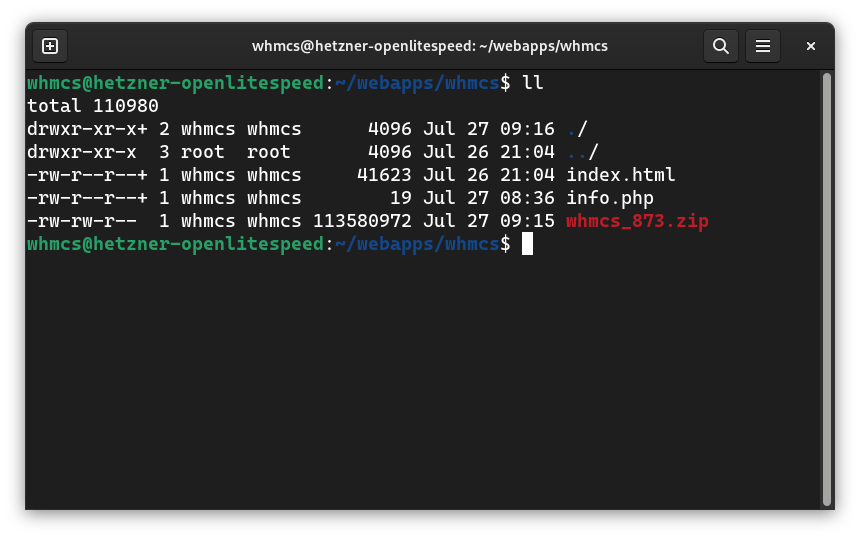
    The above screenshot shows that a new zip file was created on the server. We can extract it using the unzip command. This will create another folder inside our application folder.

    We can quickly copy the necessary files to the root of the application folder, and remove the obsolete files such as the default index.html file and downloaded archive. We can also set permissions for the configuration file.

    You can execute the following commands to perform the above tasks, and terminate the session.

    unzip whmcs_87.zip # Unzip the downloaded file
    cp -r whmcs/* . # Copy installation files to correct directory
    rm -rf whmcs/ index.html whmcs_87.zip # Remove unnecessary files
    mv configuration.php.new configuration.php # Rename file
    chmod 400 configuration.php # Set Permissions
    exit # Close the SSH connection

    After executing the above commands, you can begin the installation process.

    Open your website in a web browser – you’ll see a welcome screen. Click on the install button to start the installation process.
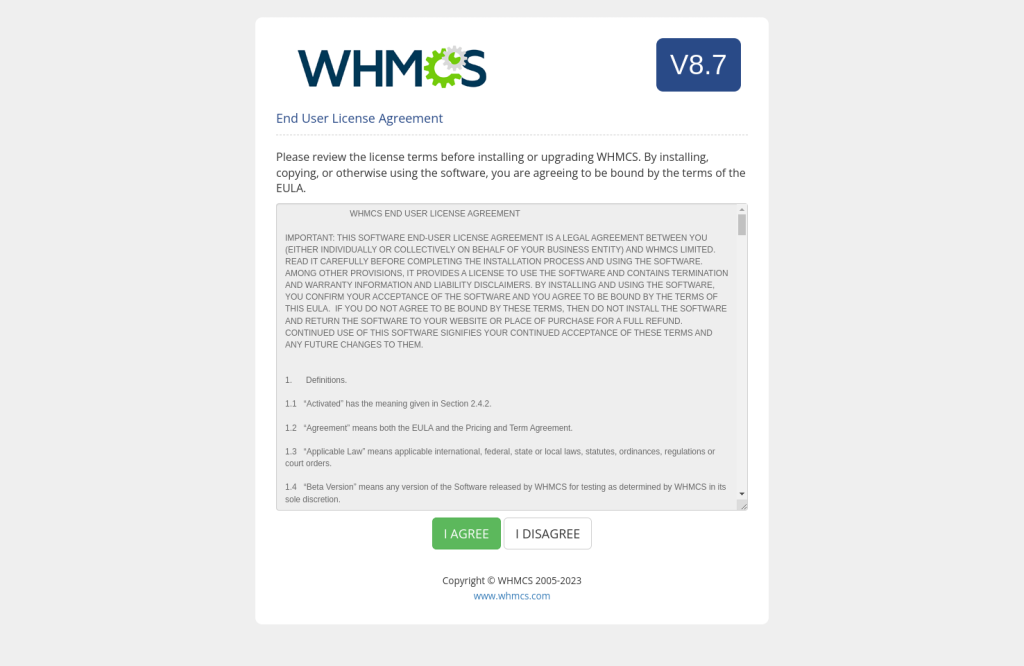
    Note: If you receive an error message asking you to install ionCube loader, you should refer to our blog post: How To Install ionCube Loader (Step-by-Step Tutorial).

    On the next screen, you will need to provide your License key for the WHMCS installation – you can get this from the WHMCS dashboard under Services > My Licenses menu.Next you need to create a database and link it to your web application.
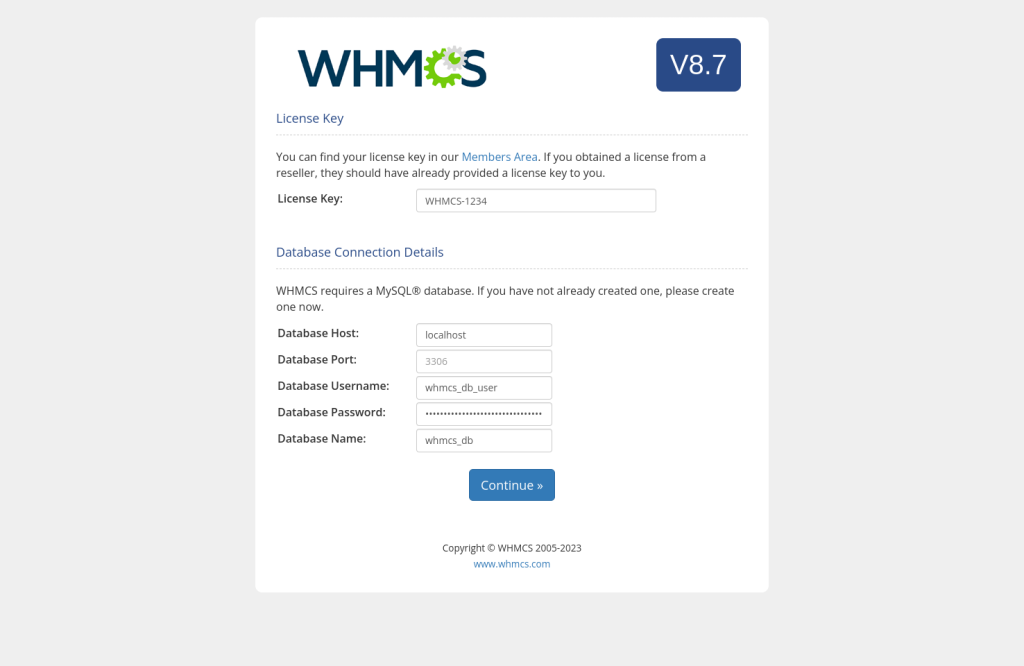
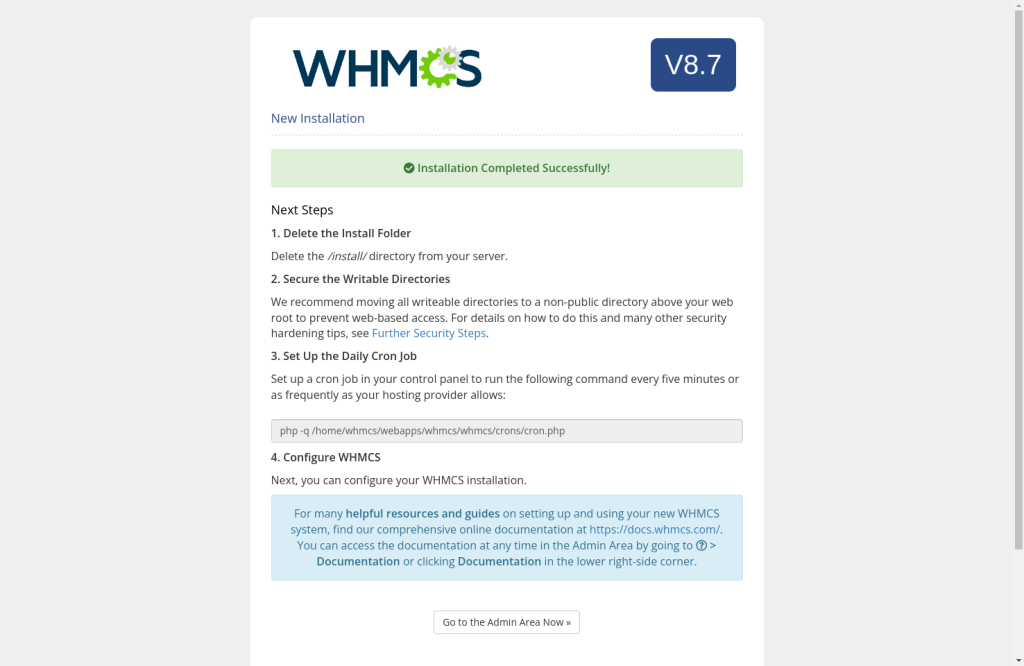
    After the installation is complete, you will see a success message, along with a list of steps to secure your installation. If you were not able to complete the installation successfully, you can refer to the troubleshooting guide by WHMCS.
    Logging in to the Dashboard

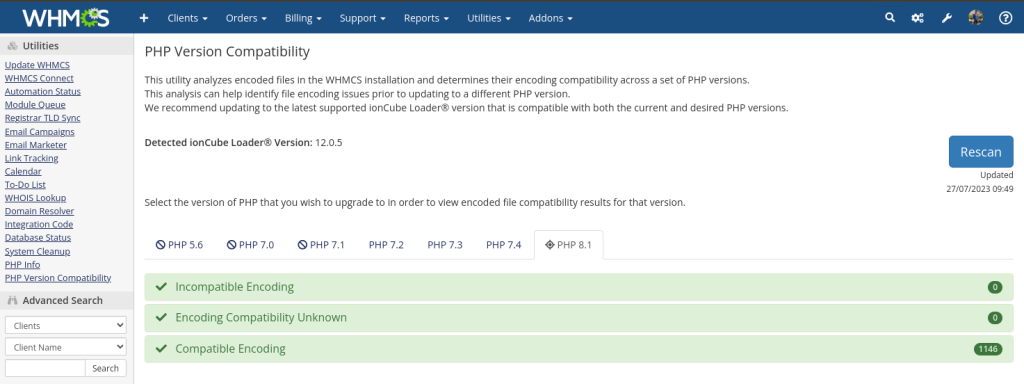
    After the installation is complete, you can log in to your dashboard to check everything is working properly. Go to the “PHP Version Compatibility” section in the left menu to confirm that everything is configured correctly.
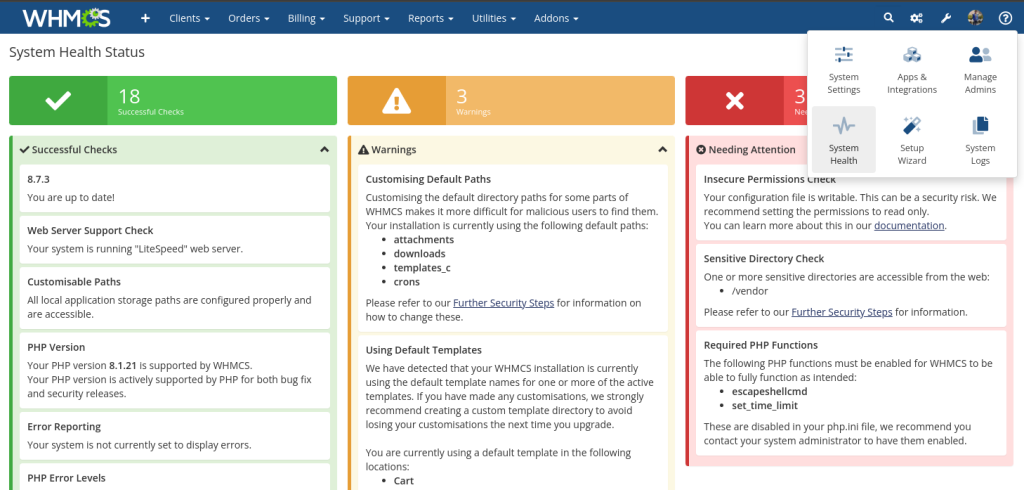
    Next, click on the wrench icon on the top right and go to the “System Health” page to check your installation. Here you will see a list of warnings. We will resolve them one-by-one to secure your WHMCS installation.
    Securing WHMCS Installation

    Deleting the Installation Directory

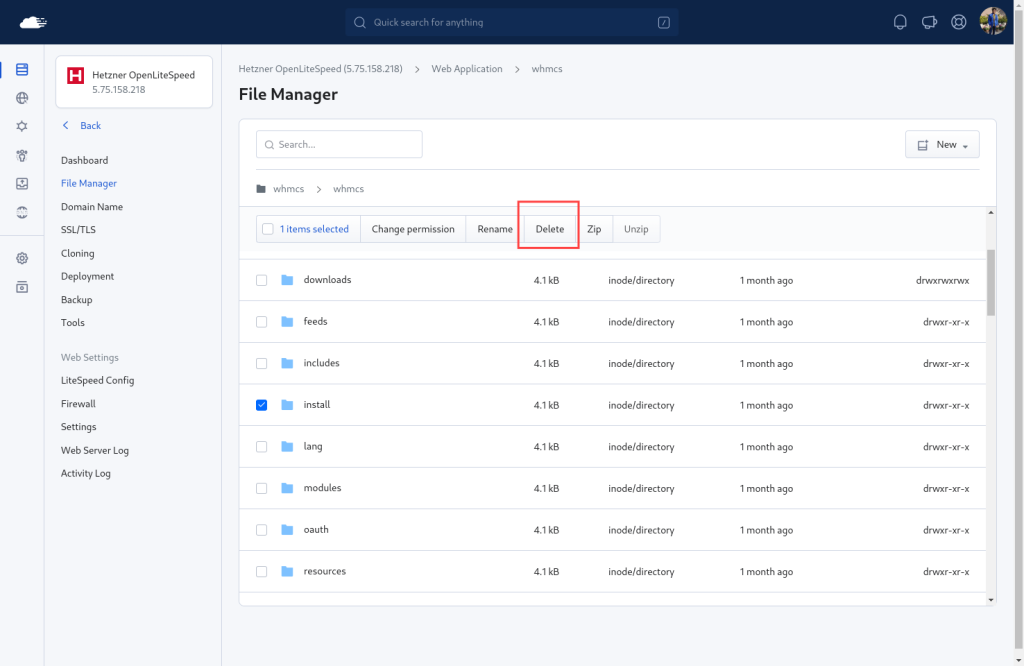
    WHMCS recommends deleting the “install” directory after installation is complete. Go to the RunCloud file manager and click on the checkbox next to the “Install” directory, and then press “Delete”.
    Enable Necessary PHP Functions

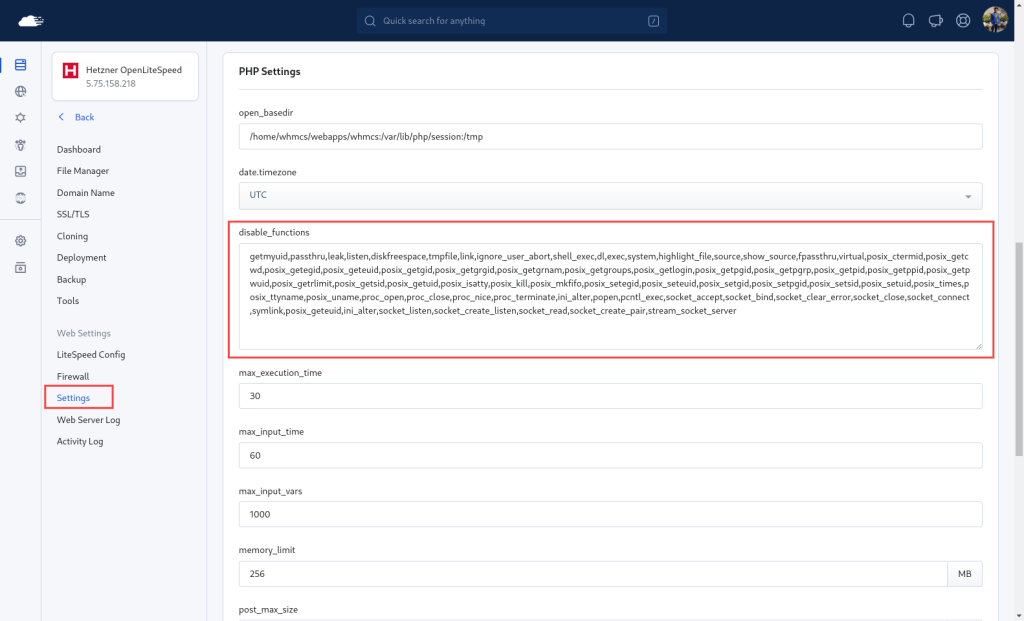
    You might need to enable certain PHP functions that are blocked on RunCloud by default.

    Go to the “Settings” tab of your web application and scroll down to the “PHP settings” section. You can delete the required functions from the “disable_functions” list, and it will be enabled for that particular web application on your server.Don’t forget to click “Update PHP Settings” for the changes to take effect.
    Change Permissions for configuration.php

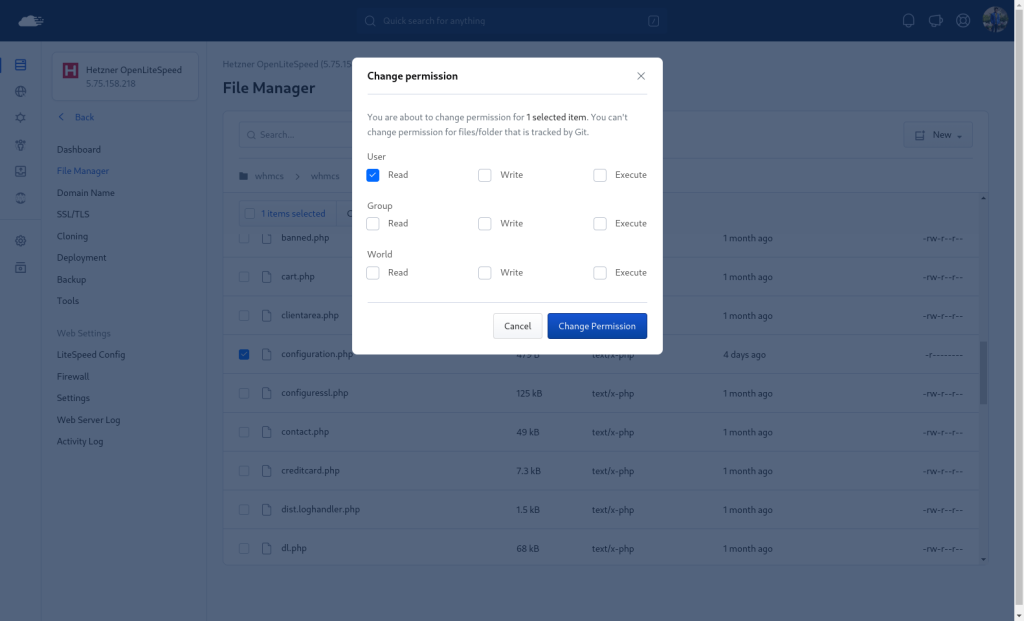
    If you are getting the “Insecure Permissions Check” message, you can update the file permissions using the RunCloud file manager.

    Simply click on the configuration.php file and then set the permissions to read only. Click on the “Change Permissions” to save the changes, and then refresh the WHMCS dashboard to see the changes.Note: If you configured the permissions via the command line earlier during installation, you won’t need to do this again.
    Rename Sensitive Directories

    We can further enhance the security of our WHMCS installation by moving certain sensitive directories to a different location. Although you can move the directories, a quick and easy way to achieve a similar level of security is by just renaming them to something obscure.

    Go to the RunCloud file manager and rename the following folders to anything you like:

    • templates_c
    • cons
    • admin

    We recommend adding a random string of alphanumeric characters either at the beginning or the end, rather than completely renaming it.
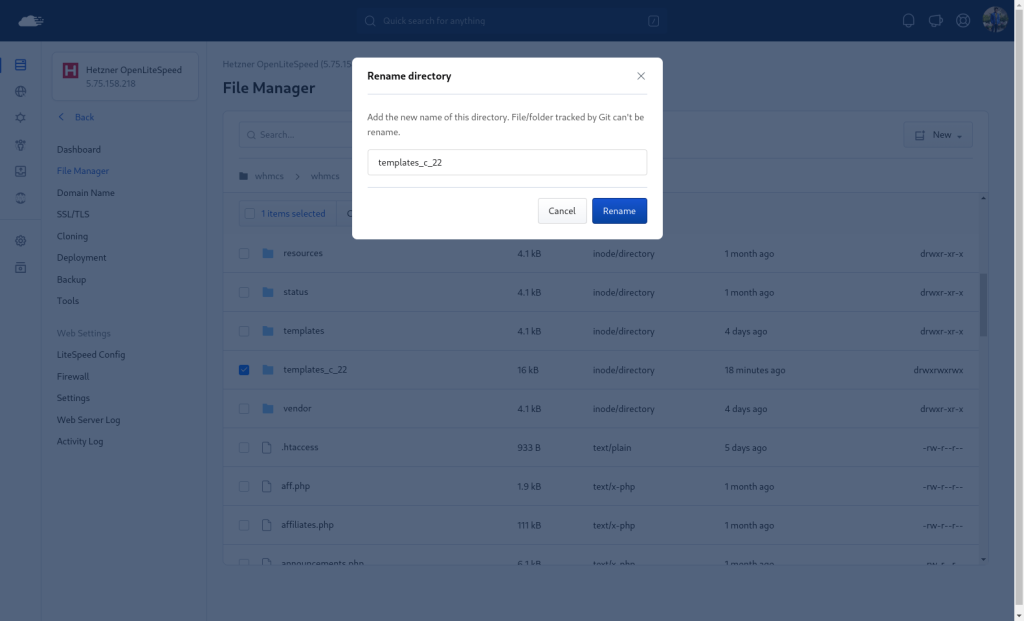
    After renaming the folders, we need to tell WHMCS where the new folders are located. To do this, add the following code snippet at the end of your configuration.php file. Make sure to replace the name of the folder with the name that you chose.

    $templates_compiledir = "/home/whmcs/webapps/whmcs/templates_c_22";
    $crons_dir = "/home/whmcs/webapps/whmcs/3f002g_crons/";
    $customadminpath = "3fw0047_admin";

    In the above example:

    • the templates_c directory was renamed to templates_c_22
    • the crons directory was renamed to 3f002g_crons
    • the admin directory was renamed to 3fw0047_admin

    Note: You don’t need to specify the entire path from the root of the server when changing the custom admin path.

    After editing, your configuration file should look similar to the following example:
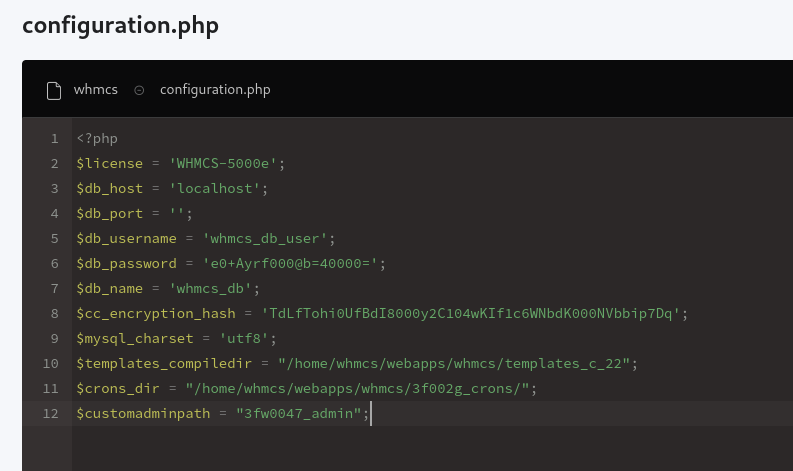
    Save the file and refresh the WHMCS dashboard. Since we changed the admin directory, this will log you out of the dashboard.

    Log in to the dashboard again by navigating to the new admin URL in your browser. For example, if you renamed your admin folder to 3fw0047_admin then your login page will be located at example.com/3fw0047_admin/.

    Setting Up Cron Jobs

    WHMCS needs to execute certain code at regular intervals to function correctly. We need to configure a cron job to handle this.

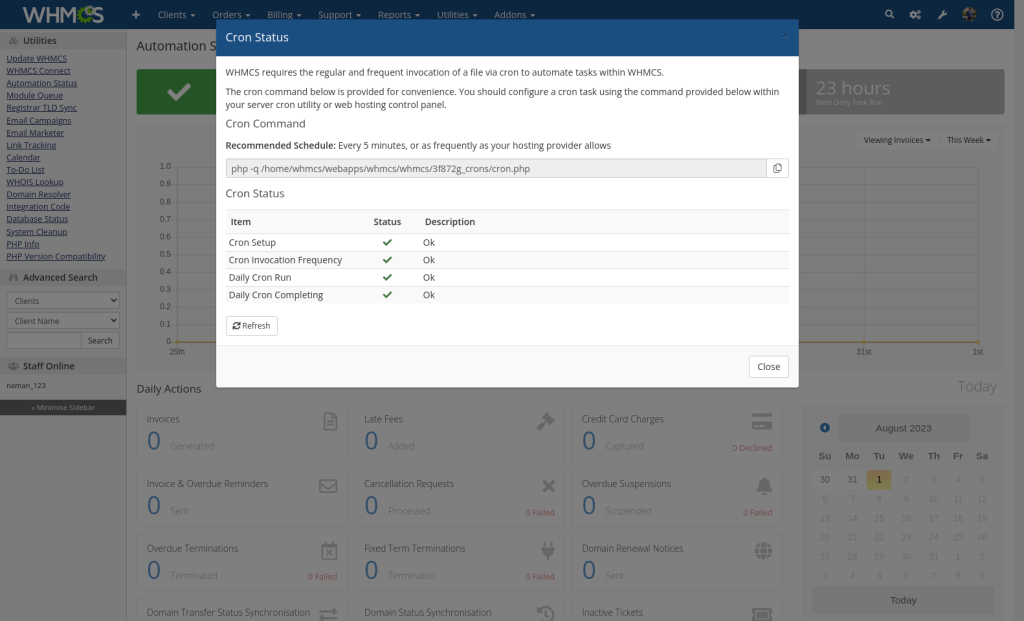
    Click on the “Automation Status” (three cogs) button on the top right of the screen. This will show you the status of your cron jobs. Since we have just configured the server, the status might be okay but it will definitely show an error message after a few hours if you don’t configure the cron job.
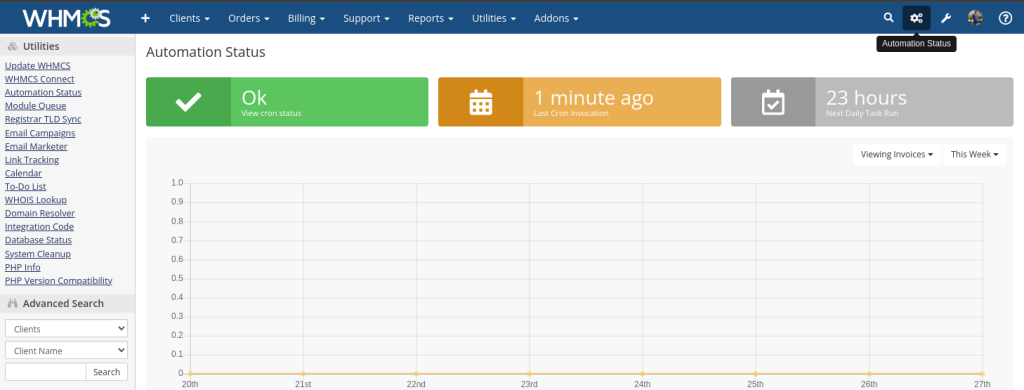
    To configure the cron job, click on the “OK” card in the middle of the screen. This will show a pop-up that displays the status of your cron jobs, along with the command that you need to execute. Copy this command.
    Next, you need to navigate back to the RunCloud dashboard and click on the “Cronjob” button in the left-menu.

    Give your job a descriptive name, and provide the name of the web application owner that you specified while creating the application.

    Select the version of the PHP that your WHMCS installation is using, and then paste the copied command in the text box provided below. Make sure to remove the “php” from the start of the command as we have already specified a custom version of PHP for this.Finally, you need to specify the frequency of the job. From the drop-down menu, select “Use Custom Settings” and then type */5 in the minute text box.
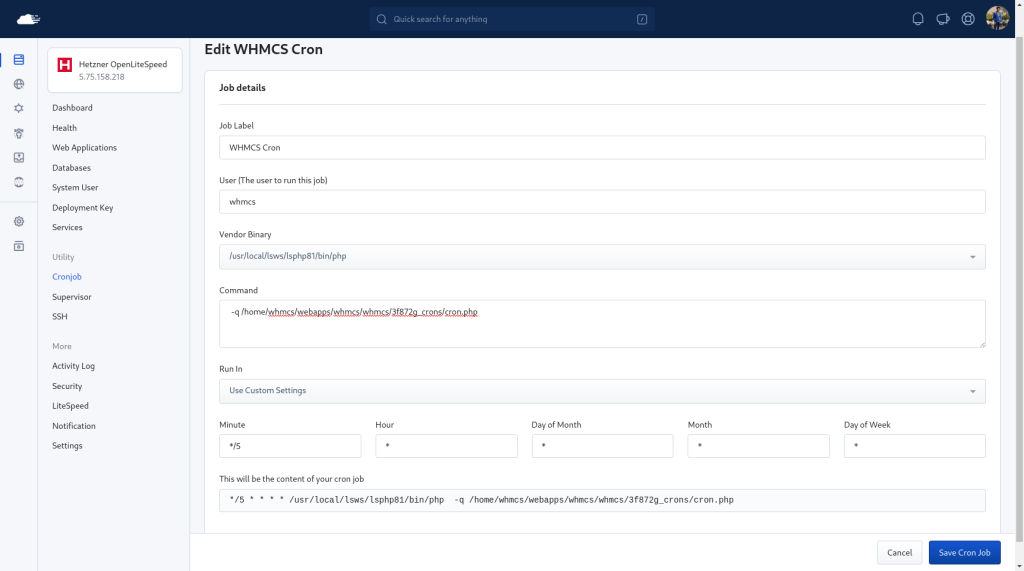
    Click on the “Save Cron Job” to add it to your server. Check the WHMCS dashboard in a couple of hours – if the cron status is still “ok” then you have performed this step successfully.

    Block Access to Sensitive Directories

    WHMCS recommends blocking requests that are served directly from the vendor. We can create a new rule on our server that will deny access to visitors.

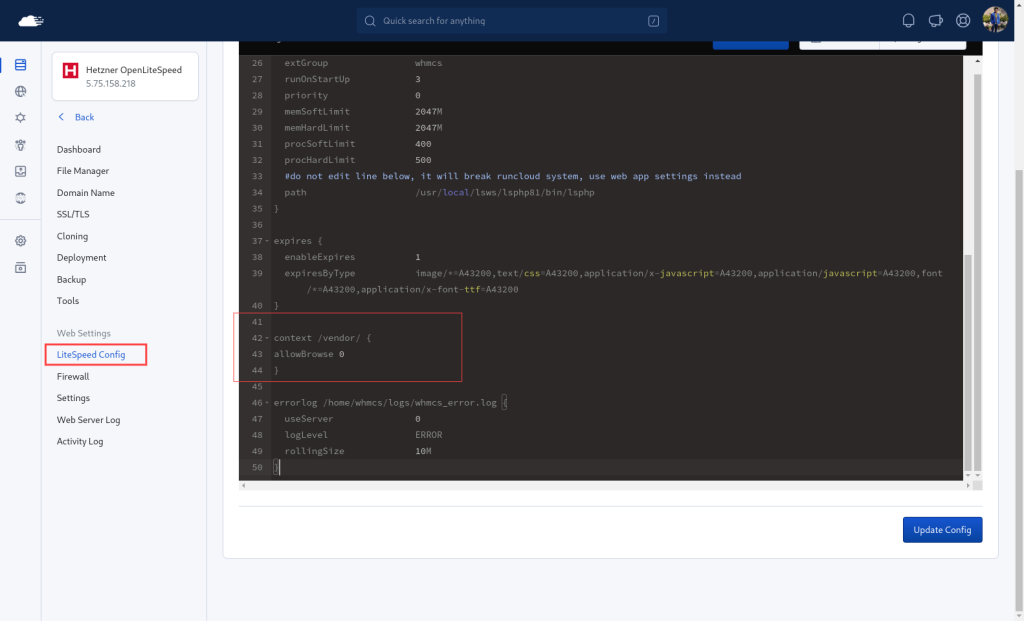
    On LiteSpeed servers, you can do this quickly by adding the following code to your LiteSpeed configuration:

    context /vendor/ {
    allowBrowse 0
    }

    After adding these lines, the configuration file should look something like this:
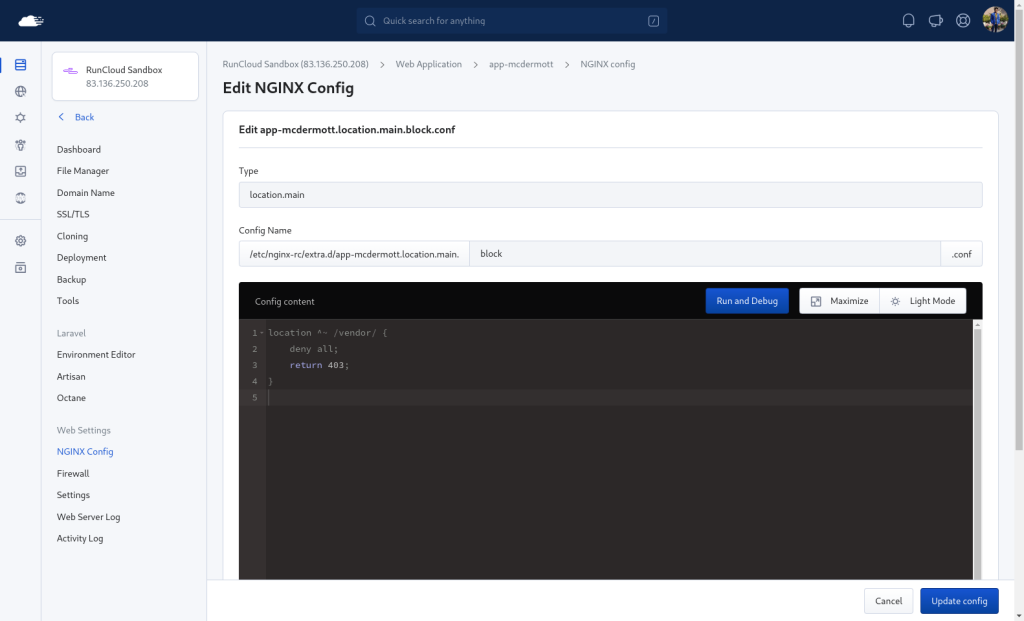
    For Nginx servers, you need to create a custom configuration to do this. Go to the “Nginx Config” page on your RunCloud dashboard, and create a new configuration. Provide a suitable name for the configuration, and then paste the following code:

    location ^~ /vendor/ {
        deny all;
        return 403;
    }

    After adding the configuration, you can press “Run and Debug” to test the configuration. If you get a success message, you can click “Save” to add the configuration to your server.
    Securing The Attachments and Downloads Directory

    You need to secure the attachments and downloads directory. This is where WHMCS will store any files that you upload or attach to your invoices, tickets, products, etc.

    The way you secure these files and directories will depend on how you want to store them.

    You might want to attach a different drive to your server to store this data, or save it on an S3 compatible storage service, such as AWS S3, DigitalOcean Spaces, etc. You can also use the default location inside your web app root directory, but you need to make sure it is not accessible from the web.

    We recommend referring to the official WHMCS documentation for this step, as it will guide you through the different options and scenarios.

    After Action Report

    WHMCS is a powerful and popular web hosting automation platform that can help you manage your clients, billing, support, domains, and more. However, it is not without its challenges and limitations. You might encounter issues with maintaining or upgrading your server.

    That’s why you need a reliable and efficient web hosting control panel to run your WHMCS web app.

    RunCloud is a cloud-based server management platform that can help you deploy, configure, optimize, and secure your web app on any cloud server. You can choose from various web application stacks and enjoy features such as SSL certificates, firewall, backup, cron jobs, SSH keys, and more.

    Working with RunCloud is easy and intuitive. You can create and manage your web app from a user-friendly dashboard, or use the API and CLI tools for more advanced tasks.

    You can also monitor your server’s health and performance with real-time graphs and alerts.

    RunCloud also provides excellent customer support and documentation to help you with any questions or issues.

    By using RunCloud to run your WHMCS web app, or any other web hosting automation platform, you can save time and improve your productivity. You can focus on growing your business and providing value to your customers, while RunCloud takes care of the technical aspects of your web app.

    RunCloud is the ultimate partner for web hosting automation – get started with RunCloud today!

  • How To Install ionCube Loader (Step-by-Step Tutorial)

    How To Install ionCube Loader (Step-by-Step Tutorial)

    Did you know that a large number of PHP applications are encoded with ionCube?

    If you want to use any of these applications on your web server, you need to install ionCube Loader – a PHP extension that allows you to run ionCube-encoded PHP files. But how do you install ionCube Loader on your web server? Is it easy or complicated? Do you need any technical skills or experience?

    In this article, we will show you how to install ionCube Loader in less than 10 minutes with our step-by-step tutorial. You will learn:

    • How to download the right Loader package
    • How to extract and copy the Loader file
    • How to edit the php.ini file
    • How to restart your web server.

    By the end of this article, you will be able to run any ionCube-encoded PHP application on your web server without any hassle. Sounds good? Then let’s get started.

    What is ionCube Loader?

    The ionCube Loader is a PHP extension that allows you to run ionCube-encoded PHP files on your web server. ionCube-encoded PHP files are files that have been protected with the ionCube PHP Encoder – a widely used tool that allows developers to encrypt their PHP code and add security features such as license management, malware protection, and code optimization.

    The loader is supplied as a PHP extension module for Windows, Linux, and macOS, and can be installed into a PHP installation. It is also freely redistributable. By installing ionCube Loader on your web server, you can benefit from the following advantages:

    • You can use third-party PHP applications that are encoded with ionCube, such as WordPress plugins, e-commerce platforms, or CMS systems.
    • You can protect your own PHP code from being stolen, modified, or reverse engineered by encoding it with ionCube PHP Encoder and running it with ionCube Loader.
    • You can improve the performance and reliability of your PHP code by using the ionCube PHP Encoder’s features such as code compression, error reporting, and vulnerability protection.

    If you are using PHP 7.4 on the OpenLiteSpeed server, ioncube Loader should be enabled by default. You can check it using the instructions provided at the end of this article. If it is not installed, you can quickly install it by running apt install lsphp74-ioncube for PHP 7.4 and apt install lsphp81-ioncube for PHP 8.1.

    You should note that ionCube does not support PHP 8.0 and ionCube Loader for PHP 8.2 is still in beta development. Since PHP 7 has reached the end of life, we will only cover the instructions to install the ionCube loader for PHP 8.1.

    Installing ionCube Loader

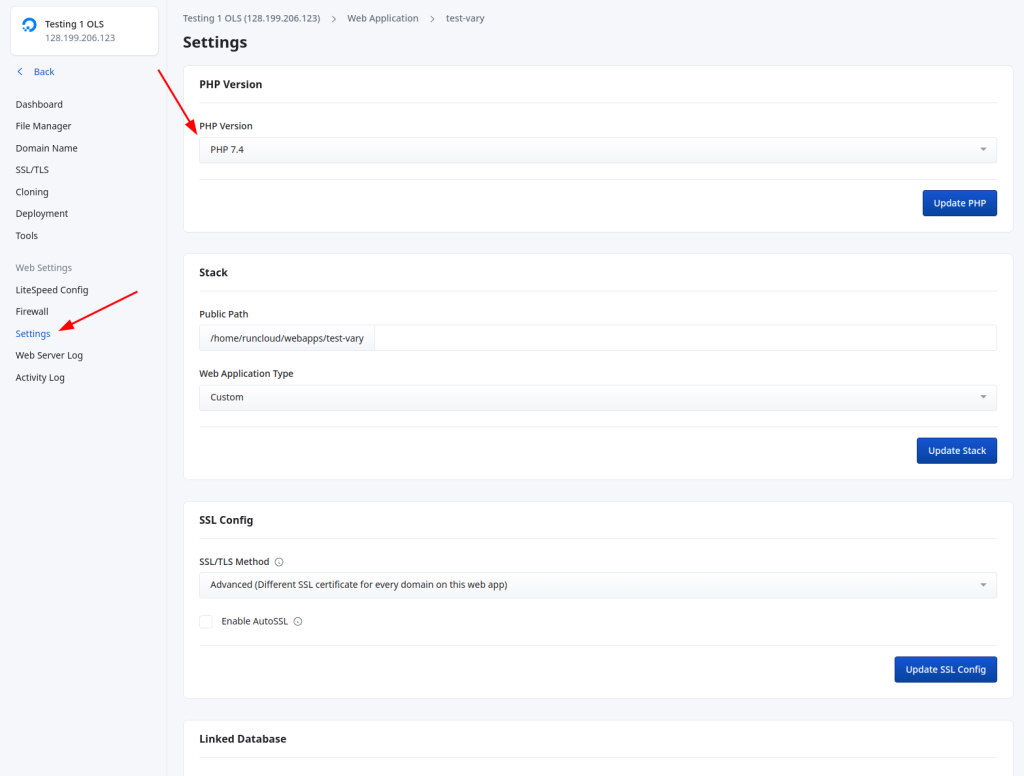
    Before you begin installing the ionCube Loader you’ll need to know which PHP version your website is running on. At RunCloud, we offer multiple versions of PHP, from 7.0 right up to the latest 8.2 release. If you’re not sure which PHP version your website is on, log in to your dashboard, and head over to ‘Settings’ on the left:

    installing ioncube loader

    So, as an example, if you find that your website is currently running PHP version 7.4, then you’ll need to make sure you install the 7.4 version of ionCube.

    On Containerized Servers

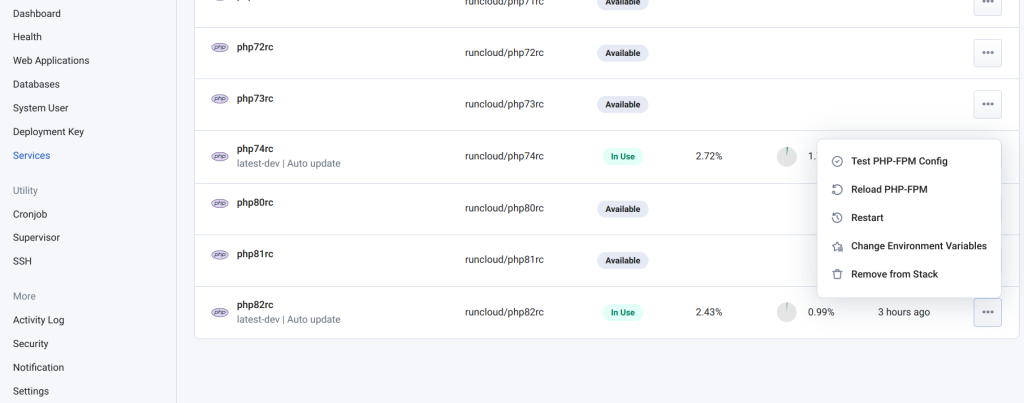
    If you are running a Containerized server on RunCloud, you can quickly install ionCube Loader with a few clicks. Go to the “Services” tab of your server and scroll down to the PHP images. Here you can see the PHP images that are available for your server.

    You need to install ionCube Loader on each PHP version separately. If an image is already “in use”, click on the “…” next to it and select “Change Environment Variables“. If the image is not being used on your server, you can click on “Add to stack“.

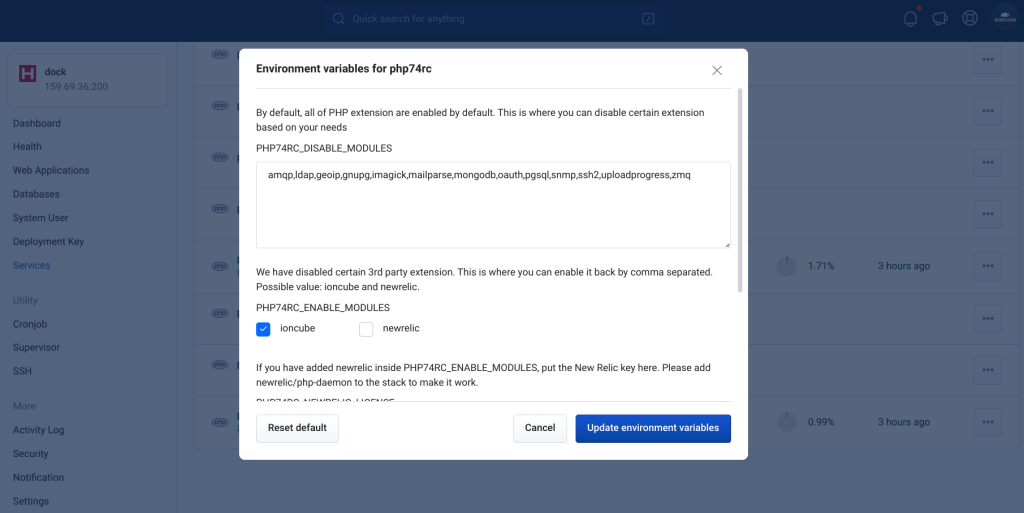
    This will open a pop-up window on your screen. Under the third party extensions menu, make sure to Check the box next to ionCube.

    Next, click on “Update Environment Variables” or “Add to Stack“, depending upon your setup.

    You need to perform the above step for each PHP version that needs ionCube Loader.

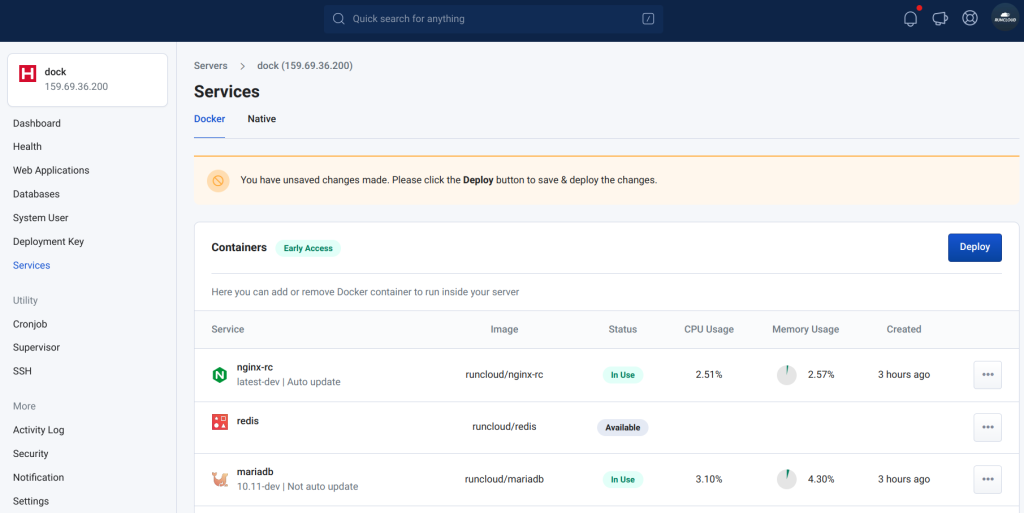
    After making the necessary changes, scroll back to the top of the services page and click on “Deploy” to save the changes. This will create new container images on your server, and all the existing (as well as new) applications on your server will be able to use the ionCube Loader.

    On OpenLiteSpeed Servers

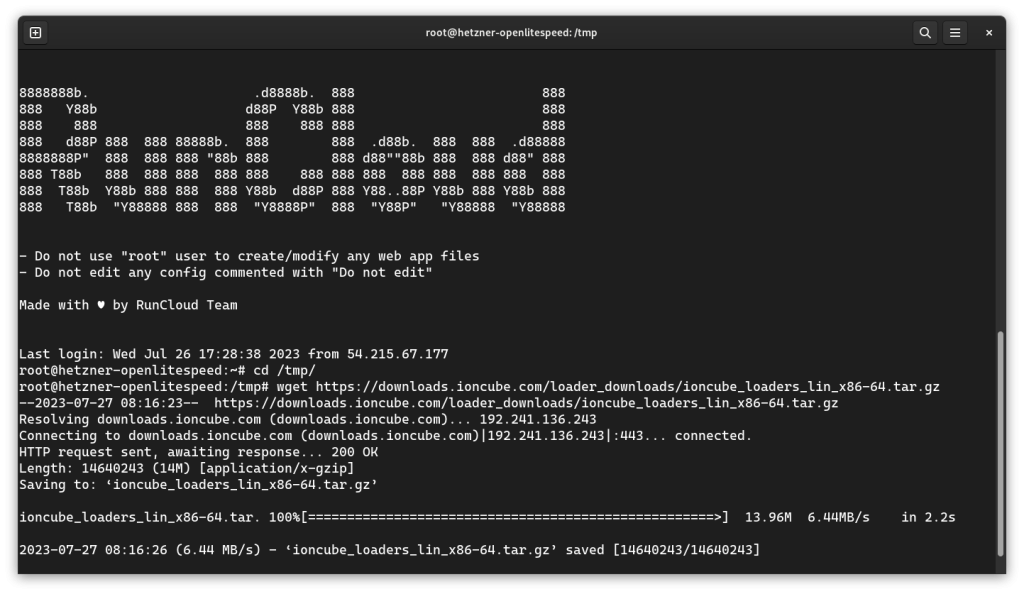
    If you are using OpenLiteSpeed servers, you will need to log in to your server via SSH. After logging in to your server, you need to download the ionCube Loader archive from the official website, and extract it. To do this, you can run the following commands:

    cd /tmp/
    wget https://downloads.ioncube.com/loader_downloads/ioncube_loaders_lin_x86-64.tar.gz
    tar -zxvf ioncube_loaders_lin_x86-64.tar.gz

    The previous command should show an output similar to the above screenshot. After extracting the archive, it will be available in the /tmp directory. However, we need to install it in our PHP environment.

    In this section, we have provided the instructions to install ionCube Loader on PHP 8.1, but the steps are similar for any other version of PHP.

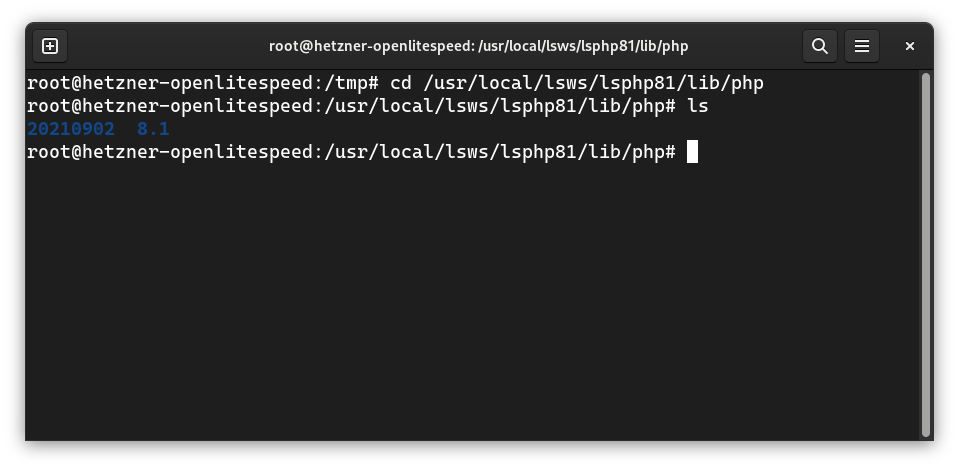
    To install ionCube, you need to copy the relevant shared library file in the PHP’s directory. Change into the installation directory of PHP 8.1 using the following command:

    cd /usr/local/lsws/lsphp81/lib/php
    ls

    After navigating to the correct directory, you can browse its contents. In the above screenshot, we can see it has two folders, one named 20210902 and the other is named 8.1.

    Execute the following commands to copy the shared library file of ionCube Loader for PHP 8.1 into the folder named 20210902. These commands will also create an entry in the mods-available directory to load the ionCube Loader next time PHP is reloaded.

    cp /tmp/ioncube/ioncube_loader_lin_8.1.so 20210902/
    echo "zend_extension=ioncube_loader_lin_8.1.so" > /usr/local/lsws/lsphp81/etc/php/8.1/mods-available/ioncube.ini

    If you want to install the loader for multiple PHP versions, you need to perform the above step for each version. Finally, you need to restart the PHP environments for the changes to take effect – run the following commands to do this:

    # For OpenLiteSpeed servers
    systemctl restart lsws-rc
    killall lsphp

    On Nginx Servers

    Similar for OpenLiteSpeed servers, to install ionCube Loader on Nginx servers, you need to log in to your web server as root, and run the following commands to download and extract the archive:

    cd /tmp/
    wget https://downloads.ioncube.com/loader_downloads/ioncube_loaders_lin_x86-64.tar.gz
    tar -zxvf ioncube_loaders_lin_x86-64.tar.gz

    Once you’ve extracted the archive, you’re ready to install the ionCube Loader. Execute the following commands to copy the shared library files in the correct location, update the relevant configuration, and to restart the PHP-fpm:

    (Again, we have only provided the commands for PHP 8.1 but the process is similar for all versions of PHP. )

    cp ioncube/ioncube_loader_lin_8.1.so /RunCloud/Packages/php81rc/lib/php/extensions/no-debug-non-zts-20210902
    echo "zend_extension=ioncube_loader_lin_8.1.so" > /etc/php81rc/conf.d/ioncube.ini
    systemctl restart php81rc-fpm

    Checking ionCube Installation

    Once you’ve installed ionCube, you may want to verify that it’s installed properly and that everything is running correctly. To do this you simply need to run one line of code, which will vary depending on your PHP version, as shown below:

    For OpenLiteSpeed

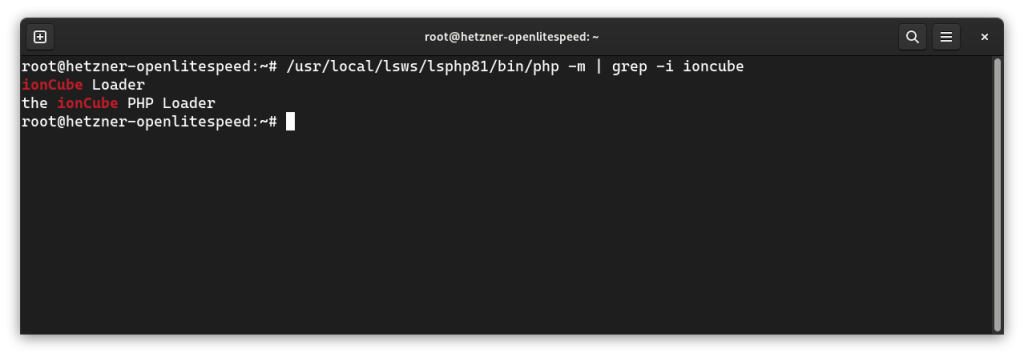
    /usr/local/lsws/lsphp81/bin/php -m | grep -i ioncube

    For Nginx

    /RunCloud/Packages/php81rc/bin/php -m | grep -i ioncube

    The above command will use the specified version of PHP to list out all the installed modules and display all the lines that contain the word ionCube. If your installation was successful, you will see the following output:

    For All PHP Versions and Server Stacks

    If you don’t want to check the installed modules via the command line, you can also do it using the web interface. This method will work on all the PHP versions, regardless of your server stack.

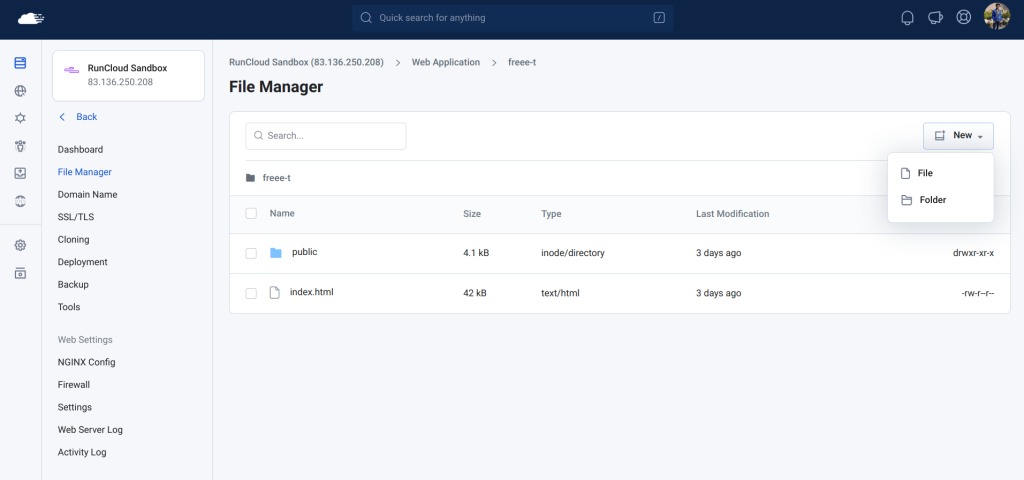
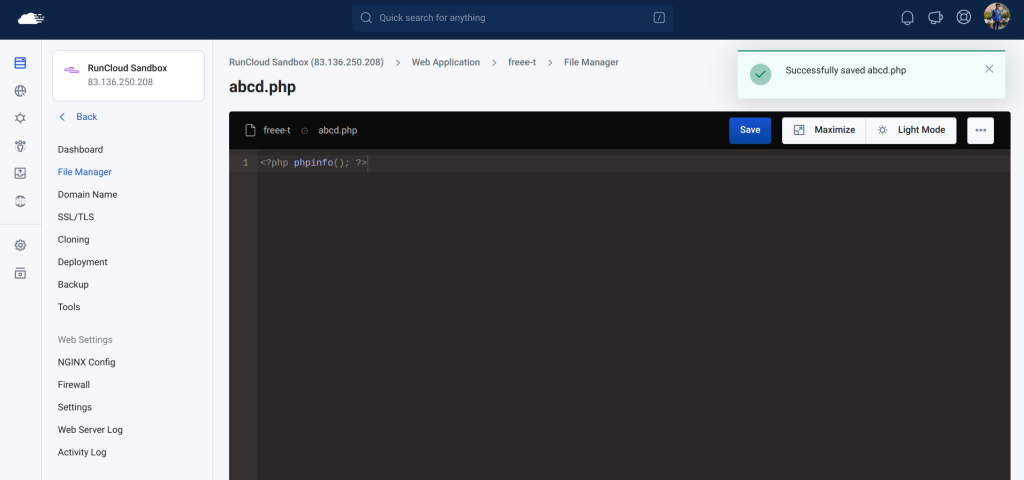
    After installing the module, make sure you have restarted your web server. Next, go to your RunCloud dashboard and select the application where you want to use ionCube Loader. Click on the “File Manager” tab on the left, and then create a new PHP file. You can name it anything – for example abcd.php.

    Next, click on the newly created file, which will open up a text editor in a new window. You need to edit this file by pasting in the following code, and saving it:

    <?php phpinfo(); ?>

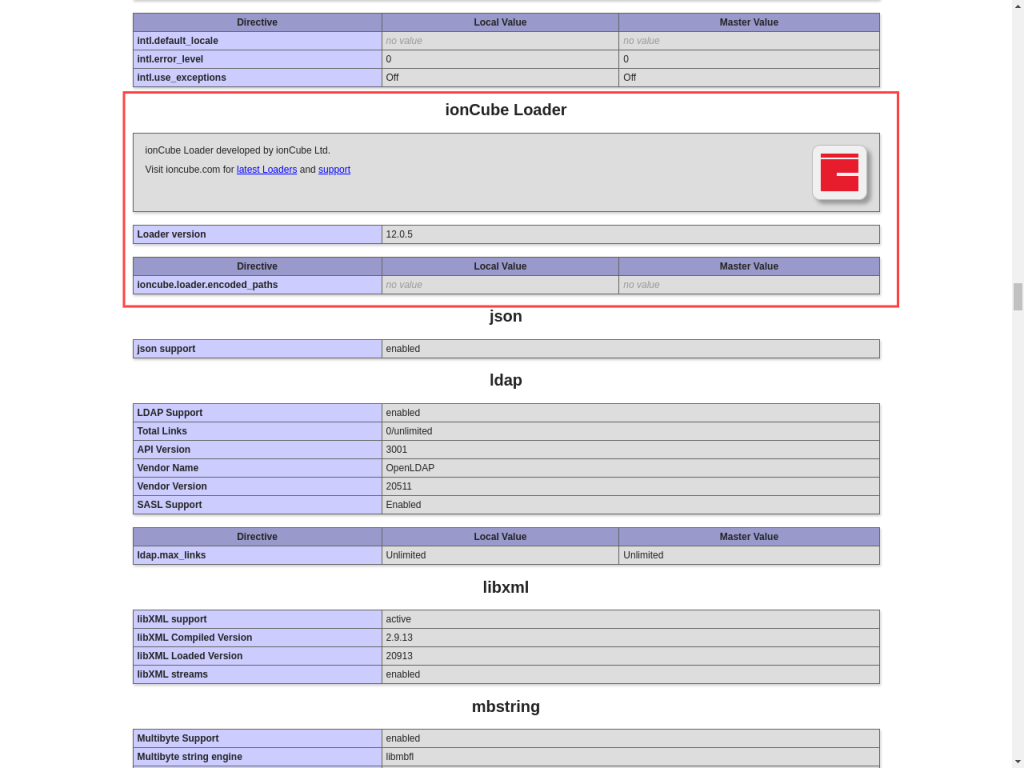
    Open this file in your browser. For example, if the URL of your site is www.example.com, you need to visit www.example.com/abcd.php to open it. You should see something like the screenshot below. Scroll down to find the version of ionCube Loader.

    In the above screenshot, we can see that the ionCube Loader is being displayed, therefore it was installed correctly. If the page fails to load or the entry is missing, then it was not installed correctly.

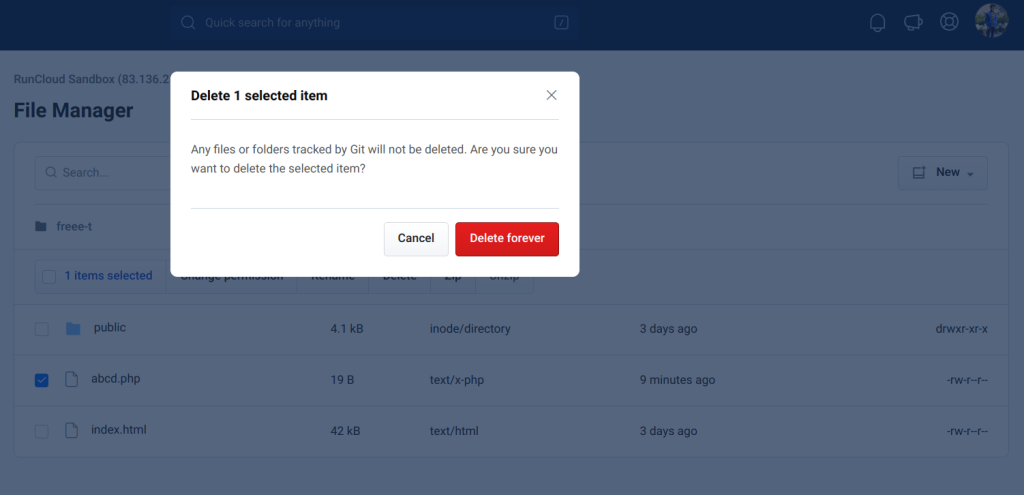
    After checking the installation, we strongly recommend deleting this configuration file. It reveals sensitive information about your server to the internet that can be used by hackers to target you.

    Backwards Compatibility And Limitations

    If you’re upgrading your version of PHP, it may not always be necessary to remove ionCube and install a newer version.

    Encoded files can, in general, run on versions of PHP equal to or greater than the source language of the Encoder used to produce them.

    So a file produced by the Encoder for PHP 7.2 can be run by the Loaders for PHP 7.2, 7.3, and 7.4, but not 7.1. This means that the Loaders offer good backwards compatibility. However, there are the following limitations:

    • The Loader for PHP 8.1 can only run files produced by the version 12 Encoder for PHP 8.1.
    • The Loaders for PHP 7.1 through 7.4 can only run files produced by the Encoders for PHP 7.
    • The Loader for PHP 7.0 can only run files produced by the Encoder for PHP 5.6.

    Conclusion

    ionCube’s tools are hugely valuable in both protecting and optimizing your PHP code. By encrypting and obfuscating your code, you are guarding it from prying eyes, and protecting your intellectual property from being used without permission, or in any way you don’t approve of.

    By using the ionCube tools your PHP code will no longer be able to be reverse engineered, copied, or stolen. But as well as this, it will also help speed up your code.

    It achieves this by compressing the code before sending it back to the clients requesting that particular resource. This compression results in faster load times for end users who are trying to view or interact with your application from their browser, making for a more enjoyable user experiences overall.

  • Everything You Need To Know About WordPress Object Caching

    Everything You Need To Know About WordPress Object Caching

    Tired of slow page load times and constant frustration with your WordPress site’s performance? The solution might just be something called ‘Object Caching’.

    In this article we’ll dive into exactly what Object Caching is and how it works. Most importantly, we’ll guide you through the steps you’ll need to go through to start using Object Caching to significantly improve the speed and efficiency of your website.

    Say ‘goodbye’ to sluggish load times, and ‘hello’ to a lightning-fast, smooth user experience.

    Let’s get started!

    What is Caching?

    Caching is a technique used to store frequently accessed information in a more accessible and responsive location. If processing a website request takes a large amount of time then it can degrade the user’s experience, potentially impacting your sales and conversions on a regular basis.

    Caching can help solve this problem by storing the frequently required data in a fast-to-access storage location. Any data that is accessed frequently and can be stored for a while is a good candidate for caching.

    Caching is often associated with RAM, but it can be used with any storage media. For example, if downloading information from a server over the network takes ten seconds, you can save time by caching the file on your hard disk.

    If reading the data from a hard disk takes too long, you can speed it up by caching the file in your RAM, which is many orders of magnitude faster than a hard disk.

    Taking this one step further, you can even cache some vital information directly in the cache memory of your CPU if the delay caused by reading the data from RAM is unacceptable.

    An infographic depicting the hierarchy of computer memory.

    Although it is useful, caching is not a silver bullet. Cached data becomes outdated after a period of time, and this can cause unexpected glitches in the application. To ensure proper functioning of your application it will be necessary to constantly replace the old copy of data with a fresh copy at regular intervals.

    One more thing to keep in mind is that as we shift towards faster storage media, the capacity decreases drastically along with the exponential increase in the cost. For example, cloud storage costs a few dollars a month for hundreds of GBs of storage. Modern SSDs are getting cheaper, but still cost hundreds of dollars for a single terabyte of storage. RAM is much faster than an SSD, but most modern computers only have about 16GB of RAM. As a surprise to no one, the cache memory size of a CPU is even lower. The Intel Core i9-13900 processor – the latest offering from Intel – still only offers 36MB of cache memory.

    Overview of Different Types of Caching

    • Server caching: When the server processing the requests caches the queries, then it is called server caching. In WordPress, there are two main types of server caching techniques:

      • Object Caching: In this, WordPress stores the results of frequent database queries and other API requests. It is called Object Caching because the result of the query is often an object (such as an item of data from a database, a row from a table, or a document).

        If you want to display the result of a complex database query, such as the number of 5 star reviews on a particular product, then Object Caching is the right choice for you as the number of reviews are likely to remain the same when a page is refreshed.

      • Page caching: This type of caching involves generating complete static pages and storing them. When a server receives a request, it serves this statically generated page instead of rendering a fresh copy of it.

        If you are serving pages that mostly remain the same, but are heavily requested by your users, then you should use this. The homepage or the pricing page of your site are unlikely to change often and are a good fit for this type of caching.

    • CDN caching: This is a good option for caching static content, such as images, fonts, CSS, JS libraries, and HTML pages, on a content delivery network (CDN). If your site uses a CDN, then all of your customers’ requests will be routed through a CDN. If the CDN has a cached copy then it serves that, otherwise it asks your server for a fresh copy, serves that, and also stores it for future use. When the cached copy gets too old, it is automatically deleted and the CDN asks for a fresh copy.

      Although this might seem like extra effort, this drastically reduces the number of requests that reach your server, and it also serves content faster to your visitors.

    • Browser caching: This is somewhat similar to CDN caching, but it happens in the user’s browser. If a user is visiting your site for the first time, they won’t notice a difference. However, returning users would already have a cached copy of your data and won’t need to make network requests; this can drastically reduce the request time.

      Sometimes, even first time users will be able to take advantage of browser caching. For example, if you use third party assets such as Google Fonts or Google Analytics on your site, and the visitor has previously visited a different site that also uses these same assets, then the browser will already have a cached copy of them, and can use those.

    What is Object Caching?

    In WordPress, Object Caching is the technique of storing the results of complex database queries in memory. These saved results are then reused when executing subsequent requests and, since the results are already computed, it takes less time to serve those requests.

    Object Caching reduces the load on the database and improves the overall performance and responsiveness of a WordPress site. As a result, you can serve more customers without needing to scale up the infrastructure, helping to save on server costs (and significantly improve the user experience).

    When Do You Need Object Caching?

    If you already have a CDN configured on your site then you might be thinking that you don’t need to use Object Caching. While a CDN does help in reducing the server load, it can’t replace Object Caching – no one particular caching solution can solve 100% of your problems.

    A way to think about caching is as a series of nested filters, where each filter catches smaller and smaller things at each level. As data passes through each level of caching, it is checked against increasingly specific and targeted rules until only the most relevant and frequently accessed data remains in the cache.

    Any WordPress site that receives a high volume of traffic, has complex queries, or requires fast and reliable performance, can benefit from Object Caching. Here are some scenarios where Object Caching can be especially beneficial:

    • High-traffic websites: Publishers and news sites that receive a high volume of traffic can benefit from Object Caching to improve page load times and reduce server load. Object Caching can help reduce the number of database queries required to load a page, which can make a big difference when dealing with large amounts of traffic.
    • eCommerce sites: Online stores that use WordPress plugins such as WooCommerce, Easy Digital Downloads, or NorthCommerce can benefit from Object Caching to improve the performance of their product pages, shopping cart, and checkout pages.
    • Course websites: WordPress sites that use a learning management system (LMS) such as LifterLMS, LearnDash, or SenseiLMS can benefit from Object Caching to improve the performance of their course pages, quizzes, and other interactive features. 
    • WordPress multisite networks: Websites that use WordPress multisite networks can benefit from Object Caching and improve the performance of their entire network. Object Caching can help reduce the number of database queries required to load pages across the network, which can improve the overall speed and responsiveness of the sites.

    What Are the Benefits of Using Object Caching?

    Object Caching can offer several benefits for WordPress sites:

    • Improved Performance: Enabling Object Caching can significantly improve the performance of WordPress sites by reducing the amount of time it takes to serve a request. By caching commonly accessed data, such as queries or API calls, Object Caching can eliminate the need to repeatedly fetch the same data from the database. This can improve the speed and responsiveness of the site, resulting in a better user experience.
    • Better Lighthouse Scores: Object Caching can directly impact your Lighthouse Scores. A properly implemented caching strategy will reduce Time To First Byte (TTFB) and First Contentful Paint (FCP) – these metrics are important factors in determining Lighthouse scores. Having a good Lighthouse score is essential for a snappy user experience – and it also improves SEO.
    • Reduced Server Costs: Object Caching can also help to reduce the load on the server. Caching the response of commonly requested database queries leads to a reduction in the number of requests sent to the database. This reduces the load on the server, and ultimately reduces the amount of resources needed to serve the site. This can result in lower hosting costs and better scalability for WordPress sites.

    What is WP_Object_Cache?

    The WordPress engine provides a built-in Object Caching functionality that can be accessed via the WP_Object_Cache class, (a ‘class’ being a blueprint for a way data should be structured). This class acts as a layer between the programmer and the underlying architecture where data is processed. It’s not recommended to use the class directly – you can use pre-defined functions to set, clear, add, and update cache values.

    Object Caching is typically achieved through the use of an external caching solution, such as Redis or Memcached, which acts as a fast, in-memory data store for cached objects. When used correctly, Object Caching can result in significant improvements in page load times, increased website stability, and a better user experience.

    What Are Redis And Memcached?

    Redis and Memcached are open-source database technologies. These are key value store databases which can each be thought of as a dictionary. In other databases, such as MySQL or MongoDB, you can store multiple values in one record, but in a key value database you can only store one value in each record.

    For example, an SQL database can be thought of as a table that contains all the test scores of a student. The student might have scored well in the last exam, or they could have been absent. All this information can be stored in the table, the design of which can be modified to add or remove information.

    SQL table:

    In the case of a key-value database such as Redis there is only one field, and it cannot be modified. This is best visualized by imagining a dictionary which can only hold one definition for one word, and nothing else.

    In this example, a key value store saves the value of a complex query which was run on above database:

    No_of_students_absent2
    Avg_marks_of_Steve24.3

    Redis stores the data in RAM for much faster access compared with storing it on the hard disk. This simple architecture makes Redis, and other similar databases, ideal for storing cached data.

    Both Redis and Memcached are designed to be used with a variety of programming languages and platforms. The key difference between the two is that Redis supports more advanced data structures, such as lists and hashes, while Memcached is simpler and focuses on the efficient storage and retrieval of key-value pairs.

    Object Cache Pro – A Better Caching Solution

    Object Cache Pro is a high-performance Object Caching plugin designed to meet the needs of mission-critical businesses. It offers a combination of performance, scalability, and reliability, which are essential for any high-traffic website. The development team uses test-driven development methodology with over 1,000 unit tests to ensure every update is safe and offers warnings about plugins that can lead to data loss.

    It’s designed to provide a smooth user experience, with tools to help identify issues, built-in query monitoring, and logging. Additionally, it’s fully customizable and works even when Redis is not on the same machine, making it ideal for horizontally scaled environments of two servers or more.

    How To Use Object Caching With WordPress

    If you’re already a RunCloud customer then getting started with Object Caching is very straightforward, as our RunCloud Hub enables you to turn on caching with a few simple clicks.

    With RunCloud Hub you don’t need the expertise of a server administrator to reap the benefits of caching – you can do so by simply installing the RunCloud Hub plugin and enabling the caching option. This installs all of the dependencies automatically, and configures them on your WordPress website.

    For a more detailed guide on configuring caching, refer to our other articles:

    If you’re not using RunCloud yet, you can still use Object Caching in WordPress by installing either the Redis Object Cache or Memcached Object Cache plugin.

    Both of these are popular choices for Object Caching in WordPress, and the decision of which one to use depends on the server environment. Redis Object Cache is known to work well on servers with high CPU usage, while Memcached Object Cache is better suited for servers with limited memory.

    Although these plugins provide a caching functionality for WordPress, they do require you to have access to a caching server. If you are using a shared hosting service you may need to contact your hosting provider for this. If that’s the case, then you should consider switching to RunCloud which makes it easy to manage your servers – and allows you to set up caching with only a few clicks. Sign up for managed hosting with RunCloud today!
    After Action Report – Get All The Benefits of Object Caching When You Deploy With RunCloud

    Improving website loading times is crucial for delivering a positive and responsive user experience, and can directly impact your website’s search engine rankings. Using caching is a smart and cost-effective solution to achieve faster website speeds without having to spend more money on hardware or infrastructure upgrades.

    An absolute essential for any mission-critical business site, let alone any serious website – caching can significantly reduce the load on your database and improve load times by storing the results of expensive computations.

    Whether you choose to set up caching on your server using Redis or Memcached plugins, or use an all-in-one solution such as RunCloud Hub, we’re sure you’ll be pleased to see the benefits of object caching.

    If you aren’t quite comfortable with the idea of deploying servers and setting up object caching entirely from scratch, we’d love for you to give RunCloud a try (for free).

    We built RunCloud so you don’t need to be a system administrator or Linux expert to manage your cloud infrastructure. With everything from backups, staging, cloning, atomic (Git) deployments, and more – we’re on a mission to make it truly enjoyable to manage your own production-grade infrastructure. Learn more & get started today.

    If you have any questions about Object Caching or need help getting started, leave a comment below or tweet us on Twitter. We’ll be happy to help!

  • How to Clone a WordPress Website (An Easy, Step-by-Step Guide)

    How to Clone a WordPress Website (An Easy, Step-by-Step Guide)

    Have you ever wondered how to create a duplicate WordPress website with all of the identical settings and configurations?

    This is where website cloning comes in.

    Website cloning is the process of creating an exact replica of an existing website. It’s a popular practice among website developers and designers to clone websites for both testing new features or designs, and building new websites faster.

    In this article, we’ll provide you with an easy, step-by-step guide on how to clone a WordPress website. Whether you’re a web developer, designer, or simply curious about cloning your website, this guide will show you exactly how to achieve this.

    How To Clone A WordPress Website

    To clone your WordPress website on RunCloud, you don’t need to install any additional plugins. The entire process from cloning the database to setting up the domain can be done entirely from within the RunCloud dashboard itself – and all within 60 seconds!

    Let’s see how to clone a WordPress site with RunCloud in under a minute.

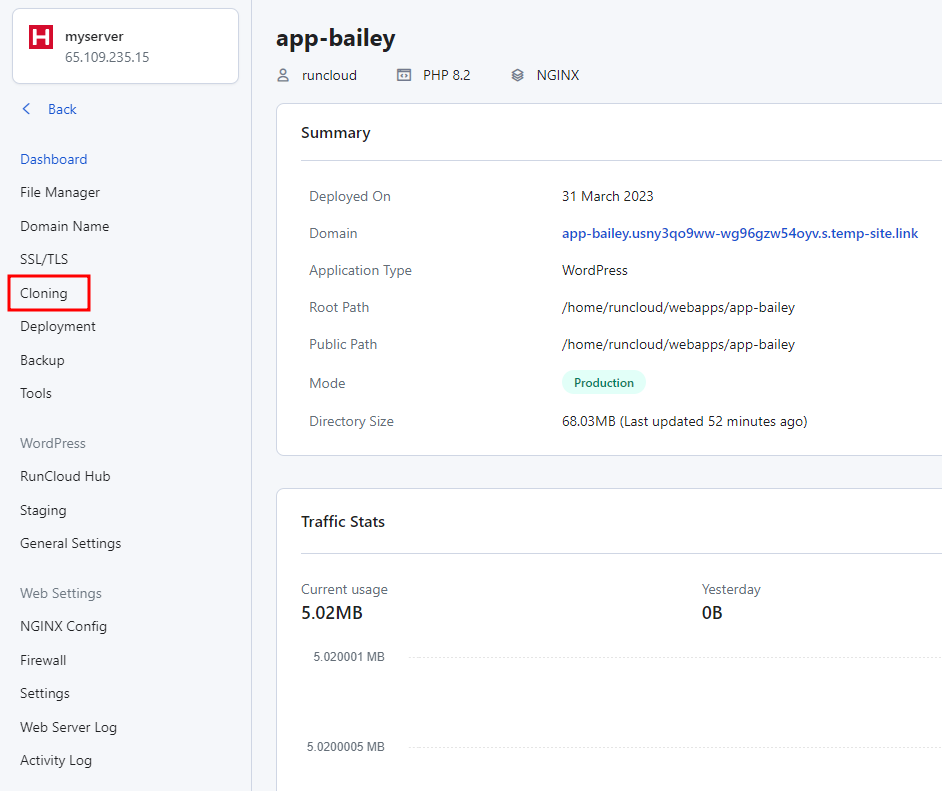
    Go to your RunCloud dashboard and open the menu of the website that you want to clone. In the left submenu, look for the “Cloning” button to make a duplicate copy of your website.

    Cloning an application on RunCLoud

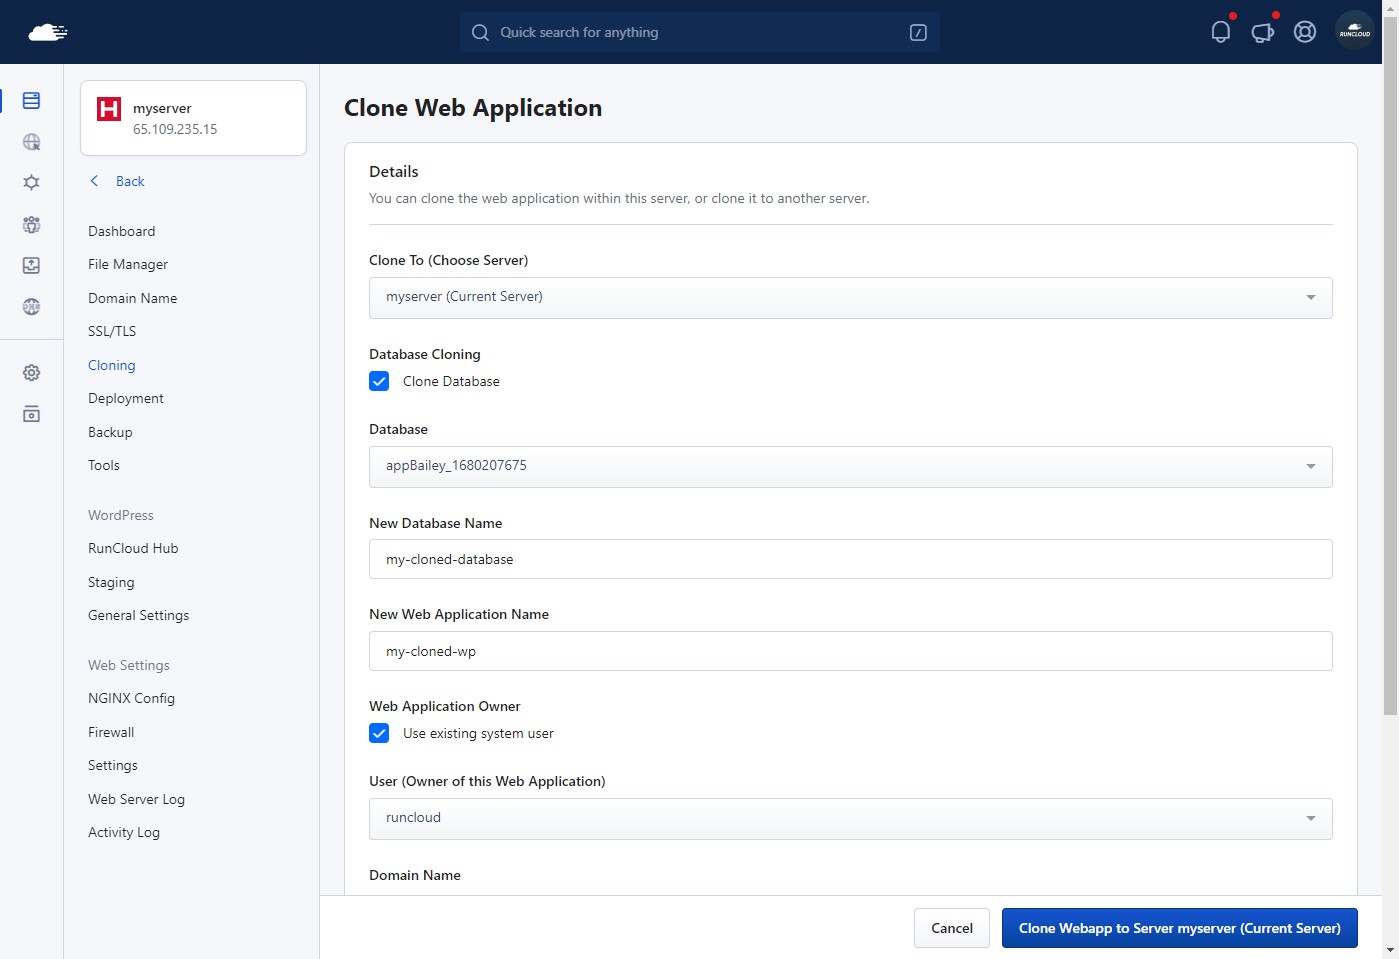
    If you have more than one server connected to your RunCloud account, you can deploy the clone to a different server. In the “Clone Web Application” submenu, select the name of the server where you want to deploy your new application.

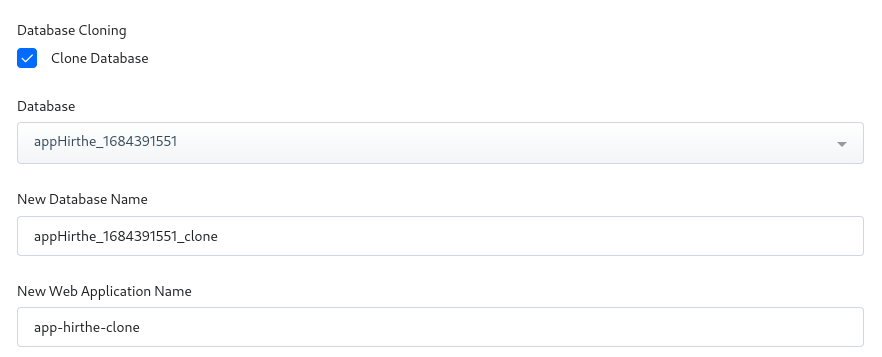
    Next, make sure you check the “Clone Database” option to create a new database with all of the posts and comments. Once you check it off, a new dropdown menu will appear asking you to select the database that you want to clone – select the database starting with the name of your existing application.

    After selecting the database, you will need to give a descriptive name to it, and provide a suitable name for the web application (website).

    Cloning a website using RunCloud utility

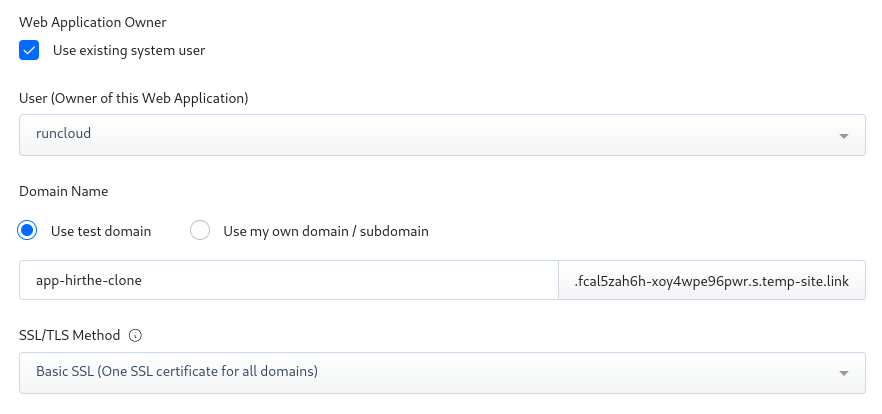
    Once you have configured all the above settings, you’ll need to specify the owner of this new application. If this is a test website, we highly recommend you create a new user – this isolates the application in the event of a security breach – minimizing the exposure of other applications on the same server.

    Next, you need to configure the domain of your website. Specify the domain name that you want to use, and configure the DNS records for it. If you are using RunCloud’s Cloudflare integration, domain names can be configured automatically for your domain.

    However, if you don’t have a registered domain name yet, you can use RunCloud’s test domain and follow along with this tutorial.

    Configuring RunCloud cloning

    After you have added all of the necessary details, click on the “Clone Webapp” button to create a duplicate application and deploy it.

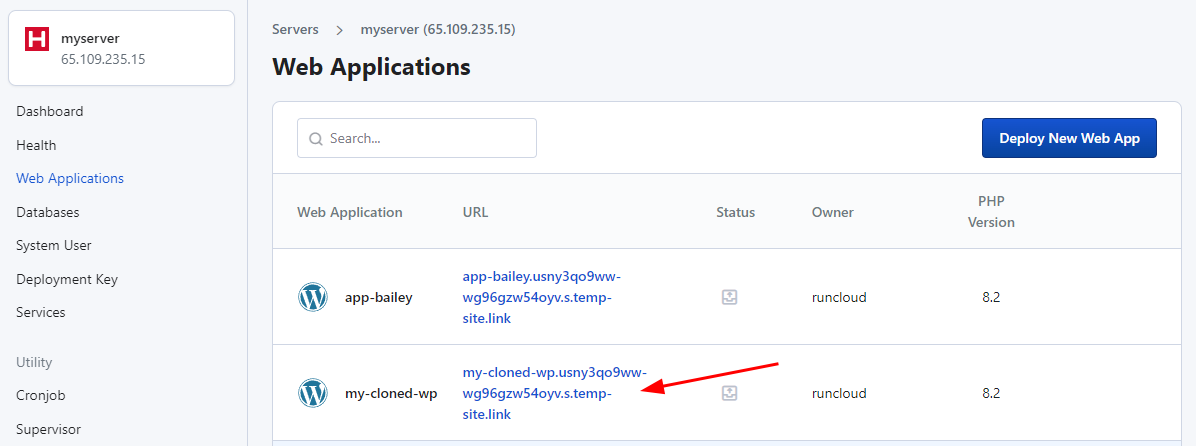
    Once you have cloned the app, you will be redirected back to the dashboard of your original WordPress site. Navigate back to the “Web Applications” tab of your server to see your newly created app.

    listing cloned applications on RunCloud

    After Action Report

    We hope this article on how to clone a WordPress website using RunCloud has been helpful to you. With our step-by-step instructions, you can easily clone any website and make changes to it without affecting the original site.

    If you are interested in learning how to create a WordPress staging site to test new features, we recommend reading our article on How to Create a Staging WordPress Site.

    We encourage you to start using RunCloud to manage your servers. With RunCloud, you don’t need the experience of a Linux administrator to manage your servers – you can easily clone websites, set up a staging environment, and launch your websites without ever needing to open up a Linux terminal. Start using RunCloud today!
    We hope you found this article useful and informative. Don’t hesitate to leave a comment or reach out to us on Twitter if you have any questions or feedback.

  • WordPress Multisite vs. Multiple Sites – Which Is Better?

    WordPress Multisite vs. Multiple Sites – Which Is Better?

    WordPress Multisite is a feature of WordPress that allows you to create and manage multiple websites from a single WordPress installation. It can be a powerful and convenient solution for website owners who want to expand their online presence and reach more customers.

    But how does WordPress Multisite compare to setting up separate WordPress sites for each of your domains?

    Whether you’re a blogger, a small business owner, a large corporation, or a university, you might benefit from using WordPress Multisite to create and run multiple websites with ease.

    In this article, we’ll explain what WordPress Multisite is and how it works. We’ll also explore the advantages and disadvantages of using it compared with using multiple WordPress sites.

    We’ll help you understand the differences between the two approaches and how they affect your website performance, security, maintenance, and scalability. By the end of this article, you’ll be able to decide which option is better for your needs and goals.

    What Is WordPress Multisite?

    WordPress Multisite is a feature that allows you to run and manage multiple websites on a single WordPress installation. In this setup, the sites are not standalone, i.e. they are all interconnected in one way or another. This means that you can create and manage a network of websites from a single dashboard.

    Usually, there is one main site, sometimes also called root site, which is managed by the network administrator. This administrator can create as many sites as needed, and grant access to other users to manage one or more of those sites. This can be configured in such a way that each site has either its own subdomain, or has its own directory.

    One of the biggest advantages of using WordPress Multisite is centralized management. With this approach, you can manage all of your websites from one dashboard. This makes it easy to update plugins, themes, and core WordPress files across all of your sites simultaneously.

    Additionally, you can manage user roles and permissions across your entire network, which saves considerable time and effort.

    Since you’re only using one WordPress installation, a Multisite Network is cost-effective. You don’t need to purchase additional hosting for each site. This can reduce operating costs significantly, especially if you’re managing a large number of sites.

    Since you are using only one server for all your sites with WordPress Multisite, it will be a lot easier to manage and update it. Instead of securing each server separately, you can focus your efforts on hardening one server and keeping it updated. Using a common server saves time and reduces the risk of conflicts that might occur when updating sites individually.

    Multisite networks allow you to build consistency in your brand and design, giving it a more professional look. The ability to update plugins or themes across all websites from a single dashboard also saves a great deal of time, and ensures that your branding and design remain consistent.

    However, while WordPress Multisite has many advantages, there are some potential drawbacks to consider as well. For example, some plugins may not be compatible with WordPress Multisite, and you may need to use separate plugins for certain functionality.

    Additionally, if one site on your network experiences an issue, it can potentially affect all of the sites on your network.

    With that being said, WordPress Multisite is ideal for institutions where each individual needs their own websites. For example, in a university, all professors can have their own website where they publish their course curriculum. Similarly, in a blog about sports, a different site can be given to different people, each with an expertise in a different sport.

    If you want to learn more, read our guide on How to Install and Setup A WordPress Multisite Network.

    Using Multiple Sites in WordPress

    One way of creating and managing multiple websites is to use separate WordPress installations for each of them. This means that each website will have its own database, files, plugins, themes, and settings. If you prefer to have more control over each of your websites, then using multiple sites might be a better option.

    The primary reason for using multiple sites is more control over each individual site. Since each has its own installation, you get more control over the site’s design, functionality, and content. This can be especially important if you have specific requirements for each of them.

    Using multiple WordPress sites is a great option for businesses who want to create niche affiliate marketing websites. This way, you can have more control and flexibility over each site, and tailor it to your specific niche and audience. You can also use different themes, plugins, and settings for each site to optimize them for conversions. If you’re looking for a better way to run multiple niche affiliate marketing websites, this approach is for you.

    When using multiple WordPress sites, you have the option to either host them on the same server, or on different servers. This gives you more flexibility and control over your hosting resources and performance. Since these are independent sites, each site administrator can choose any plugins or themes that they want.

    When you are running sites on separate servers, you have the flexibility to scale server resources for each site depending upon its needs. This can help ensure that each site is running optimally, and doesn’t experience any performance issues.

    Moreover, having sites on different servers isolates them. If one of your sites gets hacked, you might have a fighting chance to save all the other sites. You can even take extreme steps such as taking down the entire website without worrying about its impact on other sites.

    Using multiple WordPress sites can have some benefits, but it also comes with some challenges. You may need to spend more time and resources managing multiple installations, and may need to hire more technical staff. You may also have to buy separate licenses for some themes or plugins for each site, depending on the developer’s policy.

    In contrast, with a multisite network, some plugins such as PublishPress may allow you to use a single license for the whole multisite network, while other plugins such as WPForms or The Events Calendar may require you to purchase a multisite license or a license for each site in the network. You should always check the terms and conditions of the theme or plugin before using it on multiple sites.

    How to Choose Between Multisite and Multiple Sites

    After considering the two approaches, it’s clear that both have their advantages and disadvantages. Let’s take a look at additional factors that you should consider when deciding to host your website.

    How Related Are the Sites?

    A major factor to consider is how related the sites are to each other. A multisite network only makes sense if all your sites belong to an umbrella organization or follow a common objective.

    For example, you might use a multisite network to create sites for different departments, locations, or products of your business. Or you might use it to create sites for different courses, faculties, or student groups at your school.

    However, if you plan to host vastly different content from different sources and audiences, a multisite network is not the right choice.

    For example, if you want to create sites for different clients, niches, or projects that have nothing to do with each other, a multisite network will not be beneficial. In fact, it might cause more problems than it solves. The sites will share the same database, files, plugins, and themes, which can create conflicts and potentially present security risks. The sites will also be harder to manage and maintain as the network grows.

    Budget

    The cost of running the sites can vary dramatically depending on your setup, such as the hosting plan, the number of sites, and the resources they consume. If you are using a cloud provider, they will charge you separately for each server, storage, network traffic, and IP address. This can add up quickly if you have many sites on different servers.

    If you want to save some money, you might consider hosting all of the sites on one server and sharing the resources. You can do this by using either a multisite network or multiple sites. However, keep in mind that a multisite network can only run on one server, while multiple sites can be moved to different servers later if needed.

    Scalability

    Another key factor to consider is how well your sites can handle traffic spikes. If you use a multisite network, you’ll have to share the same server resources for all the sites in the network.

    This means that if you need to scale your server up (or down), you will affect all of the sites at once. But if you use multiple sites on different servers, you can easily scale up individual sites without impacting the performance of other sites.

    How Often You Need to Create New Sites

    If you will need to frequently set up more sites in the future, WordPress Multisite is the right choice for that, as it makes adding new sites easy and doesn’t require creating new WordPress installations from scratch.

    Maintenance

    If you use multiple WordPress sites, the process of managing them will become more difficult as you add more sites. You will have to log in to each site separately, update the plugins and themes, and perform backups and security checks.

    Moreover, if you host your sites on different servers, you might accidentally delete a server that hosts a site that you still need.

    WordPress Multisite can be easier to maintain because you can manage all of your sites from one dashboard. You can update the plugins and themes for the entire network, perform network-wide backups, and monitor the security of all your sites.

    Control and Functionality

    If you want to have full control over each site and customize it to your specific needs, you might prefer to use separate WordPress installations for each site. This way, you or the site administrator can make changes to the site without affecting other sites. You can choose the plugins, themes, and settings that work best for your site and its audience.

    However, if you want to have a more convenient and efficient way to manage all of the sites at once, you might want to use WordPress Multisite. This feature allows you to create and run multiple sites from a single WordPress installation and dashboard. You can access all the sites from the My Sites menu and perform network-wide tasks such as updating plugins, themes, and WordPress core.

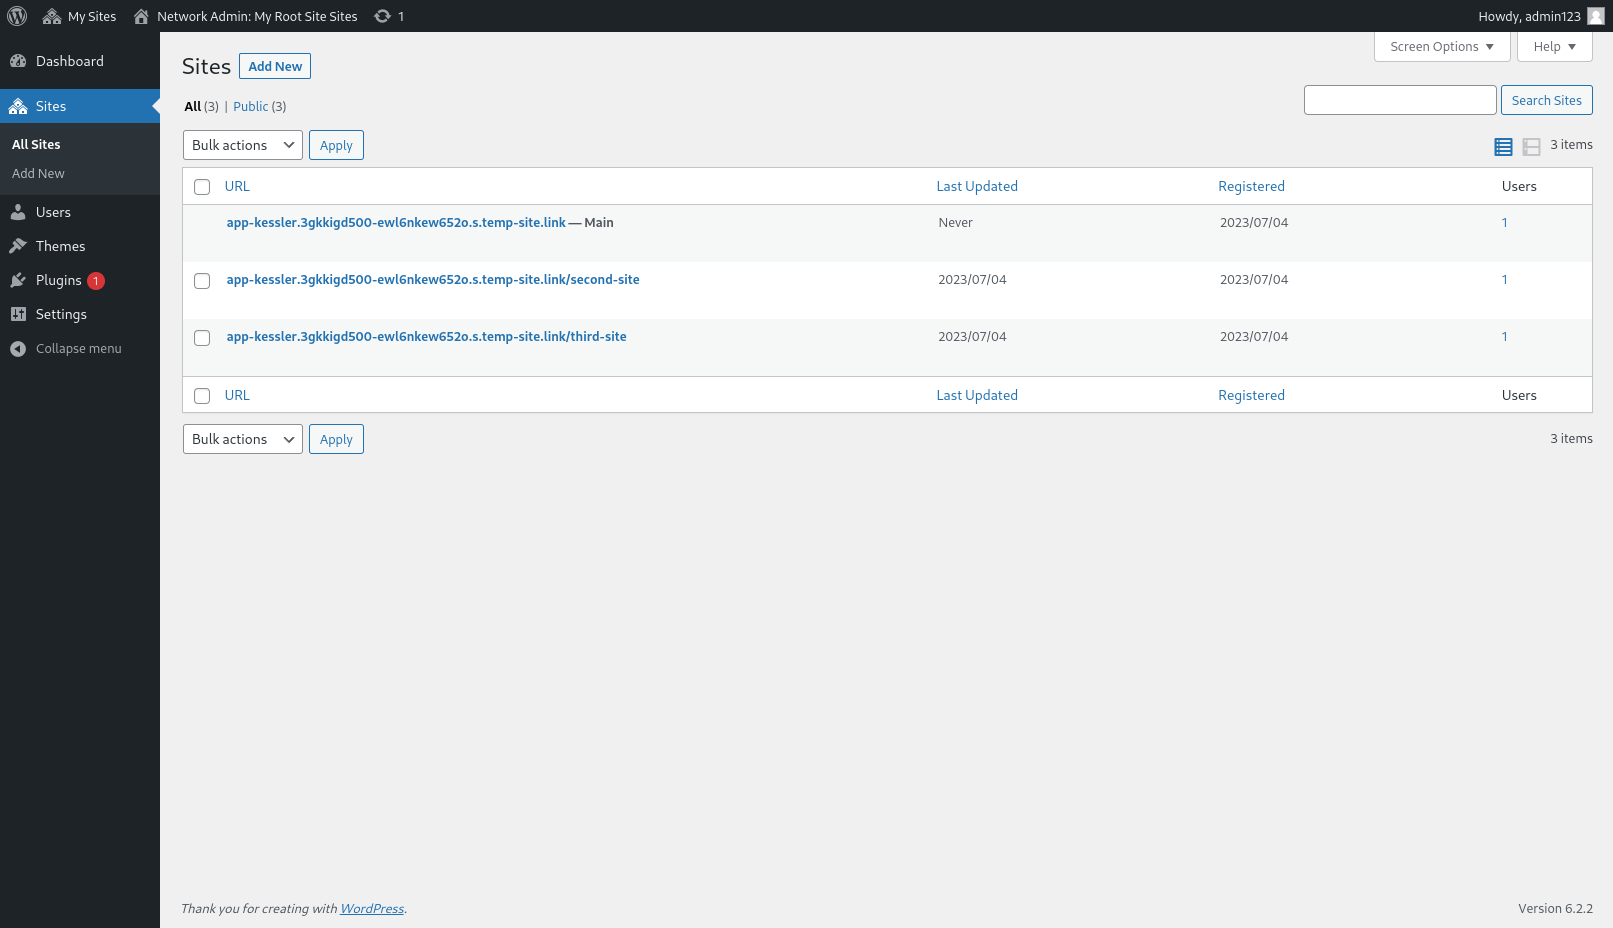
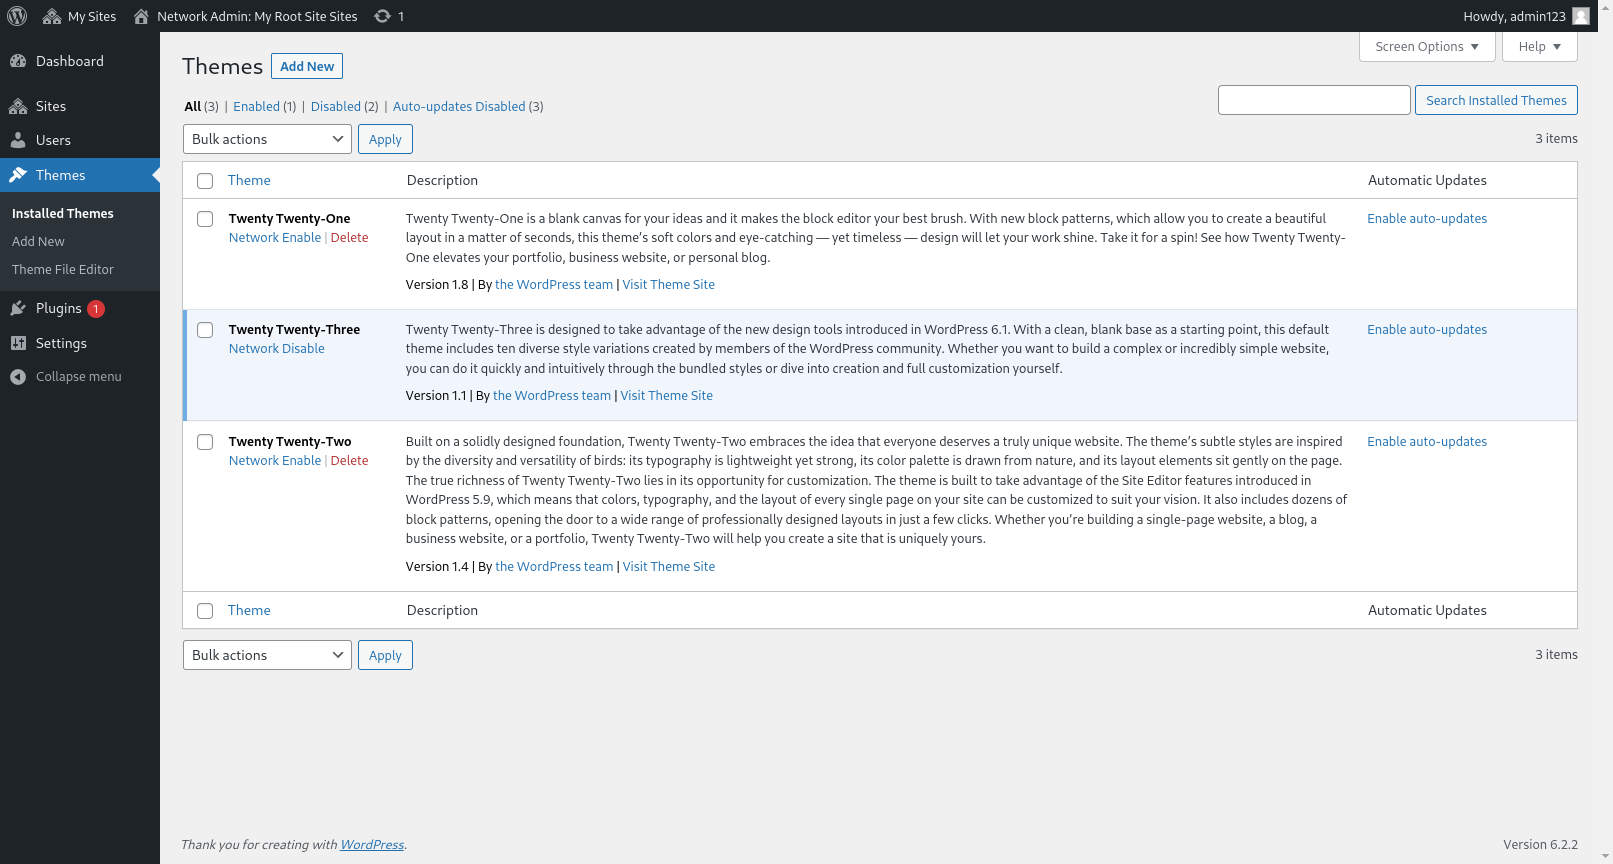
    Here are some screenshots that show what a multisite dashboard looks like and how you can perform basic maintenance tasks:

    Viewing all websites on WordPress Multisite network

    This is the multisite dashboard, where you can see an overview of your network and access the network settings.

    In the My Sites menu, you can see all of the sites in your network and quickly switch between them.

    Installing themes on a WordPress network

    This is the Network Themes screen, where the admin can update and install themes for the entire network.

    Conclusion

    As you can see, WordPress offers you two options for creating multiple websites – a Multisite Network or separate installations. Each option has its pros and cons, so you need to consider your needs and goals before choosing one.

    Whether you want to run a large network of sites, or just a few, WordPress has you covered.

    After you have made the decision, you can continue learning – by reading our other articles on WordPress:

    1. How To Install WordPress With RunCloud | Step-By-Step Guide
    2. How to Install and Setup A WordPress Multisite Network
    3. Load Balancing For WordPress — What It Is & How It Works
    4. Install And Configure Object Cache Pro for WordPress

    RunCloud is the ultimate solution for managing multiple WordPress websites or WordPress Multisite networks.

    With RunCloud, you can control all of your servers and web apps from a single dashboard, saving you time and hassle. You can also enjoy features such as automated backups, security scans, performance optimization, and more.

    Don’t miss this chance to take your WordPress management to the next level. Sign up for RunCloud today!
  • Containerized Core – A Seemingly Small (Yet Important) Improvement To Server Management

    Containerized Core – A Seemingly Small (Yet Important) Improvement To Server Management

    Docker is a technology that allows you to run applications in isolated environments called containers.

    Containers are lightweight, portable, and scalable, making them ideal for cloud-native development and deployment.

    Did you know that containerization saw a massive leap in adoption in 2022, with over 31% of developers worldwide stating that they are running container technologies?

    RunCloud Docker is a server that leverages the popular Docker technology to isolate most of your application dependencies such as Redis, MariaDB, NGINX, PHP, and beyond from the operating system level.

    This makes your applications more secure and easier to manage.

    But beyond that, this is a big under-the-hood improvement that stands to allow us to continue leveling up on how you manage your servers with RunCloud.

    RunCloud provides a simple interface to start and stop these predefined containers. Your web applications are further protected by facl, a UNIX interface to manage access, which prevents them from accessing each other’s files and folders.

    Containerized Core is now out of beta and in early access.

    This means it’s safe to use in production (while there may still be rare edge-case scenarios as it rolls out across the board).

    It’s no longer necessary to be a Linux expert anymore to be able to enjoy the flexibility and security of containerized applications.

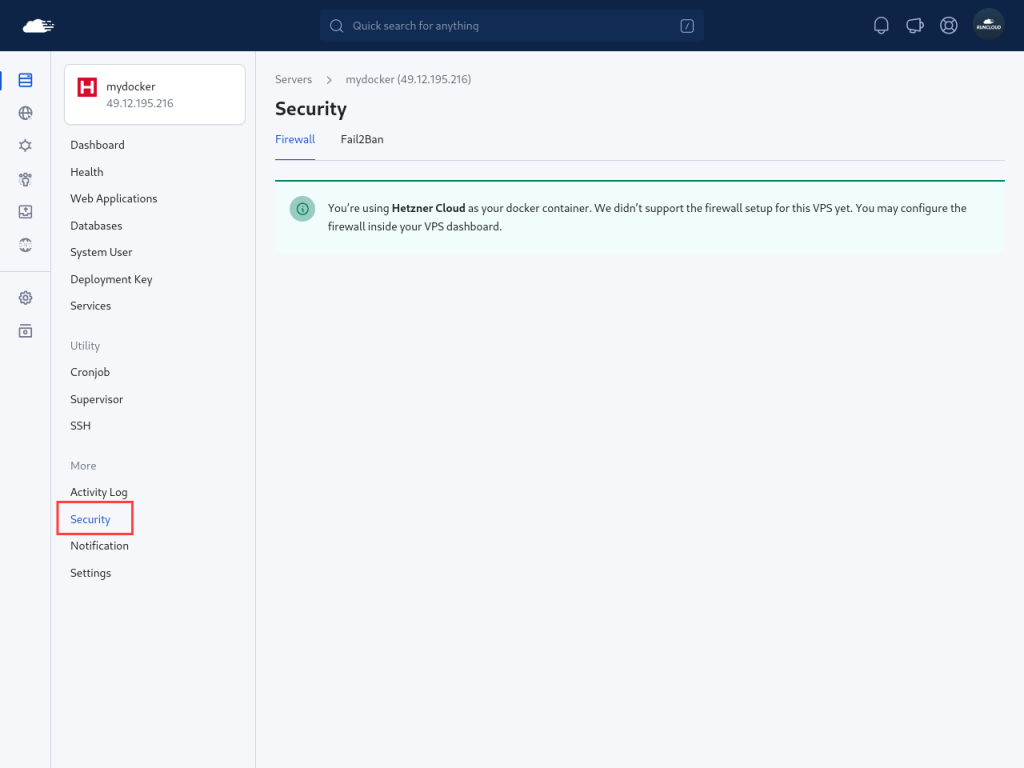
    Before we proceed, it is important to note that Docker server runs on a containerized environment without a built-in firewall. To secure your server, you need to configure the firewall provided by your cloud provider. If you use DigitalOcean, Linode, Vultr, or AWS Lightsail, RunCloud makes it easy for you to do that from the dashboard itself.

    If you attempt to configure firewall on a containerized container, you will get the error message shown in the above screenshot.

    How To Use Docker On RunCloud

    RunCloud allows you to easily manage and deploy your web applications on any cloud provider that provides a network firewall using Docker.

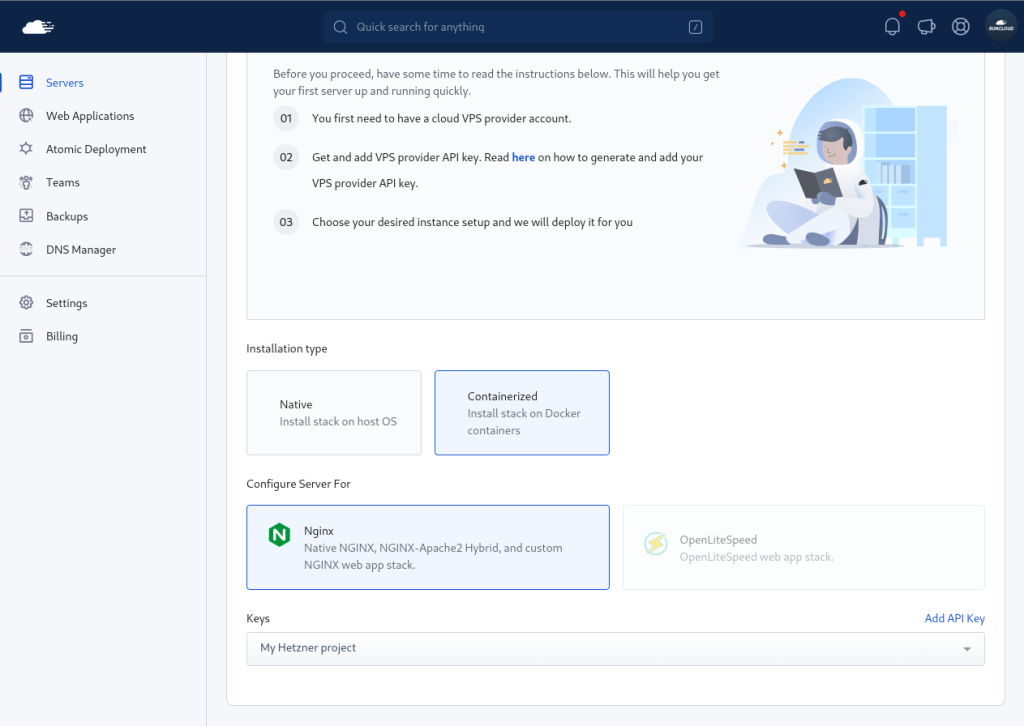
    To use Docker on RunCloud, you need to create a new server and select the Docker option during the setup installation.

    You cannot use Docker on existing servers that are already managed by RunCloud. This is because RunCloud needs to install some packages and configurations that are specific to Docker and may conflict with your existing setup.

    Here are the steps needed to create a new server with Docker on RunCloud:

    1. Log in to your RunCloud account and click on the “Connect a Server” button.
    2. Choose your cloud provider and select the provision method. We recommend using RunCloud’s automatic provisioning feature for a painless installation.
    3. In the “Installation Type” section, select the Docker option. Currently, this method only supports Nginx servers.
    Installing docker server
    1. The next steps will differ slightly depending on your installation method. If you picked the automatic installation, you can select your server configuration and deploy it directly from within the RunCloud dashboard.

      If you selected the manual installation, you’ll need to log in to your virtual machine via SSH and run the installation script.

      Either way, it’s a straightforward process; refer to our blog post about the installation process for more information.
    2. Once your server is ready, you can access it from the RunCloud dashboard and start using Docker.

    How Docker Enhances Security

    Docker provides better security for your application by isolating it from the host operating system and other applications on the same server. Docker containers have their own file system, network stack, and process space, which limits the access and impact of a potential attacker.

    Docker also supports various security features that can restrict the capabilities and resources of a container.

    For example, if you run a WordPress site in a Docker container and it gets hacked by a malicious actor, the hacker will not be able to interact with the host operating system or other containers on the same server. The hacker will be trapped in the container, and will only have access to the files and processes within it.

    In this way, you can protect your server and other applications from being compromised or damaged by a security breach.

    How to Upgrade to RunCloud Docker

    As we mentioned earlier, if you are using the native variant of RunCloud and want to upgrade to RunCloud Docker, you’ll need to create a new server with Docker, and clone your existing applications from your old server to your new server.

    If you don’t have a server with Docker installed, go back to the How To Use Docker On RunCloud section.   

    Here are the steps to upgrade from the native servers to RunCloud Docker:

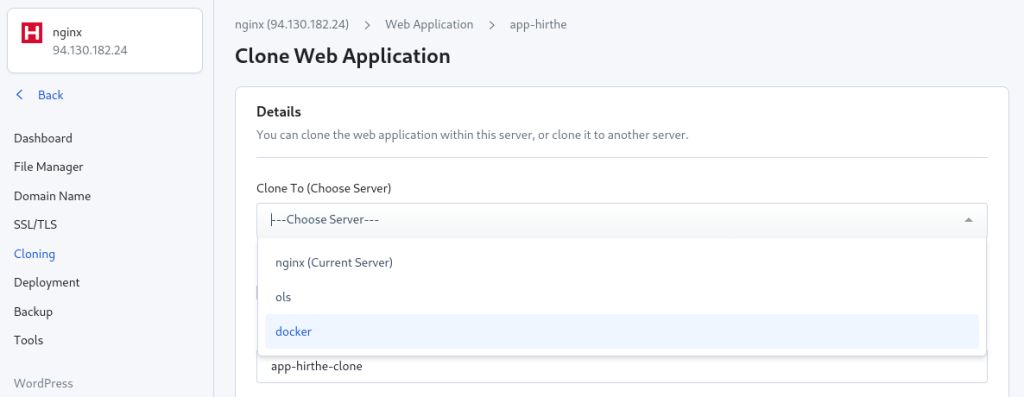
    1. Once your new server is ready, you can clone your existing applications from your old server to your new server. To do this, go to the Applications tab on your old server and click on the “Cloning” button. You need to do this individually for each application that you want to clone.

    In the above example, the server using Nginx was named “nginx” and the server using Docker was named “docker” for demonstration purposes. These names will vary depending upon your setup.

    1. Choose your new server as the destination, and enter a name for the cloned application. You can also choose whether to clone the database and the files of the application. If you are cloning a web application that relies on a database (e.g. WordPress), you must select this option.

    Select the database that you want to clone from the drop down menu. The name of the database is generally similar to the name of the application. After this, provide a new name for your database and web application – this will be displayed in the RunCloud dashboard under your new server.

    1. After this, you need to select the user account on your server that will be the owner of your web application. You can either pick one of the existing users, or create a new user.
    1. Finally, you need to configure the domain name of your application. We recommend using a test domain during migration. This will allow you to access your containerized application and, in the meantime, all the existing traffic will continue to go to your old servers. Once you are satisfied, you can update your test domain. 
    2. Click on the Clone Application button and wait for RunCloud to clone your application to your new server. Repeat the above steps for each application you want to clone from your old server to your new server.
    3. Once you have cloned all your applications, you’ll need to update the DNS records of your domains to point to your new server. To do this, you can either use RunCloud’s Cloudflare integration, or go to your domain registrar or DNS provider and change the A records or CNAME records of your domains to point to the IP address of your new server.
    4. Wait for the DNS changes to propagate, and verify that your applications are working properly on your new server. If you are planning this ahead of time, you should also read our guide on How To Speed Up DNS Propagation.

    You have successfully upgraded from the native variant to Containerized Core.

    You can now enjoy the benefits of using Docker containers on your new server. You can also log in to your server via SSH to access your new server, and manage your containers via Docker CLI.

    Conclusion

    Docker is an incredibly powerful tool for creating and running applications in containers. With this improvement to RunCloud’s core powered by containerization – we’re beyond excited for you all to take advantage of the benefits of containerization as well as what this means for the future of managing your infrastructure on RunCloud.

    The RunCloud team is committed to delivering the best possible experience to our users across the board. We welcome your feedback and suggestions on how to make it better for you. Please feel free to reach out to us, or join our community forum to share your thoughts and experiences.

    You don’t need to be a Linux expert anymore to enjoy the benefits of Docker. With RunCloud, you can create and run isolated web applications with just a few clicks.

    Sign up today and see for yourself how easy and convenient it is to use Docker on RunCloud.

  • How to Set Up an Amazon Lightsail Server with RunCloud

    How to Set Up an Amazon Lightsail Server with RunCloud

    Amazon Lightsail is an easy-to-use cloud service from Amazon Web Services (AWS) that offers you everything needed to build an application or website, and comes with predictable pricing.

    It’s one of the top choices to host your website. If you want to host your site using the AWS infrastructure without having to deal with the complexity of Amazon Elastic Cloud Compute (Adobe EC2), then Amazon Lightsail is the answer for you.

    Amazon Lightsail has a very simple pricing plan, which makes it a direct competitor to Digital Ocean, Linode, Vultr, and UpCloud – with a similar pricing range and included resources.

    Amazon has many data centers spread across different regions, including:

    1. Ohio
    2. Virginia
    3. Montreal
    4. Oregon
    5. Ireland
    6. London
    7. Paris
    8. Frankfurt
    9. Tokyo
    10. Sydney
    11. Seoul
    12. Mumbai
    13. Singapore.

    This gives you the flexibility to either choose a server location that is geographically close to your customers, or a server that’s in a remote location and which is cheaper to run.

    In this post, we will discuss how to set up an Amazon Lightsail server to host your websites with the help of RunCloud.

    Let’s get started!
    Why Use RunCloud?

    You don’t need to be a Linux expert to build and manage a website with RunCloud. Here are some of major reasons people use RunCloud:

    If you don’t have a RunCloud account, You can register for a 7-day free trial – no credit required.

    Connecting Amazon Lightsail Server via RunCloud Integration

    With our server provisioning feature, you can set up a server in Amazon Lightsail directly from the RunCloud dashboard by providing an API key from Amazon Lightsail to RunCloud.

    You’ll only need to leave the RunCloud dashboard once to get this key and add it to RunCloud 3rd Party API Key Settings.

    Within the RunCloud dashboard, for any future server creations, you’ll be able to add new servers without having to leave your dashboard.

    Creating an Amazon Lightsail API Key

    To use RunCloud with Amazon, you’ll need to integrate AWS by adding the necessary API keys to your account. You can generate these keys from your AWS dashboard.

    We strongly recommend you don’t use the root account to create your API keys. It’s a good idea to create a separate user account just for RunCloud, and limit its access to your infrastructure.

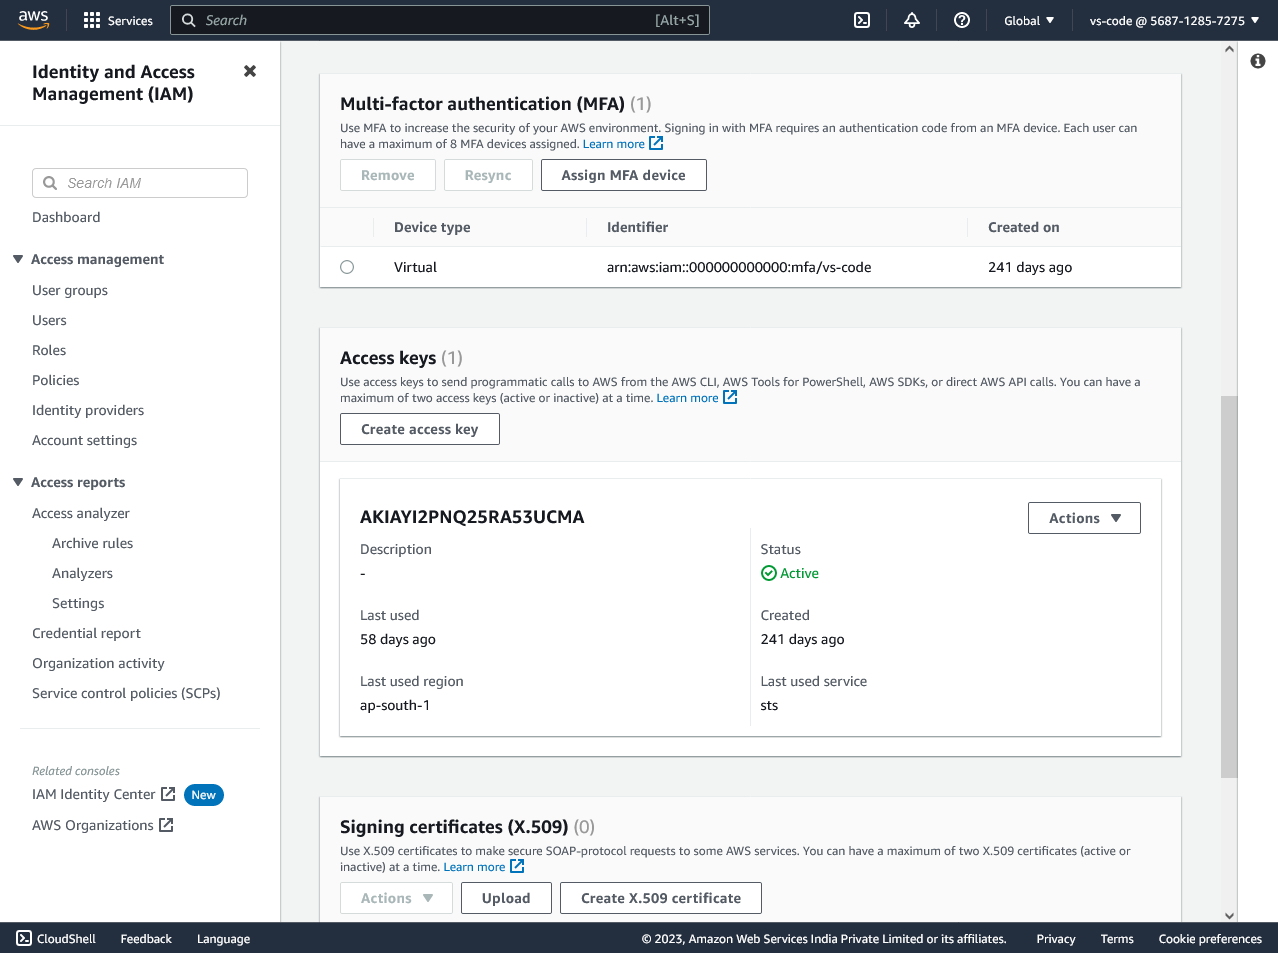
    Log into your AWS Console with a user account and open the security credentials page. You can either search for it in the search bar on the top, or use this link which will redirect you to the necessary page. Once there, scroll down to the “Access Keys” section.

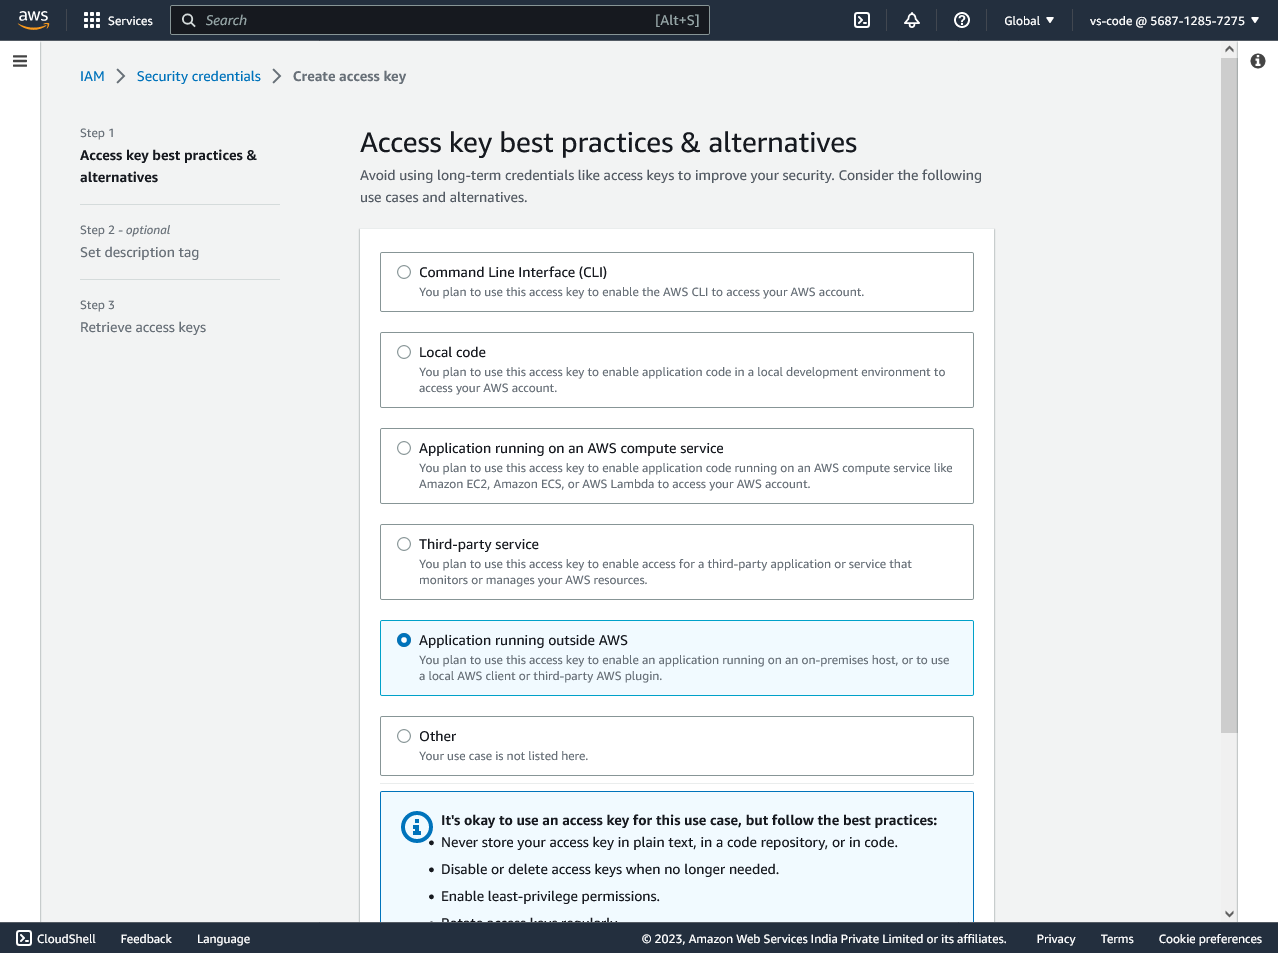
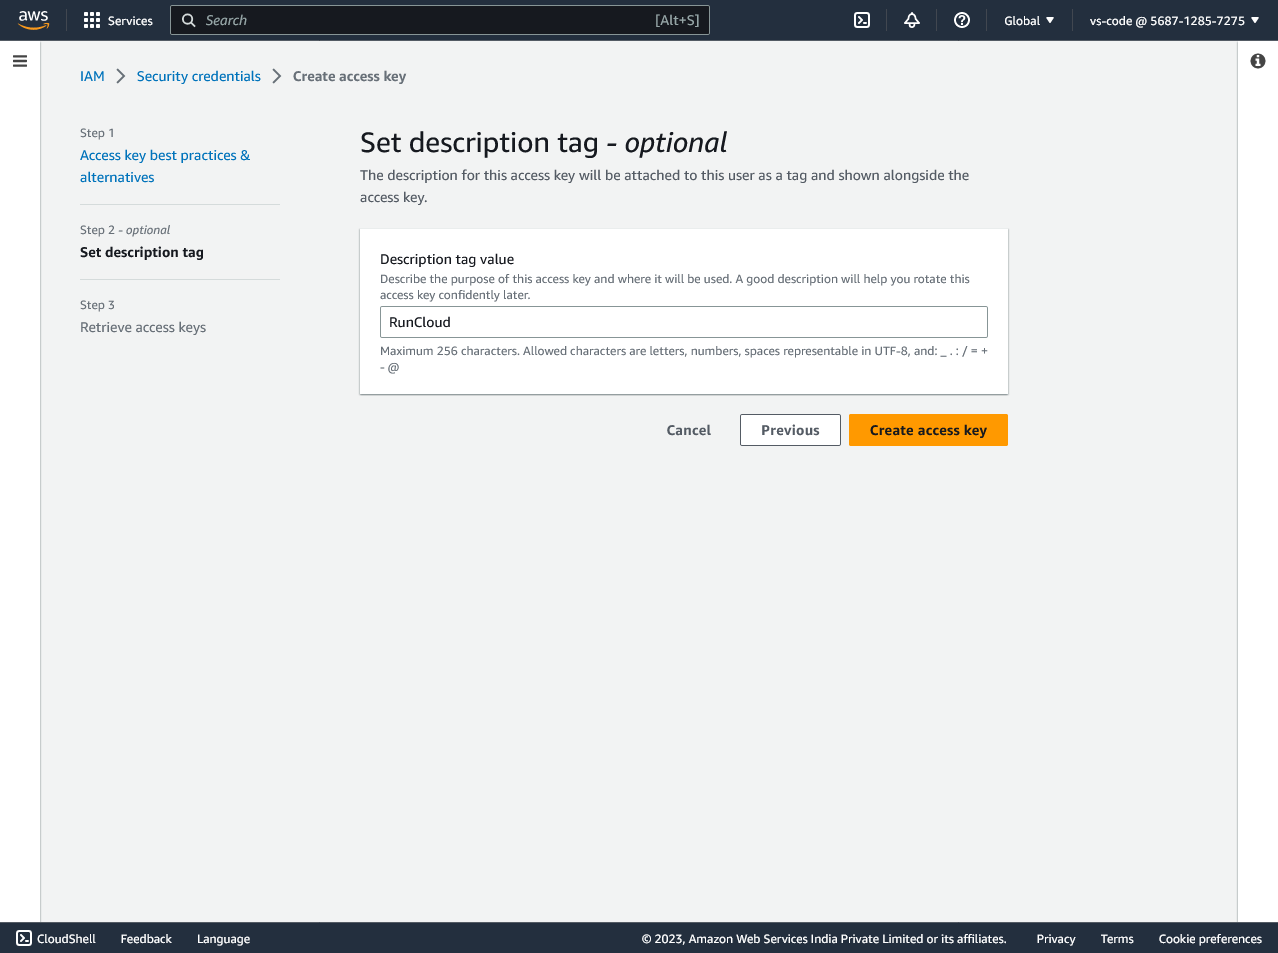
    Click on the “Create access key” button to generate your keys. On the next screen, select “Application running outside AWS” and proceed.

    Give your API key a descriptive name so that it is easy to identify later on and click “Create”.

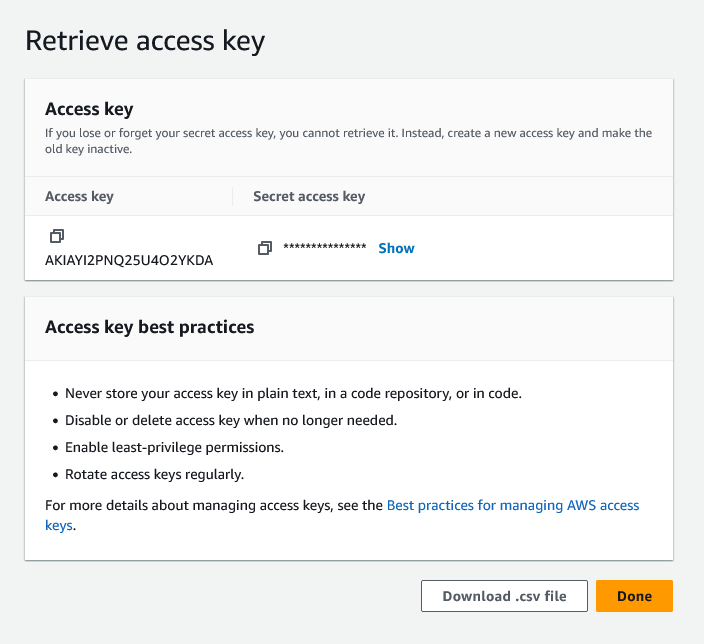
    Once you create your keys, they will only be displayed once – do not close this tab. Open the RunCloud dashboard in a new browser window to continue the integration process.

    To ensure RunCloud can fully connect to and manage your AWS Lightsail server, the AWS IAM user associated with the credentials you provide must have the necessary permissions. A missing permission can prevent specific RunCloud features from working correctly. To manage your server via the RunCloud dashboard, please make sure the IAM policy grants the following permissions on all Lightsail resources (*).

    "lightsail:GetOperations",
    "lightsail:GetBlueprints",
    "lightsail:GetInstances",
    "lightsail:GetKeyPair",
    "lightsail:DeleteKeyPair",
    "lightsail:CreateInstances",
    "lightsail:GetInstance",
    "lightsail:DeleteInstance",
    "lightsail:CreateKeyPair",
    "lightsail:ImportKeyPair",
    "lightsail:PutInstancePublicPorts",
    "lightsail:GetInstancePortStates",
    "lightsail:AttachStaticIp",
    "lightsail:GetRegions",
    "lightsail:GetOperation",
    "lightsail:GetBundles",
    "lightsail:GetKeyPairs",
    "lightsail:AllocateStaticIp"

    Adding the Amazon API Key to RunCloud

    Once you have created the API keys, you shouldn’t store them anywhere on your computer. You won’t need them again after you have added them to your RunCloud account and the integration is complete.

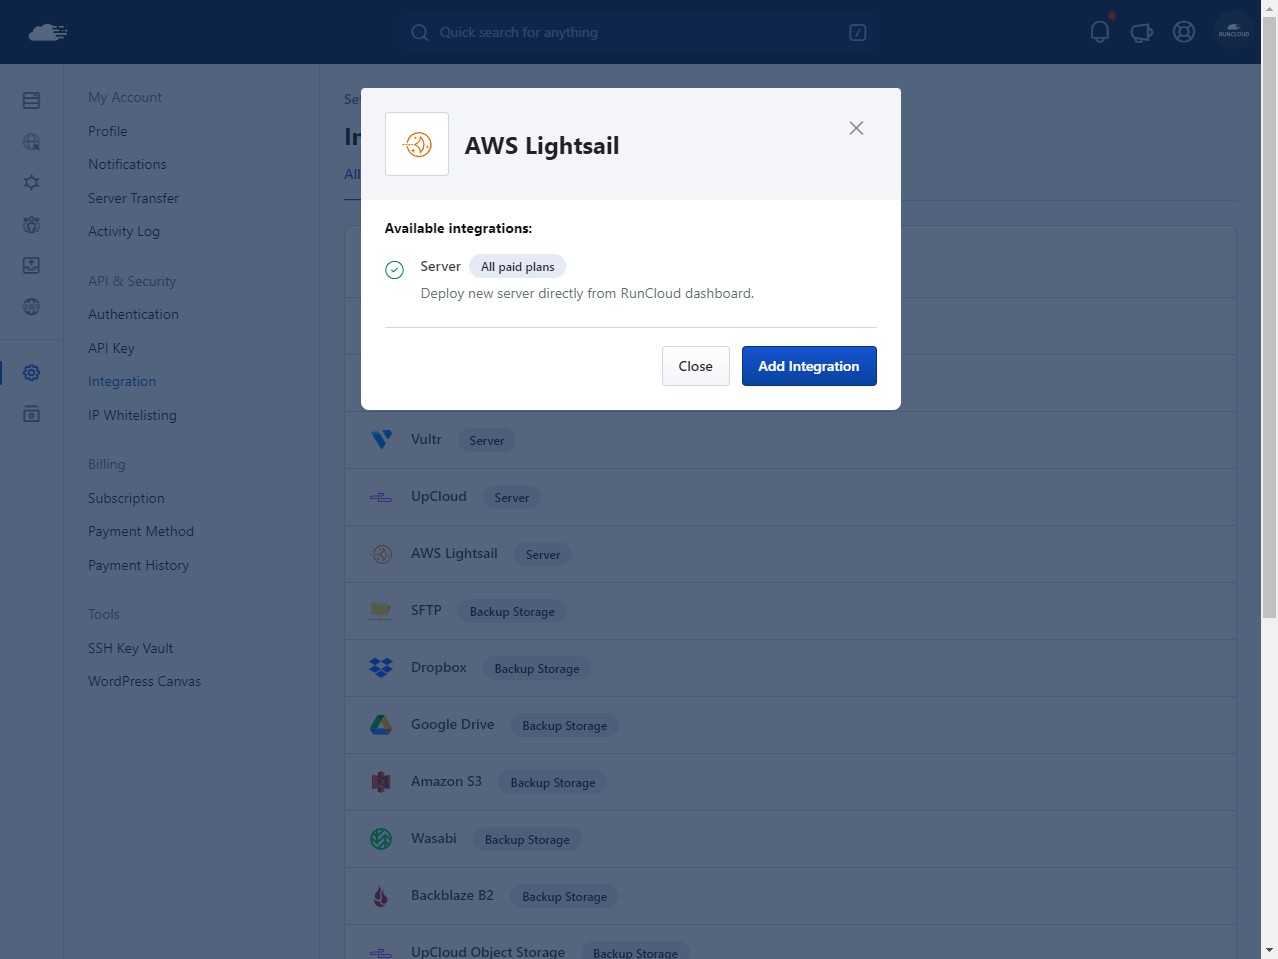
    To add an API key, go to your RunCloud dashboard. Open the Account Settings and switch to the Integrations tab. Once there, click on “AWS Lightsail” and then “Add Integration”.

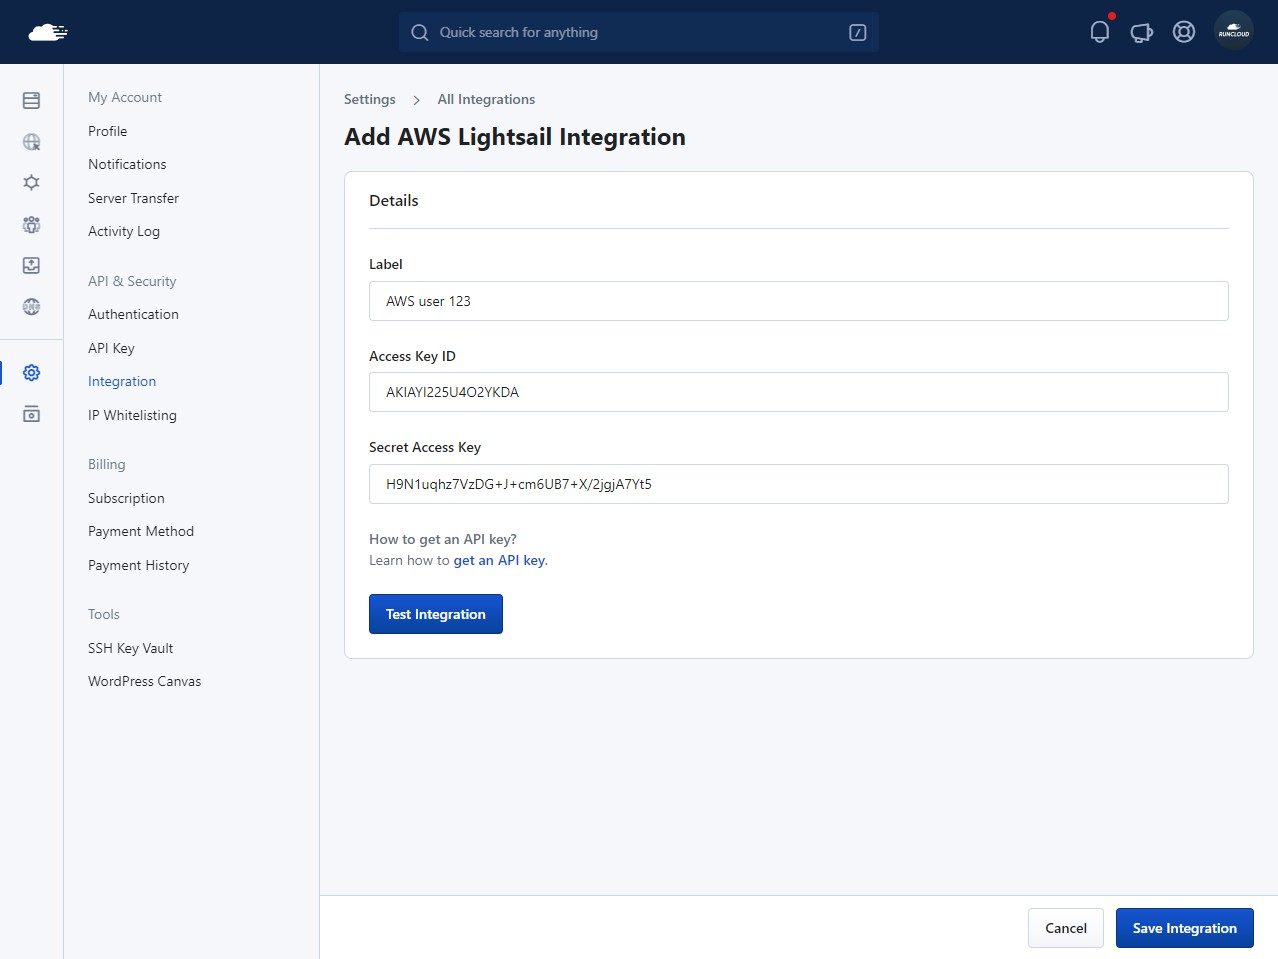
    Now, you will be presented with the following screen. Give a descriptive label to your API key, if you have more than one AWS account, this label will be helpful to distinguish between them.

    Once you’ve done that, copy and paste the “Access Key ID” as well as the “Secret Access Key” that we just generated in the creating an API key step.

    After adding the key, you can test the integration using the “Test” button. If you get a success message, you can click “Save Integration” to save the changes. Once your key is integrated, you can close the AWS tab as well.

    Deploying Amazon Lightsail Server on RunCloud

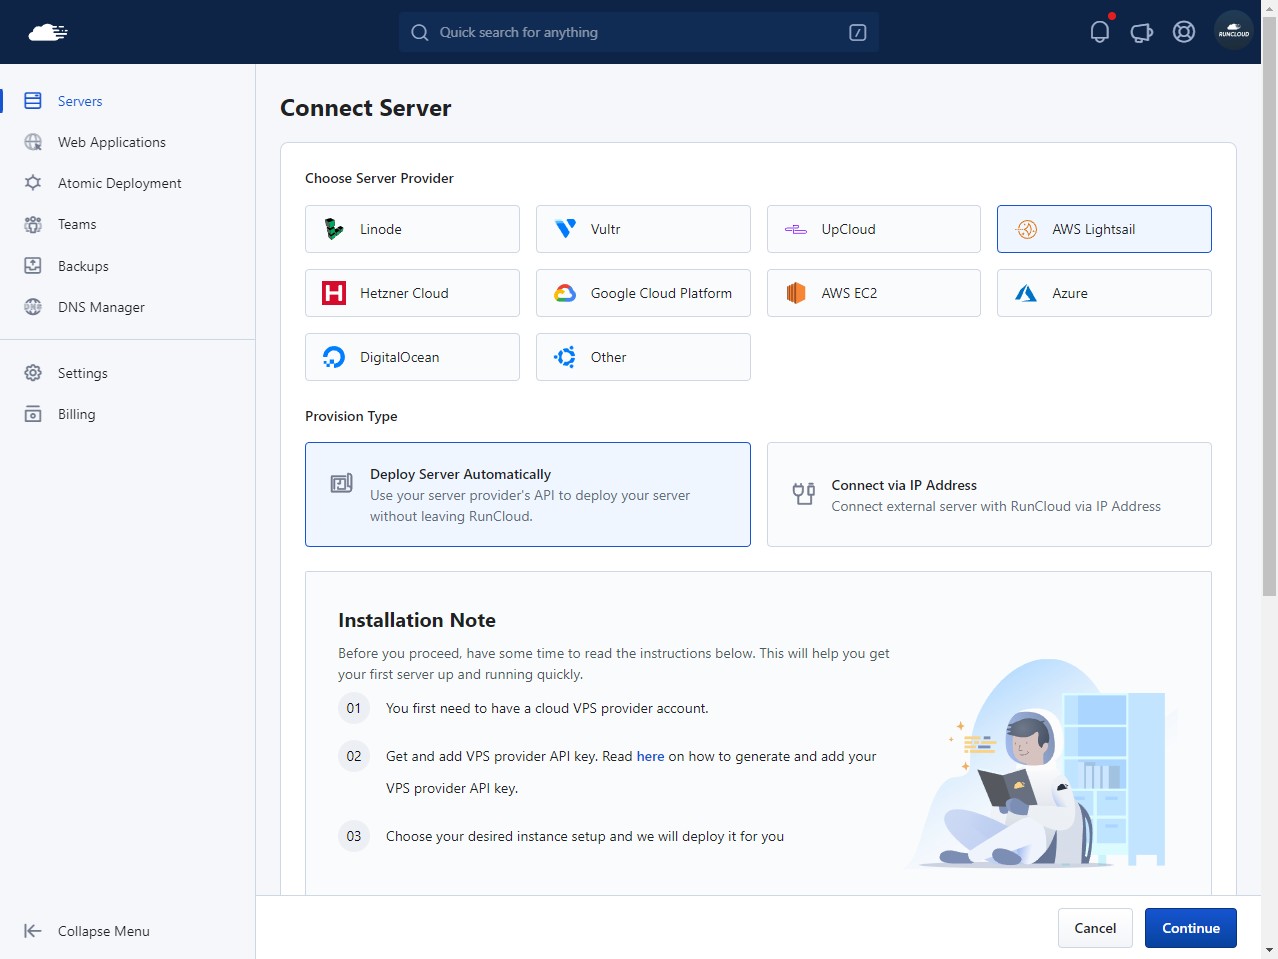
    To get started, click on the “Connect a Server” button to set up your first server.

    A screen will pop up showing you a list of available server providers. Select Amazon Lightsail from the list, and then click the “Deploy Server Automatically” provision type to use RunCloud’s automatic integration.

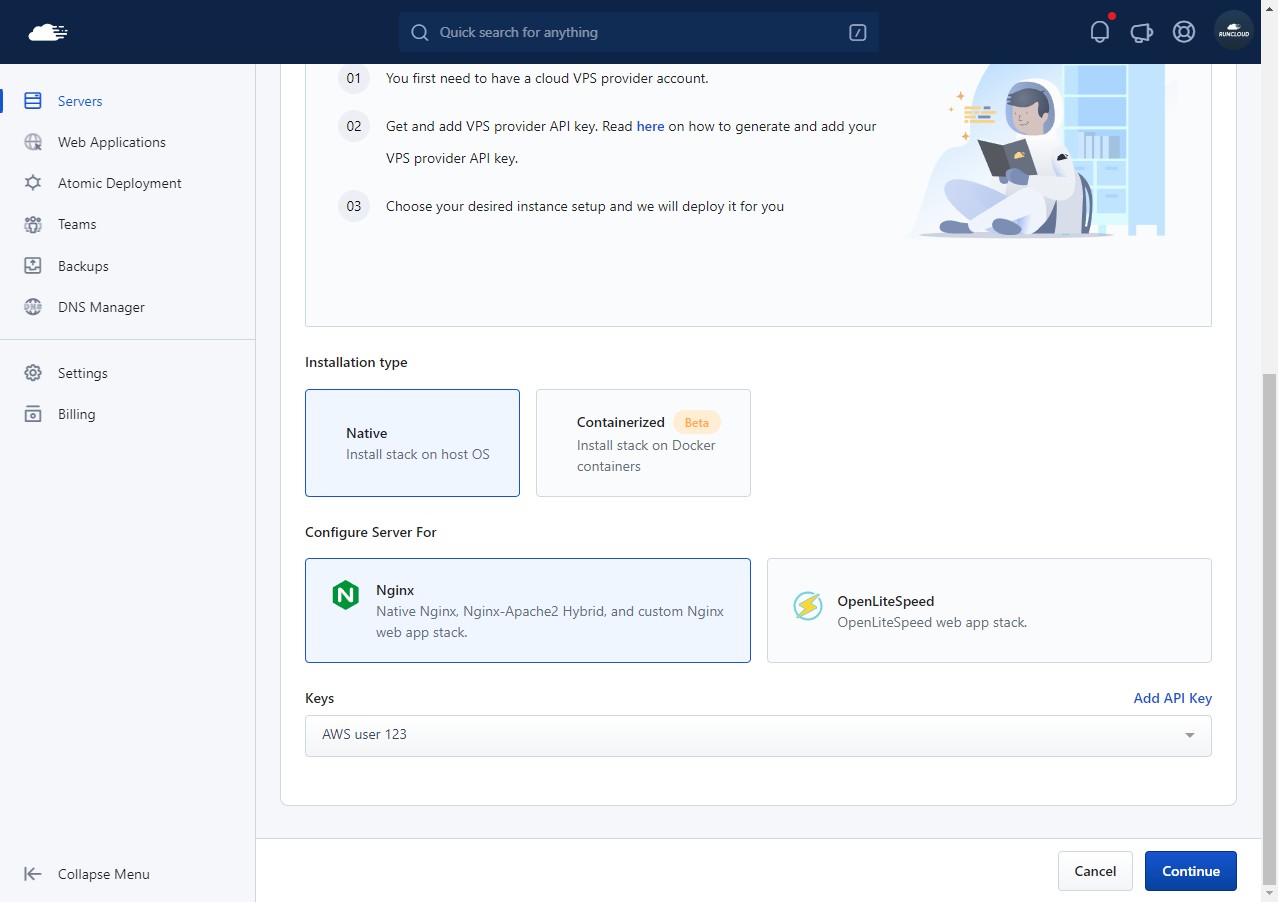
    Now, scroll down to the bottom half of the page and select the installation type as well as your desired server infrastructure. Then select the API key from the dropdown, and click “Continue”.

    Note: At the time of writing, RunCloud users will not be able to connect servers running Ubuntu 24 using AWS Lightsail to their RunCloud dashboard.

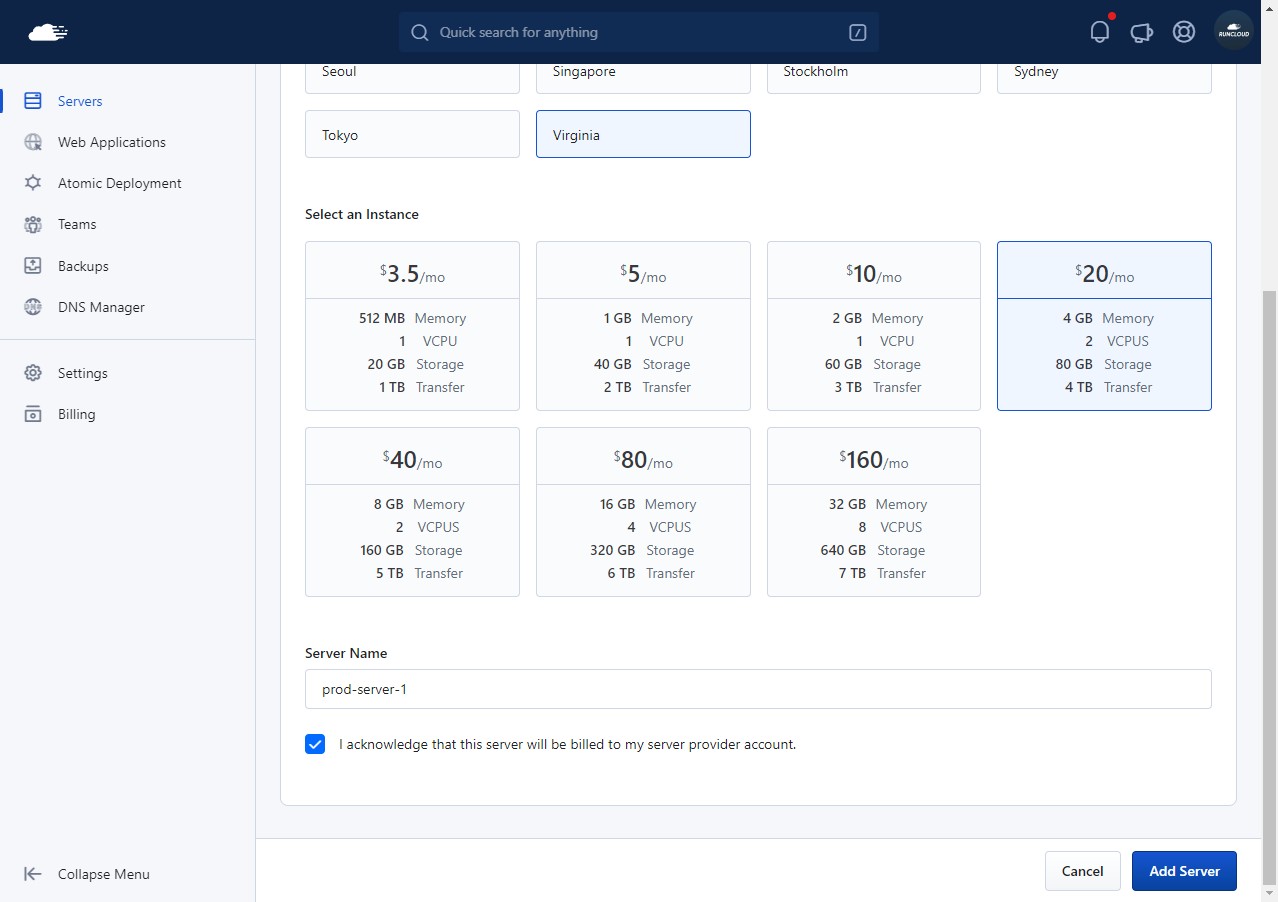
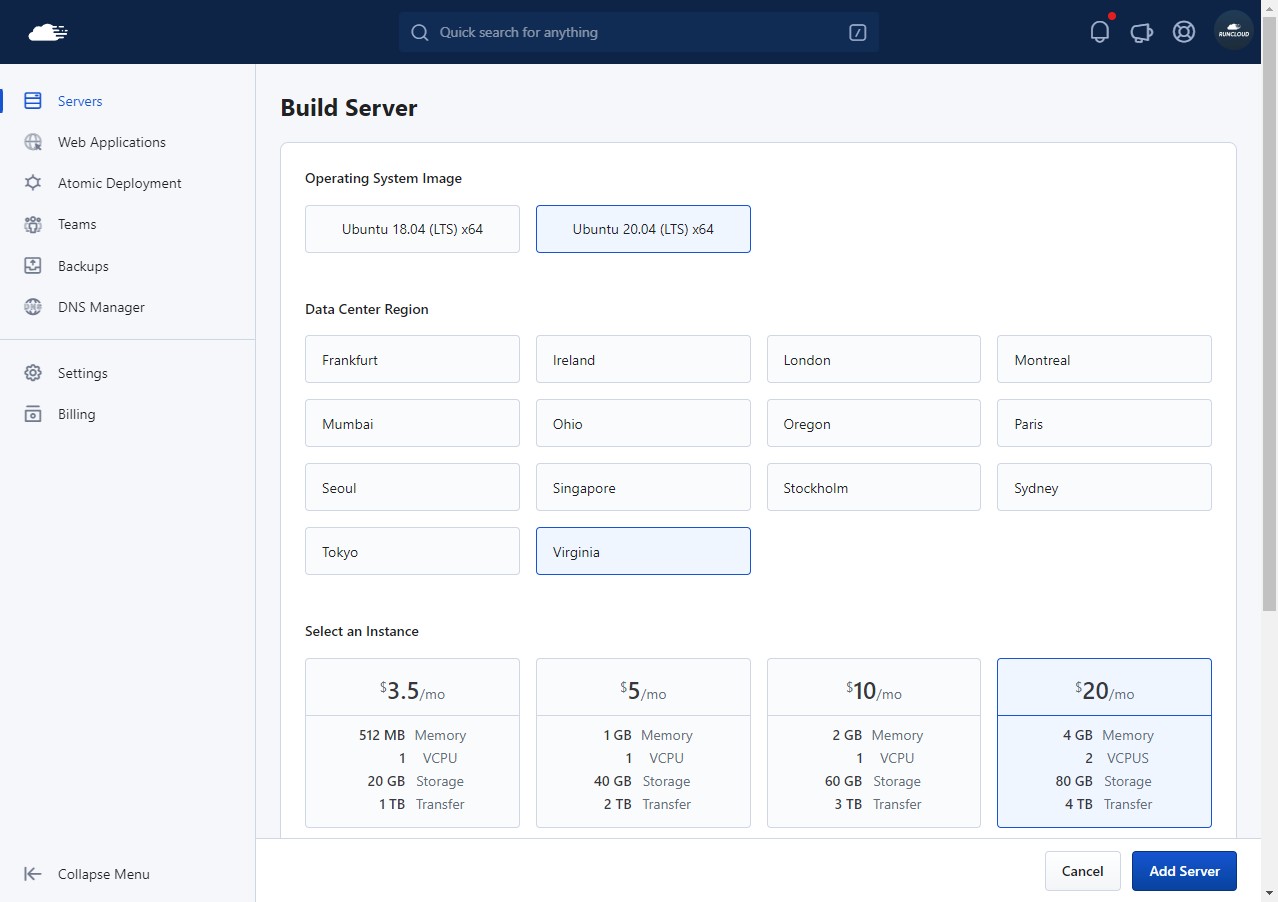
    On the next screen, you will need to specify the operating system, datacenter region and the instance type of your server. Just click on the choice you want, and it will be highlighted.

    Now scroll down to the bottom of the page, where you will be asked to provide a name for your server. Give it a suitable name, and check the box to acknowledge that you understand you will be billed for this server. Then click “Add Server”.

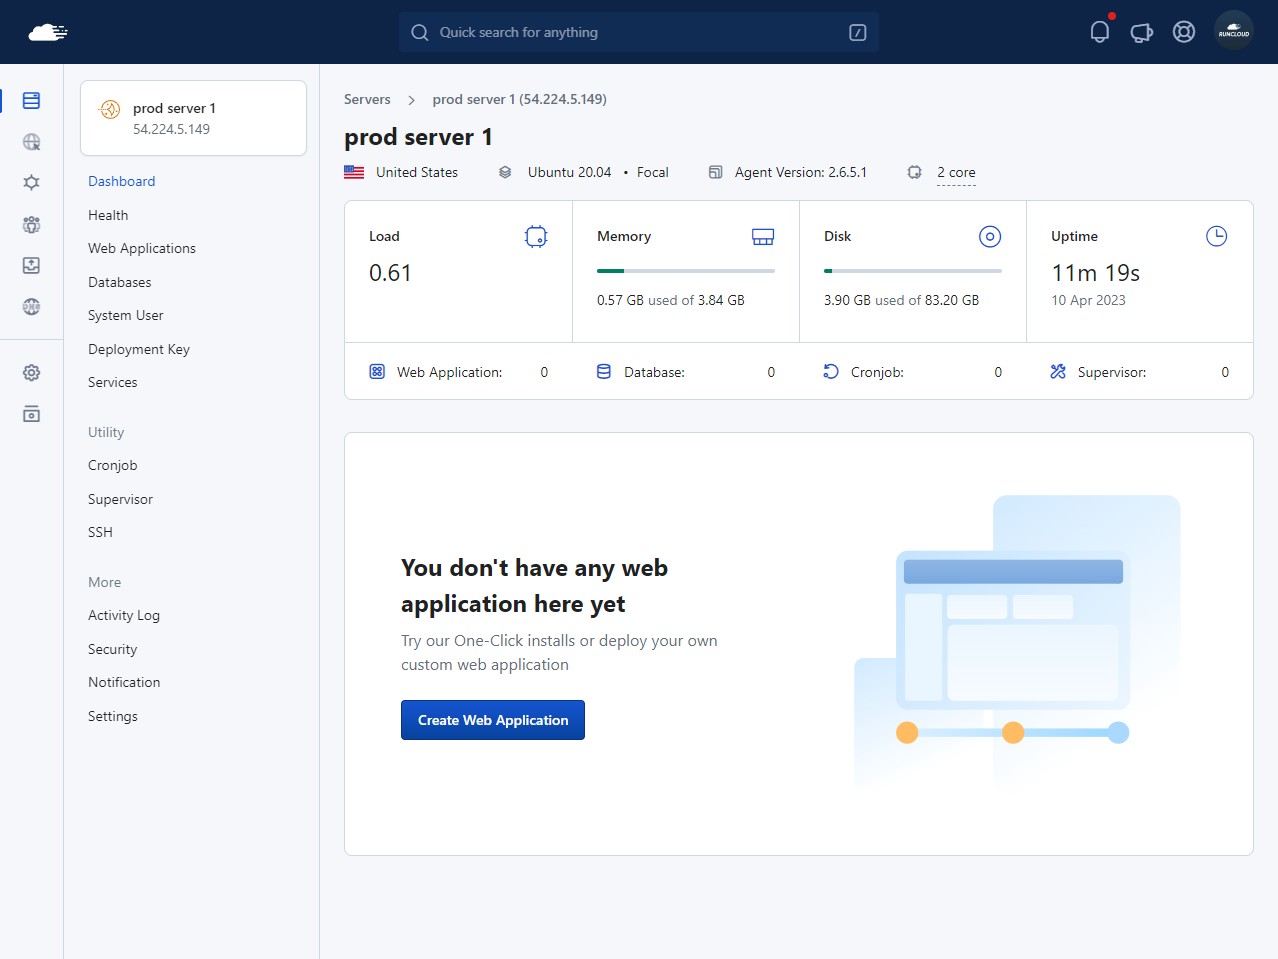
    After adding the server, RunCloud will take a few minutes to install the necessary software and dependencies on your server. You don’t need to do anything at this point, just sit back and wait for the installation to finish.

    Once finished, you will be redirected to the following screen:

    Tips – Create a Static IP Address For Amazon Lightsail

    When creating an Amazon Lightsail instance, you will get a private IP and public IP for each server. You can use the public IP to connect to your instance from the Internet, including setting up your server using RunCloud.

    Unfortunately, it’s not a static IP address. This means that this public IP will be changed automatically when you stop and restart your Amazon Lightsail server.

    If you use Amazon Lightsail to host your website, it’s highly recommended that you use the static IP address for your server. This static IP is dedicated to you, and will not be changed when you stop and restart your server. However, you will be charged $0.005 USD/hour fee for static IPs not attached to an instance.

    To reserve a static IP, go to your AWS console and open the AWS Lightsail dashboard. Once there, locate the server that you just created via RunCloud.

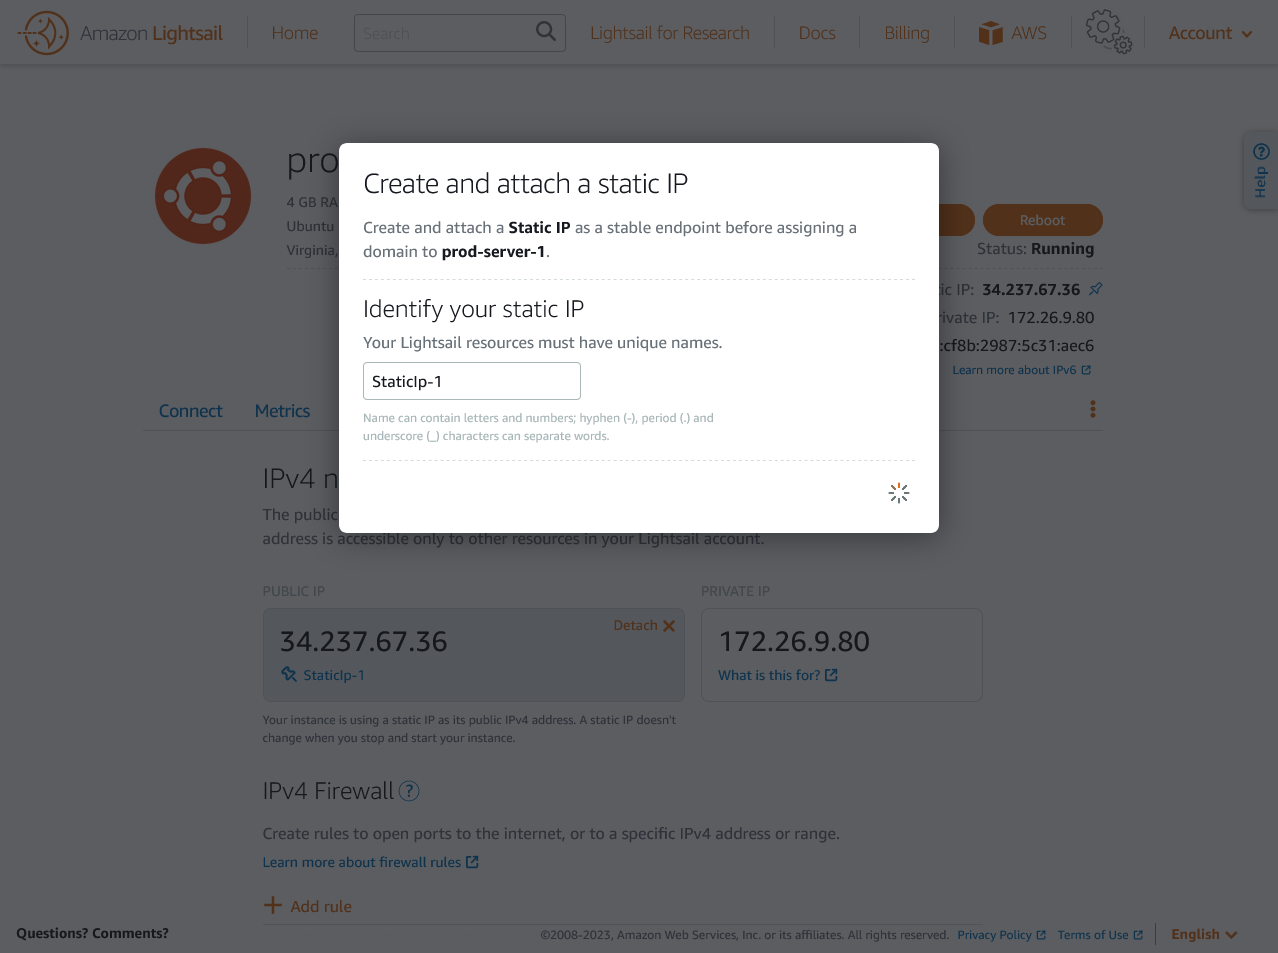
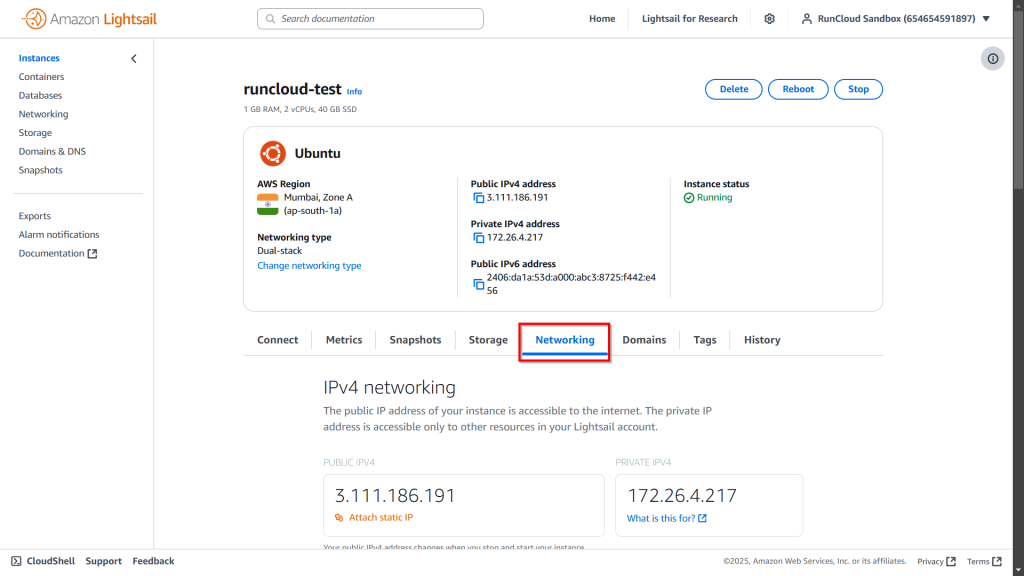
    Go to the Networking tab and click on “Attach static IP” to reserve a static IP address. Follow the instructions to create a new IP address, and save it.

    Amazon Lightsail

    After you have added the new IP address to your AWS Lightsail server, it might change from the one you have previously. If your new IP address is different from your current IP address, you will need to configure RunCloud to use this new address.

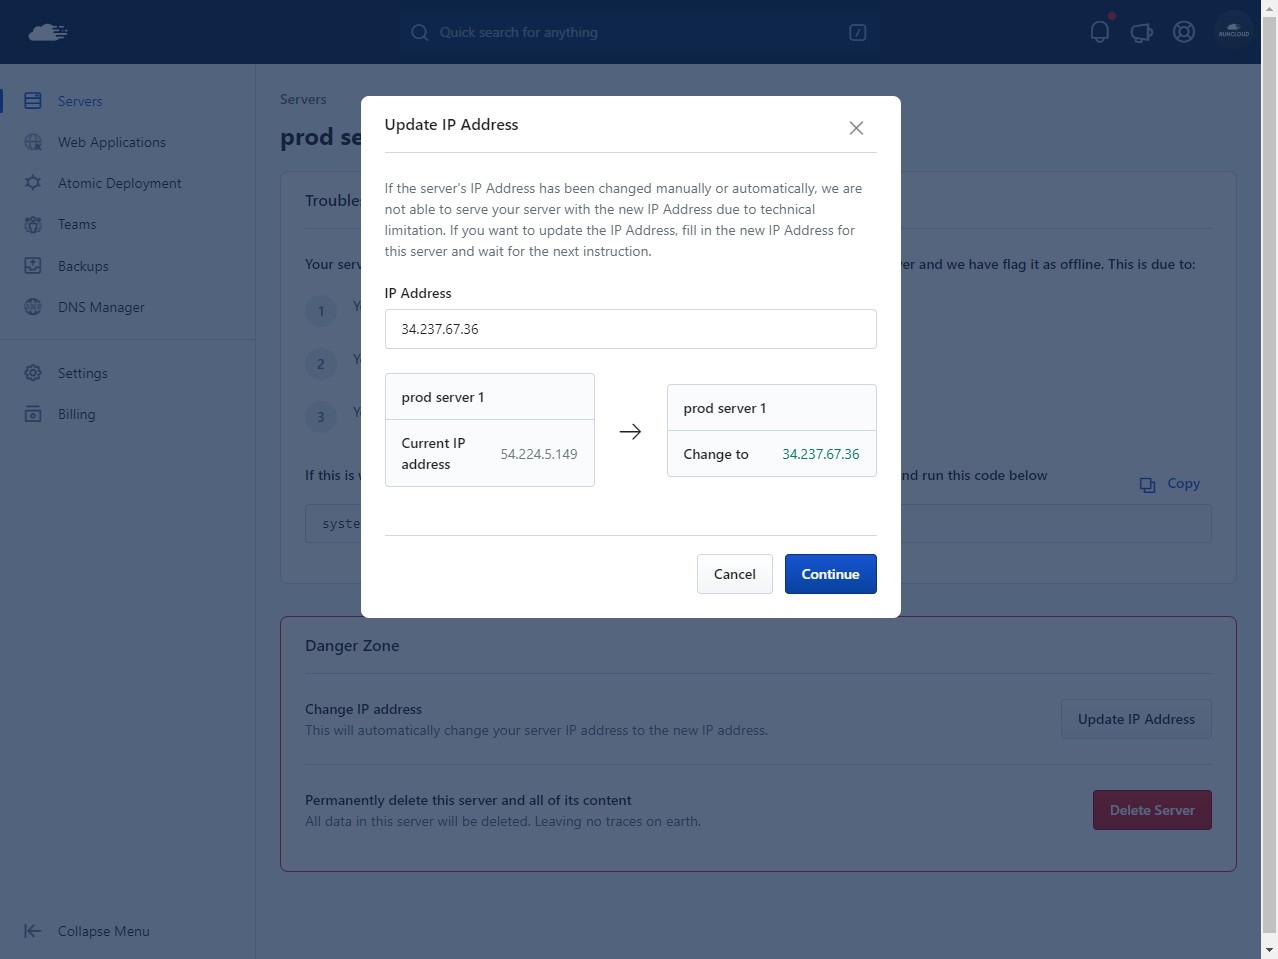
    Go to your RunCloud dashboard and click on your server. It should give you a message saying “Server information is not available”. If not, just wait for a few minutes and refresh the page. Once RunCloud is no longer able to connect your server, it will ask you to troubleshoot the issue.

    Click on the “Update IP address” button to add a new IP address. A prompt will appear asking you to enter the new address. Add the new IP address, and click “Save”.

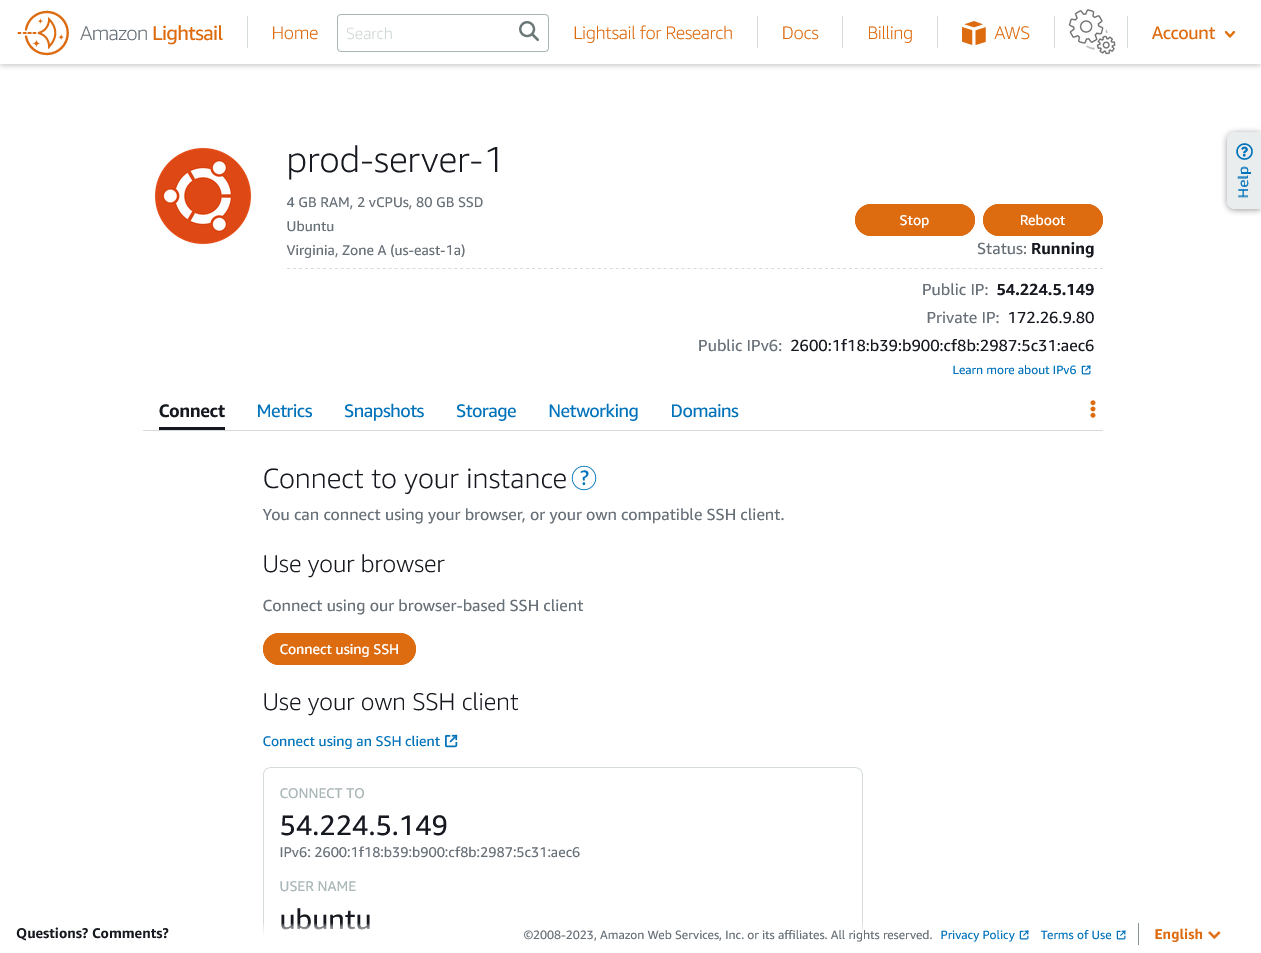
    Next, you will need to run a script in your AWS server. Go to your AWS Lightsail dashboard and click on “Connect using SSH”. This will open an SSH connection in a new browser window. Copy and paste the script from RunCloud into this window and press “Enter”.

    Please check the video below to learn how to set up a static IP address for your Amazon Lightsail server:

    Now that RunCloud should be able to connect to your server again, refresh your dashboard. If everything is still working as expected, then you can close the SSH session.

    Managing Firewall Rules for Your Lightsail Server

    When you provision a new Amazon Lightsail server directly through the RunCloud dashboard, RunCloud streamlines the setup process by automatically creating the necessary firewall rules. These initial rules are designed to secure your server while allowing essential services to function, such as traffic for SSH (port 22), HTTP (port 80), HTTPS (port 443), and the RunCloud agent communication.

    However, if your application has specific requirements, or you need to open additional ports, you can modify these rules at your own risk.

    To do so, you’ll need to leave the RunCloud dashboard and manage the settings directly within your AWS Lightsail account. Navigate to your Lightsail dashboard, select the server instance you wish to configure, and click on the “Networking” tab. Within this section, you will find the firewall configuration area where you can create new rules or edit existing ones.

    While editing the rules, you should remember that Lightsail requires you to create separate rules for both IPv4 and IPv6 traffic. For any custom rule you add, you must create an identical version for each protocol if you want the rule to apply universally.

    For example, if you want to enable the performance benefits of HTTP/3 on your server, you must create a new firewall rule to allow incoming UDP traffic on port 443 for your server’s IPv4 address. To copy this rule to IPv6, you can just select the checkbox next to “Duplicate rule for IPv6”, and AWS will automatically create another rule for you.

    After clicking “Create“, the new firewall rules will be applied to your server immediately.

    After Action Report

    Amazon Lightsail is the easiest way to get started with the Amazon Web Service infrastructure for developers who need a simple virtual private server (VPS) solution with predictable pricing, starting from $3.50 / month.

    RunCloud’s integration for AWS makes it easy to manage servers across multiple AWS accounts. After setting up your server, you can learn How To Install WordPress With RunCloud using our step-by-step guide.

    RunCloud is built for developers that want to focus on shipping great work, not on managing their infrastructure. Experience a painless server configuration so you don’t need to spend hours figuring it out.

    Get started with RunCloud today & get up and running in minutes.

  • How To Monitor Your Web App’s RAM & CPU Usage with Netdata

    How To Monitor Your Web App’s RAM & CPU Usage with Netdata

    Netdata is a powerful tool that can help you monitor your servers with ease and efficiency. It’s a distributed, real-time, performance, and health monitoring platform that can collect and display thousands of metrics from your servers, hardware, containers, and applications, including RAM and CPU usage.

    Netdata has many features and benefits that make it a great choice for server monitoring, such as:

    • Real-time data collection and visualization: Netdata collects metrics every second, and displays them on interactive charts that update every second as well. This means you can see exactly what’s happening on your servers without any delays.
    • Infinite scalability: Netdata can scale to any number of servers and metrics without compromising performance or accuracy. It stores the data locally on each server, which means it doesn’t need a central database or a query engine. You can also use Netdata Cloud to view metrics from multiple servers in one dashboard, with secure streaming and encryption.
    • Flexible and modular architecture: Netdata can monitor any system, service, or application that exposes metrics with the help of its modular architecture and hundreds of integrations. You can also extend Netdata with custom collectors, plugins, dashboards, alarms, notifications, and more. Netdata is open-source and community-driven, so you can always find new features and improvements.
    • Zero configuration: Netdata is designed to work out of the box, without any need for configuration. It can auto-detect metrics from your servers and applications, and display them on preconfigured dashboards with meaningful visualizations and health alarms.

    Netdata is compatible with RunCloud, so you can use it alongside our platform to manage your web applications.

    How to Install Netdata on RunCloud Servers

    If you want to install Netdata on your RunCloud server, you can follow these simple steps:

    1. Sign up for Netdata: To use Netdata Cloud, you’ll need to sign up for a free account on their website. Netdata Cloud will allow you to view metrics from multiple servers in one dashboard, and access other features such as Metric Correlations and War Rooms.
    2. SSH into your RunCloud server: To install Netdata on your server, you’ll need to access it via SSH. If you don’t know how to do this, you can read our post on how to connect to your RunCloud server using SSH. You will need your server’s IP address, username, and password or SSH key.
    3. Open Installation Script: Once you have logged into your server via SSH, go to the Netdata dashboard and go to the “All Nodes” tab. Once there, click on “+ Add Node” button to view the installation script.
    Netdata dashboard view existing nodes.
    1. Execute the given command: You can install Netdata on your server with a single kickstart command. Change the update channel to “Stable“, and then copy the given installation command.
    Netdata Installation script.

    Upon execution, the above command will download and run a script that will install Netdata and its dependencies on your server. Go back to your SSH terminal, paste the given command, and then press ‘Enter’.

    Executing Netdata installation script on RunCloud

    During installation, it will ask you some questions about automatic updates, release channels, anonymous statistics, and Netdata Cloud connection. Press ‘Y’ to confirm the installation and then press ‘Enter’.

    After this, the installation daemon will ask you which services should be restarted. You can use the arrow keys to navigate up/down and press the spacebar to select/deselect options if you want to do so.

    Restarting services via CLI after installation

    In most cases, default selection is right choice for most people. Press the ‘Tab’ key on your keyboard – this will move cursor to the next position. Make sure that the ‘Ok’ is highlighted, and then press ‘Enter‘ to continue the installation.

    You will be asked to confirm the installation once again, press ‘Y’ to confirm, and then press ‘Enter‘.

    Daemon using outdated libraries on RunCloud.

    After this, the installation script will once again ask you which services should be restarted – leave these settings to default. Press ‘Tab‘ to highlight the ‘Ok’ button, and press ‘Enter‘ to finish the installation.

    Netdata installation completed successfully.

    That’s it! You have successfully installed Netdata on your RunCloud server. You can now access the Netdata web interface by visiting your Netdata dashboard.

    How to View Server Metrics

    To see the RAM and CPU usage of different servers, you can use either Netdata’s web interface or Netdata Cloud. Both options will show you interactive charts that update every second with real-time metrics.

    Using Netdata’s Web Interface

    Netdata hosts a dashboard on your server, which you can view by visiting port 19999 of your server. You can change this port by editing the Netdata configuration file. By default, RunCloud blocks all non-standard ports. Therefore, you’ll need to either connect to your server via a VPN, or open up the ports to visit the dashboard.

    To open up ports, go to your RunCloud dashboard and open the “Security” tab of the server. Click on “Add New Rule” and create a new rule to open up the specified ports on TCP and UDP. Once you have created all of the rules, you’ll need to click “Deploy” to save the changes.

    Open Firewall ports RunCloud

    Once you have opened up the firewall, anyone on the internet can view your Netdata Dashboard by visiting http://<ip address>:19999.

    Note: this will allow you to view the dashboard only for this particular server – if you have more than one server, you must repeat this step for all of them.

    This option presents a simplified user interface that displays all metrics of the selected server. This is useful if you don’t want to log into your Netdata Cloud account to view the metrics. However, you won’t be able to make any changes in this dashboard; for that, you will still need to log into your account.

    Netdata Local Dashboard depicting CPU, RAM, and Disk usage

    Using Netdata Cloud Dashboard

    Once you have connected a node to your cloud account, you can see it in your dashboard. One cloud account can connect to many servers, so you’ll need to navigate the dashboard and search for the server that you want to view.

    To view all available nodes connected to your account, navigate to the “All Nodes” page, and switch to the “Nodes” tab to view all connected nodes.

    Connected nodes on Netdata cloud dashboard

    In the above screenshot, we can see two nodes are connected to our Netdata account. The first node is inactive, and the second node is posting metrics to the cloud. You can click on this node to view detailed metrics.

    Netdata dashboard showing system metrics on RunCloud

    The above screenshot shows the overview of the system metrics. To view detailed metrics such as disk, memory, CPU usage, etc. for a particular application, click on the “Applications” button in the tab on the right of the screen.

    Netdata application monitoring metrics.

    Besides monitoring, you can also use this dashboard to invite new users and collaborate with them. 

    Final Thoughts

    Netdata is a powerful and easy-to-use tool that provides real-time insights into your server’s performance and health. You can use Netdata to visualize and analyze various metrics such as memory usage, CPU load, disk I/O, network traffic, and more. You can also set up alerts and notifications to get notified when something goes wrong with your web app.

    By using Netdata on RunCloud, you can benefit from the seamless integration and compatibility between the two platforms. If you have any questions or feedback, please feel free to leave a comment below.

    If you’re tired of managing your own servers – you might want to check out RunCloud (yep, that’s us!). RunCloud is built for developers that want to focus on shipping great work, not on managing their infrastructure. We provide painless server configuration so you don’t need to spend hours figuring it out – get started with RunCloud today & get up and running in minutes.

  • How to Test WordPress 6 — and Every Subsequent Release

    How to Test WordPress 6 — and Every Subsequent Release

    Is your website losing potential customers? Shocking statistics reveal that 64% of visitors abandon slow and glitchy sites!

    It’s vital that you test your websites thoroughly to provide your users with a first-rate browsing experience if you want to stand any chance of increasing your sales.

    In this article, we will detail the steps you need to follow for setting up a WordPress staging environment and will demonstrate exactly how it can be used to test your website’s updates.

    Our step-by-step guide will ensure your site is always running smoothly and keeping customers happy.

    Let’s get started!

    Understanding New WordPress Releases

    At the time of writing, WordPress 6.2 is the latest release of WordPress (with 6.3 due to be released around August of 2023). This current release includes several major changes and enhancements that make web development easier.

    For instance, the new default theme, Twenty-Twenty-Three, now includes ten style variations – which gives you a lot of flexibility in developing your new site.

    One of the key highlights released is the enhancements in Query Loop blocks functionality. In addition to this there have been improvements in block placeholders which provide better consistency and control, and more responsive text with fluid typography.

    You can track the latest release of WordPress on the new releases page.

    Although new features make life easier, they sometimes cause compatibility issues with the existing site, especially if your site uses plugins or themes that have not been tested with the latest version. It’s a good idea to test that everything works before upgrading your website.

    That’s where a solid staging environment comes in.

    What is WordPress Staging?

    A staging environment is a duplicate copy of your website where you can try out and thoroughly test any changes – without affecting the original site.

    It’s often used to test and preview the changes to themes and plugins before making them live on the actual website. This way, website owners can test changes without any risk of disrupting users’ experiences on the live site.

    Why Do You Need to Test WordPress?

    Running and maintaining a staging site alongside your production site might seem like double the effort. However, doing this can save countless hours in debugging. Here are a few scenarios where it’s especially useful:

    1. A staging site allows developers to work more efficiently as they don’t need to worry about the potential repercussions from any failure. If you’re making changes to a live site, you’ll take regular backups and carefully inspect everything before making each change. If your site is being actively developed, this can take a lot of time. Having a sandbox environment to test and refine changes makes the development process faster.
    2. By testing the changes on a test site you can catch and fix issues before they go live. The ability to identify and proactively fix the issues even before they show up in your live environment makes it immensely valuable for businesses that cannot afford downtime.
    3. Multiple developers can work simultaneously on the staging site without worrying about clashes and overwriting each other’s work. This can speed up the development time and reduce miscommunications.

    When Should You Use WordPress Staging?

    There are many scenarios where using a test environment is helpful. Here are some of the common examples:

    1. Updating WordPress core, themes, or plugins: With WordPress, plugins can conflict with each other, leading to errors or crashes. With staging websites you can test new plugins, or updates to existing plugins, without risking the stability of the live site.
    2. Design changes: Website owners can experiment with different design changes, such as a new color scheme, layout, or font, all without affecting the live site. This is much more useful than having a mockup of the design, because the staging site can be viewed on different devices to test both responsiveness and accessibility.
    3. E-commerce changes: For e-commerce websites staging is especially useful when testing new payment gateways, product listings, or other updates that could affect the checkout process.

    Setting Up a Test Environment

    Step 1: Back Up Your Site

    Ensure that you have a working backup of your site. If you don’t have a recent copy, you can use RunCloud’s automated backup functionality to quickly create a snapshot of your site. If you’re not using RunCloud to manage your servers yet, you can use a WordPress plugin such as WP Migrate Lite, or Duplicator to make a copy of your site.

    create staging site using LocalWP

    Step 2: Setup A Test Environment

    You need to create a consistent testing environment that closely resembles your actual hosting environment. This means you should use the same operating system, PHP version, and libraries in your staging environment. Ideally your test environment should not have anything running except your test site so that it’s isolated from all potential problems.

    If you don’t have a fresh virtual machine then you can use tools such as Vagrant for building and managing virtual machine environments. It’s a customizable and scalable solution for advanced users who require more control over their development environment.

    In this tutorial, we’ll be working with Local, a WordPress development environment. It’s specifically designed for testing WordPress sites. Start by downloading the Local binary on your computer and execute it.

    The binary file will automatically download and install the necessary packages for your computer. Once you’re done, you should see a screen that looks something like this:

    LocalWP empty screen

    Step 3: Import Your Backup Into The Test Environment

    Click on “Create a new site” and select the option to use an existing zip file. Locate the backup of your live website, and use that backup to create a new site.

    Import Archive LocalWP

    Use the preferred settings for a seamless experience, and click “Import site”. Your firewall might prompt you to allow network access, so make sure you grant this access for a smooth installation.

    choose environment WordPress

    Step 4: Make The Changes To The Staging Site

    Once your site has been imported, click on the “Open site” button on the top right to view your staging site. Now you can log into your admin dashboard as you normally would, with the same credentials that you use for your live site.

    LocalWP dashboard staging

    Once you have the site up and running, you can access it on your local network and collaborate with other team members – all completely without affecting the live site.

    After you have thoroughly tested the compatibility of your plugins and themes, you can make those changes on your live site without worrying about unexpected repercussions.

    If you only made a few minor edits to your staging site, such as changing some text or colors, you can post these changes to your live site by manually implementing them. For example, you can edit the same file or setting on your live site, and then copy-paste the changes from your staging site. In this way, you can avoid overwriting your entire live site and preserve any user-generated data.

    However, if you made a complex operation on your staging site, such as installing a new plugin or theme, adding custom code, or modifying the database, it may be wise to take a backup of your staging site – and overwrite your existing live site with it. This way, you can ensure that your live site matches your staging site exactly, and avoid any compatibility issues or errors. Before you do this, however, make sure you have a backup of your live site as well in case something goes wrong.

    Creating A Staging Site on RunCloud

    If you’re using RunCloud to manage your servers, then you can create a staging site with just a few clicks. RunCloud can automatically clone entire WordPress sites without requiring you to download anything.

    To use RunCloud’s staging feature, go to your dashboard and open the “Staging” menu to set up a test environment. Click on the “Get Started” button to begin the process.

    RunCloud dashboard staging WordPress

    RunCloud will now ask you to enter the username and password that visitors will need to enter for browsing this site. This is not your WordPress admin dashboard password – your staging site will have the same login credentials as your production site.

    You can turn off this option if you like. However, we recommend you keep this on as making the test site publicly available might potentially reveal some confidential information.

    configure staging environment WordPress

    After configuring the access control of your site, you can configure the domain that you want to use. You can either use a different subdomain of your original site, or use a test domain.

    Configure staging domain RunCloud WordPress

    After configuring the necessary settings, deploy the app by clicking the “Deploy Staging” button. Once deployed, you should see the following screen. Click on the “Open Site” button in the top right corner of the screen to browse your staging site.

    staging WordPress settings RunCLoud

    After opening the site, you should see an alert asking you for login credentials. Enter the username and password that you just created. You should now be able to browse your site and make changes to it without affecting your main site.

    HTTP authentication RunCloud WordPress

    After making the changes, you can go back to the staging dashboard and click on the “Sync” button to push changes from the test environment to the production.

    WordPress Staging Plugins

    Many WordPress backup and migration plugins also provide the option to create a staging environment. Here are some of the best WordPress staging plugins.

    1. WP StageCoach
      WP Stagecoach provides the ability to easily create sandbox sites. It has some advantages over importing a backed-up copy of your test site, as it merges the database rather than overwriting the existing one. There are also some advanced features, such as protecting staging sites via a password, or offering the ability to revert changes instantly.
    2. WP Staging
      The WP STAGING plugin for WordPress allows users to create backups, staging sites, and clones of their website. Some advanced features included are support for multisite networks, and migration to another host or domain – although these are locked behind a paywall. The staging environment can quickly test updates and restore backups if necessary, making it a good choice for managing your staging environment.
    3. BlogVault Staging
      BlogVault is a WordPress backup plugin that also provides a staging environment. It can perform incremental automatic backups, and can revert to previous versions easily. This quick backup and recovery process allows you to speed up your development, as you’ll spend more time testing and less time waiting for backups.

    The staging site runs on a separate server instead of running alongside your live site. This allows you to load-test the staging site without worrying about any possible performance impact on your live site.

    After Action Report

    It is essential to test any changes before pushing them to your live site. This is even more important if you’re running a business that relies on a website for its core services. Staging environments are a great way to test your site in a sandbox environment without worrying about compatibility issues.

    We strongly encourage all WordPress site owners to test new releases and stay up to date with the latest software updates. This not only ensures that your site is functioning optimally but it also helps to ensure your site is secure. Outdated software can leave your site vulnerable to security threats, which can have serious consequences for your business.

    If you’re tired of managing your own servers – you might want to check out RunCloud (yep, that’s us!). RunCloud is built for website owners that want to focus on their customers, not on managing their infrastructure. Experience painless server configuration, backups, and worry-free staging environment migration, without the need to spend hours figuring it out – get started with RunCloud today and get up and running in minutes. Get started with RunCloud today and get up and running in minutes.

  • Fixing Redirect Loop on Cloudflare SSL

    Fixing Redirect Loop on Cloudflare SSL

    If you are using Cloudflare proxy to hide your server’s IP address from the internet, then you might encounter a glitch that causes visitors to get stuck in a redirection loop.

    Eventually, the request times out with an error message saying, “Too many redirects”.

    In this article, we will investigate why websites might get stuck in a redirection loop and how you can prevent this.

    Let’s get started!

    Why Does This Happen?

    If you’re using Cloudflare to serve visitors, you’ll probably be using Cloudflare’s TLS certificate to securely transmit these web requests. When you’re using the Flexible SSL option, Cloudflare will connect to your site over an HTTP connection, and forward the response to visitors over an HTTPS connection.

    The Nginx or Apache2 server on your machine sees these requests before they are processed by WordPress. WordPress processes these requests over HTTP protocol – which causes your site to show a mixed content warning. This is where some content of your site is served over HTTP, whilst other content is transmitted over a secure connection.

    If you try to address this issue by manually updating URLs from HTTP to HTTPS, then you might get stuck in a redirection loop.

    This happens because when you configure your site to serve content over HTTPS, it will only serve it over HTTPS. If a user makes an insecure request, the server asks them to make a new request with an HTTPS connection. Usually this isn’t a problem, but if you have misconfigured your servers, an error will occur.

    How does Cloudflare proxy work?

    If Cloudflare servers make an insecure request to your site, and you redirect that back to another Cloudflare server, then it will cause an infinite loop. Each server will keep asking the other one to serve the request, until the maximum number of requests are reached.

    How To Fix This Issue?

    There are a few ways to fix this problem. Here are some of the easier ways to resolve the redirect loop problem.

    Using Cloudflare Page Rule

    One of the simpler ways to fix this problem is by updating the settings on your Cloudflare dashboard.

    You can configure Cloudflare’s redirect rules with status code 301 to indicate that the webpage has moved over permanently.

    In your Cloudflare dashboard, open the domain that you want to configure and look for the Redirect Rules section inside the Page Rules submenu. Then create a forwarding rule to tell Cloudflare to forward HTTP requests to HTTPS.

    A screen capture of Cloudflare dashboard showing screen capture page.

    For example, if your WordPress address is https://blog.runcloud.io, Create a rule for http://blog.runcloud.io/ and use the Full URL setting with 301 redirect. 

    Updating CloudFlare TLS settings

    To make sure that you don’t get stuck in redirection loops, use either the Full or Full (Strict) setting so that all the web requests are only made using the HTTPS connection.

    A screen capture of Cloudflare dashboard showing SSL/TLS settings.

    Using SSL Certificate In RunCloud

    If you are using RunCloud to manage your servers, you can easily configure TLS certificates for all your domains. Simply go to the domain section of your web-app and click the Configure SSL/TLS button for the domain that you want to secure.

    A screen capture of RunCloud dashboard showing how to edit domain name settings.

    Once you click the option, you’ll be asked to choose whether you want to use Let’s Encrypt or a different SSL provider, if you’re not sure about this, use Let’s Encrypt as it is free – and just as secure as other providers.

    After that, you can configure how you want to verify the ownership of your domain, and what kind of certificate you want. Unless you need something specific, you can leave these settings to the default values. 

    And finally, you need to specify what happens when someone tries to access your domain over insecure connections. We recommend using the HSTS option which asks all users to only use secure connections for all web requests. However, you should know that once you enable this option, you will not be able to serve any content over HTTP connections.

    A screen capture of RunCloud dashboard showing how to configure SSL/TLS settings.

    After Action Report

    The “too many redirects” error on Cloudflare can be frustrating, but it can be easily fixed by updating the misconfigured settings on your server. By following the steps outlined in this article, you’ll be able to update your website’s settings, and adjust your SSL certificates.

    If you’re still struggling to resolve the issue, you should consider switching to a more user-friendly server management platform like RunCloud. With RunCloud, you can easily manage your server and issue SSL certificates in just a few clicks, making it a great choice for WordPress users who want a hassle-free solution.

    If you feel that having a painless server configuration so you don’t need to spend hours figuring it out sounds like a good idea (and who doesn’t?) – get started with RunCloud today, and get up and running in minutes.