Category: Content Management System

  • How To Install Magento

    How To Install Magento

    Magento 2 is a popular e-commerce platform that powers thousands of online stores around the world.

    If you’re planning to set up an online store using Magento 2, you can do this easily on RunCloud.

    In this article, we’ll guide you through the process of installing Magento 2, along with all of the necessary dependencies.

    Let’s get started!

    System Requirements

    Before we start the installation process, it’s important to ensure that the system meets the minimum requirements for running Magento. This section will provide a list of requirements, and instructions for checking your system’s compatibility.

    Magento 2.4.6 has the following requirements:

    1. Operating System: 64-bit Linux
    2. Web Server: Apache 2.4, Nginx 1.8
    3. PHP: 8.1 or 8.2 (along with the necessary PHP extensions)
    4. MySQL: 8.0
    5. Composer: 2.2
    6. Search and Analytics Engine: Elasticsearch 8.4, 7.17 or AWS OpenSearch 1.2

    Installing The Necessary PHP Extensions

    If you don’t have all of the necessary extensions, you can install them on your server by running the following command. Simply log in via SSH, copy the following command, and paste it into your terminal:

    sudo apt-get install php-intl php-gd php-zip php-bcmath php-curl php-mysqlnd php-soap php-ctype php-dom php-fileinfo php-iconv php-json php-mbstring

    Make sure you run the above command with superuser permissions. After running the command you will be asked whether you want to install the listed extensions – press ‘Y’ to continue with the installation.

    Once done, you will need to reload the PHP-FPM service. You can do this by running the following commands:

    systemctl reload php81rc-fpm
    systemctl reload php82rc-fpm
    

    Installing Elasticsearch

    Magento 2 needs a search engine installed on your machine to work properly. Some popular choices are Elasticsearch and OpenSearch.

    We have covered this topic in more detail on our blog in a post titled How To Install Elasticsearch. However, if you are in a hurry, you can use the following commands to quickly install it. Just log into your server with the necessary privileges and run these commands:

    wget -qO - https://artifacts.elastic.co/GPG-KEY-elasticsearch | sudo gpg --dearmor -o /usr/share/keyrings/elasticsearch-keyring.gpg
    sudo apt-get install apt-transport-https
    echo "deb [signed-by=/usr/share/keyrings/elasticsearch-keyring.gpg] https://artifacts.elastic.co/packages/8.x/apt stable main" | sudo tee /etc/apt/sources.list.d/elastic-8.x.list
    sudo apt-get update && sudo apt-get install elasticsearch
    sudo systemctl daemon-reload
    sudo systemctl enable elasticsearch.service
    sudo systemctl start elasticsearch.service
    

    After the installation is complete, you can check if Elasticsearch is working as expected by running the following command:

    curl http://localhost:9200

    You should get an output similar to the screenshot shown below:
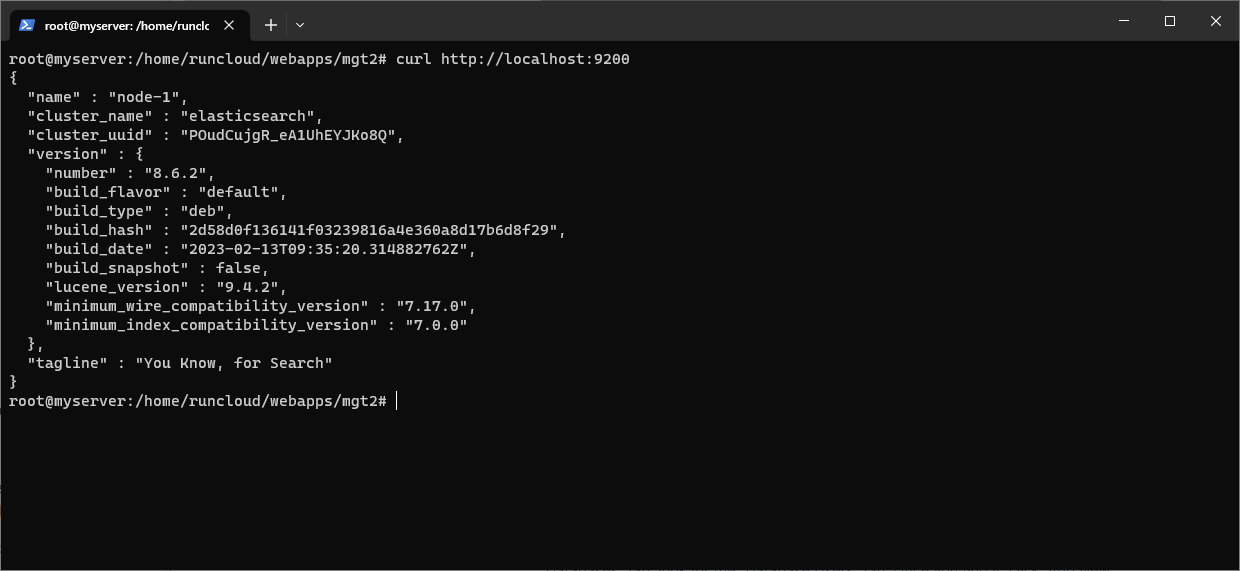
    curl request to Elasticsearch on localhost in terminal

    Creating A Database

    We recommend creating a separate database and user for Magento 2. RunCloud makes it easy to add and manage database users on your server. In this section, we’ll walk you through the process of creating a new database for your Magento 2 installation.

    Open your RunCloud dashboard and locate the server that you want to use. In the “Databases” tab, look for the “Database Users” tab. Once you find it, click “Add New Database User” to create a new account. Provide the necessary login credentials, and then make sure you save it.
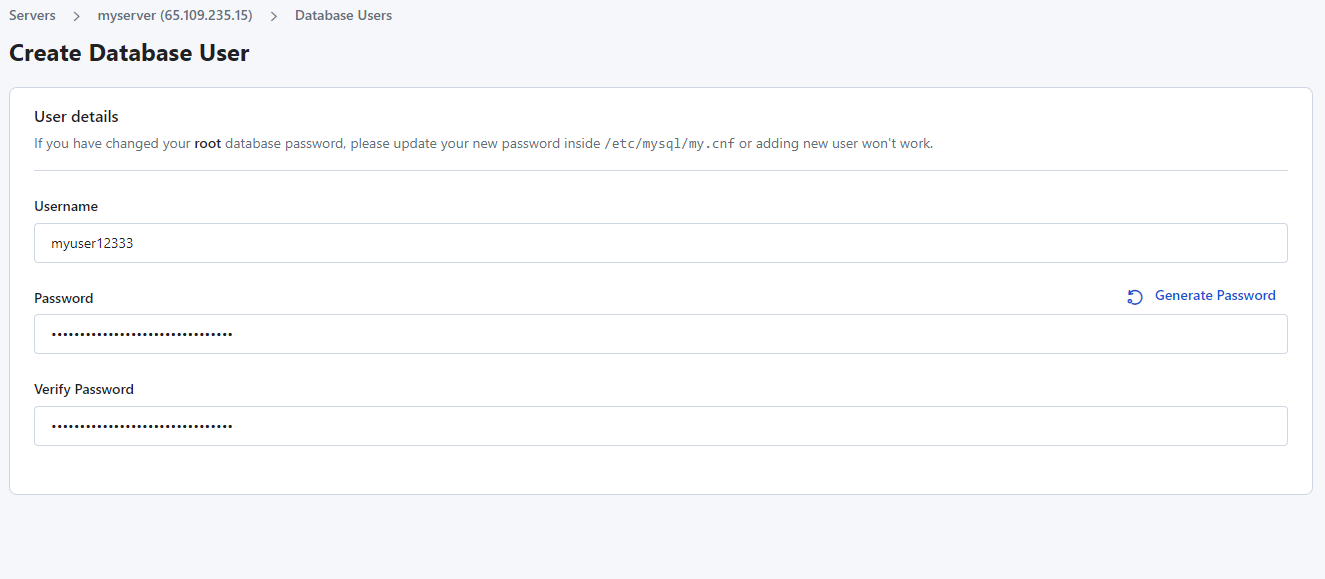
    Creating database user in RunCloud dashboard

    After creating the database user, go back to the “Databases” tab. Click on “Add New Database” and give it a suitable name. Don’t forget to grant access to the user that we just created.

    After you have created the database, save it – and continue with the installation.
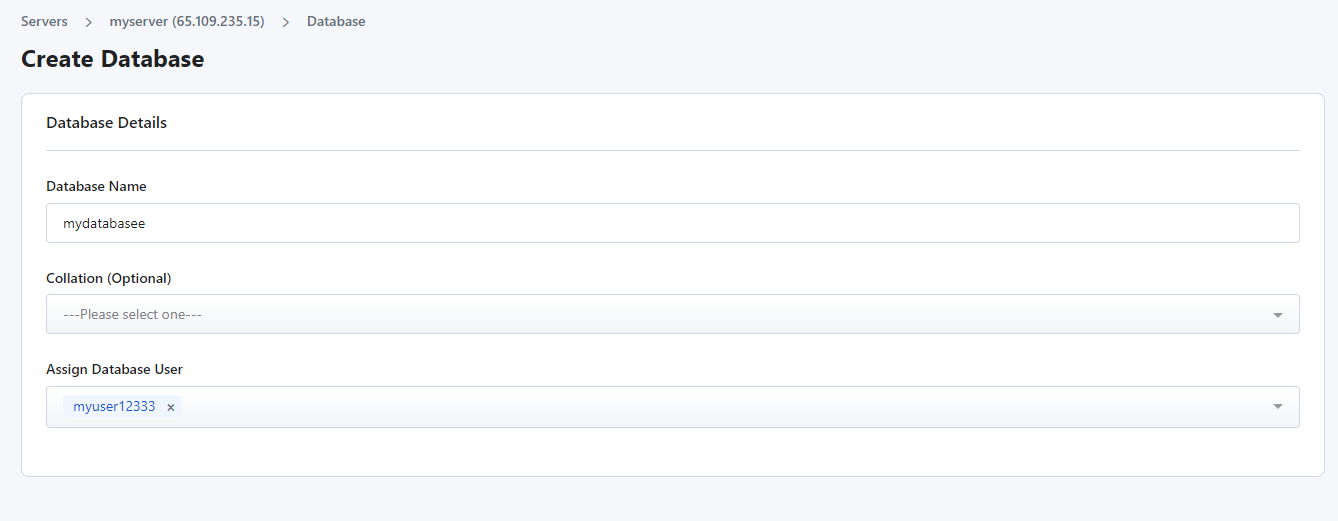
    creating database in RunCloud dashboard

    Downloading Magento 2

    After you have completed all the prerequisites for Magento 2 we can proceed with the installation. Go to your RunCloud dashboard and create a new application. Pick an “Empty Web App”, and then fill in all the necessary details.
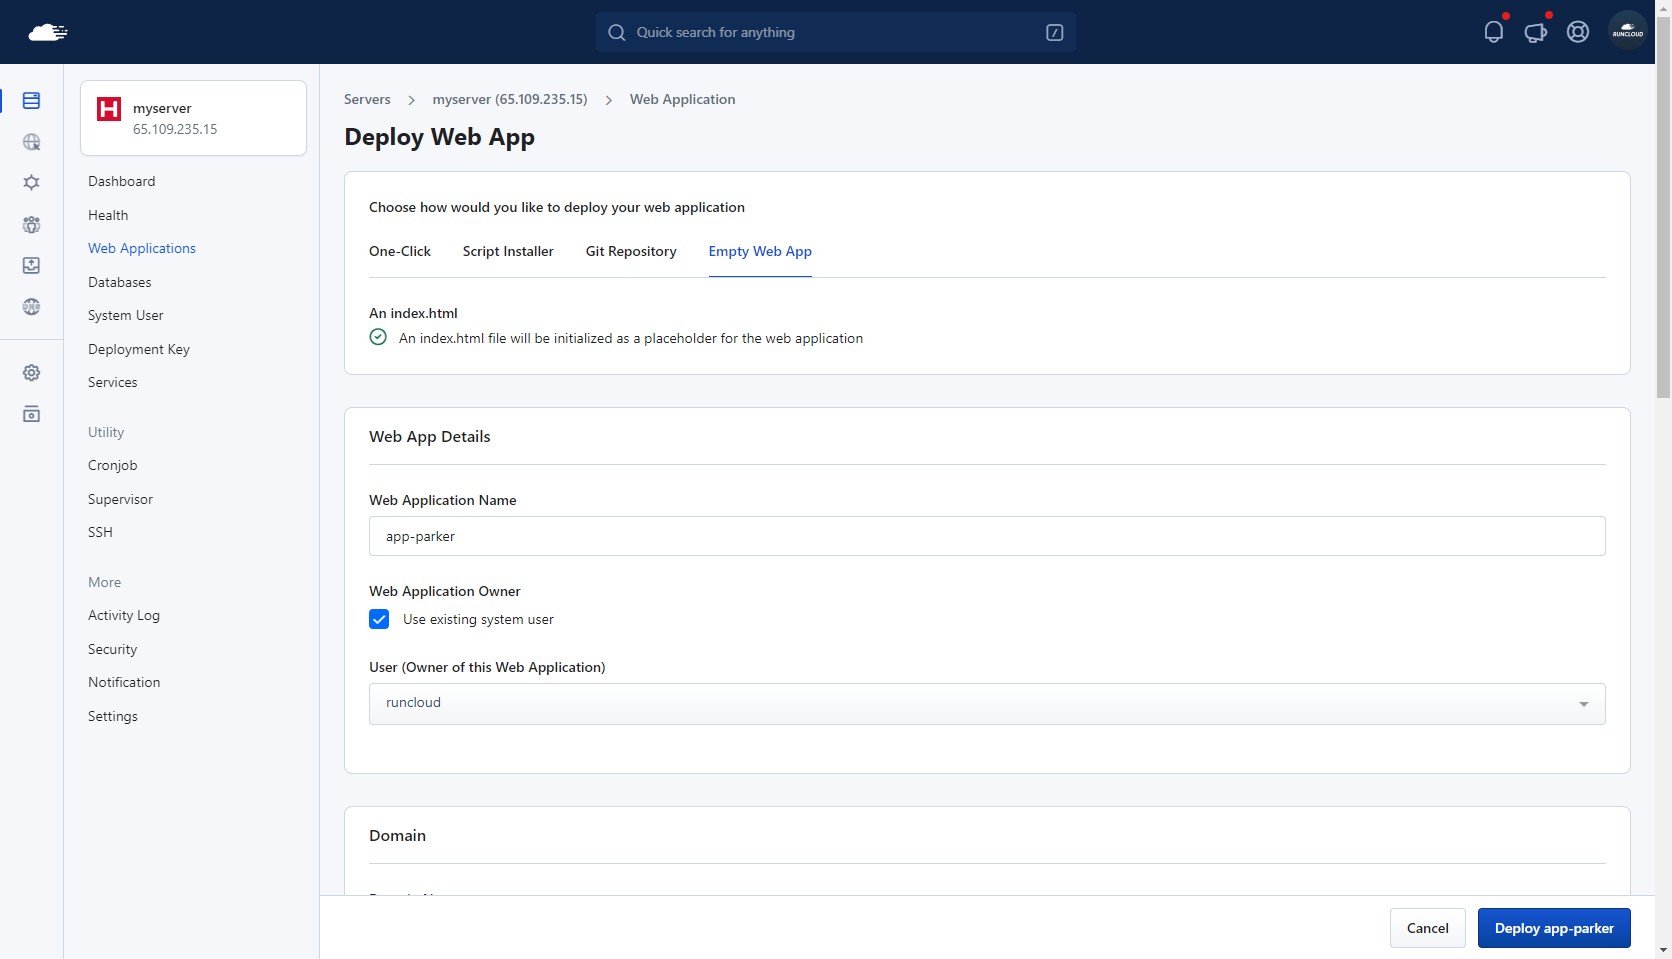
    Creating Web Aplication on RunCloud

    In the Basic settings and Stack section, add /pub in the public path and don’t forget to use a supported version of PHP. At the time of writing, the latest version of Magento (2.4.6) supports only PHP 8.1 and PHP 8.2.
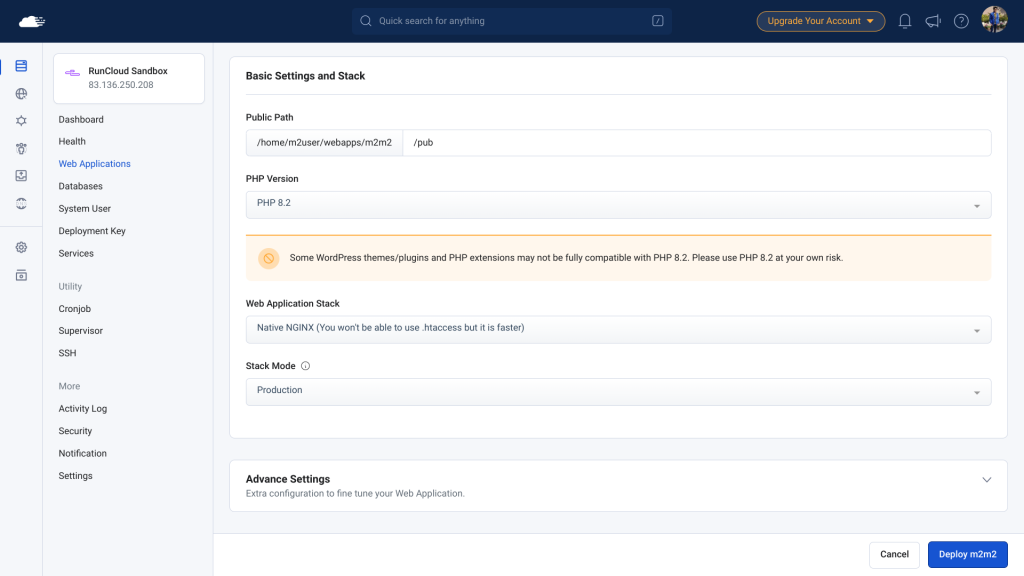
    After your application has been created, you will need to log into your server to start the installation. The following commands need to be executed as the “Owner of the web application”, so make sure you are logged in as the correct user. In the above screenshot, the owner of the application is “runcloud”.

    You can use the “whoami” command to find out the name of the current user. If you are logged in as a different user, you can use the “sudo su” command, followed by the name of the desired user to log into their account.
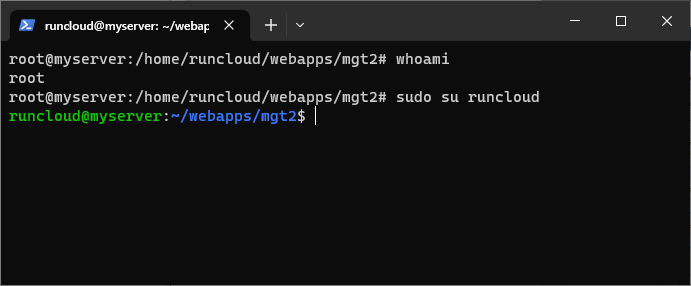
    check current user in Linux

    Once you have logged in successfully, use the “cd” command to navigate to the root directory of your project. If you are not sure what your root directory is, you can find it in the RunCloud dashboard.

    In the project directory, you can use the following commands to remove the default index.html file and download the installation files for the Magento Community Edition.

    rm -rf pub/
    composer create-project --repository-url=https://repo.magento.com/ magento/project-community-edition .

    During the installation, you will be asked to provide a username and password for downloading the files. Although Magento is free, it was acquired by Adobe, and so you will now be required to have an Adobe account.

    In this tutorial, we will only be using Magento, which is the free version of Adobe Commerce. To get your username and password, go to the Adobe Commerce Dashboard and log in with your Adobe credentials.
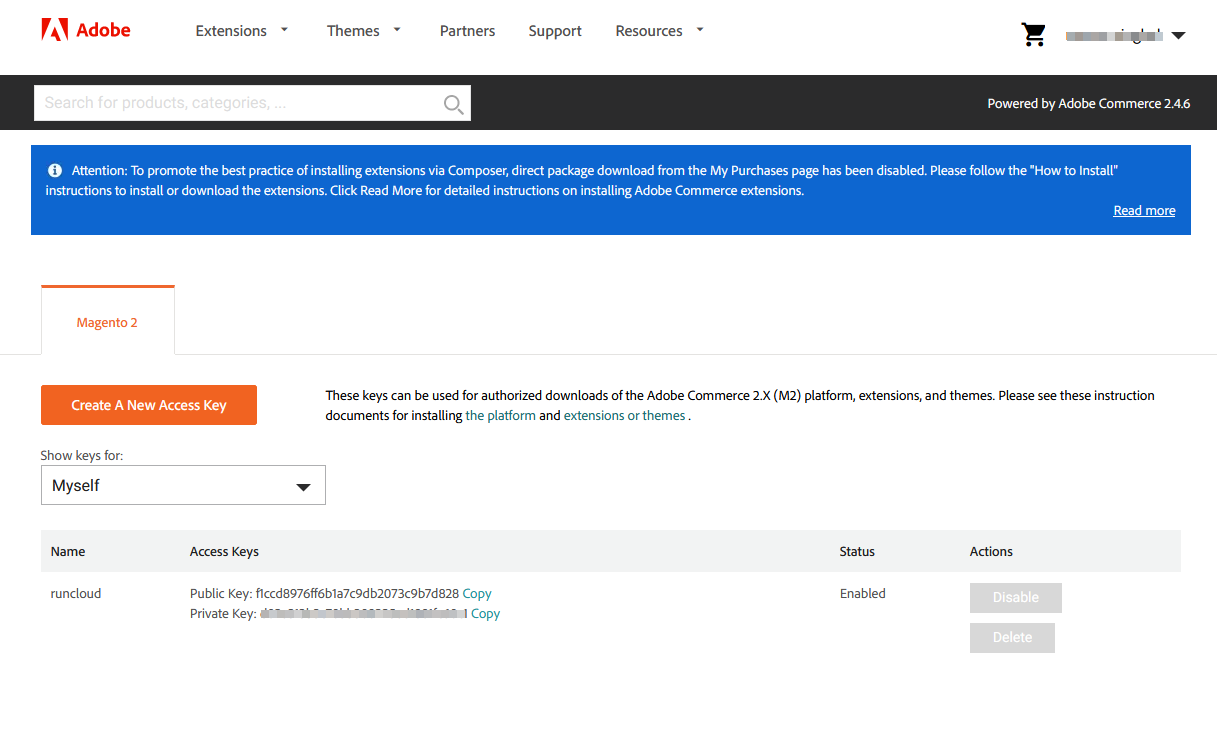
    obtaining API keys from Adobe Commerce dashboard

    In the dashboard you can create a new access key free of charge. Once you have generated the key, enter the “Public Key” in the username field, and the “Private Key” in the password field. You should note that text entered in the password field is not displayed for security purposes, but all keystrokes are being recorded.
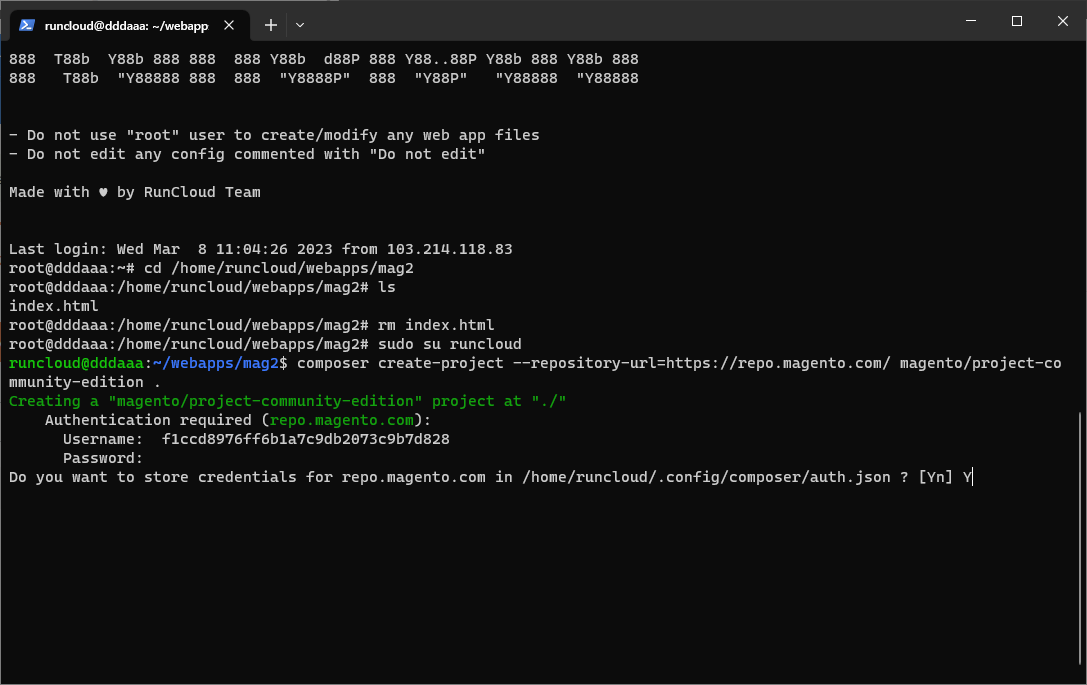
    Configuring API keys Magento2

    Installing Magento 2

    With the system requirements met, files extracted, and database created, it’s time to start the Magento 2 installation process. To begin the installation, copy and paste the command below into a text editor and make the following changes:

    1. Add the base URL with the URL of your website
    2. Add the name of the database using the database that we created
    3. Add the username and password of the database user
    4. Configure the login information of the administrator user
    5. Set your preferred currency and timezone.
    bin/magento setup:install \
    --base-url=http://www.example.com/ \
    --db-host=localhost \
    --db-name=<database-name> \
    --db-user=<username> \
    --db-password=<database_password> \
    --admin-firstname=admin \
    --admin-last name=admin \
    --admin-email=admin@example.com \
    --admin-user=admin \
    --admin-password=admin123 \
    --language=en_US \
    --currency=USD \
    --timezone=America/Chicago \
    --use-rewrites=1 \
    --search-engine=elasticsearch8 \
    --elasticsearch-host=localhost \
    --elasticsearch-port=9200 \
    --elasticsearch-index-prefix=magento2 \
    --elasticsearch-timeout=15
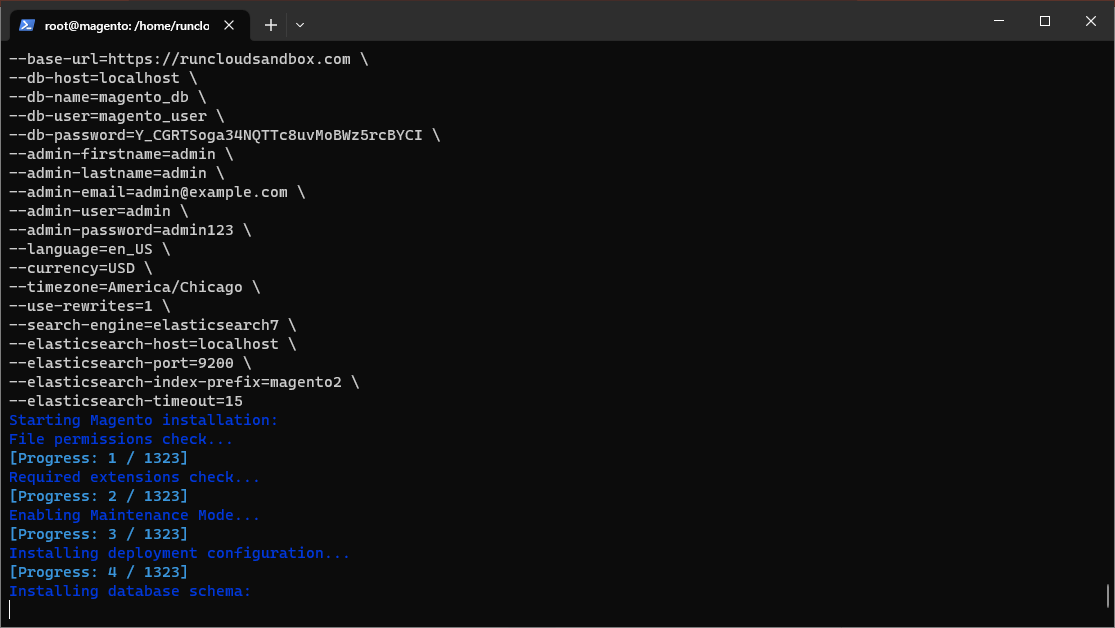
    Magento2 installation on Linux

    After making the changes, you can run the above command in your terminal to begin the installation, which should take 5-6 minutes. If you follow all the steps correctly you will be greeted with the message below. You can then go to the URL of your website to visit your Magento store.
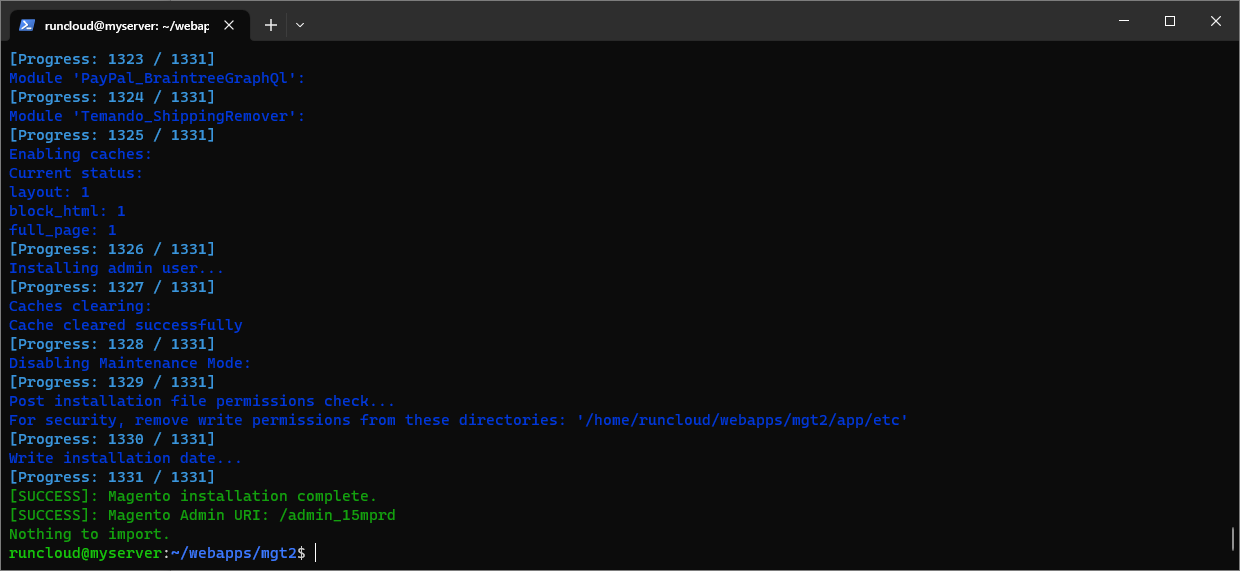
    Successful installation of Magento 2

    After the installation is finished, you can enable production mode using the following command.

    bin/magento deploy:mode:set production

    The above command will generate necessary static content for your website and enable several optimizations to serve content faster.
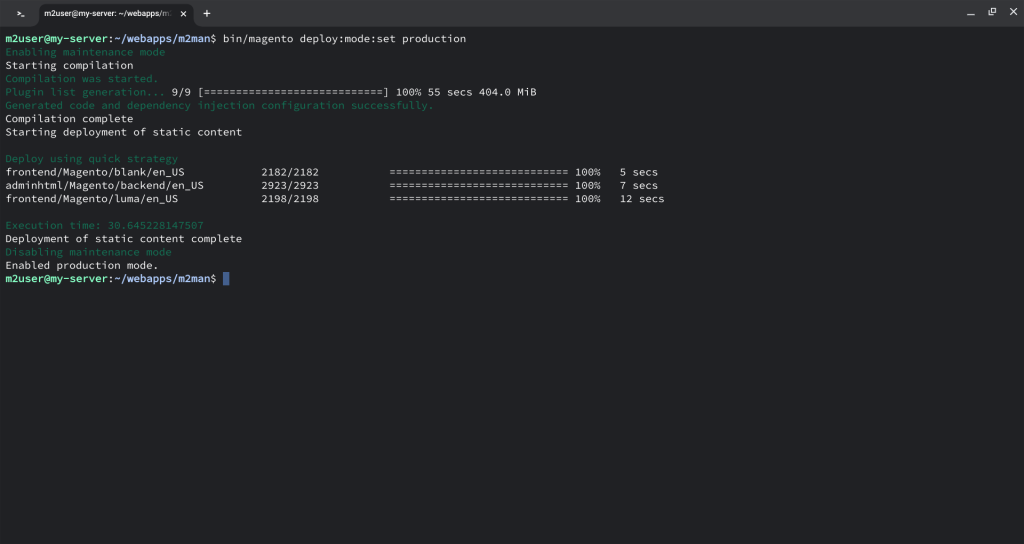
    After Action Report

    Installing Magento 2 might seem like a daunting task, but with this step-by-step guide you can set up your online store on RunCloud in no time. Once Magento 2 is installed, there are still a few post-installation steps you’ll need to take, such as verifying the installation, setting up the admin account, and configuring payment methods before you can start using your new online store. Refer to Adobe’s documentation to learn how to do this.

    If you’re ready to take your server management to the next level, sign up for RunCloud today. RunCloud is the perfect solution for you if you’re looking to make managing your servers easier. So why wait? Sign up now and start enjoying the benefits of RunCloud today!
  • How to Install Craft CMS

    How to Install Craft CMS

    Craft is a Content Management System (CMS) that is focused on doing one thing, content management. Different from WordPress, it doesn’t provide you with fancy widgets or themes – it is designed to be minimal and fast.

    In this article, we will show you how easy it is to install and configure Craft CMS when you are using RunCloud to manage your servers.

    Create An Empty Web App

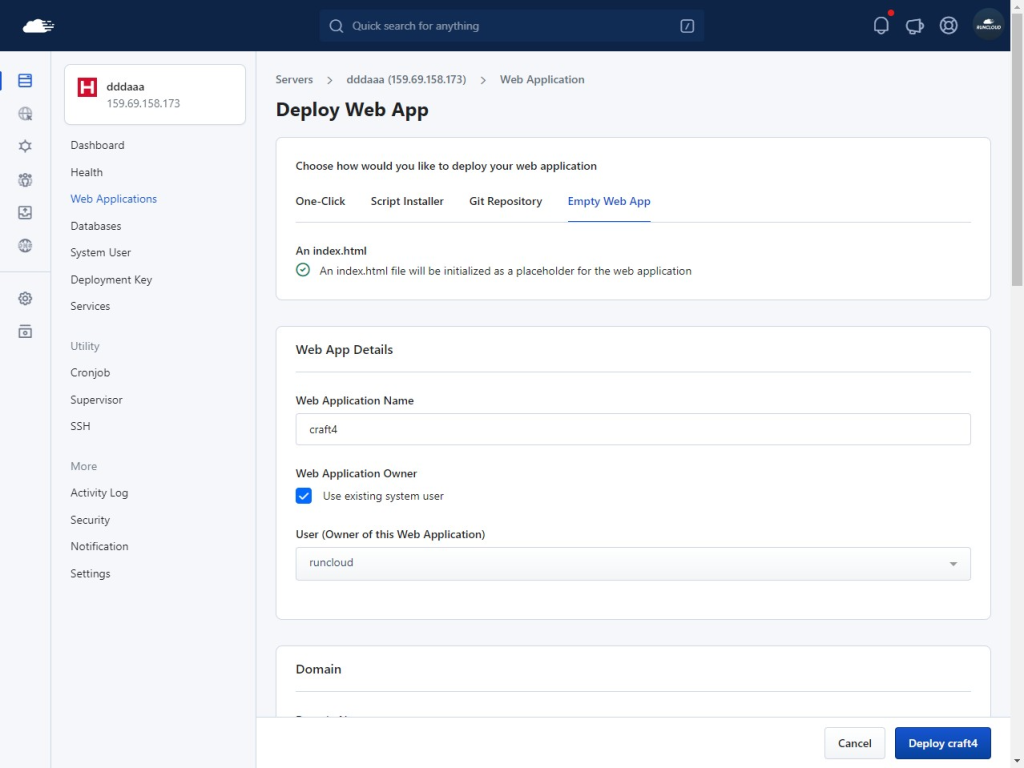
    Start by opening your RunCloud dashboard. Then, proceed to create a Web Application using RunCloud Panel, as shown in the picture below.

    Give it a descriptive name and scroll down.

    Deploying new application on RunCloud dashboard

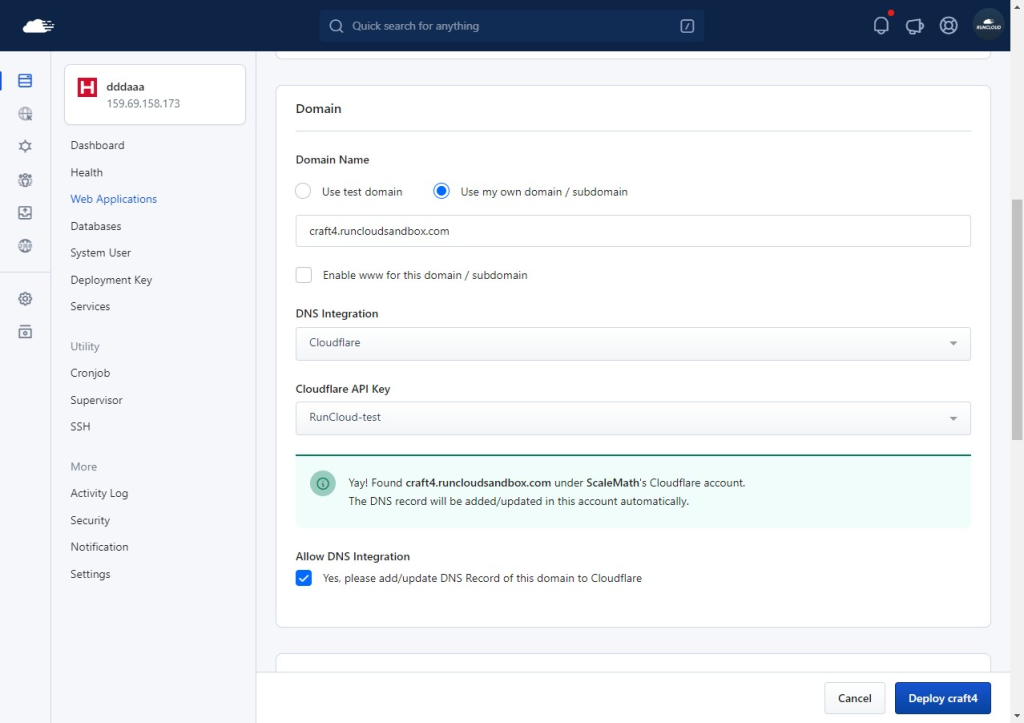
    Configure your domain name, for quick and easy setup, we recommend integrating RunCloud with Cloudflare API, which automatically handles adding and removing DNS records.

    New webapp on RunCloud dashboard

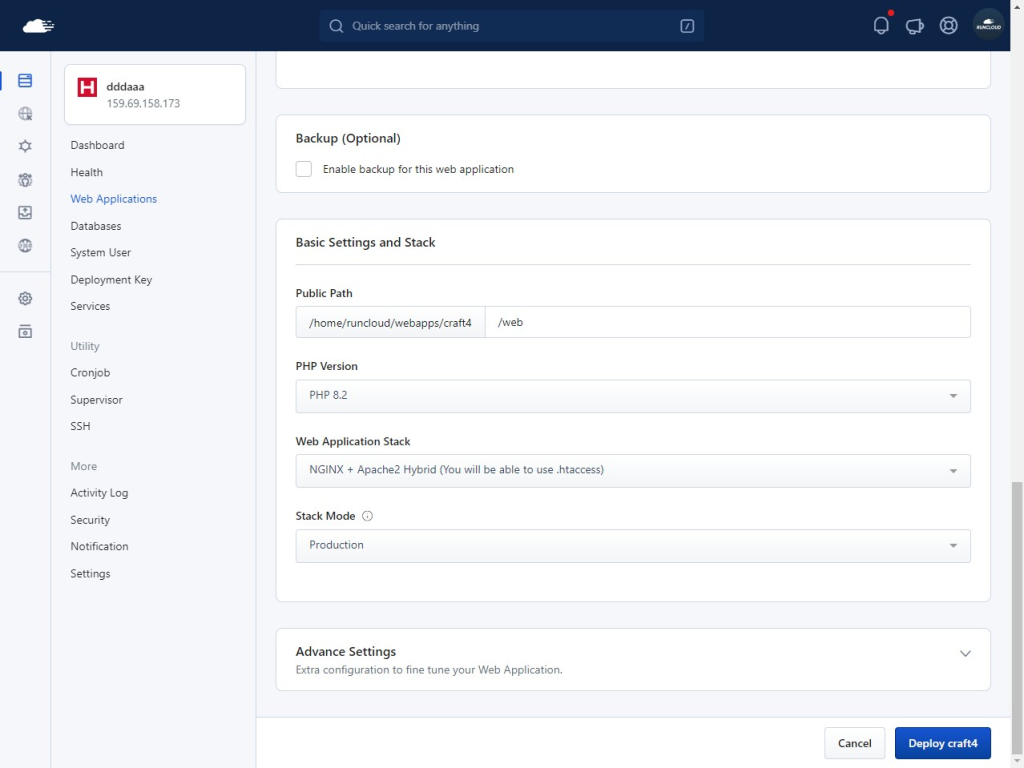
    Craft CMS recommends using PHP 8.1 and later versions for a better experience. Don’t forget to append /web to your public path, as shown below. If you don’t modify your public path, you’ll need to delete the web application and start all over again.

    Basic settings RunCloud dashboard

    Open Project Directory

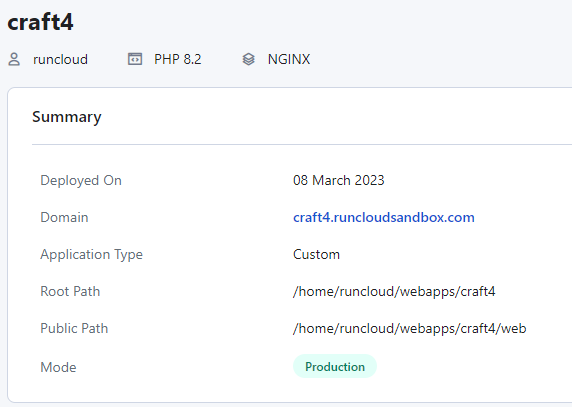
    Log into your server via SSH and browse to the root directory of your web application. You can find the root path in the RunCloud dashboard.

    Application Overview RunCloud PHP 8.2

    Copy the root path and use the cd command to navigate to the root directory in the terminal. For the above example, the command would look like this

    cd /home/runcloud/webapps/craft4

    Once you have opened your web app, remove the empty index.html file from your project, you can run the following commands to delete the file and remove the empty folder.

    rm ./web/index.html
    rmdir web/

    After running the above commands, go back to the RunCloud dashboard – don’t close the terminal yet!

    Create A Database And User

    Once you have deleted the file, we can proceed with the installation of Craft CMS, for that, we will need access to a database. Luckily, RunCloud makes it super easy to create new users and manage access.

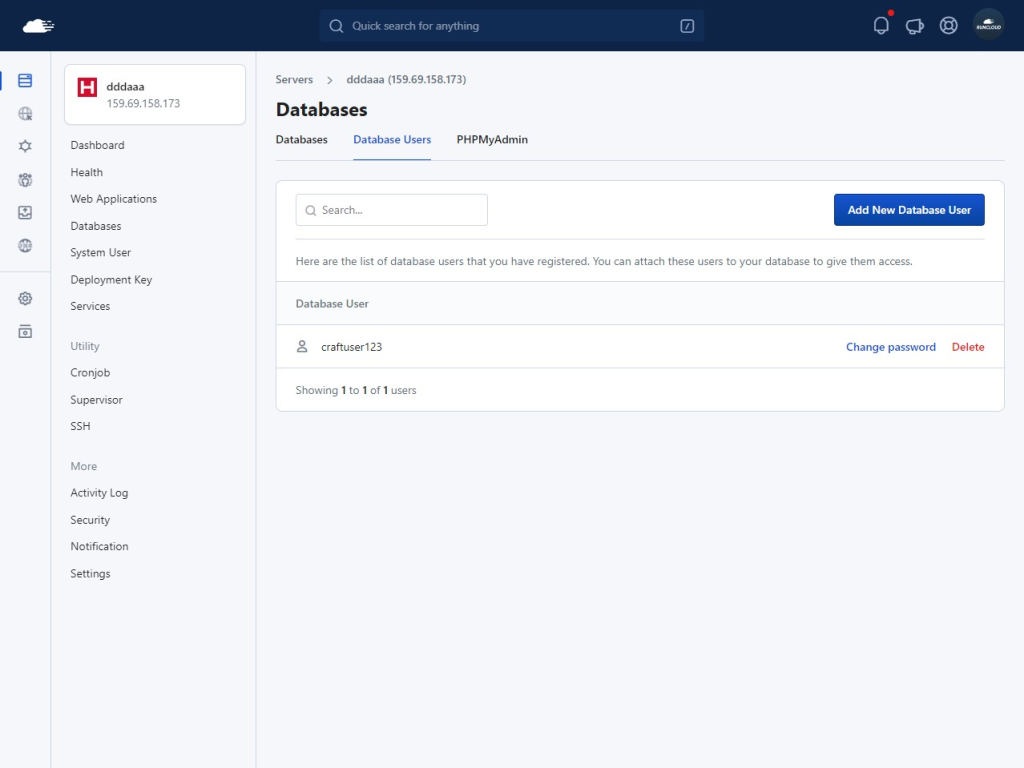
    Simply go to your RunCloud dashboard and pick the server that you are using. Locate the Databases tab on the left and open the “Database Users” submenu.

    Create a new database user and give it a secure password. Once you have created it, it should look something like this.

    Create Database in RunCloud

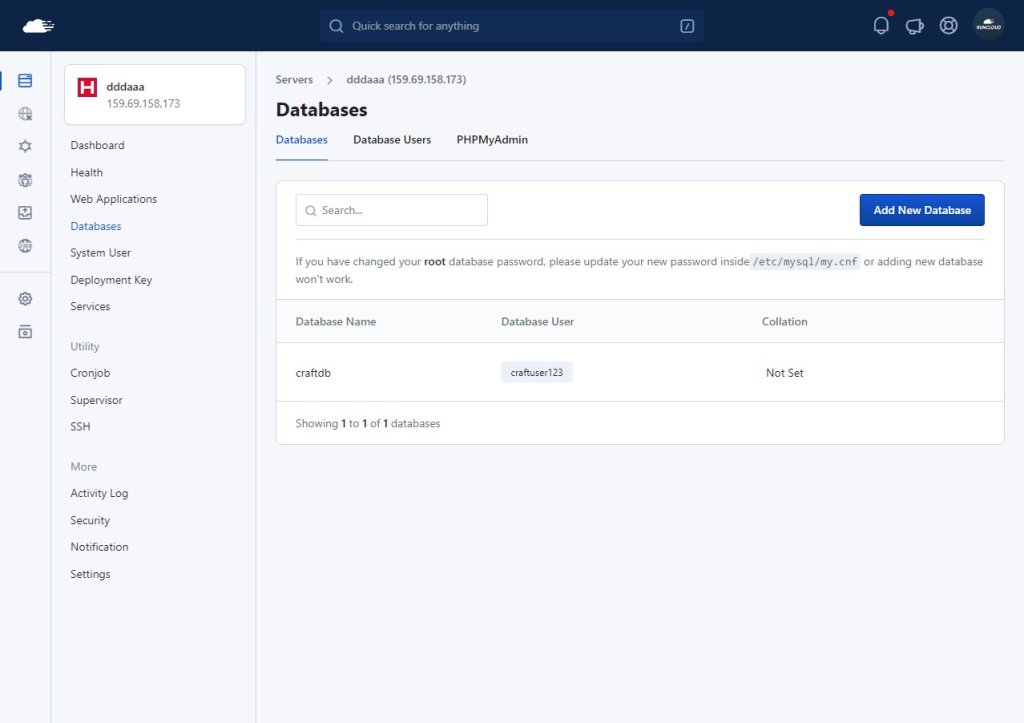
    After creating the database user, go back to the database tab and create a new database. Make sure to grant access to the user that we just created. After creating the database, it should look similar to the screenshot below.

    Create a new Database on RunCloud

    Installing The Craft CMS

    After creating the database, we can begin the installation.

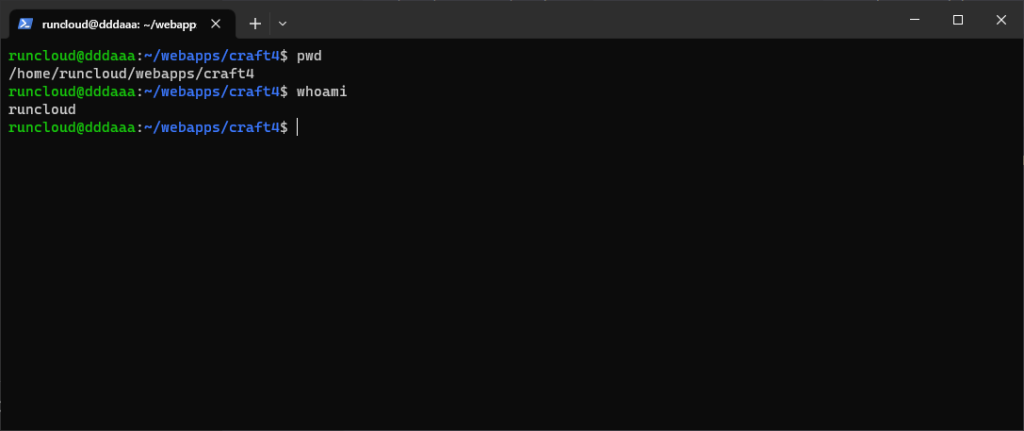
    Go back to the terminal and make sure that you are in the root directory of your project. You can run the pwd command to check your working directory, the output of this command should match the root path displayed in the RunCloud dashboard.

    Once there, make sure that you are not running as a superuser, you can check the name of your current user by running the whoami command. The output of this command can be anything except “root”. For example, in the below example, we are running the system as “runcloud” user.

    Craft CMS installation terminal

    If you are running the shell as root user, you can imitate other users by running the following command. Just replace “runcloud” with the name of another user.

    sudo su runcloud

    Once you are sure that you are in the correct directory with correct permissions, run the following command to install the Craft CMS using PHP 8.2 and Composer.

    /RunCloud/Packages/php82rc/bin/php /usr/sbin/composer create-project craftcms/craft .

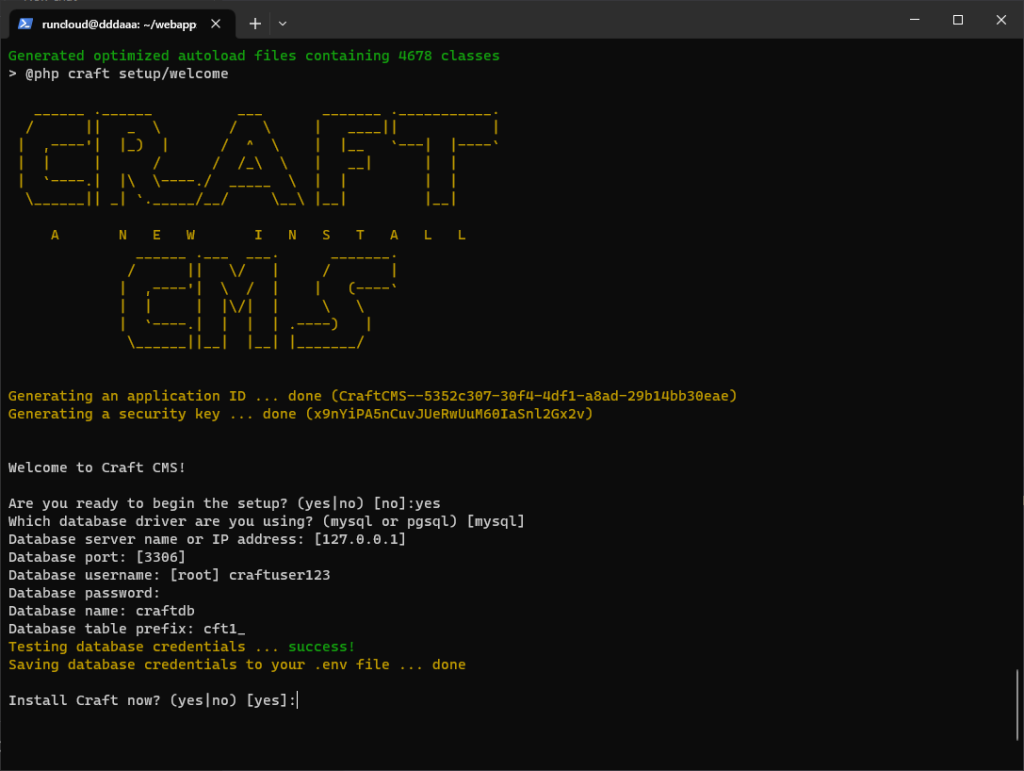
    After running the command, it will ask you if you want to begin the installation, type “yes” to start it. Leave the database driver, IP address, and database port filed empty and press enter to accept default values.

    In the database username, password, and name field, enter the details that we just created in the previous step. After this, enter some random alphabets for database prefix.

    CRAFTCMS on Linux RunCloud

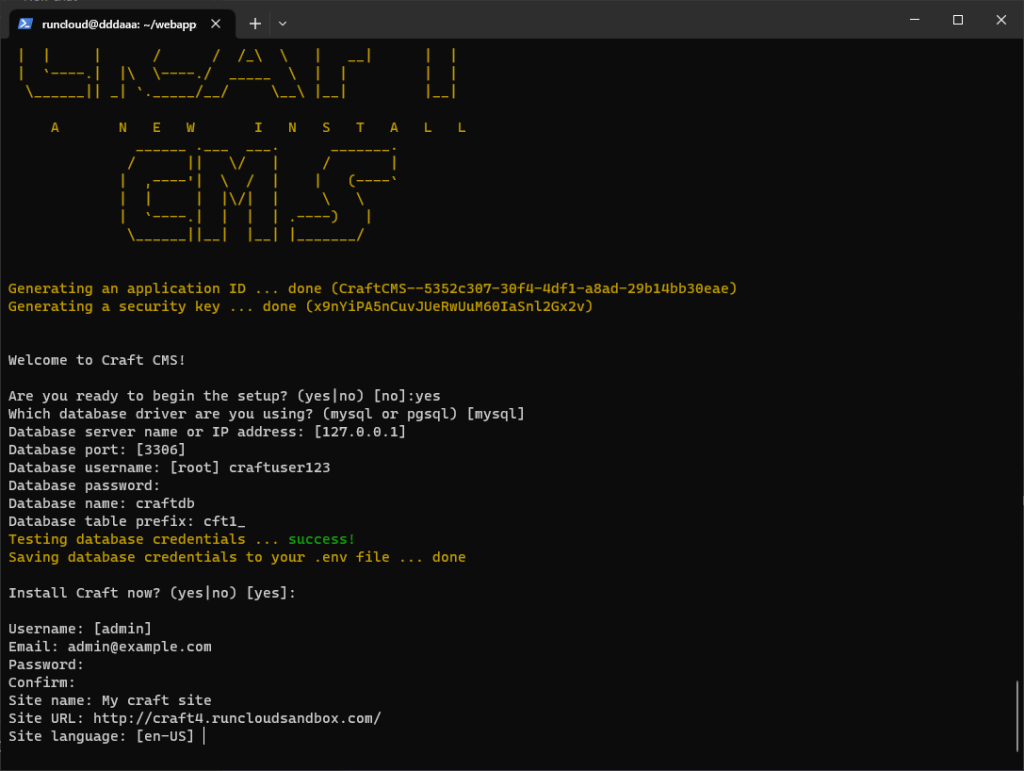
    Once you have entered the database details, you should be greeted with a message saying “Testing database credentials … success!”. After that you can configure the login credentials for the administrator account. Use a secure username and password.

    In the Site name, enter the name of the site that you want to display to users, for the site URL option, enter the complete URL of your web-application. If the URL is long and hard to memorize, you can just copy and paste the URL from the RunCloud dashboard.

    Installing CraftCMS on Ubuntu

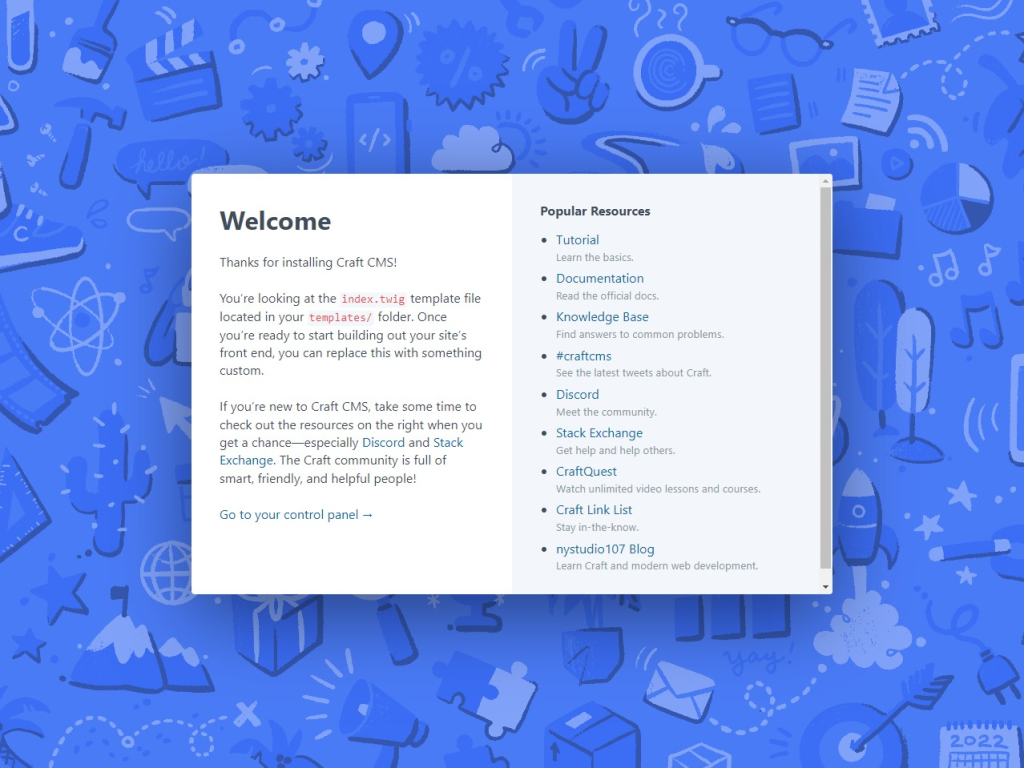
    Once you have completed the above steps, installation should automatically continue and deploy your site. Once it is completed, you can open the URL in a browser and should be greeted with a screen that looks like this.

    CraftCMS home screen Welcome

    Troubleshooting

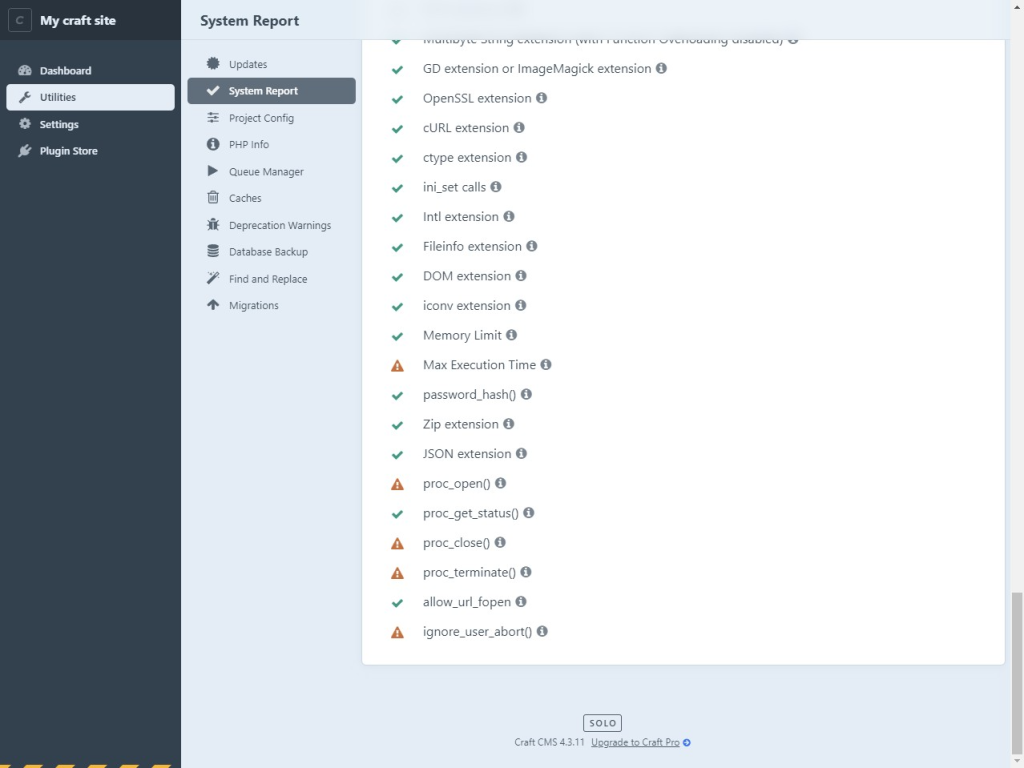
    After installation is complete, log into your dashboard and navigate to Utilities> System report. Once there, scroll down to the bottom, you should see a green check mark next to each of the options.

    In the following example, we have a warning mark next to some of the entries, we can click on “i” next to it to get more information. If that specific functionality is useful for you, then you can change this in the RunCloud dashboard.

    health checks, System Overview CraftCMS

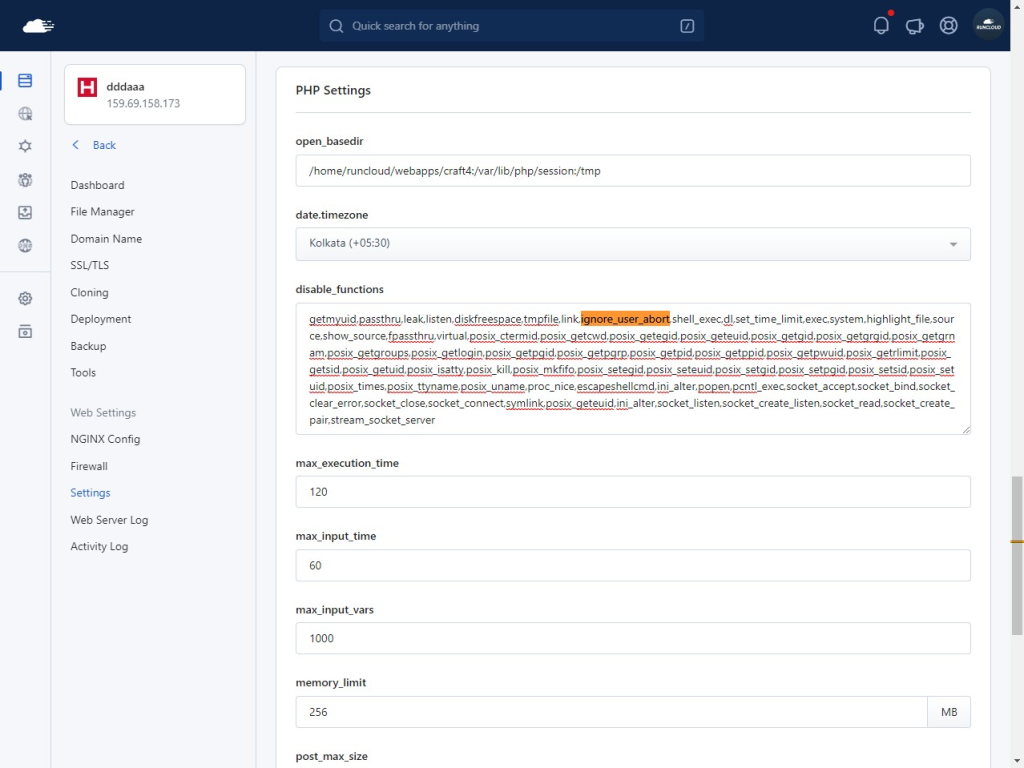
    To change these settings, open the web app in the dashboard and navigate to the Settings tab. Once opened, scroll down to the PHP settings section and modify the settings accordingly.

    If the text in the disabled functions field is too hard to read, you can press Ctrl + f in your browser to use the find function, which highlights the text on the page, as shown below. Once satisfied, don’t forget to click “Update PHP Settings” to save the changes.

    PHP settings RunCloud dashboard

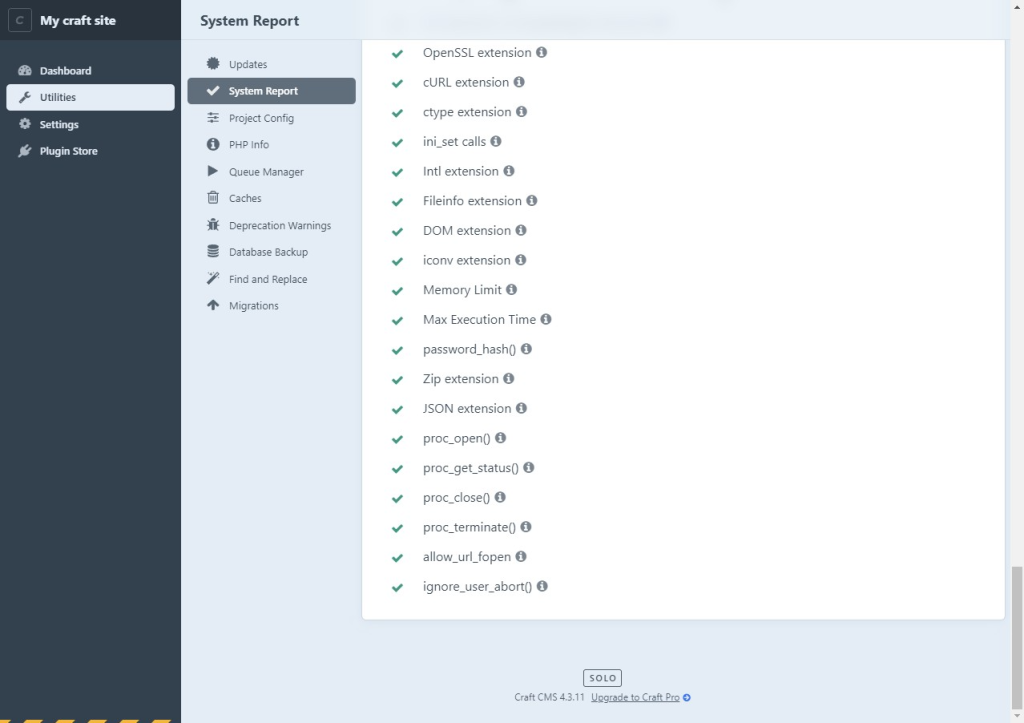
    Now you can go back to the Craft CMS dashboard and refresh the page, all the warnings that you tackled should have disappeared.

    CraftCMS system errors

    After Action Report

    Craft CMS is a popular content management system that focuses on security and performance over all other aspects of the application.

    It supports plugins and themes that can extend its functionality and improve user experience, but they are not available by default.

    If you are looking for an easy and painless way to manage your servers, RunCloud is the perfect solution for you. With its intuitive dashboard and powerful features, RunCloud makes it easy to manage your servers and deploy applications. Start using RunCloud today and see how it can simplify your infrastructure.

  • How To Install Mautic Marketing Automation Software in RunCloud (2020 Update)

    How To Install Mautic Marketing Automation Software in RunCloud (2020 Update)

    Mautic is powerful marketing automation software. It is free and it is also the world largest open-source marketing automation project.

    More than 200.000+ organizations use Mautic. It makes Mautic an excellent choice if you want to run email marketing campaigns and marketing automation directly from your server, with full total control.

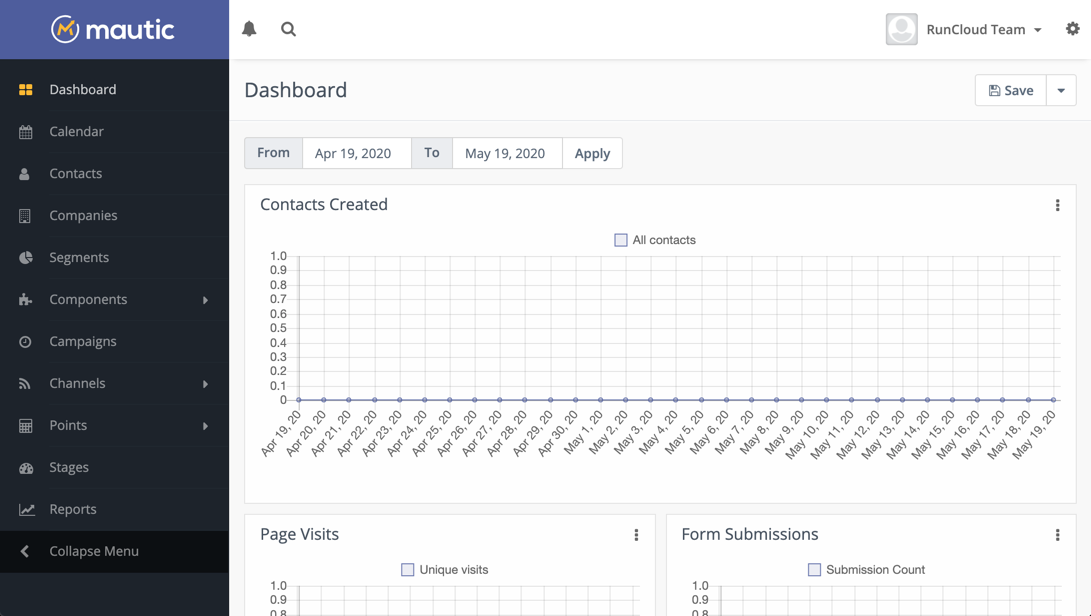
    runcloud-mautic-13-dashboard

    In this post, we will discuss about how to install Mautic using RunCloud easily.

    Get Your Cloud Server And Connect To RunCloud

    Cloud server is the best choice when you want to run your business with Mautic. It makes Mautic stable and also scalable. When your business start growing and Mautic needs more server resources, you can increase the resources (RAM/CPU) of your cloud server easily, anytime.

    Five dollar ($5) cloud server from DigitalOcean / Linode / Vultr / UpCloud / other provider is more than enough to start using Mautic.

    Quick guide on how to setup and connect your server to RunCloud

    Create PHP Web Application In RunCloud

    After setup and connect your server to RunCloud, you can create PHP web application to install Mautic.

    Using RunCloud, you can create multiple website (web applications) in one server. Basically you can install Mautic on the same server where you host your other websites using RunCloud.

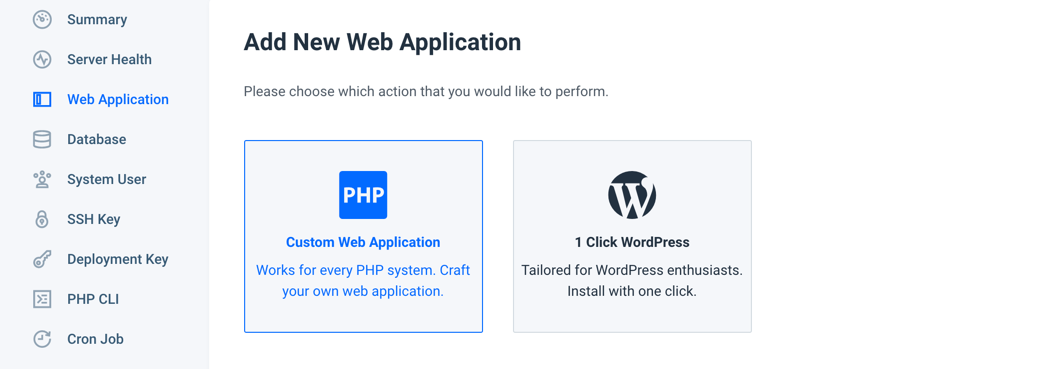
    Go to “Web Application” menu under your server in RunCloud, and click “Create Web App” button.

    runcloud-mautic-01-create-new-php-webapp

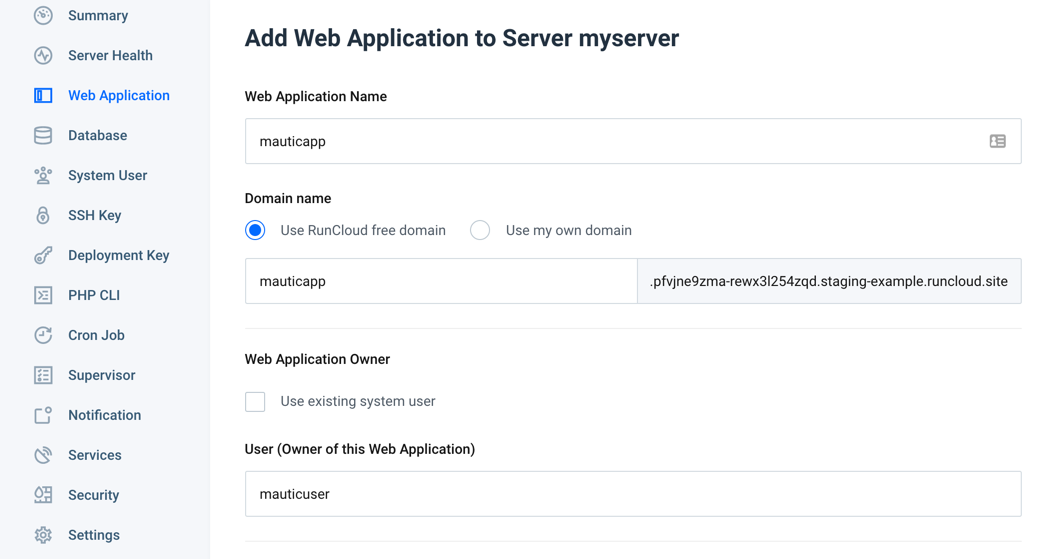
    Let’s create your PHP web application for Mautic.

    For “Web Application Name“, you can use “mauticapp“.

    For “Domain name“, you can use either your own domain/subdomain or RunCloud test domain. For this example, we will use RunCloud test domain.

    If you decide use your own domain, you will need to do an extra step to configure DNS record and wait for DNS propagation.

    You can read our quick guide on how to add your domain.

    For “Web Application Owner“, you can create new “mauticuser” system user.

    It is best practice to use different system user for different web application in the same server, for extra security purpose.

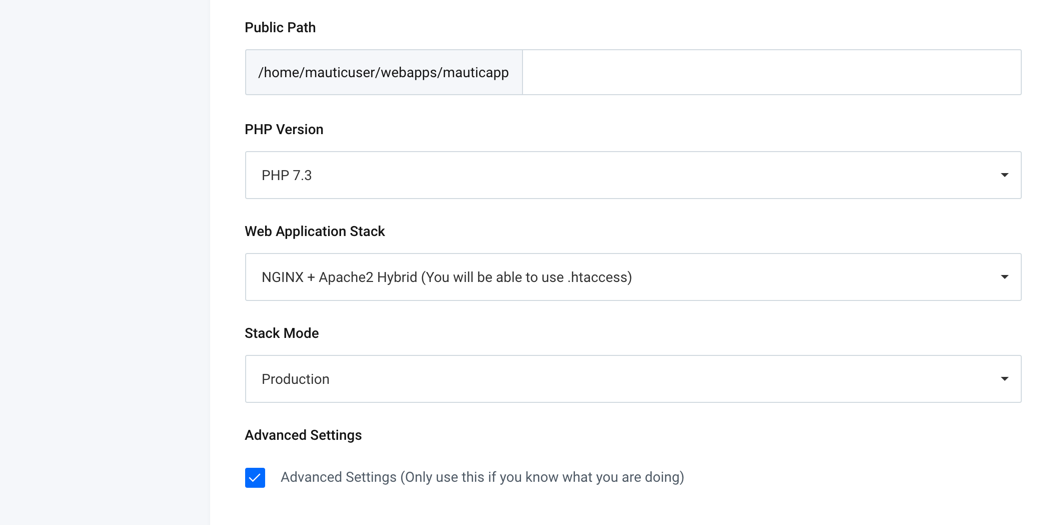
    runcloud-mautic-03-php73-version-advanced-settings

    For “PHP Version“, you can select PHP7.3 to install Mautic v2.16 stable release. Please do not use PHP7.4 because Mautic still do not officially support it.

    For “Web Application Stack“, you can choose “Nginx + Apache2 Hybrid” to allow you use .httaccess file in Mautic.

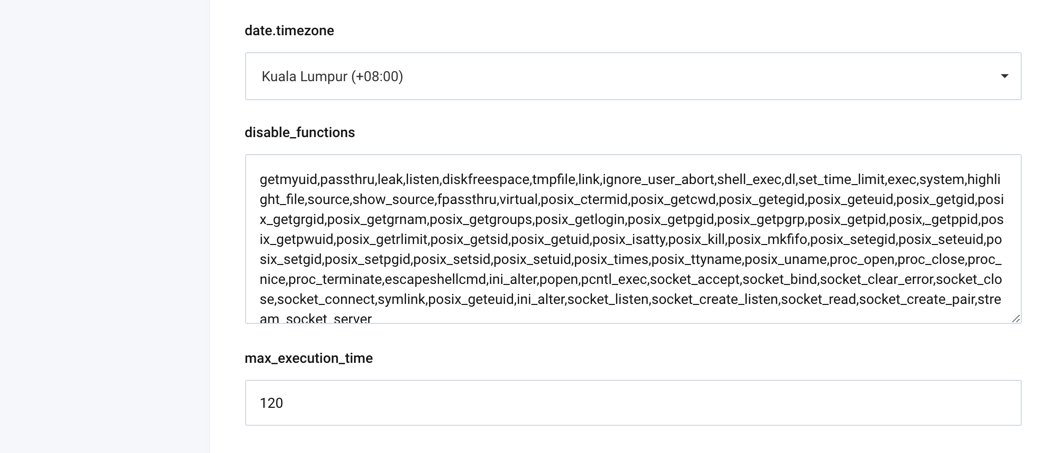
    Please click “Advanced Settings” checkbox to configure some extra settings to make your Mautic installation run smoothly.

    For date.timezone, you can select your current timezone where you run your business.

    For disable_functions, it is optional, you can remove all php_posix functions from the list.

    The php_posix is disabled by default inside RunCloud for security reason. For Mautic installation, it is just a recommendation to enable php_posix, not a requirement. But if you really want to enable php_posix, you can replace all the disable_functions with the text below.

    getmyuid,passthru,leak,listen,diskfreespace,tmpfile,link,ignore_user_abord,shell_exec,dl,set_time_limit,exec,system,highlight_file,source,show_source,fpassthru,virtual,proc_open,proc_close,proc_nice,proc_terminate,escapeshellcmd,ini_alter,popen,pcntl_exec,socket_accept,socket_bind,socket_clear_error,socket_close,socket_connect,curl_multi_exec,symlink,ini_alter,socket_listen,socket_create_listen,socket_read,socket_create_pair,stream_socket_server

    For max_execution_time, please increase the value to 120 to avoid any timeout / error issue on the installation process.

    Then, click “Add Web Application” button to create your PHP web application for Mautic.

    Prepare Mautic Installer

    There are two ways to prepare Mautic installer:

    1. Download Mautic installer files and upload it to your web application using SFTP.
    2. Download and extract Mautic installer files using SSH.

    In this post, we will show you the second way, using SSH.

    You need to login to your server using SSH from either Terminal (Mac/Linux) or PowerShell / Putty (Windows).

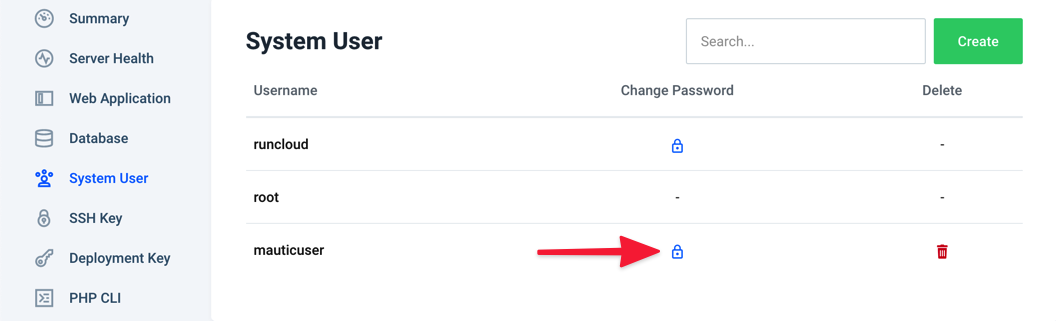
    If you want to login using password, not using SSH key, you will need to change the password of “mauticuser” system user that you have created from System User menu.

    If you use Terminal, you can run this command to login to your server.

    ssh mauticuser@<youripaddress>

    You will login to your server using “mauticuser” system user, not root. Please change “youripaddress” with the IP Address of your server.

    NOTE: Please do not login using “root”, to avoid any file/folder permission issue.

    Change the working directory to your “mauticapp” web application root path.

    cd webapps/mauticapp

    Download the Mautic script. The download might be a bit slow. Just wait for it to finish.

    wget https://www.mautic.org/download/latest -O mautic.zip

    Unzip/extract the downloaded file.

    unzip mautic.zip

    Run Mautic Installer

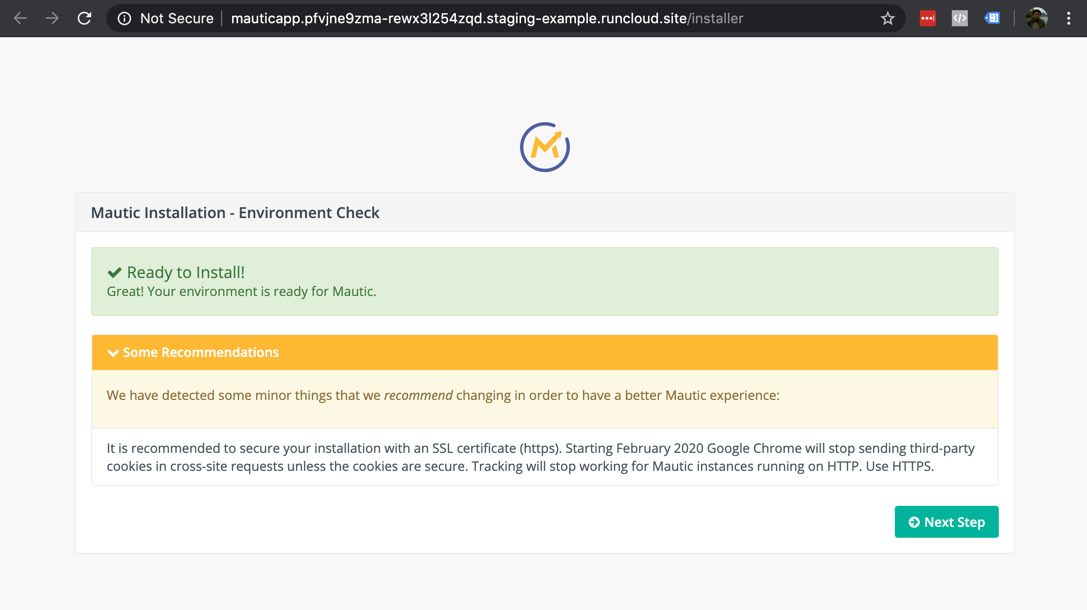
    After preparing your Mautic installer, you can visit your domain/subdomain where you install Mautic.

    Mautic recommends to secure your installation with an SSL certificate. You can skip this step if you use RunCloud free domain.

    If you use your own domain/subdomain, you can install Let’s Encrypt SSL Certificate to your website. You can read our quick guide to secure your website with HTTPS.

    Click “Next Step” button.

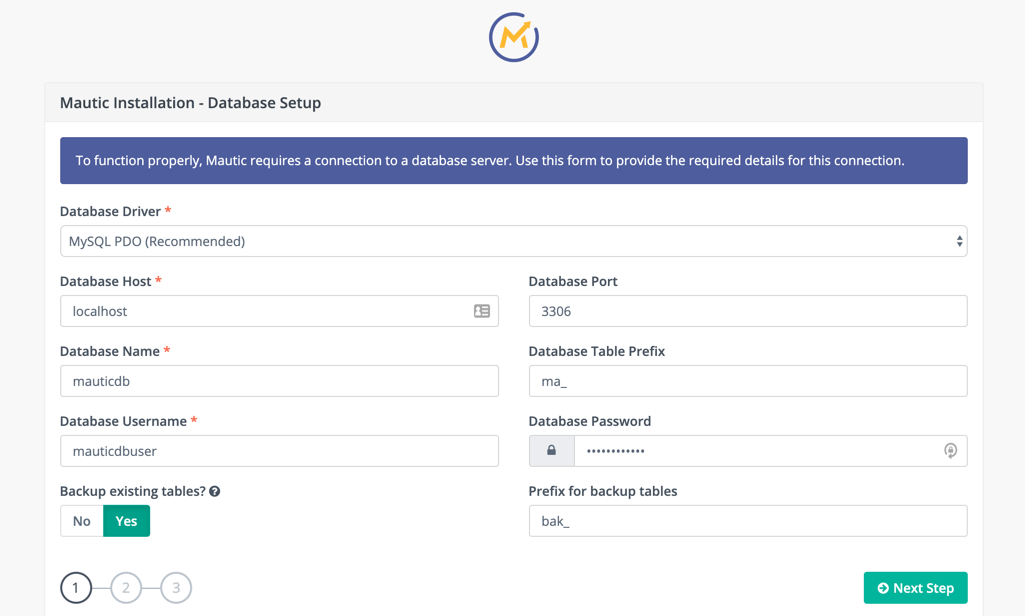
    Mautic Installation – Database Setup

    runcloud-mautic-09-database-setup

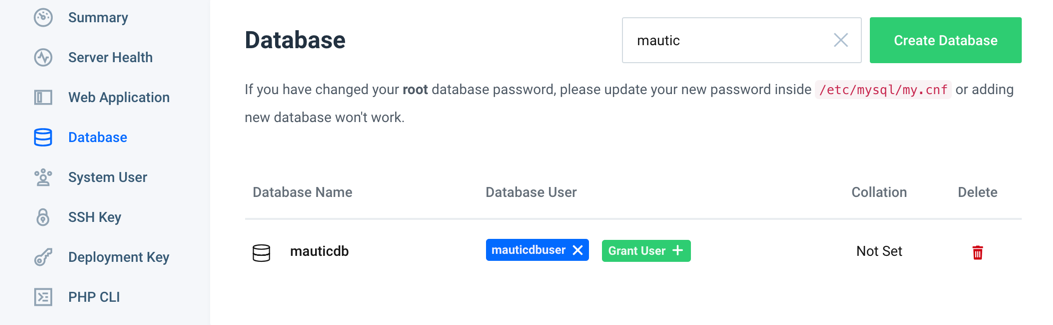
    You need to create MySQL database to install Mautic. Go to “Database” menu under your server in RunCloud.

    runcloud-mautic-06-create-database

    Click “Create Database” button and create new “mauticdb” database.

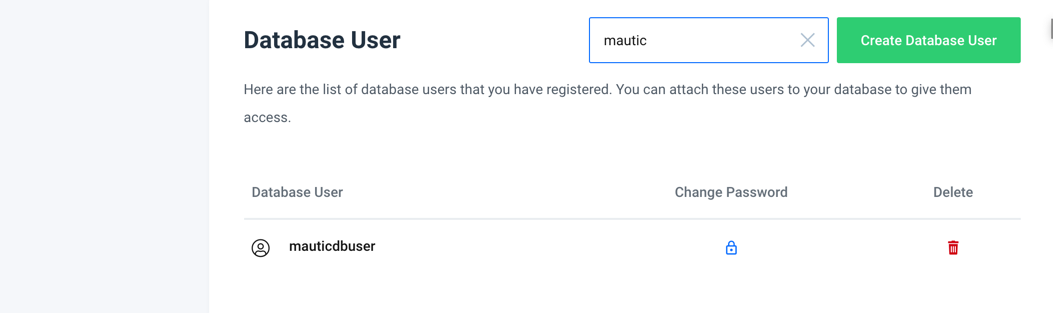
    runcloud-mautic-07-create-database-user

    Click “Create Database User” button and create new “mauticdbuser” database user.

    Then click “Grant User” button in your “mauticdb” database to connect it to “mauticdbuser” user.

    Now you continue database setup process using database name and user that you have created.

    Click “Next Step” button.

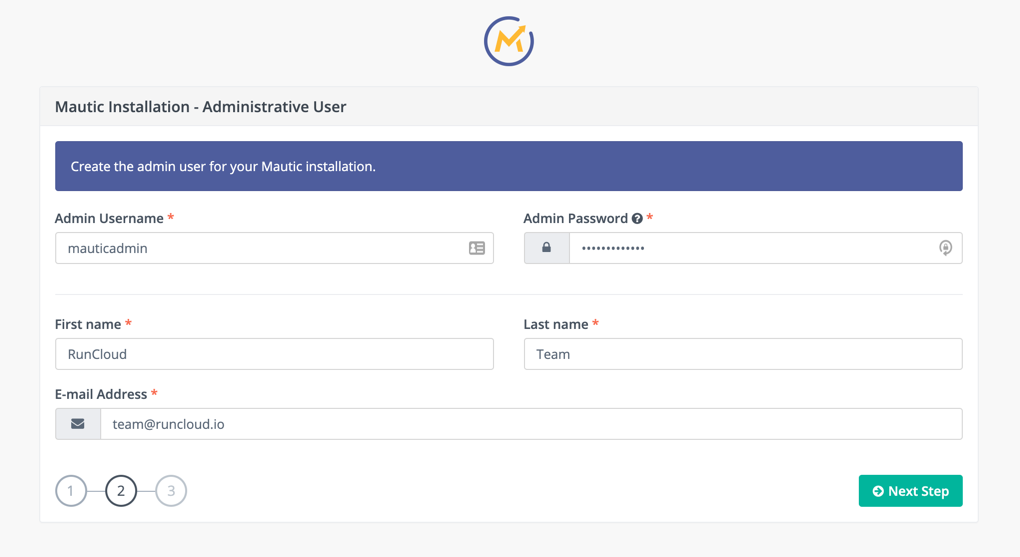
    Mautic Installation – Administrative User

    In this step, you can create the admin user for your Mautic installation.

    Click “Next Step” button.

    NOTE: If you get Error 500 screen after clicking “Next Step” button, it is possible because you have permission issue or you do not increase max_execution_time when creating PHP web application above.

    You can fix it by running this command on your web application root path.

    rm -rf app/cache/*
    chmod 777 app/cache
    php app/console cache:warmup

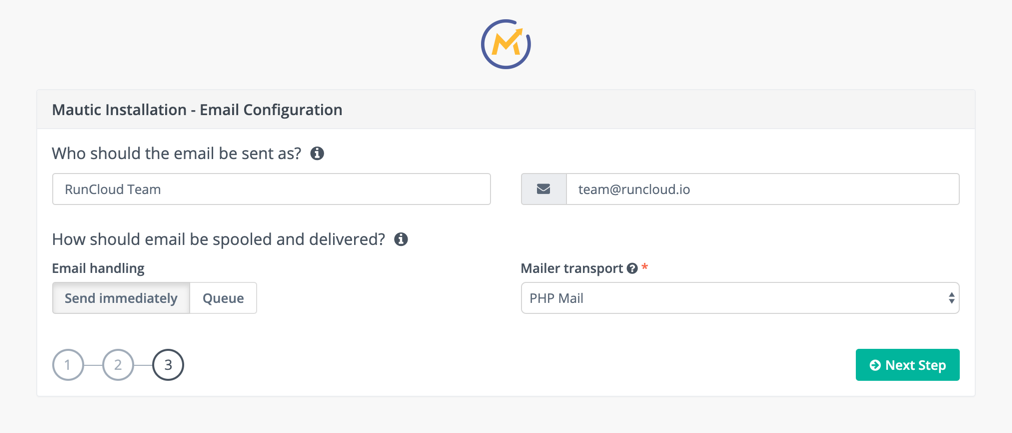
    Mautic Installation – Email Configuration

    In this step, you can setup Mautic email configuration. Mautic support sending email using PHP Mail, but we highly recommend you to use third party SMTP, for example SendGrid, Mailgun, or Amazon SES.

    You can skip this step for now and setup email configuration later from your Mautic dashboard.

    Click “Next Step” button.

    Perfect!

    When you see Mautic login screen, it means you have installed Mautic successfully!

    Setup Mautic Cron Jobs

    Mautic requires some cron jobs to run some maintenance tasks. You need to setup cron jobs to make sure Mautic can run properly.

    Fortunately, you can add cron jobs easily using RunCloud.

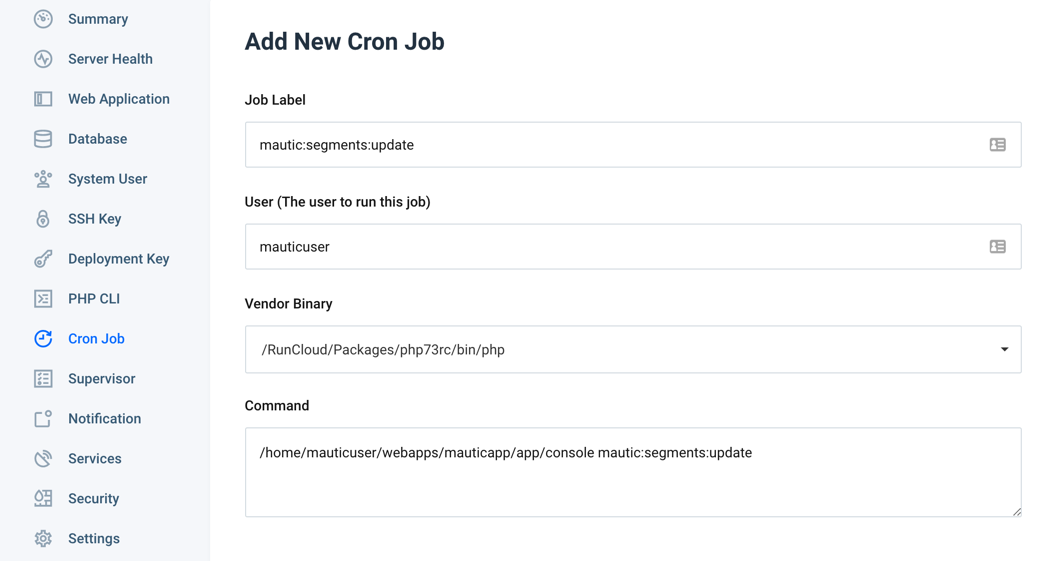
    Go to “Cron Job” menu under your server in RunCloud, and click “Create” button to create our first Mautic cron job.

    Cron Job – Updating Contact Segments (Required)

    runcloud-mautic-14-setup-cron-job

    For “Job Label”, add mautic:segments:update

    For “User”, add mauticuser, your system user for this Mautic web app.

    For “Vendor Binary”, select /RunCloud/Packages/php73rc/bin/php because you use PHP7.3 for this Mautic web app.

    For “Command”, copy paste this command below.

    /home/mauticuser/webapps/mauticapp/app/console mautic:segments:update

    NOTE: Please update this command if you use different system user (not mauticuser) and web application name (not mauticapp).

    Because Mautic use multiple cron jobs, it is HIGHLY recommended that you stagger the required jobs so as to not run the exact same minute.

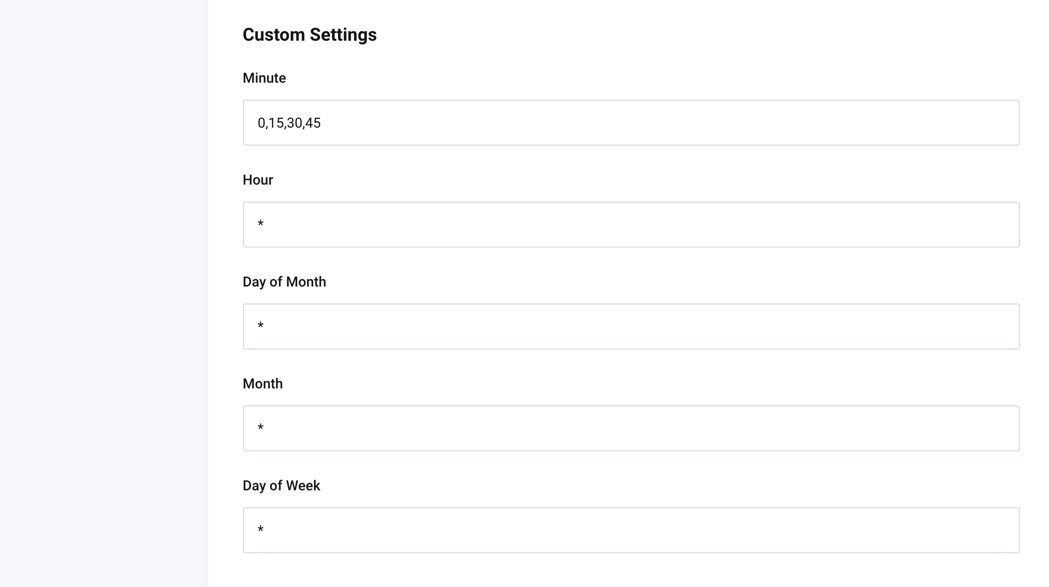
    For “Minute”, please use 0,15,30,45 to run this cron job every 15 minutes. We will use different minutes for different cron jobs.

    Click “Create Cron Job” button.

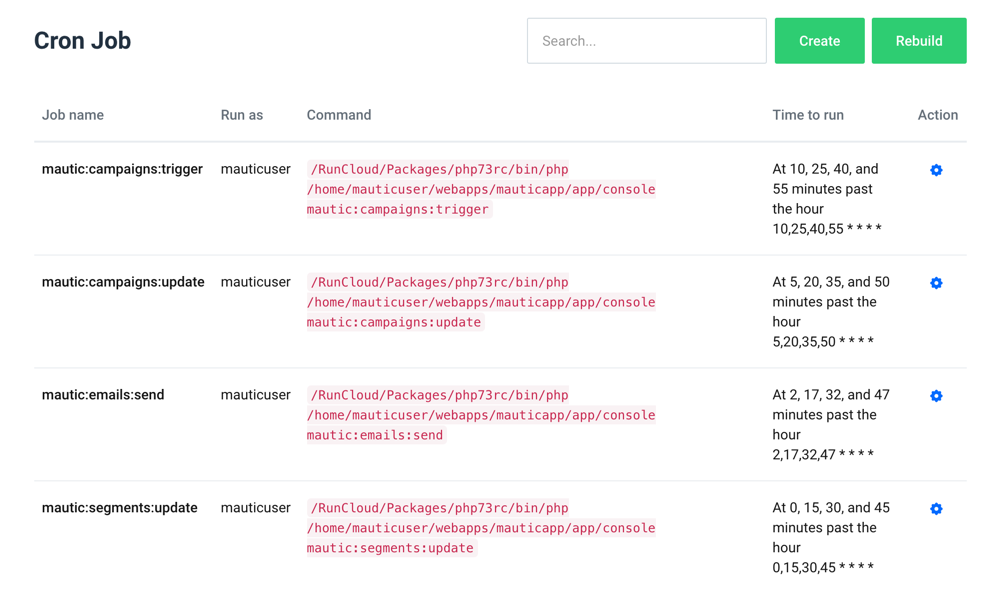
    Cron Job – Updating Campaigns (Required)

    Please repeat the process for following cron job.

    Label : mautic:campaigns:update

    Campaign :

    /home/mauticuser/webapps/mauticapp/app/console mautic:campaigns:update

    Minute : 5,20,35,50

    Cron Job – Executing Campaign Events (Required)

    Please repeat the process for following cron job.

    Label : mautic:campaigns:trigger

    Campaign :

    /home/mauticuser/webapps/mauticapp/app/console mautic:campaigns:trigger

    Minute : 10,25,40,55

    Cron Job – Processing Email Queue (Optional)

    Please repeat the process for following cron job.

    Label : mautic:emails:send

    Campaign :

    /home/mauticuser/webapps/mauticapp/app/console mautic:emails:send

    Minute : 2,17,32,47

    Perfect!

    You have completed cron jobs setup for Mautic.

    Please check this article if you want to setup other optional cron jobs in Mautic.

    Summary

    If you want to use Mautic for your marketing automation software, using RunCloud and cloud server is a perfect combination to install and run Mautic Marketing Automation Software.

    Are you using Mautic with RunCloud? Do not hesitate to share your experience with us.