Category: Content Management System

  • The Ultimate Guide To Install NextCloud Using RunCloud

    The Ultimate Guide To Install NextCloud Using RunCloud

    NextCloud is a self-hosted productivity platform that offers industry-leading, on-premise content collaboration functionality.

    It’s an alternative to Dropbox or Google Drive, but with the advantage that it can be installed on your own server, ensuring that your data remains under your control.

    You can use NextCloud to share and collaborate on documents, send and receive emails, manage your calendar, and have video chats – all without any possibility of data leaks.

    In this post, we will show you exactly how to install NextCloud using RunCloud.

    Prerequisites

    You will need a server that meets NextCloud’s system requirements. When you connect your server to RunCloud, it automatically installs all necessary dependencies, and updates them. If you have an existing server connected to RunCloud, you can use that as well – as long as it has the necessary capacity to handle additional load.

    1. Create A PHP Web Application In RunCloud

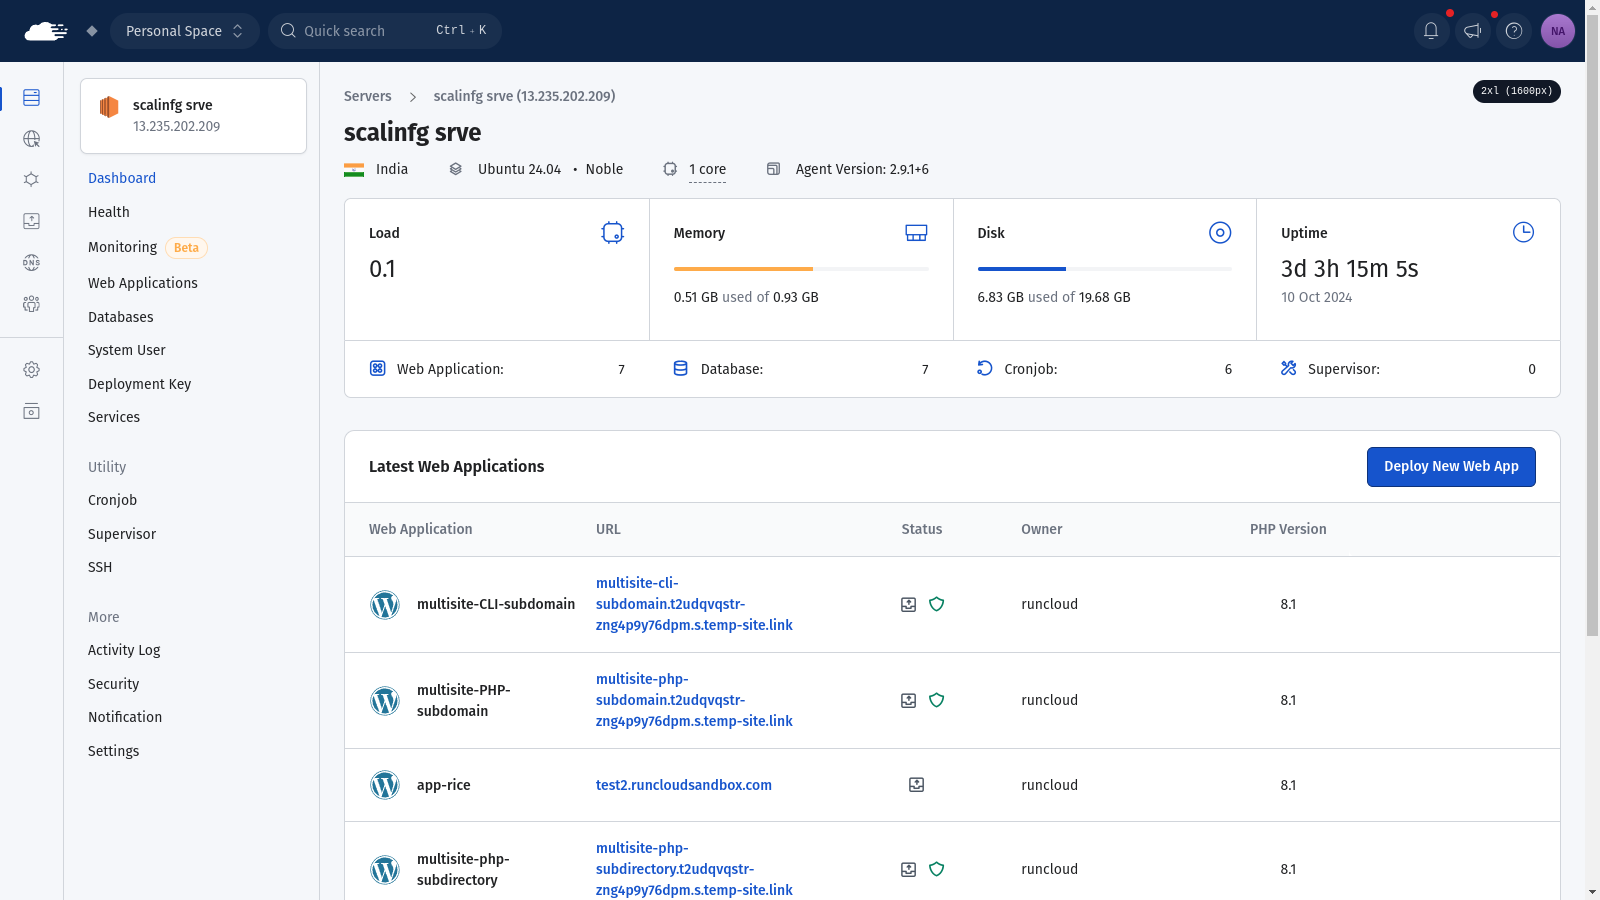
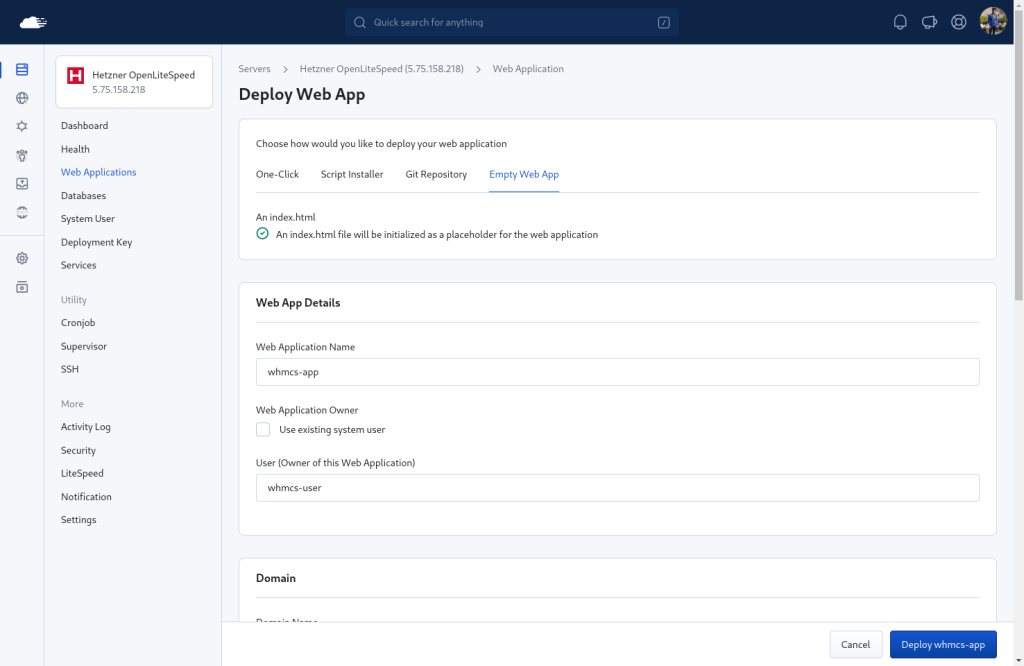
    Go to your RunCloud dashboard and click “Deploy New Web App”. Next, switch to the “Empty Web App” tab and give your application a descriptive name.
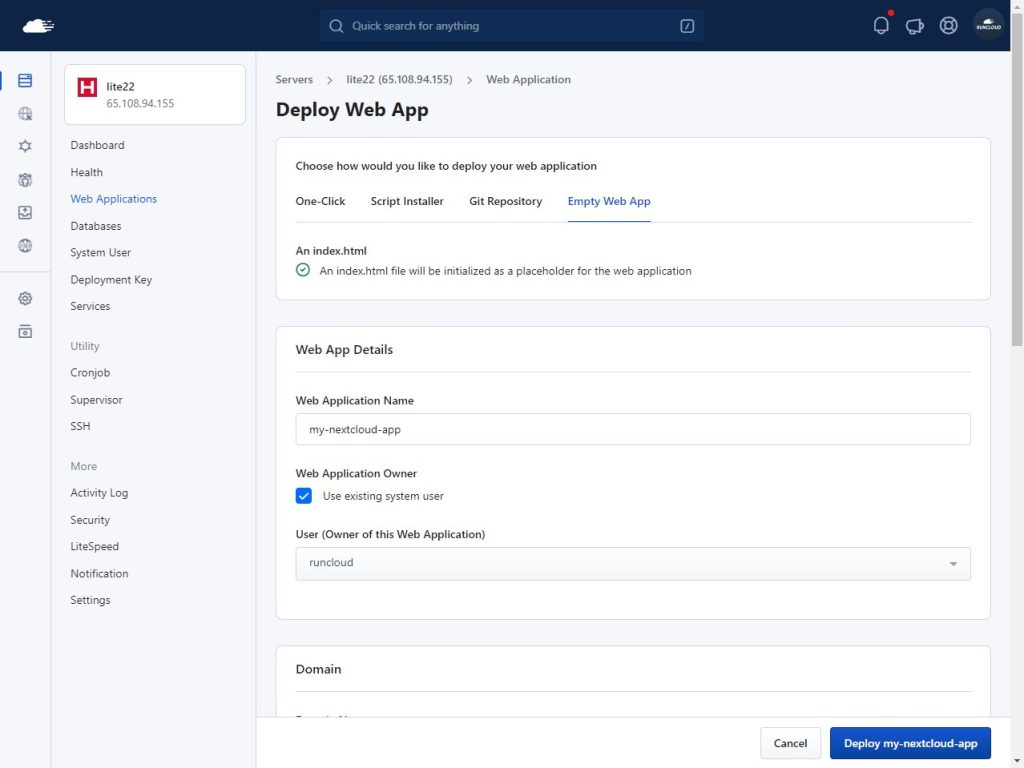
    Deploy a web app

    For “Domain name“, you can either use your own domain name or use RunCloud’s test domain. If you are using RunCloud’s Cloudflare integration, RunCloud will automatically create the necessary DNS records for your domain.
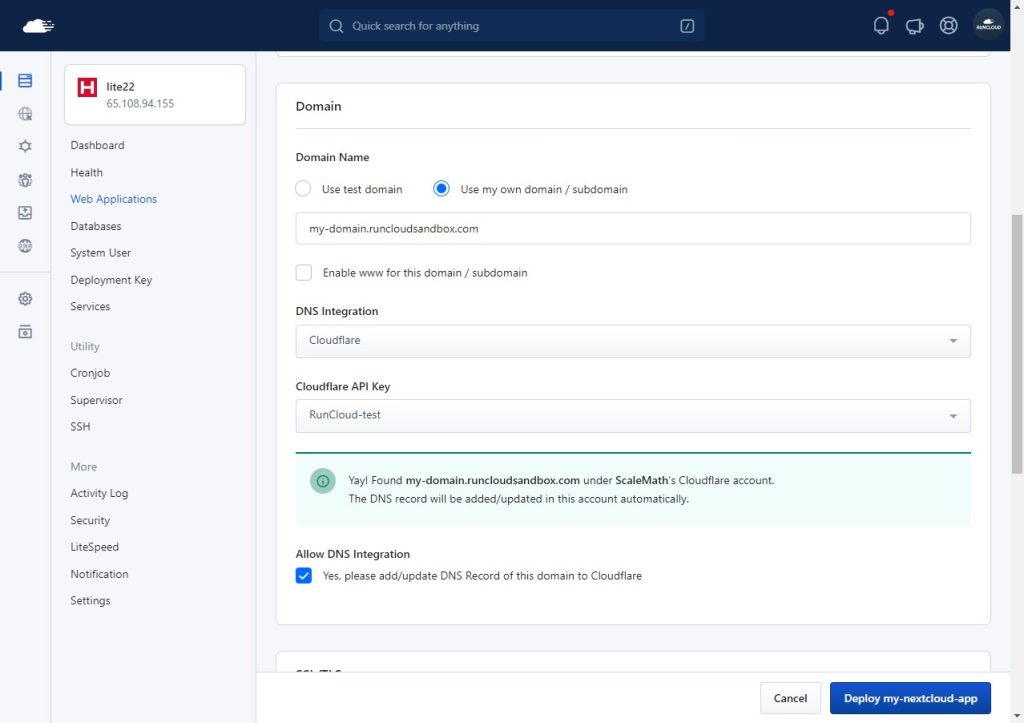
    Set domain name on RUnCloud

    Next, select PHP version 8.1 and click “Deploy” to create the web application.
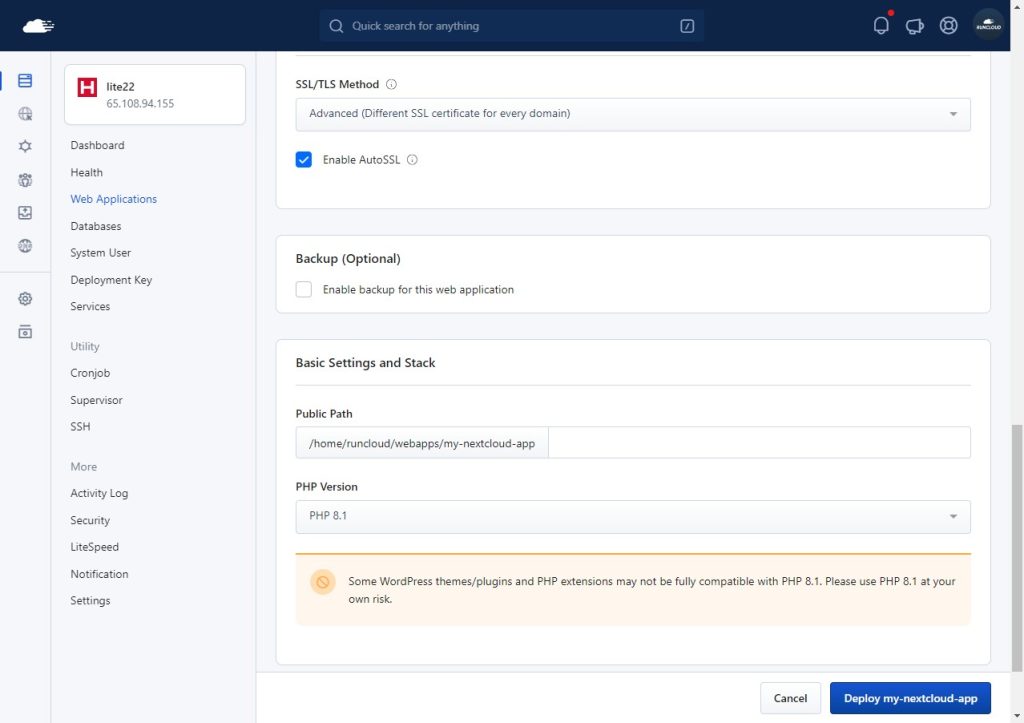
    set PHP RunCloud

    2. Prepare NextCloud Installer

    After deploying the application you will need to download the NextCloud installation file to your server. There are two ways to do this.

    2.1 Using SSH

    If you are comfortable with SSH then you can run the following commands to download the installation file to your website’s root directory. Don’t forget to update the path to your web application’s root directory (displayed in RunCloud dashboard).

    cd <path to root>
    wget https://download.nextcloud.com/server/installer/setup-nextcloud.php

    2.2 Using RunCloud File Manager

    The second method is to use RunCloud’s file manager. RunCloud has a graphical user interface for editing files on your server, and you can use this to add or remove files from your server. Click on the “File Manager” option to browse the files.
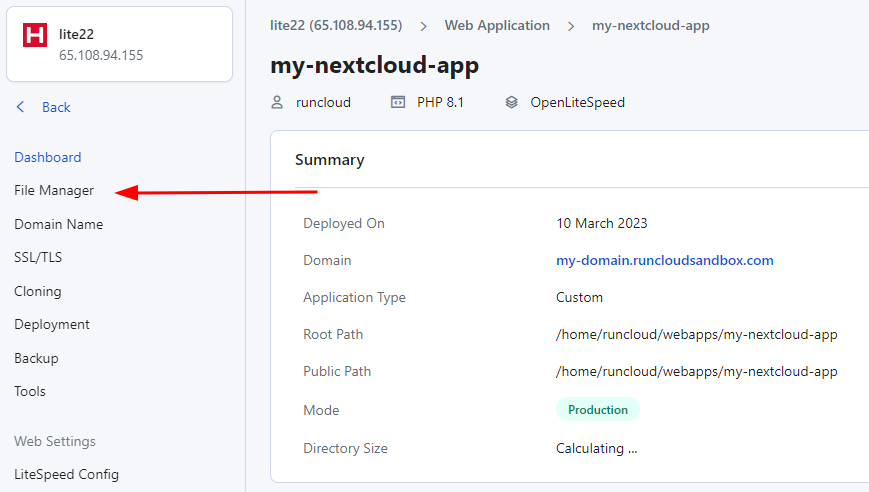
    RunCloud file manager

    Once you have opened the file manager, you should only see one file – index.html. Click on “New” and create a new file with the name setup-nextcloud.php.

    After the file has been created it will be displayed in the file manager. Click on it to edit the file – it will open a file editor in a new browser tab.
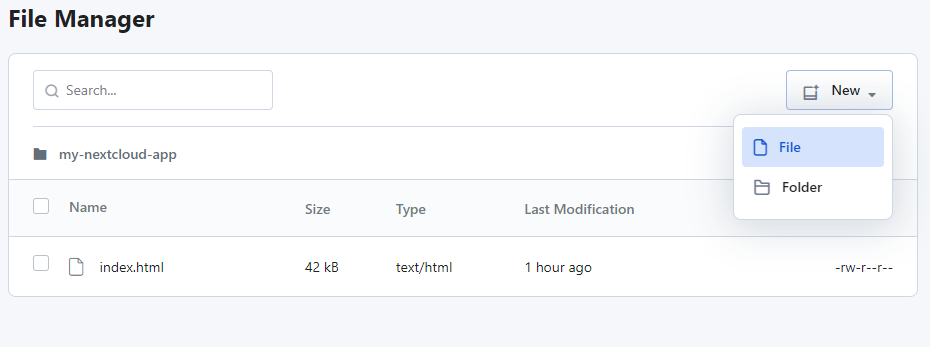
    create a file using runcloud file manager

    Download the installation file from https://download.nextcloud.com/server/installer/setup-nextcloud.php and open it in any text editor such as Notepad or VS Code. Press Ctrl + a to select all of the text, and Ctrl + c to copy it.Now go back to the RunCloud file editor and paste the text using Ctrl + v. Make sure to save the file afterwards.
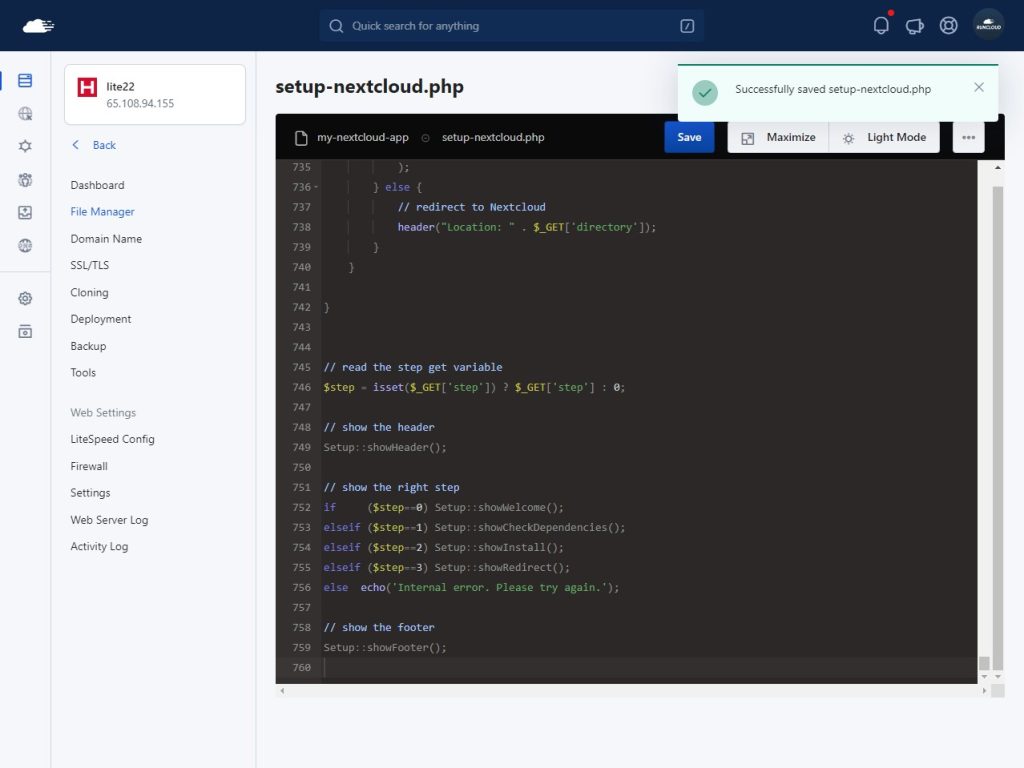
    saving file in RunCloud

    3. Run NextCloud Installer

    After preparing your NextCloud installer, open the URL of your website in a web browser. By default you will see the “Welcome to RunCloud” message present in the index.html file. Go to the address bar of your browser and append /setup-nextcloud.php to the end of the URL.

    For example, if your website is located at www.example.com, you need to go to www.example.com/setup-nextcloud.php to start the installation.

    If you followed the steps correctly, you will be greeted with the following screen. Click on “Next” to move forward with the installation.
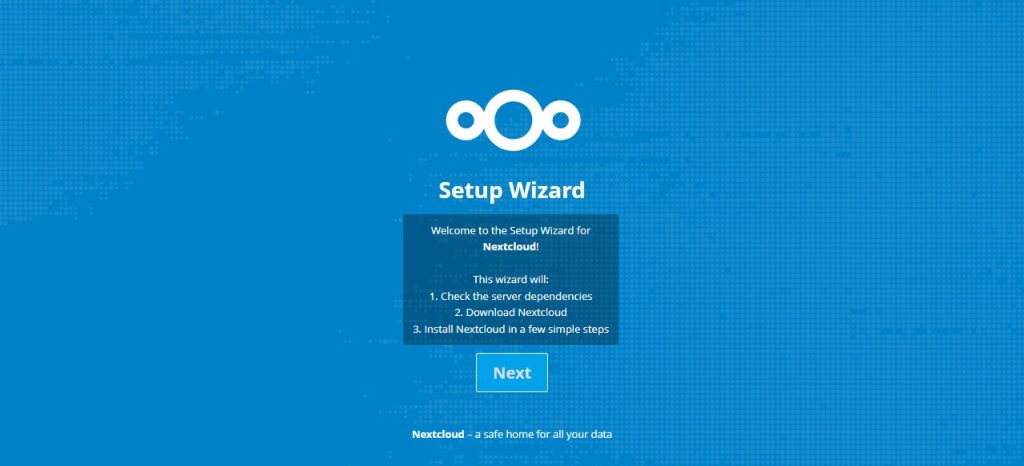
    Start Nextcloud installation

    On the next screen you will be asked to specify the installation directory of your web application. Enter a single full stop to install the setup in the current location – i.e., where we added the “setup-nextcloud.php” file.
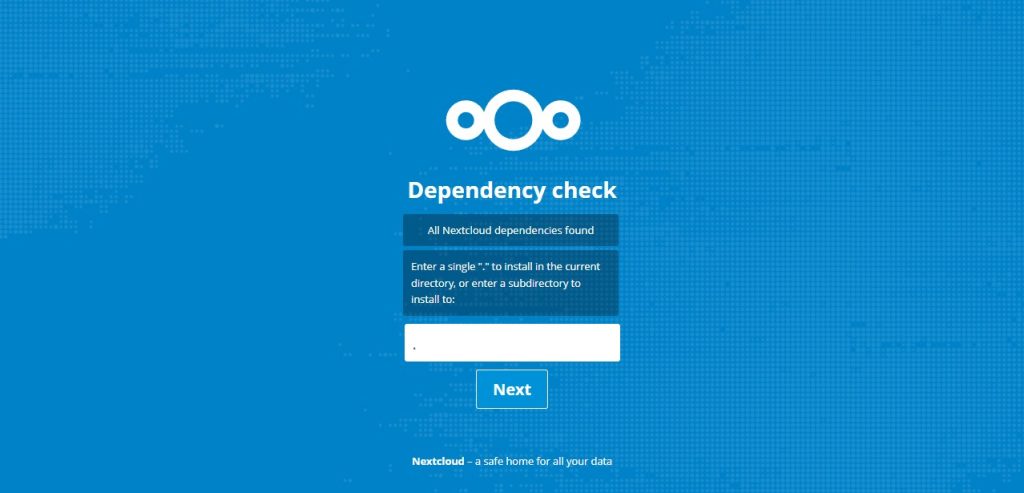
    set installation directory Nextcloud

    After you have configured the directory, the installation will begin. It will take 5-10 minutes, depending on the speed of your internet connection. Once the installation is complete you will be greeted with a success message.

    nextcloud installation successful

    4. Configure NextCloud

    After installation you will need to set up the administrator account, storage path, and the database that will be used by NextCloud.

    First, go to the RunCloud dashboard and create a new database user. After you have done this, create a new database and grant its access to the user that you just created. Once you have created the database, it should look like this:
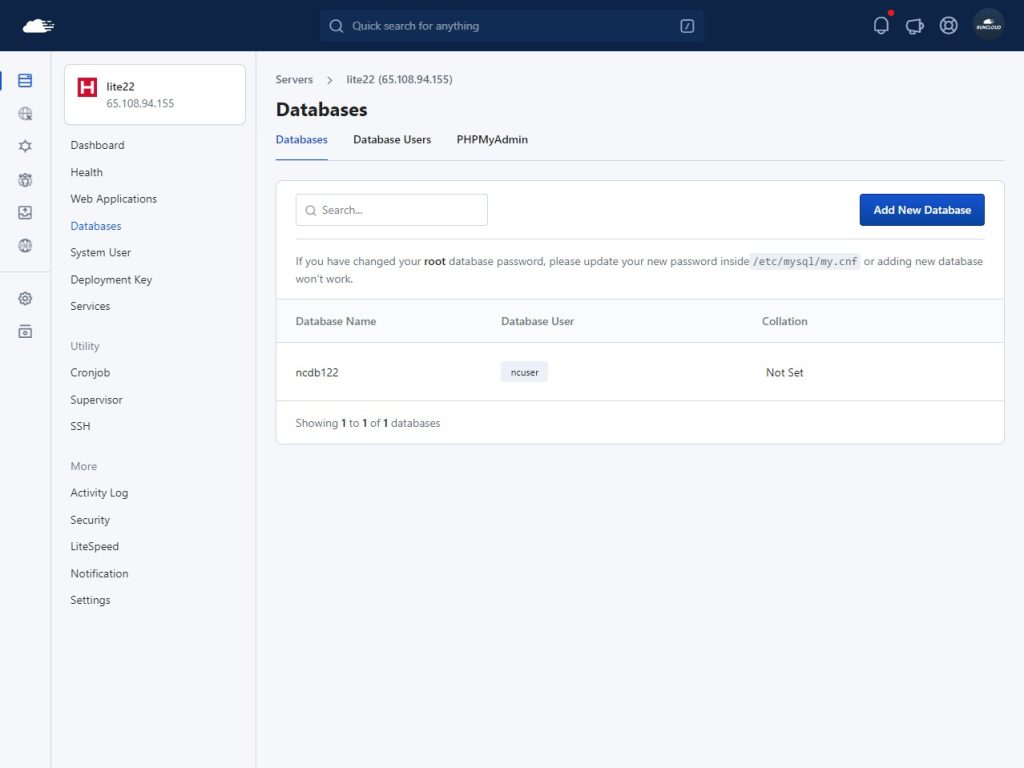
    nextcloud database create

    After creating the database, return to the NextCloud installation and enter the login credentials of your administrator account. If you don’t want to use the default path to store data then you can change that as well.

    Finally, make sure to switch to the MySQL/MariaDB tab and enter the details of the new database and user that you created in the last step. Update the database host to localhost:3306 and click “Install”. If you are using a containerised server, then you will need to enter host:3306 instead; refer to our docs on networking in containerised servers on RunCloud for more information.
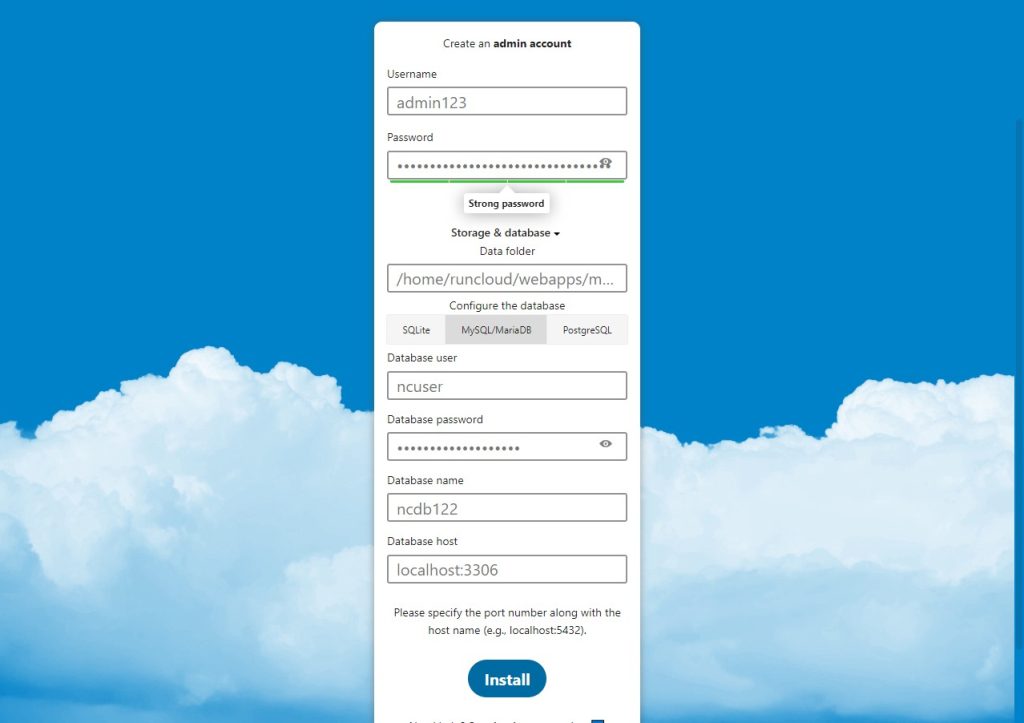
    Create Nextcloud admin account

    After installation, you will be asked if you want to install the recommended apps. You can skip this step if you wish, and install any apps at a later time from the dashboard.

    5. Troubleshooting NextCloud

    After installation, you will need to tweak a few settings to properly secure your server. Click on the user icon in the top right corner of your screen, and navigate to “Administration Settings”.
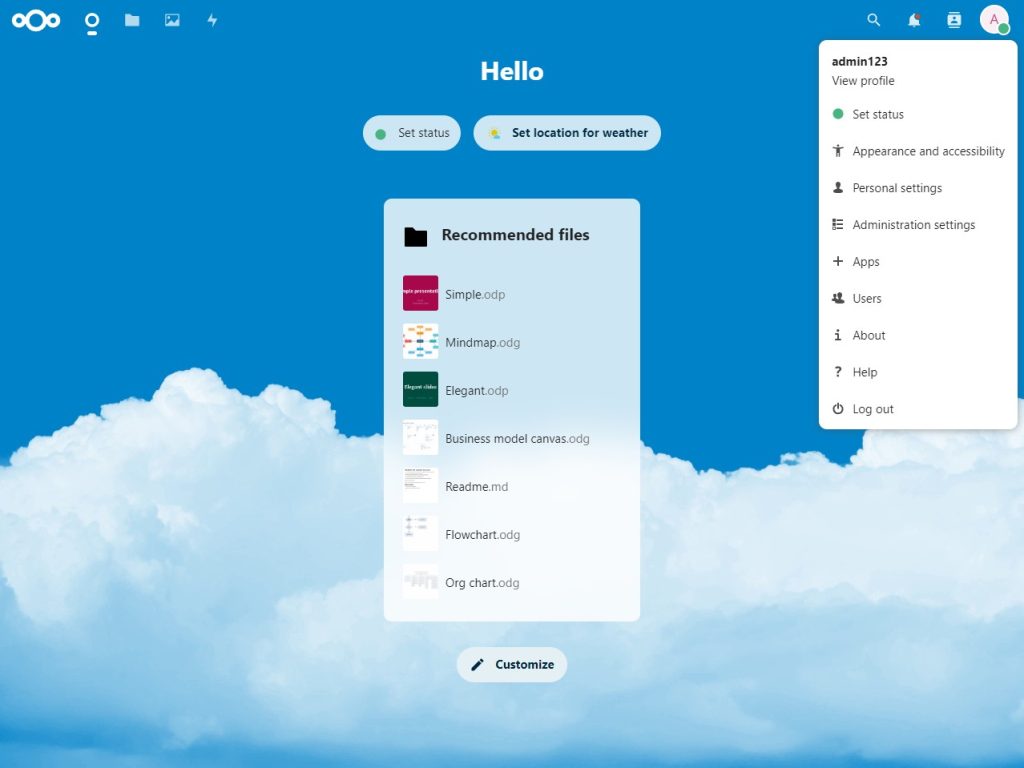
    setup Nextcloud installation

    Ideally, you should see the green “All check passed” in the security and setup warning section. However, after installing NextCloud it is possible that you might see messages in any of three different colors:

    • red (error)
    • yellow (warning)
    • black (notice)

    Fortunately, RunCloud makes it very easy to remove these messages. Let’s start with red ones first.
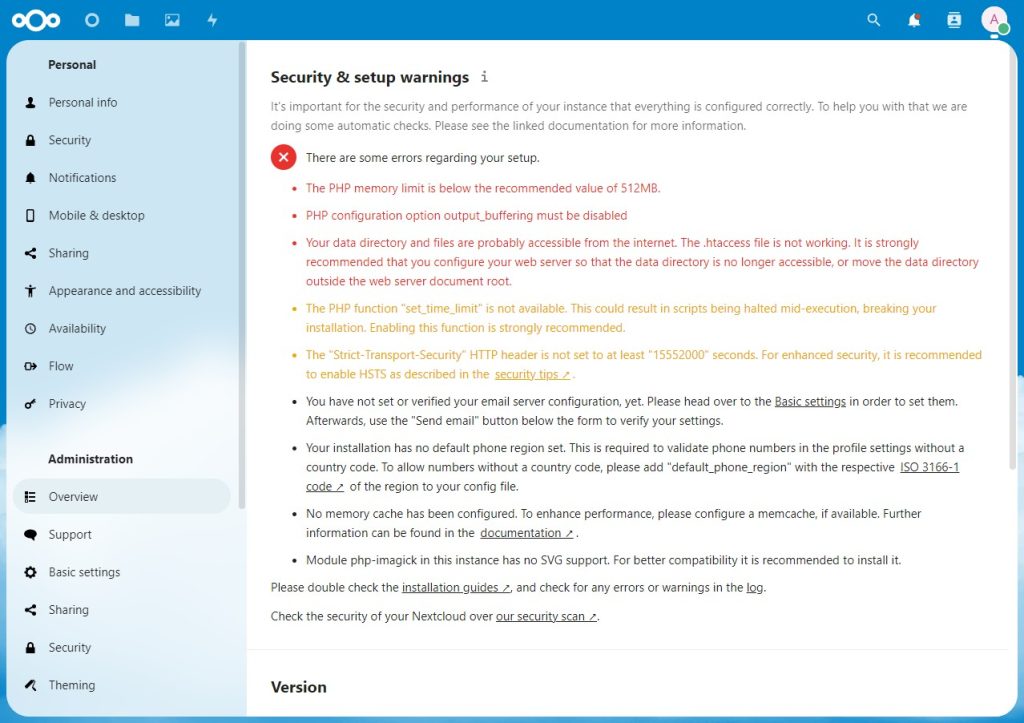
    Warnings on Nextcloud dashboard

    5.1 Fixing “PHP Memory Limit Is Below The Recommended Value”

    This can be easily fixed in the RunCloud dashboard. Go to “Settings” and scroll down to the PHP settings section. You will see the option to modify the memory limit. Update the value, and save the changes.
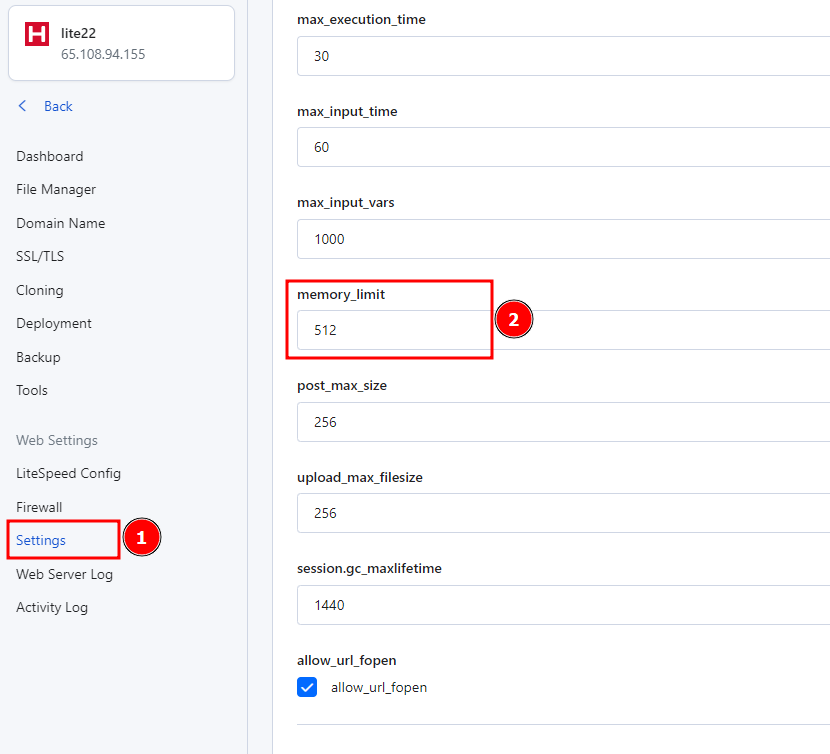
    setting memory limit on RunCloud

    5.2 Warning – PHP Function is Not Available

    NextCloud requires a number of PHP functions to run properly. If there are any unavailable PHP functions, you will probably see this warning message.

    If you see the message that the PHP function set_time_limit is not available, this could result in scripts being halted mid-execution, breaking your installation. Therefore, enabling this function is strongly recommended.

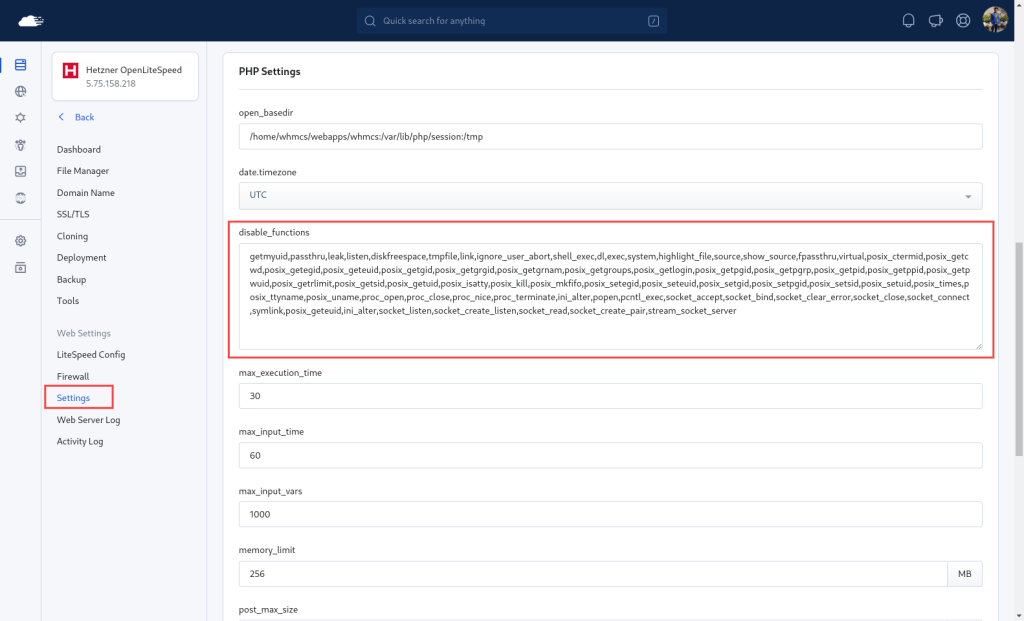
    To fix this issue, go to the RunCloud dashboard panel, select your server, click the Web Application menu, select your web application, and then click the “Settings” menu of this web app. Scroll to find the disable_functions option and remove the following functions from the text:

    • set_time_limit
    • ignore_user_abort
    • posix_getuid
    • posix_getpwuid

    After removing the functions from the list, click the “Update Web Application Settings” button. Refresh the NextCloud page – the warning message should disappear.
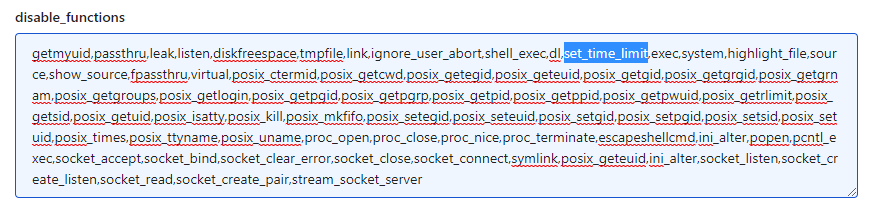
    disable php functions on RunCloud

    5.3 Fixing “Strict-Transport-Security HTTP Header…”

    Enabling HTTP Strict Transport Security policy on your server will fix multiple error messages. Go to your dashboard and click on “Domain Name”. You will see all of the domains that are associated with your application. Configure the TLS settings to enable the HSTS policy.
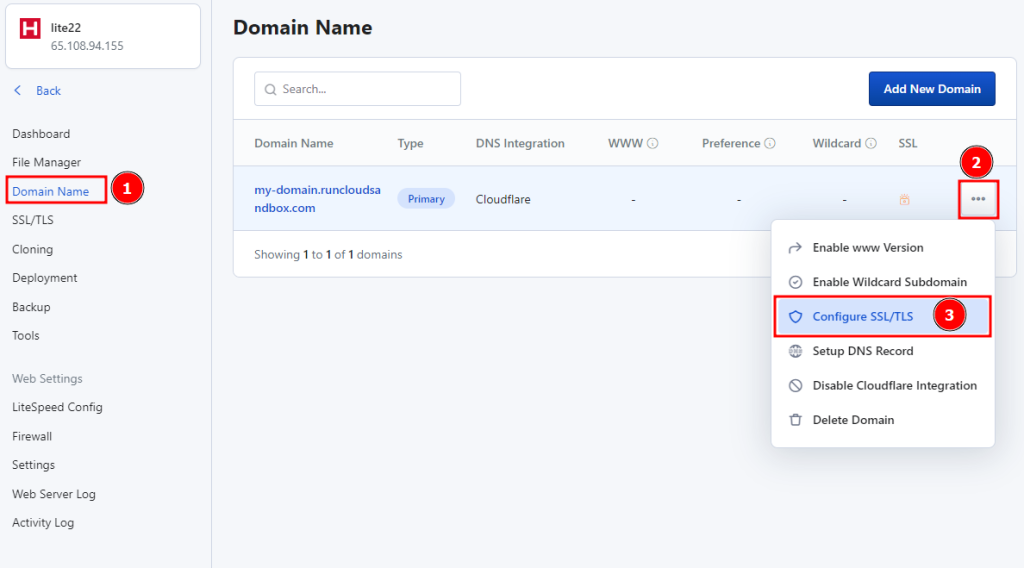
    Configure HSTS header on RunCloud

    Once there, pick the third option to enable the policy, and click “Update” to save the changes.
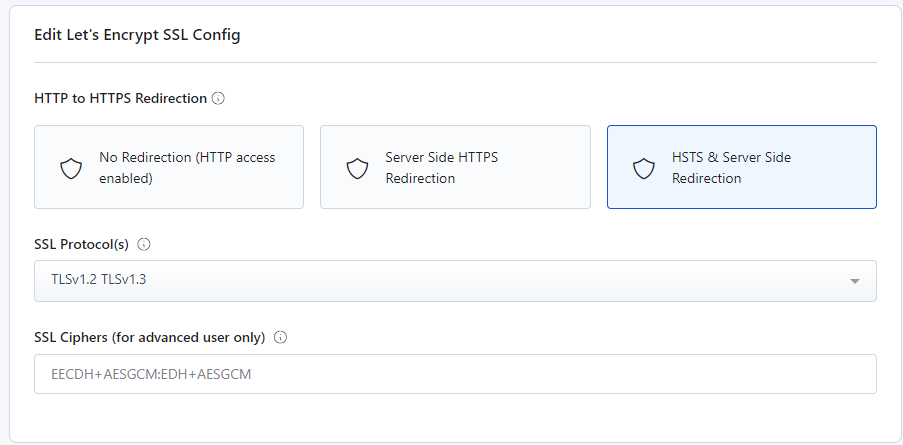
    Enable HSTS header on RunCloud

    5.4 Configure Redis Memory Cache (with Enhanced Security)

    Memory caching can significantly improve your Nextcloud server performance, as frequently requested objects are stored for faster retrieval. While Nextcloud displays a warning if a local memcache isn’t configured, it’s not strictly required. However, using a memcache is highly recommended for optimal performance.

    With RunCloud, you can use either Redis or Memcached. Follow the steps below to configure the Redis cache for your Nextcloud installation:

    Step 1: Enable Redis Service (RunCloud)

    1. Log in to your RunCloud dashboard and select the server where your Nextcloud instance is running.
    2. Navigate to the Services section.
    3. Locate the Redis service. If it’s not already running, start it. RunCloud pre-installs Redis, so you generally only need to enable it.
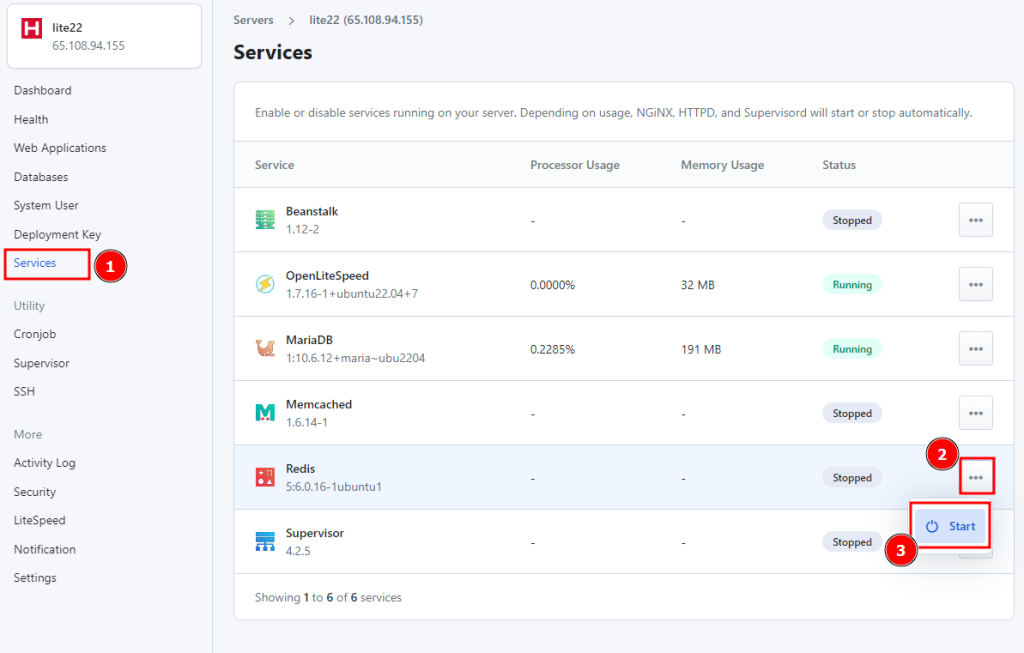
    Enable Redis on RunCloud

    Step 2: Choose Your Redis Authentication Strategy

    RunCloud sets a default Redis password for the default user. You have two primary options:

    • Option A (Simpler): Use the RunCloud Default Redis User: This is the easiest approach but less granular. You’ll use the existing default user and its password.
    • Option B (More Secure): Create a Dedicated Nextcloud Redis User: This is the best security practice. You’ll create a new Redis user with specific permissions tailored only for Nextcloud, minimizing the risk of unauthorized access.

    Step 3: Using the RunCloud Default Redis User (Option A)Retrieve the Default Password: You’ll need the default Redis password set by RunCloud. Go to your Server, click Settings, scroll down to the Redis Password tab, and copy the password from the Current Password field.
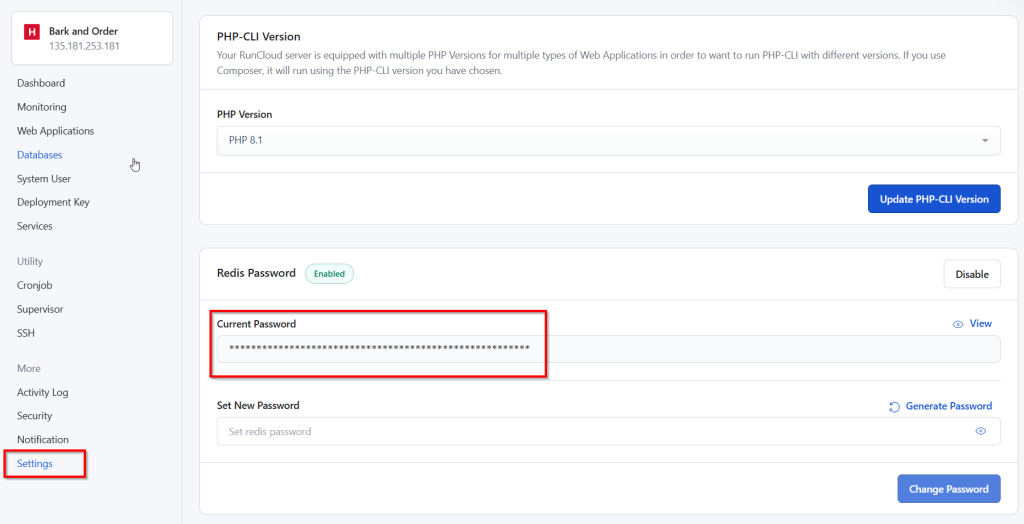
    Step 4: Creating a Dedicated Nextcloud Redis User (Option B – Recommended only for Advanced Users)

    Before we proceed further, you should note that this step is optional. Once you have the master password for your Redis server (as explained in step 3), you can use it to connect your Nextcloud instance to Redis. However, advanced users should consider creating a separate user account for Nextcloud using the following steps:

    Connect to Redis via SSH: Connect to your server via SSH and use the following redis-cli to connect to your local Redis instance:

    ## Command to connect to Redis CLI
    redis-cli -h 127.0.0.1 -p 6379 -a "your_runcloud_redis_password"

    In the above command, you will need to replace your_runcloud_redis_password with the RunCloud Redis password that you noted in step 3.

    Create the User: After this, use the ACL SETUSER command provided below to create a new user with the correct permissions. Make sure to replace nextcloud_redis_user and your_secure_password with your desired username and a strong password.

    ## Create user in Redis without Dangerous permissions
    ACL SETUSER nextcloud_redis_user >your_secure_password on ~* +@all -@dangerous

    In the above ACL Rule:

    • +@all: Grants both read and write access to your database.
    • -@dangerous: Denies dangerous commands that could harm your Redis instance.

    You can configure these parameters to add or remove specific permissions by consulting the official Redis documentation.

    Step 5: Configure Nextcloud (config.php)

    1. Access Your Nextcloud Files: In the RunCloud dashboard, go to your server, select your Nextcloud web application, and then click File Manager.
    2. Edit config/config.php: Locate and edit the config/config.php file within your Nextcloud installation directory.
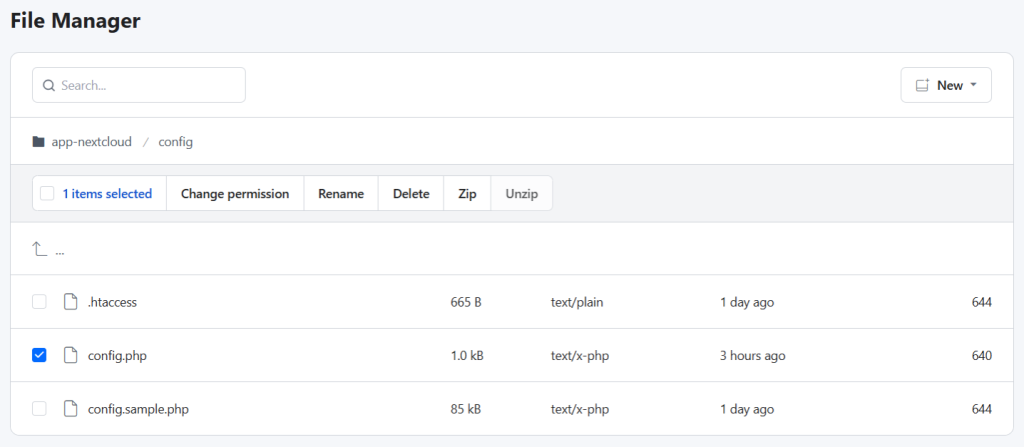
    Add the Redis Configuration: Add the following lines inside the main configuration array (not at the end of the file). Make sure the syntax is correct PHP. The location within the array doesn’t matter as long as it’s within the main $CONFIG = array ( ... ); block.

    If you chose Option A (Default User):

    'memcache.local' => '\OC\Memcache\Redis',
      'memcache.distributed' => '\OC\Memcache\Redis',
      'memcache.locking' => '\OC\Memcache\Redis',
        'redis' => [
        'host' => '127.0.0.1',
        'port' => 6379,
        'password' => 'your_runcloud_redis_password'
      ],

    If you chose Option B (Dedicated Nextcloud User):

    'memcache.local' => '\OC\Memcache\Redis',
      'memcache.distributed' => '\OC\Memcache\Redis',
      'memcache.locking' => '\OC\Memcache\Redis',
        'redis' => [
        'host' => '127.0.0.1',
        'port' => 6379,
        'user' => 'nextcloud_redis_user',
        'password' => 'your_secure_password'
      ],
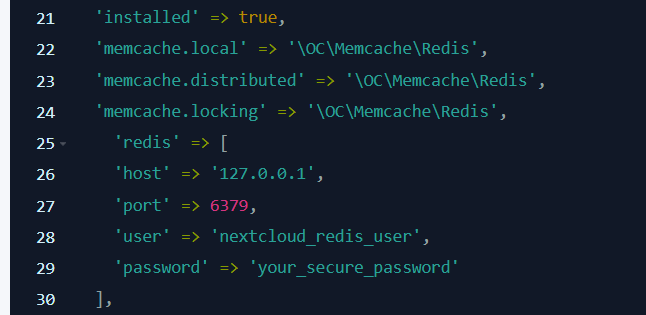
    1. Save the config.php file.

    Step 6: Verify and Test

    Log in to your Nextcloud admin interface. Go to Administration settings -> Security & setup warnings. The warning about missing memcache should be gone.

    5.5. Enable Imagick (ImageMagick PHP Extension)

    NextCloud uses Imagick for the preview generation process. When Imagick is not available, you will see a warning message in NextCloud’s automated checks.

    Imagick is optional – it’s not required, and you may safely ignore the warning if only a few users are using your NextCloud server. If you want to enable it, read our quick guide on how to install Imagick (ImageMagick PHP Extension) in RunCloud.

    5.6. WebDAV Interface Seems to be Broken

    If you are getting the WebDAV interface seems to be broken error in your Nextcloud installation then you will need to tweak your server settings to fix this error. The exact steps vary for different tech stacks on RunCloud. You can find your application stack under the “Web Application Stack” section on the Settings page for your application.
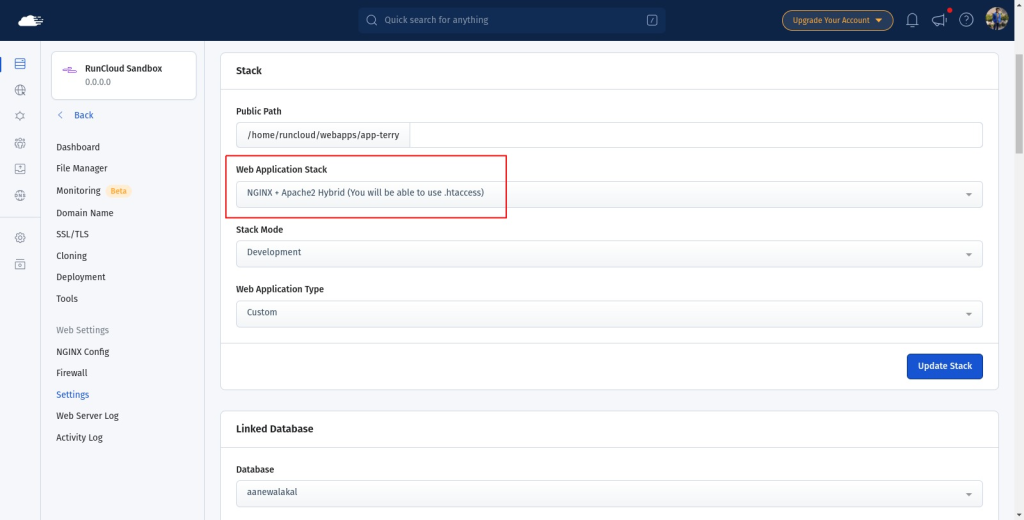
    For NGINX Hybrid Stack on RunCloud

    If you are using the default hybrid stack on RunCloud, then you will need to create a custom NGINX configuration file for your Nextcloud application. When creating the config, make sure to select the type as location.main-before and give it a descriptive name. Next, paste the following code snippet in the provided text box as shown below:

    location ~ /.well-known {
        try_files $uri @proxy;
    }
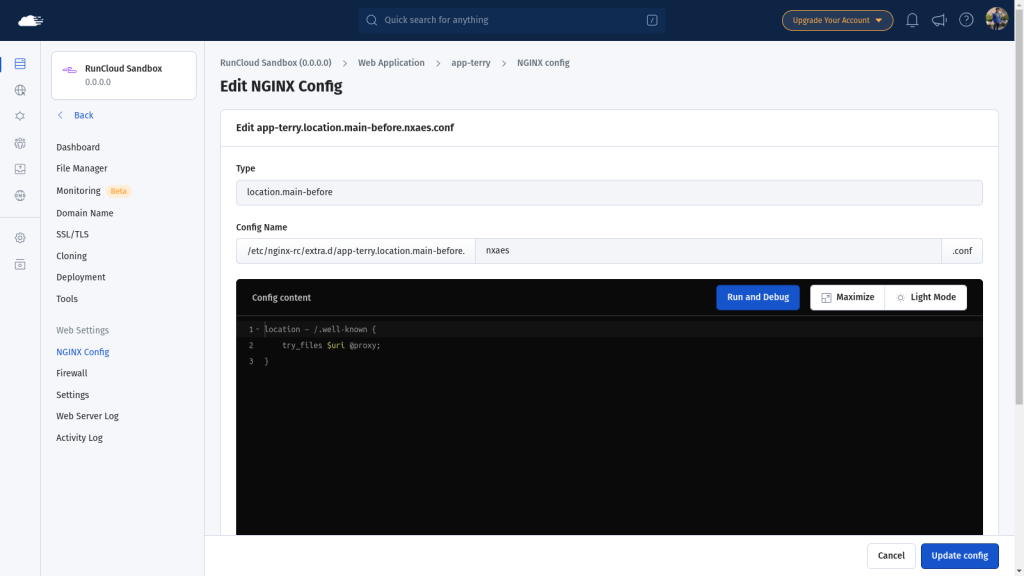
    Once you save the configuration file, you can go back to your Nextcloud applications and refresh the page to check if the error still persists.

    For Native NGINX Stack on RunCloud

    If you are using the native NGINX stack, then you will need to create a custom NGINX configuration file for your Nextcloud application. When creating the config, make sure to select the type as location.main-before and give it a descriptive name. Next, paste the following code snippet in the provided text box as shown below:

    index index.php index.html /index.php$request_uri;
    location = / {
        if ( $http_user_agent ~ ^DavClnt ) {
            return 302 /remote.php/webdav/$is_args$args;
        }
    }
    
    location = /robots.txt {
        allow all;
        log_not_found off;
        access_log off;
    }
    
    # Make a regex exception for `/.well-known` so that clients can still
    # access it despite the existence of the regex rule
    # `location ~ /(\.|autotest|...)` which would otherwise handle requests
    # for `/.well-known`.
    location ^~ /.well-known {
        # The rules in this block are an adaptation of the rules
        # in `.htaccess` that concern `/.well-known`.
    
        location = /.well-known/carddav { return 301 /remote.php/dav/; }
        location = /.well-known/caldav  { return 301 /remote.php/dav/; }
    
        location /.well-known/acme-challenge    { try_files $uri $uri/ =404; }
        location /.well-known/pki-validation    { try_files $uri $uri/ =404; }
    
        # Let Nextcloud's API for `/.well-known` URIs handle all other
        # requests by passing them to the front-end controller.
        return 301 /index.php$request_uri;
    }
    
    # Rules borrowed from `.htaccess` to hide certain paths from clients
    location ~ ^/(?:build|tests|config|lib|3rdparty|templates|data)(?:$|/)  { return 404; }
    location ~ ^/(?:\.|autotest|occ|issue|indie|db_|console)                { return 404; }
    
    # Ensure this block, which passes PHP files to the PHP process, is above the blocks
    # which handle static assets (as seen below). If this block is not declared first,
    # then Nginx will encounter an infinite rewriting loop when it prepends `/index.php`
    # to the URI, resulting in a HTTP 500 error response.
    location ~ \.php(?:$|/) {
        # Required for legacy support
        rewrite ^/(?!index|remote|public|cron|core\/ajax\/update|status|ocs\/v[12]|updater\/.+|ocs-provider\/.+|.+\/richdocumentscode(_arm64)?\/proxy) /index.php$request_uri;
    
        fastcgi_split_path_info ^(.+?\.php)(/.*)$;
        set $path_info $fastcgi_path_info;
    
        try_files $fastcgi_script_name =404;
    
        include fastcgi_params;
        fastcgi_param SCRIPT_FILENAME $document_root$fastcgi_script_name;
        fastcgi_param PATH_INFO $path_info;
        fastcgi_param HTTPS on;
    
        fastcgi_param modHeadersAvailable true;         # Avoid sending the security headers twice
        fastcgi_param front_controller_active true;     # Enable pretty urls
        fastcgi_pass unix:/var/run/<appname>.sock;
    
        fastcgi_intercept_errors on;
        fastcgi_request_buffering off;
    
        fastcgi_max_temp_file_size 0;
    }
    
    # Serve static files
    location ~ \.(?:css|js|mjs|svg|gif|png|jpg|ico|wasm|tflite|map|ogg|flac)$ {
        try_files $uri /index.php$request_uri;
        # HTTP response headers borrowed from Nextcloud `.htaccess`
        add_header Cache-Control                     "public, max-age=15778463,asset_immutable";
        add_header Referrer-Policy                   "no-referrer"       always;
        add_header X-Content-Type-Options            "nosniff"           always;
        add_header X-Frame-Options                   "SAMEORIGIN"        always;
        add_header X-Permitted-Cross-Domain-Policies "none"              always;
        add_header X-Robots-Tag                      "noindex, nofollow" always;
        add_header X-XSS-Protection                  "1; mode=block"     always;
        access_log off;     # Optional: Don't log access to assets
    }
    
    location ~ \.woff2?$ {
        try_files $uri /index.php$request_uri;
        expires 7d;         # Cache-Control policy borrowed from `.htaccess`
        access_log off;     # Optional: Don't log access to assets
    }
    
    # Rule borrowed from `.htaccess`
    location /remote {
        return 301 /remote.php$request_uri;
    }
    
    # location / {
    #     try_files $uri $uri/ /index.php$request_uri;
    # }

    After adding the above snippet to your configuration file, you need to modify the line which contains fastcgi_pass unix:/var/run/<appname>.sock;. In this line, you need to replace the <appname> with the name of your application that you entered in the step 1. Once you have saved this config file, you will need to create another NGINX config file for this application, but this time at the root location. Paste the following text in the text box and hit save:

    try_files $uri $uri/ /index.php$request_uri;

    Once you save the second config file, you can go back to your Nextcloud installation and verify that the error is gone.

    For Containerised NGINX Stack on RunCloud

    If you are using containerised Docker servers on RunCloud to run your Nextcloud installation, then you will need to create custom NGINX config to redirect web requests. The steps for creating the custom configuration for this stack are similar to the native NGINX stack on RunCloud (as described above), but there is one key distinction.

    When editing the fastcgi_pass unix:/var/run/<appname>.sock; line in your configuration, you will need to replace it with fastcgi_pass unix:/var/run/php/<appname>.sock;. After replacing the line, you can modify it to update <appname> with the name of your application and continue with the rest of the process.

    Summary

    NextCloud is an open source file manager that provides many additional features such as calendar management and file sharing. If you want to run your own version of Dropbox or Google Drive on your server for your own team or business, NextCloud is a great solution, allowing you to share and collaborate on documents, and have video chats without potential data leaks.

    RunCloud is a server management platform that makes it easy to manage and optimize your servers with an easy to use graphical user interface. Sign up for RunCloud today and see how it can save you time and money.


  • The Best Free eCommerce Platforms for Selling in 2025

    The Best Free eCommerce Platforms for Selling in 2025

    If you’re starting an online store and want to keep costs low, several platforms offer generous free plans with all the basics you need to begin selling.

    This guide compares the leading free e-commerce platforms, highlighting their key features, so you can choose the one that best fits your business. You’ll see how each platform performs in areas like usability, scalability, extensions, and long-term flexibility.

    Top Free eCommerce Platforms

    WooCommerce (Free, Open-Source)

    WooCommerce is a highly flexible e-commerce plugin that can be installed on WordPress. Because it works with WordPress, you get all the familiar blog and website functionality and a large range of tools to sell things online.

    One of the best things is that WooCommerce is open-source. This allows you to use extra features (called extensions) built by third-party developers. Some of these extensions are free, while others cost money, but they give you the flexibility to add the exact features your store needs.

    You can extend WooCommerce with plugins for subscriptions, shipping providers, payment gateways, and more.

    The core features of WooCommerce handle all the essential stuff for running an online shop. You can easily create product pages (for physical items, downloads, or even products with different options), track your inventory, process orders, and let customers manage their accounts.

    WooCommerce also determines taxes and shipping zones for you, which is a significant help if you sell to customers in different countries. Because it’s part of WordPress, you can easily write blog posts and optimize your site for search engines, helping people find your store organically. It gives you the power to sell products and build your brand’s online presence in one place.

    📖 Suggested read: WordPress.com vs. WordPress.org – The Differences & Which To Choose

    Shopify (Free Trial Available)

    Shopify is a paid eCommerce platform that enables you to easily build websites. However, it also includes a free trial, allowing you to try it out without commitment. Regardless of which Shopify plan you choose, you’ll receive some core features to make online selling easier. Shopify reports higher conversion rates through its hosted checkout, which is included on all plans. This means more people who start a purchase actually finish it.

    You also gain access to tools for in-person selling. Shopify POS (Point of Sale) lets you sell at physical locations and automatically syncs your online and in-person inventory. You’re not just limited to your website, either. Every plan allows you to promote and sell your products across various channels, including Instagram, TikTok, and Google. This helps you reach customers where they’re already spending their time.

    To see how your store is doing, every plan provides in-depth analytics. You get reports to track your sales, see where your customers are coming from, and find ways to improve. Plus, every Shopify plan lets you use apps from their app store. These apps add a range of extra functionality, including apps to help you source products, customize your store’s design, and do pretty much anything else you might need.

    📖 Suggested read: 11 Alternatives To reCAPTCHA to Protect Your Site from Spam

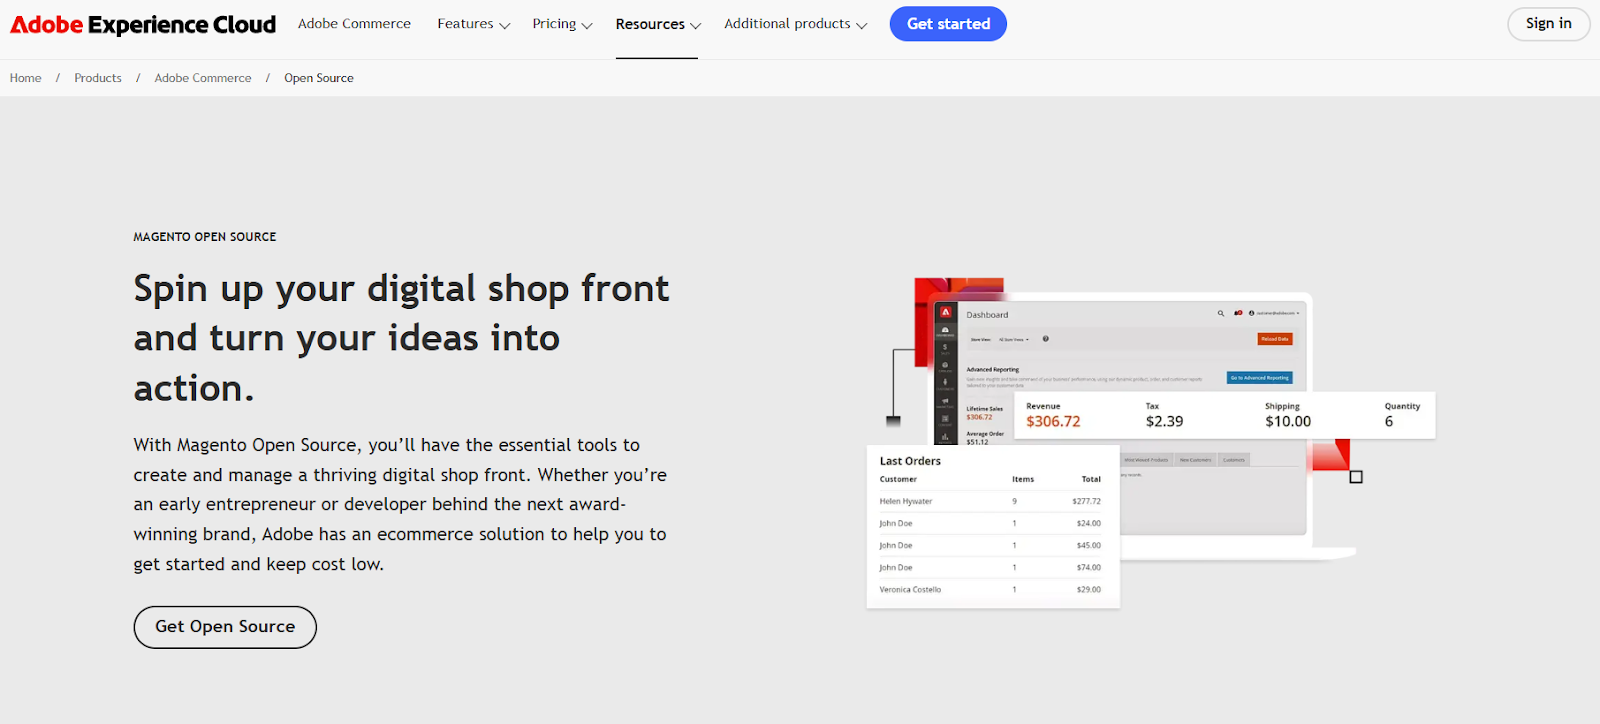
    Magento Open Source

    Magento is now part of Adobe Commerce, a business suite that helps you build online stores that are fast, engaging, and personalized. Adobe Commerce lets you build “headless” storefronts. This means the front end (the part customers see) and the back end (where you manage everything) are separate. This gives you a great deal of flexibility. You can use developer-friendly tools to create custom experiences, connect to different systems using APIs, and even use pre-built services from Adobe. It also helps your site rank higher in search engines. Making updates is easier, too, because you can change the front end without messing with the back end.

    Adobe Commerce includes “Edge Delivery Services” that make your store load quickly. Faster sites rank better in search results, get more visitors, and convert more customers. They also use a “performance first” design that helps your site achieve good scores on Google’s tests. You can access ready-to-use components (such as product pages, shopping carts, and customer accounts) that you can simply drop into your site. Plus, you can build your own custom components if you need something specific.

    Even without coding skills, it’s easy to create and publish content for your store. Familiar tools like Google Docs and Microsoft Word make it simple to build pages, add images, insert links, and include forms. Dynamic blocks let you tailor content for different customer groups, while scheduling tools allow you to plan updates in advance – no developer needed.

    Adobe Commerce helps connect the commerce platform to Adobe Experience Manager Assets. This tool efficiently manages, approves, and edits digital content, allowing you to track progress. Finally, the tool can use A/B testing to test different content, designs, and layouts to see what works best.

    Bagisto

    Bagisto is an open-source eCommerce platform built on the Laravel framework. Its architecture is designed for flexibility, featuring an API-first, headless structure that enables the building of expansive, multi-vendor marketplaces, as well as robust, multi-tenant SaaS capabilities, making it a comprehensive tool for modern digital commerce.

    It uses a headless commerce approach, which decouples the front-end presentation layer from the back-end commerce engine. This separation enables developers to build highly customized and high-performance storefronts using modern frameworks, such as React, Vue.js, and Next.js. By interacting with the back end through GraphQL APIs, the front end can deliver ultra-fast and engaging user experiences. This architecture not only improves site speed and flexibility but also allows for seamless integration across multiple channels, including web, mobile apps, and point-of-sale systems, without altering the underlying back-end processes.

    Bagisto supports multi-vendor marketplaces with tools for vendor accounts, commissions, and product approval. The central administrator retains complete oversight, with powerful tools to manage vendors, define global or seller-specific commission rates, and approve products. This structure benefits customers by offering a diverse range of products and the ability to compare prices from different sellers, all within one convenient location.

    Bagisto’s Virtual Try-On feature is a notable addition, which uses AR technology to enable customers to visualize products on themselves before making a purchase. This interactive tool enhances customer engagement and confidence by allowing them to realistically preview items such as clothing, glasses, and makeup, which in turn helps reduce return rates and increase sales. If you’d like to try it out for yourself, read our guide on how to get started with Bagisto.

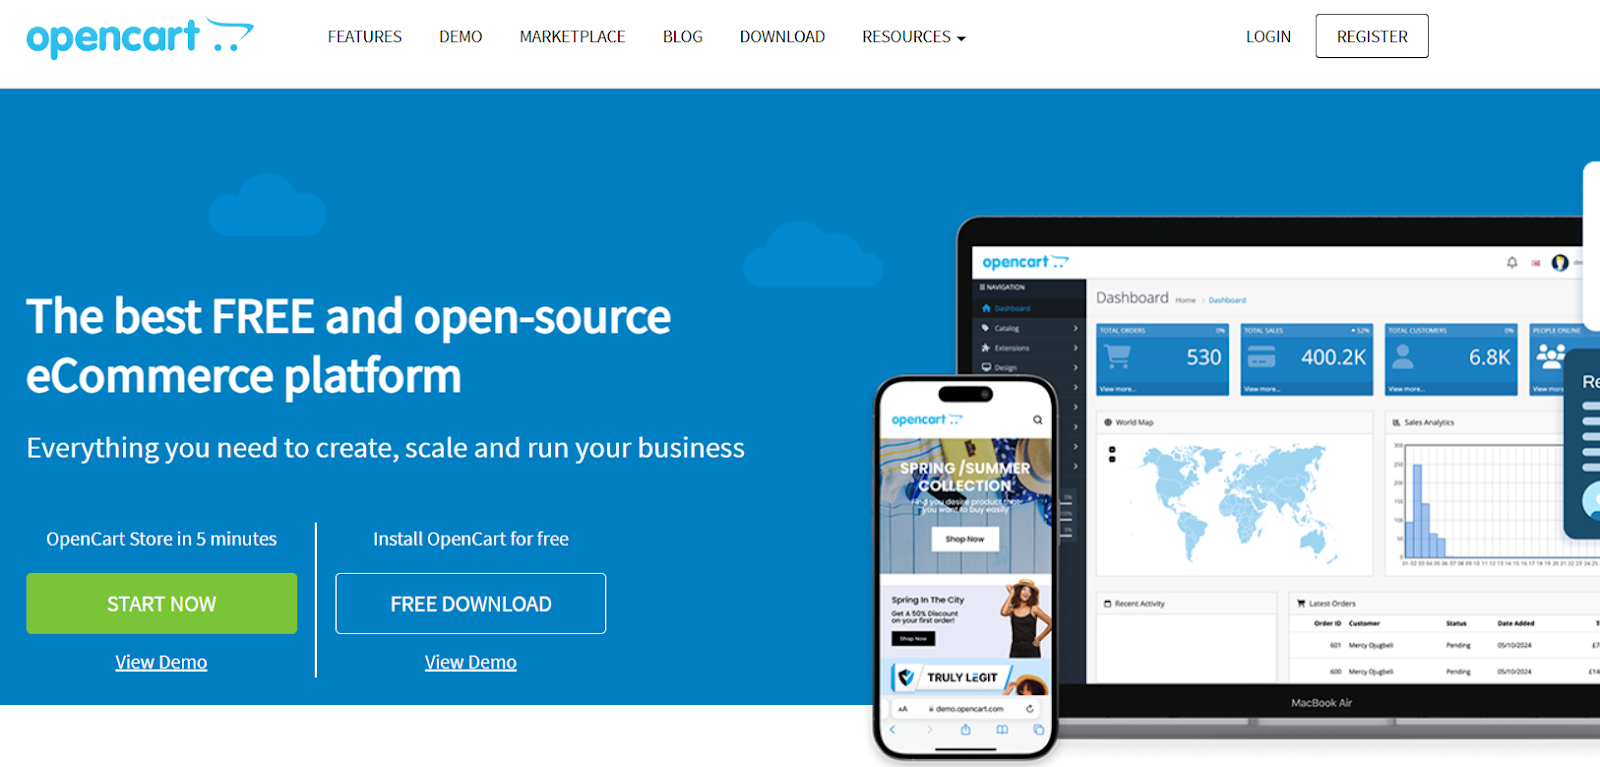
    OpenCart

    OpenCart provides a comprehensive suite of tools designed to enable the administration of your online store to be as efficient as possible. It includes everything from product management to detailed reporting, with the centralized administrator dashboard offering an immediate overview of crucial business metrics, including order totals, customer activity, and real-time sales analytics – all presented through intuitive widgets for rapid assessment.

    Additionally, OpenCart’s robust user management system allows you to create multiple user accounts with granular permission controls. This allows you to delegate responsibilities securely and maintain operational efficiency within your team. The platform also features multi-store functionality and allows centralized management.

    OpenCart supports extensive product customization through options and attributes, accommodating variations in size, color, and other characteristics. An integrated affiliate system facilitates collaborative marketing efforts, allowing you to incentivize external partners to promote your products and track their performance.

    To drive sales and enhance customer engagement, OpenCart provides versatile tools for creating discounts, coupons, and special promotions, allowing you to implement diverse pricing strategies. Finally, integrated backup and restore capabilities ensure data security and business continuity.

    📖 Suggested read: How to Host Your Websites on Vultr with RunCloud

    PrestaShop

    PrestaShop Classic is available for free to download. It is a self-hosted e-commerce solution that gives merchants considerable control over their online stores. This option is particularly well-suited for those who already have a preferred hosting provider and possess the technical expertise to manage their server environment or are willing to learn.

    The download includes a selection of pre-installed essential modules, streamlining the initial setup process and enabling you to begin selling products relatively quickly. Furthermore, direct integration with the PrestaShop Marketplace from within the back office gives access to a vast library of themes and additional modules, allowing for extensive customization and feature expansion.

    A significant advantage of PrestaShop is its huge customizability, which comes from its open-source foundation. This flexibility also allows the platform to adapt and scale alongside your business. PrestaShop is renowned for its robust SEO capabilities, providing all the necessary tools to optimize your store’s visibility in search engine results, helping to drive organic traffic. With this self-hosted solution, you retain complete ownership of your store’s data, ensuring autonomy and control over your business information.

    Square Online

    Square provides an online e-commerce platform and a point of sale (POS) system with a comprehensive suite of tools designed to allow sales across various channels, with minimal setup and no formal training needed.

    Square POS offers a solution to fit your needs, whether you’re selling in a physical store, online, over the phone, or even remotely in the field. The system is modular, allowing you to choose the specific features that align with your business operations. Many of these core features are available at no monthly cost, making it an accessible option for businesses of all sizes. This flexibility ensures you only pay for the processing and features you use.

    A core component of Square POS is its integrated online store functionality. This feature lets you easily create a website to showcase your products or services, accept online orders, and manage bookings. You can also seamlessly integrate your online store with social media platforms such as Instagram and Facebook, helping to expand your reach and connect with customers where they already spend their time.

    In addition to basic transaction processing, Square POS offers features to help you manage your business more effectively. The Customer Directory automatically creates profiles for each customer, simplifying communication and relationship management.

    Additionally, Square offers business banking services, including a checking account with instant access to your sales revenue through a free debit card and a savings feature that automatically sets aside portions of your sales for designated purposes, such as taxes or future investments. This combination of sales tools and financial management features positions Square POS as a comprehensive solution for streamlining business operations.

    📖 Suggested read: The Complete WordPress Speed Optimization Guide

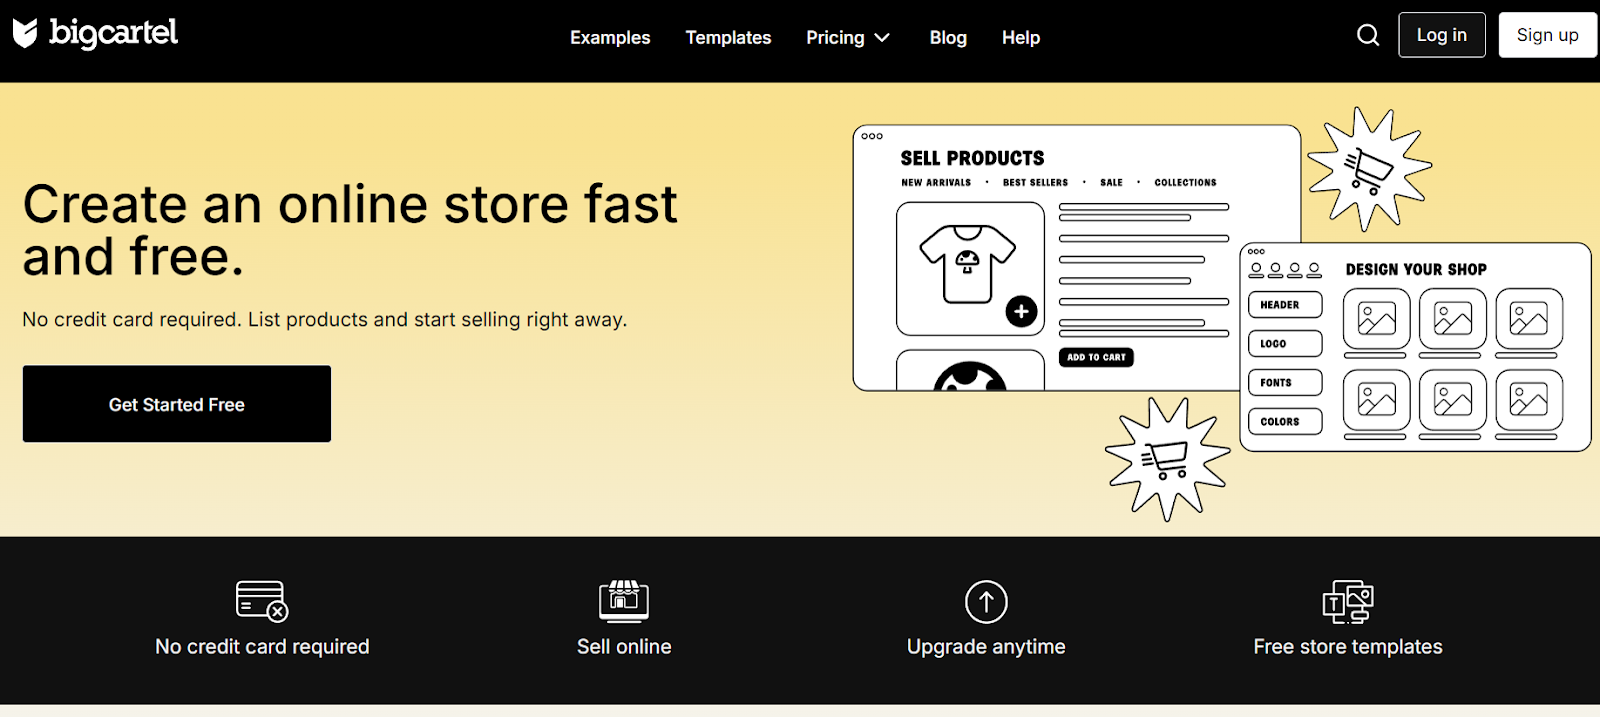
    Big Cartel

    Big Cartel offers a free plan, called the Gold plan, specifically designed to help artists, creators, and independent business owners launch an online store quickly and without any upfront financial commitment. This plan requires no credit card information, allowing you to list up to five products and begin selling immediately.

    It focuses on simplicity and ease of use, making it an ideal option for those new to e-commerce or those wanting to test the waters before investing in a paid plan. The Gold plan provides the essential tools to establish an online presence and generate revenue, with the option to upgrade to a paid plan later as your business expands and your needs evolve.

    The free Gold plan includes various features to facilitate a smooth store setup and management experience. You get access to free, customizable store templates, allowing you to create a visually appealing online shop that reflects your brand’s aesthetic without needing any coding knowledge.

    The plan also includes real-time sales and visitor statistics, giving insights into your store’s performance. The automatic sales tax feature simplifies the normally difficult part of the process.

    Beyond the website, Big Cartel also provides easy-to-use iOS and Android apps, enabling you to manage your store on the go, from processing orders to updating product listings. While the Gold plan is limited to five product listings, it provides a fully functional e-commerce platform with core features like multiple product variants (size, color, etc.), sales tax calculation, and real-time sales data.

    📖 Suggested read: The 19 Best & Most Reliable Transactional Email Services

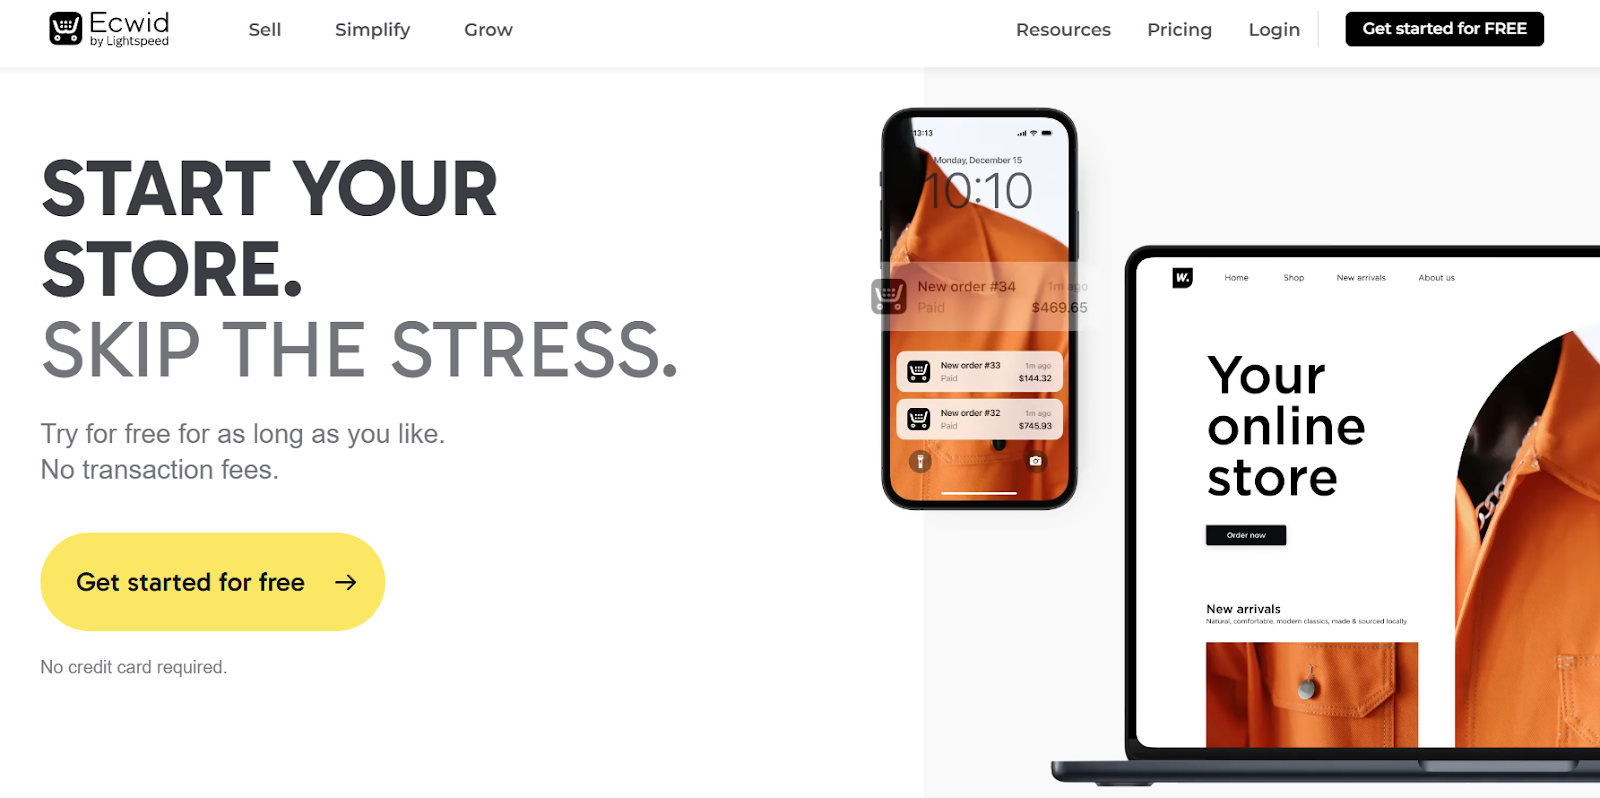
    Ecwid

    Ecwid (E-Commerce Widget) is a flexible e-commerce platform suitable for businesses at any stage, from launching its first online store to scaling a large enterprise. It allows users to start without a credit card and use the basic features indefinitely, with no transaction fees. This risk-free approach enables entrepreneurs to validate their business ideas, add a store to existing websites, or create a new standalone store using customizable content blocks and themes.

    The platform provides a comprehensive suite of tools to manage all aspects of e-commerce, from marketing and sales to store operations. Ecwid allows you to sell across multiple channels, including social media platforms including Instagram and Facebook, marketplaces such as Amazon, and your website – all managed from a central dashboard.

    For store management, Ecwid offers automated solutions for domain name registration, SSL certificates, tax calculations, payment processing, and shipping, simplifying complex tasks and allowing business owners to focus on growth.

    As businesses grow, Ecwid provides features to support scaling and long-term success. It provides advanced reporting tools to get insights into customer behavior and marketing effectiveness, enabling data-driven decision-making. Ecwid supports custom code modifications and integration with Next.js for those with more advanced technical needs, offering greater design flexibility. Throughout the entire journey, Ecwid emphasizes its commitment to customer support, offering assistance via live chat, email, and phone, ensuring users have access to help whenever needed. The platform is trusted worldwide.

    📖 Suggested read: How To Install WordPress With RunCloud | Step-By-Step Guide

    Zen Cart

    Zen Cart is a free, open-source e-commerce platform prioritizing merchant freedom and control. It offers a comprehensive set of built-in features without restrictions on product quantity, sales volume, or the number of administrative users.

    It has a product variant management system with specific pricing and inventory control. It also supports wholesale/B2B sales, discount coupons, gift vouchers, and various pricing options (sales, specials, percentage discounts). Zen Cart is designed for global commerce, supporting multiple languages and currencies, diverse payment gateways like PayPal, AuthorizeNet, and Square, and traditional methods.

    Free eCommerce Platforms

    Choosing the Right Free eCommerce Platform

    Choosing the right e-commerce platform is crucial for any online business, whether you’re a startup, a creative entrepreneur, or an established company looking to expand its online presence.

    These options range from simple website builders with e-commerce features to fully dedicated e-commerce platforms.

    Each offers different strengths: some prioritize design flexibility, while others focus on scalability or specific features such as abandoned cart recovery, robust SEO tools, or extensive third-party integrations.

    However, if your priority is ultimate control, customization options, and long-term scalability for potentially high-volume online sales, WooCommerce is the ideal choice. While other platforms offer website embed options and some allow you to set up a store, they typically have certain limitations.

    Being open-source, WooCommerce offers unparalleled flexibility for product management, shipping options, inventory tracking, site analytics, and even integrating blogging tools for content marketing.

    The trade-off is that WooCommerce, unlike a hosted SaaS solution, requires you to manage your own hosting. This is where a service like RunCloud becomes invaluable.

    If you choose WooCommerce for its flexibility, the next step is reliable hosting. RunCloud lets you host WooCommerce on fast, developer-friendly cloud servers without the complexity of manual server management. You get full control over performance, security, backups, and scaling – all through an easy dashboard.

    Launch your WooCommerce store on a fast, secure cloud server managed through RunCloud’s simple dashboard.

    Create your free RunCloud account to get started.

    FAQs on Free eCommerce Platforms

    What is the best free eCommerce platform for beginners?

    For beginners, WooCommerce (a WordPress plugin) is highly recommended. It’s user friendly, has a massive community for support, and offers extensive customization options, especially when hosted on a powerful platform such as RunCloud.

    Can I sell digital products on these platforms?

    Yes, most free eCommerce platforms, including WooCommerce, support the sale of digital products. Within the platform settings, you can easily configure downloads, subscriptions, and license keys.

    Do I need technical skills to use these platforms?

    Basic computer literacy is helpful, but extensive technical skills aren’t generally required for free platforms like WooCommerce. However, managing your own server with RunCloud does involve some technical understanding, though RunCloud’s interface simplifies the process considerably.

    How do transaction fees work on free platforms?

    The “free” platform doesn’t charge transaction fees, but the payment gateways you use (like PayPal or Stripe) will. These fees are typically a percentage of the transaction plus a fixed amount.

    What payment gateways are supported?

    Most free platforms, especially WooCommerce, support a wide range of payment gateways. These include popular options like PayPal, Stripe, Square, and many others, often available as add-ons or extensions.

    Can I customize my online store?

    Absolutely! Customization is a major strength of platforms like WooCommerce. You can choose themes, add plugins, and even modify code (if you’re comfortable) to create a unique storefront.

    How do I migrate from one platform to another?

    Migration depends on the specific platforms involved. While some offer built-in tools, you might need third-party plugins or manual export/import of data (products, customers, orders) for a smooth transition.

    Are there any limitations on free plans?

    Yes, “free” often means limitations on features, storage, or the number of products you can list. WooCommerce is free, but you’ll pay for hosting (consider RunCloud), premium themes, and extensions.

    What is the best platform for high-volume sales?

    WooCommerce, coupled with robust hosting, is a strong contender for high-volume sales. Its scalability and the ability to optimize your server environment are crucial for handling large amounts of traffic and transactions.

    How do I optimize my store for SEO?

    Use descriptive product titles and descriptions, optimize images with alt text, and use SEO plugins such as Yoast SEO (for WooCommerce/WordPress). Additionally, ensure your site is fast (RunCloud can help with this) and mobile-friendly, which are key ranking factors.

  • Postfix vs Exim vs Sendmail Email MTA – Which One to Use in 2025?

    Postfix vs Exim vs Sendmail Email MTA – Which One to Use in 2025?

    If you send emails from your Linux server, you’ll need a Mail Transfer Agent (MTA) to process them, but choosing the right one can feel like navigating a complex technological labyrinth.

    There are a few popular MTAs available in the market: Postfix, Exim, and Sendmail. However, selecting the right one can be challenging, as each has its own set of pros and cons.

    Whether you’re a startup looking to establish your first email infrastructure or an enterprise seeking to optimize your existing systems, understanding the nuanced differences between these Mail Transfer Agents is necessary to build an effective infrastructure.

    In this comprehensive guide, we’ll dive deep into the functions and features of Mail Transfer Agents. We will share detailed comparisons of Postfix, Exim, and Sendmail, along with the pros and cons of each MTA.

    Let’s get started!

    What are Mail Transfer Agents?

    A Mail Transfer Agent (MTA) is like a digital postal service for email. It’s software in Linux systems that handles email message routing, delivery, and transmission across different computer networks. Think of an MTA as a specialized postal worker who knows how to pick up an email from one computer and deliver it to the correct destination, no matter how far away it might be.

    How Do Mail Transfer Agents Work?

    Mail Transfer Agents work through a series of systematic steps:

    1. Message Reception: When you send an email, the MTA first receives the message from your email client. It examines the recipient’s email address to determine where the message needs to go.
    2. Routing: The MTA then decides the best path to deliver the email. It uses Domain Name System (DNS) lookups to find the correct mail server for the recipient’s domain.
    3. Message Queuing: If the destination server is temporarily unavailable, the MTA doesn’t give up. It places the email in a queue and will attempt delivery multiple times over a set period.
    4. SMTP Protocol: Most MTAs use the Simple Mail Transfer Protocol (SMTP) to communicate between email servers. This is like a standardized language that ensures emails can be understood and transferred correctly.
    5. Delivery: Once the recipient’s mail server is reached, the MTA hands off the message to the Mail Delivery Agent (MDA), which places the email in the recipient’s mailbox.

    Suggested read: How to Send Email from PHP (With Guided Walkthrough)

    Why are Mail Transfer Agents Required in Linux?

    Mail Transfer Agents are essential in Linux systems for several reasons:

    1. Reliable Communication: MTAs ensure that emails are delivered reliably, even with network interruptions or temporary server issues. They can retry delivery and provide detailed error reporting.
    2. Security: Many MTAs include robust security features like spam filtering, virus scanning, and encryption support. Popular Linux MTAs like Postfix and Sendmail offer advanced security mechanisms.
    3. Flexibility: Linux MTAs can handle complex routing scenarios, support multiple domains, and integrate with various authentication methods.

    Suggested read: How To Resolve The “Email Address is Not Verified” Error With AWS SES

    Comparing Postfix vs. Exim vs. Sendmail Email MTA

    Let’s examine some of the most popular MTAs available and understand their pros and cons.

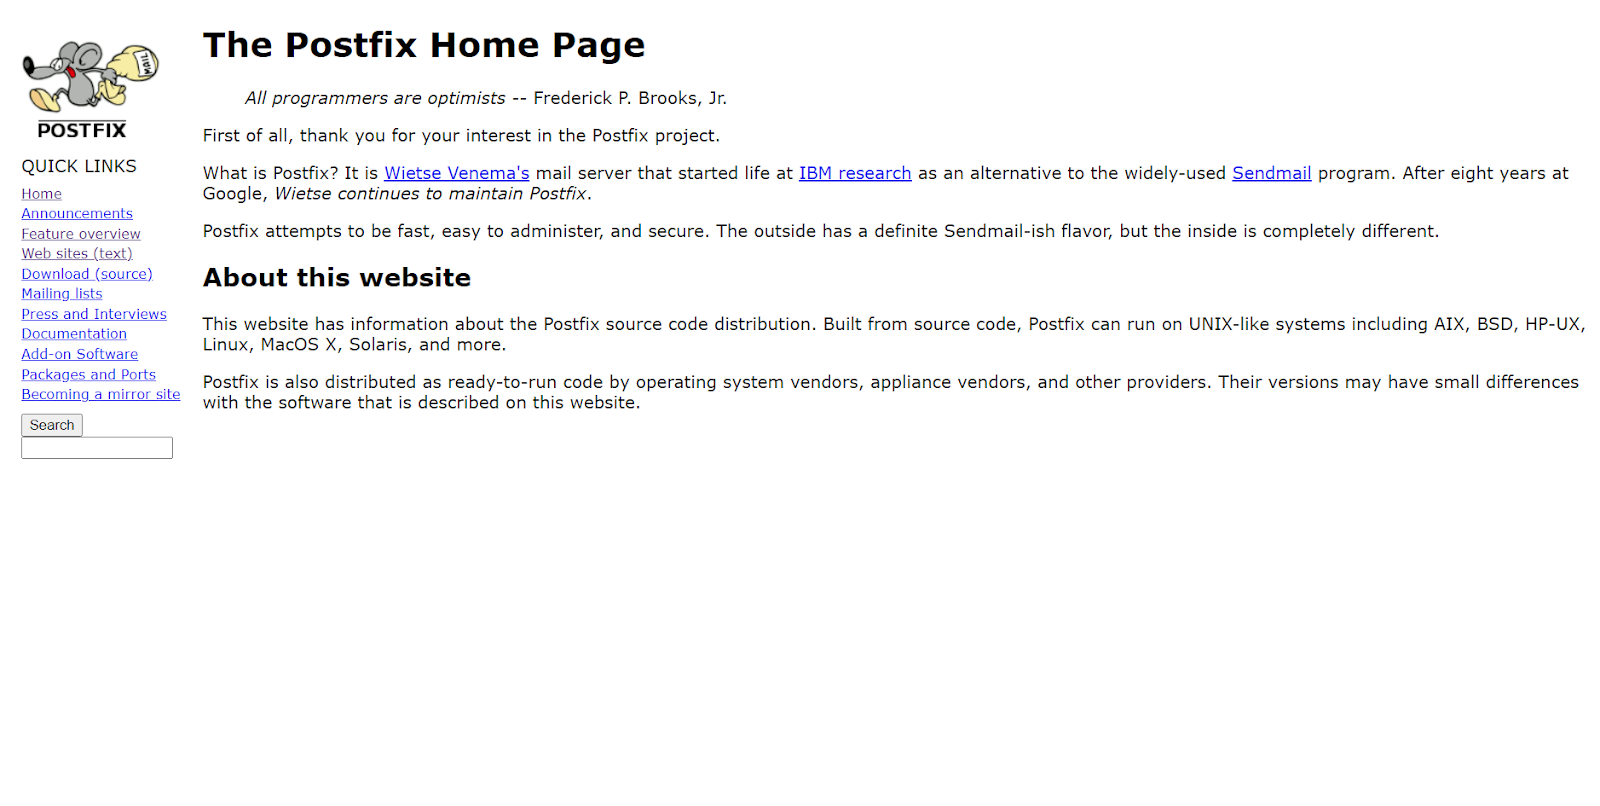
    What is Postfix?

    Postfix is a powerful, open-source Mail Transfer Agent (MTA) designed to efficiently route and deliver electronic mail across complex network environments. It was designed to provide robust email routing capabilities while maintaining exceptional security standards. It is popular for its modular architecture, which allows system administrators to configure and customize email transmission with granular control and enhanced protection against potential security vulnerabilities.

    Postfix supports multiple operating systems, including AIX, BSD, Linux, MacOS X, and Solaris, which makes it a highly adaptable solution for diverse computing environments. It also ensures seamless communication across different email systems and supports advanced features such as SMTP authentication, encryption, and internationalized email addressing.

    Suggested read: Using Mailgun To Send Transactional Email From WordPress

    Pros of Postfix

    Postfix offers an impressive array of advantages, making it a preferred choice for system administrators and organizations. Its modular design enables extensive customization through support for multiple databases, including LDAP, MySQL, PostgreSQL, and MongoDB. This allows seamless integration with existing authentication and directory services.

    It also provides robust security features, including advanced access controls, spam filtering capabilities, and support for encryption protocols like TLS, which help protect email communications from unauthorized access and potential threats.

    Cons of Postfix

    Despite its numerous strengths, Postfix presents certain challenges that organizations must carefully consider during implementation. The configuration complexity can be intimidating for less experienced system administrators as it requires deep technical knowledge to fully leverage its advanced features and customize its numerous parameters effectively.

    Some organizations might find the initial setup and fine-tuning process time-consuming, especially when integrating Postfix with existing email infrastructure or implementing complex routing and filtering rules.

    Additionally, it has a huge feature set, which can sometimes translate into increased resource consumption. This can potentially impact system performance on lower-powered hardware configurations.

    Suggested read: What are Linux Logs? What Are They & How To Use Them

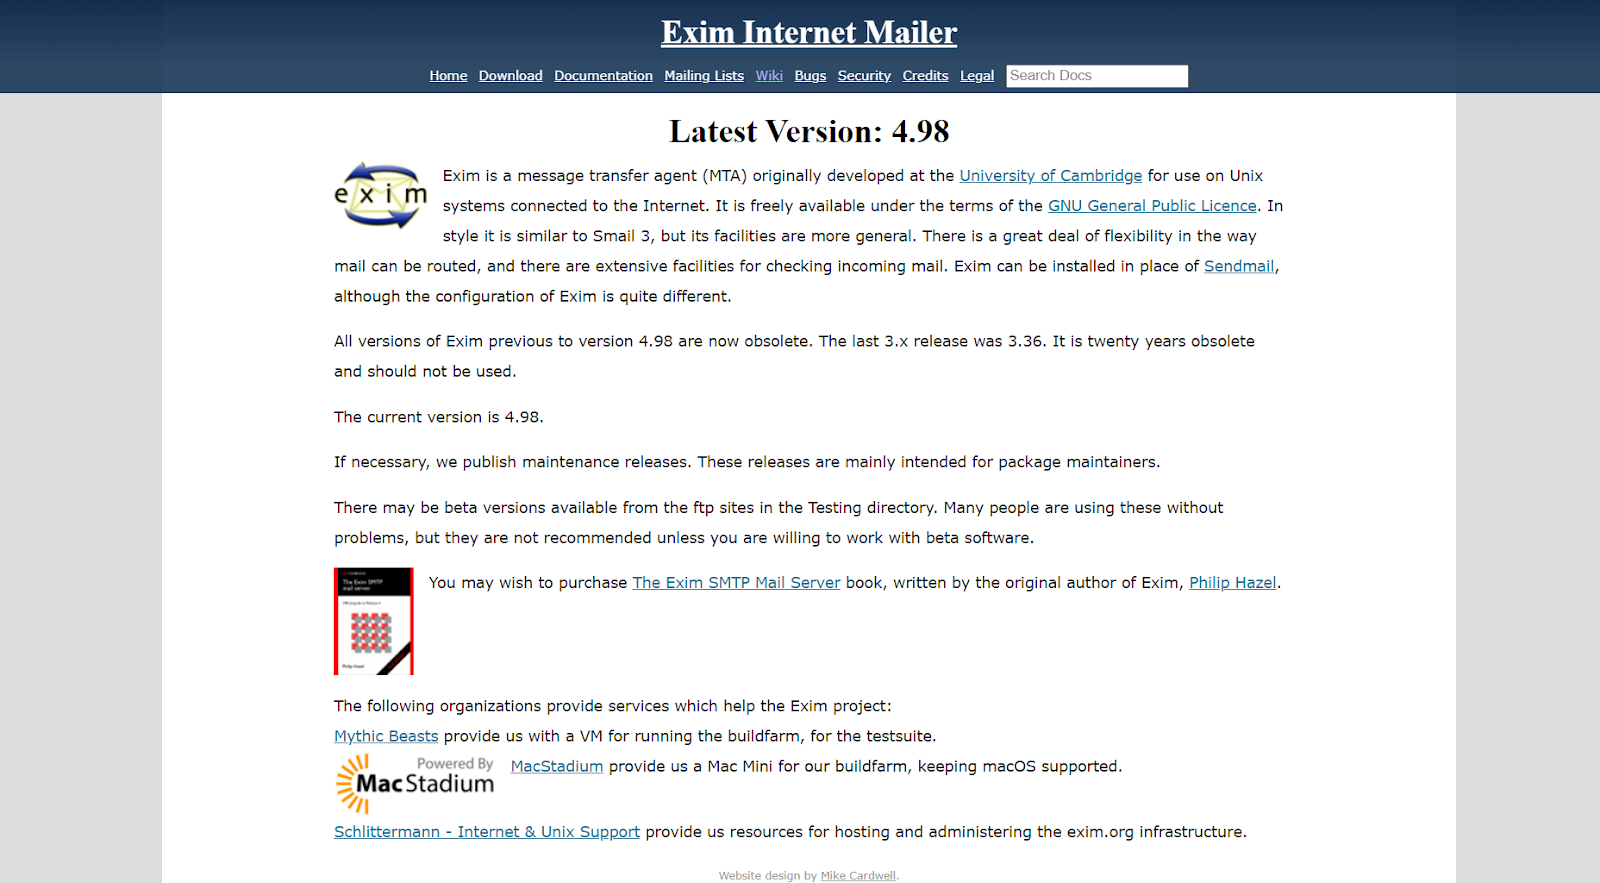
    What is Exim?

    Exim is a mail transfer agent (MTA) used in Unix-like operating systems. The first version of EXIM was developed in 1995 for use in the University of Cambridge Computing Service’s e-mail systems. Exim is distributed under the GPL and is free to download, use, and modify.

    Exim follows the Sendmail design model, where a single main binary controls all the MTA facilities. This monolithic design is considered by some to be inherently less secure and slower, but despite this, Exim’s security record is much better than Sendmail and comparable with Qmail and Postfix, as is its speed. In advanced areas such as queue handling, address routing, and testing, it exhibits excellent performance.

    Suggested read: How To Flush DNS Cache — A Full Guide

    Pros of EXIM

    Exim is a highly versatile Mail Transfer Agent with robust message transport capabilities. It is an SMTP and LMTP email transport solution and provides comprehensive incoming and outgoing email handling mechanisms across multiple transport protocols. EXIM MTA supports RFC 2821 SMTP and RFC 2033 LMTP standards, enabling flexible message transmission through various methods, including TCP/IP, standard input/output, and daemon-based configurations.

    Additionally, its incoming server capabilities are particularly impressive, as it supports SMTP over multiple interfaces, including direct TCP/IP connections, inetd (internet service daemon) integration, and standard input processing. It also has advanced features such as encrypted and authenticated connections on specific ports like 587. EXIM also provides advanced routing controls that enable message redirection, quarantine, and delivery through multiple transport mechanisms.

    Suggested read: Uptime Monitoring Tools: Why You Need Them, and What to Look for

    Cons of Exim

    Exim isn’t a Mail Transport Agent, so there are some features that you won’t get. For example, it will not store emails and doesn’t support IMAP or POP protocols. However, it can deliver messages to mailstores that do, either using SMTP or LMTP message delivery or, in some cases, by saving messages directly into mailboxes.

    Exim doesn’t have a Graphical User Interface (GUI) to help you configure it, but some Linux distributions add one. Various tools are available to give you graphical views of Exim’s mail queues, traffic, and logs.

    What is Sendmail?

    Sendmail is an established Mail Transfer Agent that has been used for email communication in Unix and Unix-like operating systems for decades. It has become the de facto standard for routing and delivering email across complex network environments.

    Sendmail is critical in managing email transmission by interpreting email addresses, determining the most efficient routing path, and ensuring messages reach their intended destinations across different computer networks.

    Pros of Sendmail

    Sendmail offers numerous advantages that have established its reputation in the world of email infrastructure. Its extraordinary flexibility allows system administrators to create highly customized email routing configurations, making it adaptable to complex network environments. Sendmail supports extensive configuration options through its powerful configuration file, enabling precise control over email processing, routing, and security mechanisms.

    Being open-source, Sendmail benefits from continuous community improvements and has robust support for various authentication methods, encryption protocols, and integration with modern security technologies. Its long-standing presence in the market means it has weathered numerous technological shifts and continues to provide reliable email transmission services for organizations worldwide.

    Cons of Sendmail

    Despite its historical significance, Sendmail has several notable challenges that have prompted many organizations to explore alternative Mail Transfer Agents. The configuration process is notoriously complex, requiring deep technical expertise and extensive knowledge of its configuration syntax, which can be intimidating for less experienced system administrators.

    Its monolithic design has been criticized for potential security vulnerabilities, as a single binary controls multiple email processing functions. The default configuration can be less secure if not carefully managed, and the learning curve for proper implementation is steep. Performance can be slower than that of more modern MTAs, and the configuration complexity makes routine maintenance and troubleshooting time-consuming. These limitations have led many organizations to migrate to more contemporary and user-friendly email transfer agents such as Postfix and Exim.

    Postfix vs. Sendmail vs. Exim – Feature Comparison Table

    FeaturePostfixSendmailExim
    Open Source StatusFully open-source, actively maintainedOpen-source, less actively developedFully open-source, GPL licensed
    Configuration ComplexityModerate, more intuitiveHigh, complex configurationModerate to high, flexible but detailed
    Security ModelModular, security-focused designMonolithic, historically more vulnerableFlexible, strong security controls
    Performance ScalabilityHigh, efficient routingModerate, can be slowerGood, advanced queue handling
    Database IntegrationExtensive (LDAP, MySQL, PostgreSQL)Limited native supportModerate database connectivity

    Wrapping Up – Which Transfer Agent Should You Choose: Postfix, Exim, or Sendmail Mail?

    In this post, we have provided you with the pros and cons of some of the most popular MTAs; however, selecting the right MTA is critical and will depend on your specific organizational requirements, technical expertise, and infrastructure complexity.

    Postfix is the recommended solution for most scenarios as it offers an optimal balance between security, performance, and ease of configuration. However, if your organization works with legacy systems or complex email routing requirements, Sendmail remains a viable option, though it demands more advanced technical skills. Exim is also a good option for those seeking a highly customizable solution with robust routing capabilities.

    Implementing and managing Linux servers can be complex and time-consuming – that’s where RunCloud comes to the rescue.

    Our platform simplifies server management, offering one-click DNS configurations, automated security updates, and intuitive monitoring tools that take the complexity out of infrastructure management.

    Ready to simplify your server management? Sign Up for RunCloud Today.

    FAQs on Mail Transfer Agents

    Does Sendmail need an SMTP server?

    Sendmail is an SMTP server itself, functioning as both a Mail Transfer Agent (MTA) and an SMTP server simultaneously. It natively handles email routing, transmission, and delivery using the SMTP protocol without requiring a separate SMTP server.

    Does PHP use Sendmail?

    PHP can use Sendmail as a default method for sending emails on Unix and Linux systems by leveraging the built-in mail() function. The PHP configuration allows developers to specify the Sendmail path for email transmission, enabling seamless integration with the system’s mail transfer infrastructure.

    What is the main difference between postfix and prefix operators?

    This question seems unrelated to Mail Transfer Agents and more like a programming concept. In programming, prefix operators modify a variable before its value is used, while postfix operators modify a variable after its current value is used.

    What are the two roles of Simple Mail Transfer Protocol?

    Simple Mail Transfer Protocol (SMTP) primarily serves two critical roles: transferring email messages between email servers, and routing emails from a sender’s email client to the recipient’s mail server. SMTP ensures reliable, standardized communication for email transmission across different network infrastructures.

    What is the message transfer agent SMTP?

    SMTP is not a message transfer agent but a communication protocol MTAs use to send and receive email messages between servers. It defines the rules and procedures for transmitting emails, ensuring consistent and reliable communication across different email systems.

    What are the two types of user agents in email?

    The two primary types of user agents in email are the Mail User Agent (MUA), the email client interface users interact with (like Thunderbird or Outlook), and the Web-based Email User Agent, which allows users to access and manage emails through web browsers.

    What is the difference between MTA and MUA?

    A Mail Transfer Agent (MTA) is responsible for routing and delivering emails between servers using protocols such as SMTP, acting like a postal service for electronic messages. In contrast, a Mail User Agent (MUA) is the email client software that users directly interact with to compose, read, and manage their emails.

  • Managing WordPress Development with Git and Composer: A Modern Approach

    Managing WordPress Development with Git and Composer: A Modern Approach

    Are you struggling with WordPress development workflows? Tired of SFTP uploads and manual plugin updates?

    This comprehensive guide will show you how to modernize your WordPress development process using Git, Composer, and proper environment management.

    By the end of this article, you’ll understand how to:

    • Set up a professional WordPress development environment
    • Manage WordPress core, plugins, and themes with Composer
    • Handle sensitive configuration data securely
    • Deploy WordPress sites with confidence across different environments
    • Collaborate effectively with your development team

    Note: This workflow will not make sense for all types of WordPress sites. If you don’t know what Git and version control are or don’t build sites by writing themes, plugins, etc. – you will likely not benefit from this workflow.

    Let’s get started!

    The Importance of Version Control for WordPress Development

    Version control is essential to any modern web development workflow, including WordPress projects. Version control systems like Git provide a robust and reliable way to track changes, collaborate with team members, and maintain a comprehensive history of a project’s evolution.

    If you are working on a complex WordPress project, then using version control offers several key benefits:

    1. Collaborative development: With version control, multiple developers can work on the same codebase simultaneously, seamlessly merging their changes and resolving any conflicts. This is useful for larger WordPress projects or teams with multiple contributors.
    2. Reliable code history: Version control systems act as a safety net, allowing you to easily revert to your project’s previous working states if necessary. This is particularly important when making significant changes or experimenting with new features, as you can always roll back to a known good version.
    3. Deployment and environment management: By maintaining your WordPress codebase in a version control system, you can streamline your deployment process and ensure consistent environments across different stages (e.g., development, staging, production). This helps eliminate the “it works on my machine” problem and promotes reliable, predictable deployments.
    4. Code auditing and reviews: Version control systems enable code reviews, allowing team members to scrutinize changes, provide feedback, and maintain code quality standards. 
    5. Branching and feature development: Git’s branching capabilities allow developers to work on new features or bug fixes in isolation without disrupting the main codebase. This facilitates a more organized and structured development process.

    Given these compelling advantages, it’s clear that version control can benefit advanced WordPress users. However, as we mentioned earlier, if you don’t build your own sites, this might not be the best approach for you.

    The Challenges With Traditional WordPress Deployment Workflows

    While WordPress is a powerful and flexible content management system, the traditional deployment workflows used by many WordPress developers can often introduce significant challenges and inefficiencies. If you have worked with WordPress in the past, then you will likely have encountered several common issues with these conventional approaches:

    1. Manual file management: In a typical WordPress deployment, developers often rely on manual file transfers (e.g., FTP, SFTP) to push updates to the production server. This process is error-prone, time-consuming, and lacks a comprehensive audit trail of the changes made.
    2. Inconsistent environments: Without a robust system for managing dependencies and configurations, it’s common for WordPress sites to suffer from “it works on my machine” problems, where a feature or bug fix behaves differently in the development, staging, and production environments.
    3. Difficulty tracking changes: Relying on manual file transfers can make it challenging to keep track of the specific changes made to a WordPress site over time. This makes it harder to debug issues, revert problematic updates, or collaborate effectively with other team members.
    4. Lack of automated deployment: Traditional WordPress deployment workflows often lack the ability to automate the deployment process. This results in a more labor-intensive and error-prone process, especially for teams that manage multiple WordPress sites.

    These challenges can lead to increased development time, higher maintenance costs, and a higher risk of production issues.

    At RunCloud, we believe that addressing these problems by adopting modern development practices, such as those enabled by the Bedrock boilerplate, can significantly improve the efficiency, reliability, and scalability of WordPress projects – particularly at the enterprise level

    Steps for Setting Up a WordPress Project with Git

    This guide walks you through setting up a WordPress project using Git for version control, ensuring a structured and organized development workflow. We’ll cover creating a new repository, excluding unnecessary files, and organizing your project directory.

    Prerequisites

    If you haven’t already, download and install Git and Composer on your local computer. Choose the appropriate version for your operating system. 

    Note: You will also need to create an account on a supported Git provider. In this tutorial, we will deploy the applications to RunCloud using GitHub.

    Install Bedrock WordPress

    In this tutorial, we will use Bedrock to maintain and develop WordPress locally. Execute the following commands on your local computer to create a new project and change the directory to the new project:

    composer create-project roots/bedrock my-wordpress-site
    cd my-wordpress-site

    Setting Up Your .env File

    After creating the project, you will need to configure the local development environment. Environment variables are crucial for maintaining secure and flexible WordPress configurations across different environments.

    Bedrock uses the PHP dotenv library to load environment variables from a .env file, keeping sensitive information out of version control while allowing different configurations for development, staging, and production environments.

    Execute the command below to create a sample .env file in your project.

    # Copy the example file to create your .env
    cp .env.example .env

    After creating the file, you can edit it to configure your local database credentials. Copy and paste the following code snippet into your .env file and edit the necessary fields to include your database name and credentials:

    # Database connection settings
    DB_NAME='your_database_name'
    DB_USER='your_database_user'
    DB_PASSWORD='your_secure_password'
    DB_HOST='localhost'   # Use 'localhost' for local development
                         # Use actual host for production/staging
    # Optional: Use DATABASE_URL instead of individual settings
    # DATABASE_URL='mysql://user:password@localhost:3306/database_name'

    After editing your database credentials, you can edit your WordPress environment settings. Copy and paste the following code snippet into your environment file and edit it accordingly:

    # Environment type
    WP_ENV='development'  # Options: development, staging, production
    # Site URLs
    WP_HOME='https://example.com'  # Your site's home URL
    WP_SITEURL='https://example.com/wp'  # WordPress core location

    Finally, you must add authentication keys and salts to your .env file. You can use any random string of text or generate these values using the WordPress Salt Generator and add them to your .env file in the following format:

    # Authentication Keys and Salts
    AUTH_KEY='your_generated_key'
    SECURE_AUTH_KEY='your_generated_key'
    LOGGED_IN_KEY='your_generated_key'
    NONCE_KEY='your_generated_key'
    AUTH_SALT='your_generated_salt'
    SECURE_AUTH_SALT='your_generated_salt'
    LOGGED_IN_SALT='your_generated_salt'
    NONCE_SALT='your_generated_salt'

    While working with a .env file, there are a few things that you should keep in mind:

    1. Never commit your .env file to version control
    2. Use strong, unique passwords for database credentials
    3. Generate new salts for each environment

    After editing the .env file, you can save it and visit your WordPress URL to view your site locally.

    Note: This step assumes that you already have a webserver daemon, such as Caddy, Nginx, Apache, etc., running on your local machine to serve your WordPress website at the specified address.

    Initialize Git Repository

    Once your website is up and running, you can initialize a new Git repository using the following command:

    git init
    git add .
    git commit -m "Initial Bedrock project setup"

    The above command will create a new git project in your WordPress directory. You can now start tracking it via version control. However, most people use a Git server, such as GitHub or GitLab, to manage and collaborate with other developers.

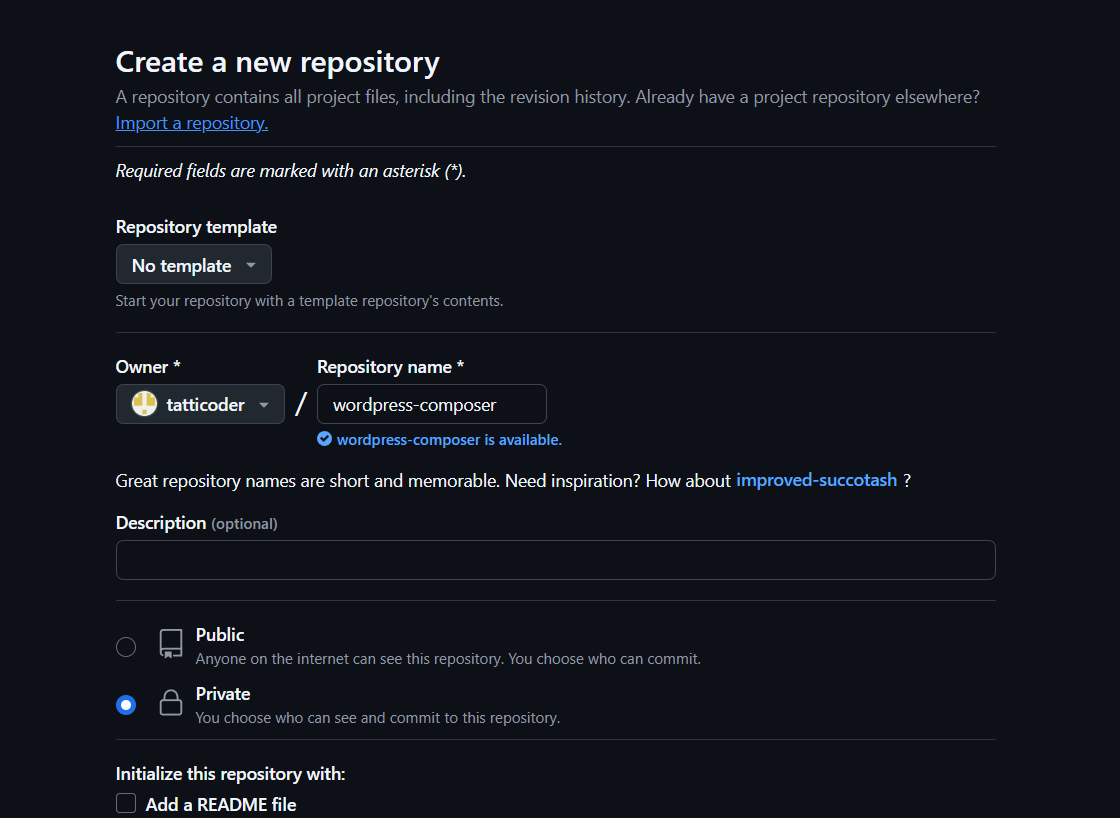
    In this example, we will use GitHub to manage and track the changes in this repository, but RunCloud supports multiple Git providers. To do this, create a new empty repository in your GitHub account and do not initialize it – i.e., ensure that “Add a Readme” is unchecked.

    This will create a repository without any content. On the repository dashboard, scroll down to the bottom and look for the following commands:

    git branch -M main
    git remote add origin git@github.com:tatticoder/wordpress-composer.git
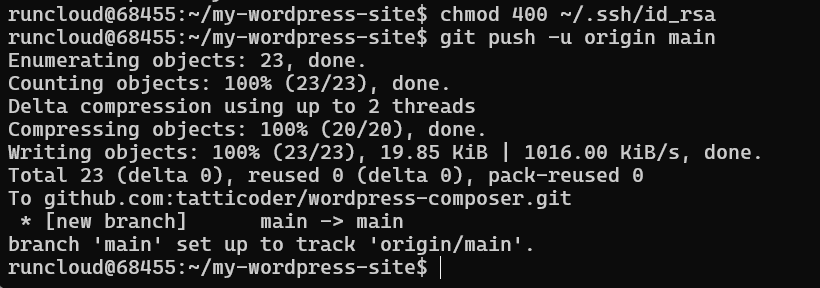
    git push -u origin main

    Note: Do not copy the above commands; they are only provided as an example. You must copy the commands specific to your git repository.

    Once you find the necessary git commands in your git dashboard, go back to your terminal window and execute them. After you push the changes, your local code repository will be uploaded to the cloud.

    Deploy WordPress via Git on RunCloud

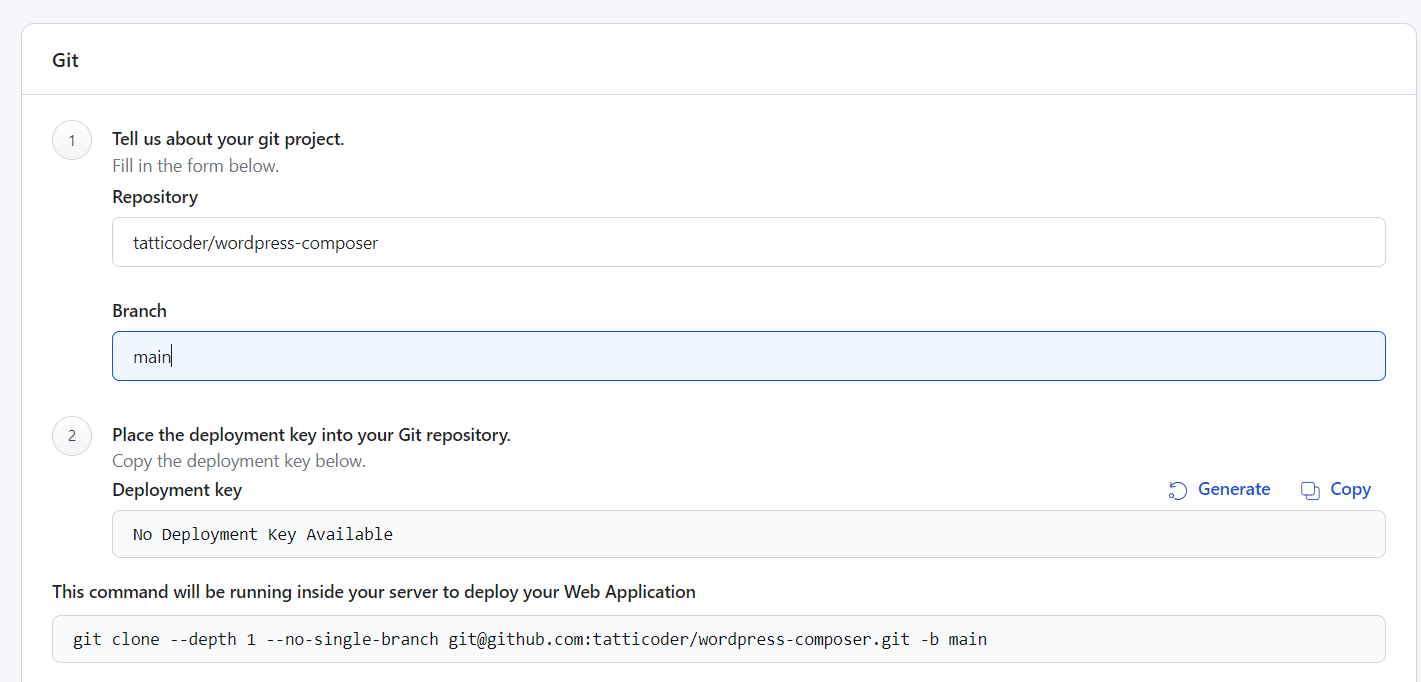
    After uploading your Git repository to the cloud, you can deploy it to your RunCloud server. The deployment steps are straightforward, but if you need step-by-step instructions, refer to our documentation on Git deployments.

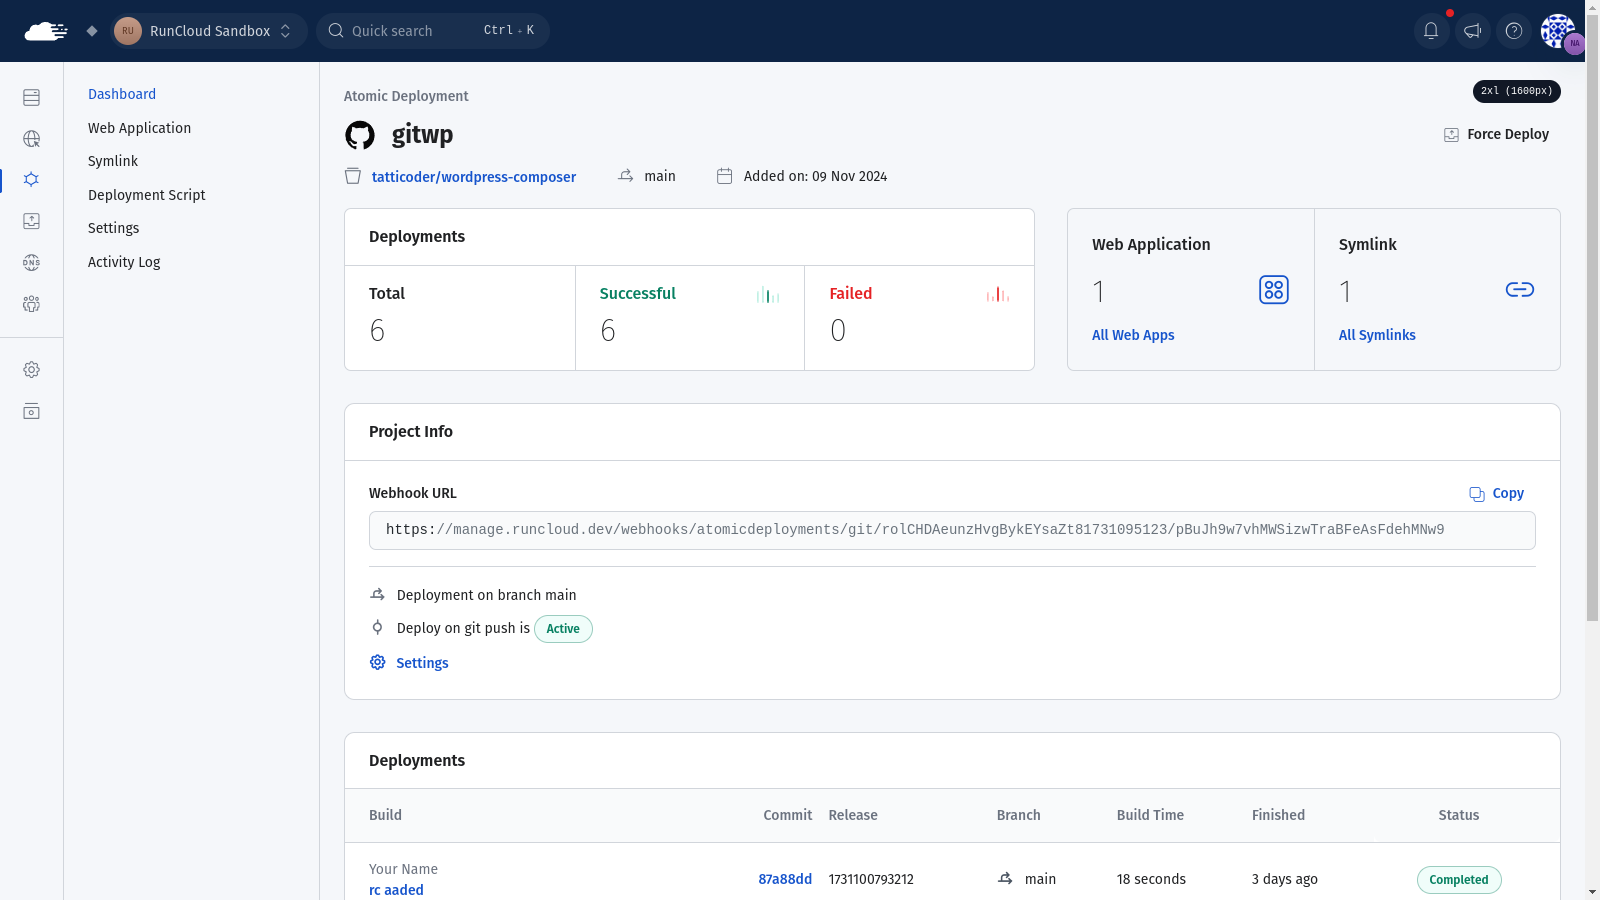
    After creating your git application on RunCloud, you will need to upgrade it to an Atomic Deployment project to take advantage of additional features. To learn more about this, follow the steps outlined in our documentation on Atomic Deployments.

    Next, you must create a new database for your web application in the RunCloud dashboard. Take note of the credentials created in this step, as we will need them later. Optionally, if you are using a Docker server, you should read our documentation on networking in a RunCloud containerized server before moving on to the next step.

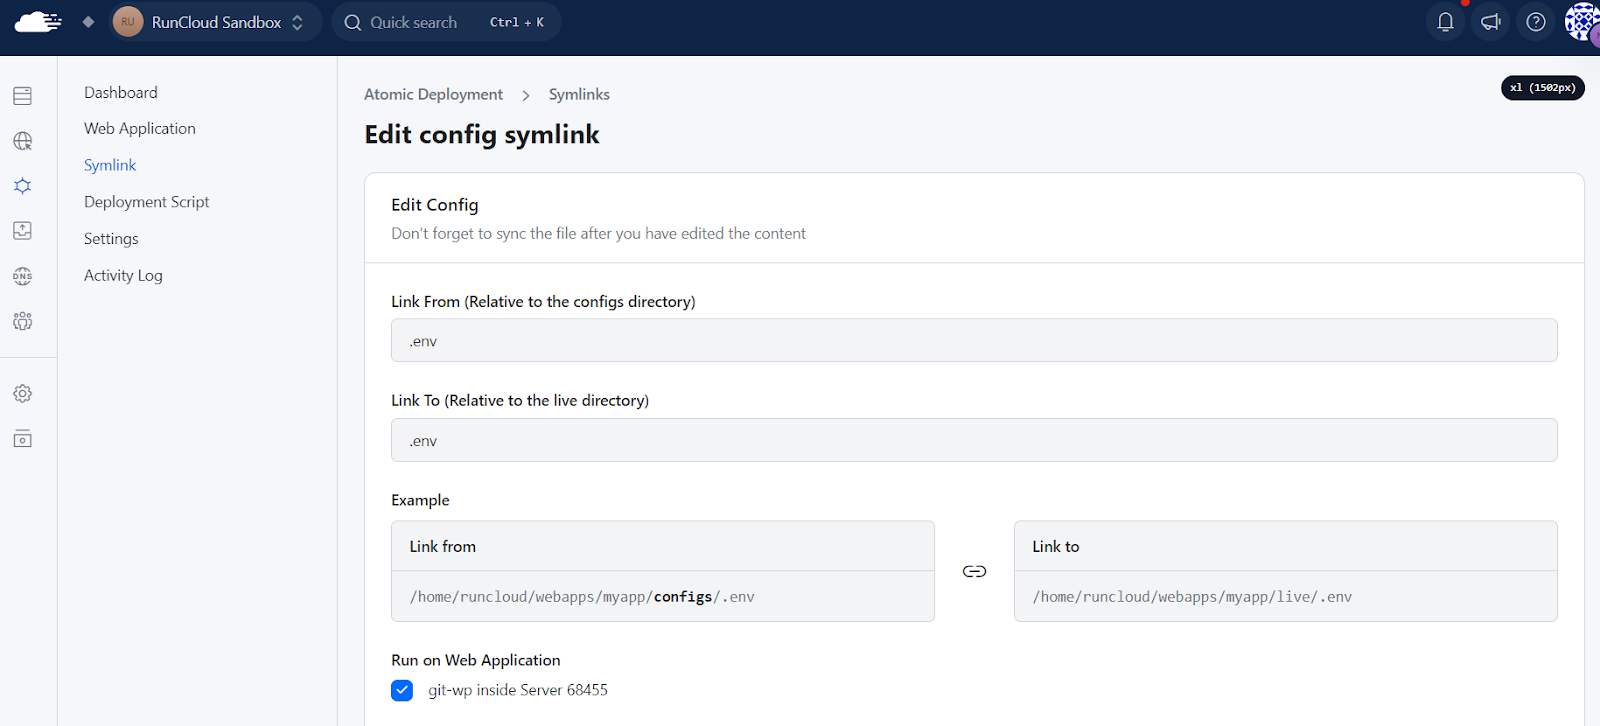
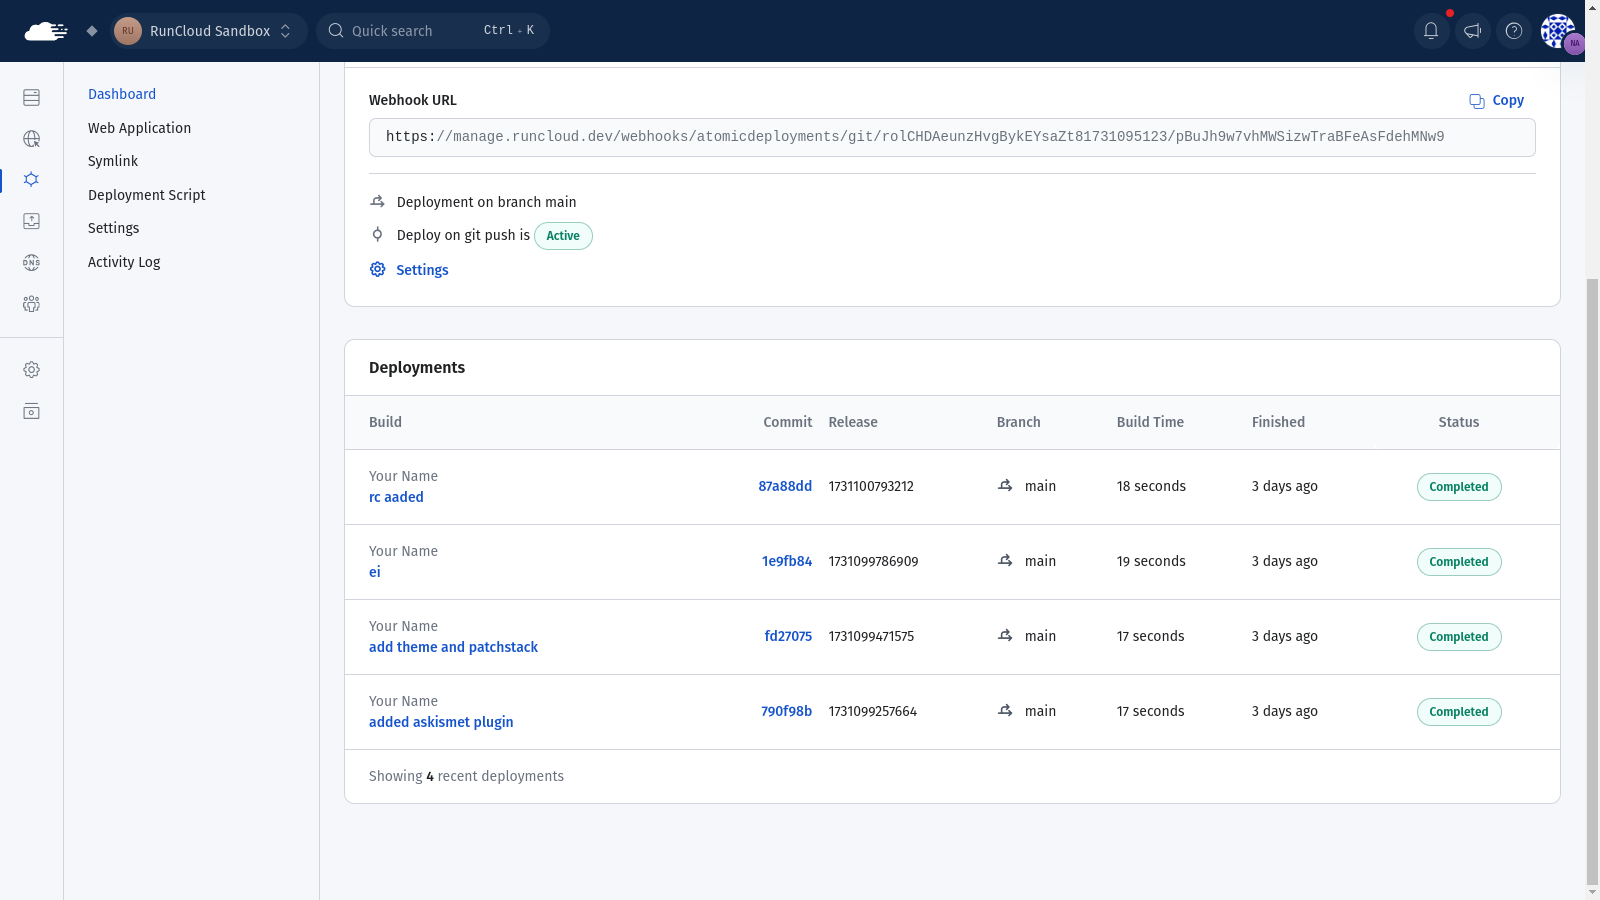
    After that, you will need to configure a new environment variable file using Symlink for this website before you can use it. To do this, navigate to the “Symlink” tab in your atomic deployment dashboard and create a new configuration file. Next, add .env in both the “Link From” and “Link To” fields as shown below.

    After this, you can add a secure passphrase to lock your configuration file. You will need this passphrase again if you want to edit your file later.

    Finally, you can configure your Bedrock environment variables to meet your requirements. Here, you must add the database credentials you created earlier and configure the host if you are using RunCloud docker. This setup process is nearly identical to the “Setting up .env file” step we covered earlier. 

    After configuring your .env file, you must configure your web application’s public path to point your web server’s document root to the web directory within the Bedrock project. You can also connect your database to your web application to ensure it is backed up properly via the RunCloud backup service. 

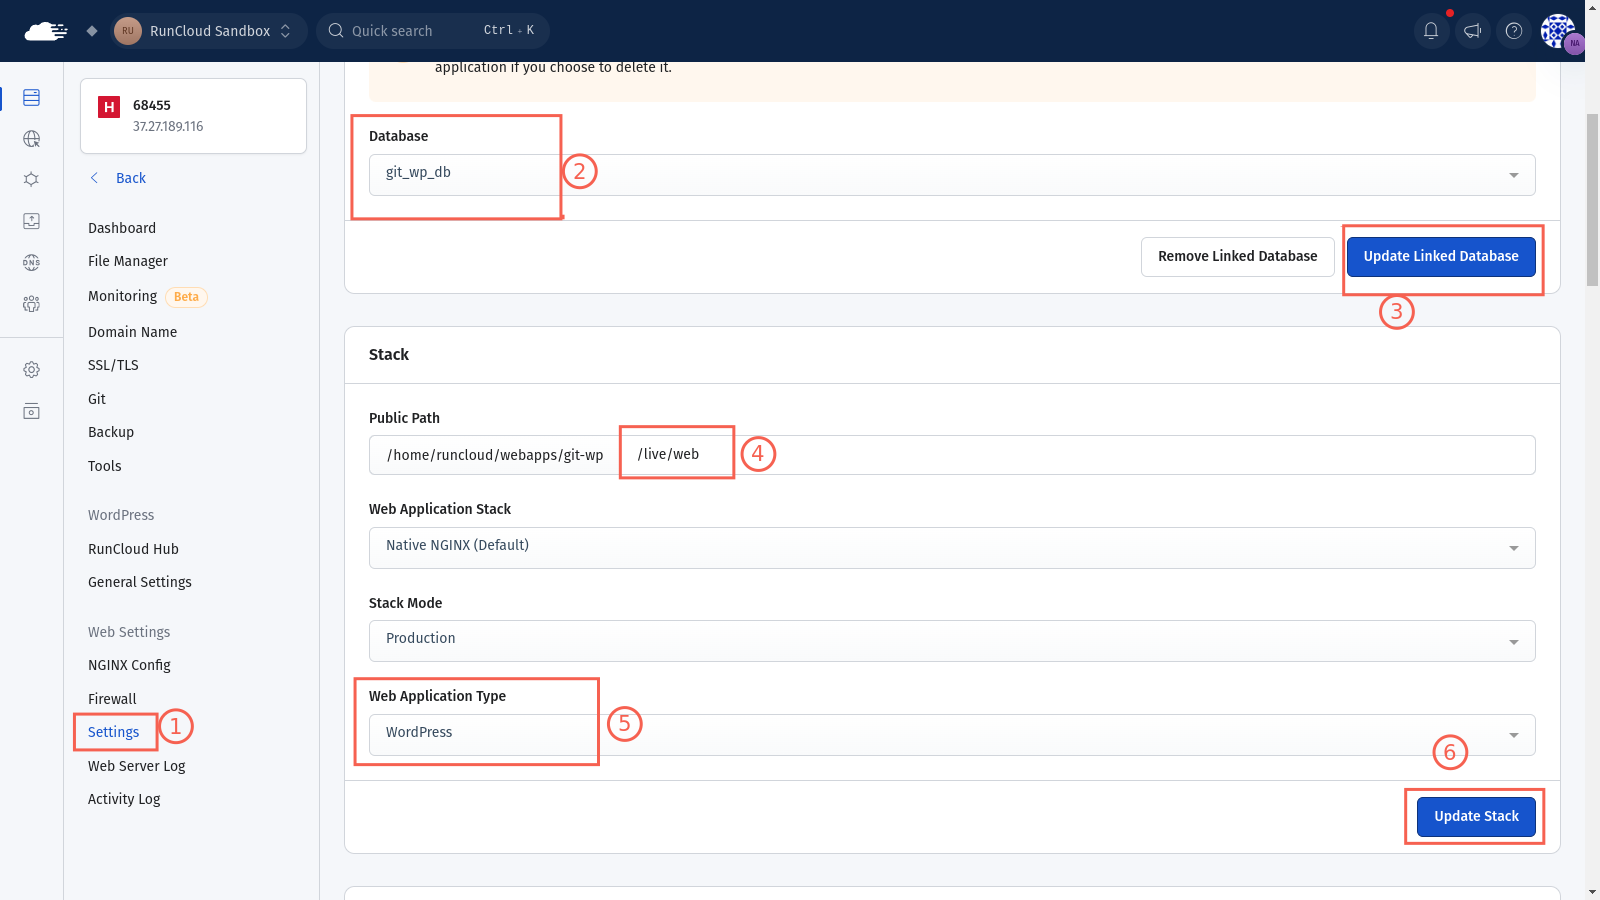
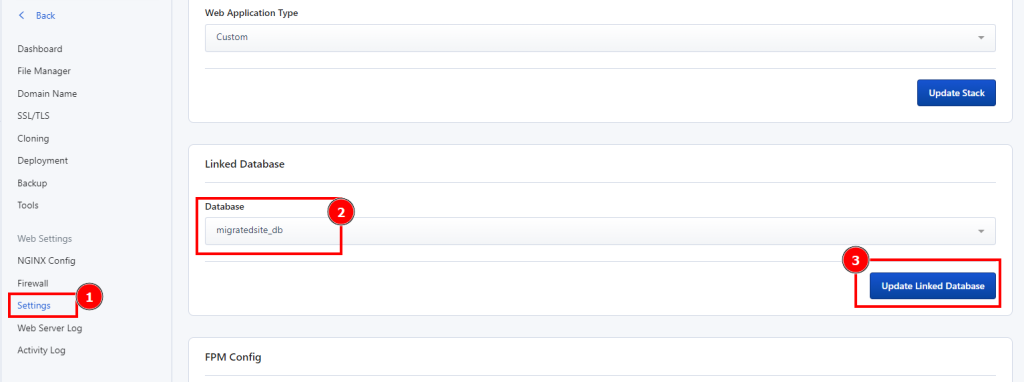
    To do this, go to your web application dashboard and navigate to the Settings tab. Select the database you created from the drop-down menu on this page and click Update Linked Database.

    Next, make sure that your web application’s public path ends with /live/web. Finally, change the web application type to WordPress from the drop-down menu. Once you hit Update Stack, your website will be accessible to everyone on the Internet.

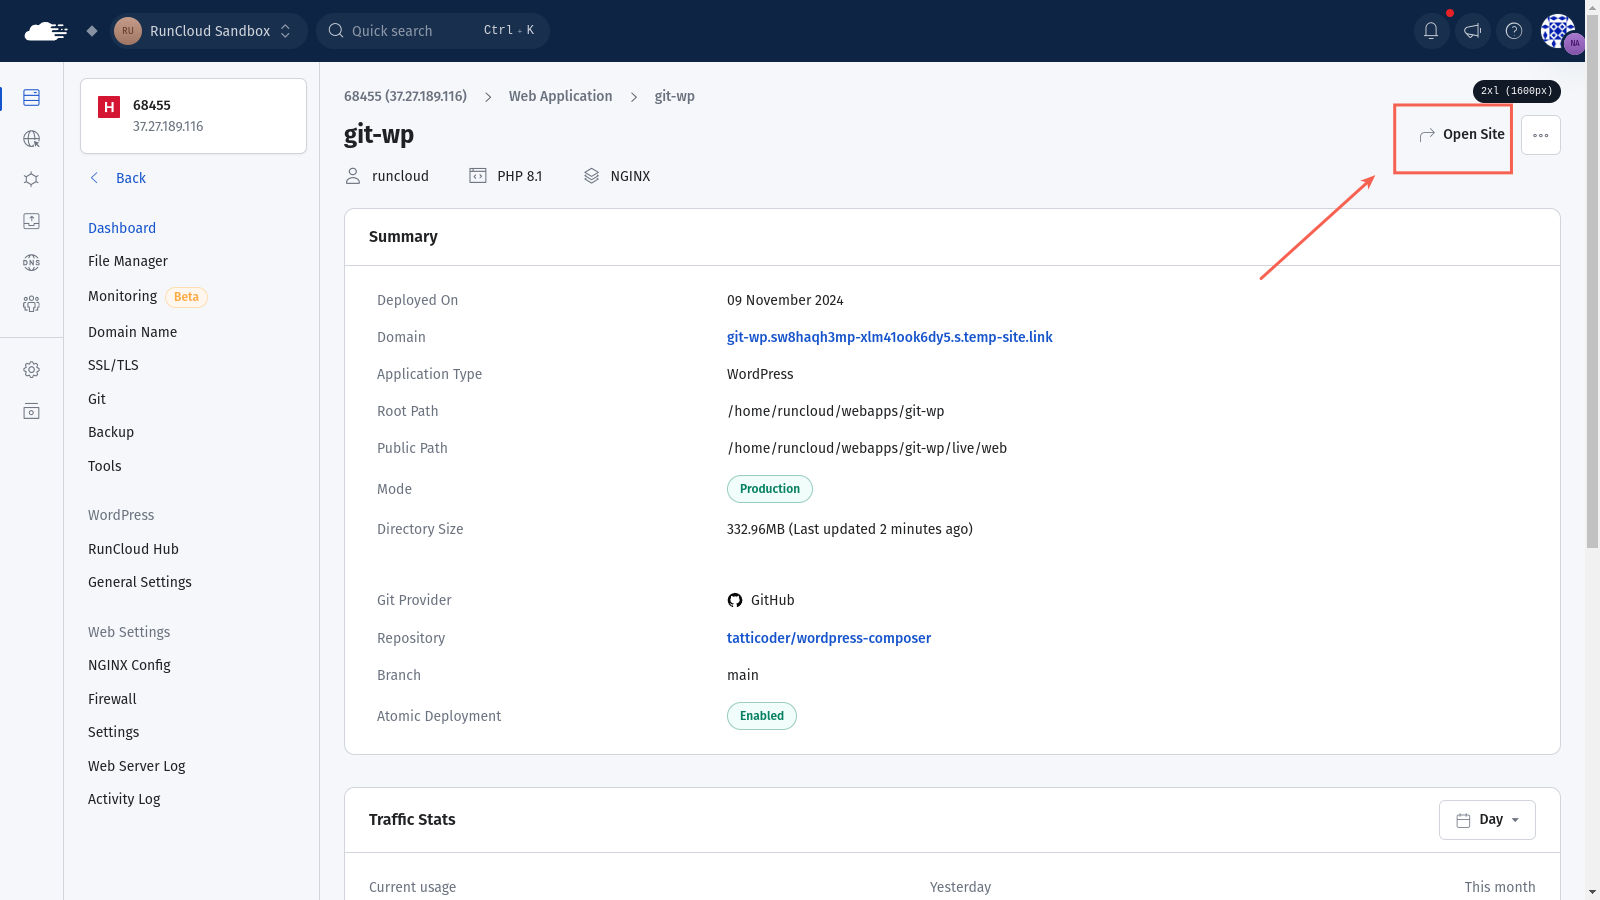
    After deploying your application, you can view it by clicking Open Site in your RunCloud dashboard.

    Configure Cron Jobs (Optional)

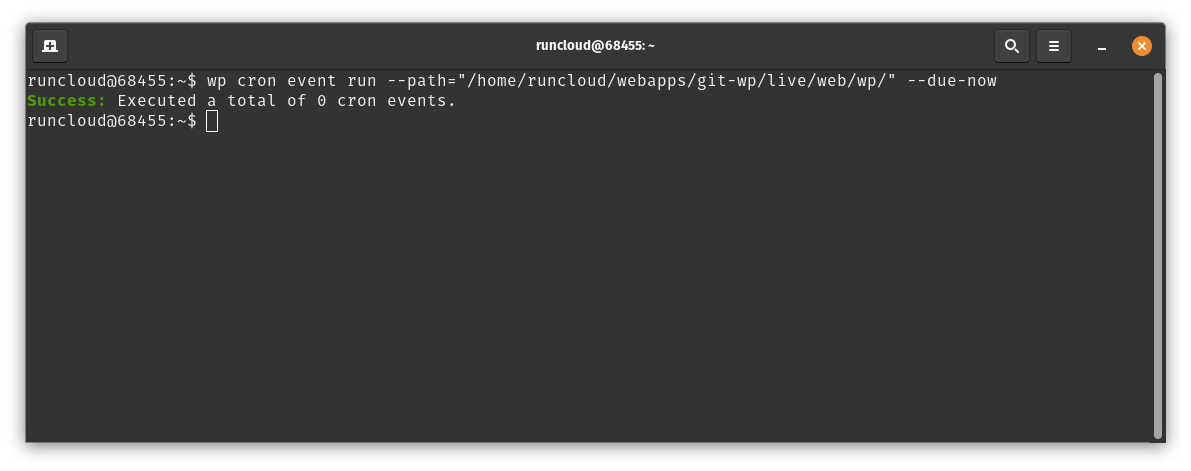
    After deploying your application, you can configure your .env file in the production environment to disable the default WordPress cron job. Once you have disabled the cron job, you can use the RunCloud dashboard to configure a new cron job for your WordPress site.

    While configuring your cron jobs, use the correct public path for your WordPress installation. If you followed the steps correctly, then the complete WordPress path will look something like this:

    /home/runcloud/webapps/application-name/live/web/wp/

    You can use the above path to run PHP cron commands on your server. For example, you can run the following command to execute the PHP cron file directly:

    php /home/runcloud/webapps/application-name/live/web/wp/wp-cron.php

    Developing With Git Workflow

    When working on a new feature or bug fix, it’s recommended to create a dedicated Git branch for that work. This allows you to isolate your changes and collaborate more effectively with other team members. You can create a new branch from your Bedrock project directory with a command like git checkout -b feature/my-new-feature.

    After you’ve completed your work on a feature branch, you can merge those changes back into the main development branch (usually main or dev) using a Git merge command, such as git merge feature/my-new-feature. This integrates your feature into the codebase and makes it available for deployment.

    If you have configured a webhook for your application (as described in Atomic deployment documentation), then your live website will be updated automatically as soon as you push your changes to the cloud.

    Handling Modified Files Not Managed By Git

    While Bedrock encourages managing most of your project’s files and configurations in Git, some files, such as wp-config.php, may contain sensitive or environment-specific information you don’t want to commit to your repository.

    In these cases, you’ll need to deploy these files separately, perhaps using environment variables or including them in your deployment process.

    Similarly, user-generated content, such as media uploads, is typically not managed in your Git repository, as it can quickly bloat the repository size and is more efficiently stored and served directly from the web server.

    During deployment, you’ll need to ensure that these non-Git-managed files are properly transferred to the deployment environment, either as part of your deployment process or through a separate content synchronization step.

    Managing Themes And Plugins as Composer Dependencies

    Bedrock uses Composer, a dependency management tool for PHP, to install and manage the WordPress core updates, plugins, and themes. This allows you to easily update WordPress core by simply updating the Composer dependency rather than manually downloading and replacing files.

    Installing third-party plugins and themes

    Bedrock encourages you to manage your project’s themes and plugins as Composer dependencies as well. This is done by specifying the required plugins and themes in the composer.json file.

    For example, to install the Akismet plugin, you would run composer require wpackagist-plugin/akismet. Composer will then fetch the plugin from the WordPress.org plugin repository and install it in the appropriate directory for your Bedrock project.

    Handling private/premium plugins and themes

    For private or premium plugins and themes that are not available on the WordPress.org repository, Bedrock provides a way to include them as Composer dependencies as well. This involves configuring custom package repositories in the composer.json file, such as a private Git repository or a custom Composer repository provided by the plugin/theme vendor. This ensures that your project’s dependencies are all managed consistently and are version-controlled.

    Keeping WordPress Core And Dependencies Up-To-Date

    One of the key benefits of using Composer with Bedrock is the ability to keep your WordPress core and all other dependencies up-to-date. When a new version of WordPress, a plugin, or a theme is released, you can simply run the composer update command to fetch the latest versions.

    Bedrock also provides a composer outdated command to help you identify which dependencies have newer versions available, making it easy to stay current on updates and security patches. You can consult the Bedrock documentation for more details and advanced usage scenarios, such as handling database migrations, configuring environments, and integrating with continuous integration/deployment tools.

    Conclusion

    By separating WordPress core from your custom code, managing dependencies with Composer, and adopting a Git-based development workflow, you can enjoy several benefits:

    • Improved version control and collaboration for your team
    • Easier management of WordPress core, plugin, and theme updates
    • Consistent and reproducible development and deployment environments
    • Enhanced security through the use of environment-specific configurations
    • Streamlined deployment processes, potentially with automated CI/CD pipelines

    The WordPress ecosystem has evolved significantly over the years, and developers must keep pace with modern development practices. By embracing tools such as Git, Composer, and Bedrock, you can elevate your WordPress projects to a new level of maintainability, scalability, and efficiency.

    If you’re a developer & still manage your WordPress sites without Git, we highly encourage you to explore the benefits of the Bedrock approach and adopt these modern WordPress management practices. They will not only improve your development workflow but also make your WordPress sites easier to maintain in the long run.

    Naturally, we recommend using RunCloud, a powerful server management platform that makes setting up the ideal WordPress development workflow as well as managing production-grade infrastructure even easier. 

    RunCloud seamlessly integrates with your Git-based WordPress projects, allowing you to automate deployments, manage environment-specific configurations, and ensure consistent deployment environments.

    By combining the benefits of Bedrock’s Git and Composer-based approach with RunCloud’s server management capabilities, you can create a streamlined and efficient WordPress development and deployment workflow.

    Sign up for RunCloud today and take your WordPress projects to new heights of productivity and reliability.

  • How to Install & Set Up Ghost (NGINX and OpenLiteSpeed)

    How to Install & Set Up Ghost (NGINX and OpenLiteSpeed)

    Ghost is a free and open-source blogging platform built with Node.js. As a fast, modern WordPress alternative, Ghost is focused completely on professional publishing. If you only want to publish content on the web and don’t need the additional features offered by WordPress, then Ghost is a great choice.

    In this post, we will discuss how to install Ghost using RunCloud.

    Let’s get started!

    Create A New User

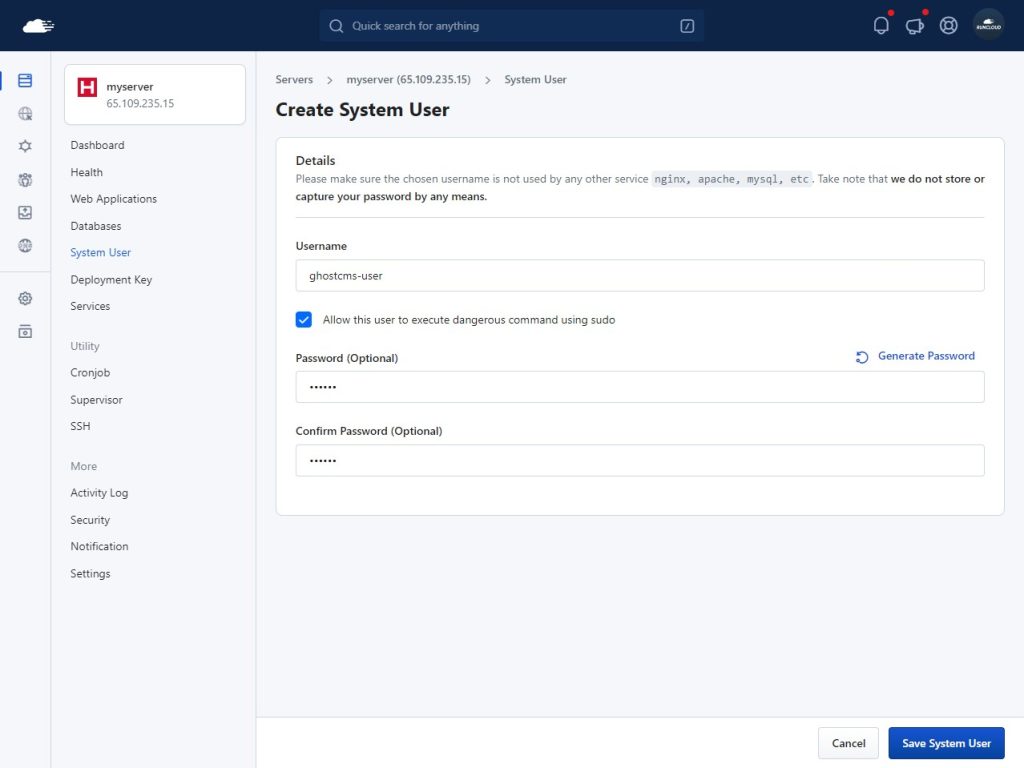
    Ghost CLI needs sudo privileges, so instead of running your site as a root user, we recommend creating a new user with these sudo privileges. This can be done by running commands in the terminal, but it’s much easier to do within the RunCloud dashboard.

    To create a new user, go to the RunCloud dashboard and open the “System User” menu.

    Once opened, click “Add New System User” to create a new user. Give it a descriptive name and a secure password. Make sure to check the box to allow the execution of privileged commands.After this, click “Save System User” and continue the installation process.

    Create A New Database

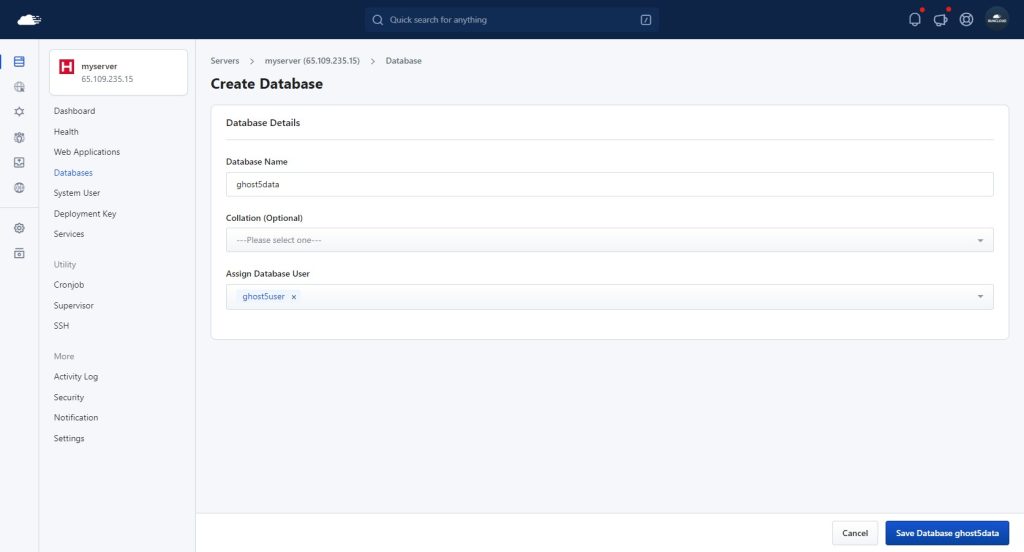
    After creating the system user, the next step is to create a new database and database user. To do this, go to the “Database” menu under your server in the RunCloud Dashboard to create a new database user. Give this database user a suitable name and a secure password, and note these credentials, as they will be needed later during the installation.

    After creating the database user, create a new database and grant permission to the user we just created. Save the changes before proceeding to the next step.

    Create An Empty Web App

    After you have created the user, go to the “Web Applications” tab and create a new web application on your server.

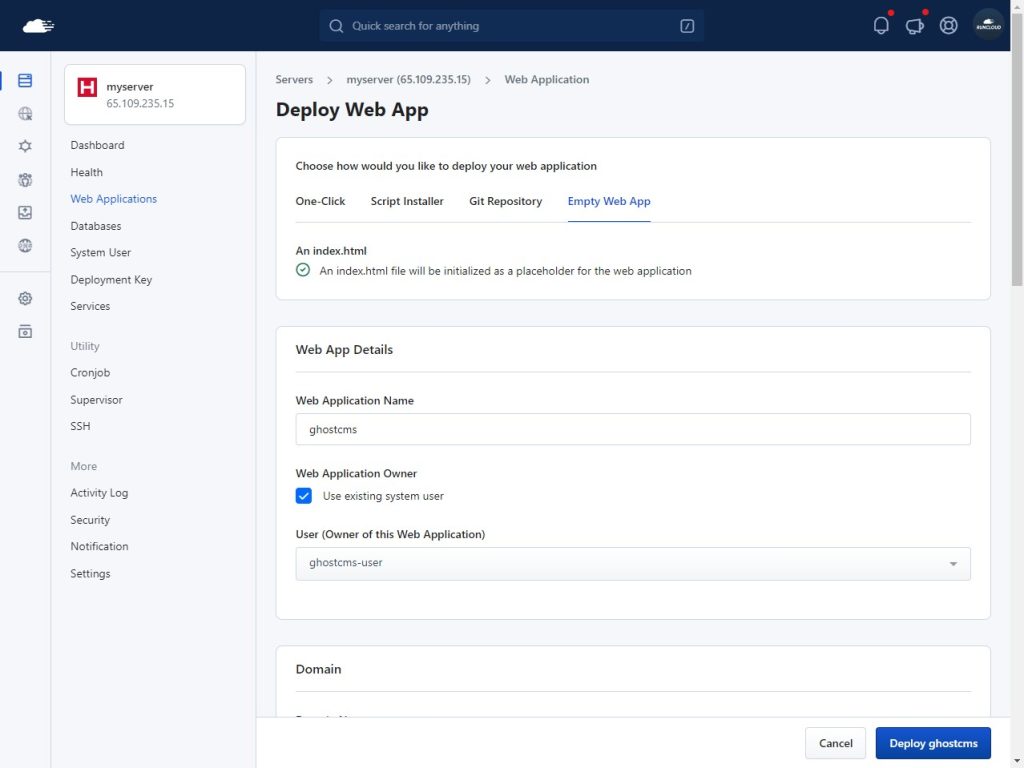
    Choose the “Empty Web App” option and give your application a suitable name. Don’t forget to change the application’s owner. Instead of using the default RunCloud user, we will create the user account we just created as the owner of the web application.

    After configuring the application owner, you can manually set up the domain and configure the DNS records on your DNS registrar’s site.

    If you are using RunCloud’s Cloudflare integration, you can take advantage of the automatic DNS update functionality.

    It is also possible to install Ghost using RunCloud’s test domain. If you want to follow this tutorial without setting up your domain or subdomain, use the RunCloud test domain.

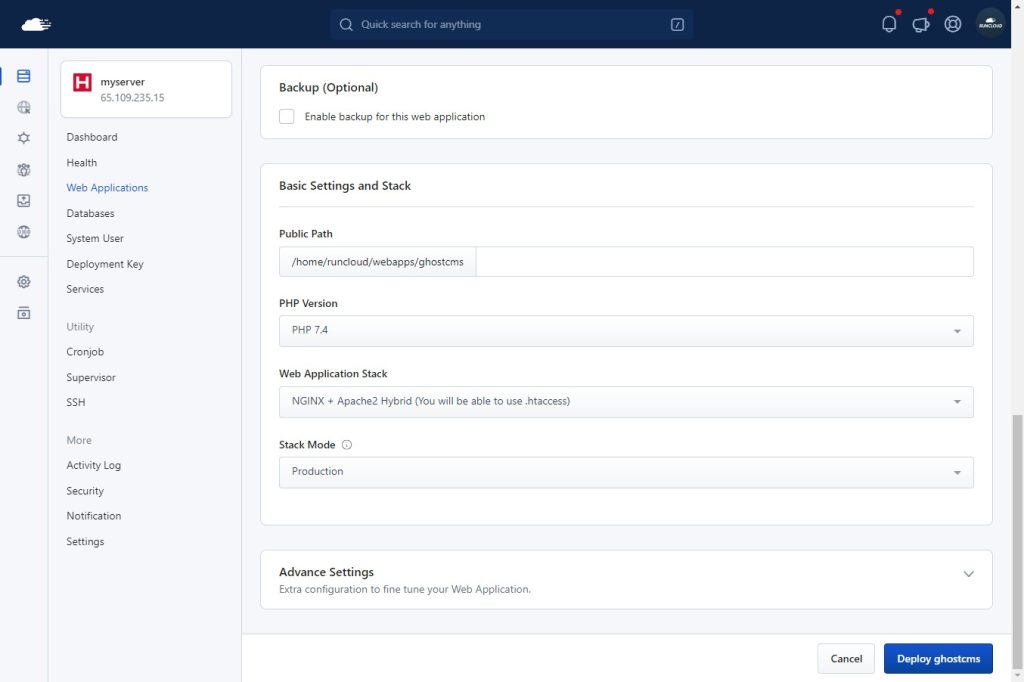
    For “Web Application Stack”, we recommend choosing “Native NGINX + Custom Config” to install Ghost CMS and then clicking “Deploy” to finish the set-up process.

    If your server runs on OpenLiteSpeed, we’ve included notes on different steps in this guide.

    After creating the app, go to the settings page and scroll down to the “Linked Database” section. From the dropdown menu, select the database we just created. Remember to click “Update Linked Database” to save the changes.

    Installing Ghost-CLI (for NGINX and OLS servers)

    Note: If you want to install GhostCMS on a Docker server, skip this section and jump to the Docker installation instructions.

    In the previous step, we created a dummy web application in the RunCloud dashboard, which helps us perform administrative tasks such as monitoring the logs from the RunCloud dashboard. Now, we will use Ghost-CLI, a command-line tool, to install and configure Ghost CMS and replace that dummy application.

    To avoid permission conflicts, we will install the Ghost-CLI as the web application’s owner. To do this, log in to your server as the system user assigned to the web application – you can either do this via SSH or use the su (switch user) command.

    # Method 1
    ssh ghostcms-user@<youripaddress>
    # Method 2
    ssh root@<youripaddress>
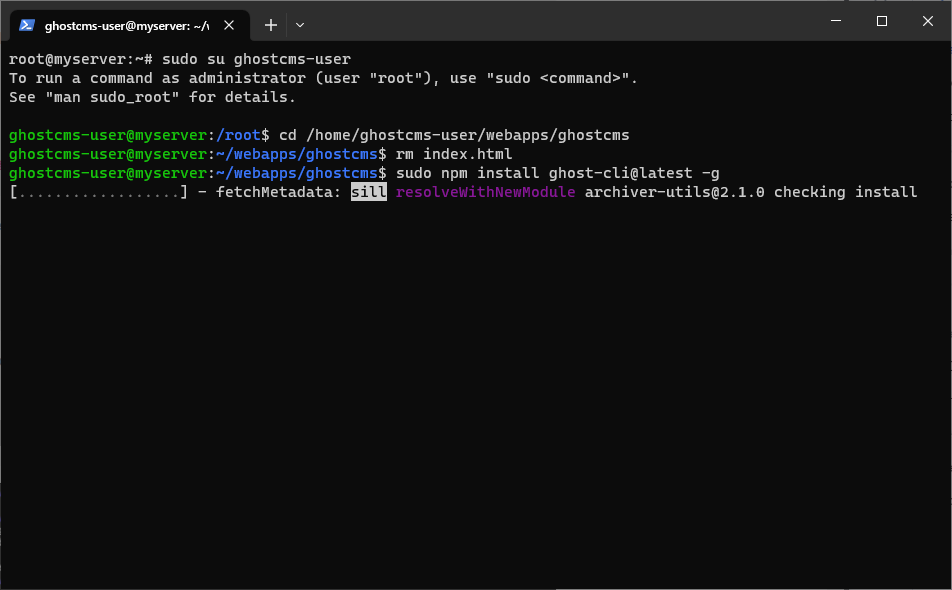
    sudo su ghostcms-user

    After logging in to the server, navigate to the root directory of your web application using the following command. Replace the “<path to root>” with your path – you can find this in the RunCloud dashboard:

    cd <path to root>

    Once in the correct directory, you can run the following commands to remove the default “index.html” file and begin the installation:

    rm index.html
    sudo npm install ghost-cli@latest -g

    After the installation is complete, you can run “ghost version” on your terminal to check the version of Ghost-CLI and ensure that the CLI works as expected.

    Checking Node.js version

    Ghost CMS needs Node.js to function properly. At the time of writing, the recommended node version was 18; refer to the official website to see the recommended node version.

    Execute the following command to see the version of the node installed on your server:

    node -v

    In the above screenshot, the first number in v18.18.0 indicates the major version number of the software. The major version number reflects the software’s level of compatibility and functionality. The other numbers after the dot (.) are minor version numbers or patch numbers. They do not affect the compatibility or functionality of the software as much as the major version number. Therefore, they can be ignored if you are only interested in the major version number.

    Note: If you created your server before 27 September 2023, you might need to update the node version manually. Refer to our guide for updating the node on your RunCloud server to learn how to do this.

    Installing Ghost CMS

    After installing Ghost-CLI, you can run the following command to start the Ghost CMS installation:

    ghost install

    During the installation, follow the instructions on the screen and enter the necessary information to proceed.

    When asked for the hostname, enter 127.0.0.1. Using the default value causes the Ghost CMS to use the IPv6 address, which leads to an ECONNREFUSED::1:3306 error at a later stage in the installation.

    When asked, “Do you wish to set up Systemd?” please enter “Y”, and when prompted, “Do you wish to start Ghost”, enter “Y” again.

    If you follow the instructions correctly you will get a message that the installation was successful. However, when you visit your site you will see a 404 error message. This is because we skipped the NGINX setup during installation. We can configure this manually to fix it.

    Before we set up the server proxy, we need to know which port Ghost will use for this website. Run the following command to get the details of your web application:

    ghost ls 

    The above command will show an output that looks like this:

    In the example above, the port number is 2368. Note down this port number.

    Installation on Docker

    In addition to installing Ghost directly on an NGINX or OpenLiteSpeed server, you can also deploy Ghost using Docker. This allows you to take advantage of the consistency and portability of containerized applications.

    To deploy Ghost on a Docker server, you must first set up an empty web application on your RunCloud server by following the steps described above. Once that is done, follow these steps:

    1. Log in to the server via SSH: Connect to your RunCloud server using SSH to access the terminal and run Docker commands.
    2. Create a Docker Compose file: Create a docker-compose.yml file that defines the Ghost container. This file should include the necessary environment variables for your database connection and the URL for your Ghost installation.

    Here’s an example docker-compose.yml file:

    services:
      ghost:
        image: ghost:5-alpine
        restart: always
        ports:
          - 8080:2368
        environment:
          database__client: mysql
          database__connection__host: host
          database__connection__user: ghost_user
          database__connection__password: asd123456
          database__connection__database: ghost_db
          url: http://ghost.example.com
        volumes:
          - ghost:/var/lib/ghost/content
        extra_hosts:
          - 'host:host-gateway'
    volumes:
      ghost:
    1. Modify Dockerfile: After creating the above file, you must edit certain sections to ensure your application runs correctly. First, if deploying more than one Ghost container, you must replace 8080 with a unique port number for each container. Next, you must replace http://ghost.example.com with the URL of the web application you deployed earlier.
    2. Create a custom NGINX proxy: Next, create a custom NGINX proxy for your RunCloud app to the custom port you defined in the Docker Compose file (in this case, 8080). You can use the same NGINX configuration as you would for a Ghost non-Docker installation (described below in this tutorial).
    3. Start the Docker container: Finally, run docker-compose up -d in the directory containing the docker-compose.yml file to start the Ghost container.

    Setting Up A Proxy

    You need to configure your server to redirect all the incoming traffic to the given port. This step is different for NGINX and OpenLiteSpeed servers. If you are not sure which server is installed on your machine, you can check this in the RunCloud dashboard and then follow along the instructions corresponding to your server.

    For NGINX

    Return to the RunCloud dashboard, open your web application, and go to the NGINX Config menu. Click the “Create Config” button and follow the steps below.

    • For the “Type” option, select the value “location.root”.
    • For the “Config Name” option, you can use the value “ghost”.
    • Copy and paste the text below into the “ConfigContent” text area. Make sure to change XXXX to the port number we noted earlier:
    proxy_set_header X-Forwarded-For $proxy_add_x_forwarded_for;
    proxy_set_header X-Forwarded-Proto $scheme;
    proxy_set_header X-Real-IP $remote_addr;
    proxy_set_header Host $http_host;
    proxy_pass http://127.0.0.1:XXXX;

    You can click “Run and Debug” to see if this custom config has any issues. Then, click the “Add Config” button to finish it.

    For OpenLiteSpeed

    In the RunCloud dashboard, open the empty web application created in the Create An Empty Web App step and look for the “LiteSpeed Config” in the side menu to open the configuration file.

    We need to edit a few lines in this file. Firstly, note down the name of the extprocessor – we will use this later.

    Next, disable the existing configuration by adding # before the type and address line.

    After that, add the following lines below the commented lines. Don’t forget to change xxxx to the port number we noted earlier.

    type                    proxy
    address                 localhost:xxxx

    At this stage, your configuration file should look like this:

    Next, scroll down and add the following code snippet to your configuration file. Be careful not to paste it in the middle of an existing config block. Replace the <my-ghost> with the name of the extprocessor that we noted down earlier.

    context / {
      type                    proxy
      handler                 <my-ghost>
      addDefaultCharset       off
    }

    At this point, your config file will look something like this:

    Click on “Update Config” to save the settings.

    Finally, we need to restart the OpenLiteSpeed service for the changes to take effect. Open the server page in your RunCloud dashboard and look for the “Services” option in the side menu. On that page, click the “…” button next to the OpenLiteSpeed server and “Restart”.

    Log In To Your Ghost Dashboard

    After setting up the proxy config, you can visit your website. To configure the admin account, go to https://example.com/ghost. You must enter basic details on this page, such as the site name and admin login details.

    After setting up the admin account, you can log into the Ghost dashboard and start publishing.

    After Action Report

    Ghost CMS is an effective modern publishing platform powered by Node.js. RunCloud makes it easy to install and configure Ghost CMS. After following the steps mentioned in this article, you will be able to set up your own CMS and start publishing content.

    After installation, you can learn more about Ghost-CLI commands and tutorials to customize your Ghost blog.I

    f you’re tired of managing your own servers, check out RunCloud, a simple yet powerful control panel for cloud servers. RunCloud is built for developers who want to focus on shipping great work, not on managing their infrastructure. Discover painless server configuration and say goodbye to spending hours figuring it out – get started with RunCloud today to get up and running in minutes.

    Ghost Installation FAQs

    What is Ghost blog, and why should I use it?

    Ghost is a free and open-source blogging platform designed to be simple, elegant, and focused on writing. It is a great choice for users who want to create a professional-looking blog without the complexities of traditional content management systems such as WordPress.

    What are the requirements for installing Ghost?

    To install Ghost, you will need a web server running either NGINX or OpenLiteSpeed, Node.js, MySQL, or SQLite. You will also need to configure your server’s domain name and SSL/TLS certificate.

    How do I install Ghost on an NGINX server?

    To install Ghost on an NGINX server, you must first install Node.js and MySQL, then download and install the Ghost NPM package. Next, you will need to configure NGINX to serve the Ghost application and set up the database connection. Finally, you will need to start the Ghost service and configure any additional settings.

    How do I install Ghost on an OpenLiteSpeed server?

    Installing Ghost on an OpenLiteSpeed server is similar to the NGINX process but with a few key differences. First, you must install Node.js and MySQL, then download and extract the Ghost files. Next, you will need to configure OpenLiteSpeed to serve the Ghost application and set up the database connection. Finally, you will need to start the Ghost service and configure any additional settings.

    What are some common issues that can arise when installing Ghost?

    Some common issues that can arise when installing Ghost include problems with the Node.js or MySQL installation, difficulty configuring the web server, and issues with the database connection. It’s important to carefully follow the installation instructions and troubleshoot any errors.

    How do I customize the appearance of my Ghost blog?

    Ghost offers a wide range of themes and customization options, allowing you to easily change the look and feel of your blog. You can install pre-built themes or create custom themes using Ghost’s theme development tools.

    What are the best practices for securing a Ghost blog?

    To secure your Ghost blog, keep your software up-to-date, use strong passwords, and configure your web server with appropriate security settings. You should also consider enabling two-factor authentication and monitoring your blog for suspicious activity.

    How do I integrate my Ghost blog with other tools and services?

    Ghost offers many integrations, allowing you to connect your blog to other tools and services, such as social media platforms, email marketing providers, and analytics tools. You can also use Ghost’s API to build custom integrations and extend your blog’s functionality.

  • Migrating from WordPress to Ghost: A Complete Guide

    Migrating from WordPress to Ghost: A Complete Guide

    Are you feeling constrained by WordPress or simply looking for a fresh start? Ghost offers a compelling alternative for content creators, whether you’re seeking better performance, a cleaner writing experience, or a modern publishing platform.

    Ghost is a focused publishing platform built with modern technology. It excels at what it does best: running beautiful, fast, and secure blogs without the complexity of traditional CMS systems. Its built-in membership features, native newsletter capabilities, and straightforward interface make it an attractive choice for professional publishers and bloggers.

    This article explains how to migrate content from your existing WordPress site to a GhostCMS blog using simple steps.

    But before we get started, there is one thing that you should know about!

    Important Disclaimer: Before beginning the migration process, please note that certain WordPress features may not transfer perfectly to Ghost. For example, advanced custom fields, multisite networks, and some specialized plugins may not migrate as expected. You’ll need additional configuration after migration if your WordPress site uses multiple authors or scheduled posts. Consider these limitations when planning your migration strategy.

    Option 1: Ghost Pro (The Easy Way)

    If you want a hassle-free migration experience, Ghost Pro’s Concierge service is your best option. When you subscribe to an annual Ghost Pro Creator, Team, or Business plan, their team will handle the entire migration process for you. This is particularly recommended if you:

    • Have a complex WordPress setup
    • Want to ensure nothing gets lost in translation
    • Prefer a hands-off approach
    • Need professional support throughout the process

    Option 2: Manual Migration (The DIY Approach)

    If you have basic technical knowledge, you can migrate your website without help. Follow the steps below to migrate your WordPress content to a Ghost blog manually:

    Step 1: Prepare Your WordPress Site

    1. Log in to your WordPress dashboard
    2. Navigate to Plugins → Add New
    3. Search for “Ghost” (ensure it’s by Ghost Foundation)
    4. Click “Install Now” followed by “Activate“
    Ghost Plugin for WordPress

    Step 2: Export Your Content

    1. After installing the plugin, go to “Tools” → “Export to Ghost” in your WordPress dashboard
    2. Review the preparation guide to understand what will be exported
    3. Click “Download Ghost File” to get a ZIP file containing your content
    4. Store this file safely, as it contains all of your posts, pages, tags, and images
    Export Ghost data

    Step 3: Prepare Your Ghost Installation

    1. After downloading your content, you can upload it to your Ghost website. This tutorial assumes that your Ghost site is properly set up and running. If this is not the case, you can refer to our guide on installing Ghost CMS to view the step-by-step instructions.
    2. Open your Ghost website and navigate to your Ghost Admin panel
    3. Navigate to “Settings” → “Advanced” and scroll down till you see the “Migration Tools” section.
    Import Ghost

    Step 4: Import Your Content

    1. On the import page, click “Universal Import“
    2. Drag and drop your exported ZIP file or click to select it via File Explorer.
    3. Wait for the import process to complete (this may take several minutes, depending on your content volume)

    Step 5: Post-Migration Tasks

    1. Verify all content has been imported correctly
    2. Check that images are displaying properly
    3. Update any internal links to match your new Ghost URL structure
    4. All the scheduled posts from WordPress will be marked as drafts in Ghost. If you have any scheduled posts, you must manually review and schedule them in Ghost.

    Troubleshooting Tips

    Sometimes, things don’t go as planned, and you might encounter issues. Here are some of the common problems that you may encounter:

    Large Image Sets

    If you have hundreds of images on your WordPress site, downloading and uploading them can take quite a long time. If this is the case, you can download just the JSON file in step 2 and migrate your images manually.

    Directly copying images from the source server to the destination server will be much faster as it won’t require you to compress, download, and then upload the same files to the server. However, it will require you to have a basic understanding of SSH. If you are going down this path, then you should check out our previous article, in which we explain how to transfer files using SFTP.

    Alternatively, if both your WordPress site and Ghost site are on the same server, you can simply copy and paste the images from one folder to another via SSH. To do this, you must copy all the content in the /wp-content/uploads/ folder in your WordPress installation and paste it into your Ghost installation’s/content/images/wordpress/ folder.

    If you are unsure how to do this, refer to our post, which explains how to copy files via the command line in Linux.

    Export Failures

    If the full export fails:

    1. Try the JSON export option instead (excludes images)
    2. Download images separately from your server
    3. Manually organize images in the correct directory structure
    4. Create a new ZIP with both the JSON and organized images

    Error During Ghost Zip Import

    Sometimes, the WordPress export can create problematic ZIP files that Ghost won’t accept. Some people on the community forums have reported issues with the WordPress-generated ZIP file structure:

    1. If you find plain text error messages at the beginning of your ZIP file, this can make the archive unreadable
    2. The solution is simple:
      • Extract all contents from the original WordPress export
      • Create a fresh ZIP file on your local machine
      • Include only the essential JSON and image files
      • Use this newly created ZIP for the Ghost import

    After Action Report: Post-Migration Considerations

    In this guide, we have provided the necessary steps to migrate your WordPress website to Ghost. After migrating from WordPress to Ghost, there are five essential steps that you should take:

    1. Set up redirects from your old WordPress URLs to your new Ghost URLs
    2. Update any external services pointing to your old WordPress site
    3. Test all forms and interactive elements on your new Ghost site
    4. Review your SEO settings and metadata
    5. Update your DNS settings if changing domains

    RunCloud makes this transition period smoother by allowing you to run both applications simultaneously. This keeps your WordPress site active while you perfect your Ghost installation. This parallel running capability ensures you can thoroughly test everything without risking downtime or disrupting your online presence.

    The real beauty of RunCloud is that it doesn’t force you to choose between platforms or compromise your hosting setup. You get a powerful, user-friendly dashboard that handles both PHP and Node.js applications with equal efficiency, expert support when needed, and the freedom to evolve your web presence on your terms.

    Ready to experience hosting without boundaries? Sign up for RunCloud today and join thousands of developers who trust us with their web applications – start with a 7-day free trial.

    Frequently Asked Questions: WordPress to Ghost Migration

    Will I lose my SEO rankings when moving to Ghost?

    You won’t lose your SEO rankings if you properly set up 301 redirects from your old WordPress URLs to your new Ghost URLs. Ghost has built-in SEO features and automatically generates the necessary meta tags and structured data for search engines.

    What happens to the functionality of my WordPress plugins after migrating to Ghost?

    Most essential features provided by WordPress plugins are available as native features in Ghost, eliminating the need for plugins. However, if you rely on very specific plugin functionality, you’ll need to check if Ghost provides an alternative solution or if you can achieve the same result through Ghost’s integrations.

    Can I keep my WordPress theme design in Ghost?

    While you can’t directly port your WordPress theme to Ghost, you can create or purchase a similar theme that matches your current design. Ghost uses a modern theming system based on Handlebars, and many professional themes can be customized to match your WordPress site’s look.

    What happens to my WordPress comments in Ghost?

    Ghost doesn’t have a native commenting system but integrates well with third-party solutions such as Disqus, Cove, or membership discussions. You can migrate your existing WordPress comments to one of these platforms, though the process may require additional steps.

    Will my WordPress media library transfer completely to Ghost?

    The Ghost migration tool will transfer your images, but other media types, including PDFs or audio files, must be moved manually. Videos embedded from services such as YouTube or Vimeo will continue to work normally in Ghost.

    Can I keep my WordPress users and their roles in Ghost?

    Basic user information and author attributions will transfer, but all users must set up new passwords in Ghost. Ghost has a simpler role system than WordPress (Admin, Editor, Author, and Contributor), so some custom WordPress roles may need to be reorganized.

    Will my scheduled posts work in Ghost after migration?

    Scheduled posts will transfer to Ghost, but you must verify their scheduling after migration. Ghost handles scheduling differently from WordPress, so it’s recommended that all scheduled content be double-checked after the migration.

    Will my WordPress forms still work in Ghost?

    WordPress forms won’t transfer directly to Ghost, but Ghost integrates with popular form services such as TypeForm or Google Forms. You’ll need to recreate your forms using one of these third-party services and embed them in your Ghost content.

    Can I test the migration before going live?

    You can set up a test Ghost installation and perform a trial migration before moving your live site. This lets you identify and fix potential issues without affecting your live WordPress site.

    What happens to my WordPress categories?

    Categories from WordPress are converted to tags in Ghost since Ghost uses a simpler taxonomy system. Ghost will preserve the hierarchical organization by displaying former categories before regular tags.

    Will my internal links break after migrating to Ghost?

    Internal links within your content must be updated to match Ghost’s URL structure. The migration tool can handle basic URL updates, but you should verify all internal links after migration, especially if you’re changing domains.

    Can I move my WordPress e-commerce store to Ghost?

    Ghost isn’t designed for e-commerce like WordPress with WooCommerce but integrates well with external e-commerce platforms. You’ll need to set up your store on a platform such as Shopify or Gumroad and integrate it with your Ghost site.

    Do WordPress shortcodes work in Ghost?

    WordPress shortcodes won’t work in Ghost and must be replaced with standard HTML or Markdown. Ghost uses a clean, card-based editor that eliminates the need for most shortcodes.

    Can I migrate my WordPress subscription/membership system to Ghost?

    Ghost’s built-in membership and subscription system is often more powerful than WordPress solutions. While member data won’t automatically transfer, Ghost provides tools to import members and set up new subscription plans.

    Will my RSS feeds still work in Ghost?

    Ghost automatically generates RSS feeds with a slightly different URL structure from WordPress. You must update any services using your RSS feed to point to your new Ghost RSS feed URL.

  • Top 8 Popular Web Hosting Control Panels in 2025

    Top 8 Popular Web Hosting Control Panels in 2025

    Managing servers can be challenging, and every second of downtime can cost you visitors and revenue. But fear not! Whether you’re a seasoned developer, a budding entrepreneur, or somewhere in between, you can use a web hosting control panel to manage your web hosting environment effortlessly.

    But with so many options available, how do you know which is right for you?

    Should you stick with the tried-and-true cPanel or venture into new territories with platforms such as RunCloud or Plesk?

    In this comprehensive comparison of web hosting control panels, we’ll explore the world of server management tools, explore various features and functionalities of popular platforms, and help you find the perfect match for your unique requirements.

    Let’s get started!

    What Are Web Hosting Control Panels?

    Web hosting control panels are web-based interfaces that simplify website and hosting account management. They provide a user-friendly graphical interface to handle various server and website administration tasks without requiring advanced technical knowledge.

    Suggested read: Self-Managed or Managed Hosting: Which Is Right for You?

    Benefits of Using Web Hosting Control Panels

    Although you can directly log in to your server via SSH and make the necessary changes, it often takes time and requires advanced skills. On the other hand, there are several perks of using a web hosting panel:

    1. Ease of use: Simplify complex server management tasks through intuitive interfaces.
    2. Time-saving: Automate routine tasks like software installations and updates.
    3. Centralized management: Access all hosting features and settings from a single dashboard.
    4. File management: Upload, download, and organize website files easily.
    5. Email administration: Create and manage email accounts, forwarders, and autoresponders.
    6. Database management: Create, modify, and manage databases without command-line knowledge.
    7. Domain management: Handle domain registrations, DNS settings, and subdomains.
    8. Security features: Implement SSL certificates, IP blocking, and other security measures.
    9. Performance monitoring: Track resource usage and website statistics.
    10. Scalability: Easily upgrade hosting plans or add new services as needed.

    Suggested read: 15 Best Email Hosting For Small Business (2024)

    Best & Most Popular Web Hosting Control Panels

    There are many good web hosting control panels; let’s take a look at some of them:

    RunCloud

    RunCloud is a premium cloud management platform that offers a comprehensive solution for developers and agencies looking to streamline their server management processes. RunCloud provides a user-friendly interface and powerful features, making deploying and maintaining websites and applications in the cloud easy.

    RunCloud hosting panel

    One of RunCloud’s standout features is its ability to simplify complex server management tasks. With RunCloud, you don’t need to be a Linux expert to run your websites efficiently. RunCloud’s intuitive dashboard puts everything at your fingertips, from backups and staging to cloning and atomic deployments. This means you can manage production-grade infrastructure without getting bogged down in command-line intricacies or server configuration headaches.

    You can use its automated backup system, which ensures your data is always safe. It also offers unique staging features for WordPress sites, allowing you to test changes in a secure environment before pushing them live. If you are using git to manage and track your software versions, then you can use RunCloud’s atomic deployment capability, which enables seamless updates without downtime.

    RunCloud backups

    RunCloud offers powerful collaboration tools for agencies that make managing multiple client websites from a single dashboard easy. It also supports dozens of popular cloud providers and storage backup solutions out of the box.

    Advanced users can use RunCloud API to create integration with their existing workflows and build custom solutions tailored to their specific needs.

    RunCloud integrations

    Suggested read: What Is Managed WordPress Hosting & Do You Need It?

    hPanel by Hostinger

    Hostinger’s proprietary cloud management platform, hPanel, is designed to offer a user-friendly and efficient hosting experience. It provides a streamlined interface that simplifies website management tasks for users of all skill levels.

    hPanel offers essential features such as one-click installations for popular content management systems such as WordPress, Joomla, and Drupal. It also includes tools for domain management, email account creation, and file management through an integrated file manager.

    It includes features such as LiteSpeed Web Server and LiteSpeed Cache for WordPress, which improves website loading speeds. Also, hPanel offers a user-friendly database management interface, making it easier for users to handle MySQL databases without advanced technical knowledge.

    Suggested read: The Best WHMCS Alternatives (Free, Open Source & Premium)

    Cloudways Panel

    Cloudways is an advanced cloud management platform that provides managed cloud hosting solutions. It allows users to choose from multiple cloud infrastructure providers, including DigitalOcean, Linode, Vultr, AWS, and Google Cloud. This approach allows users to use their existing cloud credits while benefiting from Cloudways’ simplified management interface.

    Like many other providers, Cloudways Panel also features a one-click application deployment system for popular platforms such as WordPress, Magento, and Laravel. The panel includes built-in caching solutions, a CDN, and automated backups.

    One of the notable features of Cloudways Panel is the ability to quickly scale server resources as needed, which makes it an excellent choice for growing websites and applications.

    Suggested read: 3 Free Ways To Migrate WordPress From Shared Hosting To Cloud Server

    cPanel

    cPanel is one of the industry’s most widely used and long-standing web hosting control panels. It offers comprehensive tools for managing websites, domains, email accounts, databases, and server settings.

    cPanel’s interface is divided into several sections, and each section focuses on specific aspects of web hosting management, such as Files, Databases, Domains, Email, Metrics, Security, and Software.

    cPanel includes popular features such as the File Manager for easy file uploads and management, phpMyAdmin for database administration, and the Softaculous auto-installer for quick deployment of hundreds of web applications

    It also offers robust email management capabilities including spam filters and webmail access.

    cPanel is a very popular platform, and its wide adoption in the hosting industry means that many third-party applications and scripts are compatible with it out of the box.

    Plesk

    Plesk is a handy toolbox for managing websites and servers with minimal effort. It’s designed to simplify server management for beginners and tech experts. Plesk offers a clean, easy-to-use interface that lets you handle everything from setting up email accounts to installing WordPress with just a few clicks.

    Most of the tools discussed in this guide require installing and hosting your website on Linux. However, Plesk supports many different operating systems and can be used on various types of servers. Therefore, if you are using Windows servers, Plesk is one of the best solutions out there.

    It’s also great for web developers and designers because it offers a WordPress toolkit for easily managing, securing, and automating WordPress instances, plugins, and themes.

    Webmin

    Webmin is like the Swiss Army knife of server management tools for software developers. It’s open-source, which means it’s free to use and can be customized by anyone. Webmin is super flexible and supports Debian, RHEL, FreeBSD, and other operating systems.

    The user interface is not as polished as some of the other tools mentioned above, and it doesn’t provide one-click install options for popular CMSs like WordPress. However, you can still use it to set up a new website, manage user accounts, or configure system settings.

    It offers several advanced features, making it a good choice for power users. For example, if you run a web agency, you can use the disk quotas feature to limit the amount of space each user is allowed to consume. You can also use your existing LDAP server to manage users and control access.

    DirectAdmin

    DirectAdmin is designed to be a no-fuss control panel that does the job without overwhelming you with too many options. This makes it perfect for small businesses or individuals who want to manage their websites without getting lost in technical jargon.

    Despite its simplicity, DirectAdmin doesn’t skimp on features. It covers all the basics, such as managing email accounts, databases, and domains. It also has some nice touches, including an easy-to-use backup system and a user-friendly file manager.

    One thing people particularly like about DirectAdmin is that it uses few server resources, which means your websites can run faster and smoother. If you want this, you should check out the DirectAdmin Web Control Panel Demo.

    VestaCP

    VestaCP is a comprehensive and user-friendly hosting control panel with many features for managing websites, servers, and web applications. It provides a powerful set of tools for both beginners and experienced users. For example, it provides tools for domain administration, DNS configuration, database management, and email setup.

    It also offers a Let’s Encrypt integration, which offers free SSL/TLS certificates. The control panel includes a file manager with syntax highlighting, SSH/FTP capabilities, and a flexible backup system, making it a versatile solution for various hosting needs.

    One of VestaCP’s strengths is its focus on security and user management. It offers a built-in firewall with customizable rules that allow you to block unwanted traffic. The control panel also provides comprehensive monitoring and logging features that allow users to keep track of their server’s performance through CPU, memory, and disk usage metrics.

    Which Web Hosting Control Panel Should You Choose?

    People have different web hosting needs, making it difficult to recommend one single solution to everyone. In this section, we have explained which solution is best for which user:

    For WordPress and PHP-based projects

    If you’re building websites or applications on WordPress or PHP, RunCloud is your best bet. It offers a streamlined experience tailored specifically for these technologies, with features such as one-click WordPress installations, automatic updates, and optimized server configurations.

    For Windows server environments

    If you’re working with Windows servers, Plesk is an excellent choice. It provides a comprehensive suite of tools designed to work seamlessly in Windows environments and supports technologies such as ASP.NET and MS SQL.

    For open-source enthusiasts

    Webmin is worth considering if you’re looking for an open-source solution with maximum flexibility. As a free and highly customizable control panel, Webmin gives you granular control over your server’s configuration. It supports a wide range of Linux distributions and offers modules for managing virtually every aspect of your server. While it may have a steeper learning curve, Webmin provides unparalleled freedom to tailor your server management experience.

    Wrap-up: Choosing the Right Web Hosting Control Panel for You

    In this post, we’ve explored a variety of web hosting control panels, from industry standards such as cPanel to newer, specialized solutions such as RunCloud. Each platform offers unique features and benefits that cater to different needs and skill levels.

    As you weigh your options, remember that RunCloud offers a powerful, user-friendly solution combining ease of use and advanced features. RunCloud eliminates the need for deep Linux expertise by providing advanced features such as an intuitive interface, automated backups, staging environments, and atomic deployments.

    Its robust integrations and API capabilities make it an excellent choice for developers and agencies looking to automate their workflows and focus on creating outstanding web experiences.

    Sign up for RunCloud today!

    FAQs on Web Hosting Control Panels

    Do I need cPanel to host a website?

    No, cPanel is not strictly necessary to host a website. While cPanel is a popular and user-friendly option, many alternative control panels and hosting solutions are available. You can host a website using other advanced control panels such as RunCloud or even manage your server manually if you have the technical expertise.

    Is GoDaddy a cPanel?

    No, GoDaddy is not a cPanel. GoDaddy is a web hosting and domain registrar company that offers various hosting services. While some of GoDaddy’s hosting plans include cPanel as the control panel, GoDaddy itself is a service provider, not a control panel.

    What is the difference between cPanel and web hosting?

    cPanel is a control panel used to manage web hosting services. Web hosting is the actual service of storing and serving website files on a server. It is the foundation that makes your website accessible on the Internet. In contrast, cPanel is a tool that simplifies the management of that hosting environment, including tasks like file management, email setup, and database administration.

    Is there an alternative to cPanel?

    Yes, there are several alternatives to cPanel. Some popular options include Plesk, DirectAdmin, Webmin, and RunCloud. These alternatives offer similar functionality to cPanel, allowing users to manage their web hosting environments through user-friendly interfaces.

    What are the disadvantages of a Web Hosting Control Panel?

    While web hosting control panels offer many benefits, they have disadvantages. These can include additional costs, as many control panels require licensing fees. They may also introduce security vulnerabilities if not properly maintained and updated.

  • What is WHMCS and How Is It Used?

    What is WHMCS and How Is It Used?

    If you’re running a web hosting business, you know how challenging and time-consuming it can be to manage your clients, billing, support, domains, and more.

    You need a solution that can automate your tasks and make your life easier.

    That’s where WHMCS comes in.

    WHMCS is a powerful and popular web hosting automation platform that can help you run your business smoothly and effectively. But how do you install WHMCS on RunCloud, the best cloud server management platform?

    In this article, we will explain what WHMCS is and how it works, and then we will guide you through the quick and simple steps of installing it on RunCloud. You’ll also learn about some of the best alternatives to WHMCS that can offer you more features and benefits for your web hosting business. Read on to find out more!

    What Is WHMCS

    WHMCS is short for Web Host Manager Complete Solution. It’s a management platform that simplifies the process of selling domain names and hosting services online. WHMCS provides a suite of tools that can automate daily operations such as billing, invoicing, client management, and support requests.

    WHMCS was first introduced back in 2005, and since then it has become a popular choice for web hosting companies to manage their online business. It’s an invaluable tool for such hosting companies, as it helps them to manage their businesses more efficiently and effectively.

    If you’re looking for alternatives to WHMCS, you might want to check out this article: The Best WHMCS Alternatives (Free, Open Source & Premium). It will give you an overview of some of the most popular and promising options for web hosting automation. You might find a solution that suits your needs and budget better than WHMCS.

    Key Features Of WHMCS

    1. Billing and Invoicing: WHMCS can automate the process of generating invoices, and allows users to manage their finances and payments easily. You can also configure recurring billing, payment reminders and promotional discounts to boost your sales.
      There are mechanisms set in place to handle multi-currency transactions, as well as initiating refunds in case of a dispute.
    2. Client Management: It provides a centralized location to manage client data and information such as order history, support tickets, and billing information. Having a unified dashboard which tracks everything streamlines the operations process, and improves productivity.
    3. Product and Service Management: WHMCS allows you to manage your products and services quickly and easily. You can add new products, set up pricing, packages, and use custom options to provide additional offerings to your customers.
    4. Support Ticket System: There is a built-in support ticket system for managing customer support requests and inquiries. This system can be organized to replicate the hierarchy of support staff, and organize them in departments to segregate responsibilities.
      It’s possible to open and communicate in a ticket via email or directly from the web interface. The ticketing system also supports attachments, and you can set up additional escalation rules to perform automated actions and enforce SLAs.
    5. Integrations: WHMCS has built-in support for various payment gateways such as PayPal, Stripe, Skrill, eWay, etc. It can integrate with various domain registrars, including GoDaddy, ResellerClub, NameCheap, and more.
      It can send notifications via Slack and Hipchat, which makes it easier for users to manage all aspects of their business.
    6. Customizable: One of the key features of WHMCS is its modular architecture which allows for unlimited customizations. It offers a powerful API that supports both XML and JSON to execute actions within WHMCS from third party code. There are themes and templates available, which can be used to create a professional and branded experience for clients.

    Benefits of using WHMCS

    1. Improved Efficiency: WHMCS can automate various business operations, thereby reducing manual work, saving time and improving efficiency. This will free up time for businesses to focus on growth and improving overall efficiency.
    2. Streamlined Financial Management: The platform facilitates billing and invoicing automatically for a large number of clients, allowing businesses to manage their finances and maximize their revenue.
    3. Improves Customer Experience: With WHMCS, you get a centralized location to manage your client accounts and manage support tickets. Having a user friendly interface that makes it easy to perform the desired actions, and ask questions from support staff, leads to improved customer satisfaction.
    4. Easy to Use: WHMCS consolidates multiple tools and features into a single platform. This eliminates the need to switch between multiple tools to manage business operations. It also provides tutorials, guides, and support resources to help users quickly get up to speed with the platform.

    How Install WHMCS on RunCloud

    Creating an Empty Web app

    Log in to your RunCloud dashboard, and select the server you want to use. Click on the Web Application tab and then click on the “Deploy New Web Application” button.

    Choose a name for your web app, such as whmcs-app, and then select the web application owner. We recommend creating a new owner for each web application.

    Next, choose a domain name for your web app, such as whmcs.example.com, and make sure you have pointed it to your server’s IP address or hostname.

    Select the PHP version that you want to use. At the time of writing, WHMCS recommends using PHP 8.1. Finally, click on the Create Web Application button, and wait until your web app is created and ready to use.

    After creating the web application, you need to log into your server as the owner of the application via SSH, and navigate to the root directory of your web application. If you are not sure how to do this, we recommend reading How To Add a SSH Key and How To Use SSH Keys with PuTTY.

    Download WHMCS Binaries

    Prerequisite: You need to install and enable ionCube first. Follow our tutorial on installing ionCube Loader and confirm that you have it installed.

    After installing the ionCube Loader, you need to download and extract the WHMCS installation archive on your server. You can either download it to your personal computer and then move it to your server via FileZilla, or you can follow the instructions below to download it directly to your server if you’re feeling adventurous!

    To download the binary directly to your server, we will use the curl command. First, go to https://download.whmcs.com/ and open the DevTools page in your browser.

    In the DevTools windows, switch to the “Network” tab – any web requests that you make on download.whmcs.com will be recorded here.

    Next, go back to the download page and download the latest available binary – you need to have a valid license key to access this page.

    Choose the Full Release option, and click on the Download button. This will start downloading the zip file to your local computer. You can cancel the download if you like as we won’t be using the downloaded file.In the network tab, you should see a single request – this is the request that was made to download the zip file. Right click on the request, and go to Copy > Copy as Curl. If you are using Windows, you might see two options – select the “Copy as Curl (bash)”.

    If you followed the instructions correctly, you will have copied the curl request that contains the necessary cookies and request headers that are specific to your license key. We can paste this into your server terminal to make the same request again (i.e. download the file). After pasting it in the terminal, we need to specify the name of the file that will be downloaded. To do this, write -o whmcs_87.zip at the end of the command. The resulting command should look something like this:
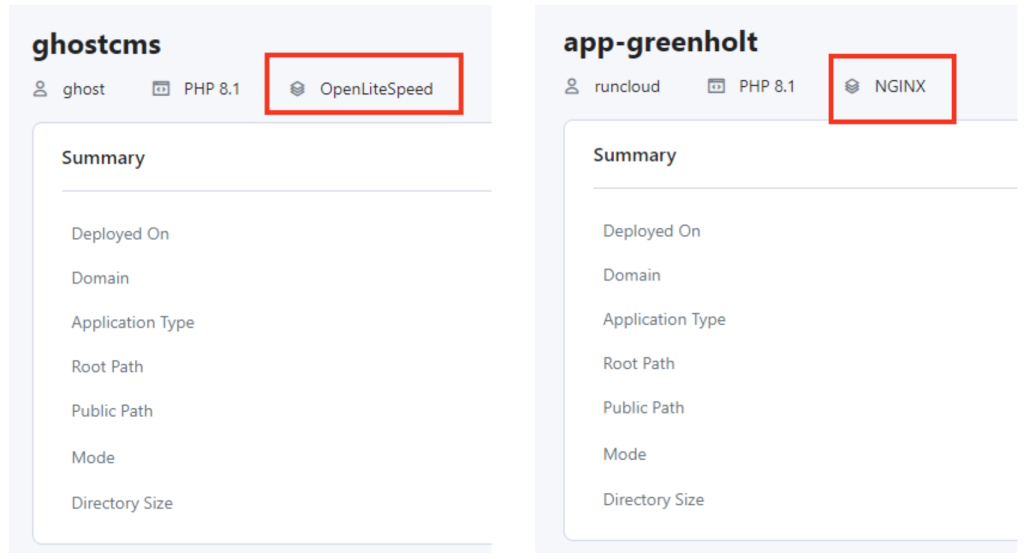
    The above command will download the file to your server and save it as whmcs_87.zip. You can use the ll command to list all the files in the current directory.
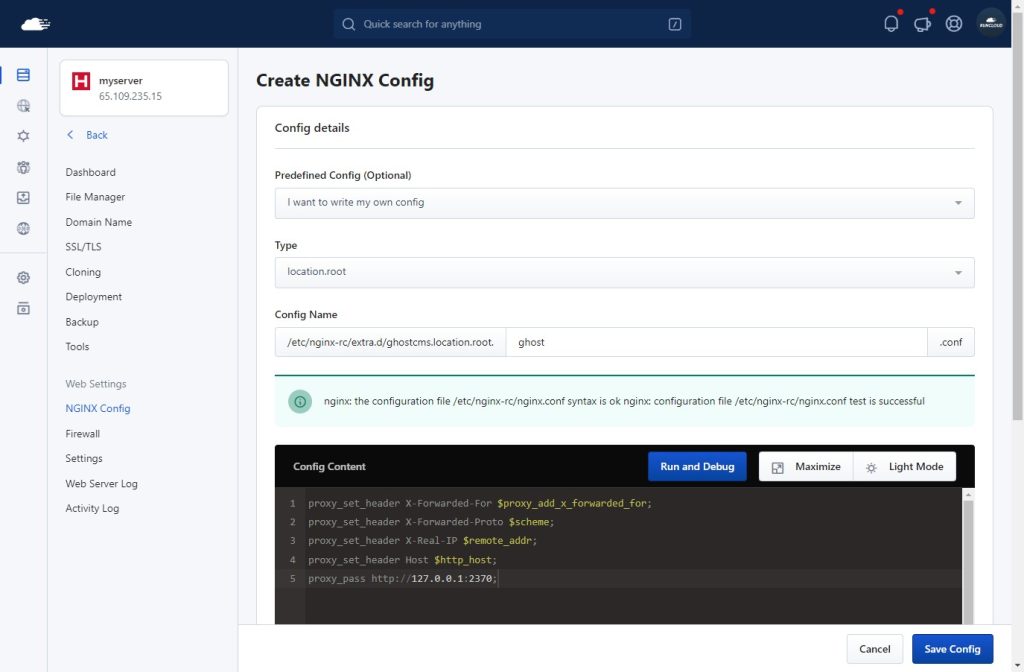
    The above screenshot shows that a new zip file was created on the server. We can extract it using the unzip command. This will create another folder inside our application folder.
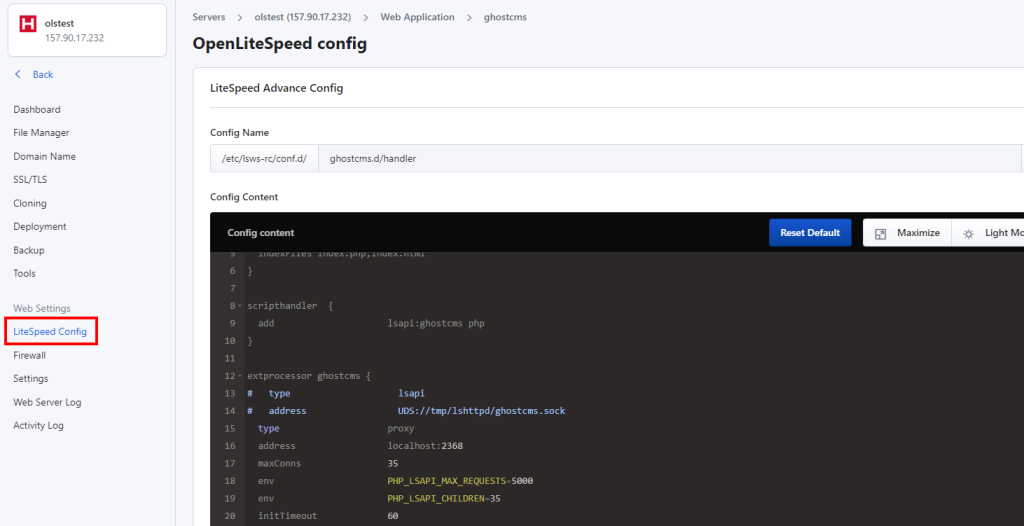
    We can quickly copy the necessary files to the root of the application folder, and remove the obsolete files such as the default index.html file and downloaded archive. We can also set permissions for the configuration file.

    You can execute the following commands to perform the above tasks, and terminate the session.

    unzip whmcs_87.zip # Unzip the downloaded file
    cp -r whmcs/* . # Copy installation files to correct directory
    rm -rf whmcs/ index.html whmcs_87.zip # Remove unnecessary files
    mv configuration.php.new configuration.php # Rename file
    chmod 400 configuration.php # Set Permissions
    exit # Close the SSH connection

    After executing the above commands, you can begin the installation process.

    Open your website in a web browser – you’ll see a welcome screen. Click on the install button to start the installation process.

    Note: If you receive an error message asking you to install ionCube loader, you should refer to our blog post: How To Install ionCube Loader (Step-by-Step Tutorial).

    On the next screen, you will need to provide your License key for the WHMCS installation – you can get this from the WHMCS dashboard under Services > My Licenses menu.Next you need to create a database and link it to your web application.

    After the installation is complete, you will see a success message, along with a list of steps to secure your installation. If you were not able to complete the installation successfully, you can refer to the troubleshooting guide by WHMCS.

    Logging in to the Dashboard

    After the installation is complete, you can log in to your dashboard to check everything is working properly. Go to the “PHP Version Compatibility” section in the left menu to confirm that everything is configured correctly.

    Next, click on the wrench icon on the top right and go to the “System Health” page to check your installation. Here you will see a list of warnings. We will resolve them one-by-one to secure your WHMCS installation.

    Securing WHMCS Installation

    Deleting the Installation Directory

    WHMCS recommends deleting the “install” directory after installation is complete. Go to the RunCloud file manager and click on the checkbox next to the “Install” directory, and then press “Delete”.

    Enable Necessary PHP Functions

    You might need to enable certain PHP functions that are blocked on RunCloud by default.

    Go to the “Settings” tab of your web application and scroll down to the “PHP settings” section. You can delete the required functions from the “disable_functions” list, and it will be enabled for that particular web application on your server.Don’t forget to click “Update PHP Settings” for the changes to take effect.

    Change Permissions for configuration.php

    If you are getting the “Insecure Permissions Check” message, you can update the file permissions using the RunCloud file manager.

    Simply click on the configuration.php file and then set the permissions to read only. Click on the “Change Permissions” to save the changes, and then refresh the WHMCS dashboard to see the changes.Note: If you configured the permissions via the command line earlier during installation, you won’t need to do this again.

    Rename Sensitive Directories

    We can further enhance the security of our WHMCS installation by moving certain sensitive directories to a different location. Although you can move the directories, a quick and easy way to achieve a similar level of security is by just renaming them to something obscure.

    Go to the RunCloud file manager and rename the following folders to anything you like:

    • templates_c
    • cons
    • admin

    We recommend adding a random string of alphanumeric characters either at the beginning or the end, rather than completely renaming it.

    After renaming the folders, we need to tell WHMCS where the new folders are located. To do this, add the following code snippet at the end of your configuration.php file. Make sure to replace the name of the folder with the name that you chose.

    $templates_compiledir = "/home/whmcs/webapps/whmcs/templates_c_22";
    $crons_dir = "/home/whmcs/webapps/whmcs/3f002g_crons/";
    $customadminpath = "3fw0047_admin";

    In the above example:

    • the templates_c directory was renamed to templates_c_22
    • the crons directory was renamed to 3f002g_crons
    • the admin directory was renamed to 3fw0047_admin

    Note: You don’t need to specify the entire path from the root of the server when changing the custom admin path.

    After editing, your configuration file should look similar to the following example:

    Save the file and refresh the WHMCS dashboard. Since we changed the admin directory, this will log you out of the dashboard.

    Log in to the dashboard again by navigating to the new admin URL in your browser. For example, if you renamed your admin folder to 3fw0047_admin then your login page will be located at example.com/3fw0047_admin/.

    Setting Up Cron Jobs

    WHMCS needs to execute certain code at regular intervals to function correctly. We need to configure a cron job to handle this.

    Click on the “Automation Status” (three cogs) button on the top right of the screen. This will show you the status of your cron jobs. Since we have just configured the server, the status might be okay but it will definitely show an error message after a few hours if you don’t configure the cron job.

    To configure the cron job, click on the “OK” card in the middle of the screen. This will show a pop-up that displays the status of your cron jobs, along with the command that you need to execute. Copy this command.

    Next, you need to navigate back to the RunCloud dashboard and click on the “Cronjob” button in the left-menu.

    Give your job a descriptive name, and provide the name of the web application owner that you specified while creating the application.

    Select the version of the PHP that your WHMCS installation is using, and then paste the copied command in the text box provided below. Make sure to remove the “php” from the start of the command as we have already specified a custom version of PHP for this.Finally, you need to specify the frequency of the job. From the drop-down menu, select “Use Custom Settings” and then type */5 in the minute text box.

    Click on the “Save Cron Job” to add it to your server. Check the WHMCS dashboard in a couple of hours – if the cron status is still “ok” then you have performed this step successfully.

    Block Access to Sensitive Directories

    WHMCS recommends blocking requests that are served directly from the vendor. We can create a new rule on our server that will deny access to visitors.

    On LiteSpeed servers, you can do this quickly by adding the following code to your LiteSpeed configuration:

    context /vendor/ {
    allowBrowse 0
    }

    After adding these lines, the configuration file should look something like this:

    For Nginx servers, you need to create a custom configuration to do this. Go to the “Nginx Config” page on your RunCloud dashboard, and create a new configuration. Provide a suitable name for the configuration, and then paste the following code:

    location ^~ /vendor/ {
        deny all;
        return 403;
    }

    After adding the configuration, you can press “Run and Debug” to test the configuration. If you get a success message, you can click “Save” to add the configuration to your server.

    Securing The Attachments and Downloads Directory

    You need to secure the attachments and downloads directory. This is where WHMCS will store any files that you upload or attach to your invoices, tickets, products, etc.

    The way you secure these files and directories will depend on how you want to store them.

    You might want to attach a different drive to your server to store this data, or save it on an S3 compatible storage service, such as AWS S3, DigitalOcean Spaces, etc. You can also use the default location inside your web app root directory, but you need to make sure it is not accessible from the web.

    We recommend referring to the official WHMCS documentation for this step, as it will guide you through the different options and scenarios.

    After Action Report

    WHMCS is a powerful and popular web hosting automation platform that can help you manage your clients, billing, support, domains, and more. However, it is not without its challenges and limitations. You might encounter issues with maintaining or upgrading your server.

    That’s why you need a reliable and efficient web hosting control panel to run your WHMCS web app.

    RunCloud is a cloud-based server management platform that can help you deploy, configure, optimize, and secure your web app on any cloud server. You can choose from various web application stacks and enjoy features such as SSL certificates, firewall, backup, cron jobs, SSH keys, and more.

    Working with RunCloud is easy and intuitive. You can create and manage your web app from a user-friendly dashboard, or use the API and CLI tools for more advanced tasks.

    You can also monitor your server’s health and performance with real-time graphs and alerts.

    RunCloud also provides excellent customer support and documentation to help you with any questions or issues.

    By using RunCloud to run your WHMCS web app, or any other web hosting automation platform, you can save time and improve your productivity. You can focus on growing your business and providing value to your customers, while RunCloud takes care of the technical aspects of your web app.

    RunCloud is the ultimate partner for web hosting automation – get started with RunCloud today!

  • Everything You Need To Know About WordPress Object Caching

    Everything You Need To Know About WordPress Object Caching

    Tired of slow page load times and constant frustration with your WordPress site’s performance? The solution might just be something called ‘Object Caching’.

    In this article we’ll dive into exactly what Object Caching is and how it works. Most importantly, we’ll guide you through the steps you’ll need to go through to start using Object Caching to significantly improve the speed and efficiency of your website.

    Say ‘goodbye’ to sluggish load times, and ‘hello’ to a lightning-fast, smooth user experience.

    Let’s get started!

    What is Caching?

    Caching is a technique used to store frequently accessed information in a more accessible and responsive location. If processing a website request takes a large amount of time then it can degrade the user’s experience, potentially impacting your sales and conversions on a regular basis.

    Caching can help solve this problem by storing the frequently required data in a fast-to-access storage location. Any data that is accessed frequently and can be stored for a while is a good candidate for caching.

    Caching is often associated with RAM, but it can be used with any storage media. For example, if downloading information from a server over the network takes ten seconds, you can save time by caching the file on your hard disk.

    If reading the data from a hard disk takes too long, you can speed it up by caching the file in your RAM, which is many orders of magnitude faster than a hard disk.

    Taking this one step further, you can even cache some vital information directly in the cache memory of your CPU if the delay caused by reading the data from RAM is unacceptable.

    An infographic depicting the hierarchy of computer memory.

    Although it is useful, caching is not a silver bullet. Cached data becomes outdated after a period of time, and this can cause unexpected glitches in the application. To ensure proper functioning of your application it will be necessary to constantly replace the old copy of data with a fresh copy at regular intervals.

    One more thing to keep in mind is that as we shift towards faster storage media, the capacity decreases drastically along with the exponential increase in the cost. For example, cloud storage costs a few dollars a month for hundreds of GBs of storage. Modern SSDs are getting cheaper, but still cost hundreds of dollars for a single terabyte of storage. RAM is much faster than an SSD, but most modern computers only have about 16GB of RAM. As a surprise to no one, the cache memory size of a CPU is even lower. The Intel Core i9-13900 processor – the latest offering from Intel – still only offers 36MB of cache memory.

    Overview of Different Types of Caching

    • Server caching: When the server processing the requests caches the queries, then it is called server caching. In WordPress, there are two main types of server caching techniques:

      • Object Caching: In this, WordPress stores the results of frequent database queries and other API requests. It is called Object Caching because the result of the query is often an object (such as an item of data from a database, a row from a table, or a document).

        If you want to display the result of a complex database query, such as the number of 5 star reviews on a particular product, then Object Caching is the right choice for you as the number of reviews are likely to remain the same when a page is refreshed.

      • Page caching: This type of caching involves generating complete static pages and storing them. When a server receives a request, it serves this statically generated page instead of rendering a fresh copy of it.

        If you are serving pages that mostly remain the same, but are heavily requested by your users, then you should use this. The homepage or the pricing page of your site are unlikely to change often and are a good fit for this type of caching.

    • CDN caching: This is a good option for caching static content, such as images, fonts, CSS, JS libraries, and HTML pages, on a content delivery network (CDN). If your site uses a CDN, then all of your customers’ requests will be routed through a CDN. If the CDN has a cached copy then it serves that, otherwise it asks your server for a fresh copy, serves that, and also stores it for future use. When the cached copy gets too old, it is automatically deleted and the CDN asks for a fresh copy.

      Although this might seem like extra effort, this drastically reduces the number of requests that reach your server, and it also serves content faster to your visitors.

    • Browser caching: This is somewhat similar to CDN caching, but it happens in the user’s browser. If a user is visiting your site for the first time, they won’t notice a difference. However, returning users would already have a cached copy of your data and won’t need to make network requests; this can drastically reduce the request time.

      Sometimes, even first time users will be able to take advantage of browser caching. For example, if you use third party assets such as Google Fonts or Google Analytics on your site, and the visitor has previously visited a different site that also uses these same assets, then the browser will already have a cached copy of them, and can use those.

    What is Object Caching?

    In WordPress, Object Caching is the technique of storing the results of complex database queries in memory. These saved results are then reused when executing subsequent requests and, since the results are already computed, it takes less time to serve those requests.

    Object Caching reduces the load on the database and improves the overall performance and responsiveness of a WordPress site. As a result, you can serve more customers without needing to scale up the infrastructure, helping to save on server costs (and significantly improve the user experience).

    When Do You Need Object Caching?

    If you already have a CDN configured on your site then you might be thinking that you don’t need to use Object Caching. While a CDN does help in reducing the server load, it can’t replace Object Caching – no one particular caching solution can solve 100% of your problems.

    A way to think about caching is as a series of nested filters, where each filter catches smaller and smaller things at each level. As data passes through each level of caching, it is checked against increasingly specific and targeted rules until only the most relevant and frequently accessed data remains in the cache.

    Any WordPress site that receives a high volume of traffic, has complex queries, or requires fast and reliable performance, can benefit from Object Caching. Here are some scenarios where Object Caching can be especially beneficial:

    • High-traffic websites: Publishers and news sites that receive a high volume of traffic can benefit from Object Caching to improve page load times and reduce server load. Object Caching can help reduce the number of database queries required to load a page, which can make a big difference when dealing with large amounts of traffic.
    • eCommerce sites: Online stores that use WordPress plugins such as WooCommerce, Easy Digital Downloads, or NorthCommerce can benefit from Object Caching to improve the performance of their product pages, shopping cart, and checkout pages.
    • Course websites: WordPress sites that use a learning management system (LMS) such as LifterLMS, LearnDash, or SenseiLMS can benefit from Object Caching to improve the performance of their course pages, quizzes, and other interactive features. 
    • WordPress multisite networks: Websites that use WordPress multisite networks can benefit from Object Caching and improve the performance of their entire network. Object Caching can help reduce the number of database queries required to load pages across the network, which can improve the overall speed and responsiveness of the sites.

    What Are the Benefits of Using Object Caching?

    Object Caching can offer several benefits for WordPress sites:

    • Improved Performance: Enabling Object Caching can significantly improve the performance of WordPress sites by reducing the amount of time it takes to serve a request. By caching commonly accessed data, such as queries or API calls, Object Caching can eliminate the need to repeatedly fetch the same data from the database. This can improve the speed and responsiveness of the site, resulting in a better user experience.
    • Better Lighthouse Scores: Object Caching can directly impact your Lighthouse Scores. A properly implemented caching strategy will reduce Time To First Byte (TTFB) and First Contentful Paint (FCP) – these metrics are important factors in determining Lighthouse scores. Having a good Lighthouse score is essential for a snappy user experience – and it also improves SEO.
    • Reduced Server Costs: Object Caching can also help to reduce the load on the server. Caching the response of commonly requested database queries leads to a reduction in the number of requests sent to the database. This reduces the load on the server, and ultimately reduces the amount of resources needed to serve the site. This can result in lower hosting costs and better scalability for WordPress sites.

    What is WP_Object_Cache?

    The WordPress engine provides a built-in Object Caching functionality that can be accessed via the WP_Object_Cache class, (a ‘class’ being a blueprint for a way data should be structured). This class acts as a layer between the programmer and the underlying architecture where data is processed. It’s not recommended to use the class directly – you can use pre-defined functions to set, clear, add, and update cache values.

    Object Caching is typically achieved through the use of an external caching solution, such as Redis or Memcached, which acts as a fast, in-memory data store for cached objects. When used correctly, Object Caching can result in significant improvements in page load times, increased website stability, and a better user experience.

    What Are Redis And Memcached?

    Redis and Memcached are open-source database technologies. These are key value store databases which can each be thought of as a dictionary. In other databases, such as MySQL or MongoDB, you can store multiple values in one record, but in a key value database you can only store one value in each record.

    For example, an SQL database can be thought of as a table that contains all the test scores of a student. The student might have scored well in the last exam, or they could have been absent. All this information can be stored in the table, the design of which can be modified to add or remove information.

    SQL table:

    In the case of a key-value database such as Redis there is only one field, and it cannot be modified. This is best visualized by imagining a dictionary which can only hold one definition for one word, and nothing else.

    In this example, a key value store saves the value of a complex query which was run on above database:

    No_of_students_absent2
    Avg_marks_of_Steve24.3

    Redis stores the data in RAM for much faster access compared with storing it on the hard disk. This simple architecture makes Redis, and other similar databases, ideal for storing cached data.

    Both Redis and Memcached are designed to be used with a variety of programming languages and platforms. The key difference between the two is that Redis supports more advanced data structures, such as lists and hashes, while Memcached is simpler and focuses on the efficient storage and retrieval of key-value pairs.

    Object Cache Pro – A Better Caching Solution

    Object Cache Pro is a high-performance Object Caching plugin designed to meet the needs of mission-critical businesses. It offers a combination of performance, scalability, and reliability, which are essential for any high-traffic website. The development team uses test-driven development methodology with over 1,000 unit tests to ensure every update is safe and offers warnings about plugins that can lead to data loss.

    It’s designed to provide a smooth user experience, with tools to help identify issues, built-in query monitoring, and logging. Additionally, it’s fully customizable and works even when Redis is not on the same machine, making it ideal for horizontally scaled environments of two servers or more.

    How To Use Object Caching With WordPress

    If you’re already a RunCloud customer then getting started with Object Caching is very straightforward, as our RunCloud Hub enables you to turn on caching with a few simple clicks.

    With RunCloud Hub you don’t need the expertise of a server administrator to reap the benefits of caching – you can do so by simply installing the RunCloud Hub plugin and enabling the caching option. This installs all of the dependencies automatically, and configures them on your WordPress website.

    For a more detailed guide on configuring caching, refer to our other articles:

    If you’re not using RunCloud yet, you can still use Object Caching in WordPress by installing either the Redis Object Cache or Memcached Object Cache plugin.

    Both of these are popular choices for Object Caching in WordPress, and the decision of which one to use depends on the server environment. Redis Object Cache is known to work well on servers with high CPU usage, while Memcached Object Cache is better suited for servers with limited memory.

    Although these plugins provide a caching functionality for WordPress, they do require you to have access to a caching server. If you are using a shared hosting service you may need to contact your hosting provider for this. If that’s the case, then you should consider switching to RunCloud which makes it easy to manage your servers – and allows you to set up caching with only a few clicks. Sign up for managed hosting with RunCloud today!

    After Action Report – Get All The Benefits of Object Caching When You Deploy With RunCloud

    Improving website loading times is crucial for delivering a positive and responsive user experience, and can directly impact your website’s search engine rankings. Using caching is a smart and cost-effective solution to achieve faster website speeds without having to spend more money on hardware or infrastructure upgrades.

    An absolute essential for any mission-critical business site, let alone any serious website – caching can significantly reduce the load on your database and improve load times by storing the results of expensive computations.

    Whether you choose to set up caching on your server using Redis or Memcached plugins, or use an all-in-one solution such as RunCloud Hub, we’re sure you’ll be pleased to see the benefits of object caching.

    If you aren’t quite comfortable with the idea of deploying servers and setting up object caching entirely from scratch, we’d love for you to give RunCloud a try (for free).

    We built RunCloud so you don’t need to be a system administrator or Linux expert to manage your cloud infrastructure. With everything from backups, staging, cloning, atomic (Git) deployments, and more – we’re on a mission to make it truly enjoyable to manage your own production-grade infrastructure. Learn more & get started today.

    If you have any questions about Object Caching or need help getting started, leave a comment below or tweet us on Twitter. We’ll be happy to help!

  • WordPress Multisite vs. Multiple Sites – Which Is Better?

    WordPress Multisite vs. Multiple Sites – Which Is Better?

    WordPress Multisite is a feature of WordPress that allows you to create and manage multiple websites from a single WordPress installation. It can be a powerful and convenient solution for website owners who want to expand their online presence and reach more customers.

    But how does WordPress Multisite compare to setting up separate WordPress sites for each of your domains?

    Whether you’re a blogger, a small business owner, a large corporation, or a university, you might benefit from using WordPress Multisite to create and run multiple websites with ease.

    In this article, we’ll explain what WordPress Multisite is and how it works. We’ll also explore the advantages and disadvantages of using it compared with using multiple WordPress sites.

    We’ll help you understand the differences between the two approaches and how they affect your website performance, security, maintenance, and scalability. By the end of this article, you’ll be able to decide which option is better for your needs and goals.

    What Is WordPress Multisite?

    WordPress Multisite is a feature that allows you to run and manage multiple websites on a single WordPress installation. In this setup, the sites are not standalone, i.e. they are all interconnected in one way or another. This means that you can create and manage a network of websites from a single dashboard.

    Usually, there is one main site, sometimes also called root site, which is managed by the network administrator. This administrator can create as many sites as needed, and grant access to other users to manage one or more of those sites. This can be configured in such a way that each site has either its own subdomain, or has its own directory.

    One of the biggest advantages of using WordPress Multisite is centralized management. With this approach, you can manage all of your websites from one dashboard. This makes it easy to update plugins, themes, and core WordPress files across all of your sites simultaneously.

    Additionally, you can manage user roles and permissions across your entire network, which saves considerable time and effort.

    Since you’re only using one WordPress installation, a Multisite Network is cost-effective. You don’t need to purchase additional hosting for each site. This can reduce operating costs significantly, especially if you’re managing a large number of sites.

    Since you are using only one server for all your sites with WordPress Multisite, it will be a lot easier to manage and update it. Instead of securing each server separately, you can focus your efforts on hardening one server and keeping it updated. Using a common server saves time and reduces the risk of conflicts that might occur when updating sites individually.

    Multisite networks allow you to build consistency in your brand and design, giving it a more professional look. The ability to update plugins or themes across all websites from a single dashboard also saves a great deal of time, and ensures that your branding and design remain consistent.

    However, while WordPress Multisite has many advantages, there are some potential drawbacks to consider as well. For example, some plugins may not be compatible with WordPress Multisite, and you may need to use separate plugins for certain functionality.

    Additionally, if one site on your network experiences an issue, it can potentially affect all of the sites on your network.

    With that being said, WordPress Multisite is ideal for institutions where each individual needs their own websites. For example, in a university, all professors can have their own website where they publish their course curriculum. Similarly, in a blog about sports, a different site can be given to different people, each with an expertise in a different sport.

    If you want to learn more, read our guide on How to Install and Setup A WordPress Multisite Network.

    Using Multiple Sites in WordPress

    One way of creating and managing multiple websites is to use separate WordPress installations for each of them. This means that each website will have its own database, files, plugins, themes, and settings. If you prefer to have more control over each of your websites, then using multiple sites might be a better option.

    The primary reason for using multiple sites is more control over each individual site. Since each has its own installation, you get more control over the site’s design, functionality, and content. This can be especially important if you have specific requirements for each of them.

    Using multiple WordPress sites is a great option for businesses who want to create niche affiliate marketing websites. This way, you can have more control and flexibility over each site, and tailor it to your specific niche and audience. You can also use different themes, plugins, and settings for each site to optimize them for conversions. If you’re looking for a better way to run multiple niche affiliate marketing websites, this approach is for you.

    When using multiple WordPress sites, you have the option to either host them on the same server, or on different servers. This gives you more flexibility and control over your hosting resources and performance. Since these are independent sites, each site administrator can choose any plugins or themes that they want.

    When you are running sites on separate servers, you have the flexibility to scale server resources for each site depending upon its needs. This can help ensure that each site is running optimally, and doesn’t experience any performance issues.

    Moreover, having sites on different servers isolates them. If one of your sites gets hacked, you might have a fighting chance to save all the other sites. You can even take extreme steps such as taking down the entire website without worrying about its impact on other sites.

    Using multiple WordPress sites can have some benefits, but it also comes with some challenges. You may need to spend more time and resources managing multiple installations, and may need to hire more technical staff. You may also have to buy separate licenses for some themes or plugins for each site, depending on the developer’s policy.

    In contrast, with a multisite network, some plugins such as PublishPress may allow you to use a single license for the whole multisite network, while other plugins such as WPForms or The Events Calendar may require you to purchase a multisite license or a license for each site in the network. You should always check the terms and conditions of the theme or plugin before using it on multiple sites.

    How to Choose Between Multisite and Multiple Sites

    After considering the two approaches, it’s clear that both have their advantages and disadvantages. Let’s take a look at additional factors that you should consider when deciding to host your website.

    How Related Are the Sites?

    A major factor to consider is how related the sites are to each other. A multisite network only makes sense if all your sites belong to an umbrella organization or follow a common objective.

    For example, you might use a multisite network to create sites for different departments, locations, or products of your business. Or you might use it to create sites for different courses, faculties, or student groups at your school.

    However, if you plan to host vastly different content from different sources and audiences, a multisite network is not the right choice.

    For example, if you want to create sites for different clients, niches, or projects that have nothing to do with each other, a multisite network will not be beneficial. In fact, it might cause more problems than it solves. The sites will share the same database, files, plugins, and themes, which can create conflicts and potentially present security risks. The sites will also be harder to manage and maintain as the network grows.

    Budget

    The cost of running the sites can vary dramatically depending on your setup, such as the hosting plan, the number of sites, and the resources they consume. If you are using a cloud provider, they will charge you separately for each server, storage, network traffic, and IP address. This can add up quickly if you have many sites on different servers.

    If you want to save some money, you might consider hosting all of the sites on one server and sharing the resources. You can do this by using either a multisite network or multiple sites. However, keep in mind that a multisite network can only run on one server, while multiple sites can be moved to different servers later if needed.

    Scalability

    Another key factor to consider is how well your sites can handle traffic spikes. If you use a multisite network, you’ll have to share the same server resources for all the sites in the network.

    This means that if you need to scale your server up (or down), you will affect all of the sites at once. But if you use multiple sites on different servers, you can easily scale up individual sites without impacting the performance of other sites.

    How Often You Need to Create New Sites

    If you will need to frequently set up more sites in the future, WordPress Multisite is the right choice for that, as it makes adding new sites easy and doesn’t require creating new WordPress installations from scratch.

    Maintenance

    If you use multiple WordPress sites, the process of managing them will become more difficult as you add more sites. You will have to log in to each site separately, update the plugins and themes, and perform backups and security checks.

    Moreover, if you host your sites on different servers, you might accidentally delete a server that hosts a site that you still need.

    WordPress Multisite can be easier to maintain because you can manage all of your sites from one dashboard. You can update the plugins and themes for the entire network, perform network-wide backups, and monitor the security of all your sites.

    Control and Functionality

    If you want to have full control over each site and customize it to your specific needs, you might prefer to use separate WordPress installations for each site. This way, you or the site administrator can make changes to the site without affecting other sites. You can choose the plugins, themes, and settings that work best for your site and its audience.

    However, if you want to have a more convenient and efficient way to manage all of the sites at once, you might want to use WordPress Multisite. This feature allows you to create and run multiple sites from a single WordPress installation and dashboard. You can access all the sites from the My Sites menu and perform network-wide tasks such as updating plugins, themes, and WordPress core.

    Here are some screenshots that show what a multisite dashboard looks like and how you can perform basic maintenance tasks:

    Viewing all websites on WordPress Multisite network

    This is the multisite dashboard, where you can see an overview of your network and access the network settings.

    In the My Sites menu, you can see all of the sites in your network and quickly switch between them.

    Installing themes on a WordPress network

    This is the Network Themes screen, where the admin can update and install themes for the entire network.

    Conclusion

    As you can see, WordPress offers you two options for creating multiple websites – a Multisite Network or separate installations. Each option has its pros and cons, so you need to consider your needs and goals before choosing one.

    Whether you want to run a large network of sites, or just a few, WordPress has you covered.

    After you have made the decision, you can continue learning – by reading our other articles on WordPress:

    1. How To Install WordPress With RunCloud | Step-By-Step Guide
    2. How to Install and Setup A WordPress Multisite Network
    3. Load Balancing For WordPress — What It Is & How It Works
    4. Install And Configure Object Cache Pro for WordPress

    RunCloud is the ultimate solution for managing multiple WordPress websites or WordPress Multisite networks.

    With RunCloud, you can control all of your servers and web apps from a single dashboard, saving you time and hassle. You can also enjoy features such as automated backups, security scans, performance optimization, and more.

    Don’t miss this chance to take your WordPress management to the next level. Sign up for RunCloud today!