Category: Laravel

  • How To Configure LSCache for Laravel (Configuration Guide)

    How To Configure LSCache for Laravel (Configuration Guide)

    A critical part of any software development process is the maintenance and enhancement of web application performance. It’s not something that’s done every now and then or considered at the end – it’s a never-ending process of optimizing and striving to build the most efficient and lean codebase. Throughout this process, the use of optimization technologies such as dynamic content acceleration (DCA) tools is prevalent.

    Web developers commonly employ DCA solutions to significantly improve the performance of web applications. These solutions streamline the workload of web servers by providing a more efficient, reliable, and faster network infrastructure.

    In the case of LiteSpeed servers, a built-in DCA known as LSCache has the features you need to reduce the loading time of your web pages.

    What is LSCache?

    LiteSpeed Cache, or LSCache, is a built-in, high-performance dynamic content acceleration feature available on the LiteSpeed server stack. It works by eliminating extra layers of reverse-proxy in websites, thus, optimizing the speed of accessing web content.

    LSCache Module vs. LSCache Plugin

    When developers mention the word LSCache, they are generally referring to the module, which, as mentioned before, is built-in to the LiteSpeed server stack itself. While you are busy building all your Laravel web app functionalities, the LSCache module works behind the scenes in caching your web resources to improve its speed.

    The automatic caching of the LSCache module may sound pretty convenient, but what if you want to control the module? Say, for instance, you want to instruct it on what resources to cache and how long you intend to cache them? Well, that’s where the LSCache plugin may come into action.

    The LSCache plugin is an add-on interface that allows you to utilize your module. Through this plugin, you’ll be able to directly manage how your web resources are cached.

    Why Should You Use LSCache Plugin for Your Laravel Web Applications?

    Web applications, like Laravel apps, are recreated every time users visit them, resulting in an increased round-trip time (RTT). RTT is a metric that determines how long a request gets submitted from a client to its server and back.

    An increase in RTT means a slower loading time. To prevent this aftermath, developers utilize the LSCache plugin. This highly customizable plugin offers developers an interface to easily configure website caches, thereby optimizing web apps and reducing the RTT.

    What is the Server-level Requirement of LSCache Plugin for Laravel?

    The LSCache plugin is simply an interface that will communicate to the LSCache module of your web server. For this plugin to work, ensure that your Laravel web application is running on a LiteSpeed server.

    How to Install the LSCache Plugin to your Laravel Application?

    To install the LSCache plugin in your Laravel application, follow the steps below.

    Step 1: Obtain a LightSpeed-powered hosting or server for your Laravel application.

    LSCache plugin will not work unless your Laravel app is powered by LiteSpeed. View your options through LightSpeed’s official hosting providers. You can also obtain your own LiteSpeed server via LiteSpeed’s download page.

    Step 2: Configure your server’s cache policy.

    Once you’ve acquired your server, you will need to configure its cache root and cache policy. Cache root refers to the storage path of the object files the module will cache. Cache policy, on the other hand, is a group of settings that manages the cache behavior.

    You will also need to enable the cache engine of your virtual hosts by including the following code in your vhost’s config file:

    <IfModule Litespeed> 
    CacheEngine on
    </IfModule>

    Step 3: Verify if LSCache is Working.

    Now that you’ve configured the cache settings, you’ll need to verify if your Laravel website is being cached. You can accomplish this by using your browser developer tools. To do so, follow the steps below:

    1. Navigate to your website using your browser and access the Network tab from your developer tools. This tab can be viewed by right-clicking and choosing Inspect.
    2. Refresh the web page and you’ll notice that requests get submitted.
    3. From the list of requests, click the first resource and you should see x-litespeed-cache: hit in your response header. This means that LSCache is correctly configured on your web page. An example is shown below for your reference:
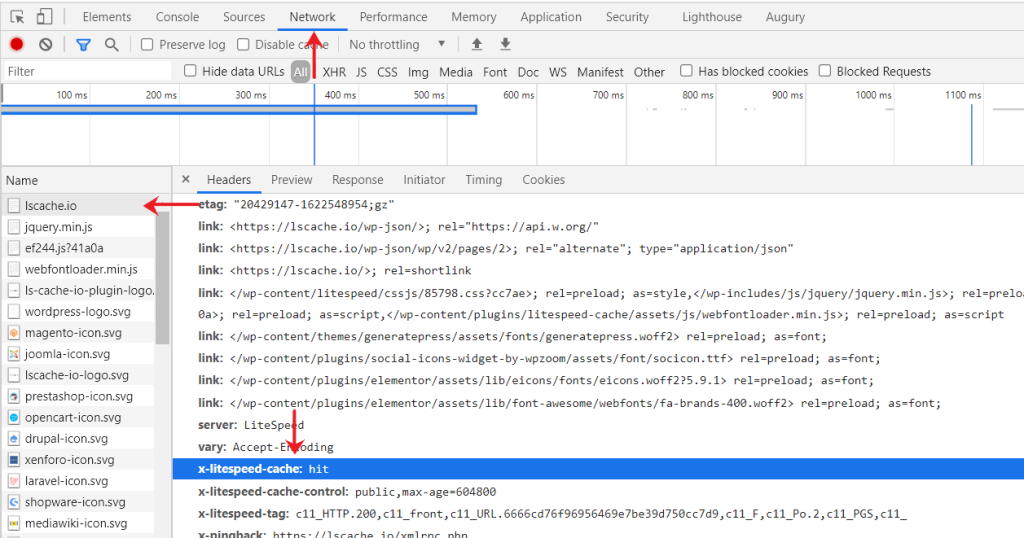
    How to configure LScache in laravel apps

    Step 4: Install the LSCache plugin for Laravel using Composer.

    When you’re certain that LSCache is working properly, it’s time to install the LSCache package for Laravel using Composer. You can easily require this package through this script:

    composer require litespeed/lscache-laravel

    In later versions of Laravel, an auto-discovery feature was made available, so you don’t need to make changes when you install the LSCache plugin. For earlier versions, particularly between 5.1 and 5.4, the auto-discovery feature is not yet present, so you’ll need to perform the following additional steps:

    1. Add the code below in the aliases section of the config/app.php file:
    'aliases' => [
       ...
       'LSCache'   => Litespeed\LSCache\LSCache::class,
    ],
    1. You will also need to include the following middlewares under $middleware and $routeMiddleware of the app/Http/Kernel.php:
    protected $middleware = [
       ...
       \Litespeed\LSCache\LSCacheMiddleware::class,
       \Litespeed\LSCache\LSTagsMiddleware::class,
    ];
    
    protected $routeMiddleware = [
       ...
       'lscache' => \Litespeed\LSCache\LSCacheMiddleware::class,
       'lstags' => \Litespeed\LSCache\LSTagsMiddleware::class,
    ];
    1. After including all the scripts above, you’ll need to copy the config/lscache.php file into your config/ directory.

    The last step that you must do is to enable the CacheLookup. In your .htaccess level or vhost, include the following codes:

    <IfModule Litespeed>
       CacheLookup on
    </IfModule>

    You should now be able to configure your LSCache after successfully installing the plugin.

    How to Configure LSCache Plugin for Laravel?

    The LSCache plugin for Laravel comes with three functionalities—setting cache control headers, setting specific tags, and purging.

    Step 1. Setting the Cache Control

    You can configure the settings of your LSCache in the config/lscache.php file. From here, you can control the TTL (Time to Live), ESI (Edge Side Includes), and the default cacheability:

    • LSCACHE_DEFAULT_TTL – Set how long a cache lasts in seconds. The default for this setting is 0.
    • LSCACHE_ESI_ENABLED – This setting allows you to enable ESI. ESI lets you fragment web pages, providing a faster and more efficient way of caching them. You can set either true or false values to enable or disable this setting. By default, this setting is configured to be false.
    • LSCACHE_DEFAULT_CACHEABILITY – In this setting, you can set the default cache setting such as private, public, no-cache, or no-vary.
    • LSCACHE_GUEST_ONLY – You may also want to configure the cache if it can be enabled for guests only through this setting. It also accepts true or false, with the latter as the default value.

    Middleware is used to configure the cache-control header. You can override the settings in your Laravel routes similar to the codes below.
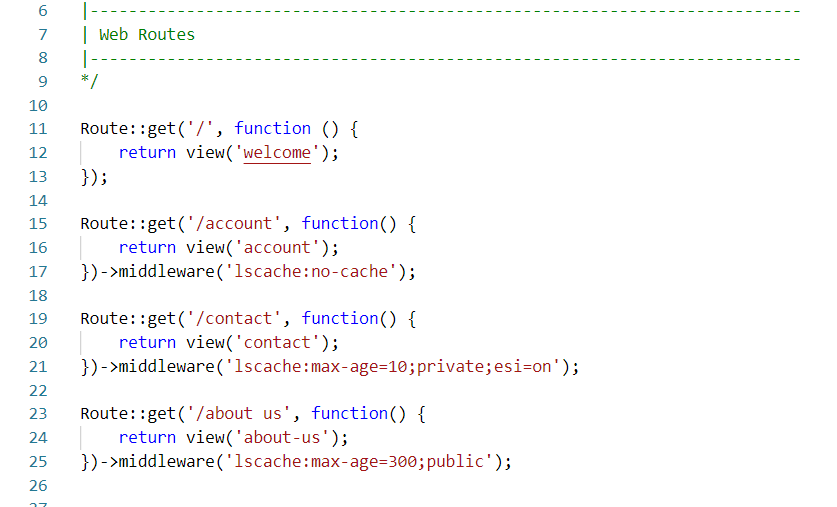
    The first route ‘/’ uses the default cache-control header in your config/lscache.php. For the ‘/account’ route, the ‘lscache:no-cache’ header prevents the route from being cached.

    In the case of the ‘/contact’ route, notice that three settings have been overridden. The route has been set to have a max-age of 10 seconds (TTL), a private cacheability, and an enabled ESI.

    Step 2. Setting Specific Tags

    Sometimes, it is a good practice to assign tags to web pages so that you can easily target them the moment you want to purge the cache. You just need to include the lstags middleware in your route, as shown in the example below.
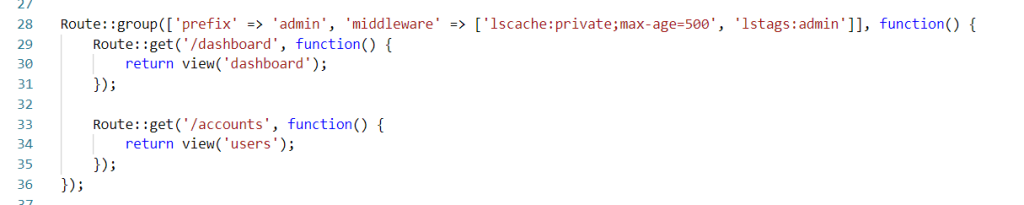
    Step 3. Purging

    Suppose data gets updated in your server and you want to remove an existing cache to recache the new data. In which case, you just need to purge the existing cache first. You can do this by configuring your controller to use the purge method:
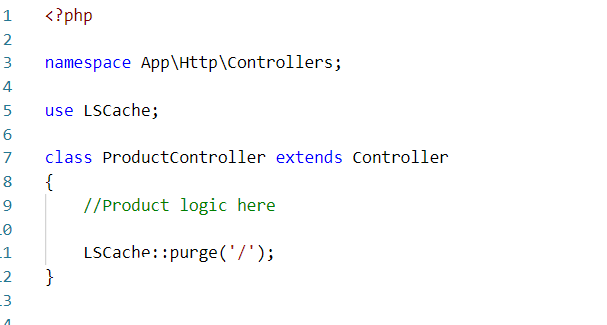
    The purge() method lets you purge a specific page. If you want to purge all pages, you can use the purgeAll() or purge(*) instead. You can also purge pages with a specific tag by including the tag keyword inside the purge method, as in:

    LSCache::purge(‘tag=products’);

    Conclusion

    Configuring LSCache in your Laravel applications may be a bit tricky, but you’ll get the hang of it eventually, especially when you fully understand why it is needed. Throughout this article, we provided all the essentials of the LSCache plugin, how to configure it, and, more importantly, its impact on your Laravel apps.

    There are numerous tools out there that you can use to cache and optimize your web pages, and it might thrill you to know that LSCache is among the best!

    Recommended read: What is Laravel and how to use it?

  • How To Install ImageMagick PHP Extension (Imagick)

    How To Install ImageMagick PHP Extension (Imagick)

    Do you want to manipulate images in various ways without using complex tools or libraries? If you answered yes, then you need to know about ImageMagick, a powerful and versatile image processing software that works seamlessly with PHP web applications.

    Even if you are using a CMS or a framework such as WordPress or Laravel for building your website, you may need to install the ImageMagick PHP extension for advanced image processing.

    In this post, we will show you how to install ImageMagick PHP Extension (Imagick) for your PHP web application on RunCloud, the best web application management platform for developers and agencies.

    Note: If you are using RunCloud Docker, you can install ImageMagick and many other PHP extensions for your Docker containers with a few simple steps. Follow our dedicated tutorial to learn how to install ImageMagick PHP extension on RunCloud Docker.

    What is ImageMagick

    ImageMagick is a free and open-source software that was created in 1987 by John Cristy to create, edit, compose, or convert bitmap images.

    It can read and write over 200 image formats, including PNG, JPEG, GIF, HEIC, TIFF, DPX, EXR, WebP, Postscript, PDF, and SVG.

    You can use ImageMagick to resize, flip, mirror, rotate, distort, shear and transform images, adjust image colors, apply various special effects, or draw text, lines, polygons, ellipses and Bézier curves.

    ImageMagick vs GD Library

    ImageMagick is not the only image optimization library in PHP application.

    GD is another library that is also very popular and it is automatically available in RunCloud server.

    Both ImageMagick and GD Library can be used for:

    • Resize / crop images
    • Apply filters to image, for example color, contrast, brightness, etc.
    • Adding content to image, for example text, shape, other image (watermark), etc.
    • Compress images
    • Convert images to different file types

    The key differences between ImageMagick and GD library are:

    • ImageMagick supports over 100 major image formats
    • ImageMagick usually produces better quality images, although sometimes better quality image will also increase the image file size
    • GD is widely available and usually enabled by default, but you have install and enable ImageMagick

    How to Install ImageMagick PHP Extension

    On WordPress, you might want to use the ImageMagick Engine WordPress Plugin for processing resizing and cropping images in WordPress dashboard.

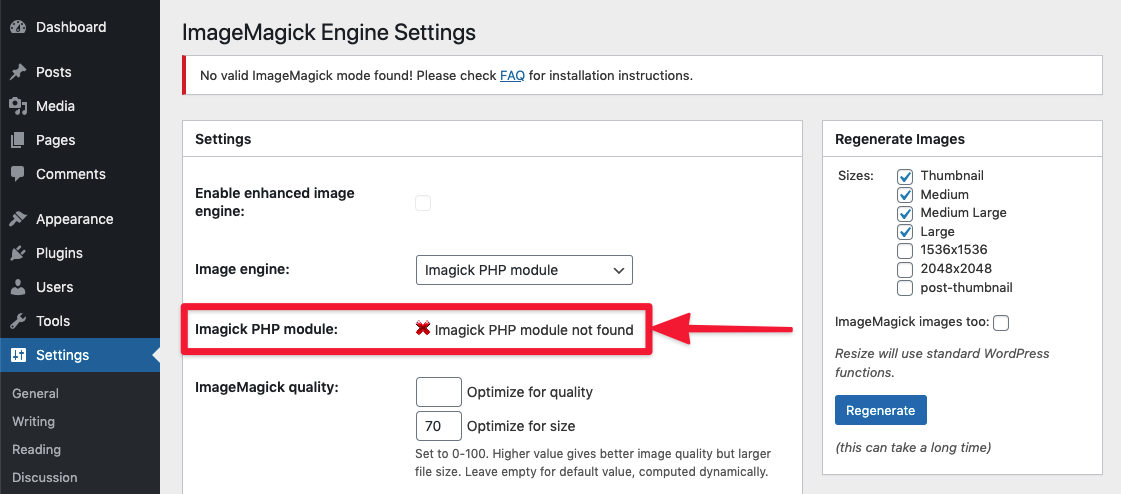
    When ImageMagick is not installed on the server, you will see “ImageMagick PHP module not found” warning on the plugin Settings page.

    runcloud-imagemagick-01-imagick-php-module-not-found2

    Disclaimer: This tutorial is intended for Ubuntu and Debian based distributions only. If you are using Fedora, RHEL, Windows, or Mac, please refer to the official ImageMagick website for installation instructions.

    The first step to install ImageMagick is to check the PHP version of your web application. This is because the installation process varies depending on the PHP version. However, once you have installed ImageMagick for a certain PHP version, it will work for all web applications that use the same PHP version on your server.

    You can find the PHP version of your web application in your RunCloud dashboard.

    Imagick PHP Module for PHP version X.X

    1. To install ImageMagick PHP extension for any PHP version on your server, you need to log in to your server as a root user using Terminal (Mac OSX / Linux) or Powershell / Putty (Windows).
    ssh root@<youripaddress>
    1. Next, you need to run this command, replacing <version> with the specific PHP 8.x version that you want to install ImageMagick for. For example, if you want to install ImageMagick for PHP 8.1, you would replace <version> with 81.
    apt-get install php<version>rc-pecl-imagick
    1. After the installation is complete, you need to reload the PHP-FPM service on your server by running this command, again replacing <version> with the specific PHP 8.x version that you installed ImageMagick for.
    systemctl reload php<version>rc-fpm
    1. To verify that ImageMagick is installed and activated, you can run this command, which will display the ImageMagick version and configuration:
    /RunCloud/Packages/php<version>rc/bin/php -i | grep imagemagick

    For example, if your website uses PHP 8.0, your commands should look something like.

    # install imagick module
    apt-get install php80rc-pecl-imagick
    
    # reload PHP-FPM
    systemctl reload php80rc-fpm
    
    # check / verify if imagick is installed
    /RunCloud/Packages/php80rc/bin/php -i | grep imagemagick

    Similarly, for website using PHP 7.4, the commands should look like.

    # install imagick module
    apt-get install php74rc-pecl-imagick
    
    # reload PHP-FPM
    systemctl reload php74rc-fpm
    
    # check / verify if imagick is installed
    /RunCloud/Packages/php74rc/bin/php -i | grep imagemagick

    If ImageMagick has been installed correctly, you will get an output similar to the following image.

    imagemagick succesfully installed

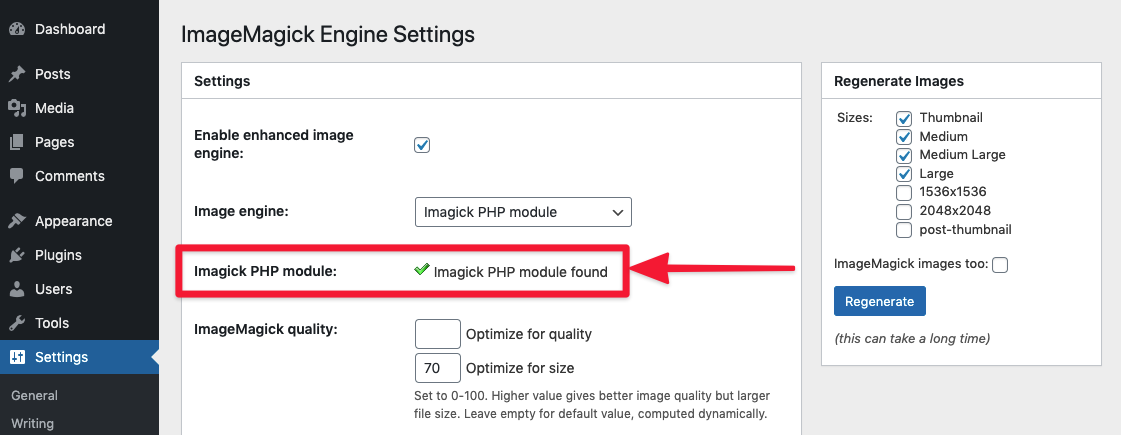
    After installing ImageMagick correctly, you can see the warning disappear in ImageMagick Engine WordPress Plugin.

    Optional: Adding PDF Support To ImageMagick

    If you want to allow ImageMagick to process PDF files, you will have to login as root user again to your server and edit policy.xml.

    For example, you can use nano to edit this file by running this command.

    nano /etc/ImageMagick-6/policy.xml

    Then please scroll down and locate this line.

      <policy domain="coder" rights="none" pattern="PDF" />

    You need to disable it by commenting out that line. For example, you can replace that line by following line.

      <!-- <policy domain="coder" rights="none" pattern="PDF" /> -->

    Please save the file and exit the editor.

    Then reload the PHP-FPM again, for example for PHP 8.1 you can run this command again.

    systemctl reload php81rc-fpm

    NOTE: Please be careful when you enable PDF support for Imagick. Make sure you always use it with trusted PDF files.

    How Does WordPress Use the Imagick PHP Extension?

    WordPress supports both ImageMagic and GD Library for PHP image processing extensions to resize and crop images in your website.

    By default, WordPress will try to use ImageMagick. If it is not available or it doesn’t support the requested mime-type, WordPress will use the GD extension.

    If you need more control of the quality of re-sized images, you can use ImageMagick Engine WordPress Plugin.

    Image Watermark WordPress plugin is another cool plugin that allows you to watermark each image that you upload to your WordPress site using Imagick.

    If you enable PDF support for the Imagick PHP extension, you will get one extra bonus, WordPress will automatically generate an image for each PDF you upload to your WordPress site!

    How Does Laravel uses ImageMagick PHP Extension?

    If you use Laravel for your website, there are some libraries that you can use for image processing. Let’s take a look:

    1. Intervention Image is an open-source PHP image handling and manipulation library. It provides an easier and more expressive way to create, edit, and compose images and supports currently the two most common image processing libraries GD Library and Imagick.
    2. PDF to image is a library that makes it easy to work with the PDF files and helps convert PDF files to images using Imagick and Ghostscript.

    FAQs

    • What is the difference between ImageMagick and Imagick?

      ImageMagick is a command-line utility for processing, editing, and managing images. It is available for all different kinds of operating systems, and you can use it as a standalone application or a library. ImageMagick supports hundreds of image formats and can perform a wide range of image manipulation operations, such as resizing, cropping, color correction, watermarking, and more.

      Imagick is a PHP extension of ImageMagick. It provides a native implementation of the ImageMagick API for PHP, which means you can use ImageMagick’s features and functions within your PHP scripts. Imagick is useful for creating dynamic images, generating thumbnails, applying filters, and other tasks that require image processing in PHP.

      To use Imagick, you need to have ImageMagick installed on your server and enable the Imagick extension in your php.ini file.

    • What is GD in WordPress?

      GD is a PHP extension that can handle image processing in WordPress. It is similar to Imagick, but it has some limitations, such as supporting fewer image formats and producing lower-quality images. However, GD is more widely available on web hosting servers and may be faster than Imagick in some cases.

      To use GD in WordPress, you need to have it installed and enabled on your server. You can check if GD is available by using the phpinfo() function.

    • What PHP Extensions does WordPress need ?

      These are essential PHP extensions for WordPress:
      json: Handles communication with other servers and processes data in JSON format.
      mysqli or mysqlnd: Connects to the MySQL database for content storage and user data management.
      curl: Performs remote requests.
      dom: Validates Text Widget content and configures IIS7+.
      exif: Works with image metadata.
      fileinfo: Detects file upload mimetypes.
      hash: Used for hashing (including passwords).
      igbinary: Optimizes serialization.
      imagick: Enhances image quality.
      intl: Enables locale-aware operations.
      mbstring: Handles UTF8 text.
      openssl: For SSL-based connections.
      pcre: Improves pattern matching.
      xml: Used for XML parsing.
      zip: Handles zip archives.
      These extensions empower WordPress, ensuring seamless functionality and compatibility with plugins and themes. 🌟🔧

    • How to Install ImageMagick in cPanel?

      To install ImageMagick in cPanel, log in to WHM using your root credentials.
      Navigate to the Software tab and select Module Installers.
      Click Manage next to PHP PECL, search for “Imagick,” and click Install.

    • Do I need Imagick for WordPress?

      Imagick is not strictly required for a basic WordPress installation, but it significantly enhances image quality and functionality. If you plan to work extensively with images, such as resizing, optimizing, or creating thumbnails, Imagick is highly recommended.

    • How to Fix ImageMagick PHP module not found?

      To fix the ImageMagick PHP module issue on WordPress, you need to install and enable the module on your server using cPanel, SSH, or web hosting support. Then, you can check the module status on your WordPress dashboard under “Tools” > “Site Health”.

    Summary

    In this post, we will walked you through the steps to install the ImageMagick PHP extension for your web application on RunCloud, the best web application management platform for developers and agencies. If you are looking to move away from Cpanel then you should check out RunCloud.

    If you are not using RunCloud yet, you are missing out on a lot of benefits and features that can make your web development and hosting experience easier and faster. With RunCloud, you can host as many websites as you like on a single server.

    Sign up for RunCloud today to see how RunCloud can help you manage your web applications and servers with ease and convenience.