Category: Linux

  • How to Use FTP to Upload Files to WordPress Without Password [Step By Step]

    How to Use FTP to Upload Files to WordPress Without Password [Step By Step]

    Have you ever needed to upload a massive plugin that WordPress couldn’t handle? Or dive deep into your website’s files to fix a mysterious error?

    While WordPress is user-friendly, sometimes you need more direct control.

    That’s where FTP (File Transfer Protocol), or more accurately, its secure sibling SFTP (Secure File Transfer Protocol), comes in.

    This article is your comprehensive guide to understanding and using FTP with WordPress. We’ll cover everything from the basics of FTP to uploading files, troubleshooting how to connect securely, navigate your WordPress directory structure, uploading files, troubleshooting common FTP issues, and even how server management platforms such as RunCloud integrate with FTP.

    Whether you’re a beginner blogger or a seasoned developer, mastering FTP can unlock a new level of control over your WordPress website. Stop relying solely on the WordPress dashboard – let’s learn how to take the reins!

    What is FTP?

    FTP is a standard network protocol used to transfer files between two computers on a computer network. It’s a set of rules that computers follow to copy files from one machine to another. While it’s been a fundamental part of the Internet for decades, standard FTP is inherently insecure.

    How Does FTP Work?

    FTP operates on a client-server model. The client (e.g., an FTP software like FileZilla) initiates a connection to the server (e.g., your web hosting server). FTP uses two separate channels for communication:

    1. Control Channel (Port 21 – for plain FTP): This channel is used for sending commands and responses between the client and server. These commands include “login”, “list files”, “change directory”, “upload file”, “download file”, etc. The control channel establishes the connection and manages the session.
    2. Data Channel (Various Ports): This channel is used for the actual transfer of file data.
    3. With SFTP (SSH File Transfer Protocol), the process is different. SFTP is a subsystem of SSH (Secure Shell). It uses a single secure channel (usually port 22) for both commands and data transfer. All communication is encrypted, making it vastly more secure than standard FTP.

    📖 Suggested read: FTP vs. SFTP – What’s The Difference & Why It Matters

    How to Use FTP to Upload Files to WordPress via SSH Key: Step-by-Step Guide

    In this guide, we will walk you through using FTP (specifically, the secure version, SFTP) to upload files to your WordPress website. While WordPress offers a built-in file uploader for media and plugins, FTP provides more control and is essential for certain tasks, like uploading large files, modifying theme or plugin files directly, or troubleshooting.

    Step 1: Choose an FTP Client

    An FTP client is a software application that allows you to connect to a remote server and transfer files. Many free and paid options are available, but for security and ease of use, we strongly recommend choosing one that supports SFTP (SSH File Transfer Protocol).

    We recommend you take a look at our previous blog post titled “The Best 5 FTP Client for Windows and Mac” – but if you’re in a hurry, here are some popular and reliable choices:

    • FileZilla (Free, Cross-Platform): A widely used, well-regarded, free, open-source FTP client. It’s available for Windows, macOS, and Linux.
    • WinSCP (Free, Windows): Another popular free and open-source client, specifically for Windows.
    • Cyberduck (Free/Paid, Windows & macOS): A versatile client that supports FTP and SFTP and cloud storage services like Amazon S3 and Google Cloud Storage. It has a simple, drag-and-drop interface.
    • Transmit (Paid, macOS): A powerful and feature-rich FTP client for macOS, known for its speed and reliability.

    We’ll assume you’ve chosen FileZilla for this guide, but the general steps will be similar for other clients.

    📖 Suggested read: ​How to Use SFTP with FileZilla to Securely Transfer Files on RunCloud

    Step 2: Connect with FTP Credentials from Your Hosting Provider

    Before you can connect, you’ll need your SFTP credentials. These are not the same as your WordPress admin credentials. Your hosting provider (or server management platform) will provide these details. You’ll typically need the following:

    • Host (or Server Address): This is usually a domain name (e.g., example.com) or an IP address (e.g., 192.168.1.1).
    • Username: This is your SFTP username, often specific to your web hosting account or a user you created on your server.
    • SSH Key: A secret key (like a password) associated with your SFTP username.
    • Port: This is usually 22 for SFTP. Never use port 21 (which is for unencrypted FTP) unless you have a very specific and secure reason.

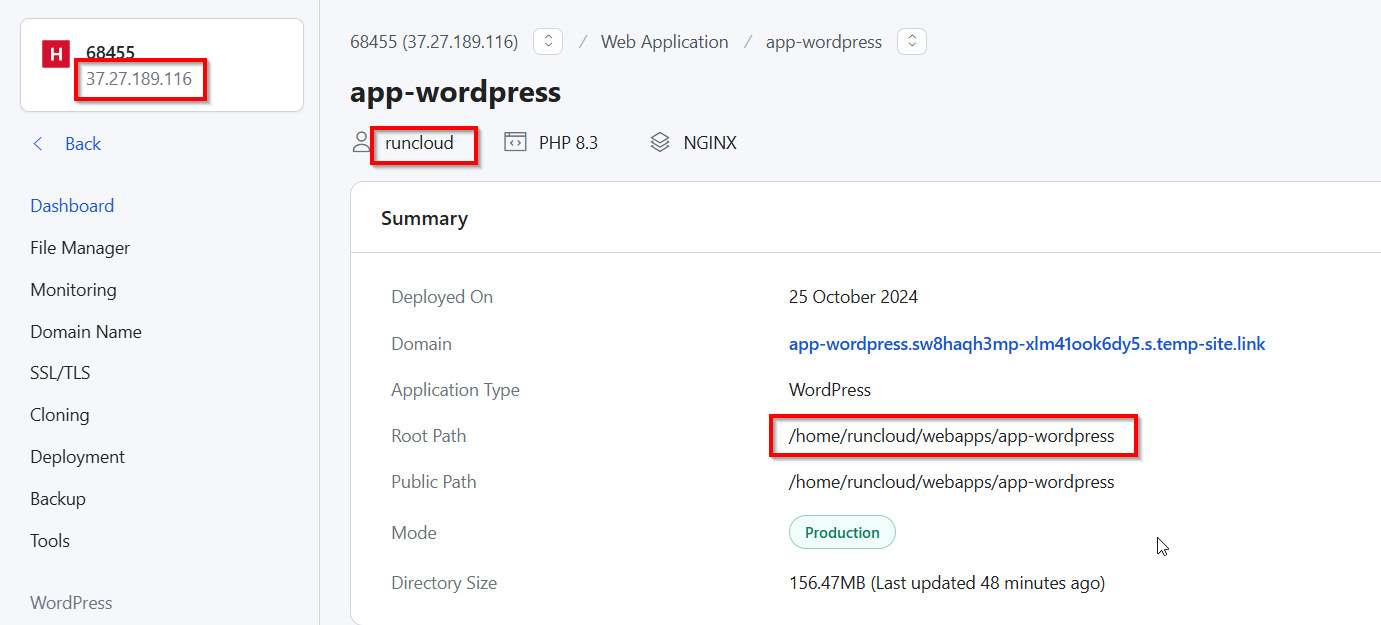
    Finding Your Credentials: The exact steps for finding your credentials will vary for different cloud providers. However, if you’re using RunCloud, this process is quick and painless. Navigate to your server, then to “Web Applications”. Select your WordPress installation, and note down the IP address, username, and root path (highlighted in the image below).
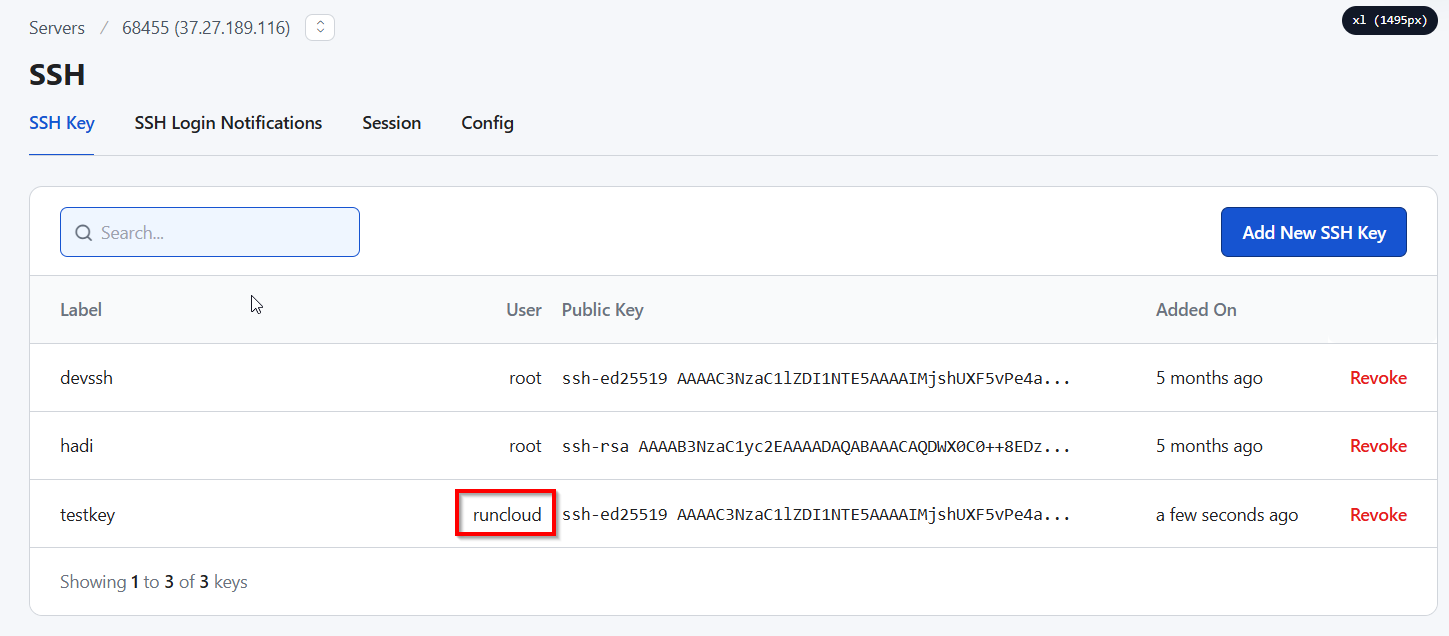
    After this, ensure that the SFTP user you noted in the previous step has SSH access to your server by navigating to the SSH menu of the server section. If the username is missing from the list, follow RunCloud documentation to learn more about generating and storing SSH keys in the RunCloud vault.
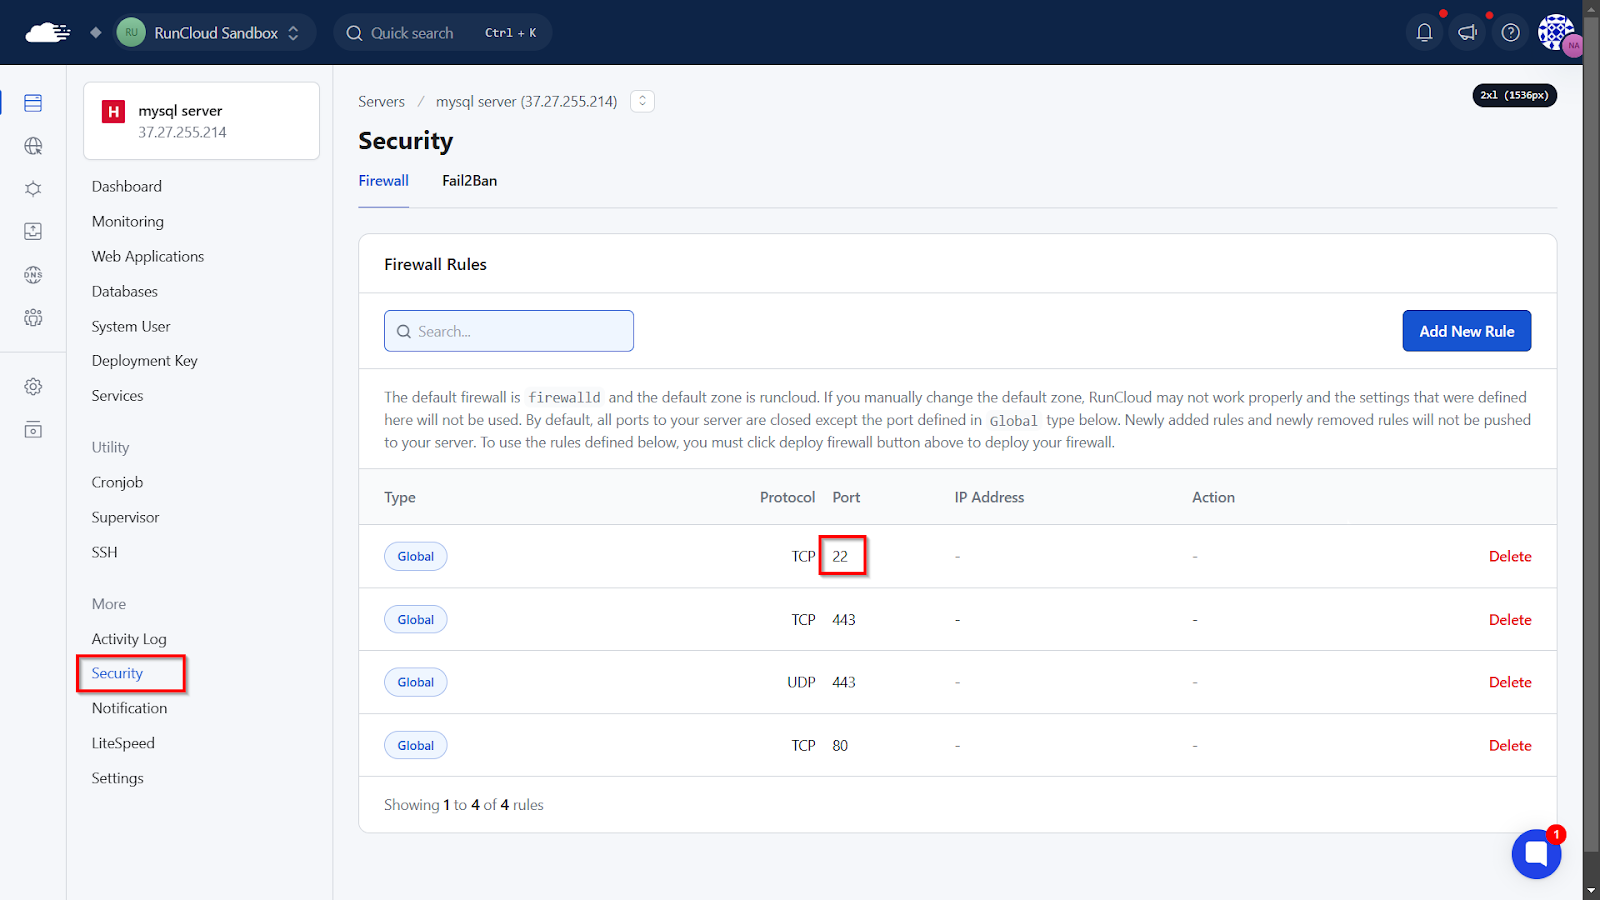
    After this, navigate to your server’s “Security” section and ensure that TCP traffic is allowed on the port being used for SSH. It uses port 22 by default, but server administrators often change it to something unique.
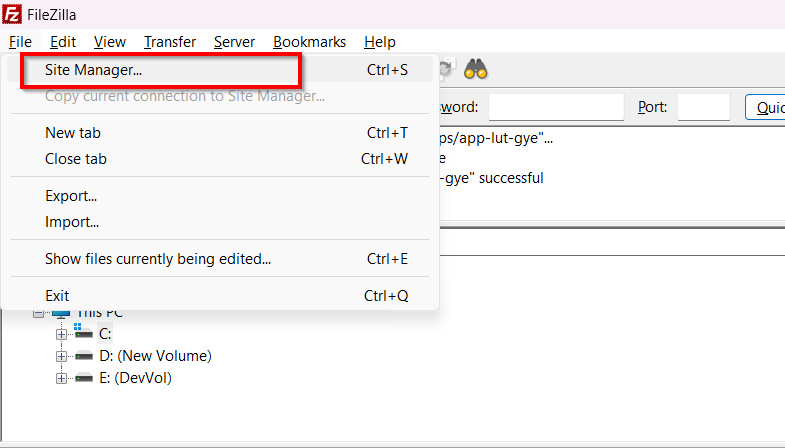
    Once you have gathered all the necessary information, you can open your FTP software and create a connection. In Filezilla, you can do this by clicking on “File > Site Manager”.
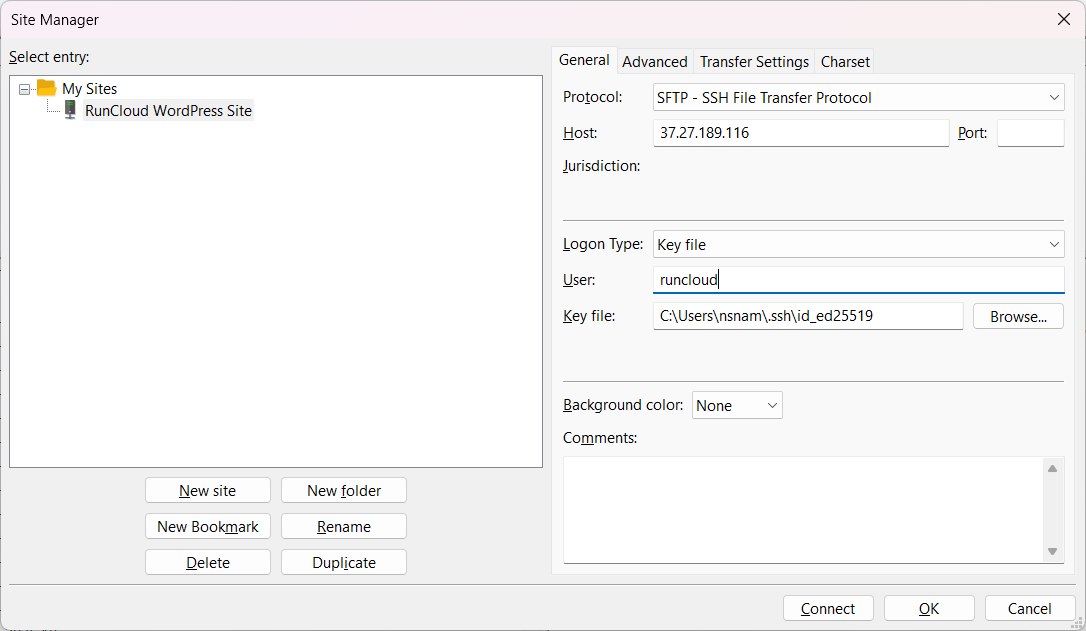
    In the Site Manager menu, fill in the following information:

    • Protocol: SFTP
    • Hostname: IP address that you noted earlier
    • Port: If you are not using the default port (22), then you need to enter your port number here
    • Logon Type: Key file
    • User: Enter the username that you noted earlier
    • Key File: Browse the files on your computer and select the private SSH key for your server
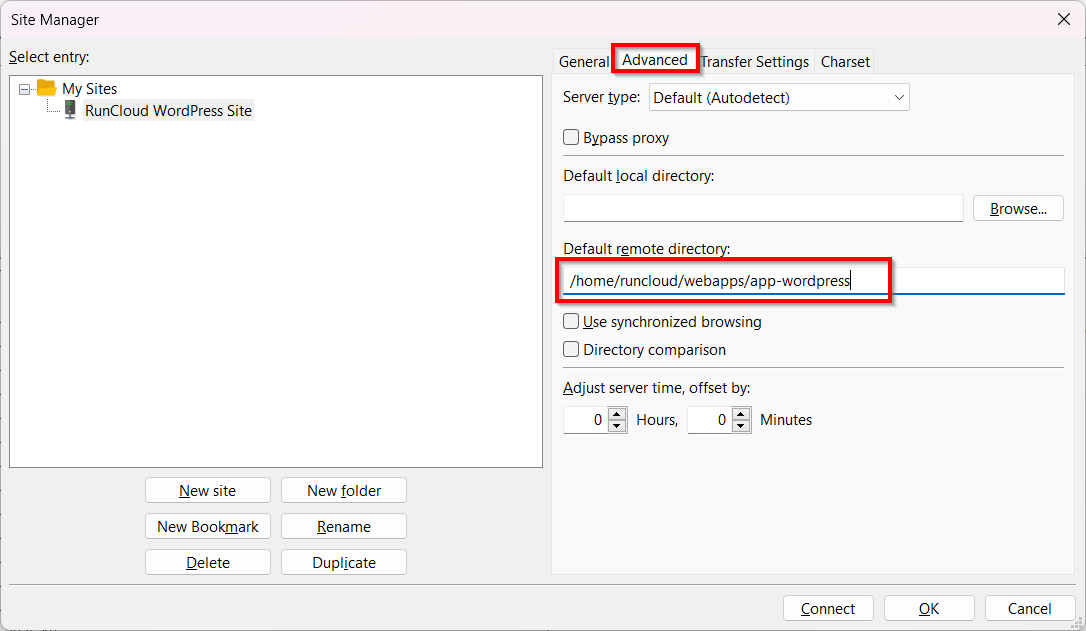
    After entering the above information, you can connect to the server. But we encourage you to go one step further and switch to the Advanced tab.

    On this tab, you can set the default local directory (the folder where WordPress is installed on your computer) and the default remote directory (the path you noted earlier).

    📖 Suggested read: How to Check if TCP Port is Open, Closed, or in Use on Linux?
    Finally, you can click “Connect” to initiate the connection with your server. The first time you connect to a server via SFTP, your client will likely display a warning about an unknown host key. This is a security measure to prevent man-in-the-middle attacks. Verify the key’s fingerprint against the one provided by your hosting provider (if available). If it matches, you can safely accept the key and proceed.

    Step 3: Navigate to Your WordPress Directory Structure

    Once connected, you’ll typically see two panes in your FTP client:

    • Left Pane (Local Site): This shows the files and folders on your local computer.
    • Right Pane (Remote Site): This shows the files and folders on your web server.

    You need to navigate to the correct directory on your server where your WordPress files are located. The exact path can vary depending on your hosting setup, but if you follow the steps described above, you will be in your WordPress directory.
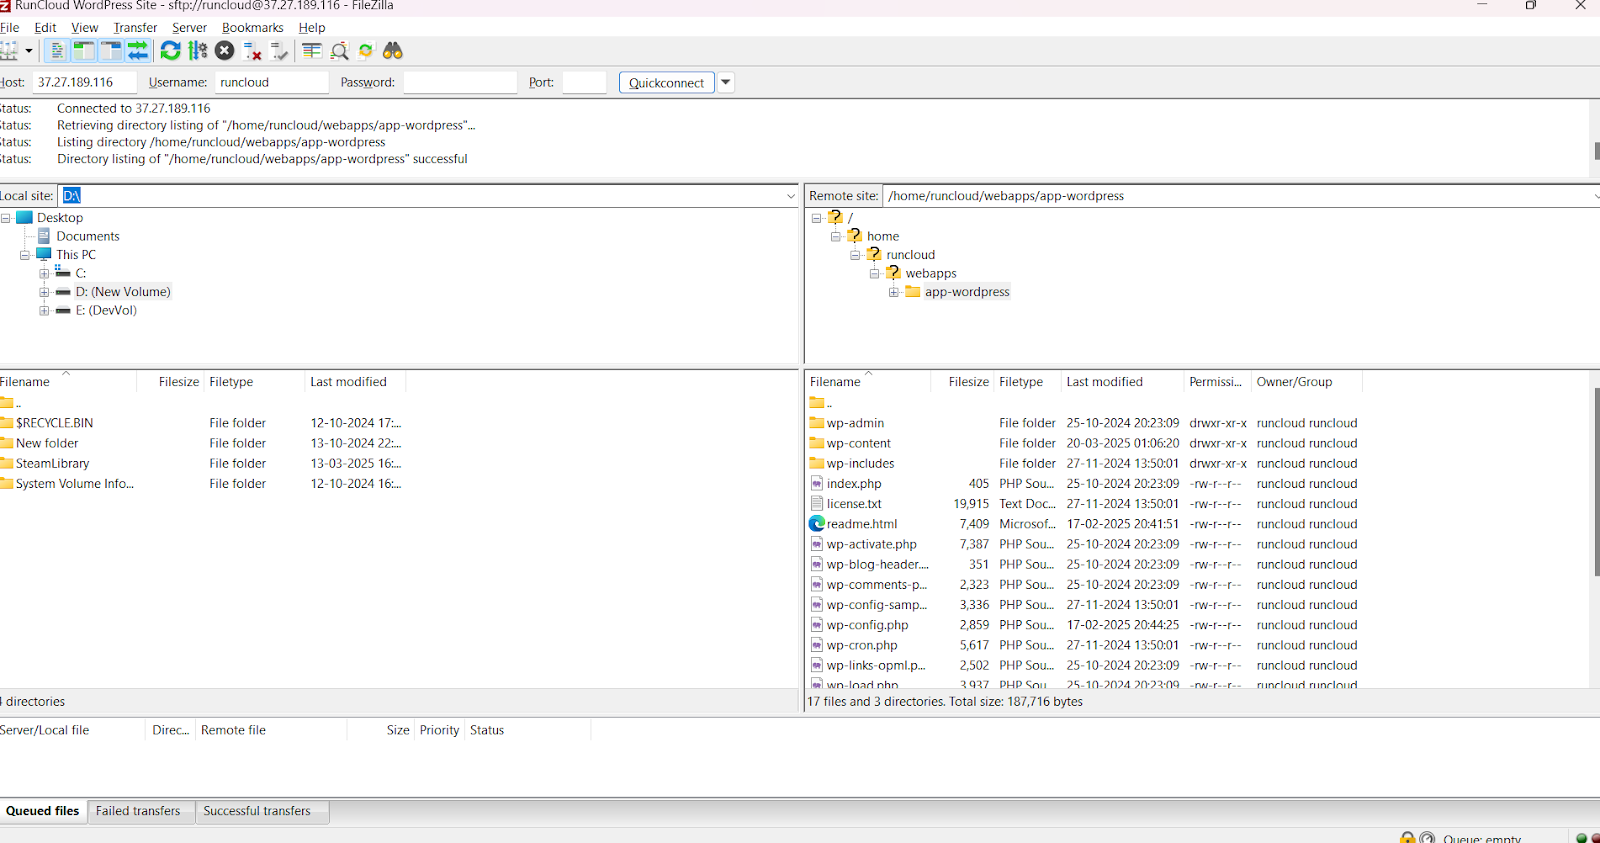
    ⚠️ Important: Do not modify core WordPress files (in wp-admin and wp-includes) unless you know what you’re doing. Most file uploads will be within the wp-content directory.

    Step 4: Uploading Files to WordPress

    Now that you’re in the correct directory, uploading files is straightforward:

    1. Locate the file(s) on your local computer (left pane).
    2. Navigate to the destination directory on the server (right pane). For example, if you’re uploading a new theme, navigate to wp-content/themes/.
    3. Drag and Drop: Drag the file(s) or folder(s) from the left pane (local) to the right pane (remote). Alternatively, right-click the file(s) and choose “Upload”.
    4. File Transfer Queue: FileZilla will show the progress of the upload in a queue at the bottom of the window.

    Things to keep in mind:

    • Overwriting Files: If a file with the same name already exists in the destination directory, the FTP client will usually ask you if you want to overwrite it. Be cautious when overwriting files, especially if you’re unsure what they are.
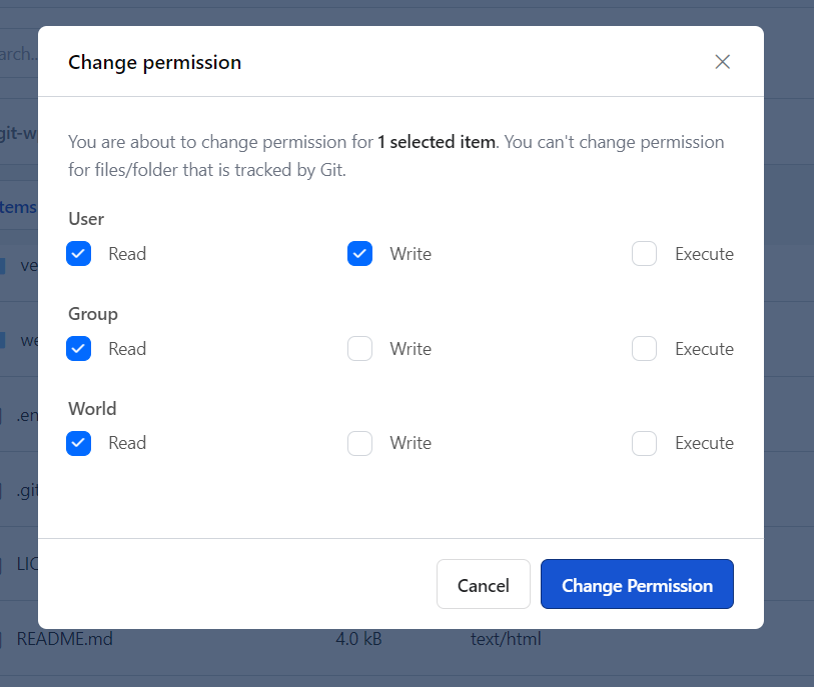
    • File Permissions: Sometimes, you might need to adjust file permissions after uploading. This controls who can read, write, and execute files. Incorrect permissions can cause issues with your website. Your hosting provider or RunCloud documentation can provide guidance on appropriate file permissions. Generally, folders are 755, and files are 644.

    Step 5: Verifying Successful Uploads

    After the upload is complete, it’s a good idea to verify that the files were transferred correctly:

    1. Check the FTP Client: FileZilla (and most other clients) will indicate successful transfers in the queue. Look for any error messages.
    2. Test on Your Website: If you uploaded a plugin or theme, go to your WordPress admin dashboard and check if it appears in the Plugins or Themes section. Activate it and test its functionality. If you upload media files, check the Media Library.
    3. Check File Permissions (if necessary): If you’re experiencing issues, use your FTP client or RunCloud’s file manager to check and adjust file permissions as needed.
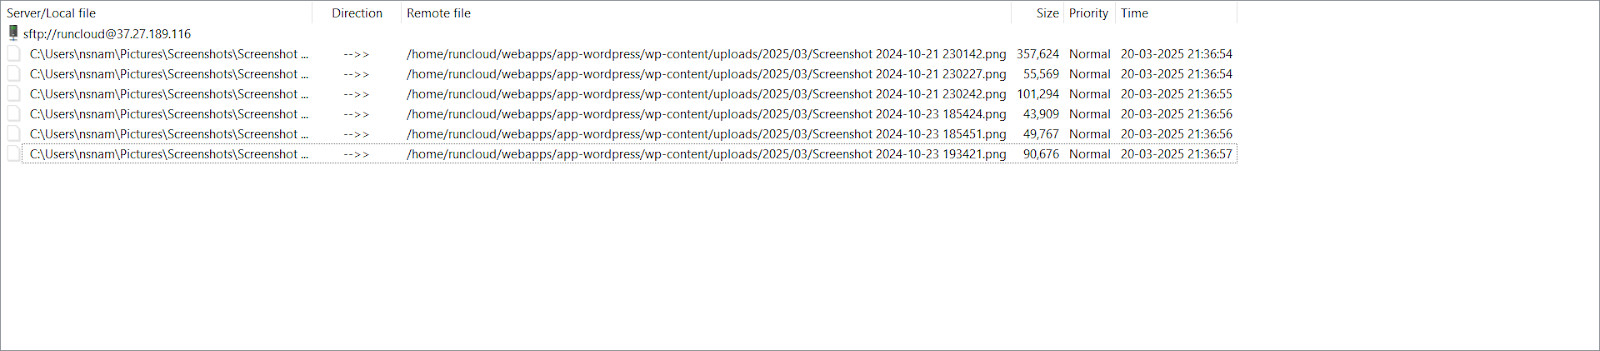
    By following these steps, you can confidently use FTP (SFTP) to upload files to your WordPress website. This gives you greater control over your site’s files and enables you to perform tasks that might not be possible through the WordPress admin interface alone.

    📖 Suggested read: How to Fix WordPress Stuck in Maintenance Mode? [100% WORKING]

    Troubleshooting Common FTP Issues

    Even with careful setup, you might encounter issues when using FTP to connect to your WordPress server. This section covers some of the most common problems and provides solutions to get you back on track.

    Connection Errors

    Connection errors are often the first hurdle. Here’s a breakdown of common causes and how to fix them:

    “Connection refused” or “Could not connect to server”

    This usually indicates a problem with the server address, port, or firewall. To solve this issue, try the following steps:

    • Verify Credentials: Double-check the Host/Server Address, Username, Password, and Port. Ensure you’re using port 22 for SFTP (and not 21 for insecure FTP). Even a small typo can prevent connection. Copy and paste the credentials directly from your hosting provider’s control panel or RunCloud dashboard to avoid errors.
    • Check the Server Status: Is your server up and running? Your hosting provider’s status page or RunCloud’s server overview will show you if there are any known outages.
    • Firewall Issues: A firewall on your computer, router, or server might be blocking the connection.
      • Local Firewall: Temporarily disable your computer’s firewall (e.g., Windows Firewall, macOS Firewall) to see if it’s the culprit. If it is, you must add an exception for your FTP client (e.g., FileZilla) to allow connections on port 22.
      • Router Firewall: Check your router’s configuration to ensure it’s not blocking outgoing connections on port 22. You might need to forward port 22 to your computer’s internal IP address.
      • Server Firewall: If you’re managing your server (e.g., with RunCloud), check the server’s firewall rules. Ensure that port 22 is open for incoming connections. RunCloud provides a firewall management interface that simplifies this.
    • Incorrect Protocol: Make sure you’re using SFTP, not plain FTP. Your FTP client should have an option to select the protocol.

    “Authentication failed”

    This means your username or password (or both) is incorrect.

    • Double-Check Credentials: Carefully re-enter your username and password. Pay attention to capitalization, as usernames and passwords are often case-sensitive.
    • Reset Password: If you’re unsure of your password, reset it through your hosting provider’s control panel.
    • SSH Key Authentication (Advanced): If you use SSH key authentication instead of a password, ensure your private key is correctly configured in your FTP client, and the corresponding public key is authorized on the server.

    📖 Suggested read: 3 Ways to Fix Too Many Authentication Failures SSH Root? [SOLVED]

    File Permissions Problems

    Incorrect file permissions can prevent your WordPress website from functioning correctly. When uploading files, you might see errors such as “Permission denied,” or your website might display errors or behave unexpectedly.

    Linux (and Unix-like) systems use file permissions to control who can read, write, and execute files and directories. A standard permission set is 755 (owner: read/write/execute, group: read/execute, others: read/execute) for directories and 644 (owner: read/write, group: read, others: read) for files.

    “Permission denied” when uploading

    If you see this error, then you likely don’t have write permission to the target directory. Use your FTP client to change the directory’s permissions.

    Changing Permissions in FileZilla:

    1. Right-click on the file or directory.
    2. Choose “File permissions…”
    3. Enter the numeric value (e.g., 755) or check the appropriate boxes for read, write, and execute.
    4. Optionally, check “Recurse into subdirectories” to apply the changes to all files and folders within the directory.
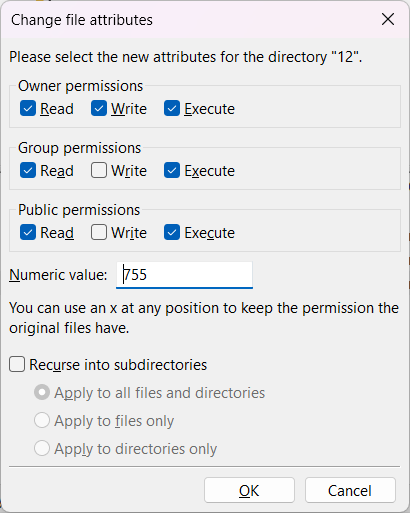
    Alternatively, RunCloud provides a one-click option named “Fix Permissions” that will fix all permissions issues. Follow the instructions described in the RunCloud documentation to learn how to resolve file access issues on your server.

    Timeouts and Other Common Issues

    Connection Timeouts

    If your connection is slow or unstable, the FTP client might time out before a transfer completes. You can try the following approaches to fix this:

    • Increase Timeout Settings: Most FTP clients have settings to adjust the connection timeout. Increase the timeout value (e.g., to 60 seconds or more).
    • Use a Wired Connection: For a more stable connection, use a wired Ethernet connection instead of Wi-Fi.

    Transfer Failures

    Sometimes, files might fail to transfer completely; ensure you have enough disk space on both your local computer and the server. RunCloud provides a built-in disk usage monitoring solution to make this easy.

    Wrapping Up: Who Should Use FTP for Their WordPress Websites?

    Throughout this guide, we’ve discussed the details of using FTP and, more importantly, its secure counterpart, SFTP, with WordPress.

    The need for direct FTP access is generally low for basic WordPress users (bloggers and small business owners) who primarily focus on content creation and use the standard WordPress interface for tasks like plugin installation and media uploads. The built-in WordPress tools, combined with a user-friendly server management platform like RunCloud, handle the vast majority of day-to-day operations.

    RunCloud, for instance, offers a comprehensive file manager directly within its web-based dashboard. This file manager allows you to browse your WordPress directories, perform basic text file edits, and manage file permissions, all without needing a separate FTP client.
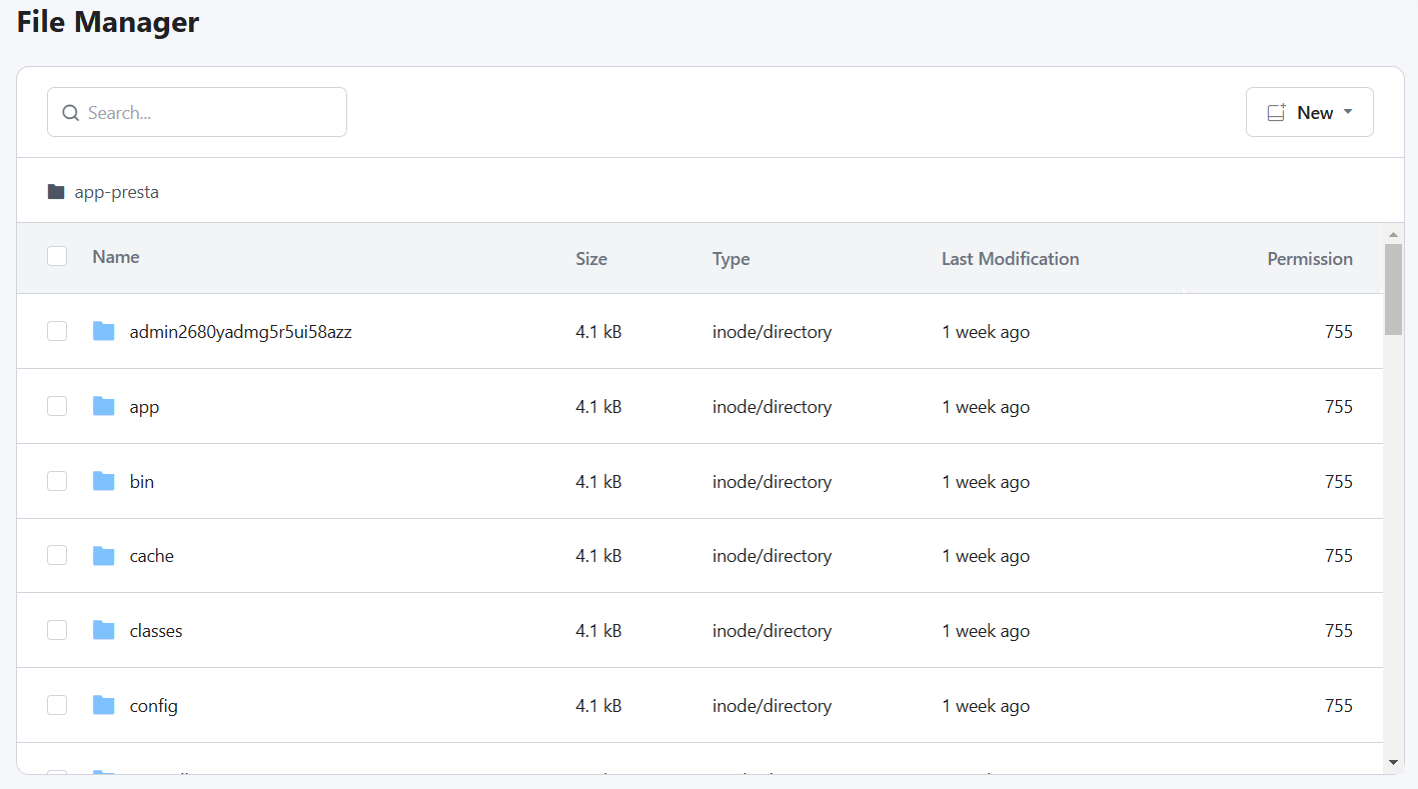
    However, the need for FTP (SFTP) increases as your WordPress usage becomes more sophisticated. Intermediate users, such as freelancers or agencies managing multiple WordPress sites, often need to customize themes and plugins (requiring direct code edits), troubleshoot issues by examining server logs, or upload larger files that might be cumbersome through the WordPress interface.

    In these scenarios, SFTP provides the necessary direct access and control. RunCloud seamlessly integrates with SFTP, offering easy SFTP user management.

    RunCloud provides the perfect balance of ease of use and advanced functionality. Sign up for RunCloud today.

    FAQs on Using FTP with WordPress

    What is the difference between FTP and SFTP?

    FTP transmits data in plain text, making it highly vulnerable to interception. SFTP (Secure File Transfer Protocol) encrypts all communication, including your username, password, and file data, ensuring secure transfers. Always use SFTP; it’s like the difference between a postcard and a sealed letter.

    Do I need FTP to install WordPress plugins?

    Generally, you don’t need FTP to install plugins, as WordPress has a built-in plugin installer through the admin dashboard. However, FTP (specifically SFTP) can be useful for troubleshooting, manually uploading large plugins, or when the built-in installer fails. RunCloud’s file manager offers a web-based alternative to FTP for many tasks, but direct server access via SFTP is still available.

    Can I use FTP on shared hosting?

    Yes, you can usually use FTP (SFTP is strongly recommended) on shared hosting accounts. Your hosting provider will typically provide you with SFTP credentials to access your web space. However, shared hosting environments may have limitations on connection speeds or concurrent connections.

    What are the security risks of using FTP?

    The primary risk of using plain FTP is the unencrypted transmission of your credentials and data, which exposes them to potential eavesdropping. This can lead to a compromised website, stolen data, or malicious code injection. Always prioritize SFTP to mitigate these significant security risks.

    How do I find my FTP credentials?

    Your web hosting provider provides your FTP (SFTP) credentials, often found in your hosting control panel (like cPanel, Plesk, or a custom panel). For RunCloud-managed servers, you can create SFTP users and manage their access through the RunCloud dashboard, granting specific directory permissions. You will typically need a hostname (or IP address), username, password, and sometimes a port number (22 for SFTP, 21 for FTP – but again, avoid plain FTP).

    Is FTP still relevant in 2025?

    While web-based file managers and other tools are becoming more common, FTP (specifically SFTP) remains relevant for developers and power users. SFTP provides a robust and secure way to directly manage files on a server, which is crucial for tasks like debugging, custom development, and large file transfers. It’s a fundamental tool for server management, even with modern alternatives.

    What do I do if my FTP connection keeps dropping?

    Network instability, firewall issues, or server-side restrictions can cause frequent FTP connection drops. Try using a wired connection instead of Wi-Fi, check your firewall settings to ensure SFTP (port 22) is allowed, and contact your hosting provider or check RunCloud’s server logs for potential issues. Sometimes, adjusting the timeout settings in your FTP client can also help.

    How can I speed up my FTP transfers?

    To improve FTP (SFTP) transfer speeds, ensure you have a stable internet connection and use a wired connection if possible. You can also try using an FTP client that supports multiple concurrent connections (if your server allows it) and compressing files before transferring them. Consider the geographical location of your server; transferring files to a server closer to you will generally be faster.

  • 8 Best GTmetrix Alternatives for Website Performance Testing (Includes Free)

    8 Best GTmetrix Alternatives for Website Performance Testing (Includes Free)

    Website speed matters – if your site loads slowly, people will leave.

    GTmetrix is a common tool for checking website performance, but it’s not the only one.

    This post examines different ways to test your website’s performance, including exploring several GTmetrix alternatives we recommend considering. We’ll also cover options if you’re looking for a free website performance evaluation tool or just want to find the best website performance analyzer for your specific needs.

    Let’s get started!

    What is GTmetrix?

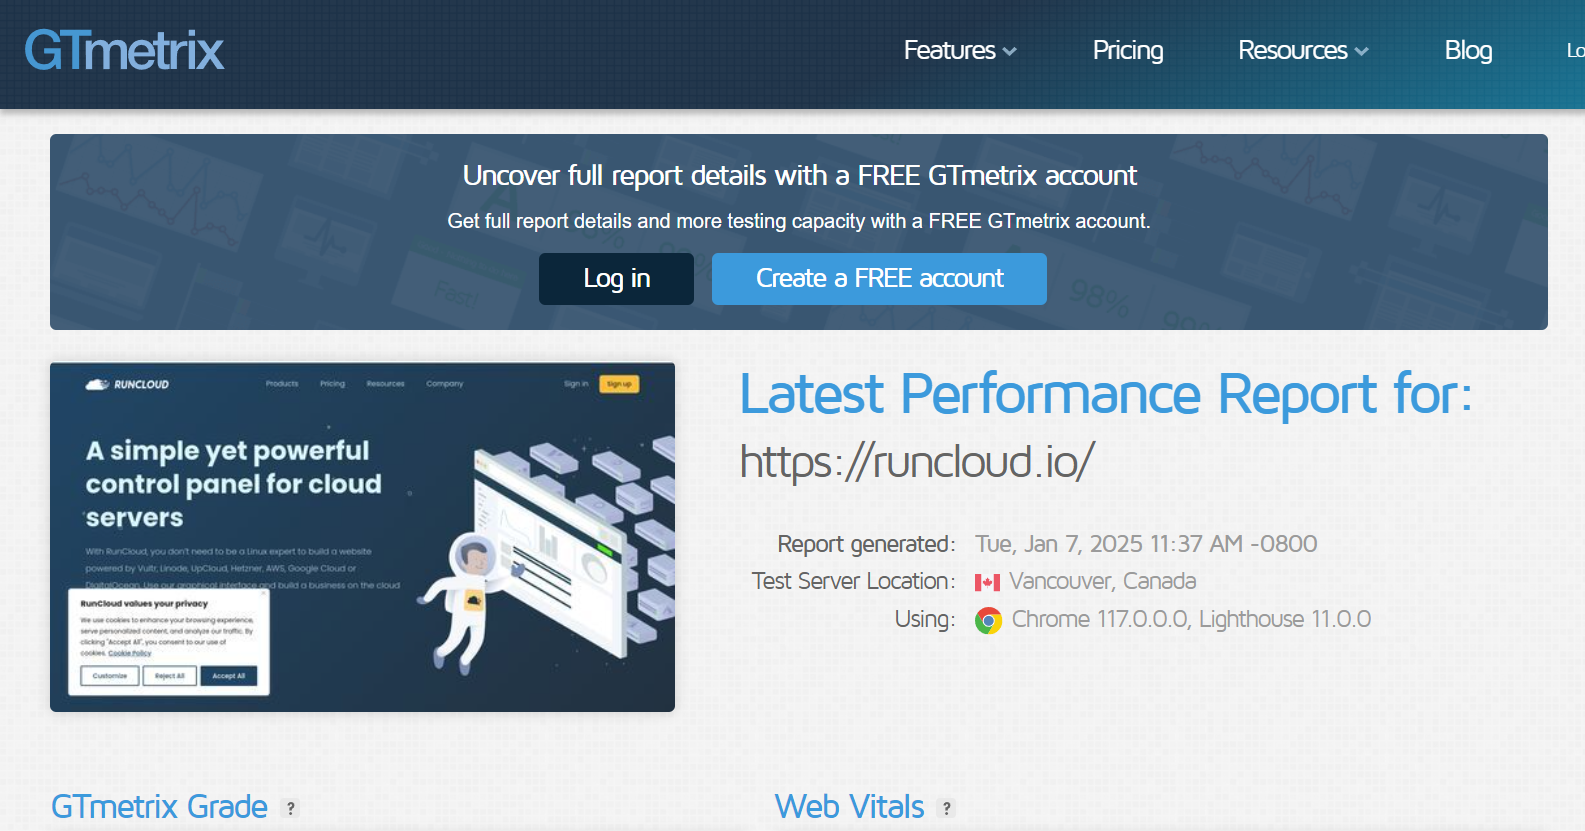
    GTmetrix is a powerful and widely used online performance analysis tool for websites. It is a virtual performance auditor that examines your website’s loading behavior and provides you with a detailed breakdown of its strengths and weaknesses. It goes beyond a simple page load timer and dives deep into the mechanics of how your site interacts with a user’s browser.

    Here are a few reasons why people use GTmetrix to evaluate their web performance:

    • Simulated User Experience: GTmetrix simulates a real user accessing your website from various locations and using different browser configurations (Chrome, Firefox). This allows you to understand how your site performs under different conditions and for a global audience.
    • Performance Audits: GTmetrix runs a series of performance audits based on Google PageSpeed Insights and its own recommendations. These audits identify areas that need optimization and provide clear, actionable suggestions.
    • Historical Data Tracking: You can save and track reports over time to monitor the impact of code changes and server configurations on performance. This allows you to detect regressions and fine-tune your website over time.
    • Multiple Testing Options: GTmetrix allows you to run tests from different locations, simulating various user experiences. You can also specify connection speeds and devices.
    • Integration and Automation: GTmetrix provides API access for integration with other tools and for automating performance testing as part of your CI/CD pipeline. This allows for continuous and repeatable testing.

    GTmetrix provides a rich data set to help developers understand why a website is performing the way it is and guide them to specific areas for performance optimization, but it still has a few limitations.

    Suggested read: 15 Best Performance Testing Tools to Improve Your Site in 2021

    Limitations of GTmetrix

    While GTmetrix is incredibly useful, it’s essential to understand its limitations to ensure you interpret results accurately and use the tool effectively.

    • Synthetic Tests are Not Real: GTmetrix relies on synthetic testing, which simulates a user experience through a virtual browser. This is great for controlled experiments and consistent measurements but doesn’t always perfectly represent real user behavior. Factors like network conditions, device capabilities, and user interactions affecting page load vary significantly. To get a complete picture, you should complement GTmetrix data with RUM tools (Real User Monitoring) that capture actual usage data.
    • Focus on Front-End Performance: GTmetrix is heavily focused on front-end performance, which is how the browser delivers and renders the page. While it will identify server performance issues (like slow TTFB), it won’t provide insight into server-side bottlenecks, database performance, or application-specific code.
    • Test Server Variation: While the tests are controlled, variations in test server load or network conditions may occasionally affect results. Run tests multiple times to verify consistency. Having highly variable results might indicate an external problem with the test or the tested website’s server.
    • Limited Device Emulation: GTmetrix emulates a limited set of mobile devices and browsers. For in-depth testing on a wide range of devices, you still need to rely on other tools, such as browser device emulators and real device testing.

    Suggested read: The Complete WordPress Speed Optimization Guide

    Top 8 GTmetrix Alternatives

    Here are some of the most popular alternatives to GTmetrix, which can be used to evaluate the performance of websites and web applications.

    1 – DebugBear

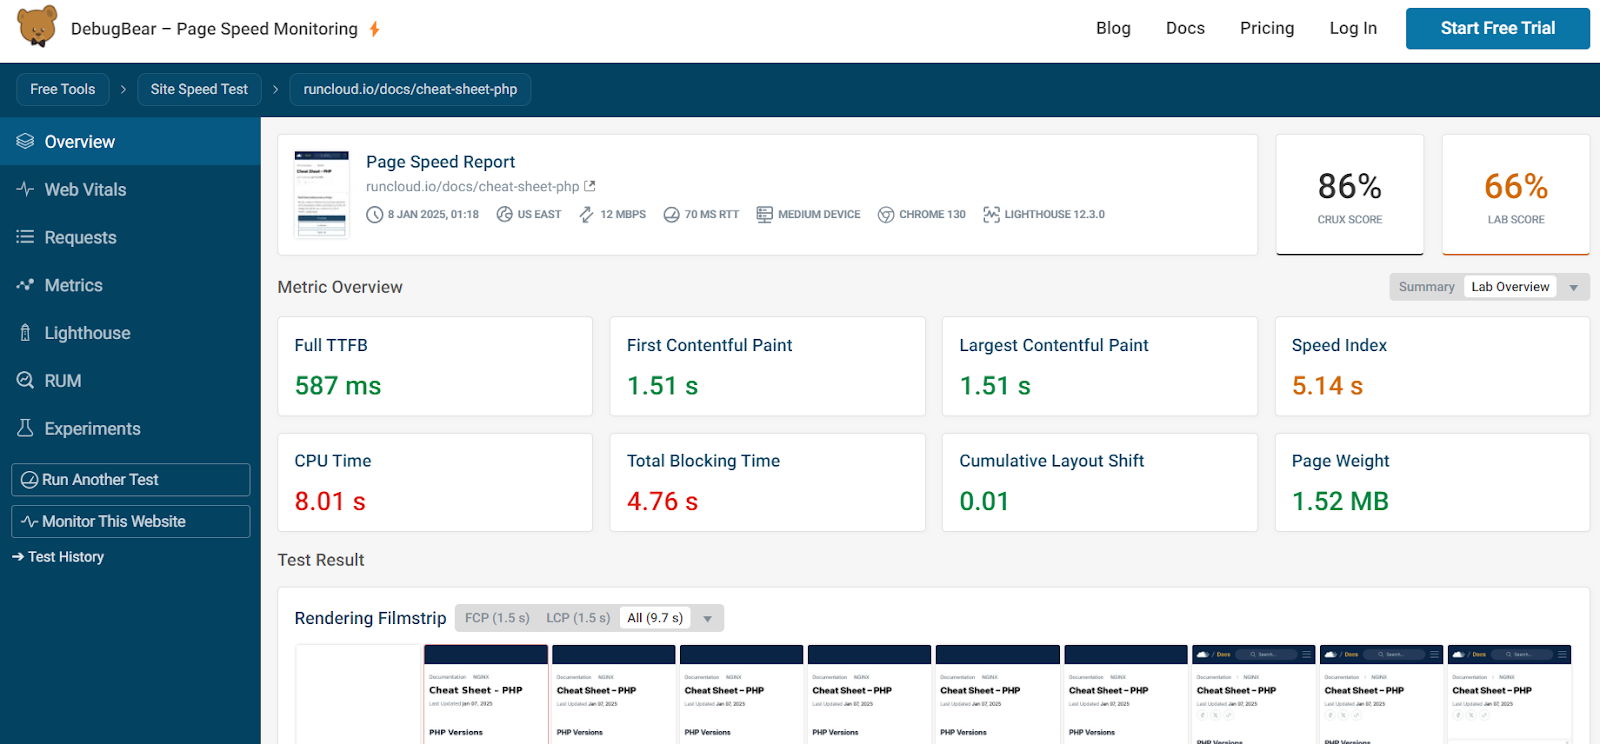
    DebugBear is a performance auditing suite focusing on real-user data and lab-based tests. It can pinpoint areas where a website is underperforming by providing a multi-faceted view. First, it gathers data from Google’s Chrome User Experience Report (CrUX), which tests represent actual user experiences. It shows the distribution of core web vital metrics including First Contentful Paint (FCP), Largest Contentful Paint (LCP), Cumulative Layout Shift (CLS), and Interaction to Next Paint (INP).

    DebugBear is best for projects that require ongoing, in-depth performance analysis and tracking, and is especially well suited for sites that must keep up with Core Web Vitals and performance regressions. DebugBear excels at providing a more detailed and actionable approach to performance monitoring.

    It produces real-world data, which is vital for understanding how your site performs for actual users. For example, in the above report we can see metrics are categorized as “Good”, “Needs Improvement”, and “Poor”, with a percentage breakdown to show the distribution. It also provides a 25-week trend graph for these metrics.

    Why it’s a great alternative: While GTmetrix is more of a point-in-time audit, DebugBear is useful for continuous monitoring and offers a complementary approach to the same problem. DebugBear provides historical tracking data, allowing us to analyze site performance improvements over time.

    Suggested read: How To Optimize Laravel for Performance (8 Expert Tips)

    2 – SpeedVitals

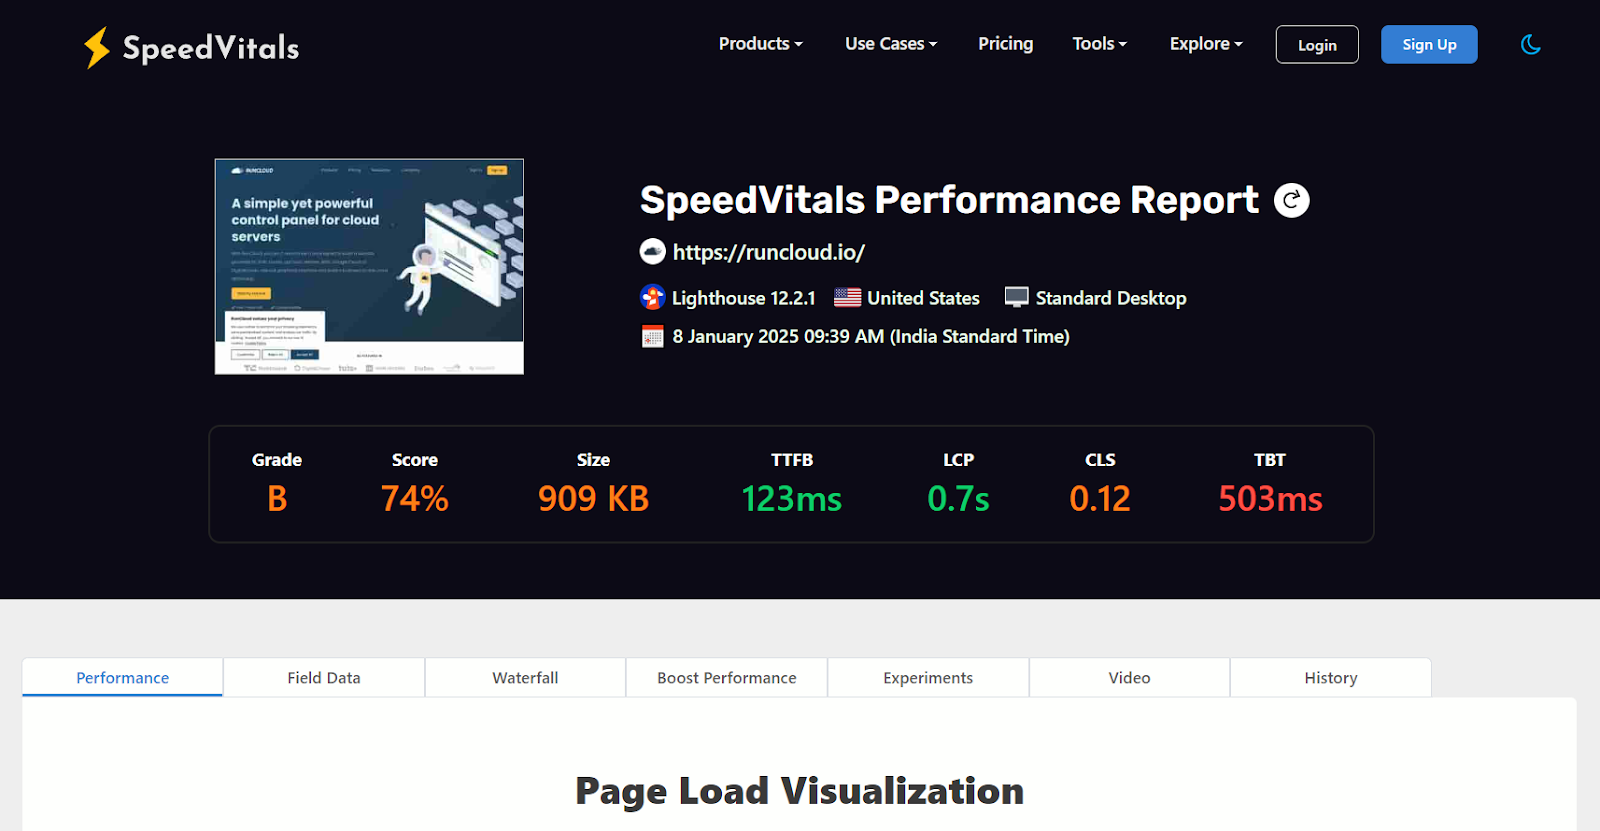
    SpeedVitals is a performance testing tool that provides a user-friendly interface with in-depth performance analysis. It takes a visual approach to analyzing metrics such as FCP, LCP, and CLS. Additionally, it provides core web vitals and page speed scores. It also includes real user monitoring and continuous monitoring.

    It is well-suited for users who want a tool that offers a very rich visual representation of page performance and an easy-to-grasp summary of common metrics. The SpeedVitals report gives a good overview of how well a website performs, using a combination of easy-to-understand grades and numbers alongside technical analysis for those who want more details.

    Why it’s a great alternative: SpeedVitals combines GTmetrix’s performance tracking features with easier visual analytics and in-depth monitoring for real users. The report provides a visual timeline showing how the website appears to the user during load, which helps identify performance bottlenecks.

    It also uses data to measure specific metrics for elements on the page to further understand how the user experiences the site. For example, we can track how long it takes for the first piece of text or image to show up, how fast the page feels like it’s loading, and how long before the user can fully interact with the page. The report also breaks down the size of different types of files, like JavaScript, images, and CSS, to show which ones take up the most space and slow down the website.

    Experts can dive even deeper to analyze which part of the page is the last to load, and it even shows animations of where page elements might shift around to help pinpoint the root of the problem. One of the best sections of the report is the “Code Coverage” area, which shows parts of the website’s code that aren’t even being used. This is helpful because eliminating unused code can make the site much faster.
    Suggested read: Website Load Testing – How To Test Website Performance At Scale

    3 – Google PageSpeed Insights

    As the name suggests, PageSpeed Insights was developed by Google, and it uses the same technology as Google crawl bots to track your website. It offers scores, audits, and specific recommendations based on Google’s web performance best practices, particularly relevant for SEO.

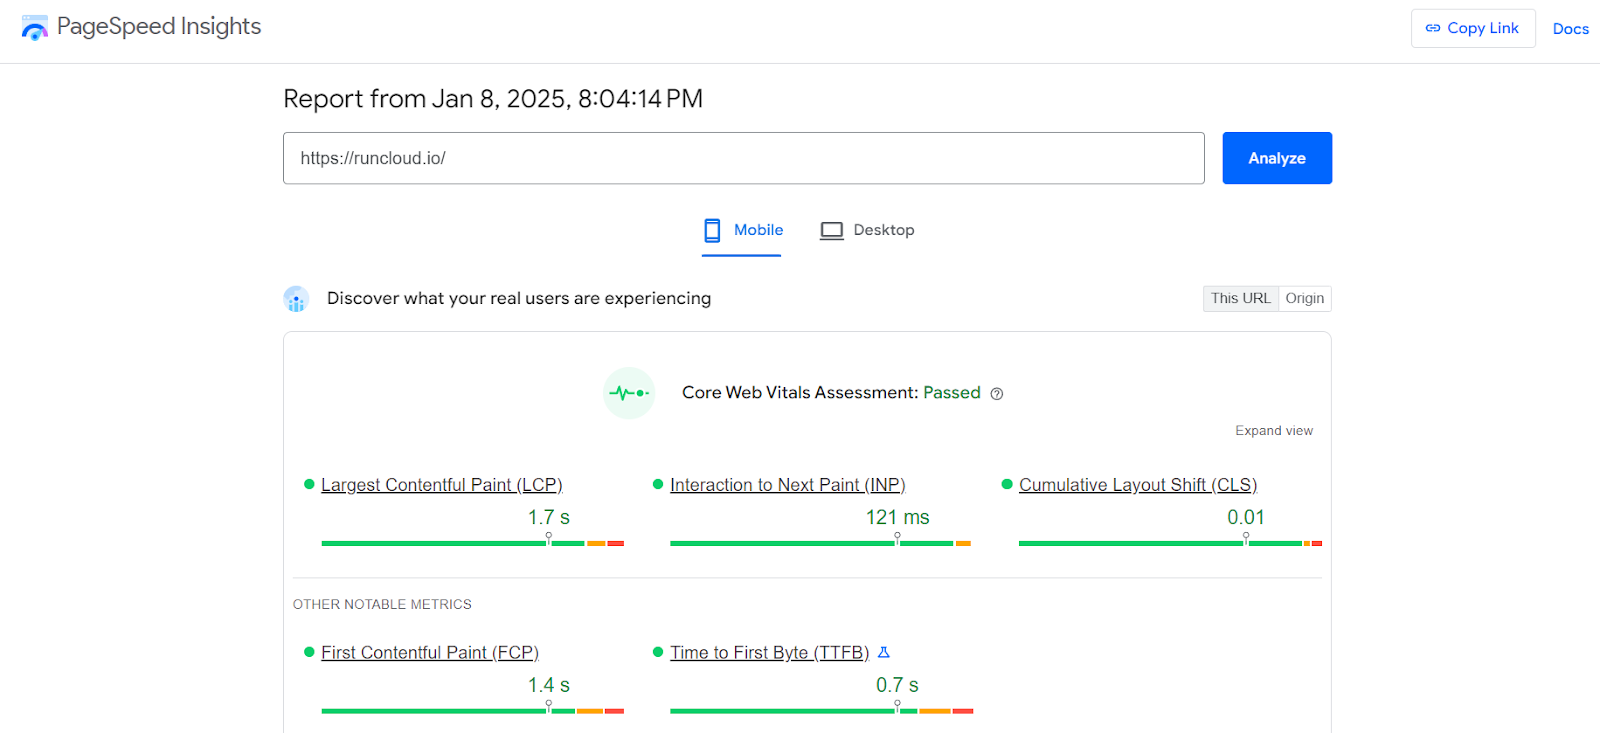
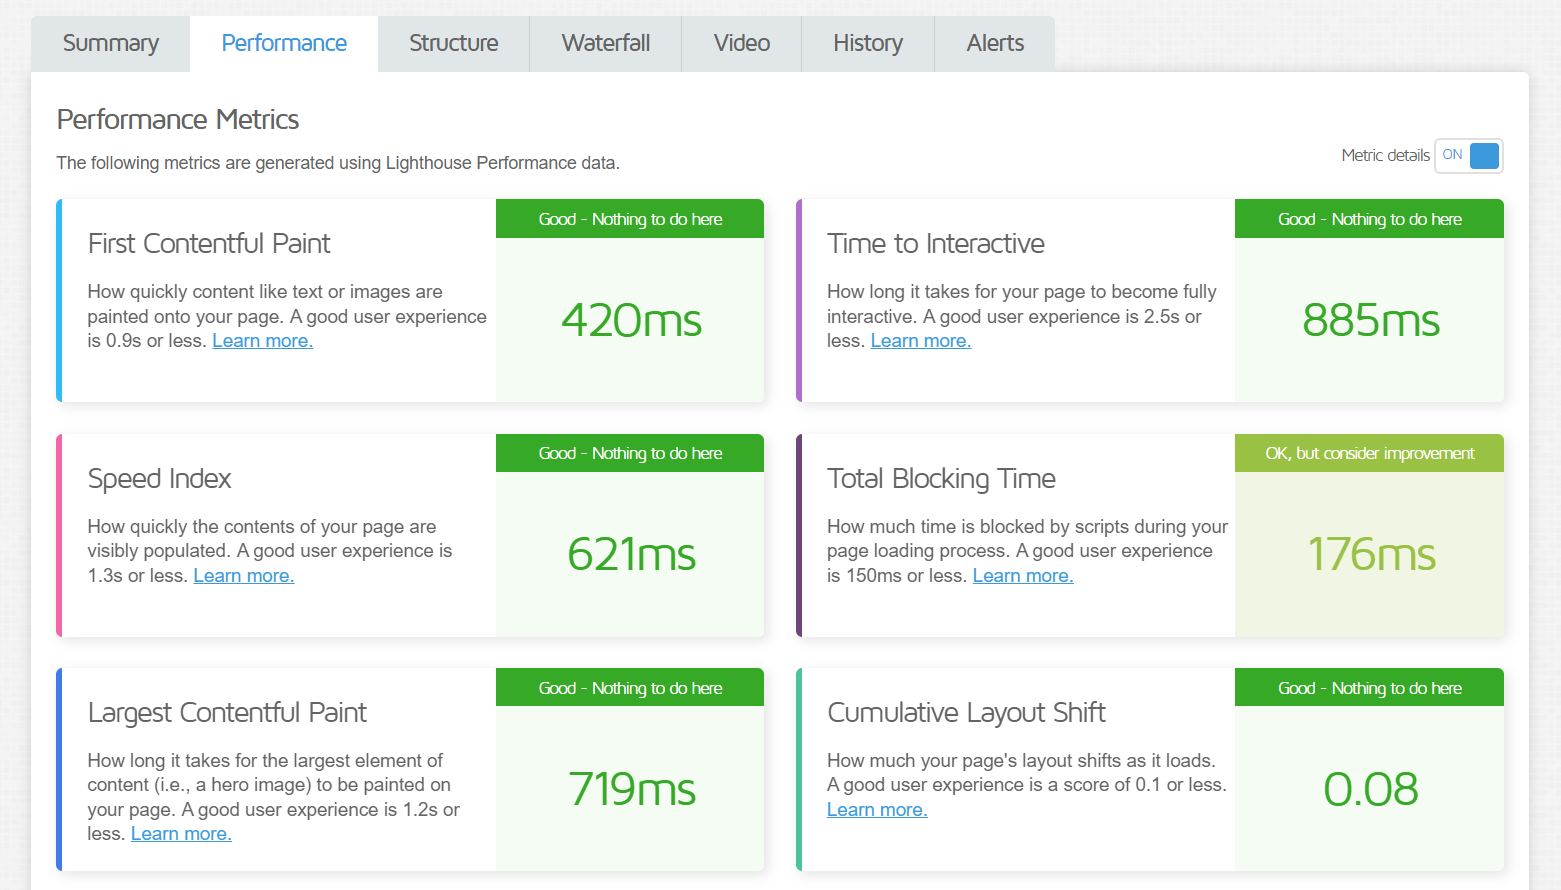
    Google PageSpeed Insights provides both real-world user experience data and lab-based diagnostic information. At the top of the report, it presents a clear summary of “Core Web Vitals” based on real user data from the Chrome UX Report (CrUX). It also shows some additional user metrics, such as FCP and TTFB, which are useful in measuring the quality of user experience and provide a benchmark for performance improvements. It is important to note that this data is gathered from real Chrome users and will not be available for every website.

    Why it’s a great alternative:It provides a perspective on what impacts SEO rankings and offers actionable guidance. Although GTmetrix has PageSpeed Insights data, using it directly allows for more frequent updates.

    Suggested read: How to Optimize Your Site for Google’s Core Web Vitals

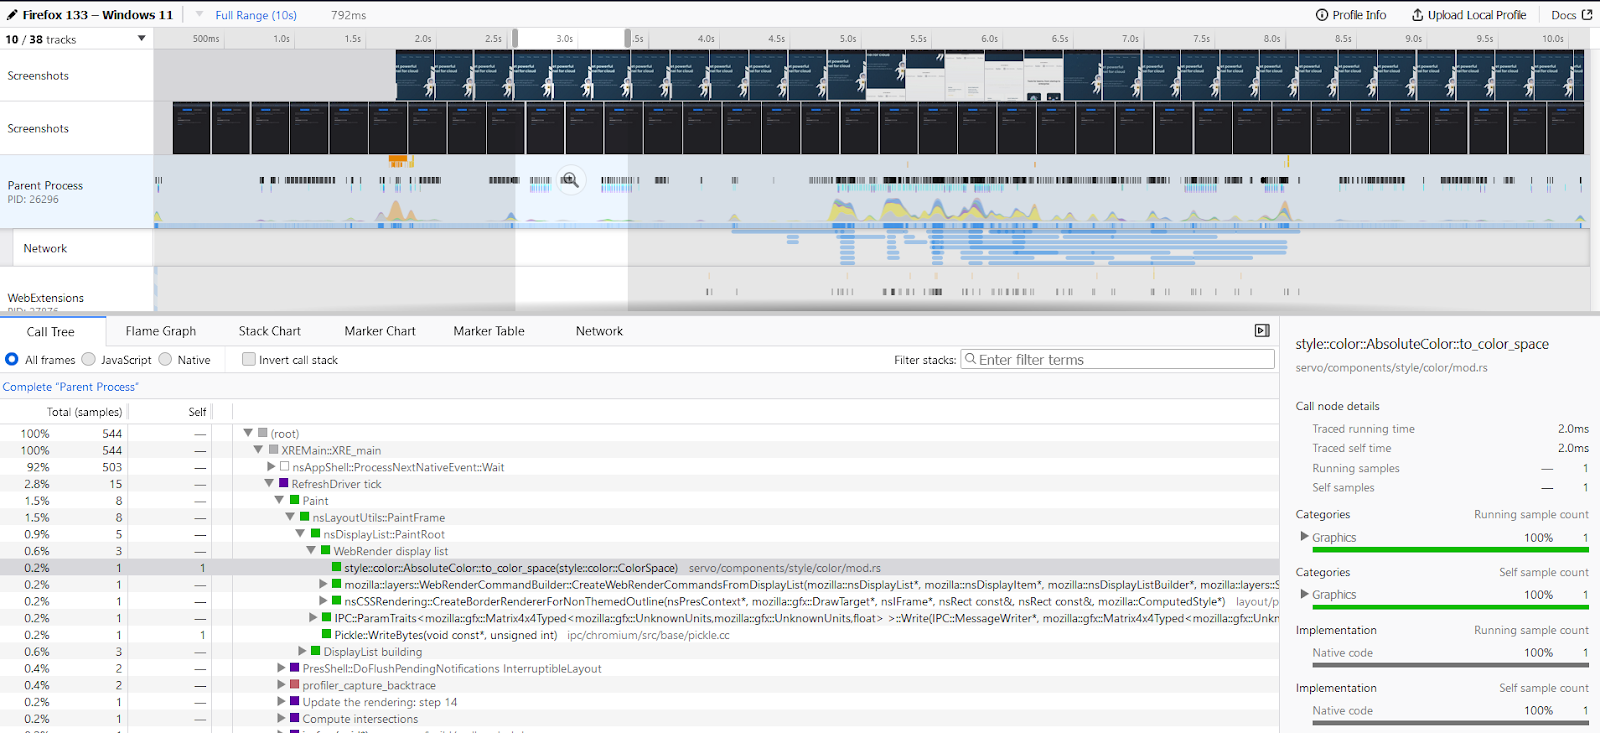
    4 – Firefox Profiler

    The Firefox Profiler is a remarkably powerful yet often overlooked performance auditing tool directly integrated into the Firefox browser. Unlike many other profiling solutions that require external installations or complex setups, it’s readily accessible, making it an incredibly convenient option for developers.

    What truly sets it apart is its ability to provide a holistic view of a website’s performance from your own network on your own computer. This is different from most other tools that use virtual machines on the cloud to test your website.
    By testing the website on your own computer, you can test not just network activity but also intricate details of JavaScript execution, rendering processes, and even interactions with the browser’s internal systems. The profiler’s data is presented across multiple interactive visualizations.

    The “Call Tree” provides a hierarchical breakdown of function calls, allowing developers to pinpoint exactly where the code spends its time. The “Flame Graph” visually represents these calls as stacked bars, making it easy to identify performance bottlenecks at a glance.

    The “Stack Chart” provides insight into the call stack and functions. The “Marker Chart” provides an overall timeline with specific markers for rendering, javascript execution, and other key processes, allowing developers to visualize how these different processes interact.

    Why it’s a great alternative:The depth of information offered by the Firefox Profiler goes beyond simple performance metrics. It captures low-level browser operations, which enable developers to diagnose issues that might not be apparent through other tools. This feature is especially useful for tracking how efficiently data is handled within a web application.

    Suggested read: Uptime Monitoring Tools: Why You Need Them, and What to Look for

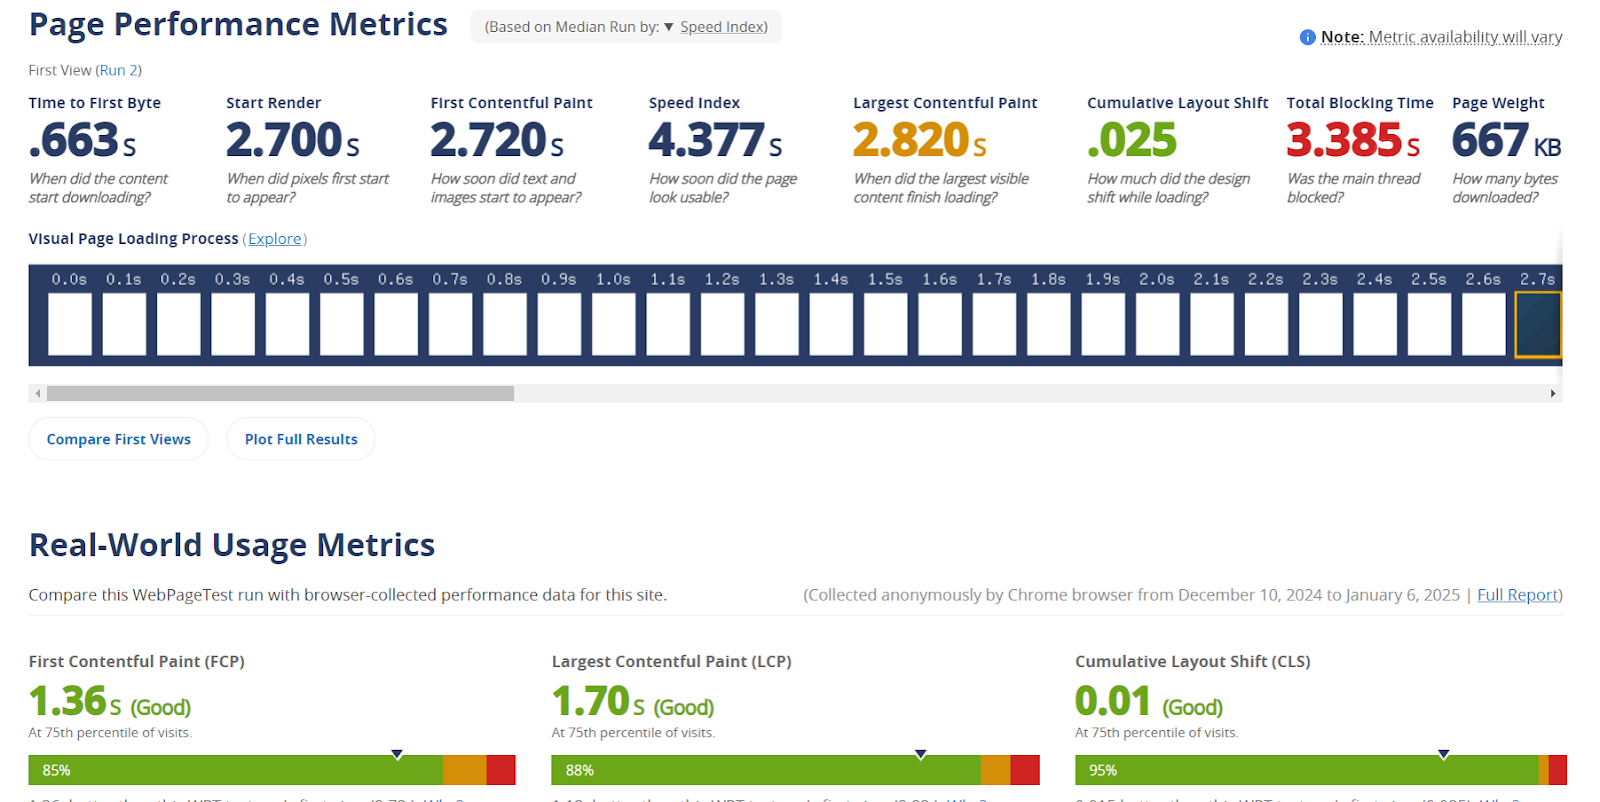
    5 – WebPageTest

    Catchpoint’s WebPageTest is a customizable testing tool that allows deep control over test conditions such as geographic locations, connection speeds, and device types. It is also well known for its advanced waterfall charts and visual rendering metrics.

    A clean and concise interface provides developers insights into critical metrics such as TTFB, FCP, Speed Index, LCP, CLS, and TBT. These metrics are further enriched by an “Is it Quick?” assessment, which highlights key aspects like render-blocking requests and identifies if the largest content is rendered too late.

    This allows technical users to target specific performance challenges, such as optimizing resource loading, image delivery, and JavaScript processing. The platform also generates a detailed filmstrip showing page load progression, which lets developers visualize the website’s rendering over time.

    WebPageTest is best for developers who need highly granular control over testing environments and for in-depth debugging of performance issues. It presents both synthetic test results and real-user metrics. Furthermore, users can even inspect videos of each test run to identify any visual issues during page load. By breaking down the resources by type and size, WebPageTest makes it easy for developers to identify areas that need to be optimized. This powerful set of features gives developers all the tools they need to find performance bottlenecks.

    Why it’s a great alternative:It offers advanced configuration options for more complex testing requirements. Additionally, WebPageTest provides practical recommendations categorized into “Opportunities”, “Tips”, and “Pro” experiments. The “Is it Usable?” and “Is it Resilient?” sections give performance metrics for these key web factors often missed by other tools.

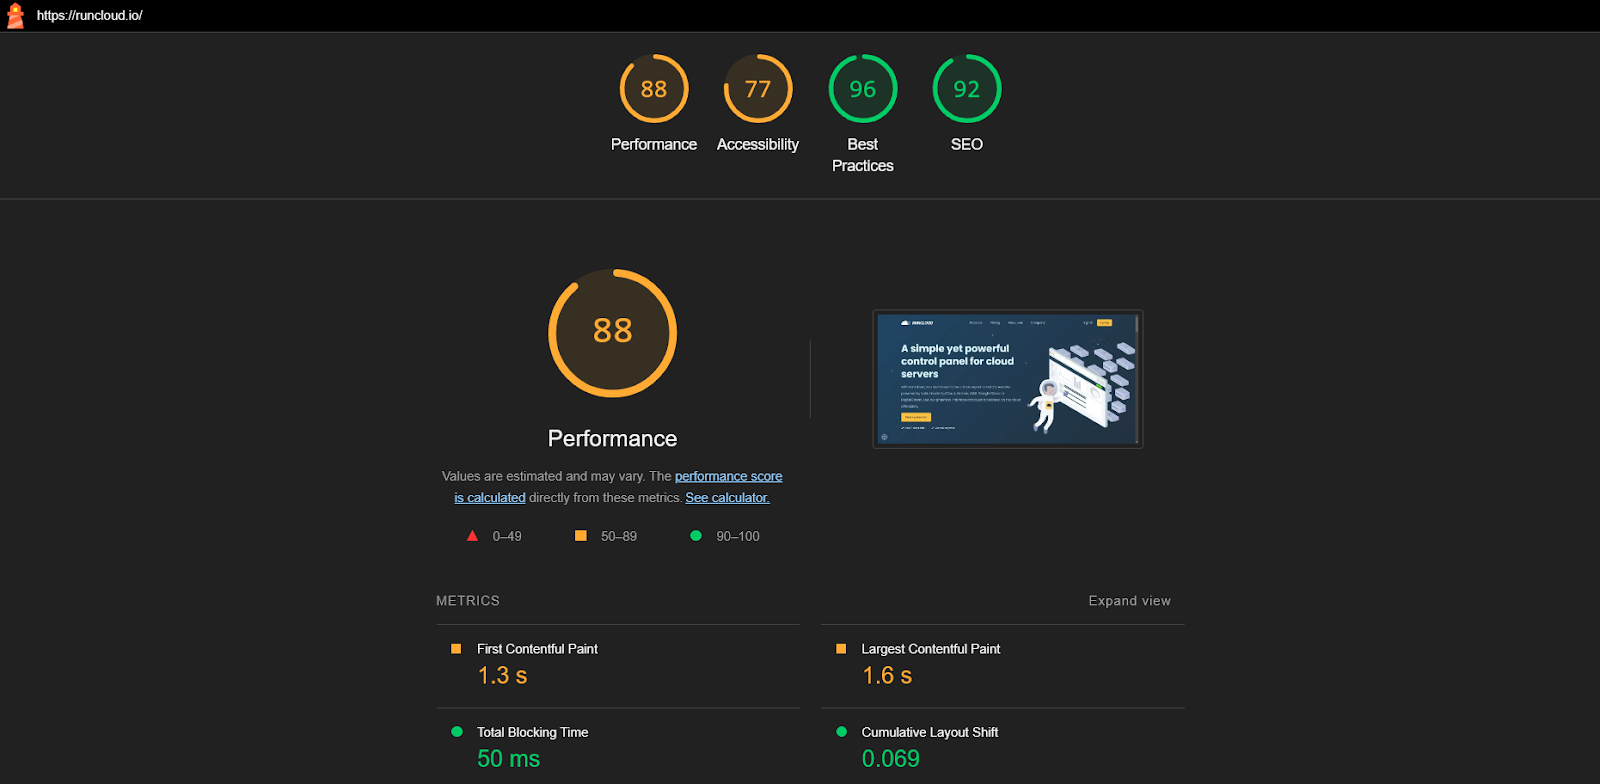
    6 – Lighthouse (Chrome DevTools)

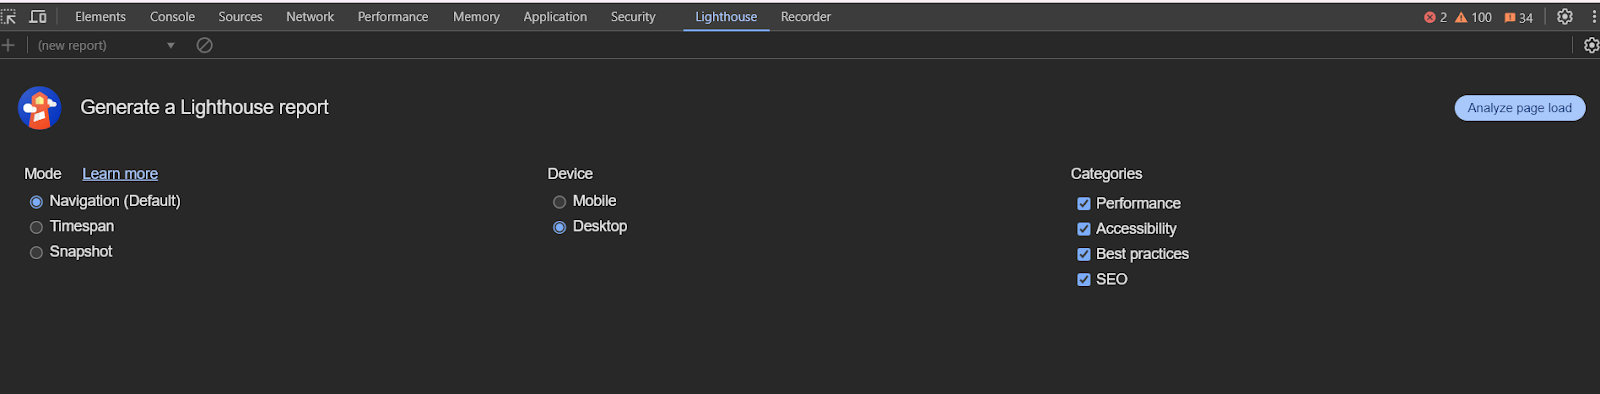
    The Lighthouse analyzer is built into Chromium browsers and provides a comprehensive website performance audit. You can open it by navigating to the desired URL in your browser and switching to the Lighthouse tab in the Developer tools menu.

    The Lighthouse report breaks down the performance analysis into four key categories: Performance, Accessibility, Best Practices, and SEO. The report begins with an overall performance and individual scores for each performance metric. It provides both numeric values and a visual grade indicating whether the metric is considered good, needs improvement, or is poor.

    It also flags issues related to initial server response time, JavaScript execution, and network payloads, giving a full look at the site’s performance. For accessibility, the report identifies issues with names and labels, ARIA attributes, contrast, tables and lists, and navigation using headings, which developers can use to ensure a website is usable to everyone.

    Why it’s a great alternative: It is integrated directly into Google Chrome and provides instant performance audits without leaving the browser. This is especially useful during development for iterative feedback loops.
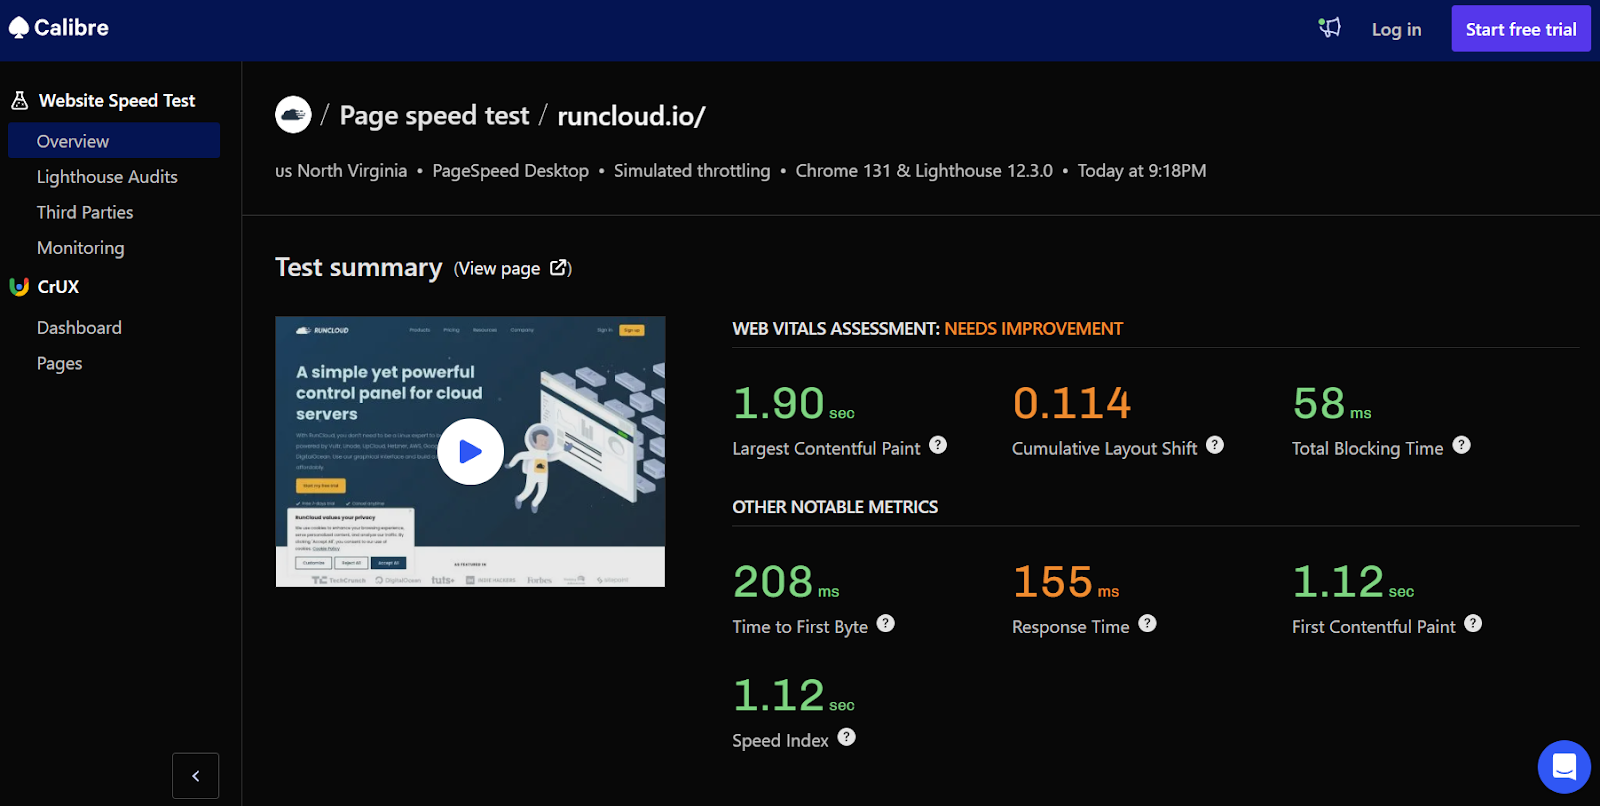
    7 – Calibre

    The Calibre website audit tool offers a compelling suite of features for web developers and comes with real-user data and long-term monitoring capabilities. You can use its Chrome User Experience Report (CrUX) functionality to accurately view how real users experience a website across different devices (desktop, tablet, and phone).

    It presents this data not just as a single data point but provides a view of how the metrics change over time. This long-term perspective allows developers to detect changes in performance over the long term and make informed optimization decisions. Additionally, a clear indication of whether the site is passing the core web vitals assessment provides a quick, high-level overview of the website’s status.

    By offering a 75th percentile view, Calibre reliably represents the user experience rather than relying on averages that outliers can skew. The histogram visualization gives developers a clear idea of the metric’s distribution, highlighting the range of user experiences.

    Why it’s a great alternative: Calibre offers granular data over time and alerts you to performance regressions. It’s designed for teams that need to integrate performance testing into their CI/CD pipelines. This allows developers to observe trends, identify regressions after updates, and ensure long-term site health. This long-term trend analysis is particularly valuable because it allows you to make strategic decisions based on real user data. This continuous monitoring and integration approach complements GTmetrix’s ad-hoc analysis.

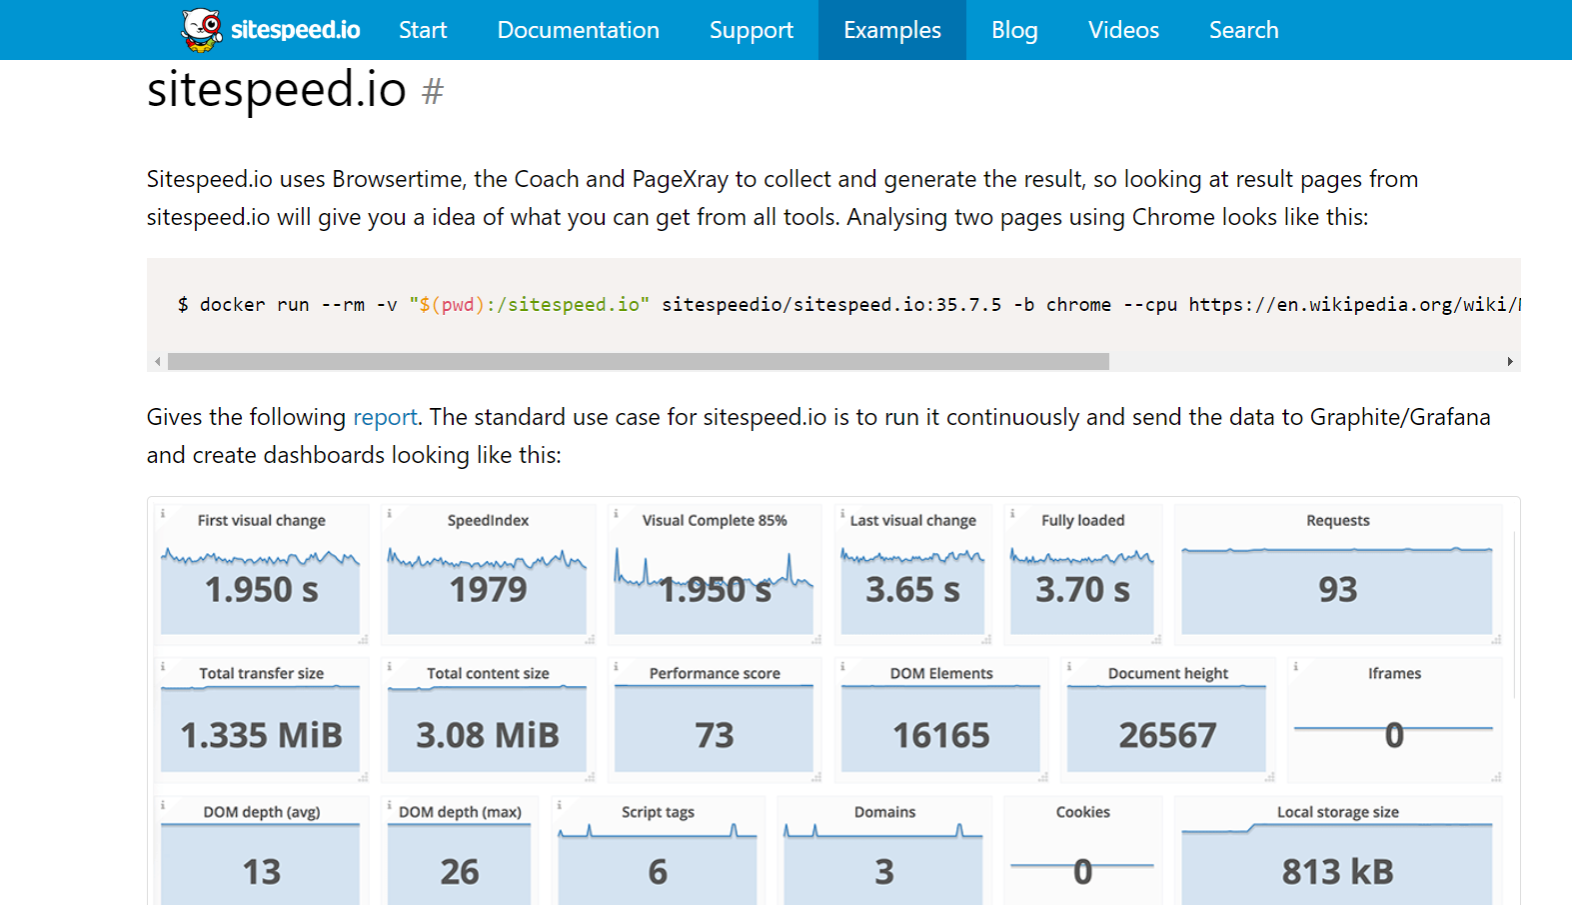
    8 – SiteSpeed.io

    Sitespeed.io is a comprehensive, open-source web performance monitoring and testing platform that prioritizes user control and data ownership. Unlike many commercial offerings, it allows users to run their own performance tests, store their own data, and customize the analysis process. This commitment to transparency and flexibility is a core differentiator.
    The platform is not just a single tool but a collection of modular components, including Browsertime (for timing metrics), Coach (for best practice analysis), PageXray (for page resource analysis), and Throttle (for network emulation), all managed and unified by the primary sitespeed.io tool. This modular design enables users to assemble a performance analysis workflow that precisely meets their needs, making it suitable for both simple tests and complex, large-scale monitoring.
    Further, it emphasizes not being a “black box” solution by allowing the end user to configure different parameters through its command-line interface. This flexibility and control extend to deployment and integration – Sitespeed.io can be easily deployed using Docker, which provides a ready-to-go environment with necessary browsers and dependencies, drastically simplifying the setup process. It also offers traditional installation using npm, which opens up usage for many developers.

    It supports visualization integrations with time-series databases such as Graphite, InfluxDB, and Grafana. These are industry-standard tools that allow the creation of custom performance dashboards and long-term trend analysis. Additionally, the ability to run tests on Android phones and through custom scripting means sitespeed.io adapts to different testing needs.

    Why it’s a great alternative: Sitespeed.io provides a developer-friendly approach to performance monitoring, which makes it ideal for those who want the flexibility of an open-source tool and the ability to customize their performance testing pipelines. This dedication to privacy and open-source principles sets it apart from many commercial solutions, making it an attractive option for developers and organizations that value data security and transparency.

    Final Thoughts

    Throughout this post, we’ve discussed various web performance analysis tools and explored the strengths and unique benefits each offers. We have compared and evaluated various tools, and whether you are looking for a one-time audit, ongoing monitoring of site speed and core web vitals, or debugging locally with browser tools, you can find something that fits your needs.

    If you are building a website, good website performance isn’t just about using the right analysis tools – it begins with a solid foundation, and having a well-configured and responsive server is essential.

    A powerful hosting environment can significantly improve TTFB and reduce the time it takes for your site to begin loading.

    This is where RunCloud comes in.

    RunCloud gives you control over server configurations and optimizes your server-side processes. This can drastically reduce your site’s load time and improve the user’s experience.

    Ready to take your site’s performance to the next level?

    Start building lightning-fast websites today with RunCloud!

    FAQs on GTmetrix Alternatives

    Is GTmetrix now paid?

    While GTmetrix offers a free version with many features, it also offers paid plans that unlock more advanced capabilities, such as increased test limits, monitoring, and detailed historical analysis. The free version is still functional but has limitations compared to the paid versions.

    What is a good website loading speed?

    Generally, a good website loading speed is under 3 seconds for the initial page load, with under 2.5 seconds being optimal; however, Core Web Vitals metrics such as LCP should be under 2.5 seconds.

    Is PageSpeed Insights reliable?

    PageSpeed Insights is a reliable tool for measuring web performance because it is based on the same methodology Google uses to assess website performance. The provided data and recommendations align with Google’s SEO ranking factors and best practices, making it a key tool for SEO optimization.

    Is GTmetrix better than PageSpeed Insights?

    GTmetrix offers more granular detail with its waterfall analysis and is generally more flexible for testing various parameters. At the same time, PageSpeed Insights provides scores and recommendations directly relevant to Google’s ranking criteria. Which is better depends on your specific needs, such as deep performance debugging or general compliance with Google’s guidelines.

    Does GTmetrix use Lighthouse?

    Yes, GTmetrix incorporates Lighthouse data into its reports. It runs a Lighthouse audit to generate its PageSpeed and other associated performance scores. GTmetrix is a wrapper around Lighthouse and other performance analysis tools, providing additional metrics and functionality.

    What is the difference between DebugBear and GTmetrix?

    DebugBear focuses more on continuous monitoring and detailed performance tracking over time, making it excellent for catching performance regressions. GTmetrix is primarily used for point-in-time performance analysis, offering detailed waterfall charts and audits.

  • How to Partition and Format Disk Drives on Linux? (Detailed Guide)

    How to Partition and Format Disk Drives on Linux? (Detailed Guide)

    Disk, partitions, ext4, mkfs, /dev/sda, filesystem – these are common keywords when working with Linux servers, but what do they really mean?

    Managing storage is a fundamental aspect of server administration, and it can initially seem intimidating. Terms like formatting, mounting, partition table (GPT, MBR), and choosing the right file system type (NTFS, FAT32, exFAT) can quickly become overwhelming.

    This guide explains the essential concepts of disk partitioning and disk formatting in Linux. We’ll start by explaining what disk partitioning and disk formatting are – and why they’re necessary. Then, we’ll explore different types of file systems and help you understand their strengths and weaknesses. Finally, we’ll provide step-by-step instructions for both partitioning and formatting your disk on Linux systems.

    So let’s get started!

    What is a Disk Drive?

    A disk drive, also known as a storage drive, is a non-volatile storage device for a computer. This device retains data even when the system loses power. The drive stores the operating system, applications, and user data, and the computer uses it to both read and write data.

    Suggested read: 9 Best Linux Distros in 2024

    What is a disk drive

    Types of Disk Drives

    Disk drives come in all shapes and sizes, each with its own speed and storage capabilities. Knowing their differences can help you pick the right one for your needs.

    • Hard Disk Drives (HDDs): HDDs store data on spinning magnetic platters and use a read/write head that moves across the surface. They are a cost-effective option for large storage capacities, but their mechanical nature results in slower access times.
    • Solid-State Drives (SSDs): SSDs use flash memory to store data, eliminating moving parts and providing significantly faster read/write speeds than HDDs. This results in faster boot times, application loading, and overall system responsiveness, although typically at a higher cost per gigabyte.
    • NVMe SSDs (Non-Volatile Memory Express SSDs): NVMe SSDs are a type of SSD that uses a high-speed PCIe interface. They deliver even greater performance than standard SATA SSDs. This interface allows for much higher bandwidth and lower latency, making them ideal for demanding workloads.

    Suggested read: How to Check Running Processes in Linux Using ps, top, htop, and atop Commands

    What is Disk Partitioning?

    Disk partitioning is a fundamental aspect of storage management that divides a physical hard drive (or other storage device such as an SSD) into multiple logical sections. System administrators perform this division to organize data, isolate operating systems, or improve system performance.

    Each partition functions as an independent unit, almost as if it were a separate physical disk. The operating system then treats each partition as a distinct volume. This separation allows multiple file systems and operating systems to coexist on a single physical drive and simplifies backup and recovery processes.

    Suggested read: How to Kill a Process in Linux From the Command Line

    How to Partition Disk Drive on Linux

    Here’s a step-by-step guide to partitioning a disk drive on Linux:

    Step 1: Identify the Disk

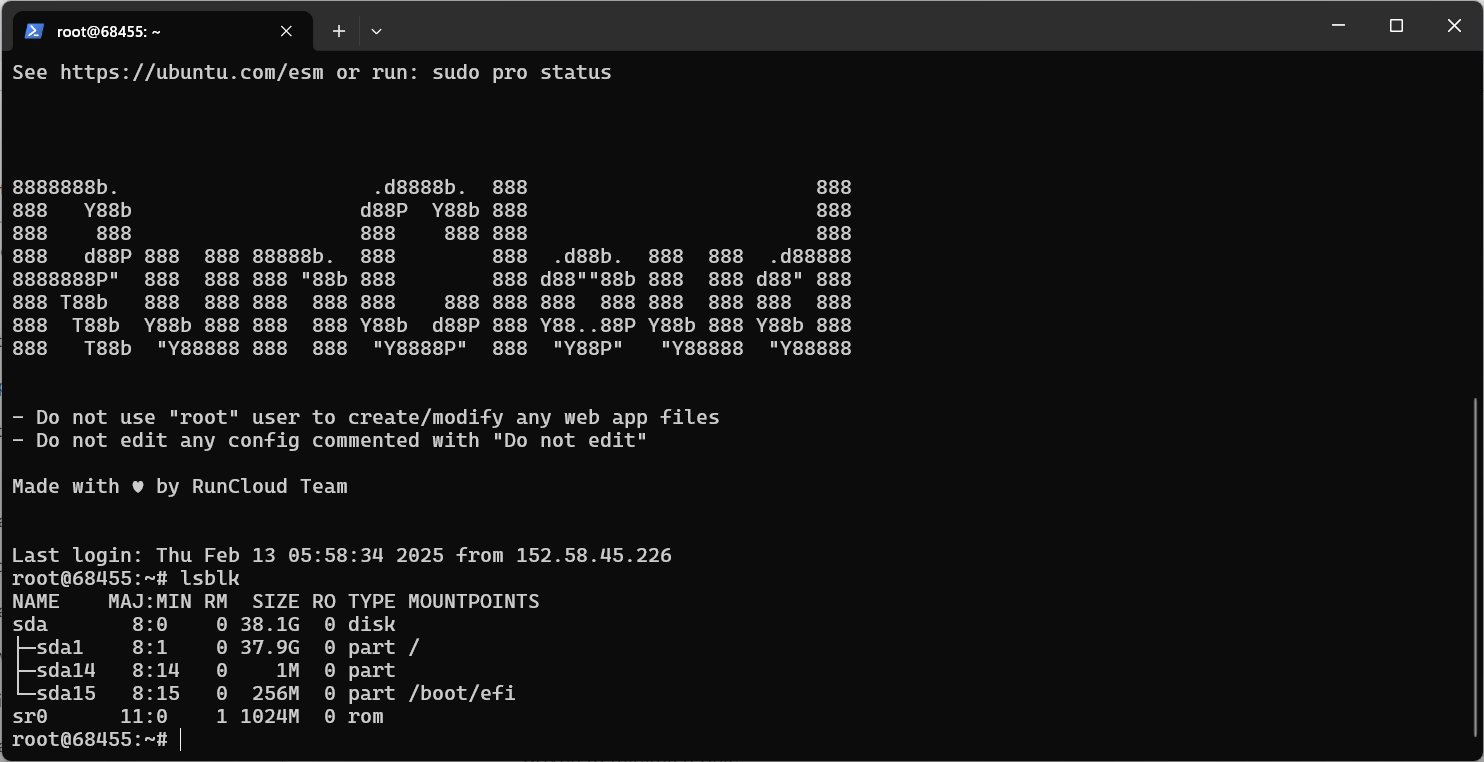
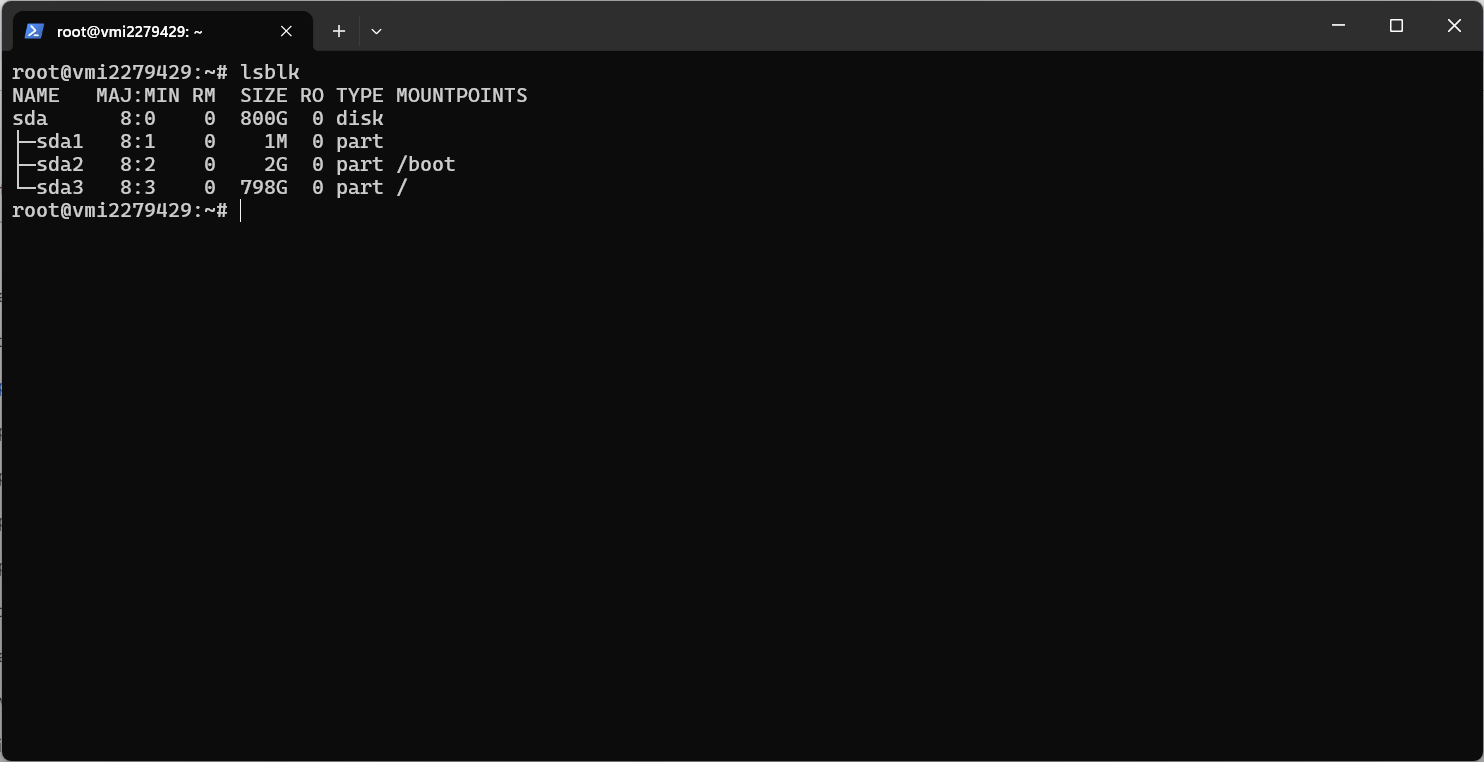
    Before partitioning a disk, you need to identify the correct device name. Use the lsblk command in your terminal to list all block devices (disks and partitions) connected to your system.

    After executing the command, carefully examine the output and pay attention to the NAME, SIZE, TYPE, and MOUNTPOINT columns.

    You’re looking for a disk (indicated by TYPE being “disk”) that is not currently mounted (has no MOUNTPOINT) or is a disk you are sure you want to repartition (which results in losing all data stored on it). The NAME will typically be something like /dev/sda, /dev/sdb, /dev/nvme0n1, etc.

    Be absolutely certain you have the correct device name – partitioning the wrong disk will result in data loss.

    If in doubt, do not proceed!

    To minimize risk, disconnect any non-essential external drives.

    Step 2: Choose a Partitioning Tool

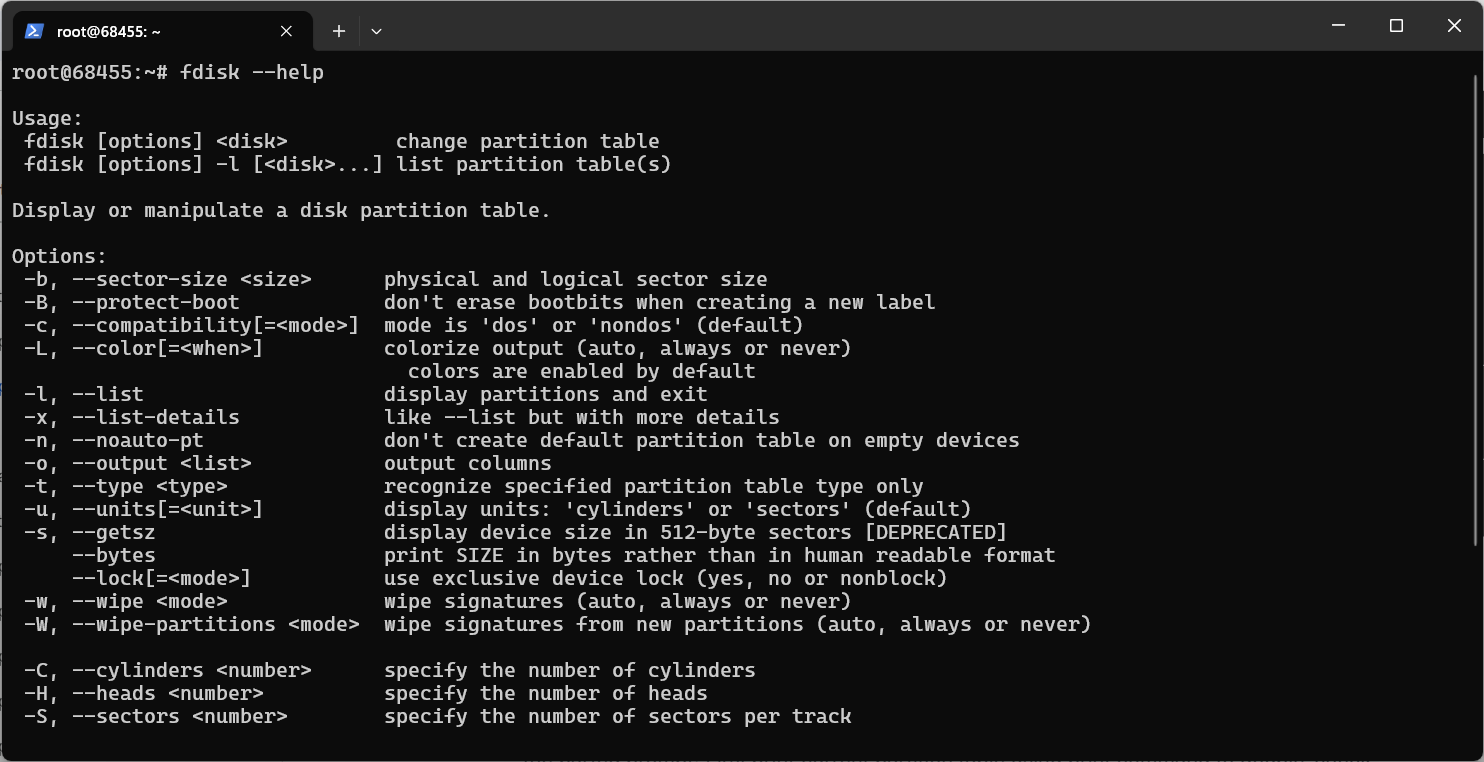
    Linux offers several tools for partitioning disks, each with its own strengths. For command-line interaction, fdisk and parted are popular choices. fdisk is a classic, menu-driven utility suitable for most tasks, especially on disks using the older MBR partition scheme. On the other hand, parted supports both MBR and the newer GPT (GUID Partition Table) scheme and is often preferred for disks larger than 2TB.

    The cfdisk utility offers a text-based interface that provides a middle ground between fdisk’s simplicity and parted’s power. GParted is a widely used and user-friendly option for a graphical interface, but it is not useful for Linux servers as they don’t have a GUI.

    We’ll focus on using parted for this guide due to its versatility. To start the interactive partitioning session, we’ll use parted /dev/sdX (replacing /dev/sdX with the actual disk name).

    Step 3: Create a New Partition

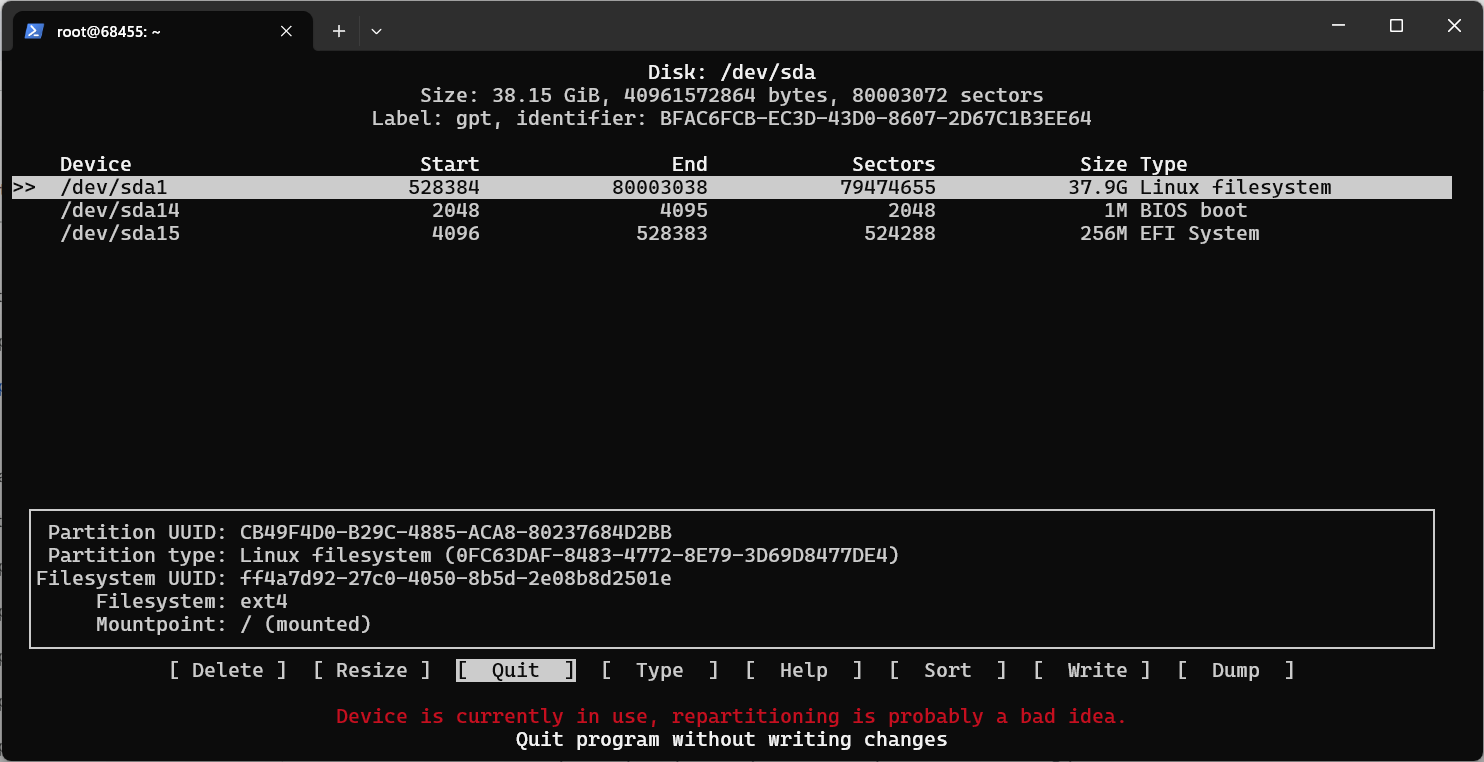
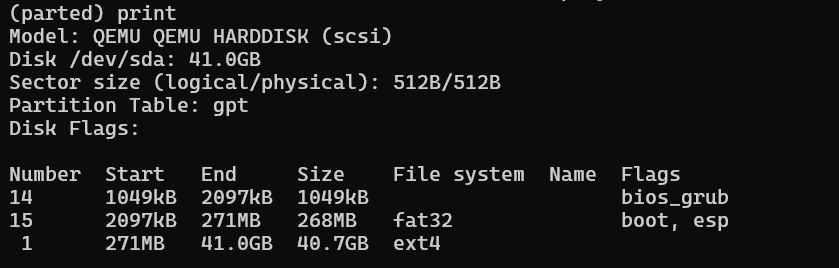
    Once you’ve started parted with the correct disk (e.g., sudo parted /dev/sdb), you’ll be at the parted prompt. First, print the current partition table using the print command to double-check the device.

    • Select Partition Table Type (if needed): If the disk is brand new or you want to change the partition table type, use the mklabel command. For example, (parted) mklabel GPT.
    • Create the Partition: Use the mkpart command. You’ll be prompted to enter the following:
      • Partition type: primary, extended (only on MBR), or logical (only within an extended partition). With GPT, you’ll almost always choose the primary.
      • File system type: This is a hint for later formatting; it doesn’t actually format the partition. Choose ext4, fat32, ntfs, etc., as appropriate.
      • Start: Specify the partition’s starting point, either in megabytes (MB) or gigabytes (GB) or as a percentage of the disk (e.g., 0%).
      • End: Specify the partition’s ending point using the same units as the start (e.g., 100GB or 100%).
      • Example: (parted) mkpart primary ext4 0% 100% (creates a primary partition using the ext4 formatting that takes the entire disk).
    • Repeat (if needed): Repeat the mkpart command for each additional partition you want to create.

    Step 4: Verify the Partition

    After creating the partition(s), you can verify the changes using the print command within the parted prompt. This command displays the current partition table, showing the partition number, start and end points, size, file system type (hint), and any flags. Carefully review this output to ensure the partitions are as you intended.

    If anything looks incorrect, you can use rm <number> (e.g., rm 1 to remove partition number 1) to delete a partition within parted and recreate it.

    Once satisfied, type quit to exit parted and save the changes to the disk.

    What is Disk Formatting?

    Disk formatting prepares a storage device (the whole disk or a partition) for use by an operating system. This process creates a specific file system – a structured method for organizing and storing files. The operating system uses this file system to manage data on the device. Formatting lays the groundwork that defines how the operating system will track files, directories, and free space.

    Suggested read: How to Check Linux CPU Usage or Utilization? (5 Ways)

    What is a File System?

    A file system is the underlying structure that an operating system uses to manage data on a storage device. It determines how files are named, stored, organized, and accessed. Think of it as the librarian of your hard drive, keeping track of where everything is located and how to retrieve it. Without a file system, a storage device would just be a collection of unorganized data.

    There are multiple popular file system formats:

    • ext4 (Fourth Extended Filesystem): The ext4 file system is the standard and most widely used file system for Linux distributions. It’s a journaling file system that records changes before they are written to disk. This improves reliability and reduces the risk of data corruption in case of power failures or system crashes. ext4 offers excellent performance, supports large files and volumes, and is generally the best choice for Linux server environments. It also includes delayed and multiblock allocation features to enhance write performance.
    • NTFS (New Technology File System): NTFS is the primary file system used by Windows operating systems. Like ext4, it’s a journaling file system with improved reliability and data recovery capabilities. NTFS supports features such as file permissions, encryption (BitLocker), disk quotas, and shadow copies (for backups and restoring previous versions of files). It also supports much larger file and partition sizes than older FAT systems.
    • FAT32 (File Allocation Table 32): FAT32 is an older file system known for its broad compatibility. It’s commonly used on USB flash drives and SD cards because it can be read and written by virtually any operating system, including Windows, macOS, and Linux. However, FAT32 has significant limitations: it supports a maximum file size of only 4GB and a practical maximum volume size of 2TB. This makes it unsuitable for storing large files like modern video files.
    • exFAT (Extended File Allocation Table): exFAT is a Microsoft-developed file system designed to overcome the limitations of FAT32 while maintaining good cross-platform compatibility. It supports very large file and partition sizes, making it suitable for storing large media files and using large external drives. exFAT is often used on SDXC cards and large USB drives when compatibility with Windows and macOS is needed. It is often the preferred filesystem for USB thumb drives.

    Suggested read: How do you check if the TCP port is open, closed, or in use on Linux?

    How to Format a Disk Drive on Linux

    Here’s a step-by-step guide to formatting a disk drive (or, more accurately, a partition) on Linux:

    Step 1: Identify the Partition to Format

    Before formatting, you must know the exact device name of the partition you want to format. Formatting the wrong partition will result in irreversible data loss.

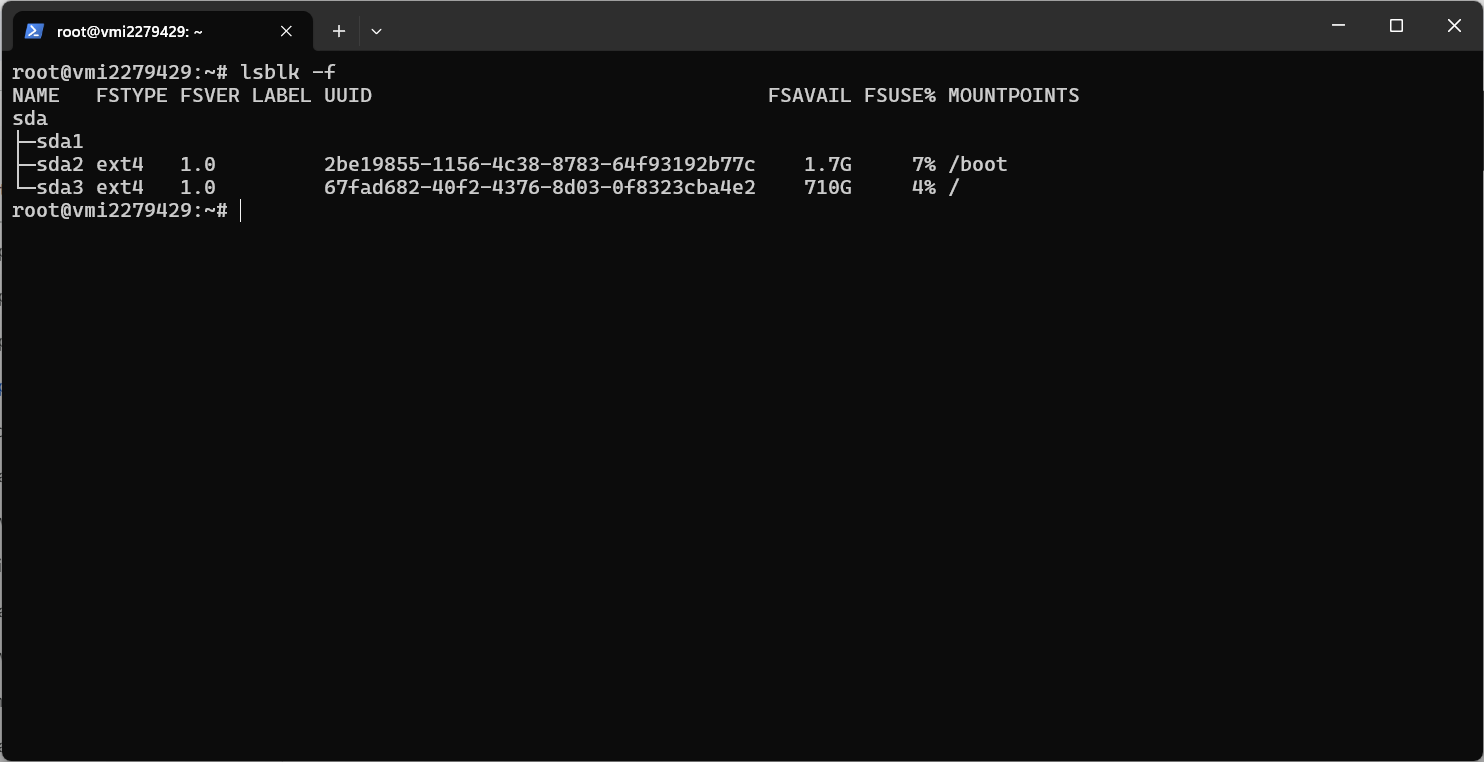
    Use the lsblk command in your terminal to list all block devices and their partitions. Carefully examine the output, paying attention to the NAME, SIZE, TYPE, and MOUNTPOINT columns.

    You’re looking for the specific partition (e.g., /dev/sda1, /dev/sdb2, /dev/nvme0n1p1 – the “p” and number indicate a partition, not the whole disk). The TYPE column will show “part” for partitions. Double-check the SIZE to ensure it matches the partition you intend to format.

    Step 2: Unmount the Partition

    If the partition you intend to format is currently mounted (meaning it’s accessible as a directory), you must unmount it before formatting. Use the umount command followed by either the device name or the mount point. For example:

    • sudo umount /dev/sdX1 (replace /dev/sdX1 with the actual partition name)
    • sudo umount /mnt/mydirectory (if the partition is mounted at /mnt/mydirectory)

    If the umount command reports that the device is busy, it means a process is still using the partition. You must identify and stop that process before you can unmount it.

    Step 3: Format the Partition

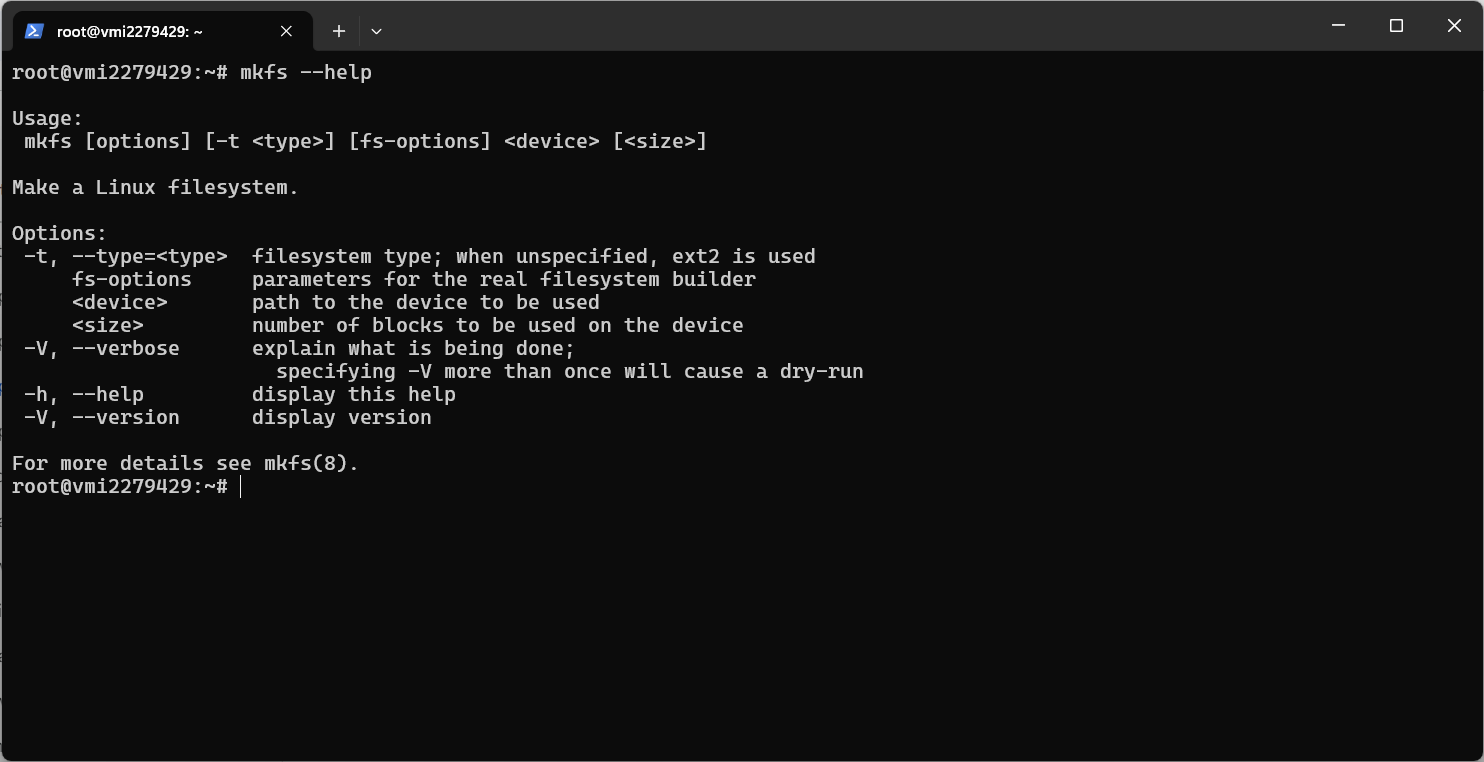
    Use the mkfs command (make file system) with the appropriate option for your chosen file system. The general format is: sudo mkfs -t [filesystem type] [options] /dev/sdX1. The -t option specifies the filesystem type. Here are the specific commands:

    • For ext4: sudo mkfs -t ext4 /dev/sdX1
    • For FAT32: sudo mkfs -t vfat -F 32 /dev/sdX1 (the -F 32 specifies FAT32; you can also use -F 16 for FAT16, but this is rarely needed)
    • For NTFS: sudo mkfs -t ntfs /dev/sdX1
    • For exFAT: sudo mkfs -t exfat /dev/sdX1

    Remember to replace /dev/sdX1 with the actual partition name in the above examples.

    Step 5: Verify the Format

    After formatting the partition, you can verify the result using several methods:

    • lsblk -f: This command shows each partition’s file system type (FSTYPE) and UUID. Check that the FSTYPE matches what you intended.
    • blkid /dev/sdX1: This command specifically shows the specified partition’s UUID and TYPE (file system).
    • Mount and check: Mount the partition (e.g., sudo mount /dev/sdX1 /mnt) and then use df -h to check the disk space and file system type. This confirms that the partition is usable. After testing, you can unmount the partition with the command sudo umount /dev/sdX1 or sudo umount /mnt if that is where it is mounted.

    Suggested read: How to Find Most Used Disk Space Directories and Files in Linux

    Wrapping Up: Disk Partitioning and Formatting

    Understanding the different file systems, choosing the right tools, and, most importantly, double-checking every command before execution are critical for maintaining data integrity and system stability. Remember to always back up important data before making any changes to partitions.

    Managing Linux servers, especially tasks like disk partitioning and monitoring, can seem daunting. However, with tools such as RunCloud, the process becomes significantly easier and more streamlined.

    RunCloud provides a user-friendly web interface that simplifies server management tasks, including monitoring disk usage, managing services, and deploying applications. Instead of wrestling with the command line for every operation, you can use RunCloud’s intuitive dashboard to oversee your server’s health and performance. This allows you to focus on your applications and websites rather than getting bogged down in the complexities of server administration.

    Ready to experience the ease of Linux server management? Start your free trial with RunCloud today!

    FAQs on Partitioning and Formatting Disk Drives on Linux

    What is the difference between partitioning and formatting?

    Partitioning divides a physical hard drive or storage device into logical sections. Each section, a partition, functions like an independent disk. On the other hand, formatting prepares a partition (or an entire unpartitioned disk) by creating a specific file system (e.g., ext4, NTFS, FAT32). This file system allows an operating system (such as Linux or Windows) to organize, store, and retrieve files. Partitioning divides the disk while formatting prepares a partition for data.

    How do I know which file system to choose?

    The best file system depends on system compatibility and your specific needs. Ext4 is generally recommended for Linux servers due to its performance, reliability, and features. If you require compatibility with Windows, NTFS or exFAT are good choices, especially for USB drives. FAT32 offers broad compatibility but has limitations on maximum file size and max volume size. Consider factors like journaling (for data recovery) and support for large files when selecting.

    Can I resize partitions without losing data?

    Yes, but it’s risky and requires careful planning. Tools like parted, GParted, and GNOME Disks allow resizing, but always back up your data first. Shrinking a partition is generally safer than expanding it, especially if the partition being expanded is at the end of the disk. If free space isn’t directly adjacent to the partition you’re expanding, data movement is required, increasing the risk of data loss if interrupted.

    What tools are recommended for disk management on Linux?

    For command line (CLI) use, fdisk, parted, and cfdisk are powerful for partitioning.
    mkfs (e.g., mkfs.ext4, mkfs.vfat) is used for formatting.
    For a GUI, GParted and GNOME Disks offer user-friendly interfaces for both partitioning and formatting.
    lsblk displays information about block devices (disks and partitions).
    blkid shows UUIDs and file system types.
    df helps monitor disk space usage.

    Is it safe to format a disk drive?

    Formatting is safe for the drive but permanently erases all data on the selected partition or disk. Always double-check that you’ve selected the correct partition (using lsblk, for example) before formatting. Ensure you have backups of any important data.

    How do I recover data from a formatted drive?

    Data recovery after formatting is possible but not guaranteed, and it becomes increasingly difficult the more the drive is used after formatting. Specialized data recovery software (often commercial) attempts to reconstruct file system structures. To maximize recovery chances, immediately stop using the drive after accidental formatting. Professional data recovery services are often the best option for critical data.

    What are primary, extended, and logical partitions?

    These terms relate to the older MBR (MS-DOS) partition table scheme. An MBR disk can have a maximum of four primary partitions. To overcome this limitation, one primary partition can be designated as an extended partition, which can then be subdivided into multiple logical partitions. GPT (GUID Partition Table), the modern standard, doesn’t have these limitations and supports many more partitions directly.

    How do I check disk space usage on Linux?

    The df (disk free) command is the primary tool. df -h displays usage in human-readable format (e.g., GB, MB). You can also use du (disk usage) to see the size of specific directories and files. GNOME Disks provides a graphical view of disk space.

    Can you partition a drive without formatting?

    Yes, you can. Partitioning simply creates the divisions on the disk. Formatting is a separate step that creates a file system within a partition to make it usable by an operating system. You might partition a disk and leave some partitions unformatted for later use or different purposes.

  • How to Restrict WordPress Admin Access by IP Address (Easy Guide)

    How to Restrict WordPress Admin Access by IP Address (Easy Guide)

    Open access to your wp-admin directory and wp-login.php makes it a prime target for brute-force attacks and unauthorized access.

    By whitelisting specific IP addresses and implementing WordPress admin access control, you can effectively stop hackers, block automated bots, and significantly reduce failed login attempts.

    This WordPress tutorial will show you how to restrict WordPress admin access by IP address by either editing the .htaccess file directly, applying NGINX configurations, or using a security plugin.

    Whether you use NGINX, Apache, or rely on a managed server provider, this guide will teach you how to whitelist (and blacklist) specific IP addresses.

    Let’s get started!

    What is IP Address Restriction?

    IP Address Restriction, also known as IP whitelisting, is a security measure that limits access to a specific resource, such as your WordPress admin area (/wp-admin), to only a pre-approved list of IP addresses.

    Simply put, it is like a digital security guard that allows only those with the correct “address” to enter. It says, “Only connections from these specific IP addresses are allowed to access this website area”.

    Why Restrict Admin Access by IP Address?

    Restricting admin access by IP address adds another layer of security to your WordPress site. By default, the admin login page is accessible to anyone on the internet, which makes it a prime target for malicious actors.

    IP restriction makes it exponentially more difficult for attackers to access the WordPress backend. Even if an attacker obtains valid login credentials (through phishing, malware, or other means), they will still be blocked if their IP address is not on the approved list. This is especially useful if you and your team work from fixed locations with static IPs.

    Additionally, brute force attacks involve repeatedly attempting to guess login credentials. Limiting access to only trusted IP addresses reduces the possibility of brute-force attacks originating from other locations. Although you can also use security plugins to stop brute force attempts, IP restriction stops them before they even start. If rate limiting is in place, this significantly reduces the load on your server and prevents potential account lockouts for legitimate users.

    Suggested Read: How to Unban IP Address in Fail2Ban? (Step-By-Step Guide)

    How To Restrict WordPress Admin Access by IP Address

    There are several ways to restrict access to your WordPress admin area, each with advantages and disadvantages. Here are three common methods:

    Method 1: Using .htaccess File

    The .htaccess file is a configuration file used by Apache web servers. You can directly edit it to restrict access based on IP addresses. Follow the steps below to do this:

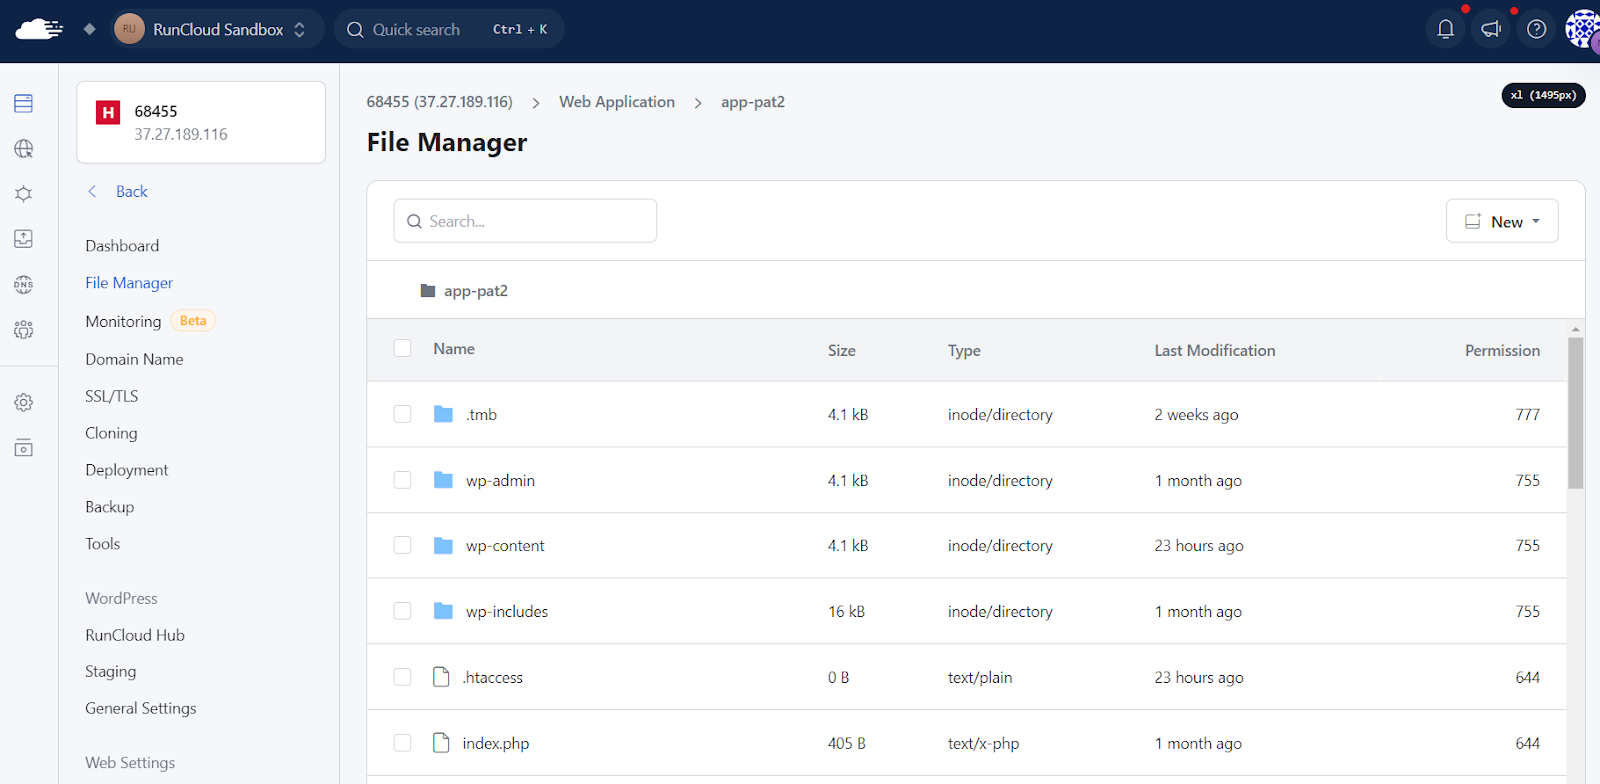
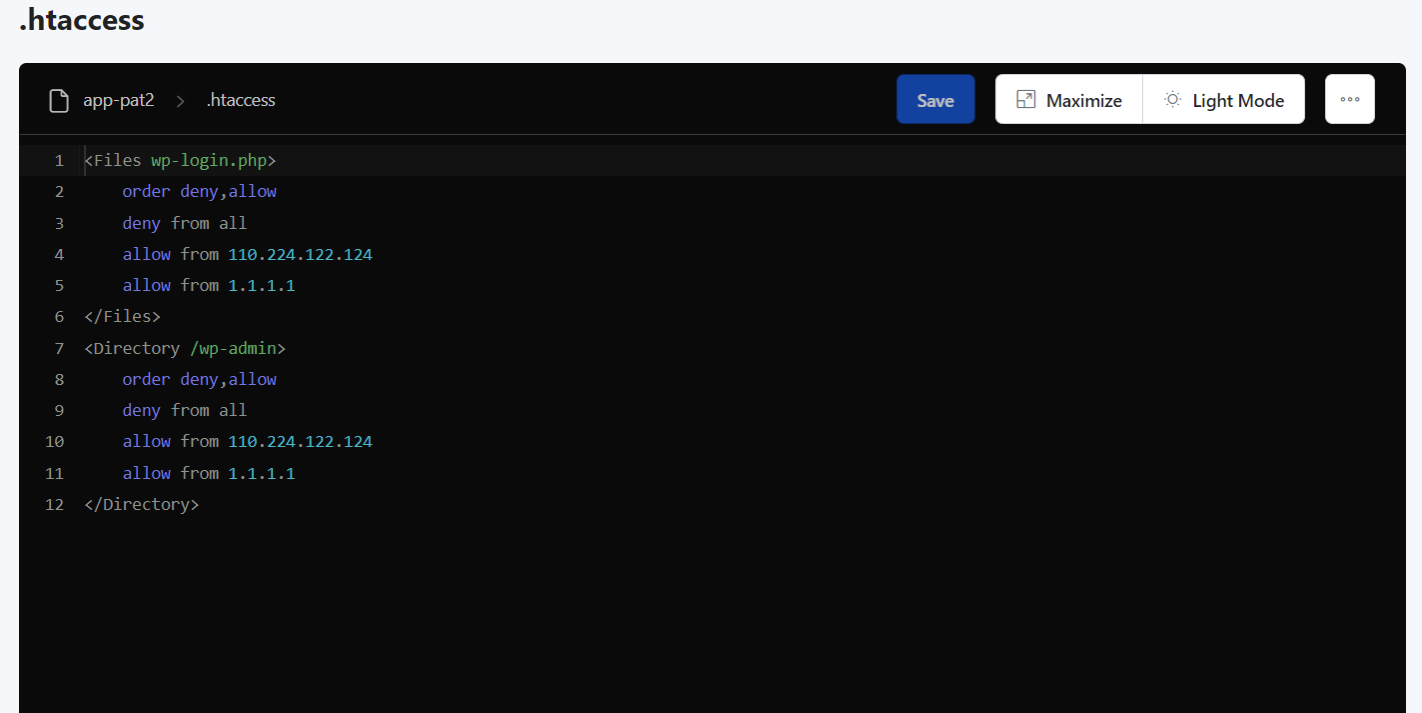
    1. Access the .htaccess file: The .htaccess file is usually located in the root directory of your WordPress installation (the same directory where wp-config.php resides). RunCloud provides convenient access to your server’s filesystem. Log in to your RunCloud dashboard, select your server, and then the web application you want to modify. Here, you’ll find a “File Manager” in the left menu that you can use to edit files.
    1. Edit the .htaccess file:

    Important: Before making any changes, always download a copy of your .htaccess file to your computer and make a backup.

    • In the RunCloud File Manager, click on the .htaccess file to open the file in a text editor.
    • Add the following code block to the beginning of the file but after the “# BEGIN WordPress” section (if it exists). If there is no WordPress section, place it at the beginning:
    <Files wp-login.php>
        order deny,allow
        deny from all
        allow from YOUR_IP_ADDRESS
        allow from ANOTHER_IP_ADDRESS
    </Files>
    <Directory /wp-admin>
        order deny,allow
        deny from all
        allow from YOUR_IP_ADDRESS
        allow from ANOTHER_IP_ADDRESS
    </Directory>

    Replace YOUR_IP_ADDRESS and ANOTHER_IP_ADDRESS with the actual IP addresses from which you want to allow access. You can add as many ‘allow from‘ lines as needed. Place the <Files …> section above the <Directory> section if you have no WordPress section.

    1. Save and Upload: Save the changes to the .htaccess file by clicking the Save button on the top right.
    2. Test: Try accessing /wp-admin or /wp-login.php from an IP address on the allowed list. You should be able to log in. After that, try accessing it from an IP address not on the list. You should be denied access.

    Suggested Read: How to Block IP Address Using WordPress .htaccess File to Stop Bad Visitors

    Method 2: Using NGINX Config

    If you use an NGINX web server, you’ll need to modify the NGINX configuration file instead of using .htaccess. RunCloud significantly simplifies this process.

    1. Access the NGINX Configuration: Log in to your RunCloud dashboard, select your server, and then the web application you want to modify. You should see “NGINX Config” in the left menu on this screen.
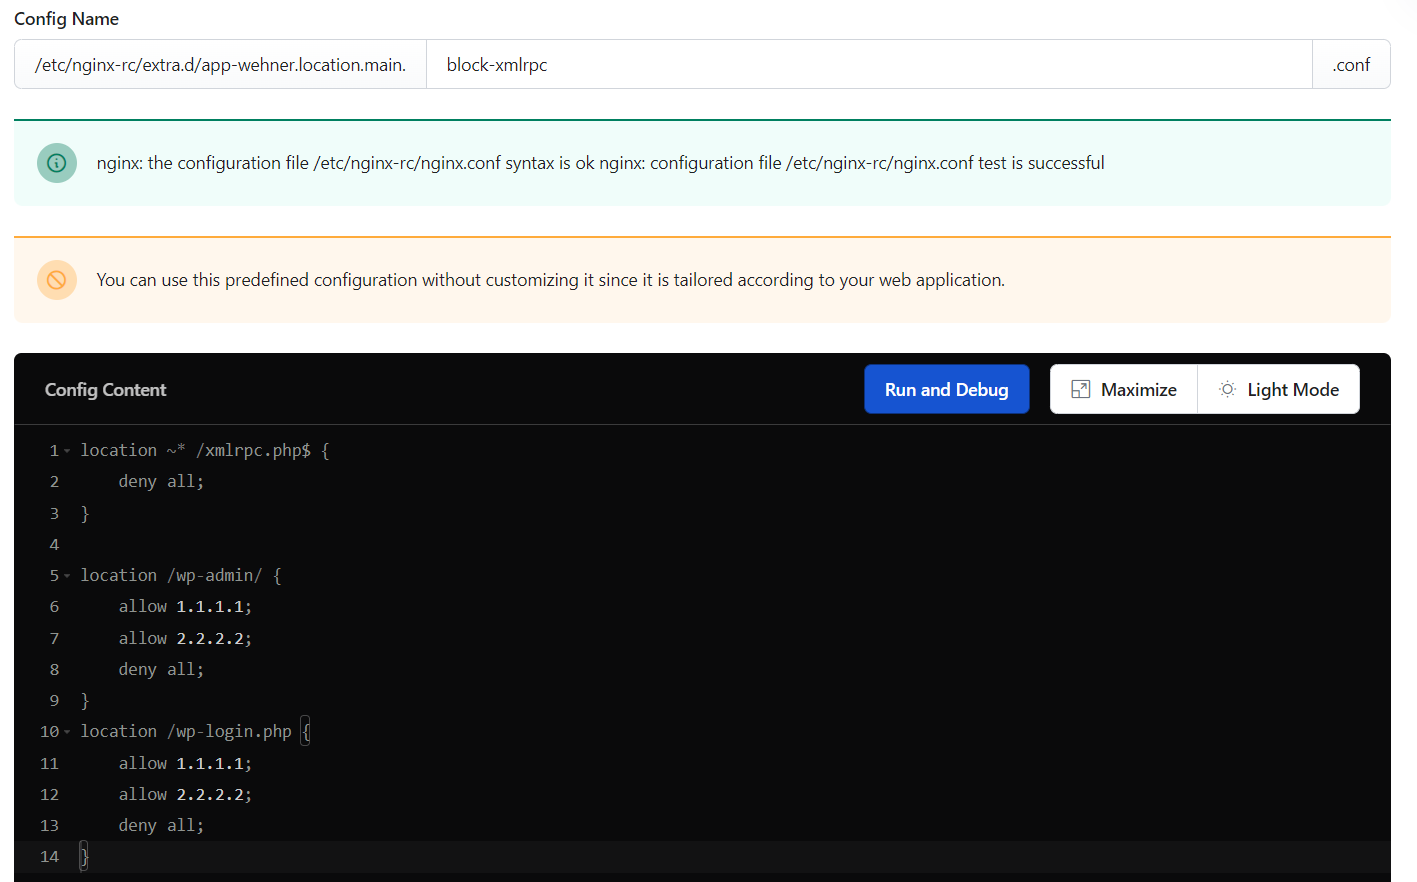
    2. Edit the NGINX Configuration: RunCloud provides a user-friendly interface for editing NGINX configurations, eliminating the need for SSH access and manual configuration. On the next screen, click “Create a New Configuration”, and select “Block XML-RPC” from the dropdown menu. This predefined configuration isn’t necessary, but it is recommended as it automatically fills most fields and makes it harder for novice users to make mistakes.
    1. Add configuration: Copy the code snippet below and paste it into the text field in your RunCloud dashboard. Replace YOUR_IP_ADDRESS and ANOTHER_IP_ADDRESS with the actual IP addresses you want to allow. You can add multiple allow lines as needed. The deny all line ensures that any IP address not explicitly allowed is blocked.
    location /wp-admin/ {
        allow YOUR_IP_ADDRESS;
        allow ANOTHER_IP_ADDRESS;
        deny all;
    }
    location /wp-login.php {
        allow YOUR_IP_ADDRESS;
        allow ANOTHER_IP_ADDRESS;
        deny all;
    }
    1. Save and Apply: In RunCloud, simply save the changes you’ve made to the NGINX configuration within the editor. RunCloud automatically checks the configuration for errors before applying it, preventing common mistakes that could break your website.
    2. Test: As with the .htaccess method, test access from both allowed and disallowed IP addresses to ensure it works correctly. Any attempt to access the website from a disallowed IP address should result in the following message being displayed:

    Suggested Read: What is DNS & How Does It Work? Everything you need to know.

    Method 3: Using a WordPress Security Plugin

    Several WordPress security plugins offer IP address restriction features. This is often the easiest method for those less comfortable with server configuration files. In this tutorial, we will explain how to block IP addresses using Patchstack.

    1. Install and Activate Patchstack: Install and activate the Patchstack security plugin from the WordPress plugin repository. You can do this directly through your WordPress dashboard by navigating to “Plugins” > “Add New“, searching for “Patchstack“, and clicking “Install Now“, followed by “Activate“.
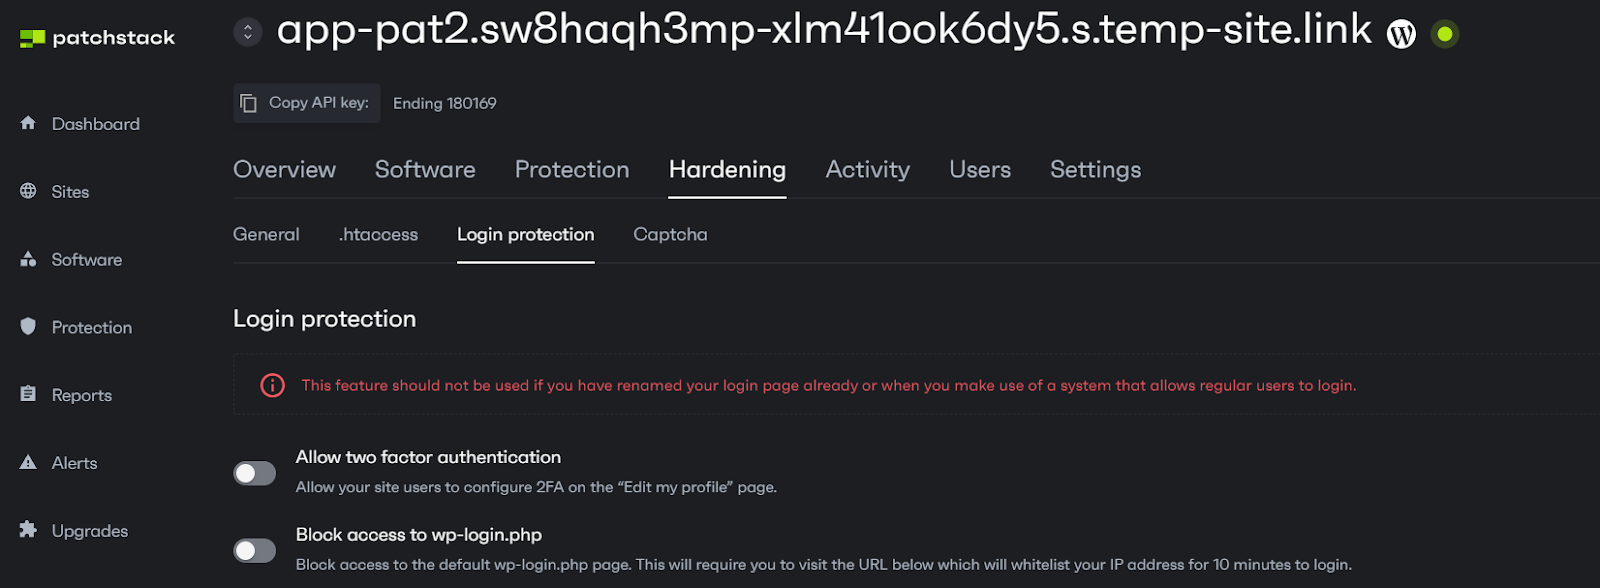
    2. Access Patchstack Options: Once activated, you must integrate your WordPress website with your Patchstack account. In your Patchstack dashboard you can access the Patchstack configuration options by navigating to “Hardening” > “Login Protection” within your Patchstack dashboard. This section provides various settings related to login security, including the IP whitelisting feature.
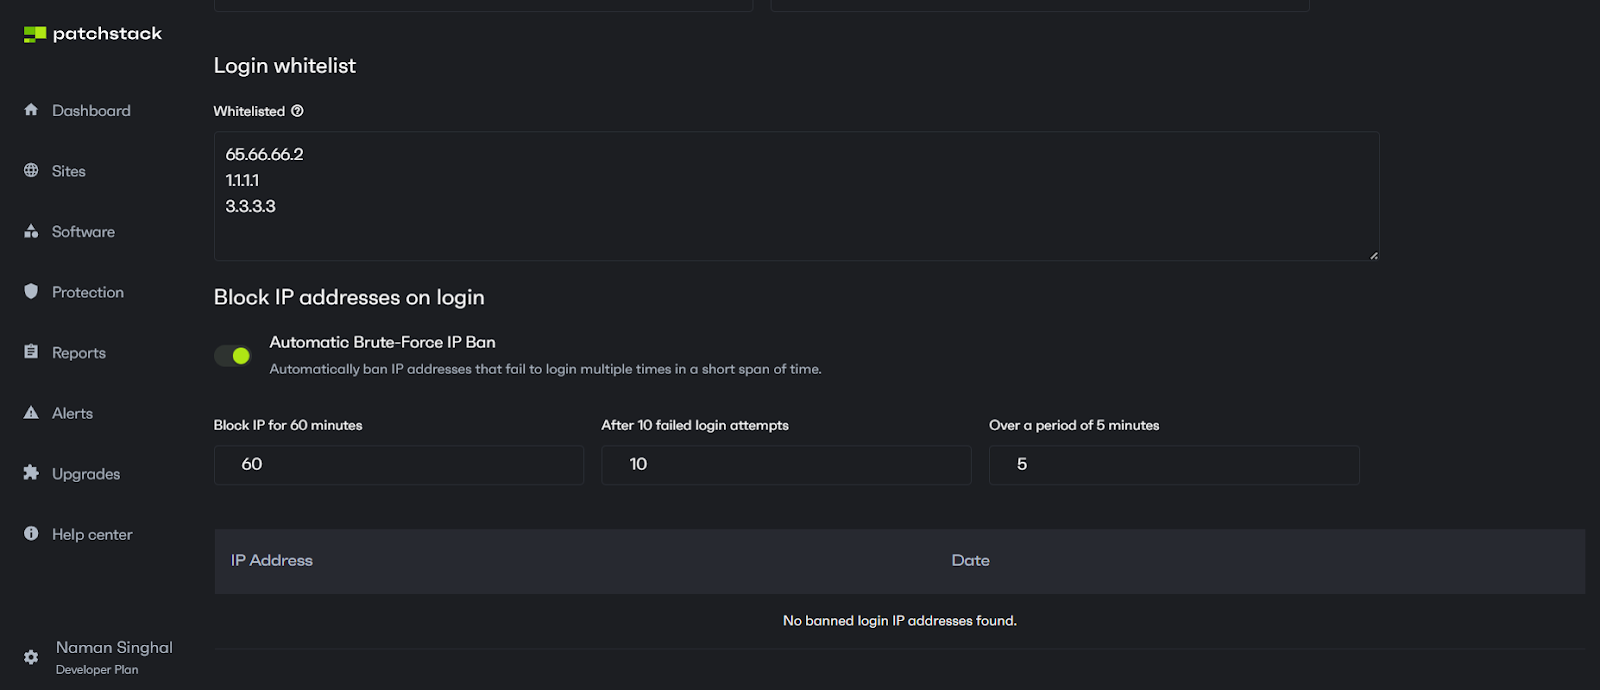
    1. Add IP Addresses to Whitelist: Within the “Login Protection” settings, locate the section dedicated to whitelisting IP addresses. Here, you can enter the IP addresses you wish to allow access to your WordPress admin area, ensuring they are never blocked due to failed login attempts or other security measures. Each IP address must be entered on its own line, and Patchstack supports several formats for defining IP ranges.
      The following formats are accepted:
      • 127.0.0.1: A specific IP address.
      • 127.0.0.*: A wildcard, allowing all IP addresses within the 127.0.0 range.
      • 127.0.0.0/24: CIDR notation specifies a range of IP addresses (in this case, 127.0.0.1 to 127.0.0.255).
      • 127.0.0.0-127.0.0.19: An IP range using a hyphen to define the start and end of the range.
    2. Save Changes: After adding the desired IP addresses to the whitelist, click the “Save Changes” button at the bottom of the page. This action will save your configurations and activate the IP whitelisting, ensuring that only the specified IP addresses can access your WordPress admin area without being subject to blocking rules.

    Suggested Read: How to Set or Change System Hostname in Linux

    Wrapping Up: Who Should Restrict Admin Access by IP Address?

    The short answer: nearly everyone running a WordPress site should strongly consider restricting admin access by IP address. While it might seem like an advanced security measure, the risk of leaving your admin area wide open to brute-force attacks and unauthorized logins far outweighs the perceived complexity.

    Protecting your WordPress backend is very important whether you’re a small business owner, a blogger, or a large enterprise.

    RunCloud’s intuitive interface significantly simplifies blocking unwanted IPs and managing server configurations. Editing your .htaccess file (for Apache servers) or your NGINX configuration becomes a breeze within the RunCloud panel.

    Compared to restrictive hosting panels, RunCloud offers limitless flexibility. You have complete control over your server environment, and RunCloud allows you to optimize your WordPress site for maximum security and performance.

    Speaking of performance, RunCloud’s optimized server configurations, combined with the added security of IP restriction, can lead to a faster, more responsive website. By blocking malicious traffic before it even reaches your server, you reduce the load on your resources, which improves page load times and enhances the overall user experience.

    Sign up for RunCloud today.

    FAQs on Restricting WordPress Admin Access by IP Address

    Can I restrict access to multiple IP addresses?

    You can restrict access to the WordPress admin area (/wp-admin) to multiple specific IP addresses by adding multiple Allow from lines in your .htaccess file. This allows trusted team members or developers from different locations to access the backend. RunCloud’s robust server management features and built-in web firewalls can complement this by providing additional layers of security beyond IP restrictions.

    What happens if my IP address changes?

    If your IP address changes, you will be locked out of your WordPress admin area. You’ll need to update the .htaccess file with your new IP address. Consider using a static IP address or a dynamic DNS service if your IP changes frequently to avoid constant updates.

    Is it safe to edit the .htaccess file?

    Editing the .htaccess file can be risky if done incorrectly, as it can potentially cause website errors or make it inaccessible entirely.

    What security plugins work best for IP restriction?

    Patchstack provides a user-friendly interface and additional security features beyond simple IP restrictions. These features work well with RunCloud’s server-level security and built-in firewalls.

    How do I know if my site is secure after making changes?

    After implementing IP restrictions, test the configuration by attempting to access the WordPress admin area from an IP address that is not allowed. If you are blocked, the restriction is working correctly.

    What are the risks of not restricting admin access?

    Failing to restrict access to your WordPress admin area significantly increases the risk of brute-force attacks, unauthorized access, and potential website compromise. Hackers can exploit vulnerabilities or use stolen credentials to gain control of your site, leading to data breaches, malware injection, and reputational damage. RunCloud’s web application firewall helps mitigate some of these risks, but IP restriction adds a crucial layer of defense.

    How can I temporarily allow access from another location?

    To temporarily allow access from another location, you can add appropriate rules to whitelist the new IP address in the .htaccess file. Remember to remove it when access is no longer needed to maintain security.

  • Managing WordPress Development with Git and Composer: A Modern Approach

    Managing WordPress Development with Git and Composer: A Modern Approach

    Are you struggling with WordPress development workflows? Tired of SFTP uploads and manual plugin updates?

    This comprehensive guide will show you how to modernize your WordPress development process using Git, Composer, and proper environment management.

    By the end of this article, you’ll understand how to:

    • Set up a professional WordPress development environment
    • Manage WordPress core, plugins, and themes with Composer
    • Handle sensitive configuration data securely
    • Deploy WordPress sites with confidence across different environments
    • Collaborate effectively with your development team

    Note: This workflow will not make sense for all types of WordPress sites. If you don’t know what Git and version control are or don’t build sites by writing themes, plugins, etc. – you will likely not benefit from this workflow.

    Let’s get started!

    The Importance of Version Control for WordPress Development

    Version control is essential to any modern web development workflow, including WordPress projects. Version control systems like Git provide a robust and reliable way to track changes, collaborate with team members, and maintain a comprehensive history of a project’s evolution.

    If you are working on a complex WordPress project, then using version control offers several key benefits:

    1. Collaborative development: With version control, multiple developers can work on the same codebase simultaneously, seamlessly merging their changes and resolving any conflicts. This is useful for larger WordPress projects or teams with multiple contributors.
    2. Reliable code history: Version control systems act as a safety net, allowing you to easily revert to your project’s previous working states if necessary. This is particularly important when making significant changes or experimenting with new features, as you can always roll back to a known good version.
    3. Deployment and environment management: By maintaining your WordPress codebase in a version control system, you can streamline your deployment process and ensure consistent environments across different stages (e.g., development, staging, production). This helps eliminate the “it works on my machine” problem and promotes reliable, predictable deployments.
    4. Code auditing and reviews: Version control systems enable code reviews, allowing team members to scrutinize changes, provide feedback, and maintain code quality standards. 
    5. Branching and feature development: Git’s branching capabilities allow developers to work on new features or bug fixes in isolation without disrupting the main codebase. This facilitates a more organized and structured development process.

    Given these compelling advantages, it’s clear that version control can benefit advanced WordPress users. However, as we mentioned earlier, if you don’t build your own sites, this might not be the best approach for you.

    The Challenges With Traditional WordPress Deployment Workflows

    While WordPress is a powerful and flexible content management system, the traditional deployment workflows used by many WordPress developers can often introduce significant challenges and inefficiencies. If you have worked with WordPress in the past, then you will likely have encountered several common issues with these conventional approaches:

    1. Manual file management: In a typical WordPress deployment, developers often rely on manual file transfers (e.g., FTP, SFTP) to push updates to the production server. This process is error-prone, time-consuming, and lacks a comprehensive audit trail of the changes made.
    2. Inconsistent environments: Without a robust system for managing dependencies and configurations, it’s common for WordPress sites to suffer from “it works on my machine” problems, where a feature or bug fix behaves differently in the development, staging, and production environments.
    3. Difficulty tracking changes: Relying on manual file transfers can make it challenging to keep track of the specific changes made to a WordPress site over time. This makes it harder to debug issues, revert problematic updates, or collaborate effectively with other team members.
    4. Lack of automated deployment: Traditional WordPress deployment workflows often lack the ability to automate the deployment process. This results in a more labor-intensive and error-prone process, especially for teams that manage multiple WordPress sites.

    These challenges can lead to increased development time, higher maintenance costs, and a higher risk of production issues.

    At RunCloud, we believe that addressing these problems by adopting modern development practices, such as those enabled by the Bedrock boilerplate, can significantly improve the efficiency, reliability, and scalability of WordPress projects – particularly at the enterprise level

    Steps for Setting Up a WordPress Project with Git

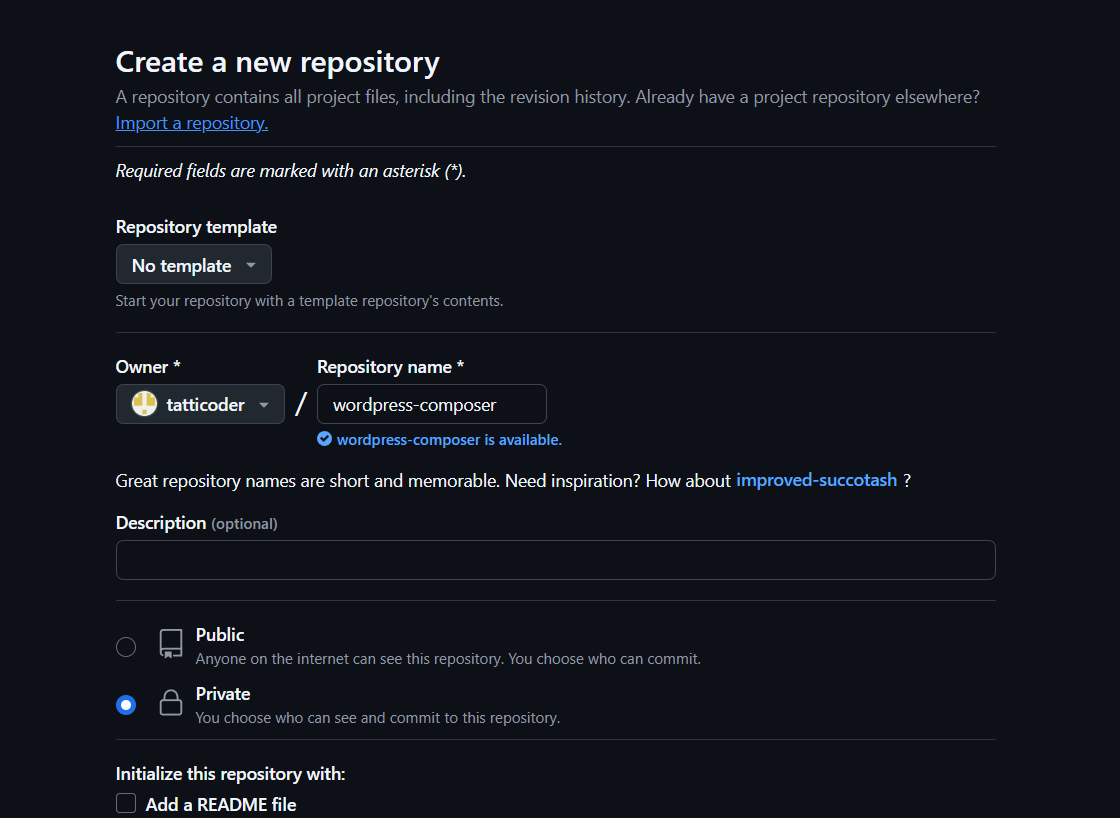
    This guide walks you through setting up a WordPress project using Git for version control, ensuring a structured and organized development workflow. We’ll cover creating a new repository, excluding unnecessary files, and organizing your project directory.

    Prerequisites

    If you haven’t already, download and install Git and Composer on your local computer. Choose the appropriate version for your operating system. 

    Note: You will also need to create an account on a supported Git provider. In this tutorial, we will deploy the applications to RunCloud using GitHub.

    Install Bedrock WordPress

    In this tutorial, we will use Bedrock to maintain and develop WordPress locally. Execute the following commands on your local computer to create a new project and change the directory to the new project:

    composer create-project roots/bedrock my-wordpress-site
    cd my-wordpress-site

    Setting Up Your .env File

    After creating the project, you will need to configure the local development environment. Environment variables are crucial for maintaining secure and flexible WordPress configurations across different environments.

    Bedrock uses the PHP dotenv library to load environment variables from a .env file, keeping sensitive information out of version control while allowing different configurations for development, staging, and production environments.

    Execute the command below to create a sample .env file in your project.

    # Copy the example file to create your .env
    cp .env.example .env

    After creating the file, you can edit it to configure your local database credentials. Copy and paste the following code snippet into your .env file and edit the necessary fields to include your database name and credentials:

    # Database connection settings
    DB_NAME='your_database_name'
    DB_USER='your_database_user'
    DB_PASSWORD='your_secure_password'
    DB_HOST='localhost'   # Use 'localhost' for local development
                         # Use actual host for production/staging
    # Optional: Use DATABASE_URL instead of individual settings
    # DATABASE_URL='mysql://user:password@localhost:3306/database_name'

    After editing your database credentials, you can edit your WordPress environment settings. Copy and paste the following code snippet into your environment file and edit it accordingly:

    # Environment type
    WP_ENV='development'  # Options: development, staging, production
    # Site URLs
    WP_HOME='https://example.com'  # Your site's home URL
    WP_SITEURL='https://example.com/wp'  # WordPress core location

    Finally, you must add authentication keys and salts to your .env file. You can use any random string of text or generate these values using the WordPress Salt Generator and add them to your .env file in the following format:

    # Authentication Keys and Salts
    AUTH_KEY='your_generated_key'
    SECURE_AUTH_KEY='your_generated_key'
    LOGGED_IN_KEY='your_generated_key'
    NONCE_KEY='your_generated_key'
    AUTH_SALT='your_generated_salt'
    SECURE_AUTH_SALT='your_generated_salt'
    LOGGED_IN_SALT='your_generated_salt'
    NONCE_SALT='your_generated_salt'

    While working with a .env file, there are a few things that you should keep in mind:

    1. Never commit your .env file to version control
    2. Use strong, unique passwords for database credentials
    3. Generate new salts for each environment

    After editing the .env file, you can save it and visit your WordPress URL to view your site locally.

    Note: This step assumes that you already have a webserver daemon, such as Caddy, Nginx, Apache, etc., running on your local machine to serve your WordPress website at the specified address.

    Initialize Git Repository

    Once your website is up and running, you can initialize a new Git repository using the following command:

    git init
    git add .
    git commit -m "Initial Bedrock project setup"

    The above command will create a new git project in your WordPress directory. You can now start tracking it via version control. However, most people use a Git server, such as GitHub or GitLab, to manage and collaborate with other developers.

    In this example, we will use GitHub to manage and track the changes in this repository, but RunCloud supports multiple Git providers. To do this, create a new empty repository in your GitHub account and do not initialize it – i.e., ensure that “Add a Readme” is unchecked.

    This will create a repository without any content. On the repository dashboard, scroll down to the bottom and look for the following commands:

    git branch -M main
    git remote add origin git@github.com:tatticoder/wordpress-composer.git
    git push -u origin main

    Note: Do not copy the above commands; they are only provided as an example. You must copy the commands specific to your git repository.

    Once you find the necessary git commands in your git dashboard, go back to your terminal window and execute them. After you push the changes, your local code repository will be uploaded to the cloud.

    Deploy WordPress via Git on RunCloud

    After uploading your Git repository to the cloud, you can deploy it to your RunCloud server. The deployment steps are straightforward, but if you need step-by-step instructions, refer to our documentation on Git deployments.

    After creating your git application on RunCloud, you will need to upgrade it to an Atomic Deployment project to take advantage of additional features. To learn more about this, follow the steps outlined in our documentation on Atomic Deployments.

    Next, you must create a new database for your web application in the RunCloud dashboard. Take note of the credentials created in this step, as we will need them later. Optionally, if you are using a Docker server, you should read our documentation on networking in a RunCloud containerized server before moving on to the next step.

    After that, you will need to configure a new environment variable file using Symlink for this website before you can use it. To do this, navigate to the “Symlink” tab in your atomic deployment dashboard and create a new configuration file. Next, add .env in both the “Link From” and “Link To” fields as shown below.

    After this, you can add a secure passphrase to lock your configuration file. You will need this passphrase again if you want to edit your file later.

    Finally, you can configure your Bedrock environment variables to meet your requirements. Here, you must add the database credentials you created earlier and configure the host if you are using RunCloud docker. This setup process is nearly identical to the “Setting up .env file” step we covered earlier. 

    After configuring your .env file, you must configure your web application’s public path to point your web server’s document root to the web directory within the Bedrock project. You can also connect your database to your web application to ensure it is backed up properly via the RunCloud backup service. 

    To do this, go to your web application dashboard and navigate to the Settings tab. Select the database you created from the drop-down menu on this page and click Update Linked Database.

    Next, make sure that your web application’s public path ends with /live/web. Finally, change the web application type to WordPress from the drop-down menu. Once you hit Update Stack, your website will be accessible to everyone on the Internet.

    After deploying your application, you can view it by clicking Open Site in your RunCloud dashboard.

    Configure Cron Jobs (Optional)

    After deploying your application, you can configure your .env file in the production environment to disable the default WordPress cron job. Once you have disabled the cron job, you can use the RunCloud dashboard to configure a new cron job for your WordPress site.

    While configuring your cron jobs, use the correct public path for your WordPress installation. If you followed the steps correctly, then the complete WordPress path will look something like this:

    /home/runcloud/webapps/application-name/live/web/wp/

    You can use the above path to run PHP cron commands on your server. For example, you can run the following command to execute the PHP cron file directly:

    php /home/runcloud/webapps/application-name/live/web/wp/wp-cron.php

    Developing With Git Workflow

    When working on a new feature or bug fix, it’s recommended to create a dedicated Git branch for that work. This allows you to isolate your changes and collaborate more effectively with other team members. You can create a new branch from your Bedrock project directory with a command like git checkout -b feature/my-new-feature.

    After you’ve completed your work on a feature branch, you can merge those changes back into the main development branch (usually main or dev) using a Git merge command, such as git merge feature/my-new-feature. This integrates your feature into the codebase and makes it available for deployment.

    If you have configured a webhook for your application (as described in Atomic deployment documentation), then your live website will be updated automatically as soon as you push your changes to the cloud.

    Handling Modified Files Not Managed By Git

    While Bedrock encourages managing most of your project’s files and configurations in Git, some files, such as wp-config.php, may contain sensitive or environment-specific information you don’t want to commit to your repository.

    In these cases, you’ll need to deploy these files separately, perhaps using environment variables or including them in your deployment process.

    Similarly, user-generated content, such as media uploads, is typically not managed in your Git repository, as it can quickly bloat the repository size and is more efficiently stored and served directly from the web server.

    During deployment, you’ll need to ensure that these non-Git-managed files are properly transferred to the deployment environment, either as part of your deployment process or through a separate content synchronization step.

    Managing Themes And Plugins as Composer Dependencies

    Bedrock uses Composer, a dependency management tool for PHP, to install and manage the WordPress core updates, plugins, and themes. This allows you to easily update WordPress core by simply updating the Composer dependency rather than manually downloading and replacing files.

    Installing third-party plugins and themes

    Bedrock encourages you to manage your project’s themes and plugins as Composer dependencies as well. This is done by specifying the required plugins and themes in the composer.json file.

    For example, to install the Akismet plugin, you would run composer require wpackagist-plugin/akismet. Composer will then fetch the plugin from the WordPress.org plugin repository and install it in the appropriate directory for your Bedrock project.

    Handling private/premium plugins and themes

    For private or premium plugins and themes that are not available on the WordPress.org repository, Bedrock provides a way to include them as Composer dependencies as well. This involves configuring custom package repositories in the composer.json file, such as a private Git repository or a custom Composer repository provided by the plugin/theme vendor. This ensures that your project’s dependencies are all managed consistently and are version-controlled.

    Keeping WordPress Core And Dependencies Up-To-Date

    One of the key benefits of using Composer with Bedrock is the ability to keep your WordPress core and all other dependencies up-to-date. When a new version of WordPress, a plugin, or a theme is released, you can simply run the composer update command to fetch the latest versions.

    Bedrock also provides a composer outdated command to help you identify which dependencies have newer versions available, making it easy to stay current on updates and security patches. You can consult the Bedrock documentation for more details and advanced usage scenarios, such as handling database migrations, configuring environments, and integrating with continuous integration/deployment tools.

    Conclusion

    By separating WordPress core from your custom code, managing dependencies with Composer, and adopting a Git-based development workflow, you can enjoy several benefits:

    • Improved version control and collaboration for your team
    • Easier management of WordPress core, plugin, and theme updates
    • Consistent and reproducible development and deployment environments
    • Enhanced security through the use of environment-specific configurations
    • Streamlined deployment processes, potentially with automated CI/CD pipelines

    The WordPress ecosystem has evolved significantly over the years, and developers must keep pace with modern development practices. By embracing tools such as Git, Composer, and Bedrock, you can elevate your WordPress projects to a new level of maintainability, scalability, and efficiency.

    If you’re a developer & still manage your WordPress sites without Git, we highly encourage you to explore the benefits of the Bedrock approach and adopt these modern WordPress management practices. They will not only improve your development workflow but also make your WordPress sites easier to maintain in the long run.

    Naturally, we recommend using RunCloud, a powerful server management platform that makes setting up the ideal WordPress development workflow as well as managing production-grade infrastructure even easier. 

    RunCloud seamlessly integrates with your Git-based WordPress projects, allowing you to automate deployments, manage environment-specific configurations, and ensure consistent deployment environments.

    By combining the benefits of Bedrock’s Git and Composer-based approach with RunCloud’s server management capabilities, you can create a streamlined and efficient WordPress development and deployment workflow.

    Sign up for RunCloud today and take your WordPress projects to new heights of productivity and reliability.

  • How to Fix a 403 Forbidden Error on Your Site

    How to Fix a 403 Forbidden Error on Your Site

    Are you encountering the frustrating “403 Forbidden” error on your website? This cryptic message can be a roadblock for both website owners and visitors when browsing a website.

    The 403 Forbidden error message means that access to a requested resource has been denied – but it doesn’t provide any information on how to fix it.

    In this comprehensive guide, we’ll discuss the 403 Forbidden error, explain its meaning, why it happens, and (most importantly) how to resolve a 403 Forbidden error.

    We’ll discuss common causes, from pesky .htaccess file issues to plugin conflicts in WordPress, and provide steps to troubleshoot and fix each issue.

    Whether you’re a seasoned developer or a website owner with limited technical experience, this guide will give you the knowledge to fix your site’s 403 errors.

    Let’s get started!

    403 Forbidden Error: What Does It Mean?

    The 403 Forbidden error is an HTTP status code a web server returns when serving a web request. It indicates that a client’s request has been received and understood, but the server refuses to authorize the request.

    This is a server-side error that signals an explicit denial of access. It is not a client-side issue, as the server determines the client’s identity (or lack thereof) and has concluded that the client does not have the necessary resource access privileges.

    This differs from a 401 Unauthorized error, which signifies that valid authentication is required before granting access. A 403 signifies that access is explicitly denied, even if authentication is successful or not required.

    The 401 error code is usually used to enforce a security policy. This ensures that only authorized users or processes can access sensitive or restricted content while preventing access to resources that are not meant to be publicly available.

    Tip: We recommend checking out the httpstat.us website to explore different HTTP errors firsthand.  

    Fixing Common Causes of a 403 Forbidden Error

    Many are six main causes of an HTTP 403 forbidden access error on a website. Let’s examine each one and see how to resolve it.

    #1 – Browser Settings

    Sometimes, a 403 Forbidden error isn’t directly related to file permissions or server settings but to issues with how your browser identifies you to the website. Websites often use authentication credentials, like usernames and passwords, or browser cookies to remember your login status and preferences. The server might interpret your request as unauthorized if these credentials or cookies are corrupted, outdated, or mismatched.

    If your browser has stored corrupted or outdated login info, or a site has recently changed how it handles logins, you might see a 403 error.

    In these cases, a simple fix is to clear your browser’s cache and cookies, then try logging in again with your most recent username and password. If you still have issues, check that you don’t have any browser extensions that might be interfering with this process.

    #2 – Poorly Configured .htaccess File

    One of the most common reasons for encountering a 403 error lies within a special file called .htaccess. This file is typically used on Apache web servers, a popular choice for hosting websites. The .htaccess file acts like a rulebook for your website, controlling how visitors access different parts of it. It can manage things such as redirects, password protection, and access permissions.

    If your .htaccess file becomes corrupt or wrongly configured, it can mistakenly block access even to visitors who should see your content, triggering a 403 error. If you suspect that the .htaccess file is causing an issue, the first step is usually to simply rename or remove it, which temporarily disables its rules.

    You can find your .htaccess file in the public_html directory or your website’s root folder. You can often locate it using an FTP client, which lets you access your website files on the server. If the 403 error disappears, you’ve pinpointed the problem. You can now add the correct configuration to your .htaccess file.

    #3 – CDN and VPN Issues

    CDNs and VPNs manipulate web traffic, and if they are not configured properly, they can inadvertently trigger a 403 Forbidden error. For instance, CDNs can sometimes have overly strict hotlink protection rules. This can block users from accessing your site or specific resources if they appear to be coming from an unauthorized domain.

    VPNs can change your IP address, which can sometimes cause issues with website access, especially if the website has implemented strict security measures or location-based restrictions, triggering a 403 error.

    Additionally, misconfigured DNS records, particularly your A records, can cause issues if your domain name doesn’t properly point to the correct server when using a CDN. This could confuse the server and ultimately trigger a 403, because the system won’t be able to resolve the domain to a resource and will then give you an error response.

    Troubleshooting Steps:

    • Temporarily disable your VPN: This helps determine if your VPN’s IP address is the root cause.
    • Temporarily disable your CDN services: This will help you bypass any CDN security measures and allow you to access the source website directly.
    • Clear your browser cache and cookies: Outdated cached data can sometimes interfere with your login process.
    • Review your DNS records: Specifically check your A records to ensure your domain correctly points to your server or CDN provider’s server.

    #4 – File and Directory Permissions

    One of the most common reasons why you might encounter a 403 Forbidden error is due to incorrect file permissions and directory permissions on your server.

    Every file and folder on a server has a set of permissions that determine who can access them, what they can do with them (read, write, execute), and if the web server can access them. If these permissions are not set correctly, the web server might be blocked from accessing the necessary resources, leading to a 403 error.

    In the following example, you can see that all the files and directories have their own permissions:

    Every file and directory has an owner in addition to permissions. This is known as file ownership, which defines which user account is associated with and manages these files. The web server needs to have the appropriate permissions on these files and the right user ownership. If these are wrong, the web server will be unable to access the files needed for a webpage to work.

    To view and reset file permissions, you can use an FTP/SFTP client, such as FileZilla, or a file manager application within your hosting account’s control panel. This client allows you to connect to your server and see the permissions of individual files and directories.

    Files often have a 644 permission code, while directories typically have 755. These numbers represent different owner, group, and public user access levels. If you want to learn more about this topic, you can refer to this excellent resource by Patchstack, which explains how WordPress file permissions work.

    To change file permissions, you can use the chmod command in a Linux environment, which you can access via your server’s command line. However, if you are using RunCloud, you can resolve file access issues with the click of a button. Simply navigate to the Tools section of your web application dashboard in RunCloud and click Fix Ownership to resolve file permission errors.

    Additionally, you can use the RunCloud File Manager to edit and configure the file permissions for each file and directory individually. To do this, select the file you want to modify, click on the Change Permissions button, and then click on checkboxes to grant/revoke specific permissions.

    #5 – Hotlink Protection Misconfiguration

    Websites sometimes directly link to content on other websites without permission. Hotlink protection is a security measure designed to prevent other websites from directly linking to and using your site’s resources, such as images, videos, and other files. The idea is to protect your web server resources and prevent other websites from leeching your bandwidth.

    When done correctly, hotlink protection ensures that these assets are only used on your own site or authorized domains. However, if hotlink protection is set up incorrectly, it can lead to a 403 Forbidden error even for users trying to access your site. This misconfiguration is often caused by overly restrictive settings, misconfigured rules, or improperly formatted entries within the setup.

    Here’s how to check and correct your hotlink protection settings if you suspect they’re causing 403 errors:

    • Review your .htaccess code for hotlink protection rules: Access your server’s public_html or root directory and find your .htaccess file. Open the file using a text editor and look for any rules related to hotlinking (look for phrases such as “RewriteCond” or “RewriteRule”). These rules usually have the conditions and actions to take when a hot-linked image is detected. Review these rules and check for any syntax errors.
    • Check your Cloudflare security settings or your CDN provider settings: If you use a CDN, such as Cloudflare, look for the hotlink protection settings within their security dashboards. Ensure that the domains that need access are correctly whitelisted and that your settings are not too restrictive.
    • Ensure only valid IP addresses are allowed access: Confirm that any IP whitelisting rules are valid and up-to-date. Ensure you are not using a blacklist of IP addresses that your regular users are now using.
    • Ensure your domain name is whitelisted: In addition to IP addresses, your domain name needs to be whitelisted and added to the allowed list in your .htaccess configuration, CDN security settings, and firewall. Review and update your settings to include all the domain names where you will link to these assets.

    While performing these actions, you should be careful, as a slight misconfiguration can lead to site-wide problems and even leave your server vulnerable to attacks. If you want a simpler and painless way to disable hotlinking and enable CORS requests on your server, then you should use RunCloud.

    #6 – WordPress Plugin Conflicts

    One of the common causes of a 403 Forbidden error, particularly on WordPress websites, is plugin incompatibilities.

    Sometimes, a plugin might have incorrect permissions, conflict with other security plugins, or have misconfigured settings, which can lead to the server refusing to serve a resource. When this occurs, the server can inadvertently block access to your site, resulting in a 403 error that can make it difficult to access your website. Occasionally, the problem isn’t a conflict but a badly coded plugin simply causing problems.

    To troubleshoot a plugin-related 403 error, you’ll need to temporarily deactivate all your plugins. You must now use a trial-and-error method by re-activating each of your plugins one by one, refreshing your page after each activation. If the 403 returns, you’ve found the plugin causing the error. Once you find the problematic plugin, you can update or remove it.

    Conclusion

    In this guide, we have explained how to identify, troubleshoot, and fix HTTP 403 issues. By carefully checking each potential cause discussed in this post, you can significantly reduce the occurrence of 403 errors and ensure a smoother experience for your website’s visitors.

    While tackling these errors directly is possible, managing servers and applications manually can be time-consuming and complex.

    If you’re looking for a simpler and more efficient way to manage your cloud infrastructure, look no further than RunCloud.

    With RunCloud, you can easily deploy, manage, and scale your applications, leaving you free to focus on your business, not the nitty-gritty details of server management. RunCloud’s intuitive interface streamlines server administration, making common tasks like file management, permission setting, and application deployment easy.

    Ready to make cloud management easier? Sign up for RunCloud today and experience the difference firsthand.

    FAQs on the HTTP 403 Error

    What exactly does a 403 Forbidden error mean?

    A 403 Forbidden error means the web server understands the request but refuses to fulfill it, indicating a problem with the access permissions to the resource you’re trying to view. It’s different from a 404 “Not Found” error; the server knows the resource exists, but you cannot access it. Often, it signals an issue on the server side rather than a problem with the client’s browser.

    Is a 403 error my fault, or is it a problem with the website?

    While the error is presented in your browser, a 403 Forbidden error is usually a server-side issue. The problem likely stems from incorrect server configurations, file permissions, or security rules. You should check your settings and the website and server settings to understand the root cause.

    How is a 403 error different from a 401 error?

    Both are related to access, but a 401 Unauthorized error means you are missing valid authentication credentials, meaning you might need to log in or provide a token. A 403 Forbidden means that even with correct authentication, the server explicitly refuses you access to the resource, suggesting permission or resource-based access issues. You could be logged in but still blocked by a 403 error.

    If I use RunCloud to deploy my app, can it still have a 403 error?

    Using RunCloud doesn’t eliminate the possibility of a 403 error, as it manages deployment but doesn’t control your site’s internal settings. RunCloud helps automate and streamline your server setups, but you still need to configure your application’s permissions and .htaccess files correctly and check for plugin compatibility issues with WordPress.

    How can RunCloud help me diagnose a 403 error if I suspect server settings are the issue?

    While RunCloud’s primary role is server management, it provides server logs and file access features for troubleshooting a 403 error. You can review server logs directly from the RunCloud dashboard to identify configuration and error messages that could pinpoint the cause. File access via RunCloud’s interface allows you to verify file ownership and permission settings for your server configuration files.

    Can RunCloud automatically fix 403 errors?

    RunCloud doesn’t automatically fix 403 errors, as it’s a server management platform and not a troubleshooting tool. RunCloud provides the tools and the automated processes needed for easy access to your files and server configuration settings, which will help you quickly resolve many problems, including a 403 error. You’ll need to manually adjust permissions, configurations, or correct security rules based on the reasons for your access denial.

    How can I quickly check if the .htaccess file is causing a 403 error?

    You can quickly rename your .htaccess file to temporarily disable its rules using an FTP client, RunCloud’s file manager, or the command line. If the error disappears after renaming, you know the problem is within that file. You can then regenerate the .htaccess file by saving your permalink settings.

    What should I do if incorrect file permissions are causing a 403 error?

    Using an FTP client or RunCloud’s file management interface, review the ownership and permissions settings on your server files and ensure they are appropriately configured for your specific system. For example, directories are usually 755, and files are usually 644, but individual applications will have specific requirements, so you must ensure they match your application. Use RunCloud to correct the permissions settings to allow the server to access the files correctly.

    I suspect a WordPress plugin is causing the 403 error. How can I troubleshoot this?

    First, disable all your WordPress plugins by renaming the plugins folder in /wp-content via FTP or RunCloud’s file manager. If the error disappears, reactivate the plugins one by one to isolate which one is the issue. Update the offending plugin, replace it, or contact its support if the problem continues.

    Can a CDN or VPN cause a 403 error?

    Yes, CDNs and VPNs can sometimes trigger 403 errors if their security rules are overzealous or if they’re causing IP mismatches. Temporarily disabling your VPN and temporarily bypassing your CDN can often quickly pinpoint if these services are indeed contributing to the error.

  • ARM64 vs X64 – Everything you need to know

    ARM64 vs X64 – Everything you need to know

    In the rapidly changing world of technology, choosing the right processor architecture can significantly affect performance, efficiency, and cost.

    At RunCloud, we’ve witnessed the impact of CPU architecture choices, particularly in server environments where performance and efficiency directly affect business costs. While consumers might be exploring ARM processors for personal computing, our focus is on the server-side revolution: how different CPU architectures are affecting cloud infrastructure, application performance, and operational efficiency.

    In this comprehensive RunCloud guide, we explore the differences between ARM and x86 architecture. Whether you’re looking to optimize your server fleet or understand the latest computing trends, we’ll provide the insights you need to make informed decisions.

    From performance benchmarks to practical implications, we’ll break down everything you need to know about ARM and x86 architectures in the context of modern computing and cloud infrastructure.

    Let’s get started!

    What is CPU Architecture?

    CPU architecture is the fundamental design and operational blueprint of a computer’s central processing unit. It defines how it processes, manages, and executes instructions at the most elemental hardware level. It dictates the core structural elements that determine how a processor:

    • Interprets machine instructions
    • Manages data flow
    • Handles computational tasks
    • Allocates and uses registers
    • Manages memory interactions

    To understand this, you can think of CPU architecture as the engine design in a car, software as the driver’s instructions, and the operating system as the dashboard and control mechanisms that coordinate everything.

    How is CPU Architecture Different from Software?

    Software operates as an abstract layer on top of the CPU architecture. It is basically a set of instructions translated into machine-level commands. It depends on the underlying architecture for execution and can be compiled or interpreted to match specific CPU instructions.

    How is CPU Architecture Different From The Operating System?

    Operating systems manage hardware resources and provide an interface between other software and the computer’s hardware. Through specialized kernels and drivers, an operating system can support multiple CPU architectures.

    However, this is only possible if the developer creates a specialized version of the operating system for a particular architecture. For example, Windows has a special version of its operating system for Windows on ARM devices.

    Aspect

    CPU Architecture

    Software/OS

    Level of Operation

    Hardware-level

    Logical/Functional level

    Modification Complexity

    Requires physical redesign

    Can be updated/replaced easily

    Dependence

    Direct hardware capabilities

    Dependent on an underlying architecture

    ARM Server Architecture

    ARM64 refers to the 64-bit ARM processor architecture, also known as ARMv8-A. It is a RISC (Reduced Instruction Set Computer) design that provides significant improvements over the previous 32-bit ARM architecture.

    ARM64 processors are widely used in various devices, including smartphones, tablets, laptops, and servers. They are also used in nearly all modern mobile devices, where power efficiency is crucial. Although it still has some rough edges, ARM64 is gaining traction in the embedded system design and cloud computing domains, where its performance and scalability are valuable assets.

    There are two primary reasons why people use the ARM CPUs:

    1. Improved performance: Compared to 32-bit ARM processors, ARM64 processors have a more efficient instruction pipeline and can execute more instructions per clock cycle.
    2. Power efficiency: The ARM64 architecture is designed for low power consumption, making it well-suited for mobile, embedded, and IoT (Internet of Things) applications.

    X86 Server Architecture

    The X64 architecture, also known as AMD64 or Intel 64, is a 64-bit extension of the x86 architecture. It was developed by AMD and later adopted by Intel to develop CPUs. Now, it has become the predominant 64-bit processor architecture for desktop and server computers.

    X86 architecture was predominantly used in the early days of computing, but it was later replaced by X64 architecture for several reasons:

    1. 64-bit registers and address space: X64 processors support 64-bit integer and floating-point data types, allowing them to access significantly more memory (up to 16 exabytes) compared to the 32-bit x86 architecture.
    2. Expanded instruction set: X64 introduces additional instructions and registers that enhance performance for 64-bit applications. This includes support for more general-purpose registers, which can improve the efficiency of arithmetic and logical operations.
    3. Backward compatibility: X64 processors maintain compatibility with the 32-bit x86 instruction set, ensuring that existing software designed for 32-bit systems can run seamlessly on 64-bit platforms.

    ARM vs x64(x86) Server Architecture Comparison Guide

    RunCloud supports both ARM and AMD64 CPU architecture for your servers, but if you are looking to pick between ARM and x86 architecture, then there are several things that you should know:

    Core Architectural Comparison

    The ARM and x86 architectures are two fundamentally different approaches to CPU design, primarily distinguished by their instruction set architectures (ISA).

    • ARM follows a Reduced Instruction Set Computing (RISC) model, which is a simpler, more streamlined instruction that can be executed quickly and with lower power consumption.
    • In contrast, x86 uses a Complex Instruction Set Computing (CISC) approach, which supports more complex, multi-step instructions that can perform sophisticated operations with fewer lines of code.

    While these architectures cannot directly run each other’s machine-level code due to their distinct instruction sets, modern programming languages provide a critical abstraction layer. Compilers can translate high-level code into architecture-specific machine instructions, allowing the same source code to be compiled for both ARM and x86 processors.

    This means a Python, Java, or C++ program can be compiled to generate native instructions specific to ARM or x86 architectures, enabling software portability across different CPU types while maintaining optimal performance for each platform.

    Feature

    ARM Architecture

    x86 Architecture

    Instruction Set

    RISC (Reduced Instruction Set Computing)

    CISC (Complex Instruction Set Computing)

    Power Efficiency

    Typically 30-50% better power efficiency

    Higher power consumption but improving with newer generations

    Cost Structure

    Lower licensing costs, emerging ecosystem

    Mature ecosystem, competitive pricing due to scale

    Market Maturity

    Growing rapidly, especially with AWS Graviton

    Dominant market position, extensive vendor support

    Software Compatibility

    Software compatibility between ARM and x86 architectures has significantly improved, with most modern programming languages and frameworks offering native support for both platforms through cross-compilation techniques.

    Major platforms such as Linux, Windows, and macOS now provide robust toolchains that enable developers to build applications that can be easily recompiled for different CPU architectures.

    While some specialized software and low-level system utilities may still require architecture-specific modifications, the vast majority of high-level applications can now be seamlessly adapted between ARM and x86 with minimal additional engineering effort.

    Software Type

    ARM Support

    x86 Support

    Linux Distributions

    Full support in major distros (Ubuntu, RHEL, etc.)

    Universal support

    Container Support

    Native Docker support, growing ecosystem

    Comprehensive support

    Web Servers

    nginx, Apache, Lighttpd

    All web servers supported

    Databases

    MySQL, PostgreSQL, MongoDB

    All major databases

    Programming Languages

    Most languages supported natively

    Universal support

    Cost Considerations

    ARM-based server architecture is considered a cost-effective alternative to traditional x86 systems, primarily due to its inherently lower power consumption and more efficient chip design. The fundamental energy efficiency of ARM processors allows data centers to significantly reduce electricity costs.

    This reduction in operational expenses is why major cloud providers and enterprise data centers are gradually shifting their infrastructure towards ARM-based solutions.

    But the cost advantages extend beyond just power consumption.

    ARM’s design allows for more compact and thermally efficient chip manufacturing, resulting in lower hardware production costs and the ability to create denser server configurations. This economic incentive is particularly compelling for hyperscale cloud providers and large-scale computing environments that operate thousands of servers simultaneously.

    Factor

    ARM

    x86

    Hardware Costs

    Lower initial investment

    Variable, competitive at scale

    Operating Costs

    Lower power consumption

    Higher power costs

    Support Costs

    It may require specialized knowledge

    Widely available expertise

    Benchmarks: ARM vs x86 Server Performance

    We designed a controlled testing environment that minimized variables and provided a fair assessment of ARM versus x86 server performance.

    We deployed two identical server configurations within the same cloud provider and region, carefully matching specifications including vCPU count, memory allocation, and network parameters.

    After that, we created a standard WordPress installation with 20 blog posts for our performance evaluation.

    We used k6 for load testing and Grafana for performance visualization to execute a 5-minute load test with 20 concurrent virtual users. During our tests, we tracked critical performance metrics, including requests per second, response times, and HTTP failure rates.

    Metric

    ARM

    x86

    Requests Made

    8.8k

    5.7k

    HTTP Failures

    0

    0

    Peak Requests per Second (RPS)

    32

    21.67

    P95 Response Time

    383ms

    893ms

    arm64 vs x64 benchmarks

    The benchmark results show notable performance advantages for ARM-based servers in this specific test scenario. Key observations include:

    1. Request Volume: ARM servers processed approximately 54% more requests compared to x86 servers, indicating a significant throughput improvement.
    2. Request Efficiency: The peak requests per second for ARM servers (32 RPS) substantially outperform x86 servers (21.67 RPS), which shows enhanced computational efficiency.
    3. Latency Performance: The P95 response time for ARM servers (383ms) is markedly lower than that for x86 servers (893ms), representing a dramatic reduction in latency that could improve user experience.

    By maintaining strict control over testing variables and using industry-standard performance analysis tools, we created a transparent and reproducible benchmark methodology. Our goal was not to declare a definitive winner but to provide an objective, data-driven perspective on the current performance capabilities of ARM and x86 server architectures.

    While these benchmarks highlight ARM’s impressive performance, it’s important to understand that server architecture selection is nuanced. x86 server architecture is a robust, mature technology with:

    • Extensive ecosystem support
    • Proven reliability
    • Widespread enterprise adoption
    • Significant ongoing development and optimization

    The results should be interpreted as a demonstration of ARM’s emerging capabilities rather than a wholesale replacement recommendation. When considering architectural transitions, you should evaluate their specific workload requirements, existing infrastructure, compatibility needs, and total cost of ownership.

    Final Thoughts: Navigating Server Architectures with Flexibility

    Throughout this article, we have discussed the different nuances of ARM and x86 architectures, as well as each platform’s strengths and considerations.

    However, the choice between ARM and x86 is no longer a binary decision but a strategic consideration dependent on specific workload requirements, cost structures, and performance needs.

    If you manage a fleet of servers, balancing ARM and x86 environments can quickly become a logistical nightmare. Deployment, optimization, and consistent performance management across different server types demand significant technical expertise – RunCloud is designed to eliminate these complexities.

    RunCloud provides comprehensive support for both ARM and x86 server environments. Whether you’re exploring performance optimizations or scaling your infrastructure, RunCloud ensures seamless deployment, monitoring, and control across different server architectures.

    Learn more about how RunCloud can help you manage your servers.

  • How to Install Ubuntu Mail Server? [Step By Step Guide]

    How to Install Ubuntu Mail Server? [Step By Step Guide]

    Are you looking for a simple but thorough guide on how to set up a Ubuntu Mail Server? Look no further!

    Dive into our step-by-step guide on ‘How to Install Ubuntu Mail Server‘ and unlock the secrets to mastering your own email server today!

    In this post we will walk you through the steps of installing and configuring Mailcow, a very popular email server for sending and receiving emails.

    But first, let’s learn a little bit about Mailcow.

    Mailcow Email Server logo

    What is the Mailcow Email Server?

    Mailcow is an open-source email server solution that makes setting up email services on Linux a breeze. It’s specifically designed for running inside containerized servers, integrating key components such as a mail transfer agent, a webmail client, and security features – all into one single system.

    Mailcow is essentially a collection of Docker containers that run various mail server applications, including (but not limited to) SOGo, Postfix, and Dovecot. Each container represents a single application – and they are all connected in a bridged network.

    It offers a modern and user-friendly web interface, known as the Mailcow UI, which provides a simple and easy interface for configuring nearly all settings and administrative tasks, such as enabling the easy creation of new domains and email addresses with just a few clicks.

    All the data, such as emails and user data, is stored in Docker volumes. This setup makes Mailcow a robust and straightforward choice for those seeking a self-hosted email server solution.

    How to Install SMTP Email Server in Ubuntu

    Here are the step-by-step instructions for installing the Mailcow email server on a Linux server:

    Prerequisites

    If you don’t plan on sending too many emails, then you’re better off using a third-party email service as it’s generally cheaper than maintaining and running a private email server. We’ve already covered the topic of using third-party email servers in extensive detail in our previous posts, which you can jump to here:

    1. Using Mailgun To Send Transactional Email From WordPress
    2. How to Send Email from PHP (With Guided Walkthrough)
    3. 15 Best Email Hosting For Small Business (2024)
    4. The 19 Best & Most Reliable Transactional Email Services 2023

    If you are determined to set-up your own email server, we recommend installing it on a separate VPS from your websites. By doing it this way, if someone hacks into your website, they won’t be able to gain access to your emails and user data.

    As we’ve mentioned, we will be using Mailcow as our email server, so begin by making sure your machine meets the following minimum requirements so that the installation process goes smoothly:

    1. CPU: 1 GHz
    2. RAM: Minimum 6 GiB + 1 GiB swap (default config)
    3. Boot Disk: 20 GiB (without emails)
    4. Architecture: x86_64, ARM64

    You can provision your server from any cloud provider that meets these requirements. In this tutorial, we will be using a Ubuntu 22 instance on Hetzner. Once your machine is up and running, you need to log in to your server via the command line and install Docker.

    Some providers may block outgoing ports to prevent spam, so make sure you configure your firewall settings to allow incoming TCP connections on all of the following ports: 25, 465, 587, 143, 993, 110, 995, 4190, 80, and 443.

    On Hetzner, you’ll need to submit a special request to unblock port 25 and 465 by going to your server settings and switching to the networking tab. On this screen, you will see a button labeled ‘Request Unblocking Ports’.

    When you click on the ‘Request Unblocking Ports’ button, you will see a dialog box which will require you to justify the need for this action. In the provided textbox, explain why you need an email server and submit the request – most requests are automatically approved within a minute.

    Dashboard Domain Setup

    Once you have a server up and running, it’s time to set up your DNS records. Although this action can be left until later, we recommend doing this first because DNS propagation takes time.

    Go to your DNS registrar’s dashboard and add the relevant A/AAAA records for the dashboard of your email server to point this domain to your machine. After setting up the mail server, your users will need to visit this website to send and read emails.

    Note: This domain can either be a completely separate fully-qualified domain name, or it can be a subdomain of your existing domain – it doesn’t matter.

    If you’re using RunCloud, you can easily set up and configure your DNS records using the DNS manager right from your RunCloud dashboard.

    setting up domain name in RunCloud

    Suggested Read: How To Speed Up DNS Propagation | Ultimate Guide

    Mailcow Installation

    Log in to your server with root privileges and start the process of installing Mailcow by running the following commands:

    cd /opt
    git clone https://github.com/mailcow/mailcow-dockerized
    cd /opt/mailcow-dockerized
    ./generate_config.sh 

    The above commands will download and store the necessary files for starting the installation on your server. If you executed the above commands correctly, the command line will prompt you to enter the domain name that you configured in the previous step. After entering the domain name, you will be asked to specify some basic settings such as timezone and the development branch.

    Enter your timezone, or just press ‘Enter’ to use the default settings. Next, press ‘1’ to use the stable version and then press ‘Enter’ – this will download the necessary files for starting the installation. Finally, execute the following commands to download and run the docker containers:

    docker compose pull
    docker compose up -d
    Installing Mailcow Email Server in Ubuntu

    After executing the above Docker commands, you will see that all the necessary containers have been started.

    Dashboard Setup

    Once your Docker containers are up and running, you can visit your Mailcow dashboard main page in your browser using the domain name that you specified earlier. On this screen, you will see a login page for the default admin account – the admin credentials are admin and moohoo.

    install-ubuntu-mail-server

    When you log in to your dashboard for the first time, you will see a statistics page for your server that shows basic diagnostic information such as CPU usage, memory usage, and all the currently running services.

    Inbox Domain Setup

    In your Mailcow dashboard, you can now start adding different domain names for your email inboxes. Click on the Email dropdown and select Configuration. In the domains tab, you can click on “Add domain” and follow the instructions on screen to set it up.

    After filling in all the information, you will be asked to configure the DNS records for this domain. Go to your DNS registrar’s dashboard and create all the required records using the values provided by Mailcow.

    Setting up these DNS records correctly is necessary for sending and receiving emails via your mail server. Read our post titled DKIM – What Is It & Why Your Emails Need It to understand this better.

    User Setup

    After adding an inbox domain to your mail server, you can start using it immediately by creating new user accounts. Switch to the users tab and click on “Add User” to create a new account.

    On the next screen, you can fill in your username, full name, a login password, and configure other email settings such as the rate limit or the protocol that can be used to access your email address.

    Webmail Setup

    After adding users to your server, you can open your SOGo dashboard by clicking on the Apps > Webmail. Once you click on Webmail, it will show you a login form, where you can enter the email address and password that you just created.

    Once you log in to your email account, you can start using it to send and receive emails normally.

    Wrapping Up

    Setting up an email server on Ubuntu can be a complex task, but with the right tools and guidance it becomes entirely manageable. We’ve walked through the process of installing a Mailcow email server, which offers a robust and straightforward solution for those seeking a self-hosted email server.

    However, it’s important to note that if you’re planning to send fewer emails, using a third-party email service might be a more efficient and cost-effective solution. These services often provide better deliverability, simplified scalability, and dedicated support – which can save you a lot of time and effort in the long run.

    Lastly, for managing and deploying web applications to the cloud, we highly recommend using RunCloud. It’s a powerful and user-friendly platform that simplifies the process of managing, configuring, and deploying applications, making it an excellent tool for developers of all skill levels.

    Sign up for RunCloud today!

    FAQ on Ubuntu Mail Server

    Does Ubuntu have a mail server?

    Ubuntu does not have a mail server of its own, but it supports several mail servers, such as Postfix, Sendmail, and Exim.

    How to create an SMTP server in Ubuntu?

    To create an SMTP server in Ubuntu, you can install Postfix, which is a popular and powerful SMTP server. Here are the steps:
    Update your package list using sudo apt-get update.
    Install Postfix using sudo apt-get install postfix.
    During the installation, a prompt will appear asking for the type of mail configuration. Select ‘Internet Site’.
    Enter the fully qualified domain name (FQDN) for your server.
    Once the installation is complete, you can edit the configuration file located at /etc/postfix/main.cf as per your requirements.

    How to set up Sendmail in Ubuntu?

    Setting up Sendmail in Ubuntu involves a few steps:
    Install Sendmail using sudo apt-get install sendmail.
    Configure /etc/mail/sendmail.mc by defining SMART_HOST.
    Run make in /etc/mail to implement the changes.
    Restart the Sendmail service with sudo service sendmail restart.

    What is the difference between Ubuntu and CentOS mail servers?

    The primary difference lies in the package management and the associated configurations. Ubuntu uses apt for package management, while CentOS uses yum. Therefore, the installation and configuration commands will differ. However, both can run the same mail servers such as Postfix or Sendmail.

    Why do I need a mail server in Linux?

    A mail server in Linux allows you to control your mail data, apply extensive customizations, integrate with other applications in your environment, and more. It’s particularly useful for businesses that require extensive control over their email.

    What is the default Linux mail server?

    There isn’t a default mail server for all Linux distributions.

    Should you use Sendmail or Postfix?

    Both Sendmail and Postfix are robust and reliable mail servers. Postfix is often favored for its ease of configuration and better security track record. However, some might prefer Sendmail because of its wide usage and extensive online resources.

    How do I run a local SMTP server?

    To run a local SMTP server, you can use tools such as Postfix or Sendmail. After installing them, you need to configure the mail server to run on your local machine, usually by setting the inet_interfaces parameter to localhost in the configuration file.

  • Introduction to Bash For Loops: A Beginner’s Guide

    Introduction to Bash For Loops: A Beginner’s Guide

    If you’re new to the command line and Linux, fear not! You don’t need to be a Linux expert to start using the power of the terminal.

    In this article, we’ll demystify the ‘for’ loop in Bash scripting. Whether you’re a developer, sysadmin, or just curious about the command line, understanding ‘for’ loops is essential.

    Why Are ‘For’ Loops Necessary?

    The ‘for’ loop is a fundamental construct that allows you to repeat a set of commands or actions multiple times. It’s like having a trusty assistant who diligently performs a task for you over and over again. Whether you’re processing files, managing directories, or automating tasks, there are many scenarios when loops are useful:

    1. File Processing and Batch Operations:
      • Loop through files in a directory to perform batch operations, such as renaming, moving, or compressing them.
      • Process log files, extract relevant information, and generate reports.
    2. System Administration and Configuration:
      • Iterate over a list of user accounts to apply changes (e.g., setting permissions, updating passwords).
      • Configure network interfaces, firewall rules, or services on multiple servers.
    3. Backup and Archiving:
      • Create backup scripts that loop through directories and files to archive or synchronize data.
      • Rotate log files by compressing older logs and keeping a specified number of recent ones.
    4. Automating Repetitive Tasks:
      • Run commands on multiple remote servers via SSH.
      • Schedule regular tasks (e.g., backups, database maintenance) using cron jobs.
    5. Data Processing and Transformation:
      • Parse CSV files or other structured data formats.
      • Transform data (e.g., converting file formats, extracting specific fields).

    Loops in general are versatile and can be adapted to various scenarios. They allow you to iterate over lists, directories, or any other collection of items in your scripts.

    In this post, we’ll explore the basic syntax of ‘for’ loops, and demonstrate their versatility with practical examples. By the end, you’ll be ready to wield this powerful tool in your Linux journey.


    Basic Syntax of Bash ‘For’ Loop

    A 'for' loop is a control structure in programming that allows you to repeat a set of commands for each item in a list. It’s like a conveyor belt that processes each item one by one.

    Syntax:

    • for variable in list: This line initializes a loop. The variable represents the current item from the list.
    • do: This marks the beginning of the loop body.
    • # Commands to execute for each item in the list: Here, you can put any commands or actions you want to perform on each item.
    • done: This marks the end of the loop.
    for variable in list
    do
        # Commands to execute for each item in the list
    done

    Explanation:

    • You define a variable (usually a single letter) to keep track of the current item.
    • The list contains multiple items (e.g., filenames, numbers, or strings).
    • For each item in the list, the commands inside the loop are executed.
    • Once all items are processed, the loop ends.

    Execution Frequency:

    • The for loop executes once for each item in the specified list.
    • If there are n items in the list, the loop will run n times.
    • For example, if you have a list of three filenames (file1.txt, file2.txt, and file3.txt), the loop will execute three times, once for each filename.
    for filename in file1.txt file2.txt file3.txt
    do
        if [ "$filename" == "file2.txt" ]; then
            echo "Found file2.txt! Exiting loop."
            break
        fi
        echo "Processing $filename"
    done
    bash for loops

    Using Bash ‘For’ Loop

    Looping through Files and Directories

    You can use a 'for' loop to process files or directories. This is ideal if you want to traverse through a directory which has a large number of files, or if the number of files keep changing.

    #!/bin/bash
    for file in /path/to/files/*; do
        echo "Processing file: $file"
        # Add your custom commands here
    done
    bash for loop file processing

    Iterating over a Range of Numbers

    To loop through a range of numbers, use the {start..end} notation. If you want to run the loop a fixed number of times, you can create a list of numbers using this format.

    #!/bin/bash
    for i in {1..5}; do
        echo "Number: $i"
    done
    number list in for loop

    Using ‘for’ with Command Substitution

    The ‘for’ loop is flexible and powerful. You can redirect the output of other commands in the loop, and then process each item in the list.

    #!/bin/bash
    for user in $(cut -d: -f1 /etc/passwd); do
        echo "User: $user"
    done

    Nested ‘for’ Loops

    If a simple ‘for’ loop isn’t enough, you can use multiple ‘for’ loops together to achieve more complex functionality.

    #!/bin/bash
    for outer in A B C; do
        for inner in 1 2 3; do
            echo "$outer->$inner"
        done
    done

    Final Thoughts

    You’ve now unlocked the potential of Bash for loops. It is like a Swiss Army knife for your command line adventures. Mastering the ‘for’ loop opens up endless possibilities for automating tasks and managing data efficiently in your Linux environment.

    Remember, the command line need not be intimidating, but if you do find it a bit daunting then you should check out RunCloud, a web platform to manage your servers that works with any cloud provider. Sign up for RunCloud and experience the best of both worlds:

    • Web-Friendly Dashboard: Get started quickly without diving into complex Linux commands. RunCloud provides an intuitive interface for managing your servers.
    • Command Line Freedom: If you’re a terminal enthusiast, RunCloud gives you the flexibility to tinker with the command line whenever you wish.
  • How to Change/Reset MySQL Root Password on Ubuntu Linux?

    How to Change/Reset MySQL Root Password on Ubuntu Linux?

    Did you forget the root password for your MySQL Server?

    Or maybe you provisioned your RunCloud server via the auto-install method and never had the need to use your password in the first place?

    Whatever may be the case, if you want to reset your MySQL password then you’ve come to the right place!

    In this guide, we’ll walk you through how to set, change, and recover your MySQL root password on an Ubuntu server via MySQL command line.

    If you have no prior experience managing MySQL, don’t worry – with RunCloud, it is as easy as ABC.

    How to Reset Your MySQL Root Password in Linux

    Step 1: Log in to the Server with SSH

    We have already written in-depth documentation on connecting to your RunCloud account via SSH, but if you’re not using RunCloud, you can use the following SSH command to log in to your server:

    ssh user@server_ip_address

    In the above command, replace the user with the username of your Linux account, and server_ip_address with your server’s IP address.

    Keep in mind that the Linux account must have superuser permissions to execute the commands given in the next step.

    Step 2: STOP MySQL Server

    After logging in to your server, you need to stop the MySQL service. You can use the following command to do this:

    Note: If you have any websites or other services that are using this database, then they will not be able to connect to your database while you carry out this action, so it is best to do this outside of business hours.

    sudo systemctl stop mysql
    logging into root user via command line

    Step 3: Restart MySQL Server

    After stopping the server, you can now restart it in the safe mode. This will allow us to execute SQL commands without needing to enter the password.

    Since the command --skip-grant-tables enables anyone to connect without a password, it is considered highly insecure, which is why all commands that follow must be done within a brief period. The ampersand (&) at the end is required as it ensures that the command is being run parallel with the commands that follow afterwards.

    To start MySQL without permission checking, execute the following command:

    sudo mysqld_safe --skip-grant-tables &
    MySQL root password

    Step 4: Log in to MySQL

    Once your server is up and running, you can log in to MySQL as the root user without the need for any password by executing the following command:

    mysql -u root

    Step 5: Change MySQL Password with Command Line

    Once you’re logged in to the MySQL server, you can do anything you like – such as changing the password for users, granting permissions, deleting database, etc.

    To change the root password, execute the following command:

    ALTER USER 'root'@'localhost' IDENTIFIED BY 'RunCloud_password';
    FLUSH PRIVILEGES;

    In the above command, replace the RunCloud_password with your new password.

    Alternatively, you can also use the following command to change the password:

    SET PASSWORD FOR 'root'@'localhost' = PASSWORD('RunCloud_password');
    FLUSH PRIVILEGES;

    Step 6: Stop & Restart MySQL Server

    Finally, you need to stop the MySQL service and restart it in normal mode. To do this, first exit from the MySQL CLI by using the exit; command, and then restart the service using the following commands:

    sudo systemctl stop mysql
    sudo systemctl start mysql

    That’s it! Once your server is up and running, you can start using it normally. To log in to your server via the new password, use the following command:

    mysql -u root -p

    The above command will prompt you to enter a password. To complete the login process, type your password and press Enter. Keep in mind that the password will not be displayed on screen for security reasons.

    Step 7: Edit RunCloud Configuration File (Only for RunCloud Users)

    If you are using RunCloud to manage your servers, then you will need to edit a config file on your server so that RunCloud agent can access your MySQL database using the new password. To edit the config file, execute the following command on your terminal:

    nano /etc/mysql/conf.d/root.cnf

    The above command will open a text editor in your terminal, you can use the arrow keys on your keyboard to navigate and replace the existing password with your new password.

    After editing the file, you can save it by pressing Ctrl + O and exit the editor by pressing Ctrl + X. If you need step-by-step instructions on editing the file, then you should read our post on editing files over SSH using Nano.

    Frequently Asked Questions

    How do I find my MySQL root password?

    You cannot directly find the MySQL root password due to security reasons. However, you can reset it. To recover the password, you need to stop the MySQL server process, start the MySQL server with the --skip-grant-tables and --skip-networking options, and then connect to the MySQL server as the root user.

    What is the password for the root user in MySQL Workbench?

    The password for the root user in MySQL Workbench is the one you set during the installation of MySQL. If you haven’t set any password, you might be able to log in directly.

    How to change SQL password using CMD?

    You can change the SQL password using the command line by using the ALTER USER statement.

    How to reset MySQL root password in Docker?

    To reset the MySQL root password in Docker, you need to first access your MySQL container using the docker exec command and then, follow the steps described in this post to reset your root password.

    How to reset the root password in MySQL Mac?

    To reset the root password in MySQL on a Mac, you need to stop the MySQL Server first. Then, start the server in safe mode with a privilege bypass. In a new window, connect to the database, set a new password (as explained in this post), and flush the permissions.

    Can a MySQL user change their own password?

    Yes, a MySQL user can change their own password using the SET PASSWORD or ALTER USER statement.

    How to Recover the MySQL Root Password?

    Unfortunately, you cannot retrieve the MySQL root password. However, you can reset it by following the steps mentioned in this post.

    How to find MySQL root password in RunCloud?

    If you install RunCloud via manual installation, then the MySQL root password is displayed on your terminal screen at the end of the RunCloud agent installation on your server.

    Wrapping Up

    RunCloud is a powerful and easy-to-use platform that helps you manage your websites on any cloud server. With RunCloud, you don’t need to be a Linux expert to set up, secure, and optimize your web applications. You can do everything from a simple and intuitive dashboard, saving you time and hassle.

    RunCloud supports various web servers, PHP versions, databases, and frameworks. You can also monitor your server performance, back up your data, and automate your tasks with RunCloud. Whether you are a developer, a freelancer, or a business owner, RunCloud can help you run your websites faster and smoother.

    What are you waiting for? Join RunCloud today and enjoy the best web hosting solution for your websites. It’s free for 7 days, no strings attached!