Author: RunCloud Team

  • How to Install WordPress with Apache on Ubuntu 2026

    How to Install WordPress with Apache on Ubuntu 2026

    In this comprehensive guide, we’ll walk you through the process of installing WordPress on an Ubuntu server using the Apache web server. This setup, often referred to as a LAMP stack (Linux, Apache, MySQL, PHP), is a time-tested method for hosting WordPress sites.

    We’ll cover everything from preparing your Ubuntu server and installing the necessary software packages to configuring Apache, setting up a MySQL database, and finally installing and configuring WordPress itself.

    It’s worth noting that while this manual process offers a deep understanding of your server environment, it can be time-consuming and requires ongoing maintenance. For those seeking a more streamlined approach, we’ll also touch on how managed solutions such as RunCloud can simplify this process, offering features such as one-click WordPress installations, automated security updates, and easy server management.

    Whether you’re a developer looking to understand the intricacies of WordPress hosting, a system administrator expanding your skill set, or simply an enthusiast wanting to take control of your web presence, this guide will equip you with the knowledge to set up a robust WordPress installation on your own Ubuntu server.

    As the world’s most popular content management system, powering just under half of all websites on the Internet, WordPress’s flexibility, extensive plugin ecosystem, and user-friendly interface make it ideal for everything from personal blogs to large-scale enterprise websites.

    While there are many ways to host WordPress, including managed solutions and one-click installers, understanding the manual installation process can provide valuable insights into the underlying technology stack and give you greater control over your web environment.

    Before You Install WordPress

    Before we explain how to install WordPress, let’s ensure you have everything necessary to successfully follow this tutorial step-by-step:

    1. A Server Running the Latest Version of Ubuntu: You’ll need a server deployed with the most recent Ubuntu release. You can set this up with any cloud provider of your choice. For this tutorial, we’ll be using UpCloud, known for its user-friendly interface and straightforward setup process.
    2. Privileged Access to Your Linux Server: When deploying your server, be sure to securely note down the credentials for the root user (or the privileged sudo user). You must have either root access or the ability to use the sudo command to install applications on your server.

    Having these prerequisites in place will ensure a smooth installation process as we move forward with setting up WordPress on your Ubuntu server using Apache.

    Steps for Installing WordPress on Ubuntu

    In this section, we will provide you with the instructions for installing and configuring WordPress on a fresh Ubuntu server.

    Step 1 – Installing All Of The Required Packages (LAMP)

    The first step to setting up WordPress on your Ubuntu server is to install the necessary components of the LAMP stack: Apache, PHP, and MySQL.

    • Apache serves as the web server, processing and delivering web content to visitors.
    • PHP is the scripting language that WordPress is built upon, allowing for dynamic content generation.
    • MySQL, is a relational database management system, that stores all of WordPress’s content, user information, and settings.

    Together, these components create a robust and efficient platform for running WordPress.

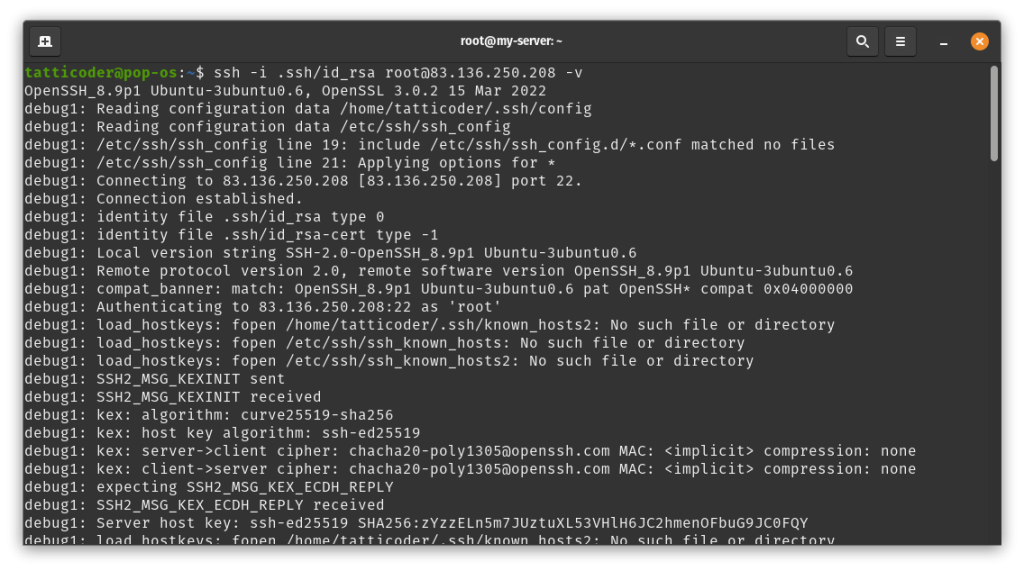
    To begin this process, you’ll need to access your server via SSH (Secure Shell) using a terminal or command line interface. Once connected, you can execute the following command to update your server’s package manager cache to ensure you’re installing the most recent versions of the software and install the necessary packages:

    sudo apt update
    sudo apt install apache2 mysql-server php-curl php-gd php-mbstring php-xml php-xmlrpc php-soap php-intl php-zip php libapache2-mod-php php-mysql -y

    After running these commands in your terminal, you will need to wait for a few minutes for the installation process to complete successfully.
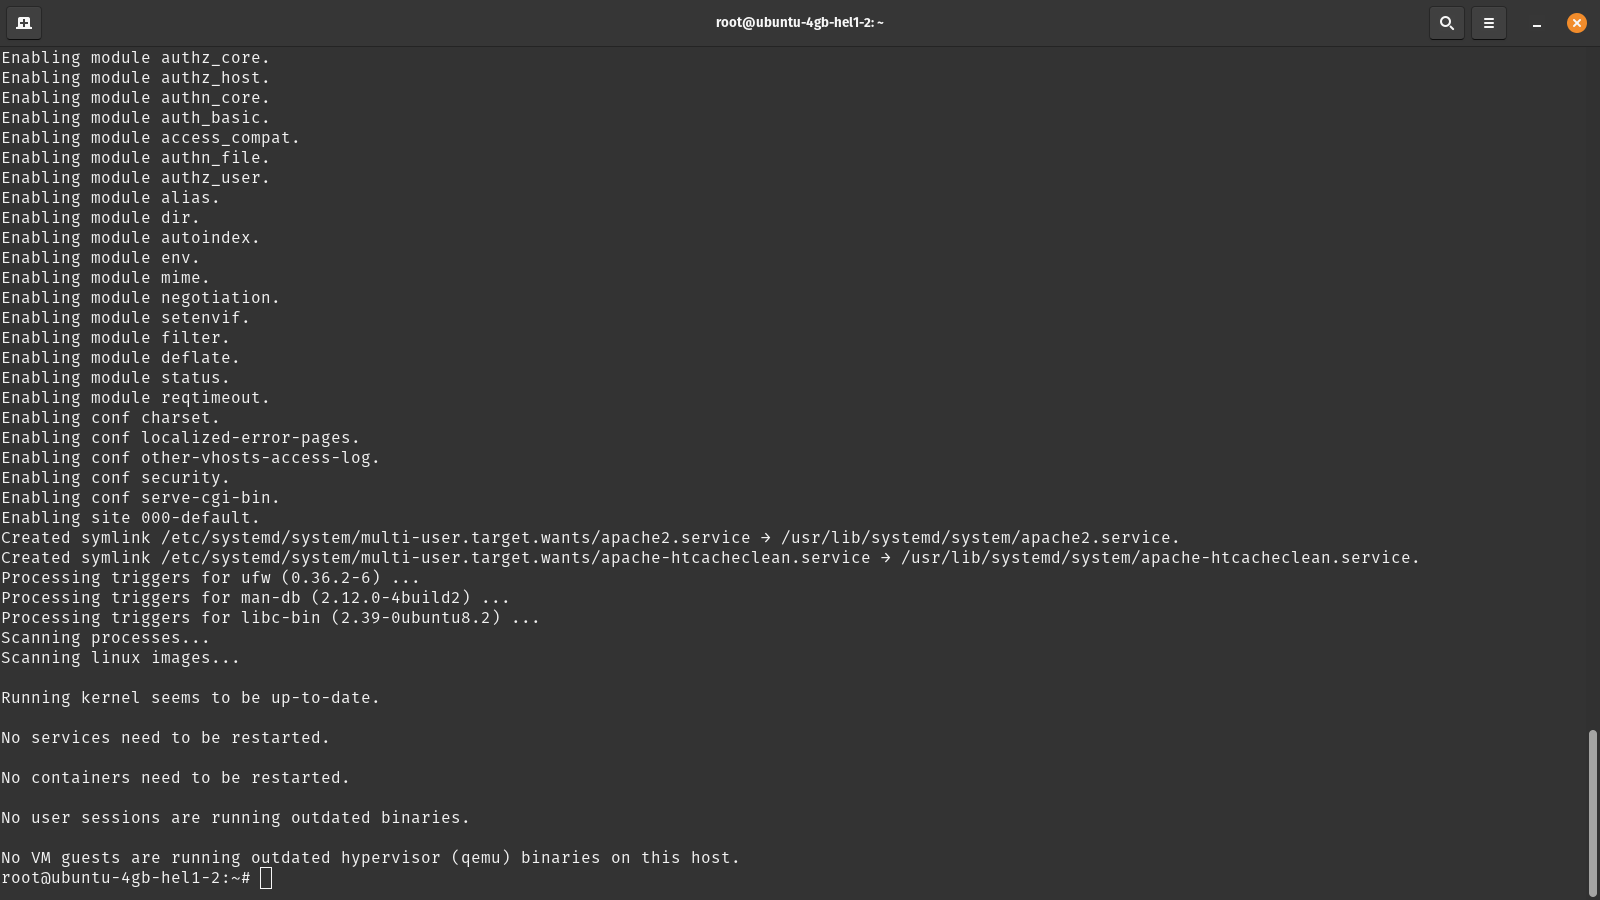
    After successfully installing the packages, it’s important to configure your server’s firewall to allow incoming HTTP traffic. This step is necessary if you want your website to be accessible on the internet. Simply run the following command to enable it:

    sudo ufw allow in "Apache"

    This command instructs the Uncomplicated Firewall (UFW) to create a rule allowing incoming connections to Apache. To confirm that the firewall rule has been properly applied, you can check the status of UFW at any time by running the command:

    sudo ufw status

    Additionally, you can verify that Apache is functioning correctly by opening a web browser and navigating to your server’s IP address (http://[your server ip]). If everything is set up properly, you should see Apache’s default welcome page. This default page serves as a confirmation that Apache is installed and responding to HTTP requests, even though your WordPress site isn’t set up yet.

    Step 2 – Configure MySQL

    After installing MySQL, it’s important to configure it securely, especially for production environments. The mysql_secure_installation script helps you improve the security of your MySQL installation. To begin the configuration, run the following snippet:

    sudo mysql_secure_installation

    This script will guide you through several security-related options:

    1. Password Validation: You’ll be asked if you want to set up the VALIDATE PASSWORD component. For production sites, it’s recommended to answer ‘Y’ and choose a strong password policy (level 2 is the most secure). This ensures all MySQL passwords meet high-security standards.
    2. Set Root Password: If you haven’t set a root password yet, you’ll be prompted to do so. Choose a strong, unique password for the MySQL root user.
    3. Remove Anonymous Users: It’s advisable to remove anonymous users by answering ‘Y’. This prevents unauthorized database access.
    4. Disallow Root Login Remotely: It’s safer to disallow root login from remote machines for single-server setups. Answer ‘Y’ to this prompt.
    5. Remove Test Database: The test database is unnecessary for most installations. Removing it (by answering ‘Y’) reduces potential security risks.
    6. Reload Privilege Tables: Answer ‘Y’ to this final prompt to ensure all changes take effect immediately.

    For a test or development environment, you can be less stringent and skip the password validation setup, use a simpler root password, and potentially keep the test database. However, even for test sites, it’s generally good practice to remove anonymous users and disallow remote root login. These settings can be changed later if needed, but starting with a secure configuration is always recommended, even for test environments.

    Step 3 – Create MySQL Database & User for WordPress

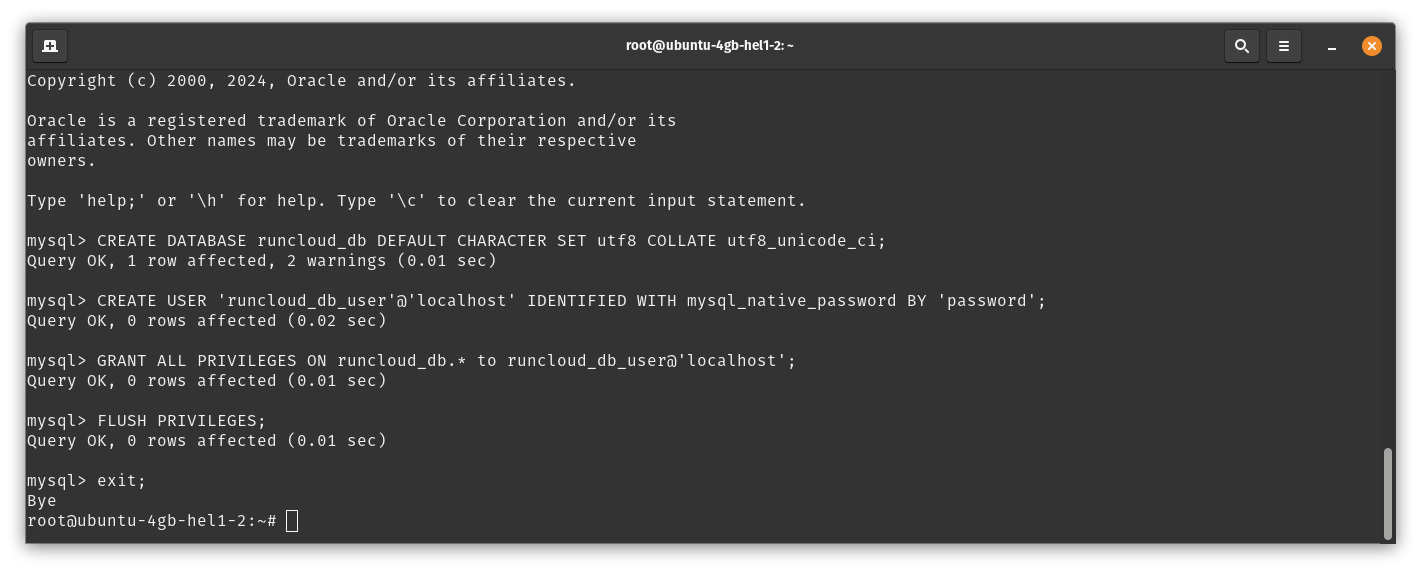
    Having installed MySQL earlier, it’s now time to create a database for WordPress to store its content, including posts, pages, comments, and user information. To begin this process, open MySQL by running the following command:

    sudo mysql

    This command will open the MySQL prompt. If all previous steps were completed successfully, you should see the MySQL welcome message in your terminal. To create a new database for WordPress, execute the following SQL command:

    CREATE DATABASE wordpress_db DEFAULT CHARACTER SET utf8 COLLATE utf8_unicode_ci;

    You can replace ‘wordpress_db’ with any name you prefer for your database. Next, we need to create a MySQL user for WordPress and grant it access to the database. Run the following command to create a new user:

    CREATE USER 'wp_user'@'localhost' IDENTIFIED BY 'your_secure_password';

    Replace ‘wp_user’ with your chosen username and ‘your_secure_password’ with a strong, unique password. Make sure to record this information, as you’ll need it during the WordPress setup process. To grant the new user full privileges on the WordPress database, use this command:

    GRANT ALL PRIVILEGES ON wordpress_db.* TO 'wp_user'@'localhost';

    Ensure you replace ‘wordpress_db’ and ‘wp_user’ with the database and username you chose earlier. Finally, to apply these changes and exit MySQL, run these two commands in succession:

    FLUSH PRIVILEGES;
    exit;

    These steps create a dedicated database and user for your WordPress installation, ensuring proper functionality and security.
    Step 4 – Create a Virtual Host File in Apache

    Apache’s virtual host functionality is a powerful feature that allows a single server to host multiple websites or applications, each with its own domain name. This concept is similar to NGINX’s server blocks.

    In this section, we’ll set up a virtual host for our WordPress site, using ‘runcloud-example.com’ as our domain name. Remember to replace this with your actual domain throughout the process.

    First, let’s create the necessary directory structure and set the appropriate permissions by executing the following commands:

    sudo mkdir -p /var/www/runcloud-example.com
    sudo chown -R $USER:$USER /var/www/runcloud-example.com

    Next, we’ll create and configure the Apache virtual host file and edit its contents by running the following command:

    sudo nano /etc/apache2/sites-available/runcloud-example.com.conf

    Next, you need to paste the following configuration in the new file and replace ‘runcloud-example.com’ with your domain:

    <VirtualHost *:80>
        ServerName runcloud-example.com
        ServerAlias www.runcloud-example.com
        ServerAdmin webmaster@localhost
        DocumentRoot /var/www/runcloud-example.com
        ErrorLog ${APACHE_LOG_DIR}/error.log
        CustomLog ${APACHE_LOG_DIR}/access.log combined
    </VirtualHost>
    <Directory /var/www/runcloud-example.com/>
        AllowOverride All
    </Directory>

    After editing the configuration file, save and close it (press CTRL+X, then Y, then Enter). If you get stuck at any point, you should read our previous post, which explains how to edit files with nano.

    Now, you need to enable the new virtual host and disable the default one by executing the following commands:

    sudo a2dissite 000-default
    sudo a2ensite runcloud-example.com
    sudo a2enmod rewrite
    sudo systemctl reload apache2

    At this point, when you visit your server’s IP address or domain name in a web browser, you should see a directory listing or a default page, depending on the contents of your /var/www/runcloud-example.com directory. This indicates that your virtual host is correctly configured and Apache is serving content from the appropriate directory.

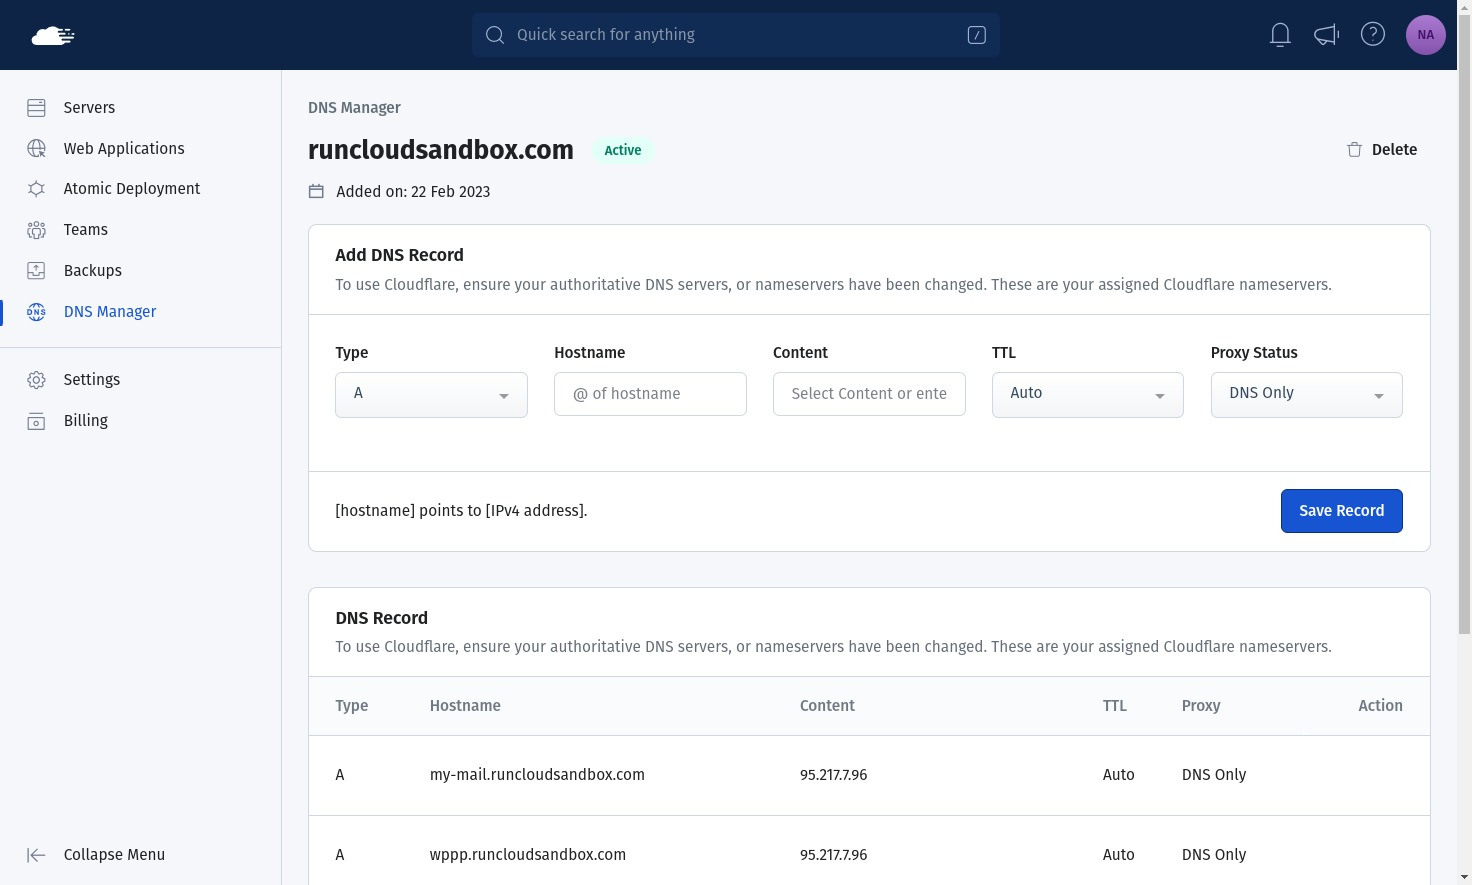
    If you haven’t already, remember to update your domain’s DNS settings to point to your server’s IP address. This ensures that when someone visits your domain, they’re directed to your Apache server.

    Step 5 – Installing WordPress

    Once you have configured everything else, you can start downloading and setting up the WordPress files on your server. Run the following commands to download and extract the necessary files in the required directories:

       wget -O /tmp/wordpress.tar.gz https://wordpress.org/latest.tar.gz
       sudo tar -xzvf /tmp/wordpress.tar.gz -C /var/www/runcloud-example.com
       sudo chown -R www-data:www-data /var/www/runcloud-example.com

    After executing these commands, you can complete the WordPress installation through your web browser. Navigate to your server’s IP address or domain name, and you’ll be greeted by the WordPress setup wizard. Here, you’ll need to enter the database information that was created earlier (database name, username, and password).

    Once you’ve submitted this information, WordPress will create the necessary database tables. You’ll then be prompted to set up your site title, admin username, and password.

    After this step, you will be able to log in to your new WordPress site and start customizing it to your needs.

    While this process gives you a fully functional WordPress site, it’s important to note that manual installation can be complex and time-consuming, especially for those new to server management. It’s prone to errors and requires ongoing maintenance to keep the server secure and up-to-date.

    This is why we recommend using RunCloud to manage your WordPress websites.

    Effortless WordPress Setup with RunCloud

    Setting up a WordPress website with RunCloud is refreshingly simple and straightforward. RunCloud’s user-friendly interface and automated processes take the complexity out of web hosting, allowing you to focus on what really matters – your content and your business.

    Here’s how easy it is to get your WordPress site up and running with RunCloud:

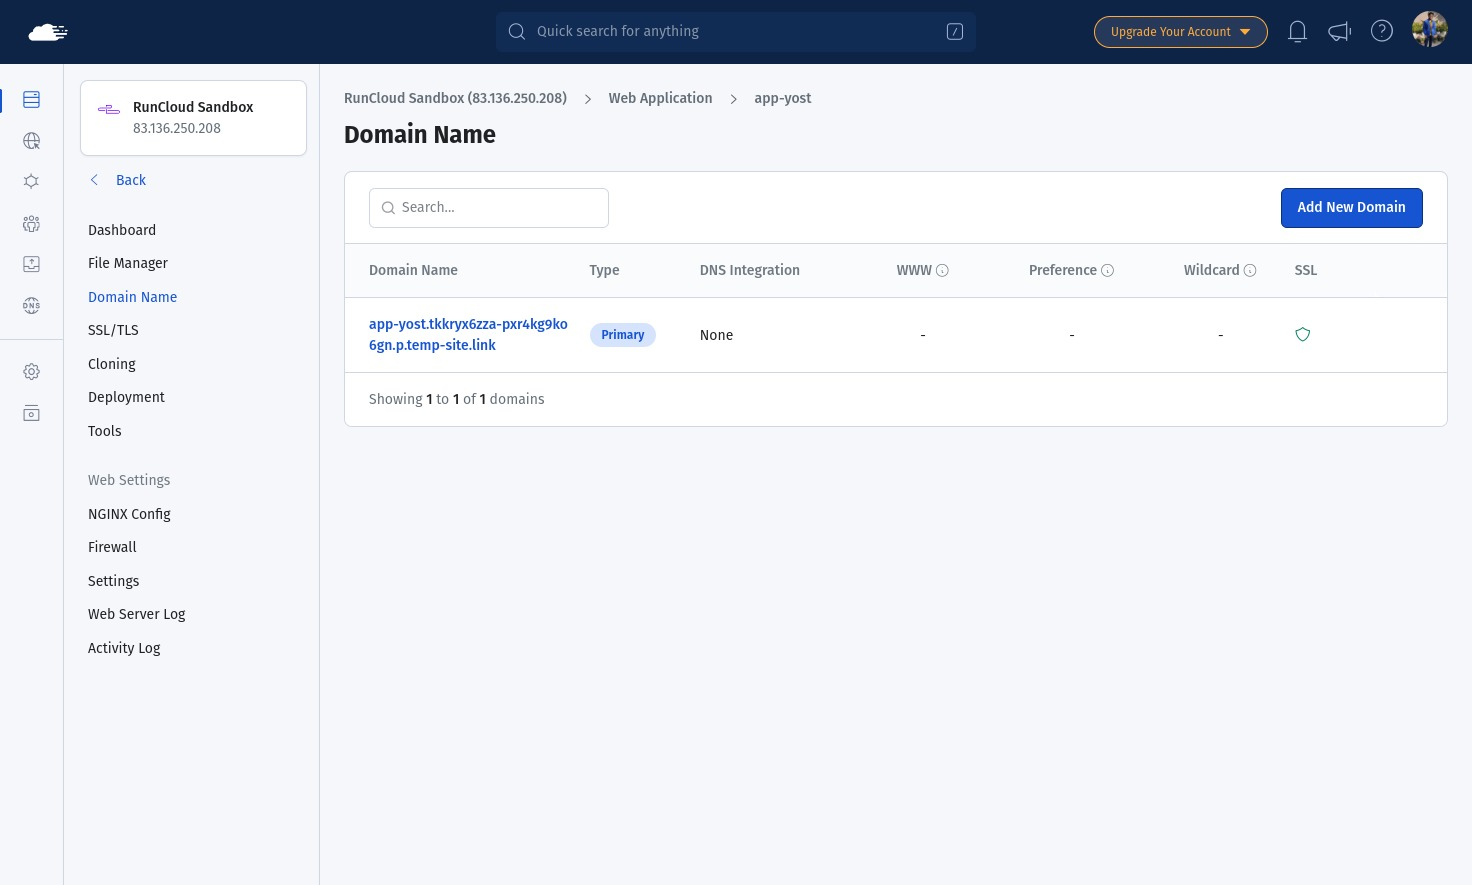
    1. Enter Website Details: Simply provide a name for your new website. This name is for your reference within RunCloud and doesn’t have to be your final domain name.
    2. Set Site Title: Enter the title for your website. Don’t worry, you can always change this later from within WordPress.
    3. Create User Credentials: Choose a username and password for your WordPress admin account. These will be used to log in to your WordPress dashboard once the site is set up.
    4. Configure Domain: RunCloud provides you with two different options:
    • Configure your own domain name if you have one ready to use.
    • Opt for RunCloud’s test domain, which allows you to start developing your site immediately and switch to your own domain later.
    1. Deploy WordPress: With all details entered, simply click the “Deploy” button and let RunCloud work its magic.

    And that’s it! In just a few minutes, RunCloud will have your WordPress site fully set up, secured, and ready for you to start customizing.
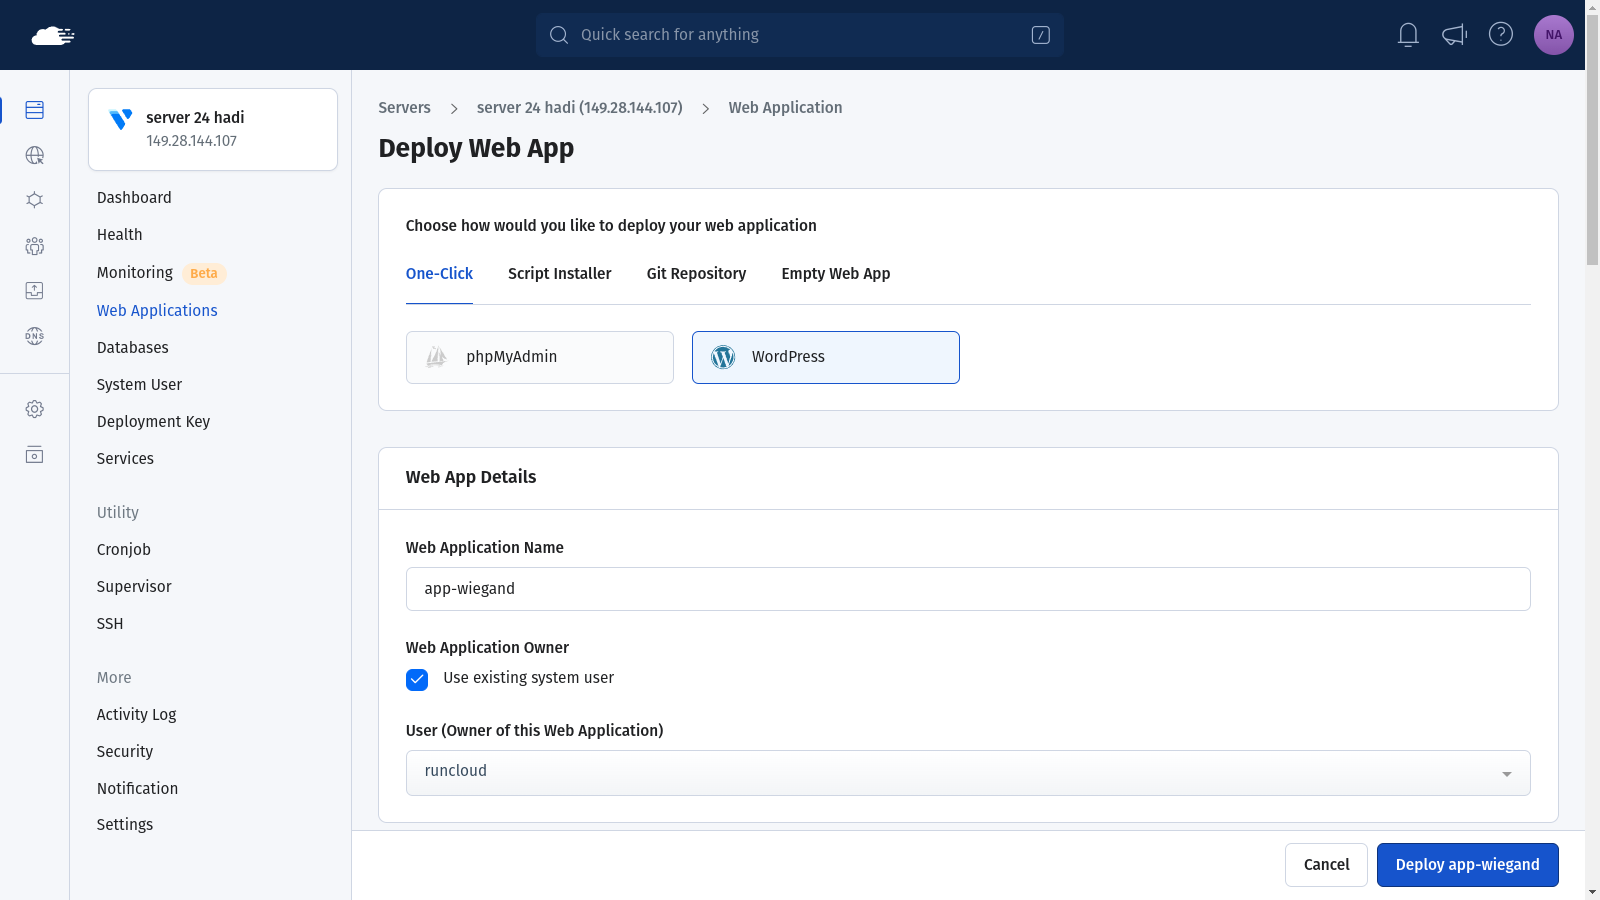
    RunCloud’s streamlined process eliminates the need for complex server configurations, database setups, or file transfers. It’s perfect for developers who want to save time, agencies managing multiple client sites, or anyone who prefers to focus on creating great web content rather than wrestling with server management.

    Moreover, RunCloud also provides features such as automatic updates, robust security measures, and easy scalability which not only simplifies the initial setup but also ensures your WordPress site remains secure with minimal effort on your part.

    Final Thoughts: Simplify Your WordPress Management with RunCloud

    In this guide, we’ve provided a comprehensive walkthrough for manually installing and configuring WordPress on an Ubuntu server with Apache. While this process offers valuable insights into the inner workings of web hosting, it’s clear that managing multiple websites across various servers can quickly become a complex and time-consuming task.

    This is where RunCloud truly shines, offering a streamlined solution that simplifies website management without sacrificing control or performance. Here’s why RunCloud is the ideal choice for both novice and experienced web developers:

    1. Effortless Multi-Site Management – easily oversee multiple WordPress websites from a single, intuitive dashboard.
    2. Enhanced Security – benefit from automated firewall configuration and updates to keep your sites protected.
    3. Automated Backups – ensure your data is always safe with scheduled, hassle-free backups.
    4. WordPress Staging Environments – test changes and updates in a safe environment before pushing them live.
    5. Integrated DNS Management – simplify your workflow by managing your domains directly within the RunCloud interface.
    6. Versatility Beyond WordPress – seamlessly works with other popular applications such as Nextcloud, Ghost CMS, WHMCS, Laravel, and more.
    7. Performance Optimization – leverage built-in caching and optimization tools to keep your sites running at peak performance.

    While the manual process we’ve outlined provides a solid foundation for understanding WordPress hosting, RunCloud automates this knowledge, allowing you to focus on what truly matters – creating and managing outstanding websites.

    Whether you’re a solo developer, part of an agency, or managing enterprise-level websites, RunCloud offers the tools and simplicity you need to succeed.

    Start using RunCloud today!

  • How to Check if TCP Port is Open, Closed or in Use on Linux?

    How to Check if TCP Port is Open, Closed or in Use on Linux?

    When working with networking services, you might encounter networking ports on Linux.

    In this post, we will explain everything you need to know about networking ports in Linux, including how different networking protocols (TCP and UDP) use these ports. We will also show you how to check if a TCP port is open, closed or in use on Linux. Where relevant, we also reference UDP ports to show how the same tools behave differently.

    What are Linux Networking Ports?

    In Linux, a networking port is a numbered endpoint that allows software applications to send and receive data over a network. While the IP address is used to identify the host in a network, the port number identifies a specific process or service running on that host. These ports are identified by port numbers, which range from 0 to 65,535 and are integral to how Linux machines communicate with other machines on the network.

    One simple way to think about this is that each application has its own numbered “mailbox” (port). Incoming data is delivered to the correct application by checking the port number.

    For example, in your RunCloud server, think of SSH, HTTP, and HTTPS as different apartments – port 22 is the mailbox for SSH, port 80 is for HTTP, and port 443 is for HTTPS. When data arrives, it knows which ‘apartment’ to go to based on these ‘mailbox numbers’.

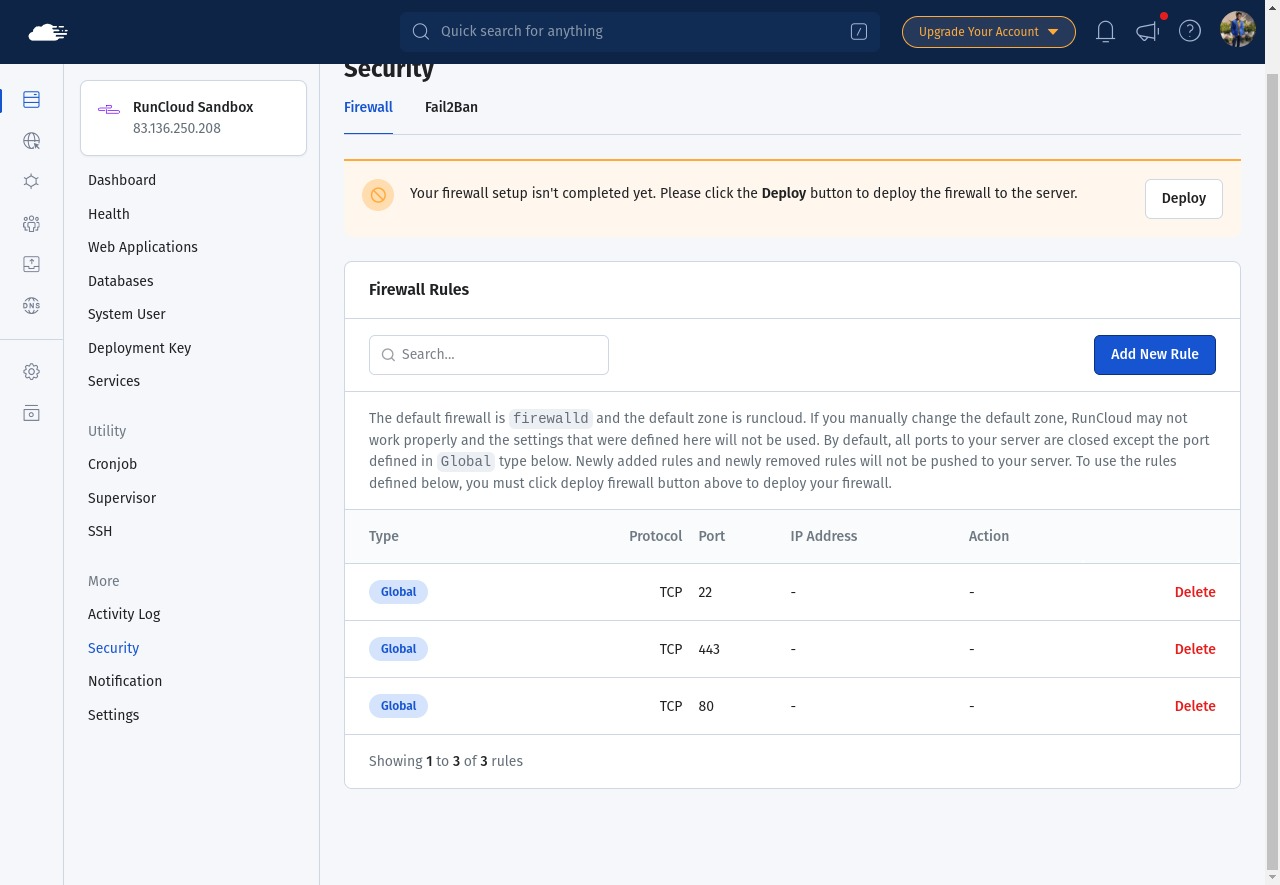
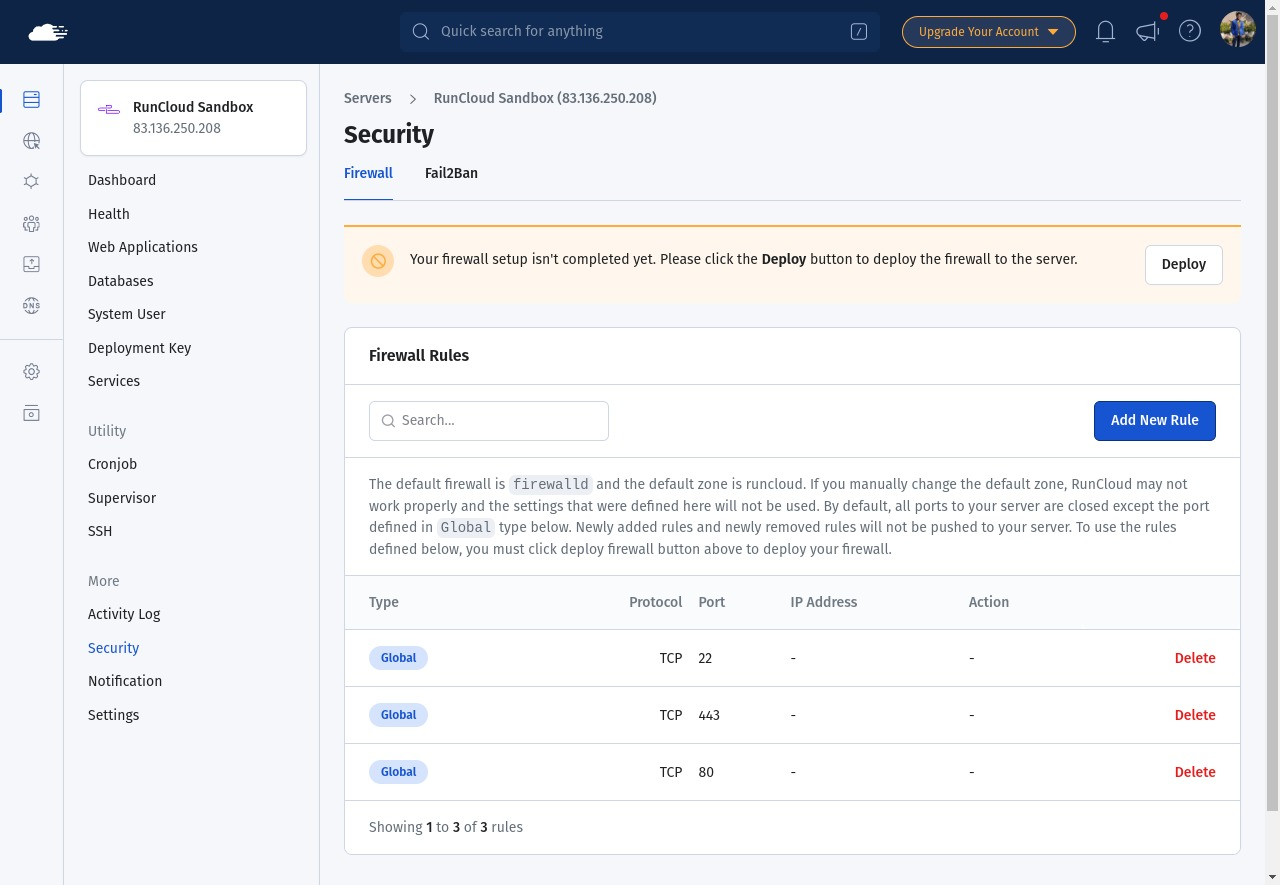
    In much the same way that you can open, close, or check your mailbox, RunCloud allows you to manage these ‘mailboxes’ (ports) from the Security tab. You can also configure firewall settings to open a port to allow data in, or close a port to deny data.

    Types of Linux Transport Protocols

    Let’s continue with our apartment building analogy to explain the difference between UDP and TCP in the context of networking ports.

    UDP (User Datagram Protocol) is like a postman who delivers mail without waiting for you to confirm that you’ve received it – he simply drops the mail in your mailbox (port) and moves on. This makes UDP fast and efficient, but there’s no guarantee that the mail (data) will be received.

    TCP (Transmission Control Protocol), on the other hand, is like a courier service that requires you to sign for a package – the courier (TCP) establishes a connection with you (the software application), ensures you’re available to receive the package (data), and only then delivers it. This makes TCP reliable, but slower than UDP due to the time taken to establish the connection.

    Although TCP and UDP are different technologies, they can both be used for sending data over a network, and since they both have different advantages and disadvantages, they are often used simultaneously for different purposes.

    Common Networking Ports in Linux

    If you’re creating a networking application on Linux, then you’ll need to use a port to receive data. However, only one program can listen on a port at one time. If a port is already being listened to by another process, attempting to bind to it will result in an error.

    In this section, we’ll list a few well-known port numbers, which range from 0 to 1023 and are standardized across all operating systems as well as software applications. Here are some common networking ports used in Linux:

    1. Port 21 – File Transfer Protocol (FTP): FTP uses this port for transferring files between systems. For example, you might use FTP to upload a website’s files to its hosting server.
    2. Port 22 – Secure Shell (SSH): SSH is used for secure remote administration of systems. For example, a system administrator may use SSH to log in to a web server located in a different geographical location.
    3. Port 80 – Hypertext Transfer Protocol (HTTP): This port is used by web servers for non-encrypted communication. When you access a website using http://, your browser communicates with the web server on port 80.
    4. Port 443 – HTTP Secure (HTTPS): Port 443 is used for secure web communication encrypted with SSL/TLS. When you access a website using https://, your browser communicates with the web server on port 443.
    5. Port 3306 – MySQL Database System: MySQL, a popular database management system, listens on this port. Applications connect to this port to communicate with the database.

    To learn more about this, you can refer to the Internet Assigned Numbers Authority’s list of registered port numbers and protocols used by each application.

    How to Check if a Port is in Use on Linux

    On Linux, you can use built-in utility tools to check if a port is in use – let’s see how:

    Using the netstat Command

    In Linux, netstat (network statistics) is a command-line tool that displays network connections (both incoming and outgoing), routing tables, and a number of network interfaces.

    On many modern Linux distributions, netstat may not be installed by default. It’s used for finding problems in the network, and to determine the amount of traffic on the network as a performance measurement.

    Here’s a brief overview of some common uses of the netstat command:

    1. netstat: Running the command without any options will display a list of open sockets.
    2. netstat -a: This will display all connections and listening ports.
    3. netstat -t: Displays only TCP connections.
    4. netstat -u: Used to display only UDP connections.
    5. netstat -n: Shows numerical addresses instead of trying to determine symbolic host, port or user names.
    6. netstat -s: Shows statistics by protocol. By default, statistics are shown for TCP, UDP and IP; The -p option may be used to specify a subset of the default.
    7. netstat -r: This command is used to display the routing table.
    8. netstat -i: You can display the interfaces that are being used for network connections using this command.

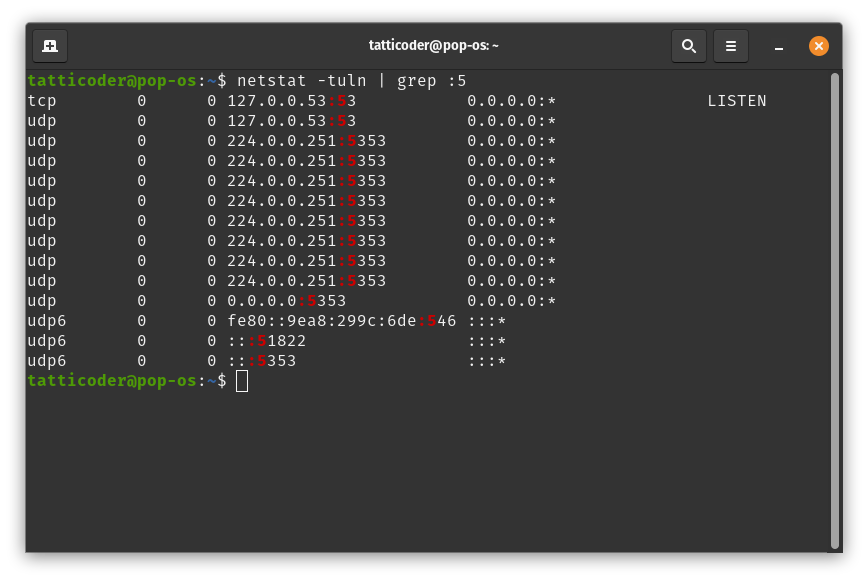
    For example, if you want to check whether a service is running and listening on the expected ports, you might use netstat -tuln. This will list all TCP (-t) and UDP (-u) connections that are currently listening (-l) and display all addresses as numbers (-n).

    Using the ss Command

    In Linux, ss (socket statistics) is a command-line tool used to view socket statistics and other network information similar to netstat. Here’s a brief overview of some common uses of the ss command:

    1. ss: Running the command without any options will display a list of open sockets.
    2. ss -a: This command will display all active (listening and non-listening) sockets.
    3. ss -t: Display only TCP sockets.
    4. ss -u: Used to display only UDP sockets.
    5. ss -n: Shows numerical addresses instead of trying to determine symbolic host, port or user names.
    6. ss -l: Display only the listening sockets.

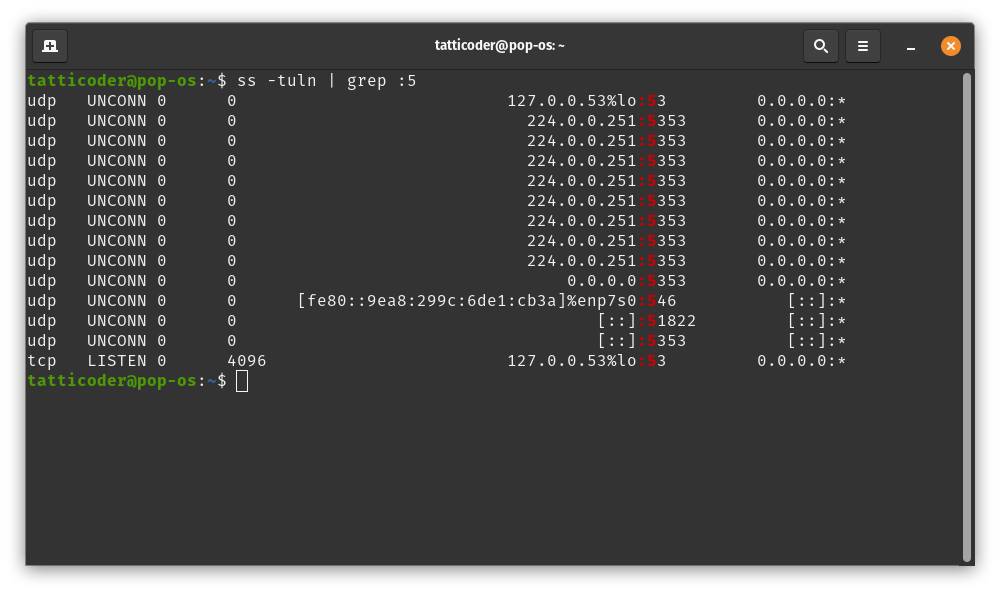
    For example, if you want to check whether a service is running and listening on the expected ports, you might use ss -tuln. This will list all TCP (-t) and UDP (-u) connections that are currently listening (-l) and display all addresses as numbers (-n).

    To check whether a specific port is listening, you can use the grep command in combination with ss. For example, ss -tuln | grep :<your-port-number>. Replace <your-port-number> with the port number you want to check. This command will filter out the output of the ss command to only show lines that include your specified port number.

    How to Check if a Port is Open on Linux?

    On Linux, nc (netcat) is a versatile command-line tool that can read and write data across network connections using TCP or UDP protocols, and it is often referred to as the “Swiss-army knife” for TCP/IP networking. To check whether a port is open or closed on your computer, you can use the following command:

    nc -zv <your-ip-address> <your-port-number>

    Here’s what each part does:

    • -z: This flag tells nc to scan for listening daemons, without sending any data to them.
    • -v: This flag makes nc give more verbose output – it will tell you more about what’s going on.
    • <your-ip-address>: This is the IP address of the machine you want to check the port on. You can replace this with localhost to check your own machine.
    • <your-port-number>: This is the port number you’re checking.

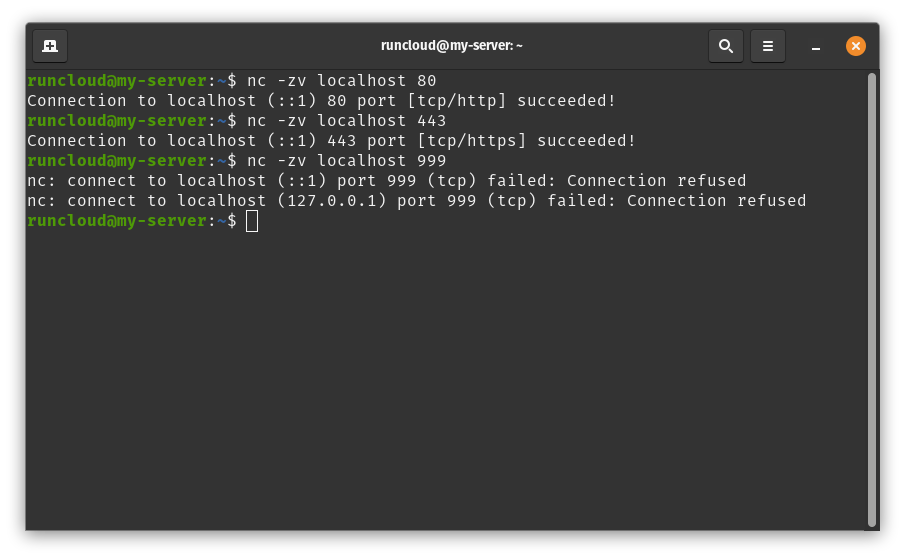
    For example, if you want to check whether a web server is running on your own machine, you might use nc -zv localhost 80. If the port is open, nc will return a success message such as localhost [127.0.0.1] 80 (http) open. If the port is closed, it will return a failure message.

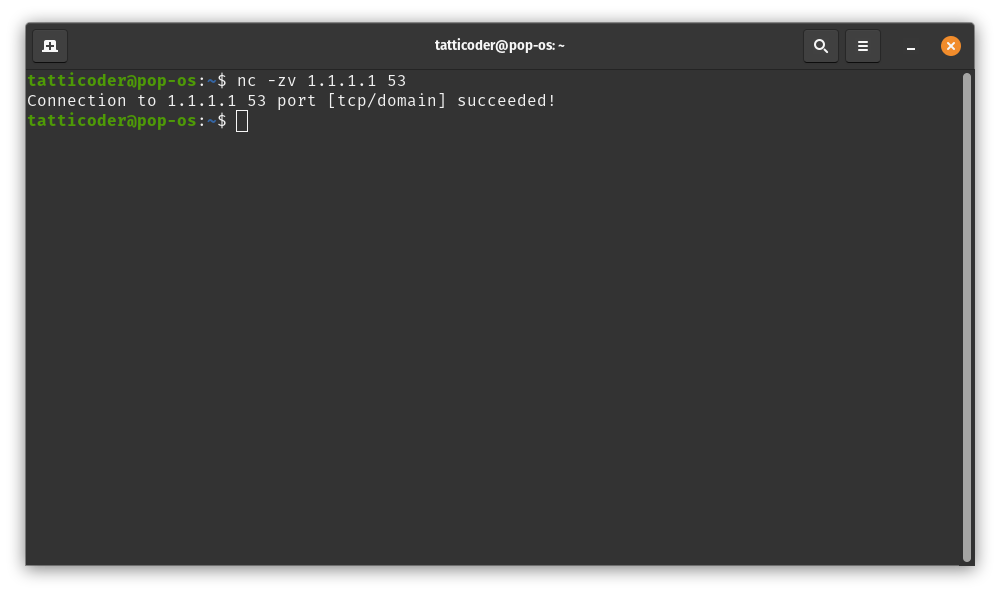
    To check whether a port is open on a remote machine, you can replace localhost with the IP address of the remote machine. For example, nc -zv 1.1.1.1 53 will check if port 53 is open on the machine with IP address 1.1.1.1.

    How to Check if a Port is Closed on Linux?

    If a port is not in use or not open, it is closed. You can verify whether a port is open by using the nc command as described above – if the port is closed, the command will return a failure message.

    Wrapping Up: Linux Ports and RunCloud

    Managing ports is a crucial aspect of Linux system administration and checking which ports are open, closed, or in use can help maintain the security and efficiency of your system. We strongly recommend you close unnecessary ports and only keep those open that are required by your applications.

    RunCloud simplifies this process by providing a user-friendly dashboard that allows you to manage your Linux server and networking with just a few clicks.

    If you’re looking for a way to make managing your Linux server and its ports easier, consider signing up for RunCloud. It’s designed to streamline server management for Linux users.

    FAQs on Linux Ports

    How do I get a list of all ports?

    The Internet Assigned Numbers Authority maintains a port registry that ranges from 0-65,535. If you want to get a list of all ports which are currently in-use, then you can use the following netstat command on your Linux server.
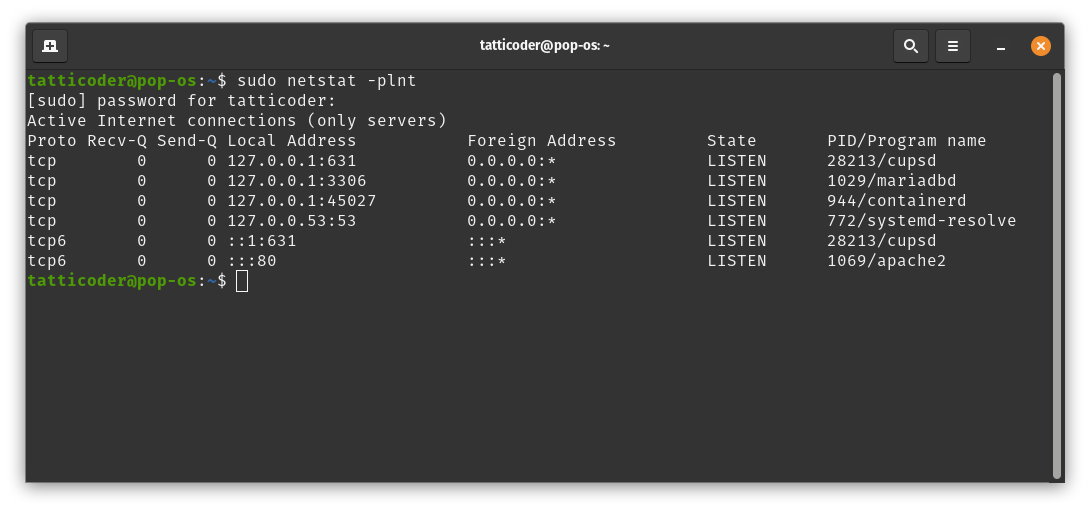
    sudo netstat -plnt

    How to check port connectivity in Linux?

    To check port connectivity in Linux, you can use the nc (netcat) command as follows: nc -zv  
    Replace  and  with your IP address and the port number you want to check, respectively.

    How do I know if port 443 is open in Linux?

    To check if port 443 is open on Linux, you can use the nc (netcat) command as follows: nc -zv localhost 443

    How to list all open ports in Linux using netstat?

    To list all open ports in Linux using netstat, you can use the following command:
    netstat -tuln
    This command will list all TCP and UDP ports that are being listened to.

    How many ports does Linux have?

    Linux has a total of 65,536 ports, ranging from 0 to 65,535.

    Can you ping a port?

    While the term “ping a port” is not technically accurate, you can check if a specific port is open using the telnet or nc (netcat) command.

    Is port 22 SSH or SFTP?

    Port 22 is used for both SSH and SFTP – SFTP operates over port 22, using the underlying Secure Shell (SSH) protocol to establish a secure and encrypted connection for secure file transfers.

    What is port 80 in Linux?

    Port 80 in Linux is typically used for HTTP (Hypertext Transfer Protocol), which is used for transmitting hypertext over the internet.

    What port is SFTP?

    SFTP uses port 22, the same as SSH.

    What port is FTP?

    FTP (File Transfer Protocol) typically uses port 21 for control commands and port 20 for data transfer.

  • Cloud Hosting vs VPS Hosting – Which One Should you Choose in 2025?

    Cloud Hosting vs VPS Hosting – Which One Should you Choose in 2025?

    Cloud hosting or VPS hosting? If you’re needing to have your website hosted on the internet, you may be overwhelmed at the choices available. Two popular choices for web hosting include cloud hosting and VPS hosting – but what is the difference, and which should you choose?

    In this post, we will explain what cloud hosting and VPS hosting are, what the differences are between these two hosting options, and show how to get started with VPS hosting.

    If you are in a hurry, you can jump directly to our VPS hosting vs cloud hosting comparison table ->

    What is Cloud Hosting?

    Cloud hosting is a type of web hosting service that uses a network of virtual servers to host websites and applications. Instead of relying on a single physical server, cloud hosting distributes resources across multiple interconnected servers, creating a scalable and flexible hosting environment.

    You can easily sign up for a cloud environment and take advantage of its more robust network of servers that are distributed around the globe.

    Traditional cloud hosting providers only used to provide basic services such as virtual servers and storage space, but modern cloud providers offer more advanced services – such as serverless functionality, hosted database, CDNs, DDoS protection, and more.

    Types of Cloud Hosting

    There are several types of cloud hosting services available, each of which caters to different needs and levels of control:

    1. Infrastructure as a Service (IaaS) provides virtualized computing resources over the internet where users have full control over the infrastructure, including operating systems and storage. For example, Amazon EC2, Google Compute Engine, etc.
    2. Platform as a Service (PaaS) offers a platform for developers to build, run, and manage applications. Here the cloud provider handles underlying infrastructure, allowing users to focus on deployment and management. Google App Engine and Heroku are both examples of PaaS.

    Top Cloud Hosting Providers

    If you want to host a website, there are several good cloud providers to choose from. here are the top three that we would recommend:

    1. Amazon Web Services (AWS):
      • Offers a wide range of cloud services
      • Highly scalable and customizable
      • Requires technical expertise to set up and manage
    2. Google Cloud Platform (GCP):
      • Provides robust infrastructure and advanced tools
      • Known for its strong performance and global network
      • Provides powerful dashboard for monitoring
    3. DigitalOcean:
      • User-friendly interface and straightforward pricing
      • Popular among developers and small to medium-sized businesses
      • Provides optimized WordPress droplets

    Pros of Cloud Hosting

    Even the biggest of companies these days are moving their websites to cloud hosting.

    But why?

    What are the main factors that make cloud hosting such an appealing option for so many businesses?

    1. Scalability: If your website goes viral, you can easily adjust resources based on traffic and demand with little more than a moment’s notice.
    2. Reliability: Cloud providers often provide redundant power and network connectivity to ensure especially high uptime.
    3. Performance: Cloud providers make it possible to host websites closer to end users, which can lead to faster loading times.
    4. Flexibility: The wide range of cloud hosting providers means that there is tremendous choice between many different service models.
    5. Cost-effective: If you are running a small website, purchasing your own servers can be expensive. With cloud hosting, you pay only for the resources you use.

    Cons of Cloud Hosting

    Although Cloud hosting is incredibly popular today, there are a few things you should be aware of before you sign up:

    1. Complexity: A cloud environment can be challenging to set up and manage for non-technical users.
    2. Potential security concerns: If the cloud server is not configured properly then personal data can be compromised.
    3. Dependency on internet connectivity: While the cloud is great for hosting websites, it requires a stable internet connection to work. If you need your data to be available even during a network outage, then cloud is not the right option for you.
    4. Possible vendor lock-in: Cloud providers make it easy for you to sign up to new services, but make it extremely difficult to move to another cloud provider.
    5. Costs can escalate: With the advent of serverless computing, it is easier to lose track of your bills. In some instances, users have even reported getting billed for hundreds of thousands by cloud providers.

    What is VPS Hosting?

    VPS (Virtual Private Server) hosting is a type of web hosting that uses virtualization technology to provide dedicated (private) resources on a server that’s shared with multiple users. It sits between shared hosting and dedicated hosting in terms of cost and performance.

    In a VPS environment, a physical server is divided into multiple virtual compartments, each functioning as a separate server with its own operating system, dedicated resources (CPU, RAM, storage), and full root access.

    This allows for greater control, customization, and performance compared to shared hosting, while being more cost-effective than dedicated hosting.

    Types of VPS Hosting

    There are several types of VPS hosting available, catering to different needs and levels of management:

    1. Managed VPS Hosting: In this case, the hosting provider handles server management, updates, and security. It is ideal for users who lack either technical expertise, or time for server administration, and often includes features such as automatic backups and 24/7 support.
    2. Unmanaged VPS Hosting: In this hosting, users have full control over the server and are responsible for all management tasks. It is typically less expensive than managed VPS hosting but requires technical knowledge to maintain the server.

    Suggested read: What Is Managed WordPress Hosting & Do You Need It?

    Top VPS Hosting Providers

    If you are looking for reliable hosting providers, we would suggest that you can’t go wrong with any of the following:

    1. Linode:
      • A trusted VPS provider with a high reliable servers
      • Offers high-performance SSDs and a global network
      • Provides both managed and unmanaged options
    2. Vultr:
      • Offers affordable servers with hourly billing
      • Provides a wide range of operating systems and locations
      • Known for its user-friendly control panel
    3. Servebolt:
      • Offers managed VPS hosting for WordPress websites
      • Provides free server management and updates
      • Known for its reliable support and first party WordPress plugins

    Suggested read: Self-Managed or Managed Hosting: Which One is Right for You?

    Pros of VPS Hosting

    1. Dedicated resources: When you request resources from cloud providers, they can sometimes refuse you if there are no servers available. With VPS hosting, you are guaranteed CPU, RAM, and storage allocation throughout the duration of your contract.
    2. Root access: On a VPS server, you get full control over the server environment to configure it as you like.
    3. Cost-effective: VPS hosting often has a fixed monthly cost, and usually works out as being more affordable than dedicated hosting.

    Cons of VPS Hosting

    Before you sign up for VPS hosting, you should learn about following risks:

    1. Technical knowledge required: With a VPS server, you need to have technical knowledge for configuring it properly, especially for unmanaged VPS.
    2. Resource limitations: Unlike cloud hosting, resources on a VPS server are not instantly scalable, which means that you need to plan weeks (or even months) ahead of time should you need to increase or decrease your server resources.
    3. Responsibility for security: If you are running an unmanaged VPS, you will need to handle security incidents and configure firewalls to protect your server from cyber attacks.
    4. Potential noisy neighbor effect: While it is very unlikely, there is a small possibility that your website may suffer if another tenant on your physical server is consuming a lot of resources.

    The Differences Between Cloud Hosting vs VPS Hosting

    Here’s a comprehensive, side-by-side comparison of Cloud Hosting and VPS Hosting:

    Feature

    Cloud Hosting

    VPS Hosting

    Infrastructure

    Distributed across multiple servers

    Single server divided into virtual compartments

    Scalability

    Highly scalable, often in real-time

    Limited scalability, may require downtime

    Performance

    Variable, depends on current resource allocation

    Consistent, based on allocated resources

    Flexibility

    Highly flexible, easily add/remove resources

    Flexible within allocated resources

    Security

    Shared responsibility model

    User or host responsible, depending on management type

    Support

    Varies, often includes managed services

    Varies, from fully managed to self-managed

    Reliability

    High, due to distributed infrastructure

    Good, but dependent on single physical server

    Availability

    Very high, often with multi-region redundancy

    High, but typically tied to a single data center

    Cost

    Pay-as-you-go, can be more cost-effective for variable workloads

    Fixed monthly cost, predictable billing

    Suggested read: How To Host Multiple Websites On One Server | Ultimate Guide

    VPS or Cloud Hosting – Which One is Right for You?

    Choosing between Virtual Private Server (VPS) hosting and cloud hosting depends on a number of factors, including scalability, performance, cost, and specific use cases. Both options have their own advantages, and each can cater to different needs.

    • Choose VPS hosting if:
      • You have a predictable workload and need dedicated resources at a lower cost.
      • You require more control and customization over your server environment.
      • You are looking for stable and consistent performance without the need for frequent scaling.
    • Choose cloud hosting if:
      • You anticipate varying workloads, and need the ability to scale resources up or down easily.
      • High availability and reliability are critical to your operations.
      • You prefer a flexible pricing model and are comfortable with managing a more complex hosting environment.

    Final Thoughts

    Choosing between VPS hosting and cloud hosting ultimately depends on your specific needs, technical expertise, and budget.

    Both options offer unique benefits tailored to different use cases, whether you’re a small business owner looking for cost-effective solutions, a tech startup founder needing scalable and reliable infrastructure, or a freelance developer seeking control and customization.

    Understanding the nuances of each hosting type will help you make an informed decision that more closely matches your own unique business goals and technical requirements. With the right hosting solution, you can ensure optimal performance, reliability, and scalability for your online presence.

    Ready to simplify your server management and streamline your hosting experience? Sign up for RunCloud today!

    RunCloud makes server management easier by allowing you to deploy and remove sites with just a few clicks on your own server, no matter what cloud provider you choose.

    FAQs on VPS vs Cloud Hosting

    Which one is cheaper: cloud hosting vs VPS hosting?

    The cost comparison between cloud hosting and VPS hosting isn’t straightforward, as it depends on various factors:
    Cloud hosting typically uses a pay-as-you-go model, which can be cheaper for variable workloads or websites with fluctuating traffic whereas VPS hosting usually has a fixed monthly cost, which can be more economical for stable, predictable workloads.

    Why is VPS hosting so expensive?

    VPS hosting isn’t necessarily expensive, but it can be pricier than shared hosting because you’re allocated a specific amount of CPU, RAM, and storage. The higher cost is due to the superior performance, resources, and control you get compared to shared hosting.

    Is AWS cheaper than VPS?

    AWS (Amazon Web Services) isn’t necessarily cheaper or more expensive than traditional VPS hosting – it depends on your specific use case:
    For variable workloads or applications that need to scale quickly, AWS can be more cost-effective due to its pay-as-you-go model.
    For stable, predictable workloads, a traditional VPS might be cheaper due to its fixed pricing.
    AWS offers more services and features, which can add to the cost but also provide more value.

    What is the difference between storage VPS and cloud VPS?

    Storage VPS: Typically a traditional VPS with larger storage allocations, often uses local storage for better I/O performance, ideal for applications requiring large amounts of data storage..
    Cloud VPS: Part of a distributed cloud infrastructure, may use network-attached storage for better flexibility, better for applications needing flexible resources and scaling.

    Does Amazon offer VPS?

    Amazon doesn’t offer traditional VPS hosting, but they provide similar services through Amazon EC2 (Elastic Compute Cloud), which is part of AWS.
    EC2 instances are virtual servers in the cloud that function similarly to VPS, but with the added benefits of cloud infrastructure, such as easy scaling and pay-as-you-go pricing.

    Does Google Cloud have VPS?

    Google Cloud doesn’t offer traditional VPS hosting. Instead, they provide Google Compute Engine, which is a virtual machine instance in the cloud that functions much like a VPS, but with the advantages of cloud infrastructure, including flexible scaling and usage-based billing.

  • How to Install WordPress on Docker in 2025 [Step-By-Step Guide]

    How to Install WordPress on Docker in 2025 [Step-By-Step Guide]

    Are you launching a new WordPress site? If yes, then making the decision to install WordPress on Docker makes a great deal of sense.

    Why use Docker for running a WordPress website?

    You’re obviously looking at how to install WordPress on Docker, but it’s worth being fully aware of why this is a good idea.

    In this article we’ll explain exactly what the benefits are of using Docker over a traditional VPS, and how you can easily install and run WordPress (as well as WooCommerce) on Docker.

    But first, let’s see what Docker is and why people use it.

    What is Docker?

    Docker is a platform that uses containerization technology to enable developers to create, deploy, and manage applications in a consistent environment across different systems.

    A container is a lightweight, standalone, and executable package that includes everything needed to run a piece of software: the code, runtime, system tools, libraries, and settings.

    Unlike traditional virtual machines, containers share the host system’s kernel, which makes them more efficient in terms of resource usage and speed.

    Docker provides a high level of isolation and security while allowing multiple containers to run on the same host system without interfering with each other. Containers are highly portable and can run consistently on any environment that supports Docker – from a developer’s local machine to large-scale production servers in the cloud.

    Suggested Read: How To Create a Docker Image For Your Application

    What are the Advantages of Docker in WordPress?

    Using Docker for WordPress offers several significant advantages:

    Consistent Development Environments

    Docker ensures that the WordPress environment is consistent across all stages of development, from local development to testing and production. This consistency eliminates the “it works on my machine“ problem, ensuring that if a WordPress site works in a Docker container on one machine, it will work in a Docker container on any other machine.

    Simplified Dependency Management

    WordPress sites often rely on specific versions of PHP, MySQL, and various extensions. Docker allows developers to define these dependencies in a Dockerfile and docker-compose.yml file, ensuring that everyone working on the project uses the same versions and configurations. This avoids issues arising from incompatible dependencies or missing libraries.

    Isolation and Security

    Docker containers run in isolated environments, which means that each WordPress instance is completely separated from others. This isolation enhances security by limiting the potential impact of vulnerabilities in one container on others. Additionally, Docker’s use of namespaces and control groups (cgroups) provides further isolation and resource control, enhancing the security and stability of the overall system.

    Scalability and Load Balancing

    Docker makes it easy to scale WordPress instances horizontally. By spinning up additional containers, you can distribute the load across multiple instances to handle increased traffic. Docker’s orchestration tools, such as Kubernetes and Docker Swarm, further simplify the process of managing multiple containers, load balancing, and ensuring high availability.

    Resource Efficiency

    Containers share the host system’s kernel and use fewer resources compared to traditional virtual machines. This efficiency means you can run more WordPress instances on the same hardware, reducing costs and improving performance. Docker’s lightweight nature also contributes to faster start-up times for containers, enhancing the overall responsiveness of the system.

    Flexibility and Portability

    Docker containers can run on any platform that supports Docker, including various Linux distributions, Windows, and macOS. This flexibility allows developers to work in their preferred environment and ensures that the WordPress site can be deployed across different infrastructures without modification. This portability is particularly beneficial for cloud deployments and hybrid environments.

    How to Install WordPress on a Server Using Docker

    Let’s walk through the steps for setting up a WordPress website using Docker Compose on a Linux server.

    Prerequisites

    Make sure you have Docker and Docker Compose installed on your Linux server. If you don’t, you can install them by following the official documentation for Docker and Docker Compose.

    Once they are installed, you can check whether are are working properly using the following commands:

    docker --version
    docker-compose -v

    Create a Project Directory

    First, you need to log in to your server via SSH and create a directory where you’ll store your WordPress files – you can name it anything you like. For example, run the following code snippet to create a folder named my-wordpress-site:

    mkdir my-wordpress-site
    cd my-wordpress-site

    Create a Docker Compose YAML File

    After creating the directory, you need to create a file named ‘docker-compose.yml‘. This file will define the services and configurations required for your WordPress installation.

    Open the docker-compose.yml file in your preferred text editor (such as nano, vim, or gedit). Read our tutorial on how to edit files over SSH if you don’t know how to do this.

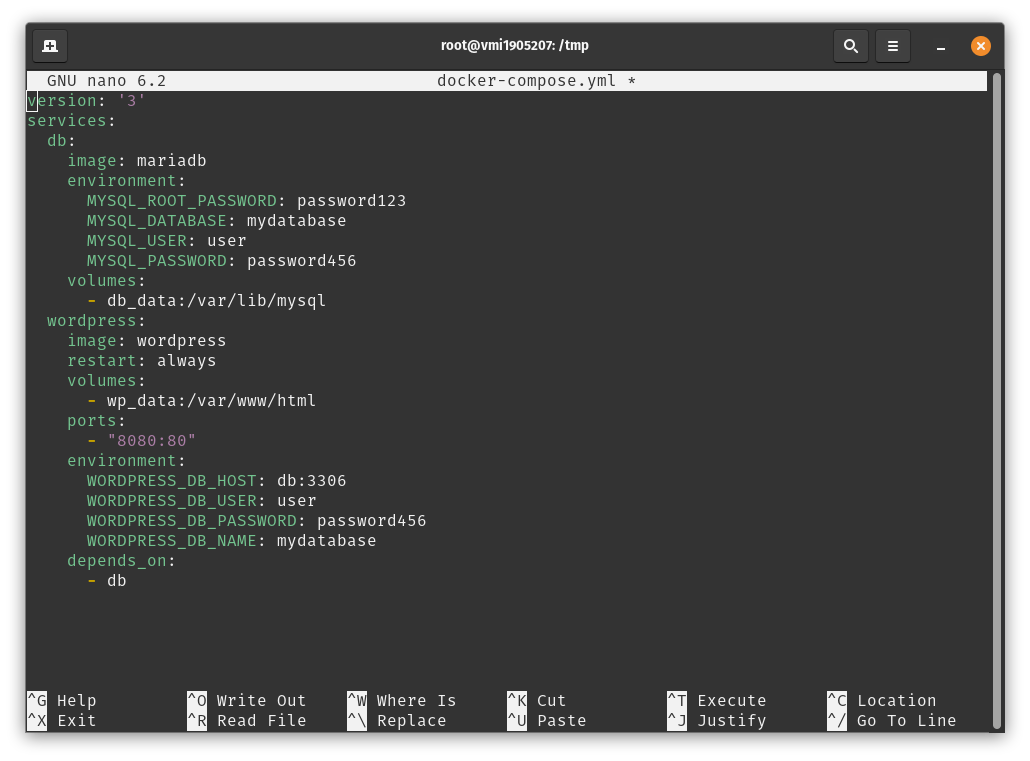
    After opening the file in a text editor, add the following content to the file:

    version: '3'
    services:
      db:
        image: mysql:5.7
        volumes:
          - db_data:/var/lib/mysql
        restart: always
        environment:
          MYSQL_ROOT_PASSWORD: your_mysql_root_password
          MYSQL_DATABASE: wordpress
          MYSQL_USER: wordpress
          MYSQL_PASSWORD: your_mysql_password
      wordpress:
        depends_on:
          - db
        image: wordpress:latest
        ports:
          - 8000:80
        restart: always
        volumes:
          - wp_data:/var/www/html
        environment:
          WORDPRESS_DB_HOST: db:3306
          WORDPRESS_DB_USER: wordpress
          WORDPRESS_DB_PASSWORD: your_mysql_password
    volumes:
      db_data: {}
      wp_data: {}


    In the above snippet, replace your_mysql_root_password and your_mysql_password with your desired MySQL root password and WordPress database password, respectively. You can also change the database user if you want to set it to a custom value.

    Start the Docker Containers

    After creating the file, you need to run the following command in your project directory to start the Docker containers:

    docker-compose up -d

    When you run the above command, Docker Compose will pull the necessary images, set up the containers, and configure network connections. This process may take a few minutes.

    Access Your WordPress Site

    Once the containers are up and running, open a web browser and type the following URL to access your website:

    http://your-server-IP:8000

    Make sure you replace your-server-IP with the actual IP address of your server.

    Once you open the above URL in your browser, the WordPress setup wizard should appear, guiding you through the initial configuration.

    Installing WordPress on Docker

    Follow the instructions in the setup wizard to complete the installation by setting your preferred language, site title, username, password, and email address. After successful setup, you’ll be taken to the WordPress admin dashboard where you can customize your website by installing themes, plugins, and publishing content.

    Stop and Restart Containers

    Once you have started the containers, they will keep running in the background until you shut them down. If you wish to stop the containers for any reason, then you can use the following command:

    docker-compose down

    This command will terminate and remove the containers while retaining the data in the database volume. If you want to restart the containers later, go to your project directory and run:

    docker-compose up -d

    Suggested read: What Are Docker Logs And How To Use Them

    Installing WordPress Using RunCloud

    We have explained how to use Docker to install multiple websites on a single server, but did you know that you can also do this using RunCloud – and much more easily?

    RunCloud allows you to install new WordPress applications with a single click, and provides you an option to choose between Nginx, OpenLiteSpeed, and Docker server environments.

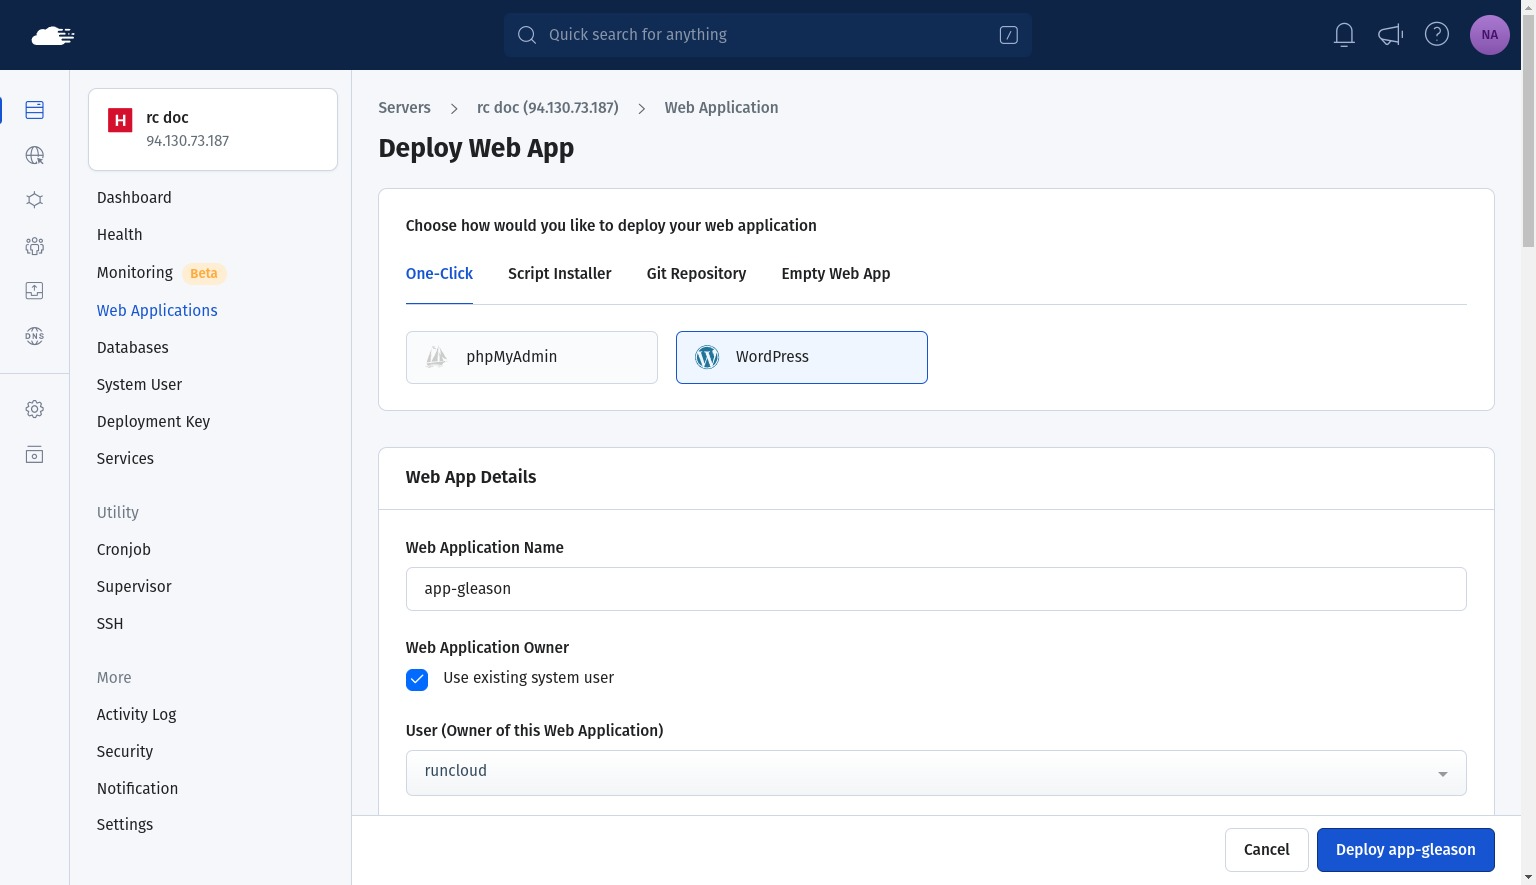
    To launch a WordPress site, all you need to do is click “Deploy a web app” and fill in the basic details such as the name of the application (or use the default name provided by RunCloud).

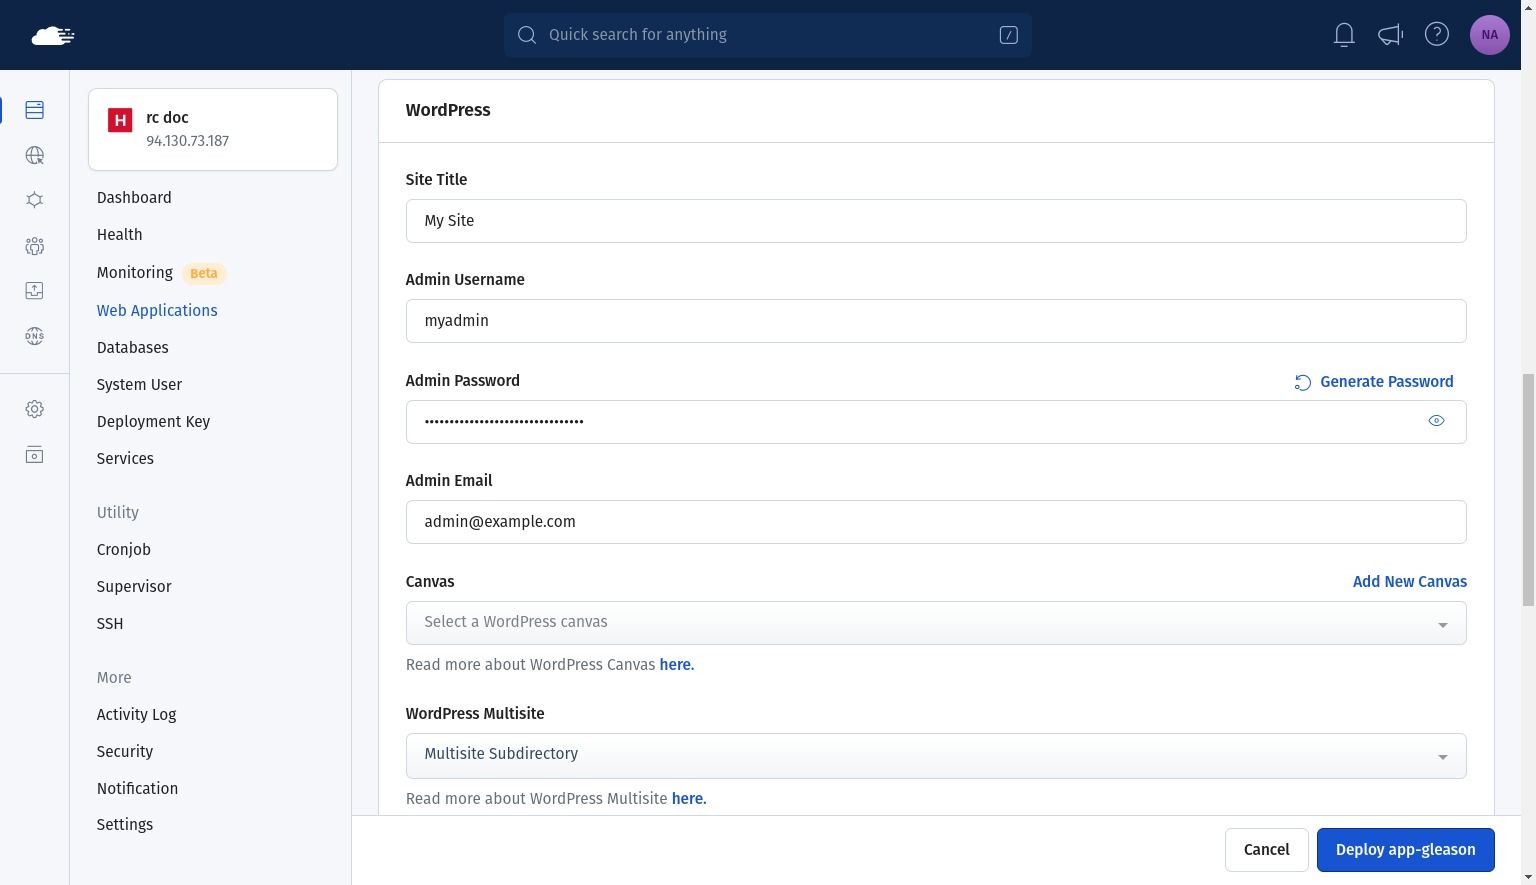
    Next, you need to configure the login information for your WordPress dashboard, and other information such as site name, multisite option, etc.

    After you have configured the login credentials, you can continue setting DNS, backup, PHP version, etc. or just use the default configuration and change it later from the RunCloud dashboard.

    Wordpress on RunCloud

    After making the necessary changes, you can hit “Deploy” to automatically set up your website on your server – and the best part is that you can do the exact same process once again to install another site (or as many as you want) on the same server.

    Suggested read: 20 Essential Docker Commands You Should Know

    Wrapping Up

    In this post, we have walked you through how to install WordPress on Docker. One of the main reasons people use Docker is because it allows them to run multiple applications on the same server, which saves costs.

    But what if we told you that there is a better way to take advantage of the flexibility of Docker without leaving the comfort of a GUI dashboard?

    RunCloud provides a feature rich dashboard which is compatible with any cloud provider and doesn’t impose arbitrary restrictions on the number of apps, backups, cron jobs, etc. – if your server can handle it, then you can do it!

    Start using RunCloud today!

    FAQ: Installing WordPress on Docker

    Can WordPress run on Kubernetes?

    Yes, WordPress can run on Kubernetes. While Docker is commonly used for local development and testing, Kubernetes provides a powerful orchestration platform for deploying and managing containerized applications, including WordPress. Kubernetes allows you to achieve scalability, resilience, and ease of management for your WordPress deployment.

    What are the best practices for Docker in WordPress?

    When using Docker for WordPress, consider the following best practices:
    Use Docker Compose: Docker Compose simplifies the setup by defining services, networks, and volumes in a single YAML file. It allows you to coordinate multiple containers (e.g., MySQL, Nginx, and WordPress) to work together.
    Separate Containers: Run WordPress and its components (like MySQL or Nginx) in separate containers. This isolation ensures better resource management and scalability.
    Persistent Volumes: Use persistent volumes to store data (e.g., WordPress files, database) outside the containers. This ensures data persistence even if containers are restarted or rescheduled.
    Security: Secure your containers by using environment variables for sensitive information (e.g., database credentials). Avoid hardcoding secrets in your Dockerfiles or Compose files.
    Regular Backups: Back up your data regularly. Docker volumes make it easier to back up and restore data.

    How to update WordPress in a Docker container?

    To update WordPress in a Docker container:
    Pull the Latest WordPress Image: Pull the latest WordPress image from Docker Hub using docker pull wordpress:latest.
    Stop and Remove Existing Containers: Stop and remove the existing WordPress container and its associated containers (e.g., MySQL, Nginx).
    Create New Containers: Create new containers using the updated WordPress image. Ensure that you use the same volumes for data persistence.
    Update Configuration: If necessary, update your configuration files (e.g., wp-config.php) to match any changes in the new WordPress version.
    Restart Containers: Restart the containers to apply the changes.

    Default Login for WordPress Docker

    There are no default credentials for WordPress regardless of Docker environments. You need to set up credentials when you log in to your WordPress dashboard for the first time.

  • 8 Best Linux Mail Transfer Agents in 2025 (Our Top Picks)

    8 Best Linux Mail Transfer Agents in 2025 (Our Top Picks)

    In this post, we’re going to take a look at a vital part of the email system, called the Mail Transfer Agent, sometimes referred to as “mail delivery agent” or even “mail transport agent“. We will discuss what the mail transfer agent is, the advantages of using the mail transfer agent, and finally take a look at some of the best transfer agents for Linux servers.

    Did you know that email has been around since 1971, and that currently there are over 8 billion email addresses in the world, used by over 4.5 billion users?

    Also, every single second sees over 3.13 million emails sent, which means that since you started reading this article, roughly 8 million emails have landed in people’s inboxes. At least a few of which were actually wanted!

    Let’s get started!

    What is a Mail Transfer Agent?

    An MTA, or Mail Transfer Agent, is a crucial component of the email delivery system that is responsible for transferring emails between the computers of a sender and a recipient. It acts as an intermediary, ensuring that emails reach their intended destinations.

    MTA Functions

    Acceptance

    MTAs are like the receptionists for emails – when you send an email from your Mail User Agent (MUA) such as Gmail or Outlook, the MTA is the first to greet it. It checks if the email is properly formatted, and if the sender and recipient addresses are valid. If everything looks good, the MTA accepts the email and lets it in.

    Routing

    Once the message is received, MTA directs it to the recipient’s inbox. It looks up the MX records to find out which mail server (destination) the email should go to.

    Auto-Responses

    If an email fails to reach its destination (maybe the recipient’s server is down), the MTA sends an automatic reply (like saying, “Oops, something went wrong!”) back to the sender.

    Queueing

    If an email can’t be delivered right away (maybe the recipient’s server is busy), the MTA keeps trying until it successfully delivers the message.

    Suggested read: How to Send Email from PHP (With Guided Walkthrough)

    Best Linux Mail Transfer Agents (MTAs) You Should Try

    When it comes to managing email delivery, choosing the right Linux Mail Transfer Agent (MTA) is crucial. Here are some top-performing MTAs that you should consider, along with their key features:

    S no.NameLink
    1Exim Internet MailerVisit Website
    2PostfixVisit Website
    3ProofpointVisit Website
    4AxigenVisit Website
    5PostalVisit Website
    6OpenSMTPDVisit Website
    7CitadelVisit Website
    8Courier Mail ServerVisit Website
    1. Exim Internet Mailer

    Exim is a message transfer agent (MTA) developed at the University of Cambridge for Unix systems connected to the Internet. It operates under the GNU General Public License and offers extensive facilities for checking incoming email.

    Although the website looks quite outdated, it is still being actively developed, and you can get the latest updates from its GitHub repository.

    It provides a web-based administration and configuration tool for easy management which can be configured as an intermediate mail relay, a mail server for multiple domains, or anything in between.

    Exim’s architecture allows for complex configurations and customization as most Linux distributions come with sane default configurations for Exim, making it straightforward to set up.

    In addition to supporting basic features such as IMAP server, webmail server, and mail filtering technologies, it also provides the ability to automatically process bounced emails or send emails as faxes.

    Suggested read: How to Change/Reset MySQL Root Password on Ubuntu Linux

    1. Postfix

    Postfix is an email agent designed for Unix systems that aims to be fast, easy to administer, and secure. While its external appearance may resemble Sendmail, its internal architecture is fundamentally different.

    Postfix runs on various UNIX platforms, including AIX, BSD, HP-UX, LINUX, MacOS X, Solaris, and Tru64 UNIX. It relies on ANSI C, a POSIX.1 library, and BSD sockets.

    While configuring Postfix can be challenging for first time users, its security features and flexibility make it worth exploring. Some of its key features include SMTP client support, configurable DNS filters, and compatibility with various databases (e.g., MongoDB, MySQL, PostgreSQL).

    Suggested read: Mastering the Echo Command in Linux (with Practical Examples)

    1. Proofpoint

    Sendmail, a descendant of the original delivermail program by Eric Allman, is a well-known project within the free and open-source software and Unix communities. It used to be an independent project of its own, but now it is a part of the email protection and thread intelligence suite in Proofpoint.

    Sendmail provides a general-purpose email routing facility, and offers a versatile set of delivery methods for sending emails that makes it suitable for large, complex environments.

    Sendmail prioritizes security, and its open-source nature allows for community scrutiny and contributions. Additionally, the software releases are signed with PGP keys – which means you can be sure that you’re not running a modified version of the software. It also enables enterprises to plan their messaging infrastructure for the long term, including virtualization, consolidation, and cloud migration.

    Suggested read: Using Mailgun To Send Transactional Email From WordPress

    1. Axigen

    Axigen is an all-in-one email, calendaring, and collaboration platform designed for demanding users, from small businesses to large service providers. The free mail server license includes unrestricted access to new version upgrades, patches, and updates, but technical support is available only for those with commercial versions.

    It allows you to gather all your email in one place by retrieving messages from external accounts (e.g., Yahoo! Mail, Gmail) directly into your Axigen inbox. You can also generate temporary email addresses for newsletter subscriptions, or automate administration tasks using the Command Line Interface (CLI) and dedicated APIs.

    Team users can grant permissions to other team members to send emails in your name, or define group workflows via public folders – which makes it useful when one colleague is out on a vacation.

    Suggested read: How To Speed Up DNS Propagation – The Ultimate Guide

    1. Postal

    Postal is a comprehensive and fully featured mail delivery platform designed for websites and web servers. It’s open source, and allows you to host your mail server in-house, and configure it as you like.

    You can use it to manage mail servers and view mail logs using its easy-to-use web interface, or set up webhooks to receive real-time notifications about message delivery or issues. It supports IP Pools that allow you to send mail from different IP addresses to maintain a good IP reputation.

    It also provides a development mode that allows you to automatically hold messages in Postal during testing and development. This is useful if you don’t want to accidentally send out emails to all your customers.

    Suggested read: How To Flush DNS Cache — A Full Guide

    1. OpenSMTPD

    OpenSMTPD is a server-side SMTP protocol implementation, which follows the standards defined by RFC 5321. It enables ordinary machines to exchange emails with other systems using the SMTP protocol. While it lacks frills and is not beginner-friendly, OpenSMTPD offers a fairly complete SMTP solution that is freely usable and reusable under the ISC license.

    Despite its somewhat outdated website, OpenSMTPD is actively maintained on its GitHub repository, and unlike feature-heavy alternatives, OpenSMTPD provides a barebones and efficient implementation of a mail transport agent.

    Suggested read: How to Copy Files in Linux and Overwrite Without Confirmation

    1. Citadel

    Citadel is an advanced, multi-user, client/server messaging solution designed for email, collaboration, message boards, content management, and other groupware applications. Whether you’re a small organization or a large-scale public access system, Citadel offers powerful features while remaining easy to install and use.

    It is an open-source messaging platform that combines email, collaboration, groupware, and content management. In addition to mailing capabilities, Citadel users can take advantage of a unique “rooms” architecture, bulletin boards (forums), instant messaging, RSS aggregation, and more. You can learn about the additional features offered by Citadel by exploring their documentation.

    1. Courier Mail Server

    The Courier Mail Server is an integrated mail/groupware server that provides a comprehensive suite of services based on open commodity protocols, including ESMTP, IMAP, POP3, LDAP, SSL, and HTTP. It also offers features such as web-based calendaring, mailing lists, and efficient mail storage using the maildir format.

    The Courier mail server can function either as an intermediate mail relay, or perform final delivery to mailboxes. It supports authentication via PAM, LDAP, PostgreSQL, or MySQL, and includes features such as DNS-based blacklists, message filtering, and secure mail delivery channels.

    You can use its aggregator proxy which distributes mailboxes across multiple servers, and connects clients to the right server based on the mailbox being accessed.

    Wrapping Up

    In this post, we have covered different Linux Mail Transfer Agents (MTAs) and how they handle the routing, forwarding, and delivery of emails across networks. We have explored both open source and proprietary tools available for processing emails on a Linux server.

    If you are interested in deploying websites as well, then you should definitely check out RunCloud – an all-in-one website management platform.

    RunCloud simplifies server management, making it easy for developers, designers, and businesses to deploy websites on the internet. With features such as automated backups, SSL certificate management, and seamless scaling, RunCloud streamlines the process, allowing you to focus on your content and applications.

    Ready to take control of your web hosting? Sign up for RunCloud today and experience hassle-free server management! 🚀🌐

    FAQs on Mail Transfer Agents (MTAs)

    What is a Mail Transfer Agent (MTA)?

    A Mail Transfer Agent (MTA), also known as a mail server or mail relay, is a software application responsible for routing and forwarding emails across the Internet. It acts as the intermediary that ensures your email reaches its intended recipient.

    What is the Simple Mail Transfer Protocol (SMTP) process?

    SMTP is an application layer protocol used for sending emails. Here’s how it works:
    The sender’s email client (Mail User Agent, or MUA) connects to the SMTP server.
    The SMTP server verifies the sender’s credentials and checks for any issues related to the sender’s domain or IP address.
    The SMTP server then relays the email to the recipient’s SMTP server.
    The recipient’s server delivers the email to the recipient’s mailbox using protocols such as POP3 or IMAP4.

    Is Gmail a mail transfer agent?

    No, Gmail is not an MTA. Gmail is an email service provided by Google, and it uses MTAs behind the scenes to route and deliver emails. Gmail’s MTA handles the email transfer process, ensuring messages reach their intended recipients.

    What are the phases of mail transfer?

    The phases of mail transfer include:
    Submission: The sender’s MUA submits the email to the MTA.
    Routing: The MTA determines the most efficient path for delivery using MX records.
    Delivery: The MTA delivers the email to the recipient’s MDA (Mail Delivery Agent).
    Retrieval: The recipient’s MUA retrieves the email from the MDA.

    What is the difference between Sendmail and SMTP?

    Sendmail is MTA software that routes and delivers emails. It was widely used in the past but has been largely replaced by other MTAs, whereas SMTP is a protocol used by MTAs to transfer emails. SMTP defines how emails are sent and relayed between servers.

    What is the difference between MTA, MDA, & MUA?

    MTA (Mail Transfer Agent): Routes and forwards emails between servers.
    MDA (Mail Delivery Agent): Delivers emails to the recipient’s mailbox.
    MUA (Mail User Agent): The user’s email client for composing, reading, and organizing emails.

    Which protocol is used for transferring mail?

    The Simple Mail Transfer Protocol (SMTP) is used for transferring mail between MTAs.

  • How to Connect a MySQL Database to PHP (A Developer’s Guide)

    How to Connect a MySQL Database to PHP (A Developer’s Guide)

    PHP and SQL are two of the most commonly used tools in web development. PHP is a server-side scripting language that is used to create dynamic web pages, while SQL is a database management system that is used to store and retrieve data.

    You don’t need to be a Linux expert to manage your servers anymore.

    In this article, we will show you how to connect a MySQL database to PHP using the RunCloud dashboard.

    We will also discuss two main ways to connect PHP to MariaDB: using mysql_connect and PDO.

    Step 1: Create a Database

    Before we can start using a database, we need to create a database on the server. We also need to create a user account with permissions to access this database. This can be done easily from the RunCloud dashboard itself.

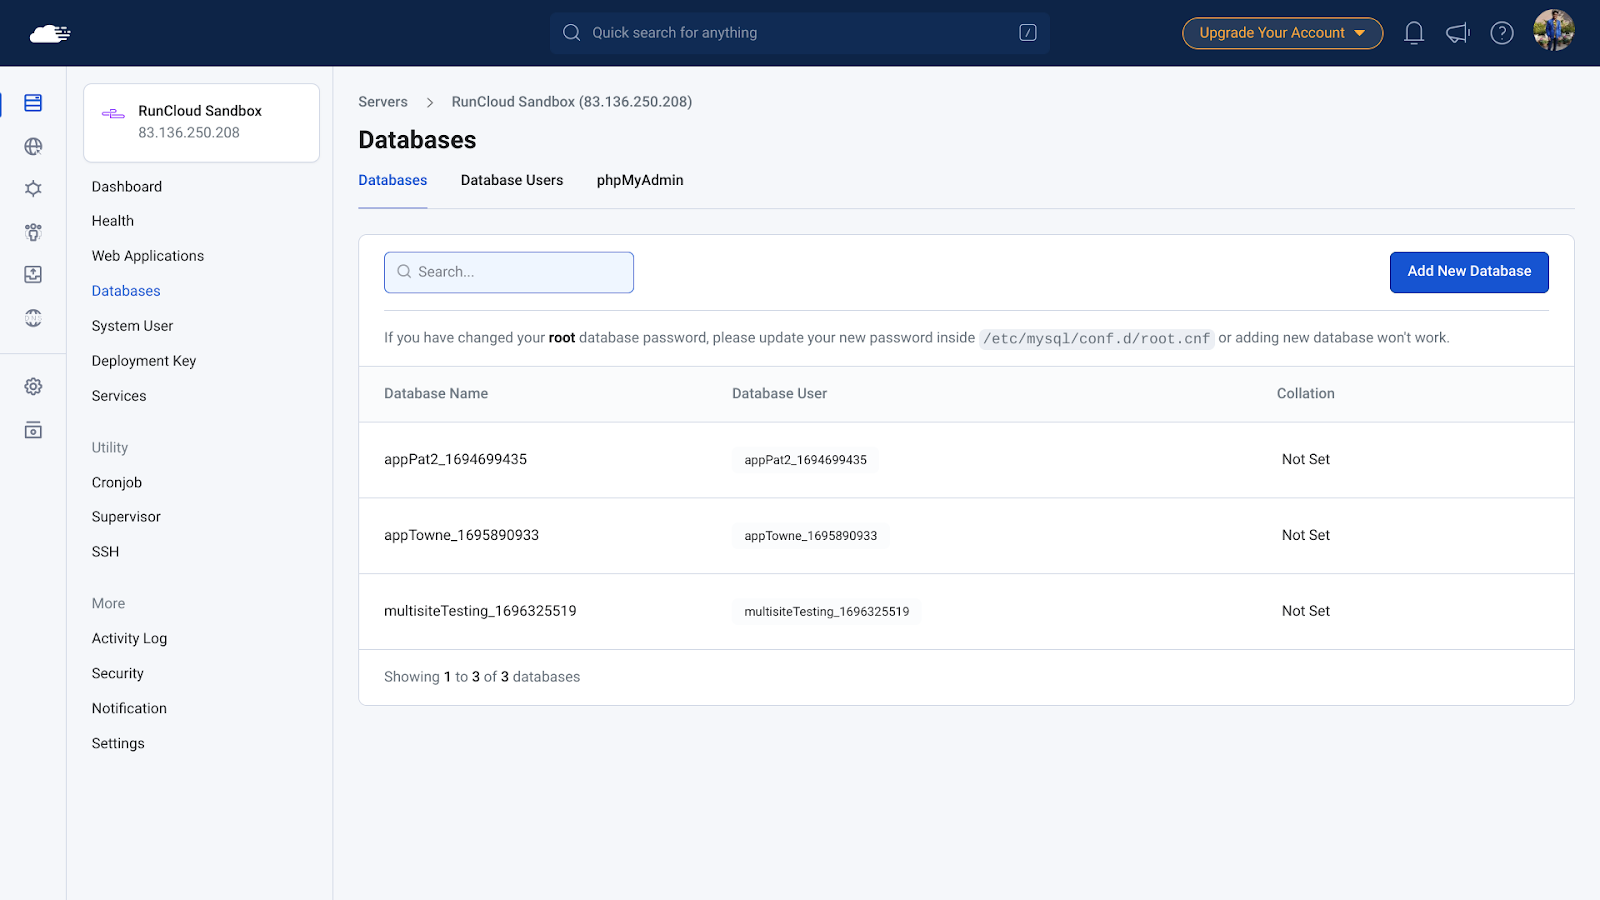
    Open the server on which you want to deploy your application, and click on the “Databases” button in the left menu.

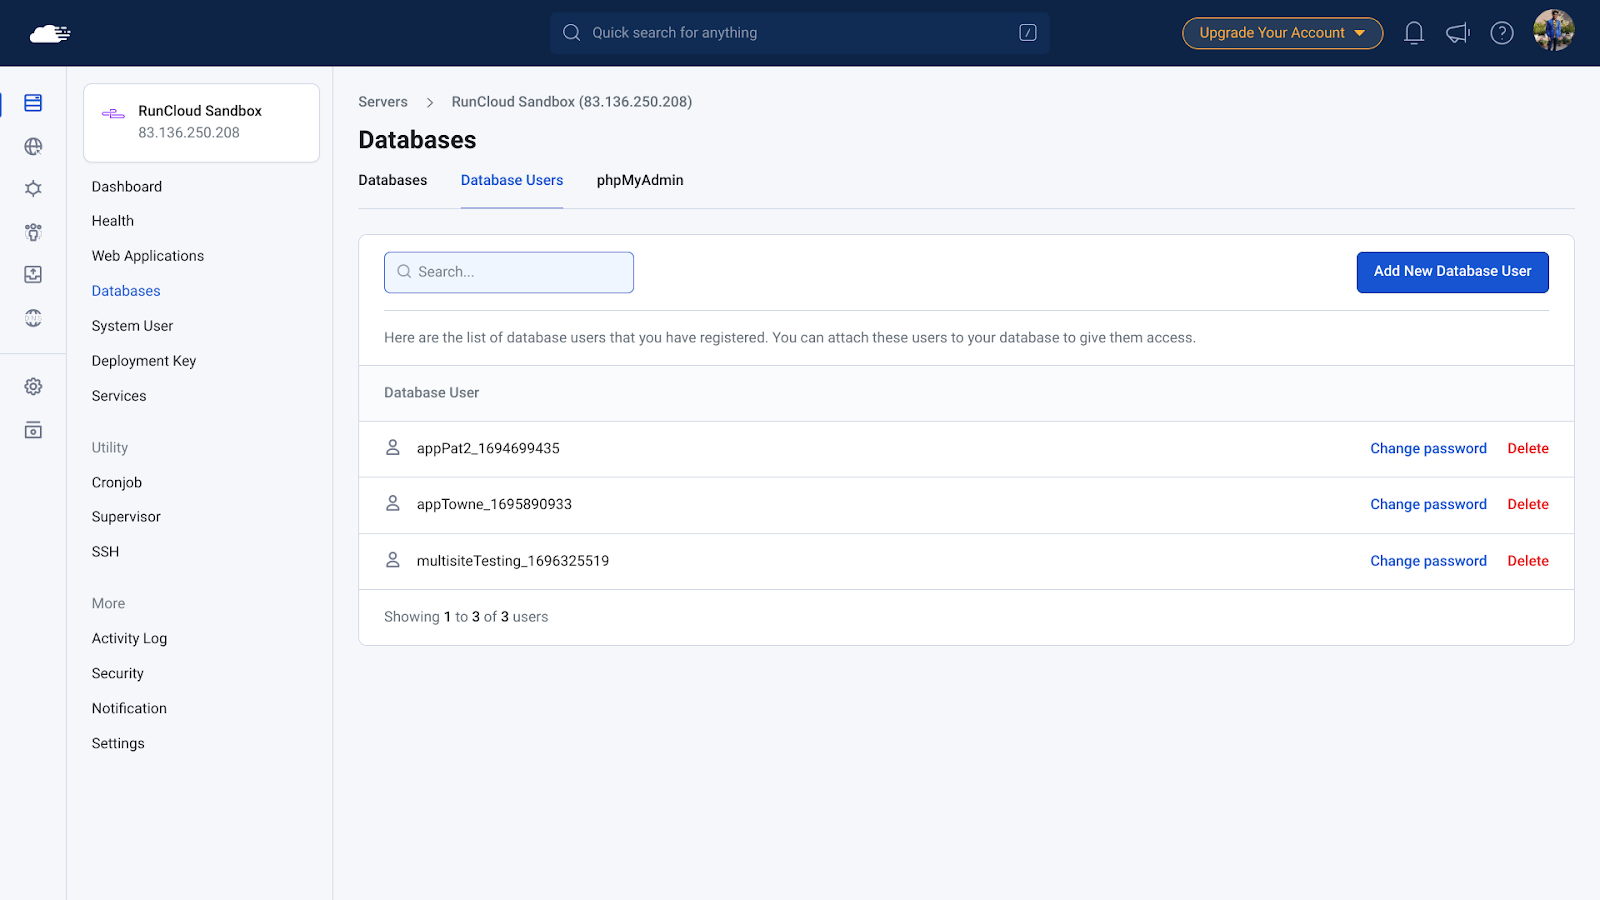
    On the next screen, click on “Database Users” and then select “Add New Database User” to create a new user account.

    On the next screen, give a descriptive name to the user account and set a password. Be sure to note down these credentials as they will be needed later. Once you have provided the username and password, click “Save” to create the user.

    Next, we need to create a database. Click on the “Databases” tab to view all the available databases. To create a fresh database, click on “Add New Database”.

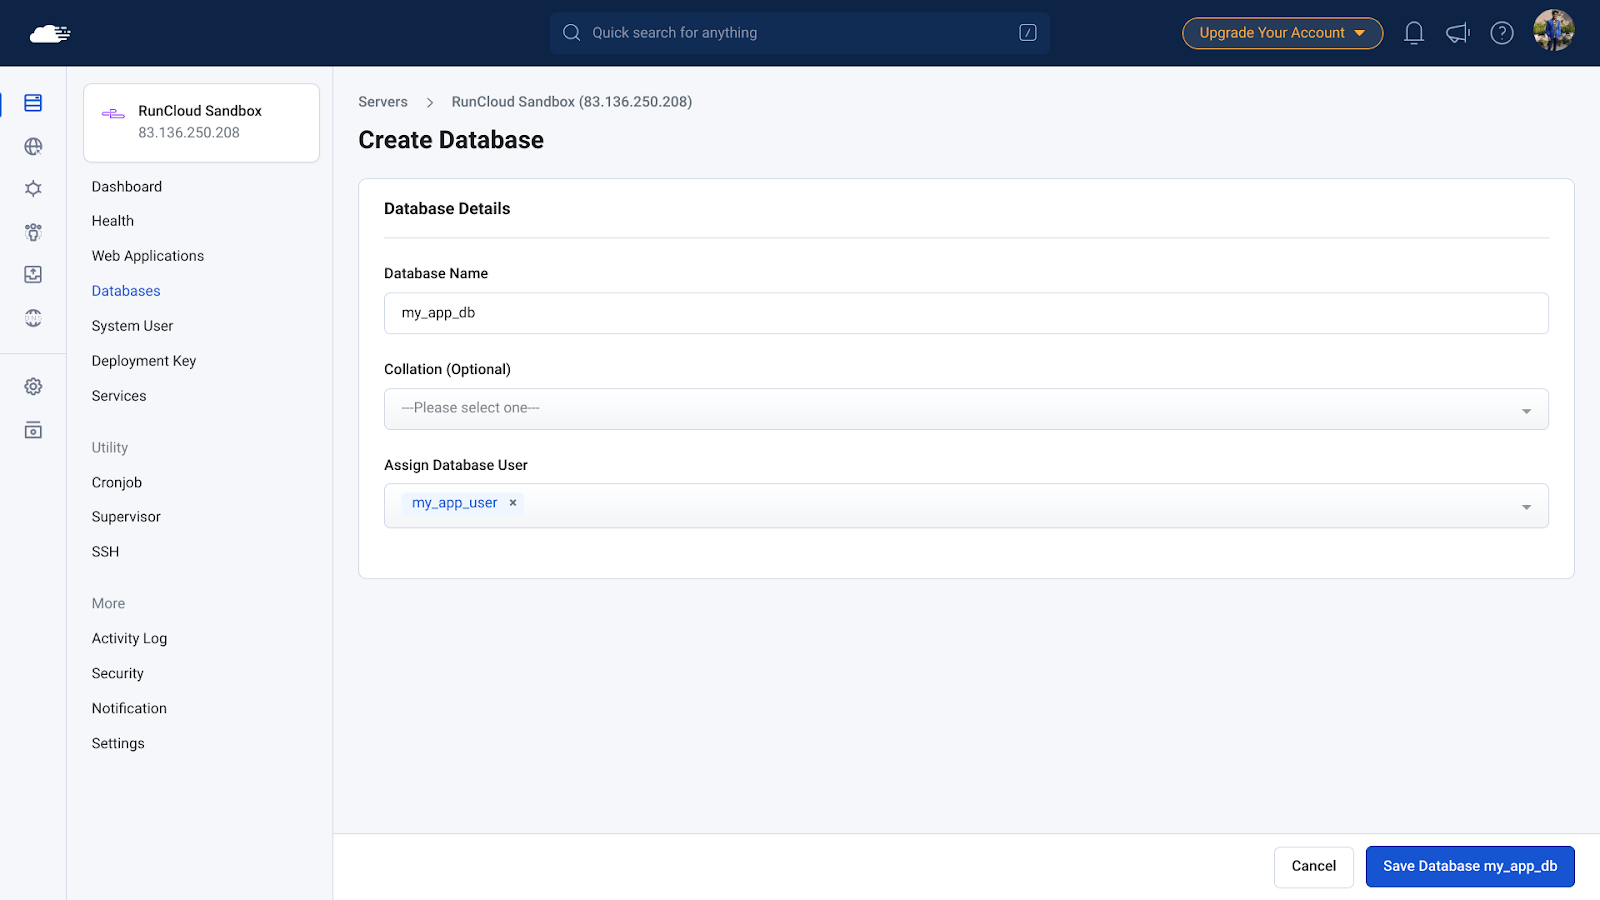
    When creating a database you will be asked to provide a name – this can be anything you like. For database collations, you can either leave it blank or refer to our documentation post: Understanding Database Collations.

    Finally, from the drop-down menu, select the user account that we created earlier.

    Once you have configured these settings, click on “Save”.

    Step 2: Connecting to Web Applications

    You must deploy a web application on the RunCloud server to run your PHP code. The process to create an application is very simple. In this tutorial we will be creating an empty web application, but the process is similar for any other type of application.

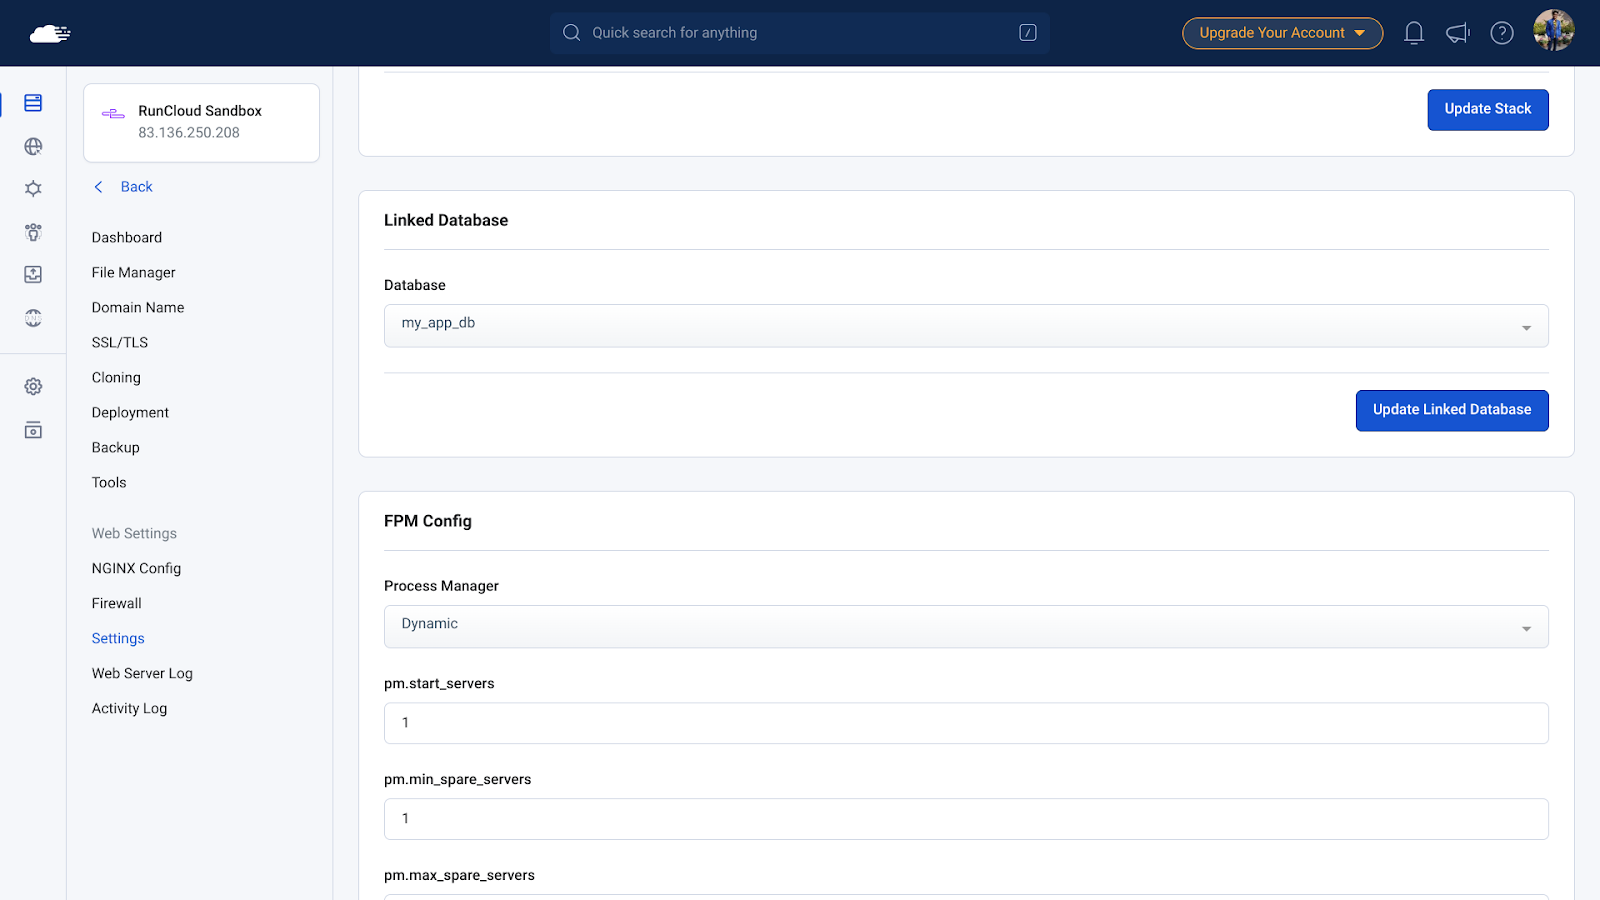
    Firstly, go to your web application settings page in the RunCloud dashboard, and scroll down until you see the linked databases section.

    Click on the drop-down button, select the database that we just created, and then save the changes.

    Next, we will create a PHP file on your server that will host the code to connect to your database.

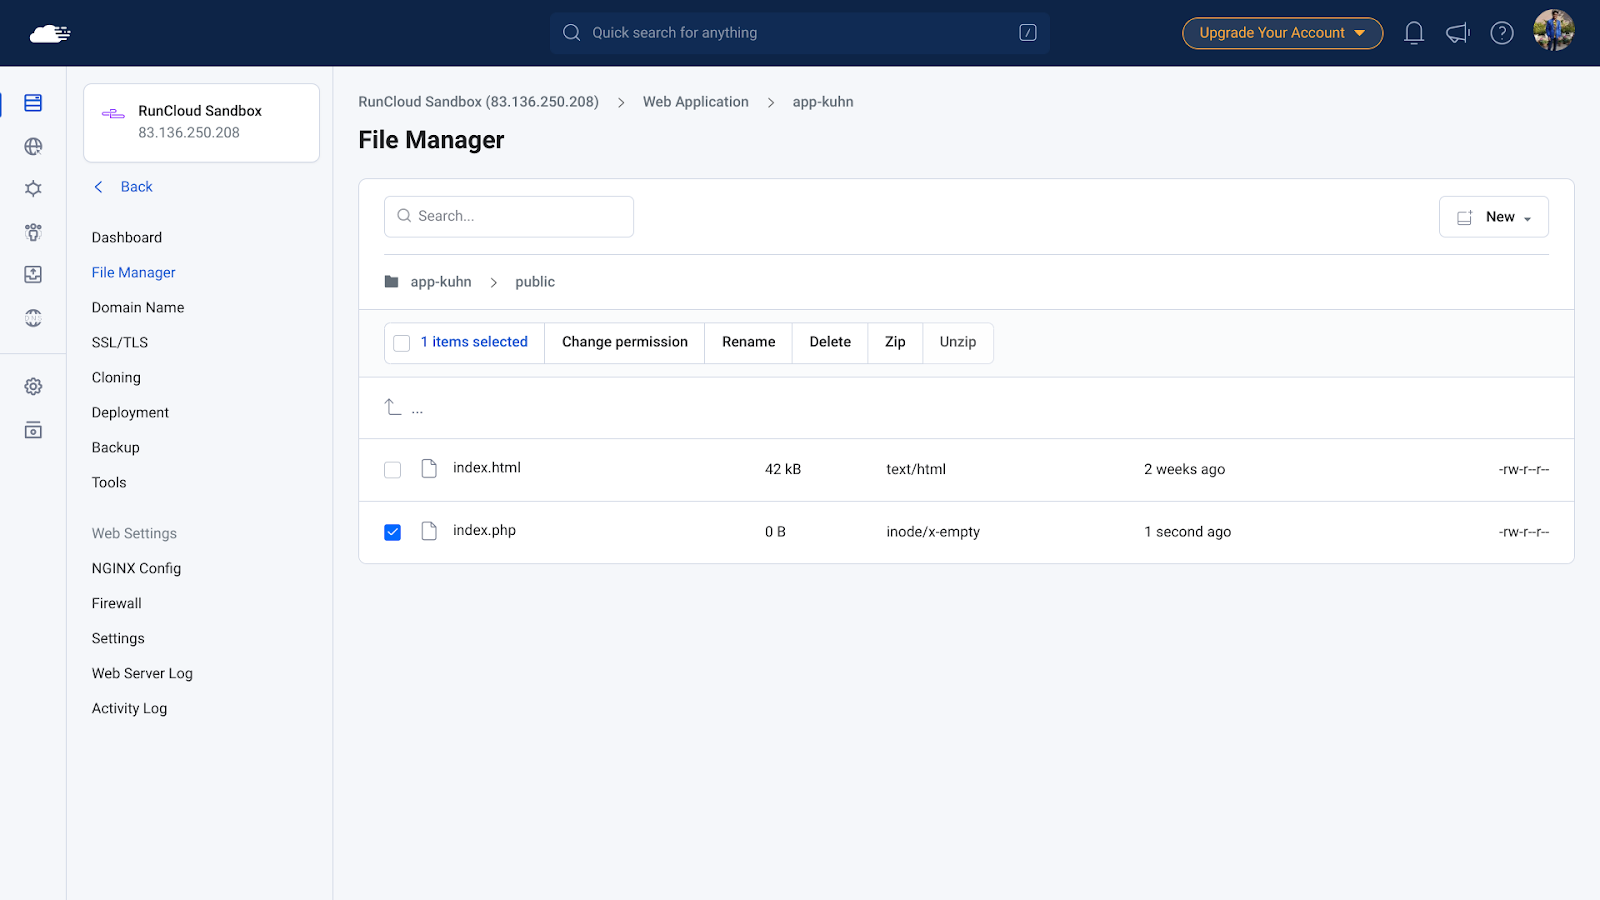
    To do this, click on the File Manager tab in the left menu. Here you will see a list of all the files present in your application.

    Click on New > File to create an empty file, and then give it the desired name.

    Once you have created the file, click on it. This will open the text editor in a new window where you can edit the file.

    Step 3: Coding Database Connection Module

    The final step for using a database in your web application is to configure a pre-built library. This will allow you to perform database operations without needing to understand how the database handles these operations. There are two popular ways to do this:

    Step 3.1: Use MySQLi

    The mysqli connect is a PHP extension used to connect to MySQL databases. It is a simple and easy-to-use method that is ideal for small projects. It is also faster than PDO because it is a native PHP extension. However, it does not support all of the features of PDO.

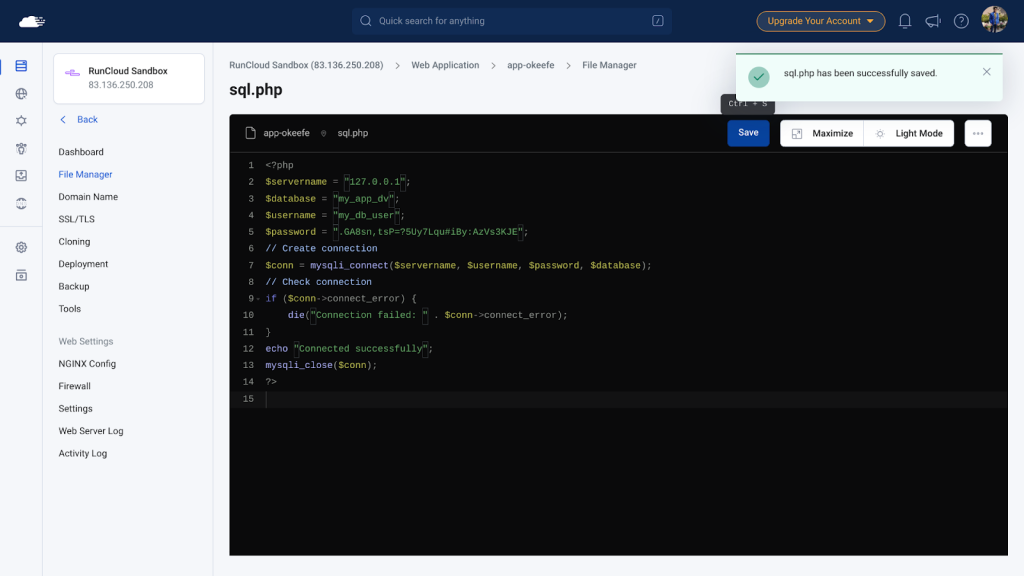
    To use this module, paste the following code snippet in the text editor. Make sure to replace the values of database, username, and password variables with the credentials that you noted down earlier.

    <?php
    $servername = "127.0.0.1";
    $database = "my_app_dv";
    $username = "my_db_user";
    $password = ".GA8sn,tsP=?5Uy7Lqu#iBy:AzVs3KJE";
    // Create connection
    $conn = mysqli_connect($servername, $username, $password, $database);
    // Check connection
    if ($conn->connect_error) {
        die("Connection failed: " . $conn->connect_error);
    }
    echo "Connected successfully";
    mysqli_close($conn);
    ?>

    Step 3.2: Use PDO

    PDO is a PHP extension that provides a data-access abstraction layer. PDO also supports multiple database drivers, which makes it more flexible than mysqli connect. However, it is slower than mysqli connect because it is not a native PHP extension.

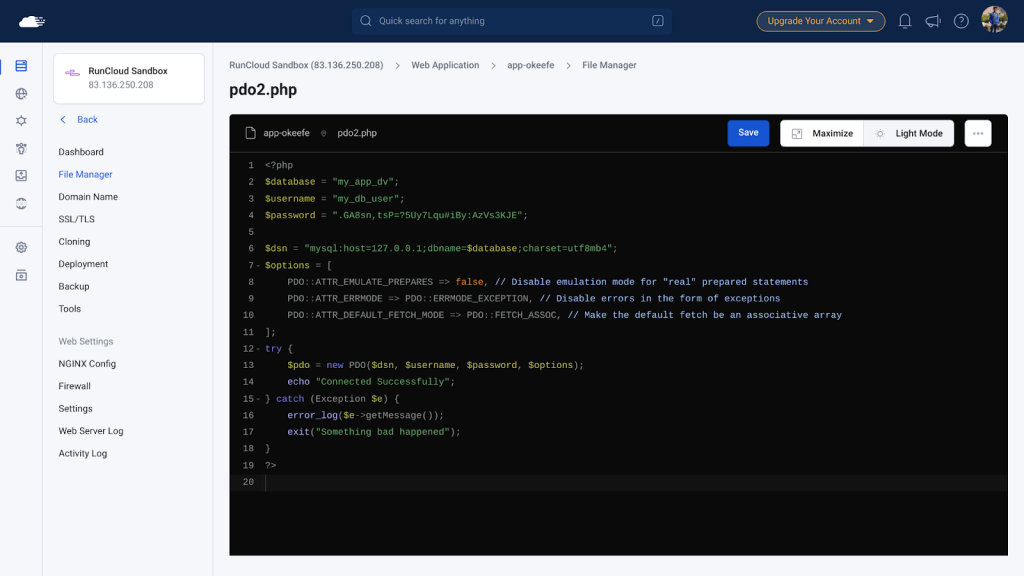
    To use this method, copy the following code example and paste it into your text editor. Don’t forget to update the credentials in the first three lines with the values that you noted down earlier.

    <?php
    $database = "my_app_dv";
    $username = "my_db_user";
    $password = ".GA8sn,tsP=?5Uy7Lqu#iBy:AzVs3KJE";
    $dsn = "mysql:host=127.0.0.1;dbname=$database;charset=utf8mb4";
    $options = [
        PDO::ATTR_EMULATE_PREPARES => false, // Disable emulation mode for "real" prepared statements
        PDO::ATTR_ERRMODE => PDO::ERRMODE_EXCEPTION, // Disable errors in the form of exceptions
        PDO::ATTR_DEFAULT_FETCH_MODE => PDO::FETCH_ASSOC, // Make the default fetch be an associative array
    ];
    try {
        $pdo = new PDO($dsn, $username, $password, $options);
        echo "Connected Successfully";
    } catch (Exception $e) {
        error_log($e->getMessage());
        exit("Something bad happened");
    }
    ?>

    Step 4: Save and Test Connection

    Once you have added the code to your server, click on “Save” to save the changes, and then visit the page in your browser. When you request this page, the server will execute the PHP code and establish a connection to the server.

    The exact path of this page will vary depending on what you named the file. For instance, if the domain name of your website is https://www.example.com and you named your file sql.php then you can browse this file at https://www.example.com/sql.php.

    If you see a “Connected Successfully” message then it means your code has successfully established a connection with your database, and you can now start using it in your code.

    Wrapping Up

    In this article, we have seen how to connect a MySQL database to PHP. We have outlined the steps needed for creating a database and granting permissions to user accounts before connecting to the database. We discussed two main ways to connect PHP to MariaDB: using mysqli connect and using PDO – both methods have their own benefits and drawbacks.

    If you want to host your web application on the cloud, but aren’t sure where to start, then you should check out RunCloud.

    RunCloud is a great platform for managing your servers, even if you are not a Linux expert.

    With RunCloud, you can easily create web applications, manage databases, and connect PHP to MariaDB. So, what are you waiting for?

    Sign up for RunCloud today and take your server management skills to the next level!

  • Best 9 htop Alternatives for Linux, Mac & Windows in 2025

    Best 9 htop Alternatives for Linux, Mac & Windows in 2025

    When it comes to monitoring system resources on Linux, htop has been the go-to tool for many administrators and developers alike. Its simple interface and real-time metrics have made it a staple in the toolkit of those who prefer a comprehensive overview of their system’s performance.

    You might already know about htop, a great tool for monitoring resource usage on your computer, but it is not the only one out there. In this post, we will show you the best 9 htop alternatives for Linux (including Ubuntu and CentOS), Mac and Windows in 2024.

    Let’s get started!

    What is htop?

    htop is an interactive system-monitoring tool for Unix systems, including Linux. It provides real-time insights into system performance, allowing users to view and manage system processes more efficiently than with the traditional top command. htop displays system metrics such as CPU, memory, swap usage, and process information in a user-friendly, color-coded interface. Users can interact with the tool to perform tasks such as killing processes, renicing tasks, and sorting processes by various criteria.

    Unlike the standard top command, htop offers a more dynamic and user-friendly experience. It supports vertical and horizontal scrolling, making it easier to view all processes running on the system, and includes features such as searching for processes, tree view for process hierarchy, and customizable display options. htop is highly customizable and can be configured to suit individual preferences and needs.

    Suggested read: How to Copy Files in Linux and Overwrite without Confirmation

    3 Best htop Alternatives for Linux

    While htop is a powerful tool, there are several alternatives that provide additional features and cater to different use cases. Here are three of the best htop alternatives for Linux:

    Glance

    Glance is a cross-platform monitoring tool that provides a unified view of system metrics. It is designed to be simple yet comprehensive, displaying essential information about CPU, memory, disk I/O, network interfaces, and processes. Glance is easy to use and provides a web-based interface for remote monitoring.

    How to Install Glance

    To install Glance, follow these steps:

    1. Install Glance: You can use the apt package manager to install Glance on your Linux computer by using the following command:
    sudo apt install glances
    1. Run Glance: After installing the glance, you can start it by executing the following command:
       glances

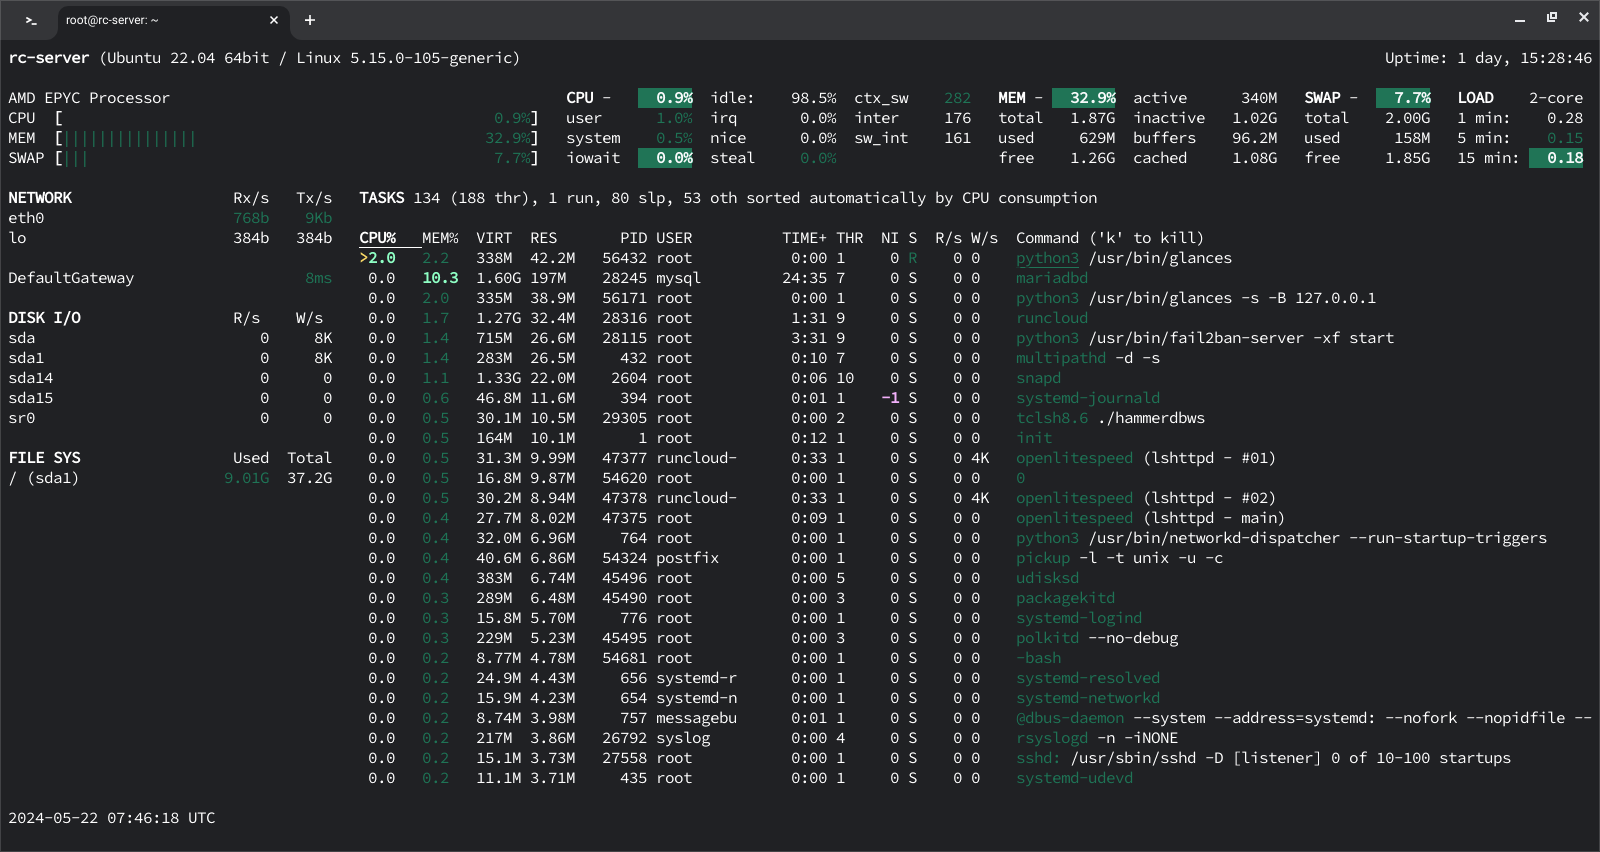
    In the above example, we can see how the Glances displays an overview of the system resources in the terminal over an SSH connection.

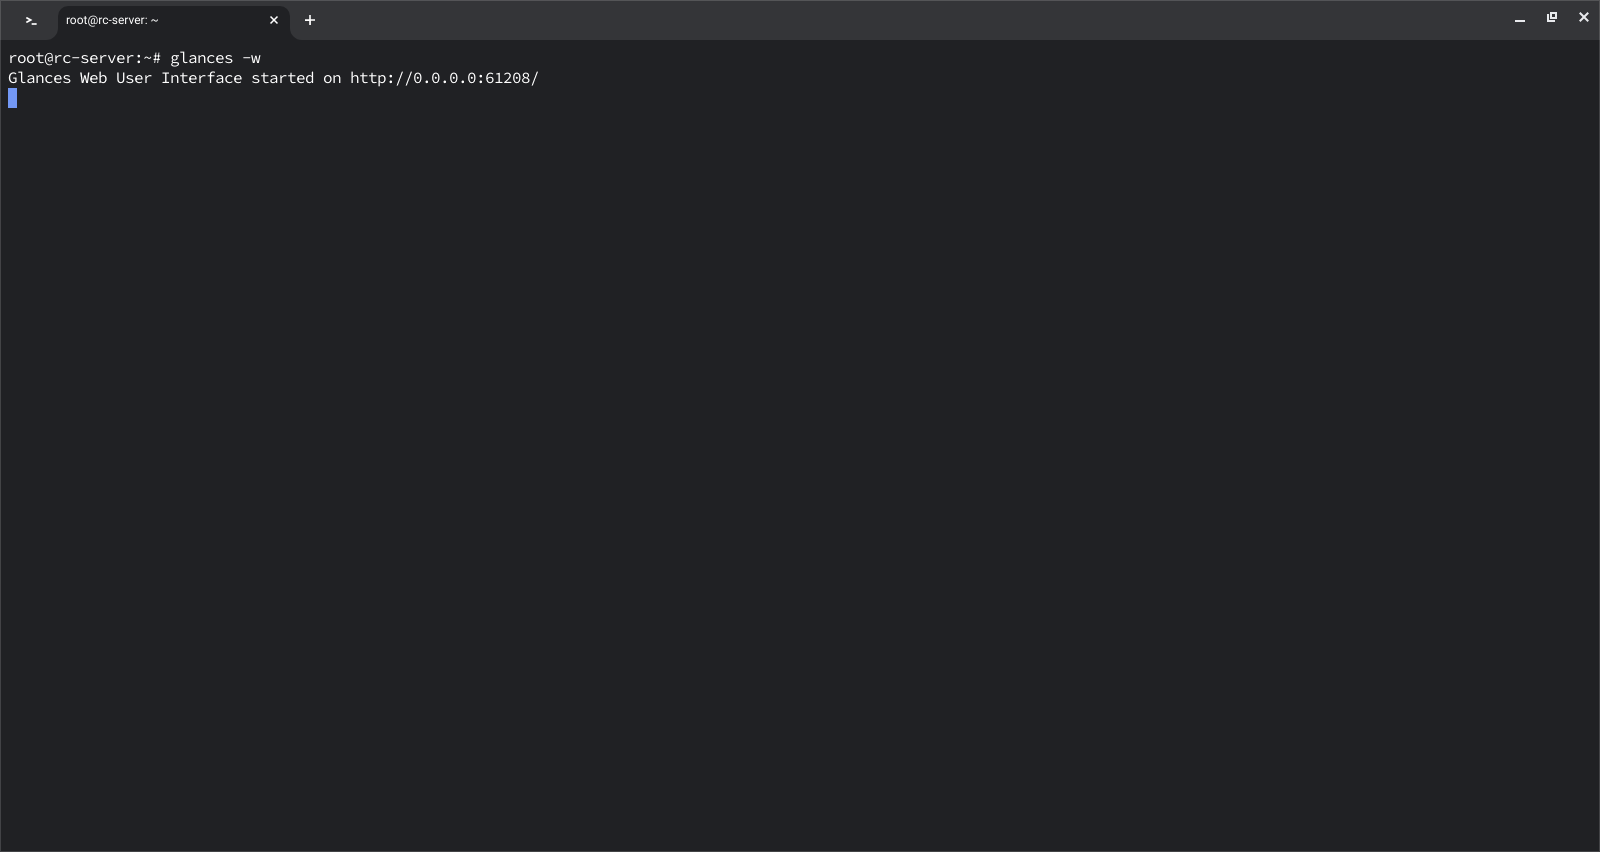
    1. Web Interface (Optional): If you want to access the same information over a web interface, then you can start the Glance with the -w parameter, this will start a web server where you can see your resource usage.
       glances -w

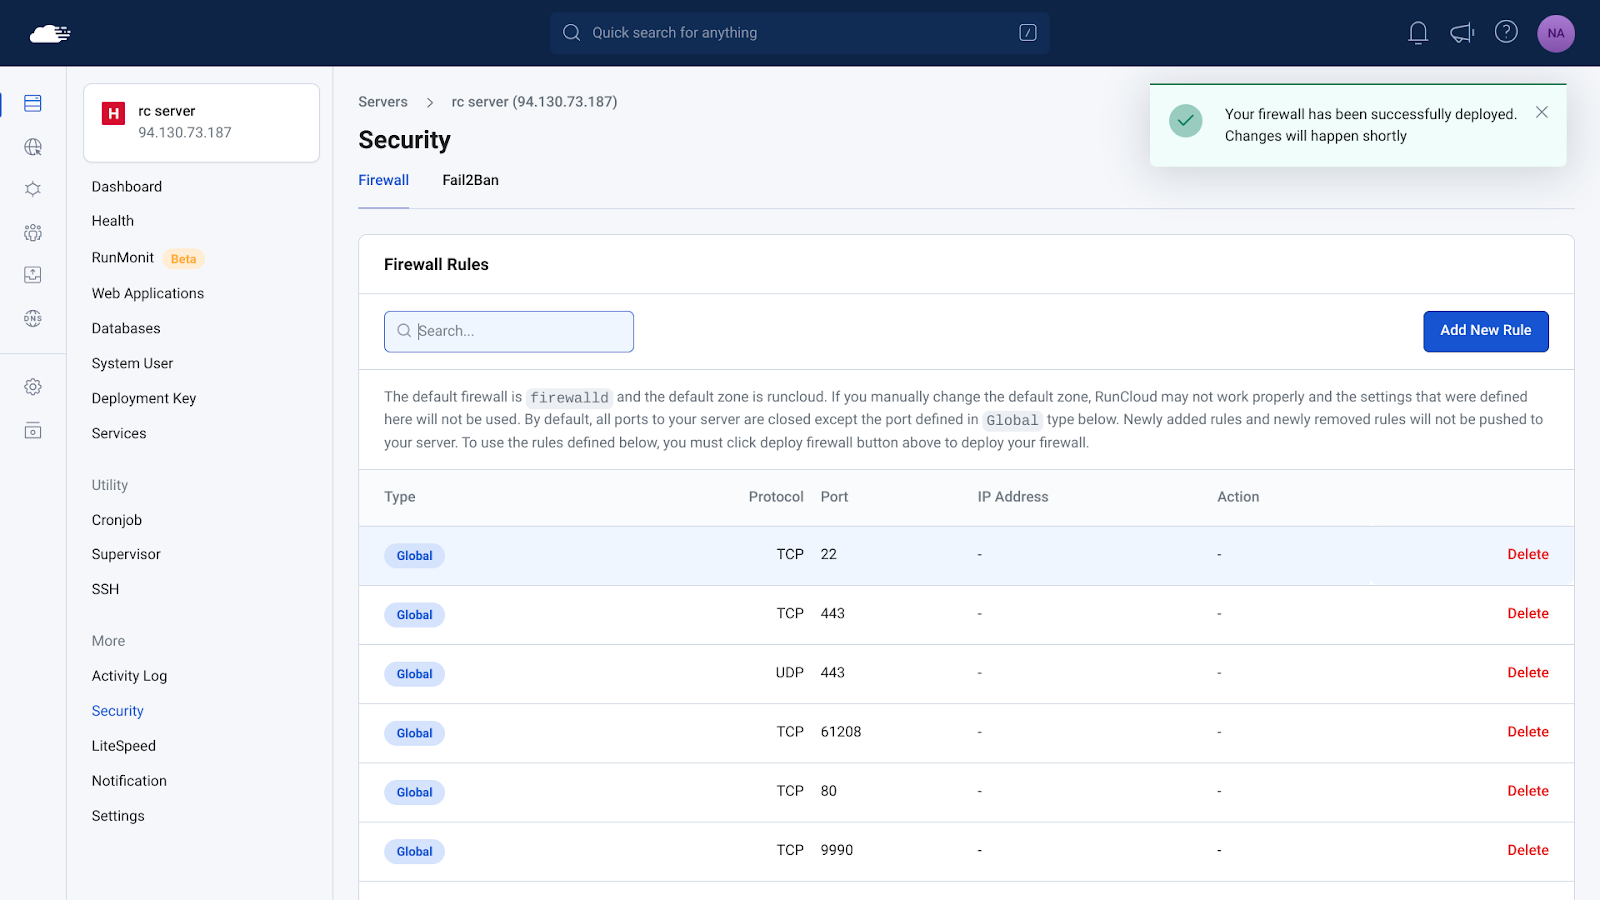
    In the above example, we can see that the server was started on localhost but if you are using a VPS then you will need to configure your firewall settings to view this interface. Fortunately, this is very simple using the RunCloud dashboard. Just go to the Security tab of your server and add a new rule to open your desired port.

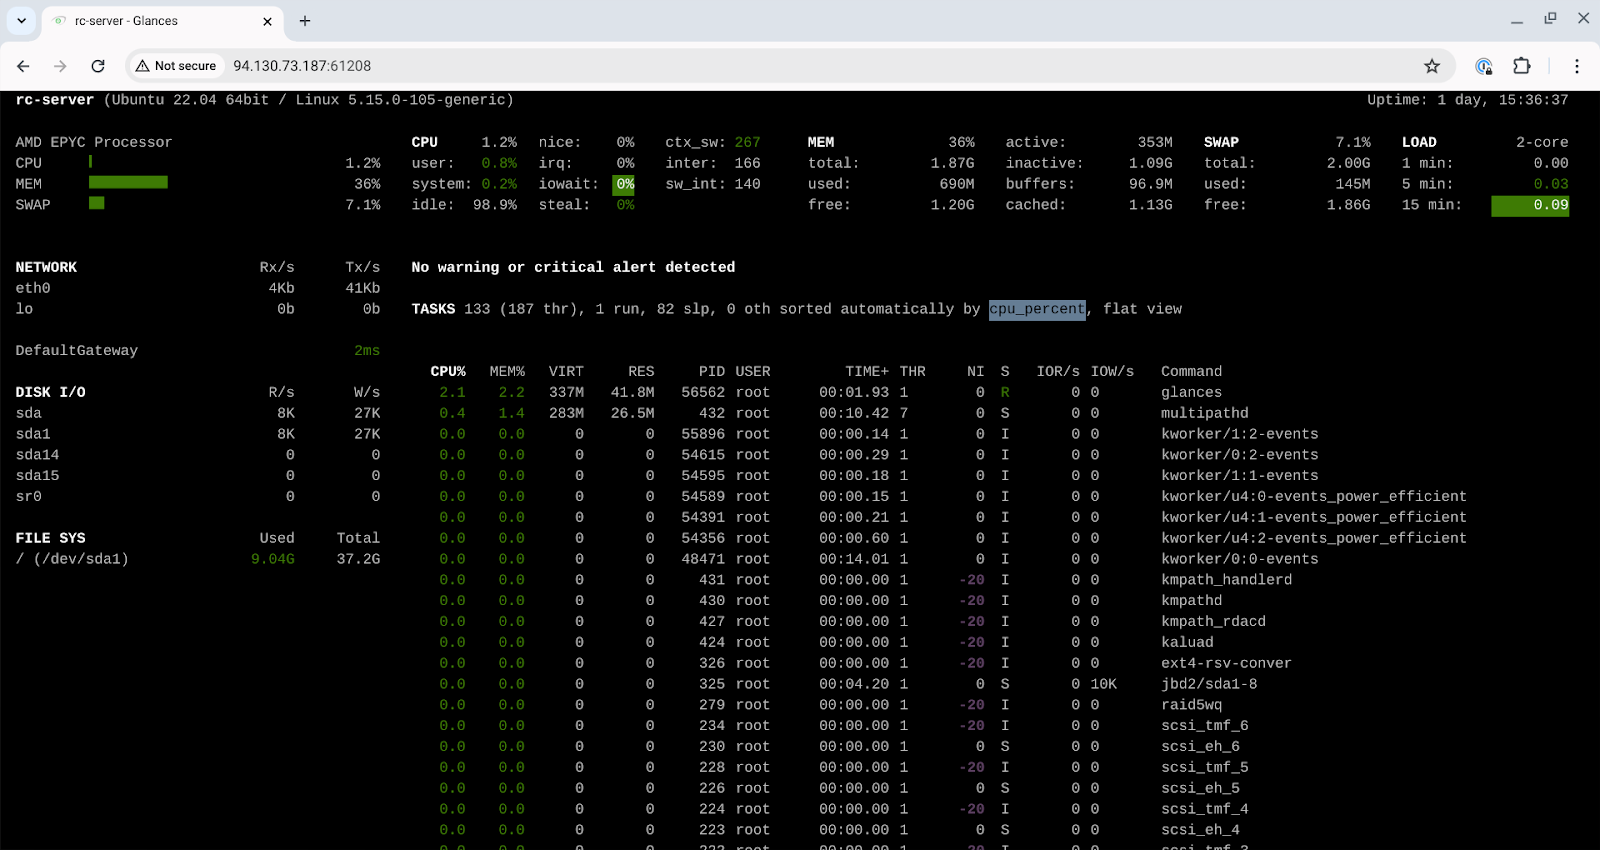
    In the above example, the Glances daemon was running on port 61208, once you have configured your firewall, you can access the same dashboard in your web browser by entering the IP address of your server followed by : symbol and the port number as shown below.

    Suggested read: Mastering the Echo Command in Linux (with Practical Examples)

    atop

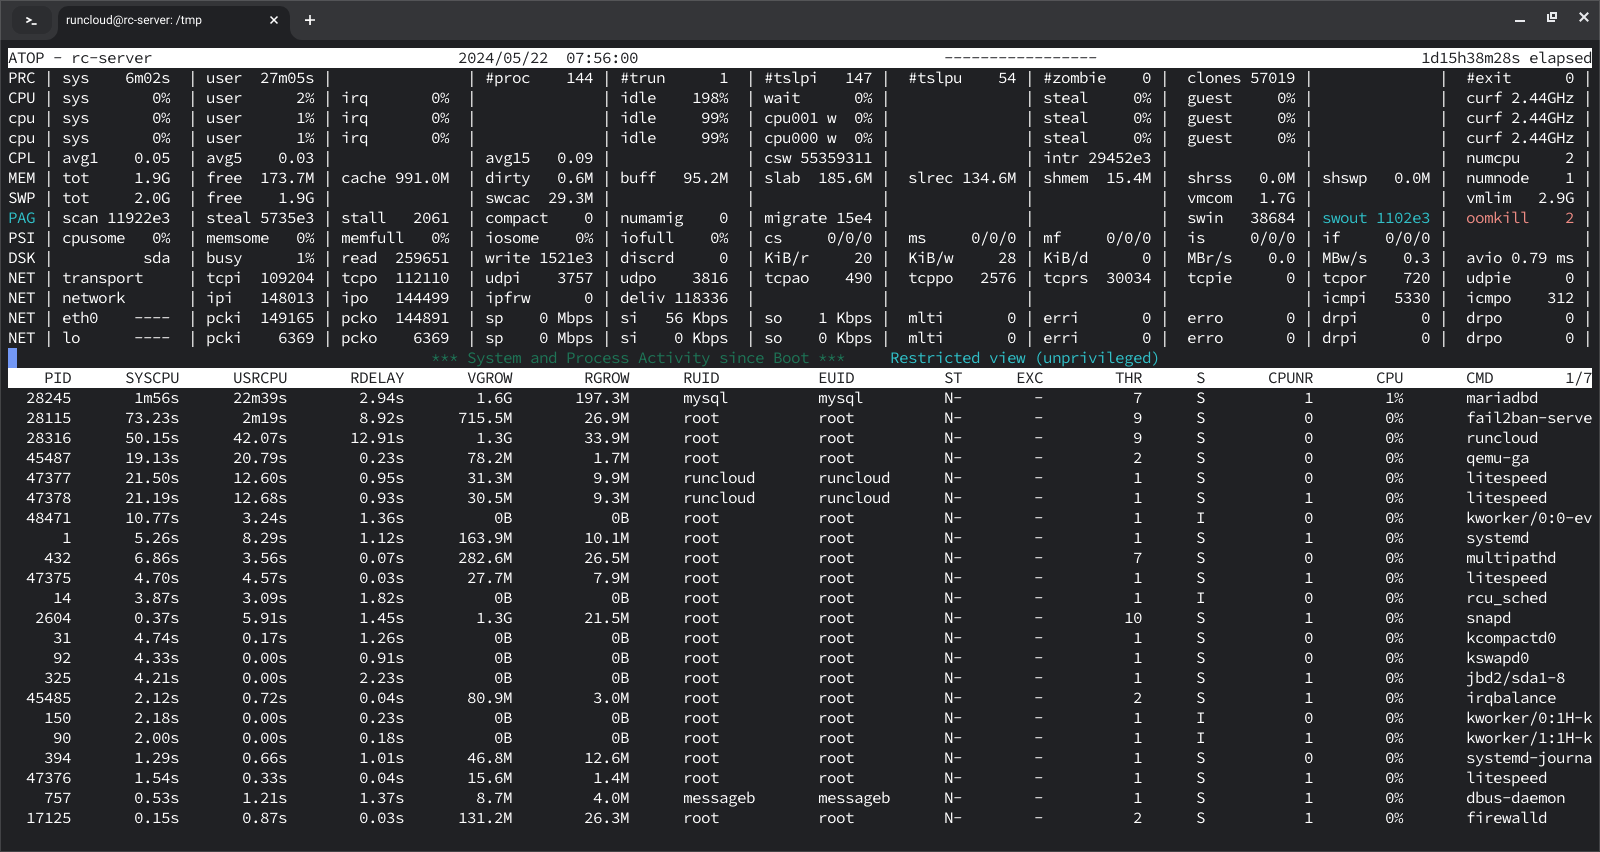
    atop is an advanced system and process monitor that provides detailed information about system resources. It is particularly useful for performance analysis and troubleshooting as it logs system activity and can show resource usage by individual processes over time. On Ubuntu, you can install and run atop with the following command:

    sudo apt-get install atop
    sudo atop

    In the above example, we can see the system metrics and resource usage on the server using atop dashboard. To enable logging, you can configure atop to run as a daemon by editing the configuration file located at /etc/default/atop and set LOGINTERVAL to a desired value (e.g., 600 for 10-minute intervals).

    Suggested read: What are Linux Logs? What Are They & How To Use Them

    nmon

    nmon (Nigel’s Monitor) is a system performance monitoring tool originally developed for AIX and later ported to Linux. It provides a comprehensive overview of system performance, including CPU, memory, disk I/O, network, and filesystem statistics. nmon is known for its lightweight design and efficiency, making it suitable for real-time monitoring and historical performance analysis.

    To install nmon, first make sure that your package manager list is up to date, after that you can execute the following commands to download an run it:

    sudo apt-get install nmon
    nmon

    Once running, you can use various keyboard shortcuts to view different metrics. For example, press c to view CPU usage, m for memory usage, and d for disk statistics.

    These alternatives to htop offer a range of features that can be tailored to specific monitoring needs, providing powerful tools for system administrators and users alike.

    Suggested read: How to Create and Manage Cron Jobs on Linux

    3 Best htop Alternatives for Mac

    Mac users often require robust system monitoring tools to keep track of their system’s performance and resources. While htop is a popular choice, several other tools offer similar and additional functionalities tailored to macOS. Here are three of the best htop alternatives for Mac:

    iStat Menus

    iStat Menus is a comprehensive system monitoring tool that integrates seamlessly with macOS. It provides real-time data on CPU usage, memory, disks, network activity, and other system metrics directly from the menu bar. iStat Menus is highly customizable, allowing users to choose which information to display and how to display it.

    How to Install iStat Menus

    1. Download: Visit the official iStat Menus website iStat Menus and download the latest version.
    2. Install: Open the downloaded .dmg file and drag the iStat Menus icon to your Applications folder.
    3. Launch: Open iStat Menus from your Applications folder and follow the setup instructions.
    4. Customize: Configure the tool to display the metrics you need from the menu bar.

    Activity Monitor

    Activity Monitor is the built-in macOS application that provides detailed information about the processes running on your Mac, as well as overall system resource usage. It offers insights into CPU, memory, energy, disk, and network usage, making it a powerful tool for everyday system monitoring.

    How to Access Activity Monitor

    1. Open Finder: Click on the Finder icon in your dock.
    2. Navigate to Applications: Go to the Applications folder and then the Utilities folder.
    3. Launch Activity Monitor: Double-click on Activity Monitor to open it.
    4. Usage: Use the tabs to monitor CPU, memory, energy, disk, and network activity.

    mactop

    Latest Apple laptops use Apple silicone which was built using Arm architecture, this means that a lot of the software built for x86 chips is not compatible with latest Apple laptops. mactop is one of the few softwares which was specially built for Apple silicone and it is guaranteed to work with all the M1, M2, and M3 series chips.

    You can download and compile the source code from its GitHub repository or simply download and install a pre-built binary directly using brew by using the following command:

    brew install mactop

    Once it is installed, you can start using it via the following command:

    sudo mactop

    3 Best htop Equivalent Alternatives for Windows

    Windows users looking for powerful system monitoring tools similar to htop on Unix systems have several good options available. These tools provide detailed insights into system performance, process management, and resource usage, making them indispensable for advanced users and system administrators. Here are three of the best htop equivalent alternatives for Windows:

    Sysinternals Suite

    Sysinternals Suite is a collection of tools from Microsoft which provides detailed information about the processes running on your system, including the handles and DLLs that processes have opened or loaded. It offers a comprehensive overview of system activity, making it an essential tool for troubleshooting and performance monitoring.

    How to Install Process Explorer

    1. Download Sysinternals Suite: You can either visit the Sysinternals Suite page to download the entire suite or manually download individual tools from SysInternals Live website.
    2. Extract the Files: After downloading the file, you can extract the downloaded ZIP file to a desired location.
    3. Launch Process Explorer: Navigate to the extracted folder and double-click on procexp.exe to launch Process Explorer. This will open a new window where you can explore different processes running on your computer.
    1. Launch Process Monitor: In addition to process explorer, you can also launch the procmon.exe file to run the Process Monitoring tool. Once you have opened the tool, you can browse and manage different processes running on your system and forcefully terminate them if necessary.

    Suggested read: How To Check Disk Space in Linux

    Windows Task Manager

    Windows Task Manager is a built-in system monitoring tool that provides real-time information on CPU, memory, disk, and network usage, as well as detailed process management. It is a powerful utility for basic and intermediate system monitoring and troubleshooting which can be used by anyone without needing to install any additional software.

    How to Access Windows Task Manager

    1. Open Task Manager: On your Windows computer, press Ctrl + Shift + Esc or right-click on the taskbar and select “Task Manager”.
    2. View Processes: In the “Processes” tab, view the list of running applications and background processes along with their CPU, memory, disk, and network usage.
    1. Performance Tab: Click on the “Performance” tab to see an overview of system resources such as GPU, CPU, Memory, Network, and Disk.
    1. Details and Services: If you want granular control over services, then you switch to the “Details” and “Services” tabs for more advanced process management and service control.

    btop++

    btop++ is an advanced system resource monitor that works on Windows, providing a detailed and visually appealing interface similar to htop. It offers insights into CPU, memory, disk I/O, and network usage, making it a versatile tool for system performance monitoring.

    How to Install btop++

    1. Download: Visit the btop++ GitHub repository (also available for Linux) and download the latest release for Windows.
    2. Extract the Files: Extract the downloaded ZIP file to a desired location.
    3. Install Required Dependencies: Ensure you have Microsoft Visual C++ Redistributable installed, if not, download and install it from the official Microsoft website.
    4. Launch btop++: Navigate to the extracted folder and double-click on btop.exe to launch btop++.
    5. Usage: After installing it, you can use the interface to monitor system performance metrics and manage processes.
    btop++ htop alternative

    Wrapping Up

    Monitoring system performance is crucial for maintaining optimal functionality and troubleshooting potential issues on your Windows, Mac, or Linux systems. While hTop is known to users for its comprehensive and interactive interface, there are powerful alternatives available across different platforms.

    Recently, RunCloud has announced the addition of RunCloud Monitoring, a powerful tool designed to identify high resource usage and slow SQL queries on your server. This feature helps ensure that your servers are running smoothly and efficiently, saving you time and reducing the potential for downtime.

    Whether you are managing a server or using a personal computer, having the right monitoring tools at your disposal is essential. Sign up for RunCloud today and take advantage of our comprehensive server management and monitoring solutions to keep your systems in top shape.

  • 5 Ways to Fix the SSH Connection Refused Error [SOLVED]

    5 Ways to Fix the SSH Connection Refused Error [SOLVED]

    When managing your servers, you will often need to use the Secure Shell (SSH) protocol, but sometimes you might see a “Connection Refused” message.

    If so, then don’t worry, because in this post we will explain five ways to fix the SSH connection refused error – as well as answering some of the frequently asked questions we receive from people with this issue.

    Let’s get started!

    What Causes the SSH Connection Refused Error?

    SSH (Secure Shell) is a protocol used for secure remote logins and other secure network services over an insecure network.

    There are several reasons why you might encounter a “Connection Refused” error when trying to connect via SSH:

    1. Incorrect SSH Port

    SSH uses port 22 by default, but many security professionals recommend changing it to something arbitrary to reduce brute force attacks. If you’re trying to connect to a different port that isn’t open or configured for SSH, you’ll get a connection refused error.

    ssh connection refused error linux

    Suggested read: 3 Ways to Fix Too many Authentication Failures SSH Root? [SOLVED]

    2. Incorrect SSH Login Credentials

    There are two main ways to log in to a server via SSH – with either a password, or with SSH keys. If you enter the wrong username-password combination, or use the incorrect SSH key, then the SSH daemon on the server will refuse the connection.

    If you’re using PuTTY to connect to your server, then you should read our guide on How To Use SSH Keys with PuTTY on RunCloud.

    3. SSH Isn’t Installed on Server

    If the SSH server software isn’t installed on the server, or if it’s not running, you won’t be able to connect. You can check if the SSH server is running using the following command:

    systemctl status ssh

    SSH daemon status in Linux

    In the above example, we can see that the server displays Active (running) status which means it is ready to accept incoming SSH requests.

    4. SSH Access Has Been Disabled

    SSH provides complete access to your server, meaning you can remotely access any data and execute arbitrary commands from anywhere across the world. Due to this, it can be a problem if hackers are able to establish an SSH connection with your server. To avoid this, many server administrators disable SSH entirely on the server for security reasons. If this is the case, you’ll need to enable SSH access before you can connect to the server.

    5. Server Firewall Conflicts with SSH

    Quite often, servers are secured behind firewalls to withstand cyber attacks. If your firewall is blocking incoming traffic on the SSH port then you will get a connection refused error. You’ll need to adjust the firewall settings to allow SSH connections.

    If you’re using RunCloud, then you can access these settings from the Security tab on your RunCloud dashboard:

    Changing firewall rules on RunCloud

    How to Fix the SSH Connection Refused Error

    Here are some steps you can take to troubleshoot and fix an SSH “Connection Refused” error:

    1. Verify Your SSH Port

    If you are using a cloud VPS, then you might be able to use a built-in SSH login functionality that allows you to access your machine remotely. If you are able to log in to your server with this method and not via the command line, then you might be connecting to the wrong port.

    You can verify the SSH port by checking the SSH configuration file (/etc/ssh/sshd_config) on the server using the following command:

    grep Port /etc/ssh/sshd_config

    SSH config on UBUNTU server Linux

    In the above example, we can see that the line starts with a # symbol, i.e., it is commented. If you want to change the default port number, then you can edit this configuration file using nano and uncomment it.

    2. Check Your SSH Login Credentials

    When logging in to the server, your username on the server will be different from your username on your laptop. Make sure you’re using the correct username and password. If you’re unsure, you can ask the administrator of the server to reset your password or create a new user with SSH access.

    3. Ensure SSH Is Installed on the Server

    You can check if SSH is installed by running the command which ssh on the server. If SSH is not installed, you can install it using the package manager for your operating system (for example, apt-get install openssh-server on Ubuntu).

    Suggested read: ​How to Use SFTP with FileZilla to Securely Transfer Files on RunCloud

    4. Enable SSH Access on your Server

    It is possible that the SSH daemon is installed on your server, but is disabled for security reasons. If SSH access has been disabled, you’ll need to enable it using the following command:

    sudo service ssh start

    In the above example, we have used the service command to start the SSH daemon, which didn’t return any errors. This means that the service was started successfully.

    Additionally, if the service is already running then it won’t make any changes, i.e. it will keep running.

    5. Resolve Server Firewall Conflicts with SSH

    If the server’s firewall is blocking SSH connections, you’ll need to adjust the firewall settings. This can usually be done by adding a rule to allow connections on the SSH port (usually port 22). The exact command will depend on your firewall software (for example, ufw allow 22 for UFW on Ubuntu).

    If you’re using RunCloud, you can easily configure your firewall settings and set-up fail2ban to automatically block malicious robots that try to brute force into your server.

    Final Thoughts

    In this post, we’ve explored various reasons behind the SSH Connection Refused error, and provided solutions to address this issue and similar problems with SSH. As we’ve seen, the causes can range from server-side problems to client-side misconfigurations, and each issue requires a unique approach to resolve.

    Managing SSH connections across multiple servers can be a daunting task, especially when dealing with complex web applications. This is where RunCloud comes into play.

    RunCloud simplifies Linux server management and makes it easy to manage SSH connections across multiple servers. It provides straightforward solutions for deploying and managing your web applications, thereby reducing the complexity of server operations.

    So why wait? Take the first step towards hassle-free server management.

    Sign up for RunCloud today and experience the ease of managing SSH connections and web applications like never before.

    FAQ on SSH Connections

    How do I fix port 22 connection refused?

    The error “port 22: Connection refused” typically indicates that your SSH client is unable to establish a connection with the SSH server. It can occur due to various reasons:
    The SSH server may not be running on the remote host.
    The host or IP address provided could be incorrect.
    The SSH server may be using a different port than the default port 22.
    A firewall might be blocking the SSH connection.
    There could be network connectivity issues between the client and server.

    What is the cause of the connection being refused?

    The “Connection Refused” error occurs when a server refuses to establish a connection with a client. This can happen for a variety of reasons:
    The server is not running.
    The server is overloaded and cannot accept new connections.
    The client is trying to connect to the wrong port.
    The client’s IP address is blocked by the server.

    How do I debug SSH connection issues?

    To debug SSH connection issues, you can use the verbose mode in SSH. The -v flag in the SSH command provides debugging information about the SSH connection progress. There are different levels of verbosity; using multiple -v flags increases the verbosity (the maximum verbosity level is 3).

    How do I SSH into an IP address?

    To SSH into an IP address, use the SSH command followed by the username and the IP address of the server. For example, ssh username@ip_address.

    How do I reset my SSH connection?

    To reset your SSH connection, you can restart the SSH service using the following command: sudo systemctl restart ssh.service.

    How do I know if my SSH is blocked?

    If you are unable to establish an SSH connection, it could be because your firewall is blocking the SSH port. You can check your firewall settings to see if the SSH port (default is 22) is allowed.

    What is the difference between SSL and SSH?

    Both SSL and SSH are cryptographic protocols used for secure communication over a network, but they serve different purposes. SSL is primarily used for securing web-based communications, while SSH is used for secure remote access to servers and devices.

    What is the difference between SSH and telnet?

    SSH and Telnet are both protocols used for remote terminal service – the key difference is that SSH provides a secure, encrypted connection, while Telnet does not. This makes SSH more secure, and the preferred method for remote access.

    On which port SSH is running?

    By default, SSH runs on port 22.

    Why Does PuTTY Say Connection Refused?

    The “Connection Refused” error in PuTTY usually means that the network connection PuTTY tried to make to your server was rejected by the server. This can happen if the server does not provide the service which PuTTY is trying to access.

  • How to Fix DNS_PROBE_FINISHED_NXDOMAIN Error

    How to Fix DNS_PROBE_FINISHED_NXDOMAIN Error

    Are you tired of seeing the DNS_PROBE_FINISHED_NXDOMAIN error appear when you’re just trying to surf the web?

    In this post, we will share helpful tips for troubleshooting the DNS_PROBE_FINISHED_NXDOMAIN error and discuss some easy fixes. But first, let’s learn more about this cryptic error and why it occurs.

    What is the DNS_PROBE_FINISHED_NXDOMAIN Error?

    The DNS_PROBE_FINISHED_NXDOMAIN error is a common issue that users might encounter when trying to visit a website. This error is displayed when the Domain Name System (DNS), which is responsible for translating domain names into IP addresses, is unable to perform this function for a particular website.

    When you enter a website’s URL into your browser, a DNS query is sent to a DNS server to retrieve the IP address associated with that domain name. If the DNS server cannot find this IP address, it returns an NXDOMAIN response, indicating that the domain does not exist. This response is then relayed back to your browser, which displays the DNS_PROBE_FINISHED_NXDOMAIN error.

    screenshot of DNS_PROBE_FINISHED_NXDOMAIN error

    Most browsers these days use Chromium technology (the software developed by Google Chrome) and show the default, cryptic error message. However, other browsers such as Mozilla Firefox show a simple error message when you encounter “DNS_PROBE_FINISHED_NXDOMAIN”, with possible fixes.

    DNS_PROBE_FINISHED_NXDOMAIN on Firefox

    Similarly with the Safari browser, you will see a different error message which says “Safari Can’t Find the Server” instead of the error code described above.

    DNS_PROBE_FINISHED_NXDOMAIN

    What Causes the DNS_PROBE_FINISHED_NXDOMAIN Error?

    There are several common scenarios where you might see the DNS_PROBE_FINISHED_NXDOMAIN Error, and understanding these common causes can help in troubleshooting and resolving the issue faster. Let’s take a look at them one by one.

    DNS Server Outage

    If the DNS server that your system is using is experiencing issues or is down, then it may not be able to resolve domain names into IP addresses, leading to the DNS_PROBE_FINISHED_NXDOMAIN error.

    Incorrect DNS Settings on Your Computer

    If the DNS settings on your system or router are incorrect, your system may not be able to communicate with the DNS server properly. If you recently changed your router settings, then consider either reverting them to default or using a commercially available DNS provider such as Google, Cloudflare, or Quad9.

    Poorly Configured DNS Records

    When you set-up your DNS records for your domain, it can take up to 48 hours for the changes to propagate. If you incorrectly configure your DNS records, for example, if you write best.example.com instead of test.example.com then you are likely to face the DNS_PROBE_FINISHED_NXDOMAIN error, and you will have to wait for a couple of hours for the DNS changes to propagate.

    To make the process easier and less error-prone, use RunCloud’s built-in DNS management system that allows you to configure multiple domain names on a single website.

    In addition to automatically adding relevant records, RunCloud’s DNS manager also allows you to edit and delete your DNS records from one single dashboard.

    Non-Existent Domain

    If the website you’re trying to access does not exist, or the domain name has been entered incorrectly, the DNS server will not be able to find the corresponding IP address, resulting in the DNS_PROBE_FINISHED_NXDOMAIN error.

    If you’re using RunCloud to host your website, you can simply click on the “Open Site” button in your dashboard to visit the website. This will make sure that you’re visiting the correct URL, and not making mistakes such as typing 0 instead of O.

    To further troubleshoot the DNS_PROBE_FINISHED_NXDOMAIN issue, you can check the DNS records of the website on a public DNS service – simply go to any DNS provider’s website such as dns.google and enter the name of the website to view its actual DNS records. If the DNS records do not exist, then you can notify the website administrator to rectify the problem.

    Problems with Internet Connection

    If your internet connection is unstable or not working, your system may not be able to reach the DNS server to resolve the domain name, causing the DNS_PROBE_FINISHED_NXDOMAIN error.

    Firewall or Security Software Interference

    Sometimes, firewall settings or security software on your system can interfere with DNS operations and prevent your system from communicating with the DNS server. Additionally, many antivirus softwares hijack your computer’s DNS settings to block certain websites, so double check your security settings to make sure nothing is blocking your DNS requests.

    Browser Extensions

    Occasionally, the problem could be with the web browser itself – certain settings or extensions could interfere with the browser’s ability to resolve domain names. Update your browser and consider disabling ad-block extensions that filter DNS queries for blocking traffic.

    How to Fix the DNS_PROBE_FINISHED_NXDOMAIN Error

    In this section, we will provide some potential solutions to resolve the DNS_PROBE_FINISHED_NXDOMAIN error:

    Checking the Internet Connection

    Firstly, make sure that your internet connection is stable. You can do this by trying to access other websites or using online speed test tools.

    Method 1: Do a Ping Test

    If you’re not able to connect to a website, then a simple way to test your connection is by doing a ping test. Simply open a terminal (or command line on Windows) and execute the following command:

    Ping -c 4 runcloud.io

    In the above command, replace runcloud.io with the domain of the website that you are trying to test. After executing the command, if you don’t see an error message, then you can rest assured that your internet connection is working fine.

    Method 2: Check Other Websites

    If you don’t want to test your connectivity settings using a terminal, then you can simply use any browser app to open any popular website. If you are using a WiFi connection, then you can also consider opening the website on a different device connected to the same WiFi, which will make it easier for you to isolate the problem.

    Changing the DNS Server

    If your DNS service provider has crashed, then it might be a good idea to switch to a reputable DNS provider. We recommend using Cloudflare, Google, or Quad9’s DNS services to avoid disruptions in the future.

    Here is a brief overview of how to change your DNS settings on different systems:

    1. Windows: Go to Control Panel > Network and Internet > Network and Sharing Center > Change adapter settings. Right-click on your connection, select Properties, then select Internet Protocol Version 4. Click on Properties, then select “Use the following DNS server addresses” and input the new DNS addresses.
    2. macOS: Go to System Preferences > Network > Advanced > DNS, and then add the DNS server IP addresses.
    3. Linux: Edit the /etc/resolv.conf file and add the line “nameserver [DNS server IP address]”. If you’re using a graphical user interface, then you can also edit it using the network settings utility menu.

    Flushing the DNS Cache

    If you’re facing this problem on one particular device, then you can probably resolve it by flushing the cache. Doing so will remove all the stored DNS entries and force your computer to fetch new records from the authoritative server. Here’s how you can do this on different systems:

    1. Windows: Open Command Prompt as an administrator and type “ipconfig /flushdns”.
    2. macOS: Open Terminal and type “sudo killall -HUP mDNSResponder”.
    3. Linux: Open Terminal and type “/etc/init.d/nscd restart”.

    Resetting the Chrome Flag Settings

    If you’re using a custom built version of Chrome, or have enabled specific experimental flags, then you can expect some occasional abnormal behavior and errors. Reset your browser settings and turn off all experimental features to make sure your browser is not causing any issues.

    In Google Chrome, you can do this by going to chrome://flags/, and clicking on “Reset all to default”.

    Disable your VPN

    A VPN (Virtual Private Network) is a service that allows you to connect to the internet via a server run by a VPN provider. All data traveling between your device and the VPN server is encrypted so that only you and the server can see it.

    When you use a VPN, all your DNS queries travel along the encrypted tunnel between your device and the VPN server, offering greater privacy; however, this can sometimes cause errors such as DNS_PROBE_FINISHED_NXDOMAIN.

    For instance, if the VPN’s DNS server is not responding properly, or if there’s a mismatch between the VPN’s DNS server and your device’s DNS settings, you might see an error.

    To resolve this issue, you can check your VPN settings – look for any settings related to DNS and see if you can change them. For example, some VPNs allow you to choose between using their DNS servers or using the default DNS servers provided by your ISP.

    If changing these settings doesn’t resolve the issue, consider disabling the VPN temporarily to see if that fixes the problem. If the error disappears when the VPN is disabled, it’s likely that the VPN’s DNS servers were causing the issue.

    Conclusion

    In this article, we’ve covered the DNS_PROBE_FINISHED_NXDOMAIN error, a common issue that can occur when browsing the internet. This error is often related to DNS settings, and can be caused by various factors such as incorrect DNS configuration, network issues, or VPN settings.

    We’ve explored several solutions to the DNS_PROBE_FINISHED_NXDOMAIN problem, including checking your DNS settings, resetting your IP and DNS cache, and troubleshooting potential issues with your VPN.

    Managing websites and servers can be challenging, and dealing with cryptic error messages is certainly not fun.

    At RunCloud, we have made it our mission to make managing web servers easier so that our customers don’t encounter such problems in the future.

    Start using RunCloud today and discover how it can significantly speed up your workflow.

  • MariaDB vs MySQL – A Detailed Comparison & How You Should Choose

    MariaDB vs MySQL – A Detailed Comparison & How You Should Choose

    MariaDB and MySQL – which one should you choose?

    Both are widely used for different applications in web development, and so in this post we will provide a detailed analysis and comparison of both MySQL and MariaDB to help you decide which one is better suited for your needs.

    Let’s dive right in!

    What is MySQL?

    MySQL is a widely used open-source relational database management system (RDBMS) developed by MySQL AB, now owned by Oracle Corporation. It stores data in a structured format using rows and columns, making it easy for users to create, manage, and manipulate databases.

    MySQL is renowned for its reliability, scalability, and ease of use, as it is compatible with many programming languages, frameworks, and tools, offering connectors and APIs for popular languages such as PHP, Python, Java, and more.

    Suggested read: How to Change/Reset MySQL Root Password on Ubuntu Linux?

    Pros & Cons of MySQL

    Pros:

    • MySQL is a free and open-source database which means you don’t need to pay anything to use it.
    • MySQL is compatible with most operating systems and programming languages which makes it versatile.
    • MySQL has a simple syntax and is easy to use.
    • It is scalable and capable of handling millions of rows.

    Cons:

    • MySQL is not very efficient in handling extremely large databases and it can slow down as the database grows over time.
    • It doesn’t have as good a developing and debugging tool as compared to paid databases.
    • MySQL is prone to data corruption as it is inefficient in handling transactions.

    Who Uses MySQL?

    MySQL is widely used in the software industry, and to illustrate this, here are a few interesting insights from the 2023 Stack Overflow Developer Survey:

    • 41% of all respondents use MySQL, indicating its widespread adoption across different user categories.
    • 40.5% of professional developers use MySQL, highlighting its importance in the professional coding and development community.
    • Interestingly, 45% of those learning to code also use MySQL, suggesting its role as a fundamental tool for beginners in coding and database management.
    • Among those who have worked with MariaDB, another popular open-source database system, 5,290 respondents expressed a desire to work with MySQL.
    • MySQL is not only desired by 24% of respondents, but also admired by 50%, reflecting its reputation and popularity in the tech community.

    These statistics highlight MySQL’s significant role in both professional and learning environments, and its continued relevance in the ever-evolving tech landscape.

    Suggested Read: How To Properly Backup Your Website (Disaster Recovery) with RunCloud

    What is MariaDB?

    MariaDB is another popular open-source RDBMS developed by the original creators of MySQL due to concerns over its acquisition by Oracle Corporation. MariaDB is designed to maintain high compatibility with MySQL, allowing it to function as a drop-in replacement in many cases.

    It is part of most cloud offerings (including RunCloud) and is the default in most Linux distributions. MariaDB is known for its speed, scalability, and robustness, with a rich ecosystem of plugins and storage engines making it versatile for a wide variety of use cases.

    Pros & Cons of MariaDB

    Pros:

    • MariaDB is a free MySQL clone with improvements such as faster speed and better replication.
    • It is open-source, easy to install, and reliable for business critical workloads.
    • MariaDB offers better query execution and is great for large data sets.
    • Switching to MariaDB from MySQL is a simple task.
    • MariaDB supports more storage engines compared to MySQL.

    Cons:

    • While MariaDB strives to maintain compatibility with MySQL, new features are diverging, which might cause issues for some applications.
    • MariaDB has a relatively smaller community compared to MySQL

    Who Uses MariaDB?

    MariaDB is used by a diverse group of individuals and professionals. Here are some key insights from the Stack Overflow Developer Survey 2023:

    • 17.61% of all respondents in the survey reported using MariaDB.
    • Among professional developers, the usage of MariaDB is slightly higher at 17.69%.
    • For those who are learning to code, 12.34% reported using MariaDB.
    • 5,813 of the total respondents who worked with MySQL expressed a desire to work with MariaDB.
    • MariaDB is desired by 11%, and admired by 53% of respondents.

    These statistics highlight the widespread use and appreciation of MariaDB in the developer community.

    Difference Between MariaDB vs MySQL

    MariaDB and MySQL are both open-source relational database management systems (RDBMS) that store data in a tabular format. Let’s see how they both differ from each other:

    CriteriaMariaDBMySQL
    OwnershipMariaDB is entirely open-source.MySQL is owned and distributed by Oracle. It has one fully open-source version and one paid enterprise version.
    LicensingMariaDB is fully licensed under GPL v2.MySQL is available under GPL or proprietary license.
    PerformanceMariaDB is often considered to excel as it provides enhanced speed and efficiency compared to MySQL.MySQL’s performance may be slower compared to MariaDB on some large databases.
    CompatibilityMariaDB is designed to maintain high compatibility with MySQL.MySQL is compatible with a wide range of systems.
    A table showing difference Between MariaDB vs MySQL

    Suggested read: How To Install phpMyAdmin Easily Using RunCloud

    MySQL vs. MariaDB: Which One Should You Choose?

    When it comes to choosing between MySQL and MariaDB, both share a common ancestry. However, they have distinct features and characteristics that can influence your decision.

    Let’s take a look at the key differences and help you make an informed choice:

    1. Licensing:

    • MySQL: Follows a dual-license approach. While the community edition is open-source under the GNU General Public License (GPL), the commercial version has a different license.
    • MariaDB: MariaDB is fully GPL licensed, emphasizing openness and community-driven development.

    2. Performance:

    • MariaDB: In many scenarios, MariaDB offers improved performance compared to MySQL. Benchmarks have shown that MariaDB can handle certain workloads more efficiently.
    • MySQL: While MySQL is reliable, some users find MariaDB’s performance enhancements appealing.

    3. Storage Engines:

    • MariaDB: Supports a wide range of storage engines, including InnoDB, Aria, TokuDB, and MyRocks. This flexibility allows you to choose the most suitable engine for your specific use case.
    • MySQL: Also supports various engines, but its default storage engine is InnoDB.

    4. Ecosystem:

    • MySQL: Oracle Corporation, the owner of MySQL, provides official support and services, which can be a critical factor for enterprises. For example, the MySQL Database Service allows database administrators to leverage existing Oracle Cloud Infrastructure user identities and group memberships for authentication into MySQL database service instances
    • MariaDB: Some tools and features specifically created for MySQL may not be fully supported in MariaDB.

    Suggested read: SQLite vs MySQL vs PostgreSQL (Detailed Comparison)

    Final Thoughts

    It’s clear that MySQL has an extensive and well-established ecosystem which is backed by Oracle providing a sense of security and reliability for enterprises, while MariaDB offers a strong alternative with its own set of features and community support.

    • If you value openness, performance, and community-driven development, MariaDB is an excellent choice as it provides a seamless migration path from MySQL and offers additional features.
    • However, if you have specific requirements or are already invested in the MySQL ecosystem, MySQL remains a solid option.

    Managing your own server infrastructure can be tedious and time-consuming – why not leave it to the experts?

    With RunCloud, you can manage and deploy your web applications with a single click, without any hassle – you don’t need to be a Linux expert to manage your servers. RunCloud gives you the time to focus on what you do best, while we handle the server management for you.

    Start using RunCloud today and experience the ease of stress-free server management.

    FAQs – MariaDB vs MySQL

    Why is MySQL replaced by MariaDB?

    The original developers of MySQL created MariaDB to ensure the preservation of MySQL’s structure and features after it was acquired by Oracle Corporation.

    Which One to Use for WordPress MariaDB or MySQL?

    While both MariaDB and MySQL are suitable for WordPress, many WordPress hosting providers offer MariaDB as a database option by default as it includes many improvements and optimizations over MySQL, especially in performance and scalability.

    Do people still use MySQL?

    Yes, MySQL is still widely used by a wide range of websites and applications, including household brands such as Spotify, Netflix, Facebook, and Booking.com.

    Is there a workbench for MariaDB?

    Yes, MySQL Workbench, an application for database design, development, maintenance, and testing for several database systems, can also connect to MariaDB.

    How secure is MariaDB?

    MariaDB secures data at every layer – from encrypted communication and storage, to pluggable authentication and role-based access control. It also has an advanced database proxy with a built-in firewall to detect and prevent data breaches by blocking queries and masking sensitive data.

    Is MariaDB a NoSQL database?

    While MariaDB is primarily an SQL database, it does have some NoSQL capabilities, including the NoSQL protocol module that allows a MariaDB server or cluster to execute transactions for applications using MongoDB client libraries.

    Can I use MariaDB on Windows?

    Yes, MariaDB can be installed and used on Windows.

    Is MariaDB suitable for big data?

    Yes, MariaDB is suitable for big data as it supports various storage engines that enhance its performance compared to other databases for similar workloads.

    Why PostgreSQL over MySQL?

    PostgreSQL offers some advantages over MySQL, such as full compliance with the SQL standard, extensive support for NoSQL features such as JSON and hstore, and a powerful extension system that allows you to extend its functionality.

    Is MariaDB’s syntax the same as MySQL?

    Yes, MariaDB is a fork of MySQL, and was designed to be highly compatible with MySQL. It therefore uses the same SQL statements for querying and modifying data.