Creating a WordPress staging site is a vital way to test out changes to a website without risking any impact on your live site.
Whether you’re making changes to your theme, testing out a new plugin or configuration, or adding custom code, it is extremely easy for unexpected conflicts or misconfigurations to wreak havoc on a website, which can seriously impact your users’ experience.
Creating a copy of your website and running it in a testing environment is a safe way to test any changes you want to make to your live site without risking anything.
This tutorial will walk you through creating and using the One-Click WordPress staging site functionality on RunCloud without installing unnecessary WordPress plugins.
Let’s get started!
Creating a WordPress Staging Site
This section will explain how to create a WordPress Staging site without installing any additional WordPress plugins. Before you get started, make sure that you have a WordPress website connected to your RunCloud account.
Step 1: Accessing the WordPress Staging Menu
Open your RunCloud dashboard and navigate to the WordPress website where you want to create a staging environment. On this screen, click the “Staging” button in the left menu, which will bring up a new screen.
Click on “Get Started” to proceed with the process.
If you have installed WordPress manually, you might not see the staging button in the left menu. In this case, go to your web application’s “Settings” page and scroll to the “Stack” sub-section. Click on the “Web Application Type” dropdown menu and select WordPress.
Once you save the changes and refresh the page, you will see the staging button in the left menu.
Step 2: Creating Your WordPress Staging Site
In the Staging menu, you’ll see several options to create and configure your staging site.
First, you need to configure if you want to enable HTTP authentication for this site. Since the staging site is not meant for the public, enabling this functionality is a good idea.
Check the box next to Site Authentication and enter a username and password in the provided fields to enable this functionality.
Next, you must choose between using RunCloud’s free domain or your own domain/subdomain. RunCloud’s free domain is faster to set up and instantly accessible. A custom domain requires additional DNS configuration and propagation time. No matter what you choose, you always have the option to change your domain name later.
Finally, you should remember that search engines penalize sites if they post duplicate content. Since the staging site is a clone of the original site, enabling “Discourage Search Engine” is always recommended to prevent search engines from indexing your staging site.
Once you have configured the required settings, click the “Deploy Staging” button to start the creation process.
Step 3: Accessing Your WordPress Staging Site
Once the staging site is created, you’ll see a new web application in your RunCloud dashboard. In the following screenshot, we can see that the server contains two applications, and the staging site has a special ‘copy’ symbol next to its name to indicate that it is a staging site.
Click on the URL next to your site name to visit your staging site. If you enabled Site Authentication, enter the username and password you configured in the previous step. If a user doesn’t know the username and password, they will be shown a 401 unauthorized error message.
Step 4: Managing Your WordPress Staging Site
Once you are logged in to your staging site, you can treat it as a standard web application. You can change settings, test new themes, try out plugins, and make any other changes without affecting your production site.
If something goes wrong, you can either revert your changes by moving data from the production site to the staging site (as explained below) or delete the staging site and create a fresh copy with only a few clicks.
Step 5: Syncing Between WordPress Staging and Production
After you have tested the changes on your staging site, you can directly apply them on your live site without manually implementing every change. RunCloud provides a special Sync functionality that allows you to move data from the staging site to the production site without any headaches.
Here’s how you can move data between sites:
Navigate to the Sync/Merge options in the Staging menu.
Choose the sync direction: Click the arrows to flip the transfer direction.
Production to Staging: Update staging with the latest production data.
Staging to Production: Apply tested changes to your live site.
Select sync options:
Full sync
Migrate selected database tables only
Click the “Sync” button and confirm your choices in the popup.
Final Thoughts on WordPress Staging
In this post, we have highlighted the importance of creating a staging environment for your business-critical websites and shared steps for creating a staging environment for WordPress.
Creating and managing multiple sites, each with its own staging environment, can be challenging, but it doesn’t have to be. RunCloud offers a comprehensive solution for managing cloud servers with ease and efficiency.
RunCloud’s user-friendly interface makes it a powerful tool for developers looking to streamline their server management processes. Whether managing a single site or multiple projects, RunCloud provides the tools you need to deploy, manage, and scale your web applications confidently.
Try RunCloud today and experience the ease of creating and managing staging environments.
Of the top ten million websites, over 41% use WordPress.
Every single minute, there are 90,000 attacks on WordPress sites.
Every single week Google blacklists 70,000 websites due to security issues.
If you’re running a WordPress website, these statistics make startling reading and underline just how critical it is to take WordPress security seriously and keep up to date with the latest advice.
Fortunately, that’s what we’re going to do right now.
Securing your WordPress website is essential, but how can you achieve this effectively? This is where WordPress security plugins come in.
There are several WordPress security plugins that you can install to help you protect your website from online threats. Choosing a good plugin will keep your WordPress website safe and protect it from spammers and malware.
Let’s examine why it is crucial to secure your WordPress site, what you can do to keep it safe, and six of the best WordPress security plugins that will keep your site safe.
Do You Need To Secure Your WordPress Site?
No matter what the size of your site is: yes.
Keeping your website secure is vital. Spammers don’t see whether your site is big or small – they’re just looking for a way to infect your site with viruses and malware. Weekly, about 18 million websites get infected with malware. While the WordPress core software is very secure (as long as you keep it fully up to date), the themes and plugins you use can leave your website vulnerable.
If a virus, malware, or spammer successfully attacks your website, then it can:
Negatively impact your Google ranking
Access all your important and private information
Damage your website and brand reputation
Do severe damage to your online business
But if you install a security plugin on your website, then not only will it protect your website and keep it safe, but it will also:
Keep all your confidential website files safe
Detect and inform you whenever there is a security threat
A good WordPress security plugin should contain the following characteristics:
Real-time Malware Analysis: Google blacklists websites when its crawlers detect something harmful to the user, such as distributing malware. Many security plugins use heuristic analysis and signature-based detection to identify and eradicate malicious code.
Threat Monitoring: Security plugins should conduct continuous, unrestricted security scans and automated clean-up operations, periodically update their rules to adapt to evolving threats, and protect against cyber attacks.
Web Application Firewall (WAF): Many security plugins implement an intelligent traffic analysis system that checks HTTP/HTTPS requests in real time. Advanced plugins often use rule-based filtering and anomaly detection to preemptively block malicious payloads before interacting with WordPress.
Secure Login Authentication: Good WordPress security plugins deploy advanced brute force deterrence mechanisms, such as adaptive challenge-response systems (CAPTCHA) and configurable login attempt rate limiting. These configurations harden your website security and make it difficult for hackers to break in.
Single dashboard for Multi-site Security: WordPress sites often need maintenance and updates, which can take a great deal of time. When running multiple websites, there’s a possibility that you’ll be using a different combination of plugins and themes, which adds even more complexity to maintenance. Modern security plugins can track and update multiple WordPress websites from a single dashboard, which makes this task much more manageable.
Resource-Optimized Security Stack: This stack implements an event-driven architecture and asynchronous processing to deliver comprehensive protection with minimal computational overhead. It offers granular configuration options to fine-tune the balance between security depth and site performance.
Vulnerability Management: Good security plugins can execute automated vulnerability scans across the WordPress core, themes, and plugins. The scan findings are cross-referenced with real-time threat intelligence databases. If a vulnerability is detected, the plugin should notify the site administrator and take steps to prevent it from being exploited.
Let’s take a deep dive and examine some of the best WordPress security plugins you should seriously consider for your website.
Patchstack
Patchstack is one of the most trusted WordPress security plugins. It sets itself apart by tackling vulnerabilities head-on rather than just reacting to malware. Patchstack actively tracks and maintains a database of vulnerabilities, keeping you one step ahead of hackers.
One of its key strengths is its ability to detect and automatically fix vulnerabilities with “vPatches,” essentially patching vulnerabilities without requiring a plugin update. This is a game-changer for website owners as it eliminates the need to wait for developers to release updates and provides immediate protection.
What sets Patchstack apart is its dedication to open-source security. It is trusted by reputable white hat hackers in the WordPress community, and it partners with leading security researchers, hosting companies, and developers to ensure the entire WordPress ecosystem remains secure.
Patchstack also runs a managed Vulnerability Disclosure Program (mVDP), which helps developers comply with emerging security regulations and provides a standardized approach for handling vulnerability reports.
Pricing:
Patchstack offers three plans designed to cater to various user needs, from individual website owners to developers and businesses managing large website portfolios.
The “Community” plan is a free plan that offers basic vulnerability monitoring with a 48-hour early warning. This lets users understand Patchstack’s capabilities and assess its value before committing to a paid plan. However, key features such as vPatches and instant mitigation require the pay-per-site protection add-on, which costs $5/website/mo.
The “Developer” plan is priced at $89 per month (billed annually) and is specifically tailored for professionals building websites. It includes unlimited website protection, vulnerability detection, real-time protection, and software management, providing a robust and secure environment for development work.
The “Business” tier, priced at $459 per month (billed annually), is best suited for businesses managing a large volume of websites. It offers protection for up to 500 websites and enhanced features like vulnerability detection, real-time protection, and software management. This tier is ideal for businesses that need to deploy security at scale and ensure consistent protection across their entire online presence.
Sucuri
Sucuri is one of the most popular security plugins for WordPress and is trusted by over 800,000 websites. It offers an advanced WAF that can easily protect websites from DDoS attacks and other malicious threats. Moreover, Sucuri’s WAF blocks attacks and optimizes your website’s performance by reducing load times and enhancing availability.
It also features Security Activity Auditing, which meticulously tracks and logs significant security events and provides a detailed historical record of changes and potential threats. Additionally, you can use File Integrity Monitoring to ensure your website’s files remain untouched by unauthorized modifications. This can also alert you to potential malware or hacking attempts.
Sucuri also implements effective security hardening and strengthens your WordPress site’s security by applying recommended configurations. Finally, in the unfortunate event of a security breach, Sucuri provides post-hack security actions and offers guidance and tools to help clean up your website and restore its integrity.
Pricing:
The Basic plan costs $199.99/year and is suitable for bloggers and small site owners who need occasional malware cleanup and continuous security scans. The pro plan costs $299.99/year and offers advanced support for SMBs.
The Business Platform, priced at $499.99/year, prioritizes speed with rapid malware cleanup and frequent scans for vulnerability detection. Additionally, the Junior Dev subscription, priced at $999.98/year, caters to freelancers, web professionals, and agencies managing 2-5 websites.
Wordfence is a robust and comprehensive security solution for WordPress websites. It has over 5 million active installs on WordPress.org and has earned its reputation as the most popular firewall and security scanner. It offers a robust firewall, malware scanner, and login security features, all powered by its Threat Defense Feed, which ensures constant updates for maximum protection.
Wordfence offers advanced features such as real-time firewall rules and malware signatures, a real-time IP blocklist, and a powerful central management dashboard for multiple sites. With its user-friendly interface, detailed security assessments, and ongoing updates, Wordfence is an invaluable tool for any WordPress website owner seeking to safeguard their online presence.
Pricing:
Wordfence offers a free version that provides essential security features such as a firewall and malware scanner, but with a 30-day update delay. For enhanced protection, you can use the $119/year “Industry Leading Firewall” plan, which offers real-time updates, country blocking, a dynamically updated IP blocklist, and premium customer support.
The $490/year “Real-Time Threat Intelligence” plan is suitable for busy business owners as it offers managed installation, configuration, optimization, and monitoring, including unlimited incident response. For mission-critical websites that demand the highest level of security, the $950/year plan provides 24/7 incident response with a 1-hour response time and a 24-hour resolution guarantee.
All-In-One Security (AIOS), is a user-friendly WordPress security plugin that packs a punch. It provides a comprehensive suite of features, many of which are free, making it accessible to a wide range of users.
AIOS protects your website from brute force attacks and bots with its Login Security suite, while its Web Application Firewall shields you from malicious traffic and exploits. The plugin can enhance your site’s security by preventing spam comments and content theft through features such as iFrame prevention and copywriting protection.
Its flexible Two-Factor Authentication (TFA) offers granular control for enhanced security. For example, you can configure TFA to be mandatory for specific user roles, require it after a set period, or adjust how often it’s needed for trusted devices. The plugin also incorporates anti-bot protection, allows you to customize the TFA design, and provides emergency codes for access when your device is lost.
Additionally, AIOS Premium’s Smart 404 Blocking automatically and permanently blocks bots that generate excessive 404 errors, protecting your website from malicious activity. You can monitor these blocks through handy charts that provide insights into the frequency and origin of 404 errors.
Pricing:
As the name suggests, the free plan is completely free to use. However, you can opt for a premium plan, which starts at $70.00/year and offers protection for two websites.
Solid Security
Solid Security Pro is a robust WordPress security plugin that protects your site and business from common vulnerabilities. It offers a comprehensive suite of features such as enhanced login security, vulnerability scanning, and brute force attack prevention. The plugin allows you to set custom login requirements, enforce strong passwords, and enable two-factor authentication or passkeys to eliminate weak credentials.
SolidWP Security goes beyond traditional two-factor authentication methods by embracing cutting-edge technologies for a more seamless and secure login experience. You can log in using Apple Face ID, Apple Touch ID, Windows Hello, or passkey technology (WebAuthn). This flexibility increases security and ensures a smooth login process across different devices.
SolidWP also integrates with popular CAPTCHA providers such as Cloudflare Turnstile, Google reCAPTCHA, and hCaptcha to offer robust protection against automated attacks. You can even utilize YubiKeys or Trusted Platform Module (TPM) devices for enhanced physical security. This comprehensive approach to two-factor authentication ensures that your website remains secure while providing users with convenient and reliable access options.
Pricing:
Solid Security Pro starts at $99 per year for a single site. However, there are discounts for bulk purchases. You can choose a plan that suits your budget and the number of websites you need to protect.
Which WordPress Security Plugin Is Right For You?
It’s never going to be a one-solution-fits-all when it comes to security. But having said that, it doesn’t matter whether your website is a small business site run by you alone or a medium or even large business with hundreds of employees. Security is a non-negotiable must.
A free plugin such as All-In-One Security or Wordfence might be sufficient for basic protection if you’re a small business owner or individual managing a single website. However, if you manage multiple websites or require more advanced features like real-time protection, vulnerability patching, and managed support, paid plugins such as Patchstack or Solid Security Pro offer comprehensive solutions.
Ultimately, consider your website’s size, traffic volume, and the level of security you require to determine the ideal plugin for your needs.
Let us know in the comments below if you have any questions or recommendations, and which security plugin you prefer!
Final Thoughts
We hope this guide has given you a clearer understanding of the various WordPress security plugins available and helped you identify the best fit for your website. Remember, choosing the right plugin is only the first step. Securing your WordPress website goes beyond a single plugin; it requires a holistic approach.
One crucial element of WordPress security often overlooked is choosing a secure hosting provider.
RunCloud is the best WordPress hosting provider because it offers advanced security features out of the box. When you manage your WordPress website with RunCloud, you can use robust solutions such as the ModSecurity firewall, Fail2ban, and access control lists in Redis without getting into technical details.
Ready to take your WordPress security to the next level? Sign up for RunCloud today and experience the difference a genuinely secure hosting platform can make.
FAQs on WordPress Plugin Security
What are the top WordPress security plugins recommended for 2024?
The top WordPress security plugins for 2024 include Patchstack, Sucuri, All In One WP Security. These plugins offer comprehensive security features and have consistently received positive reviews from users and experts.
How do security plugins protect my WordPress site?
Security plugins protect your WordPress site through various methods, including firewalls, login protection, and regular security audits. They also often provide features like two-factor authentication, file integrity monitoring, and protection against brute force attacks.
Are security plugins compatible with the latest version of WordPress?
Yes, reputable security plugins are regularly updated to maintain compatibility with the latest WordPress versions. It’s crucial to keep WordPress and your security plugins up-to-date to ensure optimal protection and compatibility.
Do I need to use all six plugins, or is one sufficient for adequate security?
Using one comprehensive security plugin is sufficient for adequate protection. Using multiple security plugins can lead to conflicts and potentially slow down your site, so choosing one robust solution that meets your specific needs is often better.
Are there any free options among the best WordPress security plugins?
Yes, many top WordPress security plugins offer free versions with basic features. For example, Patchstack, Sucuri, and All In One WP Security have free versions, though premium versions typically offer more advanced features.
How often should I update these security plugins?
You should update your security plugins as soon as new versions are released, typically every few weeks to months. Enabling automatic updates can protect you against the latest security threats.
Can security plugins slow down my WordPress site’s performance?
While security plugins can potentially impact site performance, most modern security plugins are optimized to minimize their impact. The slight performance trade-off generally outweighs the security benefits, but you can often adjust settings to balance security and performance needs.
Do you develop Laravel projects regularly? If so, you might eventually forget what version you used while developing the application.
Whether you’re a seasoned developer or just starting with Laravel, knowing how to quickly and accurately determine your project’s version is essential.
This comprehensive guide will walk you through various methods to check your Laravel version using the command line interface (CLI). We’ll cover several applicable techniques across different operating systems and environments to ensure you can access this vital information regardless of your development setup.
By the end of this article, you’ll be equipped with multiple reliable ways to find your Laravel version, enabling you to make informed decisions about updates and troubleshooting.
Let’s dive in!
What is Laravel?
Laravel is a powerful, open-source PHP web application framework designed to make web development more efficient and enjoyable. It offers a wide range of built-in tools and libraries that simplify common tasks such as routing, authentication, caching, and database management.
Method 2: How to Check the Laravel Framework Application File
1. Locate the composer.json File
Find the composer.json file in your Laravel project’s root directory. RunCloud users can access the source code of their web applications directly from the RunCloud dashboard using a user-friendly interface. Click “File Manager” on the left menu and select the file you want to open.
2. Open the composer.json File
Open the composer.json file using a text editor of your choice.
3. Find the Laravel Version Information
Look for the “require” section in the composer.json file. You’ll find the Laravel framework version listed there like this:
"require": {
    "laravel/framework": "^8.0"
}
Alternatively, you can use command line utilities such as grep to filter and view the file’s contents. For example, you can run the following command to view the Laravel version:
After adding the above code snippet, save and close the file. Remember, if you are using RunCloud, you can easily edit your website’s source code via the dashboard.
2. Access the Route in a Browser
Visit http://your-app-url/laravel-version in your web browser. You’ll see the Laravel version displayed.
3. Remove the Route After Use
For security reasons, remember to remove this route after checking the version.
As we’ve explored throughout this guide, Laravel is a powerful and versatile framework that offers numerous methods to check and manage its version. While Laravel provides excellent tools for development, managing Laravel applications in production environments can sometimes be challenging.
This is where RunCloud comes in to simplify your Laravel deployment and management processes.
Quickly deploy Laravel applications with just a few clicks.
Automatically configure your server for optimal Laravel performance.
Manage multiple Laravel versions across different projects.
Automate Laravel updates and maintenance tasks.
Monitor your Laravel applications’ health and performance.
Implement robust security measures to protect your Laravel sites.
Using RunCloud, you can focus more on developing your Laravel applications and less on server management and deployment intricacies.
Whether you’re a solo developer or part of a larger team, RunCloud streamlines your workflow and enhances your productivity.
Ready to Simplify Your Laravel Management?
Don’t let server management complexities slow down your Laravel development. Sign up for RunCloud today and experience the ease of managing your Laravel applications in a user-friendly, efficient environment.
FAQs on Laravel
Which Laravel version is best?
The best Laravel version depends on your project’s specific needs, but generally: For new projects: Use the latest stable version for the most up-to-date features and security updates. For long-term projects: Consider using the latest LTS (Long Term Support) version for extended support and stability.
Is Laravel outdated?
Actually, Laravel is still relevant. It’s actively maintained and regularly updated, and follows a consistent release schedule: Major versions are released annually. Frequent minor releases and patches throughout the year. The framework evolves with modern PHP practices and web development trends.
Is Laravel frontend or backend?
Laravel is primarily a backend framework, but it offers tools for frontend development as well: Backend: Laravel is a PHP framework for server-side logic, database interactions, and API development. Frontend support: Blade templating engine for server-side rendering Laravel Mix for asset compilation Inertia.js integration for building single-page apps Vue.js and React support out-of-the-box While Laravel excels in backend development, it provides seamless integration with various front-end technologies, making it a versatile choice for full-stack development.
Which framework is better than Laravel?
The “best” framework depends on specific project needs, team expertise, and personal preferences. Some frameworks often compared to Laravel include: Symfony: More modular, suitable for large, complex applications. CodeIgniter: Lighter and faster for smaller projects. Yii: Known for its performance and security features. Zend/Laminas: Enterprise-level framework with a steep learning curve. Lumen: Laravel’s micro-framework for microservices and APIs. Laravel stands out for its elegant syntax, robust features, and excellent documentation. It’s particularly strong in rapid application development and developer-friendly features.
How do I install a new version of Laravel?
To install a new version of Laravel, use Composer to create a new Laravel project: composer create-project –prefer-dist laravel/laravel project-name After installation, navigate to your project directory and set up your environment.
What is Laravel’s latest version?
Laravel 11, released in March 2024, is the latest version as of September 2024. Laravel typically releases major versions annually, so it’s always a good idea to check the official Laravel website or GitHub repository for the most current information.
Do I need to install PHP before Laravel?
Laravel is a PHP framework, so PHP is a prerequisite and must therefore be installed first. Install PHP on your system before installing Laravel. Ensure your PHP version meets Laravel’s requirements. For Laravel 11, PHP 8.2+ is required. Additional PHP extensions (such as OpenSSL, PDO, Mbstring, Tokenizer, XML, Ctype, JSON) may be needed. Install Composer, the PHP dependency manager used to install Laravel. After setting up PHP and Composer, you can proceed with Laravel installation.
If you’re involved with managing servers, then you’ll already be aware of how little servers offer as far as user interfaces are concerned. Most of the work necessitates the use of the command line interface.
When monitoring servers, you often need to track multiple things simultaneously, such as disk usage, network, CPU temperatures, etc. While all of this information is best presented in a dashboard interface, many creative people have developed makeshift dashboards in the CLI that display information about your system as if you were using a graphical user interface.
By the end of this article, you will be able to use ps, top, htop, and atop, which are some of the most powerful command-line utilities that provide deep insights into system behavior.
Each tool has its strengths, and system administrators often combine them to get a comprehensive view of their systems.
Let’s get started!
The ps Command
The ps command is short for “process status”. It is a fundamental tool in Linux for viewing information about active processes.
The basic syntax for using the ps command is:
ps [options]
When run without any options, ps typically shows:
The processes associated with the current terminal session
The ps command shows useful information, but you can use advanced options and flags to change its default behavior. Here’s a list of some of the possible options:
-e or -A: Show all processes
-f: Full format listing, providing more details
-u username: Show processes for a specific user
-p pid: Show information for a specific process ID
–sort=[+|-]key: Sort the output. Use + for ascending, – for descending
-o format: Customize the output format
Examples of ps Command Usage
The ps command is very flexible. You can mix and match the above flags to produce the desired output. For example:
List all processes: ps -e
Full format listing of all processes: ps -ef
Show processes for a specific user: ps -u username
Display processes sorted by CPU usage: ps -eo pid,ppid, cmd,%cpu,%mem --sort=-%cpu
The top command is a real-time system monitoring tool that provides a dynamic, interactive view of a Linux system’s running processes. It displays system summary information and a list of processes or threads currently managed by the Linux kernel.
You can run the top command by executing the following in your terminal:
top
This command launches the top interface, which refreshes by default every 3 seconds.
Understanding the top Interface
The top interface is divided into two main sections presenting different information. Here’s is a quick overview of both sections:
The top command also offers various flags and options that allow you to customize its behavior and output. Here are some of the most useful ones:
-b (Batch mode): This runs top in batch mode, which is useful for sending output to other programs or a file.
-n (Number of iterations): This parameter specifies the number of iterations before the top exits. It is useful in scripts or when capturing a specific number of samples.
-p (Monitor specific PIDs): Shows only the processes with the specified PIDs.
-u (Show specific user’s processes): Displays only the processes the specified user owns.
-H (Show threads): Shows individual threads instead of processes.
-o (Sort field): Sorts the process list by a specific field (e.g., CPU usage, memory usage). For example, top -o %CPU
–i (Ignore idle processes): Does not display idle or zombie processes.
-c (Show command line): Displays the full command line for each process instead of just the command name.
-d (Delay time): Sets the delay between updates (in seconds). The default is 3.0 seconds.
These flags can be combined for more specific outputs. For example, the following command will run top in batch mode for five iterations, sorts by memory usage, shows only the root’s processes, and sends the output to a file:
top -b -n 5 -o %MEM -u root > top_output.txt
Remember, you can also interactively use many of these options by pressing the corresponding key while top is running. For instance, pressing ‘h‘ toggles the thread view, ‘i‘ ignores idle processes, and ‘c‘ toggles the command line display.
The htop Command
htop is an interactive process viewer for Unix systems, designed as an enhanced alternative to the top command. It offers several advantages over other process viewers:
User-friendly interface: Colorful and more intuitive than top.
Mouse support: The mouse can be used to select and interact with the terminal.
Tree view: Visualize process relationships.
Easier process management: Kill processes without entering their PID.
Built-in meters: Includes built-in CPU, memory, and swap usage meters.
Installing htop
htop is typically not pre-installed on most systems. Run the following command with the necessary permissions on your Ubuntu/Debian systems to install it:
sudo apt update && sudo apt install htop
After installation, you can launch htop by simply typing htop in the terminal.
The htop interface is divided into two main sections:
Header (top) section shows system-wide stats and meters
CPU usage (per-core and overall)
Memory usage
Swap usage
Tasks, load average, uptime
Process list (bottom) shows detailed information about each process
The htop interface can be overwhelming at first glance, but once you learn to navigate it, you’ll get detailed information about your system with only a few key presses. Let’s see some keyboard actions and what they do on htop interface:
Up/Down arrows: Move through the process list
Left/Right arrows: Scroll horizontally for wide columns
Like other command line utilities, you can pass some flags to htop to customize its output and display. For example, here is a list of commands with their corresponding effect@
htop -t: Start in tree view
htop -u username: Show only processes of a specific user
htop -p PID1,PID2,...: Show only specified processes
The atop Command
atop (Advanced Top) is a powerful, interactive monitor that allows users to view the load on a Linux system. It shows the status of the most critical hardware resources (CPU, memory, disk, and network) at a system level. It has several unique features that set it apart from other monitoring tools:
Persistent logging: atop can write snapshots to a log file for long-term analysis.
Resource-specific views: It has dedicated screens for CPU, memory, disk, and network details.
Cumulative reporting: It can show resource consumption since the system boot.
Process accounting: It can also track short-lived processes that might be missed by interval sampling.
atop is not pre-installed on most systems. You can run the following command to install it on most Ubuntu/Debian distributions:
sudo apt update && sudo apt install atop
After installation, the atop service typically starts automatically for continuous logging.
To view the atop interface, simply type atop in the terminal. This will open up a new screen where you will see the following information:
System-level information:
Date, time, uptime, and number of systems
CPU statistics (user, system, idle, wait, etc.)
Memory and swap usage
Disk I/O statistics
Network statistics
Process-level information:
PID: Process ID
SYSCPU: System CPU time
USRCPU: User CPU time
VGROW: Virtual memory growth
RGROW: Resident memory growth
RDDSK: Disk read activity
WRDSK: Disk write activity
ST: Process state
EXC: Exit code
CMD: Command name
atop is a powerful tool, and you can enjoy its powers once you learn to navigate it. Here’s a list of some of the basic commands that you can try to get started with atop:
t: Show detailed system and process statistics for one specific interval
c, m, d, n: Toggle between CPU, memory, disk, and network-specific views
v: Show program version info
z: Show only active processes (hide idle processes)
1: Show average-per-CPU utilization
P, M, D: Sort by CPU, memory, or disk activity, respectively
Final Thoughts: Simplifying System Monitoring with RunCloud
This post has covered some of the most common system monitoring tools for Linux servers. While command-line tools provide powerful and flexible monitoring capabilities, they still require a certain level of expertise to use effectively. Moreover, if you manage multiple servers or want a more user-friendly interface, these tools might not be enough for you.
This is where RunCloud comes into play. RunCloud’s dashboard simplifies server monitoring and management, making it accessible even to those without deep Linux expertise.
Here’s how RunCloud enhances your monitoring experience:
Centralized Monitoring: Instead of logging into each server individually, you can monitor all your servers from a single dashboard.
User-Friendly Interface: RunCloud presents complex system information in an easy-to-understand graphical interface, eliminating the need to interpret command-line output.
Disk Usage Monitoring: Easily track disk usage across all your servers, helping you prevent disk space issues before they become critical.
Slow Script Detection: RunCloud can identify slow-running scripts, a feature that typically requires setting up additional monitoring tools on your servers.
Alerts and Notifications: Set up custom alerts for various metrics to notify you immediately of any issues.
Have you ever found yourself scratching your head, wondering why your buddy can’t access your site while you can access it just fine?
Chances are, your Fail2Ban rules might have blocked them. Don’t worry, we’ve all been there!
In this guide, we’ll explain Fail2Ban and how it works under the hood. This information will help you confidently navigate the server configuration to modify and unban specific IP addresses.
I know what you’re thinking: “Ugh, sounds like a tech nightmare!” But hold your horses! We’re not just going to throw a bunch of command-line gibberish at you. Nope, we’ve got a secret weapon that’ll make managing Fail2Ban as easy as ordering pizza online.
Ready to dive in?
What is Fail2Ban?
Fail2Ban is an open-source intrusion prevention software framework for Linux systems. It monitors system logs and responds to malicious activities by blocking IP addresses. You should note that Fail2Ban alone can’t protect your servers; it is typically used with iptables or similar firewalls to block traffic from banned IP addresses.
Here’s why you should use Fail2Ban on your server:
It prevents brute-force attacks
It reduces server load from persistent attack attempts
It protects multiple services (SSH, web servers, mail servers)
It allows for custom rule creation to address specific threats
It integrates with existing firewall systems
How Does Fail2Ban Work?
There are several components in a Fail2Ban module that help in protecting your server.
Log Monitoring
Fail2Ban continuously monitors specified log files to identify patterns that indicate potential attacks. Fail2Ban triggers automated responses to mitigate security risks when such patterns are detected.
Furthermore, Fail2Ban runs as a background daemon and consumes minimal system resources, allowing configuration reloading without requiring a full restart. Importantly, Fail2Ban maintains its state across system reboots, ensuring consistent protection even after server restarts.
Jail System
Fail2Ban organizes its rules using a “jail” concept where each jail corresponds to a specific service, such as SSH or Apache. Within these jails, Fail2Ban combines filters and actions. Filters define patterns to detect in system logs, identifying potential threats or malicious behavior.
When triggering a filter, Fail2Ban responds with predefined actions, such as blocking the offending IP address. This modular approach allows Fail2Ban to adapt to various services and efficiently protect against unauthorized access and attacks.
Configuration Structure
Fail2Ban uses a hierarchical configuration system to protect against unauthorized access and attacks efficiently. Let’s see how it works:
jail.conf: This is the default configuration file.
jail.local: Administrators can override the default settings here to tailor them to their needs.
filter.d/*.conf: These files define log parsing rules. They specify patterns to detect in system logs to identify potential threats or malicious behavior.
action.d/*.conf: These files specify actions for rule violations. Fail2Ban responds with predefined actions when a filter triggers, such as blocking an offending IP address.
Pattern Matching
Fail2Ban uses regular expressions (regex) for log analysis. This allows it to efficiently identify complex patterns within log files, including IP addresses and timestamps. It also provides customization by supporting user-defined regex for unique log formats.
Beyond static rules, Fail2Ban dynamically adapts to real-time scenarios. You can configure it to lift bans on IP addresses after specified durations automatically. This ensures that legitimate users regain access if they were accidentally blocked. For repeat offenders, Fail2Ban can escalate ban durations to strengthen security measures. Additionally, you can synchronize the list of offending IPs across multiple servers to enhance the overall protection of your network.
How to Unban an IP in Fail2Ban?
Sometimes, you might need to unban an IP address that Fail2Ban has blocked. Here’s how to do it:
Step #1: List all Banned IPs in Fail2Ban
Fail2Ban stores a list of all the IPs currently banned from connecting to your server. Run the following command to see all active jails on your server:
sudo fail2ban-client status
This command shows all active jails. To see banned IPs for a specific jail (e.g., sshd), you can run the following command:
sudo fail2ban-client status sshd
In the above example, don’t forget to replace the sshd with the name of the jail that you want to analyze.
In the above example, you can see the list of all the IP addresses that were banned from connecting to this server. This command can help you identify whether one of your colleagues’ IP addresses was accidentally banned.
Step #2: Unban Specific IP in Fail2Ban
If you find that Fail2Ban banned your IP address, you can either wait for Fail2Ban to unban it or remove it automatically. An offending IP address is banned for 10 minutes by default, but server administrators can extend or reduce this.
However, if you don’t want to wait for the IP address to be automatically removed from the block list, then you can manually log in to your server and run the following command:
sudo fail2ban-client set JAIL unbanip IP_ADDRESS
In the above command, replace JAIL with the specific jail name (e.g., sshd) and IP_ADDRESS with the IP you want to unblock. For example:
sudo fail2ban-client set sshd unbanip 192.168.1.100
The following example shows that the offending IP was found in the block list once. Therefore, the server returned 1 as the output.
This functionality can be handy if you frequently perform security tests on your site that result in your IP address getting banned. This command allows you to continue performing security tests without turning off the firewall or waiting for long periods.
However, there’s an even better way to do this.
Step #3: Whitelist Specific IP in Fail2Ban (optional)
If you have a static IP address or a corporate network where the list of IP ranges is fixed, you can whitelist these IP addresses. Once you add the addresses to the whitelist, these IP addresses will never get blocked, regardless of the number of failed attempts.
However, this can also be a security flaw if misconfigured. We strongly recommend only adding IP addresses belonging to your organization or company. Follow the steps below to prevent Fail2Ban from banning a specific IP in the future:
After opening the config file, you need to add the list of IP addresses to the ignoreip line. This will tell Fail2Ban to ignore these IP addresses in the future. By default, the 127.0.0.1/8 IP range is automatically whitelisted. If you want to add a specific IP, such as 192.168.1.100 then you can add this IP after it as shown below.
ignoreip = 127.0.0.1/8 ::1 192.168.1.100
Once you have added the IP addresses, you can save the file by pressing Ctrl + O, Enter, or Ctrl + X. After saving the file, you need to reload the Fail2Ban service to use the updated configuration. This is slightly faster than restarting the service, as it simply refreshes the configuration without shutting down the application.
sudo systemctl reload fail2ban
After making the changes, checking whether the service is up and running is always a good idea. Run the following command to see if your Fail2Ban service is running smoothly:
systemctl status fail2ban
In the following example, we can see that the service is showing the status of active (running), which means that changing the configuration files didn’t cause any unexpected problems with the Fail2Ban service.
How do you unban IPs in Fail2Ban with RunCloud?
RunCloud provides a user-friendly interface to manage Fail2Ban, making it easier to unban IPs. Here’s how you can do it:
Log in to your RunCloud dashboard and navigate to the server where you want to unban an IP.
Go to the “Security” tab and switch to the “Fail2Ban” section.
On this screen, you’ll see a list of banned IPs.
Click the “Delete” button next to the IP you want to unban. If there are too many IPs, you can filter out the IP addresses by using the search functionality.
Final Thoughts
Implementing strict Fail2Ban rules is necessary for protecting your servers from potential threats. A properly configured Fail2Ban instance can help you defend against various attacks. However, it’s essential to recognize that even well-configured systems can sometimes produce false positives, potentially blocking legitimate traffic.
This is why understanding how to unban IP addresses is essential. It lets you quickly restore access for legitimate users who may have been inadvertently blocked, maintaining security and accessibility.
While Fail2Ban is a powerful tool, its complexity can be scary, especially for those new to server management. This is where RunCloud shines.
RunCloud provides a user-friendly interface that simplifies Fail2Ban management, making it accessible to users of all experience levels.
With RunCloud:
You can easily view and manage banned IPs
Unbanning becomes a simple, one-click process
Complex configurations are streamlined through an intuitive interface
This approach is significantly more straightforward than using CLI commands directly on the server. RunCloud’s interface streamlines the entire process, allowing you to focus on your core tasks rather than getting bogged down in server management complexities.
Ready to Simplify Your Server Security?
If you want to enhance your server security without the steep learning curve, RunCloud offers the perfect solution. With its intuitive Fail2Ban integration, you can enjoy robust protection and easy management.
Add your IP to the ignoreip list in the Fail2Ban configuration file (/etc/fail2ban/jail.local). In RunCloud, you can do this through the web interface in the Fail2Ban settings.
Does a VPN bypass an IP ban?
VPNs can potentially bypass IP bans as they change your IP address. However, if the new VPN IP is also detected performing suspicious activities, it can get banned.
Is Fail2ban an IPS or IDS?
Fail2Ban is primarily an Intrusion Prevention System (IPS). It actively blocks potential threats based on log analysis rather than detecting and reporting them like an IDS.
How do I allow IP?
To allow an IP, add it to the ignoreip list in Fail2Ban’s configuration. In RunCloud, this can often be done through the web interface in the Fail2Ban or firewall settings.
How do I know if my IP is banned with Fail2Ban?
Check the Fail2Ban status using sudo fail2ban-client status or look in the banned IP list in RunCloud’s Fail2Ban section. If you can’t access the server, your IP might be banned.
What is the default block time for fail2ban?
The default block time varies but is often set to 10 minutes or 1 hour. In RunCloud, you can check and modify this setting in the Fail2Ban configuration section.
How can the permanent ban in Fail2Ban be bypassed?
To bypass a permanent ban, an administrator must manually unban the IP. If it’s your IP, you may need to contact your hosting provider or use a different IP to access the server and unban yourself.
Git gives you several ways to undo changes, but knowing which one to use can be confusing.
You might need to revert a single commit, restore a previous version, or completely reset your repository to an earlier state. Each command handles this differently.
This guide explains how git reset works, how it differs from git revert and git restore, and when to use each. It also walks you through the steps to safely return your repository to a previous commit using git reset.
Understanding Git Reset
Git reset is a versatile command that moves your current branch pointer to a different commit.
This action can:
Undo recent changes or remove specific commits.
Adjust what’s staged for your next commit.
Update your working directory to match an earlier point in your project’s history.
Because it can rewrite history, understanding how each reset mode behaves is critical before using it.
Git provides several ways to undo or modify changes, but each command serves a distinct purpose.
The table below highlights the differences between git reset, git revert, git restore, and git checkout, helping you choose the safest command for your situation.
Follow these detailed steps to perform a Git reset and restore your project to a previous commit:
Step 1: Find the Target Commit Hash with git log
First, you need to find the commit hash of the point you want to reset to. Open your terminal or command prompt, navigate to your Git repository, and use the following command to view your commit history:
git log
This command will display a list of commits, each with a unique hash, author information, date, and commit message.
Alternatively, you can view this commit history in your Git provider’s dashboard. Scroll through the list and find the commit you want to reset to. Note down the commit hash, which is a long string of letters and numbers.
Step 2: Choose the Correct Reset Mode
Git offers several reset modes, each with different effects on your working directory and staging area (see previous section).
Choose the mode that fits your goal. In this example, a mixed reset (the default) is used to unstage changes while keeping them in your working directory for review.
Step 3: Execute the git reset Command
Now that you’ve identified the commit and chosen the reset type, you can perform the reset. Use the following command, replacing <commit-hash> with the hash you noted earlier:
git reset <commit-hash>
This command will move your branch pointer to the specified commit and update your staging area. Your working directory will remain unchanged, allowing you to review the changes before committing them again.
Step 4: Review the changes
After performing the reset, it’s important to review the changes. Use the following command to see the status of your working directory:
git status
This will show you which files have been modified, added, or deleted since the commit you reset to. You can also use git diff to see the specific changes in each file.
Step 5: Commit the changes
Once you have reverted the changes, you can make modifications and edits to the files as you normally would.
If you’re satisfied with the reset and any restorations you’ve made, you can now commit these changes. First, add the files you want to include in the commit:
git add .
git commit -m "Reverted to previous state and restored specific files"
Step 7: Push the changes (if working with a remote repository)
If you’re working with a remote repository and want to update it with your reset changes, you’ll need to force push. Be cautious with this step, as it can overwrite the remote history:
git push --force origin <branch-name>
Replace <branch-name> with the name of your current branch (e.g., main or master).
Mastering Git reset gives you precise control over your project’s history — allowing you to cleanly adjust commits, recover from mistakes, and prepare your repository for deployment.
RunCloud takes that same precision into production with Atomic Deployments.
When you deploy through RunCloud, each release is packaged and deployed as a single, complete unit. If anything goes wrong, RunCloud automatically falls back to the previous version in seconds, protecting uptime and data integrity.
Combining Git proficiency with RunCloud’s Atomic Deployment system creates a seamless, reliable workflow: commit confidently, deploy instantly, and roll back safely whenever needed.
No, git reset does not delete new files. It only affects tracked files and the staging area, leaving untracked files untouched.
What is the difference between git reset and git restore?
git reset moves your branch pointer and can modify commit history, the staging area, or both, depending on the reset mode used. git restore only affects files in your working directory or staging area. It restores file content to match a specific commit without changing the repository history.
What is the difference between git reset and git reset hard?
git reset can be used in several modes (–soft, –mixed, or –hard), each controlling how much of your work is reset. git reset –hard is the most destructive option as it resets your branch, staging area, and working directory to match the target commit, permanently discarding all uncommitted changes in tracked files.
Is git reset local or remote?
git reset is a local operation. It only affects your local repository and does not modify the remote branch until you push changes. To overwrite the remote history after a reset, you would need to use git push –force, but this should be done with caution on shared branches.
Does git reset restore deleted files?
Yes. If a deleted file was tracked by Git, running git reset to a commit where that file existed will restore it. However, untracked files deleted outside of Git cannot be recovered this way.
What does git reset file do?
git reset removes the specified file from the staging area (the index) but leaves your working directory unchanged. This is useful if you accidentally added a file with git add and want to unstage it before committing.
Will git reset remove local changes?
Yes, but only when using the –hard option. git reset --hard resets both your working directory and staging area to match the specified commit, permanently removing all uncommitted changes in tracked files. Using git reset without –hard (e.g., –soft or –mixed) will leave your working directory changes intact.
Can I undo a git reset?
Yes. You can recover from a reset using git reflog. Run git reflog to view recent branch movements and find the commit reference for the state you want to restore. Then reset back to it using: git reset --hard <commit-hash>
Can I use git reset to remove commits from a remote repository?
By default, git reset only affects your local branch. If you’ve already pushed those commits to a remote, you’ll need to force-push to update the remote branch: git push --force origin <branch-name> Use this with care, as it rewrites history for anyone else working on the same branch.
As cyber threats evolve, we constantly hear new terms for attacks such as DoS, DDoS, and DrDoS, but many people find it confusing to understand the differences between them.
In this post, we will help you understand each type of attack, how they affect your network, and how they are different from one another.
We’ll also explain the basics of DoS and DDoS attacks, show how to detect and protect against them, and describe the unique features of DDoS attacks.
By the end of this article, you’ll have a clear view of how these attacks work and how you can protect your systems from them.
Let’s get started!
What is a DoS Attack?
A Denial of Service (DoS) attack is a malicious attempt to disrupt the normal functioning of a targeted server, service, or network by overwhelming it with a flood of internet traffic. The primary goal of a DoS attack is to render the target system inaccessible to legitimate users, effectively “denying service” to those who need it.
If you think DoS attacks are uncommon, you should know that Cloudflare, a popular cloud provider, reports that in 2023, they blocked 14 million DDoS attacks.
That’s not 14 million requests – it’s 14 million separate attacks, with each attack possibly consisting of hundreds of millions of malicious requests.
Types of DoS Attacks
DoS attacks come in various forms, each with its own method of overwhelming the target system:
Volume-Based Attacks: These attacks attempt to consume all available bandwidth of the target system.
Protocol Attacks: These exploit vulnerabilities in network protocols to exhaust server resources.
Application Layer Attacks: These target vulnerabilities in web applications and services.
Examples of DoS Attacks
SYN Flood
A SYN Flood attack takes advantage of the TCP handshake process by sending a large number of SYN requests to a server. These requests initiate a connection, but never complete it, exhausting the server’s resources. This overwhelms the server’s ability to process legitimate requests, potentially causing a denial of service.
Ping of Death
The Ping of Death attack involves sending oversized ICMP packets to a target system. When the target tries to reassemble these fragmented packets, buffer overflows can occur, resulting in system crashes or unexpected behavior. This exploit takes advantage of vulnerabilities in how systems handle large packets.
HTTP Flood
An HTTP Flood attack targets web servers by overwhelming them with a massive number of HTTP requests. By sending continuous and numerous requests, the attacker consumes server resources, potentially leading to slow performance or complete downtime. This type of attack mimics normal web traffic, making it difficult to detect and block.
Slowloris
The Slowloris attack maintains many open connections to a target web server, keeping each connection alive as long as possible. By sending partial HTTP requests, the server’s resources are tied up in trying to handle these incomplete requests, leaving fewer resources available for legitimate traffic. This method effectively disrupts server operations without requiring high bandwidth.
What is a DDoS Attack?
A Distributed Denial of Service (DDoS) attack is similar to a DoS attack as it also tries to overwhelm the target infrastructure with a flood of Internet traffic.
However, unlike a Denial of Service (DoS) attack, which uses a single computer and Internet connection, a DDoS attack uses multiple computers and Internet connections, often distributed globally in what is referred to as a botnet.
These botnets are distributed globally, making it extremely difficult to pinpoint and block the sources of the attack.
For example, Dyn suffered from one of the largest recorded DDoS attacks in 2016. The attack used the Mirai botnet, which consisted of numerous compromised Internet of Things (IoT) devices. By sending an overwhelming amount of traffic to Dyn’s servers, the attack disrupted major websites and online services, including Twitter, Netflix, and Reddit, causing significant outages across the United States and Europe.
Similarly, in 2023, security researchers found a vulnerability in the HTTP/2 protocol which allowed attackers to create very large DDoS attacks. This vulnerability lets attackers easily overload web servers, making websites slow or unavailable. Since this was a new kind of attack, numerous websites across the internet were disrupted due to traffic spikes.
A Distributed Reflection Denial of Service (DrDoS) attack, also known as a Reflected DDoS attack, is a more sophisticated form of DDoS attack.
In a DrDoS attack, the attacker spoofs the victim’s IP address and sends requests to a large number of reflectors (such as DNS servers or NTP servers). These reflectors then send their responses to the victim, overwhelming their network.
DrDoS attacks are particularly dangerous due to their amplification factor. A small amount of attack traffic can generate a much larger volume of attack traffic directed at the victim. This makes them both more difficult to trace back to the original attacker and more devastating in their impact on the target.
In 2021, Cloudflare stopped a huge DrDoS attack that reached almost 2 terabits per second (Tbps) by using its strong security systems. This attack used different methods, such as UDP floods and DNS amplification, to try to overwhelm the target’s network. Although this attack was unsuccessful, it was one of the biggest attacks observed to date and could have done serious damage.
Types of DrDoS Attacks
DrDoS attacks can be categorized based on the protocol or service they exploit:
DNS Amplification: This technique exploits DNS resolvers to send a large volume of DNS response traffic to a target. By sending small queries with a spoofed source IP address (the target’s address) to these resolvers, the attacker causes them to send amplified responses to the target, overwhelming it with traffic.
NTP Amplification: This type of attack Exploits Network Time Protocol (NTP) servers to flood a target with traffic. Attackers send crafted requests to NTP servers with the target’s IP address, which causes the servers to respond with a significantly larger volume of data.
SSDP Amplification: This method takes advantage of the Simple Service Discovery Protocol, commonly used by Universal Plug and Play (UPnP) devices, to overwhelm a target with traffic. Attackers send discovery requests to devices with the target’s spoofed IP address, which causes these devices to send their responses directly to the target, multiplying the traffic load.
Memcached Amplification: This approach uses improperly configured memcached servers to generate extremely large traffic volumes aimed at a target. By sending small requests with a forged IP address, attackers can cause the servers to respond with enormous payloads, massively amplifying the attack traffic directed at the target.
Difference Between DoS vs DDoS vs DrDoS
While DoS (Denial of Service), DDoS (Distributed Denial of Service), and DrDoS (Distributed Reflection Denial of Service) attacks all aim to disrupt services, they differ in their execution and impact.
Here’s a brief comparison:
Aspect
DoS
DDoS
DrDoS
Source
Single attacking system
Multiple attacking systems
Multiple intermediate systems
Scale
Generally smaller
Large scale
Potentially massive scale
Complexity
Simpler to execute
More complex
Highly sophisticated
Detection
Easier to detect and mitigate
More challenging to mitigate
Very difficult to trace and mitigate
Traffic Amplification
No amplification
No amplification
Significant traffic amplification
Example
SYN Flood from a single source
Botnet attacks from multiple sources
DNS Amplification attack
How to Detect DoS Attacks
Although researchers use advanced traffic monitoring and anomaly detection systems to reliably detect a DoS attack, there are several simple things that you can monitor to detect DoS attacks on your website:
A sudden spike in network traffic can indicate a DoS attack, as attackers flood the server with excessive requests to overwhelm its resources. Monitoring tools can help detect these abnormal traffic patterns and allow you to respond quickly before they affect service availability.
A noticeable slowdown in server response times may signal that the server is struggling to process a large number of incoming requests.
Unusual patterns in incoming requests, such as repeated access attempts from a single IP or strange request types, can indicate a DoS attack. Analyzing logs and traffic data can help identify these anomalies, allowing you to implement measures to block or filter out malicious traffic.
High CPU or memory usage on your server, especially during non-peak hours, can be a sign of a DoS attack. You can use server monitoring tools such as New Relic to track your resource usage.
Protecting Your Server with RunCloud
Setting up a secure server can be tough, but RunCloud makes it easy.
When you use RunCloud to create a new server, you immediately benefit from several security features automatically:
Fail2Ban: This tool helps prevent brute-force attacks by temporarily or permanently banning IPs that show malicious signs.
Auto-Updates: RunCloud automatically updates your server’s software and applies necessary security patches to protect it 24/7.
Firewall: RunCloud automatically closes unnecessary ports that hackers might try to use – this reduces the attack surface significantly. The firewall also protects your server from various attacks, including DoS attacks. Here’s what the WAF does:
Rate Limiting: Prevents a single IP address from making too many requests in a short time.
Request Filtering: Blocks requests that look suspicious or dangerous.
IP Blacklisting: Automatically blocks computers that show malicious behavior.
These features work together to keep your server safe in real-time. This means you can focus on your work without worrying about attacks.
Adding Custom Firewall Rules on RunCloud
If the default security settings are not enough for you, you can enhance your website’s security by adding custom firewall rules. This feature allows you to precisely control incoming traffic by filtering requests based on various parameters such as Cookie, Country, Hostname, IP Address, URI, and more. By configuring these rules, you can fine-tune your security settings to block or allow specific types of traffic.
For example, you might want to block traffic from certain IP addresses or countries, or allow requests only from specific hostnames.
To implement this, open your web application dashboard in RunCloud and then navigate to Firewall > Add Firewall Rule.
On this page, use the custom rule interface to set conditions like:
When incoming requests match…
Field: Hostname
Operator: equals
Value: e.g., example.com
Then…
Action: Allow, Block, or Disable Rule
Once you have modified the settings, you can click on “Save and Deploy Rule” to add this firewall rule to your server.
Want to learn more about how RunCloud keeps your server safe?
In our research for this article, which highlights how DoS and DDoS attacks can cause significant damage to websites and online services, we were shocked to discover that 1 in 25 Cloudflare survey respondents indicated that DoS attacks were carried out by state-level or state-sponsored threat actors.
By following the suggestions provided in this article, you can quickly detect and fend off many basic DoS attacks. However, if you need something more sophisticated, then you should sign up for RunCloud.
With RunCloud, you’re not just getting a control panel – you’re getting peace of mind.
You can sleep well at night knowing your server is in good hands. RunCloud is always working to keep your server safe, updated, and running smoothly.
DDoS attacks are generally considered more serious than DoS attacks. This is because they use multiple sources, making them harder to mitigate and potentially causing more severe disruptions due to their larger scale and complexity.
Are DoS attacks always intentional?
No, DoS attacks are not always intentional. While many are deliberate, some can occur due to configuration errors, unexpected traffic spikes, software bugs, or hardware failures that mimic DoS effects.
What is the difference between a brute force attack and a DoS attack?
Brute force attacks aim to gain unauthorized access by guessing passwords or encryption keys. DoS attacks, on the other hand, attempt to make a service unavailable by overwhelming it with traffic or exploiting vulnerabilities to exhaust system resources.
What is a DoS attack with an example?
A DoS attack attempts to make a computer or network resource unavailable to its intended users. An example is a SYN flood, where an attacker sends many SYN packets with spoofed IP addresses, overwhelming the server with half-open connections.
Is a DoS attack illegal?
Yes, in most jurisdictions, DoS attacks are considered illegal. They’re typically classified as a form of cybercrime under various laws such as the Computer Fraud and Abuse Act in the United States.
Can you stop DDoS attacks?
While it’s challenging to completely prevent DDoS attacks, their impact can be mitigated. Strategies include traffic analysis and filtering, bandwidth expansion, cloud-based protection, and using web application firewalls (WAF).
Does CAPTCHA prevent DoS?
CAPTCHA can help mitigate certain types of application-layer DoS attacks by preventing automated bot attacks. However, it’s not effective against network-layer attacks and should be used in conjunction with other security measures.
Can IDS prevent DOS attacks?
An Intrusion Detection System (IDS) can help detect DoS attacks but typically can’t prevent them alone. For effective prevention, IDS should be combined with other tools such as firewalls and intrusion prevention systems (IPS).
What is an example of a DDoS attack?
A notable example is the Mirai Botnet attack in 2016. It used a massive network of compromised IoT devices to launch a DDoS attack that caused widespread internet outages across North America and Europe.
If you build and manage multiple web applications, then you are probably already using Git to manage and track your source code.
Although Git is extremely useful in tracking the code, it can make the deployment process a little tricky, especially if you are working with a big team on a project with multiple branches.
In this post, we will share step-by-step instructions on how you can use RunCloud to deploy your Laravel applications and streamline your entire workflow.
Let’s get started!
Prerequisites
Before we get started, you need to make sure that you meet the following requrrements:
Log in to your RunCloud dashboard and click “Create Web App“.
Choose “Git Repository” as the installation method and select your Git provider.
Next you need to enter basic details such as the name of this application and the domain name that you want to use.
After that, you need to fill-in the basic details about your git repository such as the name of the repository and the branch that you want to use. Pay close attention to the capitalisation as it might cause errors at a later stage.
After entering the details, you will see a deployment key which was automatically generated by RunCloud for your server. Adding the deployment key to your Git Repository allows RunCloud to access the source code in this repository on your behalf.
Copy the provided deployment key and go to your Git provider’s dashboard and navigate to your repository’s settings.
Find the “Deploy Keys” or similar section and add the copied key. For step-by-step instructions, refer to the documentation post specific to your git provider.
Step 3: Deploy the Web Application
After adding the key, you can return to the RunCloud dashboard and click on the “Deploy” button to initiate the deployment process.
Wait for RunCloud to clone your repository and set up the initial files. This process usually takes less than a minute to complete.
Step 4: Set Up Webhooks
After you have deployed the web application on your server, RunCloud will generate a WebHook URL. This URL can be used to notify RunCloud when a new version of your application is available which is useful when you want to automatically deploy the latest version of your application.
In the RunCloud dashboard, navigate to the “Git” menu for your web app and copy the webhook URL provided by RunCloud.
Next, you need to go to your Git provider’s repository settings and find the “Webhooks” section. On this screen, create a new webhook and paste the RunCloud webhook URL. Make sure to set the content type to JSON, you can leave all other settings to their default values. After making the changes, save the webhook configuration.
RunCloud provides you a user friendly interface to edit the environment variables from RunCloud dashboard itself. But before you can access this interface, you need to make sure that the .env file exists in your repository.
In this tutorial, we are using a boilerplate template which comes with .env.example file, we will simply rename it to .env. You can do this by opening the File Manager for your web app and locating the .env.example file in your project root. After that, click on the checkbox next to it and click on rename.
If you don’t have an .env.example file, then you can simply create a new file named .env and leave it empty.
Step 6: Install Dependencies
Deploying an application to your RunCloud server merely clones the web application and configures the relevant settings. If you are using third party dependencies, then you will need to manually install them or create deployment scripts to automatically perform certain actions after the application is updated.
If you don’t want to configure deployment scripts right now, then you can manually log in to server via SSH and navigate to your project’s root directory. Here, you can run the necessary commands to install or remove dependencies. For example, to install composer dependencies, you can run the following command:
composer install
After installing the dependencies, you can also run the PHP artisan commands in this directory. For example, you can run php artisan key:generate to create new keys. However, later in this tutorial, we will show you a better way to do this.
Step 7: Configure Web Application Settings
After installing the dependencies, you need to tweak your application settings for it to work correctly. Firstly, you need to return to the RunCloud dashboard and go to your web app’s settings page. Here you will find the “Web Application Stack” section; in the “Public Path” field, add /public to change the publick path of your web application.
After creating the application, you can visit your web app’s URL to ensure it’s functioning correctly. Start by test key features of your Laravel application to verify proper setup. Next, we recommend you to make a small change in your Git repository and push it to test the automatic deployment via webhook. If the webhook was successful, you will see a corresponding entry in the “Webhooks History” section.
Step 9 (Bonus): Leverage RunCloud’s Laravel Management Features
Now, as we promised earlier, we will show you how to use RunCloud to manage your Laravel applications smoothly. After changing your web application stack, you will see a new “Laravel” section in the left menu, this unlocks a bunch of new features for you.
Firstly, you can easily view and update environment variables directly from the RunCloud dashboard. This eliminates the need for manually editing and updating .env files.
Next, you can run Artisan commands with a single click through the RunCloud interface and keep track of which command was executed in the log entries. This eliminates the need to log into your server which can be slow and tedious.
Finally, you can take advantage of RunCloud’s monitoring dashboard to keep track of your resource usage and identify slow scripts.
In this guide, we’ve covered how to use Laravel and deploy applications to RunCloud in minutes. RunCloud is a powerful tool that significantly simplifies server and application management. RunCloud works with a variety of platforms and frameworks, not just Laravel. It supports:
Start using RunCloud today and experience the ease of managing your web applications. Whether you’re a solo developer or part of a team, RunCloud can streamline your deployment process and server management tasks.
You might know how to build a Next.js application, but do you know how to deploy it on a server? If your answer is no, then you’ve come to the right place.
Next.js allows you to build a fast website, but the big question is: where to deploy your Next.js app? There are lots of options out there for hosting, but in this guide, we’re going to focus on using a VPS (Virtual Private Server) as it gives you more control and flexibility.
In this article, we’ll walk you through how to deploy your Next.js app on a VPS server. We’ll keep it simple and straightforward, perfect for when you’re ready to take your project live.
Ready to get started? Let’s dive in and get your Next.js app online!
There are multiple ways to deploy your web application to RunCloud servers, let’s take a look at each of them.
Method 1: Creating an Empty Application
First things first, we’ll create an empty web app where you can add your custom code and other assets for your website. Log into your RunCloud dashboard, navigate to the “Web Applications” section, and click on “Create Web Application“. Switch to the “Empty Web App” tab to create a blank application, give your web app a name that describes your project. You can configure other basic details such as domain name and tech stack or just leave them as default – you can always change them later.
In the basic settings section, set the public folder to /build – this is where your website will be served from. If you are using a custom build directory in your project, you can replace this with the path of your directory. After configuring the app, you can click on “Deploy” to save the changes.
Method 2: Deploy Using Git
If you already have an existing NextJS application stored in a git repository, you can use Git Deployment to connect your existing app to RunCloud to directly deploy your own application instead of creating a blank application.
The process of cloning a Git repository to RunCloud is exceedingly simple, just switch to the “Git Repository” tab and select your Git provider. In this example, we will be using GitHub. Enter a descriptive name for your web application and select a user account on your server. It is always recommended to create a new user account for maximum security.
Next, you need to fill in the details about your Git Repository, enter the name of your repository and the branch that you want to deploy to this server. After that, you need to copy the provided deployment key from RunCloud dashboard and add it to your Git repository.
On GitHub, you can add a deployment key by navigating to “Settings > Deploy Keys”. On this screen, you need to provide a suitable title for your deployment key and paste the key that you copied from RunCloud dashboard. Click on “Add Key” to save this key to your repository.
Once you have added the deployment key to your Git repository, you can go back to your RunCloud dashboard and deploy your web application. Once your application is deployed, you will see a screen similar to the following screenshot. After you have configured the Git Deployment on your server, you can consider enabling Atomic deployment to automatically deploy new versions of your application when a new commit is published.
Navigating to Root Directory of Web Application
With our web app created, it’s time to access your server, open up your terminal or SSH client and connect to your VPS using SSH by typing ssh username@your_server_ip and pressing enter. If you need step by step instructions for this process, you can refer to our documentation which explains How To Connect to Your Server via SSH.
Now that we’re on the server, you need to navigate to the root directory of your web application. Run cd <root-path> and replace <root-path> with the root path displayed in your RunCloud dashboard.
Before creating the app, we’ll switch to the web app user with su <username> command to ensure we have the right permissions. Don’t forget to replace <username> with the actual username of the system user displayed in your RunCloud dashboard. In the following example, the name of the user account is runcloud.
If you have cloned your existing repository, then you can skip this step. Before we start building our Next.js app, we need to clear out the default web page created by RunCloud. You can run the pwd command to make sure that you are in the correct directory before deleting the files via terminal. If you are not sure, you can always use the RunCloud file manager to manually delete the files. To permanently delete the default files, run rm -rf ./* in the root of your web application. This command deletes the default index.html and any other files that might be created during application initialization.
Once you have deleted the default files, you can start adding your custom code to this website. Run the npx create-next-app . command in your terminal to set up a new Next.js app in the current directory. RunCloud already comes with NodeJS pre-installed, however you have the option to install a custom version of Node JS if your application requires it.
Finally, we need to install all the dependencies and build the app to create a production-ready app which optimizes the resources and compresses necessary dependencies. Run npm install command and npm run build to bundle everything into the build directory.
Setting Up NGINX Reverse Proxy for Next.js
After successfully setting up your Next.js application on your server with RunCloud, the final step is to make it accessible to the world through your domain. This can be done by setting up an NGINX reverse proxy.
Here’s how to configure the reverse proxy in your RunCloud dashboard for your Next.js application:
Navigate to Your Web Application: In your RunCloud dashboard, go to the “Web Application” section and select the application you created for your Next.js project.
Change the Web Application Stack:
Go to the “Settings” page for your web application.
You need to change the Web Application Stack. By default, it might be set to a native NGINX stack. For a Next.js application, you need to change this to NGINX + Custom. This setting is important because it allows NGINX to properly route all incoming requests to your running Next.js application.
Create the Reverse Proxy File:
After changing the stack, go back to your Web Application’s main screen and click on “NGINX Config”.
Create a new configuration file for your web application and select the pre-defined configuration for the reverse proxy from the dropdown menu.
Edit the Configuration File: In the configuration file, uncomment the line containing proxy_pass directive by removing the # symbol before it. After that, replace the <port number of your app> with the actual port number of your application.
Set the Correct Port for Next.js: By default, Next.js applications run on port 3000. If you have not changed this in your application’s configuration, then 3000 is the correct port to use. If you have configured your app to run on a different port, make sure you change 3000 to your custom port number.
After adding the code to the configuration file, save your changes.
Once the process is complete, open your web browser and navigate to your domain. If everything has been configured correctly, you should now see your Next.js application live.
Wrapping Up
If you find yourself facing any permission issues during this process, then you should double-check that you’re using the correct user for your web application. Additionally, if you don’t see your homepage when you visit your domain, then you can pop back into your RunCloud dashboard and verify that the public directory is set to the folder where your build files are stored.
If you’re new to server management or just looking to simplify your workflow, you need to check out RunCloud – an all-in-one web management platform. From easily setting up new web apps to managing databases, SSL certificates, and server security, RunCloud puts the power of efficient server management at your fingertips.
RunCloud takes the complexity out of server administration, allowing you to focus on what really matters – creating amazing web applications. Start using RunCloud today!
FAQ on Next.js Deployment
Is Next.js faster than React?
Next.js is built on top of React and can offer performance improvements in certain scenarios: Server-side rendering (SSR) can lead to faster initial page loads Automatic code splitting reduces bundle sizes Built-in image optimization enhances loading speeds Static site generation (SSG) can dramatically improve performance for static content However, a well-optimized React app can also be very fast. The performance difference depends on the specific use case and implementation.
Does Netflix use Next.js?
Yes, Netflix uses Next.js for some of its web applications. They’ve publicly shared that they use Next.js for their marketing pages and some internal tools. However, it’s important to note that large companies like Netflix often use multiple technologies across their ecosystem.
Is Next.js better for SEO than React?
Next.js can offer SEO advantages over a standard React application: Server-side rendering provides fully rendered content for search engine crawlers Automatic static optimization can create static HTML for better indexing Built-in features like automatic sitemap generation and robots.txt support These features make it easier to implement SEO best practices, but a well-configured React app with proper SSR can also achieve good SEO results.
Can you use Next.js without a server?
Yes, you can use Next.js without a traditional server in several ways: Static site generation (SSG) allows you to pre-render pages at build time Export your Next.js app as static HTML files Deploy to serverless platforms that handle the server-side aspects for you However, some Next.js features (like API routes) require a Node.js runtime.
Can Next.js run serverless?
Yes, Next.js has excellent support for serverless deployment: Platforms like Vercel (created by the Next.js team) offer native serverless deployment AWS Lambda, Google Cloud Functions, and Azure Functions can host Next.js apps Serverless Next.js component for AWS CDK deployment Netlify and other JAMstack platforms support Next.js serverless functions Serverless deployments can offer benefits like automatic scaling and reduced operational overhead.
What is Next.js not good for?
While Next.js is versatile, there are scenarios where it might not be the best choice: Simple static websites (overkill for basic HTML/CSS sites) Applications requiring fine-grained control over the server (e.g., real-time apps with WebSockets) Projects with strict size limitations (Next.js adds some overhead) Electron or other desktop applications (though it can be used for parts of them) Always consider your specific project requirements when choosing a framework.
Hostnames and domain names – even if you don’t know the difference (yet!), one thing is for sure:
https://142.250.279.1174
…is not as easy to remember as:
google.com
…yet as far as a computer is concerned, they’re both the same thing, and typing either of them into your browser’s address bar will take you to the right page.
The thing is, as humans we don’t find it too easy to remember long numbers.
Many years ago those of us of a certain age remembered dozens of phone numbers off by heart. But these days, who needs to even remember phone numbers, when you can just click someone’s name, or profile picture?
Hostnames and domain names are a little like that – a way for us carbon-based lifeforms to remember and recognise places we want to go on the web more easily than using long strings of meaningless numbers.
We can leave the strings of numbers to our silicon-based overlords! It’s what they do best, after all.
But although we might prefer to enter a hostname or domain name, that still needs to be converted into the underlying number (just as clicking on the photo of your Great Auntie Mable will result in your phone converting that request into her phone number, with dialing code).
In this post, we will take a look at the two methods used by computers to convert hostnames and domain names to and from IP addresses – the strings of numbers like the example above.
We will also discuss the pros and cons of both hostnames and domain names to help you decide which one is right for you.
Let’s get started, carbon-based lifeforms!
What are Host Names?
A hostname is a human-readable label assigned to a device on a network,and it serves as a more user-friendly alternative to IP addresses, allowing easier identification and communication between devices.
A hostname is local to your computer, and so you can set it to pretty much anything you want.
Yes, you could give a hostname to your computer such as ‘Johns-Main-Computer’, or ‘Sara-Laptop-New’, or even ‘PC-Next-To-Cat-Bed’.
Just as more than two people can have the same name, more than two computers can have the same hostname as well.
In case you have two computers next to the cat bed.
You might have already configured a hostname without knowing it. When you set up a new computer or deploy a new server in the cloud, you are asked to provide a name for this computer – this is the hostname.
Hostnames are not just limited to computers. Phones, IoT devices such as security cameras, headphones, refrigerator, and lightbulbs – all show a name in their respective interface – this is their hostname.
There are several reasons why people use hostnames on their devices:
Human-readable: Hostnames are easier to remember and use than IP addresses, making system administration more intuitive.
Flexibility: Hostnames can be changed without altering the underlying IP address, allowing for more flexible network management.
Abstraction: They provide a layer of abstraction between the network infrastructure and the services running on it, making it easier to move services between different physical or virtual machines.
Security: Hostnames can obscure the actual network structure, potentially improving security by not exposing IP addresses directly.
Integration with DNS: Hostnames integrate seamlessly with DNS, enabling automatic resolution to IP addresses.
Drawbacks of Hostnames
While there aren’t many drawbacks, there are a few things that you should be aware of:
Maintenance overhead: In large networks, maintaining and updating hostname records can become complex and time-consuming.
Potential for conflicts: In environments without proper management, duplicate hostnames can cause conflicts and connectivity issues.
Performance impact: Resolving hostnames to IP addresses introduces a small latency compared to using IP addresses directly.
Are Hostnames and Usernames The Same on Linux?
No, the hostname and username are not the same on Linux systems. They serve different purposes:
Aspect
Hostname
Username
Definition
Name assigned to the entire Linux machine or system
Name associated with a specific user account on the Linux system
Purpose
Identifies the device on a network
Identifies individual users who can log in to and use the system
Scope
System-wide
User-specific
Uniqueness
One per system
Multiple can exist on a single system
Viewing Command
hostname
whoami (for current user) or cat /etc/passwd (for all users)
Setting/Changing
Usually set during system installation or by system administrators
Created when adding new users, can be changed with usermod command
Storage Location
Typically in /etc/hostname
User information stored in /etc/passwd
Used For
Network identification, system configuration
User authentication, file ownership, access control
Impact of Change
Affects entire system and potentially network configuration
Only affects the specific user account
Examples
ubuntu-server, dev-machine-01, webserver-prod
john, alice, admin, root
Relation to Login
Not directly used for login (except in network authentication)
Used to log in to the system
Relation to Home Directory
No direct relation
Each username typically has an associated home directory (e.g., /home/username)
What are Domain Names?
Similar to a hostname, a domain name is a human-readable address used to identify and locate specific websites or resources on the internet.
However, there is one key distinction – they are unique.
Only one person can have access to one domain name at a time, and this access is managed using domain registrars who charge a yearly fee for this service.
Domain names serve as a user-friendly alternative to IP addresses by providing a memorable and meaningful way to access online resources. They are a crucial component of the Domain Name System (DNS), which translates domain names into IP addresses that computers use to identify each other on the network.
While almost anything can be a hostname, there are certain rules that you must follow for registering a domain name.
You must pick from one of the existing Top-Level Domains (TLDs)
Top-Level Domains (TLDs) are the extensions at the end of website addresses, such as .com, or .gov.
Only the extremely large companies with very deep pockets such as Canon or CERN have the resources to make their own TLD – the rest of us must use one of the publicly available TLDs.
There are many TLDs available for you to choose from, including:
Internationalized Domain Names (IDNs): münchen.de (German), 例子.中国 (Chinese), مثال.مصر (Arabic), उदाहरण.भारत (Hindi), and many more.
You must follow the structure and syntax for your TLD
When you use a domain name, you are limited by the specifications set by your TLD registrar. While these restrictions vary, usually you must follow the following guidelines:
Length: A domain name can be up to 253 characters long, including the TLD.
Labels: Each part separated by dots is called a label, and can be up to 63 characters long.
Characters:
Use only letters (a-z), numbers (0-9), and hyphens (-).
Domain names are case-insensitive.
Cannot start or end with a hyphen.
Cannot have two consecutive hyphens, except for Internationalized Domain Names (IDN) using Punycode.
Some TLDs (but not all) allow using emoticons such as 🎉 💀 💚 in the domain name
Management overhead: There is a reason why nixCraft has posted a haiku about DNS. Maintaining and renewing domain names requires ongoing attention and administration – and it can be challenging. Even big tech companies such as Meta struggle with DNS.
Security concerns: Domain names can be targets for hijacking or spoofing attacks, requiring additional security measures. It is an old protocol which was developed at a time when security was not as important because very few people had access to the internet.
Dependency on registrars: The availability and control of a domain name depends on the reliability and policies of domain registrars. Even the tech giants such as Google forget to renew their domain names, and if you forget to renew your domain, someone else might snatch it and you may lose it forever.
No, hostnames and domain names are not the same, although they are related concepts: A hostname is a label assigned to a specific device on a network, such as webserver01 or johns-laptop. A domain name is a human-readable address for a website or online service, such as example.com. A fully qualified domain name (FQDN) often combines a hostname with a domain name, such as webserver01.example.com.
How do I find my hostname and domain name?
To find your hostname: On Windows: Open Command Prompt and type hostname On macOS/Linux: Open Terminal and type hostname To find your domain name: If you own a website, your domain name is the address you registered (e.g., yourwebsite.com)
Can you have a domain without a host?
Yes, you can have a domain without a specific host. A domain name can exist without being associated with any particular server or IP address. This is common when: You’ve just registered a domain but haven’t set up hosting yet You’re using the domain for email only You’re holding the domain for future use
What is the hostname of a domain name IP address?
An IP address doesn’t inherently have a hostname. However, you can set up a reverse DNS (PTR record) that associates an IP address with a hostname. For example: IP address: 192.0.2.1 Potential hostname: server1.example.com Many ISPs and hosting providers automatically set up reverse DNS for their IP addresses.
Can a hostname be an IP address?
While it’s not a best practice, technically, you can use an IP address as a hostname. However, this defeats the purpose of hostnames, which are meant to be human-readable labels. It’s generally better to assign a descriptive hostname and let DNS handle the translation to IP addresses.
Can you have a domain name without hosting?
Yes, you can own a domain name without having hosting services. When you register a domain, you’re essentially reserving that name in the global DNS. You don’t need to immediately associate it with a web hosting service. You might do this to: Secure the name for future use, Use it for email addresses only, Set up DNS redirects without actual hosting.
Is domain and hosting the same thing?
No, domain and hosting are different: A domain is your address on the internet (e.g., yourwebsite.com) Hosting is the service that stores your website files and makes them accessible online You typically need both to run a website: The domain points visitors to your site The hosting service provides the server where your site lives
Is www part of the domain name?
Technically, “www” is a subdomain, not part of the main domain name. However, it’s so commonly used that many people consider it part of the domain name. Many websites are set up to work with or without “www”, treating them as equivalent. However, in DNS terms, “www” is indeed a separate subdomain that can be configured differently from the root domain if desired.

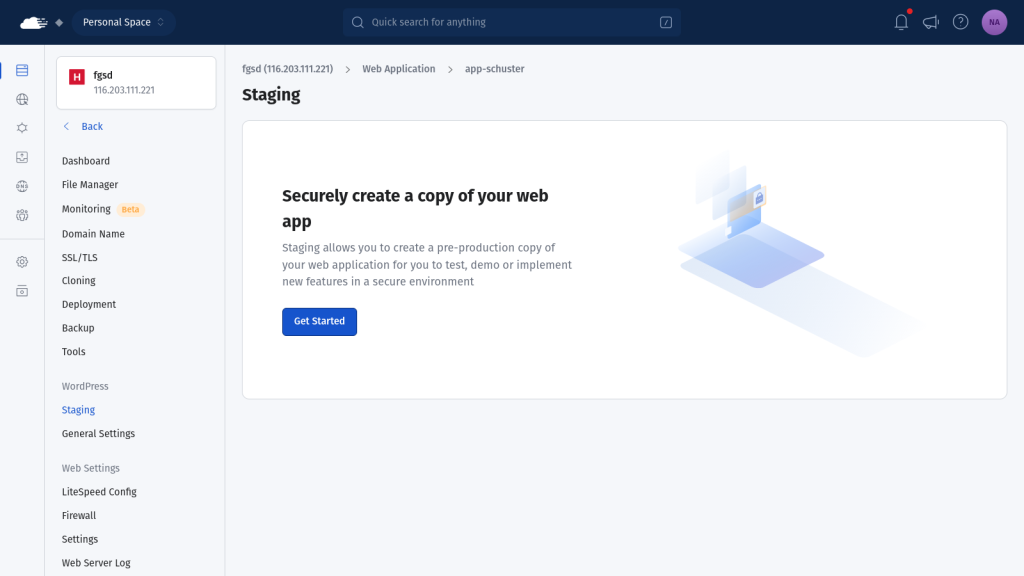
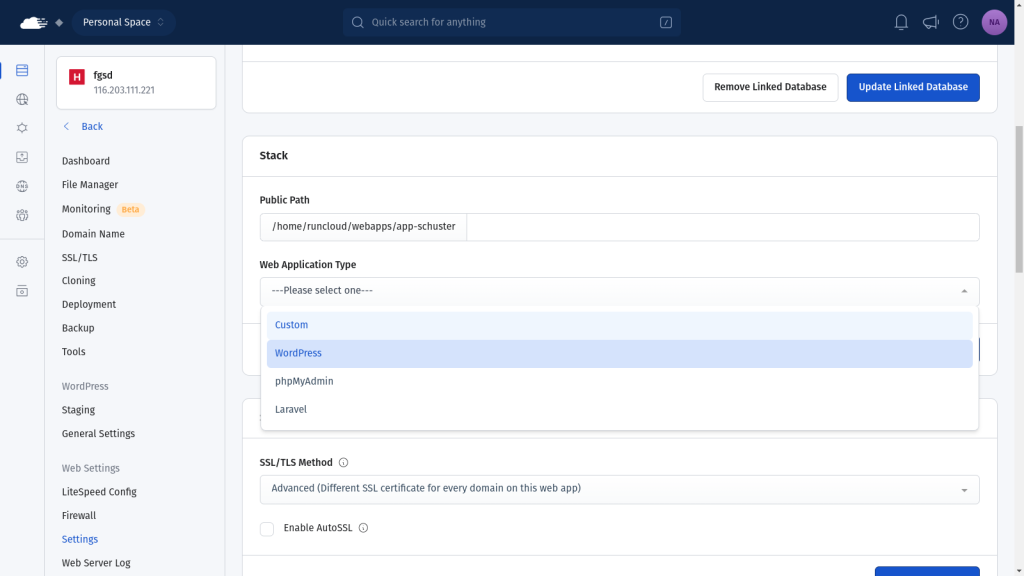
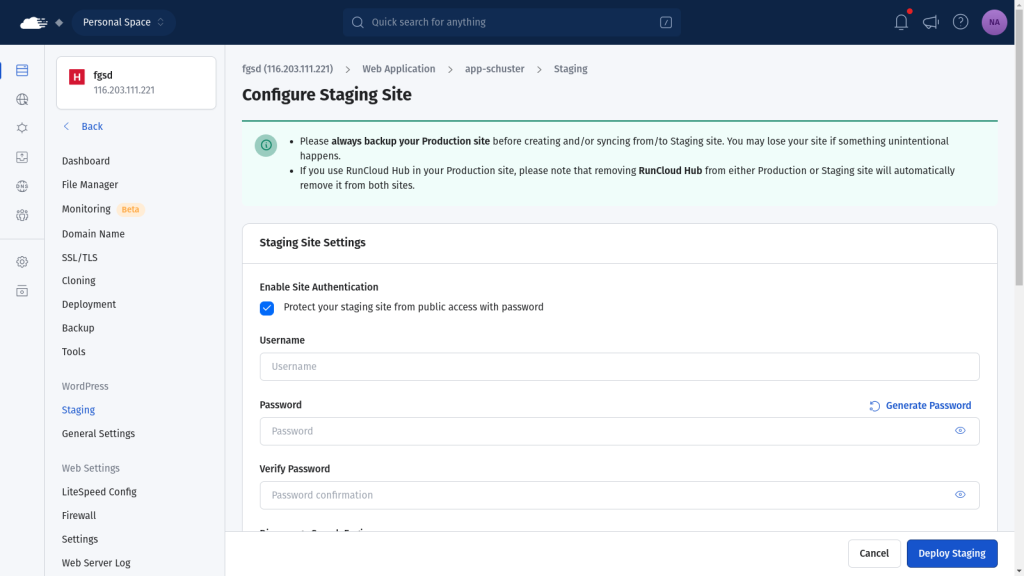
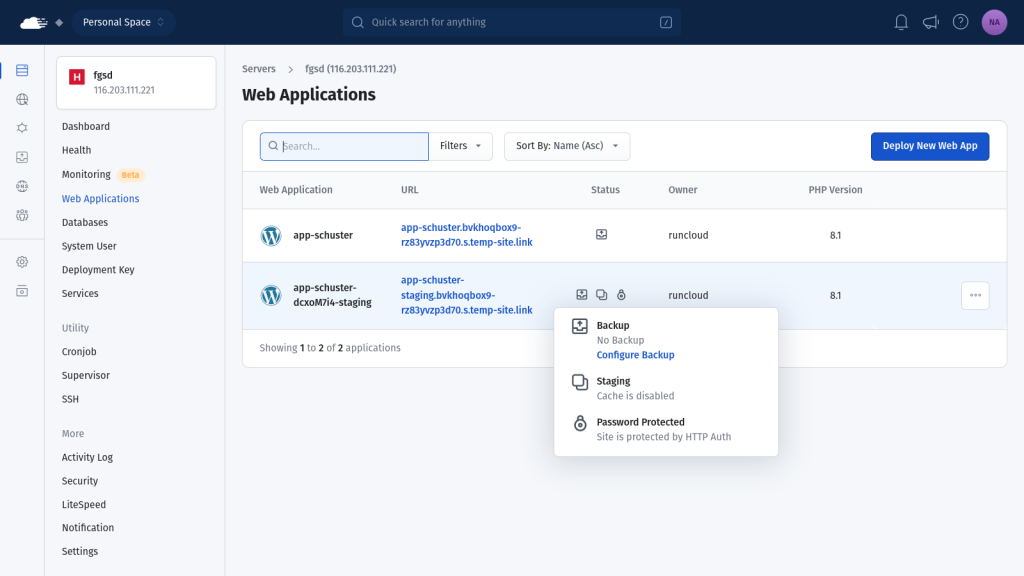
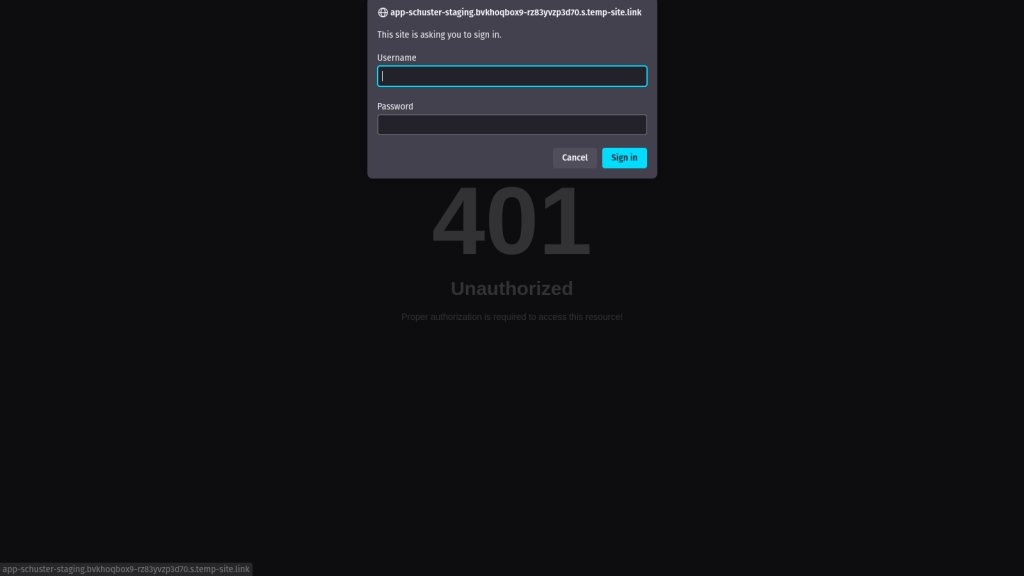
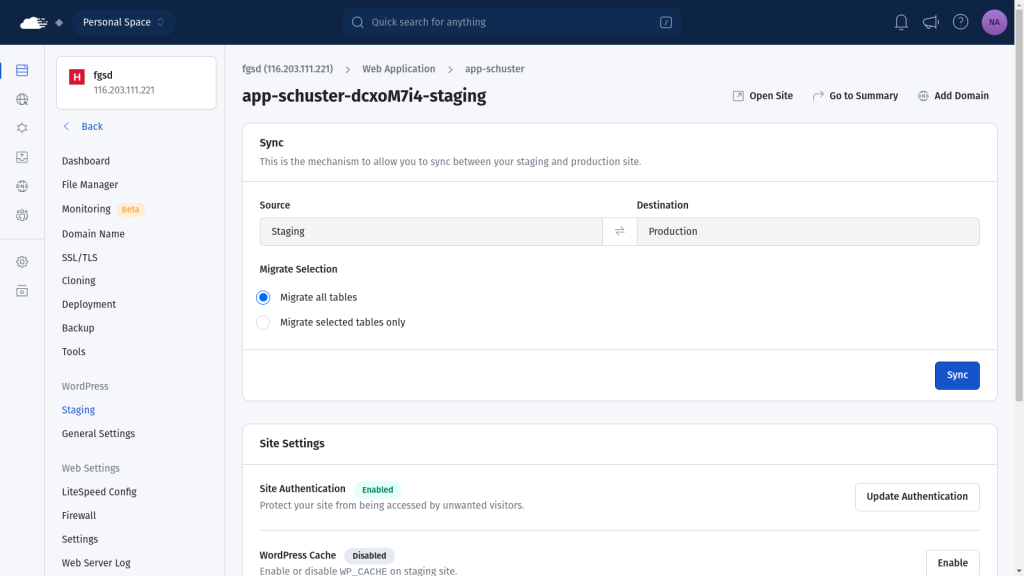

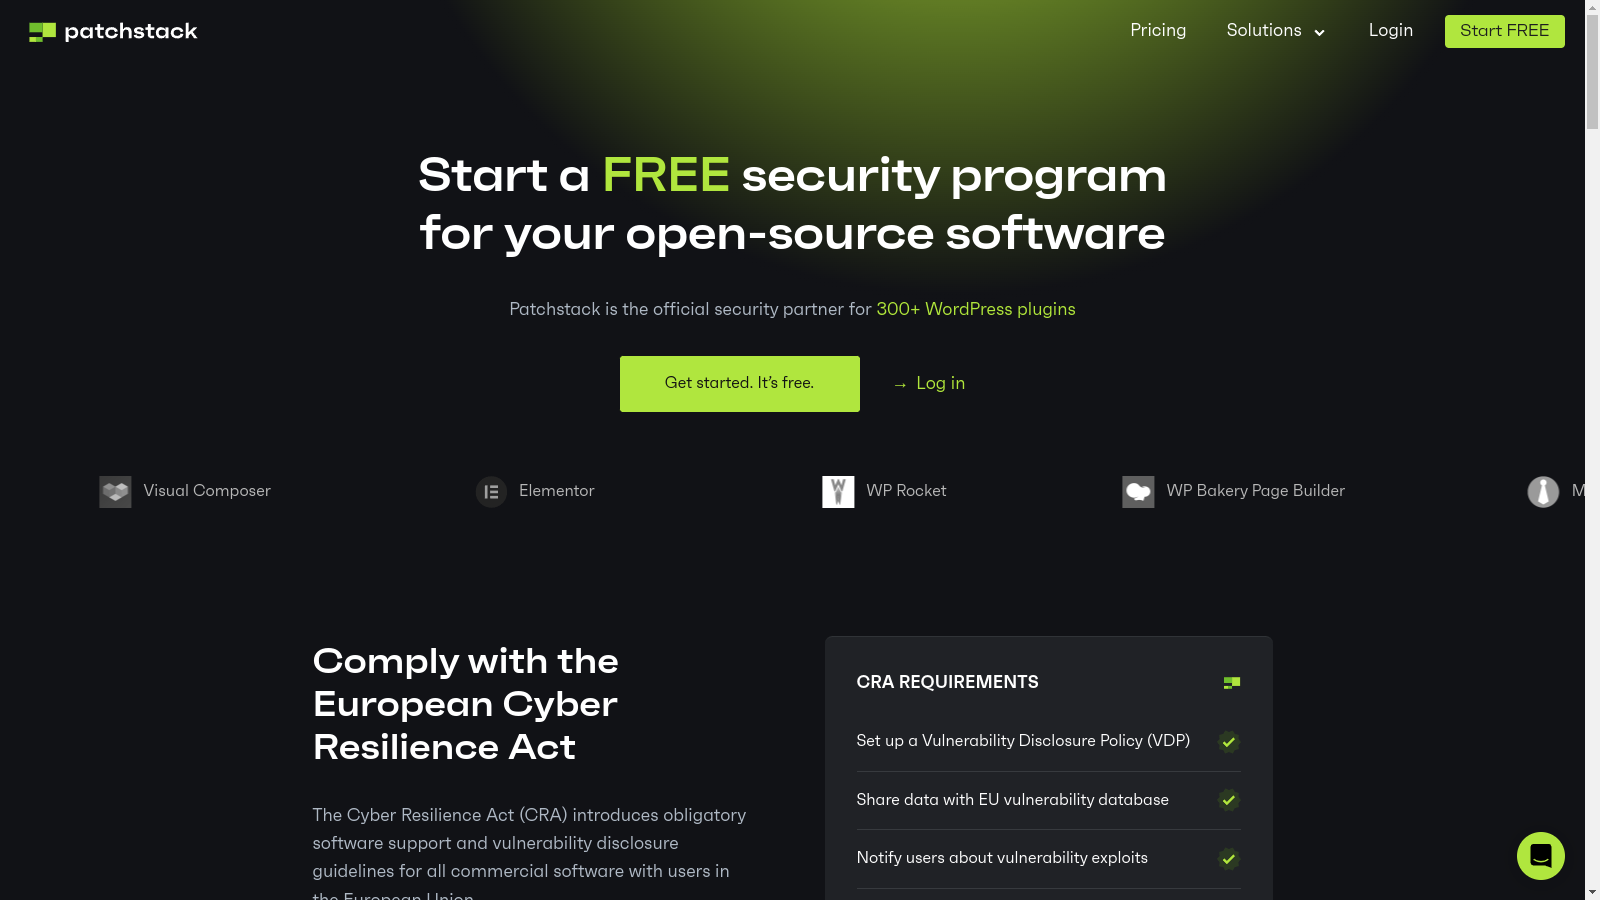




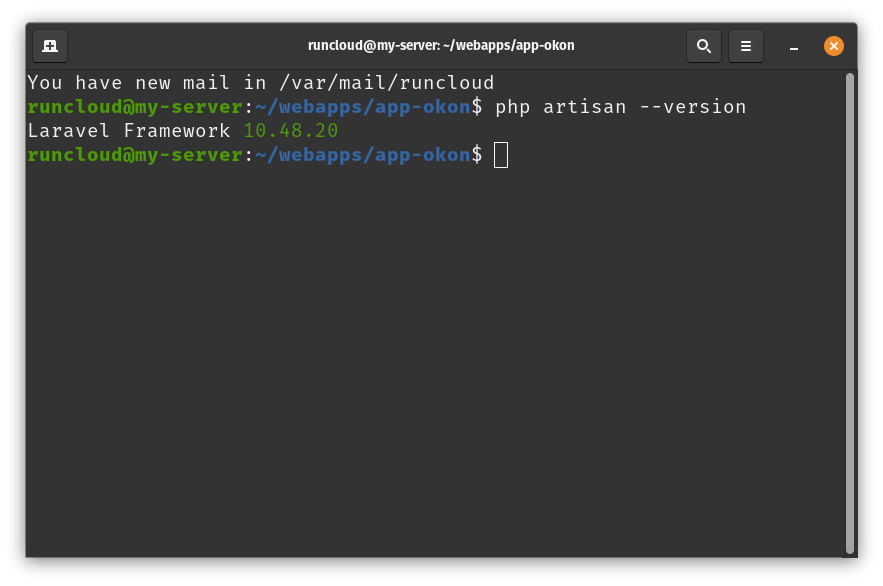
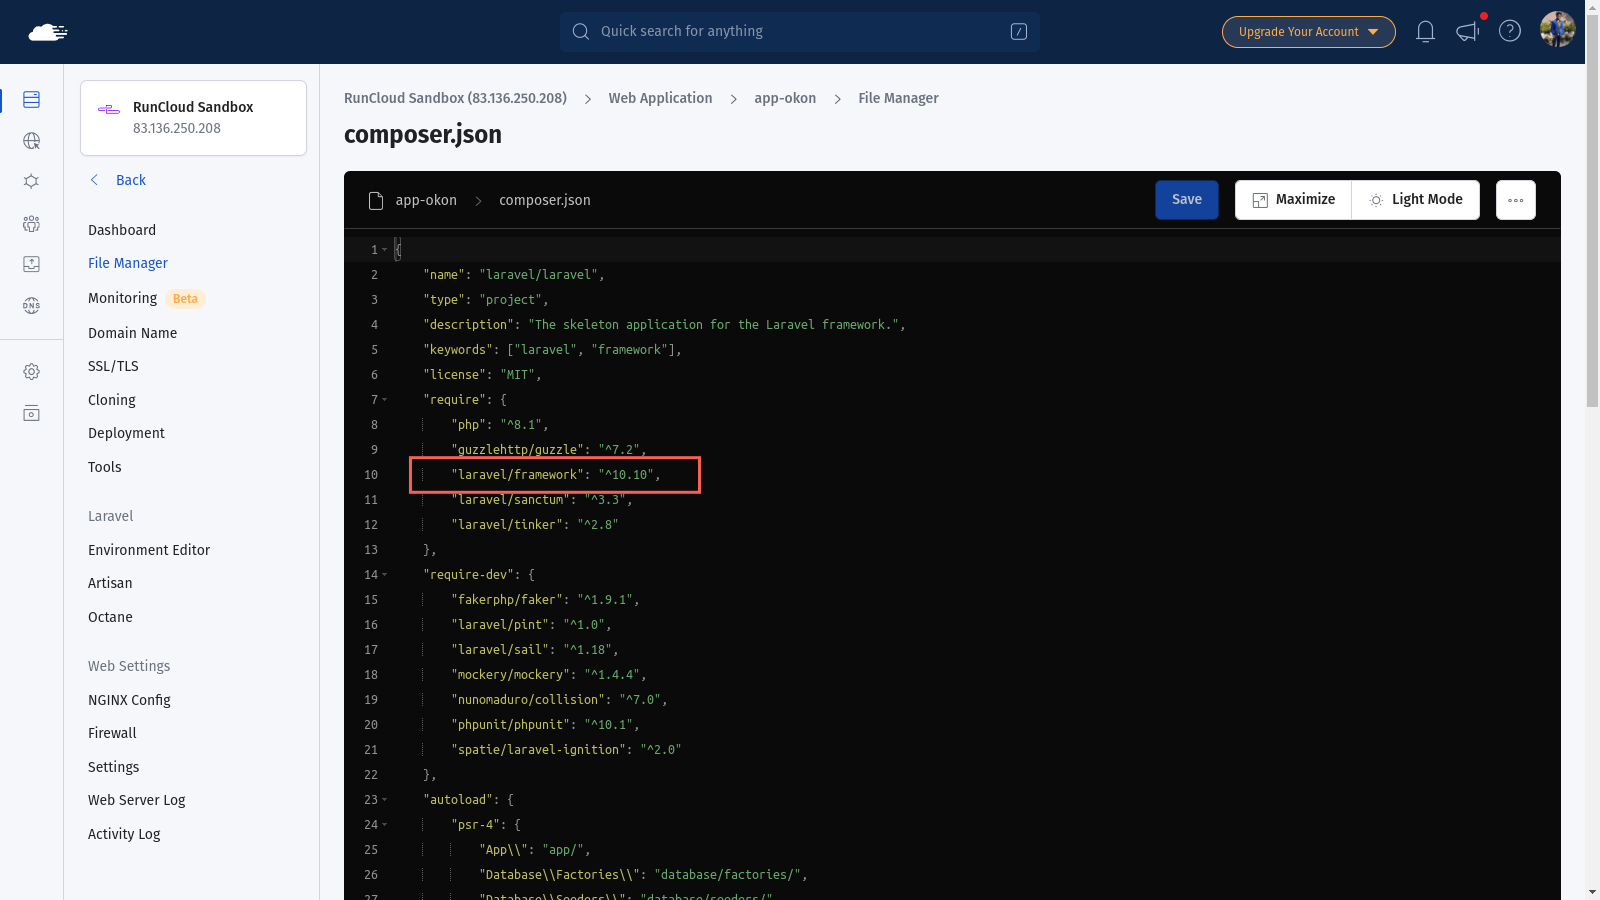
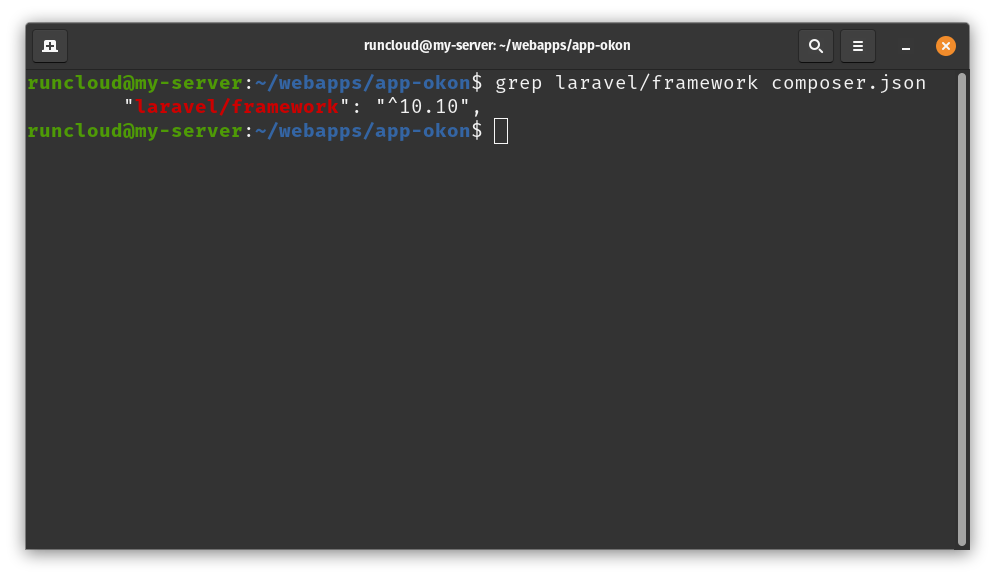
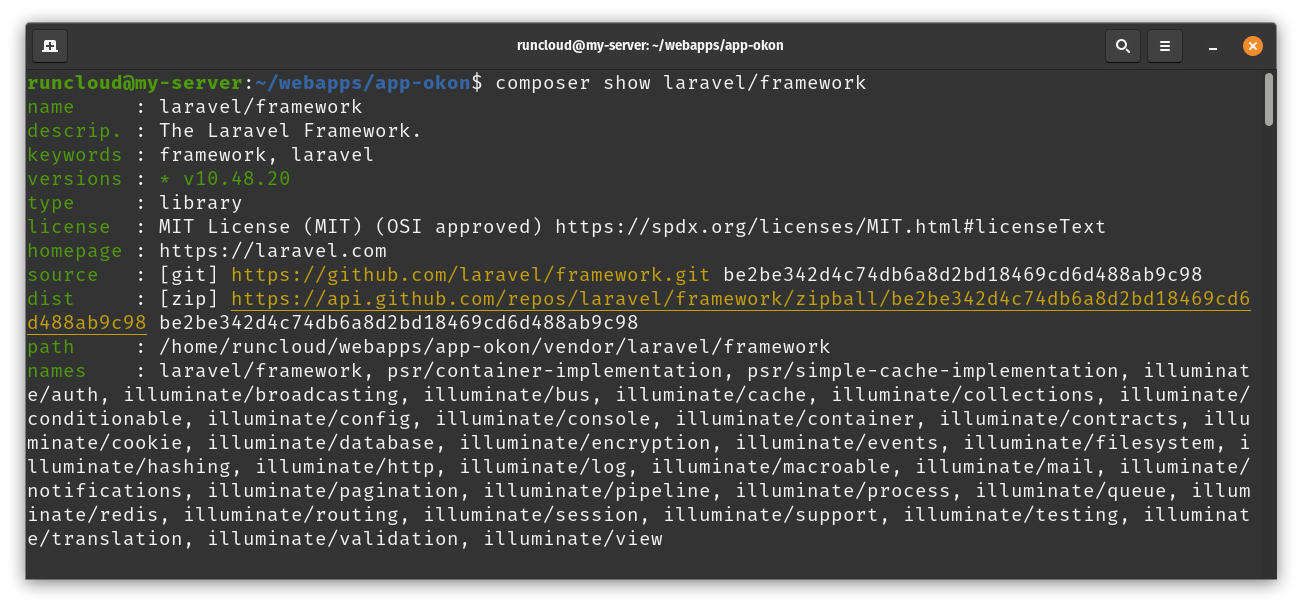
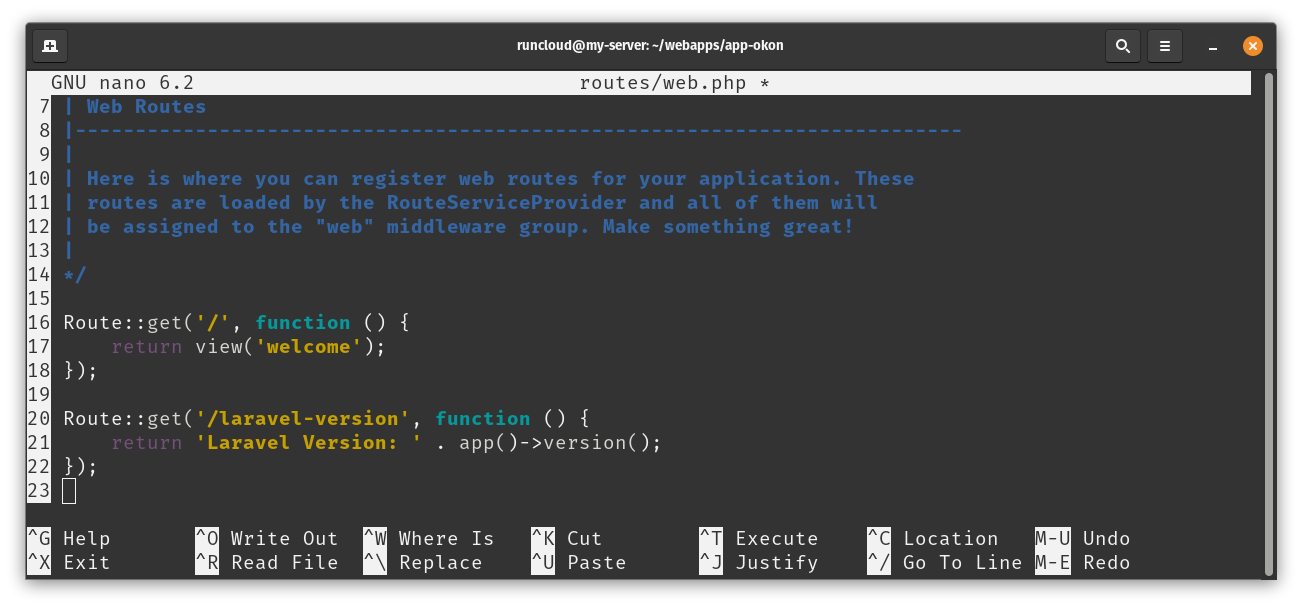
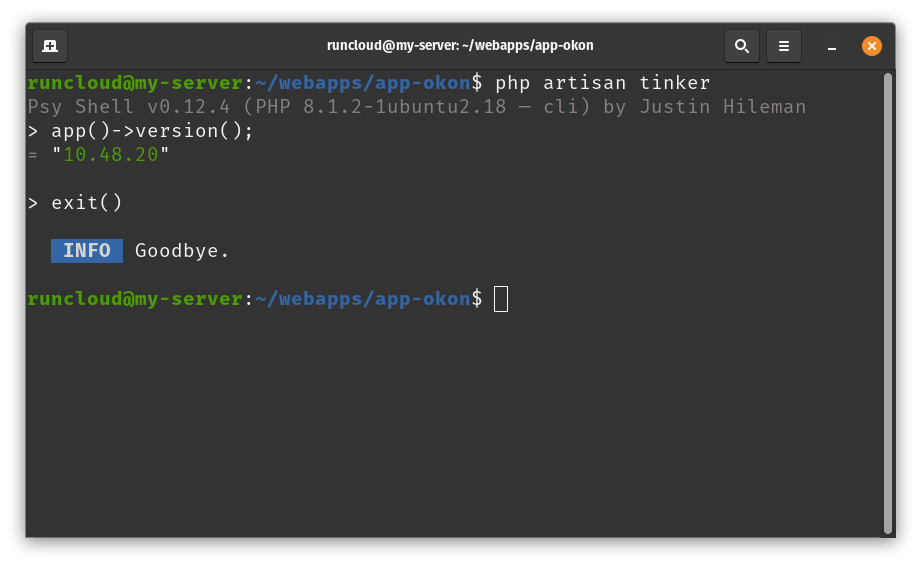

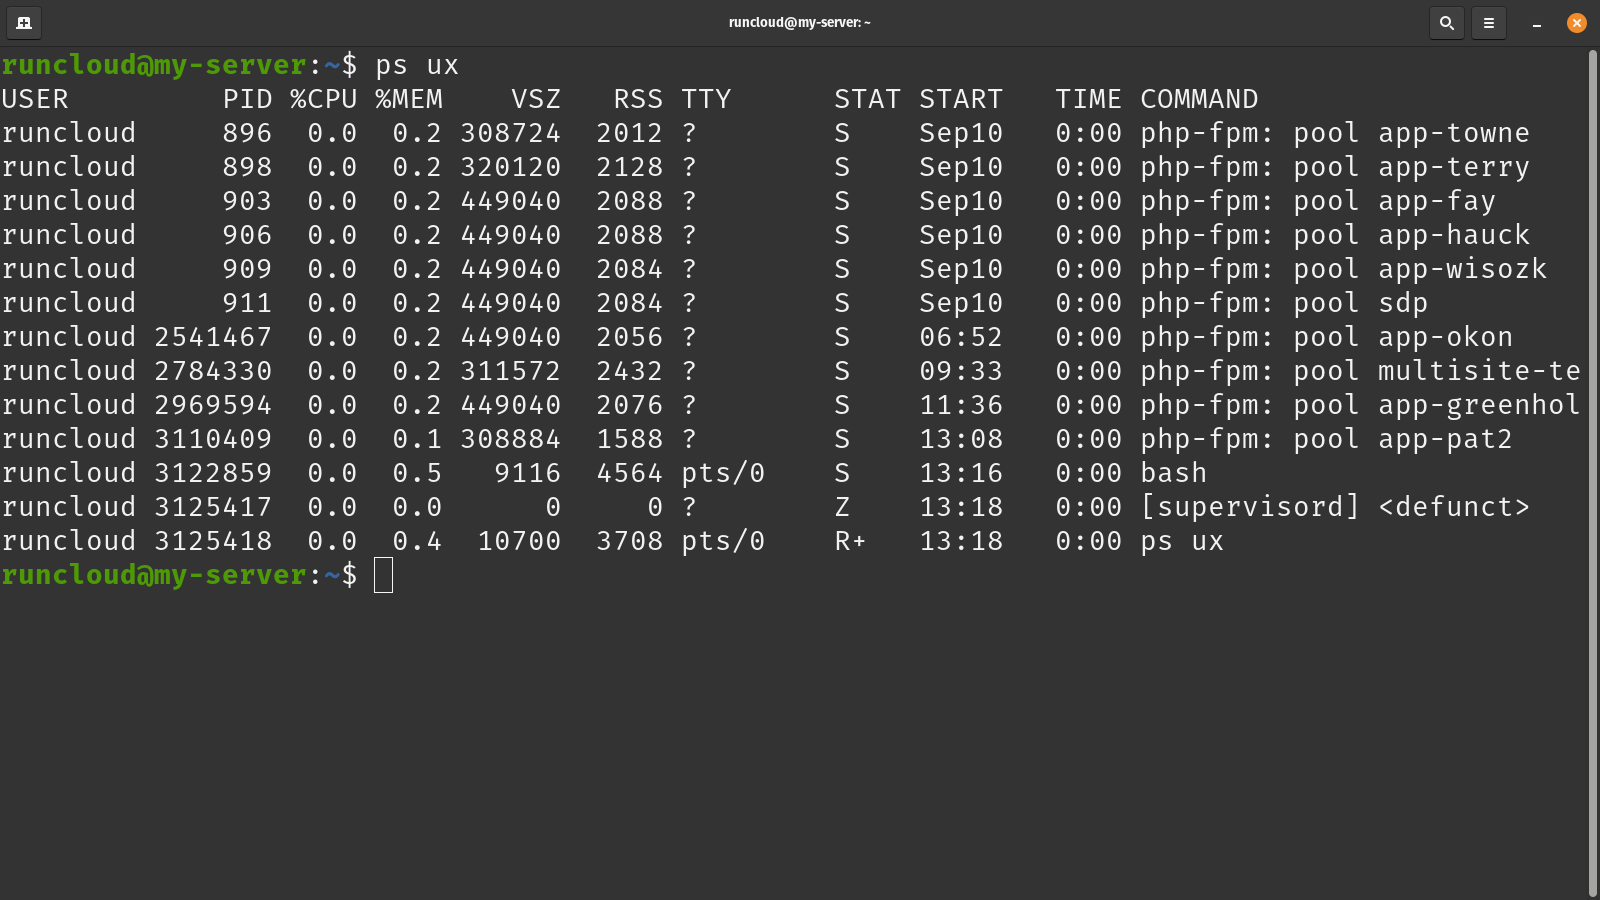
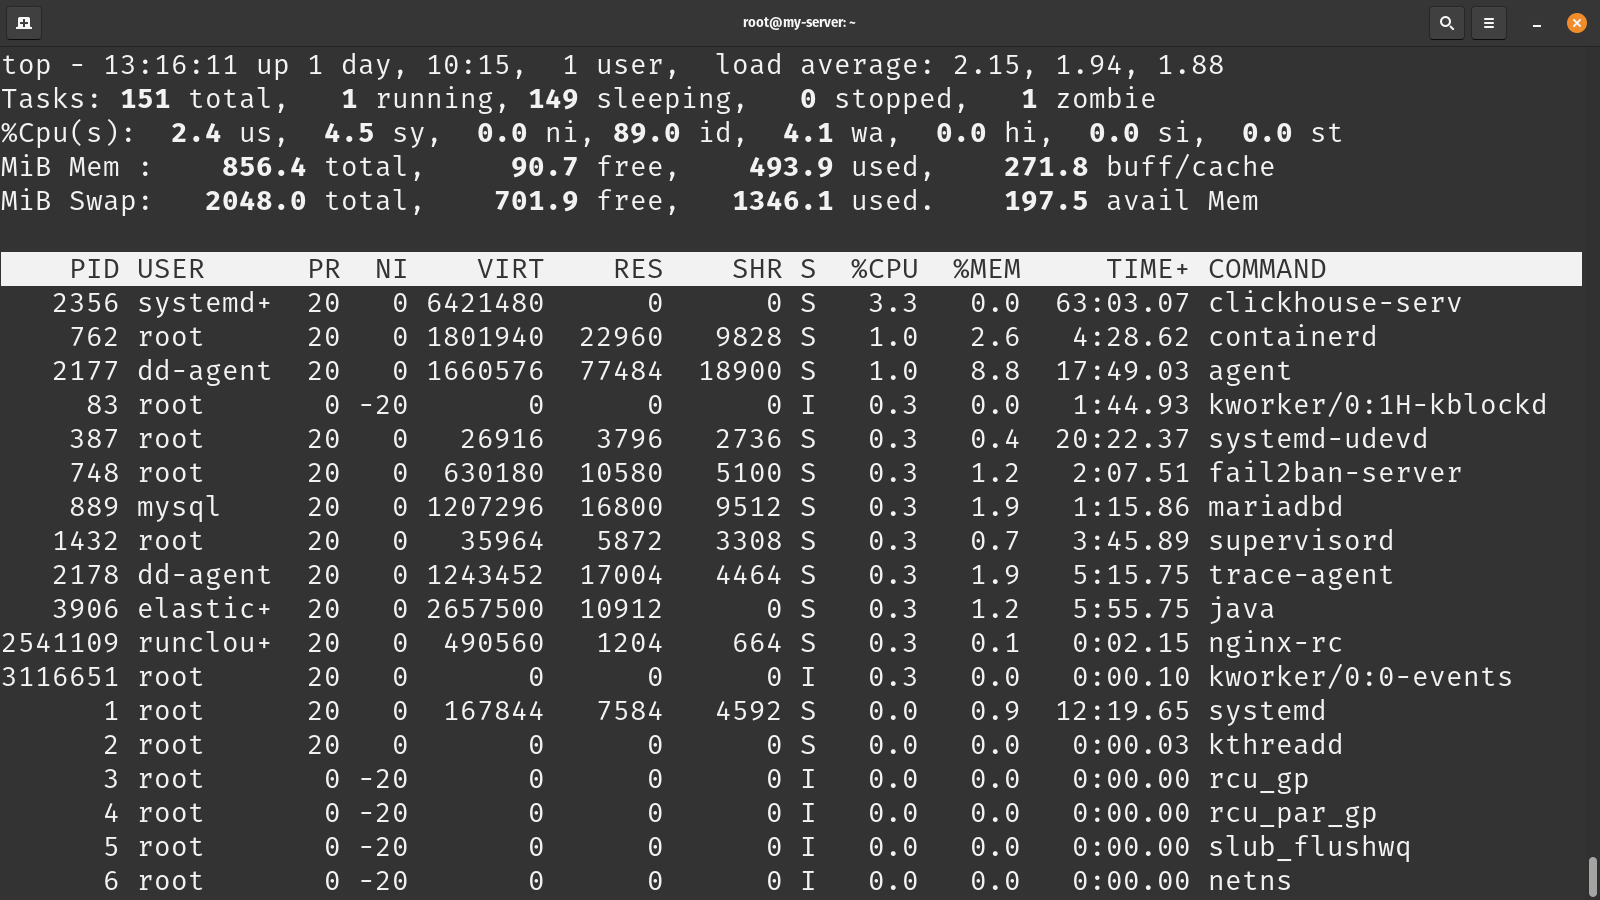
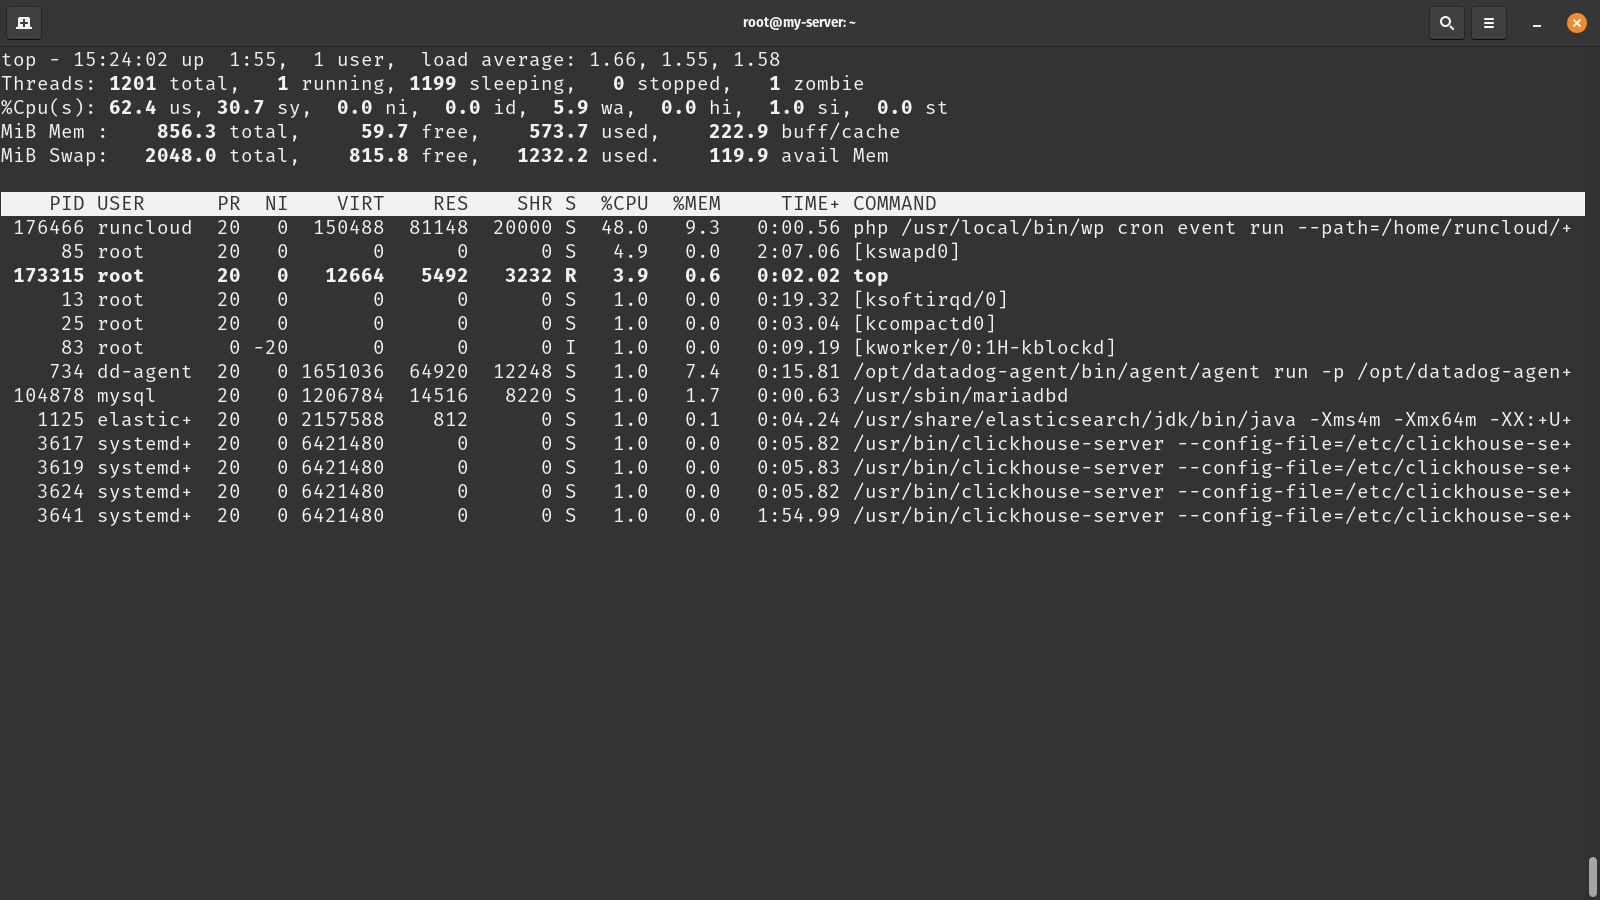
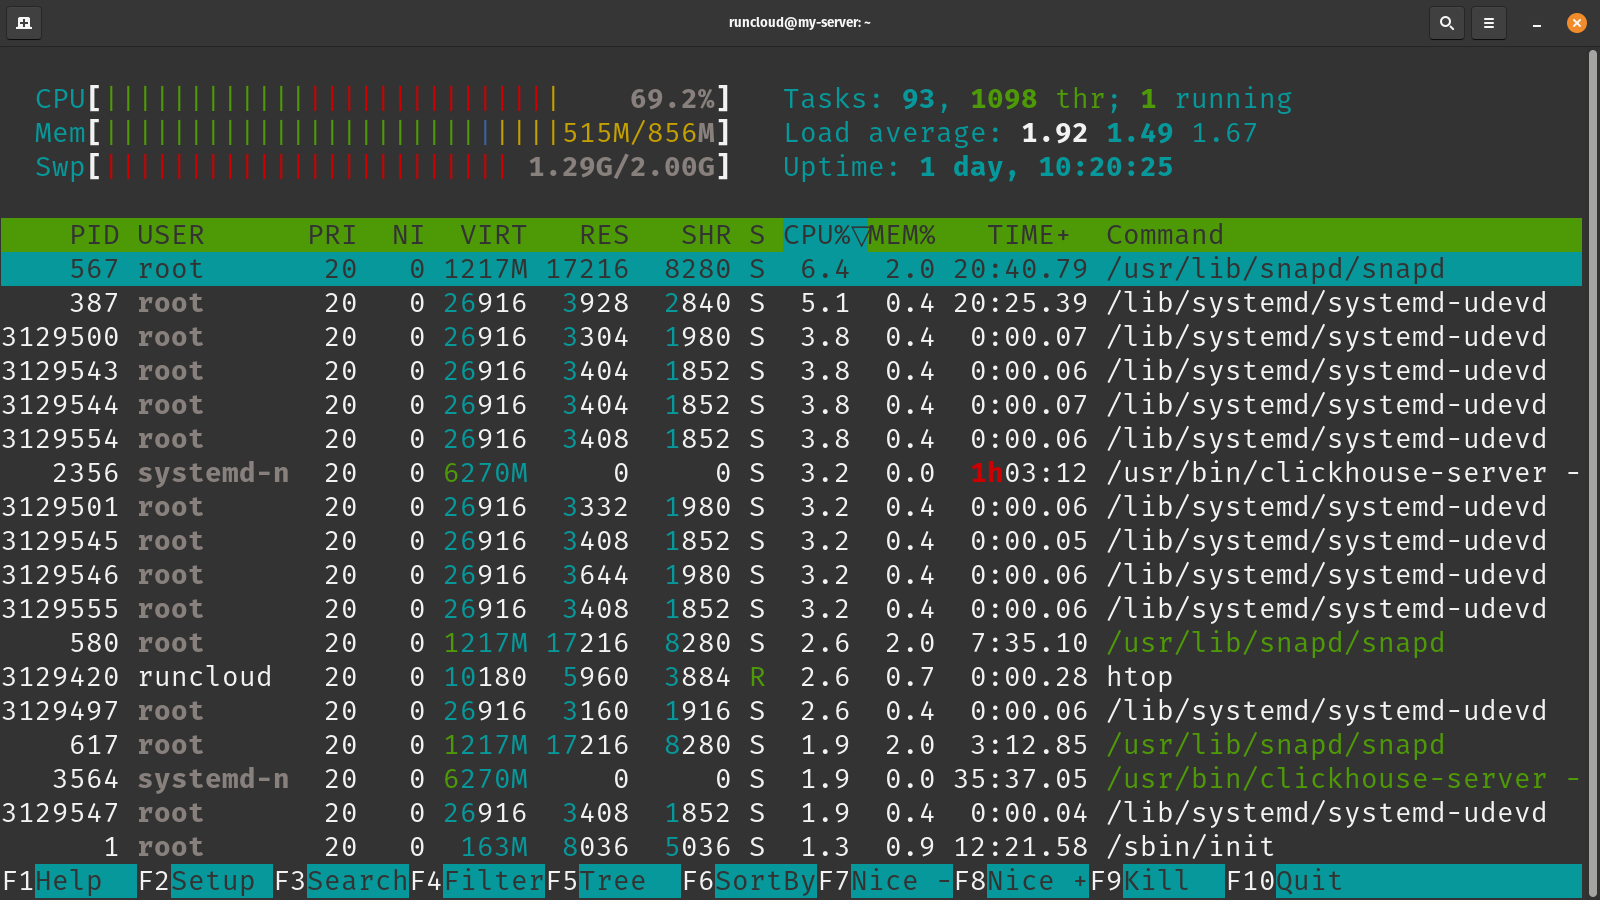
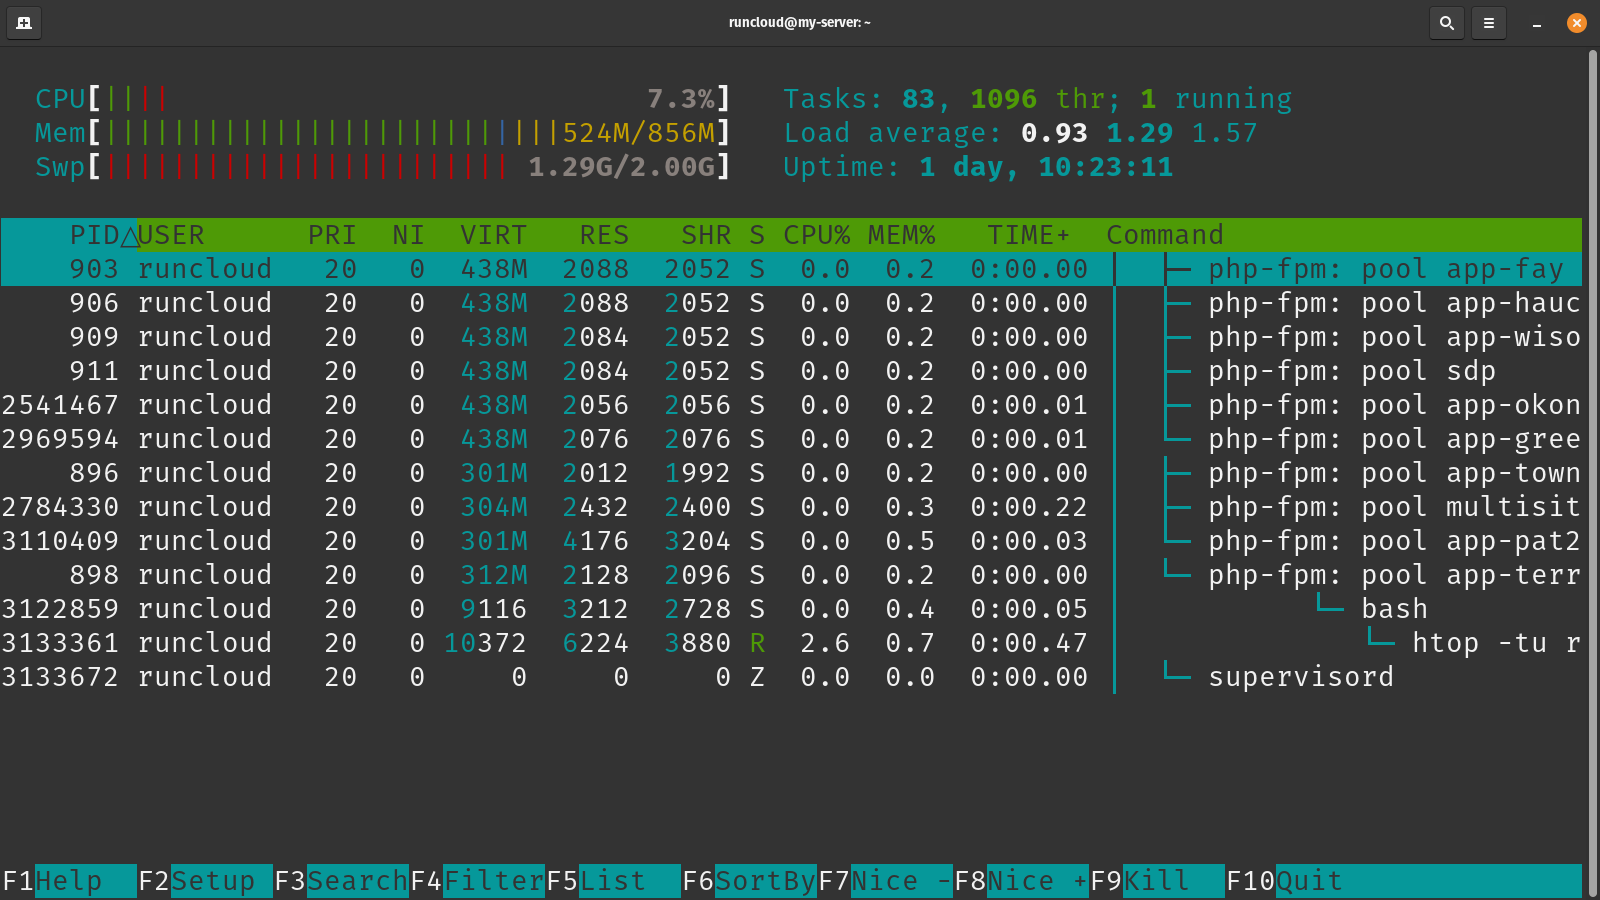
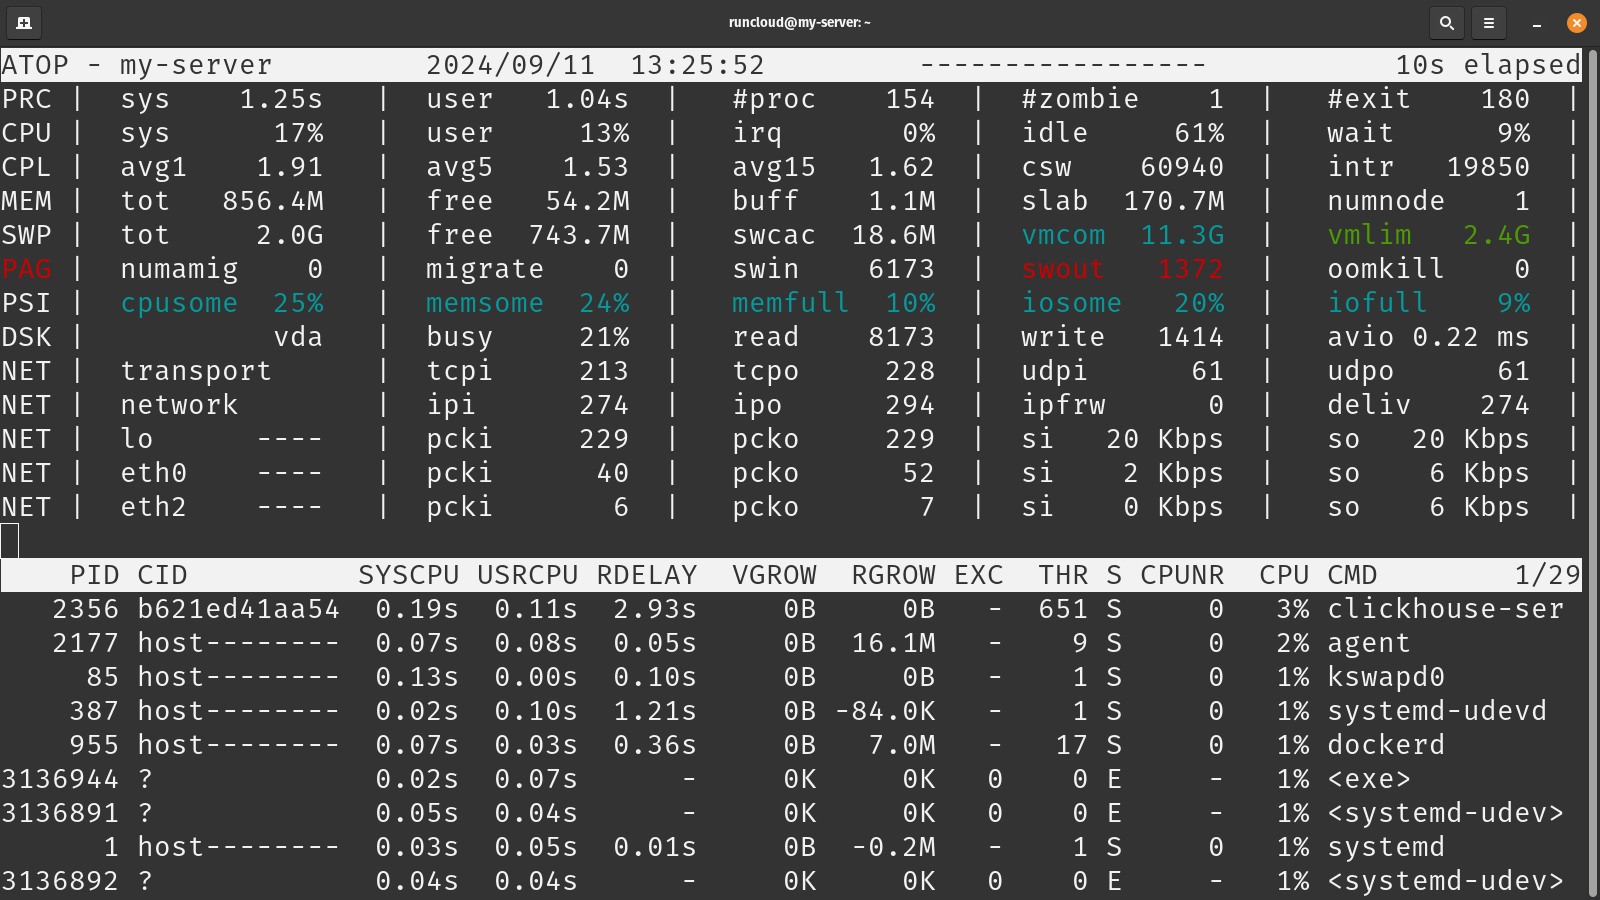
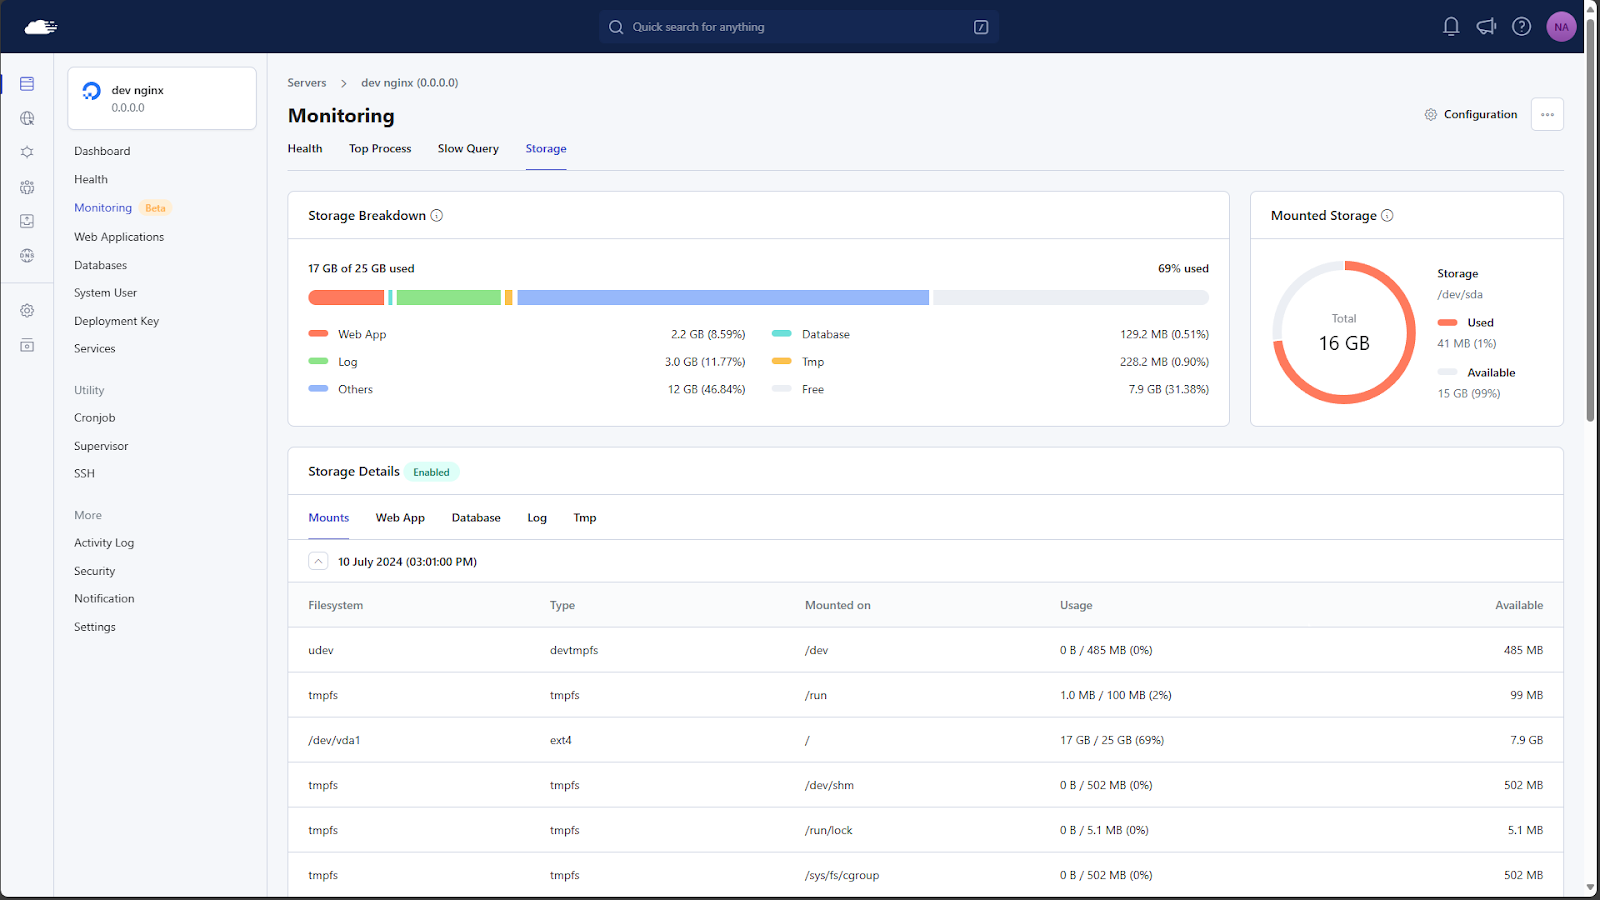

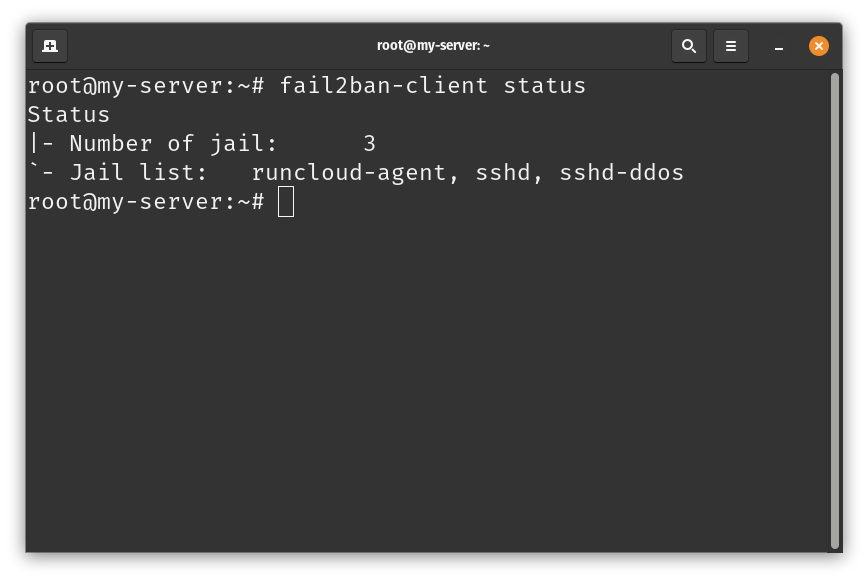
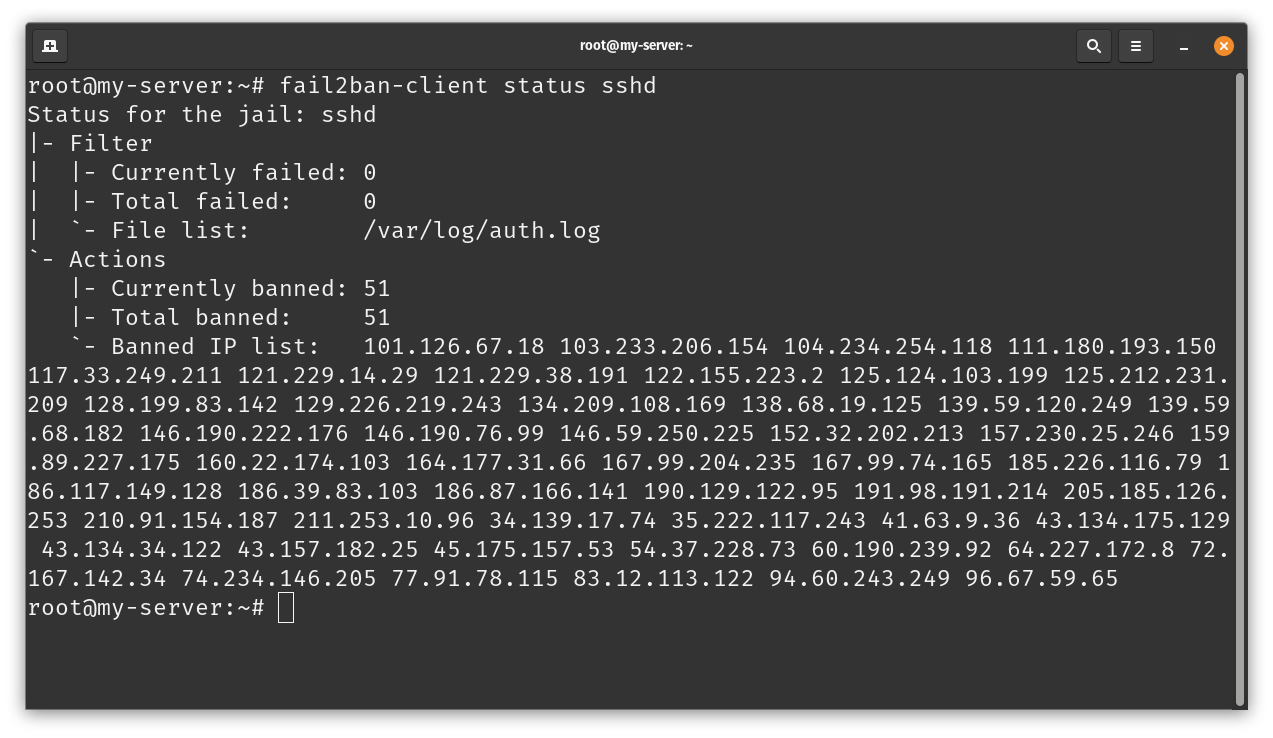
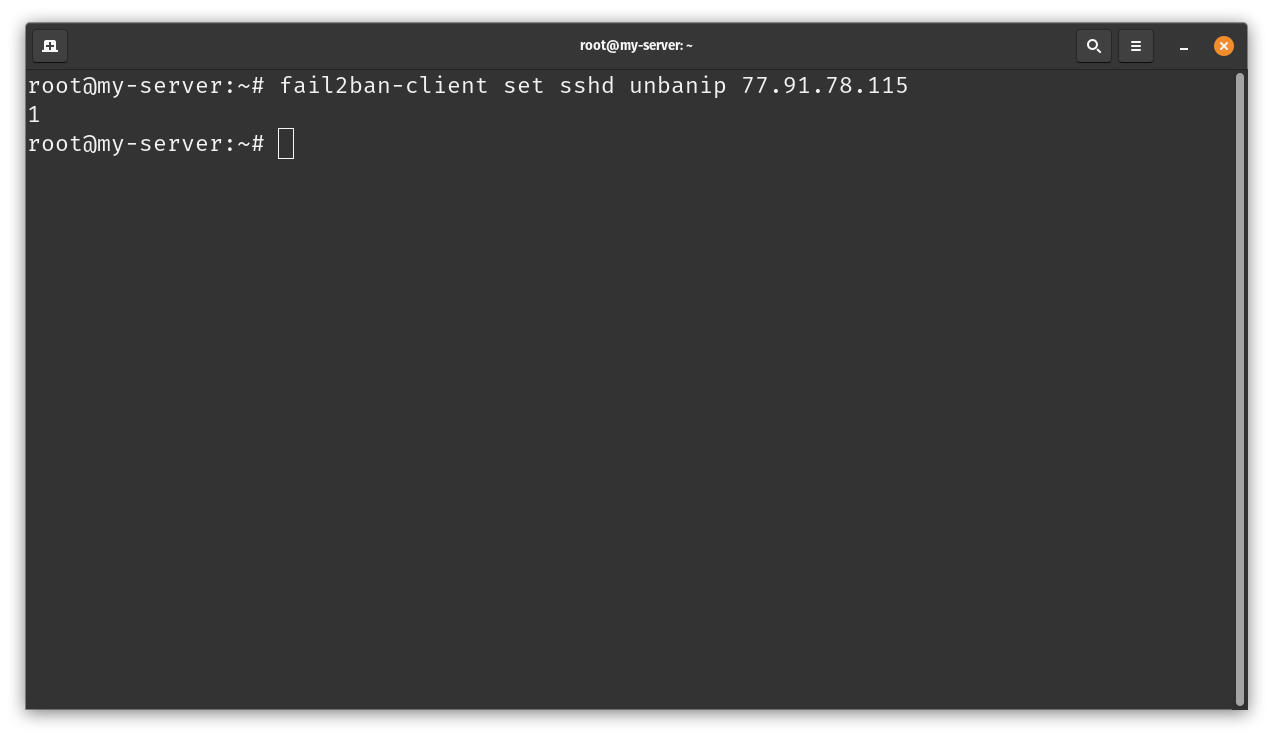
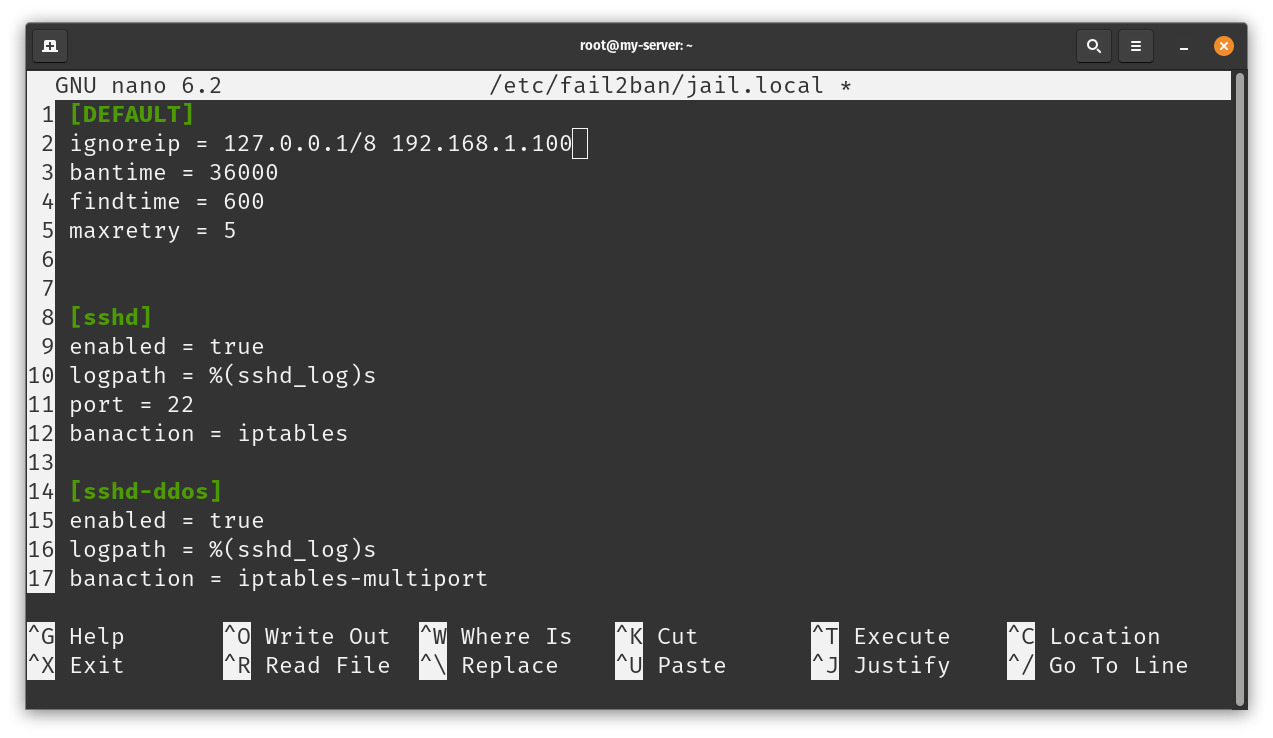
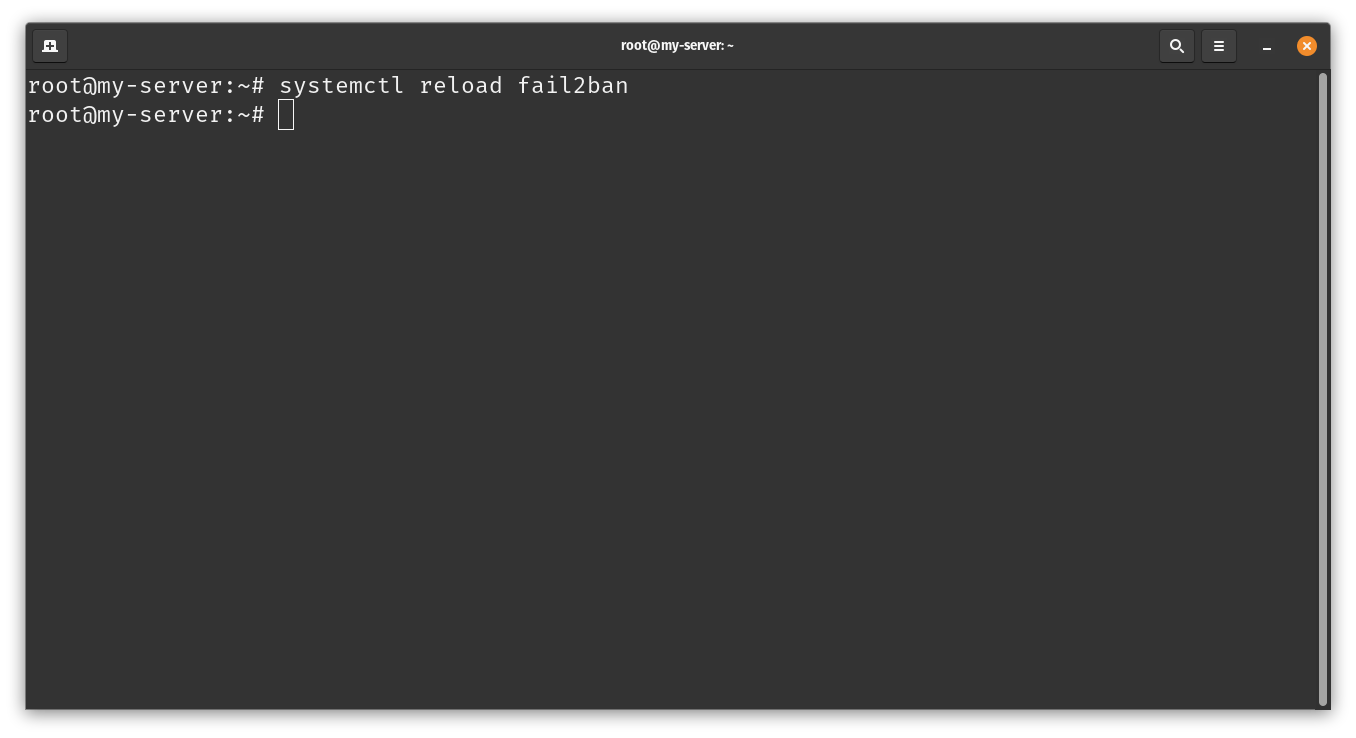
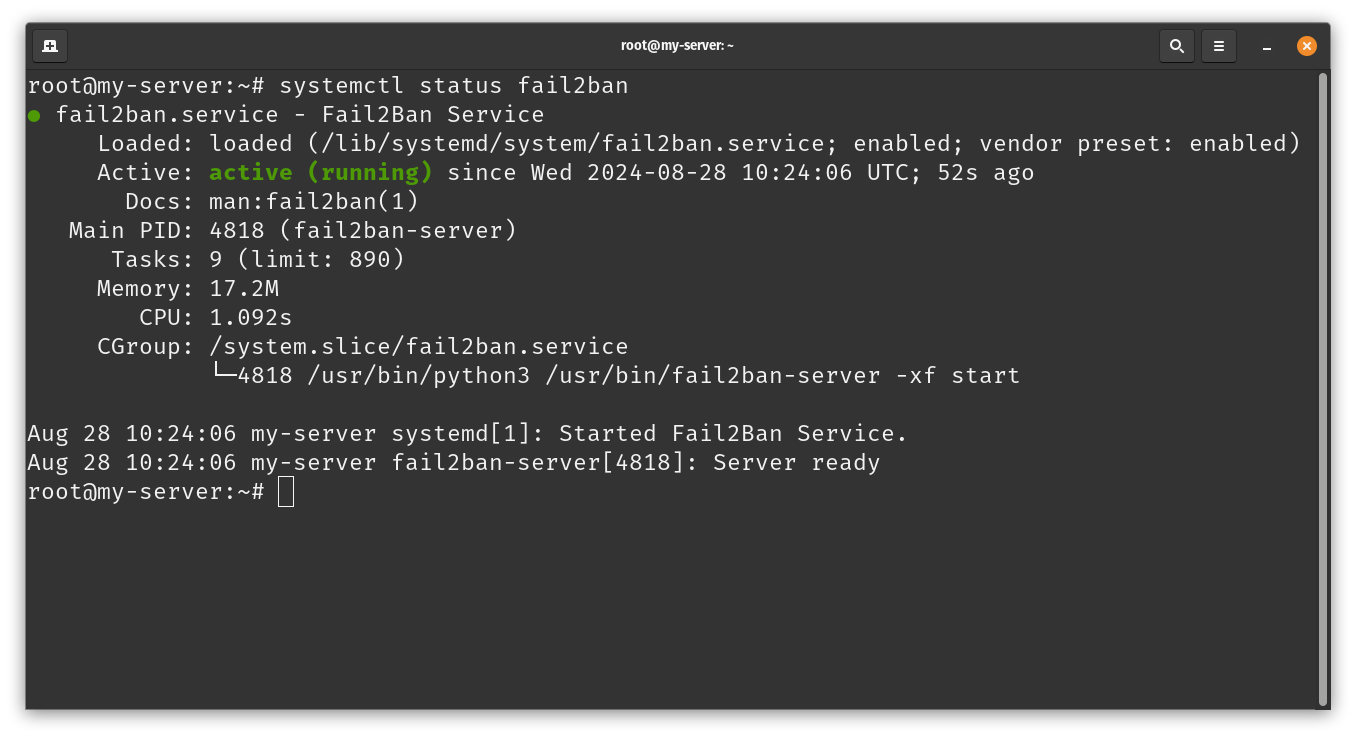
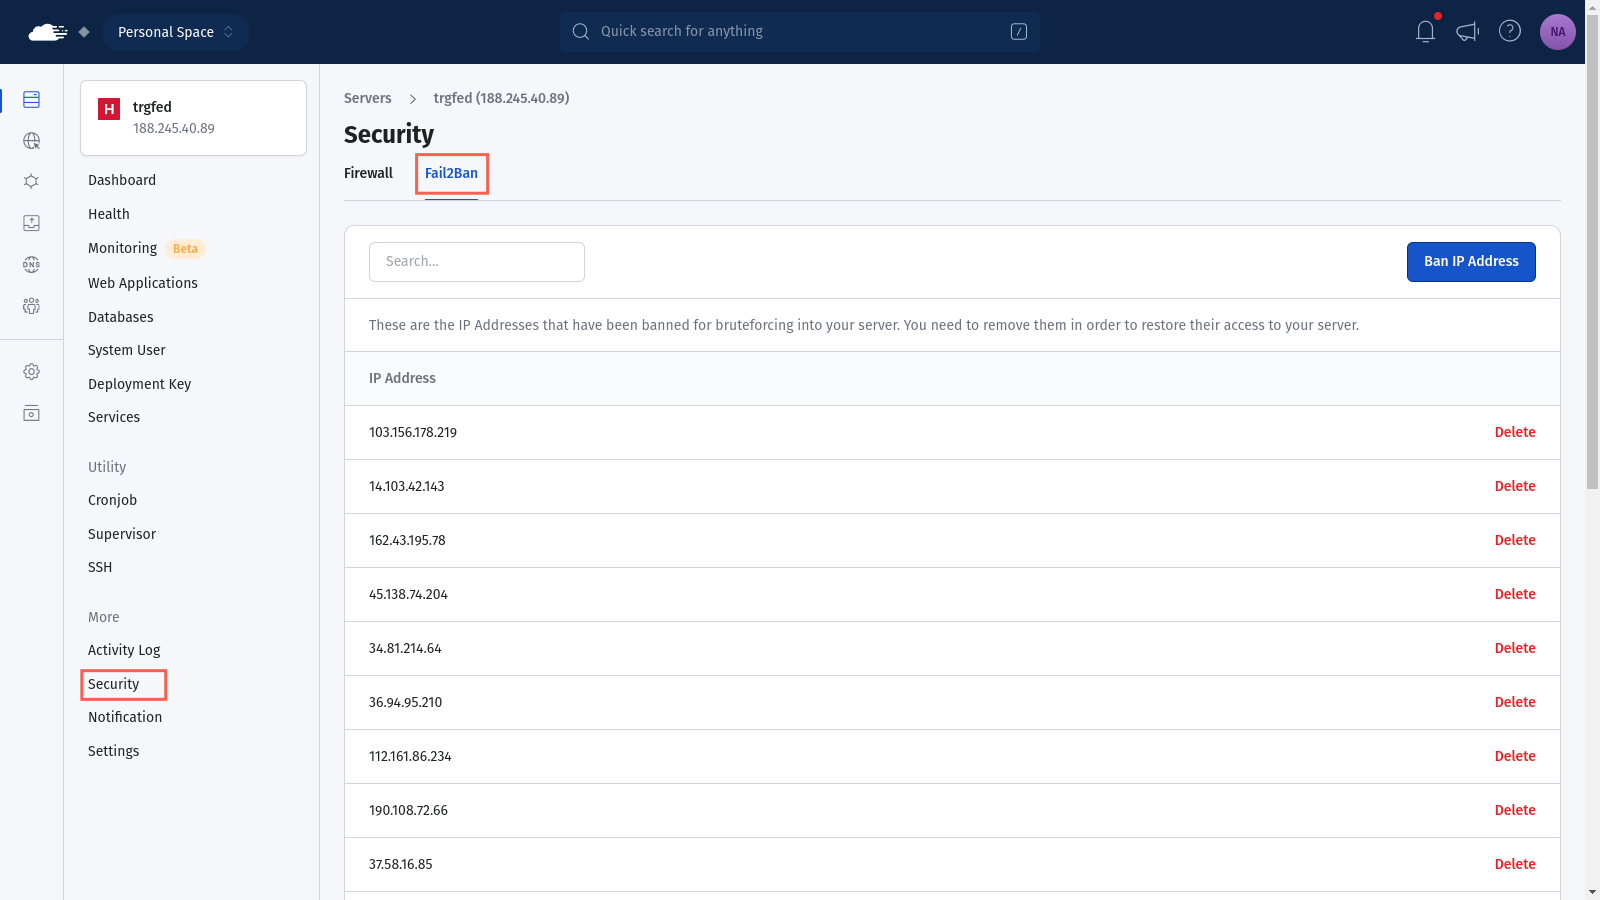
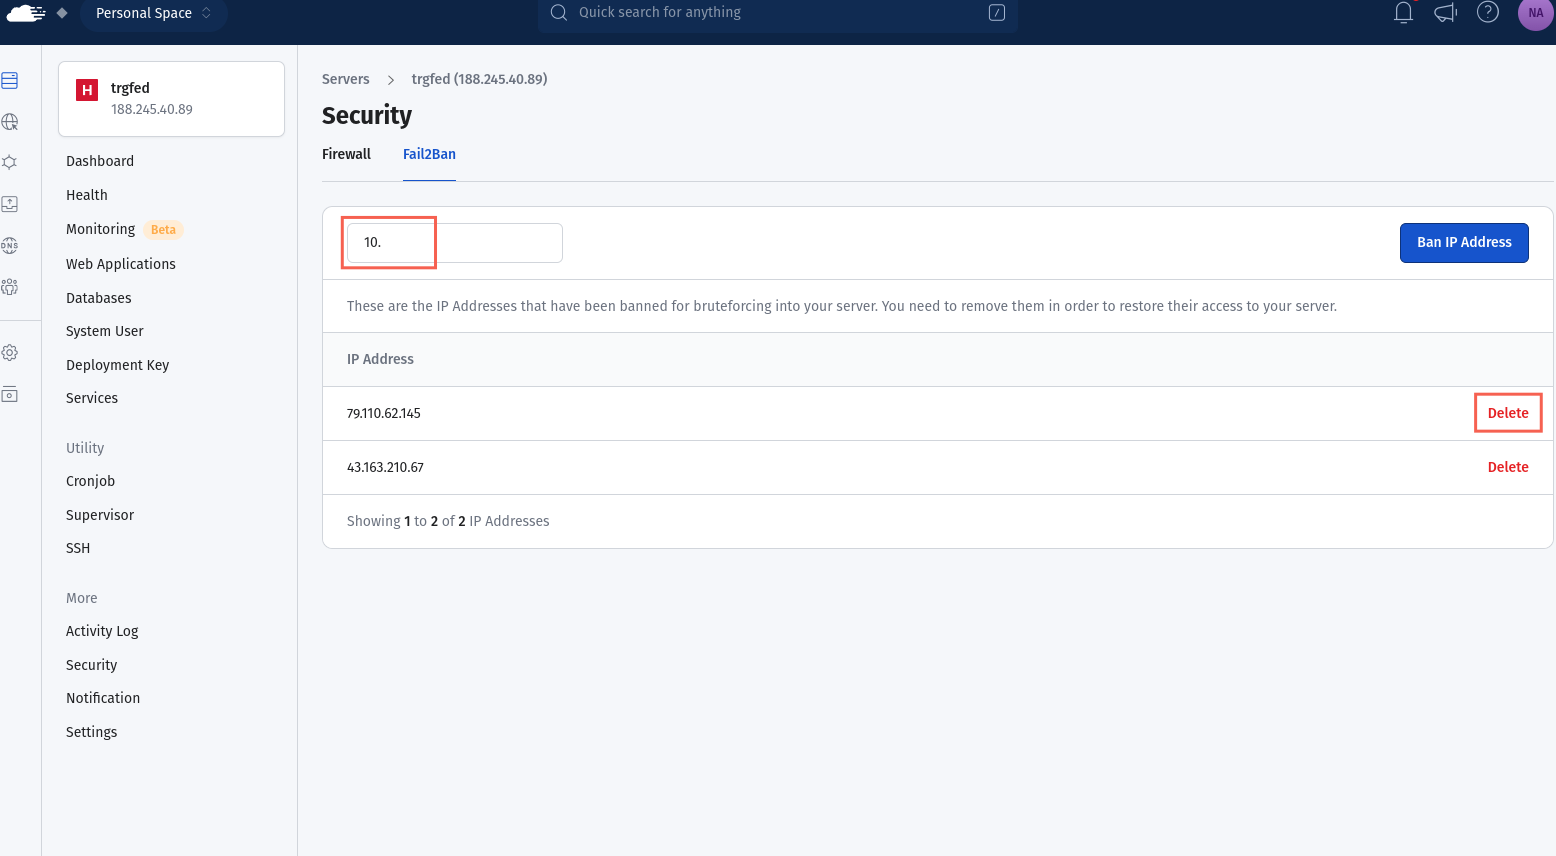

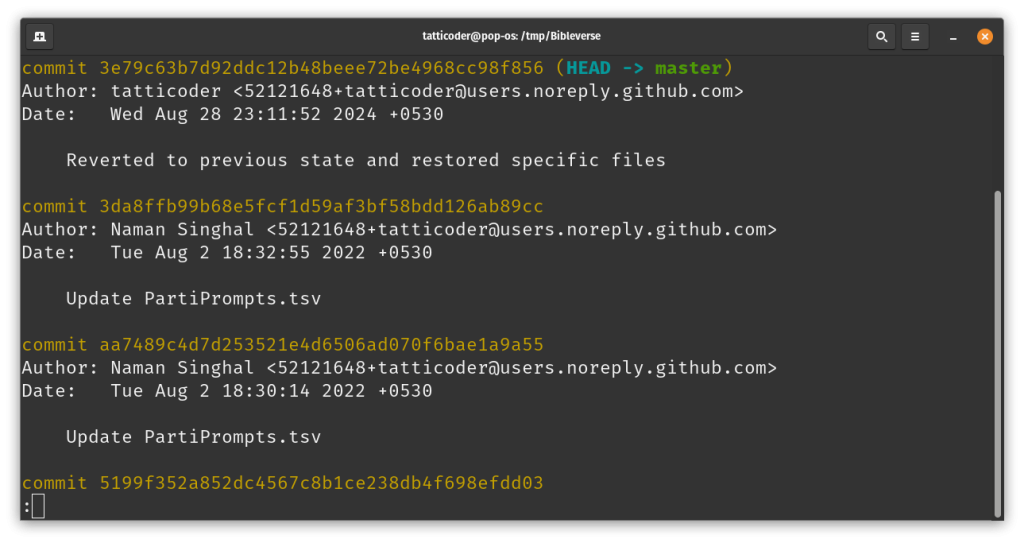
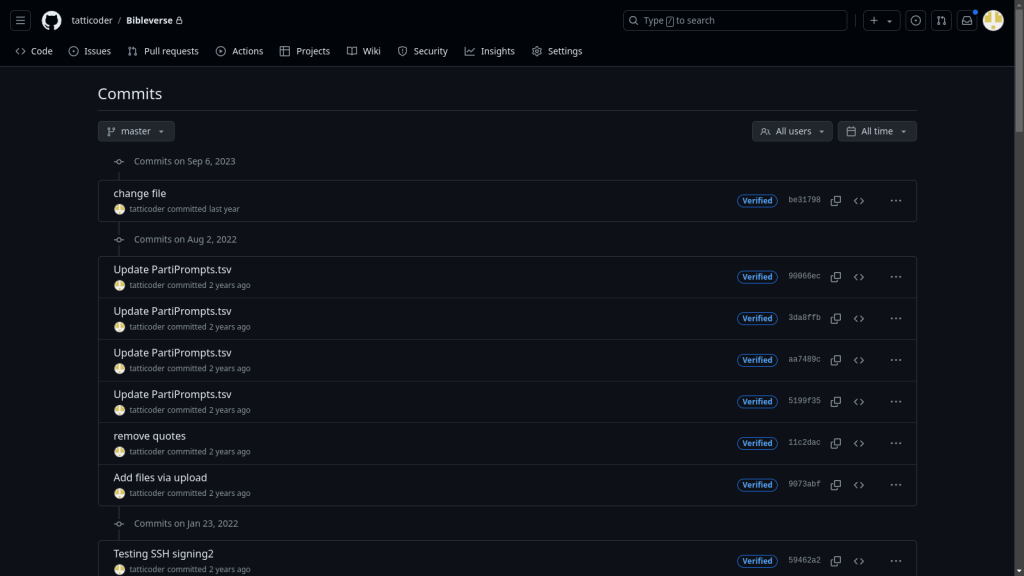
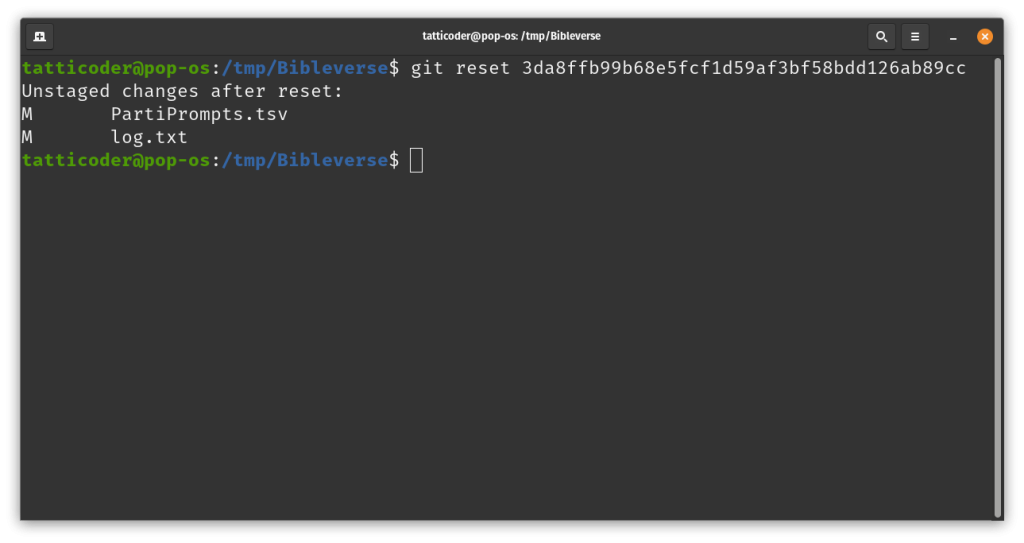
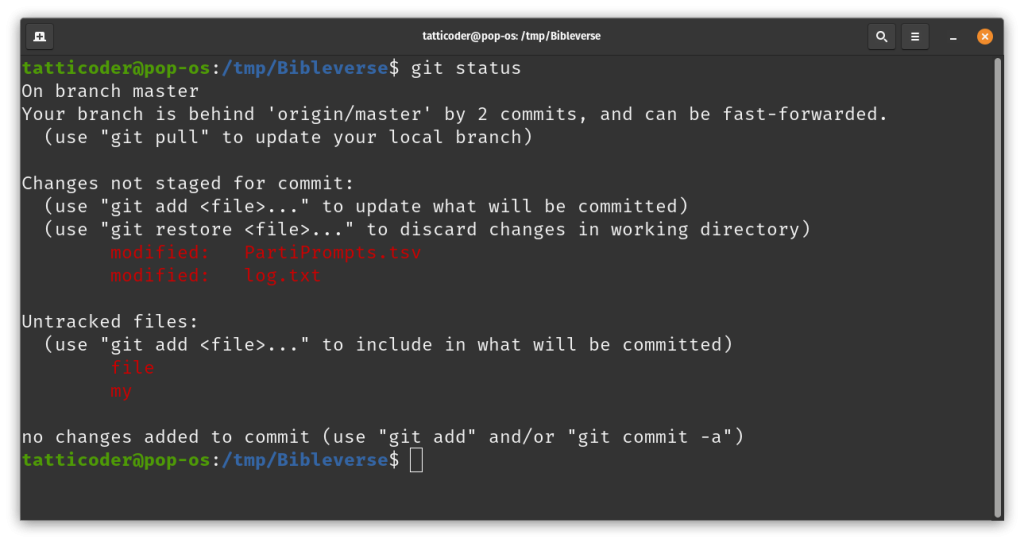
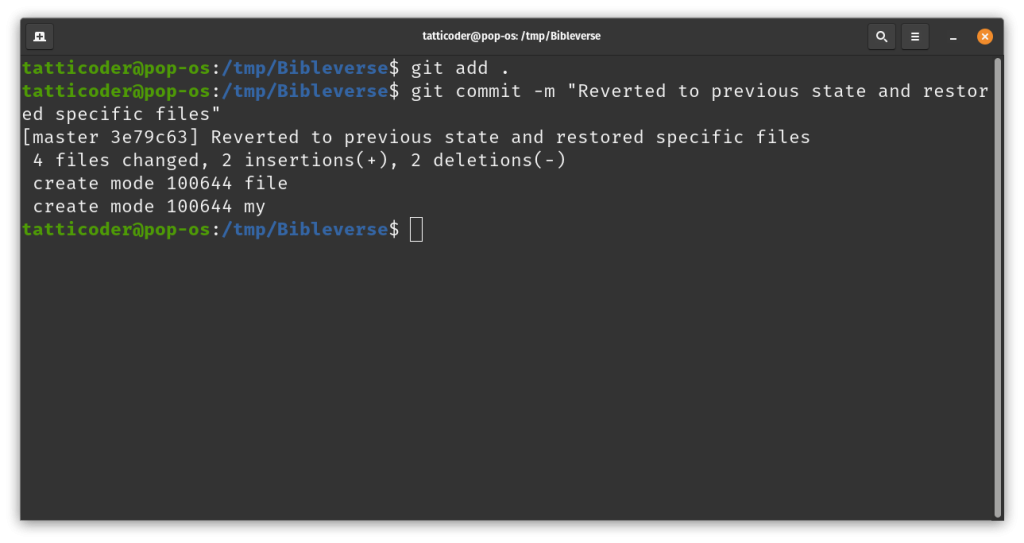
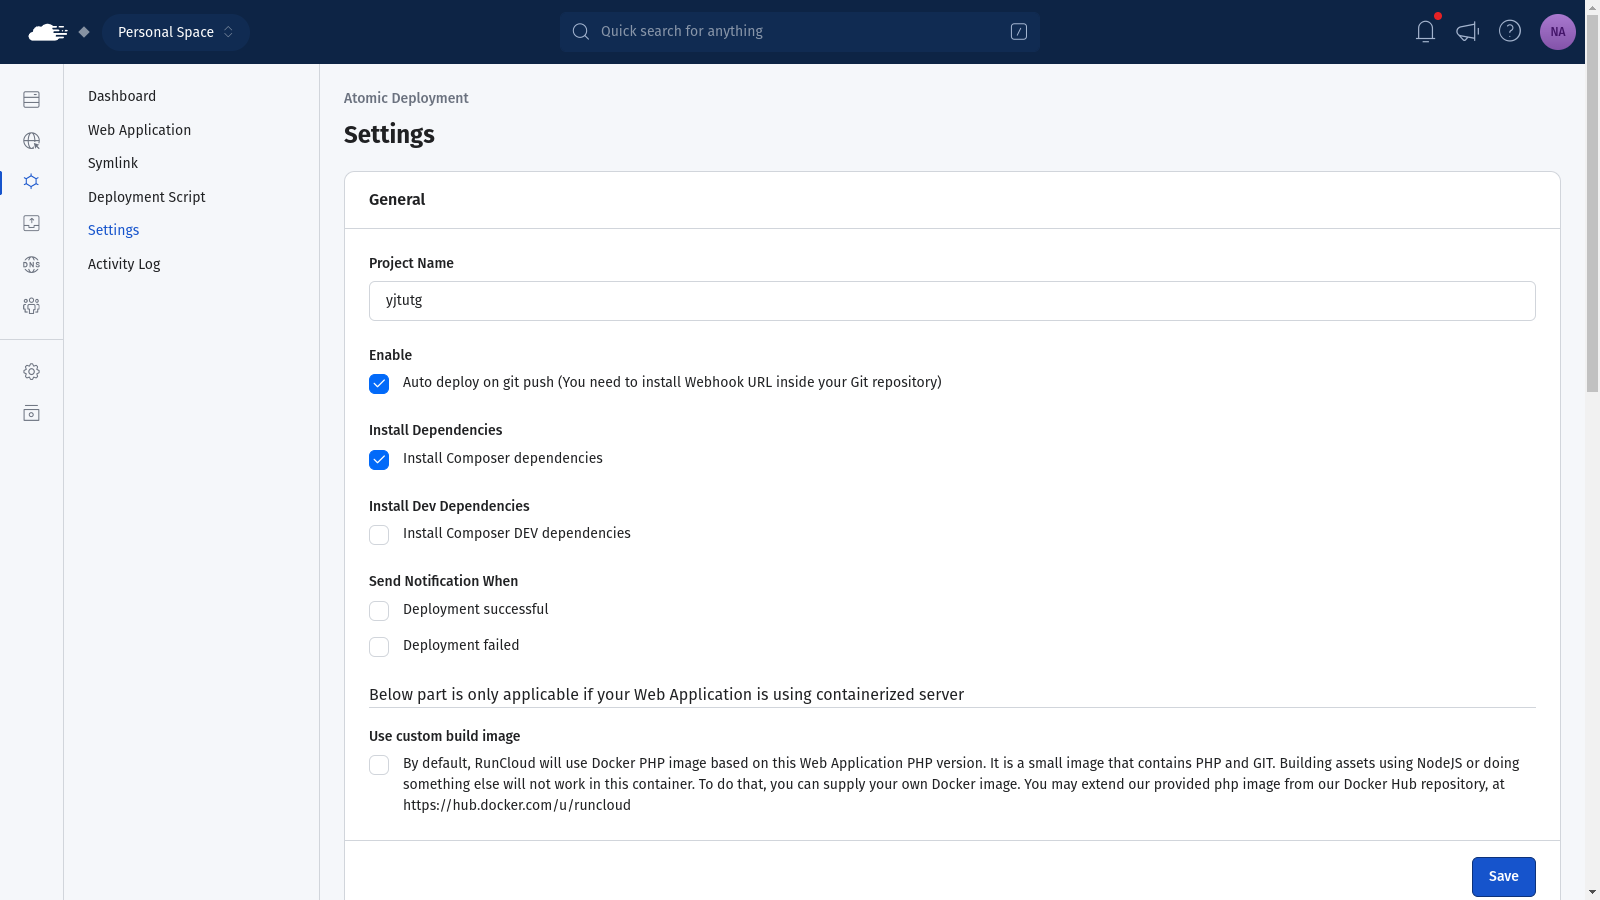
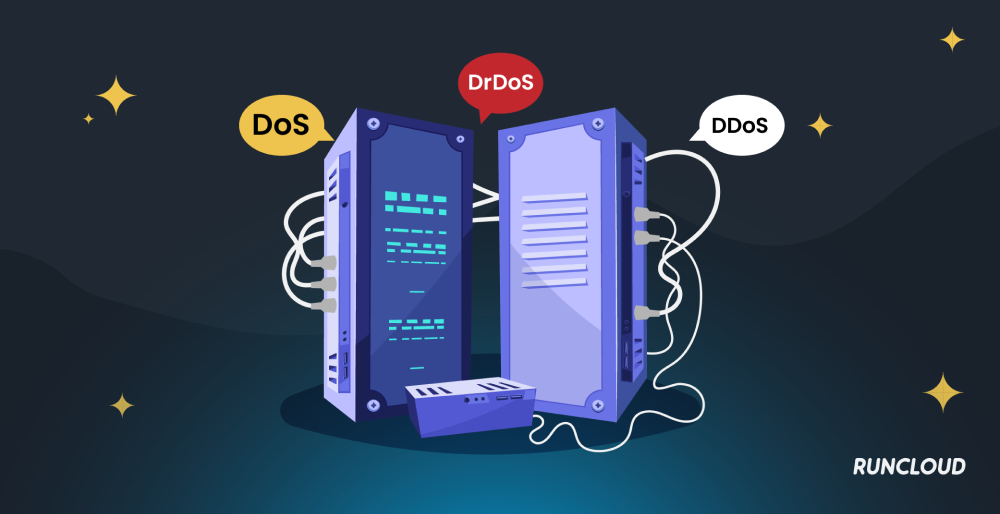
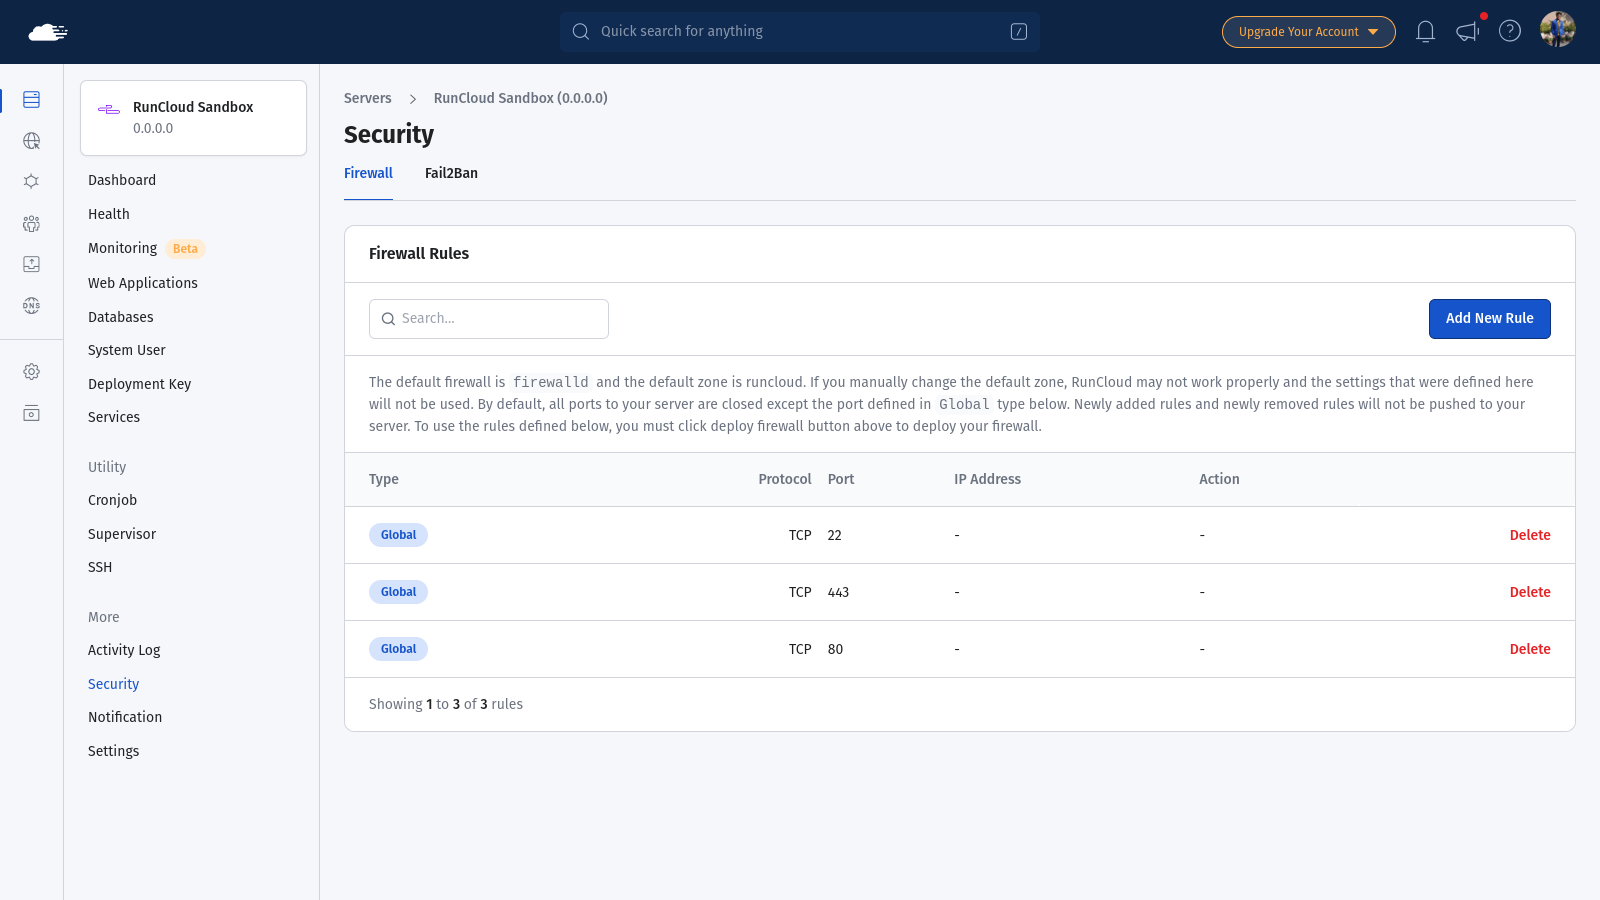
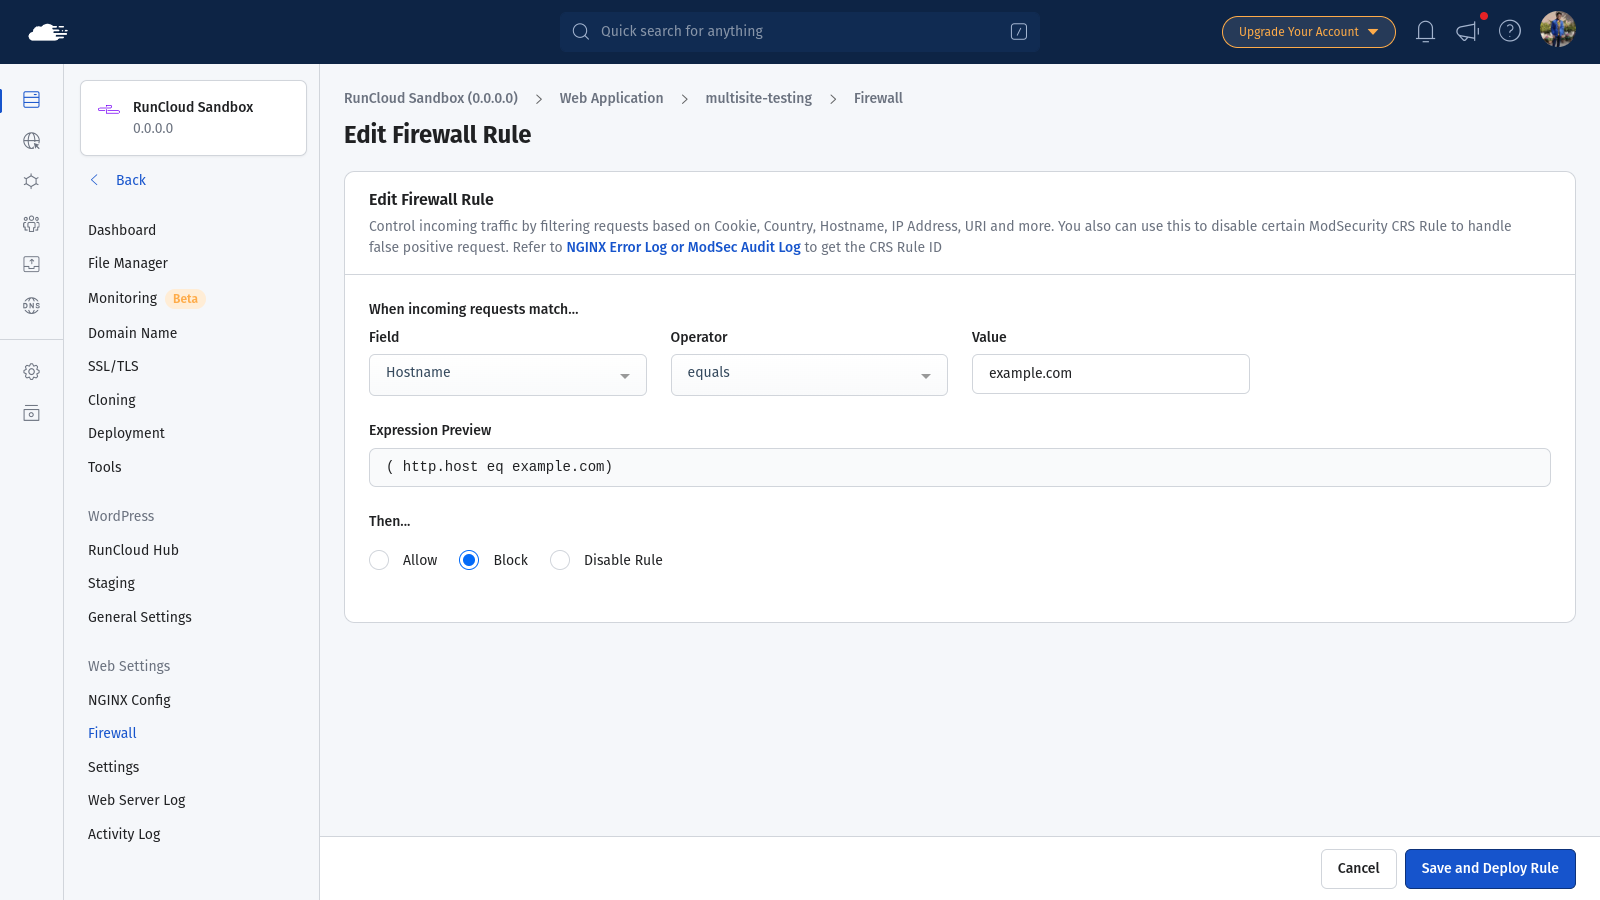

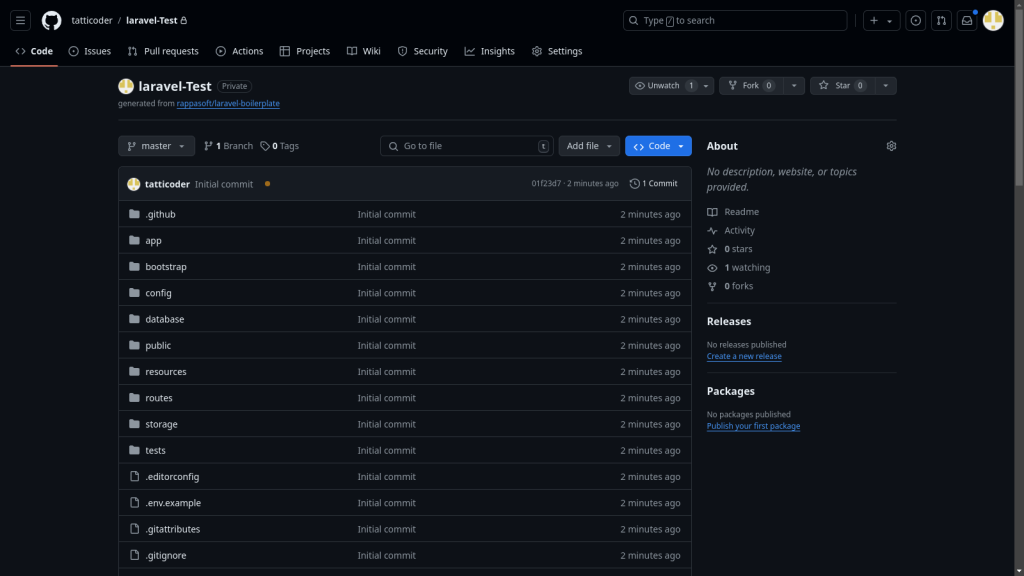
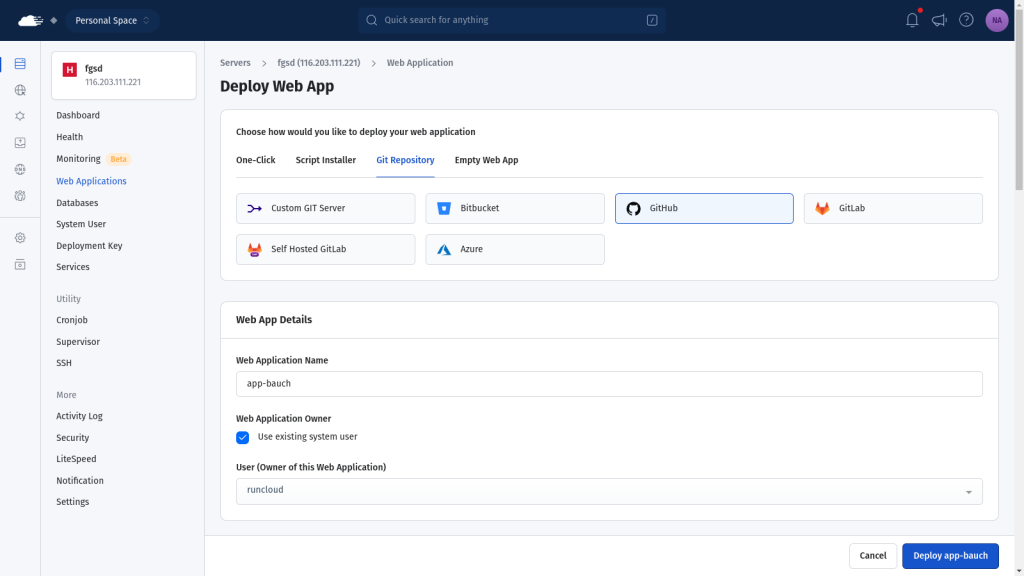
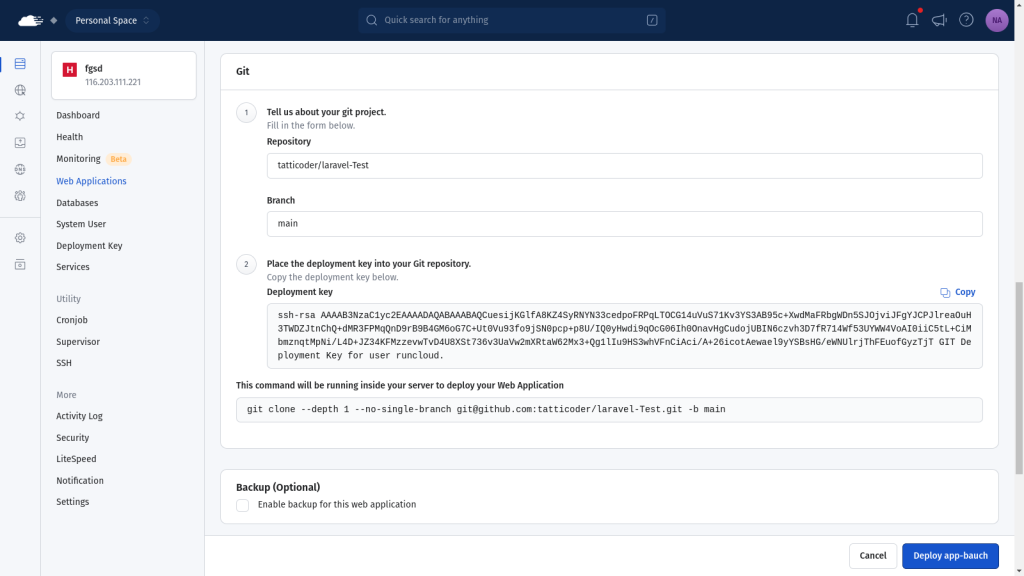
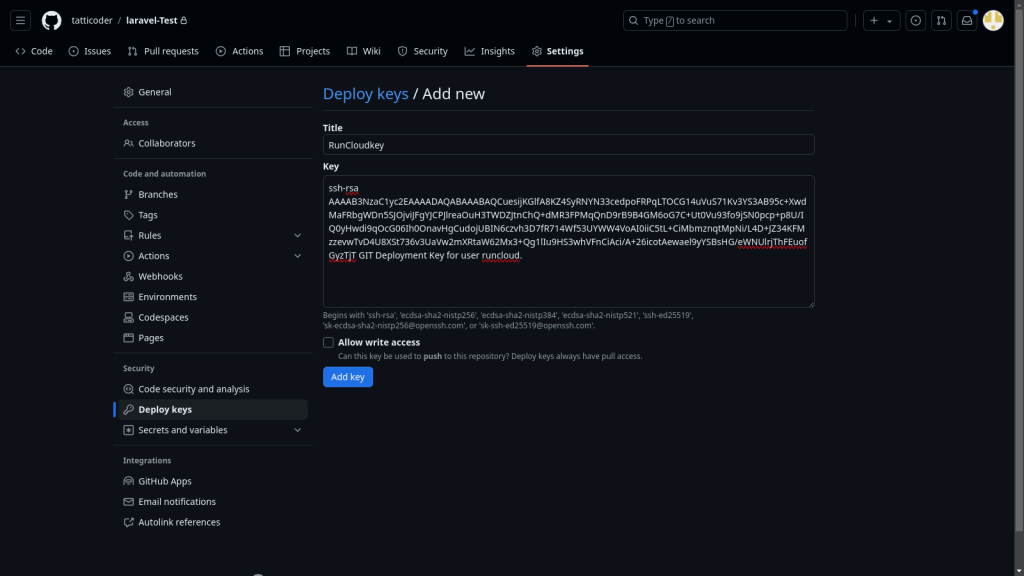
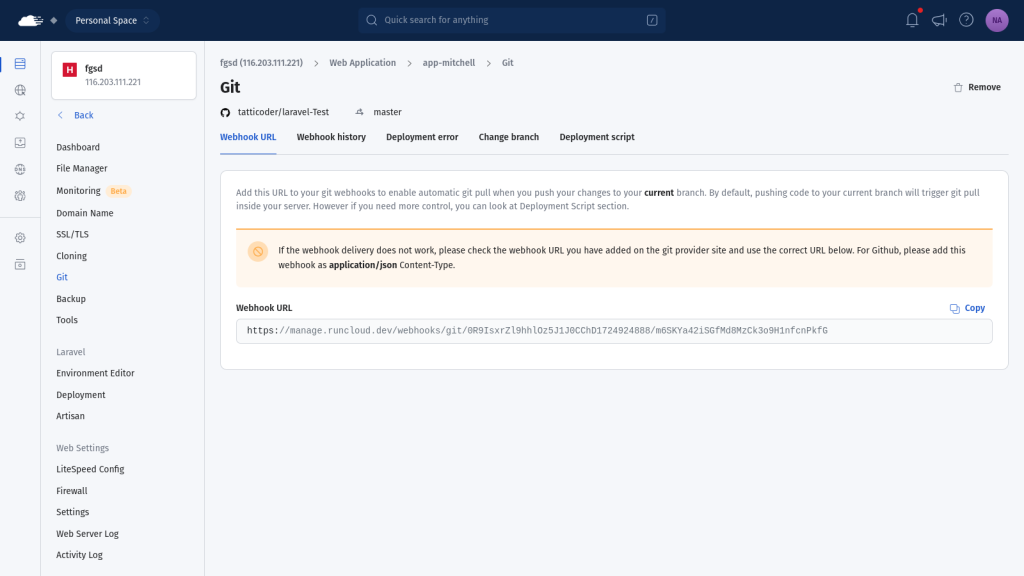
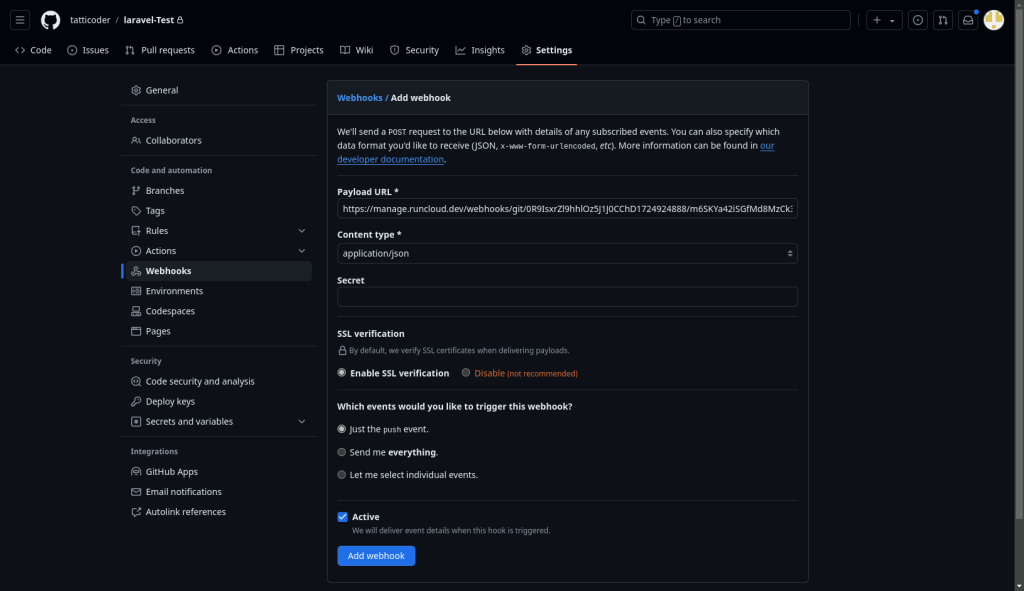
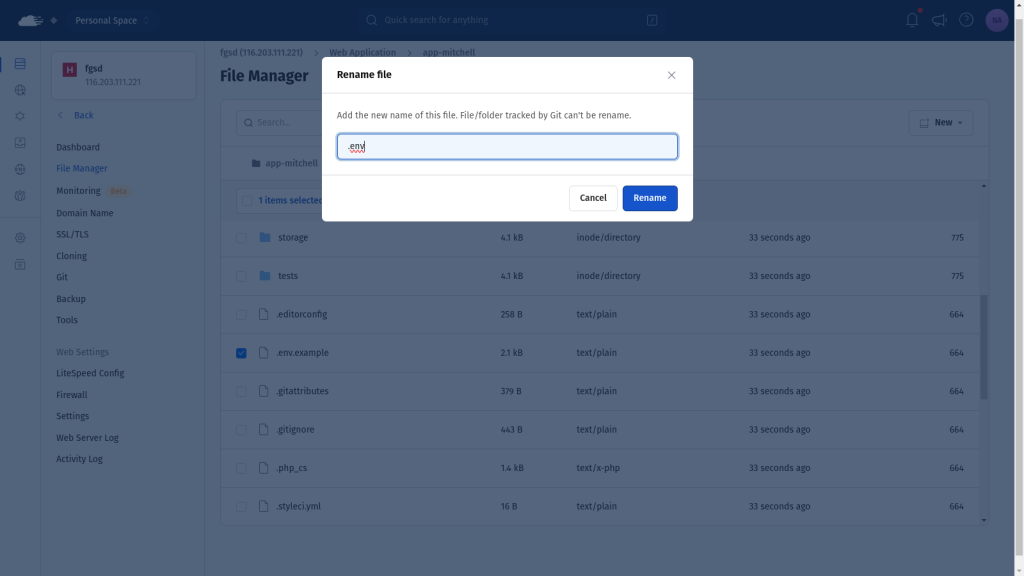
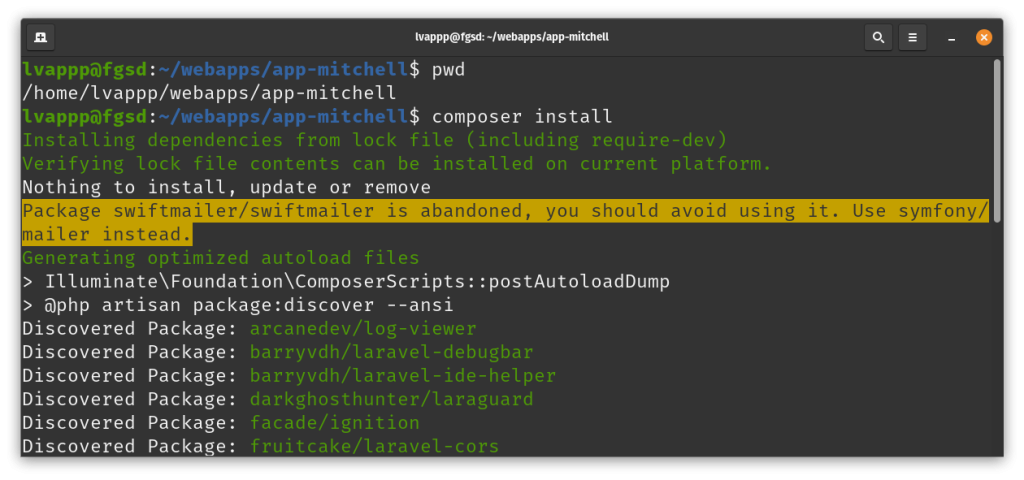
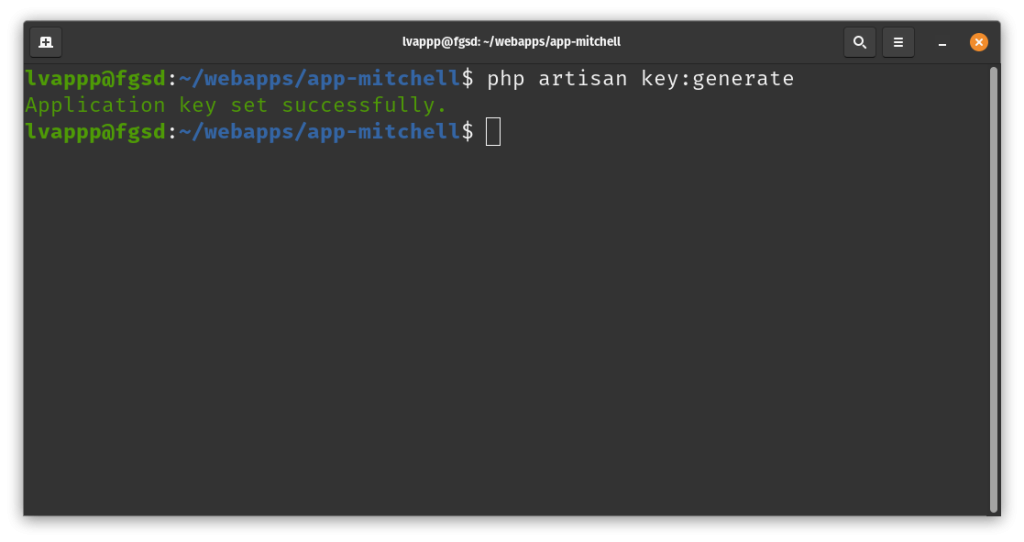
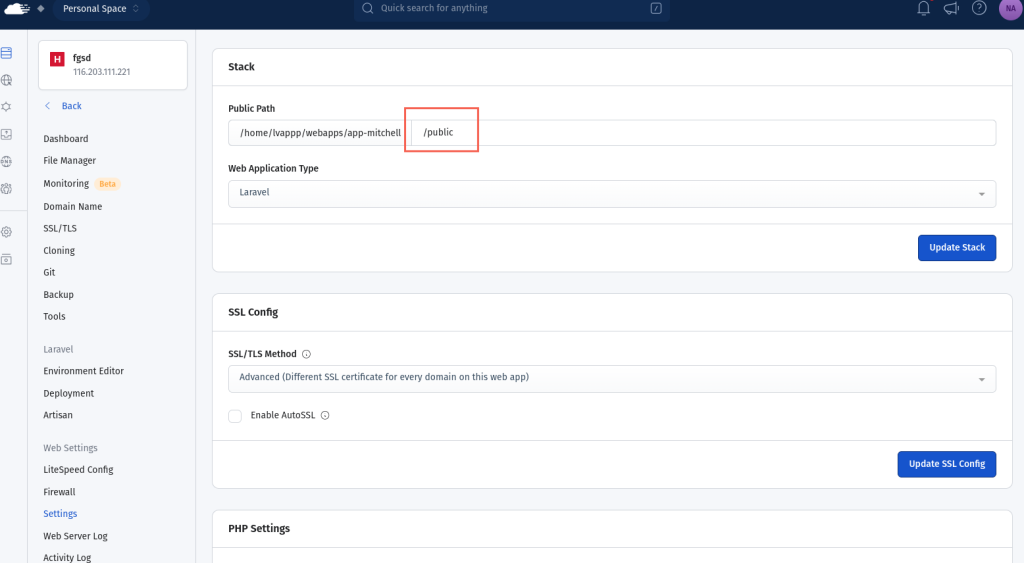
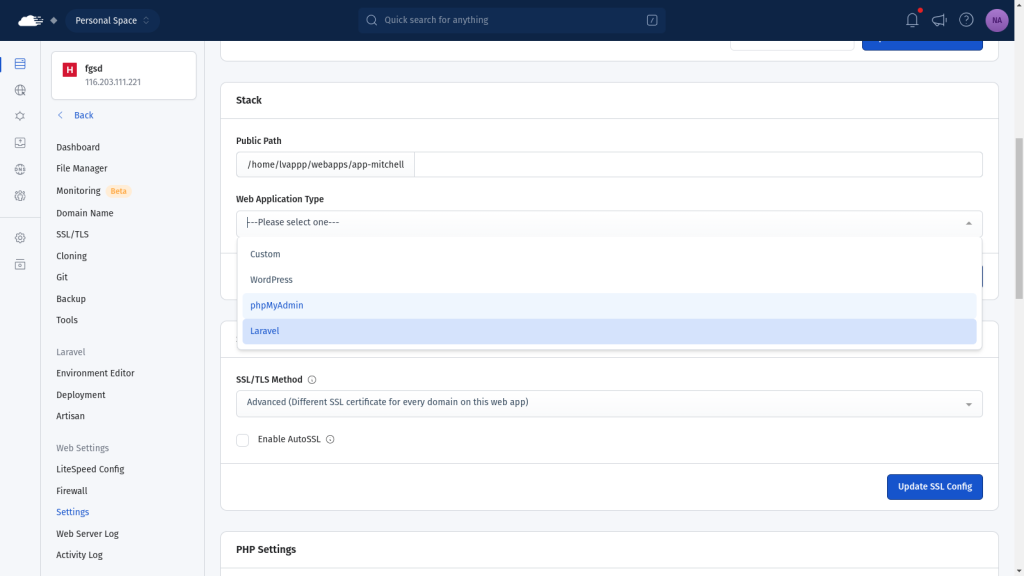
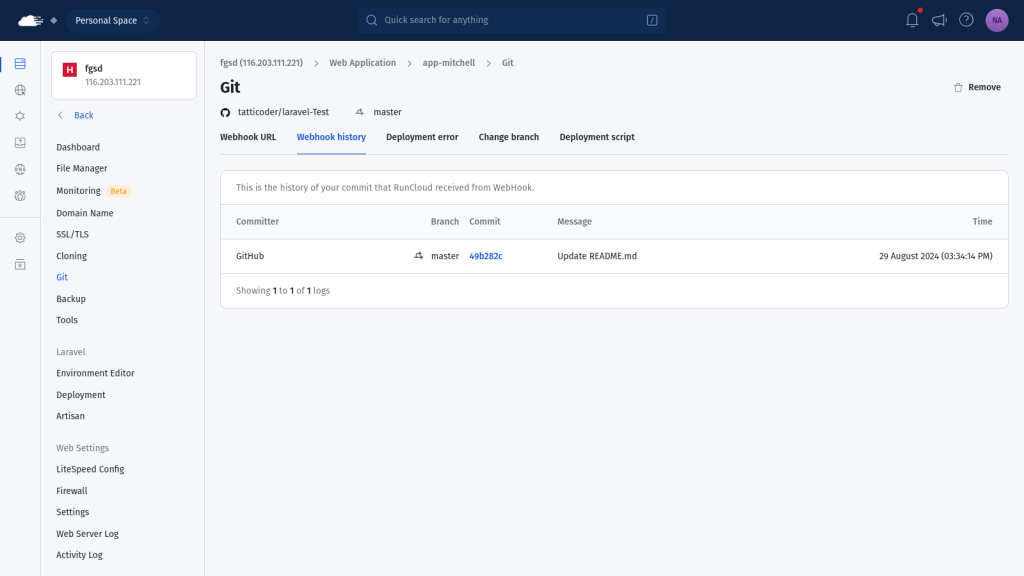
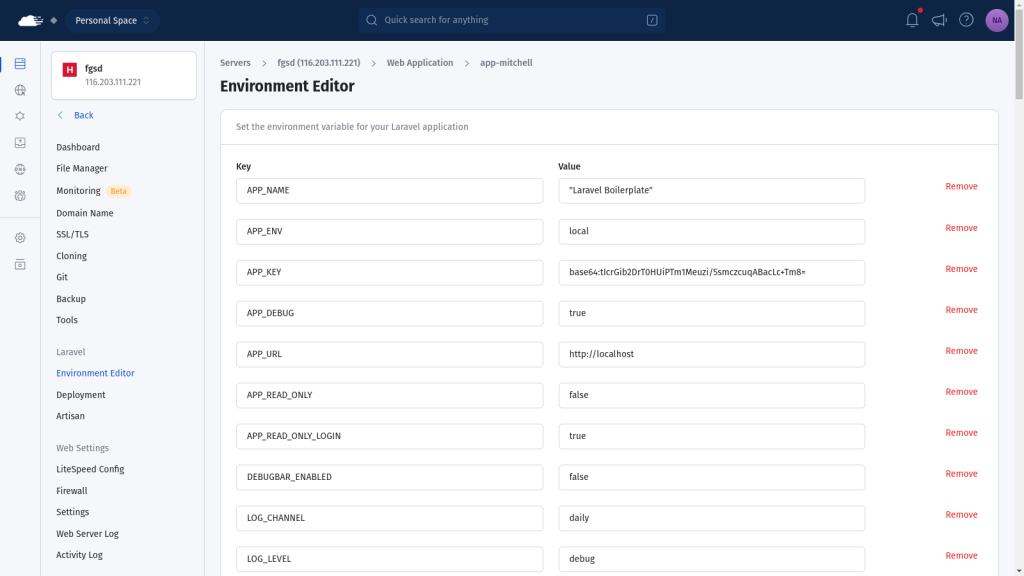
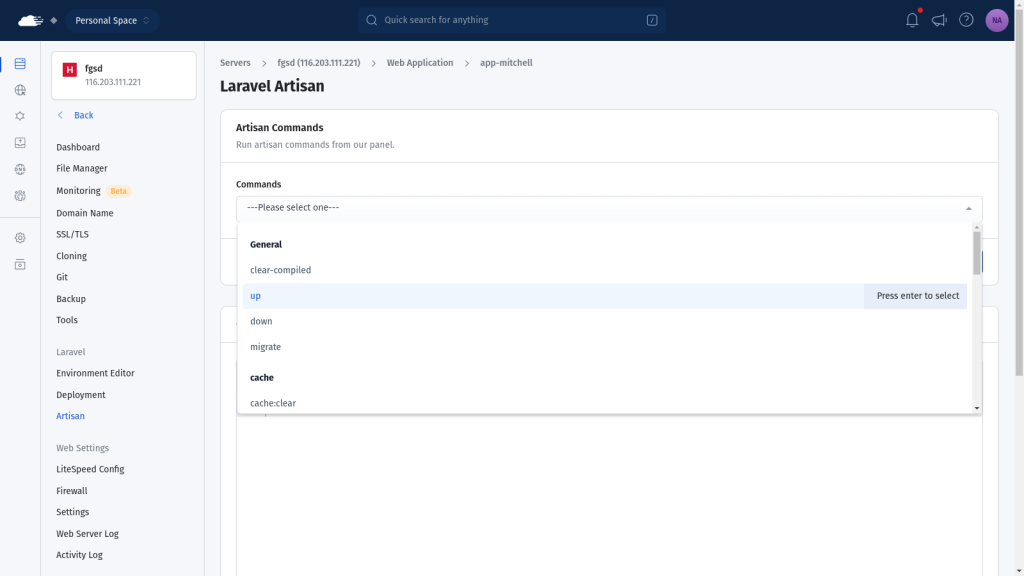

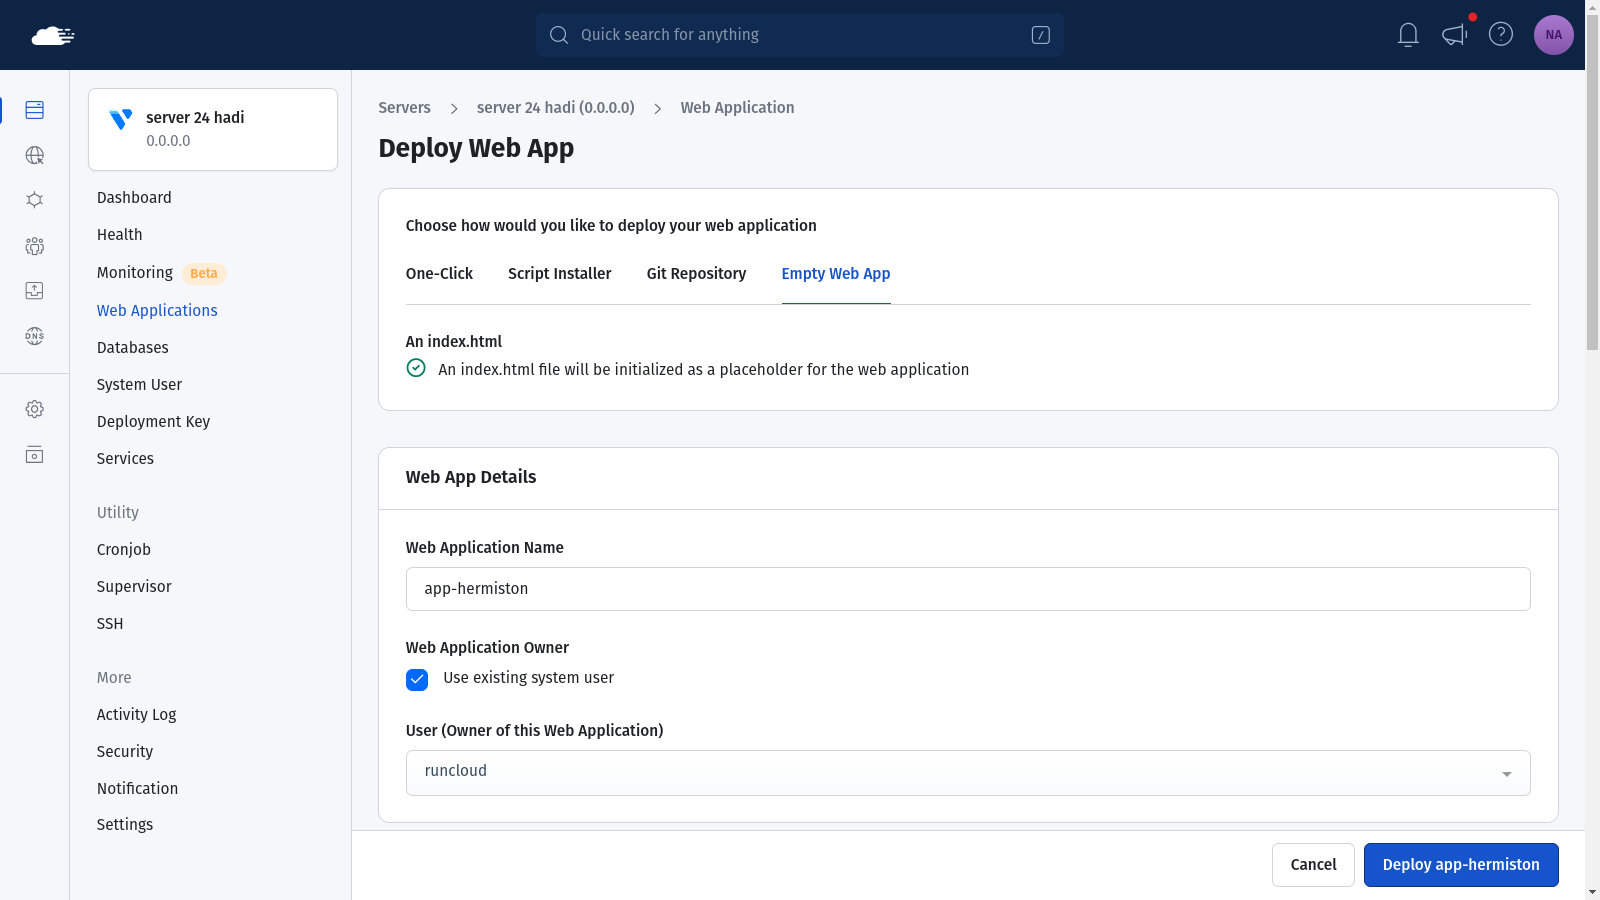
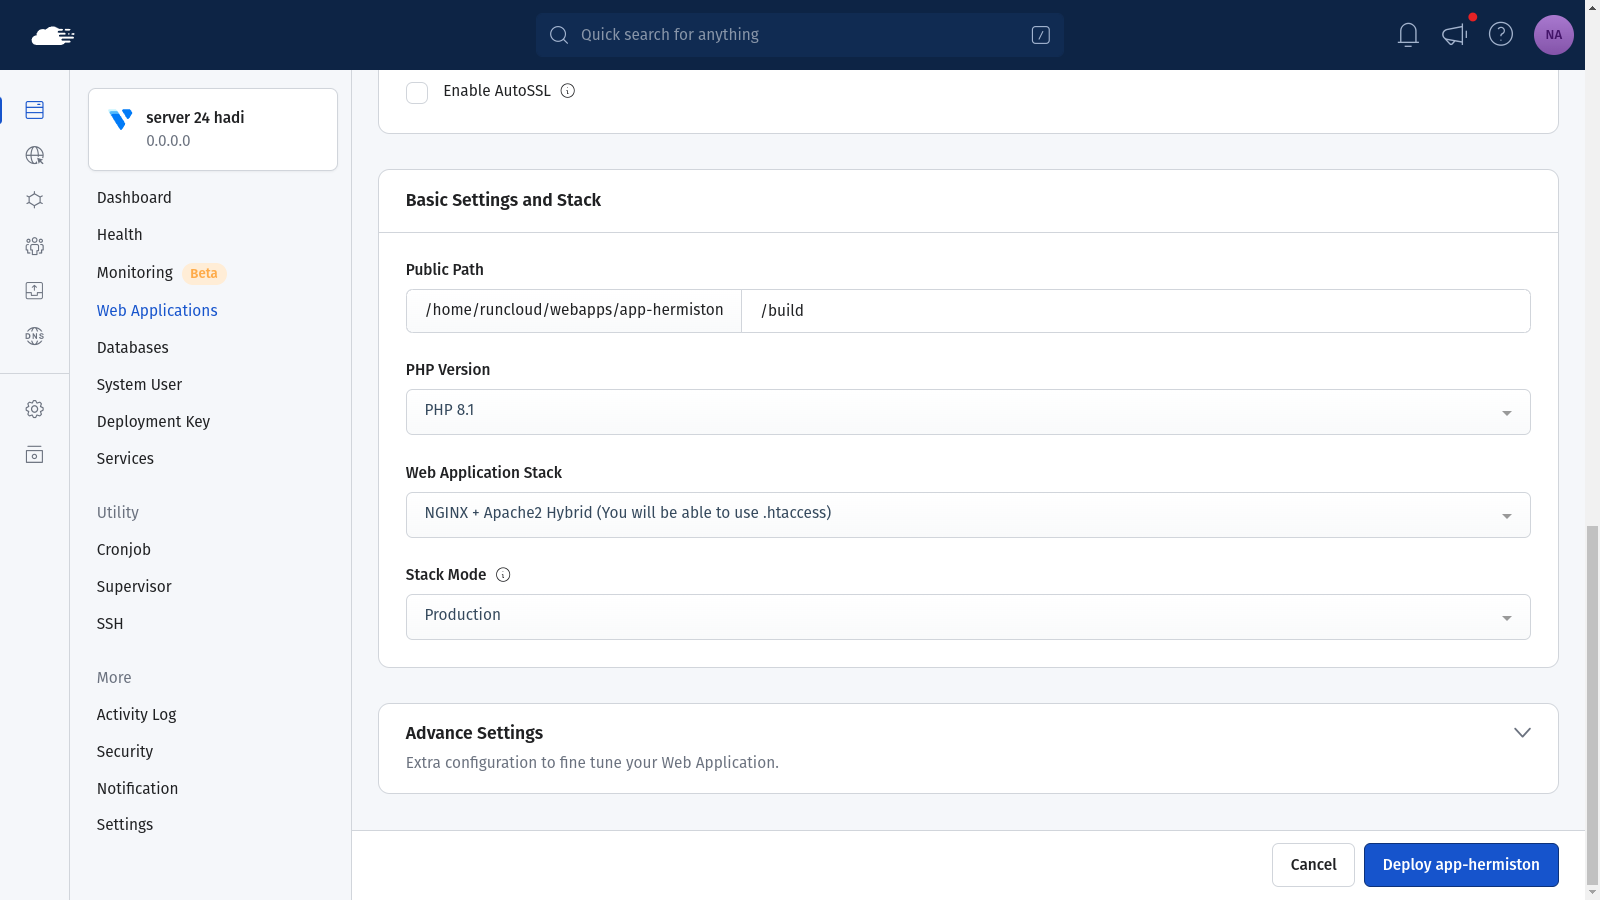
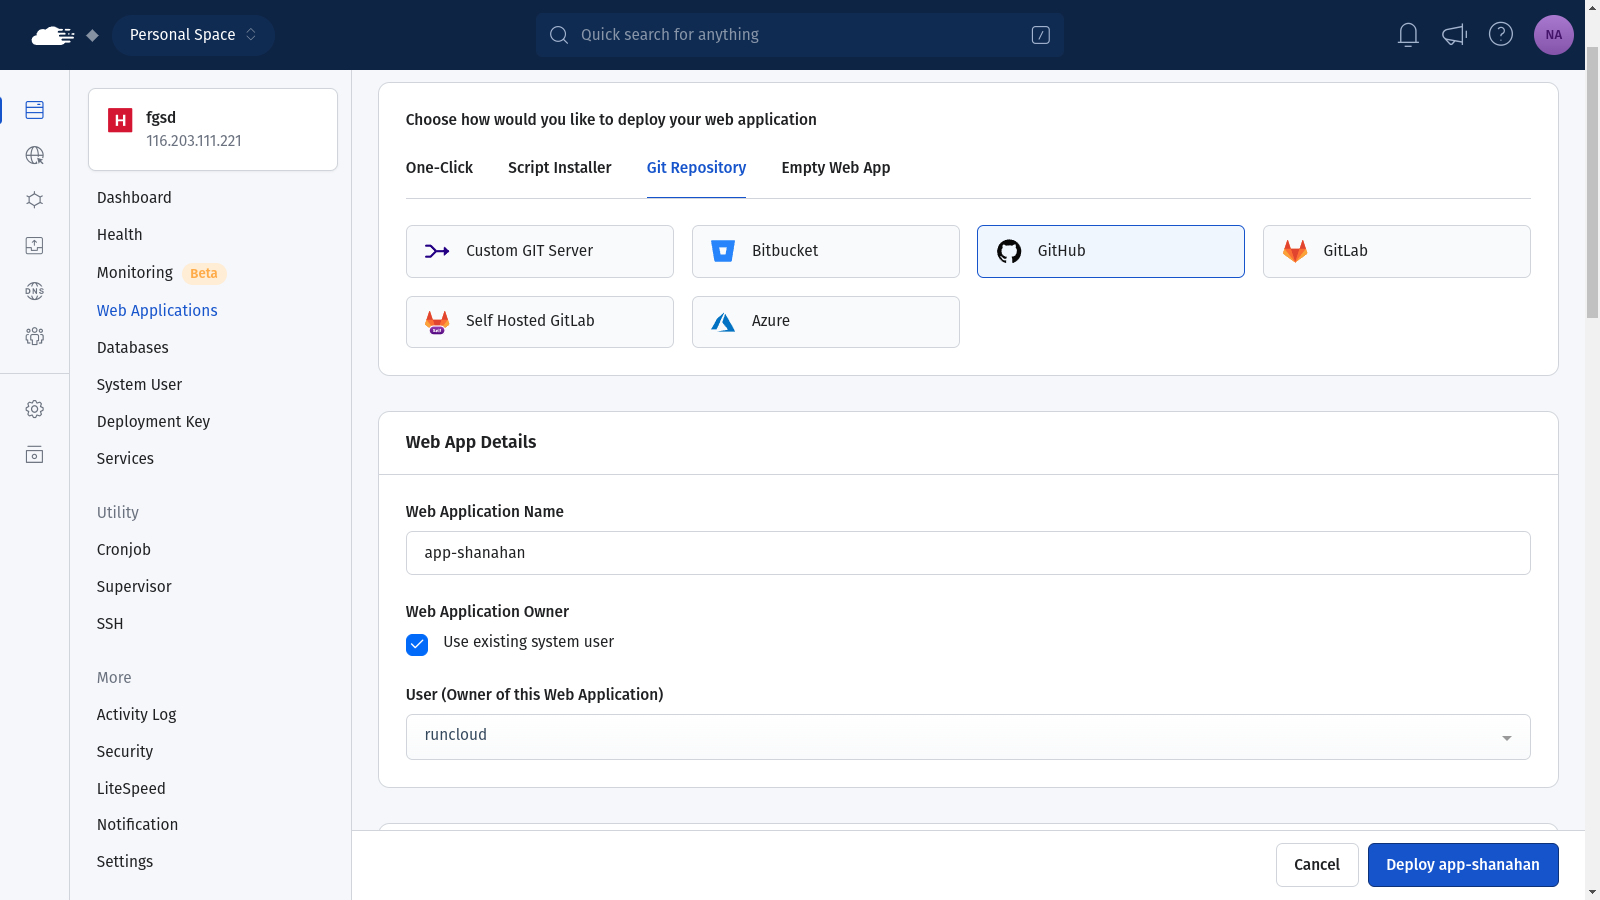
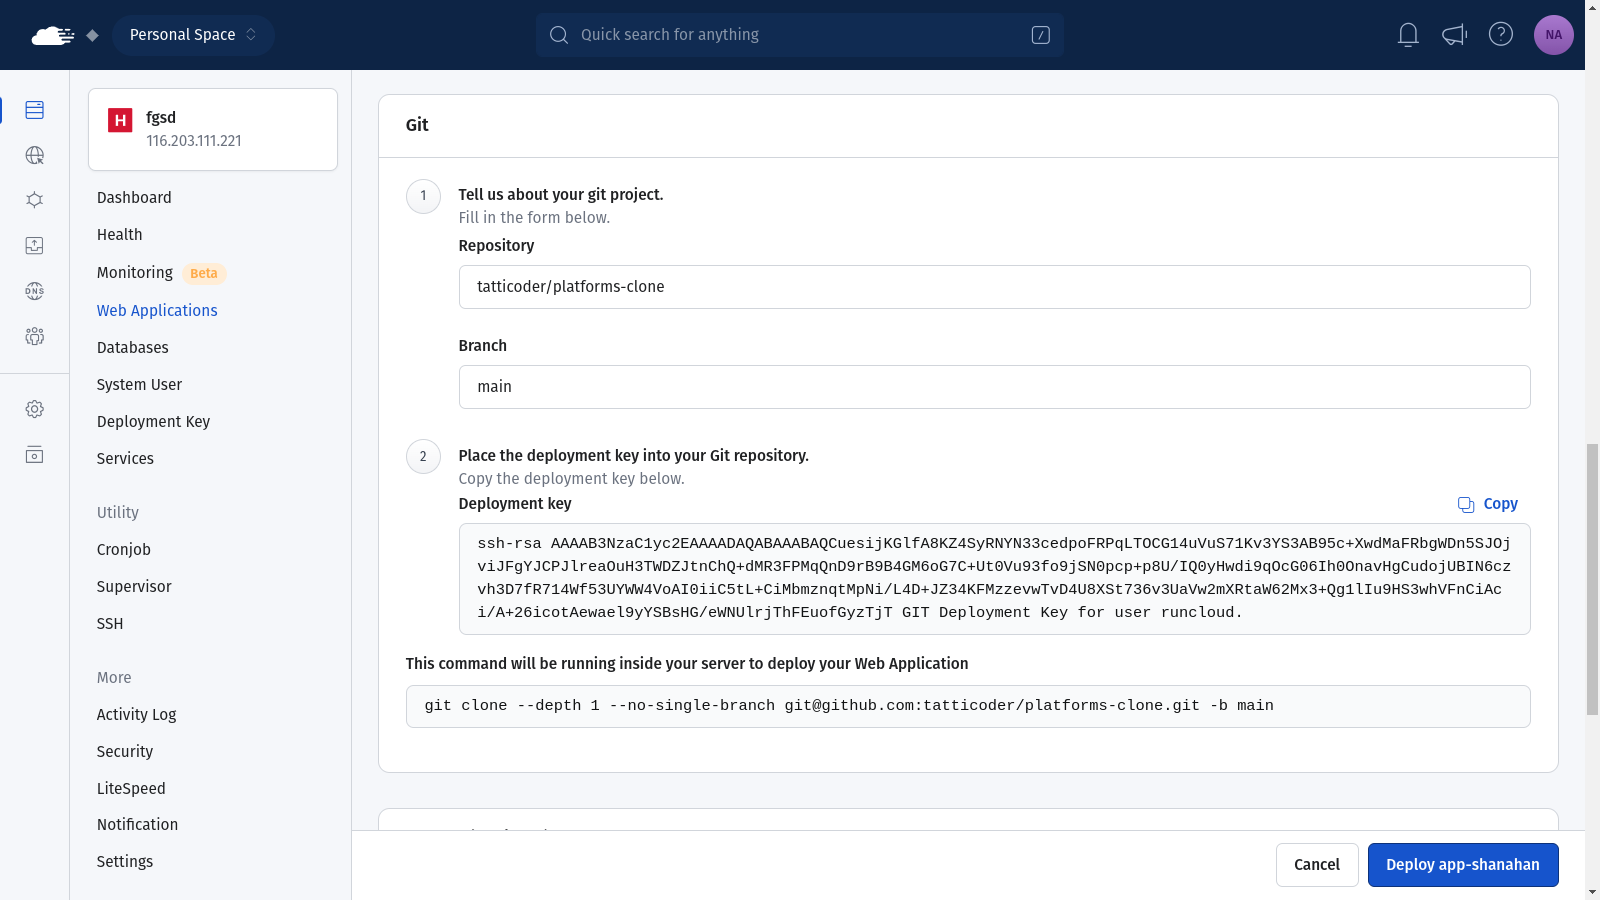
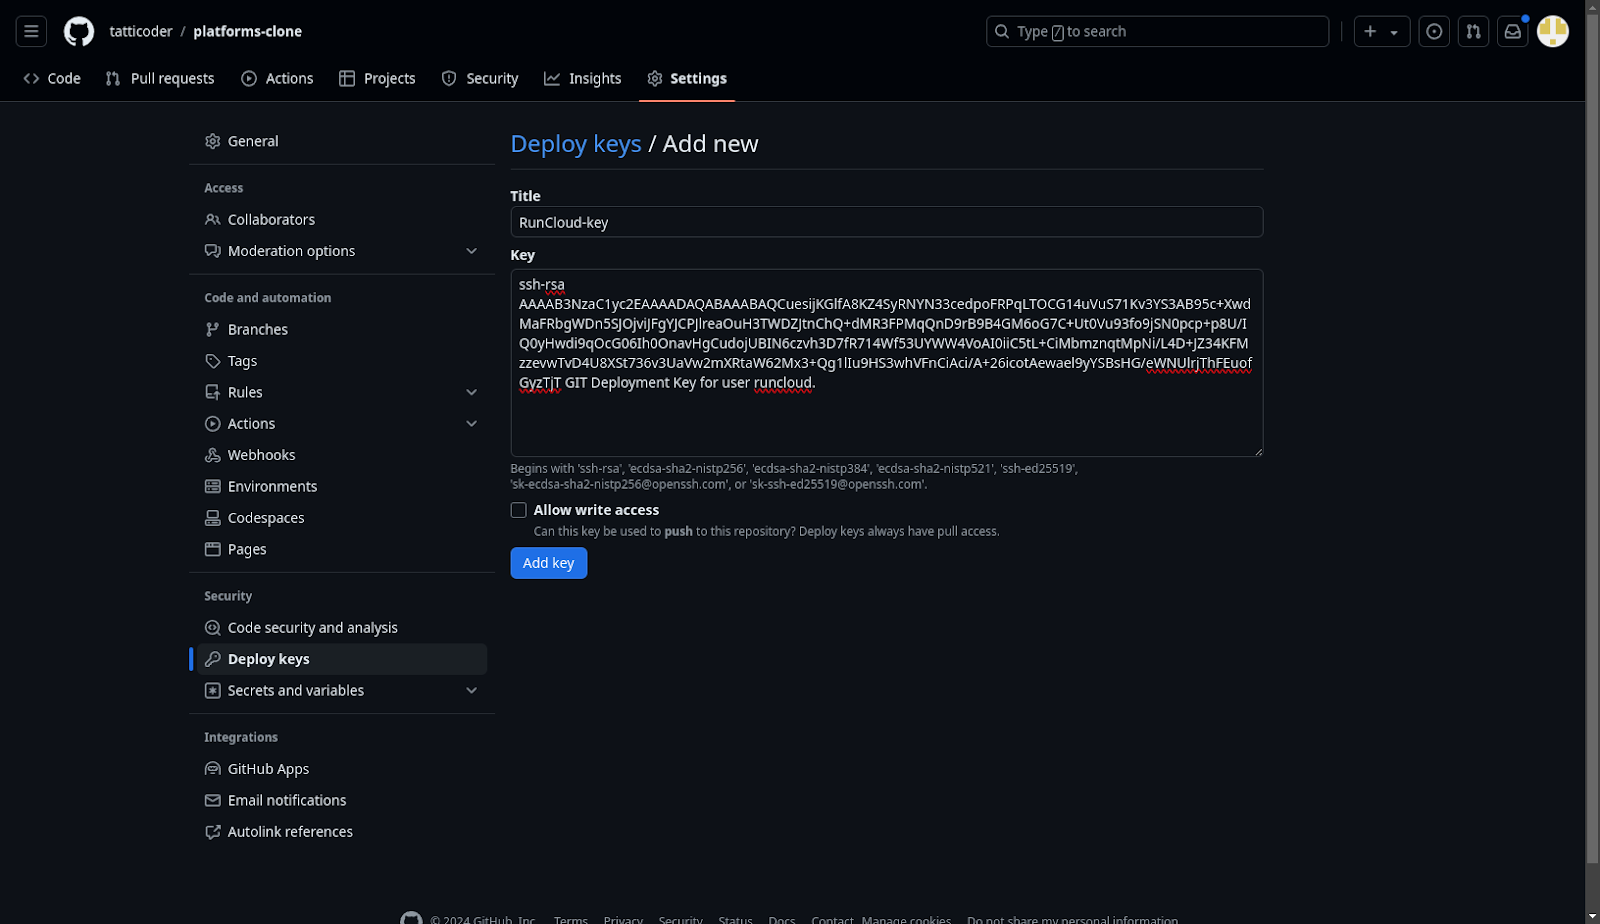
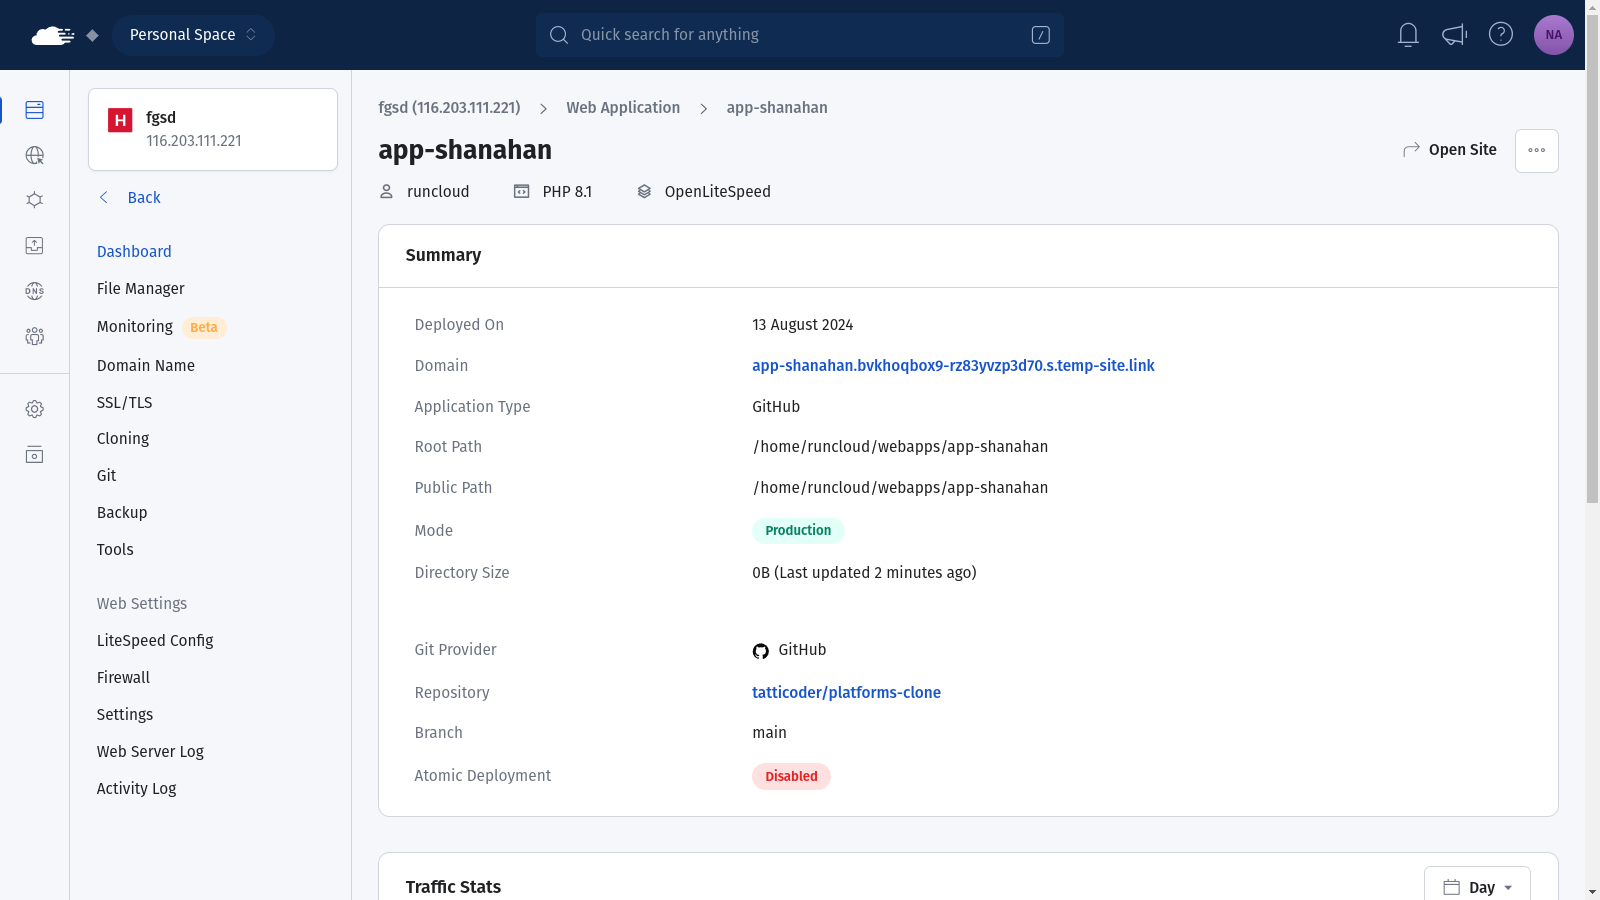
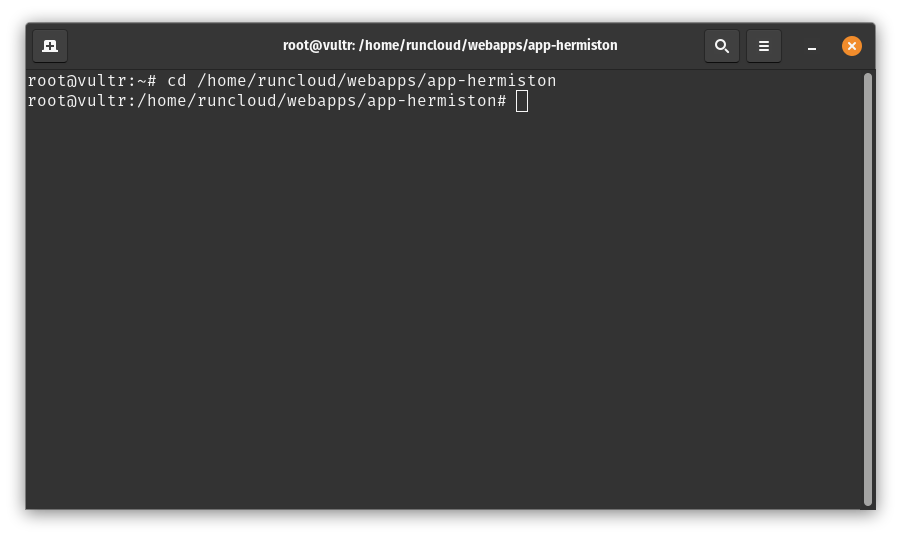
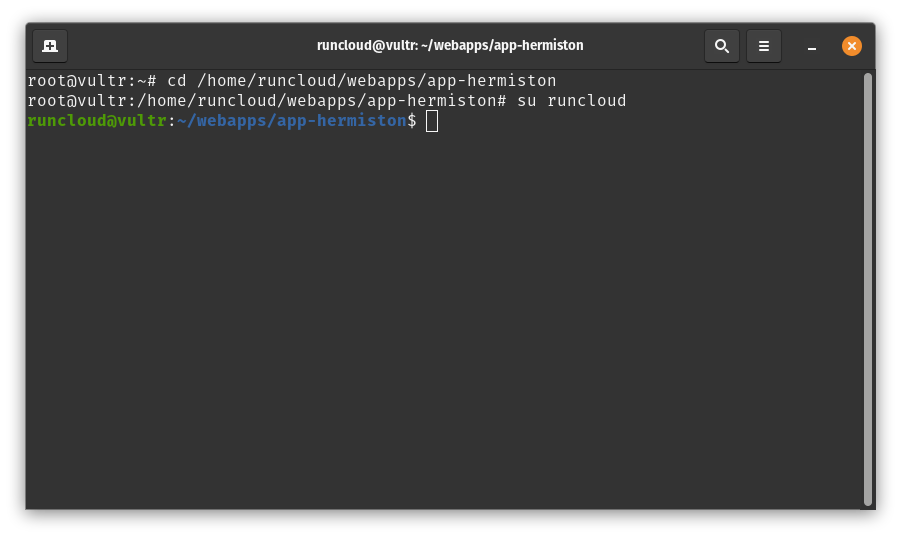
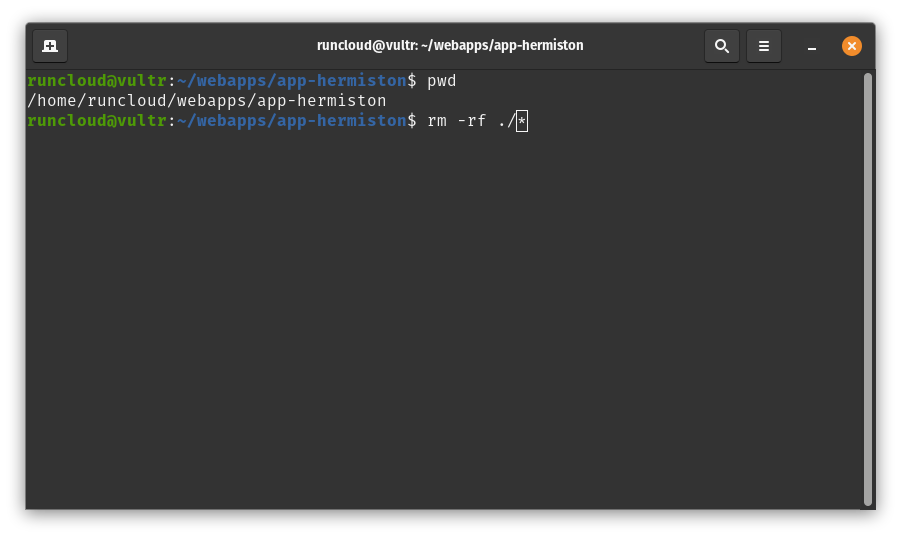
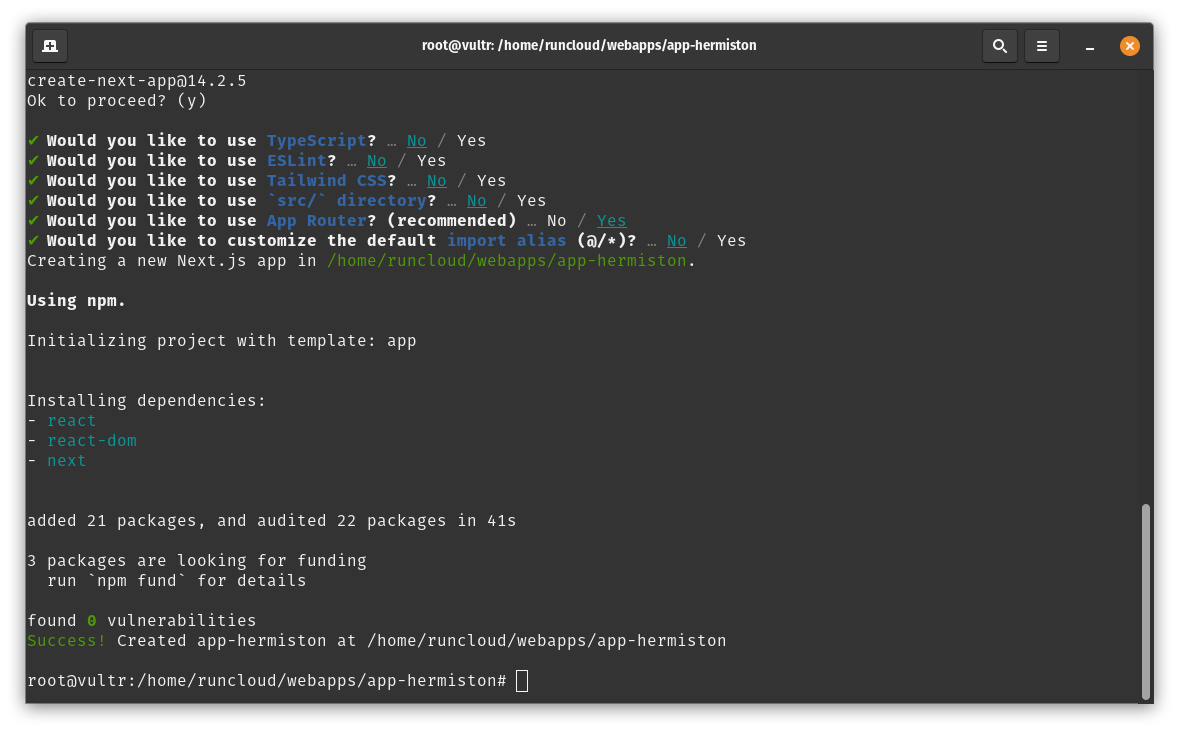
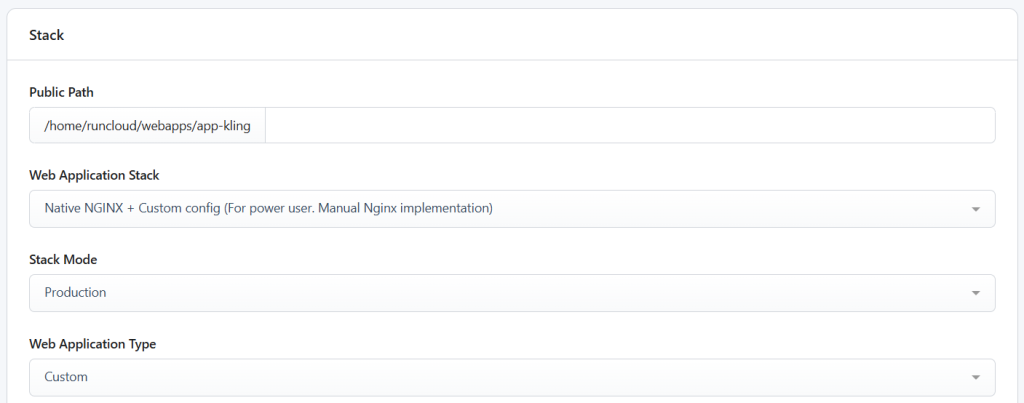
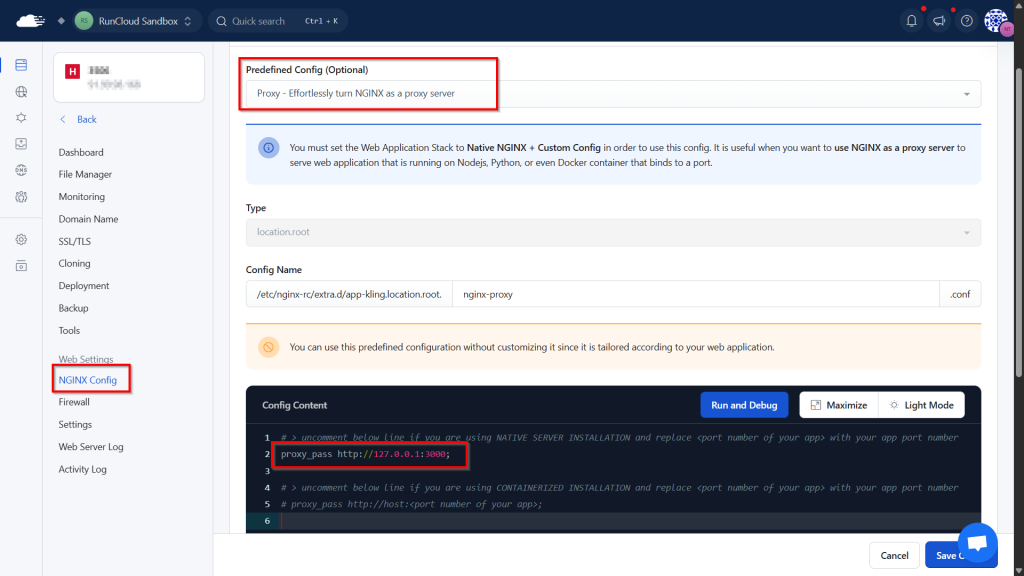
![Hostname vs Domain Name: What’s the Difference? [With Example]](https://rcwp.scalemath.dev/wp-content/uploads/2024/08/HOST-DOMAIN-header.png)