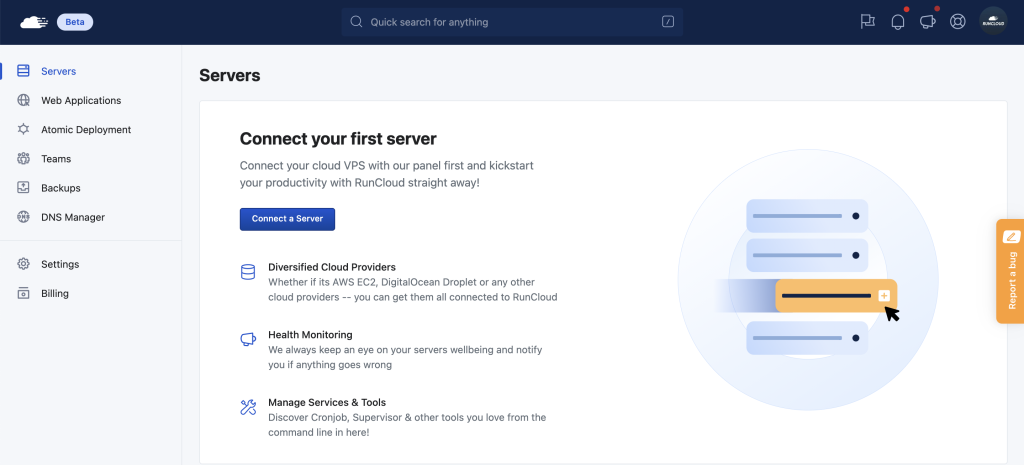
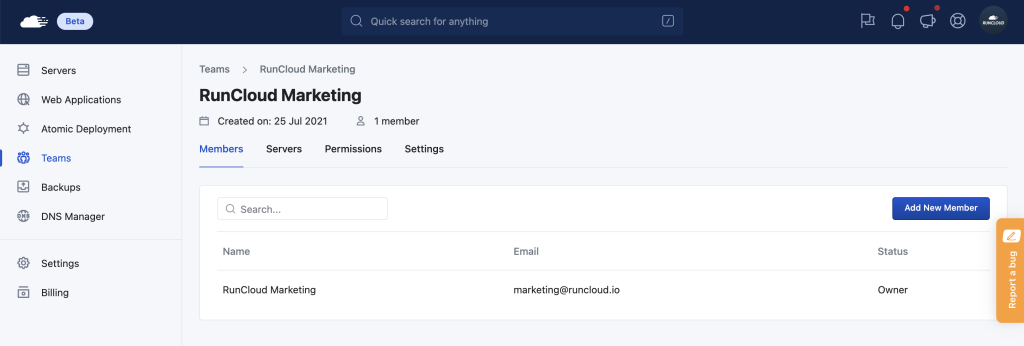
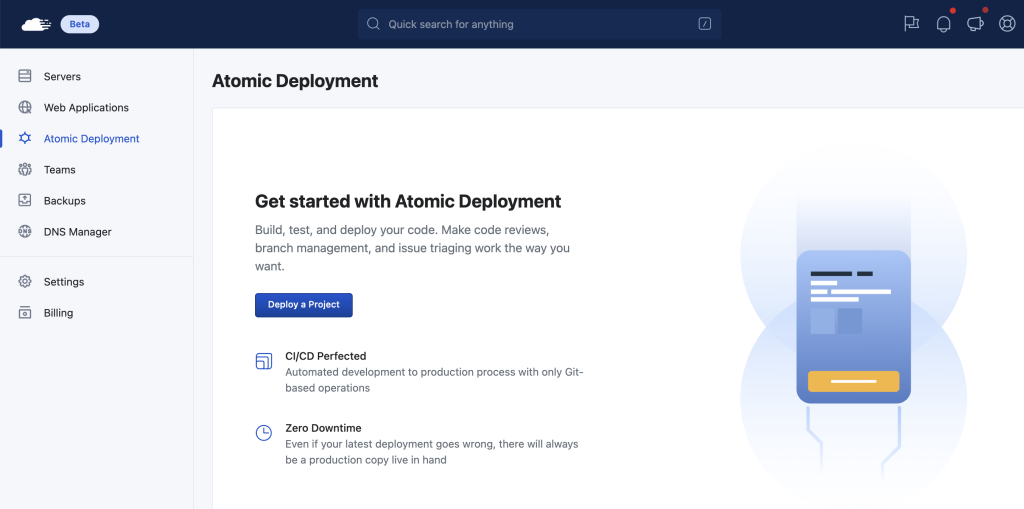
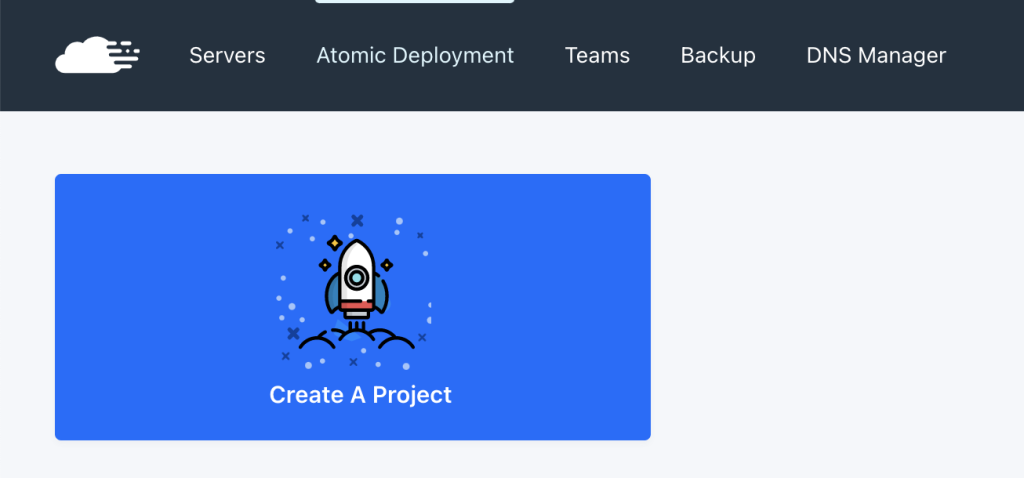
Today, we’re proud to announce that our all-new interface with a fresh new look to make managing your servers not only effortless but also more enjoyable than ever is now in beta.
We’re super excited to hear what you all think! Please note that this is an early-stage beta but that’s exactly why we’re inviting you to jump in, try it out and let us know what you think now already. You can switch from classic dashboard (manage.runcloud.io) to new dashboard (new.runcloud.io), and vice versa, anytime from the top-right profile dropdown menu. You can switch back to the classic RunCloud dashboard at any time and it will still be available during this beta.
Let’s dive into some of the specific improvements this release includes:
General Improvements
Our all-new dashboard that is fully accessible from any device, including your mobile device.
Global Search (beta) – you can quickly search anything in your RunCloud account (servers, web applications, database, etc.). We have a number of improvements planned to Global Search during this beta.
Server Tags – you can add tag(s) to your servers to help organize your servers and make managing them easy as you grow.
Web Applications top level menu. You can see the list of all web applications from all of your servers. This is extremely useful as you have a number of web applications across a growing number of servers that you manage.
Shortcut to edit .env file and deployment script
Better view for your activity logs, sorted by date
Recently viewed servers & web apps feature.
Improved Billing/Subscription flow.
Improved Team flow when creating team and invite team member with email notification
Improved activity logs, sorted by date.
Server Management Improvements
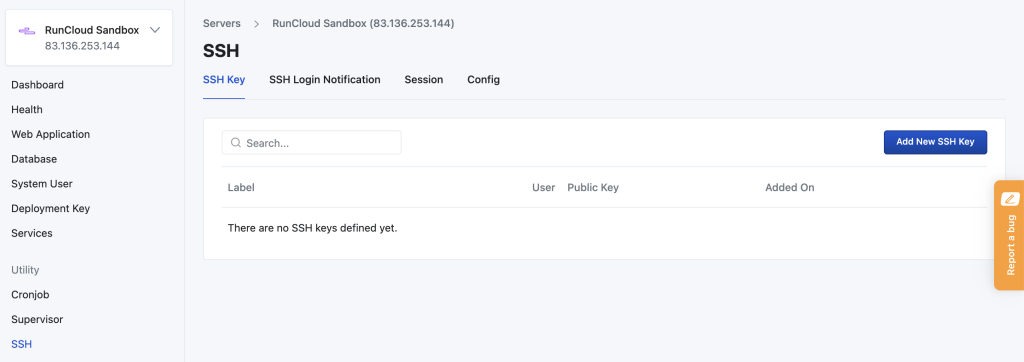
Central SSH utilities. SSH key, login notification, session and config are in page with tabs.
Laravel web app type. For Laravel users, you can edit web app settings and change web app type from Custom to Laravel to unlock some Laravel features.
Laravel Octane. Yes, you can run your web app with Laravel Octane in RunCloud with Nginx server easily.
Server settings have been simplified by moving other settings to respective group.
Web Application Improvements
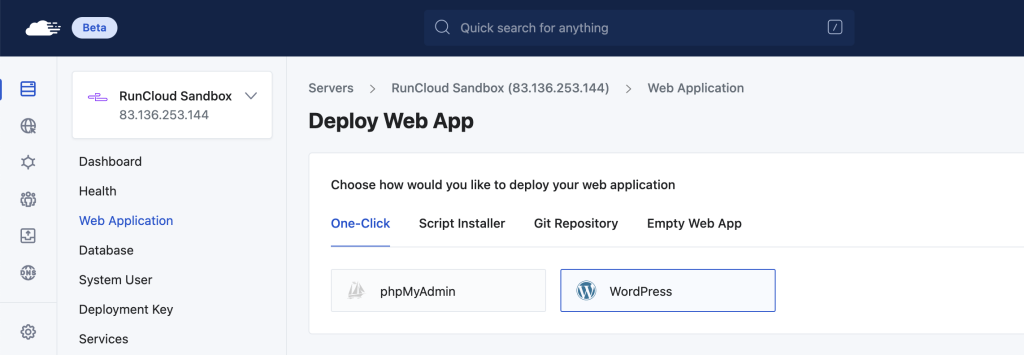
Improved flow for creating a web application to help users start deploying web applications smoothly.
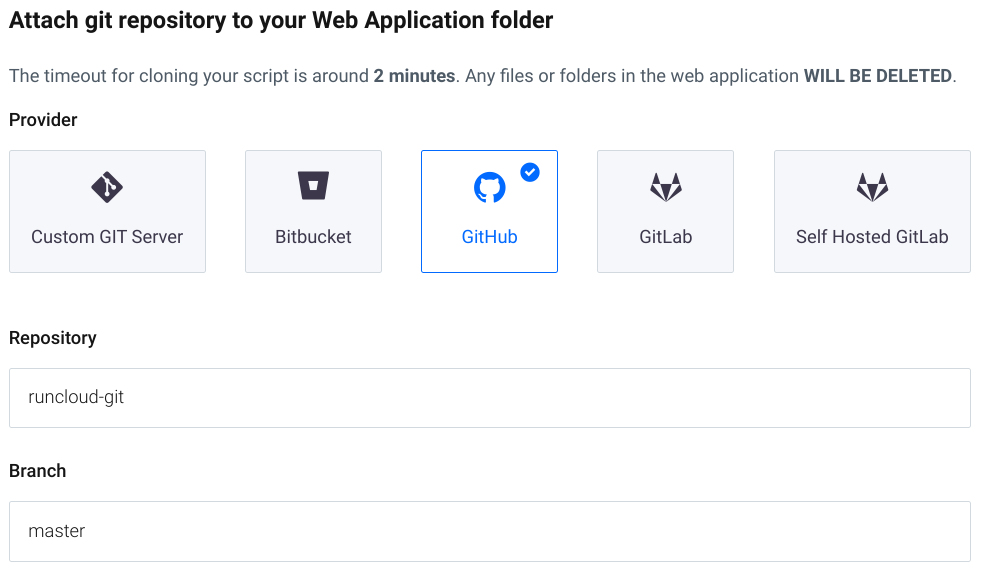
Creating git web app are now more informative for easy integration.
New interface for managing databases.
New float for creating cron
Artisan Commands – you can run some common artisan commands directly from RunCloud dashboard
Notable WordPress-related improvements include:
RunCloud Hub, WordPress Staging, Cloning, and General Settings (update home URL) is fully compatible with most WordPress web app types, including:
Regular Individual WordPress Installations
WordPress Multisite subdomain
WordPress Multisite subdirectory
WordPress Bedrock
Custom WordPress with WordPress files in a subdirectory but served from the website’s root
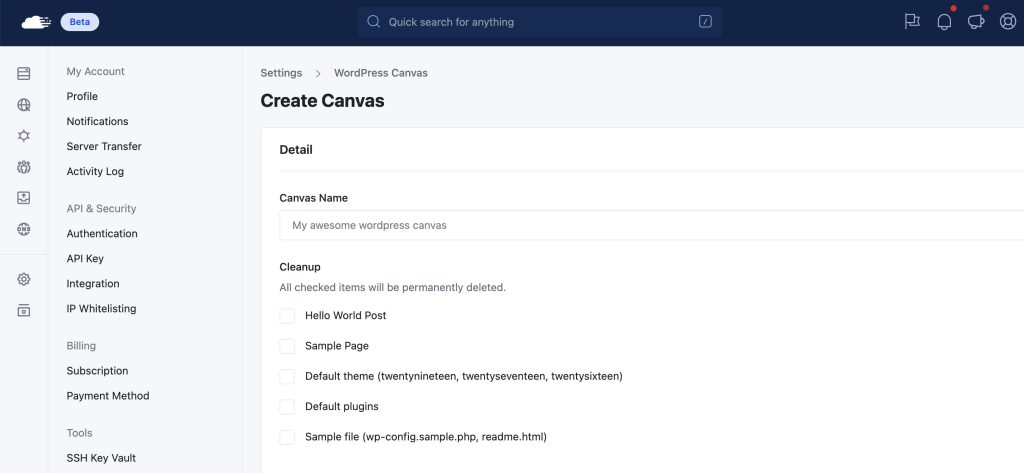
Improved WordPress Canvas flow, you can choose to activate plugin and also custom theme (ZIP).
Generate .htaccess automatically when cloning from Native NGIN to OpenLiteSpeed to prevent 404 issues.
Fulll support for Wordfence’s WAF during staging & cloning.
Regenerate Elementor CSS cache files during staging, cloning, and general settings update.
Profile Improvements
Cleaner API key interface.
Rework on WordPress Canvas interface.
Simplified billing interface.
Team Improvements
New flow for creating teams and team invitation now with email notification.
Atomic Deployment Improvements
Various improvements to the atomic deployment interface.
Other Miscellaneous Improvements & Bug Fixes
Added: File manager zip/unzip feature
Updated: RunCloud Agent version 2.4.8 iteration 7
Updated: WAF Modsec CRS version 3.3.2
Updated: NodeJS version 14 LTS for new server
Fixed: team member can not manage domain and ssl on shared team server
Fixed: invoice/receipt print issue
Remember, this is a beta – but that’s exactly why we’re inviting you to try it out today! During the beta, you’ll be able to leave direct feedback by using the Report Bug option in the menu, as shown below:
Currently experiencing an “SSL_ERROR_NO_CYPHER_OVERLAP” error code in the Mozilla Firefox web browser?
You’ve come to the right place – in this guide, we’ll show you exactly how to fix it.
What Is The “SSL_ERROR_NO_CYPHER_OVERLAP” Error?
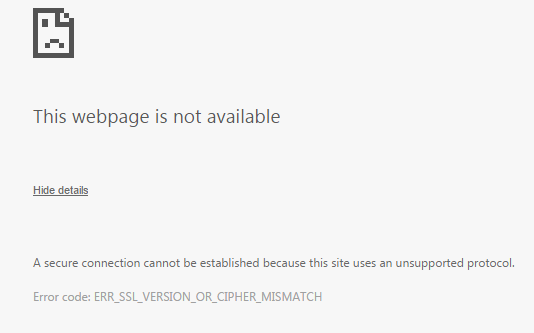
The “SSL_ERROR_NO_CYPHER_OVERLAP” error occurs when your browser is unable to obtain the security data for a website you’re trying to access. Unlike other browser errors, the SSL_ERROR_NO_CYPHER_OVERLAP error happens specifically with Firefox. Google Chrome has a similar but slightly different version of it, with its message reading “ERR_SSL_VERSION_OR_CIPHER_MISMATCH“.
SSL stands for Secure Sockets Layer and is responsible for providing privacy, authentication, and integrity to internet communications. The “SSL_ERROR_NO_CYPHER_OVERLAP” error typically occurs when Firefox fails to get the proper security information from the website your browser is attempting to establish a connection with. This can happen for a variety of reasons…
What Causes the SSL_ERROR_NO_CYPHER_OVERLAP Error in Firefox?
It may be due to the website itself (something server-side) or a locally misconfigured setting in your Firefox browser. If many different websites give you the same error, it is far more likely to be your own Firefox browser settings.
An outdated version of Firefox is also a potential cause of Firefox error “SSL_ERROR_NO_CYPHER_OVERLAP” appearing. In any case, it’s best to always keep Firefox up-to-date to avoid errors like this in the future.
3 Ways to Fix SSL_ERROR_NO_CYPHER_OVERLAP Error
Coming across errors is never a great experience, and we try our best to make it a learning one. With each problem, there’s bound to be a solution. The “SSL_ERROR_NO_CYPHER_OVERLAP” error is no exception.
So, without further ado, let’s dive right in and fix this error…
1. Update Firefox Browser
Update your Firefox Web Browser. An outdated Firefox version is prone to the “SSL_ERROR_NO_CYPHER_OVERLAP” error appearing This is because older Firefox versions might support outdated cypher suites and obsolete TLS versions, which are kept up-to-date for a reason.
Installing the latest update for your Firefox web browser is a fairly simple task.
To update Firefox – open your browser, and:
Select the Menu button at the top-right corner of your screen. This is the icon with three lines.
Click Help and select About Firefox.
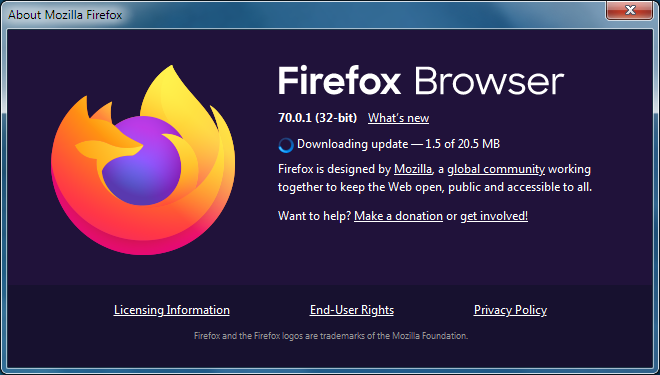
The About Mozilla Firefox window opens. Firefox will check for updates and download them automatically.
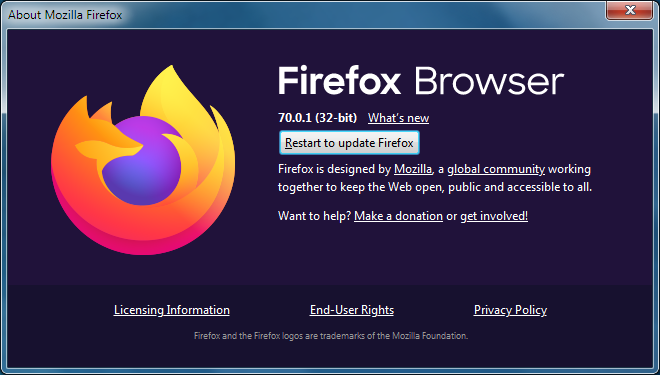
When the download is complete, select Restart to update Firefox.
Note: As mentioned in the official Firefox support website, if you had any problems with updating, simply download the latest version of Firefox. You can do so by heading to the Systems & Languages page or you can also use their official download page.
2. Reset SSL3 and TLS Settings
If you’re already using the latest version of Firefox or updating didn’t help, the next step is resetting your SSL3 and TLS settings. Not all websites require these protocols to make a connection, but some do. Therefore, if these settings in your Firefox browser are disabled, it might be the reason you’re running into the “SSL_ERROR_NO_CYPHER_OVERLAP” error.
To reset your SSL3 & TLS Settings:
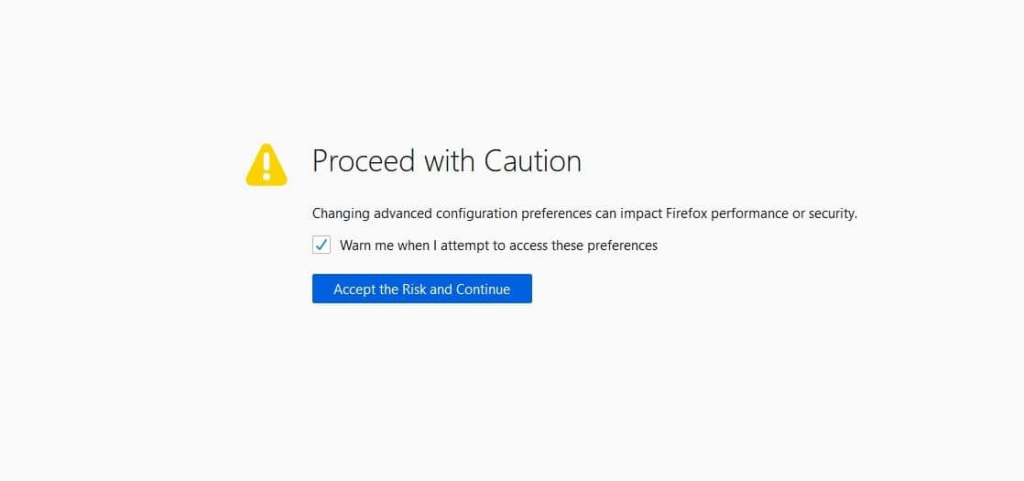
Open a new tab in your Firefox browser and type “about:config” in the address bar. You may see a message saying, “This might void your warranty!” or “Proceed with Caution”.
This warning is Firefox’s way of preventing users, such as yourself, from accidentally making critical changes to your browser’s settings. But we know what we’re doing, so click on Accept the Risk and Continue to proceed.
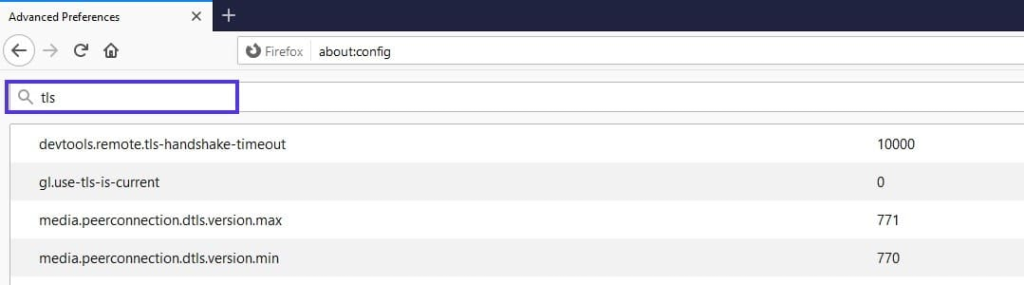
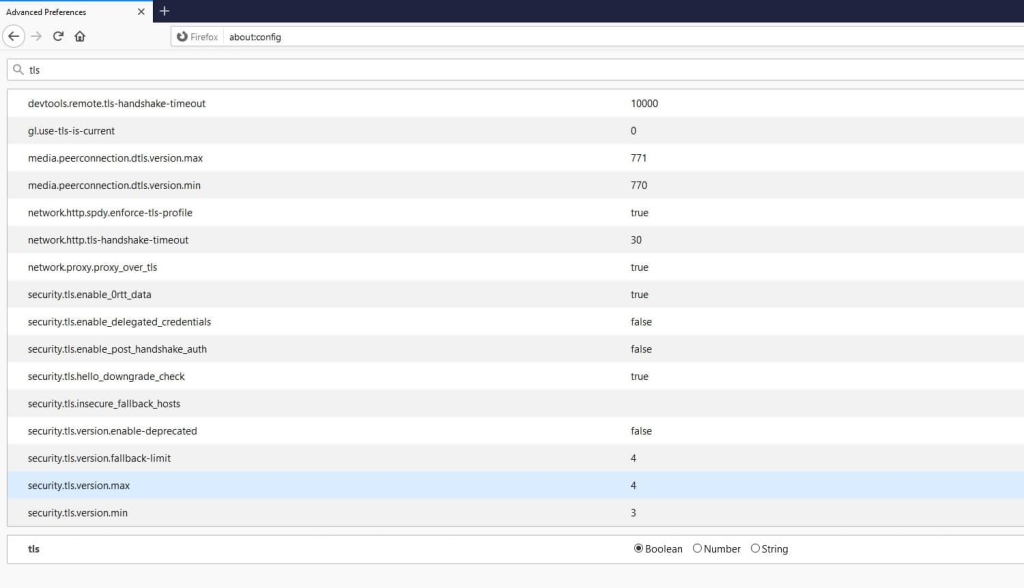
The “Advanced Preferences” screen should appear. In the search bar, type “tls”.
This generates the list of all your TLS configurations.
Values that are bolded indicate that they have been changed. Right-click on them and select Reset to restore them to the default settings.
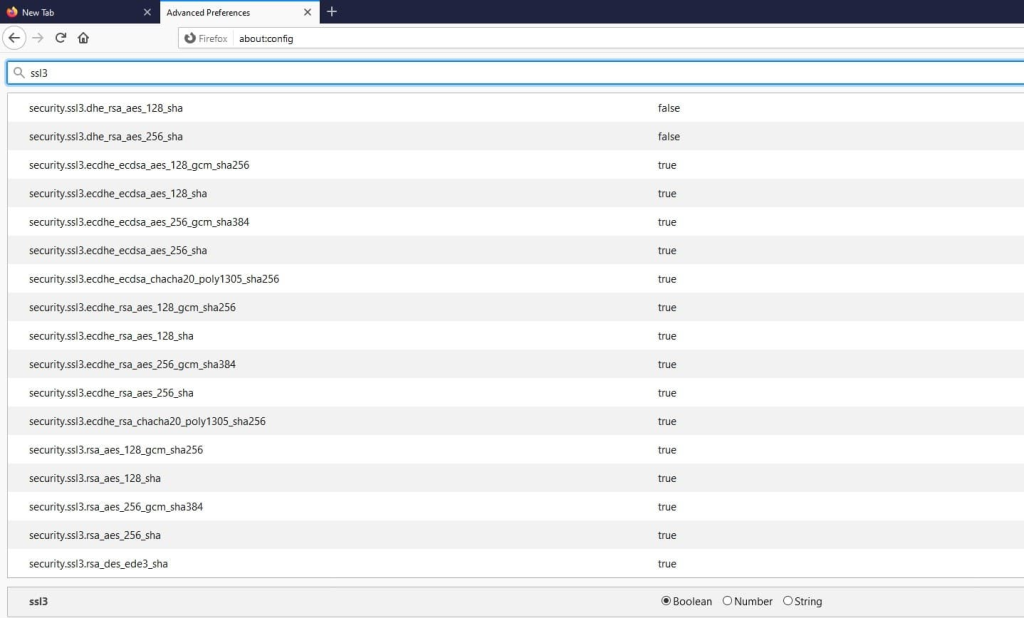
Afterward, repeat the same process for SSL3. Type “ssl3” in the search bar, and reset any changed value.
Additionally, make sure that the following two items are set to false.
security.ssl3.dhe_rsa_aes_128_sha
security.ssl3.dhe_rsa_aes_256_sha
Setting these to false disables Firefox from using these low-encryption cyphers. This is essential for security purposes.
3. Bypass Security Protocols and Configurations of Your Browser
It’s generally not recommended to bypass browser security protocols as their job is to keep you from accessing unsafe websites. That being said, if you know the site you’re trying to access is secure, manually entering a cypher validation should help bypass this error.
To bypass browser security protocols:
Navigate again to the “about:config” screen of your Firefox browser and type “tls” into the search bar.
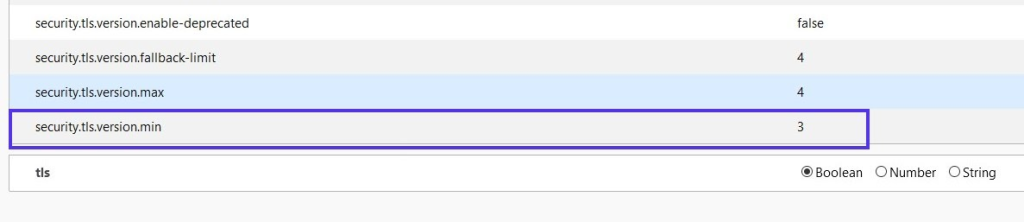
From the list, navigate to “security.tls.version.min”.
Select the pencil icon on the far right to edit the item, then input “0” as the value. Next, repeat the same process for ”security.tls.version.fallback-limit”.
Another way to bypass encryption protocols in your browser is by changing your browser’s privacy settings.
To change your Firefox Privacy & Security Settings::
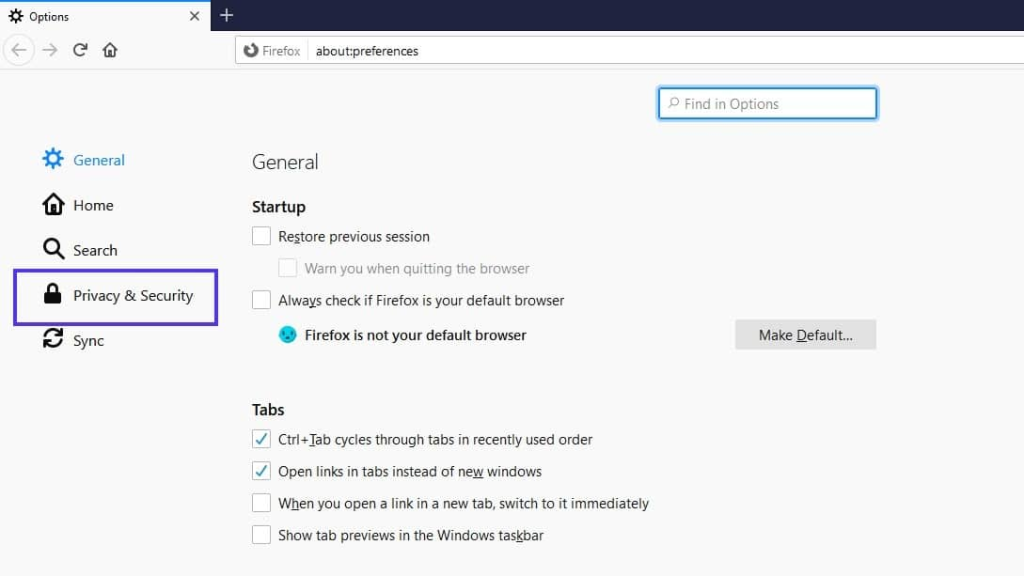
Open your Firefox menu, then navigate to Options and then Privacy & Security.
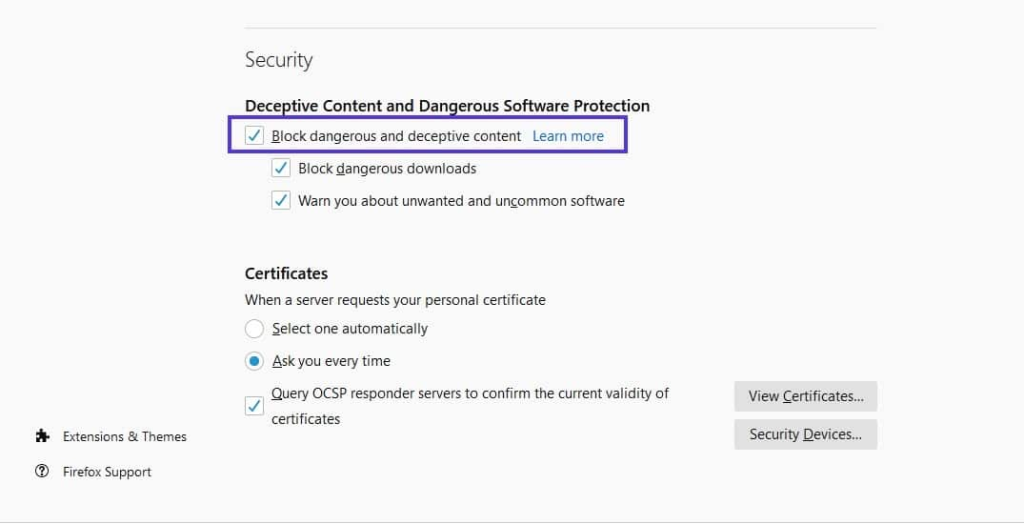
Under the Security section, deselect ”Block dangerous and deceptive content”.
If the error still hasn’t been resolved, chances are it’s a server-related issue. Most often, this happens when a site is using the RC4-only cipher suite.
Some ciphers, such as the RC4, are no longer supported by major browsers due to vulnerabilities. You can run an SSL check to verify that your SSL certificate isn’t using outdated ciphers.
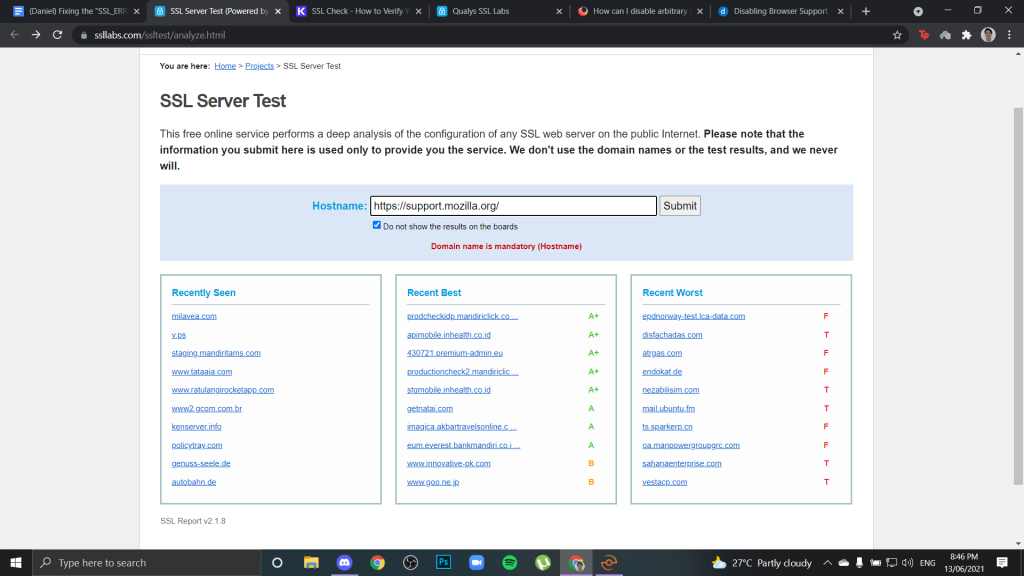
To perform an SSL Check, you can use the free SSL check tool Qualys SSL Labs. Here’s a link to the SSL Check tool to get you started.
Enter your domain into the Hostname field then click on “Submit”. You also have the option to hide public results if that’s what you prefer. It could take a minute or two to scan the site’s SSL/TLS configuration on your web server.
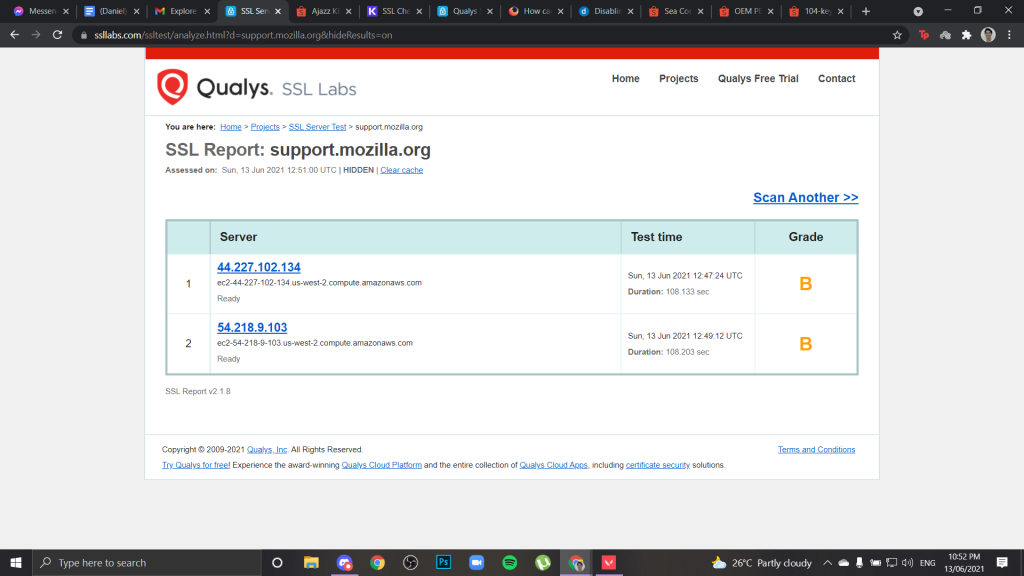
Once scanned, SSL Labs will assign you an SSL server rating, any grade from an A to an F. You should always be aiming for an A. This means both the SSL and intermediate certificates are set up correctly. It also shows that the webserver host, like WordPress, that you might be using is up to current specifications.
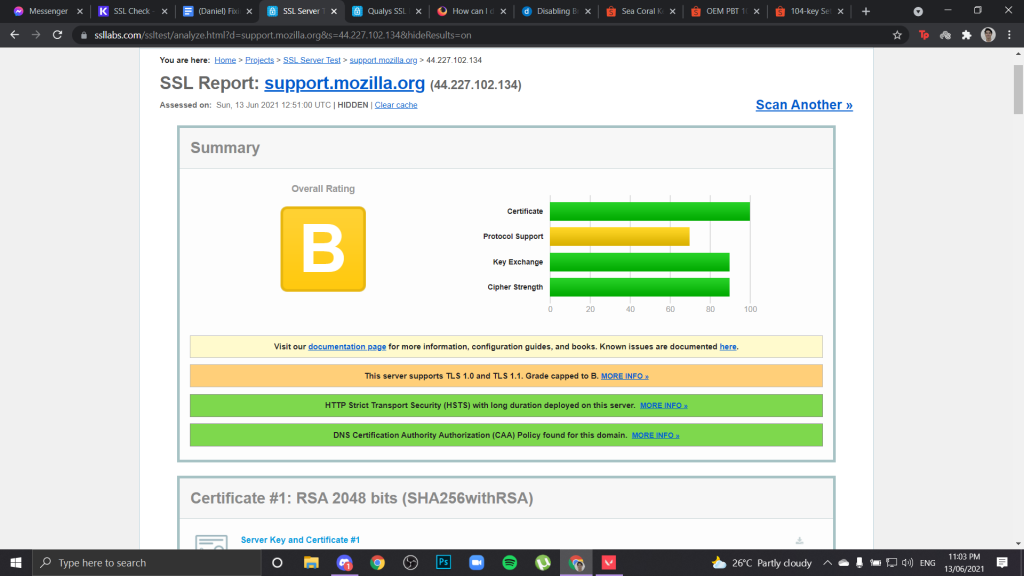
If you click on the IP address, you’ll be shown a brief summary of that server’s rating.
For more information on SSL Labs SSL checks, their official guide can be found here.
That’s about it in bypassing encryption protocols through your privacy settings. Generally, if you aren’t the site owner, the only other course of action is to contact them to let them know about the problem you’ve experienced on their site – and, helping them get to the bottom of it by sharing this guide with them. 😊
In the case that the error is only appearing on one website, this is likely a server-side issue. Only the server admin can resolve this issue.
Usually, this only happens when a website is still using RC4-Only Cipher Suite, and the settings with the server “security.tls.unrestricted_rc4_fallback” preference is toggled to false.
Frequently Asked Questions (You Might Also Ask)
What does error code SSL_error_no_cypher_overlap mean?
The “SSL_ERROR_NO_CYPHER_OVERLAP” is an error code unique to Firefox. Other browsers have these errors as well but typically use different codes. This error happens when Firefox fails to get the proper security information from the website you tried to connect to. This can happen for reasons of an outdated browser version, misconfigured SSL3 and TLS web browser settings, or it could be completely server-sided.
What does Pr_end_of_file_error mean?
The PR_END_OF_FILE_ERROR (Secure Connection Failed) appears when some Mozilla Firefox users attempt to visit a certain website. This error essentially means that the browser wasn’t able to establish a secure connection because all cypher suites failed.
What is a cypher mismatch?
This issue means that your browser cannot establish a secure connection with a web server that uses HTTPS and SSL.
How do I bypass “secure connection failed”?
To fix this, you need to visit the settings option of whichever security software that you are using and locate the SSL scanning feature of the software.
Once you find it, uncheck the box that indicates if it is enabled. Once the feature is disabled on your security software, you should try revisiting the website.
What causes “secure connection failed”?
Sometimes the ‘Secure Connection Failed’ error may occur on Firefox if Firefox finds the website to be dangerous or untrustworthy. That is why Firefox browser testing is so critical. If Firefox approves the website, it means that there’s a problem with the SSL connection.
Sometimes the ‘Secure Connection Failed’ error may occur on Firefox if Firefox finds the website to be dangerous or untrustworthy. A website that uses HTTPS:// at the start of its URL indicates that it is a secure website. When Firefox doesn’t find a website secure, it will trigger an error displaying “Secure Connection Failed”.
What is “secure connection failed”?
Secure Connection Failed error is typically related to the security certificate (otherwise known as SSL) not being valid, expired, or simply missing. This notification quite often has merit, as the browser tries to warn that the connection is not secure, and you might suffer from serious issues if you proceed.
How do you solve not connecting a potential security problem?
To fix the “Secure Connection Failed” error in Mozilla Firefox:
1. Select “Continue With an Insecure Connection”. 2. Add the site to your List of Trusted Sites. 3. Temporarily disable your Antivirus and Firewall. 4. Clear the SSL State. 5. Clear Your Browsing History. 6. Permit Firefox to Trust Root Authorities. 7. Change Your Security Settings.
Running into issues especially with SSL certificate validation is not something anyone enjoys waking up to especially because getting to the bottom of what’s causing it can take some time. Fortunately, since you made it to the end of this guide – you should have been able to confidently ensure that you & your website visitors no longer encounter this error.
Here at RunCloud, we’re on a mission to make server management and deployments easier. Part of this, of course, naturally has to include SSL certificates. That’s why we offer AutoSSL to automatically handle deploying new SSL certificates for new domains that are added to your web applications (perfect for WaaS or SaaS businesses).
Have any additional questions about fixing this SSL error or just want to join the conversation? Leave a comment below or Tweet at us (we’re @runcloud) 💬
Ready to deploy a new server but unsure how to choose the ideal server location?
Server providers like Digital Ocean, UpCloud, Linode, and AWS have made it incredibly easy to deploy a server virtually anywhere, so you can pick the ideal server location.
But how should you choose your server locations? And how do professional SysAdmins choose the locations for their servers?
Why Does Server Location Matter?
The server that hosts your website can be physically situated at one of the thousands of available locations in different data centers across the globe (depending on your server provider of choice).
When you load up a website, a signal is sent from your computer to the server, and then onto the destination. If the server is far away, it’s going to take longer for that connection to happen.
Therefore, the location of your host server can play a crucial role when it comes to your website’s load speed, and by extension, its SEO.
One study conducted by KISSmetrics claims that 47% of internet users expect a web page to load in 2 seconds or less. This percentage is even bigger among mobile users, who make up over 50% of Google’s users. Hardly surprising given the attention span of people today.
Google has indicated that site load speed is one of their algorithm’s main signals to rank pages. So, having visitors leave your page before it is even fully loaded is bad for SEO and results in lower conversion rates – drastically decreasing your business’ earning potential.
What Is Network Latency & TTFB?
Before choosing your ideal server location, there are various other factors that play an important role in selecting your ideal server location. Two of these factors are network latency and TTFB.
What Is Network Latency?
Network Latency is the time taken by the site visitor to connect to a web server, their request to be processed and the server to begin sending data. It is measured in milliseconds. Network latency is affected by several factors, including:
Round trips: It is the journey taken by an object request (script files, HTML files, etc) to your web server and back to the user. Round trip is generally affected by the distance between the web server and user along with the number of intermediary points through which the connection travels.
Server performance: The correlation between server performance metrics — including server speed, available RAM, the hardware used and site latency.
Any small change in the latency can have some effect on the page load time and user experience. This becomes more important for eCommerce websites where high latency can improve the speed and user experience of the website.
Measuring Latency through TTFB
Time to First Byte (TTFB) is the time taken by the user’s browser to begin loading a webpage after your server reaches an initial request. TTFB can be affected by three main factors:
The total amount of time it takes for your request to reach the network through the server.
The total amount of time it takes for the server to process the request and generate the response.
The total amount of time it takes for the response to propagate back to the web browser.
There are two ways to measure TTFB:
Actual TTFB: The total time it takes for the web browser to receive the first byte of data from a server. Network speed and connectivity can affect actual TTFB.
Perceived TTFB: The time taken by the user to notice that the page has started to load. It is important UX and SEO metrics and is mostly influenced by the time it takes for an HTML file to parse.
Choosing Your Ideal Server Location
Choosing the ideal server location is sure not a child’s play. First, let’s see how others choose server locations.
How Do People Server Location?
When was the last time you put some thought into where your server is? We ran a survey among RunCloud customers and here’s what they had to say:
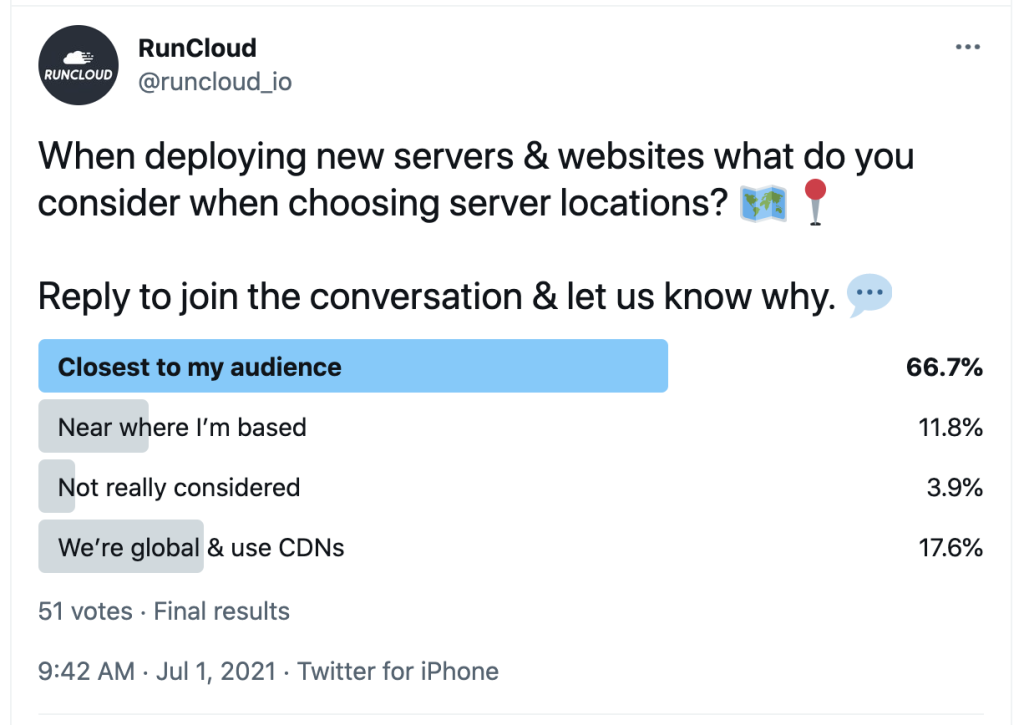
66.7% chose a server in proximity to their own customers;
11.8% chose a server that’s physically close to themselves;
3.9% didn’t really consider the location of their servers;
17.6% said they are global and use CDNs.
Screenshot of our Twitter poll
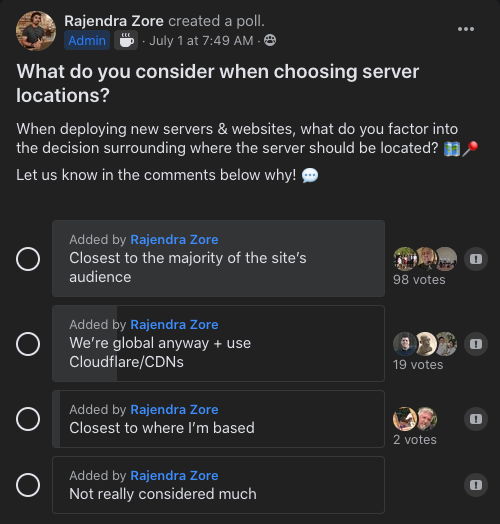
Screenshot of our Facebook poll
So, what should you have in mind when choosing the ideal location for your server?
How To Choose Your Server Location?
Around 66.7% of the people in the above surveys preferred to choose the server location closest to the majority of the site’s audience. While choosing the ideal server location you should consider the important factor surrounding where your server should be located. For most people locating their server near to the majority of their users is the first choice. Perhaps, you should consider that while making your choice.
How To Reduce Latency?
There are different steps you can take at different points across the network to improve network latency. Like, making sure that the people on your network aren’t increasing your latency with lots of downloads or using up all the bandwidth. Also, check out the application performance to make sure that no applications are acting up in weird ways and putting pressure on the network. You can also subnet by grouping together endpoints that communicate frequently with each other. Using traffic shaping and bandwidth allocation measures also helps to reduce network latency.
Use A Content Delivery Network To Reduce Latency:
One way to reduce your website latency is to use CDNs, thus improving your overall website’s performance and UX. Website latency can be reduced by any one of the following methods:
Content caching: CDNs cache and compress mirror versions of the web pages are stored in strategically placed data centres. Later, content is delivered to your users based on their geolocation, thus reducing round trip times and latency.
Connection optimization: CDNs can optimize connections between users and origin servers through session reuse, network peering and TCP pre-pooling. Premium CDNs speed up the communication process further by routing traffic through a tier 1 network backbone that has the least amount of hops.
Along with reducing latency, CDNs can also improve your site’s page load times through front-end optimization like image optimization, minification and file compression.
Which Server Location Is Right for You?
Price plays a large part when choosing a server, especially when you’re on a budget. Or, you may be tempted to get a server close to your location.
However, investing in a server that’s close to the majority of your site’s visitors can be a real game-changer, especially if you’re running an online business. After all, how fast your end-users can access the site, find an item, and make a purchase, is what can make or break its success.
How the Server’s End-User Proximity Affects Your Website’s Success
If your target audience resides in a particular area or country, then it makes sense to host your website on a server as near to them as possible. Right?
Having it hosted further away can be a serious obstacle, as the geographical distance between your server and your site’s end-users can exponentially increase the time it takes for them to access the website. This can lead to your site loading slower for its users, and, as a consequence, you could be losing visitors and conversions.
With that in mind, we recommend you consider the server’s proximity to your clients and site visitorsas a priority when choosing your ideal server location.
Using a CDN to Change Your Server Location
What happens if your hosting provider doesn’t let you change your server’s location?
In this case, you have a couple of options:
Change hosting provider
Use a Content Delivery Network (CDN)
It can be a hassle to switch web hosting, so using a CDN like Cloudflare can be an easy workaround.
A CDN is a collection of servers placed in strategic geographical locations, acting as a network for caching internet content.
A cached version of your site is stored at each location, so when someone tries to visit your website they’ll be connected to the nearest server on the CDN instead of having to go directly to yours.
Using one can significantly shorten load time by increasing the delivery speed of your site’s data that’s cached on the CDN. This is not the same as web hosting, however, since the CDN is used only for caching your site’s data to improve its delivery speed, not hosting it.
Ideally, you want to combine well-placed servers with a good CDN to get the fastest load speed for your site. There are also many CDN providers to choose from ― Cloudflare, Imperva, StackPath, and Sucuri, to name just a few.
Cloudflare is by far the biggest and most popular solution, and integrates seamlessly with RunCloud, making it easier than ever to manage your servers and moving them to your most ideal server location.
In Summary – Choosing Your Ideal Server Location
Choosing the ideal server location plays a crucial role in its success.
If you can afford it, host your website on servers as close to your target audience as possible. This will lead to more conversions, fewer visitors abandoning your site, and better SEO.
Secondly, getting a good CDN will also improve your site’s load speed significantly. CDNs cache your site’s content on a group of servers in important geographic locations, so that your site can be accessed much faster even if the server it’s hosted on is far away from the site’s visitor.
Lastly, if you’re looking for a way to easily manage your websites, servers, and connections in one intuitive dashboard, you’ll love working with RunCloud.
Hundreds of agency owners, business owners as well as experienced developers rely on RunCloud to build, deploy and operate their servers so they can focus on growing their business. Freedom to host servers with your server provider of choice, giving you full control of server location while managing them all in one centralized dashboard – RunCloud.
IPv4 and IPv6 are networking protocols that allow electronic devices to communicate with one another. These protocols give connected devices an IP (Internet Protocol) address that is used to locate and send data between devices across the web and on local networks. But why are Internet Service Providers and cloud hosting companies are upgrading their networks to support IPv6? What are the differences between IPv4 and IPv6?
We’re going to guide you through the complexities of IPv4 and IPv6 with the goal of giving you a better understanding of the technology involved, key differences, and advantages/disadvantages of each one.
What is IPv4?
IPv4, or Internet Protocol Version 4, is a 32-bit addressing scheme that provides IP addresses as well as protocols to provide routing and connectivity to connected devices.
Each IP address provided by IPv4 will be in the format of xxx.xxx.xxx using decimal digits ranging from 0-9. With this format of addressing, there can be around 4.3(4,294,967,296) billion IPv4 addresses.
What is IPv6?
IPv4 or Internet Protocol Version 6 is a 128-bit addressing scheme that Is used similarly to IPv4. The biggest difference between the two protocol versions is that IPv6 utilizes 128-bit addressing vs IPv4’s 32-bit.
Each IPv6 is in the format of xxxx.xxxx.xxxx.xxxx.xxxx.xxxx.xxxx.xxxx. Ouch! That’s a bit hard on the eyes. IPv6 addresses are formatted in 8 groups of 4 hexadecimal characters. With this format we can create a total of 340,282,366,920,938,463,463,374,607,431,768,211,456 addresses. That’s an insane amount!
What Happened To IPv5?
So, what happened to IPv5 and why did we hop from IPv4 to IPv6? IPv5, originally designed in 1979, included improvements for streaming data.
The introduction of this protocol led to technologies that we use today such as VoIP(Voice over IP) and MPLS(Multi-Protocol Label Switching). IPv5 still uses the same addressing scheme as IPv4, which was one of the main reasons why this protocol version was never released to the public.
Why Was IPv6 Invented In The First Place?
The main reason that the IPv6 protocol was created was to prevent us from running out of IP addresses. Currently, IPv4 addresses are constantly traded to meet the demands of the growing number of devices being used on the web. Making the swap to IPv6 will stop us from worrying about this problem for a long time to come.
IPv4 vs. IPv6 – Which One Comes Out On Top?
After learning about IPv4 and IPv6 you must be wondering, which one should I be using? The truth is… either. Or even both… Don’t worry, the following sections will shed some light on the key differences between both protocol versions.
Key Differences
Some of the key differences between IPv4 and IPv6 are:
No need for NAT(Network Address Translation) in IPv6
IPv4 sections are separated by a dot(.) and IPv6 by a colon(:)
IPv4 packets utilize 12 headers while IPv6 uses 8
Easier administration on local networks with IPv6
Simplified routing in IPv6 (mostly due to not utilizing NAT)
IPv4 vs IPv6 – Security
What the common trend seems to state is that IPv6 is more secure than IPv4. That isn’t necessarily true and is all dependent on your network design. The three most significant technologies that people believe make IPv6 more secure than IPv4 are the innate defense from IP scanning, the built-in usage of IPsec, and the removal of NAT as a dependency.
Let’s dive into each of these in more detail.
IP Scanning
A common method hackers use to attack a network is through scanning public IP addresses and attempting to scan the network for vulnerabilities such as open ports. This attack method works well on IPv4 networks due to the average time it takes to scan every public IPv4 address being around 5 minutes. When utilizing IPv6 addresses, that time jumps from 5 minutes to an estimated 38 billion years.
That being said, you wouldn’t want to rely on the extended address range for any security. Even with an estimated time of 38 billion years, if your address was at the beginning of the list and you had unsecured ports opened, your network would still get attacked. While the odds are low that this can happen, the risk is still similar to IPv4 and is easily avoidable by securing open ports on your network.
IPsec
IPsec, or Internet Protocol Security, was designed to provide security to the network layer, specifically authentication and encryption. For IPv6, IPsec is a mandatory feature, and for IPv4, it’s typically used for encryption while utilizing VPNs. IPsec is a nice security feature that is easily implemented.
For both IPv4 and IPv6 protocols, there are subtle nuances for utilizing IPsec properly. Starting with IPv6, IPsec is a mandatory feature for this protocol version. What this means is that all devices that support IPv6 will innately have IPsec as a feature set.
However, while IPsec is mandatory on all devices, its utilization is completely optional. Essentially, if you don’t confirm that you are using IPsec, there’s a chance that it may be turned off. Think of a door with a lock. The lock can provide great security for securing your home… if you don’t remember to lock the door, that lock does nothing.
NAT
NAT, or Network Address Translation, is a method of IP address mapping that is utilized to preserve public IPv4 addresses. This is mostly utilized in LANs (local area networks) with a one-to-many setup. Network Address Translation with a one-to-many setup ends up giving your router a single public IP address shared by all of your devices Due to IPv6 having enough addresses that no device needs to share a public IP, NAT isn’t used at all.
Some people view the removal of NAT as a boost to security while others view it as a negative. In actuality, it doesn’t make too much of a difference for your network’s security.
NAT can be nice due to its innate functionality of masking the current device’s public IP when sending data on the web. This process doesn’t add any extra security, the security comes from the use of a stateful firewall, which is supported by almost all routers. A stateful firewall remembers the hosts that the device is sending data to, and only allows packets back from hosts that you are sending data to. Put simply, this built-in firewall will block all traffic that was not initiated by the current device.
The biggest takeaway from this section is that IPv6 is more secure out of the box than IPv4. That being said, if you were to apply some simple configurations to your network, you can reach the same level of security with IPv4 that you would have with IPv6.
IPv4 vs IPv6 – Speed
This is a hot topic in networking, what about the difference in speed? Currently, it looks like IPv6 is faster than IPv4, but under most circumstances, the difference amounts to milliseconds – something that won’t have an effect on the end-user.
At the current time of writing of this article, it is believed that the slight increase of speed comes from the fact that devices can utilize public IP addresses when using IPv6, instead of sending data back and forth using NAT with IPv4.
Since IPv6 can send data directly between devices, IPv6 just needs to check the data was transmitted correctly, while IPv4 needs to do error checking at multiple levels to ensure the data is intact and accurate when it’s received by the other device. So yes, in terms of speeds, IPv6 is slightly faster.
Why you don’t need to switch from IPv4 to IPv6 right away
A lot is going on with transitioning from IPv4 to IPv6. It was estimated that around this time we would be at 50% utilization of IPv6 addresses worldwide. At present, we are at around 30% global utilization.
The future adoption of IPv6 largely depends on several factors such as migrations from ISPs, large enterprises, and cloud providers. Implementing this change on their end is a large and expensive task. Due to the fact that IPv4 addresses are being exhausted, there will be an apex where the cost of IPv4 addresses starts to exceed the cost of the transition to IPv6.
Is IPv6 Going To Become More Common In The Future?
Put simply, yes! As the connected world increases rapidly, the more we will need to utilize IPv6. The idea is to slowly move over devices to IPv6 to release pressure on IPv4 addresses. That being said, even though the technology is moving in this direction, the more IPv6 addresses we utilize, the more IPv4 addresses that will be released back into the pool for someone else to acquire.
The main reason you would not want to swap over to IPv6 right away is that all of the sites and services you visit may not support IPv6. As the adoption rate grows higher, the less of a problem this will be.
Effortless Server & Web Application Management with RunCloud
We’ve covered a lot of topics in this article regarding IPv4, IPv6, IPsec, NAT, IP Scanning, etc… that’s a lot of information to parse. Now that we are at the end of this article you might be wondering how to go about upgrading to IPv6, how to upgrade your network to support both IPv4 and IPv6 users, or even if your network is currently secure? Or am I vulnerable to some of the issues listed earlier?
This is where RunCloud comes in. RunCloud is a simple, yet powerful control panel that can help you manage multiple cloud services across various platforms. For example, earlier on in this article, we mentioned how IPv6 has IPsec built-in by default but may not necessarily be turned on. Utilizing a service like RunCloud will give you a simple method for securing and managing your entire server down effortlessly.
So, IPv4 or IPv6? Which one?
IPv4 vs. IPv6? Honestly, it doesn’t matter too much. What really matters is how you go about securing and optimizing your server and network to deliver optimal speeds and secure connections. If the option is available to you, it doesn’t hurt to flip that dual-stack switch up, just to be prepared for the future.
One day, we will eventually be using IPv6 addresses, IPv6 is the future of IP addresses. All networks will slowly start to make the transition over to IPv6. This transition will not happen overnight nor will it happen over the next couple of months. It’ll be years until most websites and services can be visited over IPv6. It will be even longer before websites completely shut off their IPv4 support.
So, there really isn’t much to worry about apart from focusing on deploying servers that are reliable, fast, and secure which is what we at RunCloud are dedicated to making easier than ever – and it’s why we’re trusted by people new to server management all the way to senior Linux SysAdmins.
Looking for an alternative to Google Analytics? You’ve come to the right place.
Dominating over 85.4 percent of the market for web analytic tools, Google Analytics is (by far) the most popular way to measure and track the performance of the website.
While Google Analytics is no doubt an incredibly powerful tool – it’s not the only one, with many privacy-oriented alternatives encouraging website visitors to migrate away to help protect the privacy of their website visitors.
So, without further ado – let’s dive right into this definitive list of the very best Google Analytics alternatives out there so you can find the one that’s right for your business.
What Is Data Sampling and Why Is It Important?
Before we touch on the powerful Google Analytics Alternatives on this list, let’s first go over what data sampling is.
Once a website reaches over 5 million views per month, Google no longer reviews all of the user data. Instead, it analyzes just 500,000 users from the 5 million (only 10 percent). Although the data from these users is “good enough”, it’s not nearly as accurate as it could be.
So, when you’re a company with tens of millions of views, getting analytics from just 10 percent of your visitors becomes a problem. It means 90 percent of all your users are unaccounted for.
The analytics tools below don’t sample data, and that’s one of the biggest pros of switching away from Google Analytics.
With that clarified and out of the way, here are the six best alternatives to Google Analytics.
The 6 Best Alternatives to Google Analytics In 2021
Fathom is a privacy-centered, cookie-less alternative. Google Analytics has been known to collect data on more than just web activity. They also curate your user and reader’s data for Google’s own interests. Whether you want to protect your user’s browsing data or be known as a privacy-focused website, replacing your analytics tool with Fathom is a great way to start.
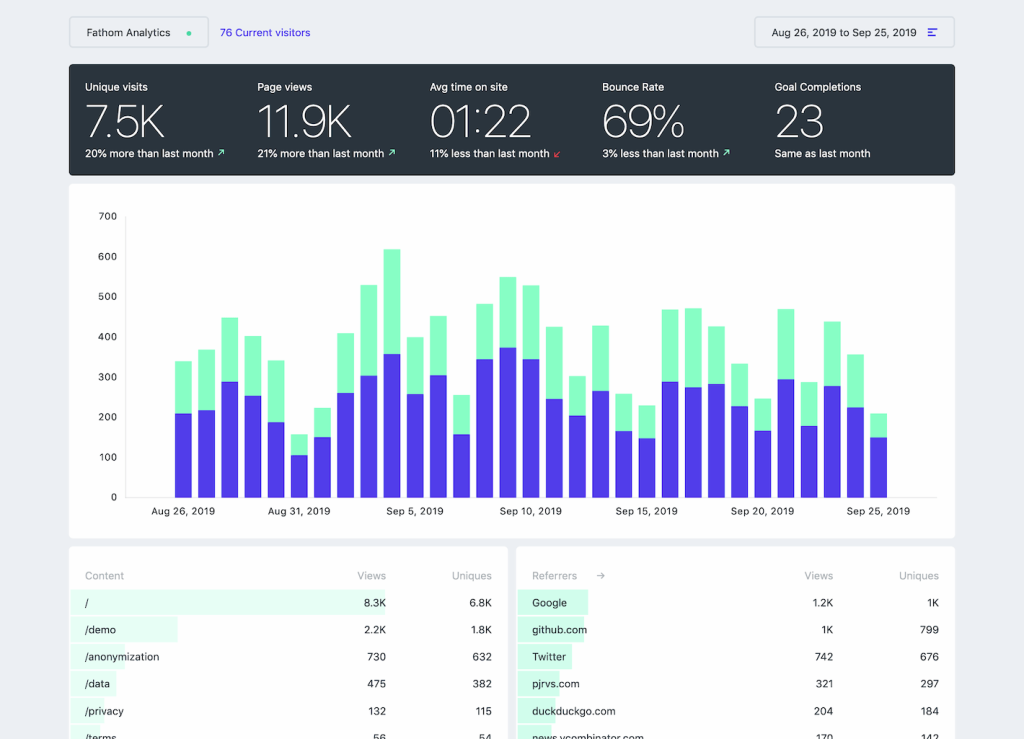
Integrating Fathom Analytics into your website is straightforward. Fathom’s web reports are also just as simple, coming in only a one-page view with all the basic analytic data. Things like unique visitors, site views, bounce rate, the average time on the site, and referral (how users commonly found your site) statistics are viewed on one page. There’s also a section for content, which shows the page views and unique visitors per page, like your homepage, top post, and more.
Where Fathom really shines is their privacy-focused, simplistic approach to analytics. Fathom users see all their stats on one page and can traverse between days, weeks, months, and even years. You can also cycle between daily and hourly data too.
Key Features For This Alternative to Google Analytics
Fathom’s dashboard is simple; everything is shown on a single page of data
Users can receive email reports weekly, monthly, or both
Custom domains bypass ad-blockers
Fathom is easy to install and is a lightweight script. So, it’s just as fast, or even faster, than Google Analytics’ load time
Fathom does not collect customer data for their own pockets, unlike Google and no personal identifiable information (PIII) is collected, making it GDPR, ePrivacy, PECR, and CCPA compliant
Setting up Fathom is not only easy but comes with a 7-day free trial, and that’s always a plus. For the technical geeks out there, Fathom isn’t an open-source platform, so you won’t be able to add your own plug-ins or dive into a forum of other Fathom users to exchange GitHub links.
Not everything is perfect, so here are a few points to consider where Fathom falls short.
Points to Consider
Fathom is a paid tool, which can feel intimidating considering Google Analytics is free.
Fathom’s pricing plan is based on the number of views, so the cost increases as your website becomes more popular.
No option to view page-specific metrics. So looking at how specific pages perform is next to impossible.
No bounce rate metrics for individual pages. Bounce rates allow you to spot which pages need attention and improved user retention.
Fathom Analytics vs. Google Analytics – How Do They Compare?
Where Google wins in this bout is in its sheer number of features. Google Analytics is a powerful tool, especially when you learn how to use it correctly. However, Google’s data-collecting leaves less to be desired, especially when your users have to go through cookie prompts every time they go on your website.
Fathom, on the other hand, is more privacy-focused and bare-boned. While you get a lot of basic analytics, the functionality to hone into specific pages isn’t there. The upside to Fathom is that since you aren’t targeting users with advertisements or collecting their data, some internet laws don’t require you to have a cookie prompt. This can easily make users feel welcome to your site.
Pricing
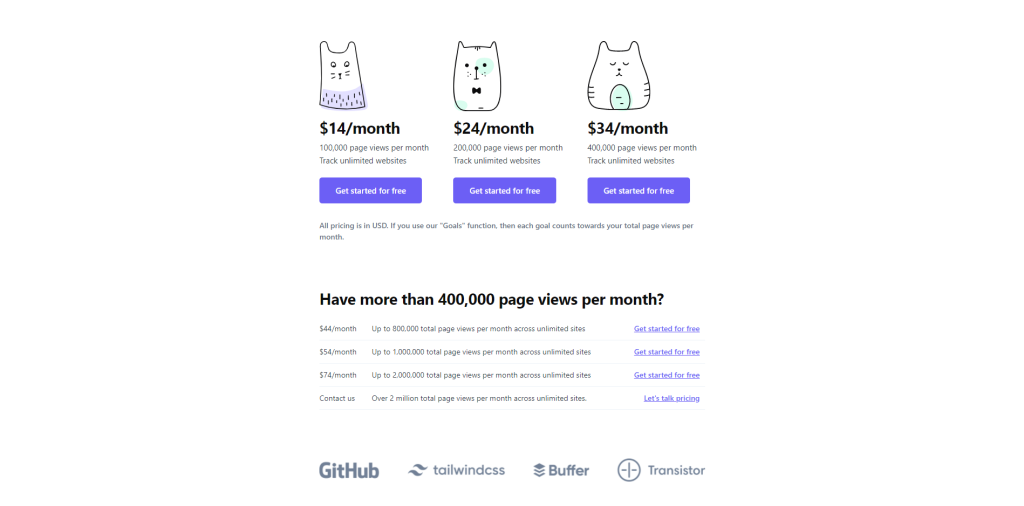
$14/month (100,000 page views per month)
$24/month (200,000 page views per month)
$34/month (400,000 page views per month)
$44/month (800,000 page views per month)
$54/month (1,000,000 page views per month)
$74/month (2,000,000 page views per month)
You can check here for their complete pricing plans.
Our Thoughts on Fathom Analytics
Fathom is definitely a good option if you value privacy, especially user privacy. It’s a premium experience that you can give to your visitors, at the cost of losing more powerful features that you would get with Google Analytics.
All in all, it’s worth a try and comes with a free 7-day trial. This is an excellent analytics tool for website owners or managers that don’t want to spend too much time looking at numbers.
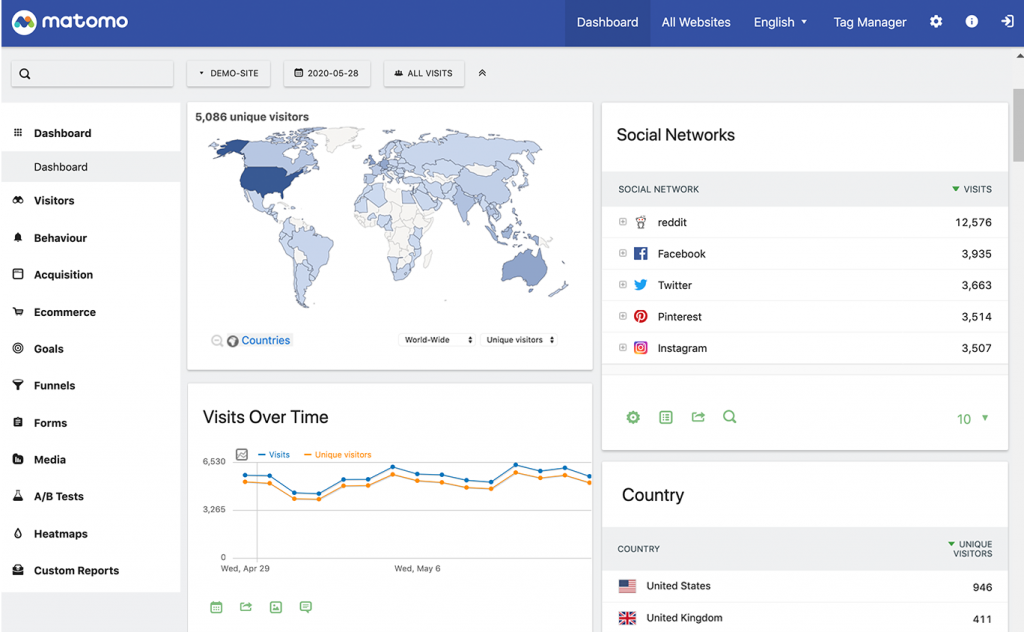
Matomo is an open-source web analytics software. It was previously known as Piwik and PHPMyVisites back in 2007 when it was founded. The program is GPL-licensed and also puts visitor privacy first, protecting your viewer’s data from advertising companies.
Considering that Matomo is a dedicated program, the web analytics that it provides are advanced. Unlike Google Analytics, Matomo doesn’t do any form of data sampling, so everything you get is the full picture. Suffice to say, Matomo works just as well as Google Analytics but as a stand-alone program with privacy features for your users. It’s a win-win.
For those of you who are wary about transferring, Matomo has a lengthy 21-day free trial period. Their pricing plans are also very diverse, offering 10 different payment options based on how many views you’re getting. The higher the views, the lower the payment costs.
Key Features For This Alternative to Google Analytics
Creates visitor profiles for each viewer that track their on-site interactions, viewing frequency, and more
Analytics are 100 percent accurate, Matomo does not sample data like Google Analytics
Testing and data features like heatmaps, A/B testing, form analytics, white-label reporting, and enhanced visitor profiles help you understand your data and make better business decisions
Matomo catches keyword performance across Bing, Yahoo, and Google, showing you what keywords brought visitors to your website
Reports can be custom formatted through 200 different templates
Matomo does not track user data for 3rd party advertising programs, so your users don’t have to fill in consent forms
These are the main key features from Matomo, but you can find more on their product features page. Similarly, they also have a live demo available too, so you can have hands-on experience with that. Now, Matomo isn’t perfect. Here are some points you might want to consider.
Points to Consider
You have to pay extra for advanced features if you go for the free version. These are billed yearly but range from €19 to €499 a year
Matomo is a technical alternative, so those who are unfamiliar with web-related tasks might find it hard to migrate
Pricing is expensive, but if you go for their Cloud package then most of the advanced features come free.
Matomo vs. Google Analytics – How Do They Compare?
Google Analytics is by far easier to set up than Matomo. It’s also a free service that doesn’t require much technical knowledge to set up and keep on running. Contrast that to Matomo, which often requires setting up a brand new server just to run the program, and you can see how Google Analytics is more convenient.
Matomo protects your users’ data and analyzes all of your visitors, unlike Google, which samples data. Users who can afford the advanced features get to use Matomo’s powerful tools for better analytics as well. By ensuring that your user’s data are not pocketed by Matomo, your users don’t have to fill in page-blocking consent forms about cookies while they scroll through your site.
Pricing
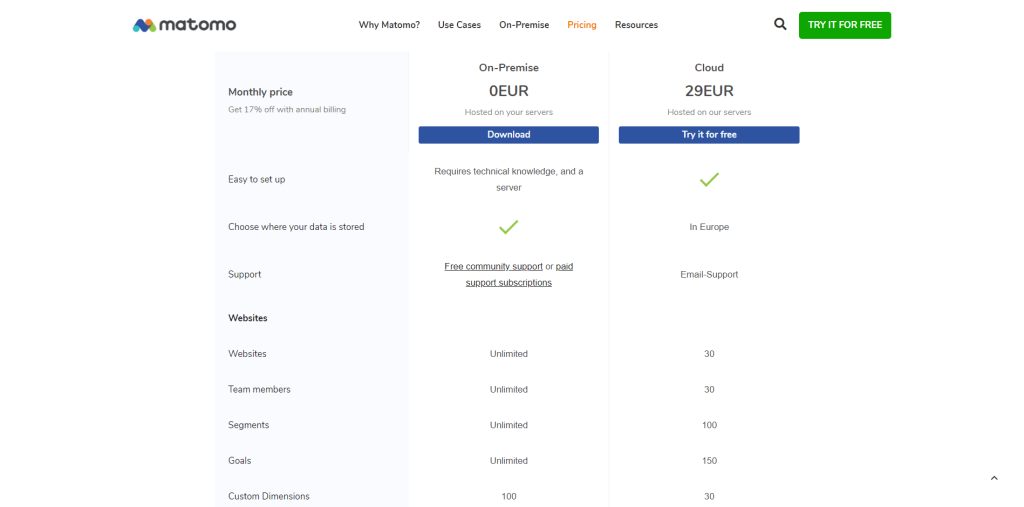
On-premise servers: unlimited websites, team members, segments, and goals; raw data retention is forever; extra features require additional monthly charges
Cloud servers: limited websites, team members, segments, and goals; raw data retention is forever; extra features come available with the plan
On-premise is free, but cloud prices will differ depending on monthly visits. You can check here for their complete pricing plans.
Our Thoughts on Matomo
Matomo is an excellent and equally powerful alternative to Google Analytics. Unfortunately, it comes with the need for web-related skills to pull off properly if you want the free plan. They do offer cloud hosting though, which comes with dedicated tech support and technical help.
Users who do have the skills to set up servers and manage this program on their own, Matomo has a dedicated user base who can guide and help you along the way.
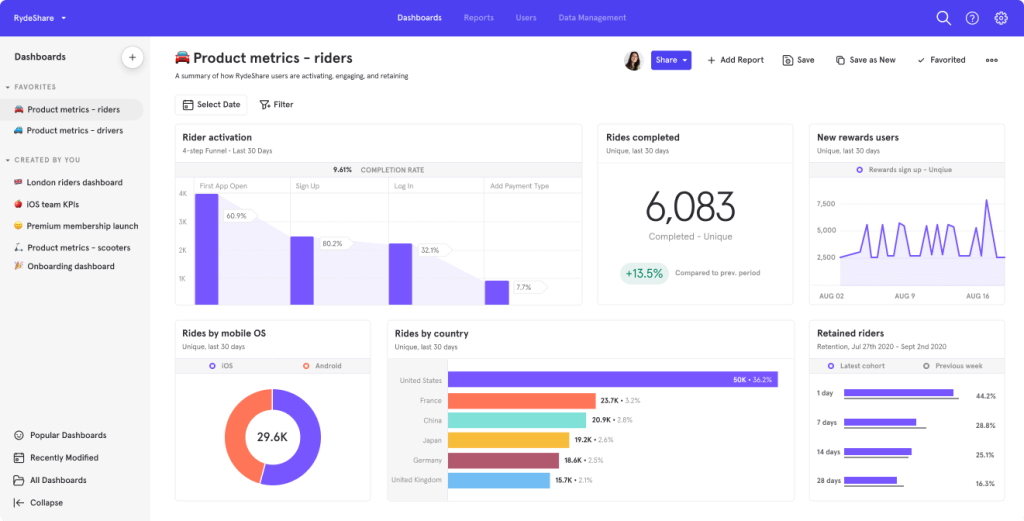
MixPanel is one of the best alternatives to Google Analytics on the market. It’s used by over 26,000 companies worldwide, including the likes of Samsung, Twitter, and Expedia.
Blurring the line between data collecting and being a tool for retaining your users, MixPanel offers more than just analytics. It’s a complete set of tools to build your website and brand from the ground up. Although MixPanel doesn’t have a fool-proof alibi for being privacy-focused, this analytics service excels in other areas. From tracking real-time data to user interaction and even customizing funnels easily, MixPanel outclasses Google in all these areas.
Setting up and getting started is simple here. Reports are easy to create and customize, even with the numerous types of data you can arrange. It’s user-friendly and comes with a ton of customization in the UI alone. They have a lot of features, so strap yourselves in for this one.
Key Features For This Alternative to Google Analytics
Users can quickly make custom reports based on time, browser, device, and many other metrics
MixPanel identifies all your users uniquely and can group them based on their actions
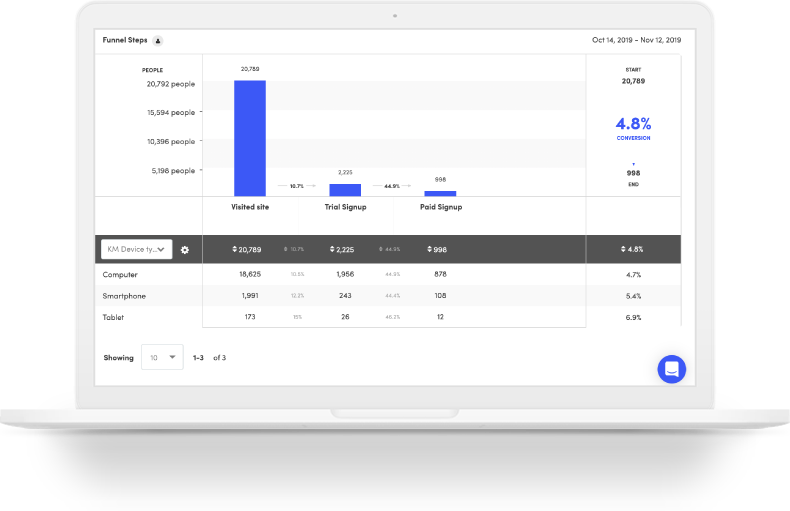
Easily make funnels and segmentations around your website to get page-specific data
Intuitive and simple interface, which keeps data management clean
Integrates with over 50 top tools in the market to help you analyze your stats and grow your business
Send messages or offers to real-time users who are browsing through your website
Points to Consider
MixPanel is better at reporting real-time events and what users do on your website. They aren’t great at finding your keywords, best-ranking pages, referrers, and so on.
The pricing can be too high for small businesses with a limited budget
MixPanel vs. Google Analytics – How Do They Compare?
Google is a better option if you’re looking for results about how users came to your site. Google Analytics will show you your keyword search performance, top-visited pages, and so on. It’s also a much cheaper option between the two because it’s free.
On the other hand, MixPanel is an enterprise-level tool that might be too expensive for most companies. However, they do offer a great deal when it comes to real-time and behavioral tracking. This lets users make informed decisions about how their visitors are interacting with their site, which helps optimize and increase user retention.
Pricing
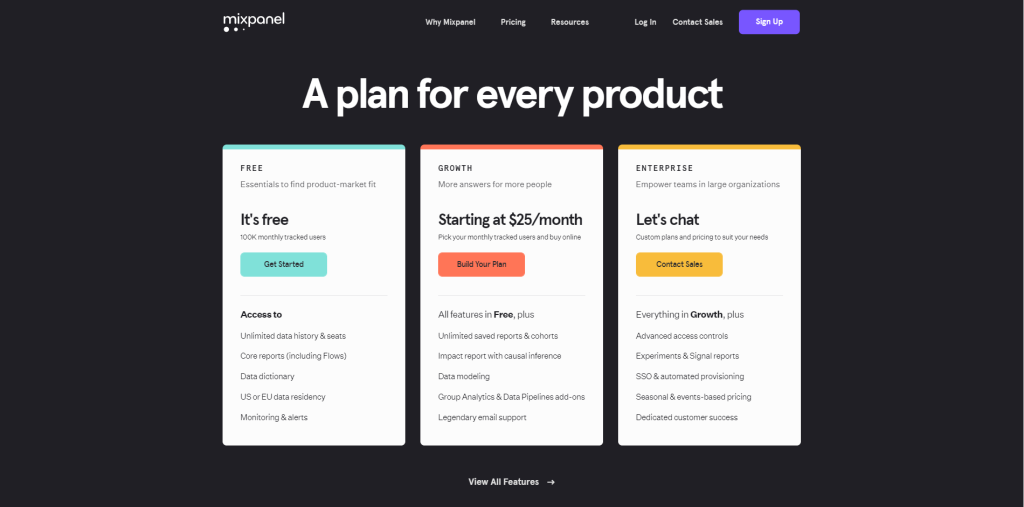
Free plan (100,000 users per month)
$25/month (additional monthly costs depend on monthly tracked users picked, includes all features in Free and more)
You can check here for their complete pricing plans.
Our Thoughts on MixPanel
Companies that are getting hundreds of thousands of views but little revenue in customer purchases will want to invest in MixPanel. By tracking user behavior closely, you’ll be able to optimize the process of how your visitors go around your site. Increasing user retention is a great way to improve profits with customers who are already there.
On the other hand, informational websites that offer a more read-and-leave approach might not benefit from this. Websites like The Verge target readers and benefit from ad revenue more than selling direct products. Samsung, on the other hand, sells a lot of items and will benefit from optimizing the buying process so that their sales increase.
Kissmetrics is a step above how MixPanel performs. It’s more complicated with a higher learning curve, but the rewards for mastering the platform cannot be understated.
Just like MixPanel, Kissmetrics focuses more on real-time user behavior than just pages of where your user came from. This lets you easily monitor key areas around your website and see how changes instantly affect your users’ experience. Founded in 2008, a year before MixPanel, Kissmetrics has been analyzing users for more than a decade. The analytics service specializes in deep tracking users for insights, by making user profiles, funnels, custom reports, and more.
Make no mistake, Kissmetric is a very premium service. It’s more expensive than MixPanel, but comes with dedicated email support, cross-platform or device support, and other testing tools like staging sandboxes, A/B tests, and flexible funnels. Here are some of Kissmetrics’ notable key features.
Key Features For This Alternative to Google Analytics
Email customer support
Website segmentations allow you to easily identify and track the behavior of users around key areas on your website
Kissmetrics monitors customer interaction to your website regardless of device: phone, computer, tablet, etc.
Customize reports from different data sets and funnels, helping you make informed decisions based on valuable behavioral data
Makes visitor profiles for every single person and tracks their behavior. Doesn’t sample data
Points to Consider
Much higher price compared to others on this list
Lots of reviews complain about the lack of optimization with the interface.
One of the highest learning curves for web analytics. Installing and integrating takes practice
They don’t actively advertise their privacy policies, unlike other companies that strongly push privacy first
Kissmetrics vs. Google Analytics – How Do They Compare?
Google Analytics is better at pointing out where users came from and how they got to your website. Keyword search indexes, top-performing pages, and referrers help increase the ranking potential of your website. And of course, Google Analytics is cheaper at $0 per month.
Kissmetrics works just like a beefed-up MixPanel. It tracks user behavior and helps websites optimize the user experience. User behavior is further trickled down into individual user profiles, giving invaluable insight into how groups of users interact with your website. Finally, Kissmetrics does a better job at evaluating user behavior around specific areas of your website too.
Pricing
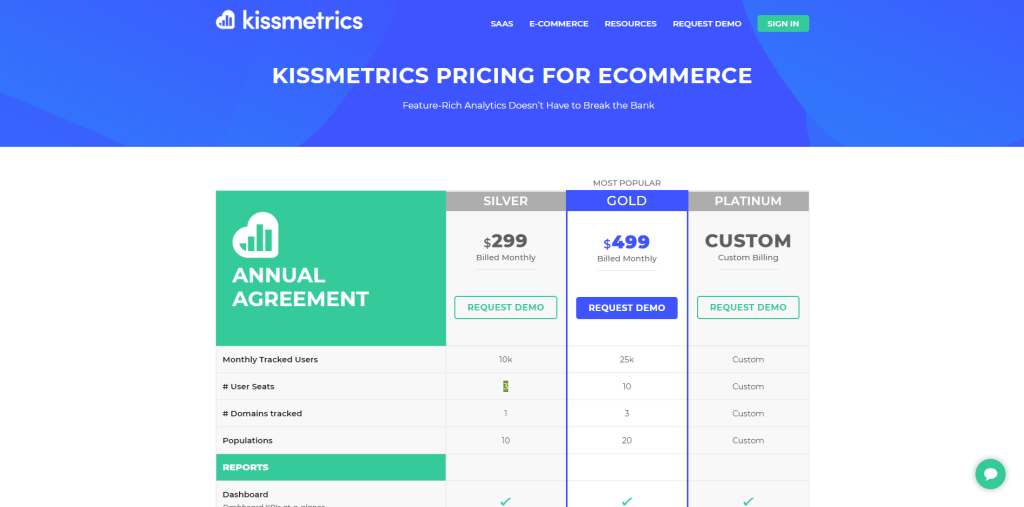
$299/month for up to 10,000 unique visitors per month, with email and in-app chat support
$499/month for up to 25,000 unique visitors with email, in-app chat, and phone support.
For over 25,000 unique visitors per month, directly contact Kissmetrics.
You can check here for their complete pricing plans.
Our Thoughts on Kissmetrics
Kissmetrics is a premium industry service. If you can afford it and want to invest in something powerful, it’s definitely worth your money. Just keep in mind that aside from the hefty price tag, there’s also a steep learning curve.
This Google Analytics alternative is perfect for companies that are getting lots of monthly visitors. Companies that want to improve and streamline the user experience for better turnarounds in profit. If you think your unique visits per month aren’t aligning with the number of purchases from your customers, Kissmetrics is a great way to analyze and grow your business.
If you liked what you read about Kissmetrics and MixPanel, then GoSquared something very similar at a much more affordable price. This website has integrated the fine connection between web analytics and user behaviors seamlessly.
GoSquared is a simple-to-use web platform with an intuitive dashboard. There’s virtually no learning curve, yet users are greeted with a mix of web analytics and behavioral tools. While GoSquared isn’t as powerful as Kissmetrics and MixPanel, you still get tools like segmentation, event and user interaction tracking, conversion tracking, heatmaps, custom reports, and more. It’s an excellent bang for your buck type deal that’s perfect for startups who need something affordable.
Where GoSquared shines is its ability to provide behavioral data without losing what Google Analytics provides—web analytics. Users still get to see their keyword indexes, top-performing pages, and referral tracking. The integration process is simple and easy as well, especially for websites hosted on CMS platforms like Shopify and WordPress.
Key Features For This Alternative to Google Analytics
GoSquared has a refreshingly simple interface. This is perfect for companies and business owners who’d like to check and understand their own analytics themselves
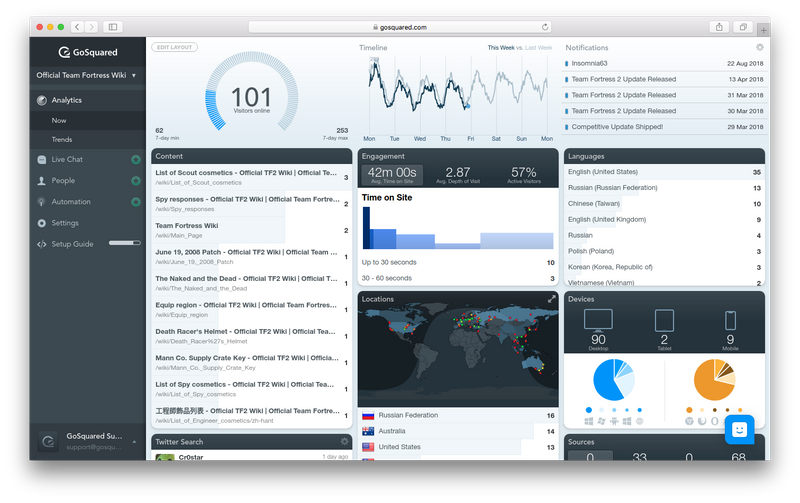
The Now Dashboard is a real-time analytics page to show you what’s happening on your website right now. Similar to MixPanel and Kissmetrics
Dedicated e-commerce metrics like revenue, transaction volume, items sold, etc.
User interaction, heatmaps, conversion, and event tracking for behavioral data
Email and live chat customer service support. Even offers phone support for enterprise-level plans.
Live chat support for individual customers
Points to Consider
Data is exported into Microsoft Excel rather than customizable reports
User reviews complain about slow customer support responses
No funnels
GoSquared vs. Google Analytics – How Do They Compare?
Google Analytics still has the edge when it comes to web analytics. Keyword indexing, referrer tracking, top-performing pages, the whole works come complete with Google. Also, the free cost from Google is always a plus.
GoSquared still has a lot of what Google has to offer, yet is different enough to provide twice the value. With GoSquared’s behavioral data, businesses can optimize customer retention, satisfaction, and the interface experience. The live chat system also adds a very personal way to talk to customers directly, which is as convenient as it gets.
Pricing
Free plan for up to 1,000 pageviews per month.
$79/month for up to 10 million pageviews per month.
$499/month for unlimited pageviews.
You can check here for their complete pricing plans.
Our Thoughts on GoSquared
Users who love MixPanel and Kissmetric but can’t afford them will love this one. GoSquared is basically a lighter version of those two analytical tools, all without sacrificing the importance of web-based analytics.
Real-time data, behavioral stats, and web performance. GoSquared is a steal at the price point it’s at, although it does get pricier past a certain view count.
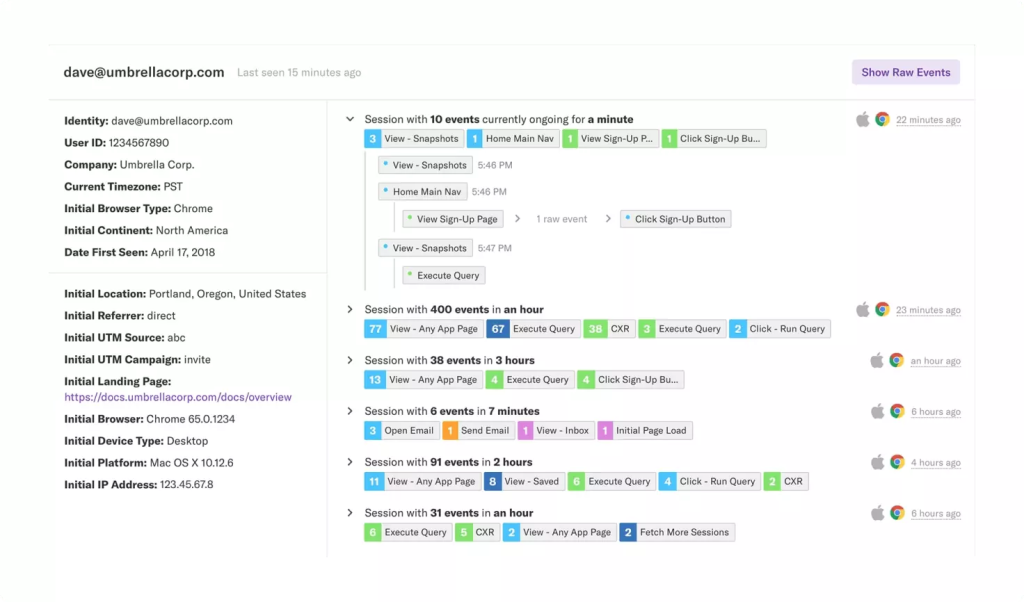
Heap stands out from the rest of this list right from the beginning. Its ability to start recording user behavior across your entire site as soon as it’s installed, without requiring any setup, means you don’t have to waste time adding triggers or conditions.
Also, Heap is perfect for users and website owners who might not know how or where to set up funnels. Since Heap immediately captures all user behavior around your website interface, you don’t have to worry about setting up your own heatmaps and funnels. For example, Heap automatically tracks how many users click buttons, comments, and more. This lets you compare data from all over your website.
By collecting and storing so much data, Heap promotes cross-referencing and hypothesizing, unlike any other platform. Unfortunately, that also means you might have two pieces of data that seem correlated but don’t actually connect. That grey area does irritate some users and we’ll talk about that below. For now, here are Heap’s key features.
Key Features For This Alternative to Google Analytics
Heap immediately collects all sorts of user interaction data from your website the moment it’s installed. This removes the need to set up specific funnels, which is beginner-friendly
All the pieces of data you get can be correlated with each other through multiple graphs, views, and arrangements. Doing so helps you understand if there’s a connection between different behaviors around your website
Heap has an Autocapture function that doesn’t require you to write in any code to your website to start capturing user behavior
Segments user behavior into groups so you can analyze them together
Points to Consider
Because of how free and open the data collection system is, inexperienced website owners feel unguided in analyzing the collected data. Without funnel suggestions, it gets difficult for you to formulate valid theories on your own
Lack of customization for graphs and formatting, particularly with graph colors, titles, line names, etc.
Heap vs. Google Analytics – How Do They Compare?
Google Analytics and Heap are two completely different types of analytical tools at this point. However, whichever one is more useful depends on your use case. Google Analytics is best for figuring out how your user got to your website.
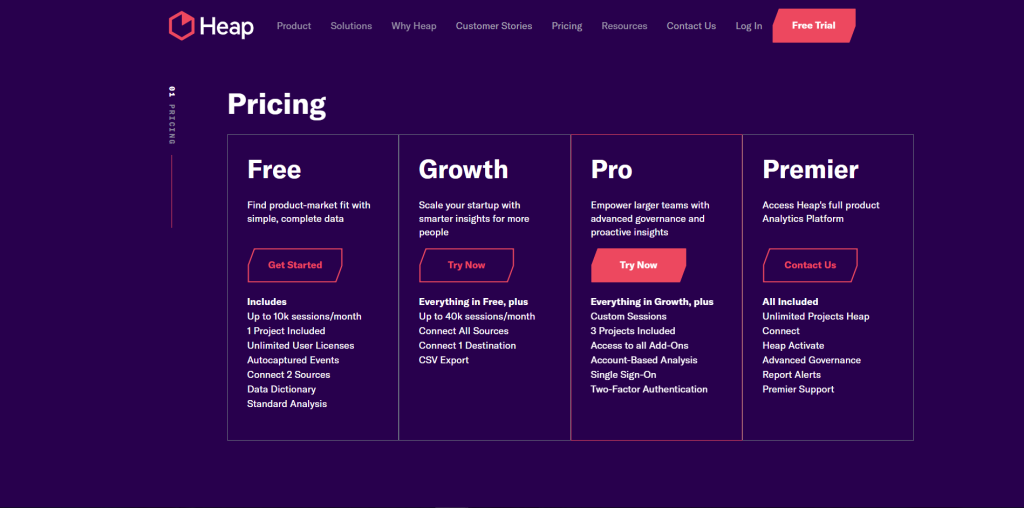
On the contrary, Heap is best at figuring out what your user does on your website. It does a fantastic job at this, capturing every user interaction the moment Heap is integrated into your site. It’s purely a behavioral tool but is also affordable for most startups, with the first analyzed 10,000 monthly visits being completely free.
Pricing
Free plan for up to 10,000 sessions per month.
For more sessions per month, directly contact Heap.
You can check here for their complete pricing plans.
Our Thoughts on Heap
Heap is a great alternative for Google Analytics if you’re a website that needs to optimize the user experience. Websites that sell products, like Amazon, study user behavior down to the smallest habits to continue selling products efficiently.
For eCommerce, SaaS, and other product-oriented website owners, Heap definitely has a lot of value for your website. On the other hand, businesses that focus on read-and-leave users should stick to Google Analytics or migrate to Fathom and Matomo instead.
Google Analytics Is Great – Should You Even Consider Alternatives?
While we’re advocates for privacy and protecting website visitors (of course) – as of present we (at RunCloud) are still avid users of Google Analytics (as well as Google’s entire suite of services, actually).
Because while some of these alternatives are easier to set up and easier to use, it’s widely accepted that Google Analytics is the only analytics solution that integrates with the rest of Google’s products (i.e. Google Ads, etc.) so if you grow your business with PPC advertising and want to truly track the impact of your marketing efforts justifying the migration is difficult. While if you run websites and are more interested in a few KPIs & really prioritize your website visitor’s right to privacy over everything else – Fathom is an excellent alternative to Google Analytics. that can easily be tracked using Fathom.
Have you considered making the switch to a Google Analytics alternative in the past & what did you end up deciding? Let us know & join the conversation in the comments. 💬
A critical part of any software development process is the maintenance and enhancement of web application performance. It’s not something that’s done every now and then or considered at the end – it’s a never-ending process of optimizing and striving to build the most efficient and lean codebase. Throughout this process, the use of optimization technologies such as dynamic content acceleration (DCA) tools is prevalent.
Web developers commonly employ DCA solutions to significantly improve the performance of web applications. These solutions streamline the workload of web servers by providing a more efficient, reliable, and faster network infrastructure.
In the case of LiteSpeed servers, a built-in DCA known as LSCache has the features you need to reduce the loading time of your web pages.
What is LSCache?
LiteSpeed Cache, or LSCache, is a built-in, high-performance dynamic content acceleration feature available on the LiteSpeed server stack. It works by eliminating extra layers of reverse-proxy in websites, thus, optimizing the speed of accessing web content.
LSCache Module vs. LSCache Plugin
When developers mention the word LSCache, they are generally referring to the module, which, as mentioned before, is built-in to the LiteSpeed server stack itself. While you are busy building all your Laravel web app functionalities, the LSCache module works behind the scenes in caching your web resources to improve its speed.
The automatic caching of the LSCache module may sound pretty convenient, but what if you want to control the module? Say, for instance, you want to instruct it on what resources to cache and how long you intend to cache them? Well, that’s where the LSCache plugin may come into action.
The LSCache plugin is an add-on interface that allows you to utilize your module. Through this plugin, you’ll be able to directly manage how your web resources are cached.
Why Should You Use LSCache Plugin for Your Laravel Web Applications?
Web applications, like Laravel apps, are recreated every time users visit them, resulting in an increased round-trip time (RTT). RTT is a metric that determines how long a request gets submitted from a client to its server and back.
An increase in RTT means a slower loading time. To prevent this aftermath, developers utilize the LSCache plugin. This highly customizable plugin offers developers an interface to easily configure website caches, thereby optimizing web apps and reducing the RTT.
What is the Server-level Requirement of LSCache Plugin for Laravel?
The LSCache plugin is simply an interface that will communicate to the LSCache module of your web server. For this plugin to work, ensure that your Laravel web application is running on a LiteSpeed server.
How to Install the LSCache Plugin to your Laravel Application?
To install the LSCache plugin in your Laravel application, follow the steps below.
Step 1: Obtain a LightSpeed-powered hosting or server for your Laravel application.
LSCache plugin will not work unless your Laravel app is powered by LiteSpeed. View your options through LightSpeed’s official hosting providers. You can also obtain your own LiteSpeed server via LiteSpeed’s download page.
Step 2: Configure your server’s cache policy.
Once you’ve acquired your server, you will need to configure its cache root and cache policy. Cache root refers to the storage path of the object files the module will cache. Cache policy, on the other hand, is a group of settings that manages the cache behavior.
You will also need to enable the cache engine of your virtual hosts by including the following code in your vhost’s config file:
<IfModule Litespeed>
CacheEngine on
</IfModule>
Step 3: Verify if LSCache is Working.
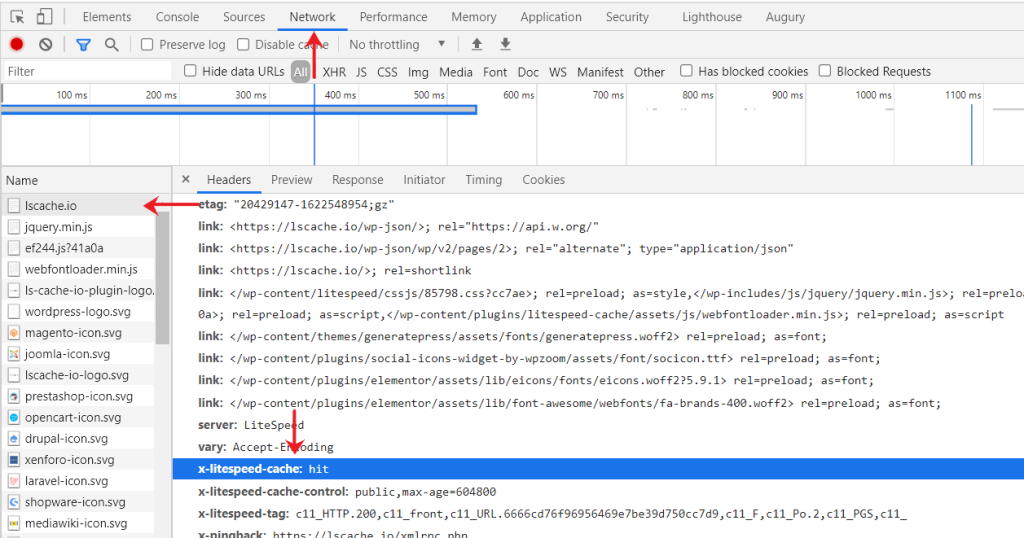
Now that you’ve configured the cache settings, you’ll need to verify if your Laravel website is being cached. You can accomplish this by using your browser developer tools. To do so, follow the steps below:
Navigate to your website using your browser and access the Network tab from your developer tools. This tab can be viewed by right-clicking and choosing Inspect.
Refresh the web page and you’ll notice that requests get submitted.
From the list of requests, click the first resource and you should see x-litespeed-cache: hit in your response header. This means that LSCache is correctly configured on your web page. An example is shown below for your reference:
Step 4: Install the LSCache plugin for Laravel using Composer.
When you’re certain that LSCache is working properly, it’s time to install the LSCache package for Laravel using Composer. You can easily require this package through this script:
composer require litespeed/lscache-laravel
In later versions of Laravel, an auto-discovery feature was made available, so you don’t need to make changes when you install the LSCache plugin. For earlier versions, particularly between 5.1 and 5.4, the auto-discovery feature is not yet present, so you’ll need to perform the following additional steps:
Add the code below in the aliases section of the config/app.php file:
After including all the scripts above, you’ll need to copy the config/lscache.php file into your config/ directory.
The last step that you must do is to enable the CacheLookup. In your .htaccess level or vhost, include the following codes:
<IfModule Litespeed>
   CacheLookup on
</IfModule>
You should now be able to configure your LSCache after successfully installing the plugin.
How to Configure LSCache Plugin for Laravel?
The LSCache plugin for Laravel comes with three functionalities—setting cache control headers, setting specific tags, and purging.
Step 1. Setting the Cache Control
You can configure the settings of your LSCache in the config/lscache.php file. From here, you can control the TTL (Time to Live), ESI (Edge Side Includes), and the default cacheability:
LSCACHE_DEFAULT_TTL – Set how long a cache lasts in seconds. The default for this setting is 0.
LSCACHE_ESI_ENABLED – This setting allows you to enable ESI. ESI lets you fragment web pages, providing a faster and more efficient way of caching them. You can set either true or false values to enable or disable this setting. By default, this setting is configured to be false.
LSCACHE_DEFAULT_CACHEABILITY – In this setting, you can set the default cache setting such as private, public, no-cache, or no-vary.
LSCACHE_GUEST_ONLY – You may also want to configure the cache if it can be enabled for guests only through this setting. It also accepts true or false, with the latter as the default value.
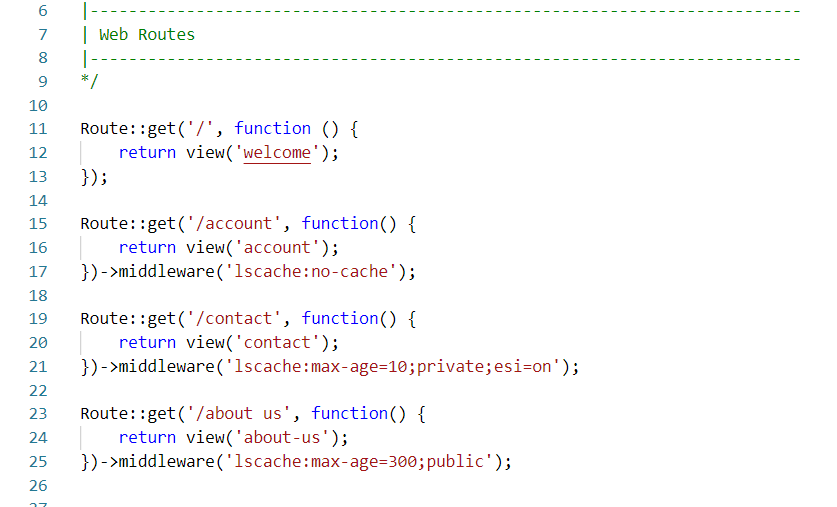
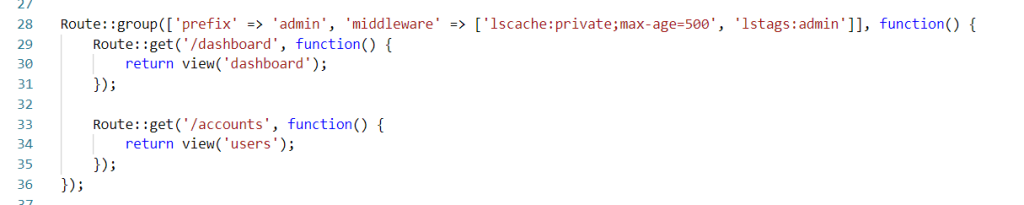
Middleware is used to configure the cache-control header. You can override the settings in your Laravel routes similar to the codes below.
The first route ‘/’ uses the default cache-control header in your config/lscache.php. For the ‘/account’ route, the ‘lscache:no-cache’ header prevents the route from being cached.
In the case of the ‘/contact’ route, notice that three settings have been overridden. The route has been set to have a max-age of 10 seconds (TTL), a private cacheability, and an enabled ESI.
Step 2. Setting Specific Tags
Sometimes, it is a good practice to assign tags to web pages so that you can easily target them the moment you want to purge the cache. You just need to include the lstags middleware in your route, as shown in the example below.
Step 3. Purging
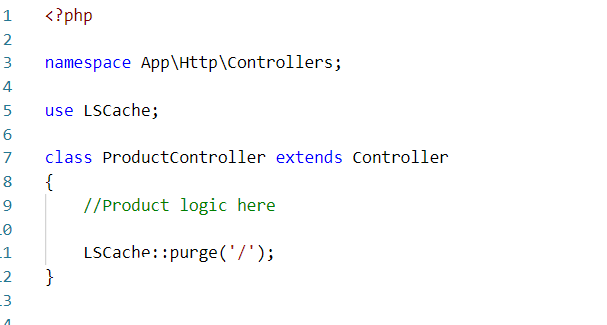
Suppose data gets updated in your server and you want to remove an existing cache to recache the new data. In which case, you just need to purge the existing cache first. You can do this by configuring your controller to use the purge method:
The purge() method lets you purge a specific page. If you want to purge all pages, you can use the purgeAll() or purge(*) instead. You can also purge pages with a specific tag by including the tag keyword inside the purge method, as in:
LSCache::purge(‘tag=products’);
Conclusion
Configuring LSCache in your Laravel applications may be a bit tricky, but you’ll get the hang of it eventually, especially when you fully understand why it is needed. Throughout this article, we provided all the essentials of the LSCache plugin, how to configure it, and, more importantly, its impact on your Laravel apps.
There are numerous tools out there that you can use to cache and optimize your web pages, and it might thrill you to know that LSCache is among the best!
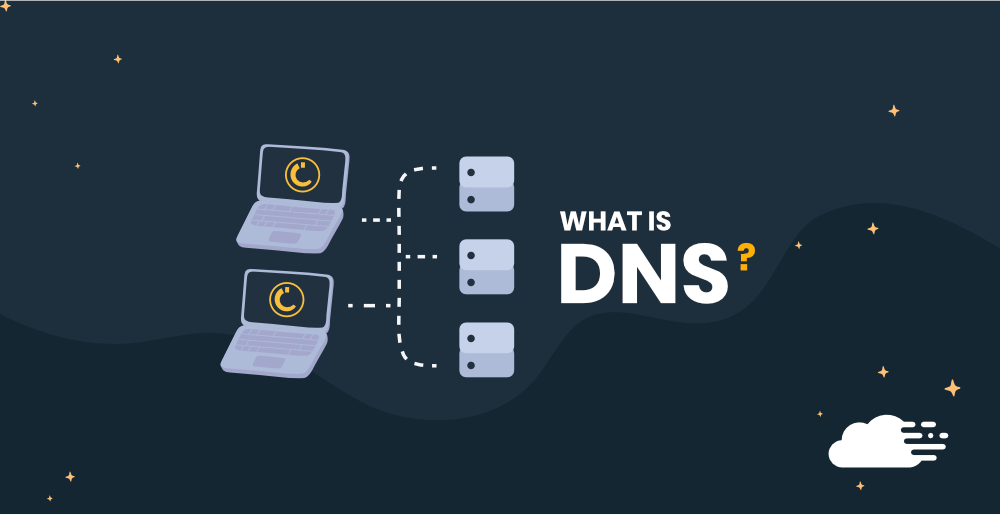
If you have your own website or have been working in the online hemispheres, you’ve probably heard of the term DNS a few times before. But what is DNS and how does DNS work?
Shortly said: DNS stands for Domain Name System and is used to convert human meaningful names (like your domain name) to computer meaningful names (IP addresses).
But there is more to it! We’re here to break down what a DNS is, its different types, and how everybody with access to the internet uses it every day.
What is DNS?
DNS servers translate domain names to IP addresses so browsers can easily connect to the websites you’re looking for. Similar to how a phone translates a contact name to a phone number.
When you open a website on your browser by navigating to a URL – your computer starts to initiate a connection to the website’s IP address. But, if this is the first time you’re visiting that website, how can your browser know what the IP address is? That’s where DNS servers come in.
A DNS server will look for the IP address of the domain name you just searched for, and connect you to their server. Like the Yellow Pages or any other phonebook, but then for websites. Here’s a real-world example:
If you search for facebook.com, your DNS server will look for Facebook’s IP address for you. Without the DNS, you’d have to enter 69.171.250.35 to open Facebook on your browser.
DNS is a fundamental part of the internet, without it, we’d have to memorize IP addresses to go to websites. which I’m sure we’d all agree is something nobody wants. 😄
When Was DNS Invented?
The Domain Name System (DNS) was invented back in 1983 because memorizing IP addresses made using the internet impractical. By connecting IP addresses to names, DNS made browsing through the internet much easier.
A quick overview of the history of DNS:
During the 70s, there was rapid growth in the number of computers used in the world. IP addresses were assigned manually as computers were only able to communicate using numbers back then. This was when the first 3-network system – Packet radio, ARPANET, and SATNET – was introduced.
The technology was progressing too quickly and people were having problems with the bookkeeping of numbers and IP addresses, so a unified solution was needed.
This task fell into the hands of Paul Mockapetris, the inventor of DNS. He designed a system that automatically mapped IP addresses to domain names, making the internet easier to use.
All of this resulted in the birth of DNS in 1983, and the same system has been used worldwide ever since.
How Does DNS Work
Domain Name Systems convert a hostname, or web address, into a computer-friendly IP address. A domain name, together with its matching IP address, is called a DNS resource record.
The DNS server has a collection of domain names and their respective IP addresses, like a phonebook, which is where the translating is done.
Therefore, you’re no longer required to remember IP addresses, and instead, just have to input the name of the website. The DNS recursive resolver will then find the IP address connected to the website you entered and direct you to the correct website.
Types of DNS Service
There are two types of DNS services that are integral to the DNS infrastructure. Each of these services performs different roles, which we’ll share below.
Recursive DNS Resolver
A recursive DNS resolver performs the repetitive tasks of tracking down the correct DNS record. When you type in a website address, the recursive resolver finds the correct DNS nameserver by making a series of requests. If it can’t find the correct IP address, because of a misspell or the website simply doesn’t exist, the DNS resolver will keep making requests until it times out. This is where caching comes in.
Caching works as a temporary storing location that provides a shortcut to the recursive resolver. It can readily provide the information the recursive resolver needs if it has the records stored.
You can think of this as your local DNS server. Whenever you type in the website’s domain name, your local DNS does its best to find you the website you’re looking for. If it’s a website that you frequently go to, the recursive DNS resolver keeps a copy of the website’s domain name and IP address. This makes your DNS faster because it already knows where you’re going without having to make a series of requests.
Authoritative DNS Server
An authoritative DNS server is responsible for the DNS resource records. It stores the list of website names and IP addresses and responds to the requests from the recursive DNS resolver. This server provides results to those requests without needing to ask or search from a different source.
These DNS servers are the dedicated stop-zone for DNS requests. Whenever you visit a new website, chances are you’re getting your IP address from here.
Authoratative DNS Server vs. Recursive DNS Resolver – What’s The Difference?
To put it simply, a recursive DNS resolver asks the questions and tries to provide an answer if it can be found in the cache. An authoritative DNS server already has the answers at hand, and can readily provide an answer.
The recursive DNS resolver will only pass the requests to the authoritative DNS server if it’s unable to find the IP address for the requested website in the cache. That’s why the authoritative server is considered to be the tail-end of the entire DNS query process, while the recursive server is regarded as the middleman.
Recursive DNS resolvers are faster than authoritative DNS servers because they cache the details of websites you frequently visit. This decreases loading time, which is why changing your DNS to a faster network can make your computer feel faster. Although your internet speed doesn’t change, faster DNS networks mean a faster response time to your browser.
How Does A DNS Lookup Work?
A DNS lookup is the process of looking up a DNS record from a DNS server. The DNS lookup translates email addresses and domain names from computers, servers, and smartphones into numerical addresses.
Here’s how a DNS Lookup process works:
When a user types in a web address, the computer sends that information to the recursive DNS resolver.
The recursive DNS resolver looks through your computer’s cache files to see if there’s an IP address for that website.
If there isn’t one, the recursive DNS resolver then sends out a request to another server.
If the recursive DNS resolver can find the IP address on one of the servers, the search will end, and the website will load on the user’s computer.
Otherwise, the recursive DNS resolver will send requests to servers until it reaches the authoritative DNS servers.
The authoritative DNS servers will then look for the IP address in its records.
Once the authoritative DNS servers find the IP address, they’ll send it back to the recursive DNS resolver.
The recursive DNS resolver will then send the IP address to your computer, and the website will load in the browser.
As you can see, there are a lot of steps in the DNS process; which is why each connection must happen as quickly as possible. We’ll get into DNS speeds later on, but first, we need to explain the different types of DNS queries.
What Are the 3 Types of DNS Queries?
DNS queries are requests made by DNS servers to look for the IP address you’re trying to connect to. Whether it’s your DNS server back to your computer, or your DNS server requesting from another DNS server, these queries all do one thing: find the website you’re looking for.
There are three types of DNS queries in a DNS lookup.
1. Recursive Query
A recursive query is when the DNS server receives a user’s request for a record and responds with the answer, the IP address, to that request. An error message might occur if the server is unable to find that IP address.
2. Iterative Query
An iterative query happens when the server is allowed to provide a referral of what is considered to be the best possible answer to the user. This answer may already be in the cache records. If not, it will direct the user to an authoritative server for an appropriate answer. This process will continue through other DNS servers until it can complete the request or timeout.
3. Non-Recursive Query
A non-recursive query is a request with readily available answers. This happens when either the record is already stored in the cache files or the authoritative server.
The Importance of Reliable DNS Servers
To have a good DNS server matters, because it makes your browsing experience faster, or completely puts it off the rails. A faulty DNS server can be the difference between connecting to a website or being told that the website can’t be found.
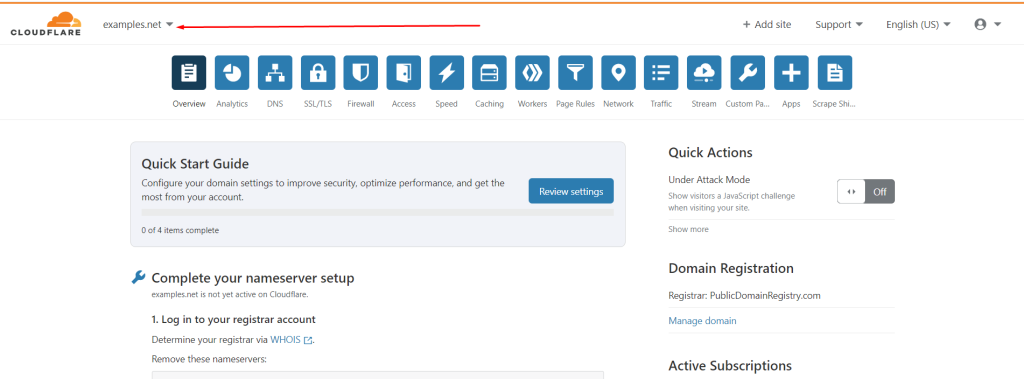
A great DNS server is the difference between connecting to a website in 2 seconds or in half a second. If you’re on the market for a DNS server, RunCloud recommends Cloudflare. And, you’ll be pleased to hear that Cloudflare’s Fast, Secure and Resilient DNS is entirely free to get started with.
After Action Report – Switching To Reliable A DNS Server
DNS truly is the backbone of the internet, working quietly in the background to fulfill virtually every request made on the internet across the world. So, what next?
Well, if you’re reading this because you run a website and care about your infrastructure – we recommend looking into Cloudflare. Cloudflare is one of the most popular solutions for internet security, DDoS protection, and optimizing loading times for your website.
And if you’ve been looking to make significant improvements to your server infrastructure as well, RunCloud makes this effortless. Choose your server provider (Digital Ocean, AWS, Linode, UpCloud) & get your site up and running in a matter of minutes.
There are several steps to checking your DNS settings which we’ve listed below. These steps may be a little different depending on your operating system on PC.
1. Click on Start then select Control Panel. 2. Next, double click on Network Connections/Network and Internet. 3. Right-click on Network Connection or Network and Sharing Centre. You’d want to open up the menu and select Properties. 4. Double click on Internet Protocol (TCP/IP). 5. Ensure the “Obtain an IP address automatically” box is checked. 6. Additionally, ensure the “Obtain DNS server address automatically” box is checked.
If you are using a Macbook, you can follow these steps.
1. Click on the Apple symbol, and select System Preferences. 2. Select the network you’re using—it could be a wifi or cable connection. Then click Advanced. 3. Click the DNS tab. 4. This will open up your DNS settings page, where you can see which DNS server you’re using. It should display 192.168.1.254 by default, but you will be able to correct your settings by removing or adding DNS servers.
Is a paid DNS server better than a free DNS server?
DNS servers are widely used for free, however, a paid DNS server can offer more security for online companies. Security with a paid DNS server means being less prone to hacks and interference. If you’re just a regular joe though, then a free DNS is more than enough for you to browse around.
What are the benefits of DNS?
One of the major benefits of DNS is an added layer of security. The process verifies digital signatures and allows users to ensure the website is from a secure IP address. A DNS also offers a stable, high-speed internet connection and allows users to visit any website without having to remember individual IP addresses.
What problem does the DNS solve?
DNS solves the main problem of having to memorize and list IP addresses to load a particular website. It lets users connect and load any website to its browser by just entering the site address.
What are my DNS settings and what should they be?
You can do a search on the best DNS servers to use in your area. But some of the best performing DNS servers and their addresses are listed below.
– Quad 9: 9.9.9.9 and 149.112.112.112; – Cisco OpenDNS: 208.67.222.222 and 208.67.220.220; – Cloudflare 1.1.1.1: 1.0.0.1 and 1.1.1.1; and – Google Public DNS: 8.8.8.8 and 8.8.4.4.
For more than ten years, the Cloudflare team has provided security services to website creators worldwide and is currently helping thousands of businesses maintain and secure their online resources.
Since its creation, Cloudflare has released many strong firewall utilities, such as IP rules, CIDR rules, ASN rules, country rules, and HTTP user-agent blocking, to name a few, and Cloudflare Firewall Rules are a recent addition to these. These rules combine how firewall utilities are used, and provide users with more flexibility and control over how their firewall works.
In this article, you’ll learn everything you need to know about firewalls, how to start implementing and editing Cloudflare Firewall Rules on your website, and why security is so important.
What Are Cloudflare Firewall Rules?
Cloudflare Firewall Rules are a flexible and intuitive framework website owners can use to filter HTTP requests – giving you complete control of which requests are able to reach your application.
Firewall rules integrate well with existing Cloudflare tools, as they allow you to combine multiple techniques into a cohesive set of rules. For example, you can create one rule to block traffic from users matching a particular pattern, instead of having to use three or four different rules in as many places to accomplish the same result.
They also give you the advantage of continuously checking the site traffic and responding accordingly to threats. You can define expressions that inform Cloudflare of what or what not to look at and what kind of action should be taken when those particular requirements are satisfied.
Why Are Firewalls Necessary for Your Website?
Cloudflare is mainly used to decrease web page load speed and protect your site from online threats. It also fights against spammers, malware injections, and DDoS attacks.
Around 70% of WordPress installations are prone to hackers, making it more necessary to use Firewalls from Cloudflare to protect your site from unwanted threats. Some of the reasons why firewalls are required for your website are:
Cloudflare utilizes three different types of minification, JavaScript, CSS, and HTML, to reduce file size and increase load speeds by removing unwanted white spaces, newline delimiters, and unnecessary characters.
With the introduction of HTTP/3, Cloudflare supports multiple page elements parallelly over a single TCP connection along with push technology and header compression.
Cloudflare WAF protects your site from many vulnerabilities that popular CMS tools (WordPress, Joomla, etc.) are prone to. Cloudflare WAF has more than 145 rules to protect your site from all types of web application attacks.
Cloudflare has a rate-limiting function that helps mitigate DOS attacks, brute force login attempts, and other malicious intent against the application layer. The rate-limiting function allows you to configure thresholds, define responses, and gain insights on websites.
As you can see, Cloudflare not only improves SEO by speeding up your website, it provides a whole host of advanced security features to protect your site from attacks.
Cloudflare Firewall Rules – Matching & Actions
Cloudflare Firewall Rules are made up of two main functionalities: Matching, which lets you define a filter to precisely match your traffic, and Actions, through which you determine the action Cloudflare will take after you set the matching filter.
Matching
Matching lets you filter out any incoming traffic to your website. For example, if you wanted to restrict certain countries, redirect visitors to a location-specific page, or filter out particular IP addresses, then you would use matching rules to do this.
Among the most important features Cloudflare is introducing is the known bots (cf.client.bot) field. It provides you with a Cloudflare-approved list of good bots obtained through reverse DNS lookups. You will find a comprehensive list of bots approved by sites such as Google, Yahoo, Bing, Linkedin, Apple, and more.
Note: Since the “allow listing” function has been removed, it’s recommended that you include cf.client.bot in an Allowed rule. This would prevent Cloudflare Firewall Rules from unintentionally blocking good crawlers.
What’s more, Cloudflare Firewall Rules also come with an algorithm that gives a threat score to IPs by measuring their online reputation. The threat score ranges from 0 to 100 and is divided into the following categories:
High – for scores from 0 to 13;
Medium – for scores from 14 to 23;
Low – for scores from 24 to 48;
Essentially Off – for scores greater than 49.
However, setting up matching rules alone won’t achieve much. This is where Actions come in.
Actions
With matching filters set up, you can instruct Cloudflare Firewall Rules to apply the standard Cloudflare actions (Block, JavaScript Challenge, and Challenge) as well as the new Allow action.
Block: used for blocking traffic from getting access to your web application.
JavaScript Challenge: used to block traffic from visitors who don’t have JavaScript support, which is usually bots.
Challenge (Captcha): used to set up a Captcha challenge to block potential bots.
Allow: used for allowing visitors access to your web application.
Three Examples of Cloudflare Firewall Rules In Action
In this section, you’ll find three ways to set up Cloudflare Firewall Rules by using the dashboard and why they might be helpful.
We’ll be covering:
How to block particular countries from visiting your site
How to make your WordPress site more secure with captcha
How to prevent bad bot traffic from coming to your site
Note: Another way to set up these rules is by using API and Terraform.
To begin, log into your Cloudflare dashboard. From there, choose the domain name for which you want to set up Cloudflare Firewall Rules.
Next, click on Firewall from the top sections and then on Firewall Rules.
This section lets you set up a new firewall rule, browse and filter existing rules, activate, deactivate, modify, and delete rules. To try out the below examples, click on Create a Firewall rule.
Example 1 – Block All Countries Except the USA
To block all countries except a single one (in our example, it will be the United States of America), follow the steps below:
First, give your rule a name.
From the Field drop-down, choose Country.
Next, from the Operator drop-down, choose does not equal.
In the Value drop-down, choose the United States.
Finally, choose an action drop-down, select Block, and then click on the blue Deploy button in the lower right-hand corner.
Conversely, if you would like to block a single country, pick equals from the Operator drop-down and then follow the procedure as mentioned above.
Expression Editor:
(ip.geoip.country ne “US”)
Example 2 – WordPress Security
WordPress security is an important thing that site owners don’t think much about. Every day, Google blacklists about 10,000+ websites for malware and around 50,000+ websites every week for phishing. It’s essential to keep your WordPress site secure from malware and threats and avoid getting your site blocked.
Why Is WordPress Security Important?
Whether your website is big or small, hackers don’t care about it. One way or the other, they can find different ways to use the information against you. They typically look for your personal and financial information and then try to cause damage to you and your company with the collected info.
Mark Ronso, Marketing Manager at Top Writers Review, said, “a business’s reputation can be seriously damaged due to a hacked website. Hackers commonly install malicious software or viruses to extract the data in the background, which can result in a loss of trust in your business and customers turning to a competitor.”
Hence, to keep your business safe and secure, you’ll need to protect your site through WordPress plugins or a Cloudflare firewall. So, which one is the best, and what’s the difference between the two?
WordPress Plugins vs. Cloudflare Firewall – Which Is Better?
A lot of people choose to install free plugins to handle the security of their site, instead of having to use a third-party tool like Cloudflare – usually, because it’s too complicated or to save money. In reality, Cloudflare doesn’t take long to install and provides you with much more functionality than any other WordPress plugin.
Here are the key differences you should know about:
Cloudflare firewall:
Cloudflare firewall seamlessly integrates with CDNs like WordPress
Cloudflare’s Automatic Platform Optimization (APO) caches your site and optimizes the assets, increasing your site’s speed.
Cloudflare firewall offers a free SSL certificate and DNS service, along with powerful DDoS protection.
Increases the speed and performance of your site by rewriting insecure URLs dynamically to their secure counterparts.
Free to get started
WordPress Security Plugins:
Regularly scans your site for malware code and has a real-time firewall feature that protects your site from known and unknown threats.
Many free plugins don’t offer features like IP blocking, country blocking, and protection from brute-force logins.
Some WordPress plugins allow you to rename the login gateways to avoid potential attacks.
You never know what permissions you’re giving up to the plugin developer.
All things considered, most WordPress plugins don’t increase your site’s speed or offer as many advanced features that Cloudflare firewall provides. Cloudflare firewall is recommended over free security plugins to protect your website from any attacks.
How to Secure Your WordPress Site With Cloudflare Firewall
Repeat the process mentioned above of creating a new firewall rule and naming it, but this time, click on the Edit expression.
By doing so, you are directly accessing the Expression Editor. In the field, paste the following:
((http.request.uri.path contains “/xmlrpc.php”) or (http.request.uri.path contains “/wp-login.php”) or (http.request.uri.path contains “/wp-admin/” and not http.request.uri.path contains “/wp-admin/admin-ajax.php” and not http.request.uri.path contains ” /wp-admin/theme-editor.php”)) and ip.geoip.country ne “US”
After that, pick Challenge (Captcha) from the Choose an action drop-down, and then click Deploy.
Now you will have set up a Captcha challenge for all visitors outside the US who attempt to reach WordPress xmlrpc.php, wp-login.php, and /wp-admin (except admin-ajax.php and theme-editor.php), in order to block potential hackers from accessing your WordPress website.
If your login or admin URLs have been changed, feel free to edit the original expression to match.
Example 3 – Block Bad Bot Traffic
Bad bots are assigned to do a number of fraudulent practices and malicious activities like ad scams, malware attacks, and data theft. Around 40% of internet traffic consists of bad bot traffic, and, during the pandemic, there was a 788% increase in bad bot traffic to retail websites globally between September and October 2020, resulting in a loss of $82 million during peak season.
Blocking out bad traffic helps avoid attackers trying to launch a DDoS attack on your site. Most DDoS attacks slow down your site by directing a large amount of traffic towards your site, overloading the server, and making it go offline.
While the list of user agents to block may vary based on your specific needs, here are some common ones to consider:
Yandex: A Russian search engine bot.
muckrack: Associated with media monitoring services.
Qwantify: A bot from the Qwant search engine.
Sogou: A Chinese search engine bot.
BUbiNG: A web crawler.
CFNetwork: Associated with Apple’s networking framework. While legitimate Apple users utilize CFNetwork, some malicious bots or scrapers may also impersonate it.
Scrapy: A Python-based web crawling framework.
SemrushBot: Associated with the Semrush SEO tool.
AhrefsBot: A bot from the Ahrefs SEO tool.
Baiduspider: A bot from the Baidu search engine.
python-requests: A Python library for making HTTP requests.
Various “crawl” and “spider” user agents: These may include legitimate search engine bots, but it’s essential to filter out excessive or suspicious crawling behavior.
The procedure here is similar to the previous example. The only difference is that you should choose Block from the Choose an action drop-down and paste the following in Expression Editor:
(http.user_agent contains "Yandex") or (http.user_agent contains "muckrack") or (http.user_agent contains "Qwantify") or (http.user_agent contains "Sogou") or (http.user_agent contains "BUbiNG") or (http.user_agent contains "CFNetwork") or (http.user_agent contains "Scrapy") or (http.user_agent contains "SemrushBot") or (http.user_agent contains "AhrefsBot") or (http.user_agent contains "Baiduspider") or (http.user_agent contains "python-requests") or (http.user_agent contains "crawl" and not cf.client.bot) or (http.user_agent contains "Crawl" and not cf.client.bot) or (http.user_agent contains "bot" and not http.user_agent contains "bingbot" and not http.user_agent contains "Google" and not http.user_agent contains "Twitter" and not cf.client.bot) or (http.user_agent contains "Bot" and not http.user_agent contains "Google" and not cf.client.bot) or (http.user_agent contains "Spider" and not cf.client.bot) or (http.user_agent contains "spider" and not cf.client.bot)
This rule will block bot traffic with user agents containing the strings “crawl,” “bot,” “spider,” and some other custom user agents.
Remember that blocking user agents should be done thoughtfully. Regularly review your website logs and adjust your blocking rules as needed to strike a balance between security, performance, and user experience.
How To Test That Your Firewall Rules Work
Once you’re all set up, you should check to see if your Cloudflare Firewall Rules work. To do this, you can access the Firewall Event Activity Log by going back to the Overview section of the firewall. There, you can see a list of firewall events and details related to them.
Note, checking your Firewall Rules can take some time to do if you don’t get much traffic. If this is the case, wait a couple of days and monitor Google Analytics to make sure there are no abnormalities before returning to Cloudflare and checking the activity log.
The most important thing to look out for are challenge and block events.
When challenge and block events appear on the list, take your time to go through them and see if any good bots were blocked when they shouldn’t have been, or if any known bad bots made it through. You need to make sure no positive traffic gets denied access to your site because of an error in setting up firewall rules.
Summary – Use Cloudflare Firewall Rules To Your Advantage
RunCloud lets you easily manage your server and web application, and seamlessly integrates with Cloudflare. We hope you’ve found this guide useful in setting up & effectively implementing Cloudflare firewall rules to improve the security and performance of your web application.
Have you been struggling to convert paying customers into raving fans? Then it might be time to create an online community. And forums are an excellent opportunity to build a thriving online community and allow your users to connect, share, and give each other feedback.
Online forums provide more interaction between customers and your brand than social media, resulting in stronger engagement and brand affinity. At the end of the day – you’re launching a community to strengthen the connection between users and your brand – and the forum software you choose to do this has a huge impact as it’s what members of your community are going to interact with. So – let’s dive right in!
What Makes Great Forum Software?
Most forums include basic features like user-role systems – allowing you to separate admins, moderators, and normal users – as well as letting you register an account, create threads and respond to other users’ messages.
Apart from the basic functionality, here are some other features to look out for when you are choosing an online forum software:
Profile customization: Enable users to personalize their profile by giving them more flexibility and control, which increases engagement.
User-friendly text editor: Almost all forums are 100% text-based; this is why a user-friendly text editor is important for users to create and customize their posts.
Private messaging: Most forums are all about community discussion, and enabling private messaging is a great way to advance interpersonal relationships.
Comment signatures: Comment signatures are similar to profile customization, allowing users to add relevant information about themselves, links to their work, or even something like a joke – usually resulting in more engagement.
Achievement systems: Some forums have ‘user levels’ that can be unlocked after completing specific tasks or being active on the platform.
It’s not necessary for your desired forum building software to offer all the features we just mentioned. What’s most important is that the forum provides the best experience for your customers.
For example, if your goal is to set up a forum that lets users submit customer support queries, it might be irrelevant to enable achievements or signature features.
However, having modern features in the forum can be beneficial as it keeps users coming back again and again.
Three Ways to Build Your Community Using Forum Software
People notice when brands pay attention to their customers, listen to their issues, and converse with them; they especially notice when brands grow their own communities.
But, how exactly does that happen? Through word-of-mouth marketing.
Customers who find themselves as valued community members are much more likely to talk about your brand to their friends, family, and co-workers.
Here are a few tips on how you can build a strong community using your forum software.
Spread the word
Spreading the word about your new forum through different marketing strategies, like including CTAs to join your forum in email newsletters or social posts, helps inform people about your new community.
You can even also your customers to help in spreading the word by posting content about the forum on their social media. For example: “Like, follow, and share this post to win our product!”.
Keep engaging with your community regularly
Moderating your forum and engaging with your audience is an important part of community building. Your customers will be less likely to participate if they feel that they are being ignored or unheard.
Answering queries and responding to their feedback shows your users that you value their opinions and experiences with your product.
Create a helpful environment
The ideal forum should be a safe place for your customers, prospects, and audience to interact, ask, and answer questions. By creating a helpful environment or creating community guidelines that focus on patience and kindness, your community will grow without the need to monitor it 24/7 constantly.
The Best Forum Software to Build Your Community in 2021
Discourse is an open-source forum software that can be used in tandem with your existing website and CMS platform. It’s mobile-friendly and allows users to get dynamic notifications, badges, emojis, and more. There’s also a built-in moderation system that protects your community from spam and abuse.
Discourse offers a number of features and integrations for every use case, and the platform’s interface is similar to the traditional forum structure that you may be familiar with.
The best thing about Discourse is its unique user ranking system that provides experienced members with certain moderation capabilities. This leads to a self-moderated community where users are rewarded for their meaningful collaborations and engagement.
If you want to use this open-source forum software and don’t know how to host a website or don’t have the resources to do so, Discourse offers a managed hosting solution for a monthly subscription starting at $100.
Key features:
Mobile device optimization
Advanced moderation settings
Business plugins and social media integrations
Rich messaging tools
Performance analytic tools
Price: Free, open-source version, business plans start at $100/month
Using a multi-purpose platform CMS like WordPress to power your online community allows you access to many different software options in the form of plugins like bbPress. You can use bbPress to create multisite forums and maintain them from one dashboard within your WordPress site.
WordPress has many more plugins which provide basic forum features with extra benefits.
Key features:
Provides access to the largest collection of themes and plugins on the web
Allows you to set up both regular websites and online discussion sites
Provides a wide variety of forum plugins for a highly personalized experience
PhpBB has an intuitive board set-up where users can post public or private messages, and you can create as many internal messaging boards as you want without spending any extra bucks. You can also use different extensions to add new options to your forum community. This makes phpBB very customizable and allows you to personalize the forum software according to your needs.
PhpBB lets you create password-protected forums for extra security, sub-forums, and gives the option to display active topics and community guidelines at the top of your forum.
Invision Community is a very popular forum software for large businesses and enterprises. It includes a forum module that can power thousands of message boards around the web and offers a large number of community management apps to help you engage with your audience.
It has a fully customizable interface with rich content creation tools and a comprehensive admin panel that makes it easy to set up and manage. It enables users to customize every part of their forums, right down to the activity feed on a user-by-user basis. Invision Community also lets users create and manage their own communities, known as clubs, that seamlessly integrate with your forum. These clubs have designated club leaders who can add new forums, calendars, or galleries to the community.
Vanilla offers both open-source and premium versions of its forum software. The open-source version provides users with a self-hosting platform with essential features and community-built plugins, and the premium version offers a powerful cloud-based solution for enterprise customers.
Some of its features include a wide array of marketing integrations, automatic content curation, and gamification practices. These features aim not just to support and increase user engagement, but also to improve business effectiveness.
Vanilla can also be used as help desk software to create a robust ticket system for customer support efforts. The platform’s built-in knowledge base allows businesses to develop a self-service system that helps relieve support demand.
Another great feature is its intuitive dashboard that lets you manage every aspect of your community. You can view stats, manage users, and use an advanced editor that recognizes HTML, BBCode and Markdown using this software.
Vanilla also allows you to adjust permissions of forums or members if you’re looking to control access. It enables your users to submit, view, and vote on ideas to drive innovation for your business; use the Q&A option to connect and help each other with your products or services. The best part of Vanilla is that it offers an on-boarding process with useful checklists, training materials and provides access to their support reps.
Key features:
User-friendly setup process
Mobile-friendly interface
Social and data sharing integration
Wide range of themes and plugins
Auto-saving feature
Price: Free open-source version or business plans start at $689/month
VBulletin is a popular option for hosting your forum, with over 100,000 websites trusting vBulletin to manage their community – including NASA, EA, and Sony Pictures. The software includes many great features like advanced security, built-in SEO, and responsive web design. With VBulletin, you can create an unlimited number of open forums as well as private forums.
VBulletin provides a fun and unique features for your community members, including friends lists, member birthdays, and the ability to see who’s online. The software forum offers quality support for its users, has a clean design, and is also known as one the fastest forums available.
Flarum, despite still being in the beta phase, has already secured a place for itself as one of the best software forums available. The main reason for this lies in the core ethos upon which the solution has been built: simple, modern, and fast.
And, beyond that – it’s also easy to install and loads fast because of its lightweight JavaScript framework. The software emphasizes user experience, with the platform’s user interface being modern and sleek. The elegant, simple design is complemented by smooth animations and large buttons, which provide a professional look.
One of Flarum’s most unique features is its two-pane interface. This feature provides users with a flexible environment to participate in numerous discussions without opening several tabs. Other engagement-focused features include a floating message composer, discussion-organized notifications, live chat, and user mentions.
Of course, as we all know is incredibly important – Flarum is also optimized to work incredibly well on mobile devices that make it easy to navigate online communities on any device.
Key features:
Easy forum set up
User-friendly design tools
Two-pane interface
Advanced permission settings
Comprehensive APIs
Price: Free
Summary – Building An Online Forum Shouldn’t Be Complicated
We explored some of the best community solutions based on ease of use, growth potential, and features.
However, the question remains which forum software is best for your community? To choose the right option, you will have to determine your goals, list the features you need, and settle on what budget you’re working with. Then, all you need to do is match your requirements with one of the forum-building tools we’ve mentioned.
But, if you’re overwhelmed with choices and can’t decide, here’s what we would recommend:
The best forum software for small communities – WordPress
With WordPress, you can easily create a forum or discussion board. Many WordPress forum plugins can help you to build a forum with basic functionalities and more advanced functionalities like a question & answer board, custom social network feature, and more according to your requirement. And for something even simpler that requires almost no setup, an even easier place to start is with a Facebook Group which is also where we initially launched RunCloud’s Community.
The best forum software for large, purpose-driven communities – Discourse
From expanding small communities to managing large, complex communities, Discourse really has everything you need to manage and run a thriving forum. It’s open-source, incredibly flexible, and even encourages longer, sustained conversations that people can add to over time.
As a community participant or owner – what’s your favorite forum software? Let us know & join the conversation by leaving a comment below! 💬
If you’ve ever worked in a team of software developers – chances are you’ve heard them mention Git, GitHub, forking, and version control. The internet is rife with comments from developers about how GitHub is a godsend and completely changes the way they write code; but, what is GitHub anyway?
At its core, GitHub is a cloud-based platform that allows developers to collaborate & track changes to their code.
Before we dive into GitHub, what it is & how it works – it’s important to understand Git first. In the following article, we take a deep dive into the underlying systems powering GitHub, its main features, and how it integrates with RunCloud.
An Introduction to Git & Version Control
Created by Linus Torvalds (the founder of Linux) in 2005, Git is an open-source, distributed version control system. Essentially, it’s software designed for tracking changes made to any group of files. Because it’s distributed, every codebase, along with its history, is available to every GitHub user. This makes collaboration and revisions much easier as developers can seamlessly work together.
If you’ve ever saved a game and then reloaded back to that point after doing something wrong, or created a system recovery point in your computer, you inherently understand the concept of Git.
So, What is GitHub?
GitHub launched in 2008 after spending a brief period in beta. It’s a for-profit company that has become one of the largest version control systems in the world – mostly because of its safety and user-friendliness. As of May 2021, GitHub is used by more than 55 million users, with more than 228 million repositories.
The interface streamlines Git’s capabilities, allowing even amateur users to start writing code on the platform. GitHub is particular for open-source projects, since anyone can sign up and host a public code repository without any charge. That’s one of the reasons why GitHub has more than 42 million public repositories.
GitHub has also become one of the largest developer communities worldwide. It’s used by employers and recruiters to look for talented coders, and many developers use it for networking purposes as well.
While there are a few competitors in the market like GitLab and SourceForge, neither of them really come close to the sheer number of users on GitHub. According to Gitlab itself, they have an estimated 30 million users, which is almost half that of GitHub.
GitHub supports all popular programming languages, and makes version control extremely easy. You can always view the changelog to see editions to the code and who made them. Let’s dive a little deeper into what version control is, and why it’s so important for developers.
Version Control Explained
Version control is the established practice of making and tracking changes to a project’s code. As new features are added to the project, the code continues to grow. Without version control, it’s difficult for the software team to figure out how the code was revised and what changes were made.
Instead of delving into the official source code for a particular program, developers can work in a more efficient manner. In case they make a mistake, they can simply revert to the older version to compare what went wrong. This is particularly helpful for DevOps teams who want to keep development time as minimal as possible.
Version control also protects the source code from human error and because everything’s in the cloud, the chances of a developer losing their source code from GitHub are next to none. Version control systems like GitHub help ensure that all revisions to the code are tracked.
All the subsequent changes made to the code are stored in a central “hub.” This makes it easy for developers to share their code and collaborate with others. One developer may work on a specific feature while another might focus on fixing an existing bug thanks to version control systems like GitHub. Two common techniques used by developers include branching and merging.
Branching: This technique allows developers to replicate part of the original code and work on it. This isolates a section of the code, and doesn’t have any effect on the original project.
Merging: Once the developer has made changes to the code, they can use the git merge command to bring together independent lines of code into the official source code.
It’s Not Just for Teams
While it may seem that a lot of GitHub’s features are geared towards teams of software developers, many others can take advantage of it as well. Amateur software developers can easily track changes made by others in a codebase and learn from it.
One of the major features of GitHub is “forking.” Forking allows you to copy an entire repository from one user account and bring it on your own, thus giving you write access to it. Once you are done making changes, you can then send a notification to the owner, and they can decide whether to merge the changes or leave them be.
Easily Contribute To Public Projects
When you send a request to the original owner for review (known as a pull request), the project maintainer is able to view your activity on GitHub, as well as any past contributions you have made on the platform. If accepted, you’ll get credit for the changes, and enhance your reputation.
Prior to GitHub, developers who wanted to contribute to a project had limited options to contact the authors. They relied mainly on email, and even then, convincing the authors to even consider their contribution used to be difficult.
With GitHub, every user has a discrete profile that serves a similar purpose to a resume. This allows groups of experts to find like-minded developers and collaborate with each other on projects, and also provides a free option to host your portfolio if you’re looking for a new role in the software industry.
How to Use GitHub with RunCloud
RunCloud makes it incredibly easy to deploy web applications that use version control (i.e. Git) in particular with GitHub. We also integrate directly with Bitbucket, Gitlab as well as custom Git servers…
If you are using Git, you can easily generate a deployment key within RunCloud and attach it to your repository. RunCloud can then clone your repository and register the Webhook URL. This way, automatic deployment of web apps becomes much easier.
Here’s how to use GitHub with RunCloud.
Step 1: Create an Account
You need to register for an account on RunCloud so you can deploy your server. We offer a free 5-day trial period that lets you explore its features and see how it simplifies server management.
Step 2: Deploy a Server
You will have to provision a server from a cloud provider, such as DigitalOcean, AWS, or Google Cloud. Once you are done, it’s time to connect the server.
Step 3: Connect the Server
Now that you’re logged into your account – you’ll need to go ahead and connect your first server to RunCloud. This only takes a few minutes, to get started, click Let’s get started as shown below:
Step 4: Deploy Your Web App from Git
RunCloud allows you to attach your project to your web apps with ease. An automatic pull will sync the latest code to your website. When you get to the Web Application Screen, select Git. You can also easily switch repository branch.
Simply add your Deployment Key to the Git repository, and then select a provider (GitHub, shown above). Add the repository name and your GitHub username, and then click on Attach Git Repository to connect to your web app.
If you are looking for a robust server management platform, RunCloud is a fantastic choice. We support NGINX and OpenLiteSpeed & offer easy 1-click installations for popular apps like WordPress, Joomla, and Laravel.
And for those of you with more complex, mission-critical infrastructure – we also offer built-in support for Atomic Deployments with zero downtime. In short, Atomic Deployment is essentially a script that allows your web application to be updated from Git so that it continuously runs, while the code updates in the background, ensuring zero downtime on your server during the entire process
Getting Started with GitHub
If you’re interested in a weekend well spent – and have been planning to improve your deployment infrastructure, all you need is two things. A GitHub account (completely free) and your RunCloud account. Going forward as your team grows and you manage multiple sites, you won’t even be able to imagine going back to the days with no version control for changes you deploy to your web applications.
Already using RunCloud with GitHub for version control? Or, have any other questions? Let us know & join the conversation by leaving a comment below. 💬