Category: Tips & Tricks

  • How To Install ImageMagick PHP Extension (Imagick)

    How To Install ImageMagick PHP Extension (Imagick)

    Do you want to manipulate images in various ways without using complex tools or libraries? If you answered yes, then you need to know about ImageMagick, a powerful and versatile image processing software that works seamlessly with PHP web applications.

    Even if you are using a CMS or a framework such as WordPress or Laravel for building your website, you may need to install the ImageMagick PHP extension for advanced image processing.

    In this post, we will show you how to install ImageMagick PHP Extension (Imagick) for your PHP web application on RunCloud, the best web application management platform for developers and agencies.

    Note: If you are using RunCloud Docker, you can install ImageMagick and many other PHP extensions for your Docker containers with a few simple steps. Follow our dedicated tutorial to learn how to install ImageMagick PHP extension on RunCloud Docker.

    What is ImageMagick

    ImageMagick is a free and open-source software that was created in 1987 by John Cristy to create, edit, compose, or convert bitmap images.

    It can read and write over 200 image formats, including PNG, JPEG, GIF, HEIC, TIFF, DPX, EXR, WebP, Postscript, PDF, and SVG.

    You can use ImageMagick to resize, flip, mirror, rotate, distort, shear and transform images, adjust image colors, apply various special effects, or draw text, lines, polygons, ellipses and Bézier curves.

    ImageMagick vs GD Library

    ImageMagick is not the only image optimization library in PHP application.

    GD is another library that is also very popular and it is automatically available in RunCloud server.

    Both ImageMagick and GD Library can be used for:

    • Resize / crop images
    • Apply filters to image, for example color, contrast, brightness, etc.
    • Adding content to image, for example text, shape, other image (watermark), etc.
    • Compress images
    • Convert images to different file types

    The key differences between ImageMagick and GD library are:

    • ImageMagick supports over 100 major image formats
    • ImageMagick usually produces better quality images, although sometimes better quality image will also increase the image file size
    • GD is widely available and usually enabled by default, but you have install and enable ImageMagick

    How to Install ImageMagick PHP Extension

    On WordPress, you might want to use the ImageMagick Engine WordPress Plugin for processing resizing and cropping images in WordPress dashboard.

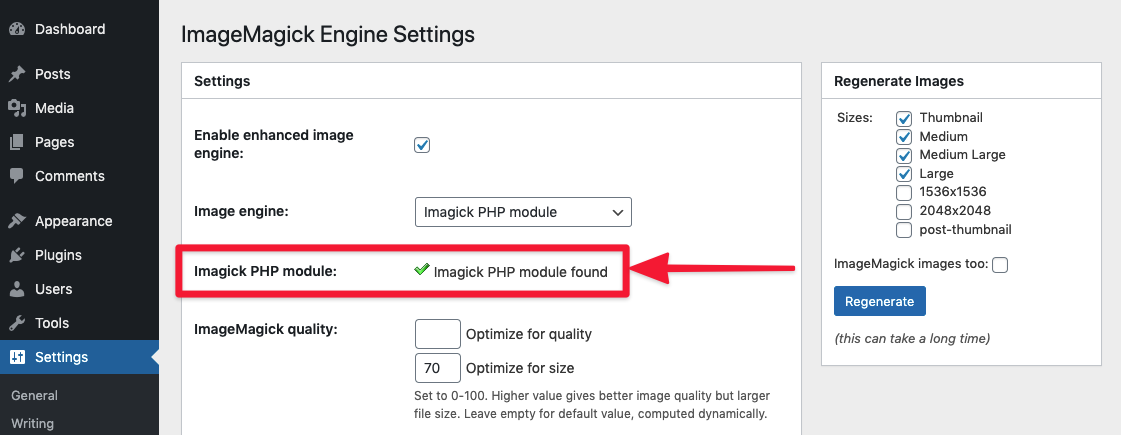
    When ImageMagick is not installed on the server, you will see “ImageMagick PHP module not found” warning on the plugin Settings page.
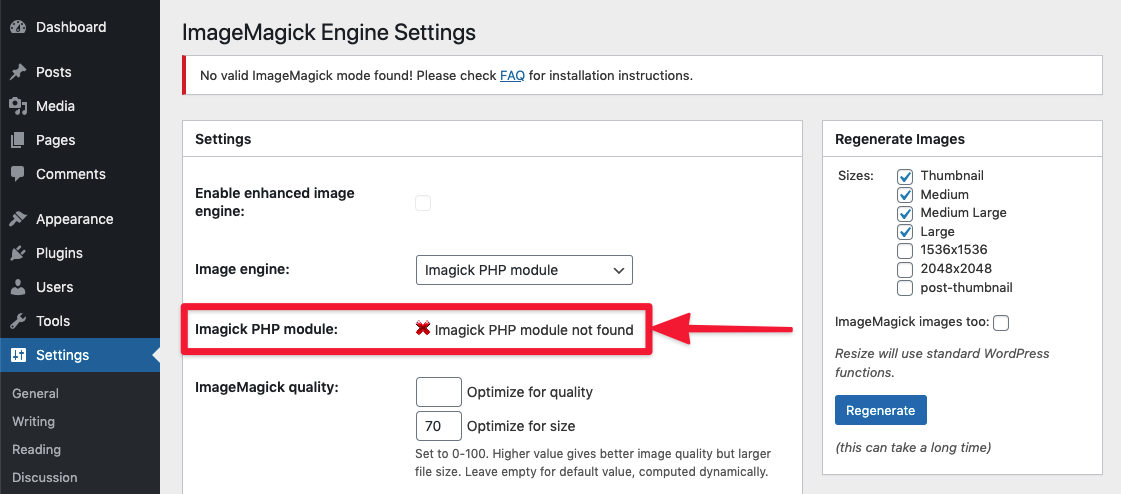
    runcloud-imagemagick-01-imagick-php-module-not-found2

    Disclaimer: This tutorial is intended for Ubuntu and Debian based distributions only. If you are using Fedora, RHEL, Windows, or Mac, please refer to the official ImageMagick website for installation instructions.

    The first step to install ImageMagick is to check the PHP version of your web application. This is because the installation process varies depending on the PHP version. However, once you have installed ImageMagick for a certain PHP version, it will work for all web applications that use the same PHP version on your server.

    You can find the PHP version of your web application in your RunCloud dashboard.

    Imagick PHP Module for PHP version X.X

    1. To install ImageMagick PHP extension for any PHP version on your server, you need to log in to your server as a root user using Terminal (Mac OSX / Linux) or Powershell / Putty (Windows).
    ssh root@<youripaddress>
    1. Next, you need to run this command, replacing <version> with the specific PHP 8.x version that you want to install ImageMagick for. For example, if you want to install ImageMagick for PHP 8.1, you would replace <version> with 81.
    apt-get install php<version>rc-pecl-imagick
    1. After the installation is complete, you need to reload the PHP-FPM service on your server by running this command, again replacing <version> with the specific PHP 8.x version that you installed ImageMagick for.
    systemctl reload php<version>rc-fpm
    1. To verify that ImageMagick is installed and activated, you can run this command, which will display the ImageMagick version and configuration:
    /RunCloud/Packages/php<version>rc/bin/php -i | grep imagemagick

    For example, if your website uses PHP 8.0, your commands should look something like.

    # install imagick module
    apt-get install php80rc-pecl-imagick
    
    # reload PHP-FPM
    systemctl reload php80rc-fpm
    
    # check / verify if imagick is installed
    /RunCloud/Packages/php80rc/bin/php -i | grep imagemagick

    Similarly, for website using PHP 7.4, the commands should look like.

    # install imagick module
    apt-get install php74rc-pecl-imagick
    
    # reload PHP-FPM
    systemctl reload php74rc-fpm
    
    # check / verify if imagick is installed
    /RunCloud/Packages/php74rc/bin/php -i | grep imagemagick

    If ImageMagick has been installed correctly, you will get an output similar to the following image.

    imagemagick succesfully installed

    After installing ImageMagick correctly, you can see the warning disappear in ImageMagick Engine WordPress Plugin.
    Optional: Adding PDF Support To ImageMagick

    If you want to allow ImageMagick to process PDF files, you will have to login as root user again to your server and edit policy.xml.

    For example, you can use nano to edit this file by running this command.

    nano /etc/ImageMagick-6/policy.xml

    Then please scroll down and locate this line.

      <policy domain="coder" rights="none" pattern="PDF" />

    You need to disable it by commenting out that line. For example, you can replace that line by following line.

      <!-- <policy domain="coder" rights="none" pattern="PDF" /> -->

    Please save the file and exit the editor.

    Then reload the PHP-FPM again, for example for PHP 8.1 you can run this command again.

    systemctl reload php81rc-fpm

    NOTE: Please be careful when you enable PDF support for Imagick. Make sure you always use it with trusted PDF files.

    How Does WordPress Use the Imagick PHP Extension?

    WordPress supports both ImageMagic and GD Library for PHP image processing extensions to resize and crop images in your website.

    By default, WordPress will try to use ImageMagick. If it is not available or it doesn’t support the requested mime-type, WordPress will use the GD extension.

    If you need more control of the quality of re-sized images, you can use ImageMagick Engine WordPress Plugin.

    Image Watermark WordPress plugin is another cool plugin that allows you to watermark each image that you upload to your WordPress site using Imagick.

    If you enable PDF support for the Imagick PHP extension, you will get one extra bonus, WordPress will automatically generate an image for each PDF you upload to your WordPress site!

    How Does Laravel uses ImageMagick PHP Extension?

    If you use Laravel for your website, there are some libraries that you can use for image processing. Let’s take a look:

    1. Intervention Image is an open-source PHP image handling and manipulation library. It provides an easier and more expressive way to create, edit, and compose images and supports currently the two most common image processing libraries GD Library and Imagick.
    2. PDF to image is a library that makes it easy to work with the PDF files and helps convert PDF files to images using Imagick and Ghostscript.

    FAQs

    • What is the difference between ImageMagick and Imagick?

      ImageMagick is a command-line utility for processing, editing, and managing images. It is available for all different kinds of operating systems, and you can use it as a standalone application or a library. ImageMagick supports hundreds of image formats and can perform a wide range of image manipulation operations, such as resizing, cropping, color correction, watermarking, and more.

      Imagick is a PHP extension of ImageMagick. It provides a native implementation of the ImageMagick API for PHP, which means you can use ImageMagick’s features and functions within your PHP scripts. Imagick is useful for creating dynamic images, generating thumbnails, applying filters, and other tasks that require image processing in PHP.

      To use Imagick, you need to have ImageMagick installed on your server and enable the Imagick extension in your php.ini file.

    • What is GD in WordPress?

      GD is a PHP extension that can handle image processing in WordPress. It is similar to Imagick, but it has some limitations, such as supporting fewer image formats and producing lower-quality images. However, GD is more widely available on web hosting servers and may be faster than Imagick in some cases.

      To use GD in WordPress, you need to have it installed and enabled on your server. You can check if GD is available by using the phpinfo() function.

    • What PHP Extensions does WordPress need ?

      These are essential PHP extensions for WordPress:
      json: Handles communication with other servers and processes data in JSON format.
      mysqli or mysqlnd: Connects to the MySQL database for content storage and user data management.
      curl: Performs remote requests.
      dom: Validates Text Widget content and configures IIS7+.
      exif: Works with image metadata.
      fileinfo: Detects file upload mimetypes.
      hash: Used for hashing (including passwords).
      igbinary: Optimizes serialization.
      imagick: Enhances image quality.
      intl: Enables locale-aware operations.
      mbstring: Handles UTF8 text.
      openssl: For SSL-based connections.
      pcre: Improves pattern matching.
      xml: Used for XML parsing.
      zip: Handles zip archives.
      These extensions empower WordPress, ensuring seamless functionality and compatibility with plugins and themes. 🌟🔧

    • How to Install ImageMagick in cPanel?

      To install ImageMagick in cPanel, log in to WHM using your root credentials.
      Navigate to the Software tab and select Module Installers.
      Click Manage next to PHP PECL, search for “Imagick,” and click Install.

    • Do I need Imagick for WordPress?

      Imagick is not strictly required for a basic WordPress installation, but it significantly enhances image quality and functionality. If you plan to work extensively with images, such as resizing, optimizing, or creating thumbnails, Imagick is highly recommended.

    • How to Fix ImageMagick PHP module not found?

      To fix the ImageMagick PHP module issue on WordPress, you need to install and enable the module on your server using cPanel, SSH, or web hosting support. Then, you can check the module status on your WordPress dashboard under “Tools” > “Site Health”.

    Summary

    In this post, we will walked you through the steps to install the ImageMagick PHP extension for your web application on RunCloud, the best web application management platform for developers and agencies. If you are looking to move away from Cpanel then you should check out RunCloud.

    If you are not using RunCloud yet, you are missing out on a lot of benefits and features that can make your web development and hosting experience easier and faster. With RunCloud, you can host as many websites as you like on a single server.

    Sign up for RunCloud today to see how RunCloud can help you manage your web applications and servers with ease and convenience.

  • How To Install Mautic Marketing Automation Software in RunCloud (2020 Update)

    How To Install Mautic Marketing Automation Software in RunCloud (2020 Update)

    Mautic is powerful marketing automation software. It is free and it is also the world largest open-source marketing automation project.

    More than 200.000+ organizations use Mautic. It makes Mautic an excellent choice if you want to run email marketing campaigns and marketing automation directly from your server, with full total control.

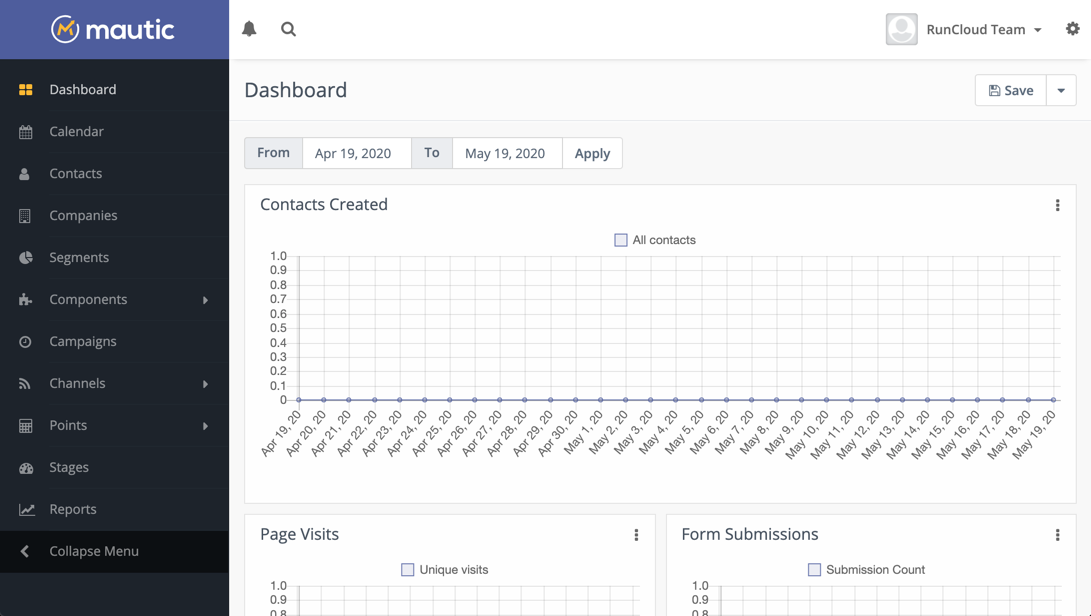
    runcloud-mautic-13-dashboard

    In this post, we will discuss about how to install Mautic using RunCloud easily.

    Get Your Cloud Server And Connect To RunCloud

    Cloud server is the best choice when you want to run your business with Mautic. It makes Mautic stable and also scalable. When your business start growing and Mautic needs more server resources, you can increase the resources (RAM/CPU) of your cloud server easily, anytime.

    Five dollar ($5) cloud server from DigitalOcean / Linode / Vultr / UpCloud / other provider is more than enough to start using Mautic.

    Quick guide on how to setup and connect your server to RunCloud

    Create PHP Web Application In RunCloud

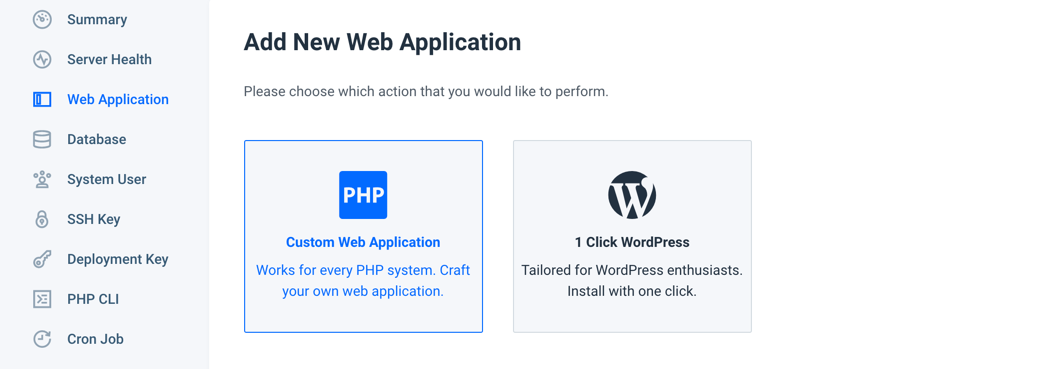
    After setup and connect your server to RunCloud, you can create PHP web application to install Mautic.

    Using RunCloud, you can create multiple website (web applications) in one server. Basically you can install Mautic on the same server where you host your other websites using RunCloud.

    Go to “Web Application” menu under your server in RunCloud, and click “Create Web App” button.

    runcloud-mautic-01-create-new-php-webapp

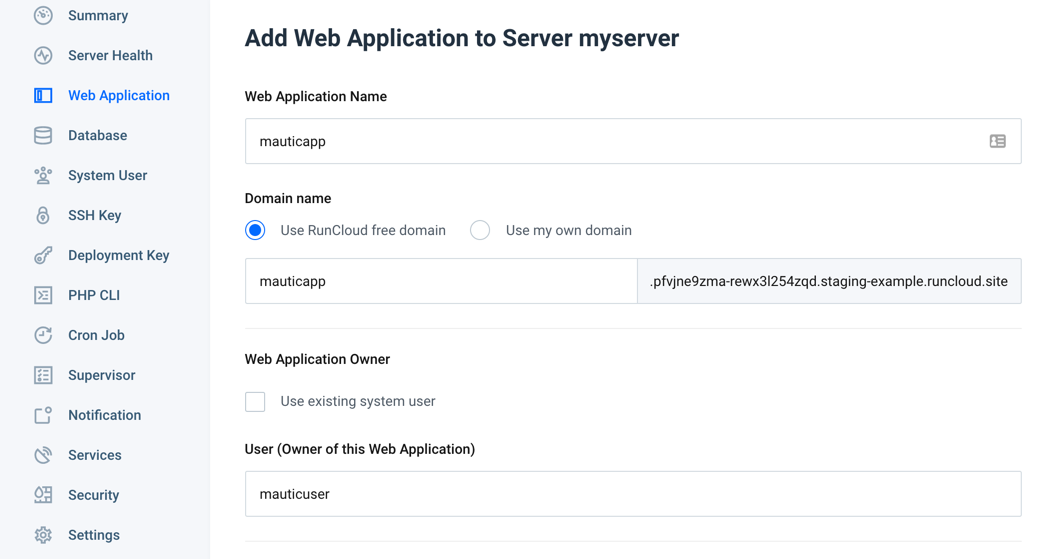
    Let’s create your PHP web application for Mautic.

    For “Web Application Name“, you can use “mauticapp“.

    For “Domain name“, you can use either your own domain/subdomain or RunCloud test domain. For this example, we will use RunCloud test domain.

    If you decide use your own domain, you will need to do an extra step to configure DNS record and wait for DNS propagation.

    You can read our quick guide on how to add your domain.

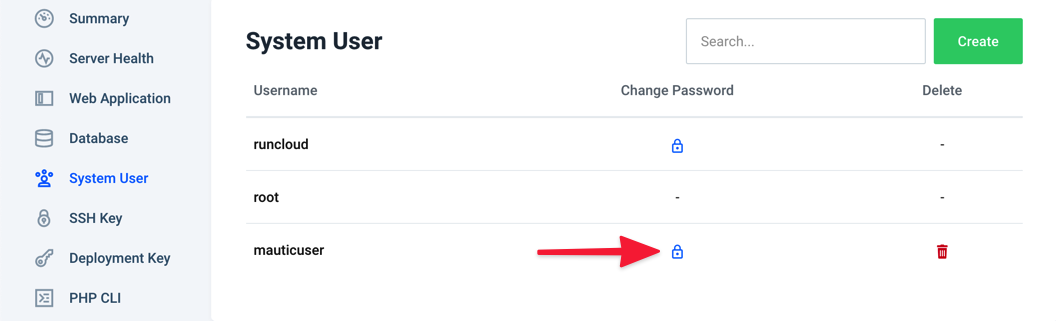
    For “Web Application Owner“, you can create new “mauticuser” system user.

    It is best practice to use different system user for different web application in the same server, for extra security purpose.

    runcloud-mautic-03-php73-version-advanced-settings

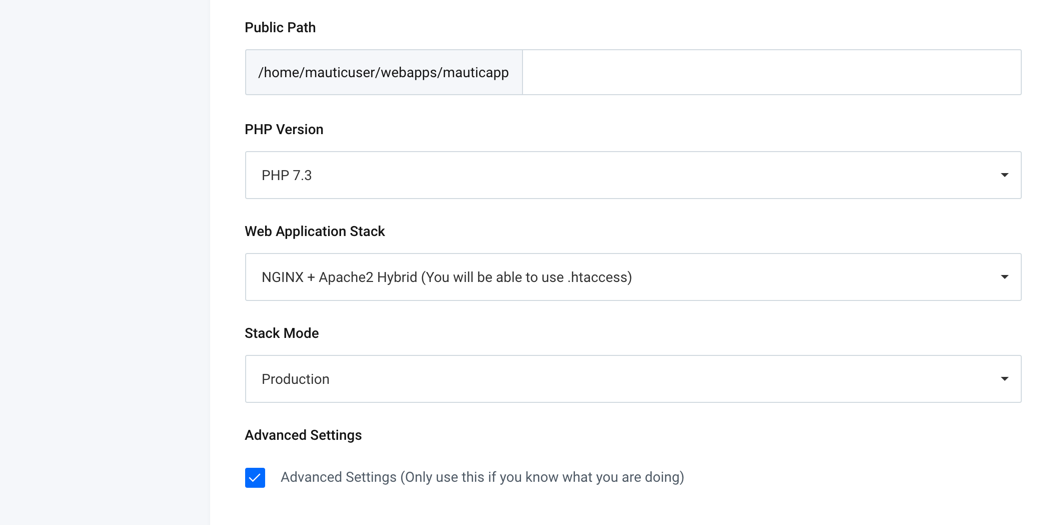
    For “PHP Version“, you can select PHP7.3 to install Mautic v2.16 stable release. Please do not use PHP7.4 because Mautic still do not officially support it.

    For “Web Application Stack“, you can choose “Nginx + Apache2 Hybrid” to allow you use .httaccess file in Mautic.

    Please click “Advanced Settings” checkbox to configure some extra settings to make your Mautic installation run smoothly.

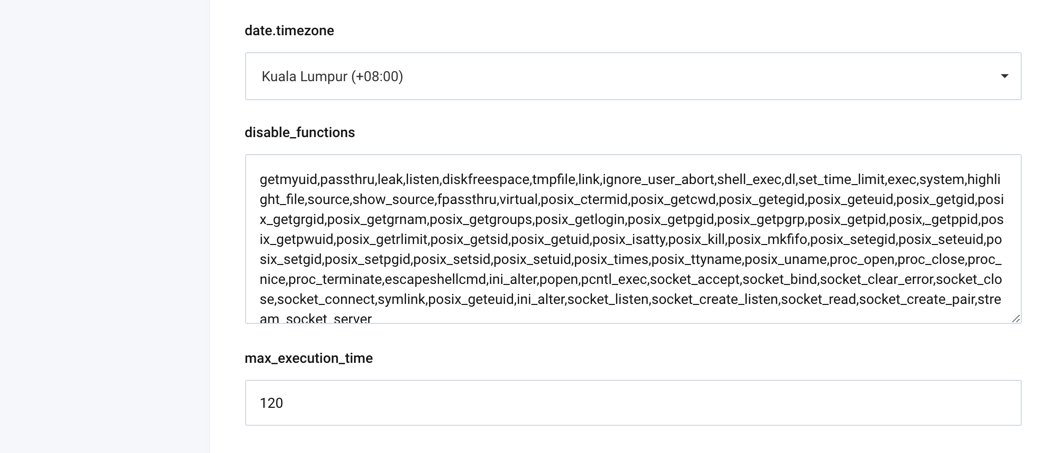
    For date.timezone, you can select your current timezone where you run your business.

    For disable_functions, it is optional, you can remove all php_posix functions from the list.

    The php_posix is disabled by default inside RunCloud for security reason. For Mautic installation, it is just a recommendation to enable php_posix, not a requirement. But if you really want to enable php_posix, you can replace all the disable_functions with the text below.

    getmyuid,passthru,leak,listen,diskfreespace,tmpfile,link,ignore_user_abord,shell_exec,dl,set_time_limit,exec,system,highlight_file,source,show_source,fpassthru,virtual,proc_open,proc_close,proc_nice,proc_terminate,escapeshellcmd,ini_alter,popen,pcntl_exec,socket_accept,socket_bind,socket_clear_error,socket_close,socket_connect,curl_multi_exec,symlink,ini_alter,socket_listen,socket_create_listen,socket_read,socket_create_pair,stream_socket_server

    For max_execution_time, please increase the value to 120 to avoid any timeout / error issue on the installation process.

    Then, click “Add Web Application” button to create your PHP web application for Mautic.

    Prepare Mautic Installer

    There are two ways to prepare Mautic installer:

    1. Download Mautic installer files and upload it to your web application using SFTP.
    2. Download and extract Mautic installer files using SSH.

    In this post, we will show you the second way, using SSH.

    You need to login to your server using SSH from either Terminal (Mac/Linux) or PowerShell / Putty (Windows).

    If you want to login using password, not using SSH key, you will need to change the password of “mauticuser” system user that you have created from System User menu.

    If you use Terminal, you can run this command to login to your server.

    ssh mauticuser@<youripaddress>

    You will login to your server using “mauticuser” system user, not root. Please change “youripaddress” with the IP Address of your server.

    NOTE: Please do not login using “root”, to avoid any file/folder permission issue.

    Change the working directory to your “mauticapp” web application root path.

    cd webapps/mauticapp

    Download the Mautic script. The download might be a bit slow. Just wait for it to finish.

    wget https://www.mautic.org/download/latest -O mautic.zip

    Unzip/extract the downloaded file.

    unzip mautic.zip

    Run Mautic Installer

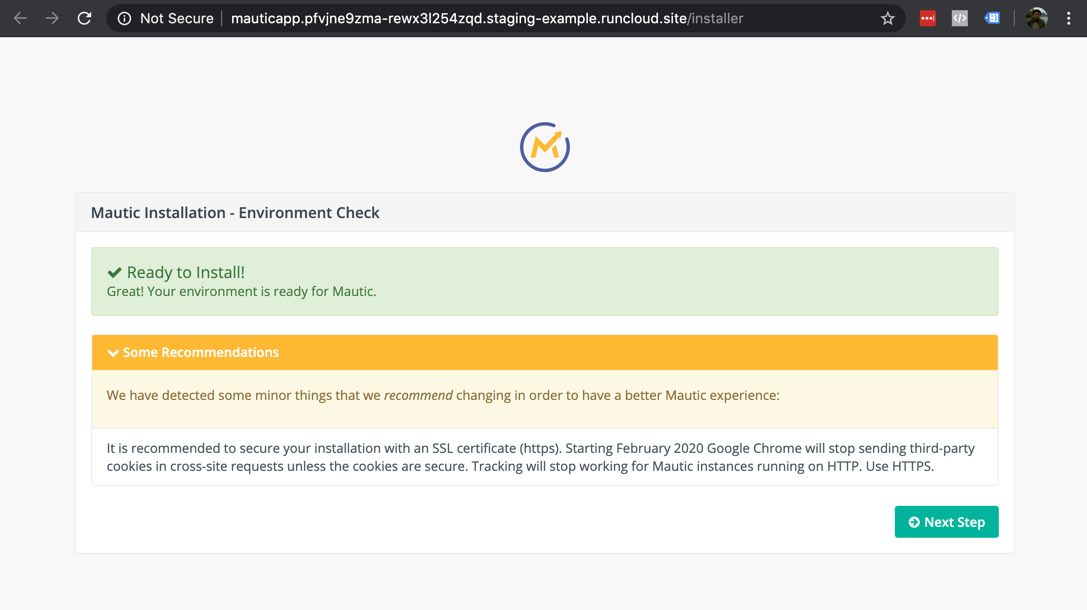
    After preparing your Mautic installer, you can visit your domain/subdomain where you install Mautic.

    Mautic recommends to secure your installation with an SSL certificate. You can skip this step if you use RunCloud free domain.

    If you use your own domain/subdomain, you can install Let’s Encrypt SSL Certificate to your website. You can read our quick guide to secure your website with HTTPS.

    Click “Next Step” button.

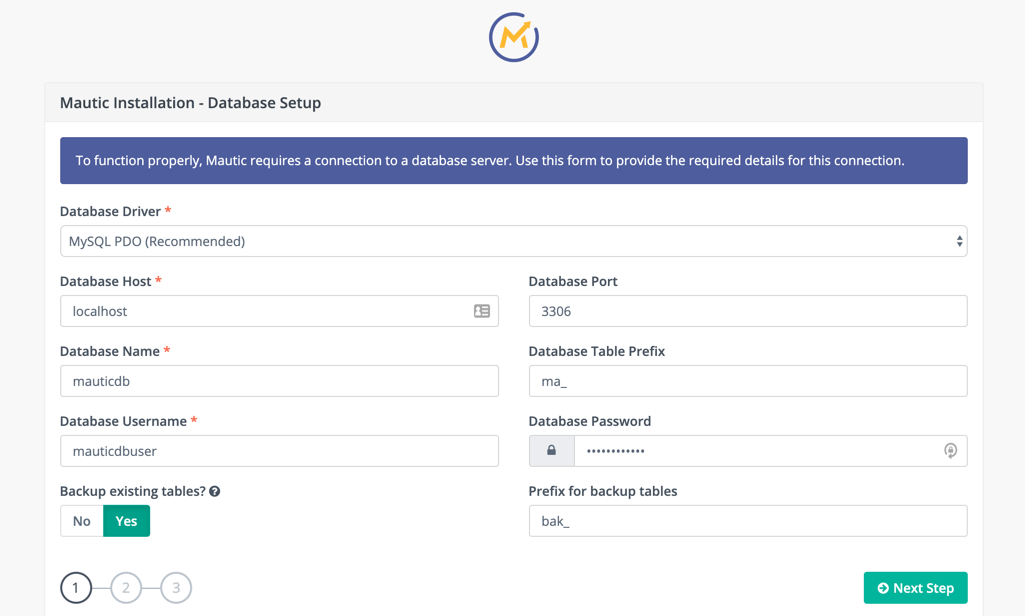
    Mautic Installation – Database Setup

    runcloud-mautic-09-database-setup

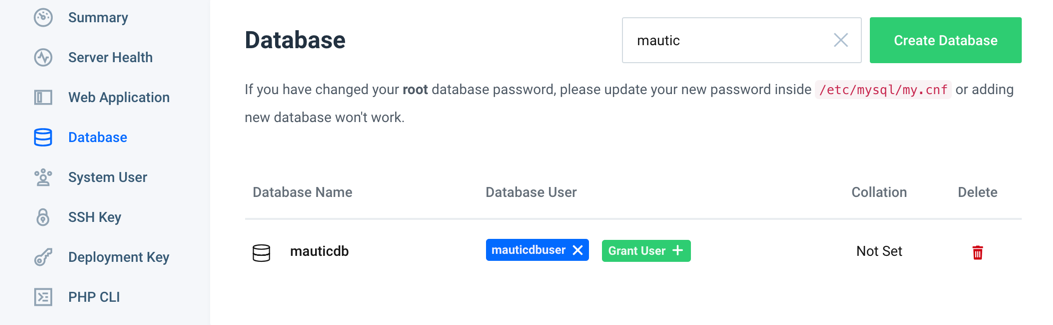
    You need to create MySQL database to install Mautic. Go to “Database” menu under your server in RunCloud.

    runcloud-mautic-06-create-database

    Click “Create Database” button and create new “mauticdb” database.

    runcloud-mautic-07-create-database-user

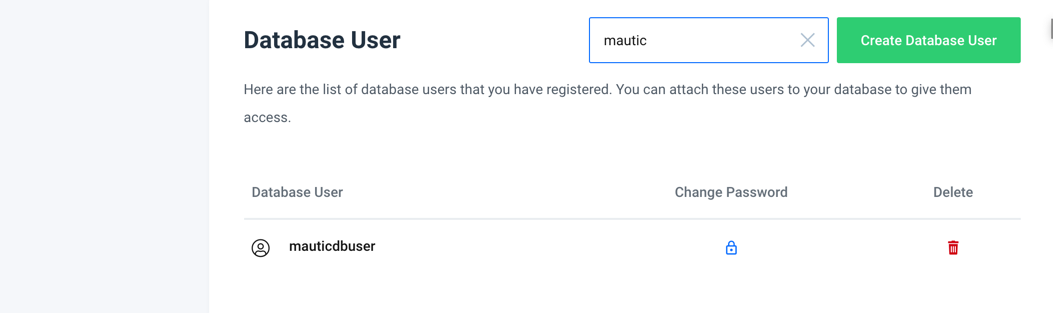
    Click “Create Database User” button and create new “mauticdbuser” database user.

    Then click “Grant User” button in your “mauticdb” database to connect it to “mauticdbuser” user.

    Now you continue database setup process using database name and user that you have created.

    Click “Next Step” button.

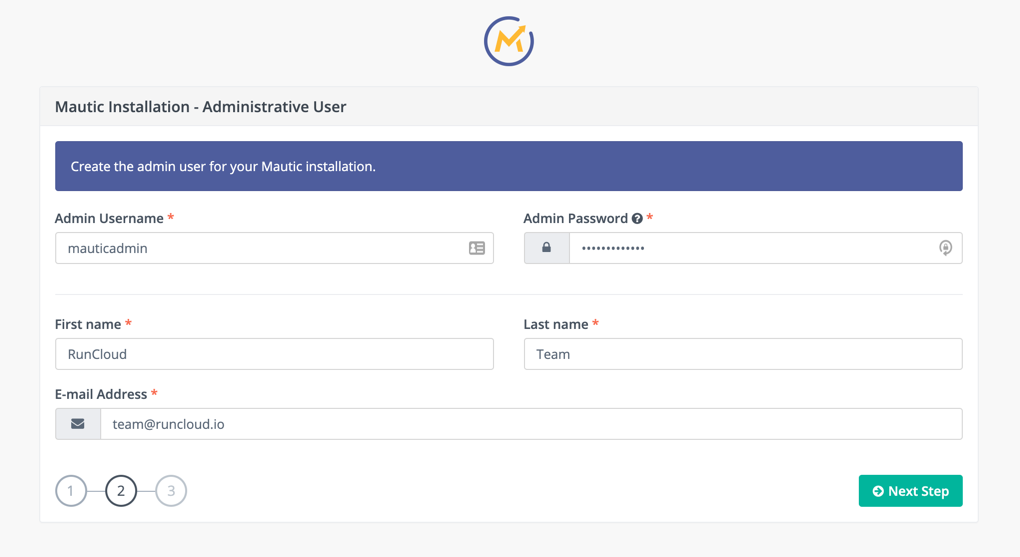
    Mautic Installation – Administrative User

    In this step, you can create the admin user for your Mautic installation.

    Click “Next Step” button.

    NOTE: If you get Error 500 screen after clicking “Next Step” button, it is possible because you have permission issue or you do not increase max_execution_time when creating PHP web application above.

    You can fix it by running this command on your web application root path.

    rm -rf app/cache/*
    chmod 777 app/cache
    php app/console cache:warmup

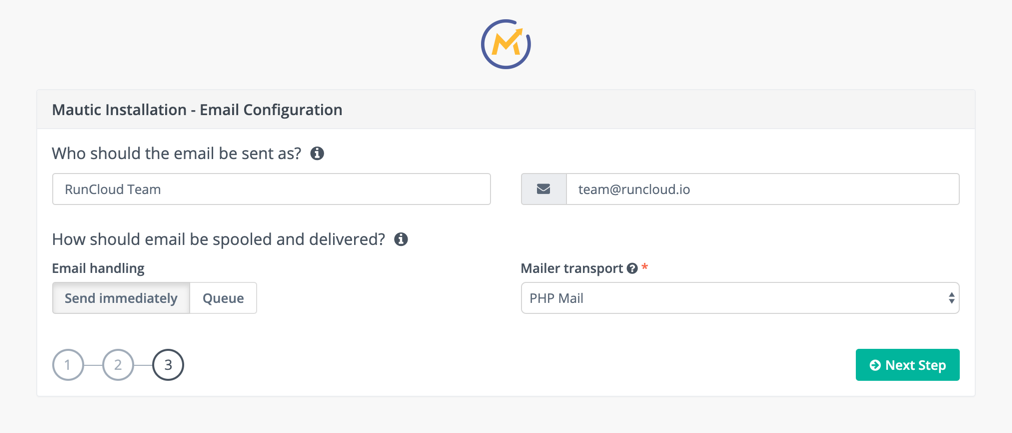
    Mautic Installation – Email Configuration

    In this step, you can setup Mautic email configuration. Mautic support sending email using PHP Mail, but we highly recommend you to use third party SMTP, for example SendGrid, Mailgun, or Amazon SES.

    You can skip this step for now and setup email configuration later from your Mautic dashboard.

    Click “Next Step” button.

    Perfect!

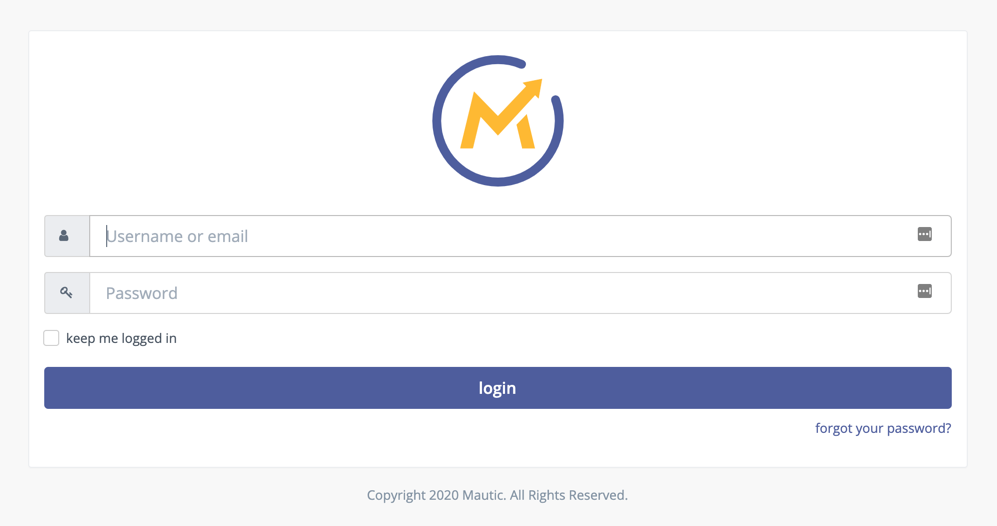
    When you see Mautic login screen, it means you have installed Mautic successfully!

    Setup Mautic Cron Jobs

    Mautic requires some cron jobs to run some maintenance tasks. You need to setup cron jobs to make sure Mautic can run properly.

    Fortunately, you can add cron jobs easily using RunCloud.

    Go to “Cron Job” menu under your server in RunCloud, and click “Create” button to create our first Mautic cron job.

    Cron Job – Updating Contact Segments (Required)

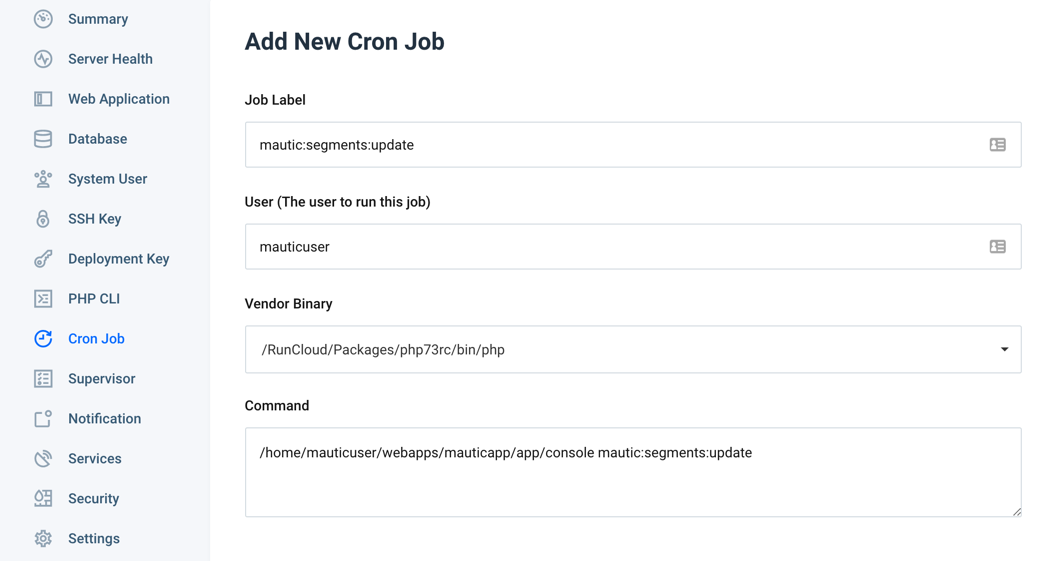
    runcloud-mautic-14-setup-cron-job

    For “Job Label”, add mautic:segments:update

    For “User”, add mauticuser, your system user for this Mautic web app.

    For “Vendor Binary”, select /RunCloud/Packages/php73rc/bin/php because you use PHP7.3 for this Mautic web app.

    For “Command”, copy paste this command below.

    /home/mauticuser/webapps/mauticapp/app/console mautic:segments:update

    NOTE: Please update this command if you use different system user (not mauticuser) and web application name (not mauticapp).

    Because Mautic use multiple cron jobs, it is HIGHLY recommended that you stagger the required jobs so as to not run the exact same minute.

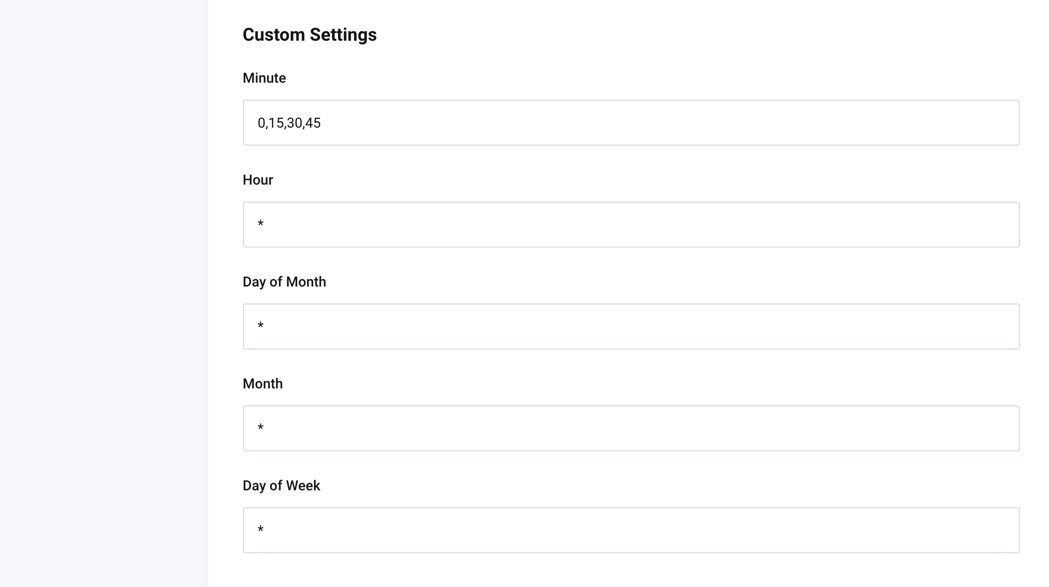
    For “Minute”, please use 0,15,30,45 to run this cron job every 15 minutes. We will use different minutes for different cron jobs.

    Click “Create Cron Job” button.

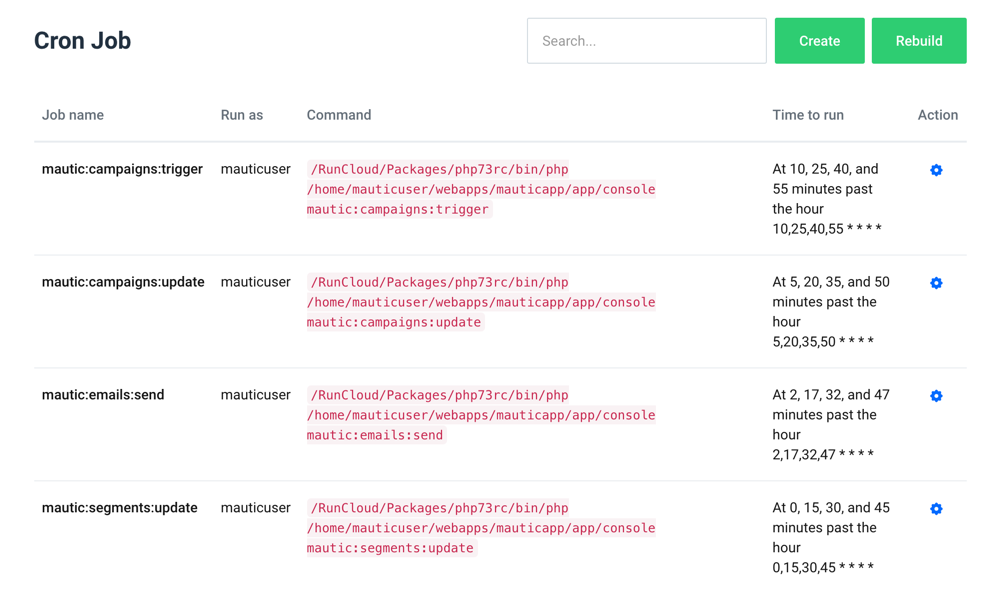
    Cron Job – Updating Campaigns (Required)

    Please repeat the process for following cron job.

    Label : mautic:campaigns:update

    Campaign :

    /home/mauticuser/webapps/mauticapp/app/console mautic:campaigns:update

    Minute : 5,20,35,50

    Cron Job – Executing Campaign Events (Required)

    Please repeat the process for following cron job.

    Label : mautic:campaigns:trigger

    Campaign :

    /home/mauticuser/webapps/mauticapp/app/console mautic:campaigns:trigger

    Minute : 10,25,40,55

    Cron Job – Processing Email Queue (Optional)

    Please repeat the process for following cron job.

    Label : mautic:emails:send

    Campaign :

    /home/mauticuser/webapps/mauticapp/app/console mautic:emails:send

    Minute : 2,17,32,47

    Perfect!

    You have completed cron jobs setup for Mautic.

    Please check this article if you want to setup other optional cron jobs in Mautic.

    Summary

    If you want to use Mautic for your marketing automation software, using RunCloud and cloud server is a perfect combination to install and run Mautic Marketing Automation Software.

    Are you using Mautic with RunCloud? Do not hesitate to share your experience with us.

  • 3 Free Ways To Migrate WordPress From Shared Hosting To Cloud Server

    3 Free Ways To Migrate WordPress From Shared Hosting To Cloud Server

    WordPress Migration From Shared To Cloud

    You probably start your website hosting from a small shared hosting account. As your website grows, you will hit the limitations of shared hosting, and then you know it is time to consider moving to a better hosting environment like cloud hosting. Cloud hosting is more reliable, higher scalability, flexible pricing, better security, and performance. Find out why cloud hosting is better for your business.
    In this article, you will learn the various ways to migrate WordPress site from shared hosting to cloud hosting

    7 Steps to Migrate a Website

    Generally, in order to move a website from one location to another, you will have to copy all of the data including files and database. There are many ways to do it, and here are the steps:

    1. Backup! Always keep at least a recent backup of your website before you do anything
    2. Export files from current website
    3. Export database from current website
    4. Create a hosting account on the new server
    5. Upload files to a new website
    6. Import database to the new website
    7. Update DNS records

    At RunCloud, we have the migration service to migrate your website from the other web hosting server (shared hosting) to a RunCloud managed a server. It is free for the first web application!

    If you would like to do it yourself, here are some methods to migrate your website from shared hosting to cloud hosting. We will use WordPress, the most popular CMS in the world, as an example.

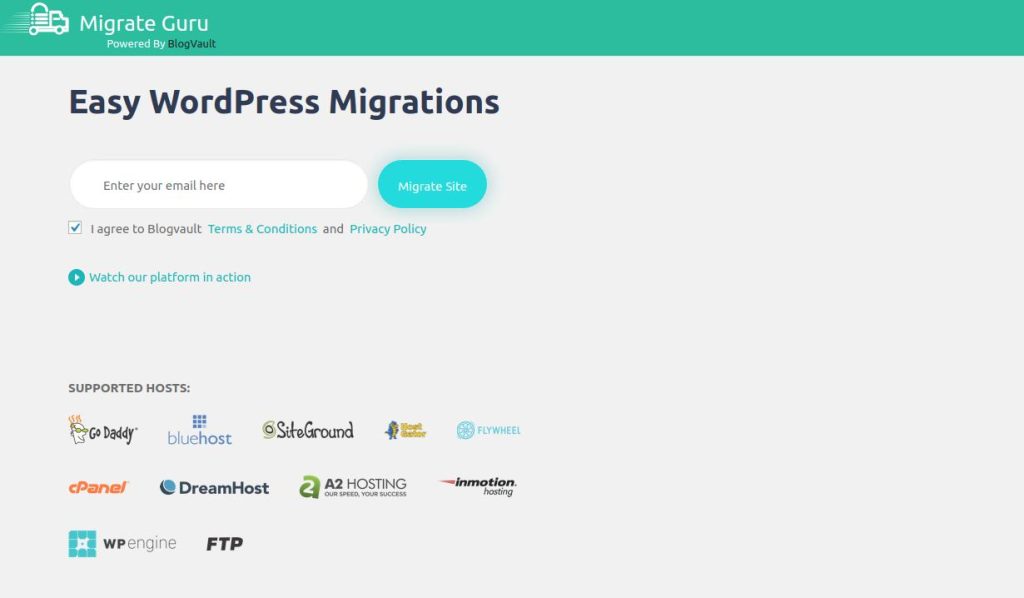
    1. WordPress Migration Plugin: Migrate Guru

    migrate guru wordpress migration plugin

    Migrate Guru is a WordPress migration plugin from BlogVault, a WordPress backup solution company. The beauty of Migrate Guru is that it is a free one-click migration plugin that supports unlimited sized websites, from 50MB or 50GB website.

    The migration process works on their server, so it won’t overload your server. No extra disk storage is required. Your files are copied to their server and deleted after the migration is complete. It also automatically rewrites URLs, bypasses import-export scripts, and handles serialized data.

    Requirements:
    • Migrate Guru plugin installed on existing WordPress site
    • A WordPress installation on new cloud hosting
    • FTP/SFTP access to new cloud hosting

    How to use Migrate Guru to migrate WordPress site

    1. Click on Migrate Guru from the sidebar menu in WordPress dashboard
    2. Fill in your email address then click “Migrate Site”
    3. On the new page, select FTP
    4. Enter FTP details, including destination site URL and directory path
    5. Click the “Migrate” button to start the migration
    6. Make a cup of coffee. You will be notified by email once the migration completed
    7. Enjoy your speedy site on new cloud hosting

    2. WordPress Migration Plugin: All-in-one WP Migration

    All-in-one WP Migration is one of the most popular WordPress migration plugins with over 2 millions active installations and 5,200+ 5 stars rating. The plugin is highly compatible with different operating systems and web hosting providers. It does not require any PHP extensions and works with all PHP versions from PHP 5.2 onwards. It supports WordPress version 3.3 to the latest version.

    Requirement:

    • All-in-one WP Migration installed on both current a new WordPress site

    How to use All-in-one WP Migration to Migrate A WordPress site

    a. Current server

    all in one wp migrate wordpress plugin
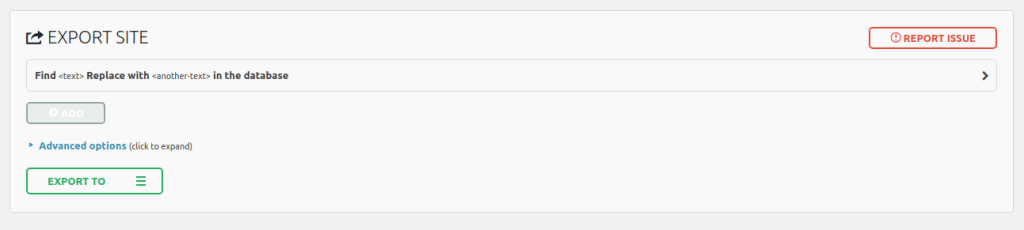
    1. On the current WordPress dashboard, click on “All-In-One WP Migration” > export
    2. (Optional) Use the Find Replace within the database to replace existing domain name, if you change the website domain name on the new server
    3. Click “EXPORT TO” and select FILE to download the website export file (.wpress file extension)

    b. New server

    all in one wp migrate import site
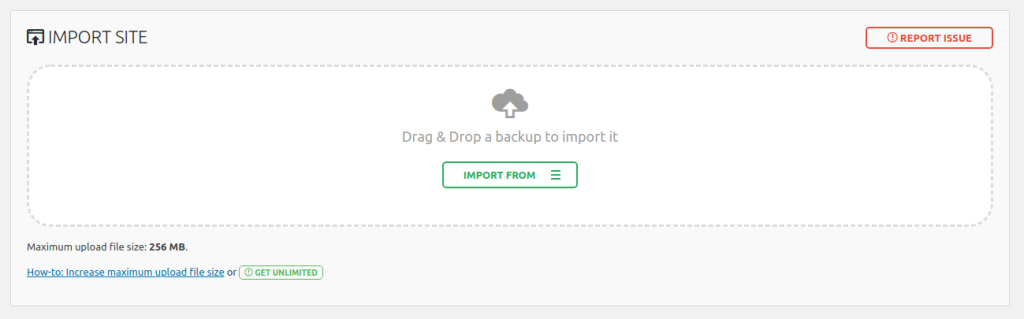
    1. On new cloud hosting WordPress dashboard, click on “All-In-One WP Migration” > import
    2. Click “IMPORT FROM” > FILE (or your .wpress export file source)
    3. Select your website export file (.wpress) to start website import
    4. Click the “Proceed” button to overwrite the WordPress site with your All-in-one WP migration export file.
    5. “Your site has been imported successfully!”

    Note:

    • The free plugin has a 512MB upload limit for importing website
    • You can buy the Unlimited extension to remove the import limit, restore a backup from the server, and support WP-CLI commands. Other cloud storage extensions are available too.
    • You may need to save the WordPress permalink structure twice after import complete.

    3. WordPress Migration with WP-CLI and Rsync

    Using WP-CLI and Rsync is the fastest way to migrate a WordPress site. It is more stable and reliable than using a WordPress plugin. Recommended if you want to migrate a huge website and you have SSH access on both existing and new servers.

    WP CLI is a powerful command line tool for managing WordPress. You can install WordPress. update plugins configure multisite, and much more, without using a web browser.

    Rsync is a Linux command line tool for fast local and remote file synchronization. It is a popular tool and included in most Linux distribution by default. Digital Ocean has a good tutorial on using Rsync to sync directories on the server.

    Requirement:

    • SSH access on both current and new servers
    • WP-CLI on both current and new servers

    How To Install WP-CLI

    You can easily install WP-CLI via shell with two command lines:

    sudo wget -q https://raw.githubusercontent.com/wp-cli/builds/gh-pages/phar/wp-cli.phar -O /usr/bin/wp
    sudo chmod 755 /usr/bin/wp

    How to use WP-CLI and Rsync to migrate WordPress site

    a. Current server

    1. Connect to the current server via SSH
    2. Navigate to your WordPress root directory (example: /var/www/vhosts/sitename/public_html/)
    3. Export WordPress database using WP-CLI command:
      wp db export db.sql --allow-root

    b. New server

    1. Connect to the new server via SSH
    2. Navigate to the directory where you want your WordPress site to be in (example: /home/runcloud/webapps/yoursite)
    3. Pull website files from a current server using Rsync:
    rsync -avz --progress --exclude wp-config.php username@currentserver.com:/var/www/vhosts/sitename/public_html/* .
    1. Create an empty WordPress database. RunCloud user can easily create a database via RunCloud dashboard. You can create a database using command lines too:
      mysql -u root -p
      You will enter MySQL shell then use the following commands to create WordPress user and database:
    CREATE USER wordpressuser@localhost IDENTIFIED BY 'passw0rd';
    CREATE DATABASE wordpress;
    GRANT ALL PRIVILEGES ON wordpress.* TO wordpressuser@localhost IDENTIFIED BY 'passw0rd';
    FLUSH PRIVILEGES;
    quit;

    Remember change passw0rd to the secure password, you want to use. These credentials will be used for the wp-config.php file.

    • Generate WordPress configuration file using WP-CLI command: wp core config --dbname=wordpress --dbuser=wordpressuser --dbpass=passw0rd --allow-root
    • Import the WordPress database dumped in the directory using WP-CLI command: wp db import db.sql --allow-root
    • Update WordPress installation ownership and use the recommended permissions for files & directories:
    sudo chown -R runcloud:runcloud /home/runcloud/webapps/yoursite/
    sudo find /home/runcloud/webapps/yoursite/ -type f -exec chmod 644 {} +
    sudo find /home/runcloud/webapps/yoursite/ -type d -exec chmod 755 {} +

    Note:

    • If the SSH is using a non-standard port, you can pass the port parameter to SSH with the -e option: rsync -avz -e 'ssh -p <port-number>' --progress --exclude wp-config.php username@currentserver.com:/var/www/vhosts/sitename/public_html/* .
    • If you are migrating to a new domain. Run database search & replace to update the new domain name in the database: wp search-replace 'https://old-domain.com' 'https://new-domain.com'
    • runcloud:runcloud is a reference that is in place of your system username
    • /home/runcloud/webapps/yoursite where runcloud should be the system username and yoursite should be your web application
    • To fix ownership of system user, use the navigation menu and go into your web application, scroll down to Tools, and click the Fix Ownership button.

    Tips: DNS Propagation

    After website files and database migration, you will need to update the domain name’s DNS records to the new cloud server IP address.

    You can try speeding up the DNS propagation time by lowering the TTL (Time To Live). This will refresh the DNS at a quicker rate. You can try set TTL to as low as 120 (2 minutes). However, some of the networks may still update slowly.

    Wrapping Up

    RunCloud is a powerful and easy-to-use platform that helps you manage your websites on any cloud server. With RunCloud, you don’t need to be a Linux expert to set up, secure, and optimize your web applications. You can do everything from a simple and intuitive dashboard, saving you time and hassle.

    RunCloud supports various web servers, PHP versions, databases, and frameworks. You can also monitor your server performance, back up your data, and automate your tasks with RunCloud. Whether you are a developer, a freelancer, or a business owner, RunCloud can help you run your websites faster and smoother.

    What are you waiting for? Join RunCloud today and enjoy the best web hosting solution for your websites. It’s free for 7 days, no strings attached!

  • The 7 Best WordPress Staging Plugins to Create a Test Site

    The 7 Best WordPress Staging Plugins to Create a Test Site

    It is important to test any new changes and updates before apply to your live site. It can prevent some unexpected errors and downtime. We use a Staging site to create a testing environment.

    A staging site is a duplicate copy (or clone) of your live website. It allows you to do customizations, test new features, install a new plugin, and more without affecting the live site. Your website visitors won’t be interrupted while you are working on the staging site. Some staging site setups even allow you to push the changes to the live site.

    IMPORTANT! RunCloud has released One-click WordPress Staging feature that allows you to create an exact copy of your entire website (web application) for staging and development purpose in seconds.

    Quick guide on how to easily create a WordPress staging site in RunCloud →

    In this article, you will learn about some WordPress staging plugins, both free and paid, that will create a staging site for the testing environment.

    1. WP Staging (Free)

    WP Staging is probably the easiest way to create a staging site in just a few clicks. It creates a clone of your website into a subfolder. In the background, the files and database are copied and the links within the content also replaced with the new path.

    Simple instructions:

    1. Install WP Staging plugin on main site
    2. Name your staging site (a subfolder) and start cloning using WP Staging
    3. Login to your new staging site

    The free plugin has 40,000 active installations and 5-stars ratings. The Pro edition supports WordPress multisites, cloning for subdomains, and the ability to copy modifications from staging site to the live website.

    WP Staging

    2. All-in-One WP Migration (Free)

    All-in-One WP Migration is a popular plugin to migrate WordPress site from one host to another. The fact that it package the whole site (files & database) for easy migration, make it also ideal to create a staging site.

    You will need to install WordPress on the staging site before you can import the All-in-One WP Migration website package file. The staging site can be a subfolder, subdomain, or even a different domain. The maximum website export size limit is 512MB.

    Simple instruction:

    1. Install WordPress on staging site
    2. Install All-in-One WP Migration plugin on both main and staging sites
    3. Export main site using All-in-One WP Migration with staging site URL replacement
    4. Import the website package file on staging site
    5. Done.

    The free plugin has over 2 million active installations and 4.5 stars ratings (5000+ 5 Stars). The plugin’s premium extensions support unlimited website size, cloud storage, multisite, and more.

    All-in-One WP Migration

    3. Duplicator (Free)

    Duplicator is another popular WordPress migration plugin like All-in-One WP Migration. It creates a package file and installer for easy website restoration on a blank site. Need not have existing WordPress installation on the target site.

    Simple instruction:

    1. Install Duplicator plugin
    2. Create a new package using Duplicator
    3. Download the installer and package file
    4. Upload installer and package file to target site (subfolder, subdomain, or domain)
    5. Run the Duplicator installer to restore website
    6. Done.

    The free plugin has over 1 million active installations and 5 stars ratings. The Pro version supports scheduled backups, cloud storage, multisite, cPanel integration, and more.

    Duplicator

    4. BackupBuddy (Paid)

    BackupBuddy plugin to create WordPress staging site

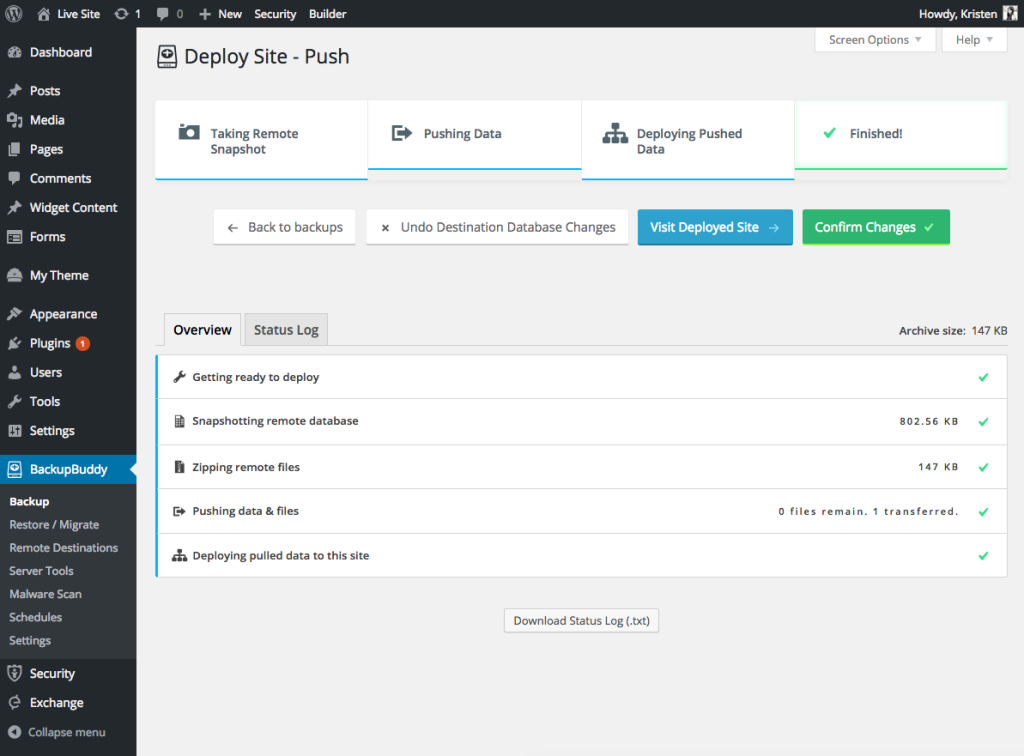
    BackupBuddy is a premium backup plugin from iThemes that supports scheduled automatic backups and store backup files off-site. It includes a Deployment feature, which you can push or pull WordPress staging site’s changes back and forth between the staging site and the live site.

    How to setup WordPress staging site with BackupBuddy Deployment

    1. Install BackupBuddy plugin and make a backup of your Live Site
    2. Create a Staging site by restoring your backup on a new domain (or sub-domain)
    3. Add define('BACKUPBUDDY_API_ENABLE', true); to the wp-confg.php file of your Live Site.
    4. On the Live Site, goto BackupBuddy > Remote Destinations and select Show Deployment Key at the top of the page
    5. Copy the given API key
    6. On the Staging Site, goto BackupBuddy > Remote Destinations and click the Add New option and then select BackupBuddy Deployment
    7. Paste the API key you copied from the Live Site into your Staging Site

    Price: iTheme BackupBuddy price starts from $80/year for 1 site.

    BackupBuddy

    5. WP Stagecoach (Paid)

    WP Stagecoach is a premium one-click WordPress staging site solution that work on any host and does not overwrite database during import.

    The database merging is an unique feature that allows you to push staging site changes to live site without replacing the live site’s database. WP Stagecoach monitor and keep a database changes log on the staging site. It then “playback” database changes during import to live site.

    WP Stagecoach can host your staging site on their server, so you can test the site in a isolated environment, and saving hosting disk space usage. During site import, you can import files, database or both.

    Price: WP Stagecoach price starts from $120/year for 10 domains.

    WP Stagecoach

    6. BlogVault (Paid)

    BlogVault is a premium WordPress cloud backup plugin with staging site feature. It offer one-click WordPress staging site that host on its server. The staging site is password-protected and block search engine indexing by default.

    BlogVault also handle WordPress database merging when you import staging site changes to the live site. The 1-click Merge feature allows you to compare Live and Staging site, then do complete merge in a single click or selective merge handpick modifications.

    Price: BlogVault price starts from $89/year for 1 site.

    BlogVault

    7. ManageWP (Free/Paid)

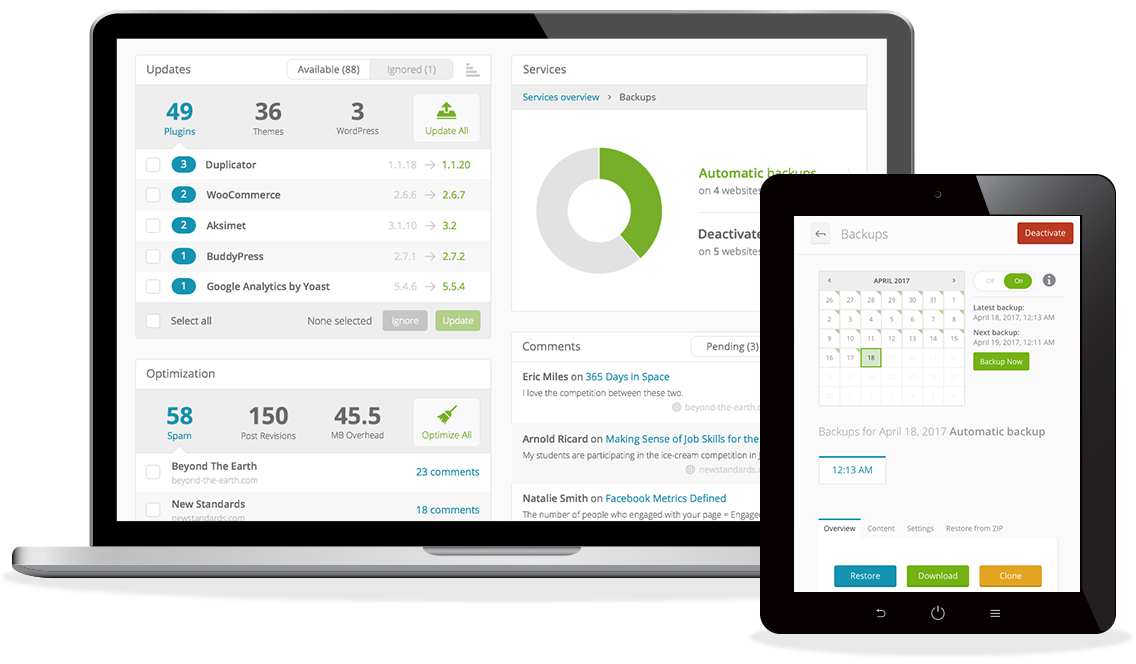
    ManageWP is an online WordPress website management tool. It is free to use for unlimited websites with optional premium add-ons. With the premium backup, it can clone your website to an existing website or another server. It does not offer hosting for staging websites.

    ManageWP Smart Clone will compare the source and destination files. Skip the same files and clone only the different files and the database.

    Price: Free. Requires Premium Backup ($2/month per site) for clone/staging feature.

    ManageWP

    Bonus Tips

    A staging site is a duplicate of your live site. In search engine optimization (SEO), duplicate pages are bad for your website ranking. You should avoid search engines from indexing your staging site. The good news is that it is easy to disallow index.

    Here are few ways to disallow index on your staging site:

    1. Add “noindex” tag to your staging site. Goto Settings > Reading and check the box for Discourage search engines from indexing this site
    2. Password protect your staging site using RunCloud’s HTTP basic authentication.
    3. Create a robots.txt text file in the WordPress installation root of your staging site. And add these two lines:
    User-agent: *
    Disallow: /

    Summary

    Having a WordPress staging site is important for testing changes before you push them to live site. Setting up a WordPress staging site is easy with the various plugins listed here.

    WP Staging is great to create a simple staging site. All-in-One WP Migration and Duplicator are backup plugins but also can be used to create a clone of live site for testing purpose. Premium plugins offer more features and support pushing staging site updates to the live site.

    How do you create a staging site? Please tell us in the comment.

  • Looking for an alternative to phpMyAdmin? Look no further…

    Looking for an alternative to phpMyAdmin? Look no further…

    Most small to medium-sized websites and web applications use MySQL as the database of choice for back-end storage. In fact, many of the world’s largest and fastest-growing organizations, including Facebook, Google, and Adobe rely on the stability and maturity of MySQL to power their high-volume websites, business-critical systems and packaged Software as a Service (SaaS) platforms. MySQL is a great choice for a number of reasons, primary among them are its high-availability features, reliable scalability, cost-effectiveness, and the huge community of active developers.

    At RunCloud, we use MariaDB for your database. It is an enhanced drop-in replacement for MySQL, made by the original developers of MySQL with the promise of maintaining ongoing and future compatibility with MySQL. This means every tool created for MySQL is also compatible with MariaDB, and this solution is future-proof.

    Some developers or database administrators do not need any tools when it comes to managing the MySQL database. However, for users with limited knowledge, or those who just want to perform some quick administration tasks on the database, a database administration tool can be of great help and a major time-saver. There are a lot of choices when it comes to managing cloud-hosted MySQL and MariaDB databases.

    A quick Google search shows that phpMyAdmin is one of the most popular choices and easily recommended. But did you know that there are other FREE RunCloud-compatible database managers that are worth looking into?

    phpMyAdmin

    Alternatif phpMyAdmin

    First, only a little introduction to PHPMyAdmin is needed as it is one of the most famous database management tools around. Launched in 1998, phpMyAdmin was written primarily in PHP. It is a free and open-source administration tool for MySQL and MariaDB. Over the years, its popularity has grown, especially for web hosting services, due to its portability, easily accessible web interface, ease of use (even for someone with minimal skills) and functionality. This has led to it becoming the tool of choice provided by most shared hosting companies in their control panel for managing MySQL or MariaDB databases.

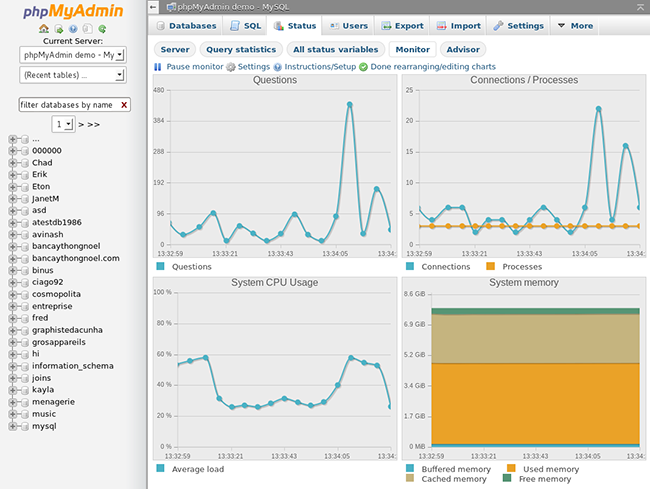
    Another contributing factor to its success is that, unlike other database manager tools, phpMyAdmin has live charts to monitor MySQL server activity such as connections, processes, CPU/memory usage, etc. It also includes a debugger and can generate Entity Relationship Diagram (ERD) in PDF format so large databases can be looked at as a whole, unfortunately, on the downside, it does not have syntax highlighting or code completion, but in general, it has an impressive feature set.

    Alternatif Status

    phpMyAdmin monitoring dashboard

    Since phpMyAdmin is a public-facing Web Application and is only accessible using a web browser, some developers have reservations about using it, considering it a potential security vulnerability.

    Previously RunCloud did not recommend using phpMyAdmin for database management due to these potential security risks, but after receiving many requests from users who insisted on using it, the developers at RunCloud included it in the script installer. At RunCloud, we listen to our clients.

    In the RunCloud dashboard, users can
    install phpMyAdmin using One Click phpMyAdmin install in less than 5 minutes. Instead of accessing the database from a web interface through an open port, it is recommended to create another web app within the RunCloud dashboard and install phpMyAdmin in that web app and enable SSL there so that the connection is encrypted and secured.

    HeidiSQL

    Alternatif HeidiSQL


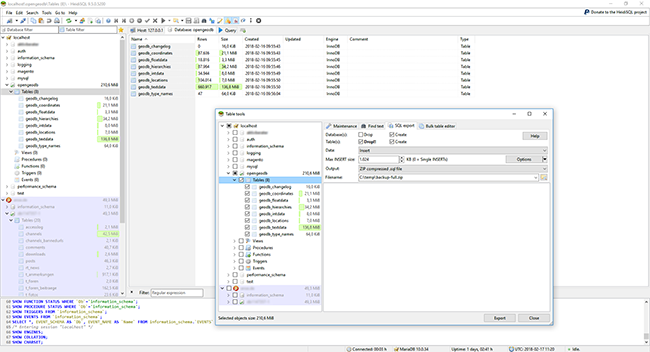
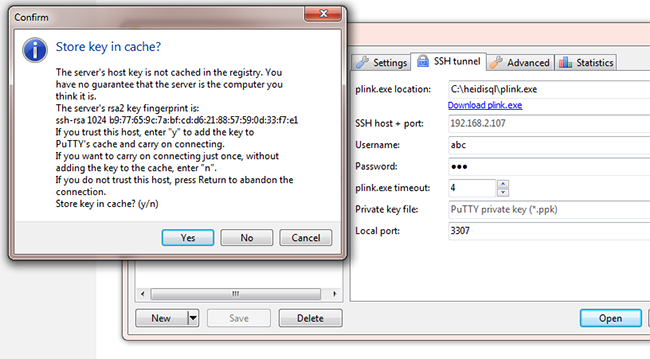
    HeidiSQL is a Windows-based platform launched in 2002. Unlike phpMyAdmin, HeidiSQL users connect to MySQL or MariaDB database via SSH tunnel. There is no need to establish a separate SSH tunnel connection using Putty or Terminal. So all communications to and from are encrypted. Among database managers,  HeidiSQL’s interface is considered very pleasant not to mention comprehensive and intuitive.

    Furthermore, there is also a portable version that does not require administrative privileges and installation.

    Although it has no built-in debugger, it does have syntax checks and auto-completion features, alongside powerful user management features where the administrator has granular control to easily set privileges on a per-database level or give access to only certain commands.

    Alternatif Data

    HeidiSQL’s comprehensive and intuitive interface

    Alternatif Box

    Built-in tunnelling option in HeidiSQL using plink.exe

    MySQL Workbench

    Alternatif MySQL

    Any MySQL database management tool list would be incomplete without mentioning the software developed by the company which owns MySQL, Oracle Corporation. MySQL Workbench was released in 2005 and replaced a previous software package called MySQL GUI Tools Bundle. This is the only SQL client which is supported and developed by MySQL, so you can be sure that it always contains all the functions to match the most recent updates for MySQL. It is also a cross-platform software that can be used on Windows, Linux, and Mac OS. So the experience is consistent from one OS to another.

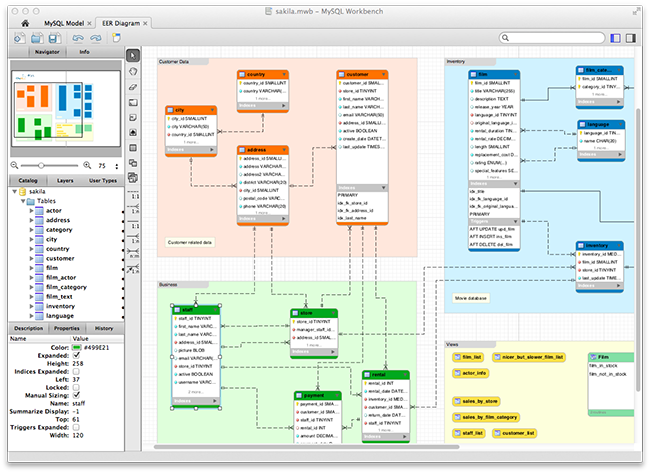
    In a nutshell, MySQL Workbench is more of a unified visual tool for database architects, developers, and database administrators. It has enhanced entity-relationship modelling support and it is one of the few software packages that can do both forward engineering (updating the database schema with changes made to its entities and relationships via the ERD visual designer) and reverse engineering (producing an ERD from a database).

    Alternatif Workbench

    Extensive ERD in MySQL Workbench

    However, it can be resource-intensive and some say it is overkill when all you need is to perform simple tasks. And as everyone knows, if the software is resource-intensive, it can tend to crash more often.

    Due to the many features it provides, some regard the interface as cluttered and unintuitive. Hence, this tool is not recommended for beginners. So, unless the user is an advanced database administrator and there is ample client and server resources, it is not recommended. If, however, its needs are met, then MySQL Workbench can be a powerful tool to have since nearly every SQL command can be utilized in a GUI.

    Sequel Pro

    Alternatif Sequel Pro

    Among users who are on Mac OS machines, Sequel Pro is a top choice due to its comprehensive features, where the GUI provides many powerful functions instead of having to keep resorting to terminal commands. Sequel Pro was built specifically for Mac OS machines to manage MySQL / MariaDB. With Sequel Pro, users can easily create and edit databases, manage users and easily do a full database export for backup (where multiple formats are supported like SQL, CSV and XML). Even imported CSV files can be easily converted to tables.  

    Alternatif SSh

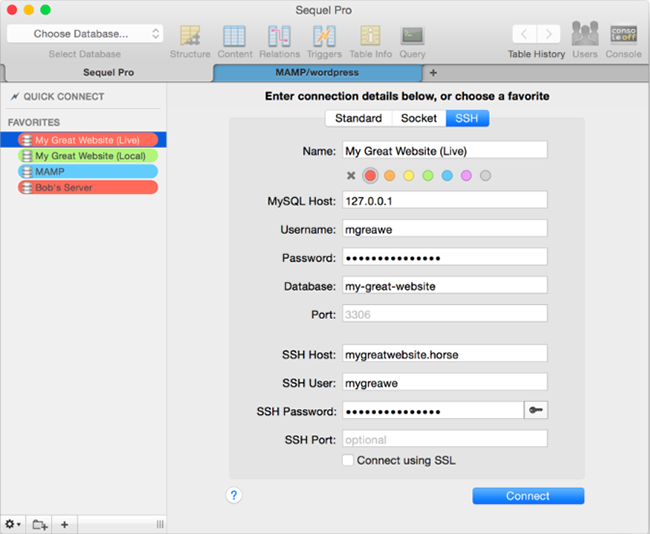
    Sequel Pro’s connection interface

    Sequel Pro allows users to connect to their MySQL/MariaDB through standard, socket or SSH, either locally or remotely. It even allows users to group and colour code the servers into staging or production sites, just like how a Mac user can colour code the files in the Finder app on a Mac machine.

    For a user who manages multiple projects at one time, Sequel Pro is practical as it allows multiple open connections to different databases. The connections remain connected until the user decides to disconnect them. The user management feature also allows for user creation with user privilege and connection management.

    Since it does not have a visual query editor, running a query requires a little bit of MySQL syntax knowledge. Fortunately, it does have highly flexible and customisable filters that can be applied on a table. And these filters can be used across different tables with ease. The queries can be saved and there is a history for queries that have been run, but the results of the queries themselves are not saved.

    All in all, this tool is very powerful when it comes to digging for information from the database as complex queries and filters can be done through the control panel instead of relying on terminal commands.

    Adminer

    Alternatif Adminer

    Last but not least, we have Adminer. Previously known as phpMinAdmin, it was initially released as a light alternative to phpMyAdmin. It is famously known for being lightweight and the installer is just a single file. It is good to go once it is uploaded.

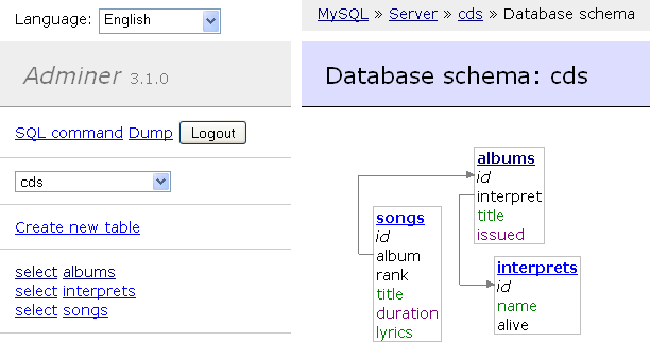
    Being lightweight means that it had to forgo some features like auto-completion and a debugger but it does have syntax highlighting as well as ERD design, which is the ability to draw entity-relationship diagrams for the database.

    The Adminer interface is more functional rather than being focused on aesthetics, but nevertheless, it is fast and easy to use.

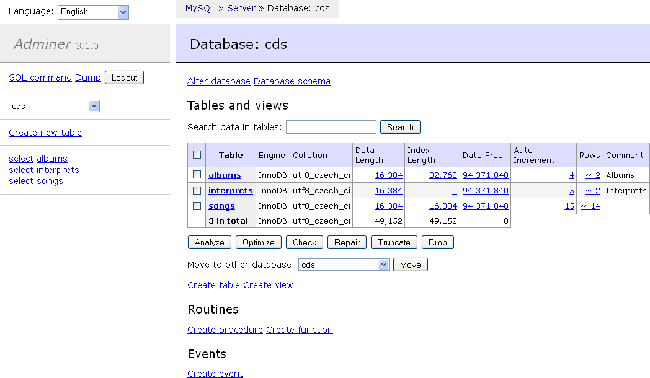
    Alternatif Database

    Adminer’s lightweight and simple interface

    Alternatif cds

    ERD visualisation in Adminer

    Conclusion

    So there you go, the recommended tools to administer your MariaDB in RunCloud (or any other cloud service provider). The best practice would be to not use a public-facing web tool when managing your server especially the database which has sensitive data. Rather, use a tool that can support SSH connection so that the communication between you and your servers are encrypted and less prone to be intercepted by irresponsible parties.

    Not including Sequel Pro is a mistake – I imagine it is the only tool that any of your Mac Users use.

  • How to Change/Reset MySQL Root Password on Ubuntu Linux?

    How to Change/Reset MySQL Root Password on Ubuntu Linux?

    Did you forget the root password for your MySQL Server?

    Or maybe you provisioned your RunCloud server via the auto-install method and never had the need to use your password in the first place?

    Whatever may be the case, if you want to reset your MySQL password then you’ve come to the right place!

    In this guide, we’ll walk you through how to set, change, and recover your MySQL root password on an Ubuntu server via MySQL command line.

    If you have no prior experience managing MySQL, don’t worry – with RunCloud, it is as easy as ABC.

    How to Reset Your MySQL Root Password in Linux

    Step 1: Log in to the Server with SSH

    We have already written in-depth documentation on connecting to your RunCloud account via SSH, but if you’re not using RunCloud, you can use the following SSH command to log in to your server:

    ssh user@server_ip_address

    In the above command, replace the user with the username of your Linux account, and server_ip_address with your server’s IP address.

    Keep in mind that the Linux account must have superuser permissions to execute the commands given in the next step.

    Step 2: STOP MySQL Server

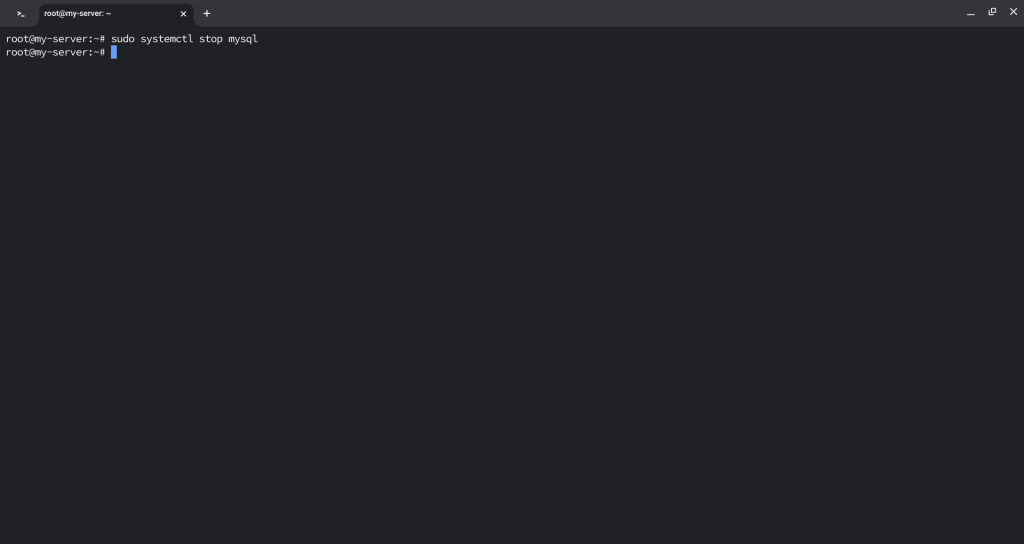
    After logging in to your server, you need to stop the MySQL service. You can use the following command to do this:
    Note: If you have any websites or other services that are using this database, then they will not be able to connect to your database while you carry out this action, so it is best to do this outside of business hours.

    sudo systemctl stop mysql
    logging into root user via command line

    Step 3: Restart MySQL Server

    After stopping the server, you can now restart it in the safe mode. This will allow us to execute SQL commands without needing to enter the password.
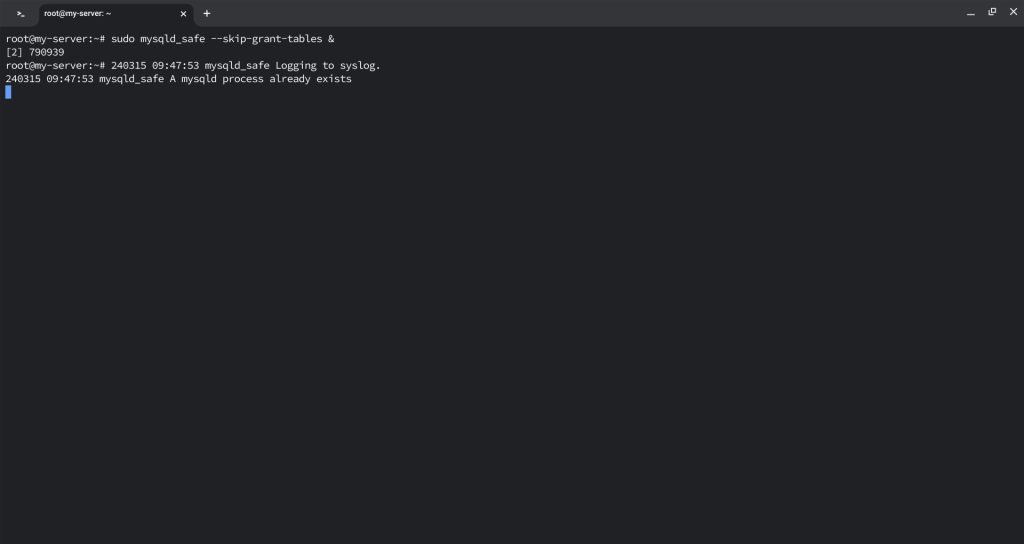
    Since the command --skip-grant-tables enables anyone to connect without a password, it is considered highly insecure, which is why all commands that follow must be done within a brief period. The ampersand (&) at the end is required as it ensures that the command is being run parallel with the commands that follow afterwards.

    To start MySQL without permission checking, execute the following command:

    sudo mysqld_safe --skip-grant-tables &
    MySQL root password

    Step 4: Log in to MySQL

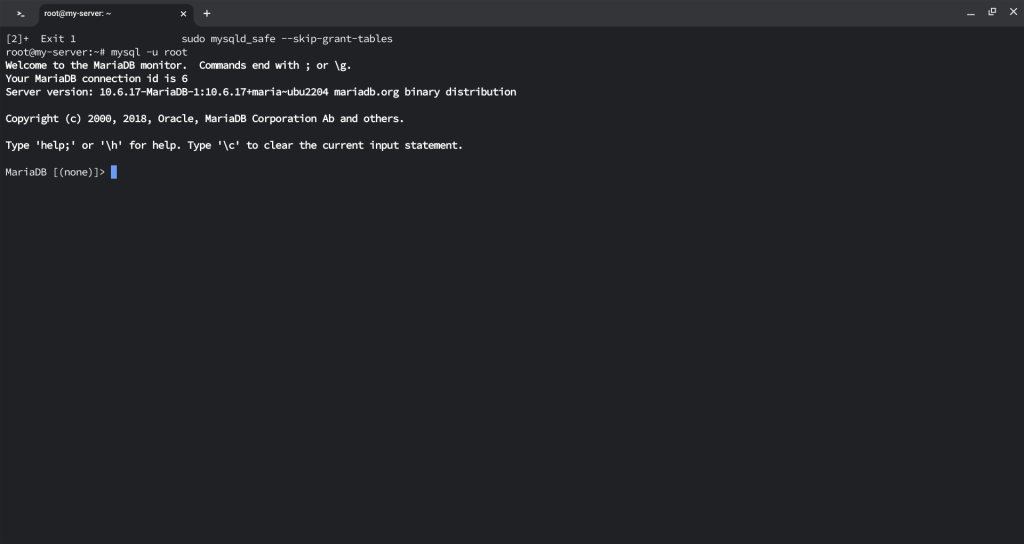
    Once your server is up and running, you can log in to MySQL as the root user without the need for any password by executing the following command:

    mysql -u root

    Step 5: Change MySQL Password with Command Line

    Once you’re logged in to the MySQL server, you can do anything you like – such as changing the password for users, granting permissions, deleting database, etc.

    To change the root password, execute the following command:

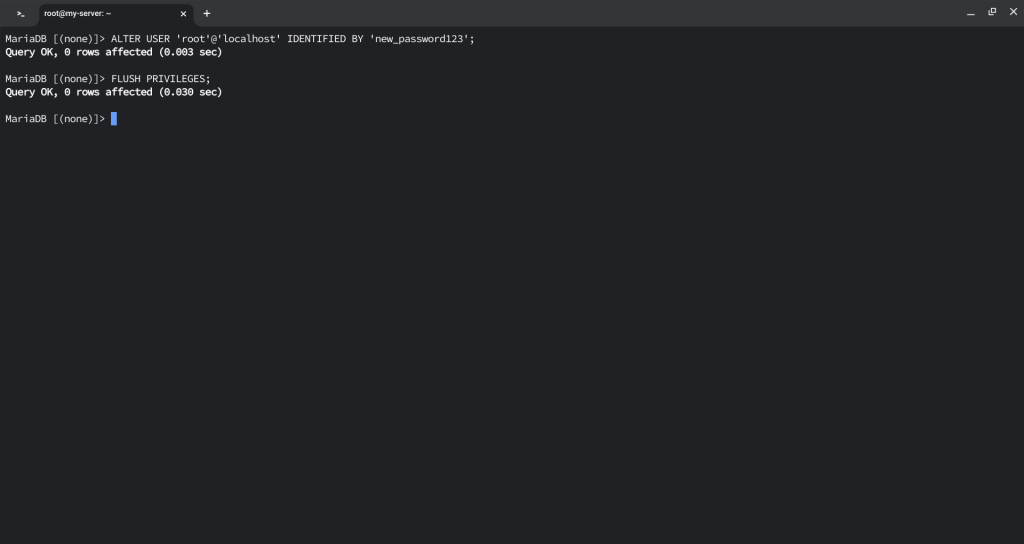
    ALTER USER 'root'@'localhost' IDENTIFIED BY 'RunCloud_password';
    FLUSH PRIVILEGES;

    In the above command, replace the RunCloud_password with your new password.

    Alternatively, you can also use the following command to change the password:

    SET PASSWORD FOR 'root'@'localhost' = PASSWORD('RunCloud_password');
    FLUSH PRIVILEGES;

    Step 6: Stop & Restart MySQL Server

    Finally, you need to stop the MySQL service and restart it in normal mode. To do this, first exit from the MySQL CLI by using the exit; command, and then restart the service using the following commands:

    sudo systemctl stop mysql
    sudo systemctl start mysql

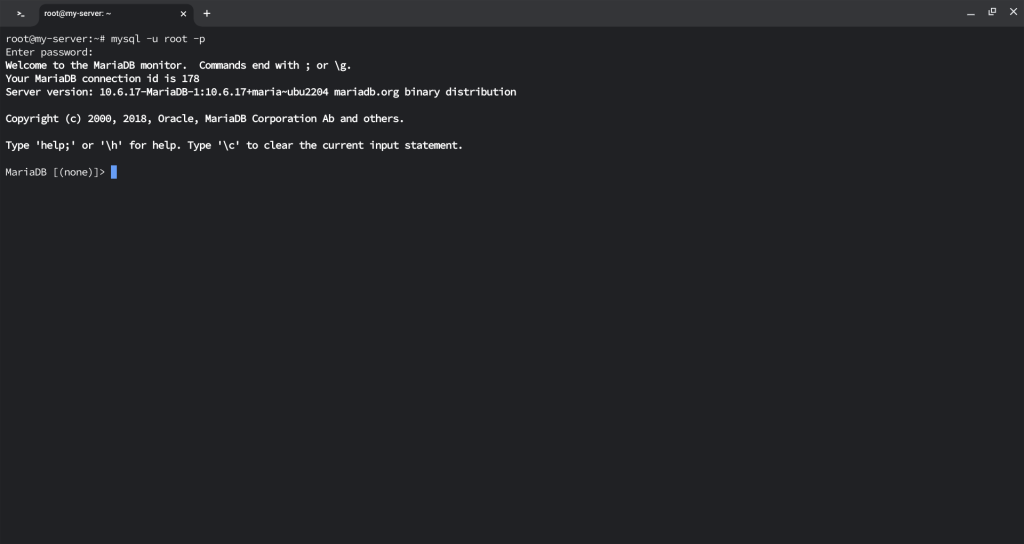
    That’s it! Once your server is up and running, you can start using it normally. To log in to your server via the new password, use the following command:

    mysql -u root -p

    The above command will prompt you to enter a password. To complete the login process, type your password and press Enter. Keep in mind that the password will not be displayed on screen for security reasons.

    Step 7: Edit RunCloud Configuration File (Only for RunCloud Users)

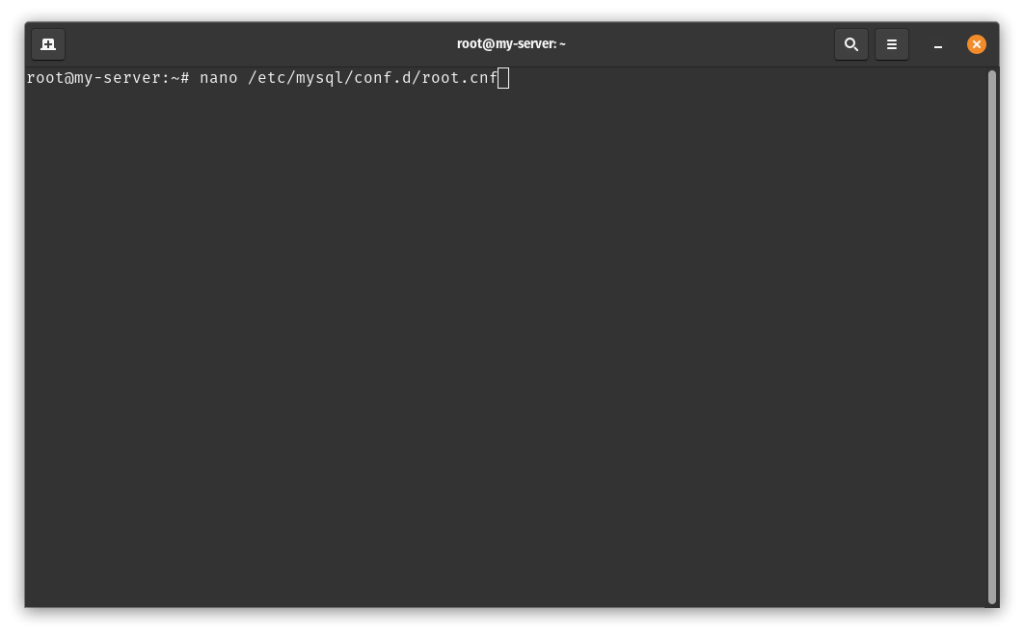
    If you are using RunCloud to manage your servers, then you will need to edit a config file on your server so that RunCloud agent can access your MySQL database using the new password. To edit the config file, execute the following command on your terminal:

    nano /etc/mysql/conf.d/root.cnf

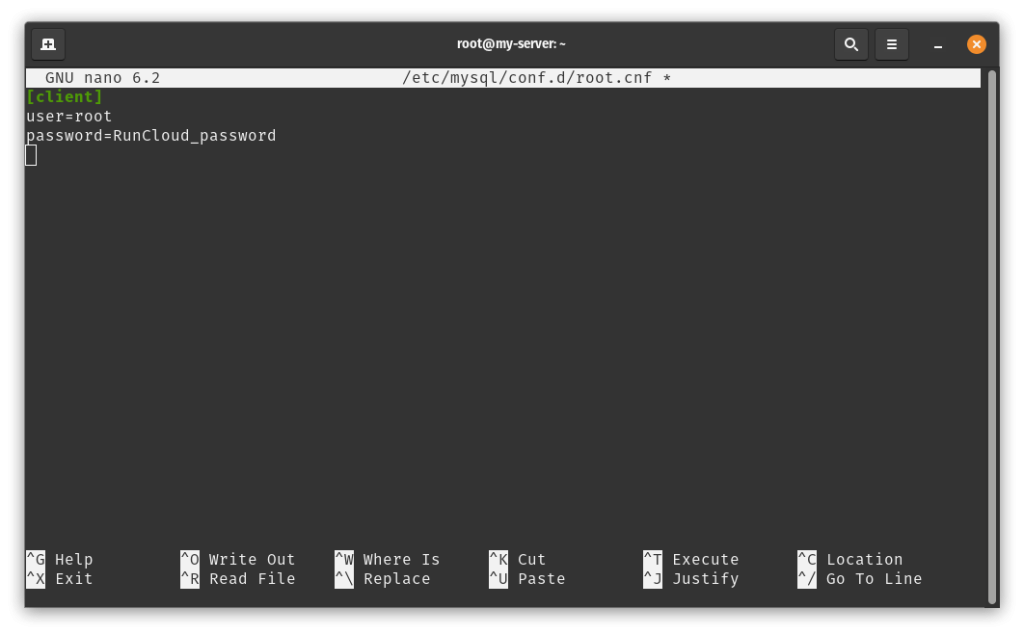
    The above command will open a text editor in your terminal, you can use the arrow keys on your keyboard to navigate and replace the existing password with your new password.

    After editing the file, you can save it by pressing Ctrl + O and exit the editor by pressing Ctrl + X. If you need step-by-step instructions on editing the file, then you should read our post on editing files over SSH using Nano.

    Frequently Asked Questions

    How do I find my MySQL root password?

    You cannot directly find the MySQL root password due to security reasons. However, you can reset it. To recover the password, you need to stop the MySQL server process, start the MySQL server with the --skip-grant-tables and --skip-networking options, and then connect to the MySQL server as the root user.

    What is the password for the root user in MySQL Workbench?

    The password for the root user in MySQL Workbench is the one you set during the installation of MySQL. If you haven’t set any password, you might be able to log in directly.

    How to change SQL password using CMD?

    You can change the SQL password using the command line by using the ALTER USER statement.

    How to reset MySQL root password in Docker?

    To reset the MySQL root password in Docker, you need to first access your MySQL container using the docker exec command and then, follow the steps described in this post to reset your root password.

    How to reset the root password in MySQL Mac?

    To reset the root password in MySQL on a Mac, you need to stop the MySQL Server first. Then, start the server in safe mode with a privilege bypass. In a new window, connect to the database, set a new password (as explained in this post), and flush the permissions.

    Can a MySQL user change their own password?

    Yes, a MySQL user can change their own password using the SET PASSWORD or ALTER USER statement.

    How to Recover the MySQL Root Password?

    Unfortunately, you cannot retrieve the MySQL root password. However, you can reset it by following the steps mentioned in this post.

    How to find MySQL root password in RunCloud?

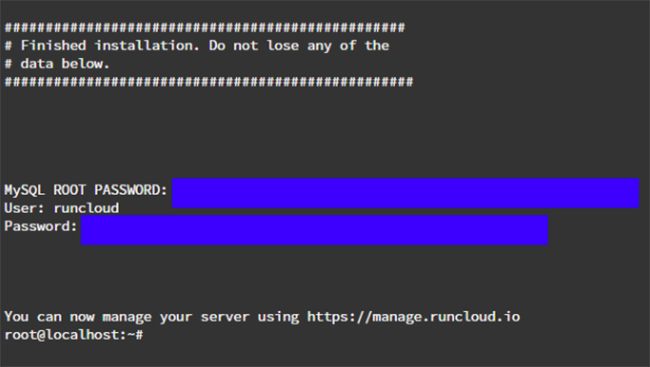
    If you install RunCloud via manual installation, then the MySQL root password is displayed on your terminal screen at the end of the RunCloud agent installation on your server.

    Wrapping Up

    RunCloud is a powerful and easy-to-use platform that helps you manage your websites on any cloud server. With RunCloud, you don’t need to be a Linux expert to set up, secure, and optimize your web applications. You can do everything from a simple and intuitive dashboard, saving you time and hassle.

    RunCloud supports various web servers, PHP versions, databases, and frameworks. You can also monitor your server performance, back up your data, and automate your tasks with RunCloud. Whether you are a developer, a freelancer, or a business owner, RunCloud can help you run your websites faster and smoother.

    What are you waiting for? Join RunCloud today and enjoy the best web hosting solution for your websites. It’s free for 7 days, no strings attached!

  • Why Authentication Using SSH Public Key is Better than Using Password and How Do They Work?

    Why Authentication Using SSH Public Key is Better than Using Password and How Do They Work?

    What is SSH?

    SSH, or Secure Shell, is a network protocol that allows users to remotely manage their servers or computers over the Internet, in which the communication between the two machines are strongly encrypted and protected from being eavesdropped. The user runs a client on his or her machine and the network connection carries the user’s keystrokes and commands from the user’s local machine to the remote server. The network connection then carries back the server’s responses to the user.

    Compared to the older method of remotely managing the computers using a non-protected network protocol like telnet and rlogin, SSH presents a secure alternative over an unsecured network connection (like Internet). Nowadays SSH comes shipped in mostly (if not all) servers.

    A user can connect to the remote server by keying in the username and password through SSH by running the puTTY client, Terminal, Bash or any other clients. However, there is another option that is safer and less cumbersome then keying in your password every time you want to connect to your remote server, which is to authenticate using SSH public key on the said SSH server.

    What is SSH public key authentication and how do they work?

    An SSH server can authenticate a user in several ways, where the most commonly used method would be through passwords and public key authentication.

    Normally, how a user would securely connect to their server would be to open up  puTTY/Terminal/Bash and initiate an SSH connection either by logging in using a GUI or typing in a terminal ssh username@IPAddress and then proceed to key in the password when prompted.

    But instead of keying in your password in the puTTY/Terminal client when you want to login to your remote server, another way to safely authenticate would be to authenticate using an SSH public key, which is authenticating without keying in the password.

    SSH key authentication works in pairs: private key and public key. Unlike symmetric encryption (which uses the same key to encrypt and decrypt), SSH key authentication employs asymmetric encryption algorithm, where the encryption and decryption use different keys.

    A user (or an authorised person) needs to generate both private key and a public key. The private key must be kept safely and confidential, to the extent of not sharing it with anybody else. If the private key is compromised, it is almost as good as gone, as the malicious user may gain access to the remote server using the private key, moreover if the private key is unprotected by any passphrase.

    The public key which was generated together with the private key can be shared with any server. The public key is then uploaded to the remote server that the user wants to log in using the SSH protocol. Hence, a relation may also be such that; one private key to one public key placed in many servers.

    Another person having access to a public key does not mean that he/she can decrypt the messages. Only a user with the private key can decrypt the messages. The public key is only there as a means to encrypt the messages where the messages can only be decrypted by the person with the private key. It is safe to say that private key cannot be derived from the public key. Hence, the public key does not have the ability to decrypt the messages that it sends out, or even decrypt the messages that the private key has encrypted.

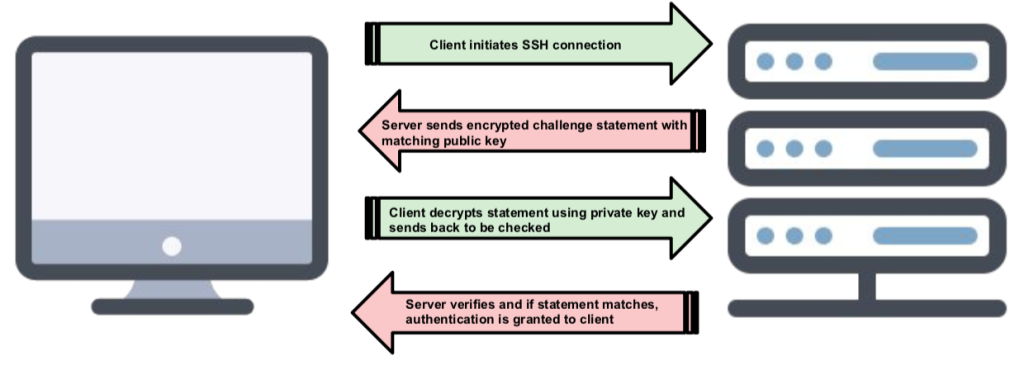
    ssh authentication protocol

    SSH Public Key Authentication simplified

    So in the case where a user is authenticating using the SSH keys (instead of manually keying in the password), the server will then send an encrypted challenge statement back to the user and the user will then decrypt the message with the private key and then send it back to the remote server to be checked. The server will then verify that that the message is correctly decrypted and if it matches the challenge statement earlier, then the client is authenticated.

    Basically, the remote SSH server is testing the client whether the client has the right private key that is associated with the public key on that remote server. If the client can prove that it has the right private key, then the client is authenticated.

    Why authenticate using SSH key instead of password?

    Undeniably, the main advantage of authentication using SSH public key over authentication using password would be security. No matter how long or complex a password is, it can never equate with the cryptographic strength that SSH public key offers.

    A password is susceptible to brute-force attack by a malicious user or worse, a password can even be guessed by someone who knows about the user’s personal information that can be used to retrieve the password.

    Additionally, using SSH public key also would eliminate the need for users having to remember complicated passwords or writing them down.

    Public key authentication also allows for a non-interactive login should a user need to access a remote server multiple times without needing to key in the password multiple times every time he or she logs in (or when session is disconnected due to idle time) as well as to automate processes that need to be authenticated which come from a remote machine.

    Best Practices

    However, all the above advantages are meaningless if the private key is not kept in a safe place. To increase the security, instead of storing the private key on a hard drive, it is recommended that that it is stored on a cryptographic device like a smart card or a usb token, so that it is not accessible by malicious users should an unauthorized user gains access to the computer. Additionally, the private key can be encrypted with a passphrase. But this is only applicable for interactive logins (for non-automated tasks) as it may require a person to key in the passphrase in order to use the private key.

    Since creating a pair of SSH keys requires minimal effort, often times, keys are generated or re-generated (and in many cases, self-provisioned) unnecessarily just to solve minor issues. If left unchecked, this can lead to unmanaged chaos where there are many public keys without knowing who they are attached to, or whether the person is still authorized to access the servers. As such, policies and rules must to be implemented to regulate the usage of private and public keys in any organisation, like keeping an inventory,

    RunCloud servers support the use of SSH public key authentication and it can be done easily and quickly.

    Wrapping Up

    RunCloud is a powerful and easy-to-use platform that helps you manage your websites on any cloud server. With RunCloud, you don’t need to be a Linux expert to set up, secure, and optimize your web applications. You can do everything from a simple and intuitive dashboard, saving you time and hassle.

    RunCloud supports various web servers, PHP versions, databases, and frameworks. You can also monitor your server performance, back up your data, and automate your tasks with RunCloud. Whether you are a developer, a freelancer, or a business owner, RunCloud can help you run your websites faster and smoother.

    What are you waiting for? Join RunCloud today and enjoy the best web hosting solution for your websites. It’s free for 7 days, no strings attached!

  • How to Create Wildcard Subdomain for Unlimited Subsites

    How to Create Wildcard Subdomain for Unlimited Subsites

    What is Wildcard subdomain

    Wildcard subdomain is a wildcard (catch-all) DNS record that will match request for non-existent subdomains. It is specified by a “*” as part of the domain name, example: *.yourdomain.com.

    With wildcard subdomain setup, you do not need to create a DNS record for each subdomain. Example: unlimited subdomain for WordPress multisite setup.

    In this tutorial, you will learn how to create a wildcard subdomain with RunCloud.

    Step 1: Create a wildcard subdomain with domain registrar

    In order to create a wildcard subdomain, you need to add a wildcard DNS recoord for your domain name. You will need to access your domain name control panel for DNS management, usually provided by your domain registrar.

    Here I will show you how to create a wildcard subdomain for your RunCloud server. In this example, I am using Cloudflare for DNS management.

    Goto DNS management page and follow the steps below to create a wildcard subdomain DNS record:

    1. Select “A” for record type (you can also use CNAME)
    2. Use “*” for DNS record name
    3. Fill in your RunCloud server IP address for the DNS record value
    4. If you are using Cloudflare, select “grey cloud” to skip going through Cloudflare network.
    5. Click “Add Record” button to add the wildcard subdomain DNS record

    Next, we need to setup the RunCloud server to response to the wildcard subdomain requests.

    Step 2: Create web application for wildcard subdomain with RunCloud

    There are two ways to response to the wildcard suddomain requests:

    1. create web applications to response to each wildcard subdomain request. Example: a.yoursite.com, b.yoursite.com, c.yoursite.com, …
    2. create a web application that answers all wildcard subdomain requests. Example: *.yooursite.com

    Solution 1: Create a web application for each subdomain
    At “Web Application” in RunCloud panel… Click “Create Web App” button to create a new web application.

    Remember to type your desire subdomain name (a.yoursite.com) for “Domain Name”. select PHP version and web application stack then click “add web application” button to create a new web application on your server.

    Any future request to the subdomain will be served by the web application you just created. Do not need to add a new subdomain DNS record at domain management panel.

    Any subdomain request that is not assigned to any web application will be fall back to the default web application (if you have setup one).

    Solution 2: Create a web application to answer all subdomain requests

    If you have a web application like WordPress multisite, that will answer all subdomain requests, then use this approach to setup the web application that for wildcard subdomain.

    Similar to Solution 1 above, create a new web application but at the “Domain Name” field, you enter a wildcard subdomain instead, example: *.yoursite.com

    The web application with wildcard subdomain will answer all subdomain requests that is not assigned to any other web applications.

    Let’s say you have a web application with domain name “client.yoursite.com”, then request for “client.yoursite.com” will not be answered by the web application with wildcard subdomain “*.yoursite.com”.

    Tips: After creating a wildcard subdomain, you would like to make a free SSL certificate (HTTPS) for all the subsites.

    Summary

    In order to create a working wildcard subdomain, you need to setup it at domain registrar (add wildcard DNS record) and RunCloud panel (create web application).

    Once setup wildcard subdomain, you do not need to manually add new subdomain DNS record for your new web application or website.

    All you need to do is create a new web application using RunCloud panel and it will work automatically.

  • How to Block IP Address Using WordPress .htaccess File to Stop Bad Visitors

    How to Block IP Address Using WordPress .htaccess File to Stop Bad Visitors

    In this tutorial, we show you how to block bad visitors by their IP addresses using only Apache .htaccess file. No WordPress plugin required.

    Your public website is on the internet for anyone, including bad visitors like bad bots, spammers, hackers, malicious users. They are annoying, taking up your web server resources, and potential security risk.
    The good news is that you can “blacklist” them by blocking their IP address. An IP address is a string of 4 numbers separated by a single dot (IPv4) or 8 groups of 4 hexadecimal digits (IPv6). Each device on the internet is identified by an unique IP address.

    At RunCloud, we support 4 different web server stack:

    If you are using NGINX+Apache2 Hybrid web server stack, then you can easily block IP address using the .htaccess file in your WordPress root folder.

    What is .htaccess file

    .htaccess is a configuration file for Apache web server. You can create and edit an .htaccess file using any plain text editor.

    When the Apache server loads a web folder, it detects and execute the .htaccess file. .htaccess file can be used to modify Apache server configuration, enable or disable functionality and features — including blocking visitors by IP address.
    One of the advantages of using .htaccess is that it is executed before website is loaded. It also does not take up system resources like PHP & MySQL.

    Identify bad IP addresses

    We need to identify a bad IP address before we can block it. Here we show two ways to find bad IP addresses that visit your WordPress site.

    1. Find IP address of spammers

    WordPress dashboard comments IP address

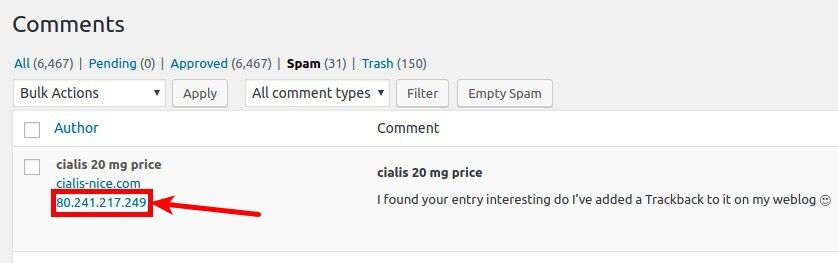
    Login your WordPress dashboard then goto Comments. Click on “Spam” to list all the spam comments. The spammer’s IP address is displayed in the “Author” column. Identify the repeating spammers then copy their IP addresses. We will block them later.

    2. Find IP address of brute force attacks or login attempts

    We can find all visitors IP addresses in the web server access log file. It is a bit tricky and takes some experiences to identify a bad visitor.

    Apache access log file path on RunCloud is:

    /home/runcloud/logs/apache/app-name_access.log
    • runcloud is the RunCloud default system user name. Replace it with your own system user name.
    • Replace app-name with your web application name.

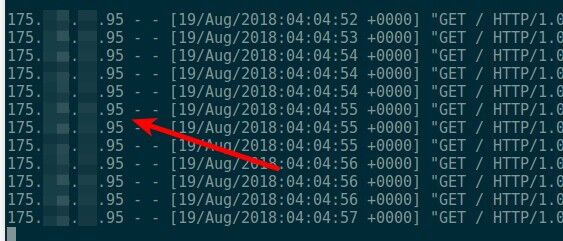
    Check the Apache server log file and identify IP addresses that repeatedly visit (flooding) your website pages in a short period (every few seconds).

    RunCLoud Log file

    Who is the IP address?
    Write down the suspicious IP addresses. It is a good idea to check who owns the IP addresses before blocking them. You do not want to mistakenly blocking a genuine visitor like Google bots, right? Simply visit https://who.is/ to check the owner of an IP address.

    Block IP address using WordPress .htaccess file

    Warning: Your website may not be accessible if you mess up the .htaccess file. Please make sure you backup your .htaccess file before edit it.

    Now you have a list of bad IP addresses you want to ban them from visiting your website. You can easily block the IP addresses using .htaccess file.

    Please note that .htaccess file only works if you are using Apache or NGINX+Apache2 Hybrid web server stack.
    A default WordPress .htaccess file will look like the below:

    # BEGIN WordPress
    <IfModule mod_rewrite.c>
    RewriteEngine On
    RewriteBase /
    RewriteRule ^index\.php$ - [L]
    RewriteCond %{REQUEST_FILENAME} !-f
    RewriteCond %{REQUEST_FILENAME} !-d
    RewriteRule . /index.php [L]
    </IfModule>
    # END WordPress

    Depends on your site configuration, your .htaccess file may look different. It is fine. Make sure you make a backup copy of the .htaccess file.

    Edit your WordPress .htaccess file using any plain text editor (or RunCloud web based file editor) and add the following lines to the top of the file:

            Order Allow,Deny
            Allow from All
            # add new line to block eacg IP address
            # 192.168.8.1

    Add each IP address that you want to block as a new line below the above lines. Save the .htaccess file and any visitors with the IP addresses are unable to access your site.

    Tip: You can temporary unblock an IP address by comment it — add a “#” at the beginning of the line.

    Bonus: 6G Firewall

    Now that you know how to block an IP address using WordPress .htaccess file. It is a small step to fight malicious visitors.

    Blocking visitor by IP address is a temporary solution because IP addresses change constantly. It is best for quickly blocking certain visitors.

    Check out the 6G Firewall by Jeff Starr, if you are looking for more complete WordPress security protection using only .htaccess file. It is free and open source.

    Fine-tuned to minimize false positives, the 6G Firewall protects your site against a wide variety of malicious URI requests, bad bots, spam referrers, and other attacks.

    Hope this article is helpful to you fighting annoying malicious visitors to your WordPress site. Please share with us about how do you ban bad website visitors in the comment.

    Wrapping Up

    RunCloud is a powerful and easy-to-use platform that helps you manage your websites on any cloud server. With RunCloud, you don’t need to be a Linux expert to set up, secure, and optimize your web applications. You can do everything from a simple and intuitive dashboard, saving you time and hassle.

    RunCloud supports various web servers, PHP versions, databases, and frameworks. You can also monitor your server performance, back up your data, and automate your tasks with RunCloud. Whether you are a developer, a freelancer, or a business owner, RunCloud can help you run your websites faster and smoother.

    What are you waiting for? Join RunCloud today and enjoy the best web hosting solution for your websites. It’s free for 7 days, no strings attached!

  • Cloudflare DNS for RunCloud (Security & Performance)

    Cloudflare DNS for RunCloud (Security & Performance)

    Cloudflare DNS is one of best DNS providers in the world. It offers free accounts so everyone can not only manage their domain names, but also benefit from the additional security and performance enabled by their integrated features. In this article, we will share some tips to enable you to use Cloudflare with RunCloud and improve your server and web application’s security and performance.

    What is Domain Name System (DNS)?

    Domain Name Servers (DNS) are the Internet’s equivalent of a phone book. They maintain a directory of domain names and translate them to IP addresses. They are important so that you do not need to memorize a domain’s IP address, a string of numbers, for every website you wish to visit. Essentially, “runcloud.io” is far easier to remember than 45.56.94.252.

    Most domain name registrars include DNS management tools with their domain registration service. In addition, there are also free DNS services available if your domain registrar does not include DNS hosting, or if you prefer to manage your DNS elsewhere.

    Cloudflare, the Best DNS for Everyone

    Cloudflare is a U.S. company that provides DNS services, a Content Delivery Network (CDN), DDoS protection, and other Internet security services.

    Cloudflare DNS is one of the top 3 domain name services in the world and the fastest performance DNS provider.

    Cloudflare, DNS updates only take a few seconds, so no more waiting for DNS propagation that could take up to 48 hours with other services.

    Best of all, Cloudflare is available for absolutely everyone. You can sign up for a free Cloudflare account, and benefit from extra add security and performance features with no extra cost.

    Using Cloudflare on RunCloud

    RunCloud offers an easy way to manage your server and web application. You still need a DNS service to resolve your domain name to your RunCloud managed server’s IP address and load your web application.

    The following are some tips for RunCloud customers who are using Cloudflare’s DNS service for their servers:

    1. Restore visitor’s real IP addresses

    Cloudflare acts as a proxy to your RunCloud server, thus all visitors will appear from Cloudflare IP addresses. This is a hindrance to visitor tracking or identifying attackers.

    In order to restore a visitor’s IP address, we need to retrieve the visitor’s originating IP address in the HTTP header from all Cloudflare’s IP addresses.

    Login to your RunCloud server by SSH as root. Then, edit /etc/nginx-rc/main-extra.conf :
    # nano /etc/nginx-rc/main-extra.conf

    Add the following lines in the file:

    set_real_ip_from 103.21.244.0/22;
    set_real_ip_from 103.22.200.0/22;
    set_real_ip_from 103.31.4.0/22;
    set_real_ip_from 104.16.0.0/12;
    set_real_ip_from 108.162.192.0/18;
    set_real_ip_from 131.0.72.0/22;
    set_real_ip_from 141.101.64.0/18;
    set_real_ip_from 162.158.0.0/15;
    set_real_ip_from 172.64.0.0/13;
    set_real_ip_from 173.245.48.0/20;
    set_real_ip_from 188.114.96.0/20;
    set_real_ip_from 190.93.240.0/20;
    set_real_ip_from 197.234.240.0/22;
    set_real_ip_from 198.41.128.0/17;
    set_real_ip_from 199.27.128.0/21;
    set_real_ip_from 2400:cb00::/32;
    set_real_ip_from 2606:4700::/32;
    set_real_ip_from 2803:f800::/32;
    set_real_ip_from 2405:b500::/32;
    set_real_ip_from 2405:8100::/32;
    set_real_ip_from 2c0f:f248::/32;
    set_real_ip_from 2a06:98c0::/29;
    real_ip_header X-Forwarded-For;
    

    Make sure you check your NGINX configuration files syntax for errors after editing them:
    # nginx-rc -t

    Then, reload the NGINX service:
    # systemctl reload nginx-rc

    Now your visitors will be shown with their real IP addresses.

    2. Stop Cloudflare’s HTTPS redirect loop

    If you are combining Cloudflare Flexible SSL option and SSL (Let’s Encrypt or Custom SSL) on your Web Application, it can cause a redirect loops, causing the browser to display “The page isn’t redirecting properly’ or “ERR_TOO_MANY_REDIRECTS”.

    The solution would be using Cloudflare Full SSL or Full (Strict) SSL. Or, use only the Cloudflare SSL and remove the RunCloud generated SSL certificate from your Web Application’s Management panel in the RunCloud dashboard.

    3. Protect Your Web Application using CloudFlare Page Rules

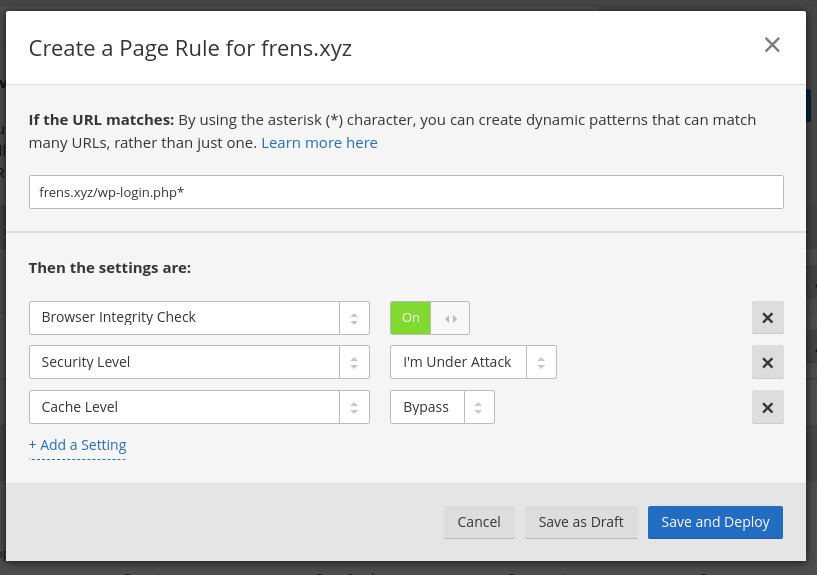
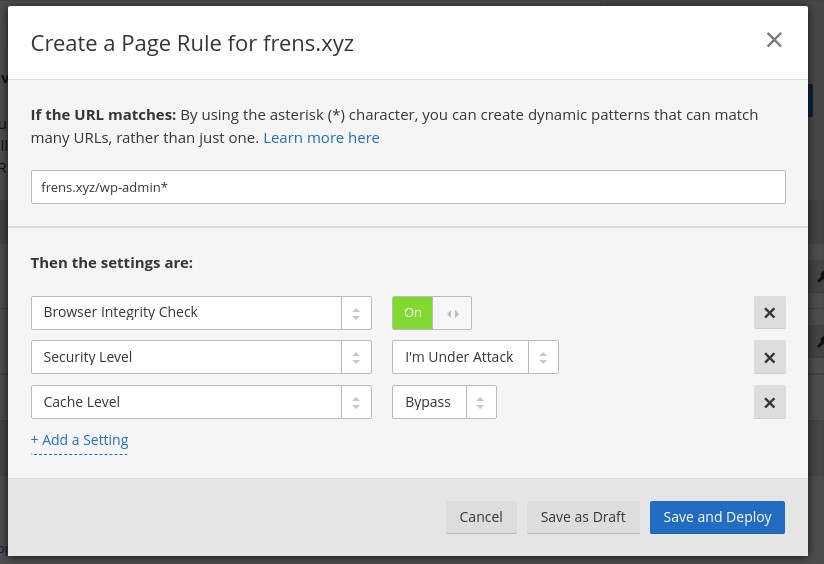
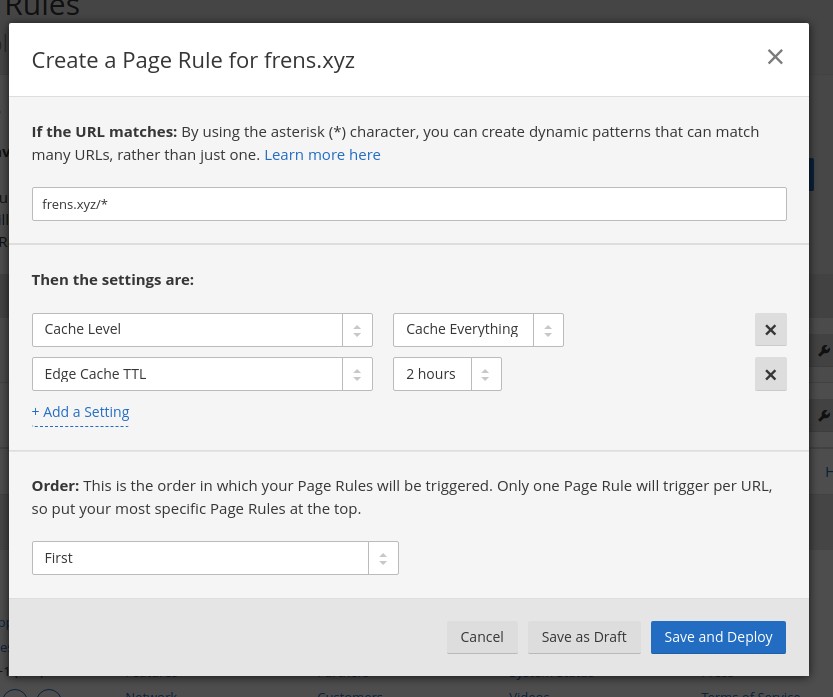
    Cloudflare offers Page Rules to control your Cloudflare settings by URL. It is useful to add custom settings to certain web paths, for example you may wish to set higher security on your application login page. The following are the Page Rules to protect a WordPress application’s login page and admin panel:

    Protect WordPress login page
    cloudflare dns for runcloud
    URL: domain.tld/wp-login.php*

    Page Rule Settings:

    • Browser Integrity Check: On
    • Security Level: I’m Under Attack
    • Cache Level: Bypass

    Protect WordPress admin panel
    cloudflare dns for runcloud
    URL: domain.tld/wp-admin*

    Page Rule Settings:

    • Browser Integrity Check: On
    • Security Level: I’m Under Attack
    • Cache Level: Bypass

    Cloudflare “I’m Under Attack” mode adds an additional set of protections to a site to stop potentially malicious HTTP traffic from being passed to your server. When activated, your visitor will receive an interstitial page for about 5 seconds while Cloudflare check to make sure it is a legitimate human visitor.

    4. Improve Web Performance

    By default, Cloudflare only caches specific static file types and not HTML and other resources. You can use the Cache Everything mode in a Page Rule to achieve maximum performance by caching other non-static file extensions (full page cache).
    cloudflare dns for runcloud
    URL: domain.tld/*
    Page Rule Settings:

    • Cache Level: Cache Everything
    • Edge Cache TTL: 2 hours

    “Cache Everything” will cache whole web page contents on Cloudflare. The “Edge Cache TTL” controls the refetch time, setting how often Cloudflare checks the origin server for updated content. 2 hours means Cloudflare will check for updates for Cache Everything’s cache every 2 hours.

    Now you know some Cloudflare tips to improve your RunCloud server’s security and performance. Are you a Cloudflare user? What is your best tip? Please share in the comment.

    RunCloud provides the perfect platform for hosting your web applications in the cloud, and works seamlessly with other cloud leaders such as Cloudflare. Sign up today for a free trial and you can explore and enjoy all the benefits RunCloud has to offer.