Category: Tips & Tricks

  • Everything You Need To Know About WordPress Object Caching

    Everything You Need To Know About WordPress Object Caching

    Tired of slow page load times and constant frustration with your WordPress site’s performance? The solution might just be something called ‘Object Caching’.

    In this article we’ll dive into exactly what Object Caching is and how it works. Most importantly, we’ll guide you through the steps you’ll need to go through to start using Object Caching to significantly improve the speed and efficiency of your website.

    Say ‘goodbye’ to sluggish load times, and ‘hello’ to a lightning-fast, smooth user experience.

    Let’s get started!

    What is Caching?

    Caching is a technique used to store frequently accessed information in a more accessible and responsive location. If processing a website request takes a large amount of time then it can degrade the user’s experience, potentially impacting your sales and conversions on a regular basis.

    Caching can help solve this problem by storing the frequently required data in a fast-to-access storage location. Any data that is accessed frequently and can be stored for a while is a good candidate for caching.

    Caching is often associated with RAM, but it can be used with any storage media. For example, if downloading information from a server over the network takes ten seconds, you can save time by caching the file on your hard disk.

    If reading the data from a hard disk takes too long, you can speed it up by caching the file in your RAM, which is many orders of magnitude faster than a hard disk.

    Taking this one step further, you can even cache some vital information directly in the cache memory of your CPU if the delay caused by reading the data from RAM is unacceptable.

    An infographic depicting the hierarchy of computer memory.

    Although it is useful, caching is not a silver bullet. Cached data becomes outdated after a period of time, and this can cause unexpected glitches in the application. To ensure proper functioning of your application it will be necessary to constantly replace the old copy of data with a fresh copy at regular intervals.

    One more thing to keep in mind is that as we shift towards faster storage media, the capacity decreases drastically along with the exponential increase in the cost. For example, cloud storage costs a few dollars a month for hundreds of GBs of storage. Modern SSDs are getting cheaper, but still cost hundreds of dollars for a single terabyte of storage. RAM is much faster than an SSD, but most modern computers only have about 16GB of RAM. As a surprise to no one, the cache memory size of a CPU is even lower. The Intel Core i9-13900 processor – the latest offering from Intel – still only offers 36MB of cache memory.

    Overview of Different Types of Caching

    • Server caching: When the server processing the requests caches the queries, then it is called server caching. In WordPress, there are two main types of server caching techniques:

      • Object Caching: In this, WordPress stores the results of frequent database queries and other API requests. It is called Object Caching because the result of the query is often an object (such as an item of data from a database, a row from a table, or a document).

        If you want to display the result of a complex database query, such as the number of 5 star reviews on a particular product, then Object Caching is the right choice for you as the number of reviews are likely to remain the same when a page is refreshed.

      • Page caching: This type of caching involves generating complete static pages and storing them. When a server receives a request, it serves this statically generated page instead of rendering a fresh copy of it.

        If you are serving pages that mostly remain the same, but are heavily requested by your users, then you should use this. The homepage or the pricing page of your site are unlikely to change often and are a good fit for this type of caching.

    • CDN caching: This is a good option for caching static content, such as images, fonts, CSS, JS libraries, and HTML pages, on a content delivery network (CDN). If your site uses a CDN, then all of your customers’ requests will be routed through a CDN. If the CDN has a cached copy then it serves that, otherwise it asks your server for a fresh copy, serves that, and also stores it for future use. When the cached copy gets too old, it is automatically deleted and the CDN asks for a fresh copy.

      Although this might seem like extra effort, this drastically reduces the number of requests that reach your server, and it also serves content faster to your visitors.

    • Browser caching: This is somewhat similar to CDN caching, but it happens in the user’s browser. If a user is visiting your site for the first time, they won’t notice a difference. However, returning users would already have a cached copy of your data and won’t need to make network requests; this can drastically reduce the request time.

      Sometimes, even first time users will be able to take advantage of browser caching. For example, if you use third party assets such as Google Fonts or Google Analytics on your site, and the visitor has previously visited a different site that also uses these same assets, then the browser will already have a cached copy of them, and can use those.

    What is Object Caching?

    In WordPress, Object Caching is the technique of storing the results of complex database queries in memory. These saved results are then reused when executing subsequent requests and, since the results are already computed, it takes less time to serve those requests.

    Object Caching reduces the load on the database and improves the overall performance and responsiveness of a WordPress site. As a result, you can serve more customers without needing to scale up the infrastructure, helping to save on server costs (and significantly improve the user experience).

    When Do You Need Object Caching?

    If you already have a CDN configured on your site then you might be thinking that you don’t need to use Object Caching. While a CDN does help in reducing the server load, it can’t replace Object Caching – no one particular caching solution can solve 100% of your problems.

    A way to think about caching is as a series of nested filters, where each filter catches smaller and smaller things at each level. As data passes through each level of caching, it is checked against increasingly specific and targeted rules until only the most relevant and frequently accessed data remains in the cache.

    Any WordPress site that receives a high volume of traffic, has complex queries, or requires fast and reliable performance, can benefit from Object Caching. Here are some scenarios where Object Caching can be especially beneficial:

    • High-traffic websites: Publishers and news sites that receive a high volume of traffic can benefit from Object Caching to improve page load times and reduce server load. Object Caching can help reduce the number of database queries required to load a page, which can make a big difference when dealing with large amounts of traffic.
    • eCommerce sites: Online stores that use WordPress plugins such as WooCommerce, Easy Digital Downloads, or NorthCommerce can benefit from Object Caching to improve the performance of their product pages, shopping cart, and checkout pages.
    • Course websites: WordPress sites that use a learning management system (LMS) such as LifterLMS, LearnDash, or SenseiLMS can benefit from Object Caching to improve the performance of their course pages, quizzes, and other interactive features. 
    • WordPress multisite networks: Websites that use WordPress multisite networks can benefit from Object Caching and improve the performance of their entire network. Object Caching can help reduce the number of database queries required to load pages across the network, which can improve the overall speed and responsiveness of the sites.

    What Are the Benefits of Using Object Caching?

    Object Caching can offer several benefits for WordPress sites:

    • Improved Performance: Enabling Object Caching can significantly improve the performance of WordPress sites by reducing the amount of time it takes to serve a request. By caching commonly accessed data, such as queries or API calls, Object Caching can eliminate the need to repeatedly fetch the same data from the database. This can improve the speed and responsiveness of the site, resulting in a better user experience.
    • Better Lighthouse Scores: Object Caching can directly impact your Lighthouse Scores. A properly implemented caching strategy will reduce Time To First Byte (TTFB) and First Contentful Paint (FCP) – these metrics are important factors in determining Lighthouse scores. Having a good Lighthouse score is essential for a snappy user experience – and it also improves SEO.
    • Reduced Server Costs: Object Caching can also help to reduce the load on the server. Caching the response of commonly requested database queries leads to a reduction in the number of requests sent to the database. This reduces the load on the server, and ultimately reduces the amount of resources needed to serve the site. This can result in lower hosting costs and better scalability for WordPress sites.

    What is WP_Object_Cache?

    The WordPress engine provides a built-in Object Caching functionality that can be accessed via the WP_Object_Cache class, (a ‘class’ being a blueprint for a way data should be structured). This class acts as a layer between the programmer and the underlying architecture where data is processed. It’s not recommended to use the class directly – you can use pre-defined functions to set, clear, add, and update cache values.

    Object Caching is typically achieved through the use of an external caching solution, such as Redis or Memcached, which acts as a fast, in-memory data store for cached objects. When used correctly, Object Caching can result in significant improvements in page load times, increased website stability, and a better user experience.

    What Are Redis And Memcached?

    Redis and Memcached are open-source database technologies. These are key value store databases which can each be thought of as a dictionary. In other databases, such as MySQL or MongoDB, you can store multiple values in one record, but in a key value database you can only store one value in each record.

    For example, an SQL database can be thought of as a table that contains all the test scores of a student. The student might have scored well in the last exam, or they could have been absent. All this information can be stored in the table, the design of which can be modified to add or remove information.

    SQL table:

    In the case of a key-value database such as Redis there is only one field, and it cannot be modified. This is best visualized by imagining a dictionary which can only hold one definition for one word, and nothing else.

    In this example, a key value store saves the value of a complex query which was run on above database:

    No_of_students_absent2
    Avg_marks_of_Steve24.3

    Redis stores the data in RAM for much faster access compared with storing it on the hard disk. This simple architecture makes Redis, and other similar databases, ideal for storing cached data.

    Both Redis and Memcached are designed to be used with a variety of programming languages and platforms. The key difference between the two is that Redis supports more advanced data structures, such as lists and hashes, while Memcached is simpler and focuses on the efficient storage and retrieval of key-value pairs.

    Object Cache Pro – A Better Caching Solution

    Object Cache Pro is a high-performance Object Caching plugin designed to meet the needs of mission-critical businesses. It offers a combination of performance, scalability, and reliability, which are essential for any high-traffic website. The development team uses test-driven development methodology with over 1,000 unit tests to ensure every update is safe and offers warnings about plugins that can lead to data loss.

    It’s designed to provide a smooth user experience, with tools to help identify issues, built-in query monitoring, and logging. Additionally, it’s fully customizable and works even when Redis is not on the same machine, making it ideal for horizontally scaled environments of two servers or more.

    How To Use Object Caching With WordPress

    If you’re already a RunCloud customer then getting started with Object Caching is very straightforward, as our RunCloud Hub enables you to turn on caching with a few simple clicks.

    With RunCloud Hub you don’t need the expertise of a server administrator to reap the benefits of caching – you can do so by simply installing the RunCloud Hub plugin and enabling the caching option. This installs all of the dependencies automatically, and configures them on your WordPress website.

    For a more detailed guide on configuring caching, refer to our other articles:

    If you’re not using RunCloud yet, you can still use Object Caching in WordPress by installing either the Redis Object Cache or Memcached Object Cache plugin.

    Both of these are popular choices for Object Caching in WordPress, and the decision of which one to use depends on the server environment. Redis Object Cache is known to work well on servers with high CPU usage, while Memcached Object Cache is better suited for servers with limited memory.

    Although these plugins provide a caching functionality for WordPress, they do require you to have access to a caching server. If you are using a shared hosting service you may need to contact your hosting provider for this. If that’s the case, then you should consider switching to RunCloud which makes it easy to manage your servers – and allows you to set up caching with only a few clicks. Sign up for managed hosting with RunCloud today!

    After Action Report – Get All The Benefits of Object Caching When You Deploy With RunCloud

    Improving website loading times is crucial for delivering a positive and responsive user experience, and can directly impact your website’s search engine rankings. Using caching is a smart and cost-effective solution to achieve faster website speeds without having to spend more money on hardware or infrastructure upgrades.

    An absolute essential for any mission-critical business site, let alone any serious website – caching can significantly reduce the load on your database and improve load times by storing the results of expensive computations.

    Whether you choose to set up caching on your server using Redis or Memcached plugins, or use an all-in-one solution such as RunCloud Hub, we’re sure you’ll be pleased to see the benefits of object caching.

    If you aren’t quite comfortable with the idea of deploying servers and setting up object caching entirely from scratch, we’d love for you to give RunCloud a try (for free).

    We built RunCloud so you don’t need to be a system administrator or Linux expert to manage your cloud infrastructure. With everything from backups, staging, cloning, atomic (Git) deployments, and more – we’re on a mission to make it truly enjoyable to manage your own production-grade infrastructure. Learn more & get started today.

    If you have any questions about Object Caching or need help getting started, leave a comment below or tweet us on Twitter. We’ll be happy to help!

  • How to Clone a WordPress Website (An Easy, Step-by-Step Guide)

    How to Clone a WordPress Website (An Easy, Step-by-Step Guide)

    Have you ever wondered how to create a duplicate WordPress website with all of the identical settings and configurations?

    This is where website cloning comes in.

    Website cloning is the process of creating an exact replica of an existing website. It’s a popular practice among website developers and designers to clone websites for both testing new features or designs, and building new websites faster.

    In this article, we’ll provide you with an easy, step-by-step guide on how to clone a WordPress website. Whether you’re a web developer, designer, or simply curious about cloning your website, this guide will show you exactly how to achieve this.

    How To Clone A WordPress Website

    To clone your WordPress website on RunCloud, you don’t need to install any additional plugins. The entire process from cloning the database to setting up the domain can be done entirely from within the RunCloud dashboard itself – and all within 60 seconds!
    Let’s see how to clone a WordPress site with RunCloud in under a minute.

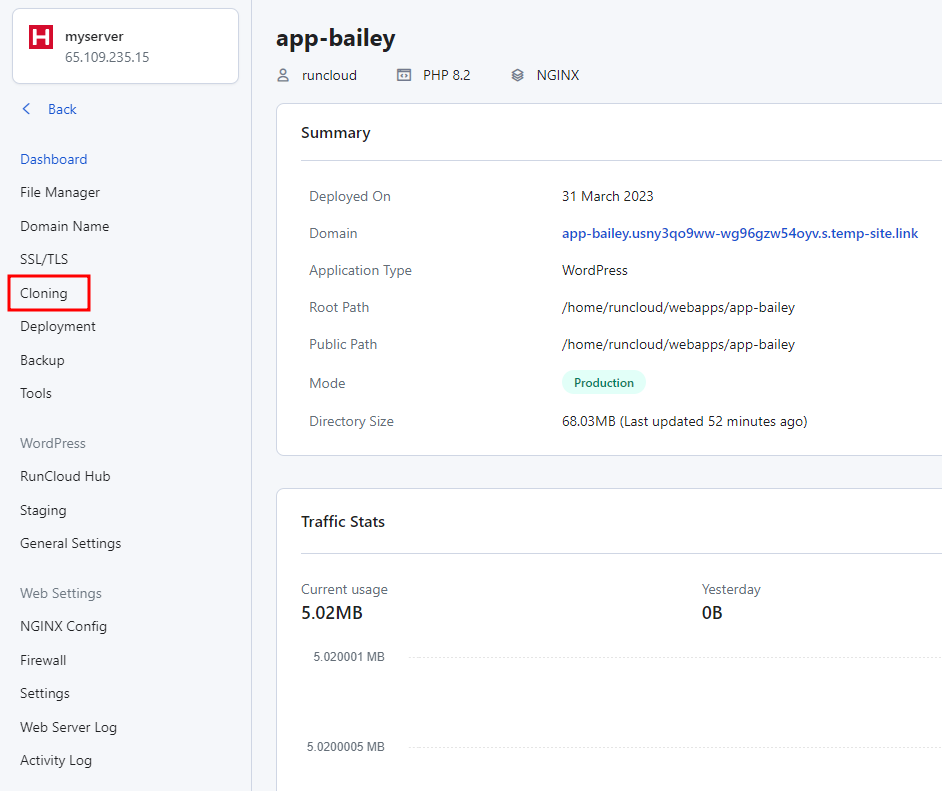
    Go to your RunCloud dashboard and open the menu of the website that you want to clone. In the left submenu, look for the “Cloning” button to make a duplicate copy of your website.

    Cloning an application on RunCLoud

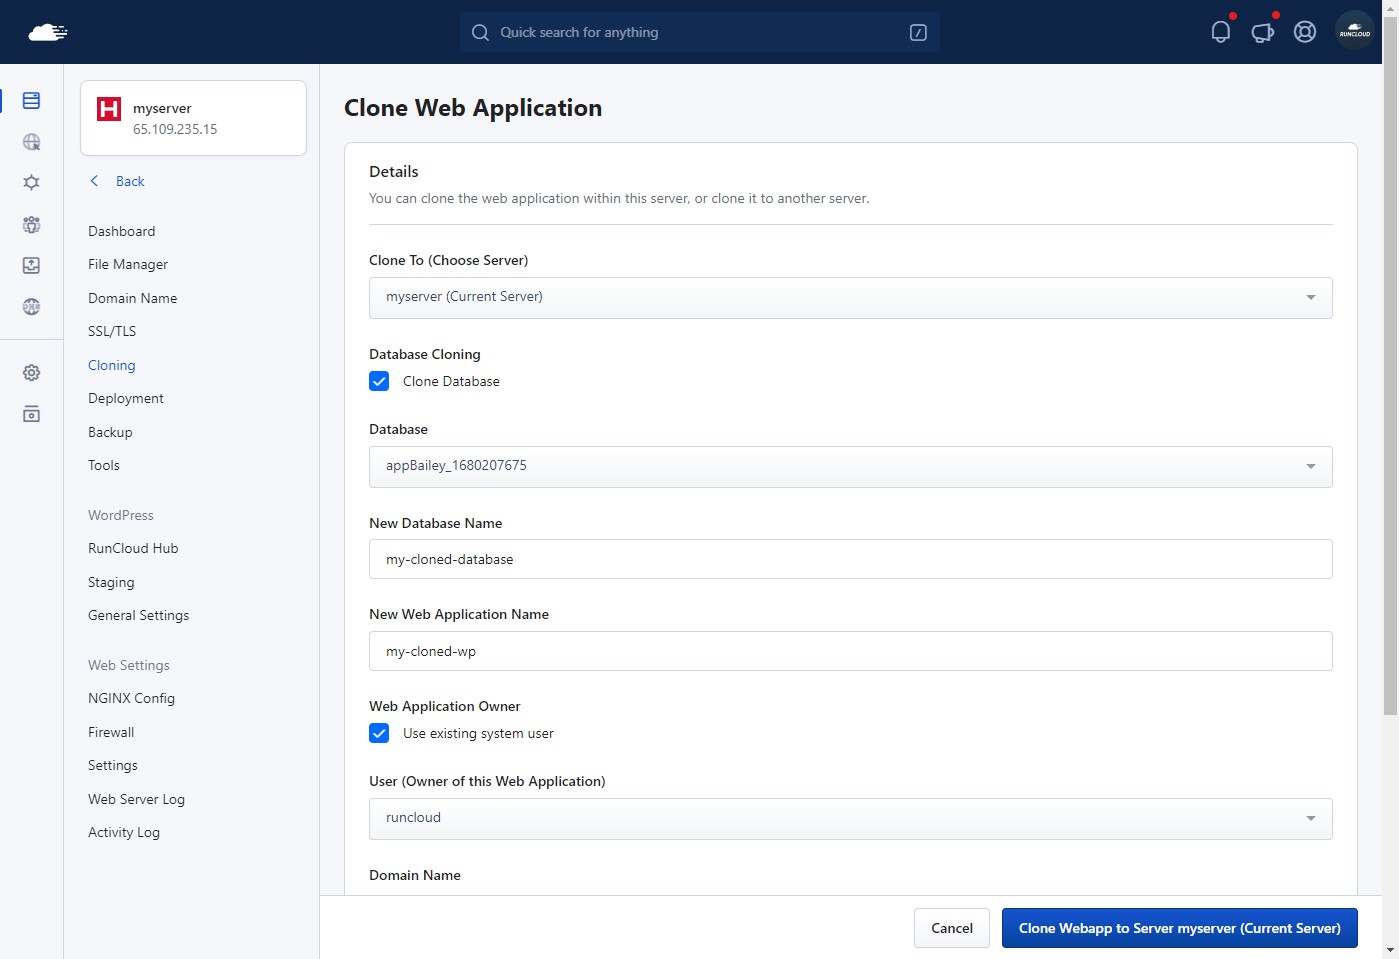
    If you have more than one server connected to your RunCloud account, you can deploy the clone to a different server. In the “Clone Web Application” submenu, select the name of the server where you want to deploy your new application.

    Next, make sure you check the “Clone Database” option to create a new database with all of the posts and comments. Once you check it off, a new dropdown menu will appear asking you to select the database that you want to clone – select the database starting with the name of your existing application.

    After selecting the database, you will need to give a descriptive name to it, and provide a suitable name for the web application (website).

    Cloning a website using RunCloud utility

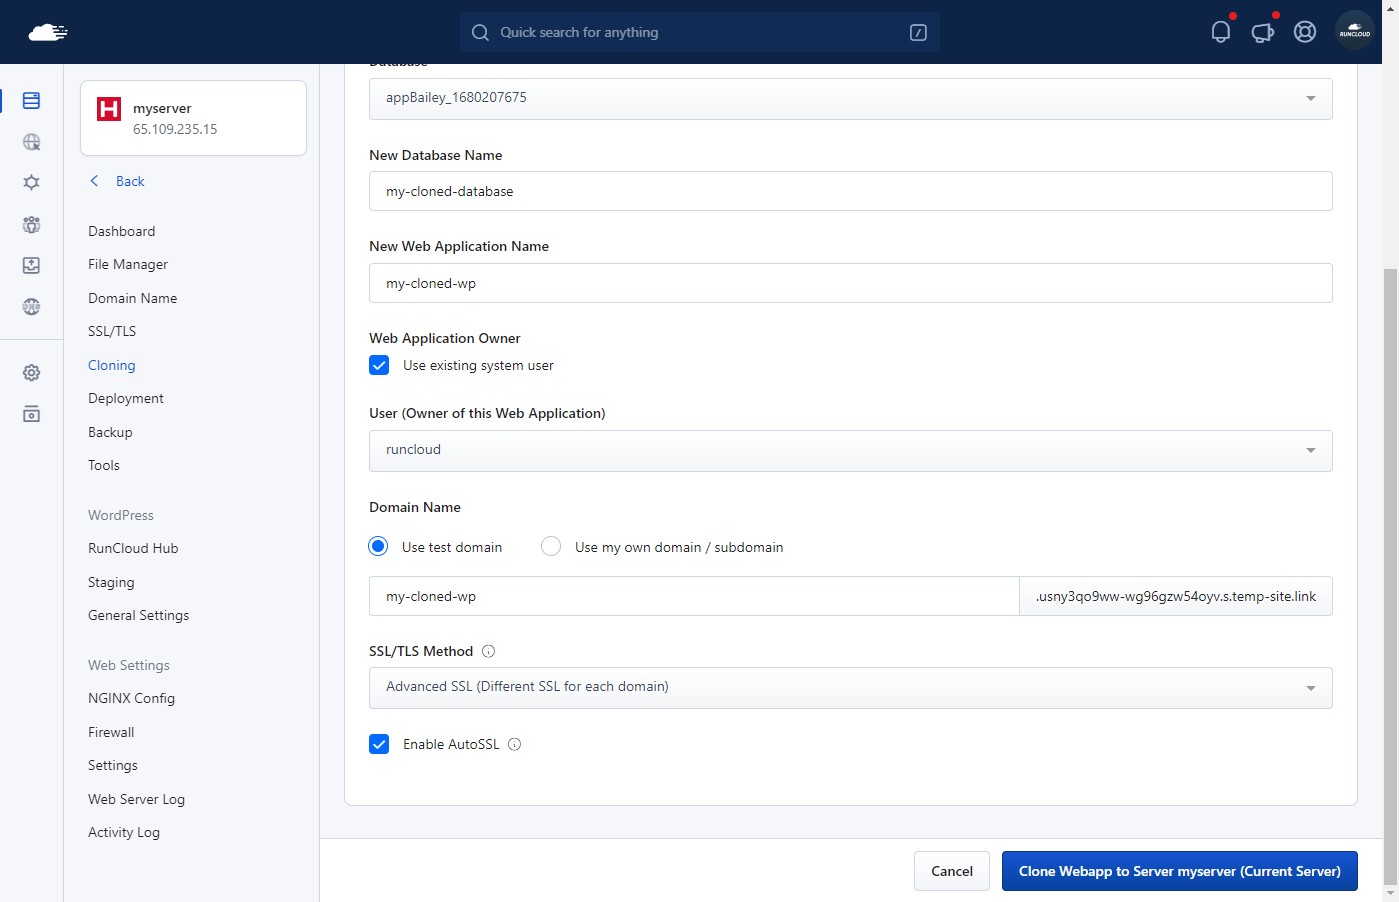
    Once you have configured all the above settings, you’ll need to specify the owner of this new application. If this is a test website, we highly recommend you create a new user – this isolates the application in the event of a security breach – minimizing the exposure of other applications on the same server.

    Next, you need to configure the domain of your website. Specify the domain name that you want to use, and configure the DNS records for it. If you are using RunCloud’s Cloudflare integration, domain names can be configured automatically for your domain.

    However, if you don’t have a registered domain name yet, you can use RunCloud’s test domain and follow along with this tutorial.

    Configuring RunCloud cloning

    After you have added all of the necessary details, click on the “Clone Webapp” button to create a duplicate application and deploy it.

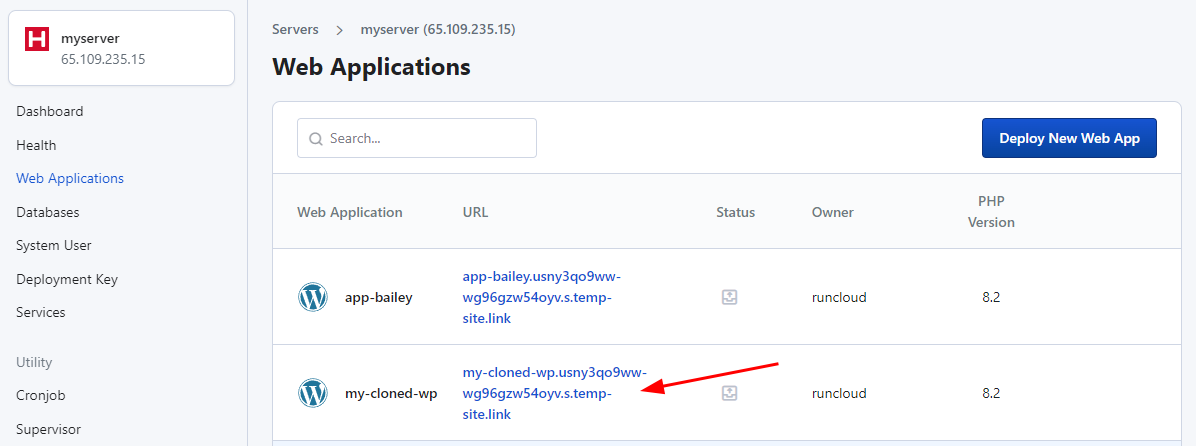
    Once you have cloned the app, you will be redirected back to the dashboard of your original WordPress site. Navigate back to the “Web Applications” tab of your server to see your newly created app.

    listing cloned applications on RunCloud

    After Action Report

    We hope this article on how to clone a WordPress website using RunCloud has been helpful to you. With our step-by-step instructions, you can easily clone any website and make changes to it without affecting the original site.

    If you are interested in learning how to create a WordPress staging site to test new features, we recommend reading our article on How to Create a Staging WordPress Site.

    We encourage you to start using RunCloud to manage your servers. With RunCloud, you don’t need the experience of a Linux administrator to manage your servers – you can easily clone websites, set up a staging environment, and launch your websites without ever needing to open up a Linux terminal. Start using RunCloud today!

    We hope you found this article useful and informative. Don’t hesitate to leave a comment or reach out to us on Twitter if you have any questions or feedback.

  • How To Monitor Your Web App’s RAM & CPU Usage with Netdata

    How To Monitor Your Web App’s RAM & CPU Usage with Netdata

    Netdata is a powerful tool that can help you monitor your servers with ease and efficiency. It’s a distributed, real-time, performance, and health monitoring platform that can collect and display thousands of metrics from your servers, hardware, containers, and applications, including RAM and CPU usage.

    Netdata has many features and benefits that make it a great choice for server monitoring, such as:

    • Real-time data collection and visualization: Netdata collects metrics every second, and displays them on interactive charts that update every second as well. This means you can see exactly what’s happening on your servers without any delays.
    • Infinite scalability: Netdata can scale to any number of servers and metrics without compromising performance or accuracy. It stores the data locally on each server, which means it doesn’t need a central database or a query engine. You can also use Netdata Cloud to view metrics from multiple servers in one dashboard, with secure streaming and encryption.
    • Flexible and modular architecture: Netdata can monitor any system, service, or application that exposes metrics with the help of its modular architecture and hundreds of integrations. You can also extend Netdata with custom collectors, plugins, dashboards, alarms, notifications, and more. Netdata is open-source and community-driven, so you can always find new features and improvements.
    • Zero configuration: Netdata is designed to work out of the box, without any need for configuration. It can auto-detect metrics from your servers and applications, and display them on preconfigured dashboards with meaningful visualizations and health alarms.

    Netdata is compatible with RunCloud, so you can use it alongside our platform to manage your web applications.

    How to Install Netdata on RunCloud Servers

    If you want to install Netdata on your RunCloud server, you can follow these simple steps:

    1. Sign up for Netdata: To use Netdata Cloud, you’ll need to sign up for a free account on their website. Netdata Cloud will allow you to view metrics from multiple servers in one dashboard, and access other features such as Metric Correlations and War Rooms.
    2. SSH into your RunCloud server: To install Netdata on your server, you’ll need to access it via SSH. If you don’t know how to do this, you can read our post on how to connect to your RunCloud server using SSH. You will need your server’s IP address, username, and password or SSH key.
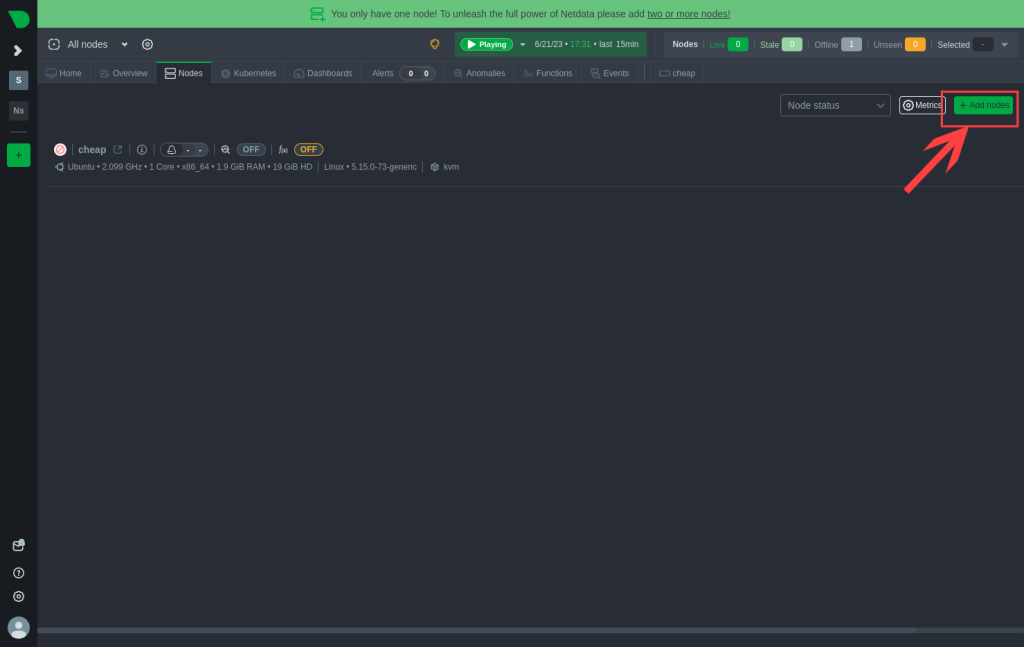
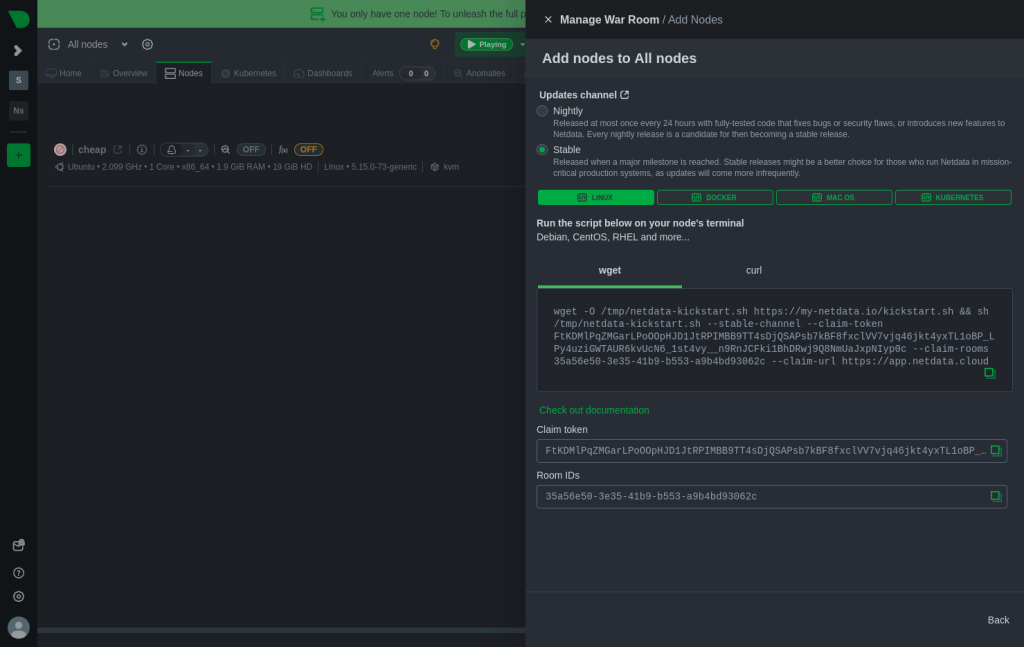
    3. Open Installation Script: Once you have logged into your server via SSH, go to the Netdata dashboard and go to the “All Nodes” tab. Once there, click on “+ Add Node” button to view the installation script.
    Netdata dashboard view existing nodes.
    1. Execute the given command: You can install Netdata on your server with a single kickstart command. Change the update channel to “Stable“, and then copy the given installation command.
    Netdata Installation script.

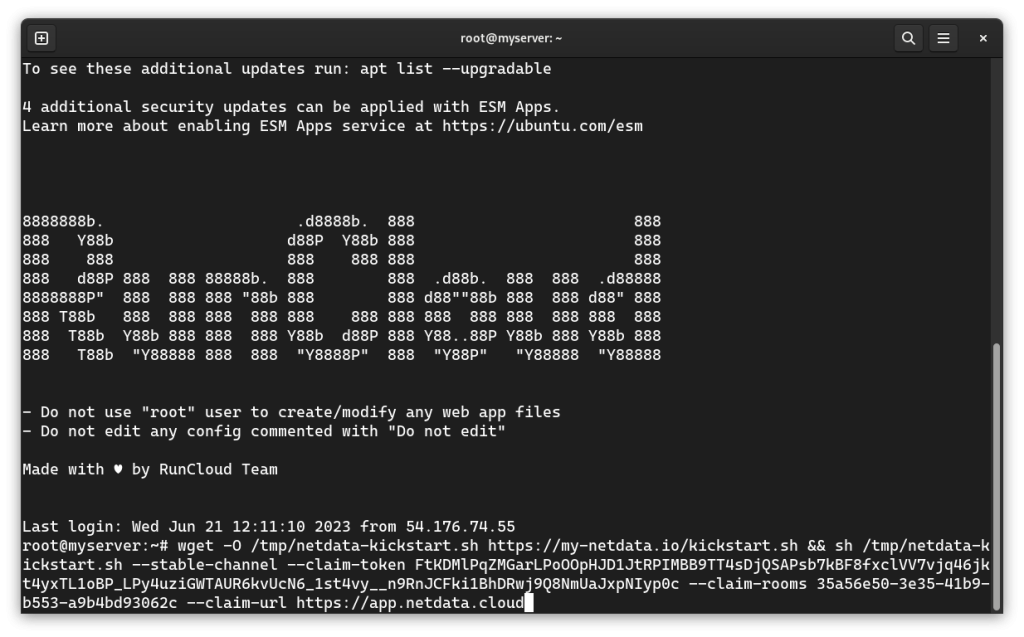
    Upon execution, the above command will download and run a script that will install Netdata and its dependencies on your server. Go back to your SSH terminal, paste the given command, and then press ‘Enter’.

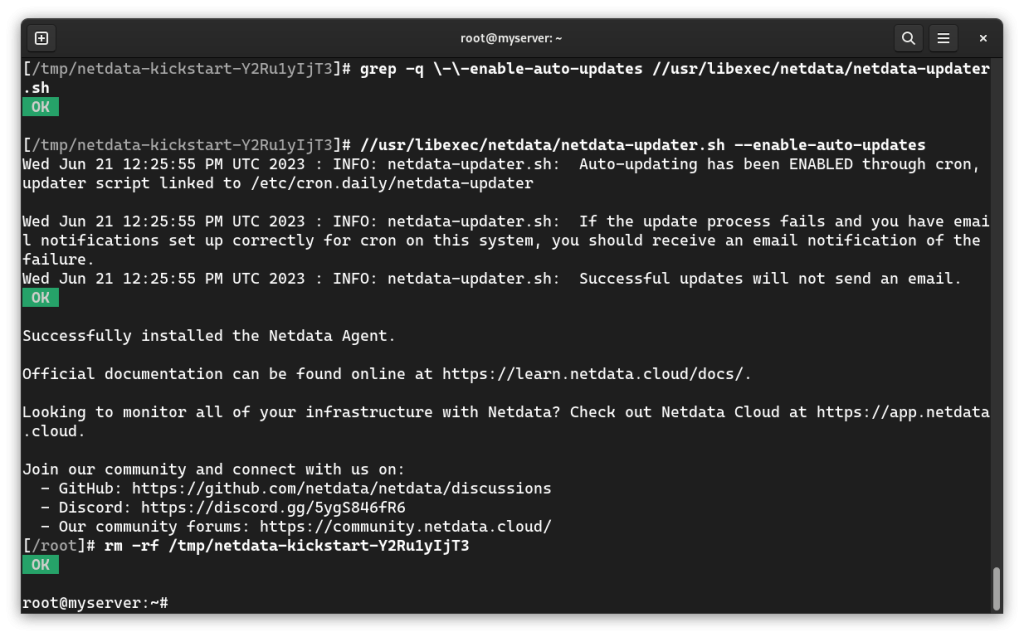
    Executing Netdata installation script on RunCloud

    During installation, it will ask you some questions about automatic updates, release channels, anonymous statistics, and Netdata Cloud connection. Press ‘Y’ to confirm the installation and then press ‘Enter’.

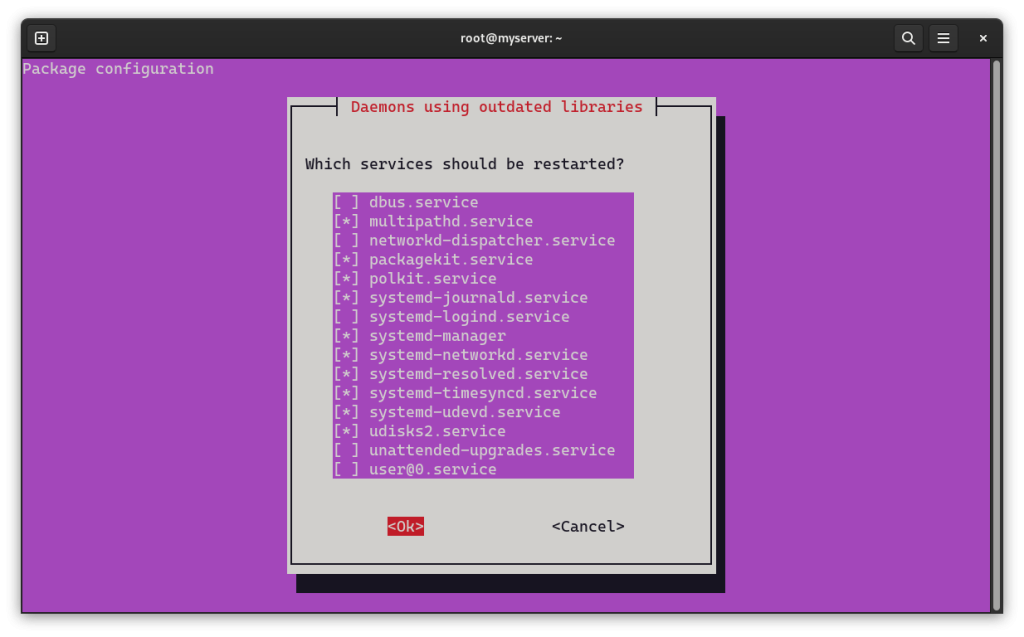
    After this, the installation daemon will ask you which services should be restarted. You can use the arrow keys to navigate up/down and press the spacebar to select/deselect options if you want to do so.

    Restarting services via CLI after installation

    In most cases, default selection is right choice for most people. Press the ‘Tab’ key on your keyboard – this will move cursor to the next position. Make sure that the ‘Ok’ is highlighted, and then press ‘Enter‘ to continue the installation.

    You will be asked to confirm the installation once again, press ‘Y’ to confirm, and then press ‘Enter‘.

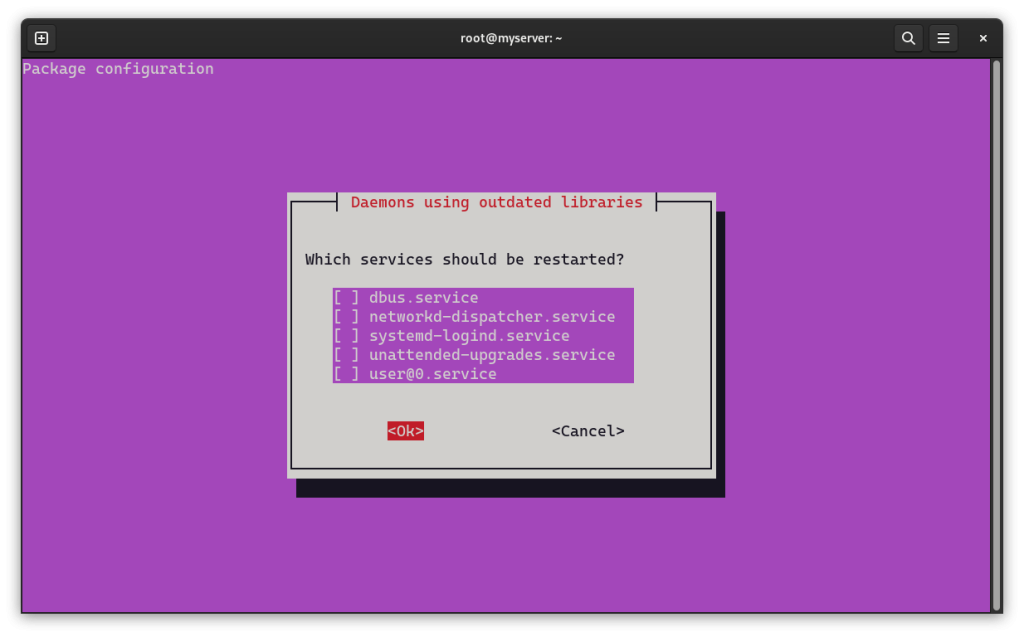
    Daemon using outdated libraries on RunCloud.

    After this, the installation script will once again ask you which services should be restarted – leave these settings to default. Press ‘Tab‘ to highlight the ‘Ok’ button, and press ‘Enter‘ to finish the installation.

    Netdata installation completed successfully.

    That’s it! You have successfully installed Netdata on your RunCloud server. You can now access the Netdata web interface by visiting your Netdata dashboard.

    How to View Server Metrics

    To see the RAM and CPU usage of different servers, you can use either Netdata’s web interface or Netdata Cloud. Both options will show you interactive charts that update every second with real-time metrics.

    Using Netdata’s Web Interface

    Netdata hosts a dashboard on your server, which you can view by visiting port 19999 of your server. You can change this port by editing the Netdata configuration file. By default, RunCloud blocks all non-standard ports. Therefore, you’ll need to either connect to your server via a VPN, or open up the ports to visit the dashboard.

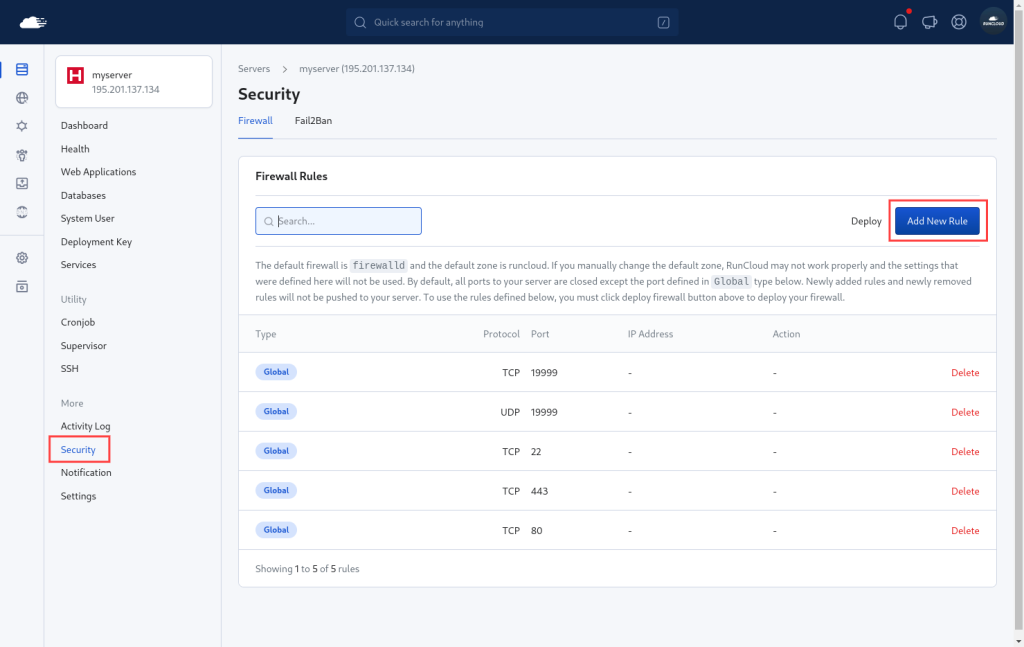
    To open up ports, go to your RunCloud dashboard and open the “Security” tab of the server. Click on “Add New Rule” and create a new rule to open up the specified ports on TCP and UDP. Once you have created all of the rules, you’ll need to click “Deploy” to save the changes.

    Open Firewall ports RunCloud

    Once you have opened up the firewall, anyone on the internet can view your Netdata Dashboard by visiting http://<ip address>:19999.

    Note: this will allow you to view the dashboard only for this particular server – if you have more than one server, you must repeat this step for all of them.

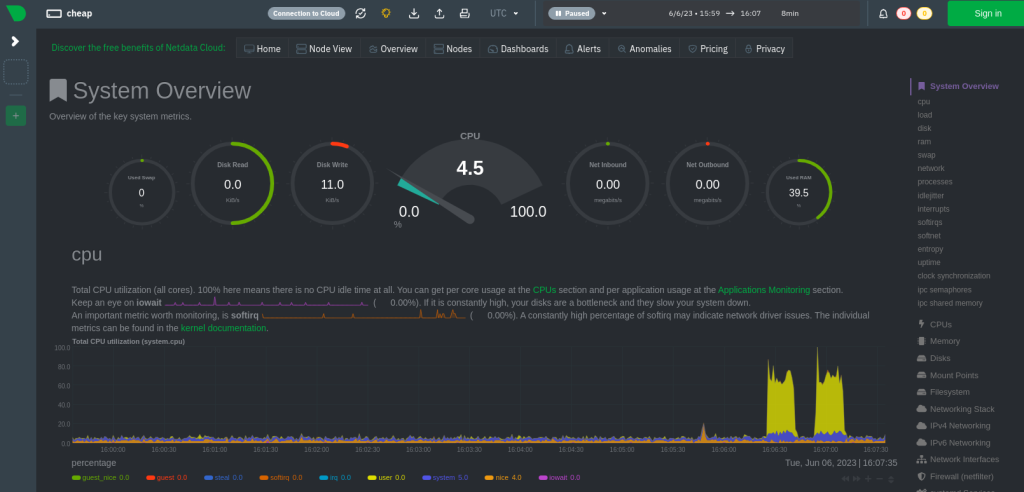
    This option presents a simplified user interface that displays all metrics of the selected server. This is useful if you don’t want to log into your Netdata Cloud account to view the metrics. However, you won’t be able to make any changes in this dashboard; for that, you will still need to log into your account.

    Netdata Local Dashboard depicting CPU, RAM, and Disk usage

    Using Netdata Cloud Dashboard

    Once you have connected a node to your cloud account, you can see it in your dashboard. One cloud account can connect to many servers, so you’ll need to navigate the dashboard and search for the server that you want to view.

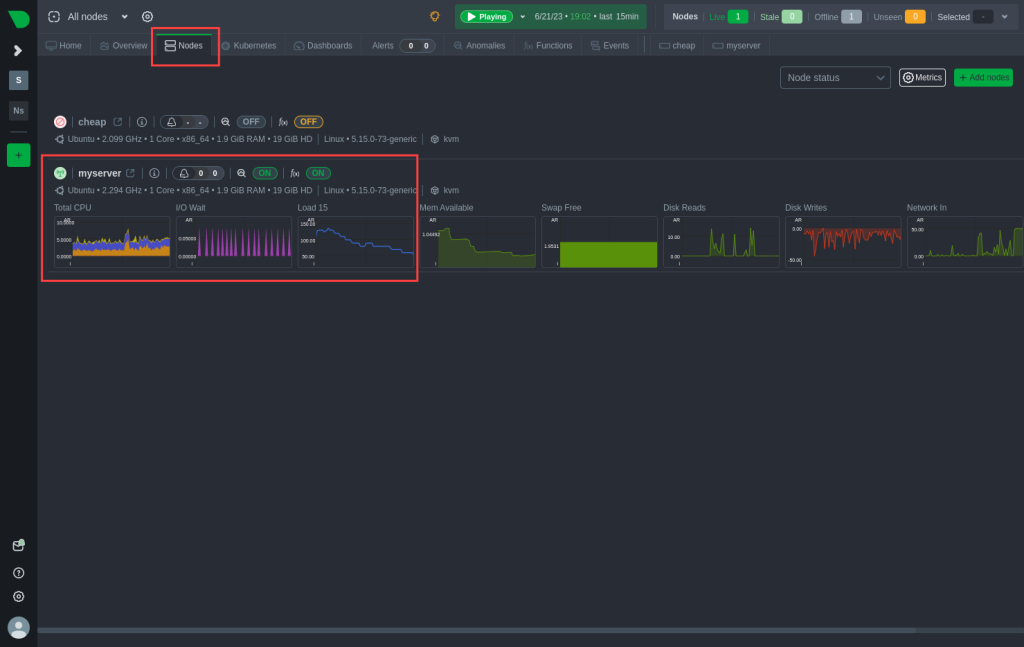
    To view all available nodes connected to your account, navigate to the “All Nodes” page, and switch to the “Nodes” tab to view all connected nodes.

    Connected nodes on Netdata cloud dashboard

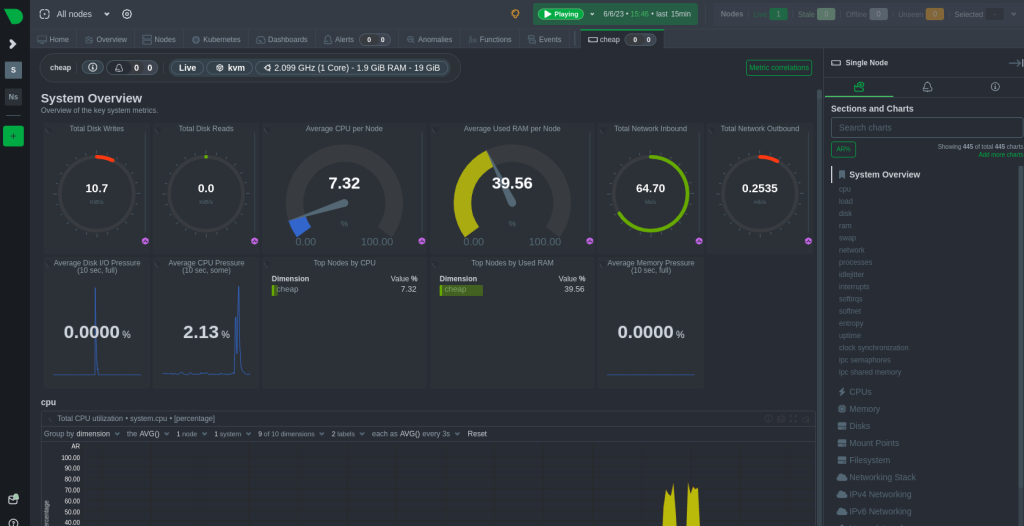
    In the above screenshot, we can see two nodes are connected to our Netdata account. The first node is inactive, and the second node is posting metrics to the cloud. You can click on this node to view detailed metrics.

    Netdata dashboard showing system metrics on RunCloud

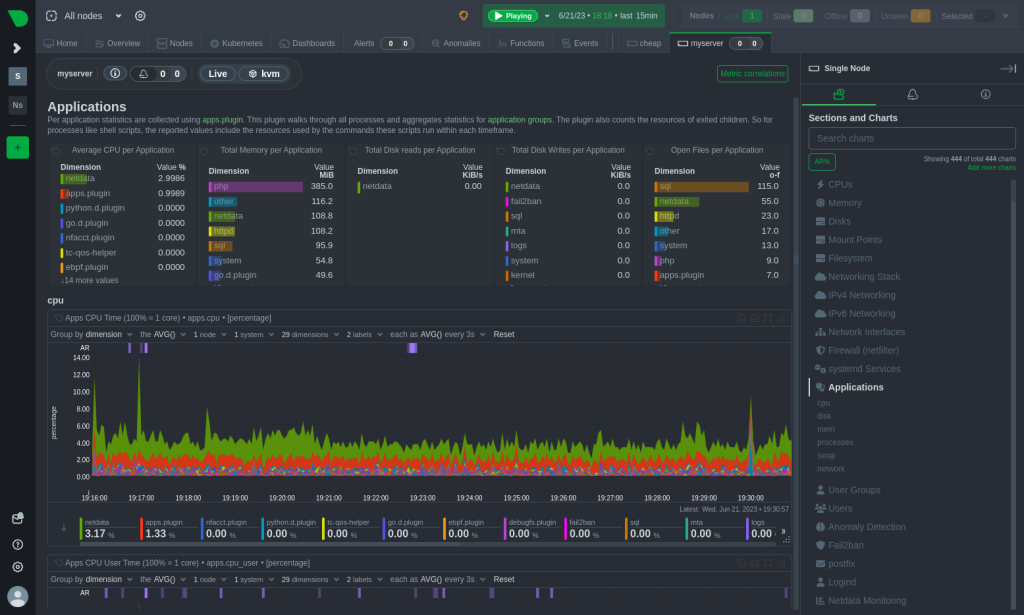
    The above screenshot shows the overview of the system metrics. To view detailed metrics such as disk, memory, CPU usage, etc. for a particular application, click on the “Applications” button in the tab on the right of the screen.

    Netdata application monitoring metrics.

    Besides monitoring, you can also use this dashboard to invite new users and collaborate with them. 

    Final Thoughts

    Netdata is a powerful and easy-to-use tool that provides real-time insights into your server’s performance and health. You can use Netdata to visualize and analyze various metrics such as memory usage, CPU load, disk I/O, network traffic, and more. You can also set up alerts and notifications to get notified when something goes wrong with your web app.

    By using Netdata on RunCloud, you can benefit from the seamless integration and compatibility between the two platforms. If you have any questions or feedback, please feel free to leave a comment below.

    If you’re tired of managing your own servers – you might want to check out RunCloud (yep, that’s us!). RunCloud is built for developers that want to focus on shipping great work, not on managing their infrastructure. We provide painless server configuration so you don’t need to spend hours figuring it out – get started with RunCloud today & get up and running in minutes.

  • Fixing Redirect Loop on Cloudflare SSL

    Fixing Redirect Loop on Cloudflare SSL

    If you are using Cloudflare proxy to hide your server’s IP address from the internet, then you might encounter a glitch that causes visitors to get stuck in a redirection loop.

    Eventually, the request times out with an error message saying, “Too many redirects”.

    In this article, we will investigate why websites might get stuck in a redirection loop and how you can prevent this.

    Let’s get started!

    Why Does This Happen?

    If you’re using Cloudflare to serve visitors, you’ll probably be using Cloudflare’s TLS certificate to securely transmit these web requests. When you’re using the Flexible SSL option, Cloudflare will connect to your site over an HTTP connection, and forward the response to visitors over an HTTPS connection.

    The Nginx or Apache2 server on your machine sees these requests before they are processed by WordPress. WordPress processes these requests over HTTP protocol – which causes your site to show a mixed content warning. This is where some content of your site is served over HTTP, whilst other content is transmitted over a secure connection.

    If you try to address this issue by manually updating URLs from HTTP to HTTPS, then you might get stuck in a redirection loop.

    This happens because when you configure your site to serve content over HTTPS, it will only serve it over HTTPS. If a user makes an insecure request, the server asks them to make a new request with an HTTPS connection. Usually this isn’t a problem, but if you have misconfigured your servers, an error will occur.

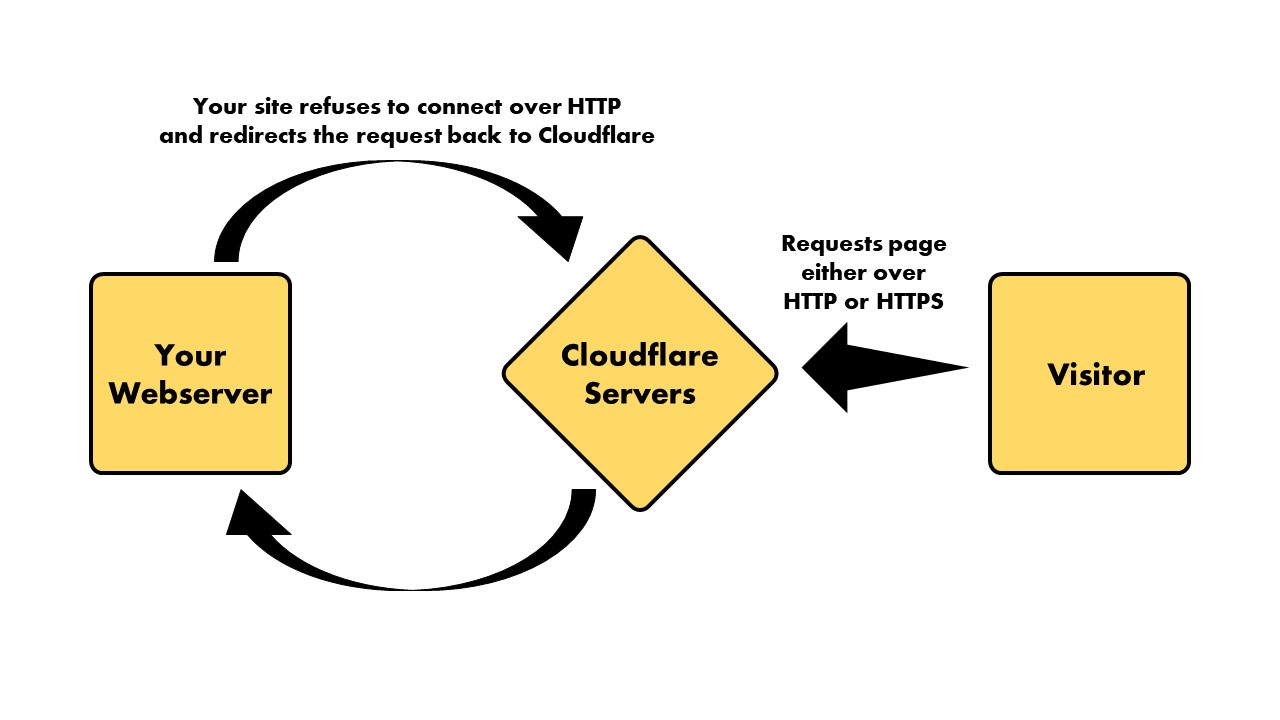
    How does Cloudflare proxy work?

    If Cloudflare servers make an insecure request to your site, and you redirect that back to another Cloudflare server, then it will cause an infinite loop. Each server will keep asking the other one to serve the request, until the maximum number of requests are reached.

    How To Fix This Issue?

    There are a few ways to fix this problem. Here are some of the easier ways to resolve the redirect loop problem.

    Using Cloudflare Page Rule

    One of the simpler ways to fix this problem is by updating the settings on your Cloudflare dashboard.

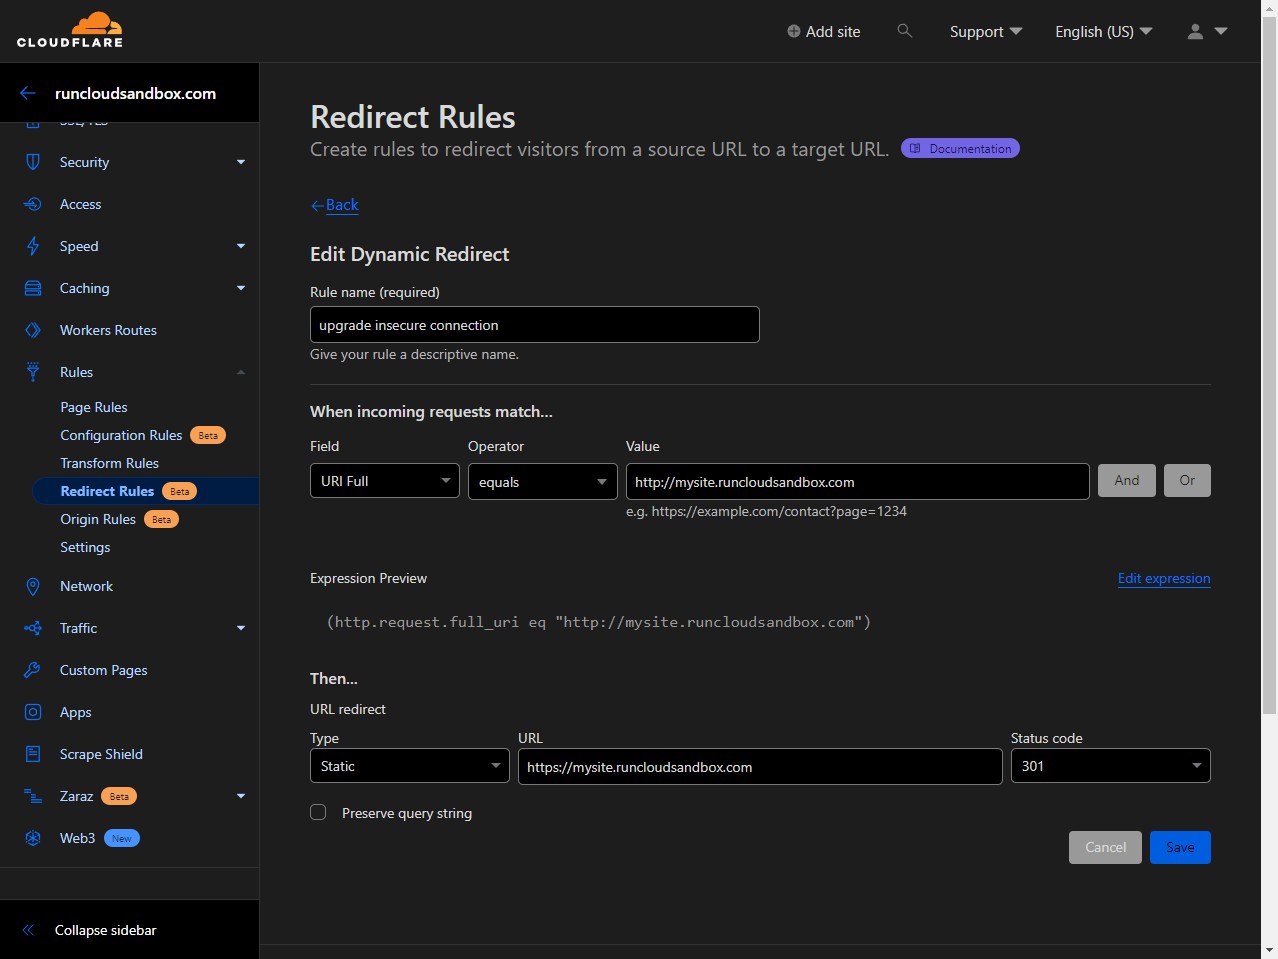
    You can configure Cloudflare’s redirect rules with status code 301 to indicate that the webpage has moved over permanently.

    In your Cloudflare dashboard, open the domain that you want to configure and look for the Redirect Rules section inside the Page Rules submenu. Then create a forwarding rule to tell Cloudflare to forward HTTP requests to HTTPS.

    A screen capture of Cloudflare dashboard showing screen capture page.

    For example, if your WordPress address is https://blog.runcloud.io, Create a rule for http://blog.runcloud.io/ and use the Full URL setting with 301 redirect. 

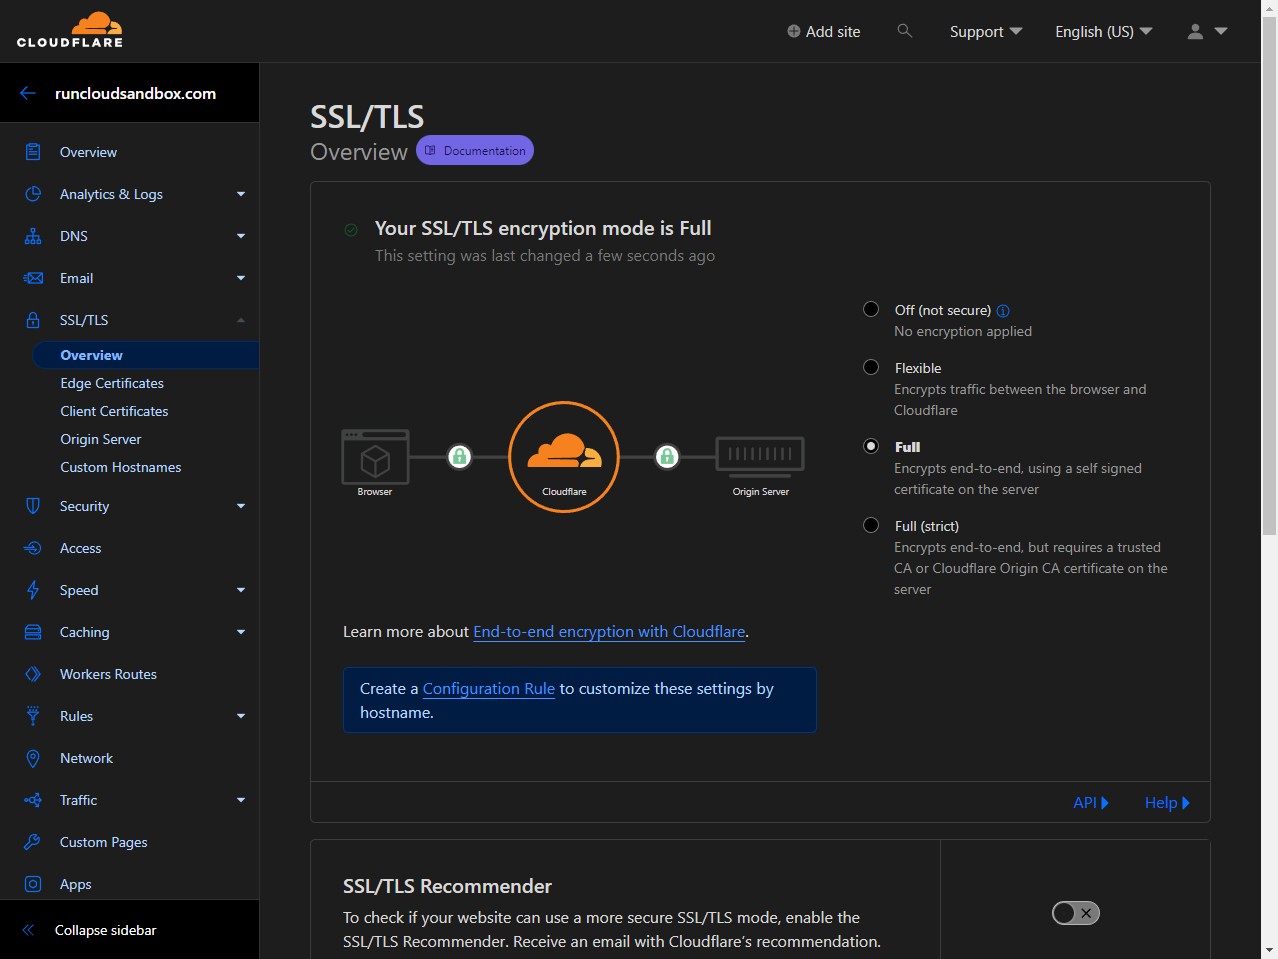
    Updating CloudFlare TLS settings

    To make sure that you don’t get stuck in redirection loops, use either the Full or Full (Strict) setting so that all the web requests are only made using the HTTPS connection.

    A screen capture of Cloudflare dashboard showing SSL/TLS settings.

    Using SSL Certificate In RunCloud

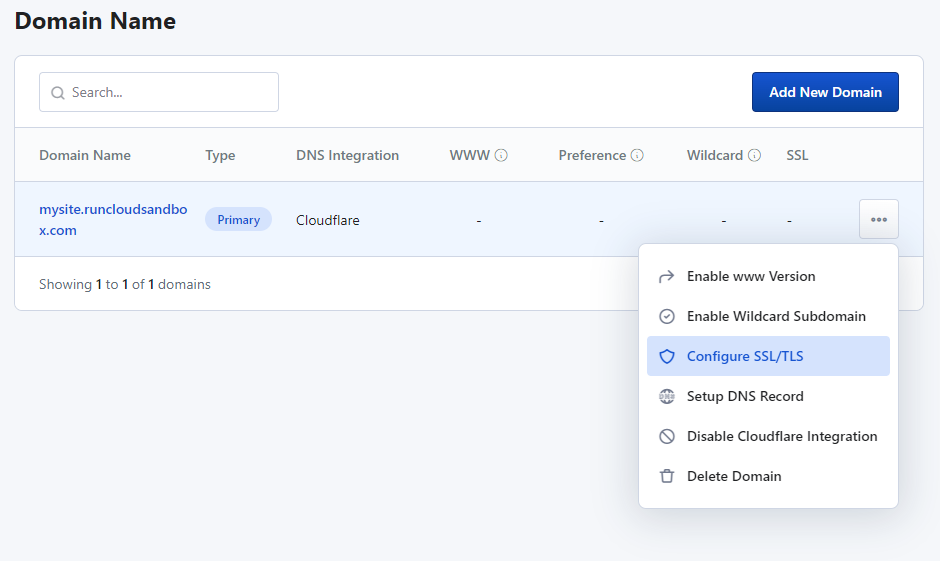
    If you are using RunCloud to manage your servers, you can easily configure TLS certificates for all your domains. Simply go to the domain section of your web-app and click the Configure SSL/TLS button for the domain that you want to secure.

    A screen capture of RunCloud dashboard showing how to edit domain name settings.

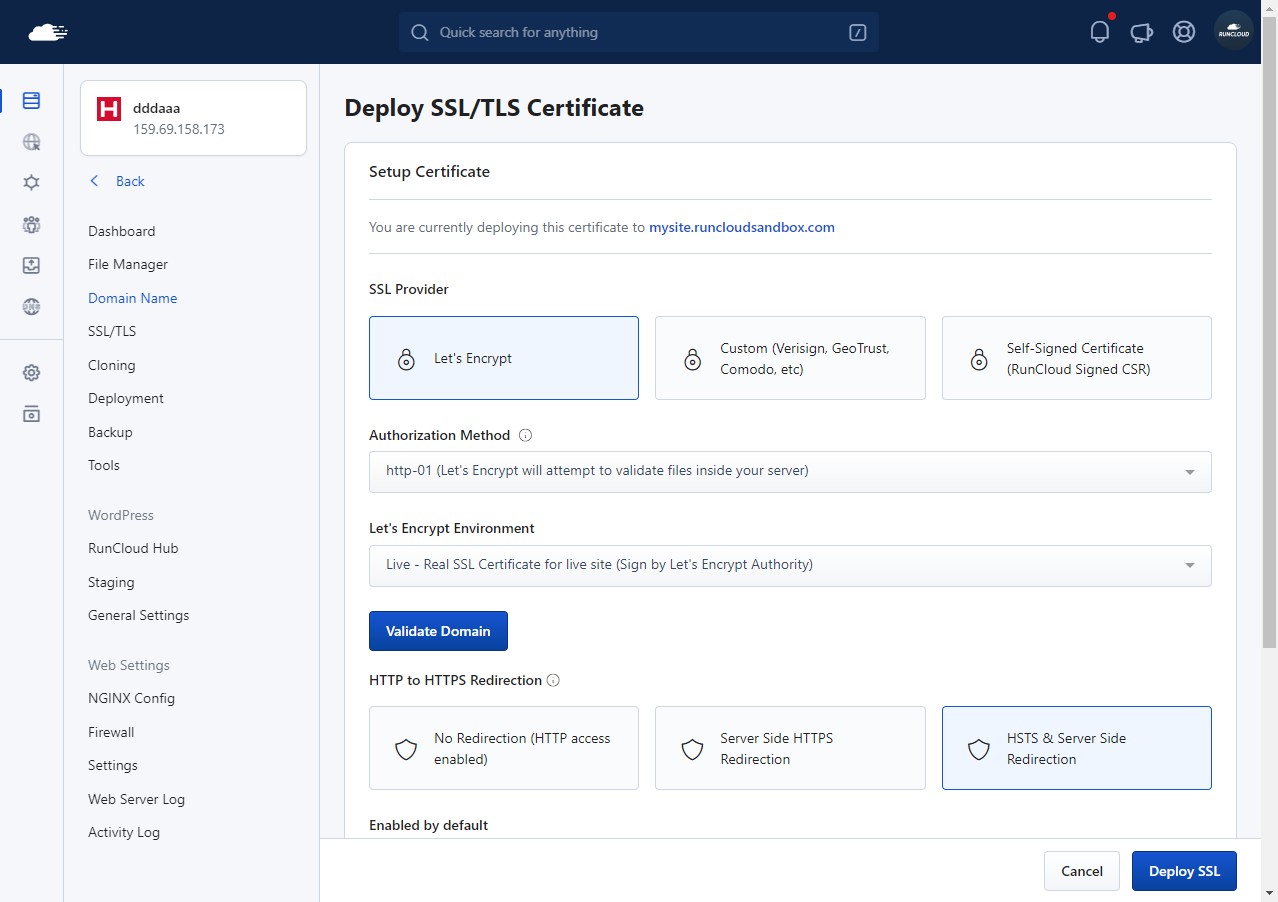
    Once you click the option, you’ll be asked to choose whether you want to use Let’s Encrypt or a different SSL provider, if you’re not sure about this, use Let’s Encrypt as it is free – and just as secure as other providers.

    After that, you can configure how you want to verify the ownership of your domain, and what kind of certificate you want. Unless you need something specific, you can leave these settings to the default values. 

    And finally, you need to specify what happens when someone tries to access your domain over insecure connections. We recommend using the HSTS option which asks all users to only use secure connections for all web requests. However, you should know that once you enable this option, you will not be able to serve any content over HTTP connections.

    A screen capture of RunCloud dashboard showing how to configure SSL/TLS settings.

    After Action Report

    The “too many redirects” error on Cloudflare can be frustrating, but it can be easily fixed by updating the misconfigured settings on your server. By following the steps outlined in this article, you’ll be able to update your website’s settings, and adjust your SSL certificates.

    If you’re still struggling to resolve the issue, you should consider switching to a more user-friendly server management platform like RunCloud. With RunCloud, you can easily manage your server and issue SSL certificates in just a few clicks, making it a great choice for WordPress users who want a hassle-free solution.

    If you feel that having a painless server configuration so you don’t need to spend hours figuring it out sounds like a good idea (and who doesn’t?) – get started with RunCloud today, and get up and running in minutes.

  • How to Send Email from PHP (With Guided Walkthrough)

    How to Send Email from PHP (With Guided Walkthrough)

    In most cases, we normally recommend using transactional email services such as Mailgun, Amazon SES, or Mandrill rather than sending emails from your own service. But if you are feeling enthusiastic you can even set up your own server too.

    That’s what we’re going to cover in this article.

    Take your tech skills to the next level with our easy-to-follow guide on how to send emails from PHP! No need to worry about complicated code – our step-by-step walkthrough makes it a breeze. This guide will guide you through setting up your own mailing service on your Ubuntu server or other similar Debian distros.

    Ways to Send Email From PHP

    There are multiple ways of sending emails from PHP, but the two most basic ones are:

    • Using the mail() function: This is the built-in PHP function for sending email. It is a simple and easy-to-use option for sending basic emails.
    • Using a library or framework: Several libraries and frameworks are available for PHP that make it easier to send emails. Some popular options include PHPMailer and SwiftMailer.

    Using external mail packages such as SwiftMailer or PHPMailer is generally recommended over PHP’s built-in mail function because they offer more advanced features and functionality. While the mail function can be useful for sending basic emails, it has very limited capabilities.

    One major limitation of the mail function is that it doesn’t allow you to add attachments to your emails. This can be a significant issue if you need to send files or documents as part of your communication.

    In addition, using the mail function can make it difficult to meet industry standards, and build trust with Google and other email providers. Establishing trust and following best practices are both crucial for ensuring that your emails are recognized as safe and secure. This can be challenging with the mail function, as it doesn’t provide the necessary tools and capabilities to meet these standards.

    These are two of the most compelling reasons to use external mail packages such as SwiftMailer or PHPMailer instead of PHP’s built-in mail function. However, if you are still interested in learning how to send emails from a PHP web server, you are in the right place! While it may not be the most efficient or effective option, there is still significant value in understanding how to use the mail function and other methods for sending emails from PHP.

    How to Send Email With PHP From Web Server in 5 Steps

    The process of sending an email with PHP from your web server is fairly simple, so we’re going to break it down into five steps.

    1. Install Dependencies

    Installing dependencies is the first step in setting up your PHP application to send email. Dependencies are external libraries or packages that your application requires to function properly.

    First, we will install Sendmail and GNU Mailutils on the server. To install these tools, enter this command:

    sudo apt update && sudo apt install mailutils sendmail-base

    2. Update The sendmail_path Inside php.ini

    You will need to update the php.ini file to let PHP know where sendmail is located. This file can be located at either “/etc/php74rc/php.ini” or “/etc/php/7.4/apache2/php.ini”. If you are using a later version of PHP then run php -v to find out what version you are using, and update the path accordingly.

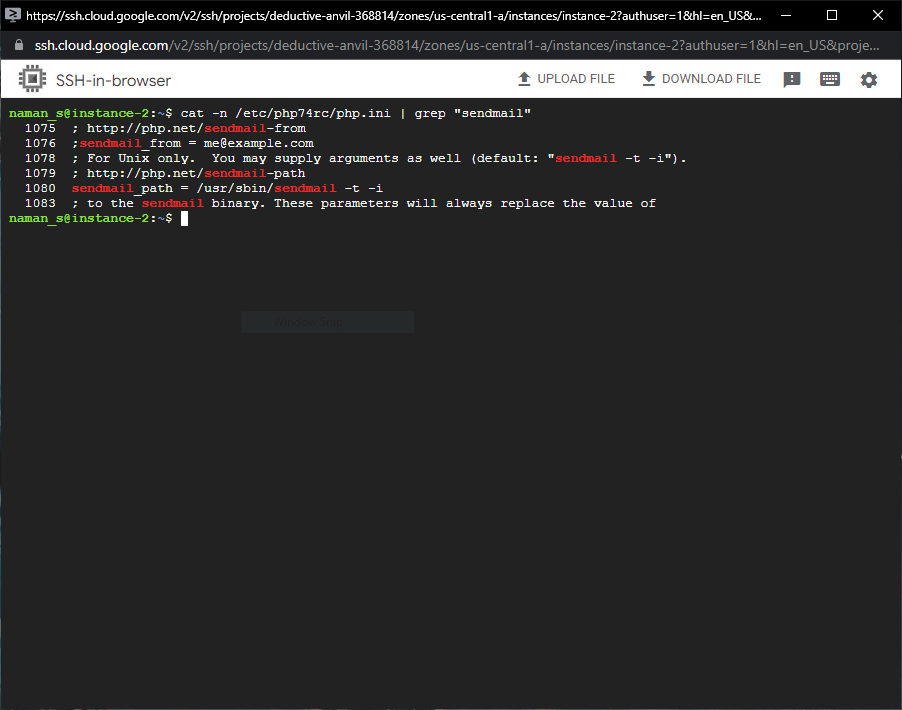
    The php.ini file is pretty big, and it’s hard to parse all the information in a terminal editor. We will use the following command to find out the exact line number of the setting so we can jump directly there:

    cat -n /etc/php74rc/php.ini | grep "sendmail"

    Note down the line numbers displayed on the left of the text. Next, we will edit the /etc/php74rc/php.ini file. You can use your favorite terminal editor, or simply paste the following command to open the nano editor.

    sudo nano /etc/php74rc/php.ini

    Scroll down to the line number we noted, and search for “sendmail_path =”. It should look something like this:

    ; For Unix only.  You may supply arguments as well (default: "sendmail -t -i").
    ; http://php.net/sendmail-path
    ;sendmail_path =

    Uncomment the sendmail_path by removing the ; and add the sendmail path. The default value is “/usr/sbin/sendmail -t -i”. You should have something like this:

    ; For Unix only.  You may supply arguments as well (default: "sendmail -t -i").
    ; http://php.net/sendmail-path
    sendmail_path = /usr/sbin/sendmail -t -i

    Now press Ctrl + O to save the file. Press Enter to confirm the filename and location, and press Ctrl + X to exit the editor. Now when you run the ‘cat -n /etc/php74rc/php.ini | grep “sendmail”’ command, you should see the updated path.

    Now restart the php service with:

    systemctl restart php74rc-fpm

    3. Change hostname

    Now we will edit the server hostname. You can find the hosts file at /etc/hosts. Update the localhost address as shown below.

    # Old Value

    127.0.0.1      localhost.localdomain localhost 

    # New Value

    127.0.0.1      test.runcloud.me test

    And then we change the hostname on the fly with:

    hostname test.runcloud.me

    4. Configure sendmail

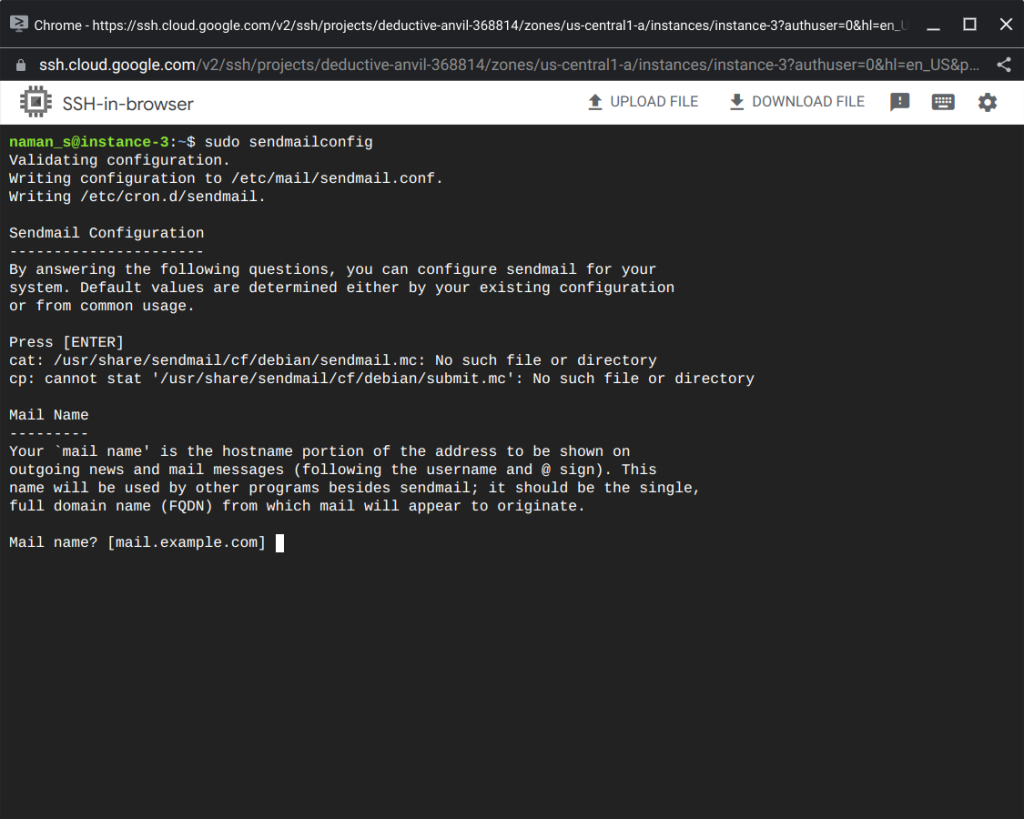
    Now we need to configure the sendmail CLI. We can do this by running the following command, and entering the necessary details:

    sendmailconfig

    5. The Basics of PHP Mail Function

    You can use the following PHP code to use the inbuilt PHP mail function:

    mail($to, $subject, $message, $headers)

    That is the basic way to start sending email from your server. Here’s an example of real-world usage:

    <?php
    $to = 'youremail@gmail.com';
    $subject = 'This is a test email';
    $message = 'Hello john!';
    $from = 'jane@runcloud.me';
    $headers = sprintf("From: %s\r\nReply-To: %s", $from, $from);
    mail($to, $subject, $message, $headers);

    Now add the mail.php inside your web application. Make sure you have replaced the $from variable to your own email address.

    It is important to keep in mind that simply sending an email from your PHP web application doesn’t guarantee that it will be delivered to the recipient’s inbox. There are many factors that can influence whether an email is delivered, and it’s not uncommon for emails to be caught by spam or security filters.

    For example, Google has many filters in place to identify and block potentially malicious or spammy emails. For your emails to pass these filters and reach the recipient’s inbox, they need to meet certain security and quality standards.

    By following the steps to send email from PHP, you will have the basic ability to send emails from your web application. However, to ensure that your emails are delivered effectively and avoid being caught by filters, you will need to focus on security attributes and other factors that can help your emails pass spam and security checks. This may require additional effort and attention to detail, but is essential for ensuring that your emails are delivered safely and successfully.

    How To Make Sure Your Email Sent From PHP Will Be Delivered

    Although you’re now set up to send emails from PHP, the next task is to ensure that your emails include certain standards and attributes to pass spam checks, and actually end up in the inbox of your recipients.

    In this section, we will go through the process of testing your email for deliverability using services such as mail-tester and mailook which help identify the probability of your email getting flagged as possible spam.

    Testing Your Email Deliverability.

    Open up either of the mail testing websites, and you should get an email address to send it to. Add this email to your $to variable, and you should get something like this:

    <?php
    $to = 'web-ovl78@mail-tester.com';
    $subject = 'This is a test email';
    $message = 'Hello john!';
    $from = 'jane@runcloud.me';
    $headers = sprintf("From: %s\r\nReply-To: %s", $from, $from);
    mail($to, $subject, $message, $headers);

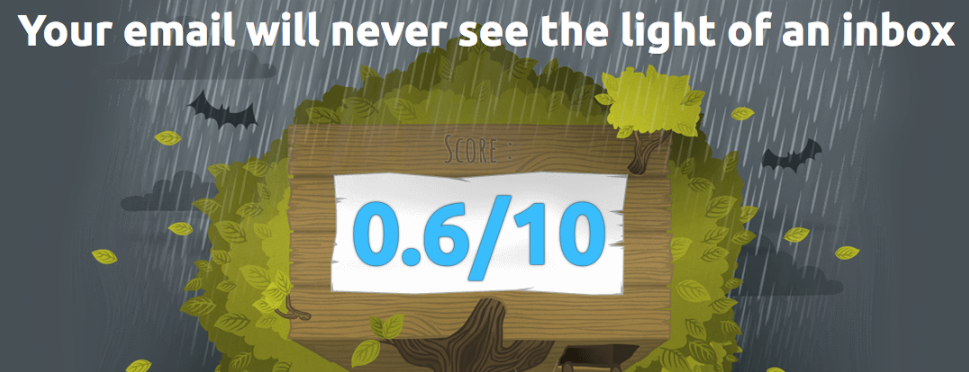
    Now visit the mail.php again inside your browser; this should execute the code again and send another email. Check the score of this mail from the Mail Tester. This is our result:

    With this score, your email will never reach any inbox! This is expected and we will configure a few settings, which will increase the score dramatically.

    Setting SPF Records

    Sender Policy Framework (SPF) is the TXT-based DNS record that you can add to your DNS as a policy for sending emails. Your server hostname needs to be verified as an email sender.

    You can use SPF Wizard to generate your SPF record. We are using the following records for our test domain (runcloud.me).

    runcloud.me. IN TXT "v=spf1 a:test.runcloud.me -all"
    test.runcloud.me. IN TXT "v=spf1 ip4:45.118.132.8 -all"

    Don’t forget to change your a:<your own domain> and ip4:<your server IP>

    This is how it looks like when you query the DNS records from Cloudflare.

    Let’s break this down line-by-line to get a better understanding. In the given configuration, the first line tells the internet that test.runcloud.me can send email on behalf of runcloud.me. So your outgoing emails will look like jane@runcloud.me even though our actual domain is test.runcloud.me.

    The second record tells the internet that the mail server for test.runcloud.me is located at the given IP address(es). The ~all bit at the end of each record tells everyone that they should ignore all the emails which do not originate from the given server.

    Having done that, we sent the email to the Mail Tester as before and then checked the score.

    This is a significant improvement. However, some inboxes might still refuse the email.

    Setting MX Records

    Mail servers also check for MX records, and the domain (runcloud.me) doesn’t have any MX records. Because of this, it gets a penalty. We will add an MX record to improve it further, and check the score again after adding this.

    This time we 9/10 which is much better. If you are not getting the same score, wait for a few hours so that modified TXT records are propagated across the servers. Learn more about How to speed up DNS propagation.

    Setting PTR Record

    Your server reverse IP lookup should return your server hostname (test.runcloud.me). You can do this from the Digital Ocean or Linode panel if you are using their service. Alternatively, any IaaS-based company that provides VPS/Server will always give you access to modify your PTR record.

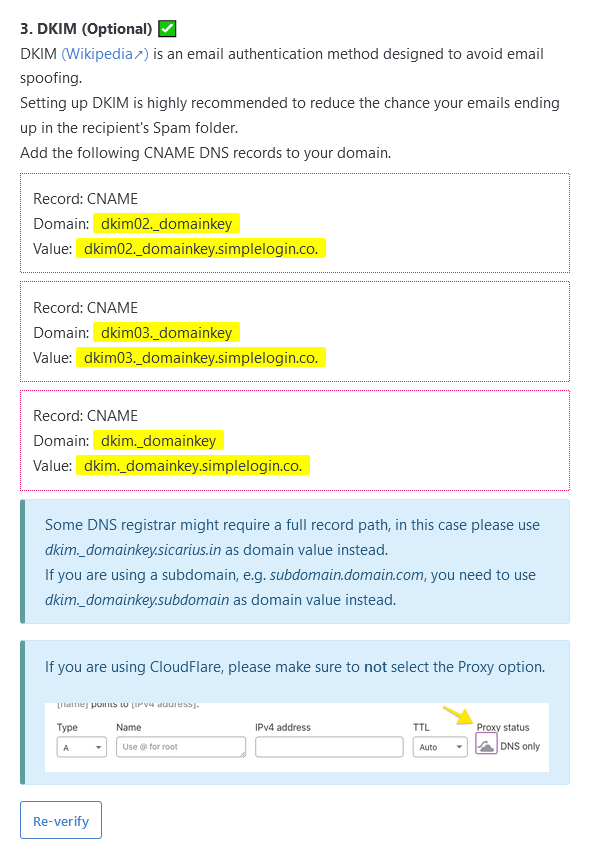
    Setting DKIM Record

    DomainKeys Identified Mail (DKIM) is a digital signature that verifies the authenticity of a given email and checks whether it was authorized by the owner of the domain. Learn more about why your mail server needs a DKIM record.

    All modern email service providers support DKIM, simply create new CNAME records with the given values, and it should work automatically.

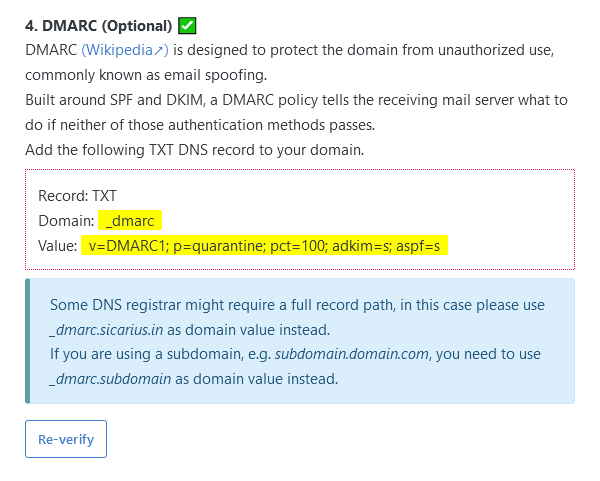
    Setting DMARC Record

    Domain-based Message Authentication, Reporting & Conformance (DMARC) is a validation system that makes it harder for malicious actors to spoof your domain and send emails on your behalf. Although it is optional, it is recommended to use it if your email provider supports it.

    You can create a new DNS record with values provided by your email server to use it.

    After creating all the records, our score has significantly improved. It is very close to a perfect score, but it is not there yet. In our testing, we used a shared email server that was flagged as spam in the past 28 days. This is expected, and it should not matter to most of the people.

    However, if this is unacceptable, you can rent a private IP address and use it to send emails. If you don’t send spam messages, it will slowly build the reputation of your IP address, and your emails will get closer to a perfect score.

    Using SSL/TLS To Connect Securely

    You should be connecting SSL/TLS. Failing to do so will result in Gmail blocking your email, as you can see in Google’s help documentation.

    If you encounter any errors, you can check the /var/log/maillog or var/log/mail.log file on your terminal to see the mail server logs. This is particularly handy for fetching information about postfix, smtpd, and other email-related services running on your server.

    You can simply run the following command to view a continuous stream of logs in your terminal.

    tail -f /var/log/mail.log

    After adding all of these certificates and policies, and making your web server fully compliant with industry standards, you should be able to send emails using PHP from your webserver without deliverability issues.

    Conclusion

    In conclusion, sending emails from PHP is viable, but using external email packages such as SwiftMailer or PHPMailer is generally recommended. These packages offer more advanced features, and better reliability, and can save you time, money, and effort. Additionally, using an external email package can increase your chances of successful email delivery.

    If you do choose to send emails from your web server using PHP, it is important to follow this guide carefully and pay attention to factors such as deliverability, security, and industry standards. This may require additional effort, but it is necessary to ensure that your emails are delivered safely and effectively.

    To make the process of sending email from PHP even easier and more reliable, consider using a platform like RunCloud. With RunCloud, you can easily set up and manage your PHP web server, install dependencies, and send email without the hassle. Start using RunCloud today!

  • The 19 Best & Most Reliable Transactional Email Services for 2026

    The 19 Best & Most Reliable Transactional Email Services for 2026

    If your transactional emails don’t reach the inbox, your application doesn’t work as it should:

    • Password resets fail.
    • Order confirmations go missing.
    • Users lose trust.

    Choosing a transactional email provider isn’t just about cost. It’s about deliverability, infrastructure, uptime, and how well the service integrates with your stack.

    In this guide, we review 19 transactional email services for 2026, comparing their reliability, technical capabilities, scalability, and pricing to help you choose the right fit for your business.

    How to Select The Best Transactional Email Service

    Choosing the right transactional email provider is an important decision. When comparing providers, you should use the following criteria to assess their capabilities.

    1. Deliverability and Sender Reputation Management

    The single most important metric is deliverability. It doesn’t matter how cheap a service is if your password resets end up in the spam folder. Top-tier services offer dedicated sender-reputation management tools that monitor your domain’s health. 

    1. API and SMTP Integration

    Check whether the provider allows you to send via HTTP for faster throughput than standard SMTP. A flexible SMTP relay allows for easy integration with legacy systems, while a modern, well-documented Web API is preferred for speed and advanced functionality. 

    1. Scalability and Uptime

    Always check the provider’s Service Level Agreement (SLA) regarding uptime. You need a guarantee (typically 99.9% or higher) that the service will remain operational during business hours.

    1. Analytics, Reporting, and Validation

    Email providers should provide comprehensive analytics and reporting insights into open rates, click-through rates, and delivery failures. 

    What Are Transactional Emails, And Why Do You Need Them?

    Transactional emails are automated emails triggered by a specific action or event, such as a purchase confirmation or password reset request.

    These emails are sent to individual recipients and serve primarily to inform them of a specific transaction. They may also include relevant information such as confirmation numbers, shipping details, and account updates.

    Transactional emails are essential for businesses because they enable them to communicate important information to customers promptly and efficiently. These emails can help to increase customer engagement and satisfaction by providing real-time updates and confirmations.

    Transactional emails can also help reduce customer support inquiries by providing clear, detailed information about specific transactions. They provide an essential way to build customer trust and loyalty by demonstrating that the business is professional and responsive.

    TL;DR: Quick Comparison of Top Transactional Email Services

    ServiceFree/Trial OfferStarting Paid Plan (Approx.)Key Feature
    1. Amazon SES
    Free tier availableVaries (Complex AWS pricing)Highly Scalable, integrates with the AWS ecosystem
    2. Bento30-day trial$30/month (min. 3000 users)Separate infrastructure/IPs for transactional emails
    3. BirdN/A$0.005 per messageFocus on deliverability, Adaptive Delivery technology
    4. BrevoFree plan (300 emails/day)$9/month (5,000 emails per month)97% deliverability claim, free inbound parsing service
    5. CourierUp to 10,000 notifications/monthUnifies notifications (Email, SMS, Push, Chat)
    6. Customer.ioNot Available$100/month for 5,000 usersUser’s entire messaging journey visibility
    7. Elastic EmailFree tier availableAPI: $19/monthDrag-and-drop designer, WordPress Sender integration
    8. GetResponseNot Available$19/month for 1,000 contactsComprehensive marketing automation, send-time optimization
    9. MailerSendFree plan (500 emails/month)$5/month for 5,000 emailsCollaboration-focused, dynamic drag-and-drop editor
    10. MailgunFree plan (100 emails/day)$15/month for 10,000 emails99.99% uptime, Send Time Optimization (STO)
    11. MailtrapFree tier available$15/monthSandbox for email testing/debugging, secure environment
    12. Moosend30-day free trial$9/month (unlimited emails to 500 contacts)Email automation, e-commerce AI, product recommendations
    13. Netcore Cloud EmailFree trial available$349/month (Basic plan)AI-powered predictive segmentation and STO
    14. OmnisendFree (500 emails/month)$16/month (6,000 emails to 500 contacts)Comprehensive eCommerce marketing platform
    15. PostmarkFree tier available$15/month for 10,000 emails4x faster delivery, dedicated IP option
    16. SendGrid100 emails per day$19.95/month for 50,000 emails96% inboxing rate claim, modern UI, add-ons
    17. SendLayerN/A (Starts at $5)$5/month for 1,000 emailsSuitable for small businesses, unlimited mailing lists
    18. SendPulseFree plan (12,000 emails/month)$15/month for 10,000 emailsMultichannel support (SMS, push, in-app, chat), automation
    19. SocketLabsFirst Month Free$39.95/month for 40,000 emailsSmart delivery rules, supports all major authentication

    The Top 19 Transactional Email Services

    The following list (in alphabetical order) includes the email services we consider reliable, offer a good range of features, provide the right integrations, and have a proven track record.

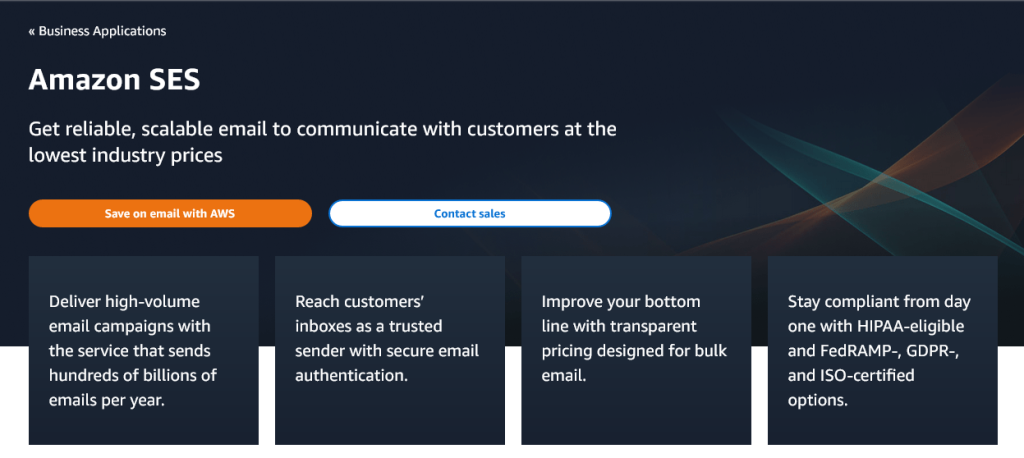
    1. Amazon SES

    Amazon SES (Simple Email Service) is a cloud-based email service from Amazon Web Services. It offers a scalable email delivery service for sending high-volume email campaigns. 

    Pricing: AWS is known for its complex pricing plans. There is a free tier available, but once it’s exhausted, your total spend will depend on several factors, including the number of emails sent and received, network bytes transmitted, and more. 

    amazon ses Transactional Email Service homepage

    Amazon SES integrates well with the rest of the AWS ecosystem and supports a variety of deployments, including dedicated, shared, or owned IP addresses. It also provides reports on sender statistics and a deliverability dashboard to help businesses make every email count.

    It’s suitable for many use cases, such as automated transactional messages, marketing emails, timely customer notifications, and bulk email communications.

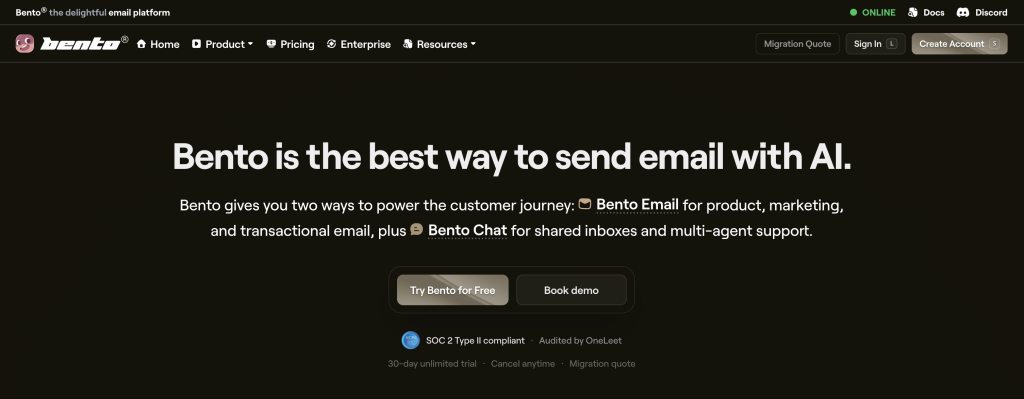
    2. Bento 

    Bento is a new, up-and-coming email marketing company that provides a transactional email API for small and medium businesses. It has a separate infrastructure for sending transactional emails, which are prioritized over other traffic. This means it uses separate IPs for sending transactional emails, which offers better deliverability. 

    Pricing: Bento offers a 30-day trial. After that, you need to pay $0.01 per user per month, with a minimum charge of $30/month, for up to 3000 users.

    Bento Homepage

    It integrates with popular CMSs such as WordPress, Webflow, WPFusion, and LearnDash. It can also be integrated with eCommerce platforms like WooCommerce, Shopify, and Magento to send emails directly. They also provide customer support via Discord (in addition to email and phone), which can’t be said of any other tool on this list.

    3. Bird

    Bird offers a proprietary email infrastructure designed to maximize reliable throughput and engagement. Unlike platforms that rely on third-party aggregators, Bird owns its delivery stack, achieving a 99.3% inbox placement rate and 99.99% uptime. The system uses AI-powered routing optimization to automatically select the most efficient delivery paths based on real-time ISP data and engagement history.

    This ensures that high-volume marketing blasts and critical transactional alerts land directly in the inbox, bypassing spam filters and avoiding latency issues common with standard providers.

    To streamline campaign creation, Bird features a robust drag-and-drop Email Studio equipped with a library of conversion-optimized templates. This feature ensures that every email feels individually curated, significantly boosting open rates and customer engagement compared to static mass mailings.

    Pricing: Bird offers a flexible pay-as-you-go model with no upfront commitment, charging a competitive base rate of 0.005 per message and 0.0005 per push notification. For larger organizations seeking predictability, Bird offers a Monthly Targeted Contacts bundle starting at 50,000 contacts, though most developers will appreciate the transparency of the consumption-based structure for API-triggered transactional traffic.

    Bird uses next-generation artificial intelligence to transform email from a one-way broadcast into a two-way conversation channel. Its Intelligent Email Chatbots can answer customer queries and provide product recommendations directly within the email thread, reducing friction in the buying journey.

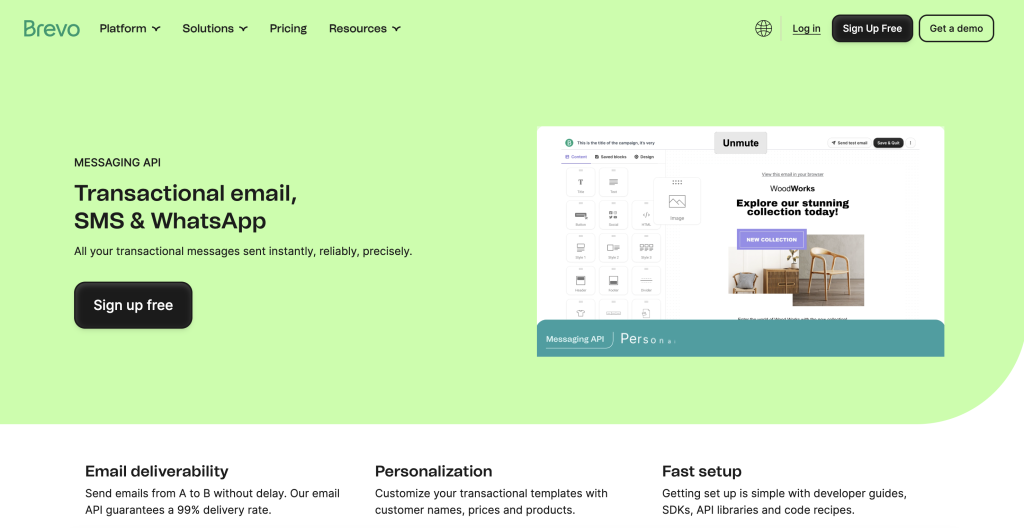
    4. Brevo (Sendinblue)

    Brevo’s transactional email service delivers more than 99% of messages without a single hiccup, ensuring critical communications like password resets, order confirmations, and shipping updates land directly in the inbox, not the spam folder.

    The platform prioritizes high-performance email deliverability through a trusted infrastructure that isolates transactional traffic from marketing streams. It offers advanced features, including extended log retention and real-time analytics. 

    Pricing: Brevo offers a volume-based pricing model that charges users by the number of emails sent rather than the size of their contact list, with unlimited contacts across all tiers. The platform offers a generous Free plan that allows 300 emails per day, while the paid “Starter” plan starts at approximately $9 per month for 5,000 emails. 

    Brevo offers a robust REST API and SMTP relay that integrates seamlessly with any CMS or custom application using native libraries for PHP, Node.js, and Python. In addition to offering dynamic content personalization, it also enables you to inject user-specific details directly into responsive email templates.

    5. Courier

    Courier is a transactional notification platform that unifies notifications across teams, products, and channels. It supports multiple channels, including email, SMS, push, in-app, and chat – all in a single API, making it easy to launch new channels. 

    Pricing: Courier offers a free Developer plan that includes 10,000 notifications per month and single sign-on (SSO) via Google or GitHub. For growing needs, their Pro plan is a pay-as-you-go option starting at $0.005 per send, while the custom-priced Enterprise plan adds advanced features like a dedicated Solutions Architect and multi-tenant management.

    courier Transactional Email Service homepage

    It also offers a Preferences API that allows users to choose which notifications they want to receive. It allows for easy integration with existing communication APIs and can build a notification template in minutes. 

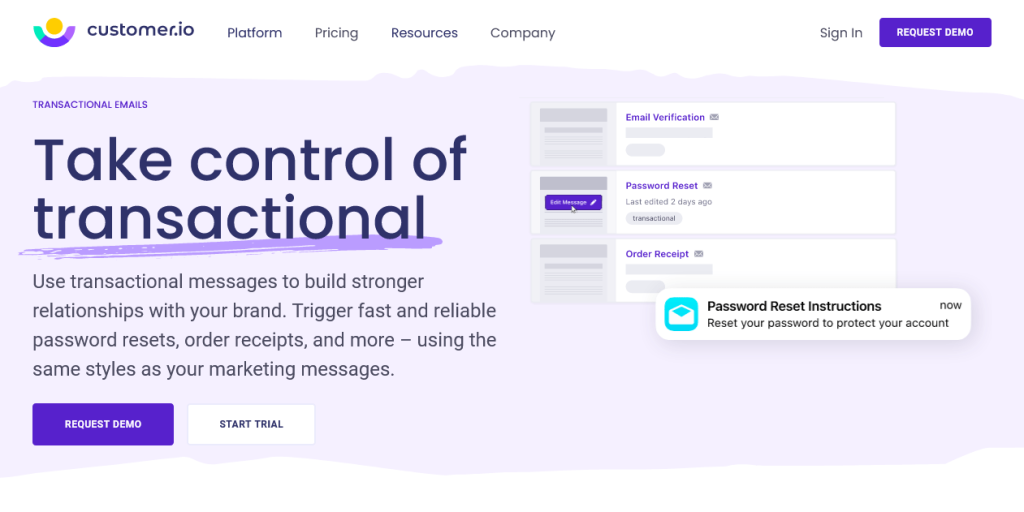
    6. Customer.io

    Customer.io is a marketing and customer management platform that can send transactional emails, SMS, and in-app notifications. It is well-suited for sending password resets, order receipts, and other transactional messages. It has a separate infrastructure for sending transactional emails reliably and claims to have a 99.5% uptime.  

    Pricing: There are three different pricing options. Their Essentials plan starts at $100/month and allows sending email, push, in-app, and SMS notifications to 5,000 users. 

    customer io Transactional Email Service homepage

    Customer.io has a unique feature that sets it apart: you can get the entire messaging journey of a user. This allows you to see all the messages the user has received over time, whether they are password reset instructions or marketing promotions. 

    7. Elastic Email

    Elastic Email is an email marketing platform offering various tools for businesses to create and send effective email campaigns. The platform includes features such as a drag-and-drop email designer, customizable templates, personalization options, advanced scheduling, automation, and detailed statistics and reports for continuous learning and development. 

    Pricing: There are different pricing plans for using the email marketing and email API features. You can test the integration with a limited sending capacity for free. Paid plans start at $19/month for up to 50k emails, and they include essential features for reliable sending, including Email API, Designer, verification, tracking, and support.

    elastic email Transactional Email Service homepage

    Elastic Email also offers tools for building a contact list, including subscription forms, pop-ups, and landing pages. The Elastic Email WordPress Sender can connect your WordPress server with the Elastic Email API to maintain all your email campaigns.

    8. GetResponse

    GetResponse is a comprehensive email marketing automation platform that provides powerful tools to grow online businesses. It offers a variety of features, including email marketing, autoresponders, send-time optimization, newsletter templates, marketing automation, web events, advanced triggering, multichannel engagement, signup forms, A/B testing, list management, lead magnet funnels, eCommerce marketing automation, and more.

    Pricing: GetResponse offers three standard marketing tiers, Starter ($19/Mo), Marketer ($59/mo), and Creator ($69/mo), which all include unlimited monthly marketing sends but don’t include dedicated transactional features. Access to transactional emails, SMTP connections, and dedicated IPs is exclusively reserved for the Enterprise plan, which operates on a custom pricing model tailored to specific business needs. 

    getresponse Transactional Email Service homepage

    You can use it to communicate with customers efficiently and effectively, build a mailing list, and promote and sell your products online. Additionally, it integrates with popular eCommerce platforms such as WooCommerce, Magento, and Shopify, and offers a free plan with a demo for large businesses.

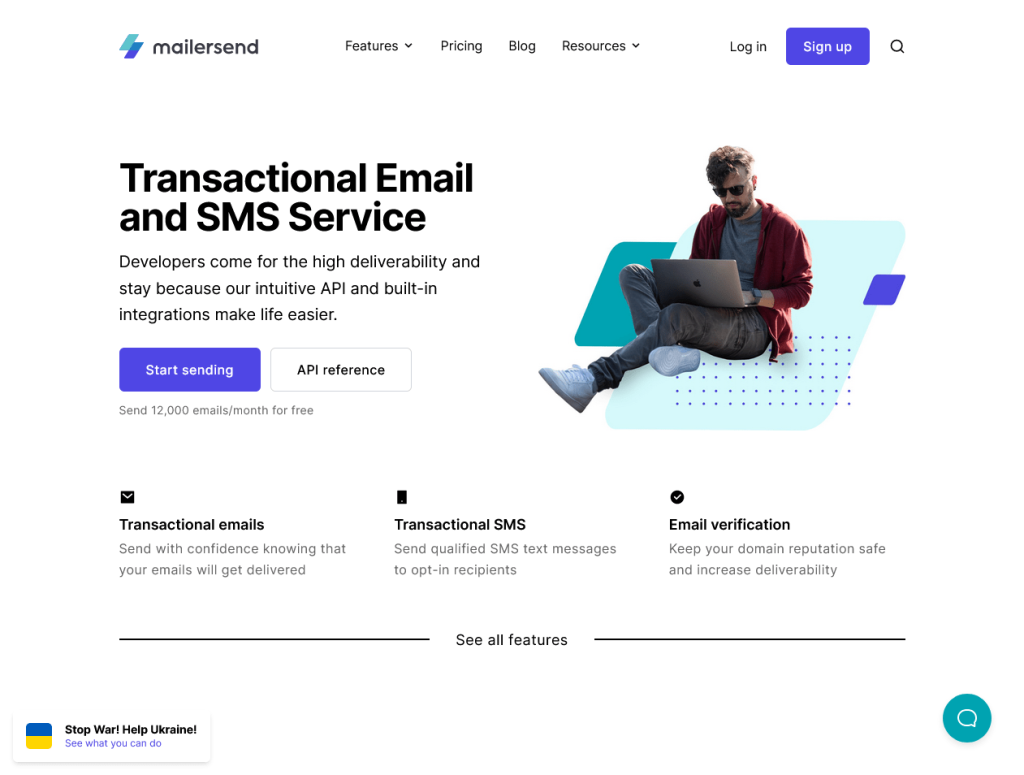
    9. MailerSend

    MailerSend is a transactional email service designed for team collaboration. It offers features such as an intuitive user interface, dynamic email templates, a robust RESTful API with a 99.5% SLA (service level agreement), and a drag-and-drop editor for creating responsive email templates.

    Pricing: The Free plan offers 500 emails per month and 10 email verification credits. The paid plans (Hobby, Starter, and Professional) offer increasing volumes of emails and SMS messages, starting at 5,000 emails per month for the Hobby plan and going up to 50,000 emails and 150 SMS messages for the Professional plan. 

    mailersend Transactional Email Service homepage

    MailerSend has a library of pre-designed dynamic email templates that can be easily personalized and integrated with the user’s preferred programming language. It also provides tools to improve email deliverability, including email verification and analytics. 

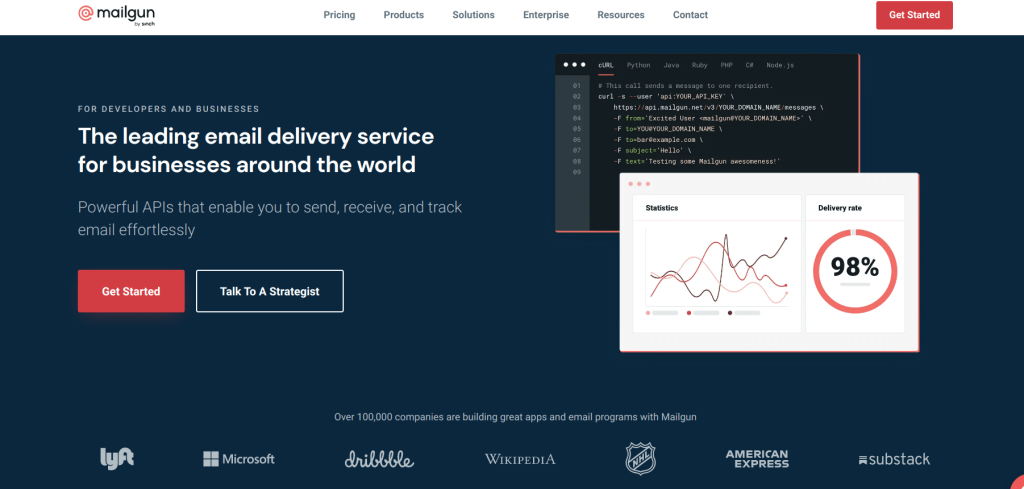
    10. Mailgun

    Mailgun provides powerful email-sending infrastructure via its Email API and SMTP relay services. The Email API enables easy integration and the sending of transactional or bulk emails, with 99.99% server uptime.

    Pricing: You can sign up for a free plan that offers 100 emails per day. The Basic plan starts at $15 per month and allows the sending of up to 10,000 emails.

    mailgun Transactional Email Service homepage

    You can use the Simple Mail Transfer Protocol (SMTP) to send marketing and transactional emails, with authentication protocols such as SPF, DMARC, and DKIM. They also offer inbound email routing and send time optimization – a feature that delivers your email when the recipients view their inbox. 

    11. Mailtrap

    Mailtrap is an email delivery platform built for both development and production. Developers can test, inspect, and debug emails in a secure sandbox and then seamlessly move to staging or live environments. Key features include spam score checking, SMTP and API support, detailed analytics, and team collaboration.

    Pricing: Free tier available; paid plans start at $15/month.

    It also offers Email Sandbox functionality that provides a secure environment for developers and QA teams to capture and inspect SMTP traffic from staging and development builds without risking accidental emails to real customers.

    This tool speeds up the quality assurance process by allowing users to automate test scenarios via a flexible API, validate HTML and CSS for client compatibility, and analyze spam scores to ensure optimal deliverability.

    12. Moosend

    Moosend is an email marketing and email automation software that offers features such as email sending, newsletter editing, personalization, audience management (segmentation, CRM tools), marketing growth (landing pages, subscription forms), automation (marketing automation, e-commerce AI, product recommendations), and tracking and reporting. 

    Pricing: Once the 30-day free trial ends, the cheapest plan costs $9/month and allows unlimited email sends to 500 contacts.

    moosend homepage Transactional Email Service

    Moosend also offers a variety of resources, such as a marketing blog, an academy, templates, webinars, and CRM tools. It also allows users to compare it with other email marketing software products such as MailChimp, ConvertKit, Constant Contact, and ActiveCampaign. The built-in integrations for WordPress, WooCommerce, and Magento make sending emails right out of the box easy.

    13. Netcore Cloud Email

    Netcore Cloud also offers an email marketing platform to businesses and enterprise customers. The platform uses AI to make every email more impactful through predictive segmentation, predictive engagement, send-time optimization, and subject-line optimization.

    Pricing: The Basic plan costs $349, the Scale plan costs $589, and the Growth plan costs $899. A free trial is also available.

    netcore cloud Transactional Email Service homepage

    The platform also provides actionable insights to support better decision-making and offers personalized customer journeys. It also offers resources and tools for email marketing, including A/B testing, email collection, and four email marketing types.

    14. Omnisend

    Omnisend is a comprehensive eCommerce marketing platform that offers powerful email and SMS marketing functionality. It includes email campaigns, automation, segmentation, pop-ups and forms, reporting, and multiple channels.

    Pricing: Omnisend offers a free tier for up to 500 contacts, while the Standard plan lets growing businesses start at $11.20 per month with the upfront discount. High-volume senders can opt for the Pro plan at $41.30 per month, which includes unlimited emails and monthly global SMS credits equal to the subscription price. 

    omnisend Transactional Email Service homepage

    Omnisend offers resources such as migration tools and multi-store accounts. It also integrates with 80+ popular services, including WooCommerce, Shopify, and Wix. This integration makes it easy for businesses to create on-brand, shoppable emails, automate sales, fully leverage customer data, capture and convert new subscribers, track and learn what’s working best, and tap into omnichannel marketing.

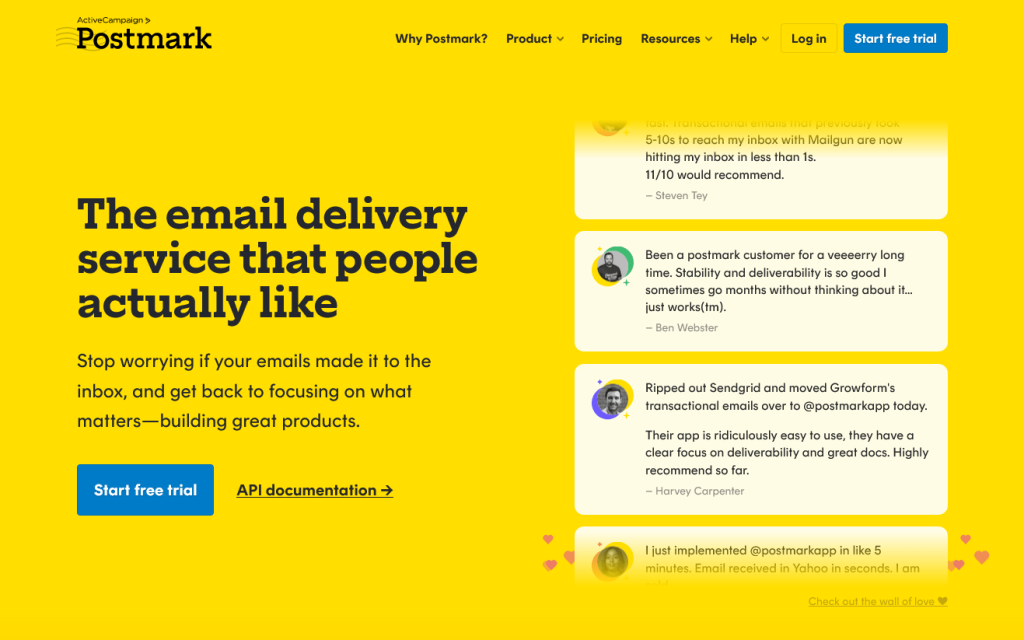
    15. Postmark

    Postmark is a transactional email service that delivers emails and claims to be 4x faster than the competition. It offers a variety of features, including an email API, SMTP service, message streams, email templates, inbound email, analytics, and integrations.

    Pricing: It offers a free plan with a limit of 100 emails/month. Paid plans start at $15/month for 10,000 emails, and you can pay an additional $50/month for a dedicated IP address.

    postmark Transactional Email Service homepage

    Postmark also offers detailed open and delivery tracking for every email, responsive templates for sending transactional emails, and customer support. You can use a web dashboard to track bounced emails and webhooks to notify the app of any issues.

    16. SendGrid

    Twilio SendGrid is an email marketing service that enables businesses to manage email campaigns, design emails, automate messages, and achieve high deliverability. It claims to have an average inboxing rate of 96%. 

    Pricing: The free plan offers 100 emails per day. Paid plans start at $19.95/ month for 50,000 emails. 

    sendgrid Transactional Email Service homepage

    The SendGrid email platform has a modern UI and provides visibility into the entire email lifecycle. It also provides add-ons such as 30 Days of Email Activity History, Dedicated IP Address, Twilio Products and APIs, Personalized Support, and Twilio Segment products to maximize email marketing. 

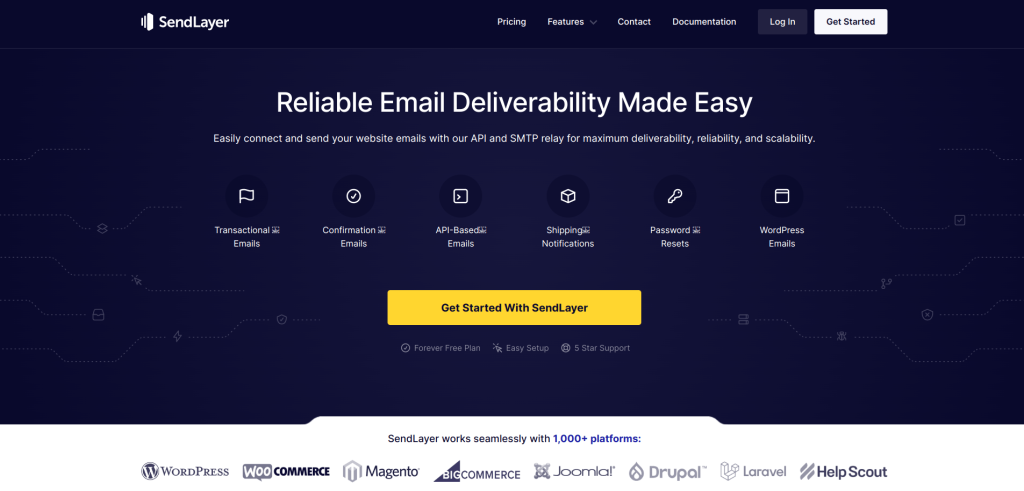
    17. SendLayer 

    SendLayer is an email delivery platform that provides a reliable and easy-to-use service for sending transactional emails. It offers detailed email logs, open-and-click analytics, mailing lists, API, SMTP email relay, and email analytics. 

    Pricing: The cheapest plan starts at $5/month and allows sending up to 1,000 emails. 

    sendlayer Transactional Email Service homepage

    SendLayer is suitable for small businesses that are just getting started. Some of its key features include unlimited mailing lists and event-based webhooks, which automatically trigger actions based on specific events, such as an email being opened or a link being clicked. 

    18. SendPulse

    SendPulse offers a transactional email service that lets users send email campaigns via SMTP or the API. The service offers a free plan that allows up to 12,000 emails per month. 

    Pricing: The free plan allows sending 12,000 emails per month. Paid plans start at $74.85/month for 100,000 emails. Alternatively, you can opt for the pay-as-you-go plan, which costs $15/year for 10,000 emails.

    sendpulse Transactional Email Service homepage

    SendPulse supports multiple channels, including SMS, push, in-app, and chat. Their service includes automation, dedicated IP addresses, SPF and DKIM authentication, a list of unsubscribed contacts, open and click tracking, a custom tracking domain, and webhooks for tracking email status. Additionally, they offer a variety of tools for sending transactional emails, including a drag-and-drop editor, subscription forms, email templates, and a Chrome extension.

    19. SocketLabs

    SocketLabs is an email delivery service that provides technology, infrastructure, and expertise in order to help businesses improve their email deliverability. The company offers a range of solutions, including SMTP service, email APIs, and tailored solutions.

    Pricing: The Core Email Essentials and Reporting plan offers a free first month, then costs $39.95 per month for 40,000 emails, with essential features such as SMTP/API and 10 days of insight history. For users requiring higher volume and advanced features, the Pro 100k plan is priced at $89.95 per month and includes 100,000 emails, a dedicated IP address, and extended performance history.

    socketlabs Transactional Email Service homepage

    They also provide detailed reporting, automatic bounce processing, and advanced analytics to help customers understand and improve their email delivery performance. Additionally, they offer a free trial, with migration tools for customers looking to switch from other email service providers. It supports DKIM, SPF, DMARC, and MTA-STS. It also constructs smart delivery rules based on the ever-changing rulesets of mailbox providers. 

    Final Thoughts

    Transactional email directly affects how your application functions. When delivery is delayed or inconsistent, password resets fail, confirmations don’t arrive, and user confidence drops.

    The right provider depends on your sending volume, infrastructure, and level of technical control. Focus on deliverability, authentication support, uptime guarantees, and API flexibility. Pricing matters, but performance matters more.

    Of course, reliable email delivery also depends on the environment your application runs in. Poor server configuration, mismanaged DNS, or inconsistent deployment practices can undermine even the best email provider.

    If you want tighter control over your cloud servers, simplified deployment workflows, and a cleaner way to manage production infrastructure, sign up for a free trial of RunCloud and see how it fits into your stack.

    When your infrastructure is stable and your email delivery is reliable, your application performs the way it should.

    Frequently Asked Questions 

    What are the most common use cases for transactional emails?

    The most frequent use cases include order confirmations, password resets, shipping notifications, account verification emails, and two-factor authentication codes. Unlike marketing emails, these are triggered one-to-one by a user’s action.

    How do I ensure my emails don’t end up in spam?

    To avoid deliverability issues, ensure you have proper authentication (SPF/DKIM) set up. Use email validation to verify addresses before sending, and keep your transactional traffic on a separate IP from your marketing traffic. 

    What is the difference between throttling and frequency caps?

    Throttling is a mechanism ISPs (or your provider) use to limit the number of emails accepted from a sender over a specific period to prevent server overload. Frequency caps are rules you set to limit how many emails a specific subscriber receives in a given timeframe to prevent user fatigue.

    Can I test my transactional emails before going live?

    Yes. Most providers offer A/B testing for subject lines or content within your transactional flows. You should also use a sandbox environment to test prebuilt flows and templates without emailing real customers.

  • DKIM – What Is It & Why Your Emails Need It

    DKIM – What Is It & Why Your Emails Need It

    Are you tired of seeing your emails end up in the spam folder? Want to protect your business from phishing attacks? Then you need to know about DKIM!

    Recent studies show that using DKIM (DomainKeys Identified Mail) significantly increases email deliverability and reduces the risk of phishing attacks. It really can be that easy – with just a few simple steps, you can protect your emails from being diverted to spam, and your business from the growing problem of cyber threats.

    Let’s get started!

    What Is DKIM?

    DKIM (DomainKeys Identified Mail) is a method of authenticating the origin of an email message. It allows the person receiving the message to check that it was actually sent by the domain it claims to be sent from, and that it hasn’t been modified during transit.

    Using DKIM helps to protect against spoofing and phishing attacks, in which attackers try to trick recipients into thinking that an email is from a legitimate source, when it is actually from an unauthorized or malicious source. It also helps to improve email deliverability, by allowing email servers to more easily distinguish legitimate messages from spam or other types of unwanted email.

    How Does DKIM Work?

    When a domain owner wants to use DKIM to authenticate their emails, they first generate a private/public key pair and publish the public key in their DNS records. The private key is used to create a digital signature, which is added to the headers of each email sent from that domain.

    The signature is an encrypted message that is unique to each email, and it contains information about the email, such as the sender, the recipient, and the date and time it was sent. It also includes a hash of the email’s content, a fixed-length string of characters generated using a mathematical function.

    When an email server receives an email with a DKIM signature, the server retrieves the public key from the DNS records and uses it to verify the signature. This involves decrypting the signature using the public key, and then comparing the resulting information to the email itself. If the information matches and the signature is valid, the email is considered authentic.

    If the signature is invalid or cannot be verified, it could indicate that the email has either been modified in transit, or is not from the domain it claims to be. In this case, the server may mark the email as spam or block it altogether, to protect the recipient from potentially malicious or unwanted content.

    Why Do Your Emails Need DKIM?

    Email security is vital for protecting the confidentiality, integrity, and availability of email communication. It is essential for businesses, organizations, and individuals who rely on email as a primary means of communication, as email is often used to transmit sensitive information, such as financial data, personal information, and confidential documents.

    There are two main problems with email – reliable delivery of outgoing emails and the potential threat of phishing attacks from incoming emails. According to Statista, a leading market and consumer data provider, out of 336.41 billion emails sent in July 2021, almost 283 billion emails were spam.

    Phishing attacks can trick recipients into disclosing sensitive information or downloading malware. These attacks often rely on spoofing the sender’s address or domain, so the email appears to be from a trusted source. The Anti-Phishing Working Group (APWG), an international coalition of counter-cybercrime responders and forensic investigators, concluded that the third quarter of 2022 was the worst quarter for phishing that APWG has ever observed. They observed a total of 1.2 million phishing attacks, a new record.

    This is where DKIM can help. By allowing email servers to verify an email’s authenticity, DKIM helps protect against spoofing and phishing attacks, making it more difficult for attackers to impersonate legitimate domains.

    DKIM helps the recipient verify an email’s origin, reducing the chances of getting marked as spam and increasing email deliverability. Many email servers use various filters and algorithms to identify and block spam and other unwanted emails. Having a valid DKIM signature can help increase the chances that an email will be delivered to the recipient’s inbox.

    On the other hand, not using DKIM can have consequences for the security and deliverability of emails. Without a DKIM signature, emails are more vulnerable to spoofing and phishing attacks, and they may be more likely to be marked as spam or blocked by email servers. This can lead to reduced deliverability and a decreased ability to communicate effectively through email.

    Setting Up DKIM for Your Domain

    To set up DKIM for an email domain, follow these steps:

    1. Generate a private/public key pair

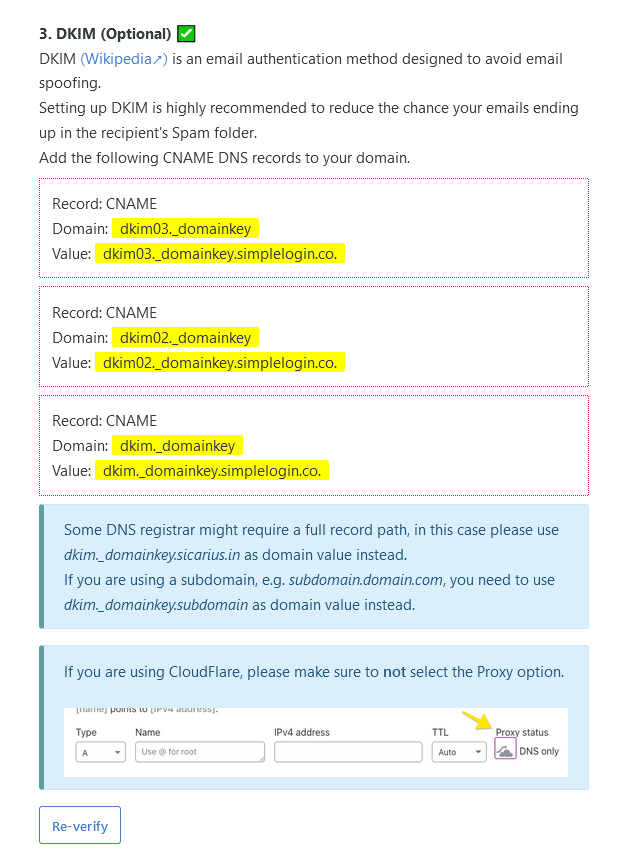
    The first step in implementing DKIM is to generate a private/public key pair, which will be used to create and verify the DKIM signature. Several tools and resources are available for generating a key pair, such as OpenSSL, and DKIMCore; however, you are far more likely to use an email service provider such as Gmail, Outlook, or SimpleLogin, which will generate these keys on your behalf.

    generating a private public key pair for implementing dkim

    2. Add the public key to your DNS records

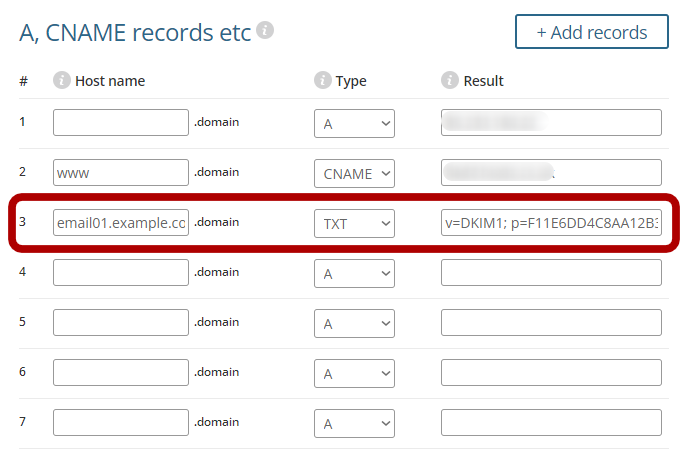
    After generating the key pair, you will need to add the public key to your DNS records, to retrieve and verify the DKIM signature. The specific steps for doing this will depend on the DNS provider you are using, but you will need to create a new TXT record and add the public key as the value.

    adding the public key to dns record

    3. Modify your email server’s configuration

    Next, you will need to modify your email server’s configuration to add the DKIM signature to outgoing emails. The specific steps for doing this will depend on the email server software you are using, but usually you will need to add the private key and other necessary information to the server’s configuration file. The exact steps vary by mailing software and the version you are using. Refer to your server’s documentation for precise steps.

    If you didn’t create a key in step 1, and are using an email service, then look for the option to “verify DNS records”. This will configure the required settings automatically and start signing all outgoing emails.

    4. Test and troubleshoot

    After completing the above steps, you should test your DKIM setup to ensure it is working correctly. Send a test email to yourself and check the email headers to verify that the DKIM tests are passing.

    How To Verify The DKIM Signature Of An Email

    Once you have configured the DNS records, verifying that everything is working correctly is a good idea. You can do this by following the steps given below:

    1. Send an email from your mailbox using the custom domain to a different address.
    2. Open the recipient’s mailbox, click on the menu icon, and look for the option to view the original message. On Gmail, this option is called “Show original”. However, in other email clients this can be called “View raw message”, or “Show email headers”.
    option show original to verify the dkim signature
    1. Once you open the raw message, you can look for the line starting with “DKIM-Signature” to verify that the headers are correct. Gmail provides a handy summary table at the top of the screen which can tell you if your message passed the DKIM check.
    dkim verification pass

    Conclusion

    DKIM is an essential email security feature already being used by 20,420 businesses to reduce the chances of email spoofing and phishing. We encourage you to configure the DKIM setting on your email server to take advantage of the additional security and decrease the chances of getting marked as spam.

    If you are looking for a simple yet powerful dashboard to configure your servers, then try RunCloud, which provides an easy and convenient way to maintain your servers without needing to learn about the intricacies of Linux servers. Start with a free trial today and experience the difference yourself.

  • How To Resolve The “Email Address is not Verified” Error With AWS SES

    How To Resolve The “Email Address is not Verified” Error With AWS SES

    Amazon Simple Email Service, also known as AWS SES, is an email marketing platform that you can use to send and receive emails through your own addresses and domains.

    AWS SES can be used to send transactional emails, including any personalized emails or for newsletter campaigns. It’s a highly modular platform that you can use to create email marketing campaigns, set up autoresponders, and even use it for live ticketing support.

    However, if you’re getting the “Email address is not verified error”, this post will guide you on how to solve it.

    What is the “Email Address is not verified” Error?

    When you start Amazon SES, it launches in a sandbox environment before you can switch it to production. Once you sign up, Amazon will verify whether you actually own the email address and the domain.

    The error usually arises when you try to send emails from an entity, such an email address or a domain, that hasn’t been verified in Amazon SES. Here’s how you can fix this error.

    How to Fix the “Email Address is not verified” Error

    Here’s a brief guide on how to fix this error:

    Verify if Your SES Account is Still in Sandbox Mode, and Request Production Access

    This is easy to do. Just open your SES console in the region by selecting “Account dashboard”. SES is region-locked, so you’ll need access for each region that you plan on sending emails from.

    If you’re in Sandbox mode still, simply click on “Request production access”. You’ll have to submit a form to AWS, and it may take up to a few days (usually a few hours) to get approval.

    Once you get production access to AWS SES, you’ll be able to send emails freely from any of the verified identities.

    Check Your Verified Identities

    Before you start sending emails, make sure you look in the left sidebar menu to ensure that the email address or domain that you’re using to send emails from is verified.

    Whenever you add a new email address, you’ll receive a confirmation email with a link to verify. As soon as you click that link, its status will change.

    Similarly, when adding a domain, you’ll have to add the record that you receive with the registrar in your DNS records. It may take up to 48 hours for DNS records to propagate, but once they’re done, the status of your domain will also change to verified.

    After Action Report — Getting Started with AWS SES is Easy

    That’s it! Fixing the “Email address is not verified error” is quite easy with AWS SES. Once you fix the issue, you’ll be able to send emails freely through the platform. Have you experienced this issue before? Let us know how you fixed it, and join the conversion in the comments (or by Tweeting @RunCloud_io)!

  • Cheat Sheet To All Bash Shortcuts You Should Know

    Cheat Sheet To All Bash Shortcuts You Should Know

    The Linux Bash is commonly used by developers, though it may seem fairly difficult to navigate at first. The use of arrow keys to navigate between commands is obviously a hassle and often becomes a major challenge.

    However, in general, Bash is quite easy to use. If you’re going to use it on a VPS, it’s important that you know about the different shortcuts that Bash has to offer. Here’s a full list of different Bash shortcuts that you can use, divided in separate categories.

    Editing

    The following list of shortcuts will allow you to easily edit commands. 

    ShortcutAction
    CTRL + x, CTRL + eEdit the current command in $EDITOR
    CTRL + _Undo
    ALT + DELDelete word before the cursor
    ALT + dDelete word after the cursor
    CTRL+ yPaste the last item
    CTRL + dDelete character below the cursor
    CTRL + hDelete character before the cursor
    CTRL + wCut the word just before the cursor to clipboard
    CTRL + dCut the word after the cursor to clipboard
    CTRL + uCut the line before the cursor to clipboard
    CTRL + kCut the line after the cursor to clipboard

    Navigation

    These are the shortcuts that you can use to navigate Bash.

    ShortcutAction
    CTRL + eGo to the end of the line
    CTRL + aGo to the start of the line
    CTRL + xToggle between the current position of the cursor or to the start of the line
    CTRL + fMove cursor forward by one character
    CTRL + bMove cursor back by one character
    ALT + fMove cursor forward by one word
    ALT + bMove cursor back by one word

    History

    You can use these shortcuts to check your history or bring up a history search.

    ShortcutAction
    CTRL + gExit history search
    CTRL + rOpen history search
    CTRL + pSee previous commands
    CTRL + nSee the next commands in history

    Control

    These are commands that you can use to control processes in Bash.

    ShortcutAction
    CTRL + lClear your entire screen
    CTRL + zSuspend currently running processes and move them in the background
    CTRL + cKill currently running processes
    CTRL + dExit current shell
    EnterExit a suspended SSH session

    After Action Report – Use These Commands to Simplify Bash

    These are some of the many commands that you can use to simplify your use of Bash and move between commands more easily.

    Already using Bash on your VPS? Let us know if you have any other commands to add, and join the conversation by leaving a comment below! 💬

  • The Best Email Marketing Plugins For WordPress

    The Best Email Marketing Plugins For WordPress

    Email marketing is one of the most effective ways to connect with your customers. Whether you’re a small business trying to grow or an established brand, the right email marketing software can help you build relationships with your audience and increase revenue. But not all email marketing plugins are created equal, so we’ve put together this list of our favorite WordPress plugins.

    Constant Contact for WordPress

    constant contact for WordPress

    Constant Contact for WordPress is a tool that will allow you to create email opt-ins and capture leads within your WordPress website. It’s an excellent choice for small businesses, bloggers, churches, and nonprofits.

    The app allows you to set up forms in minutes and then send them out in email blasts or via social media. It also provides analytics so that you can see how many people have clicked on the link in their emails or opened it on social media.

    Pros

    There are a lot of great features that make Constant Contact an effective and successful marketing tool. It is easy to use, has a lot of features and functionality, and integrates well with WordPress.

    You can create newsletters in minutes with their drag-and-drop editor, or you can choose from the thousands of templates available on their website. Their platform comes packed with features like autoresponders (which send automatic email responses when someone subscribes or unsubscribes) and social media management tools so you can easily share your newsletters on Facebook and Twitter.

    Cons

    The integration between Constant Contact for WordPress and your site involves several steps that are not necessarily intuitive or easy to navigate through. For beginners, this might be frustrating when trying to set up the plugin in the first place.

    Because Constant Contact for WordPress integrates directly with your WordPress installation (and therefore requires access to certain files), it can slow down other areas of your website while it is running in the background or even cause certain pages on your site not to load properly due to conflicts between plugins or code errors during installation/setup process which may require some technical knowledge before implementing them into a production environment.

    MailChimp for WordPress

    mailchimp homepage

    The MailChimp for WordPress plugin is a free and easy way to add sign-up forms to your website. This integration allows you to create a form anywhere on your site – in content areas or in the header or footer. You can also add it directly into a post, page, or widget on a per-page basis as well.

    The features MailChimp for WordPress provides are among the most robust in the industry, making it one of our top picks for anyone looking for an easy way to get started with email marketing automation without breaking the bank.

    Pros

    MailChimp for WordPress is a freemium plugin that offers a free version and an upgraded premium version, which comes with additional features. The free version is great for getting started and the interface is simple enough to be used by beginners.

    The integration with other plugins, apps, and services is one of MailChimp’s strongest points: it has an API (Application Programming Interface) that allows you to connect your site with other software or services such as Zapier or Google Analytics, so you can send analytics data directly from those platforms into your email marketing campaigns without having to manually enter them into MailChimp.

    You can also use third-party integrations like Easy Digital Downloads or WooCommerce if you want to automate your eCommerce sales funnel using MailChimp’s powerful automation features

    Cons

    The biggest con is that you can’t customize the exit popups. There are only two available options: one that shows an email signup form, and another that redirects users to a thank you page.

    Another drawback of MailChimp for WordPress is the lack of custom fields. While you can add custom fields to your forms in order to collect more information from your subscribers, there’s no option to do so with Exit Popups or Exit Intent Popups.

    Sendinblue – Newsletter & SMTP Plugin

    sendinblue homepage

    Sending emails with Sendinblue is an excellent way to improve your email marketing strategy. The plugin has the same features as Mailchimp, and it’s easy to use. However, some users have reported issues with the plugin, especially when sending large volumes of emails. In addition, there are no templates available for this plugin like there are with Mailchimp.

    Sendinblue offers a lot of features that you would expect from a plugin like this. It offers a wide range of templates and a drag-and-drop editor that allows users to build their own newsletter design quickly and easily. Users can also customize their newsletter by changing colors, fonts, and images within the Sendinblue interface.

    Pros

    Sendinblue is a great alternative to Mailchimp. It has a lot of features and integrations, which might make it seem like an intimidating option at first. But once you get used to Sendinblue’s interface, it becomes easy to use and you will be able to take advantage of all the options available.

    It has a lot of pricing options as well, so there’s something for everyone: from free accounts with limited features up to enterprise solutions that include additional support options. And last but not least, if you ever have any questions or need help using our plugin they have great customer service available 24/7 via live chat or email.

    Cons

    SendinBlue has no tracking. This means that you’ll have to rely on your inbox to see how many clicks you’re receiving and if people are reading your emails.

    SendinBlue also doesn’t have any automation or drip campaign capabilities, so if you want to automate the sending of future newsletters or track the performance of certain campaigns over time, SendinBlue won’t help much with this.

    There are also no integrations with other services such as Zapier for automating tasks like adding subscribers into an email marketing service (like MailChimp), or Mandrill for sending transactional emails from Shopify stores. The lack of automation tools is particularly frustrating given how many options there are out there for managing these sorts of tasks.

    Campaign Monitor for WordPress

    campaign monitor for wordpress

    Campaign Monitor for WordPress is a popular email marketing service that lets you design and send newsletters, sales updates, and other messages to subscribers. It has a number of advantages over other services like Mailchimp and Constant Contact – such as its integration with WordPress – but it also costs more than similar services.

    Pros

    Campaign Monitor for WordPress is a straightforward email marketing solution that doesn’t require any coding skills, so you can set up an effective newsletter without hiring a developer or designer.

    The documentation on the plugin’s website is clear and easy to understand, and there’s also an active community forum where users can get help from other people who have used Campaign Monitor for WordPress before them. Additionally, the company offers email support for paid plans as well as free trials of their software.

    This plugin integrates with popular WordPress plugins such as WooCommerce (for eCommerce), Yoast SEO (for search engine optimization), Jetpack (for social media integrations), and Google Analytics For WordPress Users

    Cons

    Campaign Monitor for WordPress costs up to $175 per month. That’s the same price as an annual subscription to MailChimp, which has more features and offers a better user interface than Campaign Monitor.

    Also, the user interface is not as intuitive as it could be. While Campaign Monitor does include some helpful tutorials, they’re not very comprehensive—the plugin often doesn’t do what you think it should do until after reading through a few pages of instructions (and sometimes even then). Additionally, there aren’t any interactive walkthroughs available for users who want to learn how to use the plugin by doing rather than by reading about what they can do beforehand.

    OptinMonster

    optin monster homepage

    OptinMonster for WordPress is a popular email capture tool for WordPress. It offers a variety of email templates, email popups, exit-intent popups, and more. It’s a great tool for increasing email subscribers on your website or blog as it allows you to create engaging opt-ins that convert traffic into leads by using powerful lead generation tools like Opt-in Forms, Exit Popups or Slide-ins.

    Pros

    OptinMonster’s drag-and-drop interface makes it easy to add forms and campaigns to your website. You won’t need to be a developer or a designer to create beautiful, successful email marketing campaigns with the help of this plugin.

    OptinMonster integrates seamlessly with all major email marketing platforms including MailChimp, Campaign Monitor, ConvertKit, ActiveCampaign, and more! This integration also allows you to import contacts from these top third-party providers as well as directly from WordPress itself – making it super simple for you to get started building your list on day one.

    Because OptinMonster is built specifically for WordPress users who want better control over their site design than traditional webmail services like Gmail or Yahoo Mail offer (no matter what theme they’re using), there are almost no compatibility issues when using this plugin across various themes out there today – which means no more messing around trying figure out why things aren’t working right when they’re supposed too… just install/update/go!

    Cons

    There are a few drawbacks to OptinMonster for WordPress. First and foremost, the plugin has limited use. It’s best for blogs or websites that already have an email list and want to grow it further. If you don’t have an email list yet, then this isn’t the right tool for you – you’ll need something more robust like MailChimp instead.

    Another drawback is that there aren’t many templates available in OptinMonster’s library of templates (though they’re working on increasing this). This means you won’t be able to create a lot of different kinds of forms quickly; instead, you’ll need to hire someone who can build them from scratch using their own code (or purchase another plugin) in order to get more options out there.

    Lastly, while there are plenty of widgets available with OptinMonster for WordPress, not all of them will fit into your theme perfectly – so again: if you want complete control over how everything looks and works together on your site, then this may not be the best choice for your needs because it doesn’t have as much flexibility as some other plugins do!

    FluentCRM

    fluentcrm homepage

    The FluentCRM is a self hosted email marketing plugin for WordPress that allows you to send newsletter to your audience directly from the WordPress dashboard.

    Pros

    The software is easy to use, and everything happens within Gutenberg editor. Basically, everything you can do with blog post or page in Gutenberg, you can do with your email newsletter.

    It offers incredible sorting features where you can create multiple categories, lists, and tags, all in your WordPress dashboard.

    None of their plans have a limitation to how many emails you want/need to send.

    Also, their reporting tool is amazing and very simplistic which makes tracking data super easy.

    Cons

    Even though self-hosted solutions are usually less expensive, FluentCRM pricing isn’t the most affordable option there, esspecially if you have multiple websites. Another downside is that they do not offer monthly subscription, but annual only.

    Even though they offer 14-day refund, it’s still a con that they don’t offer a free trial.

    WP Email Capture

    wp email capture homepage

    WP Email Capture is a free and easy-to-use email marketing plugin for WordPress. It allows you to create and send email newsletters, email autoresponders, and campaigns.

    WP Email Capture can be used by anyone with even a passing interest in digital marketing – from the business owner who wants to gain more customers through their website or blog, to the marketer who needs something simple yet effective for sending automated emails on behalf of their clients, all the way down to someone who wants an off-the-shelf solution so they can get started quickly.

    Some of the most popular features of WP Email Capture include:

    • Autoresponder – Create autoresponders & email marketing campaigns in minutes, not weeks. WP Email Capture includes pre-made templates that you can edit to create your own unique emails.
    • Capture – Add an email capture form to any page or post on your website using the easy-to-use shortcode builder tool. Once someone fills out the form, their information is automatically added to your email list for future contact and follow-up.
    • Conversion – Monitor how many people visit your site, where they come from, what pages they visit and more with Google Analytics integration built right into WP Email Capture.
    • Segmentation – Create segments of your email list based on specific criteria like geographic location or browser type so you can send targeted emails only when it makes sense for them (i.e., don’t bother sending a discount code for shoes if someone has already bought a pair).
    • Email Builder – Create beautiful-looking emails using a drag & drop editor which comes with dozens of ready-made templates covering everything from abandoned cart reminders to end-of-year newsletters.
    • Email Marketing – Send personalized messages without having to touch code once thanks to its advanced autoresponder functionality which allows you to target specific users based on their actions within the past 6 months (or longer if needed).

    Pros

    The WP Email Capture interface is clean and intuitive, even for those who are new to the world of lead generation.

    A large part of the success of any business is determined by its ability to provide excellent customer service, and this plugin doesn’t disappoint in this area. If you have any questions about using it or need assistance setting up your form, their team will help you out as quickly as possible (often within minutes).

    Even if you’re not an experienced developer or designer, using this plugin will be a breeze since it has a simple drag-and-drop interface that makes building forms easy for anyone who knows how to use WordPress’ customizer feature. In fact, we were able to set up our first form with just one instruction because all we had to do was choose where we wanted the button on the page and select which fields should appear in our form (namely email address). The rest was handled automatically by WP Email Capture so all we had left was importing some HTML into our post editor via shortcodes before publishing.

    Cons

    The plugin only comes with one template to choose from, which may not suit your needs. There are no other templates available and there is no option to customize the template.

    Also, while some of the features of this plugin can be customized, it’s important to note that there is no option for customization of the thank you page or confirmation page. The same applies to both the thank you email and confirmation email as well.

    MailPoet

    mailpoet homepage

    MailPoet, the popular WordPress plugin that is used to send newsletters and other transactional emails, has received mixed reviews from users. There are many positive aspects of MailPoet, including its ease of use and great features. However, some users have reported problems with MailPoet’s performance and scalability.

    Pros

    MailPoet is a WordPress email plugin with a drag-and-drop editor, so you can create beautiful emails without having to write code.

    The plugin integrates seamlessly with WordPress and lets you manage your email campaigns easily.

    It is easy to use, as it has an intuitive interface that allows even beginners to start creating their first newsletter right away.

    You can also use its responsive design for mobile devices, which makes sure that your newsletter looks great no matter how the recipient accesses it.

    Cons

    As with any product, there are users that say MailPoet is not a good fit for their business. Some users report that the plugin is not very intuitive, while others say that it does not deliver emails as efficiently as they would like.

    A few people also complain about how difficult it is to track email opens and clicks.

    Icegram

    icegram homepage

    Icegram for WordPress is a free, easy-to-use plugin that can be used to create pop-ups, lead generation forms, and opt-in boxes.

    There are a few features that make Icegram different from other pop-up plugins. For one, it has multiple templates for you to choose from – you can create your own template, or choose one of the five that are included in the plugin. The second is its unique “targeting” feature, which allows you to target different users depending on their behavior on your site. For example, if someone visits a page without leaving any comments they may receive a different message than someone who leaves comments often.

    This makes Icegram special because it gives you more control over how your popups appear and how they work in relation to how people interact with your website and content. You can use this feature by choosing what kind of action or interaction triggers an Icegram popup (like submitting contact info or filling out forms) and then creating rules that determine when a certain condition has been met (for example: when someone submits contact info).

    Pros

    Icegram for WordPress is a free plugin.

    There are numerous options that you can use to customize your site, but the process of setting up this theme and adding it to your site takes just a few minutes.

    Icegram for WordPress is responsive, which means that it’ll automatically adjust its layout based on what device is viewing it (desktop computer or mobile phone). This makes it easy for visitors from all devices to see the same things when they visit your website, regardless of how they’re accessing it – and no matter where they’re located in the world.

    Cons

    It is not a standalone plugin and requires the use of other plugins, such as WooCommerce or Easy Digital Downloads, to function properly. If you don’t plan on using either of these services, then you won’t be able to utilize Icegram’s full capabilities.

    It can also be difficult to set up because it requires additional plugins and files that need to be installed manually in order for Icegram to work properly. This can make things confusing for users who aren’t familiar with WordPress or installing plugins on their site.

    Additionally, once installed there may still be problems with ensuring that everything runs smoothly together; occasionally users have reported having trouble with integrating different aspects of their site (i.e.: their blog vs product pages).

    After Action Report — Choose The Email Marketing Plugin That Fits Your Needs

    These email marketing plugins represent a great choice, and a wide range, so not all will be suitable for everyone’s needs. But everyone should find at least one plugin which meets their needs perfectly.

    When choosing which email marketing plugin to use, you’ll also want to consider a few other factors, including:

    • The email marketing plugin’s design. Does it fit in with your website’s current theme? Will it be easy for you to use and customize?
    • The quality of the support provided by the plugin creator. Is there live chat or phone support available? How often is the developer updating their product and adding new features?
    • How many active users are on that particular plugin? This isn’t necessarily an indicator of quality, but it will help you determine if there are any bugs in the code that might cause problems down the road.

    It’s hard to narrow down the best email marketing plugins for WordPress, but these are some of the most popular options you should consider.

    Which email marketing plugin have you used before? Anything that you believe we missed that’s worth mentioning? Let’s talk in the comments! 💬