Category: Cloud Education

  • How to Reduce the Impact of Third-Party Code (With/Without Plugins)

    How to Reduce the Impact of Third-Party Code (With/Without Plugins)

    You can optimize images, install caching plugins, and follow every speed guide out there – and still end up with a slow site.

    The usual culprit is third-party scripts adding hidden delays.

    This guide shows you how to find them, assess their impact, and fix the problem with simple tools.

    What Are Third-Party Scripts?

    Third-party scripts are bits of code that you add to your site but are not hosted by you. When you copy-paste a tracking code from Google Analytics or a snippet for your Facebook Pixel, you are adding a third-party script. These scripts run from someone else’s server, completely outside of your control.

    Most sites load several of these without thinking about the cost. They usually fall into a few groups:

    1. Analytics: Scripts that track your visitors, like Google Analytics, Matomo, or heatmap services like Hotjar.
    2. Advertising: Code that displays ads or tracks ad conversions, such as Google AdSense, Media.net, or the Facebook Pixel.
    3. Customer Interaction: Tools that engage your users, including live chat widgets (Tawk.to, Intercom) or third-party comment systems like Disqus.
    4. Content & Social Media: Embeds that pull in content from other platforms, like YouTube/Vimeo videos, Google Fonts, and social media share button plugins.

    Each of these adds value, but together they can create a performance nightmare. Later in this post, we’ll show you how to identify which ones are causing the most damage.

    Why Are Third-Party Scripts a Problem?

    We add new tools and scripts to our sites because they provide valuable features, but they often come with a hidden performance cost. Understanding why they slow things down will help us fix the problem.

    The External Wait

    Your website’s server quickly prepares your content, but the user’s browser must wait for a response from every other server you’ve linked to. For example, Google’s server for Analytics, Facebook’s server for the Pixel, your chat widget’s server, and so on.

    You have zero control over how fast those other servers are. If one of them is slow or temporarily down, your entire website is forced to wait.

    Render-Blocking

    When a visitor arrives at your site, their browser begins parsing the HTML document of your site from top to bottom. The parser works its way down the HTML file, and suddenly it encounters a standard <script> tag, like this:

    <script src="https://example.com/en_US/script.js"></script>

    A normal script tag loads in strict order. When the browser hits it, everything else stops until the file is fetched and executed. That pause is what creates the blank-screen delay users see.

    1. Halt DOM Construction: The parser immediately stops reading any more HTML. It cannot build any more of the page’s “skeleton” until this script is fully handled.
    2. Initiate Network Fetch: The browser must now make a completely new network request to the third-party server (in this case, example.com). This process alone has multiple potential delays, including DNS lookup, establishing a secure connection, and waiting for the external server to respond.
    3. Download the File: The browser waits to download the entire JavaScript file. If the user is on a slow connection or the external server is sluggish, this can take a significant amount of time.
    4. Execute the Script: Once the script is downloaded, the browser’s JavaScript engine must execute it from start to finish immediately. This consumes your visitor’s device CPU and memory. The browser must do this before continuing because the script could theoretically contain code (such as the old document.write() command) that alters the very structure of the DOM.
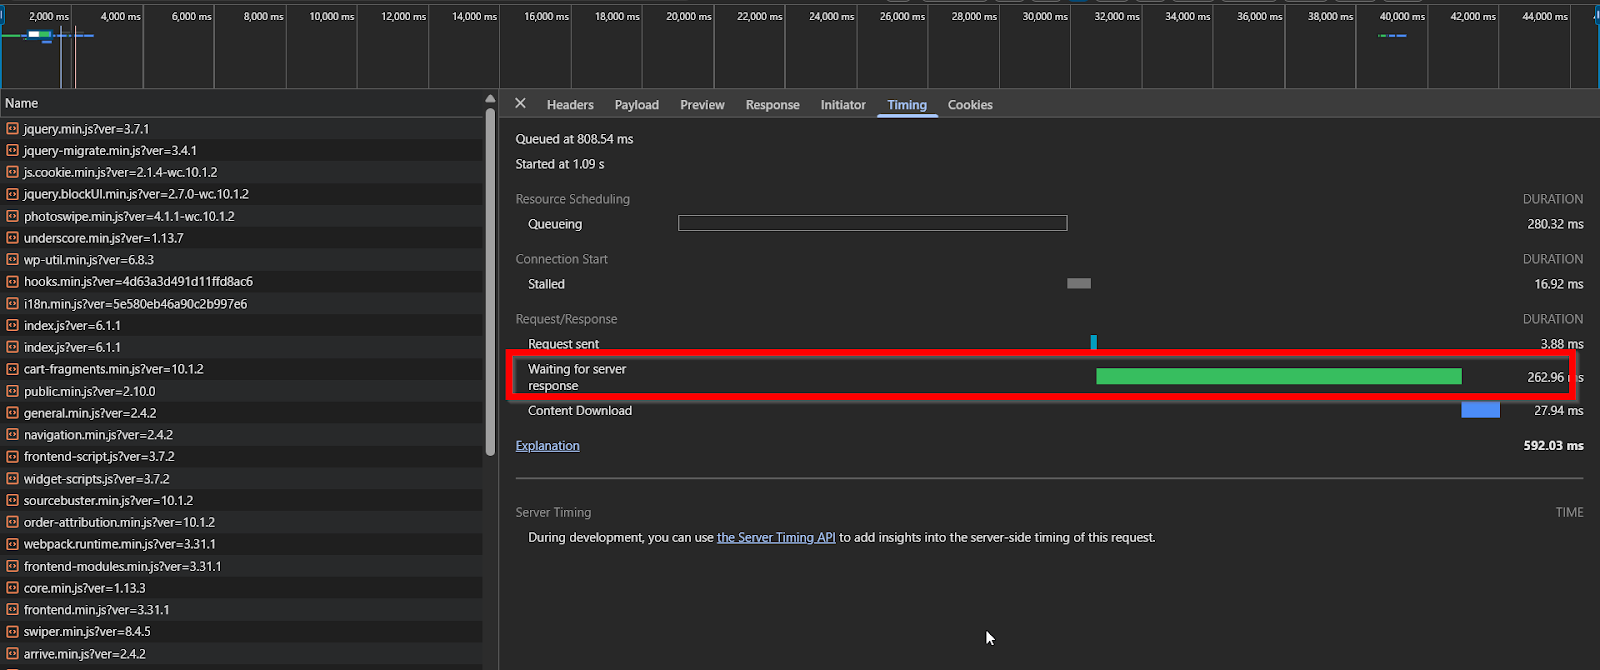
    render blockig javascript

    For the visitor, this entire sequence happens while they are staring at a blank white screen. Nothing can be painted or “rendered” for them to see because the browser’s main thread is completely tied up. This directly delays crucial performance metrics, such as First Contentful Paint (FCP), which measures the moment the first tangible content appears on the screen.

    Code Bloat

    Each additional script adds extra JavaScript and CSS files that your visitors’ browsers must download, unpack, and process. This “code bloat” consumes more of your visitors’ mobile data, drains their device’s battery, and forces their browser’s processor to work overtime, leading to a sluggish experience, especially on less powerful mobile devices.

    How to Optimize Third-Party Scripts on WordPress

    The problems mentioned above sound technical and intimidating, but we have great news: you don’t need to be a developer to fix them.

    We will guide you through a straightforward, step-by-step process to identify, audit, and optimize these scripts.

    Step 1: Finding Your Slow Script Offenders

    Before we can start optimizing a script, we need to identify it first. You need a reliable tool that can scan your website and report back exactly which third-party services are running, and more importantly, which ones are causing the biggest delays.

    Step 1.1: Choose Your Speed Test Tool

    You have several great options, but for beginners, we recommend starting with one primary tool.

    • Our Top Recommendation: Google PageSpeed Insights
      This is the industry standard. It’s free, run by Google, and focuses on Core Web Vitals.
    • A Great Alternative: GTmetrix
      GTmetrix provides incredibly detailed reports. Its most helpful feature for our purpose is the “Waterfall” chart, which provides a powerful visual timeline of every file loading on your page. This helps you literally see the scripts that are taking the longest to load. We’ll start with PSI, but it’s good to know GTmetrix is there if you want to dig deeper.

    If you are looking for more recommendations, consider reading our previous article, 8 Best GTmetrix Alternatives for Website Performance Testing (Includes Free). 

    Step 1.2: Running the Test

    This is the easiest part of the entire process.

    1. Open your web browser and navigate to the Google PageSpeed Insights website.
    2. In another tab, go to your website and copy the full URL from the address bar (e.g., https://www.example.com/).
    3. Paste your URL into the analysis box on the PageSpeed Insights page and click the “Analyze” button.

    The tool will take 30-60 seconds to scan your site and generate a comprehensive report.

    Step 1.3: Reading the Report

    The PageSpeed Insights report can look overwhelming, with scores and technical terms everywhere. If you want to learn more about this, then you can read our full-length article on How to Optimize Your Site for Google’s Core Web Vitals.

    However, if you just want to improve the scripts, you can ignore all that for now and scroll down the page past the colored circles and the sections labeled “Opportunities” and “Diagnostics.”

    You need to look for a specific diagnostic heading called “Reduce the impact of third-party code.” This is your goldmine.
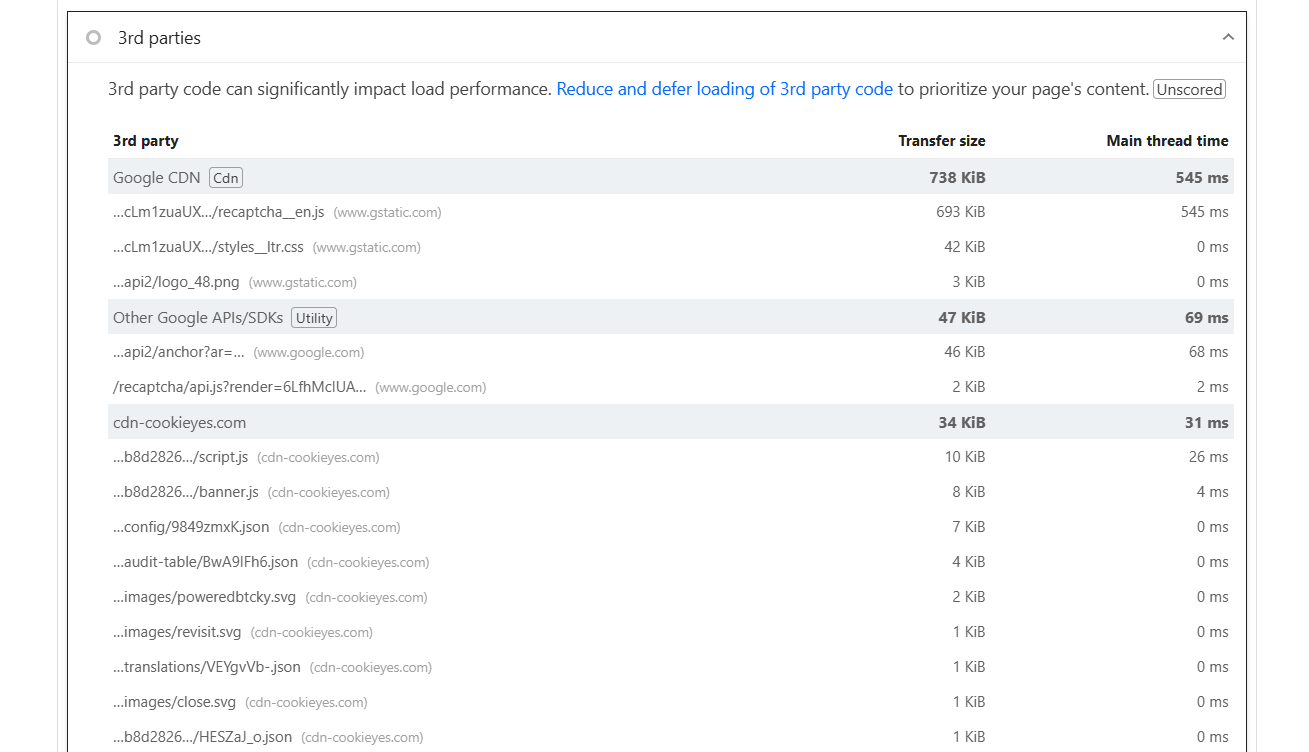
    When you click to expand this section, you will see a list of all the external domains loading resources on your site. For example:

    • googletagmanager.com or google-analytics.com (Google Analytics)
    • connect.facebook.net (Facebook Pixel)
    • fonts.gstatic.com (Google Fonts)
    • youtube.com (Embedded videos)

    The report also indicates the “Main-Thread Blocking Time,” which is the duration each script delays the construction of your page. Write down the top 3–5 scripts causing the longest main-thread blocking time. These are the ones to fix first.

    Step 2: Decide Which Scripts You Actually Need

    Now that you have your list of script offenders, your first instinct might be to look for a technical solution. But before you touch any settings, you should perform the single most effective optimization step: a strategic audit.

    The fastest script is the one you don’t load at all.

    We will approach this audit with a simple but powerful question for every third-party script you identified in your speed test. Look at each one and ask yourself:

    “Is this script helping my site reach its goals?”

    If the answer is not a clear and immediate “yes,” it’s just digital clutter that is slowing you down. It’s time to thank it for its service and let it go.

    Let’s walk through the most common scripts you found and apply this question.

    • Google Analytics
      This script tracks your website traffic, tells you where visitors come from, and shows which pages are most popular. Without this data, you will have very few insights into your user patterns.

      Verdict: KEEP. This provides essential value for making informed decisions about your site, but you may want to consider switching to alternatives, such as Plausible or Matomo Analytics.
    • Facebook Pixel / Other Ad Pixels
      These scripts track conversions from paid advertising campaigns. Ask yourself: Am I currently spending money on Facebook, Google, or other ads that rely on this pixel? If you are actively running campaigns, this script is crucial for measuring your return on investment. If you are not, it’s doing nothing but slowing down your site for every single visitor.

      Verdict: KEEP only if you are running active ad campaigns. If not, remove it for now. You can always add it back when you launch your next campaign.
    • Heatmap/Recording Scripts (e.g., Hotjar, Crazy Egg)
      These are powerful tools for understanding user behavior, but they are incredibly resource-intensive.

      Verdict: USE SPARINGLY. Turn these scripts on when you are actively running a specific test (like analyzing a new landing page), gather your data for a week or two, and then turn them off. Do not leave them running continuously.
    • Chat Widgets
      A live chat box can be a fantastic tool for lead generation, but only if people use it. Review your widget’s dashboard to determine the number of meaningful conversations it has initiated in the past month. Is it a vital part of your sales process, or is it just a slow-loading box that most visitors ignore?

      Verdict: EVALUATE. If it consistently generates leads and sales, keep it. If it sits unused, remove it and free up that performance. A simple “Contact Us” page is much faster.
    • Social Sharing Button Plugins
      Allowing visitors to share your content is great, but many plugins that do this are notoriously slow. The primary performance killer is often the “share count” feature. To display those numbers, the plugin must make separate, slow requests to Facebook, Twitter, Pinterest, and others for every single page load.

      Verdict: BE WARY. Consider switching to a modern, lightweight plugin that provides simple sharing links without the counters. The slight social proof you gain from the numbers is rarely worth the significant speed loss.
    • Comment Systems (e.g., Disqus)
      Third-party comment systems, such as Disqus, offer enhanced features like social login and improved spam filtering. However, they are often very heavy, loading many extra scripts and ads. Compare this to the default WordPress comment system, which is built in and significantly faster.

      Verdict: EVALUATE. If you have a highly active community that relies on Disqus’s features, the speed trade-off might be worth it. However, if you only get a few comments here and there, you are sacrificing critical loading speed for a feature you barely use. Choosing the right comment system is a big decision with significant performance implications. For a deeper dive into the fastest options, we highly recommend reading this detailed analysis on WordPress comment plugins.

    Step 3: Optimizing Third-party Scripts with a Plugin

    Once you have removed the unnecessary scripts, you can then use a WordPress plugin to do all the technical heavy lifting for you. We will focus on the single most impactful technique for third-party scripts: Delaying JavaScript.

    Defer vs. Delay in JavaScript

    To understand how performance plugins work, you need to know the difference between two powerful techniques for handling JavaScript. Both are designed to solve the render-blocking problem, but they do so in different ways.

    • Defer: When the browser’s HTML parser encounters a script with this attribute, it changes its default blocking behavior. Instead of stopping everything, the browser starts downloading the script file asynchronously in the background while it continues to parse the rest of the HTML and build the Document Object Model (DOM). The browser executes the deferred script only after the entire HTML document has been fully parsed.

      This is beneficial because the script’s download no longer blocks the initial rendering of the page.
    • Delay (Better for non-essential content): In this method, the target third-party script is not loaded during the initial page load. Instead, a lightweight listener script waits for the first sign of user interaction, such as scrolling down the page, moving the mouse, clicking a button, or touching the screen on a mobile device. Once that first interaction is detected, the listener dynamically injects the third-party script into the page, triggering its download and execution.

      This ensures that the page becomes interactive almost instantly, and the non-critical scripts load a few seconds later when they are least likely to impact the user’s perception of speed.

    Our Recommended Tool: WP Rocket or FlyingPress (Paid)

    You can fix these issues with free or paid tools. Paid plugins make things easier, free ones give you more manual control. Tools like WP Rocket or FlyingPress combine dozens of complex optimizations into a simple, user-friendly dashboard.

    Here is how you can implement a JavaScript delay in just a few clicks.

    1. Install and activate the WP Rocket plugin on your WordPress site.
    2. From your WordPress dashboard, navigate to Settings -> WP Rocket.
    3. In the left-hand menu, click on the “File Optimization” tab.
    4. Scroll down the page until you see the “JavaScript Files” section. Find the option labeled “Delay JavaScript execution“ and check the box to enable it.
    5. Save Changes and Clear the Cache. Click the “Save Changes” button at the bottom of the page. After it saves, you should see an option to “Clear Cache” in your top admin bar; click it to ensure your changes are live for all visitors.

    That’s it! WP Rocket is pre-configured to automatically delay many common third-party scripts. Your site should now load significantly faster on initial load. If you notice that a specific feature (such as your chat widget) has stopped working, you can add its script’s domain to the “Excluded JavaScript Files” box to have it load normally.

    Free Alternative Mention

    If you are on a tight budget, you can achieve similar results with a more hands-on approach using free plugins.

    • Flying Scripts: This is a simple, lightweight plugin designed specifically to delay JavaScript execution. You will need to manually add the keywords of the scripts you want to delay (e.g., ga, gtag, and Facebook).

    • Asset Cleanup: This is a powerful plugin that provides granular control. Its most useful feature is the ability to disable scripts on pages where they are not needed. For example, you can use it to stop your contact form plugin from loading its script on every single blog post, which is a fantastic optimization.

    Step 4: Pro-Level Tricks (That Are Still Easy for Beginners)

    By delaying JavaScript, you’ve already made a massive improvement. Now, let’s look at a couple more ways to speed up your third-party scripts:

    Technique 1: Host Google Fonts on Your Own Server

    When you use Google Fonts, your visitors’ browsers must make an extra trip to another server (fonts.googleapis.com) to download the font files. This introduces an external request and another point of failure, which can slow down your site.

    You can download those font files and host them directly on your own server. This eliminates the external request, allowing the browser to load everything from a single website.
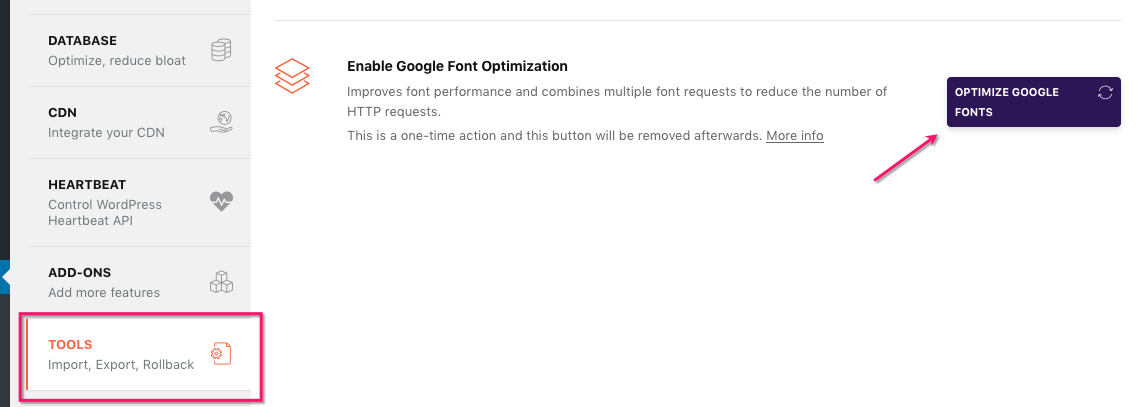
    You don’t even need to do this manually! Many performance plugins can automate this process with a single click. In performance optimization plugins like WP Rocket, you will find an option under “File Optimization” called “Optimize Google Fonts“ or “Localize Google Fonts.” Simply check the box.

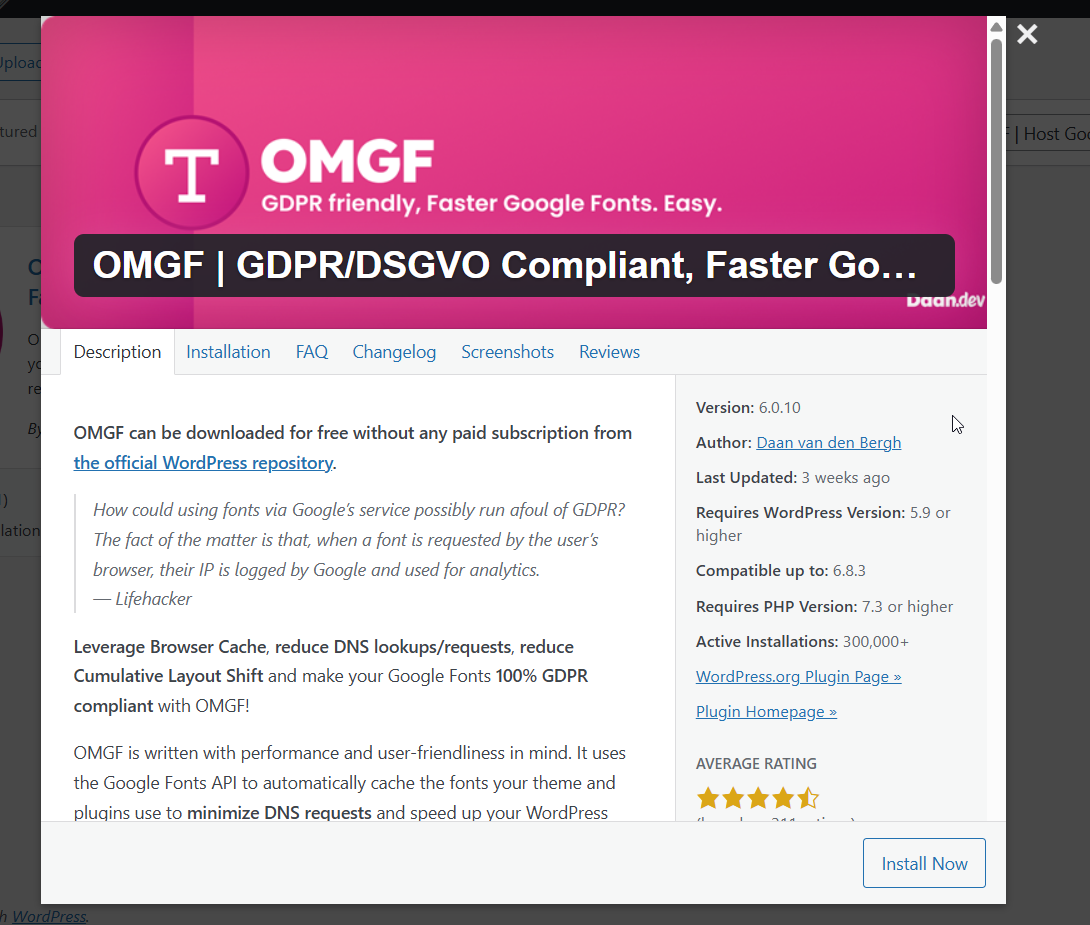
    For a free, dedicated solution, the OMGF plugin works equally well.
    Technique 2: Replace Heavy Embeds with Preview Images

    Heavy embeds, such as YouTube, Vimeo, and Maps, often add dozens of external requests before the visitor interacts with them, which can significantly impact performance. Before your visitor even interacts with them, their browser is forced to download significant amounts of data from YouTube, Twitter, or Google’s servers.

    You can replace this heavy initial load with a lightweight preview image, often referred to as a “facade.” When the page first loads, the visitor sees a static placeholder such as a thumbnail of the video, a screenshot of the map, or a stylized image of the tweet. The resource-intensive, interactive content only loads when the visitor actually clicks on the placeholder.

    In WP Rocket, this feature is enabled automatically when you check the box for “LazyLoad for iframes & videos” under the “Media” tab. This single setting will apply not just to YouTube but also to Vimeo videos and other content loaded in an iframe.

    Upgrade Your Server for Even Better Performance

    Optimizing scripts helps, but your server still carries most of the load. Third-party scripts can hit slower servers harder, especially those on shared hosting. A faster server provides more room for these tools without slowing down your site.

    If you feel like you’ve hit the limits of what shared hosting can offer, but the idea of managing your own server sounds complex and intimidating, that’s where a tool like RunCloud changes the game.

    RunCloud makes managing powerful and affordable cloud servers (from providers like DigitalOcean, Vultr, or AWS) incredibly easy, even for non-developers.

    • No Command-Line Needed: It gives you a beautiful, user-friendly control panel to manage your server, deploy websites, and configure settings without ever touching a complex command line.
    • Optimized for Speed: RunCloud automates the entire server setup process, installing a highly optimized software stack (like NGINX and the latest PHP) that is built from the ground up for speed and stability.
    • Effortless WordPress Management: You can deploy new, secure WordPress sites with a single click, complete with security features like free SSL certificates and automated backups.

    Move your site to a faster stack. RunCloud lets you manage powerful cloud servers with ease, so your site stays fast even with the tools you rely on.

    Start your free RunCloud account and see the difference.

  • Effortless n8n Hosting with RunCloud, Docker, and NGINX

    Effortless n8n Hosting with RunCloud, Docker, and NGINX

    n8n is an open-source automation platform that connects apps and services to streamline repetitive tasks – all under your control.

    If you want full control over your setup, self-hosting n8n is the way to go. But managing your own infrastructure doesn’t have to be complicated.

    In this guide, you’ll learn how to deploy n8n using Docker, configure it securely with NGINX and SSL, and use RunCloud to handle the heavy lifting – from server setup to backups.

    Let’s get started.

    Why Host n8n with RunCloud & Docker?

    Why Use RunCloud and Docker to Host n8n?

    • Full control – Keep your data and workflows on your own terms.
    • Simplified management – RunCloud handles your domain, SSL, and NGINX config.
    • Efficient setup – Docker keeps n8n isolated and updates easy.
    • Multi-app support – Run multiple apps on one server with ease.

    Let’s explore how to get your n8n instance running smoothly with RunCloud.

    Step-by-Step Instructions to Install n8n

    Follow these steps to create your own n8n instance on your server:

    You’ll need:

    • A cloud server (e.g., DigitalOcean, Vultr) connected to RunCloud
    • A domain or subdomain pointed to your server IP

    If you use RunCloud’s Cloudflare integration, DNS setup takes just a few clicks during web app creation.

    Step 1: Create a New Web Application in RunCloud

    RunCloud makes it very easy to manage domain names, SSL certificates, and backups for your web applications. But before we can configure all that, you will need to create a dedicated web application for n8n:

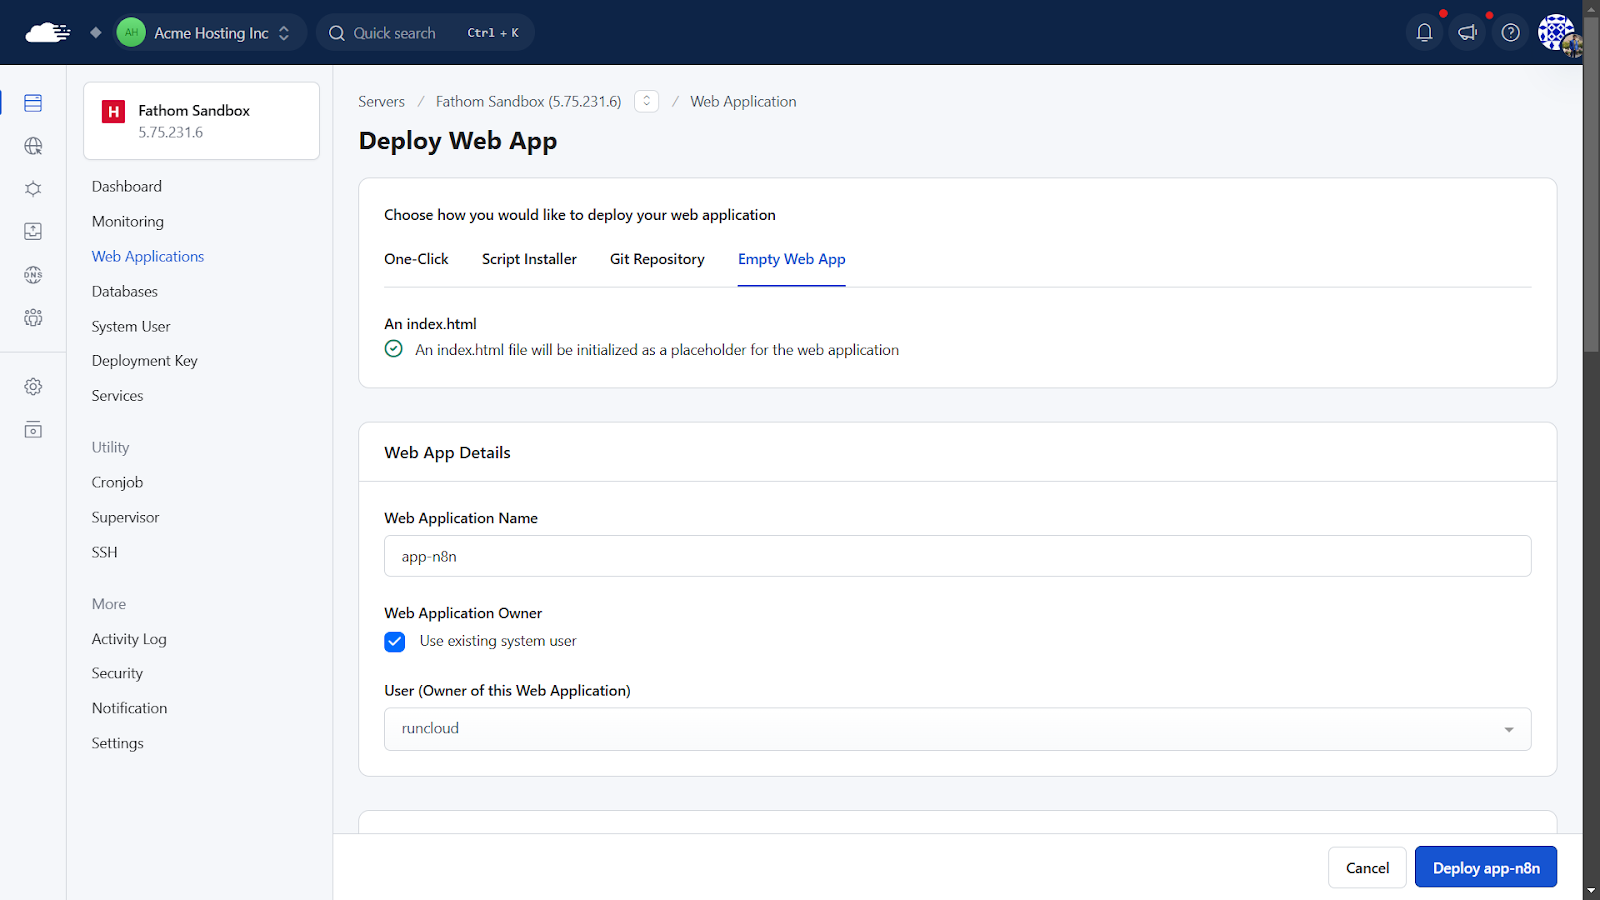
    1. Log in to your RunCloud dashboard, navigate to “Web Applications“, and click “Create Web Application“.
    2. Application Name: Give it a descriptive name, e.g., “n8n-app”.
    3. Web Application Owner: Select your system user. For maximum security, it is recommended that you create a new user account for each web application.
    4. Domain Name: Enter the custom domain you’ll use for n8n (e.g., n8n.example.com). If you are using RunCloud’s Cloudflare integration, you can easily update necessary DNS records with a single click.
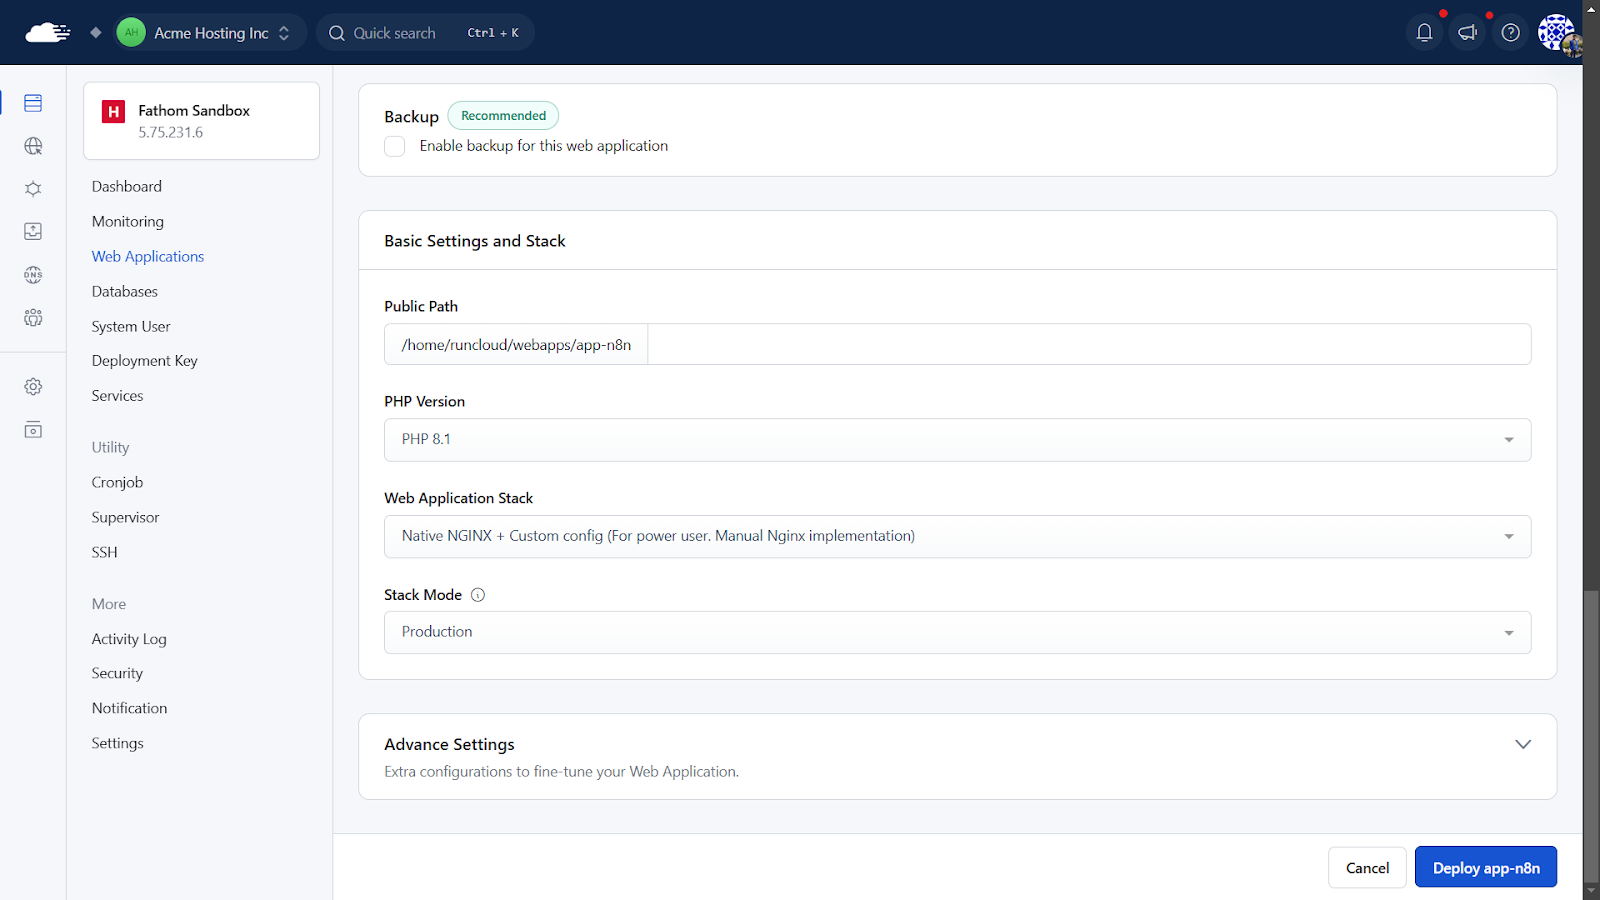
    1. PHP Version: You can select any PHP version; n8n itself doesn’t use it directly as it’s containerized, but RunCloud requires one to be set. The default is fine.
    2. Web Application Stack: For this setting, select “Native NGINX + custom config” as we will be using this as a proxy to connect to the n8n Docker container.
    3. After configuring all settings, click “Create Web Application” to deploy the web application.
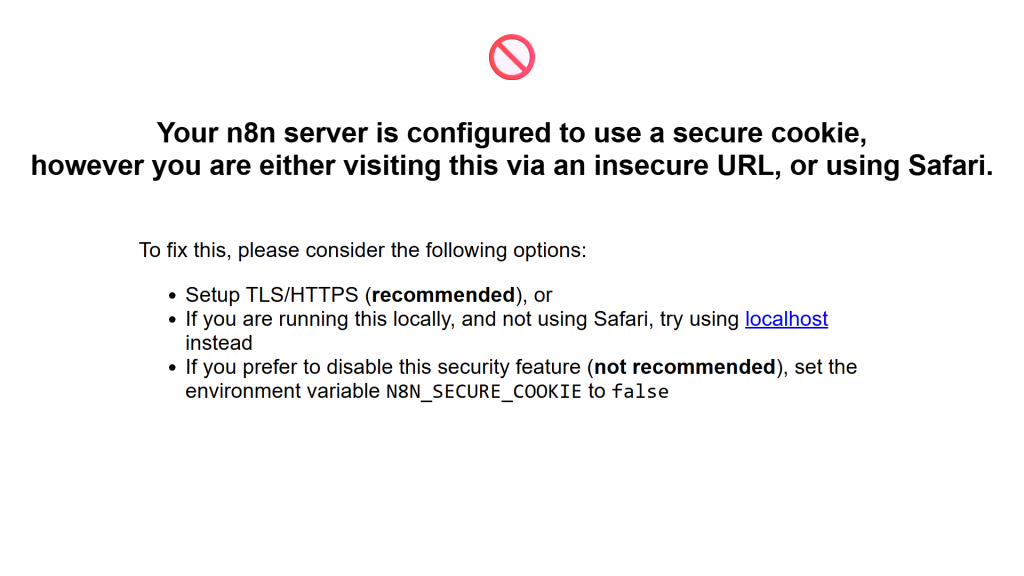
    1. SSL/TLS: Once the app is created, go to its SSL/TLS section in RunCloud. Use Let’s Encrypt to get a free SSL certificate. If you skip this step, you will get the following error later in the process:

    Step 2: SSH into Your Server and Navigate to Your Web App Directory

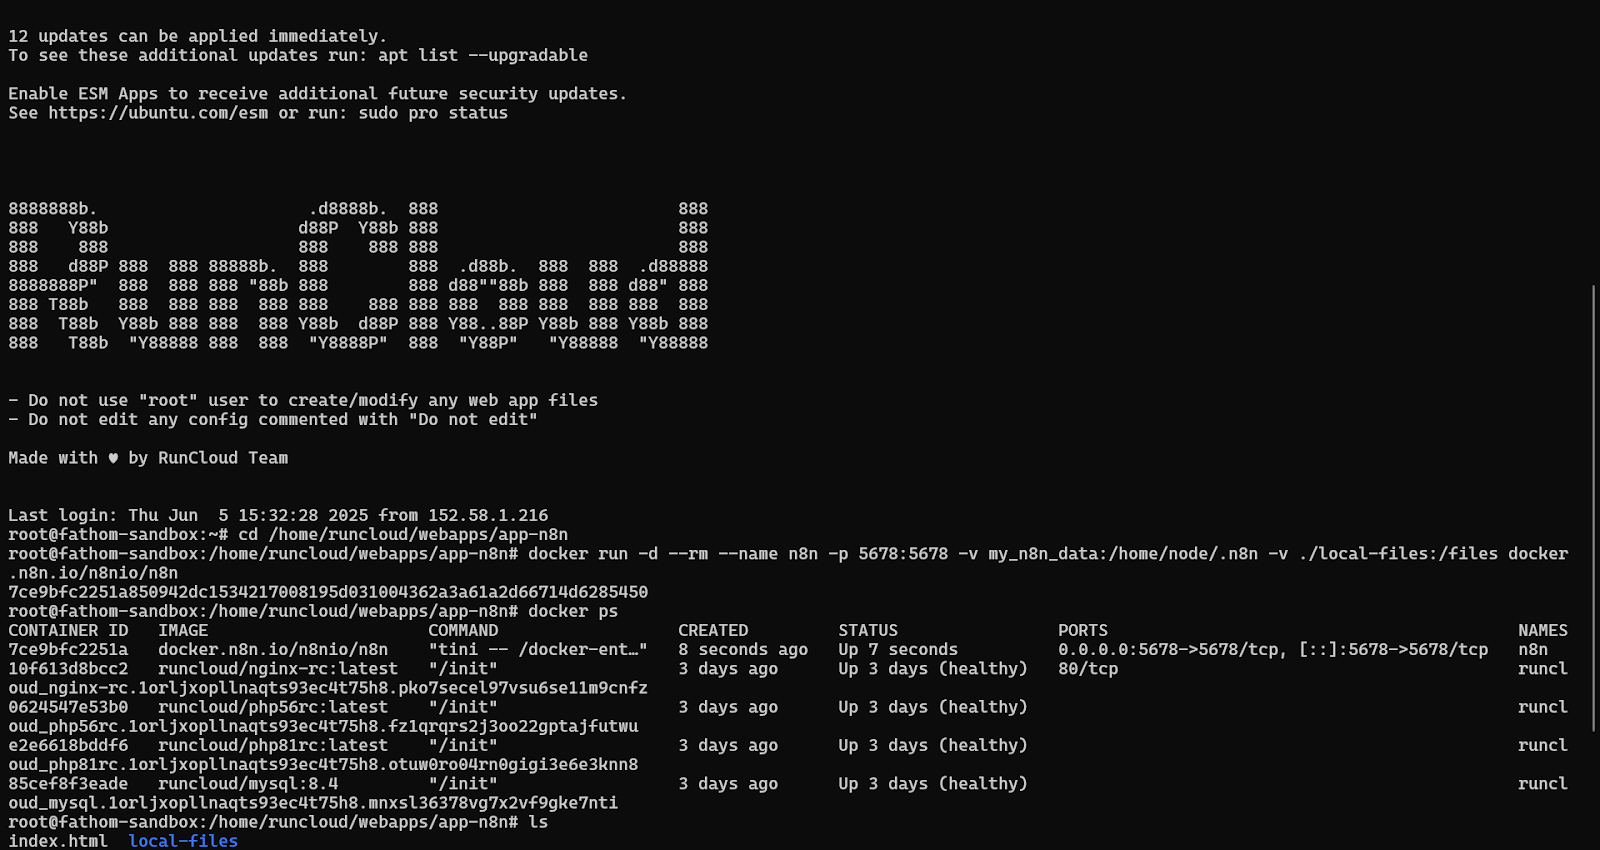
    After creating the web application, connect to your server via SSH. If you don’t know how to do this, read our documentation on How to Connect to Your Server via SSH to learn more.

    After connecting to your server, navigate to the web application’s root directory you just created in RunCloud using the ‘cd’ command. Make sure to replace the path in the following command with the actual root path of your web application:

    cd /home/runcloud/webapps/<app-name>

    Step 3: Create the local-files Directory

    In this directory, you can create a new directory that will be mapped to the Docker container. This will contain the web application data of your n8n instance. Execute the following command to create this directory:

    mkdir n8n_data
    sudo chown -R 1000:1000 n8n_data

    This will store your n8n data and assign the correct ownership permissions so that the data is accessible from the Docker container.

    Step 4: Create the Docker Application

    Now, let’s define and launch our n8n application using Docker. You have two ways to approach this. For a very quick start, you could use the following Docker run command:

    docker run -d --rm \
      --name n8n \
      -p 5678:5678 \
      -e GENERIC_TIMEZONE="UTC" \
      -e TZ="UTC" \
      -e N8N_HOST="app-n8n.EXAMPLE.com" \
      -e N8N_EDITOR_BASE_URL="https://app-n8n.EXAMPLE.com/" \
      -e N8N_PROTOCOL="https" \
      -e N8N_ENFORCE_SETTINGS_FILE_PERMISSIONS=true \
      -e N8N_RUNNERS_ENABLED=true \
      -e N8N_LICENSE_ACTIVATION_KEY="EXAMPLE" \
      -e N8N_EMAIL_MODE="smtp" \
      -e N8N_SMTP_HOST="smtp.EXAMPLE.com" \
      -e N8N_SMTP_PORT="25" \
      -e N8N_SMTP_USER="EXAMPLE" \
      -e N8N_SMTP_PASS="EXAMPLE" \
      -e N8N_SMTP_SENDER="N8N <n8n@EXAMPLE.com>" \
      -e N8N_SMTP_SSL=true \
      -e N8N_SMTP_STARTTLS=true \
      -v ./n8n_data:/home/node/.n8n \
      docker.n8n.io/n8nio/n8n

    Once you run the above command, Docker will download and run the required containers for your application.

    For more flexibility (custom env settings, time zones), use Docker Compose instead. See n8n’s Docker documentation for advanced setups.

    Step 5: Configure NGINX Reverse Proxy via RunCloud

    After enabling the Docker container, you must configure a reverse proxy to route traffic to your container.

    1. In RunCloud, go to your n8n-app
    2. Under “NGINX Config“, click “Create NGINX Config“
    3. Select: Proxy – Turn NGINX into a proxy server
    4. Name it n8n-proxy
    1. In the Content box, paste the following NGINX configuration:
    proxy_pass http://host:5678;
    # > uncomment below line if you want to disable proxy buffering
    # proxy_buffering off;
    proxy_set_header X-Real-IP $remote_addr;
    proxy_set_header X-Forwarded-Host $host;
    # > websocket support. if you want to proxy websockets, uncomment 3 lines below
    proxy_http_version 1.1;
    proxy_set_header Upgrade $http_upgrade;
    proxy_set_header Connection "upgrade";
    1. After configuring the required settings, click “Create NGINX Config“. RunCloud will test and apply this configuration on your server immediately.

    Step 6: Access Your Secure n8n Instance

    After enabling the proxy, open your web browser and go to the domain you configured for your web application (e.g., https://n8n.example.com).

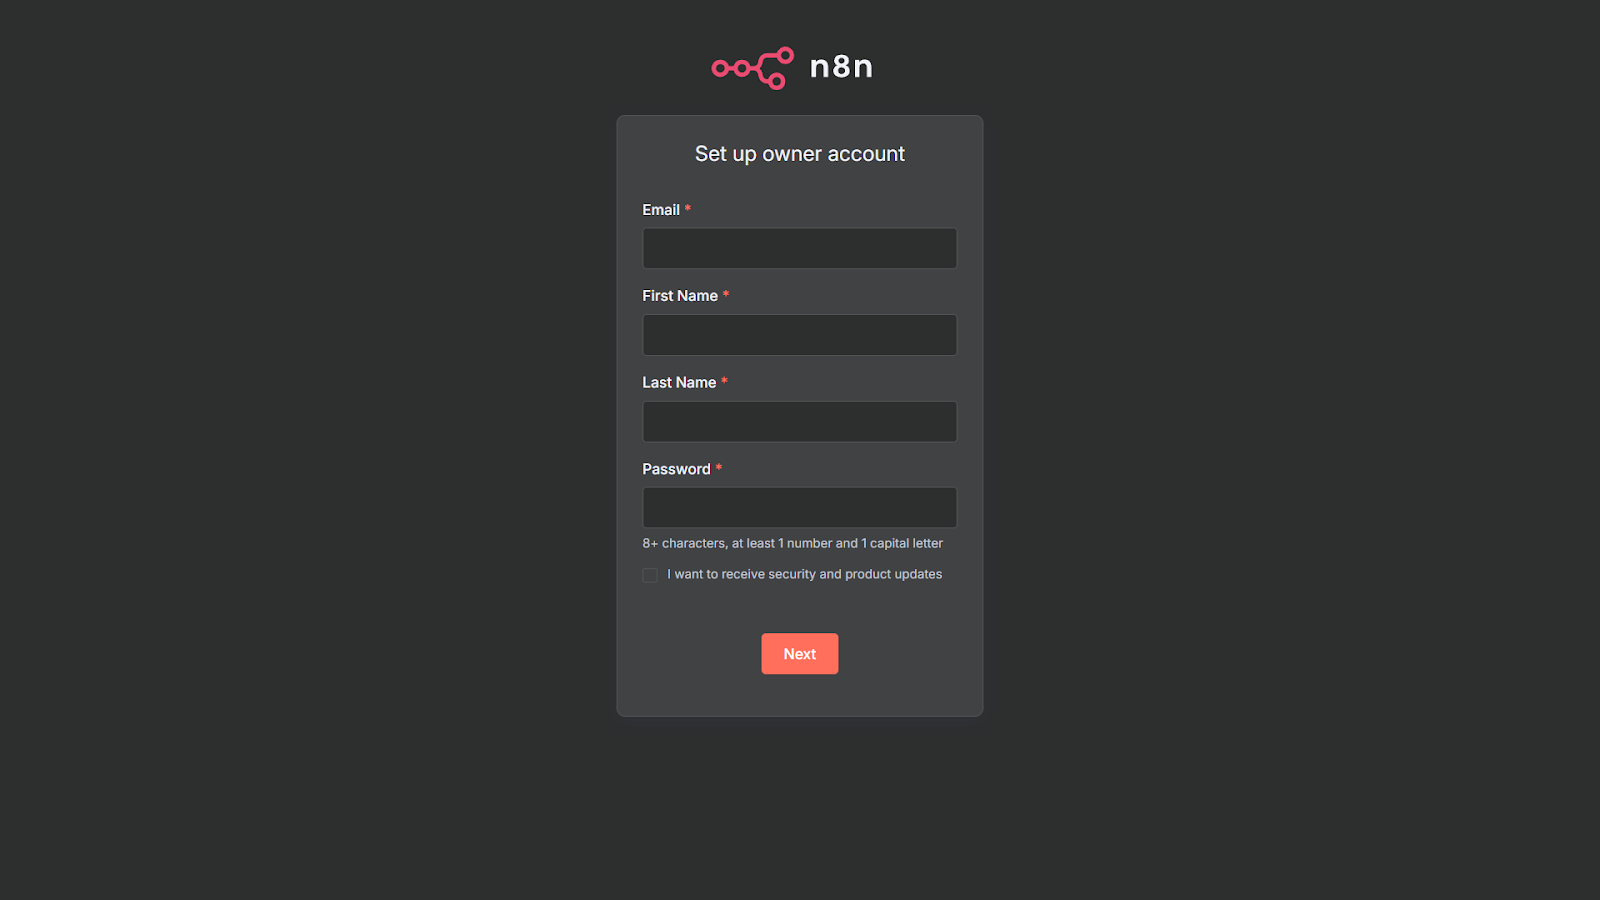
    If you use RunCloud’s built-in SSL manager, you will see the following n8n setup screen to create your account:

    Step 7: Enable Backups

    Don’t skip this. Backups protect your data and save time if anything breaks.

    In your RunCloud dashboard, set up automated backups for your n8n-app. You can create daily snapshots of your files and easily restore them if needed.

    Learn more in our backup guide.

    Final Thoughts: Your Automation Journey and Beyond with RunCloud

    You now have a secure, fully self-hosted n8n setup – managed through RunCloud and running in Docker.

    But setting up n8n is just scratching the surface of what RunCloud can simplify for you. You can also use RunCloud to effortlessly host other applications without diving deep into complex server configurations. With RunCloud, you can easily deploy and manage:

    • Nextcloud: Your private cloud for files, calendars, and contacts.
    • WHMCS: The leading web hosting automation platform.
    • WordPress: The world’s most popular content management system.
    • FreeScout: A powerful open-source help desk and shared inbox.
    • Ghost CMS: A sleek and modern platform for professional publishing.
    • And much more…

    RunCloud takes the hassle out of server administration, allowing you to focus on what you do best → building, creating, and automating.

    Ready to simplify your server management? Sign up for RunCloud today.

  • How to Deploy Supabase to Hetzner, UpCloud & More

    How to Deploy Supabase to Hetzner, UpCloud & More

    Supabase is the most popular open-source Backend-as-a-Service (BaaS) platform, which offers developers the freedom and control of self-hosting.

    By combining the power of Supabase with the simplicity of RunCloud’s server management panel, you can deploy a scalable and private backend for your applications without vendor lock-in.

    In this tutorial, we will guide you through every step of deploying a containerised Supabase instance on a server managed by RunCloud.

    We will demonstrate how RunCloud’s flexibility enables you to run complex Docker applications with ease, providing you with full control over your infrastructure.

    Let’s get started!

    How To Self-Host Supabase on RunCloud

    Before we begin, ensure you have the following three prerequisites in place. This guide assumes you have already completed these initial steps.

    1. A RunCloud Account: You can sign up for a free or paid plan on the RunCloud website.
    2. A Cloud Server Provider: You’ll need an account with a cloud provider like Hetzner, DigitalOcean, Vultr, or AWS.
    3. Basic SSH Knowledge: You will need to connect to your server via SSH. We highly recommend setting up an SSH key for secure access. RunCloud’s documentation provides a clear guide on how to manage SSH keys.

    Step 1: Choosing and Provisioning the Right Server

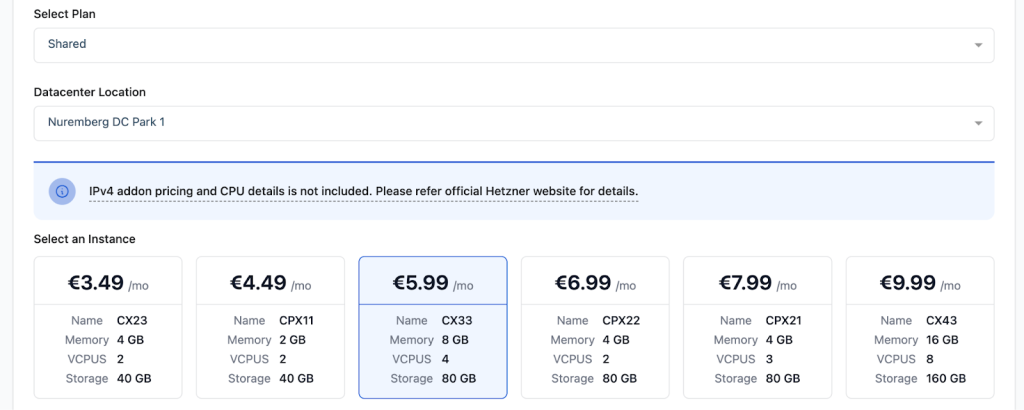
    Supabase offers a comprehensive suite of tools, including a PostgreSQL database, authentication services, storage, and more. These services are resource-intensive. To ensure a smooth experience, you’ll need to provision a server with adequate resources.

    For this tutorial, we recommend a server with at least 8GB of RAM and four vCPUs. This provides sufficient headroom for all backend services to run smoothly. Depending on your specific use case and expected traffic, you may need to scale this up or down.

    If you want to learn more about this process, read our dedicated guides, which cover the process of connecting a new server in great detail:

    Regardless of what server size you pick, your RunCloud subscription provides you with the ability to create an unlimited number of web applications.

    This flexibility allows you to deploy as many applications on your server as its hardware resources can physically handle, making it an extremely cost-effective solution for developers and agencies managing multiple projects.

    Step 2: Creating a Web Application in RunCloud

    Next, we need to create a “container” or placeholder within RunCloud for our Supabase installation. This web application will define the directory structure and the domain that will point to our Supabase instance.

    1. From your RunCloud dashboard, navigate to your server and click on Web Applications.
    2. Click Add Web Application.
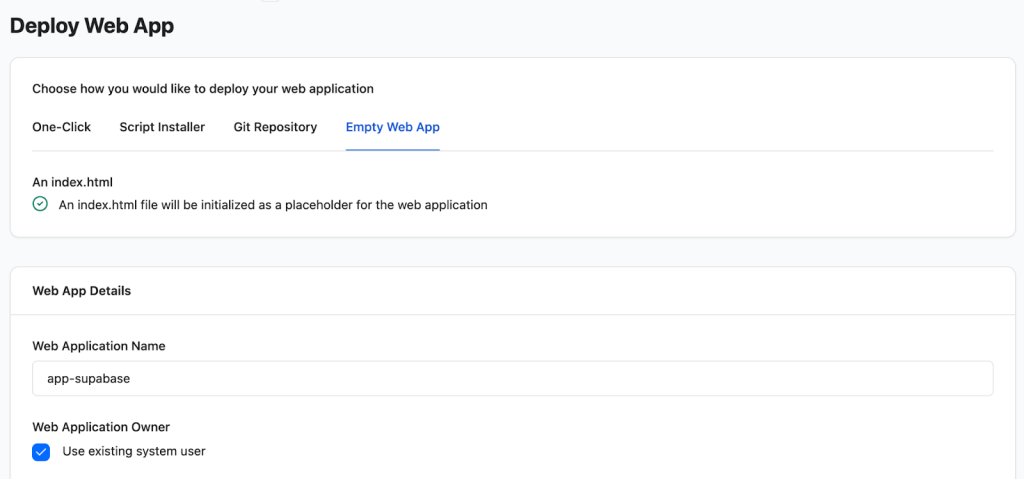
    3. Choose the Empty Web App option. This is important because we will be deploying a custom Docker setup, not a standard PHP application.
    4. Fill in the Web App Details:
      • Web Application Name: Give it a descriptive name, such as ‘app-supabase’.
      • Web Application Owner: You can use the default system user.
      • Domain Name: It’s highly recommended to use a real domain or subdomain (e.g., supabase.yourdomain.com). This will make accessing your instance much easier. For guidance on pointing your domain, please consult your domain provider’s documentation and the RunCloud DNS settings guide.
    1. Select the Web Application Stack: Select Native NGINX + Custom config. This stack gives us the raw power to configure NGINX as a reverse proxy later, which is essential for routing traffic to our Docker containers.
    2. Deploy the Application: After configuring the basic settings, you can deploy the application on your server by clicking “Deploy”. 
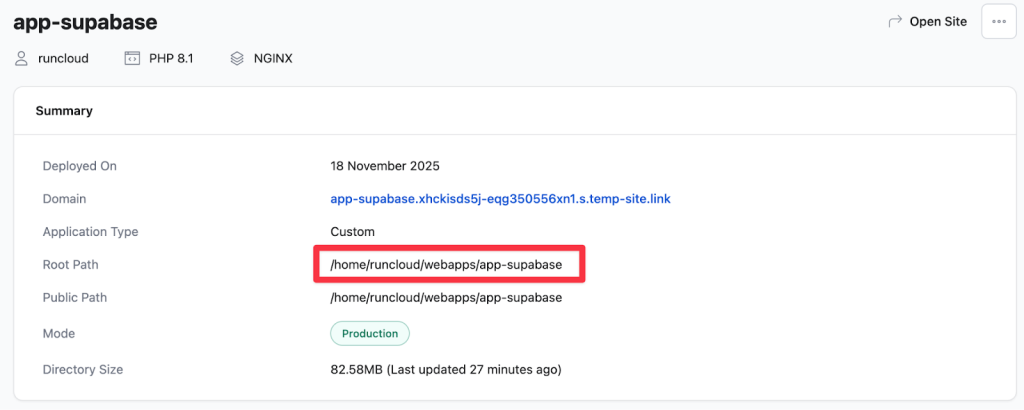
    3. Note down the Project Root: After the application is created, take note of the Web Root Path, which is displayed on the dashboard. This will be something like /home/runcloud/webapps/app-supabase. You will need this exact path in a later step.

    Step 3: Connecting to Your Server via SSH

    After creating your web application, we will begin the process of installing Supabase on the server. For this, we need to run several commands directly on the server. You’ll need to SSH into your server using the SSH credentials provided by your cloud provider.

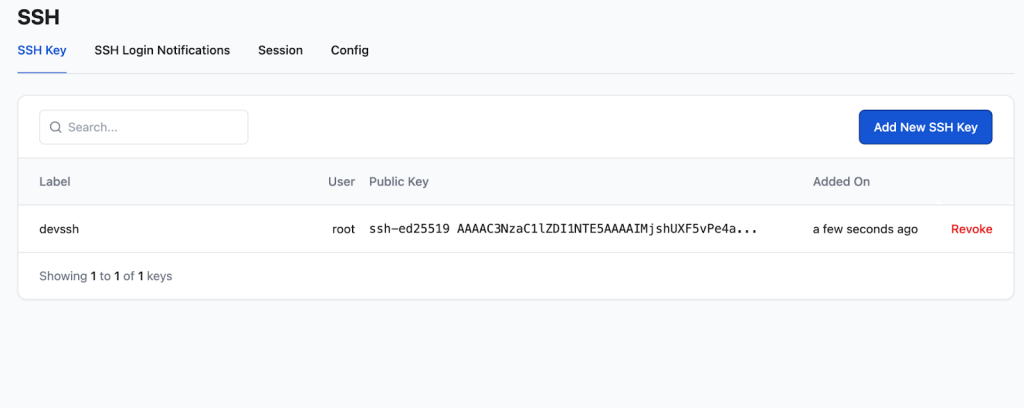
    For enhanced security and convenience, we recommend adding your public SSH key to RunCloud Vault. This allows you to log in without typing a password, and is more secure.

    Once your key is added to the RunCloud vault, open your terminal and run the following command to connect to the server via SSH: 

    ssh-i ~/.ssh/your_private_key runcloud@<YOUR_SERVER_IP>

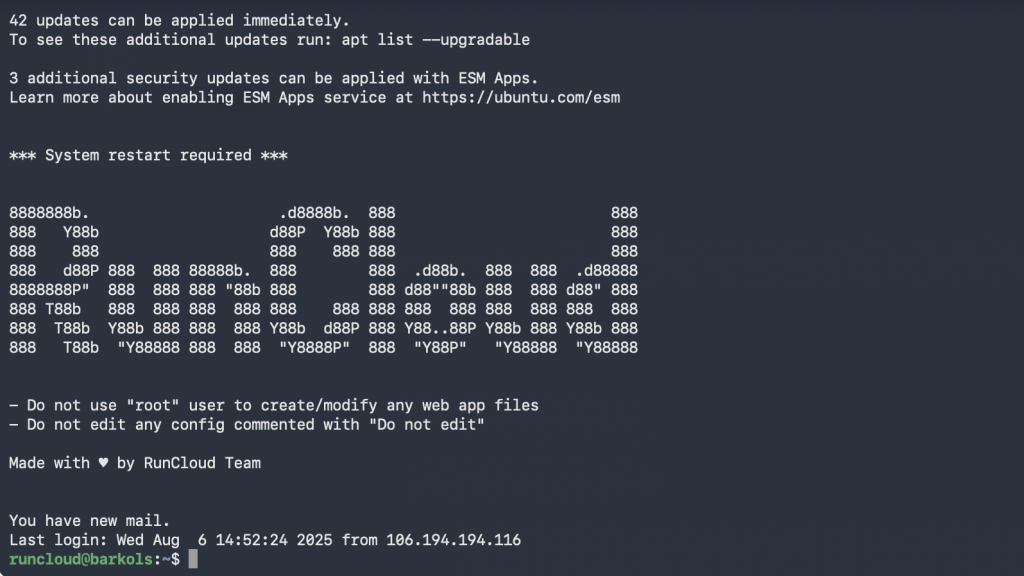
    After successful login, you’ll see a welcome message from RunCloud:

    Step 4: Cloning and Preparing the Supabase Docker Files

    Now that you’re inside the server, it’s time to download the official Supabase Docker configuration and move it into the web application directory we created. Run the following commands one by one:

    Navigate to a temporary directory. This is a safe place to clone the repository before moving the files.

    cd /tmp

    Clone the official Supabase repository. The –depth 1 flag performs a shallow clone, downloading only the latest version to save time and space.

    git clone --depth 1 https://github.com/supabase/supabase

    Copy the Docker files to the root of your project. Replace <runcloud project root> with the actual path you noted in Step 2.

    cp -rf supabase/docker/* <runcloud project root> 

    Copy the example environment file. This file contains all the configuration variables Supabase needs. We will edit this in the next step.

    cp supabase/docker/.env.example <runcloud project root>/.env

    Step 5: Configuring Your Supabase Environment

    After copying the files, you need to configure your environment. The .env file you just created contains default, insecure passwords and secret keys. You must change these before launching your Supabase installation.

    Navigate to your project root directory:

    cd <runcloud project root>

    Open the file for editing using nano: If you are not comfortable with nano, you can use any other text editor that you like, or read our blog post on How to Edit Files on Remote Servers with SSH and Nano

    nano .env

    Update Passwords and Secret Keys: After opening the file, carefully review its contents. At a minimum, you must change the following values to strong, randomly generated strings. You can use an online password generator for this.

    1. POSTGRES_PASSWORD: This is the password for the superuser account in your PostgreSQL database. Change this to a very long, complex, and unique password.
    2. JWT_SECRET: This secret is used to sign JSON Web Tokens (JWTs) for user authentication and authorisation. Update this with a long, randomly generated token, ideally 32 characters or more.
    3. ANON_KEY and SERVICE_ROLE_KEY: These JWTs are used for the anon (public) and service_role (admin/backend) users, respectively. While they are full tokens, the underlying signing secret (JWT_SECRET) is the primary vulnerability if unchanged. While changing the JWT_SECRET effectively invalidates the default keys, it is best practice to generate new, unique keys for both the ANON_KEY and SERVICE_ROLE_KEY after updating the JWT_SECRET.
    4. DASHBOARD_USERNAME and DASHBOARD_PASSWORD: These credentials control access to the Supabase management dashboard. Change both the default username and the default password to strong, unique values.
    5. SECRET_KEY_BASE: This is a cryptographic key used for various internal security features within the application framework (often related to cookie signing or encryption). Replace the current value with a long, random, and unique cryptographic key.
    6. VAULT_ENC_KEY and PG_META_CRYPTO_KEY: These are encryption keys used for encrypting secrets and other sensitive data stored within the database vault and the metadata store. Update both keys with unique, randomly generated encryption keys that are at least 32 characters long.

    The file also contains optional settings for sending emails, analytics, and logging. You can leave these blank for now unless you plan to use those services. After you have made the necessary changes, press Ctrl+X, then Y, and then Enter to save your changes in nano.

    Step 6: Launching the Supabase Services with Docker

    Once you have updated your .env file, you are now ready to launch your Supabase instance. This process is very simple, and it requires you to run just two commands:

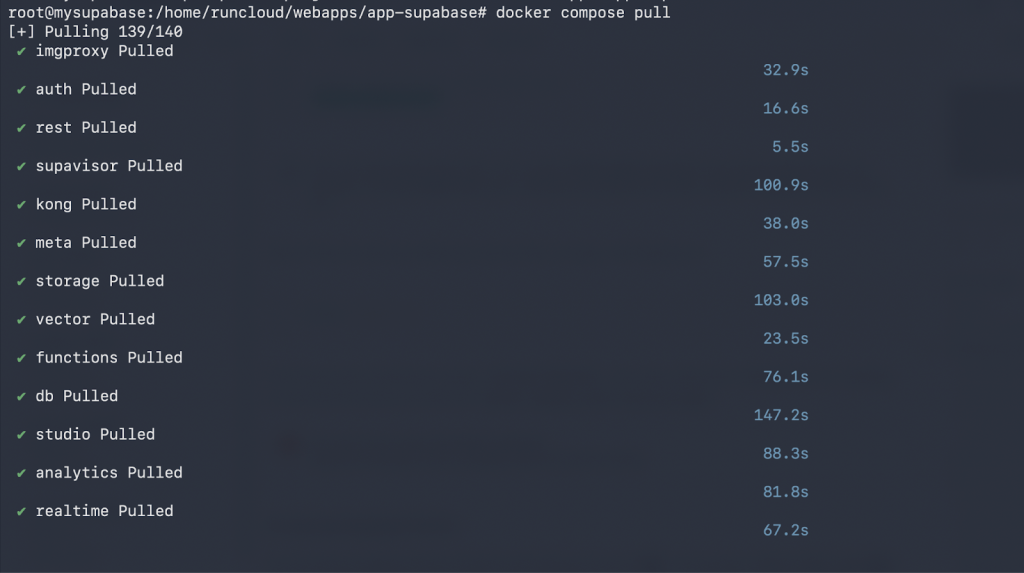
    Pull the latest Docker images

    This command downloads all the necessary container images for each Supabase service (database, auth, storage, etc.). This may take several minutes, depending on your server’s network speed.

    docker compose pull 

    Start Supabase Services in detached mode

    The ‘up’ command starts the containers, and the ‘-d’ flag runs them in the background, so they continue to run after you log out of your SSH session.

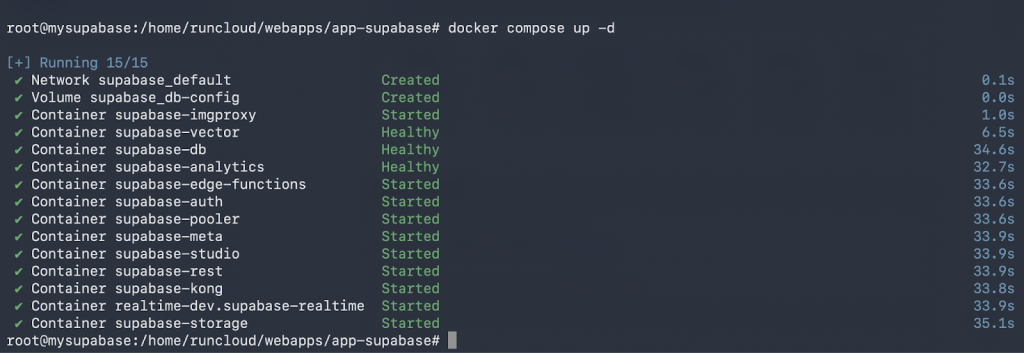
    docker compose up -d

    You will see output indicating that all the services have started successfully.

    Your Supabase instance is now running inside Docker on your server! However, it’s not yet accessible from the internet. For that, we need to set up a reverse proxy.

    Step 7: Configuring an NGINX Reverse Proxy

    The Supabase stack listens for traffic internally on port 8000. We need to tell NGINX to take all incoming web traffic (on ports 80 and 443) for your domain and forward it to this internal port. This is a classic reverse proxy setup, and RunCloud makes it very simple.

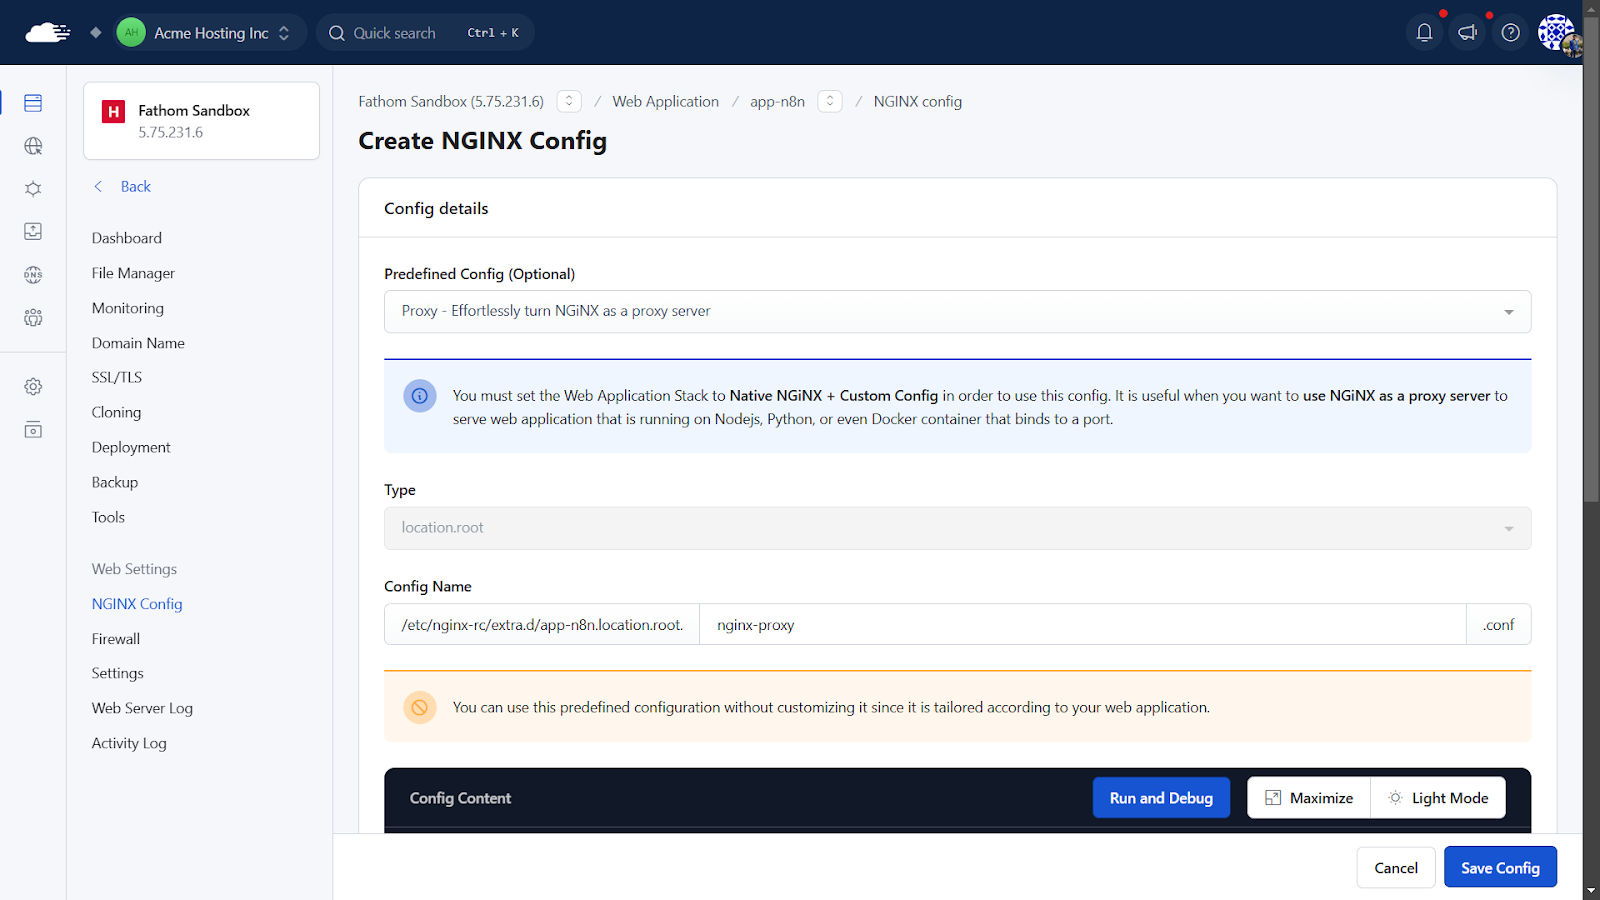
    1. Go back to your RunCloud dashboard and navigate to your app-supabase web application.
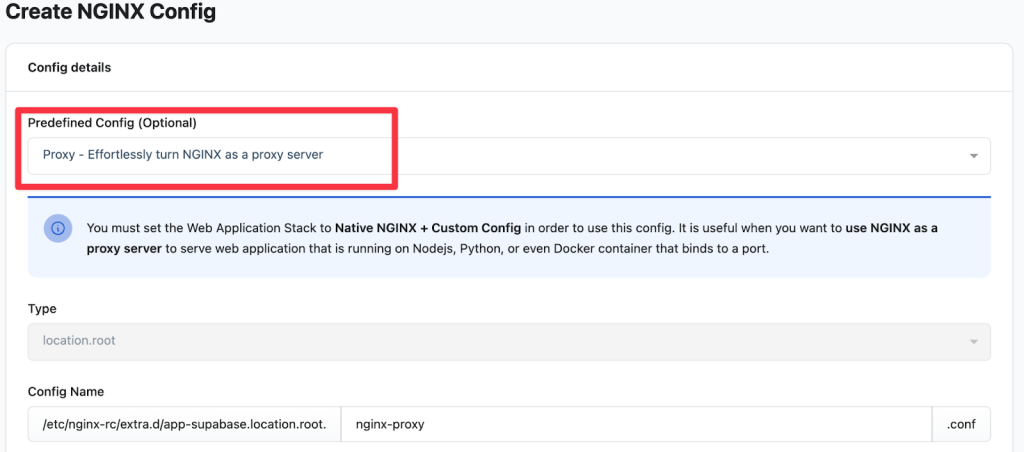
    2. Go to the NGINX Config section and click Create NGINX Config.
    3. From the “Predefined Config” dropdown, select “Proxy – Effortlessly turn NGINX…”
    1. Delete all the default content in the text editor and paste the following configuration into the editor:
    proxy_pass http://host:8000;
    proxy_set_header X-Real-IP $remote_addr;
    proxy_set_header X-Forwarded-Host $host;
    proxy_http_version 1.1;
    proxy_set_header Upgrade $http_upgrade;
    proxy_set_header Connection "upgrade";
    1. Click “Save Config” to apply the new configuration.

    Step 8: Access Your Supabase Dashboard

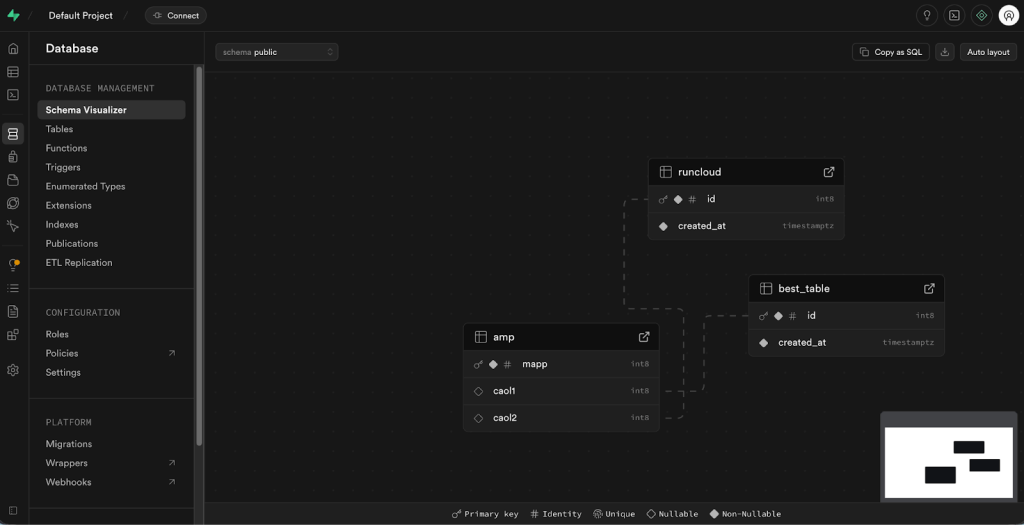
    Your self-hosted Supabase instance is fully deployed and accessible on the internet. You can now open your web browser and navigate to the domain you configured in Step 2 (e.g., https://supabase.yourdomain.com). When you visit this site, you should see the Supabase Studio login screen.

    Enter the credentials you configured in the .env file from the previous step, and you will be logged in to your own Supabase dashboard, ready to create tables, manage users, and build your next great application.

    installing a self-hosted supabase instance on runcloud

    Final Thoughts & Your Next Steps

    Congratulations on taking control of your backend by deploying a fully self-hosted Supabase instance! This tutorial shows more than just how to deploy Supabase; it showcases the true power and flexibility of RunCloud as a central hub for all your server management needs.

    But your journey with RunCloud doesn’t have to end here. The same platform that now runs your complex Dockerized Supabase application is perfectly equipped to manage all your other projects.

    Whether you’re running a high-traffic WordPress site, a modern Laravel application, a content-rich Ghost CMS, an n8n instance for your automation workloads, or even a private cloud with Nextcloud, RunCloud provides the tools to manage it all effortlessly.

    If you are a developer who needs a professional workflow, RunCloud provides features such as Git integration for atomic deployments, creating a smooth CI/CD pipeline directly from your repository.

    Perhaps one of the most compelling advantages of using RunCloud is its predictable, resource-independent pricing model. RunCloud does not charge you based on your server’s specifications or resource consumption. Whether you choose a small 2GB RAM server or a powerful 64GB machine to run your Supabase instance, your RunCloud subscription cost remains the same, offering predictable expenses as you grow.

    Sign up for RunCloud today.

    Frequently Asked Questions About Self-Hosting Supabase with RunCloud

    How do I scale my server if my Supabase application grows?

    RunCloud is completely cloud-provider agnostic, meaning it doesn’t lock you into a specific hardware provider. When you need more power, you can simply resize your server at Hetzner, DigitalOcean, or any other provider, and RunCloud will continue to manage it seamlessly.

    How does RunCloud help secure my self-hosted Supabase instance?

    Security is a primary concern with self-hosting, and RunCloud automates the most critical tasks for you. It configures an isolated web application environment, sets up a server firewall with a single click, and provides timely notifications for security updates, ensuring your server remains up-to-date and protected from common threats.

    What’s the easiest way to back up my database?

    Manually scripting database backups is tedious and prone to errors. RunCloud offers a straightforward, off-server backup solution that allows you to schedule backups for your database and files with just a few clicks. This ensures that your critical user data is always secure and can be easily restored in the event of an emergency.

    How do I add an SSL certificate to my Supabase domain to secure API calls?

    RunCloud offers free, auto-renewing Let’s Encrypt SSL certificates for any domain associated with your web application. You can secure your Supabase API endpoints and dashboard with a trusted HTTPS connection with a single click, eliminating the complexity of manual certificate generation and renewal.

    Supabase has many services. How can I monitor my server’s health and resource usage?

    RunCloud’s dashboard provides a real-time health monitoring system for your server. You can instantly check CPU, RAM, and disk usage to ensure your server has enough resources to run smoothly. This visual overview helps you anticipate scaling needs and troubleshoot performance issues before they impact your users.

  • How to Transfer a Domain to a New Registrar Without Downtime

    How to Transfer a Domain to a New Registrar Without Downtime

    Many website owners stay with their first domain registrar for years, assuming that moving a domain will break everything.

    Stories of websites disappearing and emails bouncing around during transfers make that fear understandable – but downtime isn’t inevitable.

    With the right setup, you can safely transfer your domain without losing a single visitor or email.

    In this guide, RunCloud’s team shares the exact process we use to transfer domains smoothly and confidently.

    Why Your Domain Registrar Shouldn’t Handle Your DNS

    Most people think that a Domain registrar and a DNS Host are the same thing, but they are very different:

    • A Domain Registrar is the company you pay to register and renew your domain name (e.g., yourbusiness.com). They are like the city hall that holds the deed to your property.
    • A DNS Host (or Provider) is the service that holds your domain’s records. It acts as the internet’s phonebook, directing browsers to your website, email servers, and other services. This is the GPS that directs traffic to your property.

    Often, the registrar from which you buy a domain also provides DNS hosting by default. This is convenient but creates a single point of failure.

    If you transfer your domain while the old registrar still manages your DNS records, those records are often deactivated or deleted, which can cause immediate downtime.

    The solution is to move your DNS to a dedicated, high-performance DNS provider before you start the transfer. This allows your registrar to be interchangeable without affecting live traffic.

    For this, we recommend using Cloudflare. Their free tier is more than enough for most users and offers world-class performance, security, and reliability. This strategy works regardless of which registrars you are moving between.

    However, it’s worth noting that some modern registrars have started offering their own tools to facilitate smoother transfers. For example, if you are migrating your domain to Namecheap, then you can use Namecheap’s FreeDNS, which allows you to move your DNS records to them before initiating the transfer, achieving a similar result. While this is a great feature, it isn’t universally available, and relying on a dedicated DNS provider is still the best option.

    Best Domain Registrars to Use

    You may want to consider transferring for better pricing, a cleaner user interface, improved support, or to consolidate your domains. Whatever your reason, choosing a reputable registrar is very important. We recommend one of the following DNS registrars for their fair pricing, excellent features, and developer-friendly approach:

    • Cloudflare Registrar: The best choice if you’re already using their DNS. They offer wholesale pricing (with no markup on domain registration), making them one of the most affordable options.
    • Porkbun: A community favorite known for its incredibly competitive pricing, clean UI, and excellent set of free features like WHOIS Privacy and email forwarding.
    • Spaceship: A modern registrar with a fantastic user experience, competitive pricing, and a strong focus on making domain management simple and intuitive.
    • Namecheap: A long-standing, reliable option known for its good support, frequent promotions, and a solid feature set, including free WHOIS privacy.

    Before You Transfer: Check Registrar Compatibility

    Before you start a transfer, you must first confirm that your new registrar supports your domain’s specific extension (TLD), such as .io, .store, or .ai.

    Some registrars offer excellent pricing, but only for a few common TLDs, such as .com. Others, with features like premium DNS, may be more expensive. If your new registrar doesn’t support your TLD, the transfer will fail, so always conduct thorough research to avoid a dead end.

    How Long Does a Domain Transfer Take?

    The Domain transfer process is governed by ICANN (the organization that manages domain policies) to protect you from domain theft, which is why it isn’t instant and can take anywhere from a couple of days to a few minutes.

    These official guidelines allow the current registrar a period to process the request and give the domain owner time to cancel it if it was initiated fraudulently.

    Shortly after initiating the transfer with your new registrar, your old registrar will typically send a verification email or display a notification in your account dashboard asking you to explicitly approve the “transfer out”; by confirming this request, you can speed up the transfer process.

    We strongly recommend that you not wait until your domain is close to its expiration date to begin this process. Initiating a transfer at the last minute introduces significant risks, as potential issues like a locked domain, outdated contact information, or other delays could cause the transfer to stall within the 5-7 day window. If your domain expires while the transfer is pending, it will likely fail, causing your website and email services to go offline as it enters a costly and complicated redemption period. To ensure a smooth transition, it is highly recommended to initiate the domain transfer at least two weeks before its expiration date.

    Why Your Domain Transfer Might Be Denied

    A registrar can’t deny a transfer just because they don’t want to lose you as a customer. They must follow strict ICANN rules. A denial will happen for very specific, legitimate reasons.

    Your transfer request can be denied if:

    • The Domain is Locked: You must disable the “Registrar Lock” at your current registrar before proceeding with the transfer, as described below.
    • The Domain is Too New: A domain cannot be transferred within the first 60 days of its initial registration.
    • The Domain Was Recently Transferred: A domain cannot be transferred again within 60 days of a previous transfer.
    • You Have an Unpaid Bill: The transfer can be denied if there’s an outstanding balance for a previous registration period.
    • There’s an Identity Dispute: If there is reasonable evidence of fraud or a legitimate dispute over who the true owner of the domain is.
    • There is an active legal dispute: The domain is subject to a court order or a formal domain dispute proceeding.
    • It’s under the “60-Day Change of Registrant” lock: If you have recently changed the First Name, Last Name, Organization, or email address of the official domain registrant, ICANN rules require a mandatory 60-day lock on transfers.

    Step-by-Step: How to Transfer a Domain Safely

    Now that we have discussed the prerequisites for a domain transfer, let’s proceed with the process.

    Phase 1: Setting Up DNS Server for Zero Downtime

    Before transferring the domain to a new registrar, we will migrate our DNS server to a third-party DNS provider. Do not skip these steps, as this will guarantee a smooth transfer.

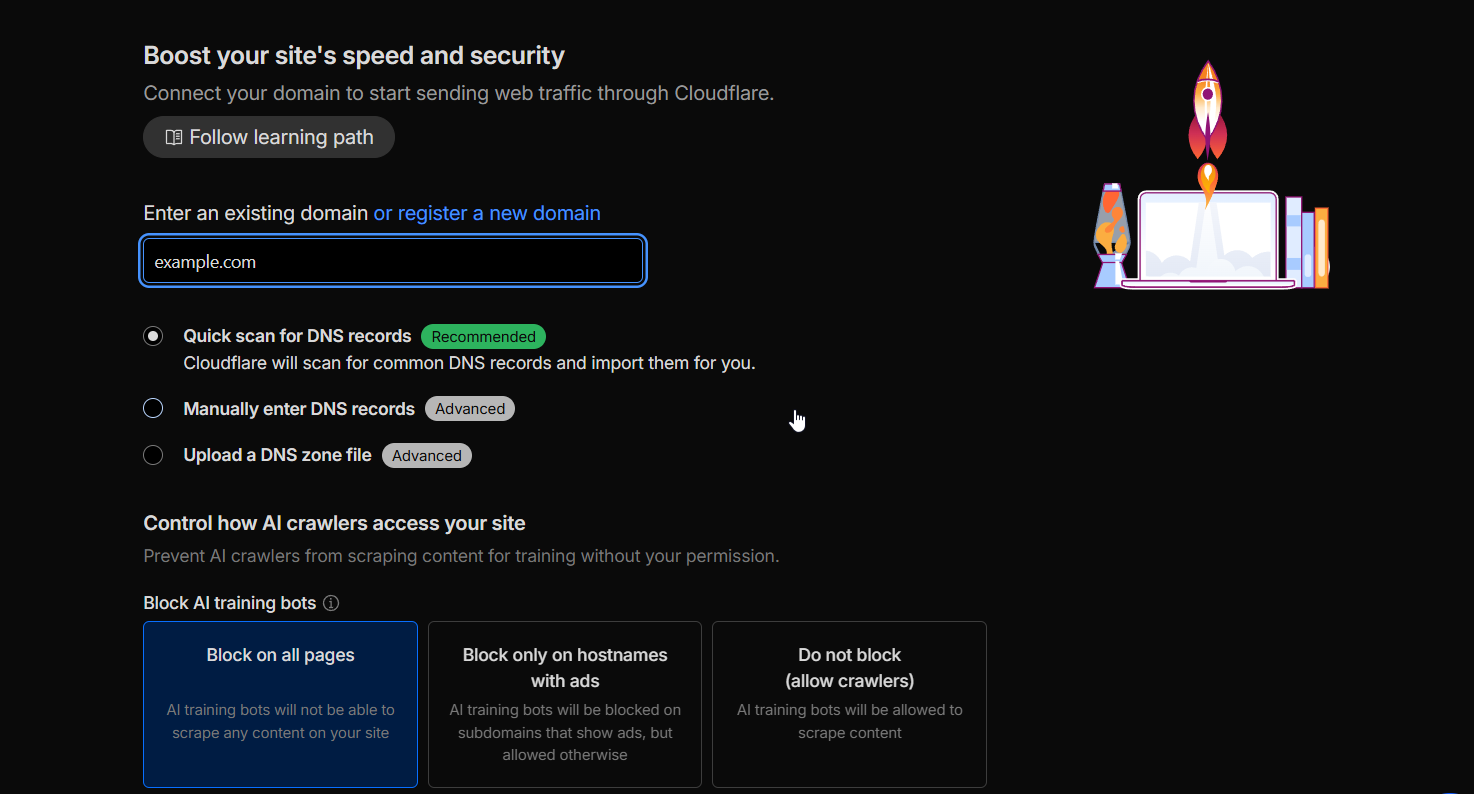
    1. Sign up for a Third-Party DNS Provider: In this tutorial, we will use Cloudflare for this process. Go to Cloudflare and sign up for a free account to follow along.
    2. Add Your Domain to the New DNS Provider: Cloudflare will prompt you to add a site. Enter your domain name. It will scan your existing DNS records from your current registrar.
    1. Verify All DNS Records Have Been Copied: This step is crucial. Cloudflare’s scan is good, but you must manually double-check that every single record has been imported.
      • Open a new tab and log in to your current registrar’s DNS management panel.
      • Compare the records side by side with what Cloudflare has imported. Pay close attention to:
        • A and AAAA records (your website’s IP address)
        • CNAME records (aliases, like www pointing to your main domain)
        • MX records (your email servers)
        • TXT records (for things like SPF, DKIM email authentication, and site verification)
        • Any other custom records you may have.
    2. Manually add any missing records in the Cloudflare DNS dashboard.
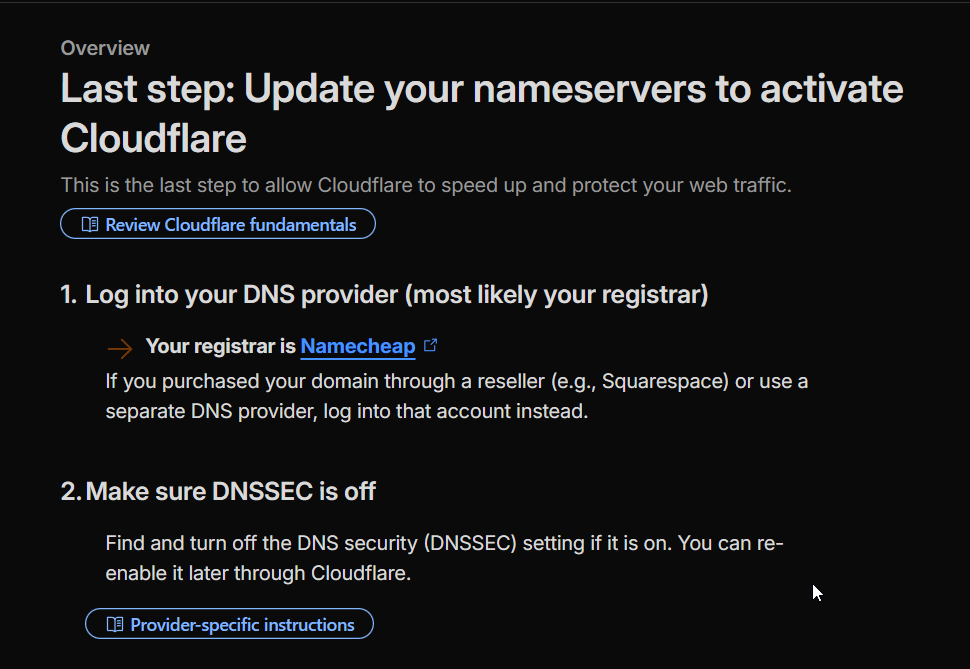
    3. Update Your Nameservers at Your Current Registrar: Cloudflare will provide you with two nameserver addresses (e.g., aragorn.ns.cloudflare.com and daphne.ns.cloudflare.com).
      • Go to your current registrar’s domain management panel.
      • Find the section for “Nameservers” or “DNS Servers”.
      • Select the option to use “Custom Nameservers”.
      • Delete the existing nameservers and replace them with the two provided by Cloudflare.
      • Save your changes.
    Doman name transfer
DNS
    1. Wait for DNS Propagation: It can take anywhere from a few minutes to 24 hours for this change to be recognized across the internet. You can monitor the progress using a tool like DNSChecker.org. Enter your domain name and select “NS” from the dropdown to see the nameserver propagation status. Once you see the new nameservers that you configured in the previous step, you’re all set.

    If you have completed the above steps, then your website and email are now being served by Cloudflare’s DNS. Your old registrar is essentially a billing entity. You are now free to transfer your domain without any risk of downtime.

    Phase 2: The Pre-Transfer Checklist (At Your CURRENT Registrar)

    Now, prepare the domain itself for the move. Log in to your current registrar and complete the following:

    1. Verify Admin Contact Info: Ensure the administrative contact email address listed for the domain is current and accessible. The transfer approval link will be sent to this address.
    2. Disable WHOIS/Domain Privacy: You’ll need to temporarily disable any privacy protection service. This allows the new registrar to see the official contact information. You can re-enable it after the transfer is complete.
    3. Unlock Your Domain: Domains are locked by default to prevent unauthorized transfers. Find the “Registrar Lock” or “Domain Lock” setting and disable it.
    4. Get the EPP/Authorization Code: This is a unique password for your domain. Look for an option like “Get EPP Code,” “Auth Code,” or “Transfer Code.” Copy this code to a safe place.

    Phase 3: The Transfer Process

    Once you have obtained your EPP code and transferred your DNS to a new DNS provider, it’s time to initiate the transfer.

    1. Sign Up at Your NEW Registrar: Create an account with your new Domain registrar.
    2. Initiate the Transfer: Find the “Transfer Domain” section and enter the domain name you wish to transfer.
    3. Provide the EPP Code: You will be prompted to enter the Authorization/EPP code you got from your old registrar.
    4. Complete the Purchase: A domain transfer almost always includes a one-year renewal of your domain registration. Complete the checkout process.
    5. Approve the Transfer via Email: Check the admin contact email inbox for an email from your registrar. It will contain a link to approve or deny the transfer; approve the transfer request to finalize the transfer.
    6. Wait for Confirmation: You will receive a final “Transfer Complete” email from your new registrar once the process is finished.

    Phase 4: Post-Transfer Cleanup

    Your domain is now safely at its new home. Let’s do a quick final checkup at your new registrar.

    • Verify Nameservers: Double-check that your domain’s nameservers are still pointing to Cloudflare (or your chosen DNS provider). They should have carried over, but it’s always a good idea to check.
    • Re-enable Registrar Lock: Lock your domain at the new registrar to prevent unauthorized transfers.
    • Re-enable WHOIS Privacy: Turn your domain privacy protection back on.
    • Check Auto-Renewal: Ensure auto-renewal is set to your preference to avoid accidentally losing the domain next year.

    Final Checks and Next Steps

    Once your domain transfer is complete, make sure the rest of your setup is just as dependable.

    RunCloud makes managing servers and domains effortless. If you’re using Cloudflare, RunCloud automatically syncs DNS records whenever you create or update an application – so your sites stay online without manual work.

    Keep your sites fast, secure, and always available. Sign up for RunCloud today.

    Frequently Asked Questions About Domain Transfers

    How long does the entire transfer process take?

    The transfer itself typically takes 5-7 days, as dictated by ICANN rules. However, if your old registrar allows you to explicitly approve the transfer, it can be completed in under an hour.

    Will my email or website go down?

    Not if you follow this guide. By moving your DNS to a third-party provider before starting (Phase 1), you decouple your live services from the registrar transfer. Your traffic never misses a request.

    I just registered or transferred this domain. Why can’t I transfer it again?

    ICANN, the governing body for domains, imposes a 60-day “Transfer Lock” on any domain that has been newly registered or recently transferred. You must wait for this period to end.

    What about my website hosting? Does this affect it?

    No. This process only changes your domain registrar. Your hosting provider, where your website’s files are stored, is completely unaffected.

  • How to Host Professional Email with Greatmail

    How to Host Professional Email with Greatmail

    As a RunCloud user, you already know how to manage high-performance websites and servers efficiently.

    But if you’re still using a personal address like mybusiness@gmail.com, you’re missing a key element of professionalism.

    While services such as Google Workspace and Microsoft 365 offer robust email solutions, their per-user costs can be high for small teams or side projects.

    In this guide, you’ll learn how to host professional, domain-branded email using Greatmail – an affordable alternative that integrates easily with your domain managed through RunCloud.

    Why Use a Dedicated Email Host Like Greatmail

    Using a dedicated email hosting provider like Greatmail offers several clear benefits:

    • Cost efficiency: Greatmail is considerably more affordable than enterprise platforms such as Google Workspace or Microsoft 365, especially if you only need core email functionality.
    • Professional image: An address that matches your domain instantly builds trust and brand credibility.
    • Simplified management: You don’t need to install or maintain your own mail server, which avoids deliverability, security, and spam blacklisting problems.
    • Improved reliability: Keeping your email separate from your website hosting ensures that email continues to function even if your web server experiences downtime.

    How to Set Up a Professional Email with Greatmail

    Let’s walk through the steps to configure your Greatmail instance.

    Step 1: Sign Up and Add Your Domain to Greatmail

    Before we touch anything in RunCloud or your DNS settings, you need to tell Greatmail that you want it to handle your email.

    1. Navigate to the Greatmail website and sign up for an account.
    2. Once you are logged into your new Greatmail admin dashboard, the first step is to add your domain name. For this, you will need to contact Greatmail support via their contact form or email. During normal business hours, they typically provision domains within 2 hours.
    3. Once it is configured, Greatmail will provide you with a specific set of DNS records. These records tell the Internet where to send your domain’s email. You’ll need these records in the next step.

    Step 2: Configure DNS Records

    Next, you will need to edit the DNS records for your domain to connect it to Greatmail’s servers. You can do this at the company where you registered your domain (e.g., Namecheap, GoDaddy, Google Domains) or a service like Cloudflare if you use one.

    You’ll need to add or update the following DNS records exactly as provided in your Greatmail dashboard.

    1. MX (Mail Exchanger) Records: Direct incoming email for your domain to Greatmail’s mail servers. These records tell other mail servers where to deliver messages for addresses like user@yourdomain.com.
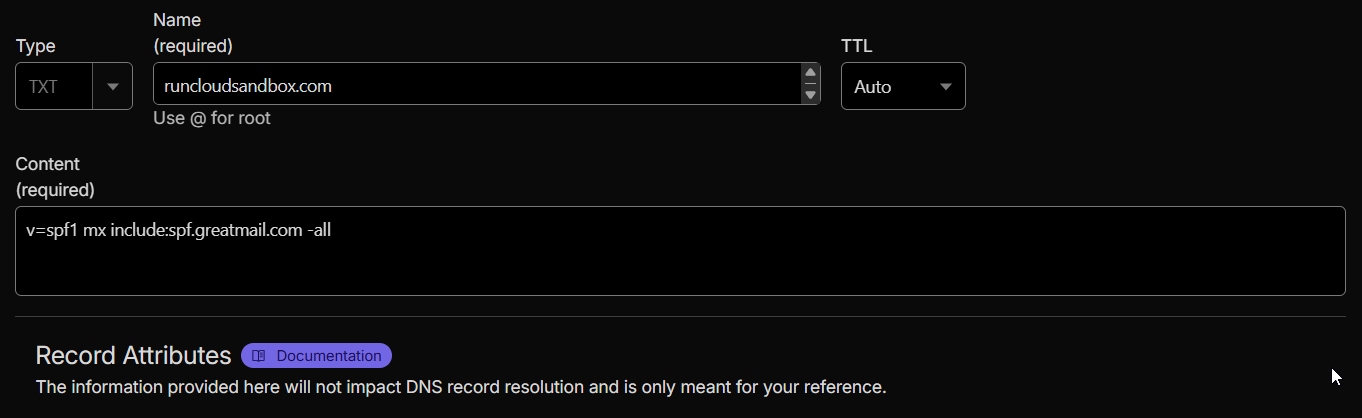
    1. SPF (Sender Policy Framework) Record: Add a TXT record authorizing Greatmail’s servers to send mail on your behalf. This helps prevent spoofing and improves deliverability.
    1. DKIM (DomainKeys Identified Mail) Record: Add the unique TXT record string provided by Greatmail to authenticate outgoing mail. This confirms to recipient servers that messages sent from your domain are genuine.

    Once these records are added, allow DNS propagation time (typically a few minutes to several hours) before proceeding.

    Step 3: Manage Email from the Greatmail Admin Panel

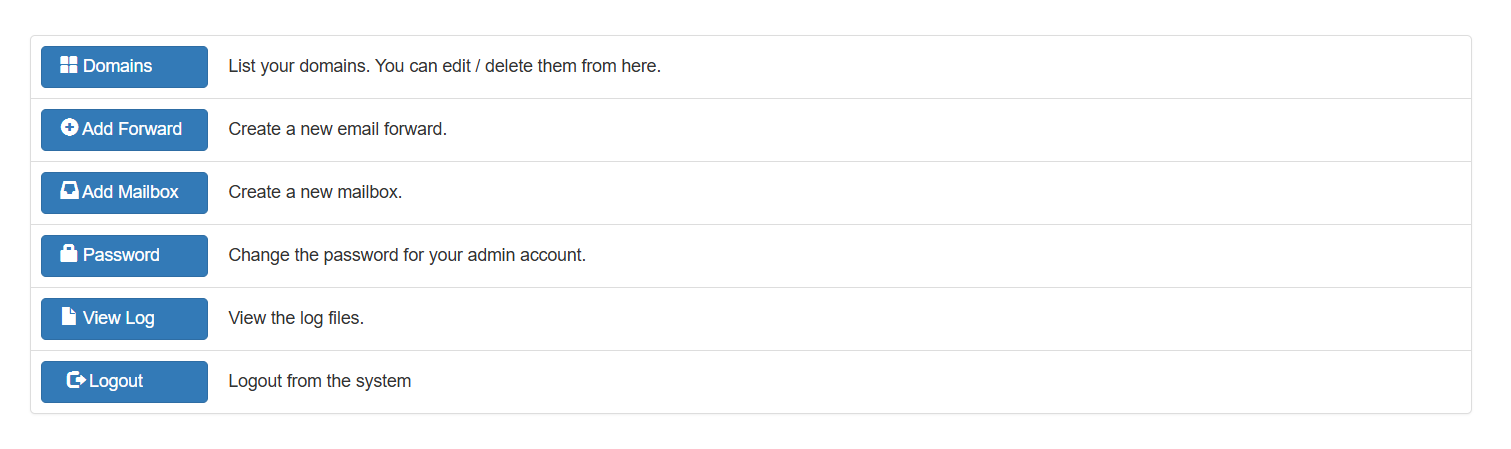
    Once your DNS is set up and verified by Greatmail, you can manage everything from their easy-to-use admin panel. Here’s a tour of the main features:

    List Your Domains

    This section provides an overview of all the domains you have added to your Greatmail account. From here, you can select a domain to manage, add new ones, or delete those you no longer need.

    Create a New Email Forward

    An email forward is an alias. This email address won’t have its own inbox but simply forwards all incoming mail to another address. This is perfect for roles like sales@yourdomain.com or info@yourdomain.com that you want to direct to your personal inbox.

    Create a New Mailbox

    A mailbox is a full email account with its own username, password, and storage space. You can access it via webmail or connect it to an email client like Outlook, Apple Mail, or Thunderbird.

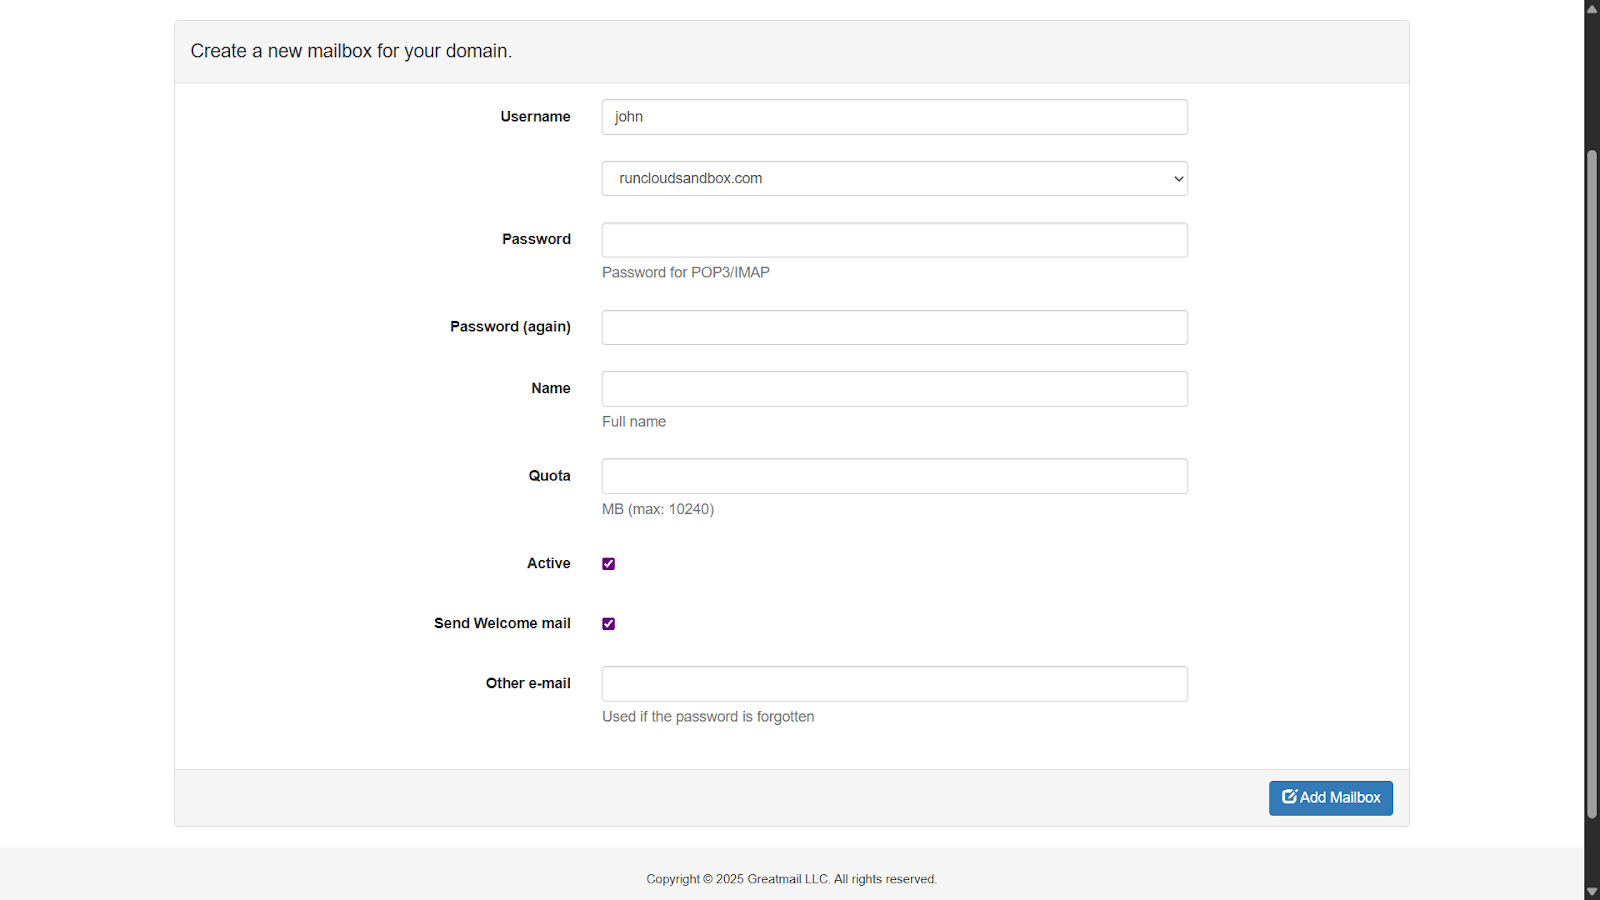
    When you select Create a new mailbox, fill in the following fields to create your professional address (for example, john@example.com):

    • Username: Enter only the part before the @ symbol (e.g., john).
    • Domain: Choose your domain (e.g., example.com).
    • Password: Enter a strong, unique password. This will be used for both webmail and email client access.
    • Name: The display name shown in recipients’ inboxes (e.g., John Doe).
    • Quota: Specify mailbox storage in MB (1000 MB = 1 GB; maximum 10240 MB).
    • Active: Keep checked to enable the account immediately.
    • Send Welcome Mail: Recommended. Sends a setup guide and server details to your alternate email.
    • Other Email: Add a recovery address for password resets (e.g., johns.personal.email@gmail.com).

    Once complete, click Add Mailbox. Your new mailbox will be created instantly.

    Step 4: Access and Use Your Email

    Once you create your email mailbox, you can access your messages, send emails, and manage your account from virtually any device. Here’s a summary of what you can do with your new mailbox:

    • Connect to Desktop & Mobile Apps: For a seamless, native experience, you can integrate your account directly into email clients like Microsoft Outlook, Apple Mail, Thunderbird, and various mobile mail apps on iOS and Android.
    • Integrate with Your Existing Gmail Account: If you love the Gmail interface, you can configure it to both send and receive emails from your new professional address, keeping everything in one place.

    How to Connect Your Account

    No matter which application you choose, the setup process follows the same basic principle. During a manual setup, you will simply need to enter the core server details for your account.

    To connect your Greatmail account, open your email client’s Add Account settings:

    • Outlook: File → Add Account
    • Apple Mail: Mail → Add Account
    • Gmail: Settings → Accounts and Import

    Then follow these steps:

    1. Choose Manual Setup, Advanced Setup, or Add Other Account instead of provider presets.
    2. Enter your full email address and password.
    3. Use the following server settings provided by Greatmail:

    Server Type

    Server Name

    Port

    Encryption

    IMAP (Incoming Mail)

    secure.greatmail.com

    993

    SSL / TLS

    POP3 (Incoming Mail)

    secure.greatmail.com

    995

    SSL / TLS

    SMTP (Outgoing Mail)

    secure.greatmail.com

    465 or 2500, 587, 2525

    SSL / TLS or STARTTLS

    Choose IMAP to sync mail across multiple devices or POP3 to download messages to one device.

    Save the configuration and allow your client to verify the connection. Your client will test the connection, and once verified, your mailbox will be ready to use.

    Wrapping Up: Host Professional Email the Easy Way

    You are now fully equipped to host your own email solution, sending and receiving messages from a credible address that builds trust with your customers and strengthens your brand. With this setup, you’re ready to grow your business without worrying about expensive per-user email fees.

    This guide shows how the right tools can simplify even complex technical workflows.

    RunCloud helps you do the same for your entire web infrastructure – from deploying applications to managing servers and securing your sites.

    Start your free RunCloud trial today and manage your websites, servers, and email with confidence.
    Frequently Asked Questions About Hosting Email with Greatmail

    Can I use Greatmail with my existing Gmail or Outlook account?

    Yes. You can connect your Greatmail address to Gmail, Outlook, or any IMAP/SMTP-compatible client.
    In Gmail, go to Settings → Accounts and Import and add your Greatmail credentials under “Send mail as” and “Check mail from other accounts.”
    In Outlook, use the manual setup option and enter Greatmail’s server settings exactly as provided in your dashboard.

    Does Greatmail support both IMAP and POP3?

    Yes. Greatmail supports both protocols.
    IMAP keeps your messages and folders synced across all devices.

    POP3 downloads emails to a single device and removes them from the server after retrieval.
    IMAP is recommended for most users who access their email from multiple devices.

    How long does DNS propagation take after adding Greatmail records?

    DNS propagation usually completes within a few minutes, but can take up to 24 hours depending on your domain registrar or DNS provider.
    You can track progress using a DNS-checking tool to confirm that the MX, SPF, and DKIM records have fully updated.

    Can I host multiple domains under one Greatmail account?

    Yes. You can manage multiple domains from the Greatmail admin panel.
    Each domain can have its own mailboxes, forwarding rules, and quotas. This is especially useful for agencies or businesses operating several brands.

    How secure is Greatmail compared to self-hosting email?

    Greatmail uses SSL/TLS encryption for all connections and enforces authentication with SPF and DKIM.
    Because Greatmail manages its own infrastructure, you benefit from maintained mail servers, spam protection, and security updates without having to run your own mail system.

    What happens to my email if I move my website to another host?

    Your email will continue to function normally as long as your DNS MX records still point to Greatmail’s servers.
    Keeping email hosting separate from web hosting ensures continuous email service, even if your website is migrated or temporarily offline.

    Does Greatmail work with RunCloud servers directly?

    Yes. You can continue managing your domain, web applications, and SSL certificates in RunCloud while Greatmail handles all mail delivery. They operate independently, which keeps your email reliable and unaffected by any changes to the web server.

  • The 5 Best UptimeRobot Alternatives for Website Monitoring

    The 5 Best UptimeRobot Alternatives for Website Monitoring

    If your website goes down, every second counts. Uptime monitoring tools alert you before visitors or customers notice.

    Uptime Robot has been the go-to option for years, but its limits and pricing have pushed many users to look elsewhere.

    Here are five reliable, free Uptime Robot alternatives worth considering in 2025 – from simple hosted options to powerful open-source tools you can run yourself.

    Let’s get started!

    What Website Uptime Monitoring Actually Does (and Why It Matters)

    Website Uptime Monitoring is the process of continuously testing a website or web service to ensure it is online and accessible to end-users. It is a specialized service that uses a global network of servers to send requests to your website, API, or server to check for a valid response.

    If an error is found, it immediately triggers an alert to notify you via channels like email, SMS, or Slack so you can resolve the issue before it significantly impacts your users and business.

    In addition to simple “up” or “down” checks, modern monitoring tools also track performance metrics like response time, verify SSL certificates, and check for specific keywords on a page to confirm everything is functioning correctly.

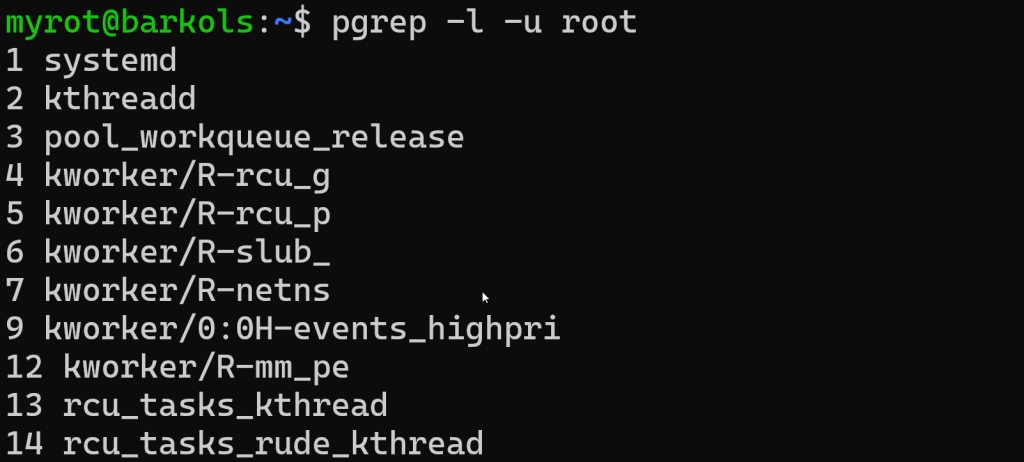
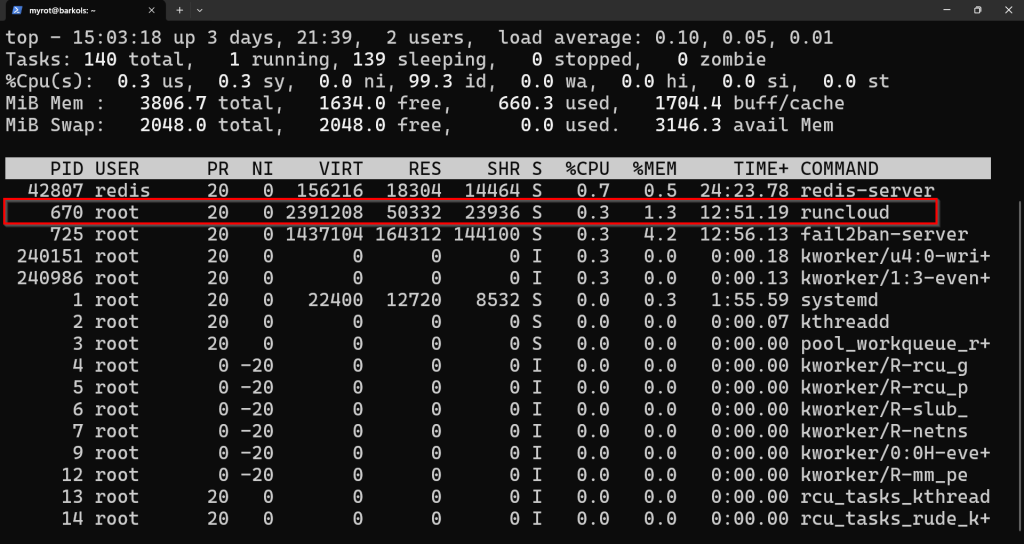
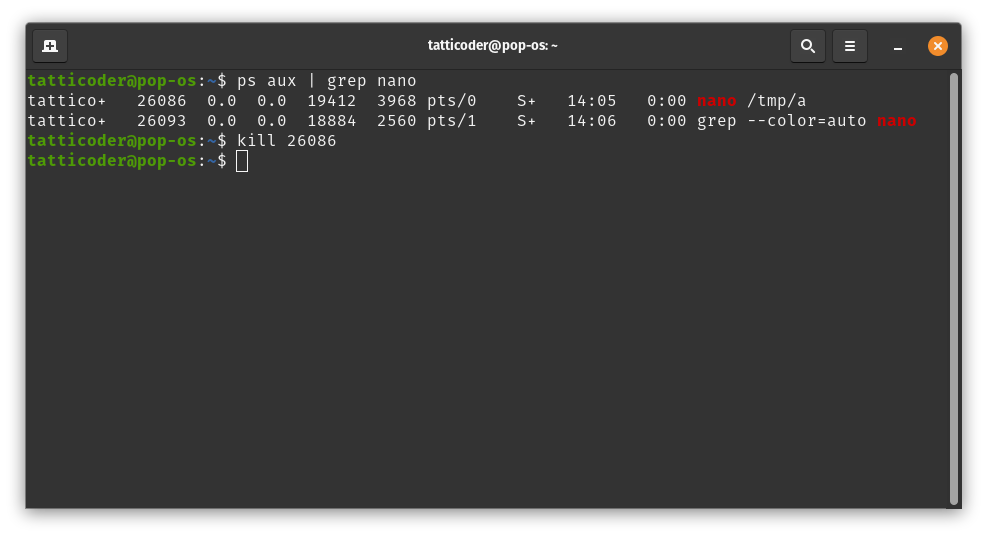
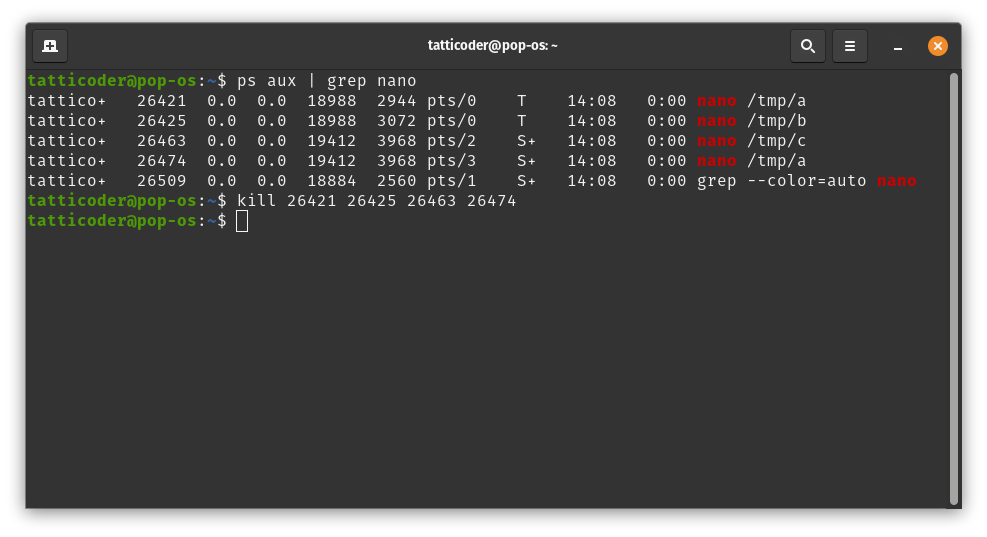
    Suggested read: How to Check Running Processes in Linux Using ps, top, htop, and atop Commands

    Key Features to Look for in Uptime Monitoring Tools

    When choosing an uptime monitoring tool, focus on features that ensure accuracy and fast alerts:

    • Frequent checks: Every 1–5 minutes from multiple global locations.
    • Smart alerts: Email, SMS, Slack, or Discord integrations.
    • Public status pages: Communicate incidents and maintenance clearly.
    • Multiple check types: HTTP/S, Ping, TCP, and SSL monitoring.
    • Extra insights: Response time, incident logs, and uptime reports.

    Suggested read: How To Install New Relic Monitoring on RunCloud

    Top 5 Free Uptime Robot Alternatives for 2025

    Here are the best free alternatives to Uptime Robot, each offering a powerful feature set for keeping your services online.

    1. Uptime Kuma (Self-Hosted, Free)

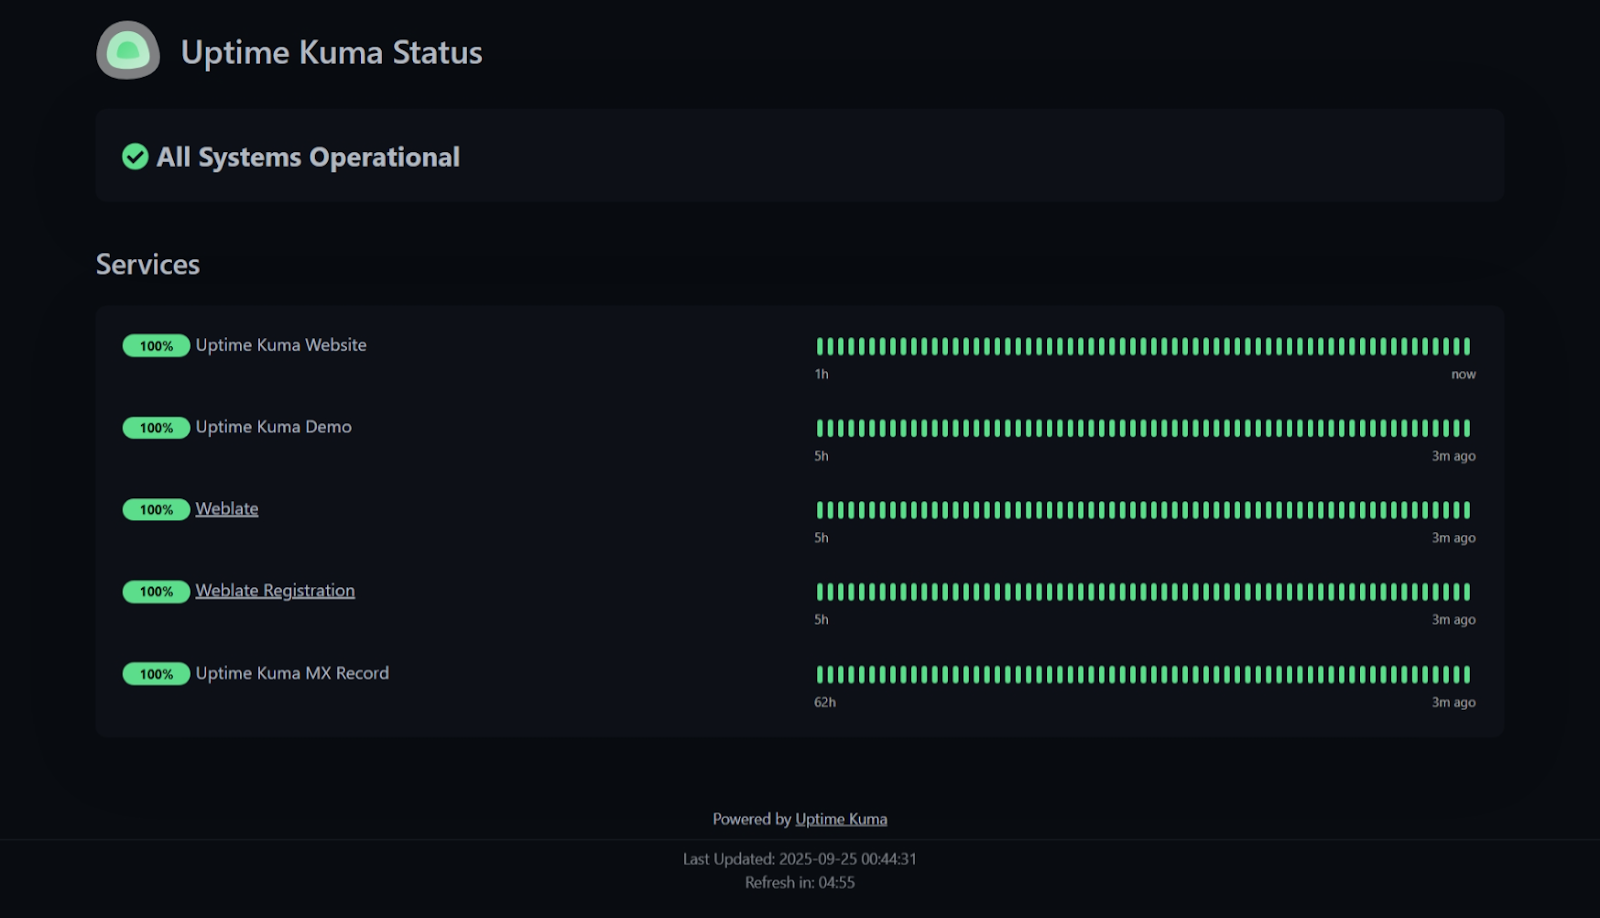
    Uptime Kuma is a self-hosted, open-source uptime monitor with a clean interface and advanced features. You can create unlimited monitors and set check intervals as short as 20 seconds. Because it runs on your own server, you control performance, data, and reliability.

    It supports a wide range of monitor types, from standard HTTP(s) and TCP ports to DNS records and Docker containers. It integrates with over 90 notification services to ensure you never miss an alert. Its highly customizable status pages allow you to present a professional and transparent view of your service health to users.

    If you want maximum control and reliability, self-hosting Uptime Kuma on a Virtual Private Server (VPS) with a management panel like RunCloud is the ideal setup. Hosting on a RunCloud-managed VPS gives you full server control, ensuring more reliable uptime than on shared hosting, where “noisy neighbors” can drain resources and impact performance.
    Suggested read: How UptimeRobot Can Save Your Website from Downtime Disasters

    2. Pulsetic

    Pulsetic is a fantastic managed monitoring service with a user-friendly interface and a surprisingly generous free-forever plan. It’s an excellent choice for startups, developers, and small businesses that want a powerful tool without the need for self-hosting. The free plan includes 10 monitors, SSL certificate monitoring, and unlimited, customizable status pages that can even be mapped to a custom domain (this feature is often reserved for paid tiers in other services).

    The status pages are beautifully designed and can be translated into any language, which makes it easy to keep a global user base informed. Alerts can be configured for email, Slack, Telegram, and other channels, ensuring your team is notified promptly. Advanced users would like to know that Pulsetic offers insightful performance reports and the ability to customize request headers, which makes it a scalable solution that can grow with your project.

    Suggested read: How To Monitor Your Web App’s RAM & CPU Usage with Netdata

    3. HetrixTools

    HetrixTools offers one of the most feature-rich free uptime monitoring plans out there. Its free-forever plan includes 15 uptime monitors with a rapid 1-minute check frequency from 4 global locations, which helps ensure outage detections are accurate and not just a regional network glitch. This plan also provides a public status page to maintain transparency with your customers and even includes a server resource monitor to help you prevent outages before they happen.

    In addition to simple uptime checks, HetrixTools provides valuable diagnostic tools during an outage and performs necessary actions such as collecting ping and MTR samples to help you debug the issue faster. The platform also monitors domain and SSL certificate expiration and sends warnings to prevent unexpected downtime caused by administrative oversights.

    Suggested read: 7 Best Control Panels for VPS Management (Free & Paid)

    4. Monika (Open Source, Free)

    Monika is a command-line uptime monitor designed for developers who like configuration-as-code. It uses a simple YAML setup and supports automated checks for downtime and slow responses – ideal for CI/CD pipelines or scheduled synthetic tests.

    Like Uptime Kuma, Monika is self-hosted and gives you complete control over your monitoring environment. And you can host it on a VPS managed by RunCloud, which ensures that your monitoring is consistent and reliable.

    Additionally, the RunCloud platform simplifies server management with features like Auto-healing, which can automatically apply updates or restart server services, reducing downtime caused by human error or delays. This automated server management, combined with Monika’s powerful configuration, creates a highly resilient and developer-centric monitoring system.

    Suggested read: Uptime Monitoring Tools: Why You Need Them, and What to Look for

    5. Hyperping

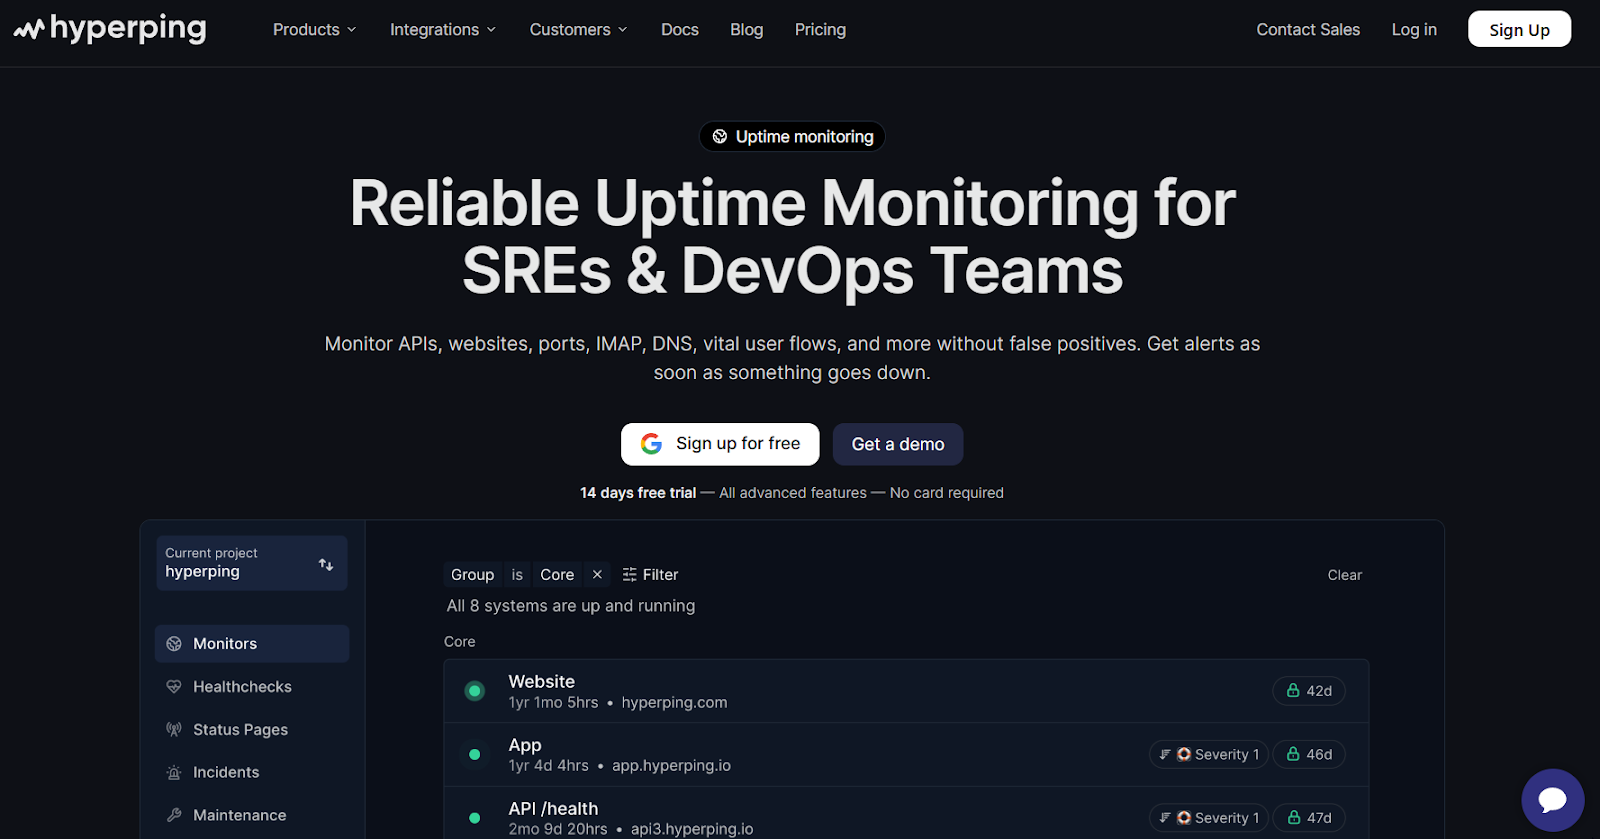
    Hyperping is a premium-feeling monitoring service that offers a sleek user interface, fast alerting, and beautifully designed status pages. While its free plan is not as extensive as some of the other services discussed in this article, it still provides access to advanced features that showcase its power, including synthetic monitoring and checks from several global regions.

    Hyperping is designed for teams that prioritize incident communication and a polished user experience. It offers features like status page subscriptions, multi-language support, and smart on-call scheduling.
    It integrates with popular communication platforms like Slack, Microsoft Teams, Google Chat, Discord, and Telegram for instant alerts. It also supports PagerDuty, OpsGenie, Intercom, Webhooks, and traditional phone and SMS notifications for comprehensive incident management and communication.

    Suggested read: 8 Best GTmetrix Alternatives for Website Performance Testing (Includes Free)

    From Monitoring to Full Uptime Management

    In this post, we’ve highlighted several powerful tools for tracking websites and applications. In addition to the tools we discussed, there are many other excellent solutions available.
    Monitoring tells you when your site is down – but prevention keeps it online.
    The best results come from combining smart monitoring tools with a well-managed, high-performance server environment. This is where a comprehensive server management platform becomes indispensable.

    Why RunCloud is the Central Hub for Reliable Uptime

    While external monitoring tools tell you when you’re down, RunCloud helps you understand why and actively works to prevent it from happening in the first place.

    • Integrated Server Health Monitoring: At its core, RunCloud provides built-in server monitoring that gives you a real-time view into critical health metrics. By tracking CPU, RAM, and disk usage, you can move beyond simple “up” or “down” alerts to analyze the root causes of performance degradation and potential downtime. This insight allows you to optimize your server resources effectively, ensuring high availability.
    • Automated Healing for Proactive Stability: One of RunCloud’s most powerful features is its automated healing service. Instead of waiting for a critical alert and manually intervening, RunCloud can be configured to automatically restart essential services if they fail, providing a self-healing infrastructure that minimizes downtime without human intervention.

    RunCloud gives you more than uptime alerts – it keeps your servers healthy, fast, and self-healing.

    Start your free RunCloud trial today and experience how much uptime improves when your infrastructure manages itself.

    FAQs on Free Uptime Robot Alternatives

    What is the best free uptime tool?

    Uptime Kuma is widely considered the best free uptime tool if you can host it yourself. It offers unlimited monitors and is completely open-source. If you want a managed service that requires no setup, then you can consider Better Uptime.

    How does Uptime Kuma work?

    Uptime Kuma works by periodically sending requests to your defined services, such as websites (HTTP/S), ports (TCP), or DNS records, to check their status. If a check fails to receive the expected response within a set time, it triggers a notification through one of its many integrated channels, like Slack or Telegram.

    Is there a good self‑hosted monitor?

    Yes, Uptime Kuma is an excellent and incredibly popular self-hosted uptime monitor that is both feature-rich and easy to deploy using Docker. It provides a modern user interface and extensive notification options without any subscription fees or limitations on the number of monitors.

    What is the cheapest Pingdom alternative?

    The cheapest Pingdom alternative is a free, self-hosted solution like Uptime Kuma, where your only cost is the minimal server resources to run it. If you prefer a managed SaaS product, Pulsetic’s generous free plan is a powerful and cost-effective alternative to Pingdom’s paid plans.

    What is the best open source uptime monitor?

    Uptime Kuma stands out as the best free open-source monitor for its quick setup, clean interface, and complete feature set. It delivers a polished, premium experience that competes with paid services, all while being completely free and community-driven.

    Are free uptime tools accurate enough?

    Yes, for the vast majority of use cases like websites, blogs, and APIs, free uptime tools are more than accurate enough for reliable monitoring. They typically use multiple global check locations to confirm downtime and prevent false positives, making them a dependable choice for most users.

  • How to Fix the Cloudflare HTTP Error 526

    How to Fix the Cloudflare HTTP Error 526

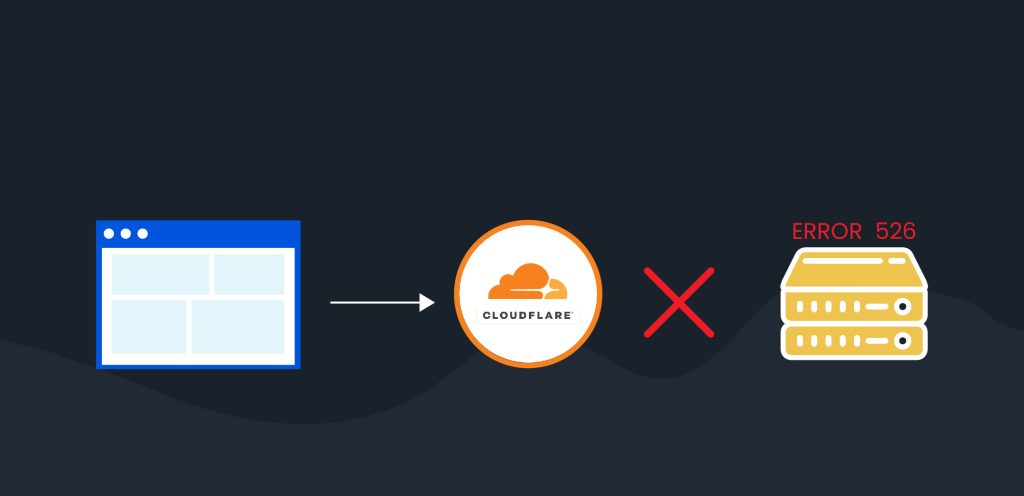
    If you’re seeing Cloudflare HTTP Error 526 (Invalid SSL Certificate) on your site, it means Cloudflare couldn’t verify the SSL certificate on your server. The result is that your visitors are blocked from accessing your website until it’s fixed.

    In this guide, we’ll show you how to fix the Cloudflare HTTP Error 526 step by step. You’ll learn what the error means, the most common causes, and the exact fixes you can apply on your RunCloud-managed server to get your site back online quickly and securely.

    Let’s get started!

    What Causes Cloudflare HTTP Error 526?

    The HTTP Error 526 is a specific error message generated by Cloudflare. It tells us that Cloudflare successfully connected to your origin web server (the server you manage with RunCloud), but it was unable to validate the SSL/TLS certificate presented by that server.

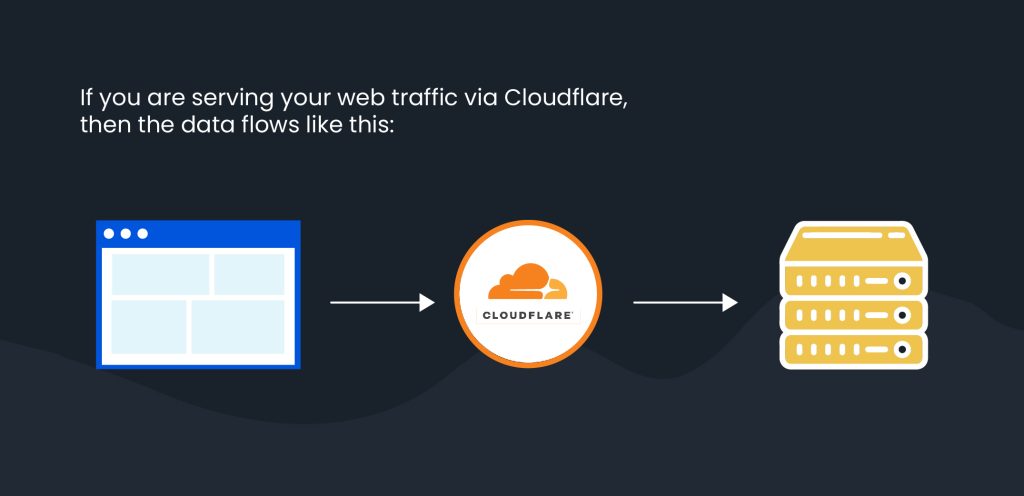
    Your Visitor → Cloudflare → Your RunCloud Server

    Your Visitor → Cloudflare → Your RunCloud Server

    The error occurs on the second leg of this journey, between Cloudflare’s network and your server. Cloudflare is acting as a security guard, and when it approached your server, the identification (the SSL certificate) was either missing, expired, or not from a trusted source.

    Cloudflare SSL/TLS Modes Explained (and How They Affect Error 526)

    The root cause of the Error 526 almost always lies within your Cloudflare SSL/TLS encryption settings. Cloudflare offers several ways to secure the connection to your server. The mode you have selected determines how strictly Cloudflare validates your server’s SSL certificate.

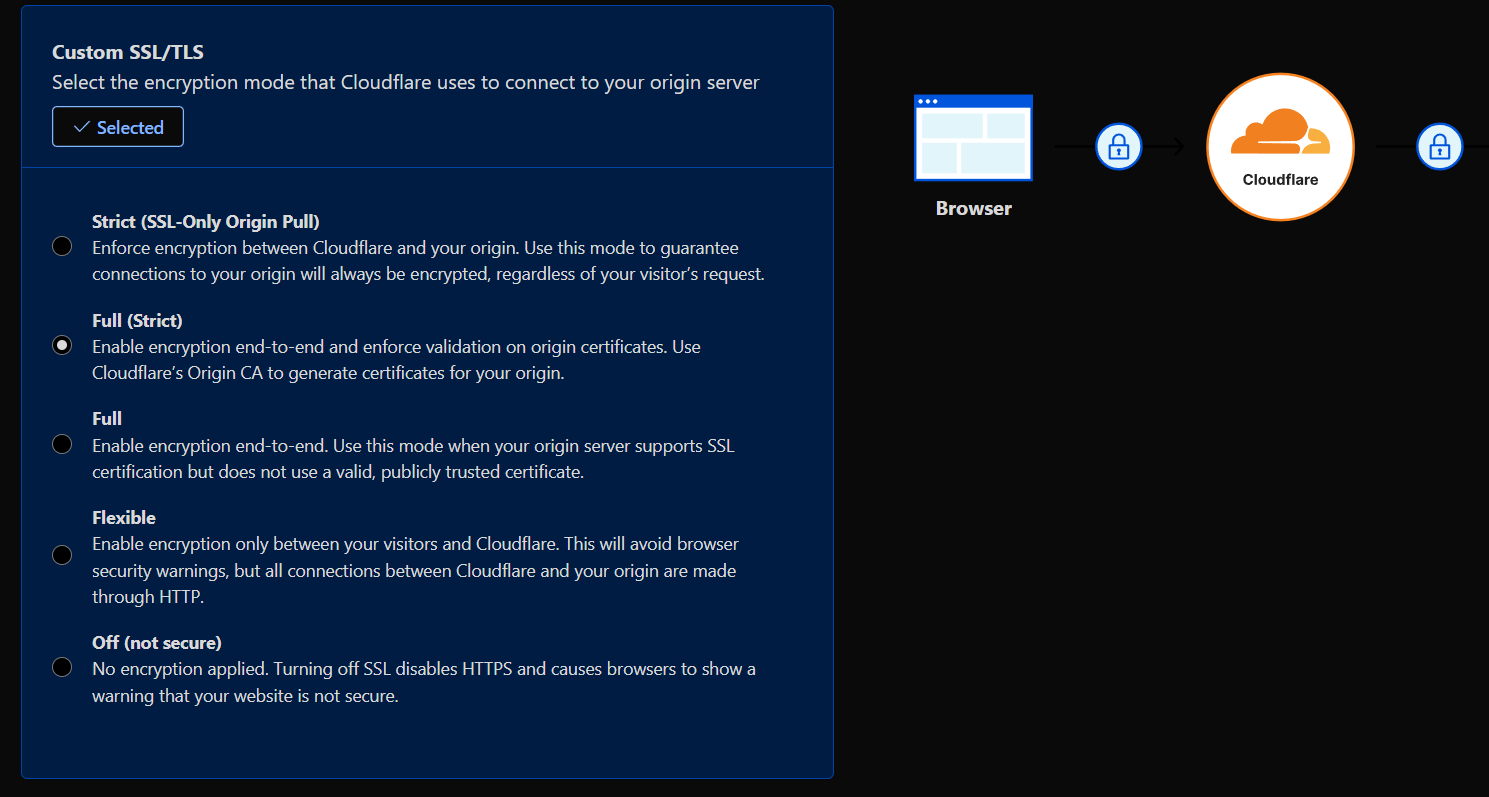
    You can find this setting in your Cloudflare dashboard under SSL/TLS > Overview:

    • Flexible: This mode encrypts traffic between the visitor and Cloudflare, but not between Cloudflare and your server. This is not the most secure method, but it is good enough for hobby sites.
    • Full: This mode encrypts the entire connection, but Cloudflare does not verify the identity of the SSL certificate on your origin server. It will accept an expired, self-signed, or unmatching CN/SAN entry for the requested hostname.
    • Full (Strict): This is a secure and recommended mode. It encrypts the entire connection and requires that your origin server has a valid, unexpired SSL certificate issued by a publicly trusted Certificate Authority (CA) such as Let’s Encrypt or Cloudflare’s own Origin server.

    The HTTP Error 526 occurs when your Cloudflare SSL/TLS mode is set to Full (Strict), but the certificate on your RunCloud server does not meet these strict requirements.

    Our goal is to fix the server’s certificate, not to downgrade this security setting.

    How to Fix Cloudflare HTTP Error 526: Step-by-Step Guide

    Follow these steps in order to diagnose and fix the problem efficiently.

    Step 1 – Check Your Cloudflare SSL/TLS Encryption Settings

    First, let’s be certain that the Full (Strict) setting is the trigger.

    1. Log in to your Cloudflare account and select your domain.
    2. Navigate to the SSL/TLS section from the left-hand menu.
    3. On the Overview tab, look for the SSL/TLS Encryption mode.
    4. Confirm that it is set to Full (Strict). If it is, proceed to the next step.

    Step 2 – Verify Your SSL Certificate on RunCloud

    Now, we need to inspect the SSL certificate that is installed on your server for the specific web application.

    Method A: Check SSL Certificates in the RunCloud Dashboard

    The RunCloud dashboard provides an easy way to check your SSL status.

    1. Log in to your RunCloud account and navigate to your server.
    2. Select Web Applications from the menu.
    3. Click on the name of the web application that is experiencing the error.
    4. In the application’s menu, click on SSL.

    Here, you will see the current SSL status. Pay close attention to the Provider, the Status (it should be “Active”), and the Valid Until date to ensure it has not expired.

    Method B: Check SSL Certificates with External Tools

    For a definitive, external check, you can use an online SSL checker or a command-line tool like openssl. These tools verify what the outside world, including Cloudflare, sees.

    Using the openssl command from your local terminal (replacing yourdomain.com with your actual domain and YOUR_SERVER_IP with your server’s IP address):

    openssl s_client -connect YOUR_SERVER_IP:443 -servername yourdomain.com

    In the output, look for the certificate details, including the “subject” (which should match your domain name) and the “notAfter” date (the expiration date).

    Step 3 – Fix Common SSL Certificate Issues Causing Error 526

    Based on what you discovered in Step 2, here are the most common scenarios and their solutions within RunCloud.

    Fix 526 Error: No SSL Certificate Installed

    If the RunCloud dashboard shows “No SSL Configuration” or an external check fails, you simply need to install a certificate.

    In the RunCloud SSL section for your web application, select Let’s Encrypt as the SSL Provider. Ensure your domain’s DNS is pointing correctly to the server, then click “Install SSL Certificate”. RunCloud will automatically provision and install a trusted certificate.

    Fix 526 Error: Expired SSL Certificate

    Let’s Encrypt certificates are issued with a 90-day validity period. RunCloud attempts to automatically renew your certificates well before they expire. However, this process can occasionally encounter issues, such as temporary DNS validation problems or other specific server conditions, which may prevent the renewal from completing successfully.

    If the automated renewal has failed, you can simply click the “Renew” button to trigger the process manually. This action immediately sends a new request to Let’s Encrypt to provision and install a valid certificate.

    Fix 526 Error: Self-Signed Certificate

    A self-signed certificate can be created by anyone and is used for testing within internal networks. Because it lacks external validation from a trusted third party, it cannot be automatically verified for authenticity.

    Therefore, when Cloudflare’s SSL/TLS encryption is set to the highly secure Full (Strict) mode, it will always reject a self-signed certificate and trigger the HTTP 526 error. The most secure and permanent solution is to replace the self-signed certificate with a certificate from a trusted authority.

    On the RunCloud platform, you can easily do this by removing the existing custom SSL configuration and using the integrated Let’s Encrypt functionality to install a valid, trusted certificate.

    Fix 526 Error: Certificate Name Mismatch

    This happens when the certificate does not cover all the hostnames for your site. For example, the certificate might only be for example.com, but visitors (and Cloudflare) are trying to reach www.example.com.

    When installing the Let’s Encrypt certificate in RunCloud, make sure to add all domain variations you use (e.g., both the root domain and the www subdomain) to the list of domains to be included in the certificate.

    Fix 526 Error: Incomplete SSL Certificate Chain

    A trusted SSL certificate relies on a “chain of trust,” which includes intermediate certificates linking your domain certificate back to a trusted root CA.

    This is rare when using RunCloud’s Let’s Encrypt integration, as it provides the complete chain. If you are installing a Custom SSL certificate from another provider, ensure you are pasting the entire certificate chain (often called fullchain.pem or a .crt file with multiple certificate blocks) into the “SSL Certificate” field, not just the single-domain certificate.

    Suggested Read: Fixing redirect loop on Cloudflare SSL

    Permanent Fix – Install a Cloudflare Origin Certificate

    If you want a permanent and guaranteed solution, you can use a Cloudflare Origin Certificate. This is a free, long-lasting certificate that you install on your RunCloud server. It is not publicly trusted, but it is specifically trusted by Cloudflare’s network, which resolves the 526 error perfectly.

    1. In Cloudflare, navigate to SSL/TLS > Origin Server.
    2. Click Create Certificate. Follow the prompts, leave all the values to default, and generate the certificate.
    Fixing HTTP error 526 with Cloudlfare origin certificate
    1. Cloudflare will show you an Origin Certificate and a Private Key. Copy both of these.
    2. In your RunCloud application’s SSL section, choose the Custom SSL option.
    3. Paste the Origin Certificate into the “Certificate” box and the Private Key into the “Private Key” box.
    1. Click Install SSL Certificate.

    Temporary Workaround – Switch to “Full” Mode in Cloudflare

    If your site is experiencing critical downtime and you need an immediate, temporary fix while you sort out the certificate issue, you can downgrade Cloudflare’s security.

    Go to Cloudflare > SSL/TLS > Overview and change the mode from Full (Strict) to Full.

    This will bring your site back online, but this is not a permanent solution.

    Downgrading your Cloudflare security exposes a potential security gap between Cloudflare and your server. Your top priority should still be to install a valid certificate on your server and switch back to Full (Strict) mode as soon as possible.

    Fix Cloudflare HTTP Error 526 with RunCloud

    The Cloudflare HTTP Error 526 is not a server crash, it’s a warning that your SSL setup isn’t fully trusted. With the right configuration, you can resolve it quickly and make sure it doesn’t come back.

    RunCloud makes SSL management simple.

    From one dashboard, you can install Let’s Encrypt, renew certificates automatically, or configure a Cloudflare Origin Certificate for long-term stability. That means less downtime, fewer SSL headaches, and a more secure experience for your visitors.

    Ready to fix Cloudflare errors and manage your servers with confidence? Start your free RunCloud trial today.

  • How to Check OS Version in Linux via Command Line

    How to Check OS Version in Linux via Command Line

    Whether you’re running Ubuntu, Arch, Debian, or any other Linux distribution, knowing how to quickly and accurately identify your OS version can be the difference between smooth operations and compatibility nightmares.

    And knowing your Linux OS version precisely is essential when troubleshooting a software installation, planning a system upgrade, or ensuring security patch compatibility.

    This straightforward guide will demystify the process of checking your Linux operating system version and provide multiple command-line techniques that work across various distributions, such as Ubuntu, CentOS, Fedora, and more.

    Understanding Linux Versions and Distributions

    Before checking your system’s version, remember that Linux comes as a “distribution” – a complete operating system built around the Linux kernel. While hundreds of different distributions are available, most systems you will encounter belong to one of two major families: Debian or Red Hat.

    For example, many servers run on distributions from the Red Hat family, such as Red Hat Enterprise Linux (RHEL) itself or others built to be compatible with it, like Rocky Linux, AlmaLinux, and CentOS Stream. On the other hand, an enormous community of developers and desktop users prefers distributions from the Debian family; the most famous is Ubuntu, which is based directly on Debian.

    This family relationship is important because software packaged for one distribution, like RHEL, will often work on its close relatives. Similarly, an application designed for Debian will usually run perfectly on Ubuntu.

    Although most Linux systems are based on these two lineages, a handful of users rely on other excellent independent distributions like Arch Linux or SUSE. Therefore, identifying your OS version is about finding the specific distribution name (e.g., Ubuntu) and its release number (e.g., 22.04), which tells you about its features and software family.

    How to Check OS Version in Linux Command Line

    There are six ways to check your Linux version via the command line. Here’s our guide to all six methods.

    1. How to Check OS Version in Linux with lsb_release

    The lsb_release -a command provides comprehensive information about your Linux distribution, including version details and codename. This command works across most Linux distributions and offers a quick, standardized way to retrieve system information.

    The lsb_release -a command

    Suggested read: How to Check Linux CPU Usage or Utilization? (5 Ways)

    2. How to Check OS Version in Linux with /etc/os-release

    The /etc/os-release file contains detailed distribution-specific information that can be viewed using the cat command. It provides the operating system name, version, and other identification details. This method offers a reliable and consistent approach to checking the OS version across different Linux distributions.

    /etc/os-release file

    Suggested read: How to Kill a Process in Linux From the Command Line

    3. How to Check OS Version and Kernel in Linux with uname

    The uname -a command displays system information, including kernel version and system architecture, which helps identify the core operating system details. If you want to check the kernel version, you can use uname -r to view the kernel release information.

    The uname -a command

    Let’s break down this example piece by piece so you can understand what it is telling you:

    FieldExample valueMeaning
    Kernel nameLinuxThe kernel in use
    Hostnameserver01The system’s network name
    Kernel rel.6.8.0-52-genericKernel version number
    Build info#53-Ubuntu SMP Fri Jul…Who built it and when
    Archx86_64CPU architecture (64-bit here)
    OS typeGNU/LinuxConfirms the operating system

    Knowing this information is extremely useful when downloading software, as you must choose a package that matches your system’s architecture (x86_64 or arm64).

    Suggested read: How to Find Most Used Disk Space Directories and Files in Linux

    4. Using the hostnamectl Command

    The hostnamectl command offers a modern, systemd based approach to retrieving system information. It displays detailed operating system and hardware details in a clean, readable format. This command is particularly useful for systems using systemd as their init system.

    The hostnamectl command

    Suggested read: Mastering the Echo Command in Linux (with Practical Examples)

    5. Using the /etc/issue File

    The /etc/issue file briefly describes the operating system and can be viewed using the cat command. It provides a quick glimpse of the system’s distribution and version. This method offers a simple, straightforward way to check basic system identification information.

    Suggested read: How to List Linux Users and Groups in Ubuntu with Command Line

    6. Using the cat /proc/version Command

    The cat /proc/version command reads the Linux kernel version directly from the virtual /proc filesystem, offering a quick and direct method to view kernel information. This command provides raw kernel details and is particularly useful for technical users seeking precise system information.

    Checking the Linux Kernel Version via CLI

    The Linux kernel is software responsible for managing your computer’s hardware and resources. While you will more frequently need to know your distribution’s version, sometimes a specific piece of software or a troubleshooting guide will require you to know the version of the Linux kernel itself.

    The kernel has its own version number, separate from the distribution’s version number. Fortunately, there is a simple and universal command to find this information on any Linux system.

    To see which kernel version your system is running, type the following command into the terminal and press Enter:

    uname -r

    After you run the command, your terminal will display your kernel version. In the above screenshot, the kernel version is 6.8.0-78-generic. This tells you the kernel’s major and minor release numbers that your system is currently using.

    Quick Guide: Checking Your Linux OS Version

    If you just want the commands without explanations, here’s a quick reference:

    Command to TypeWhat It Shows YouWhen to Use It
    hostnamectlA clean, easy-to-read summary including the distribution name, version, and kernel.Best for a quick overview.
    lsb_release -aThe full distribution name, version number, and official codename (e.g., “Jammy Jellyfish”).Use this when you need the official distribution details.
    cat /etc/os-releaseDetailed information about the distribution is formatted as simple text variables.This file is on almost all modern Linux systems and is a great alternative if other commands fail.
    cat /etc/issueA single line of text usually identifies the distribution and its version.This file contains the message shown before you log in, so it’s a simple way to see the OS name.
    uname -aThe Linux kernel version and system architecture (e.g., 64-bit), not the distribution version.Use this specifically when you need to know the kernel version for a driver or advanced software, not the OS name like “Ubuntu.”
    cat /proc/versionExtremely detailed information about the Linux kernel, including how and when it was compiled.This advanced command is useful for deep troubleshooting or when you need technical details about the kernel itself.

    Wrapping Up: When and Why to Check Your Linux OS Version

    Understanding your Linux OS version becomes particularly important when deploying web applications, and this is where platforms such as RunCloud shine for developers and website owners.

    RunCloud simplifies the complex process of Linux server management, enabling users without deep technical expertise to deploy, manage, and scale web applications effortlessly.

    Whether you’re a seasoned developer or a beginner looking to launch your first web application, RunCloud eliminates the traditional barriers associated with Linux server management.

    RunCloud provides an intuitive interface that abstracts the technical complexities, allowing you to focus on your application rather than server configuration intricacies.

    Ready to simplify your web application deployment and management? Transform your web hosting experience now with RunCloud.

    FAQs on Checking OS Version in Linux

    How do I find the kernel version in Linux?

    To find the Linux kernel version, use the command uname -r in the terminal. This command will display the current kernel release number, providing a quick and straightforward way to identify the specific kernel version running on your system.

    Which command shows the full OS version?

    The command cat /etc/os-release provides comprehensive information about your Linux distribution, including the full OS version and name. Alternatively, lsb_release -a offers detailed distribution-specific information in a user-friendly format.

    Is there a graphical way to check the OS version?

    Most Linux desktop environments, such as GNOME and KDE, offer system information tools accessible through the settings menu. This menu displays OS version details in a graphical interface. These built-in utilities provide an easy, user-friendly method for checking system information without using terminal commands.

    Can I check the OS version remotely?

    You can check the OS version remotely using SSH by executing version commands such as uname -a or cat /etc/os-release on the remote Linux system. Ensure you have proper authentication and access permissions before attempting remote system information retrieval.

    Are there differences in commands across Linux distributions?

    While core commands like uname are consistent across distributions, specific version-checking methods can vary between Linux systems including Ubuntu, CentOS, or Fedora.

    What is the significance of the OS version number?

    The OS version number indicates the current release, including kernel updates, security patches, and feature improvements. Understanding your version helps manage system compatibility and security and determines eligibility for software and hardware support.

  • How to Kill a Process in Linux From the Command Line

    How to Kill a Process in Linux From the Command Line

    Are you tired of unresponsive programs, resource-hogging applications, or rogue processes slowing your Linux system down? While knowing how to kill a process on Linux from the command line is a fundamental skill for any Linux user, the story doesn’t end with a simple kill command.

    What if you can’t find the process ID (PID)?

    What’s the difference between a “job” and a “process” – and how do you manage them?

    If you’ve ever found yourself searching for answers to these follow-up questions, you’re in the right place. This article will move past the basic ps aux | grep command and discuss more efficient tools like pgrep and pidof to find exactly what you’re looking for.

    We will learn how to manage foreground and background jobs – an essential skill for multitasking in the terminal.

    We’ll also tackle common points of confusion, such as the difference between jobs and processes, and how to find resource-hungry processes without relying on top.

    But before we kill processes, let’s first refresh our knowledge of what processes are!

    What is a Process in Linux?

    In Linux, a process is an instance of a running program. Each process has its own memory space, system resources, and a unique Process ID (PID) that the kernel assigns.

    Processes can be applications, system services, or background tasks essential for the operating system’s functionality.

    Suggested read: Introduction to Bash For Loops: A Beginner’s Guide

    What is Meant by Killing a Process in Linux?

    Killing a process in Linux means terminating or stopping a program forcefully. This action is often necessary when a process becomes unresponsive, consumes too many system resources, or needs to be stopped for maintenance or security reasons.

    Linux provides several methods to kill processes, ranging from graceful termination signals to forceful stops.

    When you kill a process, you’re essentially sending a signal to that process, instructing it to terminate. The most common signal used for this purpose is SIGTERM (signal 15), which allows the process to perform cleanup operations before exiting.

    In cases where a process doesn’t respond to SIGTERM, users can employ stronger signals such as SIGKILL (signal 9), which forces immediate termination without allowing for cleanup.

    Suggested read: How MailHog Can Transform Your Local Email Testing Process

    Reasons to Kill or Terminate a Process on Linux

    There are various scenarios where killing a process becomes necessary:

    • Unresponsive Applications: When a program freezes or becomes unresponsive, terminating it can free up system resources and allow for a restart.
    • Resource Management: Processes consuming excessive CPU or memory can be killed to maintain system stability and performance.
    • Security Concerns: Suspicious or potentially malicious processes should be terminated to prevent security breaches.
    • System Maintenance: During system updates or reconfigurations, certain processes may need to be stopped.
    • Debugging: Developers often need to terminate processes during software testing and debugging.
    • Freeing Up Ports: Killing a process can release network ports that are being held, allowing other applications to use them.
    • Clearing File Locks: Terminating a process can release file locks, enabling access to previously locked files or directories.
    • Stopping Runaway Processes: Accidental infinite loops or other programming errors can create runaway processes that need to be stopped.

    Suggested read: What is Docker and How Does it Work

    How to Find a Process ID in Linux

    Before you can stop a process, you need to find it, but multiple processes with similar names can run simultaneously. In Linux, every process running on your system has a unique Process ID (PID).

    While many users are already familiar with the ps aux | grep command, there are often faster and more precise tools for the job.

    Let’s explore the best ways to locate processes.

    Using the ps command in Linux

    The ps (process status) command gives you a snapshot of the currently running processes. It has many options, but a few combinations are incredibly useful.

    1. ps aux: This is one of the most common commands for tracking processes, as it shows all processes running for all users. You should use ps aux when you need to identify which user owns a process and how much CPU or memory it’s using.

      The ‘aux’ in this case comprises the following three parameters:
      • a = show processes for all users
      • u = display the process’s user/owner
      • x = also shows processes not attached to a terminal

    Example: To find the process ID of the RunCloud agent, you could type:

    ps aux | grep runcloud

    The second column in the output is the PID you need. You’ll notice that the output presented here is quite complex because of the number of columns, and it can be hard to locate what you need.

    Let’s look at some of the better alternatives below, which provide us with the Process ID without any other complex information.

    1. ps -ef: This command is similar to ps aux and shows every process on the system in a different format. You should use this command if you also need to find a process’s Parent Process ID (PPID).
      • -e = select every process
      • -f = display full-format listing

    Example:

    ps -ef | grep runcloud

    This command returns cleaner output; the process ID is in the second column. However, some users might still find it hard to read. Let’s look at some of the better options below, which produce even simpler output in human-readable format.

    1. ps -C <process_name>: In the previous commands, the ps utility returned a very long list of processes, and we used a different tool (grep) to extract only what we needed and discard everything else. This command provides a much cleaner way to find a process by its name without needing grep.
      • -C = select by the command name

    Example:

    ps -C runcloud

    This will list only the processes named “runcloud” with a clean output showing the PID and how long this process has been running. This command displays the information in a presentable format that is easy to read. However, it can still be cumbersome to extract the process ID of a particular process in an automated manner.

    Using the pgrep Command in Linux

    The pgrep (process grep) command is a modern and efficient tool for finding PIDs. It’s faster and less cumbersome than piping ps to grep. If you want to learn more about Linux pipes, we recommend reading our recent blog post on pipes vs xargs.

    1. Basic pgrep: Simply type pgrep followed by the process name.
    pgrep runcloud

    This command will return only the PIDs of the sshd process, nothing more.

    1. pgrep -l: If you want to see the process name alongside the PID, then you can use the -l (list-name) option
    pgrep -l runcloud
    1. pgrep -u <username>: If you need to find all processes run by a specific user, you can use the -u (user) option.
    pgrep -l -u root

    This will list the PID and name of every process owned by the user “root.”

    Using the pidof Command in Linux

    All the commands we discussed have returned some extra information. If you just want to see the process ID and nothing else, you can use the pidof command with the process name. This command is simple, fast, and doesn’t require data processing to extract the necessary information. This makes it extremely easy to integrate into bash scripts.

    Example:

    pidof runcloud

    In the above example, if any process named ‘runcloud’ is running, this command will output its PID.

    Using the top Command to find the Process ID

    The top command provides a real-time, interactive view of your system’s running processes. Just type top to launch it, and you’ll see a constantly updated list of processes, sorted by CPU usage by default. The PID is in the first column, and the command is in the last column. Once you have found what you are looking for, press the ‘q’ key to exit.

    The above example shows that the ‘runcloud’ process has the process ID 670.

    Managing Background and Foreground Tasks in Linux

    When you run a command in your terminal, it typically runs in the foreground. This means it occupies your terminal, and you must wait for it to finish before entering another command. But what if you need to run a time-consuming task and continue using your terminal?

    This can be done using the built-in job control functionality. A job is a wrapper around one or more processes, allowing you to manage them within your current terminal session.

    Sending a Job to the Background in Linux Shell

    You can start a process directly in the background by adding an ampersand (&) at the end of the command.

    Example: Let’s say you’re running a script that takes a long time.

    ./my-long-script.sh &

    The script will start, and the terminal will immediately return you to the command prompt. You’ll see output similar to [1] 12345, where [1] is the job ID and 12345 is the PID.

    The above example shows that the ls command was launched in the background and assigned the PID 241370.

    Viewing and Managing Jobs with jobs

    It is easy to forget once you have sent a job to the background. The jobs command lists all jobs associated with your current terminal session.

    jobs -l

    The -l option also shows the PID, which is very useful.

    The above example shows that the current terminal session has two jobs running in the background.

    Bringing Jobs to the Foreground and Background

    • fg (Foreground): If you need to interact with a background job again, you can bring it to the foreground with the fg command followed by its Job ID.
    fg %1

    This command brings job ID 1 back to the foreground and makes it the active process in your terminal.

    • bg (Background): If you’ve stopped a foreground process (using Ctrl+Z), you can send it to the background to continue running with bg.
    bg %1

    How to Kill a Process in Linux

    There are several ways to kill a process in Linux, but the first step is always to identify the process you want to kill. Once you identify the process, you can choose the following method based on your needs:

    How to Kill a Process Using the kill Command With a PID

    1. Using the kill command: Once you have the PID, you can use the kill command to terminate the process:
    kill PID

    Replace “PID” with the actual number you found. For instance:

    kill 1234
    kill linux process

    This sends a SIGTERM signal, asking the process to shut down gracefully.

    1. Forceful termination: If the process doesn’t respond to the regular kill command, you can use a stronger signal, SIGKILL (9), which forces immediate termination:
    kill -9 PID

    Be cautious with SIGKILL as it doesn’t allow the process to clean up, potentially leading to data loss or corruption.

    How to Kill Multiple Processes

    Sometimes, you need to terminate multiple processes simultaneously. Linux provides efficient ways to do this:

    1. Using kill with multiple PIDs: If you know the PIDs of all processes you want to terminate, you can list them after the kill command:
    kill PID1 PID2 PID3

    For example:

    kill 1234 5678 9101
    kill multiple linux process via command line
    1. Using command substitution: A more dynamic approach is to use command substitution with pgrep. This method kills all processes matching a name:
    kill $(pgrep process_name)

    For instance, to kill all Firefox processes:

    kill $(pgrep firefox)

    This command first uses pgrep to find all PIDs associated with Firefox, then passes these PIDs to the kill command.

    Suggested read: Everything You Need To Know About wp-config.php File

    How to Kill a Process Using the pkill Command

    The pkill command simplifies process termination by allowing you to kill processes based on their names rather than PIDs:

    1. Basic usage: To kill a process by name, simply type: pkill process_name
      This will terminate all processes with “process_name” in their names.
    2. Case-insensitive matching: If you need clarification on the exact capitalization of the process name, use the -i option. For instance: pkill -i firefox will match “Firefox”, “firefox”, or any other case variation.

    How to Kill a Process Using the killall Command

    The killall command is similar to pkill but requires an exact match of the process name:

    1. Basic usage: To kill all processes with an exact name match: killall process_name
    2. Forceful termination: For stubborn processes use the -9 option (equivalent to SIGKILL): killall -9 process_name

    Suggested read: Mastering the Echo Command in Linux (with Practical Examples)

    How to Kill Process in Linux by User

    Sometimes, you need to terminate all processes owned by a specific user:

    1. Listing user processes: First, you can list all processes for a user: ps -u username
      Replace “username” with the actual username.
    1. Killing user processes: To kill all processes for a user, use pkill with the -u option:
      pkill -u username. For example: pkill -u john
    1. Using killall for user processes: Alternatively, you can use the killall command to kill a particular user’s processes, as shown below.
    killall -u username

    Suggested read: What are Linux Logs? What Are They & How To Use Them

    How to Kill a Process in Linux by Name

    Killing processes by name is often more convenient than using PIDs. There are several ways to do this:

    1. Using pkill: The simplest method is by running the following command:
      pkill process_name. Don’t forget to replace process_name with the name of the process you are trying to kill.
    1. Partial name matching: Use the -f option to match a substring in the process name for more flexible matching. This is useful for processes with long or complex names. The syntax of this command is as follows:
    pkill -f "partial_process_name"

    For example, pkill -f "firefox" would match any process with “firefox” anywhere in its command line.

    How to Kill a Process in Linux with Bash Script

    Creating a bash script for process termination can be helpful for repetitive tasks. Follow the steps below to avoid typing the long and complex commands:

    1. Create the script: Use a text editor to create a file named kill_process.sh. For example, you can use the nano editor to create the file using the following command:
      nano kill_process.sh.
    2. Add the script content: After creating the file, paste the following content into it:
    #!/bin/bash
    process_name=$1
    pid=$(pgrep -f "$process_name")
    if [ -z "$pid" ]; then
        echo "Process not found."
    else
        kill $pid
        echo "Process $process_name (PID: $pid) killed."
    fi

    Once you add the content, you can save it and exit it from the file editor. This script takes a process name as an argument, finds its PID, and terminates it.

    Before you can execute the script, you need to make it executable. Change the file permissions by executing the following command to make it executable:

    chmod +x kill_process.sh

    After changing the file permissions, you can run the script by simply typing its name in the command line, followed by the name of the process you want to kill. For example:

    ./kill_process.sh firefox

    The above command will attempt to kill a process named “firefox” on your computer.

    Linux Process Management: At a Glance

    This table provides a quick reference for common commands used to manage processes directly from the command line.

    Action / GoalBash Command ExampleWhen to Use It
    Kill a process by its PIDkill 1234The standard way to terminate a process when you know its exact PID. This sends a graceful shutdown signal (SIGTERM).
    Force-kill a process by PIDkill -9 1234A last resort to forcibly terminate a non-responsive process. This sends a SIGKILL signal that cannot be ignored.
    Kill multiple specific processeskill 1234 5678When you have a specific list of PIDs, you need to terminate all at once.
    Kill a process by partial namepkill 'node'To conveniently kill a process that matches a name or pattern, without needing to find the PID first.
    Kill all processes with an exact namekillall 'firefox'To terminate all instances of a specific program (e.g., all open Firefox windows). It’s safer than pkill if other processes have similar names.
    Kill all processes owned by a userpkill -u 'Alex'To terminate all processes running under a specific user account, often for administrative or security reasons.

    Wrapping Up

    In this post, we’ve explored various methods for killing processes in Linux from the command line. From using the kill command with a process ID to tools such as pkill and killall, you should now understand how to terminate unwanted or misbehaving processes on your Linux system.

    While a good understanding of the Linux command line helps manage your website, it is not a requirement.

    With the help of a hosting platform like RunCloud, you can easily manage your Linux server without getting bogged down in the technical details.

    RunCloud provides a user-friendly interface that simplifies server management, allowing you to focus on building and growing your online presence.

    Whether you’re a seasoned Linux user or just getting started, RunCloud makes it easy to deploy, monitor, and handle mundane tasks like performing regular backups.

    Ready to take your website to the next level? Sign up for RunCloud today and let us handle the Linux management so you can spend more time on what matters most – your business.

    FAQs on Killing Linux Processes

    How do you kill unnecessary processes in Linux?

    To kill unnecessary processes in Linux, you can use commands such as kill, pkill, or killall to terminate the unwanted processes based on their process ID (PID) or name.

    What command can you use to kill a process?

    The kill -9 PID command, which sends the SIGKILL signal, can be used to forcefully terminate a process that is not responding to a regular termination signal.

    How do you find the killed process in Linux?

    To find a killed process in Linux, you can use the ps command to list all running processes or the pgrep command to search for processes by name.

    How do I gracefully shut down a process in Linux?

    To gracefully shut down a process in Linux, you can use the kill command without any signal options, which will send the SIGTERM signal and allow the process to perform cleanup operations before exiting.

    How do you end a process by keystroke?

    In Linux, you can use the Ctrl+C keyboard shortcut to interrupt and terminate the currently running foreground process.

    How do you abort a run in Linux?

    To abort a running process in Linux, you can use the Ctrl+C keyboard shortcut. This will send the SIGINT signal and interrupt the process’s execution.

    Which key is used to cancel a process?

    The Ctrl+C keyboard shortcut is commonly used to cancel or interrupt the currently running process in Linux.

    How do I kill a high CPU process in Linux?

    In Linux, you can use the top command to identify a process that consumes a large amount of CPU resources and then use the kill command to terminate it.

    What’s the difference between a “job” and a “process” in Linux

    A process is any program that is currently running on the operating system. The Linux kernel manages all processes.
    A job is a shell-level concept that manages one or more processes within a single terminal session. Think of it as a label for a task you’re running. You can move a job to the background or foreground, but the kernel still manages it as a process.

    How can I see processes in a tree-like view?

    It’s useful to see which processes were started by other processes (parent-child relationships). The pstree command is perfect for this, as it gives you a visual map of everything running on your system, which can be very helpful for troubleshooting.

  • How to Fix the “Warning: Remote Host Identification Has Changed” SSH Error

    How to Fix the “Warning: Remote Host Identification Has Changed” SSH Error

    The WARNING: REMOTE HOST IDENTIFICATION HAS CHANGED! error will stop you dead in your tracks. Despite looking like your server is under attack, this message usually means SSH is working correctly, it’s just spotted something different about your server and wants you to know.

    This security check matters, but it can be frustrating when you just need to get back to work. The key is knowing when the error signals a real problem versus routine server maintenance.

    This guide covers everything you need to know: what causes the warning, how to tell if it’s dangerous, and how to fix it without compromising your server’s security. You’ll be able to handle this error confidently, whether you’re managing one server or dozens.

    Quick Fix (If You Know Your Server is Safe)

    Already certain this error came from recent server changes? Remove the old host key with this command:

    ssh-keygen -R your-server-hostname

    Just swap your-server-hostname for your actual server address. But before you run this, make sure you understand what’s happening. Blindly removing host keys can leave you vulnerable to attacks.

    What Does This Error Mean?

    To understand the error, you need to know how SSH establishes trust. The first time you connect to a new server, it presents its “public host key”, which is a unique identifier for that server. Your SSH client asks you if you trust this key.

    When you type ‘yes’, your computer saves this key and its associated hostname/IP address in a file located at ~/.ssh/known_hosts. This file acts as your personal “phonebook” of trusted servers.

    From that point on, every time you connect, the server presents its key again. Your SSH client checks its known_hosts file and says, “Does the key this server is showing me match the key I saved for it last time?”

    The “Remote Host Identification Has Changed” error occurs when the answer is NO. The server is presenting a key your computer has never seen before.

    Remote Host Identification Has Changed

    Why Did the Host Key Change?

    More often than not, this error is caused by routine server administration, not a malicious attack. Here are the most common legitimate reasons:

    1. Server OS Reinstallation: If the server’s operating system (e.g., Ubuntu, CentOS) was reinstalled from scratch, the SSH service would have generated a new set of unique host keys. The old ones will have been wiped out with the old OS. This is the most frequent cause.
    2. Server Migration or Re-IP: The IP address you are connecting to may have been reassigned. For example, the old server 123.45.67.89 was decommissioned, and a brand new server was spun up and given the same IP address.
    3. Cloud/Virtualization Environments: In cloud environments like AWS, GCP, or Azure, virtual server instances can be terminated and replaced. The new instance will have a different host key, even if it has the same IP address or hostname.
    4. Load Balancers: If you connect to a hostname behind a load balancer, your connection might be routed to a different server in the pool from the one you connected to last time. You’ll see this error if the servers don’t share the same host key.
    5. Deliberate Key Regeneration: A system administrator may have intentionally regenerated the server’s SSH keys for security policy reasons.

    The Man-in-the-Middle (MITM) Attack

    Although this is usually a benign warning, the error’s primary purpose is to protect you from a Man-in-the-Middle (MITM) attack. Here’s how an MITM attack works in this context:

    1. You try to connect to your legitimate server.
    2. An attacker, positioned somewhere on the network between you and the server (e.g., on the same public Wi-Fi), intercepts your connection request.
    3. The attacker blocks your connection to the real server and instead presents their own fake SSH server to you.
    4. Your SSH client sees a new, unexpected host key and throws the “REMOTE HOST IDENTIFICATION HAS CHANGED” error.

    If you ignore this warning and proceed, you will send your password or other credentials directly to the attacker’s machine, completely compromising your account. This is why you must verify the cause before you implement any fix.

    How to Safely Fix the Error: The “Verify, Then Remove” Protocol

    Follow these steps to resolve the issue without compromising your security.

    Step 1: VERIFY the New Host Key

    This is the most important step. Do not proceed until you have confirmed the new key is legitimate.

    • If you are not the server administrator: Contact the person or team that is and ask them if the server’s host key was recently changed. They should be able to confirm if this is the case, and even provide you with the new key’s fingerprint.
    • If you are the server administrator: You must get the new key’s fingerprint directly from the server console.
      • Log in to the server using an alternative method (e.g., the web console provided by your cloud provider, like AWS EC2 Connect, GCP Console, or a direct KVM/IPMI connection in a data center).
      • Once logged in, run the following commands to display the fingerprints of the server’s host keys. A server usually has several key types (RSA, ECDSA, ED25519).
    # Run these on the remote server you're trying to connect TO (not on your personal laptop)
    ssh-keygen -lf /etc/ssh/ssh_host_rsa_key.pub
    ssh-keygen -lf /etc/ssh/ssh_host_ecdsa_key.pub
    ssh-keygen -lf /etc/ssh/ssh_host_ed25519_key.pub

    Compare this fingerprint with the one your local SSH client shows you in the error message. If they match, you have successfully verified the new key is authentic.

    Step 2: REMOVE the Old Host Key from known_hosts

    Once you’ve verified the new key’s authenticity, you can safely remove the old, conflicting key from your local ~/.ssh/known_hosts file. The ssh-keygen command has a specific function for removing hosts.

    On your local machine (the one you are connecting from), run the following command, replacing your-server-hostname with the actual hostname or IP address from the error message:

    ssh-keygen -R your-server-hostname

    Open the file with your favorite text editor:

    nano ~/.ssh/known_hosts

    Go to the line number mentioned in the error and delete that entire line. The line will start with the hostname or IP address. Save the file and exit the editor.

    Step 3: Reconnect and Accept the New Key

    Now that the old key is gone, try your SSH connection again. You will be prompted to accept the new key as if you were connecting for the first time. Since you have already verified its fingerprint, you can confidently type ‘yes’.

    Conclusion

    In this post, we have seen that the “Warning: Remote host identification has changed” error is an important security mechanism that is doing its job. By following the steps in this article, you can confidently handle this common issue while ensuring your connections remain secure.

    Managing servers and deploying new web applications can be challenging, especially if you are unfamiliar with Linux and the command line.

    That’s why we built RunCloud.

    With RunCloud, you can deploy and manage your web applications, databases, and firewalls directly from an intuitive dashboard, completely sidestepping common issues like the “Remote Host Identification Has Changed” error.

    Sign up for RunCloud today and experience hassle-free web server management.

    FAQs About the SSH Host Key Warning

    What does “Warning: Remote host identification has changed” actually mean in simple terms?

    This means your computer’s security system no longer recognizes your server. The first time you connected, your laptop saved a unique “fingerprint” for that server. Now, the server shows a different fingerprint.
    With RunCloud, you rarely need to connect to your server with SSH to manage your web applications, databases, or firewall. The RunCloud dashboard provides a secure, visual interface for all these tasks so that you can sidestep this error completely.

    Is this error a virus, or am I being hacked?

    Probably not! While the warning is designed to protect you from a “man-in-the-middle” attack, the most common cause is a harmless server change. For instance, if your hosting provider reinstalled the operating system on your server, a new, perfectly safe fingerprint would have been created.

    How do I fix this error quickly? I’m in a hurry!

    If you’re sure the server is safe, the fastest fix is to tell your computer to forget the old fingerprint. You can do this by running a single command on your local machine (not the server):
    ssh-keygen -R your-server-ip-or-hostname   
    Replace your-server-ip-or-hostname with your server’s actual address. After you run this, you can connect again and be asked to approve the new fingerprint.

    Why would the server’s fingerprint change? I didn’t do anything!

    This is very common, especially in cloud hosting environments. Here are a few reasons it can happen:
    The server’s operating system was reinstalled or upgraded.
    You moved your site to a new server with the same IP address as the old one.
    Your cloud provider (like AWS, DigitalOcean, etc.) replaced the underlying virtual machine.