Category: Web Design and Development

  • How to Get Your Website Indexed by Search Engines in 2026: A Complete Guide

    How to Get Your Website Indexed by Search Engines in 2026: A Complete Guide

    You’ve launched your new website. Now you’re hearing a flood of new terms: SEO, index, sitemap, crawlers. These are all important buzzwords in digital marketing, but they often boil down to one critical question:

    How do you get your website indexed by Google so people can find it?

    If you’re asking that question, you are in exactly the right place.

    Getting your website to appear in search results on Google and Bing is called “indexing”. In simple terms, it’s how search engines discover your web pages and add them to their massive database, making them available to searchers.

    While it’s true that search engines will eventually find your site on their own, passively waiting is a slow and uncertain process. By actively submitting your website and ensuring it’s properly prepared, you can dramatically speed up the process and improve your overall visibility from day one.

    This guide will walk you through every step to officially introduce your site to the world’s largest search engines.

    Let’s get started!

    Phase 1: Preparing Your Site for Crawlers

    Before you even think about submitting your site, you should first ensure it’s technically sound and “crawler-friendly”. Follow the steps below to make sure your site is ready to be indexed.

    1. Set a Preferred URL with Canonical Tags

    Canonicalization is selecting a single, “master” URL for a page that might be accessible through multiple addresses. For example, the following URLs could all show the exact same homepage:

    • http://example.com
    • https://example.com
    • https://www.example.com

    A canonical tag tells search engines to treat all pages as one page, which helps prevent duplicate content issues. To implement this, ensure every page on your site contains a canonical tag.

    If you are coding your site, then you would need to do this on your own by adding the <link rel="canonical" href="URL-of-the-page-itself"> tag in the HTML head, but most modern content management systems (CMS) handle this automatically.

    2. Create a robots.txt file

    A robots.txt file is a simple text file in your website’s root directory (e.g., example.com/robots.txt). It provides instructions to search engine crawlers and tells them which sections of your site they should not visit. You can use this file to hide certain website sections, such as private admin pages or user shopping carts.

    When you create this file, it is also recommended to include a line pointing to your XML sitemap, as this helps search engines efficiently discover all the important pages you want them to index.

    User-agent: *
    Disallow: /admin/
    Disallow: /cart/
    Sitemap: https://www.yourdomain.com/sitemap.xml

    📖 Suggested read: How to Edit robots.txt in WordPress (With & Without Plugin) 

    3. Control AI Bot Access

    With the rise of AI models trained on public web data, you may want to control whether companies can use your content for training. You can specify rules for these AI bots in your robots.txt file by adding directives that target their specific user-agents.

    For example, to block Google’s AI models from using your content, you can add a rule for Google-Extended, and to block OpenAI’s models, you can use ChatGPT-User.

    Add the following rules to your robots.txt file to disallow access for these common AI crawlers:

    # Block Google's AI model training
    User-agent: Google-Extended
    Disallow: /
    # Block OpenAI's AI model training
    User-agent: ChatGPT-User
    Disallow: /

    This instructs these specific bots not to crawl any part of your website, opting your content out of their data collection for model training.

    To learn more about editing your robots.txt file, read our full-length article on How to Edit robots.txt in WordPress (With & Without Plugin).

    4. Create XML Sitemap

    A sitemap is an XML file that lists all the important pages, videos, and images on your site and when they were last updated. A good sitemap makes it easy for search engines to find and understand your content.

    Most CMS platforms have plugins or built-in tools for this (e.g., Yoast SEO, Rank Math, or Squarespace’s native feature). Once your sitemap is ready, you can host it on your web server and ensure it is accessible via your robots.txt file.

    5. Add Structured Data (Schema Markup)

    Structured data, or Schema markup, is a standardized code format you add to your website to help search engines understand your content on a deeper level. While basic HTML elements like headings and lists give your page visual organization, structured data explicitly defines your content.

    For example, telling Google that a string of numbers is a phone number or that a piece of text is the name of a product allows search engines to better interpret your pages and qualify your site for “rich snippets”, which are enhanced, more detailed listings in search results.

    Depending on your site’s content, you can implement various Schema markup types. Some of the most common and beneficial types include:

    • Organization: Defines your business name, logo, address, and contact information.
    • Article: Specifies the headline, author, publication date, and featured image for blog posts or news stories.
    • Product: This section provides a product’s name, image, brand, price, and availability, often including review ratings.
    • FAQPage: Marks up a list of questions and answers, making them eligible to appear directly in search results.

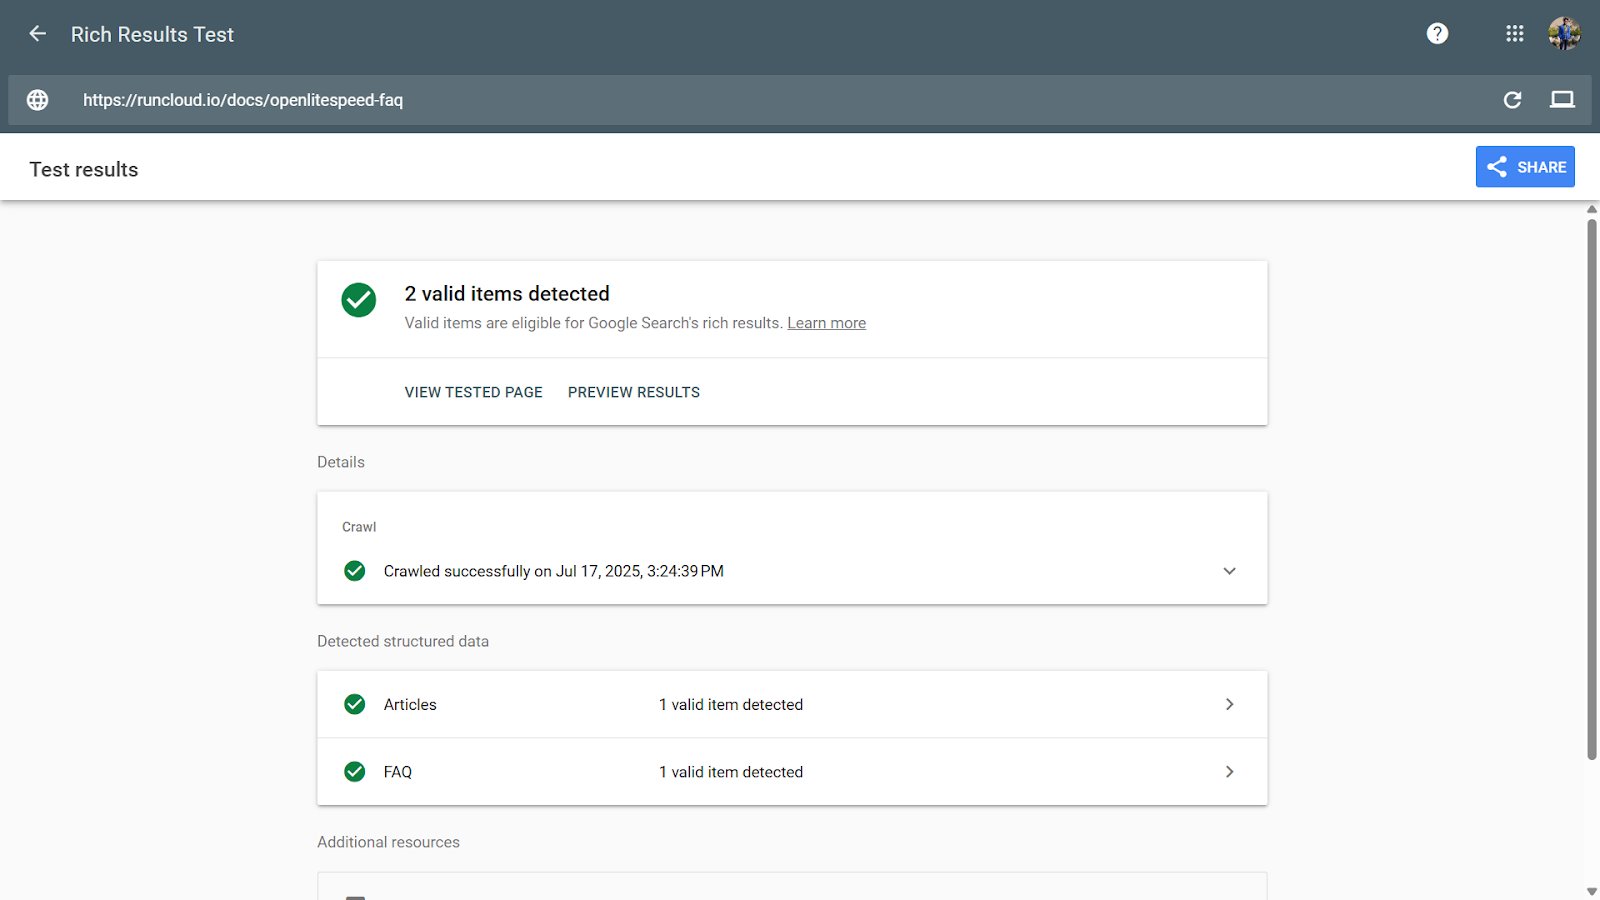
    After adding the markup to your pages, you should use a tool like Google’s Rich Results Test to validate the code and confirm that it has been implemented correctly.
    6. Optimize On-Page Elements

    Optimizing your content’s core on-page elements is an important step in preparing it for search engines. Crawlers analyze these elements first to understand a page’s topic and structure, and they directly influence how your content is displayed in search results.

    To properly structure each page, you should focus on several key components. Each serves a distinct purpose in communicating what your page is about on search engine results pages and social media platforms.

    • SEO Title (<title> tag): This is your page’s main, clickable headline that appears in search results and at the top of a browser tab.
    • Meta Description: The short summary appears under the title in search results. It doesn’t directly impact ranking, but it is an advertisement to convince users to click on your link.
    • Headings (H1, H2, H3): These tags structure your content for readers and signal the information hierarchy to crawlers. An H1 tag is typically used for the page’s main title, with H2s and H3s for subtopics.
    • Open Graph (OG) Tags: These tags control how your content’s title, description, and preview image appear when shared on social media platforms like Facebook, LinkedIn, or X (formerly Twitter).

    Phase 2: Notifying Search Engines

    After preparing your website, it is time to announce its presence to the search engines. This step lets you communicate directly with search engines to ensure they can efficiently find, crawl, and index your content.

    1. Register with Webmaster Tools

    Registering your site with Webmaster Tools is the most important step in this phase. These tools provide direct communication with the major search engines, invaluable data on how search engines see your site, alerts you to critical errors, and tools to manage your site’s appearance in search results.

    • Google Search Console: This is arguably the most important tool for monitoring and managing your site’s presence in Google Search. It offers detailed performance reports, indexing status, and mobile usability feedback.
    • Bing Webmaster Tools: This is the equivalent platform for the Microsoft Bing search engine. It’s important to note that Bing also powers search results for other popular engines like DuckDuckGo and Yahoo, so registering here expands your reach beyond just the Bing ecosystem.

    2. Verify Site Ownership

    Before you can access any of this sensitive data, search engines need to confirm that you are the website’s legitimate owner or authorized manager. During the setup process, each tool will guide you through a verification procedure.
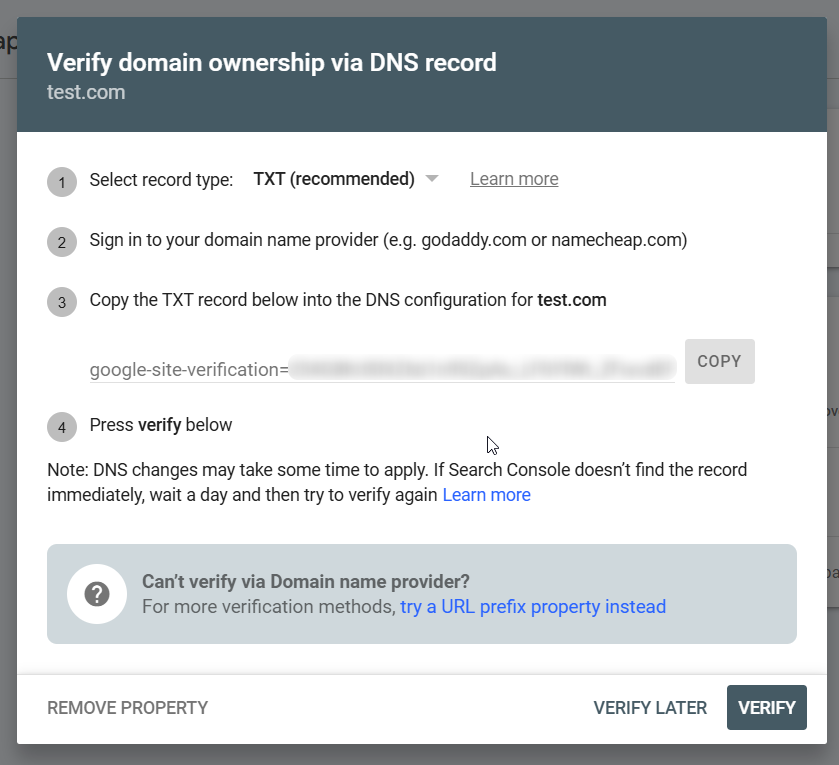
    There are several common methods to accomplish this, and you only need to choose one: you might be asked to upload a special HTML file to your server, add a unique meta tag to the code of your homepage, or verify your ownership directly through your domain name provider’s settings.

    3. Submit Your Sitemap

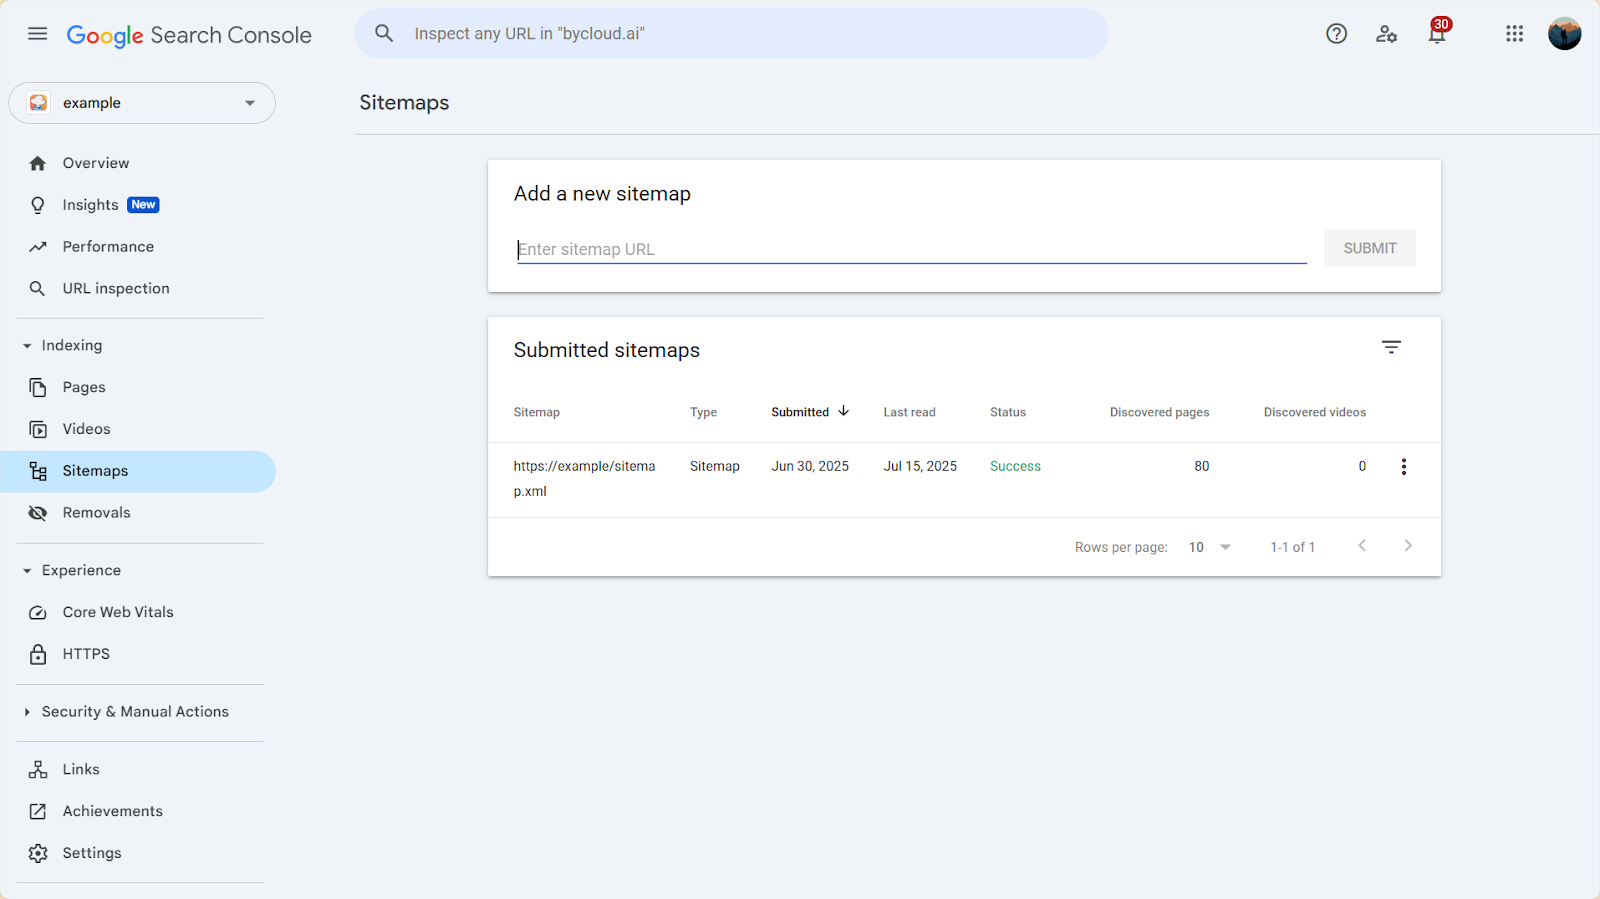
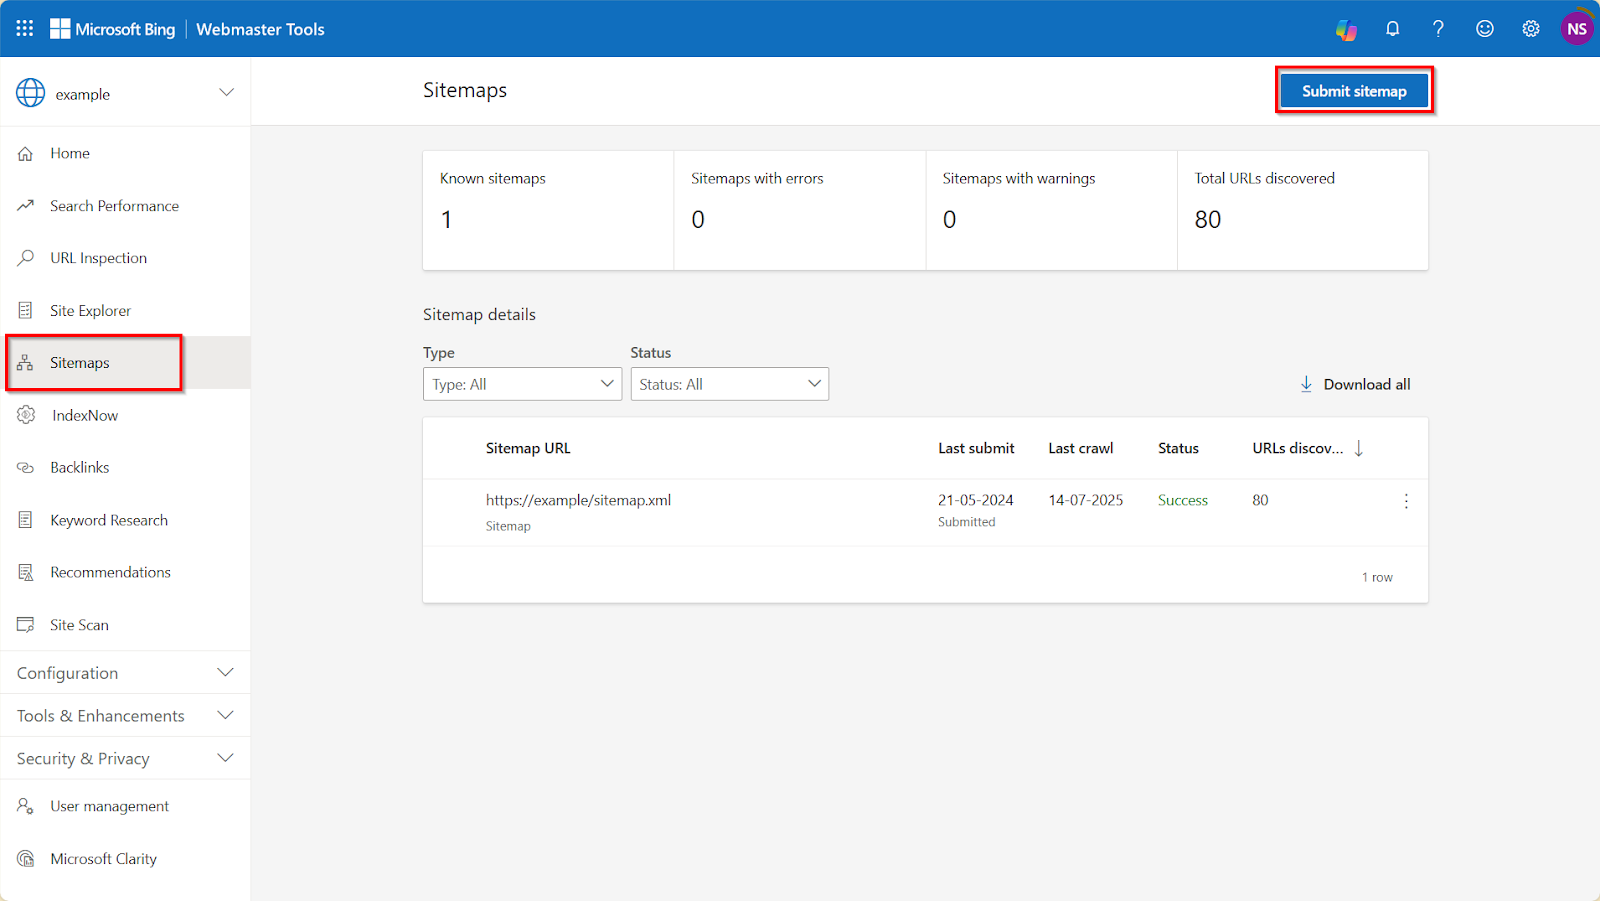
    After verifying ownership, your next step is to submit your sitemap. The process is straightforward in both Google Search Console and Bing Webmaster Tools.

    • You must locate the “Sitemaps” section within the tool’s interface.
    • Once there, you simply paste the full URL of your sitemap file into the submission field and click the “Submit” button.
    After receiving your sitemap, the search engine adds your URLs to its crawling queue. This doesn’t mean your site will be indexed instantly, but it ensures that the search engine’s crawlers, or bots, are aware of your pages and will schedule a visit to discover and evaluate your content for inclusion in their search results.
    Phase 3: Monitoring & Ongoing Updates

    While you only need to submit your website to search engines once, achieving and maintaining visibility in the search engines is an ongoing process that requires continuous monitoring and updating.

    The process of crawling and indexing is not instantaneous. After you submit your site, it can take a few days to several weeks for search engines to fully process your pages and begin showing them in search results.

    Additionally, submitting a sitemap or requesting indexing does not guarantee inclusion. Search engine systems are designed to prioritize high-quality, relevant, and useful content, and they will ultimately make the final decision on what to index.

    After indexing the site, you can check your site’s progress using the tools available.

    • The URL Inspection Tool in Google Search Console is your best friend for examining individual pages. You can enter any URL from your site to receive a detailed report on its current indexing status, see if it is mobile-friendly, and identify any specific issues preventing it from being shown on Google.
    • Use the Index Coverage Report in Google Search Console for a high-level overview. This report gives you a complete picture of your site, showing which pages are successfully indexed, which have warnings that may affect their performance, and which have been excluded from the index entirely, along with the specific reasons for each status.

    Phase 4: Advanced & Real-Time Indexing

    In addition to the standard sitemap submission, there are more advanced, real-time methods for notifying search engines of changes on your site. These protocols are designed for speed, allowing you to alert search engines the moment content is published, updated, or removed.

    IndexNow Protocol

    The IndexNow protocol is a simple, open-source initiative that allows website owners to instantly notify multiple search engines whenever site content is created, updated, or deleted.

    Instead of waiting for search engine crawlers to discover a change, you can proactively “ping” them, dramatically speeding up the discovery process.

    This protocol is supported by a growing list of major search engines, including Microsoft Bing, Yandex, Naver, Seznam, and Yep. While Google does not natively participate in IndexNow, it has confirmed that it is monitoring these signals to assess the protocol’s utility. The primary benefit of using IndexNow is the acceleration of content discovery on supporting search engines. Your latest updates appear in search results much faster, resulting in more relevant traffic and fresher content for users.

    Implementation is often straightforward, as many modern Content Management Systems (CMS) and Content Delivery Networks (CDNs) have integrated IndexNow via plugins or built-in features. It can also be implemented directly via a simple API key for more custom setups. You can find more details and resources at the official IndexNow website and Bing’s IndexNow portal.

    Google’s Indexing API

    Google offers its proprietary system for real-time notifications called the Indexing API. However, you should note that this API has a very strict and narrow use case, and using it for other purposes is against Google’s guidelines. The Indexing API is designed exclusively for two specific types of time-sensitive content:

    • JobPosting: Pages containing structured data for job listings.
    • BroadcastEvent: Pages with structured data for livestream videos.

    Using the Indexing API is essential for websites that feature this kind of short-lived content. It lets you directly notify Google when a job has been filled or a livestream has ended, ensuring the information remains fresh and accurate in search results.

    Implementing Google’s Indexing API is a more technical process intended for developers. It requires setting up a Google Cloud project, creating a specific service account, and managing access tokens to make API calls. The complete technical documentation and instructions are in Google’s official developer guide.

    TL;DR: How to Index Websites Instantly

    FeatureSitemap SubmissionURL Inspection ToolIndexNow ProtocolGoogle Indexing API
    Use CaseInitial site submission; bulk updatesRequesting re-index for 1-2 important URLsInstantly notify multiple engines of any changeInstantly notify Google of job/livestream changes
    Supported ByAll major search enginesGoogleBing, Yandex, etc.Google only
    Content TypeAll content typesAll content typesAll content typesJobs & Livestreams ONLY
    SpeedSlow (Days to weeks)Medium (Hours to days)InstantInstant

    Final Thoughts

    This post explains how to actively notify search engines of your site’s existence using standard and advanced methods. Following these steps gives your site the best possible start to being discovered by Google, Bing, and the audiences they serve.

    However, getting indexed is only part of running a successful website.

    Your server’s ongoing performance, speed, and security are critical in search engine rankings and user experience.

    Managing these technical elements can be a constant hassle, pulling your focus away from what you do best: creating great content and growing your business.

    To speed things up and eliminate the burden of complex server administration, consider using RunCloud. You shouldn’t have to be a server expert to run a fast, secure website. RunCloud simplifies the entire process, providing you with a powerful and intuitive dashboard to deploy, manage, and monitor your cloud servers without ever needing to touch the command line.

    Ready to take the complexity out of server management? Sign up for RunCloud today.

    Frequently Asked Questions about Website Indexing

    Why isn’t my website showing up on Google after I submitted my sitemap?

    Submitting a sitemap informs Google that your site exists, but doesn’t guarantee immediate indexing. Indexing can be delayed if Google’s systems determine your site’s quality is low or technical issues prevent its crawlers from accessing your content. Use the URL Inspection Tool in Google Search Console to check for specific page errors.

    How long does it take for a new website to be indexed?

    The timeline for indexing a new website can vary widely, from a few days to several weeks. Factors like your site’s authority, technical health, and content quality all affect how quickly search engines crawl and index your pages.

    What does “Discovered – currently not indexed” mean in Google Search Console?

    This status means Google knows your page exists but has chosen not to crawl and index it yet. This often happens when Google’s systems feel that crawling the URL might overload your server or that the content is not of high enough quality to warrant indexing at this time. Improving your overall site quality and internal linking can help resolve this over time.

    What’s the difference between blocking a page in robots.txt and using a noindex tag?

    Blocking a page in robots.txt prevents search engine crawlers from visiting or seeing the page’s content. A noindex meta tag allows crawlers to visit the page but explicitly instructs them not to include it in their search results index. Use noindex for pages you want Google to know about but keep private, and robots.txt for sections you want crawlers to ignore completely.

    Do I need to resubmit my sitemap whenever I add a new page?

    No, you do not need to manually resubmit your sitemap for every change. Modern sitemap tools automatically update a “last modified” date, and search engines will re-check your sitemap periodically to find new and updated URLs. Manually submitting is generally only necessary for the initial setup or after a major site overhaul.

    Is it worth using IndexNow if Google doesn’t officially support it?

    Yes, it is still highly recommended that most sites use the IndexNow protocol. It provides instant indexing benefits on major search engines like Bing and Yandex, which can drive significant traffic. Since implementation is often as simple as a plugin, the small effort provides a large benefit across the web, even if Google is not yet a direct participant.

    Can I use the Google Indexing API for my blog posts or e-commerce products?

    You should not use the Google Indexing API for standard content like blog posts or product pages. The API is strictly for time-sensitive JobPosting and BroadcastEvent (livestream) content. Misusing the API for other content types is against Google’s guidelines and can result in your access being revoked.
  • How to Fix the “Safari Can’t Establish a Secure Connection to the Server” Error

    How to Fix the “Safari Can’t Establish a Secure Connection to the Server” Error

    Have you ever tried to open your bank, favorite store, or work portal – only to be stopped by this message?

    “Safari Can’t Establish a Secure Connection to the Server.”

    It’s frustrating, vague, and can block you completely – on a Mac, iPhone, or iPad.

    But what does this error mean?

    This guide explains what’s happening behind the scenes when Safari shows this message and gives you a step-by-step checklist to fix it. Whether the problem lies with your device or the website’s server, you’ll leave with a clear path to restore access.

    Let’s start by understanding why this error happens in the first place.

    What Causes the “Safari Can’t Establish a Secure Connection to the Server” Error?

    When you visit a website on your browser, your computer encrypts the data so no one else on your network can read it. This encryption is done using a TLS/SSL handshake. If any part of this process fails, Safari will terminate the connection and display this error to protect you from potentially insecure communication.

    The causes can range from a simple misconfiguration on your device to a serious problem with the website’s server.

    In this article, we will proceed with troubleshooting in a logical order, from the most common and simplest fixes to more advanced, system-level solutions.

    Let’s get started!

    Common Fixes to Solve the Secure Connection Error

    If you encounter the “Can’t Establish a Secure Connection to the Server” error, you should begin your troubleshooting process with these steps. The following solutions are entirely safe and non-destructive to your data and will successfully resolve the “secure connection” error in most situations.

    1. Verify the Website Address and Reload the Page

    The most straightforward fix is often to check the website’s domain name. Carefully check the URL in Safari’s address bar for any typos. A single misspelled character in a website’s domain name can direct your browser to an entirely different server or a server that does not possess a valid security certificate for the address you intended to visit, immediately triggering this security error.

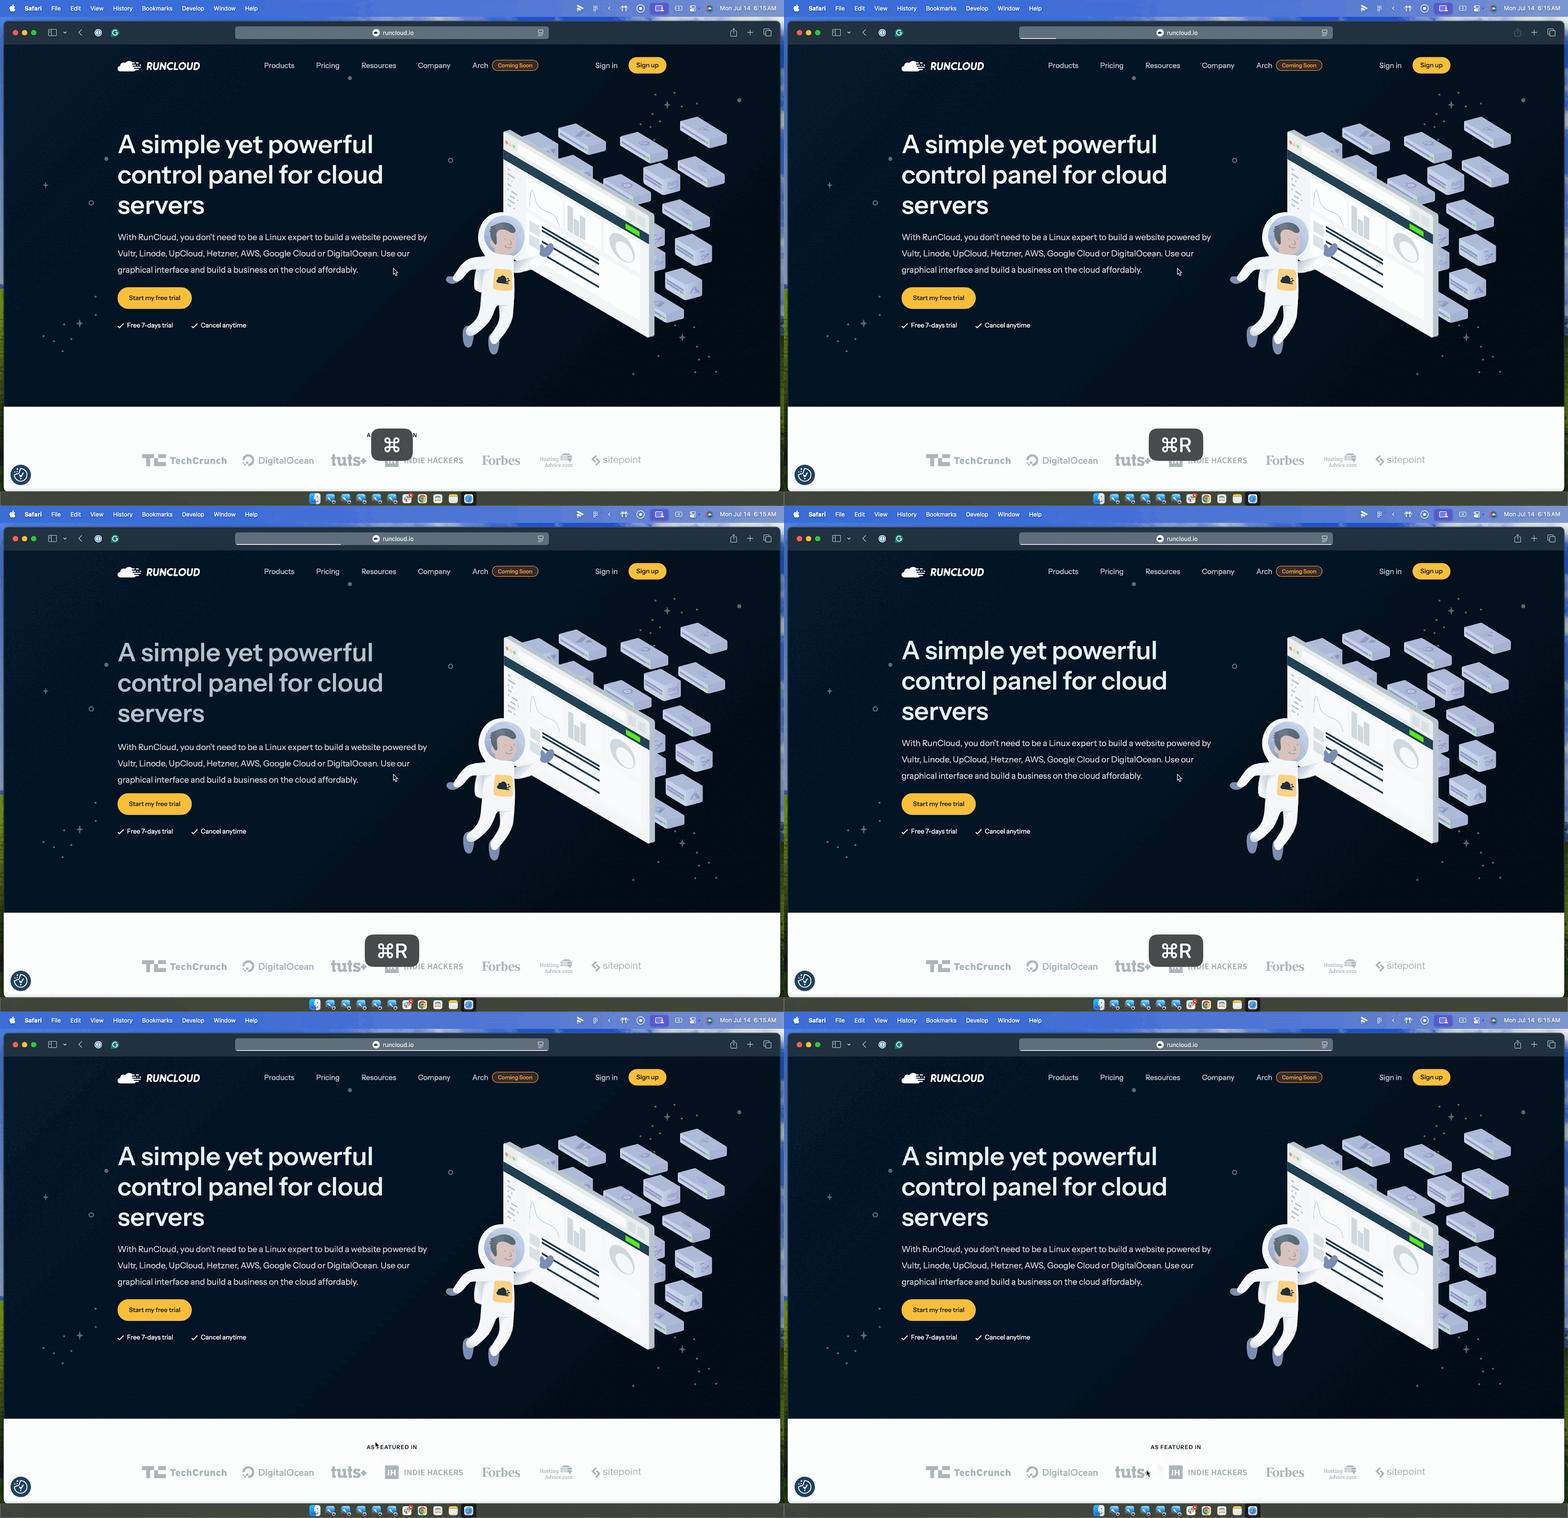
    If the web address is correct, the next step is to perform a “force reload” of the page. You can accomplish this by pressing the Cmd + R key combination on your keyboard or by clicking the reload icon in the address bar. This action instructs Safari to discard any temporary data stored for the page and request a completely fresh copy from the server. This can resolve transient network hiccups or minor glitches that may have interrupted the initial connection.

    safari can't establish a secure connection

    2. Check and Correct Your System’s Date & Time

    An incorrect date or time setting on your computer or mobile device is the most frequent culprit behind this connection error. Secure browsing depends on accurate system time.

    Secure websites use SSL/TLS certificates that are only valid for a specific period, which includes a defined start date and an expiration date. If your device’s clock is set to a date and time outside this valid range, Safari will correctly determine that the website’s certificate is invalid. As a security precaution to protect your information, Safari will refuse to establish the connection.

    To resolve this, you should configure your device to automatically set its date and time using Apple’s reliable network time servers.

    How to Fix on macOS (Ventura & later):

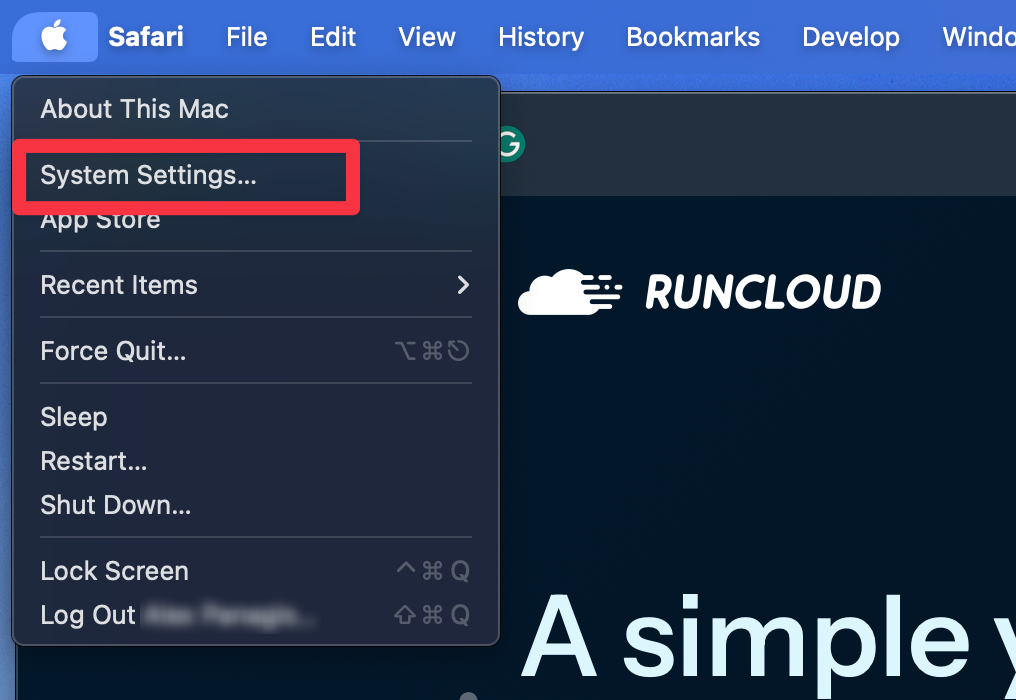
    1. Navigate to the Apple menu in the top-left corner of your screen and select System Settings.
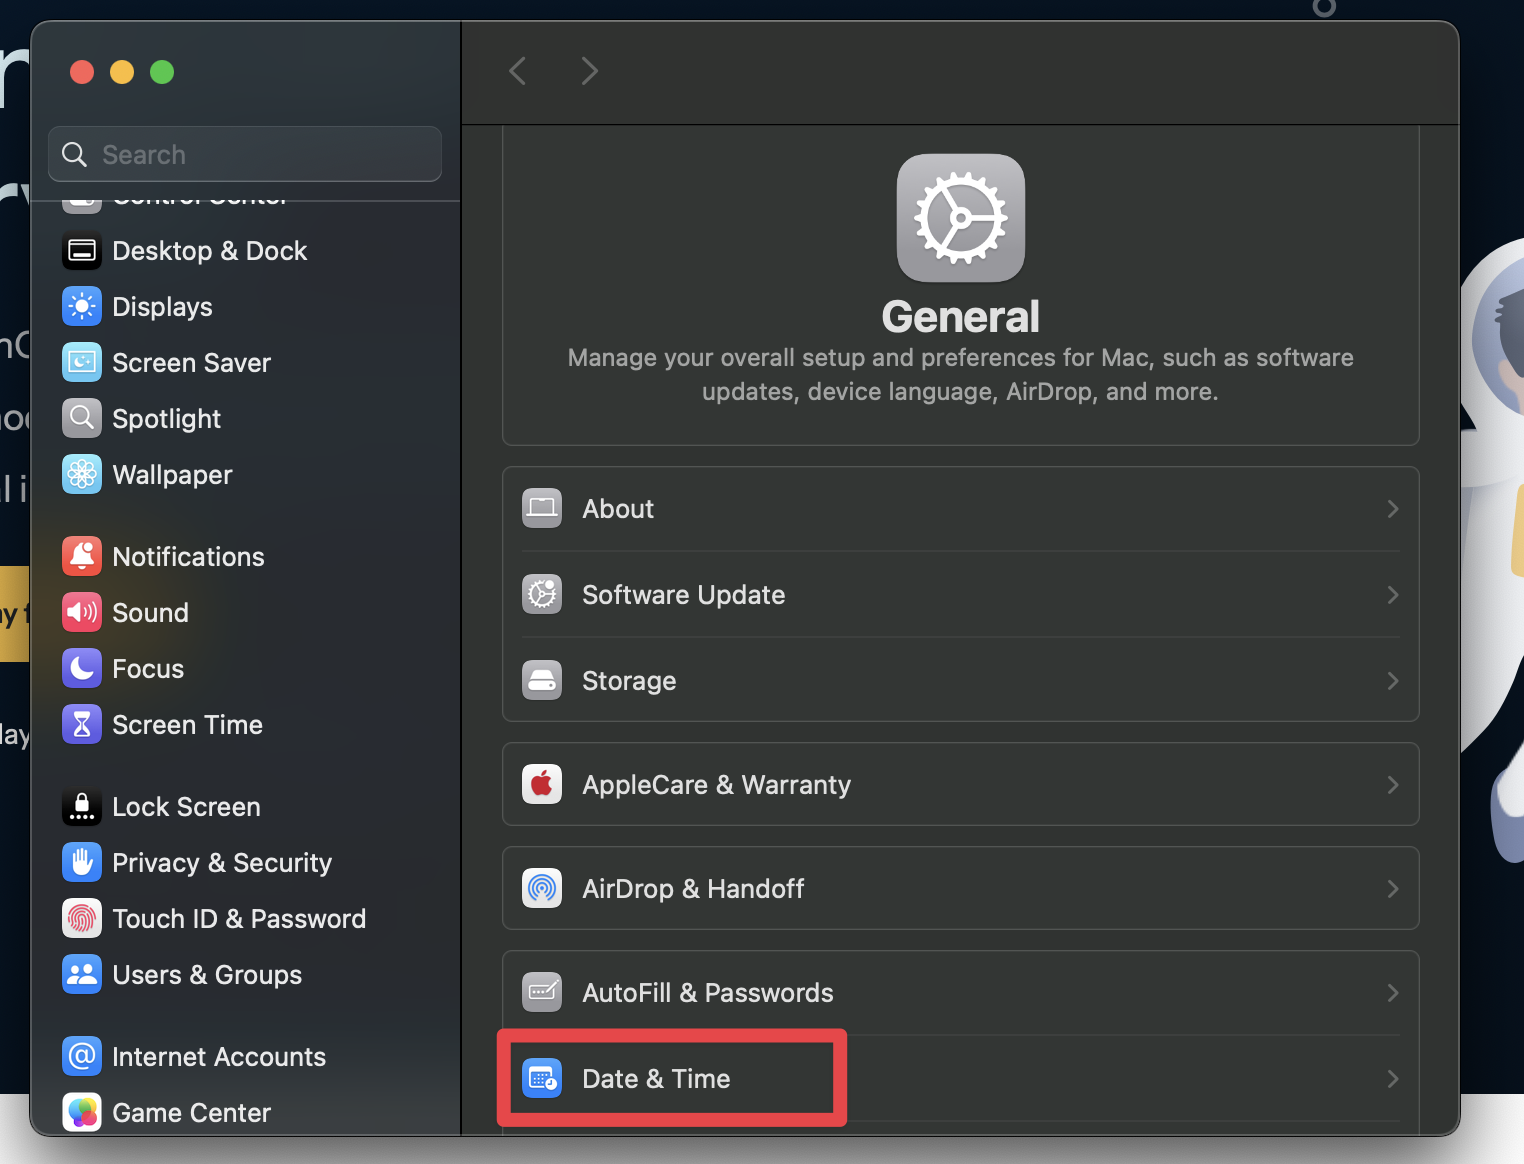
    1. Click General in the sidebar, then choose the Date & Time option on the right.
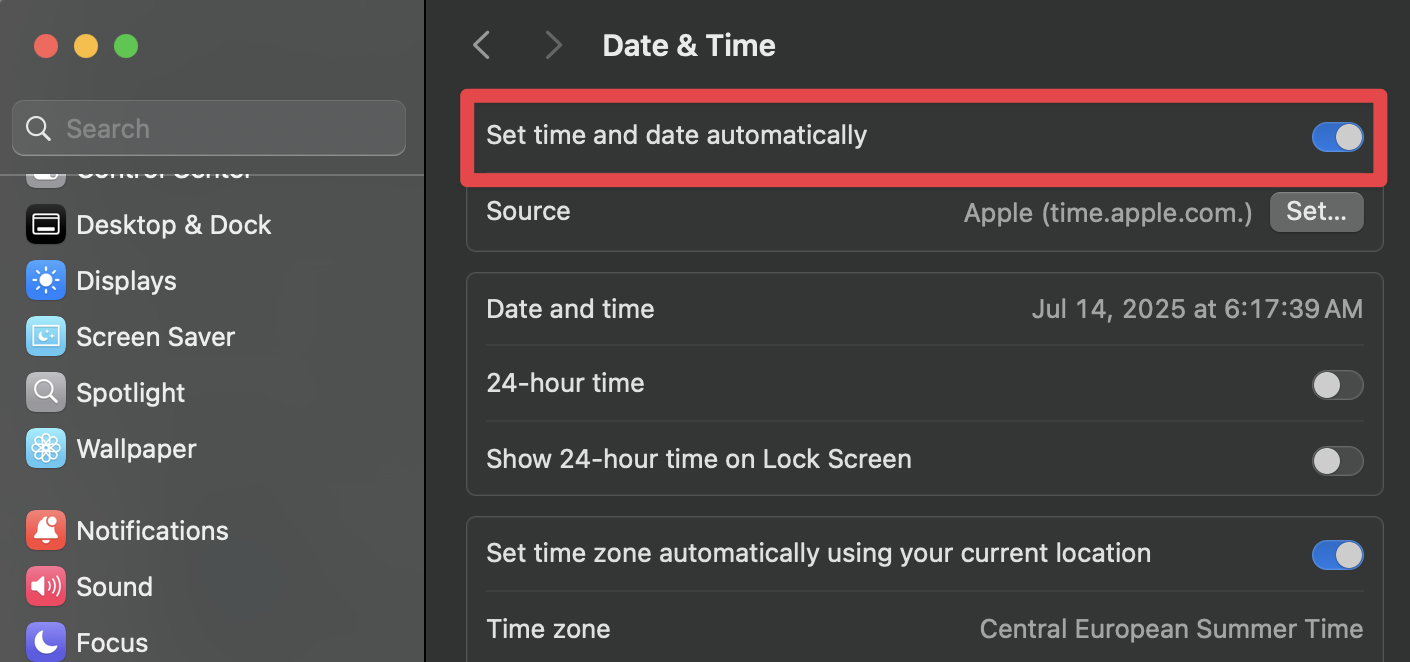
    1. Ensure the toggle switch next to “Set time and date automatically” is in the ‘on’ position.
    1. Make sure the server is set to time.apple.com or another reliable source.

    How to Fix on iOS / iPadOS:

    1. Open the Settings application from your Home Screen.
    2. Tap on General, and then select Date & Time.
    3. Verify that the toggle for “Set Automatically” is enabled, which allows your device to sync its time with the cellular or Wi-Fi network.

    3. Test the Issue Using a Private Window

    To determine whether the connection error is caused by your browser’s stored data or extensions, you should try opening the website in a private Window. A Private Window creates a temporary, isolated browsing session that acts as a “clean slate.” Safari doesn’t use your browsing history, cookies, or cached data in a Private Window.

    Additionally, it disables all third-party browser extensions you may have installed, such as ad blockers, security tools, or shopping assistants. Creating this clean environment allows you to test whether one of these components interferes with the secure connection process.

    To perform this test, follow these instructions:

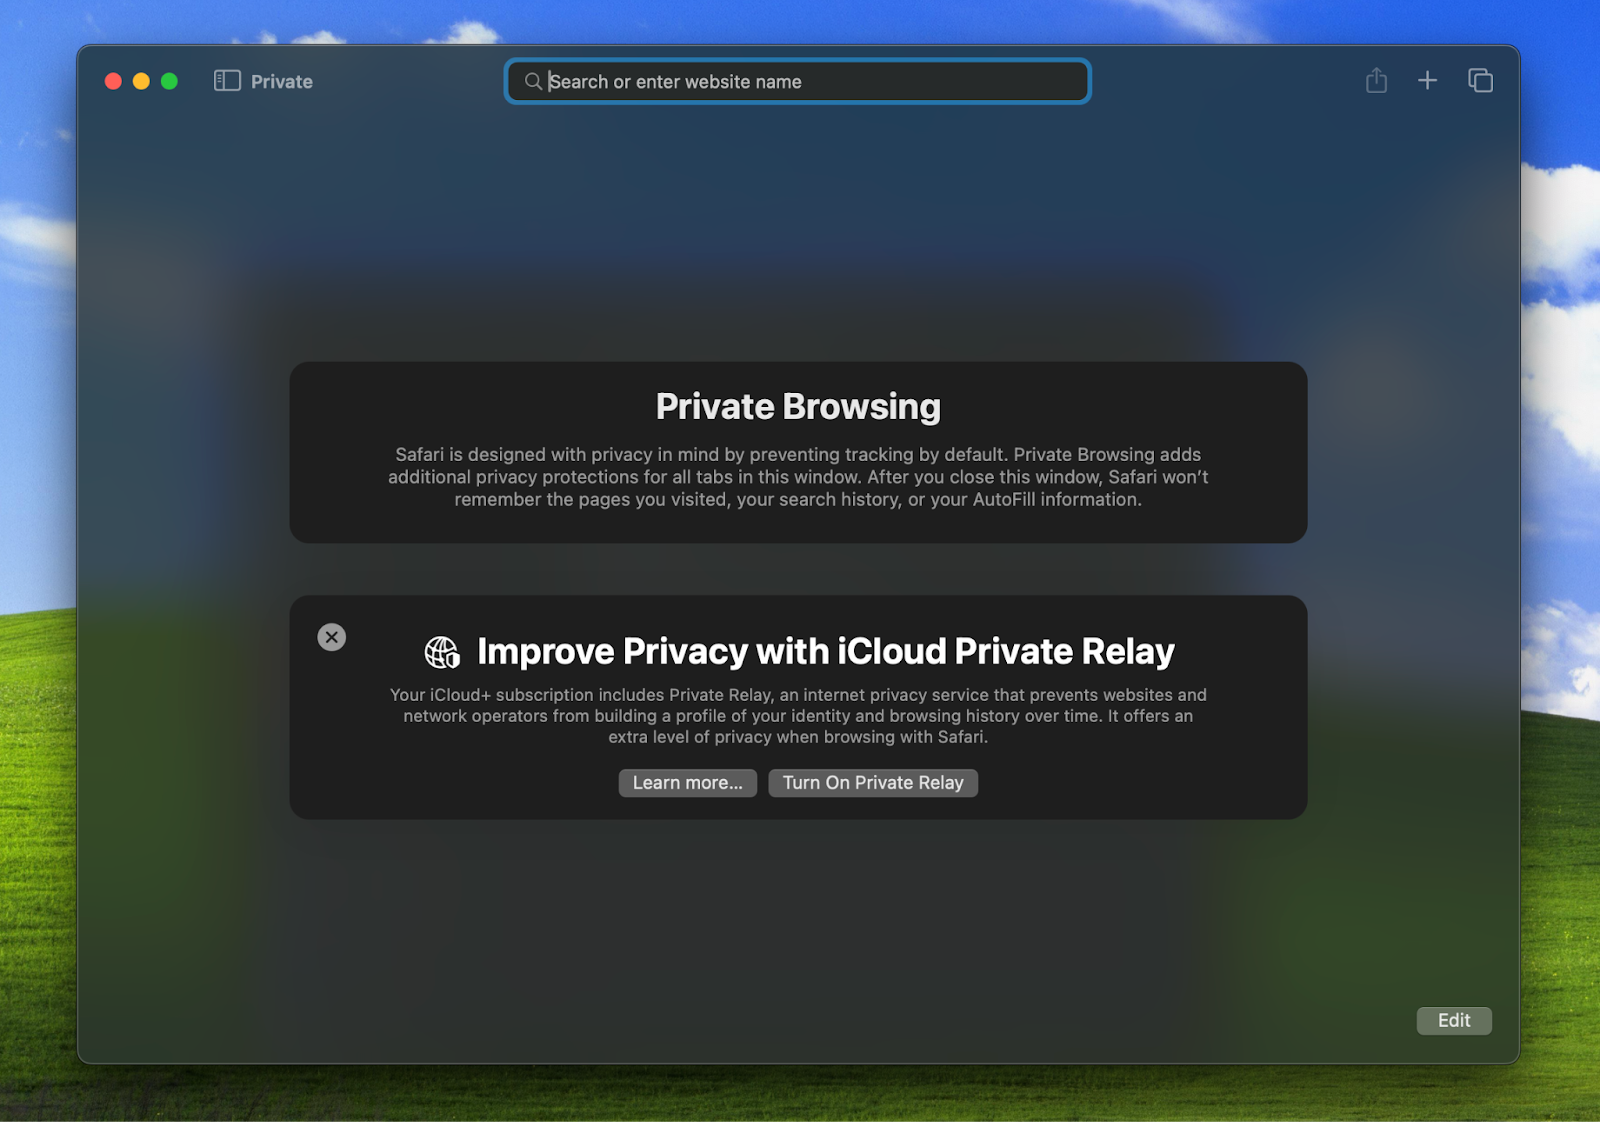
    1. With Safari open, go to the File menu at the top of your screen and select New Private Window. Alternatively, you can use the keyboard shortcut Shift + Cmd + N.
    2. A new, dark-themed Safari window will appear, indicating you’re in Private Browsing mode.
    3. In the address bar of this new private window, type or paste the website URL that was previously failing and press Enter.

    Now, carefully observe the result, as it will tell you exactly where to look for the problem:

    • If the website loads successfully in the Private Window: This confirms the problem is within your Safari profile. It confirms that the issue lies within your regular Safari profile and is caused by corrupted website data (cache or cookies) or an interfering browser extension. You should now proceed directly to Step 4 to clean up this data.
    • If the error message appears again in the Private Window: This tells you that the problem is unrelated to your browser’s data or extensions. The cause is deeper, likely related to your device’s network settings, system-wide configurations, or an issue on the website’s server. In this case, you can skip the next step and move on to Network-Level Troubleshooting.

    4. Clear Corrupted Website Data (Cache & Cookies)

    If your test in Step 3 was successful, this step usually resolves it. Over time, the data that Safari stores to make websites load faster (the cache) and remember your login sessions (cookies) can become corrupted or “stale.” This outdated information can conflict with a website’s server when it tries to establish a new, secure connection.

    We will first try a targeted approach, which is highly recommended as it will not log you out of other websites.

    How to Clear Data for a Single Site (Recommended Method):

    This removes data just for the affected site, leaving your data for all other sites untouched.
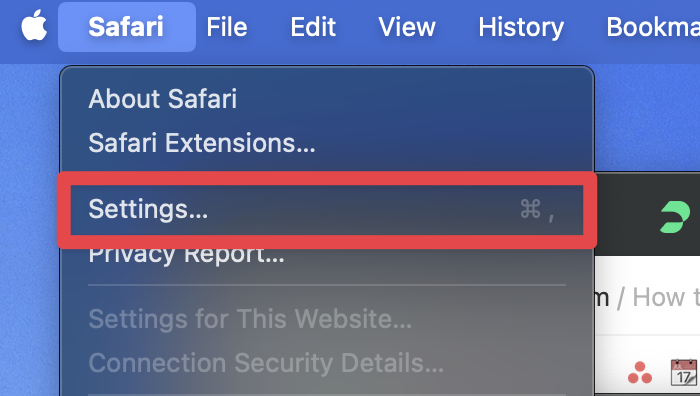
    1. Open Safari and click on Safari in the menu bar at the top of the screen, then select Settings (or Preferences on older macOS versions).
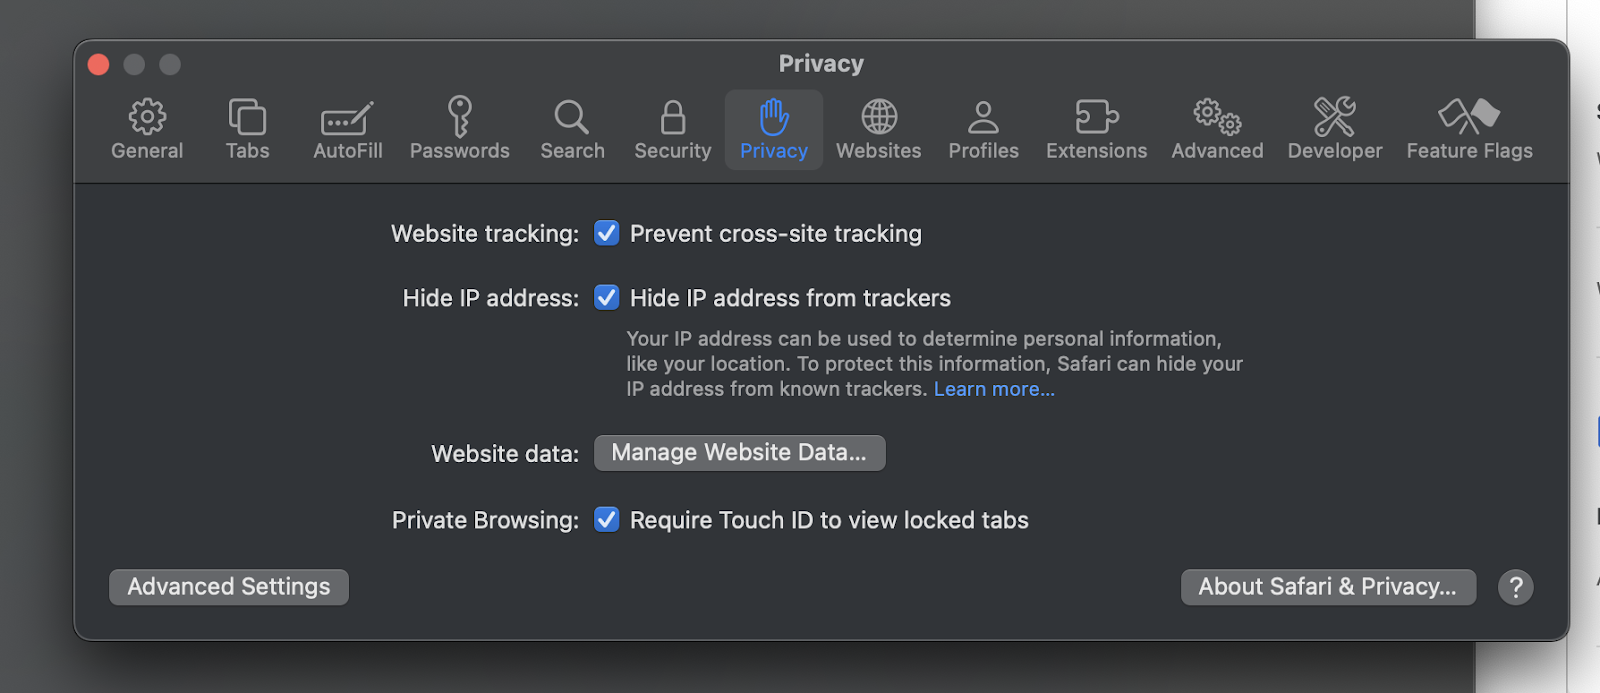
    1. In the Settings window, navigate to the Privacy tab. This section controls how Safari handles website tracking and stored data.
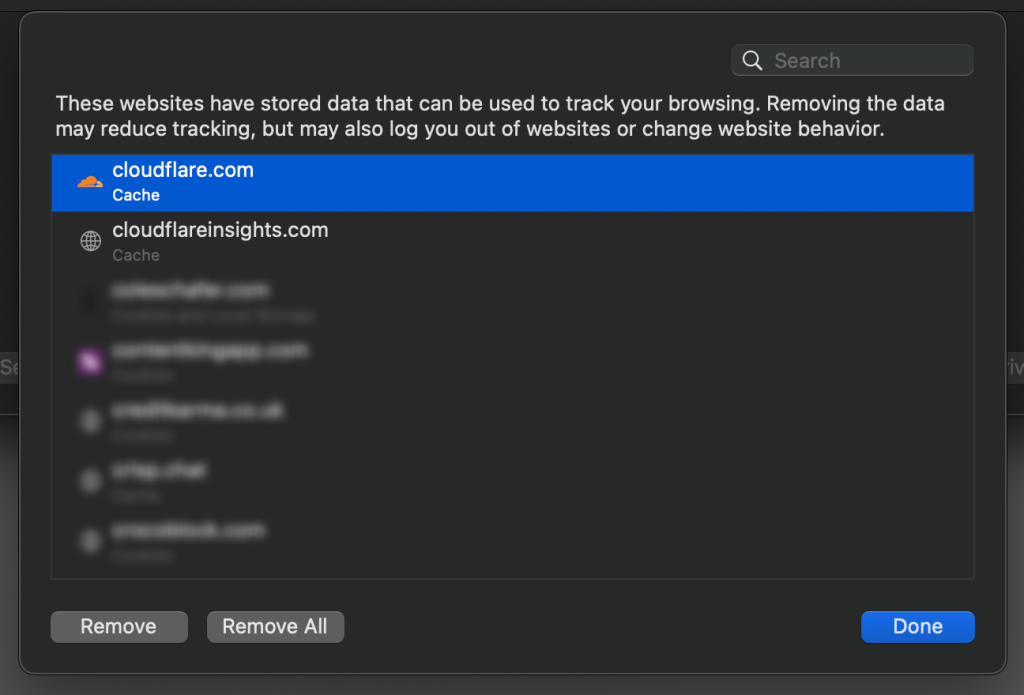
    1. Click the button labeled Manage Website Data…. This will open a new window showing all the websites that have stored data on your computer.
    2. In the search bar in the corner of this window, type the name of the website causing the error (e.g., “example.com”).
    1. Select the website from the list and click the Remove button.
    2. Click Done. To ensure the changes take full effect, quit Safari (Cmd + Q) and reopen it. Now, try accessing the website again.

    How to Clear All Browser History and Data (Use if the Targeted Method Fails):

    If removing the data for the specific site did not work, you can take a more drastic step. This action will remove your browsing history and sign you out of all websites you are currently logged into.

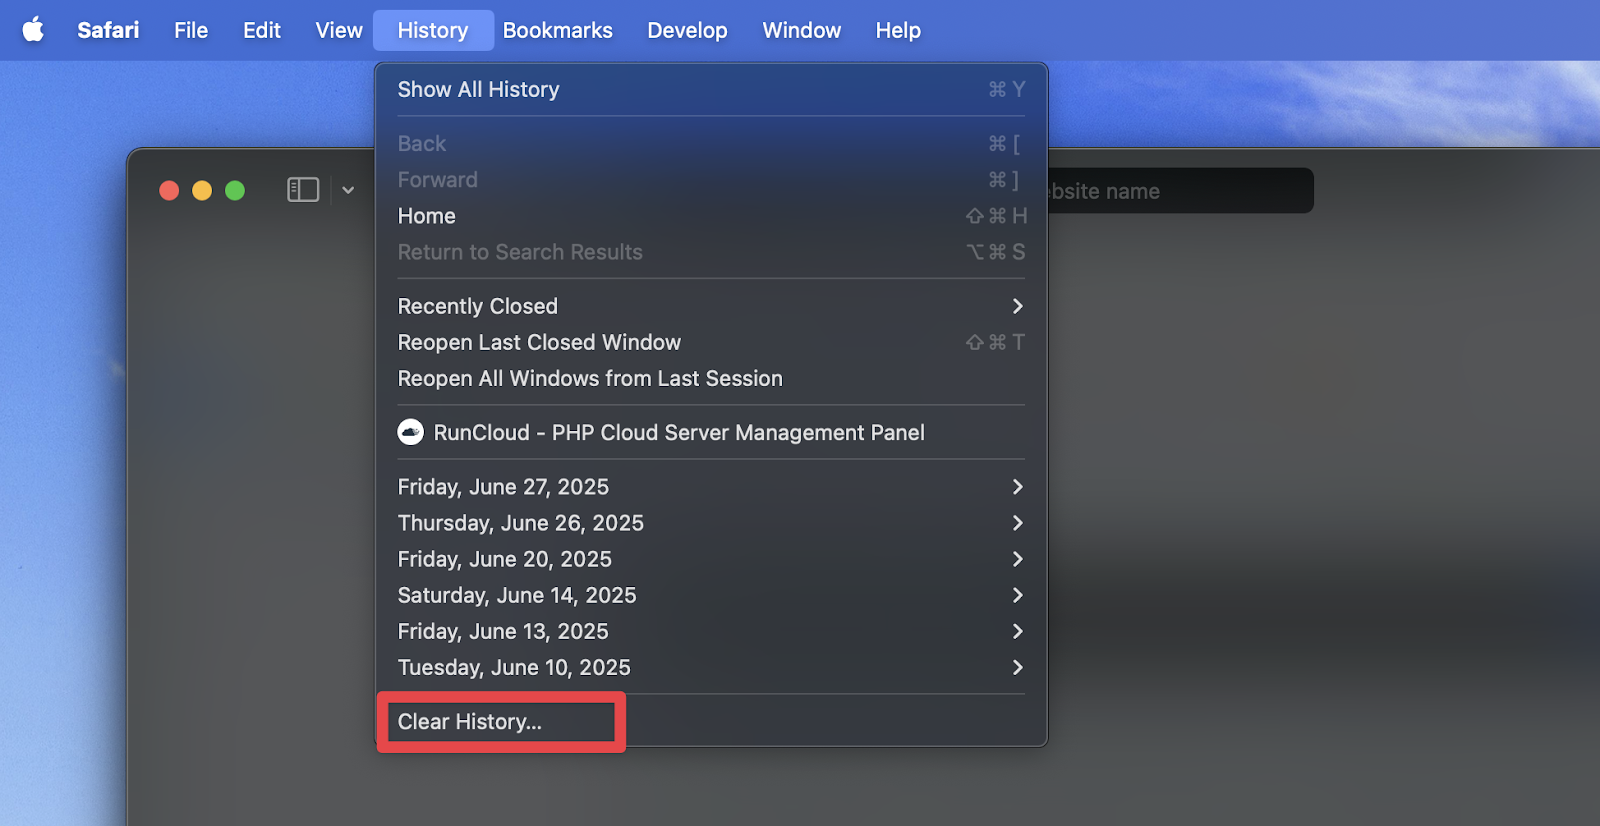
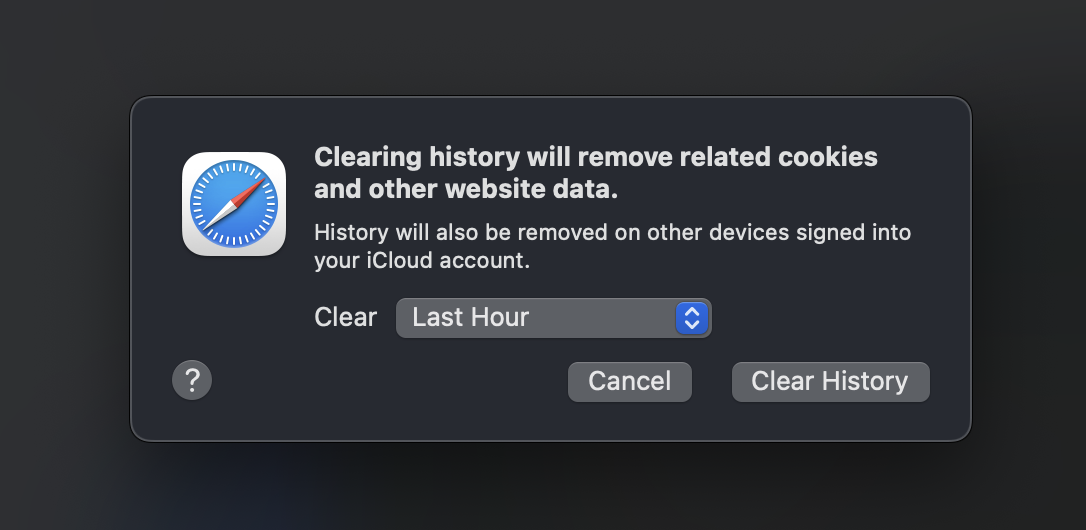
    1. In the Safari menu bar, click History, then select Clear History… from the bottom.
    2. A small dialog box will appear. Click the dropdown menu next to “Clear” and select all history.
    1. Click the Clear History button to confirm. This action comprehensively removes all history, cookies, and cached data from Safari.
    2. After the process is complete, try visiting the website one more time.

    Network-Level Troubleshooting

    If the fixes mentioned above didn’t work, the problem may lie in your network configuration or filtering software. Follow these steps to continue the troubleshooting process

    5. Disable VPN, Antivirus, or Firewall Software

    If you are using any third-party security and network software that intercepts your network traffic to scan it. Then this “man-in-the-middle” position can sometimes interfere with the delicate TLS handshake.

    1. Temporarily disable active VPN clients, antivirus programs (like Norton, Avast, McAfee), or third-party firewalls.
    2. Quit and restart Safari completely.
    3. Try visiting the site again.

    These network security applications install their own “root certificates” to decrypt and inspect your traffic. If their software is outdated or misconfigured, it can break the connection to legitimate sites. If disabling one of them fixes the issue, you need to update that software or adjust its “SSL/TLS Inspection” settings.

    6. Change Your DNS Servers

    A Domain Name System (DNS) server is like the Internet’s phonebook. A slow, unreliable, or misconfigured DNS server can cause connection failures. These DNS issues can sometimes lead to routing problems or timeouts before the secure connection is established.
    Most ISPs use their own DNS server to analyze and predict network traffic patterns, but these servers are sometimes poorly maintained, making them unreliable. If you use a custom DNS server, consider switching to a public DNS server such as Google DNS, Cloudflare, or Quad9, which are fast, reliable, and highly secure.
    How to Change DNS on macOS:

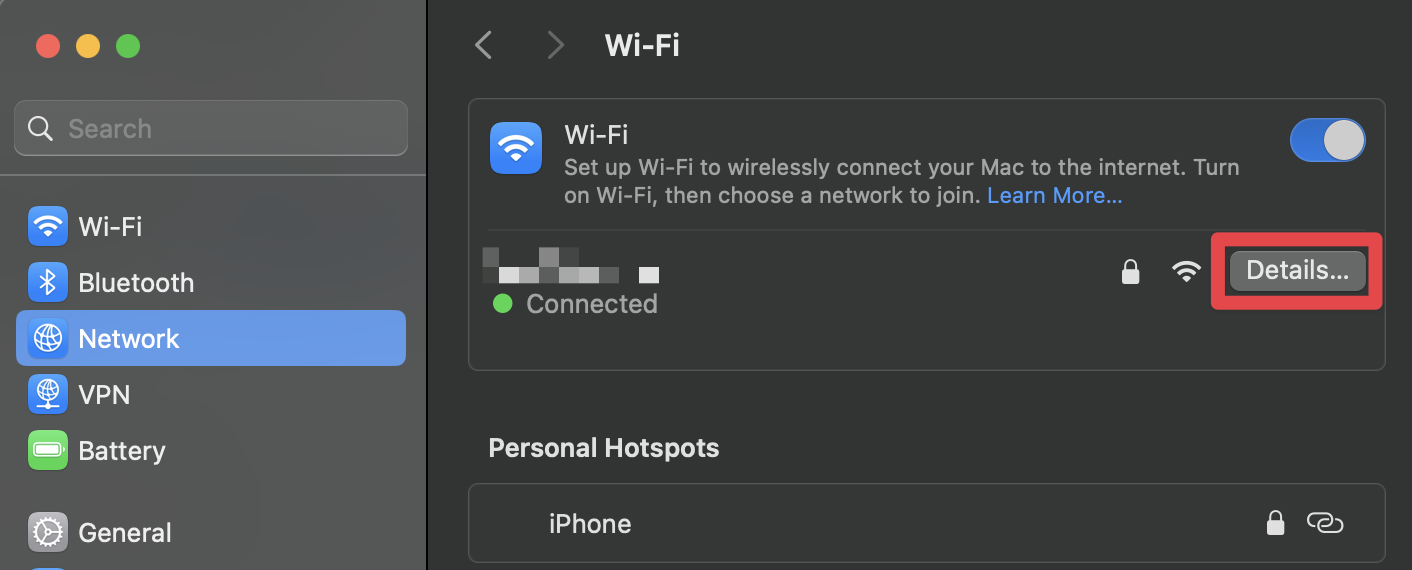
    1. Go to Apple menu > System Settings > Wi-Fi.
    2. Click the Details… button next to your active network connection.
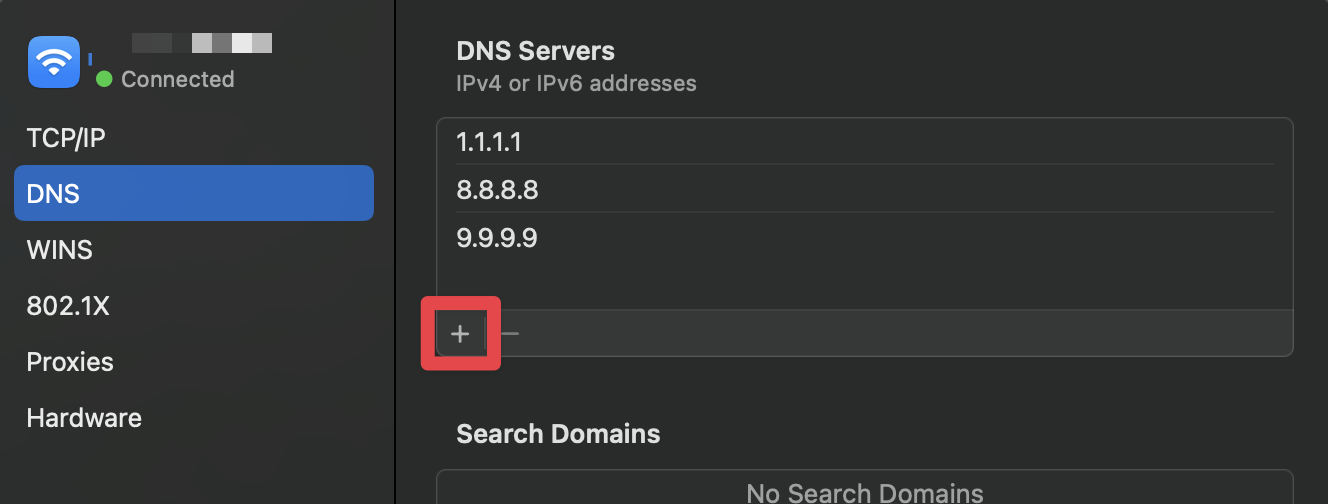
    3. Select the DNS tab from the sidebar.
    1. Click the + button and add the following servers:
      • 8.8.8.8 (Google)
      • 1.1.1.1 (Cloudflare)
      • 9.9.9.9 (Quad9)
    2. Click OK.

    How to Change DNS on iOS / iPadOS:

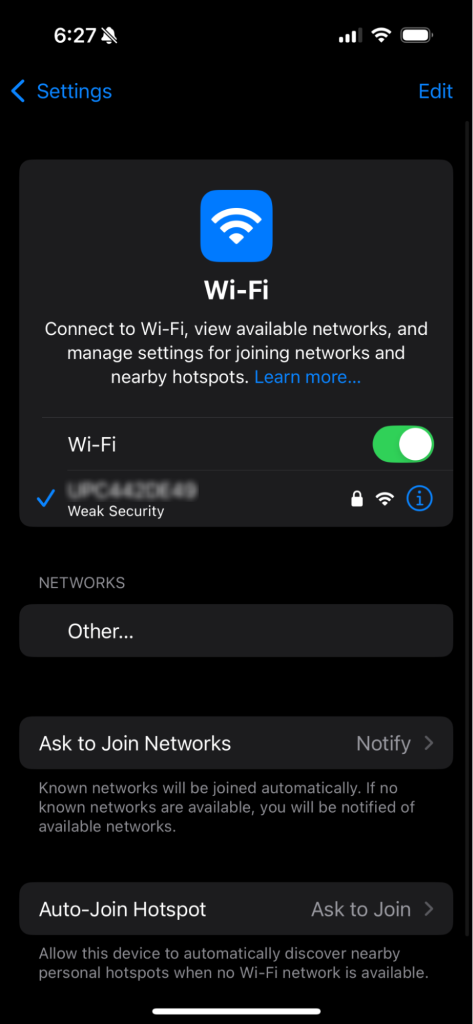
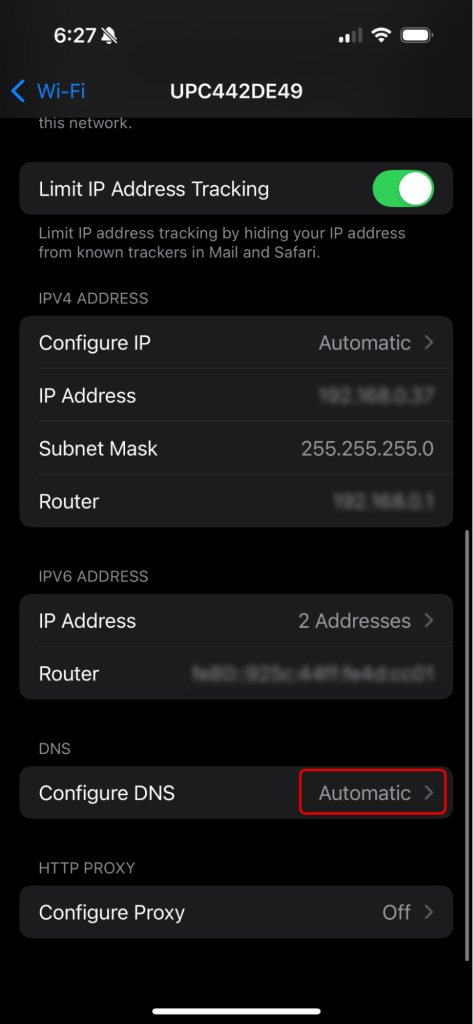
    1. Go to Settings > Wi-Fi.
    2. Tap the i (info) icon next to your network.
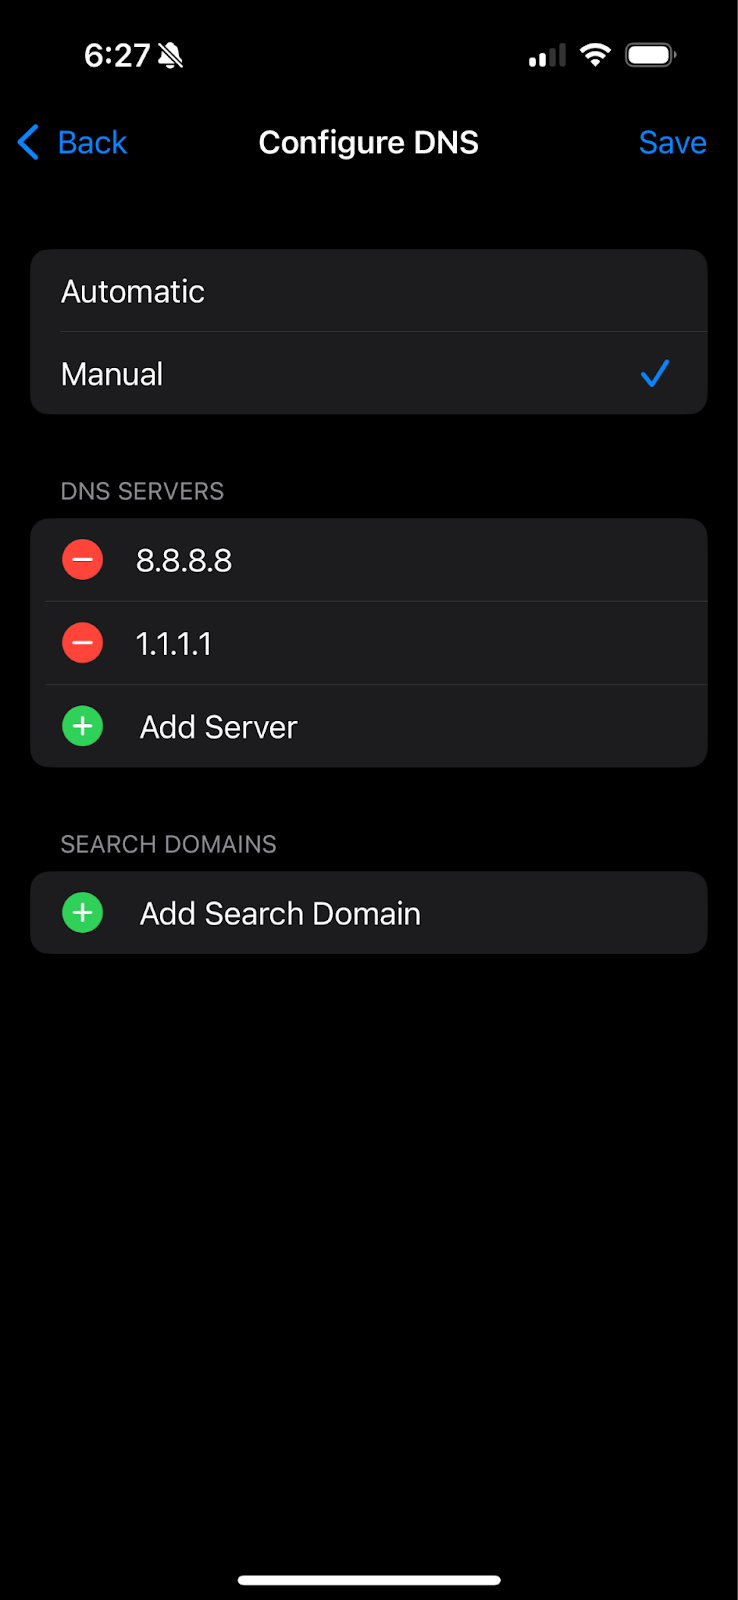
    1. Scroll down and tap Configure DNS.
    1. Select Manual, then Add Server to enter 8.8.8.8 and 1.1.1.1. Remove any old entries.
    2. Tap Save.

    Advanced System-Level Solutions

    Please proceed with the following steps, fully understanding that they involve changes to your core operating system.

    7. Update macOS and Safari to the Latest Version

    One of the most useful steps to resolve secure connection errors is to ensure your entire operating system is up-to-date. A modern, secure website server may refuse to communicate with a browser that uses older, deprecated security protocols (like early versions of TLS), because older protocols are now blocked for security reasons. Updating your OS is the only way to ensure Safari can “speak” this language’s latest and most secure version.

    Newer operating systems also include the latest version of the Apple Trust Store. It is a verified list of all the global organizations (Certificate Authorities) trusted to issue legitimate SSL/TLS security certificates. If a website is using a certificate from a newer authority that isn’t on your outdated list, Safari will be unable to verify its authenticity and will block the connection.

    Therefore, when you perform a software update, you not only get security patches and new features but also refresh Safari’s core components and directory of trusted entities.

    To check for and install updates on your Mac:

    1. Navigate to the Apple menu in the top-left corner of your screen and select System Settings.
    2. Click on General in the sidebar, and then choose Software Update.
    3. Your Mac will automatically check for available updates. If one is found, follow the on-screen prompts to download and install it.

    To update your iPhone or iPad:

    1. Open the Settings app, go to General, and tap on Software Update.
    2. Your device will check for and allow you to install any pending updates.

    8. Inspect Keychain Access for Problematic Certificates (For Advanced Users)

    Warning: This is a highly advanced troubleshooting step and should only be attempted if you are comfortable navigating core system utilities.

    Your Mac’s Keychain Access is a secure digital vault that stores all your passwords, private keys, and security certificates. Occasionally, a manually installed, expired, or corrupted certificate within this vault can create a conflict that blocks a secure connection to a specific website. This is particularly common if you have previously installed a “self-signed certificate” for a local development server or a corporate network, as these can sometimes interfere with public web traffic.

    Keychain Access is the heart of your Mac’s security. Deleting the wrong certificate (especially a “root” certificate) can cause widespread connection failures across multiple applications and websites. Therefore, you should only proceed if you strongly believe a specific certificate is the cause.

    To carefully inspect and remove a rogue certificate:

    1. Open Spotlight Search by pressing Cmd + Space, Keychain Access, and Enter.
    2. Once the application is open, focus on the “Keychains” panel at the top left. Select the System keychain, which contains certificates that affect all users on the Mac.
    3. In the bottom-left “Category” panel, click on Certificates to filter the main window’s view.
    4. You will now see a list of all system-level certificates. Carefully scan this list for any entries related to the website you are having trouble with. Pay close attention to any certificates marked with a red ‘X’ icon, as this is a clear visual sign that macOS considers them expired or untrusted.
    5. If, and only if, you locate a certificate that you are confident is the source of the problem (e.g., an expired certificate for that specific domain), you can attempt to remove it. Right-click on the certificate and select Delete.
    6. Enter your admin password to confirm the change. After deleting it, quit and restart Safari to see if the issue is resolved.

    Check A Different Website

    If you have tried everything above and the error persists on only one specific website, the problem is likely on the server’s end. This can be due to any of the following reasons:

    • Expired SSL Certificate: This is the most common server-side cause. The website owner forgot to renew their certificate.
    • Insecure Protocol Support: The server might be using an old, insecure version of TLS (like TLS 1.0 or 1.1), which Safari now blocks by default.
    • Certificate Name Mismatch: The certificate was issued for www.example.com, but the server is shop.example.com.
    • Incomplete Certificate Chain: The server isn’t providing the necessary intermediate certificates for Safari to establish trust.

    How to Verify a Server-Side Problem:

    You can use a third-party SSL checker tool to verify if the problem persists on the server itself. Go to a site like SSL Labs’ SSL Test or Security Headers and enter the hostname of the website you can’t access (e.g., www.example.com). The tool will run a deep analysis of the server’s configuration. It will give you a grade (A+ to F) and point out specific errors like expired certificates or weak protocol support.

    If the test reveals a problem, your only recourse is to contact the website’s administrator and inform them of the issue.

    Final Thoughts

    This guide covered the main causes behind the “Safari Can’t Establish a Secure Connection to the Server” error. By following the steps outlined above, you should be well-equipped to identify and resolve the issue from your end. For most users, these solutions will restore secure access to the websites you need.

    However, if you are a website owner or server administrator who has landed here while scratching your head over this error on your own domain, you know firsthand that hosting a secure server is no easy task. Even small mistakes can cause downtime and frustrate users, directly impacting your credibility and business. This is precisely why RunCloud has built solutions to eliminate these complexities.

    RunCloud provides a powerful server management panel that works with any cloud provider you choose, such as DigitalOcean, AWS, or Google Cloud. Its platform features a fully automatic SSL integration that deploys and renews Let’s Encrypt certificates without any manual intervention, ensuring you never have to worry about an expired certificate again.

    Additionally, its integrated DNS manager simplifies the once-complex task of pointing your domains correctly, preventing the configuration errors that often lead to secure connection failures.

    Prevent Errors Like This with RunCloud

    If you’re managing your own server or building websites for clients, errors like “Safari Can’t Establish a Secure Connection” are more than just frustrating – they’re a sign that something’s misconfigured. In many cases, these issues are caused by expired SSL certificates, DNS errors, or mismanaged server settings.

    RunCloud makes all of this easier.

    • Automatic SSL: RunCloud issues and renews Let’s Encrypt certificates automatically – no manual setup, no downtime, no security warnings.
    • Integrated DNS Manager: Configure domains properly with built-in tools that reduce errors and streamline deployment.
    • User-friendly interface: Manage everything through a clean, modern panel – no need to log in to the terminal just to tweak settings or fix issues.
    • Works with any cloud provider: Use RunCloud with DigitalOcean, AWS, Google Cloud, and more.

    If you’re tired of manually fixing preventable problems – or worried your users might be seeing connection errors without your knowledge – it’s time to take server management seriously.

    Get started with RunCloud – and keep your websites fast, secure, and always available.

  • How to Easily Fix Leverage Browser Caching Warning in WordPress

    How to Easily Fix Leverage Browser Caching Warning in WordPress

    Are you staring at that stubborn “Leverage Browser Caching” warning in your Google PageSpeed Insights report? You’re not alone. It’s one of the most common performance recommendations, and it often sounds far more complicated than it is.

    In this guide, we will explain browser caching from a server-level perspective and show you how to fix the leverage browser caching warning in WordPress by setting the correct Cache-Control and Expires headers.

    By the end of this article, in addition to fixing the “Leverage Browser Caching” warning in WordPress, you will see noticeable speed improvements in your website.

    Let’s get started!

    What is the “Leverage Browser Caching” Warning in WordPress?

    When someone visits your site for the first time, their browser has to download all the website’s assets, such as your logo, stylesheets (CSS), and scripts (JavaScript). Browser caching is a set of instructions that your server can send along with these files that says, “These files can be stored on your computer for a while. You don’t need to download them again on your next visit.”

    When these instructions are missing, the browser has to re-download all those files on every page load, making the site feel much slower for returning visitors.

    📖 Suggested read: LiteSpeed Cache WordPress Plugin Configuration Tutorial

    Why Does Google PageSpeed Insights Show The “Leverage Browser Caching” Warning?

    Google PageSpeed Insights shows the “Leverage Browser Caching” warning because adding proper caching controls speeds up the website for repeat users. When Google recommends a website to its users in search results, Google’s goal is to provide the best experience for its users, and that includes sending them to sites that load quickly.

    The warning is triggered for two main reasons:

    1. Slows Down Repeat Visits: Without caching, returning visitors have the same slow, “first-time” loading experience every time they visit. Fixing this makes the site feel almost instantaneous for them, which greatly boosts user experience.
    2. Wastes Resources: Forcing the browser to re-download the duplicate files repeatedly uses unnecessary bandwidth (both for the user and your server) and increases your server’s workload.

    📖 Suggested read: How to Use Redis Full-Page Caching to Speed Up WordPress

    How to Fix the “Leverage Browser Caching” Warning in WordPress

    You can easily fix the “Leverage Browser Caching” warning by adding specific rules, known as caching headers, to your server’s configuration. In this section, we’ll explore the primary methods to implement this on your server.

    ⚠️ But before we go any further, here is a note of warning!

    We understand that editing server configuration files or even .htaccess can feel intimidating. What if you make a mistake?

    This is where RunCloud provides a layer of confidence with automated backups. Before implementing any of the caching rules discussed in this guide, you can take a one-click, on-demand backup of your entire web application’s files. If anything goes wrong, you’ll be able to quickly and easily restore your entire website to its previous state in seconds.

    #1 – Setting Cache-Control Headers

    The Cache-Control header is the most powerful way to manage browser caching. It gives the browser precise instructions on how to handle a file. The max-age directive in this header tells the browser how many seconds it takes to keep a file cached before asking for it again.

    For example, a max-age of 31536000 tells the browser to store the file for one year. You can also specify directives such as public, meaning the file can be cached by any cache (like a browser or a CDN), or private for user-specific data.

    On a RunCloud server using an NGINX + Apache2 hybrid or OpenLiteSpeed stack, you can add these rules to your .htaccess file. For a pure NGINX stack, you would use the “NGINX Config” editor in your RunCloud dashboard. A typical rule looks like this for your .htaccess file, targeting different file types with appropriate expiration times:

    <IfModule mod_headers.c>
      <filesMatch "\.(ico|jpeg|jpg|png|gif|svg|webp)$">
        Header set Cache-Control "max-age=31536000, public"
      </filesMatch>
      <filesMatch "\.(css)$">
        Header set Cache-Control "max-age=2592000, public"
      </filesMatch>
      <filesMatch "\.(js)$">
        Header set Cache-Control "max-age=2592000, public"
      </filesMatch>
    </IfModule>

    📖 Suggested read: The Best WordPress Caching Plugins To Speed Up Your Site (2025)

    #2 – Using Expires Headers to Set Expiration Dates for Static Assets

    The Expires header is an older, simpler method for enabling browser caching. Instead of specifying a duration in the same way Cache-Control does, the Expires header sets a specific future date and time when the cached file should be considered “stale”.

    While Cache-Control is the modern standard, and it will override the Expires header if both are present, including Expires headers is still good practice for compatibility with older proxy servers and browsers.

    Adding expiration headers is very straightforward, especially in the .htaccess file found on RunCloud’s Apache2 or OpenLiteSpeed stacks. The mod_expires module allows you to set human-readable expiration times, making configuration easy.

    For example, you can specify “access plus 1 year” for images and “access plus 1 month” for CSS and JavaScript files. This tells the browser to calculate the expiration date based on when the user first accessed the file.

    Here is a simple and effective ruleset to add to your .htaccess file:

    <IfModule mod_expires.c>
      ExpiresActive On
      ExpiresByType image/jpeg "access plus 1 year"
      ExpiresByType image/png "access plus 1 year"
      ExpiresByType image/gif "access plus 1 year"
      ExpiresByType image/webp "access plus 1 year"
      ExpiresByType text/css "access plus 1 month"
      ExpiresByType application/javascript "access plus 1 month"
    </IfModule>

    📖 Suggested read: Everything You Need to Know About WordPress Object Caching

    #3 – Fixing “Leverage Browser Caching” Warning for Third-Party Scripts and Resources

    One of the most common frustrations for site owners is seeing a caching warning for scripts that aren’t even hosted on their own server. This frequently happens with resources such as Google Analytics, Google Fonts, or Facebook Pixel. You can’t control their caching headers because these files are located on Google’s or Facebook’s servers. This is why PageSpeed Insights will still flag them, even if your server is perfectly configured.

    While you technically can’t “fix” the headers on their servers, the only workaround is to host these scripts locally on your server. For example, you could download the Google Fonts files and serve them directly from your domain.

    However, the biggest downside to this approach is maintenance. When Google updates its Analytics script or adds new font characters, your local copy will become outdated, and you are responsible for manually updating it.

    For most users, the performance gain from caching these small third-party scripts locally is not worth the maintenance and potential security risks of running outdated code. Also, hosting third-party content on your own servers might break copyright laws in some jurisdictions. The best practice is often to correctly configure caching for all your assets and accept the warning for these third-party services.

    📖 Suggested read: Which is Better: Redis Full-Page Cache or NGINX FastCGI Caching?

    Best WordPress Plugins to Fix the “Leverage Browser Caching” Warning

    For many users, manually editing server configuration files can be daunting. Thankfully, the WordPress ecosystem has many powerful plugins that can automatically configure these settings with just a few clicks.

    #1 – How Litespeed Cache Solves Browser Caching Issues

    If your WordPress site runs on a RunCloud server with the OpenLiteSpeed (OLS) stack, you can quickly configure the LiteSpeed Cache for WordPress (LSCache).

    Unlike other caching plugins, LSCache is not a third-party plugin that provides basic caching solutions. It is a server-level solution that integrates directly with the OpenLiteSpeed web server. This deep integration allows it to manage caching with incredible efficiency.

    📖 Suggested read: How to Easily Optimize Your WordPress Website With RunCloud Hub

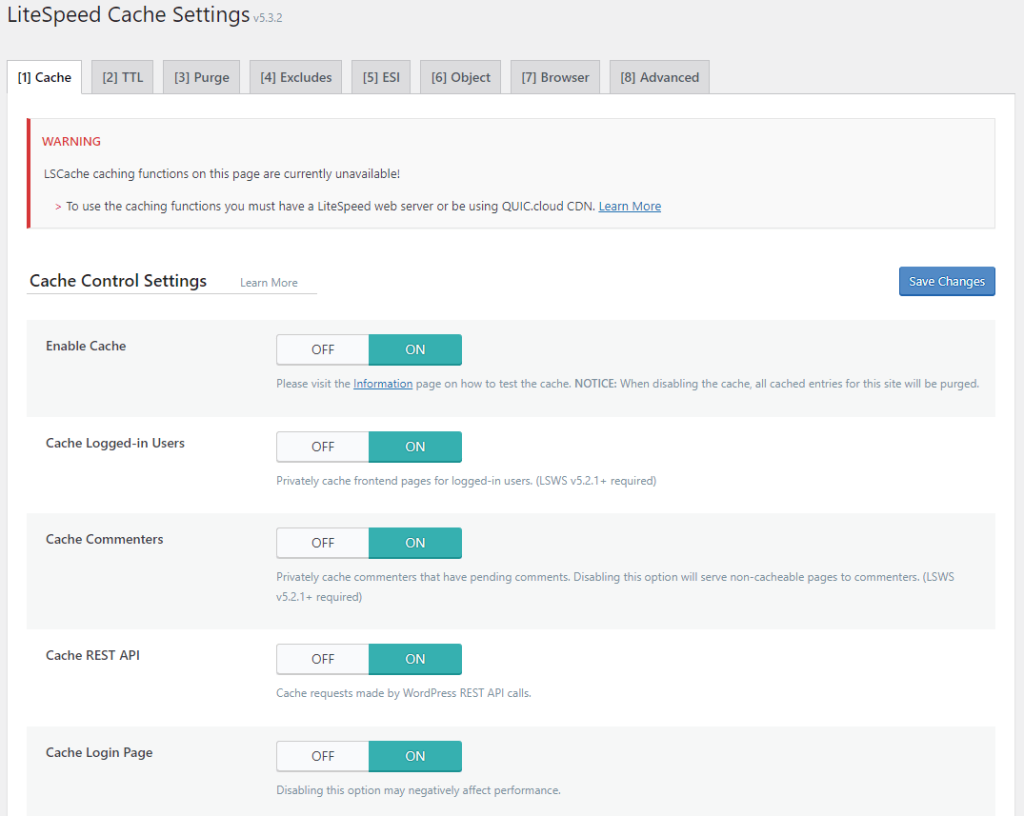
    When you install and activate the LSCache plugin, you can navigate to the LiteSpeed Cache > Cache > Browser tab in your WordPress dashboard. You’ll find a simple toggle switch for “Browser Cache” here. Turning this on will automatically add the optimal Cache-Control and Expires rules to your .htaccess file.

    This configuration also sets long cache lifetimes for your static assets, instantly solving the “Leverage Browser Caching” warning for all files hosted on your server. Additionally, this plugin is “talking” directly to the OLS server, and it can create highly optimized rules and work seamlessly with its other powerful features, like full-page caching and ESI.

    If you want step-by-step instructions for this, we recommend reading our thorough article covering the LiteSpeed Cache WordPress plugin configuration.

    #2 – Using RunCloud Hub to Manage Browser Caching Automatically

    If your site is running on the NGINX stack, then you can use RunCloud’s highly optimized page cache solution called RunCache. When you install the RunCloud Hub on your WordPress site, RunCloud automatically applies an advanced NGINX configuration that serves your site with incredible speed. This default configuration already includes best-practice rules for browser caching.        

    This means that for most users, RunCache automatically solves the browser caching warning without you needing to do anything extra. It’s configured to tell browsers to cache static assets like images, CSS, and JS for a long period.

    We recommend reading the following documentation posts if you want to learn more about RunCloud Hub:

    Wrapping Up

    The “Leverage Browser Caching” warning is a direct signal that you’re sacrificing site speed and user experience. You should fix this warning as soon as you see it, as this improvement directly impacts user satisfaction, reduces bounce rates, and sends positive signals to search engines like Google, which heavily favor fast, responsive websites as part of their Core Web Vitals initiative.

    And with a platform like RunCloud, you can move beyond basic plugin solutions to implement a far superior, server-level caching strategy.

    A typical WordPress caching plugin operates within the WordPress environment. WordPress and its underlying PHP code must first be loaded into memory for a cache to be built or served. While this is better than nothing, it still consumes server resources including memory and PHP workers.

    RunCloud Hub allows you to configure RunCache, its native NGINX FastCGI cache. This server-level cache intercepts requests before they even reach WordPress. It serves a pre-made, static HTML version of your page directly from the web server’s memory. This method is dramatically faster and more efficient, bypassing the resource-intensive process of loading PHP and the WordPress application.

    RunCloud provides a powerful, intuitive Hub with server-level performance tools like RunCache at your fingertips.

    Deploy your first lightning-fast, securely managed WordPress site with RunCloud today.

    FAQs on Fixing Browser Caching Warnings in WordPress

    How do I enable browser caching?

    Enabling browser caching requires adding specific instructions (headers) to your server’s configuration. These headers tell a visitor’s browser which files to store and for how long.
    With a Plugin: The easiest method for most WordPress users is to use a caching plugin like RunCloud Hub (RunCloud’s native NGINX page cache), W3 Total Cache, or WP Rocket. These plugins automatically add the necessary rules for you.
    Manually: For Apache or OpenLiteSpeed stacks, you can add caching rules directly to your .htaccess file. For NGINX-only stacks, you must add these rules to your NGINX location configuration file via the RunCloud dashboard.

    How do I set cache expiration?

    While both Cache-Control and Expires headers can be used to control how long a browser stores your files, we recommend using Cache-Control with the max-age directive, as it is the modern standard.
    The max-age value is set in seconds. For files that change frequently (like CSS or JavaScript), a shorter cache time is best. For static files that rarely change (like images, fonts, or videos), you should use a long cache time.
    Here are some common max-age values to use:
    1 Hour: max-age=3600
    1 Day: max-age=86400
    1 Week: max-age=604800
    1 Month: max-age=2592000
    1 Year: max-age=31536000
    For example, to cache a logo image for one year, you would set the header: Cache-Control: max-age=31536000.

    How to cache static files?

    To cache static files, you target them by their file extension. The most common static files to cache are:
    Images: .jpg, .jpeg, .png, .gif, .svg, .webp, .ico
    Stylesheets: .css
    JavaScript: .js
    Fonts: .woff, .woff2, .ttf, .eot
    You can create a block in your .htaccess or NGINX config file that applies caching headers specifically to these file types.

    How to fix caching issues?

    Caching issues, like seeing old content, usually stem from one of three places:
    Server Cache: Your server might be serving a cached page version. Use your plugin’s “Clear Cache” button or purge the cache via RunCloud Hub plugin.
    Browser Cache: Your browser has an old version stored. Perform a hard refresh (Ctrl+Shift+R or Cmd+Shift+R) or completely clear your browser’s cache.
    CDN Cache: If you use a CDN such as Cloudflare, you may need to purge its cache through the CDN provider’s dashboard.

    How do I clear the browser cache?

    Clearing your browser cache forces it to download the newest versions of all files from your website.
    Keyboard Shortcut: The quickest way is to press Ctrl+Shift+Delete (on Windows/Linux) or Cmd+Shift+Delete (on Mac). This opens a dialog to clear browsing data.
    Hard Refresh: To bypass the cache for a single page load, use Ctrl+F5 or hold Shift while clicking the reload button.

    How do I disable caching temporarily?

    You can temporarily disable caching in your browser’s Developer Tools for development or debugging.
    Press F12 (or right-click and “Inspect”) to open Developer Tools.
    Go to the “Network” tab.
    Check the box labeled “Disable cache”.
    The browser will not use its cache for that tab as long as the Developer Tools window is open.

    How do I cache third-party scripts?

    You cannot directly control the cache headers for scripts hosted on third-party servers (like Google Analytics, Facebook Pixel, or Google Fonts). Their servers determine the cache policy. This is a common reason why performance tools still show a “leverage browser caching” warning. Hosting those scripts on your own server is the only way to fix this. However, you are responsible for manually updating them, which can be a maintenance and security risk. For most users, it is safe to ignore caching warnings related to these major third-party scripts.

  • The Best Free eCommerce Platforms for Selling in 2025

    The Best Free eCommerce Platforms for Selling in 2025

    If you’re starting an online store and want to keep costs low, several platforms offer generous free plans with all the basics you need to begin selling.

    This guide compares the leading free e-commerce platforms, highlighting their key features, so you can choose the one that best fits your business. You’ll see how each platform performs in areas like usability, scalability, extensions, and long-term flexibility.

    Top Free eCommerce Platforms

    WooCommerce (Free, Open-Source)

    WooCommerce is a highly flexible e-commerce plugin that can be installed on WordPress. Because it works with WordPress, you get all the familiar blog and website functionality and a large range of tools to sell things online.

    One of the best things is that WooCommerce is open-source. This allows you to use extra features (called extensions) built by third-party developers. Some of these extensions are free, while others cost money, but they give you the flexibility to add the exact features your store needs.

    You can extend WooCommerce with plugins for subscriptions, shipping providers, payment gateways, and more.

    The core features of WooCommerce handle all the essential stuff for running an online shop. You can easily create product pages (for physical items, downloads, or even products with different options), track your inventory, process orders, and let customers manage their accounts.

    WooCommerce also determines taxes and shipping zones for you, which is a significant help if you sell to customers in different countries. Because it’s part of WordPress, you can easily write blog posts and optimize your site for search engines, helping people find your store organically. It gives you the power to sell products and build your brand’s online presence in one place.

    📖 Suggested read: WordPress.com vs. WordPress.org – The Differences & Which To Choose

    Shopify (Free Trial Available)

    Shopify is a paid eCommerce platform that enables you to easily build websites. However, it also includes a free trial, allowing you to try it out without commitment. Regardless of which Shopify plan you choose, you’ll receive some core features to make online selling easier. Shopify reports higher conversion rates through its hosted checkout, which is included on all plans. This means more people who start a purchase actually finish it.

    You also gain access to tools for in-person selling. Shopify POS (Point of Sale) lets you sell at physical locations and automatically syncs your online and in-person inventory. You’re not just limited to your website, either. Every plan allows you to promote and sell your products across various channels, including Instagram, TikTok, and Google. This helps you reach customers where they’re already spending their time.

    To see how your store is doing, every plan provides in-depth analytics. You get reports to track your sales, see where your customers are coming from, and find ways to improve. Plus, every Shopify plan lets you use apps from their app store. These apps add a range of extra functionality, including apps to help you source products, customize your store’s design, and do pretty much anything else you might need.

    📖 Suggested read: 11 Alternatives To reCAPTCHA to Protect Your Site from Spam

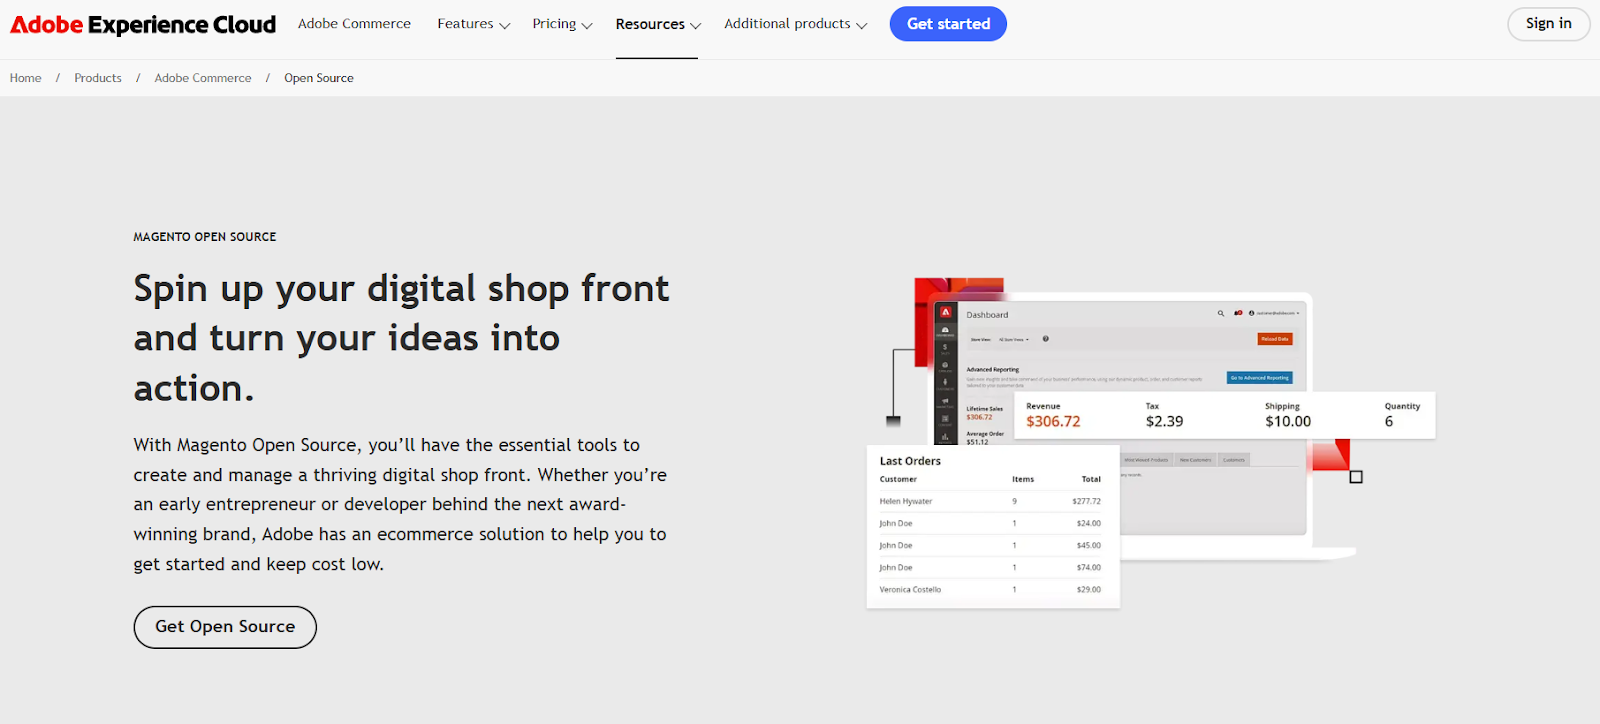
    Magento Open Source

    Magento is now part of Adobe Commerce, a business suite that helps you build online stores that are fast, engaging, and personalized. Adobe Commerce lets you build “headless” storefronts. This means the front end (the part customers see) and the back end (where you manage everything) are separate. This gives you a great deal of flexibility. You can use developer-friendly tools to create custom experiences, connect to different systems using APIs, and even use pre-built services from Adobe. It also helps your site rank higher in search engines. Making updates is easier, too, because you can change the front end without messing with the back end.

    Adobe Commerce includes “Edge Delivery Services” that make your store load quickly. Faster sites rank better in search results, get more visitors, and convert more customers. They also use a “performance first” design that helps your site achieve good scores on Google’s tests. You can access ready-to-use components (such as product pages, shopping carts, and customer accounts) that you can simply drop into your site. Plus, you can build your own custom components if you need something specific.

    Even without coding skills, it’s easy to create and publish content for your store. Familiar tools like Google Docs and Microsoft Word make it simple to build pages, add images, insert links, and include forms. Dynamic blocks let you tailor content for different customer groups, while scheduling tools allow you to plan updates in advance – no developer needed.

    Adobe Commerce helps connect the commerce platform to Adobe Experience Manager Assets. This tool efficiently manages, approves, and edits digital content, allowing you to track progress. Finally, the tool can use A/B testing to test different content, designs, and layouts to see what works best.

    Bagisto

    Bagisto is an open-source eCommerce platform built on the Laravel framework. Its architecture is designed for flexibility, featuring an API-first, headless structure that enables the building of expansive, multi-vendor marketplaces, as well as robust, multi-tenant SaaS capabilities, making it a comprehensive tool for modern digital commerce.

    It uses a headless commerce approach, which decouples the front-end presentation layer from the back-end commerce engine. This separation enables developers to build highly customized and high-performance storefronts using modern frameworks, such as React, Vue.js, and Next.js. By interacting with the back end through GraphQL APIs, the front end can deliver ultra-fast and engaging user experiences. This architecture not only improves site speed and flexibility but also allows for seamless integration across multiple channels, including web, mobile apps, and point-of-sale systems, without altering the underlying back-end processes.

    Bagisto supports multi-vendor marketplaces with tools for vendor accounts, commissions, and product approval. The central administrator retains complete oversight, with powerful tools to manage vendors, define global or seller-specific commission rates, and approve products. This structure benefits customers by offering a diverse range of products and the ability to compare prices from different sellers, all within one convenient location.

    Bagisto’s Virtual Try-On feature is a notable addition, which uses AR technology to enable customers to visualize products on themselves before making a purchase. This interactive tool enhances customer engagement and confidence by allowing them to realistically preview items such as clothing, glasses, and makeup, which in turn helps reduce return rates and increase sales. If you’d like to try it out for yourself, read our guide on how to get started with Bagisto.

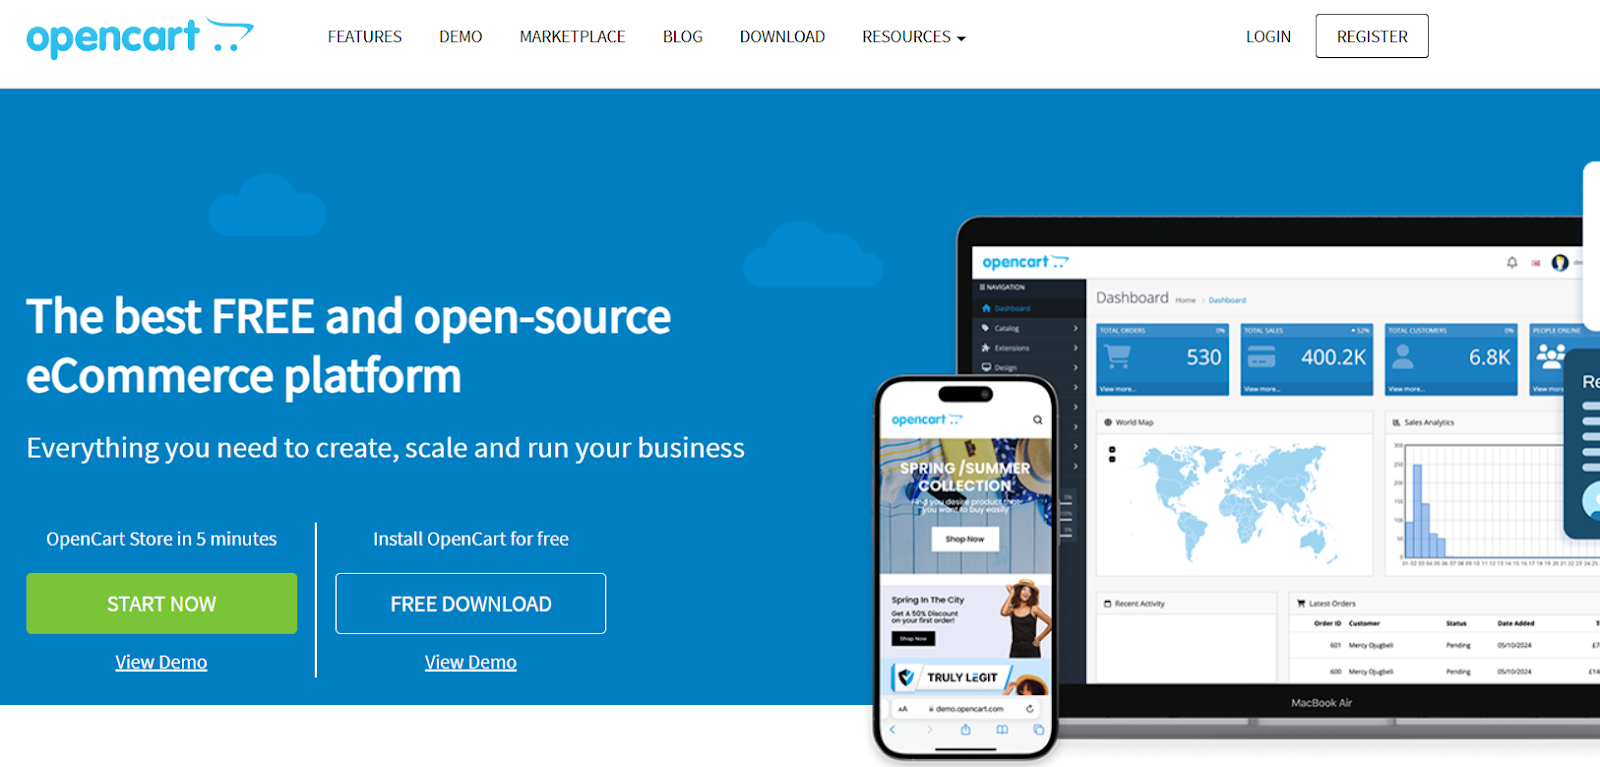
    OpenCart

    OpenCart provides a comprehensive suite of tools designed to enable the administration of your online store to be as efficient as possible. It includes everything from product management to detailed reporting, with the centralized administrator dashboard offering an immediate overview of crucial business metrics, including order totals, customer activity, and real-time sales analytics – all presented through intuitive widgets for rapid assessment.

    Additionally, OpenCart’s robust user management system allows you to create multiple user accounts with granular permission controls. This allows you to delegate responsibilities securely and maintain operational efficiency within your team. The platform also features multi-store functionality and allows centralized management.

    OpenCart supports extensive product customization through options and attributes, accommodating variations in size, color, and other characteristics. An integrated affiliate system facilitates collaborative marketing efforts, allowing you to incentivize external partners to promote your products and track their performance.

    To drive sales and enhance customer engagement, OpenCart provides versatile tools for creating discounts, coupons, and special promotions, allowing you to implement diverse pricing strategies. Finally, integrated backup and restore capabilities ensure data security and business continuity.

    📖 Suggested read: How to Host Your Websites on Vultr with RunCloud

    PrestaShop

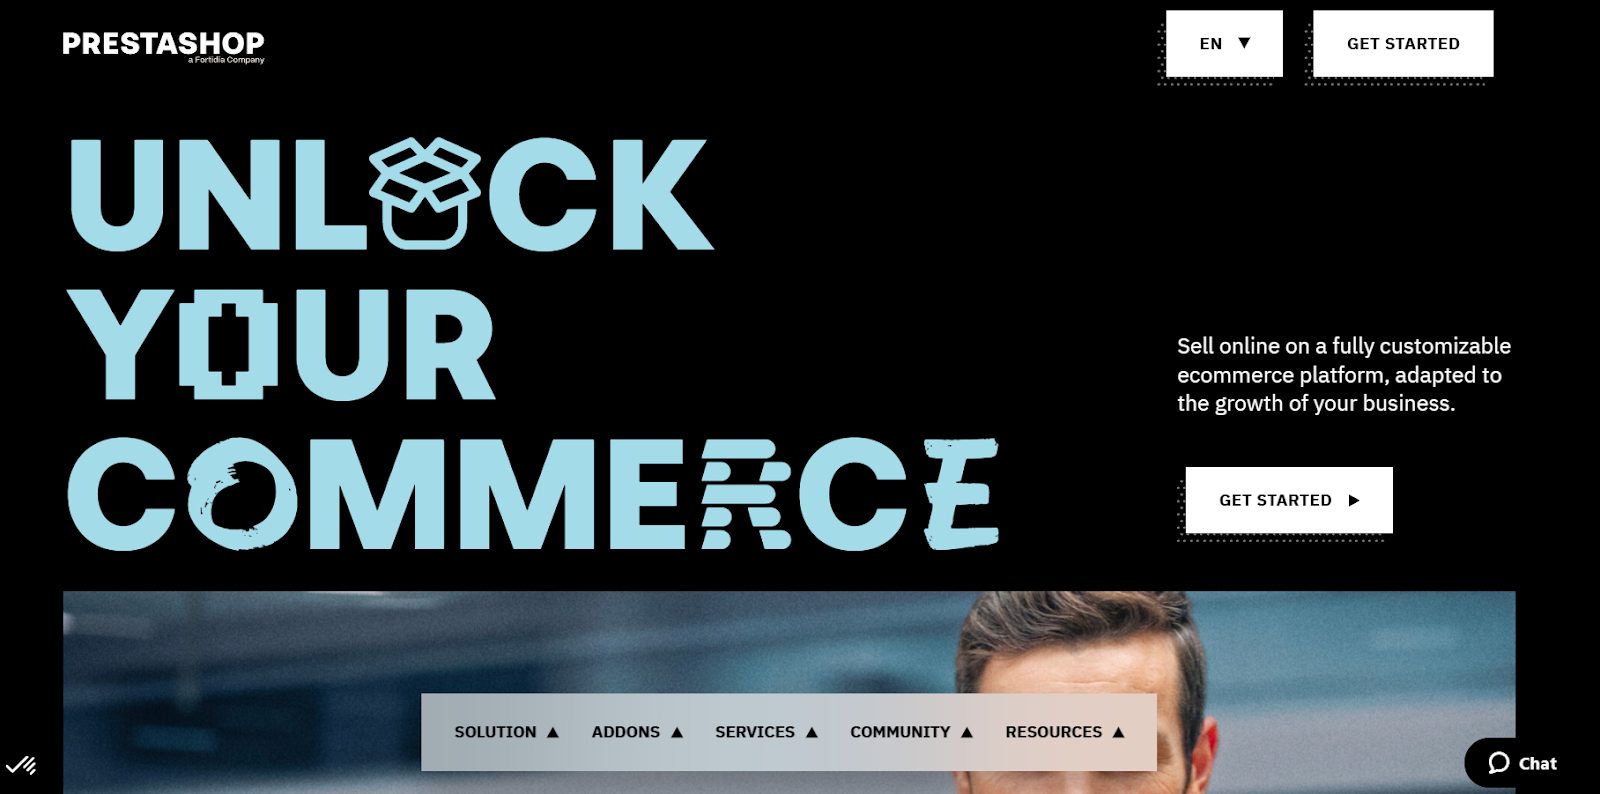
    PrestaShop Classic is available for free to download. It is a self-hosted e-commerce solution that gives merchants considerable control over their online stores. This option is particularly well-suited for those who already have a preferred hosting provider and possess the technical expertise to manage their server environment or are willing to learn.

    The download includes a selection of pre-installed essential modules, streamlining the initial setup process and enabling you to begin selling products relatively quickly. Furthermore, direct integration with the PrestaShop Marketplace from within the back office gives access to a vast library of themes and additional modules, allowing for extensive customization and feature expansion.

    A significant advantage of PrestaShop is its huge customizability, which comes from its open-source foundation. This flexibility also allows the platform to adapt and scale alongside your business. PrestaShop is renowned for its robust SEO capabilities, providing all the necessary tools to optimize your store’s visibility in search engine results, helping to drive organic traffic. With this self-hosted solution, you retain complete ownership of your store’s data, ensuring autonomy and control over your business information.

    Square Online

    Square provides an online e-commerce platform and a point of sale (POS) system with a comprehensive suite of tools designed to allow sales across various channels, with minimal setup and no formal training needed.

    Square POS offers a solution to fit your needs, whether you’re selling in a physical store, online, over the phone, or even remotely in the field. The system is modular, allowing you to choose the specific features that align with your business operations. Many of these core features are available at no monthly cost, making it an accessible option for businesses of all sizes. This flexibility ensures you only pay for the processing and features you use.

    A core component of Square POS is its integrated online store functionality. This feature lets you easily create a website to showcase your products or services, accept online orders, and manage bookings. You can also seamlessly integrate your online store with social media platforms such as Instagram and Facebook, helping to expand your reach and connect with customers where they already spend their time.

    In addition to basic transaction processing, Square POS offers features to help you manage your business more effectively. The Customer Directory automatically creates profiles for each customer, simplifying communication and relationship management.

    Additionally, Square offers business banking services, including a checking account with instant access to your sales revenue through a free debit card and a savings feature that automatically sets aside portions of your sales for designated purposes, such as taxes or future investments. This combination of sales tools and financial management features positions Square POS as a comprehensive solution for streamlining business operations.

    📖 Suggested read: The Complete WordPress Speed Optimization Guide

    Big Cartel

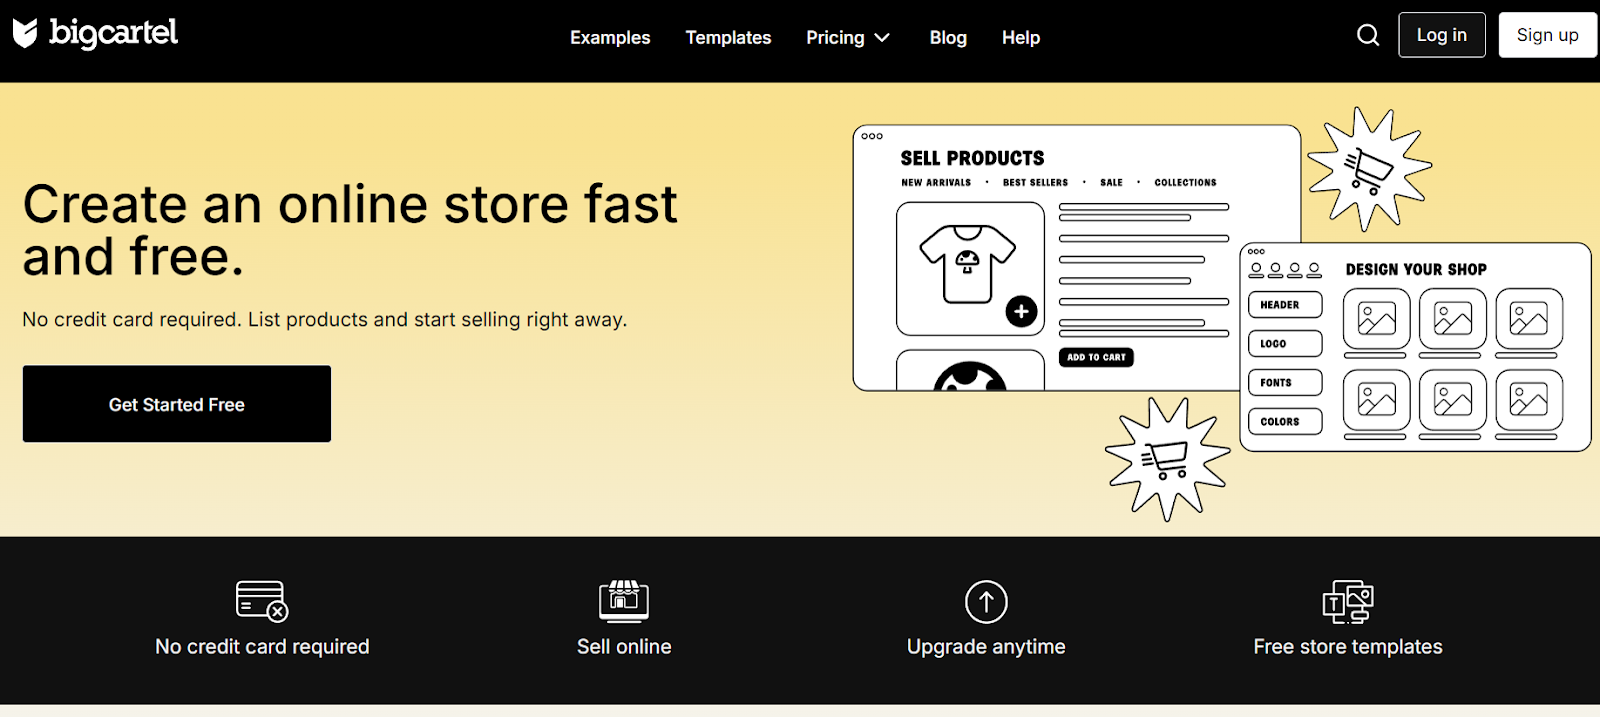
    Big Cartel offers a free plan, called the Gold plan, specifically designed to help artists, creators, and independent business owners launch an online store quickly and without any upfront financial commitment. This plan requires no credit card information, allowing you to list up to five products and begin selling immediately.

    It focuses on simplicity and ease of use, making it an ideal option for those new to e-commerce or those wanting to test the waters before investing in a paid plan. The Gold plan provides the essential tools to establish an online presence and generate revenue, with the option to upgrade to a paid plan later as your business expands and your needs evolve.

    The free Gold plan includes various features to facilitate a smooth store setup and management experience. You get access to free, customizable store templates, allowing you to create a visually appealing online shop that reflects your brand’s aesthetic without needing any coding knowledge.

    The plan also includes real-time sales and visitor statistics, giving insights into your store’s performance. The automatic sales tax feature simplifies the normally difficult part of the process.

    Beyond the website, Big Cartel also provides easy-to-use iOS and Android apps, enabling you to manage your store on the go, from processing orders to updating product listings. While the Gold plan is limited to five product listings, it provides a fully functional e-commerce platform with core features like multiple product variants (size, color, etc.), sales tax calculation, and real-time sales data.

    📖 Suggested read: The 19 Best & Most Reliable Transactional Email Services

    Ecwid

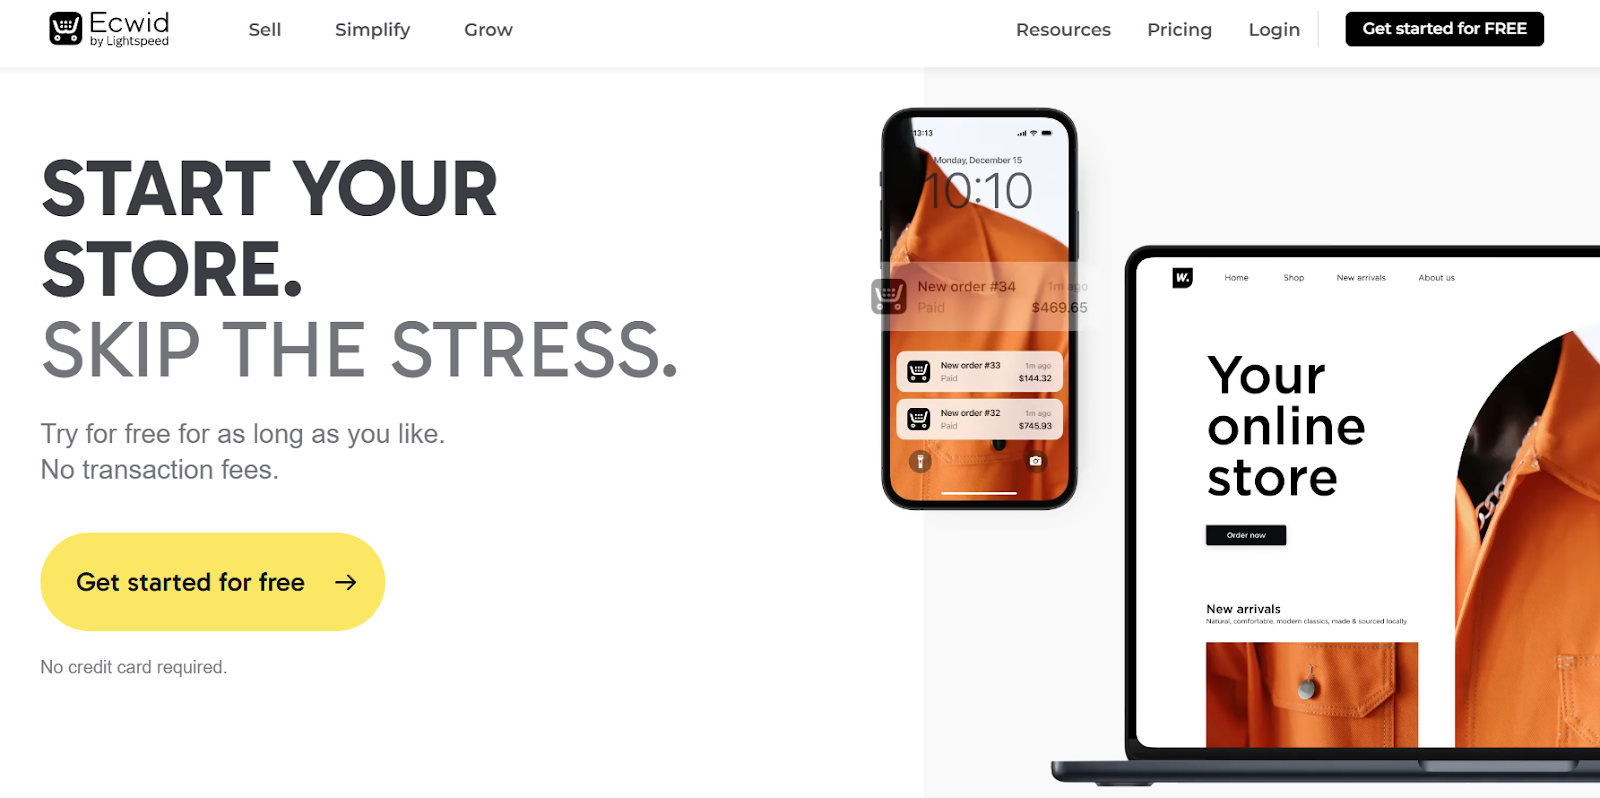
    Ecwid (E-Commerce Widget) is a flexible e-commerce platform suitable for businesses at any stage, from launching its first online store to scaling a large enterprise. It allows users to start without a credit card and use the basic features indefinitely, with no transaction fees. This risk-free approach enables entrepreneurs to validate their business ideas, add a store to existing websites, or create a new standalone store using customizable content blocks and themes.

    The platform provides a comprehensive suite of tools to manage all aspects of e-commerce, from marketing and sales to store operations. Ecwid allows you to sell across multiple channels, including social media platforms including Instagram and Facebook, marketplaces such as Amazon, and your website – all managed from a central dashboard.

    For store management, Ecwid offers automated solutions for domain name registration, SSL certificates, tax calculations, payment processing, and shipping, simplifying complex tasks and allowing business owners to focus on growth.

    As businesses grow, Ecwid provides features to support scaling and long-term success. It provides advanced reporting tools to get insights into customer behavior and marketing effectiveness, enabling data-driven decision-making. Ecwid supports custom code modifications and integration with Next.js for those with more advanced technical needs, offering greater design flexibility. Throughout the entire journey, Ecwid emphasizes its commitment to customer support, offering assistance via live chat, email, and phone, ensuring users have access to help whenever needed. The platform is trusted worldwide.

    📖 Suggested read: How To Install WordPress With RunCloud | Step-By-Step Guide

    Zen Cart

    Zen Cart is a free, open-source e-commerce platform prioritizing merchant freedom and control. It offers a comprehensive set of built-in features without restrictions on product quantity, sales volume, or the number of administrative users.

    It has a product variant management system with specific pricing and inventory control. It also supports wholesale/B2B sales, discount coupons, gift vouchers, and various pricing options (sales, specials, percentage discounts). Zen Cart is designed for global commerce, supporting multiple languages and currencies, diverse payment gateways like PayPal, AuthorizeNet, and Square, and traditional methods.

    Free eCommerce Platforms

    Choosing the Right Free eCommerce Platform

    Choosing the right e-commerce platform is crucial for any online business, whether you’re a startup, a creative entrepreneur, or an established company looking to expand its online presence.

    These options range from simple website builders with e-commerce features to fully dedicated e-commerce platforms.

    Each offers different strengths: some prioritize design flexibility, while others focus on scalability or specific features such as abandoned cart recovery, robust SEO tools, or extensive third-party integrations.

    However, if your priority is ultimate control, customization options, and long-term scalability for potentially high-volume online sales, WooCommerce is the ideal choice. While other platforms offer website embed options and some allow you to set up a store, they typically have certain limitations.

    Being open-source, WooCommerce offers unparalleled flexibility for product management, shipping options, inventory tracking, site analytics, and even integrating blogging tools for content marketing.

    The trade-off is that WooCommerce, unlike a hosted SaaS solution, requires you to manage your own hosting. This is where a service like RunCloud becomes invaluable.

    If you choose WooCommerce for its flexibility, the next step is reliable hosting. RunCloud lets you host WooCommerce on fast, developer-friendly cloud servers without the complexity of manual server management. You get full control over performance, security, backups, and scaling – all through an easy dashboard.

    Launch your WooCommerce store on a fast, secure cloud server managed through RunCloud’s simple dashboard.

    Create your free RunCloud account to get started.

    FAQs on Free eCommerce Platforms

    What is the best free eCommerce platform for beginners?

    For beginners, WooCommerce (a WordPress plugin) is highly recommended. It’s user friendly, has a massive community for support, and offers extensive customization options, especially when hosted on a powerful platform such as RunCloud.

    Can I sell digital products on these platforms?

    Yes, most free eCommerce platforms, including WooCommerce, support the sale of digital products. Within the platform settings, you can easily configure downloads, subscriptions, and license keys.

    Do I need technical skills to use these platforms?

    Basic computer literacy is helpful, but extensive technical skills aren’t generally required for free platforms like WooCommerce. However, managing your own server with RunCloud does involve some technical understanding, though RunCloud’s interface simplifies the process considerably.

    How do transaction fees work on free platforms?

    The “free” platform doesn’t charge transaction fees, but the payment gateways you use (like PayPal or Stripe) will. These fees are typically a percentage of the transaction plus a fixed amount.

    What payment gateways are supported?

    Most free platforms, especially WooCommerce, support a wide range of payment gateways. These include popular options like PayPal, Stripe, Square, and many others, often available as add-ons or extensions.

    Can I customize my online store?

    Absolutely! Customization is a major strength of platforms like WooCommerce. You can choose themes, add plugins, and even modify code (if you’re comfortable) to create a unique storefront.

    How do I migrate from one platform to another?

    Migration depends on the specific platforms involved. While some offer built-in tools, you might need third-party plugins or manual export/import of data (products, customers, orders) for a smooth transition.

    Are there any limitations on free plans?

    Yes, “free” often means limitations on features, storage, or the number of products you can list. WooCommerce is free, but you’ll pay for hosting (consider RunCloud), premium themes, and extensions.

    What is the best platform for high-volume sales?

    WooCommerce, coupled with robust hosting, is a strong contender for high-volume sales. Its scalability and the ability to optimize your server environment are crucial for handling large amounts of traffic and transactions.

    How do I optimize my store for SEO?

    Use descriptive product titles and descriptions, optimize images with alt text, and use SEO plugins such as Yoast SEO (for WooCommerce/WordPress). Additionally, ensure your site is fast (RunCloud can help with this) and mobile-friendly, which are key ranking factors.

  • How to Edit robots.txt in WordPress (With & Without Plugin)

    How to Edit robots.txt in WordPress (With & Without Plugin)

    Not having a strong web presence is like not existing at all. Your website is your storefront, your portfolio, and your voice.

    Controlling how search engine crawlers discover and interact with it is crucial for its success.

    In this guide, we will discuss the robots.txt file, a critical tool for managing your WordPress robots.txt file and optimizing your site for SEO. We’ll cover everything from the basics of robots.txt rules and directives (like Disallow and Allow) to editing your file using popular SEO plugins or even directly via FTP or cPanel.

    But that’s not all! We’re going beyond traditional search engines.

    In the age of AI, we’ll show you how to manage your website’s presence in tools like ChatGPT and Claude using specific robots.txt user-agent configurations.

    You will also learn to control whether your content is used to train these powerful AI models, giving you unprecedented control over your digital footprint. This feature has become increasingly important with the advancement of AI, so understanding your robots.txt file and web robots in general is more powerful than ever.

    By the end of this guide, you’ll be a robots.txt expert!

    What is robots.txt?

    The robots.txt file is a plain text file in your website’s root directory (e.g., yourwebsite.com/robots.txt). It is a set of instructions for search engine crawlers (also known as bots or spiders) that tells them which parts of your site they shouldn’t access. It’s a tool for controlling how search engines interact with your website, but it’s not a security mechanism. It is a public file that any human or bot can see.

    📖 Suggested read: 15 Best Performance Testing Tools to Improve Your Site

    Purpose of robots.txt

    The primary purpose of robots.txt is to manage crawler traffic, not to hide pages from search results entirely. While it strongly suggests which areas to avoid, it doesn’t guarantee exclusion from search indexes. Here’s a breakdown of its key functions:

    • Preventing Crawling of Duplicate Content: Websites often have multiple URLs that lead to the same content (e.g., with and without “www” or with different URL parameters). robots.txt can help you indicate which version you prefer search engines to crawl and avoid duplicate content penalties.
    • Blocking Access to Sensitive Directories: You might have areas of your website that are not intended for public consumption, such as your admin panel (/wp-admin/ on WordPress), staging environments, or directories containing internal files. robots.txt can tell crawlers to steer clear of these. However, remember that this is a suggestion, not an enforced restriction; for true security, use proper authentication and authorization methods.
    • Conserving Crawl Budget: Large websites, especially e-commerce sites, can have thousands or even millions of pages. Search engines have a limited “crawl budget” – the amount of time and resources they’ll dedicate to crawling a particular site. You can ensure that crawlers prioritize indexing your most valuable content by strategically disallowing less important or dynamically generated pages (like certain search result filters).
    • Specifying the Location of Sitemaps: robots.txt can include a directive pointing search engines to your XML sitemap(s). Sitemaps are lists of all the important URLs on your site, helping search engines discover and index your content more efficiently.

    📖 Suggested read: 10 Best WordPress Management Tools To Easily Manage Multiple Websites

    How Search Engines Use robots.txt

    When a search engine crawler (like Googlebot) visits a website, it typically checks for the robots.txt file first. It parses the file and looks for instructions specifically targeted at it (via the User-agent directive).

    1. User-agent: This line specifies which crawler the following rules apply to. User-agent: * means the rules apply to all crawlers. You can also target specific crawlers, like User-agent: Googlebot.
    2. Comments: Lines starting with # are considered comments and will be ignored by web crawlers.
    3. Disallow: This is the core directive. It tells the crawler not to access the specified URL path. For example, Disallow: /private/ would instruct crawlers to avoid the /private/ directory and everything within it.
    4. Allow: This directive is used to override a Disallow rule. It’s helpful if you want to block an entire directory but allow access to a specific file or subfolder within it. For instance:
    User-agent: *
    Disallow: /images/
    Allow: /images/logo.png

    The above code snippet blocks access to the /images/ directory, except for the logo.png file. You should note that robots.txt is based on a cooperative system. Reputable search engines (like Google, Bing, etc.) generally respect the instructions in robots.txt. However, malicious bots or scrapers might ignore them completely.

    Therefore, robots.txt should not be relied upon for security; use proper authentication and .htaccess rules for sensitive areas. Also, a disallowed page may still appear in search results if it is linked from other pages.

    📖 Suggested read: How To Install WordPress With RunCloud | Step-By-Step Guide

    Importance of robots.txt For AI Crawlers

    While robots.txt has always been important for managing traditional search engine crawlers, its importance has grown significantly with the rise of AI-powered crawlers. These AI crawlers, used by companies like OpenAI, are designed to gather vast amounts of data from the web, often to train large language models (LLMs) and other AI systems. This introduces new considerations for website owners regarding data usage, privacy, and control.

    Why is robots.txt More Important Now?

    • Data Usage Control: AI models require massive datasets for training. Your website’s content, if crawled, could potentially be used to train these models. robots.txt allows you to express your preference regarding this usage. You can choose to allow AI crawlers to access your content, disallow them entirely, or selectively control access to specific parts of your site.
    • Performance and Bandwidth: AI crawlers can be very aggressive and potentially overload your server. robots.txt can help you manage this by limiting their access or specifying crawl delays (though not all crawlers respect crawl-delay directives).
    • Ethical Considerations: There are ongoing discussions and debates about the ethics of using publicly available data to train commercial AI models. robots.txt allows website owners to participate in this discussion by making their preferences known.
    • Search Indexing: Some AI crawlers enhance search experiences within specific AI products. Controlling access to these can directly impact whether your content is discoverable through these AI-powered search interfaces.

    How to Edit the robots.txt in WordPress

    Two primary ways to edit your robots.txt file in WordPress are using a plugin (generally recommended for ease of use and safety) or editing the file directly (which requires more technical knowledge).

    Method 1: Editing robots.txt with a Plugin

    This is the recommended method for most users, especially beginners. Many SEO plugins offer built-in robots.txt editors, which provide a user-friendly interface and reduce the risk of syntax errors.

    1. Install and Activate an SEO Plugin: You can use popular plugins such as Yoast SEO, Rank Math, All in One SEO Pack, SEOPress, etc. These plugins offer a wide range of SEO features, including robots.txt management.
    2. Locate the robots.txt Editor: The exact location of the editor varies depending on the plugin. Refer to the official documentation of your WordPress plugin to follow along:
    3. Edit the File: The plugin will typically provide a text area where you can view and edit the contents of your robots.txt file. Make your desired changes and exclude any unnecessary paths from crawling.
    4. Save Changes: Click the “Save Changes” or similar button to apply your modifications.
    5. Test your Changes: Use the Google search console’s robots.txt tester to ensure your edits work correctly.

    Advantages of using a plugin:

    • User-Friendly Interface: Simplifies and streamlines the editing process.
    • Syntax Validation: Many plugins will check for basic syntax errors, reducing the risk of accidentally blocking important parts of your site.
    • Integrated with SEO Tools: Often provides seamless integration with other SEO features within the plugin.
    • Reversion Options: Some plugins offer version history or backup options, allowing you to revert to previous versions if needed.

    Method 2: Editing robots.txt without a Plugin

    If you don’t want to use an additional plugin, you can directly access and modify the robots.txt file on your server. However, this requires more technical expertise and, if not done carefully, carries a higher risk of errors.

    1. Access Your Server: You’ll need to connect to your server using one of the following methods:
      • RunCloud File Manager: RunCloud provides a built-in file manager for creating and modifying text files on your server.
      • FTP (File Transfer Protocol): Connect to your server using an FTP client such as FileZilla. Your web hosting provider usually provides your FTP credentials (hostname, username, and password).
      • cPanel File Manager: Most web hosting providers offer cPanel, which includes a web-based File Manager. Log in to your cPanel account and navigate to the File Manager.
      • SSH (Secure Shell): Advanced users can use SSH to obtain command-line access to the server. This requires SSH credentials and familiarity with command-line tools.
    1. Locate the robots.txt File: Navigate to the root directory of your WordPress installation. This is typically the directory where your wp-config.php file is located. If it doesn’t exist, you can create a new plain text file named robots.txt.
    2. Edit the File:
      • RunCloud File Manager: Locate the file and click on it; this will open a text editor in a new browser window.
      • FTP: Download the robots.txt file to your computer and edit it using a plain text editor such as Notepad++, Sublime Text, or VS Code. You can’t use a word processor like Microsoft Word. After editing the file, save it and upload the modified file back to the server, overwriting the existing file.
      • cPanel File Manager: Right-click on the robots.txt file and select “Edit” or “Code Edit” (depending on your cPanel version). Make your changes directly in the web-based editor.
      • SSH: Use the nano or vim command-line text editors to edit your robot.txt file.
    Editing robots.txt in runcloud
    1. Save Changes: Ensure you save the changes you’ve made to the file. If using FTP, ensure the updated file is uploaded and overwrites the old one.
    2. Test Your Changes: After editing your file directly, it is essential to test it. Use Google Search Console’s robots.txt Tester tool to verify that your changes are working as intended and that you haven’t accidentally blocked important content.

    While editing the robots.txt file directly without a plugin can be more technically involved, it offers some distinct advantages for advanced users and those who prefer greater control over their website’s settings.

    📖 Suggested read: How Google Interprets the robots.txt Specification

    This approach ensures that all the necessary features and tools are built directly into the core system. You have complete autonomy over the file’s content and structure without depending on external plugins or add-ons. This eliminates compatibility issues, potential security risks, and the need for additional software installations.

    However, it does have a few disadvantages:

    • Higher Risk of Errors: Requires careful attention to syntax; mistakes can have significant negative consequences.
    • Less User-Friendly: Requires technical knowledge of FTP, cPanel, or SSH.
    • No versioning: If you make a mistake, it will be difficult to revert.

    Unless you are comfortable with server-side file management, a plugin is strongly recommended for editing your robots.txt file in WordPress. If you do choose to edit directly, always test your changes thoroughly using Google Search Console’s robots.txt Tester.

    📖 Suggested read: How to Fix WordPress Revisions Not Showing [SOLVED]

    If you aren’t comfortable with command line tools but still want to edit your configuration files manually, then you should note that RunCloud users can manage and edit their robots.txt through a clean, intuitive interface, offering a safer alternative to direct FTP or SSH access while maintaining control.

    📖 Suggested read: 3 Free Ways To Migrate WordPress From Shared Hosting To Cloud Server

    Managing AI Crawlers with robots.txt

    This section will focus on managing AI crawlers using robots.txt, specifically for OpenAI crawlers. By understanding these crawlers and their user agents, you can control their access to your website’s content.

    OpenAI provides clear documentation on its crawlers, allowing you to make informed decisions about how you want them to interact with your site.

    • GPTBot: This is OpenAI’s primary crawler for training its generative AI foundation models (like those powering GPT-3, GPT-4, etc.). Disallowing GPTBot signals that you do not want your website’s content used for training these models.
    User-agent: GPTBot
    Disallow: /

    This example blocks GPTBot from crawling your entire site.

    • OAI-SearchBot: This crawler specifically displays websites in search results within ChatGPT’s search features. Allowing OAI-SearchBot can help your site appear in these results.
    User-agent: OAI-SearchBot
    Allow: /

    This allows OAI-SearchBot to crawl your site. You might combine this with a “disallow” command for GPTBot to appear in search results but prevent model training.

    • ChatGPT-User: It is not used to crawl the web automatically. It is a proxy through which a user’s request is sent. It is not used for general training purposes.
    User-agent: ChatGPT-User
    Allow: /

    You can combine rules for different crawlers in a single robots.txt file. For example:

    User-agent: *
    Disallow: /wp-admin/
    Disallow: /private/
    User-agent: GPTBot
    Disallow: /
    User-agent: OAI-SearchBot
    Allow: /

    The above example will:

    1. Blocks all crawlers (including traditional search engines) from /wp-admin/ and /private/.
    2. Blocks GPTBot from the entire site (preventing training data collection).
    3. Allows OAI-SearchBot to crawl the entire site (enabling appearance in ChatGPT search).

    While we provided an overview of OpenAI’s crawlers and user agents, we recommend reading AI / LLM User Agents: Blocking Guide to learn more.

    📖 Suggested read: How to Easily Create a WordPress Staging Site in RunCloud

    After Action Report: Mastering Your robots.txt File

    Throughout this guide, we’ve shown you why robots.txt is a small but mighty file that manages how search engines and, increasingly, AI crawlers interact with your website. We discussed its core purposes: managing crawl traffic, conserving crawl budget, and specifying sitemap locations. We also explained that robots.txt is a suggestion, not a security mechanism.

    Controlling your site’s interaction with crawlers is essential for a healthy web presence. You want search engines to index your valuable content efficiently, avoid duplicate content issues, and protect sensitive areas. With the advent of AI crawlers, you also need to consider how your content might be used for training AI models, and robots.txt gives you a voice in that process.

    But managing files directly on your server, especially for tasks like editing robots.txt, can be intimidating. Traditional methods such as FTP clients and cPanel’s File Manager can feel clunky and risk errors if you’re not experienced.

    This is where RunCloud shines.

    RunCloud’s intuitive dashboard provides a built-in File Manager that simplifies server-side file management. No more juggling FTP clients or navigating complex cPanel interfaces!

    • Direct Access: Access your website’s root directory and locate your robots.txt file.
    • Built-in Text Editor: RunCloud’s File Manager includes a powerful yet easy-to-use text editor directly within the dashboard. You can make changes to your robots.txt file, save them, and then be done – all without leaving your browser.
    • Secure and Streamlined: RunCloud’s interface provides a secure and streamlined way to manage server files, minimizing the risk of accidental errors.
    • One-Click Staging: Create a staging environment to experiment with before pushing changes to the live server.

    Ready for Effortless WordPress Management? Choose RunCloud.

    RunCloud isn’t just about simplifying robots.txt management. It’s a complete WordPress hosting platform designed for speed, security, and ease of use. From deploying new sites with a single click to managing server configurations, backups, and security settings, RunCloud empowers you to take control of your WordPress hosting without headaches.

    Here’s why RunCloud is the best choice for your WordPress site:

    • Blazing Fast Performance: Optimized server configurations and caching mechanisms ensure your site loads incredibly quickly, improving user experience and SEO.
    • Robust Security: Built-in security features, including firewalls and regular security updates, protect your site from threats.
    • Effortless Management: An intuitive dashboard makes server management a breeze, even for non-technical users.
    • Scalability: Easily scale your server resources as your website grows.
    • Expert Support: RunCloud’s support team can assist you with any questions or issues.

    Start your free trial today and see how easy WordPress hosting can be.

    FAQs on robots.txt in WordPress

    What is the difference between robots.txt and meta tags?

    Robots.txt is a site-wide file instructing search engine crawlers which directories to avoid. At the same time, meta tags are placed within individual page HTML and control how that specific page is indexed and displayed. Meta tags offer finer-grained control.

    Can I block specific pages with robots.txt?

    In your robots.txt file, you can use the Disallow: directive followed by the specific page’s URL path. For example, Disallow: /private-page/ will block that URL.

    How do I test my robots.txt file?

    Use Google Search Console’s robots.txt Tester tool. This tool validates your syntax and shows if any URLs you intend to block are accessible.

    Is it safe to edit robots.txt?

    Editing robots.txt can impact your site’s search visibility, so proceed cautiously; mistakes can block important content. Platforms such as RunCloud make managing and editing your robots.txt easier and safer through a user-friendly interface.

    What happens if I disallow all in robots.txt?

    Using User-agent: * and Disallow: / in your robots.txt file will instruct all search engines not to crawl any part of your website, effectively removing it from search results.

    Can plugins affect my robots.txt file?

    Yes, some WordPress SEO plugins can create or modify your robots.txt file. Review plugin settings carefully to avoid conflicts or unintended disallow rules.

    How often should I update my robots.txt?

    Update your robots.txt file whenever you make significant changes to your website’s structure or want to adjust which sections are accessible to search engines. Regular reviews are recommended, but not frequent updates.

    What is the correct syntax for robots.txt?

    The basic syntax uses User-agent to specify the crawler (e.g., User-agent: * for all) and Disallow to specify paths to block (e.g., Disallow: /wp-admin/). Allow can override Disallow for specific files or folders within a disallowed directory.

  • 8 Best Cheap Web Hosting Services in 2025

    8 Best Cheap Web Hosting Services in 2025

    Looking for reliable web hosting that won’t break the bank in 2025? We’ve analyzed and compared the top 8 affordable hosting providers to help you make an informed decision.

    From shared hosting plans starting at just $2.99/month to scalable cloud solutions, this comprehensive guide covers everything you need to know about budget-friendly hosting options that don’t compromise quality.

    Whether you’re launching your first blog or managing multiple high-traffic websites, we’ll show you how to get the best value for your money with features like free SSL certificates, unlimited bandwidth, and 24/7 customer support.

    Let’s find the best cheap web hosting options for 2025 – and the perfect solution for your needs.

    What is Web Hosting?

    Web hosting is a service that makes websites accessible online by storing website files on powerful servers connected to the global network. When you purchase web hosting, you’re essentially renting space on a server that maintains your website’s files, databases, and other essential resources needed for your site to function properly.

    These specialized computers (servers) are maintained in secure data centers with redundant power supplies, cooling systems, and high-speed internet connections to ensure your website remains accessible 24/7.

    Modern web hosting providers offer additional services beyond simple storage, including:

    • Automated backups
    • Security features
    • Content delivery networks (CDN)
    • Easy-to-use control panels for website management

    Suggested read: Top 8 Popular Web Hosting Control Panels in 2024

    Types of Web Hosting

    Web hosting services come in several distinct varieties, each designed to meet different needs, budgets, and technical requirements for websites of varying sizes and complexities.

    Shared Hosting

    Shared hosting is the most economical and beginner-friendly option. In this hosting, multiple websites share resources on a single server. This hosting type is perfect for small businesses, personal blogs, and startups just beginning their online journey and don’t require extensive server resources.

    Modern shared hosting plans often include features such as one-click installers, managed security updates, and user-friendly control panels that make website management accessible to non-technical users. Shared hosting is affordable because of the economy of scale, where server maintenance and management costs are distributed among many users.

    VPS Hosting

    Virtual Private Server (VPS) hosting is a significant step up from shared hosting. It offers dedicated resources within a virtualized server environment that provides better performance and reliability. With VPS hosting, your website operates in an isolated container with guaranteed CPU, RAM, and storage allocations, ensuring consistent performance regardless of other users on the physical server.

    VPS hosting offers root access and the flexibility to customize your server environment, install specific software, and configure security settings according to your needs. This makes it ideal for growing websites, e-commerce stores, and applications that need more resources and control than shared hosting can provide. The scalability of VPS hosting allows you to adjust resources as your needs change, making it a future-proof solution for evolving websites.

    Suggested read: Self-Managed or Managed Hosting: Which One is Right for You?

    Dedicated Hosting

    Dedicated hosting provides the best performance by allocating an entire physical server exclusively to your website or application. This premium hosting solution offers maximum resources, complete server customization options, and the highest level of security since no other users share your server hardware.

    Dedicated hosting is ideal for high-traffic websites, resource-intensive applications, and organizations with specific compliance requirements that necessitate complete server control. With dedicated hosting, you have the freedom to choose your server’s operating system, install any required software, and configure the server exactly to your specifications.

    Cloud Hosting

    Cloud hosting is the most flexible and scalable hosting solution. You can use a network of connected servers to host websites and applications with good reliability and resource scalability. You can also structure your services so that websites use resources from multiple servers, providing better redundancy and the ability to handle traffic spikes without service interruption.

    Cloud hosting platforms typically offer pay-as-you-go pricing models, ensuring you only pay for the resources you use while being able to scale up or down instantly based on demand. Cloud hosting is particularly well-suited for websites with variable traffic patterns, e-commerce sites that need to scale during peak seasons, and applications that require high availability and performance. Most cloud hosting providers offer advanced features such as load balancing, automated scaling, and global content delivery networks (CDN) to enhance website performance and user experience.

    Suggested read: 10 Best Self-Hosted Email Server Platforms to Use in 2024

    Top 8 Cheap Web Hosting Services in 2025

    The web hosting landscape continues to evolve in 2025, offering more features and better performance at increasingly competitive prices. We’ve tested and analyzed these services to help you make an informed decision based on your specific hosting requirements and financial constraints.

    RunCloud + Cloud VPS

    RunCloud transforms how developers and businesses manage their cloud servers by providing an intuitive server control panel that works seamlessly with all the major cloud providers such as DigitalOcean, Vultr, Linode, and many more. This powerful combination delivers enterprise-level features at a fraction of the cost of traditional managed hosting solutions.

    RunCloud provides automated server setup, enhanced security, and streamlined deployment processes, significantly reducing the technical overhead of managing cloud servers. Its server management capabilities make it ideal for developers and agencies managing multiple websites.

    Suggested read: The 7 Best Node.js Hosting Platforms for 2024 (Free + Paid)

    Key Features

    RunCloud offers a comprehensive suite of features to streamline server management and website deployment. You can use RunCloud’s one-click server provisioning, automated SSL certificate management, and advanced security features that protect your websites from common threats.

    RunCloud provides complete access to your server resources and doesn’t put arbitrary restrictions on the number of websites, size of your website, PHP workers, etc., to upsell you expensive subscriptions and add-ons. If your server can handle it, you can deploy it using RunCloud.

    You can take advantage of its integrated Git deployment, staging environments, and in-house caching solutions that enhance website performance. Furthermore, automated backup systems with easy restore options make disaster recovery straightforward and reliable. The best part is that these features work seamlessly on multiple servers regardless of your cloud platform.

    Cost

    • Essentials Plan ($9/month): The Essentials plan offers management for one server with unlimited web applications. This entry-level plan includes crucial features including full backups, Git deployment, and server-side caching, making it ideal for those who need professional-grade hosting management without complexity.
    • Professional Plan ($19/month): The Professional plan expands capacity to 50 servers and includes advanced features such as custom NGINX configurations and enhanced firewall protection. The 10 GB increase in backup storage and the ability to clone web applications make this plan perfect for agencies managing multiple client websites.
    • Business Plan ($49/month): The Business plan represents the best value for established agencies. It offers management for up to 100 servers, advanced features including zero-downtime deployments, and a comprehensive WordPress toolkit. This plan includes powerful team collaboration tools with 10 team seats, unlimited staging environments, and robust API access, making it ideal for mission-critical workloads and larger organizations.
    • Enterprise Plan ($399/month): The Enterprise plan provides management for up to 500 servers with 100GB of backup storage and enhanced API capabilities. This comprehensive solution includes 50 team seats and significantly higher API request limits, making it perfect for businesses requiring extensive resources, strict SLAs, and enterprise-grade support.

    Suggested read: Cloud Hosting vs VPS Hosting – Which One Should You Choose in 2024?

    Hostinger

    Hostinger has established itself as a market leader in affordable web hosting. It offers good performance and features that rival more expensive providers. Their infrastructure uses cloud technology and SSD storage across all plans, which provides fast and reliable website performance.

    Hostinger’s proprietary control panel, hPanel, provides an intuitive interface that simplifies website management tasks and offers a smoother learning curve than traditional cPanel interfaces.

    Suggested read: 15 Best Email Hosting For Small Business (2024)

    Key Features

    Hostinger delivers a comprehensive hosting package that includes a website builder, one-click WordPress installation, and free SSL certificates across all plans. Furthermore, Hostinger’s LiteSpeed web servers and custom-built caching solutions provide exceptional speed and performance optimization.

    You can use its weekly backups, 24/7 customer support through live chat, and robust security suite, including automated updates and malware scanning. It also includes a free domain name with annual plans, unlimited bandwidth on higher-tier packages, and integrated Git support for developers.

    Suggested read: How To Setup Amazon EC2 (AWS) To Host Your Websites

    Cost

    Hostinger’s shared hosting plans start at an incredibly competitive pricing of $2.99 per month with a 48-month commitment, making it one of the most affordable quality hosts available. The mid-tier plans range from $3.99 to $7.99 monthly, offering additional resources and features suitable for growing websites. Premium plans include cloud hosting options starting at $15.99 monthly, providing dedicated resources and enhanced performance.

    Bluehost

    Bluehost is a top-tier hosting provider recommended by WordPress.org. The company’s extensive experience in the hosting industry is shown through its robust infrastructure and comprehensive feature set.

    Bluehost provides a complete website solution, from domain registration to advanced hosting features. Bluehost’s integration with WordPress makes it exceptionally easy to launch and manage WordPress sites, while their resource allocation ensures stable performance even during traffic spikes.

    Suggested read: What Is Managed WordPress Hosting & Do You Need It?

    Key Features

    Bluehost provides a feature-rich hosting environment with a custom-designed control panel, integrated website builder, and automated WordPress installation tools. Higher-tier plans offer unlimited website hosting, free domain registration for the first year, and comprehensive email hosting capabilities. The Bluehost platform also offers advanced security features, including SSL certificates, spam protection, and domain privacy options. It offers robust e-commerce features, such as WooCommerce integration and shopping cart functionality.

    Cost

    The Basic plan is $2.95/month for single websites, scaling up to the Pro plan at $13.95/month for enhanced performance and resources. The Plus plan at $4.95/month and the Choice Plus plan at $5.45/month cater to users needing multiple websites and additional security features, with all plans requiring a 12-month commitment. The renewal rates increase significantly after the initial term, with Basic renewing at $11.99/month, Plus at $16.99/month, Choice Plus at $21.99/month, and Pro at $28.99/month, making it important to consider long-term hosting costs.

    SiteGround

    SiteGround distinguishes itself in the web hosting industry through superior performance, innovative technology, and exceptional customer support. The company uses Google Cloud infrastructure and proprietary speed optimization tools to deliver outstanding website performance. Its development team regularly implements cutting-edge features like ultrafast PHP, advanced caching mechanisms, and automated WordPress updates.

    SiteGround’s proactive security measures, including AI-powered anti-bot systems and real-time monitoring, protect websites from various threats. Furthermore, their custom-built Site Tools control panel offers a modern, efficient interface for managing hosting services.

    Key Features

    SiteGround delivers enterprise-level features across all plans, including its proprietary SuperCacher technology for enhanced performance. The platform provides automated daily backups, free SSL certificates, and advanced security features, including custom WAF rules. It also offers advanced features such as staging environments, Git integration, and collaboration tools perfect for development teams. It also includes free email hosting, unlimited databases, and unmetered traffic, making it an excellent deal for people looking for a one-stop solution.

    Cost

    For the first subscription period, SiteGround offers three comprehensive hosting tiers: StartUp at $2.99/month for single websites, GrowBig at $4.99/month for unlimited websites, and GoGeek at $7.99/month for high-traffic sites. These promotional rates require a 12-month prepaid commitment, and it’s important to note that subsequent renewals will be billed at regular rates: StartUp at $17.99/month, GrowBig at $29.99/month, and GoGeek at $44.99/month.

    A2 Hosting

    A2 Hosting has built a strong reputation for delivering blazing-fast hosting services through their turbo servers and optimized hosting environment. The servers use NVMe SSD storage, server-side caching, and optimized hardware configurations that significantly reduce page loading times. Their developer-friendly approach provides support for multiple programming languages and frameworks.

    A2 Hosting implements features such as KernelCare for automatic kernel updates and dual firewall protection, which enhance its security. Its “Guru Crew” support team offers knowledgeable assistance 24/7/365. It is strongly committed to environmental sustainability, which is evident because it offers green hosting initiatives through carbon offset programs.

    Key Features

    A2 Hosting claims it offers Turbo Servers that deliver up to 20X faster page loads than standard hosting solutions. It also offers perpetual security features, including HackScan protection and dual firewall implementation. If you sign up for A2 Hosting, you can use its A2 Optimized Site Accelerator, free site migration, and automatic backup systems functionality to manage your WordPress website. It also supports multiple PHP versions, Python, Ruby, and other programming languages, making it ideal for developers.

    Cost

    A2 Hosting provides comprehensive hosting solutions to match different website needs and budgets. It starts with shared hosting at $11.99/month (renewing at $25.99) for beginners, WordPress hosting at $18.99/month (renewing at $35.99) for content creators, VPS hosting at $28.99/month (renewing at $51.99) for growing businesses, and dedicated hosting at $41.99/month (renewing at $61.99) for high-performance requirements.

    DreamHost

    DreamHost is a reliable and user-friendly hosting provider that offers unique features and pricing structures that set it apart from competitors. Their custom control panel provides a streamlined experience compared to traditional cPanel interfaces.

    DreamHost offers transparent pricing without aggressive upselling tactics, maintaining consistent rates even during renewal periods. Its infrastructure includes solid-state drives, unlimited bandwidth, and automated daily backups across all plans. Its commitment to privacy and security includes free domain privacy protection and enhanced SSL certificate options.

    Key Features

    DreamHost provides a comprehensive hosting package with unlimited storage and bandwidth across most plans. The platform offers automated WordPress installation and updates, custom control panel access, and free domain privacy protection.

    You can manage and create your WordPress websites using DreamHost’s automated daily backups, free SSL certificates, and unlimited email accounts. DreamHost also provides advanced features like shell access, Python support, and unlimited MySQL databases.

    Cost

    The Shared Starter plan begins at an affordable $2.95/month (renewing at $6.99). It includes essential features such as unlimited traffic, WordPress installation, and free domain registration, making it ideal for new websites and small projects.

    The mid-tier DreamPress plan, specifically optimized for WordPress, starts at $16.95/month (renewing at $19.99) and supports up to 100k monthly visitors with advanced features including staging environments, priority migration, and essential CDN services.

    InMotion Hosting

    InMotion Hosting provides business-focused hosting solutions and is known for its exceptional technical support capabilities. Their infrastructure supports advanced features like SSH access, multiple Python environments, and Ruby support, which makes it an excellent choice for developers and growing businesses.

    InMotion’s BoldGrid website builder and pre-installed WordPress features make it easier for businesses to establish their online presence quickly. Their commitment to customer education includes an extensive knowledge base and tutorial system.

    Key Features

    InMotion Hosting delivers comprehensive hosting solutions and advanced security features, including hack and malware protection, automatic backups, and free SSL certificates. It also offers professional email accounts, website builder tools, and a suite of marketing tools useful for developing and growing websites. Advanced users can also use advanced features such as SSH access, Git support, and optional root access on VPS plans, all from a single dashboard.

    Cost

    InMotion Hosting offers comprehensive hosting solutions for different business needs and technical requirements. Their WordPress hosting starts at an affordable $2.75/month (renewing at $10.99). It includes valuable features such as a free domain, SSL, premium themes, and unlimited email addresses. At the same time, their VPS hosting begins at $2.85/month (renewing at $11.49) with high-availability servers and cloud-powered reliability.

    For more demanding applications, their dedicated hosting starts at $5.99/month (renewing at $26.99) with configurable server options, and their premium dedicated solutions begin at $35.00/month (renewing at $69.99), offering maximum flexibility and control.

    HostGator

    HostGator is a popular choice for affordable web hosting. It offers reliable services with comprehensive features suitable for both beginners and experienced users. HostGator’s infrastructure supports unlimited websites, storage, and bandwidth while maintaining strong uptime performance through redundant server systems. Their user-friendly approach includes one-click installations for over 75 popular applications.

    HostGator excels in offering scalable solutions that grow with your business, from shared hosting to dedicated servers. HostGator’s comprehensive support system includes 24/7/365 customer service through multiple phone, live chat, and email channels.

    Key Features

    HostGator provides a robust hosting environment with unmetered bandwidth and storage, which is useful when hosting a high-traffic website. Like many other hosting providers, HostGator includes a free website builder, one-click WordPress installation, and free SSL certificates. HostGator offers comprehensive security features, including regular server monitoring, firewall protection, and DDoS prevention to protect your website from automated attacks.

    Cost

    The Baby Plan starts at an affordable $4.50/month (renewing at $16.49) for basic hosting needs. In comparison, the Business Plan provides enhanced features at $6.25/month (renewing at $21.99), and the Pro Plan delivers premium capabilities at $13.95/month (renewing at $29.69).

    Final Thoughts

    Choosing the right web hosting provider is crucial for your website’s success. While all the providers listed above offer excellent services, your specific choice should align with your technical requirements, budget, and growth expectations.

    For personal blogs and hobby websites, Hostinger and Bluehost offer exceptional value. However, combining RunCloud with cloud VPS providers for growing businesses and agencies presents a more scalable and cost-effective solution.

    While traditional hosting providers charge premium rates for managing multiple high-traffic websites, RunCloud’s innovative approach allows you to manage unlimited websites across multiple servers for a fraction of the cost.

    By combining RunCloud’s server management platform with affordable cloud VPS providers, you can achieve enterprise-level performance at budget-friendly prices.

    Ready to transform how you manage your web hosting? Start your journey with RunCloud today!

    FAQs on Cheap Web Hosting Services

    Is shared hosting suitable for my website?

    Shared hosting is ideal for small to medium-sized websites that receive moderate traffic (up to 10,000 monthly visitors) and don’t require extensive server resources. It’s particularly well-suited for personal blogs, small business websites, and portfolio sites that don’t have complex database requirements or heavy server-side processing needs. However, if your website experiences sudden traffic spikes or requires specialized software, you might consider VPS hosting instead.

    Can I upgrade my hosting plan later?

    Most reputable hosting providers offer seamless upgrading options that allow you to scale your resources without significant downtime or technical complications. The upgrade process typically involves a few clicks in your hosting control panel, and providers such as RunCloud make it especially easy to manage resources across different hosting plans. Your website files and databases are usually automatically migrated to the new server environment during the upgrade.

    What is the difference between VPS and shared hosting?

    VPS hosting provides dedicated server resources (CPU, RAM, storage) that are exclusively yours, offering better performance and reliability than shared hosting. Shared hosting places multiple websites on the same server with shared resources, making it more affordable but potentially less stable if other sites on the server consume excessive resources. VPS hosting also offers root access and more customization options, while shared hosting is more restricted but easier to manage.

    Are cheap hosting services reliable?

    Reputable budget hosting providers can offer reliable service by optimizing their infrastructure and automating many processes to reduce costs. However, you should research provider reviews, uptime guarantees, and support quality before choosing a cheap host.

    What features should I look for in a cheap hosting service?

    Essential features should include free SSL certificates, automated backups, 24/7 customer support, and a user-friendly control panel. The host should also provide adequate storage and bandwidth for your needs, basic security features such as malware scanning, and a one-click installer for popular applications like WordPress.

    How do I transfer my website to a new hosting provider?

    Many hosting providers offer free migration services, especially for WordPress sites, and tools like RunCloud can significantly simplify the process. After the transfer, updating your DNS settings and verifying that all website functionality works correctly before pointing your domain to the new host is important.

  • The 8 Best Cloudflare Alternatives in 2026

    The 8 Best Cloudflare Alternatives in 2026

    A reliable and performant content delivery network (CDN) is essential if you’re running a business online. Cloudflare CDN has long been a go-to solution for web developers, but what if you’re looking for something different?

    Whether you’re seeking better performance, enhanced security, or more customization options, the market is brimming with Cloudflare alternatives that could be a better fit for your needs.

    In this comprehensive guide, we’ll dive into the world of CDNs, exploring high-performance options, cost-effective free solutions, and specialized platforms for DDoS protection and web application firewall (WAF) capabilities. We’ll also address common Cloudflare issues and highlight the top Cloudflare alternatives to help you avoid these pitfalls.

    Let’s get started!

    What is Cloudflare?

    Cloudflare is a popular content delivery network (CDN) and web security provider that helps improve the performance and security of websites and online applications. It was founded in 2009, and since then, Cloudflare has grown to become one of the largest CDN providers in the world, serving trillions of requests per month across its global network of data centers.

    People use Cloudflare for two main reasons:

    1. Improve Website Performance: Cloudflare’s network of servers around the world can cache static content (such as images, CSS, and JavaScript files) closer to end-users, reducing the distance data has to travel and resulting in faster load times. This particularly benefits websites and web apps with a global user base.
    2. Enhance Website Security: Cloudflare provides a range of security features to protect websites from common threats, including DDoS attacks, malicious bots, and vulnerabilities. It can also help filter out spam, block bad IPs, and provide SSL/TLS encryption.

    Unlike many other cloud providers, Cloudflare has its own backbone network. By routing a website’s traffic through Cloudflare’s own network, website owners can leverage these performance and security benefits without managing the underlying infrastructure themselves.

    Suggested read: How to Use Cloudflare Firewall Rules to Protect Your Web Application

    Disadvantages of Cloudflare

    While Cloudflare is a popular and powerful service, it’s not without its drawbacks. Some of the key disadvantages of using Cloudflare include:

    1. Vendor Lock-in: Integrating a website with Cloudflare can create a degree of vendor lock-in. Migrating away from Cloudflare to another CDN or security provider can be a complex and time-consuming process, which may discourage some users from exploring alternative options.
    2. Single Point of Failure: By routing all of a website’s traffic through Cloudflare’s network, the service becomes a single point of failure. For example, in 2022, Cloudflare experienced an outage, and many websites became unavailable.
    3. Privacy Concerns: Cloudflare’s position as an intermediary between users and a website means it has visibility into a significant amount of user data and web traffic. While Cloudflare has policies to protect user privacy, some users may be uncomfortable with this level of third-party access to their data.
    4. Increased Complexity: Integrating Cloudflare with a website can add an additional layer of complexity to the overall infrastructure. This may make it more challenging to troubleshoot issues or optimize performance, especially for users unfamiliar with Cloudflare’s tools and processes.
    5. Limited Control: By using Cloudflare, website owners relinquish a certain degree of control over their website’s performance and security. While Cloudflare provides a range of configuration options, the ultimate decisions and implementation details are in the hands of the Cloudflare team.
    6. Cost: Cloudflare offers both free and paid plans, but the paid plans can become expensive for websites with high traffic or bandwidth requirements.

    Website owners should carefully weigh the benefits of using Cloudflare against these potential drawbacks and determine if the provided features align with their specific needs and requirements.

    Suggested read: How to Fix Cloudflare Captcha Failure in 2024 [SOLVED]

    8 Best Cloudflare Alternatives

    There are many great CDN providers available in the market. These are our recommendations, with each compared to Cloudflare CDN.

    1. Fastly

    Fastly is a great alternative to Cloudflare for customers looking to improve their website’s performance and security. Fastly is a leading CDN provider that offers several advantages over Cloudflare:

    1. Greater Control and Customization: Fastly provides users with more granular control over their CDN configuration and settings, allowing for greater customization and optimization to meet the unique needs of each website or application. This level of control can be especially beneficial for enterprises or developers who require more advanced features and capabilities.
    2. Improved Performance: Fastly’s global network of Points of Presence (PoPs) is strategically located to minimize latency and improve content delivery speeds for end-users, often outperforming Cloudflare’s network in certain regions or use cases.
    3. Advanced Security Features: Fastly’s security offerings, such as its web application firewall (WAF) and bot management solutions, are highly regarded in the industry and can provide more robust protection against threats compared to Cloudflare’s standard security features.
    4. Reliability and Uptime: Fastly is known for its reliable and highly available network. It has a strong track record of maintaining excellent uptime and minimizing service disruptions, which is crucial for mission-critical websites and applications.
    5. Transparency and Support: Fastly is generally praised for its transparent pricing, comprehensive documentation, and responsive customer support, which can be valuable for users who require more hands-on guidance and assistance.

    While Cloudflare is a reliable and widely used CDN, Fastly’s focus on customization, performance, security, and customer support can make it a more compelling choice for enterprises, developers, and users with complex or specialized requirements.

    Suggested read: Cloudflare R2 vs AWS S3 – Full Comparison

    2. Akamai CDN

    Akamai is another prominent CDN provider that we recommend as an alternative to Cloudflare, particularly for customers with large-scale or high-traffic websites and applications. Some of the key advantages of Akamai over Cloudflare include:

    1. Enterprise-grade Scale and Capacity: Akamai operates one of the world’s largest and most interconnected CDN networks. It can handle massive volumes of traffic and deliver content at scale, making it a preferred choice for enterprises with global reach and high-volume requirements.
    2. Advanced Cybersecurity Solutions: Akamai is renowned for its robust security offerings, including its web application firewall (WAF), DDoS mitigation, and bot management solutions, which are often seen as more comprehensive and effective than Cloudflare’s security features.
    3. Extensive Integrations and Partnerships: Akamai has a wide range of integrations and partnerships with various technology providers, making integrating with existing infrastructure and workflows easier, especially for larger organizations with complex technology stacks.
    4. Dedicated Support and Professional Services: Akamai provides a higher level of dedicated support and professional services compared to Cloudflare, which can be beneficial for customers who require more hands-on guidance, custom configurations, or enterprise-level service-level agreements (SLAs).
    5. Granular Reporting and Analytics: Akamai’s advanced analytics and reporting capabilities can offer more in-depth insights into website and application performance, security threats, and user behavior, which can be valuable for data-driven decision-making and optimization.

    While Akamai’s enterprise-grade features and support come at a higher price point compared to Cloudflare, the investment can be justified for organizations with mission-critical web properties, stringent security requirements, or the need for more comprehensive and tailored CDN solutions.

    Suggested read: Amazon Route 53 vs. Cloudflare DNS – Which Is Better?

    3. Amazon CloudFront (AWS)

    Amazon CloudFront is a CDN service offered by Amazon Web Services (AWS). Some of the key advantages of using CloudFront over Cloudflare include:

    1. Seamless Integration with AWS Ecosystem: For customers who are already deeply invested in the AWS cloud platform and take advantage of other AWS services, CloudFront can offer a more seamless and integrated experience with easier management and optimization within the broader AWS ecosystem.
    2. Robust Security and Compliance Features: CloudFront integrates with various AWS security services, such as AWS Web Application Firewall (WAF) and AWS Shield, providing comprehensive and customizable security solutions that can meet the needs of enterprises with strict security and compliance requirements.
    3. Scalability and Performance: As part of the AWS global infrastructure, CloudFront can leverage the scale and resources of the AWS network to deliver high-performance content delivery, with the ability to handle sudden spikes in traffic or bandwidth demands.
    4. Developer-Friendly Tools and APIs: CloudFront provides a suite of developer-friendly tools, APIs, and integrations that can simplify the deployment, management, and automation of CDN services, particularly for teams already familiar with the AWS ecosystem and toolset.

    While Cloudflare excels in its ease of use and out-of-the-box functionality, CloudFront may be the preferred choice for organizations that are deeply invested in the AWS platform, have complex security and compliance requirements, or prioritize cost optimization and seamless integration with other AWS services.

    Suggested read: Fixing Redirect Loop on Cloudflare SSL

    4. Imperva

    Imperva is another great alternative to Cloudflare CDN, particularly for customers seeking a more comprehensive, enterprise-grade web application security solution.

    1. Advanced Web Application Firewall (WAF): Imperva’s WAF solution is widely regarded as one of the most robust and feature-rich in the market. It offers advanced threat detection, behavioral analysis, and custom rule-creation capabilities to protect against a wide range of web application vulnerabilities and attacks.
    2. DDoS Mitigation and Bot Management: Imperva’s DDoS protection and bot management capabilities are highly effective in defending against sophisticated, large-scale DDoS attacks and malicious bot activity, providing a higher level of protection than Cloudflare’s standard security offerings.
    3. API Security: Imperva offers comprehensive API security features, including API discovery, monitoring, and protection against API-specific threats, which can be particularly valuable for organizations with a significant API-driven infrastructure.
    4. Compliance and Regulatory Support: Imperva has a strong focus on compliance and regulatory requirements, with features and solutions tailored to help customers meet standards such as PCI DSS, GDPR, and HIPAA, making it a preferred choice for enterprises in highly regulated industries.
    5. Professional Services and Support: Imperva provides a higher level of professional services, technical support, and customer success resources compared to Cloudflare, which can be beneficial for organizations that require more hands-on guidance, customization, and enterprise-level support.

    While Cloudflare is a compelling all-in-one CDN and security solution, Imperva’s specialization in web application security and its enterprise-grade features and support can make it more suitable for organizations with complex security requirements, strict compliance needs, or a strong emphasis on API-driven architectures.

    Suggested read: How To Use Fail2ban With WordPress And Cloudflare Proxy

    5. BunnyCDN

    BunnyCDN is a cost-effective and high-performance CDN that you can use as an alternative to Cloudflare, particularly for small to medium-sized websites and applications. Here’s why BunnyCDN can be a great choice:

    1. Affordable Pricing: BunnyCDN offers very competitive pricing, with a pay-as-you-go model that can be more cost-effective than Cloudflare’s plans, especially for websites with lower traffic or bandwidth requirements.
    2. Excellent Performance: BunnyCDN’s global network of servers is designed for speed, with low latency and fast content delivery that can often match or exceed Cloudflare’s performance.
    3. Ease of Use: BunnyCDN’s user-friendly dashboard and simple setup process make it a great option for users who don’t require advanced features or want to minimize the complexity of managing their CDN.
    4. Scalability: Despite its affordability, BunnyCDN can still handle large traffic spikes and scale to meet the needs of growing websites and applications.
    5. Customization Options: While not as extensive as some enterprise-grade CDNs, BunnyCDN still offers a range of customization options, such as custom caching rules and edge computing features, to fine-tune the CDN to specific requirements.

    6. KeyCDN

    KeyCDN is a well-regarded CDN provider that offers a great alternative to Cloudflare, particularly for users who value performance, simplicity, and cost-effectiveness.

    1. High-Performance Delivery: KeyCDN is known for its fast content delivery and low latency, thanks to its global network of servers and advanced caching mechanisms.
    2. Straightforward Pricing: KeyCDN offers a transparent and straightforward pricing model with no hidden fees or complex tiered plans, making it easy for users to understand and predict their CDN costs.
    3. Ease of Use: KeyCDN’s user-friendly interface and simple setup process make it a great choice for users who want to quickly and easily integrate a CDN into their website or application without the need for extensive technical expertise.
    4. Scalability: While not as large as Cloudflare’s global network, KeyCDN’s infrastructure is still capable of handling significant traffic and bandwidth demands, making it a viable option for growing websites and applications.
    5. Specialized Features: KeyCDN offers some specialized features, such as its image optimization tools and advanced caching controls, that may appeal to users with specific content delivery needs.

    8. Sucuri CDN

    Sucuri CDN is a unique offering that can be used as an alternative to Cloudflare. It is particularly well suited for customers who are primarily focused on web application security and are looking for a more specialized security-focused CDN solution.

    1. Comprehensive Security Features: Sucuri CDN’s core strength lies in its advanced security features, including its web application firewall (WAF), DDoS mitigation, and malware detection capabilities. These features can provide a higher level of protection than Cloudflare’s standard security offerings.
    2. Focused on Security-First Approach: Unlike Cloudflare, which provides a broader range of services, Sucuri CDN focuses solely on web security, allowing it to dedicate more resources and expertise to its security-related features and capabilities.
    3. Managed Security Services: Sucuri CDN offers a range of managed security services, such as website monitoring, incident response, and security consulting, which can be valuable for organizations that lack in-house security expertise or resources.
    4. Compliance and Regulatory Support: Sucuri CDN is designed to help customers meet various compliance and regulatory requirements, such as PCI DSS, HIPAA, and GDPR, making it a suitable choice for organizations operating in highly regulated industries.
    5. Seamless Integration: Sucuri CDN can integrate seamlessly with existing website and application infrastructure, allowing customers to leverage its security features without significantly disrupting their current setup or workflow.

    While Cloudflare provides a more comprehensive set of services, including performance and security features, Sucuri CDN’s laser-focused approach to web application security can make it a more appealing choice for organizations prioritizing robust and specialized security solutions.

    Which Cloudflare Alternative CDN is Right For You?

    When it comes to choosing a Cloudflare alternative CDN, the “right” choice can depend on the user’s or organization’s specific needs and requirements.

    Let’s explore some common use cases and which CDN providers might be the best fit for them:

    Small to Medium-Sized Websites/Bloggers – BunnyCDN

    Small to medium-sized website owners and bloggers often prioritize cost-effectiveness, ease of use, and reliable performance. BunnyCDN’s affordable pricing, straightforward setup, and fast content delivery make it an excellent Cloudflare alternative for this user persona.

    Enterprise-Level Organizations – Akamai

    Enterprises with complex security requirements, high-traffic websites, and the need for advanced features and customization often find Akamai to be a strong Cloudflare alternative. These providers offer enterprise-grade security solutions, scalability, and dedicated support.

    AWS-Centric Businesses – Amazon CloudFront

    For organizations that are deeply invested in the AWS ecosystem and are already leveraging other AWS services, Amazon CloudFront can be a natural Cloudflare alternative. Its seamless integration with the broader AWS platform and cost optimization opportunities make CloudFront a compelling choice.

    Security-Focused Customers – Sucuri CDN, Imperva

    Customers prioritizing robust web application security and compliance may find either Sucuri CDN or Imperva to be better Cloudflare alternatives. These providers offer specialized security features, such as advanced web application firewalls (WAFs) and DDoS mitigation, tailored to meet the needs of security-conscious organizations.

    Developers and Tech-Savvy Users – Fastly, KeyCDN

    Developers and technically inclined users who value customization, performance optimization, and developer-friendly tools may prefer Fastly or KeyCDN as Cloudflare alternatives. These providers offer more granular control, advanced features, and streamlined integration with various development workflows.

    Wrapping Up

    In this post, we have provided a list of the best Cloudflare CDN alternatives for websites. Ultimately, the choice of a Cloudflare alternative CDN should be based on a thorough understanding of the user’s specific needs, such as performance requirements, security concerns, budget, and the level of technical expertise within the organization. By carefully evaluating these factors, users can identify the Cloudflare alternative that best suits their unique needs.

    Ready to optimize your web hosting experience? Try RunCloud!

    RunCloud offers more than just server management – we provide a comprehensive solution that works seamlessly with any CDN provider you choose.

    With RunCloud, you’ll get:

    • Simplified server management and deployment
    • Advanced security features and monitoring
    • One-click SSL certificate installation
    • Automated backups and recovery options
    • 24/7 expert technical support

    Join thousands of satisfied users who trust RunCloud for their web hosting management needs. Sign up for RunCloud today!

    FAQs on Cloudflare

    Can I avoid Cloudflare?

    Yes, you can avoid using Cloudflare. As a content delivery network (CDN) and web security provider, Cloudflare is an optional service that website owners can choose to use or not use, depending on their specific needs and requirements.

    What is faster than Cloudflare?

    Other leading CDN providers, such as Fastly, Akamai, and Amazon CloudFront, may offer faster content delivery and lower latency than Cloudflare in certain regions or use cases, depending on factors like network infrastructure, server locations, and optimization techniques.

    Will Cloudflare make my site faster?

    In many cases, yes. Cloudflare’s global network of servers and caching capabilities can significantly improve website performance by reducing the distance between users and the content they’re accessing, resulting in faster load times. However, the extent of the performance improvement can vary based on factors like your website’s architecture, content, and user base.

    Is GoDaddy better than Cloudflare?

    GoDaddy and Cloudflare provide different services, so it’s not a direct comparison. GoDaddy is a domain registrar and web hosting provider, while Cloudflare is a content delivery network and web security service. Cloudflare may offer better website performance and security features. At the same time, GoDaddy may be a more convenient and all-in-one solution for users who need domain registration, hosting, and basic website management.

    Is Google DNS better than Cloudflare CDN?

    Google DNS and Cloudflare CDN are not directly comparable, as they serve different purposes. Google DNS is a free, public Domain Name System (DNS) resolver, while Cloudflare CDN is a content delivery network and web security provider.

    Is Cloudflare a Chinese company?

    No, Cloudflare is not a Chinese company. Cloudflare is an American company founded in 2009 and headquartered in San Francisco, California. It does not have any known Chinese ownership or affiliation.

    Why is Cloudflare blocking my browser?

    Cloudflare may block or challenge your browser if it detects suspicious or potentially malicious activity, such as a DDoS attack, a high volume of requests from a single IP address, or the use of a VPN or proxy. This is part of Cloudflare’s security measures to protect the websites and applications it serves.

    Has Cloudflare ever been hacked?

    While Cloudflare has a strong security record overall, there have been a few isolated incidents where Cloudflare has experienced security breaches or vulnerabilities. However, the company has a history of being transparent about such incidents and working quickly to address and resolve any issues.

  • Hostname vs Domain Name: What’s the Difference? [With Example]

    Hostname vs Domain Name: What’s the Difference? [With Example]

    Hostnames and domain names – even if you don’t know the difference (yet!), one thing is for sure:

    https://142.250.279.1174

    …is not as easy to remember as:

    google.com

    …yet as far as a computer is concerned, they’re both the same thing, and typing either of them into your browser’s address bar will take you to the right page.

    The thing is, as humans we don’t find it too easy to remember long numbers.

    Many years ago those of us of a certain age remembered dozens of phone numbers off by heart. But these days, who needs to even remember phone numbers, when you can just click someone’s name, or profile picture?

    Hostnames and domain names are a little like that – a way for us carbon-based lifeforms to remember and recognise places we want to go on the web more easily than using long strings of meaningless numbers.

    We can leave the strings of numbers to our silicon-based overlords! It’s what they do best, after all.

    But although we might prefer to enter a hostname or domain name, that still needs to be converted into the underlying number (just as clicking on the photo of your Great Auntie Mable will result in your phone converting that request into her phone number, with dialing code).

    In this post, we will take a look at the two methods used by computers to convert hostnames and domain names to and from IP addresses – the strings of numbers like the example above.

    We will also discuss the pros and cons of both hostnames and domain names to help you decide which one is right for you.

    Let’s get started, carbon-based lifeforms!

    What are Host Names?

    A hostname is a human-readable label assigned to a device on a network, and it serves as a more user-friendly alternative to IP addresses, allowing easier identification and communication between devices.

    A hostname is local to your computer, and so you can set it to pretty much anything you want.

    Yes, you could give a hostname to your computer such as ‘Johns-Main-Computer’, or ‘Sara-Laptop-New’, or even ‘PC-Next-To-Cat-Bed’.

    Just as more than two people can have the same name, more than two computers can have the same hostname as well.

    In case you have two computers next to the cat bed.

    You might have already configured a hostname without knowing it. When you set up a new computer or deploy a new server in the cloud, you are asked to provide a name for this computer – this is the hostname.

    Hostnames are not just limited to computers. Phones, IoT devices such as security cameras, headphones, refrigerator, and lightbulbs – all show a name in their respective interface – this is their hostname.

    Tip: Read our post to learn How to Set or Change System Hostname in Linux.

    Hostnames can take various forms depending on the context and network setup. Here are some examples:

    1. Simple hostnames:
      • webserver01
      • database-master
      • loadbalancer
    2. Fully Qualified Domain Names (FQDNs):
      • www.example.com
      • mail.google.com
      • api.github.com
    3. Internal hostnames:
      • jenkins.internal
      • monitoring.corp.local
      • git.dev.company

    How To Check Hostname on Linux

    If you are using Linux, it is extremely easy to check the hostname of your computer using the command line.

    Just type in hostname in the terminal and it will show you your hostname:

    hostname of linux

    Suggested read: What is DNS & How Does It Work? Everything You Need to Know.

    Advantages of Hostnames

    There are several reasons why people use hostnames on their devices:

    1. Human-readable: Hostnames are easier to remember and use than IP addresses, making system administration more intuitive.
    2. Flexibility: Hostnames can be changed without altering the underlying IP address, allowing for more flexible network management.
    3. Abstraction: They provide a layer of abstraction between the network infrastructure and the services running on it, making it easier to move services between different physical or virtual machines.
    4. Security: Hostnames can obscure the actual network structure, potentially improving security by not exposing IP addresses directly.
    5. Integration with DNS: Hostnames integrate seamlessly with DNS, enabling automatic resolution to IP addresses.

    Drawbacks of Hostnames

    While there aren’t many drawbacks, there are a few things that you should be aware of:

    1. Maintenance overhead: In large networks, maintaining and updating hostname records can become complex and time-consuming.
    2. Potential for conflicts: In environments without proper management, duplicate hostnames can cause conflicts and connectivity issues.
    3. Performance impact: Resolving hostnames to IP addresses introduces a small latency compared to using IP addresses directly.

    Are Hostnames and Usernames The Same on Linux?

    No, the hostname and username are not the same on Linux systems. They serve different purposes:

    Aspect

    Hostname

    Username

    Definition

    Name assigned to the entire Linux machine or system

    Name associated with a specific user account on the Linux system

    Purpose

    Identifies the device on a network

    Identifies individual users who can log in to and use the system

    Scope

    System-wide

    User-specific

    Uniqueness

    One per system

    Multiple can exist on a single system

    Viewing Command

    hostname

    whoami (for current user) or cat /etc/passwd (for all users)

    Setting/Changing

    Usually set during system installation or by system administrators

    Created when adding new users, can be changed with usermod command

    Storage Location

    Typically in /etc/hostname

    User information stored in /etc/passwd

    Used For

    Network identification, system configuration

    User authentication, file ownership, access control

    Impact of Change

    Affects entire system and potentially network configuration

    Only affects the specific user account

    Examples

    ubuntu-server, dev-machine-01, webserver-prod

    john, alice, admin, root

    Relation to Login

    Not directly used for login (except in network authentication)

    Used to log in to the system

    Relation to Home Directory

    No direct relation

    Each username typically has an associated home directory (e.g., /home/username)

    What are Domain Names?

    Similar to a hostname, a domain name is a human-readable address used to identify and locate specific websites or resources on the internet.

    However, there is one key distinction – they are unique.

    Only one person can have access to one domain name at a time, and this access is managed using domain registrars who charge a yearly fee for this service.

    Domain names serve as a user-friendly alternative to IP addresses by providing a memorable and meaningful way to access online resources. They are a crucial component of the Domain Name System (DNS), which translates domain names into IP addresses that computers use to identify each other on the network.

    While almost anything can be a hostname, there are certain rules that you must follow for registering a domain name.

    You must pick from one of the existing Top-Level Domains (TLDs)

    Top-Level Domains (TLDs) are the extensions at the end of website addresses, such as .com, or .gov.

    Only the extremely large companies with very deep pockets such as Canon or CERN have the resources to make their own TLD – the rest of us must use one of the publicly available TLDs.

    There are many TLDs available for you to choose from, including:

    1. Common TLDs: .com, .org, .net
    2. Newer TLDs: .app, .blog, .shop, .io
    3. Country Code TLDs (ccTLDs): .us (United States), .uk (United Kingdom), .de (Germany)
    4. Sponsored TLDs (sTLDs): .edu (educational institutions), .gov (U.S. government)
    5. Internationalized Domain Names (IDNs): münchen.de (German), 例子.中国 (Chinese), مثال.مصر (Arabic), उदाहरण.भारत (Hindi), and many more.

    You must follow the structure and syntax for your TLD

    When you use a domain name, you are limited by the specifications set by your TLD registrar. While these restrictions vary, usually you must follow the following guidelines:

    1. Length: A domain name can be up to 253 characters long, including the TLD.
    2. Labels: Each part separated by dots is called a label, and can be up to 63 characters long.
    3. Characters:
      • Use only letters (a-z), numbers (0-9), and hyphens (-).
      • Domain names are case-insensitive.
      • Cannot start or end with a hyphen.
      • Cannot have two consecutive hyphens, except for Internationalized Domain Names (IDN) using Punycode.
      • Some TLDs (but not all) allow using emoticons such as 🎉 💀 💚 in the domain name

    Suggested read: How To Speed Up DNS Propagation | The Ultimate Guide

    Advantages of Domain Names

    We see domain names everywhere, and here’s why people love them so much:

    1. User-friendly: Domain names are easy to remember and type, making it simple for users to access websites and online services.
    2. Branding: They provide a powerful branding tool, allowing businesses and individuals to create a unique online identity.
    3. Flexibility: Domain names can be pointed to different IP addresses or services, allowing for easy migration or load balancing of web services.
    4. Email functionality: Domain names enable the creation of custom email addresses, enhancing professional communication and brand consistency.
    5. SEO benefits: A well-chosen domain name can improve search engine optimization and visibility online.

    Suggested read: How To Flush DNS Cache — A Full Guide

    Drawbacks of Domain Names

    Using a domain name is not all sunshine and rainbows – let’s see why:

    1. Cost: Domain names require registration and renewal fees, which can be significant for premium or highly sought-after names.
    2. Availability: Many desirable domain names are already taken, limiting choices for new websites or businesses. Although most domains cost ~$10/year some people end up paying thousands of dollars just for acquiring the domain. In July 2024, an AI company spent $1,800,000 just to acquire a domain name for their website.
    3. Management overhead: There is a reason why nixCraft has posted a haiku about DNS. Maintaining and renewing domain names requires ongoing attention and administration – and it can be challenging. Even big tech companies such as Meta struggle with DNS.
    4. Security concerns: Domain names can be targets for hijacking or spoofing attacks, requiring additional security measures. It is an old protocol which was developed at a time when security was not as important because very few people had access to the internet.
    5. Dependency on registrars: The availability and control of a domain name depends on the reliability and policies of domain registrars. Even the tech giants such as Google forget to renew their domain names, and if you forget to renew your domain, someone else might snatch it and you may lose it forever.

    Suggested read: Cloudflare DNS for RunCloud (Security & Performance)

    Hostname vs Domain Name – Comparison Table

    Aspect

    Hostname

    Domain Name

    Definition

    A label assigned to a device on a network

    A human-readable address for locating and identifying computer services and devices on the internet

    Primary Purpose

    Identify specific devices within a network

    Provide a memorable address for websites and online services

    Scope

    Local to a network or organization

    Global across the entire internet

    Uniqueness

    Must be unique within a network

    Must be globally unique

    Format

    Can be simple labels (e.g., webserver01)

    Hierarchical structure (e.g., www.example.com)

    Resolution

    Typically resolved to IP addresses via local DNS or hosts file

    Resolved to IP addresses via the global DNS system

    Registration

    Usually not required; set by network administrators

    Requires registration with a domain registrar

    Cost

    Generally free to assign

    Involves registration and renewal fees

    Length Restrictions

    Typically limited to 63 characters per label

    Up to 253 characters total, including dots

    Allowed Characters

    Letters (a-z), numbers (0-9), hyphens (-)

    Letters, numbers, hyphens, and dots (for separation)

    Subdomains

    Can be part of a domain (e.g., host.example.com)

    Can have multiple levels (e.g., sub.example.com)

    Use in URLs

    Not typically used in URLs

    Forms the base of URLs (e.g., https://www.example.com)

    Email Addresses

    Not used in email addresses

    Forms the part after @ in email addresses

    Management

    Managed by local network administrators

    Managed through domain registrars and DNS providers

    Changes

    Can be changed easily within the local network

    Changes propagate through the global DNS system (takes time)

    Security Implications

    Part of internal network security

    Subject to various internet-wide security concerns (e.g., domain hijacking)

    Examples

    webserver01, database-master, localhost

    google.com, github.io, www.cam.ac.uk

    Suggested read: 3 Ways to Fix Too many Authentication Failures SSH Root? [SOLVED]

    Conclusion

    When hosting a website, just setting the domain name is not enough – you must also run and maintain a server.

    This can be difficult to manage if you are not used to working with a command line interface.

    Luckily, RunCloud provides a fully-functional server management platform that can help you deploy and manage your websites with ease.

    Start using RunCloud today!

    FAQs on Hostname vs Domain Name

    Are hostnames and domain names the same?

    No, hostnames and domain names are not the same, although they are related concepts: A hostname is a label assigned to a specific device on a network, such as webserver01 or johns-laptop. A domain name is a human-readable address for a website or online service, such as example.com. A fully qualified domain name (FQDN) often combines a hostname with a domain name, such as webserver01.example.com.

    How do I find my hostname and domain name?

    To find your hostname:
    On Windows: Open Command Prompt and type hostname
    On macOS/Linux: Open Terminal and type hostname
    To find your domain name:
    If you own a website, your domain name is the address you registered (e.g., yourwebsite.com)

    Can you have a domain without a host?

    Yes, you can have a domain without a specific host. A domain name can exist without being associated with any particular server or IP address. This is common when:
    You’ve just registered a domain but haven’t set up hosting yet
    You’re using the domain for email only
    You’re holding the domain for future use

    What is the hostname of a domain name IP address?

    An IP address doesn’t inherently have a hostname. However, you can set up a reverse DNS (PTR record) that associates an IP address with a hostname. For example:
    IP address: 192.0.2.1
    Potential hostname: server1.example.com
    Many ISPs and hosting providers automatically set up reverse DNS for their IP addresses.

    Can a hostname be an IP address?

    While it’s not a best practice, technically, you can use an IP address as a hostname. However, this defeats the purpose of hostnames, which are meant to be human-readable labels. It’s generally better to assign a descriptive hostname and let DNS handle the translation to IP addresses.

    Can you have a domain name without hosting?

    Yes, you can own a domain name without having hosting services. When you register a domain, you’re essentially reserving that name in the global DNS. You don’t need to immediately associate it with a web hosting service. You might do this to: Secure the name for future use, Use it for email addresses only, Set up DNS redirects without actual hosting.

    Is domain and hosting the same thing?

    No, domain and hosting are different:
    A domain is your address on the internet (e.g., yourwebsite.com)
    Hosting is the service that stores your website files and makes them accessible online
    You typically need both to run a website:
    The domain points visitors to your site
    The hosting service provides the server where your site lives

    Is www part of the domain name?

    Technically, “www” is a subdomain, not part of the main domain name. However, it’s so commonly used that many people consider it part of the domain name.
    Many websites are set up to work with or without “www”, treating them as equivalent. However, in DNS terms, “www” is indeed a separate subdomain that can be configured differently from the root domain if desired.

  • The 10 Best PHP Frameworks (Complete Guide)

    The 10 Best PHP Frameworks (Complete Guide)

    Are you old enough to remember these early website designs of Amazon and Google from 1997?

    You don’t have to go anywhere near that far back in time, though, to notice that websites today have become increasingly complex, demanding far more functionality and accessibility.

    Today, professionally designed websites are able to deliver powerful, robust experiences, with much greater levels of security and accessibility, whilst looking cleaner and easier to navigate.

    One of the reasons for this increased functionality and power is PHP (which stands for PHP: Hypertext Preprocessor – yes, the first ‘P’ of ‘PHP’ really does stand for ‘PHP’!).

    Today, over three quarters of all web pages on the internet are powered by PHP, an open-source, server-side scripting language that is used to build dynamic web pages and web applications.

    PHP has been around since 1995, and since then it has had plenty of time to flourish, giving the PHP community a great opportunity to build many frameworks for the PHP ecosystem.

    In this article we’ve covered some of the best PHP frameworks available for you to use right now. But before we get started, let’s first answer the question – what exactly is a framework?

    What is a PHP Framework?

    A framework is a repository of pre-built components which provides a structured approach to development. The components also lend a hand in faster project completion, along with a more streamlined process and enhanced productivity.

    PHP frameworks offer a myriad of unique benefits that make developing applications easier for all developers – beginners and professionals alike.

    The ready-to-use elements and built-in features of frameworks in PHP contribute massively to cost savings.

    Developers can save the trouble of rewriting excess code and reduce development efforts by making use of the pre-built elements in PHP. Along with saving developmental costs, this also makes the process more time-efficient.

    The scalability and ease of maintenance that comes with PHP frameworks make it a compelling choice for many developers and organizations.

    Things To Keep In Mind When Choosing A PHP Framework

    There are a few pointers that you should keep in mind when picking a PHP Framework:

    • Popularity and community size: Most frameworks are community-driven; having a vibrant community to support and enhance a framework is a massive advantage for support and discussion.
    • Principle and Aims: You should properly research what the framework is meant to accomplish. Keep an open mind and look for a different solution if it doesn’t seem to fit your demands and objectives as a framework.
    • Sustainability: Will the framework continue to support your technology stack in the future, and is it regularly maintained? Sustainability is a significant factor to consider if you want long-term project support.
    • Support: If you have any queries or worries, who can you contact? This issue frequently relates to the requirements for community size and popularity. You should have access to online tools and documentation to guide you through any issues that might pop up.

    Testing the frameworks out before adding them to your tech stack is, nevertheless, the best way to decide. Try to narrow it down to two or three frameworks, and just play around with them instead of testing every single one.

    The 10 Best PHP Frameworks For Web Development

    It’s easy to convince yourself that PHP is the language you need to use for your next project. And there is no denying that PHP is a useful tool for any web development project – especially when you consider the vast number of quality websites that use it worldwide.

    However, this doesn’t really address which particular PHP framework will work best for your project. Here are 10 PHP frameworks that are great for development:

    Laravel

    If you’re even remotely familiar with PHP, it’s highly likely that you’ve already heard of Laravel. This framework sits at the top of all PHP framework lists, and is widely regarded as the first choice for web developers.

    Pricing: The Laravel framework is open-source software licensed under the MIT license.

    Key benefits:

    • Easy to learn and master
    • An active and thriving community
    • Wide availability of tutorials and documentation
    • Intuitive database manipulation
    • Insightful reporting enabled by Laravel Horizon and Telescope
    The Laravel php framework

    Laravel is popular because of its ease of use, combined with its accessibility. But its simplicity and easy usage doesn’t stop Laravel from being implemented in the most complex of projects.

    Along with many other capabilities, it has the platform’s own Blade templating engine, a local development environment, Homestead, a powerful RESTful routing system, and much more.

    CodeIgniter

    CodeIgniter, although our second recommendation, is no less powerful than Laravel. It even surpasses Laravel in some aspects. It’s a powerful and versatile PHP framework with support for an array of high-level features and rapid project development.

    Pricing: It is freely available under the MIT license.

    Key Benefits:

    • Built-in protection against CSRF and XSS attacks
    • Clear and detailed documentation
    • Extremely lightweight
    • Reduces the need for tedious configuration
    • Great performance
    CodeIgniter one of the most powerful and versatile PHP frameworks

    CodeIgniter is surprisingly lightweight, clocking in at just a single megabyte – and it’s fast too. It follows the Model-View-Controller (MVC) pattern. This means that it separates the application logic from the presentation and the data. MVC is a good thing because it makes the code more organized, modular, and reusable. It also makes it easier to test, debug, and maintain the application.

    We like CodeIgniter because its user-friendly library and helpful structure lets developers express their creativity – without being constrained by a tonne of tedious coding work.

    Symfony

    Symfony is an incredible framework, made by the renowned developers at SensioLabs. It has a massive community of over 300,000 developers from around the globe.

    Pricing: It is released under MIT license and you can use it for free.

    Key benefits:

    • Stability makes Symfony suitable for large enterprises
    • Thriving, robust ecosystem with an enormous community of devs
    • More than 50 stand-alone components available for your own applications
    • Excellent and up-to-date documentation
    • Feature-rich and dependable

    Symfony has emerged as a developer’s favorite framework thanks to its advanced features, coupled with the intuitive environment. The community is growing quickly despite the fact that Symfony’s large feature set presents a steeper learning curve. There are a lot of unofficial support groups available which will make development easier.

    Symfony makes repetitive tasks such as creating forms, routing authentication, configuring objects, and templating much easier.

    Laminas

    Laminas, formerly known as Zend Framework, is an object-oriented PHP framework that is open-source and is renowned for its scalability and excellent selection of reusable components.

    Pricing: The code is licensed under BSD 3-Clause, so you can use it for free.

    Key benefits:

    • Suitable for complex and large-scale projects
    • Easy integration with third-party PHP libraries
    • Intuitive session management features
    • Extensive documentation
    • Large and active community base

    Developers are able to optimize efficiency and cut down on superfluous overheads by choosing only the components that are actually needed, thanks to Laminas’ exceptionally large component library.

    It also places a high priority on security, and offers strong capabilities to guarantee the development of secure applications.

    Laminas Project is very adaptable and follows PHP best practices, which is crucial for developers who wish to incorporate features unique to their projects.

    Yii

    Yii framework (which stands for Yes, it is!) is straightforward and progressive. It’s a component-based PHP framework with outstanding performance in creating modern web applications. Although Yii is a web programming framework that can be used for any type of PHP project, it’s particularly suited for the rapid building of large-scale web applications.

    Pricing: The Yii Framework is published under BSD License and gives you the flexibility to use it freely for commercial purposes.

    Key benefits:

    • Simplified database management allows devs to model database data right into objects, and eliminates SQL queries
    • Particularly adept in working with AJAX
    • Strong caching support
    • Easy learning curve

    Yii is easy to install and has robust security features, making it ideal for highly secure projects such as forums, CMSs (content management systems), e-commerce sites, and portals. It is one of the oldest PHP frameworks to still be in active use. Naturally, community support is excellent and it still remains very popular among developers.

    CakePHP

    Released in April 2005, CakePHP is a reliable PHP framework for web development licensed under the MIT Licence. It uses ORM (Object Relational Mapping) techniques and is built on the MVC (Model View Controller) architecture. Being so widely used and implemented, CakePHP is incredibly reliable, secure, and fast.

    Pricing: The Cake Software Foundation has released this framework under the MIT license.

    Key Benefits:

    • CakePHP makes it easy to implement CRUD operations by providing a set of conventions and tools that simplify the interaction with the database.
    • Simple debugging and testing process of applications
    • Strong built-in security features
    • Plug-in support
    • Allows the creation of reusable code

    Don’t judge this framework by its age, as almost all modern features are available with CakePHP, including protection against SQL injection, validation against form tampering, protection against Cross-Site Request Forgery (CSRF), and prevention against Cross-Scripting Platform (XSS).

    It powers the websites of global brands such as Hyundai, BMW, and Express. That says a lot about CakePHP!

    Phalcon

    Phalcon, a play on the words “PHP” and “falcon”, is a full stack framework with the objective of demonstrating an unconventional approach to developing web apps because it is written as a C-extension. This means that it is implemented in C and directly integrated into PHP for enhanced performance. Most PHP frameworks are written in PHP itself, which requires more memory and CPU resources to run.

    Phalcon stands out for its low-level architecture, code compilation, memory management, security measures, and the absence of file reads, which leads to better speed.

    Pricing: It is freely available under BSD 3-Clause License.

    Key Benefits:

    • Advanced features such as a universal autoloader and powerful asset management
    • Robust caching
    • Low server-side resource requirements
    • Effortless integration with most other PHP libraries
    • Small and lightweight, and exceptionally performant

    One interesting feature about Phalcon is that, even though it is written in C, you don’t need to know C to use it. Its functionality is exposed as PHP classes and interfaces under the Phalcon namespace, ready to be used.

    With its unique coding style hinting at elements from C and C++, Phalcon is geared towards simplifying PHP development and enhancing the overall development experience.

    Fat-Free Framework (F3)

    Simple to use and designed with minimalism in mind, Fat-Free Framework (F3) is a PHP micro-framework that gets the job done. It is easy to learn and is beginner-friendly. It is also one of the most lightweight frameworks out there, clocking in at a tiny 90 KB.

    Pricing: Fat-Free Framework is free and released as open source software under the GNU Public License (GPL v3).

    Key benefits:

    • Lightweight footprint
    • Modular and scalable structure
    • Supports both SQL and NoSQL databases
    • Powerful ORM features enabled by ‘Axon’
    • Does not require complex configuration

    Since F3 was established in 2009, it has gained a vibrant and mature community, as well as more than 2,600 stars on GitHub.

    Because MVC is enabled but not required, F3 is adaptable – and compatible with classes from other sources. This framework focuses on developing PHP apps that are fast to load, and have a straightforward setup procedure that increases developer productivity, all while avoiding application complexity.

    Slim

    Slim is a barebones micro-PHP framework that follows the Agile methodology. It features a stripped-down codebase without the support for third-party dependencies. That works in Slim’s favor as the lack of dependencies makes the framework remarkably fast.

    Pricing: The Slim framework is freely available under the MIT license.

    Key benefits:

    • Features all important features such as URL routing, session, cookie encryption, and client-side HTTP caching
    • Great for rapid prototyping purposes
    • Active maintenance and responsive devs
    • Suited for the development of RESTful APIs and microservices

    Slim has a flat learning curve and is pretty easy to understand. In fact, you can have a simple app running in just a few minutes without any prior experience. Building compact apps and APIs is an excellent match for Slim, and the fact that it offers both first-party and third-party components makes it ideal if you demand more functionality from the framework.

    FuelPHP

    With more than 300 contributors, FuelPHP is a community-driven PHP framework that supports HMVC (Hierarchical Model View Controller). HMVC creates an additional layer between the Controller and the View – a design pattern that brings several benefits, such as improved organizability of the code, increased modularity, greater flexibility, and support for code reuse.

    Pricing: It is freely available under the MIT license.

    Key benefits:

    • FuelPHP ORM is both lightweight and powerful
    • HMVC support
    • Great modularity
    • Ability to choose the folder and file structure for your projects
    • Useful command-line utility tool

    FuelPHP takes security seriously, and implements features such as output encoding and CSRF defense, URI, XSS, input filtering, and escaping data entered by the user and sent to SQL queries. Moreover, you can use Oil, FuelPHP’s command-line tool, to run scripts, debug code, and create common components.

    Conclusion

    Although it is not absolutely necessary, using PHP in your development framework is worth considering given the language’s widespread use and features. We hope our recommendations help you with a decision to select a framework that ideally fits your needs.

    No matter what PHP framework you are using, deploying and managing your applications on the internet is always used to be a hassle. We have built RunCloud to solve this exact problem, now you can focus on developing your applications and leave the heavy-lifting of managing your servers to us.

    RunCloud supports all things PHP and provides a quick and easy way to perform complicated tasks such as deploying new applications, performing backups, running cron jobs, etc. with only a couple of clicks. Start using RunCloud and see for yourself!

  • Cloudflare R2 vs AWS S3 – Full Comparison

    Cloudflare R2 vs AWS S3 – Full Comparison

    Cloud storage is a vital service for developers who need to store and access large amounts of data on the cloud. However, choosing the right cloud storage provider can be challenging, as there are many factors to consider, such as pricing, performance, reliability, compatibility, and features.

    In this article, we will compare two popular cloud storage services: Cloudflare R2 and AWS S3. We will look at the similarities and differences between these two services in terms of their pricing, performance, reliability, compatibility, and features. Let’s get started!

    What Is AWS S3?

    AWS S3 is short for a simple storage solution, it is a cloud-based service that stores data. It lets you store and access any amount of data over the internet. Data is stored in buckets, you can create buckets to organize your data and control who can access it. Customers are charged a monthly fee for storing their data and a network fee for each time it is requested over the internet.

    S3 can be used to host static websites, backup files, archive data, and integrate with other AWS services. S3 is highly scalable, reliable, and secure – and above all, has a thriving ecosystem and community.

    AWS S3 hero image

    What is Cloudflare R2?

    Cloudflare R2 is a cloud storage service that lets you store and access data over the internet. The most attractive feature of this service is the absence of network egress fees. However, customers are still charged a monthly fee for storing their data, changing it, and reading it. It is compatible with the S3 API, which means you can use existing tools and libraries to work with your data.

    R2 can be integrated with Cloudflare Workers, a serverless platform that lets you run code at the edge. R2 is globally distributed and integrated with Cloudflare’s CDN, which makes it fast and reliable.

    Cloudflare R2 hero image

    Cloudflare R2 vs AWS S3: Features Comparison

    Storage Options

    Both Cloudflare R2 and AWS S3 do not have a limit on the amount of data that can be stored in a bucket. You can store as much data as you like. However, there is a limit on the size of individual objects. A single object can be a maximum of 5 TB, and to upload files larger than 5GB, you have to use the multipart upload process.

    AWS S3 offers a range of storage options for different use cases and performance requirements. The main storage options are:

    • S3 Standard: This is the default storage option for frequently accessed data. It is suitable for cloud applications, dynamic websites, content distribution, and big data analytics. The first 50 TB of data costs $0.023 per GB every month.
    • S3 Intelligent-Tiering: This is a storage option that automatically moves data to the most cost-effective access tier based on access frequency without performance impact or operational overhead. It is ideal for data with unknown or changing access patterns, such as long-lived data sets that are accessed infrequently but require rapid access when needed.

    It has a complex pricing structure – Frequent, Infrequent, and Archive Instant Access Tier are all priced differently, starting at $0.023, $0.0125, and $0.004 per GB per month. In addition to this, customers are also charged a monitoring and automation fee for objects greater than 128 KB which costs $0.0025 per 1,000 objects.

    • S3 Standard-Infrequent Access: This storage option is for less frequently accessed data that still needs to be available quickly when accessed. It is suitable for backups and disaster recovery. It costs $0.0125 per GB per month.
    • S3 One Zone-Infrequent Access: This is similar to the above option except that S3 Standard-IA stores data across multiple Availability Zones, while S3 One Zone-IA stores data in a single Availability Zone and has a lower cost. It is more suitable for re-creatable data that is not important. This storage class is priced at $0.01 per GB.
    • S3 Glacier Instant Retrieval, S3 Glacier Flexible Retrieval (formerly S3 Glacier), and S3 Glacier Deep Archive: These are storage options for archiving data that is rarely accessed and does not require immediate access. They offer different retrieval times and costs depending on the urgency of the data access. They are suitable for long-term archiving and digital preservation of data.
      For example, if you need to store a large number of logs for regulatory purposes, this is the right choice for it. Data stored in Instant Retrieval ($0.004/GB), Flexible Retrieval ($0.0036/GB), and Deep Archive ($0.00099/GB) can be accessed within a couple of milliseconds, or it can take up to 12 hours.
    • S3 Outposts: This is a storage option for storing S3 data on-premises using AWS infrastructure. This service extends AWS infrastructure and services to customer sites. It is suitable for data residency requirements that cannot be met by an existing AWS Region and costs tens of thousands of dollars per month.

    You can also use S3 Lifecycle policies to automatically transition objects between storage options. All the prices mentioned above are for the North Virginia region of AWS, the exact prices vary from region to region.

    Cloudflare R2 provides only one storage class and does not change prices based on location. The first ten GB of storage, ten million read operations and one million write operations are free every month. Beyond the free limit, you can pay $0.015/GB for storage, $0.36, and $4.50 for a million write and read operations, respectively.

    The buckets are created automatically in a region closest to you, you can suggest a suitable location for your bucket, but it is not guaranteed. The object life cycle feature (currently in beta) from Cloudflare can automatically delete objects that are older than a certain time period – this is great for reducing billing costs.

    Security

    Cloudflare R2 encrypts your data at rest – all objects stored in R2, including their metadata, are encrypted at rest using AES-256. The encryption keys are stored and managed by Cloudflare internally. In addition to this, Cloudflare adheres to industry-standard security compliance certifications, such as SOC 2 Type II, PCI DSS Level 1, ISO 27001/27002, GDPR, and CCPA.

    AWS S3 on the other hand offers far more flexibility. AWS S3 supports server-side encryption with three key management options: SSE-KMS, SSE-C, and SSE-S3, as well as client-side encryption. SSE-KMS allows you to use AWS Key Management Service (KMS) or your own customer master keys (CMKs) to encrypt your data. SSE-C allows you to provide your own encryption keys. SSE-S3 uses keys that are managed by S3 and protected by AWS KMS1. These options are not available in Cloudflare R2.

    Although both Cloudflare and AWS use TLS to encrypt your data in transit, AWS takes it one step further by offering AWS PrivateLink, a service to establish a private connection between your VPC and S3 – this transfers your data without exposing it to the internet.

    AWS S3 maintains compliance programs, such as PCI-DSS, HIPAA/HITECH, FedRAMP, EU Data Protection Directive, and FISMA, to help you meet regulatory requirements. AWS S3 also provides various mechanisms to control access to your data, such as AWS Identity and Access Management (IAM), Access Control Lists (ACLs), bucket policies, query string authentication, and pre-signed URLs.

    Data Migration

    AWS S3 provides various options for migrating data from different sources, such as on-premises systems, other cloud providers, or other S3-compatible services. You can either use online services such as AWS DataSync, AWS Direct Connect, AWS Transfer Family, etc. or physically move your data using offline services such as AWS Snowcone, AWS Snowball, and AWS Snowmobile.

    Cloudflare R2 on the other hand has a much less mature ecosystem. The only option to transfer data is by either using its Super Slurper service for one time migrations or Sippy for incremental data migration.

    Other Features

    Cloudflare R2 is still evolving and growing, it has a limited number of features that work well in certain environments. You can use it with Cloudflare Workers, a serverless runtime, to bind a bucket to a Worker and change objects on the fly as they go in or out of R2 storage buckets.

    AWS S3, on the other hand, offers a solution for all your requirements and offers many features that are not available on Cloudflare R2.

    AWS Marketplace

    AWS Marketplace for S3 allows you to explore and subscribe to third-party software products that are built for Amazon S3 from within the S3 Management Console. You can choose from various product types, such as SaaS, AMI, CFT, and containers.

    There are solutions available for many categories, such as Storage, backup and Recovery, Data Integration and Analytics, Observability and Monitoring, Threat Detection, and Permissions. The marketplace helps streamline the process of deploying software solutions that run on AWS.

    AWS S3 marketplace

    Bucket Versioning

    AWS S3 bucket versioning is a feature that allows you to keep multiple versions of an object in the same bucket. You can use bucket versioning to preserve and restore every version of an object stored in your bucket. This can help you recover objects from accidental deletion or overwriting.

    By default, your bucket is unversioned, which means that there is only one version of each object in the bucket. If you enable versioning for a bucket, AWS S3 automatically generates a unique version ID for each object that is stored or modified in the bucket.

    If you overwrite an object in a versioned bucket, AWS S3 adds a new version of the object in the bucket. The previous version remains in the bucket, you can still access and restore the previous version of the object if you need to.

    Object Locking

    Object locking in AWS S3 is a feature of versioned buckets that allows you to store objects using a write-once-read-many (WORM) model. This can help prevent objects from being deleted or overwritten for a fixed amount of time or indefinitely. It is useful if you need to meet regulatory requirements that require WORM storage or add an extra layer of protection against object changes and deletion.

    Object locking provides two retention modes: governance mode and compliance mode. These retention modes apply different levels of protection to your objects. In governance mode, users can’t overwrite or delete an object version or alter its lock settings unless they have special permissions. In compliance mode, a protected object version can’t be overwritten or deleted by any user, including the root user in your AWS account. When an object is locked in compliance mode, its retention mode can’t be changed, and its retention period can’t be shortened.

    Performance and Reliability

    Both Cloudflare and AWS are the titans of the cloud industry and boast 99.999999999% (eleven 9’s) of annual durability. This is very hard to interpret, let’s understand this with the help of an example. Imagine you have a big bucket of rice with one billion grains, if your bucket offered similar reliability then you will lose a maximum of one grain every year.

    Both cloud services are globally distributed, have redundancy built into their infrastructure, and offer a similar level of performance and reliability.

    Cost

    Cloudflare takes pride in its simple pricing plans. It offers a generous free tier, beyond which customers are charged $0.015 per GB of storage, $4.50 for million operations that change the state of the object, and $0.36 per million object reads every month. Cloudflare R2 does not charge any network egress fee.

    Cloudflare R2 purchase dashboard

    AWS, on the other hand, is infamous for its complex pricing structure. Even for experienced professionals, calculating your AWS bill is an arduous ordeal. You are charged separately for each storage class, you pay a fee for requests made against your buckets, and you pay for all bandwidth into and out of Amazon S3 (except in a few cases). There is an additional data retrieval fee for reading data from certain storage classes. Moreover, if you are using storage management features such as Amazon S3 Inventory, S3 Storage Class Analysis, etc. then you will be billed for them separately.

    You can use R2 Calculator and Amazon S3 calculator to calculate an estimate of your monthly bill. Let’s compare both services with the help of a few examples.

    Example 1

    Let us assume you store 10000 GB of data in a cloud bucket that is frequently accessed from North Virginia. You perform 5000000 write operations and 25000000 read operations every month. The above scenario will cost you $265 ($230 for storage, $25 for PUT requests, and $10 for GET requests) every month when using AWS S3 Standard. A similar solution will cost $173.25 per month on Cloudflare.

    If you are serving traffic to the internet, then AWS will also levy an outbound data transfer fee. If you transfer 10TB of data, you will be charged $921 per month. Cloudflare does not charge any network egress fee.

    In this scenario, if you use AWS S3, you will end up paying $1,186.60 ($265+$921) every month whereas if you use Cloudflare R2, you will only need to pay $174 per month.

    Example 2

    In this scenario, let’s assume you need to store 100000 GB of data that is seldom accessed. On AWS, there is a special storage class for such objects, S3 Glacier Deep Archive. If you perform 5000 write operations every month and a negligible amount of read requests and outbound data transfer, then your AWS bill will be approximately $100 whereas Cloudflare will charge you nearly $1500. 

    Related: Amazon Route 53 vs. Cloudflare DNS – Which Is Better?

    Final Thoughts

    Cloudflare R2 is a new and upcoming service. It has not fully matured yet and still has some room for improvement. It has lower prices than AWS S3 and can be a good option for delivering data on the web. However, it does not have all the features and flexibility offered by S3.

    In short: It’s a good option for some use cases – in fact, in some cases, even a great solution – but not to be considered a drop-in substitute for S3 and what it’s capable for (especially if you already use AWS for various other parts of your architecture.

    If you’re tired of managing your own servers – you might want to check out RunCloud (yep, that’s us!). RunCloud is built for developers that want to focus on shipping great work, not on managing their infrastructure. Painless server configuration, so you don’t need to spend hours figuring it out – get started with RunCloud today & get up and running in minutes.