Category: WordPress

  • How To Install WordPress On OpenLiteSpeed

    How To Install WordPress On OpenLiteSpeed

    WordPress is the world’s leading (and by far the most popular) content management system (CMS) – currently powering over 40% of all websites on the internet & continuing to gain market share year after year.

    After all, it’s trusted by prestigious brands like Bloomberg, the BBC, and TechCrunch – just to name a few – for good reason.

    In this guide, we’ll walk you through how to deploy a WordPress website on OpenLiteSpeed – a server stack built for speed, security, and scalability – using RunCloud as well as manually. So, without further ado – let’s dive in:

    Getting Started – Server Requirements

    To Deploy WordPress on OpenLiteSpeed, you will need:

    1. A server with a fresh, clean installation of Ubuntu 18.04/20.04 x86_64 LTS
    2. You will need at least one static public IP Address (especially for Google Cloud and AWS users where an additional step is required to set up a static public IP Address for your server).
    3. Make sure ports 22, 80, 443, and 34210 are open (especially for Google Cloud, AWS, Azure, and Alibaba Cloud users where an additional step is required to open these necessary ports for your server).

    How To Deploy WordPress on OpenLiteSpeed (Recommended)

    The easiest & therefore recommended way to deploy WordPress on OpenLiteSpeed is using RunCloud. Let’s see how you can get both your server and site up and running in 3 simple steps…

    1. Create or Log Into Your RunCloud Account

    The first step is to log into your RunCloud account. If you don’t have a RunCloud account we’ll recommend you to create one:
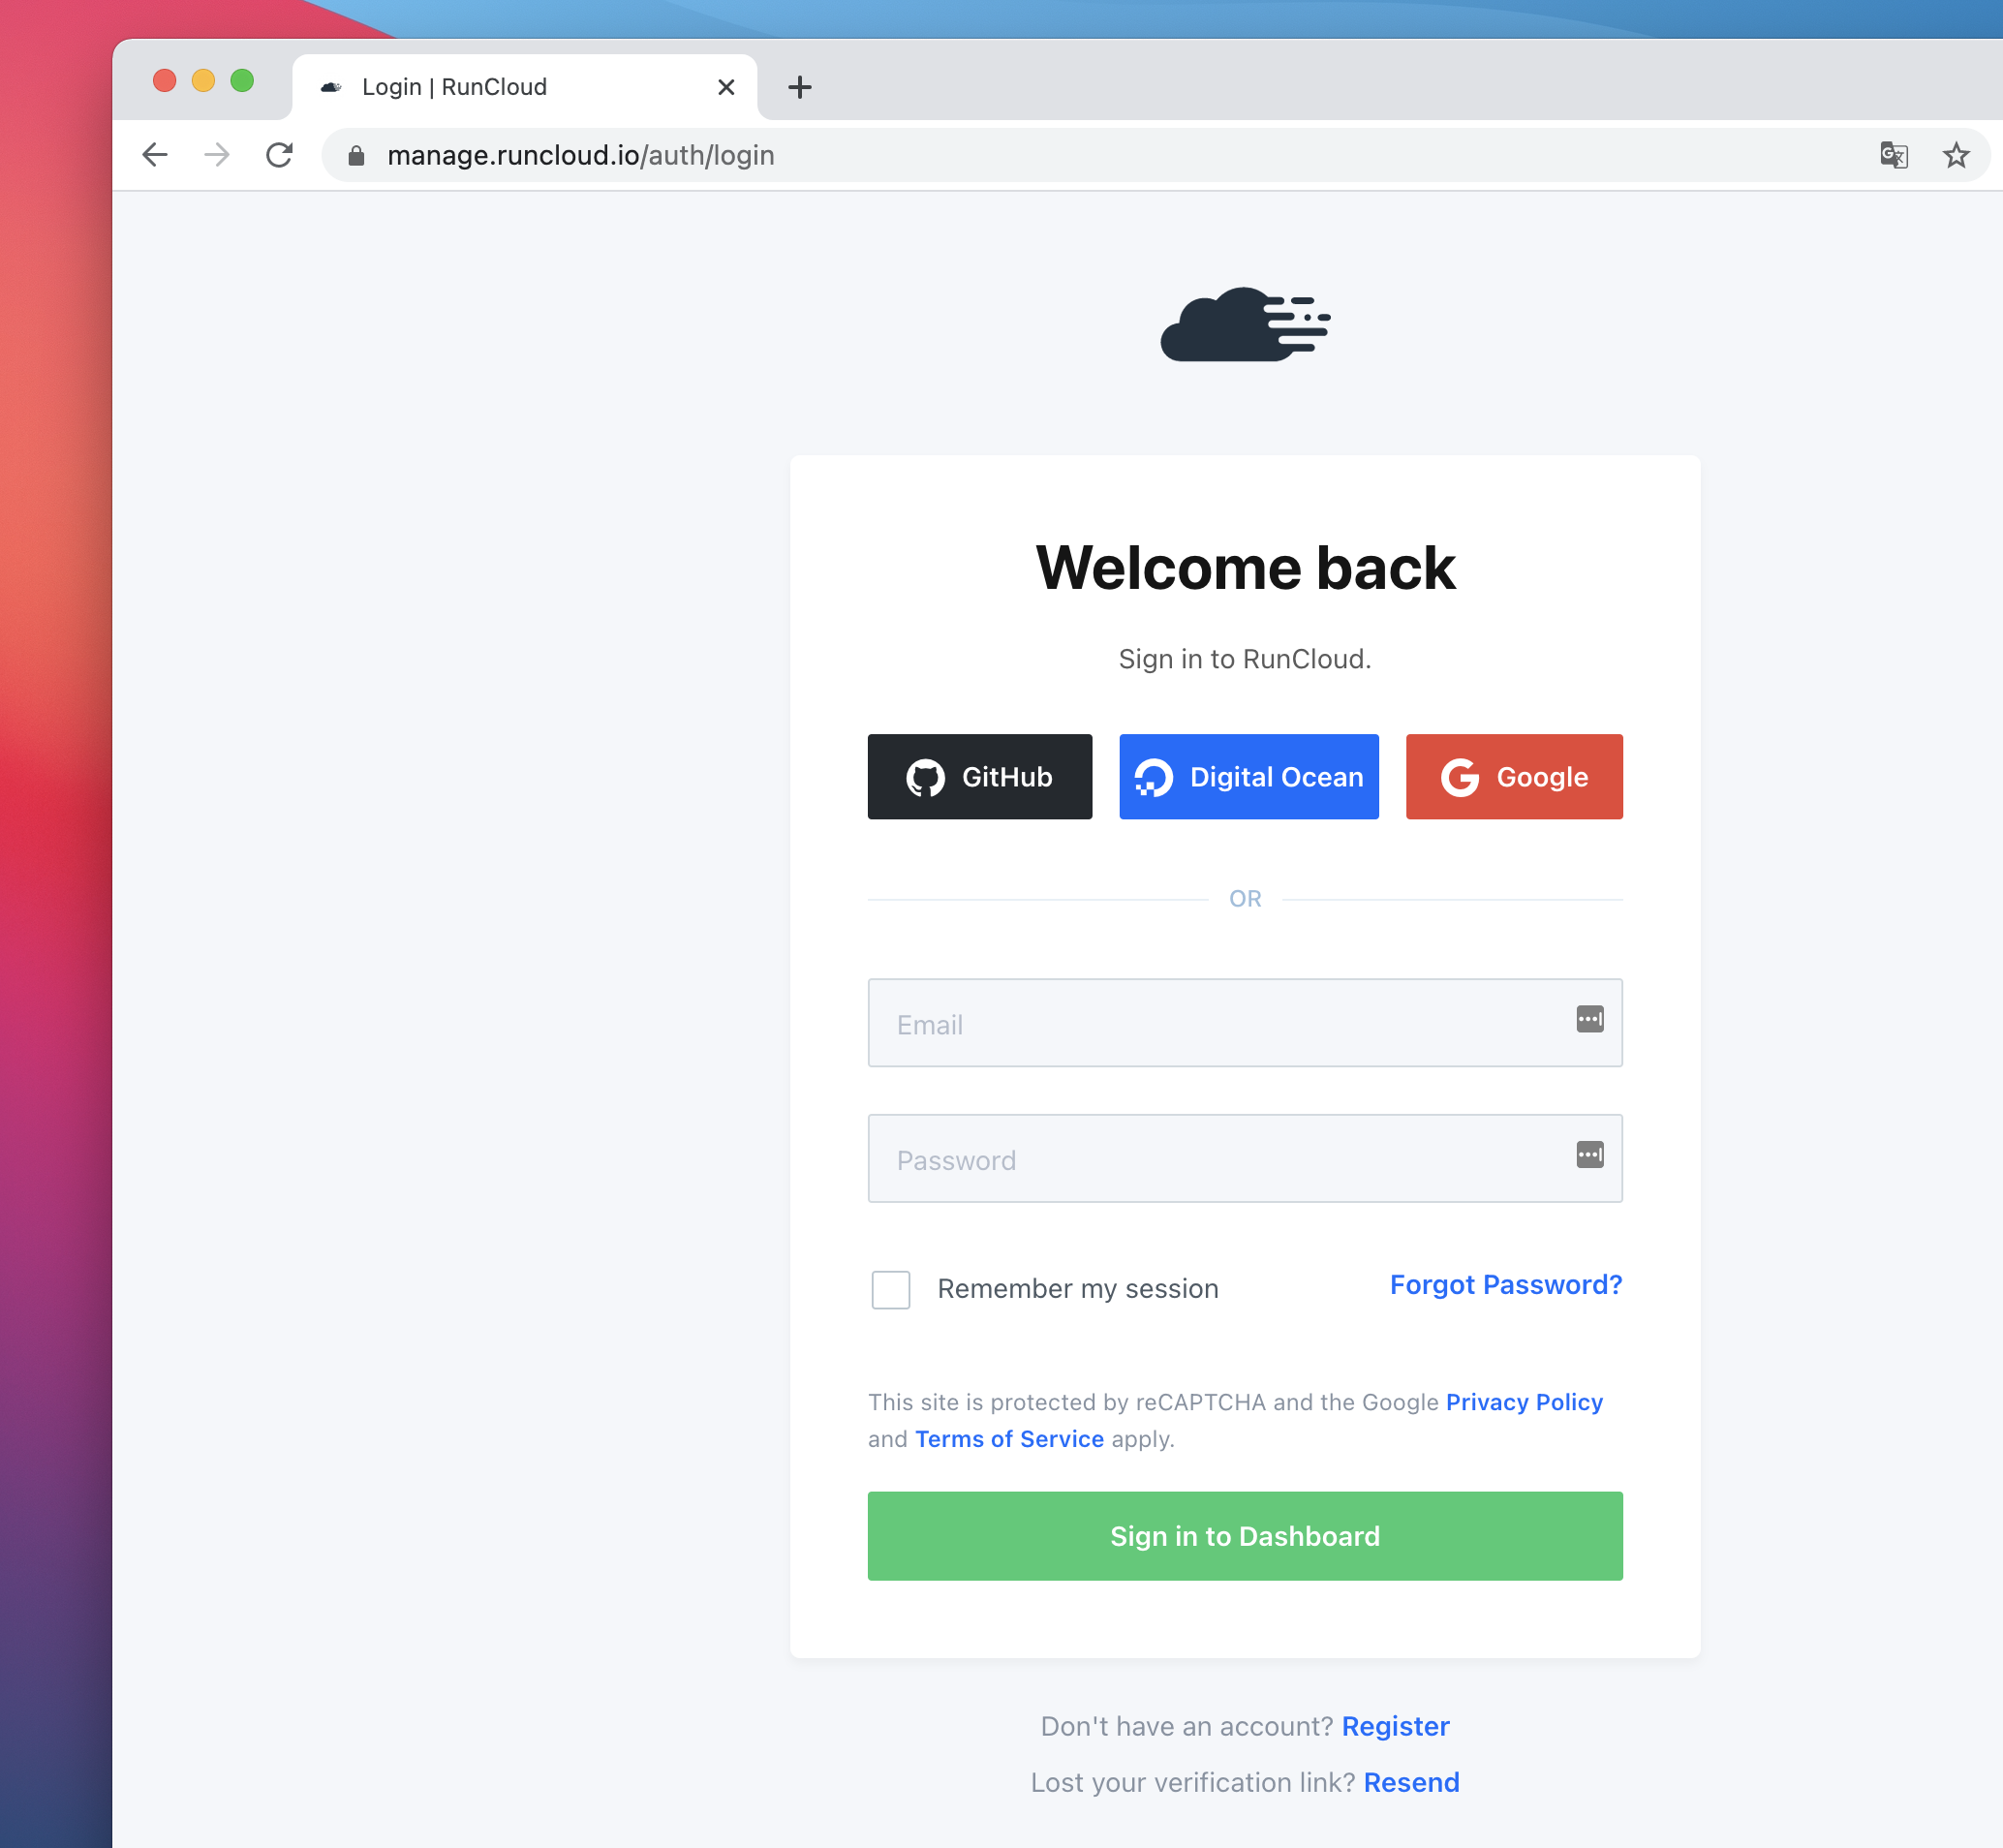
    RunCloud Dashboard

    2. Connect Your Server

    Now that you’re logged into your account – you’ll need to go ahead and connect your first server to RunCloud. This only takes a few minutes, to get started, click Let’s get started as shown below:
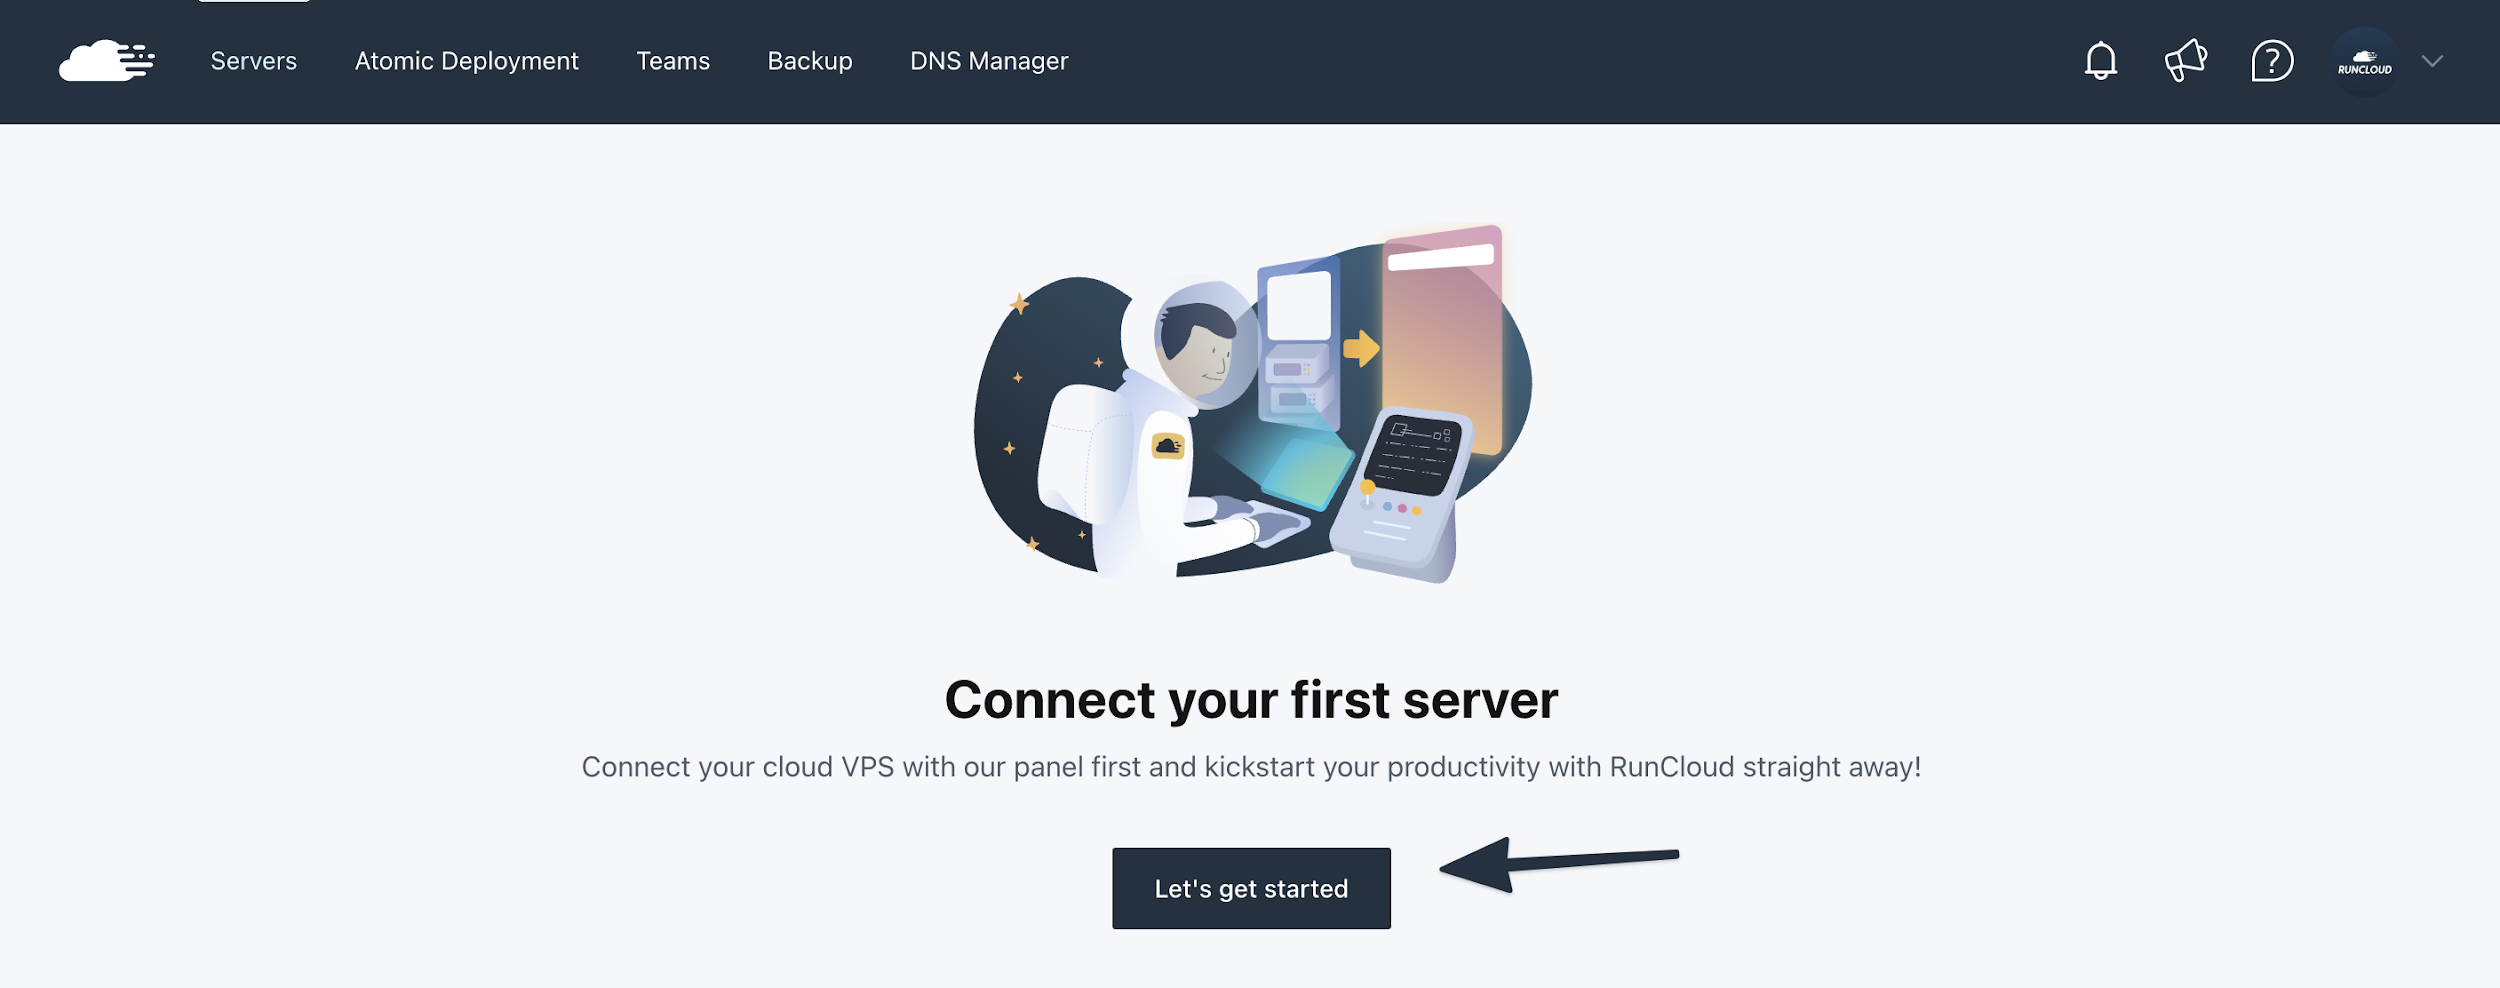
    Connect Server RunCloud

    Next, you’ll see a list of compatible cloud hosting providers. Go ahead and make your choice (for example, UpCloud) and choose the Connect via IP Address option if you’ve already deployed a new server with your cloud hosting provider:
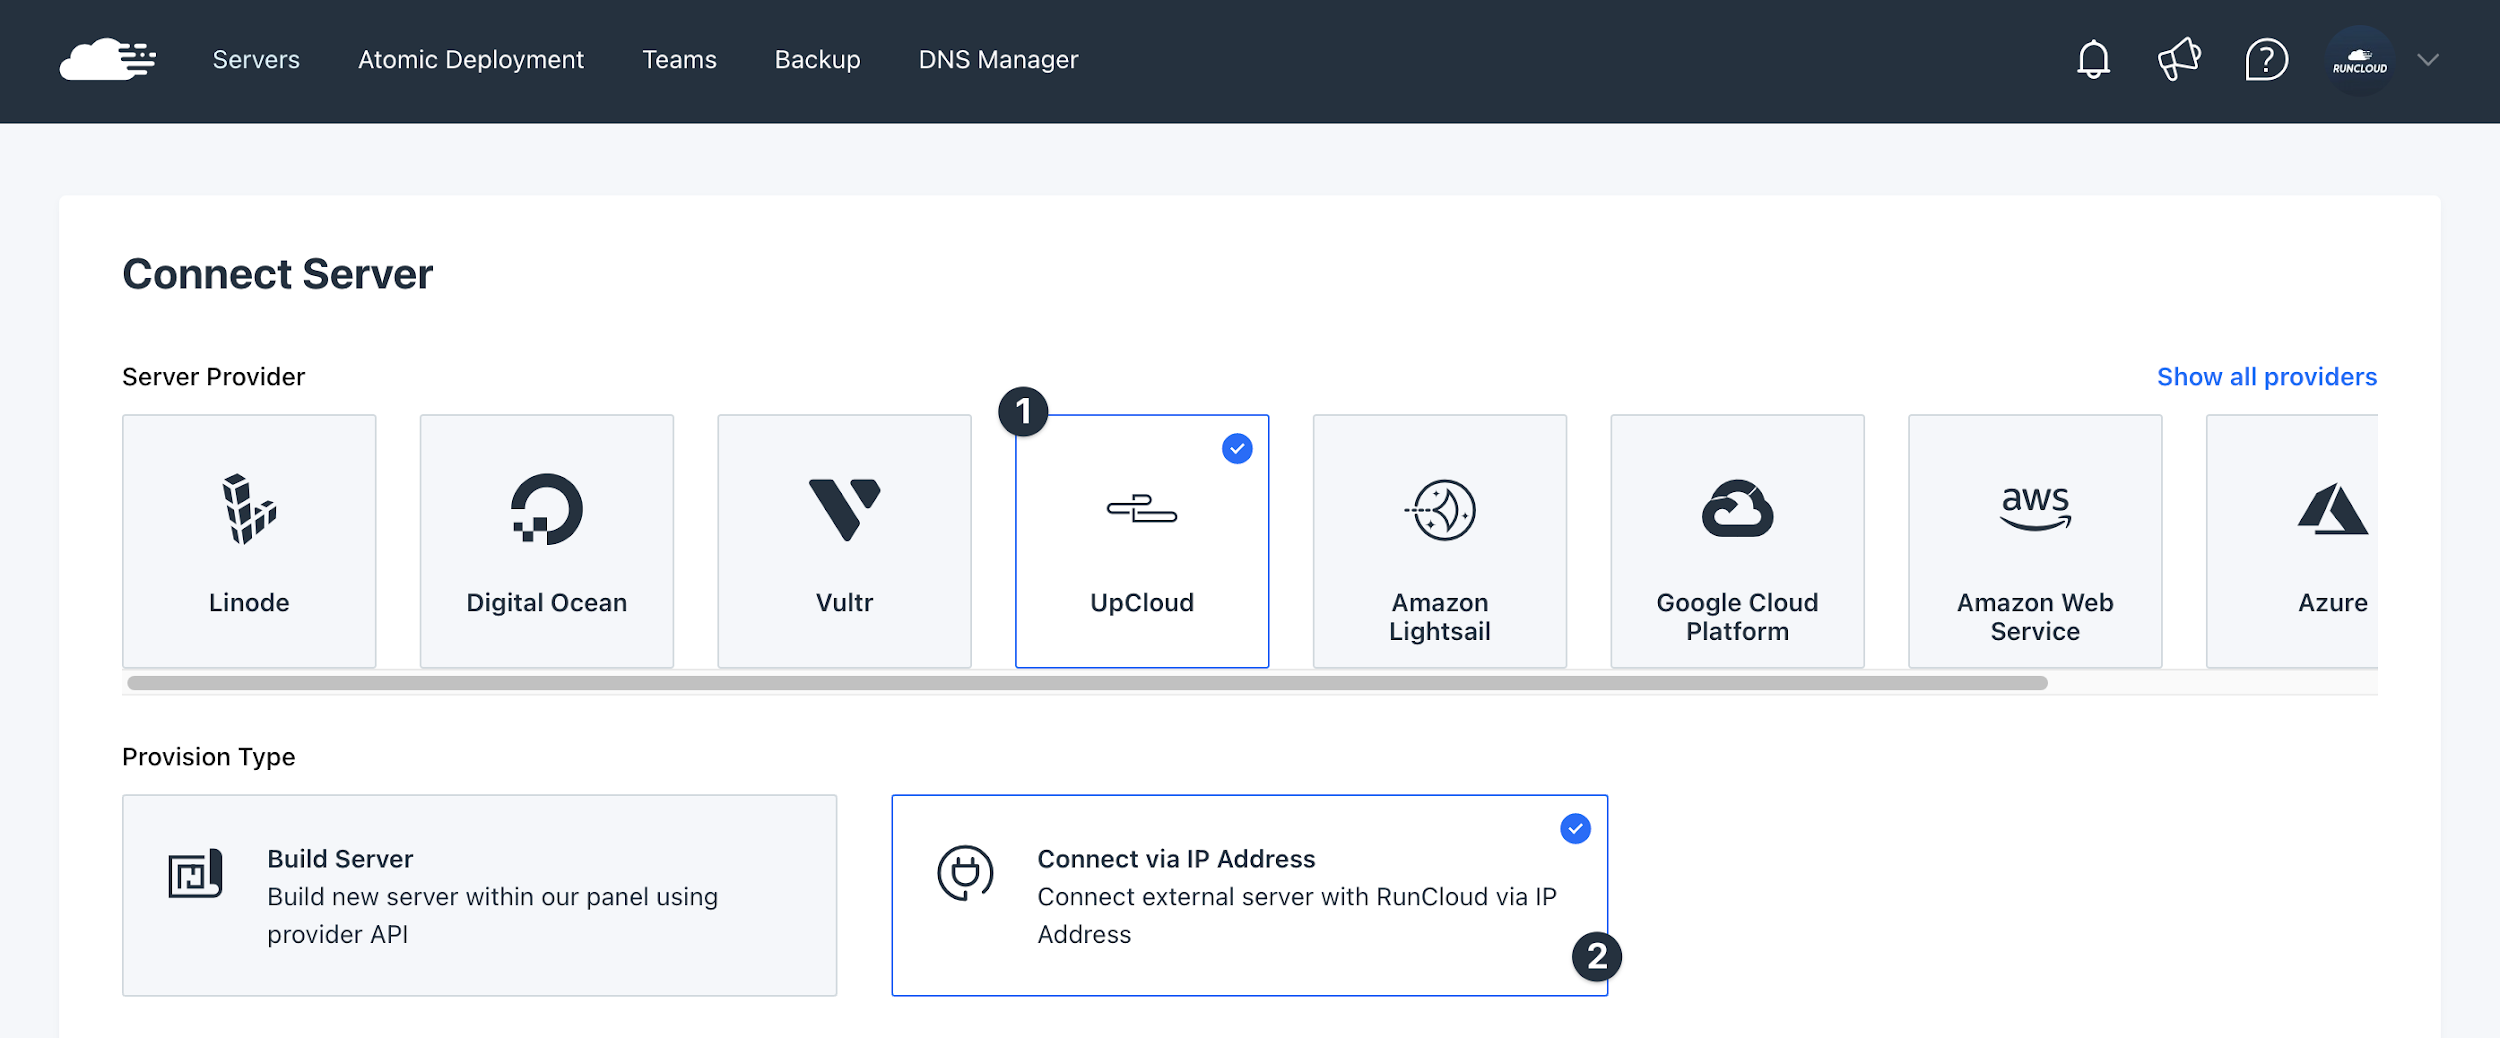
    Select Server Provider UpCloud

    You can alternatively use our integrations for Vultr, Digital Ocean, Linode, and UpCloud’s APIs to automate the entire server build & deployment process.

    Once selected, scroll down and select OpenLiteSpeed as your preferred server stack:
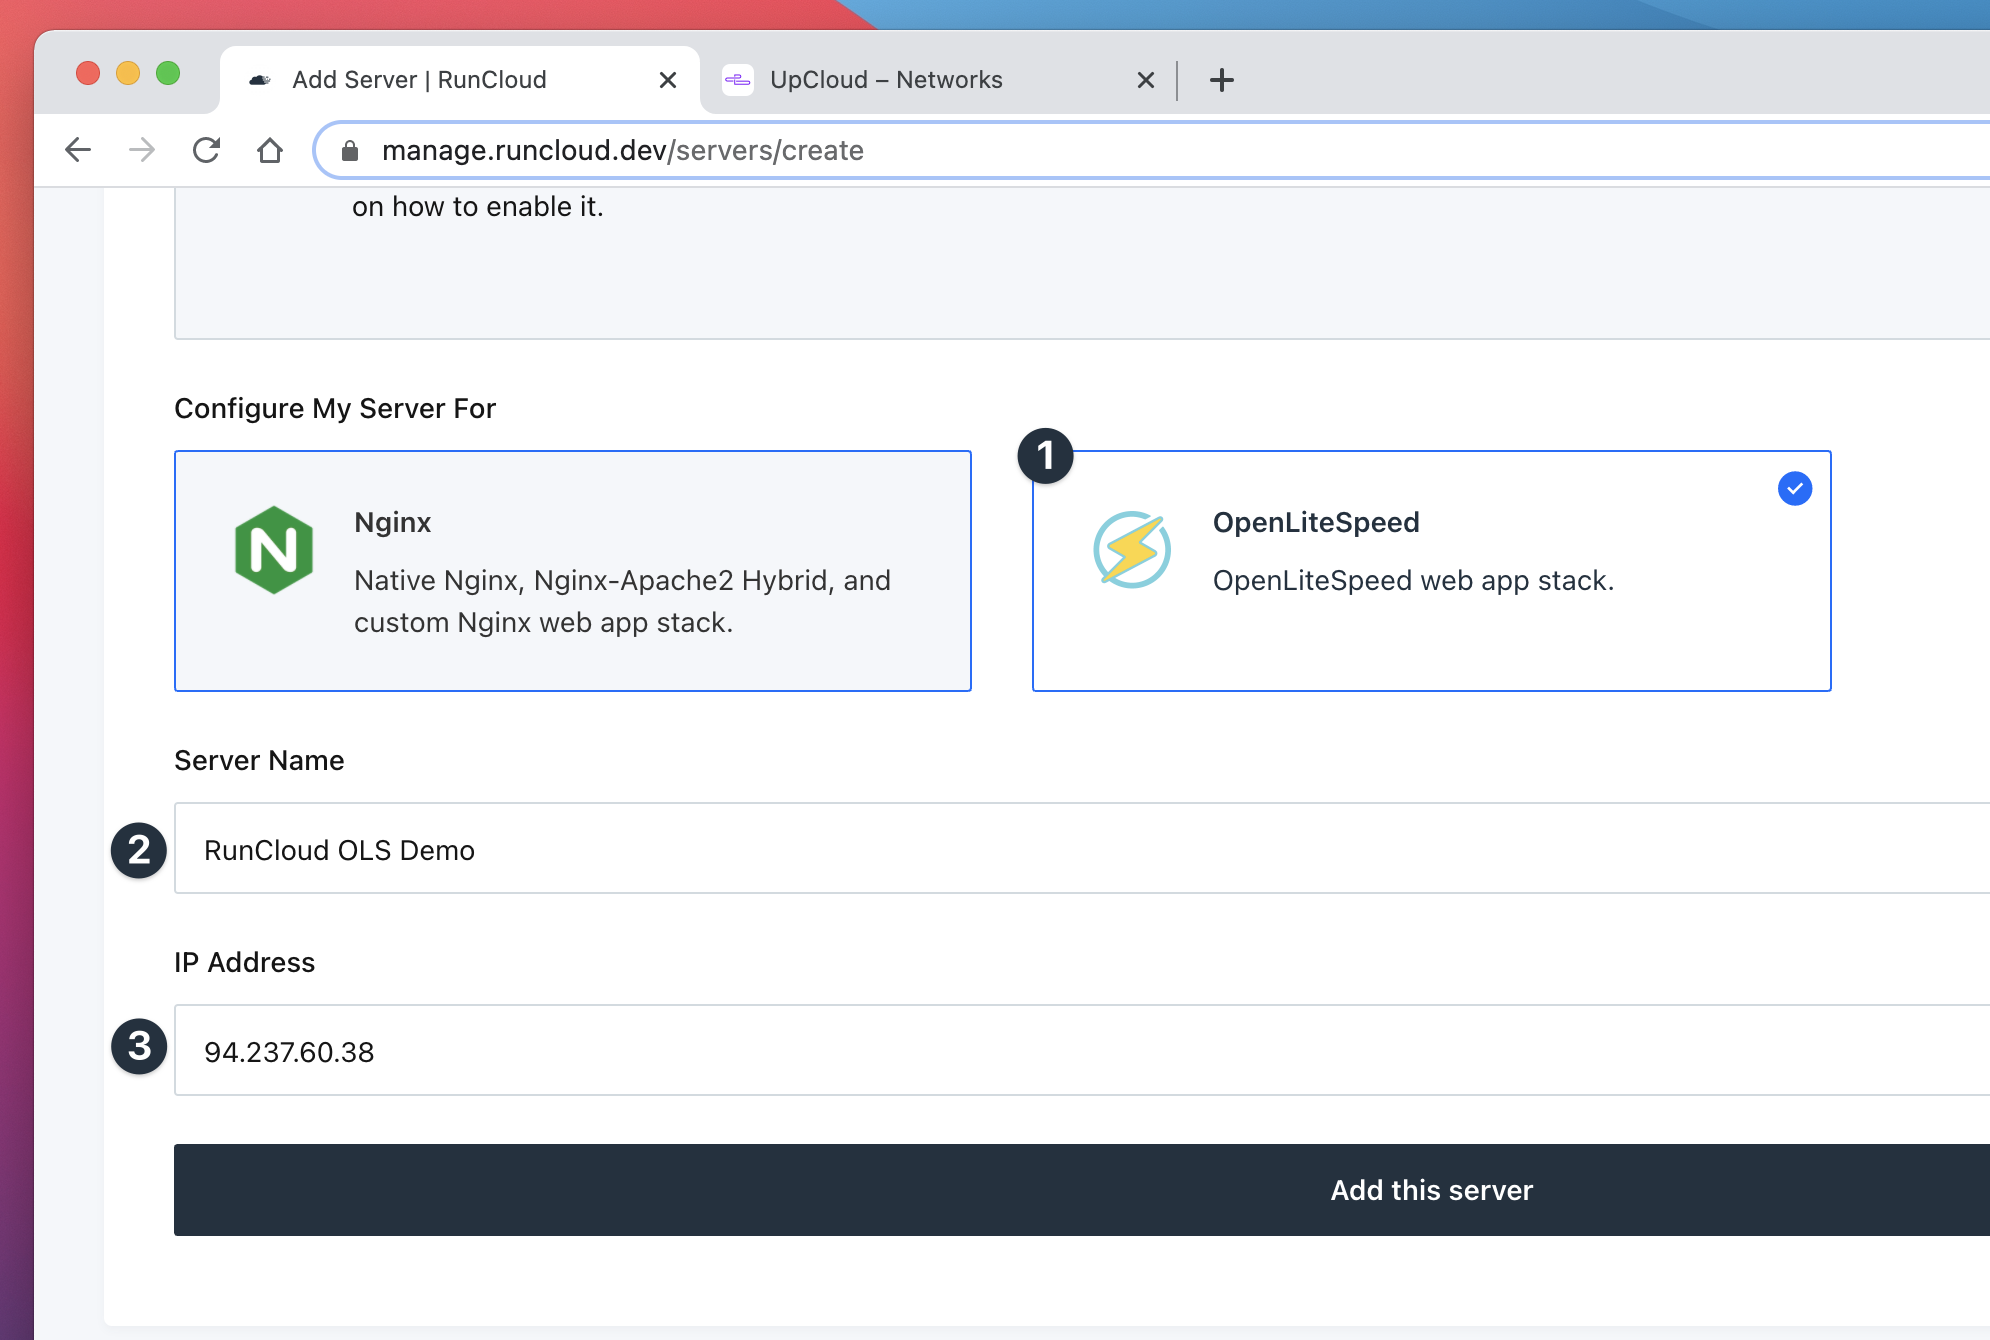
    OpenLiteSpeed Server Stack RunCloud

    Then, give your server a suitable name (so it’s easy to locate later), enter the server’s IP address, and click Add this server. You’ll then be taken to the following page where you’ll be asked to enter your server’s root password:
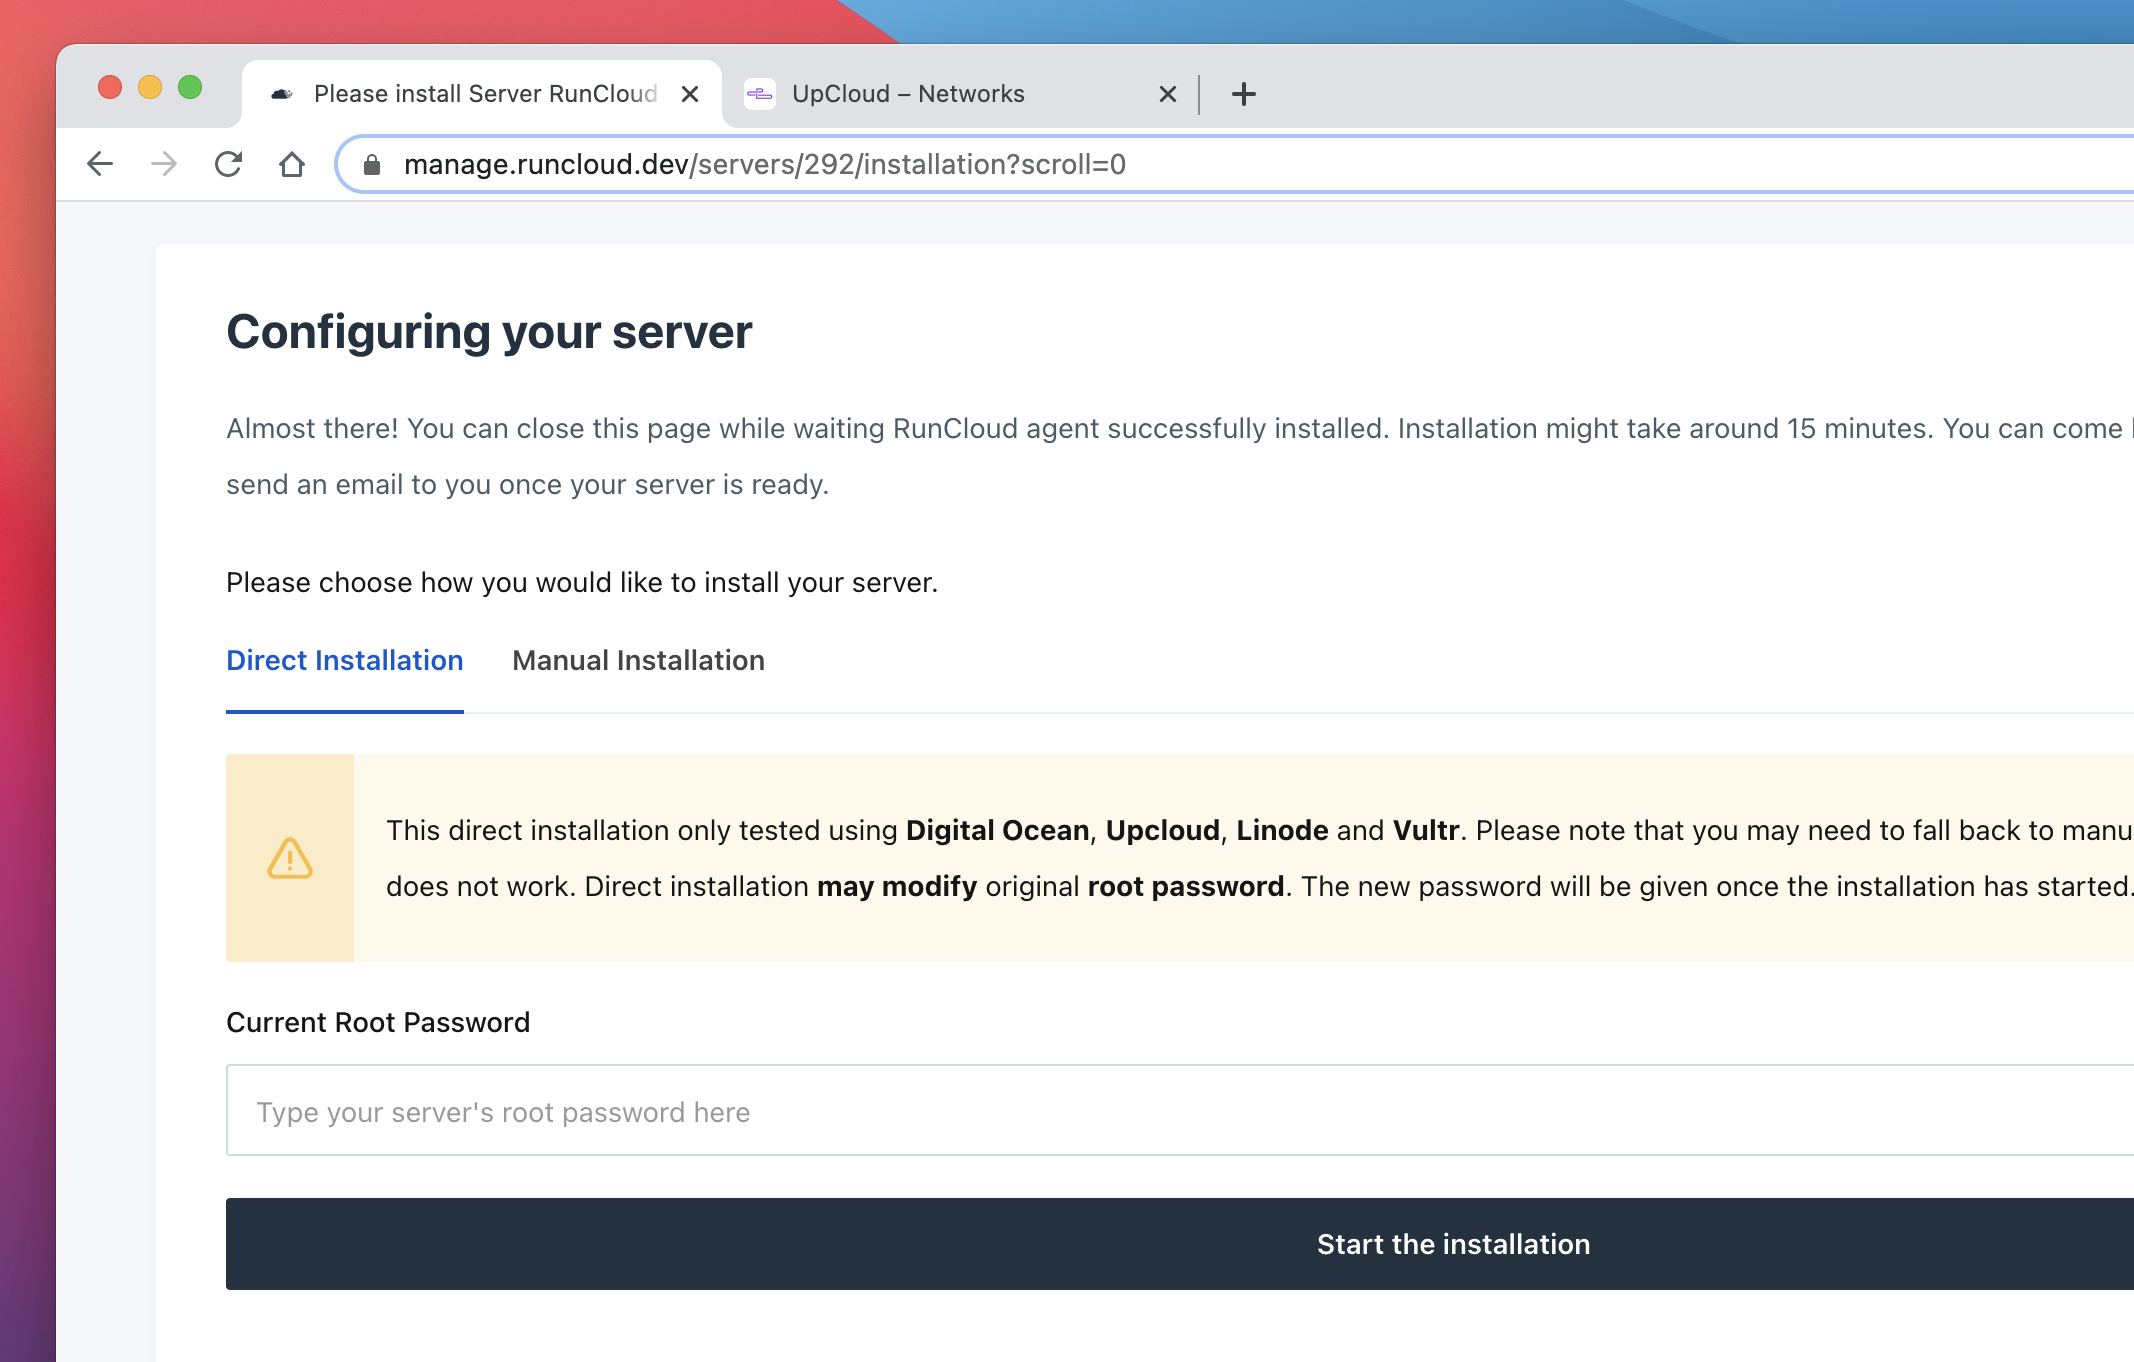
    Server Credentials

    You’ll then be prompted to enter your server’s root password, which will be automatically emailed to you by UpCloud once your server has finished deploying. And with other server providers, it’s typically quite easy to locate in their respective account areas. Once entered, click Start the installation.

    As RunCloud configures your server – this is what you’ll see:
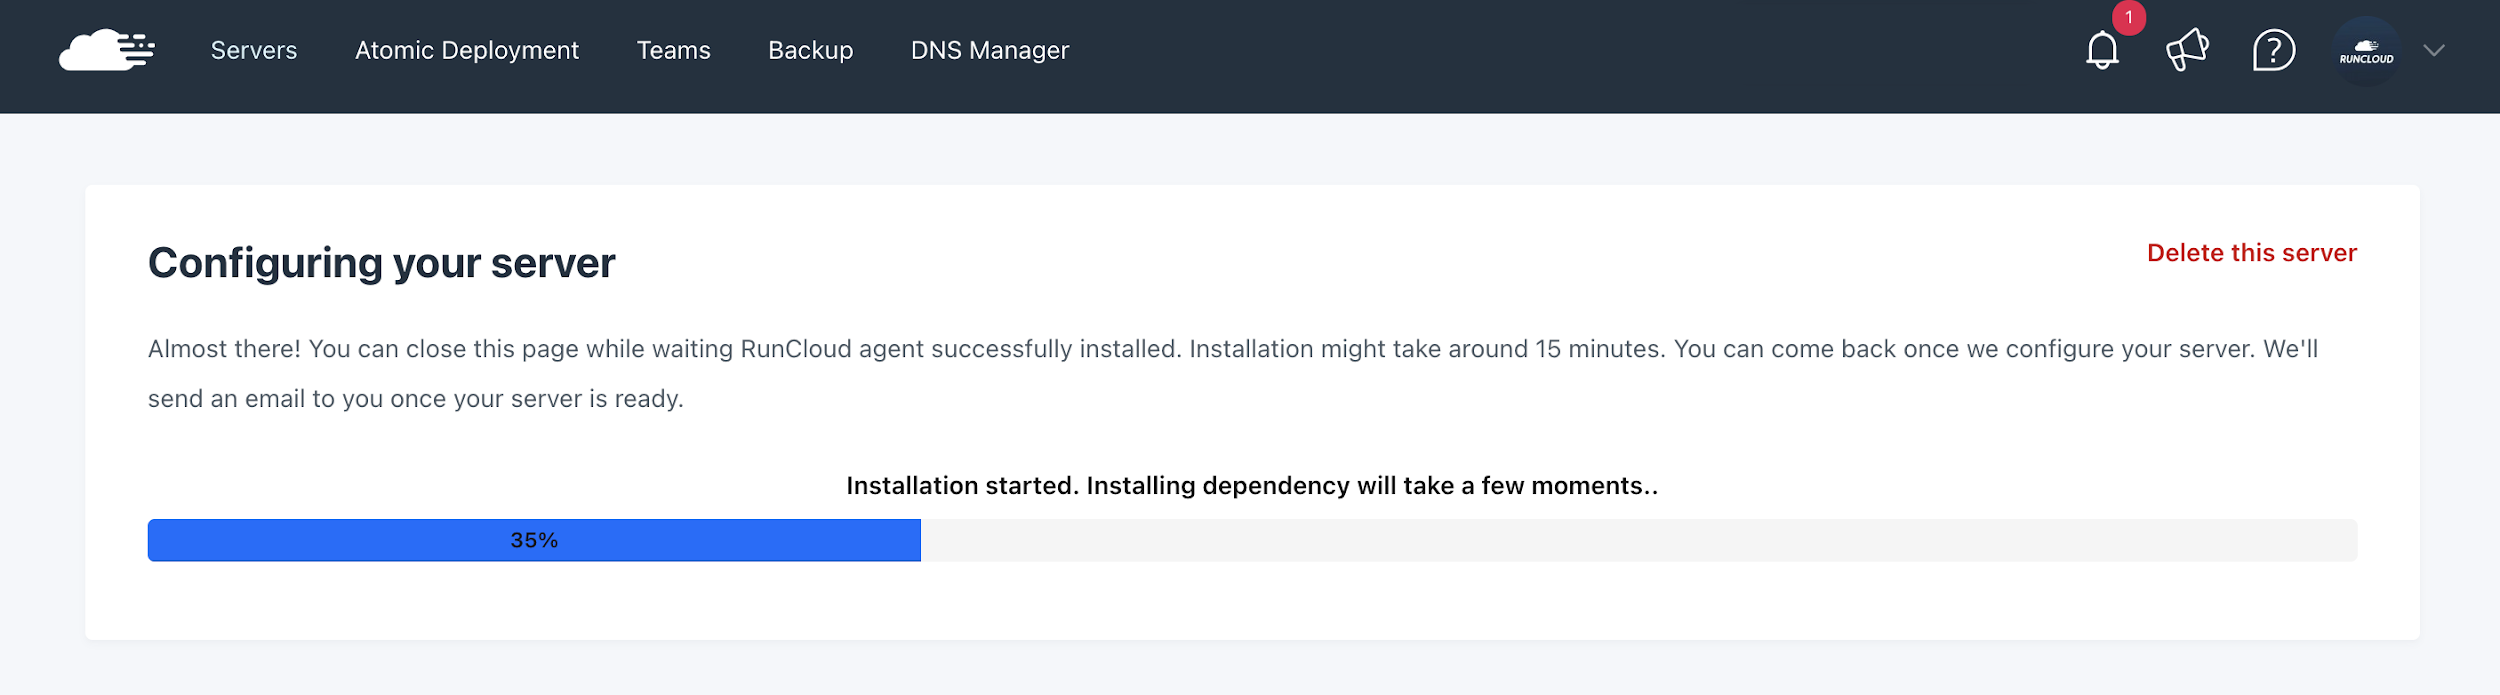
    RunCloud Server Configuration

    And once complete, OpenLiteSpeed will have been successfully installed and configured which means you can now deploy WordPress using RunCloud’s easy 1-Click WordPress installation.
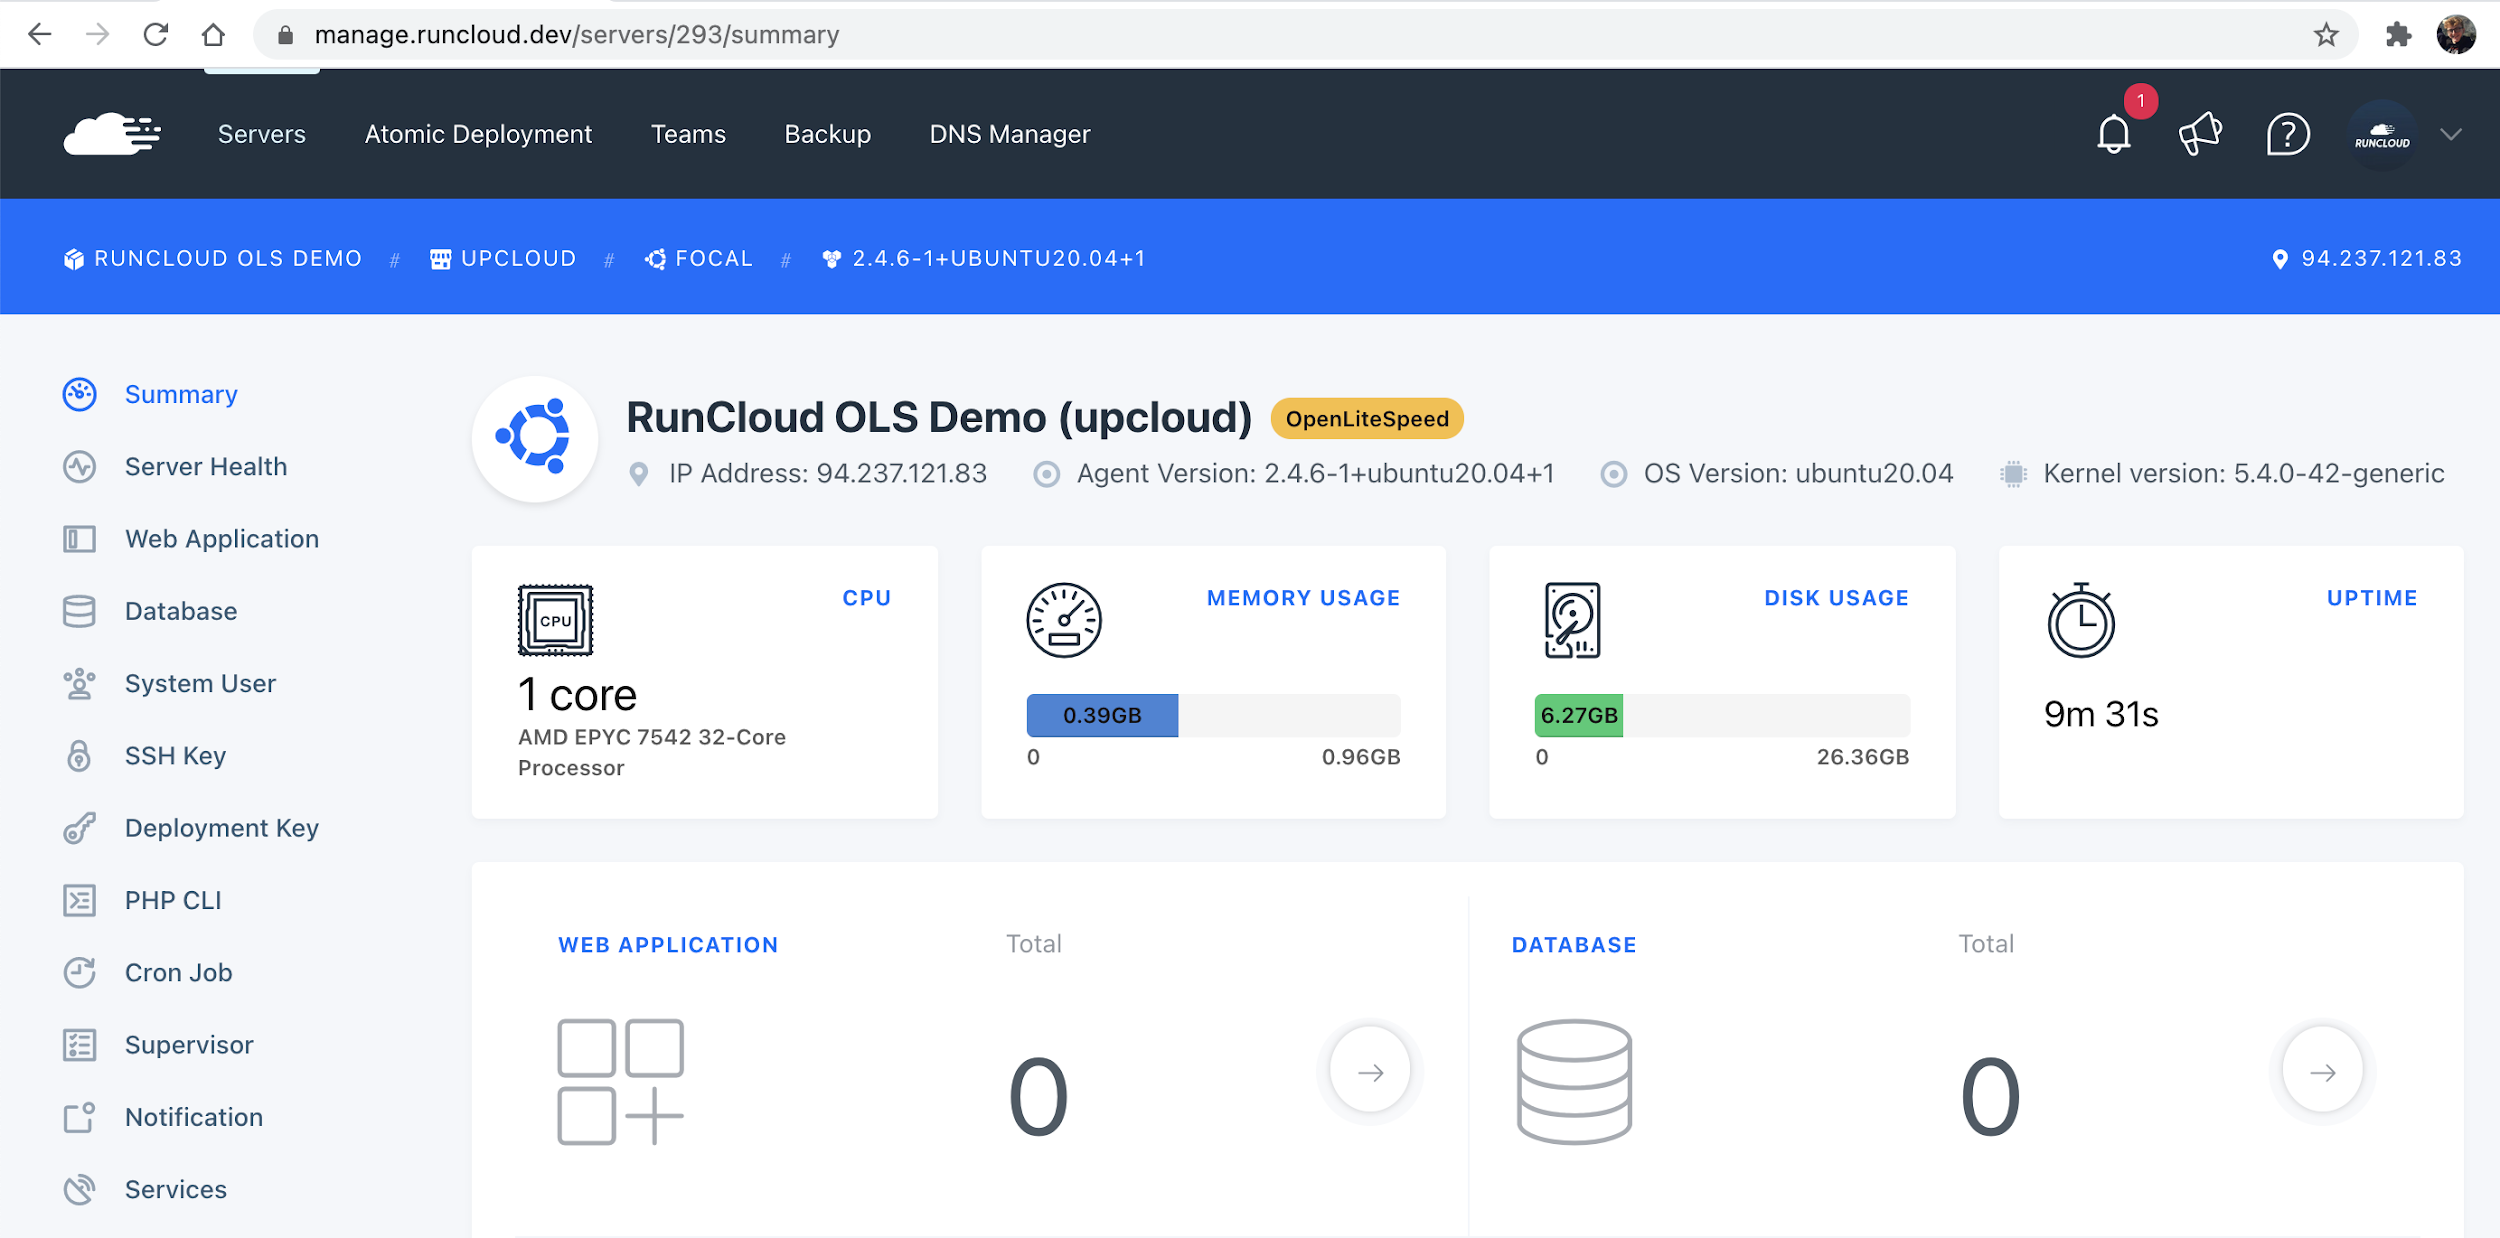
    RunCloud Server Dashboard

    3. Deploy WordPress With RunCloud’s 1-Click Install

    Now that your server is connected to RunCloud, the last step is to create your brand-new web application (in this case, WordPress) using our easy, one-click WordPress installation.

    • Select your server and navigate to the Web Application tab – as shown below:
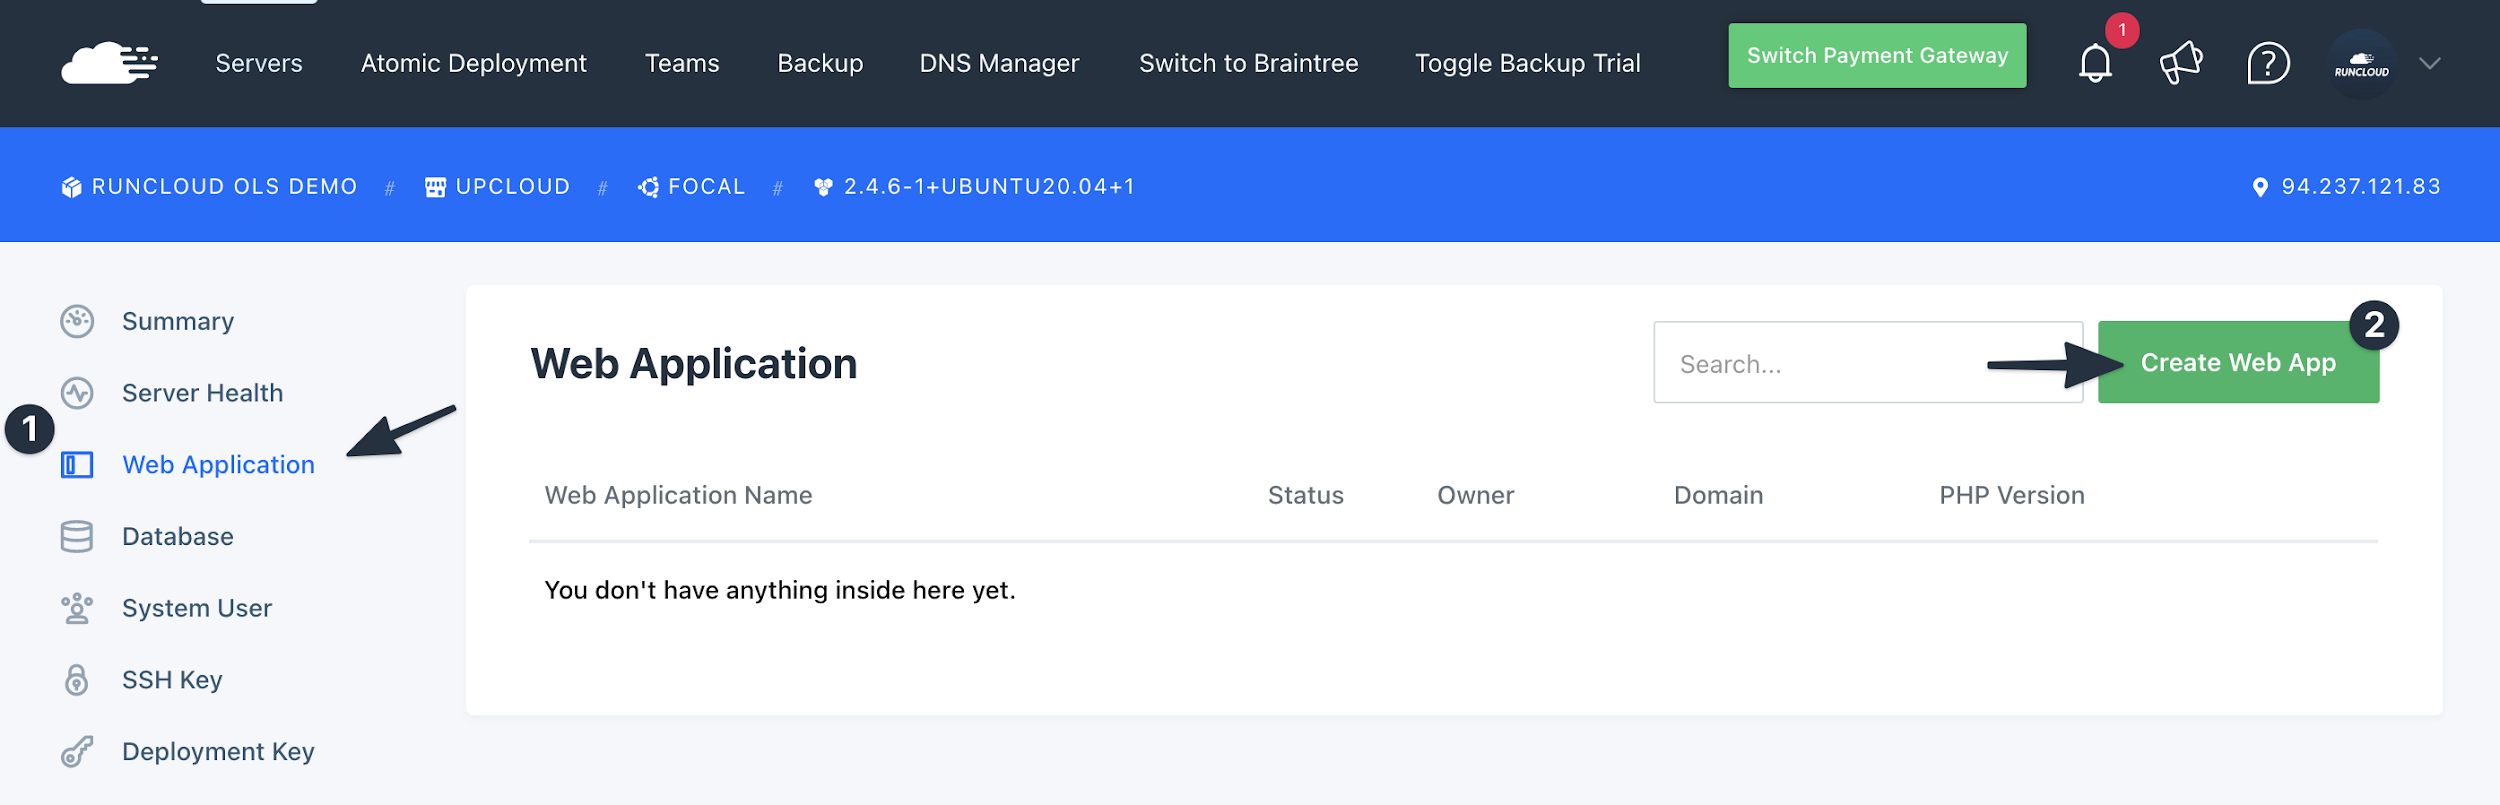
    Create Web Application
    • In the top right corner, click Create Web App and proceed to select RunCloud’s 1-Click WordPress option:
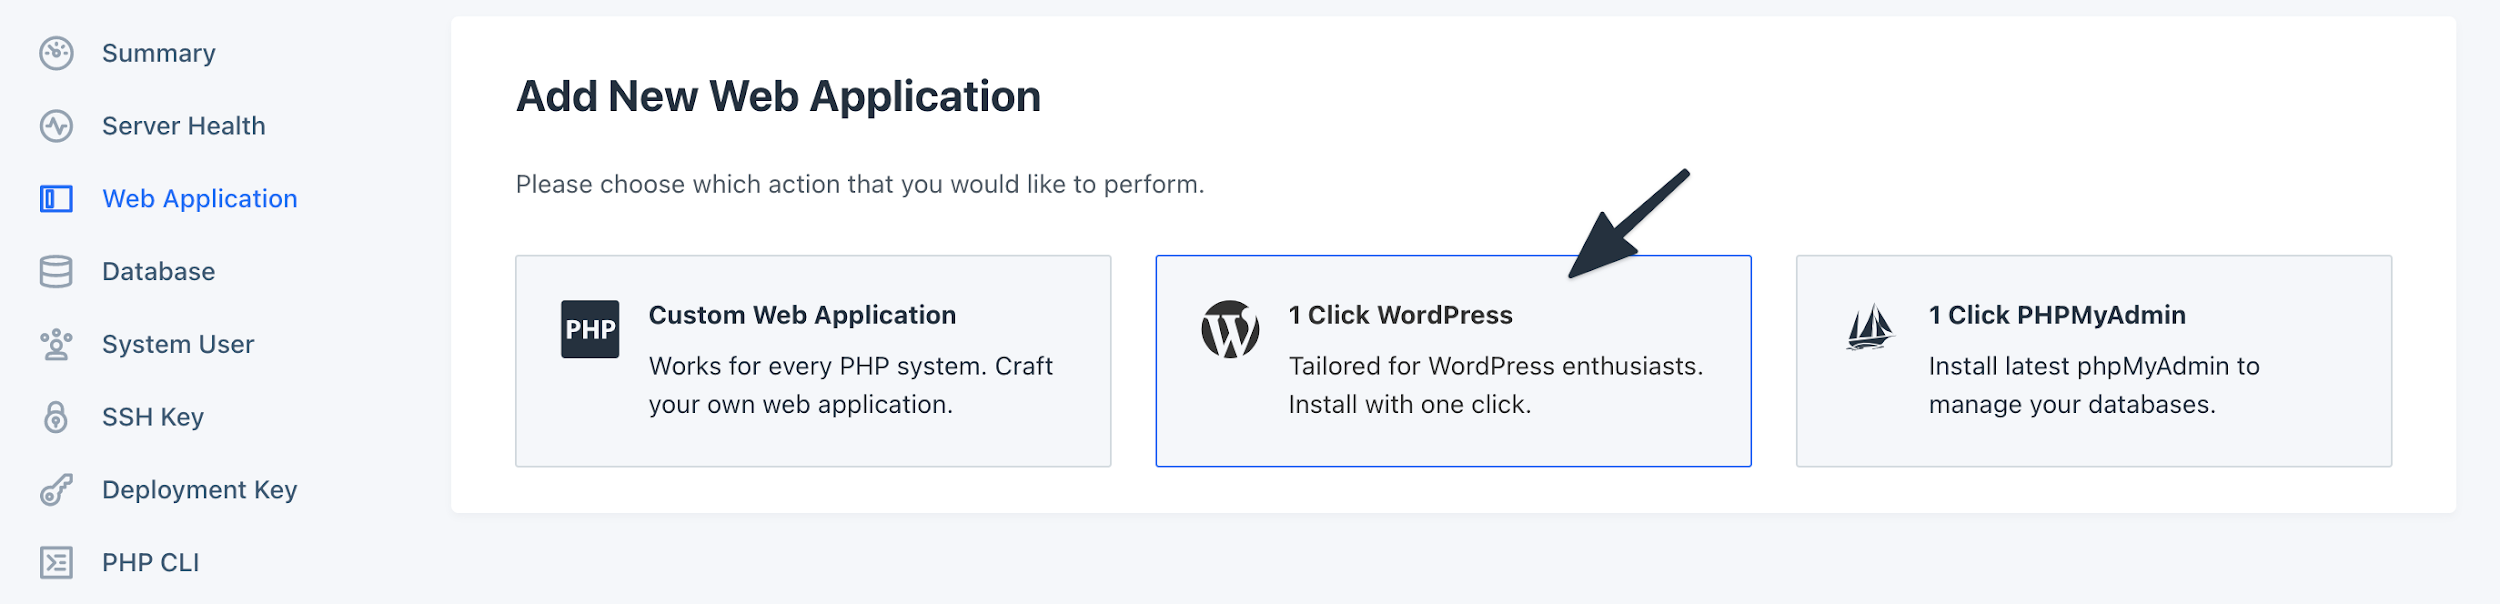
    1-Click WordPress Installation

    There are a few standard WordPress-related settings that you can configure here such as your first user account as well as the site administrator email address – as well as enabling the automatic installation of LiteSpeed’s official caching plugin for WordPress (which we highly recommend leaving enabled).

    For reference, the officially LiteSpeed Caching plugin paired with LSCache is an incredible combination. The plugin is one of (if not) the best & most well-maintained caching plugins for WordPress – here’s a quick preview of what it’ll look like in your WordPress dashboard when you’re done following this tutorial to install OpenLiteSpeed:
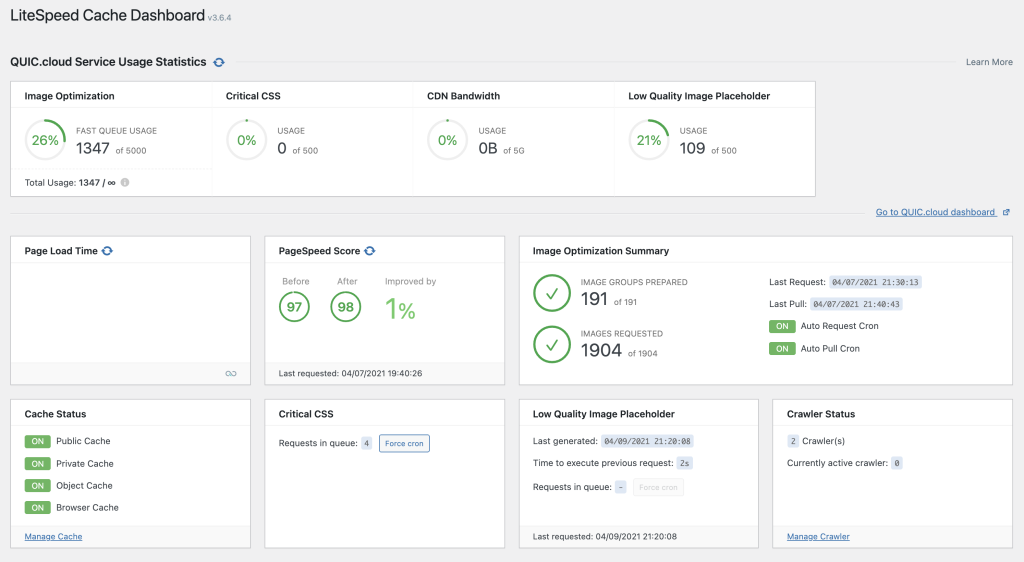
    LiteSpeed Cache Plugin WordPress

    And once you’re done entering your credentials, simply click confirm and that’s it. RunCloud will take care of the entire WordPress installation process.
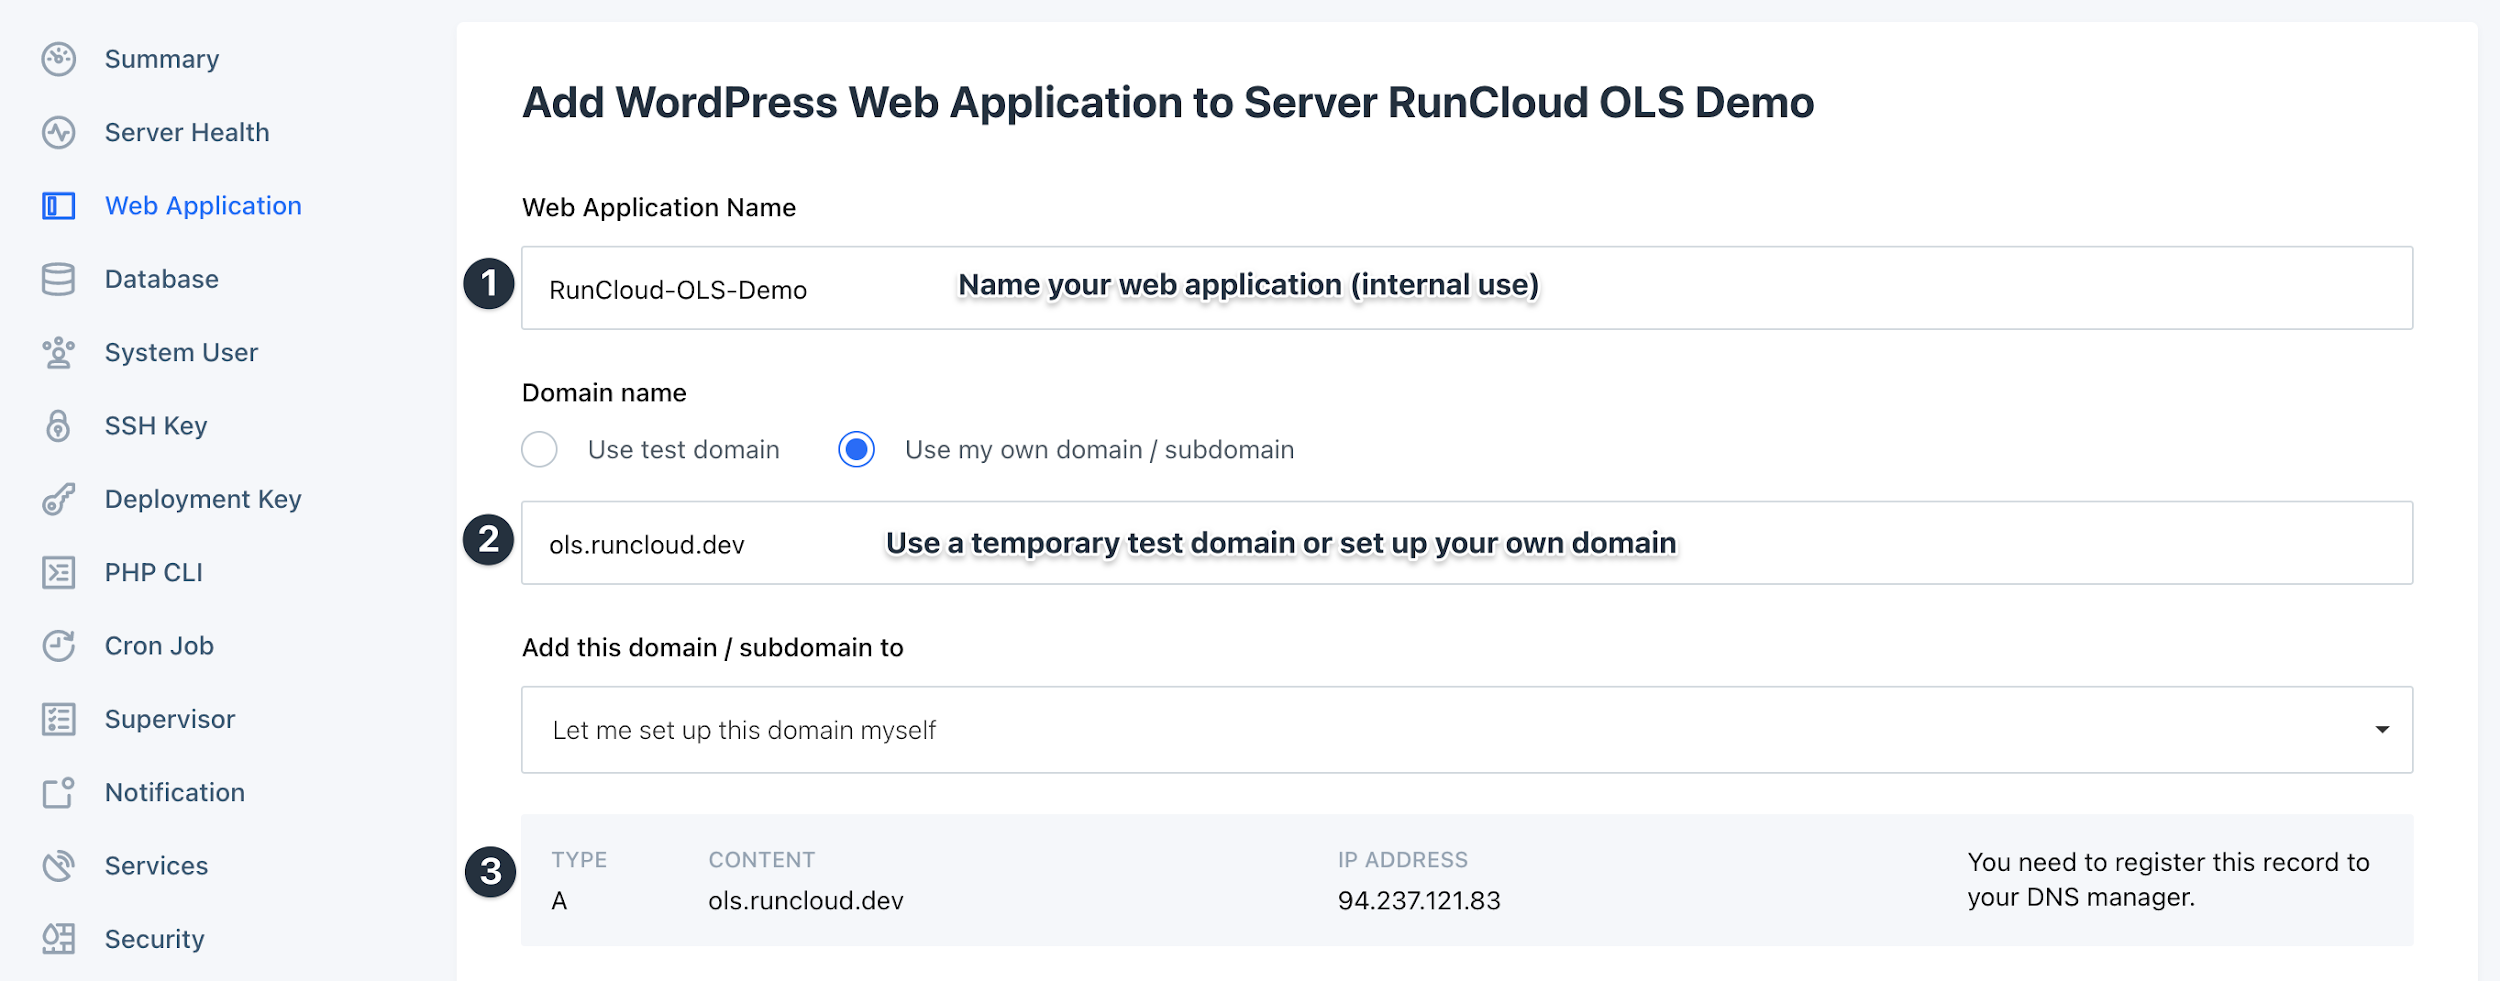
    Add Domain Name

    Once RunCloud finishes deploying WordPress on your brand-new server, here’s what you’ll see:
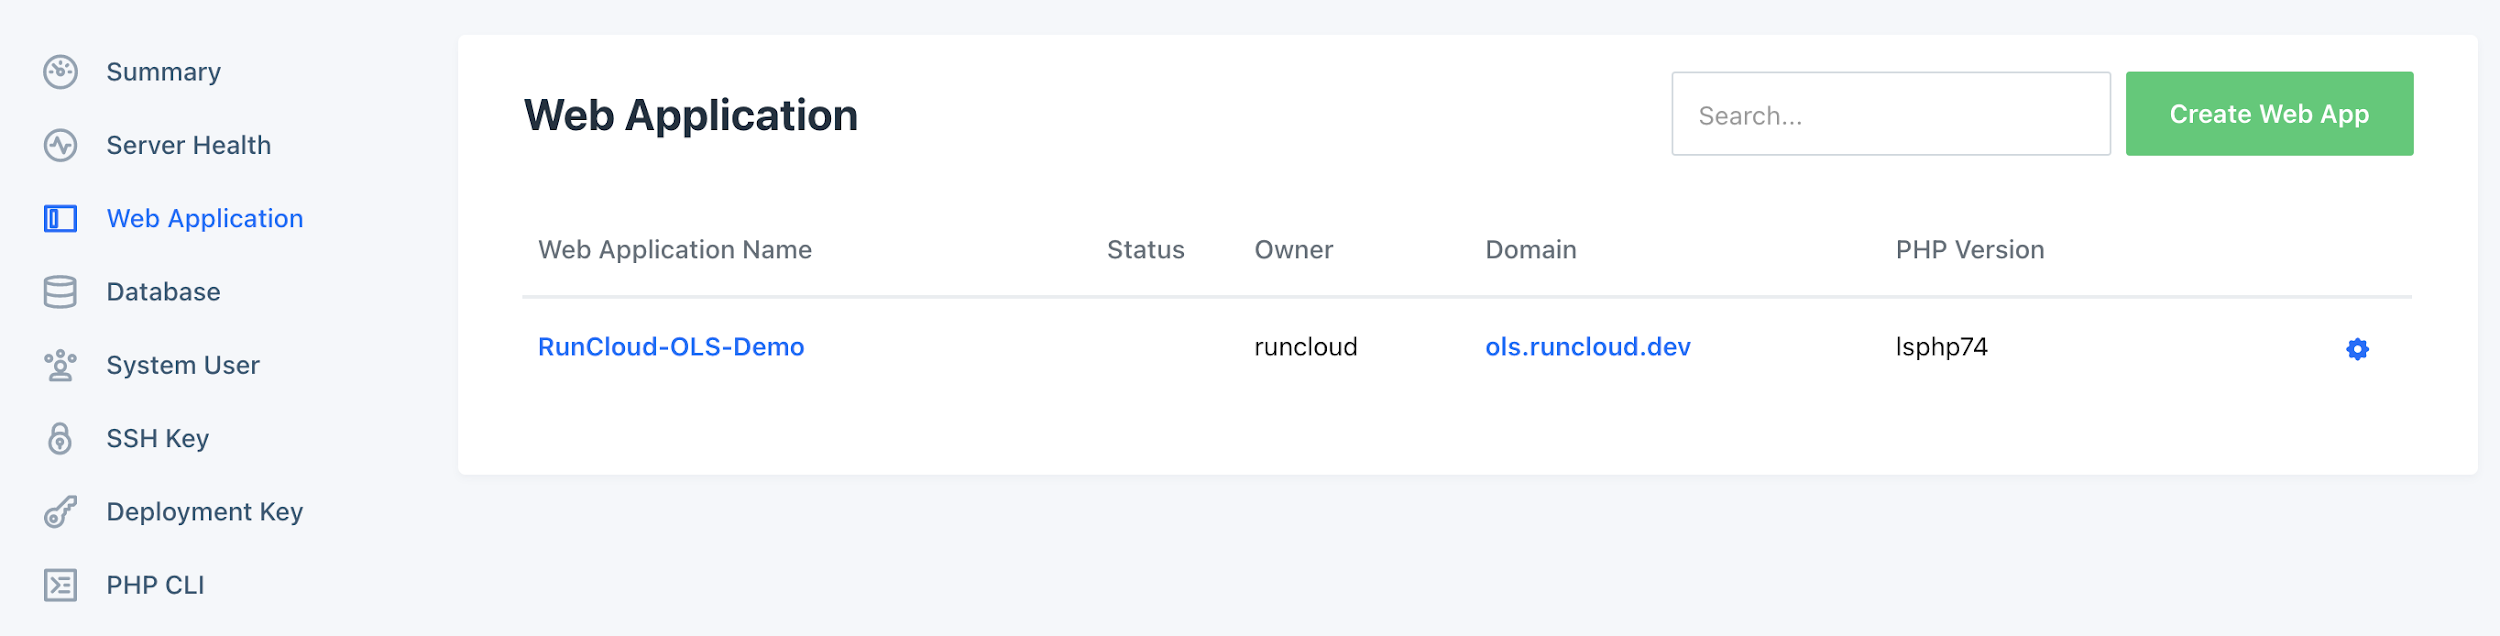
    Manage Web Applications

    Now you can manage your WordPress installation right here from your RunCloud dashboard. In order for your site to be accessible from a URL of your choice, you’ll need to navigate to your web application’s Domains options where you’ll be able to connect a domain and then be prompted to create the necessary A record to point to this IP address with your DNS provider. Once you’ve connected a domain, you’ll be able to deploy a free Let’s Encrypt SSL certificate in the SSL tab or alternatively install a custom certificate from another service such as Cloudflare.

    With RunCloud, you can finally enjoy hosting and managing servers with features like cloning, staging, atomic deployment, built-in backups, and more…

    As you’ll quickly notice when you begin to take a look around your newly installed WordPress website, just clicking around the WordPress admin area on your new site, you’ll feel a noticeable difference in how snappy pages are loading in comparison to what you’re likely accustomed to. Websites running on NGINX on RunCloud can benefit from the RunCloud Hub as well as RunCache, while sites using OpenLiteSPeed can instead take advantage of the official LiteSpeed Caching plugin.

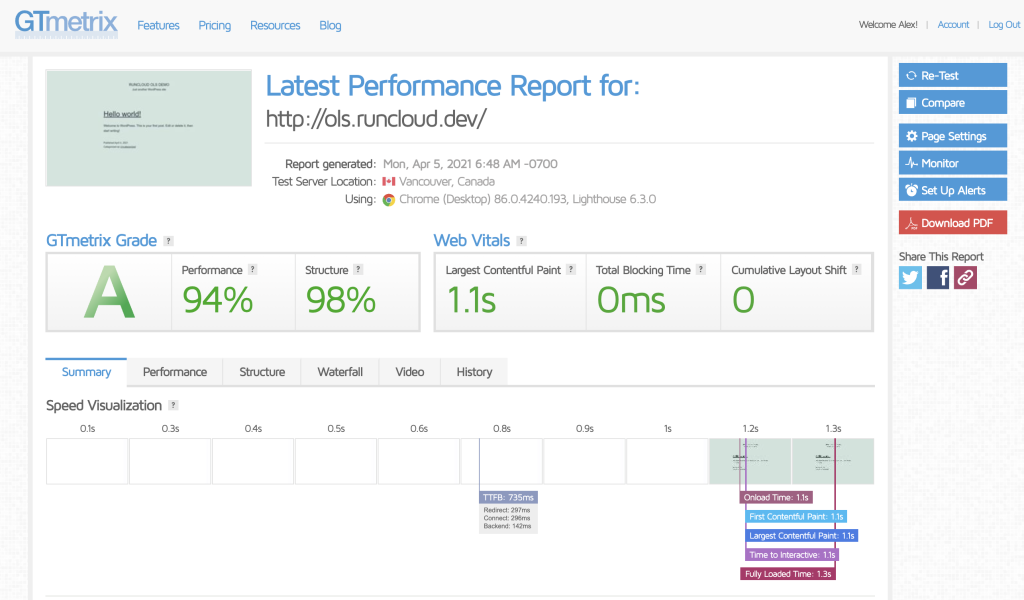
    So now, let’s actually drop in the demo site we set up for this tutorial to run a quick performance test with GTMetrix and Google PageSpeedInsights.
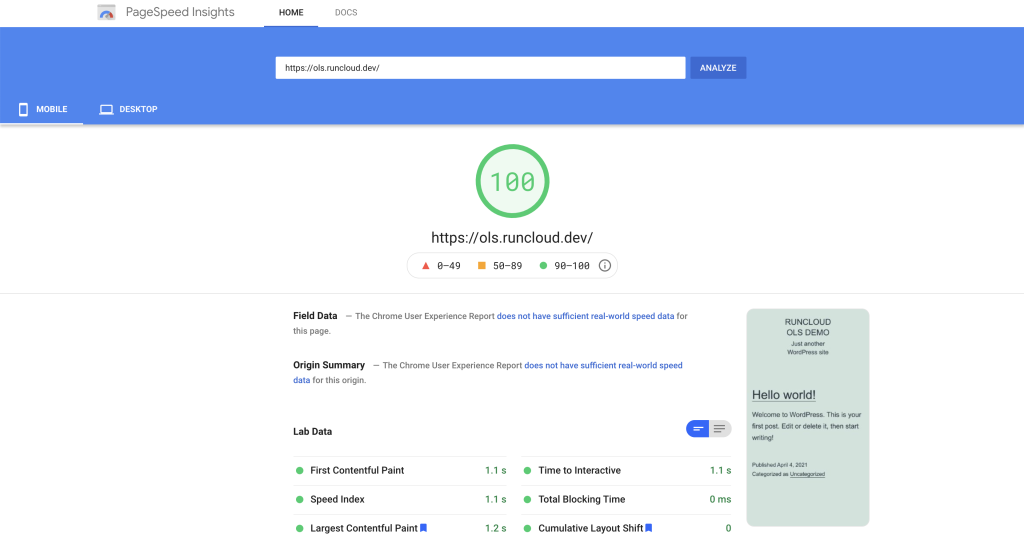
    Google PageSpeed Insights OpenLiteSpeed
    GT Metrix Performance Test OLS

    With no optimization of any kind done, this is quite impressive & truly a result of OpenLiteSpeed’s highly performant server stack as well as RunCloud’s configuration and UpCloud’s rock-solid infrastructure. Though it is worth noting that most benchmarks begin to observe the more notable differences when comparing OpenLiteSpeed and other server stacks under heavier load so we look forward to you deploying your sites and enjoying the benefits of the OpenLiteSpeed server stack which was built for speed, security, and scalability!

    Migrating Sites from NGINX to OpenLiteSpeed

    If you already have sites hosted on servers running NGINX that you’d like to move over to OpenLiteSpeed servers, the process couldn’t be easier with RunCloud.

    1. Deploy a new server with OpenLiteSpeed (as outlined above)
    2. Clone the web app from the NGINX server to your new OpenLiteSpeed server
    3. Test and if you run into any issues, simply rebuild the web application
    4. Point your domain to your new server

    Ready to get started? Create your RunCloud account today.

    How To Deploy WordPress on OpenLiteSpeed (Manual)

    However, for those of you who are just looking to test OpenLiteSpeed on a sandbox server – here’s how you can manually install WordPress on OpenLiteSpeed:

    1. Installing MariaDB server:

    MariaDB server is a popular open-source alternative to MySQL database. It’s easily available in the standard repositories. The first step is to update the packages list on the server, using the following command:

    sudo apt update

    After the packages list has been updated, run the below command to install the MariaDB server and MariaDB client on your server. There, you will be asked to confirm to use storage space. Type Y and press the Enter key to proceed with the installation.

    sudo apt install mariadb-server

    Use the below command to conduct the secure installation of MySQL on your server.

    sudo mysql_secure_installation

    The command prompt will take you through the wizard, including the following questions. Answer them as shown below:

    • Change the root password: N
    • Remove anonymous user: Y
    • Disallow root login remotely: Y
    • Remove test database and access to it: Y
    • Reload Privilege Table Now: Y

    The MariaDB server has been installed and configured. You can proceed to create the first database.

    Go into the MySQL client by running the following command.

    sudo mysql

    Enter the below commands to build a database and grant all permissions on that database to a new database user account.

    • mysql > CREATE DATABASE wordpress;
    • mysql > GRANT ALL ON wordpress.* TO ‘wordpress’@’localhost’ IDENTIFIED BY ‘password’;

    Flush the privilege table and exit from the mysql shell.

    • mysql > flush privileges;
    • mysql > exit;

    Now, your database is ready to install WordPress.

    The next step is to install all the required PHP extensions.

    1. Installing required PHP extensions

    WordPress works with both PHP and SQL. Before installing WordPress, you will need to install the following PHP extensions to ensure that WordPress runs on the server seamlessly.

    sudo apt install lsphp74-common lsphp74-curl lsphp74-imap lsphp74-json lsphp74-mysql lsphp74-opcache lsphp74-imagick lsphp74-memcached lsphp74-redis

    3. Configuring OpenLiteSpeed

    You will need to configure the OpenLiteSpeed server to host your WordPress site. Here, you are required to set the correct version of the PHP processor, allow the rewrite module and various other features.

    Configure your server to use Isphp74 as a PHP server instead of the default PHP processor.

    • Go to Server Configuration > External App and click the edit icon.
    • OpenLiteSpeed SAPI app
    • Replace lsphp with lsphp74
    • Replace uds://tmp/lshttpd/lsphp.sock with uds://tmp/lshttpd/lsphp74.sock
    • Replace lsphp73/bin/lsphp with $SERVER_ROOT/lsphp74/bin/lsphp

    Once you make the changes, click on the save icon on the top right corner of the panel. The next step is to configure the rewrite module, an important part of the WordPress feature. Go to the Virtual Hosts and click on the view icon.

    Click on the General tab. Edit the General options with the edit icon at the top right corner.

    In the Document Root field, type $VH_ROOT/html/wordpress and click the save button at the top right corner.

    Again click on the General tab of virtual hosts configuration. And click the edit icon next to the Index Files section.

    In the Index Files Field, add index.php at the beginning of the section. Click on the Save button at the top right corner.

    Go to the Rewrite tab of the Virtual Hosts configuration view and edit the Rewrite Control Options.

    Set Enable Rewrite and Auto Load from .htaccess to Yes. Click on the save icon at the top right corner.

    Click on the restart icon to apply the changes once the configuration is done on the OpenLiteSpeed server.

    4. Downloading and extracting WordPress

    Your server is ready to host WordPress. Now, you can download and install WordPress.

    Navigate to the virtual host root which is /usr/local/lsws/Example/html

    cd /usr/local/lsws/Example/html/

    Download the latest version of WordPress using the wget command below.

    wget https://wordpress.org/latest.tar.gz

    Extract the zip files, which will create a directory called ‘wordpress’ in /usr/local/lsws/Example/html

    tar xvfz latest.tar.gz

    5. Setting up the ownership and permissions of the file

    By setting up the right ownership of files and folders, you will not come across any problems while installing or downloading any new themes or plugins. Let’s check how you can set up the ownership of the files and folders.

    Firstly, remove ownership from the WordPress directory through the below command.

    sudo chown -R nobody:nogroup /usr/local/lsws/Example/html/wordpress

    Using the below command, set 750 permissions to the directories and 640 to the files.

    sudo find /usr/local/lsws/Example/html/wordpress/ -type d -exec chmod 750 {} \;
    sudo find /usr/local/lsws/Example/html/wordpress/ -type f -exec chmod 640 {} \;0

    6. Installing WordPress

    Through the IP address of your OpenLiteSpeed server or your domain (if set), you can open the WordPress installation wizard in your web browser.

    In the first screen, you will be asked to choose your preferred language. Select your language and click on the Continue button.

    Next, WordPress prompts you to keep the database server information and credentials ready. Click on the “Let’s Go!” button. Fill up the details as shown below:

    • Database name: the database you created through the MySQL shell, wordpress in this example.
    • Username: Here, you need to input the database user
    • Password: Type in the password of your database user
    • Database Host: localhost
    • Table Prefix: wp_ is the default table prefix. However, you can type something else to enhance the security of your website.

    Click on the Submit button to confirm.

    Up till now, the configuration of the database connection for the WordPress installation has been done. Next, click on the “Run the Installation” button to set up your WordPress site.

    You will be asked to enter your website’s details, create an administrator account, and create a password.

    When you have filled up all the details, click on the Install button.

    On successful installation, you will be able to see the login screen. Log in using the username and password that you created earlier in the installation wizard. Once logged in, you can see the WordPress website’s admin dashboard.

    7. Creating and configuring SSL certificates

    Now, WordPress is successfully installed on your web server. To add a security layer between your website server and your audience, you will have to obtain and install SSL certificates.

    If you already use Certbot to obtain SSL certificates for your OpenLiteSpeed server, you can use the already installed Certbot client. Then, you can skip the installation step and check out the steps to obtaining certificates for your WordPress site.

    If you do not have the Certbot installed, use the steps here to get the client.

    Update the packages installed on the server using the following commands:

    sudo apt update

    Install the Certbot client with the following command.

    sudo apt install certbot

    Now you can obtain the SSL certificates for your server with the below command.

    sudo certbot certonly --webroot

    Note: Before you can obtain SSL certificates, you will need to have a domain name: A record pointing to your OpenLiteSpeed server’s public IP address.

    Then, you will have to answer the following questions.

    • Enter Email address: Type in your email address
    • Accept the terms of service: A
    • Share your Email Address with EFF: Type Y for yes and N for No.
    • Enter Domain name: Type your FQDN (fully qualified domain name) here
    • Input the Web root: /usr/local/lsws/Example/html/wordpress/

    The validation process will be completed, once you are done answering the above questions. The certificate files will be saved in /etc/letsencrypt/live/<your-domain>/ directory.

    Configure the WordPress site on your OpenLiteSpeed server to use the SSL certificate. Navigate to the Virtual Host configuration and open the SSL tab. Edit the SSL Private Key & Certificate.

    Type the fields as follows:

    • Private Key File: /etc/letsencrypt/live/<your-domain>/privkey.pem
    • Certificate File: /etc/letsencrypt/live/<your-domain>/fullchain.pem
    • Chained Certificate: Yes
    • CA Certificate Path: /etc/letsencrypt/live/<your-domain>/fullchain.pem
    • CA Certificate File: /etc/letsencrypt/live/<your-domain>/fullchain.pem

    Once completed, go to Listeners and add a new listener.

    Fill in the fields as follows:

    • Listener Name: SSL
    • IP Address: ANY
    • Post: 443
    • Binding:
    • Enable REUSEPORT: Not Set
    • Secure: Yes

    Apply the new settings by clicking the save icon on the right.

    Next, view the SSL listener to configure the Virtual host mapping.

    Add a row in Virtual Host Mappings.

    Choose the virtual host and type in your domain name. Save the settings from the save button on the top right corner.

    Once you’ve configured the SSL with your OpenLiteSpeed server, click on the restart icon to apply the changes.

    You can now visit your website on https protocol as well.

    Now, you are all set to work on your newly installed website.

    Given how time-consuming the manual installation of OpenLiteSpeed (as well as the deployment of WordPress) is, this isn’t recommended for those of you who aren’t system administrators or don’t have significant experience managing servers.

    This is actually exactly why we built RunCloud.

    Painless server configuration that automates all of this so you don’t need to spend hours figuring it out – get started with RunCloud today & get up and running in minutes.

    Already deployed your WordPress website on OpenLiteSpeed? Or, have any other questions or already deployed your WordPress website on OpenLiteSpeed? Let us know & join the conversation by leaving a comment below. 💬

  • How To Use NGINX FastCGI Cache (RunCache) To Speed Up Your WordPress Performance

    How To Use NGINX FastCGI Cache (RunCache) To Speed Up Your WordPress Performance

    It is no secret that NGINX FastCGI Cache can drastically increase your WordPress performance by improving server response time and reducing the load on PHP-FPM and MySQL/MariaDB server.

    NGINX FastCGI Cache is usually an advanced topic for developer experts or sysadmins who are familiar with linux commands and the NGINX config.

    In this post, we will enlighten everyone from beginner to expert for this topic, and make NGINX FastCGI Cache (RunCache) as one of your top favourite features in RunCloud.

    What is NGINX FastCGI Cache

    Before we talk about NGINX FastCGI Cache, let’s talk about how your website works.

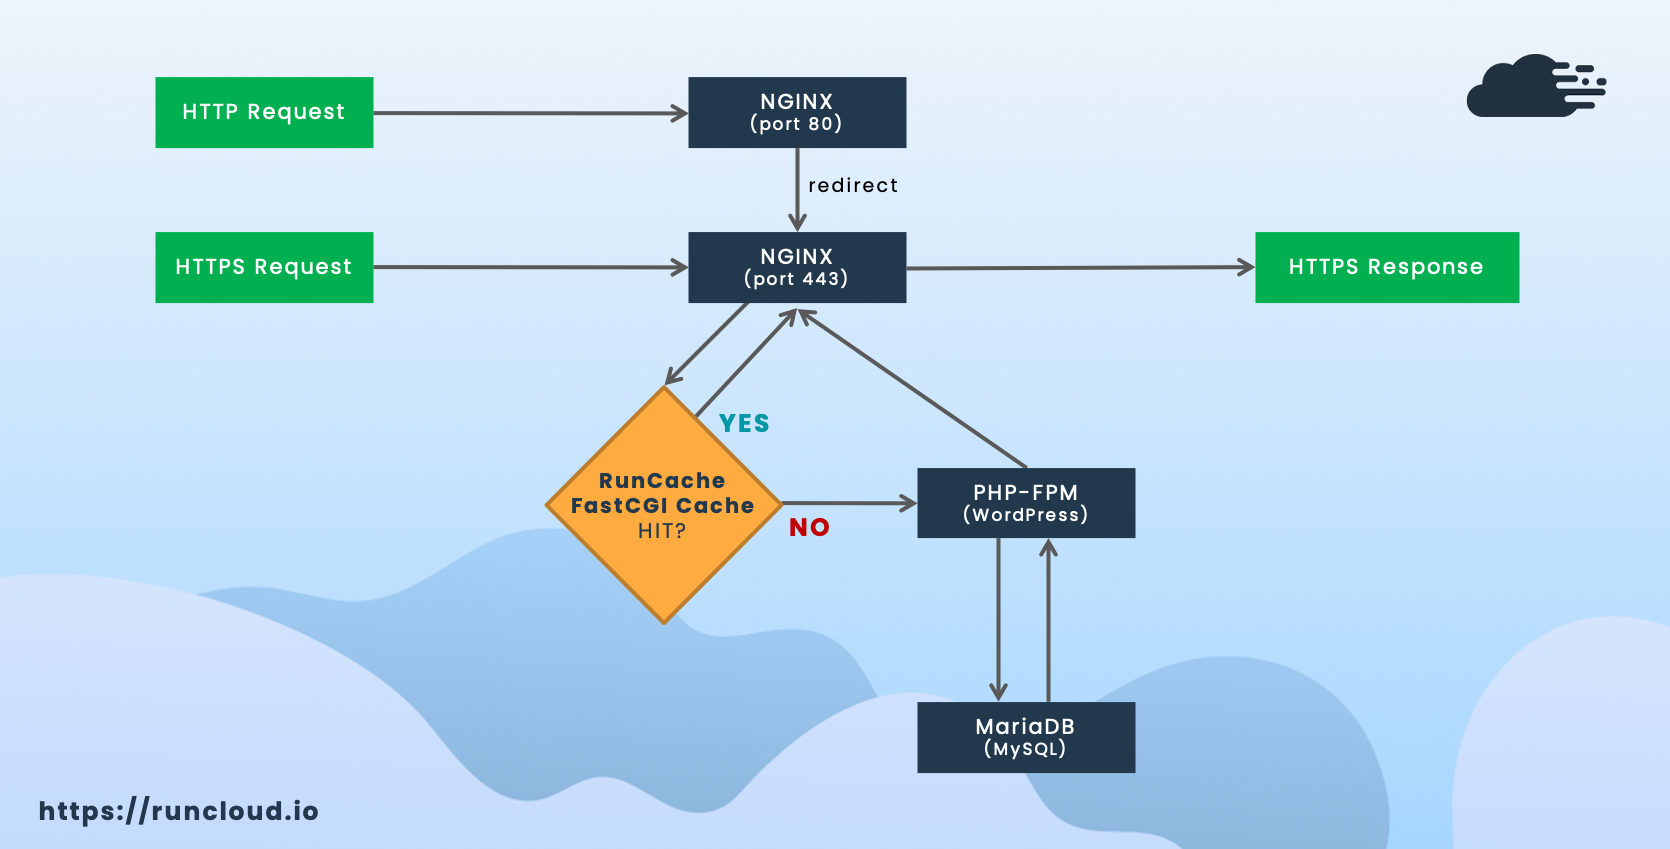
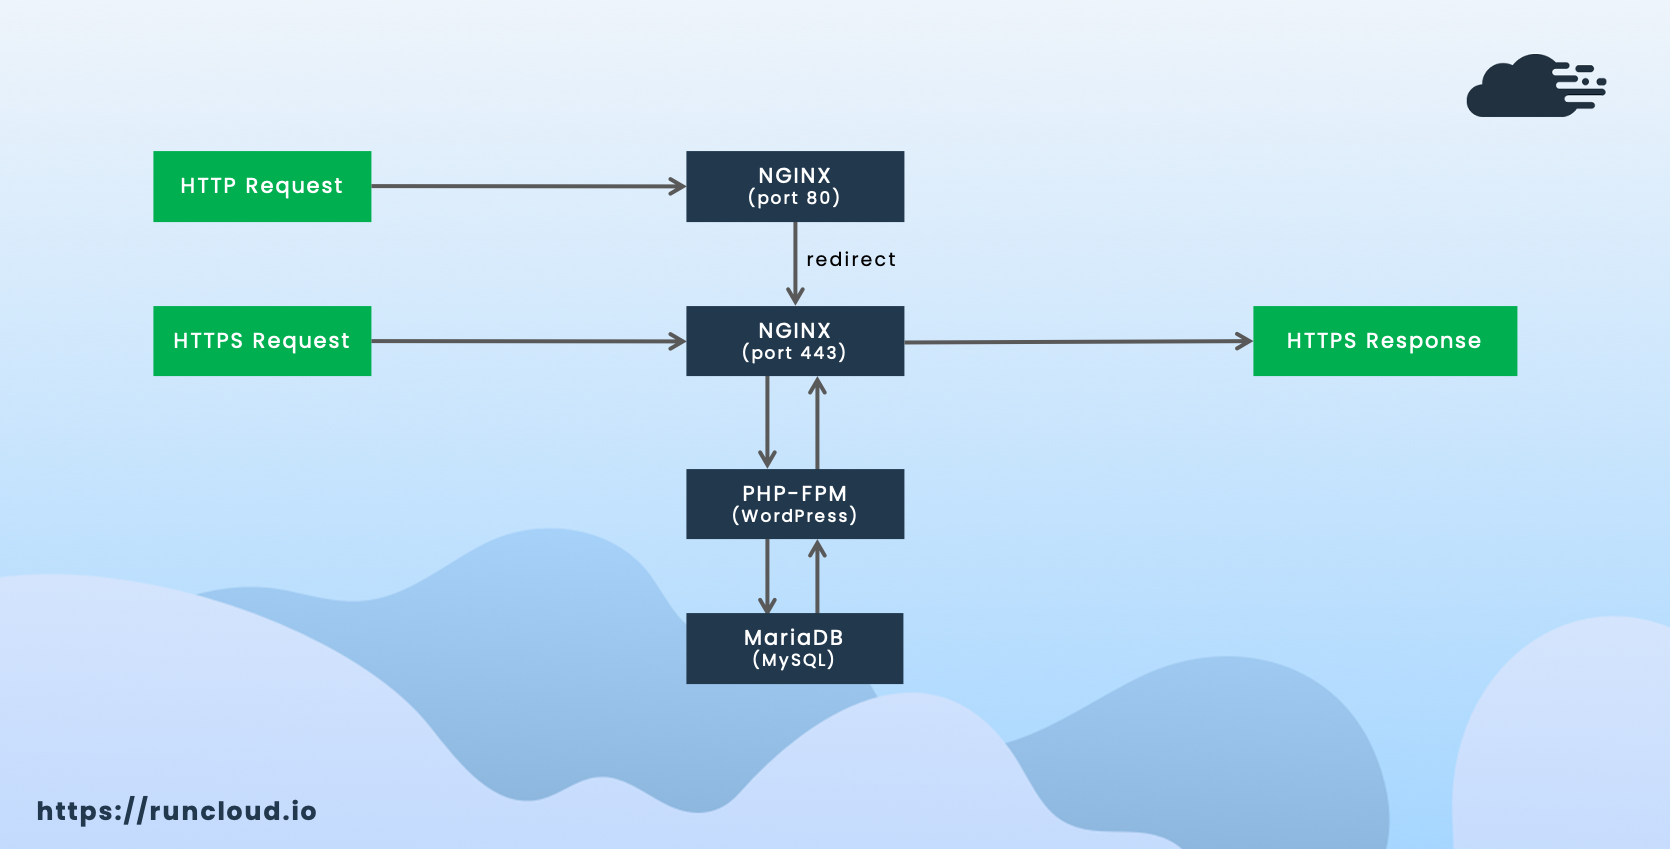
    1. When a user visits your WordPress page, the web browser sends an HTTP/HTTPS request to NGINX.
    2. NGINX passes the request to PHP-FPM and NGINX will catch any PHP codes when trying to grabbing the page.
    3. PHP-FPM processes the page and runs through the MariaDB/MySQL database query to retrieve the page.
    4. PHP-FPM sends the generated “static” HTML page back to NGINX.
    5. NGINX send the generated HTML page to the web browser for the user.

    When using NGINX FastCGI, this built-in NGINX module will be in between NGINX and PHP-FPM and it is able to generate a cached HTML page from PHP-FPM.

    When another user visits the same WordPress page, your website will not perform the same PHP and database requests again because the page is already cached and served by FastCGI.

    As a result, your server response time will be much faster after the initial load.

    Your PHP-FPM and MariaDB/MySQL load will be reduced.

    Your server CPU resource usage will be lower.

    And finally, your server can handle more traffic with the same server specifications when using NGINX FastCGI Cache, ultimately allowing you to keep a more affordable server without having to scale any further.

    NGINX FastCGI Cache vs Varnish Cache

    When talking about server-side caching mechanism, Varnish is also one of the top popular choices.

    Unfortunately, Varnish is designed to accelerate HTTP and doesn’t support the HTTPS protocol.

    After Let’s Encrypt provides a free SSL/TLS for everyone and Google encourages HTTPS Everywhere and made the move to boost search engine rankings for sites using HTTPS URLS, most websites use HTTPS now for their website to ensure safety from online threats.

    There is a workaround to use Varnish with HTTPS, by adding an SSL/TLS terminator in front of Varnish to convert HTTPS to HTTP.

    NGINX FastCGI does support HTTPS protocol, which is an excellent alternative to Varnish, without having to increase any complexity in the server.

    NGINX FastCGI Cache (RunCache) vs WordPress Cache Plugins

    Many WordPress users ask the same question, which one is better?

    Actually, both are good for your WordPress website.

    When using regular shared hosting, NGINX FastCGI is not available and the only option available is the WordPress cache plugin.

    You will need a VPS / Dedicated server to allow you to optimize your WordPress site using NGINX FastCGI Cache.

    With proper setup, NGINX FastCGI Cache can perform better than any WordPress cache plugin.

    Who Need NGINX FastCGI Cache (RunCache) For WordPress

    All WordPress pages can gain huge benefits when using NGINX FastCGI Cache (RunCache).

    For blogs, magazines, news, company profile websites, and all types of “static” WordPress sites, all WordPress pages can be fully cached and served faster, excluding WordPress admin pages, which are not cached for obvious for reasons.

    For e-commerce, membership, forum, and all types of “dynamic” WordPress sites, most WordPress pages can be fully cached and served faster, except some pages those should stay dynamic.

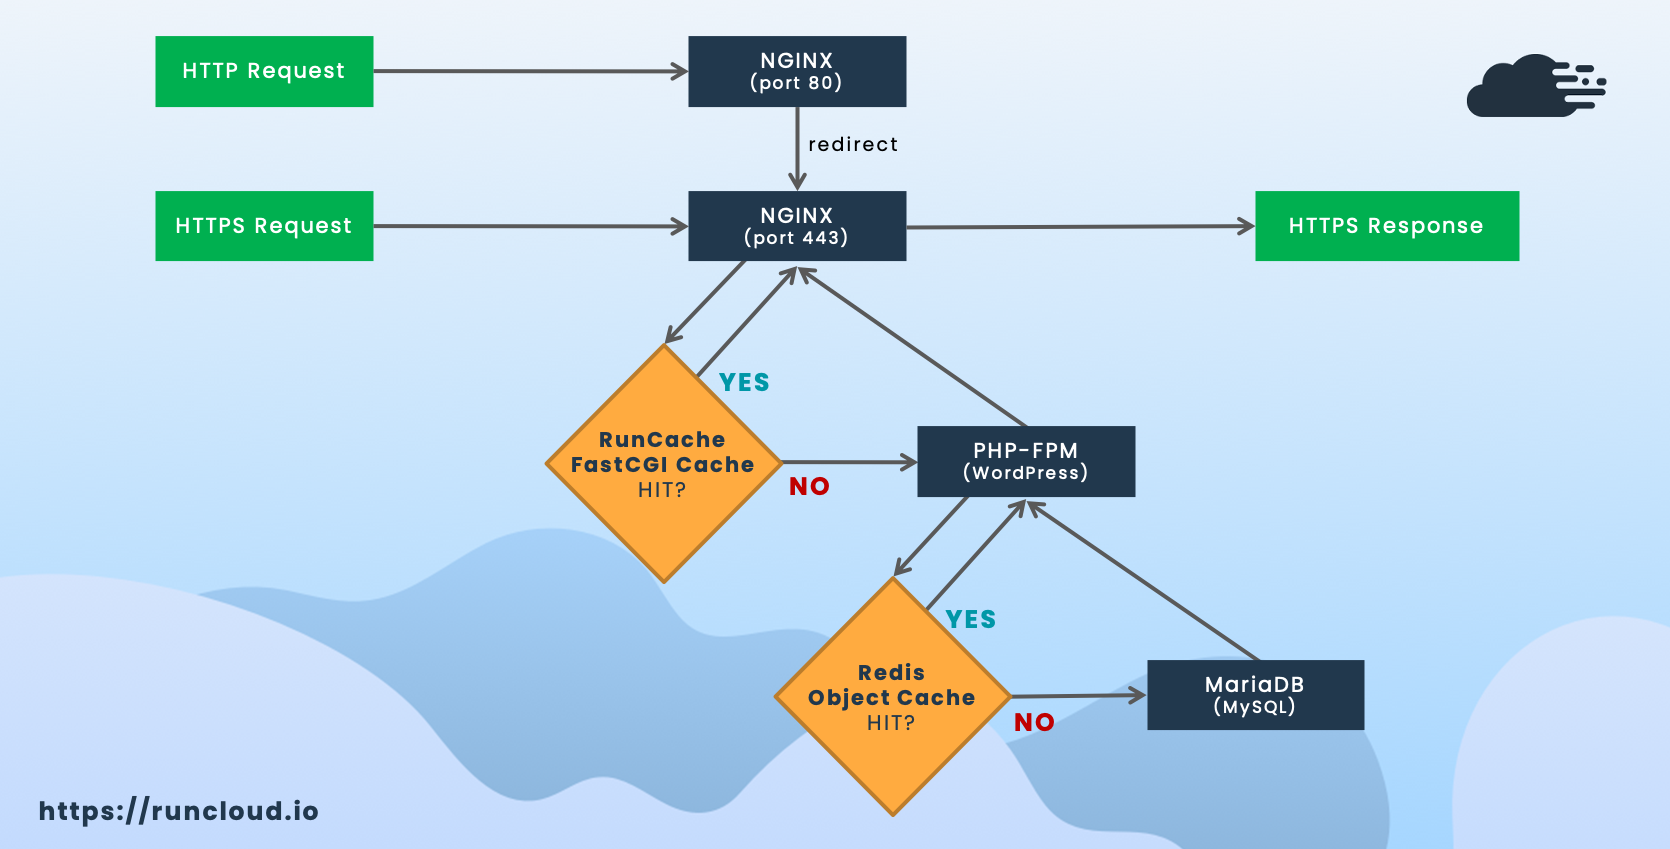
    For example, in the case of WooCommerce, the homepage, shop page, and single product page can be fully cached, but cart, checkout, and my account pages should be excluded. For these dynamic pages, you can use Redis Object Cache to reduce your MySQL database load and make your dynamic pages load faster, but you do not want to cache these pages fully as the latest changes will not be seen

    How To Install NGINX FastCGI Cache (RunCache) Using RunCloud Hub

    RunCloud Hub is a hub for all RunCloud plugins for WordPress. It is not only for NGINX FastCGI Cache (RunCache), but also Redis Object Cache and Server Health & Transfer Stats monitoring directly from your WordPress dashboard.

    If you want to use NGINX FastCGI Cache (RunCache) to speed up your WordPress website, then RunCloud Hub is the perfect choice for you.

    You can read the complete guide on how to install RunCloud Hub here.

    Once you have installed the RunCloud Hub plugin, NGINX FastCGI Cache (RunCache) is automatically installed and enabled in your WordPress website, no complex process required.

    How To Check If NGINX FastCGI Cache (RunCache) Works

    When using any cache WordPress plugin, usually you can check if your WordPress page has been cached by checking the footprint at the end of your web page source code.

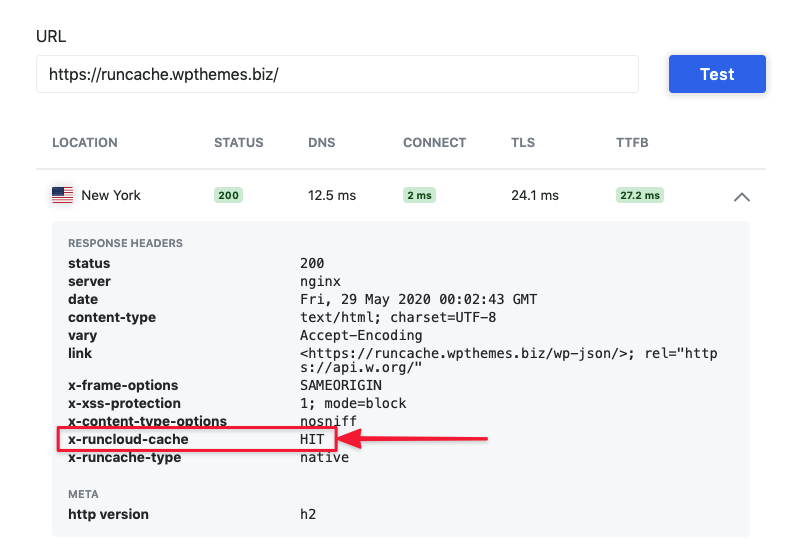
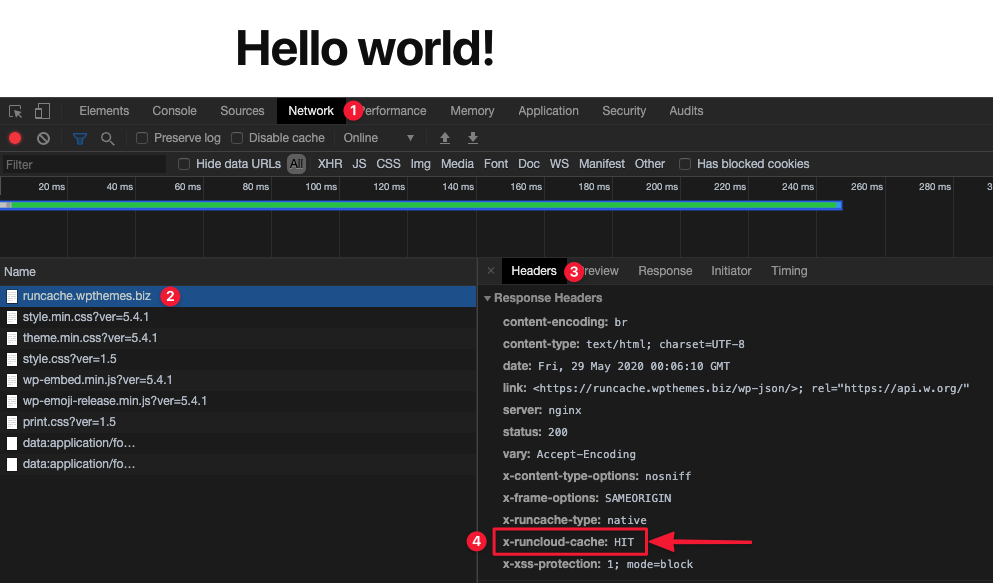
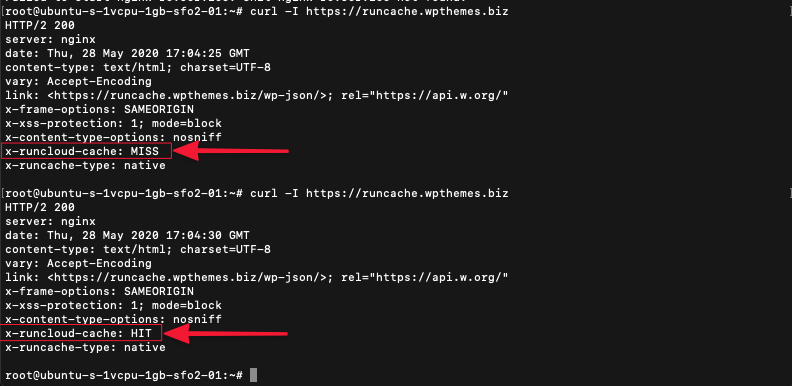
    NGINX FastCGI Cache (RunCache) works on the server-side, which means there is no footprint on your web page,  you need to check the headers of your website to see these possible values of x-runcloud-cache.

    • HIT : Page is cached and served from the cache.
    • MISS : Page is served dynamically from the server, not from the cache. The response might then have been cached. Refreshing this page again should change the header from MISS to HIT or BYPASS.
    • BYPASS : Page is served dynamically from the server, not from the cache. It is excluded from cache, for example WordPress dashboard admin pages or WooCommerce cart/checkout pages.
    • STALE : Page is served from the cache in cache directory.
    • EXPIRED : Cache is expired. Page is served dynamically from server.

    There are many ways to check the headers of your website, for example:

    Check HTTP Headers With KeyCDN Performance Test

    KeyCDN Performance Test is a free online web performance test to test your website from 10+ test location, from United States to Asia areas.

    You can use this tools to evaluate TTFB (Time to first byte) of your website from many locations.

    Using this tool, you can also check the response header to see if this web page is served by NGINX FastCGI Cache (RunCache).

    Check HTTP Headers With Google Chrome

    You can also view the response HTTP headers in Google Chrome by following these steps:

    1. In Chrome, visit your web page, and open Web Developer Tools by pressing F12 or right click and select Inspect.
    2. When opened, click and select the “Network” tab.
    3. Refresh the page to get fresh page data.
    4. Select the top HTTP request on the left panel and observe HTTP headers on the right panel.

    Check HTTP Headers With cURL

    If you are familiar with linux command, you can use cURL to check HTTP headers quickly.

    curl -I http://yourdomain

    Performance Benchmark : Handling More Traffics

    By eliminating PHP-FPM and MariaDB/MySQL when serving your WordPress page from NGINX FastCGI Cache, the huge benefit is your server can handle more traffics with the same server specifications.

    For this test, we use DigitalOcean 1GB RAM ($5) and default WordPress installation using Twenty Nineteen WordPress Theme.

    We use two different tools:

    • Loader.io – load testing
    • New Relic Infrastucture – CPU usage monitoring

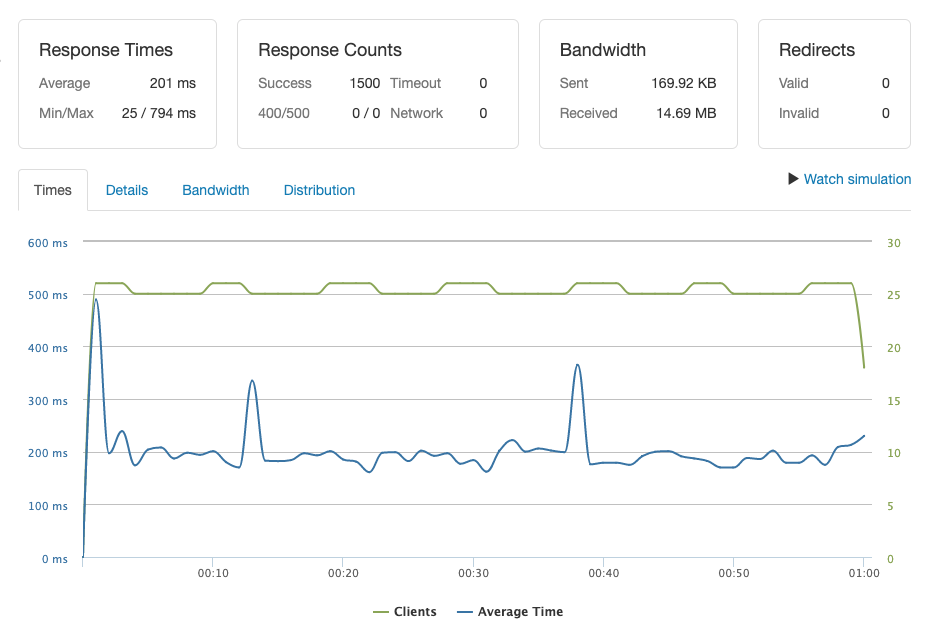
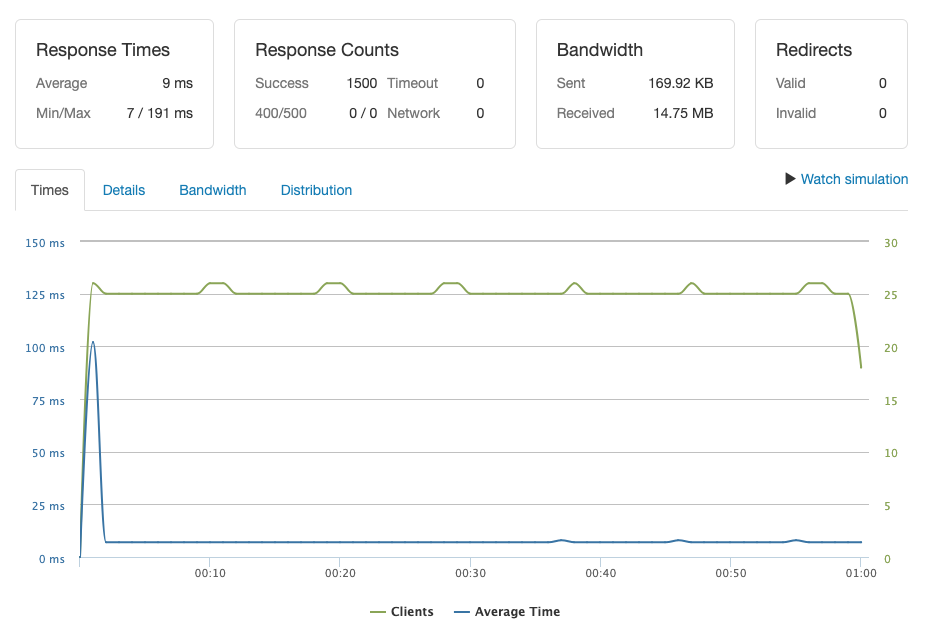
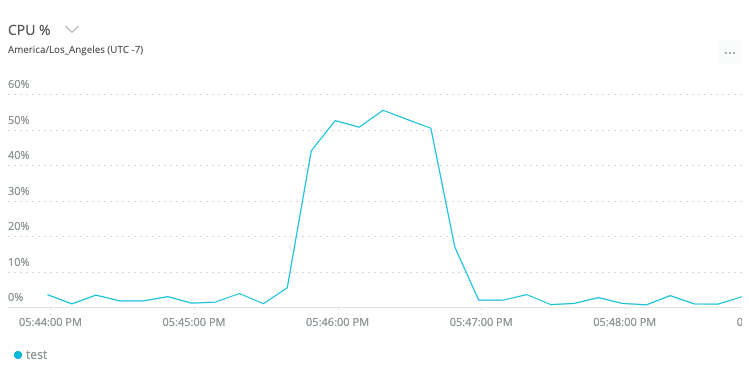
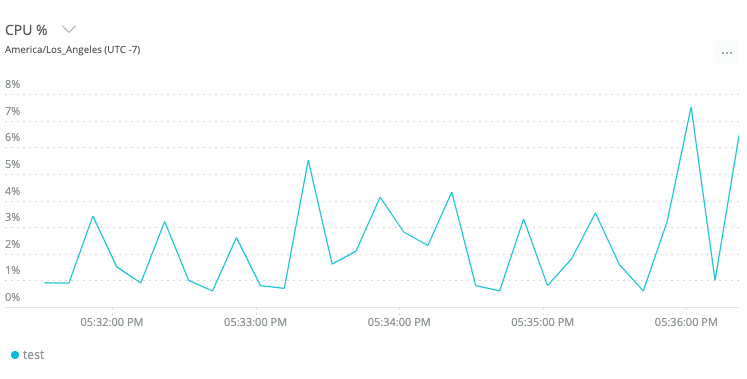
    First Test – 25 users per second in 1 minute

    Without NGINX FastCGI Cache (RunCache), average response time is 201 ms.

    With NGINX FastCGI Cache (RunCache), average response time is only 9 ms. It is big improvement!

    Without NGINX FastCGI Cache (RunCache), the CPU usage jump to 50%.

    With NGINX FastCGI Cache (RunCache), the CPU usage is very low.

    Second Test – from 0 to 100 users in 1 minute

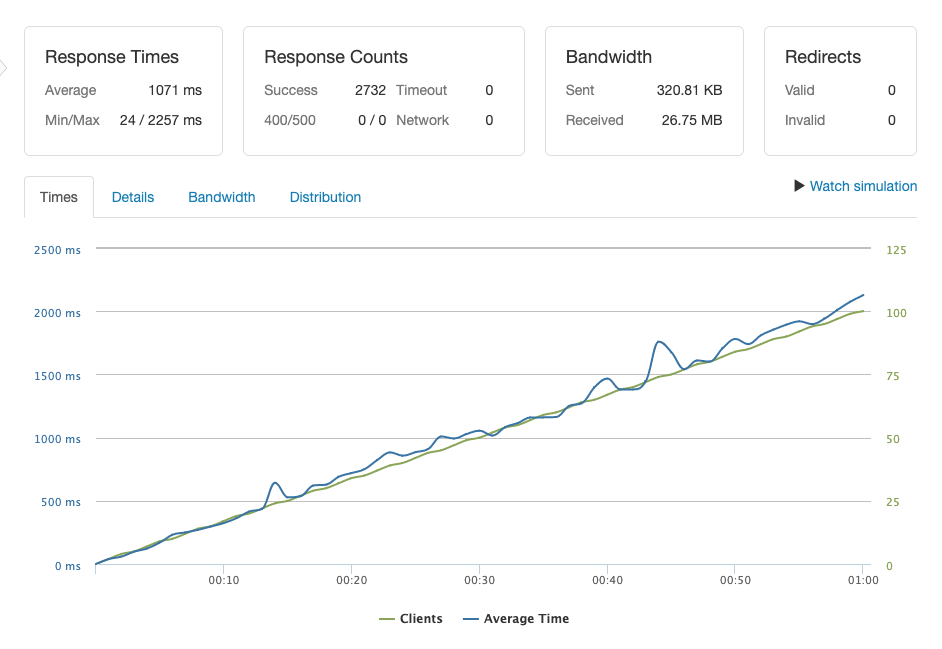
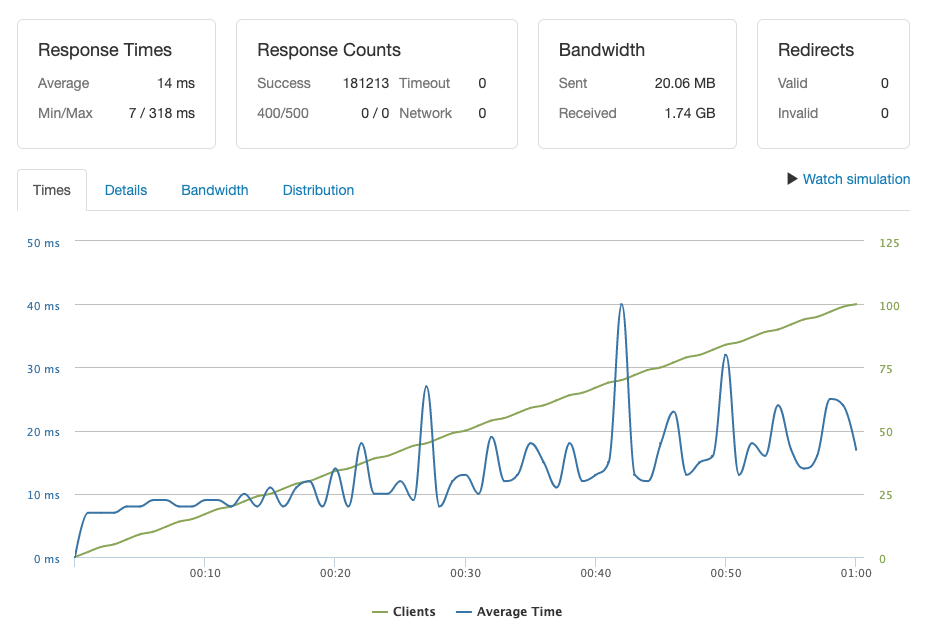
    For this test we use Loader.io to send from 0 concurrent user and increasing to 100 concurrent users within 1 minute.

    Without NGINX FastCGI Cache (RunCache), average response time is 1071 ms. You can see that as concurrent users increase, the response time increase also.  Your website will be slow when you have more visitors.

    With NGINX FastCGI Cache (RunCache), the average response time is still low, 14 ms, increasing visitors from 0 to 100 users doesn’t affect too much on the response time.

    Exploring RunCache Features

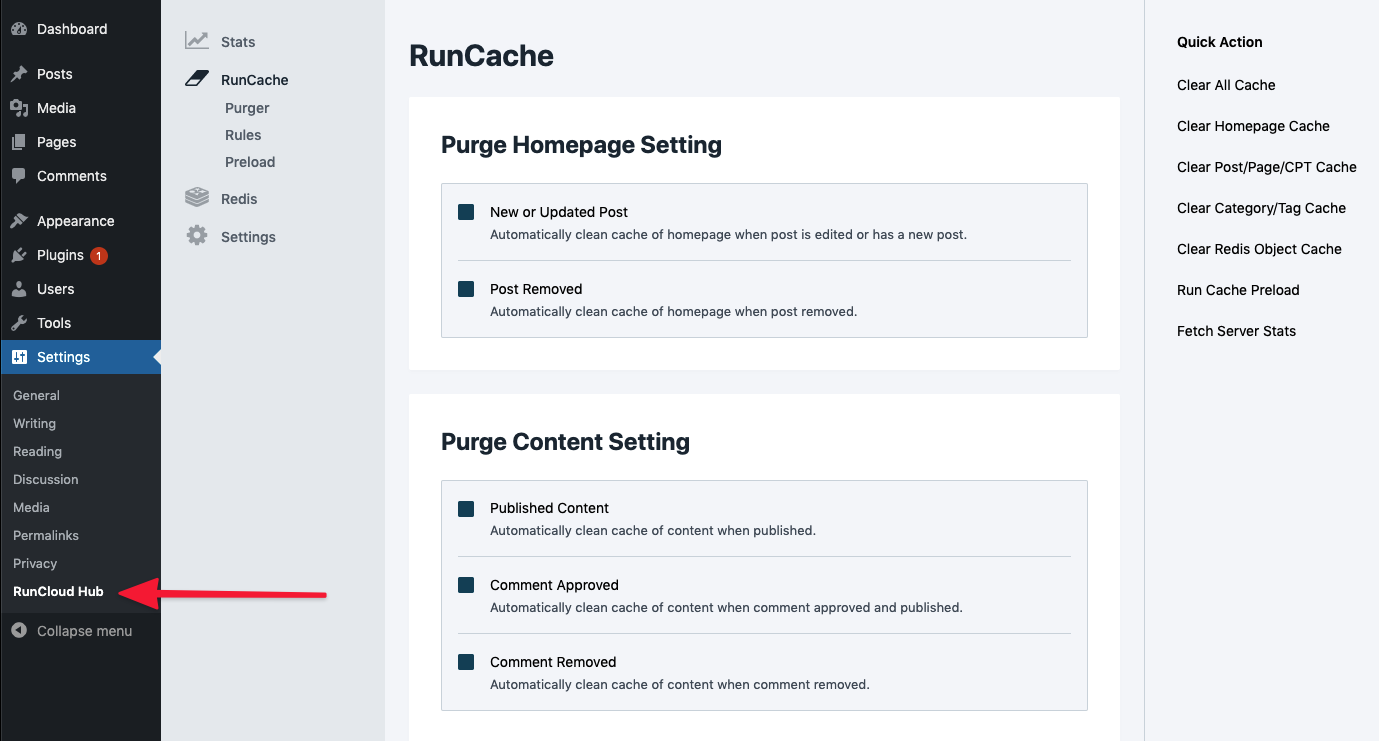
    Using RunCloud Hub WordPress plugin, you will have more controls on how NGINX FastCGI Cache (RunCache) works in your WordPress website.

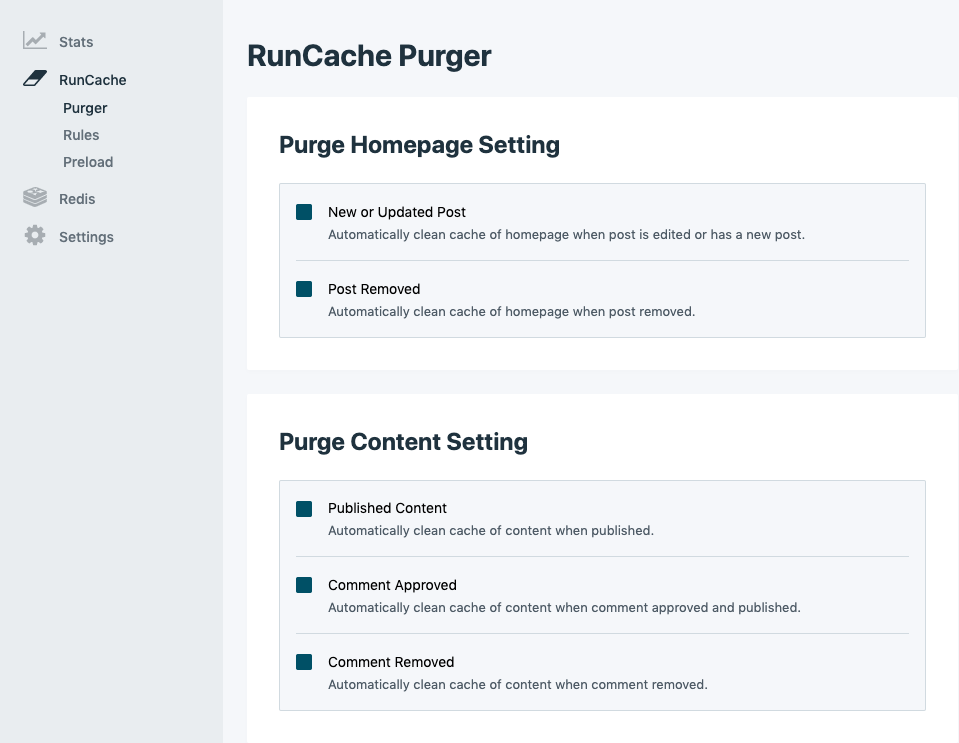
    RunCache Purger

    Purger settings allow you to have more control when the cache is cleared, for example:

    • Automatically clean cache of homepage when post is edited or has a new post.
    • Automatically clean cache of homepage when post removed.
    • Automatically clean cache of post/page/CPT when published.
    • Automatically clean cache of post/page/CPT when comment approved and published.
    • Automatically clean cache of post/page/CPT when comment removed.

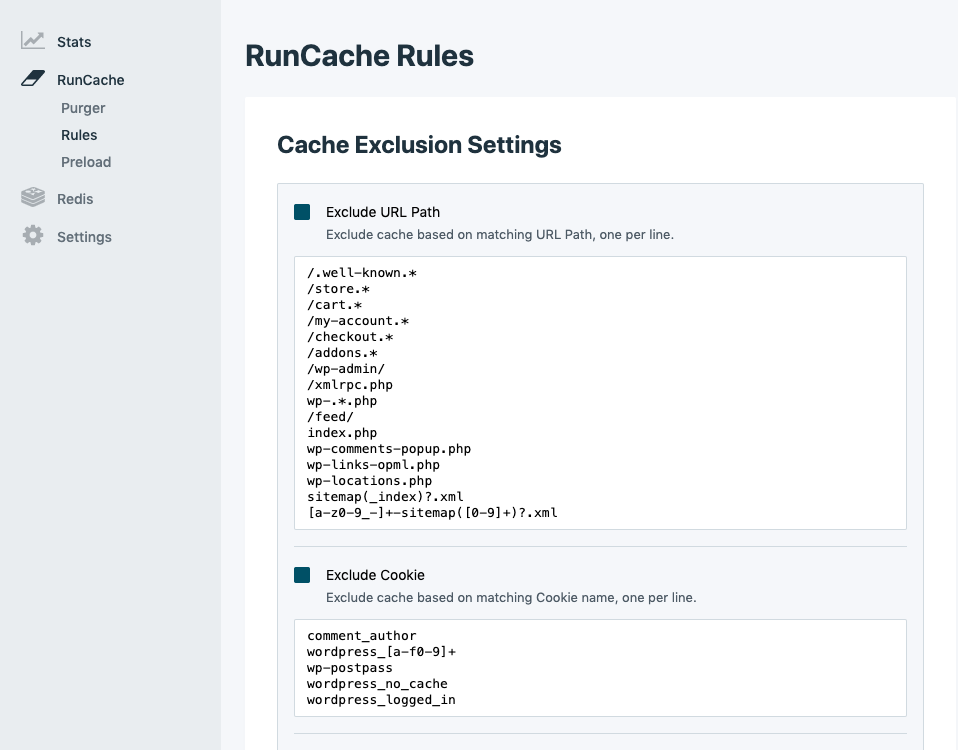
    RunCache Rules / Exclusion

    Rules settings allow you to control Cache Exclusion.

    Exclude URL Path option allows you to exclude cache based on matching URL Path. This is very useful when you have dynamic pages that should not be cached in your website.

    For example, in WooCommerce, you have the Cart, Checkout, and My Account page that must never be cached. For WooCommerce users, no action needed, these pages have been added by default.

    Exclude Cookie option allows you to exclude cache based on matching Cookie name.

    Exclude Browser option allows you to exclude cache based on matching Browser User-Agent.

    Exclude Visitor IP option allows you to exclude cache based on matching Visitor IP Address.

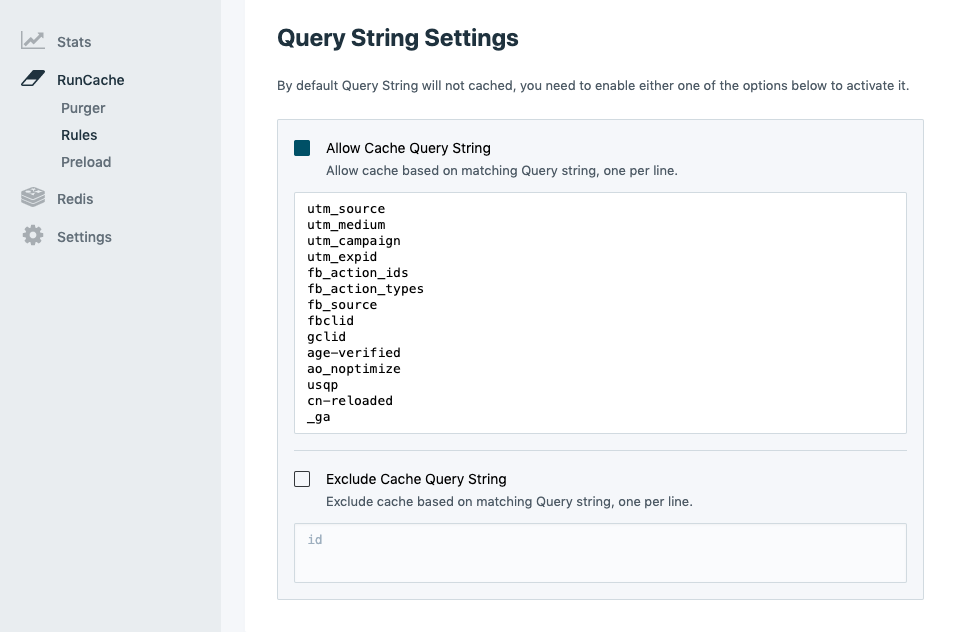
    RunCache also has dedicated settings for query strings, because query strings will not cache by default.

    Allow Cache Query String option make it possible for you to allow cache based on matching query string, for example UTM parameters (utm_source, utm_medium, utm_campaign), fbclid, gclid, etc.

    Exclude Cache Query String option allows you to exclude cache based on matching Query string.

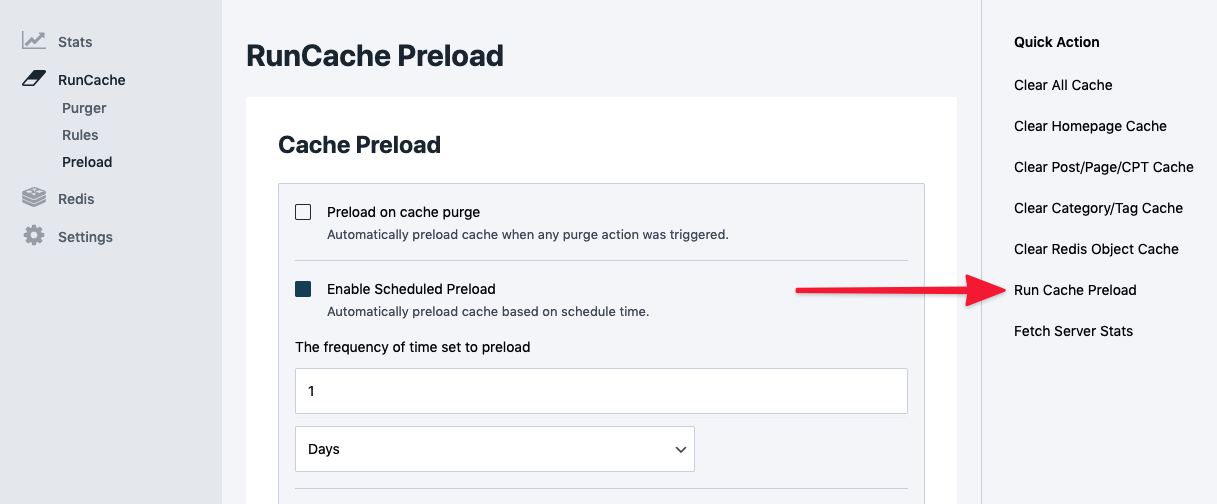
    RunCache Preload

    Preload settings allow you to generate caches of your pages without having to wait for a user to visit your pages. Normally, cache is generated after a user visits a page.

    You have the options to:

    • Preload caches automatically when any purge action was triggered.
    • Preload caches automatically based on schedule time (day/week/month).
    • Preload caches manually by clicking “Run Cache Preload” link.

    If you have big number of posts / pages / products in your WordPress sites, cache preload process somestimes can consume your server CPU resources. It is better to run cache preload manually for this case.

    Is It Compatible With Popular WordPress Cache / Optimization Plugins?

    Short answer, YES!

    The important thing to understand, NGINX FastCGI Cache (RunCache) works on the server level and popular WordPress cache / optimization plugins work on the WordPress/application level.

    They are in different spaces and it should be compatible.

    When you use both page caching feature from RunCache and your favourite cache plugin, it is possible if NGINX FastCGI Cache (RunCache) stores the caches from generated caches of the cache plugin, it doubles the page cache.

    You can choose to disable the page cache feature from your WordPress cache / optimization plugins if you find any issue with RunCache.

    For page cache use cases, RunCache should be faster because once your website page cache is available, it will be served to your visitor directly from your server without WordPress.

    If you do not want to use any cache plugin and fully use RunCache, you can still use any optimization plugin, for example Autoptimize, to minify HTML, CSS, and Javascript files in your website.

    Summary

    In RunCloud, we provide you with full control over your server. That is why we do not apply any server-side caching mechanisms automatically to your server.

    If you want to apply server-side caching to one of your web applications within your server, then RunCache (RunCloud Hub) is your answer.

    RunCache allow you to utilize NGINX FastCGI Cache to speed up your WordPress performance without having to deal with linux command to setup NGINX FastCGI Cache.

    All paid plan users (Basic, Pro, Business) can enjoy the full functionality of this feature.

    It has been a largely requested feature that we knew would be useful to you and we are very excited to bring this feature to RunCloud. Never ever hesitate to suggest new features that you want to see, and we will make it happen.

  • How To Install ImageMagick PHP Extension (Imagick)

    How To Install ImageMagick PHP Extension (Imagick)

    Do you want to manipulate images in various ways without using complex tools or libraries? If you answered yes, then you need to know about ImageMagick, a powerful and versatile image processing software that works seamlessly with PHP web applications.

    Even if you are using a CMS or a framework such as WordPress or Laravel for building your website, you may need to install the ImageMagick PHP extension for advanced image processing.

    In this post, we will show you how to install ImageMagick PHP Extension (Imagick) for your PHP web application on RunCloud, the best web application management platform for developers and agencies.

    Note: If you are using RunCloud Docker, you can install ImageMagick and many other PHP extensions for your Docker containers with a few simple steps. Follow our dedicated tutorial to learn how to install ImageMagick PHP extension on RunCloud Docker.

    What is ImageMagick

    ImageMagick is a free and open-source software that was created in 1987 by John Cristy to create, edit, compose, or convert bitmap images.

    It can read and write over 200 image formats, including PNG, JPEG, GIF, HEIC, TIFF, DPX, EXR, WebP, Postscript, PDF, and SVG.

    You can use ImageMagick to resize, flip, mirror, rotate, distort, shear and transform images, adjust image colors, apply various special effects, or draw text, lines, polygons, ellipses and Bézier curves.

    ImageMagick vs GD Library

    ImageMagick is not the only image optimization library in PHP application.

    GD is another library that is also very popular and it is automatically available in RunCloud server.

    Both ImageMagick and GD Library can be used for:

    • Resize / crop images
    • Apply filters to image, for example color, contrast, brightness, etc.
    • Adding content to image, for example text, shape, other image (watermark), etc.
    • Compress images
    • Convert images to different file types

    The key differences between ImageMagick and GD library are:

    • ImageMagick supports over 100 major image formats
    • ImageMagick usually produces better quality images, although sometimes better quality image will also increase the image file size
    • GD is widely available and usually enabled by default, but you have install and enable ImageMagick

    How to Install ImageMagick PHP Extension

    On WordPress, you might want to use the ImageMagick Engine WordPress Plugin for processing resizing and cropping images in WordPress dashboard.

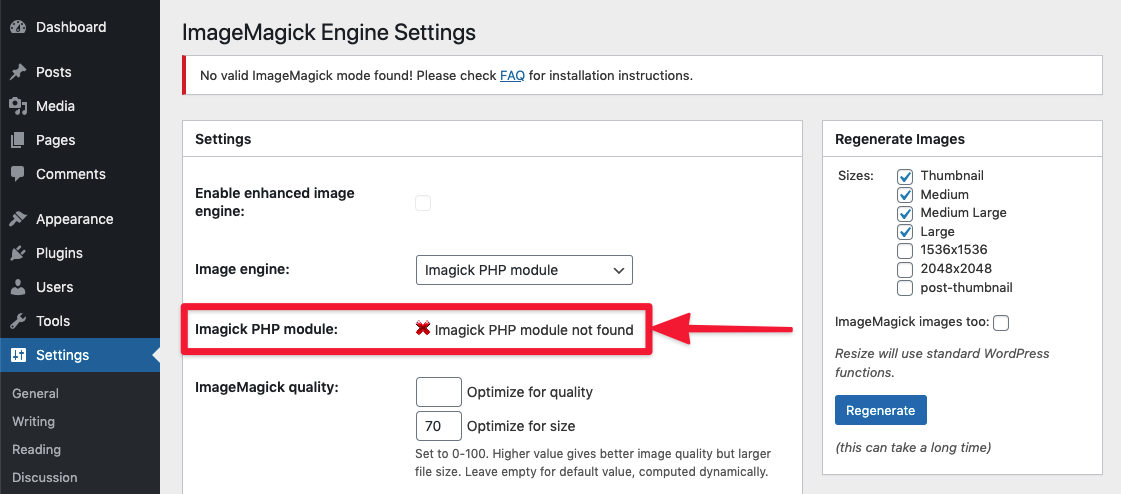
    When ImageMagick is not installed on the server, you will see “ImageMagick PHP module not found” warning on the plugin Settings page.

    runcloud-imagemagick-01-imagick-php-module-not-found2

    Disclaimer: This tutorial is intended for Ubuntu and Debian based distributions only. If you are using Fedora, RHEL, Windows, or Mac, please refer to the official ImageMagick website for installation instructions.

    The first step to install ImageMagick is to check the PHP version of your web application. This is because the installation process varies depending on the PHP version. However, once you have installed ImageMagick for a certain PHP version, it will work for all web applications that use the same PHP version on your server.

    You can find the PHP version of your web application in your RunCloud dashboard.

    Imagick PHP Module for PHP version X.X

    1. To install ImageMagick PHP extension for any PHP version on your server, you need to log in to your server as a root user using Terminal (Mac OSX / Linux) or Powershell / Putty (Windows).
    ssh root@<youripaddress>
    1. Next, you need to run this command, replacing <version> with the specific PHP 8.x version that you want to install ImageMagick for. For example, if you want to install ImageMagick for PHP 8.1, you would replace <version> with 81.
    apt-get install php<version>rc-pecl-imagick
    1. After the installation is complete, you need to reload the PHP-FPM service on your server by running this command, again replacing <version> with the specific PHP 8.x version that you installed ImageMagick for.
    systemctl reload php<version>rc-fpm
    1. To verify that ImageMagick is installed and activated, you can run this command, which will display the ImageMagick version and configuration:
    /RunCloud/Packages/php<version>rc/bin/php -i | grep imagemagick

    For example, if your website uses PHP 8.0, your commands should look something like.

    # install imagick module
    apt-get install php80rc-pecl-imagick
    
    # reload PHP-FPM
    systemctl reload php80rc-fpm
    
    # check / verify if imagick is installed
    /RunCloud/Packages/php80rc/bin/php -i | grep imagemagick

    Similarly, for website using PHP 7.4, the commands should look like.

    # install imagick module
    apt-get install php74rc-pecl-imagick
    
    # reload PHP-FPM
    systemctl reload php74rc-fpm
    
    # check / verify if imagick is installed
    /RunCloud/Packages/php74rc/bin/php -i | grep imagemagick

    If ImageMagick has been installed correctly, you will get an output similar to the following image.

    imagemagick succesfully installed

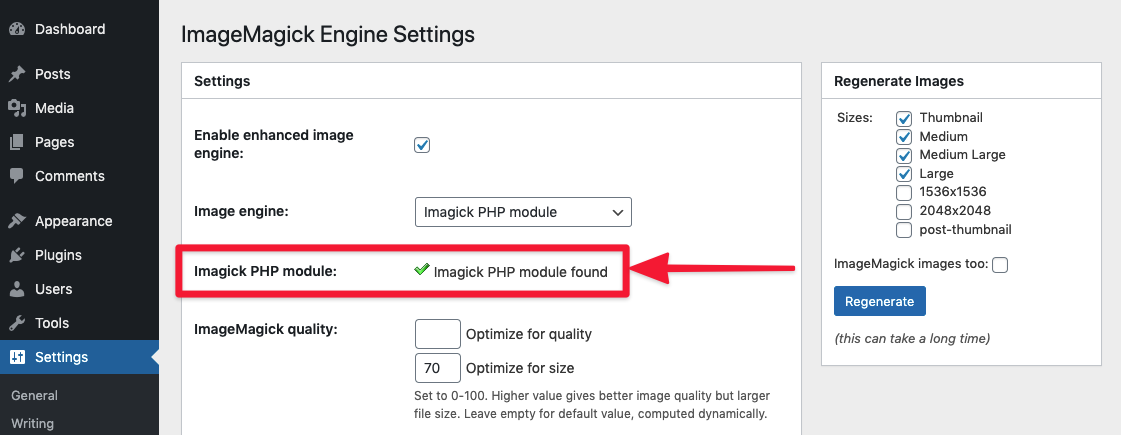
    After installing ImageMagick correctly, you can see the warning disappear in ImageMagick Engine WordPress Plugin.

    Optional: Adding PDF Support To ImageMagick

    If you want to allow ImageMagick to process PDF files, you will have to login as root user again to your server and edit policy.xml.

    For example, you can use nano to edit this file by running this command.

    nano /etc/ImageMagick-6/policy.xml

    Then please scroll down and locate this line.

      <policy domain="coder" rights="none" pattern="PDF" />

    You need to disable it by commenting out that line. For example, you can replace that line by following line.

      <!-- <policy domain="coder" rights="none" pattern="PDF" /> -->

    Please save the file and exit the editor.

    Then reload the PHP-FPM again, for example for PHP 8.1 you can run this command again.

    systemctl reload php81rc-fpm

    NOTE: Please be careful when you enable PDF support for Imagick. Make sure you always use it with trusted PDF files.

    How Does WordPress Use the Imagick PHP Extension?

    WordPress supports both ImageMagic and GD Library for PHP image processing extensions to resize and crop images in your website.

    By default, WordPress will try to use ImageMagick. If it is not available or it doesn’t support the requested mime-type, WordPress will use the GD extension.

    If you need more control of the quality of re-sized images, you can use ImageMagick Engine WordPress Plugin.

    Image Watermark WordPress plugin is another cool plugin that allows you to watermark each image that you upload to your WordPress site using Imagick.

    If you enable PDF support for the Imagick PHP extension, you will get one extra bonus, WordPress will automatically generate an image for each PDF you upload to your WordPress site!

    How Does Laravel uses ImageMagick PHP Extension?

    If you use Laravel for your website, there are some libraries that you can use for image processing. Let’s take a look:

    1. Intervention Image is an open-source PHP image handling and manipulation library. It provides an easier and more expressive way to create, edit, and compose images and supports currently the two most common image processing libraries GD Library and Imagick.
    2. PDF to image is a library that makes it easy to work with the PDF files and helps convert PDF files to images using Imagick and Ghostscript.

    FAQs

    • What is the difference between ImageMagick and Imagick?

      ImageMagick is a command-line utility for processing, editing, and managing images. It is available for all different kinds of operating systems, and you can use it as a standalone application or a library. ImageMagick supports hundreds of image formats and can perform a wide range of image manipulation operations, such as resizing, cropping, color correction, watermarking, and more.

      Imagick is a PHP extension of ImageMagick. It provides a native implementation of the ImageMagick API for PHP, which means you can use ImageMagick’s features and functions within your PHP scripts. Imagick is useful for creating dynamic images, generating thumbnails, applying filters, and other tasks that require image processing in PHP.

      To use Imagick, you need to have ImageMagick installed on your server and enable the Imagick extension in your php.ini file.

    • What is GD in WordPress?

      GD is a PHP extension that can handle image processing in WordPress. It is similar to Imagick, but it has some limitations, such as supporting fewer image formats and producing lower-quality images. However, GD is more widely available on web hosting servers and may be faster than Imagick in some cases.

      To use GD in WordPress, you need to have it installed and enabled on your server. You can check if GD is available by using the phpinfo() function.

    • What PHP Extensions does WordPress need ?

      These are essential PHP extensions for WordPress:
      json: Handles communication with other servers and processes data in JSON format.
      mysqli or mysqlnd: Connects to the MySQL database for content storage and user data management.
      curl: Performs remote requests.
      dom: Validates Text Widget content and configures IIS7+.
      exif: Works with image metadata.
      fileinfo: Detects file upload mimetypes.
      hash: Used for hashing (including passwords).
      igbinary: Optimizes serialization.
      imagick: Enhances image quality.
      intl: Enables locale-aware operations.
      mbstring: Handles UTF8 text.
      openssl: For SSL-based connections.
      pcre: Improves pattern matching.
      xml: Used for XML parsing.
      zip: Handles zip archives.
      These extensions empower WordPress, ensuring seamless functionality and compatibility with plugins and themes. 🌟🔧

    • How to Install ImageMagick in cPanel?

      To install ImageMagick in cPanel, log in to WHM using your root credentials.
      Navigate to the Software tab and select Module Installers.
      Click Manage next to PHP PECL, search for “Imagick,” and click Install.

    • Do I need Imagick for WordPress?

      Imagick is not strictly required for a basic WordPress installation, but it significantly enhances image quality and functionality. If you plan to work extensively with images, such as resizing, optimizing, or creating thumbnails, Imagick is highly recommended.

    • How to Fix ImageMagick PHP module not found?

      To fix the ImageMagick PHP module issue on WordPress, you need to install and enable the module on your server using cPanel, SSH, or web hosting support. Then, you can check the module status on your WordPress dashboard under “Tools” > “Site Health”.

    Summary

    In this post, we will walked you through the steps to install the ImageMagick PHP extension for your web application on RunCloud, the best web application management platform for developers and agencies. If you are looking to move away from Cpanel then you should check out RunCloud.

    If you are not using RunCloud yet, you are missing out on a lot of benefits and features that can make your web development and hosting experience easier and faster. With RunCloud, you can host as many websites as you like on a single server.

    Sign up for RunCloud today to see how RunCloud can help you manage your web applications and servers with ease and convenience.

  • How To Use Redis Object Cache To Speed Up Dynamic WordPress Site

    How To Use Redis Object Cache To Speed Up Dynamic WordPress Site

    With RunCloud, you don’t need to be a Linux expert to host high-performance WordPress websites, both “static” WordPress sites (simple blog) and “dynamic” WordPress sites (WooCommerce and membership).

    For any types of highly dynamic websites, you can use Redis Object Cache to use less database resources by caching the results of complex database queries, speed up PHP execution time in your server, and make your dynamic website load much faster.

    In this blog post, we will explain Redis Object Cache, which is probably not a term that many WordPress users are familiar with.

    WordPress Caching System

    WordPress users usually understand at least two caching systems: page caching and browser caching.

    Actually, there are many caching system in WordPress, for example:

    • page caching
    • browser caching
    • database caching
    • object caching
    • transient caching
    • fragment caching
    • opcode caching
    • CDN caching

    In RunCloud, we divide them into three types:

    1. Server-side Caching: caching at the server level. NGINX page caching (RunCloud Hub) and Varnish page caching are two examples of server-side caching.
      • They are not available on regular shared hosting.
      • You will need a VPS / Dedicated server to allow you to optimize your website using server-side caching.
      • Another example of server-side caching is “persistent” object caching.
    2. WordPress-side Caching: caching at the WordPress level. Page caching feature of many popular caching WordPress plugins is one example of WordPress-side caching.
      • You can control it from your WordPress dashboard.
    3. Client-side Caching: caching at the local browser level. Browser cache is an example of client-side caching.
      • Once you visit your website, your browser saves the static data of your website, such as images, CSS, and javascript files.
      • Everytime you visit your website again or hit the F5 button to refresh your website, static data will be served from the local browser cache.

    For this post, we will only be covering the object cache, specifically Redis Object Cache.

    What is Redis Object Cache

    If page caching works on caching the HTML page output, then object caching works on caching your database queries.

    WordPress has special WP_Object_Cache class for caching the result of complex database queries, which may be computationally expensive to regenerate, to reduce your server load.

    By default, the object caching is non-persistent, data stored in the cache resides in memory only and only for the duration of the request.

    We can make it persistent, cached data can be used across page loads, by using persistent object caching system, for example:

    • Redis Object Cache
    • Memchached Object Cache
    • APC / APCu Object Cache
    • File-based Object Cache

    Redis Object Cache is the first choice because it is very popular and used by many popular websites like Twitter, GitHub, Weibo, Pinterest, Snapchat, Craigslist, Digg, StackOverflow, Flickr, and many others.

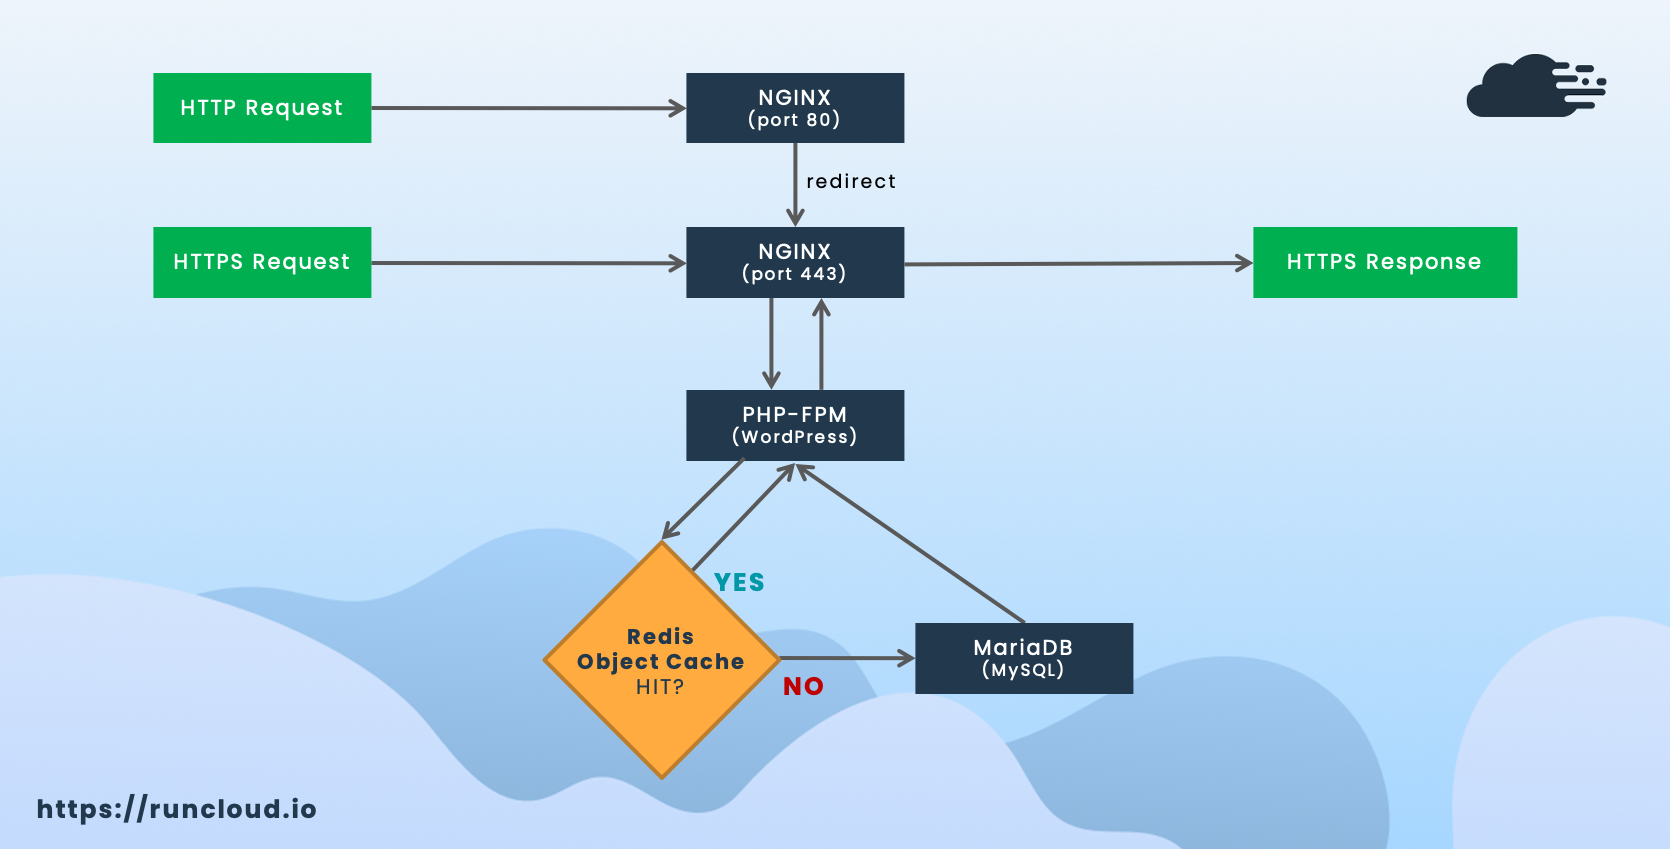
    When a user visits a WordPress page, many complex database queries are performed on your server and the results are cached by Redis Object Cache.

    When another user visits the same WordPress page, your website will not perform the same complex database queries again, because the results are already cached and served by the Redis Object Cache.

    It will reduce your database queries, reduce your server load, and make your dynamic WordPress site load faster.

    Who Need Redis Object Cache

    Page caching is enough for many WordPress sites, especially for blogs, magazines, news, and company profile websites.

    But if your WordPress site has many dynamic pages, page caching will be not enough because your dynamic pages should be not cached using page caching.

    For example, Redis Object Cache will be very useful for these dynamic websites to reduce your MySQL database load and make your dynamic pages load faster.

    • E-commerce websites using WooCommerce, Easy Digital Downloads, etc. Your cart, checkout, and my account pages are dynamic pages.
    • Membership websites. Your member area and some password protected pages are dynamic pages.
    • Forums and Social Networking websites using BBPress, BuddyPress, etc.

    How To Use Redis Object Cache

    Redis Object Cache is a server-side caching, and it requires Redis to be installed and activated in your server.

    For RunCloud users, there is no need to install Redis yourself, as Redis has been installed to your server.

    It saves your time dealing with the linux command to install Redis. It can be complicated for common users with minimum linux knowledge.

    In RunCloud, there are two ways to use Redis Object Cache.

    1. RunCloud Hub WordPress Plugin
    2. Redis Object Cache WordPress Plugin

    How To Install Redis Object Cache Using RunCloud Hub

    RunCloud Hub is a hub for all RunCloud plugins for WordPress. It is not only for Redis Object Cache, but also RunCache (Nginx server-side caching) and Server Health & Transfer Stats monitoring directly from your WordPress dashboard.

    If you want to use a combination of Nginx page caching and Redis object caching, then RunCloud Hub is the perfect choice for you.

    You can read the complete guide on how to install RunCloud hub here.

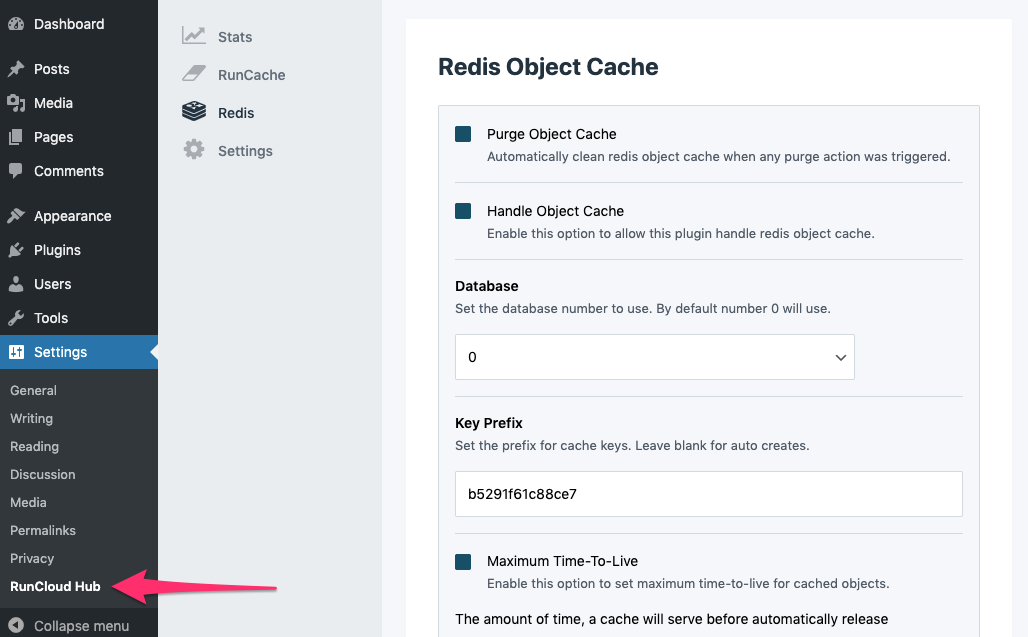
    Once you have installed the RunCloud Hub plugin, Redis Object Cache is automatically installed and enabled in your WordPress website, no complex process required.

    runcloud-redis-object-cache-runcloud-hub

    You can also disable Redis Object Cache temporarily by unchecking “Handle Object Cache” option under Redis settings in RunCloud Hub page.

    How To Install Redis Object Cache Using Redis Object Cache WordPress Plugin

    If you do not want to use RunCache (Nginx page caching) in RunCloud Hub, and only want to use Redis Object Cache, you can use Redis Object Cache WordPress Plugin.

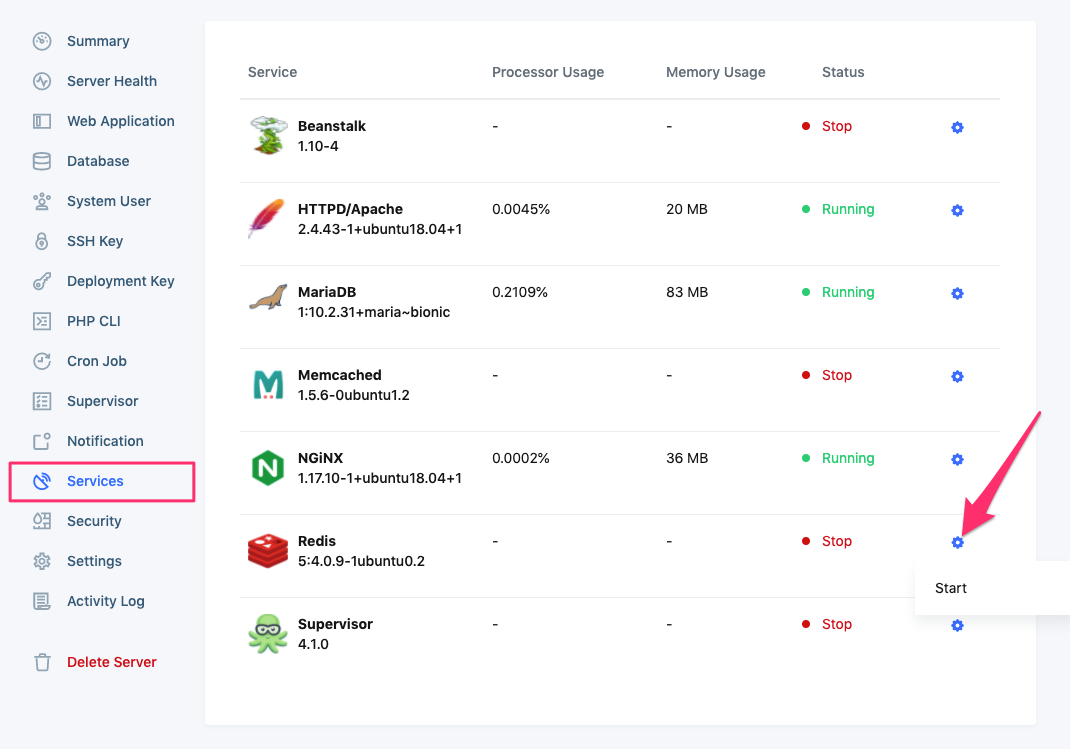
    First, you need to run Redis on your RunCloud server. Redis has been installed in your server, but it is probably inactive. Go to Services menu under your server in RunCloud, and enable Redis.

    Second, install and activate Redis Object Cache WordPress Plugin.

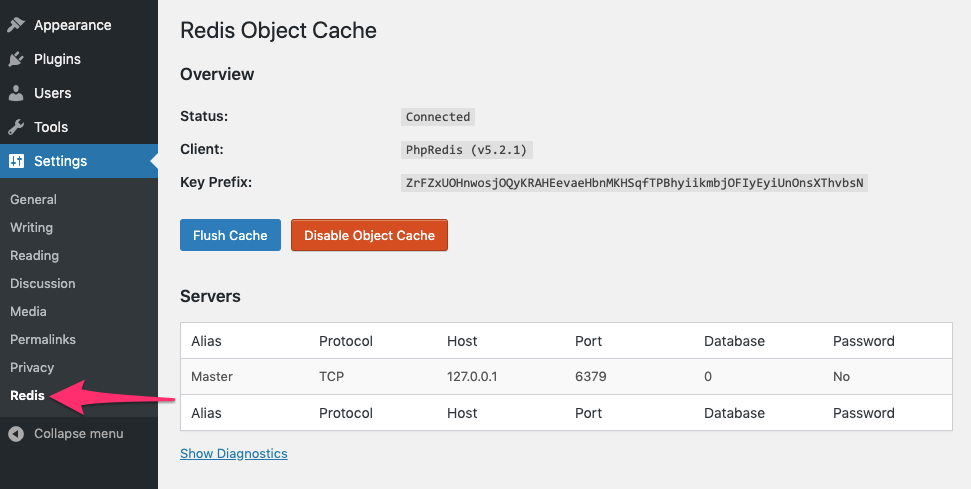
    Third, enable the object cache under Settings – Redis, or in Multisite setups under Network Admin – Settings – Redis.

    runcloud-redis-object-cache-wordpress-plugin

    Note: If you use Redis Object Cache in multiple websites (web applications) in single RunCloud servers, you have to add WP_CACHE_KEY_SALT constant to wp-config.php of each web applications. Please read plugin documentation for more details.

    How To Check If Redis Object Cache Works

    Redis Object Cache works by reducing your complex database queries. We can monitor and compare the database queries before and after using Redis Object Caches.

    You can install and activate Query Monitor WordPress plugin to help you monitor the number of database queries in a WordPress website.

    In this example, we use a default WordPress installation with Twenty Nineteen WordPress theme.

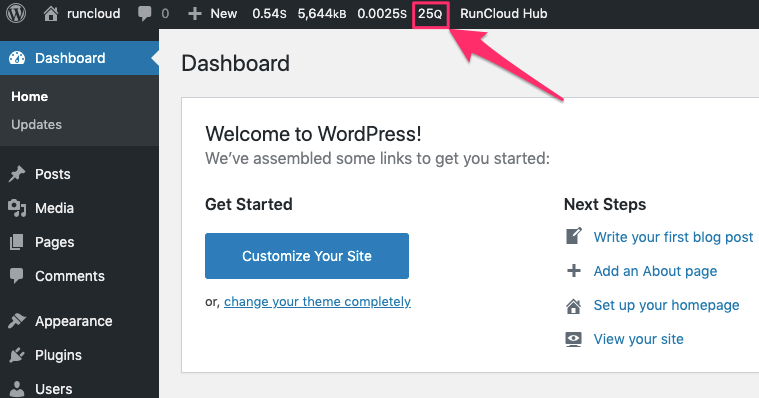
    runcloud-redis-object-cache-dashboard-before
    Redis Object Cache in WordPress Dashboard page (BEFORE)
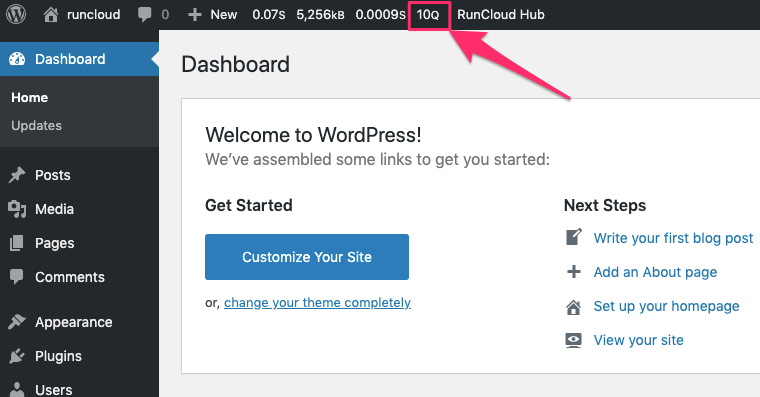
    runcloud-redis-object-cache-dashboard-after
    Redis Object Cache in WordPress Dashboard page (AFTER)

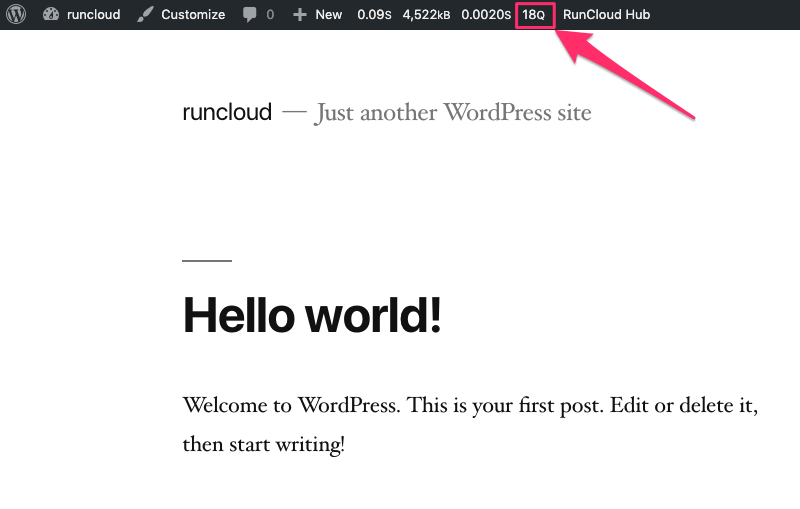
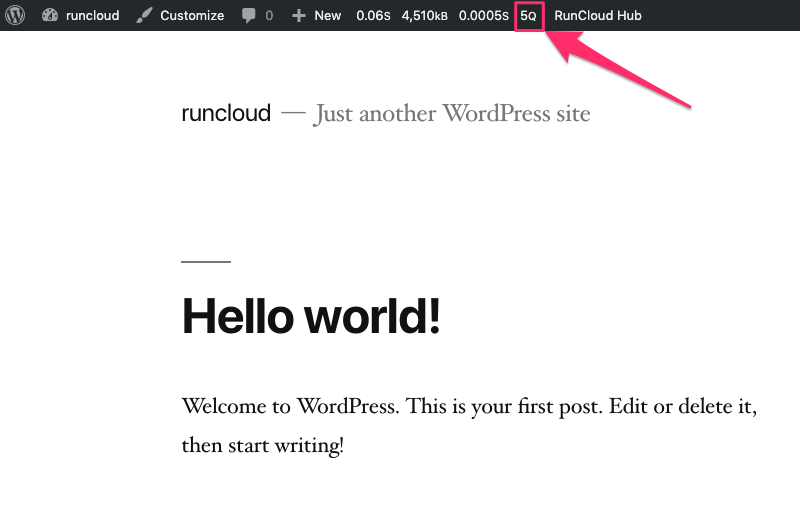
    In WordPress dashboard, Redis Object Cache can reduce the number of database queries from 25 to 10 queries only.

    runcloud-redis-object-cache-frontend-before
    Redis Object Cache in WordPress Homepage (BEFORE)
    runcloud-redis-object-cache-frontend-after
    Redis Object Cache in WordPress Homepage (AFTER)

    In WordPress homepage, Redis Object Cache can reduce the number of database queries from 18 to 5 queries only.

    You can imagine when you use Redis Object Cache in a WooCommerce (ecommerce) website, where the number of database queries in your WordPress can be 50-100 queries per page, Redis Object Cache can help a lot!

    Summary

    Redis Object Cache is a very useful feature to speed up dynamic WordPress sites, especially ecommerce (WooCommerce) and membership sites by reducing database load to make your dynamic pages load faster.

    All paid plan users (Basic, Pro, Business) can enjoy the full functionality of this feature.

    Never ever hesitate to suggest new features that you want to see, and we will make it happen.

  • 3 Free Ways To Migrate WordPress From Shared Hosting To Cloud Server

    3 Free Ways To Migrate WordPress From Shared Hosting To Cloud Server

    WordPress Migration From Shared To Cloud

    You probably start your website hosting from a small shared hosting account. As your website grows, you will hit the limitations of shared hosting, and then you know it is time to consider moving to a better hosting environment like cloud hosting. Cloud hosting is more reliable, higher scalability, flexible pricing, better security, and performance. Find out why cloud hosting is better for your business.

    In this article, you will learn the various ways to migrate WordPress site from shared hosting to cloud hosting

    7 Steps to Migrate a Website

    Generally, in order to move a website from one location to another, you will have to copy all of the data including files and database. There are many ways to do it, and here are the steps:

    1. Backup! Always keep at least a recent backup of your website before you do anything
    2. Export files from current website
    3. Export database from current website
    4. Create a hosting account on the new server
    5. Upload files to a new website
    6. Import database to the new website
    7. Update DNS records

    At RunCloud, we have the migration service to migrate your website from the other web hosting server (shared hosting) to a RunCloud managed a server. It is free for the first web application!

    If you would like to do it yourself, here are some methods to migrate your website from shared hosting to cloud hosting. We will use WordPress, the most popular CMS in the world, as an example.

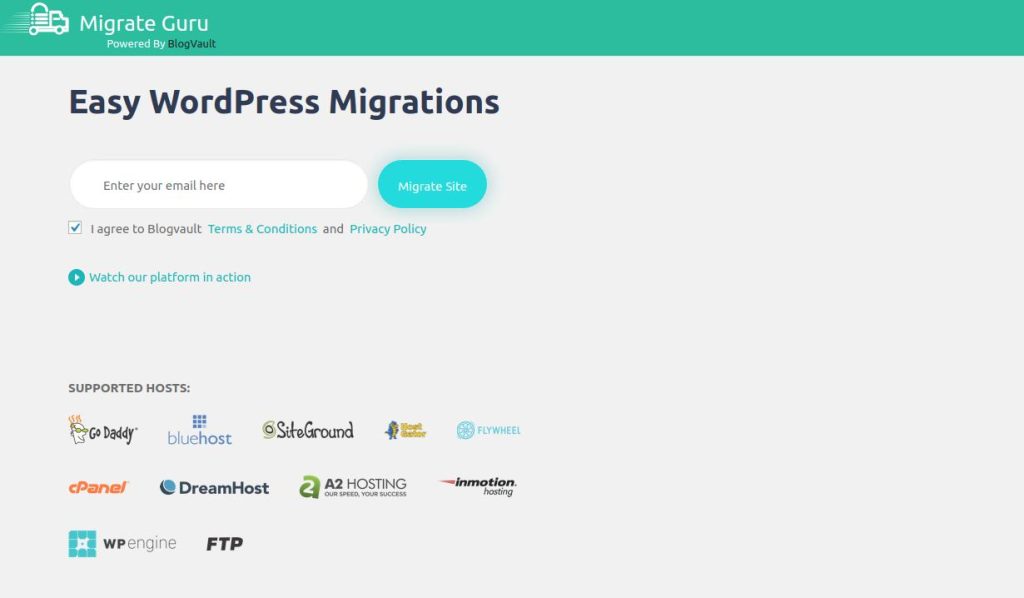
    1. WordPress Migration Plugin: Migrate Guru

    migrate guru wordpress migration plugin

    Migrate Guru is a WordPress migration plugin from BlogVault, a WordPress backup solution company. The beauty of Migrate Guru is that it is a free one-click migration plugin that supports unlimited sized websites, from 50MB or 50GB website.

    The migration process works on their server, so it won’t overload your server. No extra disk storage is required. Your files are copied to their server and deleted after the migration is complete. It also automatically rewrites URLs, bypasses import-export scripts, and handles serialized data.

    Requirements:
    • Migrate Guru plugin installed on existing WordPress site
    • A WordPress installation on new cloud hosting
    • FTP/SFTP access to new cloud hosting

    How to use Migrate Guru to migrate WordPress site

    1. Click on Migrate Guru from the sidebar menu in WordPress dashboard
    2. Fill in your email address then click “Migrate Site”
    3. On the new page, select FTP
    4. Enter FTP details, including destination site URL and directory path
    5. Click the “Migrate” button to start the migration
    6. Make a cup of coffee. You will be notified by email once the migration completed
    7. Enjoy your speedy site on new cloud hosting

    2. WordPress Migration Plugin: All-in-one WP Migration

    All-in-one WP Migration is one of the most popular WordPress migration plugins with over 2 millions active installations and 5,200+ 5 stars rating. The plugin is highly compatible with different operating systems and web hosting providers. It does not require any PHP extensions and works with all PHP versions from PHP 5.2 onwards. It supports WordPress version 3.3 to the latest version.

    Requirement:

    • All-in-one WP Migration installed on both current a new WordPress site

    How to use All-in-one WP Migration to Migrate A WordPress site

    a. Current server

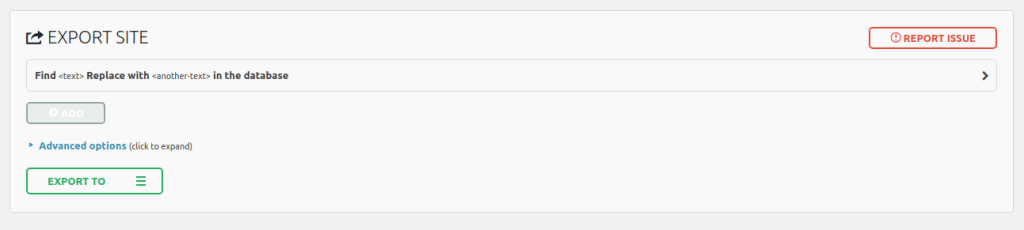
    all in one wp migrate wordpress plugin
    1. On the current WordPress dashboard, click on “All-In-One WP Migration” > export
    2. (Optional) Use the Find Replace within the database to replace existing domain name, if you change the website domain name on the new server
    3. Click “EXPORT TO” and select FILE to download the website export file (.wpress file extension)

    b. New server

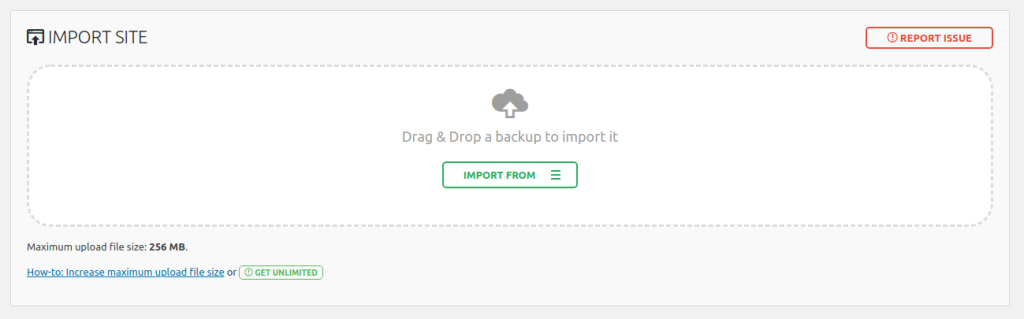
    all in one wp migrate import site
    1. On new cloud hosting WordPress dashboard, click on “All-In-One WP Migration” > import
    2. Click “IMPORT FROM” > FILE (or your .wpress export file source)
    3. Select your website export file (.wpress) to start website import
    4. Click the “Proceed” button to overwrite the WordPress site with your All-in-one WP migration export file.
    5. “Your site has been imported successfully!”

    Note:

    • The free plugin has a 512MB upload limit for importing website
    • You can buy the Unlimited extension to remove the import limit, restore a backup from the server, and support WP-CLI commands. Other cloud storage extensions are available too.
    • You may need to save the WordPress permalink structure twice after import complete.

    3. WordPress Migration with WP-CLI and Rsync

    Using WP-CLI and Rsync is the fastest way to migrate a WordPress site. It is more stable and reliable than using a WordPress plugin. Recommended if you want to migrate a huge website and you have SSH access on both existing and new servers.

    WP CLI is a powerful command line tool for managing WordPress. You can install WordPress. update plugins configure multisite, and much more, without using a web browser.

    Rsync is a Linux command line tool for fast local and remote file synchronization. It is a popular tool and included in most Linux distribution by default. Digital Ocean has a good tutorial on using Rsync to sync directories on the server.

    Requirement:

    • SSH access on both current and new servers
    • WP-CLI on both current and new servers

    How To Install WP-CLI

    You can easily install WP-CLI via shell with two command lines:

    sudo wget -q https://raw.githubusercontent.com/wp-cli/builds/gh-pages/phar/wp-cli.phar -O /usr/bin/wp
    sudo chmod 755 /usr/bin/wp

    How to use WP-CLI and Rsync to migrate WordPress site

    a. Current server

    1. Connect to the current server via SSH
    2. Navigate to your WordPress root directory (example: /var/www/vhosts/sitename/public_html/)
    3. Export WordPress database using WP-CLI command:
      wp db export db.sql --allow-root

    b. New server

    1. Connect to the new server via SSH
    2. Navigate to the directory where you want your WordPress site to be in (example: /home/runcloud/webapps/yoursite)
    3. Pull website files from a current server using Rsync:
    rsync -avz --progress --exclude wp-config.php username@currentserver.com:/var/www/vhosts/sitename/public_html/* .
    1. Create an empty WordPress database. RunCloud user can easily create a database via RunCloud dashboard. You can create a database using command lines too:
      mysql -u root -p
      You will enter MySQL shell then use the following commands to create WordPress user and database:
    CREATE USER wordpressuser@localhost IDENTIFIED BY 'passw0rd';
    CREATE DATABASE wordpress;
    GRANT ALL PRIVILEGES ON wordpress.* TO wordpressuser@localhost IDENTIFIED BY 'passw0rd';
    FLUSH PRIVILEGES;
    quit;

    Remember change passw0rd to the secure password, you want to use. These credentials will be used for the wp-config.php file.

    • Generate WordPress configuration file using WP-CLI command: wp core config --dbname=wordpress --dbuser=wordpressuser --dbpass=passw0rd --allow-root
    • Import the WordPress database dumped in the directory using WP-CLI command: wp db import db.sql --allow-root
    • Update WordPress installation ownership and use the recommended permissions for files & directories:
    sudo chown -R runcloud:runcloud /home/runcloud/webapps/yoursite/
    sudo find /home/runcloud/webapps/yoursite/ -type f -exec chmod 644 {} +
    sudo find /home/runcloud/webapps/yoursite/ -type d -exec chmod 755 {} +

    Note:

    • If the SSH is using a non-standard port, you can pass the port parameter to SSH with the -e option: rsync -avz -e 'ssh -p <port-number>' --progress --exclude wp-config.php username@currentserver.com:/var/www/vhosts/sitename/public_html/* .
    • If you are migrating to a new domain. Run database search & replace to update the new domain name in the database: wp search-replace 'https://old-domain.com' 'https://new-domain.com'
    • runcloud:runcloud is a reference that is in place of your system username
    • /home/runcloud/webapps/yoursite where runcloud should be the system username and yoursite should be your web application
    • To fix ownership of system user, use the navigation menu and go into your web application, scroll down to Tools, and click the Fix Ownership button.

    Tips: DNS Propagation

    After website files and database migration, you will need to update the domain name’s DNS records to the new cloud server IP address.

    You can try speeding up the DNS propagation time by lowering the TTL (Time To Live). This will refresh the DNS at a quicker rate. You can try set TTL to as low as 120 (2 minutes). However, some of the networks may still update slowly.

    Wrapping Up

    RunCloud is a powerful and easy-to-use platform that helps you manage your websites on any cloud server. With RunCloud, you don’t need to be a Linux expert to set up, secure, and optimize your web applications. You can do everything from a simple and intuitive dashboard, saving you time and hassle.

    RunCloud supports various web servers, PHP versions, databases, and frameworks. You can also monitor your server performance, back up your data, and automate your tasks with RunCloud. Whether you are a developer, a freelancer, or a business owner, RunCloud can help you run your websites faster and smoother.

    What are you waiting for? Join RunCloud today and enjoy the best web hosting solution for your websites. It’s free for 7 days, no strings attached!

  • The 7 Best WordPress Staging Plugins to Create a Test Site

    The 7 Best WordPress Staging Plugins to Create a Test Site

    It is important to test any new changes and updates before apply to your live site. It can prevent some unexpected errors and downtime. We use a Staging site to create a testing environment.

    A staging site is a duplicate copy (or clone) of your live website. It allows you to do customizations, test new features, install a new plugin, and more without affecting the live site. Your website visitors won’t be interrupted while you are working on the staging site. Some staging site setups even allow you to push the changes to the live site.

    IMPORTANT! RunCloud has released One-click WordPress Staging feature that allows you to create an exact copy of your entire website (web application) for staging and development purpose in seconds.

    Quick guide on how to easily create a WordPress staging site in RunCloud →

    In this article, you will learn about some WordPress staging plugins, both free and paid, that will create a staging site for the testing environment.

    1. WP Staging (Free)

    WP Staging is probably the easiest way to create a staging site in just a few clicks. It creates a clone of your website into a subfolder. In the background, the files and database are copied and the links within the content also replaced with the new path.

    Simple instructions:

    1. Install WP Staging plugin on main site
    2. Name your staging site (a subfolder) and start cloning using WP Staging
    3. Login to your new staging site

    The free plugin has 40,000 active installations and 5-stars ratings. The Pro edition supports WordPress multisites, cloning for subdomains, and the ability to copy modifications from staging site to the live website.

    WP Staging

    2. All-in-One WP Migration (Free)

    All-in-One WP Migration is a popular plugin to migrate WordPress site from one host to another. The fact that it package the whole site (files & database) for easy migration, make it also ideal to create a staging site.

    You will need to install WordPress on the staging site before you can import the All-in-One WP Migration website package file. The staging site can be a subfolder, subdomain, or even a different domain. The maximum website export size limit is 512MB.

    Simple instruction:

    1. Install WordPress on staging site
    2. Install All-in-One WP Migration plugin on both main and staging sites
    3. Export main site using All-in-One WP Migration with staging site URL replacement
    4. Import the website package file on staging site
    5. Done.

    The free plugin has over 2 million active installations and 4.5 stars ratings (5000+ 5 Stars). The plugin’s premium extensions support unlimited website size, cloud storage, multisite, and more.

    All-in-One WP Migration

    3. Duplicator (Free)

    Duplicator is another popular WordPress migration plugin like All-in-One WP Migration. It creates a package file and installer for easy website restoration on a blank site. Need not have existing WordPress installation on the target site.

    Simple instruction:

    1. Install Duplicator plugin
    2. Create a new package using Duplicator
    3. Download the installer and package file
    4. Upload installer and package file to target site (subfolder, subdomain, or domain)
    5. Run the Duplicator installer to restore website
    6. Done.

    The free plugin has over 1 million active installations and 5 stars ratings. The Pro version supports scheduled backups, cloud storage, multisite, cPanel integration, and more.

    Duplicator

    4. BackupBuddy (Paid)

    BackupBuddy plugin to create WordPress staging site

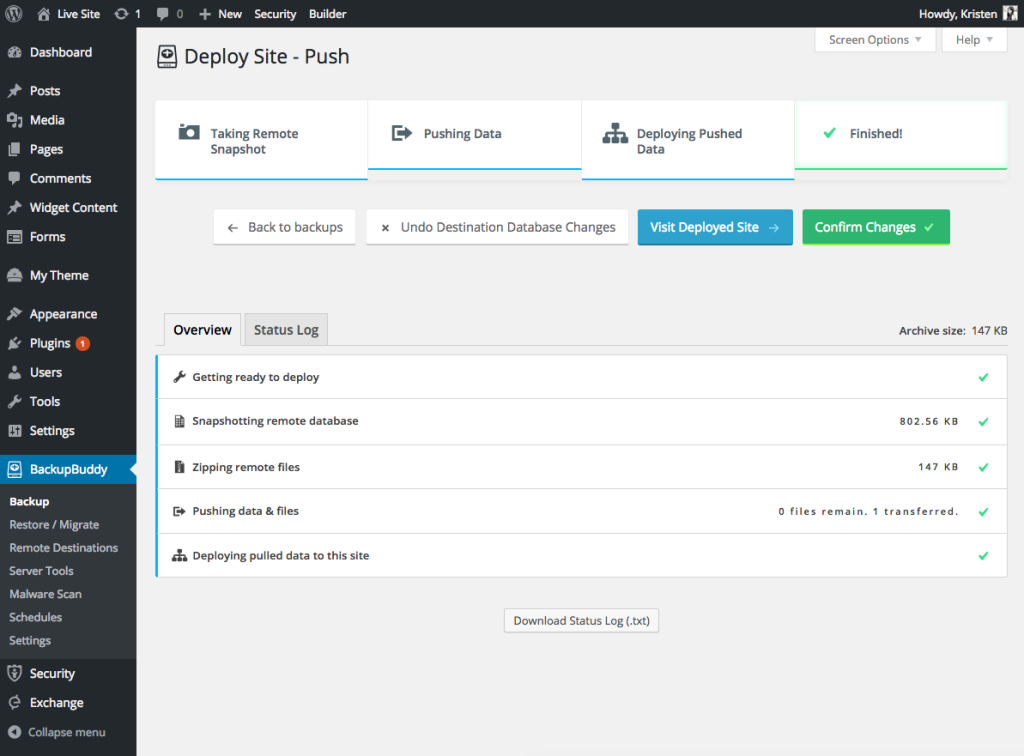
    BackupBuddy is a premium backup plugin from iThemes that supports scheduled automatic backups and store backup files off-site. It includes a Deployment feature, which you can push or pull WordPress staging site’s changes back and forth between the staging site and the live site.

    How to setup WordPress staging site with BackupBuddy Deployment

    1. Install BackupBuddy plugin and make a backup of your Live Site
    2. Create a Staging site by restoring your backup on a new domain (or sub-domain)
    3. Add define('BACKUPBUDDY_API_ENABLE', true); to the wp-confg.php file of your Live Site.
    4. On the Live Site, goto BackupBuddy > Remote Destinations and select Show Deployment Key at the top of the page
    5. Copy the given API key
    6. On the Staging Site, goto BackupBuddy > Remote Destinations and click the Add New option and then select BackupBuddy Deployment
    7. Paste the API key you copied from the Live Site into your Staging Site

    Price: iTheme BackupBuddy price starts from $80/year for 1 site.

    BackupBuddy

    5. WP Stagecoach (Paid)

    WP Stagecoach is a premium one-click WordPress staging site solution that work on any host and does not overwrite database during import.

    The database merging is an unique feature that allows you to push staging site changes to live site without replacing the live site’s database. WP Stagecoach monitor and keep a database changes log on the staging site. It then “playback” database changes during import to live site.

    WP Stagecoach can host your staging site on their server, so you can test the site in a isolated environment, and saving hosting disk space usage. During site import, you can import files, database or both.

    Price: WP Stagecoach price starts from $120/year for 10 domains.

    WP Stagecoach

    6. BlogVault (Paid)

    BlogVault is a premium WordPress cloud backup plugin with staging site feature. It offer one-click WordPress staging site that host on its server. The staging site is password-protected and block search engine indexing by default.

    BlogVault also handle WordPress database merging when you import staging site changes to the live site. The 1-click Merge feature allows you to compare Live and Staging site, then do complete merge in a single click or selective merge handpick modifications.

    Price: BlogVault price starts from $89/year for 1 site.

    BlogVault

    7. ManageWP (Free/Paid)

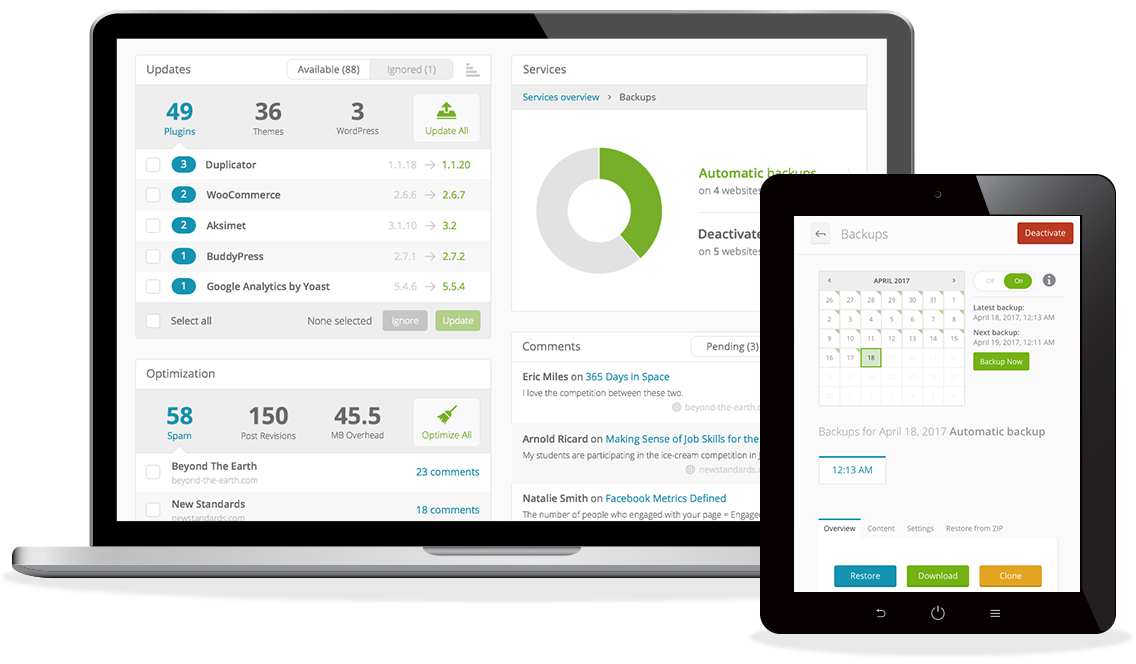
    ManageWP is an online WordPress website management tool. It is free to use for unlimited websites with optional premium add-ons. With the premium backup, it can clone your website to an existing website or another server. It does not offer hosting for staging websites.

    ManageWP Smart Clone will compare the source and destination files. Skip the same files and clone only the different files and the database.

    Price: Free. Requires Premium Backup ($2/month per site) for clone/staging feature.

    ManageWP

    Bonus Tips

    A staging site is a duplicate of your live site. In search engine optimization (SEO), duplicate pages are bad for your website ranking. You should avoid search engines from indexing your staging site. The good news is that it is easy to disallow index.

    Here are few ways to disallow index on your staging site:

    1. Add “noindex” tag to your staging site. Goto Settings > Reading and check the box for Discourage search engines from indexing this site
    2. Password protect your staging site using RunCloud’s HTTP basic authentication.
    3. Create a robots.txt text file in the WordPress installation root of your staging site. And add these two lines:
    User-agent: *
    Disallow: /

    Summary

    Having a WordPress staging site is important for testing changes before you push them to live site. Setting up a WordPress staging site is easy with the various plugins listed here.

    WP Staging is great to create a simple staging site. All-in-One WP Migration and Duplicator are backup plugins but also can be used to create a clone of live site for testing purpose. Premium plugins offer more features and support pushing staging site updates to the live site.

    How do you create a staging site? Please tell us in the comment.

  • How to Block IP Address Using WordPress .htaccess File to Stop Bad Visitors

    How to Block IP Address Using WordPress .htaccess File to Stop Bad Visitors

    In this tutorial, we show you how to block bad visitors by their IP addresses using only Apache .htaccess file. No WordPress plugin required.

    Your public website is on the internet for anyone, including bad visitors like bad bots, spammers, hackers, malicious users. They are annoying, taking up your web server resources, and potential security risk.
    The good news is that you can “blacklist” them by blocking their IP address. An IP address is a string of 4 numbers separated by a single dot (IPv4) or 8 groups of 4 hexadecimal digits (IPv6). Each device on the internet is identified by an unique IP address.

    At RunCloud, we support 4 different web server stack:

    If you are using NGINX+Apache2 Hybrid web server stack, then you can easily block IP address using the .htaccess file in your WordPress root folder.

    What is .htaccess file

    .htaccess is a configuration file for Apache web server. You can create and edit an .htaccess file using any plain text editor.

    When the Apache server loads a web folder, it detects and execute the .htaccess file. .htaccess file can be used to modify Apache server configuration, enable or disable functionality and features — including blocking visitors by IP address.
    One of the advantages of using .htaccess is that it is executed before website is loaded. It also does not take up system resources like PHP & MySQL.

    Identify bad IP addresses

    We need to identify a bad IP address before we can block it. Here we show two ways to find bad IP addresses that visit your WordPress site.

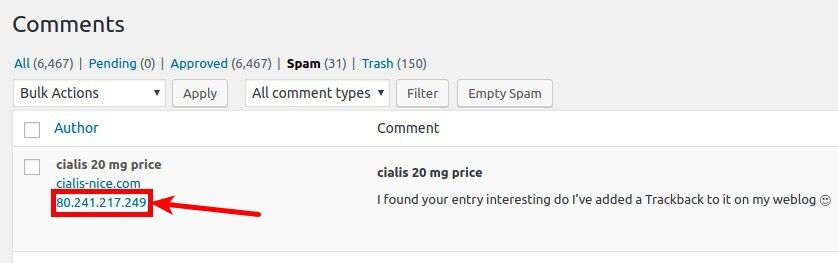
    1. Find IP address of spammers

    WordPress dashboard comments IP address

    Login your WordPress dashboard then goto Comments. Click on “Spam” to list all the spam comments. The spammer’s IP address is displayed in the “Author” column. Identify the repeating spammers then copy their IP addresses. We will block them later.

    2. Find IP address of brute force attacks or login attempts

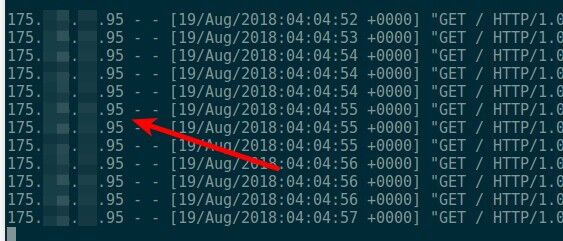
    We can find all visitors IP addresses in the web server access log file. It is a bit tricky and takes some experiences to identify a bad visitor.

    Apache access log file path on RunCloud is:

    /home/runcloud/logs/apache/app-name_access.log
    • runcloud is the RunCloud default system user name. Replace it with your own system user name.
    • Replace app-name with your web application name.

    Check the Apache server log file and identify IP addresses that repeatedly visit (flooding) your website pages in a short period (every few seconds).

    RunCLoud Log file

    Who is the IP address?
    Write down the suspicious IP addresses. It is a good idea to check who owns the IP addresses before blocking them. You do not want to mistakenly blocking a genuine visitor like Google bots, right? Simply visit https://who.is/ to check the owner of an IP address.

    Block IP address using WordPress .htaccess file

    Warning: Your website may not be accessible if you mess up the .htaccess file. Please make sure you backup your .htaccess file before edit it.

    Now you have a list of bad IP addresses you want to ban them from visiting your website. You can easily block the IP addresses using .htaccess file.

    Please note that .htaccess file only works if you are using Apache or NGINX+Apache2 Hybrid web server stack.
    A default WordPress .htaccess file will look like the below:

    # BEGIN WordPress
    <IfModule mod_rewrite.c>
    RewriteEngine On
    RewriteBase /
    RewriteRule ^index\.php$ - [L]
    RewriteCond %{REQUEST_FILENAME} !-f
    RewriteCond %{REQUEST_FILENAME} !-d
    RewriteRule . /index.php [L]
    </IfModule>
    # END WordPress

    Depends on your site configuration, your .htaccess file may look different. It is fine. Make sure you make a backup copy of the .htaccess file.

    Edit your WordPress .htaccess file using any plain text editor (or RunCloud web based file editor) and add the following lines to the top of the file:

            Order Allow,Deny
            Allow from All
            # add new line to block eacg IP address
            # 192.168.8.1

    Add each IP address that you want to block as a new line below the above lines. Save the .htaccess file and any visitors with the IP addresses are unable to access your site.

    Tip: You can temporary unblock an IP address by comment it — add a “#” at the beginning of the line.

    Bonus: 6G Firewall

    Now that you know how to block an IP address using WordPress .htaccess file. It is a small step to fight malicious visitors.

    Blocking visitor by IP address is a temporary solution because IP addresses change constantly. It is best for quickly blocking certain visitors.

    Check out the 6G Firewall by Jeff Starr, if you are looking for more complete WordPress security protection using only .htaccess file. It is free and open source.

    Fine-tuned to minimize false positives, the 6G Firewall protects your site against a wide variety of malicious URI requests, bad bots, spam referrers, and other attacks.

    Hope this article is helpful to you fighting annoying malicious visitors to your WordPress site. Please share with us about how do you ban bad website visitors in the comment.

    Wrapping Up

    RunCloud is a powerful and easy-to-use platform that helps you manage your websites on any cloud server. With RunCloud, you don’t need to be a Linux expert to set up, secure, and optimize your web applications. You can do everything from a simple and intuitive dashboard, saving you time and hassle.

    RunCloud supports various web servers, PHP versions, databases, and frameworks. You can also monitor your server performance, back up your data, and automate your tasks with RunCloud. Whether you are a developer, a freelancer, or a business owner, RunCloud can help you run your websites faster and smoother.

    What are you waiting for? Join RunCloud today and enjoy the best web hosting solution for your websites. It’s free for 7 days, no strings attached!

  • Using Mailgun To Send Transactional Email From WordPress

    Using Mailgun To Send Transactional Email From WordPress

    What is Transactional Email

    Transactional email is the email sent when something triggered from your Web Application such as resetting the user password.

    My WordPress didn’t send email

    This is a common problem if you didn’t configure your server to relay email. Configuring the server to send email is hard. How hard it is? You need to pass 6 marks in MailTester to send an email to Gmail. And your email must be sent using SSL/TLS. Instead of sending email using secure communication, a perfect Simple Mail Transfer Protocol (SMTP) server would require you to set DomainKeys Identification Mail (DKIM), Sender Rewriting Scheme (SRS) (If you are sending email from multiple domains), Sender Policy Framework (SPF), Pointer Record (PTR) and also Domain Message Authentication Reporting (DMARC). Apart from that, you have to deal with messy Postfix configuration which you can’t understand at first look of its configuration files. You read it right, files, not file.

    What is MailGun

    MailGun is a transactional email service. It is a good third party email service which you can use to send your email to any available email without dealing with messy configuration. MailGun can send up to 10,000 emails per month for free and that is why we are suggesting MailGun for your transactional email service. We are not affiliated to MailGun in any way and we are recommending it because it is the best transactional email service we have tried so far. If you don’t want to use MailGun and insisted on sending email from your own server, take a look at our post on how to send email via PHP.

    Registering to MailGun

    When you are registered to MailGun, you need to add your Credit Card. They won’t charge you if you didn’t reach 10,000 emails per month. If you didn’t add your Credit Card, your email is limited to only whitelisted emails (we won’t discuss what it is).

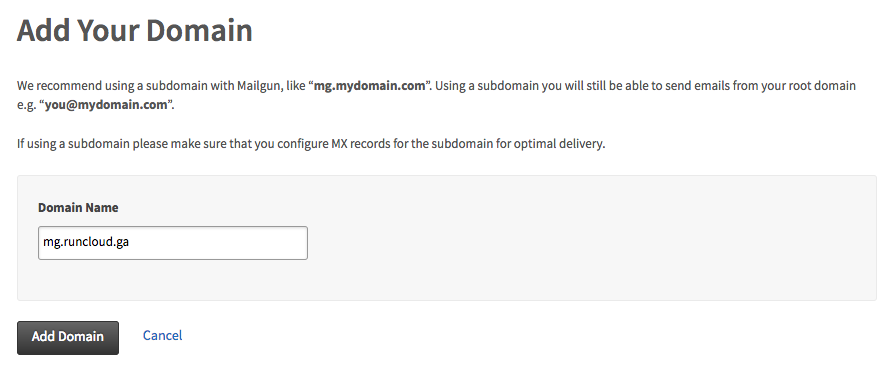
    Adding A New Domain To MailGun

    To add a new domain, MailGun will ask you to use a subdomain instead of the root domain. In this tutorial, I will show you how to configure MailGun for runcloud.ga domain. As suggested by MailGun, I will be using mg.runcloud.ga.

    Configuring DNS Records

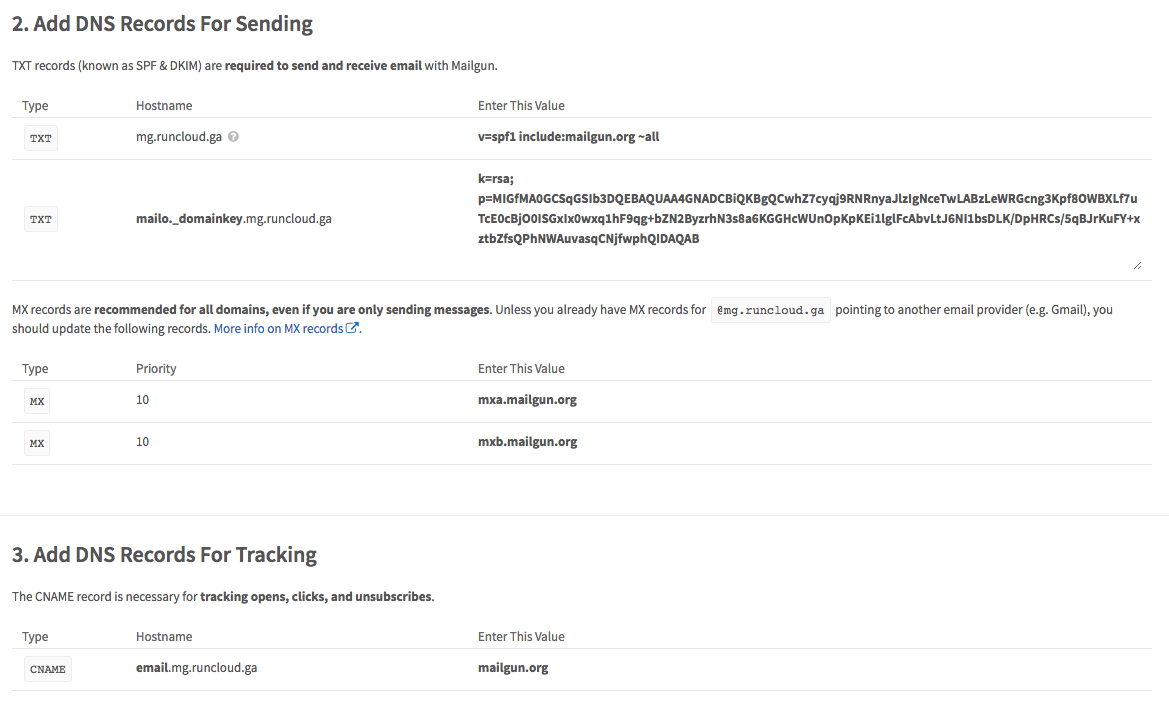
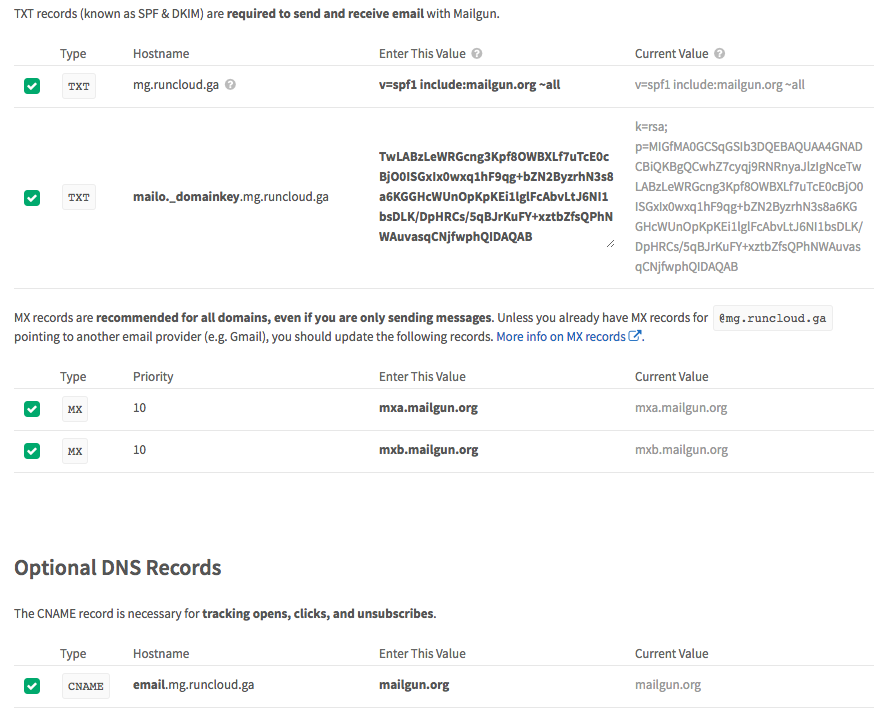
    After that, you will receive configuration options like the image below.

    Mailgun DNS records

    Don’t freak out! It is an easy setup. MailGun will ask you to add DNS record as shown above. I am a fan of Cloudflare DNS (only the DNS), and I am using their DNS service to manage my runcloud.ga domain. If you are using other DNS Service such as DNSMadeEasy, Digital Ocean DNS, or Linode DNS, this configuration won’t be any different.

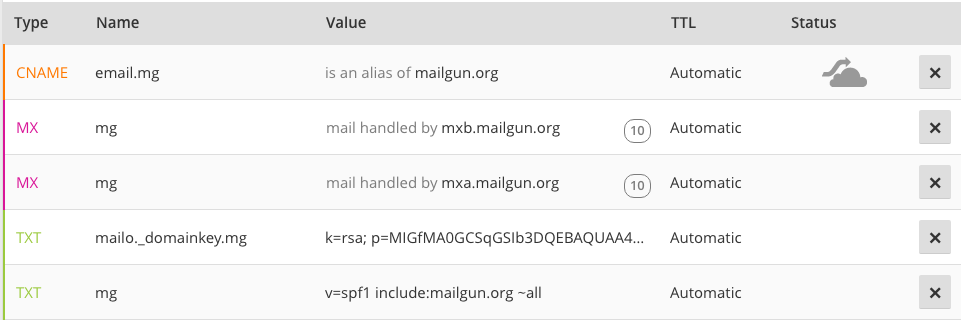
    After filling out the DNS Records inside Cloudflare, we will get the settings like the image below.

    Check DNS Records

    After filling in the DNS records, wait for at least 1 minutes (if you are using Cloudflare) and go back to MailGun. You will see a button to check DNS Records. By clicking that button, you should get all green check marks if you do everything right.

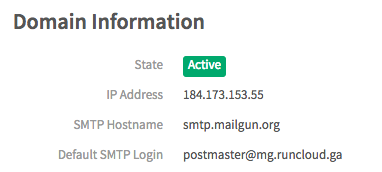
    Besides that, you can see your domain is active inside MailGun

    Creating MailGun Sender Account

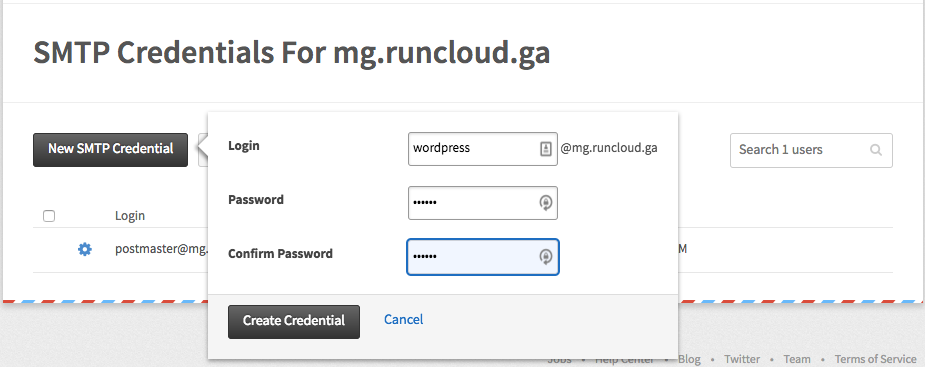
    To add a sender account, click Manage SMTP Credentials inside MailGun. Fill in the data like the image below.

    You can use any username that you want. For me, I simply choose wordpress@mg.runcloud.ga. And don’t forget the password. We will use this account in the next step.

    WordPress SMTP Plugin

    There are plenty of WordPress plugins for SMTP and my suggestion is Easy WP SMTP and SMTP Mailing Queue. What is the different between both plugins? Easy WP SMTP just a plugin to replace default WordPress email sending method. While SMTP Mailing Queue will queue the email and send the email using cronjob. Check out our post on how to enable true cron job and make WordPress faster.

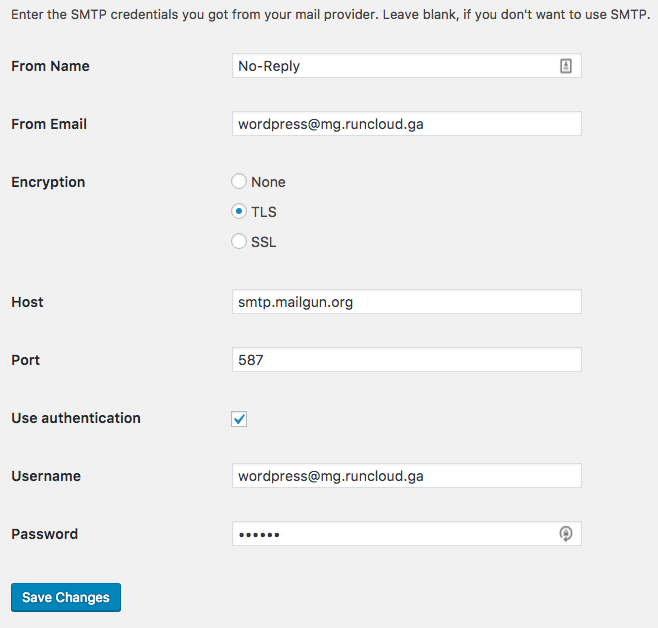
    SMTP Settings

    Inside any SMTP plugins that you are using, every plugin won’t differ much in configuration. All of them will ask for SMTP host, encryption, port, and credential. Now fill in the data with the same credential that you have created inside MailGun.

    For the host, MailGun uses smtp.mailgun.org. For the port, you can use either 25, 587 or 465.

    Testing

    Some of the plugins that you are using may have a function to test sending email. But if your plugin doesn’t have it, just request a forgot password from WordPress.

    Wrapping Up

    RunCloud is a powerful and easy-to-use platform that helps you manage your websites on any cloud server. With RunCloud, you don’t need to be a Linux expert to set up, secure, and optimize your web applications. You can do everything from a simple and intuitive dashboard, saving you time and hassle.

    RunCloud supports various web servers, PHP versions, databases, and frameworks. You can also monitor your server performance, back up your data, and automate your tasks with RunCloud. Whether you are a developer, a freelancer, or a business owner, RunCloud can help you run your websites faster and smoother.

    What are you waiting for? Join RunCloud today and enjoy the best web hosting solution for your websites. It’s free for 7 days, no strings attached!