Blog

  • How to Connect a MySQL Database to PHP (A Developer’s Guide)

    How to Connect a MySQL Database to PHP (A Developer’s Guide)

    PHP and SQL are two of the most commonly used tools in web development. PHP is a server-side scripting language that is used to create dynamic web pages, while SQL is a database management system that is used to store and retrieve data.

    You don’t need to be a Linux expert to manage your servers anymore.

    In this article, we will show you how to connect a MySQL database to PHP using the RunCloud dashboard.

    We will also discuss two main ways to connect PHP to MariaDB: using mysql_connect and PDO.

    Step 1: Create a Database

    Before we can start using a database, we need to create a database on the server. We also need to create a user account with permissions to access this database. This can be done easily from the RunCloud dashboard itself.

    Open the server on which you want to deploy your application, and click on the “Databases” button in the left menu.

    On the next screen, click on “Database Users” and then select “Add New Database User” to create a new user account.
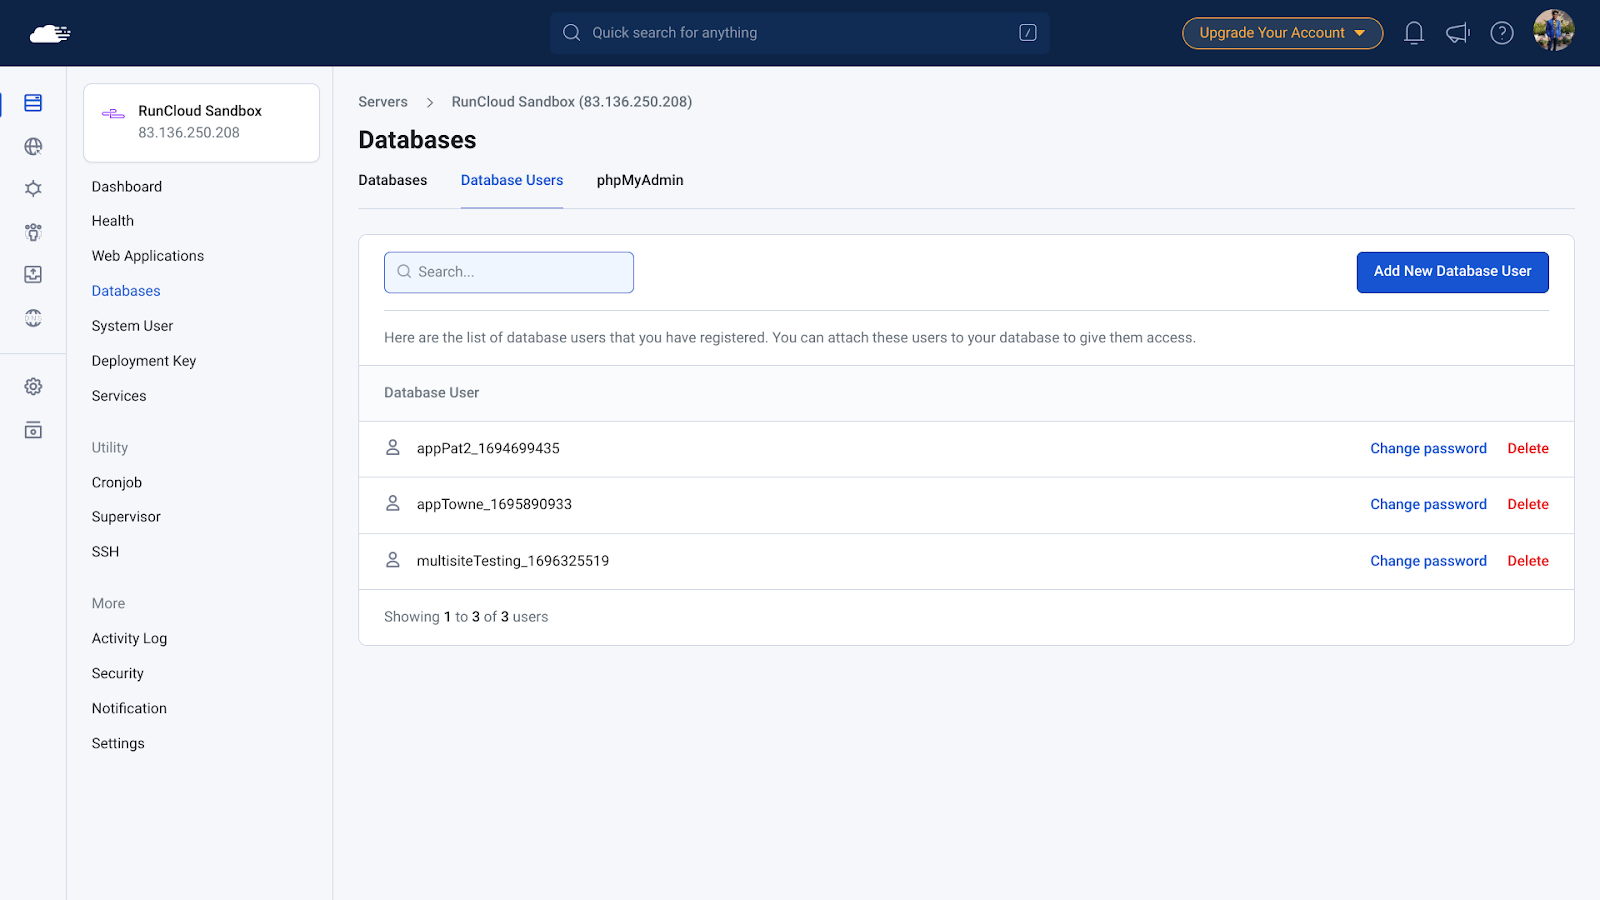
    On the next screen, give a descriptive name to the user account and set a password. Be sure to note down these credentials as they will be needed later. Once you have provided the username and password, click “Save” to create the user.

    Next, we need to create a database. Click on the “Databases” tab to view all the available databases. To create a fresh database, click on “Add New Database”.
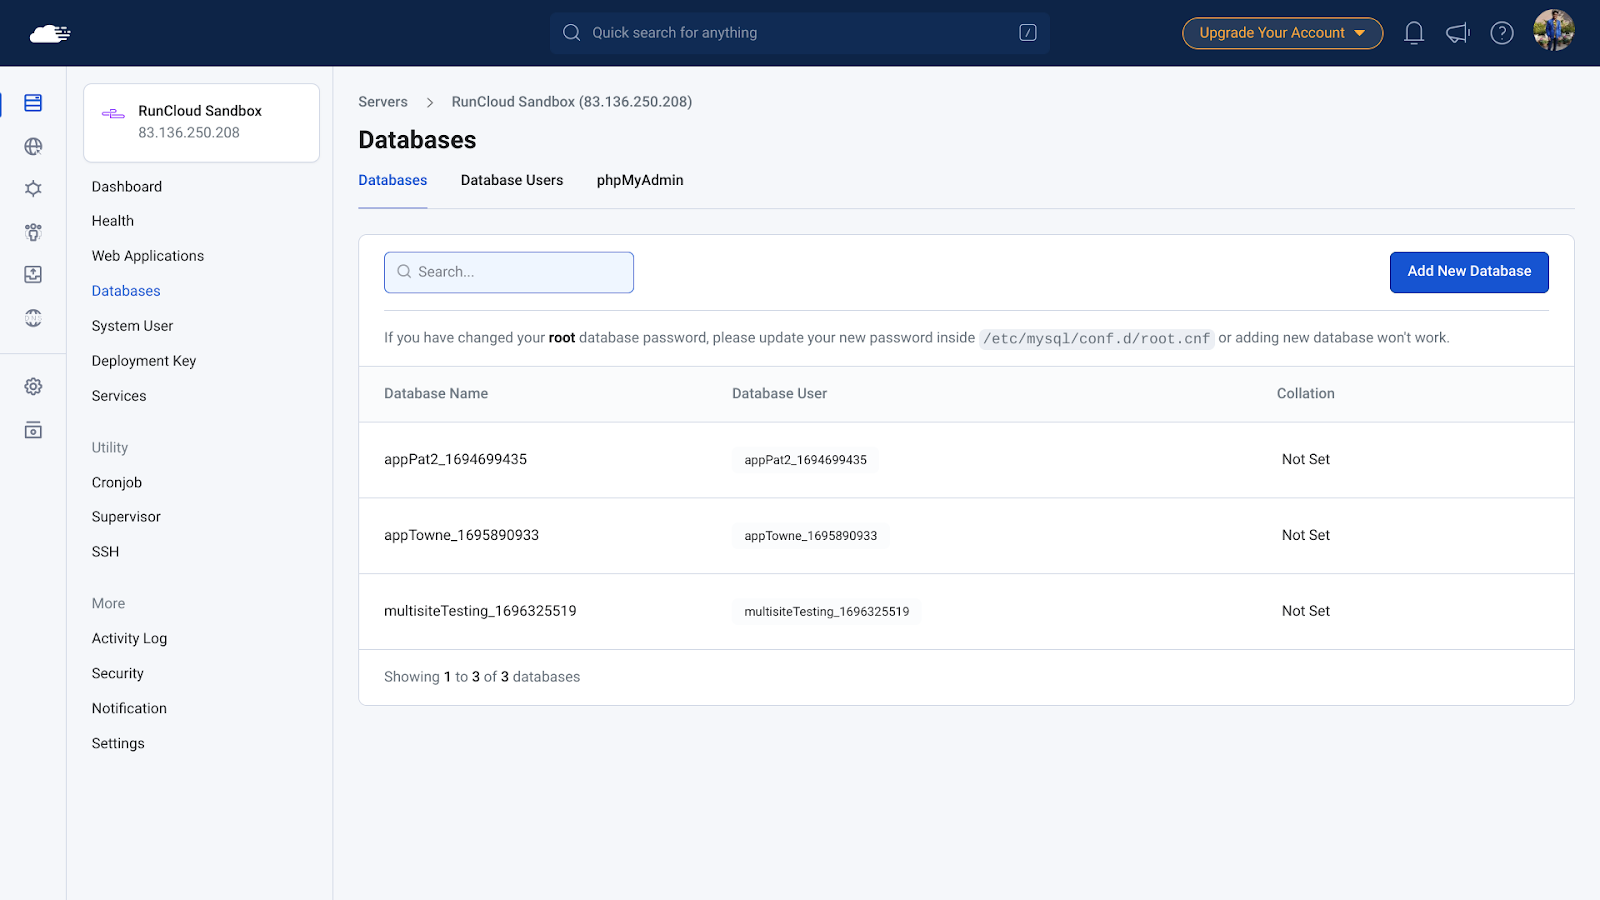
    When creating a database you will be asked to provide a name – this can be anything you like. For database collations, you can either leave it blank or refer to our documentation post: Understanding Database Collations.
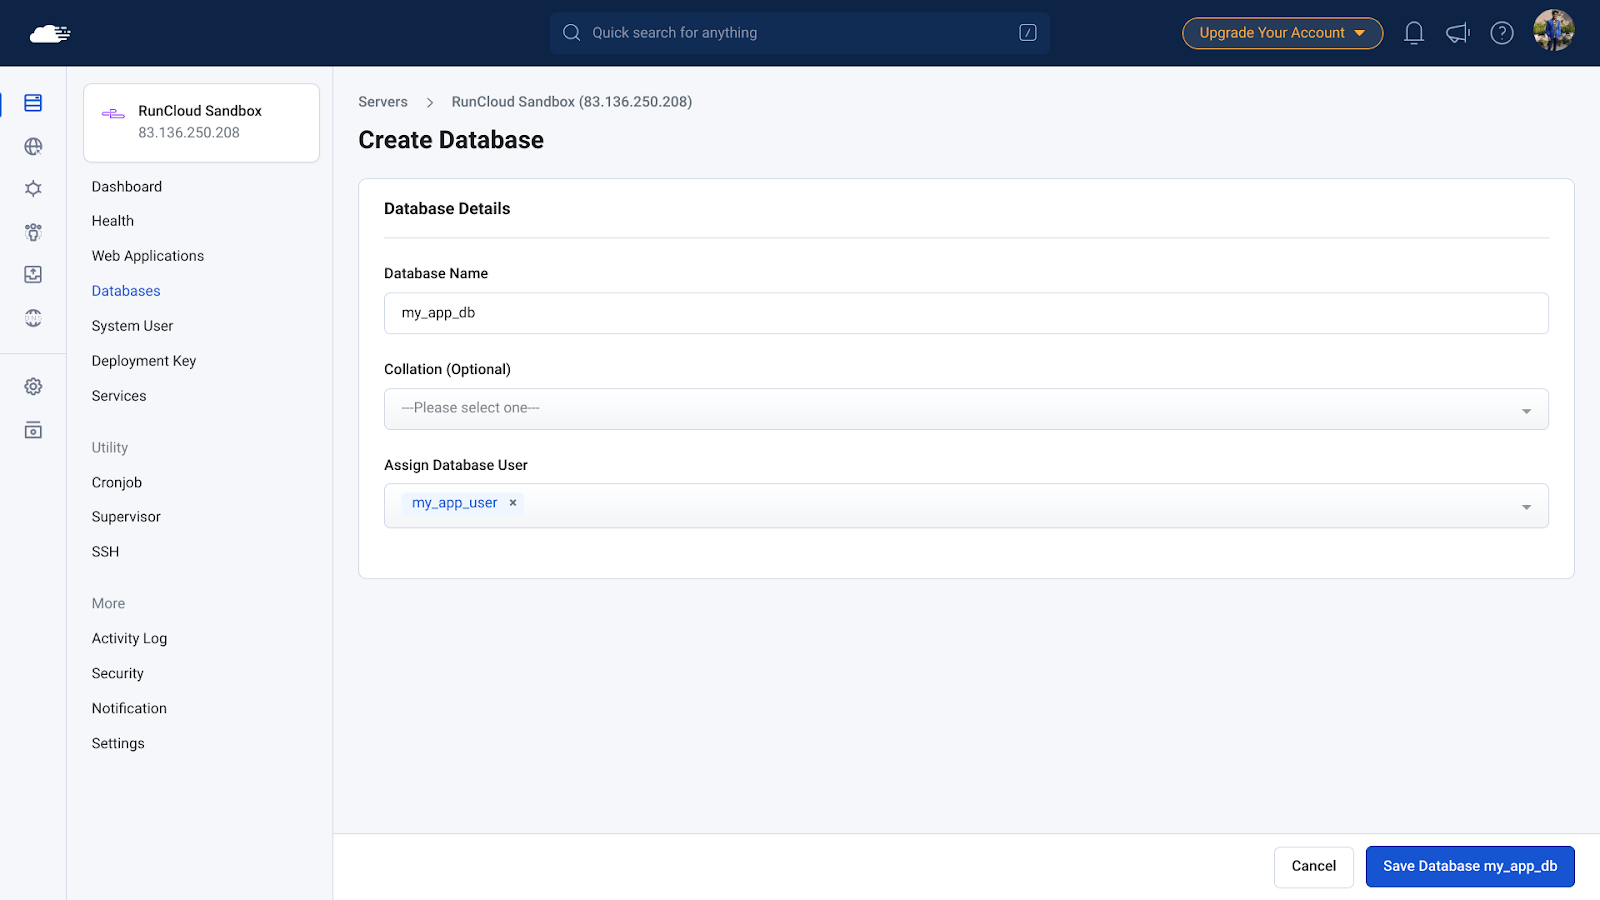
    Finally, from the drop-down menu, select the user account that we created earlier.

    Once you have configured these settings, click on “Save”.

    Step 2: Connecting to Web Applications

    You must deploy a web application on the RunCloud server to run your PHP code. The process to create an application is very simple. In this tutorial we will be creating an empty web application, but the process is similar for any other type of application.

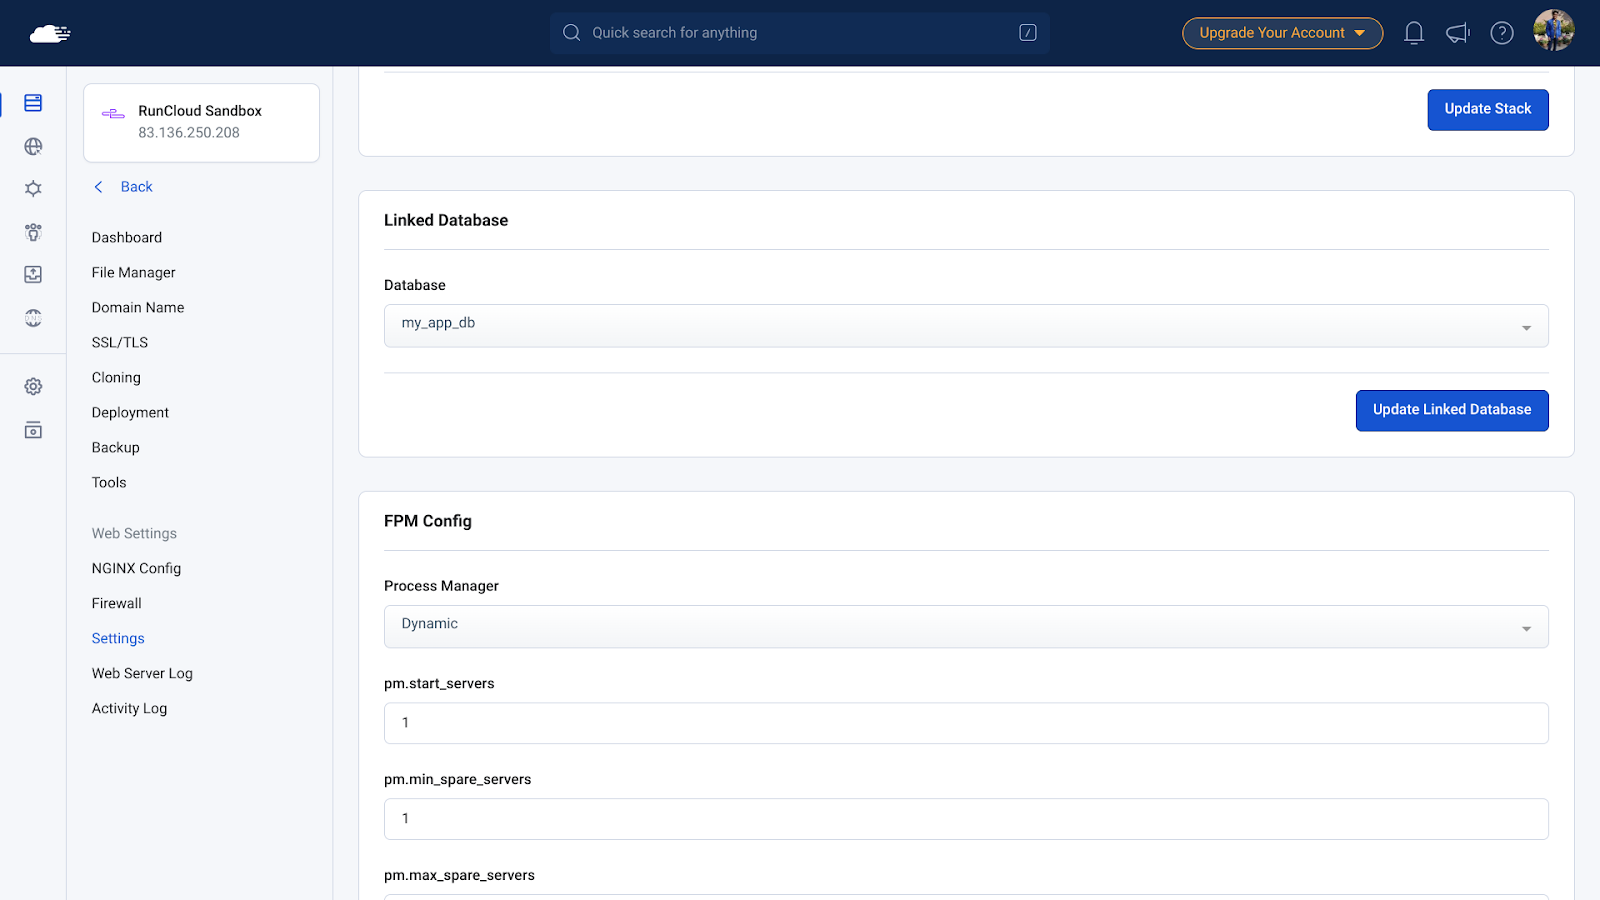
    Firstly, go to your web application settings page in the RunCloud dashboard, and scroll down until you see the linked databases section.

    Click on the drop-down button, select the database that we just created, and then save the changes.
    Next, we will create a PHP file on your server that will host the code to connect to your database.

    To do this, click on the File Manager tab in the left menu. Here you will see a list of all the files present in your application.

    Click on New > File to create an empty file, and then give it the desired name.
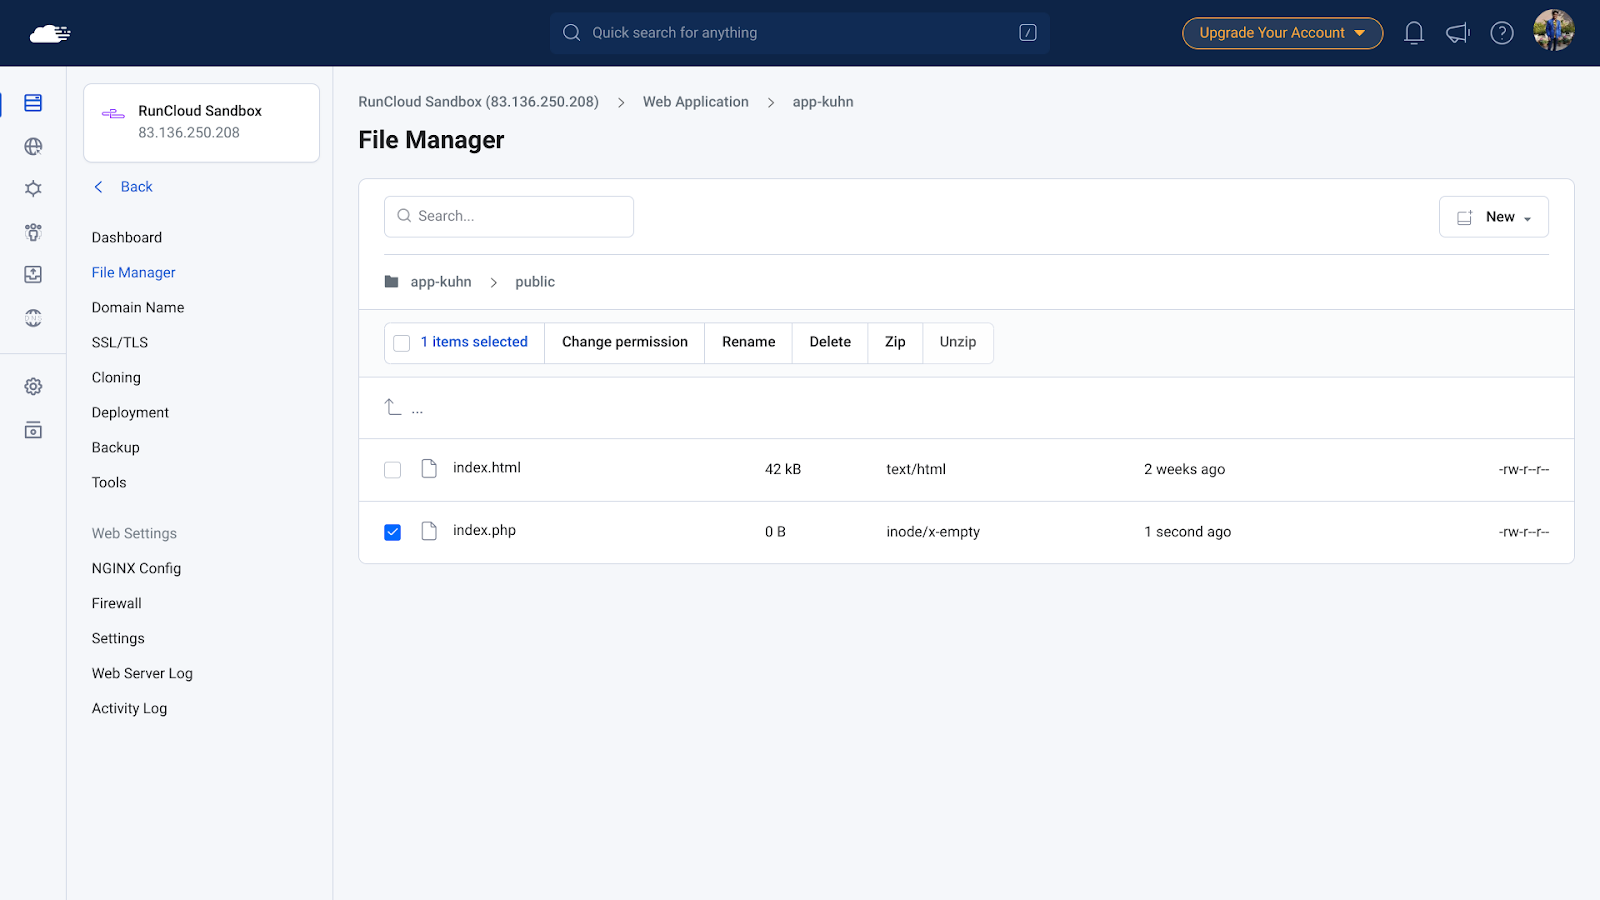
    Once you have created the file, click on it. This will open the text editor in a new window where you can edit the file.

    Step 3: Coding Database Connection Module

    The final step for using a database in your web application is to configure a pre-built library. This will allow you to perform database operations without needing to understand how the database handles these operations. There are two popular ways to do this:

    Step 3.1: Use MySQLi

    The mysqli connect is a PHP extension used to connect to MySQL databases. It is a simple and easy-to-use method that is ideal for small projects. It is also faster than PDO because it is a native PHP extension. However, it does not support all of the features of PDO.

    To use this module, paste the following code snippet in the text editor. Make sure to replace the values of database, username, and password variables with the credentials that you noted down earlier.

    <?php
    $servername = "127.0.0.1";
    $database = "my_app_dv";
    $username = "my_db_user";
    $password = ".GA8sn,tsP=?5Uy7Lqu#iBy:AzVs3KJE";
    // Create connection
    $conn = mysqli_connect($servername, $username, $password, $database);
    // Check connection
    if ($conn->connect_error) {
        die("Connection failed: " . $conn->connect_error);
    }
    echo "Connected successfully";
    mysqli_close($conn);
    ?>
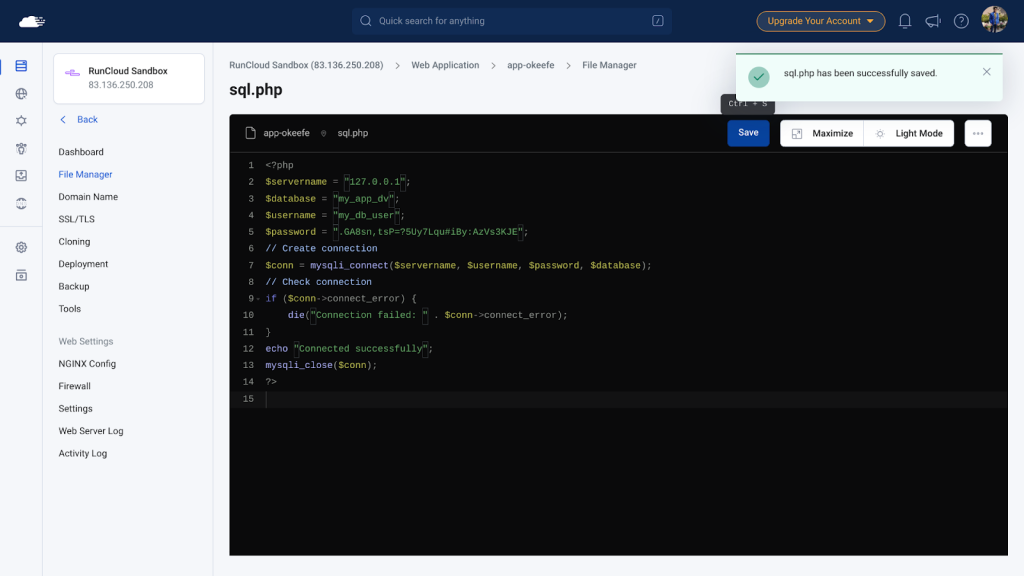
    Step 3.2: Use PDO

    PDO is a PHP extension that provides a data-access abstraction layer. PDO also supports multiple database drivers, which makes it more flexible than mysqli connect. However, it is slower than mysqli connect because it is not a native PHP extension.

    To use this method, copy the following code example and paste it into your text editor. Don’t forget to update the credentials in the first three lines with the values that you noted down earlier.

    <?php
    $database = "my_app_dv";
    $username = "my_db_user";
    $password = ".GA8sn,tsP=?5Uy7Lqu#iBy:AzVs3KJE";
    $dsn = "mysql:host=127.0.0.1;dbname=$database;charset=utf8mb4";
    $options = [
        PDO::ATTR_EMULATE_PREPARES => false, // Disable emulation mode for "real" prepared statements
        PDO::ATTR_ERRMODE => PDO::ERRMODE_EXCEPTION, // Disable errors in the form of exceptions
        PDO::ATTR_DEFAULT_FETCH_MODE => PDO::FETCH_ASSOC, // Make the default fetch be an associative array
    ];
    try {
        $pdo = new PDO($dsn, $username, $password, $options);
        echo "Connected Successfully";
    } catch (Exception $e) {
        error_log($e->getMessage());
        exit("Something bad happened");
    }
    ?>
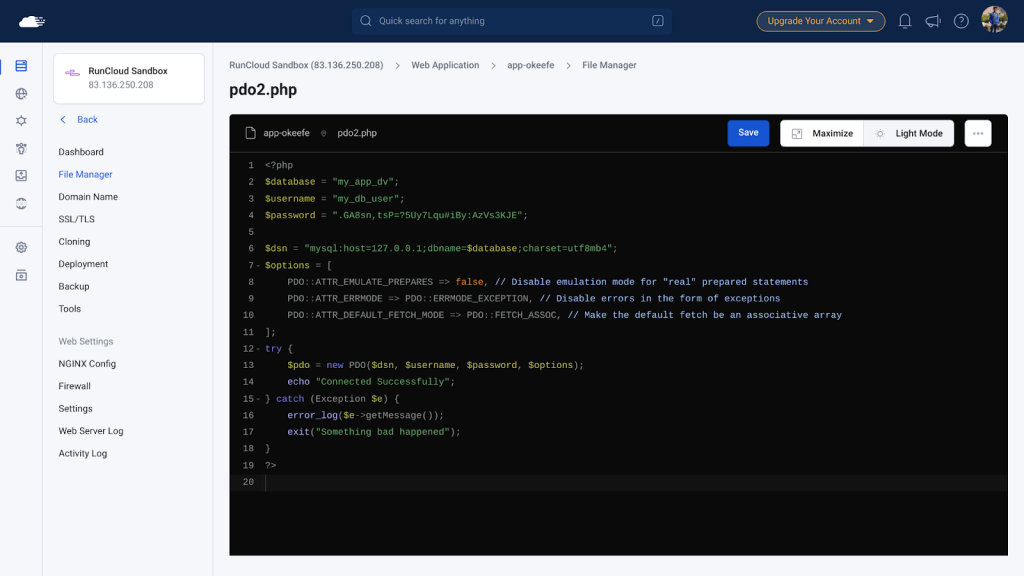
    Step 4: Save and Test Connection

    Once you have added the code to your server, click on “Save” to save the changes, and then visit the page in your browser. When you request this page, the server will execute the PHP code and establish a connection to the server.

    The exact path of this page will vary depending on what you named the file. For instance, if the domain name of your website is https://www.example.com and you named your file sql.php then you can browse this file at https://www.example.com/sql.php.

    If you see a “Connected Successfully” message then it means your code has successfully established a connection with your database, and you can now start using it in your code.

    Wrapping Up

    In this article, we have seen how to connect a MySQL database to PHP. We have outlined the steps needed for creating a database and granting permissions to user accounts before connecting to the database. We discussed two main ways to connect PHP to MariaDB: using mysqli connect and using PDO – both methods have their own benefits and drawbacks.

    If you want to host your web application on the cloud, but aren’t sure where to start, then you should check out RunCloud.

    RunCloud is a great platform for managing your servers, even if you are not a Linux expert.

    With RunCloud, you can easily create web applications, manage databases, and connect PHP to MariaDB. So, what are you waiting for?

    Sign up for RunCloud today and take your server management skills to the next level!

  • Best 9 htop Alternatives for Linux, Mac & Windows in 2025

    Best 9 htop Alternatives for Linux, Mac & Windows in 2025

    When it comes to monitoring system resources on Linux, htop has been the go-to tool for many administrators and developers alike. Its simple interface and real-time metrics have made it a staple in the toolkit of those who prefer a comprehensive overview of their system’s performance.

    You might already know about htop, a great tool for monitoring resource usage on your computer, but it is not the only one out there. In this post, we will show you the best 9 htop alternatives for Linux (including Ubuntu and CentOS), Mac and Windows in 2024.

    Let’s get started!

    What is htop?

    htop is an interactive system-monitoring tool for Unix systems, including Linux. It provides real-time insights into system performance, allowing users to view and manage system processes more efficiently than with the traditional top command. htop displays system metrics such as CPU, memory, swap usage, and process information in a user-friendly, color-coded interface. Users can interact with the tool to perform tasks such as killing processes, renicing tasks, and sorting processes by various criteria.

    Unlike the standard top command, htop offers a more dynamic and user-friendly experience. It supports vertical and horizontal scrolling, making it easier to view all processes running on the system, and includes features such as searching for processes, tree view for process hierarchy, and customizable display options. htop is highly customizable and can be configured to suit individual preferences and needs.

    Suggested read: How to Copy Files in Linux and Overwrite without Confirmation

    3 Best htop Alternatives for Linux

    While htop is a powerful tool, there are several alternatives that provide additional features and cater to different use cases. Here are three of the best htop alternatives for Linux:

    Glance

    Glance is a cross-platform monitoring tool that provides a unified view of system metrics. It is designed to be simple yet comprehensive, displaying essential information about CPU, memory, disk I/O, network interfaces, and processes. Glance is easy to use and provides a web-based interface for remote monitoring.

    How to Install Glance

    To install Glance, follow these steps:

    1. Install Glance: You can use the apt package manager to install Glance on your Linux computer by using the following command:
    sudo apt install glances
    1. Run Glance: After installing the glance, you can start it by executing the following command:
       glances

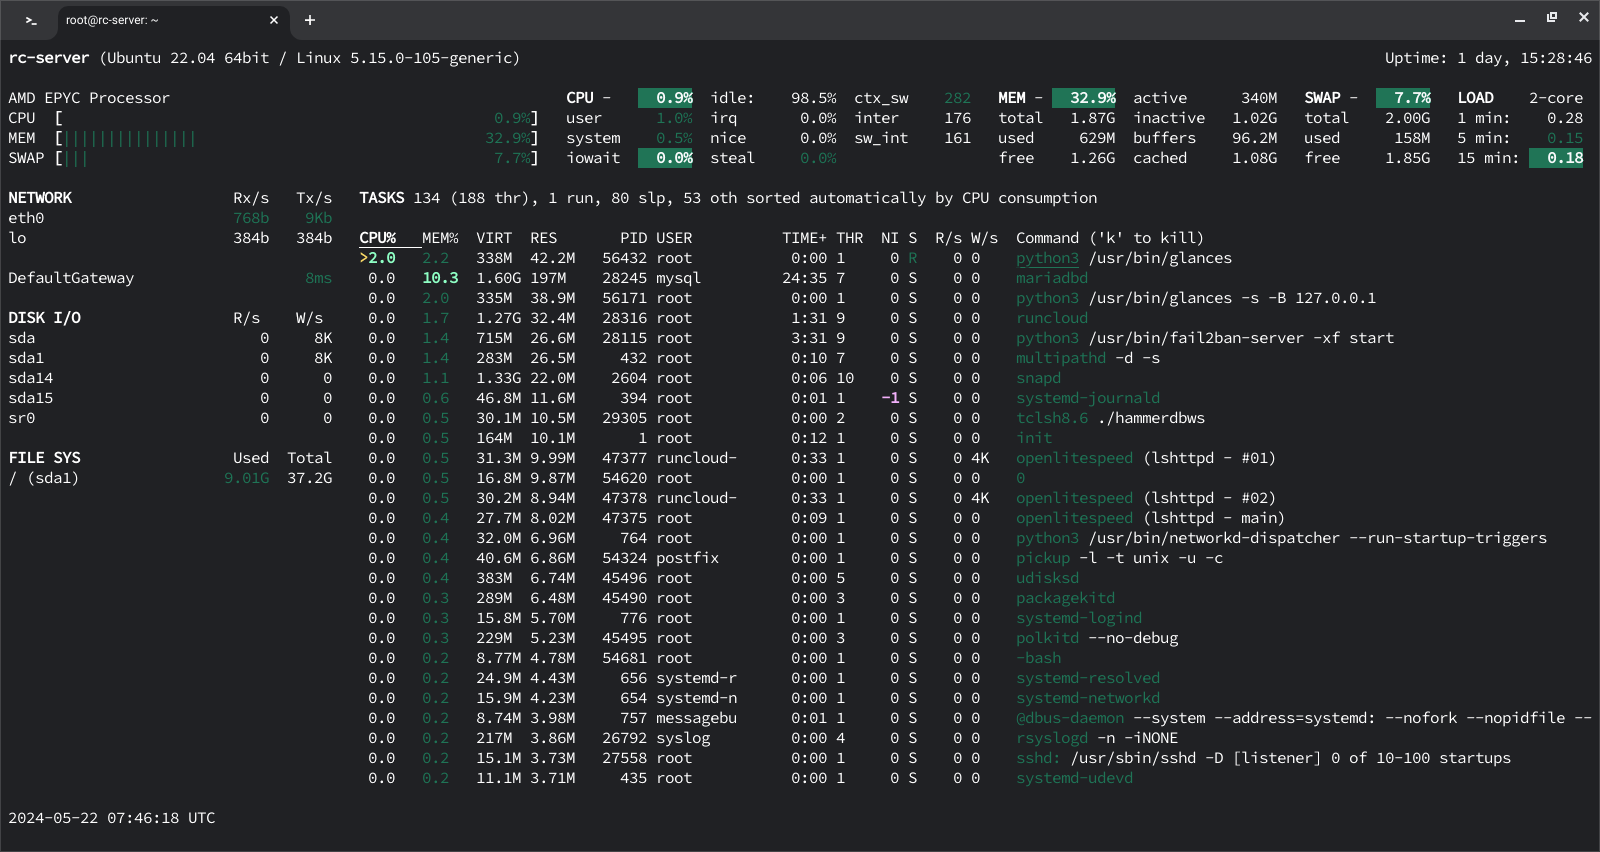
    In the above example, we can see how the Glances displays an overview of the system resources in the terminal over an SSH connection.

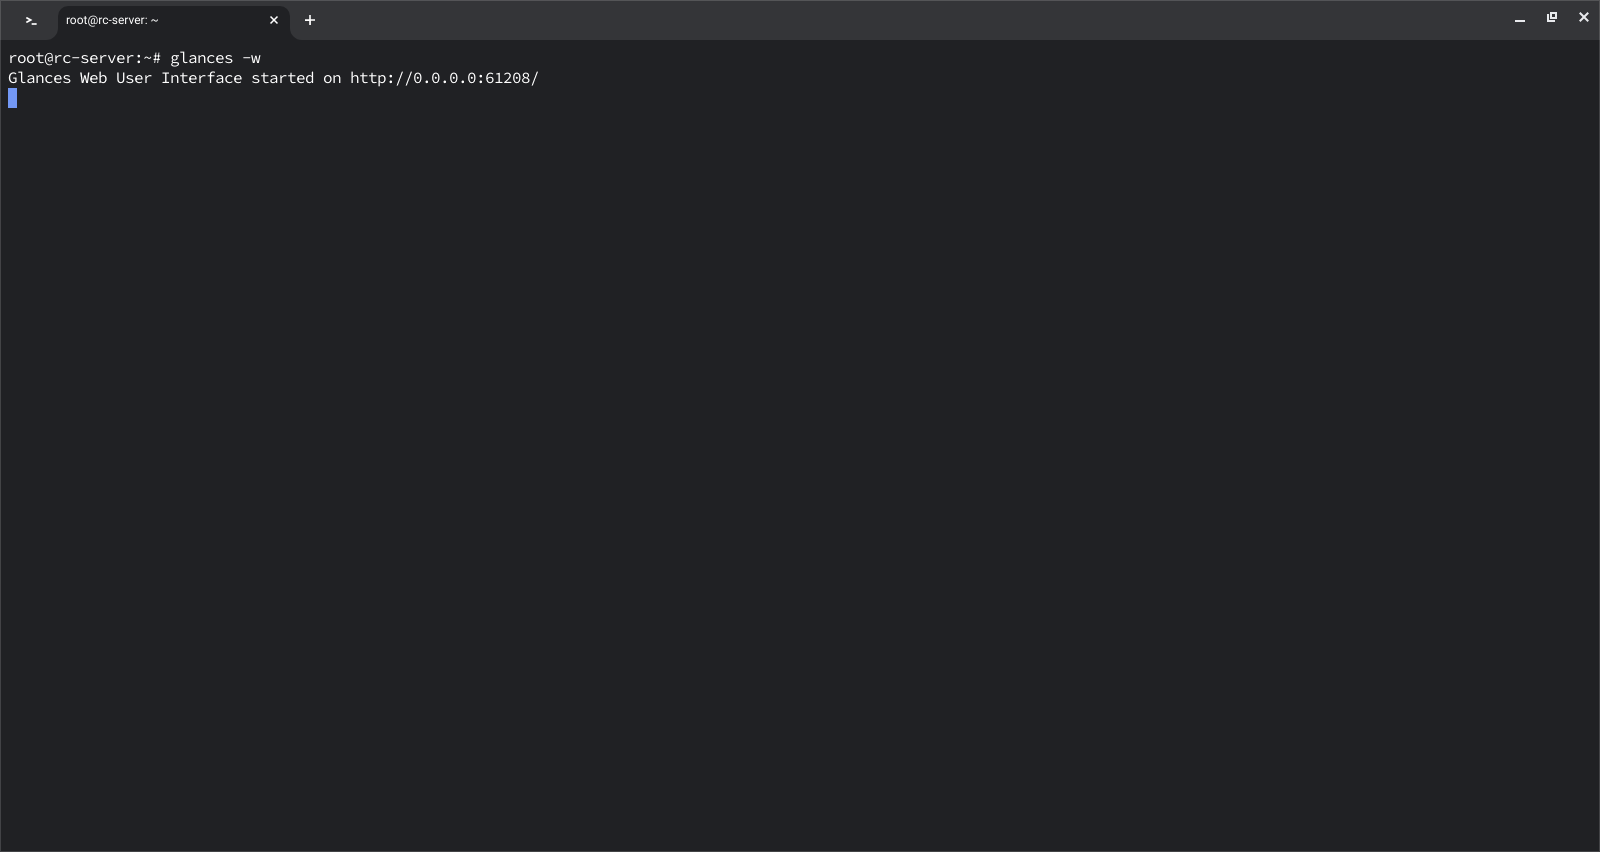
    1. Web Interface (Optional): If you want to access the same information over a web interface, then you can start the Glance with the -w parameter, this will start a web server where you can see your resource usage.
       glances -w

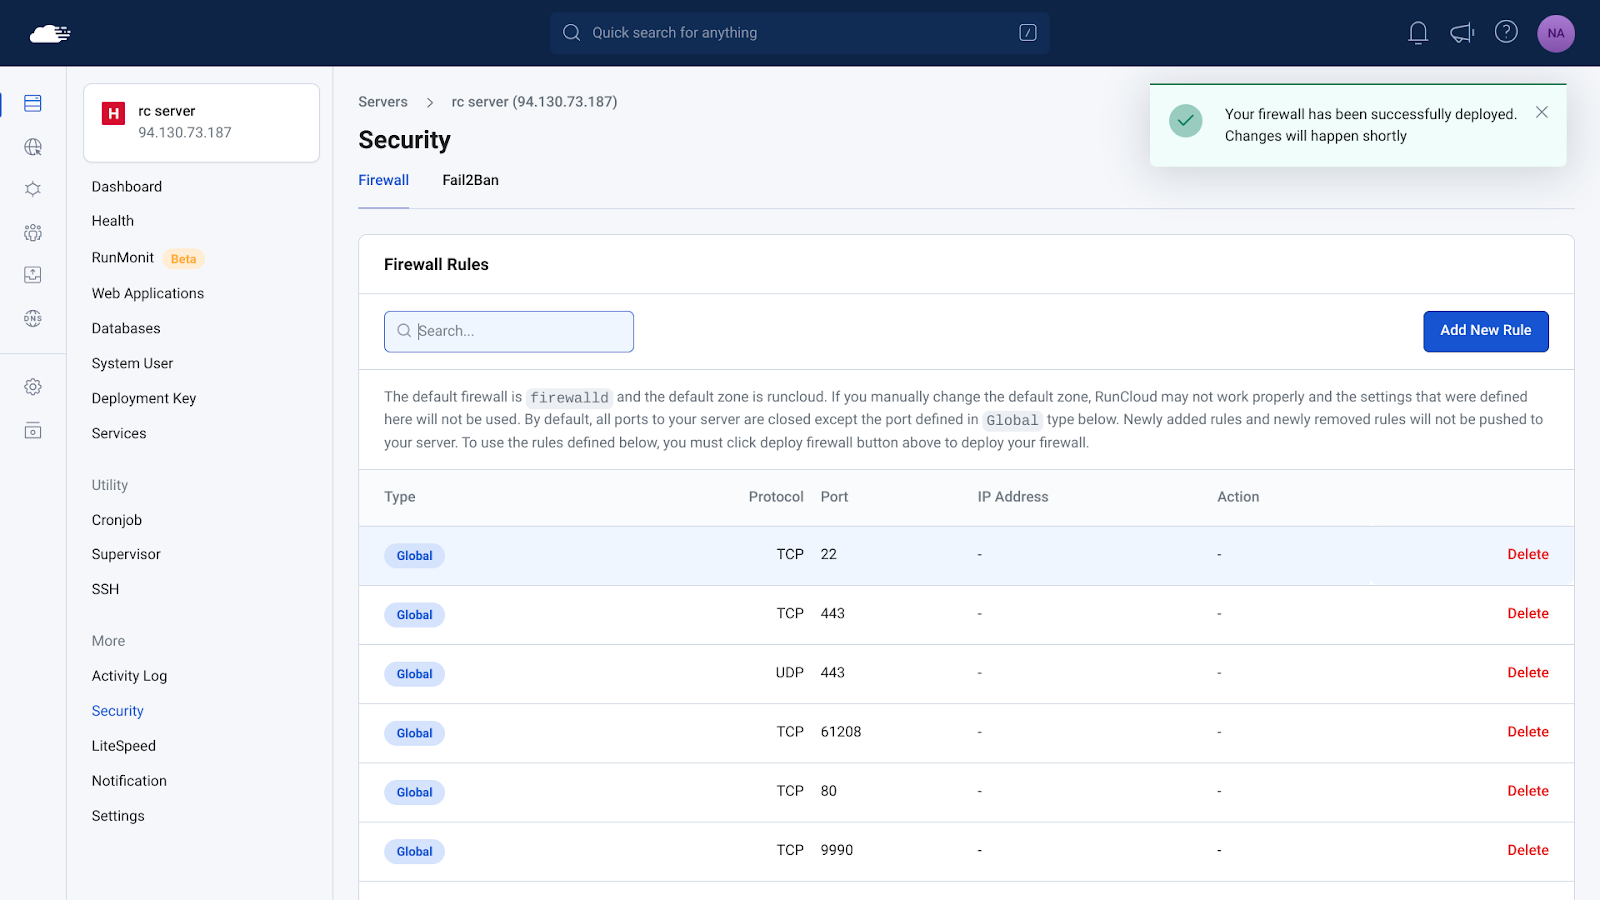
    In the above example, we can see that the server was started on localhost but if you are using a VPS then you will need to configure your firewall settings to view this interface. Fortunately, this is very simple using the RunCloud dashboard. Just go to the Security tab of your server and add a new rule to open your desired port.

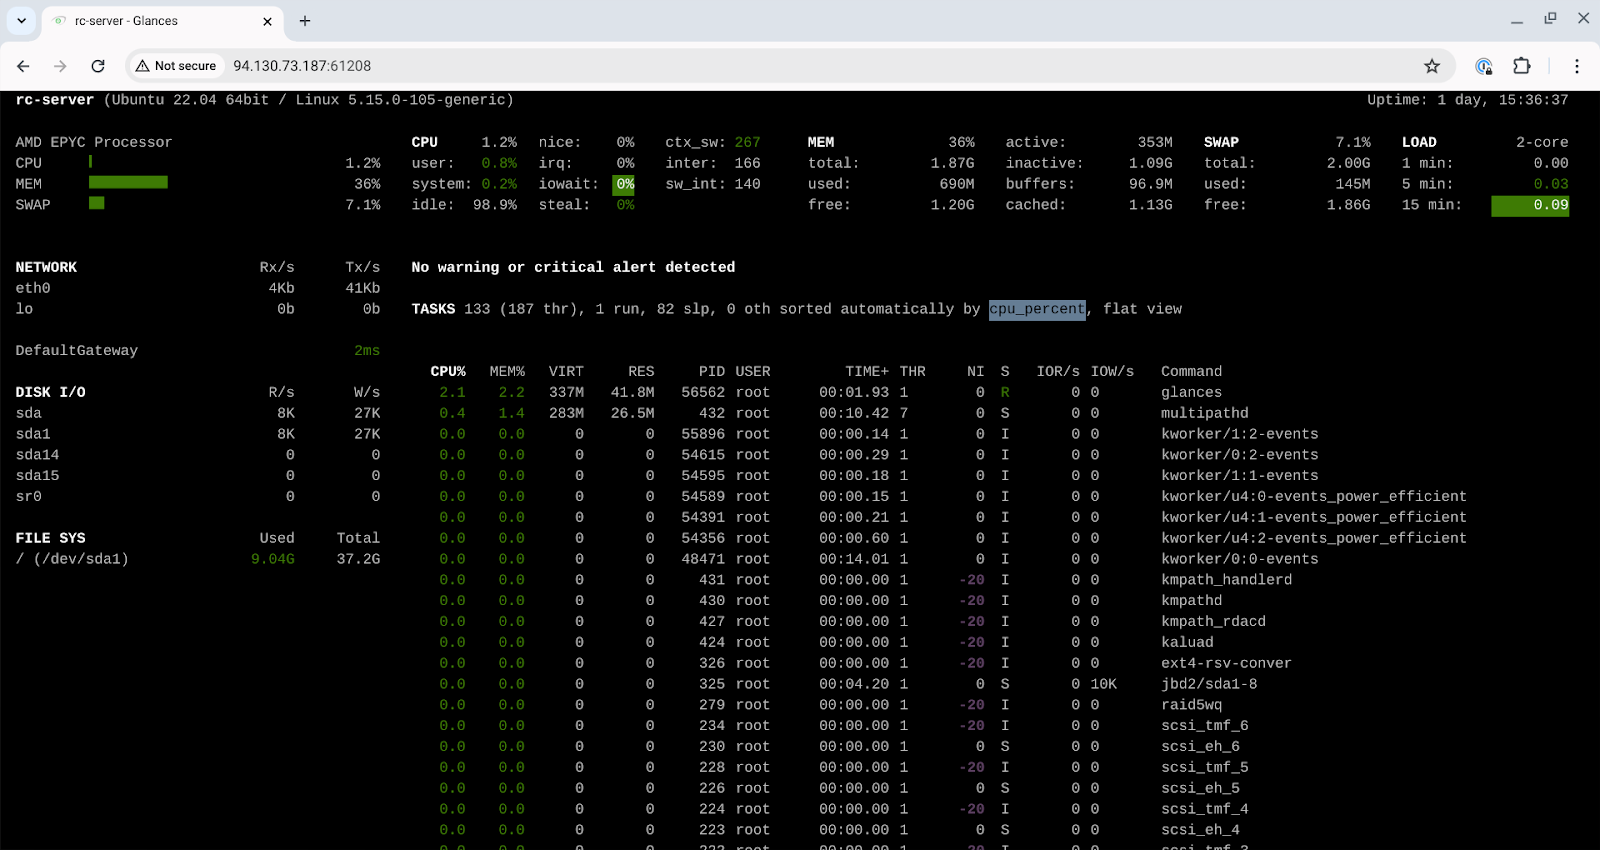
    In the above example, the Glances daemon was running on port 61208, once you have configured your firewall, you can access the same dashboard in your web browser by entering the IP address of your server followed by : symbol and the port number as shown below.

    Suggested read: Mastering the Echo Command in Linux (with Practical Examples)

    atop

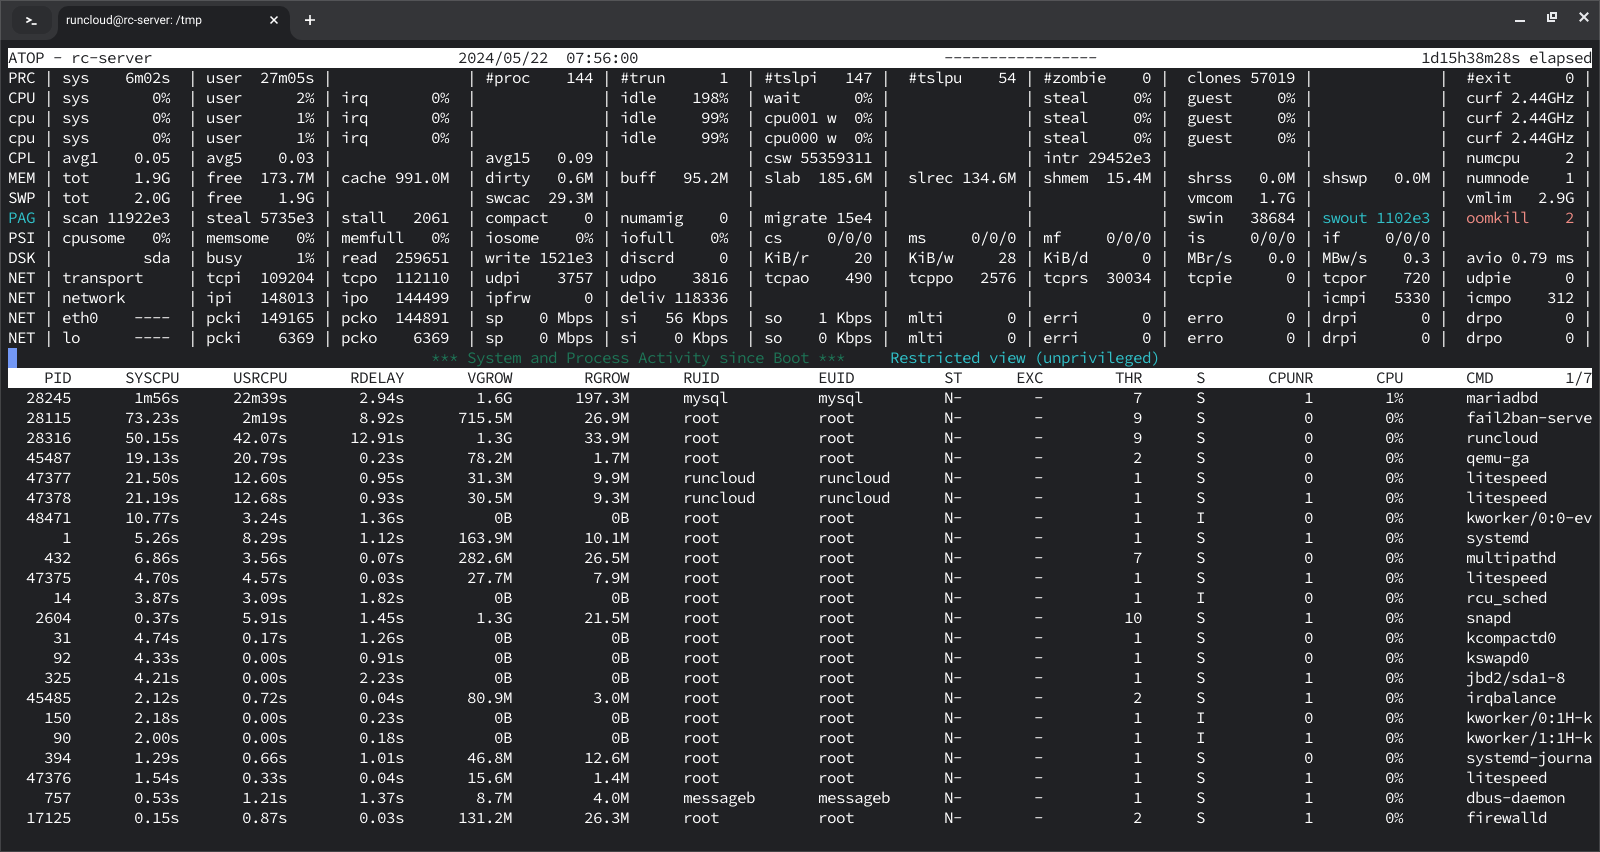
    atop is an advanced system and process monitor that provides detailed information about system resources. It is particularly useful for performance analysis and troubleshooting as it logs system activity and can show resource usage by individual processes over time. On Ubuntu, you can install and run atop with the following command:

    sudo apt-get install atop
    sudo atop

    In the above example, we can see the system metrics and resource usage on the server using atop dashboard. To enable logging, you can configure atop to run as a daemon by editing the configuration file located at /etc/default/atop and set LOGINTERVAL to a desired value (e.g., 600 for 10-minute intervals).

    Suggested read: What are Linux Logs? What Are They & How To Use Them

    nmon

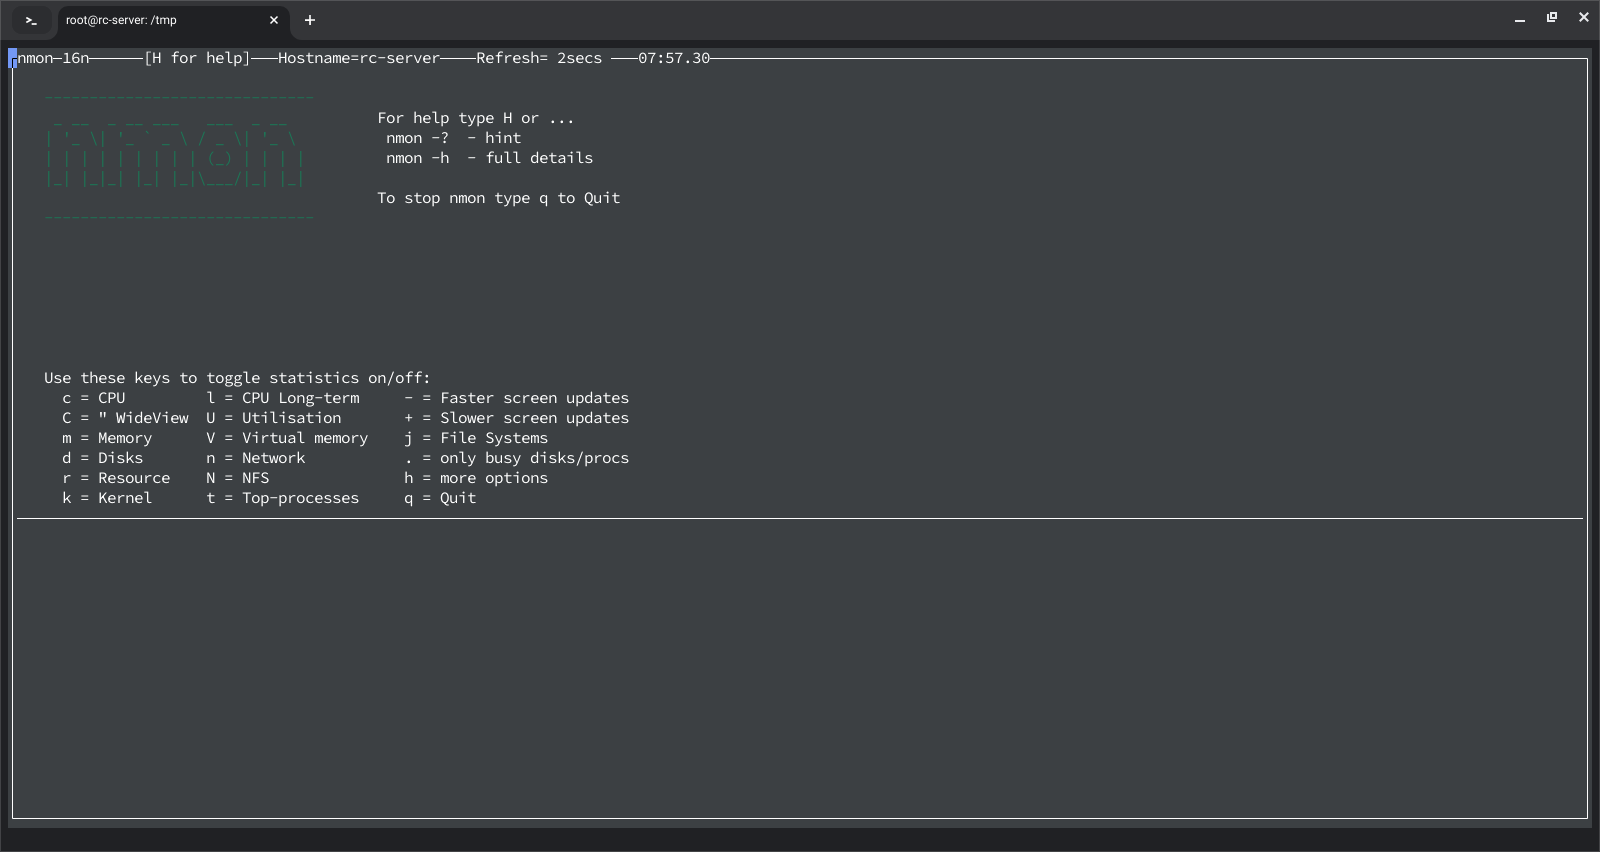
    nmon (Nigel’s Monitor) is a system performance monitoring tool originally developed for AIX and later ported to Linux. It provides a comprehensive overview of system performance, including CPU, memory, disk I/O, network, and filesystem statistics. nmon is known for its lightweight design and efficiency, making it suitable for real-time monitoring and historical performance analysis.

    To install nmon, first make sure that your package manager list is up to date, after that you can execute the following commands to download an run it:

    sudo apt-get install nmon
    nmon

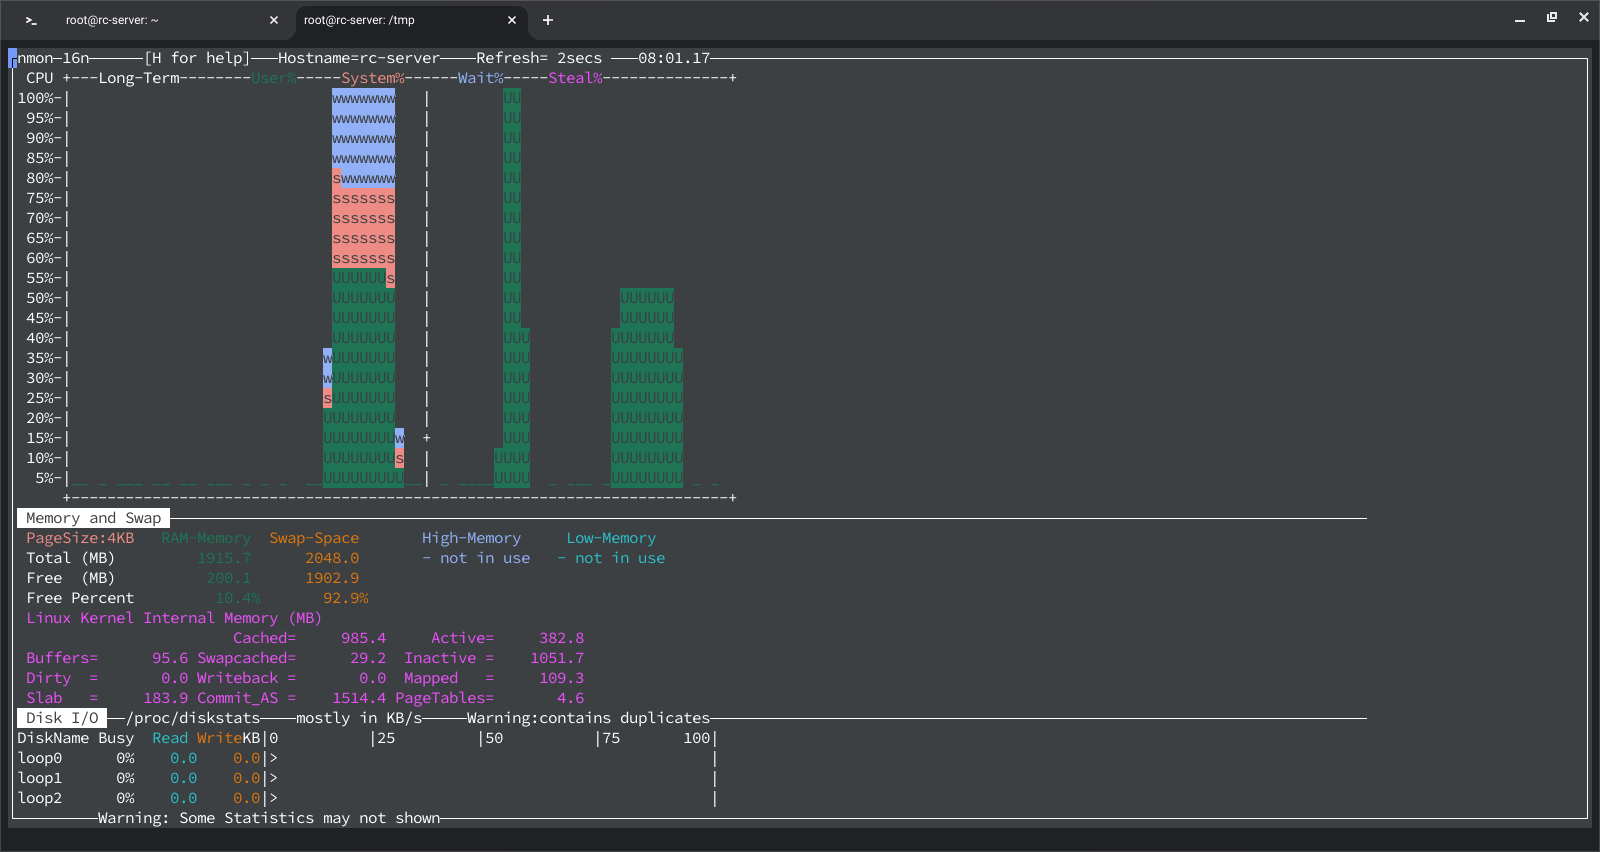
    Once running, you can use various keyboard shortcuts to view different metrics. For example, press c to view CPU usage, m for memory usage, and d for disk statistics.

    These alternatives to htop offer a range of features that can be tailored to specific monitoring needs, providing powerful tools for system administrators and users alike.

    Suggested read: How to Create and Manage Cron Jobs on Linux

    3 Best htop Alternatives for Mac

    Mac users often require robust system monitoring tools to keep track of their system’s performance and resources. While htop is a popular choice, several other tools offer similar and additional functionalities tailored to macOS. Here are three of the best htop alternatives for Mac:

    iStat Menus

    iStat Menus is a comprehensive system monitoring tool that integrates seamlessly with macOS. It provides real-time data on CPU usage, memory, disks, network activity, and other system metrics directly from the menu bar. iStat Menus is highly customizable, allowing users to choose which information to display and how to display it.

    How to Install iStat Menus

    1. Download: Visit the official iStat Menus website iStat Menus and download the latest version.
    2. Install: Open the downloaded .dmg file and drag the iStat Menus icon to your Applications folder.
    3. Launch: Open iStat Menus from your Applications folder and follow the setup instructions.
    4. Customize: Configure the tool to display the metrics you need from the menu bar.

    Activity Monitor

    Activity Monitor is the built-in macOS application that provides detailed information about the processes running on your Mac, as well as overall system resource usage. It offers insights into CPU, memory, energy, disk, and network usage, making it a powerful tool for everyday system monitoring.

    How to Access Activity Monitor

    1. Open Finder: Click on the Finder icon in your dock.
    2. Navigate to Applications: Go to the Applications folder and then the Utilities folder.
    3. Launch Activity Monitor: Double-click on Activity Monitor to open it.
    4. Usage: Use the tabs to monitor CPU, memory, energy, disk, and network activity.

    mactop

    Latest Apple laptops use Apple silicone which was built using Arm architecture, this means that a lot of the software built for x86 chips is not compatible with latest Apple laptops. mactop is one of the few softwares which was specially built for Apple silicone and it is guaranteed to work with all the M1, M2, and M3 series chips.

    You can download and compile the source code from its GitHub repository or simply download and install a pre-built binary directly using brew by using the following command:

    brew install mactop

    Once it is installed, you can start using it via the following command:

    sudo mactop

    3 Best htop Equivalent Alternatives for Windows

    Windows users looking for powerful system monitoring tools similar to htop on Unix systems have several good options available. These tools provide detailed insights into system performance, process management, and resource usage, making them indispensable for advanced users and system administrators. Here are three of the best htop equivalent alternatives for Windows:

    Sysinternals Suite

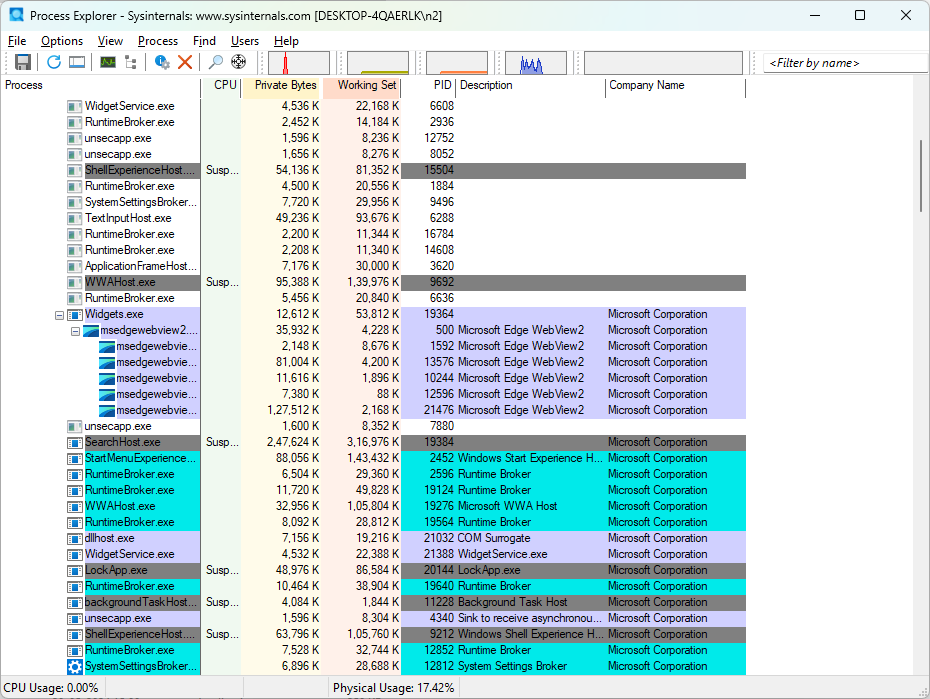
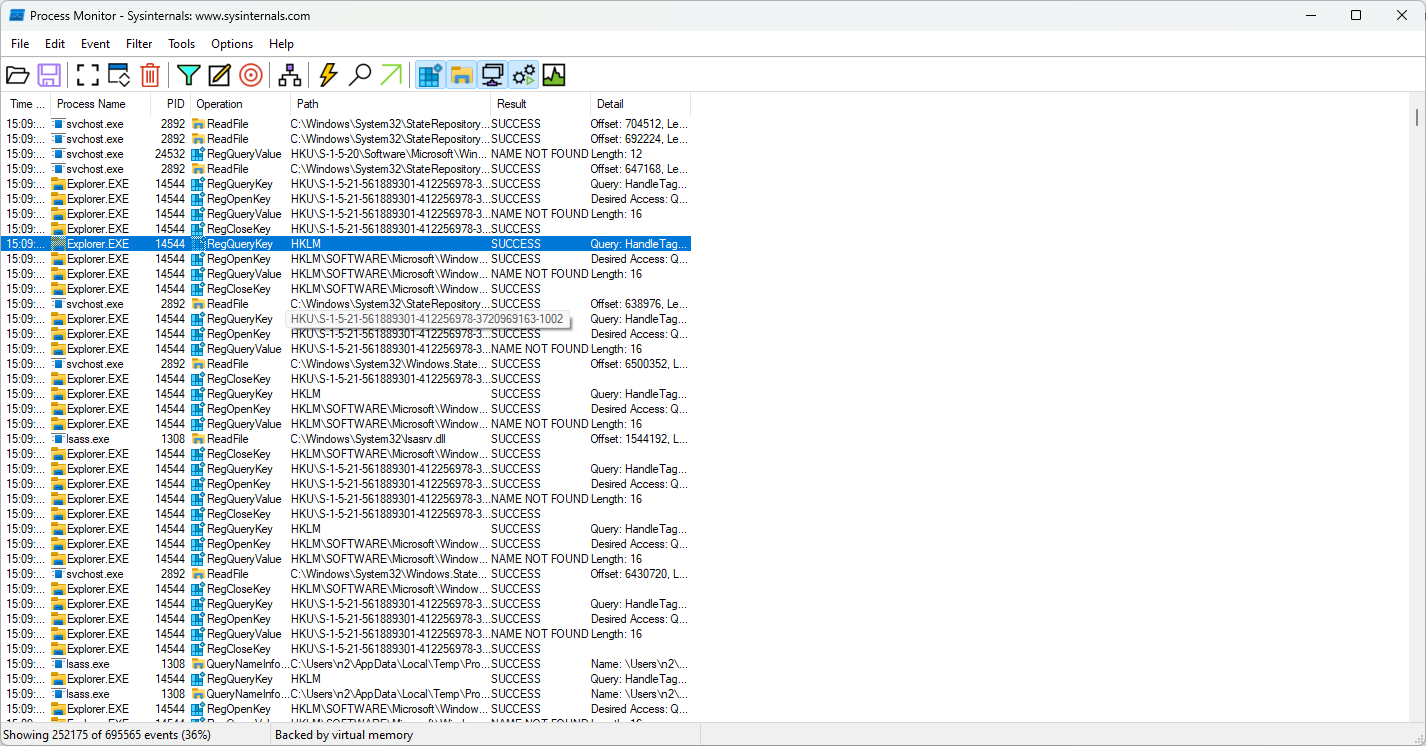
    Sysinternals Suite is a collection of tools from Microsoft which provides detailed information about the processes running on your system, including the handles and DLLs that processes have opened or loaded. It offers a comprehensive overview of system activity, making it an essential tool for troubleshooting and performance monitoring.

    How to Install Process Explorer

    1. Download Sysinternals Suite: You can either visit the Sysinternals Suite page to download the entire suite or manually download individual tools from SysInternals Live website.
    2. Extract the Files: After downloading the file, you can extract the downloaded ZIP file to a desired location.
    3. Launch Process Explorer: Navigate to the extracted folder and double-click on procexp.exe to launch Process Explorer. This will open a new window where you can explore different processes running on your computer.
    1. Launch Process Monitor: In addition to process explorer, you can also launch the procmon.exe file to run the Process Monitoring tool. Once you have opened the tool, you can browse and manage different processes running on your system and forcefully terminate them if necessary.

    Suggested read: How To Check Disk Space in Linux

    Windows Task Manager

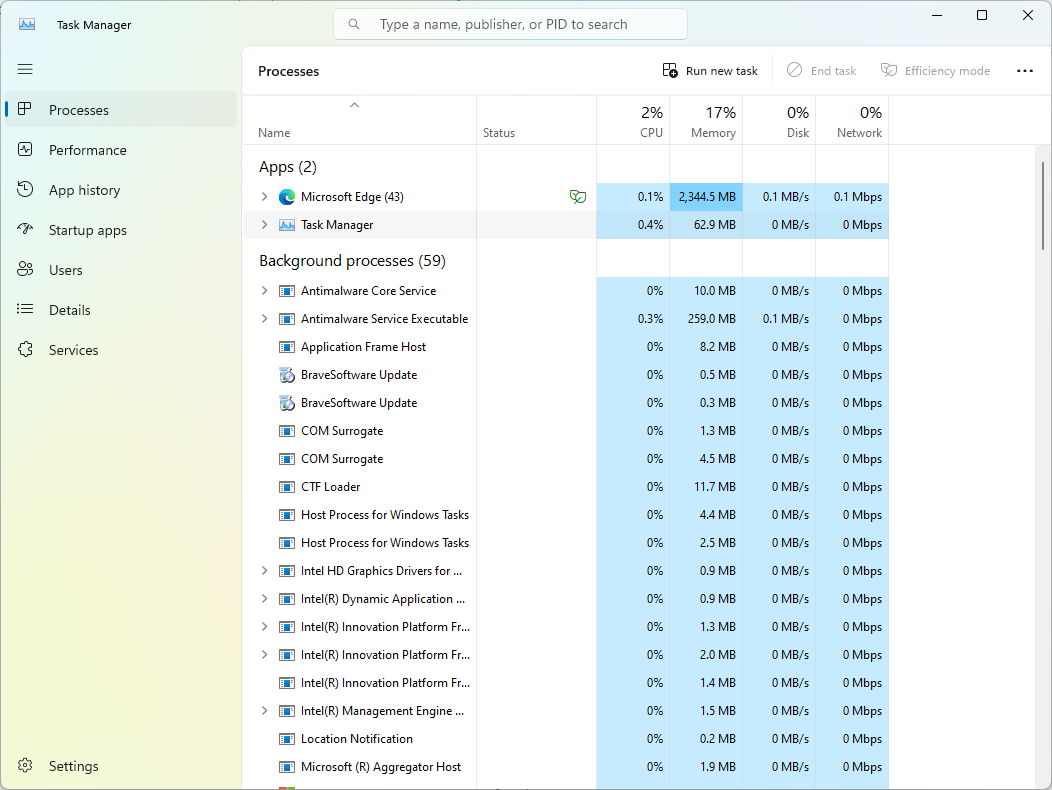
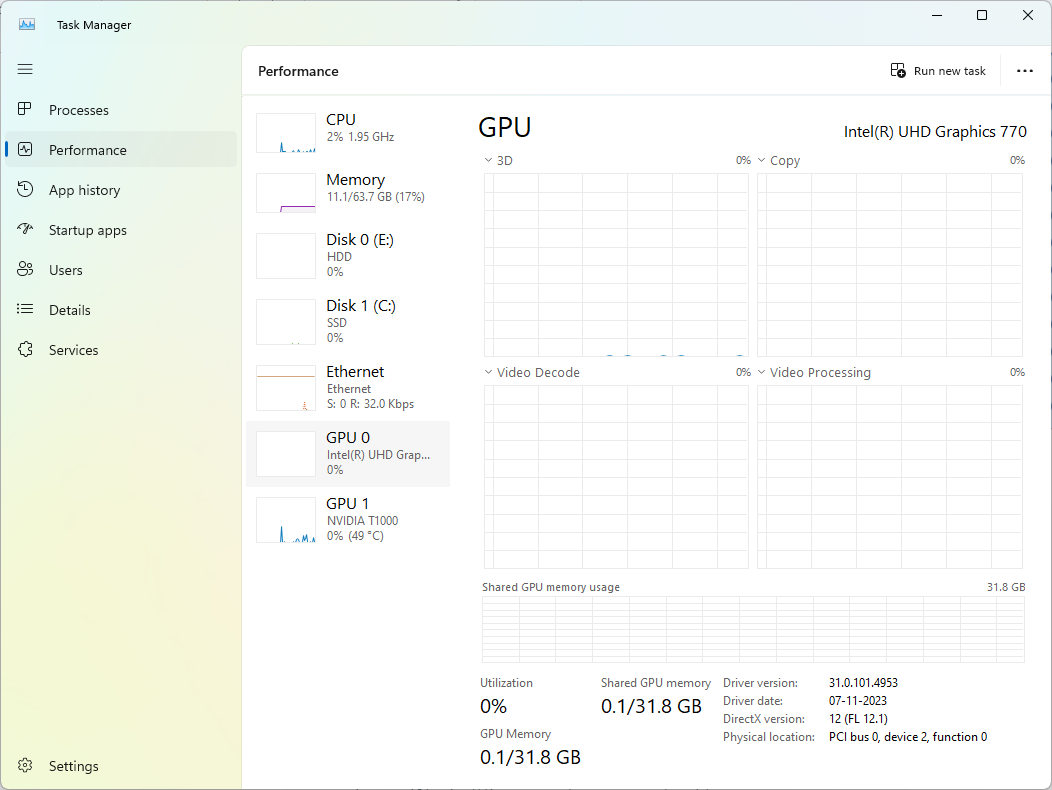
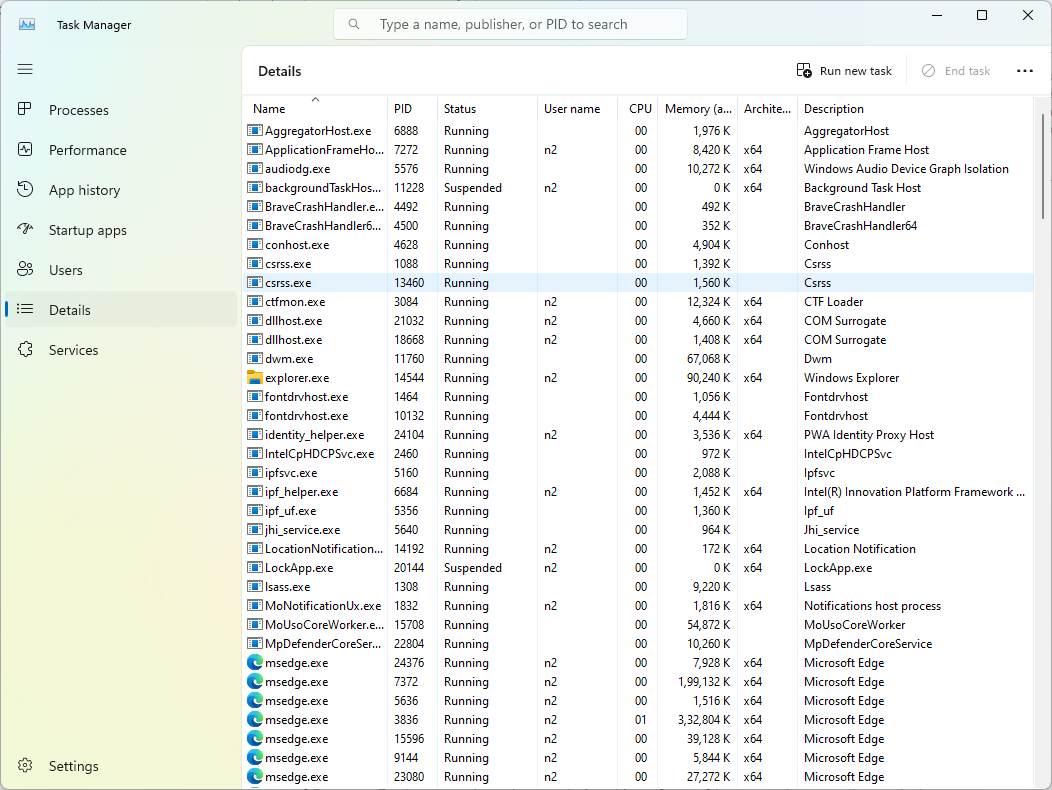
    Windows Task Manager is a built-in system monitoring tool that provides real-time information on CPU, memory, disk, and network usage, as well as detailed process management. It is a powerful utility for basic and intermediate system monitoring and troubleshooting which can be used by anyone without needing to install any additional software.

    How to Access Windows Task Manager

    1. Open Task Manager: On your Windows computer, press Ctrl + Shift + Esc or right-click on the taskbar and select “Task Manager”.
    2. View Processes: In the “Processes” tab, view the list of running applications and background processes along with their CPU, memory, disk, and network usage.
    1. Performance Tab: Click on the “Performance” tab to see an overview of system resources such as GPU, CPU, Memory, Network, and Disk.
    1. Details and Services: If you want granular control over services, then you switch to the “Details” and “Services” tabs for more advanced process management and service control.

    btop++

    btop++ is an advanced system resource monitor that works on Windows, providing a detailed and visually appealing interface similar to htop. It offers insights into CPU, memory, disk I/O, and network usage, making it a versatile tool for system performance monitoring.

    How to Install btop++

    1. Download: Visit the btop++ GitHub repository (also available for Linux) and download the latest release for Windows.
    2. Extract the Files: Extract the downloaded ZIP file to a desired location.
    3. Install Required Dependencies: Ensure you have Microsoft Visual C++ Redistributable installed, if not, download and install it from the official Microsoft website.
    4. Launch btop++: Navigate to the extracted folder and double-click on btop.exe to launch btop++.
    5. Usage: After installing it, you can use the interface to monitor system performance metrics and manage processes.
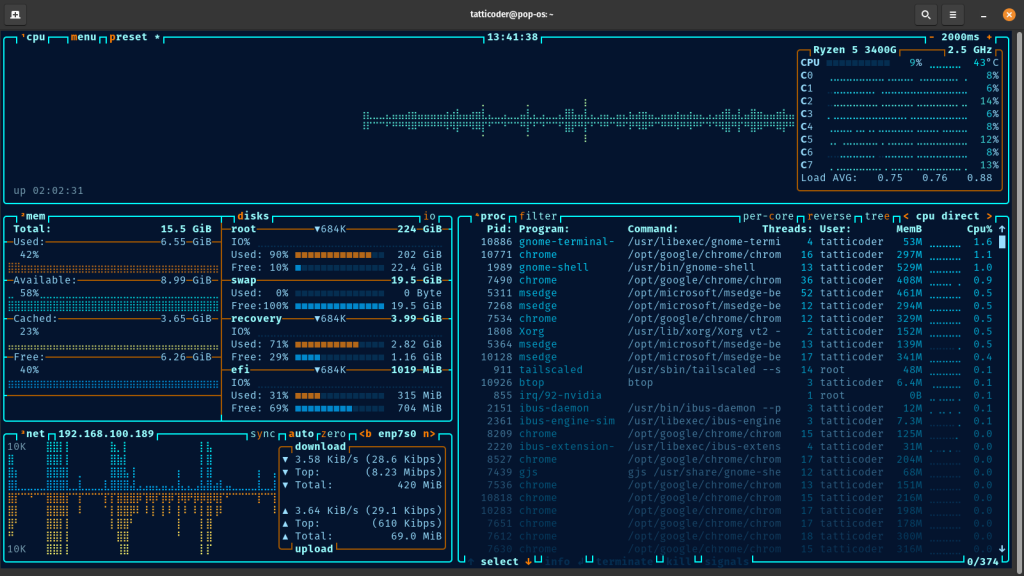
    btop++ htop alternative

    Wrapping Up

    Monitoring system performance is crucial for maintaining optimal functionality and troubleshooting potential issues on your Windows, Mac, or Linux systems. While hTop is known to users for its comprehensive and interactive interface, there are powerful alternatives available across different platforms.

    Recently, RunCloud has announced the addition of RunCloud Monitoring, a powerful tool designed to identify high resource usage and slow SQL queries on your server. This feature helps ensure that your servers are running smoothly and efficiently, saving you time and reducing the potential for downtime.

    Whether you are managing a server or using a personal computer, having the right monitoring tools at your disposal is essential. Sign up for RunCloud today and take advantage of our comprehensive server management and monitoring solutions to keep your systems in top shape.

  • 5 Ways to Fix the SSH Connection Refused Error [SOLVED]

    5 Ways to Fix the SSH Connection Refused Error [SOLVED]

    When managing your servers, you will often need to use the Secure Shell (SSH) protocol, but sometimes you might see a “Connection Refused” message.

    If so, then don’t worry, because in this post we will explain five ways to fix the SSH connection refused error – as well as answering some of the frequently asked questions we receive from people with this issue.

    Let’s get started!

    What Causes the SSH Connection Refused Error?

    SSH (Secure Shell) is a protocol used for secure remote logins and other secure network services over an insecure network.

    There are several reasons why you might encounter a “Connection Refused” error when trying to connect via SSH:

    1. Incorrect SSH Port

    SSH uses port 22 by default, but many security professionals recommend changing it to something arbitrary to reduce brute force attacks. If you’re trying to connect to a different port that isn’t open or configured for SSH, you’ll get a connection refused error.

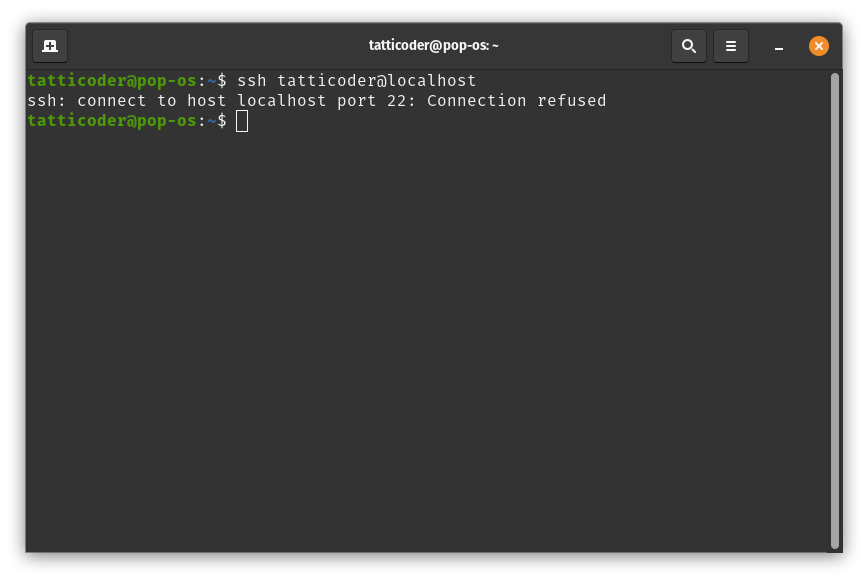
    ssh connection refused error linux

    Suggested read: 3 Ways to Fix Too many Authentication Failures SSH Root? [SOLVED]

    2. Incorrect SSH Login Credentials

    There are two main ways to log in to a server via SSH – with either a password, or with SSH keys. If you enter the wrong username-password combination, or use the incorrect SSH key, then the SSH daemon on the server will refuse the connection.

    If you’re using PuTTY to connect to your server, then you should read our guide on How To Use SSH Keys with PuTTY on RunCloud.

    3. SSH Isn’t Installed on Server

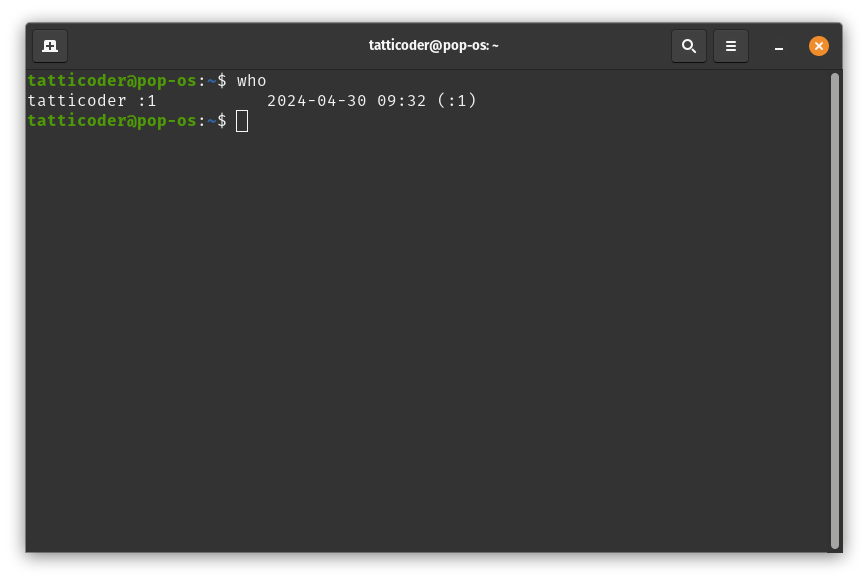
    If the SSH server software isn’t installed on the server, or if it’s not running, you won’t be able to connect. You can check if the SSH server is running using the following command:

    systemctl status ssh

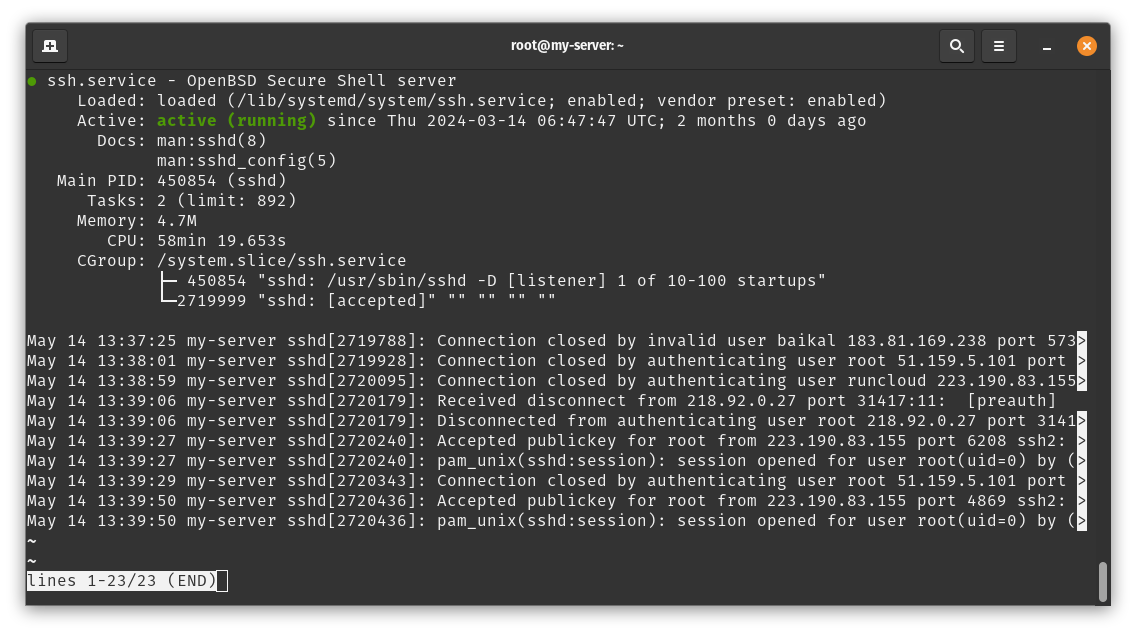
    SSH daemon status in Linux

    In the above example, we can see that the server displays Active (running) status which means it is ready to accept incoming SSH requests.
    4. SSH Access Has Been Disabled

    SSH provides complete access to your server, meaning you can remotely access any data and execute arbitrary commands from anywhere across the world. Due to this, it can be a problem if hackers are able to establish an SSH connection with your server. To avoid this, many server administrators disable SSH entirely on the server for security reasons. If this is the case, you’ll need to enable SSH access before you can connect to the server.

    5. Server Firewall Conflicts with SSH

    Quite often, servers are secured behind firewalls to withstand cyber attacks. If your firewall is blocking incoming traffic on the SSH port then you will get a connection refused error. You’ll need to adjust the firewall settings to allow SSH connections.

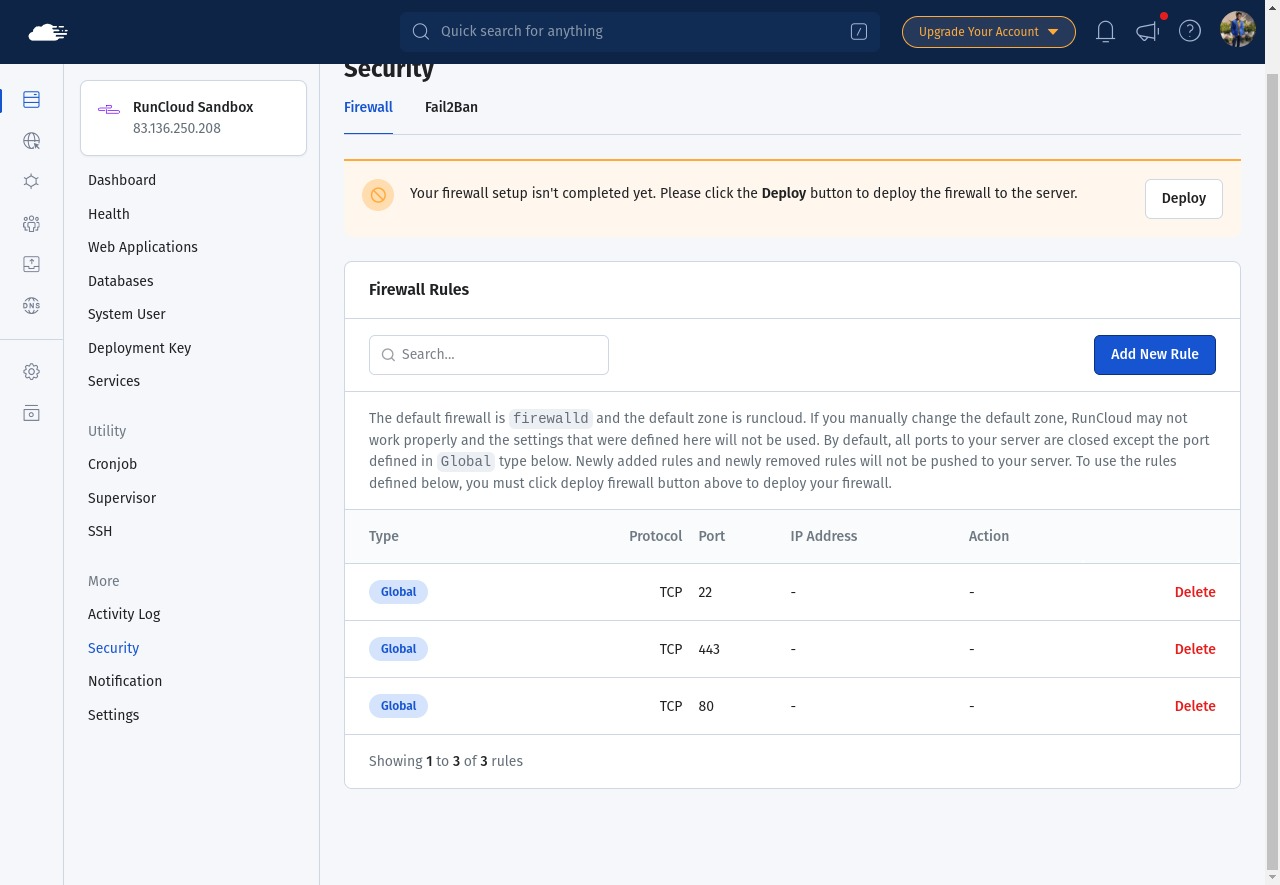
    If you’re using RunCloud, then you can access these settings from the Security tab on your RunCloud dashboard:

    Changing firewall rules on RunCloud

    How to Fix the SSH Connection Refused Error

    Here are some steps you can take to troubleshoot and fix an SSH “Connection Refused” error:

    1. Verify Your SSH Port

    If you are using a cloud VPS, then you might be able to use a built-in SSH login functionality that allows you to access your machine remotely. If you are able to log in to your server with this method and not via the command line, then you might be connecting to the wrong port.

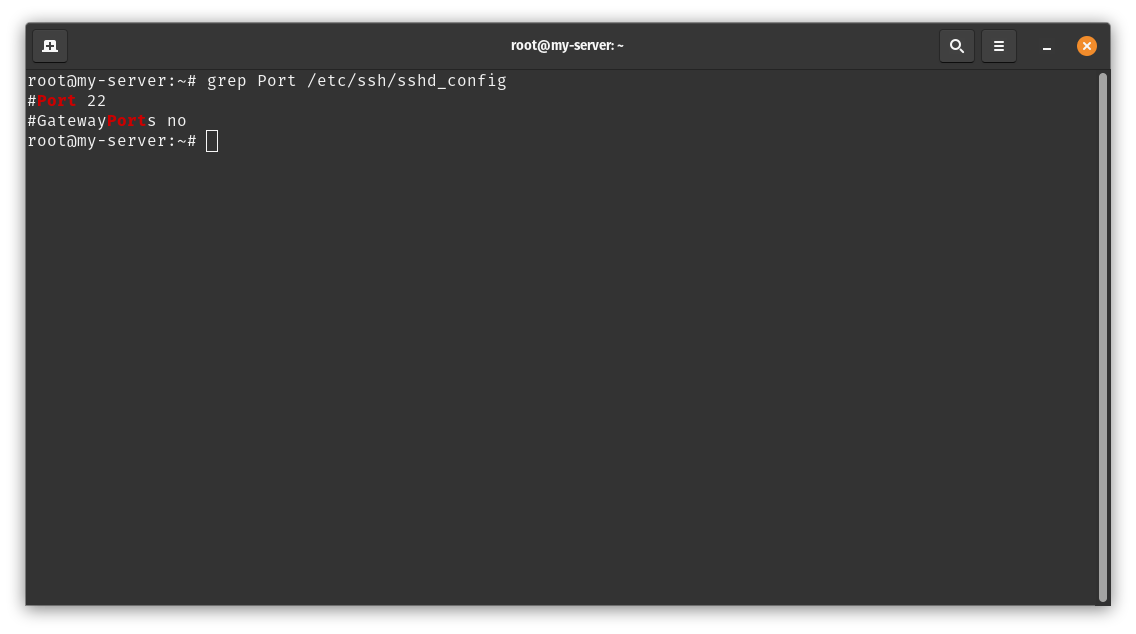
    You can verify the SSH port by checking the SSH configuration file (/etc/ssh/sshd_config) on the server using the following command:
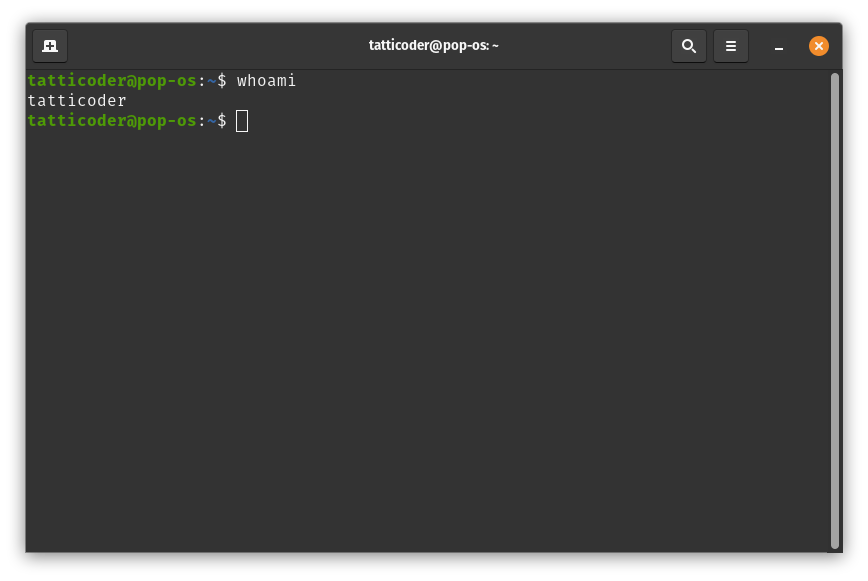
    grep Port /etc/ssh/sshd_config

    SSH config on UBUNTU server Linux

    In the above example, we can see that the line starts with a # symbol, i.e., it is commented. If you want to change the default port number, then you can edit this configuration file using nano and uncomment it.

    2. Check Your SSH Login Credentials

    When logging in to the server, your username on the server will be different from your username on your laptop. Make sure you’re using the correct username and password. If you’re unsure, you can ask the administrator of the server to reset your password or create a new user with SSH access.

    3. Ensure SSH Is Installed on the Server

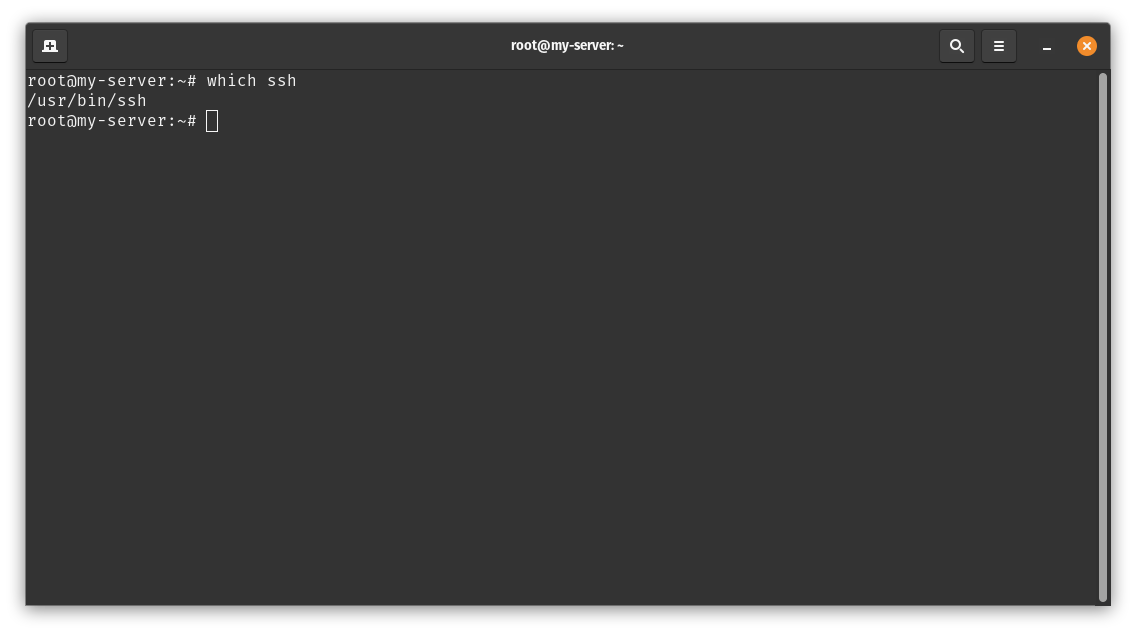
    You can check if SSH is installed by running the command which ssh on the server. If SSH is not installed, you can install it using the package manager for your operating system (for example, apt-get install openssh-server on Ubuntu).

    Suggested read: ​How to Use SFTP with FileZilla to Securely Transfer Files on RunCloud

    4. Enable SSH Access on your Server

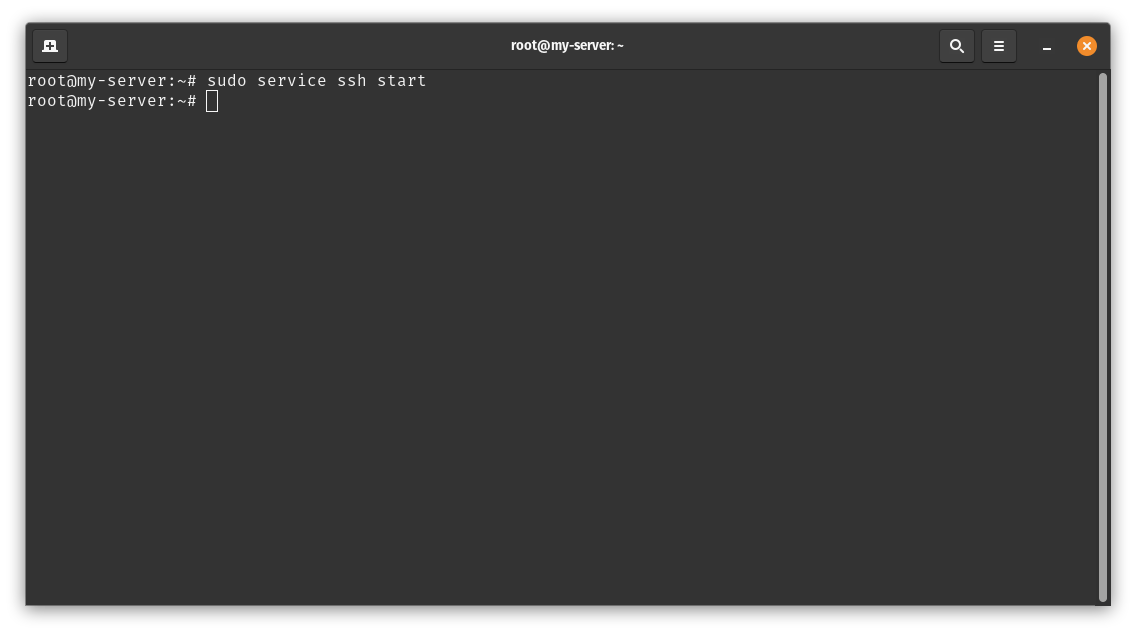
    It is possible that the SSH daemon is installed on your server, but is disabled for security reasons. If SSH access has been disabled, you’ll need to enable it using the following command:

    sudo service ssh start

    In the above example, we have used the service command to start the SSH daemon, which didn’t return any errors. This means that the service was started successfully.

    Additionally, if the service is already running then it won’t make any changes, i.e. it will keep running.

    5. Resolve Server Firewall Conflicts with SSH

    If the server’s firewall is blocking SSH connections, you’ll need to adjust the firewall settings. This can usually be done by adding a rule to allow connections on the SSH port (usually port 22). The exact command will depend on your firewall software (for example, ufw allow 22 for UFW on Ubuntu).

    If you’re using RunCloud, you can easily configure your firewall settings and set-up fail2ban to automatically block malicious robots that try to brute force into your server.

    Final Thoughts

    In this post, we’ve explored various reasons behind the SSH Connection Refused error, and provided solutions to address this issue and similar problems with SSH. As we’ve seen, the causes can range from server-side problems to client-side misconfigurations, and each issue requires a unique approach to resolve.

    Managing SSH connections across multiple servers can be a daunting task, especially when dealing with complex web applications. This is where RunCloud comes into play.

    RunCloud simplifies Linux server management and makes it easy to manage SSH connections across multiple servers. It provides straightforward solutions for deploying and managing your web applications, thereby reducing the complexity of server operations.

    So why wait? Take the first step towards hassle-free server management.

    Sign up for RunCloud today and experience the ease of managing SSH connections and web applications like never before.

    FAQ on SSH Connections

    How do I fix port 22 connection refused?

    The error “port 22: Connection refused” typically indicates that your SSH client is unable to establish a connection with the SSH server. It can occur due to various reasons:
    The SSH server may not be running on the remote host.
    The host or IP address provided could be incorrect.
    The SSH server may be using a different port than the default port 22.
    A firewall might be blocking the SSH connection.
    There could be network connectivity issues between the client and server.

    What is the cause of the connection being refused?

    The “Connection Refused” error occurs when a server refuses to establish a connection with a client. This can happen for a variety of reasons:
    The server is not running.
    The server is overloaded and cannot accept new connections.
    The client is trying to connect to the wrong port.
    The client’s IP address is blocked by the server.

    How do I debug SSH connection issues?

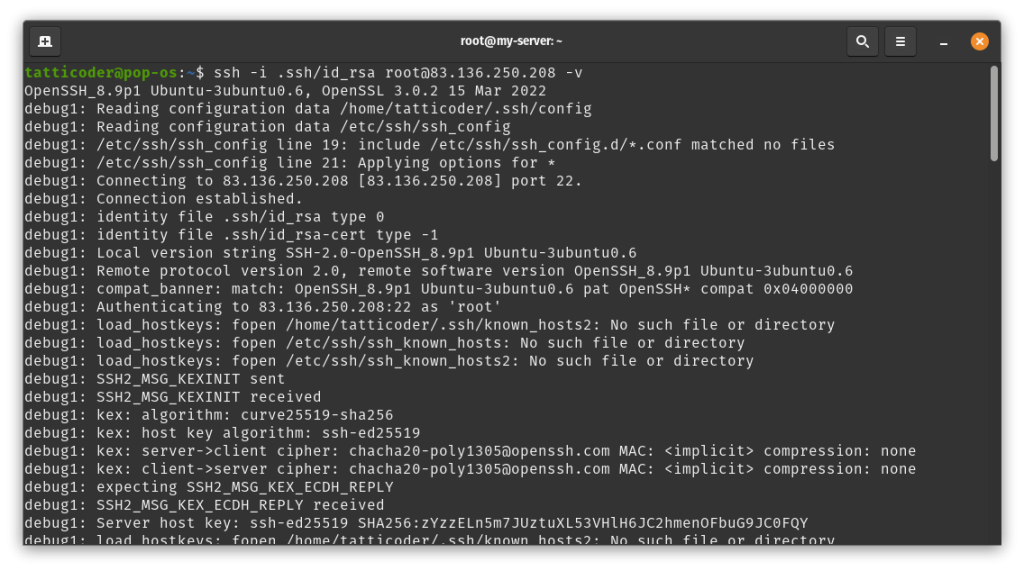
    To debug SSH connection issues, you can use the verbose mode in SSH. The -v flag in the SSH command provides debugging information about the SSH connection progress. There are different levels of verbosity; using multiple -v flags increases the verbosity (the maximum verbosity level is 3).

    How do I SSH into an IP address?

    To SSH into an IP address, use the SSH command followed by the username and the IP address of the server. For example, ssh username@ip_address.

    How do I reset my SSH connection?

    To reset your SSH connection, you can restart the SSH service using the following command: sudo systemctl restart ssh.service.

    How do I know if my SSH is blocked?

    If you are unable to establish an SSH connection, it could be because your firewall is blocking the SSH port. You can check your firewall settings to see if the SSH port (default is 22) is allowed.

    What is the difference between SSL and SSH?

    Both SSL and SSH are cryptographic protocols used for secure communication over a network, but they serve different purposes. SSL is primarily used for securing web-based communications, while SSH is used for secure remote access to servers and devices.

    What is the difference between SSH and telnet?

    SSH and Telnet are both protocols used for remote terminal service – the key difference is that SSH provides a secure, encrypted connection, while Telnet does not. This makes SSH more secure, and the preferred method for remote access.

    On which port SSH is running?

    By default, SSH runs on port 22.

    Why Does PuTTY Say Connection Refused?

    The “Connection Refused” error in PuTTY usually means that the network connection PuTTY tried to make to your server was rejected by the server. This can happen if the server does not provide the service which PuTTY is trying to access.

  • How to Fix DNS_PROBE_FINISHED_NXDOMAIN Error

    How to Fix DNS_PROBE_FINISHED_NXDOMAIN Error

    Are you tired of seeing the DNS_PROBE_FINISHED_NXDOMAIN error appear when you’re just trying to surf the web?

    In this post, we will share helpful tips for troubleshooting the DNS_PROBE_FINISHED_NXDOMAIN error and discuss some easy fixes. But first, let’s learn more about this cryptic error and why it occurs.

    What is the DNS_PROBE_FINISHED_NXDOMAIN Error?

    The DNS_PROBE_FINISHED_NXDOMAIN error is a common issue that users might encounter when trying to visit a website. This error is displayed when the Domain Name System (DNS), which is responsible for translating domain names into IP addresses, is unable to perform this function for a particular website.

    When you enter a website’s URL into your browser, a DNS query is sent to a DNS server to retrieve the IP address associated with that domain name. If the DNS server cannot find this IP address, it returns an NXDOMAIN response, indicating that the domain does not exist. This response is then relayed back to your browser, which displays the DNS_PROBE_FINISHED_NXDOMAIN error.

    screenshot of DNS_PROBE_FINISHED_NXDOMAIN error

    Most browsers these days use Chromium technology (the software developed by Google Chrome) and show the default, cryptic error message. However, other browsers such as Mozilla Firefox show a simple error message when you encounter “DNS_PROBE_FINISHED_NXDOMAIN”, with possible fixes.

    DNS_PROBE_FINISHED_NXDOMAIN on Firefox

    Similarly with the Safari browser, you will see a different error message which says “Safari Can’t Find the Server” instead of the error code described above.

    DNS_PROBE_FINISHED_NXDOMAIN

    What Causes the DNS_PROBE_FINISHED_NXDOMAIN Error?

    There are several common scenarios where you might see the DNS_PROBE_FINISHED_NXDOMAIN Error, and understanding these common causes can help in troubleshooting and resolving the issue faster. Let’s take a look at them one by one.

    DNS Server Outage

    If the DNS server that your system is using is experiencing issues or is down, then it may not be able to resolve domain names into IP addresses, leading to the DNS_PROBE_FINISHED_NXDOMAIN error.

    Incorrect DNS Settings on Your Computer

    If the DNS settings on your system or router are incorrect, your system may not be able to communicate with the DNS server properly. If you recently changed your router settings, then consider either reverting them to default or using a commercially available DNS provider such as Google, Cloudflare, or Quad9.

    Poorly Configured DNS Records

    When you set-up your DNS records for your domain, it can take up to 48 hours for the changes to propagate. If you incorrectly configure your DNS records, for example, if you write best.example.com instead of test.example.com then you are likely to face the DNS_PROBE_FINISHED_NXDOMAIN error, and you will have to wait for a couple of hours for the DNS changes to propagate.

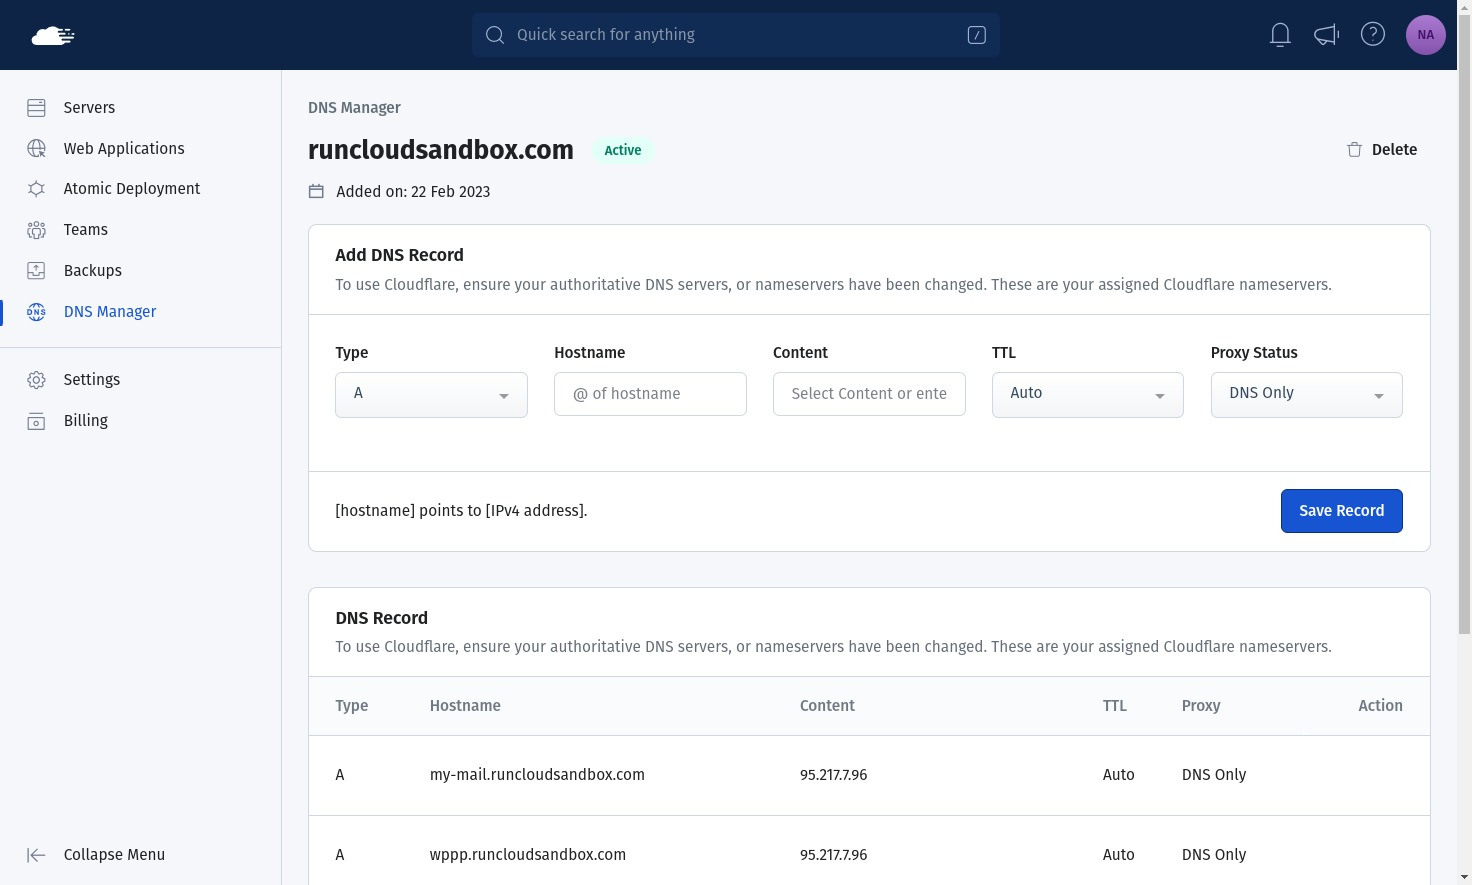
    To make the process easier and less error-prone, use RunCloud’s built-in DNS management system that allows you to configure multiple domain names on a single website.

    In addition to automatically adding relevant records, RunCloud’s DNS manager also allows you to edit and delete your DNS records from one single dashboard.

    Non-Existent Domain

    If the website you’re trying to access does not exist, or the domain name has been entered incorrectly, the DNS server will not be able to find the corresponding IP address, resulting in the DNS_PROBE_FINISHED_NXDOMAIN error.

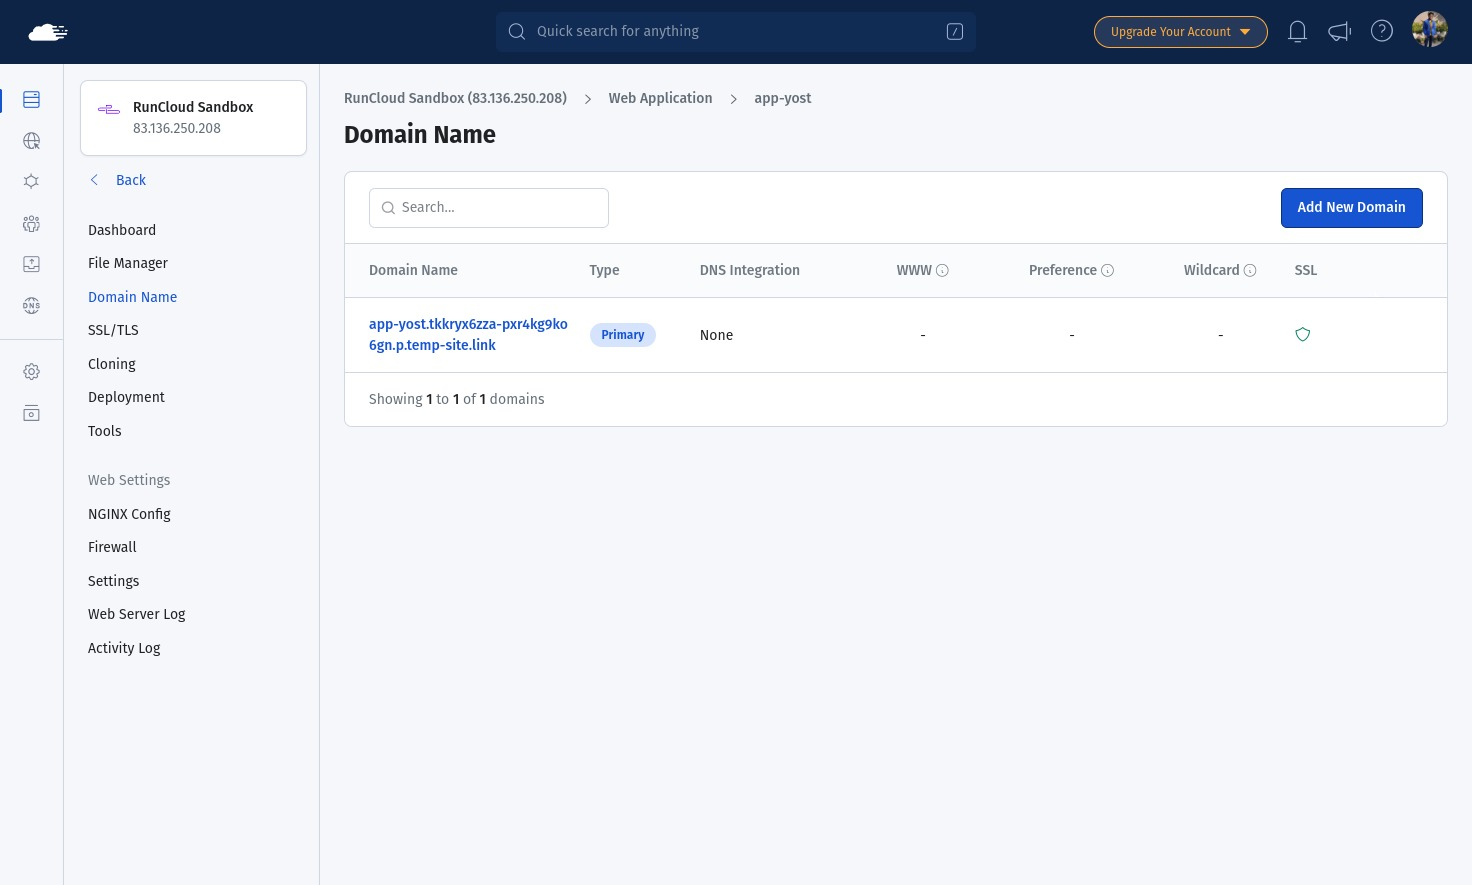
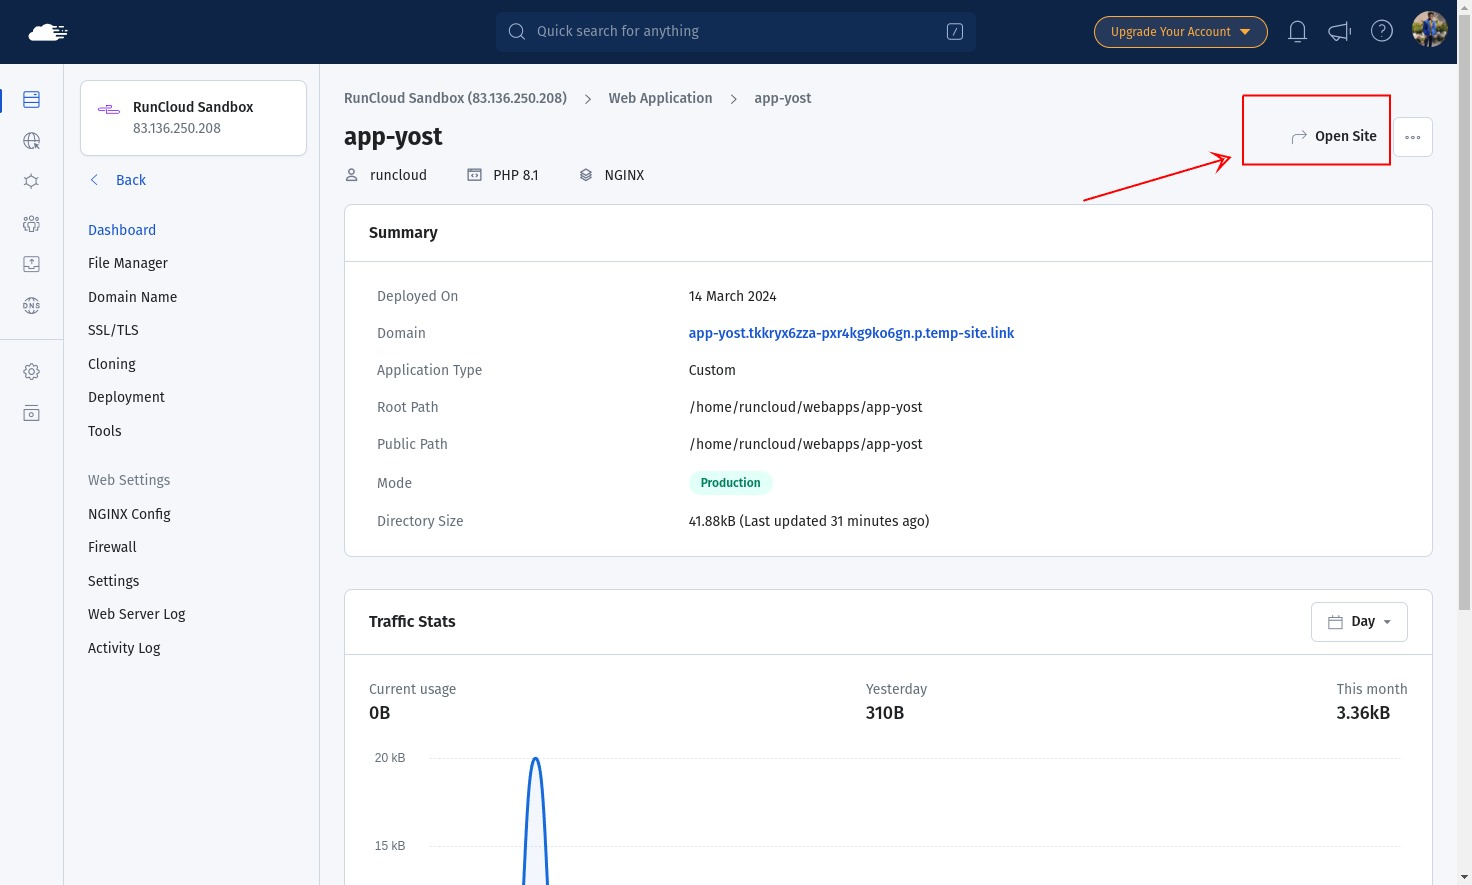
    If you’re using RunCloud to host your website, you can simply click on the “Open Site” button in your dashboard to visit the website. This will make sure that you’re visiting the correct URL, and not making mistakes such as typing 0 instead of O.

    To further troubleshoot the DNS_PROBE_FINISHED_NXDOMAIN issue, you can check the DNS records of the website on a public DNS service – simply go to any DNS provider’s website such as dns.google and enter the name of the website to view its actual DNS records. If the DNS records do not exist, then you can notify the website administrator to rectify the problem.

    Problems with Internet Connection

    If your internet connection is unstable or not working, your system may not be able to reach the DNS server to resolve the domain name, causing the DNS_PROBE_FINISHED_NXDOMAIN error.

    Firewall or Security Software Interference

    Sometimes, firewall settings or security software on your system can interfere with DNS operations and prevent your system from communicating with the DNS server. Additionally, many antivirus softwares hijack your computer’s DNS settings to block certain websites, so double check your security settings to make sure nothing is blocking your DNS requests.

    Browser Extensions

    Occasionally, the problem could be with the web browser itself – certain settings or extensions could interfere with the browser’s ability to resolve domain names. Update your browser and consider disabling ad-block extensions that filter DNS queries for blocking traffic.

    How to Fix the DNS_PROBE_FINISHED_NXDOMAIN Error

    In this section, we will provide some potential solutions to resolve the DNS_PROBE_FINISHED_NXDOMAIN error:

    Checking the Internet Connection

    Firstly, make sure that your internet connection is stable. You can do this by trying to access other websites or using online speed test tools.

    Method 1: Do a Ping Test

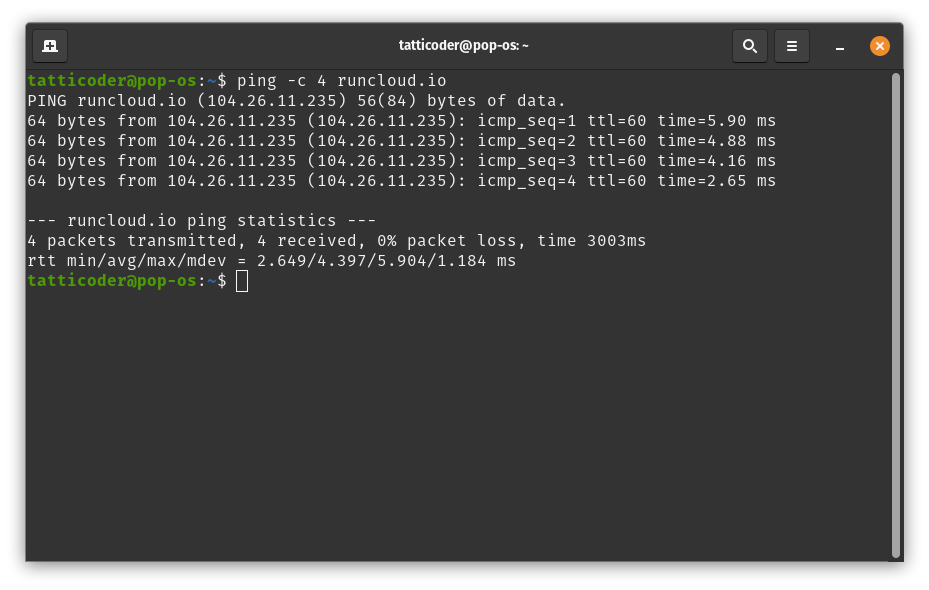
    If you’re not able to connect to a website, then a simple way to test your connection is by doing a ping test. Simply open a terminal (or command line on Windows) and execute the following command:

    Ping -c 4 runcloud.io

    In the above command, replace runcloud.io with the domain of the website that you are trying to test. After executing the command, if you don’t see an error message, then you can rest assured that your internet connection is working fine.

    Method 2: Check Other Websites

    If you don’t want to test your connectivity settings using a terminal, then you can simply use any browser app to open any popular website. If you are using a WiFi connection, then you can also consider opening the website on a different device connected to the same WiFi, which will make it easier for you to isolate the problem.

    Changing the DNS Server

    If your DNS service provider has crashed, then it might be a good idea to switch to a reputable DNS provider. We recommend using Cloudflare, Google, or Quad9’s DNS services to avoid disruptions in the future.

    Here is a brief overview of how to change your DNS settings on different systems:

    1. Windows: Go to Control Panel > Network and Internet > Network and Sharing Center > Change adapter settings. Right-click on your connection, select Properties, then select Internet Protocol Version 4. Click on Properties, then select “Use the following DNS server addresses” and input the new DNS addresses.
    2. macOS: Go to System Preferences > Network > Advanced > DNS, and then add the DNS server IP addresses.
    3. Linux: Edit the /etc/resolv.conf file and add the line “nameserver [DNS server IP address]”. If you’re using a graphical user interface, then you can also edit it using the network settings utility menu.

    Flushing the DNS Cache

    If you’re facing this problem on one particular device, then you can probably resolve it by flushing the cache. Doing so will remove all the stored DNS entries and force your computer to fetch new records from the authoritative server. Here’s how you can do this on different systems:

    1. Windows: Open Command Prompt as an administrator and type “ipconfig /flushdns”.
    2. macOS: Open Terminal and type “sudo killall -HUP mDNSResponder”.
    3. Linux: Open Terminal and type “/etc/init.d/nscd restart”.

    Resetting the Chrome Flag Settings

    If you’re using a custom built version of Chrome, or have enabled specific experimental flags, then you can expect some occasional abnormal behavior and errors. Reset your browser settings and turn off all experimental features to make sure your browser is not causing any issues.

    In Google Chrome, you can do this by going to chrome://flags/, and clicking on “Reset all to default”.

    Disable your VPN

    A VPN (Virtual Private Network) is a service that allows you to connect to the internet via a server run by a VPN provider. All data traveling between your device and the VPN server is encrypted so that only you and the server can see it.

    When you use a VPN, all your DNS queries travel along the encrypted tunnel between your device and the VPN server, offering greater privacy; however, this can sometimes cause errors such as DNS_PROBE_FINISHED_NXDOMAIN.

    For instance, if the VPN’s DNS server is not responding properly, or if there’s a mismatch between the VPN’s DNS server and your device’s DNS settings, you might see an error.

    To resolve this issue, you can check your VPN settings – look for any settings related to DNS and see if you can change them. For example, some VPNs allow you to choose between using their DNS servers or using the default DNS servers provided by your ISP.

    If changing these settings doesn’t resolve the issue, consider disabling the VPN temporarily to see if that fixes the problem. If the error disappears when the VPN is disabled, it’s likely that the VPN’s DNS servers were causing the issue.

    Conclusion

    In this article, we’ve covered the DNS_PROBE_FINISHED_NXDOMAIN error, a common issue that can occur when browsing the internet. This error is often related to DNS settings, and can be caused by various factors such as incorrect DNS configuration, network issues, or VPN settings.

    We’ve explored several solutions to the DNS_PROBE_FINISHED_NXDOMAIN problem, including checking your DNS settings, resetting your IP and DNS cache, and troubleshooting potential issues with your VPN.

    Managing websites and servers can be challenging, and dealing with cryptic error messages is certainly not fun.

    At RunCloud, we have made it our mission to make managing web servers easier so that our customers don’t encounter such problems in the future.

    Start using RunCloud today and discover how it can significantly speed up your workflow.

  • MariaDB vs MySQL – A Detailed Comparison & How You Should Choose

    MariaDB vs MySQL – A Detailed Comparison & How You Should Choose

    MariaDB and MySQL – which one should you choose?

    Both are widely used for different applications in web development, and so in this post we will provide a detailed analysis and comparison of both MySQL and MariaDB to help you decide which one is better suited for your needs.

    Let’s dive right in!

    What is MySQL?

    MySQL is a widely used open-source relational database management system (RDBMS) developed by MySQL AB, now owned by Oracle Corporation. It stores data in a structured format using rows and columns, making it easy for users to create, manage, and manipulate databases.

    MySQL is renowned for its reliability, scalability, and ease of use, as it is compatible with many programming languages, frameworks, and tools, offering connectors and APIs for popular languages such as PHP, Python, Java, and more.

    Suggested read: How to Change/Reset MySQL Root Password on Ubuntu Linux?

    Pros & Cons of MySQL

    Pros:

    • MySQL is a free and open-source database which means you don’t need to pay anything to use it.
    • MySQL is compatible with most operating systems and programming languages which makes it versatile.
    • MySQL has a simple syntax and is easy to use.
    • It is scalable and capable of handling millions of rows.

    Cons:

    • MySQL is not very efficient in handling extremely large databases and it can slow down as the database grows over time.
    • It doesn’t have as good a developing and debugging tool as compared to paid databases.
    • MySQL is prone to data corruption as it is inefficient in handling transactions.

    Who Uses MySQL?

    MySQL is widely used in the software industry, and to illustrate this, here are a few interesting insights from the 2023 Stack Overflow Developer Survey:

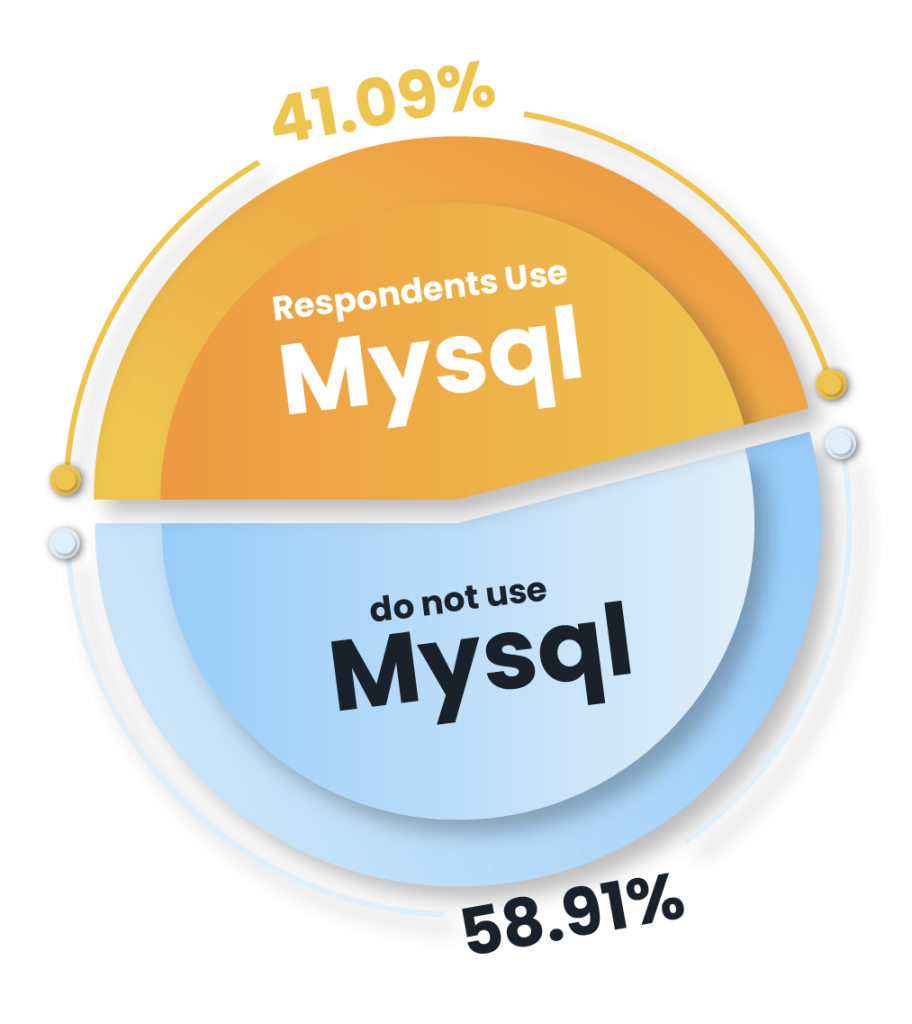
    • 41% of all respondents use MySQL, indicating its widespread adoption across different user categories.
    • 40.5% of professional developers use MySQL, highlighting its importance in the professional coding and development community.
    • Interestingly, 45% of those learning to code also use MySQL, suggesting its role as a fundamental tool for beginners in coding and database management.
    • Among those who have worked with MariaDB, another popular open-source database system, 5,290 respondents expressed a desire to work with MySQL.
    • MySQL is not only desired by 24% of respondents, but also admired by 50%, reflecting its reputation and popularity in the tech community.

    These statistics highlight MySQL’s significant role in both professional and learning environments, and its continued relevance in the ever-evolving tech landscape.

    Suggested Read: How To Properly Backup Your Website (Disaster Recovery) with RunCloud

    What is MariaDB?

    MariaDB is another popular open-source RDBMS developed by the original creators of MySQL due to concerns over its acquisition by Oracle Corporation. MariaDB is designed to maintain high compatibility with MySQL, allowing it to function as a drop-in replacement in many cases.

    It is part of most cloud offerings (including RunCloud) and is the default in most Linux distributions. MariaDB is known for its speed, scalability, and robustness, with a rich ecosystem of plugins and storage engines making it versatile for a wide variety of use cases.

    Pros & Cons of MariaDB

    Pros:

    • MariaDB is a free MySQL clone with improvements such as faster speed and better replication.
    • It is open-source, easy to install, and reliable for business critical workloads.
    • MariaDB offers better query execution and is great for large data sets.
    • Switching to MariaDB from MySQL is a simple task.
    • MariaDB supports more storage engines compared to MySQL.

    Cons:

    • While MariaDB strives to maintain compatibility with MySQL, new features are diverging, which might cause issues for some applications.
    • MariaDB has a relatively smaller community compared to MySQL

    Who Uses MariaDB?

    MariaDB is used by a diverse group of individuals and professionals. Here are some key insights from the Stack Overflow Developer Survey 2023:

    • 17.61% of all respondents in the survey reported using MariaDB.
    • Among professional developers, the usage of MariaDB is slightly higher at 17.69%.
    • For those who are learning to code, 12.34% reported using MariaDB.
    • 5,813 of the total respondents who worked with MySQL expressed a desire to work with MariaDB.
    • MariaDB is desired by 11%, and admired by 53% of respondents.

    These statistics highlight the widespread use and appreciation of MariaDB in the developer community.

    Difference Between MariaDB vs MySQL

    MariaDB and MySQL are both open-source relational database management systems (RDBMS) that store data in a tabular format. Let’s see how they both differ from each other:

    CriteriaMariaDBMySQL
    OwnershipMariaDB is entirely open-source.MySQL is owned and distributed by Oracle. It has one fully open-source version and one paid enterprise version.
    LicensingMariaDB is fully licensed under GPL v2.MySQL is available under GPL or proprietary license.
    PerformanceMariaDB is often considered to excel as it provides enhanced speed and efficiency compared to MySQL.MySQL’s performance may be slower compared to MariaDB on some large databases.
    CompatibilityMariaDB is designed to maintain high compatibility with MySQL.MySQL is compatible with a wide range of systems.
    A table showing difference Between MariaDB vs MySQL

    Suggested read: How To Install phpMyAdmin Easily Using RunCloud

    MySQL vs. MariaDB: Which One Should You Choose?

    When it comes to choosing between MySQL and MariaDB, both share a common ancestry. However, they have distinct features and characteristics that can influence your decision.

    Let’s take a look at the key differences and help you make an informed choice:

    1. Licensing:

    • MySQL: Follows a dual-license approach. While the community edition is open-source under the GNU General Public License (GPL), the commercial version has a different license.
    • MariaDB: MariaDB is fully GPL licensed, emphasizing openness and community-driven development.

    2. Performance:

    • MariaDB: In many scenarios, MariaDB offers improved performance compared to MySQL. Benchmarks have shown that MariaDB can handle certain workloads more efficiently.
    • MySQL: While MySQL is reliable, some users find MariaDB’s performance enhancements appealing.

    3. Storage Engines:

    • MariaDB: Supports a wide range of storage engines, including InnoDB, Aria, TokuDB, and MyRocks. This flexibility allows you to choose the most suitable engine for your specific use case.
    • MySQL: Also supports various engines, but its default storage engine is InnoDB.

    4. Ecosystem:

    • MySQL: Oracle Corporation, the owner of MySQL, provides official support and services, which can be a critical factor for enterprises. For example, the MySQL Database Service allows database administrators to leverage existing Oracle Cloud Infrastructure user identities and group memberships for authentication into MySQL database service instances
    • MariaDB: Some tools and features specifically created for MySQL may not be fully supported in MariaDB.

    Suggested read: SQLite vs MySQL vs PostgreSQL (Detailed Comparison)

    Final Thoughts

    It’s clear that MySQL has an extensive and well-established ecosystem which is backed by Oracle providing a sense of security and reliability for enterprises, while MariaDB offers a strong alternative with its own set of features and community support.

    • If you value openness, performance, and community-driven development, MariaDB is an excellent choice as it provides a seamless migration path from MySQL and offers additional features.
    • However, if you have specific requirements or are already invested in the MySQL ecosystem, MySQL remains a solid option.

    Managing your own server infrastructure can be tedious and time-consuming – why not leave it to the experts?

    With RunCloud, you can manage and deploy your web applications with a single click, without any hassle – you don’t need to be a Linux expert to manage your servers. RunCloud gives you the time to focus on what you do best, while we handle the server management for you.

    Start using RunCloud today and experience the ease of stress-free server management.

    FAQs – MariaDB vs MySQL

    Why is MySQL replaced by MariaDB?

    The original developers of MySQL created MariaDB to ensure the preservation of MySQL’s structure and features after it was acquired by Oracle Corporation.

    Which One to Use for WordPress MariaDB or MySQL?

    While both MariaDB and MySQL are suitable for WordPress, many WordPress hosting providers offer MariaDB as a database option by default as it includes many improvements and optimizations over MySQL, especially in performance and scalability.

    Do people still use MySQL?

    Yes, MySQL is still widely used by a wide range of websites and applications, including household brands such as Spotify, Netflix, Facebook, and Booking.com.

    Is there a workbench for MariaDB?

    Yes, MySQL Workbench, an application for database design, development, maintenance, and testing for several database systems, can also connect to MariaDB.

    How secure is MariaDB?

    MariaDB secures data at every layer – from encrypted communication and storage, to pluggable authentication and role-based access control. It also has an advanced database proxy with a built-in firewall to detect and prevent data breaches by blocking queries and masking sensitive data.

    Is MariaDB a NoSQL database?

    While MariaDB is primarily an SQL database, it does have some NoSQL capabilities, including the NoSQL protocol module that allows a MariaDB server or cluster to execute transactions for applications using MongoDB client libraries.

    Can I use MariaDB on Windows?

    Yes, MariaDB can be installed and used on Windows.

    Is MariaDB suitable for big data?

    Yes, MariaDB is suitable for big data as it supports various storage engines that enhance its performance compared to other databases for similar workloads.

    Why PostgreSQL over MySQL?

    PostgreSQL offers some advantages over MySQL, such as full compliance with the SQL standard, extensive support for NoSQL features such as JSON and hstore, and a powerful extension system that allows you to extend its functionality.

    Is MariaDB’s syntax the same as MySQL?

    Yes, MariaDB is a fork of MySQL, and was designed to be highly compatible with MySQL. It therefore uses the same SQL statements for querying and modifying data.

  • How to Install Ubuntu Mail Server? [Step By Step Guide]

    How to Install Ubuntu Mail Server? [Step By Step Guide]

    Are you looking for a simple but thorough guide on how to set up a Ubuntu Mail Server? Look no further!

    Dive into our step-by-step guide on ‘How to Install Ubuntu Mail Server‘ and unlock the secrets to mastering your own email server today!

    In this post we will walk you through the steps of installing and configuring Mailcow, a very popular email server for sending and receiving emails.

    But first, let’s learn a little bit about Mailcow.

    Mailcow Email Server logo

    What is the Mailcow Email Server?

    Mailcow is an open-source email server solution that makes setting up email services on Linux a breeze. It’s specifically designed for running inside containerized servers, integrating key components such as a mail transfer agent, a webmail client, and security features – all into one single system.

    Mailcow is essentially a collection of Docker containers that run various mail server applications, including (but not limited to) SOGo, Postfix, and Dovecot. Each container represents a single application – and they are all connected in a bridged network.

    It offers a modern and user-friendly web interface, known as the Mailcow UI, which provides a simple and easy interface for configuring nearly all settings and administrative tasks, such as enabling the easy creation of new domains and email addresses with just a few clicks.

    All the data, such as emails and user data, is stored in Docker volumes. This setup makes Mailcow a robust and straightforward choice for those seeking a self-hosted email server solution.

    How to Install SMTP Email Server in Ubuntu

    Here are the step-by-step instructions for installing the Mailcow email server on a Linux server:

    Prerequisites

    If you don’t plan on sending too many emails, then you’re better off using a third-party email service as it’s generally cheaper than maintaining and running a private email server. We’ve already covered the topic of using third-party email servers in extensive detail in our previous posts, which you can jump to here:

    1. Using Mailgun To Send Transactional Email From WordPress
    2. How to Send Email from PHP (With Guided Walkthrough)
    3. 15 Best Email Hosting For Small Business (2024)
    4. The 19 Best & Most Reliable Transactional Email Services 2023

    If you are determined to set-up your own email server, we recommend installing it on a separate VPS from your websites. By doing it this way, if someone hacks into your website, they won’t be able to gain access to your emails and user data.

    As we’ve mentioned, we will be using Mailcow as our email server, so begin by making sure your machine meets the following minimum requirements so that the installation process goes smoothly:

    1. CPU: 1 GHz
    2. RAM: Minimum 6 GiB + 1 GiB swap (default config)
    3. Boot Disk: 20 GiB (without emails)
    4. Architecture: x86_64, ARM64

    You can provision your server from any cloud provider that meets these requirements. In this tutorial, we will be using a Ubuntu 22 instance on Hetzner. Once your machine is up and running, you need to log in to your server via the command line and install Docker.

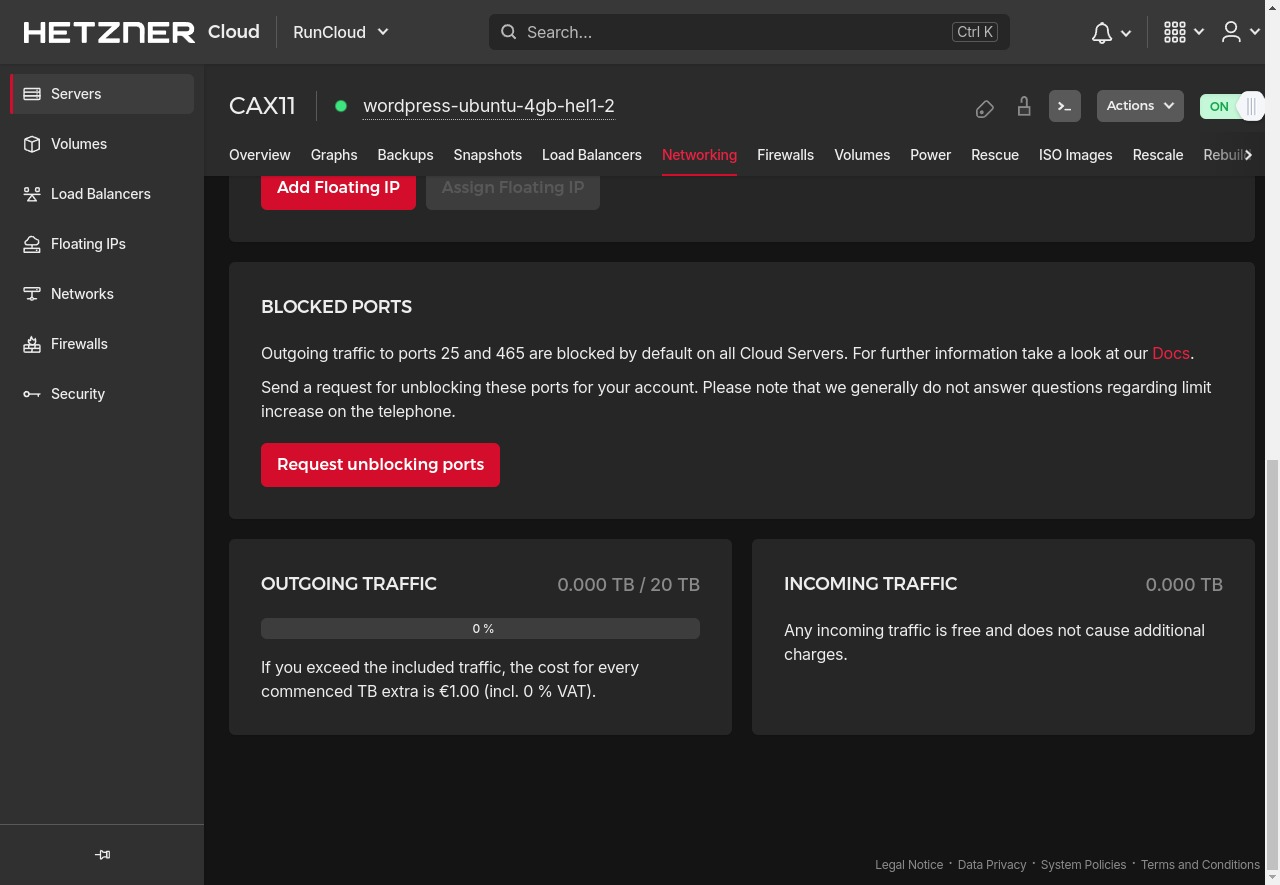
    Some providers may block outgoing ports to prevent spam, so make sure you configure your firewall settings to allow incoming TCP connections on all of the following ports: 25, 465, 587, 143, 993, 110, 995, 4190, 80, and 443.

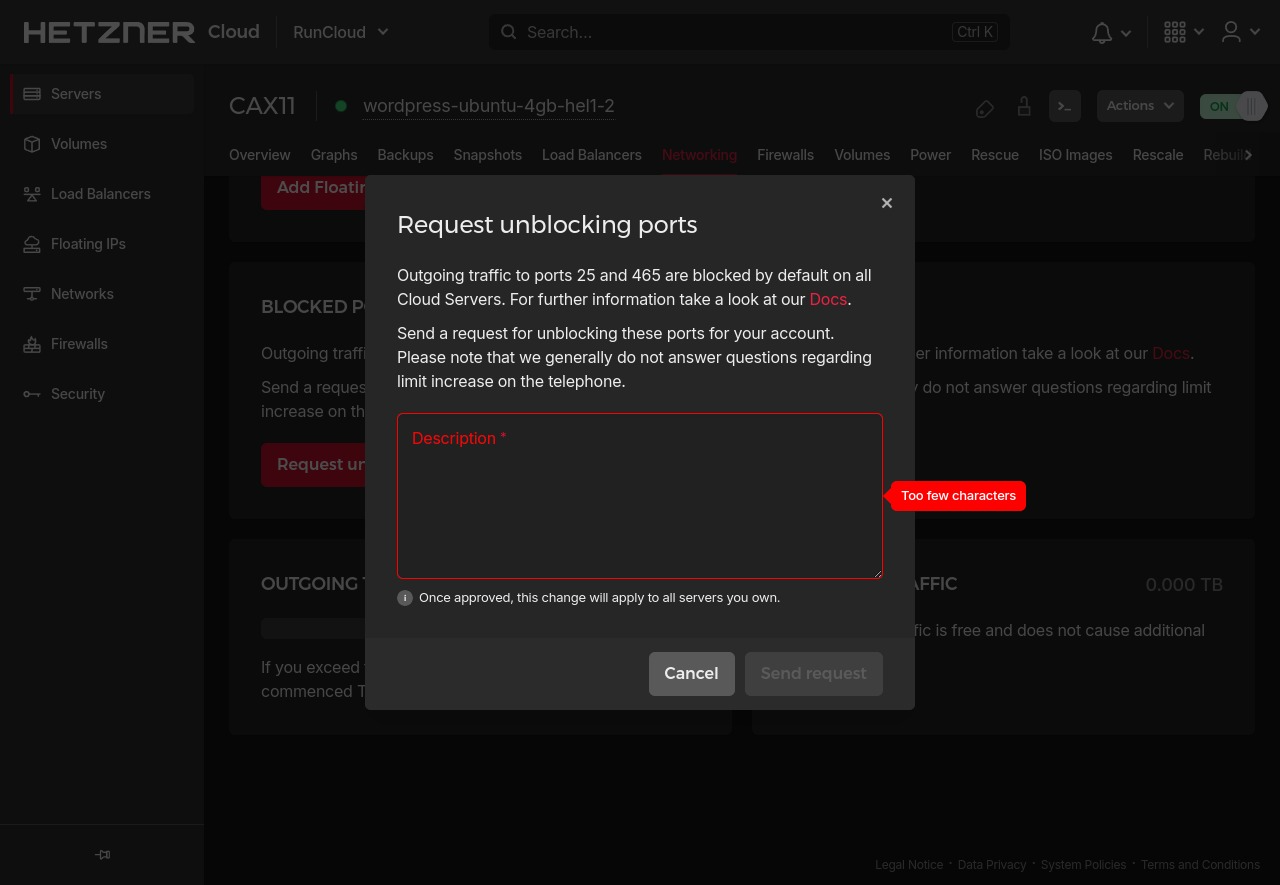
    On Hetzner, you’ll need to submit a special request to unblock port 25 and 465 by going to your server settings and switching to the networking tab. On this screen, you will see a button labeled ‘Request Unblocking Ports’.

    When you click on the ‘Request Unblocking Ports’ button, you will see a dialog box which will require you to justify the need for this action. In the provided textbox, explain why you need an email server and submit the request – most requests are automatically approved within a minute.

    Dashboard Domain Setup

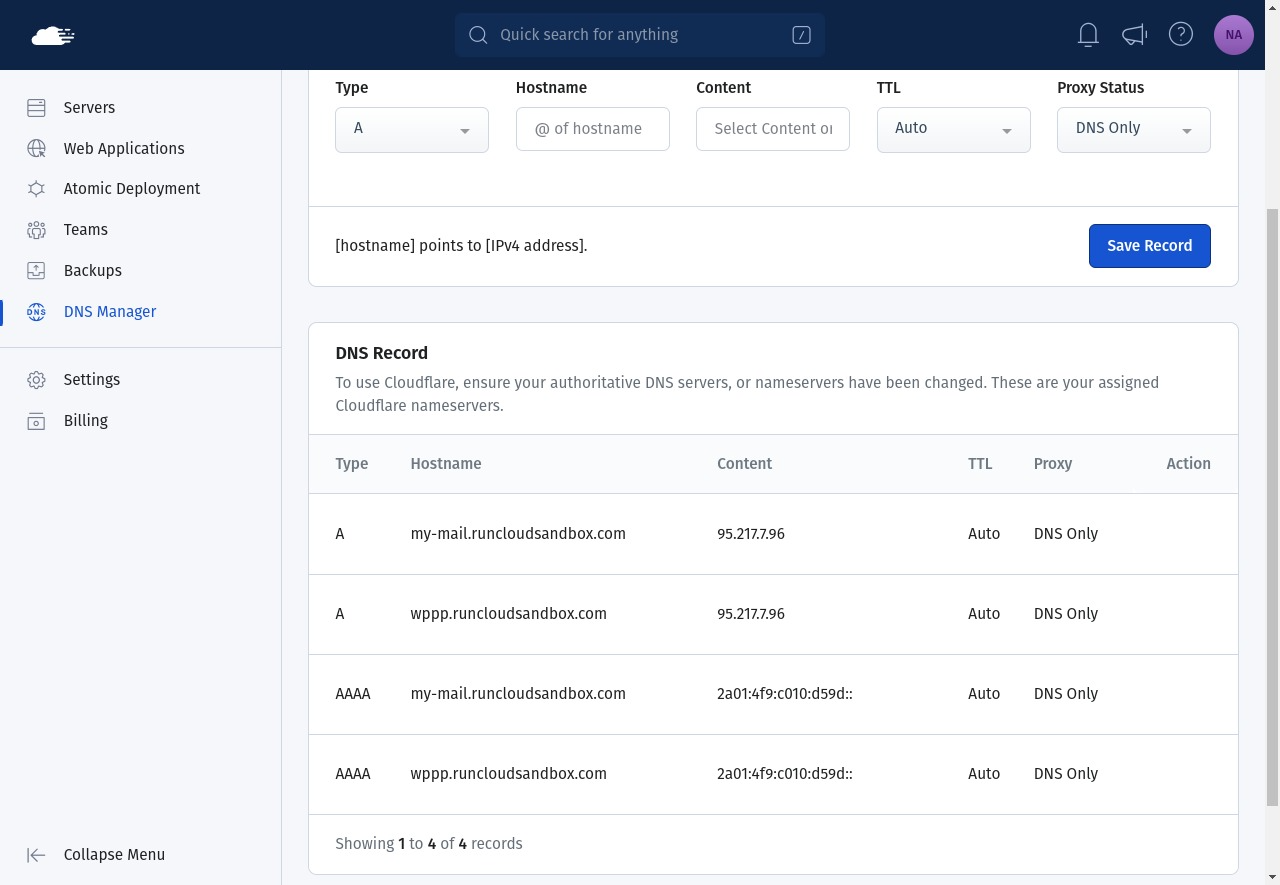
    Once you have a server up and running, it’s time to set up your DNS records. Although this action can be left until later, we recommend doing this first because DNS propagation takes time.

    Go to your DNS registrar’s dashboard and add the relevant A/AAAA records for the dashboard of your email server to point this domain to your machine. After setting up the mail server, your users will need to visit this website to send and read emails.

    Note: This domain can either be a completely separate fully-qualified domain name, or it can be a subdomain of your existing domain – it doesn’t matter.

    If you’re using RunCloud, you can easily set up and configure your DNS records using the DNS manager right from your RunCloud dashboard.

    setting up domain name in RunCloud

    Suggested Read: How To Speed Up DNS Propagation | Ultimate Guide

    Mailcow Installation

    Log in to your server with root privileges and start the process of installing Mailcow by running the following commands:

    cd /opt
    git clone https://github.com/mailcow/mailcow-dockerized
    cd /opt/mailcow-dockerized
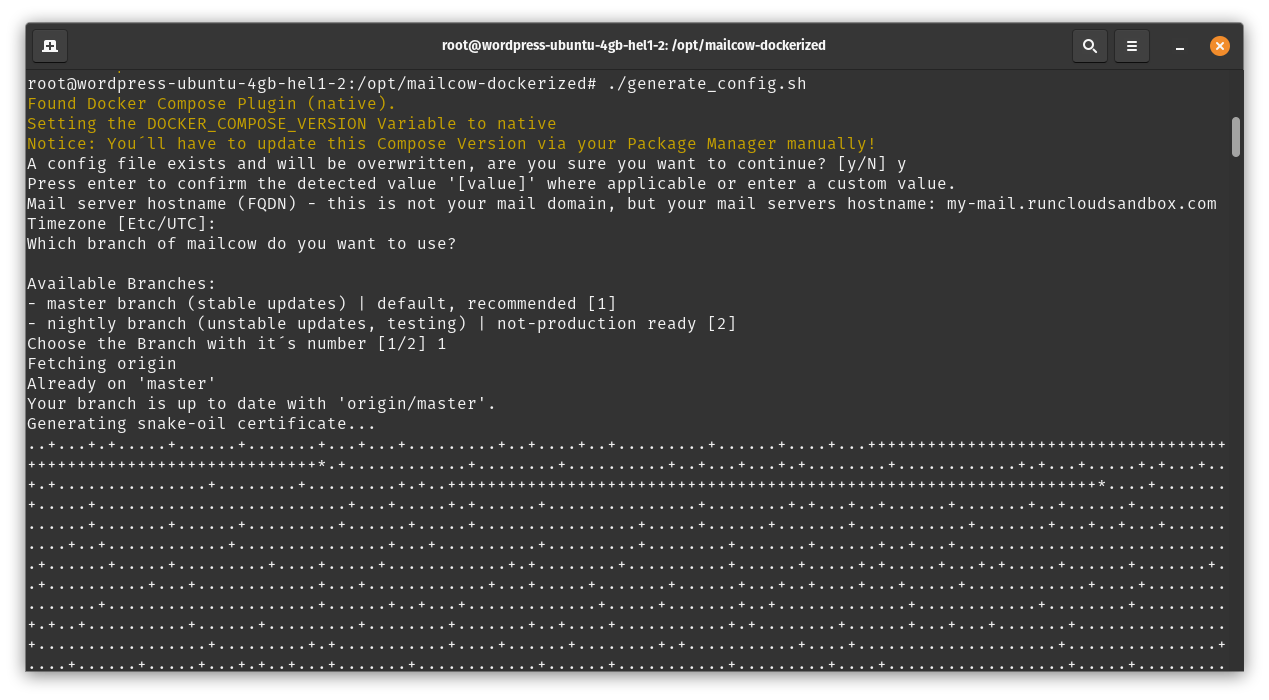
    ./generate_config.sh 

    The above commands will download and store the necessary files for starting the installation on your server. If you executed the above commands correctly, the command line will prompt you to enter the domain name that you configured in the previous step. After entering the domain name, you will be asked to specify some basic settings such as timezone and the development branch.

    Enter your timezone, or just press ‘Enter’ to use the default settings. Next, press ‘1’ to use the stable version and then press ‘Enter’ – this will download the necessary files for starting the installation. Finally, execute the following commands to download and run the docker containers:

    docker compose pull
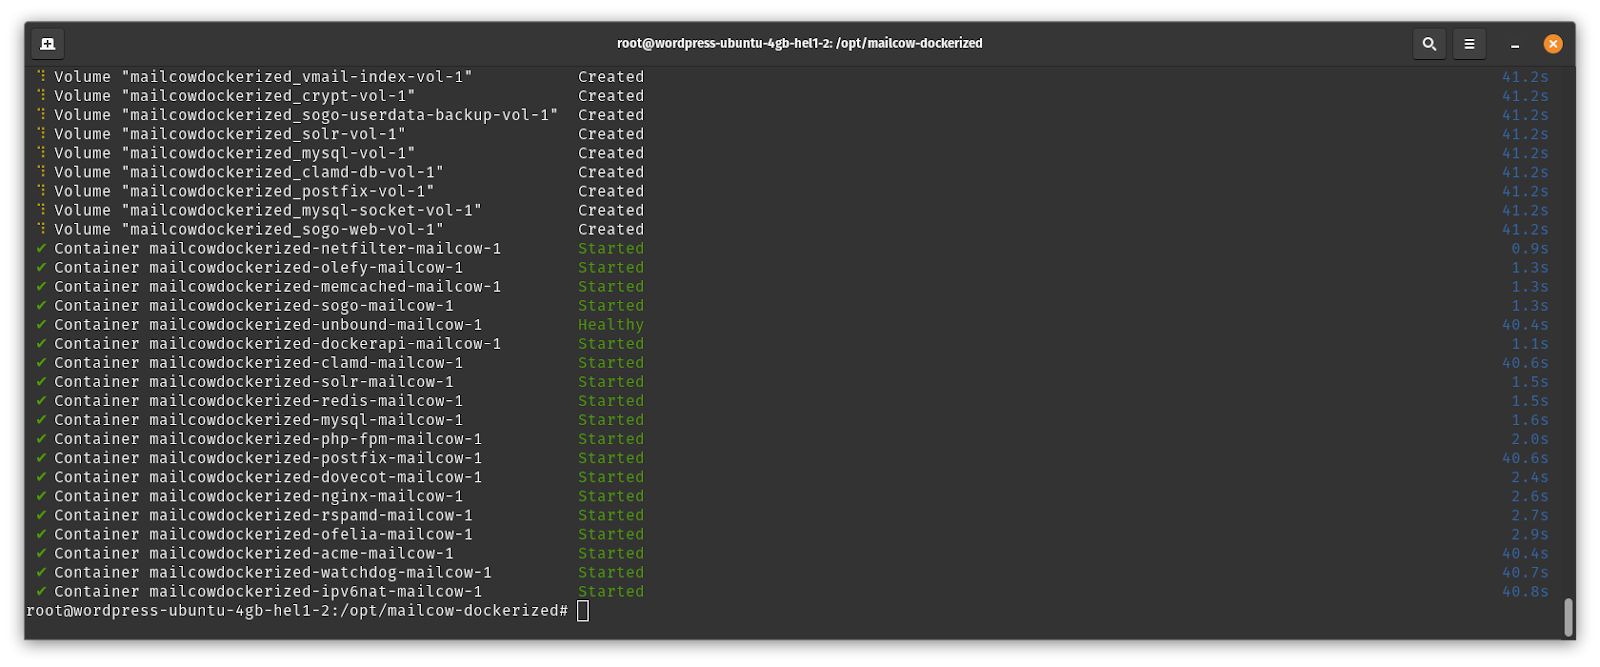
    docker compose up -d
    Installing Mailcow Email Server in Ubuntu

    After executing the above Docker commands, you will see that all the necessary containers have been started.

    Dashboard Setup

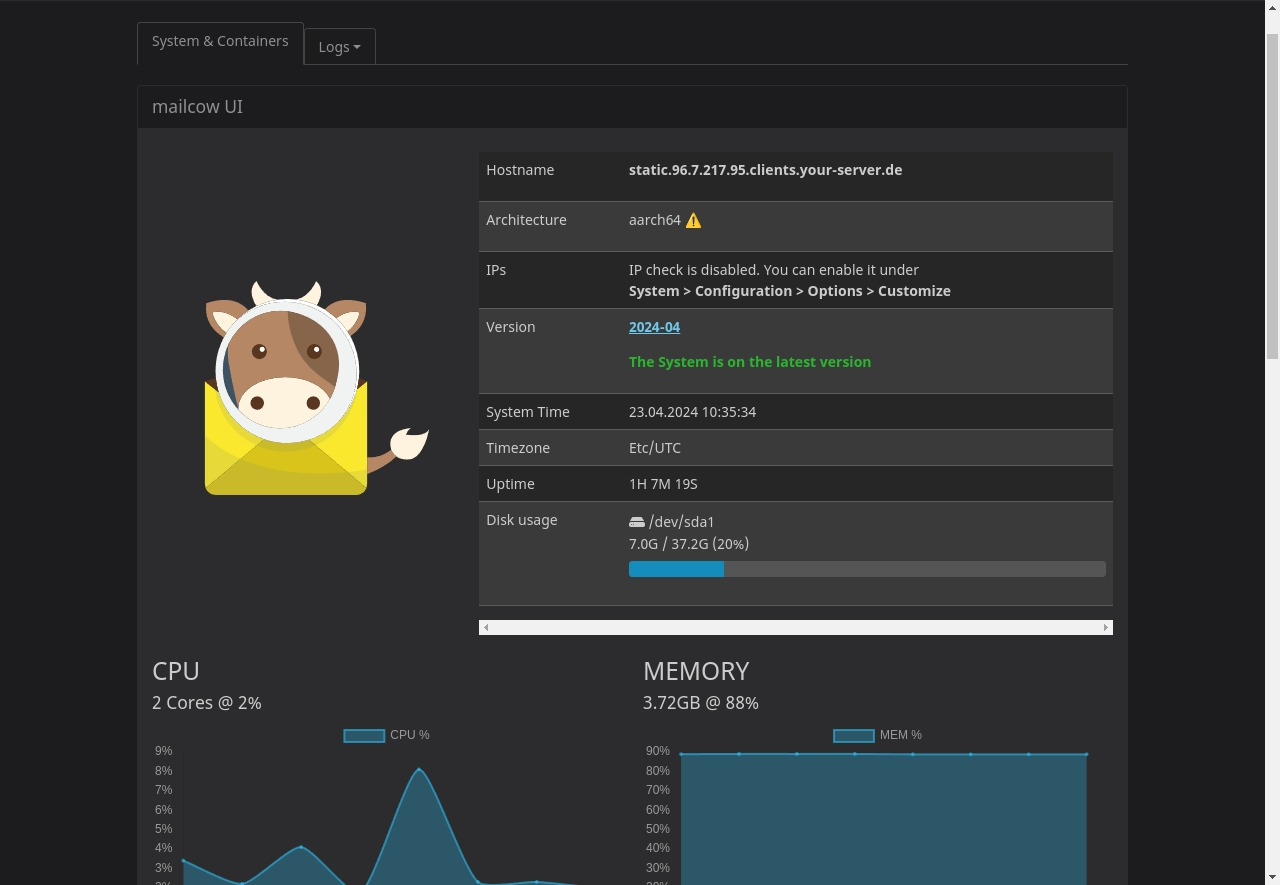
    Once your Docker containers are up and running, you can visit your Mailcow dashboard main page in your browser using the domain name that you specified earlier. On this screen, you will see a login page for the default admin account – the admin credentials are admin and moohoo.

    install-ubuntu-mail-server

    When you log in to your dashboard for the first time, you will see a statistics page for your server that shows basic diagnostic information such as CPU usage, memory usage, and all the currently running services.

    Inbox Domain Setup

    In your Mailcow dashboard, you can now start adding different domain names for your email inboxes. Click on the Email dropdown and select Configuration. In the domains tab, you can click on “Add domain” and follow the instructions on screen to set it up.

    After filling in all the information, you will be asked to configure the DNS records for this domain. Go to your DNS registrar’s dashboard and create all the required records using the values provided by Mailcow.

    Setting up these DNS records correctly is necessary for sending and receiving emails via your mail server. Read our post titled DKIM – What Is It & Why Your Emails Need It to understand this better.

    User Setup

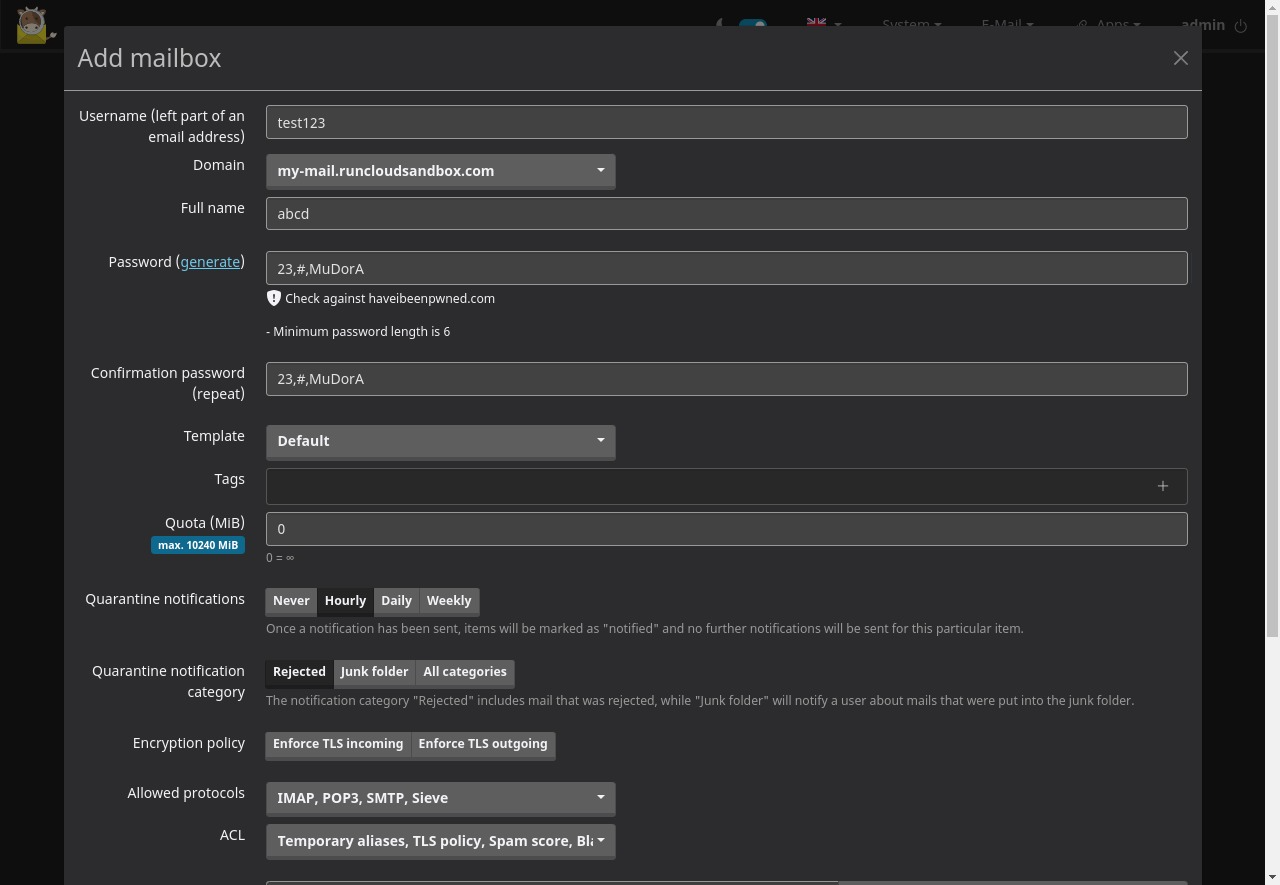
    After adding an inbox domain to your mail server, you can start using it immediately by creating new user accounts. Switch to the users tab and click on “Add User” to create a new account.

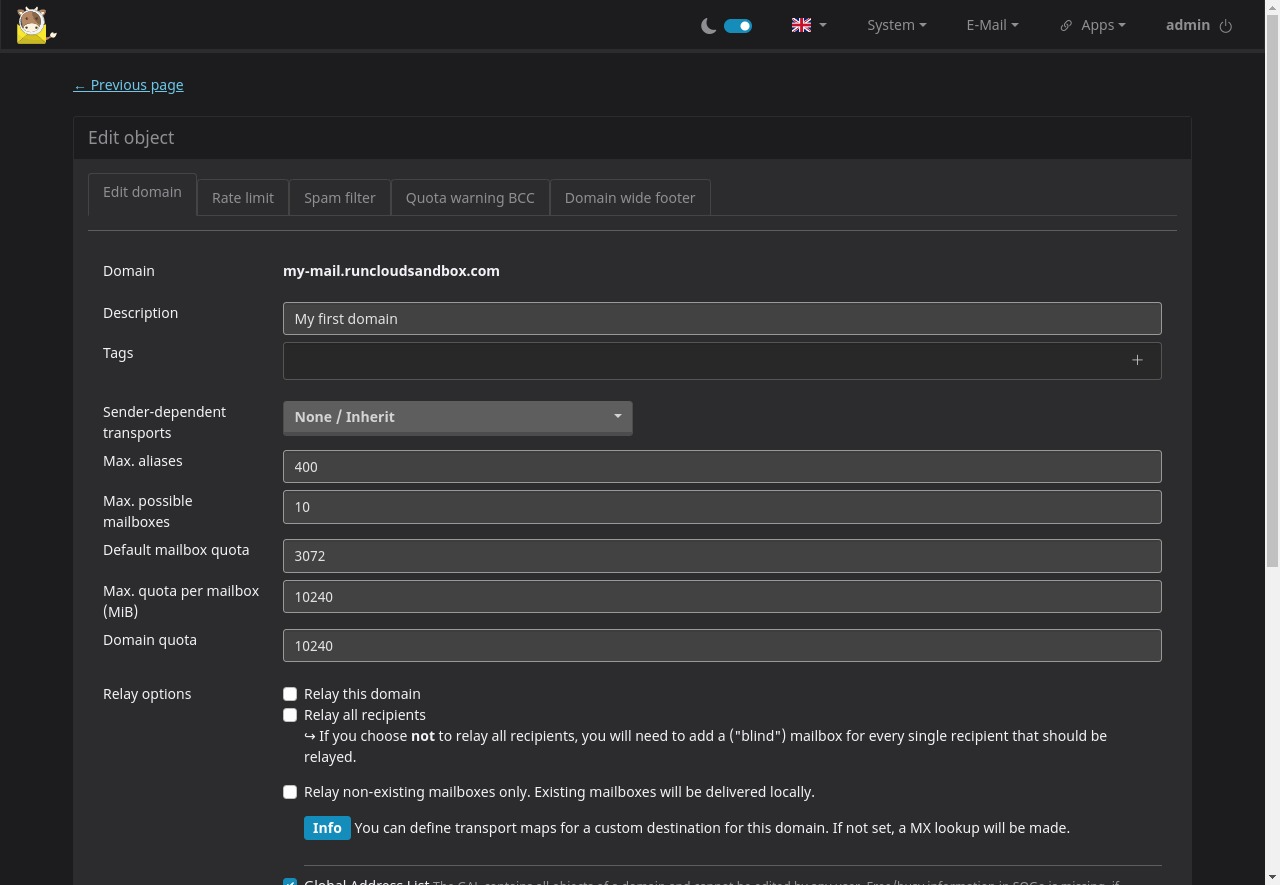
    On the next screen, you can fill in your username, full name, a login password, and configure other email settings such as the rate limit or the protocol that can be used to access your email address.

    Webmail Setup

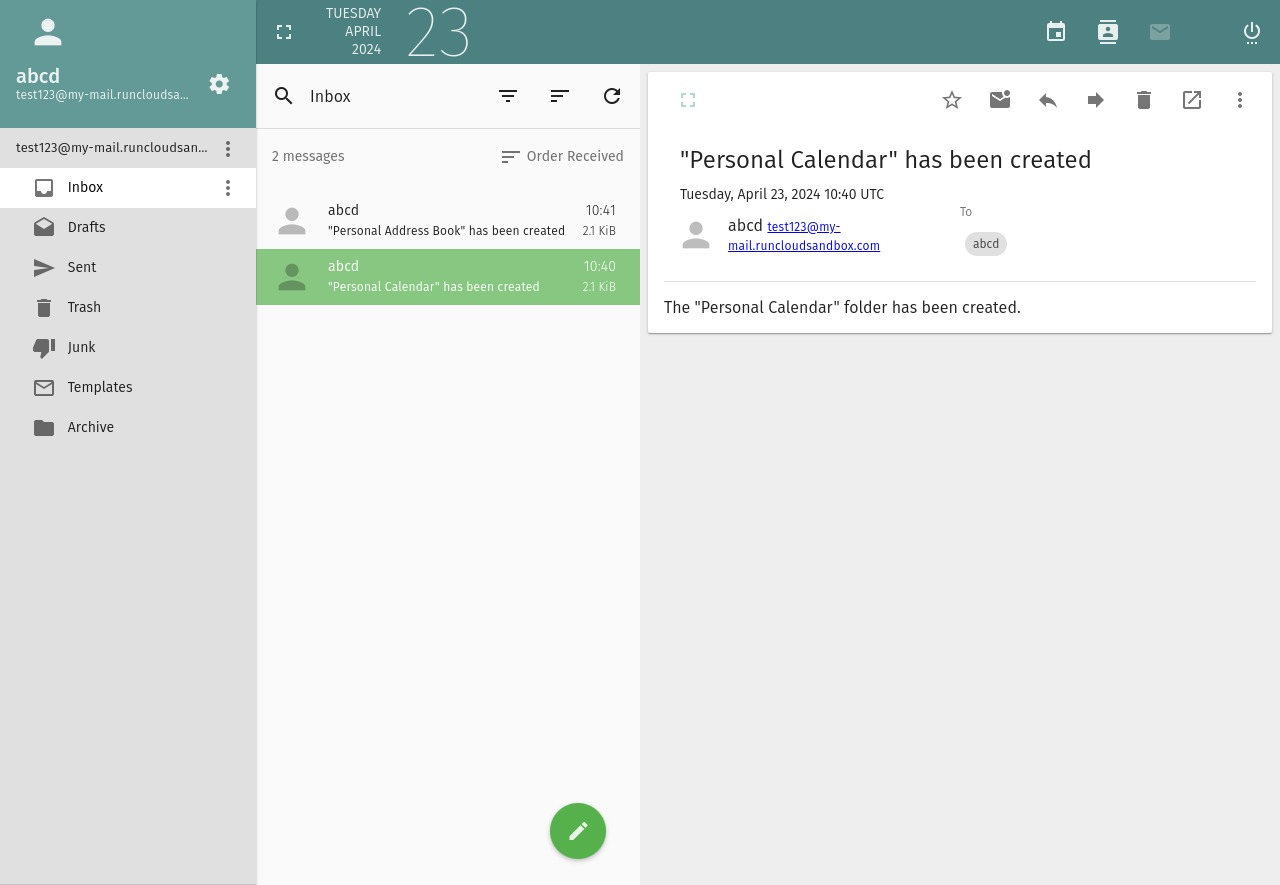
    After adding users to your server, you can open your SOGo dashboard by clicking on the Apps > Webmail. Once you click on Webmail, it will show you a login form, where you can enter the email address and password that you just created.

    Once you log in to your email account, you can start using it to send and receive emails normally.

    Wrapping Up

    Setting up an email server on Ubuntu can be a complex task, but with the right tools and guidance it becomes entirely manageable. We’ve walked through the process of installing a Mailcow email server, which offers a robust and straightforward solution for those seeking a self-hosted email server.

    However, it’s important to note that if you’re planning to send fewer emails, using a third-party email service might be a more efficient and cost-effective solution. These services often provide better deliverability, simplified scalability, and dedicated support – which can save you a lot of time and effort in the long run.

    Lastly, for managing and deploying web applications to the cloud, we highly recommend using RunCloud. It’s a powerful and user-friendly platform that simplifies the process of managing, configuring, and deploying applications, making it an excellent tool for developers of all skill levels.

    Sign up for RunCloud today!

    FAQ on Ubuntu Mail Server

    Does Ubuntu have a mail server?

    Ubuntu does not have a mail server of its own, but it supports several mail servers, such as Postfix, Sendmail, and Exim.

    How to create an SMTP server in Ubuntu?

    To create an SMTP server in Ubuntu, you can install Postfix, which is a popular and powerful SMTP server. Here are the steps:
    Update your package list using sudo apt-get update.
    Install Postfix using sudo apt-get install postfix.
    During the installation, a prompt will appear asking for the type of mail configuration. Select ‘Internet Site’.
    Enter the fully qualified domain name (FQDN) for your server.
    Once the installation is complete, you can edit the configuration file located at /etc/postfix/main.cf as per your requirements.

    How to set up Sendmail in Ubuntu?

    Setting up Sendmail in Ubuntu involves a few steps:
    Install Sendmail using sudo apt-get install sendmail.
    Configure /etc/mail/sendmail.mc by defining SMART_HOST.
    Run make in /etc/mail to implement the changes.
    Restart the Sendmail service with sudo service sendmail restart.

    What is the difference between Ubuntu and CentOS mail servers?

    The primary difference lies in the package management and the associated configurations. Ubuntu uses apt for package management, while CentOS uses yum. Therefore, the installation and configuration commands will differ. However, both can run the same mail servers such as Postfix or Sendmail.

    Why do I need a mail server in Linux?

    A mail server in Linux allows you to control your mail data, apply extensive customizations, integrate with other applications in your environment, and more. It’s particularly useful for businesses that require extensive control over their email.

    What is the default Linux mail server?

    There isn’t a default mail server for all Linux distributions.

    Should you use Sendmail or Postfix?

    Both Sendmail and Postfix are robust and reliable mail servers. Postfix is often favored for its ease of configuration and better security track record. However, some might prefer Sendmail because of its wide usage and extensive online resources.

    How do I run a local SMTP server?

    To run a local SMTP server, you can use tools such as Postfix or Sendmail. After installing them, you need to configure the mail server to run on your local machine, usually by setting the inet_interfaces parameter to localhost in the configuration file.

  • How to Open, Extract and Create RAR Files in Linux

    How to Open, Extract and Create RAR Files in Linux

    Do you want to download multiple files from a Linux server? Or maybe you want to store the logs to comply with regulations?

    In either case, you should compress the files into a RAR archive. In this post, we will show you how to create and extract RAR archives in Linux.

    But before we get started, let’s quickly understand what a RAR archive is.

    What are RAR Files?

    RAR is an acronym for Roshal Archive, which is a type of compressed file format used to reduce the size of files or groups of files. The RAR format offers several advantages over uncompressed files:

    1. Reduced Storage Space: Compressing files into a RAR archive can significantly decrease the amount of disk space they occupy.
    2. Faster Transfer Speeds: Smaller file sizes mean quicker upload and download times, especially over the internet.
    3. Improved Data Management: It’s easier to manage and organize a single RAR file than multiple smaller files.
    4. Data Integrity: RAR files can include error checking and recovery records to repair minor corruptions.
    5. Security: RAR files can be encrypted with passwords, providing an additional layer of security for sensitive data.

    It’s clear that RAR files can be pretty useful, so now let’s see how to use them via command line on Linux servers.

    Installing RAR Tools

    Before you can work with RAR files in Linux, you need to install the necessary tools. Here’s how you can do it:

    Step 1: Update System Repositories

    Connect to your server via SSH and enter the following command to update your system’s package list:

    sudo apt-get update

    This ensures that you have the latest information about available packages and their versions.

    Step 2: Install unrar & rar Packages

    To handle RAR files, you’ll need to install unrar for extracting RAR files, and rar for creating RAR files.

    Use the following command to install necessary packages:

    sudo apt-get install unrar rar -y

    After installation, you can start using these command line utilities to manage RAR archives.

    Working with RAR Files

    With the necessary tools installed, you can now create and extract RAR files using the following steps:

    Creating RAR Files

    Step 1: Navigate to the Directory

    Change to the directory containing the files you want to archive:

    cd /path/to/directory

    You can use the pwd command to check your current working directory and the ls command to see the list of all the files and directories present in the current directory.

    Step 2: RAR File Creation Command

    Once you are in the correct directory, use the rar command to create a new RAR archive:

    rar a archive_name.rar file1 file2 file3

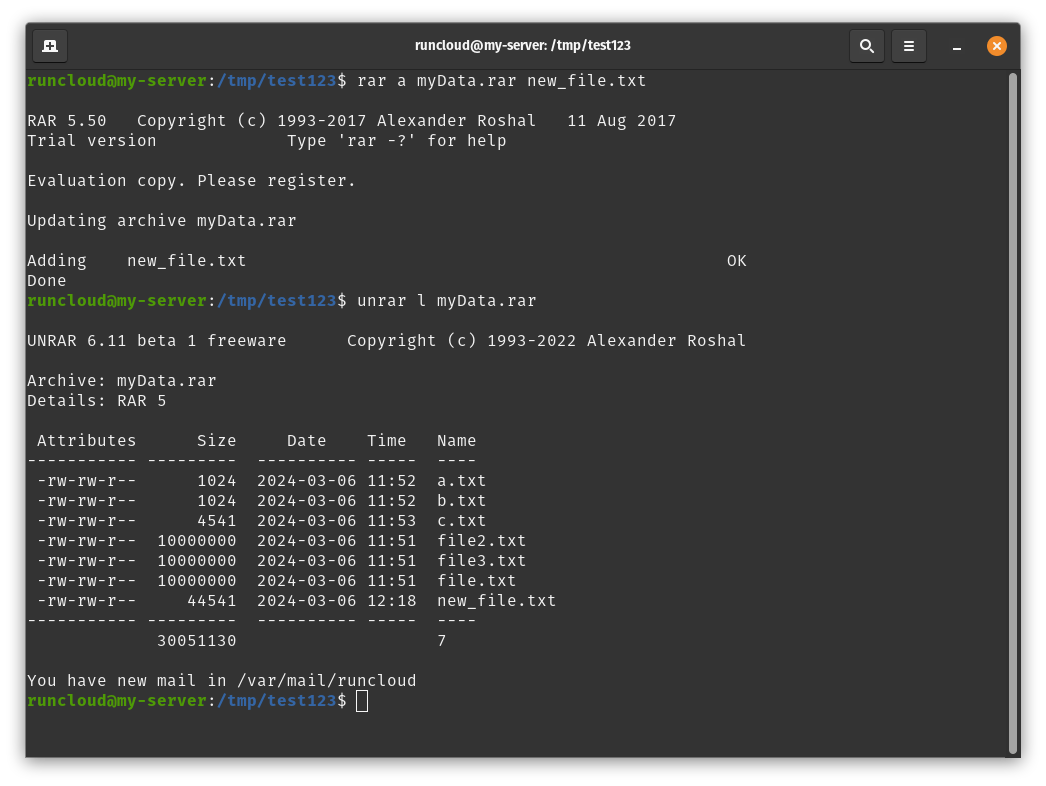
    Replace archive_name.rar with your desired archive name, and file1 file2 file3 with the files you want to include. If you want to include all the files in current directory, then you can enter * instead of file names.

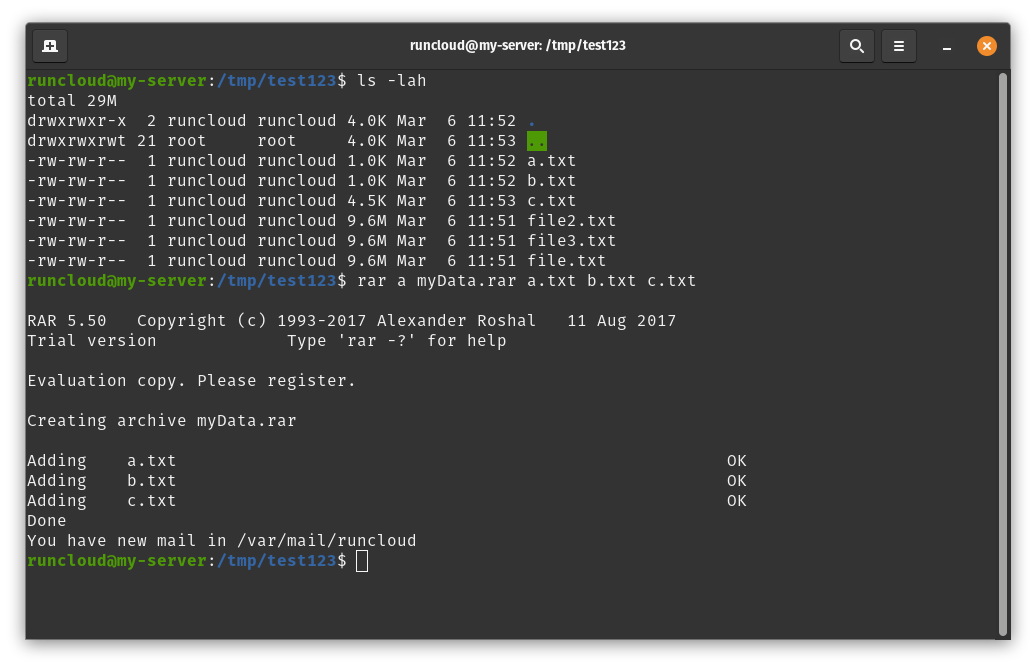
    viewing rar files in linux via command line

    In the above example, we can see that the rar utility created a new archive called myData.rar and added all the files listed that were specified in the command line arguments.

    Extracting RAR Files

    If you have downloaded a RAR file, then you can easily extract this file using the following steps:

    Step 1: Locate the RAR File

    Before we get started, make sure you know the exact path to the RAR file you wish to extract. You can either use the absolute path (from root) to the file, or the relative path (from the current location).

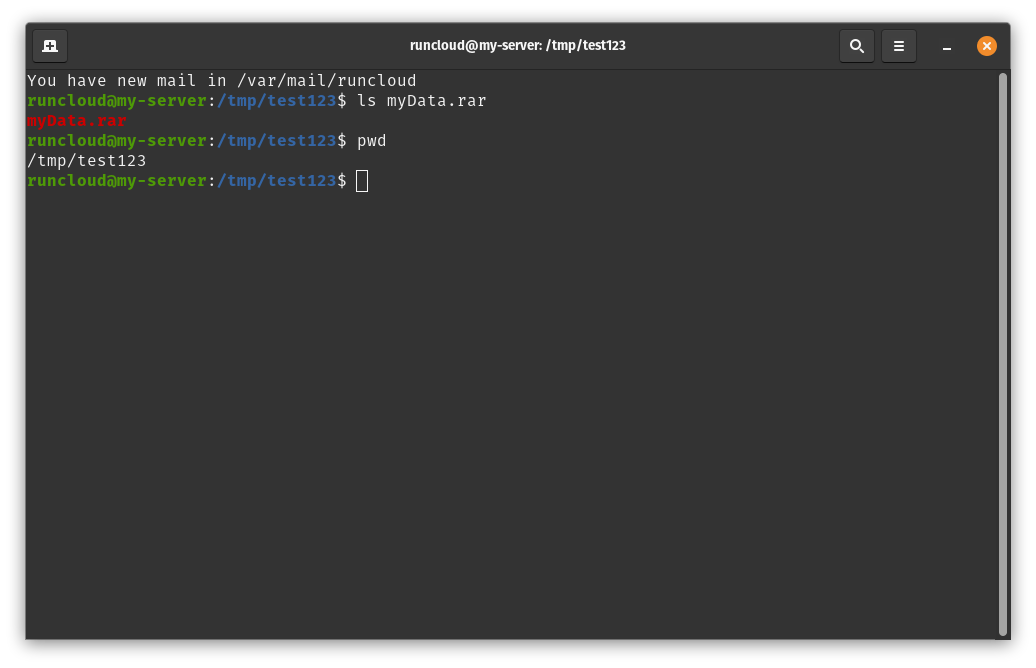
    For example, in the above screenshot, we have an archive in the current directory. For this file, the relative path would be myData.rar and the absolute path would be /tmp/test123/myData.rar.

    Step 2: Extraction Command

    After you have noted the path to your archive, you can extract its contents using the following command:

    unrar x archive_name.rar

    Replace archive_name.rar with the path of your RAR file.

    extracting rar files in linux via command line

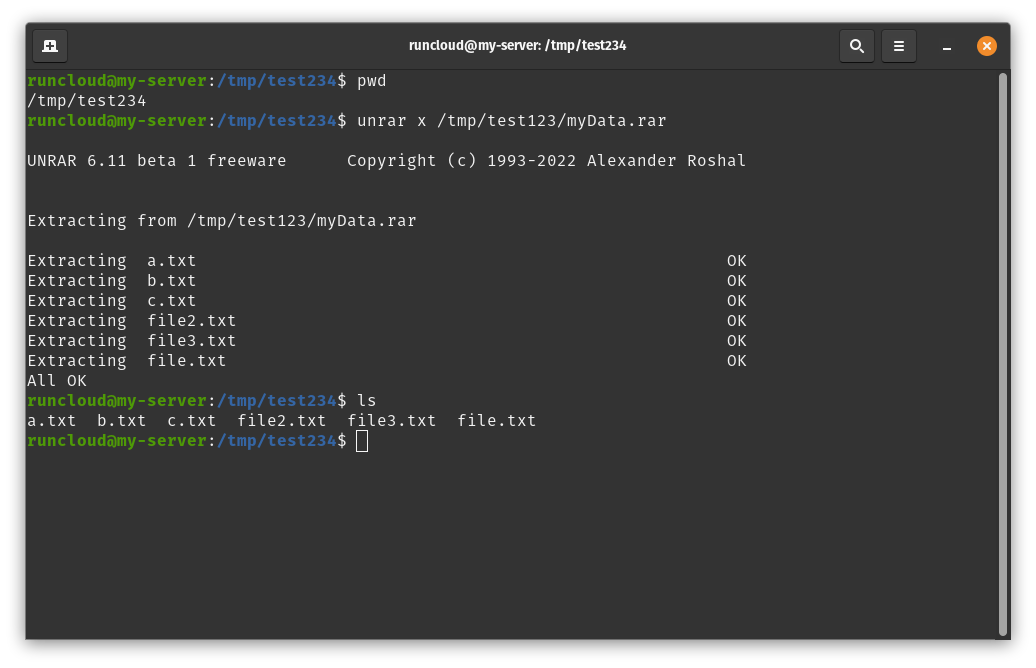
    In the above example we can see that we are working in a different directory (test234) and used the absolute path of the archive to extract it into the current working directory.

    Step 3: Directory Structure Preservation

    By default, unrar preserves the directory structure of the archived files. If you want to extract the files to a specific directory, you can specify the new path as a command line argument:

    unrar x archive_name.rar /path/to/destination

    Replace /path/to/destination with your desired directory path.

    extracting rar archives

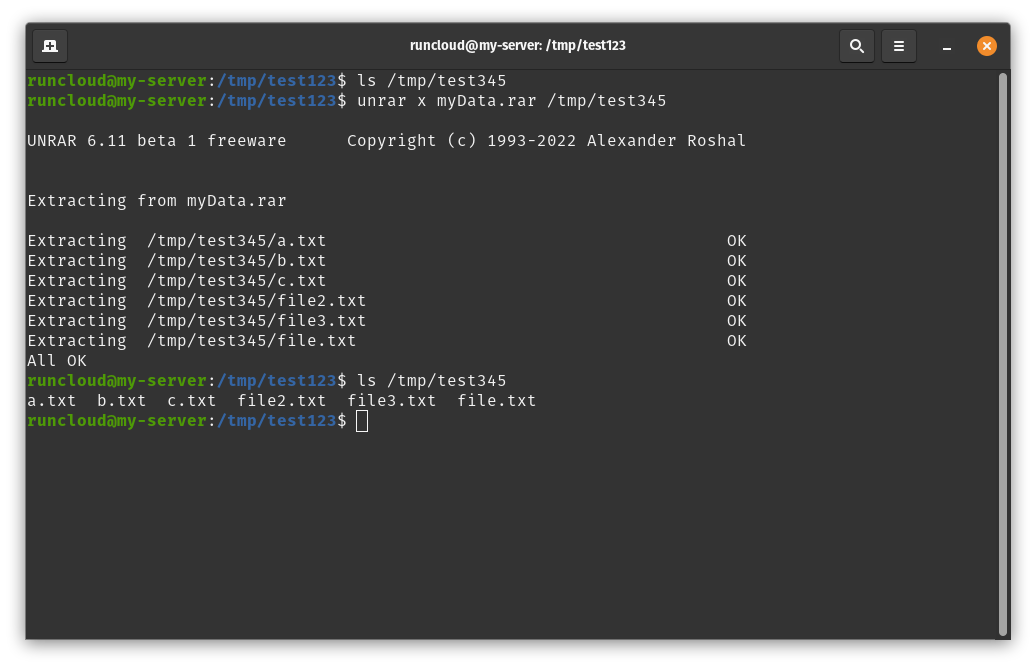
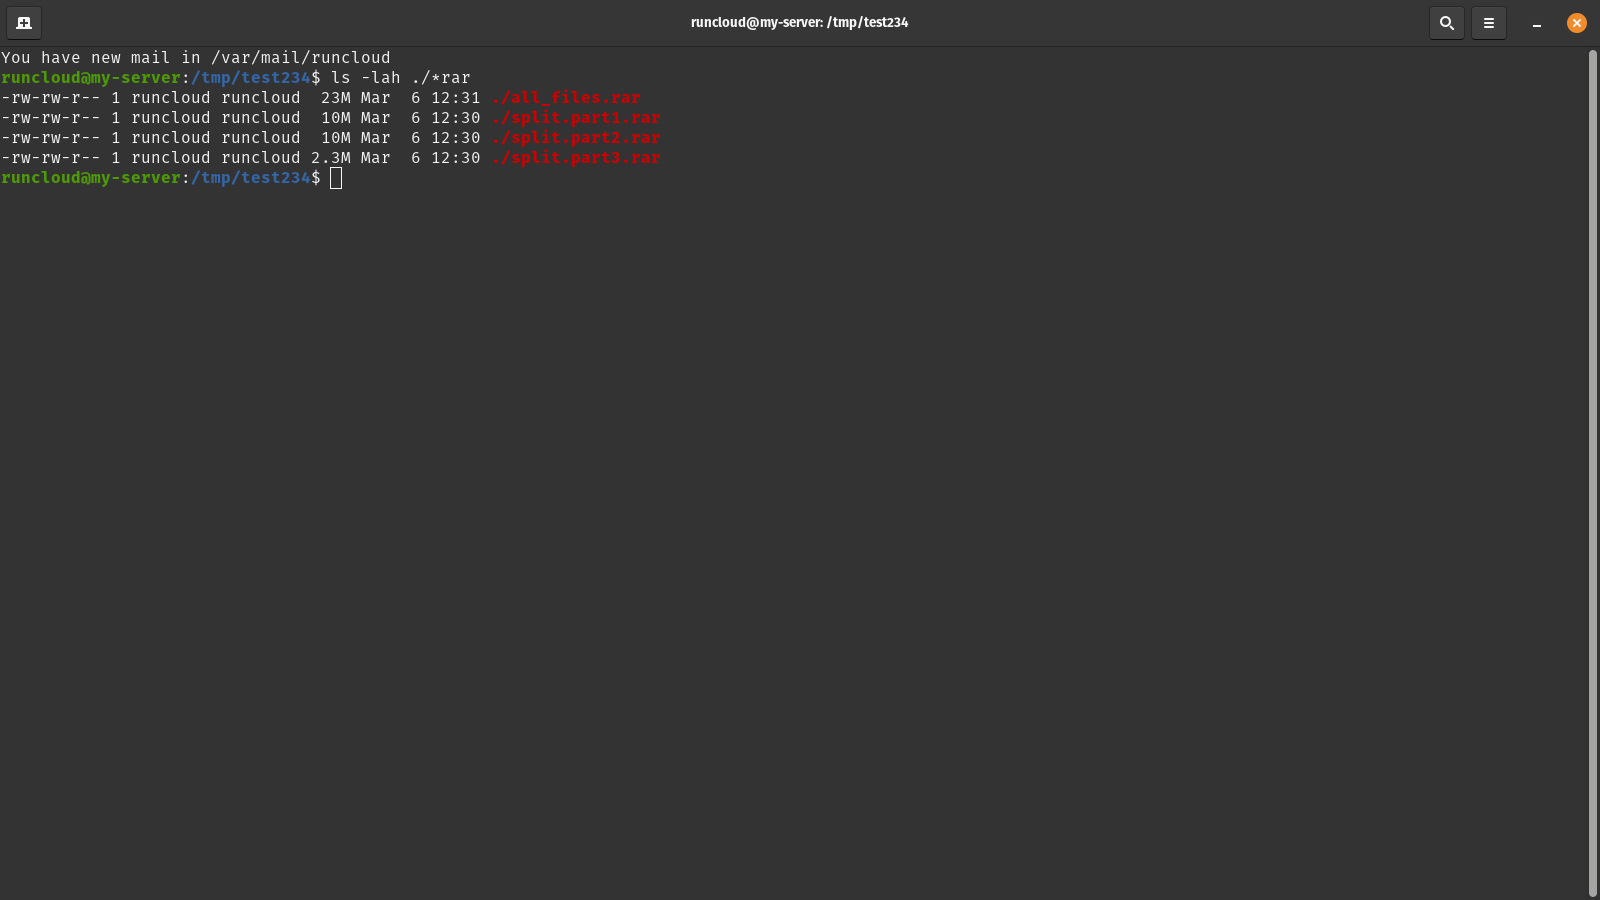
    In the above example, we can see that the /tmp/test345 directory is empty in the beginning. We use the unrar command to extract data from the archive in the specified directory. After this, we use the ls command once again to check the contents of the /tmp/test345 and confirm whether the file was extracted successfully.

    Advanced RAR Operations

    Listing Contents

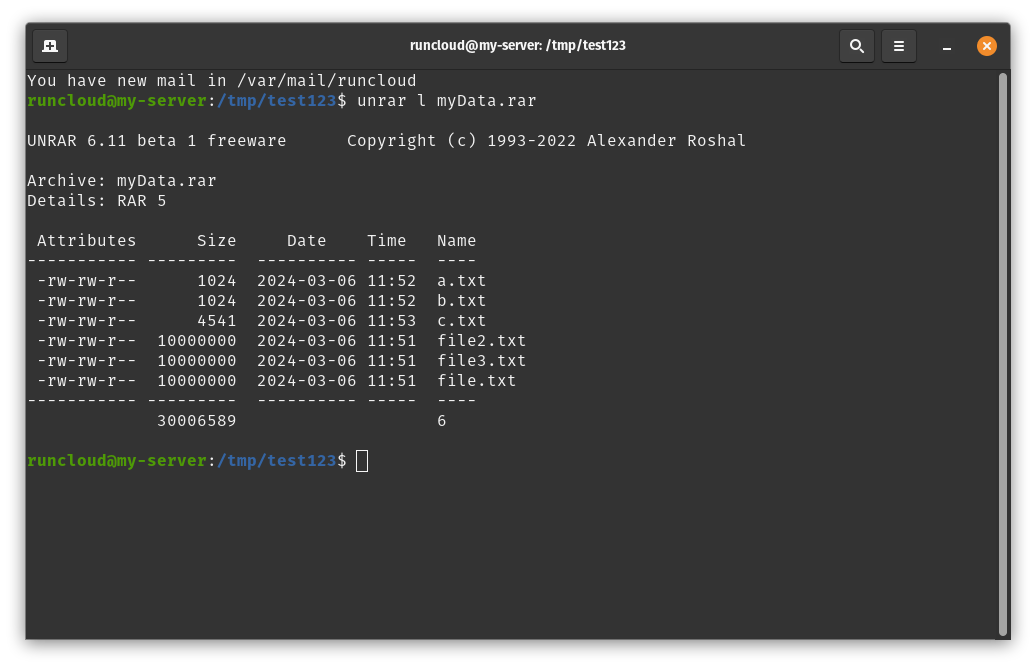
    To view the contents of a RAR file without extracting them, you can use the following command:

    unrar l archive_name.rar

    This will list all the files and folders contained within the RAR archive.

    Adding Files to an Archive

    The process of adding files to an existing RAR archive is similar to creating a new archive. You can use the following command to add a file:

    rar a archive_name.rar file_to_add

    Replace file_to_add with the name of the file you wish to add to the archive_name.rar archive.

    creating rar archive

    Setting Passwords to RAR Archives

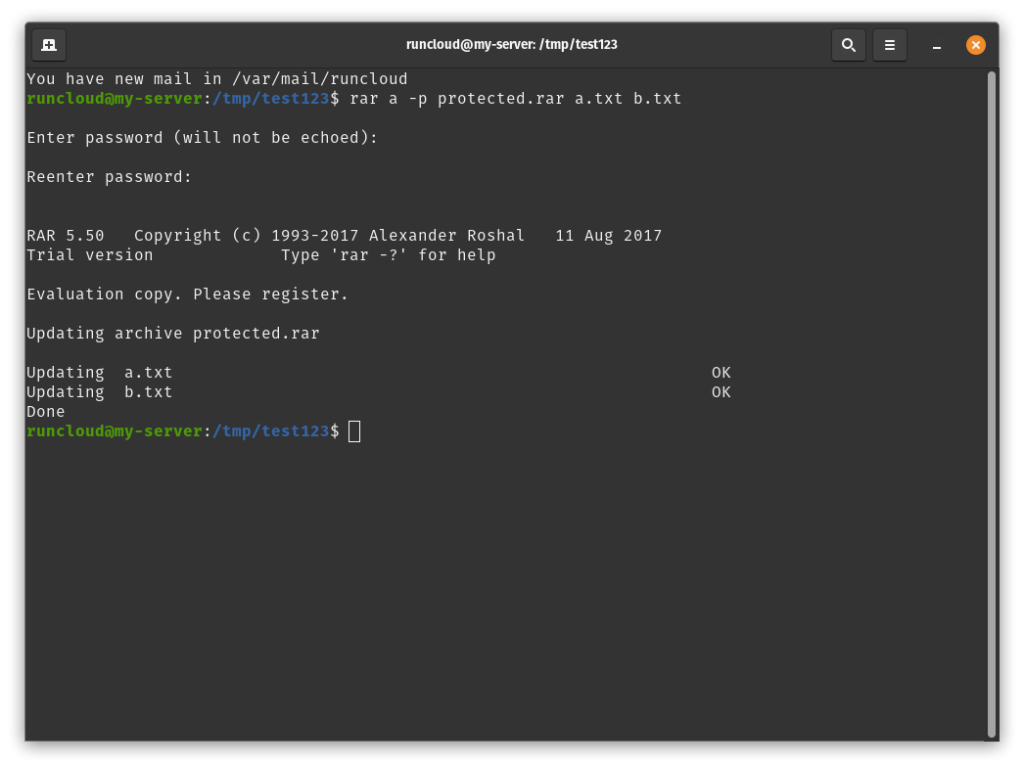
    If you are working with sensitive data, you can create a password-protected RAR file. To do this, you can use the -p option when creating the archive:

    rar a -p archive_name.rar file_to_archive

    After entering this command, you’ll be prompted to enter and verify a password for the archive. Keep in mind that when you type your password, it will not be displayed on the screen.

    Opening RAR Archives With A Password

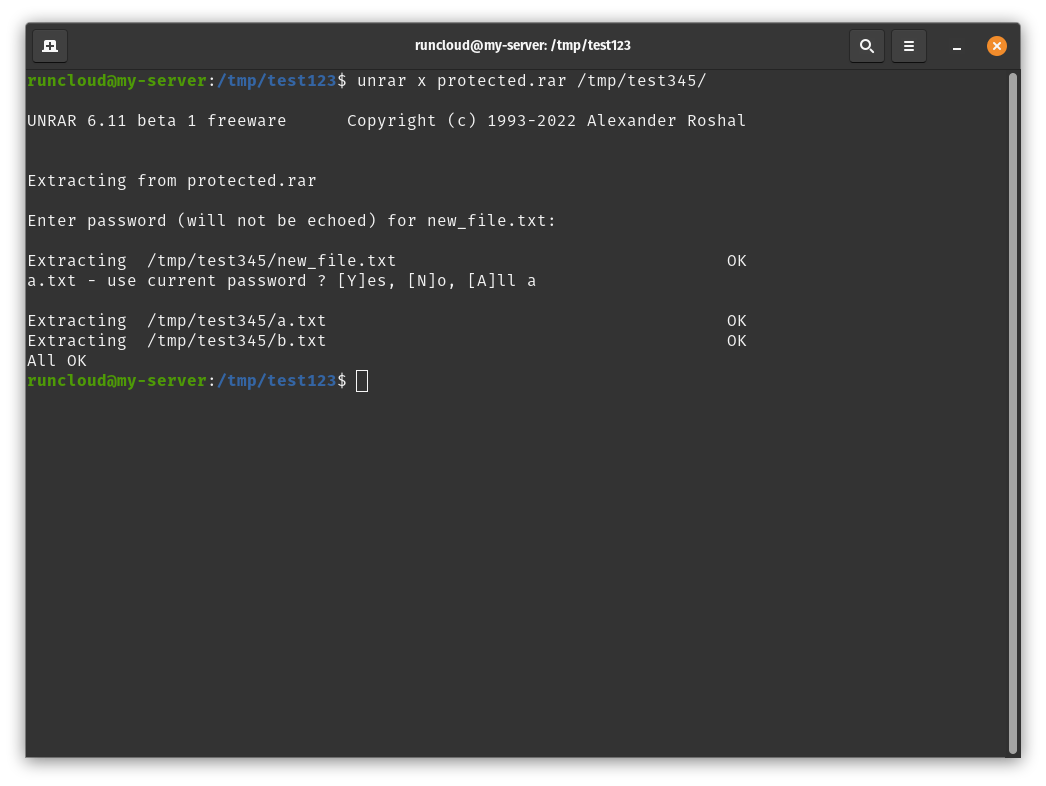
    The process of opening a password protected archive is similar to opening a simple file. Just use the following command to open the archive and enter your password when prompted:

    unrar x archive_name.rar /path/to/destination

    After typing your password, press ‘Enter’. If your archive has more than one file, you will be prompted to enter a password for each file – simply press the ‘a’ key on your keyboard to use the same password for all files.

    Splitting RAR Archives

    When working with extremely large files you sometimes need to split them into multiple parts. This is useful when you want to copy them over a network or store them in a smaller storage space.

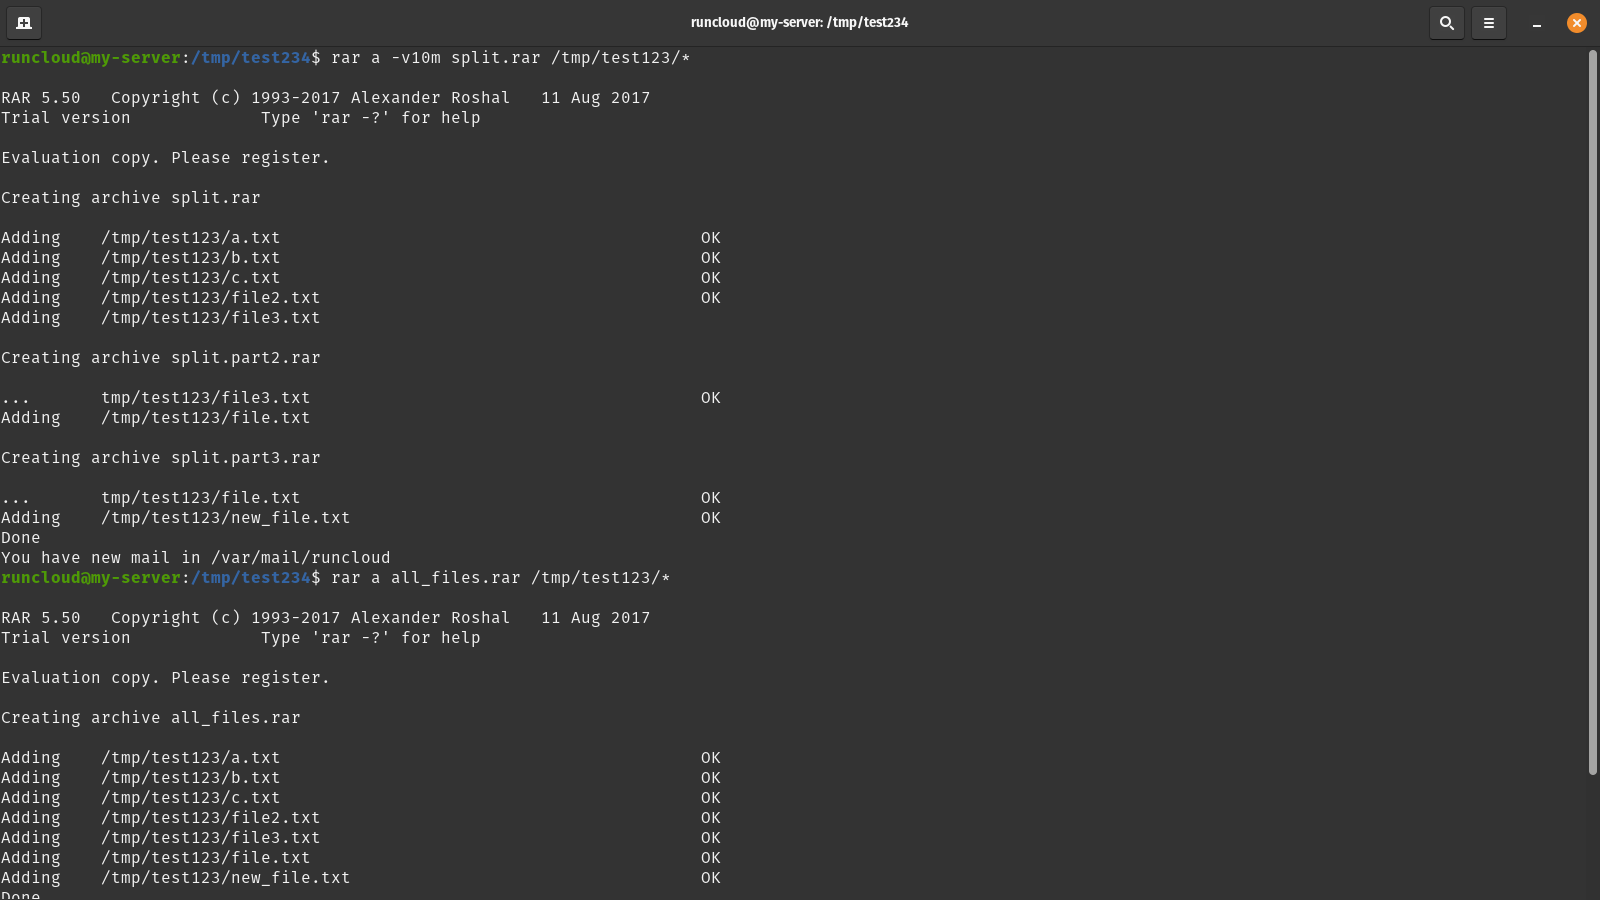
    To split a large RAR file into smaller parts, you can use the following command:

    rar a -vsize archive_name.rar file_to_archive

    Replace size with the maximum size for each split file (e.g., 10m for 10MB parts).

    In the above example, we can see that the -v10m parameter was used when creating the archive. This made sure that all the archive files were smaller than 10MB. On the other hand, if we had created a single archive, it would have resulted in a much larger file size.

    Conclusion

    Throughout this guide, we’ve explored the vast capabilities of RAR files within the Linux ecosystem. From creating and extracting archives to advanced operations such as encryption and splitting files. We encourage you to discover new ways to use these utilities and streamline your workflow.

    And if you’re looking to take your server management to the next level, consider using RunCloud.

    RunCloud simplifies server management tasks, saves you time, and lets you focus on what’s truly important – building great applications.

    With RunCloud, you can automate the tedious aspects of server management, ensuring that your Linux servers are running smoothly and efficiently.

    Start your journey with RunCloud today and experience the ease of managing servers like never before!

  • How to Set or Change System Hostname in Linux

    How to Set or Change System Hostname in Linux

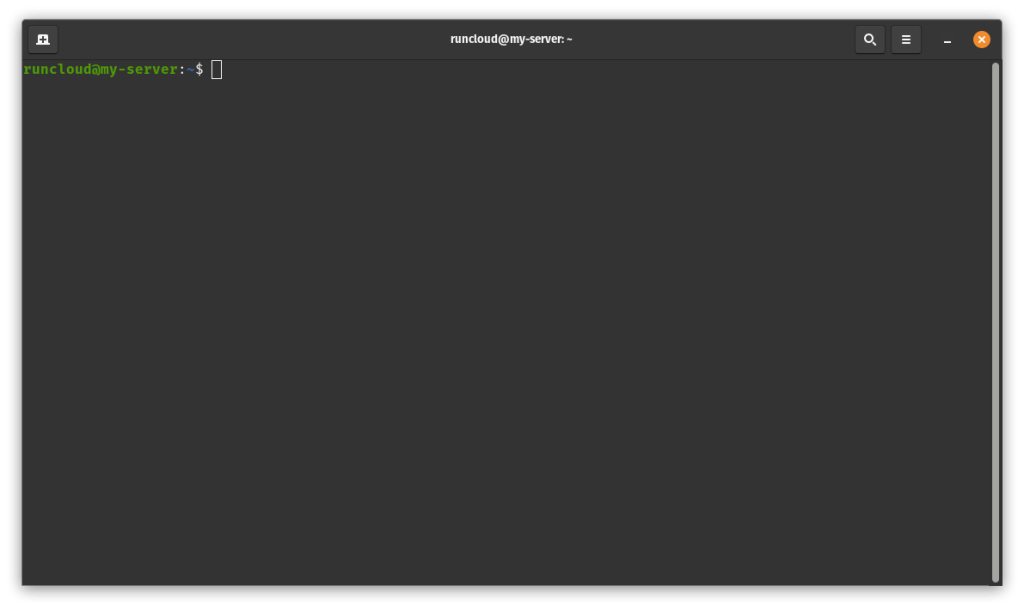
    If you’ve ever used a command line interface to access a computer, then you may have noticed a name at the start of each line – the system hostname:

    linux bash command line

    Have you ever wondered what it is, and why it’s there? If so then you’re in the right place. In this post, you will learn everything you need to know about hostnames in a Linux environment, and how to change them. But first, let’s understand what a hostname actually is.

    What is a Hostname?

    A hostname is a unique name that identifies a computer or device on a network. It can be used to communicate with other devices, access shared resources, or identify the owner or purpose of the device. A hostname can be any alphanumeric string – for example: laptop, server, or runcloud.io.

    When accessing a resource over a network, it’s not immediately obvious what computer is being used. If you have a graphical user interface, you can make a good guess by looking at the wallpaper or the time of the device, but it is very difficult when using a command line interface – and this problem only gets worse as the number of computers increases in the network.

    Having a hostname makes it possible to distinguish one computer from another. Here are some examples where hostname is useful:

    • When you connect to a wireless network, your device’s hostname may appear on the router’s client list or other devices on the same network. Changing the hostname to something more descriptive can help you identify your device easily and avoid confusion with other devices that may have similar default hostnames.
    • When you use remote access tools such as SSH or VNC to connect to your device from another computer, you may need to enter the hostname or IP address of your device. Changing the hostname to something more memorable can make it easier to remember and type the address, especially if your device has a dynamic IP address that changes frequently.
    • When you use file sharing or streaming services such as Samba or DLNA to share or access media files on your device, your device’s hostname may appear as the name of the server or the source of the files. Changing the hostname to something more meaningful can help you organize and find your files more quickly and conveniently.

    How is Hostname Different from MAC Address and IP Address?

    You may be wondering why we need hostnames when we already have MAC addresses, and IP addresses – both of which are different ways of identifying a device on a network. They serve different purposes and operate at different layers of the network – let’s see how.

    What is a MAC Address?

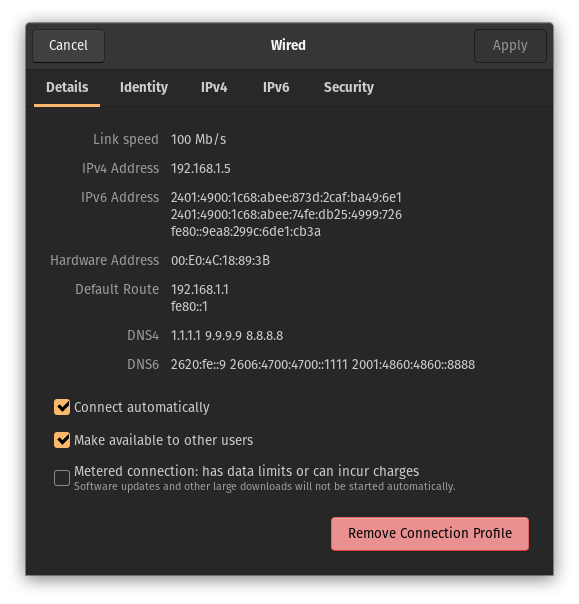
    A MAC address, also known as a hardware address, is a physical address that is assigned by the manufacturer of the network interface card (NIC) of the device. It is a 48-bit hexadecimal number that uniquely identifies the device at the data link layer (layer 2) of the network. It looks something like 00:E0:4C:18:89:3B and it is used by switches and other devices to forward data packets to the correct destination based on the MAC address of the sender and the receiver.

    A MAC address cannot be changed easily and it doesn’t depend on the network configuration or location of the device. Moreover, if your computer has more than one way to connect to a network then it will have a separate MAC address for each of them. For example, many laptop computers can connect to a network via both Wi-Fi and wired connections.

    What is an IP Address?

    An IP address is a logical address that is assigned by the network administrator or the internet service provider (ISP) of the device. It is a 32-bit (IPv4) or 128-bit (IPv6) number that uniquely identifies the device at the network layer (layer 3) of the network. For example, 192.168.100.1 and fe80::1 are IPv4 and IPv6 addresses.

    It is used by routers and other devices to route data packets to the correct network or subnet based on the IP address of the sender and the receiver. An IP address can be changed dynamically and it depends on the network configuration and location of the device.

    How is the Hostname Different?

    A hostname is a human-readable name that is assigned by the user or the system administrator of the device. A hostname can be changed easily and it doesn’t depend on the physical or logical address of the device. We need hostnames because they are easier to remember and use than MAC addresses or IP addresses, which are long and complex numbers.

    Hostnames also allow us to access devices or websites using meaningful names rather than numerical addresses. For example, it is easier to type www.google.com than 172.217.160.78 in the browser. Hostnames also enable us to change the physical or logical address of the device without affecting the name of the device or the service it provides. For example, if a server crashes, you can immediately spin up a new server with the same hostname and if everything is configured correctly, nobody would notice the crash.

    Is Hostname the Same as Domain Name?

    A hostname and a domain name are both labels used to identify and locate resources on the internet, but they are not exactly the same. A hostname is a name assigned to a specific device or server on a network, while a domain name is a name assigned to a website or a group of servers.

    Additionally, hostname is supposed to be unique in a network, but you can have more than one computer with the same hostname. However, domain names are globally unique, – you have to pay money to a domain registrar such as Namecheap or Cloudflare to register and use a domain name.

    For example, www.example.com is a domain name that represents a website, and www is a hostname that identifies a specific server within the domain. A domain name can have multiple hostnames, but a hostname can only belong to one domain name. A hostname can also be a domain name if it is registered as such. For example, google.com is both a hostname and a domain name.

    How to Check the Current Hostname on Linux

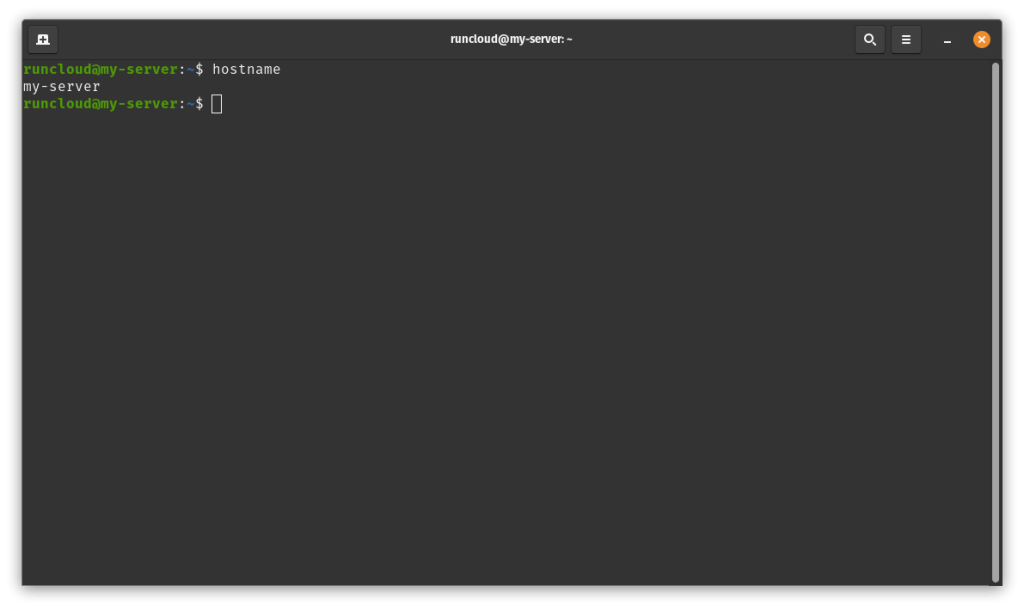
    To check the current hostname, you can use the hostname command in the terminal. It will display the name of the device as configured in the system:

    hostname
    checking hostname in linux

    In the above example, we can see that my-server is the hostname of the computer.

    How to Set or Change the Hostname Temporarily

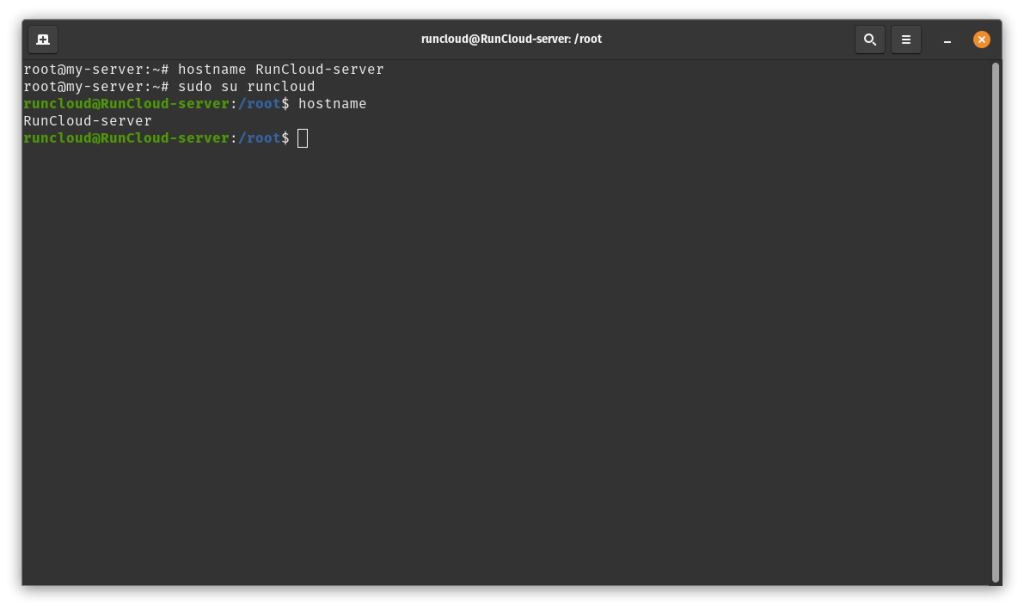
    To set or change the hostname temporarily, you can use the hostname command with a new name as an argument. This will change the name of the device only for the current session, and it will not affect other devices on the network.

    hostname newname
    Changing hostname in Linux

    In the above example, we can see that when we execute the hostname command with superuser privileges, we can change the hostname of the computer.

    How to Set or Change the Hostname Permanently

    To set or change the hostname permanently, you need to edit two files: /etc/hostname and /etc/hosts. The /etc/hostname file contains the name of the device, and the /etc/hosts file contains the mapping between the name and the IP address of the device. You need to have root privileges to edit these files.

    If you are not sure how to edit files via terminal, we recommend you read our in-depth post on editing files via Nano.

    sudo nano /etc/hostname
    # change the name to newname and save the file
    sudo nano /etc/hosts
    # change the line that starts with 127.0.0.1 to include newname and save the file

    For example, if you change your hostname to runcloud-sandbox then your hosts file should look like this:

    127.0.0.1 localhost runcloud-sandbox

    Wrapping Up

    In this post, we have learned how to set or change the system hostname in Linux. We have also learned what a hostname is, and how it differs from a MAC address and an IP address.

    We have limited our discussion to Linux computers only. However, you should know that other devices such as Windows and Android phones also have hostnames, but they may use different methods to set or change them.

    For example, Windows allows you to change the hostname from the System Properties dialog box, while Android requires you to use the terminal or edit the system files. Some devices may also have additional names or identifiers, such as Bluetooth name, device model, or network name, that are not the same as the hostname.

    If you’re looking for a way to make managing servers much easier and save time, we recommend you take a look at RunCloud.

    RunCloud is a cloud server management platform that allows you to deploy, configure, and manage your web applications on any cloud provider.

    With RunCloud, you can easily set up your server, install your web stack, secure your server, monitor your performance, and automate your tasks. RunCloud supports various web applications such as WordPress, Laravel, Drupal, Joomla, and more. RunCloud also supports various cloud providers such as DigitalOcean, AWS, Google Cloud, Azure, and more.

    Get started with RunCloud and sign up for a free trial.

  • How to List Linux Users and Groups in Ubuntu with Command Line

    How to List Linux Users and Groups in Ubuntu with Command Line

    In this article we’ll be explaining what these terms mean, why they’re important, and answering a common question – how to list Linux users and groups in Ubuntu with the command prompt.

    It doesn’t take long once you’ve dived into Linux systems before you encounter words such as ‘root’ and ‘sudo’, which aren’t at first glance entirely easy to understand.

    But first, let’s discuss the difference between root user, system user, and regular user on Linux.

    What are the 3 types of users in Linux?

    Most people are familiar with two types of user accounts on Linux, but did you know that there are actually three different types of users? Let’s see what each one of them does:

    1. Root User: The root user, also known as the superuser, has the highest level of access to the system. This user can read, write, and execute any file, and can perform administrative tasks such as creating, deleting, or modifying accounts, changing ownership of files, and managing system-wide settings. For example, the root user can use the sudo command to execute commands with administrative privileges.
    2. System Users: System users are created by the operating system during installation for running system processes and services. These users have fewer privileges than the root user and are typically used to run non-interactive or background processes. For instance, the www-data user in Ubuntu is a system user that runs the Apache web server.
    3. Regular Users: Regular users are the standard users who use the system for daily tasks. They have the least privileges and can only read, write, or execute files in their home directory. These users can’t access other users’ files or system files without appropriate permissions. For example, a regular user can create and edit files in their home directory, but cannot modify system files located in /etc or /var.

    What is the /etc/passwd File in Linux?

    The /etc/passwd file is a key file in Linux that contains information about different user and system accounts present on that system. Each line in the /etc/passwd file represents a single user account and contains seven fields separated by colons (:). Here’s a brief overview of these fields:

    1. Username: This is the name of the user. It should be unique and is used for logging in.
    2. Password Indicator: In modern Linux distributions, this field is usually set to x. The actual hashed password is stored in the /etc/shadow file, which has stricter access controls.
    3. User ID (UID): This is a unique numerical ID assigned to the user. The root user always has a UID of 0.
    4. Group ID (GID): This is the numerical ID of the user’s primary group. The group details are stored in the /etc/group file.
    5. Comment/Description/User Info: This field is optional and can contain extra information about the user, such as their full name.
    6. Home Directory: This is the absolute path to the user’s home directory, where their personal files are stored.
    7. Shell: This is the absolute path to the shell that is started whenever the user logs in.

    Suggested Read: CentOS vs Ubuntu – Which One Should You Choose in 2024?

    How to List Users in Linux?

    As we mentioned above, the /etc/passwd file contains a list of all the users on a Linux computer, and since this file can be read by any user, we can open it using various tools to see a list of all the users in Linux.

    Method 1: List Users Using the cat Command

    The cat command in Linux prints the entire contents of a file in the Linux terminal, and so you can use the following command to display the content of /etc/passwd file:

    cat /etc/passwd
    view linux users

    Method 2: List Users Using “less” or “more”

    The “less” and “more” commands are very similar – they both allow you to peek inside a file without actually printing its contents in the terminal. If the list of users is long, you can use either the less or more command for easier navigation:

    less /etc/passwd
    more /etc/passwd

    Method 3: How to List Users Using the awk Command

    The awk command provides you with the option to perform pattern matching and processing on the specified file. You can use this utility to list users by filtering the /etc/passwd file using the following command:

    awk -F: '{ print $1}' /etc/passwd

    Method 4: List Users Using the getent Command

    The getent command displays entries from databases configured in the /etc/nsswitch.conf file, including the passwd database which contains user information. To get a list of all users, you can use the following command:

    getent passwd

    Suggested read: Pipes vs Xargs: Which One To Use When Writing Bash Scripts In Linux

    What are Linux Groups?

    Simply put, a group is a collection of Linux users that makes it easier to collectively manage the permissions and privileges for each user in the group.

    In Linux, each user can belong to one or more groups, and when a user is part of a group, they inherit the permissions and privileges of that group. This system allows administrators to manage multiple users’ permissions simultaneously.

    Let’s try to imagine a Linux system as a large office building to understand the concept of groups. In this building, there are different departments such as HR, Finance, Marketing, etc. Each department is like a group in Linux.

    Now, each department will have employees working in it, and these employees correspond to a user in Linux. An employee can belong to multiple departments, just like a user can belong to multiple groups in Linux.

    In this building, each department has its own resources and access permissions. For example, only HR employees can access HR files, only Finance employees can access financial data, and so on. This is similar to how file permissions work in Linux – when a user is part of a group, they inherit the permissions of that group.

    This way, Linux groups help in managing permissions and access control efficiently, especially in environments where there are many users.

    Suggested Read: How to Find Most Used Disk Space Directories and Files in Linux

    How to List All Groups in Linux?

    There are multiple ways to list groups in Linux, let’s take a look at each one of them:

    Method 1: Use the groups Command

    In Linux, you can list all the groups that the current user is a member of by simply using the groups command (without any options) as shown below.

    groups

    Method 2: List all Groups Using the /etc/group File

    As the name describes, the /etc/group file contains information about all the groups on the system. You can use the cat command to display its content:

    cat /etc/group

    Method 3: List All Group Names Using The cut Command

    The cut command in Linux provides simple tools to view and process certain sections of a text file and display its contents to the terminal. You can use the cut command to display only the group names from the /etc/group file:

    cut -d: -f1 /etc/group

    Method 4: List All Groups Using The getent Command

    As we mentioned before, the getent command displays information from databases configured in /etc/nsswitch.conf file, including the group database which contains group information. To view a list of all the groups present on a Linux computer, you can use the following command:

    getent group

    Suggested read: How to Change/Reset MySQL Root Password on Ubuntu Linux?

    Wrapping Up

    In this post, we’ve explained how Linux users and groups work, as well as how organizing the accounts in a logical structure makes it easier for the administrators to manage and maintain the permissions.

    While it is easy to grant permissions to any user on your system, it’s important to keep in mind that misuse of user privileges, especially the root user, can lead to system instability or security vulnerabilities. Therefore, we recommend you only grant the level of access necessary to perform a task.

    While managing the accounts and permissions in Linux might sound complicated, you don’t need to be a Linux expert to do so. RunCloud simplifies the process, making it easy to manage your website and server with a single click.

    So why wait? Start making your website management effortless. Sign up for RunCloud today!

    FAQ on Linux Users and Groups

    How to create and delete a group in Linux?

    To create a group, use the groupadd command followed by the name of the group. For example, to create a group named ‘developers’:
    sudo groupadd developers
    To delete a group, use the groupdel command followed by the name of the group. For example, to delete the ‘developers’ group:
    sudo groupdel developers

    What is the chmod 777 command?

    The chmod 777 command changes the permissions of a file or directory to be fully open to all users. The three digits represent the permissions for the owner, group, and others, respectively. Each digit is the sum of read (4), write (2), and execute (1) permissions. So, ‘7’ gives full permissions.
    chmod 777 filename

    What is getent command in Linux?

    The getent command in Linux is a tool that helps users retrieve entries from a number of important text files called databases; this includes the passwd and group databases, which store user information. 
    Here are some examples of how to use the getent command:
    To fetch the list of user accounts on a Linux system (stored in a database known as passwd), you can use the command getent passwd.
    If you want to fetch details for a particular user, for example, a user called naman, then you can use the command getent passwd naman.
    If you want to fetch a list of group accounts on a Unix system (stored in a database called group), then you can use the command getent group.

    Which command lists all users currently on the system in Linux?

    The who command can be used to list all users currently logged into the system: who

    What are Linux system users?

    In Linux, there are a few user accounts that are automatically created by the system to perform background tasks. These users don’t have a password and can’t log in to interact with the computer – they are only used to grant a specific set of privileges to a particular tool or process.

    How do I know if I am a root user?

    You can use the whoami command to check if you are the root user:
    whoami If the output is ‘root’, then you are the root user.

    What is the sudo code?

    In Linux, sudo is a command that allows users to run programs with the security privileges of another user (by default, the superuser). It stands for “superuser do”. For example, to run the ls command as superuser:
    sudo ls

  • 9 Redis Alternatives Worth Keeping An Eye On

    9 Redis Alternatives Worth Keeping An Eye On

    Redis has long been one of the most admired in-memory databases – fast, flexible, and widely adopted across modern applications. In 2024, however, the company behind Redis moved the project away from its long-standing open source roots, triggering widespread concern in the developer community and sparking forks like Valkey.

    In May 2025, Redis reversed course.

    The release of Redis 8 introduced a new open source license (AGPLv3), reintegrated Redis Stack features into core Redis, and reaffirmed the company’s commitment to the open source ecosystem.

    In this post, we’ll briefly cover what Redis is and why in-memory databases are so useful. Then we’ll walk through the recent licensing changes and what they mean for developers. Finally, we’ll highlight several powerful alternatives you might want to consider, whether you’re sticking with Redis or exploring something new.

    What is Redis?

    Redis, which stands for Remote Dictionary Server, is an open-source, in-memory data structure store – which means that instead of storing the data on your hard disk, it stores it in the RAM.

    It’s primarily used as a database, cache, and message broker, and supports various data structures, including:

    • Strings
    • Hashes
    • Lists, sets
    • Sorted sets with range queries
    • Bitmaps
    • Hyperloglogs
    • Geospatial indexes
    • Streams

    All of which makes it very flexible and versatile for a wide range of applications.

    Advantages of In-Memory Databases

    If you know a little bit about web applications, you might have already heard of traditional database systems such as MySQL and MariaDB – but what makes in-memory databases special?

    1. Speed: In-memory databases use RAM instead of hard disk drives (HDD) or solid-state drives (SSD) to store data, drastically reducing the latency of reading and writing data. Using an in-memory database can deliver extremely fast read and write operations, making them suitable for scenarios where low-latency is critical.
    2. Real-Time Analytics: These databases are ideal for applications that process a lot of data, such as advanced planning, simulation, and analytics.
    3. Scalability: In-memory databases are simpler to scale up and down compared to other databases, because of how they store data.

    Redis Licensing: From Restriction to Open Source Again

    In early 2024, Redis changed its license from the permissive BSD license to a dual model: RSALv2 (Redis Source Available License) and SSPLv1. The move was designed to prevent cloud providers from monetizing Redis as a managed service without contributing back.

    While the change didn’t affect most users running Redis in their own environments, it had a major impact on providers like AWS, Google Cloud, and DigitalOcean, sparking concerns across the open source community and leading to the launch of Valkey, a fully open fork backed by several tech giants.

    In May 2025, Redis responded to this shift by releasing Redis 8 under the OSI-approved AGPLv3 license, re-establishing its open source status. The release also unified Redis Stack features (like JSON, Time Series, and probabilistic data types) into core Redis and delivered major performance improvements.

    The licensing reversal signals Redis’ renewed commitment to the open source community, but the landscape has already shifted. Forks like Valkey have gained traction, and many developers are still evaluating which long-term direction best suits their infrastructure and licensing preferences.

    Top Alternatives to Redis

    If you’re looking for other in-memory database solutions to replace Redis, then we recommend considering the following Redis alternatives.

    1. Valkey

    Valkey, a fork of Redis, is a new project that aims to resume development of the formerly open-source Redis project. It aims to be a high-performance data structure server primarily serving key/value workloads, hence the name val-key.

    The fork was triggered by Redis Labs’ licensing changes, which made Redis incompatible with the standard definition of “open source.” The large cloud vendors had profited from the open source Redis version and, as a result, Valkey is backed by major tech players including AWS, Google, Oracle, and Snap Inc.

    Just like Redis, it supports a wide range of native structures, and has an extensible plugin system for adding new data structures and access patterns. However, At the time of writing, Valkey is still not a polished product, and things are evolving. While it serves as a drop-in replacement for Redis, users should be aware of its ongoing development and potential rough edges.

    2. Dragonfly DB

    Dragonfly is a powerful in-memory data store that offers extreme performance, reliability, and scalability. It is fully compatible with Redis APIs, making it a seamless drop-in replacement for Redis – you can use the same SDKs and tooling without any code changes.

    It’s optimized for modern cloud computing, ensuring sub-millisecond reads and real-time experiences for your customers, and claims to deliver 25x more throughput compared to legacy software. Unlike traditional in-memory data stores, Dragonfly makes efficient use of memory during snapshotting which reduces the risk of out-of-memory outages.

    A single Dragonfly instance can handle workloads of up to 1TB, which means you no longer need to maintain complex distributed clusters. Additionally, it natively supports an eventually consistent primary-replica model, i.e. if the primary node fails, Dragonfly automatically fails over to the replica.

    3. Memcached

    Memcached is a free and open-source, high-performance, distributed memory object caching system designed to speed up dynamic web applications by alleviating database load. It’s useful for caching small arbitrary data (such as strings or objects) from database results, API calls, or page rendering.

    It follows a Client-Server Architecture where clients are given a list of available Memcached servers, and are then able to choose a server based on the “key.” Servers store values with their keys in an internal hash table, and evict old data (if out of memory) or reuse memory. The server doesn’t care about the data’s structure, it only stores a key, an expiration time, optional flags, and raw (pre-serialized) data.

    It’s optimized for speed and lock-friendliness, and therefore queries execute in well under 1ms on slow machines – and serve millions of keys per second on high-end servers. It also uses a least recently used cache by default, i.e., items expire after a specified time, ensuring low latency and efficient memory usage. Its simplicity and efficiency make it a popular choice for caching data.

    4. Hazelcast

    Hazelcast Platform is a unified real-time data platform that allows companies to take instant action on real-time data. It combines high-performance stream processing capabilities with a built-in fast data store, enabling businesses to automate, streamline, and enhance critical processes and applications.

    Hazelcast offers high-speed caching, resulting in improved throughput and lower latency – this allows you to process data quickly and efficiently. It also provides a high-performance, distributed, and parallelized environment that reduces the need for low-level infrastructure management.

    5. Key DB

    KeyDB is a fully open-source database that serves as a faster drop-in alternative to Redis. It’s backed by Snap Inc., and is designed for scalability and high performance which allows it to handle heavy workloads – benchmarking at over 1 million ops/sec.

    KeyDB supports various data structures, including:

    • Strings
    • Hashes
    • Lists
    • Sets
    • Sorted sets
    • Bitmaps
    • Hyperloglogs
    • Geospatial indexes
    • Streams.

    To store the data on disk, you can either periodically dump the dataset to disk, or append each command to a disk-based log.

    KeyDB scales both vertically (single node) and horizontally (active-replication or sharded cluster-mode) to meet larger workloads. You can set-up active-replica nodes to simplify high availability setups without requiring sentinel nodes for failover. Additionally, its multithreaded architecture outperforms Redis on a per-node basis.

    6. MongoDB

    MongoDB offers an in-memory storage engine that allows for more predictable latency of database operations by avoiding disk I/O. Unlike other storage engines, the in-memory storage engine doesn’t maintain any on-disk data, including configuration data, indexes, or user credentials, which makes it comparable to other in-memory databases.

    To use the in-memory storage engine, you can either specify –storageEngine inMemory as a command-line option, or include the storage.engine: inMemory in the YAML configuration file. Additionally, you need to specify the data directory (–dbpath or storage.dbPath) even though the in-memory storage engine doesn’t write data to the filesystem.

    By default, the in-memory storage engine uses 50% of physical RAM minus 1 GB, and if a write operation would exceed the specified memory size, MongoDB throws an error. Since the in-memory storage engine for MongoDB doesn’t persist data after process shutdown, it should only be used for scenarios where data persistence is not required.

    7. RethinkDB

    RethinkDB is an open-source, JSON database specially built from the ground up for the realtime web with scalability and performance in mind. It has a unique approach where, instead of polling for changes, the developer can configure RethinkDB to continuously push changes and update query results to applications in real-time. This push architecture dramatically reduces the time and effort necessary to build scalable realtime apps.

    In RethinkDB, every database process uses memory to store intermediate results and maintain internal state. The memory used varies significantly depending on the type of queries run, and the size of documents stored in the database. However, RethinkDB’s page cache keeps recently used data in memory to minimize disk access.

    It’s important to note that RethinkDB can handle databases much larger than the amount of main memory available on a server. However, the management of memory is crucial for the performance of the database and the applications that rely on it. Check out the benchmarks on RethinkDB website to get a better understanding of how performance scales with the hardware.

    8. Amazon MemoryDB

    Amazon MemoryDB for Redis is a powerful in-memory database service that provides ultra-fast performance and durability for low-latency applications. It maintains compatibility with Redis, allowing you to use the same flexible data structures, APIs, and commands without worrying about the underlying infrastructure.

    MemoryDB stores your entire dataset in memory, resulting in microsecond read latency and single-digit millisecond write latency. It is built with enhanced IO Multiplexing to improve throughput and latency at scale that allows it to handle over 13 trillion requests per day, and support peaks of 160 million requests per second.

    It also supports horizontally scaling databases by building clusters, or vertically scaling by adjusting the machine type. You can store your data across multiple availability zones for fast failover, and take advantage of its distributed transaction log for data durability, consistency, and recoverability.

    9. SAP HANA

    SAP HANA (High-performance Analytic Appliance) is a multi-model database that stores data in its memory instead of on a disk. Similar to other databases discussed in this post, HANA offers split-second response times – which is useful for applications requiring fast compute speed and the ability to handle large spikes in traffic.

    It supports column-oriented in-memory design which allows running advanced analytics alongside high-speed transactions in a single system. Moreover, it supports both structured and unstructured data, and offers advanced search, analytics, and data integration capabilities.

    It is ACID complaint, i.e., one transaction either fails completely or succeeds – there is no-inbetween. You can use it to either host multiple tenant databases in one system to pool resources, or distribute your database across multiple machines in a cluster to scale it up without compromising on security.

    Wrapping Up

    In this post, we have discussed some of the popular in-memory Redis alternative databases available for building web applications. Each database has its own strengths and weaknesses, so the choice depends on specific use cases and requirements.

    Running your own Redis alternative? Don’t let server management slow you down.

    If you’re testing or deploying Valkey, Dragonfly, or any other in-memory database, you’re likely juggling SSH sessions, tweaking config files, and firefighting performance issues.

    That’s where RunCloud steps in.

    With RunCloud, you can:

    • Spin up and manage servers on any major provider without touching the command line
    • Deploy your apps using Git or your workflow of choice
    • Monitor system resources and process logs with built-in tools
    • Automate routine tasks like SSL setup, security updates, and backups

    Whether you’re building side projects or production-grade infrastructure, RunCloud simplifies the entire ops layer – so you can stay focused on your code.

    See what server management should feel like. Try RunCloud today