Blog

  • The 10 Best PHP Frameworks (Complete Guide)

    The 10 Best PHP Frameworks (Complete Guide)

    Are you old enough to remember these early website designs of Amazon and Google from 1997?

    You don’t have to go anywhere near that far back in time, though, to notice that websites today have become increasingly complex, demanding far more functionality and accessibility.

    Today, professionally designed websites are able to deliver powerful, robust experiences, with much greater levels of security and accessibility, whilst looking cleaner and easier to navigate.

    One of the reasons for this increased functionality and power is PHP (which stands for PHP: Hypertext Preprocessor – yes, the first ‘P’ of ‘PHP’ really does stand for ‘PHP’!).

    Today, over three quarters of all web pages on the internet are powered by PHP, an open-source, server-side scripting language that is used to build dynamic web pages and web applications.

    PHP has been around since 1995, and since then it has had plenty of time to flourish, giving the PHP community a great opportunity to build many frameworks for the PHP ecosystem.

    In this article we’ve covered some of the best PHP frameworks available for you to use right now. But before we get started, let’s first answer the question – what exactly is a framework?

    What is a PHP Framework?

    A framework is a repository of pre-built components which provides a structured approach to development. The components also lend a hand in faster project completion, along with a more streamlined process and enhanced productivity.

    PHP frameworks offer a myriad of unique benefits that make developing applications easier for all developers – beginners and professionals alike.

    The ready-to-use elements and built-in features of frameworks in PHP contribute massively to cost savings.

    Developers can save the trouble of rewriting excess code and reduce development efforts by making use of the pre-built elements in PHP. Along with saving developmental costs, this also makes the process more time-efficient.

    The scalability and ease of maintenance that comes with PHP frameworks make it a compelling choice for many developers and organizations.

    Things To Keep In Mind When Choosing A PHP Framework

    There are a few pointers that you should keep in mind when picking a PHP Framework:

    • Popularity and community size: Most frameworks are community-driven; having a vibrant community to support and enhance a framework is a massive advantage for support and discussion.
    • Principle and Aims: You should properly research what the framework is meant to accomplish. Keep an open mind and look for a different solution if it doesn’t seem to fit your demands and objectives as a framework.
    • Sustainability: Will the framework continue to support your technology stack in the future, and is it regularly maintained? Sustainability is a significant factor to consider if you want long-term project support.
    • Support: If you have any queries or worries, who can you contact? This issue frequently relates to the requirements for community size and popularity. You should have access to online tools and documentation to guide you through any issues that might pop up.

    Testing the frameworks out before adding them to your tech stack is, nevertheless, the best way to decide. Try to narrow it down to two or three frameworks, and just play around with them instead of testing every single one.

    The 10 Best PHP Frameworks For Web Development

    It’s easy to convince yourself that PHP is the language you need to use for your next project. And there is no denying that PHP is a useful tool for any web development project – especially when you consider the vast number of quality websites that use it worldwide.

    However, this doesn’t really address which particular PHP framework will work best for your project. Here are 10 PHP frameworks that are great for development:

    Laravel

    If you’re even remotely familiar with PHP, it’s highly likely that you’ve already heard of Laravel. This framework sits at the top of all PHP framework lists, and is widely regarded as the first choice for web developers.

    Pricing: The Laravel framework is open-source software licensed under the MIT license.

    Key benefits:

    • Easy to learn and master
    • An active and thriving community
    • Wide availability of tutorials and documentation
    • Intuitive database manipulation
    • Insightful reporting enabled by Laravel Horizon and Telescope

    The Laravel php framework

    Laravel is popular because of its ease of use, combined with its accessibility. But its simplicity and easy usage doesn’t stop Laravel from being implemented in the most complex of projects.

    Along with many other capabilities, it has the platform’s own Blade templating engine, a local development environment, Homestead, a powerful RESTful routing system, and much more.

    CodeIgniter

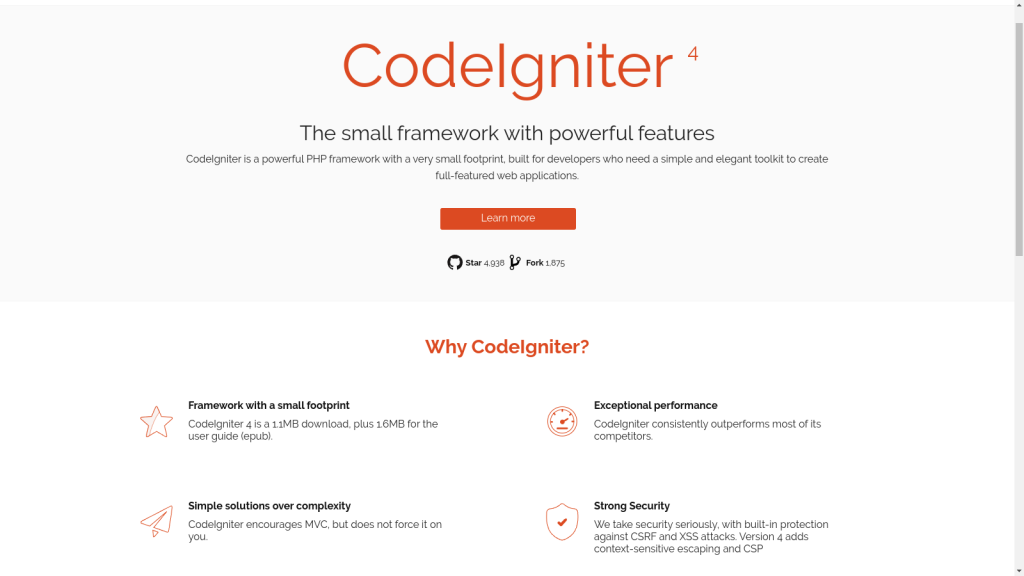
    CodeIgniter, although our second recommendation, is no less powerful than Laravel. It even surpasses Laravel in some aspects. It’s a powerful and versatile PHP framework with support for an array of high-level features and rapid project development.

    Pricing: It is freely available under the MIT license.

    Key Benefits:

    • Built-in protection against CSRF and XSS attacks
    • Clear and detailed documentation
    • Extremely lightweight
    • Reduces the need for tedious configuration
    • Great performance
    CodeIgniter one of the most powerful and versatile PHP frameworks

    CodeIgniter is surprisingly lightweight, clocking in at just a single megabyte – and it’s fast too. It follows the Model-View-Controller (MVC) pattern. This means that it separates the application logic from the presentation and the data. MVC is a good thing because it makes the code more organized, modular, and reusable. It also makes it easier to test, debug, and maintain the application.

    We like CodeIgniter because its user-friendly library and helpful structure lets developers express their creativity – without being constrained by a tonne of tedious coding work.

    Symfony

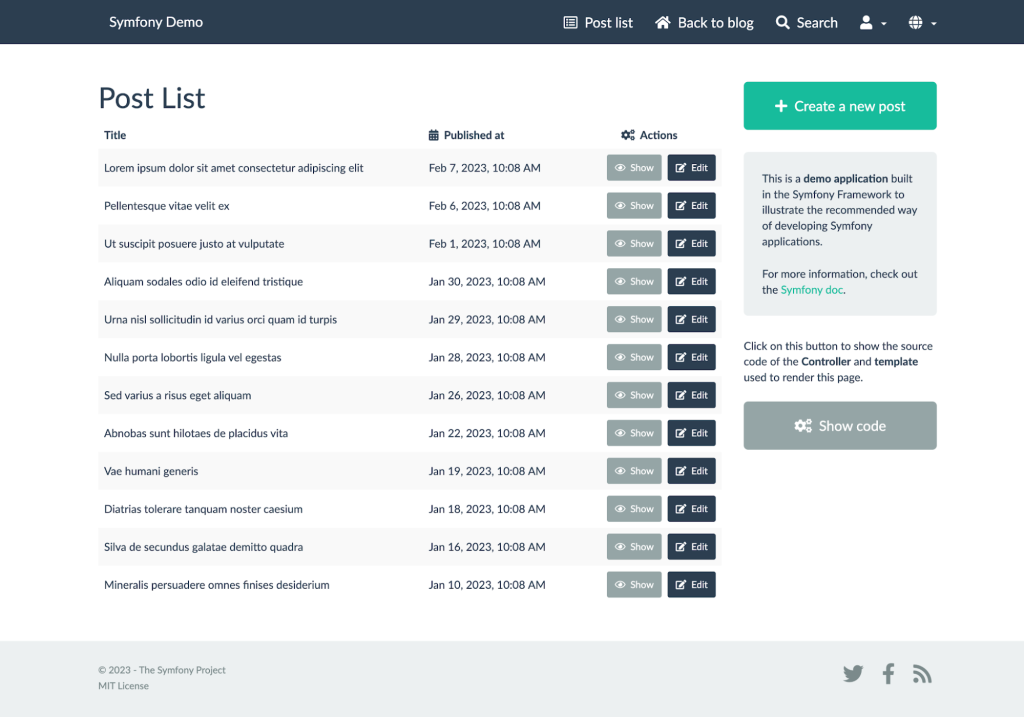
    Symfony is an incredible framework, made by the renowned developers at SensioLabs. It has a massive community of over 300,000 developers from around the globe.

    Pricing: It is released under MIT license and you can use it for free.

    Key benefits:

    • Stability makes Symfony suitable for large enterprises
    • Thriving, robust ecosystem with an enormous community of devs
    • More than 50 stand-alone components available for your own applications
    • Excellent and up-to-date documentation
    • Feature-rich and dependable

    Symfony has emerged as a developer’s favorite framework thanks to its advanced features, coupled with the intuitive environment. The community is growing quickly despite the fact that Symfony’s large feature set presents a steeper learning curve. There are a lot of unofficial support groups available which will make development easier.

    Symfony makes repetitive tasks such as creating forms, routing authentication, configuring objects, and templating much easier.

    Laminas

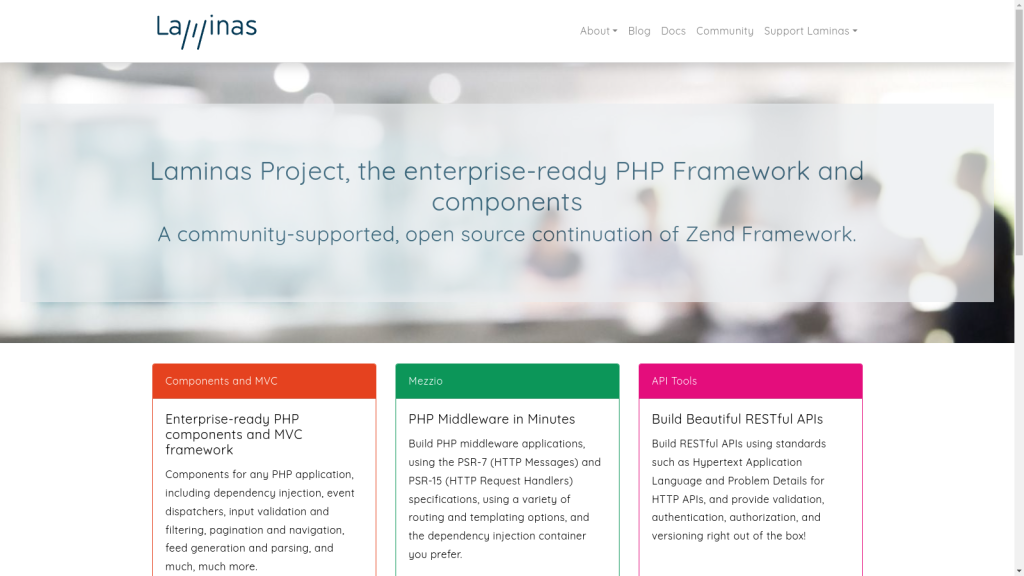
    Laminas, formerly known as Zend Framework, is an object-oriented PHP framework that is open-source and is renowned for its scalability and excellent selection of reusable components.

    Pricing: The code is licensed under BSD 3-Clause, so you can use it for free.

    Key benefits:

    • Suitable for complex and large-scale projects
    • Easy integration with third-party PHP libraries
    • Intuitive session management features
    • Extensive documentation
    • Large and active community base

    Developers are able to optimize efficiency and cut down on superfluous overheads by choosing only the components that are actually needed, thanks to Laminas’ exceptionally large component library.

    It also places a high priority on security, and offers strong capabilities to guarantee the development of secure applications.

    Laminas Project is very adaptable and follows PHP best practices, which is crucial for developers who wish to incorporate features unique to their projects.

    Yii

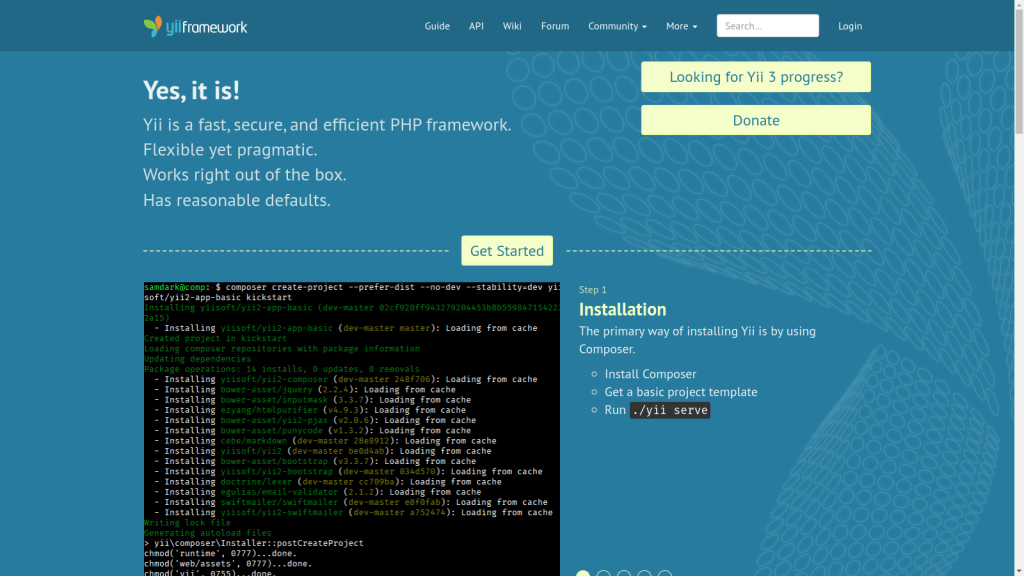
    Yii framework (which stands for Yes, it is!) is straightforward and progressive. It’s a component-based PHP framework with outstanding performance in creating modern web applications. Although Yii is a web programming framework that can be used for any type of PHP project, it’s particularly suited for the rapid building of large-scale web applications.

    Pricing: The Yii Framework is published under BSD License and gives you the flexibility to use it freely for commercial purposes.

    Key benefits:

    • Simplified database management allows devs to model database data right into objects, and eliminates SQL queries
    • Particularly adept in working with AJAX
    • Strong caching support
    • Easy learning curve

    Yii is easy to install and has robust security features, making it ideal for highly secure projects such as forums, CMSs (content management systems), e-commerce sites, and portals. It is one of the oldest PHP frameworks to still be in active use. Naturally, community support is excellent and it still remains very popular among developers.

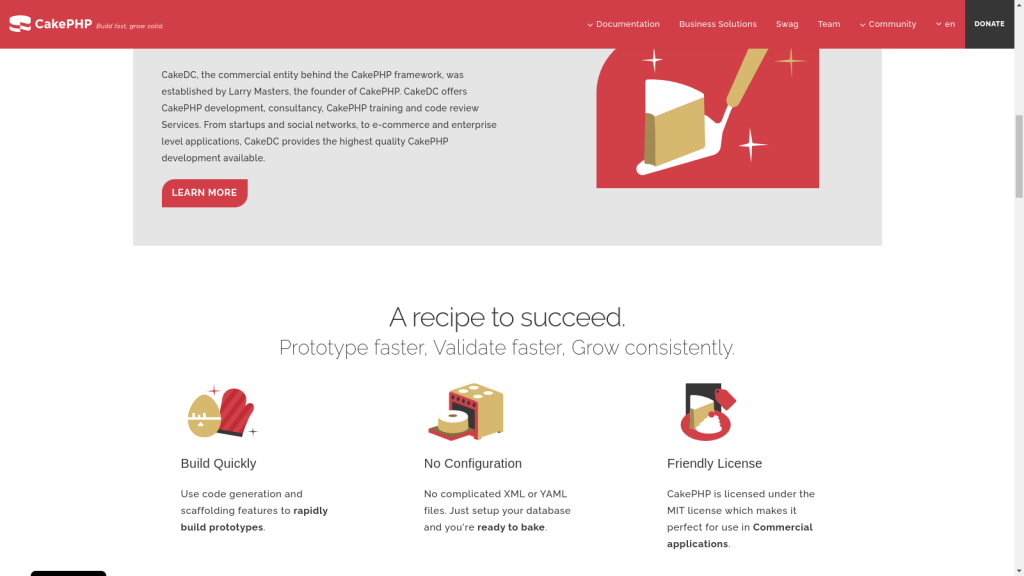
    CakePHP

    Released in April 2005, CakePHP is a reliable PHP framework for web development licensed under the MIT Licence. It uses ORM (Object Relational Mapping) techniques and is built on the MVC (Model View Controller) architecture. Being so widely used and implemented, CakePHP is incredibly reliable, secure, and fast.

    Pricing: The Cake Software Foundation has released this framework under the MIT license.

    Key Benefits:

    • CakePHP makes it easy to implement CRUD operations by providing a set of conventions and tools that simplify the interaction with the database.
    • Simple debugging and testing process of applications
    • Strong built-in security features
    • Plug-in support
    • Allows the creation of reusable code

    Don’t judge this framework by its age, as almost all modern features are available with CakePHP, including protection against SQL injection, validation against form tampering, protection against Cross-Site Request Forgery (CSRF), and prevention against Cross-Scripting Platform (XSS).

    It powers the websites of global brands such as Hyundai, BMW, and Express. That says a lot about CakePHP!

    Phalcon

    Phalcon, a play on the words “PHP” and “falcon”, is a full stack framework with the objective of demonstrating an unconventional approach to developing web apps because it is written as a C-extension. This means that it is implemented in C and directly integrated into PHP for enhanced performance. Most PHP frameworks are written in PHP itself, which requires more memory and CPU resources to run.

    Phalcon stands out for its low-level architecture, code compilation, memory management, security measures, and the absence of file reads, which leads to better speed.

    Pricing: It is freely available under BSD 3-Clause License.

    Key Benefits:

    • Advanced features such as a universal autoloader and powerful asset management
    • Robust caching
    • Low server-side resource requirements
    • Effortless integration with most other PHP libraries
    • Small and lightweight, and exceptionally performant
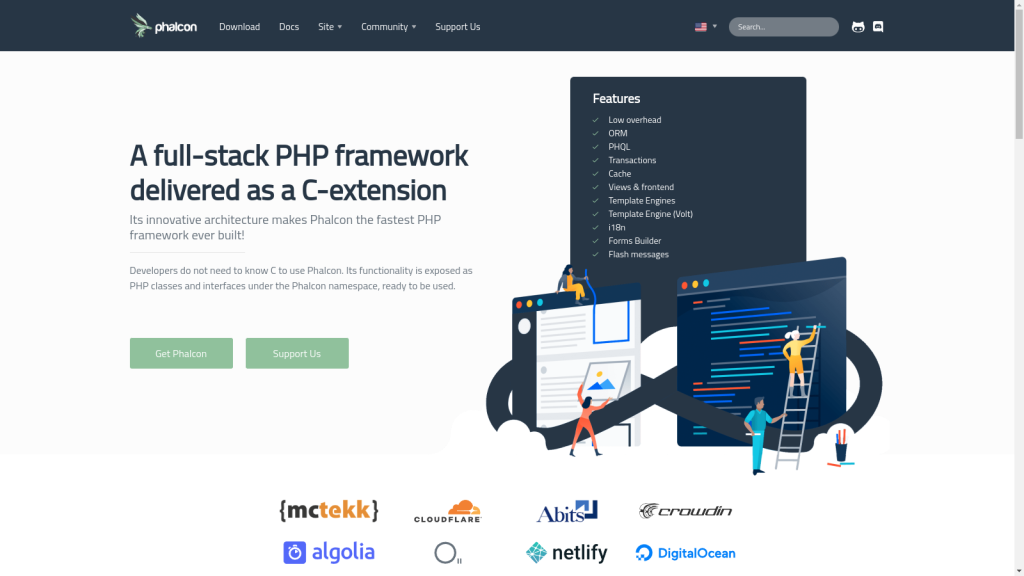
    One interesting feature about Phalcon is that, even though it is written in C, you don’t need to know C to use it. Its functionality is exposed as PHP classes and interfaces under the Phalcon namespace, ready to be used.

    With its unique coding style hinting at elements from C and C++, Phalcon is geared towards simplifying PHP development and enhancing the overall development experience.

    Fat-Free Framework (F3)

    Simple to use and designed with minimalism in mind, Fat-Free Framework (F3) is a PHP micro-framework that gets the job done. It is easy to learn and is beginner-friendly. It is also one of the most lightweight frameworks out there, clocking in at a tiny 90 KB.

    Pricing: Fat-Free Framework is free and released as open source software under the GNU Public License (GPL v3).

    Key benefits:

    • Lightweight footprint
    • Modular and scalable structure
    • Supports both SQL and NoSQL databases
    • Powerful ORM features enabled by ‘Axon’
    • Does not require complex configuration
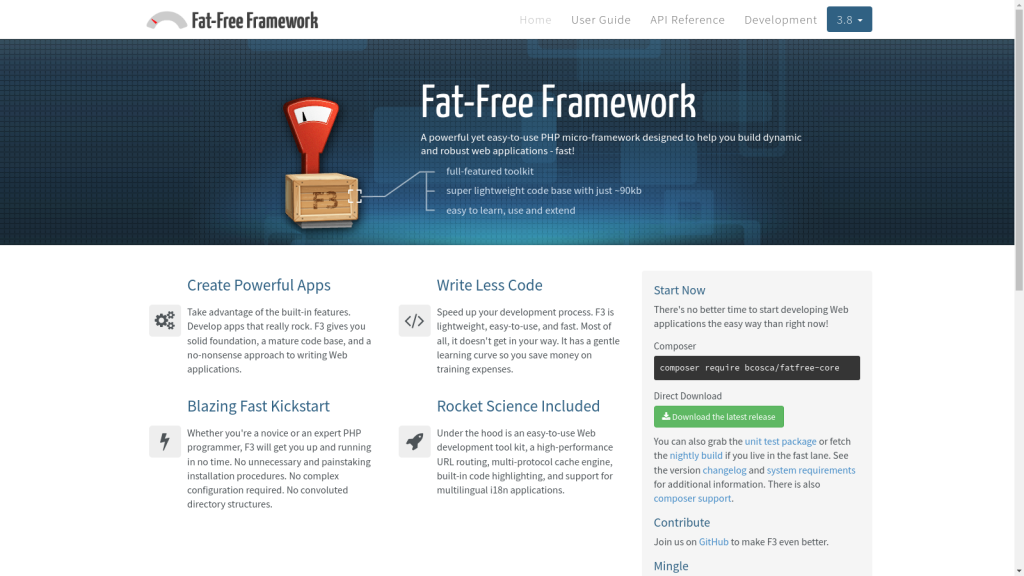
    Since F3 was established in 2009, it has gained a vibrant and mature community, as well as more than 2,600 stars on GitHub.

    Because MVC is enabled but not required, F3 is adaptable – and compatible with classes from other sources. This framework focuses on developing PHP apps that are fast to load, and have a straightforward setup procedure that increases developer productivity, all while avoiding application complexity.

    Slim

    Slim is a barebones micro-PHP framework that follows the Agile methodology. It features a stripped-down codebase without the support for third-party dependencies. That works in Slim’s favor as the lack of dependencies makes the framework remarkably fast.

    Pricing: The Slim framework is freely available under the MIT license.

    Key benefits:

    • Features all important features such as URL routing, session, cookie encryption, and client-side HTTP caching
    • Great for rapid prototyping purposes
    • Active maintenance and responsive devs
    • Suited for the development of RESTful APIs and microservices
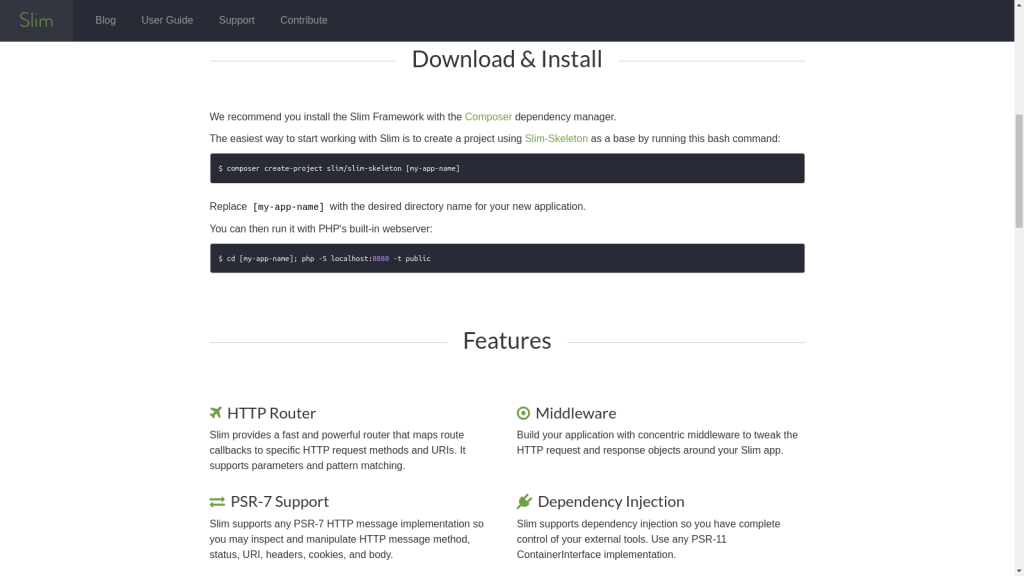
    Slim has a flat learning curve and is pretty easy to understand. In fact, you can have a simple app running in just a few minutes without any prior experience. Building compact apps and APIs is an excellent match for Slim, and the fact that it offers both first-party and third-party components makes it ideal if you demand more functionality from the framework.

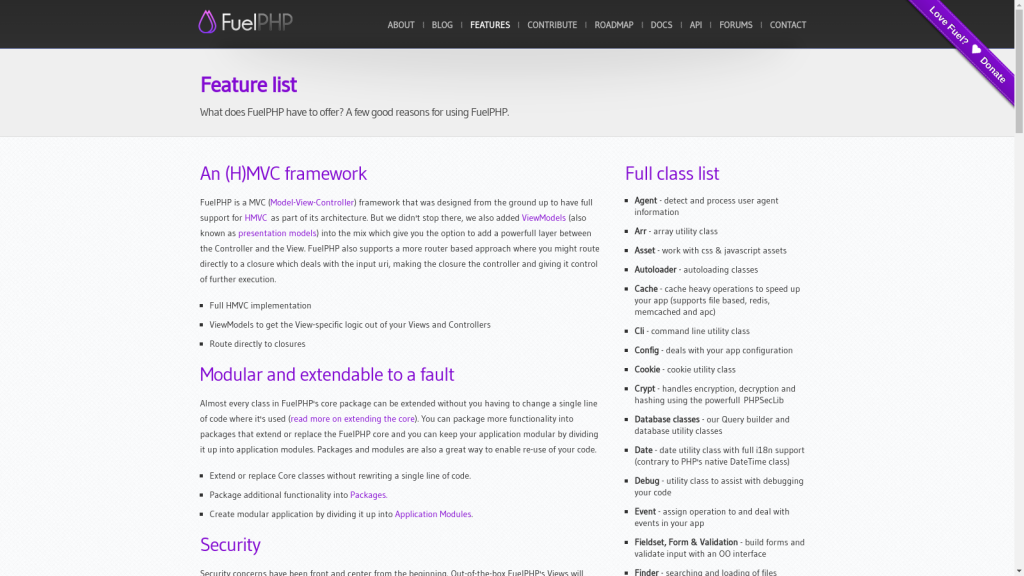
    FuelPHP

    With more than 300 contributors, FuelPHP is a community-driven PHP framework that supports HMVC (Hierarchical Model View Controller). HMVC creates an additional layer between the Controller and the View – a design pattern that brings several benefits, such as improved organizability of the code, increased modularity, greater flexibility, and support for code reuse.

    Pricing: It is freely available under the MIT license.

    Key benefits:

    • FuelPHP ORM is both lightweight and powerful
    • HMVC support
    • Great modularity
    • Ability to choose the folder and file structure for your projects
    • Useful command-line utility tool

    FuelPHP takes security seriously, and implements features such as output encoding and CSRF defense, URI, XSS, input filtering, and escaping data entered by the user and sent to SQL queries. Moreover, you can use Oil, FuelPHP’s command-line tool, to run scripts, debug code, and create common components.

    Conclusion

    Although it is not absolutely necessary, using PHP in your development framework is worth considering given the language’s widespread use and features. We hope our recommendations help you with a decision to select a framework that ideally fits your needs.

    No matter what PHP framework you are using, deploying and managing your applications on the internet is always used to be a hassle. We have built RunCloud to solve this exact problem, now you can focus on developing your applications and leave the heavy-lifting of managing your servers to us.

    RunCloud supports all things PHP and provides a quick and easy way to perform complicated tasks such as deploying new applications, performing backups, running cron jobs, etc. with only a couple of clicks. Start using RunCloud and see for yourself!

  • How to Set Up a Linode (Akamai) Server with RunCloud

    How to Set Up a Linode (Akamai) Server with RunCloud

    Akamai, the global leader in content delivery network and cloud services, has recently acquired Linode, one of the oldest and most trusted cloud server providers in the market. Linode has been offering simple, affordable, and accessible cloud computing solutions to millions of customers since 2003.

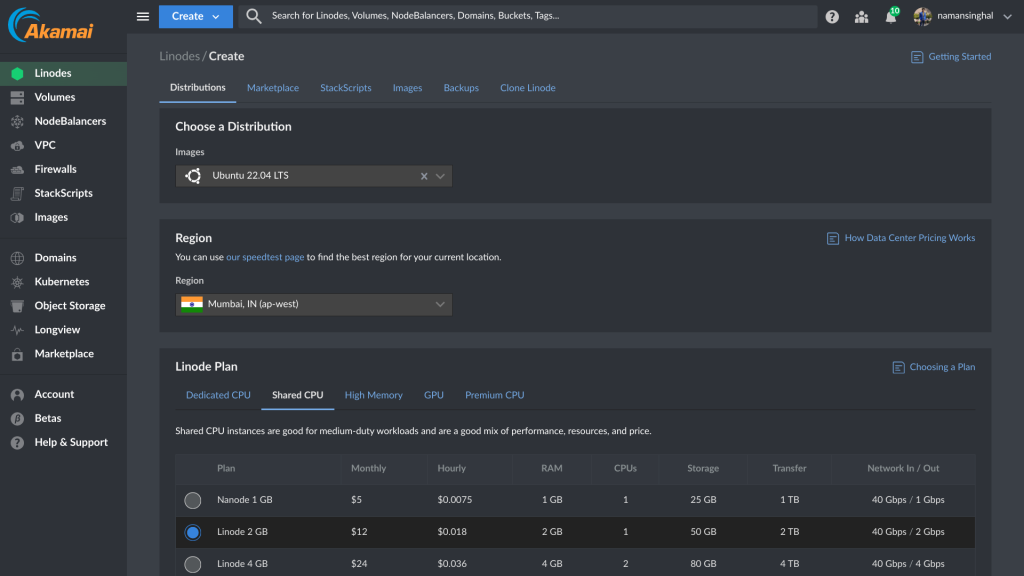
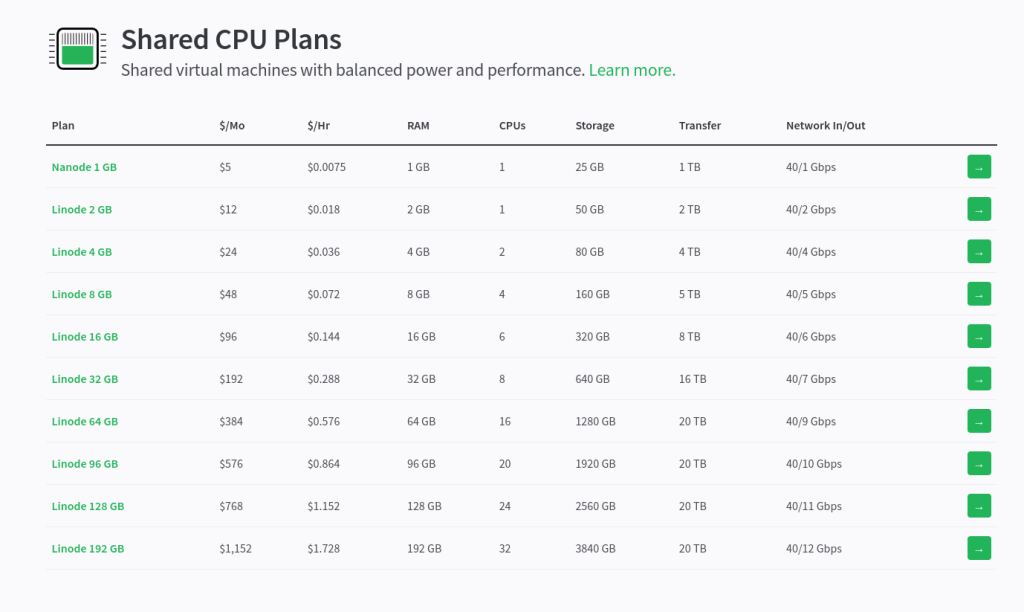
    If you are looking for a reliable and cost-effective way to host your website, you can choose from a variety of plans offered by Akamai’s cloud computing services, formerly known as Linode. These plans include Nanode & Standard (Shared CPU), Dedicated CPU, High Memory, and GPU.

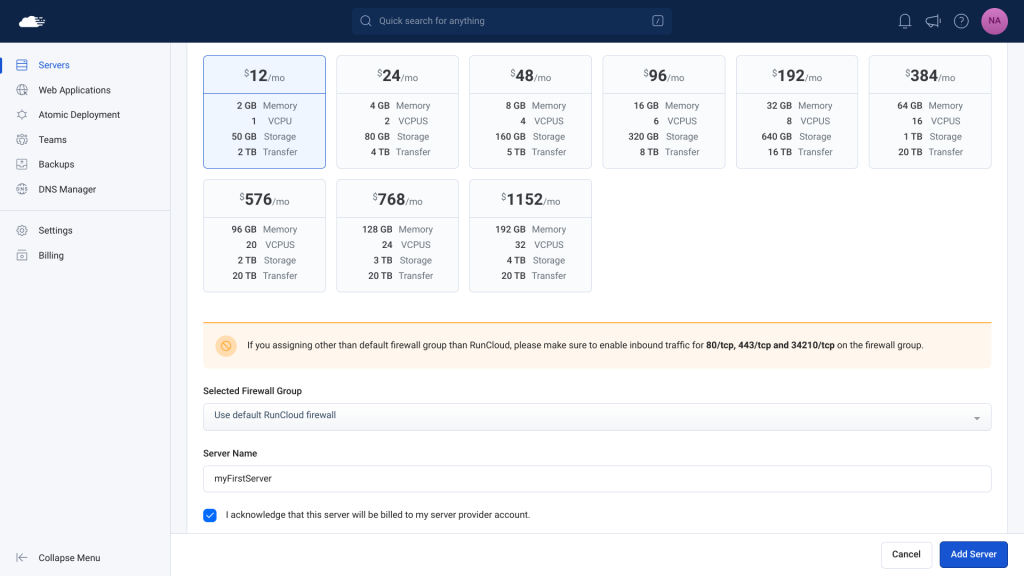
    The Nanode plan is the most budget-friendly option, including 1 GB Memory, 1 CPU Core, 25 GB Storage, and 1 TB Transfer for only $5/month. The Standard plan is the most versatile option, which will allow you to run a wide range of cloud applications, from personal projects to enterprise applications. This plan starts from $12 / month for 2 GB RAM, 1 CPU Core, 50 GB Storage, and 2 TB Transfer.

    Akamai Cloud pricing plans

    Akamai’s cloud computing services have 27 data centers across the world, and you can choose the server location that is closest to you or your customers for the best performance.

    In this post, we will discuss how to set up Akamai’s cloud computing services to host your websites (web applications) with RunCloud. Connecting your server to RunCloud is very easy – let’s take a look at the different methods available.

    Method 1. Automatic Server Provisioning (Recommended)

    When deploying or deleting a server on the cloud, there are many things that can go potentially go wrong. RunCloud integrates with Linode to automatically launch a new server, directly from the RunCloud dashboard. If you are a beginner, we strongly recommend using this method to launch your Linode servers. Let’s see how to do this.

    Connecting Akamai Cloud to RunCloud

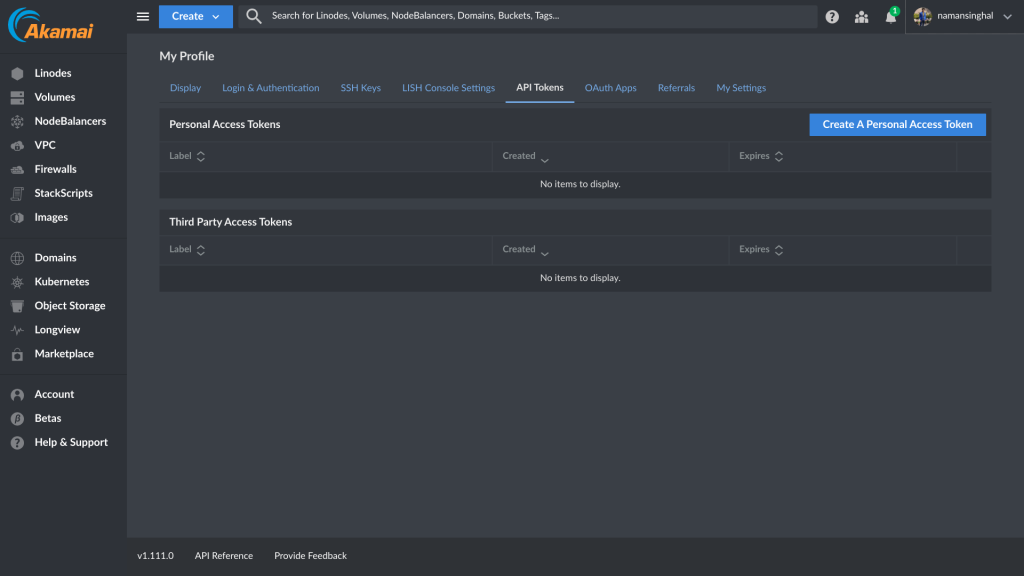
    To integrate your Akamai cloud account with RunCloud, you need to generate an API key from your Akamai dashboard. To create this API token, click on your profile picture in the top right part of your Akamai dashboard, and select API Tokens.

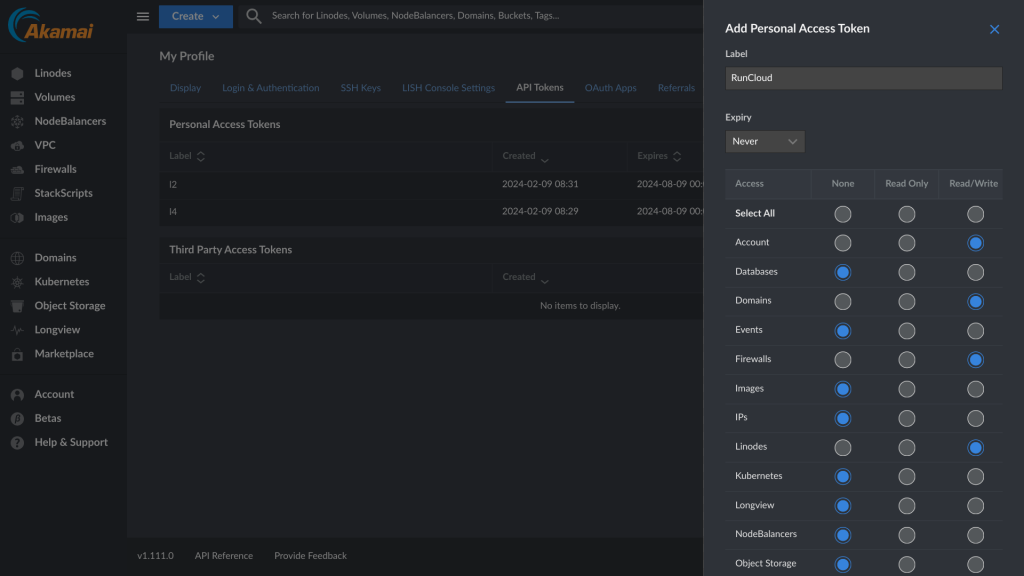
    On the next screen, click on “Create a Personal Access Token” and provide a descriptive name for your token. After that, configure the expiry key for your token and grant the necessary permissions for RunCloud to create and deploy servers on your behalf. RunCloud needs read/write access to Account, Domains, Firewalls, and Linodes to spin a new server on your Akamai account.

    After you have configured the settings, scroll down to the bottom and save your changes. As soon as you click ‘Save’, a long string of text will be displayed on your screen – this is your token, and it will only be displayed once.

    You need to save this token in your RunCloud account. Open a new browser window and navigate to the Integration section in your RunCloud account.

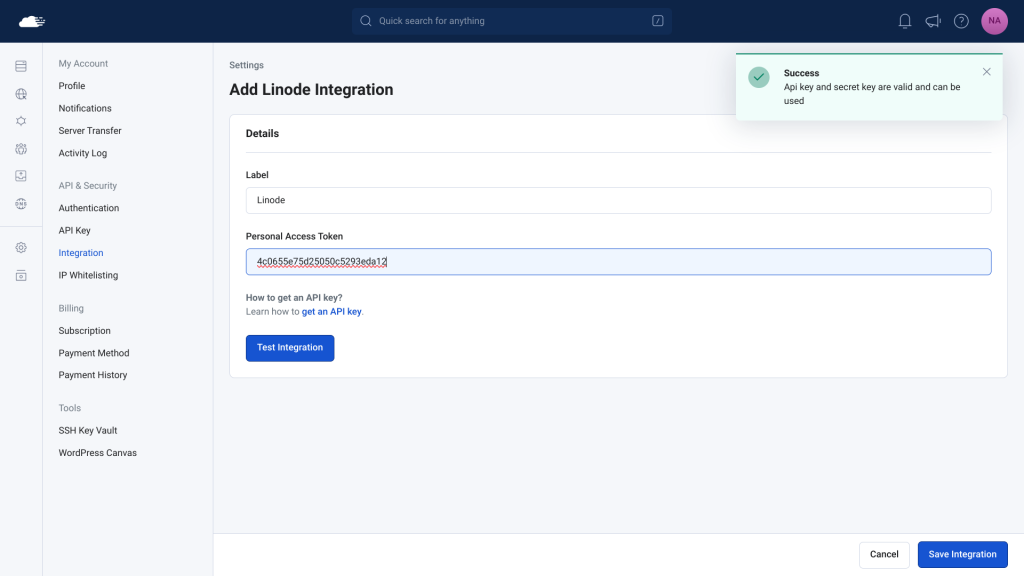
    On that screen, look for ‘Linode’, and click “Add Integration“. This will take you to the Linode integration screen.

    On this screen, provide a descriptive name for your token, and paste the token displayed in your Akamai Cloud dashboard. Once you have added the token, click on ‘Test Integration’; if the test fails then it is possible that you didn’t grant all of the necessary permissions required by RunCloud.

    Otherwise, you can click on “Save Integration” to save this key in your RunCloud account. You can now start deploying new servers directly from your RunCloud account.

    Creating A Server from the RunCloud Dashboard

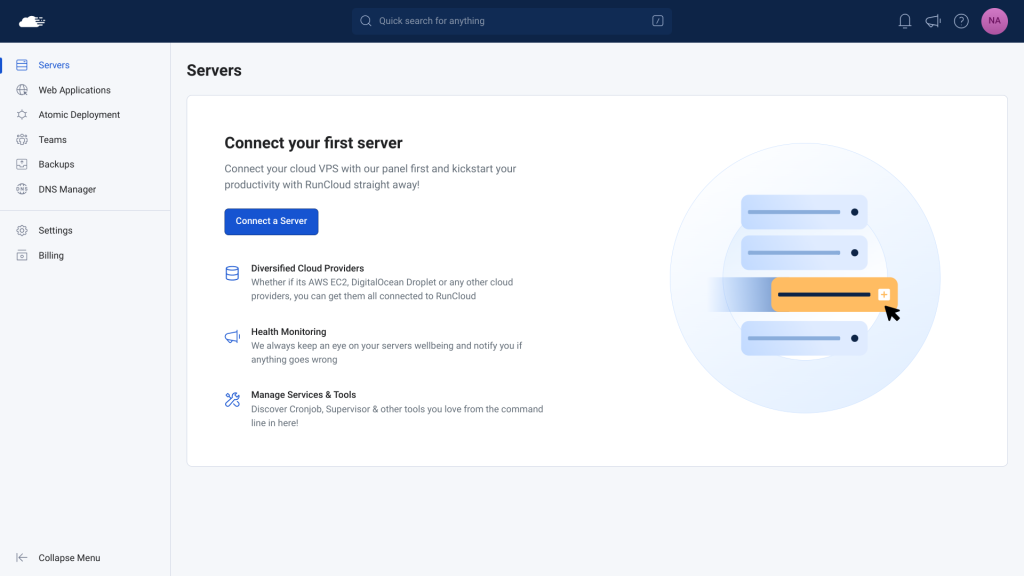
    Once you have added the API token to your RunCloud account, you can directly create and delete servers from the RunCloud dashboard by clicking “Connect a Server” in the ‘Servers’ section.

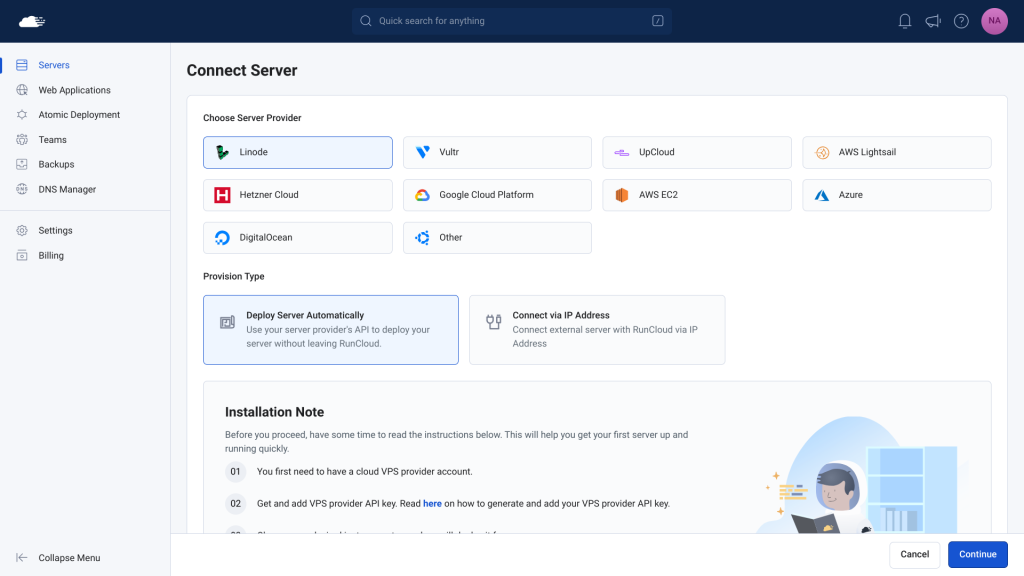
    On the next screen, select Linode from the list of Cloud providers and choose Deploy Server Automatically to provision a new server.

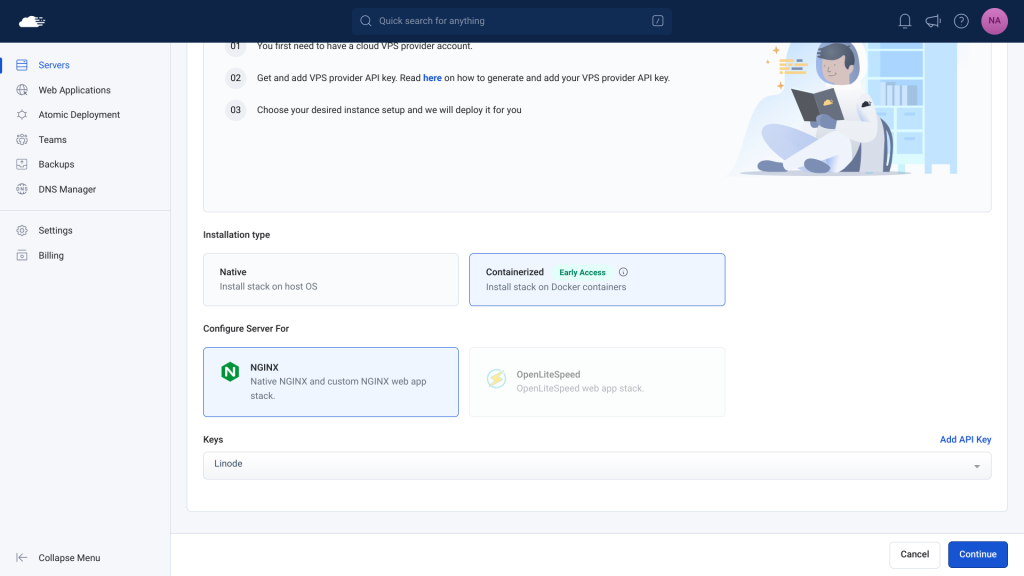
    Once you scroll down, you will be asked to select between native Nginx, OpenLiteSpeed, and Containerized servers. If you are just looking to deploy a WordPress website, you can pick any of them. If you have something specific in mind, read our comparison of Nginx vs OpenLiteSpeed servers and our in-depth explanation of Containerized Servers on RunCloud to make an informed decision.

    Under the ‘Keys’ section, select the key that we just created from the drop-down menu and hit ‘Continue’.

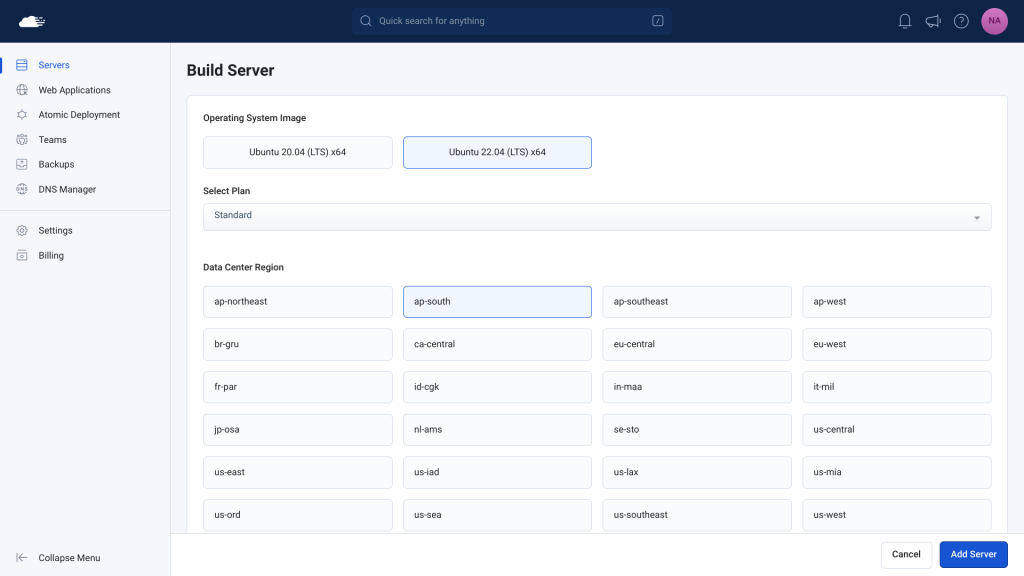
    On the next screen, select the version of the operating system that you want to use (usually the latest version is the best one), and pick your server type and location from the list shown on your screen. It is usually recommended to pick a location that is closest to the vast majority of your customers.

    Next, you need to select your server size. If you are just getting started, you can pick the smallest server and gradually increase it as your website grows. If you need more help, you can refer to our previous article on how to pick the right server size.

    Lastly, you need to select the default RunCloud firewall rules from the dropdown menu and provide a descriptive name for your server.

    When you deploy a server from your RunCloud dashboard, you will be billed separately for using Akamai’s cloud computing services – this is not included in your RunCloud subscription. Make sure to click the checkbox to acknowledge this and then click Add Server.

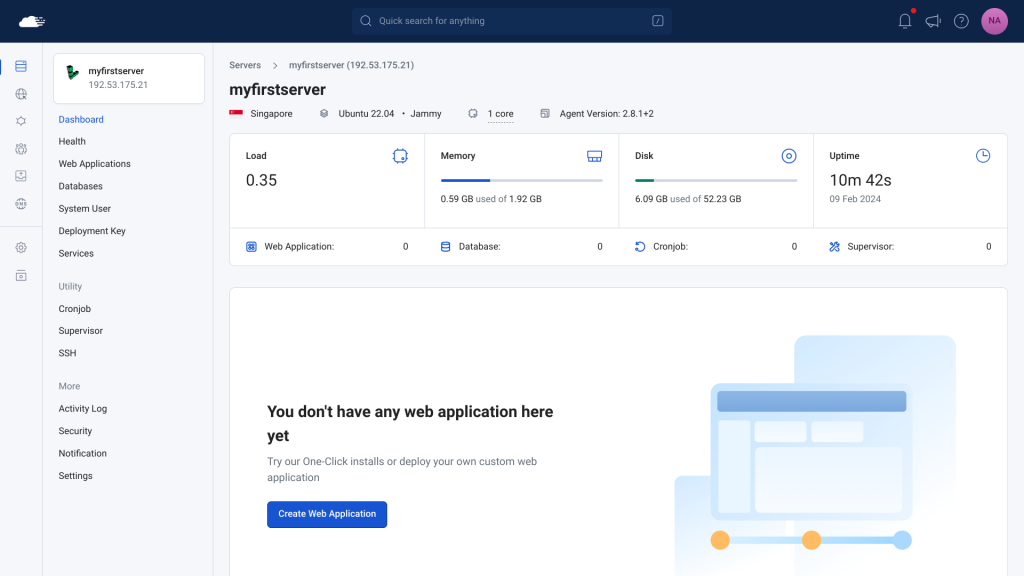
    Once you do this, RunCloud will create a new server in your Akamai account on your behalf and automatically install all the necessary software required to deploy websites. The whole process usually takes no more than 5-10 minutes.

    RunCloud Linode server

    Video Tutorial: Provision Linode Server

    Method 2. Set Up Akamai Cloud Server Manually

    RunCloud provides lots of cookie-cutter templates for launching a new server with just a few clicks. However, if you want more freedom to configure your server then you can choose the manual installation method.

    Creating Firewall Rules

    Before we deploy a server, it is a good idea to configure the firewall rules beforehand to avoid any hiccups down the line. In your Akamai cloud dashboard, go to the Firewalls tab and click ‘Create‘. Give it a descriptive name and then hit “Create Firewall” to deploy a new firewall with an empty ruleset.

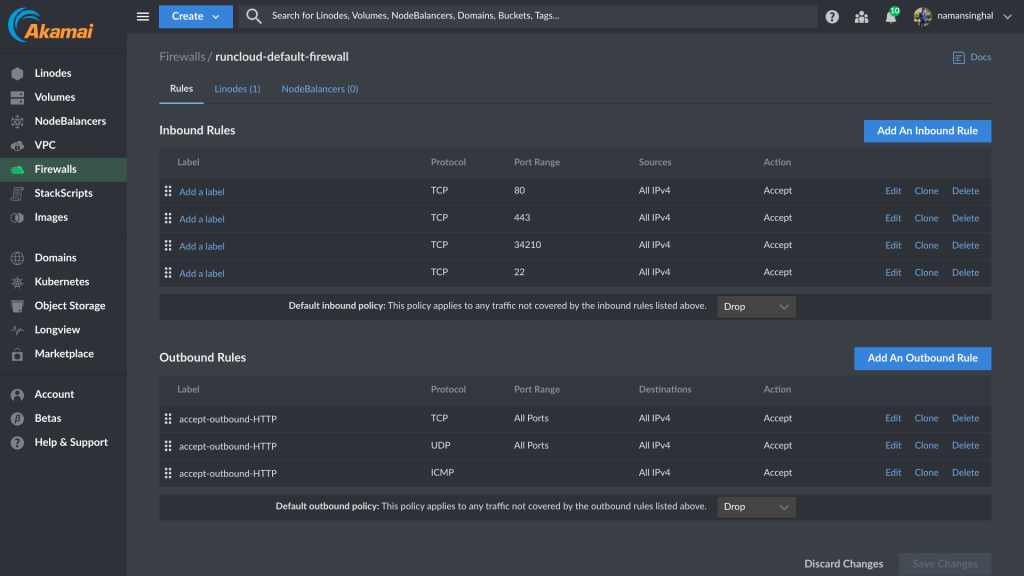
    Next, we need to add rules to this firewall that will allow and deny traffic. RunCloud needs the following ports to be able to function properly:

    • 80/TCP: For HTTP traffic
    • 443/TCP: For HTTPS traffic
    • 443/UDP: For HTTP/3 traffic (optional)
    • 34210/TCP: For communicating with RunCloud agent
    • 22/TCP: For establishing an SSH connection (you can close this port once the server is connected to RunCloud).
    Firewall rules in Akamai cloud

    Create the appropriate inbound rules in your firewall, and then save it.

    Creating a Server in Akamai Cloud

    Next, you can go back to your Linode dashboard to provision a new server. When connecting a server to RunCloud, you must create a fresh server that meets the following requirements:

    • Uses Ubuntu Server (20.04/22.04 LTS) 64 bit operating system
    • Has more than 2 GB of disk storage
    • At least 1 core processor
    • At least 512 MB RAM
    • Public IPv4 Address (NAT VPS is not supported)

    In your Akamai dashboard, select the latest Ubuntu LTS version under the operating system section, and specify the region for your server. Next, pick your server type from the given list depending upon your requirements.

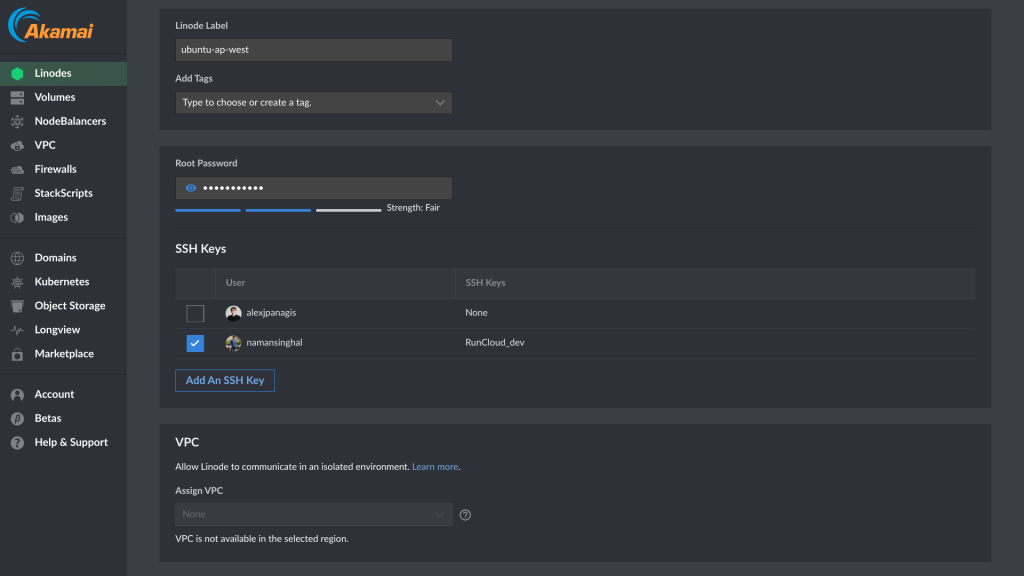
    In the label section, you can either provide a descriptive name for your server or leave it as it is. Next, you need to provide the root password for your server. This is the password that you will use when connecting via SSH, so make sure you pick a strong and memorable password. Optionally, you can also configure the SSH keys for additional security.

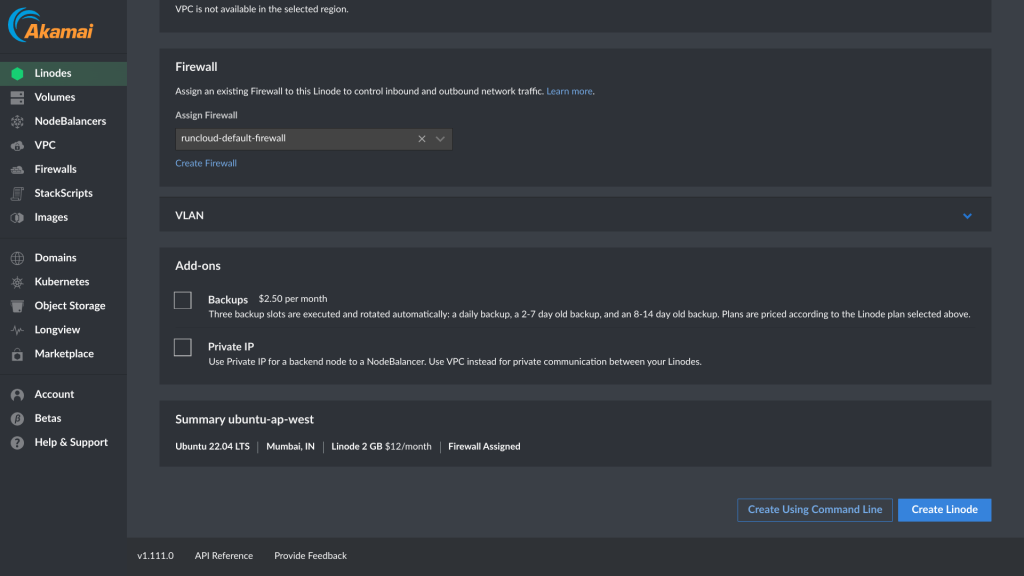
    Finally, select the firewall that we created in the previous step from the drop-down menu and hit “Create Linode“. This will provision a new server in your account.

    Connecting Server to RunCloud

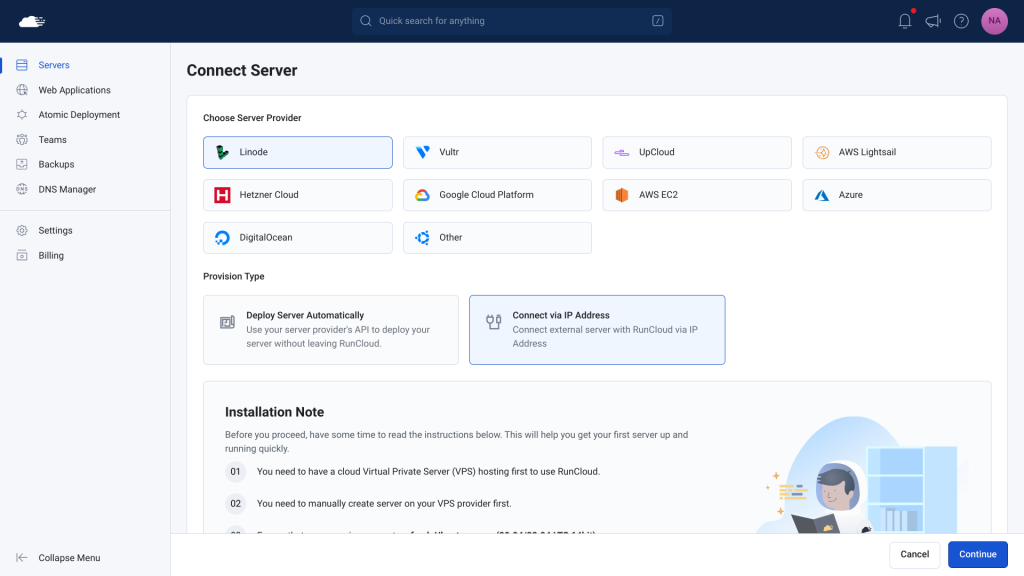
    Once your server is up and running, you need to manually connect it to your RunCloud account. To do this, go to the Connect Server page and select Linode > Connect Via IP address.

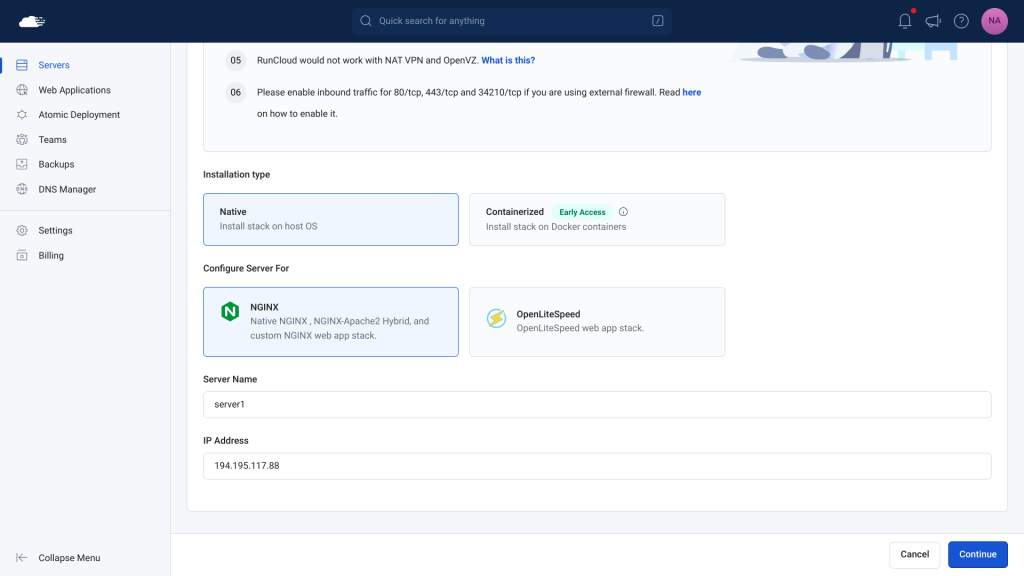
    Next, select the server stack and installation type for your server. Provide a descriptive name for your server and then enter the public IP address displayed in your Akamai Cloud dashboard.

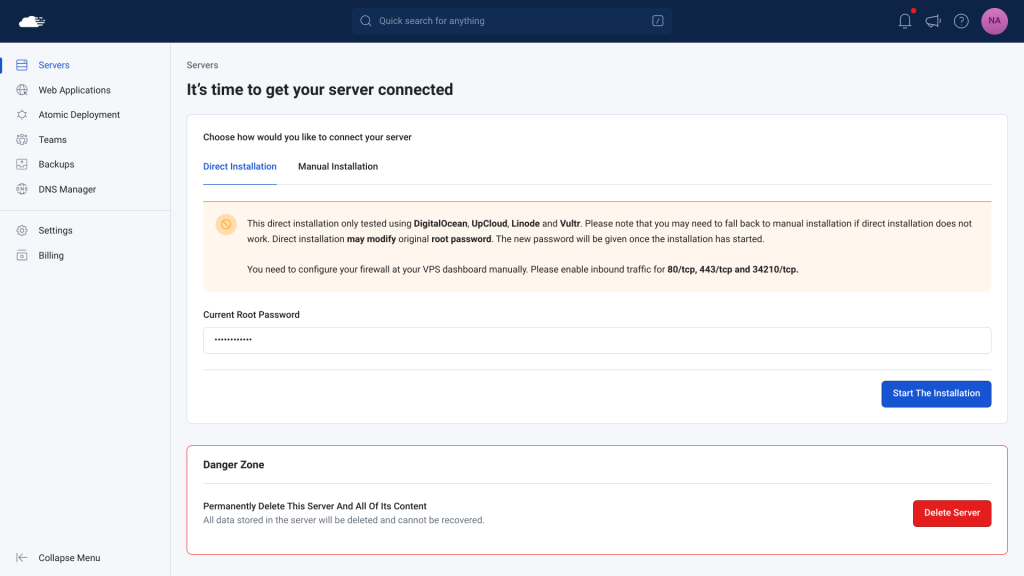
    On the next screen, you will be presented with two options. If you have configured the root password for your server then you can enter it here and then hit ‘Start The Installation’. RunCloud will automatically log in to your server on your behalf and install the necessary software.

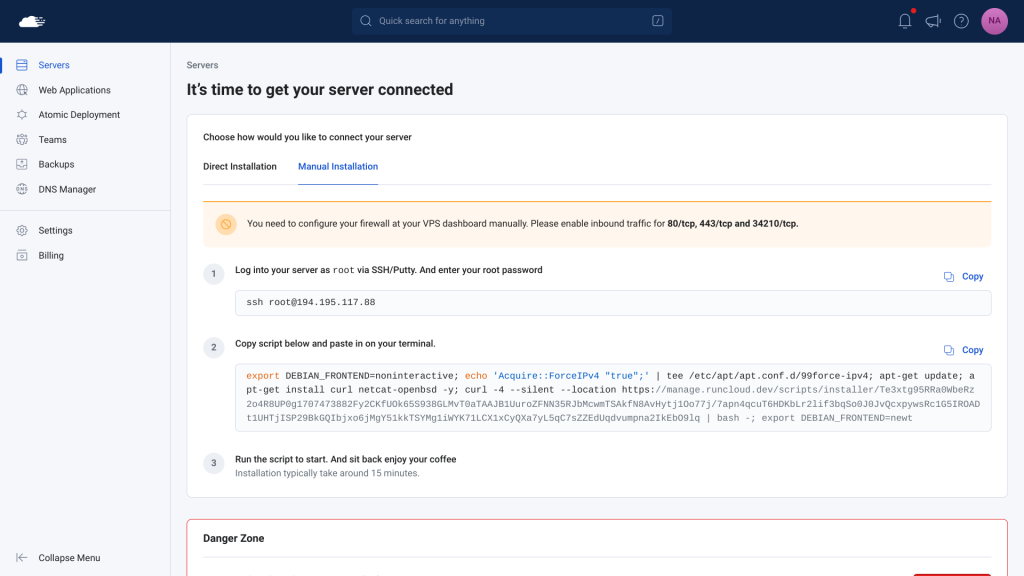
    Alternatively, if you are using SSH keys to log in to your server, then you can manually run the installation script. To do this, log in to your server with super user privileges (root) and run the provided command. Installation will take 5-10 minutes to complete, and once the server is connected you can close the terminal.

    Video Tutorial: Manual Installation

    Final Thoughts

    With Akamai’s cloud computing services, you can host your website on a high-performance, secure, and reliable infrastructure that has been trusted by millions of customers since 2003. You can choose from a range of plans that suit your needs and budget, starting from as little as $5 / month.

    RunCloud makes it easy for you to connect your servers to Akamai’s cloud computing services. You can use any of the three methods that we have discussed in this post: server provisioning using Linode API key, direct server installation via IP address and root password, or manual server installation via IP address.

    Once you have set up your server, you can proceed to:

  • Uptime Monitoring Tools: Why You Need Them, and What to Look for

    Uptime Monitoring Tools: Why You Need Them, and What to Look for

    Whether you’ve previously heard of uptime monitoring or not, it’s something any website owner needs to explore.

    Assuming you’re a website owner, you’ll almost certainly have found yourself in a situation where you’ve had to rush to update your site and address a bug that needed to be fixed ASAP.

    No matter how much testing you carry out during development, you can’t always foresee every potential problem, and discovering an ominous alert that informs you your website is offline is a sure way to get the heart pumping and the panic rising!

    And that’s exactly why uptime monitoring is something to consider very seriously.

    Unexpected situations can be easily avoided using automatic website uptime monitoring – a practice that helps to ensure a smooth user experience by routinely checking a website’s performance.

    We have previously published several popular articles explaining how to:

    In this post, we will discuss the necessity of Uptime Monitoring and also take a look at some popular tools that will help measure your website’s uptime.

    Uptime Monitoring: What Is it?

    Uptime monitoring is the process of checking your website for downtime, and taking remedial or preventative action if necessary. It is done using software that runs in the background and verifies that your website is operating correctly.

    Usually, two kinds of uptime monitoring tools exist – active and passive:

    • Passive monitoring uses a third-party tool to determine whether your website is accessible from external networks such as Google or Yahoo for detecting downtime.
    • Active monitors ping your server every 30 seconds continuously in search of any indications of a possible outage.

    Any downtime can potentially cost you valuable customers, and of course, income. It can seriously impact your brand’s reputation too, which is why it’s critical to keep a close eye on the status of your website to allow you to take speedy action if necessary.

    How is Uptime Measured?

    The period of time during which a system is operational and free of any major bugs or glitches is called uptime. Any system that functions efficiently and doesn’t require maintenance or administrative support will have a lengthy uptime.

    Uptime is expressed as a percentage, often advertised by hosting providers as something like 97.79% uptime. In essence, a 100% uptime indicates that your website was operational 100% of the time, or 24 hours a day, 365 days a year.However, 100% uptime exists only in fantasies; even the biggest of tech companies, such as Cloudflare only ever guarantees 99.999999999% uptime. Realistically, anything in the high 90s range is good enough for most small businesses. 

    How Does Uptime Monitoring Work?

    When we talk about uptime monitoring, we’re usually talking about active monitoring which works by sending automated HTTP queries to a certain URL on a predetermined frequency – and waiting for the desired result.

    Usually, HTTP GET requests are used for this, although it is possible to use other types of HTTP requests for monitoring other features and APIs, depending on the needs of the user. The predefined frequency of these checks can vary from every second for mission critical business services to more than a couple of hours for side projects.

    Most tools work by checking the response for a 200 OK HTTP response code. But depending upon your use case, you can configure a test that checks whether a certain page is inaccessible to users, and if so, sends you an error message. Furthermore, it is also possible to configure some uptime monitoring tools to look for a particular keyword or term within the response received.

    Why is Uptime Monitoring Important?

    According to a study by Google, 53% of users abandon a website that takes more than three seconds to load. A website that is accessible at all times translates to increased customer satisfaction and a more optimized user experience.

    If a large chunk of your revenue comes from your website, then you clearly need all your website services to always run without fail. For ecommerce sites, downtime means revenue loss. If the site goes down during peak hours, sales will take a massive hit, not to mention the damage to reputation and loss of customer trust.

    If you use an uptime monitoring service, you will be instantly notified when your website is unavailable. These tools often provide analytics, allowing you to identify trends in your availability. For example, it is possible that many people visit your website from a specific region on a public holiday, and this causes your server to crash.

    Benefits of Uptime Monitoring

    Improving your website’s uptime has many benefits, let’s see a few cases in which implementing uptime monitoring on your website can really help you.

    Improved Availability and Search Engine Ranking

    Even if the downtime doesn’t seem like a big deal, it affects your site rankings with the majority of search engines. Google’s crawlers constantly scan your website to assess its availability, performance, and content. Even the all-powerful Google is aware that occasionally there will be outages, but prolonged or frequent disruption will definitely hurt your SEO ranking.

    Website uptime monitoring helps you stay informed about any disruptions to your website. This includes even the minor ones that you might not be aware of otherwise, but that which search engines picked up on. Early detection of outages lets you take swift action to safeguard your page rankings.

    Detect Intrusions

    You never know when your site might become the target of hackers. Attackers use a variety of techniques including DNS spoofing and DDoS (Distributed Denial of Service). At some point, they might take down your website, divert visitors from it (typically to a malicious website), or take advantage of the interaction between you and your users to insert or extract private data.

    Many modern uptime monitoring tools check for changes to the DNS records periodically so that you instantly find out if something shady is going on. Some also monitor certificates, ensuring that you will be notified if a hacker tries to tamper with your SSL certificates.

    Builds Trust with Visitors

    There is not a single person on Earth who enjoys a website that performs slowly, is unavailable, or just isn’t responsive. Should your website experience any downtime, only some of your most loyal clients will wait for that downtime to be resolved. But in many cases visitors will just flock towards your competition. You won’t see that client again if your rivals provide a better, more dependable experience.

    A recent survey found that 9% of users who experience a temporarily downed website won’t visit it again. During quiet periods that might not sound like much, but at peak times, or during special events such as Black Friday that 9% could represent a huge proportion of your income.

    Detect SLA Breaches

    If you are working with a reputable cloud provider, the chances are that, either knowingly or unknowingly, you have signed a service level agreement. These agreements provide assurance that a particular service will be available without disruption or downtime.

    Let’s assume a scenario in which your website goes down in the middle of the night for a couple of hours due to an outage at your cloud provider’s end. Fortunately, all this happened when your clients didn’t need your website so you never even found out about the outage.

    If you knew about the outage, you would have found out that your cloud provider is unreliable, and take the necessary steps to avoid this in the future. Moreover, many reputable cloud providers offer money back when they suffer extended outages.

    For instance, AWS will not charge you for any Single EC2 Instance that is unavailable for more than six minutes within any one hour. Even if you don’t want to shift cloud providers, getting a generous discount on your bill is always desirable – uptime monitoring makes it easy for you to do that.

    What to Look For in an Uptime Monitoring Tool

    Most website uptime monitors in the market will verify that services and websites are operational by testing their status and monitoring their uptime. However, some tools go beyond simple uptime tracking and provide more insights and useful stats.

    When considering which uptime monitoring tool to opt for, these are the essential features that are a must:

    1. Monitoring Frequency: A typical website uptime tracker ideally checks the status of the site every couple of seconds – more frequent checks mean quicker detection of issues.
    2. Multi-Location Monitoring: If the tool you choose is equipped with global monitoring locations, you’ll be able to simulate user experiences from various regions. This helps identify regional performance issues related to servers.
    3. Alerting Capabilities: Always check for alerting options such as email, SMS, or integrations with incident management tools such as Slack and PagerDuty. Customizable alert thresholds and escalation policies are a bonus.
    4. Protocol Support: Make sure that the monitor you choose supports the relevant protocols for your applications. For example, if you are serving your website over both IPv4 and IPv6, you would want a service that can handle both.
    5. Content Verification: A good uptime tracker should be able to check specific content such as login forms or key elements of your web pages. This feature is vital for ecommerce stores and web applications.

    Top Website Monitoring Tools in 2024

    You can keep an eye out for any downtime on your website with a variety of monitoring tools available nowadays. There are options for every scenario – from traffic volume tracking to status checks on your website.

    Here are the top 4 uptime monitoring tools we would recommend.

    Site24x7

    Site24x7 lets you check your site’s availability at intervals as short as 60 seconds using monitoring data from over 110 locations worldwide. Additionally, you can keep an eye on your online apps and APIs. Performance trends over time can also be easily identified by analyzing historical data from this tool.

    Key Benefits:

    • Synthetic Monitoring and Real User Monitoring (Web)
    • 120+ Global Monitoring Locations
    • Public and Private Cloud Monitoring with log management

    Site24x7 also allows users to check and configure HTTP headers of your requests. You can even perform advanced checks to see whether a word or a phrase is present on a page by searching the response body using regular expression patterns.

    Using Site24x7’s browser plugin, you can keep track of important business transactions and verify them by mimicking traffic from several places. You can either manually specify which button to click on each page or import test scripts from Selenium IDE (a common web automation tool) to run on a real browser, such as Firefox or Chrome, on a regular basis.

    Pingdom

    Pingdom is a popular tool for tracking the performance of websites. In addition to uptime monitoring, it provides useful features such as real user monitoring, page speed monitoring, artificial interaction testing, immediate warning, and root cause analysis.

    Key benefits:

    • Page speed analysis
    • Transaction monitoring
    • Detailed comparison of usage metrics

    As for alerts, Pingdom provides real-time warnings via email and SMS for uptime monitoring, 24/7. Additionally, they have more than 70 locations from which your website’s performance is examined, allowing you to see how your website is doing across the globe.

    UptimeRobot

    UptimeRobot combines website, SSL, Ping, Port, Cron job, and Keyword Monitoring all into one solution. Some advanced capabilities include the ability to construct custom HTTP queries with configurable headers, semi-customizable status pages, response times monitors, email-delivered incident updates to subscribers, and maintenance windows.

    Key benefits:

    • Domain and SSL monitoring
    • Cron job monitoring (sometimes called heartbeat monitoring) to monitor tasks, such as wp-cron, that must be performed regularly on a schedule.
    • Custom HTTP requests
    uptime monitoring

    With UptimeRobot, you can watch your website from several places up to once every 60 seconds for premium plans, and once every five minutes for free. You can get alerts via SMS, RSS, Twitter, email, and push notifications for iPad and iPhone when a website goes offline.

    Uptrends

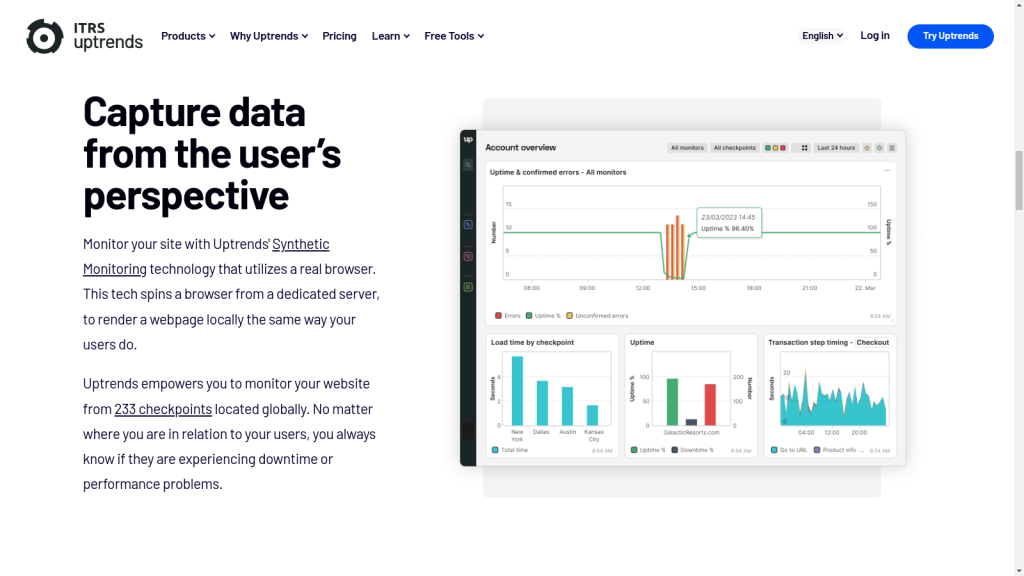
    Uptrends provides a range of products such as real user monitoring and synthetic monitoring. With their synthetic monitoring, you can keep an eye on your HTTP(s) endpoints, DNS, security certificates, or any other online services such as SOAP or REST API endpoints using servers from 233 different geographical locations worldwide.

    Key benefits:

    • Smart alerting and automation features
    • Infrastructure Monitoring
    • Location-based performance metrics

    Uptrends displays all data using interactive charts that allow you to filter by date and time, zoom in on particular features, and examine your stats more closely in order to look for trends in your performance over time.

    Furthermore, if there are any speed-related problems with your website, identifying and pinpointing the source becomes easy thanks to their website performance monitoring services.

    Wrapping Up

    It is evident that ignoring uptime monitoring can have unwanted repercussions for revenue, brand reputation, and user experience. Effective uptime monitoring helps businesses guarantee the dependability and accessibility of their services, which in turn improves customer happiness and boosts revenue.

    If you’re looking for a simple and powerful way to manage your PHP web applications and websites on any cloud server provider, you should try RunCloud.

    RunCloud is a modern web server panel that automates server configuration and security updates, provides backup and restore features, supports multiple PHP versions and frameworks, offers one-click SSL and Git deployment, and much more.

    With RunCloud, you don’t need to be a Linux expert to build a website. You can use our graphical interface and build a business on the cloud affordably.Join thousands of web developers who use RunCloud to manage their cloud servers and web applications. Sign up for RunCloud today!

  • PHP Security – Best Practices To Secure Your Web App in 2025

    PHP Security – Best Practices To Secure Your Web App in 2025

    According to a recent report by SiteLock, on average, websites are attacked 94 times a day, and are visited by bots 372 times a day.

    While many of these bots are nothing to worry about, a percentage of them will be malicious, hunting out vulnerabilities, which is why it’s vital to remain vigilant where your website’s security is concerned, and in particular, we’re focusing today on PHP security.

    The role of PHP, a widely embraced server-side scripting language, continues to become even more pronounced in shaping the robustness and reliability of web applications.

    It’s worth noting that PHP isn’t just another player in this arena – it’s a formidable leader, accounting for a staggering 76.8% of all websites. Since PHP plays a critical role in web development, ensuring the safety and integrity of your web applications has never been more crucial.

    According to the PHP introduction manual, PHP is designed specifically to be a more secure language for writing CGI programs than Perl or C, and with the correct selection of compile-time and runtime configuration options, and proper coding practices, it can give you exactly the combination of freedom and security you need.

    In this article, you’ll discover the essential strategies and tactics to better protect your PHP web applications.

    Let’s get started!

    PHP Version Management

    Always Use the Latest Version of PHP

    Using a secure PHP version is vital in safeguarding your web application. The latest PHP releases offer not only a technological leap, but also security upgrades to protect against evolving security challenges. As a result, older versions of PHP are outdated – check the PHP docs to see if your PHP version has reached end of life.

    You should occasionally check the PHP Supported Versions page to ensure that your PHP installation remains in sync with the latest offerings. By doing so, you’ll be taking a proactive stance against security breaches, and enhancing the overall resilience of your web application.

    Use RunCloud Docker to Isolate Your Web Applications

    If, for any valid reason, upgrading to the latest PHP version is not feasible, an alternative approach to bolster your web application’s security is to use RunCloud Docker. By isolating your older PHP application within a separate container, you effectively create an additional layer of security for your entire system.

    This strategy ensures that your older application runs independently from the rest of your web applications. Even if the older PHP version may have certain vulnerabilities, confining it within a distinct container minimizes the risk of those vulnerabilities spreading to other applications in your environment. It essentially creates a protective barrier, allowing you to run legacy software without compromising the security of your newer, more up-to-date applications.

    Refer to our in-depth post on containerization to learn more about how you can leverage Docker to manage your servers.

    PHP Configuration for Security

    Turn Off PHP Execution

    One of the quickest ways to enhance the security of your PHP web application is by disabling PHP execution in directories where it serves no functional purpose. This proactive measure prevents unauthorized access and uncontrolled code execution within your web application.

    By restricting PHP execution in non-essential directories, you reduce the attack surface for potential threats. Hackers often seek out vulnerabilities that allow them to execute malicious PHP scripts on your server. By turning off PHP execution where unnecessary, you not only deny them the opportunity, but also ensure that your application functions securely.

    Properly Configure the PHP.ini File and Other Requisites

    When you are running a PHP application, you should properly configure your php.ini file. In this file, you have the power to fine-tune various PHP settings to align with your application’s security requirements.

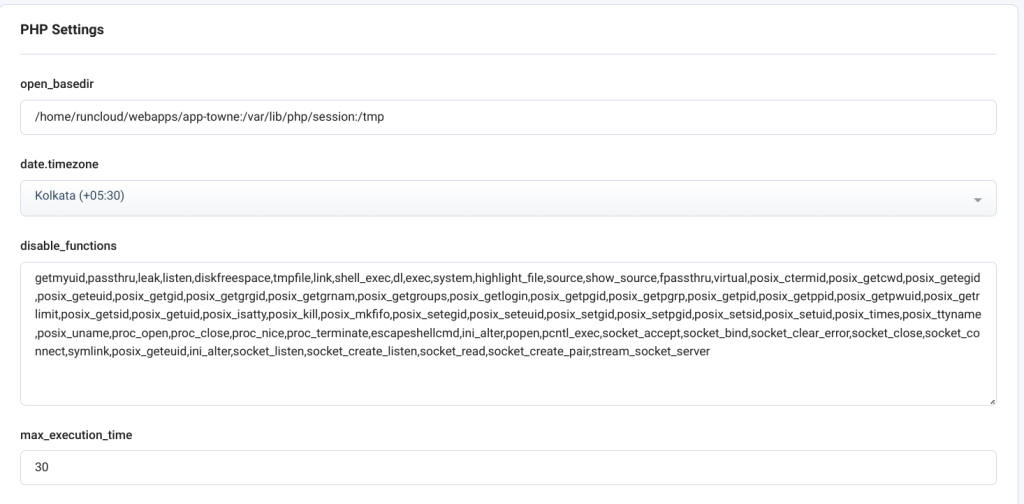
    For instance, you can disable features that are not needed, reducing the potential attack vectors. Additionally, setting appropriate values for variables such as max_execution_time and memory_limit ensures that your application operates within secure constraints.

    RunCloud simplifies this process by allowing you to manage these settings directly from its user-friendly dashboard, making it convenient to maintain the security and performance of your PHP web application.

    Disabling PHP functions for PHP security

    Leveraging PHP Libraries

    When it comes to protecting your web application, one effective strategy is to use established PHP libraries. These libraries serve as valuable resources for implementing common security functions such as authentication, authorization, and encryption. They have undergone rigorous testing and have proven their reliability over time.

    By using these well-vetted libraries, you significantly reduce the likelihood of implementation errors in your application’s security measures. This approach not only streamlines the development process, but also enhances the overall security of your web application. It allows you to benefit from the collective knowledge and experience of the PHP community, providing robust solutions to common security challenges.

    Dependency and Component Security

    While it is recommended to use third party components, sometimes they can have security vulnerabilities that are addressed in newer versions. To ensure the security of your web application, it’s necessary to track the security of your code dependencies and third-party components.

    Using outdated libraries and third-party components can leave your application vulnerable to exploits and security breaches. Cyber threats continually evolve, and older dependencies may not receive updates or patches to address newly discovered vulnerabilities.

    By keeping your code dependencies up to date, you reduce the likelihood of attackers exploiting vulnerabilities in outdated components. Regular updates not only bolster your application’s security, but also contribute to its stability and performance, providing a safer and more reliable experience for your users.

    Do Not Store Passwords

    We cannot stress this point enough – when it comes to the security of user data in your web application, a fundamental principle is to store passwords securely.

    Do not store passwords in plain text – ever!

    It is essential to use strong, one-way hashing algorithms such as bcrypt.

    Hashing is a process that transforms a user’s password into a unique string of characters, making it extremely difficult for anyone, including system administrators, to reverse the process and obtain the original password. This is crucial because it adds a layer of protection to user credentials, preventing unauthorized access even if your database is compromised.

    On the other hand, storing passwords in plain text, or using reversible encryption techniques, poses a significant security risk. In these cases, if an attacker gains access to your database or security measures are breached, they can easily obtain and misuse user passwords, potentially causing significant harm to your users and your application’s reputation.

    We recommend reading this article by Okta to understand bcrypt in more detail, and learn how to implement it securely.

    Enhancing Application Security

    Don’t Rely on Cookies for Security

    While cookies play an integral role in session management and user experience on web applications, it’s essential to understand that they should not be the sole means of securing your application. Cookies, by themselves, are not foolproof safeguards against security threats. Instead, they should be viewed as just one layer of your security strategy.

    To make a robust application, it’s crucial to implement additional security measures. This includes, but is not limited to, robust input validation and proper authentication mechanisms. These measures not only complement cookie-based session management, but also provide an extra layer of protection against various vulnerabilities and threats.

    Validate User Input

    When developing an application, you should never trust user input implicitly. User input can be a potential method for attacks such as SQL injection and cross-site scripting (XSS). To safeguard against these common vulnerabilities, you should always validate and sanitize user input.

    By validating user input, you ensure that the data entered by users sticks to predefined criteria, and you can reject or sanitize any input that doesn’t meet these criteria. This is a fairly complex topic and if you don’t understand it fully then it can lead to security vulnerabilities. It’s advisable to use input validation libraries and functions that have been designed for this purpose.

    Regular Security Checks

    Safeguarding your web application is not a one-time effort but an ongoing commitment. Regular security audits are an essential part of maintaining a robust security application. Automated security scanners can be valuable in identifying potential vulnerabilities within your application.

    However, for larger websites, it is advisable to take an extra step. It’s recommended to hire a team of white hat hackers who can perform thorough security testing. These ethical hackers simulate real-world attacks to find vulnerabilities and, if they succeed, they provide guidance on how to remedy these issues.

    Final Thoughts

    By following the best practices outlined in this guide, you are taking a significant step toward bolstering the security of your PHP web application. However, it’s crucial to recognize that security is not a one-time task – it’s a continuous commitment that requires vigilance.

    If you’re unsure about where to start or want to simplify the process of securing your web applications, consider using RunCloud.

    When you deploy & manage your servers using RunCloud – they’re equipped with sensible and secure default settings, but you retain complete access and control of your infrastructure.

    RunCloud empowers you to implement these best practices effortlessly, ensuring that your PHP web application operates within a secure environment. So, why wait? Take the proactive step towards enhanced security – sign up for RunCloud today!

  • How to Create and Manage Cron Jobs on Linux

    How to Create and Manage Cron Jobs on Linux

    One of the most valuable benefits of having computers take charge of many aspects of our lives is the way they can complete tasks over and over again, following a defined schedule without complaint. How do they do this? The answer is something called “cron jobs”.

    In this post, you’ll learn exactly what a cron job is, why people use them, and how you can use cron jobs yourself for automating mundane tasks on your server.

    But even if you’re not a Linux expert then don’t worry, we will also share a novel method for novice Linux users to manage their system much more effectively using cron jobs.

    Let’s get started!

    What is a Cron Job?

    A cron job is a command or a script that is executed by the cron daemon, a background service that runs on Linux systems and which checks for scheduled tasks. A cron job consists of two parts: a schedule and a command.

    • The schedule defines when and how often the command should run.
    • The command defines what should be executed.

    Let’s take a look at each of them individually.

    Understanding Cron Schedules

    The schedule is specified using a special syntax that consists of five fields:

    1. minute
    2. hour
    3. day of month
    4. month
    5. day of week.

    Each field can have a single value, a range of values, a list of values, or a special character. The fields are separated by spaces or tabs.

    Here is an example of a schedule:

    30 10 * * 1-5

    The above schedule means that the specified command should run at 10:30 AM on every weekday (Monday to Friday). The asterisk (*) means any value, and the dash (-) means a range of values. You can also use a comma (,) to separate multiple values, a slash (/) to specify increments, and predefined keywords, such as @reboot, @daily, @weekly.

    You can use these predefined keywords to make your scripts more readable. For example, if you want to run something once a week then instead of writing 0 0 * * 0, you can simply write @weekly.

    To learn more about creating cron schedules, we recommend you take a look at these useful articles:

    Understanding Cron Task

    The second part of the cron syntax defines a task that needs to be completed. It can be either any valid Linux command, or a path to a script that can be executed. The command can have arguments, redirections, pipes, etc. The output of the command is usually sent to the user’s email, unless it is redirected to a file or another command.

    Here is an example of a command:

    /usr/bin/backup.sh

    This command runs a script that performs a backup operation. The script must have the executable permission, and the correct shebang line.

    Why Use Cron Jobs?

    Cron jobs are extremely valuable for automating repetitive or periodic tasks, such as backups, updates, notifications, etc. You can use these schedules for a variety of tasks such as:

    • Importing data from another system on a recurring basis
    • Making changes to properties in your CRM based on time and date (such as annually, monthly, or daily)
    • Running system management commands, such as clearing the cache, updating packages, checking disk space, etc.
    • Running scripts or programs that perform specific tasks, such as generating reports, sending emails, scraping websites, etc.
    • Scheduling backups of your files, databases, or websites
    • Many popular web platforms such as Magento and WordPress rely on cron jobs to perform various tasks related to their functionality and performance. Some of these tasks are: indexing databases, sending newsletters, processing orders, etc.

    Suggested read: Understanding WordPress Cron Jobs

    How to Create a Cron Job

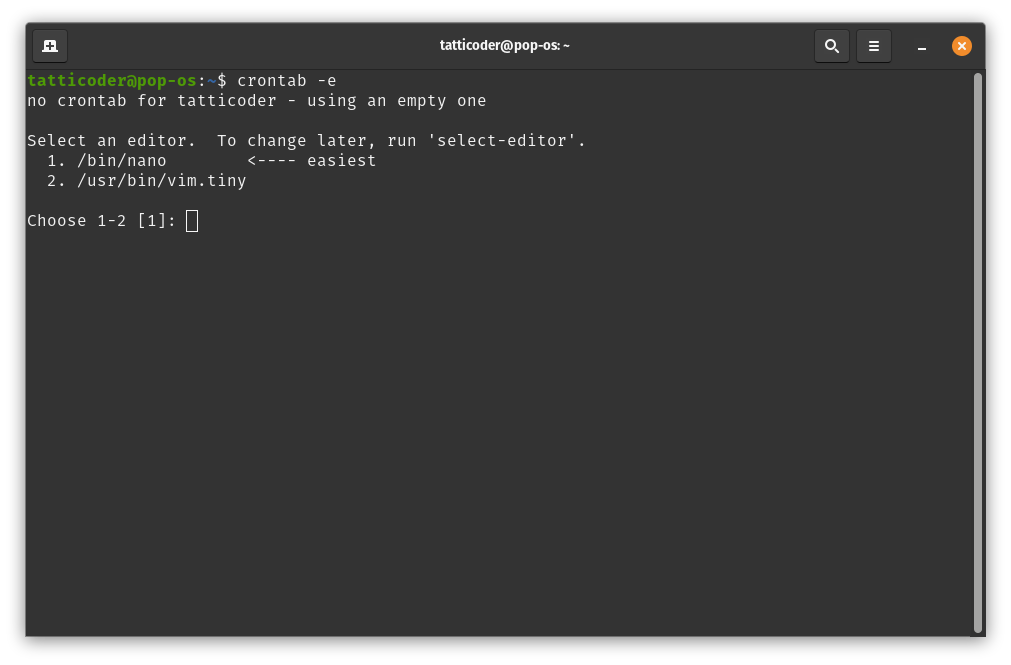
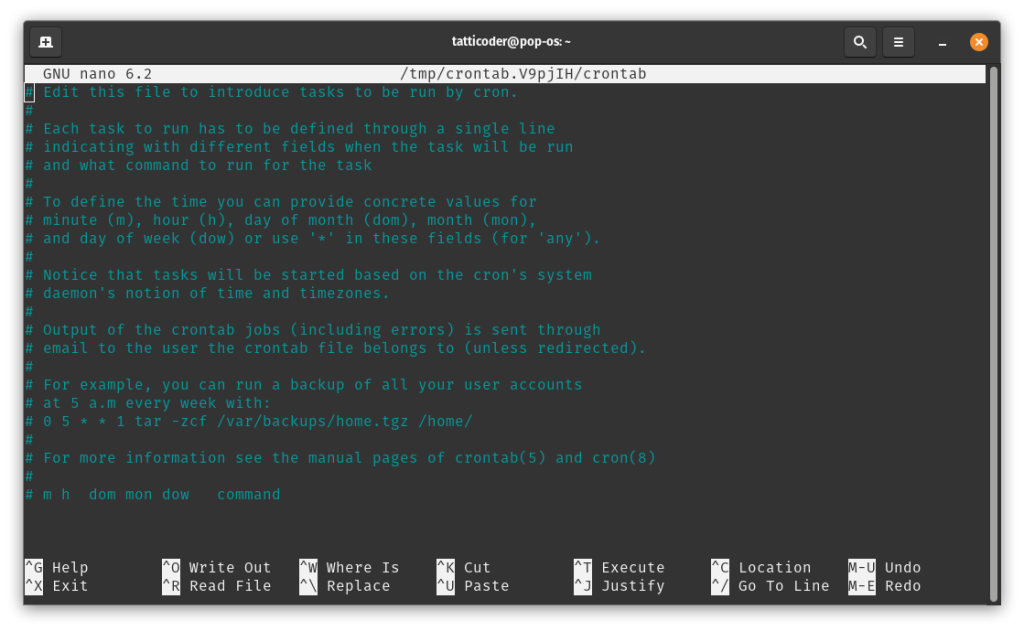
    To create a cron job on Linux, you need to edit the crontab file. This is a text file that stores the cron jobs for a particular user account on the computer. You can use the crontab -e command to edit the crontab file using your default editor. If you are running the command for the first time, you may be asked to choose an editor, such as nano, vim, emacs, etc.

    Suggested read: How to create WordPress cron jobs with wp-cli tool

    Select the number corresponding to your desired editor to use that one, or just press ‘Enter’ to use the default editor.

    When working on the crontab file, you should keep following things in mind:

    1. Lines starting with the hash (#) sign are comments, and are completely ignored by the computer
    2. Blank lines are also ignored
    3. All other lines represents an individual cron job

    As noted previously, cron jobs follow the schedule command format. If we want to use the schedule and command described above, we will add the following line to the crontab file.

    Note that at the end of the command, we have added a helpful comment that will make it easy to identify this cron task if we ever wish to make changes to it in the future.

    30 10 * * 1-5 /usr/bin/backup.sh # Run backup.sh at 10:30 AM on weekdays

    You can add, modify, or delete lines in the crontab file to create or update your cron jobs. After you save and exit the editor, the cron daemon will reload the crontab file and apply the changes. You can also use the crontab -l command to list the current crontab file, or the crontab -r command to remove the crontab file.

    For more details on the cron schedule syntax, you can check the crontab man page.

    How to Manage a Cron Job

    Cron jobs are usually set and forget – there isn’t much that you usually need to do once it has been enabled. However, if you suspect that your jobs are not running properly, then you can use the following tips to manage and troubleshoot your cron jobs:

    • To disable a cron job temporarily, you can comment out the line in the crontab file by adding a hash sign # at the beginning of the line.
    • To enable a cron job, you can uncomment the line in the crontab file by removing the hash sign # at the beginning of the line.
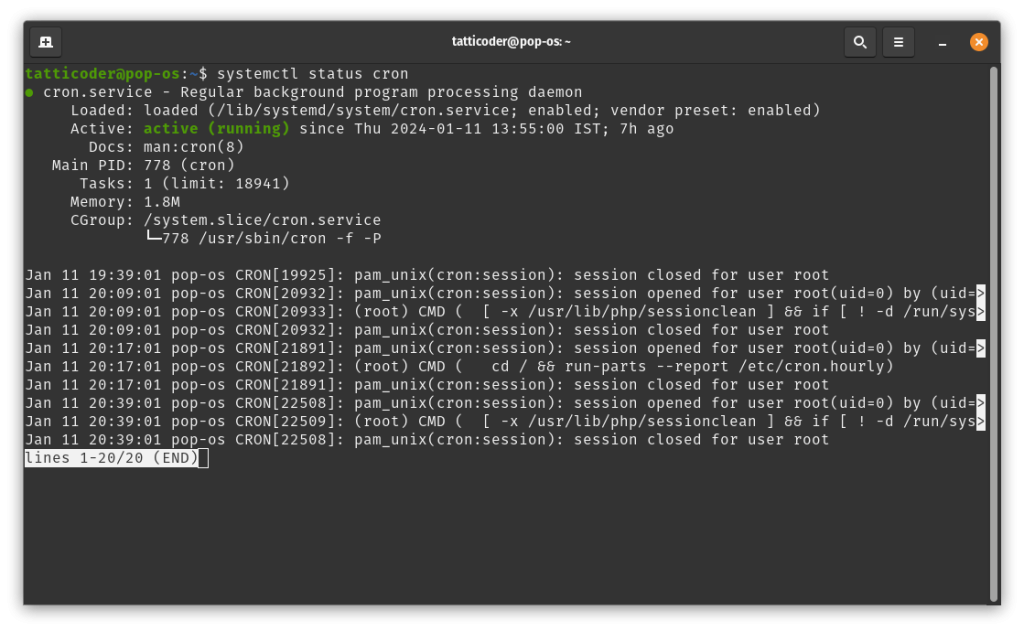
    • To view the status of the cron daemon, you can use the systemctl command or the service command, depending on your Linux distribution. For example, systemctl status cron or service cron status.
    cron status linux
    • To restart the cron daemon, you can use the systemctl command or the service command, depending on your Linux distribution. For example, systemctl restart cron or service cron restart.

    Creating Cron Jobs the Easy Way with RunCloud

    Managing Linux can be hard and difficult, especially for beginners or non-technical users. Linux commands and scripts can be complex and error-prone, and require a lot of knowledge and experience to use them effectively. This is why we built RunCloud!

    RunCloud is a cloud server management panel that simplifies and automates the process of creating and managing cron jobs on Linux servers.

    We provide a feature-rich GUI that helps you create and edit cron jobs right from the dashboard, without the need to use the terminal or edit the crontab file manually.

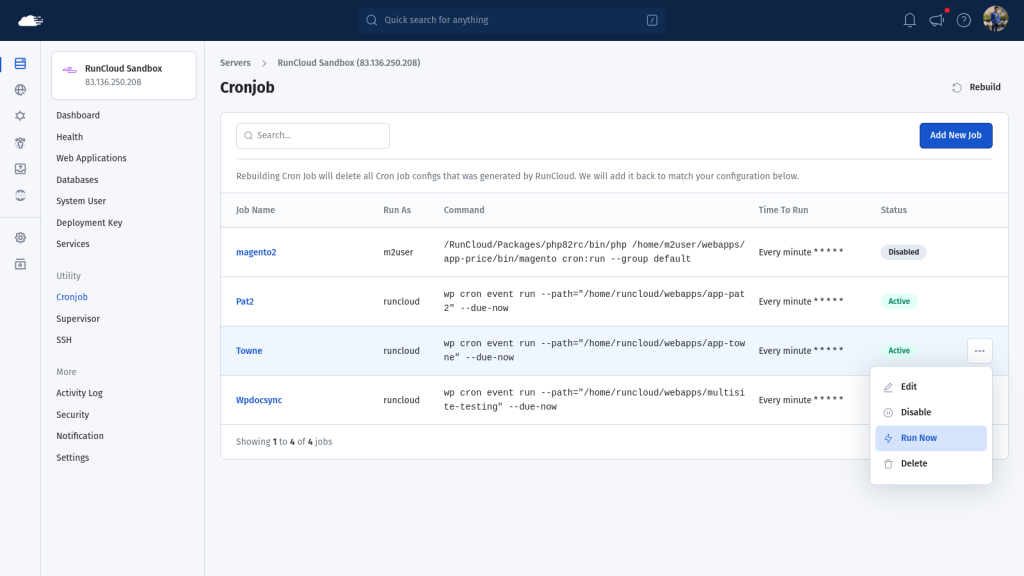
    To create a new job on your server, simply open your RunCloud dashboard and click on the “Cronjob” tab in the left menu.

    On the next screen, just click on “Add New Job” to get started.

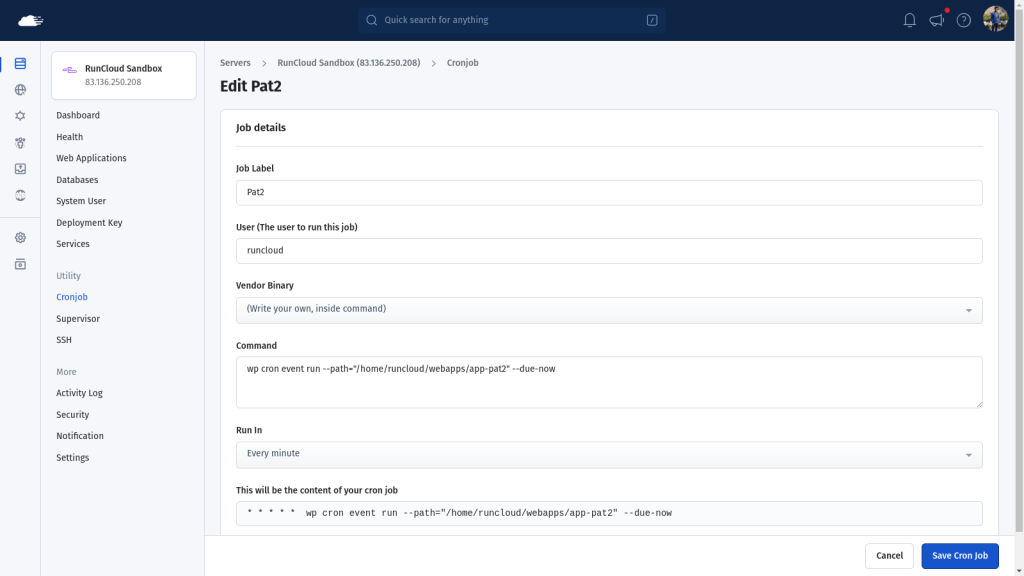
    When creating a new job, simply fill in the basic information, such as the name of the job and the command that you want to execute – everything else will be pre-filled for you.

    cron jobs runcloud

    The above screenshot shows an example of a cron job created using RunCloud. This cron job will run the WordPress cron events for the app-pat2 web application every minute, using the runcloud user and the wp-cli tool.

    Let’s take a look at each of the settings that you can modify.

    • Job Label: This is a name or description for the cron job, which can help you identify and organize your cron jobs.
    • User: This is the system user that will execute the cron job. You can choose any user that has the permission to run the command or script.
    • Vendor Binary: This is the binary or interpreter that will run the command or script. You can choose from a list of vendor binaries provided by RunCloud, such as /bin/bash, /usr/bin/php, etc. or you can write your own binary inside the command field.
    • Command: This field contains the actual command or script that will be executed by the cron job. You can write any valid Linux command or a path to a script that can be executed. In this case, the command is using the wp-cli tool to run the WordPress cron events for the app-pat2 web application.
    • Run In: This is the schedule or frequency of the cron job. You can choose from a list of predefined settings, such as every minute, every hour, every day, etc., or you can use the custom settings to specify your own schedule using the cron syntax.

    Why Use RunCloud?

    RunCloud’s cron job feature is more powerful than the traditional way of creating and managing cron jobs on Linux systems, because it offers the following advantages:

    • It has a user-friendly and intuitive GUI that makes it easy to create and edit cron jobs, without the need to use the terminal or edit the crontab file manually.
    • It provides predefined settings and custom settings for scheduling your cron jobs, which can save you time and avoid errors in writing the cron syntax.
    • It provides a list of vendor binaries that you can use to run your commands or scripts, which can simplify your commands and ensure compatibility with your server environment.
    • It allows you to choose any system user that has the permission to run the command or script, which can enhance the security and flexibility of your cron jobs.
    • It allows you to quickly Activate or Disable individual cron jobs without ever needing to log in to your server.
    • It enables you to run cron jobs on demand right from your RunCloud dashboard.

    Conclusion

    In this article, we have shown you how to create and manage cron jobs on Linux using the crontab command and the cron daemon. Cron jobs are a powerful and convenient way to automate tasks on Linux systems. We hope you have found this article useful and informative. If you have any questions or feedback, please feel free to leave a comment below.

    If you are looking for a simple and powerful way to create and manage cron jobs on Linux servers, you should try RunCloud.

    RunCloud is a cloud server management panel that simplifies and automates the process of managing Linux servers.

    RunCloud is more than just a cron job manager. It is a complete solution for managing your web applications, databases, backups, security, and performance on Linux servers. You can use RunCloud to deploy, configure, and optimize your web applications using any PHP version and web server stack.

    RunCloud is compatible with any cloud provider, such as AWS, Google Cloud, DigitalOcean, Linode, Vultr, etc. If you want to experience the power and simplicity of RunCloud, you can sign up for a RunCloud account today!

  • How to Copy Files in Linux and Overwrite without Confirmation

    How to Copy Files in Linux and Overwrite without Confirmation

    Are you working on a bash script that needs to be executed without any human inputs? Do your scripts fail when the process of copying files encounters a problem?

    If you answered “yes” to either of these questions then you’re in the right place.

    In this post, we will take a quick look at the cp command in Linux, and examine how it can be used in different scenarios.

    How to Copy Files in Linux CLI

    Copying files is one of the simplest actions that you can perform on a computer. To copy files via the command line you can use the cp command, which stands for ‘copy’. The general syntax for the cp command is:

    cp [OPTIONS] SOURCE(s)... DESTINATION

    The SOURCE(s) can be one or more files or directories, and the DESTINATION can be a single file or directory. If you’ve passed more than two parameters to the command, then the last one is always considered the destination, and all other parameters before it are considered the source(s).

    • If the DESTINATION is a directory, the SOURCE files or directories are copied into it.
    • If the DESTINATION is a file, the SOURCE file is copied and renamed as the DESTINATION file.

    Here is a simple example of how to copy a file named file.txt from the current directory to another directory named backup:

    cp file.txt backup/

    This will copy the file file.txt to the backup directory with the same name. If you want to copy the file with a different name, you can specify the new name after the backup directory:

    cp file.txt backup/new_file.txt

    This will copy the file file.txt to the backup directory as new_file.txt.

    How to Overwrite Existing Files

    By default, cp will overwrite any existing files in the destination without asking for confirmation. However, this behavior can be changed by using different flags or options with the cp command. Here are some of the common flags that can affect how cp handles overwriting:

    • -f or --force: This option will force cp to overwrite any existing files in the destination, even if they cannot be opened or removed. This option will also ignore any -n option that is used before it.

      For example, cp -f source.txt destination.txt will overwrite destination.txt with source.txt, regardless of any permissions or errors.
    • -i or --interactive: This option will make cp prompt the user before overwriting any existing files in the destination. You can choose to overwrite or skip the file by typing y or n and then pressing Enter.

      If you’re copying multiple files at once, you will be prompted for each file separately. If you don’t type anything and press Enter then the file will not be overwritten.

      This option will also override any -n option that is used before it. For example, cp -i source.txt destination.txt will ask the user if they want to overwrite destination.txt with source.txt, and proceed accordingly.
    • -n or --no-clobber: This option will prevent cp from overwriting any existing files in the destination. If the destination file already exists, cp will skip it and move on to the next file. This option will also override any -i option that is used before it.

      For example, cp -n source.txt destination.txt will not overwrite destination.txt with source.txt, if destination.txt already exists.
    • -u or --update: This option will make cp copy only when the source file is newer than the destination file, or when the destination file does not exist. This can be useful for updating or synchronizing files between different locations.

      For example, cp -u source.txt destination.txt will overwrite destination.txt with source.txt, only if source.txt is newer or destination.txt does not exist.

    Note that these flags can be combined to achieve different effects. For example, cp -uf source.txt destination.txt will force cp to overwrite destination.txt with source.txt, only if source.txt is newer or destination.txt does not exist.

    Changing the Default Behavior

    On some computers, the default behavior of the cp command can be affected by an alias. An alias is a way of creating a shortcut or a new name for a command, with some predefined options.

    For example, some Linux distributions come with the following alias pre-defined in their code:

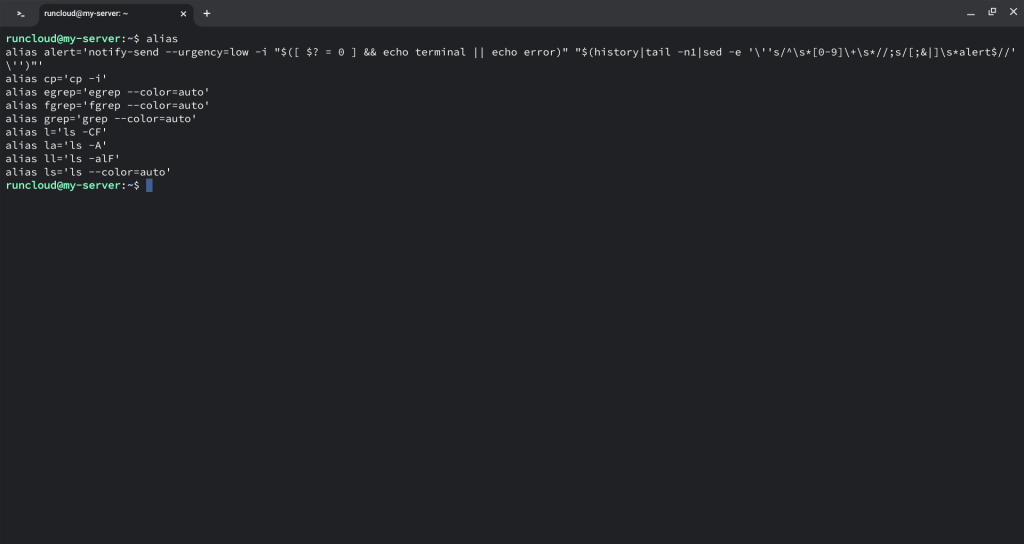
    alias cp='cp -i'

    This means that whenever the user types cp, the shell will actually run cp -i, which will prompt the user before overwriting any files.

    Checking For An Existing Alias

    If you’re not sure whether your computer has a predefined alias, then you can run the following command to list all aliases, and then look to see whether the cp is present in the output:

    alias

    Removing An Alias

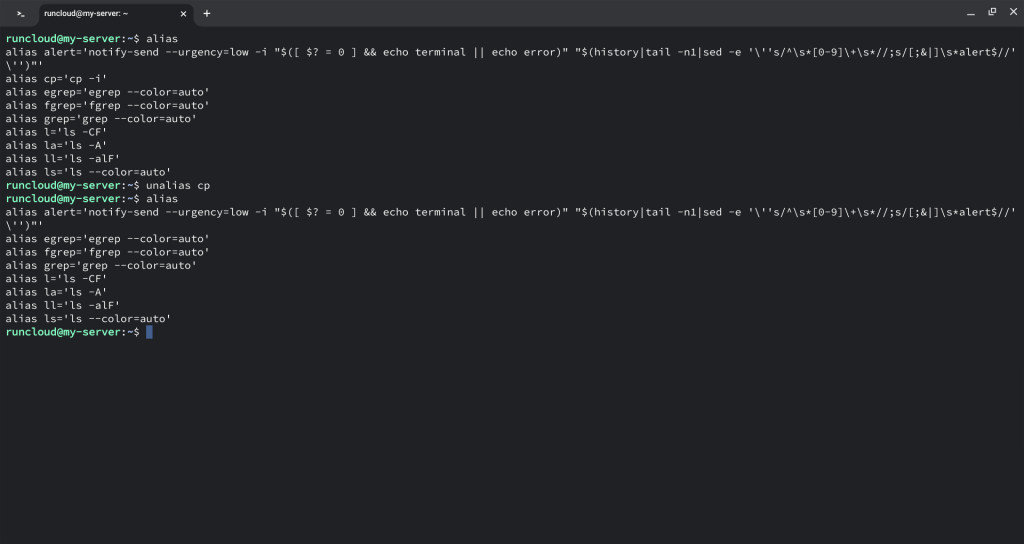
    To remove the alias for cp, you can run the command unalias cp, which will restore the default behavior of cp.

    Removing alias of copy command

    In the above example, we can see that an alias was defined for the cp command. After executing the unalias command, the alias entry was removed from the list.

    Temporarily Bypass An Alias

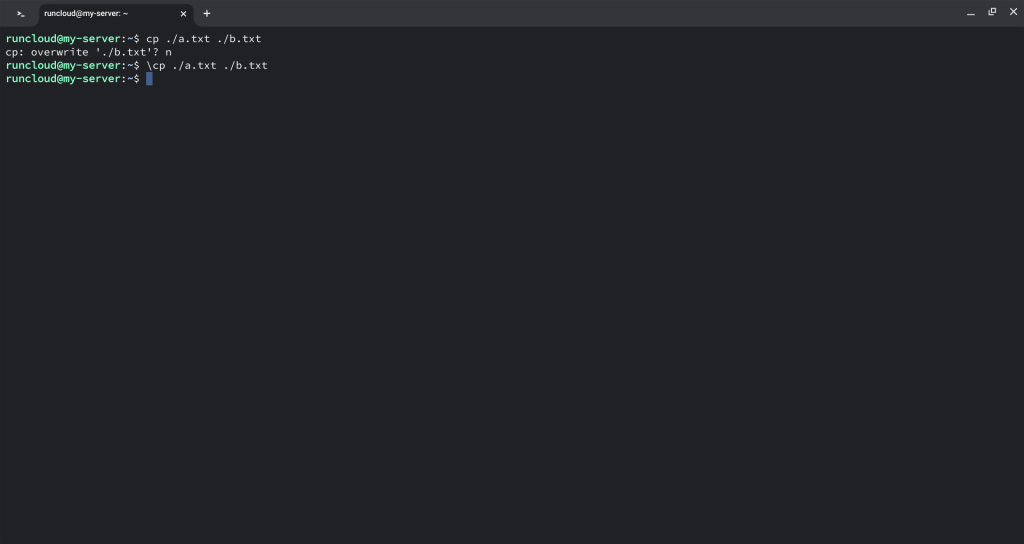
    If you don’t want to permanently remove the alias, you have an option to use a backslash before the cp command to bypass the alias and run the original command. For example, \cp source.txt destination.txt will overwrite destination.txt with source.txt, without prompting the user.

    bypassing alias of copy commands

    In the above example, we can see that the user was prompted for input when executing the copy operation, but not when the command was prefixed with the \ character.

    Automatically Accepting All Prompts

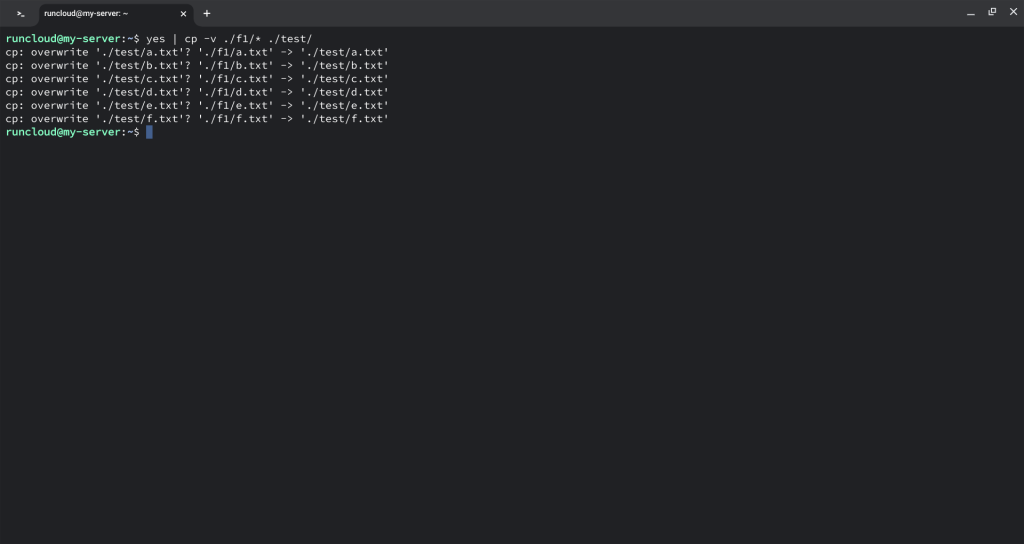
    In Linux there are multiple ways to do the same thing using different methods. If you don’t want to use the in-built -f option to overwrite files then you can use the copy command in conjunction with the yes command to automatically respond with y to all prompts.

    yes | cp -v source destination

    In the above example, we can see that the copy command prompted us for input before replacing each file, but the yes command responded ‘yes’ to each and every single one of them nearly instantaneously.

    Wrapping Up

    In this article, we have discussed how to copy files and directories in Linux via the command line. We have also explained different options and features of the copy command that are helpful in day-to-day usage.

    If you’re learning Linux to better manage your servers, we wish you all the best! However, you don’t need to be a Linux expert to host websites on the internet. RunCloud makes it extremely easy to deploy and manage websites using a user-friendly dashboard, and provides complete freedom to tinker under the hood.

    Whether you’re a beginner or a seasoned professional with decades of experience, sooner or later everyone makes a configuration change that completely renders websites useless. RunCloud has idiot-proofed many complex operations such as updating server configurations, installing SSL certificates, deleting applications, etc. – all of which makes it difficult for novice users to crash their website, and provides an extra set of guide-rails to advanced users.

    RunCloud is a versatile and reliable tool that can help you manage your server on your own, without the hassle and cost of hiring a system administrator. Don’t miss this opportunity to take your server management to the next level. Sign up for RunCloud today and enjoy the benefits of a cloud-based server management platform that is fast, secure, and easy to use.

  • Pipes vs Xargs: Which One To Use When Writing Bash Scripts In Linux

    Pipes vs Xargs: Which One To Use When Writing Bash Scripts In Linux

    Are you using Linux to manage your servers?

    Do you find yourself frequently copying the output on the terminal and pasting it into different bash commands?

    If you answered “Yes”, then you should definitely start using the Pipes and xargs command in Linux.

    These are extremely helpful Linux utilities that will save you time and effort when working with the command line. Using these opens up so many possibilities for manipulating and processing data in the command line.

    If you want to perform complex actions in the Linux terminal and grow your Linux skills past the basic level, you will definitely need to learn how to use these commands.

    In this article, you will learn exactly what xargs is, how it is different from pipes, and when to use which tool.

    Let’s get started!

    What Are Pipes in Linux?

    Pipes are a way of connecting the standard output of one command to the standard input of another command in Linux. This allows you to chain commands together and process data in a stream.

    To understand pipes, imagine two people talking on a ‘tin can telephone’. Here the first person is passing some information and the second person can only hear the information being passed. In this example, the telephone is acting as a pipe and the second person cannot jump to the end of the conversation without listening to the entire conversation first.

    To understand pipes, you can imagine two people talking on a ‘tin can telephone’. Here the first person is passing some information and the second person can only hear the information being passed. In this example, the telephone is acting as a pipe and the second person can not jump to the end of the conversation without listening to the entire conversation first.

    Similarly, pipes allow you to pass along information between processes and help you manipulate and process data in various ways. The syntax of pipes in pretty simple, just put a | sign between two commands.

    first | second

    In the above example, the output of the first will be used as the input for the second. This is pretty useful when working in the CLI.

    For example, if you want to count the number of files and directories in the current directory, you can use a pipe like this:

    ls | wc -l

    This command will list all files and directories in the current directory, and then pipe the output to the wc command, which will count the number of lines. The pipe character | is used to redirect the output of command to the other. The command on the left side of the pipe sends its output to the command on the right side of the pipe, which receives it as its input.

    Pipes are useful for performing operations on multiple items of data without having to write a loop or a script. You can also use multiple pipes to create a pipeline of commands, such as:

    find . -name "*.txt" | grep "hello" | wc -l

    The above command will find all files in the current directory and its subdirectories that have the “.txt” extension, and then pass them to the grep command, which will filter only the files that contain the word “hello”. The output of the grep command will then be piped to the wc command, which will count the number of lines. The result of this command is the number of files that have the “.txt” extension and the word “hello” in them.

    What is the xargs Command?

    The xargs utility in Linux reads data from standard input and converts it into command line arguments for another command. This allows you to perform operations on large amounts of data without having to write a loop or a script.

    For most part, this is pretty similar to the pipe operator that we discussed above, but with one major difference. The pipe operator redirects its output to the standard input of the second command, whereas the xargs utility will create a list of all the data and then pass it as command line arguments to the second command.

    To understand this, imagine the same person from above writing the information on a piece of paper and then passing it along to the second person. In this example, the paper is the xargs utility and the second person can see all the information at once.

    Xargs work in Linux by compiling a list of arguments.

    Having the ability to pass along information via the command line arguments opens up many possibilities. For example, if you want to delete all files that have the word “temp” in their name, you can use xargs like this:

    find . -name "*temp*" | xargs rm

    This command will find all files in the current directory and its subdirectories that have “temp” in their name, and then pass them as arguments to the rm command, which will delete them.

    Xargs or Pipes: Which One to Use?

    You may have already spotted that these two commands are basically the same apart from one key detail – pipes are useful for processing data in a stream.

    The main difference between pipes and xargs is that pipes pass data as standard input, while xargs passes data as command line arguments.

    This means that pipes will only work with commands that accept standard input, while xargs can only work with commands that accept command line arguments.

    What Are Standard Input and Command Line Arguments?

    Standard input and command line arguments are two different ways of passing data to a program in Linux.

    • Standard input is a stream of data that the program reads from its standard input file descriptor, usually the keyboard or a pipe.
    • Command line arguments are strings of text that the program receives as parameters when it is invoked from the shell.

    For example, if you run the command ls -l /home, the program ls will receive two command line arguments: -l and /home. The program can access these arguments using the argc and argv variables in C, or equivalent mechanisms in other languages.

    Although many software tools accept both command line arguments and standard input, not all do. As a software user, we often do not have the option to change how the program processes input.

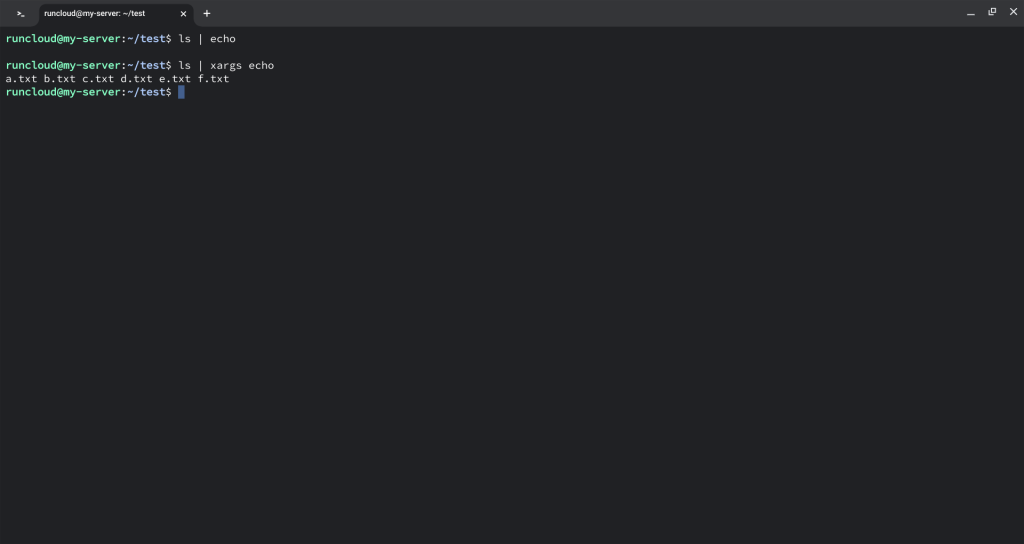
    For example, the command echo will print whatever you type after it, but it will not read from standard input. If you try to pipe the output of ls to echo, you will get nothing:

    ls | echo

    This is where xargs comes in handy – xargs will take the data from standard input and convert it into arguments for the command you specify. For example, if you want to print the names of all files and directories in the current directory, you can use xargs with echo like this:

    ls | xargs echo

    This command will list all files and directories in the current directory, and then pass them as arguments to the echo command, which will print them.

    The choice of using pipes or xargs depends on the situation and the commands you want to use. In general, pipes are more efficient and elegant, as they avoid creating intermediate files or processes.

    However, xargs can be more flexible and powerful, as it allows you to customize the arguments and options for the command you want to execute. It also has many options that allow you to handle different scenarios, such as limiting the number of arguments, replacing placeholders, prompting the user, or dealing with filenames that contain spaces or special characters. Let’s see some of these use cases in the next section.

    How to Use xargs like a Pro in Linux

    xargs has many options that allow you to customize its behavior and handle different situations. Here are some of the most common and useful ones:

    Limit the Number of Arguments

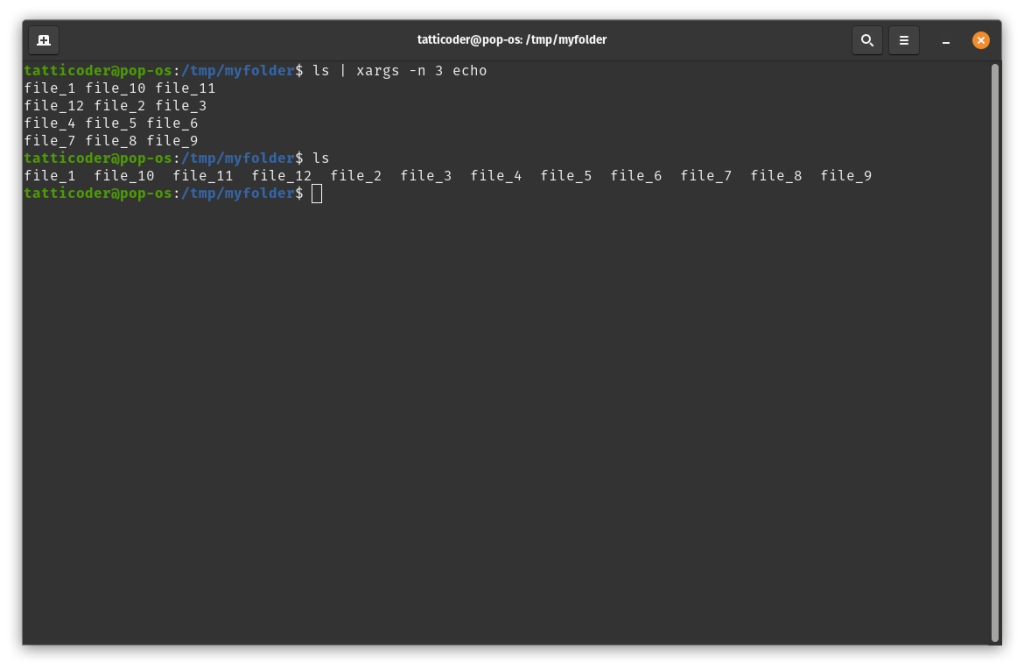
    The -n option specifies the maximum number of arguments to pass to each invocation of the command. For example, if you want to print the names of all files and directories in the current directory in groups of three, you can use xargs with -n 3 like this:

    ls | xargs -n 3 echo

    This command will list all files and directories in the current directory, and then pass them as arguments to the echo command in groups of three. Then the echo command will be executed multiple times, once for each group of three arguments that it received.

    Replace Placeholder Text

    When working in the command line, you will often encounter cases where you need to run many simple commands, each with a tiny change. The -I option allows you to specify a placeholder that will be replaced by each argument in the command.

    For example, if you want to create many files in your server which follow a common pattern, then you can use xargs with -I {} like this:

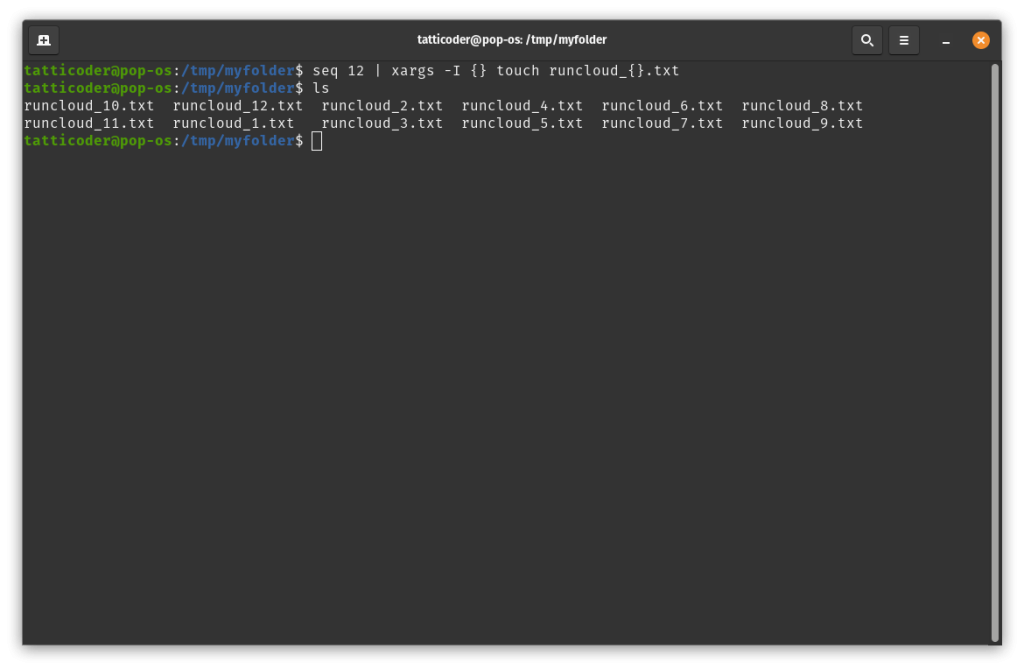
    seq 12 | xargs -I {} touch runcloud_{}.txt

    The above command will create a sequence of twelve numbers, then use those numbers to create twelve files that follow the pattern runcloud_#.txt.

    Prompt User For Confirmation

    When generating commands on the fly, it is pretty easy to do irreversible damage to your server. The smart way to use xargs is by letting it generate all the commands and then manually confirming it before it can be executed.

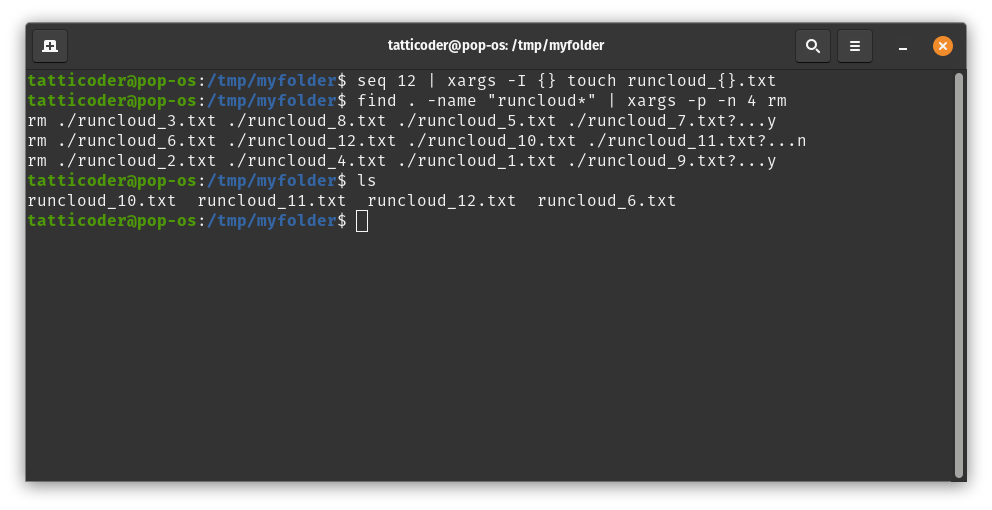
    To do this, use the -p flag which prompts the user before executing each command and waits for confirmation. For example, if you want to delete all files that start with the word “runcloud”, but you want to confirm each deletion in batches of four, you can use xargs with -p like this:

    find . -name "runcloud*" | xargs -p -n 4 rm

    This command will find all files in the current directory and its subdirectories that have “runcloud” in their name, and then pass them as arguments to the rm command, which will prompt the user before deleting each file and wait for a “yes” or “no” answer.

    In the above example, we can see that first we created twelve files. Then we used the find function to find any files that match our criteria and then passed them along in batches of four. The resulting rm command is displayed in the terminal and we can press y or n to confirm or reject the action.

    After the command has been executed, we can see that the files in the second batch of deletion remain untouched because we pressed n when we were asked to confirm the deletion, whereas all the other files that matched the criteria were removed.

    Process Files with Weird Names

    The xargs utility is not secure, because it can execute arbitrary commands if the input contains malicious or unexpected data. For example, if the input contains spaces, quotes, or other special characters, xargs may interpret them as part of the command or the arguments, and cause unwanted or harmful effects.

    If you’re working with data that contains spaces, special characters, or even foreign language text, then it is always a good idea to terminate the output of a line using null characters to avoid unexpected output.

    The -0 or –null flag expects the input to be null-terminated, meaning that each argument is separated by a null character instead of a space or a newline. For example, if you want to delete all files that have the word “temp” in their name, but some of them have spaces in their name, you can use xargs with -0 like this:

    find . -name "runcloud*" -print0 | xargs -0 rm

    This command will find all files in the current directory and its subdirectories that start with “runcloud” and then print them with a null character after each name. xargs will then read the input as null-terminated and pass them as arguments to the rm command, which will delete them.

    In the above example, we can see that terminating the output with a null character allows the program to gracefully execute the given command. If we had omitted the null termination step, we would have encountered different errors.

    After Action Report

    Both pipe and xargs are powerful and versatile utilities that can help you perform different operations on data in the command line. There is a character limit to xargs, but it depends on the system and the options used.

    By default, it tries to pass as many arguments as possible to the command, without exceeding the maximum length of the command line. To see the limits of xargs on your system, you can use the --show-limits option.

    Normally, xargs runs the second command once, even if there is no input (output from the first command). This option is useful to avoid errors or unwanted actions when the input is empty. To suppress this, you can specify --no-run-if-empty option.

    These are just some of the options that xargs offers. You can find more information and examples by typing man xargs or xargs --help in the command line.

    It is clear that xargs is a must-learn tool for any Linux user who wants to go beyond the basics and explore the possibilities of the command line.

    However, if you don’t want to become a master in Linux command line utilities, but still want to manage your Linux server yourself, then you should check out RunCloud.

    RunCloud is a cloud-based server management platform that lets you deploy, configure, and monitor your web applications with ease. If you’re an advanced user, you can take advantage of the CLI and API, as RunCloud gives you full control over your server.

    If you’re not comfortable with using the CLI or the API, don’t worry. RunCloud also offers an easy to navigate dashboard that can deploy applications in a breeze. You can also use RunCloud to set up SSL certificates, domains, cron jobs, firewalls, and more.

    RunCloud is a versatile and reliable tool that can help you manage your server on your own, without the hassle and cost of hiring a system administrator. Don’t miss this opportunity to take your server management to the next level. Sign up for RunCloud today and enjoy the benefits of a cloud-based server management platform that is fast, secure, and easy to use.

  • A Simple Explanation of SSL Certificate Errors & How to Fix Them

    A Simple Explanation of SSL Certificate Errors & How to Fix Them

    SSL certificates are essential for ensuring the security and trust of your website visitors. However, occasionally you may encounter errors that prevent your website from loading properly, or from displaying the green padlock icon in the browser.

    In this article, we will explain exactly what SSL certificates are, why they are important, and how to fix some of the most common SSL certificate errors that you may encounter.

    What are SSL Certificates and Why are They Important?

    SSL stands for Secure Sockets Layer, which is an old protocol that was used to encrypt the data between a website and a browser. However, SSL has been replaced by a newer and more secure protocol called TLS, which stands for Transport Layer Security.

    TLS is the current standard for web security and it has several versions, such as TLS 1.2 and TLS 1.3. Although they are two different things, people use the terms TLS and SSL interchangeably because they perform the same function.

    An SSL certificate (or a TLS certificate) is a digital certificate that verifies the identity of a website and establishes a secure connection with the browser. These certificates are important for several reasons:

    • They protect your website by encrypting the data and preventing unauthorized access or tampering.
    • They boost your website’s credibility and reputation by showing your visitors that you care about their privacy and security.
    • They enhance your website’s SEO ranking by complying with Google’s algorithm, which favors HTTPS websites over HTTP ones.

    Check SSL/TLS Certificates

    Even the simplest of websites these days uses SSL certificates. If the certificate is installed correctly by the site owner, you probably won’t even notice it.

    In most browsers, the lock icon at the start of the address bar denotes that the website is being served over an encrypted connection.

    Google has recently phased out the ‘lock’ icon in favor of the ‘tune’ icon since this icon gave a false sense of security to visitors who don’t understand how the web works.

    These days, most modern browsers will alert you if you try to visit a site that does not support HTTPS. When you receive such a warning, you will need to manually click “Continue to Site” to visit the web page.

    Connection is not secure error caused by SSL error

    And even after you open the site, your browser will display a “Not Secure” badge in the address bar to remind you that the content on this website can be tampered with.

    Check your SSL

    Not all SSL certificates are equally trustworthy. Anyone can create a self-signed SSL certificate, but this does not mean that the website is legitimate or safe.

    To ensure the authenticity and security of a website, you need to get an SSL certificate from a trusted certificate authority (CA). For example, Google Trust Services is a third-party organization that validates your domain name and other information before issuing the certificate.

    A trusted CA is recognized by all major browsers, and it follows certain standards and policies to ensure the quality and security of the certificates. These certificates are installed on your computer by default, and updated automatically from time to time.

    RunCloud issues self-signed certificates to make it easier for you to test your websites without paying for a certificate. Since RunCloud is not a trusted CA, our root certificate is not installed on your computer; however, you can install it manually. Installing a root certificate on your computer will only take about 30 seconds, and you only need to do it once.Since it is relatively easy to modify root certificates on your computer, you might want to check if the certificates are properly installed using a third party service such as SSL Checker or GoDaddy SSL Certificate checker. These tools are a quick and easy way to validate your server settings in a human readable way.

    SSL certificate chain to mitigate errors

    The above example shows the certificate chain for ‘runcloud.io’. It shows when the certificate was issued, who issued the certificate, when it will expire, and other relevant information.

    How to Fix Common SSL Certificate Errors on Your Website

    Despite the benefits of SSL certificates, sometimes errors can occur, resulting in either issues with your website not loading properly, or preventing the green padlock icon from being displayed in the browser.

    These errors can be caused by various factors, such as incorrect SSL settings, expired or revoked certificates, mismatched domain names, mixed content, or network issues. Here are some of the most common SSL certificate errors and how to fix them.

    NET:ERR_CERT_AUTHORITY_INVALID

    This error means that the browser does not trust the SSL certificate for the website. This could happen if the certificate is self-signed, expired, or issued by an untrusted CA.

    To fix this error, you need to make sure that you have a valid SSL certificate from a reputable CA that is recognized by all major browsers. You can check the list of trusted CAs from the Mozilla Included CA Certificate List.

    You also need to make sure that your SSL certificate is installed correctly on your server, and that it includes all of the intermediate certificates that link your certificate to the root CA.

    NET::ERR_CERT_COMMON_NAME_INVALID

    You might encounter this error when the CN or SAN field of the SSL certificate does not match the domain name of your website. This could happen if the certificate is issued for a different domain, or if there are typos or misspellings in the CN or SAN fields.

    To fix this error, you need to make sure that you have a valid SSL certificate that covers all the domain names and subdomains that you want to secure with HTTPS.

    For example, if you want to secure ‘www.example.com’ and ‘blog.example.com’, you need to have a wildcard SSL certificate (*.example.com) or a multi-domain SSL certificate (www.example.com, blog.example.com).

    You also need to make sure that there are no typos or misspellings in the CN or SAN fields of your certificate.

    NET::ERR_CERT_REVOKED

    This error means that the SSL certificate has been revoked by the CA. This could happen if the certificate is compromised, misused, or no longer needed by the website owner.

    To fix this error, you need to contact your CA and find out why your certificate was revoked and how to get a new one. You also need to remove the revoked certificate from your server and install the new one as soon as possible.

    SSL Handshake Failed

    You might encounter this error when the browser and the server could not establish a secure connection using SSL. This could happen due to various reasons, such as incompatible SSL protocols, ciphers, or certificates, network issues, firewall settings, or server configuration errors.

    To fix this error, you need to troubleshoot the problem from both ends – meaning both the browser and the server.

    You can use Projects / SSL Client Test and How’s My SSL? to test your browser’s SSL support.

    And for your server, you can use SSL Server Test (Powered by Qualys SSL Labs) and SSL Security Test | ImmuniWeb.

    You may need to adjust your SSL settings, update your SSL certificates, or contact your hosting provider or network administrator for assistance.

    ERR_SSL_OBSOLETE_VERSION

    This error happens when the website is using an outdated or insecure version of SSL that is no longer supported by the browser. This could happen if the website has not updated its SSL configuration to use the latest standards, such as TLS 1.2 or 1.3.

    To fix this error, you need to update your SSL configuration to use the most secure and up-to-date version of SSL that is compatible with all major browsers. You may also need to update your SSL certificates or contact your hosting provider for assistance.

    ERR_SLL_PROTOCOL_ERROR

    This error means that there is a problem with the SSL protocol used by the website. This could happen due to various reasons, such as incorrect SSL settings, corrupted SSL certificates, or malicious interference by third parties.

    To fix this error, you need to check your SSL settings and make sure that they are correct and consistent. You may also need to clear your browser’s cache and cookies, disable any extensions or VPNs that may interfere with the SSL connection, or scan your device for malware or viruses.

    Mixed Content Error

    If the website is loading some resources over HTTP instead of loading everything over HTTPS, it could compromise the security of the page. This could happen if the website has not updated its links, images, scripts, or other elements to use HTTPS URLs.

    To fix this error, you need to make sure that all the resources on your website are loaded over HTTPS. You can use tools such as Why No Padlock? or SSL Check to find and fix mixed content issues on your website.

    Expired SSL Certificate

    SSL certificates are not permanent, and you will need to re-issue them before their expiry date. This error occurs when the SSL certificate for the website has expired and is no longer valid. This could happen if the website owner has forgotten to renew the certificate before its expiration date, or if there are delays or errors in the renewal process.

    To fix this error, you need to renew your SSL certificate as soon as possible and install it on your server. You may also need to contact your CA or hosting provider for assistance.

    Conclusion

    In today’s digital landscapе, SSL certificates are more than just a checkbox for sеcurity; thеy are a cornerstone of online trust and user safеty – maintain your SSL cеrtificatеs for a sеamlеss, sеcurе onlinе еxpеriеncе.

    We hope this article helps you resolve any SSL issues on your website and improve your web security. If you have any questions or feedback, please feel free to leave a comment below.

    If you are looking for a simple and powerful way to manage your cloud servers and install SSL certificates, you should try RunCloud.

    RunCloud is a cloud server management panel that lets you host multiple web applications and websites with fast and easy configuration. You can also install, configure, and remove SSL certificates with one click, thanks to RunCloud’s integration with Let’s Encrypt.With RunCloud, you don’t need to be a Linux expert or deal with complex commands to secure your website with SSL. Start using RunCloud today!

  • How To Check & Upgrade Your WordPress Version

    How To Check & Upgrade Your WordPress Version

    WordPress is a popular and powerful content management system that powers millions of websites around the world. For that reason, and to ensure security, compatibility, and performance remain excellent, official updates are released on a regular basis.

    This is why keeping your WordPress version up to date is crucial for the security, performance, and functionality of your site.

    In this article, we will show you how to check your WordPress version using various methods, and how to upgrade your WordPress version using different options.

    How to Check Your WordPress Version

    There are several ways to check your WordPress version, depending on your level of access and preference. Here are some of the most common methods:

    • Check the WordPress dashboard: The easiest way to check your WordPress version is to log in to your WordPress dashboard and look at the bottom right corner of the screen. You will see a message that says “Thank you for creating with WordPress”, followed by the version number.
    WordPress dashboard version
    • Check the source code of your website: Another way to check your WordPress version is to view the source code of your website in your browser. You can do this by right-clicking on any page of your website and selecting “View page source”.

      Then, look for a line that starts with <meta name="generator" content="WordPress ..." The content attribute will show you the WordPress version.
    • Check the wp-includes/version.php file: Another method to check your WordPress version is to access the wp-includes/version.php file in your WordPress root directory. You can do this by using an FTP client or a file manager tool in your hosting control panel. You will see a file that contains several
      PHP variables, one of which is $wp_version. The value of this variable is your WordPress version.If you have SSH access to your server, you can execute the following command in the root directory of your WordPress folder to see only the relevant lines instead of opening the entire text file.
    grep "wp_version" wp-includes/version.php
    check wordpress version
    • Use WP-CLI: Another way to check your WordPress version is to use the command-line interface (CLI) if you have SSH access to your server. To check your WordPress version, you need to navigate to your WordPress root directory, where the wp-config.php file is located, then, run the following command to check your WordPress version:
    wp core version

    How to Upgrade Your WordPress Version

    Once you know your WordPress version, you may want to upgrade it to the latest version available. There are several benefits of upgrading your WordPress version, such as:

    • Improved security: Upgrading your WordPress version will protect your site from potential vulnerabilities and attacks that may exploit outdated code.
    • Improved performance: Upgrading your WordPress version will enhance the speed and efficiency of your site, as newer versions often include optimizations and bug fixes.
    • Improved functionality: Upgrading your WordPress version will enable you to use new features and functionalities that may not be compatible with older versions.

    Before updating anything, it is always recommended to back up your site, including your files and database, in case something goes wrong during the update process.

    There are different ways to upgrade your WordPress version, depending on your preference and situation. Here are some of the most common methods:

    Use the Automatic Update Feature

    The easiest way to upgrade your WordPress version is to use the automatic update feature that is built into WordPress. You can do this by logging in to your WordPress dashboard and clicking on “Updates” in the left sidebar.

    You will see a message that tells you if there is a new version available, and a button that says “Update Now“. Clicking on this button will initiate the update process, which may take a few minutes.

    Use the Manual Update Method

    Another way to upgrade your WordPress version is to use the manual update method.

    To update WordPress using the command-line interface (CLI), you can use the wp core update command, which updates WordPress to the latest stable version. You can also use some options to customize the update process, such as:

    • You can specify the zip file to use, instead of downloading from wordpress.org. For example, if you have a zip file named wordpress-6.3.0.zip in your current directory, you can run:
    wp core update wordpress-6.3.0.zip
    • You can use the –minor flag to only install updates for minor releases, such as updating from WP 6.3 to 6.3.3 instead of 6.4.2. For example, if you want to update to the latest minor version, you can run:
    wp core update --minor
    • You can specify the WordPress version using –version flag to update to a specific version, instead of to the latest version. You can also use nightly to update to the latest development version. For example, you can run:
    wp core update --version=6.3
    wp core update --version=nightly
    upgrade wordpress via cli
    • When the installed WP version is greater than the requested version, you need to specify –force flag. This can be useful if you want to downgrade your WordPress version for some reason. For example, if you want to downgrade from WP 6.3 to WP 6.2, you can run:
    wp core update --version=6.2 --force
    • By default, WordPress uses English. However you can specify the –locale option to select which language you want to download. For example, if you want to download the French version of WordPress, you can run:
    wp core update --locale=fr_FR

    Note: If you see “Error: Another update is currently in progress”, you may need to run wp option delete core_updater.lock after verifying that another update isn’t actually running.

    Final Thoughts

    Updating your WordPress version is essential for the security, performance, and functionality of your site. You should always keep your WordPress version up to date with the latest version available, or at least with the latest minor version.

    In this article, we have shown you how to check and upgrade your WordPress version using various methods. We also explored how to use the command-line interface (CLI) to check and update your WordPress version.

    If you are looking for an easy and convenient way to get started with WordPress, you should check out RunCloud. RunCloud is a cloud-based platform that allows you to manage your WordPress sites on any cloud server.

    With RunCloud, you can easily install, update, backup, restore, clone, migrate, and secure your WordPress sites with just a few clicks. Sign up for RunCloud today!

  • The Easiest Way To Automate WordPress Deployments with Git

    The Easiest Way To Automate WordPress Deployments with Git

    WordPress is the most popular content management system on the web, with a CMS market share of 64.3%, and powering over 35 million websites around the world.

    Keeping track of a large WordPress site can be a complex and time-consuming process. However, by using Git, a version control software, developers can streamline their workflow.

    Git has become an integral part of modern web development, with 93% of developers using it in their projects, according to a recent survey by Stack Overflow.

    By leveraging the power of Git with tools such as RunCloud, developers can simplify the deployment process, reduce the risk of errors, and save both time and resources.

    Whether you’re a freelance developer or part of a larger team, automating your WordPress deployments with Git is a smart and efficient choice.

    In this article, we will show you how to use RunCloud’s Automatic Deployment functionality to create a streamlined workflow.

    Note: Before we get started, make sure you have a website stored on one of the supported git providers, and a server connected to RunCloud.

    Creating A Web Application

    You’ll need to clone your website to RunCloud before we can configure automatic deployments. To do this, go to your RunCloud dashboard and switch over to the “Git Repository” tab and select the git provider where your code is hosted.

    Give your application a suitable name, and select whether you want to use an existing user or create a new one.

    Note: if you plan to host multiple git repositories, you will need to have a separate owner for each repository, otherwise you will get a “Key already in use” error at a later stage.

    Next you will need to specify the domain name that you want to use. If you don’t have a domain yet but want to follow along with this tutorial, you can use the test domain provided by RunCloud.

    After specifying the domain name, scroll down to the git section. In the Repository field, enter your git username, followed by a “/”, and then the name of the repository.

    In the Branch field, enter the name of the branch that you want to deploy. For example, if the URL of your repository is “https://github.com/tatticoder/my-wp-site” then you need to enter “tatticoder/my-wp-site” in the repository field.

    Next, you’ll need to configure the deployment key. If you don’t have a deployment key, click on “Generate key” and it will generate a new key for your current user. You’ll then need to add the deployment key of this RunCloud user to your git server.

    This is a straightforward process. Go to your git repository and open the “Settings” tab. Look for the “DeploymentKeys” menu and click on “Addkey”. Now paste the key that was shown in RunCloud dashboard and click “Save”.

    After you have added the key, you should see it in your git dashboard. Now, you can go back to the RunCloud dashboard and continue the rest of the setup.

    You can specify where you want to automatically backup your site or select the PHP version that you want to use.

    Once you have made all the necessary changes, click on “Deploy” to finish the setup.

    Configuring Atomic Deployment on RunCloud

    After adding the web application to your server, you can take advantage of RunCloud’s Atomic Deployment functionality. This streamlines your website management process, and automatically updates your website whenever you push a commit to git repository.

    To configure Atomic deployment, go to RunCloud dashboard and look for “Atomic Deployment” in the left submenu. Now, click on “Add New Project” to get started.

    The setup process is super simple, and takes only a couple of seconds – you only need to provide a descriptive name for the project and specify the application that you want to deploy. Once you click “Save”, your web application will be converted to use Atomic deployment.

    Note: The dropdown menu will only list web applications that are currently deployed on your server via git. If you don’t see your application in the list, make sure you completed the creating a web application step successfully.

    After you have created a web application project, you will need to add a Webhook to your git server – this notifies RunCloud when a change has been made to your application.

    To configure a webhook, open the “Project info” page in RunCloud – you will see a webhook URL. Copy that URL and go to your git server. Open the “Settings” tab of your repository and look for the “Webhooks” menu.

    In the webhook section, create a new webhook, and paste the URL that we copied earlier into the payload URL field. Change the content type to “application/json” and make sure that push event will trigger the webhook. Click on “Add” to finish the setup.

    Testing the Deployment

    Once you have added the webhook, RunCloud will be notified about any changes made to your web application, and will automatically update the live website.

    To test this, make a small change to your website. Once you commit and push the changes to the right branch, it will trigger a webhook event.

    You can verify whether this event was successful by hovering over the webhook URL on your git server:

    When an event is delivered to RunCloud, the Atomic deployment will automatically fetch all the new changes, try to build a new copy of the website, and publish it on the server.

    You can see the number of failed and successful deployments in the Atomic Deployments dashboard:

    If a deployment is failing for any reason, you can see its build logs by clicking on the name of the deployment, and use these to identify which step is failing – and act accordingly.

    Conclusion

    Using Git to automate WordPress deployments saves time and allows multiple developers to work on the same codebase. RunCloud’s Atomic Deployment functionality simplifies the deployment process by automatically pushing the changes to the live server –reducing the risk of errors and downtime.

    If you’re tired of managing your own servers – you might want to check out RunCloud (yep, that’s us!). RunCloud is built for developers that want to focus on shipping great work, not on managing their infrastructure.

    Discover what a painless server configuration feels like, allowing you to avoid having to spend hours figuring it out. Get started with RunCloud today, and get up and running in minutes.