Linux logs offer developers and system administrators a detailed account of all events, requests, and activity on the server. Log files can be used to monitor critical events in the kernel, the server, and for any services or applications actively running.
Server administrators can review comprehensive diagnostic information about performance, ranging from kernel events to user actions. In this post, we’re going to talk about Linux logs, what they are, why they’re important, and focus on the most important Linux logs.
What Are Linux Logs?
A Linux log is simply a file that records specific information relating to events, applications, and the kernel. When you face an issue, these files can prove to be a critically important tool for troubleshooting.
In case of a problem, administrators can simply analyze these files to determine and create a timeline for the series of events that occurred, and which eventually led to the problem.
Linux logs are generally stored in plain text and are available in the /var/log directory. Linux logs can be found for virtually everything, including boot processes, package managers, kernel, Apache, MySQL, and others.
The Most Important Linux Logs
Broadly speaking, Linux logs can be categorized under the four main headings:
Application Logs
System Logs
Service Logs
Event Logs
Since Linux logs are generally stored in plain text files, sifting through each one is incredibly difficult. That’s one of the main reasons why developers often prefer using different tools, such as log file viewers. Examples of these include Logmaster or MultiTail.
But as a system administrator, there are some Linux logs that really demand your attention. Here are the ones that you should definitely know about.
Application Logs
/var/log/syslog
This is a simple Linux log that shows you general information regarding system performance. Essentially, this log shows all the activity that has occurred in the system. This is the same as /var/log/messages, and shows you a generic log of all system activity.
All non-critical and informational messages are shown here. For Debian systems, you will use /var/log/syslog. But for other Redhat systems, such as Rhel, you will use /var/log/messages.
How to use /var/log/syslog
These Linux logs let you track any errors related to application services or any other messages that are logged when the system boots up. Commonly, this is often the first Linux log that administrators look at when something goes wrong.
It gives you a basic understanding of any errors, so in case an issue was detected during system startup, administrators can simply go through these messages to find out what went wrong.
/var/log/maillog
These Linux logs are used for storing information relating to mail servers. This is quite handy for any email-related services that are active on your server. It is also useful for postfix or for the SMTP daemon process.
How to use /var/log/maillog
If you’re running email-centric services such as MailScanner, you can find information related to them. With these logs, you can also track all incoming or outgoing emails within a defined period.
In any situation where mail delivery has failed, simply refer to the logs to find out why. More importantly, these Linux log files will also give you information about the origins of incoming emails. If there were any spamming attempts detected and blocked by the server, you can find these in the log files too.
/var/log/yum.log
If you have any packages installed that utilize the yum command, information related to those will be found in these Linux logs. This can be useful for determining if everything went well.
How to use /var/log/yum.log
You can see Linux logs that confirm whether packages were installed correctly or not, including information about other software and system components that have been installed.
In case a software package was not installed correctly, you can find information related to that in these logs. These logs will help you identify any malfunctions and correct them by identifying the underlying issue.
System Logs
/var/log/boot.log
These Linux logs contain startup messages and information pertaining to the boot. This includes the initialization script, which sends all bootup information to the log file.
Think of this as a comprehensive log file that offers detailed information about the server startup process, including all messages that are logged as the server starts up.
How to use /var/log/boot.log
In case there were issues with startup or shutdown, you will find relevant information here. This also includes information relating to any boot failures or random restarts.
These Linux logs are generally useful for determining issues related to system downtime, especially if the server experienced random shutdowns.
/var/log /dmesg
Another way to view Linux logs is dmesg. This shows you all Kernel ring buffer messages, including information that relates to any hardware components and their drivers.
The kernel is capable of detecting physical hardware devices that are connected to the server as it boots up, which is why it is capable of logging hardware errors or the general status of these components. It also includes other general logs.
How to use /var/log /dmesg
If there’s an issue with a certain piece of hardware connected to the server, you can check the dmesg logs to determine the problem and fix it. It’s great for server management, as these logs are mainly for dedicated server customers.
var/log/mysqld.log
Finally, this is the MySQL log file. All messages related to debugging, failure, or success of the MySQL daemon are logged here.
If you’re running RedHat or Fedora distros, you will find these under /var/og/mysqld.log. For Ubuntu or Debian distros, just search through the /var/log/mysql.log directory.
How to use var/log/mysqld.log
Any issues related to running or halting mysqld can be found here, so use these logs to determine what’s wrong and make changes. You can also glean valuable information about client connections to the MySQL directory using these logs.
Service Logs
/var/log/auth.log
The auth.log generally stores Linux logs associated with authentication and includes information for both failed and successful logins. Again, for Debian or Ubuntu-based systems, you can find the relevant Linux logs in /var/log/auth.log.
But, for Redhat or CentOS distros, you will find them under /var/log/secure. All relevant information regarding the user authentication process can be found here.
How to use /var/log/auth.log
If you feel that there might have been a security breach on the servers, you may want to check these logs to determine successful or failed logins. Server administrators generally keep a watchful eye and instantly become suspicious if they notice a JavaScript file out of place or anything that doesn’t make sense.
With these logs, you can quickly and efficiently analyze any suspicious activity, including failed login attempts. Since it records all activity related to user authentication, you can easily figure out if your server was the target of a brute force attack.
/var/log/cron
This log stores all messages related to cron jobs, including the time when the cron daemon began a job, any relevant failure messages, or other status information.
How to use /var/log/cron
Every time a cron job is executed, these Linux logs are used to maintain detailed information, including any error messages or issues relating to the successful execution. If your scheduled cron isn’t running properly, you might want to review these logs.
Event Logs
/var/log/faillog
The /var/log/faillog records all relevant information related to failed logins. This is very handy for honing in and finding out about any security breaches. It’s similar to the one above, but instead of showing both successful and unsuccessful logins, it only returns failed logins.
How to use /var/log/faillog
If you feel that your server was targeted in a username or password hack, these Linux logs will give you comprehensive information about any such activity.
/var/log/httpd
This is a directory of Linux logs that contain access_log and error_log files associated with the Apache server. The information is stored in two different log files, with errors kept in the error_log file and memory issues related to requests via HTTP stored in access_log.
How to use /var/log/httpd
You can view all errors related to http daemon access using the error_log file, including any system-specific problems. More importantly, the Apache server records events and errors here that occur during http request processing.
In case you experience an issue with your Apache web server, you can check the logs to determine the issue. In addition, the logs also contain IP addresses and user IDs of all clients that serve a connection request.
It also contains information about the status of all server requests, including those that were successful or ones that failed.
/var/log/kern
This log offers information about the kernel and any warnings. Kernel logs can be accessed with this terminal, so in case of any errors or warnings, you can check it out.
How to use /var/log/kern
If you’re facing issues with custom kernels, you can check warning data through this log and troubleshoot problems. It gives you comprehensive information about any kernel errors, making it easy to find problems and fix them.
Frequently Asked Questions
How Do I Analyze a Log File in Linux?
You can use a command line tool such as grep to run plain text searches. These can help you analyze log files and are generally found by default in most Linux distros.
How Do I Manually Create a Log File In Linux?
To create a log file entry in Linux, you can simply use the logger command. The command helps you connect with the syslog module. To create a log file, simply type “logger” (without the speech marks), followed by your message, and Linux will automatically add it in the /var/log/syslog directory.
Where Are Logs Kept in Linux?
You can find most of the Linux log files as plain ASCII text files. They’re commonly stored in the /var/log directory and its subdirectories.
What Is The Purpose Of Logs in Linux?
The main purpose of Linux logs is to provide a detailed event timeline in the Linux OS. It can be an excellent tool for diagnostics and for troubleshooting and is commonly used by administrators to determine what went wrong.
After Action Report – RunCloud Dashboard Makes Log Viewing Easy
Linux logs are an excellent way to identify any errors and correct them. The RunCloud dashboard makes it easy for users to find logs within their Web Application. Simply click on the Web Application, and navigate to Web Server Log.
Are you using Linux logs to keep track of server performance or to identify errors? If so, we’d love to know more about how you use them. Let us know in the comments below!
Autoptimize is a popular WordPress plugin to optimize your WordPress sites with more than 1 million active installs and around 1,200 five stars reviews at WordPress.org.
In this post, we’ll discuss how to use Autoptimize to improve the performance of your WordPress websites.
Who needs Autoptimize?
If you use lightweight WordPress theme/plugins in your WordPress site, you probably do not need any extra optimization. You only need to use a cloud server, and your WordPress will be fast. In this case, adding server-side page caching like RunCloud Hub is more than enough to improve WordPress performance.
But when you use a WordPress theme and some plugins that add extra JavaScript and CSS files to your site, you will probably need Autoptimize to improve your site performance.
In fact, Autoptimize and RunCloud Hub are a perfect combination to optimize your WordPress site.
Autoptimize works on the WordPress side to optimize your JavaScript / CSS / HTML files on your web page, and RunCloud Hub works on the server-side to cache the optimized version web page.
JavaScript Optimization
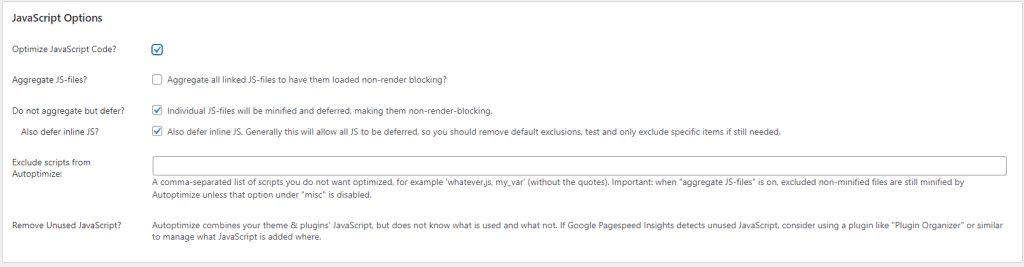
Autoptimize comes with some options to optimize JavaScript files on your web page. These JavaScript files come from WordPress core, theme, and active plugins. When you enable the “Optimize JavaScript Code?” option, JavaScript files will be minified and compressed to reduce the file size. A smaller JavaScript file size will make your web page more lightweight.
By default, the setting for JavaScript is “don’t aggregate but defer” and “also defer inline JS” and no exclusions. Aggregation is off by default since the number of HTTP requests aren’t as important with HTTP/2.
These two default options are enough for many WordPress sites to both minify and combine JavaScript files.
Please remember that these options work on your web page only if you have well-coded JavaScript codes. If you use a theme/plugin that has poorly coded JavaScript codes, these options can break some features in your web page that rely on JavaScript.
If these options work nicely on your site, then you can stop here or explore other JavaScript optimization features. You can also add a list of scripts that you do not want to optimize.
CSS Optimization
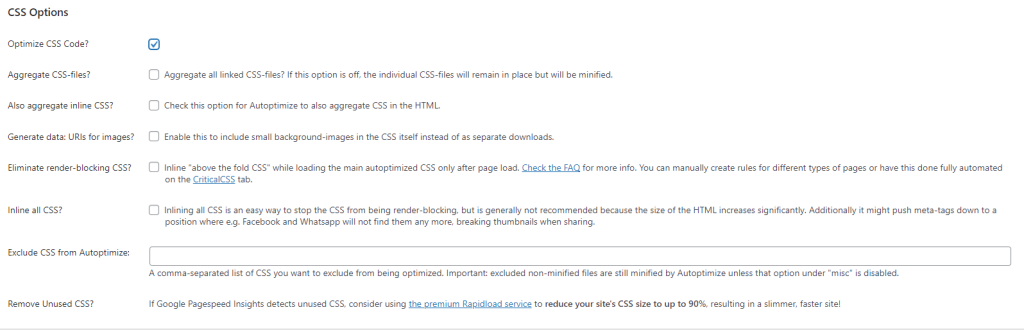
Autoptimize comes with some options to optimize CSS files on your web page. The main CSS files come from your active WordPress theme that controls the visual presentation of your web page. Other CSS files can come from your active WordPress plugins.
CSS aggregation is off by default, though you can enable it with a click. Please remember that these options work on your web page only if you have well-coded CSS codes. It’s off by default to prevent any major issues.
If you use a theme/plugin that has poorly coded CSS codes, these options can break your web page layout.
If these options work nicely on your site, you can try to enable the “Also aggregate inline CSS?” option. Autoptimize will aggregate CSS in the HTML.
HTML Optimization
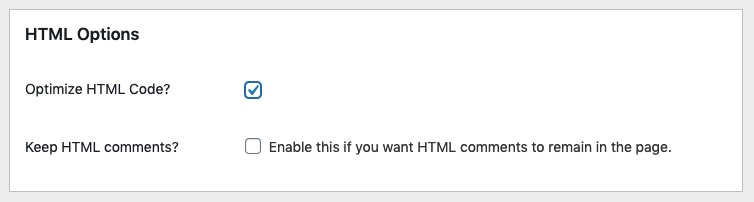
HTML optimization is a bonus after you optimize JavaScript and CSS files in your site.
Enabling the “Optimize HTML Code?” option will minify the HTML output of your web page. It will make the HTML output code not easily readable, but the file size will be smaller.
Extra Optimization
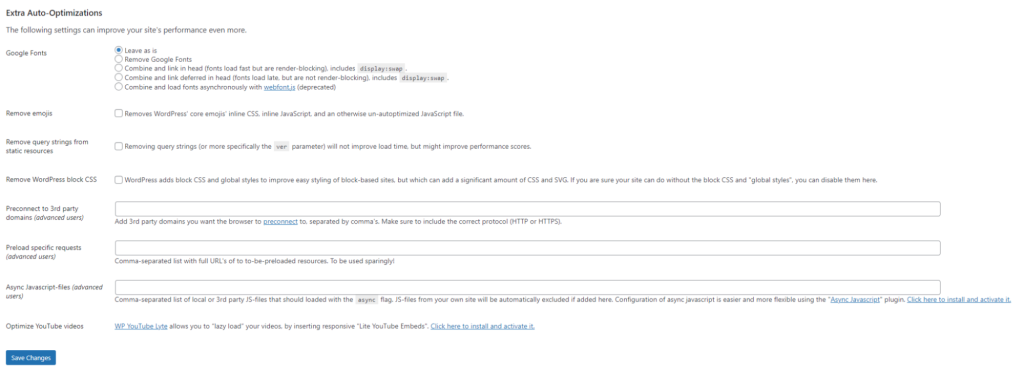
Autoptimize has some extra auto-optimization options under the Extra tab.
Google Fonts Optimization
You can use this option to optimize Google font loading on your website.
We recommend using either the “Combine and link in head” or “Combine and link deferred in head” option. Please test to see which one works best on your site.
You can enable this option to remove WordPress core emoji’s inline CSS and inline JavaScript, except you use this emoji feature on your website.
Remove query strings from static resources
If you enable JavaScript and CSS optimization, this option is no longer needed.
But if you disable JavaScript and CSS optimization, you can try to enable this option.
Please remember that this option will not improve your web loading time and performance, but it might improve performance scores when you test your website using any page speed testing tool.
Remove global styles
Introduced with WordPress 5.9, global styles often add CSS & scalable vector graphics (SVG) to your pages automatically. An option is now available to remove global styles.
Critical CSS / Above-the-fold CSS
The CSS optimization in Autoptimize is enough to optimize your CSS files on your site. The optimized CSS file is loaded in the head with render-blocking. You probably know that Google Page Speed Insight complains about render-blocking CSS on your site. If you really want to optimize your website for Google Page Speed Insight, you will probably need above-the-fold CSS.
The idea is simple. Above-the-fold is all the content you see on page load, before scrolling. Above-the-fold CSS or critical CSS will be loaded inline on the head to render the content to your user as soon as possible. Other CSS files will be loaded later in non-render blocking after page load.
YES, critical CSS is part of CSS optimization, but not everyone needs it.
There are two ways to use critical CSS in your site using Autoptimize.
Same critical CSS for all pages
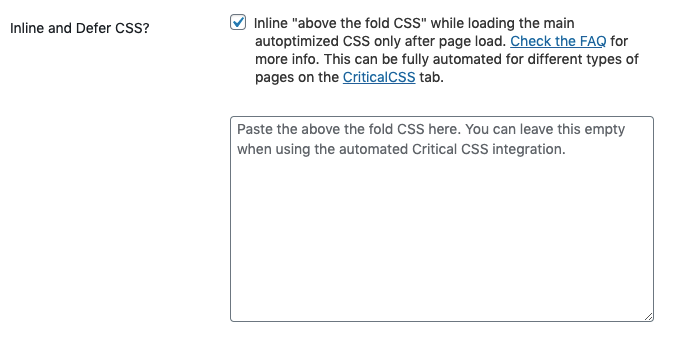
If you think you can use the same critical CSS for all pages, you can use the “Inline & defer CSS” option under the CSS Optimization section.
You can check this list of tools to generate critical CSS for your website.
Different critical CSS for different pages
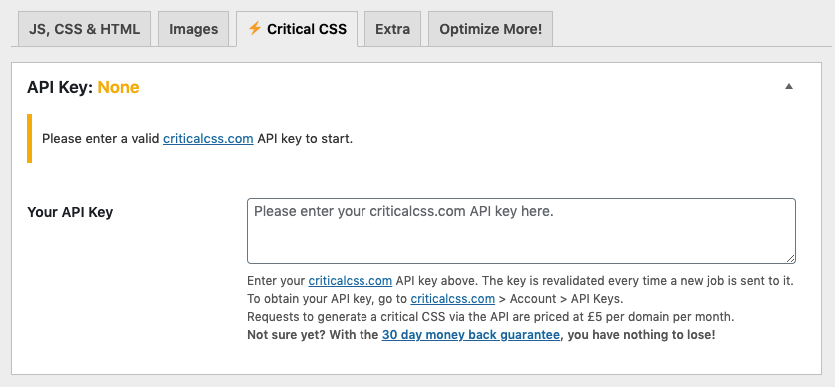
In this case, you will need to sign up for a premium service criticalcss.com to generate different critical CSS for each page on your site automatically.
Rules Panel
A rules panel is now available to help users create manual rules, even if you do not have a Critical CSS API key.
Misc Options
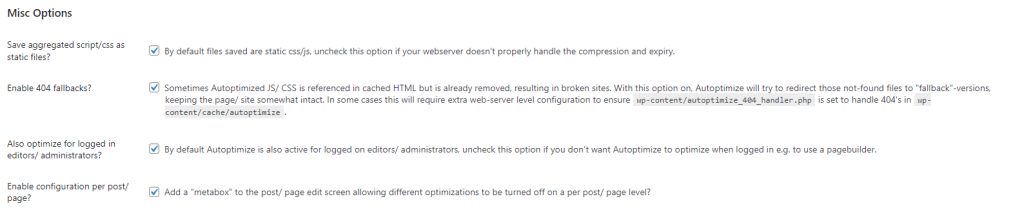
You will probably see some options in the “Misc Options” section. If needed, you can enable all of these options.
The “Save aggregated script/css as static files?” option is very important to cache the optimized JavaScript/CSS files as static files.
This is why you will see the “Autoptimize – Delete Cache” option on the admin bar to allow you to remove the optimized JavaScript/CSS files, and it will be regenerated again.
If you use RunCloud Hub and Autoptimize combo, when you click “Delete Cache” on Autoptimize, it will automatically clear RunCloud Hub caches. And when you click “Clear All Cache” on RunCloud Hub, it will also automatically clear Autoptimize caches.
You can now “Enable configuration per post/page?” to change settings per page, or per post, which is ideal for optimizing Largest Contentful Paint for your site.
After Action Report — Autoptimize Helps Boost Site Performance
Autoptimize is a popular WordPress plugin to optimize JavaScript / CSS / HTML output of your web page to improve your WordPress performance. With its latest string of new features introduced in version 3.0.3, Autoptimize is a fantastic choice if you have additional CSS and Javascript files on your site. Do you use RunCloud’s server-side caching & are considering pairing it with Autoptimize? Awesome, feel free to join the conversation below to share your experience. 💬
If you work in DevOps, you may have heard, or be familiar with, continuous integration and continuous deployment. Often, people use these terms interchangeably, but this is incorrect.
Consider that you wish to implement a change to your web application – for simple changes, these are often made directly. But when you’re considering improving your development workflow, you’ll want to be able to stage these changes, test them in a separate environment, and deploy them – all without causing your site to be temporarily inaccessible to end-users.
In essence, continuous integration and continuous deployment are two related, but separate processes for automated deployment to make changes to code. They are ways to change code in order to keep things smooth, with less need for manual testing and changing. While they do relate to each other, each is a distinct concept that needs to be understood.
In this guide, we’ll break down what these terms mean, how they’re different, the benefits of taking advantage of them in your workflow, and how to implement them properly in WordPress – so, let’s dive right in.
What Are Continuous Integration And Continuous Deployment?
As we mentioned previously, they are both methods to deploy changes to code. If you need to make some changes to the code of a site, you will need to understand both continuous integration and deployment to do so.
However, to make matters potentially a bit confusing, they can work together, with each aspect, integration, and deployment representing different factors. You have to use continuous integration as part of continuous deployment, but you may opt out of continuous deployment, however. So, they are not the same, and they need to be understood independently. Let’s dive into looking at exactly what each of these terms mean.
What Is Continuous Integration?
Continuous integration is the first element of a good CI/CD setup in your development workflow, and it is the automated method of combining code versions and validating results. This is particularly useful the more frequently you make changes, as you can create a CI pipeline that automatically builds and tests changes before you merge them.
This is especially true if you’ve developed automated tests. The benefit of CI is that developers can focus on development while the key tests run in the background to catch any changes that conflict with any other existing code. This can be in the form of deploying to a staging environment or simply running automated tests in the background.
What Is Continuous Deployment?
Continuous deployment (CD), on the other hand, is the last element of a CI/CD workflow. Once the modifications have been integrated and tested via your CI pipeline, the next step is to deploy your new release. Many developers still do this manually, which is a huge waste of time. Fortunately, if you use a service like RunCloud to manage your server infrastructure, you can easily automate your deployments making it possible to seamlessly release your code as frequently as you’d like.
No more sleepless nights thinking of launch days and pushing individual features.
Deploy with no downtime for your users and easily roll back changes if you spot anything that’s acting up in production that wasn’t caught during your testing.
Note: There is another term that is sometimes used: continuous delivery. This is very similar to continuous deployment in that it forms an important part of the development approach involved with ensuring that changes can be pushed at any time. This means that building, testing, and releasing software can take place more efficiently.
What Is The Difference Between Continuous Integration And Continuous Deployment?
Effectively, continuous integration is how to make the code updates work for the developers, assisting them in the implementation of code changes into the main branch. Continuous deployment is about getting the code to the end-user in a way that doesn’t interfere with the branch, and testing to make sure that changes are automatically implemented without issue. They both relate to each other, in that continuous integration plays a role in continuous deployment, but deployment is the step to get the results to the end-user.
How Can Continuous Integration And Continuous Deployment Work Together?
You need continuous integration if you want to do continuous deployment. In that, if a commit is being deployed regularly to production, it needs to be working, and you need to be sure of that. Continuous integration allows you to ensure that it works. So, if you want to do continuous deployment of regular commits, you need to do continuous integration.
However, if you do not have regular changes, you may not need to do continuous deployment; rather, you may choose to opt for continuous delivery and integration. The integration ensures all code changes work, and delivery requires manual approval of the implementation of the changes. Deployment becomes more useful when you are comfortable with the testing process, and you have more regular changes to implement.
Why Use Continuous Integration?
Continuous integration is useful for you and your team to ensure that code changes work. There are several reasons you should use this approach, which we outline now:
Advantages Of Continuous Integration
Fewer Bugs — Because of the automated tests, bugs get caught early on, and there is less chance of breaking.
Easy Building Of Release — As you are ensuring that integration matters are taken care of early, the release can be built much easier.
Less Context Switching — Developers immediately know when something breaks, allowing them to fix it prior to changing tasks.
Less Testing Costs — Continuous integration servers can handle hundreds of tests per second. This reduces your costs considerably.
Less Documentation — If you just use continuous integration without continuous deployment, you will have less need to document each and every automatic deployment.
Less Need For Top Level Testing — Similarly, if you forgo continuous deployment, you don’t need as much top-level testing to ensure that your automatic deployment works. In fact, you have more manual control over the process.
Why Use Continuous Deployment?
With continuous deployment, you make your life considerably easier in the long run. It allows for efficient deployments, and given that you trust your testing, it means that you can spend more time developing instead of worrying whether your changes will work outside of production.
Here are the reasons to consider using continuous deployment:
Advantages Of Continuous Deployment
Fast Development — There is no need to pause development for each and every release. Rather, the pipelines get automatically triggered to make changes.
Less time-consuming tasks — Continuous deployment automates a range of tasks, saving a lot of time.
No Daily Merging Of Changes — If you just use continuous integration, you have to take care of merges every day, but continuous deployment does this for you.
No tests for each feature — Just using continuous integration requires tests for each new feature. Continuous deployment takes care of that for you.
Less Risky Releases — With continuous deployment, you can release small batches of code, which are easier to fix.
Daily Improvements — The end users get to experience constant improvement on a daily basis.
How To Adopt Continuous Deployment?
If you want the benefits of continuous deployment, but so far are only using continuous integration and delivery, how easy it would be to adopt continuous deployment will vary depending on where you are with your project status.
When starting a project, you can implement continuous deployment as soon as possible. You can automate deployments before having end-users, to ensure all things are running smoothly, and generally check that everything is working fine. You can increase the testing and when eventually you are content with the deployment process, you can then launch with a whole continuous deployment process in place.
If your project is already running, and end-users are already present, there are some things to consider changing:
Start with continuous integration and delivery, in order to have more control and checks over the process.
Then create basic tests for automatic execution, to avoid making things too difficult.
Then you can start automating deployments so that eventually all deployments are done automatically.
When you are ready for full continuous deployment you need to ensure that everyone is ready and aware of the nature of any changes to the code, as this can affect customers. Constant planning is also required as are top-level testing capabilities.
The Best CI/CD Tools We Recommend
There are multiple tools out there to do the heavy lifting with both continuous integration and continuous deployment. Generally, they help facilitate the integration and automated deployment of code.
If you already use RunCloud to manage cloud infrastructure, we offer built-in Atomic Deployment, so you don’t have to worry about setting up, configuring, and paying for yet another service to handle your continuous integration and deployment needs.
That being said, other big names that provide services for continuous integration and deployment are Jenkins, CircleCI, and GitLab, among many others.
Jenkins is an open-source automation server, with building and integration processes, and it supports hundreds of plugins to help with integration as well as deployment.
With CircleCI, you are able to have an automated pipeline, from building to deployment, and it is compatible with many other programs, including Jenkins, GitLab, and others. It also hosts continuous integration on the cloud or behind a firewall on your own server.
GitLab is a Git repository manager and lets you trigger builds, run tests, or deploy code at each push or commit.
Find what tools you require to help with your continuous integration and deployment needs.
How Does Continuous Integration Or Continuous Deployment Work With WordPress?
Generally, WordPress projects are a bit different, due to the lack of suites for built-in units and integration tests. However, these processes can still apply to WordPress. The main concern for developers when it comes to WordPress is ensuring everything works without affecting the speed of pages. Continuous integration and continuous deployment can take care of this.
Do bear in mind the nature of the structure will be affected if the project has a standalone theme or plugin, or WordPress’s feature themes.
Generally, you would first need to build your dependencies.
Second, you test your code. If you use continuous integration and continuous deployment, you can test within your site. Different developers use different approaches, but it is something that can be done with WordPress.
Finally, you can deploy. When you deploy in WordPress, it is most likely you are deploying a plugin, theme, or full site.
RunCloud’s Atomic Deployment feature is platform-independent, which means it works with WordPress, but it also works with other platforms, such as Laravel. PHP management tools are essential for WordPress.
After Action Report – Implement CI/CD In Your Development Workflow Today
Continuous integration and continuous deployment are two terms that are used interchangeably, in part because they are often linked together. However, we explained the different natures of each of these things. Whether you wish to use continuous deployment is up to you, but it is a good way to save a lot of time and effort, once set up.
It is generally better if you can trust your testing capabilities or are in the early stages of project development. Consider learning more about how RunCloud’s Atomic Deployment can help with your site. Here are some sources you can find out more about Atomic Deployment:
Do you have any specific questions about continuous integration and continuous deployment? Or think we’ve missed something worth including in this post? Join the conversation by leaving a comment below. 💬
Docker is a popular containerization platform that has been used by developers and teams to build and scale containerized applications. However, many non-technical professionals are unaware of its capabilities, or why Docker is such a popular choice.
In the following article, we are going to do a deep dive into Docker, and explain why it is so popularly adopted and used.
What is Docker?
At its core, Docker is simply a containerization platform that’s available open-source. For those who don’t know, containerization simply refers to packaging software code using simply the libraries of the operating system and the dependencies needed to run the code.
It’s all packaged in a single, lightweight “container”, allowing consistent execution on any kind of infrastructure. Containers are preferred by developers instead of virtual machines (VMs) because they are more portable and can be used for running modern cloud-based applications.
Docker makes it easy for developers to create containers, making the process for building, managing, and deploying containers incredibly straightforward. Think of it as a toolkit that lets you manage containers using a single, straightforward API.
Here are some other reasons why Docker is so popular:
It simplifies infrastructure management
Ideal for building and sharing disk images
It can be used to maintain a centralized repository of all disk images
For instance, while you write code in Java and run it using a JVM, you can create a Dockerfile and deploy it on a Docker server.
And, like Git, Docker makes the same promises, except you can track changes in systems, instead of changes in code. Docker lets you track changes throughout your entire system, letting you pull history to see all recent updates.
We already made an entire post on what Docker is, so if you want to know more details about it, make sure to check our post here.
Why Use Docker?
So, now that you understand the basics, let’s talk about the many reasons why so many dev teams and technical professionals prefer Docker over other options, such as Kubernetes or Microsoft Azure Container Registry.
1. Security
One of the main reasons why Docker is such a preferred choice for dev teams is because it adds a layer of security that developers don’t get if they build outside of Docker. For starters, you get the option of separating individual components of a larger application into separate containers.
This way, should a single container become compromised, you won’t have to worry about the effect permeating through the rest of the application. With distributed teams working on different components, additional security is always good.
2. Version and Environment Control
Docker has the ability to track discrete versions of container images. This gives you unprecedented version control, letting you roll back to a previous iteration, view past-built versions, including developers who worked on them, and how the work was done.
More importantly, you can also decide to upload exclusively just the changes that were highlighted between an existing version of a container and the new version.
If your software runs in different environments, there’s also a risk of identifying inconsistencies in behavior depending on the machine or environment that the software runs on.
For instance, one element that works on a developer’s computer might not work on a specific server, which would be a new environment.
However, since Docker lets you isolate software in containers, you can run them separately without having to worry about environmental changes.
3. Identical Code Reproduction
One of the biggest advantages of Docker is its ability to reproduce code in an identical fashion on any system, as long as it is capable of running Docker. Just like Java apps, which tend to run in the same way as long as the machine supports Java VM, Docker containers can do the same.
You can view the exact specifications of different containers using their Dockerfiles. This way, when working in teams, you can guarantee that all software images that are built using the same Dockerfile will function the same way.
And, having consistent code documentation is obviously going to make it easier for you to identify issues and track your application development in a better manner.
4. Isolated Environment
This one links with additional security. Since the dependencies of one container don’t affect other installations on the container or other containers, developers can prevent any kind of conflicts between dependencies.
For instance, you can use separate containers for front-end development or for servers. This makes it easy for dev teams to run multiple projects on the same server, without having to worry about any conflicting dependencies.
5. Easy Technology Management
Docker makes it incredibly easy to manage new technologies and to test them out. If you’re interested in trying out new programming languages or new databases, you can easily do so. The Docker Hub has a fantastic collection of ready-to-use docker images.
Just search for a relevant Docker image, and you’re good to go. You can seamlessly add it to your existing Docker configuration. This helps teams save a great deal of time that would otherwise be spent on debugging or installing new images.
When To Use Docker
Not sure about when Docker might be useful for your development? We’ve put together a range of situations to give you a better idea about when to use Docker.
1. When Running Orchestration Engines Like Kubernetes
While it’s easy to manage a handful of containers directly from the Docker Engine, things do become a bit confusing when your software deployment includes thousands of containers and several services.
That’s why you might want to consider using an orchestration engine, such as Kubernetes. Container orchestration tools such as Kubernetes are incredibly powerful and are the preferred choice for most developers.
Docker does have its own orchestration engine, entitled Docker Swarm, though Kubernetes far outranks it in terms of popularity.
It helps automate several tasks associated with containerized architectures. This makes it incredibly easy to run multiple servers and even lets you deploy your services on several new services.
2. Ideal for Implementing Version Control
As stated above, Docker containers make it easy for you to standardize the environment and speed up software development cycles. For instance, if you perform an upgrade on a specific component that ends up breaking the entire environment, you can easily roll back to a previous Docker image.
Docker is much faster than conventional VM backups, allowing you to quickly replicate the changes and launch new Docker images.
3. When You Have Developers Working In Different Setups
Development teams tend to change quite frequently. It’s always a bit time-consuming when you are onboarding new developers to an existing project. Before they can start writing code, you need to make sure that they have a local development environment set up.
Depending upon the project complexity, this can take quite a bit of time, especially when you have to add third-party libraries and databases too. Docker simplifies this process, virtually automating it to the point where developers just have to run a single command, and Docker will do the rest.
This way, not only do you save a great deal of time, but it also allows you to activate new team members from the first day.
4. Isolating Apps
Developers tend to add new libraries, dependencies, and services to software on a daily basis. This tends to get more complex over time, which is why it’s important for you to make sure that you keep track of all parts, and above all, prevent the software from breaking.
Docker lets you isolate apps or settings within specific containers so that they won’t affect other installations or instances of apps running on the same system.
5. When You Want to Move Away From Amazon AMI Marketplace or the Warden Project
There are a couple of alternatives available to Docker, including the Amazon AMI Marketplace, which is arguably the closest substitute. However, the problem with AMIs is that they run exclusively on Amazon.
That’s not the issue with Docker, since you can run it on any Linux server, as long as it supports Docker. More importantly, Docker container services also work on Amazon EC2 (Elastic Compute Cloud).
Another option is the Warden Project, which was written for Cloud Foundry. However, Docker again wins in this field as it contains more social options, letting developers share images with others who are on the same Docker Index.
After Action Report — Docker Is Application Development Standard
Docker is a fantastic choice in most cases, but it’s not always the best choice. For instance, while Docker’s a fantastic choice for web apps, it’s not viable if you’re developing a desktop application. While you can build such apps on Docker, it’s generally not the natural environment for running apps that have rich GUIs.
All in all, Docker’s a fantastic open-source platform that greatly helps development teams streamline workflows and manage development more effectively.
Have you worked with Docker before? What are your thoughts on it? Let’s discuss in the comments!
With over a million websites powered by Laravel, Google pushing the importance of website speed, and users less & less accepting of anything other than an incredibly smooth user experience – some are giving PHP & frameworks like Laravel the reputation of being less performant than other frameworks. While there very well may be truth to this, that doesn’t mean there isn’t anything you can do about it – so, in this guide, we’ll dive deep into how you can optimize Laravel for performance.
Expert Tips on Optimizing Laravel
This article will go over several important tips, each with step-by-step guides to optimize your Laravel website. While some of the steps may sound technical, the steps will be easy to follow and recreate on your own screen.
Using Artisan Commands
Although Artisan commands are commonly listed as part of the optimization tips, it’s not really a hack. Artisan is just a Laravel command line interface that helps you execute instructions through simple commands. We’ll be using a lot of these commands later on.
Artisan Optimize Command
A quick search online will reveal many articles recommending the use of the Artisan Optimize Command. While this used to help, with much improved PHP op-code caching it’s no longer relevant. It was deprecated in Laravel 5.5, and since 5.6 it’s been removed completely. So don’t go looking for this solution as it will no longer exist!
Config Caching
Any web developer today will certainly agree that caching your files is a great way to save on loading time and increase website performance. By generating a ready, easy-to-read template of your website that your servers read instead of all your web files every time someone loads your site, loading times are cut dramatically.
The only problem with caching is that it sets your website to a semi-permanent state. If you plan on making changes anytime soon, you’ll have to undo the cache before configuring your website and then redo it when you’re done.
Aside from that, caching with Laravel is considerably easier than other frameworks because you can do so through caching engines that don’t involve coding.
If you’re ready to cache your website, simply type this in the Artisan command line:
php artisan config:cache
Remember, any changes you make on your site after this won’t have any effect because of your cache. If you want to refresh the cache config, simply type the command again. Otherwise, you can also clear the cache by typing in:
php artisan config:clear
There are multiple ways you can cache with Laravel, but these two basic commands are enough to get you started.
Route Caching
A route cache is a collection of routes around your website that helps load your pages faster. This works by avoiding the taxing and sometimes slow process of mapping your routes from scratch. With route caching, Laravel can temporarily load the routes from a pre-compiled cache instead of starting from scratch for every new user. The cache lasts only until the user exits out of your website.
Just like config caching, any changes you make to your website after the cache will not have any effect until you update the route cache. It’s important to remember to update the cache after making any changes to your website’s structure.
Here’s the command that you have to run to start the route cache:
php artisan route:cache
To clear the cache, you use a similar command:
php artisan route:clear
Route caching is a simple way to make your website feel snappier and load faster.
Use Queues
Laravel queues work like your CPU. Whenever your computer processes a task, it does so in the most efficient way possible that doesn’t degrade the quality of the user’s experience. This means that when you’re rendering a file or doing something resource intensive, your CPU makes sure that you still have processing power left for your other tasks until its limit is reached.
The way this works is that your CPU queues tasks after each other, with no strict adherence to order. If you’re rendering a file, then opening a browser window, your CPU will insert the browser process earlier to make sure it opens without delay. Just like a CPU, Laravel can also improve web performance by offloading time-consuming processes to a queue.
Simple examples of this are:
Sending emails
Downloading files
Uploading files
These tasks don’t need to be seen by the user and can be done as a background process.
Queues are an in-depth trick though and we, unfortunately, don’t have the space to cover it fully within this article. Instead, you can check out the official Laravel documentation for this. If you’re curious about what the basic commands look like, here are some examples from Artisan:
Laravel also has several queue driver support documentations and offers unique solutions for each, such as Horizon, a dashboard that monitors your queue system.
Use Eager Loading
Eager loading is a way of coding rather than a simple command that you can run via Artisan.
Eager loading is the process of sending a larger, nested data structure with more than enough information for the query. Although sending a larger query might require more memory or data, since the internet is already at blazing fast speeds, several more kilobytes or even megabytes will be barely noticeable for most users. These larger data queries are better for the server since it means sending one large query, rather than processing several hundred queries just to look for the user’s data.
The opposite of this is lazy loading, which might be what your website is utilizing by default, where single items of data are retrieved individually as and when required, resulting in many more server requests. Here’s what the query for that looks like:
$books = App\Book::all();
Foreach ($books as $book) {
Echo $book->author->name;}
Eager loading on the other hand looks like this:
$books = App\Book::with(‘author’)->get();
Foreach ($books as $book) {
Echo $book->author->name;}
A simple example where this is used is in games. Most games use eager loading when preparing levels or discrete phases. Whenever you’re loading into a map, the game loads everything in advance so that you have all the assets you need — even if you don’t explore or use all the objects inside that map.
The main downside to eager loading has always been the amount of information users would need to download or prepare to access your site. Each query would mean sending a file that’s larger than technically necessary. However, with mobile data and home Wi-Fi fast becoming near-gigabit speeds, file sizes have gone down the priority list when it comes to optimization.
Clear Up Unused Service
Another tip that involves how your code is clearing up any services that are unused by the user.
It’s common to add and start a service when your website loads, but unused services can add unnecessary burdens on your system and strain your server speed. This is especially apparent when handling larger amounts of visitors. You may even have services that were utilized at the beginning of your development process but are no longer used today.
You can open the Laravel app and go to:
config/app.php.
This will show a list of all the services installed on your server. Simply comment out the services that are unused.
NOTE: be careful with the services you’re trying to disable. You may accidentally disable a service that plays a huge role in your site, causing certain parts of your website to malfunction or not start at all.
Run tests and check the services manually on staging machines first before disabling services you aren’t sure about.
Remove Dev Dependencies
Dev dependencies are often injected into your system by default when installing Laravel or a composer for the first time. While these dependencies do aid in building your website, you don’t need these dependencies when your site is up and running.
You can input this simple command through Artisan to remove those dependencies:
composer install --prefer-dist --no-dev -o
After running this command a package or directory will be created (possibly a zip file or similar) which you can then use to install the release. The command specifies only to retrieve and package the official distribution, without dependencies.
NOTE: Dev dependencies are different from dependencies that are required at runtime. Don’t delete runtime dependencies as this may affect your website’s performance or even crash certain parts of your site.
General Web Optimization Tips
There are also several optimization hacks that you can do for your website outside of Laravel. If you’re looking to polish every aspect of your site and increase its performance and rankings on Google, then here’s what you should do next.
Use a Fast Host
A fast host is undeniably the first thing you should start looking at. Is your host fast enough and can it handle the number of visitors that your website is currently receiving, or which you anticipate will be visiting following your business’s growth? This is an essential question to ask at the moment with Google actively punishing websites which it deems too slow (including speed responses measured in milliseconds).
Going for a dedicated 3rd-party host is always the best option. Shared hosts are too slow and hosting physical servers yourself is expensive and hard to scale. 3rd-party hosts on the other hand will cost you between $25 to $150 per month on average and will provide you with blazing fast speeds, secure connections, and website optimization tools.
Minify CSS and JS Files
Your CSS and JS files are laid out to be easily read by default. This means your files have spaces, indentations, and other formatting that make it easy to read for us. However, your website doesn’t care about these visual syntax practices and can easily read your files without them.
Minifying your CSS and JS files means removing all of the unnecessary spaces, indentations, and other characters that take up valuable server space. Depending on the size of your website, this can make a significant difference in server response times. Just remember to keep a separate copy of the CSS and JS files that aren’t minified, in case you ever need to edit or review your code.
This process can be carried out very quickly by using any one of the many online CSS and JS minifiers available for free.
Compress Your Images
Images are one of the biggest performance leaks in websites that aren’t optimized. This is especially true for those who upload 1920×1080 images only display it in a 540×300 format. It may be that you upload an image at the largest size you think you’ll ever need, and then just have it rendered down to the actual size in the browser, but this is hugely damaging to response times, and having multiple image files set at all of the needed resolutions is far better.
Compressing your images will not only reduce the sizes of your image files by more than half, it will also retain the quality pretty well. Typically, you’ll have to compress the images before uploading them to your website, but there are several plug-ins and online services that will compress all the images on your site for you. From our experience, a lot of these will need to be paid for.
As either an alternative or additional solution we often recommend clients use a CDN (Content Delivery Network) which helps boost server response times too.
Reduce the Number of HTTP Requests
Another major performance issue is when websites make multiple HTTP requests from the server whenever a visitor loads a web page. Typically this can involve many separate calls from JavaScript files, CSS files, and images.
HTTP requests are basically your computer asking your website for information. Each block of information, whether that’s an image, a link, or any kind of content, will require its own separate HTTP request. Larger files will mean longer request times and many files will mean more HTTP requests.
To find out the number of HTTP requests your website needs, you can use Google Chrome’s Network panel. You should ideally aim for a number between 10 to 30 files per page. For reference, the average number of requests is typically around 60 to 75 requests.
With Laravel, you can reduce the number of individual HTTP requests easily by using the CodeSleeve/asset-pipeline. What this will do is to combine all of your separate assets (such as JavaScript files and CSS scripts) and combine them all into one single file. This reduces the HTTP requests down to one. Not only that, but it will also minify the code (something we mentioned earlier), which will help speed up the page loading time dramatically.
Use a CDN (Content Delivery Network)
If your website is hosted in the US, then it may be that visitors from across most of the US will benefit from good response times, but potentially there can be significant delays for those accessing your site from other areas around the world.
One solution to this is to use a Content Delivery Service (CDN). These provide a cached version of either your whole site, part of your site, or assets such as images/videos/audio files on various alternate servers around the world.
When a visitor’s browser requests to load a page from your site, the CDN determines their geographic location, and serves them the page, or assets, from the server that is located closest to them, or which provides the fastest response times.
Getting a CDN used to mean subscribing to another 3rd-party CDN service. However, most 3rd-party website hosts already offer CDNs as part of their basic packages. To reduce the number of payments and have your website set up more conveniently, we recommend looking for a host with CDN features instead of finding a 3rd-party CDN service.
Conclusion – Optimize Laravel for Performance
Laravel has made its name around the web-development scene because of how easy it is to use. It’s straightforward and is fast by default. However, Laravel isn’t immune to bloat and can benefit a great deal from general maintenance and optimization tips.
By using any of the top optimization tips we’ve included here you can combine the fantastic advantages of Laravel with the ever-growing need to keep your website fast and responsive, keeping Google (and your website visitors & users!) very happy. Do you have any specific questions about Laravel? Or think we’ve missed a top optimization tip? Join the conversation by leaving a comment below. 💬
Software development is a process that evolves every year, but very few things in the industry have become the standard, like Docker.
Since 2013 when it was publicly released, Docker has been used for developing, shipping, and running applications. To this day, it’s a vital part of software development that many experienced developers use.
In this article, we’ll be covering what exactly Docker is, the advantages, and disadvantages of using it, and how it actually works.
What is Docker?
Docker is an open-source containerization platform that develops, ships, and runs apps separate from your local or host infrastructure. It’s a platform that creates and manages containers that are isolated from one another but can communicate with each other through defined channels.
The reason why Docker is a popular PaaS is because of the concept of containers, where they use fewer resources than VMs.
What Are Containers and What Do They Solve?
Before we elaborate on what Docker does, let’s first understand its components.
All apps and programs are developed to run in specific environments. These environments either have the libraries or tools required by the app or run the software version that the app is compatible to run on.
Containers are such environments and include all of the libraries and tools for apps to run in. What a container does is pack these apps inside containers together with the app’s libraries and tools so that it can run anywhere without having to rely on the host’s environment.
Here’s a simple analogy:
IKEA sells furniture that requires self-assembly. But, how do they know that all their customers have the tools to assemble their furniture? They don’t. IKEA ships the tools together with the furniture so any customer in the world can set it up the moment the IKEA package arrives on their doorstep.
This is essentially how containers work, making developing and shipping software easier. By including all the tools necessary in the container environment, developers no longer have to worry about incompatibility issues with different servers or hosts. Another term that’s often thrown around with containers is microservices.
What Does Docker Do?
Docker is simply a platform that manages these containers so that you can build different, specific environments easily.
The Docker platform lets developers and programmers use containers seamlessly throughout their workspace. Whether you’re an in-house or remote team with members around the world, using Docker to ship and run your containers is a low-cost way of building software more efficiently.
But there are many more benefits to using Docker aside from convenience. We’ll talk more about how containerization is faster, more secure, and better suited for scaling, later on in this article.
What Does Docker Solve?
Docker solves the problem of creating containers yourself and managing them across an entire team. This becomes especially important when you want to optimize the workflow of your development process.
The Advantages and Disadvantages of Using Docker
Aside from just the managerial side, Docker also solves numerous other complex, arduous problems.
Here are the key advantages of using Docker
Reliability. Containerization with Docker ensures that your apps will run virtually anywhere that has Docker installed. You don’t have to worry about having incompatible versions or manually installing dependencies.
Efficiency. A huge bottleneck in software development is when apps or software break down in computers without their environment. By using containers, you can get rid of these bottlenecks and streamline workflow to focus on developing software and not getting sidetracked by installing dependencies.
Scalability. Having the option to quickly create new containers and deploy them allows for faster patches or updates to your software. Unlike monolithic programming which typically means building into existing code and then restarting it to update the program, containers let you build on top of each other independently. This means that you can add and remove containers without damaging other containers and their functionality, making it easier to scale your software.
Accessible. The routine check-up and optimization process of software maintenance is also easier with containers. Since containers work independently from each other, you can configure, update, and then deploy a container without having to shut down or disturb other containers. This makes containers easily accessible.
Lightweight. Containers are a lightweight alternative to virtual machines that need operating systems to function. Containers avoid the need to do this by sharing the host’s resources, like RAM and CPU, instead of virtual machines that require dedicated resources even if unused.
Version-freedom. Since containers are isolated from each other, you can run a container with the latest version of JavaScript while another container runs an older version. There’s no perfect version for every language and programmers are more familiar with some versions than others. Having the creative freedom to use any version without damaging other lines of code through containers makes your software all the more versatile.
Nothing is perfect and Docker is far from being the one-stop solution for everything. The platform does have its own fair share of disadvantages that you should look out for.
Disadvantages of using Docker
Steep Learning Curve. Although Docker is convenient and fast, there’s no denying the learning curve it takes to become proficient with the platform. You won’t be a master at using Docker overnight and you can expect your team members to have the same struggle. You’ll also have to learn about Linux if you need to conduct maintenance or customizations on your Docker Engine.
Platform to platform communication. Although containers talk to each other seamlessly, the companies that work in this space don’t always see eye to eye. Rival container companies don’t often work with each other, which can be a deal-breaker if you want to expand the tech you’re using.
Temporary containers. Once a container’s use is finished, such as when it finishes a process and is no longer used, the container shuts down together with all the data it processed. The data isn’t saved unless you use Volumes to store your data to the Docker Engine. This isn’t necessarily a bad thing, but it’s something noteworthy for the development process of your software. Docker has no automated solution for this yet.
Command line interface. Docker’s interface is similar to a command line, making it a bad choice for running apps that require a graphical interface. It’s mainly optimized for apps and programs that are run through commands on a terminal.
Lastly, a common problem new companies face with Docker is when they try to use it without understanding how to design and orchestrate development architecture first. Docker isn’t meant to be a one-size-fits-all platform and some programs are just better off without it.
How Docker Works
Docker works on a client-server basis. The Docker client, which is what you see, talks to the Docker daemon which takes care of executing and managing tasks.
Docker’s Core Components and Architecture
Beneath all that, there are more features from Docker that serve different functions. For today, we’ll only be focusing on Docker’s four core components.
Docker Client
The Docker client is the interface between you and the Docker daemon. This is where you’ll be inputting your commands, running programs, and mainly interacting with Docker.
Docker Daemon
The daemon is what manages everything on your Docker platform, whether it’s images, containers, volumes, or networks. In simpler terms, this is the mastermind behind your entire Docker operation. All the commands you send through the client are processed by the daemon and managed by it. Daemons can also connect with daemons from other servers.
Docker Registries
The Docker registry is an open-source system where you can store and download Docker images. You can even set up a private registry in your workspace that’s shared with your colleagues.
Docker Images
Docker images are read-only files with instructions for creating Docker containers. In simpler terms, it’s like a blueprint that tells the Docker daemon what environment to run. This is part of what makes container creation much easier and faster. Combined with the Docker registry, you can find presets of images that are publicly available or even create custom ones for your workspace that your colleagues can use.
Docker or Kubernetes
A question that’s often asked by newcomers to Docker and containerization is “What’s better, Docker or Kubernetes?”
The answer to that is surprisingly simple: both.
What is Kubernetes?
Kubernetes is a system developed by Google to manage deployment automation and containerized services. It’s built to handle and manage containers in the hundreds or thousands, and to optimize how these containers work with each other. Kubernetes does this through nodes that are built for special functions.
These nodes can be categorized into two things: workhorse nodes and head nodes. Workhorse nodes are responsible for anything computational and do all the heavy lifting. This requires more resources than the head nodes. On the other hand, head nodes are responsible for assigning tasks and receiving the final outputs.
In short, Kubernetes is made to manage and optimize the entire workflow of containers with each other, and this makes it very different from Docker.
What’s the Difference Between Docker and Kubernetes?
Docker is a containerization platform that builds, ships, and runs containers. It’s a platform that lets you build containers just as easily as you can deploy them.
In contrast, Kubernetes shines more on container management and efficiency. It handles lots of containers and optimizes them to work faster through nodes.
After Action Report – Should You Use Docker?
So, should you use Docker for your software? Well, it depends.
Docker generally has the highest impact on your development process if you need to port your environment often. The next biggest consideration for using Docker is if you’re working with large teams that have to continually test your apps back and forth. Teams that work between developers and operations managers who need to run apps on different computers would find Docker a lifesaver.
WordPress website errors can be annoying to deal with. There’s never a one-stop solution for these problems, and a vast range of causes, from themes and plugins, causing compatibility issues, to out-of-date software and even web hosting problems.
A WordPress HTTP 500 server error is something no web developer wants to see. It can damage the rankings of your website and decrease user experience if left unattended for too long. Google is quite particular about broken links and the HTTP 500 error is counted as such.
In this article, we’ll be going over everything you need to know about the 500 server error. We’ll talk about why it happens, the general and technical solutions you can do to fix it, and how you can avoid this error in the future.
Let’s start troubleshooting.
What Is WordPress HTTP 500 Internal Server Error?
The HTTP 500 server error is when your page doesn’t load or can’t be accessible. It’s a generic error response that means the server couldn’t fulfill your request. There are multiple variations of the error. Here are some common examples:
500 Internal Server Error
Temporary Error (500)
The website cannot display the page – HTTP 500
As long as there’s a “500” attached, you can safely consider it an HTTP 500 error and the steps below should resolve this issue for you.
What Causes HTTP 500 Internal Server Error?
This internal server error can be caused by a lot of things, usually server and file-related cases. Example causes for this are:
Corrupt or badly installed WordPress theme
Incompatible or compromised plugins
PHP version incompatibility
Corrupt .htaccess file
Problem with your host server
Thankfully, you can fix most of this yourself, but it’s always a good idea to consult with your web host from the start, just to make sure that issue is not on their end.
General Fixes (Try These First)
These general fixes are steps you can do that don’t involve configuring your WordPress website and changing the settings. The steps below are simple to do and are great to get out of the way before you start going into the more technical fixes below.
Open page on a different browser or use Incognito mode
Try opening your page or website on a different browser or by using incognito mode. Using a different browser would be best here. Better yet, try opening your webpage with someone else’s computer.
If your website or page opens on your 2nd browser or elsewhere, then the problem might have to do with the caching or cookies of your 1st or default browser.
Clear browser cache and delete cookies
Browser caching stores useful webpage data in local storage, so that when you revisit that site, your local cache can load the site from there. This is especially useful since most websites don’t make huge changes and caching makes things faster for you. Unfortunately, if something does change, there’s a chance that the old information your browser is storing might cause an error on your side.
NOTE: Clearing your browser cache and cookies will completely log you out of all the websites. Only go through this step if you can open your page on another browser or another computer.
Clearing your browser cache and cookies will fix this problem, by loading the webpage from scratch. Now, the process for clearing cache and cookies is somewhat different for all browsers, so we’ll only cover the steps for Google Chrome since that’s the most used browser.
On your Google Chrome browser, click on the top-right icon with the three dots (⋮).
From there, click on More tools and go to Clear browsing data.
You can choose a time range, but generally, we’d go with All time.
After that, check the boxes for:
“Cookies and other site data”
“Cached images and files”
Click on Clear data.
Once you’re through with that, try loading your website now and see if you still get the HTTP 500 Error.
Flush your DNS
A Domain Name System or DNS is like the internet’s translator between you and servers online. Your DNS stores IP addresses that you’ve been to just like a cache system. So, when you search for sites like RunCloud.io or Facebook.com, your browser can just get the IP address from the DNS instead of searching for that IP through the internet.
If an IP address changes or the DNS is compromised, it will result in providing an IP address that doesn’t work. Flushing a DNS is another way of clearing the DNS cache, so you can update and resolve connectivity issues like the HTTP 500 Error.
Close your browsers first.
Next, press the Windows + R keys to open the Run dialog box.
Type in ‘cmd’ and press Enter.
On the command prompt, type in command ‘ipconfig /flushdns’ and press Enter.
For Mac users, here’s your step-by-step process:
Open up Spotlight by pressing Command + Space.
Type in ‘Terminal’ and press Enter.
Copy-paste the following command into the Terminal: sudo dscacheutil -flushcache;sudo killall -HUP mDNSResponder and hit Enter.
You’ll be asked to enter your Mac password. This is normal, the Terminal is just asking for verification.
There’s no success or ‘operation complete’ message from Terminal when you’re done flushing your DNS, so don’t wait for one. Once you’ve completed the steps below, reload your browser and see if it fixed the issue. If the 500 Error is still there, let’s start with the more technical fixes below.
How to Fix The HTTP 500 Error – Technical Fixes
Contact Your Host
Before we proceed, contact your host and ask their support team for help first. Although there’s a good chance that the problem is with your WordPress files, having your support ticket pending as early as now will help you get a reply while you tinker with the fixes below.
Besides, there’s a good chance that your host’s support team can help you with the technical solutions anyway.
PHP Version Incompatible
Another reason you have this problem might be because of different PHP versions. Some hosts automatically update their PHP versions, which can result in errors if your WordPress theme or plugin is outdated. For this problem, you’ll want to talk to your host first and include this query in your ticket request.
Backup Your Website
Backup your website first. While the steps below shouldn’t compromise your site, it’s always better to be safe and have a backup. Depending on your provider, you may already have a daily backup that you can just fall onto if you need it.
Otherwise, you can backup your site using a backup plugin. Here are a couple you can use:
A corrupt .htaccess file is one of the common reasons why the HTTP 500 Error happens.
The .htaccess file controls many of your website’s configurations, including URL redirects and loading custom error pages. It’s like the directory and navigation system of your site. Getting this file corrupted can result in HTTP 500 Errors, among many other possible problems like 404 messages.
NOTE: configuring your .htaccess file can be difficult for beginners and you may do more harm than good to your site if you mess with the file’s settings. In this fix, we’ll only be disabling the current .htaccess file so your website can make a new one. Ideally with no errors.
Connect FileZilla or SFTP of choice to your website.
Go to the directory that stores folders like wp-admin and wp-content, then look for the .htaccess file.
When you find it, right-click the file and rename it to ‘.htaccess-old’.
Refresh your website and check if the error message is gone.
If the error is fixed, then your old .htaccess file is corrupt and producing the error. Here’s how you can create a new .htaccess file:
Open the WordPress dashboard and go to Settings.
After that, look for Permalinks and open that menu.
Create a new .htaccess file and configure it as Plain.
Click on Save Changes.
Change the permalink structure to whatever works for you and click on Save Changes when you’re done.
That should recreate a new .htaccess file for you. Reload your website and see if it fixes the issue.
Check Your Plugins
Did you recently install a new plugin or update a plugin’s configuration settings?
Plugins are a great way to elevate your site, but they can be an arrow to the knee when you have too many. They may conflict with each other or be outdated from lack of maintenance. Either way, checking your plugins is a great place to begin. Start by deactivating the most recent plugin you installed and then check your website for the error. Here’s how you can do that:
Open your WordPress admin panel. The URL for that is www.sample.com/wp-admin but replace ‘sample’ with your website name.
From there, go to Plugins.
With all your plugins listed out, look for the most recent plugin you installed and disable that.
Open your website on another tab and see if it fixed the HTTP 500 Error.
Repeat this until you’ve gone through most, if not all, of the plugins.
If the error still persists, it’s safe to assume that it isn’t because of your plugins. You can reactivate them all again.
On the other hand, if the problem is fixed and the error disappears by disabling a plugin, activate all your other plugins one-by-one until the error pops back up. The remaining disabled plugins should be the main culprits. To fix that, you can either update the plugins or replace them with an alternative.
If updating the plugin doesn’t solve your problem, try Googling your current case. Chances are that other WordPress users have also come across your problem and may have the solution.
Reinstall or Switch Your Themes
Are you using a new theme or is your theme outdated?
A new theme can break pages in a site, especially if it isn’t installed properly. Before you reinstall your theme, try switching to your old theme or with a default WordPress theme like Twenty Sixteen. Does the HTTP 500 Error still occur? If yes, then the new theme might be the problem. If not, we advise you to move to the next solution.
Now, changing your theme can be risky if you’re inexperienced. Issues like incomplete theme files, installing the wrong version of a theme, and more can occur and possibly increase your problems. We suggest only doing this if you’re either familiar with manipulating WordPress files already or have a backup of your website that you can simply restore.
Here’s the step-by-step guide on how to do that:
Connect FileZilla or your SFTP of choice to your site.
Look for your wp-content folder and then go to themes.
Find the folder with the theme you’re currently using and rename the theme folder into ‘themename-oldver’. Adding ‘-oldver’ will help you identify your old theme from your new one.
Now, install a fresh copy of your theme like you normally would.
Alternatively, some drag-and-drop builders like Themify and Elementor allow you to easily re-install themes from the WordPress dashboard. The steps for these differ from builder to builder, but try looking for your theme and go over the options. The re-install button should be there.
Once done, the fresh theme should retain all your settings and personalizations. Verify if everything works correctly and open the problematic pages that had the HTTP 500 Error. If the problem is fixed, then your old theme probably has an issue. You don’t have to delete your theme’s old copy. Keep it there just in case, you can even change the label and add a date to it.
Check File Permissions and Make Sure Your Account is Permitted
File permissions determine who can read, write, and execute the files of your WordPress site. If you were setting up new permissions or creating a new type of user, the permissions file may have been mishandled.
Although fixing the permissions is pretty straightforward, it’s a repetitive process. Here’s how you can check file permissions and then set them correctly:
Open up FileZilla and connect it to your website.
Look for your wp-content first and right-click the folder.
Select File permissions.
In the new dialogue window, you can set permissions for three types of users: Owner, Group, and Public. Here’s what they mean:
Owner – owner of the website
Group – any staff you set that can handle and access the WordPress dashboard
Public – anyone who opens your website.
As a good rule of thumb, the Owner should have all the boxes checked, and the Group and Public are only permitted to ‘Read’. You’ll want to make sure that the page with the HTTP 500 Error has the permissions set correctly.
The Numerical value there is typically set to ‘644’ for sets and ‘755’ for directories and executables. This could be different with your host though. So, if you’re unsure about the correct values you can wait until you contact your host’s support team or Google the numerical value of your host.
Repeat steps 3 to 5 but with the folders and files that are having the HTTP 500 Error.
Insufficient PHP Memory Limit
For those of you who are experiencing the HTTP 500 Error on the WordPress admin dashboard side, then this fix might help.
The PHP memory limit for your site is usually enough for most things, but it can sometimes hit a limit when you’re uploading files or trying to publish a new post.
Open your Notepad or VS Code.
Type in ‘memory=64MB’ and save the file as ‘php.ini’.
Open up FileZilla and connect it to your website.
Look for your wp-admin folder and upload the php.ini file there.
Reload your WordPress admin dashboard and see if the error still persists. If increasing your PHP memory limit worked for you, then you’ll have to contact your host for some extra help.
Again, since the PHP memory limit on your site is usually enough for regular WordPress usage, hitting the limit so frequently is still a problem. You might be running a plugin that’s inefficiently coded or have a theme function that slows down your whole site. To assess this problem, we recommend asking your host to check this for you themselves. Their support team might have a better idea of what to disable and what alternatives to use.
Fortunately, if you’re using RunCloud – this couldn’t be easier.
You can increase your PHP memory limit straight from your RunCloud dashboard for any of the web applications you have on a server connected to RunCloud.
Simply navigate to your Web Application’s Settings in your and increase the value for the memory_limit there. Ensure you hit Update PHP Settings so your changes are applied. And that’s it!
This should resolve the issue for RunCloud users.
Restore Your Site With a Backup
Although this step is often cited across other sources, we don’t recommend you restoring or reinstalling your entire website through a backup. The chance of your personal WordPress files causing the HTTP 500 Error is low, while the risk of restoring your site with a backup as an inexperienced WordPress user is higher.
Some hosts backup your WordPress site for you as part of their payment plan, so just contact their customer support team. They’ll probably fix your problem before having to restore your site to a previous backup anyway.
Reinstall Core WordPress Files
Core WordPress files, however, are a different matter. These WordPress files are the skeletal system of your site and any issues with the files will certainly have a significant impact on your website. Thankfully, reinstalling WordPress isn’t complicated. Here’s the simplest way to do it:
Open your WordPress admin dashboard.
Navigate to Updates. You’ll find it below the Home tab to the left of your screen.
On the WordPress Updates page, look for and click on Re-install Now.
WordPress will automatically start downloading on your device and will reinstall with the latest version to your site. This shouldn’t take too long since the WordPress file itself is pretty small.
If you can’t access the WordPress admin dashboard, you can try reinstalling WordPress with your SFTP. You’ll need some sort of file archiver tool to unzip the file. If you don’t have one, you can use WinRAR.
Before you proceed with the steps below, we recommend backing up your website just to be safe. While you’ll only be overriding your old WordPress files with new ones, backing up your site is just good practice.
Open up WordPress.org and download the latest WordPress version. The button will be at the top-right corner of your screen.
Once the download completes, right-click the WordPress zip and look for Extract Files…. Click on that option.
A prompt will appear on your screen asking for confirmation, you can say Yes to all of them so you can start extracting the files.
When the file is done extracting, you’ll find a ‘wordpress-versionxxx’ folder. Open that and delete wp-content.
After that, open up FileZilla or any SFTP and connect it to your website.
Copy-paste all the files from the ‘wordpress-versionxxx’ folder to your root folder. This is typically named public or public_html.
FileZilla or the SFTP you’re using will open a prompt saying ‘Target file already exists’. Click on the Overwrite option and select Ok.
Your computer should start overwriting the old WordPress files with the new ones you just downloaded. This will overwrite all the core WordPress files without touching or deleting any of your themes, plugins, and overall content.
This should be the last fix you need to fix the HTTP 500 Error once and for all. If you’re still getting the HTTP 500 Error, make sure that you’ve contacted your host’s customer support team.
How to Prevent the HTTP 500 Error From Happening?
Prevention is better than a cure and that’s especially true with website errors. HTTP 500 Errors can negatively impact your website’s SEO and it may take you weeks or even months before finding these errors yourself. Here are some routine tips you can use to prevent the error from happening again.
Update your Plugins
Make sure that all your plugins are updated. Outdated plugins that are no longer supported by your PHP version can cause these errors, even more so if that plugin is responsible for a large portion of your site.
Keep File Permissions Up To Date
Whenever you create a new user or try to reconfigure your permissions, make sure that everything is in order before you close SFTP. Incorrect permissions, especially when creating new roles for your staff can create these HTTP 500 Errors.
Use WordPress Debugging
Still getting the error? Hopefully, your host has replied by now. This step is completely optional, but it can speed up the process of either looking for other solutions or providing your host with more information.
The debugging feature shows you specifically where the error is coming from. This will be valuable information for your host, as well as providing you with error messages you can copy-paste in Google to hopefully find someone who’s had the same specific error as you.
Keep in mind though that the debugging logs can be intimidating to understand if you’re new to server management. If you don’t understand the logs that come out from the debugging, at least you can present them to your host or support team to help them fix your problem.
Here’s how you can turn debugging on.
Open your Secure File Transfer Protocol (SFTP) app. If you don’t have one, the industry standard is FileZilla. Download and install the client from the link provided.
To connect FileZilla to your site, open FileZilla.
Click File and go to Site Manager.
Enter the ftp address of your website in the Host box. Here’s what that looks like: instead of http://www.sample.com the ftp address is ftp://ftp.sample.com or ftp://sample.com.
After that, just leave the Port box blank. The default value there should be 21 and you don’t need to change this unless indicated otherwise.
From the Logon Type box, select Normal.
Next, type in your full username in the User box. This can be a proper username or an email address, it depends on how your website was set up.
Finally, enter the Password.
FileZilla should now be connected to your website after these steps.
From there, look for and open the wp-config.php file. You don’t need a code editor for this step, but you can download VS Code if you prefer the cleaner interface instead of just the default Notepad.
With the wp-config.php file open, add the code below:
define( ‘WP_DEBUG_LOG’, true);
Save the .php file and reload your website.
Any errors that come out of your site should now be logged to your debug.log file. You can find that under the /wp-content/ directory with FileZilla. Don’t forget to change the value from true to false when you’re done debugging.
Now, just send your host the debug.log file so they can fix your issue.
After Action Report — Fixing The WordPress HTTP 500 Error
The WordPress HTTP 500 Error is a cumbersome problem to fix. It’s vague, which makes troubleshooting rough. We’ve arranged the steps above to go in order of importance, so hopefully, you were able to resolve this issue without having to reach the very bottom.
Which fix worked for you? If none of them did, how did you manage to resolve this issue? Let us know in the comments below!
Are you still worried about which email hosting services will be a good fit for your business?
With a market size of over $25.70 billion, email hosting services are a popular way to communicate with your customers and send them regular updates. As good as it sounds, it’s also important to choose an affordable email service provider you need.
But, how do you go about choosing one and what are the different types of email hosting? Let’s answer those questions and take a look at the 15 best email hosting providers for small businesses.
What Are the Different Types of Email Hosting Service Providers?
Generally, there are three different types of email hosting service providers and all of them serve different purposes.
Shared web hosting email — some shared hosting websites will include basic email service. This is the bottom line though since you can’t send or receive bulk emails because of limitations on the email server.
Self-hosted email server — you can also set up and host your own email services, but the entire process is complex. We don’t recommend this for small businesses as you’ll have to take security, updates, and general maintenance into your own hands.
Third-party email hosting — the most popular choice, 3rd-party email hosting is also known as cloud email services. It works by paying a service a monthly subscription fee to rent an email server and have them manage it for you.
Important Note: Security is one of the key features you need in an email service. Don’t skimp on premium service here because it can save you from potentially malicious threats in the future.
When choosing a third-party email hosting provider, you need to evaluate important email features like custom domain name support, 24/7 customer service, anti-spam, and anti-virus, mailbox storage, email attachment limit, ease of use, supported email protocols, and more.
Here are some popular key features that are usually added as a bonus tool for some email hosts:
Syncing across all your devices
Shared calendar or integration with 3rd-party calendar apps
Instant messaging
Email encryption
The following are the 10 best third-party email hosting services (not in any order). Don’t forget to check out the comparison table at the end of the list too!
Keep note that most, if not all, of these options, have some form of security and anti-spam attached to them. If we failed to mention that, it’s probably because we had to mention other features that take precedence.
10 Best Third-Party Email Hostings
Third-party email hostings are the most popular solutions, so in this first section, we’re going to cover the top 10.
1. G Suite Gmail — Google Workspace
Google Workspace, formerly known as G Suite or Google Apps, is a set of Google cloud-based tools for online work. The tools included are Gmail, Calendar, Hangout, Drive, Docs, Sheets, Slides, Sites, and more.
Although these are standard free Google apps, the difference between G Suite and Gmail is that G Suite lets you manage and collaborate with other users. You and your employees can have the same ending email (e.g. @runcloud.com) and other professional quirks.
Gmail is the most popular email service nowadays, with over a billion active users worldwide. This makes G Suite a great way to stick with using what you already know, Gmail and other Google apps, while upgrading your capabilities to support a professional workspace. Unlike a free Gmail account, G Suite email does not contain ads nor read your email messages. So security shouldn’t be an issue.
Here are some other features you can get from Google Workspace:
Custom business emails
Ad-free email experience
Phishing and spam protection
24-hour Google Meet length with noise cancellation and recordings automatically saved to Google Drive
100 to 500 video meeting participants, meeting recording, and attendance tracking
30GB to 5TB per user. Enterprise plans are unlimited
25 MB attachment size via email, anything more must be sent as a Google Drive link
Google provides 24/7 phone and email support to Google Workspace customers as well. Refer to the migration guide to import your email messages, contacts, and calendars into Google Workspace easily.
When it comes to pricing, Google Workspace is a good all-around option. The main attraction to using this email host is that it uses Gmail and other Google tools already. If you’re already juggling a personal and business email, then sticking to Gmail through G Suite for both will streamline your work.
Google Workspace’s pricing can be expensive when you start adding multiple users since the pricing is calculated per user. If you want an email hosting service that’s only about emails, read on.
2. Zoho Mail
Zoho Workplace is arguably the 2nd-most popular alternative to Google Workspace. The basic plan includes hosted email, an office suite, and other tools for work.
This email hosting service rose in popularity as a free service for custom domain email hosting. It was like a G Suite account with domain-specific email, except it was free. Later, Zoho removed most of the email features from the free service and moved it to Mail Lite, their basic plan at $1 per month (billed annually).
Despite that change, Zoho Mail is still a popular, affordable choice for custom domain email hosting that starts from only $12 per year. That comes with:
Zoho Calendar that can be shared or grouped, together with Calendar Sync for mobile and PC
Email recall, unsending email that has already been sent
Email hosting for multiple domains
Email routing
Streams – collaboration tool for sharing and posting emails to initiate social-media style conversations
eWidget and Develop Space for integrations and custom extensions using developer tools
250MB to 1GB attachments
Email backup and restoration
White labeling rebrand for custom login URL and logo
S-MIME encryption and digital signatures
Although you’re stuck with just emails and the Zoho Calendar, the features those two tools have are full of functionality.
Zoho pricing is one of the most affordable on this list. If you’re looking for an email hosting service that’s strictly email and calendar, Zoho is a great choice. Otherwise, additional storage, file management, document writing, editing support, and more are features you’ll find elsewhere.
Keep in mind that Zoho’s Free plan is only good for 1 user, the Standard plan is good for 3 users, and the Professional plan supports unlimited users.
3. MXroute
MXroute is a cPanel-based email hosting with a very simple pricing system.
First off, MXroute offers unlimited domains and unlimited email accounts, which can be game-changing for some users. For business owners who operate a lot of websites, the option of having unlimited domains is much better than other hosting services that charge per domain.
The only limit that MXroute really emphasizes is storage space. You’ll find the details in the Pricing below. For now, here are the simple features you can get with MXroute:
Mail forwarding and other basic e-mail protocols
Afterlogic Pro, Crossbox, Rainloop, and Roundcube for webmail choices
Between 10 to 50GB of storage space
IP reputation, using reputable IP addresses so the emails you send don’t get flagged or marked as spam
Unlimited domains
Unlimited email accounts
And that’s pretty much it. Although it’s the bare basics, MXroute is still a popular choice because it’s easy and straightforward to use. They don’t sell calendars, though they license Afterlogic Pro in case you really need it, and they don’t sell groupware like G Suite or Office 365 (Microsoft’s email and tool package).
MXroute charges pricing based on year, so unfortunately monthly or short-term users are going to be stuck in a yearly contract. They also don’t have a free trial, unlike some services. But other than that, MXroute has a straightforward package and pricing system. Unlimited domains and email accounts, you just have to watch out for storage.
4. Rackspace Email
Rackspace is a managed cloud computing company founded in 1998.
They’re one of the older tech companies in the industry and all those years of operation come with solid service and consistency.
The first thing that stands out with Rackspace is its compatibility with MS Office applications like Word, Excel, and so on. Their higher-paid plans include file storage, syncing across devices, and MS Office app support.
Here’s what you can expect from working with Rackspace:
Microsoft Office support, meaning access to Office apps like MS Word, Powerpoint, and so on
25GB mailboxes regardless of the payment plan
Unlimited Email Aliases
30GB File Storage
Shared calendars
Instant messaging
Email archiving
While all these are stellar features, the Rackspace interface does feel quite dated. The color scheme and design itself feel like you teleported back to the early 2000s, so your personal taste will be the judge of that.
All Rackspace email plans have the same 25GB email storage, and it supports email attachments up to 50MB.
Rackspace charges for pricing differently. Instead of increasing the basics, like storage, all it does is charge you extra if you want more features. The Rackspace Email Plus plan is $1 higher than the Email plan, but you’ll have Office app compatibility, instant messaging, calendars, and more. Overall, it’s a solid service.
You can try Rackspace out for yourself by registering for a free 14-day trial.
5. Office 365 Outlook
Office 365 is Microsoft’s version of groupware. For those of you who already work with Outlook, upgrading your workspace with Office 365 might be a comfortable investment.
A lot of businesses still use Microsoft’s powerful MS Word and MS Excel applications. Although they aren’t web-native like Google, Microsoft Office is generally faster, easier to work with offline, and is sometimes more powerful (like Excel). These are a few reasons why businesses prefer MS Office over more cloud-based applications.
These are the features you get when subscribing to Office 365:
50 to 100GB of mailbox
Up to 150 MB email sizes
1.5TB of mailbox archives
Hosted voicemail that can provide call-answering, automated voice responses, and a dial-in user interface
Web versions of Word, Excel, and PowerPoint
Included access to Office apps like Outlook, Word, Excel, and PowerPoint as well as services like Exchange, OneDrive, Teams, and SharePoint
Online meetings with capacity for 250 people through Microsoft Teams
Access to Microsoft Bookings, Planner, and Yammer
1TB of OneDrive storage
While Office 365 looks like an absolute powerhouse of features, it does have a couple of downsides. For one, the custom email domain address only comes with their highest plan and isn’t a basic feature.
You can also migrate email and contacts from Gmail or other providers to Office 365 easily, so moving shouldn’t be a problem. Please note that Office 365 Business is not compatible with the Linux operating system.
Office 365 doesn’t offer custom email domains from the start. Having a custom email adds a ton of credibility to your emails and is something business owners can benefit from, especially the ones who do lots of cold emailing.
Aside from that, it’s a solid service with a lot to offer, granted that you transfer wholeheartedly into their workspace.
6. Yandex Mail for Domain
Yandex is a Russian company launched in 1997 as an internet search engine company. Today, the company has 18 offices worldwide and provides over 70 services in total, including Yandex Mail.
In Russia, Yandex is a big competitor of Google and they hold 44% of the market share. Besides being extremely reliable and having a good reputation, Yandex is probably the only free email hosting for a custom domain name today so it’s worth checking out.
Here are the features that come with Yandex:
1,000 mailboxes with 10GB of storage space in Yandex.Disk for the free plan. Also have access to collaboration services like Yandex Telemost, Messenger, Calendar, Notes, and Documents
100GB to 3TB of storage space in Yandex.Disk for each employee
Unlimited mailboxes in the company
Anti-spam, anti-virus, and anti-ads on the mailbox
History of file changes in Yandex.Disk for 90 days.
All in all, Yandex has been operating for decades at this point and has built itself a reputable name. So much so that according to some reviews on Reddit, their browser and other services are faster than Google’s.
Tip: Linux users should give Yandex a look because it syncs well with Linux operating systems.
If you’re interested in trying out Yandex, they offer a free 30-day trial period for their Basic service plan. Other than that, the difference between their payment plans is really just the storage space. If you don’t need a lot of space but could benefit from their premium features that come with the basic plan, then you can save some money with Yandex Mail.
7. Mailcheap
Mailcheap is another email hosting provider in this list that offers unlimited mailboxes and domains per account at affordable pricing.
It offers many different types of email hosting, from shared to a reseller to a dedicated email server. Here we only focus on the dedicated email servers, which are email servers that you own by yourself.
We don’t recommend going for shared servers if you can help it, since the service and speed are usually subpar or even slow depending on the traffic.
Here’s what Mailcheap can offer you:
Storage between 250GB to 4TB
Unlimited domains and users
Custom branding
API support for all accounts
Web-based admin panel (MasterAdmin)
Roundcube and Rainloop webmail, up to 50MB in attachments
Addressbook and calendar support
Access to server logs and advanced server configurations
Autoresponder and sieve filtering
Usage metrics
Personal and offsite data backups
Data restoration
Despite all those features being a mouthful, it comes at a costly price.
Although its shared email services can rival those of MXroute and others, shared email is generally what you don’t want to have as a growing business.
Mailcheap offers a mail migration tool to import your existing email accounts to Mailcheap without any stress.
Just like Yandex and MXroute, Mailcheap’s pricing is highly dependent on the amount of storage space you need. This is great for users who want more features but don’t necessarily need large amounts of storage. If you can afford the hefty prices that Mailcheap charges you for, you can at least rest assured that you’re backed by some beefy features.
8. FastMail
FastMail is another email hosting business that’s been in the industry for more than two decades. It promises private (no tracking), secure, ad-free email hosting, among many other robust features.
This host supports standard protocols like IMAP, SMTP, CardDAV, and CalDAV, and Its web-based email interface is fast and flexible. It also includes calendars and contacts that auto-sync on your phone, tablet, or PC. If you have multiple email accounts? You can set up FastMail to send and receive messages from other email accounts you own to manage all your emails in one place.
Here are some other features from FastMail:
600+ alias addresses
Masked emails
Shared calendars and calendar groups
Custom email domains
Add and manage users, available all paid plans
Flexible choice of email apps between Outlook and Apple Mail
Email retention archives to keep your emails intact forever
FastMail also provides an email import tool to transfer your email to FastMail from any email provider that supports IMAP protocol. On the other hand, if you want to migrate away from FastMail or make a backup of your data, you can download all your data on FastMail.
Users can access 24/7 support via email but FastMail doesn’t have a customer service phone number.
With FastMail pricing, both the storage size and a number of features change. The change in storage between 2GB, 30GB, and 100GB per user is the biggest factor between plans though. If you want something lightweight that comes with a calendar and user management, FastMail would be a great choice.
9. ProtonMail
ProtonMail is an open-source email service that sends and receives encrypted email messages.
It was founded in 2013 by a group of scientists who met at CERN, the European Organization for Nuclear Research, and share a vision of a more secure and private internet. ProtonMail founded and runs all server infrastructure exclusively in Switzerland. Therefore, the service and your confidential data are protected by Swiss privacy laws, which are among the strongest in the world. Here’s an article from ProtonMail explaining why it’s more secure than Gmail.
Besides the ProtonMail encrypted communication, you can even send a self-destruct email message with an expiration time. Email receivers cannot read your message after it has expired and is convenient for sending a one-time secret message.
Here are some other ProtonMail features:
500MB to 20GB of storage per user
Between 150 to unlimited messages per day
3 to unlimited folders or labels per user
1 to 10 custom domains for paid plans
Email filters
Autoresponders
Catch-all email feature
Multi-user support
ProtonVPN
ProtonMail is the world’s largest secure email service. It is an open-source software funded by the community and it does not show ads or track your data. Revenue from paid accounts is used to develop ProtonMail and support free users, including democracy activists and dissidents.
For all intents and purposes, ProtonMail is the most secure email hosting service on this list. ProtonMail support is available 24 hours a day, 6 days a week via email and forum.
When it comes to pricing, ProtonMail differs them according to storage, users, messages, and more. It’s quite a diverse layout of pricing plans, but the good news is that they have a free package available. You can also opt for extra storage, domain, and addresses at an added cost.
10. Namecheap Private Email
Although Namecheap is more popularly known for being a domain registrar service, they also offer email hosting plans as well — Private Email.
Their email service is powered by Open-Exchange (OX), cloud-based collaboration software for emails, calendars, task management, and document storage.
This means that Namecheap’s email hosting package comes with groupware for increased productivity and workflow. While that might sound like a great idea, it can be intimidating to move to an online workspace that’s as unfamiliar as OX. So, keep that in mind as you may have to go through a learning curve if you go with Namecheap email hosting.
Here are some features you can expect from going with Namecheap and OX:
Groupware like calendars, task management, and document storage
2 to 30GB of file storage
5 to 75GB of space for emails
1 to 5 mailboxes
Mobile sync support
Anti-spam protection
Namecheap’s features are basic compared to others on this list, but they’re solid for the price point—check the pricing details below.
All in all, though, security and data preservation like backups might be a concern since it isn’t included in any of the packages. If you can live with that, then Namecheap is one of the most affordable options here.
The main changes between Namecheap’s pricing plans are the number of mailboxes and storage space. You’ll also only have access to full mobile sync on their Pro plans and above, as well as groupware with their Ultimate plan.
5 Best Self Hosting Email Server
A self-hosting email server is a service you run on your own and it works with other email services. It prevents 3rd party to read your messages without permission and also save on per-user email subscriptions.
However, self-hosting your email is not easy (more difficult than web hosting). Mitchell Anicas, Digital Ocean software engineer, warns that “setting up and maintaining your own mail server is complicated and time-consuming, and there are several affordable alternatives—most people will get more value, in the form of saved time, out of using a paid mail service.“
Mail server is way more complex than the web server. A typical mail server consists of several required software components, Mail Transfer Agent (MTA), Mail Delivery Agent (MDA), IMAP/POP. You may also want to add other components, such as spam filter, anti-virus, and webmail.
The good news is that we have many ready-made mail server packages that make it easier to install all the mail components. Here are several popular choices of self-host mail server packages: (not in particular order)
1. MailCow
MailCow is an open-source Docker-based email server suite. It is a collection of containers linked in one bridged network. Each container represents a single application, such as Dovecot, Memcached, MySQL, PHP, Postfix, Nginx, etc. MailCow provides a web user interface to manage the mail server and email accounts.
MailCow features:
SOGo web based email
SMTP and IMAP
Easy mail client configuration
Two facto authentication and brute force protection
Email whitelist/blacklist and spam thresholds
Process isolation via docker containers
Web administration
MailCow system requirements: 1GHz CPU, 6GB + 1GB swap (default config), and 20GB storage (without emails), x86_64 system type. You can find other Mailcow prerequisites here.
2. Poste.io
Poste.io is an open-source Docker-based mail server that you can set up in 5 minutes. The database is stored in a file-based SQLite database. Update, backup, and migration is easy.
Poste.io features:
Native implementation of SPF, DKIM, DMARC, SRS
Antivirus engine (ClamAV)
Spam filter (RSPAMD)
Email redirection, autoreply, and filters
Quota limit for mailbox space or email count
Web administration
Autodiscovery for email client software
Server diagnostics
Process isolation via docker containers
Poste.io system requirements: Poste.io does not have specified system requirements. All you need is a 64-bit Linux distribution, enough CPU, and free RAM to run Spamassassin and Clamav, Docker engine running.
They have a free plan with a solid amount of features, and if you need an upgrade, the pricing plan starts at $349/year.
3. Mail-in-a-Box
Mail-in-a-Box is an open-source software bundle that makes it easy to turn a cloud server into your own email server for multiple domains.
Mail-in-a-Box features:
SMTP and IMAP
CardDAV/CalDAV through Nextcloud
Exchange ActiveSync
Roundcube webmail
DNS server auto configure SPF, DKIM, DMARC
Backup to Amazon S3 cloud storage
Static website hosting via NGINX
Free TLS(SSL) certificates from Let’s Encrypt
Web administration
Spam filtering, greylisting
Host email for multiple users and multiple domain names
Unlimited mail accounts, domains, users, mailing lists, admins
Paid professional support available
iRedMail system requirements: Fresh Linux/BSD server, 4GB RAM.
They offer a free version, and the next one on the pricing plan is iRedMail Easy which starts at $49/month.
5. Modoboa
Modoboa is a free and open source email hosting and management platform that support SMTP, IMAP/POP. It is written in Python and released under ISC license.
Modoboa features:
Web admin panel to manage domains, mailboxes, aliases and more
Support MySQL/MariaDB, PostgreSQL database
Email blacklists monitoring and DMARC report generation
Mail server monitoring
Own web mail client
Anti-spam and anti-virus via Amavis
Calendar and address book
Free SSL/TLS certificates by Let’s Encrypt
Paid professional support available
Modoboa system requirements: 2 CPU, 2GB RAM, 10GB disk storage (exclude emails), and Pyton 3.
If you know how to set up and run everything on your own, then you can use Modoboa freely. However, if you require services such as installation, update or service ticket then they have a special pricing for that. Also, they offer support plans, and the most basic plan starts at €800 per year.
BONUS: Free Email Forwarding Service for Custom Domain
Don’t feel like paying for email hosting and do not want to take the hassle to set up your own mail server? You only need to forward custom domain emails to another mailbox, such as a Gmail-free account?
Try ForwardEmail, a free, encrypted, open-source email forwarding service for the custom domain name.
All you need to do is only add DNS records to your custom domain name, then all emails to your domain will be forwarded to the email address you specified. It also supports Gmail’s “Send Mail As” feature, so that you can reply to emails from your custom domain in Gmail.
RunCloud User Choice: Email Hosting Services
We ran a poll on our Facebook Group and Twitter page. Here are the results:
G Suite — Gmail is a popular choice for free and paid email hosting because it is fast and reliable. It’s also built into other G Suite features like Google Drive, Gmail, and Calendar
Zoho Mail — Another crowd-favorite with both free and paid plans. If you want the paid plan, it’s a cheaper alternative to G Suite and offers a lot of integration with calendars, appointment scheduling, and other features.
MXroute — Affordable email hosting for unlimited users and unlimited domains using cPanel. However, the storage is quite small compared to other competitors.
Rackspace Email — All-around, affordable email service with unlimited email aliases and decent-sized mailboxes. The only downside is that mobile sync, calendars, and other features are reserved for their premium plan ($1 more per month than their basic plan).
We also made a poll on Twitter for the top 4 email hosting services from your Facebook page and this is the result.
At the end of the day, the best email hosting plan is the one that serves your company best. You’ll have to take the time and patience to understand what your business needs, but once you do know what that is, then you’ll know exactly what to look for.
There are a lot of choices and reputable companies out there, so the picking is yours. You can even avail of some free trials with some of these email hosting services.
Wrapping Up
RunCloud is a powerful and easy-to-use platform that helps you manage your websites on any cloud server. With RunCloud, you don’t need to be a Linux expert to set up, secure, and optimize your web applications. You can do everything from a simple and intuitive dashboard, saving you time and hassle.
RunCloud supports various web servers, PHP versions, databases, and frameworks. You can also monitor your server performance, back up your data, and automate your tasks with RunCloud. Whether you are a developer, a freelancer, or a business owner, RunCloud can help you run your websites faster and smoother.
What are you waiting for? Join RunCloud today and enjoy the best web hosting solution for your websites. It’s free for 7 days, no strings attached!
The GDPR is Europe’s newest law on privacy and security. Despite applying only to citizens from European Union, websites with visitors from the EU are also affected by the new law. This means websites that offer information or products that EU visitors may intentionally or unintentionally visit. More on that below.
In this article, we’ll go over what this means for your website, how Google Fonts exactly violates the GDPR, and what you can do to fix this issue.
You don’t have to say goodbye to Google Fonts, just following the guide below.
Disclaimer: This article doesn’t provide any legal advice.
How Google Fonts Work
Google Fonts generally seems harmless. It’s a collection of fonts that beautify your site, optimize its performance, and even help avoid licensing hassles for you later on.
The problem starts when your computer, or your reader’s computer, opens your website and automatically requests the Google Fonts files from Google’s servers. For Google to send you the font, it has to know where to send it first and that means collecting your IP address. That specific action is what violates GDPR but before we elaborate on the problem, let’s cover what GDPR actually is.
What is GDPR?
The GDPR, or General Data Protection Regulation, is the official regulation set to effect back in May of 2018 with the sole purpose of protecting the data and privacy of EU citizens. Since the law focuses on protecting the individual, all websites one visits are obligated to honour GDPR, which means that every website that accepts visitors from European Union needs to be GDPR compliant.
But why after all these years are we hearing about the GDPR again?
Why GDPR Matters — You Have To Care
On January 20, 2022, a court in Munich, Germany, ruled that a website owner must pay €100 in damages to an undisclosed website visitor. The damages involved sending the visitor’s IP address to Google through the server request for Google Fonts. This means that any European citizens who visit your website and request Google Fonts from Google’s servers are visitors who have the right to sue you for violating their data.
To drive the point home, the GDPR applies outside of Europe. The whole point of the GDPR is to safeguard the personal information of European citizens. So even if you’re from the USA or any other country in the world, if someone from the European Union visits your site, you’re still accountable for any infringements made against the GDPR and your EU visitors.
These infringements could result in getting sued and being fined up to €20 million or 4% of your global market share. Whichever is higher.
Why Using Google Fonts Violates GDPR
It can be confusing to understand why using Google Fonts, which should just be a way to style your site, breaches the GDPR privacy law. To help boil it down to something simple, we’ll go through the step-by-step process of how Google Fonts violates the GDPR.
Here’s what happens when someone opens your website:
A visitor lands on your website
In order to display the content visitor wants to see, he has to download the website
Google Fonts is part of your website but you don’t have the font file hosted locally
So, the visitor has to request the Google Fonts file from Google’s servers.
In order for Google to know where to deliver the desired font, it uses visitor’s IP address
The Google server records the IP address of your visitor and sends them the Google Font file.
Your website loads with the provided Google Fonts file. But, Google doesn’t delete your visitor’s IP address.
If someone from the European Union is a website visitor, then Google storing the European citizen’s IP address breaches the GDPR privacy act.
To rephrase: Whenever a visitor opens a page on your website, the visitor’s IP address is also sent to Google. Why? Because Google needs the visitor’s IP address to send the Google Fonts files to your visitor.
So, can you just keep a copy of Google Fonts files on your website host to avoid Google connecting to your visitors? Well, yes you can.
Alternative Solutions To Using Fonts While Being GDPR Compliant
As long as Google doesn’t get the IP address of your visitors through Google Fonts, your website is in the green zone.
Here’s what you can do to avoid getting fined or sued for violating the GDPR with Google Fonts.
Host Google Fonts Locally
Locally saving the Google Fonts resources to your website server eliminates the need to get the resources from Google’s servers.
You can do this by downloading the Google Fonts files and uploading it to your web host. After that, you’ll have to add some rules to your CSS files regarding the font-face of your pages.
This can be a bit technical, especially if you don’t have any CSS or coding experience in general.
Use The OMGF WordPress Plugin
For those of you who are using WordPress, the best plugin for this purpose is OMGF.
OMGF automatically downloads the Google Fonts your WordPress site uses and generates a stylesheet for it. The sheet is integrated into your site’s header and loads locally together with everything else hosted on your web server.
Keep note that OMGF will work for most sites, but there are some themes and plugins that make it difficult to retrieve Google Font data. If you have difficulty with this on your site, you can try the OMGF Pro version or skip to the next two plugins on this list.
You can search for other similar plugins, but we chose OMGF because it was developed by a reputable source that spotted this issue years ago.
Use System Default Fonts
Finally, the simplest solution you can revert to is to simply use the default system fonts. These fonts are already stored locally in your WordPress servers, so your visitors will no longer have to connect with Google.
Granted, the obvious downside to this is the lack of creative freedom with fonts and limited choices.
Can you use Google Fonts and be GDPR compliant?
Yes, you can use Google Fonts and be GDPR compliant. The only time Google Fonts breaches the GDPR terms is when served via their content delivery network and no permission to send Google your website visitors’ IP addresses has been received.
If you can severe the need for your visitor to expose their IP address to Google, you can keep using Google Fonts on your website. To severe the connection between Google and your visitor, you can either locally host Google Fonts on your own website or revert to using WordPress’ system default fonts
Conclusion
The GDPR is a European law that protects the information of EU citizens. The law applies to websites all around the world, as long as it involves the private data of European citizens. Google Fonts breaches the GDPR because EU visitors have to send Google their IP address to ask for Google Fonts files when loading your website.
By locally hosting Google Fonts on your website, you’ll eliminate the need for your visitors to give Google their IP address. Meaning that yes, it is still possible to use Google Fonts and not directly violate GDPR.
Joining some of the best Facebook groups for SysAdmins and developers is a great way to learn, improve, and stay up-to-date with the industry.
Any developer with more than a year of experience will know for a fact that tech is always evolving. With so many popular tools, languages, libraries, and other technologies out there — it’s impossible to learn everything on your own. That’s why joining a Facebook group with like-minded developers is a great idea.
In this article, we’ll be going over the best Facebook groups for SysAdmins and developers.
Let’s get started — here’s is the breakdown of some of the best Facebook groups for SysAds and Devs:
What the group is about: The RunCloud Community is a Facebook group originally made for RunCloud users and developers. It’s a medium-sized group with a lot of active members.
The group is only available for active RunCloud users and is mainly composed of posts about:
RunCloud news
Industry news for DevOps and SysAds
Personal and work-related questions
RunCloud Community is one of the most active Facebook groups on this list, despite being just 2,300 members. This makes it a great choice for developers who are looking for quick replies and a group that’s full of new content — without the fear of never seeing the same developer again.
It’s a tight-knit community with a lot to offer both beginners and veterans in this field, especially for developers and SysAds that use RunCloud.
So in case, you decide to go with RunCloud as your web hosting company, we’re 100% certain that you will find amazing support in our community of developers, sysadmins, and engineers!
Why you should join the group: RunCloud Community is a great place to learn about RunCloud, DevOps, and SysAds together with a group that practices the same technology as you. If you’re a RunCloud user, then this would be the best place to grow your skills and network with other developers or system admins.
What the group is about: The Black WPT group is a professional, helpful and enthusiastic community for web developers, programmers, engineers, and techs. This group is arguably the most active one on this list, with nearly 500 posts from December 2021 alone.
The Black WPT group places heavy emphasis on networking, mentorship, collaboration, resource sharing, and communication. Attached below are some examples of what the group posts about:
Open discussion about how the tech industry and its practices relate to black people
Safe space for candid communication and reviews of tech practices or cultures
Questions and discussions about tech news
The group is private and requires you to answer several membership questions, as well as have a profile picture that shows your face. After getting approved, you can create an introductory post: sharing your goals, aspirations, why you joined the group and anything else that seems appropriate.
Black WPT is a very helpful and collaborative community filled with several useful resources, has different mentorship programs, and is focused on making a strong network connection for every member.
Why you should join the group: If you are a member of the black developer community and like to engage with other black developers or sysadmins, then Black WPT is the perfect place for that. It’s an active group with a lot to offer newbies and vetted professionals — especially those who want to talk about how technology affects black lives.
What’s the group is about: The group discusses info about Cloud, Database, VMware, Linux, and Windows. It’s a huge group with tens of thousands of members, but the members themselves are not very active.
Although this Facebook group has a lot of members and was only recently created, it’s quite inactive. We’re only adding this to the list because there are still regular posts that new users can sift through (granted they’re all promotional content).
You can expect posts like:
Industry news
Self-promotional articles about different technologies
Tutorials and guides
Links to webinars, courses, and online lectures
Just don’t expect to find anyone who’ll reply to your questions or even entertain your comments. The group is filled with people who post their own content and don’t do anything more..
Why you should join the group: If you aren’t looking for an active community, but more of a group with a plethora of possibly interesting articles, courses, or guides to help you. Then this is a good place to find those resources.
What the group is about: Unix DevOps is a group that focuses on AIX, HP-UX, IRIX, Solaris, Tru64, Linux, Darwin, BSD, and Minix. It’s a simple group with relatively idle activity.
Although Unix DevOps isn’t the most active group in this list, it’s good to note that spamming and advertisements are a bannable offense. This means that even though they’ve only had 19 posts as of December 2021, those posts were probably questions or healthy discussions.
Now, the group was created around 13 years ago, so most of the 9,000 members may not even be active at all. Still, it’s always worth a shot since you may be able to find some users who are still frequent contributors to the group.
Why you should join the group: Unix DevOps is an old group, but with some active members who can provide value to both beginners and experts alike. It’s a great place to find a small community to who you might be able to talk on a more personal note, rather than just being limited to comments and posts.
What’s the group about: Full Stack Developers /DevOps / Software Designers and Architects is a simple community of professional developers with various backgrounds.
Besides other groups we mentioned on this list, this group has pretty much everything — learnings, experiences, troubleshooting, job opportunities, and sharing industry-related news.
However, just like any other group with thousands of members, most of them are inactive, but the ones that are active, post really good content.
Cheap or free courses, experiences from members, or even community helping you to solve the problem — you can find all of it here.
Why you should join the group: The first thing we noticed is how posts are heavily moderated — admins don’t allow all kinds of content posted, but very specific purpose-driven posts. That means the content in the group is good quality, and you can always learn something new, or in the worst-case scenario have a good laugh over a meme!
What the group is about: This Vietnamese group is a great resource for Vietnamese developers. It’s an active group, with same-day comments and replies.
Disclaimer: If you can’t speak Vietnamese, we suggest moving on to the next Facebook group.
Docker Vietnam is an engaging group for Vietnamese developers, but anyone who can speak Vietnamese is free to join. Here are some posts you can expect from Docker Vietnam:
Job or hiring posts
Online courses, lectures, or guides
Industry news
Questions about errors and general developer support
The group has more posts about questions, with several corresponding helpful comments, than it does promotional posts. It’s amazing to find a group this active, without all the advertisements. Anyone speaking Vietnamese would benefit from this Facebook group.
Why you should join the group: Vietnamese developers will benefit from local news, local job opportunities, and even finding friends that you might be able to meet in real life.
What the group is about: Helping highly motivated people break into the software development field and become rock-star developers. The group is all about helping fellow developers and promoting the group’s Software Development Mastermind course.
This Facebook group is basically a community of developers who are followers of Andy Sterkowitz and his software development course.
Although that sounds like a cult, the group is very particular about posting promotional content and spam. The group itself looks to be quite active, especially considering it’s developed more than 50,000 members despite the group only forming last 2018.
One shining quality of this group is that you can expect only one kind of post here: software development questions and problems.
You won’t find any ads in this Facebook group, the rules state that it’s strictly a group where developers can learn from each other and improve. It also helps that all the members and posts have to be approved by the admin before being accepted.
Why you should join the group: This Facebook group is all about software development problems, questions, and queries. You won’t find jobs here, people selling courses, and other types of advertisement. Developers who join this group will be greeted with the good old “why isn’t this working?” and all that fun stuff.
What the group is about: The DevOps | Knowledge Sharing & Jobs is an active group that’s full of opportunities and job listings for developers and system admins. They also have online training, courses, and workshops that are self-promoted.
For a group that was created 4 years ago, having 2,600 members is a good indication for a slowly growing, but active community. One of our favorite features from this group is their implementation of #hashtags to help organize the posts and make it easier to sort by.
Now, the group mainly have two types of posts:
Promotional content like workshops and boot camps
Job listings
There aren’t a lot of question-and-answer posts here, but you’ll find tons of opportunities if you’re job-searching. Since it is also a public group, you can easily join without having to go through any membership tests or have to wait for an admin to let you in.
Why you should join the group: The group offers a lot of job opportunities for rising developers and even vetted professionals. You should join the group if you’re looking for work and want to see the market for your skills. You can even look around and keep note of the highest-paying jobs or the ones that are most in-demand.
What the group is about: This Facebook group is dedicated to software developers and engineers. It’s a mixture of programming in C, C++, C#, Java, Android, PHP, JavaScript, MySQL, HTML/5, CSS/3, Bootstrap, JQuery, and more.
I am a Software Engineer is a weird name to name a group, but it embodies what this Facebook group is all about. Regardless of what language or framework you’re studying, chances are that this group can answer your questions and teach you more about your technology.
Here’s what posts you can expect from this Facebook group:
English only posts (strictly in the rules)
Question and answer posts about technical challenges and difficulties
Industry news
The group mainly focuses on the development side of things and doesn’t allow for promotional content like jobs or advertisements. With almost 100,000 members, it might be worrisome to keep track and know everyone. The group’s activity levels aren’t anything to boast about, with only 125 posts from December 2021.
Just the right amount of activity for a small community in a large group.
Why you should join the group: if you’re looking for a group that can answer your questions and is a safe place for you to have discussions, then I am a Software Engineer is a great place to start. You won’t have to deal with any promotional content, plus you’ll get to learn more about different technologies from one group!
What the group is about: Software developers and SysAds who use Google Cloud Platform and Kubernetes. The group is also open to other technologies, especially the ones that have a direct impact on GCP or Kubernetes like AWS.
Kubernetes and Google’s cloud platform are two of the biggest systems in the world right now. For SysAds and developers who are trying to jump on this bandwagon, this Facebook group has a lot to offer when it comes to technical resources.
You can find all sorts of posts here, like:
Question and answer posts for developers and system admins
Online courses, workshops, and boot camps (only a few of these are present)
Technical articles explaining high-level concepts of Kubernetes as well as other technologies
Industry news
The group lets you filter through all of the posts with a #hashtag system as well, and that’s always a plus. It has a designated tab for questions too, which is a godsend feature for separating technical questions from everything else that’s posted in the group.
Why you should join the group: In short, if you’re thinking about learning Kubernetes and Google Cloud Platform, this group is a great place to hang out. You can get job opportunities, technical articles about Kubernetes, online courses with discounts, and question-and-answer posts that are great for discussion.
What the group is about: The Computer Science/Software Engineering Conferences Facebook group is exactly what it sounds like — a group for conferences.
If you’re looking for a consistent stream of online events and conferences that you can attend, this is the place to start. The Facebook group requires all posts to follow a strict format, which helps organize all the events and makes things skimmable for members who are uninterested.
Although the group only offers conferences, you can still find all sorts of topics at work here. From AI safety all the way to Robotics and Smart Cities, you won’t be worried about not having enough conferences to attend.
The best part of this group is how diverse it is. There are tons of submissions from India, Switzerland, and even the UK.
Some conferences even allow users to submit papers for review, coupled with some formal benefits and perks if you win anything important.
Why you should join the group: Research papers and theses are important for developers who are taking their masters. Joining conferences to find out the latest and greatest advancements in technological developments can be a huge strength to your skills and ability to adapt to future technologies.
What the group is about: The JavaFX Software Developers & Engineers group is about all things JavaFX and Thick Client Java.
Java is a language that’s been around for a long time and still looks to be quite a force in the programming world. The JavaFX Facebook group is a great resource for question-and-answer posts!
The group bans all kinds of advertisements and job postings, so all you see in the group are technical questions that are java-related. It’s a great place to have a casual conversation with a fellow developer or to ask for help with some of your demanding problems.
As the cherry on top, the group also lets you sort through topics by #hashtags. Granted it looks like their hashtags are a bit outdated.
Why you should join this group: Java is still one of the biggest languages in the programming world and this Facebook group is a great place to start asking questions.
After Action Report – Why Should You Join Developer Groups?
Despite the criticism it now gets, Facebook is still a great place to connect with like-minded people in your industry – stay tuned with what’s going on in the industry, what other respected developers are up to & more.
We recommend picking and choosing wisely. Communities are great but they’re also incredibly time-consuming. What’s your personal favorite Facebook group? Let us know in the comments, join the conversation, and don’t forget to join the RunCloud Community.