Category: Server Management

  • How to Block AI Crawlers (GPTBot, ClaudeBot, PerplexityBot, Bytespider) on Your Server in 2026

    How to Block AI Crawlers (GPTBot, ClaudeBot, PerplexityBot, Bytespider) on Your Server in 2026

    AI crawlers can consume bandwidth, increase server load, and collect your content without sending visitors back to your website. Blocking them isn’t as simple as adding a few lines to robots.txt, since not every crawler respects those instructions.

    You also need to distinguish between different types of AI bots.

    • Training crawlers such as GPTBot, ClaudeBot, and Bytespider collect content for AI development.
    • User-triggered agents, such as ChatGPT-User and Perplexity-User, may help your pages appear as cited sources in AI-generated answers.

    Blocking every AI-related user agent could reduce your visibility as well as your server traffic.

    This guide explains how to control AI crawler access without accidentally blocking legitimate search engines or useful AI referral traffic. You will learn how to:

    • Identify the AI crawlers you may want to block
    • Set rules in robots.txt
    • block requests at the NGINX server level
    • Configure Cloudflare’s AI crawler controls
    • Test your rules and confirm they work

    By the end, you will have a layered approach that gives you greater control over who can access your content and how much server capacity automated crawlers consume.

    Why robots.txt Alone Won’t Stop AI Crawlers

    AI-related crawlers serve several different purposes. Some collect content for model training, while others build search indexes or retrieve pages in response to a user request. High-volume crawling can consume bandwidth and server resources, but the impact depends on the crawler, its request rate, your caching configuration, and your application stack.

    This is exactly why you should identify the crawler and its purpose before deciding whether to block it.

    While adding a disallow directive to your robots.txt file is the traditional method for managing bots, it is ineffective against these bots because it runs on an honor system. Aggressive scrapers, poorly configured rogue bots, and many proprietary data brokers routinely ignore robots.txt entirely.

    If you want to protect your infrastructure and intellectual property, you need to implement server-level blocking using NGINX or implement other firewall measures. This allows you to intercept these unauthorized requests at the server level, where you can drop the connection by returning a 403 Forbidden response before the request ever reaches your web application or consumes your server’s computing resources.

    Suggested read: How To Use ModSecurity and OWASP CRS For Web App Firewall (WAF) To Secure Your Website

    Which AI Bots Should You Block in 2026?

    If you want to protect your server resources and intellectual property, you should prioritize blocking the following primary training crawlers.

    Targeting High-Volume AI Training Crawlers

    The following control tokens and user agents are associated primarily with AI training, model development, or large-scale dataset collection:

    • GPTBot
    • ClaudeBot
    • Bytespider
    • Amazonbot
    • Applebot-Extended
    • Google-Extended
    • Meta-ExternalAgent
    • CCBot

    Claude-SearchBot should be considered separately, as Anthropic uses it to support search results rather than for general model training. 

    PerplexityBot is also separate from bulk training crawlers. Perplexity states that it uses PerplexityBot to build its search index and surface links in Perplexity results, not to train foundation models. Blocking it may prevent your pages from appearing in Perplexity search results. 

    block AI crawlers

    Evaluating Real-Time AI Search Agents

    Real-time fetchers operate under a different set of rules than bulk scrapers. Instead of indiscriminately harvesting data, these digital assistants visit your server only when a human query explicitly triggers them to fetch your content. This makes them an important component for maintaining visibility in modern, AI-driven search results.

    Integrating with these tools can be a good marketing move, but it requires balancing visibility against your specific privacy concerns.

    • ChatGPT-User
    • Perplexity-User
    • OAI-SearchBot
    • Claude-User

    Allowing these agents enables AI services to retrieve and cite your current content in response to user requests. It doesn’t guarantee that your page will be selected, cited, ranked prominently, or visited by the user. However, if your domain contains sensitive data or strictly paywalled content, you should weigh your goals carefully. If you prefer total privacy over AI search exposure, block these alongside the bulk training bots.

    Anthropic uses separate user agents for different purposes. ClaudeBot crawls content for model development, Claude-SearchBot supports Claude’s search results, and Claude-User may retrieve a page in response to an individual user’s request. 

    Suggested read: How to Use Cloudflare Firewall Rules to Protect Your Web Application

    Will Blocking AI Crawlers Hurt Your Google Rankings?

    Blocking AI crawlers won’t harm your traditional Google Search rankings if you implement your security blocks correctly and target the right bots. Google designed its ecosystem to allow web admins to opt out of generative AI training without sacrificing their organic SEO visibility.

    Google uses the Googlebot user agents to crawl, index, and rank your pages in standard search engine results. For AI training and generative model grounding (such as feeding live search context to Gemini), Google uses a separate control token known as Google-Extended. Disallowing Google-Extended tells Google not to use your content for training and grounding in certain Gemini systems. Google states that Google-Extended doesn’t affect inclusion or ranking in Google Search.

    Google-Extended doesn’t control AI features that form part of Google Search itself. Access to those features is governed through Googlebot and standard Search controls such as nosnippet, data-nosnippet, max-snippet, and noindex.

    However, there is a massive technical caveat for web admins: unlike most web scrapers, Google-Extended doesn’t have its own separate HTTP request user-agent string. The physical crawling is still executed using standard Google crawler user agents, meaning the Google-Extended token functions purely in a control capacity within your robots.txt file.

    Because the phrase “Google-Extended” will never appear in your server’s incoming HTTP requests, you can’t block it at the NGINX or Cloudflare WAF level using a simple User-Agent string match. You must use the traditional robots.txt opt-out method for Google’s AI training and rely on server-level blocks for other companies’ bots.

    Because of this shared infrastructure, you must be extremely cautious when writing your NGINX rules or WAF policies. Using broad wildcards like *Google* or *bot* to stop scrapers will result in a catastrophic SEO failure, as you will accidentally block the legitimate Googlebot, Googlebot-Image, and Googlebot-Video indexers that your business relies on.

    Suggested read: Linux Server Hardening: 11 Steps to Secure a Production VPS 

    Implementing a Multi-Layered Strategy for AI Bot Management

    Relying on a single method for blocking unwanted AI traffic can leave your infrastructure exposed. If you want to build a truly resilient defense, it is best to implement a layered strategy that covers public directives, server-level interception, and network-edge filtering. This ensures that if one mechanism fails or is ignored, your subsequent layers act as a fail-safe to protect your server resources.

    Layer 1 – Block AI Bots with robots.txt

    To set up your first layer of defense, create or edit a simple text file named robots.txt and place it in the root directory of your website (usually the public_html or htdocs folder). 

    To edit your robots.txt, you can simply open your web host’s file manager, create this file, and copy-paste the code below to ask all major 2026 AI training bots to stay away from your entire site:

    User-agent: GPTBot
    User-agent: ClaudeBot
    User-agent: Bytespider
    User-agent: Amazonbot
    User-agent: Applebot-Extended
    User-agent: Google-Extended
    User-agent: Meta-ExternalAgent
    User-agent: CCBot
    Disallow: /

    Why robots.txt alone is not enough (RFC 9309 is advisory)

    While adding a robots.txt file is the industry standard first step, it is important to understand that it operates entirely on an honor system. RFC 9309 standardizes how crawlers should interpret robots.txt, but it doesn’t provide authentication or access control. Compliant crawlers follow its directives voluntarily, while another client can still request the same URL directly. 

    Reputable companies like Google and OpenAI currently program their bots to respect these rules, but aggressive scrapers, rogue data brokers, and malicious AI crawlers will completely ignore your robots.txt file and scrape your content anyway. Therefore, relying on this file alone leaves your server vulnerable to heavy automated traffic, so you must implement server-level blocking as well.

    Layer 2 – Block AI Bots at the NGINX Layer

    If you search for tutorials on how to block bots using NGINX, almost every old guide will tell you to place an if statement directly inside your server block (for example, if ($http_user_agent ~* "GPTBot") { return 403; }).

    Complex rewrite logic inside an NGINX if block can produce unexpected results, particularly when it is placed inside a location block. A simple condition that performs only a return is much less problematic.

    If you want to block traffic, you should use the map directive, which is a better and highly optimized alternative to if statements. When a visitor sends a request, NGINX checks their User-Agent exactly once against this map and assigns a variable (like a simple true/false flag). Because it is evaluated outside the complex location rules, it is incredibly fast and can automatically apply to every single website hosted on your entire server without repeating code.

    To implement this on your server, you will need to access your global NGINX configuration (often located in /etc/nginx/conf.d/) and create a new file named ai_bot_map.conf. Paste the following map directive into that file, which flags the 2026 AI bots with a 1 (true) if they match, and a 0 (false) for normal human visitors:

    map $http_user_agent $is_ai_bot {
        default 0;
        "~*GPTBot" 1;
        "~*ClaudeBot" 1;
        "~*Bytespider" 1;
        "~*Amazonbot" 1;
        "~*Meta-ExternalAgent" 1;
        "~*CCBot" 1;
    }

    Don’t add Google-Extended or Applebot-Extended to this map. They are robots.txt control tokens rather than independent crawler User-Agent strings. Instead, use robots.txt to control them. 

    Choosing the response code

    After identifying the crawlers, you need to decide how your server should handle them when they arrive. Here is a list of appropriate HTTP status codes you can return when rejecting a web request.

    403 Forbidden 

    Returning a 403 Forbidden status is the most common and standard choice because it clearly communicates to the bot that the server understood the request but is actively refusing to fulfill it. 

    444 (Nginx-specific, drops the connection with no response)

    If you are dealing with an incredibly aggressive bot that is hitting your server thousands of times a minute and draining your bandwidth, you should use NGINX’s special 444 response code. Unlike standard HTTP codes, 444 doesn’t send any headers or error pages to the bot; it simply closes the connection immediately. This can reduce the response work and outbound data associated with rejected requests, although NGINX must still accept and process the connection far enough to match the rule. 

    410 Gone (signals permanent removal, deters re-crawls)

    Another good option is to return a 410 Gone status code, which signals to the AI crawler that the resource it is looking for has been permanently deleted and won’t be returned. Use 410 Gone only when the requested resource has been permanently removed. Don’t return 410 solely as a bot-blocking technique for pages that remain available to other visitors. Use 403 or 444 when you are refusing access based on the requester rather than the state of the resource. 

    Logging Blocked Requests for Audit

    You shouldn’t blindly block traffic without keeping a record of what your server is doing. You can instruct NGINX to log blocked bot attempts to a separate file so they don’t clutter your main website analytics.

    By adding a simple directive like access_log /var/log/nginx/blocked_ai_bots.log; inside the block that returns your 403 or 444 code, you create an isolated, easily readable audit trail where you can safely monitor which AI companies are trying to harvest your data.

    Suggested read: How to Block IP Address Using WordPress .htaccess File to Stop Bad Visitors

    Layer 3 – Block AI Bots at the Edge with Cloudflare WAF

    If you manage your DNS through Cloudflare, you can easily intercept AI bots at the network edge before they ever reach your web server by configuring their built-in bot policies. Cloudflare has updated its approach to AI traffic by introducing new features that categorize bots into three distinct behaviors:

    • “Search” (crawlers indexing content to answer queries later and drive referrals)
    • “Agent” (real-time automated bots acting on a human’s behalf, like chat fetch bots) 
    • “Training” (scrapers permanently absorbing your data to train large language models).

    Configure AI Bot Policies

    Cloudflare provides two related ways to manage AI traffic:

    In AI Crawl Control, open the Crawlers tab to review individual crawlers and set each one to Allow or Block.

    For broader behavior-based controls, open the Security settings and configure how Cloudflare handles Search, Agent, and Training traffic. Each category can be allowed, blocked across the domain, or blocked only on pages where Cloudflare detects advertising.

    For each type of bot, you can choose to “Block (on all pages),” “Allow (do not block),” or select “Block on pages with ads,” which uses Cloudflare’s automated detection to block bots strictly on monetized pages while leaving the rest of your site accessible.

    Additionally, from September 15, 2026, Cloudflare will automatically block ‘Training’ and ‘Agent’ bots on pages with ads for all new domains, while keeping Search bots allowed. Cloudflare’s updated system will apply the most restrictive rule to multi-purpose crawlers, such as Googlebot or Applebot, that crawl for both search indexing and AI training.

    From 15 September 2026, Cloudflare plans to evaluate multi-purpose crawlers against all their declared behaviors. A crawler that combines Search and Training may therefore be affected by your Training rule even when Search traffic is allowed.

    Review Cloudflare’s displayed outcome before applying category-wide rules, particularly where a crawler also supports conventional search discovery.
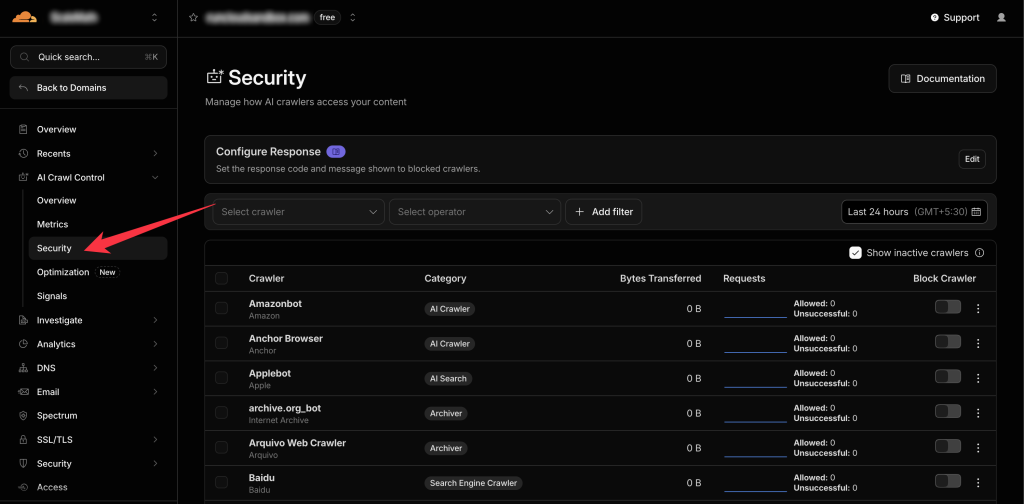
    cloudflare AI crawlers block

    Before enforcing broad blocks across your entire domain, you can also establish governance rules using Cloudflare’s AI Audit tools. The AI Audit dashboard provides visibility into which AI services are scanning your website, allowing you to clearly see the volume of requests from specific bots and understand how they interact with your content.

    By analyzing this traffic, novice users can make data-driven security decisions, such as explicitly allowing search-focused tools that drive referral traffic, while firmly rejecting exploitative scrapers.
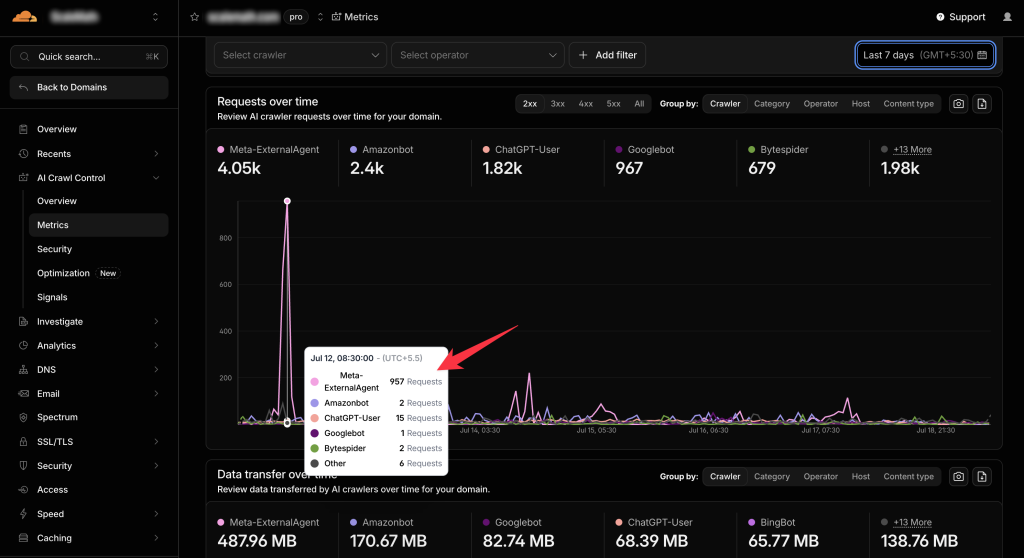
    AI traffic in cloudflare

    Future of AI Content Monetization

    Cloudflare is also testing Pay Per Crawl, which is currently in closed beta. Participating site owners can set a price and choose whether to allow, block, or charge supported crawlers.

    A crawler that doesn’t provide the required payment information receives an HTTP 402 Payment Required response. Availability and crawler participation remain limited, so this shouldn’t yet be treated as a general replacement for blocking.

    Suggested read: What is Fail2Ban with Setup & Configuration? (Detailed Guide)

    Verify that NGINX Blocking is Working

    After deploying your NGINX mapping rules, you shouldn’t simply assume they are functioning perfectly. Server-level configurations are powerful but unforgiving; a minor syntax error could potentially block legitimate traffic or fail to stop the unwanted bots you are targeting.

    You need to validate your setup to ensure your defenses are correct and not causing collateral damage to your site’s availability. Follow the steps below to verify that your block list is successfully intercepting requests.

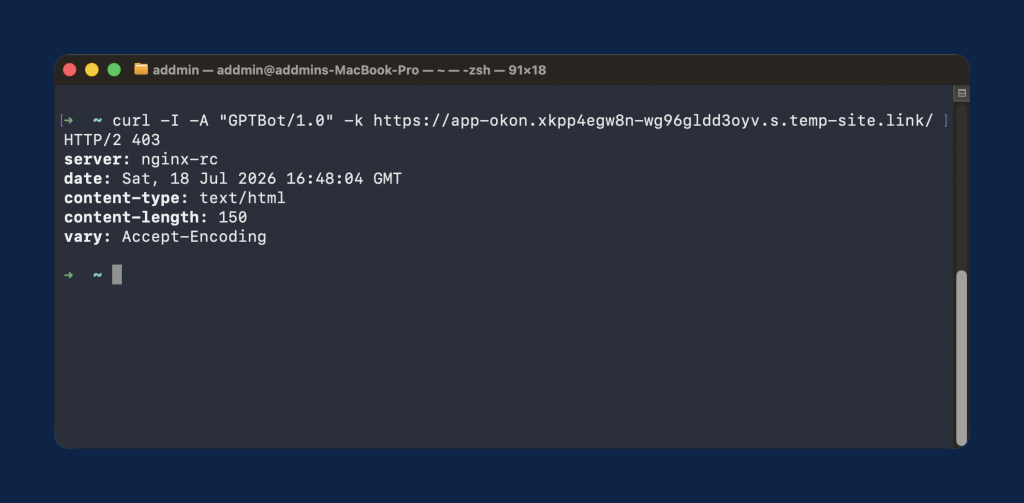
    Curl with a faked GPTBot User-Agent and expect 403

    The easiest way for a novice to test if their server block is working is to pretend to be an AI bot using the command line. Open your computer’s terminal (or Command Prompt) and type the following command exactly:

    curl -I -A "GPTBot/1.0" https://example.com

    This command sends a fake request to your site claiming to be GPTBot; if your NGINX rules are working correctly, your terminal will print out an HTTP/2 403 Forbidden error (or return an empty reply if you used the 444 code), proving the block is active.
    Tail NGINX access logs and grep for the bot user-agents

    To watch your server actively defend itself in real-time, you can filter your live server logs for specific bot names. Log in to your server via SSH and run the command:

    tail -f /var/log/nginx/access.log | grep -i "gptbot"

    The tail -f command streams the log file live, while grep filters out everything except requests containing the word “gptbot”, allowing you to sit back and watch the exact moment the AI crawler hits your server and gets rejected.

    Cross-check with Cloudflare bot analytics

    Finally, you can verify your edge-level blocks by reviewing your visual data within the Cloudflare dashboard. Navigate to Security and then click on Events to see a complete log of all web traffic that triggered your WAF rules.

    By filtering this list by “User Agent” or specifically looking at the “Block AI bots” rule metrics, you can visually confirm how many thousands of requests from scrapers like ClaudeBot and Bytespider were successfully dropped by Cloudflare’s network before they ever touched your origin server.

    Final Thoughts: Take Control of Your Server Traffic

    In this article, we have discussed how to manage custom NGINX configurations and protect your websites. It might sound overwhelming, but RunCloud makes the entire process effortless.

    With RunCloud, you can easily manage and deploy sites on your own cloud infrastructure without needing to be a command-line expert. Its highly intuitive dashboard allows you to make quick NGINX updates and instantly reload your server to deploy those security rules across all your hosted applications in just a few clicks.

    Whether you’re hosting a single high-traffic web application or managing dozens of client sites, having complete, frictionless control over your hosting environment is important. 

    Start using RunCloud today.

    Should You Block AI Crawlers? Common Questions Answered

    Will blocking GPTBot or ClaudeBot affect my Google search rankings?

    No, blocking AI crawlers like GPTBot or ClaudeBot won’t negatively impact your Google search rankings. These bots are completely separate from Googlebot, which is the scraper responsible for indexing your site for search engine results. Blocking AI scrapers only prevents your content from being scraped to train their large language models.

    What is the difference between ClaudeBot, Claude-SearchBot, and Claude-User? 

    ClaudeBot crawls web content for Anthropic’s model development. Claude-SearchBot supports Claude’s search results, while Claude-User may retrieve a page in response to an individual user’s request.
    You may choose to block ClaudeBot while allowing Claude-SearchBot and Claude-User if you want to limit training access without removing your content from Claude’s search and user-directed retrieval features.

    Can AI crawlers bypass robots.txt and NGINX blocks?

    Reputable AI crawlers will respect robots.txt directives, but rogue scrapers or malicious bots can easily ignore them. NGINX blocks are significantly more powerful because they intercept and drop the connection at the server level based on the User-Agent or IP address before the site even loads. Custom NGINX rules provide stronger enforcement than robots.txt because they can reject matching requests before they reach the application. User-Agent matching is not foolproof, since another client can spoof a crawler’s name.
    For stronger protection, combine NGINX rules with rate limiting, request logs, verified crawler IP ranges where available, and edge-level bot controls such as Cloudflare.

    Should I block ChatGPT-User and Perplexity-User the same way as I do for GPTBot?

    It depends on your goals, as GPTBot crawls your site globally for AI training, whereas ChatGPT-User and Perplexity-User act as real-time search agents triggered by active user prompts. Blocking these “User” bots will prevent those AI tools from summarizing or linking to your live pages in their chat interfaces. If you want your site to be cited as a live source in AI-generated answers, you should leave user bots alone and block only training bots.

    Does blocking Google-Extended affect Googlebot or Google Ads?

    No, blocking Google-Extended only prevents your site’s content from being used to train Google’s generative AI models, such as Gemini. It operates entirely independently from traditional search indexing and advertising systems. Disallowing Google-Extended doesn’t affect your inclusion or ranking in Google Search. It is separate from the Googlebot controls used for conventional Search crawling.
    Avoid blocking broader Google user agents or IP ranges at the server or firewall level, since an overly broad rule could interfere with Google services that rely on those crawlers.
  • How to Disable WP-Cron (wp-cron.php) on WordPress

    How to Disable WP-Cron (wp-cron.php) on WordPress

    Are your scheduled posts failing to publish, or is your website feeling slow? If you answered yes, then you might be falling victim to the hidden inefficiency of WordPress’s default background task system. 

    WP-Cron is a “virtual” crontab that triggers only when someone visits your site, but this traffic-dependent virtual cron job often leads to slow page loads, database bloat, and missed automated tasks.

    In this guide, we will walk you through WP-cron’s drawbacks and show you how to replace WP-cron with a high-performance manual cron job. 

    What is WP-Cron in WordPress?

    WP-Cron is a virtual cron job system built into WordPress that triggers time-based background tasks. This is different from a real cron (or system cron), which automatically triggers on a scheduled interval. The WordPress cron functionality only executes when a user visits your website. 

    Limitations and Common Issues with WP-Cron

    Although the built-in WordPress cron functionality is convenient for small sites, it has several major flaws:

    • Traffic Dependency: If no one visits your site, your scheduled tasks (such as publishing a post) will not run.
    • Performance Degradation: Every page load triggers a task check, adding latency and consuming server CPU.
    • Resource Spikes: During high traffic, hundreds of users may trigger the wp-cron.php file simultaneously, leading to server timeouts.
    • Reliability: Background tasks like email notifications or theme updates may hang if the PHP process times out during a heavy page request.

    For these reasons, most WordPress users disable the built-in WordPress cron jobs and replace them with a system cron job.

    Suggested Read: What Is WP Cron & Setting Up Server-Side Cron Jobs

    When Should You Consider Disabling WP-Cron?

    ScenarioWhy you should disable WP-Cron
    High TrafficPrevents multiple users from triggering overlapping cron processes.
    Scheduled TasksEnsures mission-critical tasks (backups, newsletters) run exactly on time.
    Slow Site SpeedReduces server load by removing the check-on-load requirement.
    E-commerce StoresEnsures WooCommerce inventory and order emails process reliably.

    Suggested Read: How to Create and Manage Cron Jobs on Linux

    How to Disable WP-Cron (wp-cron.php) in WordPress

    Note: If you’re using RunCloud, you can skip this step. Jump to the section below (“Method 1: Use RunCloud Server Cron Functionality”) to see how to do it with a single click.

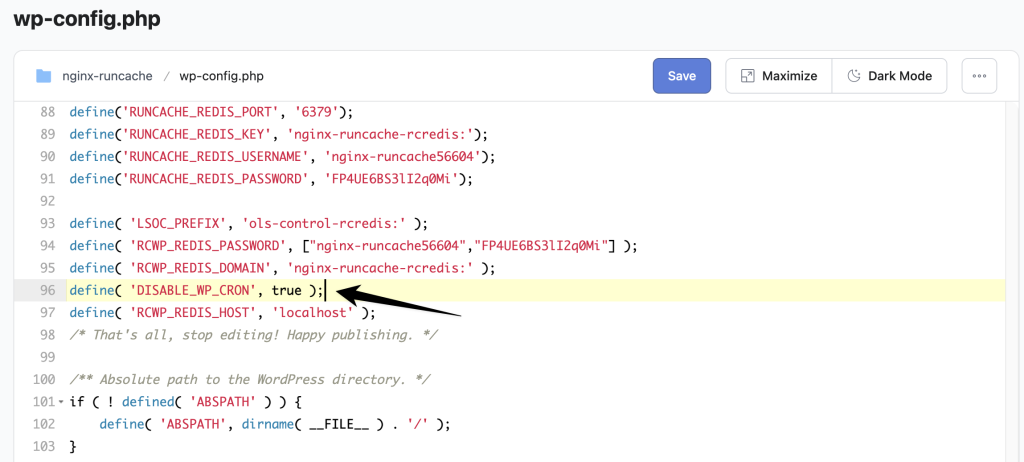
    To stop the default behavior, you must set the DISABLE_WP_CRON constant in your WordPress configuration.

    1. Log in to your hosting provider’s dashboard and open the File Manager.
    2. Locate the wp-config.php file, right-click it, and select the Code Editor.
    3. Find the line that says /* That’s all, stop editing! Happy publishing. */.
    4. Paste the following code directly above that line: 
    define( 'DISABLE_WP_CRON', true );
    1. Save your changes and close the editor.
    disable wp-cron in wordpress

    Suggested Read: 10 Best WordPress Management Tools To Easily Manage Multiple Websites

    How to Set Up a Real Cron Job for WordPress

    Once the internal cron functionality is disabled, you must replace it with a real cron job to make sure your site functions correctly.

    Method 1: Use RunCloud Server Cron Functionality (Recommended)

    The RunCloud dashboard provides a professional, “one-click” way to handle this without ever touching a command line or configuration file.

    1. Log in to your RunCloud dashboard and select your Web Application.
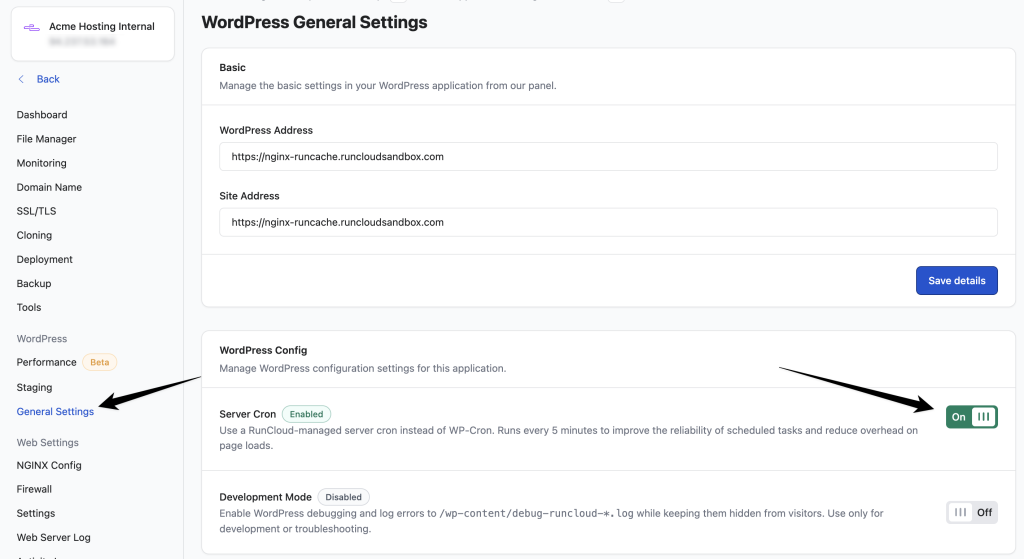
    2. Navigate to the General Settings tab in the sidebar menu.
    3. Locate the WordPress Config section on the page.
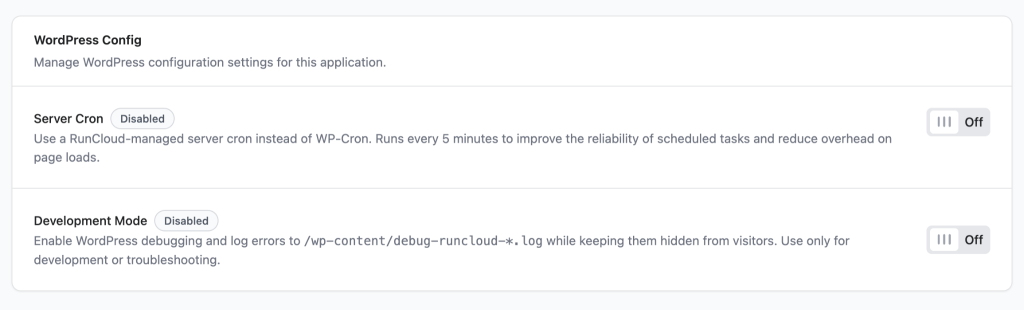
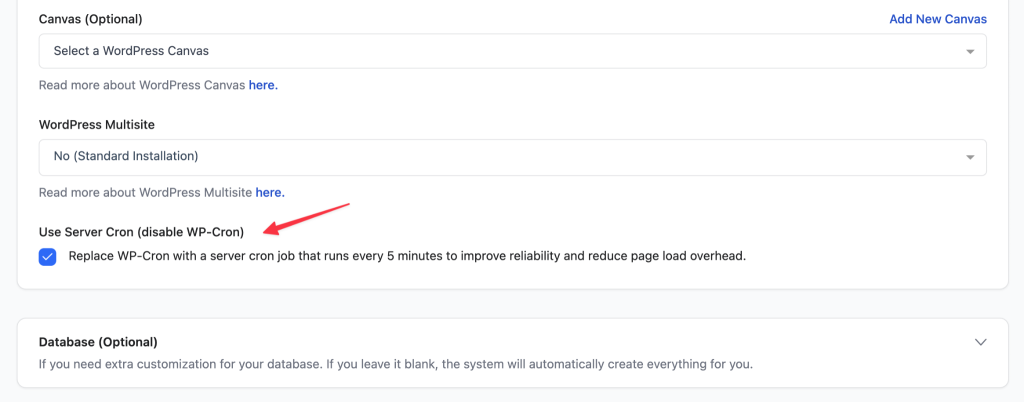
    4. Toggle the “Server Cron” switch to On.

    That’s it! RunCloud automatically disables the virtual cron job and configures a system-level cron task for you.

    enable WordPress cron in WordPress

    Suggested Read: How To Install WordPress With RunCloud | Step-By-Step Guide

    Method 2: Using the RunCloud Cron Manager

    While the standard RunCloud WordPress Cron functionality is sufficient for many websites, you’re not strictly bound to it. If you have unique requirements, such as a plugin that requires specific timing or a multisite environment where standard cron runs might conflict, you can create custom jobs.

    Setting up these custom jobs gives you granular control over when and how background tasks are processed. By bypassing the default system, you can define precise schedules that align with your site’s architecture, ensuring that even complex workflows run seamlessly. 

    1. In your RunCloud dashboard, go to the Cron Job tab for your server.
    2. Click the “Add New Job” button.
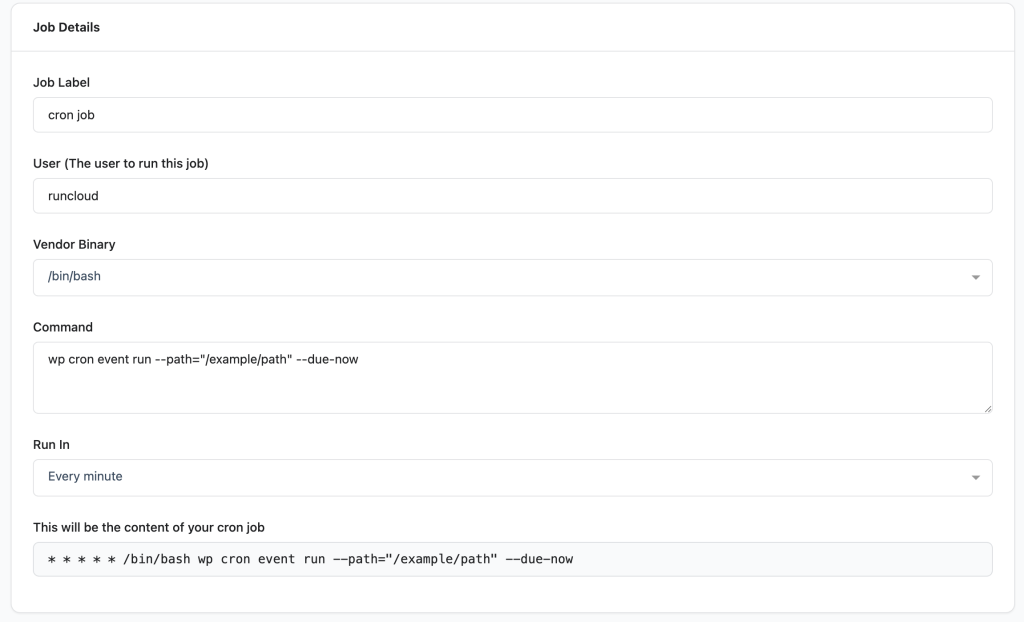
    3. On the next screen, you can specify the basic details for your cron job, such as:
      • Job Label: Give your task a descriptive name (e.g., “WordPress Newsletter Cron”) to help you easily identify it later in your dashboard.
      • User: Select the custom user who owns the web application. Using a specific system user (rather than root) is a security best practice that helps prevent permission issues.
      • Vendor Binary: Choose your execution environment. While /bin/bash is standard for general shell commands, you can also select php if you are running a direct script.
      • Command: Enter wp cron event run --path="/home/your-site/public_html" --due-now to trigger only scheduled tasks. Make sure to replace the example path in the previous command with the actual root path of your WordPress application.
      • Run In: You can choose a preset (e.g., “Every 15 minutes”) or select “Custom” to define your own timing (e.g., using a CRON expression like 0 2 * * * to run a task daily at 2:00 AM).
    4. Check the “Content of your cron job” field at the bottom; RunCloud will live-preview the final command syntax so you can verify it is correct before clicking “Save.”
    Create cron jon in WordPress

    Note: Make sure that the User selected for the cron job matches the owner of the files in your public_html directory; this prevents “Permission Denied” errors when the job attempts to write to logs or update databases.

    Suggested Read: How to Use FTP to Upload Files to WordPress Without a Password [Step By Step]

    Method 3: Using SSH

    If you’re not using RunCloud yet, then another alternative is to connect to your server via SSH to configure or manage these cron jobs manually. Follow these steps below:

    1. Connect to your server using SSH with your username or root credentials.
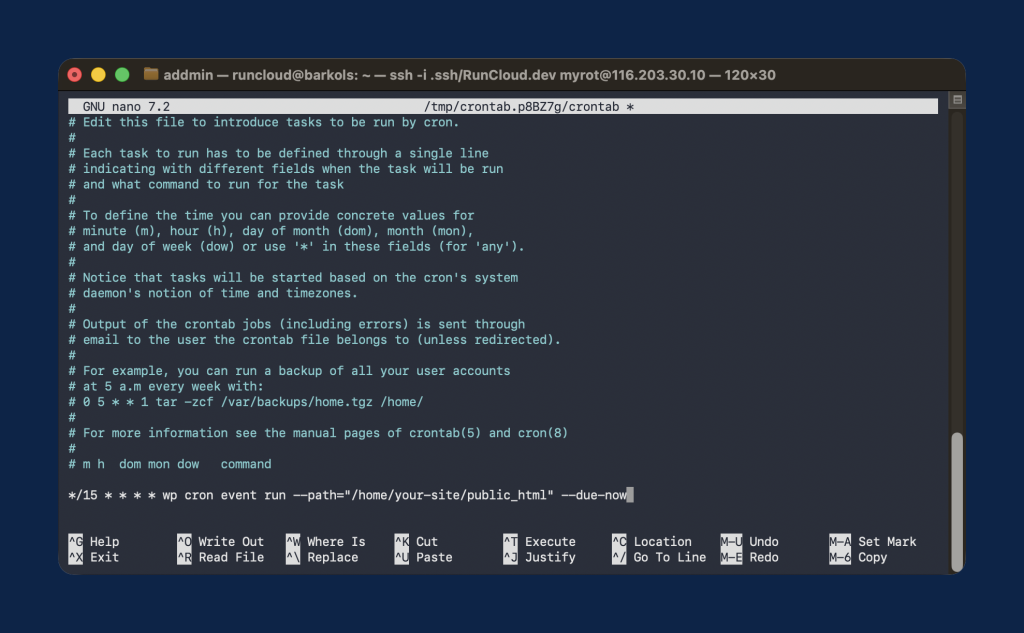
    2. Enter the command crontab -e to open your system’s crontab editor.
    3. Add a new line at the bottom of the file using the following format: 
    */15 * * * * wp cron event run --path="/home/your-site/public_html" --due-now
    1. Save and exit the editor (press Ctrl+X, then Y, then Enter).
    Edit Crontab in Linux

    After saving the file, you can verify that the task was created successfully by running crontab -l to confirm your manual cron job is active and ready.

    Suggested Read: The Best 5 WordPress Vulnerability Scanners in 2025 (Compared)

    Wrapping Up: Who Should Disable WP-Cron in WordPress?

    In this guide, we have covered several methods to optimize your WordPress background tasks, ranging from manual configuration in your File Manager to advanced SSH command-line editing. While these approaches work, they come with risks, such as syntax errors in your wp-config.php or improper file permissions that can break your site’s automation.

    If you’re looking for the most reliable, efficient, and user-friendly experience, the RunCloud Cron Manager is the superior choice. It eliminates manual configuration errors and lets you manage your scheduled tasks, custom PHP scripts, and system-level commands from a single intuitive interface.

    In addition to Cron management, RunCloud offers many useful features, including one-click SSL deployment, automated server security, easy staging environment creation, and real-time server monitoring. RunCloud is designed to save you hours of development time. 

    Explore RunCloud and see how it can help you manage WordPress sites and servers with fewer manual steps.

    Start your free 7-day trial today. 

    FAQs on Disabling WP-Cron in WordPress

    Is it safe to disable WP-Cron?

    Yes, it’s perfectly safe and actually recommended to disable the default wp-cron.php trigger for most WordPress sites. By default, WordPress checks for scheduled tasks every time a visitor loads a page, which can be inefficient. Replacing this with a system-level cron job ensures your tasks run reliably without relying on incoming web traffic.

    What are the risks of disabling WP-Cron?

    The only primary risk is forgetting to set up a replacement server-side cron job after disabling the default one. If you disable the built-in system without creating a backup task, your scheduled events will never trigger. Fortunately, RunCloud makes this transition easier by providing a one-click WP-Cron fix that handles the configuration for you.

    Do I need to set up a real cron job after disabling WP-Cron?

    Yes, if you disable the default wp-cron.php trigger, you must configure a real server cron job to maintain site functionality. Without this replacement, automated tasks such as publishing posts or sending emails will stop. 

    Will disabling WP-Cron affect scheduled posts or emails?

    Disabling the default system will only affect scheduled posts or emails if you fail to replace it with a server-level cron job. Once you move to a system cron, your scheduled posts and emails will actually become more punctual and reliable. They will no longer depend on a random visitor loading your site to trigger the execution process.

    How often should I run the real cron job?

    For most standard websites, running the system cron job once every 5 to 15 minutes is the industry standard. This frequency is enough to keep your site updated without putting unnecessary strain on your server’s resources. If you have a high-traffic site or time-sensitive tasks, you can adjust this interval within your RunCloud dashboard to meet your specific needs.

    What happens if I don’t replace WP-Cron with a server cron job?

    If you disable the default trigger without setting up a replacement, your WordPress site will essentially “go to sleep” regarding automated background tasks. You will notice that scheduled posts remain stuck in “draft” status, and automated emails, such as password reset emails or form notifications, will stop being sent. Your site will remain functional for visitors, but all background administrative automation will stop working.

    Can I re-enable WP-Cron later?

    Yes, you can easily re-enable the default behavior at any time if you change your hosting environment or troubleshooting requirements. Simply revert the DISABLE_WP_CRON constant in your wp-config.php file to false or remove the line entirely. If you used the RunCloud one-click fix, you can manage these settings through the RunCloud interface just as easily as you enabled them.

    Does disabling WP-Cron improve site performance?

    Yes, disabling the default wp-cron.php can significantly improve performance, especially for sites with lower traffic. By preventing WordPress from checking for tasks on every page load, you reduce the CPU load and server response time for your visitors. This small tweak is an effective way to streamline your resource usage and improve the overall “snappiness” of your site.

    Is disabling WP-Cron recommended for high-traffic sites?

    Absolutely, disabling the default WP-Cron is a best practice for high-traffic environments to prevent resource exhaustion. On busy sites, hundreds of concurrent users could trigger the cron process simultaneously, leading to database locking and server instability. Offloading these tasks to a server cron ensures that scheduled jobs execute once, predictably, and independently of user traffic.

    What’s the difference between WP-Cron and a real cron job?

    WP-Cron is a “virtual” cron system that triggers only when a user visits your website, making it highly dependent on incoming traffic. A real system cron job is a true server-side task that runs at precise, pre-defined intervals regardless of whether anyone is browsing your site. By using RunCloud’s one-click WP-Cron fix, you shift your site from an unreliable, traffic-dependent model to a professional, server-side automated schedule.

  • n8n vs Zapier vs Make: Which Automation Tool Is Right for You?

    n8n vs Zapier vs Make: Which Automation Tool Is Right for You?

    Automation platforms often look inexpensive until your workflows start running at scale.

    A process that captures a lead, checks a CRM, cleans the data, sends a notification, and updates another system may consume several billable tasks or credits every time it runs. Multiply that by thousands of executions, and a modest monthly subscription can quickly become a major operating cost.

    That makes the choice between n8n vs. Zapier and n8n vs. Make more than a question of which workflow builder has the easiest interface. You also need to compare how each platform charges for usage, how much control it gives your developers, and where your business data is processed.

    This guide breaks down n8n pricing alongside the task-based pricing used by Zapier and the credit-based model used by Make. It also examines n8n self-hosted pricing, including the server, storage, maintenance, and management costs that are often missed when calculating the full n8n self-hosting cost.

    You will learn:

    • How n8n, Zapier, and Make calculate workflow usage
    • What each platform may cost as your automation volume grows
    • When self-hosted automation offers better control and more predictable costs
    • What running n8n on your own server requires
    • How RunCloud can reduce the server administration involved in hosting n8n

    By the end, you should have a clearer view of whether Zapier, Make, n8n Cloud, or a self-hosted n8n deployment is the right fit for your workload, technical resources, and budget.

    Comparing n8n vs. Zapier vs. Make

    Choosing between n8n, Zapier, and Make requires analyzing three things: long-term pricing structures, processing flexibility, and data security. In this section, we will compare how these three platforms handle real-world operational demands.

    Comparing Costs at Scale

    Each platform uses a completely different mechanism to calculate your monthly usage invoice.

    • Zapier bills by Tasks (every successful action step in a workflow consumes a task).
    • Make bills by Credits (every module action, such as fetching data, routing, or updating a record, consumes one credit). For Make’s “Make Code App”, there is a resource cost of 2 credits per second of code execution.
    • n8n bills by Executions (one complete workflow run from trigger to final step equals one execution, regardless of complexity).

    To illustrate how these billing philosophies affect your budget, consider a common business scenario: processing 10,000 leads per month using a standard 7-step automation process.

    The Scenario: 7-Step Lead Enrichment Workflow

    1. Trigger: Webhook captures a new lead.
    2. Action 1: Searches a CRM database to check for an existing record.
    3. Action 2: Filters and routes the lead based on geographic location.
    4. Action 3: Formats and cleans the name and email address.
    5. Action 4: Updates the CRM contact record.
    6. Action 5: Sends an internal Slack notification to the sales team.
    7. Action 6: Sends an automated introductory email to the prospect.

    The Monthly Cost Breakdown

    • Zapier: Because Webhook triggers don’t consume tasks, the remaining 6 actions count as tasks. Running this 10,000 times a month consumes 60,000 tasks. To accommodate this volume on Zapier’s Professional plan, you must scale your task tier, which will result in an estimated subscription cost of $300-$400 per month.
    • Make: Most actions consume 1 credit, while some advanced features use more credits. Running this 10,000 times will consume at least 70,000 credits, but it can vary widely and could easily reach 200,000. This could cost you $110 to $315 per month.
    • n8n Cloud: Because n8n bills purely per workflow execution, running this 7-step pipeline 10,000 times consumes exactly 10,000 executions. This is included in the n8n Pro plan, which costs 50€ per month (billed annually).
    • n8n Self-Hosted: Running this workflow incurs no software licensing fees and only the cost of your underlying server infrastructure (typically $10-$20 per month for a standard cloud VPS).

    Note: Pricing checked in June 2026. Actual costs depend on the selected plan, billing cycle, workflow configuration, feature usage, overage charges, and applicable taxes. Check each provider’s current pricing before making a purchasing decision.

    n8n vs zapier comparison

    Comparing Flexibility & Custom Code

    When workflows require custom business logic, the platforms differ in how they handle developer integrations.

    • n8n: Was built with a developer-first mindset. n8n natively integrates JavaScript and Python code blocks across all deployment tiers. These code blocks run directly within the execution path, allowing complex array transformations, data parsing, and custom cryptography without incurring additional billing penalties.
    • Zapier: Scripting is limited to basic “Code by Zapier” blocks. These steps are subject to strict run-time limits and memory allocations, and they consume standard task quotas, making heavy data manipulation costly.
    • Make: Make’s greatest strength is its highly visual drag-and-drop routing and filtering interface, which allows non-technical users to easily build logical branches. For advanced logic, Make provides a “Make Code App” functionality; however, this incurs a 2-credit cost per 1 second of code execution, so complex scripts can rapidly drain your monthly credit pool.

    Comparing Data Sovereignty & Security

    If your organization operates in highly regulated fields such as healthcare (HIPAA), finance (PCI-DSS), or legal services, where customer data is highly sensitive, how data is handled is just as important as the cost.

    • Zapier and Make: Both are primarily managed cloud platforms. Workflow data is processed through infrastructure controlled by the provider, although the available security, data residency, and enterprise controls vary by platform and plan. Organizations handling regulated or sensitive data should assess those controls against their own legal, contractual, and compliance requirements.
    • n8n Self-Hosted: With n8n Community Edition, you can run the platform on infrastructure you control. This gives you greater control over workflow data, credentials, execution logs, storage locations, and retention policies. You remain responsible for securing the server and configuring the deployment to meet your compliance requirements.

    The True Cost of Self-Hosting n8n

    The appeal of self-hosted automation is undeniable, particularly given n8n’s self-hosted pricing. By choosing to host n8n on your own infrastructure, you can bypass the execution limits associated with SaaS cloud plans and maintain complete control over your data.

    However, understanding the total n8n pricing self-hosting cost is essential, as running your own automation stack is rarely a “zero-cost” endeavor. While the n8n Community Edition has no software license fee, your overall n8n pricing will still need to account for hardware, database management, and maintenance.

    Infrastructure and Server Costs

    To run n8n reliably in production, you need to provision a VPS from a cloud infrastructure provider. While n8n can technically run on very minimal resources, a production environment, especially one running a separate PostgreSQL database for execution logs, requires adequate RAM and CPU to prevent bottlenecks during concurrent executions.

    Here is a breakdown of typical VPS options suitable for hosting n8n in 2026:

    ProviderEntry-Level Tier (Light Testing)Production-Ready Tier (Recommended)Estimated Monthly Cost
    Hetzner Cloud1 vCPU, 2 GB RAM, 20 GB SSD2 vCPUs, 4 GB RAM, 40 GB SSD€4.00 – €8.00 / month
    DigitalOcean1 vCPU, 1 GB RAM, 25 GB SSD2 vCPUs, 2 GB RAM, 50 GB SSD$6.00 – $12.00 / month
    Vultr1 vCPU, 1 GB RAM, 25 GB SSD2 vCPUs, 2 GB RAM, 55 GB SSD$5.00 – $12.00 / month
    AWS Lightsail1 vCPU, 1 GB RAM, 40 GB SSD2 vCPUs, 2 GB RAM, 60 GB SSD$7.00 – $15.00 / month

    When calculating your hardware budget, keep in mind that n8n stores execution data by default. Every step of every workflow run writes data to your database. If you process thousands of executions daily, a standard 25 GB SSD can fill up within weeks, potentially freezing the server.

    To maintain system stability, self-hosted administrators must budget for either:

    • Sufficient SSD block storage (an extra $5 to $10/month).
    • Correctly configured execution pruning rules (e.g., setting n8n environment variables to delete execution data older than 7 days).

    In addition to the above costs, you should also budget for hardware and storage to back up your data to a separate location or a storage device.

    RunCloud server creation

    Additional Operational Overhead for Hosting n8n

    When evaluating your overall n8n pricing self-hosting cost, the time spent on server administration is often the most significant expense to include in your n8n pricing calculations. 

    1. Server Provisioning and Security Setup

    Setting up a VPS is only the first step. To make n8n usable, you must secure the server. This might require configuring a firewall (such as UFW), setting up a reverse proxy (such as NGINX, Traefik, or Caddy) to direct traffic, and closing unnecessary open ports to prevent unauthorized access to your workflow canvas.

    2. Configuring SSL Certificates

    To trigger webhooks and connect securely to external APIs, your n8n instance must run over HTTPS. This requires installing SSL certificates. While Let’s Encrypt certificates are free, configuring them to renew automatically without disrupting your reverse proxy configuration requires ongoing maintenance.

    3. Managing Updates and Preventing Downtime

    n8n is being actively developed, which is both a blessing and a curse. You will get access to new features, but you will also need to upgrade frequently to receive the latest security patches, bug fixes, and new integration nodes.

    If an update fails due to a database conflict or an incompatible custom code block, your entire automation pipeline goes offline. Without deep Linux command-line expertise, troubleshooting these failures and restoring backups can result in hours of costly business downtime.

    Managing Self-Hosted n8n Without the System Admin Headache

    For many organizations, the long-term financial math of self-hosted automation is highly compelling. However, the primary barrier to entry is what is often called the “sysadmin tax.” If your team lacks dedicated DevOps resources or deep Linux command-line expertise, the prospect of managing SSH keys, writing reverse proxy rules, and manually maintaining database performance can feel like a steep price to pay.

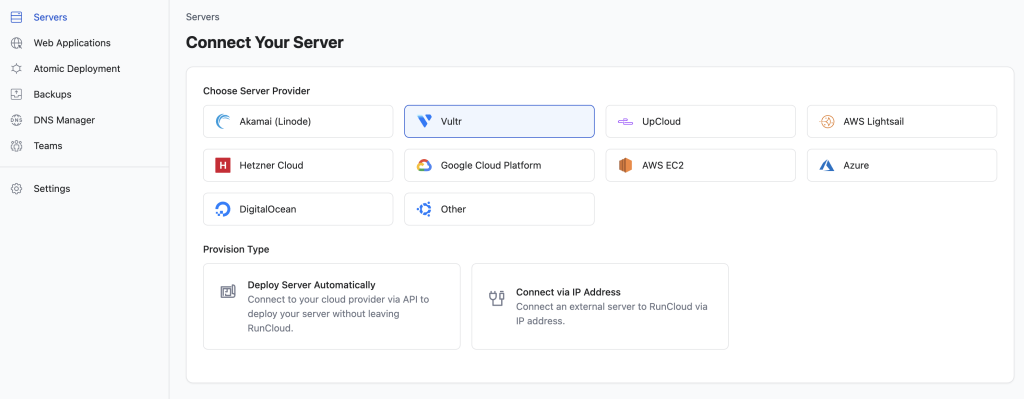
    Fortunately, there is a balanced approach that separates raw cloud infrastructure from complex server administration. By pairing a standard, cost-effective cloud server (such as Vultr, DigitalOcean, AWS, or Linode) with a centralized server management panel like RunCloud, you can establish a self-hosting environment without the technical friction of manual server setup.

    How RunCloud Simplifies Self-Hosted Server Management

    Rather than forcing you to interact with a terminal or build complex server stacks from scratch, RunCloud provides a visual control panel for your cloud servers. This helps manage the operational realities of running self-hosted applications:
    • Less Routine Command-Line Management: RunCloud provides a visual dashboard for many recurring server management tasks, including monitoring, database administration, SSL management, backups, and application configuration. Deploying and troubleshooting a self-hosted n8n instance may still require familiarity with Docker, NGINX, configuration files, or the command line. 
    • Automated SSL and Core Security: Secure communication is mandatory for any automation workflow that relies on external webhooks. RunCloud automates the deployment and renewal of Let’s Encrypt SSL certificates with a single click. It also handles server-level firewall configuration and automatically applies security patches, keeping your environment protected against vulnerabilities.
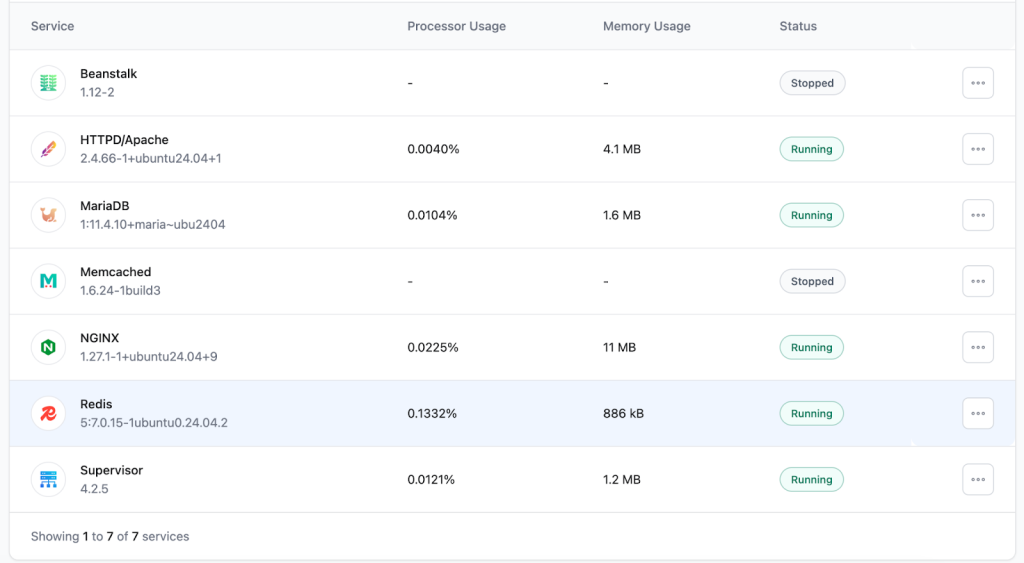
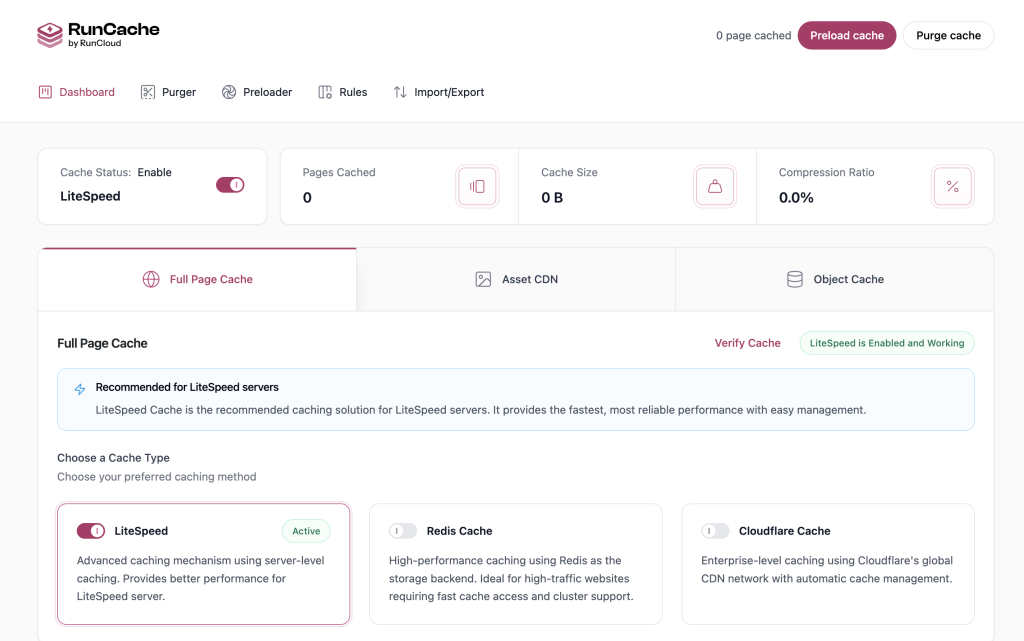
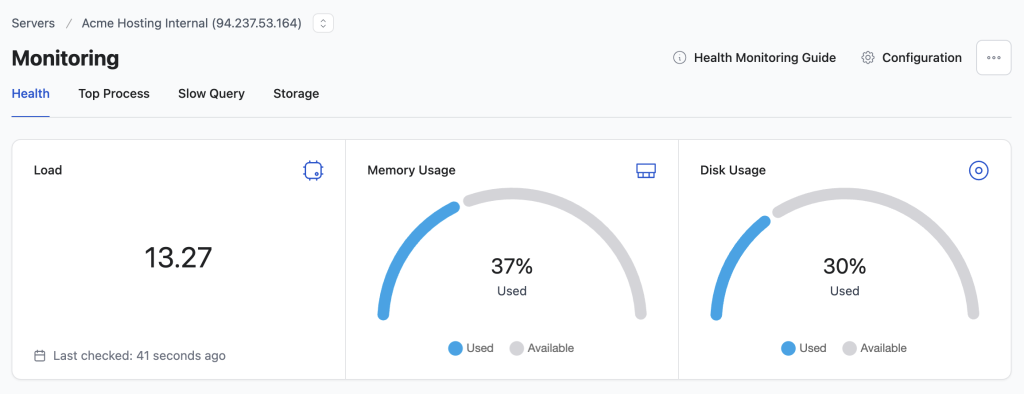
    • Centralized Multi-Server Control: If your team uses other self-hosted utilities alongside n8n, such as an independent PostgreSQL database server, a staging instance, or auxiliary microservices, you can manage and monitor them all from a single dashboard. This consolidated view gives you full visibility into your server’s resource usage (CPU, RAM, and disk storage) so you can scale your hardware as your workload grows.
    RunCloud monitoring panel

    This hybrid approach gives you the ultimate benefit of self-hosting: you can avoid cloud plan execution allowances and scale the deployment by adding appropriate server, database, and worker capacity. Your practical limits depend on the infrastructure, workflow design, external services, and n8n edition you use. 

    Final Thoughts

    Selecting the right platform for your workload is more than just picking the cheapest option. You also need to factor in your team’s technical, application, and data security capabilities, as well as your data security requirements. 

    Use the following framework to determine which option fits your business needs.

    When to Choose Zapier

    Best for: Teams with limited developer resources that require specialized, niche integrations and have the budget to support usage fees for scaling.

    • No Developer Overhead: You can build and deploy workflows without understanding APIs, JSON, or code.
    • Massive Integration Library: Access to over 9,000 apps means even highly obscure third-party tools are likely supported natively.
    • The Trade-off: As your workflow volume grows, the “per-task” billing model can quickly lead to high monthly expenses.

    When to Choose Make

    Best for: visual builders who need advanced multi-branch logic and medium-scale automation without managing any software infrastructure.

    • Visual Logic Mapping: The circular “bubble” interface makes it easy to visualize complex, multi-route databases and workflows.
    • Cost-Efficient SaaS: It is generally more affordable than Zapier for moderate volumes, though it is still subject to monthly “operation” quotas.
    • The Trade-off: Like Zapier, you are entirely dependent on their cloud infrastructure, and you cannot keep sensitive operational data entirely inside your own network.

    When to Choose n8n

    Best for: Technical teams, SaaS startups, agencies processing high volumes of data, and privacy-conscious enterprises.

    • Execution-Based & Self-Hosted Pricing: Paying per complete execution (on n8n Cloud) or self-hosting for $0 in licensing fees makes it the most scalable financial choice.
    • Developer-First Flexibility: Native JavaScript/Python nodes, AI agent features, and custom HTTP request capabilities give developers granular control over data.
    • Data Sovereignty: Running n8n on your own servers ensures sensitive customer data never leaves your infrastructure.

    Run n8n on Your Own Server Without Managing Everything Manually 

    Zapier and Make may suit teams that want a fully hosted platform and do not expect workflow costs to rise sharply with usage.

    For technical teams running larger workloads, self-hosting n8n can provide more control over data, infrastructure, and long-term costs. The trade-off is that someone still needs to configure, secure, monitor, and maintain the server.

    RunCloud helps remove much of that server management work.

    You can connect a cloud server from providers such as DigitalOcean, Vultr, AWS, or Linode, then manage key server tasks through the RunCloud dashboard. This includes SSL certificates, firewall settings, backups, server monitoring, database management, and security updates.

    You retain the cost and control benefits of self-hosted automation without having to manage every part of the server through the command line.

    Start managing your self-hosted n8n server with RunCloud.

    Frequently Asked Questions

    Is n8n really free to self-host?

    Yes. The standard self-hosted version of n8n is source-available under a “fair-code” license (the n8n Community Edition) and can be downloaded from GitHub at no cost. The Community Edition does not charge per workflow execution. The number of workflows and executions your instance can handle depends on its infrastructure, configuration, workload, and external service limits. While the software license is free, you will still need to pay for the underlying virtual private server (VPS) on which the software runs.

    What is the true n8n pricing for self-hosting?

    For a reliable production environment, your self-hosting cost generally consists of two parts:
    The Cloud VPS: A virtual server from providers like Vultr, DigitalOcean, or Hetzner typically costs $5 to $20 per month, depending on your memory and CPU requirements.
    The Server Management Panel: Using a management platform like RunCloud to handle your server administration costs a predictable flat monthly fee.
    Even when combining these two costs, the total monthly expense is usually a fraction of the price of mid-tier SaaS plans from Zapier or Make, especially if you are processing tens of thousands of executions.

    How do I secure my self-hosted n8n instance and configure SSL?

    Since n8n relies on webhooks to trigger workflows, your instance must run over a secure HTTPS connection. With RunCloud, security configuration is automated, and you can deploy and renew free Let’s Encrypt SSL certificates with a single click inside the dashboard.

    When does it make sense to transition from n8n Cloud to a self-hosted instance?

    If your workflow volume is low (under 2,500 executions per month), n8n’s Cloud Starter plan (20€/month) is highly convenient. However, if your business operations scale to tens of thousands of monthly executions, or if you need to run resource-heavy custom Python/JavaScript scripts, transitioning to a self-hosted server managed by RunCloud allows you to scale your execution volume without hitting subscription caps or facing unexpected price jumps.

  • How to Reduce Server Response Time for WordPress (TTFB Guide)

    How to Reduce Server Response Time for WordPress (TTFB Guide)

    If you have tested your WordPress site with PageSpeed Insights, you have probably seen the warning: “Reduce initial server response time.”

    This warning relates to your site’s Time to First Byte (TTFB), which measures how quickly your server responds before the page begins loading. A slow TTFB can hurt Core Web Vitals, SEO performance, and user experience.

    In most cases, the problem is not WordPress itself. It is the server stack underneath it. Slow PHP processing, missing server-side caching, unoptimized databases, and overloaded hosting environments can all significantly increase response times.

    In this guide, we will show you how to reduce TTFB in WordPress using practical server-level optimizations you can manage directly from your RunCloud dashboard.

    What TTFB Actually Measures (And What Google Wants to See)

    Time to First Byte (TTFB) is one of the most important metrics of your website’s performance. It measures the time it takes a user’s browser to receive the first byte of data from your server after an HTTP request.

    This includes the time taken for the following three steps:

    1. DNS lookup time
    2. Server processing time (executing PHP and database queries in WordPress)
    3. Network latency (how quickly data travels)

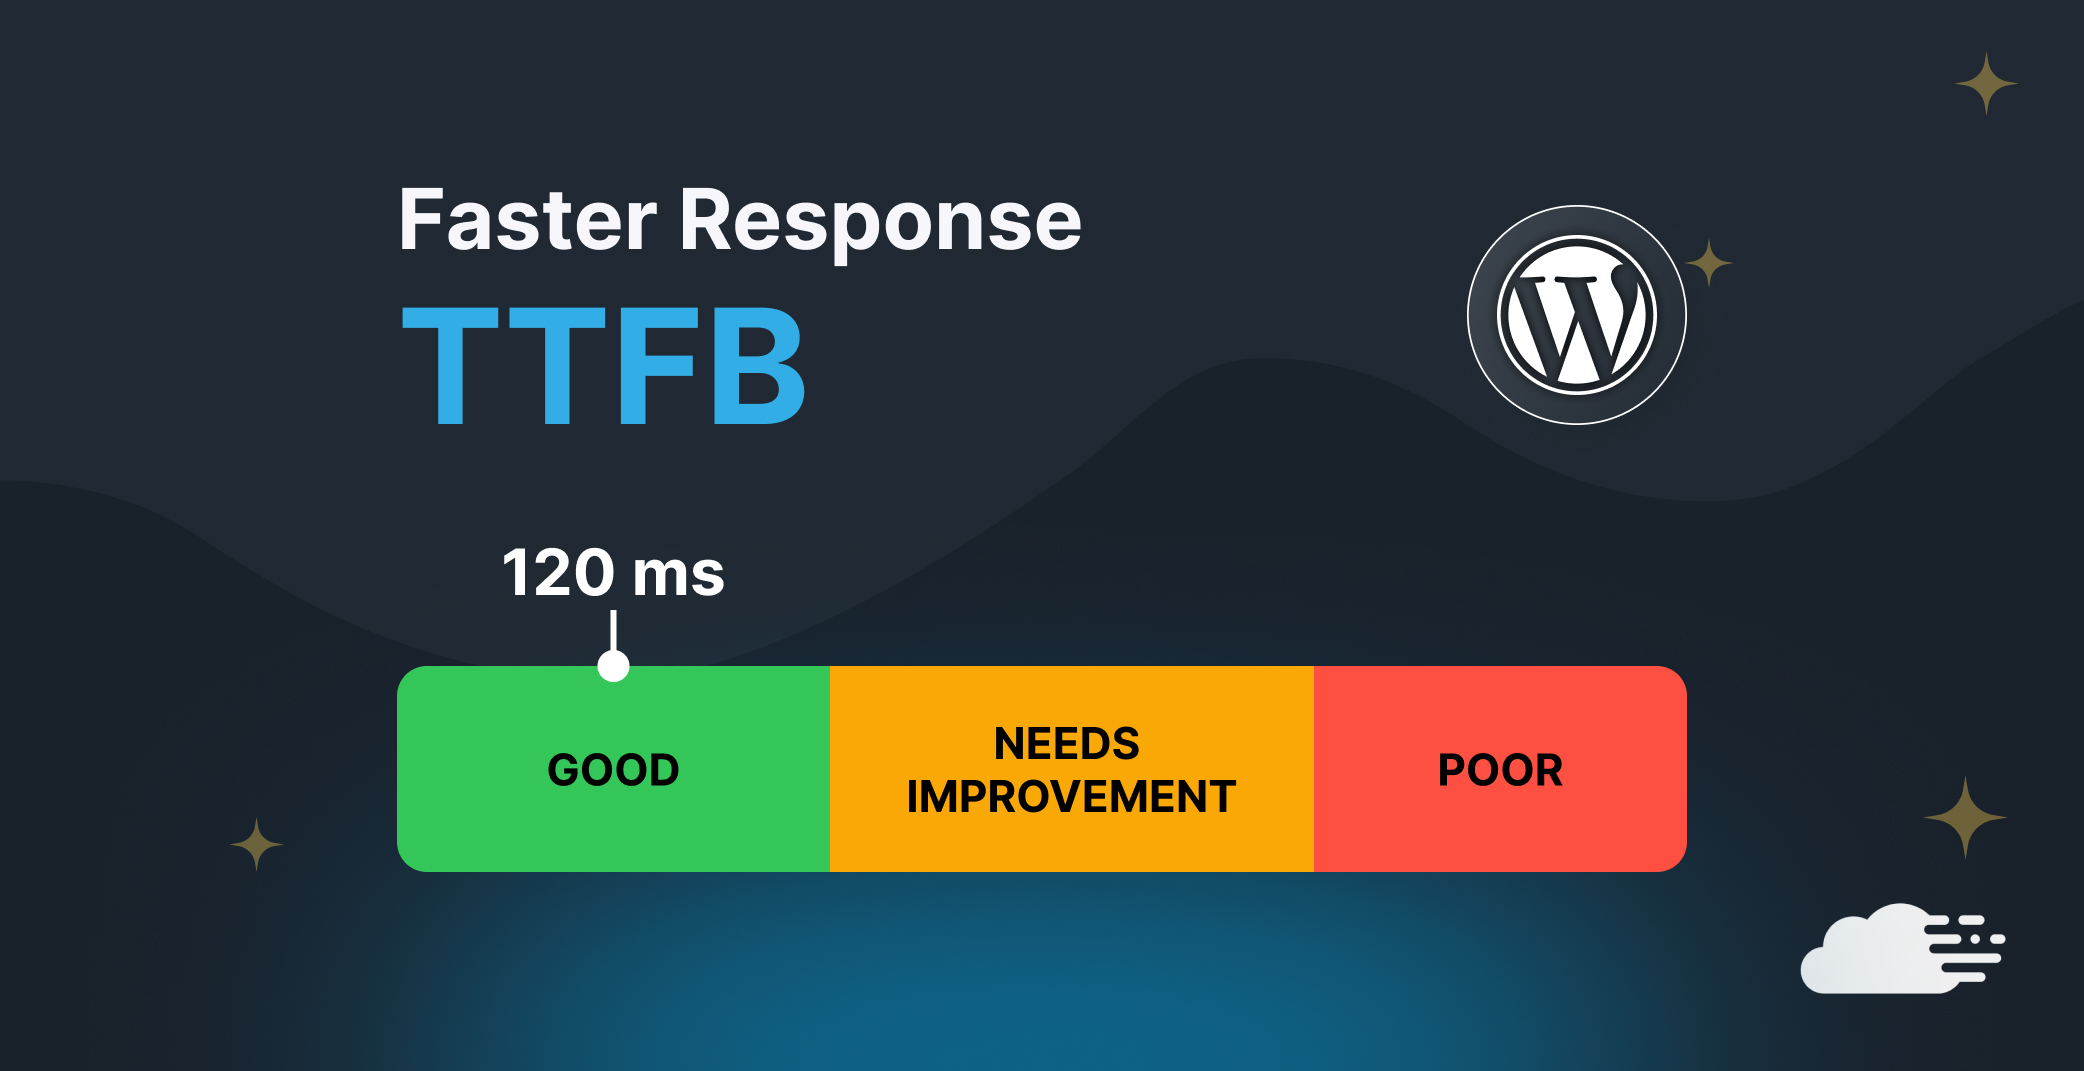
    According to Google’s official Core Web Vitals guidelines, a TTFB of under 800 milliseconds is considered “Good” and is the absolute baseline you must hit to pass their lab tests. However, WordPress performance experts aim for a TTFB of under 200 milliseconds.

    How to measure TTFB correctly

    Measuring TTFB accurately requires looking at both “lab data” (controlled tests) and “field data” (real-world user experiences).

    • PageSpeed Insights: This tool provides Chrome User Experience Report (CrUX) field data, showing the actual TTFB your users experience over 28 days, alongside real-time Lighthouse lab data.
    • GTmetrix: This is excellent for visualizing server response times with detailed Waterfall charts. It allows you to see exactly how much time is spent on DNS resolution versus the time the server spends waiting (the actual processing).
    • KeyCDN Performance Test: Physical distance of the server impacts network latency. This multi-location tool simultaneously checks your TTFB from 10+ global servers. If your TTFB is 150ms in New York but 1,200ms in Sydney, then it’s not good for your SEO.

    Why Is Your WordPress Server Response Time Slow?

    If your TTFB is failing Google’s benchmarks, the problem almost always lies under the hood of your WordPress configuration or your hosting environment. WordPress is a dynamic CMS, which means pages aren’t just sitting there ready to be served. Whenever a user visits your website, the pages are specially built for them. However, if you don’t optimize this process, it can feel slow.

    Reason 1: Uncached PHP execution is hitting MySQL on every request

    The number one killer of WordPress TTFB is a lack of page caching. When a visitor requests an uncached page, the server must spin up PHP workers, compile the theme and plugin code, query the MySQL database for the content, and stitch it all together into an HTML document.

    This heavy server processing can take anywhere from 1,000ms to over 3,000ms on an average server.

    By implementing a modern page caching solution, you can bypass this entire process and drop your page load times significantly. 

    Reason 2: Missing or misconfigured OPcache and object cache

    Even with page caching, dynamic requests (such as WooCommerce checkouts, admin dashboards, or for logged-in users) still require server processing. This is where advanced caching layers save your TTFB.

    PHP OPcache stores precompiled script bytecode in the server’s memory, eliminating the need for PHP to load and parse scripts on every request, which data shows can reduce PHP execution time by up to 70%.

    Object caching (using Redis or Memcached) stores the actual results of complex MySQL database queries in memory. Without object caching, a complex WooCommerce page might trigger 150+ database queries; with Redis enabled, those repeated queries are served from RAM almost immediately, without any processing.

    Suggested read: How to Check Linux CPU Usage or Utilization (5 Ways) 

    Reason 3: Shared hosting resource limits and server location distance

    Shared hosting environments cram hundreds of websites onto a single server. This forces you to share limited CPU cores and RAM. When traffic spikes on a neighbor’s site, your server’s response time will increase, affecting your users.

    Additionally, physical distance adds latency; data traveling from a server in London to a user in Tokyo naturally takes longer (often adding 200ms+ to TTFB). To fix this, it is a good idea to migrate to a dedicated cloud VPS managed by an optimized stack like RunCloud. Combining a high-performance VPS with a global CDN ensures you have dedicated CPU power and edge servers positioned within milliseconds of your visitors.

    How to Reduce Server Response Time in WordPress 

    Optimizing your WordPress server response time is a multi-step process that requires addressing both software inefficiencies and hardware limitations. Follow the steps below to speed up your WordPress site:

    Step 1: Enable full-page caching (FastCGI or Redis page cache)

    The simplest way to reduce TTFB in WordPress is by enabling full-page caching. Normally, WordPress dynamically generates every page by executing PHP and querying the database, which is a highly resource-intensive process. Full-page caching bypasses this entirely by saving a page’s fully rendered HTML and serving it to subsequent visitors.

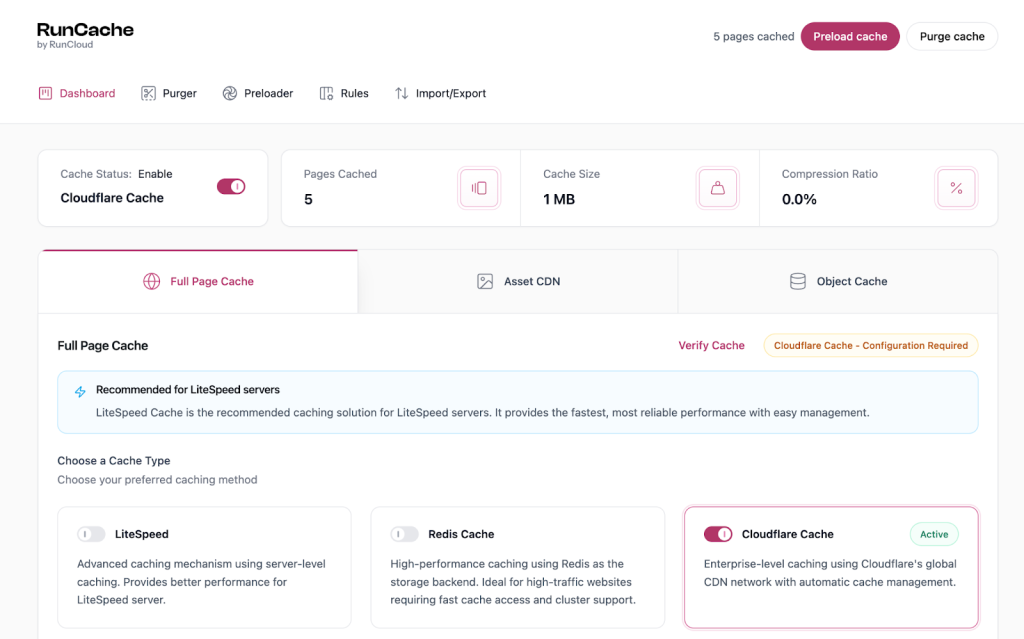
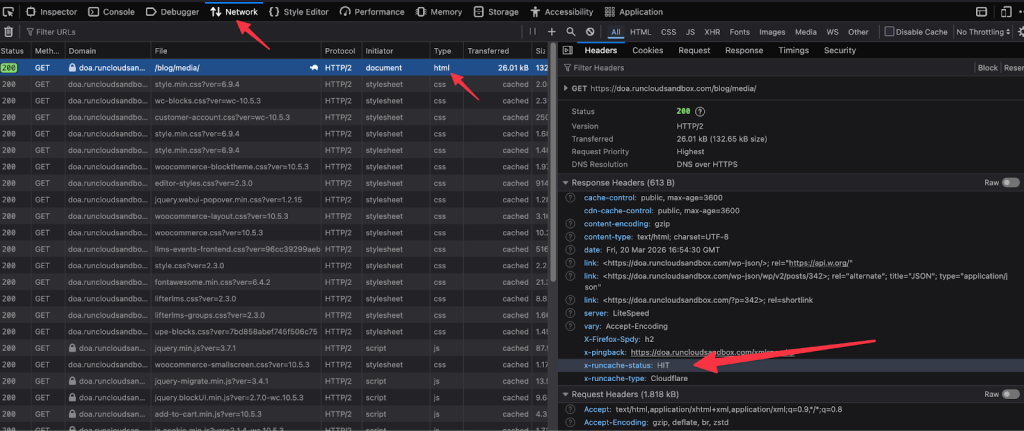
    While most WordPress users rely on WordPress caching plugins, server-level caching delivers significantly better performance. RunCache supports FastCGI caching that intercepts the user’s request before it ever reaches WordPress. This eliminates PHP overhead and reduces server response times from hundreds of milliseconds to 20-50ms.

    If you are running a blog, portfolio, or corporate site where content doesn’t change every minute, aggressive full-page caching is strongly recommended. You can set cache expiration times to automatically clear when a new post is published, ensuring visitors always get the fastest, most up-to-date version of your site.

    Screenshot of the RunCloud dashboard homepage promoting WordPress server performance, caching, and optimisation features.

    Suggested read: How to Flush DNS Cache on Windows, Mac, and Linux 

    Step 2: Switch on Redis object cache

    The full-page caching can handle static visitors, but dynamic sites like WooCommerce stores, membership portals, and active forums must bypass the page cache to serve personalized content.

    For these dynamic requests, WordPress has to query the database repeatedly, which quickly spikes server response times. Object caching stores the results of complex, frequently run database queries in RAM. When a user triggers a dynamic request, the object cache serves the stored data instantly, avoiding the need to query MySQL again.

    Many site owners dread the intimidating SSH commands required to install and configure Redis on a server. To make things easier, RunCache includes a one-click Redis activation feature that automatically configures everything. 

    Step 3: Update to the latest PHP version

    The PHP version running on your server plays a major role in your WordPress site’s performance. Each new major release of PHP comes with significant engine optimizations. For example, upgrading from PHP 7.4 to PHP 8.1 or 8.3 can drastically increase the number of requests your server can handle per second while simultaneously reducing memory consumption and TTFB.

    Despite the obvious speed benefits, many users hesitate to upgrade because of the potential for fatal errors if a legacy theme or plugin is incompatible with the newer PHP code. Upgrading safely requires a staging environment and the ability to revert if things go wrong easily.

    Screenshot of PHP version settings inside the RunCloud dashboard showing selectable PHP versions for a web application.

    With RunCloud, you are given total control to manage this process without fear. The platform lets you switch your PHP version for each web app (e.g., upgrading from 7.4 to 8.3) directly from the dashboard with zero downtime. If you spot any errors, you can instantly switch back to the previous version to troubleshoot plugin conflicts.

    Step 4: Optimize and clean your WordPress database

    WordPress relies completely on its MySQL or MariaDB database to function. Over time, databases inevitably bloat with unnecessary data, including hundreds of post revisions, auto-drafts, trashed comments, expired transients, and orphaned settings left behind by deleted plugins. A bloated database means the server has to sift through massive, unindexed tables to find the right data, directly inflating your TTFB.

    The most important area to monitor is the wp_options table, specifically the “autoloaded” rows. WordPress automatically loads this data on every single page view. If a poorly coded plugin leaves behind megabytes of useless autoloaded data, your server will choke on the processing. Performance experts strongly recommend auditing this table and keeping autoloaded data well under 1MB.

    You can regularly optimize your database using lightweight plugins such as WP-Optimize or Advanced Database Cleaner. By regularly deleting orphaned data, optimizing database tables, and adding missing indexes, you can keep your server response times incredibly low.

    Step 5: Replace wp-cron with a real cron job

    WordPress uses a built-in scheduling system called wp-cron to handle background tasks like publishing scheduled posts, checking for theme updates, and running backup plugins. This wp-cron job is triggered when a user visits your website. On high-traffic sites, it can cause random, severe spikes in server response times.

    To fix this, you should disable the default WordPress cron behavior by adding define(‘DISABLE_WP_CRON’, true); to your wp-config.php file. Once disabled, you must replace it with a real system-level cron job that pings the wp-cron.php file on a set schedule (e.g., every 5 to 15 minutes), completely decoupling background tasks from your users’ live page loads.

    For many admins, setting up a system cron requires digging into Linux crontab configurations. However, if you need a real server cron instead of wp-cron, RunCloud provides a built-in cron job manager that instantly replaces WordPress cron with a single click.

    Screenshot of the RunCloud server settings panel showing cron job configuration options for replacing WP-Cron with a real server cron job.

    Suggested read: Difference between DoS vs DDoS vs DrDoS (With Comparison Table) 

    Step 6: Use a CDN with full-page caching and a nearby Points of Presence

    No matter how optimized your server is, the laws of physics dictate that data takes time to travel across the globe. If your hosting server is located in London, but your visitor is in Sydney, the geographic distance alone will introduce hundreds of milliseconds of network latency, resulting in a poor TTFB. 

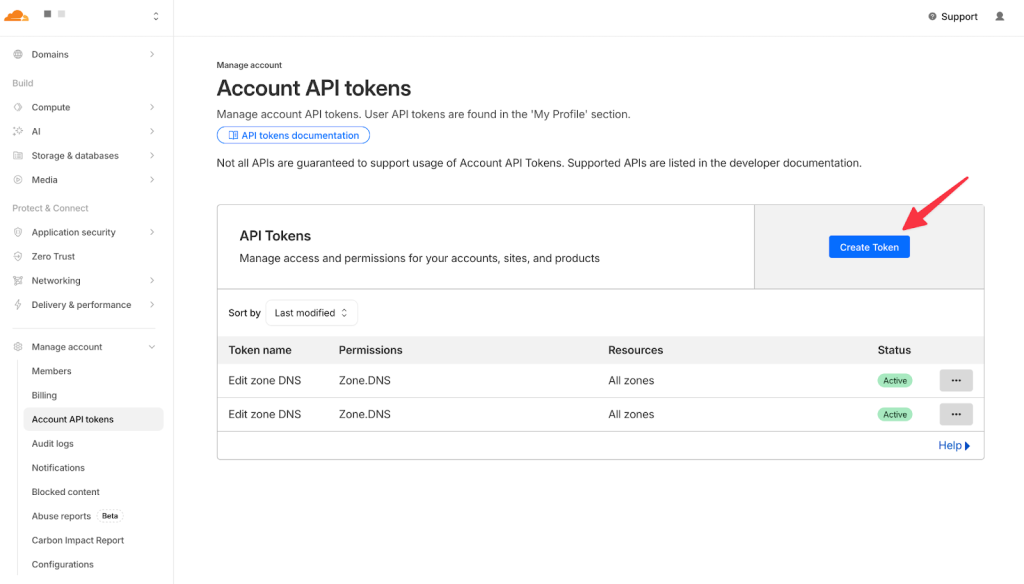
    In this case, you must use a CDN to solve this physical bottleneck. While traditional CDNs are great for caching heavy assets like images and CSS files, they still require the initial HTML document to be generated by your origin server. To dramatically improve server response times globally, you need an advanced CDN setup that supports full-page Edge caching, such as Cloudflare’s Automatic Platform Optimization for WordPress.

    By caching your pages’ HTML at the CDN’s Edge servers, your visitors can receive cached content from CDN edge locations closer to their region. This bypasses your origin server entirely for static page requests, delivering near-instantaneous server response times no matter where the user is located in the world.

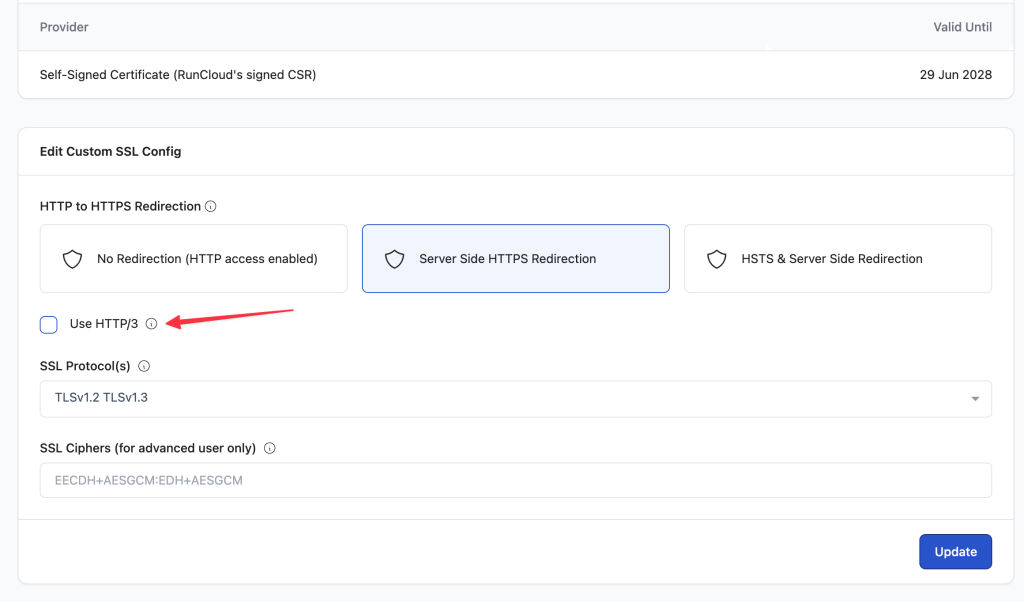
    Step 7: Enable HTTP/3 

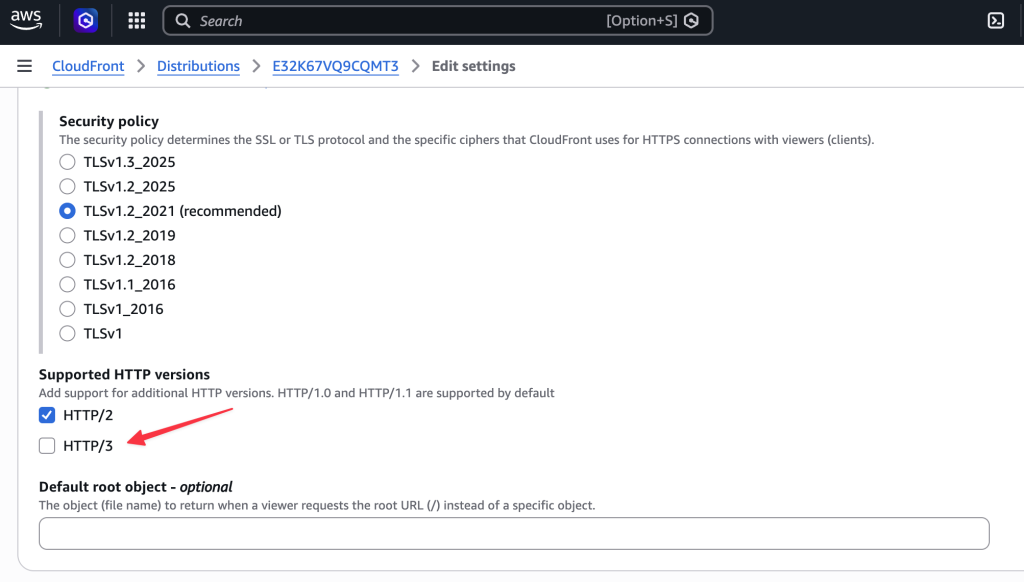
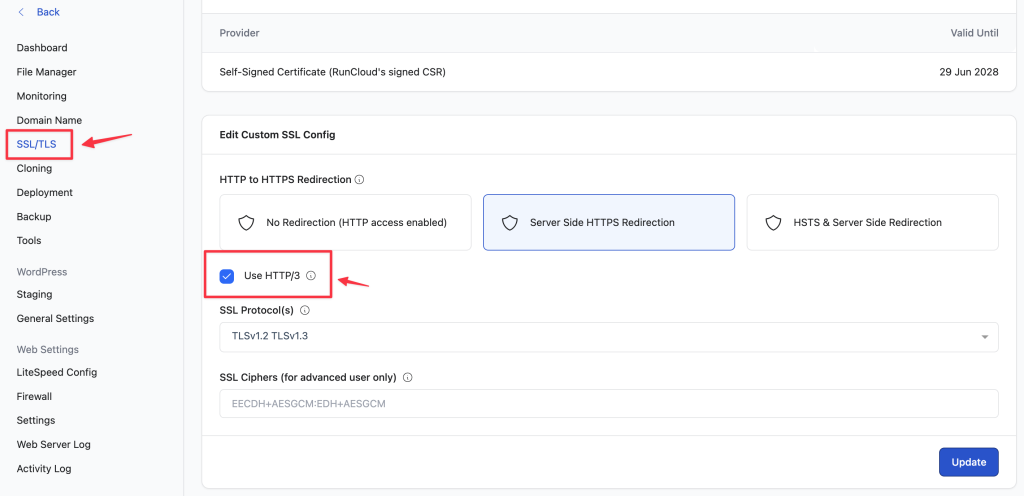
    Using a newer, more advanced network protocol can significantly improve your website’s performance, particularly during the initial connection phase. In our recent post about HTTP/2 vs HTTP/3, we explained that Older protocols like HTTP/1.1 suffer from “head-of-line blocking”, which requires the browser to open multiple, sequential connections to download site assets. In comparison, newer HTTP protocols support multiplexing, which allows multiple files to be downloaded concurrently over a single connection.

    In addition to the HTTP protocol, your SSL/TLS encryption standard matters. Secure connections require an SSL “handshake” before data can be transmitted. Older TLS 1.2 requires multiple round-trips between the browser and server to establish this secure connection. Upgrading to TLS 1.3 optimizes this by requiring only a single round-trip (and sometimes zero round-trips for returning visitors), shaving precious milliseconds off the TTFB.

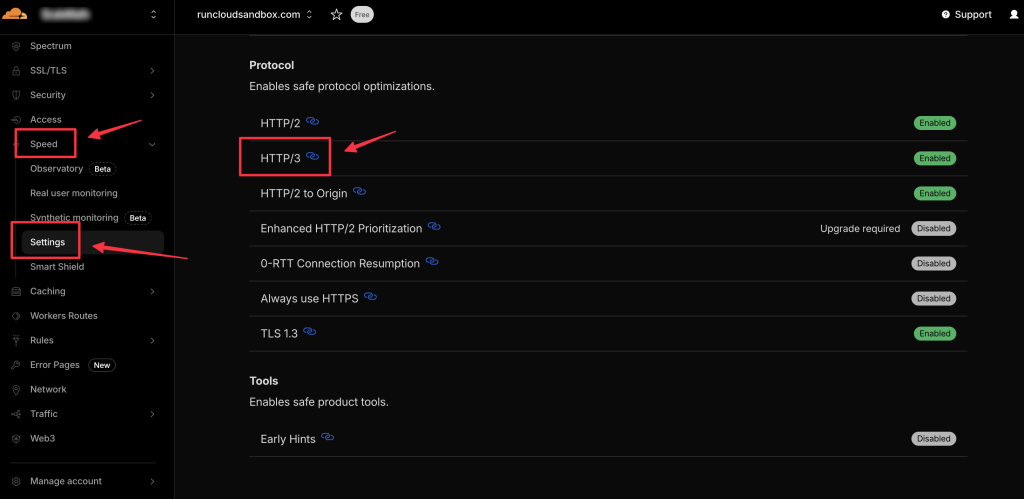
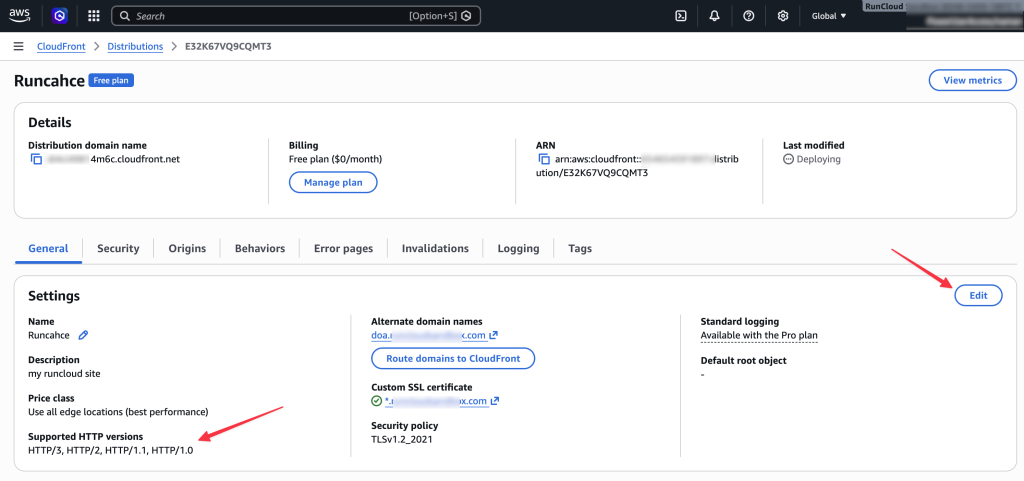
    RunCloud supports HTTP/3 without requiring manual server configuration, but if you are not using RunCloud yet, you can refer to our post on How to Enable HTTP/3 on NGINX to learn how to optimize your server. 

    Step 8: Audit and remove resource-heavy plugins

    Plugins and themes can significantly impact WordPress performance. Every activated plugin injects its own PHP code that must be executed, and many inject their own CSS and JavaScript files that must be downloaded. Poorly coded, outdated, or resource-intensive plugins (such as page builders, analytics tools, or backup solutions) can hog server CPU and drastically slow TTFB for every visitor.

    If you want to speed up your WordPress site, you should audit your plugin stack. You can use RunCloud’s built-in diagnostic tools, such as Slow Query Monitoring or Slow Script Monitoring, to profile your website’s backend. 

    Once you identify the worst offenders, replace them with lightweight alternatives or remove them entirely if the functionality isn’t strictly necessary. Offloading tasks like analytics to Google Analytics or backups to an external server panel (rather than using a WordPress plugin) drastically reduces your backend load.

    Does Your WordPress Host Set the TTFB Ceiling?

    No matter how aggressively you optimize your WordPress website, the underlying hardware and network infrastructure establish a hard limit on your maximum possible speed. You can compress your images, minify your CSS, and install premium caching plugins. Still, if your server takes a full second to process a basic request, your server response time will never meet Google’s Core Web Vitals standards. Simply put, you cannot out-optimize a slow, underpowered server.

    Shared hosts place strict caps on your resource consumption. You are restricted by low PHP memory limits, throttled CPU cores, and strict I/O (Input/Output) usage limits. Premium performance plugins like WP Rocket or LiteSpeed Cache are excellent at reducing the number of dynamic requests. Still, they cannot magically generate more CPU power to process the requests that do get through. If your host throttles your account to a fraction of a single CPU core, your dynamic WooCommerce checkouts or admin dashboard will always suffer from a TTFB well over 800ms.

    Finally, shared hosting completely locks you out of the server environment. You do not have root access to install powerful, modern server-side software. You cannot fine-tune PHP-FPM worker pools, install the latest enterprise-grade versions of Redis or Memcached, or tweak NGINX configurations to prioritize your specific traffic. You are permanently stuck with a generic, one-size-fits-all server stack that prioritizes hosting company profits over your website’s performance.

    Why VPS with a server panel changes the equation

    When you provision a server from modern cloud providers like DigitalOcean, Vultr, or Hetzner, you are allocated a dedicated, isolated CPU and RAM. Your server resources belong exclusively to your WordPress website. 

    Historically, the massive barrier to entry for using a VPS was the steep technical learning curve; you had to be a skilled Linux system administrator to manage security, databases, and web servers via the command line. This is exactly where a modern server control panel changes the equation entirely.

    By pairing your cloud VPS with RunCloud, you can get unrestricted power of dedicated cloud hardware, along with a centralized management dashboard that makes server management as easy as traditional shared hosting.

    RunCloud provides a hyper-optimized, enterprise-grade tech stack (NGINX, modern PHP, MariaDB, and Redis) designed specifically for maximum WordPress speed. It eliminates the need for SSH or terminal commands, letting you configure server-level caching, manage databases, and deploy one-click SSL certificates directly from the UI. This gives you control over your server environment, lets you bypass restrictive shared hosting limits, and permanently improves your WordPress server response times.

    Want to improve your WordPress server response times without managing everything manually? Try RunCloud for yourself. 

    FAQs

    What is a good TTFB for WordPress?

    A good Time to First Byte (TTFB) for WordPress is typically under 200 milliseconds for optimal performance, though anything under 500 milliseconds is generally acceptable for SEO. 

    Does TTFB affect Google rankings?

    Yes, TTFB directly affects your Google rankings because it acts as the critical foundation for Core Web Vitals metrics like Largest Contentful Paint (LCP). Slow server response time delays the entire page load, negatively impacting user experience, increasing bounce rates, and lowering your search engine visibility.

    Why is my server response time high even with a caching plugin?

    Your server response time might remain high if your website relies heavily on dynamic uncached requests, bloated plugins, or an unoptimized database. Even the best caching plugins cannot fix an underpowered server, which is why upgrading to a highly optimized hosting environment like RunCloud is essential for a permanent fix.

    How do I reduce TTFB on shared hosting?

    To reduce TTFB on shared hosting, you should configure an aggressive page caching plugin, optimize your database tables, and route your DNS through a Content Delivery Network (CDN). However, shared servers always have inherent resource limits, so migrating to a dedicated VPS managed by a platform like RunCloud will yield the best long-term performance.

  • Why Is WordPress Admin Slow? 8 Fixes That Actually Work

    Why Is WordPress Admin Slow? 8 Fixes That Actually Work

    You’ve optimized your website’s frontend for visitors, and it passes all core web vitals checks, but when you open the WordPress admin dashboard, time seems to stand still, and you’re left waiting ages for it to fully load. 

    Have you ever wondered why your WordPress dashboard is crawling when your live site is flying? It all comes down to how your server handles data. 

    While your website visitors are served blazing-fast, static HTML files via page caching, those rules are intentionally bypassed the moment you log in.

    In this guide, we will walk you through 8 proven backend-specific fixes (including optimizing PHP workers, stopping WP-Cron bloat, and enabling Redis object caching) to instantly speed up your WordPress admin.

    Why WordPress Admin Loads Differently From Your Frontend

    If your website loads instantly for visitors but is slow for you, it comes down to how caching works. The WordPress admin dashboard bypasses page caching entirely, meaning authenticated requests are never cached.

    While public pages serve lightweight, static HTML files to your visitors, every single click inside the wp-admin dashboard forces your server to generate the page from scratch. This triggers heavy PHP execution, dozens of database queries, and complex plugin hooks.

    To speed up your dashboard, you need a completely different set of server and application-level fixes.

    Fix 1:  Increase the PHP Memory Limit

    By default, WordPress allocates only a few MB of memory for single-site installations. This is far too low for a modern, plugin-heavy WordPress admin dashboard, and it often results in slow load times or “fatal memory exhausted” errors.

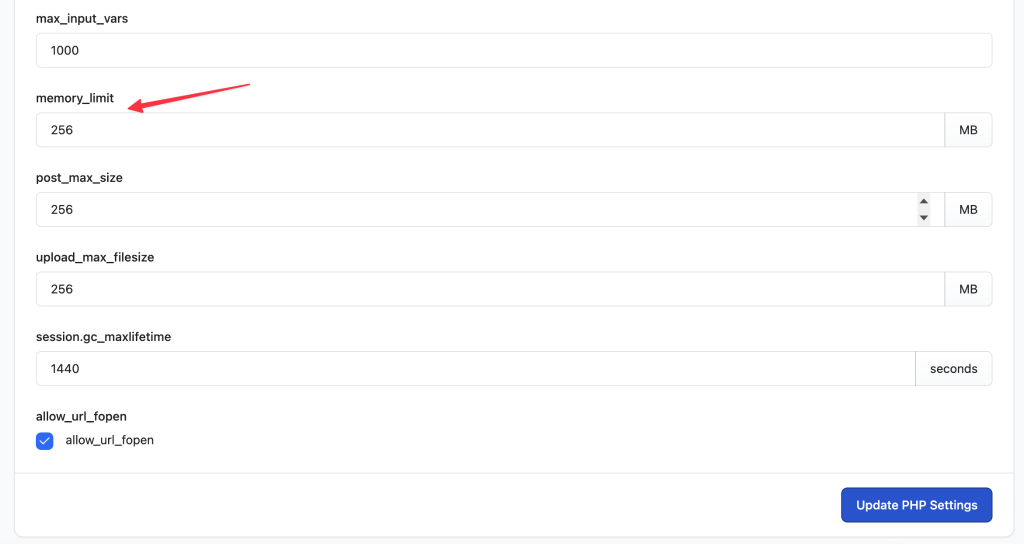
    If you’re using RunCloud, then fortunately, you don’t need to touch any code. Simply log in to your RunCloud dashboard, select your Web Application, and navigate to Settings > PHP Settings. Edit the memory_limit setting to 256M (or 512M for WooCommerce sites). 

    RunCloud PHP settings page showing the memory_limit option set to 256MB.

    If you prefer the manual route, use the RunCloud File Manager to open your wp-config.php file, then add the following line just before the “That’s all, stop editing!” line:

    define( 'WP_MEMORY_LIMIT', '256M' );

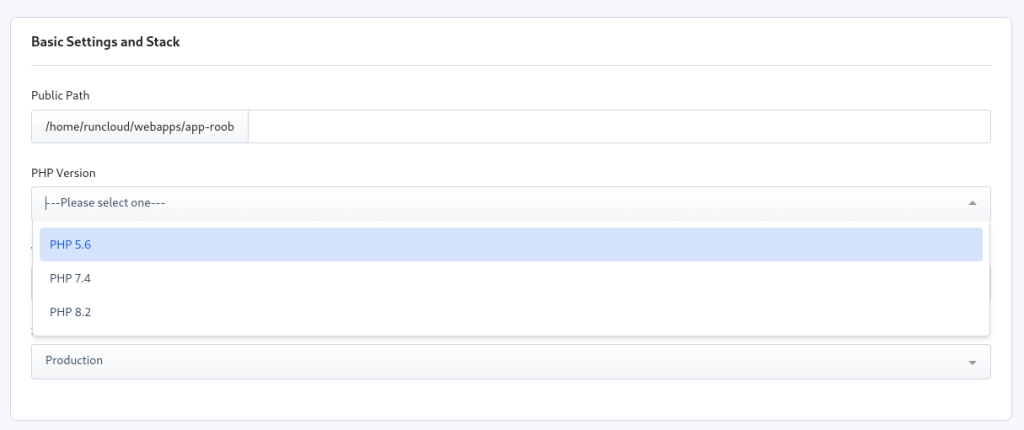
    Fix 2:  Upgrade to PHP 8.2+ and Verify OPcache Is On

    If your server is still running PHP 7.x, you’re missing out on major performance features, such as the Just-In-Time (JIT) compiler.

    Upgrading to PHP 8.2 with OPcache enabled can drastically reduce admin response times by storing precompiled script bytecode in shared memory. 

    RunCloud lets you switch PHP versions directly from the dashboard:

    • Go to your Web Application
    • Click Settings
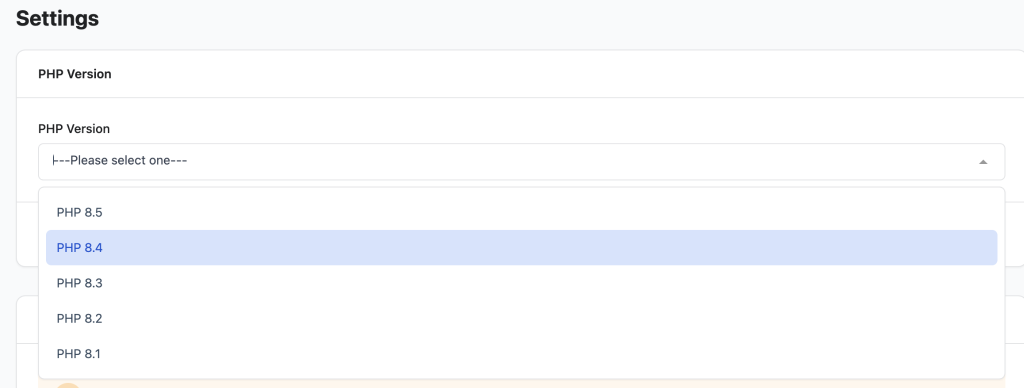
    • Select PHP 8.2 or higher from the dropdown menu

    This ensures you are using the latest advancements and optimizations from updated PHP versions.

    RunCloud dashboard dropdown menu showing available PHP versions including PHP 8.2 and PHP 8.3.

    Want to learn more about the performance benefits? Check out our detailed guide on upgrading to PHP 8.

    Fix 3: Throttle the WordPress Heartbeat API

    The WordPress Heartbeat API is responsible for autosaving posts, tracking user sessions, and showing real-time plugin notifications. However, it does this by firing continuous admin-ajax.php requests every 15 seconds. If you have multiple tabs open, it effectively hammers your server and slows the admin area to a crawl.

    You can throttle this activity to run every 60 seconds (or disable it entirely on non-essential pages). There are two ways to do this:

    • Using a Snippet: Add the following code to your theme’s functions.php file or a code snippets plugin:
    add_filter( 'heartbeat_settings', function($settings) { 
        $settings['interval'] = 60; // Delays execution to 60 seconds
        return $settings; 
    } );
    • Using a Plugin: Alternatively, install the free Heartbeat Controller plugin from the WordPress repository. Go to its settings and set the interval for the WordPress Dashboard, Frontend, and Post Editor to 60 seconds.

    Fix 4:  Audit and Cut Admin-Side Plugin Bloat

    Many poorly coded plugins load their CSS and JavaScript on every admin page, even when those assets are only needed on a specific settings screen. This bloat creates massive bottlenecks when navigating the backend.

    Follow the steps below to fix this:

    1. Install the free Query Monitor plugin. Open your admin dashboard and look at the Query Monitor data in your admin bar. It will break down exactly which plugins are taking the longest to load, generating the most database queries, or consuming the most memory.
    2. Install a plugin like Asset CleanUp or Perfmatters. These tools allow you to conditionally disable scripts and styles from loading on pages where they aren’t needed.
    3. Deactivate and permanently delete any plugins that run background processes or analytics that you don’t actually need or use daily.

    Fix 5: Clean Your Database (Revisions, Transients, Bloat)

    Every time you hit “Save Draft” or let WordPress auto-save your work, it creates a new post revision in your database. On a site that’s a few years old, this can quickly result in 10,000+ orphaned revision rows, expired transients, and metadata bloat. 

    There are two ways to fix this:

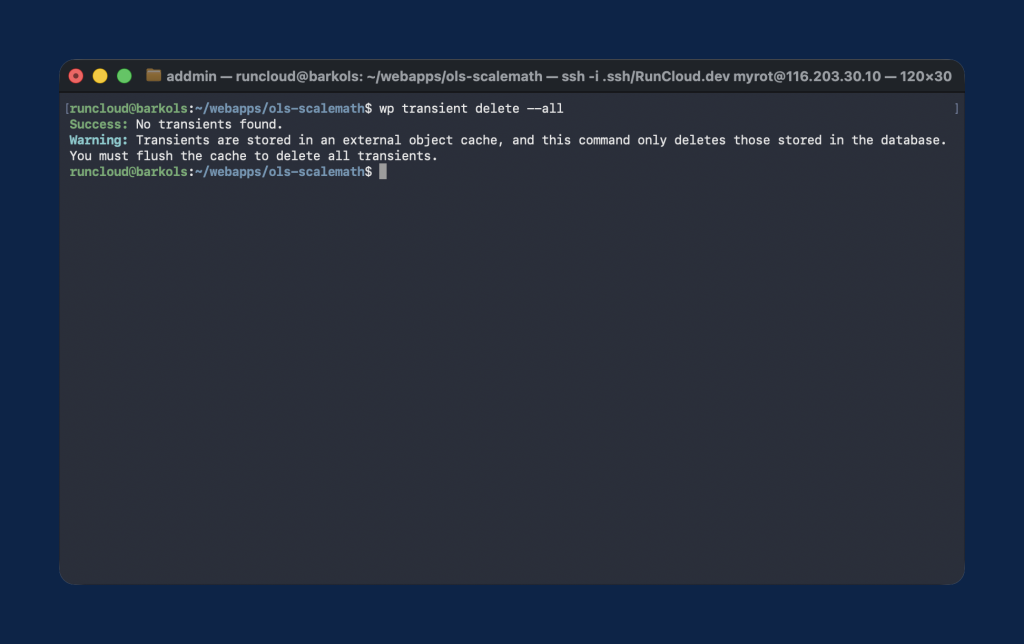
    • The WP-CLI Method (For Advanced Users): If you are comfortable in the terminal, you can clean your database in just a few seconds. Run wp transient delete –all to clear expired cached data, and run wp post delete $(wp post list –post_type=revision –format=ids) to purge old revisions.
    Terminal window showing WP-CLI commands used to delete expired transients and clean a WordPress database.
    • The GUI Method: Install a free optimization plugin, such as WP-Optimize. Use its dashboard-based tools to clean up database tables, remove spam comments, and delete post revisions. 

    Tip: Properly configuring your site’s core settings can prevent bloat before it happens. Learn more in our guide: Everything You Need To Know About the wp-config.php File.

    Fix 6: Replace WP-Cron With a Real Server Cron Job

    By default, WordPress handles scheduled tasks (like publishing scheduled posts, checking for updates, or sending emails) using Cron Jobs. However, WordPress Cron doesn’t use a real system scheduler. Whenever a user or admin visits a page, WP-Cron checks for pending tasks, which can hit the admin dashboard hard and cause random, massive spikes in load times.

    It is highly recommended to enable a real server-based cron for your WordPress website using the following steps:

    1. Disable WP-Cron: Open your wp-config.php file and add the following line to stop WordPress from executing cron on page loads:
    define('DISABLE_WP_CRON', true);
    1. Add a Server Cron: In your RunCloud dashboard, select the server where your site is hosted, and click on the Cron Job tab in the left menu. On this screen, add a new job with the following command to run every 5 minutes (*/5 * * * *):
    wp cron event run --due-now

    For more details on setting up reliable background tasks, check out our tutorial on external cron jobs in WordPress.

    If you are using RunCloud, you can replace WordPress cron jobs with real cron jobs directly from the RunCloud dashboard by selecting a checkbox during WordPress installation:

    RunCloud WordPress installation settings showing the option to use a real server cron instead of WP-Cron.

    Fix 7: Right-Size Your Server Stack (CPU, RAM, and NGINX)

    The WordPress admin dashboard bypasses the cache entirely, making the dashboard CPU-bound. A 1-core VPS will always feel sluggish in the backend, regardless of how many caching plugins you install.

    Your web server software also plays a massive role. The older Apache + mod_php stack spawns a brand-new PHP process for every single request. In contrast, NGINX paired with PHP-FPM reuses worker pools, which is far more efficient for heavy admin operations.

    RunCloud deploys NGINX + PHP-FPM by default: the fastest stack for WordPress admin performance. If your current host is still running Apache and your dashboard is lagging, then you should migrate to a modern WordPress host and ensure your server has at least 2 CPU cores and 2GB+ of RAM to give PHP-FPM the breathing room it needs to process dashboard requests instantly.

    Curious about how NGINX handles heavy traffic? Read our deep dive into advanced NGINX configuration.

    Fix 8: Add a Redis Object Cache 

    Every single time you load a page in wp-admin, WordPress runs anywhere from 30 to 80 database queries. Without an object cache, every single one of those queries hits your MySQL database. These heavy database queries are the main reason the WordPress backend (especially WooCommerce) feels slow.

    You can improve this by enabling Object caching for your WordPress site. Object caching stores the results of repeated database queries directly in your server’s RAM. By serving these queries from your memory instead of the hard disk, you can significantly speed up the load times of your WordPress admin page.

    Implementing this manually requires installing a Redis server and manually tweaking configuration files, but we’ve made it effortless with RunCache, which includes Redis object caching.

    After installing RunCache, you can enable object caching with a single toggle in your WordPress admin dashboard, without fiddling with configuration files or SSHing into the server. 

    Learn more about maximizing your database speed:

    Final Thoughts: Which Fix Do You Need?

    Troubleshooting a slow WordPress admin doesn’t have to be a guessing game. Here is a quick diagnostic cheat sheet to help you pinpoint exactly which fix will deliver the fastest results, depending on when and where you experience the lag:

    • Frontend fast, admin slow: Your server needs help handling raw queries. Start with OPcache, upgrading your Server Stack, and enabling Redis Object Cache.
    • Admin slow after a new plugin install: You are likely dealing with heavy asset bloat or conflicting background processes. 
    • Admin slow after heavy content publishing: Your database is bogged down by thousands of auto-saves, revisions, and expired transients. Clean your database to restore speed.
    • Admin is slow only in the post editor: The Gutenberg editor and the WordPress Heartbeat API are hammering your server with constant AJAX requests. You can throttle the Heartbeat API to gain some performance.
    • Admin is slow across everything, always: Your server is fundamentally starved for basic PHP resources. You should start by increasing the PHP Memory Limit and upgrading to PHP 8.2+. 

    Ready to Stop Waiting on Your WordPress Admin?

    Stop wasting hours battling manual server configurations, editing php.ini files, or staring at a loading spinner inside wp-admin. 

    With RunCloud, you don’t need to be a Linux system administrator to get enterprise-grade performance.

    We provide a highly optimized NGINX and PHP-FPM server stack engineered specifically to make WordPress fly. From 1-click PHP version upgrades to instant deployment of Redis object cache via RunCache, RunCloud puts powerful, server-level optimizations right at your fingertips (no SSH or command-line experience required).

    Sign up for RunCloud today.

    Frequently Asked Questions

    Why is WordPress admin slow, but the site loads fast?

    Your front-end website loads rapidly because traditional page caching serves static HTML files to visitors, completely bypassing heavy server processing. However, these page caches are disabled for logged-in admin requests, meaning your WordPress dashboard must load dynamically every single time. As a result, your backend speed relies entirely on raw server resources, database performance, and your specific PHP configuration.

    Does caching help speed up WordPress admin?

    Standard page caching will not speed up your WordPress admin since it is bypassed for logged-in users to ensure dynamic content remains accurate. However, implementing a Redis object cache is highly effective for accelerating your backend performance. 

    How do I enable Redis object cache in WordPress?

    To enable this manually, you must install a Redis server on your VPS and configure an object cache drop-in plugin within your WordPress files. For a much easier approach, you can simply install RunCache for your WordPress site. RunCache automatically provisions the Redis server and seamlessly configures the required WordPress drop-in, instantly optimizing your database queries.

    Is the WooCommerce admin slower than the regular WordPress admin?

    Yes, the WooCommerce admin is often slower than a standard WordPress backend because e-commerce platforms run significantly more database queries per page. Tasks like processing orders, checking inventory, and calculating analytics put a heavy, dynamic strain on your server’s database. 

  • How to Enable HTTP/3 on NGINX

    How to Enable HTTP/3 on NGINX

    If you’re running NGINX on a modern server, you’re likely leaving performance on the table by sticking with HTTP/2.

    HTTP/3 changes how browsers connect to your server. It reduces latency, improves performance on unstable networks, and can noticeably speed up real-world page loads – especially for mobile users.

    The problem is that enabling HTTP/3 on NGINX isn’t straightforward. It requires the right version, specific modules, firewall changes, and careful configuration. One small mistake can stop NGINX from restarting.

    In this guide, you’ll learn exactly how to enable HTTP/3 on NGINX step by step – from checking compatibility to verifying that it’s working correctly.

    Step-by-Step Instructions for Enabling HTTP/3 on NGINX

    Use the steps below to enable and verify HTTP/3 on your Ubuntu server.

    Step 1: Ensure You Meet Prerequisites for HTTP/3

    Before enabling HTTP/3 (QUIC) on your Ubuntu server, ensure your environment meets the prerequisites. Since HTTP/3 works over UDP rather than TCP, your underlying web server, network firewall, and encryption standards must support it.

    NGINX Version Supports HTTP/3

    The most important requirement for enabling HTTP/3 is having a compatible NGINX version. According to the official NGINX QUIC documentation, support for QUIC and HTTP/3 was officially introduced in NGINX version 1.25.0. In these newer releases, the required ngx_http_v3_module is included in the official Linux binary packages by default.

    How to Check Your Current Version: Run the following command to check your NGINX version and its compiled modules:

    nginx -V 2>&1 | grep --color -- --with-http_v3_module
    nginx server compile flags

    Look for nginx version: nginx/1.25.0 (or higher) and ensure that --with-http_v3_module is present in the configure arguments.

    If your Ubuntu repository ships older “stable” releases (like 1.18.x or 1.24.x) that do not include HTTP/3 support out of the box. Then you can install the Mainline version from the official NGINX repositories.

    Run the following commands to install the necessary dependencies:

    1. Install prerequisite packages:
    sudo apt update
    sudo apt install curl gnupg2 ca-certificates lsb-release ubuntu-keyring
    1. Import the official NGINX GPG signing key:
    curl https://nginx.org/keys/nginx_signing.key | gpg --dearmor | sudo tee /usr/share/keyrings/nginx-archive-keyring.gpg >/dev/null
    1. Add the NGINX Mainline repository for Ubuntu:
    echo "deb[signed-by=/usr/share/keyrings/nginx-archive-keyring.gpg] \
    http://nginx.org/packages/mainline/ubuntu `lsb_release -cs` nginx" \
    | sudo tee /etc/apt/sources.list.d/nginx.list
    1. Prioritize NGINX packages (APT Pinning): This ensures Ubuntu prioritizes the official NGINX repository over its own default repositories.
    echo -e "Package: *\nPin: origin nginx.org\nPin-Priority: 900\n" | sudo tee /etc/apt/preferences.d/99nginx
    1. Install the latest NGINX version:
    sudo apt update
    sudo apt install nginx

    Suggested read: How to Set Up a Hetzner Server with RunCloud 

    SSL Certificates are Configured (HTTP/3 Requires TLS 1.3)

    Unlike older HTTP versions, where HTTPS was a secondary layer, HTTP/3 inherently requires encryption via QUIC. You cannot run HTTP/3 over unencrypted http:// connections. Additionally, the QUIC protocol mandates the use of TLS 1.3 to enable faster 0-RTT (Zero Round Trip Time) handshakes and better security.

    Before proceeding, you must ensure:

    1. You have a valid domain name pointing to your Ubuntu server’s IP address.
    2. An SSL/TLS Certificate is configured. A free certificate from Let’s Encrypt (using Certbot) is perfect for this.
    3. TLS 1.3 is enabled in your config. Verify that your existing NGINX server block contains TLSv1.3 in the ssl_protocols directive.

    Your current HTTPS block should look something like this before adding HTTP/3:

    server {
        listen 443 ssl;
        server_name example.com;
    
    
        ssl_certificate /etc/letsencrypt/live/example.com/fullchain.pem;
        ssl_certificate_key /etc/letsencrypt/live/example.com/privkey.pem;
    
    
        # TLS 1.3 MUST be included for QUIC/HTTP/3 to function
        ssl_protocols TLSv1.2 TLSv1.3;
    }

    Root or Sudo Access to Edit NGINX Config

    Finally, you will need root or sudo access to your Ubuntu server. Upgrading to HTTP/3 requires modifying core NGINX configuration files, tweaking firewall rules, and restarting system services.

    Step 2: Open UDP Port 443 on Your Firewall

    Unlike HTTP/1.1 and HTTP/2 which rely on TCP, HTTP/3 uses the QUIC protocol, which operates entirely over UDP. If you don’t explicitly open UDP port 443 on your firewall, client requests will never reach your NGINX HTTP/3 listener, and browsers will silently downgrade back to HTTP/2 over TCP.

    UFW (Ubuntu)

    If you are using Uncomplicated Firewall (UFW), which comes standard on Ubuntu, simply run:

    sudo ufw allow 443/udp
    sudo ufw reload

    iptables

    If you manage your firewall directly using iptables, run the following to append the UDP rule:

    sudo iptables -A INPUT -p udp --dport 443 -m conntrack --ctstate NEW,ESTABLISHED -j ACCEPT

    After making the changes, you need to save your iptables rules using netfilter-persistent save or iptables-save, depending on your server setup

    Cloud Firewall (Hetzner, GCP, DigitalOcean)

    If your server is hosted on a cloud provider, local firewall rules (UFW/iptables) are often overridden or supplemented by cloud-level security groups. The exact steps will vary depending on your cloud provider:

    • Hetzner Cloud: Go to your server’s “Firewalls” tab and add an Inbound rule for Protocol: UDP, Port: 443.
    • Google Cloud Platform (GCP): Go to VPC Network > Firewall. Create a new ingress rule targeting your instance, select UDP, and specify port 443.
    • DigitalOcean: Navigate to Networking > Firewalls. Add an Inbound Rule for Custom UDP on port 443.

    Pro Tip: If you are using RunCloud to manage your infrastructure, our official server setup guides for providers like Hetzner and GCP cover this firewall step in great detail.

    Step 3: Add the QUIC Listener and HTTP/3 Directives to Your Server Block

    Now it’s time to tell NGINX to actually listen for QUIC traffic and advertise HTTP/3 capabilities to the browser.

    Open your website’s NGINX configuration file (e.g., sudo nano /etc/nginx/conf.d/example.com.conf or /etc/nginx/sites-available/default).

    Here is a complete, copy-paste-ready server block configured for HTTP/3:

    server {
        # 1. Standard TCP listener for HTTP/1.1 and HTTP/2 (Fallback)
        listen 443 ssl;
        
        # 2. UDP listener for QUIC and HTTP/3
        listen 443 quic reuseport;
    
    
        server_name example.com www.example.com;
    
    
        # 3. SSL/TLS Certificates
        ssl_certificate /etc/letsencrypt/live/example.com/fullchain.pem;
        ssl_certificate_key /etc/letsencrypt/live/example.com/privkey.pem;
    
    
        # 4. Enable TLS 1.3 (Required for HTTP/3)
        ssl_protocols TLSv1.2 TLSv1.3;
    
    
        # 5. Core HTTP/3 Directives
        http3 on;
        quic_retry on;
        ssl_early_data on;
    
    
        # 6. Advertise HTTP/3 to clients via the Alt-Svc header
        add_header Alt-Svc 'h3=":443"; ma=86400' always;
    
    
        # The rest of your location blocks go here...
        location / {
            try_files $uri $uri/ =404;
        }
    }

    Each directive below controls a specific part of how HTTP/3 works in NGINX. Here’s what each one does and why it matters.

    listen 443 quic reuseport;
    Tells NGINX to listen for UDP traffic on port 443 and distributes the processing load across multiple worker processes.

    http3 on;
    enables the HTTP/3 protocol decoding for the current server block.

    ssl_protocols TLSv1.3;
    Configures the use of TLS 1.3, the strict encryption standard required by the QUIC protocol.

    quic_retry on;
    Defends against UDP spoofing attacks by requiring clients to validate their IP address during the handshake.

    ssl_early_data on;
    Enables 0-RTT (Zero Round Trip Time), allowing returning clients to resume encrypted connections instantly without handshake delays.

    add_header Alt-Svc 'h3=":443"; ma=86400' always;
    Tells connecting web browsers, “Hey! I support HTTP/3 on port 443, remember this for the next 86,400 seconds (1 day).”

    If you host multiple websites (virtual hosts) on the same NGINX server, you need to be careful with the reuseport parameter. You can only define reuseport once per IP and port combination.

    For your primary website, use: listen 443 quic reuseport;

    For all other websites on the same server, omit reuseport: listen 443 quic; If you put reuseport in multiple server blocks, NGINX will throw an error and refuse to start.

    Suggested read: How to Set Up a Google Cloud Server to Host Your Websites 

    Step 4: Test and Reload NGINX

    Whenever you alter NGINX configurations, you must test the syntax before applying the changes to prevent your live server from crashing.

    Run a configuration test to confirm your changes are valid before reloading NGINX:

    sudo nginx -t

    If the output says nginx: configuration file /etc/nginx/nginx.conf test is successful, apply the changes instantly without dropping active connections by reloading NGINX:

    sudo nginx -s reload

    Step 5: Verify HTTP/3 Is Active

    You can use a web-based testing tool like http3check.net to check your setup is working as expected. Simply type your website’s domain name into the search bar and click “Check”. The tool will attempt a QUIC connection from its own servers and confirm whether UDP port 443 is open, TLS 1.3 is functioning, and your NGINX instance is successfully serving HTTP/3.

    Suggested read: How to Fix ERR_SSL_VERSION_or_CIPHER_MISMATCH 

    Enable HTTP/3 Without Touching Config via RunCloud

    Managing NGINX configurations manually can quickly become a headache, especially as your server scales. One typo in your nginx.conf, forgetting to open a UDP port, or accidentally duplicating the reuseport directive across multiple server blocks can crash your entire web server.

    If you have just completed all the manual steps above, you might be wondering: Is there an easier way to do this for my next server?

    The answer is ‘yes’, and the solution is RunCloud.

    enable http3 in runcloud nginx

    With RunCloud, you can skip the command line entirely, instead enabling HTTP/3 for each web application directly from your dashboard with a single toggle.

    Here’s how RunCloud simplifies the process:

    • No SSH Required: You never have to log in to your server’s terminal to edit configuration files.
    • No reuseport Management: RunCloud’s automated NGINX stack intelligently handles the listen 443 quic reuseport rule across multiple domains. You never have to worry about conflicting server blocks.
    • One-Click Toggles: Simply navigate to your Web Application settings, toggle HTTP/3 on, and RunCloud safely reloads your NGINX server in the background.

    For more details on how effortlessly this works, check out the official RunCloud documentation on enabling HTTP/3.

    Wrapping Up

    In this post, we have discussed the steps required to enable HTTP/3 on an NGINX server. As you can see, the manual process requires several intricate steps: checking NGINX versions, configuring firewalls for UDP port 443, and carefully modifying server block directives.

    While the benefits of HTTP/3 are worth the effort, manual configuration is tedious and prone to human error. You don’t have to do it this way.

    You can completely skip the command line and complex configuration files by using RunCloud.

    RunCloud is a server management dashboard for PHP and web applications. It provides a visual interface for configuring firewalls, managing databases, deploying code via Git, and enabling features like HTTP/3 without editing configuration files.

    If you want to avoid manual setup and reduce the risk of configuration errors, sign up for RunCloud and enable HTTP/3 in a few clicks.

    FAQs

    Does enabling HTTP/3 break HTTP/2 or HTTP/1.1?

    No, enabling HTTP/3 does not break older protocols because it runs on UDP port 443, while HTTP/2 and HTTP/1.1 operate over TCP. Modern web servers and browsers use a “fallback” mechanism that ensures that if a client doesn’t support QUIC (the foundation of HTTP/3), the connection seamlessly reverts to HTTP/2 without the user noticing.

    Why does curl –http3 work but Chrome still shows HTTP/2?

    Command-line tools like curl can be forced to use a specific protocol, but Chrome requires the server first to send an Alt-Svc (Alternative Services) header to “discover” that HTTP/3 is available. Because HTTP/3 runs over UDP, Chrome often completes the initial handshake over TCP (HTTP/2) and switches to HTTP/3 only for subsequent requests or after the protocol is cached in the browser’s memory.

    Is HTTP/3 on NGINX production-safe?

    Yes, HTTP/3 is considered production-safe and is officially supported in the NGINX mainline releases, though you should monitor your server’s CPU usage closely. Because QUIC handles encryption and packet loss at the application level rather than the kernel level, it can be more CPU-intensive than HTTP/2, especially during high-traffic spikes.

    How do I disable HTTP/3 on NGINX if needed?

    To disable HTTP/3, simply remove the quic and reuseport parameters from your listen 443 directives, and delete the add_header Alt-Svc line from your configuration file. Once you run nginx -s reload, the server will stop advertising QUIC capabilities and will no longer accept connections over UDP port 443, forcing all traffic back to standard TCP.

    Do I need a special SSL certificate for HTTP/3?

    No, your standard SSL/TLS certificate (such as a free Let’s Encrypt certificate) will work perfectly. However, the QUIC protocol explicitly requires TLS 1.3, so your NGINX configuration must enable TLS 1.3.

  • HTTP/2 vs HTTP/3: What Every Web Server Owner Needs to Know 2026

    HTTP/2 vs HTTP/3: What Every Web Server Owner Needs to Know 2026

    Most modern websites use the HTTP/2 protocol, which uses multiplexing to send multiple files over a single connection.

    This works quite well for people who surf the internet using high-speed fiber or broadband. However, if you’re using an unreliable network, such as a mobile connection, then the story is quite different.

    Why HTTP/2 Has a TCP Problem

    HTTP/2 uses TCP, which was designed in the 1970s with strict requirements that needed reliability and ordered delivery. If a single data packet is lost in transit, TCP halts the entire connection, asks the server to resend the missing packet, and waits for it to arrive before processing anything else.

    Because HTTP/2 pushes every asset (HTML, CSS, JS, Images) over a single TCP connection, a single dropped packet stalls the delivery of all other assets. 

    This strict sequential ordering creates “Head-of-Line (HoL) Blocking.” If you’re serving a page to a desktop user on a gigabit connection, then their packet loss is near zero, and HoL blocking is irrelevant.

    However, if your traffic skews heavily toward mobile, HoL blocking has a measurable negative impact on your Core Web Vitals.

    In environments with just a 2% packet loss (typical for a user on a crowded 4G network or a commuter train), HTTP/2’s HoL blocking can delay rendering by hundreds of milliseconds.

    Your CSS payload might be received correctly, but the browser can’t parse it because TCP is waiting for a dropped packet from an unrelated background image.

    HTTP/3 was engineered specifically to address the structural limitations of TCP that degrade performance on mobile devices, in high-latency connections, and in lossy networks.

    HTTP/2 vs HTTP/3 Side by Side

    HTTP/3 abandons TCP entirely. Instead, it runs on QUIC (Quick UDP Internet Connections), a protocol built on top of UDP. Let’s see what the differences are between the two protocols:

    Transport Protocol: TCP vs QUIC over UDP

    UDP is fundamentally different from TCP as it sends data packets without waiting for acknowledgments. It’s fast but inherently unreliable. QUIC solves this by building reliability on top of UDP.

    QUIC handles packet loss recovery natively. It retains the speed and lightweight nature of UDP while intelligently managing congestion.

    This shift from UDP to QUIC offers massive performance gains for mobile networks with fluctuating signal strength, but adds negligible differences for users hardwired to a corporate LAN.

    Suggested read: How To Fix ERR_SSL_VERSION_OR_CIPHER_MISMATCH 

    Handshakes and 0-RTT

    TCP and TLS 1.2/1.3 require separate handshakes to establish a connection. An HTTP/2 connection requires 2 to 3 round-trip times (RTT), i.e., several messages are sent back and forth between your browser and the server before you can start seeing the actual data for your website.

    HTTP/3 bakes the cryptographic handshake directly into the transport layer. This works differently in different cases:

    • First visits: When a user visits the website, the server establishes a connection in a single round-trip.
    • Returning visitors: For all the subsequent requests to the same server, QUIC enables 0-RTT (Zero Round Trip Time). The browser remembers the server and sends HTTP requests in the very first packet.
    • The Data: On a high-latency 3G/4G connection (e.g., 100ms ping), moving from 3-RTT to 0-RTT shaves up to 300ms off your Time to First Byte (TTFB).

    Independent Streams vs Shared Connection

    While HTTP/2 uses logical multiplexing within a single TCP tunnel, HTTP/3 uses cryptographic multiplexing via QUIC.

    This means that in HTTP/3, streams are truly independent. If packet #44 (containing a chunk of an image) is lost on a spotty Wi-Fi network, only the stream for that specific image is paused for retransmission. The streams carrying your CSS, JavaScript, and HTML continue rendering without interruption. 

    This significantly improves Largest Contentful Paint (LCP) and First Contentful Paint (FCP), especially under poor network conditions.

    Mandatory TLS 1.3 in HTTP/3

    With HTTP/2, encryption was technically optional (though practically enforced by browsers). In a standard TCP connection, the payload (your website data) is encrypted, but the transport headers (packet numbers, sequence details, flags) are sent in clear text.

    In contrast, QUIC uses TLS 1.3 directly during its own connection establishment. When a client connects to a server via HTTP/3, the transport handshake (saying “hello, let’s connect”) and the cryptographic handshake (exchanging TLS 1.3 keys) occur simultaneously in the very first packet. If the client doesn’t support or provide TLS 1.3 key negotiation, the QUIC connection can’t be established. There is no mechanism in the protocol to complete a connection first and secure it later.

    This prevents middleboxes (such as ISP routers or corporate firewalls) from inspecting or manipulating transport-layer data, reducing the likelihood of network-level interference that often causes TCP connections to drop.

    Suggested read: How to Set Up a Hetzner Server with RunCloud 

    Connection Migration on Mobile Networks

    A frequent issue for mobile users is switching networks, as may happen when walking out of a building and dropping from Wi-Fi to a 5G cellular network, for example.

    • HTTP/2 (TCP): Connections are tied to the user’s IP address. When the IP changes from Wi-Fi to 5G, the TCP connection breaks. The server and browser must negotiate a completely new connection from scratch, stalling the page load.
    • HTTP/3 (QUIC): Connections use a unique “Connection ID” rather than an IP address. When the user’s IP address changes, QUIC seamlessly migrates the existing connection to the new IP address.

    This delivers a flawless, uninterrupted user experience for mobile users on the go. It has no impact on stationary desktop users.

    Is HTTP/3 Supported on Your Stack?

    Before you begin modifying configuration files or adjusting firewall rules, verify that the layers of your hosting are fully prepared to handle QUIC traffic over UDP. The transition to the HTTP3 protocol has picked up pace in 2026, and it’s highly likely that your audience’s devices are already using it.

    According to recent data from Cloudflare Radar, HTTP/3 now accounts for an impressive 31.2% of all human web traffic worldwide, while HTTP/2 maintains the majority share at 59.1%, and legacy HTTP/1.x traffic has steadily declined to just 9.6%.

    When analyzing the distribution of secure network connections, Cloudflare Radar reports that QUIC directly handles 31.7% of all encrypted traffic, operating efficiently alongside traditional TLS 1.3, which handles 65.7%, while outdated TLS 1.2 connections have dwindled to a mere 2.6%.

    This rapid, widespread adoption proves that the global infrastructure is ready, but your individual server stack still dictates how seamlessly you can implement it.

    Browser Support: Chrome, Firefox, Safari, Edge

    From the client-side perspective, compatibility is essentially solved because the development teams behind Chrome, Firefox, Safari, and Edge have deeply integrated native HTTP/3 support into their modern browser releases.

    When a modern browser receives the Alt-Svc header from your server advertising that HTTP/3 is available, it will attempt to negotiate a QUIC connection in the background. However, if the browser discovers that UDP port 443 is blocked or heavily throttled on the user’s local network, it will silently and instantaneously revert the connection to standard HTTP/2 over TCP without ever surfacing a timeout error or disrupting the end user’s browsing experience.

    Suggested read: How to Set Up a Google Cloud Server to Host Your Websites 

    Web Server Support: NGINX, Caddy, LiteSpeed, Apache

    While client-side support is essentially universal, the server-side support is somewhat fragmented, meaning your specific web server software will entirely dictate your architectural approach and implementation strategy.

    • NGINX: If you are running NGINX, native HTTP/3 support is now fully available and highly stable, but using it requires updating your environment to version 1.25.0 and ensuring that your binary was explicitly compiled with the official ngx_http_v3_module enabled.
    • Caddy & LiteSpeed: If your backend infrastructure relies on modern, aggressively performance-focused web servers like Caddy or LiteSpeed, you will benefit from a much smoother deployment process, as both platforms feature highly mature, out-of-the-box HTTP/3 integration that requires practically zero manual configuration to activate.
    • Apache & Apache APISIX: The traditional Apache HTTP Server (httpd) still significantly lags behind its modern competitors. However, if your infrastructure uses Apache APISIX, you can enable HTTP/3 for downstream client connections by modifying the config.yaml file.

    While this configuration allows you to use QUIC’s 0-RTT, the official Apache documentation strictly warns that this functionality is currently considered experimental and explicitly advises administrators against deploying it in live production environments.

    Until these native experimental features are released as stable versions, placing your classic Apache server behind an HTTP/3-capable CDN (as discussed below) is the only feasible solution.

    Suggested read: How to Fix a 502 Bad Gateway Error 

    How to Enable HTTP3 on Your Website

    The web is constantly evolving, and at RunCloud, we want to help you stay on the leading edge with the latest protocols.

    You might be apprehensive about upgrading your production server to a brand-new protocol, and you’d be right to be cautious.

    However, unlike previous major protocol shifts, adopting HTTP/3 is a zero-risk move. It is explicitly designed to work in parallel with HTTP/2 and HTTP/1.1, rather than replacing them. Modern browsers will simply use HTTP/3 (h3) if the server offers it and the network allows it. If not, they instantly fall back to HTTP/2 (h2) without interrupting the user experience.

    Let’s see how we can enable HTTP/3 without adding unnecessary architectural complexity.

    Method 1: Use CDN (Recommended for Immediate Deployment)

    By using a modern CDN, server administrators can bypass the complexities of modifying origin server configurations, compiling experimental web server modules, or reconfiguring restrictive cloud firewalls to accept UDP traffic.

    The CDN handles the computationally heavy QUIC connection termination at the edge nodes located closest to the end user, and then seamlessly proxies that traffic back to your origin server over a standard, thoroughly tested HTTP/2 TCP connection.

    Because dashboard interfaces and underlying infrastructure architectures vary significantly across edge providers, the exact procedural steps to enable this protocol will differ by vendor, but the fundamental deployment logic remains the same.

    How to Enable HTTP/3 Using Cloudflare

    Cloudflare makes upgrading to HTTP/3 incredibly easy for beginners. You don’t need to configure complex UDP ports on your server or manually install TLS 1.3 security certificates. Cloudflare automatically handles all the heavy technical lifting on its global edge network. When you turn this feature on, Cloudflare instantly starts offering the faster QUIC protocol to your mobile and desktop visitors.

    Follow these steps to enable the protocol from your dashboard:

    1. Log in to your Cloudflare dashboard and click the domain you want to speed up.
    2. In the left-hand sidebar menu, click on Speed and go to the Settings tab.
    3. Scroll down the page until you find the section labeled Protocol. Here, you will see a list of network-layer optimization options.
    4. Find the HTTP/3 option and toggle the switch to ON. 
    5. Right below the HTTP/3 toggle, find the 0-RTT Connection Resumption option and turn it ON. This feature works perfectly with HTTP/3 to make your website load almost instantly for returning visitors by skipping the initial security handshake.

    Once you save your settings, Cloudflare will automatically serve all web requests using the best-supported protocol for your visitors.

    How to Enable HTTP/3 Using AWS CloudFront

    If you’re using AWS CloudFront (Amazon’s Content Delivery Network) to intercept and speed up the traffic at the edge of the network. This approach completely protects your underlying EC2 instances and load balancers from any risky configuration mistakes.

    Follow these steps to update your AWS distribution to use the newest web protocols:

    1. Log in to the AWS Management Console and open the CloudFront dashboard.
    2. Look at your list of delivery networks, then click your target Distribution to open its details.
    1. On the main General settings panel, click the Edit button to begin making changes.
    2. Scroll down the edit page until you reach the section titled “Supported HTTP versions.”
    3. You will notice that AWS selects HTTP/1.0 and HTTP/1.1 by default, so older web browsers can still access your site. To modernize your setup, explicitly check the boxes next to both HTTP/2 and HTTP/3.
    4. Click the Save changes button at the bottom of the screen. 
    Enable HTTP/3

    AWS will take a few minutes to update its global network. Once the deployment finishes, CloudFront will automatically start terminating QUIC connections at the edge to give your visitors a faster browsing experience.

    Method 2: The Origin Server Method (NGINX)

    If you manage your own bare-metal or VPS and want HTTP/3 at the origin, you need NGINX version 1.25.0 or the mainline branch (which includes the official QUIC module).

    Step 1: Open UDP Port 443.

    HTTP/3 requires UDP traffic. Your firewall (ufw, iptables, or AWS Security Groups) must allow UDP on port 443.

    sudo ufw allow 443/udp

    Step 2: Update NGINX Configuration

    Edit your server block to listen for both TCP (HTTP/2) and UDP (HTTP/3), and add the Alt-Svc header so browsers know HTTP/3 is available.

    server {
        # Listen on TCP for HTTP/1.1 and HTTP/2
        listen 443 ssl;
        http2 on;
    
    
        # Listen on UDP for HTTP/3 (QUIC)
        listen 443 quic reuseport;
    
    
        server_name yourdomain.com;
    
    
        # TLS 1.3 is strictly required
        ssl_protocols TLSv1.3;
        ssl_certificate /path/to/cert.pem;
        ssl_certificate_key /path/to/key.pem;
    
    
        # Broadcast to browsers that HTTP/3 is available
        add_header Alt-Svc 'h3=":443"; ma=86400';
    
    
        location / {
            # Your standard proxy or root directives
        }
    }

    Step 3: Test and Validate

    Restart NGINX (systemctl restart nginx). Open Chrome DevTools, navigate to the Network tab, right-click the column headers, and check Protocol. Reload the page a few times. You should see h3 appear instead of h2 for your primary document and assets.

    Method 3: Enabling HTTP/3 with RunCloud 

    If you manage your own servers, manually compiling experimental modules or editing NGINX configuration files via SSH introduces unnecessary risk and leaves significant room for human error. A single typo in your server block can instantly break your production site. 

    RunCloud offers a vastly superior, fully automated alternative, with an intuitive dashboard to manage everything.

    RunCloud deploys a custom NGINX stack that is already optimized for modern protocols, allowing you to modernize your infrastructure with zero technical friction.

    With RunCloud, you never have to touch a configuration file to get QUIC running. The platform handles the complex port binding and header injections for you.

    1. Open your Web Application: Log in to your RunCloud dashboard and navigate to the specific Web Application you want to optimize.
    2. Navigate to SSL/TLS Settings: Open the settings panel where you manage your domains and security certificates.
    3. Enable the Protocol: Simply click the checkbox next to Use HTTP/3.

    That’s the entire process! Because HTTP/3 requires TLS 1.3, RunCloud automatically generates, installs, and manages the lifecycle of your SSL certificates behind the scenes. You get all the performance benefits of an enterprise-grade setup without the administrative headache of rotating certificates or debugging connection failures.

    Important Firewall Note: Before you check the HTTP/3 box in RunCloud, ensure your infrastructure allows the traffic. If you’re hosting on providers such as Hetzner or Google Cloud Platform (GCP), their external network firewalls block UDP traffic by default. You will need to open UDP port 443 at the cloud provider level first. If you’re spinning up a new server, our server setup guides for Hetzner and Google Cloud Platform cover this firewall step. Once the port is open, RunCloud handles the rest of the web server configuration automatically.

    HTTP/2 or HTTP/3: Which One is Better?

    If your site traffic is predominantly desktop users on reliable broadband connections, HTTP/3 won’t significantly alter your performance metrics. In environments with near-zero packet loss, the data shows HTTP/2 and HTTP/3 perform almost identically. 

    However, if your audience includes a large percentage of mobile users, spans across multiple continents, or frequently accesses your application from lossy network environments, HTTP/3 is a low-risk, high-reward upgrade. 

    Real-world telemetry shows that switching to QUIC under a 2% packet-loss scenario can reduce Largest Contentful Paint (LCP) delays by hundreds of milliseconds. Because modern clients gracefully fall back to HTTP/2 when UDP fails, there is zero downside to enabling it.

    Ready to Upgrade to HTTP/3? 

    Sign up for RunCloud and deploy a high-speed, HTTP/3-ready server in minutes.

    Frequently Asked Questions: Upgrading to HTTP/3

    Is HTTP/3 faster than HTTP/2?

    Yes, HTTP/3 is significantly faster than HTTP/2 because it uses the QUIC protocol instead of TCP, effectively eliminating head-of-line blocking. This architectural upgrade allows web pages to load much more quickly and maintain highly stable connections, especially on unreliable mobile networks.

    Do I need to disable HTTP/2 to use HTTP/3?

    No, you do not need to disable HTTP/2 because modern web browsers and servers automatically negotiate the highest supported protocol. Keeping both protocols enabled ensures backward compatibility with older devices while delivering the maximum HTTP/3 speeds to updated browsers.

    Does HTTP/3 affect SEO or Core Web Vitals?

    Implementing HTTP/3 positively impacts SEO by directly improving crucial Core Web Vitals metrics, such as Largest Contentful Paint (LCP) and Interaction to Next Paint (INP). Because Google uses page load speeds as a ranking factor, this enhanced technical performance signals a superior user experience and can boost your organic search visibility.

    Does HTTP/3 require TLS?

    Yes, HTTP/3 strictly requires TLS 1.3 encryption, which is built into the QUIC transport protocol. This mandatory cryptographic standard ensures that all data connections are established much faster while remaining inherently secure against modern cyber threats.

    Is HTTP/3 safe to enable in production?

    HTTP/3 is widely considered safe, highly stable, and strongly recommended for live production environments by web performance experts. Because top-tier tech platforms and global CDNs already use it by default, you can confidently enable it to enhance your website’s speed and security reliably.

  • How to Use Edge Caching to Speed Up WordPress Worldwide

    How to Use Edge Caching to Speed Up WordPress Worldwide

    Is your WordPress website loading quickly for local users, but frustratingly slow for visitors on the other side of the world?

    In modern SEO, website speed is a key ranking factor. If your site takes too long to load, frustrated visitors will simply leave, costing you both traffic and sales. 

    In this beginner-friendly guide, we will break down exactly what edge caching means and why it drastically lowers your Time to First Byte (and what that is!).

    You’ll learn how modern Content Delivery Networks cache full HTML pages and how to do it safely without breaking dynamic pages like WooCommerce.

    Why Edge Caching Speeds Up WordPress 

    If your main WordPress hosting server is located in New York, a visitor from London will naturally experience a slower loading time than a visitor from Brooklyn. This happens because data has to physically travel across the ocean.

    Edge caching solves this distance problem by ensuring your website loads instantly for everyone, no matter where they live.

    What Edge Caching Means for WordPress

    To understand edge caching, think of a massive central warehouse (your web host) and dozens of small, local retail stores (the “edge” servers).

    Normally, whenever a user visits your website, their browser must request the website files directly from your main web host. Edge caching changes this by saving a copy of your WordPress site on a global network of servers (a Content Delivery Network, or CDN). 

    When someone visits your website, the server closest to them (the “edge”) serves it. Because the data travels a much shorter distance, your website appears on their screen in the blink of an eye.

    Suggested read: NGINX Caching for WordPress – Complete Guide & Tutorial

    How Caching HTML at the Edge Cuts TTFB for Global Visitors

    TTFB stands for Time to First Byte. It’s a metric that measures exactly how long it takes a user’s browser to receive the very first data from your website. A lower TTFB means a faster website.

    In the past, CDNs only saved “static” files like images or fonts. Your main server still had to do the heavy lifting of building the actual web page (the HTML) for every single visitor. Today, modern edge caching stores the entire, fully built HTML page directly on edge servers.

    Here is why caching HTML is a game-changer for your SEO and speed:

    • Zero Database Queries: WordPress doesn’t have to waste time searching its database to build the page.
    • No PHP Processing: The server doesn’t have to run complex code. It just hands the pre-built page to the visitor.
    • Instant Delivery: Because the fully built page is waiting right next door to the user, your TTFB drops from over a second to just milliseconds.

    Suggested read: How To Use Redis Object Cache To Speed Up A Dynamic WordPress Site

    When Edge Caching Will Not Help

    While edge caching is incredibly powerful, it’s not a magic fix for everything. Because edge caching is designed to serve static copies of pages to the public, it automatically turns off in a few specific situations.

    Edge caching will not speed up your site in these scenarios:

    • Logged-In Traffic: If a user is logged in to your site (e.g., a member or WordPress administrator), they need to see personalized, live content. The edge cache is bypassed, so they don’t see an old, cached version of the dashboard.
    • Uncached Dynamic Pages: E-commerce pages, such as WooCommerce Shopping Cart or Checkout pages, cannot be cached. If they were, shoppers might see other people’s items! 
    • A Slow Backend Server: Edge caching hides a slow server from your public readers. However, anytime a visitor needs to do something dynamic (like submit a contact form, use a search bar, or process a payment), the request must go back to your original WordPress host. If your hosting provider is slow or your database is bloated, these actions will still feel slow.

    Suggested read: How To Use Redis Full-Page Caching To Speed Up WordPress

    How to Implement Edge Caching for WordPress

    Configuring edge caching for WordPress might sound highly technical, but the steps are quite simple. Here is the exact step-by-step process for implementing edge caching in WordPress.

    Step 1: Pick your edge caching approach 

    Before changing any settings, you must decide how you want your CDN to interact with your WordPress host. There are two primary approaches:

    • Origin Page Cache + CDN (Traditional Method): Your WordPress server (the origin) generates and caches the HTML page locally. The CDN is used only to deliver static assets such as images, CSS, and JavaScript. While this is easy to set up, global visitors still have to wait for the HTML document to travel from your main server, keeping your Time to First Byte (TTFB) higher than ideal.
    • CDN HTML Cache (Full Page Edge Caching): The CDN stores a complete copy of the HTML document on its global edge servers. This is the preferred method for maximum speed worldwide. When a user requests a page, the edge server delivers the HTML instantly without ever contacting your WordPress host.
    • RunCache (All-in-one): For most users, Cloudflare Automatic Platform Optimization is the gold standard for CDN HTML caching. Cloudflare’s data shows that APO can improve TTFB by up to 72% globally. To get the absolute best results, we highly recommend using the RunCache Cloudflare Integration.

    This integration seamlessly bridges your local WordPress cache with Cloudflare’s global edge network. It also ensures that whenever you update a post or change a product, the edge cache is purged and rebuilt instantly, giving you blazing-fast global speeds without the headache of showing outdated content.

    Step 2: Enable Edge Caching on WordPress

    For this tutorial, we will be using RunCache with Cloudflare’s global CDN to serve your entire website from edge locations closer to your visitors. Follow these steps to generate a secure API token and connect your site.

    Step 2.1: Generate a Custom Cloudflare API Token

    To maintain high security, we recommend creating a “Custom Token” with limited permissions rather than using your Global API Key.

    1. Log in to your Cloudflare Dashboard.
    2. In the left menu, click on Manage Account and select Account API tokens.
    1. Click Create Token, then locate Create Custom Token at the bottom and click Get Started.
    2. Token Name: Enter a name like RunCache – [Your Site Name].
    3. Permissions: Add the following three permissions:
      • Zone: Cache Rules: Edit
      • Zone: Cache Purge: Purge
      • Zone: Zone: Read
    1. Zone Resources: Under “Include,” select Specific zone and choose the domain you are currently configuring.
    2. Click Continue to Summary, then Create Token.
    3. After creating the token, copy it immediately and store it in a safe place – Cloudflare will not show it to you again.

    Step 2.2: Ensure Your Domain is Proxied

    Cloudflare caching only works if your traffic is flowing through their network.

    1. In your Cloudflare Dashboard, go to the DNS tab for your domain.
    2. Locate your A or CNAME records (usually for your root domain and the www subdomain).
    3. Ensure the Proxy status toggle is set to Proxied (the cloud icon should be Orange). If it is “DNS Only” (Grey), Cloudflare’s cache will not be active.

    Step 2.3: Enable Cloudflare in the RunCache Plugin

    Now that you have your token and your DNS is ready, connect the plugin to Cloudflare.

    1. Log in to your WordPress Admin Dashboard.
    2. Navigate to RunCache in the sidebar and click on the Full Page Cache tab.
    3. Enable Cloudflare from the list of cache providers.
    4. Paste your newly created token into the API Token field.
    5. Click Save Settings.
    enable cloudflare edge caching wordpress

    Once connected, RunCache will automatically communicate with Cloudflare to manage your cache, purge outdated content when you update posts, and ensure your visitors receive the fastest possible delivery via the Cloudflare edge network.

    Suggested read: Scaling RAM & CPU Cores – How They Affect WordPress Performance

    Step 2: Set the right cache headers for HTML and assets 

    Note: if you are using RunCache, all HTTP headers are handled intelligently by RunCache, and you don’t need to configure them manually.

    CDNs don’t just guess what to cache – they follow strict instructions sent by your server, called HTTP Headers. To make edge caching work perfectly, you need to configure the following directives in Cache-Control headers correctly:

    • max-age: This tells the visitor’s local web browser how long to store the file. For edge-cached HTML, you usually want this set to a low value (e.g., max-age=3600) so browsers always request the latest version from the CDN.
    • s-maxage (Shared Max-Age): The “s” stands for shared cache (your CDN). This tells the edge server how long to hold onto the HTML file. A good rule for WordPress posts is s-maxage=604800 (7 days).
    • stale-while-revalidate: If an edge-cached page expires after 7 days, this directive tells the CDN to immediately serve the “stale” (expired) page to subsequent visitors so they don’t have to wait. In the background, the CDN quietly fetches the latest version from your WordPress server for future visitors. Setting stale-while-revalidate=86400 (24 hours) keeps your site feeling instantly fast 100% of the time.

    Suggested read: How to Easily Optimize Your WordPress Website With RunCloud Hub

    Step 3: Add bypass rules for logged-in users, WooCommerce, and dynamic cookies

    Note: if you are using RunCache, this step is handled automatically.

    The biggest risk of edge caching is caching private or dynamic information by accident. If an edge server caches a page while you are logged in, it might show your WordPress admin bar to regular visitors. To prevent this, you must set up Bypass Rules (also known as Cache Exclusions) in your CDN dashboard or via your caching plugin.

    If you’re using RunCache, you can manage these settings under the Rules tab.

    Important Bypass Rules for WordPress:

    1. Logged-in Users: Tell the CDN to completely bypass the cache if the browser contains the wordpress_logged_in_* cookie.
    2. WooCommerce Cookies: Exclude caching for any user carrying the woocommerce_items_in_cart or wp_woocommerce_session_* cookies. 
    3. Dynamic URLs: Force the CDN to bypass the cache for specific URL paths, including:
      • /wp-admin/*
      • /cart/
      • /checkout/
      • /my-account/

    By setting these rules, your public blog posts and landing pages will load from the edge instantly, while your secure, dynamic pages will safely load directly from your origin server.

    Suggested read: Understanding RunCache Purging Options in RunCloud Hub

    Step 4: Verify edge caching is working using response headers and DevTools

    Once you’ve configured your setup, you should test it to ensure the HTML is actually being served from the edge. You don’t need any fancy software to do this – just your web browser.

    1. Open your website in an Incognito/Private window (to ensure you aren’t logged in).
    2. Right-click on the page and select “Inspect” to open Developer Tools.
    3. Click the “Network” tab, then refresh the page (press F5).
    4. Then click the network request that you want to inspect.
    5. Look at the “Response Headers” section on the right side.
    6. In the response section, you need to look for the following response headers x-cache: HIT or x-runcache-status: HIT. If it says “MISS”, refresh the page one more time to prime the cache. Once it says “HIT”, your HTML is successfully loading from the edge.

    Suggested read: How To Host Multiple Websites On One Server | Ultimate Guide

    Wrapping Up 

    Edge caching is the best strategy for delivering a lightning-fast WordPress experience to visitors worldwide. However, maximizing these speed benefits requires careful management to avoid common pitfalls.

    Edge caching significantly reduces the daily workload on your origin server, but you still need a clean, conflict-free setup to keep your backend fast under heavy load. Running multiple overlapping caching layers often leads to messy system conflicts, which is why RunCloud built Runcache.

    Runcache is a modern WordPress caching plugin that consolidates all caches (local page cache, Redis object cache, and edge network) into one streamlined layer.

    And the best part is that RunCache works with any WordPress site on any host, not just those hosted on RunCloud.

    Start using RunCache to deliver faster global WordPress performance.

    FAQs

    What is edge caching in WordPress?

    Edge caching in WordPress stores a copy of your website on servers located very close to your visitors. These servers are part of a global Content Delivery Network (CDN) with hundreds of worldwide locations. When a user visits your site, the closest edge server delivers the content instead of your primary web host.

    Does edge caching cache HTML or only static files?

    Traditional CDNs only cache static files, such as images, CSS, and JavaScript. However, modern edge caching also caches your fully generated WordPress HTML pages. This advanced process is known as full-page edge caching.
    By caching HTML at the edge, your site can handle thousands of concurrent visitors without crashing. Only dynamic requests, such as form submissions, bypass the cache and reach your origin server.

    What WooCommerce pages should never be cached?

    You must never cache dynamic WooCommerce pages that contain personal user data. The three main pages to absolutely exclude from caching are the Cart, Checkout, and My Account pages. If you cache these pages, a customer might accidentally see another shopper’s private billing information. 

    Why do I still see old content after a purge?

    You usually see old content because of local browser caching. You can easily fix this by performing a hard refresh using Ctrl+F5 on Windows or Cmd+Shift+R on a Mac. Another common reason is multiple active caching layers. You might have cleared your CDN edge cache, but your WordPress caching plugin or server object cache still holds the old data. 

    Should I use edge caching with a WordPress caching plugin?

    Yes, you should absolutely use edge caching alongside a high-quality WordPress caching plugin. Edge caching excels at delivering your website files globally at lightning speeds. Meanwhile, a local caching plugin handles critical on-site performance optimizations.

  • Redis vs Memcached: Which In-Memory Data Store Should You Use?

    Redis vs Memcached: Which In-Memory Data Store Should You Use?

    If your WordPress site feels sluggish despite having a great theme and high-quality hosting, the bottleneck is likely your database.

    Every time a visitor loads a page, WordPress performs dozens of queries to fetch settings, menu structures, and widget content from your MySQL database.

    Object caching changes this by storing repetitive results in RAM and serving them instantly to your visitors.

    But which caching backend should you choose: Redis or Memcached?

    In this guide, we will discuss the differences between these two high-performance solutions. We’ll explore why Redis has become the industry standard for complex, data-heavy sites, when Memcached might still be the smarter choice for a resource-constrained VPS. By the end of this post, you will understand which of these services is right for you.

    What are Memcached and Redis?

    Memcached and Redis are both high-performance, open-source, in-memory data stores, but they were designed with different architectural philosophies.

    Memcached is a distributed memory object caching system designed specifically for simplicity, serving as a “pure” cache to speed up dynamic web applications by alleviating database load.

    Redis, by contrast, is an advanced in-memory data structure store that functions as a cache, a primary database, and a message broker, offering a much richer feature set than a traditional key-value cache.

    Suggested read: How to Set Up WooCommerce Caching: The Ultimate Guide in 2026

    Performance: Speed, Throughput, and Multi-Threading

    In raw read/write operations for simple key-value pairs, both systems deliver sub-millisecond latency and incredibly high throughput. Memcached uses a multi-threaded, non-blocking architecture, which makes it exceptionally efficient at handling thousands of concurrent connections on multi-core servers without significant locking contention.

    While early versions of Redis were single-threaded, modern Redis supports multi-threaded I/O to improve performance on high-end hardware, while maintaining a single-threaded execution model for command processing to avoid the complexities of data locking.

    For the vast majority of WordPress use cases, both systems are more than capable of handling high traffic; however, Memcached’s architectural simplicity often provides a slight edge in pure throughput for static, high-frequency key-value lookups.

    Suggested read: How To Use Redis Object Cache To Speed Up Dynamic WordPress Site

    Data Types and Persistence

    Memcached and Redis differ in how they handle data and the level of persistence they offer. Let’s see how

    Memcached: strings only, no persistence

    Memcached is strictly a key-value store where the values are treated as unstructured blobs of data (strings). It doesn’t understand the content of the data it stores, meaning if you need to update a single element within a large object, your application must retrieve the entire object, modify it in application memory, and write the whole blob back to the cache.

    Memcached is designed to be volatile; it offers no mechanism to save data to disk, meaning all cached items are lost instantly if the service restarts.

    Suggested read: Everything You Need To Know About WordPress Object Caching

    Redis data structures (hashes, sets, lists, sorted sets)

    Redis provides a powerful set of native data structures that enable developers to perform operations directly on the server. With Hashes (ideal for storing objects like user profiles), Lists, Sets, and Sorted Sets (perfect for leaderboards or queueing), you can perform granular tasks, such as pushing a new item to a list or incrementing a counter, without fetching and replacing the entire dataset.

    This reduces network bandwidth and CPU overhead, making Redis significantly more flexible for complex applications that require more than just simple caching.

    Suggested read: How To Install And Configure Object Cache Pro for WordPress

    RDB snapshots and AOF logging explained

    A key differentiator for Redis is its ability to persist data, which is achieved through two primary mechanisms: RDB (Redis Database Backup) and AOF (Append Only File).

    • RDB Snapshots: This performs point-in-time snapshots of your dataset at specified intervals (e.g., every 60 minutes if 1,000 keys changed). It is highly efficient for backups and recovery, though it carries a small risk of losing data created between the last snapshot and a crash.
    • AOF Logging: This logs every write operation received by the server into a file, which is then replayed upon startup to reconstruct the original dataset. AOF provides much higher data durability than RDB, as it can be configured to sync to disk after every write operation, effectively turning Redis into a reliable, persistent database rather than just a transient cache.

    Suggested read: How to Reduce Cache Misses & Avoid Them: Proven Tips [FIXED]

    How WordPress object caching works (WP_CACHE, drop-in)

    WordPress has a built-in object caching system that prevents redundant database queries. By default, this cache is non-persistent, meaning it exists only for a single page load. To make this persistent, meaning the cache stays alive across different page visits, you must enable the WP_CACHE constant in your wp-config.php file.

    In WordPress, a drop-in is a special type of file that WordPress core checks during its initialization. If WordPress finds a file named object-cache.php inside your /wp-content/ directory, it automatically loads it instead of using its default (non-persistent) caching mechanism.

    Here is the breakdown of how this process works, the standard implementation steps, and the conceptual bridge it creates:

    1. Default Behavior: Without a drop-in, WordPress uses its internal WP_Object_Cache class. This class stores data in PHP memory, but that memory is wiped clean at the exact moment a page finishes loading. The next time a user visits, WordPress must query the database again.
    2. The Interception: When the object-cache.php file exists, WordPress skips the default WP_Object_Cache class and use the code defined inside that drop-in file instead.
    3. The Persistent Connection: The drop-in file contains the logic to connect to an external, memory-based storage server (like Redis or Memcached). Because this storage server exists outside the scope of a single PHP request, the data persists between page loads. Now, when WordPress needs a database result, it asks the drop-in file, which fetches it from RAM (the cache server) instead of triggering a slow MySQL query.
    Memcached service in RunCloud

    Suggested read: WP Rocket vs LiteSpeed Cache: Which One is Best in 2026

    Redis vs Memcached for WordPress Object Cache

    Choosing between Redis and Memcached for WordPress object caching can be confusing, but understanding how they interact with your database is key to unlocking faster page load times. 

    Memcached with W3 Total Cache or Object Cache Pro

    Memcached is the “classic” choice for WordPress performance. It’s extremely lightweight and focuses on a single task: storing simple key-value pairs in memory. When using plugins like W3 Total Cache, Memcached is often the default choice because of its simplicity and low resource requirements.

    If you’re using a managed WordPress host or a performance-heavy plugin such as Object Cache Pro, you may find that Memcached performs exceptionally well for basic site speed. Because it’s multi-threaded and doesn’t handle disk writes, it can handle massive bursts of read requests with very little CPU overhead, making it ideal for standard, content-heavy websites.

    Redis with WP Redis / Object Cache Pro

    Redis has become the industry standard and the modern “default” for most high-performance WordPress hosts. Plugins such as WP Redis or the enterprise-grade Object Cache Pro allow WordPress to use Redis’s advanced data structures.

    Unlike Memcached, Redis can handle complex data structures, allowing WordPress to store related data together in “hashes” or “sets”. This means that when WordPress needs to update a piece of information, it can talk to Redis more intelligently, reducing the need to constantly delete and rewrite large chunks of data. 

    Suggested read: LiteSpeed Cache WordPress Plugin Configuration Tutorial

    Which performs better for WP transients and session data?

    When comparing performance for transients (temporary database entries including plugin data, API responses, or WooCommerce cart items) and session data, Redis is the clear winner.

    • Why for Transients: WordPress transients often need to be expired or searched based on specific criteria. Because Redis supports sorted sets and hashes, it can manage these transient expirations more efficiently than Memcached.
    • Why for Sessions: Because Redis supports persistence, your user session data remains intact even if you restart your server or clear the cache. Memcached would wipe all active user sessions if the server restarts, forcing your visitors to log in again.

    Wrapping Up: Which Object Caching Tool Should You Use – Memcached Or Redis?

    Deciding between Memcached and Redis ultimately comes down to your server resources and the complexity of your WordPress site.

    If you’re running a lightweight site on a resource-constrained VPS, Memcached’s minimal memory footprint makes it an excellent choice for basic query acceleration.

    However, for most modern WordPress environments, especially those using WooCommerce, complex page builders, or high-volume transient data, Redis is the superior option.

    Runcache with Redis caching

    Manually managing caching services via SSH can be tricky, especially when configuring PHP-FPM worker pools or adjusting php.ini settings.

    RunCache has simplified this process by providing native, one-click toggles to enable caching for your WordPress web application.

    This approach ensures you don’t need to manually touch configuration files, reducing the risk of downtime while optimizing cache performance.

    Whether you choose the lean profile of Memcached or the feature-rich capabilities of Redis, RunCloud ensures your site remains lightning-fast, secure, and easy to maintain.

    Sign up for your RunCloud account and experience painless server management today.

    FAQs

    Is Redis faster than Memcached for WordPress?

    While both provide excellent performance, Redis is often considered superior for complex WordPress environments because it supports advanced data structures and atomic operations. However, for simple key-value caching, the speed difference is usually negligible, meaning the “faster” choice often depends more on your specific server configuration and plugin implementation than the software itself.

    Can Memcached persist data across server restarts?

    No, Memcached is a purely volatile, in-memory key-value store, and it doesn’t have native support for persisting data to disk. If your server restarts or the Memcached service is stopped, all cached data is permanently cleared and must be rebuilt by your application.

    Does WordPress support Memcached as an object cache backend?

    Yes, WordPress has native support for Memcached as an object cache backend through the use of a persistent object cache plugin. By dropping an object-cache.php file into your wp-content directory, WordPress can efficiently store and retrieve database query results in RAM rather than querying your MySQL database repeatedly.

    What is the difference between Redis and Memcached for PHP sessions?

    The primary difference is that Redis provides persistence, allowing PHP sessions to survive server reboots, whereas Memcached loses all session data upon restart. Additionally, Redis offers better reliability for high-traffic sites due to its ability to handle more complex data types and provide snapshots of session states.

    Should I use Redis or Memcached on a VPS with limited RAM?

    Memcached is generally the better choice for a VPS with extremely limited RAM because it has a smaller memory footprint and lower overhead than Redis. Redis includes more features, such as data persistence and complex data structures, which consume more memory resources even when idle.

    What is Valkey and does it replace Redis for WordPress caching?

    Valkey is an open-source, community-driven fork of Redis created to ensure the project remains under a permissive license following changes to Redis’s licensing model. It’s fully compatible with existing Redis implementations, making it an excellent drop-in replacement that works seamlessly with WordPress caching plugins that support Redis.

  • How to Easily Find Your DNS Server IP Address in Linux

    How to Easily Find Your DNS Server IP Address in Linux

    DNS translates domain names into IP addresses so your system knows where to connect. In this guide, you will learn exactly how to check DNS server settings in Linux across all major distributions, including Ubuntu, Debian, CentOS, and RHEL.

    You’ll learn the difference between static configuration files and dynamic network managers so you can accurately list DNS servers for troubleshooting or security audits.

    Whether you’re a system administrator working via SSH or a desktop user navigating the GNOME interface, this comprehensive walkthrough ensures you never have to wonder “which DNS am I using” again.

    How to Find the Current DNS Server in Linux

    There are four common ways to view the DNS server settings in Linux:

    Method 1: Check Your DNS Server with the Terminal

    The Linux terminal is an incredibly powerful tool, and for tasks like this, it’s often the fastest way to get the information you need. You can get this information quickly with a single command. Follow the steps below to get started:

    Step 1: Open the Terminal

    First, open the terminal application. You can find it in your applications menu, or use the common keyboard shortcut: Ctrl + Alt + T.

    This will open up a new window, where you can enter your commands. If you are connected to the server via SSH, then you don’t need to take any additional steps. You can type your commands in this shell, as it’s the terminal itself.

    Step 2: Check the resolv.conf File

    For this step, you will use the cat command, which simply reads a file and displays its contents on the screen.

    In your terminal, type the following command and press Enter:

    cat /etc/resolv.conf

     You will see an output similar to the image below:

    Look for the line that starts with nameserver. The IP address immediately following it is the DNS server your system is configured to use. In the example above, the DNS server is 192.168.0.1.

    If you see an address like 192.168.0.1, your system is using your router for DNS, which then forwards the request to your ISP. This is a very common and default setup.

    If you have explicitly defined the DNS servers in your network configuration, then you might get an output similar to the following image:

    In the above example, the computer is using three different DNS servers with the following IP addresses: 1.1.1.1, 8.8.8.8, and 9.9.9.9, which belong to Cloudflare, Google, and Quad9, respectively. 

    systemd-resolved vs /etc/resolv.conf

    If you run cat /etc/resolv.conf on modern Linux distributions (like Ubuntu 18.04 and later), you will see a nameserver entry for 127.0.0.53. This doesn’t mean your actual DNS server is on your own machine.

    On these systems, /etc/resolv.conf is often a symbolic link to a “stub” file managed by systemd-resolved. The 127.0.0.53 address is a local DNS stub listener that forwards your requests to the actual upstream DNS servers.

    While this file is technically “accurate” for the OS, it doesn’t list the external DNS providers (like Google or Cloudflare) you’re actually using. To see the true upstream nameservers on these systems, you must use Method 3 (resolvectl) or Method 4 (nmcli).

    Method 2: Find The DNS Server in Linux Using The GNOME Graphical Interface

    If you prefer clicking over typing, Linux desktop environments such as GNOME provide a user-friendly way to see your network settings.

    Step 1: Open Your System Settings

    Click on the system tray area in the top-right corner of your screen, where you see the icons for Wi-Fi, volume, and power. In the menu that appears, click the gear icon (⚙️) to open the Settings window.

    Step 2: Go to Network Settings

    In the Settings window, look at the menu on the left-hand side. Click on either Wi-Fi or Wired, depending on your connection method.

    Step 3: Open Your Active Connection’s Details

    You will now see a list of available networks. Find the network you are currently connected to (it will be the one that’s toggled on). To the right of its name, click the gear icon (⚙️) to open its specific settings.

    Step 4: Find Your DNS Entry

    A new window will pop up with several tabs. It will open on the Details tab by default. Here, you can immediately see a summary of your connection. Look for the DNS entry to find your server’s IP address.

    As you can see, the DNS is listed as 192.168.0.1, which matches what we found in the terminal.

    Step 5: Understanding the “Automatic” Setting

    To see why you have this DNS server, click on the IPv4 tab at the top of this same window.

    Notice that the DNS setting has a switch toggled to Automatic. This setting, along with the Automatic (DHCP) option for IPv4 Method, instructs your computer to automatically accept the network settings provided by your router.

    Most systems use DNS settings provided automatically by the router (via DHCP). Switching to Manual lets you specify your own DNS server. If you want to manually set a different DNS server (such as Google’s 8.8.8.8), toggle this switch off, then enter the new IP address in the field.

    Method 3: Use resolvectl 

    On Linux distributions that use systemd-resolved, the resolvectl command is the recommended way to check your DNS status. This tool provides a detailed breakdown of which DNS servers are assigned to specific network interfaces.

    To use this method, you first need to connect to your remote server via SSH as described in Method 1. Once you are logged in to the terminal, run the following command:

    resolvectl status
    resolvectl status

    Look for the “DNS Servers” and “Current DNS Server” lines under your active network interface. This will show the actual IP addresses of the DNS providers your system is querying, bypassing the local stub address.

    Method 4: Use nmcli (NetworkManager Systems)

    If your server uses NetworkManager to handle connections (common in RHEL, CentOS, and most Desktop environments), the nmcli tool is the most efficient way to query DNS settings directly from the networking stack.

    Use the following command to display your network details:

    nmcli device show | grep IP4.DNS

    This command filters the output to show only the IPv4 DNS servers assigned to your active devices. It displays the DNS servers exactly as they were received from DHCP or manually configured in the NetworkManager profile.

    Bonus: Query a Site Using Any DNS Server

    After identifying your DNS server, you may not be completely satisfied with it. If you are facing network issues, you can bypass your local settings entirely and request a website’s IP address from any public DNS server worldwide.

    Why would you do this?

    If a site loads for others but not for you, your DNS server might be outdated, overloaded, or applying filters. Querying a public DNS server gives you a clean comparison.

    dig @<DNS-SERVER-IP> <WEBSITE-TO-LOOKUP>

    Let’s break that down:

    • dig: The command to run the tool.
    • @<DNS-SERVER-IP>: The @ symbol tells dig, “direct your question to this specific server.” Replace <DNS-SERVER-IP> with the IP address of the server you want to query, such as @8.8.8.8 for Google.
    • <WEBSITE-TO-LOOKUP>: The domain name you want the IP address for, such as runcloud.io.

    Let’s ask Google’s public DNS server (8.8.8.8) for the IP address of runcloud.io. Open your terminal and run this command:

    dig @8.8.8.8 runcloud.io

    The terminal will print a block of text that might look a little intimidating at first, but don’t worry! You only need to concern yourself with one specific part.

    Scroll down until you find the ;; ANSWER SECTION:. This is the response from the DNS server

    runcloud.io.                300        IN        A        104.26.10.235
    runcloud.io. 300 IN A 104.26.11.235
    runcloud.io. 300 IN A 172.67.68.114

    This tells us that, according to Google’s DNS, runcloud.io has three IP addresses: 104.26.10.235, 104.26.11.235, and 172.67.68.114. It’s that simple!

    If you prefer a graphical interface, Google offers a simple web tool that performs the same function. You can visit https://dns.google/ to see the same query we just ran, but in your browser.

    This will display the raw DNS information in a format that computers prefer (called JSON), making it easy to spot the IP address in the “data” field. It’s a great alternative if you’re not in front of a terminal.

    When Applications Bypass Your System DNS

    The IP address you found using the methods above is the default DNS server for your system. However, it’s essential to note that some applications may opt to disregard it and use their own. Before you spend hours troubleshooting, be aware of these common overrides:

    • DNS-over-HTTPS (DoH): Modern browsers can use DNS-over-HTTPS, which bypasses your system DNS for privacy. VPNs also override DNS to keep traffic secure.
    • Virtual Private Networks (VPNs): When you connect to a VPN, it almost always forces your computer to use its own private DNS servers. This is a critical security feature. If your computer uses your regular DNS while connected to a VPN, your internet service provider may still be able to see which websites you’re trying to visit, defeating a key purpose of the VPN.

    Next Steps for DNS Management

    You now know how to check your DNS server from both the terminal and GNOME, as well as how to test any DNS provider using the dig command.

    DNS checks are only one part of managing a server. RunCloud provides an easy and reliable way to deploy and manage Linux servers without manual configuration. It handles security, updates, monitoring, and performance tuning, so you can focus on your applications.

    If you want a simpler way to manage Linux servers and avoid repetitive configuration work, RunCloud gives you a clean dashboard for deployments, updates, backups, and security.

    Create your FREE RunCloud account and streamline your server workflow today.

    FAQs

    How do I check which DNS server my Linux system is using?

    You can check your active DNS servers by running the resolvectl status command. 

    Why does /etc/resolv.conf show 127.0.0.53 instead of my real DNS?

    The IP address 127.0.0.53 indicates that your system is using a local DNS stub listener managed by systemd-resolved. This local service acts as an intermediary, receiving your queries and forwarding them to the actual upstream DNS servers, which you can identify using the resolvectl status command.

    How do I set DNS to 8.8.8.8 in Linux?

    You can set your DNS to Google’s public DNS by running nmcli connection modify [connection-name] ipv4.dns “8.8.8.8”. For persistent changes on Ubuntu servers, you must add 8.8.8.8 to the nameservers section of your configuration file in /etc/netplan/ and run sudo netplan apply.