Category: Server Management

  • How to Create Wildcard Subdomain for Unlimited Subsites

    How to Create Wildcard Subdomain for Unlimited Subsites

    What is Wildcard subdomain

    Wildcard subdomain is a wildcard (catch-all) DNS record that will match request for non-existent subdomains. It is specified by a “*” as part of the domain name, example: *.yourdomain.com.

    With wildcard subdomain setup, you do not need to create a DNS record for each subdomain. Example: unlimited subdomain for WordPress multisite setup.

    In this tutorial, you will learn how to create a wildcard subdomain with RunCloud.

    Step 1: Create a wildcard subdomain with domain registrar

    In order to create a wildcard subdomain, you need to add a wildcard DNS recoord for your domain name. You will need to access your domain name control panel for DNS management, usually provided by your domain registrar.

    Here I will show you how to create a wildcard subdomain for your RunCloud server. In this example, I am using Cloudflare for DNS management.

    Goto DNS management page and follow the steps below to create a wildcard subdomain DNS record:

    1. Select “A” for record type (you can also use CNAME)
    2. Use “*” for DNS record name
    3. Fill in your RunCloud server IP address for the DNS record value
    4. If you are using Cloudflare, select “grey cloud” to skip going through Cloudflare network.
    5. Click “Add Record” button to add the wildcard subdomain DNS record

    Next, we need to setup the RunCloud server to response to the wildcard subdomain requests.

    Step 2: Create web application for wildcard subdomain with RunCloud

    There are two ways to response to the wildcard suddomain requests:

    1. create web applications to response to each wildcard subdomain request. Example: a.yoursite.com, b.yoursite.com, c.yoursite.com, …
    2. create a web application that answers all wildcard subdomain requests. Example: *.yooursite.com

    Solution 1: Create a web application for each subdomain
    At “Web Application” in RunCloud panel… Click “Create Web App” button to create a new web application.

    Remember to type your desire subdomain name (a.yoursite.com) for “Domain Name”. select PHP version and web application stack then click “add web application” button to create a new web application on your server.

    Any future request to the subdomain will be served by the web application you just created. Do not need to add a new subdomain DNS record at domain management panel.

    Any subdomain request that is not assigned to any web application will be fall back to the default web application (if you have setup one).

    Solution 2: Create a web application to answer all subdomain requests

    If you have a web application like WordPress multisite, that will answer all subdomain requests, then use this approach to setup the web application that for wildcard subdomain.

    Similar to Solution 1 above, create a new web application but at the “Domain Name” field, you enter a wildcard subdomain instead, example: *.yoursite.com

    The web application with wildcard subdomain will answer all subdomain requests that is not assigned to any other web applications.

    Let’s say you have a web application with domain name “client.yoursite.com”, then request for “client.yoursite.com” will not be answered by the web application with wildcard subdomain “*.yoursite.com”.

    Tips: After creating a wildcard subdomain, you would like to make a free SSL certificate (HTTPS) for all the subsites.

    Summary

    In order to create a working wildcard subdomain, you need to setup it at domain registrar (add wildcard DNS record) and RunCloud panel (create web application).

    Once setup wildcard subdomain, you do not need to manually add new subdomain DNS record for your new web application or website.

    All you need to do is create a new web application using RunCloud panel and it will work automatically.

  • How to Create a Subdomain for RunCloud Web Application

    How to Create a Subdomain for RunCloud Web Application

    Subdomain is an easy and free way to categorize your website content and separate them from the main website. In this tutorial, you will learn what is a subdomain, the use cases, and how to host a web application at subdomain using RunCloud.

    What is a Subdomain?

    A subdomain is a domain that is a part of a root domain, separated by a dot (“.”). For example, sub.domain.com is a subdomain of the root domain yourdomain.com .
    Subdomain is used as an easy way to create a memorable website address to organize your website content. For example, gallery.yoursite.com for the photo galleries of your website.
    Uses of subdomain includes:

    • Organizing website content according to category, i.e: support.yoursite.com, download.yoursite.com, shop.yoursite.com
    • Serve sub website for other users, i.e: jeff.yoursite.com, admin.yoursite.com, user1.yoursite.com
    • Make long link easy to remember. For example, shorten the long link https://yoursite.com/special/content/you-cannot-remember-this/123121513/ to a subdomain special.yoursite.com
    • Create a copy of your main website for testing. You can clone your main website into subdomain for testing and development, i.e: beta.yoursite.com
    • Mobile website: m.yoursite.com
    • Location specified website: malaysia.yoursite.com

    Create a subdomain for RunCloud Web Application

    It is easy to use a subdomain for your web application using RunCloud panel.
    Firstly, you will create a web application as usual but at the “Domain Name” field, you enter the subdomain instead of the root domain. Choose the PHP version and server stack, then click “Add Web Application” button to create the web application at subdomain.
    Now you need to add a DNS record for the subdomain to your domain name’s DNS zone.
    In this article, I use CloudFlare DNS for example. If you are not sure how to do it, please refer to your DNS hosting provider (usually also your domain registrar) for support.
    Here are the steps to add a subdomain DNS record for your RunCloud web application:

    1. Get your server IP address. You can view and copy the server IP address at the RunCloud servers overview or server summary page. Simply click on the IP address (numeric string) below server name to copy it. Write down the IP address because we will need it later.
    2. Login your DNS hosting control panel to add a new DNS record into your domain name’s DNS zone.
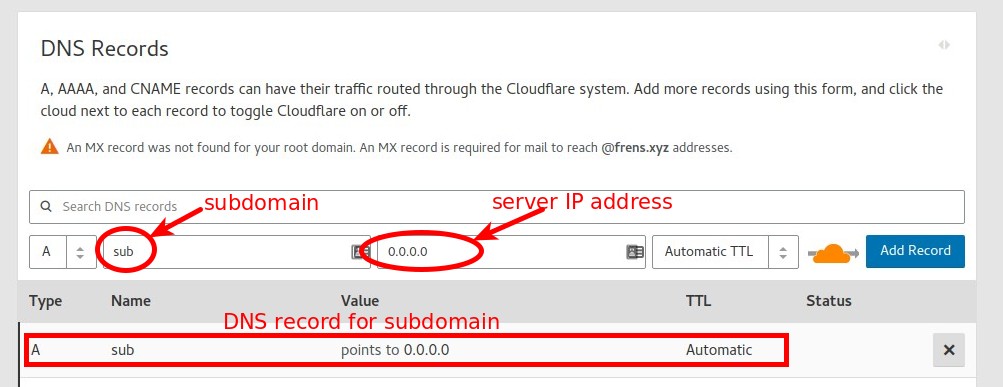
    3. Add a new “A” type DNS record, with the subdomain name and point to the server IP address. For example, sub is the subdomain and 0.0.0.0 is the server IP address (refer screenshot below)

    Now you can visit sub.yoursite.com and RunCloud will serve your web application at the subdomain as usual.

  • RunCloud API Released, MariaDB 10.2, Change IP Address Feature

    RunCloud API Released, MariaDB 10.2, Change IP Address Feature

    RunCloud developers are always working hard to bring you new and better features. Today, we are happy to announce that the RunCloud API is now available for everyone!

    Another new feature added today is the ability to reconnect a RunCloud-managed server to the RunCloud Dashboard after its IP address has changed. You can do this with the Change IP Address setting.

    Also, new RunCloud-managed servers will install MariaDB 10.2 as the default database in their server stack.

    Manage your servers using the RunCloud API

    A RunCloud API has been one of the most requested features from developers, and today we are pleased to fulfil that request. We hope you will enjoy the powerful tools that the RunCloud API provides to manage your servers.

    With the RunCloud API you can achieve nearly all the tasks possible via the Dashboard.

    Including (but not limited to):

    • Automate server management tasks
      • Server connections
      • Disk Cleanup
      • Cron Jobs
    • Automate Web Application management tasks
      • Web App creation
      • Script or Git Deployment
      • SSL Deployment
    • Automate Database Management
    • Build a custom server control panel
    • Integration with 3rd-party software/service/plugins

    And so much more…

    In computer programming, an application programming interface (API) is a set of subroutine definitions, protocols, and tools for building application software. — Wikipedia.org

    All RunCloud API communication is made over secure HTTPS. Requests and responses are in human-readable JSON format.

    How to access your RunCloud API

    You need a RunCloud account to use the API. If you don’t have one yet, you can create a free RunCloud account.

    RunCloud API key

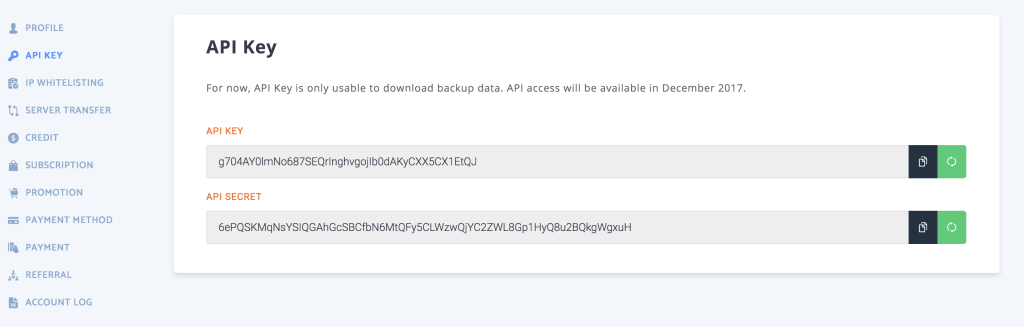
    An API Key pair, including both an API Key and an API Secret, is used for basic authentication. You need to supply these with every RunCloud API request. Your API keys are available from your RunCloud account Setting > API Key.

    Please treat your API keys as secret as your account credentials. If you believe your keys have become compromised, or for additional ongoing security, you can regenerate new API keys to revoke the old key’s access.

    What you can do with the RunCloud API

    The RunCloud API provides access to almost all RunCloud functions, such as connecting new servers, monitoring server health, stopping/starting a service, blocking an IP address, adding new system user, adding web applications and databases etc.

    Here is an example of a RunCloud API request to connect a new server:

    Request:

    curl -X POST "https://manage.runcloud.io/base-api/servers" \
        -u YOUR_API_KEY:YOUR_API_SECRET \
        -H "Content-Type: application/json" \
        --data '{
            "serverName": "My First Server",
            "ipAddress": "1.1.1.1",
            "serverProvider": "Custom Server Sdn. Bhd."
        }'
    

    Response:

    {
        "redirect": "\/servers\/M9ZpajdlbW8z\/notconnected",
        "server": {
                "id": "M9ZpajdlbW8z",
                "serverId": "NzoeztKvoRV8dYozQWHH7aI8Yu1518399464lSR9oRPQFVv4aJT4ujzNOu7hpINp3kG7RZLDRupBRbQMiYCgwwTLgfDPzYa4AVFj",
                "serverName": "My First Server",
                "ipAddress": "1.1.1.2",
                "serverProvider": "Custom Server Sdn. Bhd.",
                "connected": false,
                "online": false,
                "created_at": "2018-02-14 12:32:23",
                "created_at_humanize": "1 second ago",
                "_links": {
                    "installationURL": {
                        "method": "get",
                        "link": "https:\/\/manage.runcloud.io\/script\/installer\/NzoeztKvoRV8dYozQWHH7aI8Yu1518399464lSR9oRPQFVv4aJT4ujzNOu7hpINp3kG7RZLDRupBRbQMiYCgwwTLgfDPzYa4AVFj\/lNBqxUv1mwz8VIbjrYV4AHZFUuiAJrDuh7paeoEsAEOG76VhX8tcyo0wHWkTbY3k2Tm9Ty4H8Qwgq7Lefvf11xbXZ7n4Guy80stCHf3KCX7559sbzaU9WA9OAll8zPQn"
                    },
                    "delete": {
                        "method": "delete",
                        "link": "\/api\/servers\/M9ZpajdlbW8z"
                    }
                }
            }
    }
    

    Please treat the RunCloud API as a live beta preview now, with more features coming soon.

    You can refer to the complete RunCloud API documentation for all the RunCloud API resources & methods.

    Change a RunCloud Managed Server’s IP Address

    Change IP address

    Previously, RunCloud was not able to connect to your server if the server’s IP address changed, either manually or automatically. We understood that this limitation could indeed be very problematic.

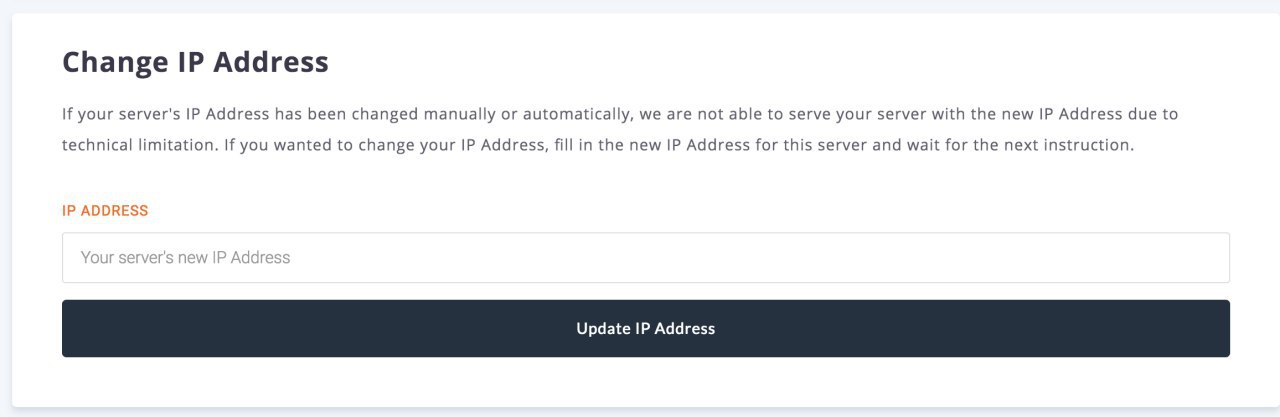
    So today, we are glad to inform you that it is now possible to update a RunCloud-managed server’s IP address using the “Change IP Address” feature. It allows RunCloud to reconnect to your server using its new IP address.

    Run script to change IP address

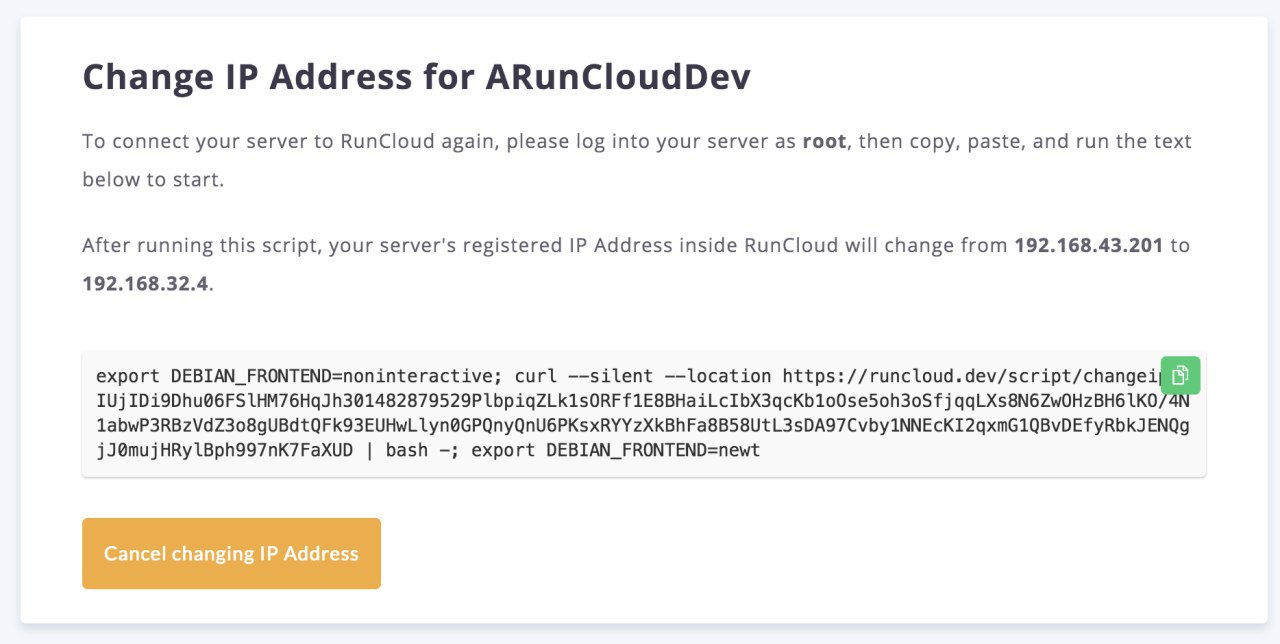
    You will need to first submit the server’s new IP address, then you will be provided a a generated script that you will need to run as root within the server. The script will update your server’s registered IP address with RunCloud, enabling reconnection.

    MariaDB 10.2 for New RunCloud Managed Server

    RunCloud will now deploy new servers with MariaDB 10.2 database server.

    MariaDB 10.2 is the current major stable version, with official support until May 2022. Check out the overview of the changes & improvements in MariaDB 10.2.

    The most noteworthy new feature in MariaDB 10.2 is “InnoDB as default storage engine”. XtraDB was the default storage engine until MariaDB 10.1

    For existing servers, please refer to the official documentation of upgrading MariaDB 10.1 to MariaDB 10.2. Here is the simplified upgrading steps:

    1. Shutdown MariaDB 10.1
    2. Take a database backup
    3. Uninstall MariaDB 10.1
    4. Install MariaDB 10.2
    5. Run mysql_upgrade
    6. Add new options to my.cnf to enable features

    Nodejs Binary

    Already provisioned servers use default Nodejs provided by Ubuntu. With the new update, the newly provisioned server will get the latest LTS version of Nodejs, which is Nodejs 8.* LTS.

    Summary

    • Now, you can integrate RunCloud API into your workflow and applications. Let us know what you will build!
    • The “Change IP address” settings feature allows you to reconnect a server after any manual/automatic IP address change.
    • MariaDB 10.2 was installed for new RunCloud-managed servers, with InnoDB as the default storage engine.

    Wrapping Up

    RunCloud is a powerful and easy-to-use platform that helps you manage your websites on any cloud server. With RunCloud, you don’t need to be a Linux expert to set up, secure, and optimize your web applications. You can do everything from a simple and intuitive dashboard, saving you time and hassle.

    RunCloud supports various web servers, PHP versions, databases, and frameworks. You can also monitor your server performance, back up your data, and automate your tasks with RunCloud. Whether you are a developer, a freelancer, or a business owner, RunCloud can help you run your websites faster and smoother.

    What are you waiting for? Join RunCloud today and enjoy the best web hosting solution for your websites. It’s free for 7 days, no strings attached!

  • ​How to Use SFTP with FileZilla to Securely Transfer Files on RunCloud

    ​How to Use SFTP with FileZilla to Securely Transfer Files on RunCloud

    In this tutorial, you will learn how to use SFTP with FileZilla to securely transfer and manage files on RunCloud server.

    FTP is not secure

    FTP (File Transfer Protocol) uses clear text for all transmissions. Anyone is able to read the FTP usernames, passwords, commands and data by packet capture (sniffing) on the network. By default, RunCloud Firewall blocks FTP (port 21) at your server. You are recommended to use SFTP for file transfer instead.

    Tip: You can use RunCloud File Manager in RunCloud panel for simple file management.

    What is SFTP?

    SSH or Secure File Transfer Protocol (SFTP) is a secure file transfer protocol for file access, transfer, and management. It adapts the Secure Shell (SSH) protocol with encryption and secure authentication on both server and client.

    SFTP provides two user-authentication options when connecting to your server: a)passwords or b)SSH2 key-based authentication. The SSH Keys is more secure than password.

    What is FileZilla?

    FileZilla is a free, open source FTP client that supports FTP, SFTP, FTPS. It is available for Windows, Mac OS X, and Linux. Download FileZilla Client.

    SFTP via Passwords

    Filezilla SFTP via Password
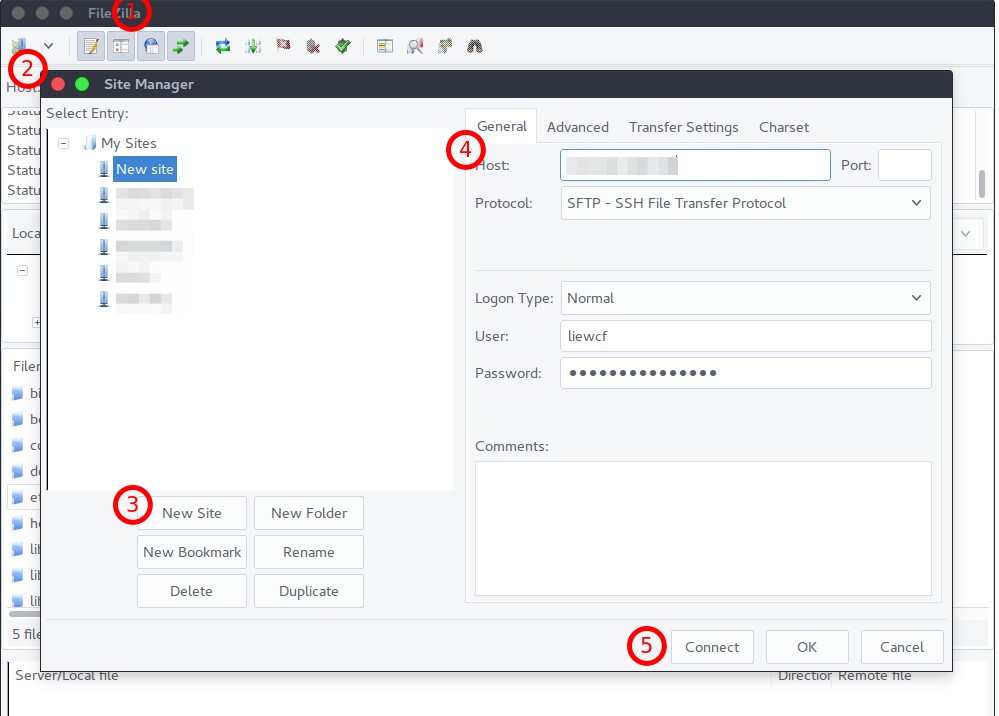
    1. Open FileZilla client
    2. Open Site Manger by clicking the top left icon in menu bar, or press Ctrl+S
    3. Click New Site button and gives a name to the new site connection
    4. At the right side panel enter the following information:
      • Host: [RunCloud server IP address]
      • Port: 22
      • Protocol: SFTP – SSH File Transfer Protocol
      • Logon Type: Normal
      • User: [System User’s username]
      • Password: [System User’s password]
    5. Click Connect button to connect (OK button to save the connection)
    6. Accept fingerprint warning when prompt
    7. You are now connected to RunCloud server via SFTP using password

    SFTP via SSH2 Key-based Authentication

    If you have not yet create an SSH key pair, then follow one of the two tutorial below:

    Method #1

    FileZilla SFTP via SSH key
    1. Open FileZilla client
    2. Open Site Manger by clicking the top left icon in menu bar, or press Ctrl+S
    3. Click New Site button and gives a name to the new site connection
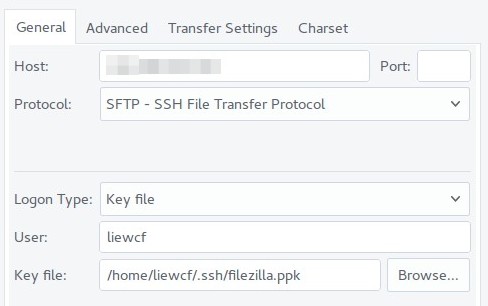
    4. At the right side panel enter the following information:
      • Host: [RunCloud server IP address]
      • Port: 22
      • Protocol: SFTP – SSH File Transfer Protocol
      • Logon Type: Key file
      • User: [System User’s username]
      • Key file: [select your SSH private key in .ppk or .pem format]
    5. Click Connect button to connect (OK button to save the connection)
    6. You are now connected to RunCloud server via SFTP using SSH key

    Method #2

    Add SSH key into FileZilla
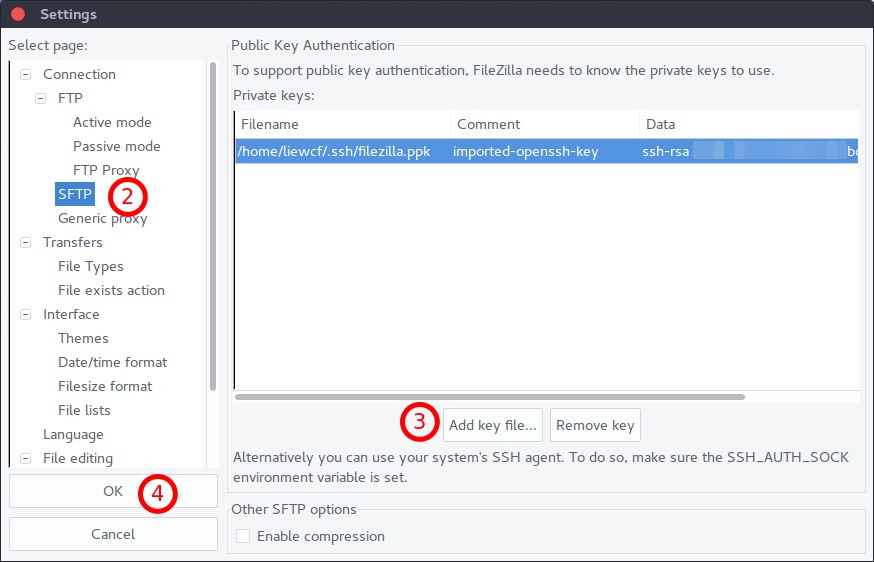
    1. Open FileZilla client
    2. In the Edit – Preferences menu, select SFTP under Connection
    3. Click Add key file… button to add your SSH private key (If your key is in OpenSSH format, FileZilla will prompt you to convert it to PuTTY’s PPK format)
    4. Click OK button to save setting and exit Preferences window
    5. Follow Method #1 above but select Interactive for Logon Type

    Wrapping Up

    RunCloud is a powerful and easy-to-use platform that helps you manage your websites on any cloud server. With RunCloud, you don’t need to be a Linux expert to set up, secure, and optimize your web applications. You can do everything from a simple and intuitive dashboard, saving you time and hassle.

    RunCloud supports various web servers, PHP versions, databases, and frameworks. You can also monitor your server performance, back up your data, and automate your tasks with RunCloud. Whether you are a developer, a freelancer, or a business owner, RunCloud can help you run your websites faster and smoother.

    What are you waiting for? Join RunCloud today and enjoy the best web hosting solution for your websites. It’s free for 7 days, no strings attached!

  • How To Use SSH Keys with PuTTY on RunCloud

    How To Use SSH Keys with PuTTY on RunCloud

    SSH keys are more secure than passwords and can help you log in without having to remember long passwords.

    With RunCloud you can easily add your ssh key to your server. If you are running an *NIX type OS such as MacOS or any Linux distro, ssh is already included with your OS. You can easily open a Terminal window execute ssh commands to connect to remote hosts.

    For Windows users, This has traditionally been a bit of a challange. It has required the installation of 3rd party software called PuTTY. This software creates SSH sessions from your local OS to the server.

    It must be mentioned that this situation has changed recently. Since the Windows 10 Creators Update in 2017, Windows 10 users can enable the Linux Bash Shell for Windows and use a beta OpenSSH client to directly connect with remote servers via SSH. We will show you how to use the Windows 10 Linux Bash Subsystem for SSH in a future tutorial. Having said this, it is a beta client so there may still be some bugs whereas PuTTY is a truly tried and battle tested solution.

    In this tutorial, I’ll guide you how to connect to your Runcloud managed server with PuTTY.

    1.Download and Install

    To get started you just need to install PuTTY to your computer. Here is the download link

    2.Create an SSH Key Pair

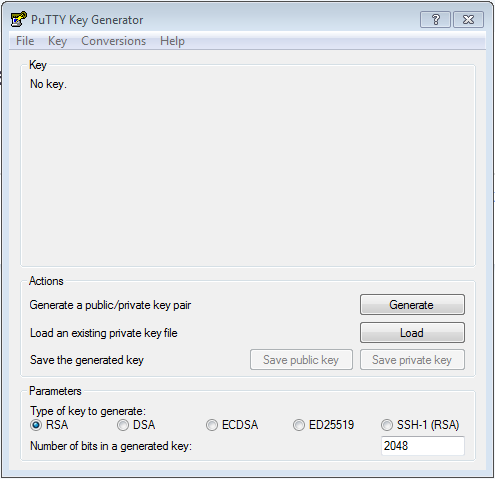
    Now you need to create an SSH key Pair. Open the PuTTYgen program through your Start Menu or by tapping the Windows key and typing “PuTTYgen”. It will look something like this:

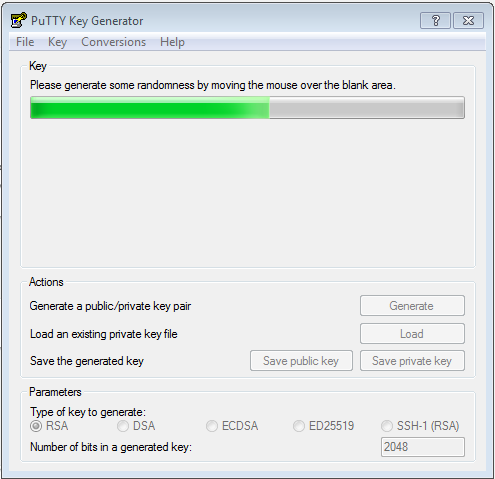
    Just click on generate button then the process will start:

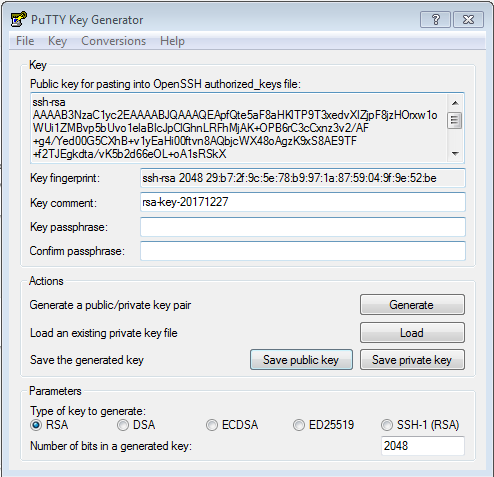
    In case you didn’t read the program’s instructions, MOVE YOUR MOUSE OVER THE BLANK AREA RANDOMLY so the program will generate an ssh key. After the key is generated the program will show you something like this:

    Remember to save the public key and the private key to any folder that you wanted. Let me explain a bit about these two keys.

    The Private key is used to determine and verify the user’s identity, therefore the key cannot be passed to anyone else. If another person obtains this key, they will be able to falsely access any account that you link with this private key and issue bogus commands.

    The Public key is the key that is associated with your private key that you will install on other machines and accounts, this will enable access to them without a password. This key can be share freely.

    Now that you have generated the keys that you need, we’ll continue to the next step.

    3.Upload Your Public Key to Runcloud.

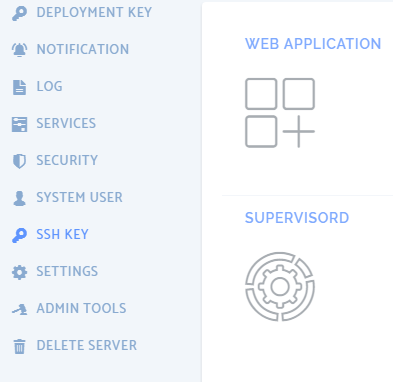
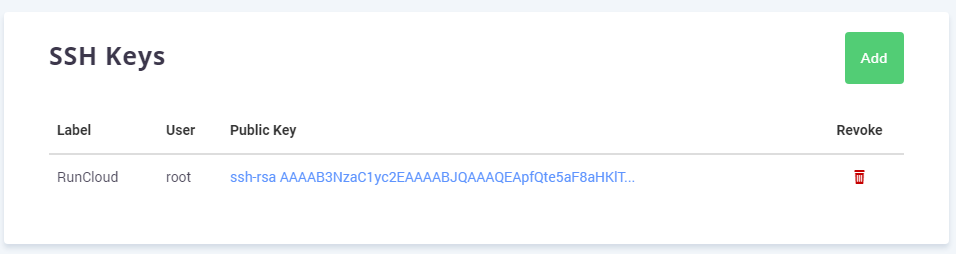
    To upload your public key to runcloud, first you need to open the ssh key menu on the runcloud panel on the server that you wish to connect to:

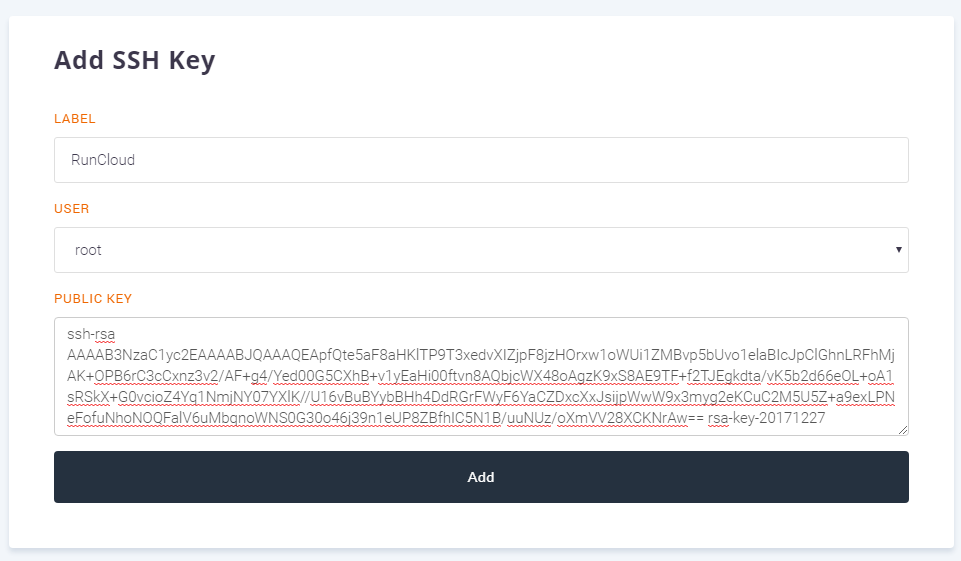
    Then you need to create SSH key, It will look like this:

    Make sure the user selected is also the Web Appilcation owner. In this tutorial, I’ll be using root (ROOT CAN’T HAVE ANY WEB APPLICATION. PLEASE DON’T USE ROOT USER TO UPLOAD, CREATE OR EDIT YOUR WEB APPLICATION FILES). After you finish your public key will be displayed on the panel screen:

    4.Setting Up an SSH Session with SSH Keys in PuTTY

    Now you have your uploaded your public key into your server, the last step is to setting up the connection.

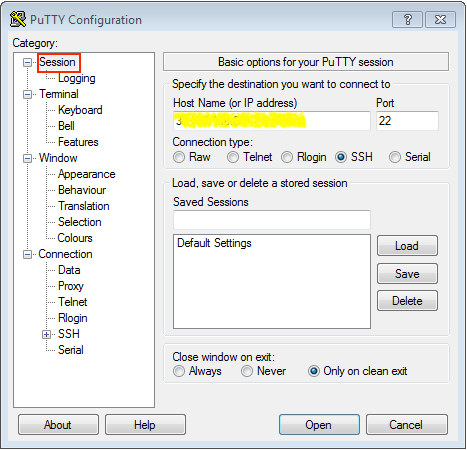
    Start up the PuTTY program through your Start Menu or by tapping the Windows key and typing “PuTTY”.

    Inside the program you will see the session screen:

    Just insert your server ip address. The port is 22 this is standard port for ssh.
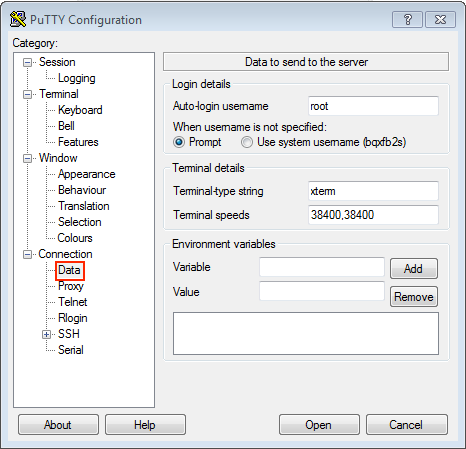
    You need to set your data and SSH auth. On the data screen I have added root to the auto-login username, but assuming you followed my advice above, you should be using the Web Application owner so use that username instead:

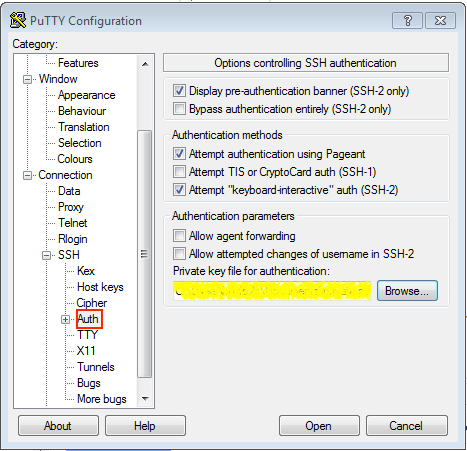
    Then select your saved private key in the SSH auth screen:

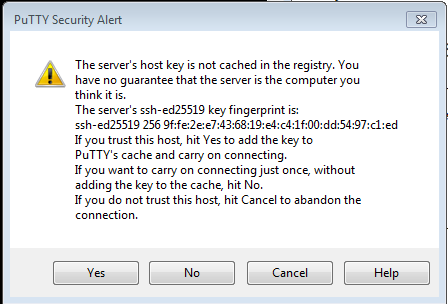
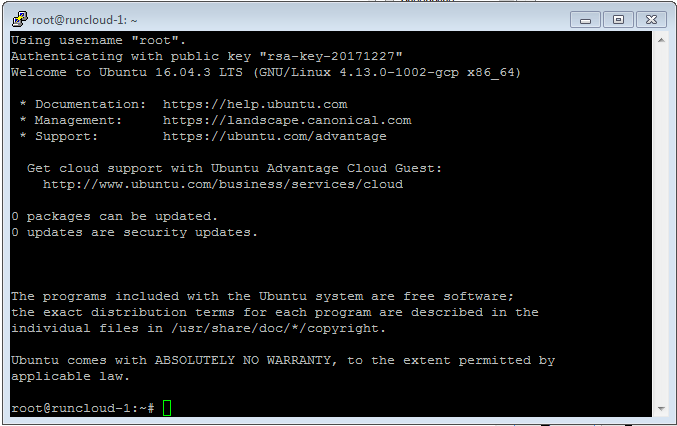
    Now all configurations are done, you just need to revisit the session screen and click the OPEN button. You will get a prompt to click yes, once clicked you are now connected:

  • Redirect to HTTPS Using htaccess Behind NGINX Proxy

    Redirect to HTTPS Using htaccess Behind NGINX Proxy

    Sometimes when building your own web application from scratch, you might want to force your web application to redirect to HTTPS. You can achieve that with HSTS, but you are thinking it is better to add the redirection rules to the .htaccess too. So how to redirect to HTTPS using .htaccess behind NGINX Proxy?

    The rewrite rules

    RewriteEngine On
    RewriteCond %{HTTP:X-Forwarded-Proto} !https
    RewriteRule ^(.*)$ https://%{SERVER_NAME}/$1 [R,L]

    Explanation

    The first line is to tell Apache to enable rewrite engine. The second line is to tell Apache to run the third line if X-Forwarded-Proto is not https. And the third lines is to simply tell Apache to rewrite every HTTP request to HTTPS. The R and L flags are to tell Apache to rewrite the URL and stop rewrite if the URL is matched.

    Why we are using %{HTTP:X-Forwarded-Proto} instead of %{HTTPS}? The Apache is behind NGINX and doesn’t know we are requesting our site using https protocol. Thus, NGINX will have to send X-Forwarded-Proto header for the backend to know about protocol we are using. X-Forwarded-Proto will only have two values, http or https.