Category: Server Management

  • Linux Server Hardening: 11 Steps to Secure a Production VPS

    Linux Server Hardening: 11 Steps to Secure a Production VPS

    Almost as soon as you deploy a server on the internet, it is under attack.

    Within seconds, automated bots begin scanning your ports and hammering your SSH login. If you’re using the default settings on your server, then you are more likely to get compromised.

    While most cloud providers offer a clean slate, those default configurations are built for convenience, not combat. To truly protect your data, you need to follow industry-standard Linux server security best practices.

    Through this guide, you will have a detailed roadmap to secure your VPS with enterprise-grade security. 

    Why a Fresh Linux VPS Is a Target for Hackers

    As soon as your cloud provider assigns a public IPv4 address to your server, the clock starts. Security researchers and malicious botnets continuously scan the entire IPv4 address space using tools such as Shodan, Censys, and Zmap.

    Honeypot data consistently shows that a new, exposed Linux server will experience its first automated SSH login attempt within 3 to 5 minutes of going live.

    If you leave default settings intact, it isn’t a matter of if you get breached, but when. If you don’t protect your server, an automated script will root your server, deploy a crypto-mining payload, and potentially leave you with a thousand-dollar cloud compute bill overnight.

    What Does the “Attack Surface” Mean?

    The “attack surface” is the exact combination of open ports, default configurations, and predictable patterns your server exposes to the internet. A fresh VPS usually has:

    • Port 22 open to the world: The universal beacon for SSH brute-force scripts.
    • Root login enabled: Giving attackers the ultimate username; they only need to guess the password.
    • Password authentication is enabled, allowing unlimited dictionary attacks against your login prompt.

    If you provision your servers through a control panel like RunCloud, much of this attack surface is already minimized for you. But if you are managing a bare-metal VPS yourself, run the commands below to manually lock it down.

    However, any one single measure won’t be enough to protect your server; that’s why we recommend following the “Swiss Cheese Model of Security”.

    Suggested read: 10 Security Tips to Secure VPS Server in 2025 [Ultimate Guide] 

    The Swiss Cheese Model of Security

    This model is built on the principle that security should never rely on a single control, as even the best defense has holes, or “slices” of weakness. 

    In this model, each layer of security (like disabling root login, configuring UFW, enabling Fail2Ban, etc.) is represented by a slice of Swiss cheese. Each slice has holes representing vulnerabilities, misconfigurations, or human error.

    • A single slice (one defense) is easily penetrated if an attacker’s exploit aligns with the hole in that single layer.
    • Multiple slices stacked together provide defense-in-depth. While the holes in the first slice (e.g., a custom SSH port) might align with the threat, the second slice (e.g., SSH key authentication) or the third slice (e.g., Fail2Ban) is highly unlikely to have a hole in the exact same spot.

    The Swiss Cheese Model of Security for Linux Server Hardening

    By stacking all 11 steps in this guide, we can ensure that even if one defense fails, the next layer (or the layer after that) will stop the threat, preventing it from reaching your core application.

    Suggested read: 5 Ways to Fix the SSH Connection Refused Error [SOLVED] 

    How to Harden a Linux Server

    Follow the steps below to protect your Linux server on the internet:

    Step 1: Disable Root Login and Create a Sudo User

    Performing regular maintenance activities on your server as the root user is dangerous – a single typo can destroy your system.

    To protect your system, we recommend creating an unprivileged user and granting it administrative rights via sudo.

    Connect to your VPS as root, then run:

    # Replace 'sysadmin' with your preferred username
    adduser sysadmin

    You will be prompted to set a password. Make it strong, even though we will disable password logins shortly. Skip the contact information prompts by hitting Enter.

    Next, add your new user to the sudo group so you can execute administrative commands:

    usermod -aG sudo sysadmin

    Verify it works before logging out. Switch to your new user and test sudo:

    su - sysadmin
    sudo ls -la /root
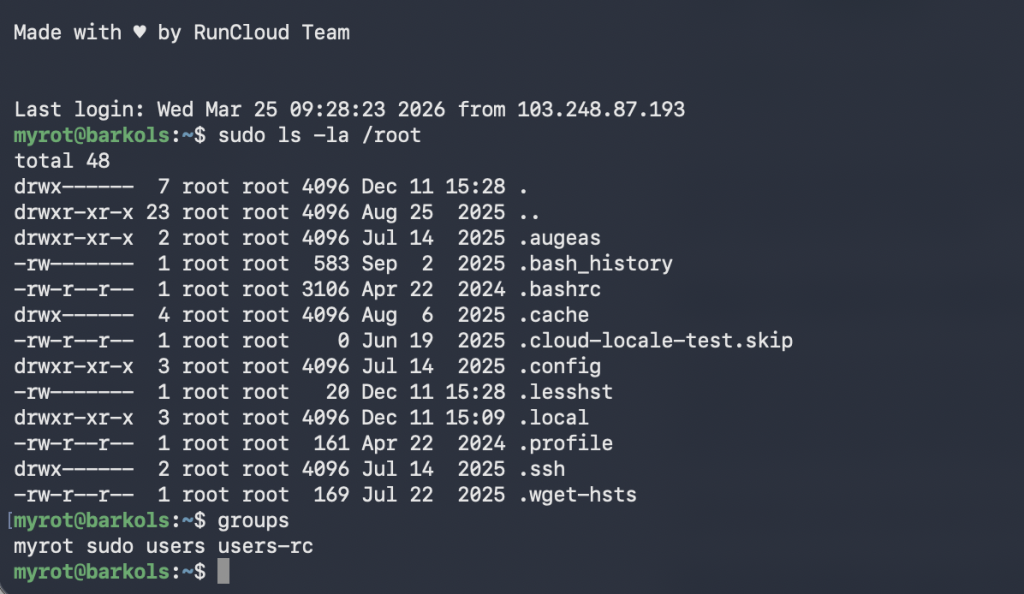
    If you are prompted for your password and can successfully see the contents of the root directory, your sudo user is ready.

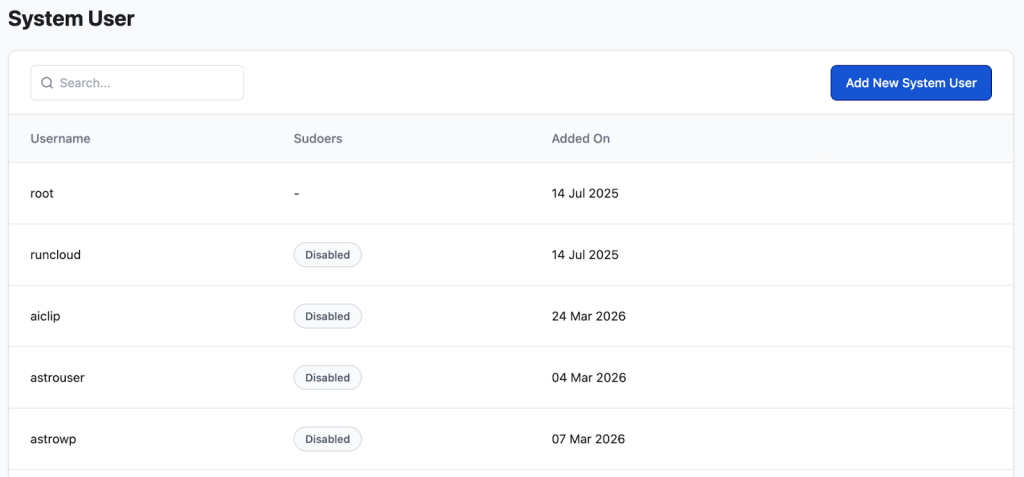
    With RunCloud, you can manage users and permissions for your Linux server directly from the web dashboard, without SSHing into the server. 
    Step 2: Switch to SSH Key Authentication and Disable Password Login

    A secure password is hard to remember, and a weak password can be cracked immediately. That’s why all cybersecurity experts agree that cryptographic keys are a better replacement for your username/password based logins.

    In this step, we are going to replace password authentication with an ed25519 SSH key pair (which is faster and more secure than older RSA keys).

    Generate your key pair locally

    Do not run this on your VPS. Open a new terminal on your local computer (your Mac, Windows, or local Linux machine):

    ssh-keygen -t ed25519 -C "your_email@example.com"

    Hit Enter to save the key to the default location (~/.ssh/id_ed25519). When prompted, you can set a strong passphrase to encrypt the key on your local disk or leave it blank if you don’t want to encrypt it.

    Copy the public key and lock down the sshd_config

    Still on your local computer, copy the public key to your VPS, targeting your new sudo user:

    ssh-copy-id sysadmin@YOUR_VPS_IP

    Now, go back to the terminal window connected to your VPS. It’s time to edit the SSH daemon configuration to disable password logins and root access permanently.

    sudo nano /etc/ssh/sshd_config
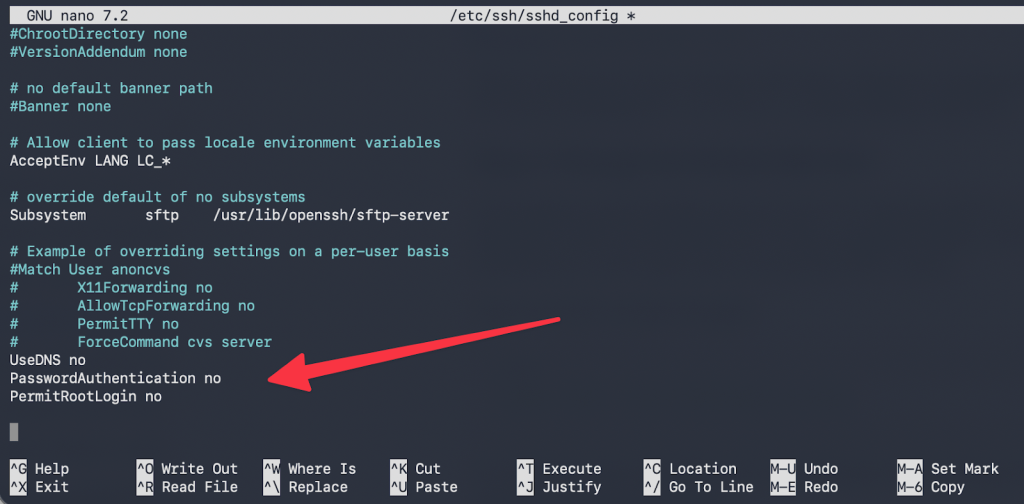
    Find the following lines, uncomment them (remove the #), and change their values to match these exactly:

    PermitRootLogin no
    PasswordAuthentication no
    PubkeyAuthentication yes

    Save and exit (CTRL+O, Enter, CTRL+X). Do not restart the SSH service just yet; we are going to change the port in the next step.
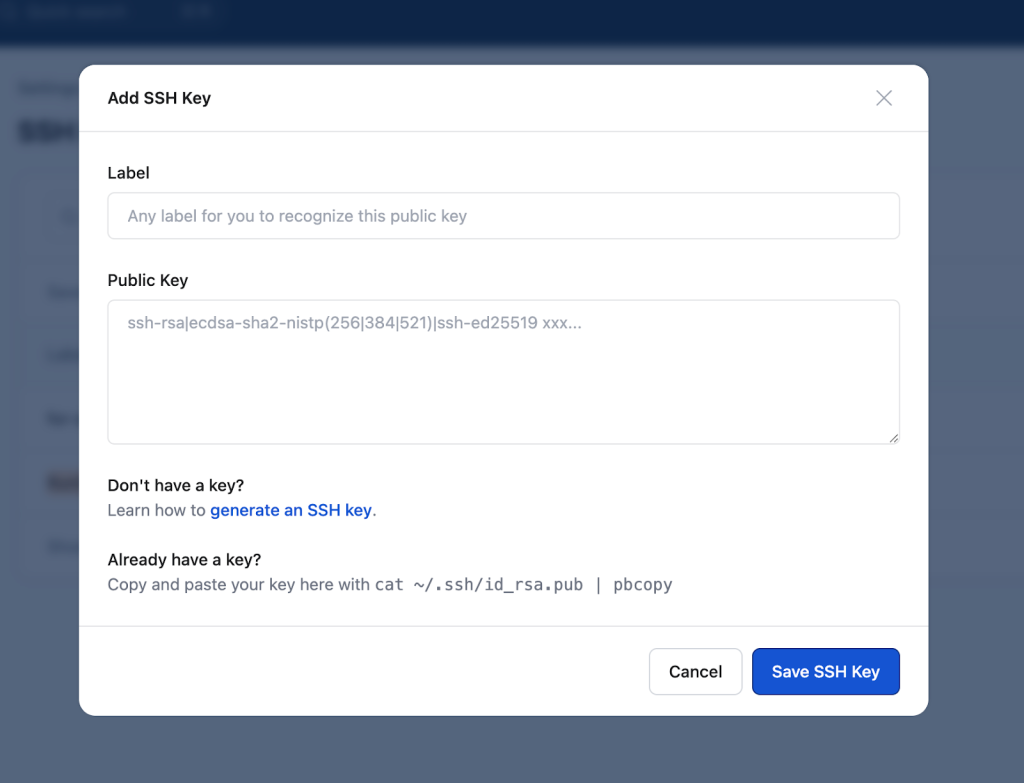
    Note: RunCloud users can add SSH keys to their servers simply by pasting their public key into the RunCloud dashboard, no nano or config editing required.

    Step 3: Change the Default SSH Port

    Most automated scripts scan for and try to exploit port 22. Moving SSH to a non-standard high port (between 1024 and 65535) won’t stop a targeted attack, but it drops botnet noise by 99%, keeping your auth logs clean and saving CPU cycles.

    Open the SSH config file again:

    sudo nano /etc/ssh/sshd_config

    Find the line that says #Port 22. Uncomment it and change it to your desired port. For this example, we will use 52222:

    Port 52222

    Save and exit.

    Warning: DO NOT restart SSH until we configure the firewall in Step 4, or you will permanently lock yourself out.

    Step 4: Configure UFW to Allow Only What You Need

    Ubuntu and Debian servers use UFW (Uncomplicated Firewall) to manage network connections. To protect your server, we recommend setting a default-deny policy for incoming traffic, allowing outgoing traffic, and explicitly opening only the ports we need.

    Run the following commands on your VPS:

    # Deny all incoming traffic by default
    sudo ufw default deny incoming
    
    
    # Allow all outgoing traffic by default
    sudo ufw default allow outgoing
    
    
    # Allow your NEW custom SSH port (crucial!)
    sudo ufw allow 52222/tcp
    
    
    # Allow HTTP and HTTPS if you are hosting web apps
    sudo ufw allow 80/tcp
    sudo ufw allow 443/tcp

    Review your staged rules:

    sudo ufw show added

    If everything looks correct, you can enable the firewall by running the following command:

    sudo ufw enable

    Once the firewall is enabled, any new traffic entering or leaving your server will be inspected and filtered according to the rules we configured above. If any application has already established a connection, it won’t be terminated, but if the application attempts to establish a new connection, it will be blocked by the firewall. 

    Now that the firewall allows traffic on your custom port, we can safely apply the SSH changes by running the following command:

    sudo systemctl restart ssh

    Testing phase: DO NOT CLOSE your current terminal session. Open a new terminal on your local machine and test your new setup:

    ssh -p 52222 sysadmin@YOUR_VPS_IP

    If you successfully connect using your SSH key, you can close the original root session.
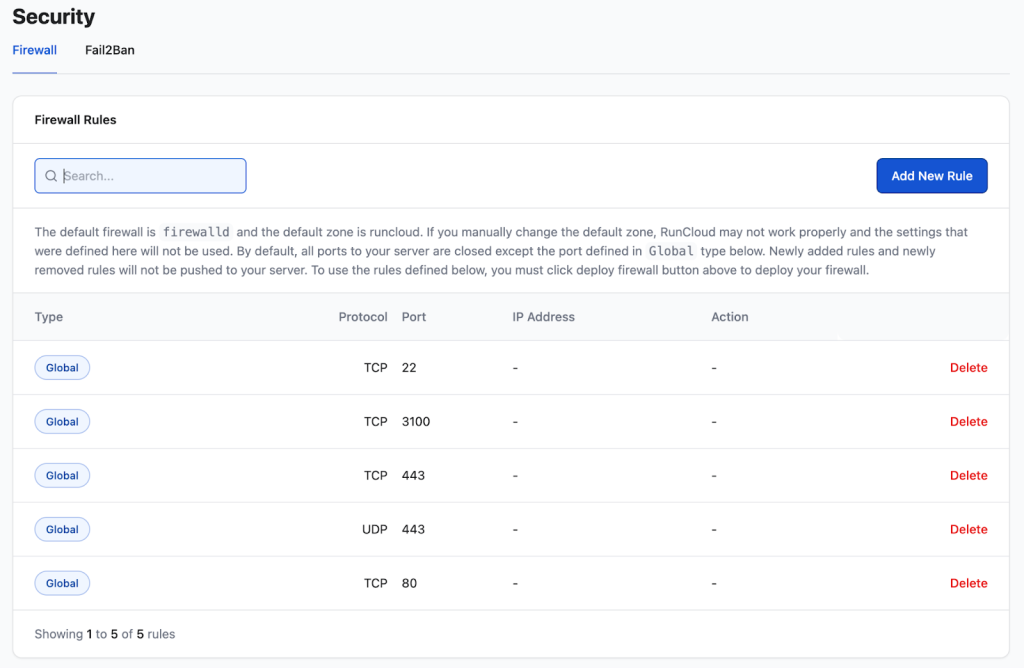
    Note: If configuring firewalls over CLI makes you nervous, RunCloud’s Firewall Manager lets you set, preview, and deploy port rules and IP whitelists directly from the dashboard without touching the terminal.

    Suggested read: Enable Zero-Trust SSH with Cloudflare on Windows, Mac, Linux, and ChromeOS 

    Step 5: Install Fail2Ban to Block Brute-Force Attacks

    Now that we have changed the SSH port and disabled password authentication, the server is relatively secure, but automated bots will still try to break in by sending random login attempts with incorrect credentials.

    Fail2Ban monitors your log files and dynamically updates your firewall to block IP addresses that show malicious behavior.

    To configure this on your Linux server, you can install the Fail2Ban package using the following command:

    sudo apt update && sudo apt install fail2ban -y

    After installing it, you need to create a set of rules (called “jails”) for your server. We strongly recommend that you don’t edit the default jail.conf file, as package updates will overwrite it. Instead, you should copy it to create a new file called jail.local. You can do this on a Linux server using the following command:

    sudo cp /etc/fail2ban/jail.conf /etc/fail2ban/jail.local

    After creating the file, you can edit your local configuration:

    sudo nano /etc/fail2ban/jail.local

    Scroll down to the [sshd] block. You need to tell Fail2Ban that you are using a custom port, and explicitly enable the jail. Modify the block to look like this:

    [sshd]
    enabled = true
    port    = 52222
    logpath = %(sshd_log)s
    backend = %(sshd_backend)s
    maxretry = 3
    bantime = 1h
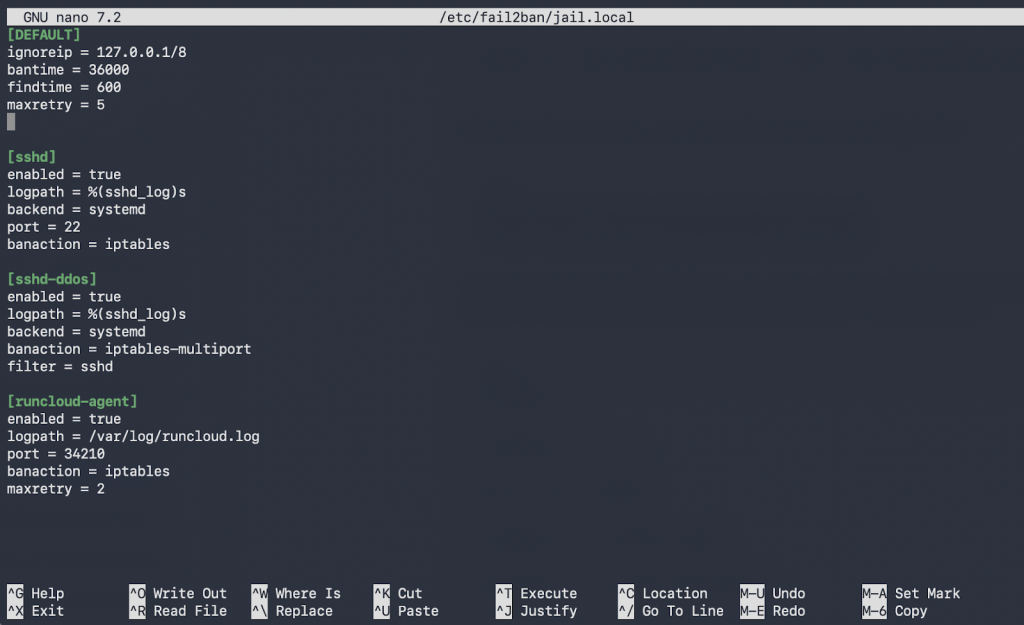
    Run the following commands to save and exit, then start and enable the service:

    sudo systemctl enable fail2ban
    sudo systemctl restart fail2ban

    After creating the service, you can verify that your SSH jail is active using the following command:

    sudo fail2ban-client status sshd
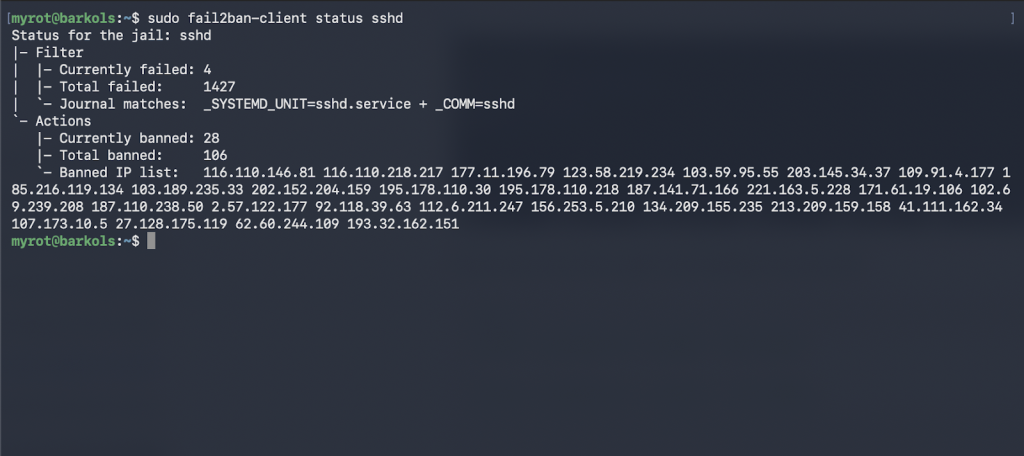
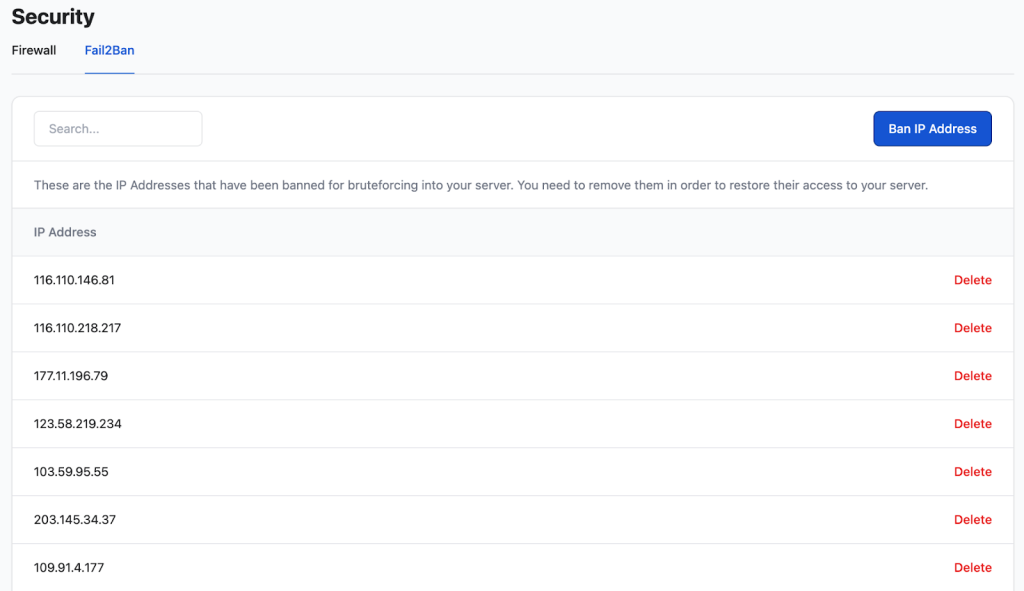
    In the screenshot above, we can see the list of IP addresses that Fail2Ban has banned from accessing our server.

    By completing these 5 steps, you have eliminated the low-hanging fruit that compromises 95% of fresh Linux setups. 

    Note: Getting Fail2Ban thresholds wrong in jail.local often results in banning yourself or failing to trigger on real attacks. That’s why RunCloud ships with Fail2Ban pre-configured for web and SSH traffic. 
    Suggested read: How to Use Cloudflare Firewall Rules to Protect Your Web Application 

    Step 6: Enable Automatic Security Updates

    A hardened server is only secure until the next CVE is published. If you are managing more than one server, you should not want to manually run apt upgrade whenever a vulnerability is discovered in OpenSSL or your kernel. Enable unattended-upgrades to automatically install critical security patches in the background.

    To do this, first you need to install the necessary packages using the following command:

    sudo apt update && sudo apt install unattended-upgrades apt-listchanges -y

    After installing the services, you can enable the service via the interactive prompt:

    sudo dpkg-reconfigure -plow unattended-upgrades

    Select Yes when prompted to automatically download and install stable updates.
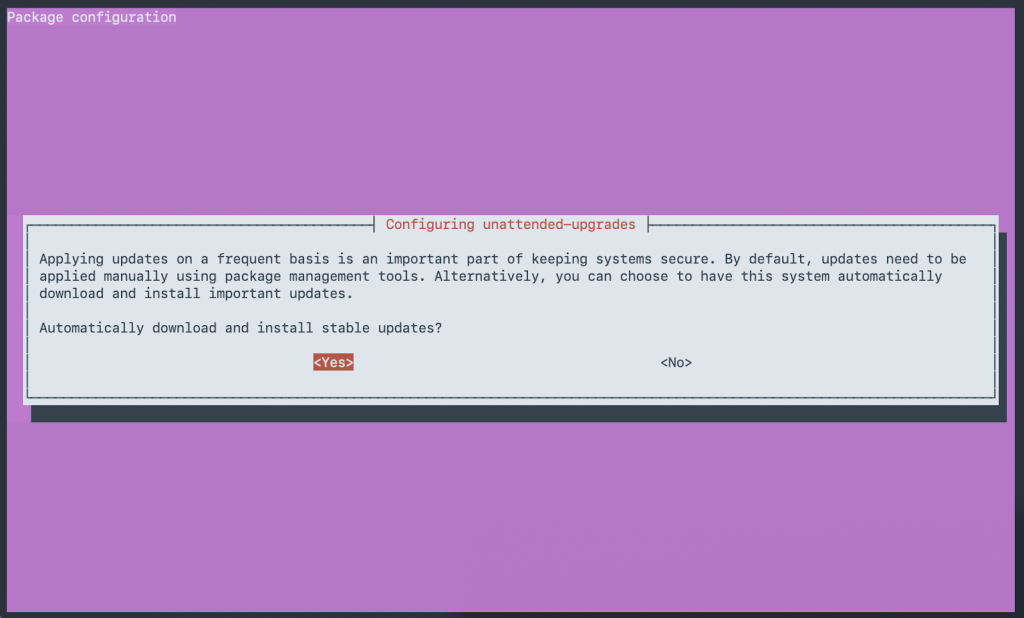
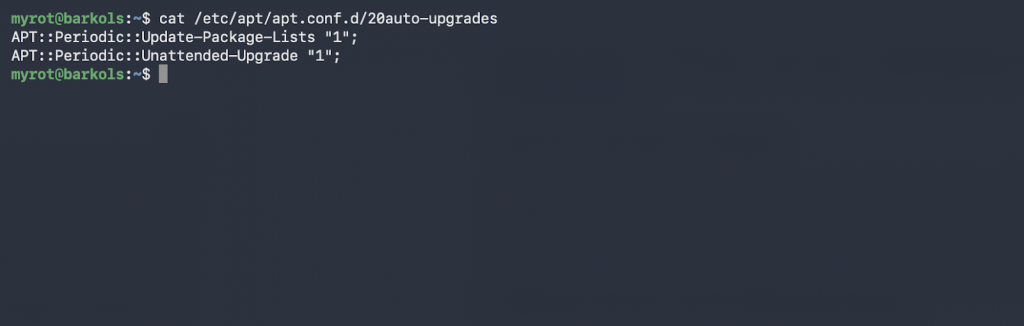
    After configuring it, check the configuration file to verify that it has been activated successfully using the following command:

    cat /etc/apt/apt.conf.d/20auto-upgrades

    When you run the above command, you should see APT::Periodic::Unattended-Upgrade "1"; in the output.
    Step 7: Remove Unused Packages and Disable Unnecessary Services

    Every service running on your server is a potential entry point for hackers. If you aren’t using a service or application, you can turn it off to protect your server and conserve resources.

    To do this, first, we will audit what is actively listening on your server’s network interfaces by using the following command:

    sudo ss -tulpn
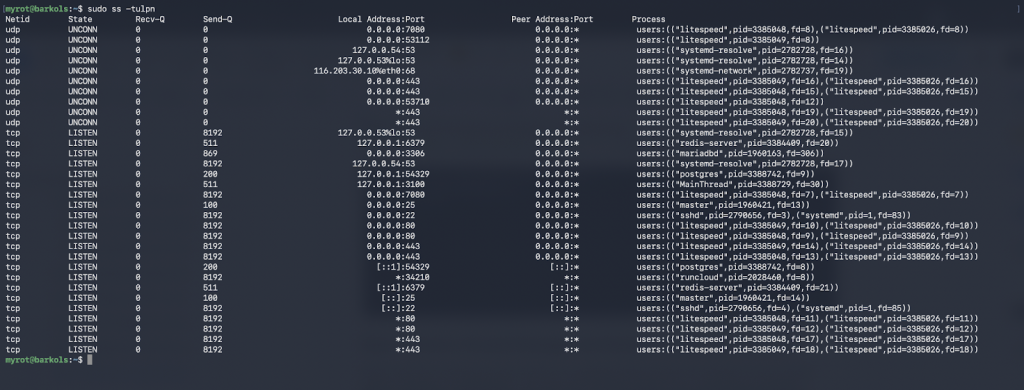
    If you see any services that you don’t want, then you can stop and disable them so they don’t start on reboot:

    sudo systemctl stop <name>
    sudo systemctl disable <name>

    In the above commands, replace the <name> with the actual name of the service that you want to disable. 

    Next, purge any orphaned packages and dependencies that came pre-installed on your provider’s OS image but which aren’t needed anymore:

    sudo apt autoremove --purge -y

    Step 8: Harden Kernel Parameters with sysctl

    By default, the Linux kernel uses networking parameters optimized for broad compatibility rather than strict security. When you deploy your server on the internet, it will be constantly bombarded with hundreds of attacks that try to exploit these compatibility features. 

    But you can mitigate several types of network attacks (like SYN floods and IP spoofing) by tweaking sysctl.conf. To do this, you can open the configuration file using the following command:

    sudo nano /etc/sysctl.conf

    In this file, we will disable certain features by appending the following lines to the bottom of the file:

    # Protect against SYN flood attacks
    net.ipv4.tcp_syncookies = 1
    
    
    # Ignore ICMP broadcast requests (prevent smurf attacks)
    net.ipv4.icmp_echo_ignore_broadcasts = 1
    
    
    # Disable ICMP redirects (prevent man-in-the-middle routing attacks)
    net.ipv4.conf.all.accept_redirects = 0
    net.ipv6.conf.all.accept_redirects = 0
    
    
    # Log spoofed packets, source routed packets, and redirect packets
    net.ipv4.conf.all.log_martians = 1
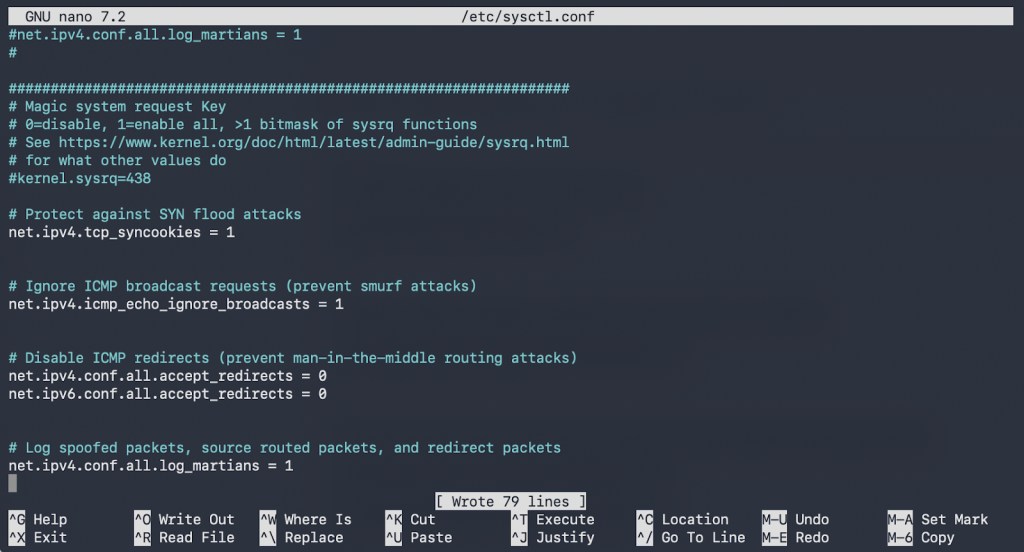
    After editing the file, you can save and exit the file editor (CTRL+O, Enter, CTRL+X). After that, you can apply the changes immediately without rebooting by running the following command:

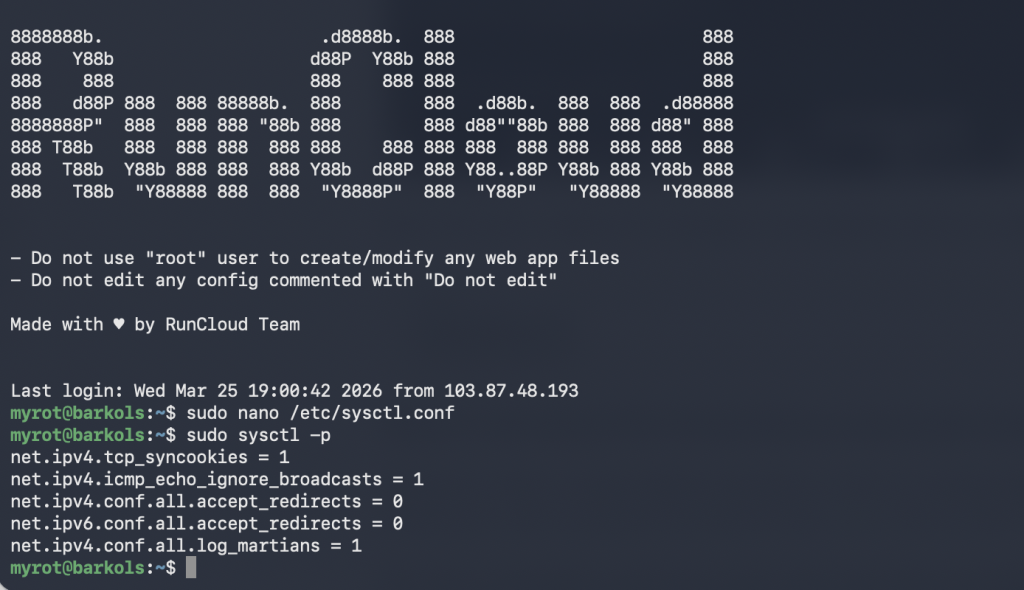
    sudo sysctl -p
    Suggested read: 16 Best Linux Distros in 2025 

    Step 9: Set Strict File Permissions and Audit User Accounts

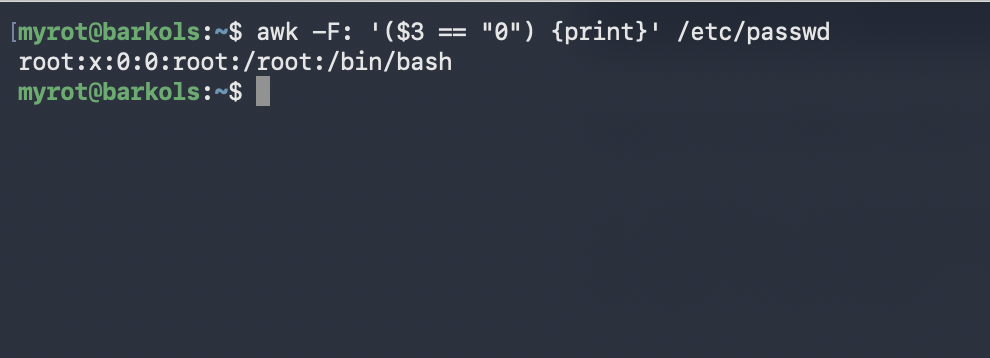
    If an attacker compromises a system, they will try to either create hidden backdoor users, or leave files with wide-open permissions. There are several steps you can take to ensure this isn’t the case on your server. First, you can audit your user accounts to ensure only root has a User ID (UID) of 0. Run this command to print any user with root-level privileges:

    awk -F: '($3 == "0") {print}' /etc/passwd

    This should output exactly one line: root:x:0:0:root:/root:/bin/bash. If you see any other user here, then it is possible that your server is compromised.
    Next, verify that no users have empty passwords:

    sudo awk -F: '($2 == "") {print}' /etc/shadow

    This should return no output.

    Finally, find and review any world-writable directories (directories anyone can write to) that don’t have the “sticky bit” set (which prevents users from deleting each other’s files):

    sudo find / -type d -perm -0002 -a ! -perm -1000 -print 2>/dev/null

    If your server is serving multiple websites, then the above command will probably return a long list of directories. You need to review this list and, if you find any rogue directories, investigate them immediately and restrict their permissions using chmod 755.

    Step 10: Review Mandatory Access Control (AppArmor and SELinux)

    AppArmor (on Ubuntu/Debian) and SELinux (on RHEL/AlmaLinux) are Mandatory Access Control (MAC) systems. They act as a high-level security guard built directly into the Linux kernel. While standard file permissions (chmod) control who can see a file, MAC systems control which specific programs are allowed to do what.

    In a standard setup, if a hacker exploits a vulnerability in a web server such as NGINX and gains “root” access, they can theoretically access every file on your server.

    With AppArmor or SELinux active, the program is confined to a “sandbox.” Even if NGINX is compromised, the MAC system detects that NGINX is attempting to access sensitive system files (such as/etc/shadow) or execute unauthorized commands. Because that behavior isn’t in the program’s predefined “security profile,” the kernel blocks the action instantly, even if the attacker has root privileges. It effectively limits the “blast radius” of any potential hack.

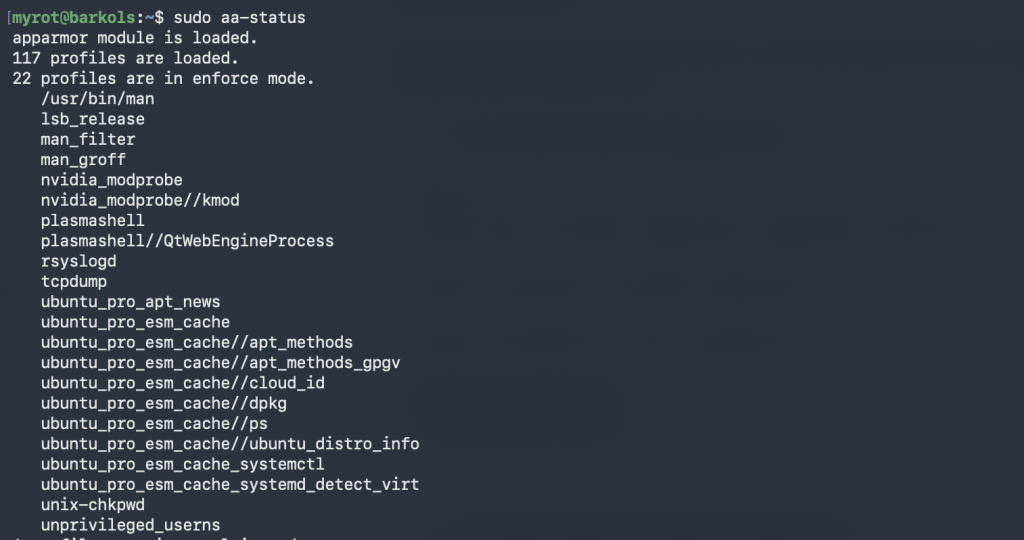
    You can run the following commands to check the configuration of these systems on your server:

    • On Ubuntu/Debian (AppArmor):
    sudo aa-status
    • On RHEL/Alma/Rocky:
    sestatus

    Manually configuring MAC systems is tricky, and beyond the scope of this article. It requires writing deep-level security profiles that define every single file, port, and network socket a program is allowed to touch. One small mistake in a profile can cause your database to crash or prevent your website from loading, leading to hours of frustrating troubleshooting.

    The good news is that if you are using RunCloud, you don’t need to lift a finger.

    RunCloud servers are engineered to be secure out of the box. The platform automatically configures and optimizes these security layers during server provisioning. Your server is hardened the moment it connects to the RunCloud panel, allowing you to focus on your applications while RunCloud handles the complex kernel security in the background.

    Step 11: Configure Off-Server Backups

    Hardening your server reduces the risk of a hack, but it cannot protect you against hardware failure, a data center fire, or an accidental rm -rf / command. Off-server backups ensure that even if your entire VPS is deleted, your business can be restored in minutes.

    There are several ways to handle backups, each with its own pros and cons:

    1. Disk-Level Snapshots: Taking a full image of your server via your provider (like DigitalOcean or AWS). These are easy but often expensive, and they’re hard to move between providers.
    2. Application Plugins: Using WordPress plugins like UpdraftPlus. These are user-friendly, but they can slow down your site because they use your server’s PHP resources to compress files.
    3. Manual Scripting: Using Linux tools to manually move data. If you choose to do this manually, you must manage three distinct parts: the database, the files, and the transport. 
      • Security: Manual rclone or script configs often store your Cloud API keys or Database passwords in plaintext on the server. If a hacker gets in, they now have your backup keys too.
      • Resource-Heavy: Compressing large folders (tar) and dumping databases every night causes high CPU and Disk I/O spikes, which can make your website sluggish during the backup window.
      • Reliability: If the script fails, you won’t know until you try to restore and find out that the files are empty.

    If you are using RunCloud, you don’t need to deal with any of this.

    RunCloud uses Incremental Backups, which is a far superior technology. Instead of zipping your entire site every night (which is slow and uses a lot of disk space), RunCloud only identifies the specific data that changed – and syncs just that.

    • Fast & Efficient: Because it only moves “changes,” backups finish in seconds rather than minutes.
    • Zero Resource Lag: It doesn’t put a heavy load on your server, keeping your website fast even during a backup.
    • Encrypted & Secure: Your S3 or Backblaze credentials are stored in RunCloud’s encrypted vault.
    • Backup Notifications: You can configure the Backup script to notify you via Slack/Email/Discord if the backup fails for any reason.
    • One-Click Restore: If something goes wrong, you don’t have to remember complex Linux commands. You just click “Restore” in the dashboard, and RunCloud puts everything back exactly where it belongs.
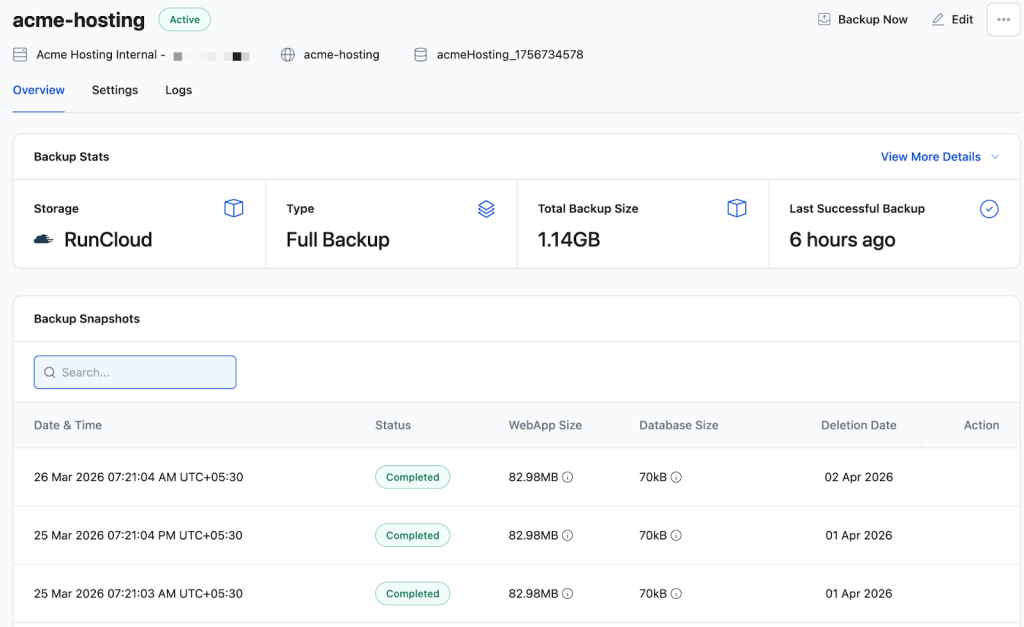
    Runcloud automated backups

    After Action Report

    If you have followed all the steps in this article, your server is now locked down and can withstand a variety of internet attacks. But a hardened server isn’t very useful if it doesn’t host anything. The next step is installing your web stack (NGINX/Apache, PHP, MySQL) and provisioning SSL certificates.

    Doing this manually means diving right back into the terminal. After hardening, managing NGINX, PHP-FPM, and SSL still requires SSH for every single configuration change, virtual host creation, and certificate renewal.

    RunCloud manages your NGINX configuration, PHP-FPM tuning, and Let’s Encrypt SSL deployments entirely from a UI, while fully respecting the hardened SSH and firewall configurations you just put in place. 

    While RunCloud simplifies complex server management tasks, it is designed for developers, agencies, and power users who need more than just a basic cPanel replacement. Once your servers are hardened, RunCloud enables you to scale your operations by offering tools for advanced management:

    • Multi-Server Management: Easily oversee, update, and manage dozens or hundreds of hardened Linux servers from a single dashboard.
    • Team & Role-Based Permissions: Delegate server access to team members or clients without sharing SSH keys or root passwords, thanks to granular control over who can manage applications, databases, or backups.
    • API-Driven Control: Integrate server and application management into your custom workflows using the RunCloud API, allowing for automated server provisioning and deployment.

    Start using RunCloud today.

    Frequently Asked Questions

    What is Linux server hardening?

    Linux server hardening is the process of reducing a system’s attack surface by patching vulnerabilities, disabling unused services, and implementing strict access controls. Common hardening steps include disabling root SSH access, configuring firewalls like UFW, and enforcing cryptographic key-based authentication.

    How long does it take to harden a Linux server?

    Manually executing a basic Linux hardening checklist on a fresh VPS typically takes an experienced sysadmin about 30 minutes. However, advanced hardening procedures like configuring SELinux, setting up intrusion detection systems, and passing compliance audits can take several hours to properly tune. 

    Should I run hardening on an existing server or only on fresh ones?

    You should ideally harden a fresh Linux server before it is ever exposed to public internet traffic or connected to your production application stack. Applying strict firewall rules, altering permissions, and modifying SSH configurations on an existing server carries a high risk of breaking active application dependencies or accidentally locking yourself out. If you must harden an existing production server, thoroughly test the new security policies in a staging environment and ensure you have recent, verified off-site backups first.

    Does changing the SSH port actually improve security?

    Changing the default SSH port from 22 to a non-standard high port is a security-through-obscurity tactic that will not stop a determined, targeted attacker running a full port scan. However, it is still highly recommended because it drops automated botnet brute-force attempts by over 99 percent. This drastically cleans up your system authentication logs, reduces wasted CPU cycles, and prevents tools like Fail2Ban from being overwhelmed by background internet noise.
  • How to Set Up a Headless WordPress Blog with Astro and Git

    How to Set Up a Headless WordPress Blog with Astro and Git

    If you want to build a completely custom frontend UI without giving up the powerful, built-in WordPress ecosystem, a headless setup is exactly what you need.

    A headless WordPress architecture lets you use the WordPress CMS for content management while using the framework of your choice for the frontend. In this tutorial, we will use Astro, a modern framework built for speed that lets you fetch data from WordPress and render it as static HTML.

    This combination provides the ultimate developer experience: you keep the familiar WordPress dashboard and plugin ecosystem while building a completely custom, high-performance frontend free from the limitations of legacy themes.

    Benefits of Headless WordPress 

    Decoupling content creation and frontend development is a major benefit. Content teams use the familiar WordPress dashboard for posts and SEO without touching the Astro codebase, speeding up the content pipeline. Simultaneously, frontend developers focus purely on UX, features, and design optimization without interrupting content work. 

    Here are the primary advantages you can expect from this headless architecture:

    • Performance: Because Astro builds statically by default, it fetches your data from the WordPress REST API at build time and generates static HTML files, making your site incredibly fast.
    • Security: Your WordPress backend is not directly exposed through the frontend, reducing your attack surface while still allowing you to apply standard security controls where needed.
    • Flexibility: You have full developer control over the frontend code while still using WordPress as a robust CMS.
    • SEO: Static pages are easily crawled and indexed by search engines.

    By the end of this tutorial, you will know exactly how to connect these two powerful tools. We will focus on producing static pages that are generated entirely at build time.

    Once you are comfortable with this workflow, you can later customize how Astro behaves. For example, you can eventually change your category pages to dynamically fetch all pages via the API on the client side, rather than generating them during the build process.

    Prerequisites

    Before starting, you need a live WordPress site with the REST API accessible (at /wp-json/wp/v2/).

    In this guide, we will not teach you how to install WordPress, as we have already covered this topic extensively in our previous blog posts. If you need help setting up your initial WordPress site, please refer to one of these guides:

    Phase 1: Prepare WordPress for Headless

    Once your WordPress site is live on the internet, the built-in WordPress REST API will already be active. We just need to make sure it is properly formatted and accessible to Astro.

    1. Set your Permalinks: The WordPress REST API relies on clean URLs to work properly.
      • Log in to your WordPress admin dashboard.
      • Navigate to Settings > Permalinks.
      • Select “Post name” (or any other clean URL structure).
      • Click Save Changes.
    2. Verify the REST API is working
      • Open a new browser tab.
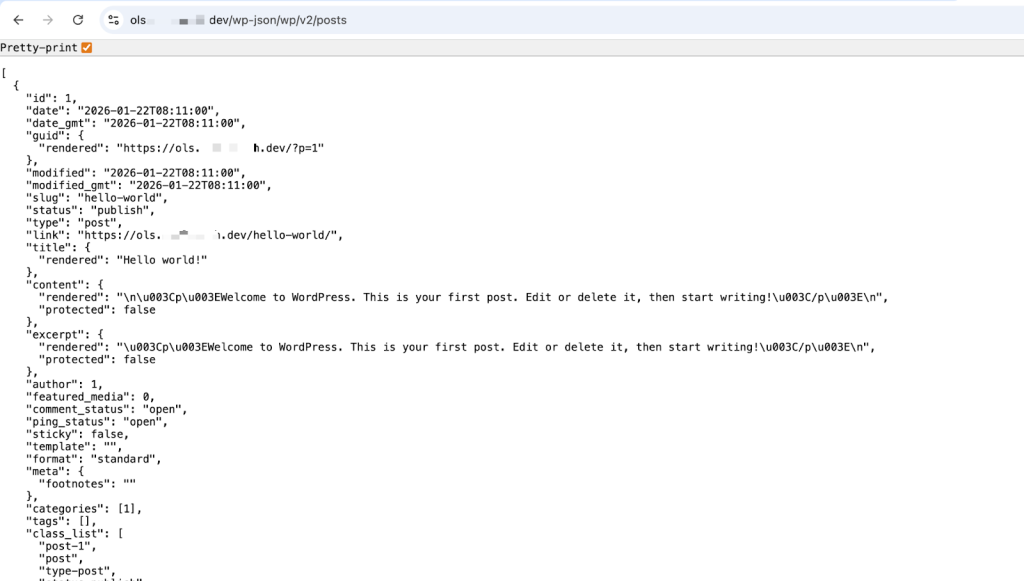
      • Visit your WordPress site’s API endpoint at https://[YOUR-WP-DOMAIN]/wp-json/wp/v2/ (replace the bracketed text with your actual domain name).
      • Check the screen for a JSON response containing the site data containing your posts. If you see this data, your headless backend is ready.
    1. Set up Custom Post Types (Optional)

    If you use Custom Post Types such as “Portfolios” or “Testimonials”, they are hidden from the REST API by default (unless a plugin actively enables show_in_rest). To use a CPT in your headless setup alongside standard posts and pages, you must configure them in your WordPress dashboard to allow REST API support.

    Note: The upcoming examples will fetch data from a WordPress site whose content types have already been configured and exposed to the REST API.

    1. Configure Authentication and Fetching Strategy (optional)

    By default, the REST API is open to the public for reading content. If you are building a private application, you can configure your WordPress site to require authentication by following the official REST API Handbook.

    Phase 2: Create WordPress Frontend with Astro 

    With your WordPress backend configured and its REST API ready to serve content, the next step is to build a fast frontend to display your posts. We’ll use Astro to fetch content from the API at build time, generating static HTML pages for maximum performance and security.

    Step 1: Create a New Astro Project

    With your WordPress site ready, create a new Astro project using the official starter template:

    npm create astro@latest my-astro-wp

    Select the following options when prompted:

    • Use A basic, helpful starter project: Yes
    • Install dependencies: Yes
    • Initialize git: Yes 

    Navigate to your project folder:

    cd my-astro-wp

    Step 2: Configure Environment Variables

    Create a .env file in the project root to store your WordPress URL:

    PUBLIC_WP_URL=https://runcloud.example.com/wp-json/wp/v2/

    Replace the URL with your actual WordPress site URL.

    Step 3: Create the Homepage That Fetches WordPress Data

    Create your homepage at src/pages/index.astro to fetch and display WordPress posts:

    ---
    import Layout from '../layouts/Layout.astro';
    interface WP_Post {
      title: { rendered: string };
      content: { rendered: string };
      excerpt: { rendered: string };
      slug: string;
      _embedded?: {
        'wp:featuredmedia'?: Array<{
          media_details: {
            sizes: {
              medium?: { source_url: string };
            };
          };
        }>;
      };
    }
    const wpUrl = import.meta.env.PUBLIC_WP_URL;
    const res = await fetch(`${wpUrl}/posts?_embed&per_page=20`);
    const posts: WP_Post[] = await res.json();
    ---
    <Layout title="Astro + WordPress Blog">
      <main>
        <h1>Latest Posts</h1>
        <ul class="post-list">
          {posts.map((post) => (
            <li class="post-item">
              {post._embedded?.['wp:featuredmedia']?.[0]?.media_details?.sizes?.medium?.source_url && (
                <img
                  src={post._embedded['wp:featuredmedia'][0].media_details.sizes.medium.source_url}
                  alt={post.title.rendered}
                  class="post-thumbnail"
                />
              )}
              <h2>
                <a href={`/posts/${post.slug}/`} set:html={post.title.rendered} />
              </h2>
              <p class="post-excerpt" set:html={post.excerpt.rendered} />
            </li>
          ))}
        </ul>
      </main>
    </Layout>
    <style>
      main {
        max-width: 800px;
        margin: 0 auto;
        padding: 2rem;
      }
      h1 {
        font-size: 2.5rem;
        margin-bottom: 2rem;
        text-align: center;
      }
      .post-list {
        list-style: none;
        padding: 0;
      }
      .post-item {
        margin-bottom: 2rem;
        padding: 1.5rem;
        border: 1px solid #eee;
        border-radius: 8px;
        text-align: center;
      }
      .post-thumbnail {
        width: 100%;
        max-width: 400px;
        height: auto;
        border-radius: 4px;
        margin-bottom: 1rem;
        display: block;
        margin-left: auto;
        margin-right: auto;
      }
      .post-item h2 {
        margin: 0.5rem 0;
      }
      .post-item h2 a {
        color: #333;
        text-decoration: none;
      }
      .post-item h2 a:hover {
        color: #0066cc;
      }
      .post-excerpt {
        color: #666;
      }
    </style>

    A note on pagination: The WordPress REST API limits the number of posts that can be returned in a single request. While per_page=20 works for small sites, larger sites will need pagination to fetch all posts.

    The maximum value for per_page is typically 100. If you exceed this, the API will silently limit the results.

    For production use, you should either:

    • Fetch multiple pages using the page parameter
    • Implement a loop to retrieve all posts during the build process

    Step 4: Create Dynamic Post Pages

    Create src/pages/posts/[slug].astro to handle individual post pages:

    ---
    import Layout from '../../layouts/Layout.astro';
    interface WP_Post {
      title: { rendered: string };
      content: { rendered: string };
      slug: string;
    }
    export async function getStaticPaths() {
      const wpUrl = import.meta.env.PUBLIC_WP_URL;
      const res = await fetch(`${wpUrl}/posts?_fields=slug,title,content`);
      const posts: WP_Post[] = await res.json();
      return posts.map((post) => ({
        params: { slug: post.slug },
        props: { post },
      }));
    }
    const { post } = Astro.props;
    ---
    <Layout title={post.title.rendered}>
      <main>
        <article>
          <h1 set:html={post.title.rendered} />
          <div class="content" set:html={post.content.rendered} />
          <a href="/" class="back-link">← Back to all posts</a>
        </article>
      </main>
    </Layout>
    <style>
      main {
        max-width: 800px;
        margin: 0 auto;
        padding: 2rem;
      }
      article {
        background: white;
        padding: 2rem;
        border-radius: 8px;
      }
      h1 {
        font-size: 2.5rem;
        margin-bottom: 2rem;
        color: #333;
      }
      .content {
        line-height: 1.8;
        color: #444;
      }
      .content :global(img) {
        max-width: 100%;
        height: auto;
        border-radius: 4px;
      }
      .content :global(p) {
        margin-bottom: 1.5rem;
      }
      .back-link {
        display: inline-block;
        margin-top: 2rem;
        color: #0066cc;
        text-decoration: none;
      }
      .back-link:hover {
        text-decoration: underline;
      }
    </style>

    Step 5: Run the Development Server

    Start the development server:

    npm run dev

    Visit http://localhost:4321 to see your headless WordPress blog in action. You should see all your WordPress posts displayed on the homepage, and clicking on any post will take you to its full article page.

    Step 6: Build for Production

    When ready to deploy, build your static site:

    npm run build

    The output will be in the dist/ folder, ready to deploy to any hosting provider, such as Netlify, GitHub Pages, or RunCloud.

    Step 7: Keep Your Content in Sync with Rebuilds

    The Astro project in the above example generates static pages at build time by default; any new or updated content published in WordPress will not appear on your live site immediately. To display the latest content, you must trigger a new build so Astro can fetch the fresh data from your REST API.

    Depending on your publishing schedule and team size, you have a few ways to manage these rebuilds.

    Option A: Manual Rebuilds (Simple)

    If you only publish content occasionally, the simplest approach is to manually trigger a deployment from your RunCloud dashboard whenever you publish a new post.

    1. Log in to your RunCloud dashboard.
    2. Navigate to Atomic Deployment > your Astro project.
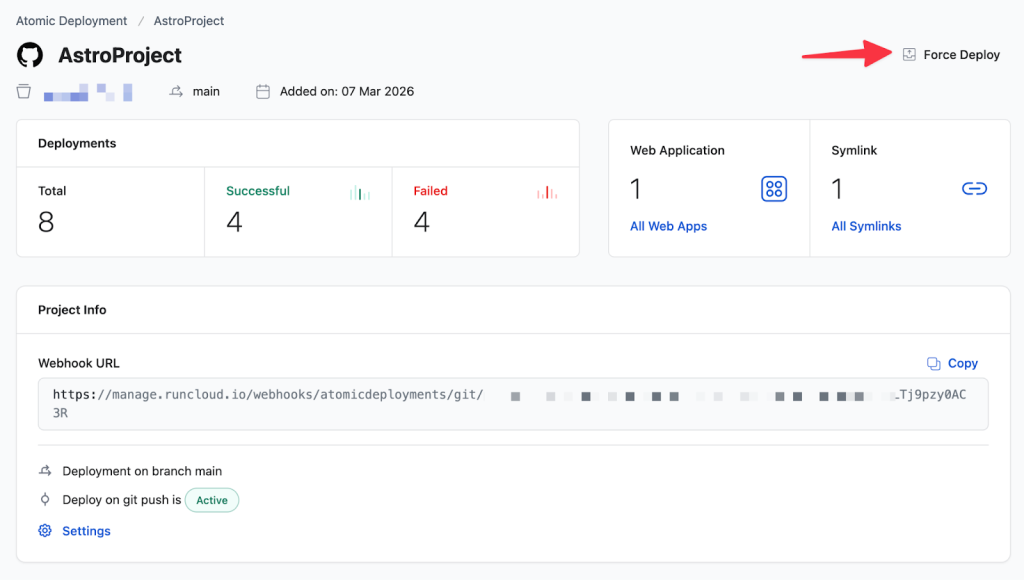
    3. Click Force Deploy to force a manual rebuild.

    RunCloud will run your deployment script, fetch the newest WordPress data, and update your live site using atomic deployment.

    Option B: Automated API Triggers (Advanced)

    By default, RunCloud automatically builds your site whenever new code changes are pushed to GitHub. However, publishing a post in WordPress does not push code to GitHub. To automate deployments based on content updates, you can use the RunCloud API to trigger a build programmatically.

    You might be tempted to add a custom PHP function to your WordPress site that pings the RunCloud API every time a post is saved. However, if you have a team of writers constantly saving drafts and making simultaneous revisions, this can result in dozens of unnecessary deployments running back-to-back, which can consume server resources and cause conflicts.

    Scheduled Deployments (Cron Jobs)

    To avoid overwhelming your deployment pipeline, the best practice is to set up a cron job. Instead of deploying on every single save, you can configure a server cron job to ping the RunCloud deployment API on a predictable schedule.

    1. Decide on a publishing schedule (for example, once every 12 hours or once a day at midnight).
    2. Create a server-level cron job that sends a POST request to your RunCloud Webhook URL at that specific interval.
    3. Instruct your content team that new posts will go live at those designated times.

    Read the RunCloud documentation to learn more about enabling API access and setting up cron jobs on RunCloud.

    Note: The need to constantly rebuild your application depends entirely on your Astro project architecture. The steps above apply to Static Site Generation (SSG), Astro’s default behavior that offers the best performance. However, if you configure Astro to use Server-Side Rendering (SSR), your application will dynamically fetch data from the WordPress API at runtime. In an SSR setup, any content changes saved in WordPress will appear on your frontend instantly, completely eliminating the need to rebuild your site after each post.

    Phase 3: Deploy Astro Project to RunCloud

    Now that your local Astro project is successfully fetching data from your headless WordPress setup, it is time to share it with the world.

    In this phase, we will push your code to GitHub and set up a deployment pipeline on RunCloud.

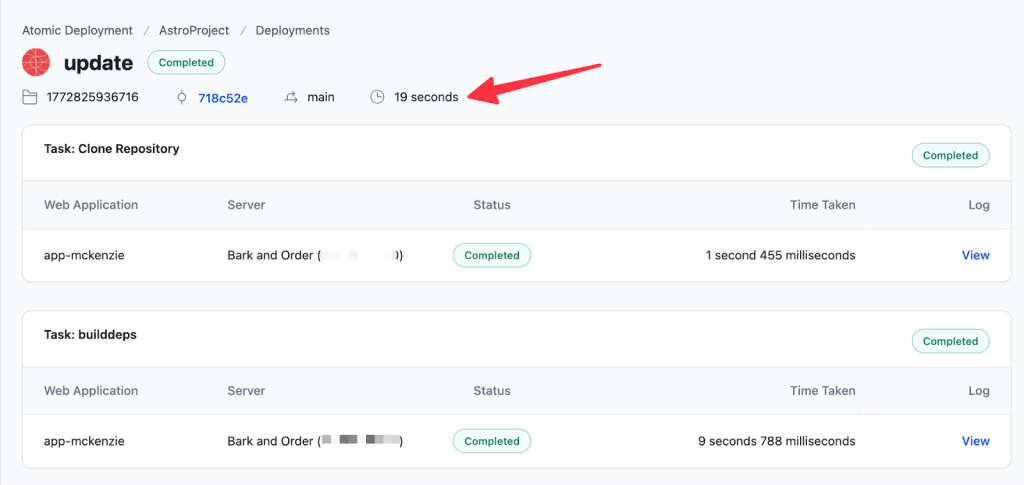
    We are going to configure an “atomic deployment.” The major benefit of this setup is that after you commit and push your code, it becomes available to users worldwide in often less than a minute. Furthermore, if a build fails for any reason, your old code will continue running smoothly with zero downtime.

    Here is how to set up your professional deployment workflow.

    Step 1: Push your Astro project to GitHub

    First, we need to host your code in a repository so RunCloud can access it.

    1. Open your web browser and log in to your GitHub account (or any supported Git provider).
    2. Navigate to your dashboard, then click the New button to create a repository.
    3. Give your repository a name.
    4. Leave the option to add a README file unchecked. It is very important that the repository is completely empty.
    5. Click Create repository.
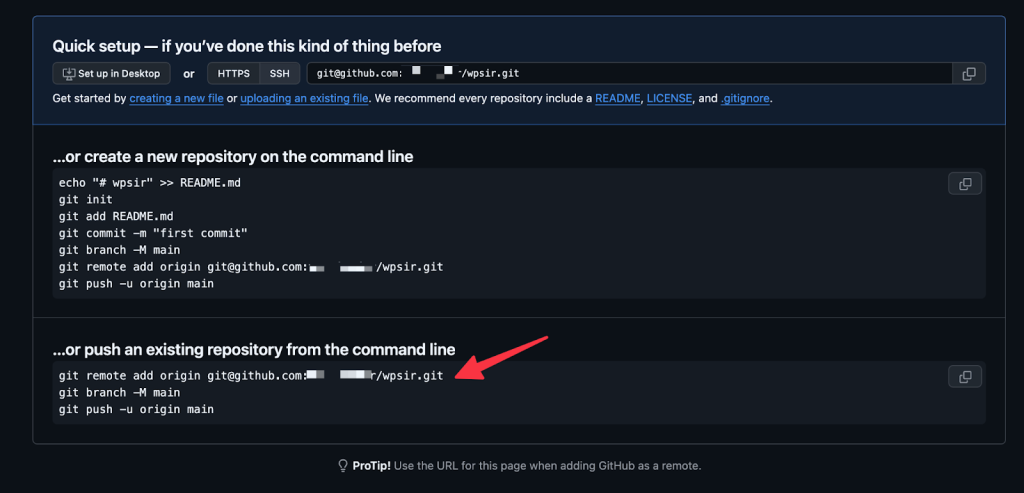
    6. GitHub will now show you a page with instructions for pushing an existing repository from the command line. Open your computer’s terminal, make sure you are in your Astro project folder, and copy and paste those specific commands to commit your code and push it to GitHub.

    Step 2: Create a new RunCloud Web Application

    Now, let’s tell RunCloud where to find your code.

    1. Log in to your RunCloud dashboard.
    2. Navigate to your server, then click Deploy New Web App.
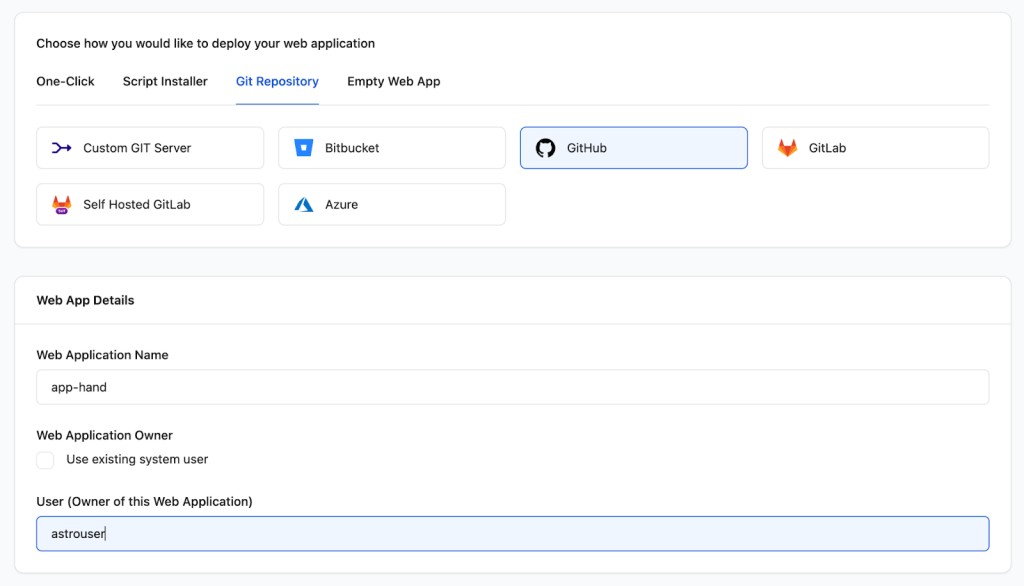
    3. Choose the option to install from a Git repository and select your Git provider.
    4. Enter a suitable name for your application.
    5. Locate the “Web Application Owner” section and uncheck the “Use existing system user” checkbox.
    6. Enter a new name, such as astrowp.
    1. Configure the domain name for your website. (You can use a test domain name for now and update it later manually or by using the RunCloud DNS manager.)
    2. Enter the details for your new project into the “Repository name” and “Branch name” fields. 
    3. Copy the deployment key generated by RunCloud. 
    4. Open your GitHub repository and navigate to Settings > Deploy keys.
    5. Click Add deploy key, paste the key provided by RunCloud, and save your changes.
    6. Return to RunCloud and leave all other settings at their defaults.
    7. Click Add Web Application.

    Note: Steps for adding deployment keys can vary by provider. For exact steps, screenshots, and a detailed guide, check out your supported provider in the RunCloud documentation.

    Step 3: Convert to Atomic Deployment and set Webhooks

    Atomic deployments keep your site up while Astro builds your new pages.

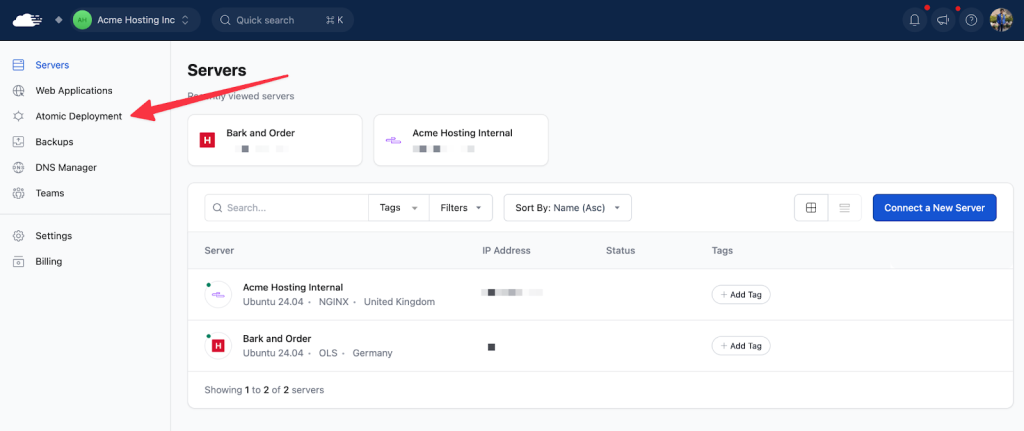
    1. Inside your RunCloud dashboard, click on Atomic Deployment in the left menu.
    2. Click the “Add New Project” button to convert your application to atomic deployments.
    1. Follow the on-screen instructions to copy the provided webhook URL.
    2. Go back to your GitHub repository, navigate to Settings > Webhooks, and click Add webhook.
    3. Paste the RunCloud URL into the “Payload URL” field and save. This ensures that GitHub tells RunCloud to update your site whenever you push new code.

    Step 4: Add your Environment Variables

    Because your code is now on a live server, it needs your “.env” file to know where your WordPress API lives. RunCloud’s atomic deployment uses a shared folder so your environment variables persist across deployments.

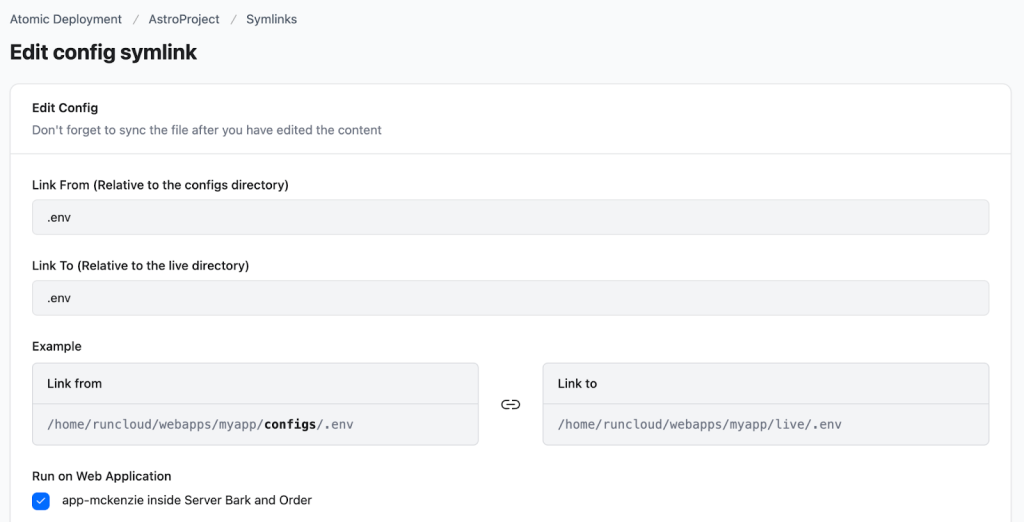
    1. In your RunCloud Web Application dashboard, navigate to Atomic Deployment > Your Project > Symlink.
    2. Click Add New Symlink.
    3. Set the “Symlink Type” to “Config”.
    4. Enter “.env” in both the “Link From” and “Link To” fields.
    5. Add your PUBLIC_WP_URL variable exactly as you did on your local machine.
    6. Set a password for encryption. Remember this password if you want to edit this file again.
    7. Click Save.

    Step 5: Install NVM via SSH

    RunCloud servers ship with a default version of Node.js, but Astro often requires a specific, modern LTS (Long-Term Support) version. We will install Node Version Manager to handle this safely.

    1. Open your terminal and log in to your server via SSH using your new system user account (for example, “astrowp”). For step-by-step instructions and a detailed guide on connecting to your server via SSH, refer to the RunCloud documentation on How to Connect to Your Server via SSH.
    2. Run the following command to download and install NVM:
    curl -o- https://raw.githubusercontent.com/nvm-sh/nvm/v0.39.5/install.sh | bash
    1. Close your terminal completely and open a new SSH session so the system recognizes the new software.
    2. Run nvm install –lts to install the latest long-term support version of Node.js.

    Note: This is the only time you need to log in via SSH; all other processes will be handled automatically by the Git deployment pipeline.

    Step 6: Create the Deployment Script

    Now we will write the instructions that RunCloud follows every time it receives new code from GitHub.

    1. In your RunCloud dashboard, navigate to Atomic Deployment > Your Project > Deployment Script.
    2. Scroll down to the Activate Latest Release section and click “Add Script”.
    3. Give this script a suitable name, and under the “When to Run This Script”, select “Before Activate latest release” from the dropdown menu.
    4. Delete the default text and paste the following script:
    # 1. Navigate to the current release directory
    cd {RELEASEPATH}
    
    
    # 2. Load NVM into the script environment 
    export NVM_DIR="/home/$USER/.nvm"[ -s "$NVM_DIR/nvm.sh" ] && \. "$NVM_DIR/nvm.sh"
    
    
    # 3. Tell the system to use the LTS version of Node.js
    nvm use --lts
    
    
    # 4. Install your Astro project dependencies
    npm install
    
    
    # 5. Build the static files using an absolute path to avoid version conflicts
    npm run build

    Note: By using the NVM in step 3, you ensure the system will not accidentally revert to RunCloud’s built-in Node version, preventing unexpected version conflicts. 

    1. Make sure to check the box next to “Run on Web Application” and then click Save to apply your new script.
    2. After that, open the Settings tab for this atomic deployment project to configure the deployment configuration options.
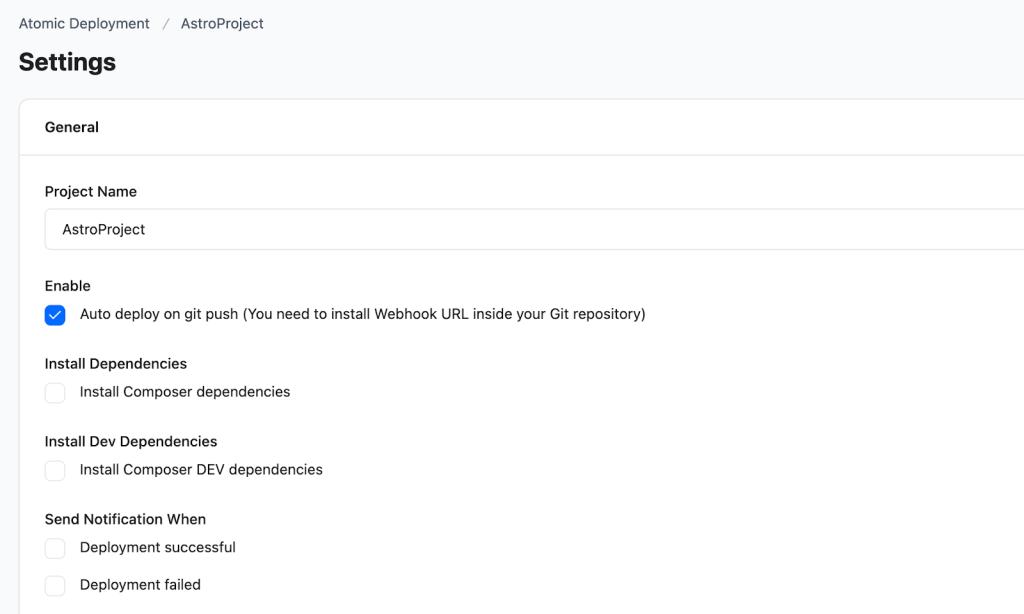
      • Auto deploy on git push: Triggers a deployment every time you push code to the configured branch. 
      • Install Composer dependencies: Ensure this is UNCHECKED. For this Astro project, we use npm install in the custom script, not Composer.
      • Install Dev Dependencies: Installs development-related PHP dependencies. (Not applicable to this Node.js/Astro project).
    3. You can optionally configure notification channels such as Slack, Discord, Telegram, or Webhooks for both successful and failed deployments in the Notifications section of your RunCloud Web Application.

    Step 7: Run your First Deployment

    You are fully configured and ready to go.

    1. Still inside the Atomic Deployment menu on RunCloud, locate the option to manually run a deployment on the top right.
    2. Click Force Deploy.
    3. Watch the deployment log. You will see RunCloud fetch your code, install dependencies, and build your Astro HTML files using your WordPress data.

    Once the build passes, your headless website is officially live. Now, if you visit the URL configured in Step 2 for your frontend web application on RunCloud, you will be able to view your newly deployed, fast, headless WordPress site powered by Astro.

    deploy astro headless wordpress site

    Phase 4: Advanced Steps (optional)

    Now that your headless WordPress and Astro website is live, you can explore a few optional advanced steps to optimize your workflow, improve performance, and expand your site features.

    Create a Staging Environment

    To take complete advantage of the RunCloud environment, it is highly recommended to build a staging environment.

    A staging environment is a private replica of your website where you can test WordPress plugins, Astro code updates, or new designs without breaking your live production site.

    Because your backend (WordPress) and frontend (Astro) are separated, you will manage their staging environments separately. You can deploy two different branches of your Astro Git repository for this purpose.

    Test your staging site locally:

    1. Clone your production WordPress site to a new staging domain on RunCloud using RunCloud’s built-in one-click WordPress staging functionality.
    2. Open your local Astro project on your computer.
    3. Open your “.env” file.
    4. Update the PUBLIC_WP_URL variable to match your new staging WordPress domain name.
    5. Run your local development server to safely test your new WordPress plugins against your Astro frontend.

    Create a cloud staging environment for your team:

    Optionally, you can create a second project on the cloud so your entire team can test changes under load or for longer durations.

    1. Open your GitHub repository and create a new branch named “staging”.
    2. Log in to your RunCloud dashboard and navigate to Web Application.
    3. Click Create Web App.
    4. Follow the standard deployment steps, but enter “staging” into the “Branch name” field.
    5. Assign a test domain name to this new web application and click Add Web Application.

    Install RunCache

    To make your headless website build even faster, you should pair it with an object caching plugin. Object caching saves the results of complex database queries and returns data instantly. This significantly speeds up your WordPress REST API responses.

    RunCache is a free tool built for this exact purpose. While it is highly optimized for RunCloud servers, it can be used on any WordPress backend site.

    Make More Pages and Endpoints

    Your website is currently fetching blog posts, but you are only limited by your imagination. You can create custom views, pages, and features using the pre-built WordPress REST APIs. Astro can generate pages for any data that WordPress outputs.

    Here are a few examples of what you can build next:

    • Author Pages: Fetch data from the /wp-json/wp/v2/users endpoint to create a directory of your blog authors and their biographies.
    • Category Pages: Fetch data from the /wp-json/wp/v2/categories endpoint to generate dynamic landing pages that group your posts by specific topics.
    • Custom Post Types: If you use a plugin to create a “Portfolio” or “Testimonials” post type, you can fetch them just like regular posts and design unique Astro layouts for them.

    If you know a little PHP, you can even write your own WordPress plugins to create completely custom REST API endpoints tailored to your exact business needs.

    To discover everything you can fetch and build, review the official WordPress API documentation:

    Final Thoughts

    Building a headless architecture with WordPress and Astro offers the best of both worlds: you get the unmatched content management experience of WordPress alongside Astro’s high-performance, developer-first environment. 

    While you are now free from the constraints of pre-built themes, a custom stack demands a fast server environment to handle deployments, security, and consistent uptime.

    RunCloud bridges this gap by turning complex server administration into a streamlined, automated workflow. Once your site is deployed, RunCloud handles the “heavy lifting” (including server-level security, SSH access, system backups, and automated continuous deployments) so you can focus entirely on your work rather than managing your OS.

    If you are looking for a professional-grade way to host and manage your headless infrastructure, RunCloud provides the stability and ease of use your project deserves.

    Sign up for your RunCloud account and experience painless server management today. 

  • How to Add Expires Headers in WordPress

    How to Add Expires Headers in WordPress

    Is your WordPress site failing performance audits like Google PageSpeed Insights or GTmetrix? One of the most common (yet easiest to fix) reasons for a low score is the “Add Expires Headers” warning.

    When this is missing, your server fails to tell visitors’ browsers which files (like images, CSS, and fonts) should be saved locally, forcing them to re-download your entire design every single time they visit a new page. This not only destroys your page speed but also eats up your bandwidth and hurts your SEO rankings.

    In this guide, we will break down exactly how “Expires Headers” work and why they are essential for a fast, responsive WordPress site. You will learn the differences between Expires and Cache-Control, how to implement these settings on NGINX and Apache servers, and how to troubleshoot common issues such as CDN conflicts or files that won’t update after a deployment.

    What Are “Expires Headers” and Why Do They Matter?

    “Expires Headers” are instructions sent by your web server to a visitor’s browser that define how long the browser should keep a file in its local cache.

    When an audit flags this as an issue, it means your server is telling the browser to check for new files too frequently, or to cache them not at all. Resolving this allows the browser to load your design elements directly from the user’s computer, dramatically increasing page speed.

    Expires vs. Cache-Control: What’s the Difference?

    While they sound similar, they are two different methods for managing how long files stay in a browser’s memory:

    • Cache-Control: This is the modern, preferred standard. It uses “max-age” to define a duration (e.g., “cache this for 30 days”).
    • Expires: This is an older method that requires you to set a specific calendar date and time.

    You can use both at the same time. This ensures maximum compatibility; modern browsers will prioritize the newer Cache-Control header, while older browsers will reliably fall back to the Expires header.

    Suggested Read: How to Easily Fix the Leverage Browser Caching Warning in WordPress

    Caching Reference Table for Novices

    Not all files are created equal when it comes to caching. Setting a one-year expiration for your main HTML file would be disastrous, as your visitors would rarely see new content. Conversely, caching an image for only an hour is a massive waste of bandwidth.

    Before we dive into the technical steps for adding headers, it’s important to understand which expiration durations are appropriate for different file types. The table below outlines recommended caching lengths for common website assets.

    File TypeRecommended DurationWhy?
    CSS & JS1 YearThese rarely change; cache busting handles updates.
    Images (JPG, PNG)1 YearImages are heavy; caching them saves massive bandwidth.
    Fonts (WOFF, TTF)1 YearFonts don’t change and are essential for rendering design.
    HTML Files0 to 12 HoursHTML changes often; you want users to see new content quickly.
    Favicon1 WeekA small file that rarely changes but is safe to update occasionally.
    Third-Party ScriptsN/AYou cannot control external scripts (e.g., Google Analytics).

    Suggested Read: Server Cache vs. Browser Cache vs. Site Cache: What’s the Difference?

    How to Add Expires Headers in WordPress

    Adding Expires headers is a simple way to speed up your site, but it requires modifying your server settings. If you aren’t sure which web server you use (Apache or NGINX), ask your hosting support team before proceeding.

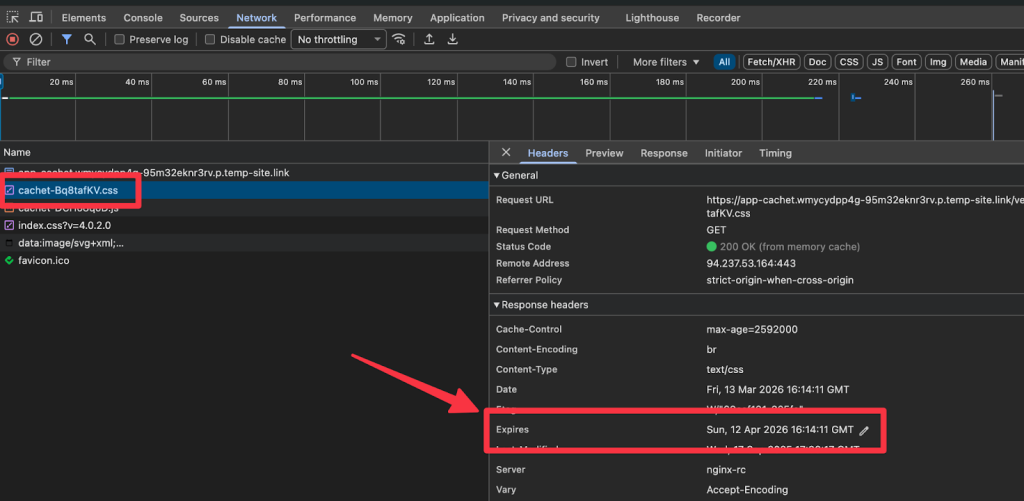
    Step 1: Check what your server is sending right now

    Before you change anything, see if your site already has these headers.

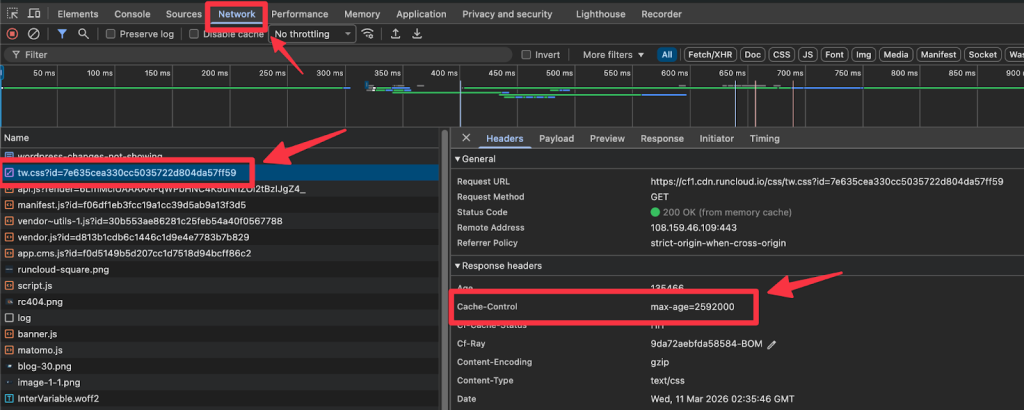
    1. Open your website in Chrome or Firefox.
    2. Right-click anywhere on the page and select Inspect.
    3. Go to the Network tab at the top of the window that pops up.
    4. Refresh your webpage (F5).
    5. Click on any file in the list (like a .jpg or .css file).
    6. Look for a sub-tab called Headers and scroll down to Response Headers. If you see Cache-Control or Expires, your site is already configured.

    Suggested Read: How To Use NGINX FastCGI Cache (RunCache) To Speed Up Your WordPress Performance

    Step 2: How to add Expires headers on NGINX for static assets

    NGINX handles headers through server configuration blocks rather than a simple file edit, which makes it very fast but slightly more technical to set up.

    Note: If you are using RunCloud, you can apply HTTP headers in just a couple of clicks directly through the RunCloud dashboard (no SSH or command-line experience required).

    If you are configuring this manually, follow these steps:

    1. Log in to your server: Use an SSH client (like PuTTY on Windows, or the built-in Terminal on macOS/Linux) and connect to your server.
    2. Locate your NGINX configuration file: It is usually found within your site’s NGINX configuration block (located at /etc/nginx/sites-available/). You will need administrative access to your server to edit these files.
    3. Identify the correct server block: Open the configuration file for your specific domain. Ensure you are editing the file that handles your primary website traffic.
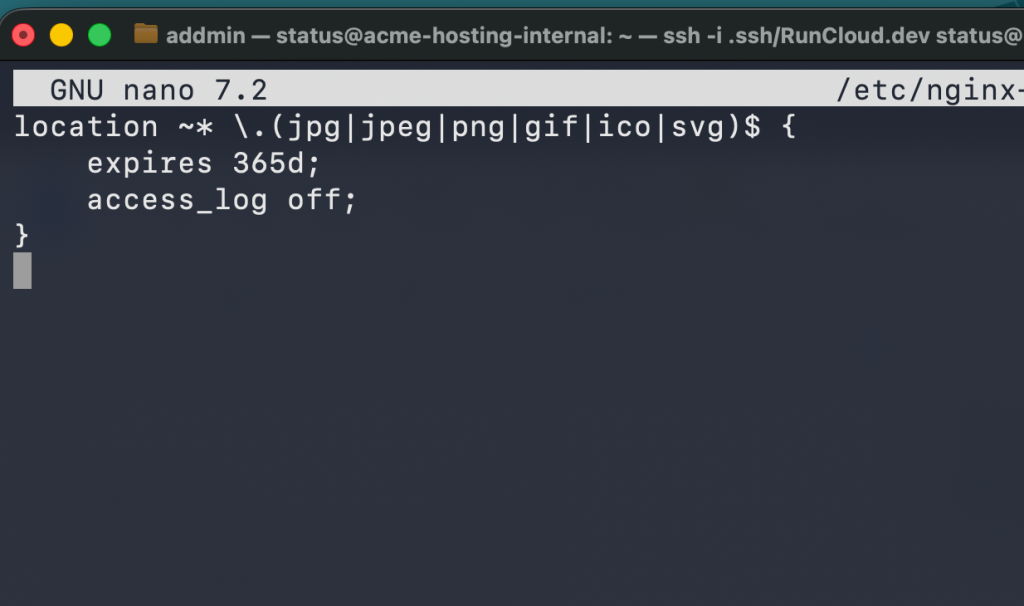
    4. Define the cache duration for file types: Inside your server block, create location rules for the specific file types you want to cache. For example, to cache images for one year, you would add:
    location ~* \.(jpg|jpeg|png|gif|ico|svg)$ {
        expires 365d;
        access_log off;
    }
    1. Add rules for CSS and JavaScript: In the same way, add a separate block for your static code files to ensure they are also cached for the long term:
    location ~* \.(css|js)$ {
        expires 365d;
        access_log off;
    }
    1. Test your configuration: Before saving and restarting, always run nginx -t in your terminal to ensure there are no syntax errors that could take your site offline.
    2. Reload NGINX: Once the configuration is verified as valid, reload NGINX using sudo service nginx reload to apply the new headers globally.
    how to add expires headers

    Step 3: How to add Expires headers on Apache using .htaccess

    If your WordPress site is hosted on Apache, you can manage your site’s performance headers by modifying the .htaccess file. Follow these steps to safely update your headers:

    1. Locate the .htaccess file: Log in to your hosting provider’s File Manager (or use an FTP client like FileZilla). Navigate to your WordPress “root” directory (this is the folder that contains your wp-config.php and wp-content folders). If you do not see a file named .htaccess, ensure your File Manager is set to “Show Hidden Files.”
    2. Create the file (if necessary): If you truly do not have an .htaccess file, create a new text file in the root directory and name it exactly .htaccess (ensure there is no .txt extension).
    3. Backup your current file: Before making any changes, right-click your existing .htaccess file and download it to your local computer. If you accidentally make a mistake and your site displays a “500 Internal Server Error,” you can simply upload the original file to instantly restore your site.
    4. Edit the file: Right-click the .htaccess file on your server and select Edit or Code Editor.
    5. Insert the Expires code: Scroll to the very top of the file. Paste the following configuration snippet. 

    Important: If you see any existing text that starts with # or looks like a comment (such as the default WordPress rewrite rules), do not delete it; place your new code above or below the existing blocks.

    <IfModule mod_expires.c>
        ExpiresActive On
        ExpiresDefault "access plus 1 month"
        
        # Cache static assets for 1 year
        ExpiresByType image/jpg "access plus 1 year"
        ExpiresByType image/jpeg "access plus 1 year"
        ExpiresByType image/gif "access plus 1 year"
        ExpiresByType image/png "access plus 1 year"
        ExpiresByType text/css "access plus 1 year"
        ExpiresByType text/javascript "access plus 1 year"
        ExpiresByType application/javascript "access plus 1 year"
        ExpiresByType application/x-javascript "access plus 1 year"
        ExpiresByType application/font-woff2 "access plus 1 year"
    </IfModule>
    1. Save and Verify: Save your changes and visit your website. Refresh your page a few times. If the site loads normally, your headers are now active. If you see an error page, delete your changes and restore the backup file you created in Step 3.
    expires headers in HTTP

    Troubleshooting Expire Headers

    Even after following the setup steps, you might find that your browser isn’t picking up the changes. This is usually due to an intermediary service or a configuration conflict. Here is how to troubleshoot the most common sticking points.

    Expires headers not showing in DevTools or curl

    If you added the code but don’t see the headers, your server might not have loaded the new configuration yet.

    • For Apache users, ensure the mod_expires module is actually enabled in your server settings.
    • For NGINX, you must reload the service (e.g., nginx -s reload) for changes to take effect.
    • If you are using a caching plugin, clear its cache entirely, as it may be serving old, cached versions of your pages that do not include the new header instructions.

    Suggested Read: NGINX Caching for WordPress – Complete Guide & Tutorial

    Cache-Control is overriding Expires 

    It is common for these two headers to “compete.” By web standards, Cache-Control (specifically max-age) takes precedence over the Expires date. If your server is configured to set both, but they conflict, the browser will ignore the Expires header entirely. To resolve this, ensure your configuration rules are consistent so that both headers dictate the same expiration duration.

    CDN is rewriting or stripping headers

    If you use a Content Delivery Network (like Cloudflare or BunnyCDN), the headers you set on your server might be ignored or overwritten by the CDN’s own settings. Check your CDN dashboard’s “Caching” or “Rules” section; it often includes its own “Browser Cache TTL” settings that act as a global override. You may need to adjust the CDN panel settings to match your desired expiration policies.

    Suggested Read: Scaling RAM & CPU Cores – How They Affect WordPress Performance

    Third-party resources still failing the audit

    Tools like PageSpeed Insights will always flag third-party scripts (such as Facebook Pixels or Google Analytics) because you do not have permission to modify headers on external servers. This is expected behavior; you cannot fix it, and it generally does not significantly affect your site’s actual performance score to warrant concern. Focus only on the files hosted on your own domain.

    Changes apply, but files do not update after deploy

    A long cache expiration value is good for performance, but can lead to deployment headaches. If you update a cached file, such as a CSS stylesheet or JavaScript script, a user’s browser will continue to display the “broken” or outdated version until its expiration date.

    This occurs because the browser trusts the long-term header instruction and loads the file from local storage rather than checking the server for an updated copy. As a result, users will not see your latest design or functionality changes.

    To overcome this caching conflict without reducing your expiration times, you can use a technique called “cache busting.” You can do this by appending a unique version parameter to the file URL in your theme’s code (e.g., changing style.css to style.css?ver=1.1).

    When the file is updated, you simply change this version number. The browser interprets the new URL as a completely different file, forcing it to bypass the old, long-term cache and download your latest changes immediately, ensuring all users see the correct, up-to-date content.

    Suggested Read: How To Use Redis Object Cache To Speed Up A Dynamic WordPress Site

    Wrapping Up

    By correctly setting expiration rules for your static assets, we can ensure that returning visitors experience lightning-fast load times, as their browsers won’t need to re-download elements like CSS, images, and fonts.

    To remove the manual guesswork from this process, we highly recommend using RunCloud to effortlessly manage your NGINX configurations.

    By centralizing your server management through RunCloud, you can easily apply, reload, and manage your HTTP headers without worrying about complex syntax errors.

    For an even smoother experience, pair this with the RunCache plugin to automatically implement the best caching rules for your WordPress site. Together, these tools ensure your site follows modern best practices, allowing you to focus on your content while your server handles the speed optimization automatically.

    Start using RunCloud today.

    FAQs on Expires Headers

    Is the Expires Header the same as the Cache-Control header?

    No, they are different methods for controlling browser caching. Cache-Control is the modern standard that uses duration (e.g., “cache for 30 days”), while Expires is an older method that requires a specific calendar date and time.

    What is a good Expires value for CSS, JS, images, and fonts?

    For these static assets, it is best to set an expiration date for one year in the future. Because these files rarely change, a long duration significantly improves load speeds for returning visitors.

    Why do I still see “Add Expires Headers” after setting them?

    You may still see this warning because your web server configuration (like NGINX or Apache) is not correctly applying the rules, or your caching plugin needs to be cleared. Additionally, some tools flag the headers even if they are present but set for a shorter duration than their specific performance policy requires.

    Can I set Expires headers for Google Fonts or analytics scripts?

    You can set headers for Google Fonts if you host them locally on your own server. However, for files hosted on third-party servers, such as Google or analytics providers, you cannot control their headers because those settings are managed exclusively by the external service.

    Should I use both Expires and Cache-Control?

    Generally, no. Since Cache-Control is the modern, preferred standard, you typically only need to set that one. However, there is no harm in including both Cache-Control and Expires. Modern browsers will use Cache-Control and ignore Expires, but including Expires provides a fallback for very old browsers that may not support Cache-Control.

    Will Expires Headers break updates after plugin/theme changes?

    They can cause issues because the browser will continue to load the old version of the file until the expiration date passes. To fix this, developers use “versioning” or “cache busting” (adding a query string like style.css?ver=1.1 to the file name) to force the browser to download the updated version immediately.

  • How to Preload Fonts in WordPress to Reduce CLS and Improve LCP

    How to Preload Fonts in WordPress to Reduce CLS and Improve LCP

    Is your WordPress site failing Core Web Vitals checks despite having optimized images and minified code?

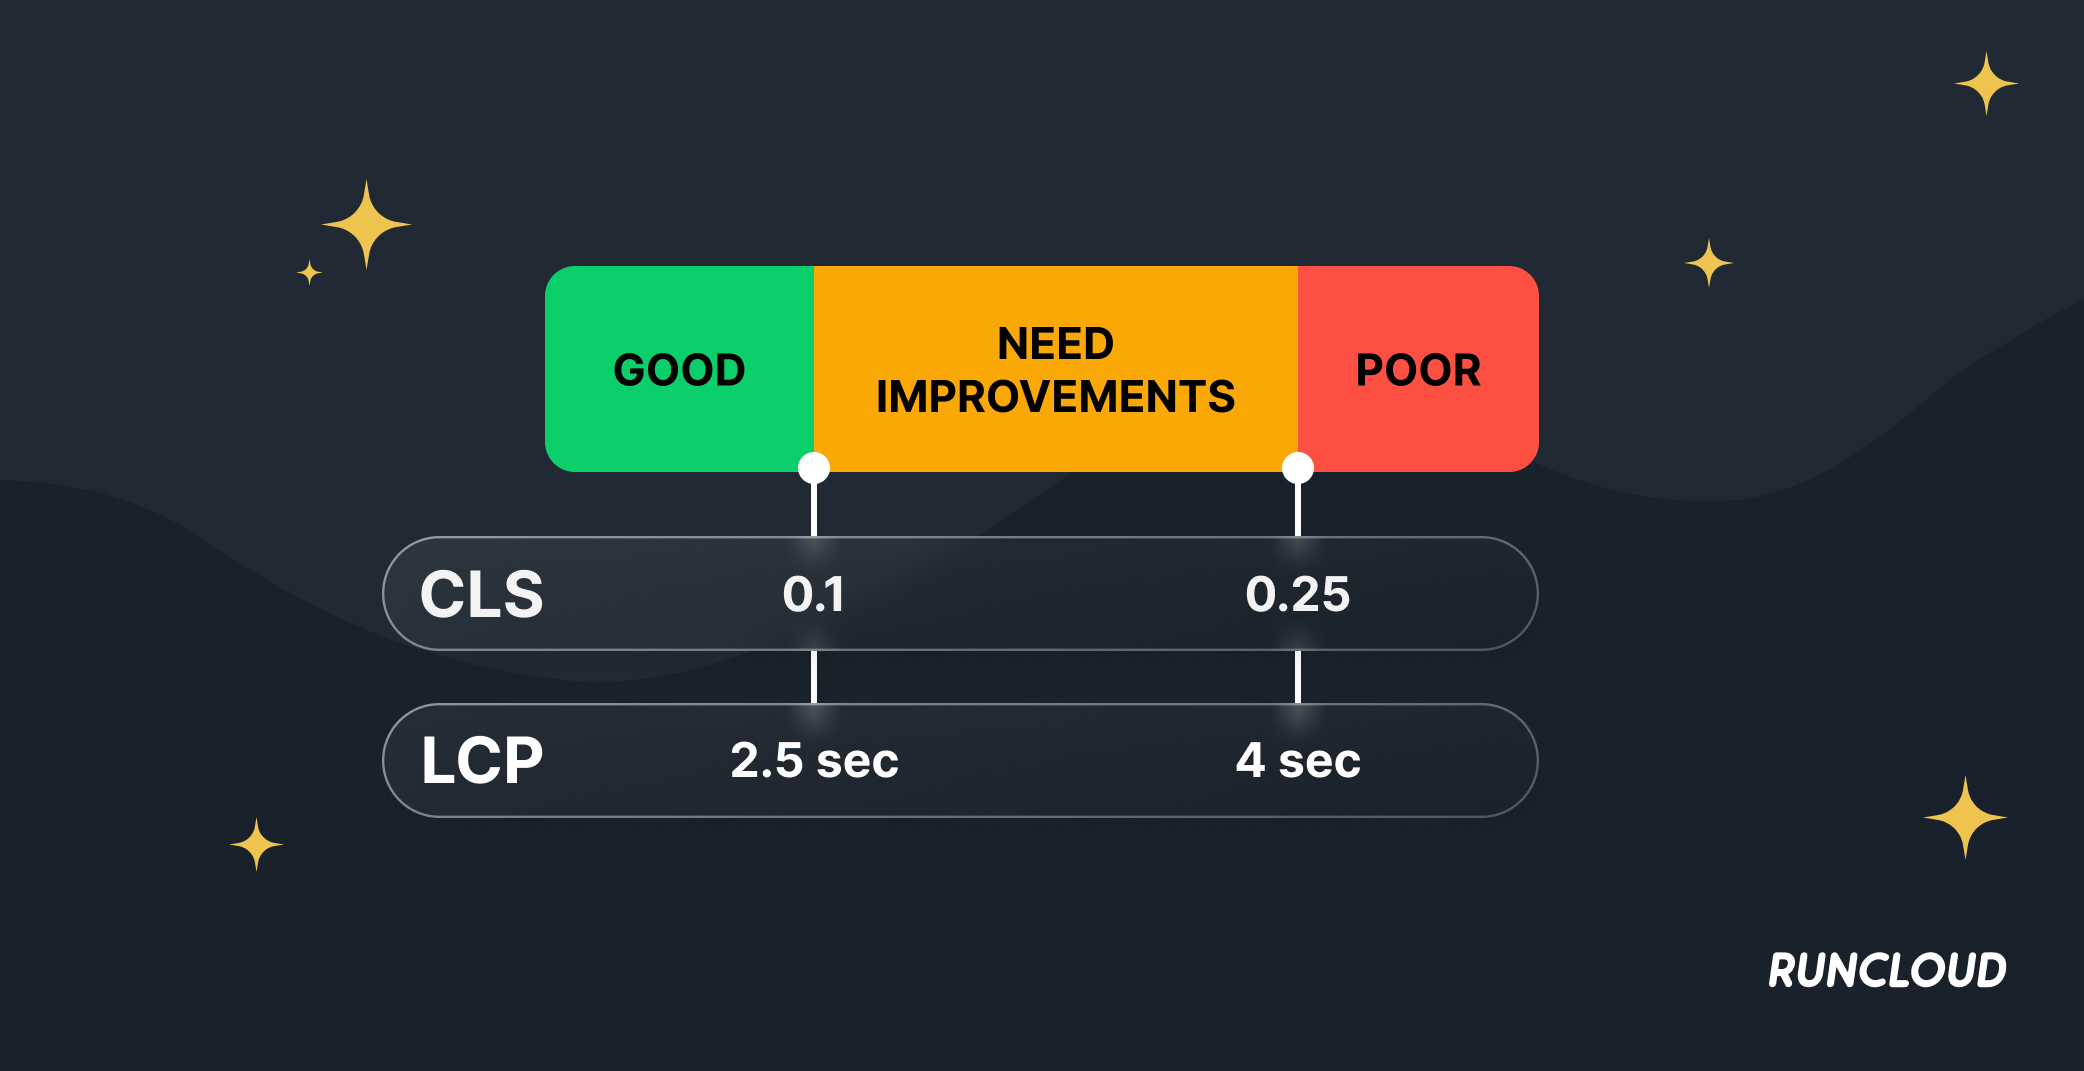
    In some cases, slow typography loading can delay Largest Contentful Paint and cause visual instability known as Cumulative Layout Shift – but only when fonts are part of the critical rendering path.

    In this guide, you will learn exactly how to preload fonts in WordPress to remove render-blocking delays and make your text appear instantly.

    We will walk you through identifying the correct font files, adding the precise code snippets to your theme, and avoiding common mistakes that can actually slow your site down.

    When This Guide Will Not Help

    This guide will not improve your Core Web Vitals if your Largest Contentful Paint element is an image, background video, or slider. In those cases, font loading is not the bottleneck, and preloading fonts will have little or no measurable impact.

    Before continuing, confirm that text (such as an H1 or hero heading) is identified as the LCP element in PageSpeed Insights or Lighthouse.

    If fonts are not flagged under “Preload key requests”, this guide is not the correct fix.

    Why Font Loading Causes CLS and LCP Issues in WordPress

    Fonts are often the “heaviest” assets on a page after images, but browsers handle them differently than other files. In WordPress, themes frequently enqueue fonts via external requests (such as Google Fonts) or bury them deep within CSS files. This creates a “chain of delays” where the browser downloads the HTML, then the CSS, and only then realizes it needs to download a font file.

    This delay exposes your site to slow server responses. If your hosting environment has a high Time to First Byte (TTFB), the browser waits even longer before starting the font download. 

    How Late Font Loading Triggers Layout Shift 

    Cumulative Layout Shift (CLS) occurs when elements on a page unexpectedly move. It happens in three parts:

    • When a browser loads a page, it may initially display a “system font” (like Arial) while the custom font is downloading. System fonts and custom fonts rarely have identical character widths.
    • Once the custom font finishes downloading, the browser swaps it in. If the new font is wider or taller, the text block expands, pushing buttons, images, and other content down the page. This movement penalizes your CLS score.
    • If your server is slow to deliver the font file due to poor caching or lack of compression, the user sees the system font for longer, making the eventual shift more noticeable and jarring.

    Suggested read: How to Make Fewer HTTP Requests on WordPress & Speed Up Your Site

    How Font Discovery Delays Render and Impacts LCP

    Largest Contentful Paint (LCP) measures how long it takes for the main content to become visible. Font preloading only helps when that element is text, such as an H1 or hero heading. If the LCP element is an image or background asset, preloading fonts will not improve this metric.

    This happens in the following manner:

    • Browsers are lazy by design; they won’t download a font until they build the “Render Tree” and confirm the font is actually used on the page. This means the browser parses HTML, downloads CSS, parses CSS, and then requests the font.
    • Many modern browsers will hide text completely until the font file is ready. If your H1 headline is waiting on a font, the screen stays blank. Since the H1 is often the LCP element, your LCP time increases by the exact amount of time it takes the font to download.

    Suggested read: How to Easily Fix Leverage Browser Caching Warning in WordPress

    When Preloading Fonts Helps vs. When It Makes Things Worse

    Preloading is a manual override that forces the browser to download the font immediately, skipping the “discovery chain.” However, it is a double-edged sword.

    • When it Helps: Preloading is excellent for the single primary font used in your LCP element (e.g., the H1 font). It ensures the text appears instantly, stabilizing LCP.
    • When it Hurts: If you preload too many files (e.g., body text, bold versions, icon fonts), you create network congestion. The browser has limited bandwidth; if it is busy downloading 5 font files, it cannot download your hero image or critical CSS. This actually worsens your page speed.

    Suggested read: How To Use NGINX FastCGI Cache (RunCache) To Speed Up Your WordPress Performance

    How to Preload Fonts in WordPress (Step-by-Step)

    Preloading fonts is a powerful way to tell browsers to prioritize typography assets and improve Core Web Vitals. However, frontend optimizations like this work best when backed by a high-performance server environment.

    Before you begin, remember that modifying site headers requires precise caching management. RunCloud’s server-level caching keeps your site fast, but you must clear the cache after applying these changes so visitors see the improvements immediately.

    Step 1: Confirm Fonts Are The Problem in PageSpeed Insights and Lighthouse

    Before adding code, verify that fonts are actually delaying your render time. Run a test on PageSpeed Insights or Google Lighthouse and look at the “Opportunities” section. If you see a warning labeled “Preload key requests,” expanding it will usually list specific font files that are delaying rendering.

    If your fonts are not listed under “Preload key requests”, stop here. Font preloading will not improve your results; focus on server response time, image optimization, or render-blocking scripts instead.

    At that point, ensure you are utilizing RunCloud’s optimized NGINX/Apache configurations.

    RunCloud helps reduce Time to First Byte (TTFB) so that when the browser finally requests the font, the server delivers it instantly without lag.

    preload font warning

    Preloading changes the order in which files load, but it does not make the files smaller or the server faster.

    Step 2: Identify the Exact Font File Used Above the Fold in DevTools

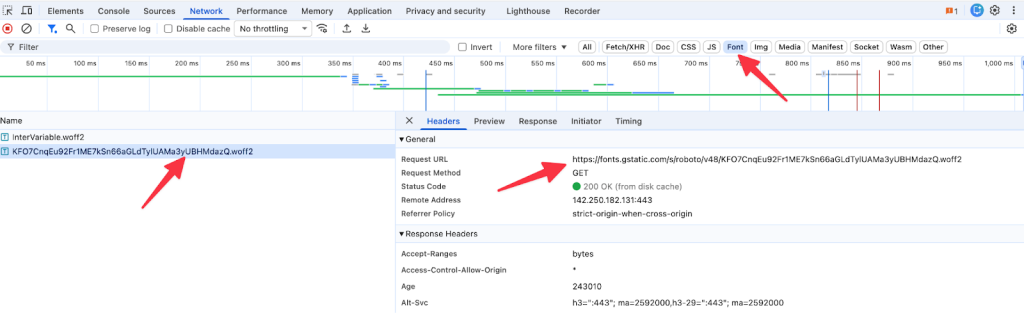
    You should never preload every font on your site, only the ones used immediately on the screen (above the fold). To find these, open your website in Chrome, right-click, and select Inspect to open DevTools. Navigate to the Network tab, reload the page, and click the Font filter. Look for the font files that load first and are critical for your main headings or navigation.

    Hover over the file name to see the full URL. You are specifically looking for .woff2 files, as these are the modern standard for compression and performance. Copy the URL of the font file you want to preload. 

    Step 3: Add The Preload Tag 

    Once you have the URL, you need to construct the HTML tag. The syntax for this HTML tag must be correct, or the browser will ignore it. The tag should look like this:

    <link rel="preload" href="/fonts/your-font-file.woff2" as="font" type="font/woff2" crossorigin>

    In the above tag, replace /fonts/your-font-file.woff2 with the path of the font that you noted down earlier. In addition to the path, make sure you include the crossorigin attribute. Even if the font is hosted on your own domain, the browser fetches it in anonymous mode. If you omit crossorigin, the browser may treat it as a different file request. 

    Suggested read: NGINX Caching for WordPress – Complete Guide & Tutorial

    Step 4: Implement it in WordPress (theme header or wp_head hook)

    There are two ways to add this tag to your WordPress site. The first method requires editing your header.php file in a child theme and pasting the line between the <head> tags. 

    The second approach is safer and more manageable. It requires adding a code snippet to your functions.php file, using the wp_head hook, to dynamically inject the link.

    Here is the code snippet to add a tag to your site header using the functions.php file and the wp_head hook. You should add this code to your child theme’s functions.php file or use a code snippet plugin.

    function add_custom_code_to_head() {
        ?>
    <link rel="preload" href="/fonts/your-font-file.woff2" as="font" type="font/woff2" crossorigin>
        <?php
    }
    add_action( 'wp_head', 'add_custom_code_to_head' );

    If you prefer not to use a plugin, you must access the functions.php file through your hosting provider, as the WordPress dashboard for Block Themes often does not allow this.

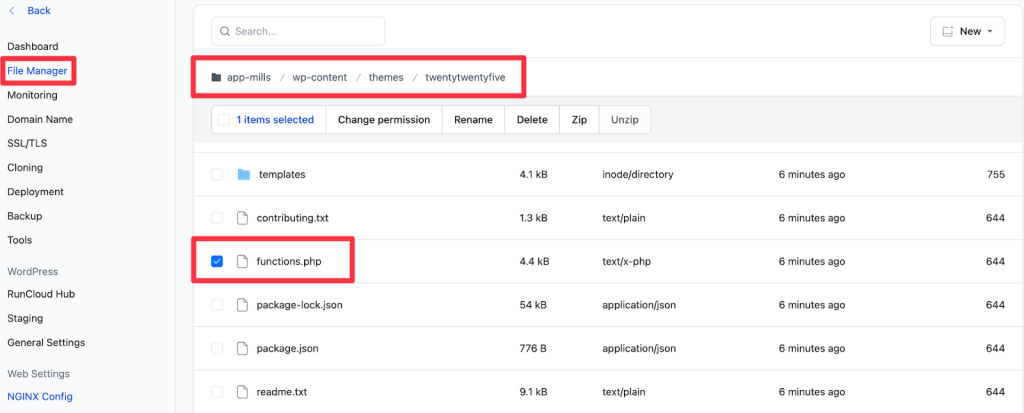
    1. Log in to your RunCloud dashboard and open the File Manager.
    2. Navigate to the folder wp-content/themes/your-active-theme-name/.
    3. Locate the functions.php file, then click it to edit it.
    4. Paste the code at the bottom of the file and save.

    After saving the file, it will automatically be included in the HTML head of your WordPress site. You can verify it by opening the devtools and searching for the tag that you noted in the previous step.

    Warning: After adding this code, you might notice that the changes appear when you are logged in but not when you inspect the site as a visitor. This happens because the server page cache is serving old HTML. Instead of hoping a browser cache clear fixes it, go to your RunCloud dashboard and purge the RunCloud server cache. This ensures the new preloading headers are served to all users immediately.

    Step 5: If using Google Fonts, add Required Preconnect Hints

    If you are not self-hosting fonts and rely on Google Fonts, true font preloading is not possible because the file URLs change dynamically.

    In this case, preconnect is only a partial mitigation, not an equivalent replacement for preloading. It helps reduce connection setup time, but it does not remove third-party latency entirely.

    Add these lines to your header:

    <link rel="preconnect" href="https://fonts.googleapis.com">
    <link rel="preconnect" href="https://fonts.gstatic.com" crossorigin>

    While this helps, reliance on external servers introduces latency you cannot control. A better long-term strategy for performance is using RunCloud’s Redis full-page caching. By efficiently caching the rest of your database content on your own server, you give the browser more time to handle external third-party connections without affecting the user’s perceived load speed.

    Suggested read: How to Create Custom NGINX Configuration Easily Using RunCloud

    Step 6: Fix Common Mistakes 

    After implementing the above steps, watch out for “double downloads” in your Waterfall chart, where the font loads once as a preload and again via CSS. This is almost always a cross-origin mismatch.

    Another common issue is CORS errors, where the font refuses to load entirely. This is frequently a server configuration issue regarding Access-Control-Allow-Origin headers.

    If you see “Cache TTL” warnings, you can fix them by using the RunCache plugin for WordPress. It uses intelligent caching rules to speed up a WordPress website without requiring code changes. If purging cache to fix these errors causes load spikes, use RunCloud’s monitoring to correlate the purges with CPU pressure and adjust your settings accordingly.

    Step 7: Re-test and Verify Improvements 

    Finally, return to PageSpeed Insights and WebPageTest. Look for the specific metrics: Largest Contentful Paint (LCP) should be faster, and Cumulative Layout Shift (CLS) should decrease because the text renders immediately rather than swapping fonts later.

    If you still see inconsistent results where some visitors get fast speeds and others don’t, your edge caching or object caching might be fragmented.

    This is where RunCache shines.

    RunCache combines page, object, and edge caching into one dashboard with auto-purging logic. If you are tired of manually debugging caching layers, create a test site to experience RunCache and see how a unified caching strategy stabilizes your font loading and overall performance.

    Suggested read: How To Use Redis Full-Page Caching To Speed Up WordPress

    Troubleshooting: What if Preloading Doesn’t Improve CLS or LCP?

    If you have implemented preloading tags but your Largest Contentful Paint and Cumulative Layout Shift scores haven’t changed, the issue is likely related to the total weight of your page or server response times.

    Minimize Font Variants to Reduce File Size and Load Time

    One of the most common reasons for slow LCP is loading too many font weights and styles (e.g., loading Light, Regular, Semi-Bold, Bold, and Extra Bold in both italics and normal). Each variation is a separate file that the browser must download, and preloading five or six files will clog your network bandwidth, blocking other critical assets like your logo or hero image.

    • Audit your typography: Check your CSS to see which weights are actually being used on the site.
    • Remove unused variants: If your specific theme only uses “Regular (400)” and “Bold (700),” remove all other weights from your request.
    • Update the preload tags: Ensure you preload only the single most important variant (usually the body text or main heading weight), not the entire family.

    Implement ‘font-display’ Strategies to Prevent Layout Shifts

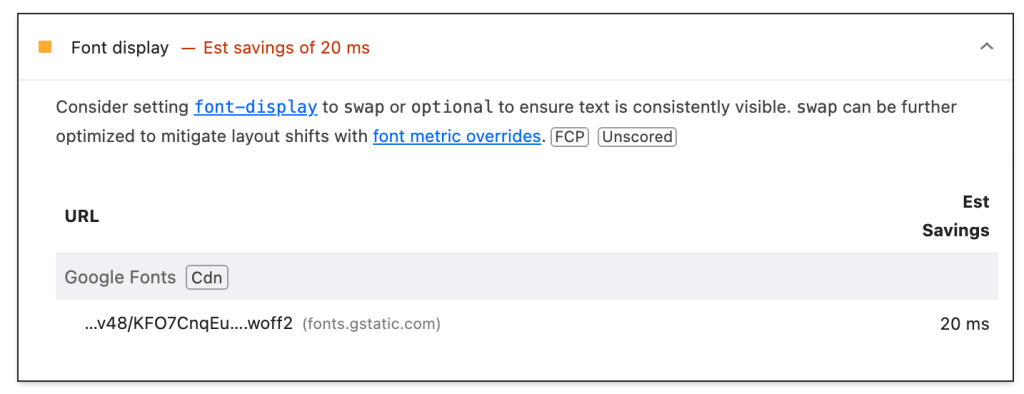
    If your LCP is good but your CLS is poor, it is likely because the text is “swapping” and changing size after the font loads. You can control this behavior using the font-display property in your CSS @font-face declaration.

    • Use font-display: swap: This tells the browser to display a fallback system font immediately (improving LCP) and swap to your custom font once it downloads. This prevents the “invisible text” phenomenon.
    • Use font-display: optional: For maximum speed, this setting tells the browser to use the custom font only if it is already cached or loads instantly. If it takes too long, the browser sticks with the system font for that page view, resulting in zero layout shift.

    Suggested read: Cloudflare DNS for RunCloud (Security & Performance)

    Self-Host Fonts to Eliminate Third-Party Latency

    Relying on Google Fonts or Adobe Fonts introduces external variables you cannot control, such as DNS lookups and connection latency to their servers. If their server is slow, your site is slow. Self-hosting the font files (uploading them to your own /wp-content/uploads/ folder) places the control back in your hands.

    When you self-host, you benefit directly from RunCloud’s high-performance NGINX/Apache configurations. RunCloud ensures that static assets hosted on your server are served with optimized compression standards. By removing the external “round trip” to Google’s servers, you stabilize your LCP scores and ensure consistent site performance regardless of external network conditions.

    Wrapping Up

    While preloading fonts can improve perceived load speed when fonts are the bottleneck, it is only one part of a broader performance strategy.

    If fonts are not delaying your render path, preloading will not change your Core Web Vitals scores.

    RunCloud helps you manage server-level caching, including Redis and optimized NGINX configurations, ensuring your site loads instantly even if a user has a stale browser cache.

    RunCache is a completely free, vendor-independent caching solution that works on any hosting provider. It lets you unify page, object, and edge caching without migrating your site or changing hosts.

    If font preloading alone does not stabilize your Core Web Vitals, RunCache gives you a practical next step without committing to new infrastructure.

    Create a test site to experience RunCache.

    FAQs on Preloading Fonts in WordPress

    Should I preload fonts on every page or only key templates?

    You should preload only the fonts used immediately “above the fold” across your entire site, such as your main navigation and heading fonts. 

    How many font files should I preload?

    You should limit preloading to only one or two critical font files (typically in WOFF2 format) to avoid blocking the main thread and slowing down your Largest Contentful Paint. If you preload too many files, you risk congesting the network, which negates the benefits of preloading.

    Why are fonts downloading twice after I add preload?

    This usually occurs if the crossorigin attribute is missing from your preload code, causing the browser to treat the request as two separate assets. 

    Does preconnect help with Google Fonts?

    Yes, using preconnect establishes an early network handshake with Google’s servers, significantly reducing the delay before the font file starts downloading. This works best when paired with RunCache Redis object caching, ensuring that while the external connection is being built, your database content is served without delay.

    Should I self-host Google Fonts to improve Core Web Vitals?

    Self-hosting is generally better for Core Web Vitals because it eliminates external DNS lookups and prevents layout shifts caused by slow third-party connections. 

  • Fix “This Site Can’t Be Reached” Error (5+ Reliable Solutions That Actually Work)

    Fix “This Site Can’t Be Reached” Error (5+ Reliable Solutions That Actually Work)

    Are you seeing the “This site can’t be reached” error on your site?

    This error is frustrating and can have multiple underlying causes, which makes troubleshooting harder. In this guide, we break those causes down and show you how to fix them.

    By the end of this guide, you’ll know how to flush DNS cache, troubleshoot local issues, and diagnose common server-side problems.

    Let’s get started!

    What Does “This Site Can’t Be Reached” Error Mean?

    When you see the “This site can’t be reached” error, your browser is telling you that the website you tried to load has failed. In simple terms, the browser cannot establish a connection with the server.

    This happens when the connection between your computer (the client) and the website’s server is severed or was never established in the first place. 

    For everyday users, this is a momentary annoyance. However, if you are a website owner or developer, then you cannot ignore this error. If you see this on your site, it means that either your web server (Apache/NGINX) or your DNS records are misconfigured.

    This is where a server management platform helps. While manual configuration is possible, tools like RunCloud automatically monitor key services and connections. RunCloud ensures that services like NGINX or PHP are actually running, so your visitors never see a dead screen.

    Suggested read: How to Flush DNS Cache on Windows, Mac, and Linux

    Why You’re Seeing the “This Site Can’t Be Reached” Error

    The internet is a complex network of connections, which is why this error can originate from your local computer, your internet service provider, or the website’s server. To fix it, you first need to understand which part of the chain is broken.

    Here are the most common reasons this error occurs:

    1. Domain Name System (DNS) Failures

    This is the most common cause of failure, and it triggers the DNS_PROBE_FINISHED_NXDOMAIN error code. This can happen if the domain has expired, or if you recently migrated your site and the DNS propagation hasn’t finished yet. It can also occur if the A Record or CNAME in your DNS settings points to the wrong IP address.

    Pro Tip: Manual DNS changes are prone to typos. RunCloud’s DNS integrations help ensure records are mapped correctly, reducing the risk of NXDOMAIN errors.

    2. Connection Timeouts and Refusals

    Sometimes the website address is found, but the web server is unavailable. You will likely see ERR_CONNECTION_TIMED_OUT or ERR_CONNECTION_REFUSED. This can happen due to several reasons:

    • Server Downtime: The physical server hosting the website may be offline or undergoing a reboot.
    • Server Misconfiguration: If the web server (like NGINX or Apache) crashes due to a syntax error, it cannot accept new visitors.
    • Firewall Blocking: Your Firewall software might be identifying the site as a threat and blocking access. If you are using RunCloud, you can easily edit your Firewall rules from your RunCloud dashboard. If you want to learn more, read our guide on using ModSecurity as a web application firewall.
    • Overload: If a server lacks resources (RAM/CPU), it may stop responding. 

    3. Local Cache Issues

    Your computer saves time by storing old data. This is referred to as a DNS cache or Browser cache. If a website moves to a new server but your computer remembers the old IP address, the connection will fail.

    You can easily fix this by flushing your DNS cache. Read our dedicated blog post titled “How to Fix DNS Server Not Responding (Windows & Mac)” to learn more about it.

    4. SSL and Security Protocol Errors

    If you encounter the ERR_SSL_PROTOCOL_ERROR or ERR_CONNECTION_RESET, you can be certain that the issue is related to security. If the website’s security certificate is out of date, modern browsers will terminate the connection to protect your data.

    If you are a site owner, then you would know that dealing with SSL expiry is a major headache. RunCloud users avoid this entirely because the platform handles automatic SSL renewal (via Let’s Encrypt), ensuring your HTTPS configuration never breaks.

    5. Network Restrictions (VPN/Proxy)

    When you use a proxy or VPN, your internet traffic is routed through a middleman. If that middleman disconnects or malfunctions, you will lose access to the web. 

    Suggested read: How to Fix DNS_PROBE_FINISHED_NXDOMAIN Error

    How to Fix The “This Site Can’t Be Reached” Error 

    Now that we have discussed the common culprits, let’s explore the solutions to get your connection back on track. We’ll start with the quickest fixes and then move on to more technical server-side diagnostics.

    Step 1: Identify the Exact Error Code

    Before you can fix the problem, you need to know exactly what conversation your browser failed to have. The “This site can’t be reached” message is a generic wrapper, but looking at the small gray text code below it reveals the specific root cause.

    fix This Site Can’t Be Reached error

    Suggested read: How to Fix the HTTP Error 503 Service Unavailable in 2025 [SOLVED]

    Step 2: Check Domain Status and DNS Configuration

    If you are seeing the DNS_PROBE_FINISHED_NXDOMAIN error, the issue is almost certainly in the DNS records. This occurs when the DNS resolution chain is interrupted.

    If you are the site owner, then you must verify your A Record (which points your domain to an IP address) and your CNAME records. You can use command-line tools like nslookup or dig to see where your domain is pointing. Read our blog post to learn how to search DNS records.

    If you recently moved your website to a new host, you may be waiting for DNS propagation to complete. This is the time it takes for servers worldwide to update their records based on your Time To Live (TTL) settings. Read our guide on How To Speed Up DNS Propagation to learn more about this.

    Pro Tip: RunCloud’s Cloudflare DNS integration reduces manual errors and helps prevent misconfigured records.

    Step 3: Flush DNS Cache and Browser Resolver Data

    Sometimes the internet is working fine, but your computer is “remembering” broken information. Your operating system stores a DNS cache to load websites faster. If a website moves to a new server IP but your computer tries to connect to the old one, the site will be unreachable.

    To fix this, you need to force your computer to look up the address from scratch. Read our guide on How to Flush DNS Cache on Windows, Mac, and Linux to learn how to fix this. 

    Step 4: Change DNS Resolvers to Rule Out ISP Issues

    If flushing DNS didn’t work, your Internet Service Provider (ISP) might be the problem. ISPs often have slow or outdated DNS servers. If their directory is down, you won’t be able to reach websites even if your internet connection is technically active.

    You can bypass your ISP by changing your network adapter settings to use public, high-speed DNS servers:

    • Google DNS: Set your Primary DNS to 8.8.8.8 and your secondary DNS to 8.8.4.4.
    • Cloudflare DNS: Set your Primary DNS to 1.1.1.1.

    If the site loads after switching to Google DNS, the fault lies with your ISP’s configuration.

    Suggested read: How to Check Linux CPU Usage or Utilization (5 Ways)

    Step 5: Check Server Availability & Web Server Health

    When the “This site can’t be reached” error isn’t caused by your internet connection or a DNS glitch, the problem usually lies within the server itself. Traditionally, diagnosing a crashed web server requires logging in via SSH and running complex command-line queries.

    RunCloud completely changes this dynamic by offering a visual interface to diagnose, fix, and even automatically prevent these crashes. RunCloud includes a powerful Auto-Healing feature that minimizes downtime without requiring manual intervention. If a service crashes or becomes unresponsive, RunCloud detects the failure immediately and automatically attempts to restart it to restore connectivity.

    If you are not using a managed platform like RunCloud, fixing an ERR_CONNECTION_REFUSED requires connecting to your server via SSH (Secure Shell) and manually running command-line utilities to check the server status. For example, to restart the NGINX or Apache services, you would need to execute commands like:

    sudo systemctl restart nginx
    sudo systemctl restart apache2

    This manual process requires technical knowledge of Linux command-line tools and can be time-consuming, especially during unexpected downtime.

    Step 6: Check Web & Server Logs

    Identifying the cause of a site crash helps prevent repeat outages. Usually, this requires digging through confusing text files on the server’s log directory (/var/log/). However, if you are using RunCloud, then you can access the NGINX and Apache logs directly from the web interface.

    Step 7: Check SSL, HTTPS Configuration, and Firewall Rules

    Finally, aggressive security settings can block connections, leading to ERR_CONNECTION_RESET or ERR_SSL_PROTOCOL_ERROR.

    If you are running local security software (such as a third-party antivirus suite, a software firewall, or a VPN client), try temporarily disabling it. These tools can sometimes aggressively intercept or block legitimate web traffic, resulting in a “Connection Refused” or “Site Can’t Be Reached” error, even when the server is healthy. If the site loads after disabling the software, you’ll need to adjust that program’s settings to allow traffic to the website.

    Final Thoughts

    Throughout this guide, we’ve explained different ways to decode and fix errors on your site. Whether the culprit was a simple internet hiccup, an aggressive firewall, or a complex DNS propagation delay, you now know how to trace the connection and find exactly what needs fixing.

    However, if you are a website owner or developer, you know that fixing the error is only half the battle. Preventing it is where the real value lies. Why waste hours debugging command-line errors when you could automate the health of your infrastructure?

    This is why many developers choose RunCloud.

    RunCloud eliminates the guesswork by providing a visual dashboard for all your server needs. RunCloud covers the essentials:

    • Automatic SSL: Never see an expired certificate error again.
    • One-Click Service Restarts: Fix crashed web servers instantly without touching a terminal.
    • Painless DNS & Domain Management: Map domains correctly every time, reducing NXDOMAIN errors.

    Sign up for RunCloud and discover how painless server management can be.

    FAQ on This Site Can’t Be Reached Error

    Why does Chrome say “This site can’t be reached” only on my computer?

    This is usually caused by a corrupted local DNS cache or a firewall blocking the connection. If the website is running, simply flushing your computer’s DNS cache should resolve the glitch.

    How do I resolve a website that is unreachable after DNS changes?

    This error often means your local network is still using the old IP address, so try flushing your DNS or accessing the site via a different network.

    Why is every website showing “This site can’t be reached”?

    You should restart your router and try changing your network adapter settings to use a public DNS, such as Google’s 8.8.8.8. However, if your internet works but all your hosted sites are down, check your cloud provider’s site to confirm if they are experiencing an outage.

    How long does DNS propagation take?

    While global propagation can technically take up to 48 hours, modern setups usually resolve within minutes. You can significantly speed up this process by lowering your TTL settings or utilizing RunCloud’s Cloudflare integration to ensure that your SSL and DNS changes deploy instantly. 

  • How to Set Up WooCommerce Caching: The Ultimate Guide in 2025

    How to Set Up WooCommerce Caching: The Ultimate Guide in 2025

    Enabling caching on a WooCommerce store is an important but delicate process that balances performance with functionality.

    Unlike a static blog, an e-commerce site is highly dynamic, managing user-specific data like shopping carts, account information, and personalized content.

    A misconfigured cache can lead to serious issues, such as showing one customer’s cart to another or displaying incorrect order information, ultimately destroying user trust and costing sales.

    When we configure the cache, our goal is to aggressively cache static content and anonymous user page views while intelligently bypassing the cache for dynamic elements and logged-in users.

    This guide will walk you through how to properly implement caching for your WooCommerce store. By following these principles, you can significantly reduce server load, decrease page load times, and provide a faster, more reliable shopping experience for your customers without compromising the dynamic nature of your e-commerce operations.

    Let’s get started!

    What is WooCommerce Caching?

    Caching instructs your server to build a web page only once and then save a static, ready-to-go copy. Instead of repeating the resource-heavy process of running code and fetching data from the database for every visitor, the server can instantly deliver this pre-made version, dramatically accelerating your site’s performance.

    The most important part of building a good cache is being smart about what to save. Modern CMSs such as WooCommerce intelligently create copies of static pages that are the same for everyone, like product pages or category listings, to make them load incredibly quickly. At the same time, it knows to exclude dynamic pages unique to each user, such as the shopping cart and checkout pages, ensuring that customers only see their items and personal information.

    📖 Suggested read: How to Easily Optimize Your WordPress Website With RunCloud Hub

    Benefits of WooCommerce Caching

    The primary benefit of caching your WooCommerce store is a massive boost in website speed. Faster-loading pages create a significantly better user experience, which keeps shoppers from getting frustrated and leaving your site. This leads directly to more sales and a lower cart abandonment rate.

    In addition to improving conversions, the website speed is an important factor for search engine optimization (SEO). Google and other search engines favor fast websites, so a well-cached store will rank higher in search results, bringing you more free, organic traffic.

    Finally, caching reduces the workload on your server and allows your store to handle many more visitors at once without slowing down or crashing, which is essential for surviving busy shopping seasons like Black Friday.

    📖 Suggested read: How to Use Redis Full-Page Caching to Speed Up WordPress

    Step-by-Step Guide: How to Set Up WooCommerce Caching

    Follow the steps below to develop an effective caching strategy for your WooCommerce site.

    1. Choosing the Right Caching Solution

    The first (and arguably the most important) decision is selecting the appropriate caching technology for your hosting environment. Your options fall into two broad categories: plugin-based caching and server-level caching.

    Caching plugins such as WP Rocket or W3 Total Cache are user-friendly options that allow you to edit and manage your caching settings from the WordPress application. Although convenient, this adds processing overhead, as WordPress must still load to serve a cached page.

    You should consider using server-level caching, a superior approach to achieve maximum performance. Modern caching plugins, such as LiteSpeed’s LSCache, operate at the web server level, before WordPress is even loaded. This allows them to serve cached pages with minimal latency and resource consumption, resulting in significantly faster response times.

    However, if you are using RunCloud, you can consider using the RunCloud Hub, which provides a good balance between the two by offering both native NGINX FastCGI cache (RunCache) and Redis Page caching. For RunCloud users, RunCloud Hub is the most efficient approach as it is specifically optimized for the server stack.

    📖 Suggested read: The Best Free eCommerce Platforms for Selling in 2025

    2. Installing and Configuring Your Caching Plugin

    Once you have chosen your caching solution, the next step is installation and initial configuration. If using a plugin like WP Rocket, installation is straightforward via the WordPress dashboard. After activation, most modern caching plugins automatically detect that WooCommerce is active and apply a default set of safe exclusion rules. These presets typically prevent the caching of critical pages like Cart, Checkout, and My Account, providing a solid baseline to prevent major functional issues.

    If you are using RunCloud, you don’t need to leave your RunCloud dashboard, as you can enable RunCloud Hub within your RunCloud dashboard and your WordPress web application.

    During the initial setup, you should avoid enabling every performance feature simultaneously. Start by enabling the core page caching feature for logged-out users. After confirming the site still functions correctly, you can incrementally enable other options like CSS or JavaScript minification, testing thoroughly after each change.

    📖 Suggested read: How to Fix WordPress High CPU Usage (10 Instant Solutions)

    3. Excluding Dynamic WooCommerce Pages from Cache

    The single most important rule of WooCommerce caching is never to cache pages that display user-specific information publicly.

    Caching these pages would result in one user’s private data being served to other visitors, a catastrophic failure for any online store.

    The primary pages that must be excluded from any page caching mechanism are the Cart, Checkout, and My Account pages. By default, their URL slugs are /cart/, /checkout/, and /my-account/, respectively.

    To prevent this scenario at a technical level, the server sends specific instructions to browsers and intermediate caches through HTTP headers. This is handled by using the Cache-Control: private header. This HTTP header specifies that the response is intended for a single user’s browser and must not be stored by any shared cache, such as a CDN or a server-level cache like RunCache. This is often accompanied by a no-store directive for maximum security.

    Almost all caching plugins and server-level configurations provide a setting labeled “Never Cache URLs” or “Exclude URLs”. You must add the relative paths for these private pages in this section. It is best practice to use wildcards to ensure all sub-pages are also excluded from the cache. For example, adding /my-account/* will ensure that account-specific pages, such as order history and address management, are excluded from the cache.

    📖 Suggested read: Server Cache vs. Browser Cache vs. Site Cache: What’s the Difference?

    4. Excluding WooCommerce Sessions and Cookies from Cache

    In addition to excluding specific URLs, you must be aware of WooCommerce cookies. WooCommerce uses cookies to track user sessions and cart contents, even for guests who are not logged in.

    For example, the woocommerce_cart_hash cookie tracks changes to the shopping cart, and the wp_woocommerce_session_ cookie contains a unique code corresponding to the customer’s session data in the database. When these cookies are present in a visitor’s browser, it signifies that the user has an active, personalized session.

    To ensure your website works as expected, you must configure your caching system to bypass the cache entirely whenever these specific WooCommerce cookies are detected. This ensures that any user who has added an item to their cart or is logged in receives a fresh, non-cached page from the server. It also ensures that dynamic elements like the mini-cart and user-specific pricing function correctly.

    📖 Suggested read: Everything You Need to Know About WordPress Object Caching

    5. Configuring Minification Settings

    Minification is removing unnecessary characters (like whitespace and comments) from CSS and JavaScript files and combining them to reduce the number of server requests.

    The minification process can improve load times and cause unexpected errors and conflicts, particularly with the complex JavaScript used by WooCommerce and its many extensions. When enabling minification, proceed cautiously and test rigorously after each change is recommended.

    We recommend enabling CSS minification first and thoroughly testing the site’s layout and design. Once satisfied, you can enable JavaScript minification and test all interactive elements, paying close attention to the add-to-cart functionality, image galleries on product pages, and checkout. If you encounter a broken feature, you can configure your caching plugin to exclude specific CSS or JavaScript files from minification.

    📖 Suggested read: LiteSpeed Cache WordPress Plugin Configuration Tutorial

    6. Integrating CDN and Edge Caching with WooCommerce

    A Content Delivery Network (CDN) is a set of computers that can distribute your static assets, such as images, CSS, and JavaScript, across a worldwide network of servers. This drastically reduces latency for international visitors by serving files from a location geographically closer to them.

    Using a CDN to serve static assets is highly recommended for WooCommerce. Most caching plugins provide a dedicated section for rewriting asset URLs to point to the CDN. Modern caching solutions, such as Cloudflare or Bunny.net Accelerator, take this a step further by caching the full HTML of your pages at the CDN level.

    The edge cache must be configured to respect the same exclusion rules as your on-site cache, bypassing the cache for dynamic URLs (cart, checkout) and any visitor with a WooCommerce session cookie.

    This ensures the CDN edge doesn’t serve a stale, generic page to an active shopper. Proper integration ensures your origin server sends the correct Cache-Control headers, which a well-configured caching plugin will manage for you.

    📖 Suggested read: How to Use Redis Object Cache To Speed Up a Dynamic WordPress Site

    7. Setting Up Object Caching (Redis/Memcached) for WooCommerce

    Caching web pages allows you to store and serve fully rendered HTML pages, but that’s not the only thing you can cache. Loading a web page launches several repetitive and complex database queries that take a long time to execute. An object cache, such as Redis or Memcached, can store the results of these database queries in the server’s fast-access RAM.

    This Object caching functionality can provide a massive performance boost for a query-heavy application such as WooCommerce, which constantly checks product stock, sale prices, user permissions, and session data. This is especially useful for logged-in users and during backend operations where page caching is not active.

    Enabling object caching can be tricky if you do it manually, but using RunCloud Hub allows you to configure it with a single click. Simply navigate to the RunCloud Hub page in your RunCloud dashboard and select Enable next to the Redis Object Cache setting.

    Enabling this optimization significantly reduces the load on your MariaDB/MySQL database, which leads to faster dynamic page generation, a more responsive WordPress admin area, and a snappier experience for active shoppers navigating your store.

    📖 Suggested read: How to Easily Optimize Your WordPress Website With RunCloud Hub

    8. Enabling Redis ACL for Object Caching

    When you enable caching for your WooCommerce store, you inherently handle sensitive personal data and Personally Identifiable Information (PII). If you host multiple WordPress websites on the same server, this can create a security risk.

    In the case of a breach, if one of the websites gets infected, the attacker can access the cached data of other sites.

    To protect this data, it’s recommended that you enable Redis Access Control Lists (ACLs). This ensures that each website can only access its own cached data. It will also prevent a malicious plugin on one site from accessing the Redis data of your other sites.

    However, correctly configuring and maintaining this security can be challenging. That’s why we’ve pre-configured it in RunCloud Hub. When you install our plugin, Redis ACLs are automatically set up for your website, providing robust security with no extra effort.

    You can verify this setting by navigating to the “Redis Object Cache Constants” section in the RunCloud Hub settings menu. If you see the following screen, then it is configured correctly.

    9. Testing and Troubleshooting Your Cache

    Creating a caching system is one thing, but running it is another. A flawed cache configuration can go unnoticed while silently costing you sales. After you deploy your cache, you should use two different web browsers or a regular and an incognito window to test it.

    Browse the site in the incognito window (representing a new, logged-out visitor) to ensure you are being served fast, cached pages. In the regular browser, log in as a test customer to verify that all dynamic functionality works correctly.

    During the tests, you should perform a complete test transaction: add a product to the cart, view the cart page, proceed to checkout, and check the mini-cart widget on various pages to ensure it updates correctly.

    Check that personalized content for logged-in users appears as it should. If you encounter an issue, the first step is to clear all caches, the plugin’s cache, any server-level cache, your CDN cache, and your browser cache, before re-testing.

    If a problem persists, disable your most recently changed setting (e.g., JS minification) and test again, working backward to isolate the source of the conflict. You can also use your browser’s developer tools to inspect page response headers. This lets you see cache status codes in HTTP headers like X-Cache: HIT or X-RunCache-Status: BYPASS to confirm your rules are working as intended.

    Final Thoughts: Achieving Peak WooCommerce Performance with RunCloud

    In this guide, we have shown you that properly configuring cache for a WooCommerce store is a multi-layered process that requires a deep understanding of how static and dynamic content interact.

    Although manual configuration offers granular control, it also introduces multiple potential failure points that can be time-consuming to troubleshoot and disastrous if implemented incorrectly.

    This is precisely why we developed RunCloud Hub, our all-in-one optimization and management plugin.

    Built to integrate seamlessly with the RunCloud platform and eliminate these complexities, RunCloud Hub handles the actions mentioned above automatically and provides WooCommerce-aware caching out of the box with no manual rules required.

    Want WooCommerce caching without the headaches? Try RunCloud Hub, which is built for store owners.

    One of the most impactful optimizations for a busy WooCommerce store is Redis Object Caching, which dramatically speeds up backend operations and dynamic requests for logged-in users. This process can be tedious and complex, requiring the deployment of a Redis instance, installing a connector plugin, and manually configuring the connection.

    However, RunCloud Hub transforms this complex task into a single click. It automatically detects your RunCloud-managed Redis server and enables you to do object caching.

    By combining the raw power of RunCloud’s server-level caching with the intelligent, WooCommerce-aware optimizations of RunCloud Hub, you can achieve fast performance without needing to be a caching expert.

    This allows you to focus on what truly matters: growing your business, managing your products, and serving your customers.

    Ready to boost your store’s speed, stability, and conversions?

    Get started with RunCloud Hub and let your caching configure itself.

    FAQs on WooCommerce Caching

    What is the best caching plugin for WooCommerce?

    RunCloud Hub is one of the best caching plugins for WooCommerce. It automatically detects and excludes cart and checkout pages to prevent issues.

    Does WooCommerce work with Redis?

    Yes, WooCommerce works extremely well with Redis, primarily using it as a persistent object cache to efficiently handle database queries. This dramatically speeds up the WordPress admin area, user-specific content, and complex store operations, reducing server load. Enabling Redis caching with a single click on a managed server platform like RunCloud Hub is extremely easy.

    How can I use Memcached with WooCommerce?

    To use Memcached with WooCommerce, you must first ensure it is installed and running on your server, then use RunCloud Hub to integrate it as an object cache. Enabling cache stores repetitive database query results in memory, accelerating your site’s backend and dynamic functions.

    How do I exclude the cart and checkout from the cache?

    Leading caching plugins like WP Rocket and FlyingPress automatically exclude the default /cart/, /checkout/, and /my-account/ pages from the cache to ensure they remain dynamic. If you need to do this manually, find the “Do Not Cache URLs” or “Exclude Pages” section in your plugin’s settings and add the slugs for these critical pages. This is essential for a functioning e-commerce store.

    Can I use object caching in WooCommerce?

    Object caching is highly recommended for WooCommerce as it significantly reduces the number of database queries required for each page load. By storing query results in a fast-access system like Redis or Memcached, everything from product filtering to order processing in the backend is sped up.

    Why is my product search not updating?

    If your product search results are not updating with new products or price changes, the cause is almost always a stale page cache. Your caching system serves an old, static HTML version of the search results page instead of generating a new one. Clearing your site-wide cache or excluding the search results page will resolve this.

    Does caching affect WooCommerce search results?

    Yes, aggressive page caching can negatively affect WooCommerce search results by serving outdated or irrelevant content to users. To avoid this, you should exclude your search results page from the page cache so that it is always generated dynamically. Implementing an object cache can still speed up the search function by optimizing the underlying database queries.

    What is the difference between a caching plugin and server-level caching?

    A caching plugin runs within your WordPress installation, while server-level caching operates before WordPress loads, making it significantly faster and more efficient. It intercepts requests at the server level, delivering a cached page without engaging PHP or your database. RunCloud Hub provides this superior server-level caching functionality, which you can enable with one click for a performance boost that plugins alone cannot match.

    How do I choose the best hosting for a high-traffic WordPress site?

    For high-traffic sites, you need a scalable cloud server (from providers like Vultr, DigitalOcean, or AWS) paired with an expert server management panel. This combination provides raw power and fine-tuned control over your server environment. Using RunCloud Hub on your server allows you to easily manage resources and deploy critical performance features like single-click caching, ensuring your site remains fast and responsive under heavy load.

  • 8 Best cPanel Alternatives in 2026 (Ranked by Use Case)

    8 Best cPanel Alternatives in 2026 (Ranked by Use Case)

    For over 20 years, cPanel has been the default control panel for web hosting. But in 2026, default doesn’t always mean best.

    Rising licensing costs and changing hosting requirements have led many developers and agencies to consider server management tools with different pricing models, technology stacks, and workflows. 

    To help you navigate the options, we’ve analyzed 10 alternatives to cPanel based on performance, usability, cost efficiency, and scalability. 

    TL;DR: Which Alternative is Right for You?

    If you don’t have time to review every tool on this list, here is the cheat sheet based on your specific goals:

    • Best Overall for Developers & Agencies: RunCloud.
      • It combines a relatively accessible interface with support for multiple server stacks. It is suited to developers and agencies that manage multiple servers and want support for NGINX, OpenLiteSpeed, and Docker-based workloads. 
    • Best for Shared Hosting Resellers:Plesk.
      • If your business model relies on providing non-technical users with hosting accounts, built-in email, and a traditional graphical interface, Plesk is one of the closest direct alternatives to cPanel. 
    • Best for WordPress-Only Hosting:SpinupWP.
      • A solid, streamlined choice if you only ever host WordPress sites and don’t need to support other frameworks like Laravel or custom PHP apps.
    • Best Free Open-Source Solution:Virtualmin.
      • If you have zero budget and are comfortable with the Linux command line, this offers the most control without a monthly fee.

    How We Ranked These Alternatives

    We evaluated these 10 tools based on the four criteria that matter most to modern server administrators in [YEAR]:

    1. Performance Stack: Which web servers, caching technologies, application runtimes, and deployment options does the panel support? 
    2. Usability vs. Control: Can you perform complex tasks (like managing Cron jobs, firewall rules, or SSL deployment) without needing to open a command line?
    3. Cost at Scale: How does the price change as you add servers, websites, applications, or hosting accounts? 
    4. Multi-Server Management: How easy is it to manage 1, 5, or 50 servers from a single dashboard?

    Top cPanel Alternatives to Manage Servers

    There are many good server management solutions available in [YEAR]. In this section, we will review and analyze our 10 top picks: 

    cPanel alternativeFree/PaidEase of useNGINX supportOpenLiteSpeed supportDocker supportPricing
    RunCloudPaidVery easy to useYesYesYesFrom $9/month
    ApisCPPaidRequires technical knowledgeNoNoNoFrom $30/year
    SpinupWPPaidEasy to useYesNoNoFrom $12/month
    ServerPilotPaidStraightforwardYesNoNoFrom $5/server + $0.50/app/month
    VirtualminFree and paidRequires technical knowledgeYesNoNo native managementFree or from $7.50/month
    AjentiFreeRequires technical knowledgeLimitedNoNo native managementFree
    FroxlorFreeRequires some technical knowledgeYesNoNo native managementFree
    PleskPaidEasy to useYesNo native supportYes, via an extensionCheck current pricing
    ISPConfigFreeRequires technical knowledgeYesNoNo native managementFree
    CyberPanelFree with paid optionsModerateNoYesYesFree with paid options

    1. RunCloud

    RunCloud is a powerful and developer-focused alternative to cPanel, built from the ground up to support modern web application workflows. It’s a cloud-based server management panel that gives you full control over your infrastructure without the complexity and bloat of legacy solutions.

    Whether you’re hosting a personal project or managing dozens of client sites, RunCloud provides a central platform for deploying and maintaining websites on supported cloud servers and VPS instances.

    Unlike cPanel, which was built in a different era and retrofitted over time, RunCloud is engineered for developers, startups, and agencies that prioritize performance, flexibility, and ease of use. It integrates seamlessly with multiple cloud providers, including DigitalOcean, Vultr, Linode, AWS, and Hetzner, and supports both x86 and ARM architectures.

    RunCloud services dashboard

    Core Features and Advantages

    • One-Click Application Installation: RunCloud lets you deploy essential applications like phpMyAdmin and WordPress with a single click.
    • Comprehensive Resource Monitoring: You can use it to monitor server performance metrics directly from the RunCloud dashboard. This allows you to track CPU usage, memory consumption, and disk space without installing additional tools.
    • Automated Backup System: RunCloud protects your valuable data with scheduled automated backups that can be configured to store critical files and databases locally or in remote storage solutions of your choice.
    • Flexible Server Stack Options: RunCloud lets you choose between multiple NGINX and Apache server configurations on x86 and ARM servers, allowing you to select a stack that suits your application’s performance and compatibility requirements. 
    • Advanced Caching Solutions: Boost website performance with support for multiple caching technologies, including NGINX full-page caching, Redis object caching, and LS Cache for lightning-fast content delivery.
    • Streamlined Development Workflow: RunCloud lets you deploy applications from Git repositories and create WordPress staging environments. Eligible plans also include Cloudflare DNS management features. 

    Why Developers Choose RunCloud Over cPanel

    • RunCloud provides full control of your server (no abstraction or black-box configurations).
    • RunCloud has a clean, fast, and purpose-built UI for developers.
    • RunCloud works across all major cloud platforms, with simple onboarding for each.
    • Backups, staging, caching, and automation tools are included in RunCloud from day one.

    RunCloud is designed as a focused productivity platform for developers and agencies who want greater control over their infrastructure and deployment workflows.

    Who is RunCloud NOT for?

    To be transparent, RunCloud is not designed to be a “shared hosting” panel for selling $5/month hosting accounts to beginners. Unlike cPanel, we do not bundle email hosting directly on your web server.

    Keeping email separate from the web server can reduce resource contention and simplify email security and deliverability management. RunCloud therefore focuses on web application hosting, while services such as Google Workspace or Zoho can handle business email. 

    Pricing

    RunCloud offers straightforward, flat-rate pricing that scales with your needs. You won’t find hidden fees or pay-per-site charges here. There are no per-app costs, and all plans include full access to the platform’s core features:

    • Essentials ($9/month): Provides foundational infrastructure, including 1 server, unlimited web applications, backups (2GB free storage, unlimited external to S3/SFTP), domain management, 1-click SSL, Git deployment, server-side caching, and 1 staging environment.
    • Professional ($19/month): Increases capacity to 50 servers, 10GB of free backup storage (with Dropbox support), 10 staging environments, and adds features such as application cloning, custom NGINX configurations, and a 6G/7G firewall.
    • Business ($49/month – Best Value): Aimed at teams with mission-critical workloads, enhancing Professional with 100 servers, 30GB free backup storage, atomic (zero-downtime) deployment, advanced SSL, advanced user management (10 seats), Cloudflare DNS, unlimited staging, support for all external backup providers, a ModSecurity WAF, and API access (120 req/min, 10k/month).
    • Enterprise ($399/month): Caters to large businesses that need scale, SLA, or compliance, expanding on Business with 500 servers, 100GB of free backup storage, 50 team seats, and significantly higher API limits (300 req/min, 400k/month).

    2. ApisCP

    ApisCP is an open-source hosting control panel built with PHP, Ruby, Node.js, Python, and Go, tailored for managing web applications. It’s engineered to provide a high degree of automation and includes built-in self-maintenance features. The goal is to offer server administrators and hosting providers a “set-it-and-forget-it” experience.

    This automation can reduce routine administration, although administrators must still understand the underlying configuration and review changes in production environments. 

    ApisCP includes a robust set of automated features, including one-click SSL certificate deployment and renewal via Let’s Encrypt, automatic updates for common web applications such as WordPress, Joomla, and Drupal, and mechanisms for securely isolating individual websites. These are particularly useful for hosting providers managing many WordPress installs. There are also proactive security measures, such as real-time threat blocking and automated remediation of system misconfigurations.

    That said, the learning curve with ApisCP is noticeably steeper, and its ecosystem is more niche. While technically robust, its interface and workflow may be less intuitive for developers looking for immediate usability and broad community familiarity. Compared with platforms designed around a simpler graphical workflow, ApisCP is more likely to appeal to experienced administrators comfortable with its command-line tools, Bootstrapper, and server configuration model. 

    Apis CP website homepage

    Pricing

    ApisCP offers licensing primarily on a per-server basis and allows users to host numerous domains and accounts, limited only by the server’s resources. The standard recurring options include:

    • Pro License: $20 per server per month. It hosts unlimited domains and accounts, includes panel updates, provides Bronze-level support (one free incident per year), and is transferable.
    • Startup License: $50 per server per year. Allows up to 30 domains or accounts, with unlimited subdomains, users, and databases.
    • Mini License: $30 per year per server. Supports up to 10 domains or accounts, with the same unlimited subdomains, users, and databases.

    ApisCP offers value to those who want to customize their stack deeply and prefer an open-source foundation.

    Who is ApisCP NOT for?

    While ApisCP is highly praised for its strict security features and performance-focused architecture, its unique design choices mean it isn’t the right fit for everyone. 

    • Users who require Debian or Ubuntu: ApisCP’s documented installation requirements currently specify RHEL-based systems, including Rocky Linux, AlmaLinux, and RHEL. It is therefore unsuitable for administrators who need to retain a Debian- or Ubuntu-based server environment. 
    • Beginners looking for a purely point-and-click experience: Unlike cPanel, which handles almost everything through a graphical interface, ApisCP heavily relies on its command-line helper (cpcmd), Ansible playbooks (Bootstrapper), and “Scopes” for advanced server management. Users who lack basic Linux system administration skills or feel intimidated by terminal-based configuration will likely find the platform’s learning curve steep.

    3. SpinupWP

    SpinupWP is a modern, cloud-based server control panel optimized for hosting and managing WordPress websites. Unlike traditional control panels that install extensive software packages directly on the server, SpinupWP connects to servers remotely via SSH to configure and manage servers hosted with providers such as DigitalOcean, AWS, Vultr, Linode, Hetzner, or on-premises hardware.

    The SpinupWP platform automates many best practices for WordPress hosting right after site creation. This includes configuring NGINX with recommended caching rules (browser caching, full-page caching, and Redis object caching), obtaining and automatically renewing free Let’s Encrypt SSL certificates, setting up server-side cron jobs essential for WordPress scheduled tasks, and optimizing server configurations to maximize WordPress performance.

    In addition, SpinupWP offers integrated backup functionality, allowing scheduled or on-demand backups to various cloud storage providers. Restoration is straightforward, ensuring that sites can be recovered quickly if something goes wrong.

    📖 Recommended Read: What is Managed WordPress Hosting?

    SpinupWP website homepage

    Pricing

    • Essentials Plan: Starts at $12 per month for one server. Designed for a single user, it includes daily backups per site, standard email support, and unlimited staging sites.
    • Advanced Plan: Starts at $19 per month for one server. This plan offers more flexible backup schedules (up to four daily, weekly, and monthly options), priority email support, multi-user access with permissions management, integrated site monitoring, and a “magic login” feature for WordPress sites.

    SpinupWP is a strong choice if your hosting needs are purely WordPress-focused. It removes much of the manual configuration work and makes it easy to deploy fast, well-optimized WordPress sites with best practices preconfigured out of the box.

    However, this WordPress-specific optimization also comes with certain limitations. SpinupWP doesn’t cater to broader use cases, such as managing PHP applications beyond WordPress, customizing server stacks, or deploying Node.js apps. If your projects grow beyond WordPress or require flexibility across different frameworks and languages, you may quickly find SpinupWP’s focus too narrow.

    Who is SpinupWP NOT for?

    SpinupWP is widely praised for bringing managed hosting speeds to unmanaged cloud servers. However, its highly specialized nature means it isn’t a universal cPanel replacement. 

    • Users hosting diverse, non-WordPress applications: SpinupWP is explicitly purpose-built for WordPress. If your infrastructure relies on Node.js, Python, or complex non-WordPress frameworks, you will find its focus far too narrow and lacking in broader multi-stack deployment tools.
    • Agencies requiring traditional, all-in-one client hosting features: Administrators who need to provide clients with traditional webmail, or who require granular, white-labeled multi-tenant dashboards for reselling, will find the platform overly restrictive.

    4. ServerPilot

    ServerPilot is built to manage cloud servers, particularly for PHP applications like WordPress. It focuses on offering a lightweight panel that enables users to set up and manage cloud instances without needing extensive server administration knowledge. ServerPilot supports modern protocols such as HTTP/3 and handles multiple PHP versions concurrently via PHP-FPM, optimizing server performance by automatically scaling PHP processes based on demand.

    One of ServerPilot’s strengths is its straightforward access to server and application logs through the web interface. This eliminates the need for SSH access for basic diagnostic tasks, which is useful for developers or site owners who prefer to work in a browser-based dashboard. ServerPilot also automates the deployment and renewal of free Let’s Encrypt SSL certificates and, by default, configures servers with modern security protocols, such as TLS 1.3.

    ServerPilot charges separately for each connected server and each deployed application. This can make it less cost-effective than flat-rate alternatives for users managing many applications, so prospective users should calculate the combined server and application charges before choosing a plan. 

    Another limitation is that ServerPilot’s feature set is deliberately minimal. It does not include integrated backup management or native Git deployment, and it offers less control over the underlying web server stack than platforms that offer a choice of server configurations. Monitoring features also depend on the selected plan. These are critical tools for modern workflows that developers increasingly expect as standard.

    ServerPilot website homepage

    Pricing

    • Economy Plan: Starting at $5 per server plus $0.50 per application monthly (billed hourly).
    • Business Plan: Starting at $10 per server plus $1 per application monthly (adds log viewing, server resource metrics, and priority support).
    • First Class Plan: Starting at $20 per server plus $2 per application monthly (adds detailed MySQL metrics and higher-priority support).

    Who is ServerPilot NOT for?

    Here is a look at who ServerPilot is NOT for:

    • Administrators requiring diverse OS support and non-PHP stacks: ServerPilot is rigidly designed to host PHP and WordPress applications exclusively on Ubuntu cloud servers. If your infrastructure relies on RHEL-based distributions (like AlmaLinux or CentOS) or Debian, you will find this platform entirely incompatible with your needs.
    • Agencies hosting a massive volume of small, low-traffic applications: ServerPilot uses a subscription-based pricing model that charges a base monthly fee per server, plus an additional fee per deployed application (e.g., a website). For freelancers or agencies attempting to pack dozens or hundreds of small, low-budget client sites onto a single cloud server, this per-app pricing structure scales poorly. It becomes significantly more expensive than flat-rate or one-time license alternatives.

    📖 Recommended Read: Website Backups

    5. Virtualmin

    Virtualmin is a comprehensive web hosting control panel engineered specifically for Linux systems. It is broadly compatible and supports major distributions, including Debian, Ubuntu, and RHEL derivatives such as Rocky Linux and AlmaLinux. For developers and system administrators who prefer a Linux-first, command-line-centered environment, Virtualmin offers a robust foundation.

    The platform offers two distinct flavors: a community-supported, open-source, GPL version and a Pro version with additional features and commercial support. This flexibility allows users to choose based on their budget and level of technical expertise.
    Both versions of Virtualmin aim to simplify server administration. Users can handle essential tasks such as applying security updates, managing user accounts, deploying web applications, and configuring services like email and databases through a web-based control panel.

    Virtualmin also provides robust backup capabilities, supporting cloud storage destinations such as Amazon S3, Google Drive, and Dropbox. Migration tools allow users to transfer websites between servers, and detailed logging and monitoring are available for those who want to examine system metrics. It also includes one-click installers for popular applications like WordPress and phpMyAdmin, and even features a built-in terminal for command-line access via the browser.

    Virtualmin website homepage

    Pricing

    • Virtualmin GPL: Free, open-source version with community support.
    • Virtualmin Professional: $7.50 per month, allowing management of up to 10 domains, with enhanced features and commercial support.

    Who is Virtualmin NOT for?

    Here are a few reasons why Virtualmin might not be right for you:

    • Beginners expecting a modern, streamlined user interface: Users looking for a simple, intuitive, point-and-click dashboard will likely find the massive array of technical menus and steep learning curve overwhelming.
    • Administrators wanting a lightweight, minimalist server stack: A standard Virtualmin installation can include DNS, email, spam filtering, and database services. This broader shared-hosting feature set may consume more resources than a web-only panel, making it less suitable for low-resource servers or users hosting only one application.

    6. Ajenti

    Ajenti is a modular web interface platform built on the Python library Ajenti Core. This foundational component provides the essential infrastructure, including an event-loop-based HTTP server, a socket engine supporting WebSockets (with XHR polling as a fallback), and a container system for managing plugins and modular functionality.

    Ajenti Panel, the default distribution, bundles a startup script and a collection of standard administrative plugins, such as a file manager, network configuration tools, and service management utilities. This creates a lightweight, ready-to-use control panel experience for users who want to manage basic server functions without relying on heavyweight alternatives like cPanel.

    Ajenti’s architecture is highly modular. Virtually any component can be replaced or extended via its Python API, offering developers the flexibility to customize routing, file handling, SSL implementation (including client certificate authentication), and server features through custom plugins. Dependency injection is used throughout the platform to manage services and plugins efficiently.

    Ajenti provides its web interface platform at no cost under the permissive MIT license. As an open-source project, Ajenti does not provide the same guaranteed release schedule or dedicated support agreements as a commercial control panel. Users may therefore need to rely on its documentation, community resources, and their own Linux knowledge when maintaining plugins or troubleshooting problems. 

    Ajenti github repository

    Pricing

    • Ajenti: Free and open-source under the MIT License.
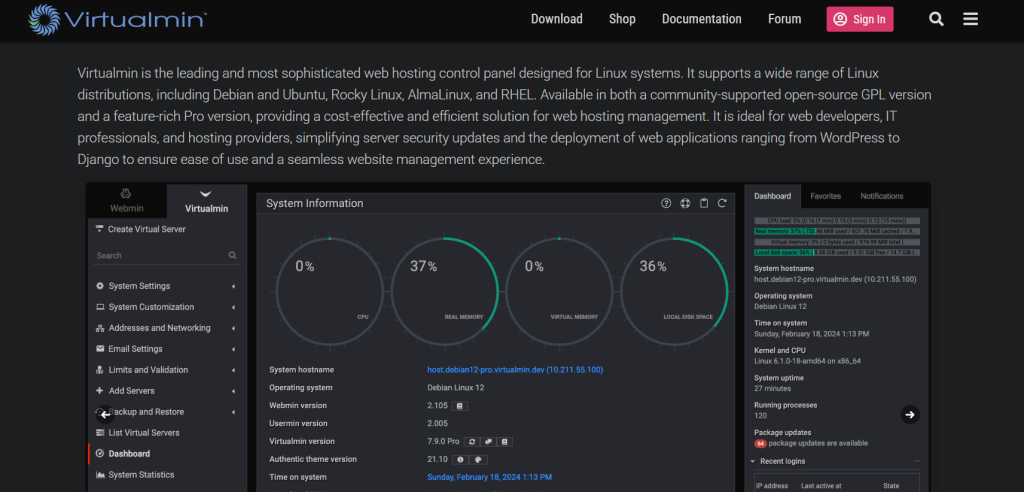
    Who is Ajenti NOT for?

    Here are a few reasons why Ajenti might not be right for you:

    • Agencies needing a highly integrated, production-ready shared hosting ecosystem: Its web hosting extensions do not provide the same breadth of integrated reseller and multi-tenant hosting features as established commercial control panels. 
    • Administrators looking for premium, 24/7 official technical support: Ajenti is a free, open-source tool maintained by a relatively small team of developers, so it lacks the guaranteed enterprise support networks of commercial panels. 
    • Beginners who expect a fully automated, point-and-click server setup: While the dashboard is visually modern, Ajenti requires a steeper learning curve and foundational Linux administration skills to configure server components effectively. 

    📖 Recommended Read: Host Multiple Websites on One Server

    7. Froxlor

    Froxlor is a lightweight, open-source (GPL) server management panel designed to simplify the administration of hosting platforms. It focuses on providing a straightforward interface for managing domains, databases, email accounts, and server configurations without the heavy resource overhead associated with larger control panels like cPanel.

    The latest major release of Froxlor introduced significant improvements to modernize the platform. Notably, the user interface has been revamped to offer a fully responsive, mobile-friendly experience, with both light and dark modes and expanded customization options via Twig templates. These updates make the panel more approachable and flexible, allowing users to tailor the look and feel to their preferences.

    Froxlor continues to maintain compatibility with major operating systems, including Debian 12 (Bookworm) and Ubuntu 24.04 (Noble). However, upgrading from older versions can present serious challenges. Unlike commercial solutions that offer migration assistance or automated upgrade paths, Froxlor relies heavily on community support and documentation. Managing upgrades manually can be risky and technically demanding, and in some cases, mistakes during an upgrade can result in significant downtime, potentially affecting all websites hosted on the server.

    Froxlor website homepage

    Pricing

    • Froxlor: Free and open-source under the GPL license.

    Froxlor’s open-source, no-cost model makes it attractive for technically skilled users managing their own environments on a tight budget. It provides enough functionality for personal servers, development environments, or non-critical projects to get basic hosting tasks done without licensing fees.

    Who is Froxlor NOT for?

    Froxlor is a lightweight, customizable, and free open-source control panel. Its lightweight philosophy means it is not a direct, feature-for-feature drop-in for everyone:

    • Beginners seeking an all-inclusive, point-and-click hosting environment: Because Froxlor is designed as a lightweight configuration manager, it does not include some features found in larger hosting suites, such as a built-in graphical file manager, drag-and-drop site builder, or extensive one-click application catalog. 
    • Enterprises demanding guaranteed, 24/7 commercial technical support: As a community-driven open-source project, Froxlor does not include the guaranteed service-level agreements or dedicated technical support offered by commercial control panels.

    8. Plesk

    Plesk is a WebOps platform that manages user accounts, hosting resources, and service plans. Administrators can use it to create individual accounts, assign specific roles and permissions, and group users under subscriptions tied to pre-defined service plans that govern resource allocations such as disk space and bandwidth.

    Its broad, all-in-one feature set may require more server resources than narrower web application management panels, making it less suitable for some low-resource VPS environments. For a detailed breakdown of how Plesk compares to other control panels and a list of competing products, see our article on Plesk Alternatives.

    Plesk website homepage

    Pricing

    • Web Admin Edition: Supports up to 10 domains and includes WP Toolkit SE.
    • Web Pro Edition: Supports up to 30 domains and includes the full WP Toolkit.
    • Web Host Edition: Supports unlimited domains and includes the full WP Toolkit.

    Plesk prices vary by server type, billing period, region, and current offer, so check its pricing page for the current rate.

    Plesk has long been a popular choice among shared hosting providers and businesses that need to manage multiple user accounts under a single server or cluster. It provides powerful administrative tools and a familiar environment for users coming from the traditional web hosting world.

    Who is Plesk NOT for?

    Plesk supports both Linux and Windows and offers an extensive extension marketplace, but its pricing and broad feature set will not suit every use case: 

    • Budget-conscious freelancers and small agencies: Plesk has undergone several price increases over the past few years. Its tier-based licensing may be less cost-effective than flat-rate or open-source alternatives for users who host only a few websites or operate on narrow margins.
    • Administrators running low-resource, minimalist cloud servers: Plesk includes a broad range of services and background processes to support its hosting, email, security, and account-management features. This can require more server resources than a narrower web-only panel, so users running low-resource VPS instances should check the system requirements before choosing it. 

    9. ISPConfig

    ISPConfig is an open-source, multi-server control panel for hosting providers and system administrators to manage a distributed hosting infrastructure from a centralized dashboard. It uses a secure, multi-level user hierarchy that clearly segregates administrators, resellers, clients, and email users, allowing system owners to delegate administrative tasks safely without giving away root-level operating system access.

    ISPConfig website homepage

    System administrators can choose to install ISPConfig in single-server mode, which combines all services on one machine, or distribute dedicated roles (such as a standalone mail node or a dedicated database cluster) across separate nodes to prevent resource contention.

    It also offers granular resource-limiting tools that let you cap disk space, databases, cron jobs, and email traffic per client or reseller. However, it lacks native OpenLiteSpeed support and does not include an integrated graphical file manager, meaning users must handle file transfers via FTP or SSH.

    Pricing

    The developers distribute ISPConfig under the open-source BSD license, which makes the platform completely free with no paid version, licensing costs, or feature gating. While the core software costs nothing, the ISPConfig support partner network offers paid, enterprise-level consulting, remote installation assistance, and server migration services for businesses that require guaranteed technical support.

    Who is ISPConfig NOT for?

    ISPConfig is not for beginners or less-technical users who want a completely hands-off, “point-and-click” hosting setup. The installation process is somewhat complex and relies on command-line scripts and manual configuration, so skipping a single dependency or misconfiguring the system hostname can break the setup.

    10. CyberPanel

    CyberPanel is a modern web control panel and high-performance OpenLiteSpeed web server that delivers a lightweight, speed-optimized hosting platform primarily tailored for WordPress users. The system runs on unmanaged virtual private servers running Ubuntu (20.04, 22.04, or 24.04), AlmaLinux (8 or 9), or CloudLinux.

    By integrating natively with OpenLiteSpeed, CyberPanel processes web traffic efficiently while maintaining full compatibility with Apache .htaccess rewrite rules and using the LiteSpeed Cache (LSCache) engine to accelerate dynamic web pages. It also includes a built-in email server which runs Postfix and Dovecot, local DNS server management, an FTP server, and a graphical file manager.

    CyberPanel website homepage

    It also offers modern features such as a Git Manager to set up auto-deployments directly from GitHub or GitLab repositories, one-click WordPress staging environments, and a basic Docker Manager to deploy and pull containerized applications. 

    Pricing

    The core CyberPanel platform, configured with the OpenLiteSpeed web server, is completely free and imposes no artificial limits on the number of domains, databases, or accounts you can host. If your organization requires the commercial LiteSpeed Enterprise web server, license tiers range from $15 to $35 per month. Some optional CyberPanel services and dashboard features require separate paid plans or add-ons. Check CyberPanel’s current pricing information before publication, as prices and packaging may change. These features can include: 

    • WordPress Manager (advanced staging, backup, and theme controls)
    • Root File Manager
    • Google Drive Backup Retention
    • Rspamd Manager (spam and virus protection for mailboxes) 

    Who is CyberPanel NOT for?

    Security-conscious administrators should review CyberPanel’s vulnerability history and update practices carefully before using it in production. Several versions were affected by critical remote-code-execution vulnerabilities in 2024, including vulnerabilities that were exploited in the wild. Users should run a supported, fully patched release and maintain independent off-server backups.

    Final Thoughts: Choosing the Right cPanel Alternative 

    Throughout this guide, we’ve explored a range of suitable alternatives for server and website management. Each platform brings something valuable to the table, from open-source flexibility to WordPress-focused simplicity. But after comparing features, pricing structures, scalability, and real-world usability, one conclusion becomes clear:

    For many developers and agencies, RunCloud offers one of the most balanced combinations of usability, performance, and infrastructure control among modern server management platforms.

    Unlike traditional control panels designed primarily for shared hosting environments, RunCloud focuses on modern development workflows and cloud-based infrastructure management. It offers full access to your servers without compromise, enabling you to manage, monitor, and scale projects with confidence. Whether you’re deploying WordPress sites, custom PHP applications, Laravel projects, or scaling agency workloads across multiple servers, RunCloud gives you the tools you need, with the efficiency and control you deserve.

    Instead of layered licensing models or extension-heavy architectures, RunCloud provides a unified platform that simplifies server management, deployment workflows, and infrastructure monitoring.

    If you are exploring alternatives to cPanel, RunCloud is worth considering for your shortlist.

    You can start a free trial of RunCloud to see how it fits your workflow and infrastructure needs.

    Frequently Asked Questions About cPanel Alternatives

    What are the best free and open-source alternatives to cPanel?

    There are several open-source alternatives, including Virtualmin, Froxlor, and Ajenti. These options offer core server management features without licensing fees, but typically require more technical expertise. They often lack the polished interfaces, integrated security, and responsive support systems that platforms like RunCloud provide.

    Can I host a website without using cPanel?

    Yes, you can. Many developers now prefer modern cloud panels such as RunCloud, SpinupWP, or ServerPilot, or even manage servers manually via SSH. Tools like RunCloud offer better performance, lower resource usage, and more streamlined workflows compared to traditional control panels.

    What are the benefits of using RunCloud over traditional control panels?

    RunCloud was built for modern developers. It offers fast deployments, Git integration, performance monitoring, caching solutions, automated backups, and multi-server management – all without the clutter and limitations typical of traditional panels like cPanel and Plesk.

    Is RunCloud a good alternative to cPanel for beginners?

    Yes, RunCloud is beginner-friendly without sacrificing power. The dashboard is intuitive, the setup processes are automated, and tasks like SSL setup, backups, and app deployment are simplified, making it accessible for newcomers and time-saving for experienced users.

    How easy is it to migrate from cPanel to an alternative like RunCloud?

    Migrating from cPanel depends on the size and complexity of your setup, but RunCloud simplifies the process with tools like Git-based deployments, database importers, and one-click WordPress installations. With proper planning, many sites can be moved with minimal downtime.

    Can I migrate my WordPress site from cPanel to RunCloud?

    Yes, easily. You can use manual backup/restore methods or RunCloud’s Git deployment and database management tools to handle the migration. RunCloud also provides a professional website migration service. After you migrate your website, you can use RunCloud’s staging environments to test your migration before going live.

    Does RunCloud support both NGINX and Apache server stacks?

    Yes. RunCloud lets you choose between an NGINX-only stack for maximum performance or an NGINX+Apache hybrid stack for broader compatibility. You can configure your server stack based on your specific application requirements. In addition to this, RunCloud also supports OpenLiteSpeed and Docker. 

    Does RunCloud include automated backup options?

    Yes. RunCloud allows you to schedule backups to local storage or remote services like Amazon S3 or Google Drive. Backup and restore processes are simple, fully integrated, and don’t require separate plugins or tools.

    Is RunCloud more affordable than cPanel?

    For most developers and businesses, yes. RunCloud charges a flat monthly fee based on the server, not per domain or user account. Unlike cPanel’s layered pricing model, RunCloud lets you deploy unlimited applications on a single server without extra fees.

    📖 Recommended Read: Website Backups Without the Headache

  • How To Migrate Away from cPanel Hosting (The Escape Guide)

    How To Migrate Away from cPanel Hosting (The Escape Guide)

    Tired of cPanel’s limits? You’re not alone.

    If you’ve ever been frustrated by slow performance during traffic spikes, blocked from switching PHP versions, or forced to file support tickets just to tweak server settings, you’ve already outgrown cPanel.

    RunCloud is the next step.

    It gives you full control over your own cloud server, with a clean, intuitive dashboard that makes server management simpler, not harder. No more waiting on support. No more working around arbitrary limits.

    This guide walks you through exactly how to migrate your WordPress site from a traditional cPanel setup to a cloud server managed by RunCloud. Step by step.

    No guesswork. No wasted time.

    Let’s get started.

    Note: If you’re not confident handling the migration yourself, RunCloud offers free expert migration for your first site. You’ll find more details at the end of this guide.

    Why Migrate From cPanel to RunCloud?

    You might be satisfied with your current server management platform, but RunCloud solves problems that you may not even know you have.

    Developers using cPanel can find themselves constrained. Switching PHP versions for specific projects, installing necessary extensions (like imagick or redis), or fine-tuning web server configurations (NGINX vs. Apache) can be slow, require support tickets, or simply be unavailable. This friction slows down development cycles and innovation.

    • RunCloud gives you complete control over the underlying cloud server infrastructure, unlike some cPanel hosts that might limit your access. You are not locked into a specific provider’s way of doing things and have the freedom to manage your server directly. This level of control allows for deeper customization and optimization specific to your needs.

    • Creating a testing version of your WordPress website, known as a WordPress staging environment, is incredibly simple with RunCloud’s one-click feature. This allows you to safely test updates, plugins, or design changes without affecting your live visitors.

    • Changing your website’s PHP version is very easy within the RunCloud dashboard. This allows you to upgrade for better performance or switch versions for compatibility testing with themes and plugins.

    • RunCloud provides a secure method to run websites requiring older, outdated PHP versions without jeopardizing the security of other sites on the same server. This is possible using the RunCloud Docker stack, which has built-in isolation that allows legacy applications to function safely alongside modern, secure websites.

    • RunCloud includes built-in integration with Cloudflare and simplifies how you manage your website’s DNS records. This connection lets you handle DNS updates and configurations more efficiently directly through the RunCloud panel, making linking your domain via Cloudflare much smoother.


      This integration allows you to manage DNS records from within the RunCloud dashboard – no need to switch between tools. It also speeds up record updates and helps prevent misconfigurations when pointing your domain to your server.

    • RunCloud uses modern, high-performance stacks (e.g., NGINX + PHP-FPM, support for caching like Redis or Memcached) that can significantly improve load times and Core Web Vitals.

    • RunCloud allows you to conveniently manage websites hosted on servers with different processor types, like ARM and x86, all from one central dashboard. This is useful if you use different kinds of cloud servers for cost or performance reasons.

    • RunCloud supports both widely used database systems, MySQL and MariaDB, giving you flexibility in choosing the right one for your web applications.

    • Managing multiple users or client sites within a single cPanel account can be insecure or inefficient. Granting specific, limited access to developers or team members is often not granular enough, leading to over-sharing of credentials or cumbersome separate accounts. RunCloud is built with teams and agencies in mind, giving you the ability to:

      • Invite team members and assign them specific roles and access to particular servers. Developers can manage their projects without needing full server admin rights.

      • Manage all your servers and client websites from a single, intuitive dashboard, regardless of the underlying cloud provider (AWS, DigitalOcean, Vultr, etc.).

      • Maintain clear separation of duties and access logs to enhance security and make it easier to track changes.

    • On traditional shared cPanel hosting, your site’s performance is often at the mercy of “noisy neighbors” and pre-defined server configurations that may not be optimal for your specific application. Therefore, scaling resources can be limited or require a complete account upgrade. RunCloud provides flexibility in how you manage and upgrade your server resources:

      • When you manage your cloud server with RunCloud, you have the option to use a dedicated server. This means its CPU, RAM, and storage are exclusively allocated to you. It will ensure that your website’s performance is consistent and not affected by other users, a common issue on traditional shared hosting.

      • As your website traffic grows or your application needs change, you can easily scale up or down your cloud server’s resources (CPU, RAM, storage). Most cloud providers (like DigitalOcean, AWS, Vultr, etc.) allow these adjustments with minimal or no downtime.

    • RunCloud ensures you retain full root access to your underlying cloud server. This gives you the ultimate freedom to install custom software, fine-tune configurations, and manage your server environment precisely as your projects require, far beyond the limitations of typical shared hosting panels.

    Is Migrating From cPanel the Right Move for You?

    Before diving into the “how“, let’s address the “why” and “if“.

    Migrating your WordPress site from a cPanel environment to a cloud server managed by RunCloud can unlock significant advantages, but it’s not necessarily the ideal path for everyone. Understanding the trade-offs will help you make an informed decision.

    cPanel is often a good fit if:

    • You manage just one or a few simple websites with stable traffic.

    • You have no immediate plans to host additional sites or require complex server configurations.

    • You don’t need advanced developer tools, deep server customization, or the specific performance benefits of a dedicated cloud environment.

    • You prefer an all-in-one solution that includes email hosting directly within your web hosting panel (even if you don’t always use it).

    If this describes your situation, your current cPanel setup might still be the most straightforward and cost-effective solution.

    However, consider migrating if you’re experiencing these cPanel pain points:

    • Rising Licensing Costs: Per-account cPanel licensing fees can add up, especially if you manage multiple sites or offer hosting to clients. RunCloud’s pricing model, combined with affordable cloud servers, can offer better value at scale.

    • Bundled Services & Bloat: You might be paying for services bundled with cPanel (like integrated email hosting, specific site builders) that you don’t use or prefer to handle with specialized third-party providers.

    • Lack of Modern Automation & Developer Workflows: If you’re struggling with manual deployment processes, limited or clunky Git integration, insufficient API access for custom workflows, or restrictive SSH access, RunCloud offers a more developer-centric environment.

    • Performance Bottlenecks & Control: If your site is outgrowing shared hosting resources, or you need fine-grained control over server software (specific PHP versions, NGINX vs. Apache, caching mechanisms like Redis/Memcached), a cloud server managed by RunCloud provides this power.

    Key Considerations Before Choosing RunCloud & Cloud Hosting

    Moving to RunCloud means managing your cloud server instance. While RunCloud dramatically simplifies this, it’s a different paradigm than traditional cPanel shared hosting:

    • Comfort with Cloud Infrastructure (Basic): You’ll choose a server from a cloud provider (like DigitalOcean, Vultr, AWS, Linode, etc.). RunCloud makes managing it easy, but you’re still responsible for the underlying server instance.

    • DNS Management: You will be responsible for pointing your domain’s DNS records (A records, CNAMEs, MX records for email) to your new cloud server’s IP address and your external email provider. This is typically managed at your domain registrar or a specialized DNS hosting service (like Cloudflare).

    What Happens to Your Email After Migrating?

    Before moving your website files, let’s talk about email.

    One of the most significant differences is moving from an all-in-one cPanel environment to a cloud server managed by RunCloud.

    RunCloud Manages Your Web Server, Not Your Email Server.

    RunCloud excels at configuring, managing, and securing the server that hosts your website. However, it does not provide email hosting services. This is intentional, and it aligns with modern best practices. Separating web hosting from email hosting generally improves reliability, deliverability, and security.

    If Your Email is Currently Hosted on your cPanel Account

    When you switch your domain’s DNS records to point your website to your new RunCloud-managed server, any email accounts hosted on that same cPanel server will stop receiving new emails. Your old emails might still be on the cPanel server (until decommissioned), but new mail will not arrive.

    Why Self-Hosting Email on Your Web Server is Discouraged

    While it might seem convenient to try to set up an email server on your new cloud instance, it’s strongly discouraged for several reasons:

    1. Deliverability Issues: Maintaining a good sender reputation to avoid your emails landing in spam folders is a complex, ongoing task. Dedicated email providers have teams and infrastructure focused solely on this.

    2. Security Risks: Email servers are frequent targets for attackers. Managing their security requires specialized expertise.

    3. Maintenance Overhead: Running an email server involves updates, blacklist monitoring, spam filtering configuration, and troubleshooting, which divert focus from your website.

    4. Resource Consumption: An email server can consume significant server resources that are better allocated to your website.

    While we strongly recommend using a dedicated, external email hosting provider for the above reasons, we understand that some users may wish to explore other options or have specific needs for services like transactional email.

    For reliable email hosting, we recommend:

    • Zoho Mail (free for personal domains)

    • Google Workspace (business-grade email and tools)

    • MXRoute (affordable plans for bulk or agency use)

    If you’re interested in learning more about the complexities of email servers or related services, RunCloud has published several articles that cover these topics:

    However, you should remember that when you update your email server, it’s best to set up your new email hosting and configure the necessary DNS records (MX, SPF, DKIM, etc.) with your DNS provider before or at the same time you update the A records that point your website to the new RunCloud-managed server. This careful timing is key to minimizing the chance of losing any incoming emails during the transition period.

    Moving Your WordPress Site From cPanel to RunCloud: A Step-by-Step Guide

    Before You Begin

    • Back Up Your Existing Site: This is the most important step. Before you touch anything, create a full backup of your current website on cPanel. This includes your website files and your database. Most cPanel hosts have a backup tool. Download this backup file and keep it somewhere safe. You can never have too many backups!

    • Choose Your Cloud Server Provider: RunCloud doesn’t host your site directly; it helps you manage a server from providers like DigitalOcean, AWS, Google Cloud, Vultr, Linode, UpCloud, etc.

      Not sure which provider to choose? Here’s a quick overview:
    1. DigitalOcean & Vultr: Great for beginners. Easy setup, predictable pricing.

    2. AWS & Google Cloud: Ideal for larger, complex projects but slightly more advanced.

    3. Linode & UpCloud: Balance of performance and affordability with strong global coverage.

    Choose based on your budget, location, and technical comfort. RunCloud works seamlessly with all of them.

    • Lower Your DNS TTL: TTL stands for “Time To Live”. It tells servers how long to store your website’s DNS information. Lowering this before you migrate (e.g., to 300 seconds or 5 minutes) means the change will happen much faster across the internet when you finally switch your domain name to point to the new server. You change this where your domain’s nameservers are pointed (your domain registrar or a service like Cloudflare).

      For example, if your domain is registered with Namecheap or GoDaddy, log in to your account, go to DNS settings, and set the TTL value for your A record to 300 seconds (5 minutes). This ensures faster propagation when switching servers.

      Read our blog post on How to Speed Up DNS Propagation to learn more.

    Step 1: Set Up Your New Server with RunCloud

    If you haven’t already done so, create a RunCloud account. Inside your RunCloud dashboard, connect to your chosen cloud provider (like DigitalOcean, Vultr, etc.) using your API key. RunCloud has a simple process for launching a new server directly from its dashboard. It will automatically install and configure the necessary software (like NGINX, Apache, MySQL/MariaDB, PHP).

    Read our documentation on connecting to cloud providers via API to get instructions for your cloud provider.

    Step 2: Create Your Website Space in RunCloud

    Once your server is ready in RunCloud, go to the “Web Application” section and click “Create Web Application”.

    On the next screen, use RunCloud’s “Script Installer” within the Web Application settings to install a fresh, clean copy of WordPress on this new space.

    For now, you don’t need to use your real domain name. RunCloud provides a free test domain that you can use for testing purposes. If you want, you can use this test domain for the migration process. You’ll find this domain listed in your Web Application settings, and can use it to preview your site before making DNS changes.

    Select the correct PHP version (try to match your old cPanel site if possible). RunCloud will set up the necessary folders and configuration for your site.

    📖 Suggested read: 10 Best Self-Hosted Email Server Platforms to Use in 2025

    Step 3: Migrate Your Website Content

    In this section, we’ll guide you through using the popular “All-in-One WP Migration” plugin, known for its ease of use. However, this plugin has file size restrictions in its free version, potentially requiring a paid extension for larger websites.

    As an alternative, especially for sites exceeding the free upload limit, refer to our post on 3 Free Ways to Migrate WordPress from Shared Hosting To Cloud Server. This post offers more flexibility and handles larger migrations effectively, although with a slightly more technical process.

    Note: If you’re migrating between different MySQL or MariaDB versions (e.g., MySQL 5.7 to 8.0), some plugins or exports may throw errors. If you run into issues during import, try exporting only content (not plugins/themes) and manually reinstall them post-migration.

    1. On Your OLD cPanel Site:

      • Log in to your WordPress dashboard and navigate to Plugins > Add New. Next, search for “All-in-One WP Migration”, install it, and activate it.

      • Find “All-in-One WP Migration” in the left-hand menu and click “Export“.

      • Click “Export To” on the next screen and choose “File“.

      • Wait for the plugin to bundle your entire site (files, database, plugins, themes) into a single .wpress file.

      • Once the file has been generated, download this .wpress file to your computer.
    1. On Your NEW RunCloud Site (using the test domain):

      • Log in to the fresh WordPress installation you created in Step 2.

      • Go to Plugins > Add New, then search for “All-in-One WP Migration”, install it, and activate it (the same plugin).

      • Find “All-in-One WP Migration” in the left-hand menu and click “Import“.

      • Click “Import From” and choose “File“.
    • Select the .wpress file you downloaded from your old site.

    • The plugin will start uploading and then processing the file. Free versions of this plugin might have upload size limits. If your site file is too large, you might need the plugin’s paid extension or explore other methods, like manually migrating files/databases or using a different plugin.

    Follow the on-screen prompts and proceed when ready. The plugin will warn you that it’s about to overwrite the site.

    Once the import is finished, the plugin will ask you to save your permalink structure. Log in using your old site’s username and password and rebuild your site’s URL structure.

    📖 Suggested read: How to Install & Set Up FreeScout on Your Personal Server

    Step 4: Test Your Migrated Site

    After the migration, open the RunCloud test domain in your browser. Click around your website to check pages, posts, images, forms, and special features. Make sure everything looks and works exactly like your old site, and fix any small issues you find.

    Step 5: Point Your Domain to the New Server

    Once you’re happy with the migrated site on the test domain, it’s time to make your real domain name point to the new RunCloud server.

    Before we go any further, planning for potential issues and having a strategy to minimize disruption during your migration is essential. While the goal is a seamless transition, some downtime during the DNS propagation phase is often unavoidable; however, you can reduce this by lowering your domain’s DNS TTL (Time To Live) values well before the switch and flushing DNS cache immediately after.

    Before making the final DNS change, thoroughly test your migrated site on the new RunCloud server using its IP address or by modifying your local hosts file to ensure everything functions correctly.

    If you notice any significant problems after the switch, revert your DNS records to your old cPanel server’s IP address (assuming it’s still active). This will allow you to restore service quickly while troubleshooting the new setup.

    1. Find Your Server IP Address: In your RunCloud dashboard, go to your server details. Your server’s public IP address will be listed there. Copy it.
    1. Update DNS Records:

      • Log in to your Cloudflare/Namecheap/Porkbun account (or wherever your domain’s DNS is managed) and find the DNS settings for your domain.

      • You’ll need to update the ‘A’ record for your main domain. Change its value (the IP address) to the new IP address you copied from RunCloud.

      • If you use ‘www’ (e.g., www.example.com), check its record too. You don’t need to change it if it’s a CNAME pointing to your main domain (yourdomain.com). If it’s another ‘A’ record, update its IP address as well.

      • Save the changes.

    2. Review Imported Records: Double-check all the DNS records in Cloudflare to ensure they are correct and that no old IP addresses are present for your web traffic.

    If you are using Cloudflare, you can also use RunCloud’s built-in DNS manager to set up and update records without leaving the dashboard.

    1. Wait for DNS Propagation: DNS changes can take a few minutes to several hours (though usually faster if you lowered the TTL earlier). You can use online tools like whatsmydns.net to check the progress.

    📖 Suggested read: What is DNS & How Does It Work? Everything You Need to Know.

    Step 6: Final Checks and Configuration on RunCloud

    Once DNS has updated, your domain should load the site from your new RunCloud server.

    1. Final Website Test: Browse your live website using your actual domain name. Here’s what to review carefully before going live:

      • Forms (contact, login, checkout)

      • Plugin functionality (especially caching, security, and SEO tools)

      • Theme-specific features and widgets

      • Custom post types or shortcodes

      • License activation for premium plugins/themes

    2. Review Robots.txt and Sitemap: Make sure your robots.txt file (e.g., yourdomain.com/robots.txt) isn’t blocking important pages from search engines. Check that your XML sitemap is working correctly. You might need to resubmit it to Google Search Console.

    3. Enable Caching: Use the RunCloud Hub dashboard for your Web Application to enable server-level caching (like NGINX FastCGI cache). This will significantly speed up your site.

    4. Enhance Security:
      • Fail2Ban: RunCloud configures fail2ban out of the box. Ensure it’s active for services like SSH and WordPress login attempts to block brute-force attacks.

      • Security Headers: Consider adding security headers (like HSTS and Content Security Policy) for better protection. RunCloud provides ways to add custom NGINX configs, and you can use it to manually configure these records in your web server configuration.

    5. Check Cron Jobs: If your WordPress site relies on scheduled tasks (like publishing, updates, or backups), confirm that cron jobs are working after the migration. You can:

      • Use the WP Crontrol plugin to view/edit scheduled events.

      • Disable WP-Cron and set up a real server-level cron job in RunCloud for better reliability. To do this, go to the RunCloud dashboard and navigate to Server Settings > Cron Jobs.

    6. Secure Your Site with an SSL Certificate (HTTPS): RunCloud makes it incredibly easy to install a free Let’s Encrypt SSL certificate for your domain(s) with just a few clicks, or you can deploy a custom SSL certificate if preferred. Once the SSL certificate is active, you can also force HTTPS with a single toggle inside the RunCloud dashboard to ensure all traffic uses the secure version.

    7. Configure Automated Backups: Use RunCloud’s built-in backup features to schedule automated daily or weekly backups of your web application files and databases to an off-server location (like S3, DigitalOcean Spaces, etc.).

    8. Monitor Server Health and Performance: RunCloud provides server health monitoring tools directly within its dashboard. You can track key metrics like CPU load, memory usage, and available disk space, and set up alerts to catch problems early.

    📖 Suggested read: The Best Email Marketing Plugins for WordPress in 2025

    Final Thoughts

    Congratulations! If you followed along, you’ve successfully navigated the migration process and moved your WordPress site from cPanel to your new RunCloud-managed server. Take a moment to appreciate the smoother, faster experience and the powerful control you now have over your hosting environment.

    After reading this guide, you’re now equipped with the knowledge to migrate your WordPress site from cPanel to a RunCloud-managed cloud server. We’re confident that these detailed steps will help you successfully transition.

    However, if you prefer expert assistance for your initial migration or manage multiple sites and value a streamlined process, you can use the RunCloud migration support. Our team can manage your first web application migration for free, ensuring a smooth start to your RunCloud experience. This allows you to see the benefits firsthand with professional guidance.

    Our dedicated paid migration service is also available for subsequent migrations or more intricate setups, starting from $350 per site. Simply provide your site details to receive a quote, and our team will handle the rest, allowing you to focus on your core business.

    Whether you take advantage of the free offer or handle it yourself using this guide, moving to RunCloud opens up a world of better performance, tighter security, and simpler server management.

    Manage your server with less hassle – and more power. Try RunCloud today.

  • How to Deploy Supabase to Hetzner, UpCloud & More

    How to Deploy Supabase to Hetzner, UpCloud & More

    Supabase is the most popular open-source Backend-as-a-Service (BaaS) platform, which offers developers the freedom and control of self-hosting.

    By combining the power of Supabase with the simplicity of RunCloud’s server management panel, you can deploy a scalable and private backend for your applications without vendor lock-in.

    In this tutorial, we will guide you through every step of deploying a containerised Supabase instance on a server managed by RunCloud.

    We will demonstrate how RunCloud’s flexibility enables you to run complex Docker applications with ease, providing you with full control over your infrastructure.

    Let’s get started!

    How To Self-Host Supabase on RunCloud

    Before we begin, ensure you have the following three prerequisites in place. This guide assumes you have already completed these initial steps.

    1. A RunCloud Account: You can sign up for a free or paid plan on the RunCloud website.
    2. A Cloud Server Provider: You’ll need an account with a cloud provider like Hetzner, DigitalOcean, Vultr, or AWS.
    3. Basic SSH Knowledge: You will need to connect to your server via SSH. We highly recommend setting up an SSH key for secure access. RunCloud’s documentation provides a clear guide on how to manage SSH keys.

    Step 1: Choosing and Provisioning the Right Server

    Supabase offers a comprehensive suite of tools, including a PostgreSQL database, authentication services, storage, and more. These services are resource-intensive. To ensure a smooth experience, you’ll need to provision a server with adequate resources.

    For this tutorial, we recommend a server with at least 8GB of RAM and four vCPUs. This provides sufficient headroom for all backend services to run smoothly. Depending on your specific use case and expected traffic, you may need to scale this up or down.

    If you want to learn more about this process, read our dedicated guides, which cover the process of connecting a new server in great detail:

    Regardless of what server size you pick, your RunCloud subscription provides you with the ability to create an unlimited number of web applications.

    This flexibility allows you to deploy as many applications on your server as its hardware resources can physically handle, making it an extremely cost-effective solution for developers and agencies managing multiple projects.

    Step 2: Creating a Web Application in RunCloud

    Next, we need to create a “container” or placeholder within RunCloud for our Supabase installation. This web application will define the directory structure and the domain that will point to our Supabase instance.

    1. From your RunCloud dashboard, navigate to your server and click on Web Applications.
    2. Click Add Web Application.
    3. Choose the Empty Web App option. This is important because we will be deploying a custom Docker setup, not a standard PHP application.
    4. Fill in the Web App Details:
      • Web Application Name: Give it a descriptive name, such as ‘app-supabase’.
      • Web Application Owner: You can use the default system user.
      • Domain Name: It’s highly recommended to use a real domain or subdomain (e.g., supabase.yourdomain.com). This will make accessing your instance much easier. For guidance on pointing your domain, please consult your domain provider’s documentation and the RunCloud DNS settings guide.
    1. Select the Web Application Stack: Select Native NGINX + Custom config. This stack gives us the raw power to configure NGINX as a reverse proxy later, which is essential for routing traffic to our Docker containers.
    2. Deploy the Application: After configuring the basic settings, you can deploy the application on your server by clicking “Deploy”. 
    3. Note down the Project Root: After the application is created, take note of the Web Root Path, which is displayed on the dashboard. This will be something like /home/runcloud/webapps/app-supabase. You will need this exact path in a later step.

    Step 3: Connecting to Your Server via SSH

    After creating your web application, we will begin the process of installing Supabase on the server. For this, we need to run several commands directly on the server. You’ll need to SSH into your server using the SSH credentials provided by your cloud provider.

    For enhanced security and convenience, we recommend adding your public SSH key to RunCloud Vault. This allows you to log in without typing a password, and is more secure.

    Once your key is added to the RunCloud vault, open your terminal and run the following command to connect to the server via SSH: 

    ssh-i ~/.ssh/your_private_key runcloud@<YOUR_SERVER_IP>

    After successful login, you’ll see a welcome message from RunCloud:

    Step 4: Cloning and Preparing the Supabase Docker Files

    Now that you’re inside the server, it’s time to download the official Supabase Docker configuration and move it into the web application directory we created. Run the following commands one by one:

    Navigate to a temporary directory. This is a safe place to clone the repository before moving the files.

    cd /tmp

    Clone the official Supabase repository. The –depth 1 flag performs a shallow clone, downloading only the latest version to save time and space.

    git clone --depth 1 https://github.com/supabase/supabase

    Copy the Docker files to the root of your project. Replace <runcloud project root> with the actual path you noted in Step 2.

    cp -rf supabase/docker/* <runcloud project root> 

    Copy the example environment file. This file contains all the configuration variables Supabase needs. We will edit this in the next step.

    cp supabase/docker/.env.example <runcloud project root>/.env

    Step 5: Configuring Your Supabase Environment

    After copying the files, you need to configure your environment. The .env file you just created contains default, insecure passwords and secret keys. You must change these before launching your Supabase installation.

    Navigate to your project root directory:

    cd <runcloud project root>

    Open the file for editing using nano: If you are not comfortable with nano, you can use any other text editor that you like, or read our blog post on How to Edit Files on Remote Servers with SSH and Nano

    nano .env

    Update Passwords and Secret Keys: After opening the file, carefully review its contents. At a minimum, you must change the following values to strong, randomly generated strings. You can use an online password generator for this.

    1. POSTGRES_PASSWORD: This is the password for the superuser account in your PostgreSQL database. Change this to a very long, complex, and unique password.
    2. JWT_SECRET: This secret is used to sign JSON Web Tokens (JWTs) for user authentication and authorisation. Update this with a long, randomly generated token, ideally 32 characters or more.
    3. ANON_KEY and SERVICE_ROLE_KEY: These JWTs are used for the anon (public) and service_role (admin/backend) users, respectively. While they are full tokens, the underlying signing secret (JWT_SECRET) is the primary vulnerability if unchanged. While changing the JWT_SECRET effectively invalidates the default keys, it is best practice to generate new, unique keys for both the ANON_KEY and SERVICE_ROLE_KEY after updating the JWT_SECRET.
    4. DASHBOARD_USERNAME and DASHBOARD_PASSWORD: These credentials control access to the Supabase management dashboard. Change both the default username and the default password to strong, unique values.
    5. SECRET_KEY_BASE: This is a cryptographic key used for various internal security features within the application framework (often related to cookie signing or encryption). Replace the current value with a long, random, and unique cryptographic key.
    6. VAULT_ENC_KEY and PG_META_CRYPTO_KEY: These are encryption keys used for encrypting secrets and other sensitive data stored within the database vault and the metadata store. Update both keys with unique, randomly generated encryption keys that are at least 32 characters long.

    The file also contains optional settings for sending emails, analytics, and logging. You can leave these blank for now unless you plan to use those services. After you have made the necessary changes, press Ctrl+X, then Y, and then Enter to save your changes in nano.

    Step 6: Launching the Supabase Services with Docker

    Once you have updated your .env file, you are now ready to launch your Supabase instance. This process is very simple, and it requires you to run just two commands:

    Pull the latest Docker images

    This command downloads all the necessary container images for each Supabase service (database, auth, storage, etc.). This may take several minutes, depending on your server’s network speed.

    docker compose pull 

    Start Supabase Services in detached mode

    The ‘up’ command starts the containers, and the ‘-d’ flag runs them in the background, so they continue to run after you log out of your SSH session.

    docker compose up -d

    You will see output indicating that all the services have started successfully.

    Your Supabase instance is now running inside Docker on your server! However, it’s not yet accessible from the internet. For that, we need to set up a reverse proxy.

    Step 7: Configuring an NGINX Reverse Proxy

    The Supabase stack listens for traffic internally on port 8000. We need to tell NGINX to take all incoming web traffic (on ports 80 and 443) for your domain and forward it to this internal port. This is a classic reverse proxy setup, and RunCloud makes it very simple.

    1. Go back to your RunCloud dashboard and navigate to your app-supabase web application.
    2. Go to the NGINX Config section and click Create NGINX Config.
    3. From the “Predefined Config” dropdown, select “Proxy – Effortlessly turn NGINX…”
    1. Delete all the default content in the text editor and paste the following configuration into the editor:
    proxy_pass http://host:8000;
    proxy_set_header X-Real-IP $remote_addr;
    proxy_set_header X-Forwarded-Host $host;
    proxy_http_version 1.1;
    proxy_set_header Upgrade $http_upgrade;
    proxy_set_header Connection "upgrade";
    1. Click “Save Config” to apply the new configuration.

    Step 8: Access Your Supabase Dashboard

    Your self-hosted Supabase instance is fully deployed and accessible on the internet. You can now open your web browser and navigate to the domain you configured in Step 2 (e.g., https://supabase.yourdomain.com). When you visit this site, you should see the Supabase Studio login screen.

    Enter the credentials you configured in the .env file from the previous step, and you will be logged in to your own Supabase dashboard, ready to create tables, manage users, and build your next great application.

    installing a self-hosted supabase instance on runcloud

    Final Thoughts & Your Next Steps

    Congratulations on taking control of your backend by deploying a fully self-hosted Supabase instance! This tutorial shows more than just how to deploy Supabase; it showcases the true power and flexibility of RunCloud as a central hub for all your server management needs.

    But your journey with RunCloud doesn’t have to end here. The same platform that now runs your complex Dockerized Supabase application is perfectly equipped to manage all your other projects.

    Whether you’re running a high-traffic WordPress site, a modern Laravel application, a content-rich Ghost CMS, an n8n instance for your automation workloads, or even a private cloud with Nextcloud, RunCloud provides the tools to manage it all effortlessly.

    If you are a developer who needs a professional workflow, RunCloud provides features such as Git integration for atomic deployments, creating a smooth CI/CD pipeline directly from your repository.

    Perhaps one of the most compelling advantages of using RunCloud is its predictable, resource-independent pricing model. RunCloud does not charge you based on your server’s specifications or resource consumption. Whether you choose a small 2GB RAM server or a powerful 64GB machine to run your Supabase instance, your RunCloud subscription cost remains the same, offering predictable expenses as you grow.

    Sign up for RunCloud today.

    Frequently Asked Questions About Self-Hosting Supabase with RunCloud

    How do I scale my server if my Supabase application grows?

    RunCloud is completely cloud-provider agnostic, meaning it doesn’t lock you into a specific hardware provider. When you need more power, you can simply resize your server at Hetzner, DigitalOcean, or any other provider, and RunCloud will continue to manage it seamlessly.

    How does RunCloud help secure my self-hosted Supabase instance?

    Security is a primary concern with self-hosting, and RunCloud automates the most critical tasks for you. It configures an isolated web application environment, sets up a server firewall with a single click, and provides timely notifications for security updates, ensuring your server remains up-to-date and protected from common threats.

    What’s the easiest way to back up my database?

    Manually scripting database backups is tedious and prone to errors. RunCloud offers a straightforward, off-server backup solution that allows you to schedule backups for your database and files with just a few clicks. This ensures that your critical user data is always secure and can be easily restored in the event of an emergency.

    How do I add an SSL certificate to my Supabase domain to secure API calls?

    RunCloud offers free, auto-renewing Let’s Encrypt SSL certificates for any domain associated with your web application. You can secure your Supabase API endpoints and dashboard with a trusted HTTPS connection with a single click, eliminating the complexity of manual certificate generation and renewal.

    Supabase has many services. How can I monitor my server’s health and resource usage?

    RunCloud’s dashboard provides a real-time health monitoring system for your server. You can instantly check CPU, RAM, and disk usage to ensure your server has enough resources to run smoothly. This visual overview helps you anticipate scaling needs and troubleshoot performance issues before they impact your users.

  • How to Host Professional Email with Greatmail

    How to Host Professional Email with Greatmail

    As a RunCloud user, you already know how to manage high-performance websites and servers efficiently.

    But if you’re still using a personal address like mybusiness@gmail.com, you’re missing a key element of professionalism.

    While services such as Google Workspace and Microsoft 365 offer robust email solutions, their per-user costs can be high for small teams or side projects.

    In this guide, you’ll learn how to host professional, domain-branded email using Greatmail – an affordable alternative that integrates easily with your domain managed through RunCloud.

    Why Use a Dedicated Email Host Like Greatmail

    Using a dedicated email hosting provider like Greatmail offers several clear benefits:

    • Cost efficiency: Greatmail is considerably more affordable than enterprise platforms such as Google Workspace or Microsoft 365, especially if you only need core email functionality.
    • Professional image: An address that matches your domain instantly builds trust and brand credibility.
    • Simplified management: You don’t need to install or maintain your own mail server, which avoids deliverability, security, and spam blacklisting problems.
    • Improved reliability: Keeping your email separate from your website hosting ensures that email continues to function even if your web server experiences downtime.

    How to Set Up a Professional Email with Greatmail

    Let’s walk through the steps to configure your Greatmail instance.

    Step 1: Sign Up and Add Your Domain to Greatmail

    Before we touch anything in RunCloud or your DNS settings, you need to tell Greatmail that you want it to handle your email.

    1. Navigate to the Greatmail website and sign up for an account.
    2. Once you are logged into your new Greatmail admin dashboard, the first step is to add your domain name. For this, you will need to contact Greatmail support via their contact form or email. During normal business hours, they typically provision domains within 2 hours.
    3. Once it is configured, Greatmail will provide you with a specific set of DNS records. These records tell the Internet where to send your domain’s email. You’ll need these records in the next step.

    Step 2: Configure DNS Records

    Next, you will need to edit the DNS records for your domain to connect it to Greatmail’s servers. You can do this at the company where you registered your domain (e.g., Namecheap, GoDaddy, Google Domains) or a service like Cloudflare if you use one.

    You’ll need to add or update the following DNS records exactly as provided in your Greatmail dashboard.

    1. MX (Mail Exchanger) Records: Direct incoming email for your domain to Greatmail’s mail servers. These records tell other mail servers where to deliver messages for addresses like user@yourdomain.com.
    1. SPF (Sender Policy Framework) Record: Add a TXT record authorizing Greatmail’s servers to send mail on your behalf. This helps prevent spoofing and improves deliverability.
    1. DKIM (DomainKeys Identified Mail) Record: Add the unique TXT record string provided by Greatmail to authenticate outgoing mail. This confirms to recipient servers that messages sent from your domain are genuine.

    Once these records are added, allow DNS propagation time (typically a few minutes to several hours) before proceeding.

    Step 3: Manage Email from the Greatmail Admin Panel

    Once your DNS is set up and verified by Greatmail, you can manage everything from their easy-to-use admin panel. Here’s a tour of the main features:

    List Your Domains

    This section provides an overview of all the domains you have added to your Greatmail account. From here, you can select a domain to manage, add new ones, or delete those you no longer need.

    Create a New Email Forward

    An email forward is an alias. This email address won’t have its own inbox but simply forwards all incoming mail to another address. This is perfect for roles like sales@yourdomain.com or info@yourdomain.com that you want to direct to your personal inbox.

    Create a New Mailbox

    A mailbox is a full email account with its own username, password, and storage space. You can access it via webmail or connect it to an email client like Outlook, Apple Mail, or Thunderbird.

    When you select Create a new mailbox, fill in the following fields to create your professional address (for example, john@example.com):

    • Username: Enter only the part before the @ symbol (e.g., john).
    • Domain: Choose your domain (e.g., example.com).
    • Password: Enter a strong, unique password. This will be used for both webmail and email client access.
    • Name: The display name shown in recipients’ inboxes (e.g., John Doe).
    • Quota: Specify mailbox storage in MB (1000 MB = 1 GB; maximum 10240 MB).
    • Active: Keep checked to enable the account immediately.
    • Send Welcome Mail: Recommended. Sends a setup guide and server details to your alternate email.
    • Other Email: Add a recovery address for password resets (e.g., johns.personal.email@gmail.com).

    Once complete, click Add Mailbox. Your new mailbox will be created instantly.

    Step 4: Access and Use Your Email

    Once you create your email mailbox, you can access your messages, send emails, and manage your account from virtually any device. Here’s a summary of what you can do with your new mailbox:

    • Connect to Desktop & Mobile Apps: For a seamless, native experience, you can integrate your account directly into email clients like Microsoft Outlook, Apple Mail, Thunderbird, and various mobile mail apps on iOS and Android.
    • Integrate with Your Existing Gmail Account: If you love the Gmail interface, you can configure it to both send and receive emails from your new professional address, keeping everything in one place.

    How to Connect Your Account

    No matter which application you choose, the setup process follows the same basic principle. During a manual setup, you will simply need to enter the core server details for your account.

    To connect your Greatmail account, open your email client’s Add Account settings:

    • Outlook: File → Add Account
    • Apple Mail: Mail → Add Account
    • Gmail: Settings → Accounts and Import

    Then follow these steps:

    1. Choose Manual Setup, Advanced Setup, or Add Other Account instead of provider presets.
    2. Enter your full email address and password.
    3. Use the following server settings provided by Greatmail:

    Server Type

    Server Name

    Port

    Encryption

    IMAP (Incoming Mail)

    secure.greatmail.com

    993

    SSL / TLS

    POP3 (Incoming Mail)

    secure.greatmail.com

    995

    SSL / TLS

    SMTP (Outgoing Mail)

    secure.greatmail.com

    465 or 2500, 587, 2525

    SSL / TLS or STARTTLS

    Choose IMAP to sync mail across multiple devices or POP3 to download messages to one device.

    Save the configuration and allow your client to verify the connection. Your client will test the connection, and once verified, your mailbox will be ready to use.

    Wrapping Up: Host Professional Email the Easy Way

    You are now fully equipped to host your own email solution, sending and receiving messages from a credible address that builds trust with your customers and strengthens your brand. With this setup, you’re ready to grow your business without worrying about expensive per-user email fees.

    This guide shows how the right tools can simplify even complex technical workflows.

    RunCloud helps you do the same for your entire web infrastructure – from deploying applications to managing servers and securing your sites.

    Start your free RunCloud trial today and manage your websites, servers, and email with confidence.

    Frequently Asked Questions About Hosting Email with Greatmail

    Can I use Greatmail with my existing Gmail or Outlook account?

    Yes. You can connect your Greatmail address to Gmail, Outlook, or any IMAP/SMTP-compatible client.
    In Gmail, go to Settings → Accounts and Import and add your Greatmail credentials under “Send mail as” and “Check mail from other accounts.”
    In Outlook, use the manual setup option and enter Greatmail’s server settings exactly as provided in your dashboard.

    Does Greatmail support both IMAP and POP3?

    Yes. Greatmail supports both protocols.
    IMAP keeps your messages and folders synced across all devices.

    POP3 downloads emails to a single device and removes them from the server after retrieval.
    IMAP is recommended for most users who access their email from multiple devices.

    How long does DNS propagation take after adding Greatmail records?

    DNS propagation usually completes within a few minutes, but can take up to 24 hours depending on your domain registrar or DNS provider.
    You can track progress using a DNS-checking tool to confirm that the MX, SPF, and DKIM records have fully updated.

    Can I host multiple domains under one Greatmail account?

    Yes. You can manage multiple domains from the Greatmail admin panel.
    Each domain can have its own mailboxes, forwarding rules, and quotas. This is especially useful for agencies or businesses operating several brands.

    How secure is Greatmail compared to self-hosting email?

    Greatmail uses SSL/TLS encryption for all connections and enforces authentication with SPF and DKIM.
    Because Greatmail manages its own infrastructure, you benefit from maintained mail servers, spam protection, and security updates without having to run your own mail system.

    What happens to my email if I move my website to another host?

    Your email will continue to function normally as long as your DNS MX records still point to Greatmail’s servers.
    Keeping email hosting separate from web hosting ensures continuous email service, even if your website is migrated or temporarily offline.

    Does Greatmail work with RunCloud servers directly?

    Yes. You can continue managing your domain, web applications, and SSL certificates in RunCloud while Greatmail handles all mail delivery. They operate independently, which keeps your email reliable and unaffected by any changes to the web server.