Category: Server Management

  • How to Set Up an Amazon EC2 (AWS) Server to Host Your Websites

    With AWS, Amazon’s cloud computing platform, you can create virtual servers in the cloud using either Amazon EC2 or Amazon Lightsail.

    Amazon EC2 is for highly configurable and performant environments, while Amazon Lightsail is for easy-to-use and affordable ones.

    This tutorial will guide you through hosting your web applications on Amazon EC2. You can also follow a short video tutorial at the end.

    Note: If you want to use Amazon Lightsail, please check our other tutorial – how to setup Amazon Lightsail to host your websites.

    Video Tutorial: How to Set Up Amazon EC2 (AWS)

    Prefer watching a video over reading? We’ve got you covered.

    You can watch this companion video tutorial while following this written guide.

    Step 1. Create an Amazon EC2 Instance

    To use AWS, you need to sign up or log in to your account.

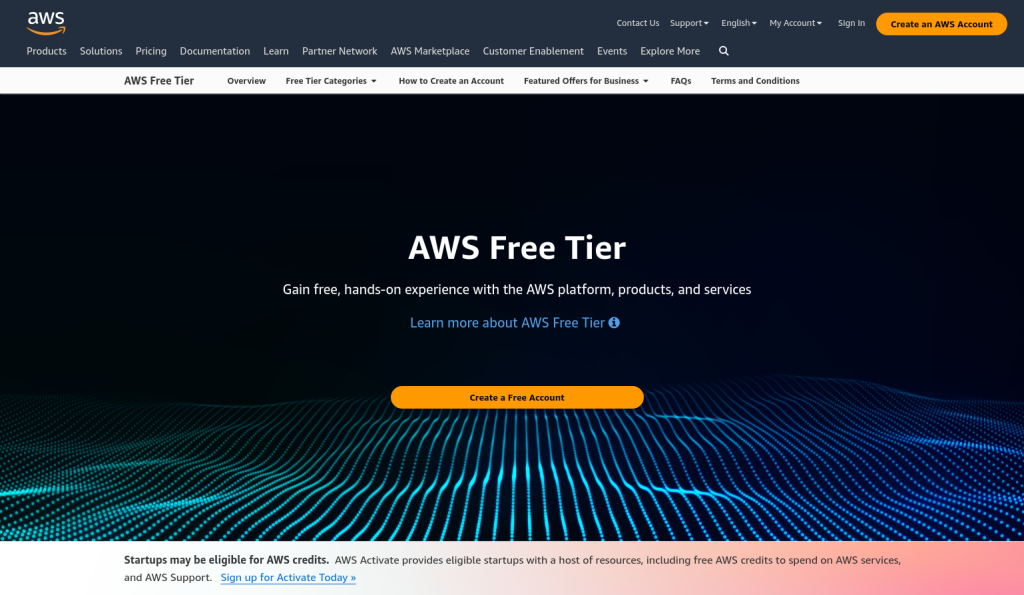
    Tip: You can try out AWS services for free up to certain limits with the AWS Free Tier. The Free Tier has three types of offers: a 12-month Free Tier, an Always Free offer, and short term trials. Refer to AWS documentation for more details.
    Choose An AWS Region

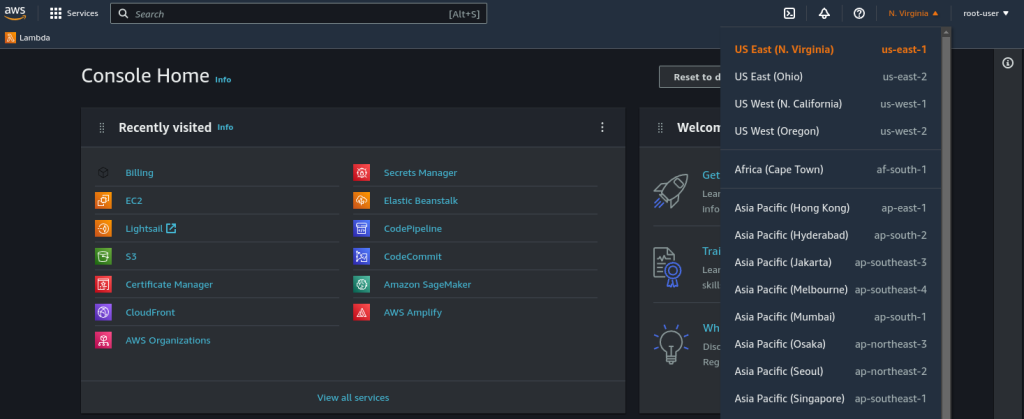
    Before you create your Amazon EC2 instance, you need to pick a region from the top-right menu. Different regions have different Amazon EC2 dashboards.

    AWS has many regions around the world, such as N. Virginia, Cape Town, Hong Kong, Mumbai, Seoul, Tokyo, etc. You should pick a region that is near you or your customers. This way, your users will experience less delay when accessing your web applications.
    Launch Instance

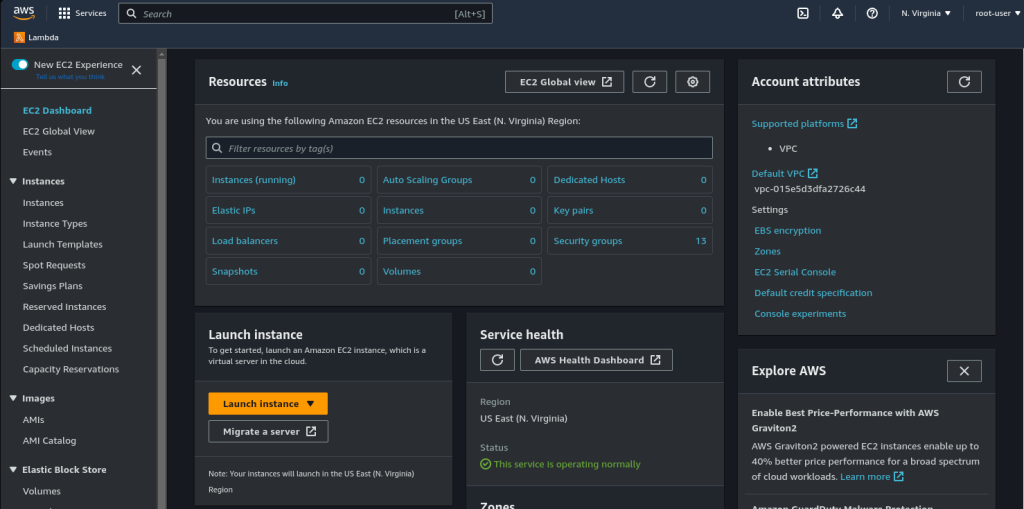
    Search for “EC2” in the search bar at the top of your screen. Go to your Amazon EC2 dashboard and click the “Instance” menu on the left sidebar.

    Then click the “Launch Instance” button to start setting up your server.
    On the next screen, you can provide a descriptive name for your server. This name will be displayed in AWS dashboard.

    Choose Ubuntu Server Image

    Next, you need to choose an Amazon Machine Image (AMI) for your instance. If you use RunCloud, we support Ubuntu 20.04, 22.04 and later LTS versions.

    To pick the latest LTS release, just Click on the “Ubuntu” button in the quick start tab under the OS section.

    Choose Amazon EC2 Instance Type

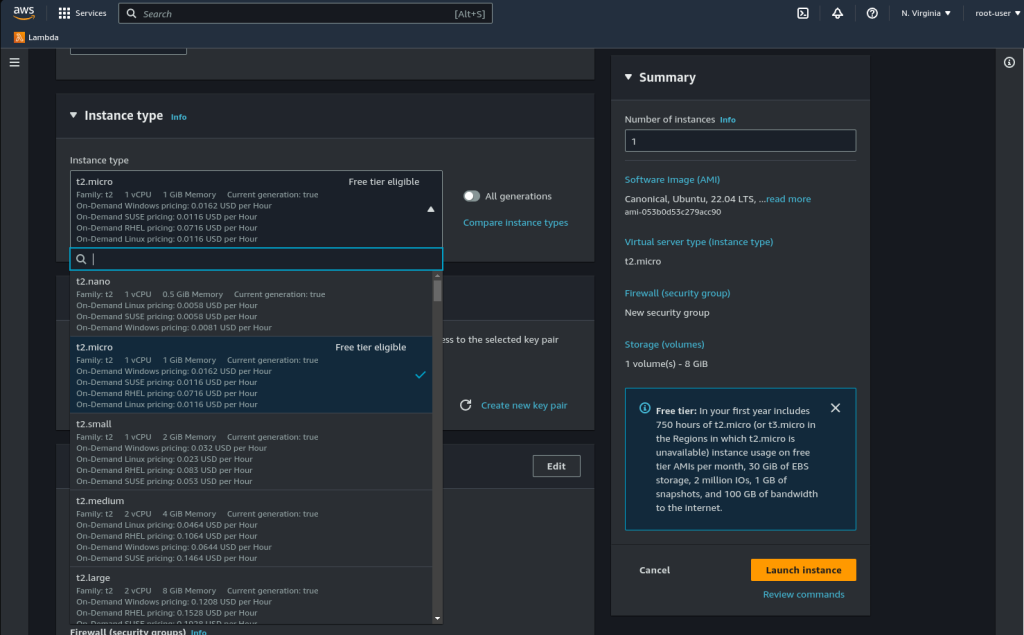
    Under the “Instance Type” option, select one of the predefined instance types for your instance. Each type has a certain number of vCPUs (virtual Central Processing Unit) and memory.

    For example, you can choose the t2.micro instance with 1 vCPU and 1GB Memory that is free for AWS Free Tier users. Each instance type in different AWS region is priced differently. Refer to the AWS pricing chart for up to date information on this topic.
    Create and Download a SSH Key

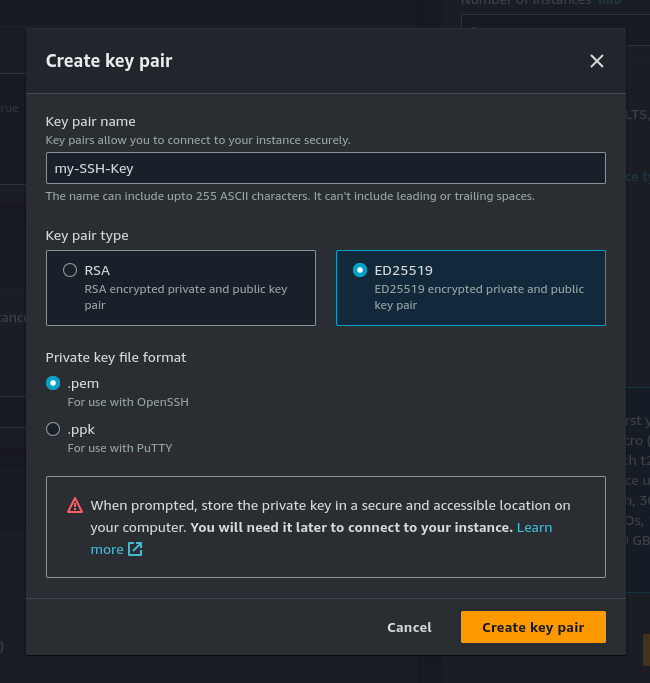
    Next, you will need to specify the SSH key that you want to use to log into this server. If you already have an existing key-pair, you can either use that, or use the built-in utility to create a new key pair and save it to your local computer. You will not be able to download the file again after it’s created.
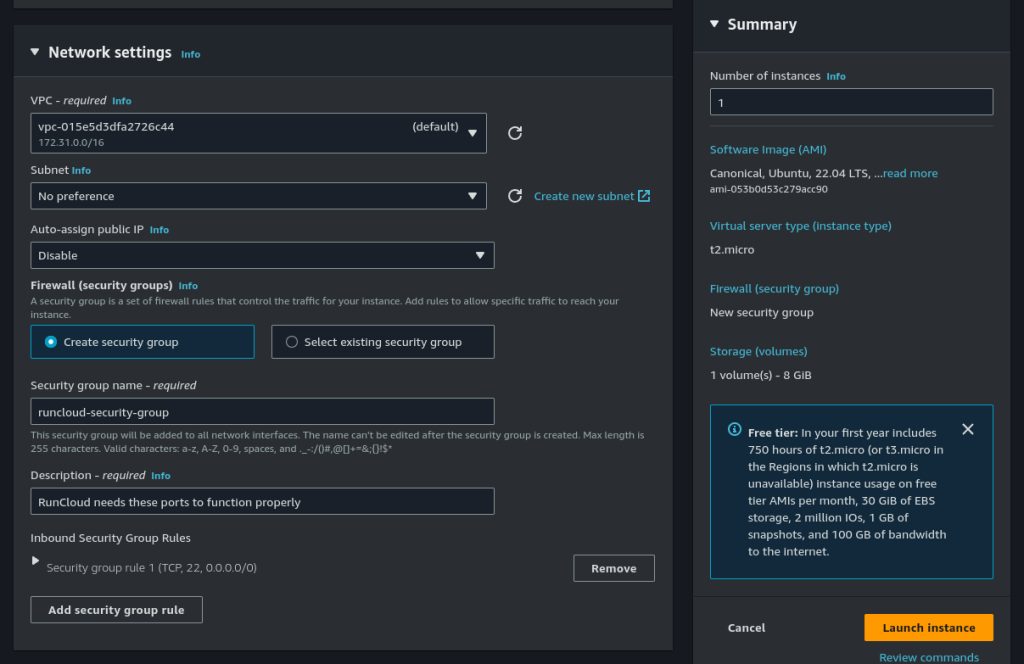
    Configure Security Group (Open Required Ports)

    Next, you need to open the required ports on your EC2 instance. This step is very important to make your Amazon EC2 instance reachable on the internet.

    You need open the following 4 ports:

    • SSH – TCP Port 22
    • HTTP – TCP Port 80
    • HTTPS – TCP Port 443
    • Custom – TCP Port 34210

    Additionally, you can also allow incoming UDP traffic on port 443 to enable HTTP3 traffic.

    To add the above rules, click on “Edit” next to the “Network Settings” sub menu and fill in the following details:

    • Auto-assign public IP: Disable (we will assign a static IP in next step)
    • Firewall (security groups): Create New security Group
      • Security group name: runcloud-security-group
      • Description: RunCloud needs these ports to function properly

    Next, you need to add the rules to open required TCP ports and allow connections from anywhere. For the SSH rule, we recommend setting the source type to “My IP“. This will block any connection requests that originate from outside your network.

    You should note that most residential internet connections do not have a permanent IP address, which means that your IP address will change roughly every 24 hours. Due to this, if you try to log in to your server in future, your SSH connection will be blocked.

    To fix this, you can just log back into your AWS account and edit the runcloud-security-group again to use your new IP.
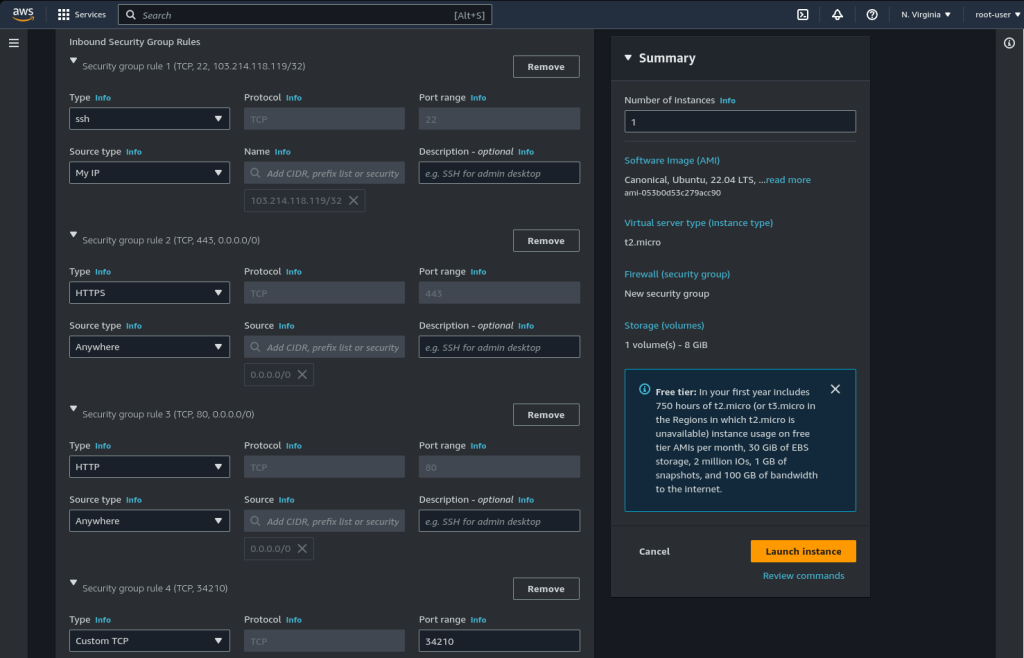
    After adding all of the rules, just leave it and scroll down to the Storage section. Your configuration is temporarily saved in your browser and it will be deployed to AWS when we launch the instance.

    Add Storage

    Within the Storage option you can configure the storage of your server. There are 3 volume types: General Purpose SSD, Provisioned IOPS SSD, and Magnetic storage. Pick the storage type and size that you want, but keep in mind that you will be billed for storage separately.

    Moreover, you will continue to get billed even if you don’t use the storage. For example, if you allocate 200 GB of storage and your server only uses 5 GB then you will be billed for the whole 200 GB every month.
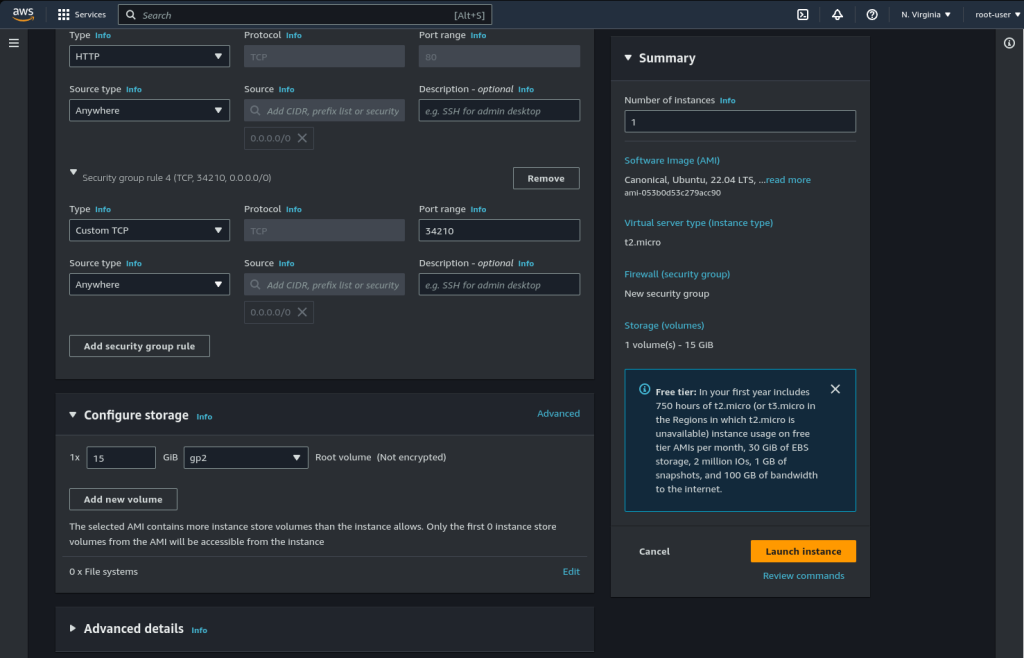
    After adding the storage, you can click on the “Launch Instance” button on the right. This will create a new server with the required settings.

    Step 2. Create A Static Public IP Address

    After creating the server, you will notice that the “Public IPv4 address” filed does not have any value. This is because we disabled the automatic assignment of public IP.
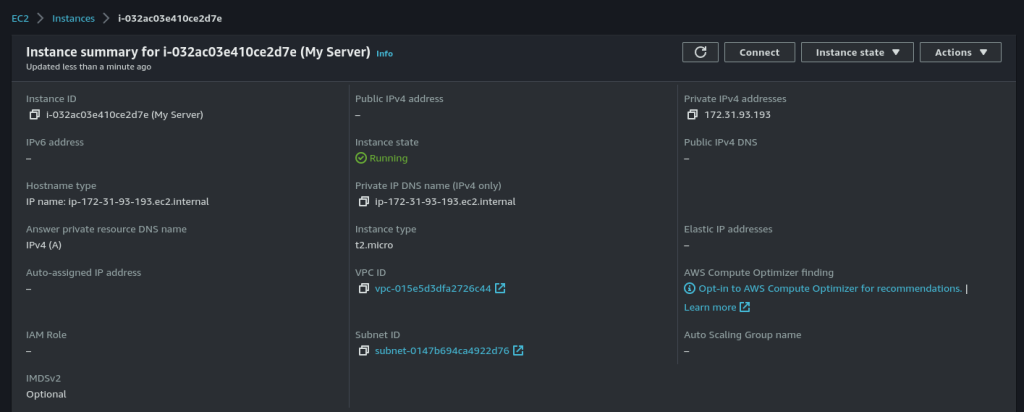
    Why You Need a Static IP Address

    • The public IP address that Amazon EC2 assigns to your instance automatically changes every time you stop and start the instance.
    • If you host your website on Amazon EC2, you should use a static IP address for your server. This way, your website will always be accessible at the same IP address.

    Amazon EC2 provides an Elastic IP address feature for this purpose. An Elastic IP address is a static IP address that stays the same after you stop and start your instance. Please keep in mind that if you use an Elastic IP address, you will not be charged separately. However, if you reserve an IP address and do not use it, then you will be charged for it.

    Moreover, if you terminate (delete) your EC2 instance, your Elastic IP will not be deleted automatically. You will need to go back to Elastic IP dashboard and manually release the IP address.

    Note: AWS limits each account to five (5) Elastic IP addresses per region by default. If you need more than 5 Elastic IP addresses in your AWS account, you can request a quota increase from the AWS Service Quotas console.

    Allocate An Elastic IP Address

    To reserve a new static IP address, go to the “Elastic IPs” section under the “Network & Security” tab in the left menu.
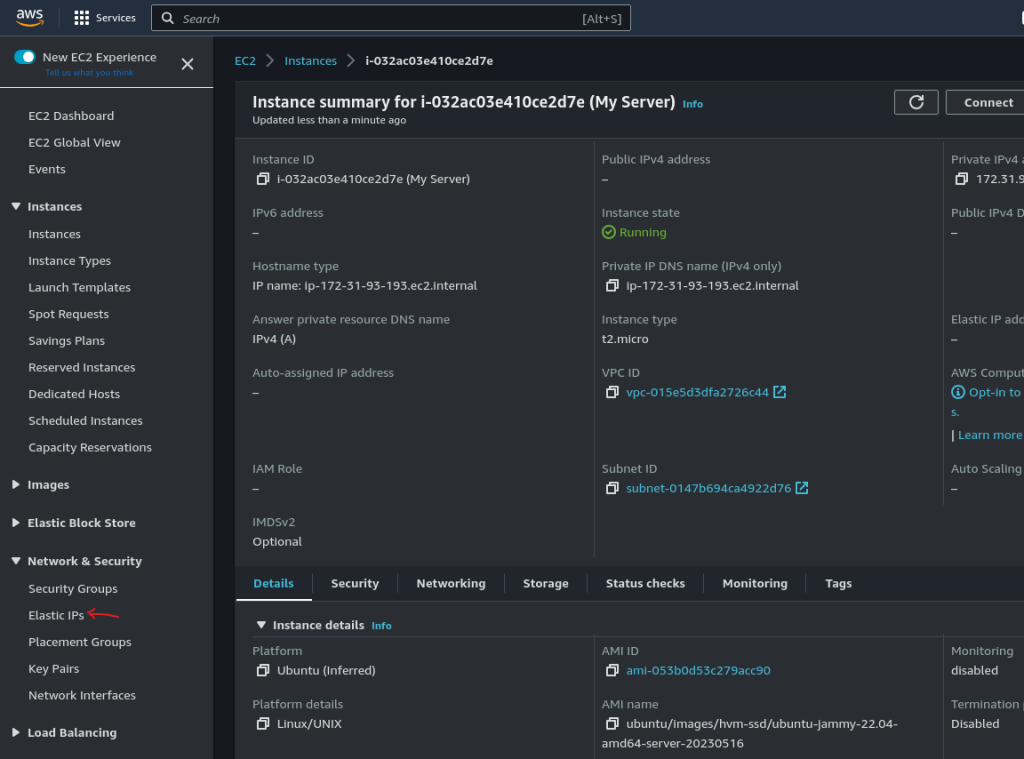
    On the next screen, click on “Allocate Elastic IP address“. This will open up a new screen – select the default values, and click “Allocate“, which will reserve a new IP address. Click on the newly allocated IP address to view its summary.

    After creating an Elastic IP address, you can continue to click the “Associate Elastic IP address” button. This will open up a new page – select the instance you wish to use this Elastic IP address from the drop down menu, and also select its corresponding private IP address.
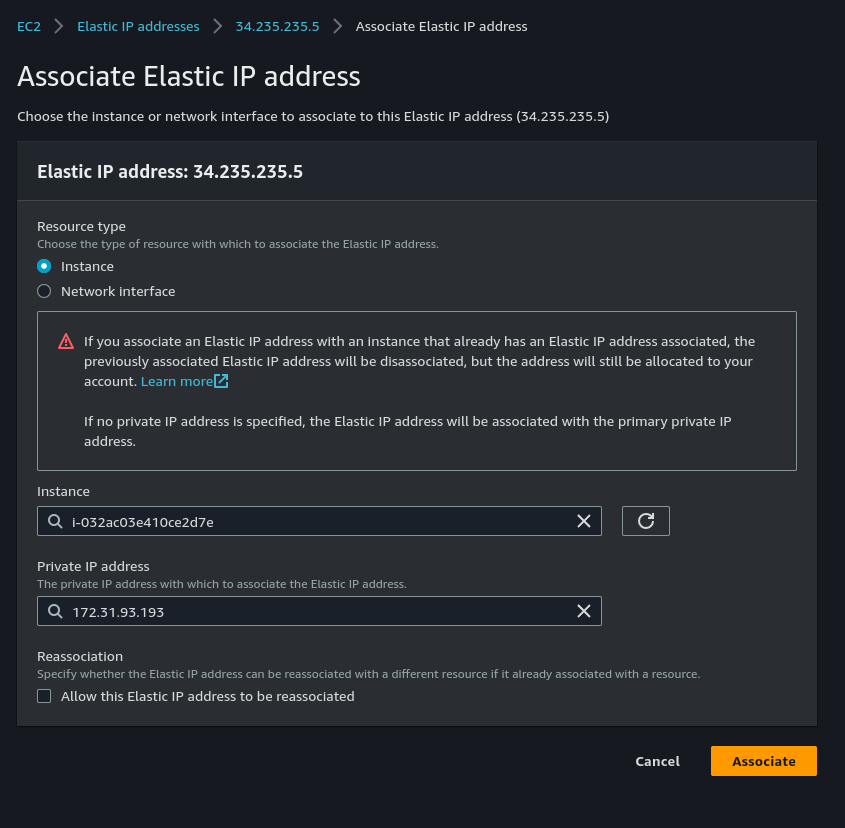
    Click on “Associate“. Now your Amazon EC2 instance has a static IP address and is ready to be used to host your websites.

    Step 3. Connect Amazon EC2 Instance To RunCloud

    RunCloud lets you connect your cloud servers using three different methods. For Amazon EC2, you can use the manual server installation method.

    Log in to the RunCloud dashboard and click the “Connect a new server” button.

    Select “AWS EC2” from the Server Provider list, and then enter a server name and the static IP address that you created in Step 2. Then click the “Add this server” button.
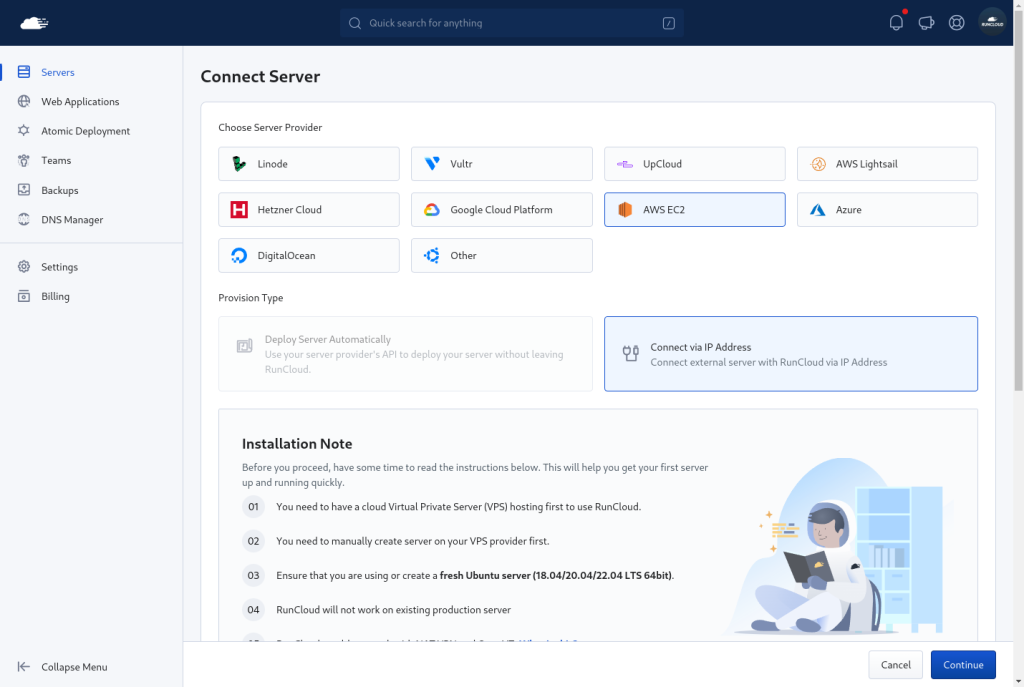
    On the next screen, choose “Manual Installation” and you will see the script that you have to run on your Amazon EC2 instance.
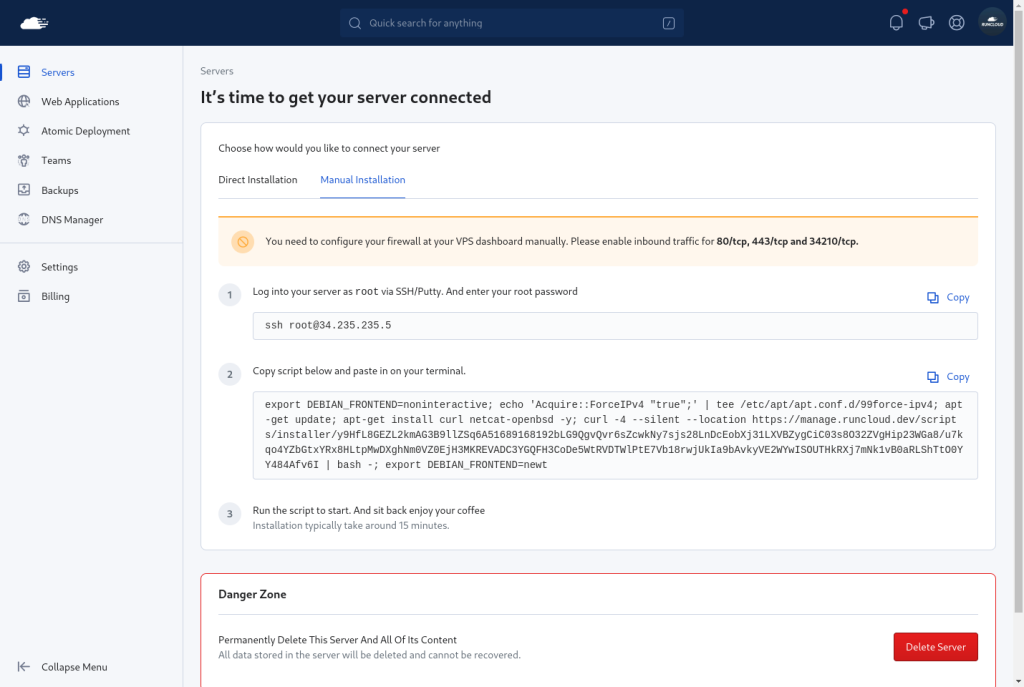
    Connect to Your Amazon EC2 Instance Using SSH

    Go back to the Amazon EC2 dashboard and find your server under the Instances menu. Select the instance and click on the “Connect” button at the top.

    On the next screen, switch to the “SSH Client” tab. There you will see the commands that you need to execute to connect to your server.
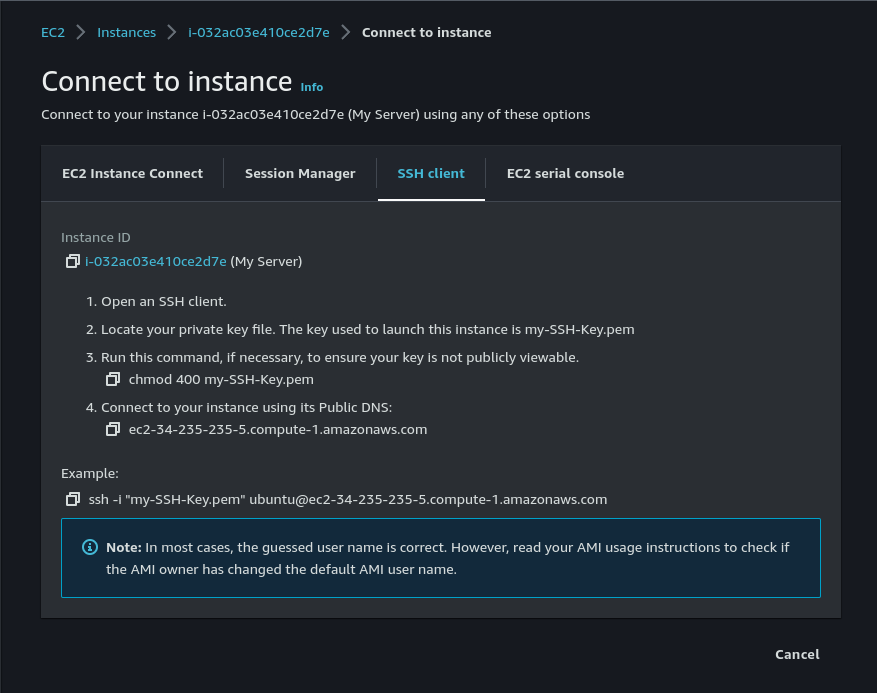
    Open an SSH client and go to the directory where you saved the SSH key that you downloaded when creating the server. To verify that you are in the correct directory, you can run ls <key name> to see if the key is present in the current directory.

    For example, is the name of your key is my-SSH-Key.pem, you will run ls my-SSH-Key.pem. If this shows you the name of your key, then you are in the right place. If you don’t get anything then you need to change the directory using cd command.

    From this directory, run the following command to change the permissions of the SSH key:

    chmod 400 <SSH Key name>.pem
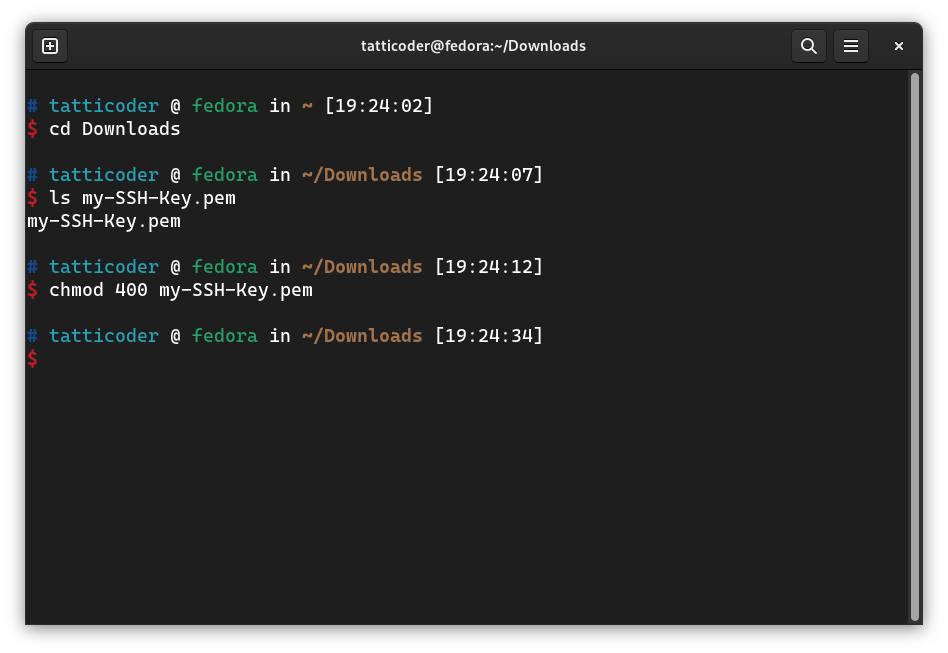
    You can copy the exact command from your AWS dashboard. After changing the permissions, you can run the example command provided in AWS dashboard:

    ssh -i <SSH Key name>.pem ubuntu@myamazonec2-public-dns

    After running the above command, you will get a warning that the authenticity of the server can’t be established when you connect to this server for the first time. Type ‘yes‘ and press “Enter“.

    Run the RunCloud Installation Script

    Finally, we will install the RunCloud agent. We need to run the RunCloud installation script command as the “root” user. Run this command to start a “root” shell.

    sudo -s

    Then, paste and run the RunCloud installer script command. You can find this script in in your RunCloud dashboard. The RunCloud installation will take a few minutes to complete.

    You can check the installer progress on the RunCloud panel too.
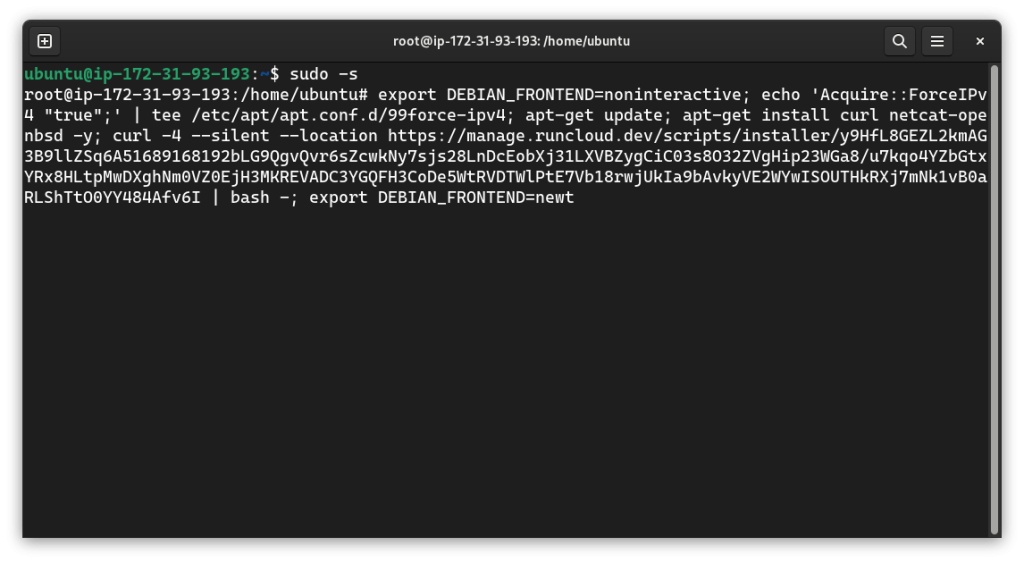
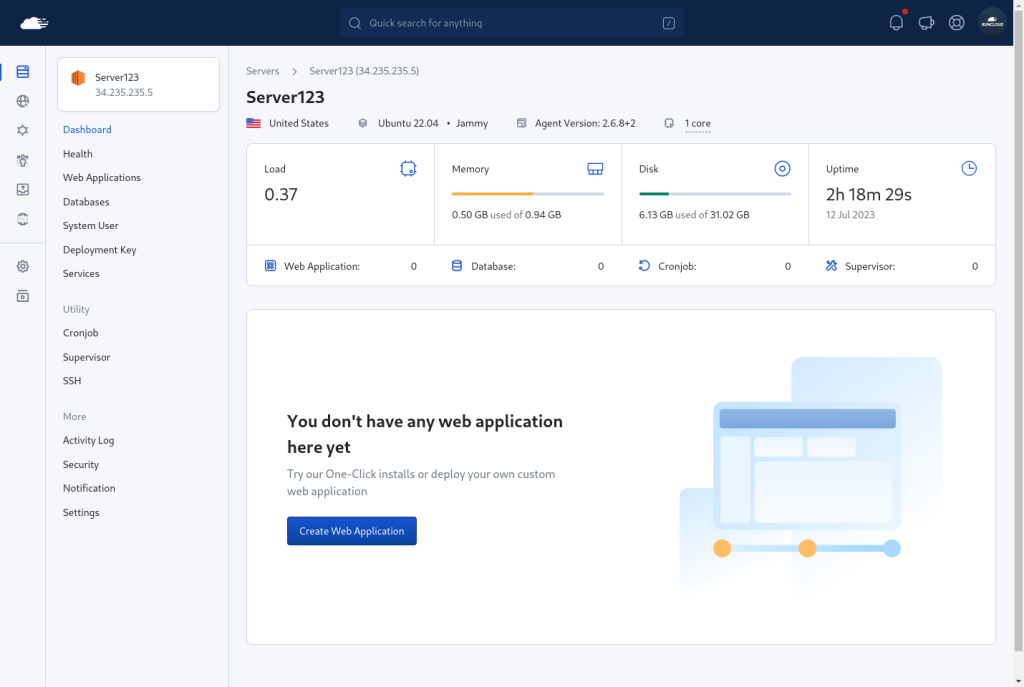
    If successful, data about your server will appear, and you will have successfully set up your Amazon EC2 server with RunCloud.
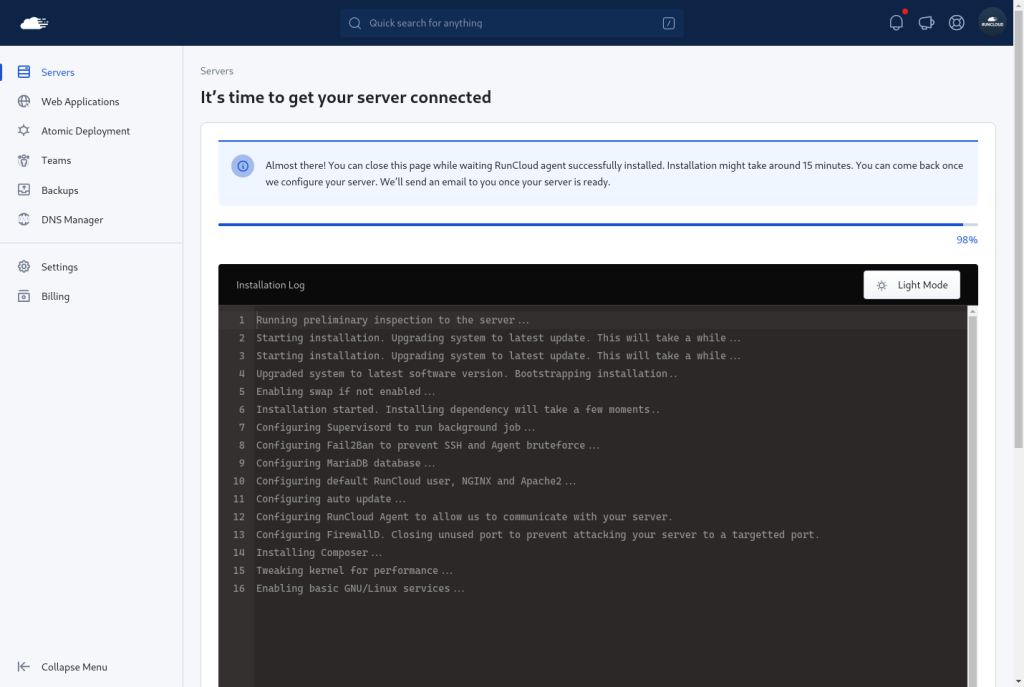
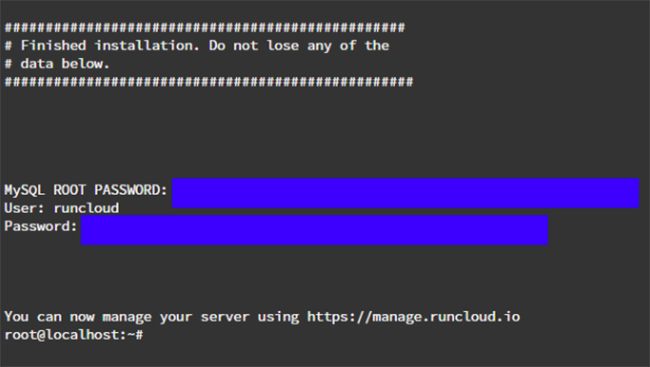
    Once it is completed, you will see the MySQL root password for your database management and the “runcloud” system user password. Please save this information in a secure place.
    Next Steps

    In this article, we have shown you how to set up Amazon EC2 (AWS) to host your websites on RunCloud.

    RunCloud makes it easy to deploy and manage web applications on any cloud server, including AWS. RunCloud and AWS work in tandem to provide you with a fast, secure, and scalable hosting solution for your websites.

    RunCloud is a fantastic tool that saves you a lot of time and hassle when you don’t want to manage your server or don’t have Linux expertise. With RunCloud, you can easily deploy and manage your web applications on any cloud server.

    Continue your journey and learn how to Create Your First Website on RunCloud.
  • How To Set Up Google Cloud Server To Host Your Websites

    The Google Cloud Platform (GCP) is a suite of cloud computing services offered by Google. All GCP data centers are connected through Google’s backbone network – one of the biggest and fastest in the world.

    RunCloud is a cloud server management tool that allows you to maintain full control of your server, and host multiple WordPress, WooCommerce, Laravel, and PHP applications with fast and easy configuration. With RunCloud, you don’t need to be a Linux expert to host your website on Google Cloud Platform servers.

    In this tutorial, we will show you how to set up a Google Cloud server to host your website using RunCloud.

    Step 1. Create a Firewall Rule to Allow Incoming Traffic

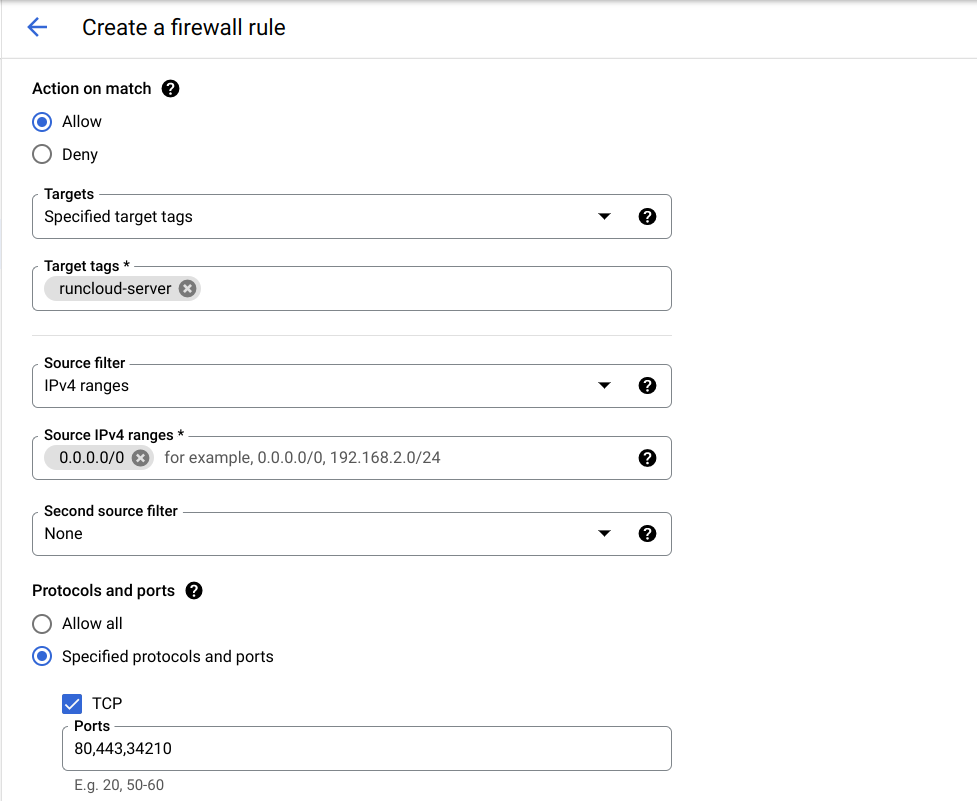
    Your server needs to allow incoming TCP connections on ports 80 and 443 to server traffic from the internet. RunCloud also requires TCP port 34210 to communicate with the server. We will make a firewall rule to allow incoming traffic on all these ports.

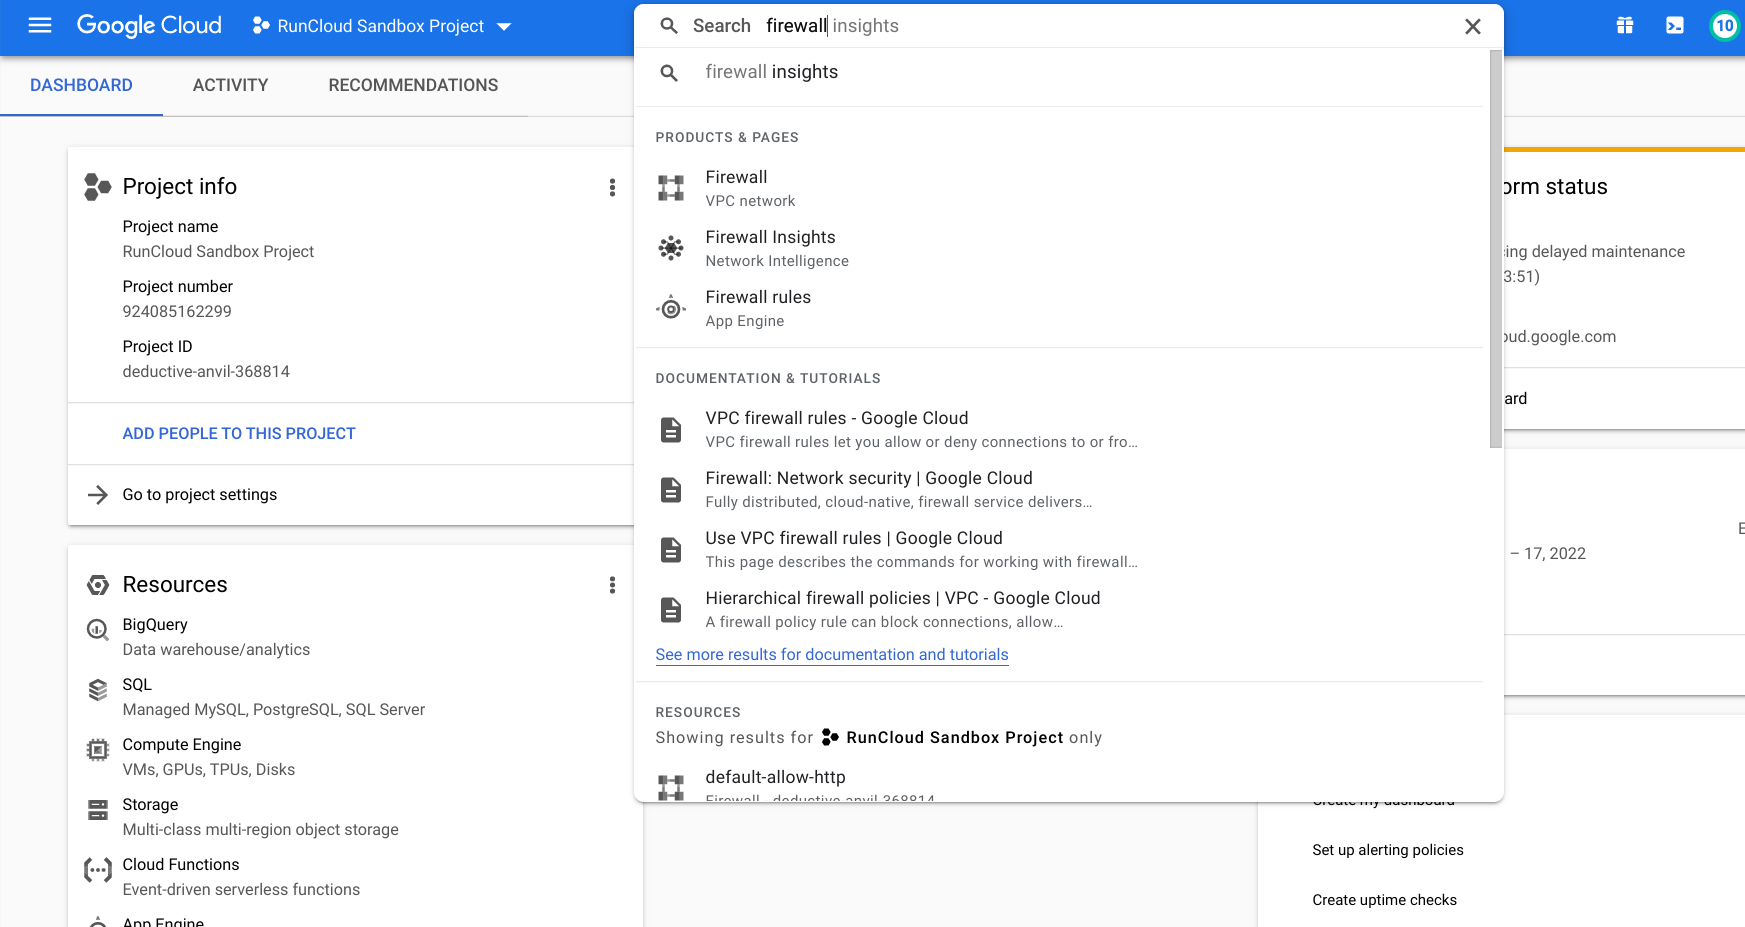
    Go to the “VPC network” > “Firewall” menu and click on “Create Firewall Rule”.

    Enter the following details, and click “Create Firewall Rule” to create a firewall rule:

    • Name: runcloud-firewall-rule
    • Description: Required by RunCloud to function properly.
    • Network: default
    • Priority: 1000
    • Direction of traffic: Ingress
    • Action on match: allow
    • Targets: Specified target tags
    • Tag: runcloud-server
    • Source filter: IP ranges
    • Source IP ranges: 0.0.0.0/0
    • Protocols and ports: Specified protocols and ports then select TCP and enter “80,443,34210”

    Additionally, you can also allow incoming UDP traffic on port 443 to enable HTTP3 traffic.

    Step 2. Reserve a Static IP Address (Optional)

    By default, Google Cloud instances are assigned an ephemeral external IP address. This means a new ephemeral IP address will be assigned to your instance whenever it is stopped and started again.

    If an instance is stopped, any ephemeral external IP addresses assigned to the instance are released back into the general Compute Engine pool, and become available for use by other projects, (GCP Documentation).

    If the IP address of the cloud instance changes, you will need to manually update it in your RunCloud Dashboard. It is highly recommended to use a static IP address for your server. This static IP is dedicated to you and will not be changed when you stop and restart the server, however you will incur additional charges for a static IP.

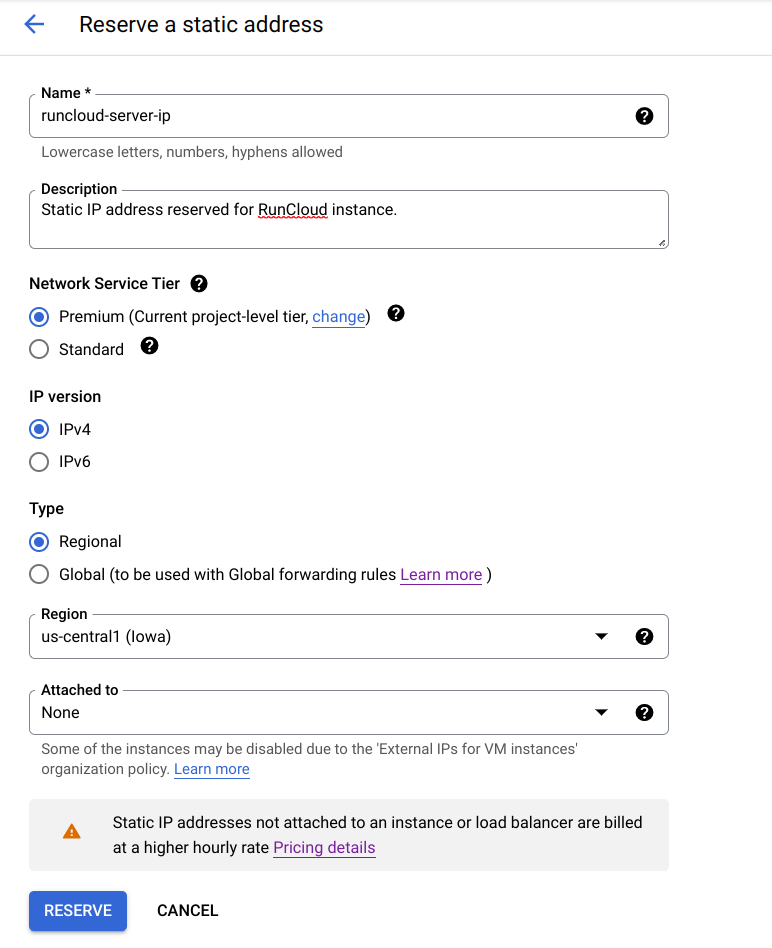
    Go to the “Reserve Static IP” option and enter the following details:

    • Name: runcloud-server-ip
    • Description: Static IP address reserved for RunCloud instance.
    • IP version: IPv4
    • Type: Regional
    • Region: Select your region, if you’re unsure then find out the region most suitable for you
    • Attached to: None

    Step 3. Create A Google Cloud Compute Engine Instance

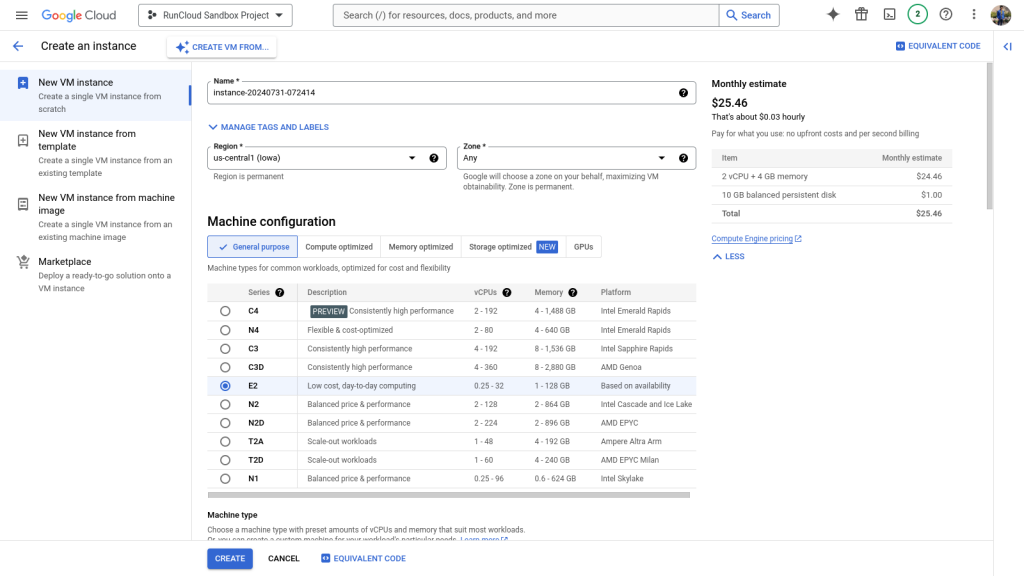
    RunCloud needs a fresh Ubuntu server to function properly, and will not work on an existing production server. Go to the “VM Instances” tab in the “Compute Engine” menu, and click on “CREATE INSTANCE”.

    Select Name and Region

    Give your instance a name, and select the region picked in step 2. We recommend you use a region and zone that is nearest to your target users/visitors. The closer your server location is to your users, the less latency they will experience. This setting is permanent and cannot be changed later.

    Select Machine Type

    Under the “Machine configuration” option, select one of the predefined GCP machine types for your instance. Each machine type gives you a certain number of vCPUs (virtual Central Processing Unit), and a fixed amount of memory.

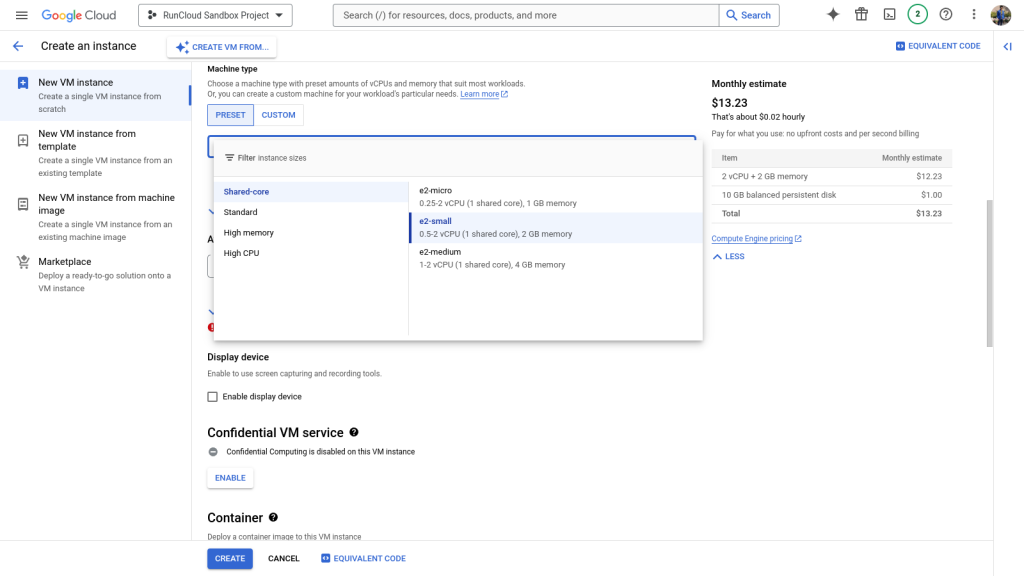
    After selecting your machine series, you can click on the drop-down menu to select the machine type and configure the number of CPU cores as well as RAM for your server. We recommend starting with the “e2-small” machine type, and scale up to match your workload at a later stage.

    Select Boot Disk and OS

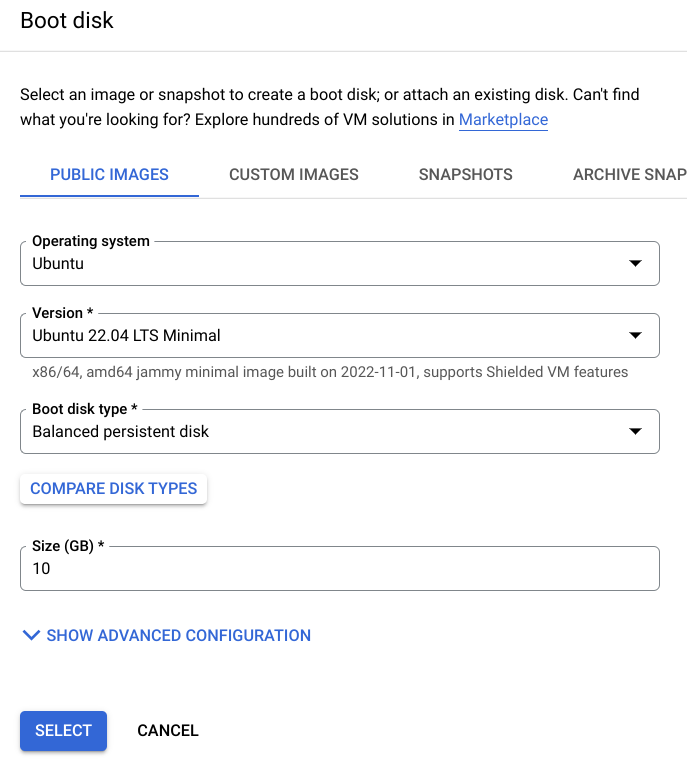
    Next, you need to attach an Ubuntu LTS boot disk to your instance. RunCloud supports Ubuntu 20, 22, and 24 LTS 64-bit at the moment. Click the “Change” button under Boot disk, then select “Ubuntu 22.04 LTS Minimal” for x86/64 architecture.

    For the “Boot disk type” option, select “Balanced persistent disk”. Alternatively, you can choose “SSD persistent disk” for better performance, or “Standard persistent disk” to reduce the storage costs. The boot disk size is customizable from 10 GB to 65,536 GB.

    Apply A Custom Firewall Rule

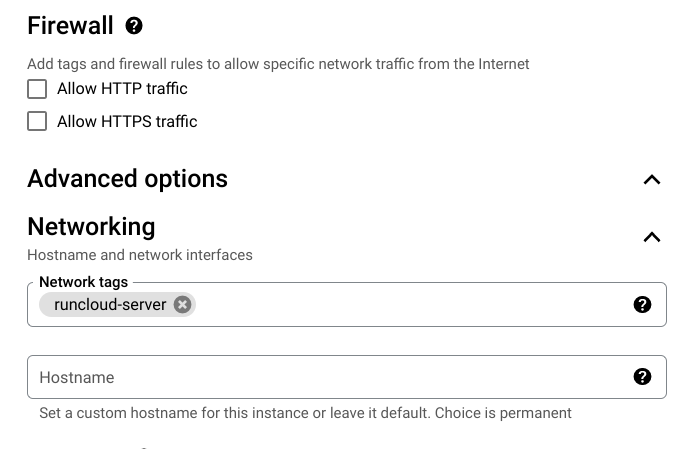
    We will leave both “Allow HTTP traffic” and “Allow HTTPS traffic” unchecked under the Firewall option because we have already created a custom firewall rule to allow internet traffic. Click on the “Advanced Options” to reveal advanced settings.

    Look for “Network tags” under the Networking section and enter the “runcloud-server” tag created in step 1.

    Assign the Static IP

    Now we will assign the static IP reserved in step 2. If you are not using a static IP, you can skip this step.

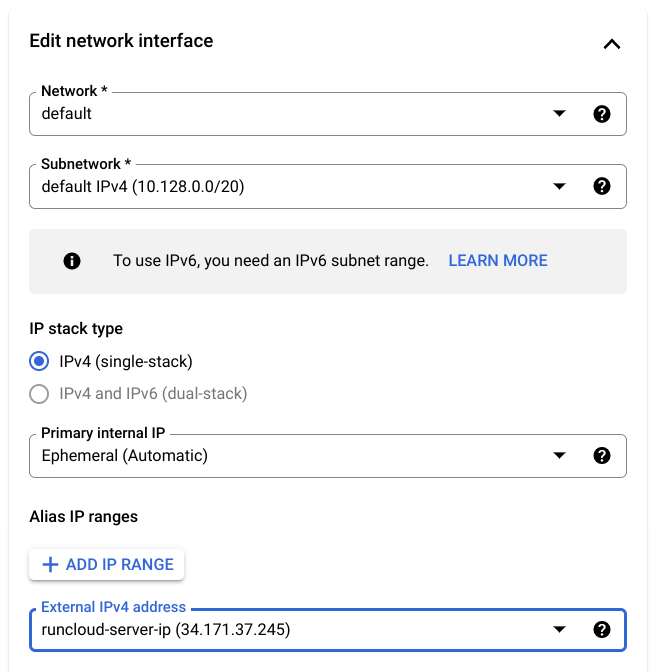
    Scroll down to “Network Interfaces” and edit the default interface settings. Leave all the settings to default, and scroll down to the “External IPv4 addresses” option. Change this from “Ephemeral” to “runcloud-server-ip”:

    Click the “Create” button to start your Google Cloud server.

    Step 4. Connect Google Cloud VM To RunCloud

    Connect Your Server

    Begin by logging in to the RunCloud dashboard, and clicking the “Connect a new server” button.

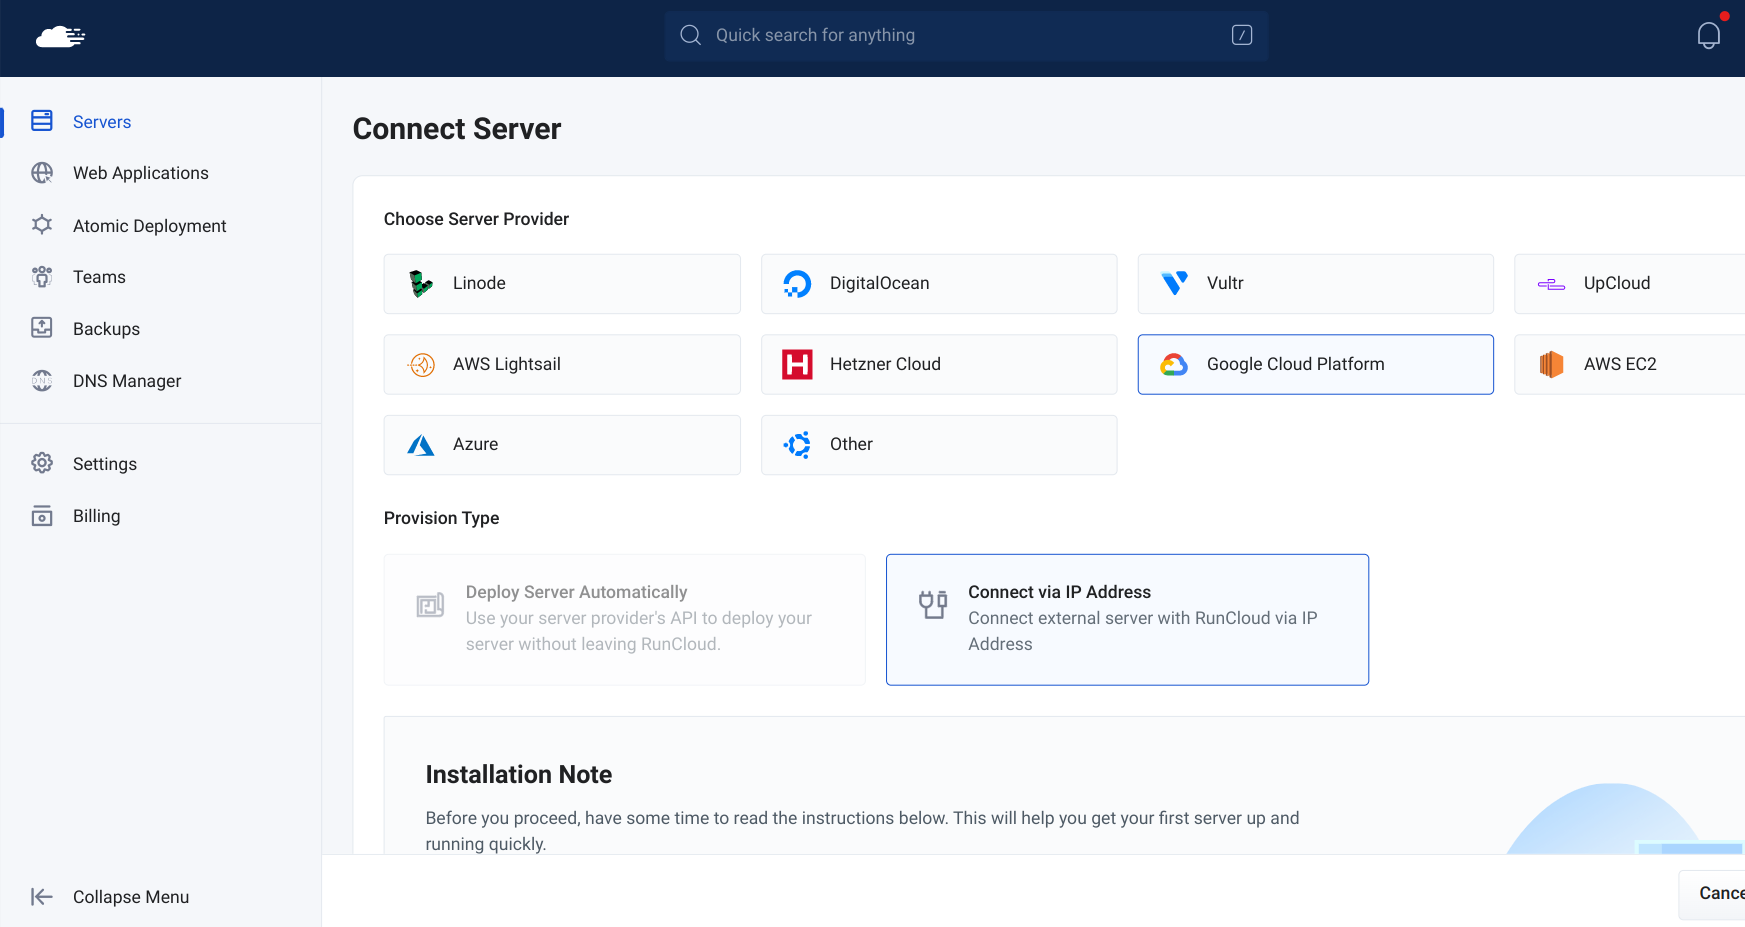
    Next, select “Google Cloud Platform” from the Server Provider list. Enter the name and external IP address of your server, then click “Continue”.

    Install RunCloud Agent

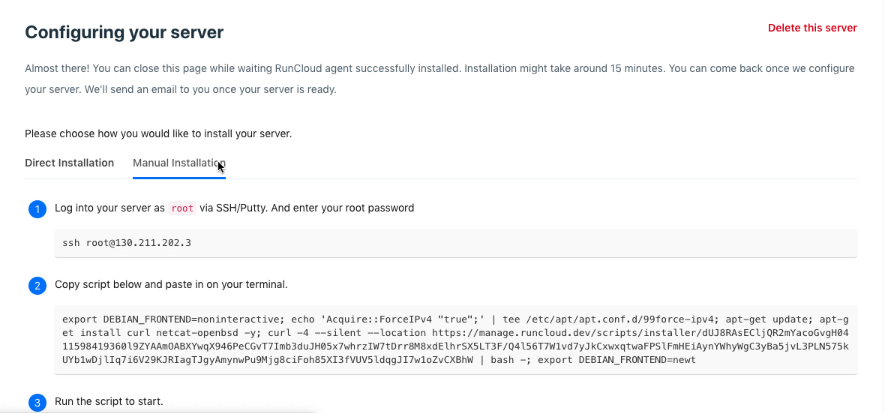
    On the next screen, choose “Manual Installation”, and you will see the script that you have to run on your Google Cloud instance.

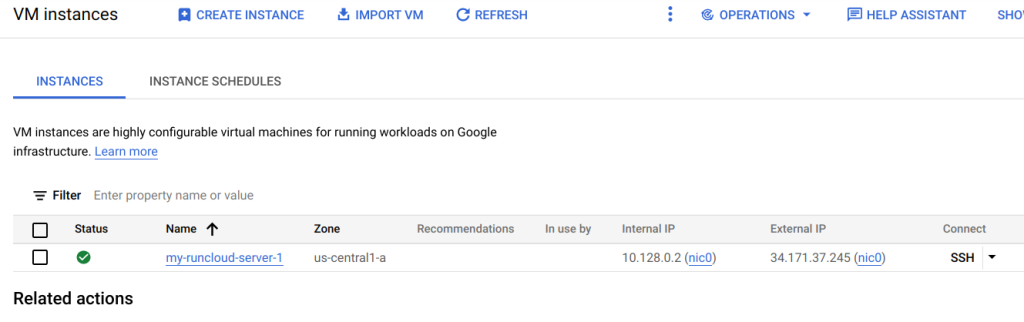
    Go to “VM instances” on your Google Cloud dashboard, and click “SSH” next to the instance that you just created. This will launch a web browser-based terminal to log in to your server.

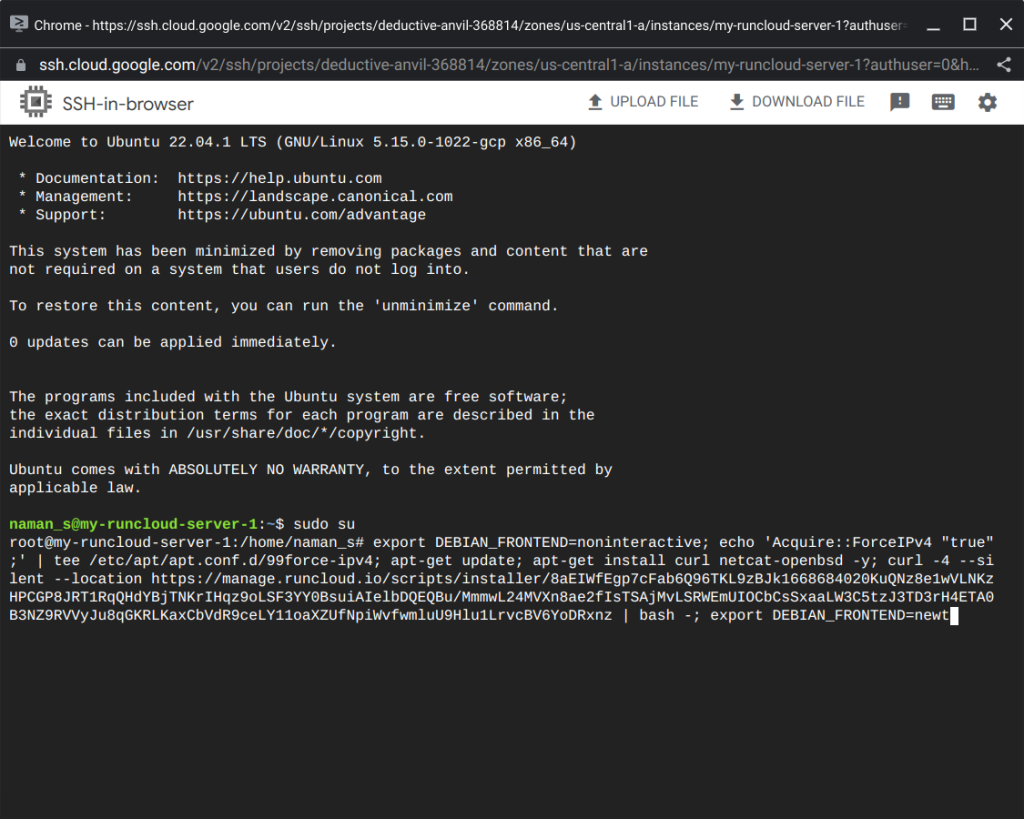
    We need to run the RunCloud installer script command as a “root” user. Run the “sudo su” command to start a “root” shell, and then paste and run the RunCloud installer script command. This should only take a few minutes to complete.

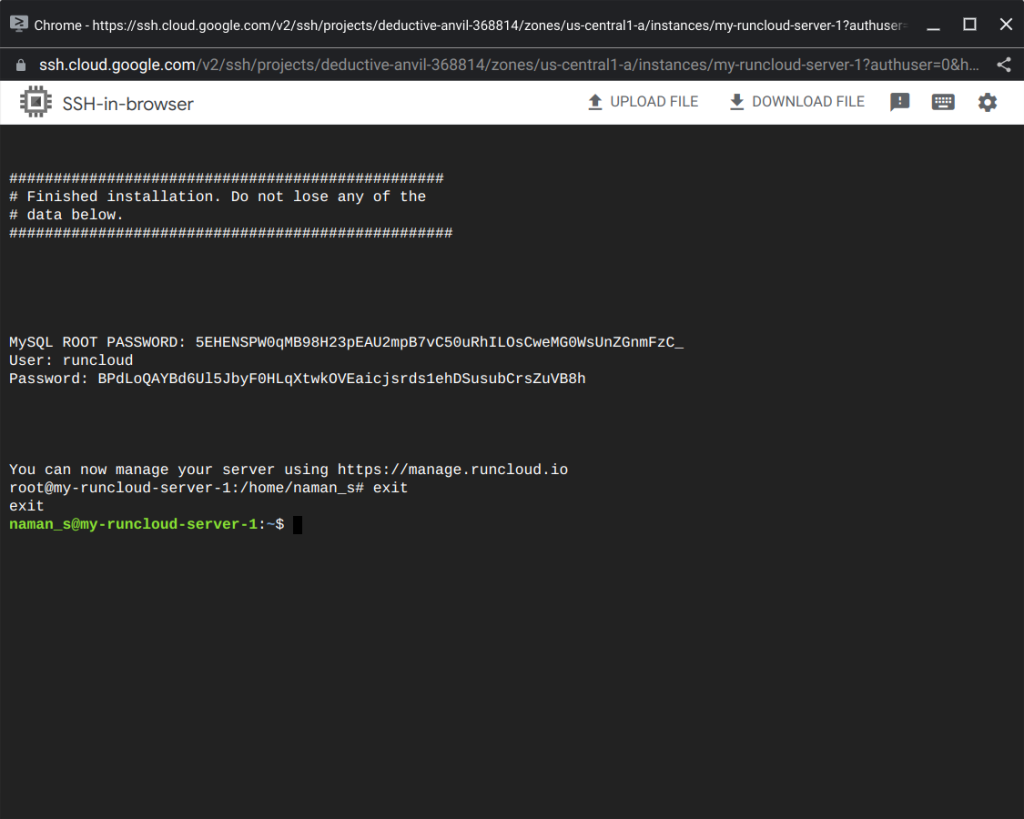
    Once it’s completed, you will see the MySQL root password for your database management, and the “runcloud” system user password. Please save this information securely in a password manager.

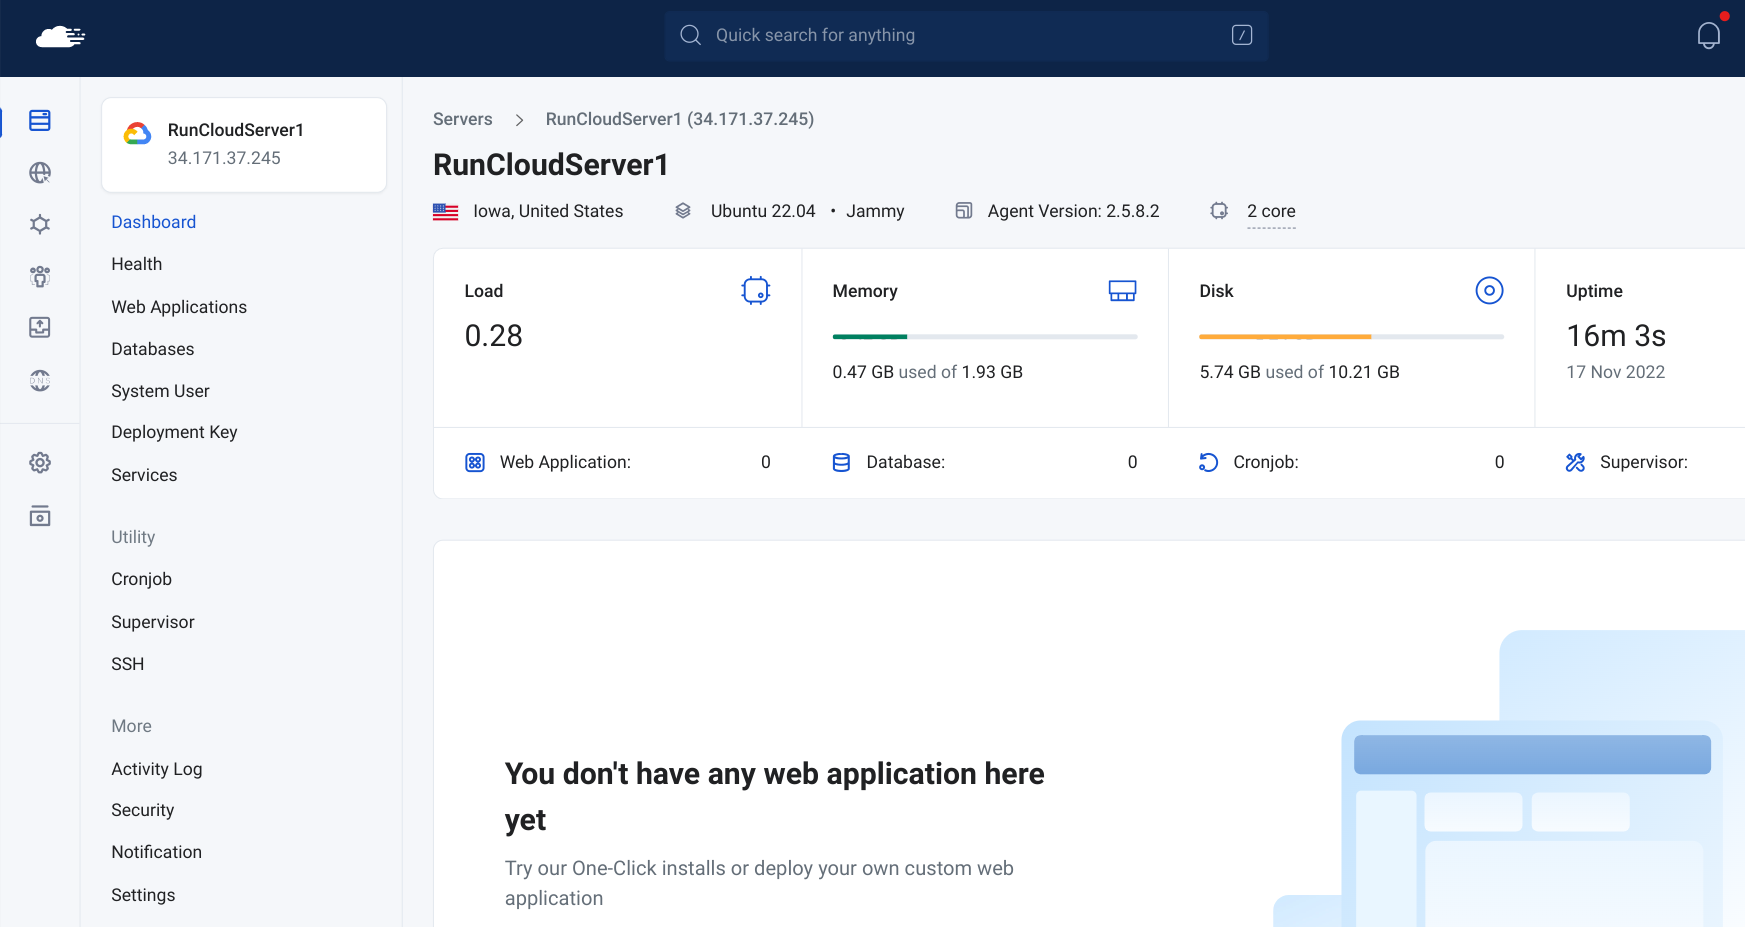
    If successful, data about your server will appear in your RunCloud dashboard, and you will have successfully set up your Google Cloud server with RunCloud.

    Video Tutorial – Setup Google Cloud Server With RunCloud

    You can watch this short video tutorial to show you all steps that we have explained above in less than 3 minutes.

    Final Thoughts

    You can use RunCloud with Google Cloud to simplify server management experience. RunCloud agent needs to be installed on a Ubuntu LTS release and requires TCP port 80, 443, and 34210 to function properly. After a successful install, you can manage the server and monitor its performance metrics from the RunCloud dashboard.

    After setting up your Google Cloud server, you can continue to:

  • How to Set Up a Vultr Server with RunCloud

    Vultr is a cloud server provider that aims to make it easy for developers and businesses to deploy their infrastructure on its advanced cloud platform. It has become one of the leading choices for hosting websites. Vultr has a global presence with 32 data centers across the world – You can select the server location that is nearest to you or your target audience.

    In this article, we will show you how to host your websites on Vultr using RunCloud. RunCloud is a server management platform that lets you connect, configure, and manage your web applications on any cloud server provider, including Vultr.

    RunCloud makes it very easy to connect your Vultr server to its dashboard. Let’s see how!

    Method 1: Deploying/Creating a Vultr Server from RunCloud Dashboard (Recommended)

    RunCloud offers a server provisioning functionality that allows you to create and delete new servers directly from the RunCloud dashboard with just a few clicks. All you need to do is add the Vultr API key to your RunCloud account.

    Adding Vultr API Key to RunCloud

    The Vultr API key is a unique identifier that allows RunCloud to communicate with your Vultr account and create servers on your behalf. To get the Vultr API key, follow these steps:

    1. Log in to your Vultr account and go to the API settings tab on Vultr.
    2. Click on the “Enable API” button to generate your API key.
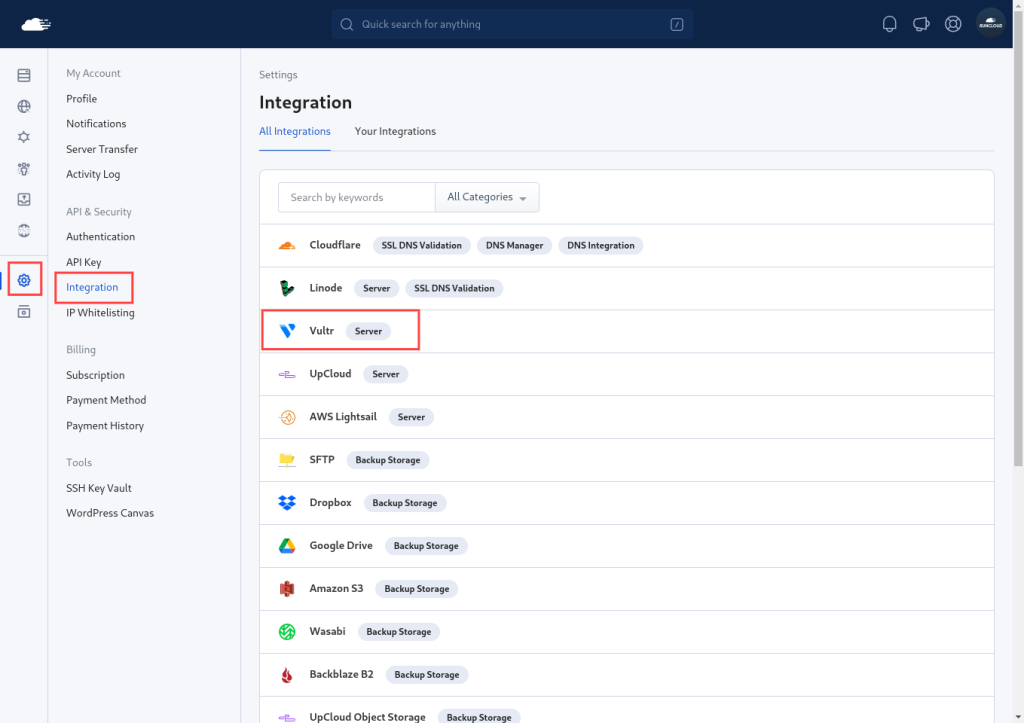
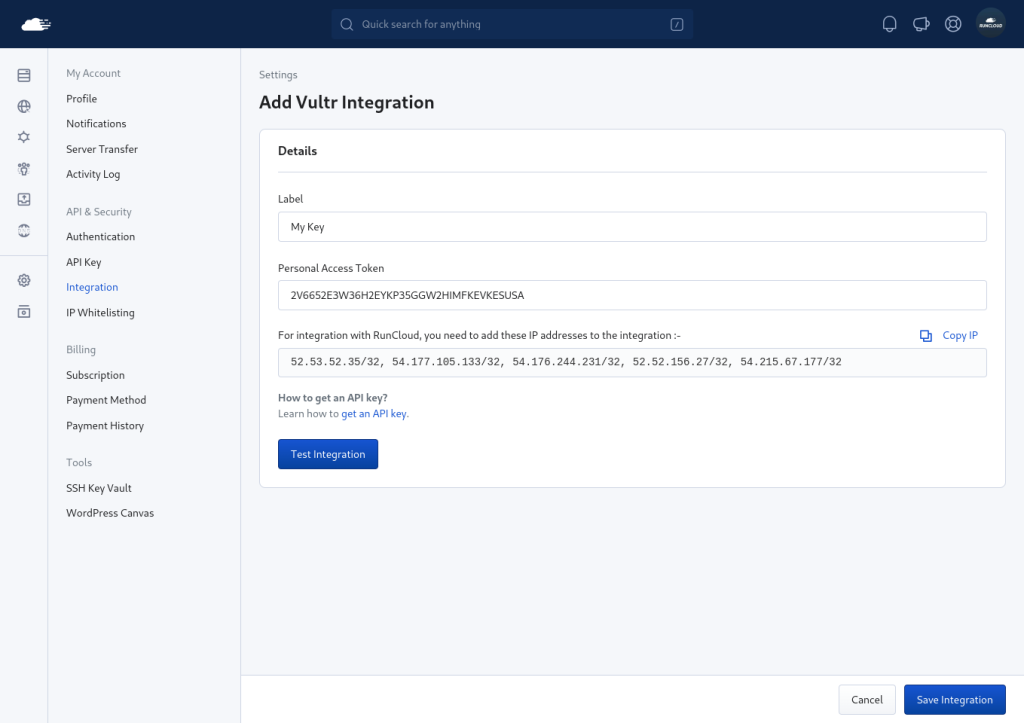
    1. Next, go to your RunCloud dashboard and navigate to the RunCloud Integrations tab in the account settings. Select “Vultr” from the list of available integrations.
    1. On the next screen, provide a descriptive name for this connection in the label field. In the “Personal Access Token” field, paste the API key generated in step 1.
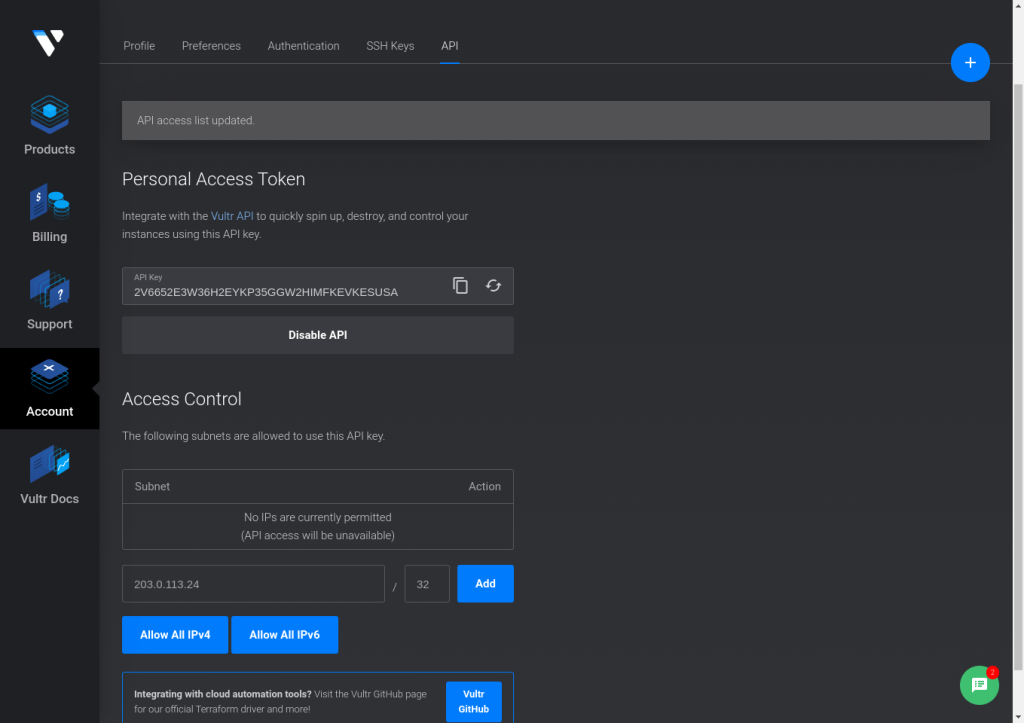
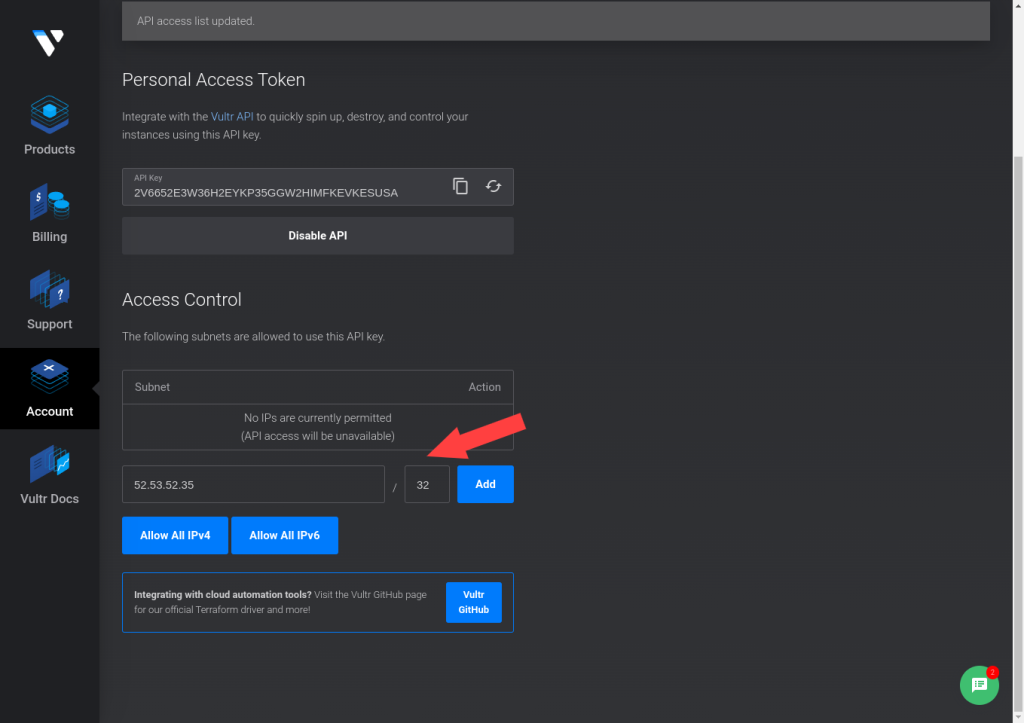
    1. Finally, you need to whitelist IP addresses listed in the RunCloud dashboard on your Vultr account. This will allow RunCloud to access your Vultr account on your behalf. To do this, you need to individually copy each IP address (without the subnet mask, i.e. /32 at the end of the address) and add it to Vultr.

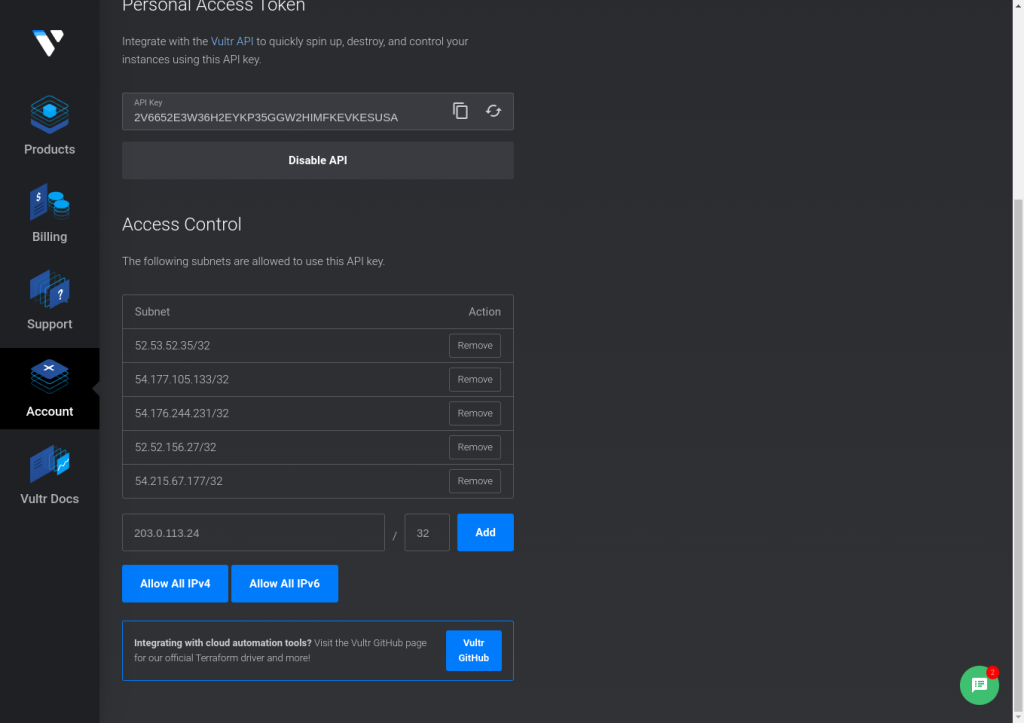
    For example, if you want to add 52.53.52.35/32, you will need to type 52.53.52.35 in the first box and then write 32 in the next box; then you need to click “Add” to add it to the list. You need to repeat this step for all of the IP addresses.

    This might seem like a lot of work for something so trivial, but this is required to properly secure your account. If you do this properly, you can set it and forget it. Once you have added all of the IP addresses, it should look something like this:

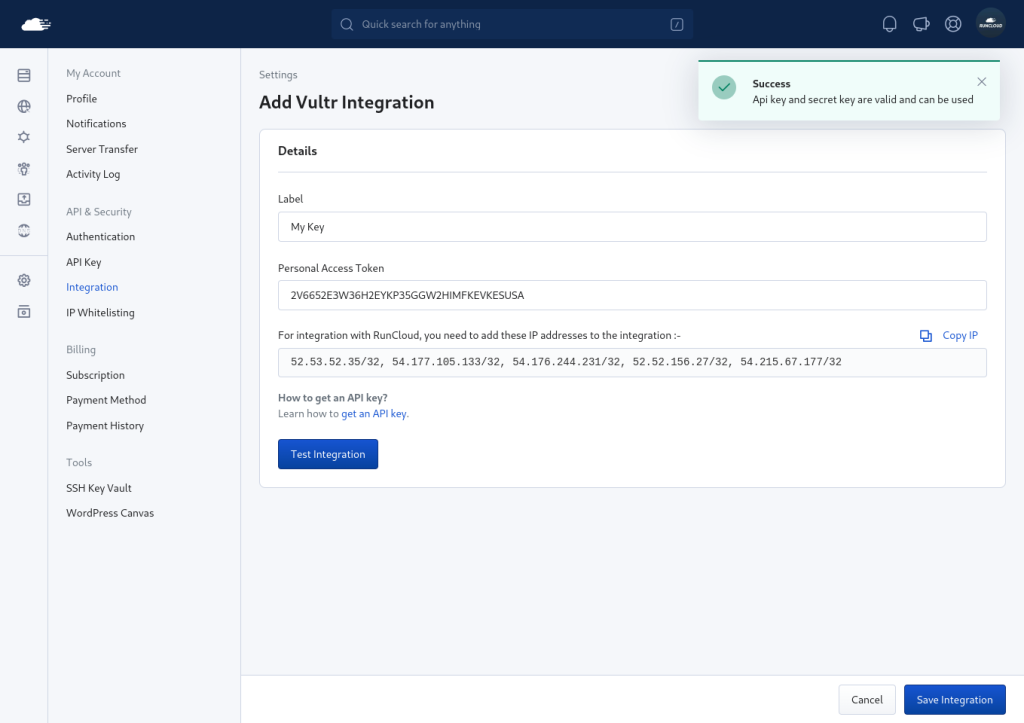
    1. After all of the necessary IP addresses have been whitelisted, you can go back to the RunCloud dashboard and test the integration. If you receive a success message, you can click “Save Integration” to add the key to your account.
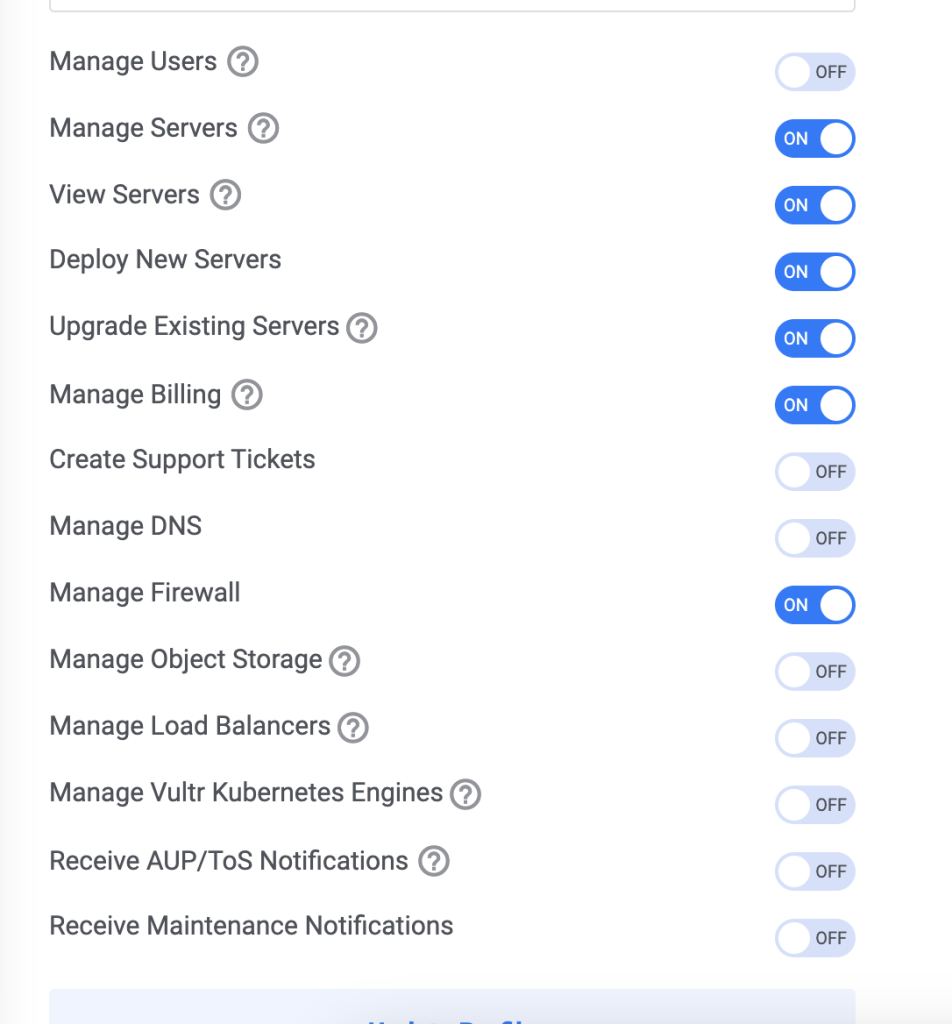
    1. If you received an error during the last step, you should double check the list of IP addresses that you have whitelisted. If you got access to your Vultr account via an invitation, the root account will need to enable the necessary permissions to create and manage servers via API on their Vultr dashboard.

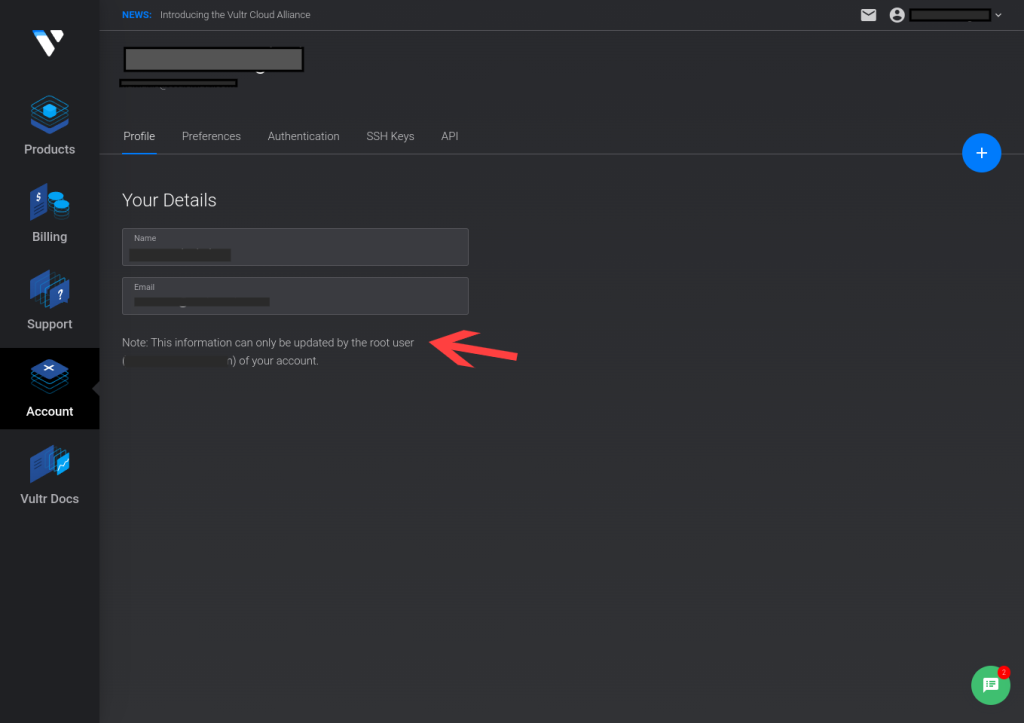
    To find the root user of your account, go to your Vultr profile menu, there you should see the email address of the root user that manages your account.

    That’s it! Your Vultr API key is now added to RunCloud and you can use it for building servers.

    Provisioning a Vultr Server with RunCloud Integration

    After adding the API key to your RunCloud account, you can build your Vultr server from the RunCloud dashboard in just a few clicks. You can choose from different OS images, plans, data center regions, and instances without leaving your RunCloud dashboard.

    Here are the steps to build your Vultr server with RunCloud:

    1. Click on the “Let’s get started” button on the RunCloud dashboard to create your first server.
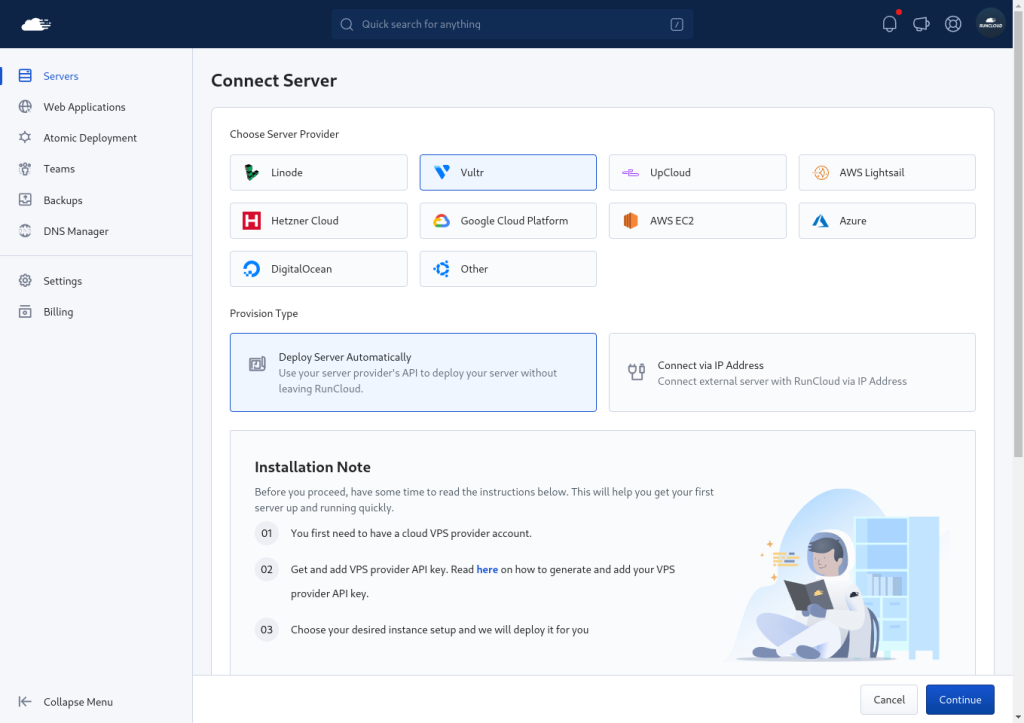
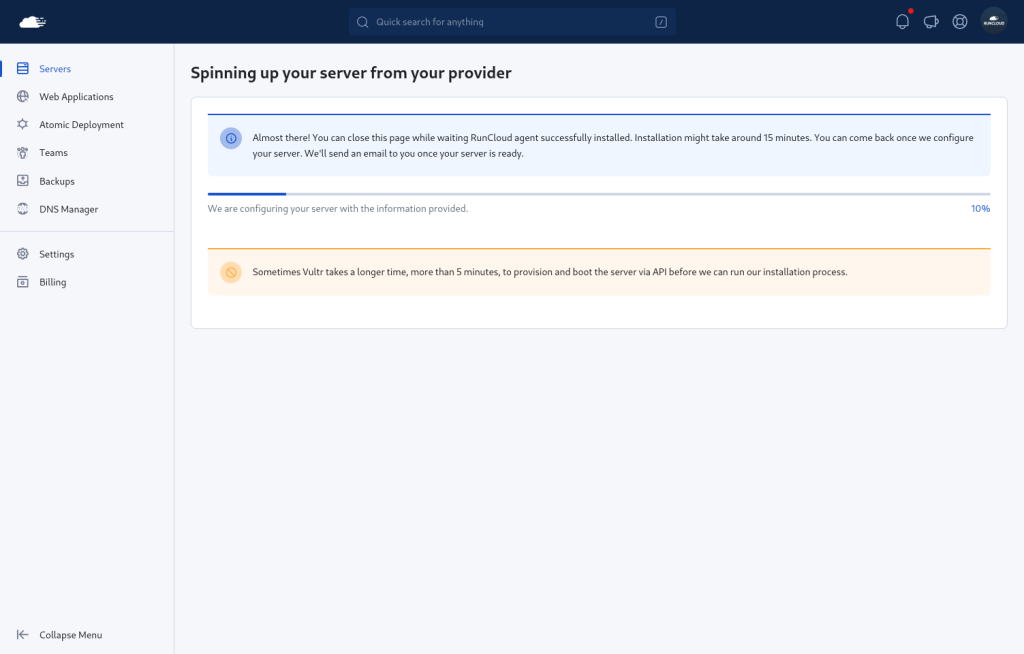
    2. On the next screen, you will see a list of available server providers. Choose Vultr and click on the “Deploy Server Automatically” option.
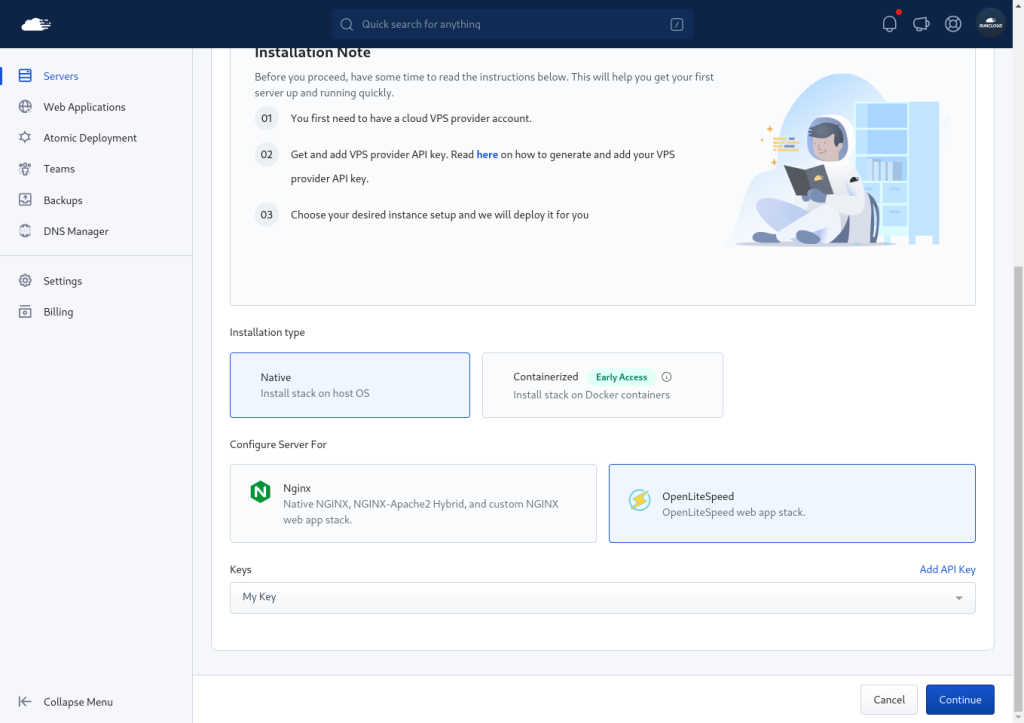
    1. Next, scroll down and select your installation type, as well as your server. After this, select the Vultr API key that we just added to RunCloud.
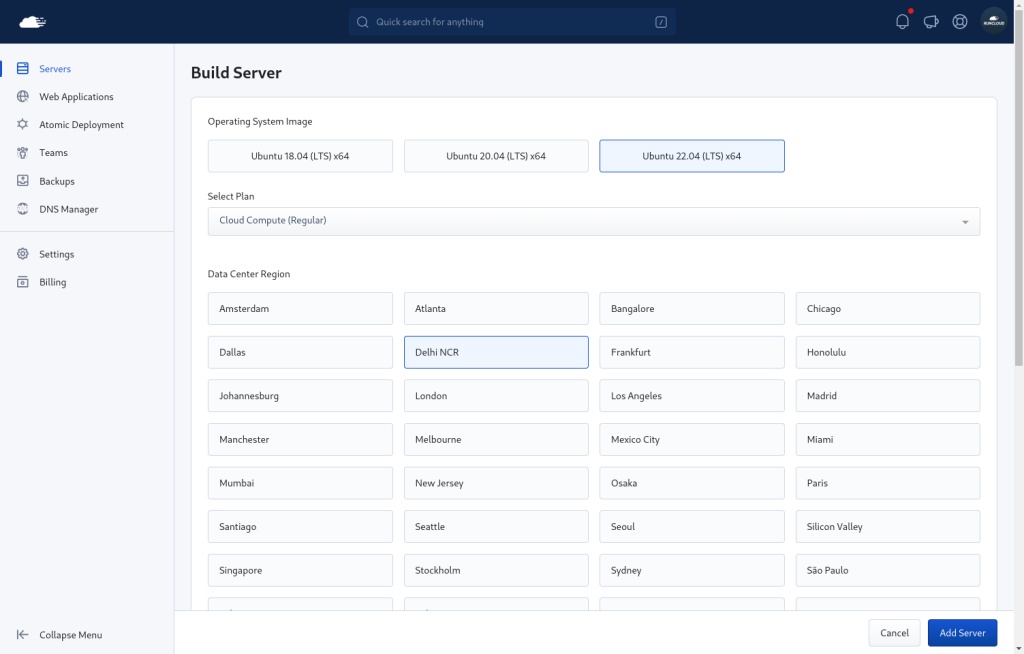
    1. On the next screen, you will see a list of options to customize your server. You can choose the OS image (we recommend the latest version), the server plan, the data center region, and the instance that suit your needs.

      After adding all of the details, click on the “Add server” button to start building your server.
    1. RunCloud will provision your server automatically, and show you the progress on the dashboard. It may take a few minutes to complete.

    When the provision is done, you will see your server details on the dashboard. Congratulations! You have successfully built your Vultr server with RunCloud.

    Video Tutorial: How to Set Up a Vultr Server from RunCloud Dashboard

    If you prefer watching a video tutorial, you can check out this YouTube video that shows you how to set up a Vultr server from the RunCloud dashboard.

    Method 2. Setup Vultr Manual Server Installation.

    Another way to set up your Vultr server with RunCloud is to use the manual server installation method. This method requires you to create a new server on Vultr using Ubuntu 22/24 LTS OS image, and then run the RunCloud installation script on your server using an SSH client. But before we do that, we need to create a firewall.

    Using the Vultr Firewall

    Vultr provides a network-level firewall that runs in front of your server. Configuring it is optional, but it can help reduce unwanted traffic before requests ever reach your instance or the OS firewall.

    This section applies only if you are hosting on Vultr. If you are using another provider, or prefer to manage access purely via the server firewall configured by RunCloud, you can skip this step.

    By default, a Vultr firewall group blocks all incoming connections. You must explicitly allow the ports your server needs to function.

    Create a Firewall Group in Vultr

    1. Log in to your Vultr dashboard.
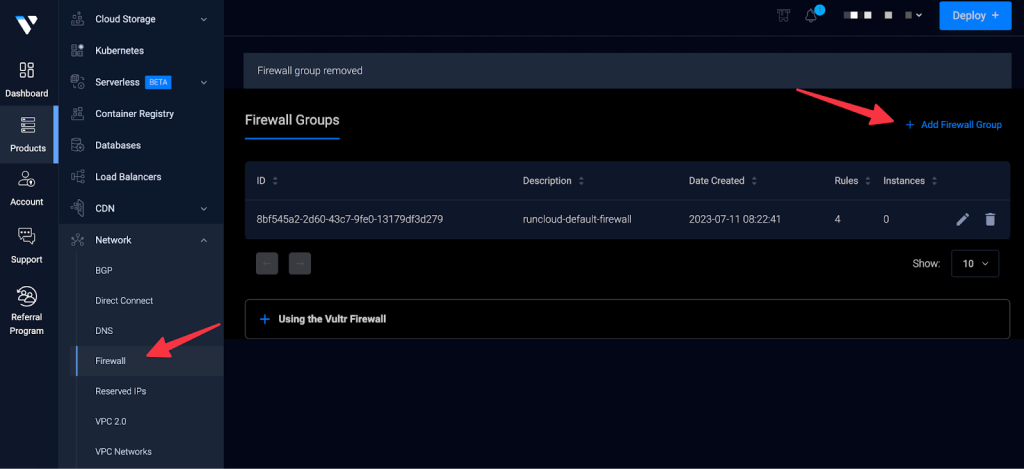
    2. Go to Network > Firewall.
    3. Click Add Firewall Group.
    4. Enter a descriptive name, such as “RunCloud Server Firewall”, and create the group.
    5. Open the newly created firewall group to manage its rules.

    Add Required Inbound Rules

    Add inbound rules to allow traffic needed for RunCloud and standard web hosting. Each rule should be created individually.

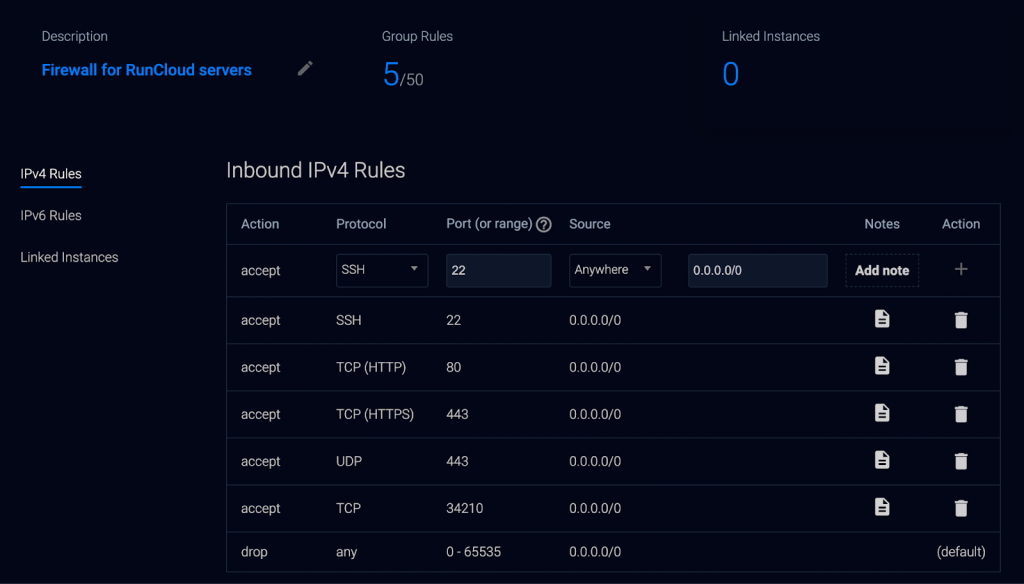
    Allow the following inbound traffic:

    • TCP port 80 – required for HTTP traffic
    • TCP port 443 – required for HTTPS traffic
    • TCP port 34210 – required for RunCloud to communicate with your server

    For SSH access:

    • TCP port 22 – required only if you connect via SSH. You can remove this rule later or restrict it to your IP address if you do not need ongoing SSH access.

    Optional performance enhancement:

    • UDP port 443 – enables HTTP/3 support if your stack and clients support it

    All rules can initially be set to allow traffic from anywhere. If you prefer a more restrictive setup, you can limit SSH access to trusted IP addresses.

    Apply the Firewall Group

    Once the rules are in place, attach the firewall group to your server instance. Firewall rules only affect new connections, so existing connections will not be interrupted.

    At this point, your Vultr firewall will block any inbound traffic that is not explicitly allowed, while still permitting RunCloud and your websites to operate normally.

    Provision VPS and Connect to RunCloud

    Here are the steps to follow:

    1. After opening the necessary firewall ports, go back to the Instances tab and click the “+” button to deploy a new server.
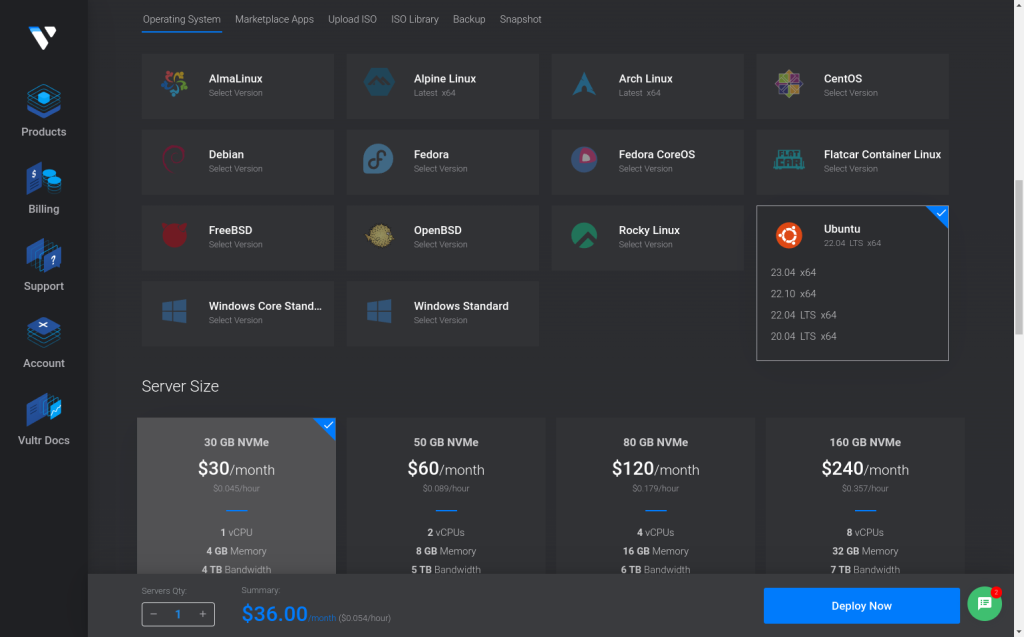
    2. On the next screen, select your desired machine type and region. Then choose Ubuntu as your OS image, and select the version that you want (22 or 24 LTS).
    1. After this, choose the plan, location, hostname, and other options that suit your needs.

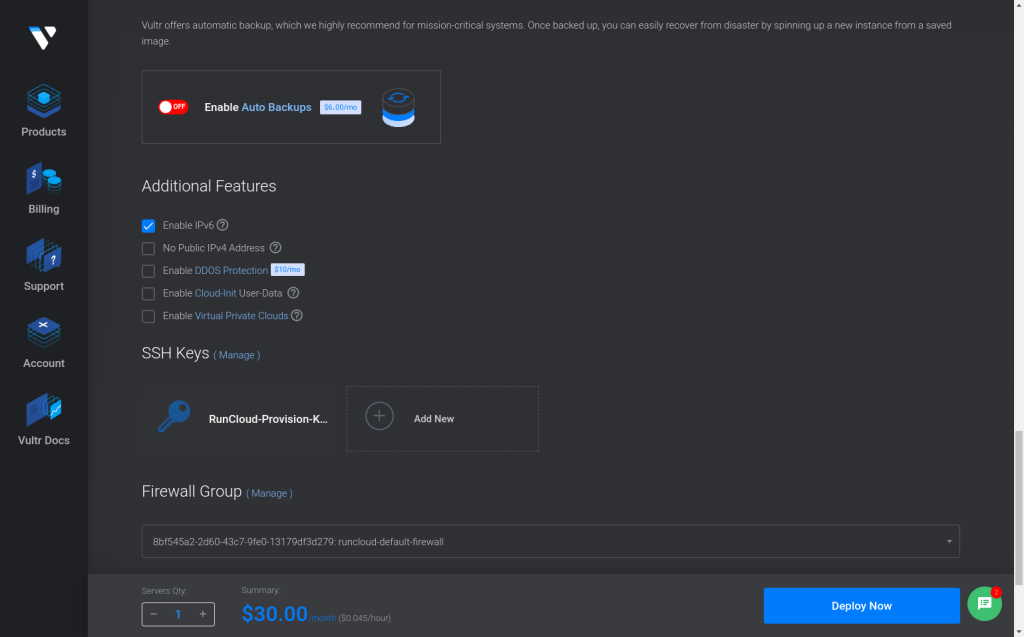
      If you plan to use automated backups on RunCloud, you can turn this feature off on Vultr.

      Finally, select the firewall group we created from the drop-down menu, then click the “Deploy Now” button.
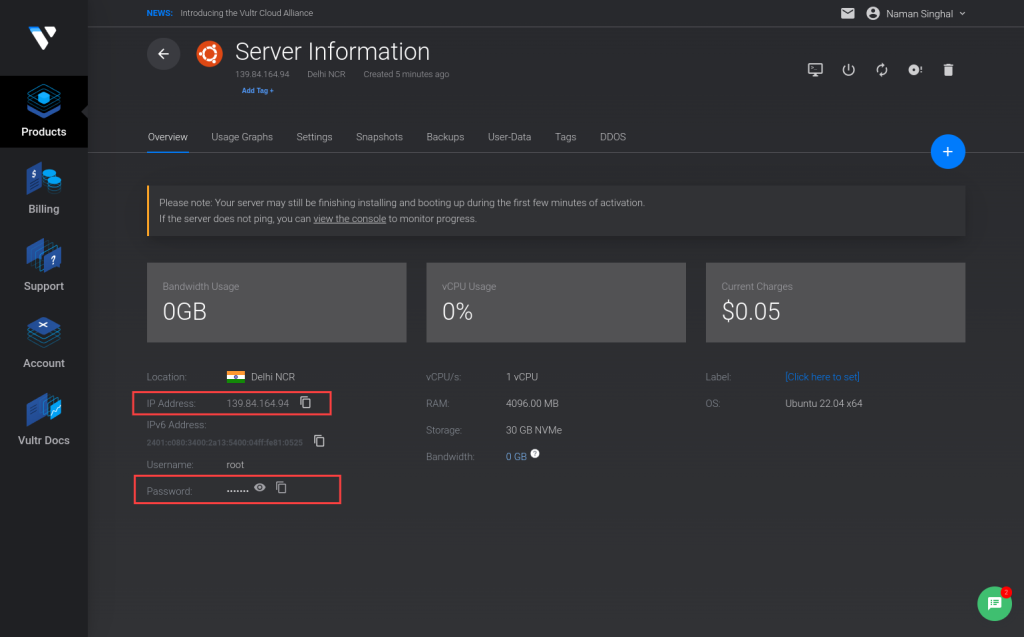
    1. Wait for a few minutes while Vultr creates your server, and assigns an IP address and a root password to it. When the server has been provisioned, note down the IP address and password for your server.
    Vultr dashboard
    1. Go back to your RunCloud dashboard and click on the “Connect New Server” button. Choose Vultr as your server provider and click on the “Connect via IP Address” option.

      Select your server stack, enter the IP address of your server and click on the “Continue” button.
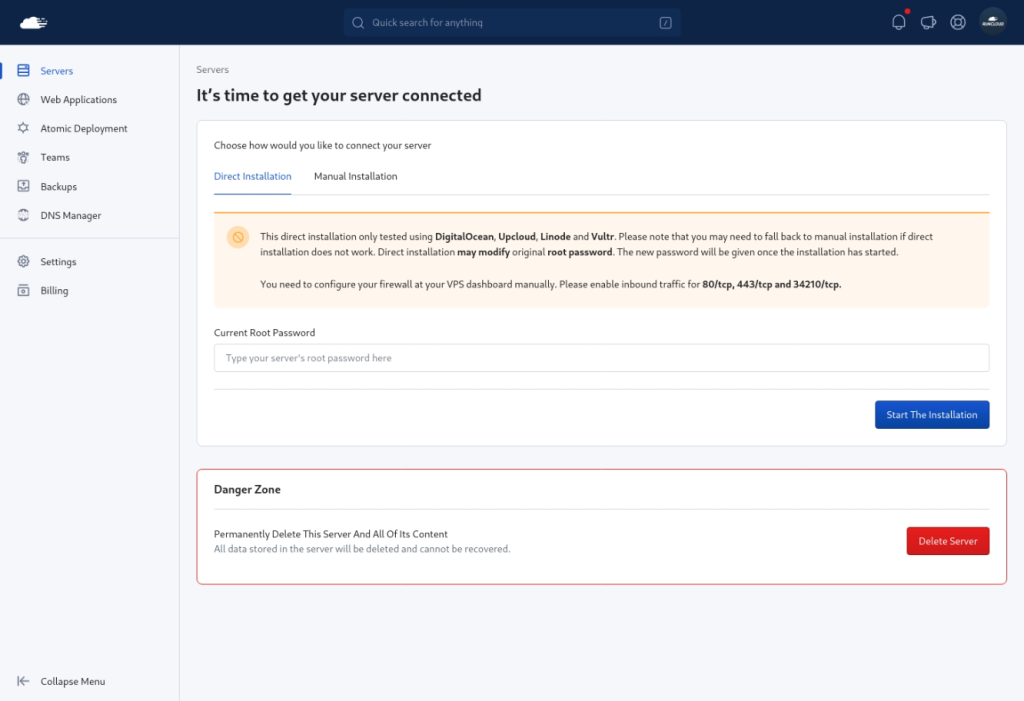
    1. On the next screen, paste the root password of your server from the Vultr dashboard. This will install the RunCloud agent on your server.

      Wait for a few minutes while the script installs the necessary packages and scripts on your server. You will see a success message when it’s done.

    That’s it! You have learned how to set up a manual Vultr server installation with RunCloud. You can now start deploying web applications.

    Video Tutorial: How to Set Up Vultr Server with RunCloud

    Final Thoughts

    In this article, we have shown you how to use the server provisioning feature of RunCloud to set up a Vultr server from the RunCloud dashboard. This is a convenient and fast way to create your Vultr server without leaving RunCloud.

    Vultr is a great option for hosting your websites, as it offers high-performance architecture, 100% local SSD, and high-performance Intel CPUs for as low as $5 / month.

    Once you have set up your server, you can start creating your websites, adding your domains, and installing various web applications using RunCloud.

    Here are some tutorials that you can follow:

    We hope you enjoyed this article and learned something new. If you have any questions or feedback, please leave a comment below.

  • RunCloud One-Click Droplet is Now Available on DigitalOcean Marketplace

    RunCloud One-Click Droplet is Now Available on DigitalOcean Marketplace

    We are happy to announce that RunCloud One-Click Droplet is available on DigitalOcean Marketplace.

    RunCloud One-Click Droplet allows you to spin your new DigitalOcean servers with RunCloud images and straightly manage your servers inside RunCloud Panel afterward.

    No need to connect your droplet through IP Address or spin the server inside our panel again.

    Step 1. Create Your RunCloud One-Click Droplet

    Login to your DigitalOcean account and create your droplet.

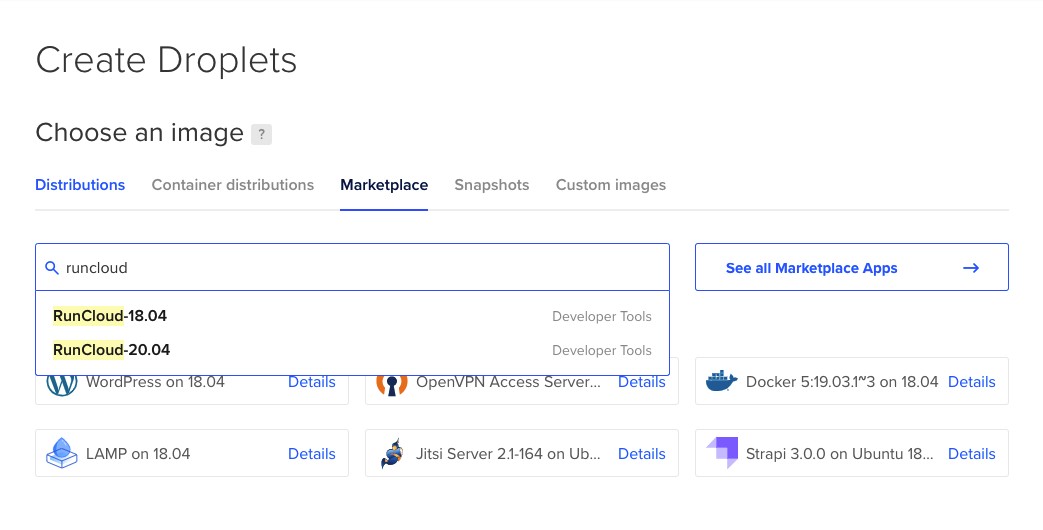
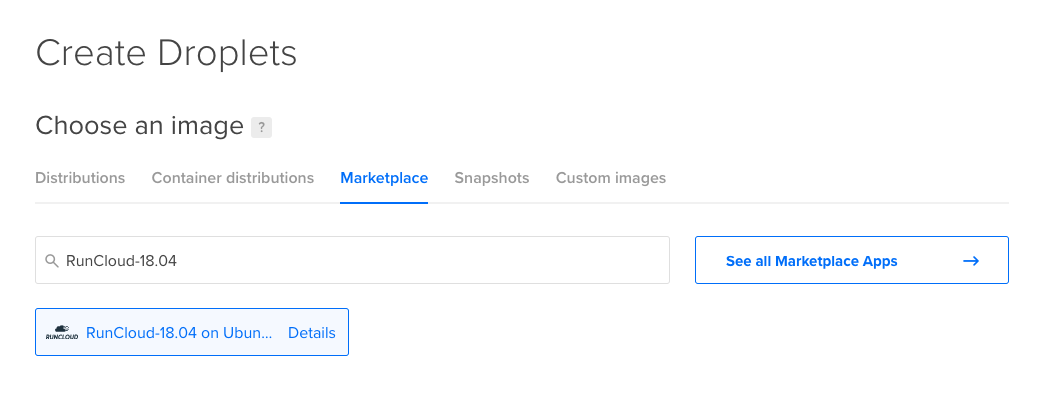
    Instead of choosing Ubuntu 16.04/18.04/20.04, you can click Marketplace tab and search for RunCloud.

    There is a RunCloud image in DigitalOcean Marketplace, RunCloud-20.04 with Ubuntu 20.04 LTS. Select it then continue the process to create a droplet.

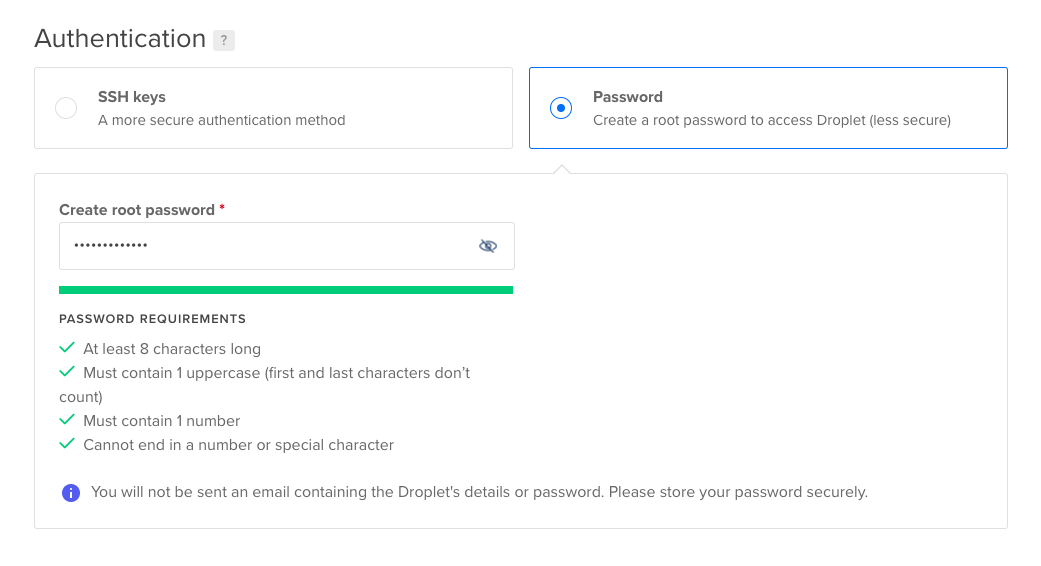
    For authentication, you can choose to use root password or SSH keys. For this example, we will create root password for our new droplet.

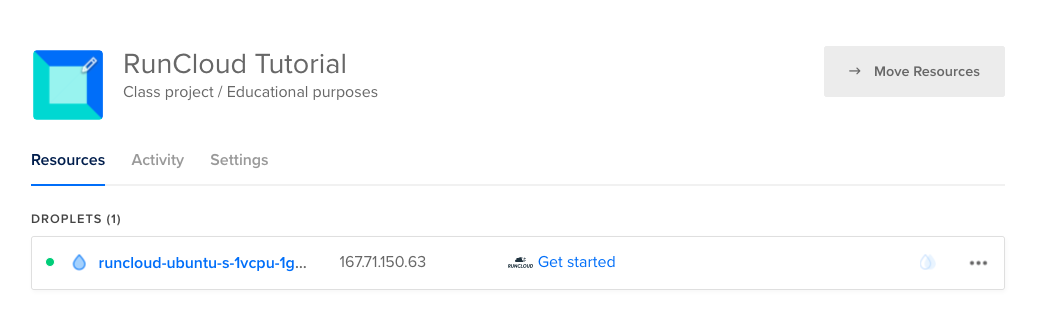
    Once the droplet is created, you will see your new droplet with RunCloud logo.

    Step 2. Connect Your DigitalOcean Server To RunCloud Account

    RunCloud generate a verification link that is accessible via SSH. It allows you to claim the server and add it to your RunCloud account.

    Login to server via SSH

    Please login to your server as the root user using Terminal (Mac OSX / Linux) or Powershell / Putty (Windows). Please change “youripaddress” with the IP Address of your server.

    ssh root@youripaddress

    Get or copy the verification URL

    After you have logged in to your server, you can see the verification URL to claim your server.

    This verification URL will be valid only for 24 hours.

    Register / login to RunCloud

    It is recommended that you have a RunCloud account before using RunCloud One-Click Droplet.

    If you did not have an account yet, you can register here for free.

    Open the verification URL to claim your server

    After you have logged in to your server, you can open the verification URL in your browser.

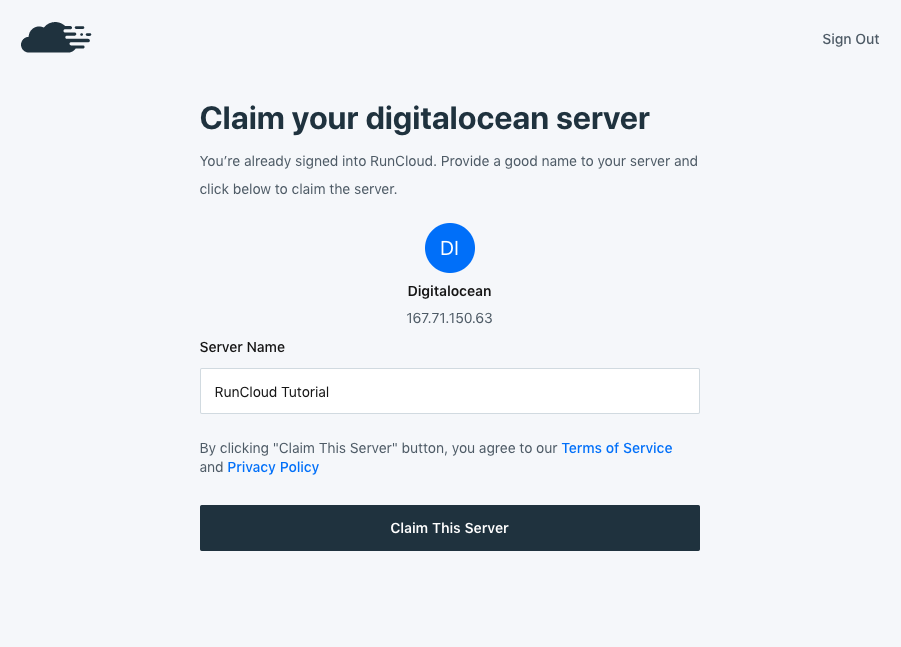
    Add the server name and click “Claim This Server” button to claim your ownership of the server.

    After few moments, you will redirected to your Droplet/Server summary page.

    Congratulations! Claim process was successful and you can start manage your droplet via RunCloud Panel.

    Walkthrough Video

    Summary

    RunCloud is a cloud server management tool that allows you to maintain full control of your server and host multiple web applications with fast and easy configuration. With RunCloud, you don’t need to be a Linux expert to host your website, powered by DigitalOcean.

    With this RunCloud One-Click Droplet release, you can have 4 different ways to setup your DigitalOcean servers using RunCloud.

    1. RunCloud One-Click Droplet, spin your RunCloud servers directly from your DigitalOcean dashboard.
    2. Direct Server Provisioning using DigitalOcean API, spin your DigitalOcean servers directly from RunCloud dashboard.
    3. Direct Server Installation via IP Address and root password
    4. Manual Server Installation via IP Address

    RunCloud One-Click Droplet is the fastest one because no need to do an extra step to setup your server with RunCloud.

  • How To Create Custom NGINX Configuration Easily Using RunCloud

    How To Create Custom NGINX Configuration Easily Using RunCloud

    NGINX is one of the most popular and powerful web servers in the world. Many websites and web applications use NGINX, and customize it with their own configurations to optimize performance, security, and functionality.

    However, creating and managing custom NGINX configs can be challenging and time-consuming, especially if you have to log into the Linux terminal and edit files manually.

    That’s why we are excited to introduce easy custom NGINX configuration in RunCloud for you. You can now create custom NGINX configs directly from the RunCloud dashboard, without having to touch the command line.

    You can also test and debug your custom NGINX configs from the RunCloud dashboard before you apply them, so you can avoid breaking your website. This will save you a lot of time and hassle, and let you focus on your web development.

    What is NGINX Config?

    NGINX, pronounced like “engine-ex”, is the open source web server that powers more than 400 million websites. It’s now also used for reverse proxying, caching, load balancing, media streaming, and more.

    In this post, we’ll focus on NGINX as a web server. From NGINX success stories, we can see that NGINX open source web server has been used by many big companies, including Adobe, Cloudflare, WordPress.com, ZenDesk, Groupon, etc.

    NGINX is a high performance web server that is great for handling many concurrent connections and serving static content. All RunCloud servers are powered by NGINX web servers.

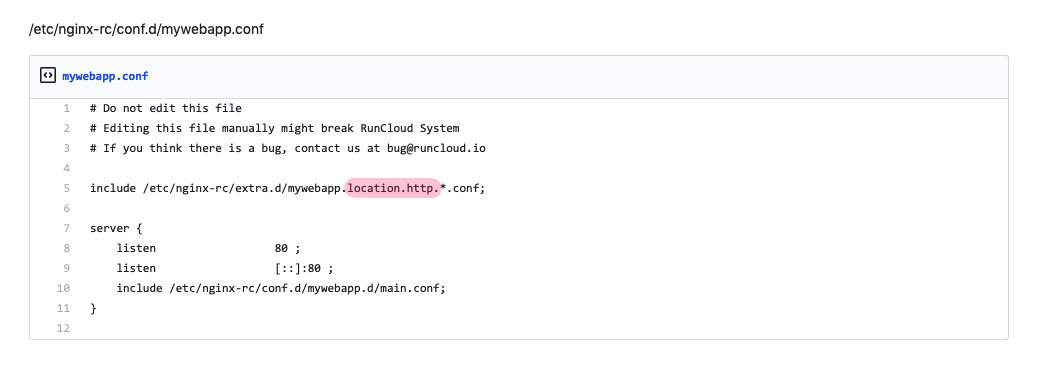
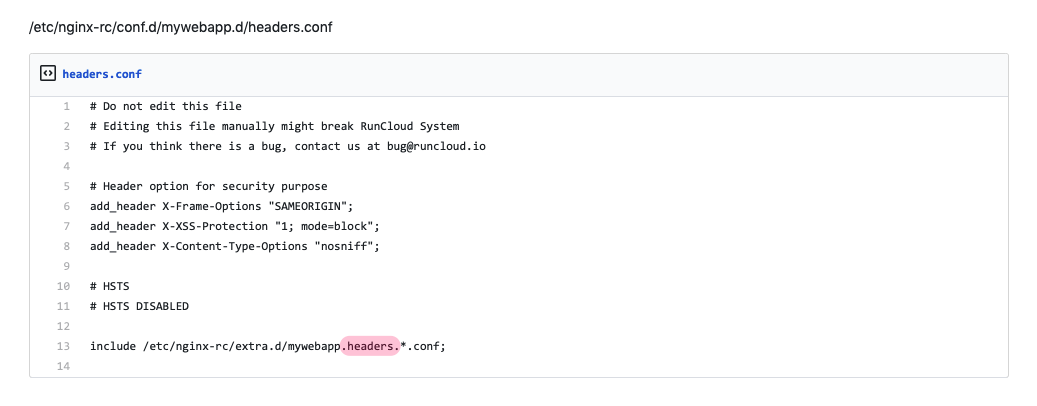
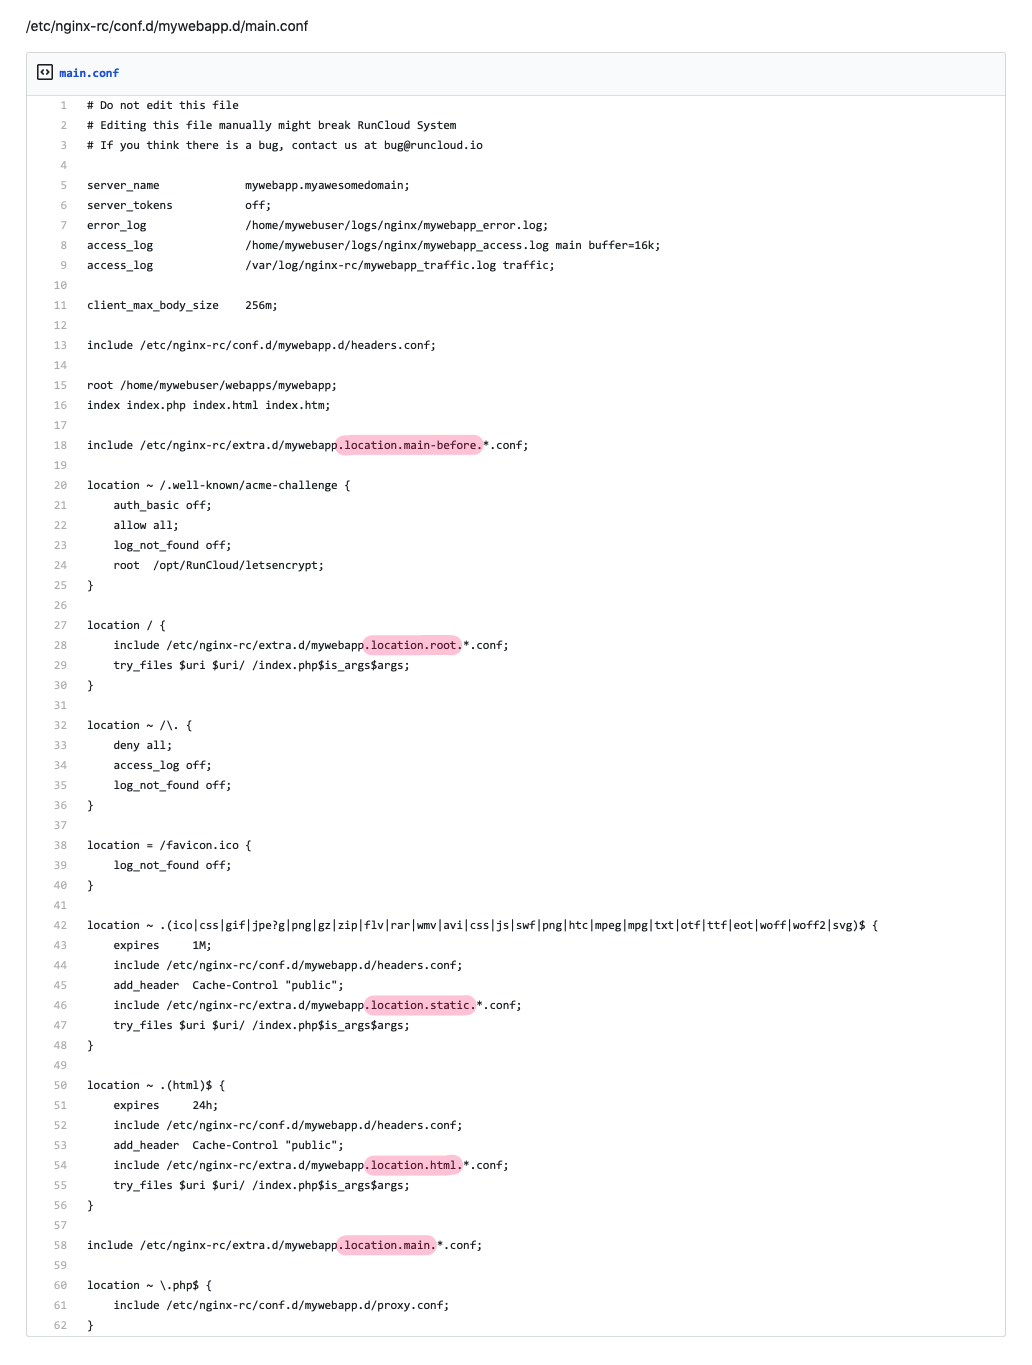
    In RunCloud, NGINX web server can be configured from NGINX configuration files that are located in the /etc/nginx-rc/ directory, with the primary configuration file found in /etc/nginx-rc/nginx.conf.

    Each web application in RunCloud has their own NGINX configs that are located in the /etc/nginx-rc/conf.d/ directory. Users can create custom NGINX configs that are located in the /etc/nginx-rc/extra.d/ directory.

    RunCloud Stacks

    RunCloud offers different stacks for your web hosting needs. Each stack has its own advantages and limitations. You can choose the stack that suits your website best.

    NGINX + Apache2 Hybrid Stack

    This stack combines the power of NGINX and Apache2. NGINX serves as a reverse proxy for Apache2, but only for PHP files. For static files (eg: CSS, JS, images, fonts), NGINX serves them directly. This way, you can enjoy the speed and efficiency of NGINX for static content, and the compatibility and flexibility of Apache2 for PHP content.

    This stack is ideal for average users who use .htaccess file to configure their website. However, if you need to do something that .htaccess file cannot do, you will need to use a custom Nginx config.

    Native NGINX Stack

    This stack uses only NGINX to handle your website. For PHP files, NGINX passes them to FastCGI to communicate with PHP-FPM. This stack is faster and more secure than the hybrid stack, but it doesn’t support .htaccess file.

    This stack requires you to use custom Nginx config if you want to rewrite or extend Nginx by including your own config.

    Native NGINX + Custom Config Stack

    This stack also uses only NGINX to handle your website, but it doesn’t serve your PHP file. This stack is suitable if you want to run other web applications or frameworks such as Node.js / Python / Golang / WebSocket / Ruby on Rails / etc., using RunCloud.

    This stack relies on custom NGINX configs to fully configure this stack. You can use custom NGINX configs to set up the proxy settings, headers, caching, and more for your web application.

    Create a Custom Nginx Config

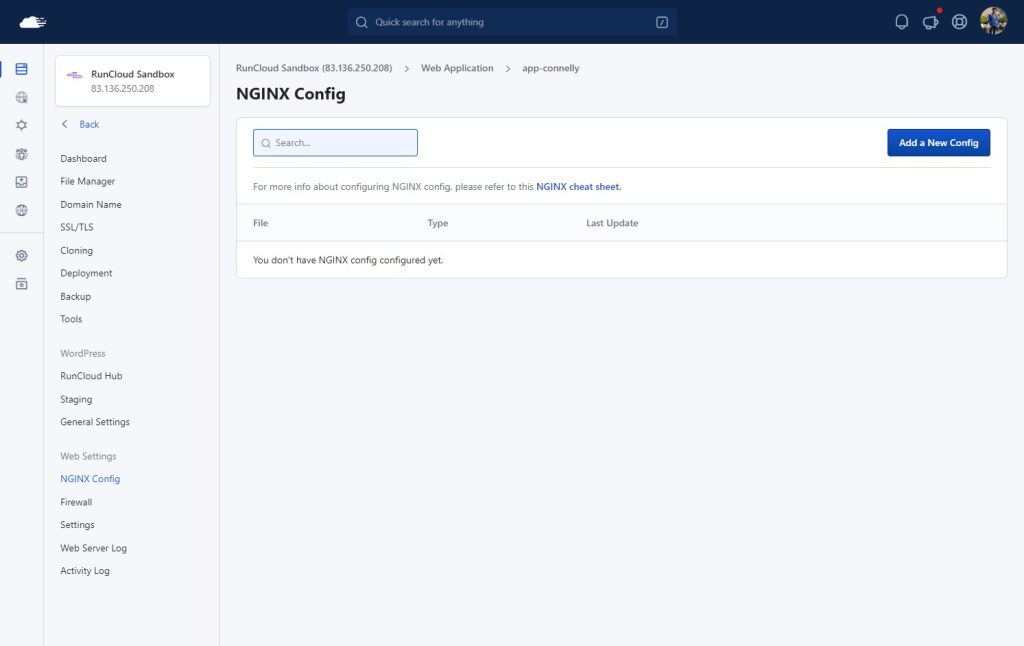
    With the new “NGINX config” feature, you can do this directly from the RunCloud dashboard easily. Please log in to your RunCloud Dashboard, choose your server, go to Web Applications menu and click one of your web applications – you will then see the “NGINX Config” menu.

    Click the “Add a New Config” button to start creating your custom NGINX config for the current web application.

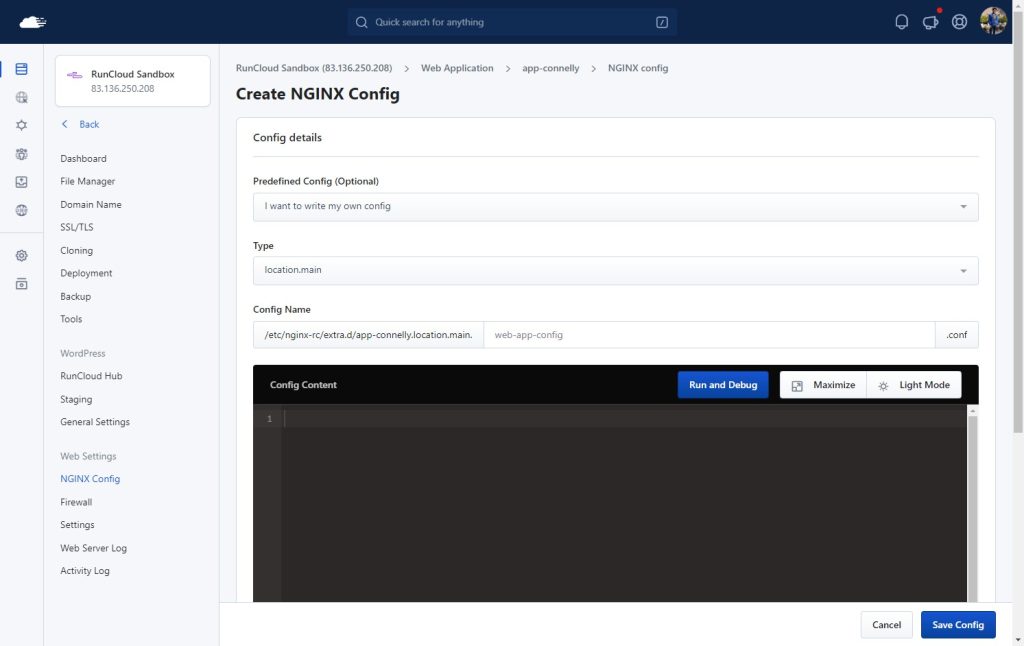
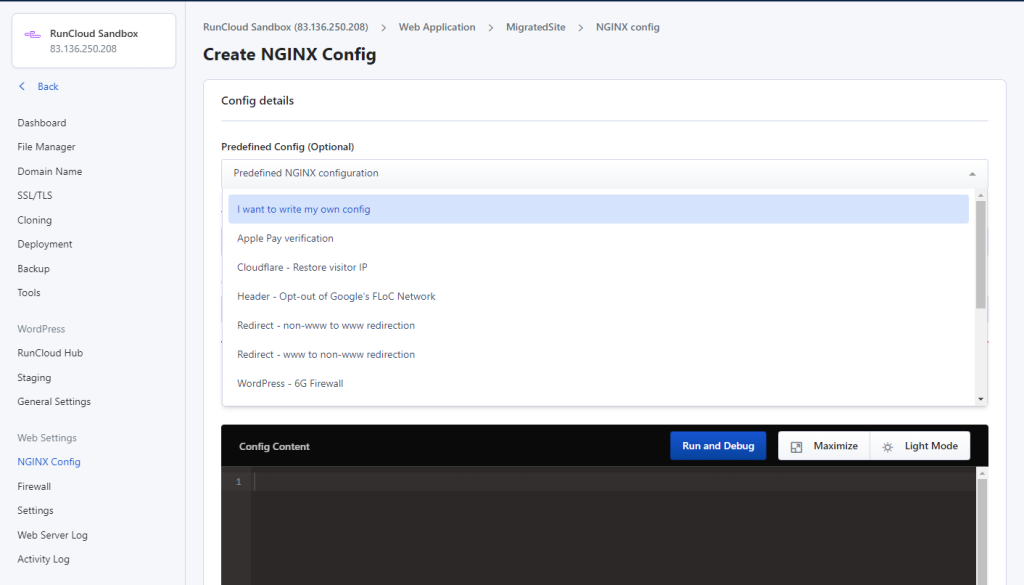
    If you are familiar with NGINX config, you can choose “I want to write my own config” and start adding your config.

    You can also start with a predefined NGINX config that we have provided. You can use it directly without customizing it.

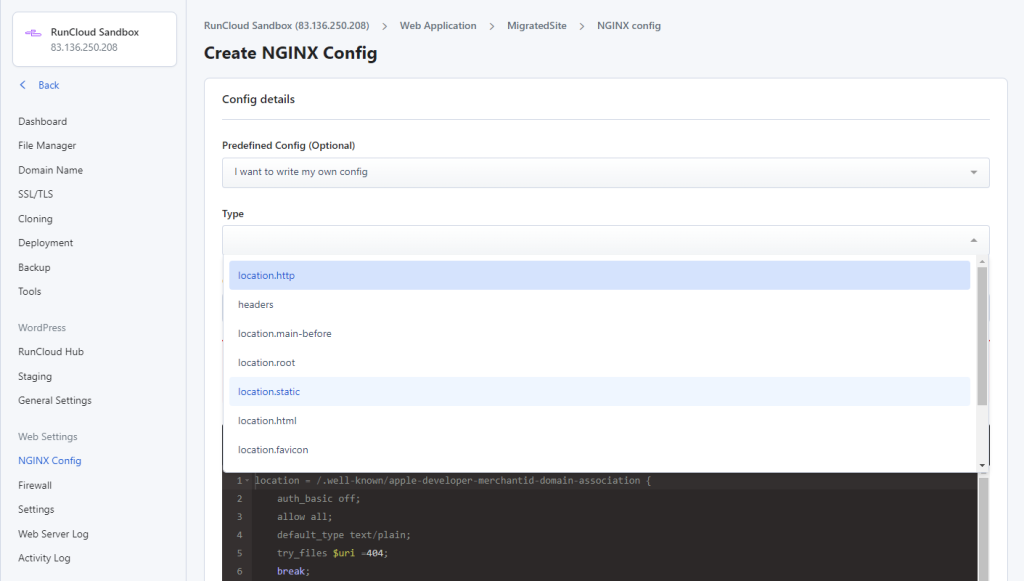
    For config “Type”, you can start with location.main (default) and location.main-before. You can start using other types when you are familiar with the NGINX config structure in RunCloud.

    Run and Debug Custom NGINX Config

    Editing NGINX config directly using Linux terminal could be dangerous, and could take your website down if you don’t have enough skill to debug your NGINX config issue.

    RunCloud provides a “Run and Debug” feature that you can use to check if your custom NGINX config is okay or not.

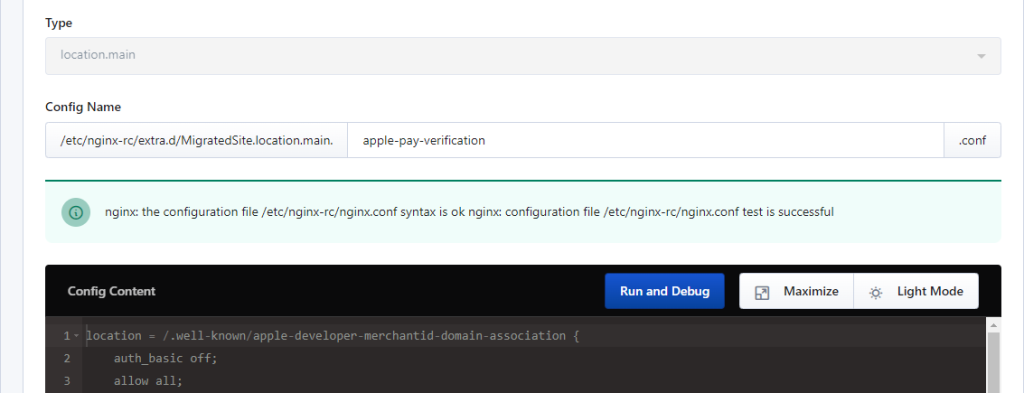
    If your custom NGINX config looks good, clicking “Run and Debug” will give you a green message.

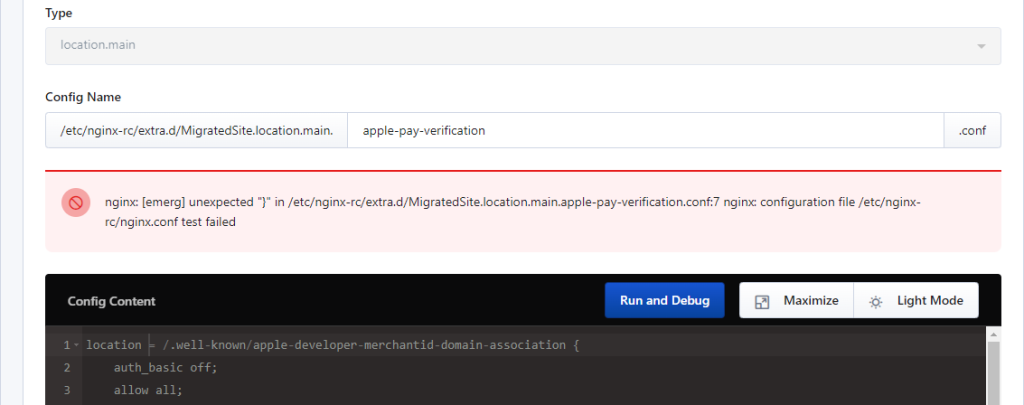
    If your custom NGINX config has some errors, clicking “Run and Debug” will give you red error message with the error details.

    Even if you don’t use the “Run and Debug” feature, and try to click the “Save config” button directly, RunCloud will debug your custom NGINX config automatically, and will stop if it encounters errors. Because of this, there’s no need to be afraid of whether your custom NGINX config could break your website.

    Predefined NGINX configs

    We also provide some predefined NGINX configurations that you can use without customizing them, since they’re tailored according to your web application.

    I want to write my own config

    If you want to customize your NGINX server settings, you can do so by selecting the “I want to write my own config” option from the dropdown menu in the Web Application Settings page. This will allow you to add your own NGINX directives in the Custom Config box. You can write anything you like, as long as it is valid NGINX syntax.

    Apple Pay verification

    If you want to use Apple Pay on your website, you need to verify your domain with Apple. This requires adding a specific file to your server and configuring your NGINX to serve it. To make this process easier, RunCloud provides a ready-made config template for Apple Pay verification. You can find it in the Config Templates page under the NGINX tab.

    All you need to do is select the template and apply it to your web application. This will automatically create the file and add the necessary NGINX directives for you. This way, you can save time and reduce the chances of error when setting up Apple Pay on your website.

    Cloudflare – Restore Visitor IP

    Cloudflare acts as a proxy to your RunCloud server, which means that all visitors will appear to be coming from Cloudflare IP addresses. This is a hindrance to visitor tracking or identifying attackers.

    In order to restore a visitor’s IP address, we need to retrieve the visitor’s originating IP address in the HTTP header from all Cloudflare’s IP addresses.

    You can use this predefined NGINX config to restore your visitor IP address, if needed.

    Header – Opt-out of Google’s FLoC Network

    This template allows you to prevent your website from participating in Google’s new tracking method called Federated Learning of Cohorts (FLoC). FLoC is a feature that lets browsers collect, profile, and store usage patterns based on a user’s browsing habits over time. This data is then used by Google and its advertising partners for targeting and personalizing ads.

    Some people may have privacy concerns about FLoC and may want to opt out of this network. By applying this template to your web application, you can add a header to your NGINX server that tells Chrome not to include your website in its FLoC calculations. This way, you can respect the privacy of your visitors and avoid being part of Google’s tracking system.

    Redirect – from non-www to www

    This simple NGINX config is useful if you want to redirect the non-www version of your website to www version.

    Note: Please use this NGINX config if only you have added both non-www and www versions of your domain to your web application’s Domain Name menu, and you have set up DNS Records for both non-www and www.

    Redirect – from www to non-www

    This simple NGINX config is useful if you want to redirect the www version of your website to non-www version.

    Note: Please use this NGINX config if only you have added both non-www and www versions of your domain to your web application’s Domain Name menu, and you have se tup DNS Records for both non-www and www.

    WordPress – 6G Firewall

    The 6G Firewall is a powerful, well-optimized blacklist that checks all URI requests against a set of carefully constructed .htaccess directives, developed by Jeff Star from Perishable Press. This happens quietly behind the scenes at the server level, which is optimal for performance and resource conservation.

    This predefined NGINX config brings 6G Firewall to NGINX web server in RunCloud servers.

    WordPress – 7G Firewall

    The 7G Firewall is the latest nG Firewall from Perishable Press. This predefined NGINX config brings 7G Firewall to NGINX web server in RunCloud servers.

    Both 6G & 7G firewalls are easy-to-use, cost-effective ways to secure your site against malicious HTTP activity. They help to protect against evil exploits, ill requests, and other nefarious garbage, such as XSS attacks, code injections, cache poisoning, response splitting, dual-header exploits, and more.

    The 6G & 7G firewalls are good alternatives of our Web App Firewall (ModSecurity & OWASP CRS). You can try either 6G or 7G firewall if ModSecurity WAF doesn’t fit with your web application.

    WordPress – Block direct PHP file execution

    This config template is a security measure that prevents hackers from running malicious PHP files on your website. By default, WordPress allows PHP execution in certain directories, such as the /wp-includes/ and /wp-content/uploads/ folders. This means that anyone who can upload files to these folders can also run PHP code on your server.

    Hackers can exploit this vulnerability by uploading backdoor access files or malware that can compromise your website. By applying this template to your web application, you can add a rule to your NGINX server that denies access to any PHP files in these directories. This way, you can protect your website from unauthorized PHP execution and improve its security.

    WordPress – Block wp-trackback.php

    This template prevents spammers from sending fake trackbacks and pings to your WordPress posts. Trackbacks and pings are notifications that another blog has linked to your content, but they can also be abused by spammers who want to create backlinks to their own websites. By applying this template to your web application, you can add a rule to your NGINX server that denies access to the wp-trackback.php file, which is responsible for handling trackbacks and pings.

    WordPress – Block xmlrpc.php

    The WordPress – Block xmlrpc.php config template is another security measure that prevents attackers from exploiting the xmlrpc.php file in WordPress, which is used for remote communication with your site. The xmlrpc.php file allows you to do things like posting to your site from your mobile device, receiving trackbacks and pingbacks from other sites, and using some features of the Jetpack plugin. However, it can also be abused by hackers who want to launch brute force attacks, DDoS attacks, or spam comments on your site.

    By applying this template to your web application, you can add a rule to your NGINX server that denies access to the xmlrpc.php file. This way, you can protect your website from xmlrpc.php attacks.

    WordPress – FlyingPress Plugin

    This config is a set of rules for NGINX server that are related to the FlyingPress plugin. The FlyingPress plugin is a speed optimization plugin for WordPress that boosts your website’s Core Web Vitals and performance. It has features such as critical CSS, lazy loading, bloat removal, font optimization, link preloading, and more.

    This config is for FlyingPress users who want to serve FlyingPress caches directly from NGINX, without touching PHP, especially when you use Native NGINX stack in RunCloud. You can use this config with either FlyingPress standalone only, or combine it with RunCloud Hub. You need to install the FlyingPress WordPress plugin first before using this config.

    The purpose of this config is to serve cached HTML files from the FlyingPress directory if they exist, and if none of the conditions that disable the cache are met. This can improve the speed and performance of your WordPress site by reducing the load on your server and delivering faster responses to your visitors.

    WordPress – Multisite Subdirectory

    The WordPress – Multisite Subdirectory config template is for WordPress sites that use the multisite feature in a subdirectory structure. By applying this template to your web application, you can add some rules to your NGINX server that enable the multisite functionality in a subdirectory mode.

    Note that this template is only needed when using WordPress inside a docker instance on RunCloud. If you’re using a regular WordPress installation on RunCloud, you don’t need this template.
    Developer Tips – RunCloud NGINX Config Structure

    If you’re a developer and want to explore the NGINX config structure in RunCloud, this information could be useful for you.

    When creating a custom NGINX config, we recommend you use location.main or location.main-before type. It works for common cases, your NGINX config will be loaded in the main location block of your web application.

    Configuration options in NGINX are called directives, and are organized into groups known as blocks.

    You can learn more about blocks in NGINX configuration here.

    Location.http

    The http block contains directives for handling web traffic. You can create custom NGINX configs that will be loaded in the http block, right before the server block of your web application.

    Headers

    You can use the headers config to add HTTP headers to your website. For example, you can add security headers, caching headers, or custom headers.

    Location blocks

    The location block lets you configure how NGINX will respond to requests for resources within the server. You can use different location configs to load custom NGINX configs in specific location blocks.

    1. location.main-before: This config will be loaded before the main location blocks in your web application. You can use this to add rules that apply either to all requests, or to specific requests based on prefixes or regular expressions.
    2. location.root: This config will be loaded inside the root location block that serves the document root of your website. You can use this to add rules that apply to the root directory.
    3. location.static: This config will be loaded inside the static location block that serves static assets (css / js / images / fonts / etc) of your website. You can use this to add rules that optimize the delivery and caching of static files.
    4. location.html: This config will be loaded inside the html location block that serves HTML pages in your website. You can use this to add rules that enhance the performance and security of HTML pages.
    5. location.favicon: This config will be loaded inside the favicon location block that serves the favicon.ico file in your website. You can use this to add rules that improve the caching and accessibility of the favicon file.
    6. location.main: This config will be loaded after the main location blocks in your web application. You can use this to add rules that override or complement the previous location blocks.
    7. location.proxy: This config will be loaded inside the proxy location block that passes requests to a backend server or service. You can use this to add rules that modify the proxy settings or headers.

    Runcloud-hub

    The runcloud-hub config is a necessary component when you use the RunCloud Hub plugin for WordPress. The runcloud-hub config enables the communication between the plugin and the NGINX server, and handles the caching rules and headers for your site. Without the runcloud-hub config, the plugin will not work properly and you will not be able to enjoy the benefits of RunCloud Hub features.

    After Action Report

    RunCloud is the ultimate solution for developers who want to host and manage their websites with ease and speed. You don’t need to be a Linux expert to use RunCloud. You can create and deploy your web applications, configure your server settings, and monitor your performance from a simple and intuitive dashboard.

    One of the features that makes RunCloud stand out is the ability to create custom NGINX configs directly from the dashboard. This gives you more flexibility and control over your web server without having to edit files manually. You can use this feature to optimize your website performance, security, and functionality.

    This feature is available for all paid plan users (Basic, Pro, Business). If you are already a RunCloud user, you can start using this feature right away. If you are not a RunCloud user yet, what are you waiting for? Join RunCloud today and see how easy and fast it is to host and manage your websites with RunCloud.

  • RunCloud Supports Ubuntu 20.04 LTS (Focal Fossa)

    RunCloud Supports Ubuntu 20.04 LTS (Focal Fossa)

    We are happy to officially support Ubuntu 20.04 LTS (Focal Fossa) in RunCloud.
    You are able to connect Ubuntu 20.04 LTS to RunCloud through IP Address installation.

    What is Ubuntu LTS

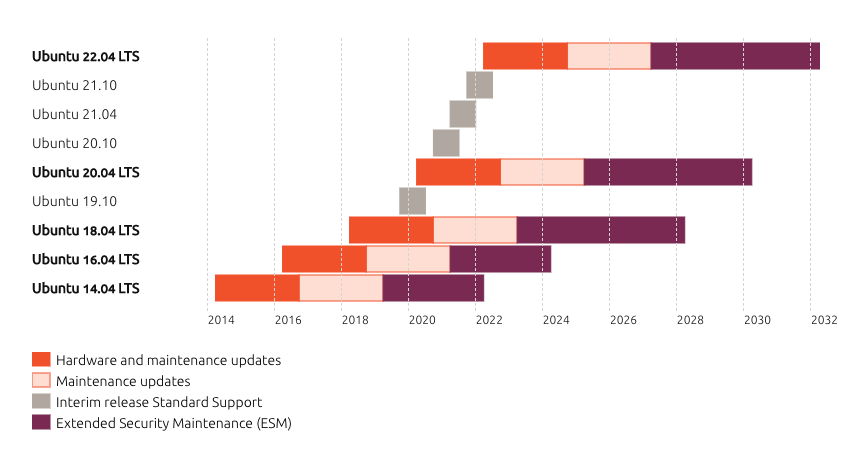
    Ubuntu LTS (Long Term Support) versions are released every 2 years and are guaranteed to receive support for at least 5 years after release.

    LTS releases are the ‘enterprise grade’ releases of Ubuntu and are utilised the most. An estimated 95% of all Ubuntu installations are LTS releases.

    ubuntu 20.04

    The previous LTS version, Ubuntu 18.04 LTS, will stop receiving updates after April 2023. Ubuntu 18.04 LTS will receive security fixes and critical updates until April 2028.

    Ubuntu 20.04 LTS, codenamed Focal Fossa, is the latest Long Term Support release and was released on 23 April 2020, and will get maintenance updates for 5 years, until April of 2025.

    What’s New In Ubuntu 20.04 LTS For RunCloud?

    Generally, an Ubuntu LTS contains only a few major changes for a server.

    You can refer to the Ubuntu 20.04 LTS release notes for new features.

    Linux Kernel 5.4

    Ubuntu 20.04 TLS is based on the long-term supported Linux kernel 5.4.

    Notable features and enhancements in linux kernel 5.4 are:

    • Since kernel 5.3, it supports new hardware including Intel Comet Lake CPUs and initial Tiger Lake platforms, AMD Navi 12 and 14 GPUs, Arcturus and Renoir APUs along with Navi 12 + Arcturus power features.
    • Since kernel 4.15, it supports AMD Rome CPUs, Radeon RX Vega M and Navi GPUs, Intel Cannon Lake platforms.
    • Boot speed improvements through changing the default kernel compression algorithm to lz4 (in Ubuntu 19.10) on most architectures, and changing the default initramfs compression algorithm to lz4 on all architectures.

    Supported PHP Versions

    Ubuntu 20.04 LTS on the RunCloud servers only supports PHP 7.2, 7.3, and 7.4 when this article is published.

    If you still want to use PHP 7.0 or 7.1, please use Ubuntu 16.04 LTS (Bionic Beaver).

    Ubuntu 16.04 vs 18.04 vs 20.04 Comparison

    Starting from today, RunCloud officially supports Ubuntu 16.04 LTS, Ubuntu 18.04 LTS, and Ubuntu 20.04 LTS.

    You can find a comparison between these OS in the RunCloud servers.

    OSUbuntu 16.04 LTSUbuntu 18.04 LTSUbuntu 20.04 LTS
    Code NameXenial XerusBionic BeaverFocal Fossa
    Released Date2016-04-212018-04-262020-04-23
    Available PHP Version7.4
    7.3
    7.2
    7.1
    7.0
    5.6
    5.5
    7.4
    7.3
    7.2
    7.1
    7.0
    7.4
    7.3
    7.2
    Initial Kernel Version4.44.155.4
    Standard support until2021-042023-042025-04
    Extended Security Maintenance Until2024-042028-042030-04

    Upgrade From Ubuntu 16.04/18.04 to 20.04???

    Do you need to upgrade from Ubuntu 16.04/18.04 LTS to Ubuntu 20.04?

    Short answer, NO!

    We do not recommend upgrading Ubuntu to a new major release at all.

    Upgrading to a major release could break all of your website on that server, it will also remove RunCloud agent, and it makes your server no longer connected to RunCloud anymore.

    If you have a RunCloud server with Ubuntu 16.04 or 18.04, please stay with this OS version, do not upgrade it to Ubuntu 20.04.

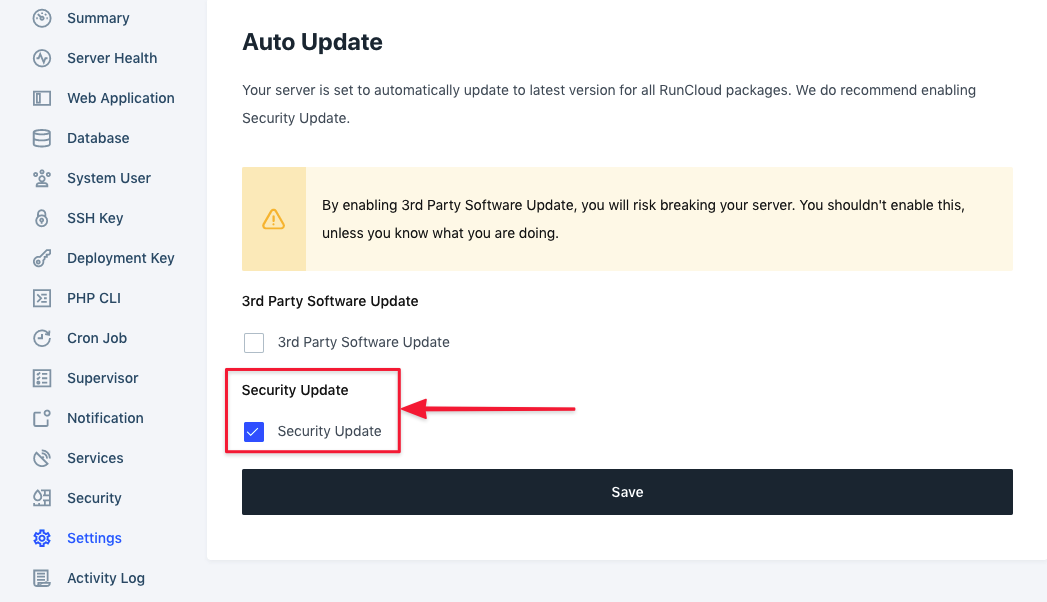
    RunCloud provides your Ubuntu 16.04 or 18.04 servers with the latest Ubuntu security updates, and takes care of this automatically for you, so you do not have to worry about anything.

    If you want to try to use Ubuntu 20.04 LTS for your current web application, please connect a fresh Ubuntu 20.04 server to RunCloud and use our Clone Web App feature to clone your web app to your new Ubuntu 20.04 server.

    Connect Ubuntu 20.04 Server To RunCloud

    RunCloud provides three different methods to connect your server to RunCloud.
    • Direct Server Provisioning using server provider API
    • Direct Server Installation via IP Address and root password
    • Manual Server Installation via IP Address

    For Ubuntu 20.04, currently, we support Direct Server Installation and Manual Server Installation via IP Address installation.

    Direct Server Provisioning for each supported Server Provider will be available soon.

    Direct Server Installation via IP Address and root password

    Using the direct server installation method, you only need to create a server with fresh Ubuntu 20.04 install, input your server IP address and root password, then sit back and relax, our direct server installation will setup your server in minutes.

    Manual Server Installation via IP Address

    Using the manual server installation method, you only need to create a server with fresh Ubuntu 20.04 install, login to your server console as root user, run RunCloud installation script, then sit back and relax, our manual server installation will setup your server in minutes.

    Summary

    At RunCloud, we are all about making your dev life easier, delivering a fast service, and ensuring your server is managed properly.

    With Ubuntu 20.04 LTS support, you are able to connect Ubuntu 20.04 LTS to RunCloud through IP Address installation.

    All RunCloud users (Free, Basic, Pro, Business) can enjoy the full functionality of this feature.

    This feature has been a requested feature that we knew would be useful to you. Never ever hesitate to suggest new features that you want to see, and we will make it happen.

  • How to Easily Clone a Web Application in RunCloud

    How to Easily Clone a Web Application in RunCloud

    Cloning a website is not an easy task and requires some knowledge of FTP, sFTP, or SSH. From there, you will need to backup all files, any databases, copy those files, move them to the new server, import the database into a new server, change over your WordPress configuration file information, update the database to reflect any of those changes, update WordPress settings to match the old website, checking to ensure everything was copied over, and so on and so forth. You get the point that this is a painfully tedious process for any user and can be very time-consuming, especially where there are multiple websites involved.

    We are introducing a Clone Web Application feature in RunCloud to clone your website (web application) easily.

    Cloning A Website (Web Application) in RunCloud

    This feature allows you to clone a web application within the same server or clone it to a different server within your RunCloud account.

    And we support cloning both custom PHP web applications and WordPress web applications. It means you can clone an existing web application within your RunCloud account.

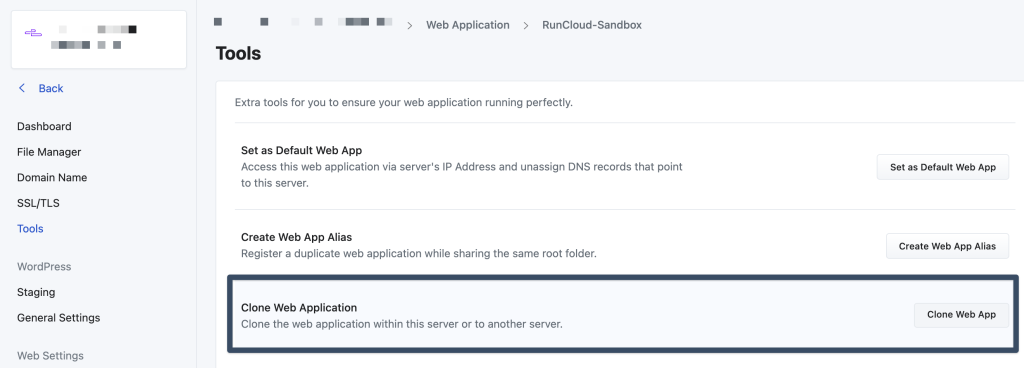
    You can find “Clone Web App” in the menu under Tools menu within your RunCloud web application.

    Cloning A Web Application To A Different Server

    For the advanced, cloning a web application to the same server might involve some Linux commands and an import of the database, but to move it to a completely different server entirely might take some time and knowledge. We make it easier for you.

    If you clone a WordPress web application or PHP application (for example Laravel) that has a database, you don’t want to forget to clone the database in the process. Missing a table from the database or an important file can cause errors and prevent a website from functioning.

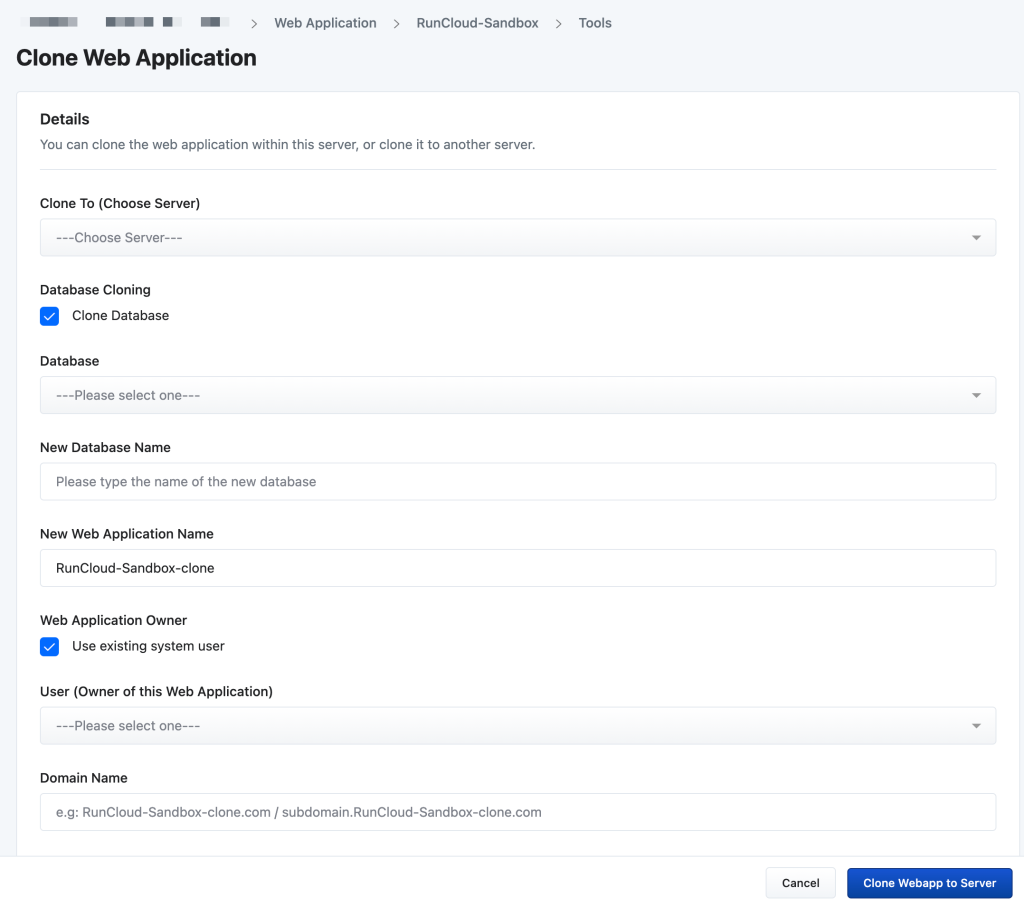
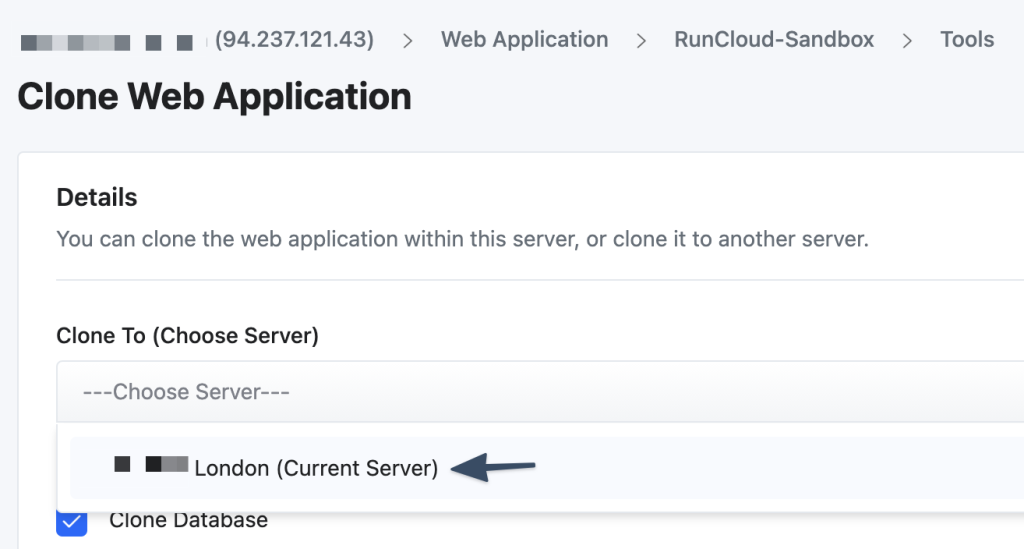
    After you have clicked the Clone Web App button, you will be taken into a screen that will allow you to set which server you would like to clone to, the port to use, the web application owner, and the settings for the database. Once you have entered in all of this information, click Clone Webapp to Server button to start the process.

    While cloning is not an instant process, RunCloud takes care of the entire process making your life easy with just a few button clicks. When cloning a web application to a different server, an exact copy of your web application will be transferred using the same configurations. The whole process takes just a few moments to clone all of your files, the database, and WordPress settings.

    You can even monitor the progress by clicking on the Notification icon at the top right.

    Done! Now your web application has been cloned to a different server within your RunCloud account.

    If you want to switch your live website to this cloned web app, you need to continue with by changing your A records in your DNS management service. Do not forget to check your domain name settings and also re-deploy Let’s Encrypt SSL/TLS in your cloned web app if you want to secure it with HTTPS.

    Cloning A Web Application Within The Same Server

    Cloning a web application within the same server is useful, for example, if you want to create a different project from an existing web app, without starting from scratch.

    If you use WordPress and you want to clone your web app for development purposes, do not use this feature, as it is better to use One-Click WordPress Staging that will give you additional features to sync/merge between your production and staging website.

    However, if you want to create an entirely new website that is similar, but might contain different content, such as a website branching off another, you might consider using this feature.

    Another use case might be if you are teaching a classroom of students and setting up a server, and you want all of the students to use the same website setup, then you could clone the website multiple times to the same server.

    When cloning web applications within the same server, it is highly advised to make sure to use a different name for both web application and database name. Upon finalizing the setup, click “Clone this webapp” button to begin the process.

    Cloning a web application within the same server is usually faster compared to cloning to a different server. You can monitor the progress by clicking the Notification icon at the top right. It will give you the details of RunCloud cloning your web application.

    Done! Now you have cloned your website within the same server.

    Summary

    Clone Web Application feature is very useful to clone/duplicate your existing web application quickly, within the same server or to a different server within your RunCloud account.

    Pro and Business plan users can enjoy the full functionality of this feature. For Basic plan users, this feature is available to try until 1st June 2020, and you are only able to clone web applications within the same server.

    When it comes to our users, we know RunCloud is important to you, and you rely on its services. We are always listening to what your pains are, and we want to solve them and make your life easier.

    The web app cloning feature has been a largely requested feature, receiving 218 upvotes that we knew would be useful to you. Never ever hesitate to suggest new features that you want to see, and we will make it happen.

  • Looking for an alternative to phpMyAdmin? Look no further…

    Looking for an alternative to phpMyAdmin? Look no further…

    Most small to medium-sized websites and web applications use MySQL as the database of choice for back-end storage. In fact, many of the world’s largest and fastest-growing organizations, including Facebook, Google, and Adobe rely on the stability and maturity of MySQL to power their high-volume websites, business-critical systems and packaged Software as a Service (SaaS) platforms. MySQL is a great choice for a number of reasons, primary among them are its high-availability features, reliable scalability, cost-effectiveness, and the huge community of active developers.

    At RunCloud, we use MariaDB for your database. It is an enhanced drop-in replacement for MySQL, made by the original developers of MySQL with the promise of maintaining ongoing and future compatibility with MySQL. This means every tool created for MySQL is also compatible with MariaDB, and this solution is future-proof.

    Some developers or database administrators do not need any tools when it comes to managing the MySQL database. However, for users with limited knowledge, or those who just want to perform some quick administration tasks on the database, a database administration tool can be of great help and a major time-saver. There are a lot of choices when it comes to managing cloud-hosted MySQL and MariaDB databases.

    A quick Google search shows that phpMyAdmin is one of the most popular choices and easily recommended. But did you know that there are other FREE RunCloud-compatible database managers that are worth looking into?

    phpMyAdmin

    Alternatif phpMyAdmin

    First, only a little introduction to PHPMyAdmin is needed as it is one of the most famous database management tools around. Launched in 1998, phpMyAdmin was written primarily in PHP. It is a free and open-source administration tool for MySQL and MariaDB. Over the years, its popularity has grown, especially for web hosting services, due to its portability, easily accessible web interface, ease of use (even for someone with minimal skills) and functionality. This has led to it becoming the tool of choice provided by most shared hosting companies in their control panel for managing MySQL or MariaDB databases.

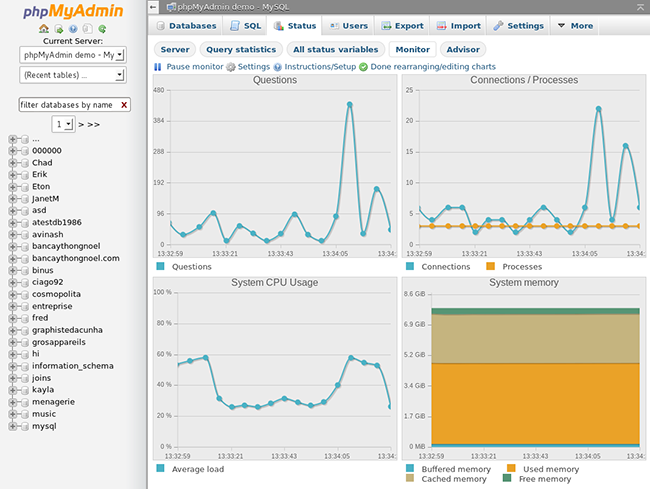
    Another contributing factor to its success is that, unlike other database manager tools, phpMyAdmin has live charts to monitor MySQL server activity such as connections, processes, CPU/memory usage, etc. It also includes a debugger and can generate Entity Relationship Diagram (ERD) in PDF format so large databases can be looked at as a whole, unfortunately, on the downside, it does not have syntax highlighting or code completion, but in general, it has an impressive feature set.

    Alternatif Status

    phpMyAdmin monitoring dashboard

    Since phpMyAdmin is a public-facing Web Application and is only accessible using a web browser, some developers have reservations about using it, considering it a potential security vulnerability.

    Previously RunCloud did not recommend using phpMyAdmin for database management due to these potential security risks, but after receiving many requests from users who insisted on using it, the developers at RunCloud included it in the script installer. At RunCloud, we listen to our clients.

    In the RunCloud dashboard, users can
    install phpMyAdmin using One Click phpMyAdmin install in less than 5 minutes. Instead of accessing the database from a web interface through an open port, it is recommended to create another web app within the RunCloud dashboard and install phpMyAdmin in that web app and enable SSL there so that the connection is encrypted and secured.

    HeidiSQL

    Alternatif HeidiSQL


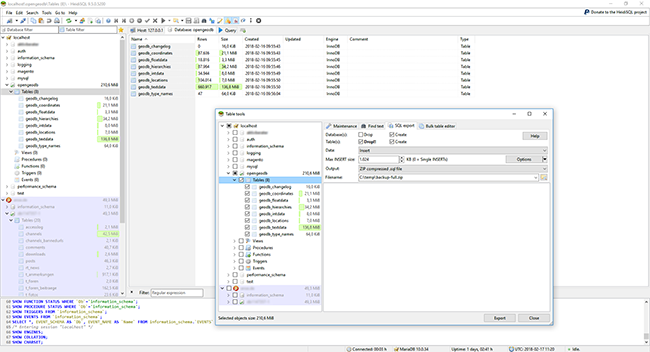
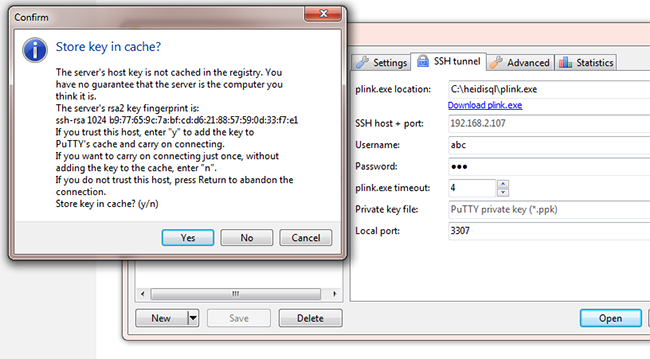
    HeidiSQL is a Windows-based platform launched in 2002. Unlike phpMyAdmin, HeidiSQL users connect to MySQL or MariaDB database via SSH tunnel. There is no need to establish a separate SSH tunnel connection using Putty or Terminal. So all communications to and from are encrypted. Among database managers,  HeidiSQL’s interface is considered very pleasant not to mention comprehensive and intuitive.

    Furthermore, there is also a portable version that does not require administrative privileges and installation.

    Although it has no built-in debugger, it does have syntax checks and auto-completion features, alongside powerful user management features where the administrator has granular control to easily set privileges on a per-database level or give access to only certain commands.

    Alternatif Data

    HeidiSQL’s comprehensive and intuitive interface

    Alternatif Box

    Built-in tunnelling option in HeidiSQL using plink.exe

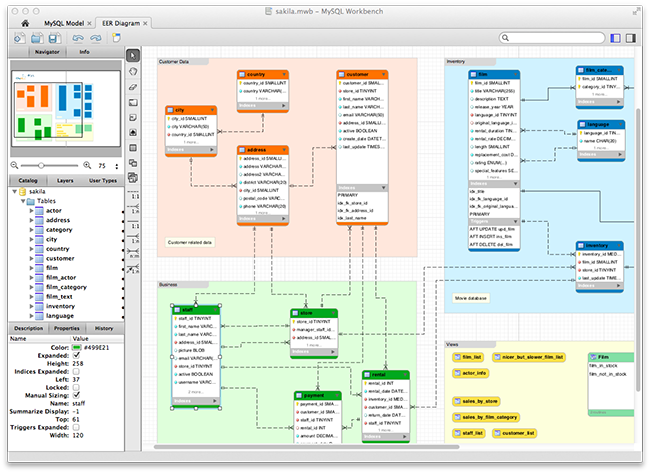
    MySQL Workbench

    Alternatif MySQL

    Any MySQL database management tool list would be incomplete without mentioning the software developed by the company which owns MySQL, Oracle Corporation. MySQL Workbench was released in 2005 and replaced a previous software package called MySQL GUI Tools Bundle. This is the only SQL client which is supported and developed by MySQL, so you can be sure that it always contains all the functions to match the most recent updates for MySQL. It is also a cross-platform software that can be used on Windows, Linux, and Mac OS. So the experience is consistent from one OS to another.

    In a nutshell, MySQL Workbench is more of a unified visual tool for database architects, developers, and database administrators. It has enhanced entity-relationship modelling support and it is one of the few software packages that can do both forward engineering (updating the database schema with changes made to its entities and relationships via the ERD visual designer) and reverse engineering (producing an ERD from a database).

    Alternatif Workbench

    Extensive ERD in MySQL Workbench

    However, it can be resource-intensive and some say it is overkill when all you need is to perform simple tasks. And as everyone knows, if the software is resource-intensive, it can tend to crash more often.

    Due to the many features it provides, some regard the interface as cluttered and unintuitive. Hence, this tool is not recommended for beginners. So, unless the user is an advanced database administrator and there is ample client and server resources, it is not recommended. If, however, its needs are met, then MySQL Workbench can be a powerful tool to have since nearly every SQL command can be utilized in a GUI.

    Sequel Pro

    Alternatif Sequel Pro

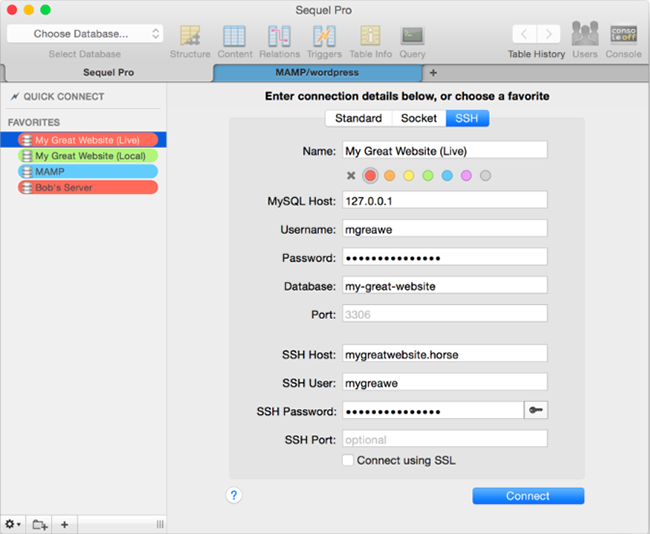
    Among users who are on Mac OS machines, Sequel Pro is a top choice due to its comprehensive features, where the GUI provides many powerful functions instead of having to keep resorting to terminal commands. Sequel Pro was built specifically for Mac OS machines to manage MySQL / MariaDB. With Sequel Pro, users can easily create and edit databases, manage users and easily do a full database export for backup (where multiple formats are supported like SQL, CSV and XML). Even imported CSV files can be easily converted to tables.  

    Alternatif SSh

    Sequel Pro’s connection interface

    Sequel Pro allows users to connect to their MySQL/MariaDB through standard, socket or SSH, either locally or remotely. It even allows users to group and colour code the servers into staging or production sites, just like how a Mac user can colour code the files in the Finder app on a Mac machine.

    For a user who manages multiple projects at one time, Sequel Pro is practical as it allows multiple open connections to different databases. The connections remain connected until the user decides to disconnect them. The user management feature also allows for user creation with user privilege and connection management.

    Since it does not have a visual query editor, running a query requires a little bit of MySQL syntax knowledge. Fortunately, it does have highly flexible and customisable filters that can be applied on a table. And these filters can be used across different tables with ease. The queries can be saved and there is a history for queries that have been run, but the results of the queries themselves are not saved.

    All in all, this tool is very powerful when it comes to digging for information from the database as complex queries and filters can be done through the control panel instead of relying on terminal commands.

    Adminer

    Alternatif Adminer

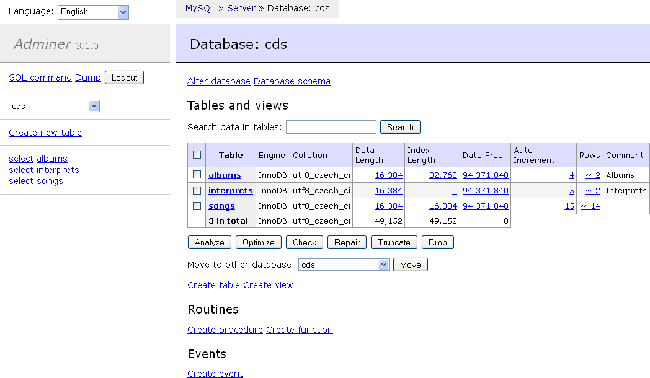
    Last but not least, we have Adminer. Previously known as phpMinAdmin, it was initially released as a light alternative to phpMyAdmin. It is famously known for being lightweight and the installer is just a single file. It is good to go once it is uploaded.

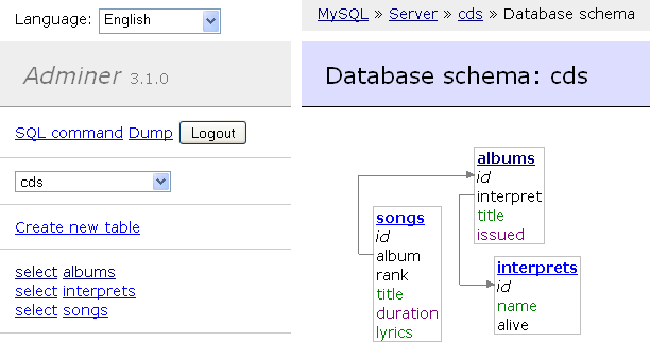
    Being lightweight means that it had to forgo some features like auto-completion and a debugger but it does have syntax highlighting as well as ERD design, which is the ability to draw entity-relationship diagrams for the database.

    The Adminer interface is more functional rather than being focused on aesthetics, but nevertheless, it is fast and easy to use.

    Alternatif Database

    Adminer’s lightweight and simple interface

    Alternatif cds

    ERD visualisation in Adminer

    Conclusion

    So there you go, the recommended tools to administer your MariaDB in RunCloud (or any other cloud service provider). The best practice would be to not use a public-facing web tool when managing your server especially the database which has sensitive data. Rather, use a tool that can support SSH connection so that the communication between you and your servers are encrypted and less prone to be intercepted by irresponsible parties.

    Not including Sequel Pro is a mistake – I imagine it is the only tool that any of your Mac Users use.

  • How to Change/Reset MySQL Root Password on Ubuntu Linux?

    How to Change/Reset MySQL Root Password on Ubuntu Linux?

    Did you forget the root password for your MySQL Server?

    Or maybe you provisioned your RunCloud server via the auto-install method and never had the need to use your password in the first place?

    Whatever may be the case, if you want to reset your MySQL password then you’ve come to the right place!

    In this guide, we’ll walk you through how to set, change, and recover your MySQL root password on an Ubuntu server via MySQL command line.

    If you have no prior experience managing MySQL, don’t worry – with RunCloud, it is as easy as ABC.

    How to Reset Your MySQL Root Password in Linux

    Step 1: Log in to the Server with SSH

    We have already written in-depth documentation on connecting to your RunCloud account via SSH, but if you’re not using RunCloud, you can use the following SSH command to log in to your server:

    ssh user@server_ip_address

    In the above command, replace the user with the username of your Linux account, and server_ip_address with your server’s IP address.

    Keep in mind that the Linux account must have superuser permissions to execute the commands given in the next step.

    Step 2: STOP MySQL Server

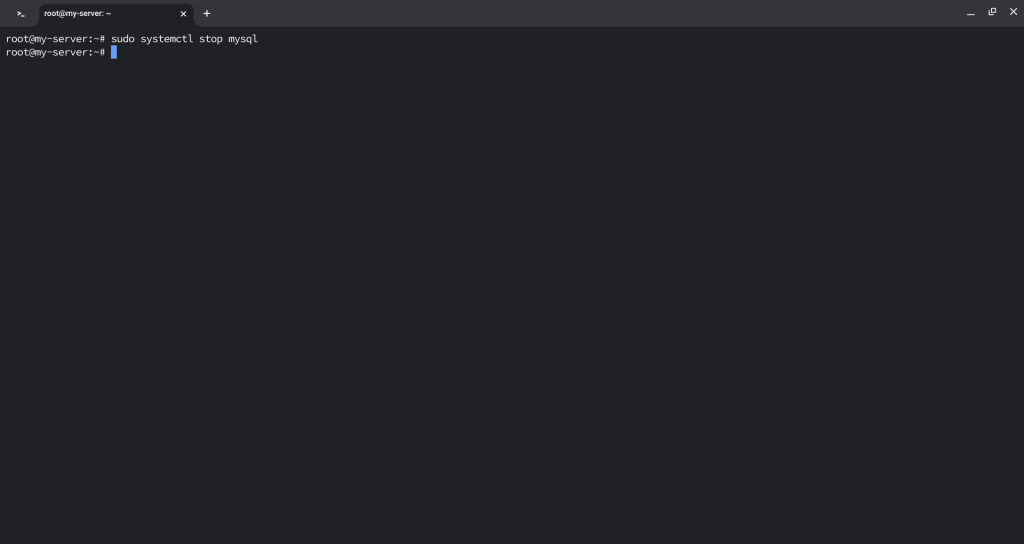
    After logging in to your server, you need to stop the MySQL service. You can use the following command to do this:

    Note: If you have any websites or other services that are using this database, then they will not be able to connect to your database while you carry out this action, so it is best to do this outside of business hours.

    sudo systemctl stop mysql
    logging into root user via command line

    Step 3: Restart MySQL Server

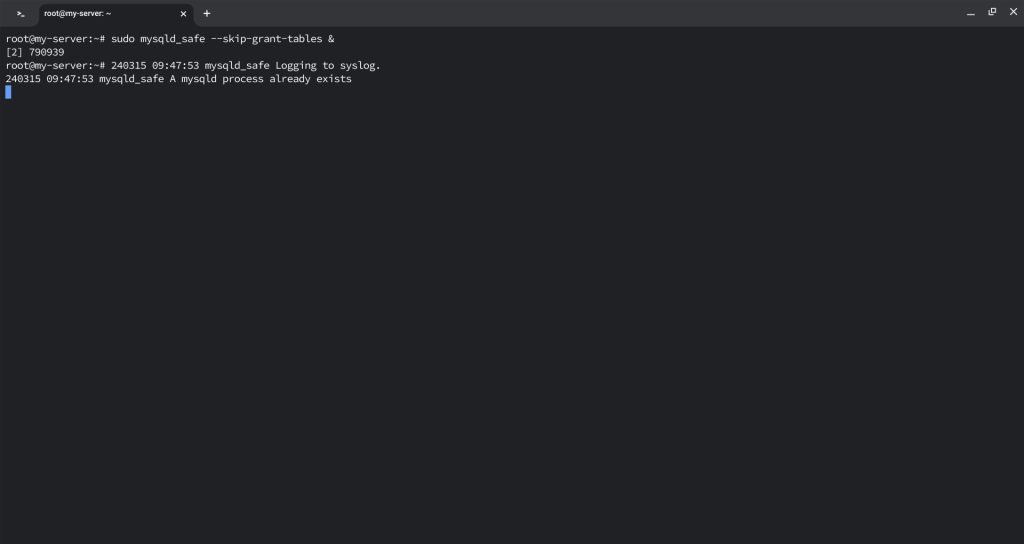
    After stopping the server, you can now restart it in the safe mode. This will allow us to execute SQL commands without needing to enter the password.

    Since the command --skip-grant-tables enables anyone to connect without a password, it is considered highly insecure, which is why all commands that follow must be done within a brief period. The ampersand (&) at the end is required as it ensures that the command is being run parallel with the commands that follow afterwards.

    To start MySQL without permission checking, execute the following command:

    sudo mysqld_safe --skip-grant-tables &
    MySQL root password

    Step 4: Log in to MySQL

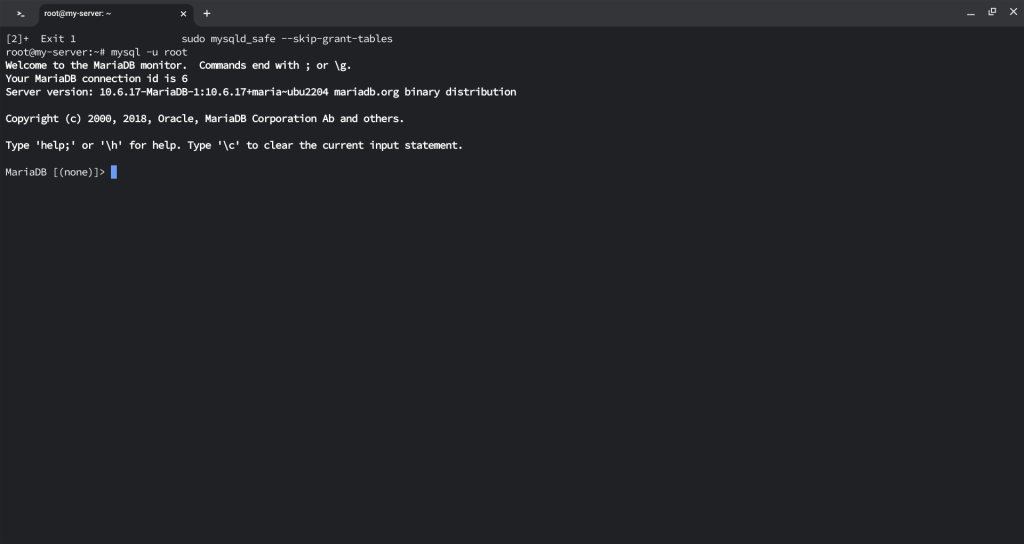
    Once your server is up and running, you can log in to MySQL as the root user without the need for any password by executing the following command:

    mysql -u root

    Step 5: Change MySQL Password with Command Line

    Once you’re logged in to the MySQL server, you can do anything you like – such as changing the password for users, granting permissions, deleting database, etc.

    To change the root password, execute the following command:

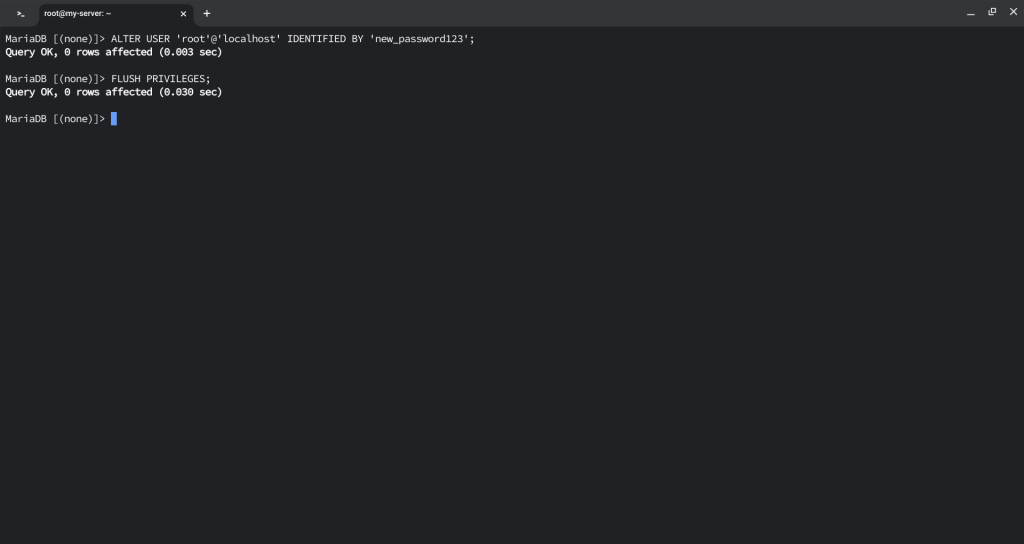
    ALTER USER 'root'@'localhost' IDENTIFIED BY 'RunCloud_password';
    FLUSH PRIVILEGES;

    In the above command, replace the RunCloud_password with your new password.

    Alternatively, you can also use the following command to change the password:

    SET PASSWORD FOR 'root'@'localhost' = PASSWORD('RunCloud_password');
    FLUSH PRIVILEGES;

    Step 6: Stop & Restart MySQL Server

    Finally, you need to stop the MySQL service and restart it in normal mode. To do this, first exit from the MySQL CLI by using the exit; command, and then restart the service using the following commands:

    sudo systemctl stop mysql
    sudo systemctl start mysql

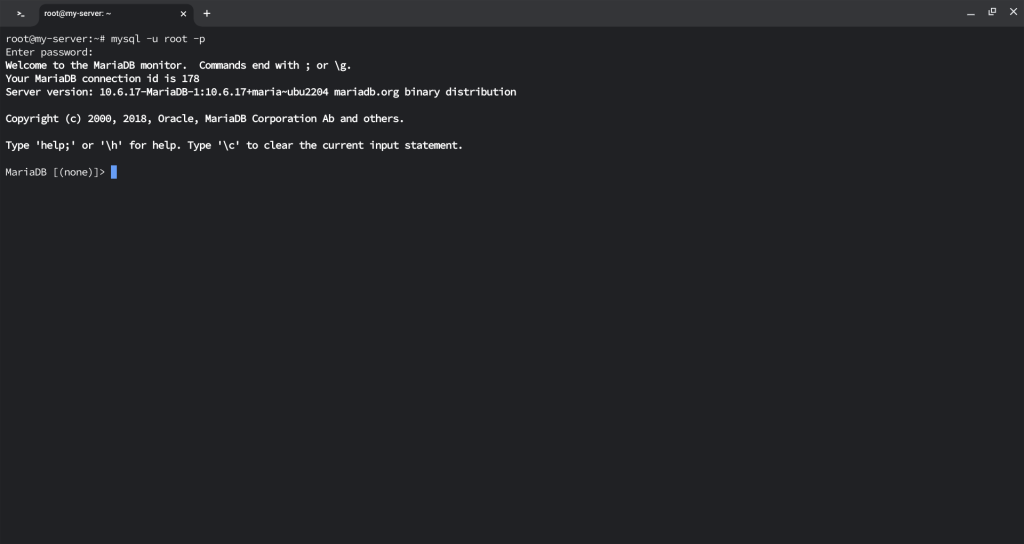
    That’s it! Once your server is up and running, you can start using it normally. To log in to your server via the new password, use the following command:

    mysql -u root -p

    The above command will prompt you to enter a password. To complete the login process, type your password and press Enter. Keep in mind that the password will not be displayed on screen for security reasons.

    Step 7: Edit RunCloud Configuration File (Only for RunCloud Users)

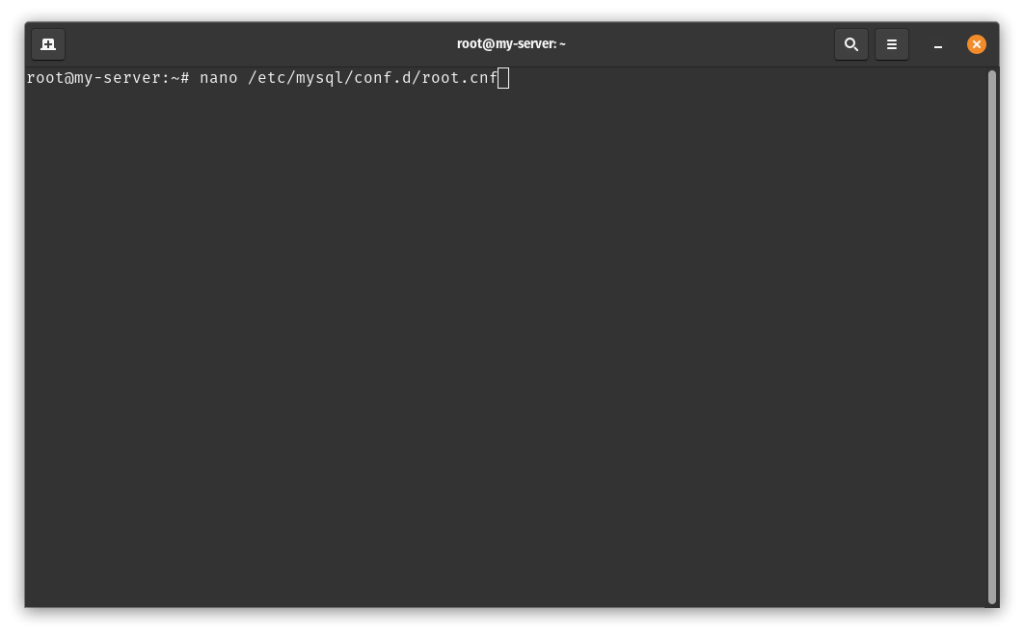
    If you are using RunCloud to manage your servers, then you will need to edit a config file on your server so that RunCloud agent can access your MySQL database using the new password. To edit the config file, execute the following command on your terminal:

    nano /etc/mysql/conf.d/root.cnf

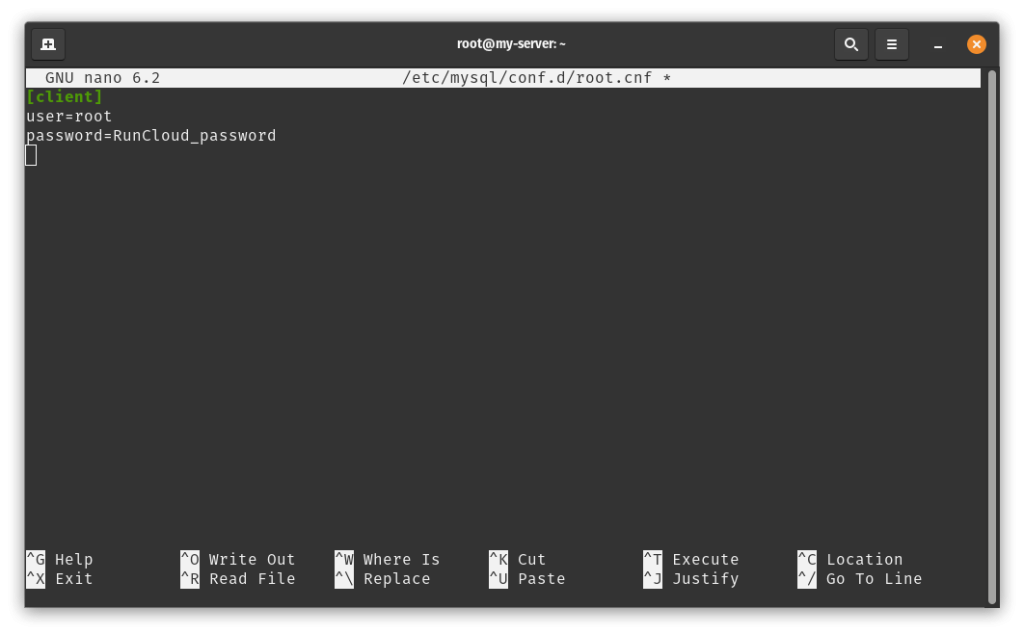
    The above command will open a text editor in your terminal, you can use the arrow keys on your keyboard to navigate and replace the existing password with your new password.

    After editing the file, you can save it by pressing Ctrl + O and exit the editor by pressing Ctrl + X. If you need step-by-step instructions on editing the file, then you should read our post on editing files over SSH using Nano.

    Frequently Asked Questions

    How do I find my MySQL root password?

    You cannot directly find the MySQL root password due to security reasons. However, you can reset it. To recover the password, you need to stop the MySQL server process, start the MySQL server with the --skip-grant-tables and --skip-networking options, and then connect to the MySQL server as the root user.

    What is the password for the root user in MySQL Workbench?

    The password for the root user in MySQL Workbench is the one you set during the installation of MySQL. If you haven’t set any password, you might be able to log in directly.

    How to change SQL password using CMD?

    You can change the SQL password using the command line by using the ALTER USER statement.

    How to reset MySQL root password in Docker?

    To reset the MySQL root password in Docker, you need to first access your MySQL container using the docker exec command and then, follow the steps described in this post to reset your root password.

    How to reset the root password in MySQL Mac?

    To reset the root password in MySQL on a Mac, you need to stop the MySQL Server first. Then, start the server in safe mode with a privilege bypass. In a new window, connect to the database, set a new password (as explained in this post), and flush the permissions.

    Can a MySQL user change their own password?

    Yes, a MySQL user can change their own password using the SET PASSWORD or ALTER USER statement.

    How to Recover the MySQL Root Password?

    Unfortunately, you cannot retrieve the MySQL root password. However, you can reset it by following the steps mentioned in this post.

    How to find MySQL root password in RunCloud?

    If you install RunCloud via manual installation, then the MySQL root password is displayed on your terminal screen at the end of the RunCloud agent installation on your server.

    Wrapping Up

    RunCloud is a powerful and easy-to-use platform that helps you manage your websites on any cloud server. With RunCloud, you don’t need to be a Linux expert to set up, secure, and optimize your web applications. You can do everything from a simple and intuitive dashboard, saving you time and hassle.

    RunCloud supports various web servers, PHP versions, databases, and frameworks. You can also monitor your server performance, back up your data, and automate your tasks with RunCloud. Whether you are a developer, a freelancer, or a business owner, RunCloud can help you run your websites faster and smoother.
    What are you waiting for? Join RunCloud today and enjoy the best web hosting solution for your websites. It’s free for 7 days, no strings attached!

  • Why Authentication Using SSH Public Key is Better than Using Password and How Do They Work?

    Why Authentication Using SSH Public Key is Better than Using Password and How Do They Work?

    What is SSH?

    SSH, or Secure Shell, is a network protocol that allows users to remotely manage their servers or computers over the Internet, in which the communication between the two machines are strongly encrypted and protected from being eavesdropped. The user runs a client on his or her machine and the network connection carries the user’s keystrokes and commands from the user’s local machine to the remote server. The network connection then carries back the server’s responses to the user.

    Compared to the older method of remotely managing the computers using a non-protected network protocol like telnet and rlogin, SSH presents a secure alternative over an unsecured network connection (like Internet). Nowadays SSH comes shipped in mostly (if not all) servers.

    A user can connect to the remote server by keying in the username and password through SSH by running the puTTY client, Terminal, Bash or any other clients. However, there is another option that is safer and less cumbersome then keying in your password every time you want to connect to your remote server, which is to authenticate using SSH public key on the said SSH server.

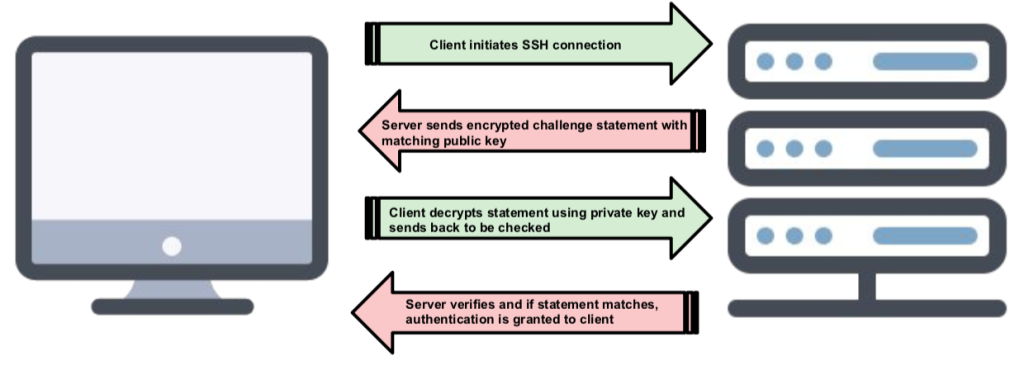
    What is SSH public key authentication and how do they work?

    An SSH server can authenticate a user in several ways, where the most commonly used method would be through passwords and public key authentication.

    Normally, how a user would securely connect to their server would be to open up  puTTY/Terminal/Bash and initiate an SSH connection either by logging in using a GUI or typing in a terminal ssh username@IPAddress and then proceed to key in the password when prompted.

    But instead of keying in your password in the puTTY/Terminal client when you want to login to your remote server, another way to safely authenticate would be to authenticate using an SSH public key, which is authenticating without keying in the password.

    SSH key authentication works in pairs: private key and public key. Unlike symmetric encryption (which uses the same key to encrypt and decrypt), SSH key authentication employs asymmetric encryption algorithm, where the encryption and decryption use different keys.

    A user (or an authorised person) needs to generate both private key and a public key. The private key must be kept safely and confidential, to the extent of not sharing it with anybody else. If the private key is compromised, it is almost as good as gone, as the malicious user may gain access to the remote server using the private key, moreover if the private key is unprotected by any passphrase.

    The public key which was generated together with the private key can be shared with any server. The public key is then uploaded to the remote server that the user wants to log in using the SSH protocol. Hence, a relation may also be such that; one private key to one public key placed in many servers.

    Another person having access to a public key does not mean that he/she can decrypt the messages. Only a user with the private key can decrypt the messages. The public key is only there as a means to encrypt the messages where the messages can only be decrypted by the person with the private key. It is safe to say that private key cannot be derived from the public key. Hence, the public key does not have the ability to decrypt the messages that it sends out, or even decrypt the messages that the private key has encrypted.

    ssh authentication protocol

    SSH Public Key Authentication simplified

    So in the case where a user is authenticating using the SSH keys (instead of manually keying in the password), the server will then send an encrypted challenge statement back to the user and the user will then decrypt the message with the private key and then send it back to the remote server to be checked. The server will then verify that that the message is correctly decrypted and if it matches the challenge statement earlier, then the client is authenticated.

    Basically, the remote SSH server is testing the client whether the client has the right private key that is associated with the public key on that remote server. If the client can prove that it has the right private key, then the client is authenticated.

    Why authenticate using SSH key instead of password?

    Undeniably, the main advantage of authentication using SSH public key over authentication using password would be security. No matter how long or complex a password is, it can never equate with the cryptographic strength that SSH public key offers.

    A password is susceptible to brute-force attack by a malicious user or worse, a password can even be guessed by someone who knows about the user’s personal information that can be used to retrieve the password.

    Additionally, using SSH public key also would eliminate the need for users having to remember complicated passwords or writing them down.

    Public key authentication also allows for a non-interactive login should a user need to access a remote server multiple times without needing to key in the password multiple times every time he or she logs in (or when session is disconnected due to idle time) as well as to automate processes that need to be authenticated which come from a remote machine.

    Best Practices

    However, all the above advantages are meaningless if the private key is not kept in a safe place. To increase the security, instead of storing the private key on a hard drive, it is recommended that that it is stored on a cryptographic device like a smart card or a usb token, so that it is not accessible by malicious users should an unauthorized user gains access to the computer. Additionally, the private key can be encrypted with a passphrase. But this is only applicable for interactive logins (for non-automated tasks) as it may require a person to key in the passphrase in order to use the private key.

    Since creating a pair of SSH keys requires minimal effort, often times, keys are generated or re-generated (and in many cases, self-provisioned) unnecessarily just to solve minor issues. If left unchecked, this can lead to unmanaged chaos where there are many public keys without knowing who they are attached to, or whether the person is still authorized to access the servers. As such, policies and rules must to be implemented to regulate the usage of private and public keys in any organisation, like keeping an inventory,

    RunCloud servers support the use of SSH public key authentication and it can be done easily and quickly.

    Wrapping Up

    RunCloud is a powerful and easy-to-use platform that helps you manage your websites on any cloud server. With RunCloud, you don’t need to be a Linux expert to set up, secure, and optimize your web applications. You can do everything from a simple and intuitive dashboard, saving you time and hassle.

    RunCloud supports various web servers, PHP versions, databases, and frameworks. You can also monitor your server performance, back up your data, and automate your tasks with RunCloud. Whether you are a developer, a freelancer, or a business owner, RunCloud can help you run your websites faster and smoother.
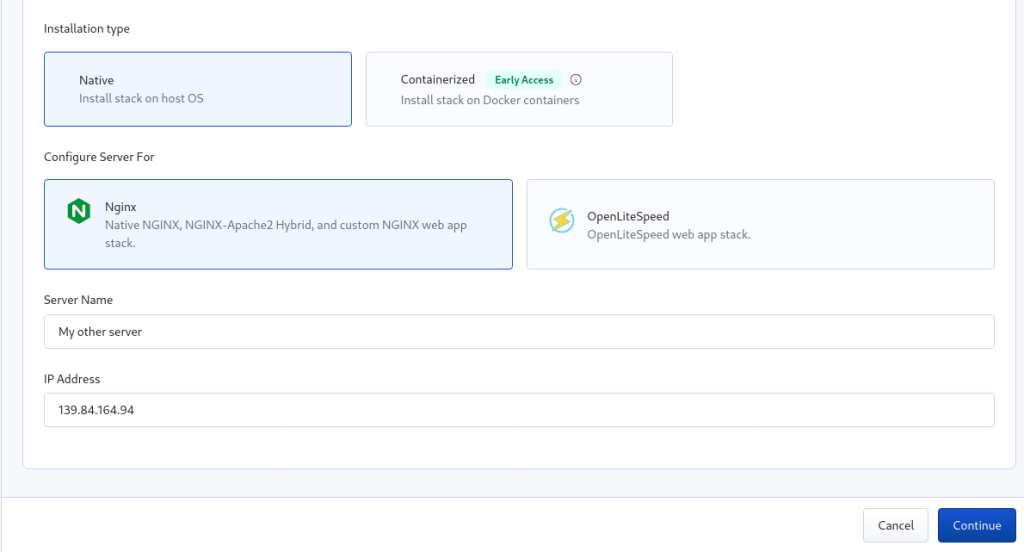
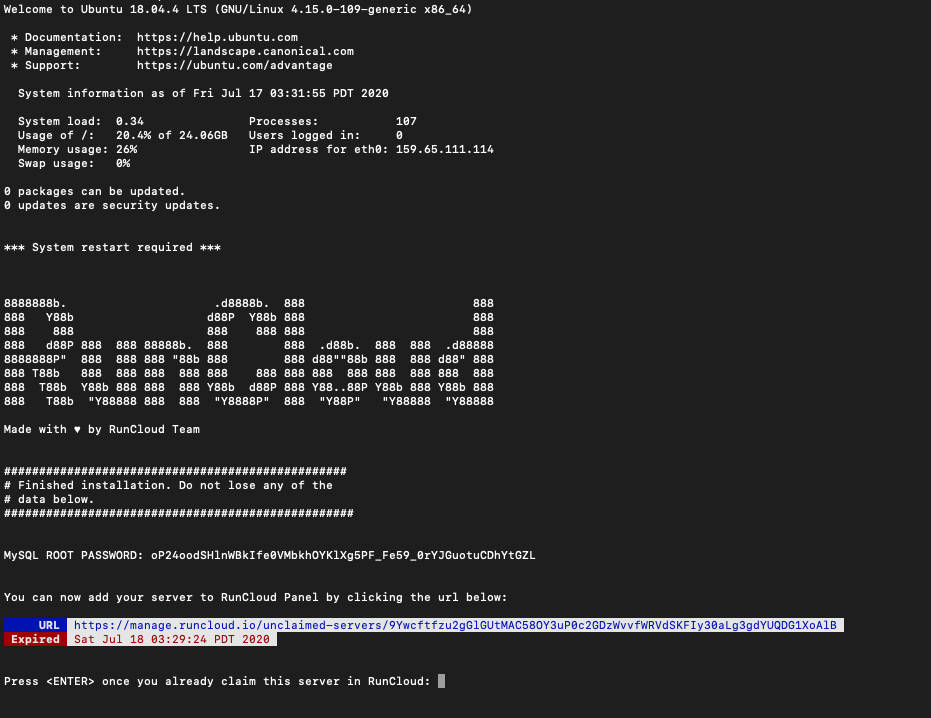
    What are you waiting for? Join RunCloud today and enjoy the best web hosting solution for your websites. It’s free for 7 days, no strings attached!