Category: Cloud Education

  • How to Install Ubuntu Mail Server? [Step By Step Guide]

    How to Install Ubuntu Mail Server? [Step By Step Guide]

    Are you looking for a simple but thorough guide on how to set up a Ubuntu Mail Server? Look no further!

    Dive into our step-by-step guide on ‘How to Install Ubuntu Mail Server‘ and unlock the secrets to mastering your own email server today!

    In this post we will walk you through the steps of installing and configuring Mailcow, a very popular email server for sending and receiving emails.

    But first, let’s learn a little bit about Mailcow.

    Mailcow Email Server logo

    What is the Mailcow Email Server?

    Mailcow is an open-source email server solution that makes setting up email services on Linux a breeze. It’s specifically designed for running inside containerized servers, integrating key components such as a mail transfer agent, a webmail client, and security features – all into one single system.

    Mailcow is essentially a collection of Docker containers that run various mail server applications, including (but not limited to) SOGo, Postfix, and Dovecot. Each container represents a single application – and they are all connected in a bridged network.

    It offers a modern and user-friendly web interface, known as the Mailcow UI, which provides a simple and easy interface for configuring nearly all settings and administrative tasks, such as enabling the easy creation of new domains and email addresses with just a few clicks.

    All the data, such as emails and user data, is stored in Docker volumes. This setup makes Mailcow a robust and straightforward choice for those seeking a self-hosted email server solution.

    How to Install SMTP Email Server in Ubuntu

    Here are the step-by-step instructions for installing the Mailcow email server on a Linux server:

    Prerequisites

    If you don’t plan on sending too many emails, then you’re better off using a third-party email service as it’s generally cheaper than maintaining and running a private email server. We’ve already covered the topic of using third-party email servers in extensive detail in our previous posts, which you can jump to here:

    1. Using Mailgun To Send Transactional Email From WordPress
    2. How to Send Email from PHP (With Guided Walkthrough)
    3. 15 Best Email Hosting For Small Business (2024)
    4. The 19 Best & Most Reliable Transactional Email Services 2023

    If you are determined to set-up your own email server, we recommend installing it on a separate VPS from your websites. By doing it this way, if someone hacks into your website, they won’t be able to gain access to your emails and user data.

    As we’ve mentioned, we will be using Mailcow as our email server, so begin by making sure your machine meets the following minimum requirements so that the installation process goes smoothly:

    1. CPU: 1 GHz
    2. RAM: Minimum 6 GiB + 1 GiB swap (default config)
    3. Boot Disk: 20 GiB (without emails)
    4. Architecture: x86_64, ARM64

    You can provision your server from any cloud provider that meets these requirements. In this tutorial, we will be using a Ubuntu 22 instance on Hetzner. Once your machine is up and running, you need to log in to your server via the command line and install Docker.

    Some providers may block outgoing ports to prevent spam, so make sure you configure your firewall settings to allow incoming TCP connections on all of the following ports: 25, 465, 587, 143, 993, 110, 995, 4190, 80, and 443.

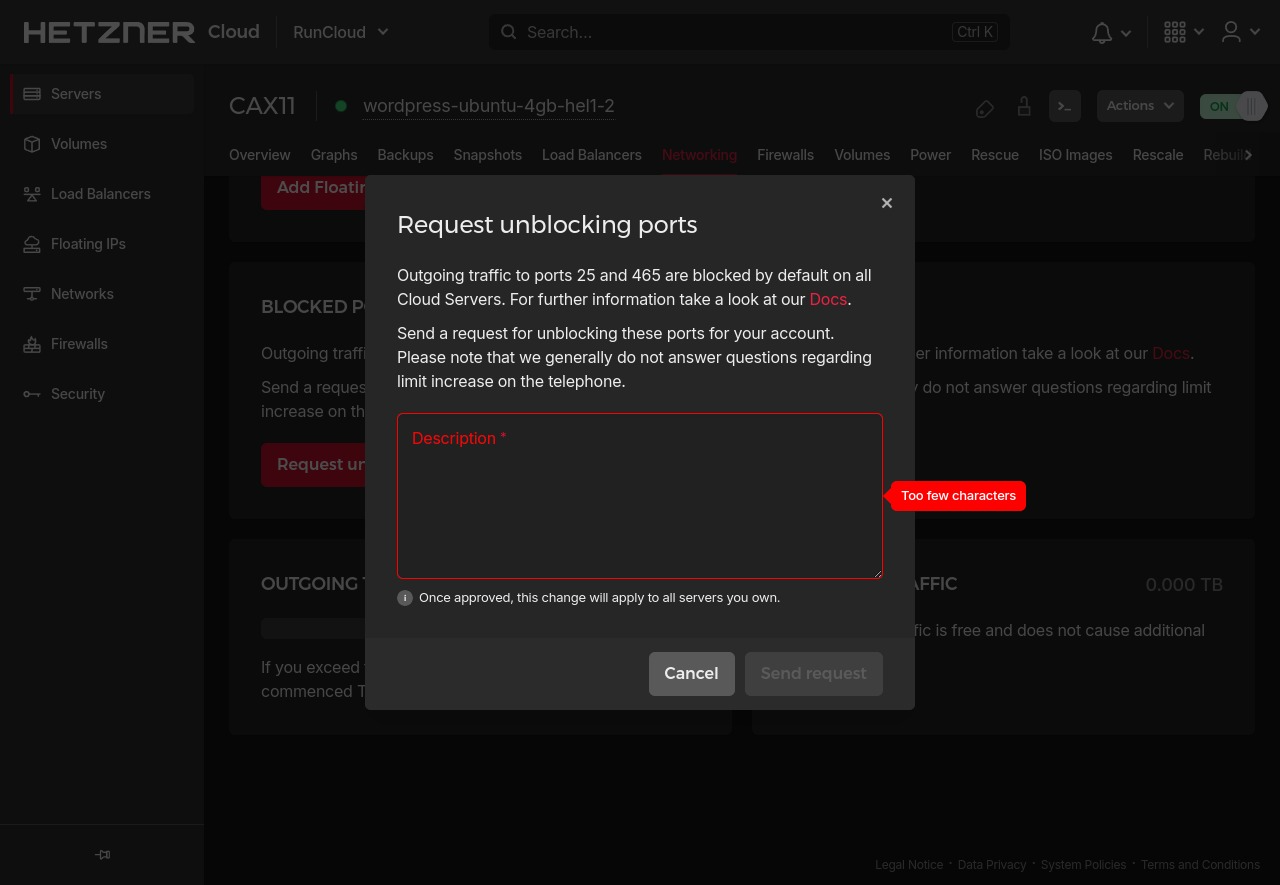
    On Hetzner, you’ll need to submit a special request to unblock port 25 and 465 by going to your server settings and switching to the networking tab. On this screen, you will see a button labeled ‘Request Unblocking Ports’.
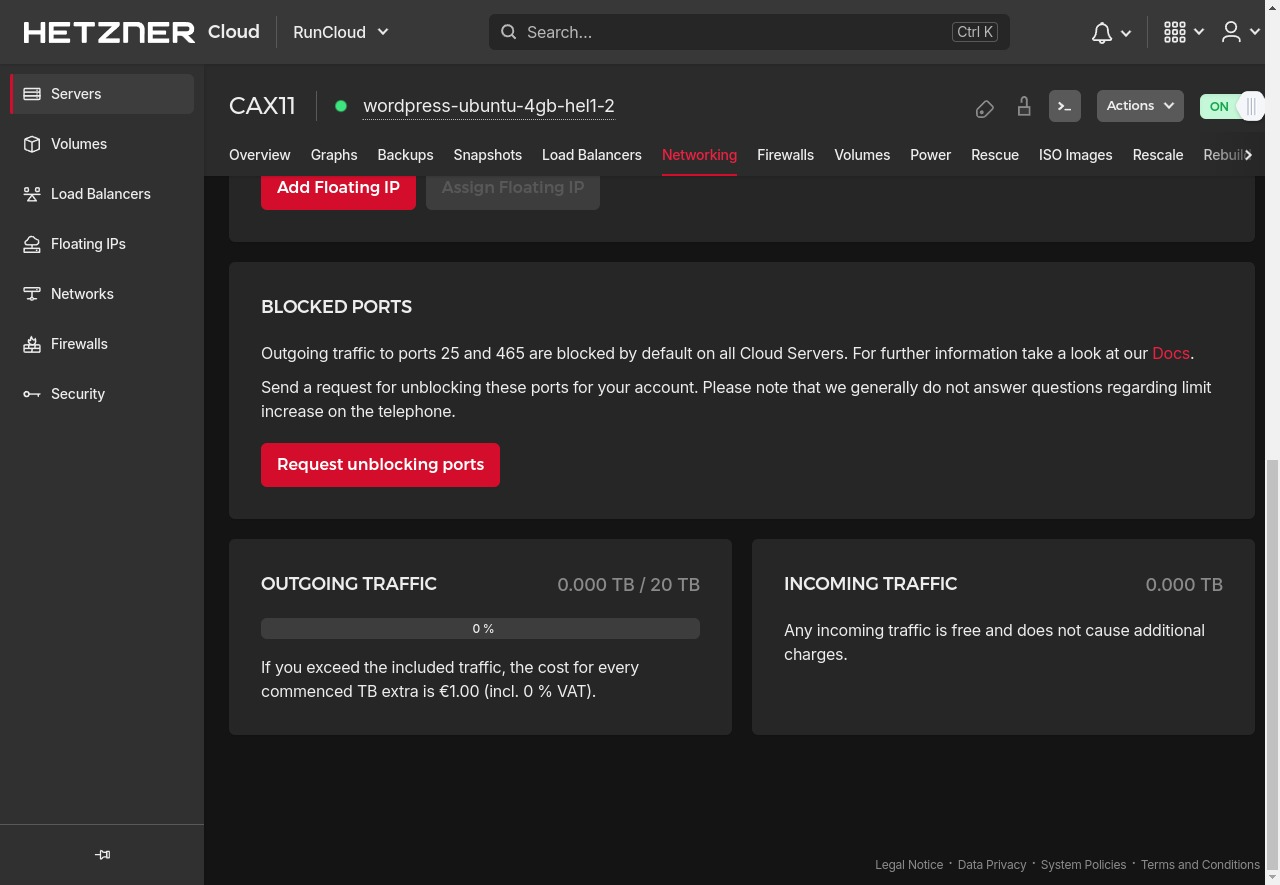
    When you click on the ‘Request Unblocking Ports’ button, you will see a dialog box which will require you to justify the need for this action. In the provided textbox, explain why you need an email server and submit the request – most requests are automatically approved within a minute.
    Dashboard Domain Setup

    Once you have a server up and running, it’s time to set up your DNS records. Although this action can be left until later, we recommend doing this first because DNS propagation takes time.

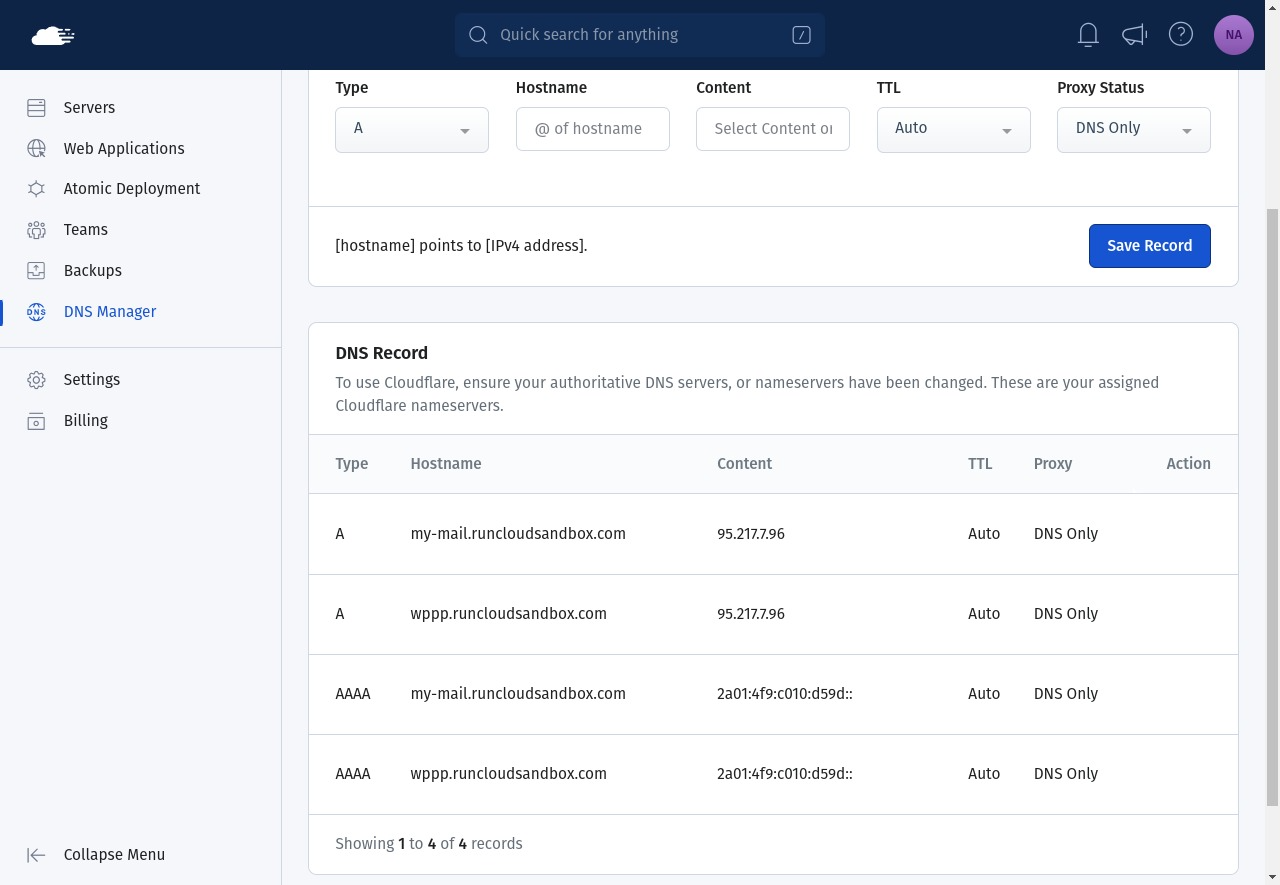
    Go to your DNS registrar’s dashboard and add the relevant A/AAAA records for the dashboard of your email server to point this domain to your machine. After setting up the mail server, your users will need to visit this website to send and read emails.

    Note: This domain can either be a completely separate fully-qualified domain name, or it can be a subdomain of your existing domain – it doesn’t matter.

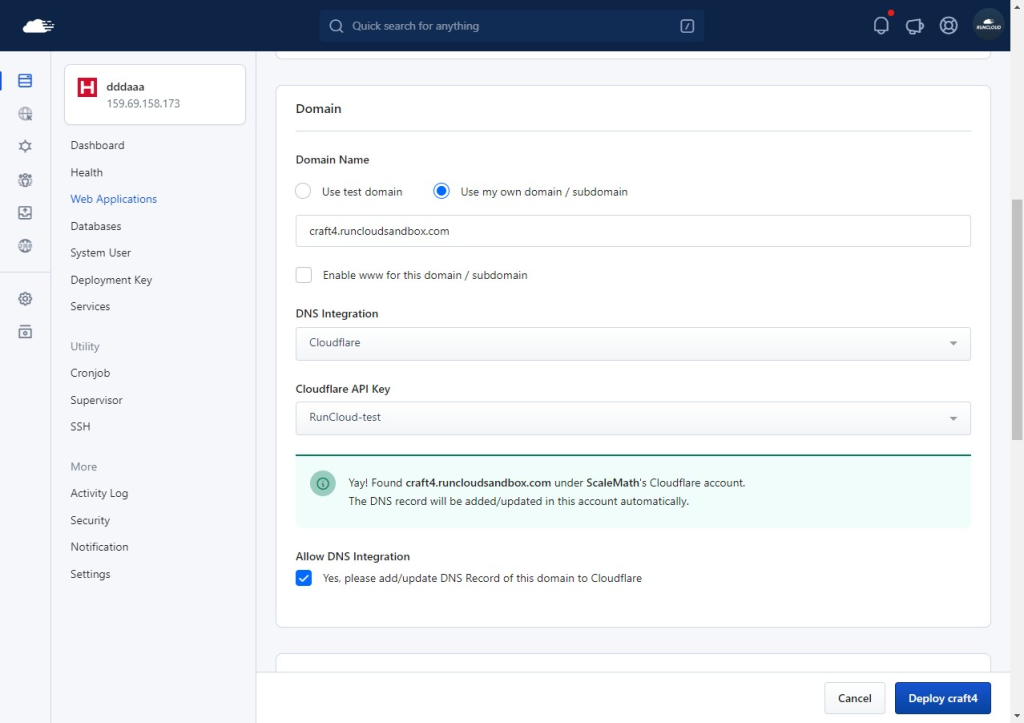
    If you’re using RunCloud, you can easily set up and configure your DNS records using the DNS manager right from your RunCloud dashboard.
    setting up domain name in RunCloud

    Suggested Read: How To Speed Up DNS Propagation | Ultimate Guide

    Mailcow Installation

    Log in to your server with root privileges and start the process of installing Mailcow by running the following commands:

    cd /opt
    git clone https://github.com/mailcow/mailcow-dockerized
    cd /opt/mailcow-dockerized
    ./generate_config.sh 

    The above commands will download and store the necessary files for starting the installation on your server. If you executed the above commands correctly, the command line will prompt you to enter the domain name that you configured in the previous step. After entering the domain name, you will be asked to specify some basic settings such as timezone and the development branch.
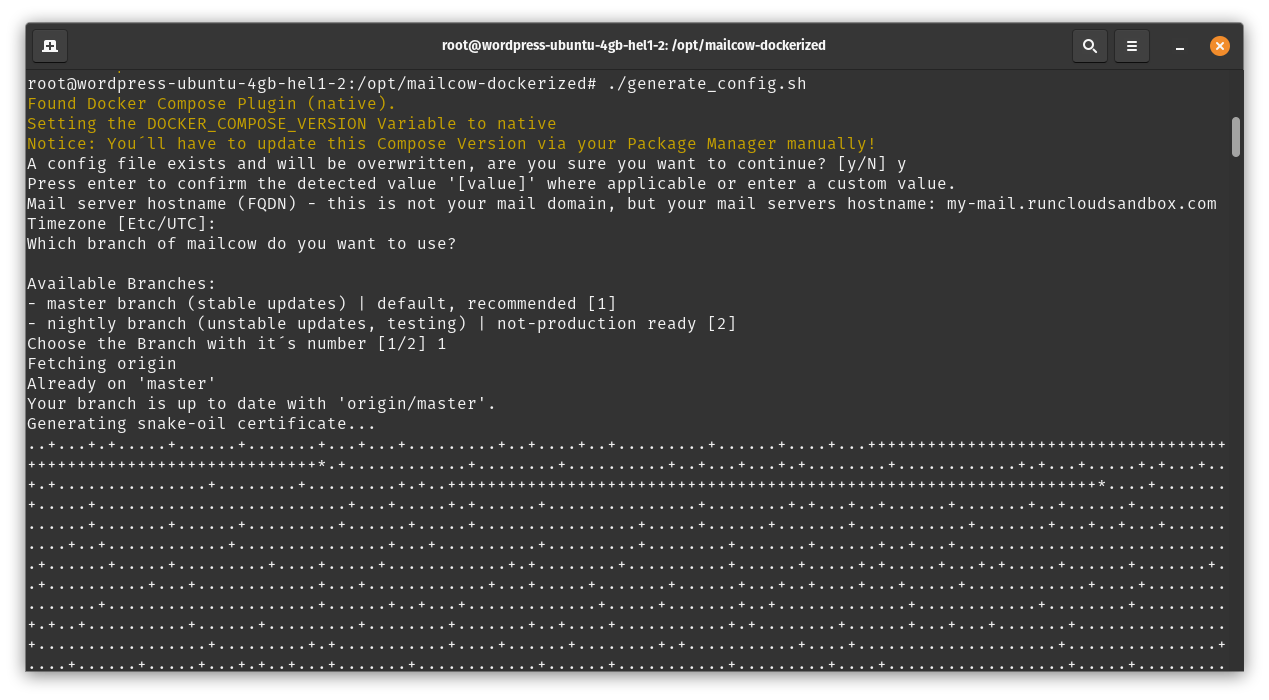
    Enter your timezone, or just press ‘Enter’ to use the default settings. Next, press ‘1’ to use the stable version and then press ‘Enter’ – this will download the necessary files for starting the installation. Finally, execute the following commands to download and run the docker containers:

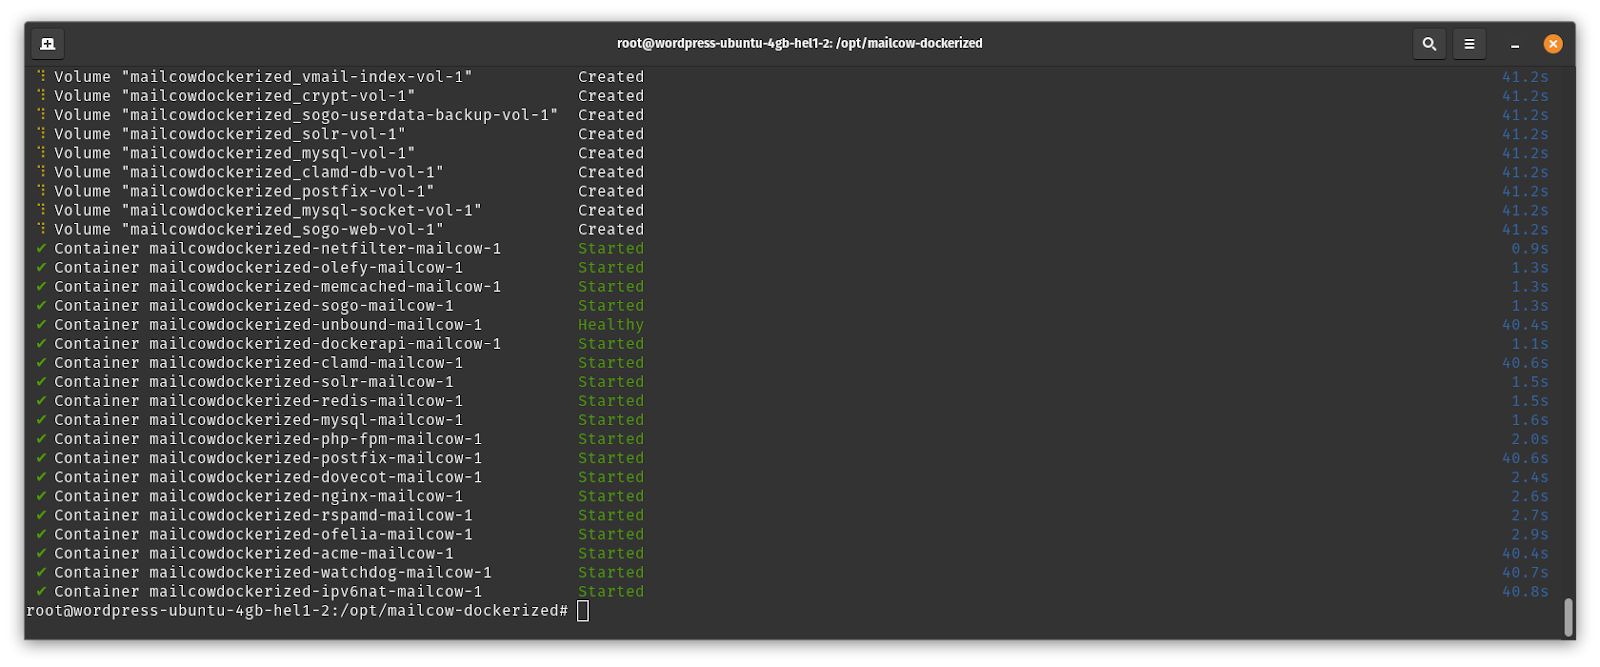
    docker compose pull
    docker compose up -d
    Installing Mailcow Email Server in Ubuntu

    After executing the above Docker commands, you will see that all the necessary containers have been started.

    Dashboard Setup

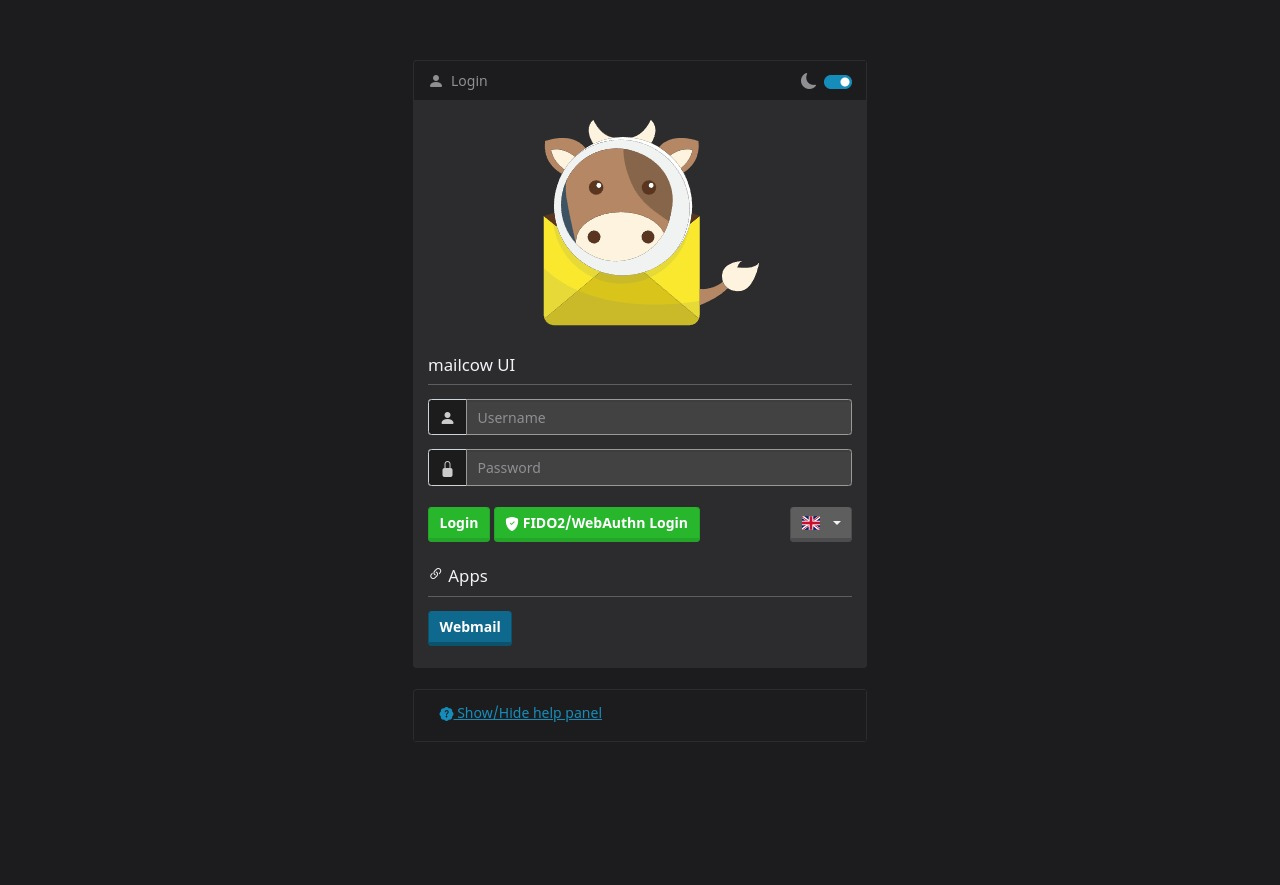
    Once your Docker containers are up and running, you can visit your Mailcow dashboard main page in your browser using the domain name that you specified earlier. On this screen, you will see a login page for the default admin account – the admin credentials are admin and moohoo.
    install-ubuntu-mail-server

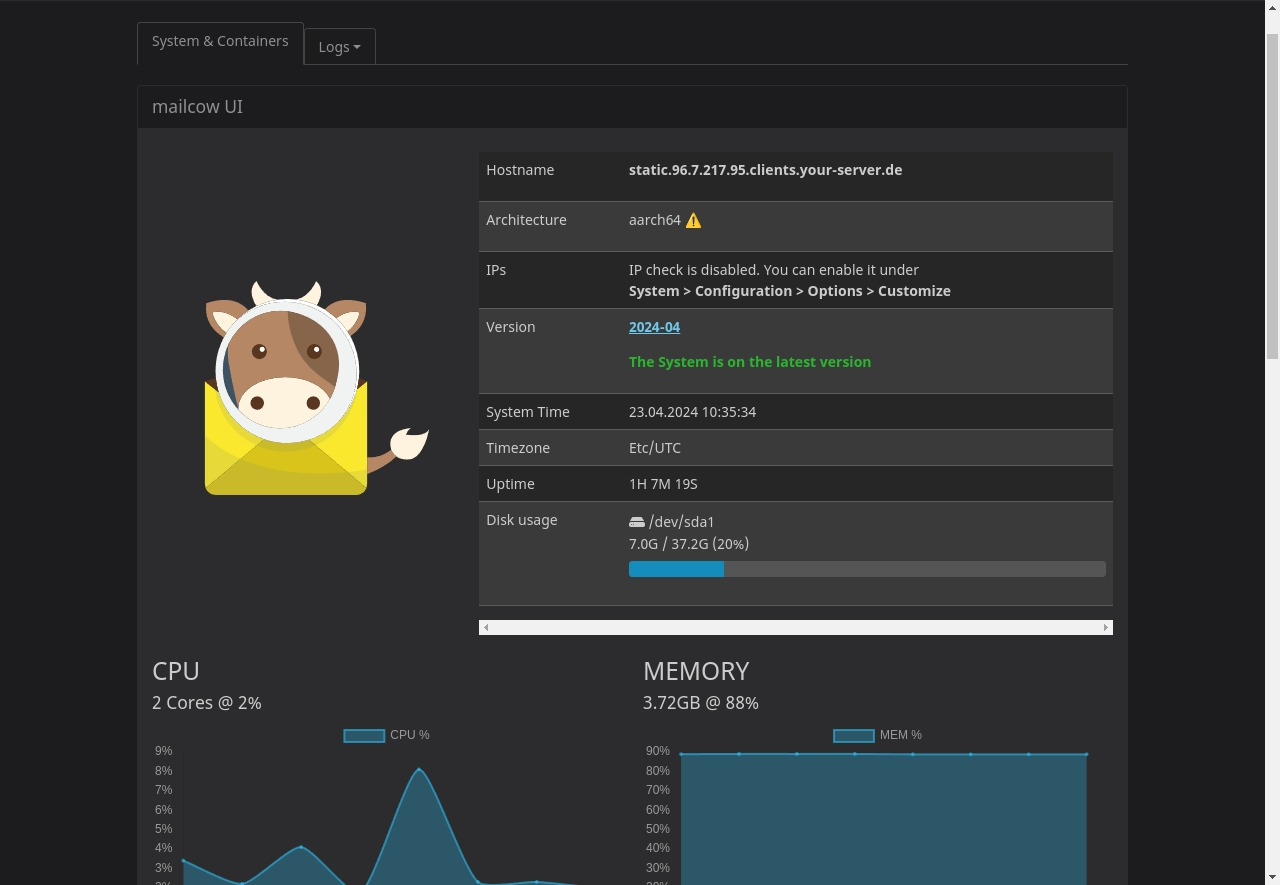
    When you log in to your dashboard for the first time, you will see a statistics page for your server that shows basic diagnostic information such as CPU usage, memory usage, and all the currently running services.
    Inbox Domain Setup

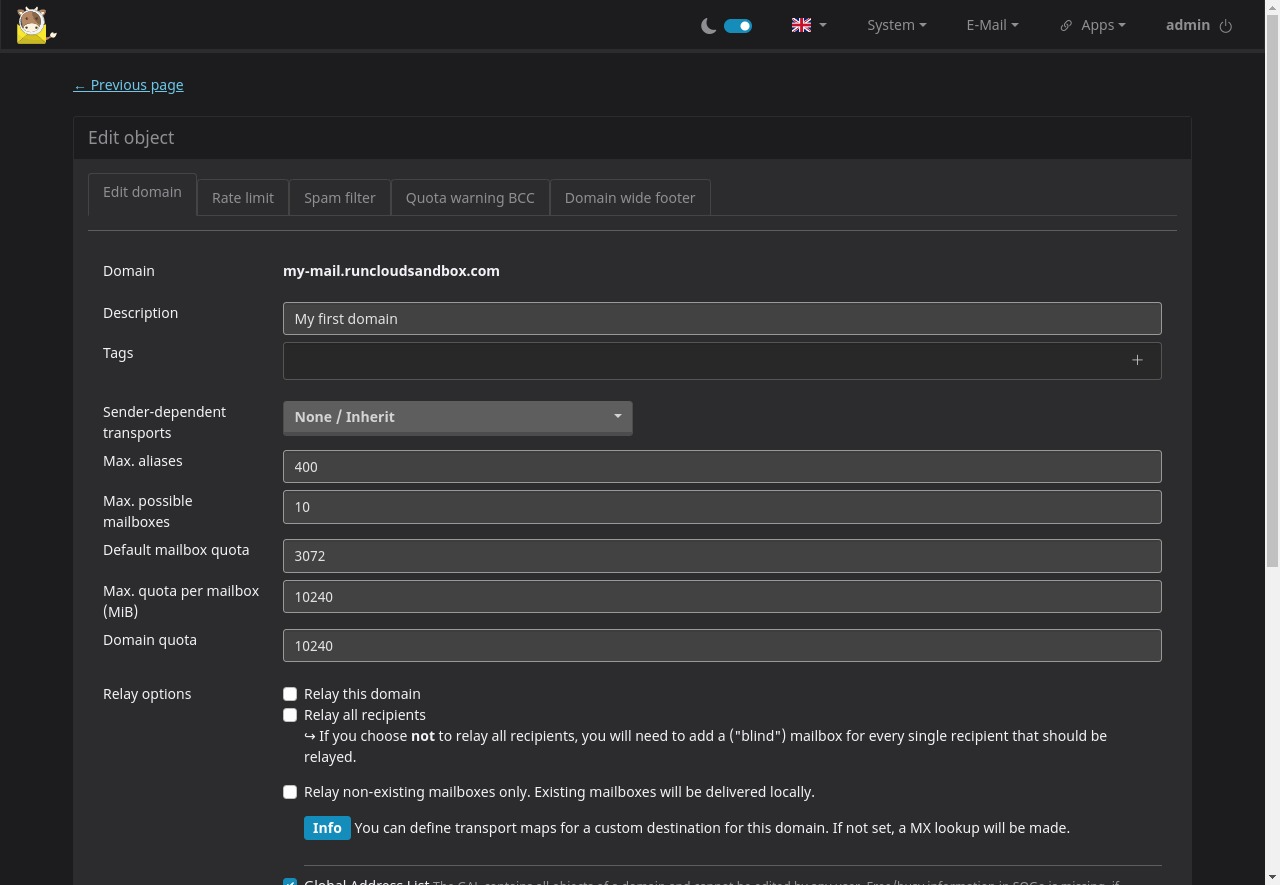
    In your Mailcow dashboard, you can now start adding different domain names for your email inboxes. Click on the Email dropdown and select Configuration. In the domains tab, you can click on “Add domain” and follow the instructions on screen to set it up.

    After filling in all the information, you will be asked to configure the DNS records for this domain. Go to your DNS registrar’s dashboard and create all the required records using the values provided by Mailcow.

    Setting up these DNS records correctly is necessary for sending and receiving emails via your mail server. Read our post titled DKIM – What Is It & Why Your Emails Need It to understand this better.
    User Setup

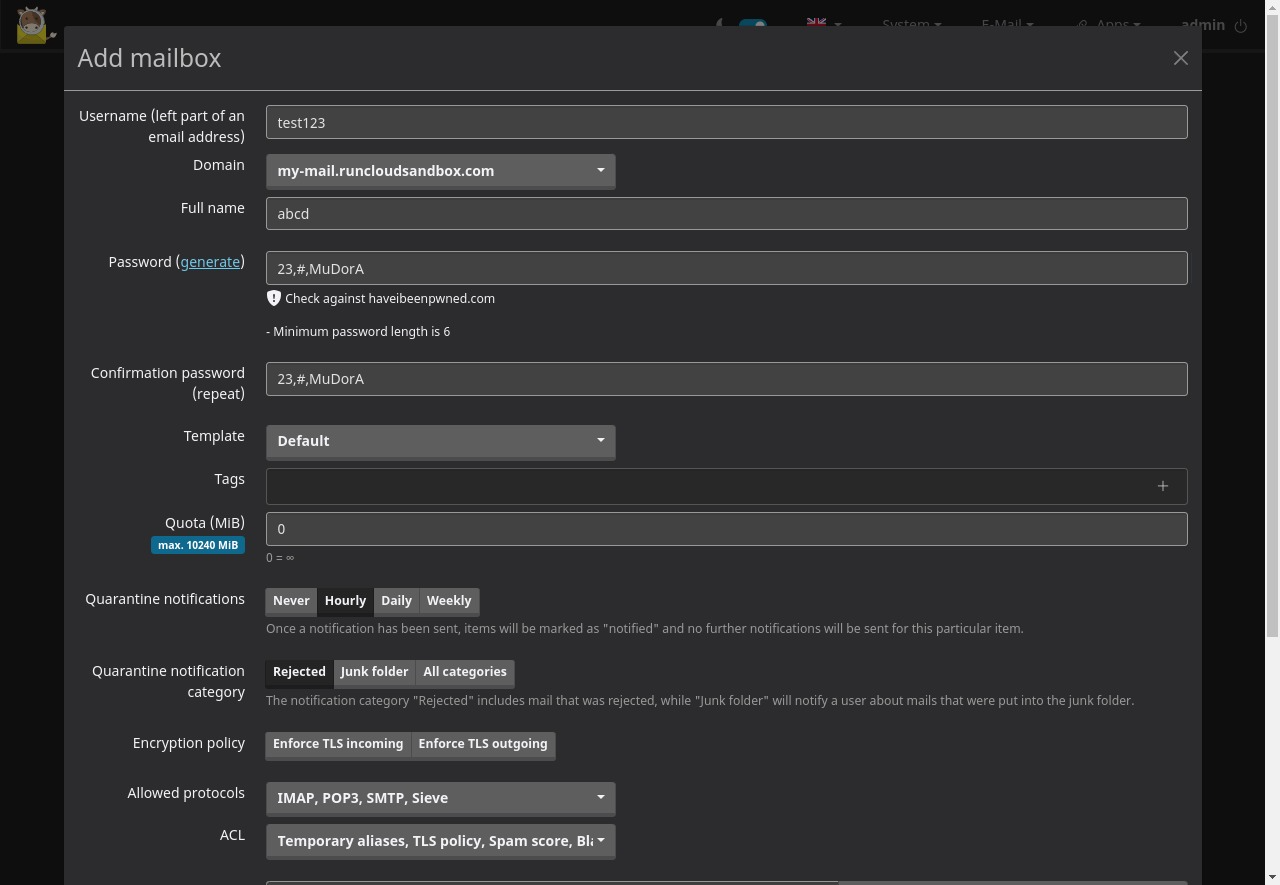
    After adding an inbox domain to your mail server, you can start using it immediately by creating new user accounts. Switch to the users tab and click on “Add User” to create a new account.

    On the next screen, you can fill in your username, full name, a login password, and configure other email settings such as the rate limit or the protocol that can be used to access your email address.
    Webmail Setup

    After adding users to your server, you can open your SOGo dashboard by clicking on the Apps > Webmail. Once you click on Webmail, it will show you a login form, where you can enter the email address and password that you just created.

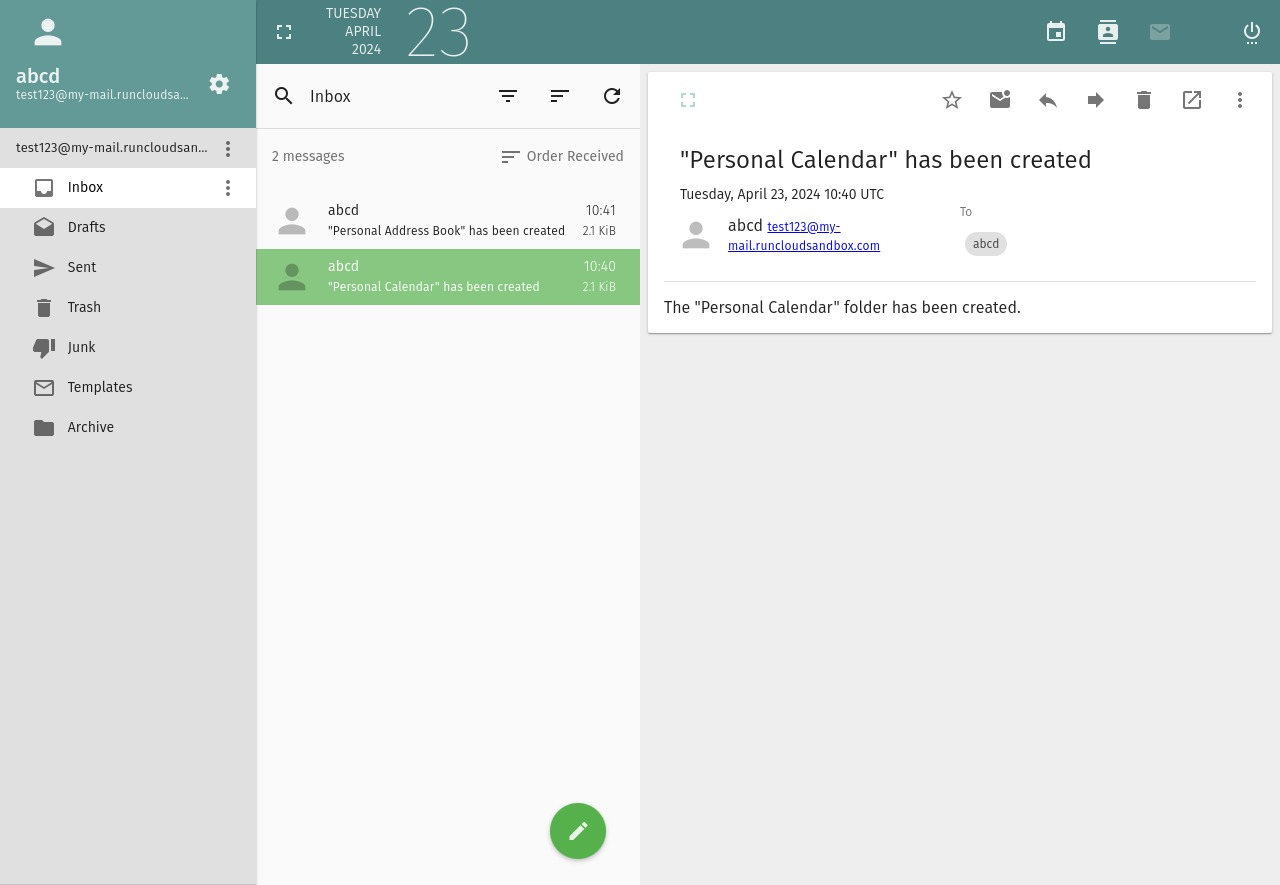
    Once you log in to your email account, you can start using it to send and receive emails normally.
    Wrapping Up

    Setting up an email server on Ubuntu can be a complex task, but with the right tools and guidance it becomes entirely manageable. We’ve walked through the process of installing a Mailcow email server, which offers a robust and straightforward solution for those seeking a self-hosted email server.

    However, it’s important to note that if you’re planning to send fewer emails, using a third-party email service might be a more efficient and cost-effective solution. These services often provide better deliverability, simplified scalability, and dedicated support – which can save you a lot of time and effort in the long run.

    Lastly, for managing and deploying web applications to the cloud, we highly recommend using RunCloud. It’s a powerful and user-friendly platform that simplifies the process of managing, configuring, and deploying applications, making it an excellent tool for developers of all skill levels.

    Sign up for RunCloud today!

    FAQ on Ubuntu Mail Server

    Does Ubuntu have a mail server?

    Ubuntu does not have a mail server of its own, but it supports several mail servers, such as Postfix, Sendmail, and Exim.

    How to create an SMTP server in Ubuntu?

    To create an SMTP server in Ubuntu, you can install Postfix, which is a popular and powerful SMTP server. Here are the steps:
    Update your package list using sudo apt-get update.
    Install Postfix using sudo apt-get install postfix.
    During the installation, a prompt will appear asking for the type of mail configuration. Select ‘Internet Site’.
    Enter the fully qualified domain name (FQDN) for your server.
    Once the installation is complete, you can edit the configuration file located at /etc/postfix/main.cf as per your requirements.

    How to set up Sendmail in Ubuntu?

    Setting up Sendmail in Ubuntu involves a few steps:
    Install Sendmail using sudo apt-get install sendmail.
    Configure /etc/mail/sendmail.mc by defining SMART_HOST.
    Run make in /etc/mail to implement the changes.
    Restart the Sendmail service with sudo service sendmail restart.

    What is the difference between Ubuntu and CentOS mail servers?

    The primary difference lies in the package management and the associated configurations. Ubuntu uses apt for package management, while CentOS uses yum. Therefore, the installation and configuration commands will differ. However, both can run the same mail servers such as Postfix or Sendmail.

    Why do I need a mail server in Linux?

    A mail server in Linux allows you to control your mail data, apply extensive customizations, integrate with other applications in your environment, and more. It’s particularly useful for businesses that require extensive control over their email.

    What is the default Linux mail server?

    There isn’t a default mail server for all Linux distributions.

    Should you use Sendmail or Postfix?

    Both Sendmail and Postfix are robust and reliable mail servers. Postfix is often favored for its ease of configuration and better security track record. However, some might prefer Sendmail because of its wide usage and extensive online resources.

    How do I run a local SMTP server?

    To run a local SMTP server, you can use tools such as Postfix or Sendmail. After installing them, you need to configure the mail server to run on your local machine, usually by setting the inet_interfaces parameter to localhost in the configuration file.

  • How to Set Up a Linode (Akamai) Server with RunCloud

    How to Set Up a Linode (Akamai) Server with RunCloud

    Akamai, the global leader in content delivery network and cloud services, has recently acquired Linode, one of the oldest and most trusted cloud server providers in the market. Linode has been offering simple, affordable, and accessible cloud computing solutions to millions of customers since 2003.

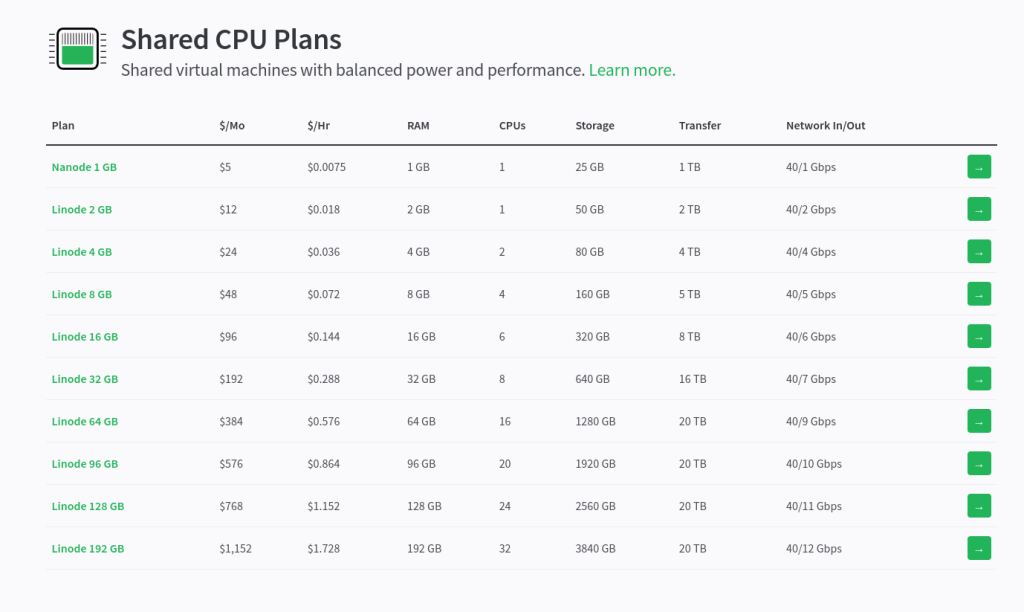
    If you are looking for a reliable and cost-effective way to host your website, you can choose from a variety of plans offered by Akamai’s cloud computing services, formerly known as Linode. These plans include Nanode & Standard (Shared CPU), Dedicated CPU, High Memory, and GPU.

    The Nanode plan is the most budget-friendly option, including 1 GB Memory, 1 CPU Core, 25 GB Storage, and 1 TB Transfer for only $5/month. The Standard plan is the most versatile option, which will allow you to run a wide range of cloud applications, from personal projects to enterprise applications. This plan starts from $12 / month for 2 GB RAM, 1 CPU Core, 50 GB Storage, and 2 TB Transfer.

    Akamai Cloud pricing plans

    Akamai’s cloud computing services have 27 data centers across the world, and you can choose the server location that is closest to you or your customers for the best performance.

    In this post, we will discuss how to set up Akamai’s cloud computing services to host your websites (web applications) with RunCloud. Connecting your server to RunCloud is very easy – let’s take a look at the different methods available.

    Method 1. Automatic Server Provisioning (Recommended)

    When deploying or deleting a server on the cloud, there are many things that can go potentially go wrong. RunCloud integrates with Linode to automatically launch a new server, directly from the RunCloud dashboard. If you are a beginner, we strongly recommend using this method to launch your Linode servers. Let’s see how to do this.

    Connecting Akamai Cloud to RunCloud

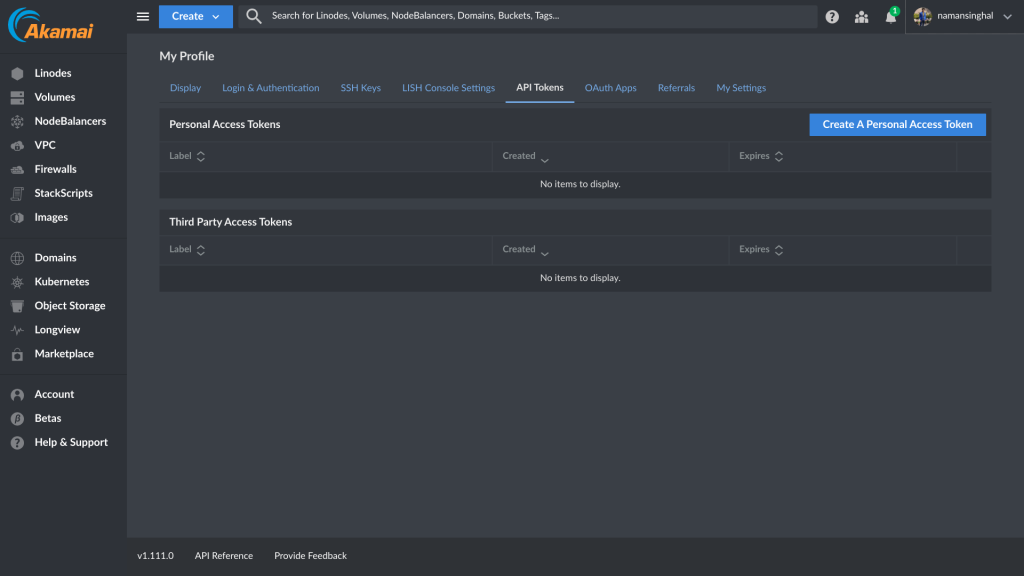
    To integrate your Akamai cloud account with RunCloud, you need to generate an API key from your Akamai dashboard. To create this API token, click on your profile picture in the top right part of your Akamai dashboard, and select API Tokens.

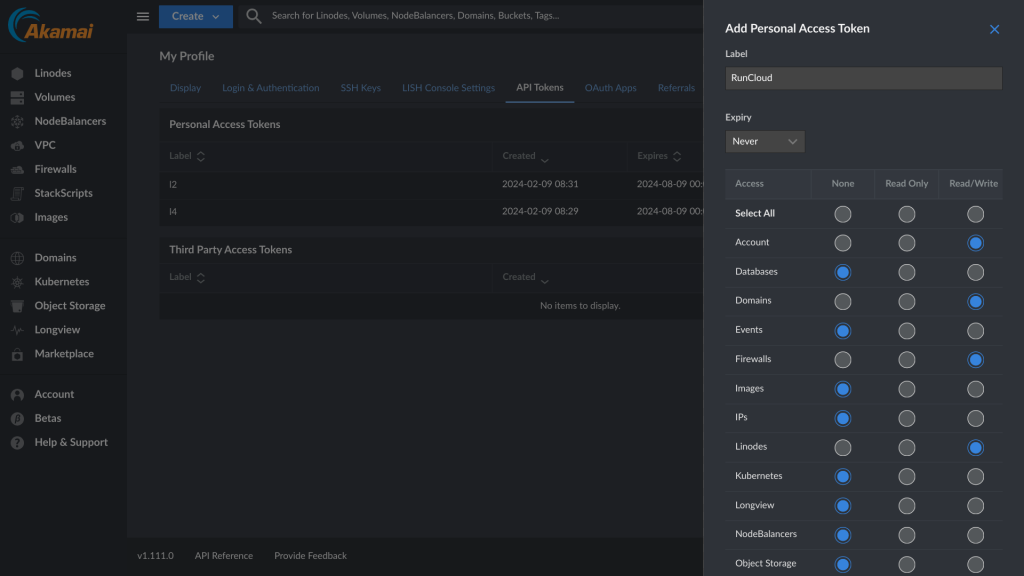
    On the next screen, click on “Create a Personal Access Token” and provide a descriptive name for your token. After that, configure the expiry key for your token and grant the necessary permissions for RunCloud to create and deploy servers on your behalf. RunCloud needs read/write access to Account, Domains, Firewalls, and Linodes to spin a new server on your Akamai account.

    After you have configured the settings, scroll down to the bottom and save your changes. As soon as you click ‘Save’, a long string of text will be displayed on your screen – this is your token, and it will only be displayed once.

    You need to save this token in your RunCloud account. Open a new browser window and navigate to the Integration section in your RunCloud account.

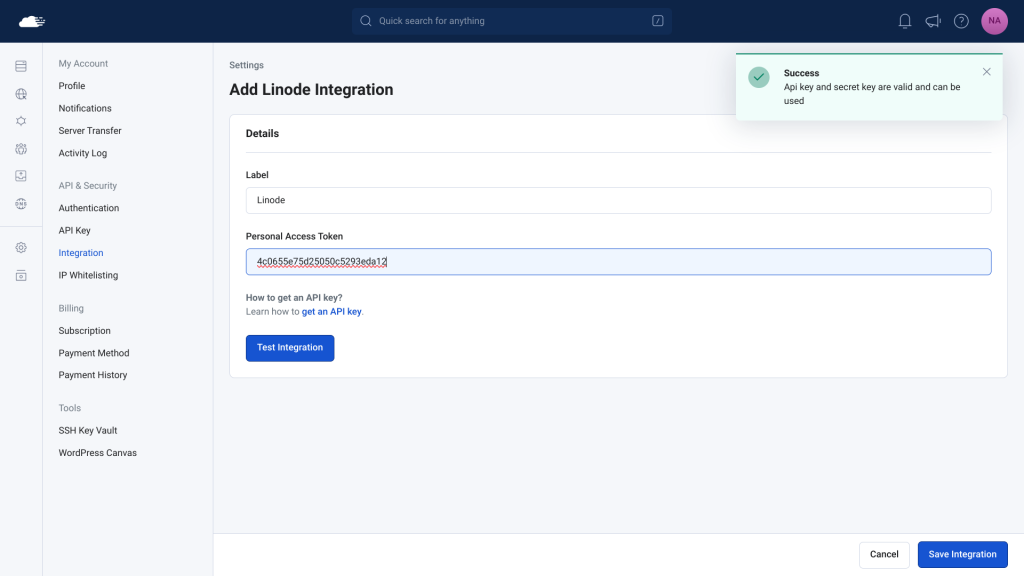
    On that screen, look for ‘Linode’, and click “Add Integration“. This will take you to the Linode integration screen.

    On this screen, provide a descriptive name for your token, and paste the token displayed in your Akamai Cloud dashboard. Once you have added the token, click on ‘Test Integration’; if the test fails then it is possible that you didn’t grant all of the necessary permissions required by RunCloud.

    Otherwise, you can click on “Save Integration” to save this key in your RunCloud account. You can now start deploying new servers directly from your RunCloud account.

    Creating A Server from the RunCloud Dashboard

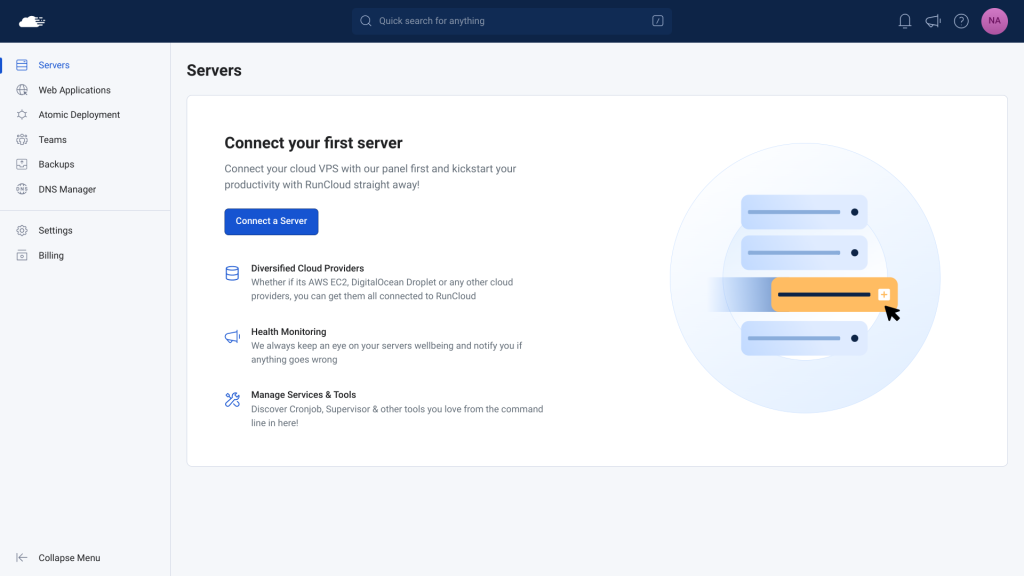
    Once you have added the API token to your RunCloud account, you can directly create and delete servers from the RunCloud dashboard by clicking “Connect a Server” in the ‘Servers’ section.

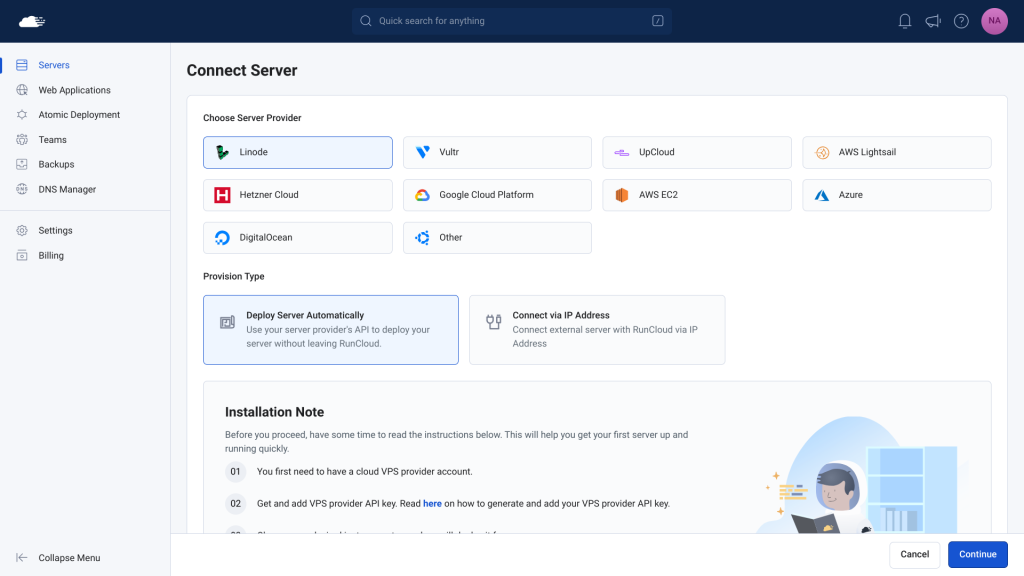
    On the next screen, select Linode from the list of Cloud providers and choose Deploy Server Automatically to provision a new server.

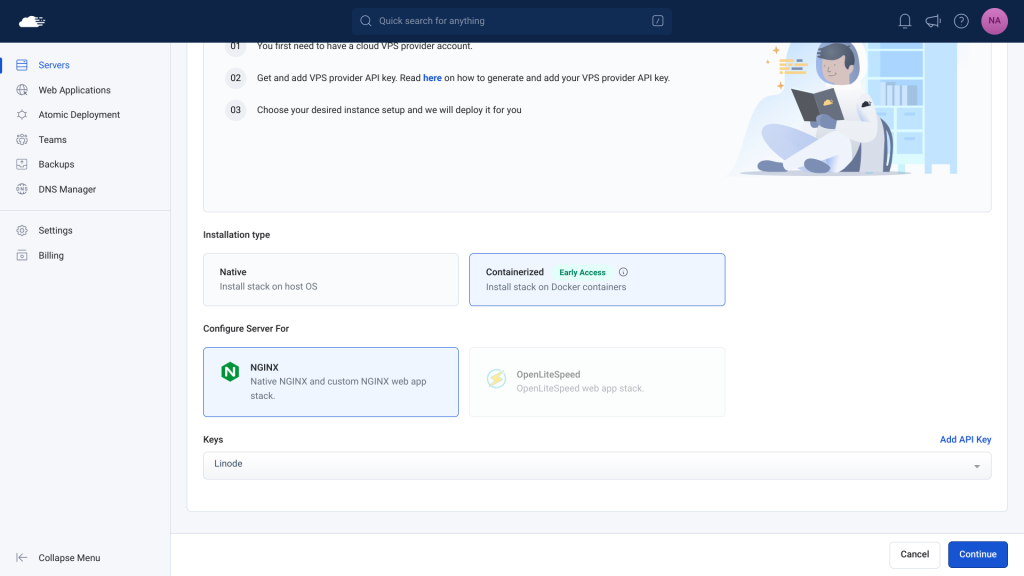
    Once you scroll down, you will be asked to select between native Nginx, OpenLiteSpeed, and Containerized servers. If you are just looking to deploy a WordPress website, you can pick any of them. If you have something specific in mind, read our comparison of Nginx vs OpenLiteSpeed servers and our in-depth explanation of Containerized Servers on RunCloud to make an informed decision.

    Under the ‘Keys’ section, select the key that we just created from the drop-down menu and hit ‘Continue’.

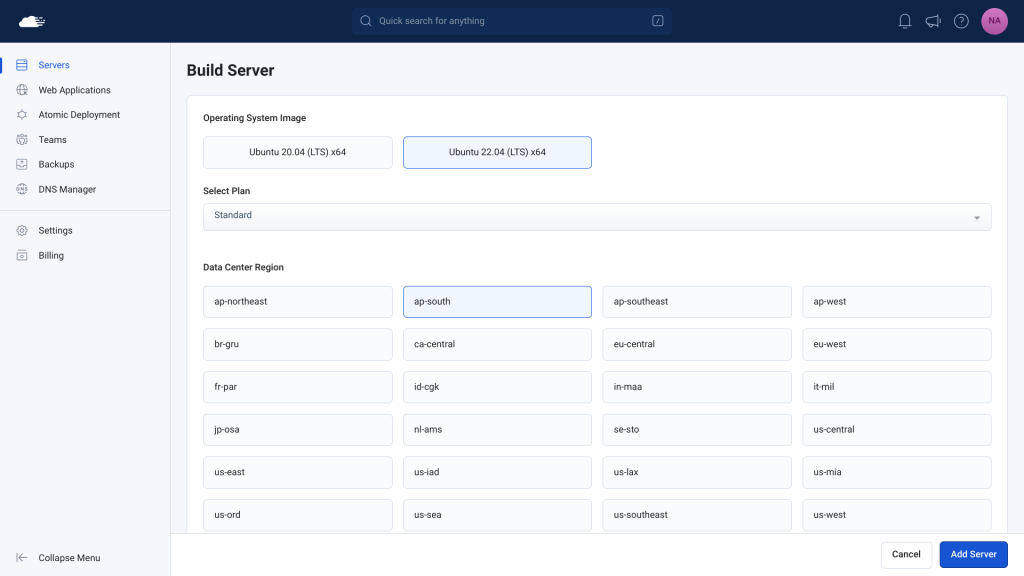
    On the next screen, select the version of the operating system that you want to use (usually the latest version is the best one), and pick your server type and location from the list shown on your screen. It is usually recommended to pick a location that is closest to the vast majority of your customers.

    Next, you need to select your server size. If you are just getting started, you can pick the smallest server and gradually increase it as your website grows. If you need more help, you can refer to our previous article on how to pick the right server size.

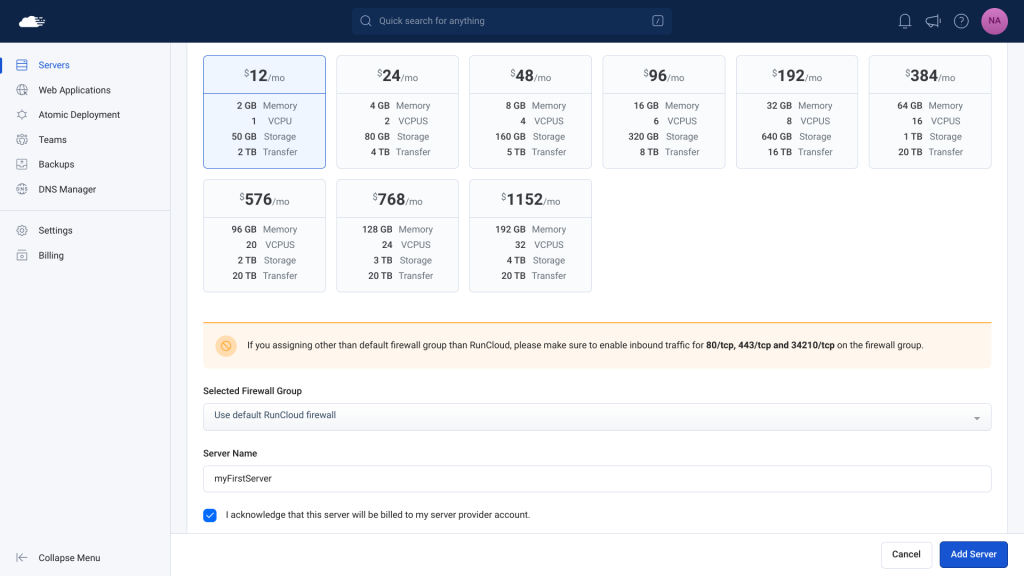
    Lastly, you need to select the default RunCloud firewall rules from the dropdown menu and provide a descriptive name for your server.

    When you deploy a server from your RunCloud dashboard, you will be billed separately for using Akamai’s cloud computing services – this is not included in your RunCloud subscription. Make sure to click the checkbox to acknowledge this and then click Add Server.

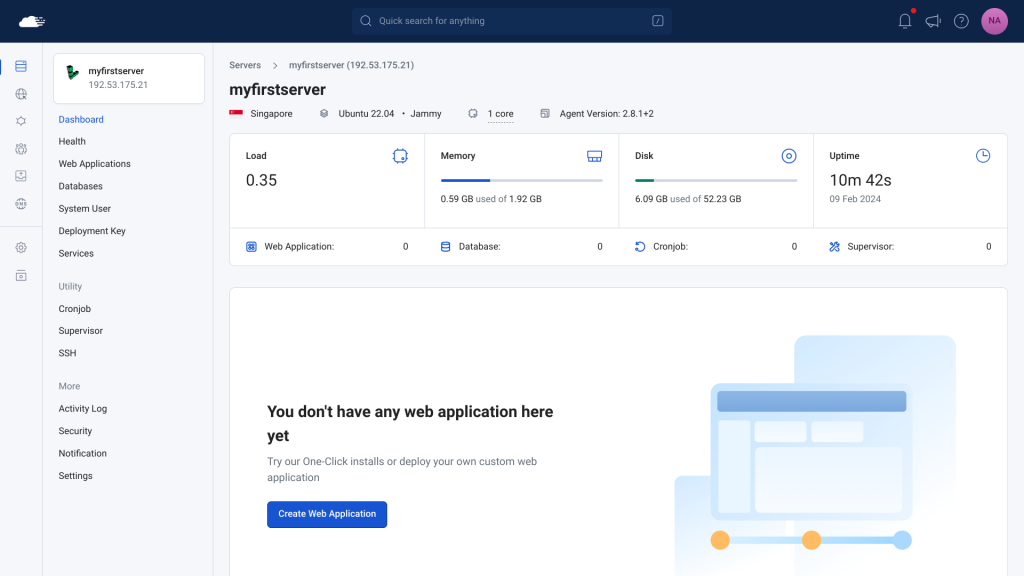
    Once you do this, RunCloud will create a new server in your Akamai account on your behalf and automatically install all the necessary software required to deploy websites. The whole process usually takes no more than 5-10 minutes.

    RunCloud Linode server

    Video Tutorial: Provision Linode Server

    Method 2. Set Up Akamai Cloud Server Manually

    RunCloud provides lots of cookie-cutter templates for launching a new server with just a few clicks. However, if you want more freedom to configure your server then you can choose the manual installation method.

    Creating Firewall Rules

    Before we deploy a server, it is a good idea to configure the firewall rules beforehand to avoid any hiccups down the line. In your Akamai cloud dashboard, go to the Firewalls tab and click ‘Create‘. Give it a descriptive name and then hit “Create Firewall” to deploy a new firewall with an empty ruleset.

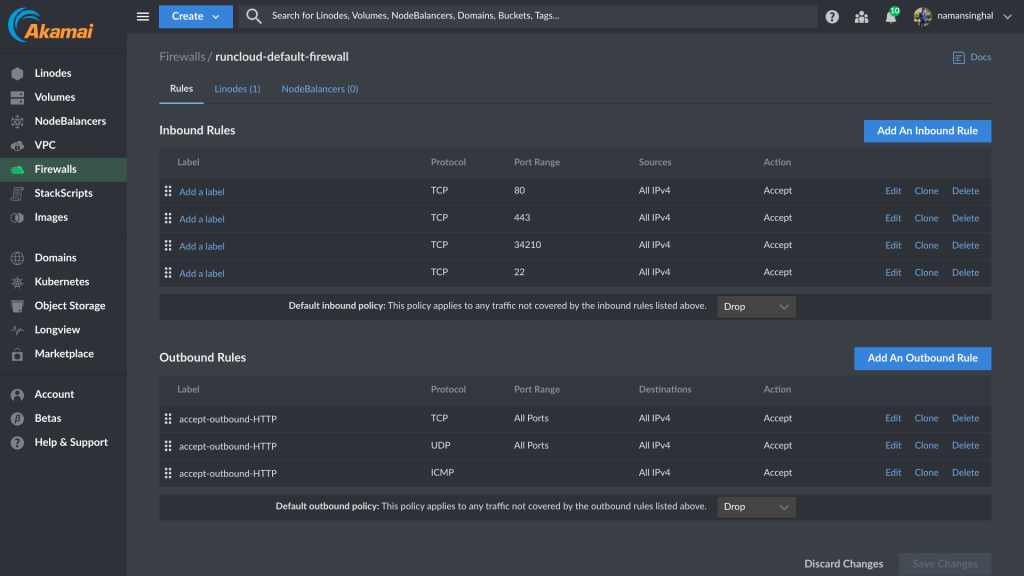
    Next, we need to add rules to this firewall that will allow and deny traffic. RunCloud needs the following ports to be able to function properly:

    • 80/TCP: For HTTP traffic
    • 443/TCP: For HTTPS traffic
    • 443/UDP: For HTTP/3 traffic (optional)
    • 34210/TCP: For communicating with RunCloud agent
    • 22/TCP: For establishing an SSH connection (you can close this port once the server is connected to RunCloud).
    Firewall rules in Akamai cloud

    Create the appropriate inbound rules in your firewall, and then save it.

    Creating a Server in Akamai Cloud

    Next, you can go back to your Linode dashboard to provision a new server. When connecting a server to RunCloud, you must create a fresh server that meets the following requirements:

    • Uses Ubuntu Server (20.04/22.04 LTS) 64 bit operating system
    • Has more than 2 GB of disk storage
    • At least 1 core processor
    • At least 512 MB RAM
    • Public IPv4 Address (NAT VPS is not supported)

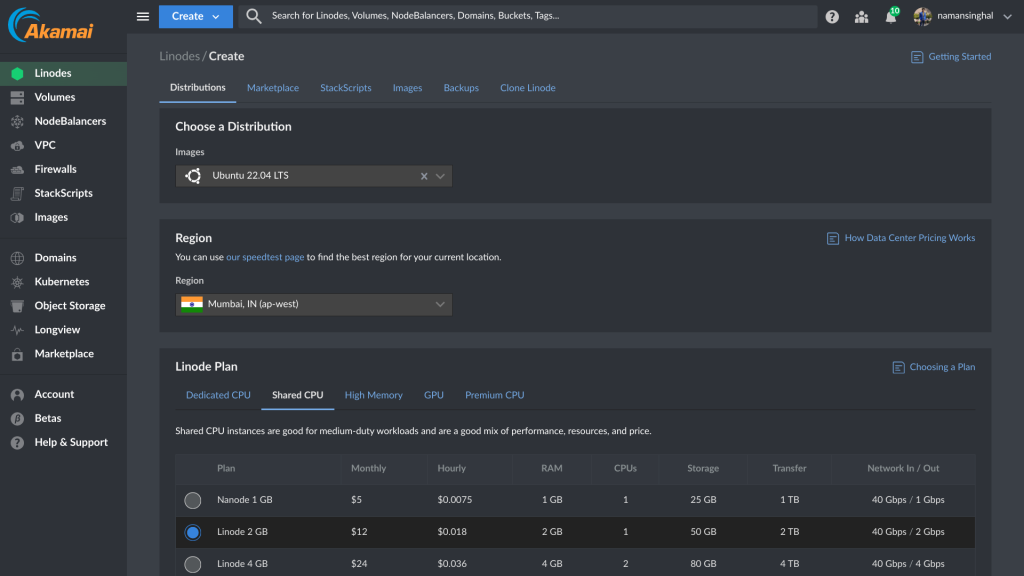
    In your Akamai dashboard, select the latest Ubuntu LTS version under the operating system section, and specify the region for your server. Next, pick your server type from the given list depending upon your requirements.

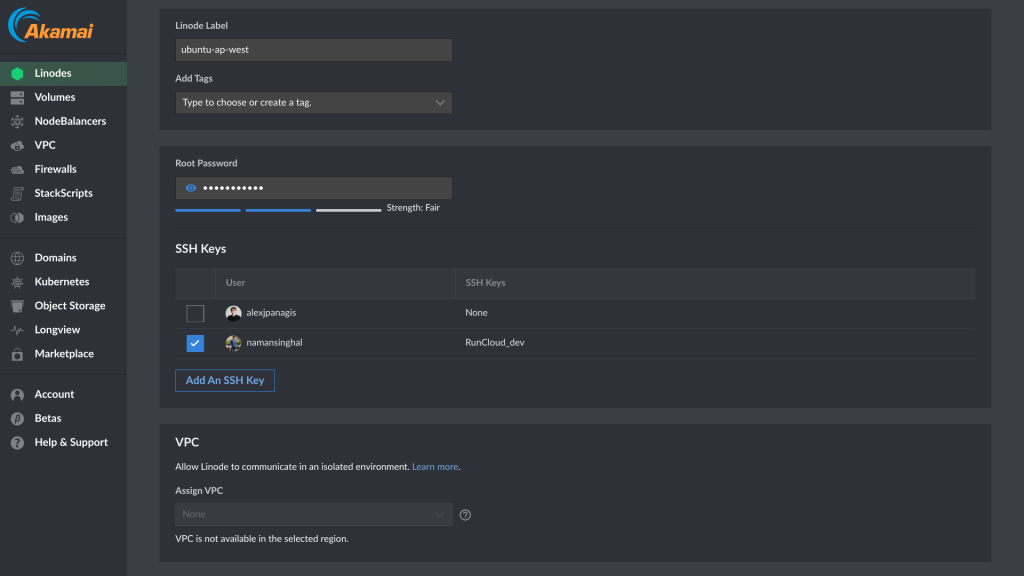
    In the label section, you can either provide a descriptive name for your server or leave it as it is. Next, you need to provide the root password for your server. This is the password that you will use when connecting via SSH, so make sure you pick a strong and memorable password. Optionally, you can also configure the SSH keys for additional security.

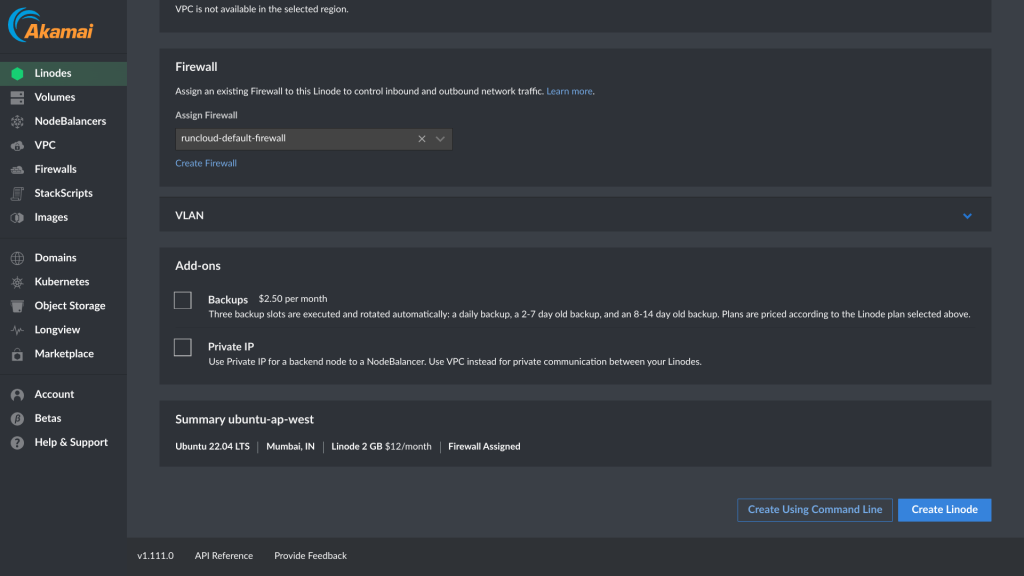
    Finally, select the firewall that we created in the previous step from the drop-down menu and hit “Create Linode“. This will provision a new server in your account.

    Connecting Server to RunCloud

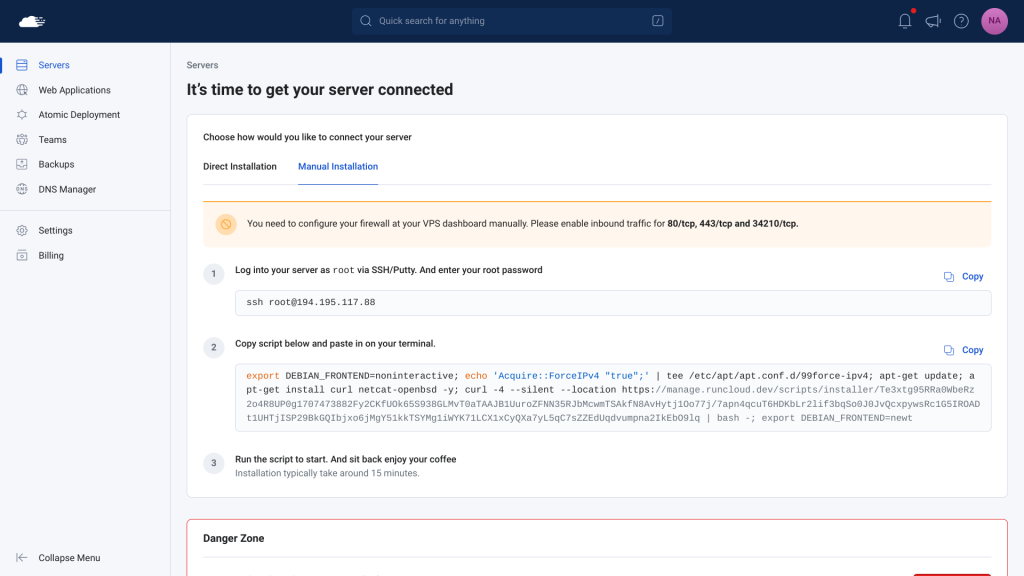
    Once your server is up and running, you need to manually connect it to your RunCloud account. To do this, go to the Connect Server page and select Linode > Connect Via IP address.

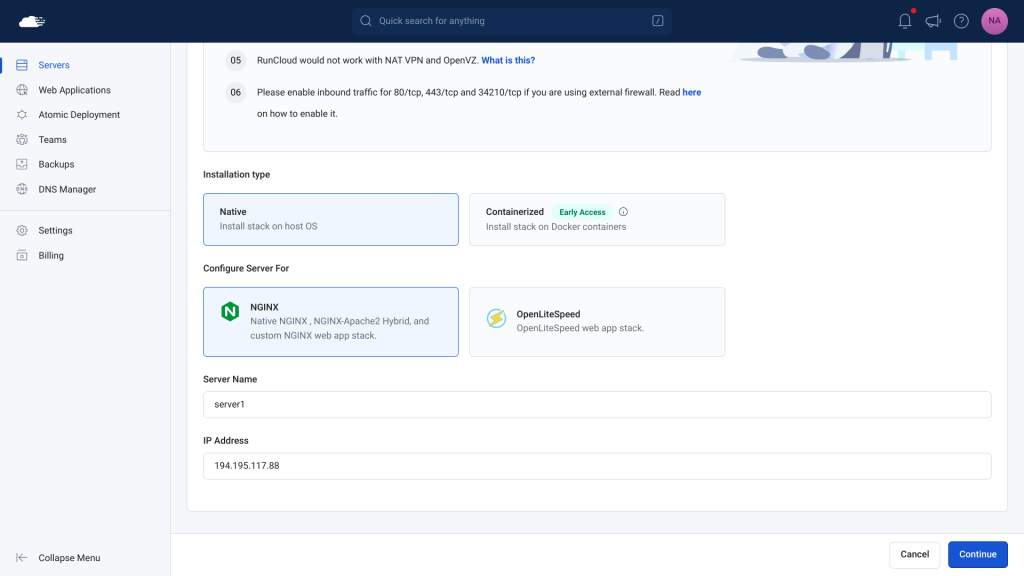
    Next, select the server stack and installation type for your server. Provide a descriptive name for your server and then enter the public IP address displayed in your Akamai Cloud dashboard.

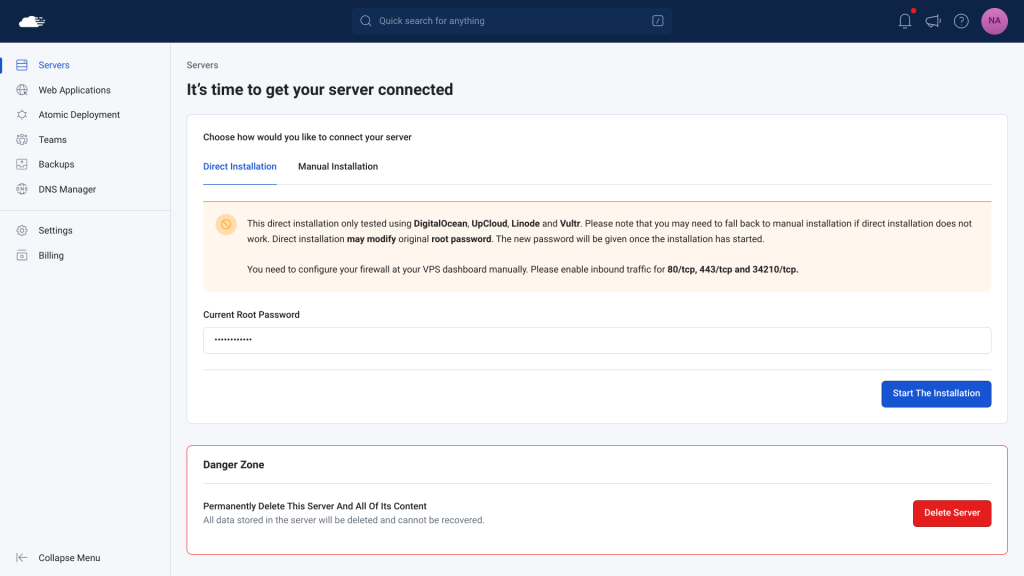
    On the next screen, you will be presented with two options. If you have configured the root password for your server then you can enter it here and then hit ‘Start The Installation’. RunCloud will automatically log in to your server on your behalf and install the necessary software.

    Alternatively, if you are using SSH keys to log in to your server, then you can manually run the installation script. To do this, log in to your server with super user privileges (root) and run the provided command. Installation will take 5-10 minutes to complete, and once the server is connected you can close the terminal.

    Video Tutorial: Manual Installation

    Final Thoughts

    With Akamai’s cloud computing services, you can host your website on a high-performance, secure, and reliable infrastructure that has been trusted by millions of customers since 2003. You can choose from a range of plans that suit your needs and budget, starting from as little as $5 / month.

    RunCloud makes it easy for you to connect your servers to Akamai’s cloud computing services. You can use any of the three methods that we have discussed in this post: server provisioning using Linode API key, direct server installation via IP address and root password, or manual server installation via IP address.

    Once you have set up your server, you can proceed to:

  • Introduction to Bash For Loops: A Beginner’s Guide

    Introduction to Bash For Loops: A Beginner’s Guide

    If you’re new to the command line and Linux, fear not! You don’t need to be a Linux expert to start using the power of the terminal.

    In this article, we’ll demystify the ‘for’ loop in Bash scripting. Whether you’re a developer, sysadmin, or just curious about the command line, understanding ‘for’ loops is essential.

    Why Are ‘For’ Loops Necessary?

    The ‘for’ loop is a fundamental construct that allows you to repeat a set of commands or actions multiple times. It’s like having a trusty assistant who diligently performs a task for you over and over again. Whether you’re processing files, managing directories, or automating tasks, there are many scenarios when loops are useful:

    1. File Processing and Batch Operations:
      • Loop through files in a directory to perform batch operations, such as renaming, moving, or compressing them.
      • Process log files, extract relevant information, and generate reports.
    2. System Administration and Configuration:
      • Iterate over a list of user accounts to apply changes (e.g., setting permissions, updating passwords).
      • Configure network interfaces, firewall rules, or services on multiple servers.
    3. Backup and Archiving:
      • Create backup scripts that loop through directories and files to archive or synchronize data.
      • Rotate log files by compressing older logs and keeping a specified number of recent ones.
    4. Automating Repetitive Tasks:
      • Run commands on multiple remote servers via SSH.
      • Schedule regular tasks (e.g., backups, database maintenance) using cron jobs.
    5. Data Processing and Transformation:
      • Parse CSV files or other structured data formats.
      • Transform data (e.g., converting file formats, extracting specific fields).

    Loops in general are versatile and can be adapted to various scenarios. They allow you to iterate over lists, directories, or any other collection of items in your scripts.

    In this post, we’ll explore the basic syntax of ‘for’ loops, and demonstrate their versatility with practical examples. By the end, you’ll be ready to wield this powerful tool in your Linux journey.


    Basic Syntax of Bash ‘For’ Loop

    A 'for' loop is a control structure in programming that allows you to repeat a set of commands for each item in a list. It’s like a conveyor belt that processes each item one by one.

    Syntax:

    • for variable in list: This line initializes a loop. The variable represents the current item from the list.
    • do: This marks the beginning of the loop body.
    • # Commands to execute for each item in the list: Here, you can put any commands or actions you want to perform on each item.
    • done: This marks the end of the loop.
    for variable in list
    do
        # Commands to execute for each item in the list
    done

    Explanation:

    • You define a variable (usually a single letter) to keep track of the current item.
    • The list contains multiple items (e.g., filenames, numbers, or strings).
    • For each item in the list, the commands inside the loop are executed.
    • Once all items are processed, the loop ends.

    Execution Frequency:

    • The for loop executes once for each item in the specified list.
    • If there are n items in the list, the loop will run n times.
    • For example, if you have a list of three filenames (file1.txt, file2.txt, and file3.txt), the loop will execute three times, once for each filename.
    for filename in file1.txt file2.txt file3.txt
    do
        if [ "$filename" == "file2.txt" ]; then
            echo "Found file2.txt! Exiting loop."
            break
        fi
        echo "Processing $filename"
    done
    bash for loops

    Using Bash ‘For’ Loop

    Looping through Files and Directories

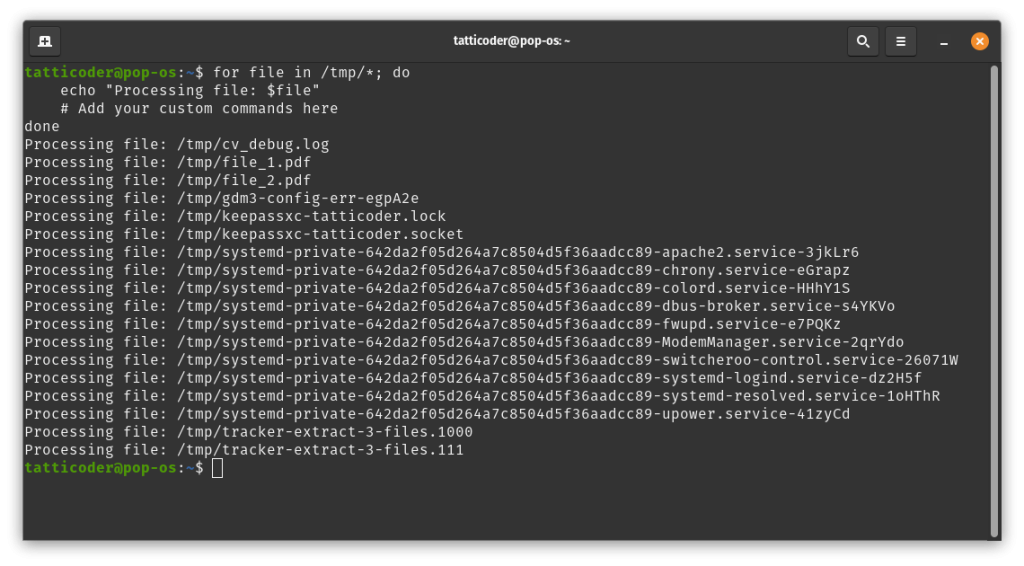
    You can use a 'for' loop to process files or directories. This is ideal if you want to traverse through a directory which has a large number of files, or if the number of files keep changing.

    #!/bin/bash
    for file in /path/to/files/*; do
        echo "Processing file: $file"
        # Add your custom commands here
    done
    bash for loop file processing

    Iterating over a Range of Numbers

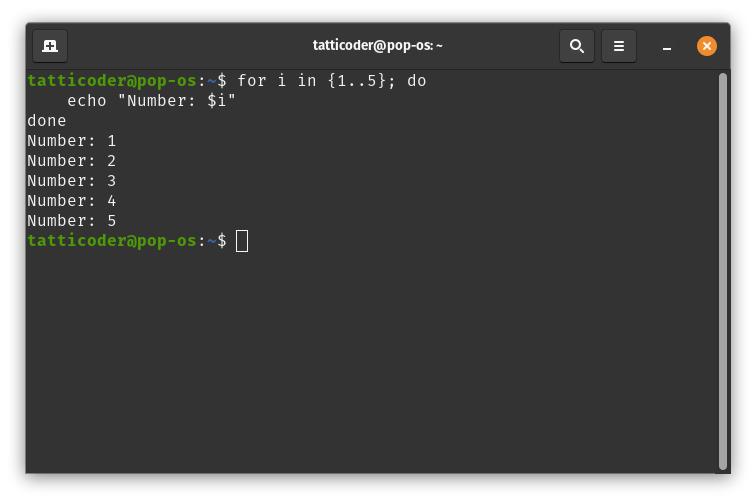
    To loop through a range of numbers, use the {start..end} notation. If you want to run the loop a fixed number of times, you can create a list of numbers using this format.

    #!/bin/bash
    for i in {1..5}; do
        echo "Number: $i"
    done
    number list in for loop

    Using ‘for’ with Command Substitution

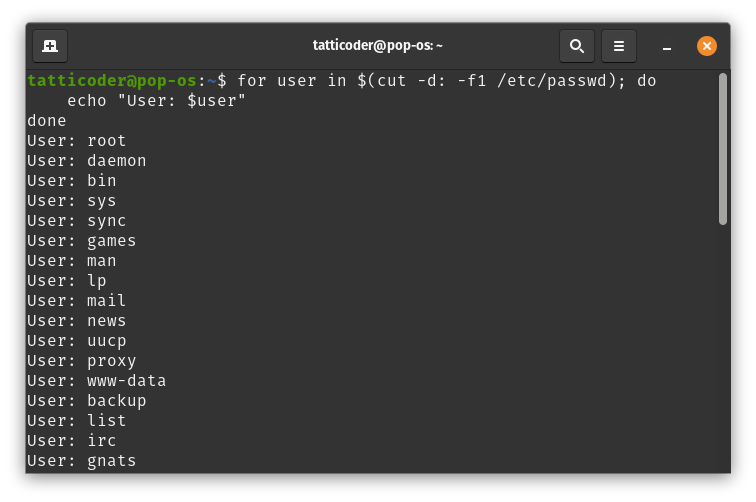
    The ‘for’ loop is flexible and powerful. You can redirect the output of other commands in the loop, and then process each item in the list.

    #!/bin/bash
    for user in $(cut -d: -f1 /etc/passwd); do
        echo "User: $user"
    done

    Nested ‘for’ Loops

    If a simple ‘for’ loop isn’t enough, you can use multiple ‘for’ loops together to achieve more complex functionality.

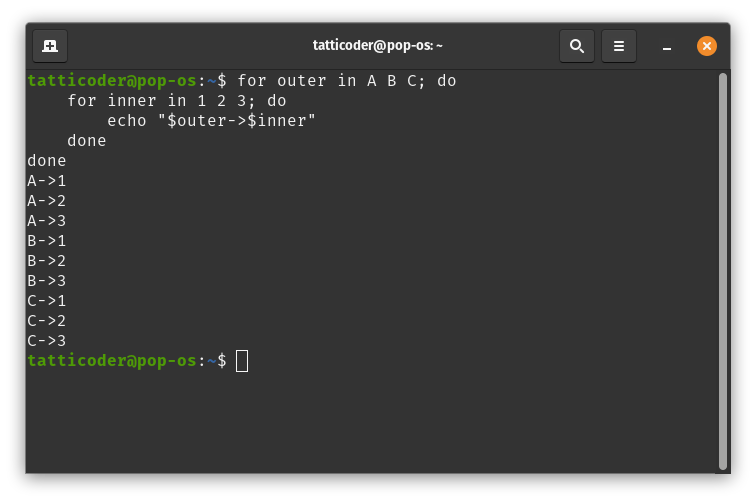
    #!/bin/bash
    for outer in A B C; do
        for inner in 1 2 3; do
            echo "$outer->$inner"
        done
    done

    Final Thoughts

    You’ve now unlocked the potential of Bash for loops. It is like a Swiss Army knife for your command line adventures. Mastering the ‘for’ loop opens up endless possibilities for automating tasks and managing data efficiently in your Linux environment.

    Remember, the command line need not be intimidating, but if you do find it a bit daunting then you should check out RunCloud, a web platform to manage your servers that works with any cloud provider. Sign up for RunCloud and experience the best of both worlds:

    • Web-Friendly Dashboard: Get started quickly without diving into complex Linux commands. RunCloud provides an intuitive interface for managing your servers.
    • Command Line Freedom: If you’re a terminal enthusiast, RunCloud gives you the flexibility to tinker with the command line whenever you wish.
  • What is WHMCS and How Is It Used?

    What is WHMCS and How Is It Used?

    If you’re running a web hosting business, you know how challenging and time-consuming it can be to manage your clients, billing, support, domains, and more.

    You need a solution that can automate your tasks and make your life easier.

    That’s where WHMCS comes in.

    WHMCS is a powerful and popular web hosting automation platform that can help you run your business smoothly and effectively. But how do you install WHMCS on RunCloud, the best cloud server management platform?

    In this article, we will explain what WHMCS is and how it works, and then we will guide you through the quick and simple steps of installing it on RunCloud. You’ll also learn about some of the best alternatives to WHMCS that can offer you more features and benefits for your web hosting business. Read on to find out more!

    What Is WHMCS

    WHMCS is short for Web Host Manager Complete Solution. It’s a management platform that simplifies the process of selling domain names and hosting services online. WHMCS provides a suite of tools that can automate daily operations such as billing, invoicing, client management, and support requests.

    WHMCS was first introduced back in 2005, and since then it has become a popular choice for web hosting companies to manage their online business. It’s an invaluable tool for such hosting companies, as it helps them to manage their businesses more efficiently and effectively.

    If you’re looking for alternatives to WHMCS, you might want to check out this article: The Best WHMCS Alternatives (Free, Open Source & Premium). It will give you an overview of some of the most popular and promising options for web hosting automation. You might find a solution that suits your needs and budget better than WHMCS.

    Key Features Of WHMCS

    1. Billing and Invoicing: WHMCS can automate the process of generating invoices, and allows users to manage their finances and payments easily. You can also configure recurring billing, payment reminders and promotional discounts to boost your sales.
      There are mechanisms set in place to handle multi-currency transactions, as well as initiating refunds in case of a dispute.
    2. Client Management: It provides a centralized location to manage client data and information such as order history, support tickets, and billing information. Having a unified dashboard which tracks everything streamlines the operations process, and improves productivity.
    3. Product and Service Management: WHMCS allows you to manage your products and services quickly and easily. You can add new products, set up pricing, packages, and use custom options to provide additional offerings to your customers.
    4. Support Ticket System: There is a built-in support ticket system for managing customer support requests and inquiries. This system can be organized to replicate the hierarchy of support staff, and organize them in departments to segregate responsibilities.
      It’s possible to open and communicate in a ticket via email or directly from the web interface. The ticketing system also supports attachments, and you can set up additional escalation rules to perform automated actions and enforce SLAs.
    5. Integrations: WHMCS has built-in support for various payment gateways such as PayPal, Stripe, Skrill, eWay, etc. It can integrate with various domain registrars, including GoDaddy, ResellerClub, NameCheap, and more.
      It can send notifications via Slack and Hipchat, which makes it easier for users to manage all aspects of their business.
    6. Customizable: One of the key features of WHMCS is its modular architecture which allows for unlimited customizations. It offers a powerful API that supports both XML and JSON to execute actions within WHMCS from third party code. There are themes and templates available, which can be used to create a professional and branded experience for clients.

    Benefits of using WHMCS

    1. Improved Efficiency: WHMCS can automate various business operations, thereby reducing manual work, saving time and improving efficiency. This will free up time for businesses to focus on growth and improving overall efficiency.
    2. Streamlined Financial Management: The platform facilitates billing and invoicing automatically for a large number of clients, allowing businesses to manage their finances and maximize their revenue.
    3. Improves Customer Experience: With WHMCS, you get a centralized location to manage your client accounts and manage support tickets. Having a user friendly interface that makes it easy to perform the desired actions, and ask questions from support staff, leads to improved customer satisfaction.
    4. Easy to Use: WHMCS consolidates multiple tools and features into a single platform. This eliminates the need to switch between multiple tools to manage business operations. It also provides tutorials, guides, and support resources to help users quickly get up to speed with the platform.

    How Install WHMCS on RunCloud

    Creating an Empty Web app

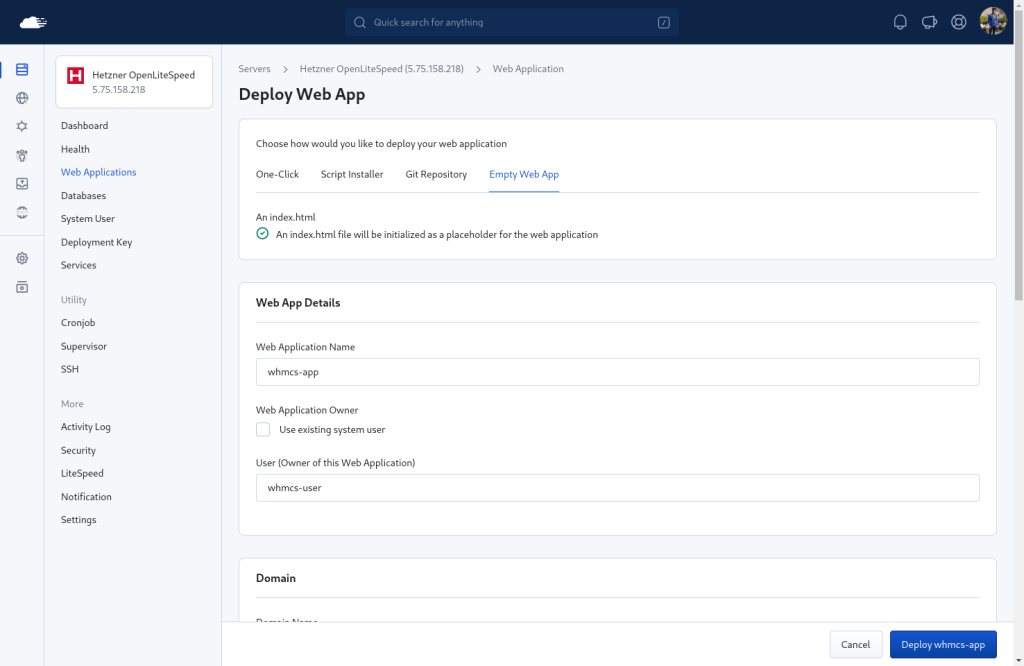
    Log in to your RunCloud dashboard, and select the server you want to use. Click on the Web Application tab and then click on the “Deploy New Web Application” button.

    Choose a name for your web app, such as whmcs-app, and then select the web application owner. We recommend creating a new owner for each web application.

    Next, choose a domain name for your web app, such as whmcs.example.com, and make sure you have pointed it to your server’s IP address or hostname.

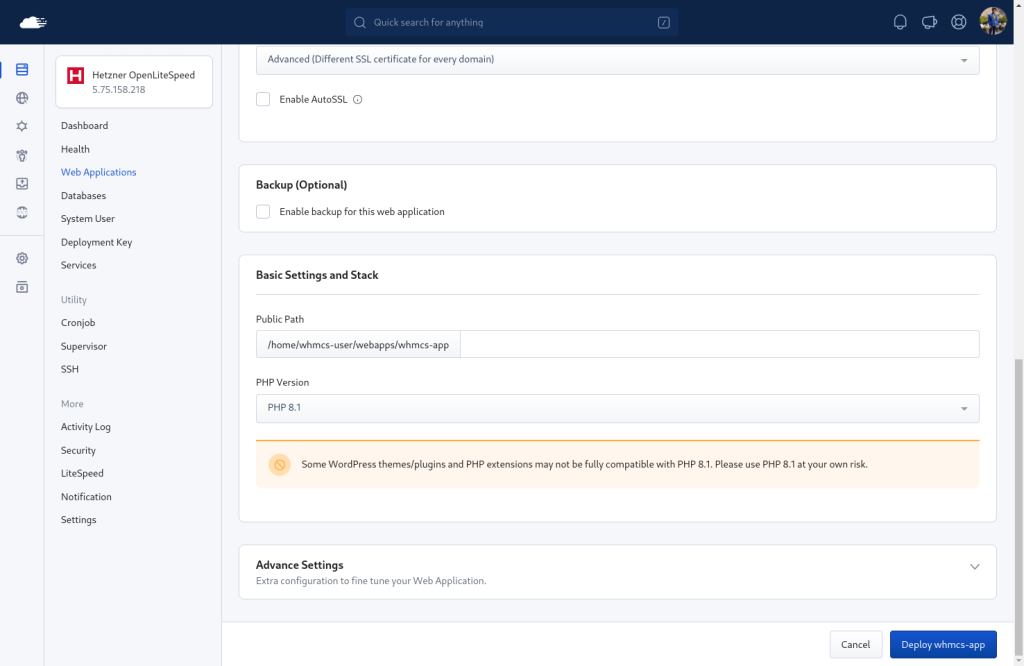
    Select the PHP version that you want to use. At the time of writing, WHMCS recommends using PHP 8.1. Finally, click on the Create Web Application button, and wait until your web app is created and ready to use.

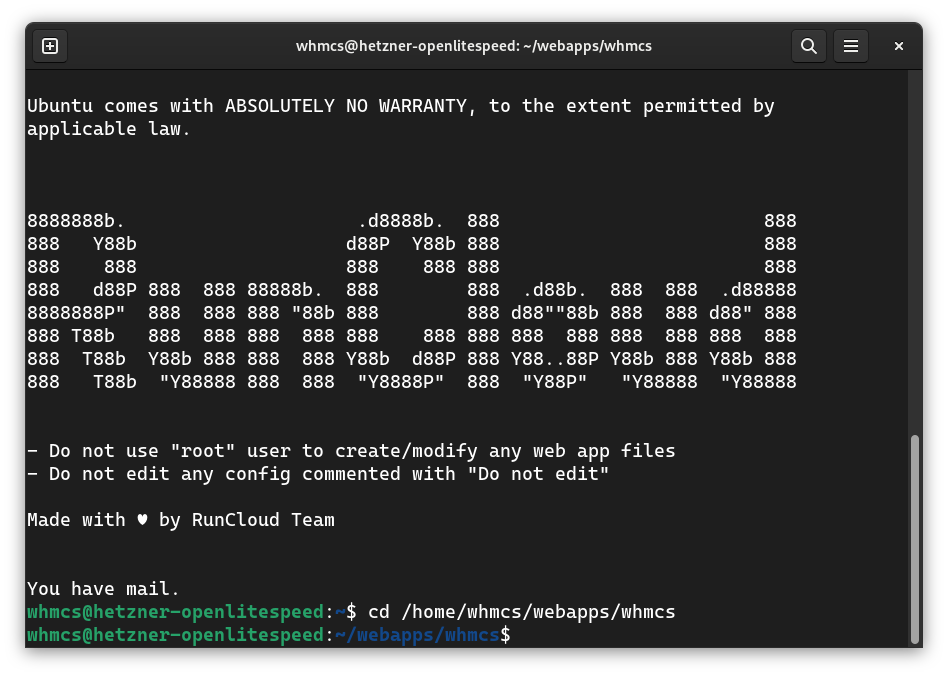
    After creating the web application, you need to log into your server as the owner of the application via SSH, and navigate to the root directory of your web application. If you are not sure how to do this, we recommend reading How To Add a SSH Key and How To Use SSH Keys with PuTTY.

    Download WHMCS Binaries

    Prerequisite: You need to install and enable ionCube first. Follow our tutorial on installing ionCube Loader and confirm that you have it installed.

    After installing the ionCube Loader, you need to download and extract the WHMCS installation archive on your server. You can either download it to your personal computer and then move it to your server via FileZilla, or you can follow the instructions below to download it directly to your server if you’re feeling adventurous!

    To download the binary directly to your server, we will use the curl command. First, go to https://download.whmcs.com/ and open the DevTools page in your browser.

    In the DevTools windows, switch to the “Network” tab – any web requests that you make on download.whmcs.com will be recorded here.

    Next, go back to the download page and download the latest available binary – you need to have a valid license key to access this page.

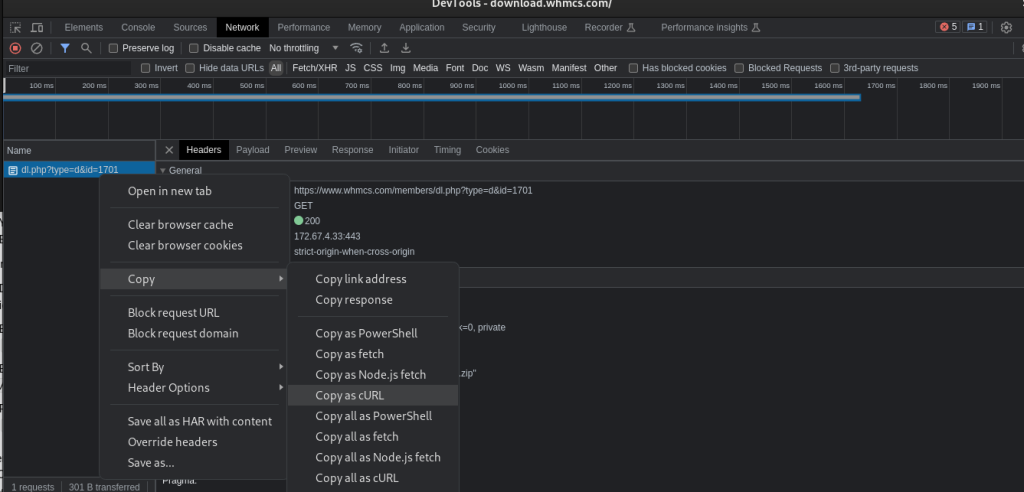
    Choose the Full Release option, and click on the Download button. This will start downloading the zip file to your local computer. You can cancel the download if you like as we won’t be using the downloaded file.In the network tab, you should see a single request – this is the request that was made to download the zip file. Right click on the request, and go to Copy > Copy as Curl. If you are using Windows, you might see two options – select the “Copy as Curl (bash)”.

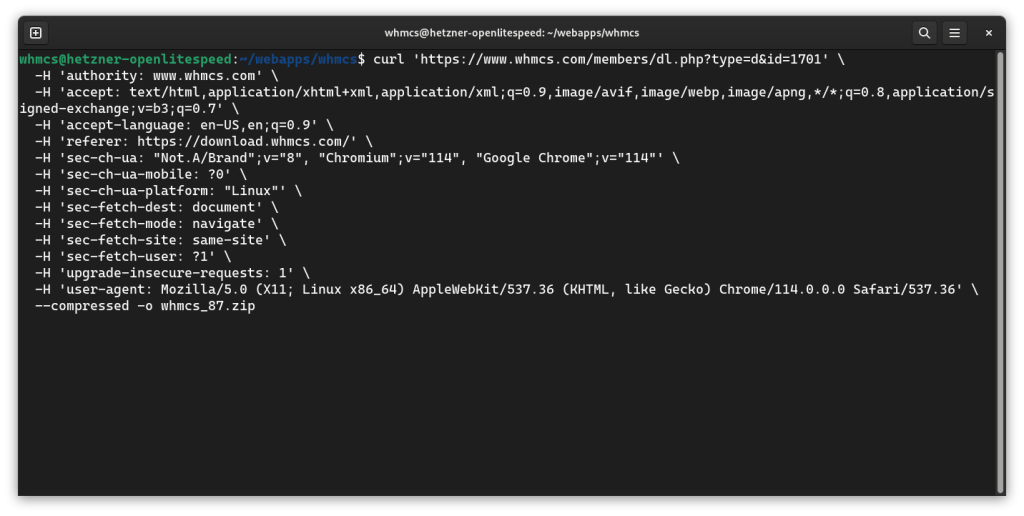
    If you followed the instructions correctly, you will have copied the curl request that contains the necessary cookies and request headers that are specific to your license key. We can paste this into your server terminal to make the same request again (i.e. download the file). After pasting it in the terminal, we need to specify the name of the file that will be downloaded. To do this, write -o whmcs_87.zip at the end of the command. The resulting command should look something like this:

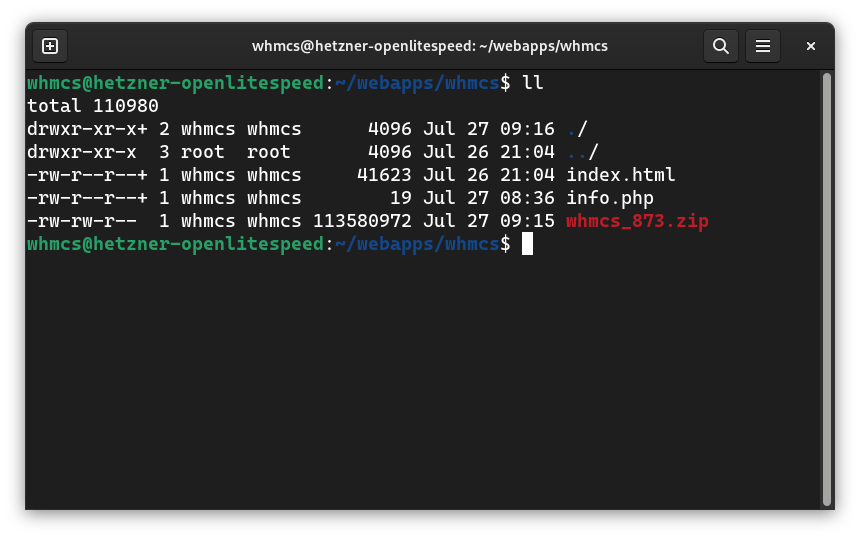
    The above command will download the file to your server and save it as whmcs_87.zip. You can use the ll command to list all the files in the current directory.

    The above screenshot shows that a new zip file was created on the server. We can extract it using the unzip command. This will create another folder inside our application folder.

    We can quickly copy the necessary files to the root of the application folder, and remove the obsolete files such as the default index.html file and downloaded archive. We can also set permissions for the configuration file.
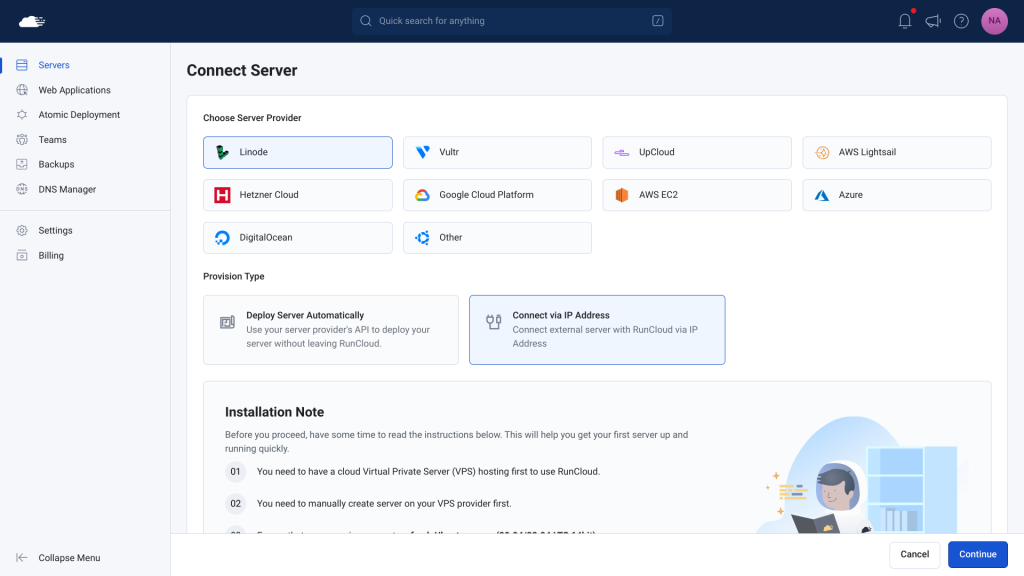
    You can execute the following commands to perform the above tasks, and terminate the session.

    unzip whmcs_87.zip # Unzip the downloaded file
    cp -r whmcs/* . # Copy installation files to correct directory
    rm -rf whmcs/ index.html whmcs_87.zip # Remove unnecessary files
    mv configuration.php.new configuration.php # Rename file
    chmod 400 configuration.php # Set Permissions
    exit # Close the SSH connection

    After executing the above commands, you can begin the installation process.

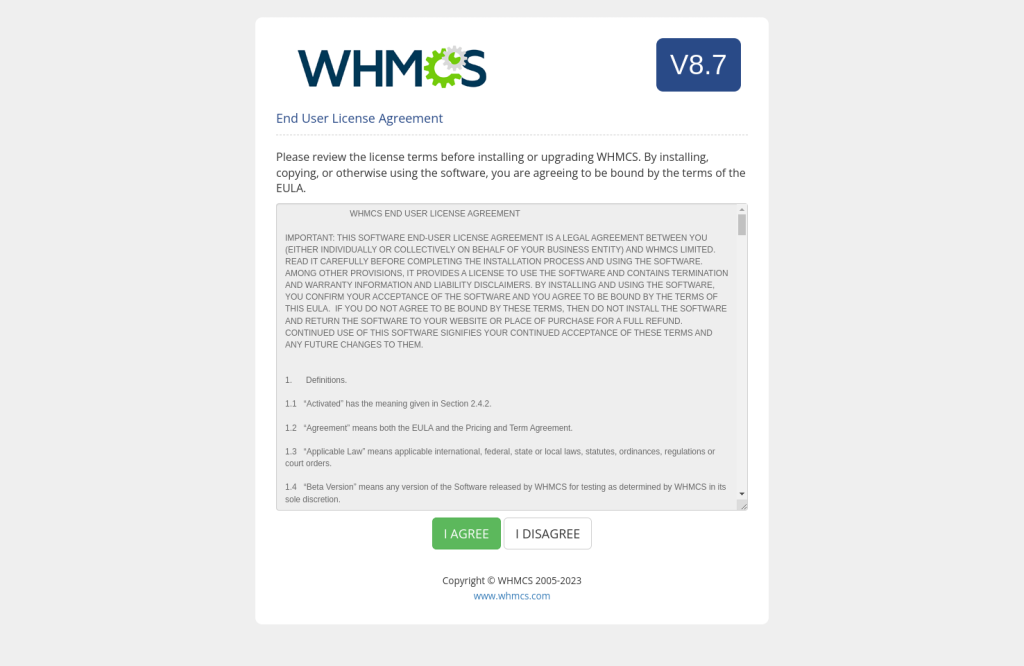
    Open your website in a web browser – you’ll see a welcome screen. Click on the install button to start the installation process.

    Note: If you receive an error message asking you to install ionCube loader, you should refer to our blog post: How To Install ionCube Loader (Step-by-Step Tutorial).

    On the next screen, you will need to provide your License key for the WHMCS installation – you can get this from the WHMCS dashboard under Services > My Licenses menu.Next you need to create a database and link it to your web application.

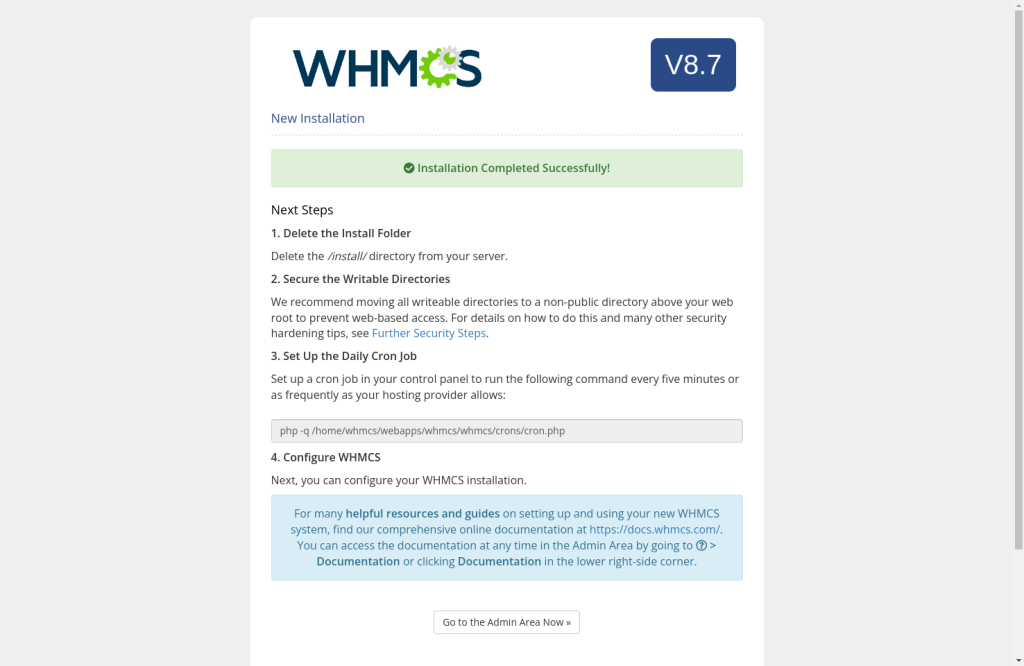
    After the installation is complete, you will see a success message, along with a list of steps to secure your installation. If you were not able to complete the installation successfully, you can refer to the troubleshooting guide by WHMCS.

    Logging in to the Dashboard

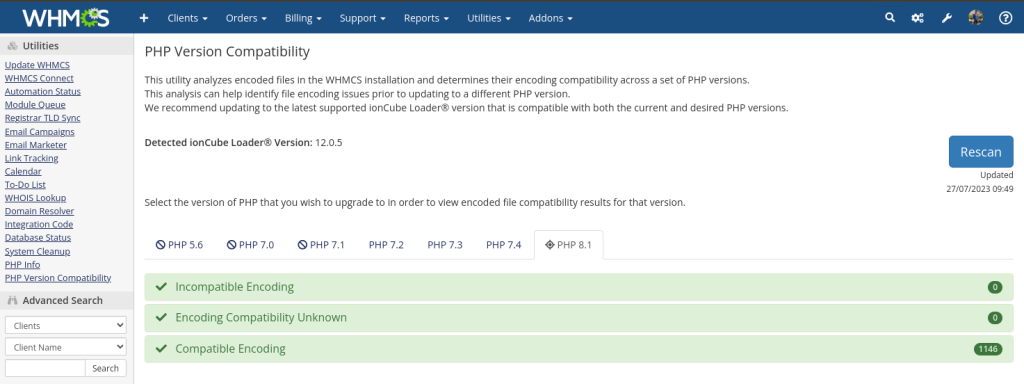
    After the installation is complete, you can log in to your dashboard to check everything is working properly. Go to the “PHP Version Compatibility” section in the left menu to confirm that everything is configured correctly.

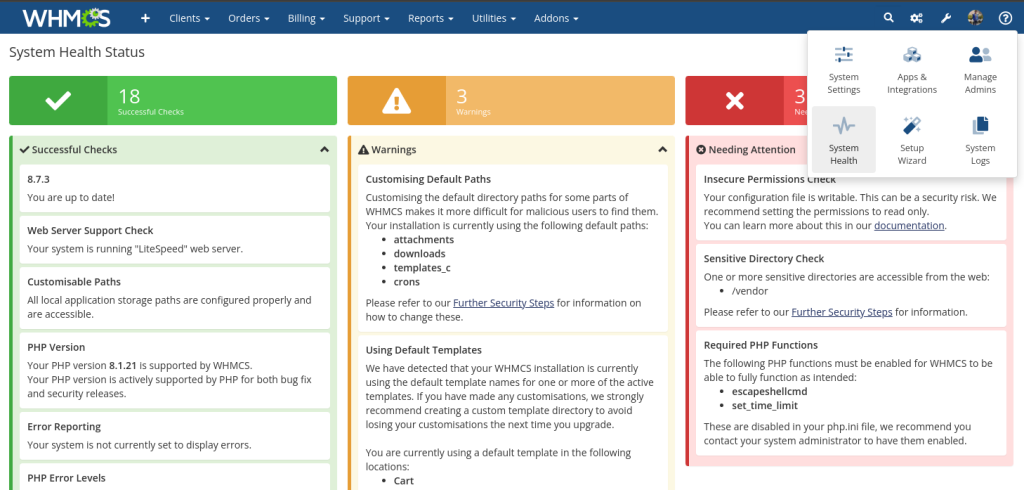
    Next, click on the wrench icon on the top right and go to the “System Health” page to check your installation. Here you will see a list of warnings. We will resolve them one-by-one to secure your WHMCS installation.

    Securing WHMCS Installation

    Deleting the Installation Directory

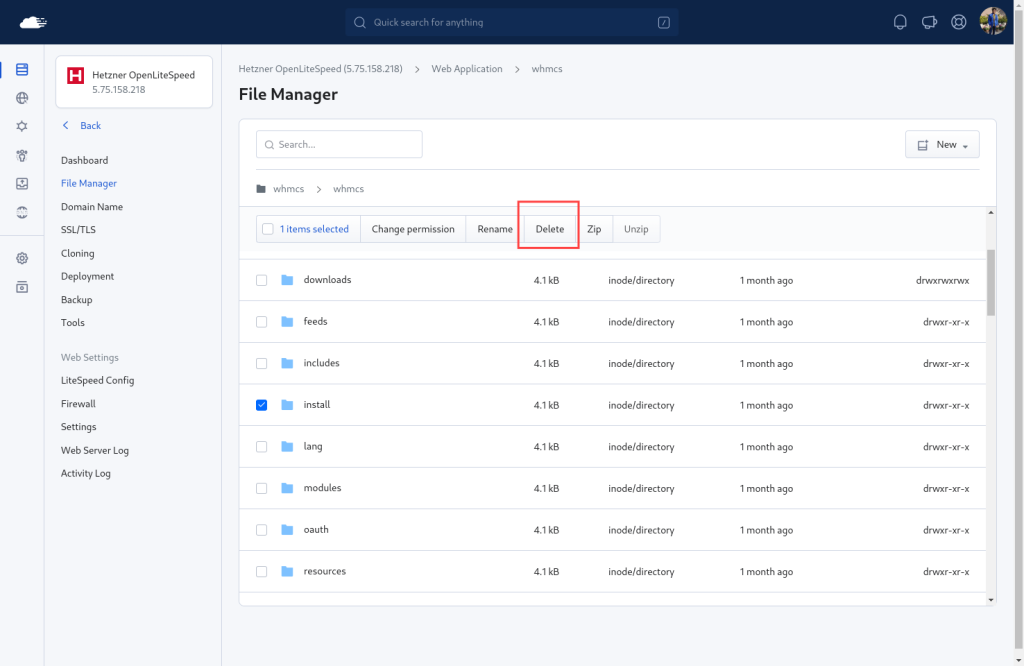
    WHMCS recommends deleting the “install” directory after installation is complete. Go to the RunCloud file manager and click on the checkbox next to the “Install” directory, and then press “Delete”.

    Enable Necessary PHP Functions

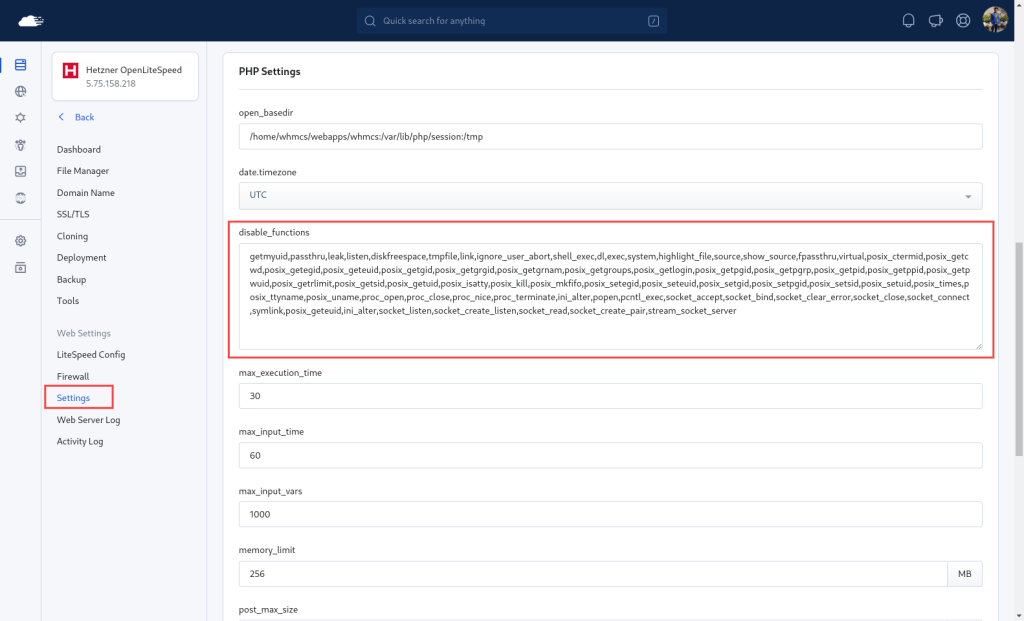
    You might need to enable certain PHP functions that are blocked on RunCloud by default.

    Go to the “Settings” tab of your web application and scroll down to the “PHP settings” section. You can delete the required functions from the “disable_functions” list, and it will be enabled for that particular web application on your server.Don’t forget to click “Update PHP Settings” for the changes to take effect.

    Change Permissions for configuration.php

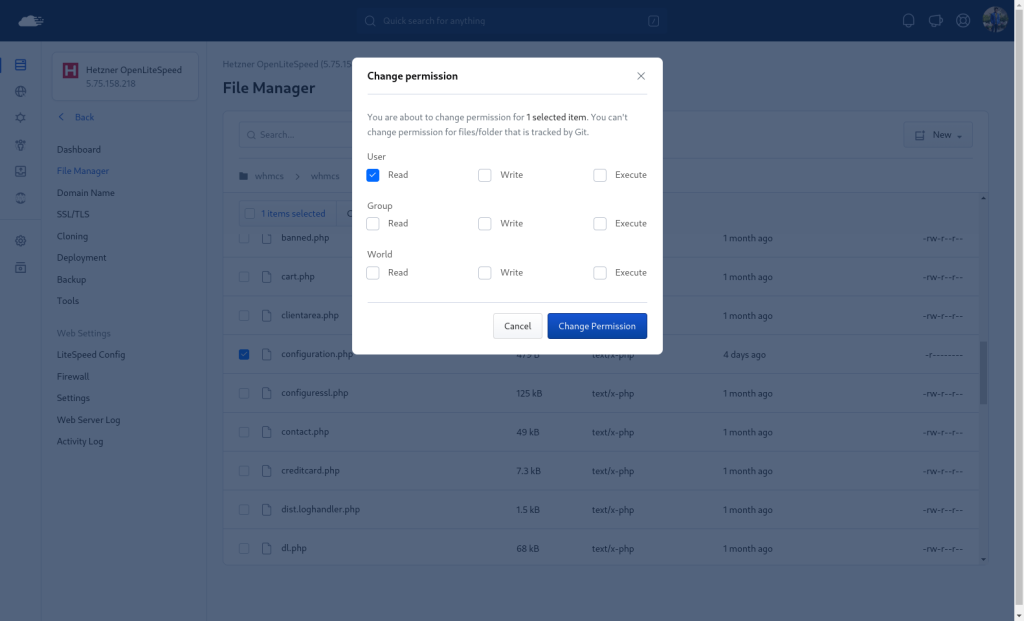
    If you are getting the “Insecure Permissions Check” message, you can update the file permissions using the RunCloud file manager.

    Simply click on the configuration.php file and then set the permissions to read only. Click on the “Change Permissions” to save the changes, and then refresh the WHMCS dashboard to see the changes.Note: If you configured the permissions via the command line earlier during installation, you won’t need to do this again.

    Rename Sensitive Directories

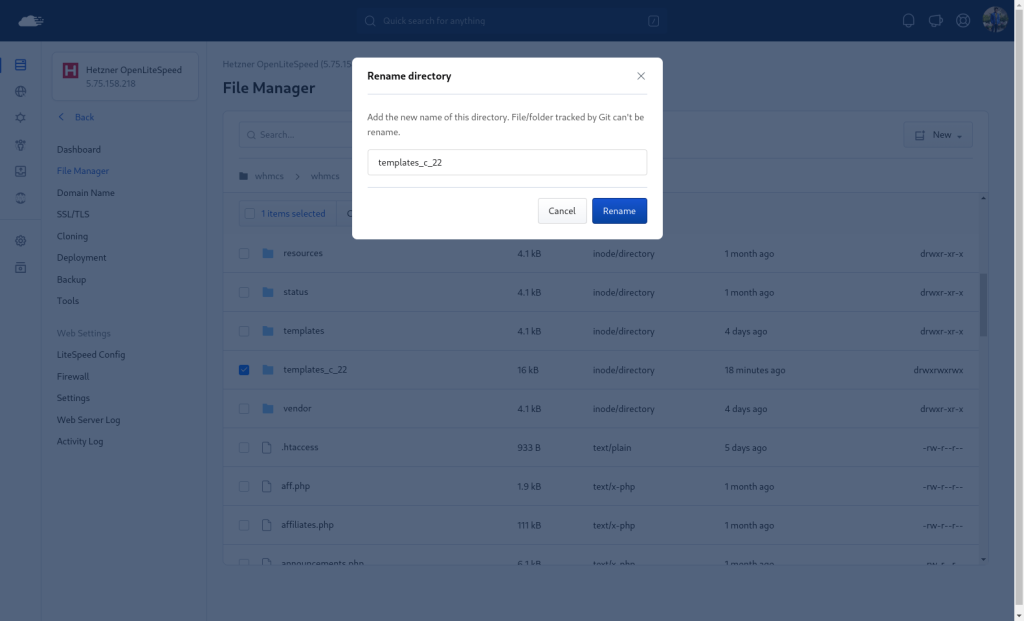
    We can further enhance the security of our WHMCS installation by moving certain sensitive directories to a different location. Although you can move the directories, a quick and easy way to achieve a similar level of security is by just renaming them to something obscure.

    Go to the RunCloud file manager and rename the following folders to anything you like:

    • templates_c
    • cons
    • admin

    We recommend adding a random string of alphanumeric characters either at the beginning or the end, rather than completely renaming it.

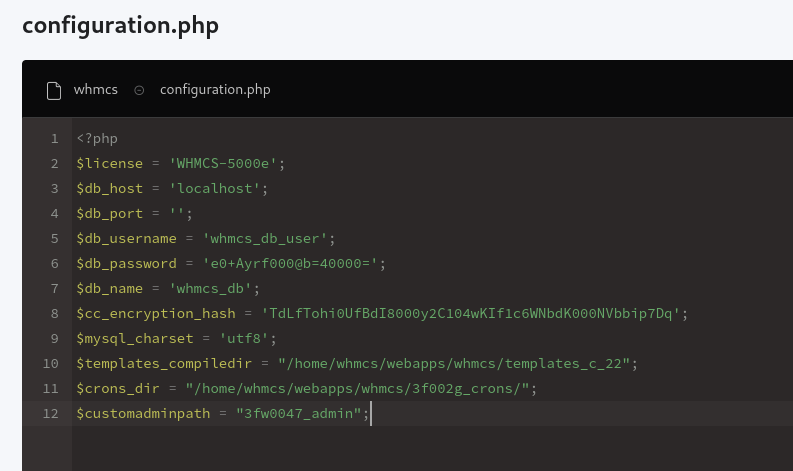
    After renaming the folders, we need to tell WHMCS where the new folders are located. To do this, add the following code snippet at the end of your configuration.php file. Make sure to replace the name of the folder with the name that you chose.

    $templates_compiledir = "/home/whmcs/webapps/whmcs/templates_c_22";
    $crons_dir = "/home/whmcs/webapps/whmcs/3f002g_crons/";
    $customadminpath = "3fw0047_admin";

    In the above example:

    • the templates_c directory was renamed to templates_c_22
    • the crons directory was renamed to 3f002g_crons
    • the admin directory was renamed to 3fw0047_admin

    Note: You don’t need to specify the entire path from the root of the server when changing the custom admin path.

    After editing, your configuration file should look similar to the following example:

    Save the file and refresh the WHMCS dashboard. Since we changed the admin directory, this will log you out of the dashboard.

    Log in to the dashboard again by navigating to the new admin URL in your browser. For example, if you renamed your admin folder to 3fw0047_admin then your login page will be located at example.com/3fw0047_admin/.

    Setting Up Cron Jobs

    WHMCS needs to execute certain code at regular intervals to function correctly. We need to configure a cron job to handle this.

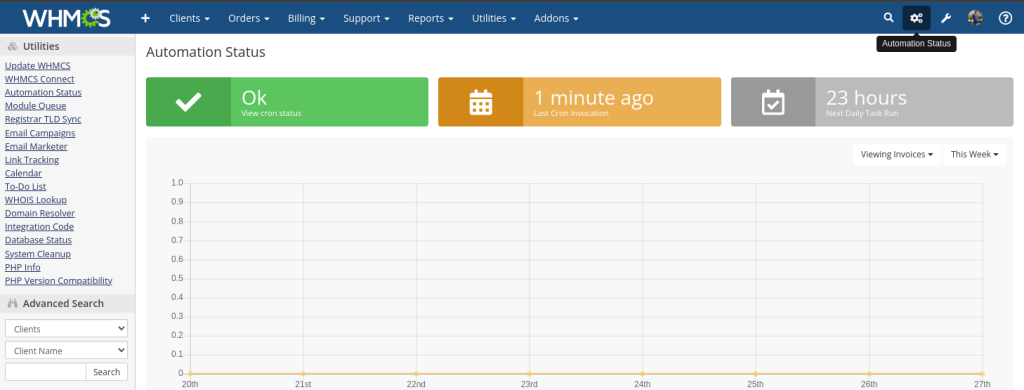
    Click on the “Automation Status” (three cogs) button on the top right of the screen. This will show you the status of your cron jobs. Since we have just configured the server, the status might be okay but it will definitely show an error message after a few hours if you don’t configure the cron job.

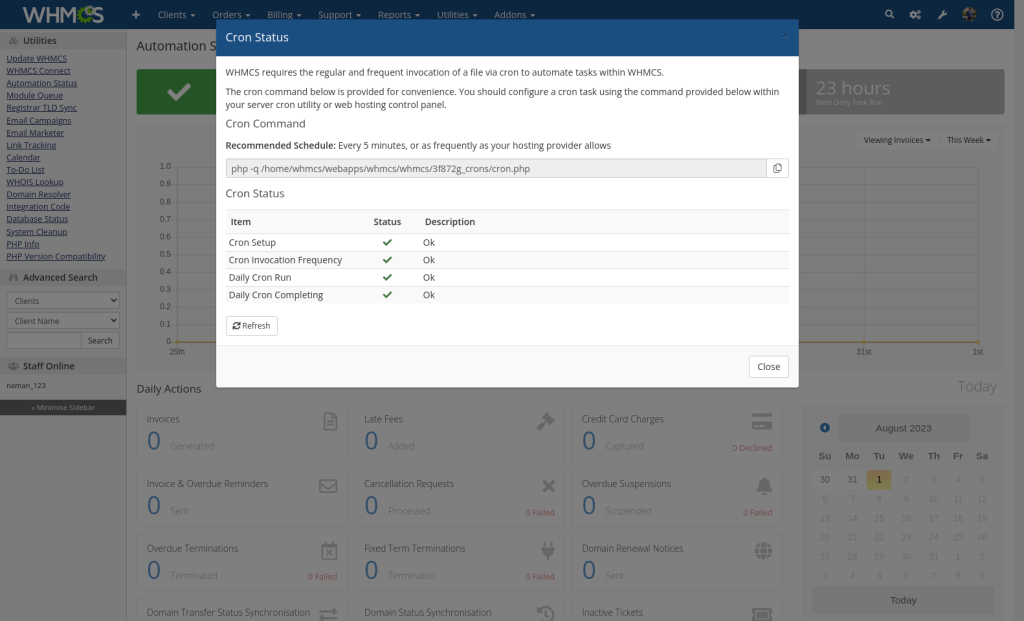
    To configure the cron job, click on the “OK” card in the middle of the screen. This will show a pop-up that displays the status of your cron jobs, along with the command that you need to execute. Copy this command.

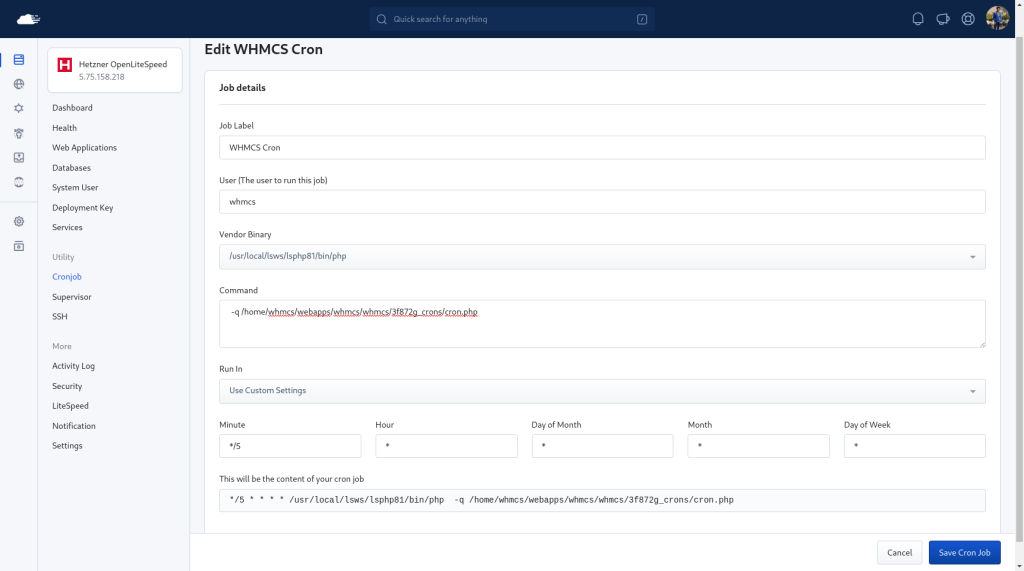
    Next, you need to navigate back to the RunCloud dashboard and click on the “Cronjob” button in the left-menu.

    Give your job a descriptive name, and provide the name of the web application owner that you specified while creating the application.

    Select the version of the PHP that your WHMCS installation is using, and then paste the copied command in the text box provided below. Make sure to remove the “php” from the start of the command as we have already specified a custom version of PHP for this.Finally, you need to specify the frequency of the job. From the drop-down menu, select “Use Custom Settings” and then type */5 in the minute text box.

    Click on the “Save Cron Job” to add it to your server. Check the WHMCS dashboard in a couple of hours – if the cron status is still “ok” then you have performed this step successfully.

    Block Access to Sensitive Directories

    WHMCS recommends blocking requests that are served directly from the vendor. We can create a new rule on our server that will deny access to visitors.

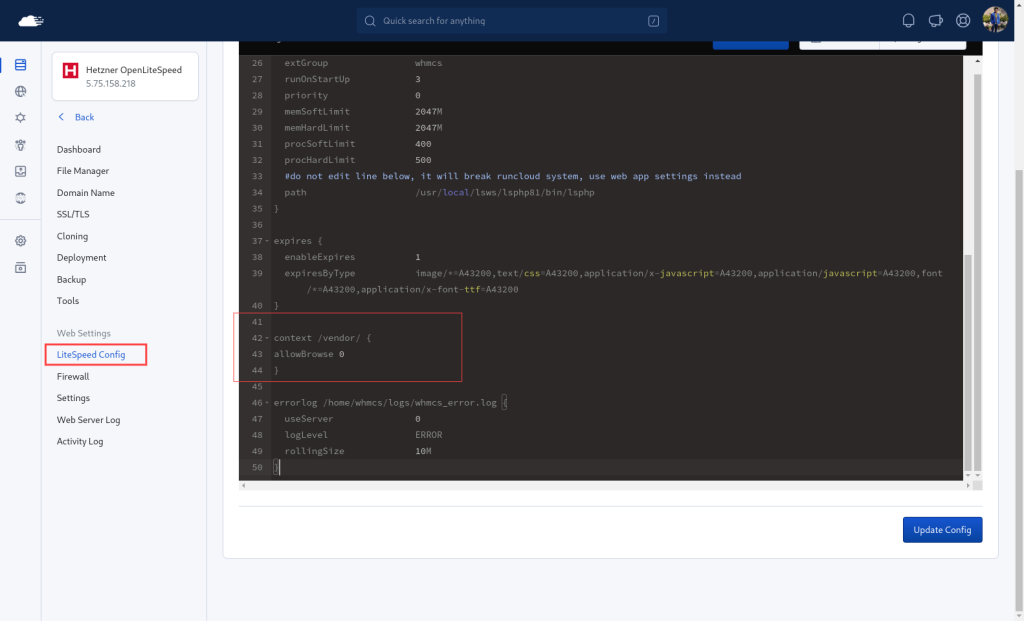
    On LiteSpeed servers, you can do this quickly by adding the following code to your LiteSpeed configuration:

    context /vendor/ {
    allowBrowse 0
    }

    After adding these lines, the configuration file should look something like this:

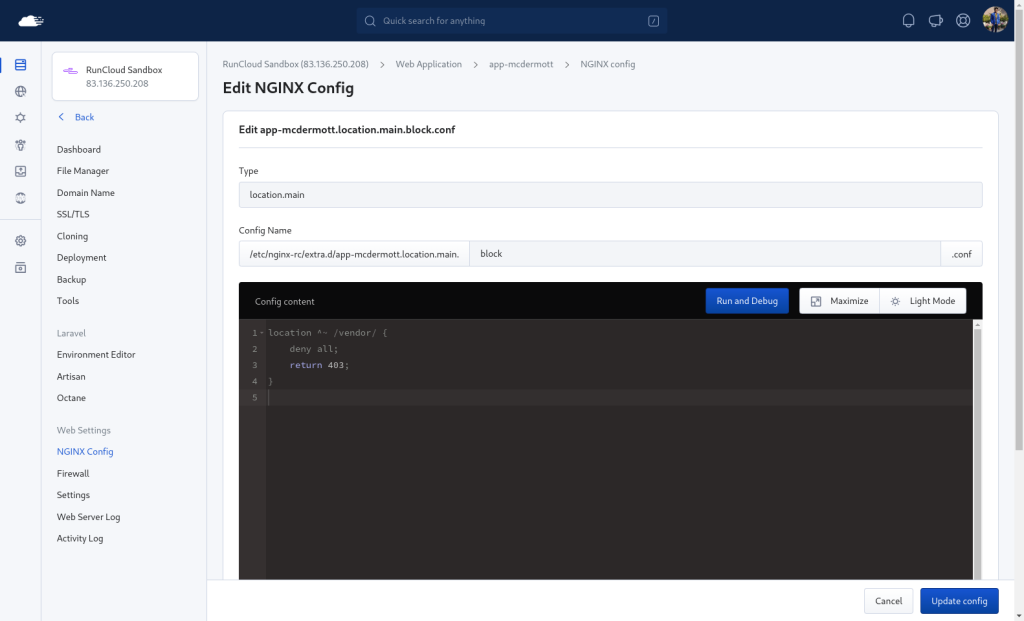
    For Nginx servers, you need to create a custom configuration to do this. Go to the “Nginx Config” page on your RunCloud dashboard, and create a new configuration. Provide a suitable name for the configuration, and then paste the following code:

    location ^~ /vendor/ {
        deny all;
        return 403;
    }

    After adding the configuration, you can press “Run and Debug” to test the configuration. If you get a success message, you can click “Save” to add the configuration to your server.

    Securing The Attachments and Downloads Directory

    You need to secure the attachments and downloads directory. This is where WHMCS will store any files that you upload or attach to your invoices, tickets, products, etc.

    The way you secure these files and directories will depend on how you want to store them.

    You might want to attach a different drive to your server to store this data, or save it on an S3 compatible storage service, such as AWS S3, DigitalOcean Spaces, etc. You can also use the default location inside your web app root directory, but you need to make sure it is not accessible from the web.

    We recommend referring to the official WHMCS documentation for this step, as it will guide you through the different options and scenarios.

    After Action Report

    WHMCS is a powerful and popular web hosting automation platform that can help you manage your clients, billing, support, domains, and more. However, it is not without its challenges and limitations. You might encounter issues with maintaining or upgrading your server.

    That’s why you need a reliable and efficient web hosting control panel to run your WHMCS web app.

    RunCloud is a cloud-based server management platform that can help you deploy, configure, optimize, and secure your web app on any cloud server. You can choose from various web application stacks and enjoy features such as SSL certificates, firewall, backup, cron jobs, SSH keys, and more.

    Working with RunCloud is easy and intuitive. You can create and manage your web app from a user-friendly dashboard, or use the API and CLI tools for more advanced tasks.

    You can also monitor your server’s health and performance with real-time graphs and alerts.

    RunCloud also provides excellent customer support and documentation to help you with any questions or issues.

    By using RunCloud to run your WHMCS web app, or any other web hosting automation platform, you can save time and improve your productivity. You can focus on growing your business and providing value to your customers, while RunCloud takes care of the technical aspects of your web app.

    RunCloud is the ultimate partner for web hosting automation – get started with RunCloud today!

  • How To Install ionCube Loader (Step-by-Step Tutorial)

    How To Install ionCube Loader (Step-by-Step Tutorial)

    Did you know that a large number of PHP applications are encoded with ionCube?

    If you want to use any of these applications on your web server, you need to install ionCube Loader – a PHP extension that allows you to run ionCube-encoded PHP files. But how do you install ionCube Loader on your web server? Is it easy or complicated? Do you need any technical skills or experience?

    In this article, we will show you how to install ionCube Loader in less than 10 minutes with our step-by-step tutorial. You will learn:

    • How to download the right Loader package
    • How to extract and copy the Loader file
    • How to edit the php.ini file
    • How to restart your web server.

    By the end of this article, you will be able to run any ionCube-encoded PHP application on your web server without any hassle. Sounds good? Then let’s get started.

    What is ionCube Loader?

    The ionCube Loader is a PHP extension that allows you to run ionCube-encoded PHP files on your web server. ionCube-encoded PHP files are files that have been protected with the ionCube PHP Encoder – a widely used tool that allows developers to encrypt their PHP code and add security features such as license management, malware protection, and code optimization.

    The loader is supplied as a PHP extension module for Windows, Linux, and macOS, and can be installed into a PHP installation. It is also freely redistributable. By installing ionCube Loader on your web server, you can benefit from the following advantages:

    • You can use third-party PHP applications that are encoded with ionCube, such as WordPress plugins, e-commerce platforms, or CMS systems.
    • You can protect your own PHP code from being stolen, modified, or reverse engineered by encoding it with ionCube PHP Encoder and running it with ionCube Loader.
    • You can improve the performance and reliability of your PHP code by using the ionCube PHP Encoder’s features such as code compression, error reporting, and vulnerability protection.

    If you are using PHP 7.4 on the OpenLiteSpeed server, ioncube Loader should be enabled by default. You can check it using the instructions provided at the end of this article. If it is not installed, you can quickly install it by running apt install lsphp74-ioncube for PHP 7.4 and apt install lsphp81-ioncube for PHP 8.1.

    You should note that ionCube does not support PHP 8.0 and ionCube Loader for PHP 8.2 is still in beta development. Since PHP 7 has reached the end of life, we will only cover the instructions to install the ionCube loader for PHP 8.1.

    Installing ionCube Loader

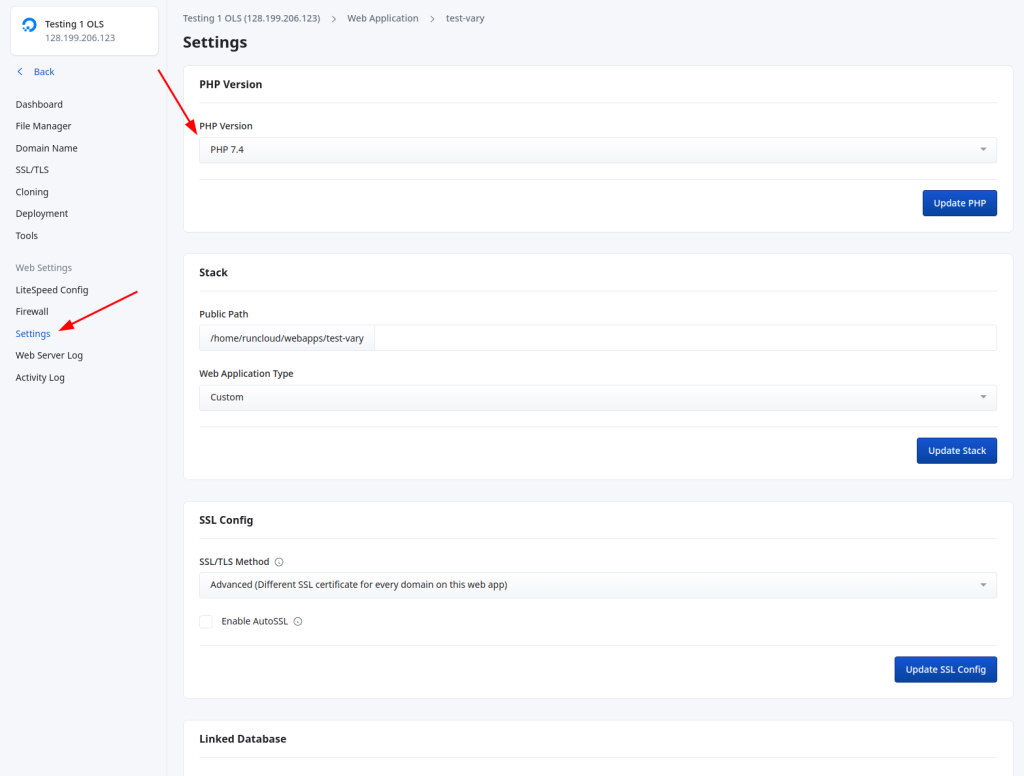
    Before you begin installing the ionCube Loader you’ll need to know which PHP version your website is running on. At RunCloud, we offer multiple versions of PHP, from 7.0 right up to the latest 8.2 release. If you’re not sure which PHP version your website is on, log in to your dashboard, and head over to ‘Settings’ on the left:

    installing ioncube loader

    So, as an example, if you find that your website is currently running PHP version 7.4, then you’ll need to make sure you install the 7.4 version of ionCube.

    On Containerized Servers

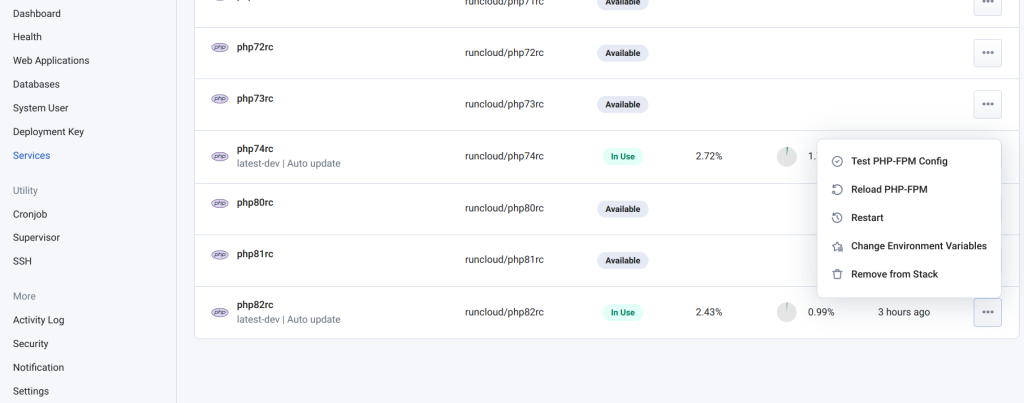
    If you are running a Containerized server on RunCloud, you can quickly install ionCube Loader with a few clicks. Go to the “Services” tab of your server and scroll down to the PHP images. Here you can see the PHP images that are available for your server.

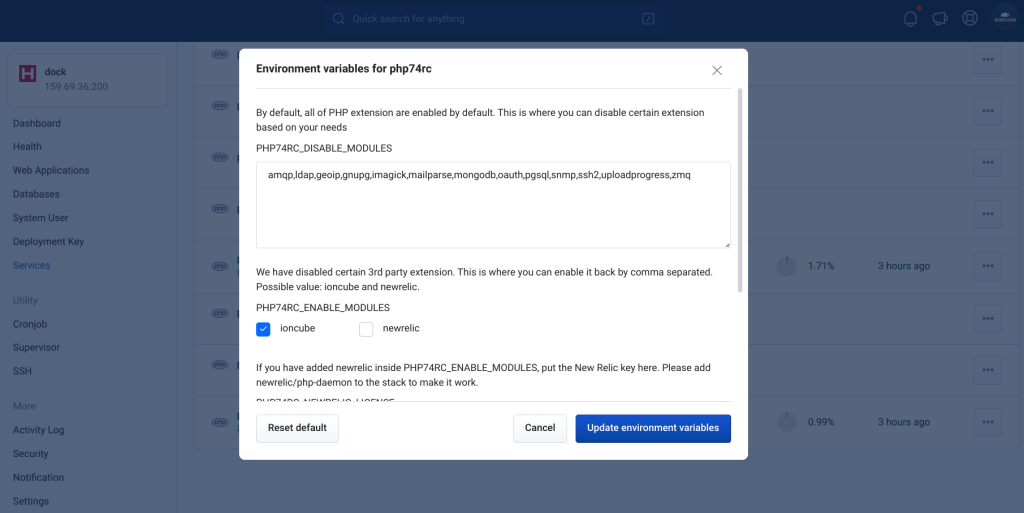
    You need to install ionCube Loader on each PHP version separately. If an image is already “in use”, click on the “…” next to it and select “Change Environment Variables“. If the image is not being used on your server, you can click on “Add to stack“.

    This will open a pop-up window on your screen. Under the third party extensions menu, make sure to Check the box next to ionCube.

    Next, click on “Update Environment Variables” or “Add to Stack“, depending upon your setup.

    You need to perform the above step for each PHP version that needs ionCube Loader.

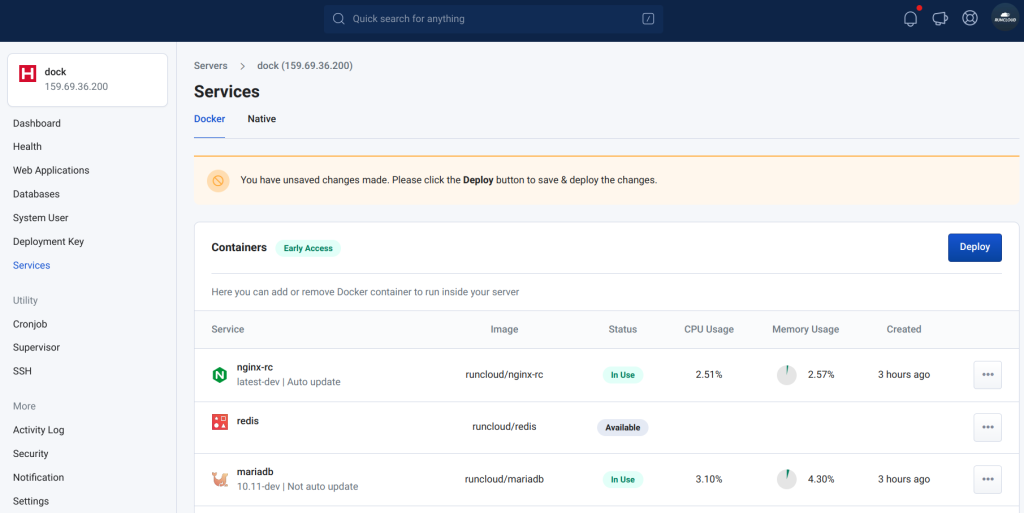
    After making the necessary changes, scroll back to the top of the services page and click on “Deploy” to save the changes. This will create new container images on your server, and all the existing (as well as new) applications on your server will be able to use the ionCube Loader.

    On OpenLiteSpeed Servers

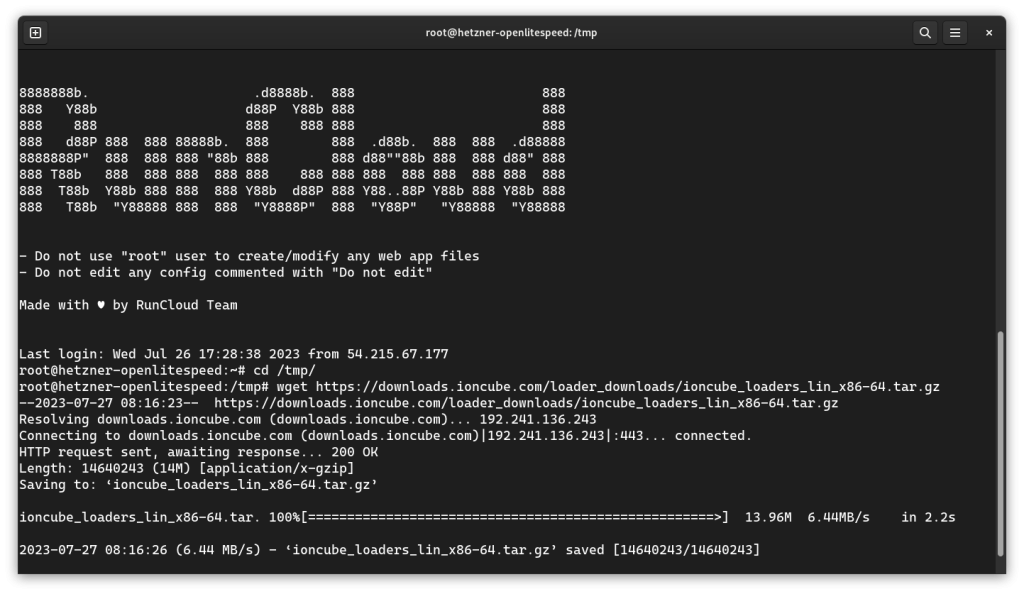
    If you are using OpenLiteSpeed servers, you will need to log in to your server via SSH. After logging in to your server, you need to download the ionCube Loader archive from the official website, and extract it. To do this, you can run the following commands:

    cd /tmp/
    wget https://downloads.ioncube.com/loader_downloads/ioncube_loaders_lin_x86-64.tar.gz
    tar -zxvf ioncube_loaders_lin_x86-64.tar.gz

    The previous command should show an output similar to the above screenshot. After extracting the archive, it will be available in the /tmp directory. However, we need to install it in our PHP environment.

    In this section, we have provided the instructions to install ionCube Loader on PHP 8.1, but the steps are similar for any other version of PHP.

    To install ionCube, you need to copy the relevant shared library file in the PHP’s directory. Change into the installation directory of PHP 8.1 using the following command:

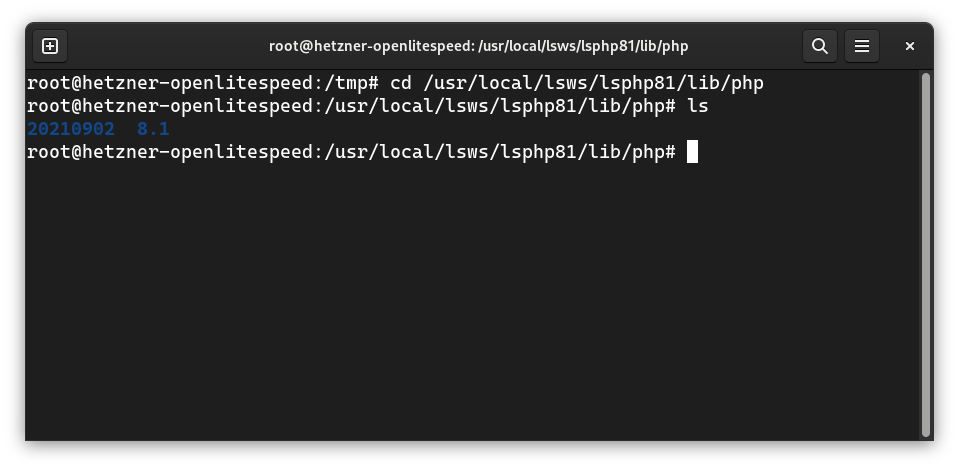
    cd /usr/local/lsws/lsphp81/lib/php
    ls

    After navigating to the correct directory, you can browse its contents. In the above screenshot, we can see it has two folders, one named 20210902 and the other is named 8.1.

    Execute the following commands to copy the shared library file of ionCube Loader for PHP 8.1 into the folder named 20210902. These commands will also create an entry in the mods-available directory to load the ionCube Loader next time PHP is reloaded.

    cp /tmp/ioncube/ioncube_loader_lin_8.1.so 20210902/
    echo "zend_extension=ioncube_loader_lin_8.1.so" > /usr/local/lsws/lsphp81/etc/php/8.1/mods-available/ioncube.ini

    If you want to install the loader for multiple PHP versions, you need to perform the above step for each version. Finally, you need to restart the PHP environments for the changes to take effect – run the following commands to do this:

    # For OpenLiteSpeed servers
    systemctl restart lsws-rc
    killall lsphp

    On Nginx Servers

    Similar for OpenLiteSpeed servers, to install ionCube Loader on Nginx servers, you need to log in to your web server as root, and run the following commands to download and extract the archive:

    cd /tmp/
    wget https://downloads.ioncube.com/loader_downloads/ioncube_loaders_lin_x86-64.tar.gz
    tar -zxvf ioncube_loaders_lin_x86-64.tar.gz

    Once you’ve extracted the archive, you’re ready to install the ionCube Loader. Execute the following commands to copy the shared library files in the correct location, update the relevant configuration, and to restart the PHP-fpm:

    (Again, we have only provided the commands for PHP 8.1 but the process is similar for all versions of PHP. )

    cp ioncube/ioncube_loader_lin_8.1.so /RunCloud/Packages/php81rc/lib/php/extensions/no-debug-non-zts-20210902
    echo "zend_extension=ioncube_loader_lin_8.1.so" > /etc/php81rc/conf.d/ioncube.ini
    systemctl restart php81rc-fpm

    Checking ionCube Installation

    Once you’ve installed ionCube, you may want to verify that it’s installed properly and that everything is running correctly. To do this you simply need to run one line of code, which will vary depending on your PHP version, as shown below:

    For OpenLiteSpeed

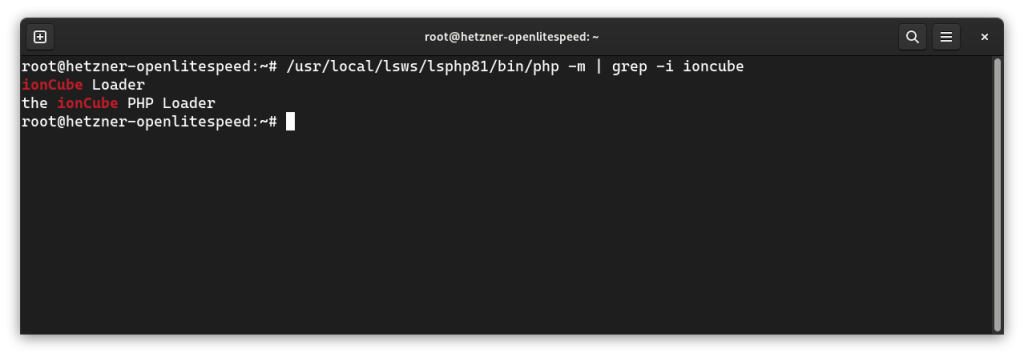
    /usr/local/lsws/lsphp81/bin/php -m | grep -i ioncube

    For Nginx

    /RunCloud/Packages/php81rc/bin/php -m | grep -i ioncube

    The above command will use the specified version of PHP to list out all the installed modules and display all the lines that contain the word ionCube. If your installation was successful, you will see the following output:

    For All PHP Versions and Server Stacks

    If you don’t want to check the installed modules via the command line, you can also do it using the web interface. This method will work on all the PHP versions, regardless of your server stack.

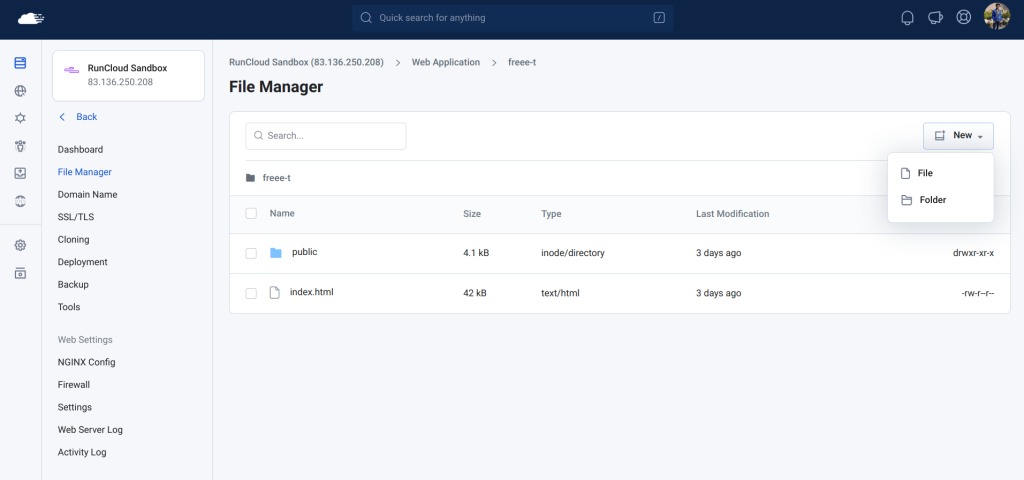
    After installing the module, make sure you have restarted your web server. Next, go to your RunCloud dashboard and select the application where you want to use ionCube Loader. Click on the “File Manager” tab on the left, and then create a new PHP file. You can name it anything – for example abcd.php.

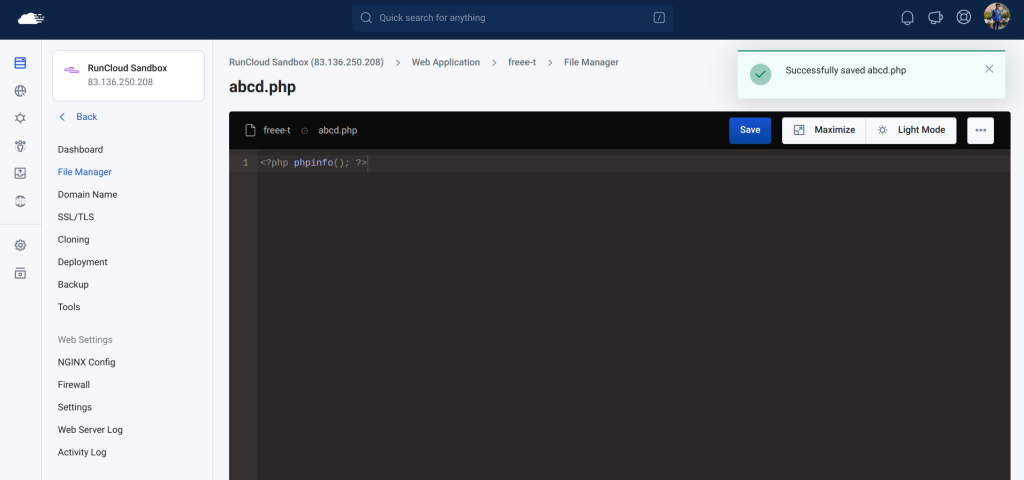
    Next, click on the newly created file, which will open up a text editor in a new window. You need to edit this file by pasting in the following code, and saving it:

    <?php phpinfo(); ?>

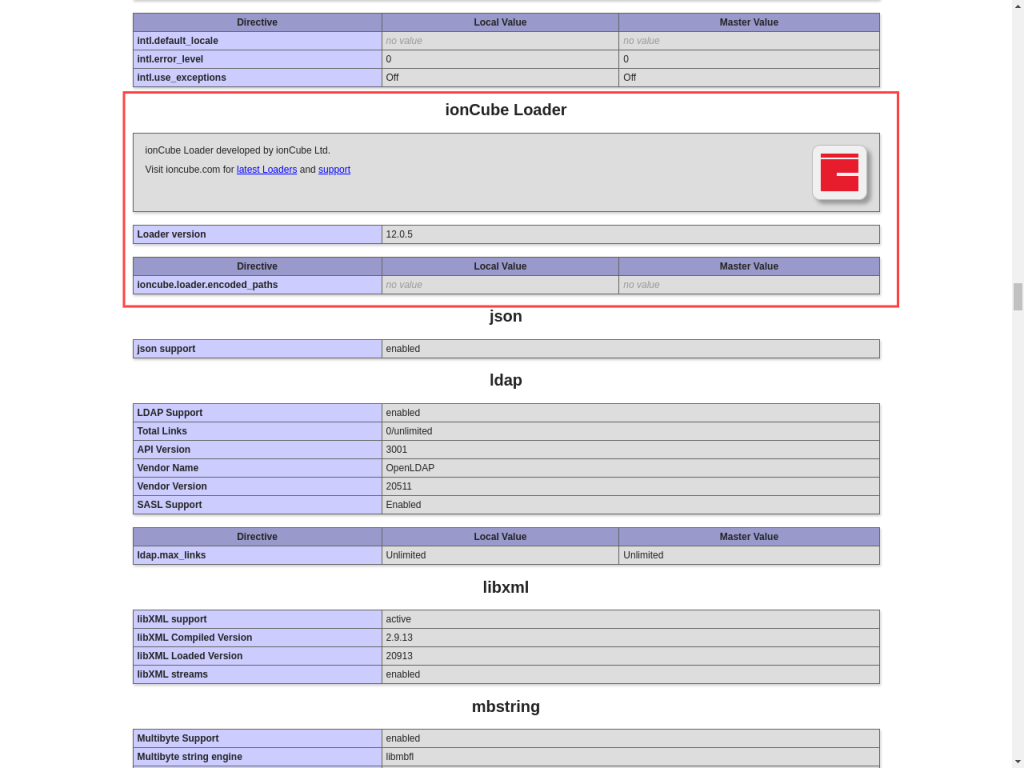
    Open this file in your browser. For example, if the URL of your site is www.example.com, you need to visit www.example.com/abcd.php to open it. You should see something like the screenshot below. Scroll down to find the version of ionCube Loader.

    In the above screenshot, we can see that the ionCube Loader is being displayed, therefore it was installed correctly. If the page fails to load or the entry is missing, then it was not installed correctly.

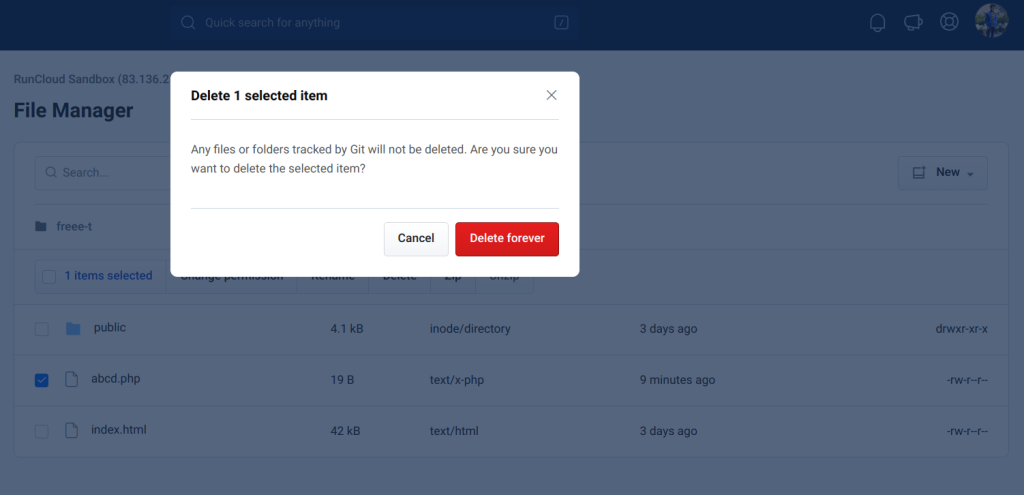
    After checking the installation, we strongly recommend deleting this configuration file. It reveals sensitive information about your server to the internet that can be used by hackers to target you.

    Backwards Compatibility And Limitations

    If you’re upgrading your version of PHP, it may not always be necessary to remove ionCube and install a newer version.

    Encoded files can, in general, run on versions of PHP equal to or greater than the source language of the Encoder used to produce them.

    So a file produced by the Encoder for PHP 7.2 can be run by the Loaders for PHP 7.2, 7.3, and 7.4, but not 7.1. This means that the Loaders offer good backwards compatibility. However, there are the following limitations:

    • The Loader for PHP 8.1 can only run files produced by the version 12 Encoder for PHP 8.1.
    • The Loaders for PHP 7.1 through 7.4 can only run files produced by the Encoders for PHP 7.
    • The Loader for PHP 7.0 can only run files produced by the Encoder for PHP 5.6.

    Conclusion

    ionCube’s tools are hugely valuable in both protecting and optimizing your PHP code. By encrypting and obfuscating your code, you are guarding it from prying eyes, and protecting your intellectual property from being used without permission, or in any way you don’t approve of.

    By using the ionCube tools your PHP code will no longer be able to be reverse engineered, copied, or stolen. But as well as this, it will also help speed up your code.

    It achieves this by compressing the code before sending it back to the clients requesting that particular resource. This compression results in faster load times for end users who are trying to view or interact with your application from their browser, making for a more enjoyable user experiences overall.

  • How To Monitor Your Web App’s RAM & CPU Usage with Netdata

    How To Monitor Your Web App’s RAM & CPU Usage with Netdata

    Netdata is a powerful tool that can help you monitor your servers with ease and efficiency. It’s a distributed, real-time, performance, and health monitoring platform that can collect and display thousands of metrics from your servers, hardware, containers, and applications, including RAM and CPU usage.

    Netdata has many features and benefits that make it a great choice for server monitoring, such as:

    • Real-time data collection and visualization: Netdata collects metrics every second, and displays them on interactive charts that update every second as well. This means you can see exactly what’s happening on your servers without any delays.
    • Infinite scalability: Netdata can scale to any number of servers and metrics without compromising performance or accuracy. It stores the data locally on each server, which means it doesn’t need a central database or a query engine. You can also use Netdata Cloud to view metrics from multiple servers in one dashboard, with secure streaming and encryption.
    • Flexible and modular architecture: Netdata can monitor any system, service, or application that exposes metrics with the help of its modular architecture and hundreds of integrations. You can also extend Netdata with custom collectors, plugins, dashboards, alarms, notifications, and more. Netdata is open-source and community-driven, so you can always find new features and improvements.
    • Zero configuration: Netdata is designed to work out of the box, without any need for configuration. It can auto-detect metrics from your servers and applications, and display them on preconfigured dashboards with meaningful visualizations and health alarms.

    Netdata is compatible with RunCloud, so you can use it alongside our platform to manage your web applications.

    How to Install Netdata on RunCloud Servers

    If you want to install Netdata on your RunCloud server, you can follow these simple steps:

    1. Sign up for Netdata: To use Netdata Cloud, you’ll need to sign up for a free account on their website. Netdata Cloud will allow you to view metrics from multiple servers in one dashboard, and access other features such as Metric Correlations and War Rooms.
    2. SSH into your RunCloud server: To install Netdata on your server, you’ll need to access it via SSH. If you don’t know how to do this, you can read our post on how to connect to your RunCloud server using SSH. You will need your server’s IP address, username, and password or SSH key.
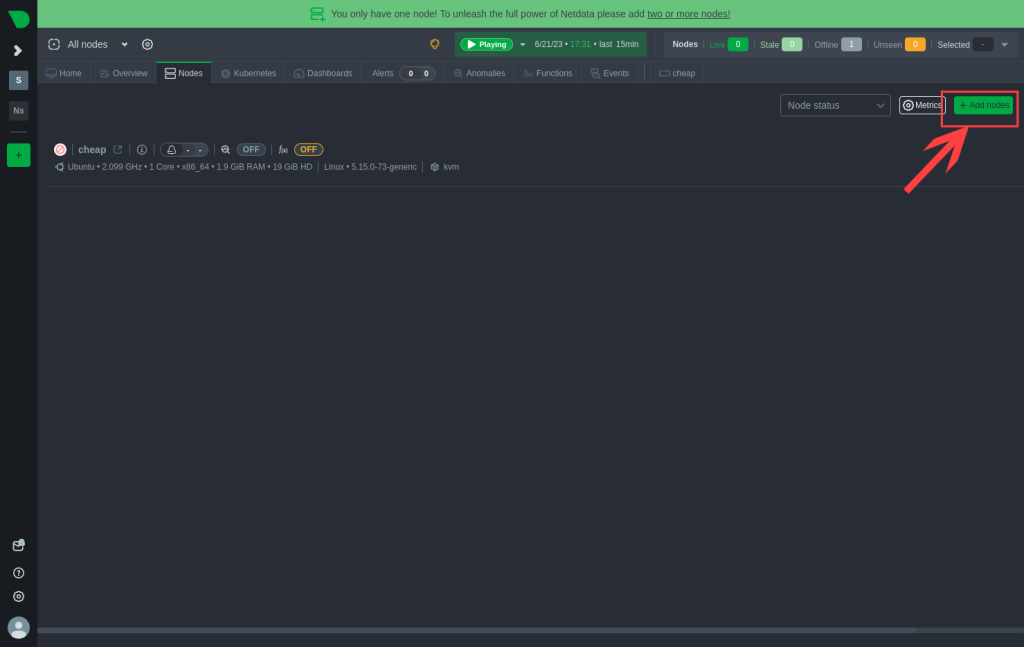
    3. Open Installation Script: Once you have logged into your server via SSH, go to the Netdata dashboard and go to the “All Nodes” tab. Once there, click on “+ Add Node” button to view the installation script.
    Netdata dashboard view existing nodes.
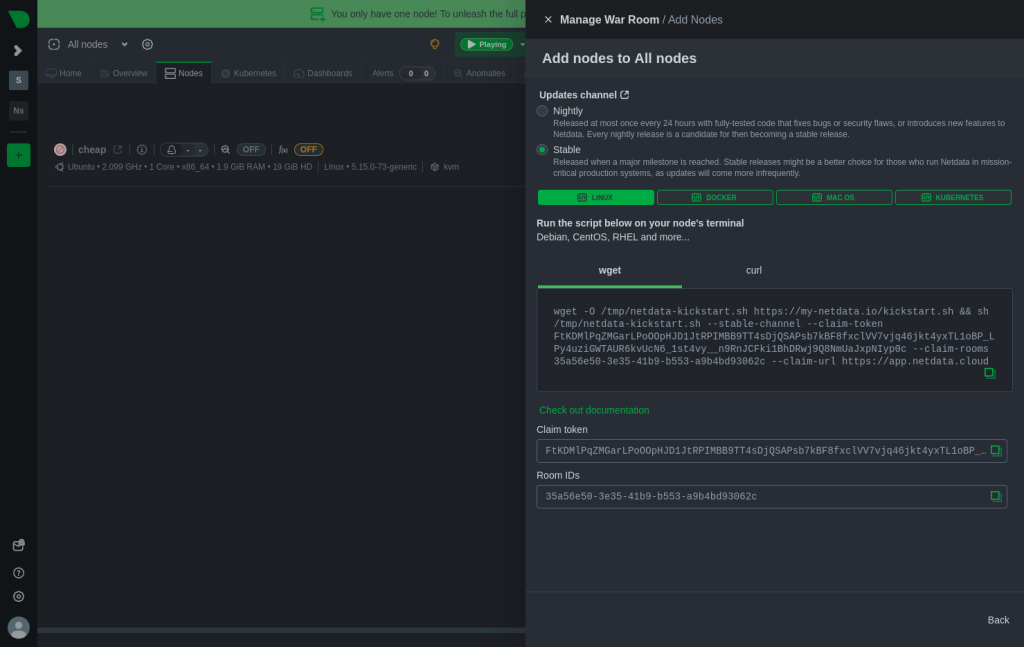
    1. Execute the given command: You can install Netdata on your server with a single kickstart command. Change the update channel to “Stable“, and then copy the given installation command.
    Netdata Installation script.

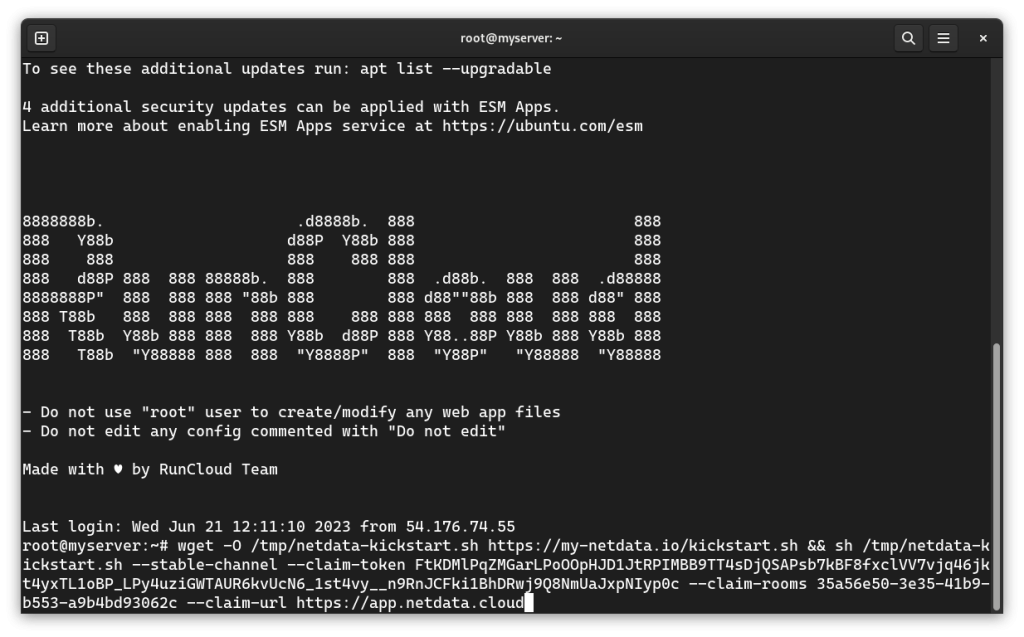
    Upon execution, the above command will download and run a script that will install Netdata and its dependencies on your server. Go back to your SSH terminal, paste the given command, and then press ‘Enter’.

    Executing Netdata installation script on RunCloud

    During installation, it will ask you some questions about automatic updates, release channels, anonymous statistics, and Netdata Cloud connection. Press ‘Y’ to confirm the installation and then press ‘Enter’.

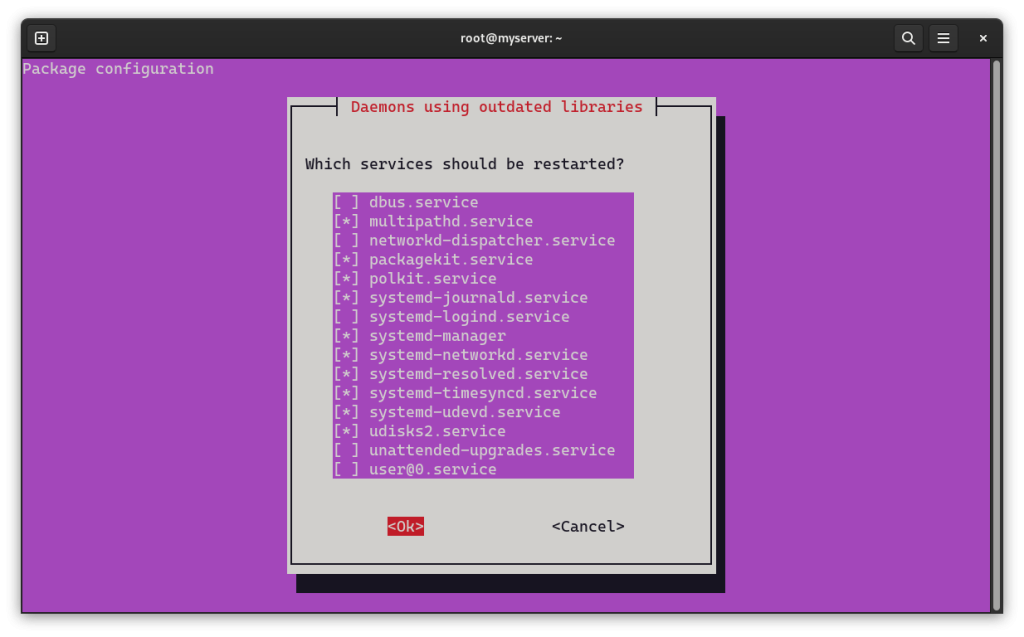
    After this, the installation daemon will ask you which services should be restarted. You can use the arrow keys to navigate up/down and press the spacebar to select/deselect options if you want to do so.

    Restarting services via CLI after installation

    In most cases, default selection is right choice for most people. Press the ‘Tab’ key on your keyboard – this will move cursor to the next position. Make sure that the ‘Ok’ is highlighted, and then press ‘Enter‘ to continue the installation.

    You will be asked to confirm the installation once again, press ‘Y’ to confirm, and then press ‘Enter‘.

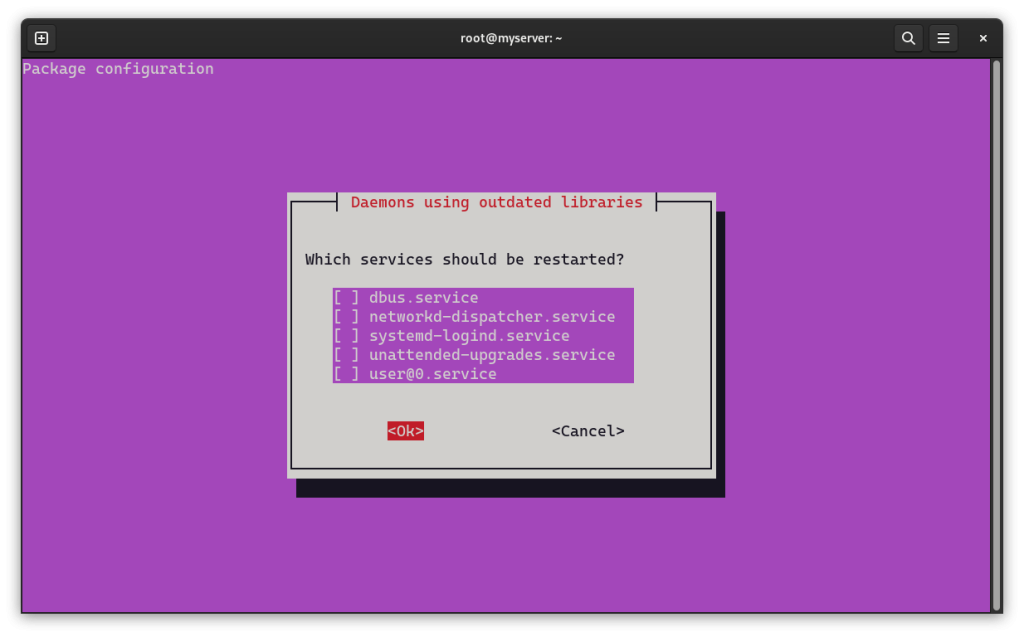
    Daemon using outdated libraries on RunCloud.

    After this, the installation script will once again ask you which services should be restarted – leave these settings to default. Press ‘Tab‘ to highlight the ‘Ok’ button, and press ‘Enter‘ to finish the installation.

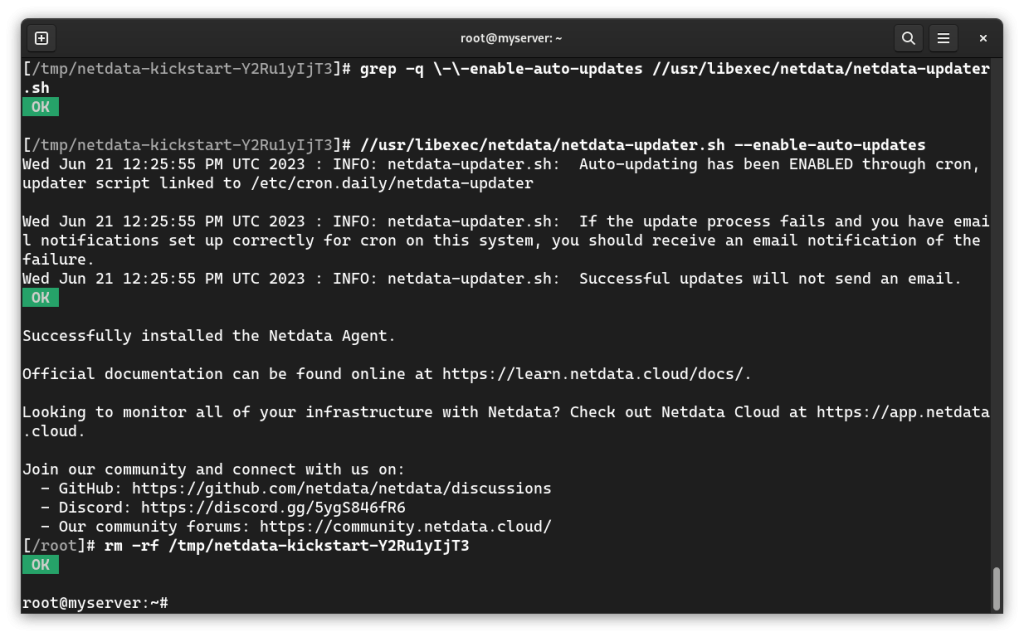
    Netdata installation completed successfully.

    That’s it! You have successfully installed Netdata on your RunCloud server. You can now access the Netdata web interface by visiting your Netdata dashboard.

    How to View Server Metrics

    To see the RAM and CPU usage of different servers, you can use either Netdata’s web interface or Netdata Cloud. Both options will show you interactive charts that update every second with real-time metrics.

    Using Netdata’s Web Interface

    Netdata hosts a dashboard on your server, which you can view by visiting port 19999 of your server. You can change this port by editing the Netdata configuration file. By default, RunCloud blocks all non-standard ports. Therefore, you’ll need to either connect to your server via a VPN, or open up the ports to visit the dashboard.
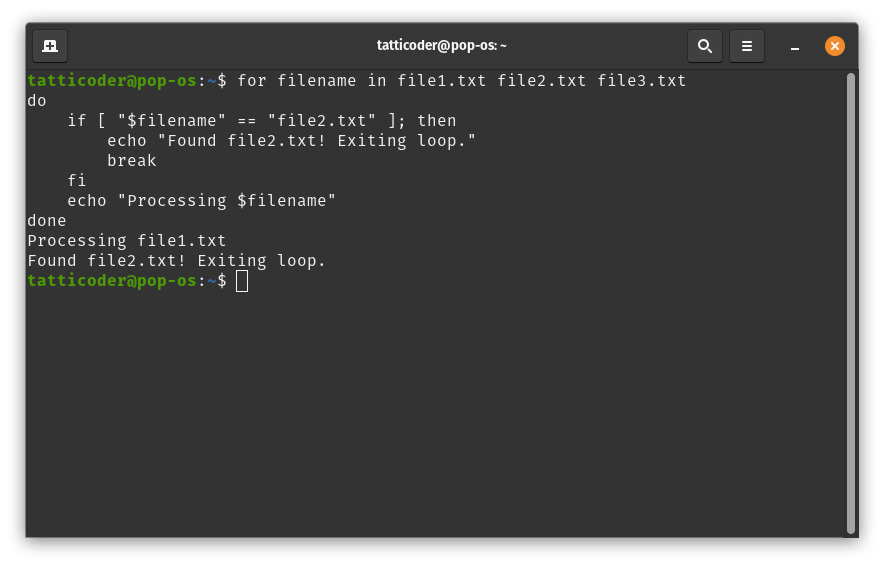
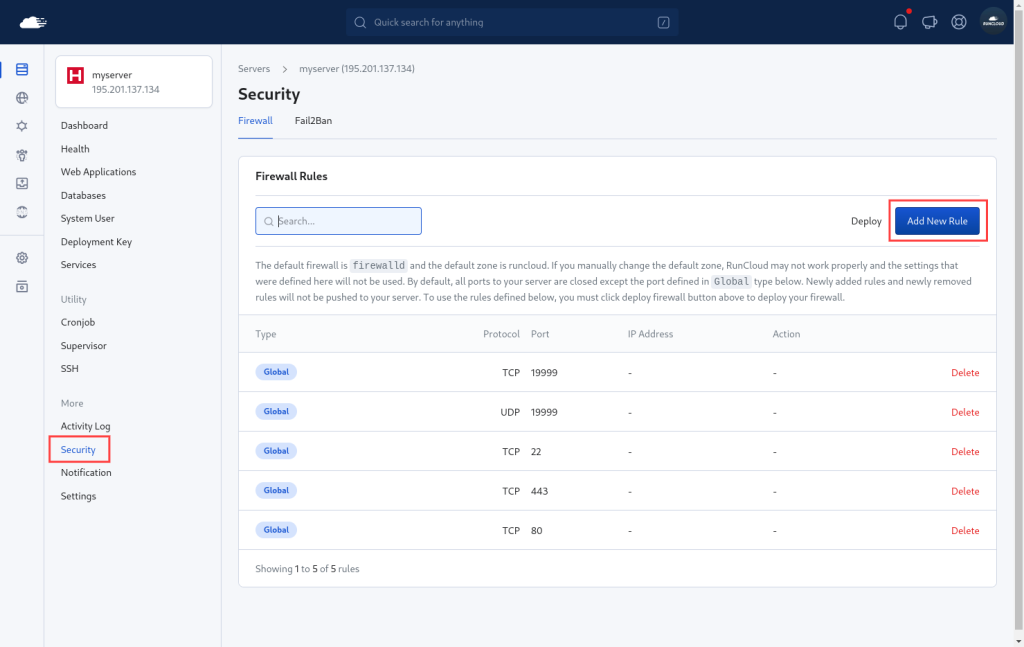
    To open up ports, go to your RunCloud dashboard and open the “Security” tab of the server. Click on “Add New Rule” and create a new rule to open up the specified ports on TCP and UDP. Once you have created all of the rules, you’ll need to click “Deploy” to save the changes.

    Open Firewall ports RunCloud

    Once you have opened up the firewall, anyone on the internet can view your Netdata Dashboard by visiting http://<ip address>:19999.

    Note: this will allow you to view the dashboard only for this particular server – if you have more than one server, you must repeat this step for all of them.

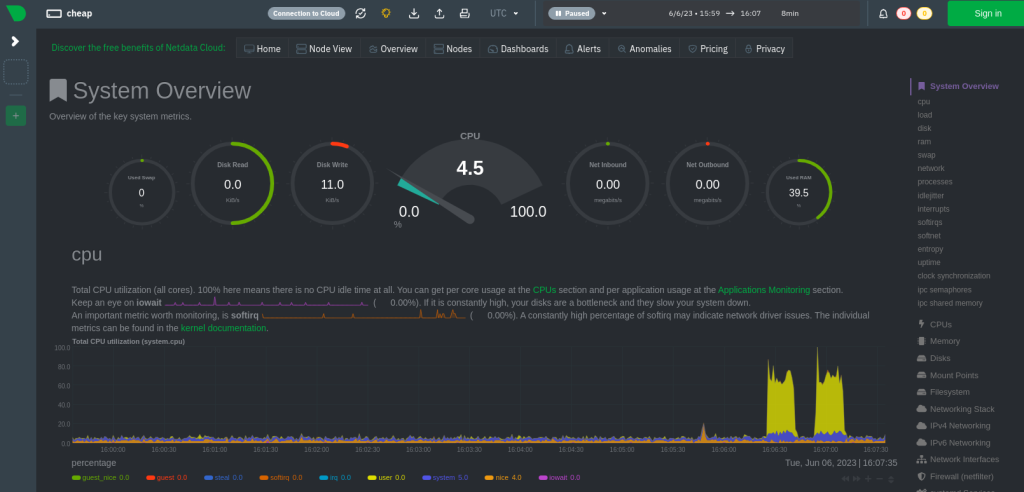
    This option presents a simplified user interface that displays all metrics of the selected server. This is useful if you don’t want to log into your Netdata Cloud account to view the metrics. However, you won’t be able to make any changes in this dashboard; for that, you will still need to log into your account.

    Netdata Local Dashboard depicting CPU, RAM, and Disk usage

    Using Netdata Cloud Dashboard

    Once you have connected a node to your cloud account, you can see it in your dashboard. One cloud account can connect to many servers, so you’ll need to navigate the dashboard and search for the server that you want to view.

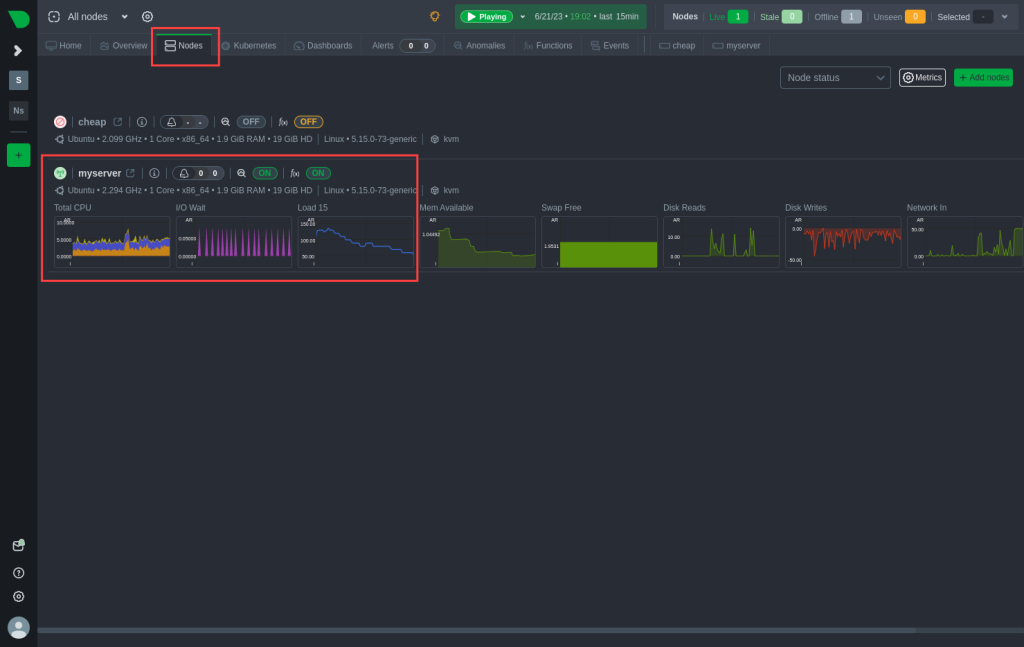
    To view all available nodes connected to your account, navigate to the “All Nodes” page, and switch to the “Nodes” tab to view all connected nodes.

    Connected nodes on Netdata cloud dashboard

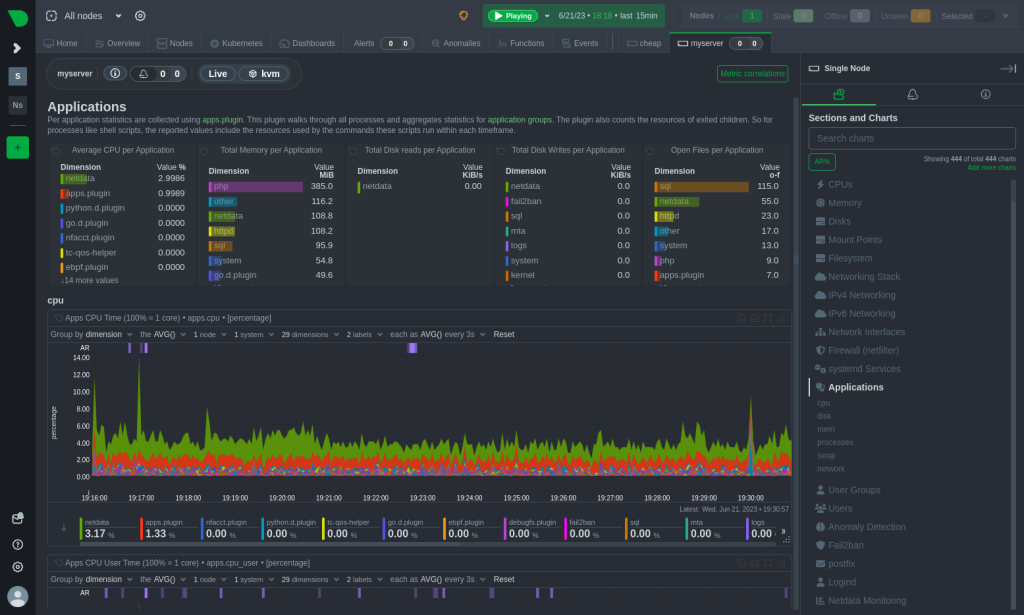
    In the above screenshot, we can see two nodes are connected to our Netdata account. The first node is inactive, and the second node is posting metrics to the cloud. You can click on this node to view detailed metrics.

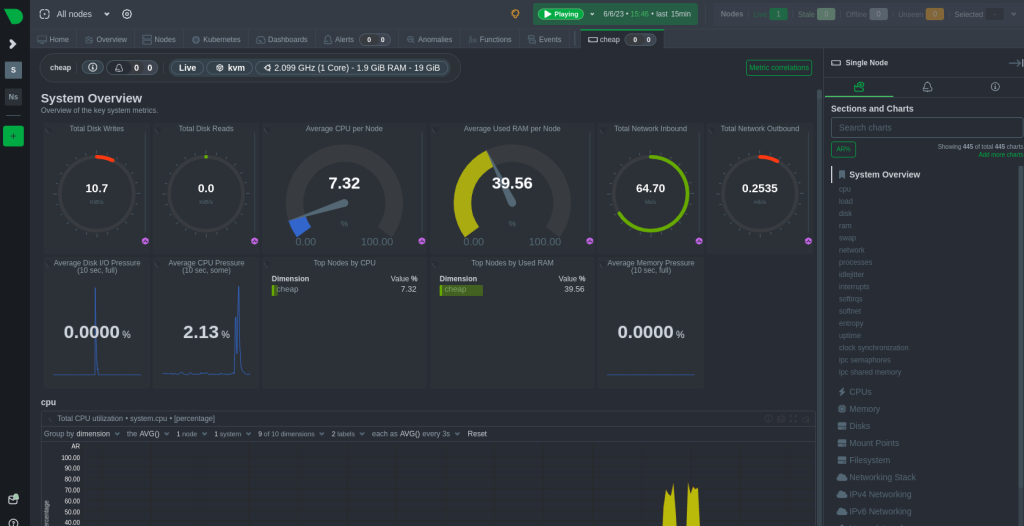
    Netdata dashboard showing system metrics on RunCloud

    The above screenshot shows the overview of the system metrics. To view detailed metrics such as disk, memory, CPU usage, etc. for a particular application, click on the “Applications” button in the tab on the right of the screen.

    Netdata application monitoring metrics.

    Besides monitoring, you can also use this dashboard to invite new users and collaborate with them. 

    Final Thoughts

    Netdata is a powerful and easy-to-use tool that provides real-time insights into your server’s performance and health. You can use Netdata to visualize and analyze various metrics such as memory usage, CPU load, disk I/O, network traffic, and more. You can also set up alerts and notifications to get notified when something goes wrong with your web app.

    By using Netdata on RunCloud, you can benefit from the seamless integration and compatibility between the two platforms. If you have any questions or feedback, please feel free to leave a comment below.

    If you’re tired of managing your own servers – you might want to check out RunCloud (yep, that’s us!). RunCloud is built for developers that want to focus on shipping great work, not on managing their infrastructure. We provide painless server configuration so you don’t need to spend hours figuring it out – get started with RunCloud today & get up and running in minutes.

  • How to Test WordPress 6 — and Every Subsequent Release

    How to Test WordPress 6 — and Every Subsequent Release

    Is your website losing potential customers? Shocking statistics reveal that 64% of visitors abandon slow and glitchy sites!

    It’s vital that you test your websites thoroughly to provide your users with a first-rate browsing experience if you want to stand any chance of increasing your sales.

    In this article, we will detail the steps you need to follow for setting up a WordPress staging environment and will demonstrate exactly how it can be used to test your website’s updates.

    Our step-by-step guide will ensure your site is always running smoothly and keeping customers happy.

    Let’s get started!

    Understanding New WordPress Releases

    At the time of writing, WordPress 6.2 is the latest release of WordPress (with 6.3 due to be released around August of 2023). This current release includes several major changes and enhancements that make web development easier.

    For instance, the new default theme, Twenty-Twenty-Three, now includes ten style variations – which gives you a lot of flexibility in developing your new site.

    One of the key highlights released is the enhancements in Query Loop blocks functionality. In addition to this there have been improvements in block placeholders which provide better consistency and control, and more responsive text with fluid typography.

    You can track the latest release of WordPress on the new releases page.

    Although new features make life easier, they sometimes cause compatibility issues with the existing site, especially if your site uses plugins or themes that have not been tested with the latest version. It’s a good idea to test that everything works before upgrading your website.

    That’s where a solid staging environment comes in.

    What is WordPress Staging?

    A staging environment is a duplicate copy of your website where you can try out and thoroughly test any changes – without affecting the original site.

    It’s often used to test and preview the changes to themes and plugins before making them live on the actual website. This way, website owners can test changes without any risk of disrupting users’ experiences on the live site.

    Why Do You Need to Test WordPress?

    Running and maintaining a staging site alongside your production site might seem like double the effort. However, doing this can save countless hours in debugging. Here are a few scenarios where it’s especially useful:

    1. A staging site allows developers to work more efficiently as they don’t need to worry about the potential repercussions from any failure. If you’re making changes to a live site, you’ll take regular backups and carefully inspect everything before making each change. If your site is being actively developed, this can take a lot of time. Having a sandbox environment to test and refine changes makes the development process faster.
    2. By testing the changes on a test site you can catch and fix issues before they go live. The ability to identify and proactively fix the issues even before they show up in your live environment makes it immensely valuable for businesses that cannot afford downtime.
    3. Multiple developers can work simultaneously on the staging site without worrying about clashes and overwriting each other’s work. This can speed up the development time and reduce miscommunications.

    When Should You Use WordPress Staging?

    There are many scenarios where using a test environment is helpful. Here are some of the common examples:

    1. Updating WordPress core, themes, or plugins: With WordPress, plugins can conflict with each other, leading to errors or crashes. With staging websites you can test new plugins, or updates to existing plugins, without risking the stability of the live site.
    2. Design changes: Website owners can experiment with different design changes, such as a new color scheme, layout, or font, all without affecting the live site. This is much more useful than having a mockup of the design, because the staging site can be viewed on different devices to test both responsiveness and accessibility.
    3. E-commerce changes: For e-commerce websites staging is especially useful when testing new payment gateways, product listings, or other updates that could affect the checkout process.

    Setting Up a Test Environment

    Step 1: Back Up Your Site

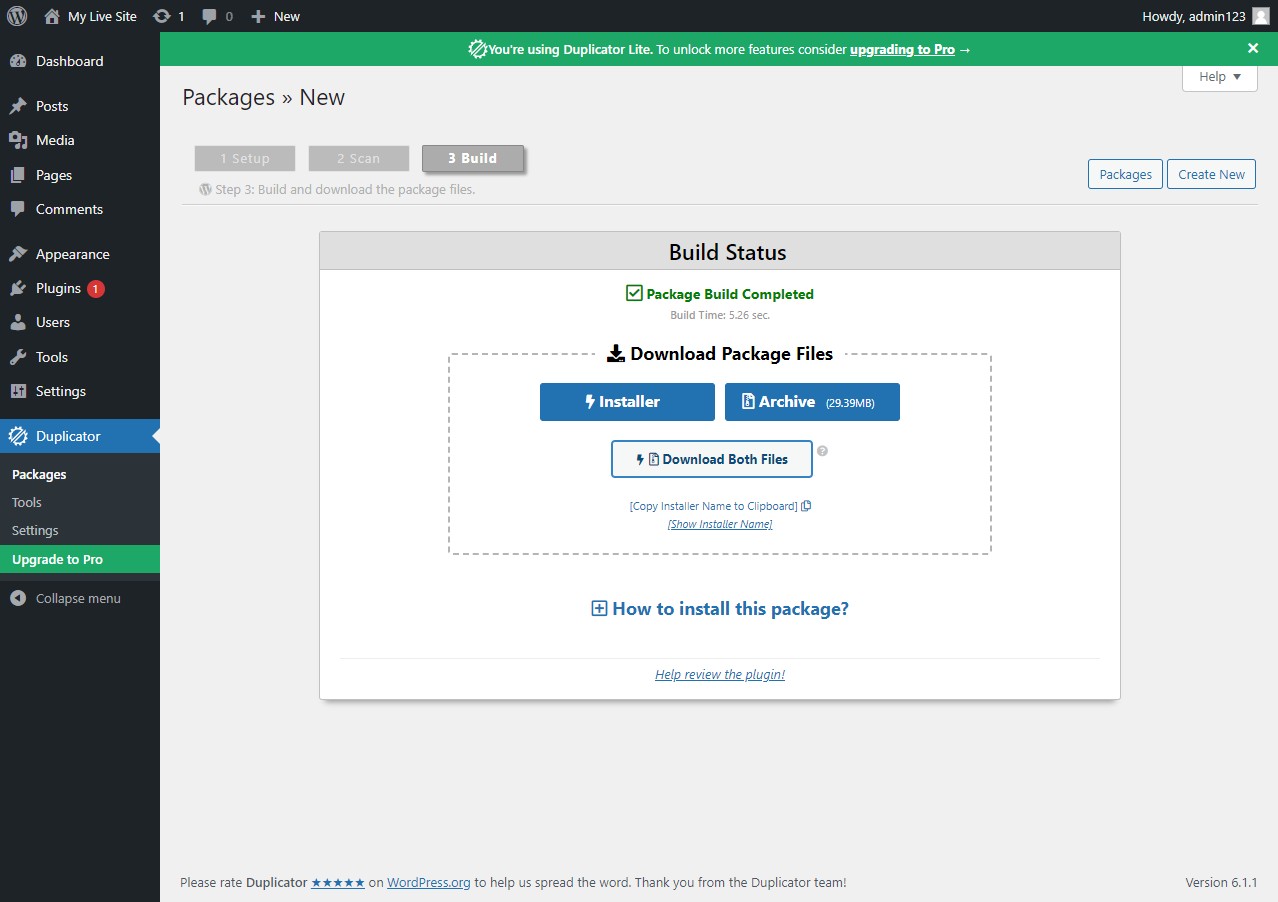
    Ensure that you have a working backup of your site. If you don’t have a recent copy, you can use RunCloud’s automated backup functionality to quickly create a snapshot of your site. If you’re not using RunCloud to manage your servers yet, you can use a WordPress plugin such as WP Migrate Lite, or Duplicator to make a copy of your site.

    create staging site using LocalWP

    Step 2: Setup A Test Environment

    You need to create a consistent testing environment that closely resembles your actual hosting environment. This means you should use the same operating system, PHP version, and libraries in your staging environment. Ideally your test environment should not have anything running except your test site so that it’s isolated from all potential problems.

    If you don’t have a fresh virtual machine then you can use tools such as Vagrant for building and managing virtual machine environments. It’s a customizable and scalable solution for advanced users who require more control over their development environment.

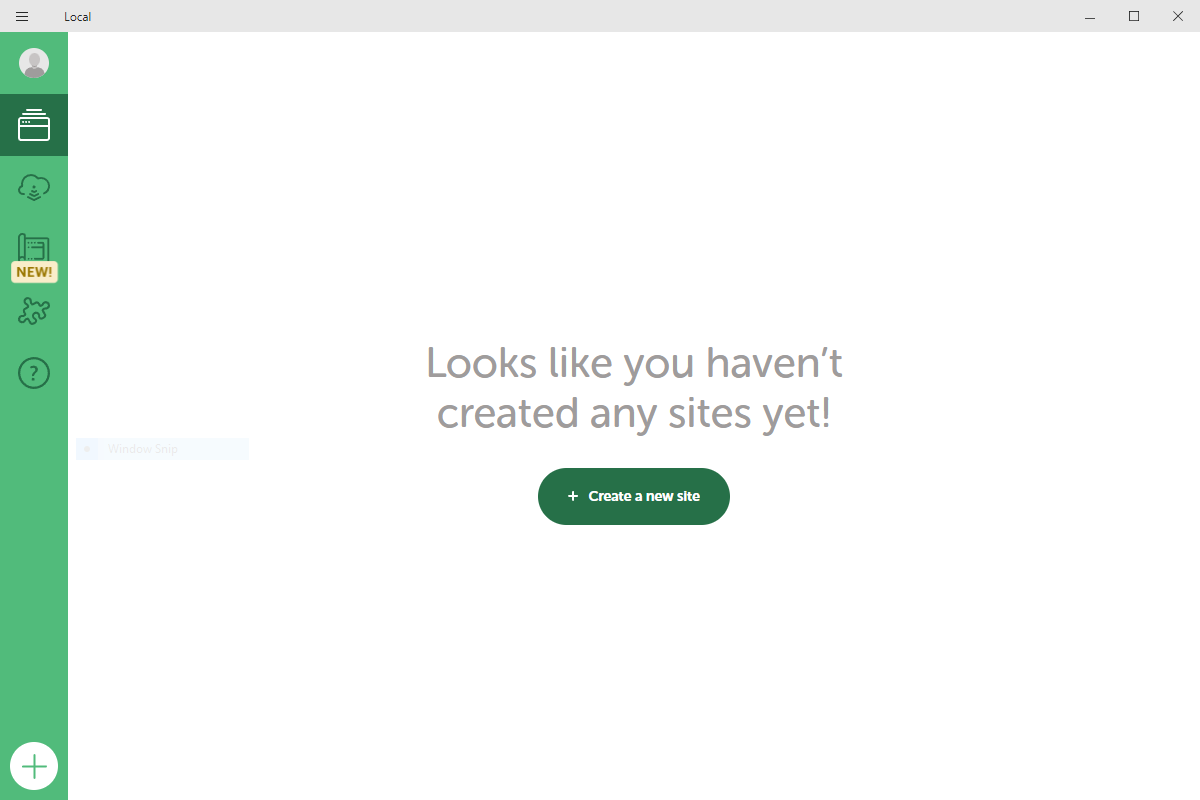
    In this tutorial, we’ll be working with Local, a WordPress development environment. It’s specifically designed for testing WordPress sites. Start by downloading the Local binary on your computer and execute it.

    The binary file will automatically download and install the necessary packages for your computer. Once you’re done, you should see a screen that looks something like this:

    LocalWP empty screen

    Step 3: Import Your Backup Into The Test Environment

    Click on “Create a new site” and select the option to use an existing zip file. Locate the backup of your live website, and use that backup to create a new site.
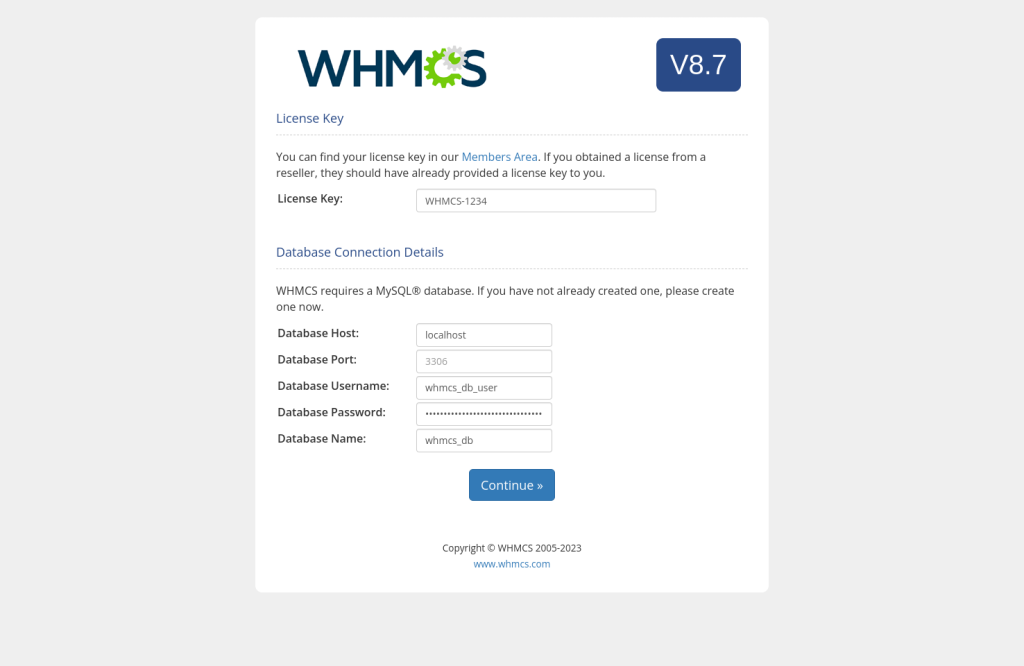
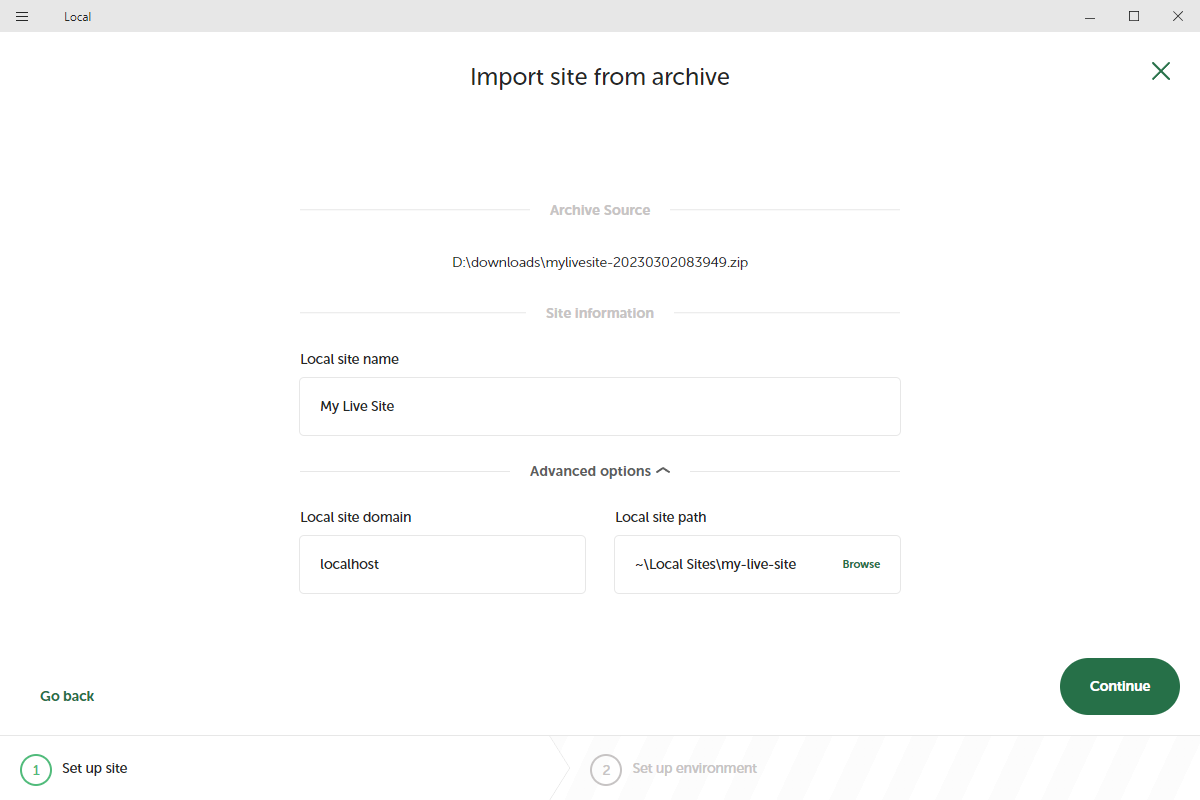
    Import Archive LocalWP

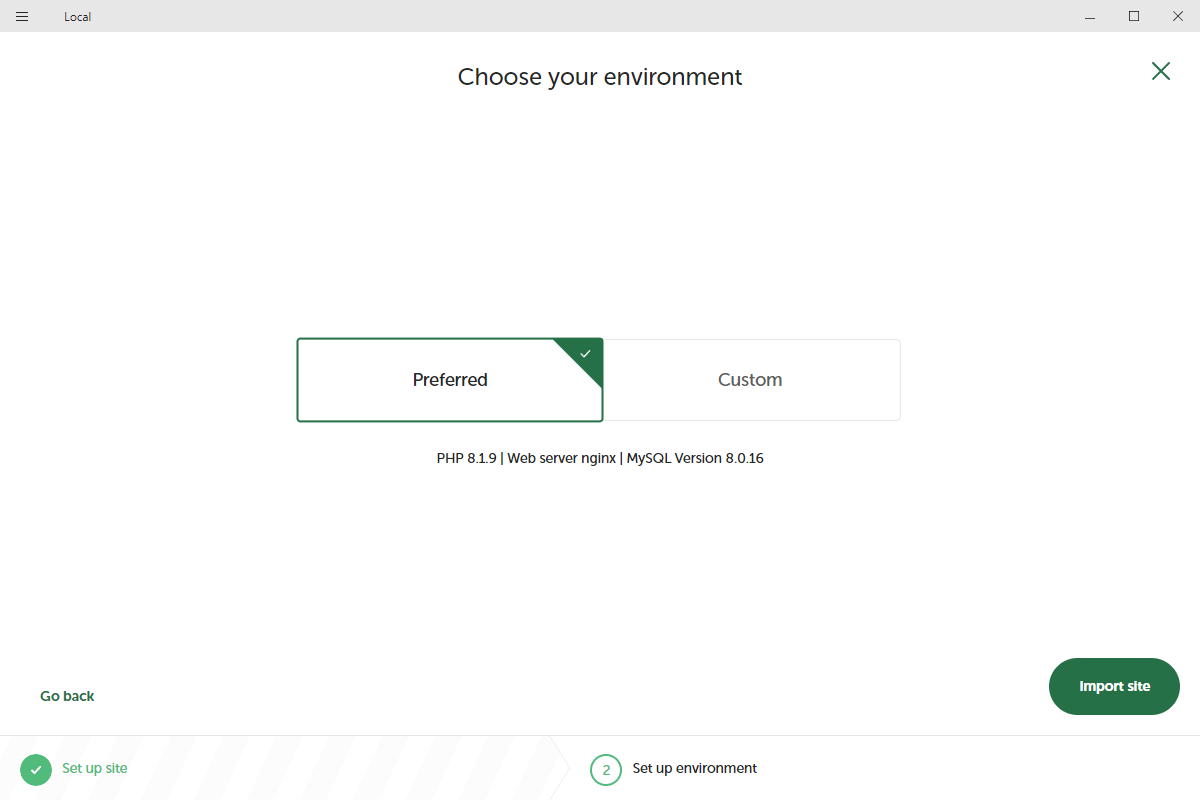
    Use the preferred settings for a seamless experience, and click “Import site”. Your firewall might prompt you to allow network access, so make sure you grant this access for a smooth installation.
    choose environment WordPress

    Step 4: Make The Changes To The Staging Site

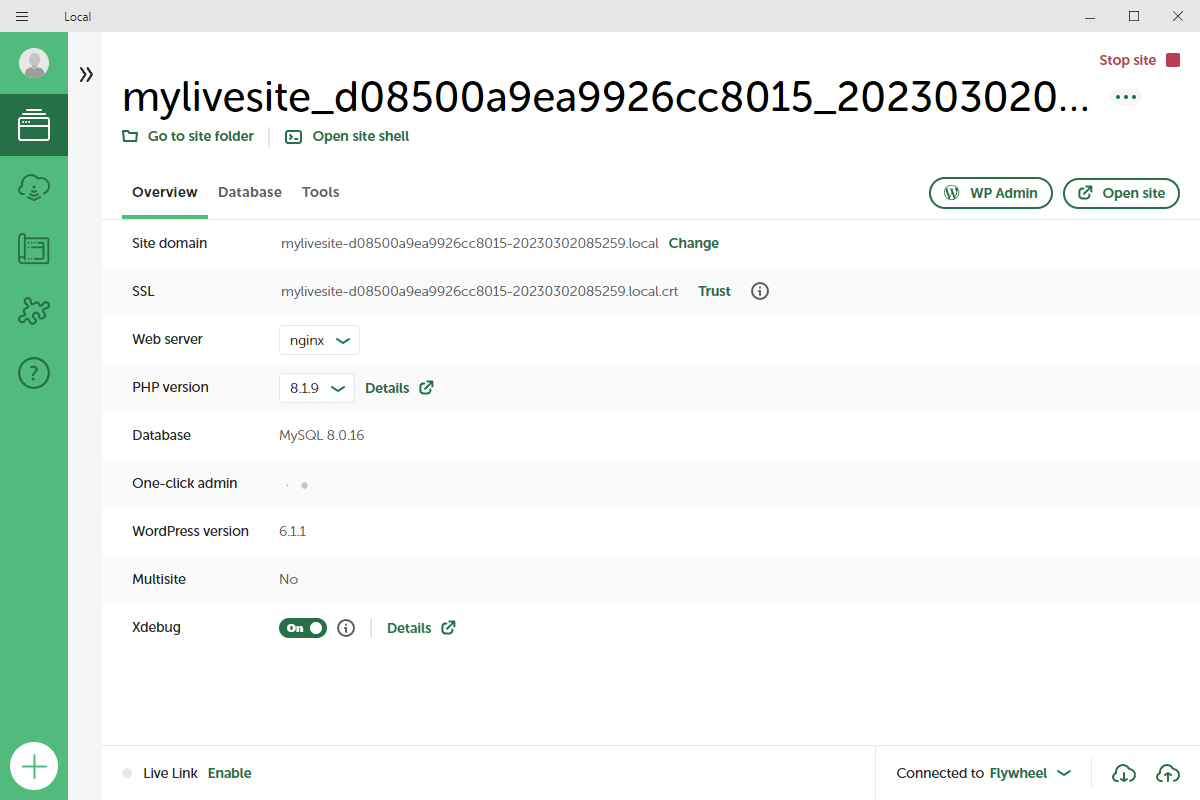
    Once your site has been imported, click on the “Open site” button on the top right to view your staging site. Now you can log into your admin dashboard as you normally would, with the same credentials that you use for your live site.
    LocalWP dashboard staging

    Once you have the site up and running, you can access it on your local network and collaborate with other team members – all completely without affecting the live site.

    After you have thoroughly tested the compatibility of your plugins and themes, you can make those changes on your live site without worrying about unexpected repercussions.

    If you only made a few minor edits to your staging site, such as changing some text or colors, you can post these changes to your live site by manually implementing them. For example, you can edit the same file or setting on your live site, and then copy-paste the changes from your staging site. In this way, you can avoid overwriting your entire live site and preserve any user-generated data.

    However, if you made a complex operation on your staging site, such as installing a new plugin or theme, adding custom code, or modifying the database, it may be wise to take a backup of your staging site – and overwrite your existing live site with it. This way, you can ensure that your live site matches your staging site exactly, and avoid any compatibility issues or errors. Before you do this, however, make sure you have a backup of your live site as well in case something goes wrong.

    Creating A Staging Site on RunCloud

    If you’re using RunCloud to manage your servers, then you can create a staging site with just a few clicks. RunCloud can automatically clone entire WordPress sites without requiring you to download anything.

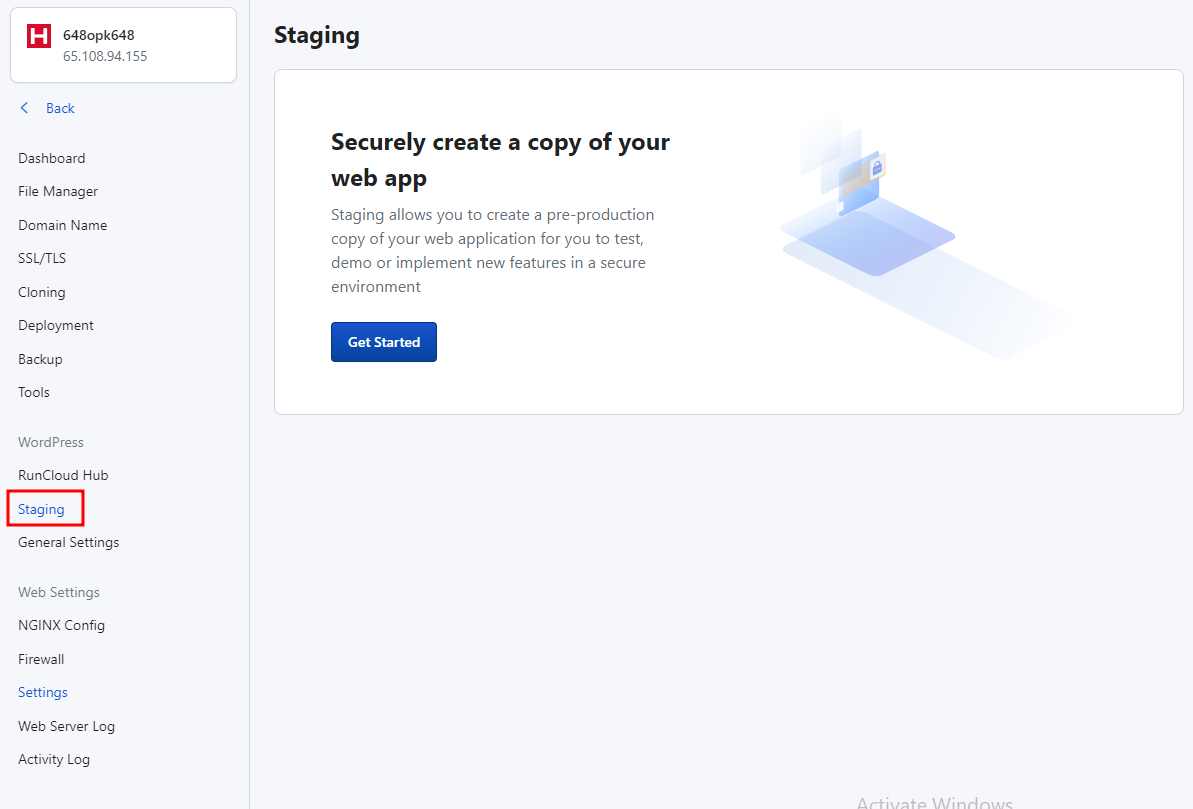
    To use RunCloud’s staging feature, go to your dashboard and open the “Staging” menu to set up a test environment. Click on the “Get Started” button to begin the process.

    RunCloud dashboard staging WordPress

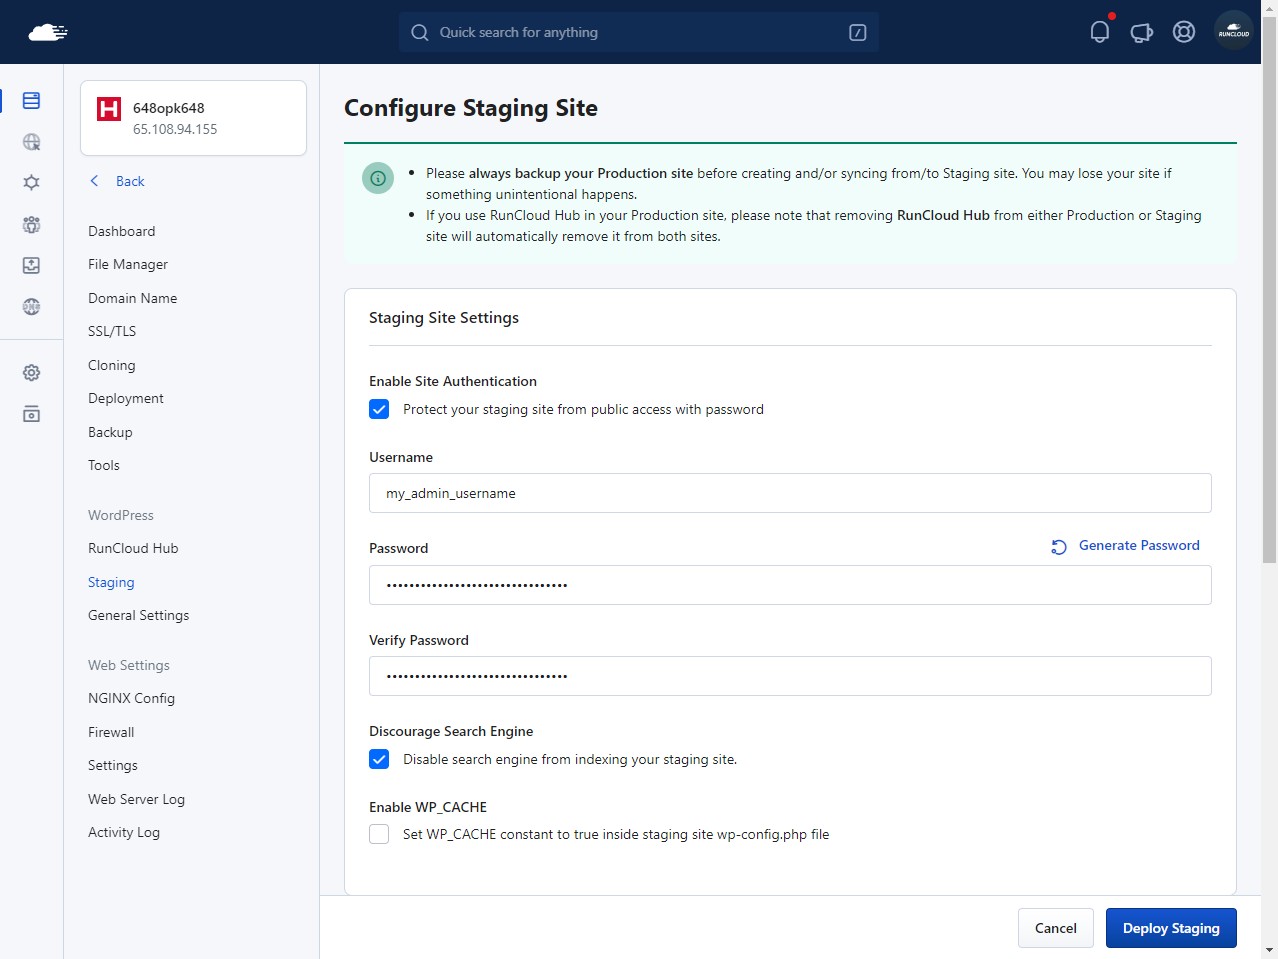
    RunCloud will now ask you to enter the username and password that visitors will need to enter for browsing this site. This is not your WordPress admin dashboard password – your staging site will have the same login credentials as your production site.

    You can turn off this option if you like. However, we recommend you keep this on as making the test site publicly available might potentially reveal some confidential information.

    configure staging environment WordPress

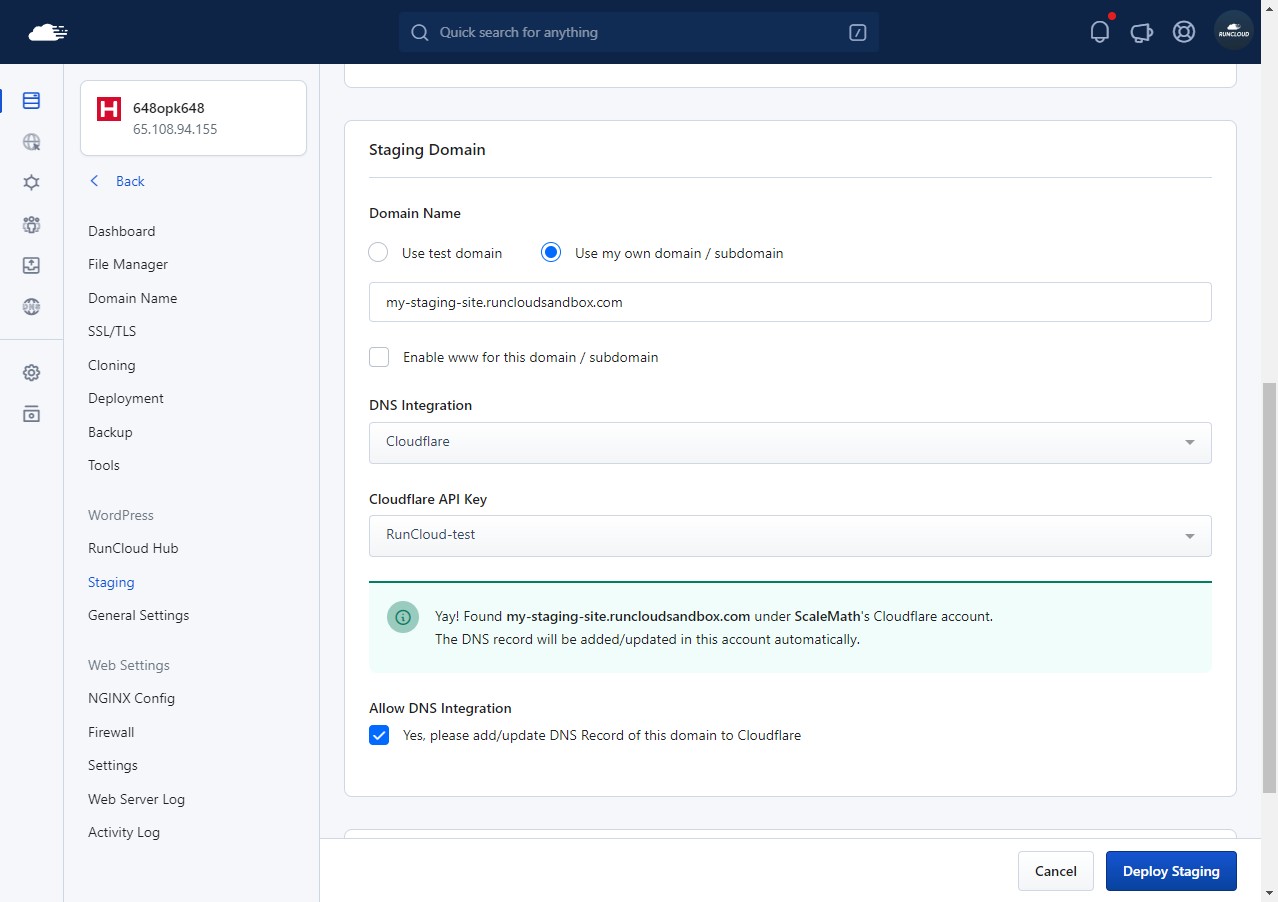
    After configuring the access control of your site, you can configure the domain that you want to use. You can either use a different subdomain of your original site, or use a test domain.

    Configure staging domain RunCloud WordPress

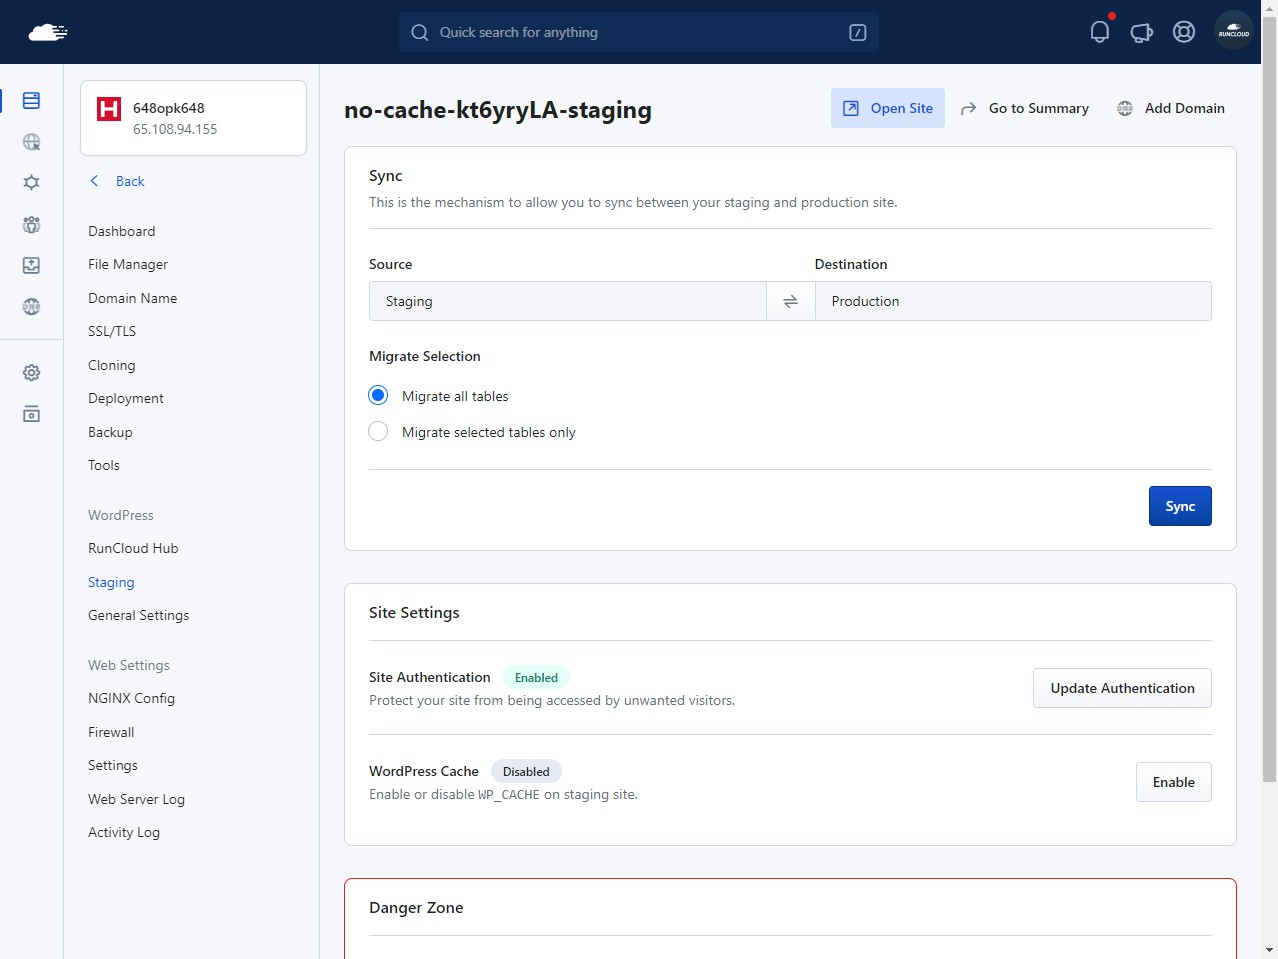
    After configuring the necessary settings, deploy the app by clicking the “Deploy Staging” button. Once deployed, you should see the following screen. Click on the “Open Site” button in the top right corner of the screen to browse your staging site.

    staging WordPress settings RunCLoud

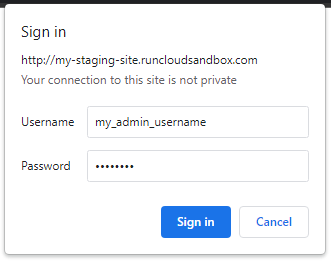
    After opening the site, you should see an alert asking you for login credentials. Enter the username and password that you just created. You should now be able to browse your site and make changes to it without affecting your main site.

    HTTP authentication RunCloud WordPress

    After making the changes, you can go back to the staging dashboard and click on the “Sync” button to push changes from the test environment to the production.

    WordPress Staging Plugins

    Many WordPress backup and migration plugins also provide the option to create a staging environment. Here are some of the best WordPress staging plugins.

    1. WP StageCoach
      WP Stagecoach provides the ability to easily create sandbox sites. It has some advantages over importing a backed-up copy of your test site, as it merges the database rather than overwriting the existing one. There are also some advanced features, such as protecting staging sites via a password, or offering the ability to revert changes instantly.
    2. WP Staging
      The WP STAGING plugin for WordPress allows users to create backups, staging sites, and clones of their website. Some advanced features included are support for multisite networks, and migration to another host or domain – although these are locked behind a paywall. The staging environment can quickly test updates and restore backups if necessary, making it a good choice for managing your staging environment.
    3. BlogVault Staging
      BlogVault is a WordPress backup plugin that also provides a staging environment. It can perform incremental automatic backups, and can revert to previous versions easily. This quick backup and recovery process allows you to speed up your development, as you’ll spend more time testing and less time waiting for backups.

    The staging site runs on a separate server instead of running alongside your live site. This allows you to load-test the staging site without worrying about any possible performance impact on your live site.

    After Action Report

    It is essential to test any changes before pushing them to your live site. This is even more important if you’re running a business that relies on a website for its core services. Staging environments are a great way to test your site in a sandbox environment without worrying about compatibility issues.

    We strongly encourage all WordPress site owners to test new releases and stay up to date with the latest software updates. This not only ensures that your site is functioning optimally but it also helps to ensure your site is secure. Outdated software can leave your site vulnerable to security threats, which can have serious consequences for your business.

    If you’re tired of managing your own servers – you might want to check out RunCloud (yep, that’s us!). RunCloud is built for website owners that want to focus on their customers, not on managing their infrastructure. Experience painless server configuration, backups, and worry-free staging environment migration, without the need to spend hours figuring it out – get started with RunCloud today and get up and running in minutes. Get started with RunCloud today and get up and running in minutes.

  • How To Install Magento

    How To Install Magento

    Magento 2 is a popular e-commerce platform that powers thousands of online stores around the world.

    If you’re planning to set up an online store using Magento 2, you can do this easily on RunCloud.

    In this article, we’ll guide you through the process of installing Magento 2, along with all of the necessary dependencies.

    Let’s get started!

    System Requirements

    Before we start the installation process, it’s important to ensure that the system meets the minimum requirements for running Magento. This section will provide a list of requirements, and instructions for checking your system’s compatibility.

    Magento 2.4.6 has the following requirements:

    1. Operating System: 64-bit Linux
    2. Web Server: Apache 2.4, Nginx 1.8
    3. PHP: 8.1 or 8.2 (along with the necessary PHP extensions)
    4. MySQL: 8.0
    5. Composer: 2.2
    6. Search and Analytics Engine: Elasticsearch 8.4, 7.17 or AWS OpenSearch 1.2

    Installing The Necessary PHP Extensions

    If you don’t have all of the necessary extensions, you can install them on your server by running the following command. Simply log in via SSH, copy the following command, and paste it into your terminal:

    sudo apt-get install php-intl php-gd php-zip php-bcmath php-curl php-mysqlnd php-soap php-ctype php-dom php-fileinfo php-iconv php-json php-mbstring

    Make sure you run the above command with superuser permissions. After running the command you will be asked whether you want to install the listed extensions – press ‘Y’ to continue with the installation.

    Once done, you will need to reload the PHP-FPM service. You can do this by running the following commands:

    systemctl reload php81rc-fpm
    systemctl reload php82rc-fpm
    

    Installing Elasticsearch

    Magento 2 needs a search engine installed on your machine to work properly. Some popular choices are Elasticsearch and OpenSearch.

    We have covered this topic in more detail on our blog in a post titled How To Install Elasticsearch. However, if you are in a hurry, you can use the following commands to quickly install it. Just log into your server with the necessary privileges and run these commands:

    wget -qO - https://artifacts.elastic.co/GPG-KEY-elasticsearch | sudo gpg --dearmor -o /usr/share/keyrings/elasticsearch-keyring.gpg
    sudo apt-get install apt-transport-https
    echo "deb [signed-by=/usr/share/keyrings/elasticsearch-keyring.gpg] https://artifacts.elastic.co/packages/8.x/apt stable main" | sudo tee /etc/apt/sources.list.d/elastic-8.x.list
    sudo apt-get update && sudo apt-get install elasticsearch
    sudo systemctl daemon-reload
    sudo systemctl enable elasticsearch.service
    sudo systemctl start elasticsearch.service
    

    After the installation is complete, you can check if Elasticsearch is working as expected by running the following command:

    curl http://localhost:9200

    You should get an output similar to the screenshot shown below:

    curl request to Elasticsearch on localhost in terminal

    Creating A Database

    We recommend creating a separate database and user for Magento 2. RunCloud makes it easy to add and manage database users on your server. In this section, we’ll walk you through the process of creating a new database for your Magento 2 installation.

    Open your RunCloud dashboard and locate the server that you want to use. In the “Databases” tab, look for the “Database Users” tab. Once you find it, click “Add New Database User” to create a new account. Provide the necessary login credentials, and then make sure you save it.

    Creating database user in RunCloud dashboard

    After creating the database user, go back to the “Databases” tab. Click on “Add New Database” and give it a suitable name. Don’t forget to grant access to the user that we just created.

    After you have created the database, save it – and continue with the installation.

    creating database in RunCloud dashboard

    Downloading Magento 2

    After you have completed all the prerequisites for Magento 2 we can proceed with the installation. Go to your RunCloud dashboard and create a new application. Pick an “Empty Web App”, and then fill in all the necessary details.

    Creating Web Aplication on RunCloud

    In the Basic settings and Stack section, add /pub in the public path and don’t forget to use a supported version of PHP. At the time of writing, the latest version of Magento (2.4.6) supports only PHP 8.1 and PHP 8.2.

    After your application has been created, you will need to log into your server to start the installation. The following commands need to be executed as the “Owner of the web application”, so make sure you are logged in as the correct user. In the above screenshot, the owner of the application is “runcloud”.

    You can use the “whoami” command to find out the name of the current user. If you are logged in as a different user, you can use the “sudo su” command, followed by the name of the desired user to log into their account.

    check current user in Linux

    Once you have logged in successfully, use the “cd” command to navigate to the root directory of your project. If you are not sure what your root directory is, you can find it in the RunCloud dashboard.

    In the project directory, you can use the following commands to remove the default index.html file and download the installation files for the Magento Community Edition.

    rm -rf pub/
    composer create-project --repository-url=https://repo.magento.com/ magento/project-community-edition .

    During the installation, you will be asked to provide a username and password for downloading the files. Although Magento is free, it was acquired by Adobe, and so you will now be required to have an Adobe account.

    In this tutorial, we will only be using Magento, which is the free version of Adobe Commerce. To get your username and password, go to the Adobe Commerce Dashboard and log in with your Adobe credentials.

    obtaining API keys from Adobe Commerce dashboard

    In the dashboard you can create a new access key free of charge. Once you have generated the key, enter the “Public Key” in the username field, and the “Private Key” in the password field. You should note that text entered in the password field is not displayed for security purposes, but all keystrokes are being recorded.

    Configuring API keys Magento2

    Installing Magento 2

    With the system requirements met, files extracted, and database created, it’s time to start the Magento 2 installation process. To begin the installation, copy and paste the command below into a text editor and make the following changes:

    1. Add the base URL with the URL of your website
    2. Add the name of the database using the database that we created
    3. Add the username and password of the database user
    4. Configure the login information of the administrator user
    5. Set your preferred currency and timezone.
    bin/magento setup:install \
    --base-url=http://www.example.com/ \
    --db-host=localhost \
    --db-name=<database-name> \
    --db-user=<username> \
    --db-password=<database_password> \
    --admin-firstname=admin \
    --admin-last name=admin \
    --admin-email=admin@example.com \
    --admin-user=admin \
    --admin-password=admin123 \
    --language=en_US \
    --currency=USD \
    --timezone=America/Chicago \
    --use-rewrites=1 \
    --search-engine=elasticsearch8 \
    --elasticsearch-host=localhost \
    --elasticsearch-port=9200 \
    --elasticsearch-index-prefix=magento2 \
    --elasticsearch-timeout=15
    Magento2 installation on Linux

    After making the changes, you can run the above command in your terminal to begin the installation, which should take 5-6 minutes. If you follow all the steps correctly you will be greeted with the message below. You can then go to the URL of your website to visit your Magento store.

    Successful installation of Magento 2

    After the installation is finished, you can enable production mode using the following command.

    bin/magento deploy:mode:set production

    The above command will generate necessary static content for your website and enable several optimizations to serve content faster.

    After Action Report

    Installing Magento 2 might seem like a daunting task, but with this step-by-step guide you can set up your online store on RunCloud in no time. Once Magento 2 is installed, there are still a few post-installation steps you’ll need to take, such as verifying the installation, setting up the admin account, and configuring payment methods before you can start using your new online store. Refer to Adobe’s documentation to learn how to do this.

    If you’re ready to take your server management to the next level, sign up for RunCloud today. RunCloud is the perfect solution for you if you’re looking to make managing your servers easier. So why wait? Sign up now and start enjoying the benefits of RunCloud today!

  • Fixing Redirect Loop on Cloudflare SSL

    Fixing Redirect Loop on Cloudflare SSL

    If you are using Cloudflare proxy to hide your server’s IP address from the internet, then you might encounter a glitch that causes visitors to get stuck in a redirection loop.

    Eventually, the request times out with an error message saying, “Too many redirects”.

    In this article, we will investigate why websites might get stuck in a redirection loop and how you can prevent this.

    Let’s get started!

    Why Does This Happen?

    If you’re using Cloudflare to serve visitors, you’ll probably be using Cloudflare’s TLS certificate to securely transmit these web requests. When you’re using the Flexible SSL option, Cloudflare will connect to your site over an HTTP connection, and forward the response to visitors over an HTTPS connection.

    The Nginx or Apache2 server on your machine sees these requests before they are processed by WordPress. WordPress processes these requests over HTTP protocol – which causes your site to show a mixed content warning. This is where some content of your site is served over HTTP, whilst other content is transmitted over a secure connection.

    If you try to address this issue by manually updating URLs from HTTP to HTTPS, then you might get stuck in a redirection loop.

    This happens because when you configure your site to serve content over HTTPS, it will only serve it over HTTPS. If a user makes an insecure request, the server asks them to make a new request with an HTTPS connection. Usually this isn’t a problem, but if you have misconfigured your servers, an error will occur.

    How does Cloudflare proxy work?

    If Cloudflare servers make an insecure request to your site, and you redirect that back to another Cloudflare server, then it will cause an infinite loop. Each server will keep asking the other one to serve the request, until the maximum number of requests are reached.

    How To Fix This Issue?

    There are a few ways to fix this problem. Here are some of the easier ways to resolve the redirect loop problem.

    Using Cloudflare Page Rule

    One of the simpler ways to fix this problem is by updating the settings on your Cloudflare dashboard.

    You can configure Cloudflare’s redirect rules with status code 301 to indicate that the webpage has moved over permanently.

    In your Cloudflare dashboard, open the domain that you want to configure and look for the Redirect Rules section inside the Page Rules submenu. Then create a forwarding rule to tell Cloudflare to forward HTTP requests to HTTPS.

    A screen capture of Cloudflare dashboard showing screen capture page.

    For example, if your WordPress address is https://blog.runcloud.io, Create a rule for http://blog.runcloud.io/ and use the Full URL setting with 301 redirect. 

    Updating CloudFlare TLS settings

    To make sure that you don’t get stuck in redirection loops, use either the Full or Full (Strict) setting so that all the web requests are only made using the HTTPS connection.

    A screen capture of Cloudflare dashboard showing SSL/TLS settings.

    Using SSL Certificate In RunCloud

    If you are using RunCloud to manage your servers, you can easily configure TLS certificates for all your domains. Simply go to the domain section of your web-app and click the Configure SSL/TLS button for the domain that you want to secure.

    A screen capture of RunCloud dashboard showing how to edit domain name settings.

    Once you click the option, you’ll be asked to choose whether you want to use Let’s Encrypt or a different SSL provider, if you’re not sure about this, use Let’s Encrypt as it is free – and just as secure as other providers.

    After that, you can configure how you want to verify the ownership of your domain, and what kind of certificate you want. Unless you need something specific, you can leave these settings to the default values. 

    And finally, you need to specify what happens when someone tries to access your domain over insecure connections. We recommend using the HSTS option which asks all users to only use secure connections for all web requests. However, you should know that once you enable this option, you will not be able to serve any content over HTTP connections.

    A screen capture of RunCloud dashboard showing how to configure SSL/TLS settings.

    After Action Report

    The “too many redirects” error on Cloudflare can be frustrating, but it can be easily fixed by updating the misconfigured settings on your server. By following the steps outlined in this article, you’ll be able to update your website’s settings, and adjust your SSL certificates.

    If you’re still struggling to resolve the issue, you should consider switching to a more user-friendly server management platform like RunCloud. With RunCloud, you can easily manage your server and issue SSL certificates in just a few clicks, making it a great choice for WordPress users who want a hassle-free solution.

    If you feel that having a painless server configuration so you don’t need to spend hours figuring it out sounds like a good idea (and who doesn’t?) – get started with RunCloud today, and get up and running in minutes.

  • How to Install Craft CMS

    How to Install Craft CMS

    Craft is a Content Management System (CMS) that is focused on doing one thing, content management. Different from WordPress, it doesn’t provide you with fancy widgets or themes – it is designed to be minimal and fast.

    In this article, we will show you how easy it is to install and configure Craft CMS when you are using RunCloud to manage your servers.

    Create An Empty Web App

    Start by opening your RunCloud dashboard. Then, proceed to create a Web Application using RunCloud Panel, as shown in the picture below.

    Give it a descriptive name and scroll down.

    Deploying new application on RunCloud dashboard

    Configure your domain name, for quick and easy setup, we recommend integrating RunCloud with Cloudflare API, which automatically handles adding and removing DNS records.

    New webapp on RunCloud dashboard

    Craft CMS recommends using PHP 8.1 and later versions for a better experience. Don’t forget to append /web to your public path, as shown below. If you don’t modify your public path, you’ll need to delete the web application and start all over again.

    Basic settings RunCloud dashboard

    Open Project Directory

    Log into your server via SSH and browse to the root directory of your web application. You can find the root path in the RunCloud dashboard.

    Application Overview RunCloud PHP 8.2

    Copy the root path and use the cd command to navigate to the root directory in the terminal. For the above example, the command would look like this

    cd /home/runcloud/webapps/craft4

    Once you have opened your web app, remove the empty index.html file from your project, you can run the following commands to delete the file and remove the empty folder.

    rm ./web/index.html
    rmdir web/

    After running the above commands, go back to the RunCloud dashboard – don’t close the terminal yet!

    Create A Database And User

    Once you have deleted the file, we can proceed with the installation of Craft CMS, for that, we will need access to a database. Luckily, RunCloud makes it super easy to create new users and manage access.

    Simply go to your RunCloud dashboard and pick the server that you are using. Locate the Databases tab on the left and open the “Database Users” submenu.

    Create a new database user and give it a secure password. Once you have created it, it should look something like this.

    Create Database in RunCloud

    After creating the database user, go back to the database tab and create a new database. Make sure to grant access to the user that we just created. After creating the database, it should look similar to the screenshot below.

    Create a new Database on RunCloud

    Installing The Craft CMS

    After creating the database, we can begin the installation.

    Go back to the terminal and make sure that you are in the root directory of your project. You can run the pwd command to check your working directory, the output of this command should match the root path displayed in the RunCloud dashboard.

    Once there, make sure that you are not running as a superuser, you can check the name of your current user by running the whoami command. The output of this command can be anything except “root”. For example, in the below example, we are running the system as “runcloud” user.

    Craft CMS installation terminal

    If you are running the shell as root user, you can imitate other users by running the following command. Just replace “runcloud” with the name of another user.

    sudo su runcloud

    Once you are sure that you are in the correct directory with correct permissions, run the following command to install the Craft CMS using PHP 8.2 and Composer.

    /RunCloud/Packages/php82rc/bin/php /usr/sbin/composer create-project craftcms/craft .

    After running the command, it will ask you if you want to begin the installation, type “yes” to start it. Leave the database driver, IP address, and database port filed empty and press enter to accept default values.

    In the database username, password, and name field, enter the details that we just created in the previous step. After this, enter some random alphabets for database prefix.

    CRAFTCMS on Linux RunCloud

    Once you have entered the database details, you should be greeted with a message saying “Testing database credentials … success!”. After that you can configure the login credentials for the administrator account. Use a secure username and password.

    In the Site name, enter the name of the site that you want to display to users, for the site URL option, enter the complete URL of your web-application. If the URL is long and hard to memorize, you can just copy and paste the URL from the RunCloud dashboard.

    Installing CraftCMS on Ubuntu

    Once you have completed the above steps, installation should automatically continue and deploy your site. Once it is completed, you can open the URL in a browser and should be greeted with a screen that looks like this.

    CraftCMS home screen Welcome

    Troubleshooting

    After installation is complete, log into your dashboard and navigate to Utilities> System report. Once there, scroll down to the bottom, you should see a green check mark next to each of the options.

    In the following example, we have a warning mark next to some of the entries, we can click on “i” next to it to get more information. If that specific functionality is useful for you, then you can change this in the RunCloud dashboard.

    health checks, System Overview CraftCMS

    To change these settings, open the web app in the dashboard and navigate to the Settings tab. Once opened, scroll down to the PHP settings section and modify the settings accordingly.

    If the text in the disabled functions field is too hard to read, you can press Ctrl + f in your browser to use the find function, which highlights the text on the page, as shown below. Once satisfied, don’t forget to click “Update PHP Settings” to save the changes.

    PHP settings RunCloud dashboard

    Now you can go back to the Craft CMS dashboard and refresh the page, all the warnings that you tackled should have disappeared.

    CraftCMS system errors

    After Action Report

    Craft CMS is a popular content management system that focuses on security and performance over all other aspects of the application.

    It supports plugins and themes that can extend its functionality and improve user experience, but they are not available by default.

    If you are looking for an easy and painless way to manage your servers, RunCloud is the perfect solution for you. With its intuitive dashboard and powerful features, RunCloud makes it easy to manage your servers and deploy applications. Start using RunCloud today and see how it can simplify your infrastructure.