Category: Cloud Education

  • How to Send Email from PHP (With Guided Walkthrough)

    How to Send Email from PHP (With Guided Walkthrough)

    In most cases, we normally recommend using transactional email services such as Mailgun, Amazon SES, or Mandrill rather than sending emails from your own service. But if you are feeling enthusiastic you can even set up your own server too.

    That’s what we’re going to cover in this article.

    Take your tech skills to the next level with our easy-to-follow guide on how to send emails from PHP! No need to worry about complicated code – our step-by-step walkthrough makes it a breeze. This guide will guide you through setting up your own mailing service on your Ubuntu server or other similar Debian distros.

    Ways to Send Email From PHP

    There are multiple ways of sending emails from PHP, but the two most basic ones are:

    • Using the mail() function: This is the built-in PHP function for sending email. It is a simple and easy-to-use option for sending basic emails.
    • Using a library or framework: Several libraries and frameworks are available for PHP that make it easier to send emails. Some popular options include PHPMailer and SwiftMailer.

    Using external mail packages such as SwiftMailer or PHPMailer is generally recommended over PHP’s built-in mail function because they offer more advanced features and functionality. While the mail function can be useful for sending basic emails, it has very limited capabilities.

    One major limitation of the mail function is that it doesn’t allow you to add attachments to your emails. This can be a significant issue if you need to send files or documents as part of your communication.

    In addition, using the mail function can make it difficult to meet industry standards, and build trust with Google and other email providers. Establishing trust and following best practices are both crucial for ensuring that your emails are recognized as safe and secure. This can be challenging with the mail function, as it doesn’t provide the necessary tools and capabilities to meet these standards.

    These are two of the most compelling reasons to use external mail packages such as SwiftMailer or PHPMailer instead of PHP’s built-in mail function. However, if you are still interested in learning how to send emails from a PHP web server, you are in the right place! While it may not be the most efficient or effective option, there is still significant value in understanding how to use the mail function and other methods for sending emails from PHP.

    How to Send Email With PHP From Web Server in 5 Steps

    The process of sending an email with PHP from your web server is fairly simple, so we’re going to break it down into five steps.

    1. Install Dependencies

    Installing dependencies is the first step in setting up your PHP application to send email. Dependencies are external libraries or packages that your application requires to function properly.

    First, we will install Sendmail and GNU Mailutils on the server. To install these tools, enter this command:

    sudo apt update && sudo apt install mailutils sendmail-base

    2. Update The sendmail_path Inside php.ini

    You will need to update the php.ini file to let PHP know where sendmail is located. This file can be located at either “/etc/php74rc/php.ini” or “/etc/php/7.4/apache2/php.ini”. If you are using a later version of PHP then run php -v to find out what version you are using, and update the path accordingly.

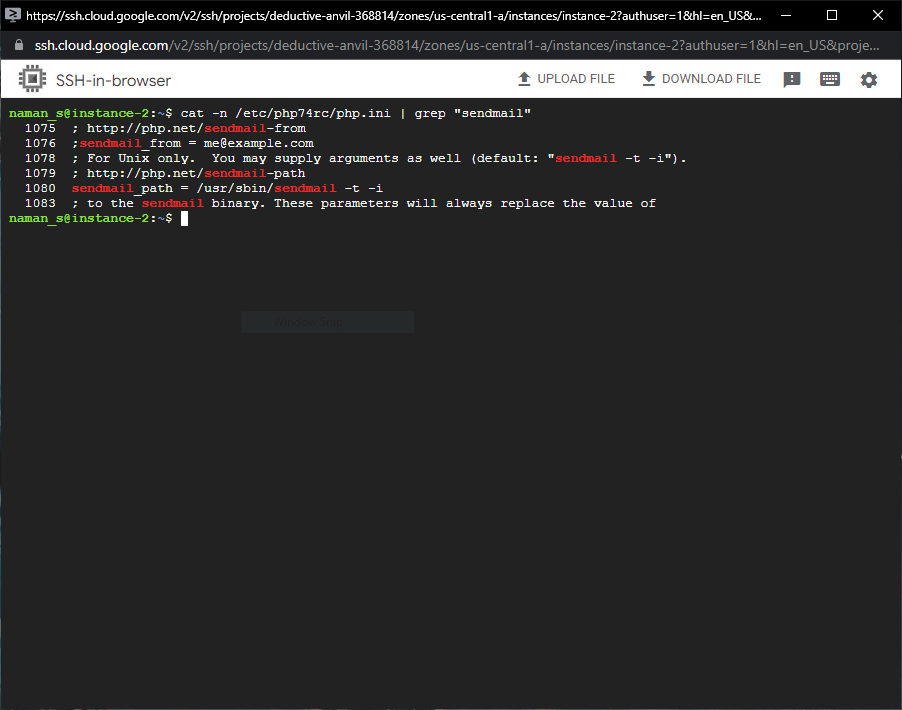
    The php.ini file is pretty big, and it’s hard to parse all the information in a terminal editor. We will use the following command to find out the exact line number of the setting so we can jump directly there:

    cat -n /etc/php74rc/php.ini | grep "sendmail"

    Note down the line numbers displayed on the left of the text. Next, we will edit the /etc/php74rc/php.ini file. You can use your favorite terminal editor, or simply paste the following command to open the nano editor.

    sudo nano /etc/php74rc/php.ini

    Scroll down to the line number we noted, and search for “sendmail_path =”. It should look something like this:

    ; For Unix only.  You may supply arguments as well (default: "sendmail -t -i").
    ; http://php.net/sendmail-path
    ;sendmail_path =

    Uncomment the sendmail_path by removing the ; and add the sendmail path. The default value is “/usr/sbin/sendmail -t -i”. You should have something like this:

    ; For Unix only.  You may supply arguments as well (default: "sendmail -t -i").
    ; http://php.net/sendmail-path
    sendmail_path = /usr/sbin/sendmail -t -i

    Now press Ctrl + O to save the file. Press Enter to confirm the filename and location, and press Ctrl + X to exit the editor. Now when you run the ‘cat -n /etc/php74rc/php.ini | grep “sendmail”’ command, you should see the updated path.
    Now restart the php service with:

    systemctl restart php74rc-fpm

    3. Change hostname

    Now we will edit the server hostname. You can find the hosts file at /etc/hosts. Update the localhost address as shown below.

    # Old Value

    127.0.0.1      localhost.localdomain localhost 

    # New Value

    127.0.0.1      test.runcloud.me test

    And then we change the hostname on the fly with:

    hostname test.runcloud.me

    4. Configure sendmail

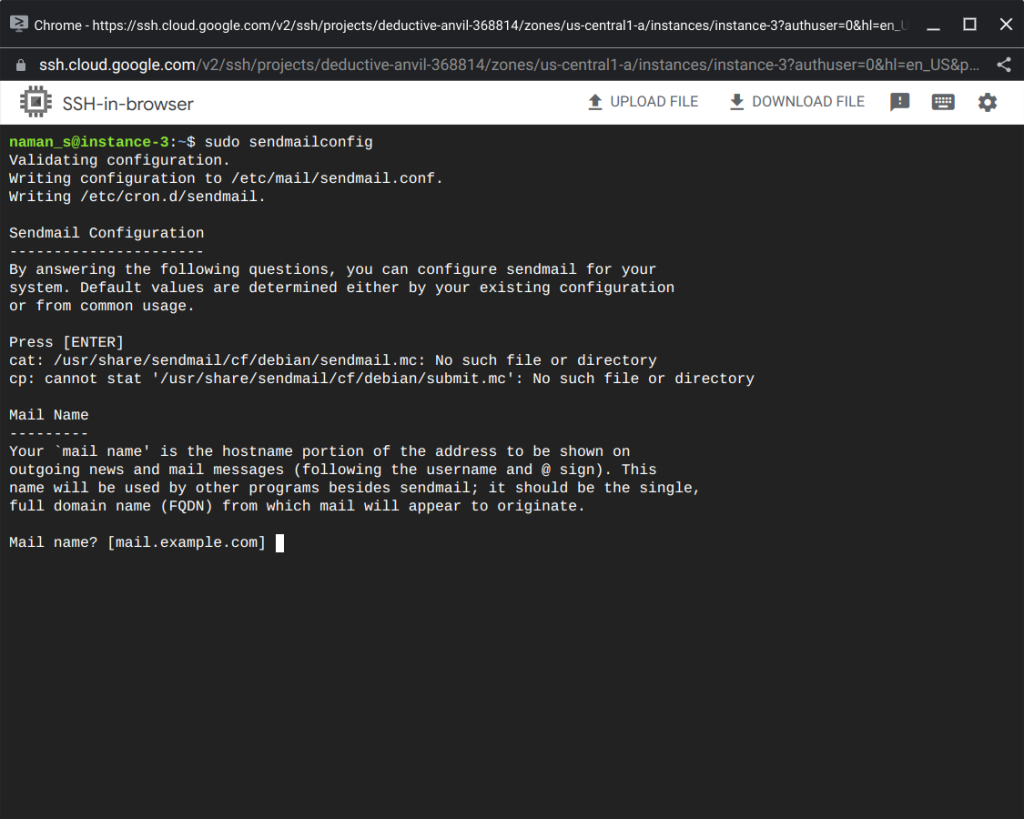
    Now we need to configure the sendmail CLI. We can do this by running the following command, and entering the necessary details:

    sendmailconfig
    5. The Basics of PHP Mail Function

    You can use the following PHP code to use the inbuilt PHP mail function:

    mail($to, $subject, $message, $headers)

    That is the basic way to start sending email from your server. Here’s an example of real-world usage:

    <?php
    $to = 'youremail@gmail.com';
    $subject = 'This is a test email';
    $message = 'Hello john!';
    $from = 'jane@runcloud.me';
    $headers = sprintf("From: %s\r\nReply-To: %s", $from, $from);
    mail($to, $subject, $message, $headers);

    Now add the mail.php inside your web application. Make sure you have replaced the $from variable to your own email address.

    It is important to keep in mind that simply sending an email from your PHP web application doesn’t guarantee that it will be delivered to the recipient’s inbox. There are many factors that can influence whether an email is delivered, and it’s not uncommon for emails to be caught by spam or security filters.

    For example, Google has many filters in place to identify and block potentially malicious or spammy emails. For your emails to pass these filters and reach the recipient’s inbox, they need to meet certain security and quality standards.

    By following the steps to send email from PHP, you will have the basic ability to send emails from your web application. However, to ensure that your emails are delivered effectively and avoid being caught by filters, you will need to focus on security attributes and other factors that can help your emails pass spam and security checks. This may require additional effort and attention to detail, but is essential for ensuring that your emails are delivered safely and successfully.

    How To Make Sure Your Email Sent From PHP Will Be Delivered

    Although you’re now set up to send emails from PHP, the next task is to ensure that your emails include certain standards and attributes to pass spam checks, and actually end up in the inbox of your recipients.

    In this section, we will go through the process of testing your email for deliverability using services such as mail-tester and mailook which help identify the probability of your email getting flagged as possible spam.

    Testing Your Email Deliverability.

    Open up either of the mail testing websites, and you should get an email address to send it to. Add this email to your $to variable, and you should get something like this:

    <?php
    $to = 'web-ovl78@mail-tester.com';
    $subject = 'This is a test email';
    $message = 'Hello john!';
    $from = 'jane@runcloud.me';
    $headers = sprintf("From: %s\r\nReply-To: %s", $from, $from);
    mail($to, $subject, $message, $headers);

    Now visit the mail.php again inside your browser; this should execute the code again and send another email. Check the score of this mail from the Mail Tester. This is our result:

    With this score, your email will never reach any inbox! This is expected and we will configure a few settings, which will increase the score dramatically.

    Setting SPF Records

    Sender Policy Framework (SPF) is the TXT-based DNS record that you can add to your DNS as a policy for sending emails. Your server hostname needs to be verified as an email sender.

    You can use SPF Wizard to generate your SPF record. We are using the following records for our test domain (runcloud.me).

    runcloud.me. IN TXT "v=spf1 a:test.runcloud.me -all"
    test.runcloud.me. IN TXT "v=spf1 ip4:45.118.132.8 -all"

    Don’t forget to change your a:<your own domain> and ip4:<your server IP>

    This is how it looks like when you query the DNS records from Cloudflare.

    Let’s break this down line-by-line to get a better understanding. In the given configuration, the first line tells the internet that test.runcloud.me can send email on behalf of runcloud.me. So your outgoing emails will look like jane@runcloud.me even though our actual domain is test.runcloud.me.

    The second record tells the internet that the mail server for test.runcloud.me is located at the given IP address(es). The ~all bit at the end of each record tells everyone that they should ignore all the emails which do not originate from the given server.

    Having done that, we sent the email to the Mail Tester as before and then checked the score.

    This is a significant improvement. However, some inboxes might still refuse the email.

    Setting MX Records

    Mail servers also check for MX records, and the domain (runcloud.me) doesn’t have any MX records. Because of this, it gets a penalty. We will add an MX record to improve it further, and check the score again after adding this.

    This time we 9/10 which is much better. If you are not getting the same score, wait for a few hours so that modified TXT records are propagated across the servers. Learn more about How to speed up DNS propagation.

    Setting PTR Record

    Your server reverse IP lookup should return your server hostname (test.runcloud.me). You can do this from the Digital Ocean or Linode panel if you are using their service. Alternatively, any IaaS-based company that provides VPS/Server will always give you access to modify your PTR record.

    Setting DKIM Record

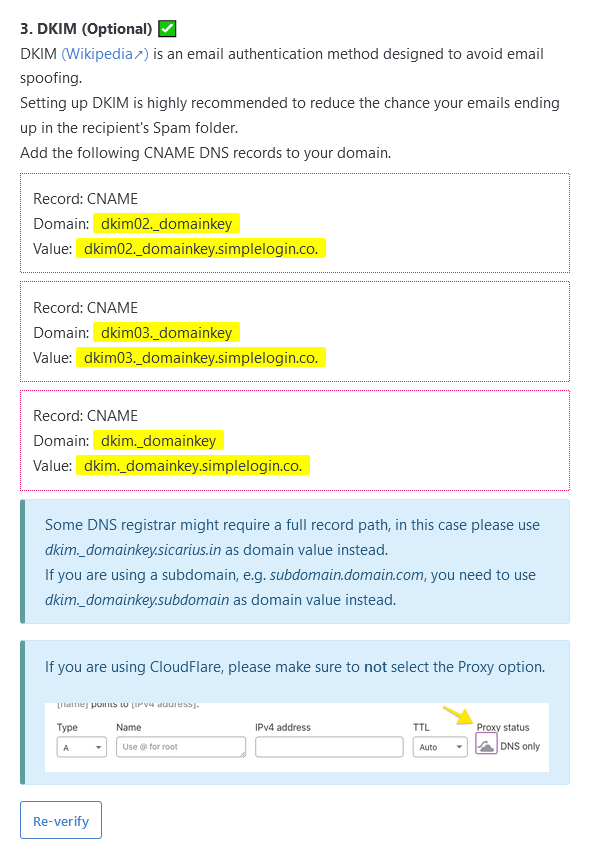
    DomainKeys Identified Mail (DKIM) is a digital signature that verifies the authenticity of a given email and checks whether it was authorized by the owner of the domain. Learn more about why your mail server needs a DKIM record.

    All modern email service providers support DKIM, simply create new CNAME records with the given values, and it should work automatically.
    Setting DMARC Record

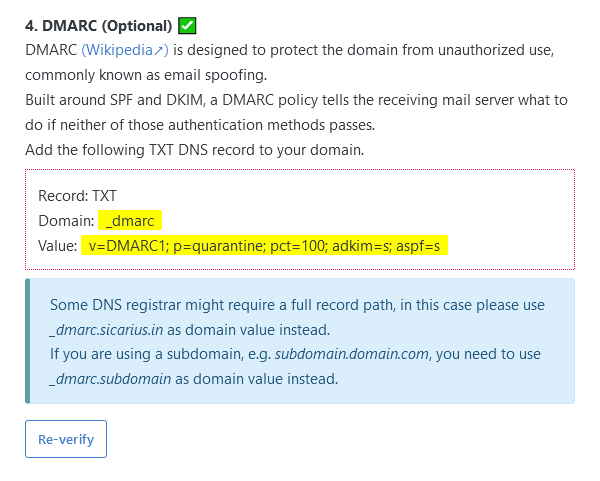
    Domain-based Message Authentication, Reporting & Conformance (DMARC) is a validation system that makes it harder for malicious actors to spoof your domain and send emails on your behalf. Although it is optional, it is recommended to use it if your email provider supports it.

    You can create a new DNS record with values provided by your email server to use it.
    After creating all the records, our score has significantly improved. It is very close to a perfect score, but it is not there yet. In our testing, we used a shared email server that was flagged as spam in the past 28 days. This is expected, and it should not matter to most of the people.

    However, if this is unacceptable, you can rent a private IP address and use it to send emails. If you don’t send spam messages, it will slowly build the reputation of your IP address, and your emails will get closer to a perfect score.

    Using SSL/TLS To Connect Securely

    You should be connecting SSL/TLS. Failing to do so will result in Gmail blocking your email, as you can see in Google’s help documentation.

    If you encounter any errors, you can check the /var/log/maillog or var/log/mail.log file on your terminal to see the mail server logs. This is particularly handy for fetching information about postfix, smtpd, and other email-related services running on your server.

    You can simply run the following command to view a continuous stream of logs in your terminal.

    tail -f /var/log/mail.log

    After adding all of these certificates and policies, and making your web server fully compliant with industry standards, you should be able to send emails using PHP from your webserver without deliverability issues.

    Conclusion

    In conclusion, sending emails from PHP is viable, but using external email packages such as SwiftMailer or PHPMailer is generally recommended. These packages offer more advanced features, and better reliability, and can save you time, money, and effort. Additionally, using an external email package can increase your chances of successful email delivery.

    If you do choose to send emails from your web server using PHP, it is important to follow this guide carefully and pay attention to factors such as deliverability, security, and industry standards. This may require additional effort, but it is necessary to ensure that your emails are delivered safely and effectively.

    To make the process of sending email from PHP even easier and more reliable, consider using a platform like RunCloud. With RunCloud, you can easily set up and manage your PHP web server, install dependencies, and send email without the hassle. Start using RunCloud today!

  • How To Use Redis Full-Page Caching To Speed Up WordPress

    How To Use Redis Full-Page Caching To Speed Up WordPress

    Is your WordPress website slow? Are you dreading low PageSpeed scores? If yes, then you should use Redis Full-Page Caching to supercharge your WordPress website.

    In this article, we will explain what Redis Full-Page Caching is and how it improves user experience.

    What Is Server-Side Page Caching?

    Before we talk about Redis Full-Page Cache, let’s talk about how your website works.

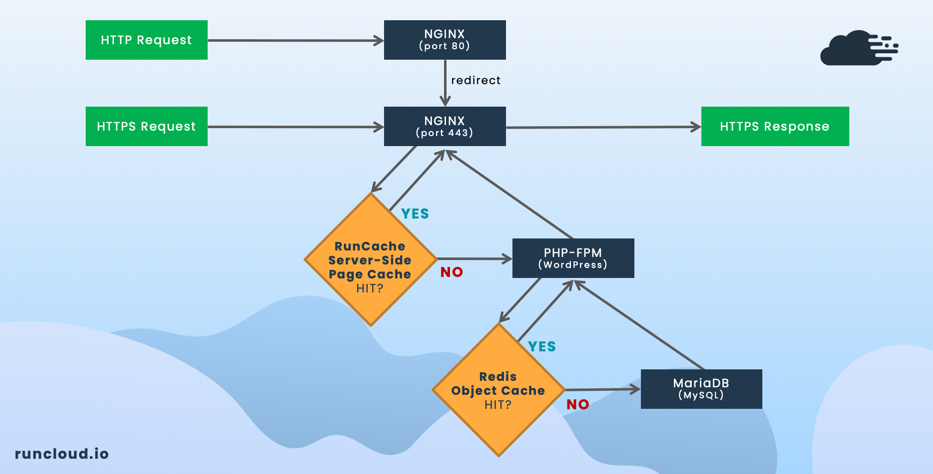
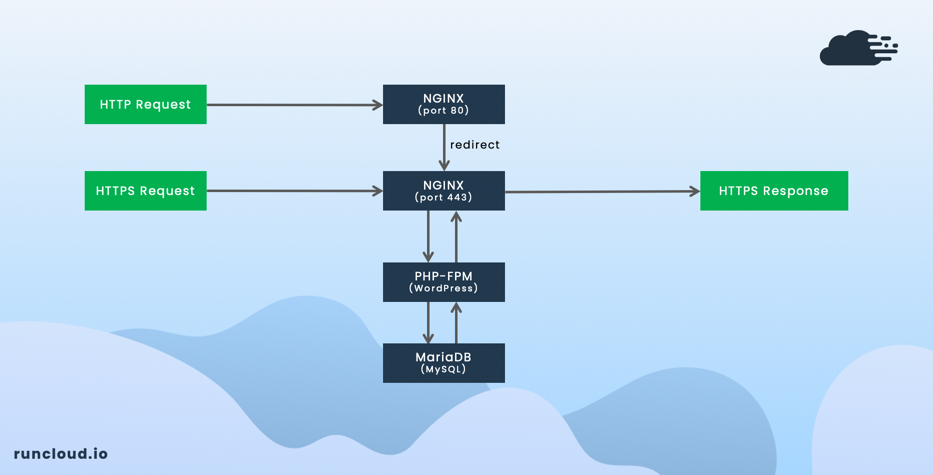
    1. When a user visits your WordPress page, the web browser sends an HTTP/HTTPS request to Nginx.
    2. Nginx passes the request to PHP-FPM, and Nginx will catch any PHP codes when trying to grab the page.
    3. PHP-FPM processes the page and runs through the MariaDB/MySQL database query to retrieve the page.
    4. PHP-FPM sends the generated “static” HTML page back to Nginx.
    5. Nginx sends the generated HTML page to the web browser for the user.

    What Are Benefits Of Using A Server-Side Cache

    When using server-side page caching, the Nginx module will be in between Nginx and PHP-FPM and it is able to generate a cached HTML page from PHP-FPM.

    When another user visits the same WordPress page, your website will not perform the same PHP and database requests again because the page is already cached and served by Nginx directly.

    As a result, your server response time will be much faster after the initial load. Your PHP-FPM and MariaDB/MySQL will experience a reduced load and your server CPU resource usage will decrease.

    This would mean that your server can handle more traffic with the same server specifications when using server-side page caching, ultimately allowing you to keep a more affordable server without having to scale any further.

    RunCloud provides two different server-side page caching methods for Nginx – namely Redis Full-Page Cache and FastCGI Page Cache. Let’s see how Redis Caching works

    What Is Redis Full-Page Caching?

    Redis, which stands for Remote Dictionary Server, is a fast and open-source, in-memory data structure store used as a database, cache, and message broker.

    In contrast to databases that store data on disk, all Redis data resides in memory, avoids seek time delays, and can access data super fast in microseconds.

    Usually, Redis is used to cache database query results and used to enable object caching, not page caching.

    Using the Nginx SRCache module, we can use Redis to serve a different purpose, to provide subrequest-based page caching as an alternative to Nginx FastCGI Cache.

    Redis Full-Page Cache vs Nginx FastCGI Cache

    Both Redis vs FastCGI Page Cache are a good solution for NGINX server-side page caching. Both of them can be installed easily in RunCloud without having to deal with Linux commands to setup, no complex process required.

    You should try it on your WordPress site to find the one which works best for your current setup. You can even switch between Redis and FastCGI page cache in one-click.

    Server-side Page Caching vs WordPress Caching Plugins

    Both are good choices for your WordPress website and the answer depends on your specific needs.

    If you are using regular shared hosting, Redis Full-Page Cache or Nginx FastCGI Cache might not be available. In this case, the only option available is to use the WordPress cache plugins.

    If you are using a dedicated server, you can optimize your WordPress site using server-side page caching. With proper setup, server-side page caching can perform better than any WordPress cache plugin.

    Who Needs Server-Side Page Caching For WordPress?

    All WordPress pages can gain huge benefits when using RunCache server-side page caching.

    For blogs, magazines, news, company profile websites, and all types of “static” WordPress sites, all WordPress pages can be fully cached and served faster, excluding WordPress admin pages, which are not cached for obvious reasons.

    For e-commerce, membership, forum, and all types of “dynamic” WordPress sites, most WordPress pages can be fully cached and served faster, except for some pages that should stay dynamic.

    For example, in the case of WooCommerce, the homepage, shop page, and single product page can be fully cached, but cart, checkout, and my account pages should be excluded. For these dynamic pages, you can use Redis Object Cache to reduce your MySQL database load and make your dynamic pages load faster, but you do not want to cache these pages fully as the latest changes will not be seen.

    Performance Benchmarks Without Caching

    Let us test the capacity of our server before we enable caching so we can quantify the improvement in performance.

    For this test, we use a e2-medium instance on Google Cloud and default WordPress installation using Twenty Twenty-Three WordPress Theme.

    We use the free Loader.io tool for stress testing.

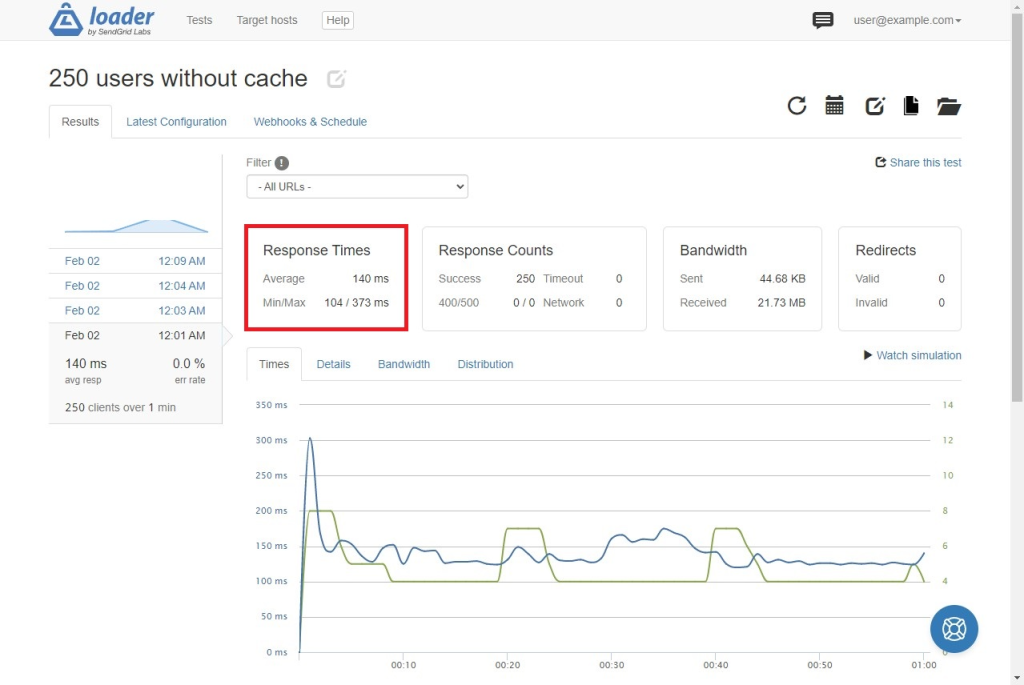
    First Test – From 0 To 250 Users In 1 Minute

    In the first test, we request the same web page from 250 different devices over the course of one minute. Without any caching, our server can successfully handle all 250 requests and manages an average response time of 140 ms.

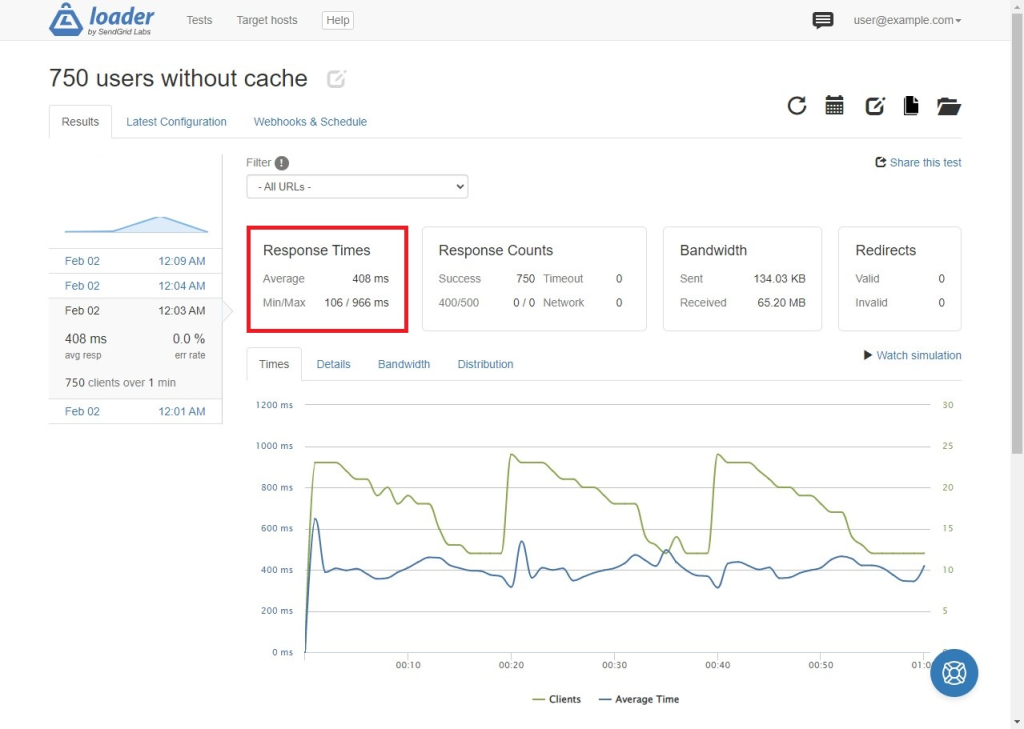
    Second Test – From 0 To 750 Users In 1 Minute

    In the second test, we request the same web page from 750 different devices over the course of one minute. Without any caching, our server can successfully handle all 750 requests and manages an average response time of 408 ms. This is slightly worse than the first test but still acceptable.

    Third Test – From 0 To 2000 Users In 1 Minute

    In the third test, we request the same web page from 2000 different devices over the course of one minute. In this case, our server had significantly higher response times and we observed timeout error in over 50% of requests. The successful requests had an average response time of 8028 ms which is unacceptable.

    Let us see how we can improve this by enabling caching.

    How To Install Redis Full-Page Cache Using RunCloud Hub

    RunCloud Hub is a hub for all RunCloud plugins for WordPress. It is not only for server-side page caching but also Redis Object Cache and Server Health & Transfer Stats monitoring directly from your WordPress dashboard.

    If you want to use server-side page caching, either Redis Full-Page Cache or Nginx FastCGI Cache to speed up your WordPress website, then RunCloud Hub is the perfect choice for you.

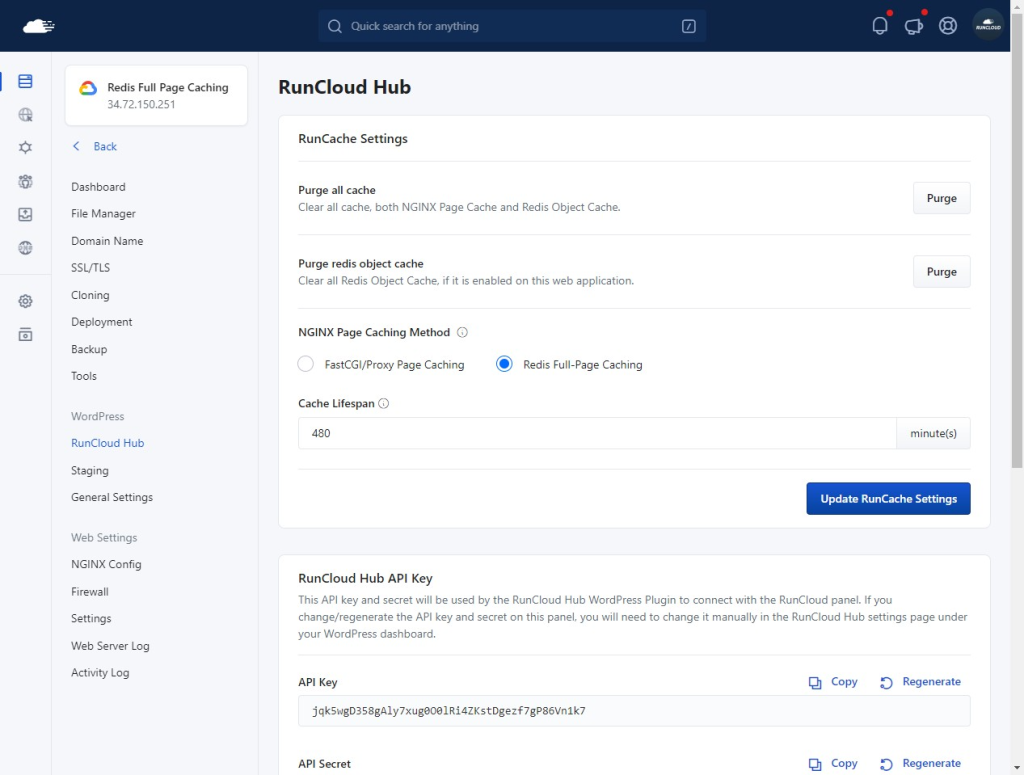
    You can simply go to the RunCloud Hub menu under your web application in the RunCloud panel, choose the Nginx page caching method, and click the Install RunCloud Hub button.

    Once you have installed the RunCloud Hub plugin, Redis Full-Page Cache (RunCache) is automatically installed and enabled in your WordPress website, no complex process is required.

    How To Check If Redis Full-Page Cache Works

    When using any cache WordPress plugin, usually the plugin adds a footprint at the of your web page source code to make it easy for you to check if your WordPress page has been cached or not.

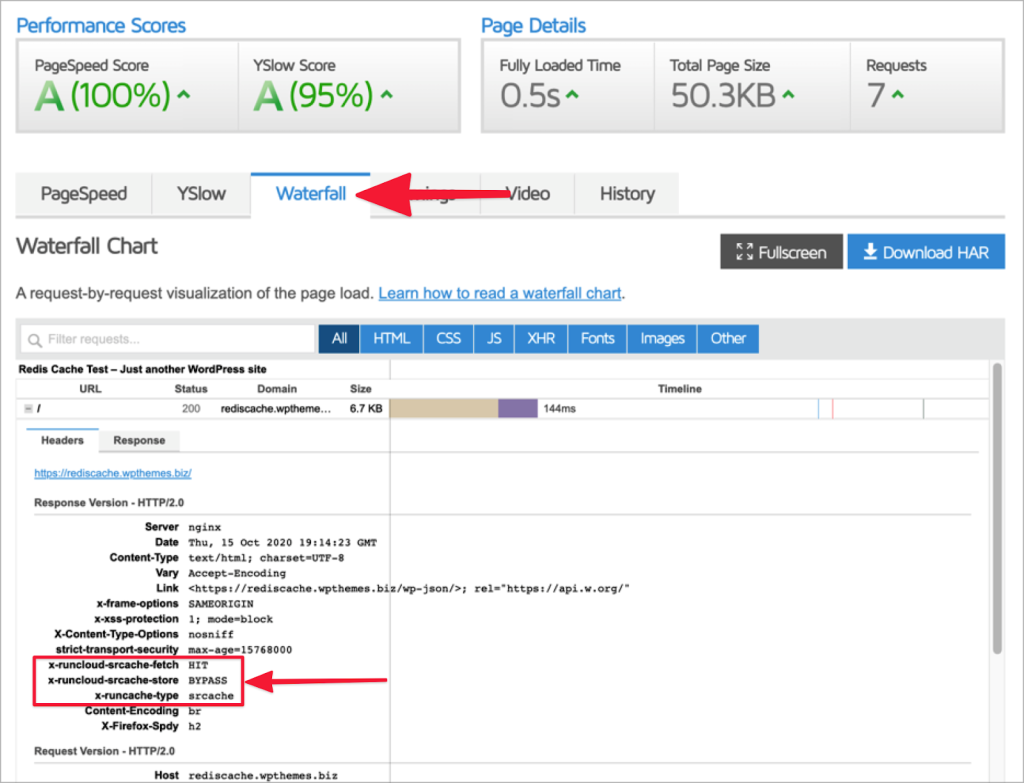
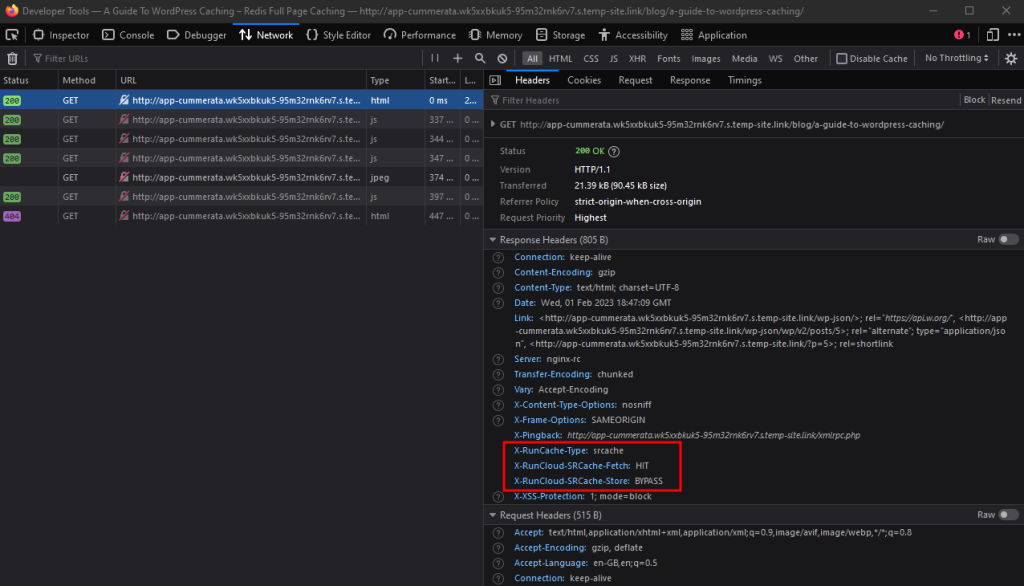
    Redis Full-Page Cache (RunCache) works on the server-side, which means there is no footprint on your web page, you need to check the headers of your website to see these possible values of X-RunCloud-SRCache-Fetch and X-RunCloud-SRCache-Store.

    The X-RunCloud-SRCache-Fetch header returns the status of the “fetch” phase for Redis Full-Page Cache. Three values are possible.

    • HIT : Page is cached and served from the cache.
    • MISS : Page is served dynamically from the server, not from the cache. The response might then have been cached. Refreshing this page again should change the header from MISS to HIT or BYPASS.
    • BYPASS : Page is served dynamically from the server, not from the cache. It is excluded from the cache, for example, WordPress dashboard admin pages or WooCommerce cart/checkout pages.

    The X-RunCloud-SRCache-Store header returns the status of the “store” phase for Redis Full-Page Cache. Two values are possible.

    • STORE : An Nginx subrequest is issued to save the HTML output of the page into Redis.
    • BYPASS : An Nginx subrequest is not issued because either it has been saved to Redis or it is excluded.

    To make it easier for you to understand, usually, we can see 3 common pairs of these headers, for example:

    “MISS” Fetch Status and “STORE” Store Status

    This is when you visit a page for the first time where this page is served dynamically from the server and the output of this page will be saved to Redis.

    “HIT” Fetch Status and “BYPASS” Store Status

    This is when you visit a page where the cache version is available in the Redis and served directly from the Redis cache.

    “BYPASS” Fetch Status and “BYPASS” Store Status

    This is when you visit a page that is excluded from the Redis cache.

    To check these headers, you can use some tools, for example:

    Check HTTP Headers With GTMetrix

    Gtmetrix is not only for testing your performance score, you can also use it to check the response header using the Waterfall feature. You can check the response header of your tested page under the Waterfall tab to see if this page is served by Redis Full-Page Cache (RunCache).

    Check HTTP Headers With Google Chrome

    You can also view the response HTTP headers in your web browser without using any additional tools by following these steps:

    1. Visit the web page that you want to test and open Web Developer Tools by pressing F12 or right-click and selecting Inspect.
    2. When opened, click and select the “Network” tab.
    3. Refresh the page to get fresh page data.
    4. Select the top HTTP request on the left panel and observe HTTP headers on the right panel.

    Performance Benchmark: Handling More Traffics

    By eliminating PHP-FPM and MariaDB/MySQL when serving your WordPress page from Redis Full-Page Cache, the huge benefit is your server can handle more traffic with the same server specifications.

    First Test – From 0 To 250 Users In 1 Minute

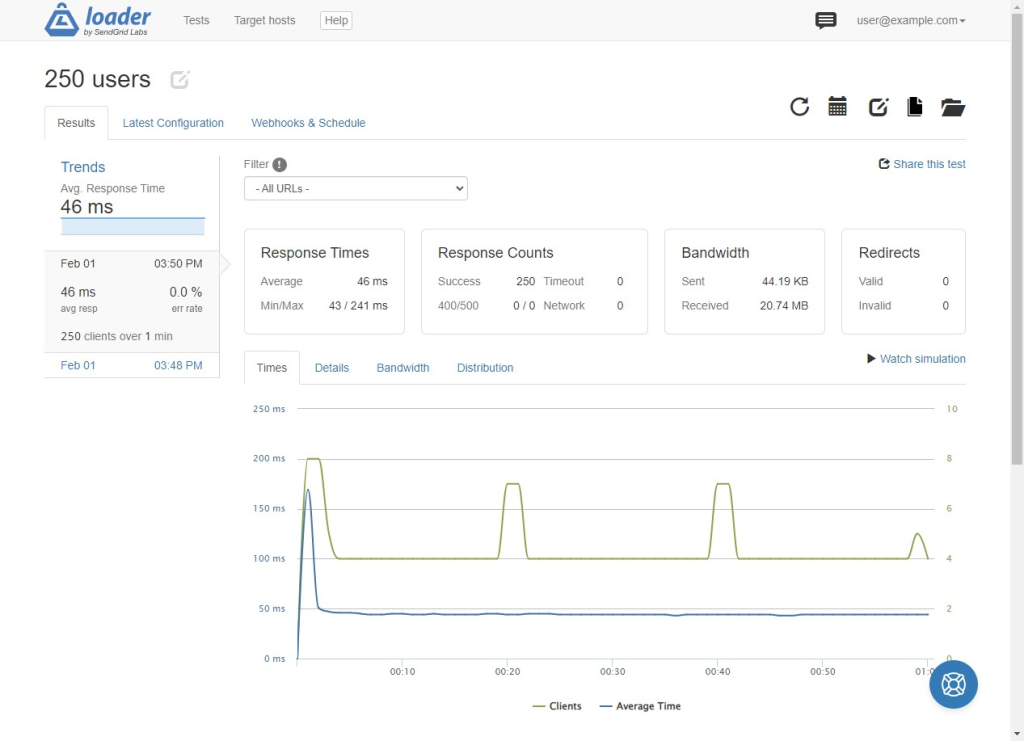
    For this test, we use Loader.io to send from 0 concurrent users and increase to 250 concurrent users within 1 minute.

    Without Redis Full-Page Cache (RunCache), the average response time was 140 ms. After enabling the cache, the average response time reduces to 46 ms. This is great as our server is responding to requests nearly 3 times faster.

    Second Test – From 0 To 750 Users In 1 Minute

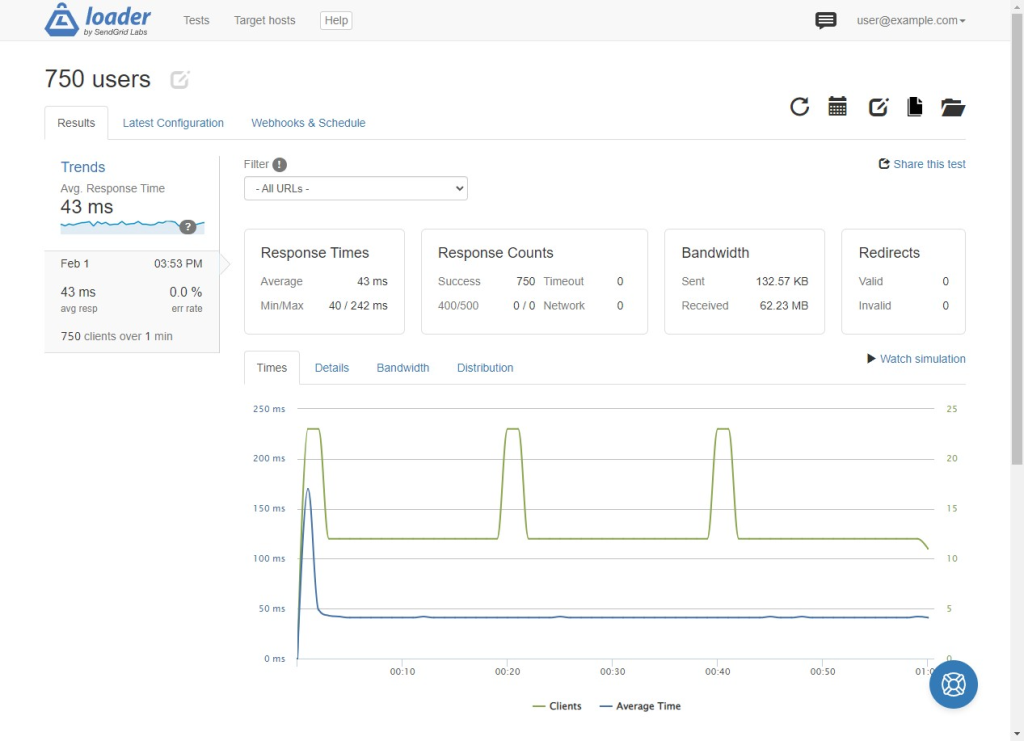
    In our second test, the average response time without Redis Full-Page Cache was 408 ms. Enabling cache lowers the response time to 43 ms. Therefore, our server can handle sudden surges in requests without degrading performance.

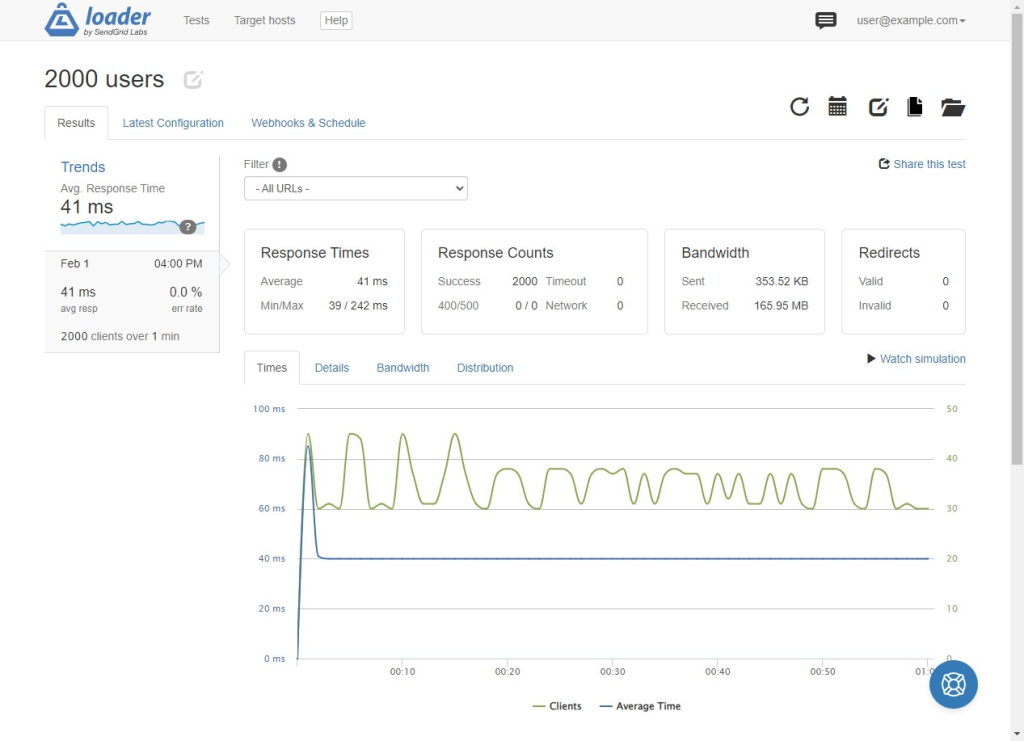
    Third Test – From 0 To 2000 Users In 1 Minute

    Without Redis Full-Page Cache, the average response time was 8028 ms and we also saw timeout error in over 50% of requests when the number of concurrent users surged to 360.

    After enabling the cache, all our requests finished without error and we observed a steady response time of 41 ms. It is a clear improvement as we can handle many more concurrent requests without crashing the server.

    Exploring RunCache Features

    Using the RunCloud Hub WordPress plugin, you will have more controls on how RunCache works on your WordPress website.

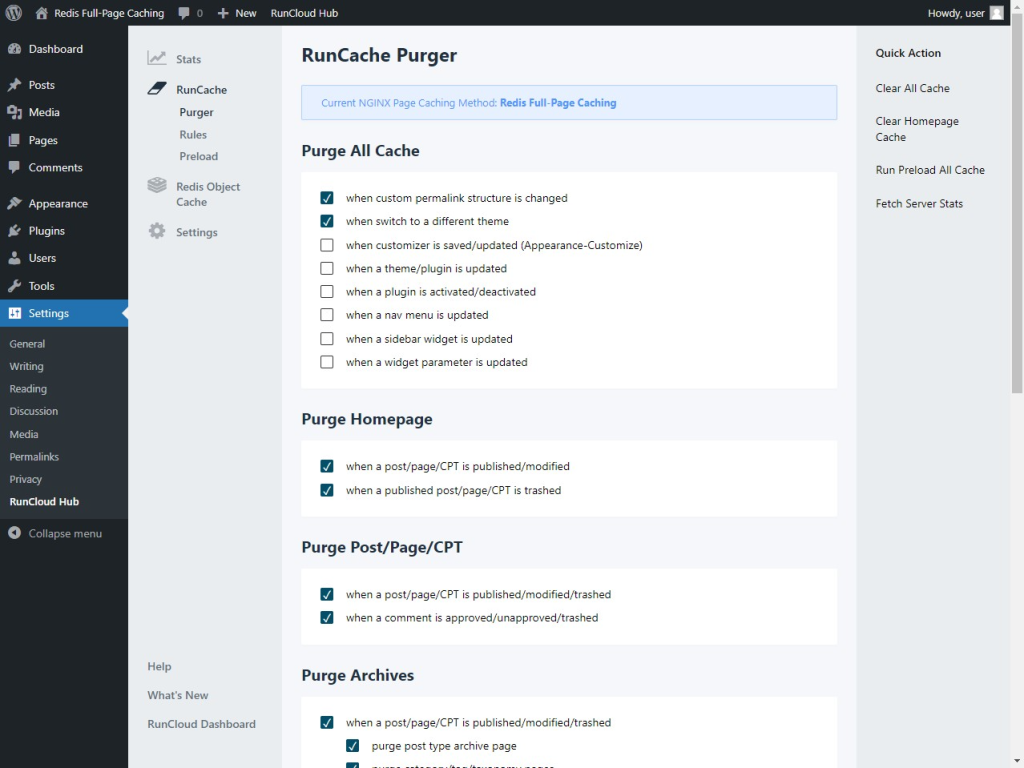
    RunCache Purger

    Purger settings allow you to have more control when the cache is cleared, for example:

    • Automatically clean cache of homepage when post is edited or has a new post.
    • Automatically clean cache of homepage when post removed.
    • Automatically clean cache of post/page/CPT when published.
    • Automatically clean cache of post/page/CPT when comment approved and published.
    • Automatically clean cache of post/page/CPT when comment removed.

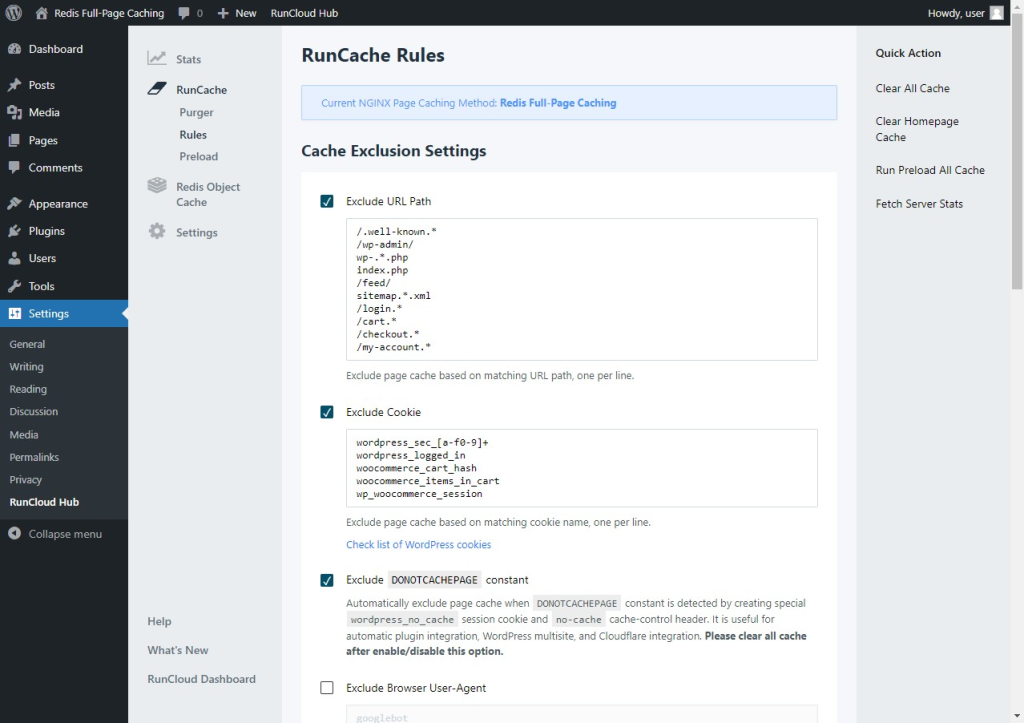
    RunCache Rules / Exclusion

    Rules settings allow you to control Cache Exclusion.

    • Exclude URL Path option allows you to exclude cache based on matching URL Path. This is very useful when you have dynamic pages that should not be cached in your website.

    For example, in WooCommerce, you have the Cart, Checkout, and My Account page that must never be cached. For WooCommerce users, no action needed, these pages have been added by default.

    • Exclude Cookie option allows you to exclude cache based on matching Cookie name.
    • The Exclude Browser option allows you to exclude cache based on matching Browser User-Agent.
    • Exclude Visitor IP option allows you to exclude cache based on matching Visitor IP Address.
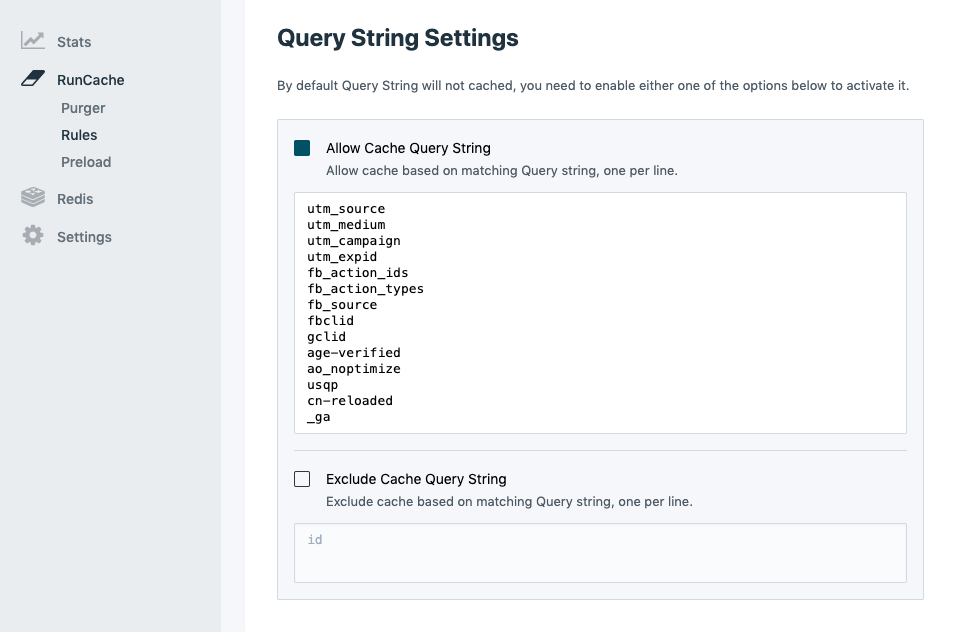
    • RunCache also has dedicated settings for query strings, because query strings will not cache by default.
    • Allow Cache Query String option makes it possible for you to allow cache based on matching query string, for example, UTM parameters (utm_source, utm_medium, utm_campaign), fbclid, gclid, etc.
    • Exclude Cache Query String option allows you to exclude cache based on matching Query string.

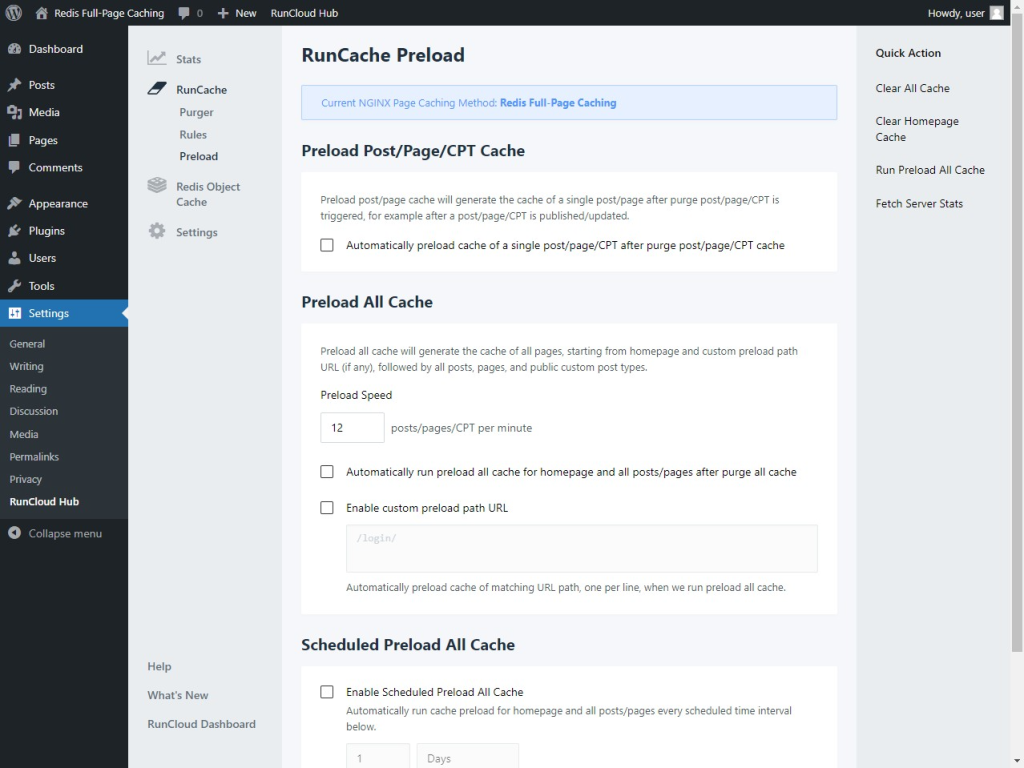
    RunCache Preload

    Preload settings allow you to generate caches of your pages without having to wait for a user to visit your pages. Normally, the cache is generated after a user visits a page.

    You have the options to:

    • Preload caches automatically when any purge action is triggered.
    • Preload caches automatically based on schedule time (day/week/month).
    • Preload caches manually by clicking the “Run Cache Preload” link.

    If you have a big number of posts/pages/products in your WordPress sites, the cache preload process sometimes can consume your server CPU resources. It is better to run a cache preload manually for this case.

    Is It Compatible With Popular WordPress Cache / Optimization Plugins?

    YES! The important thing to understand, Redis Full-Page Cache (RunCache) works on the server level and popular WordPress cache/optimization plugins work on the WordPress/application level.
    They work in different spaces and it should be compatible. If needed, you can combine it with your favorite optimization plugin, for example:

    Redis Full-Page Cache and Autoptimize Plugin

    In fact, Autoptimize and RunCache are a perfect combination to optimize your WordPress site.

    Autoptimize works on WordPress-side to optimize your Javascript / CSS / HTML files on your web page, and RunCache works on the server-side to cache the optimized version web page.

    Please read the detailed guide here, How To Use Autoptimize WordPress Plugin To Optimize Your Sites.

    Redis Full-Page Cache and WP Rocket Plugin

    When using WP Rocket plugin, combined with Redis Full-Page Cache (RunCache), WP Rocket page caching feature is automatically disabled by RunCloud Hub.

    It means Redis Full-Page Cache will handle the page caching, and you still can use other WP Rocket optimization features.

    Summary

    Redis full-page caching is a game-changer for WordPress websites looking to boost their performance. With its advanced caching capabilities, Redis offers a simple and effective solution for reducing server load times and delivering a smooth user experience.

    If you want to apply server-side caching to one of your web applications within your server, then RunCache (RunCloud Hub) is your answer. RunCache allows you to utilize either Nginx FastCGI Cache or Redis Full-Page Cache to speed up your WordPress performance without having to deal with Linux commands to set up Nginx cache. Sign up today and see the difference for yourself.

  • How to Set Up a DigitalOcean Server with RunCloud

    How to Set Up a DigitalOcean Server with RunCloud

    DigitalOcean is a well-known cloud server provider that aims to simplify cloud computing so that developers and their teams can spend more time building software that changes the world. It’s designed for developers, and provides an intuitive control panel, predictable pricing, team accounts, and more.

    DigitalOcean has many different plans, including Basic (Standard), General Purpose, Memory Optimized, and CPU Optimized.

    Currently, DigitalOcean has 10 worldwide data centers spread across 8 regions:

    1. New York
    2. San Francisco
    3. Amsterdam
    4. London
    5. Frankfurt
    6. Toronto
    7. Bangalore
    8. Singapore.

    You can choose the server location that is close to you or your customers to get lower latency.

    In this post, we will show you how to set up the DigitalOcean server to host your websites on RunCloud.

    Let’s get started!

    Adding DigitalOcean API Keys to RunCloud

    With RunCloud’s server provisioning feature, you can set up a server in DigitalOcean directly from the RunCloud dashboard by providing an API key from DigitalOcean to RunCloud.

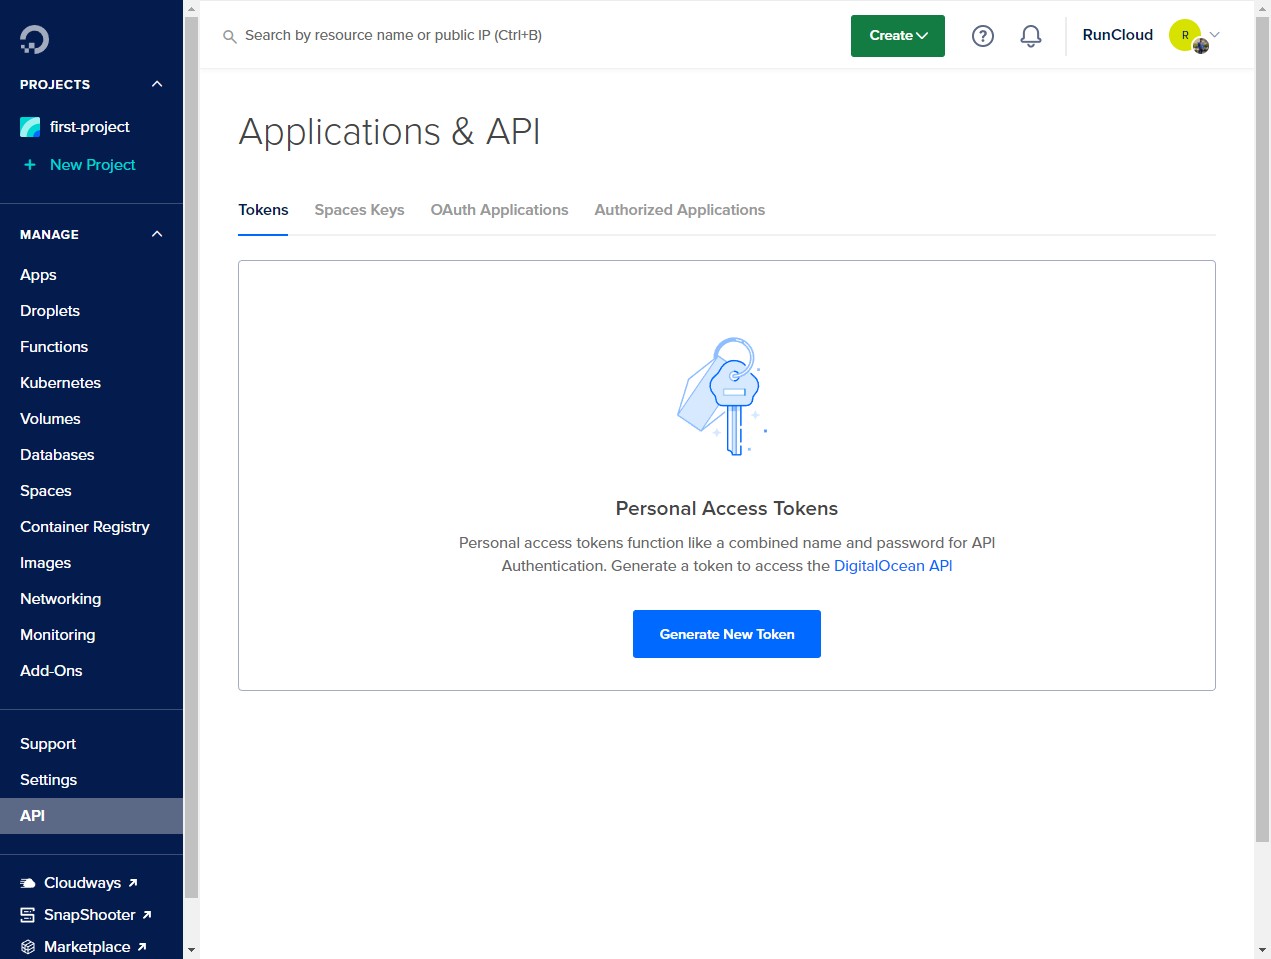
    To start the integration process, open your DigitalOcean dashboard and navigate to the “API” tab on the lower left of your screen.

    In the “Applications & API” menu, make sure that you are on the tokens tab, and click on the “Generate New Token” button to create a new key.

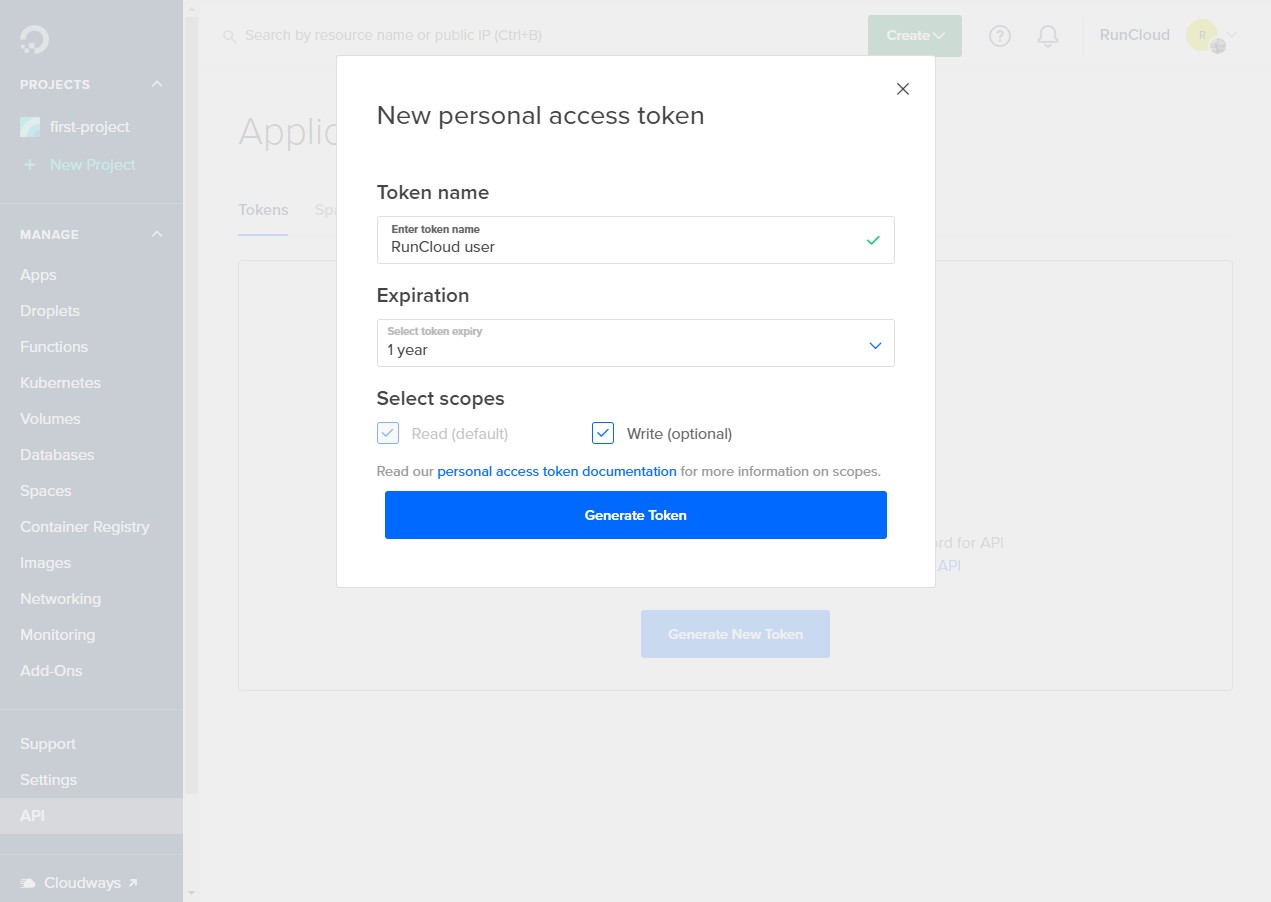
    On the next screen, give a suitable name to your key and set the expiration date of the key. Choose the expiration period carefully, because if your key expires, you will need to integrate your server with RunCloud again.

    Make sure you have granted the “Write permission”, and then click “Generate Token” to create the token.

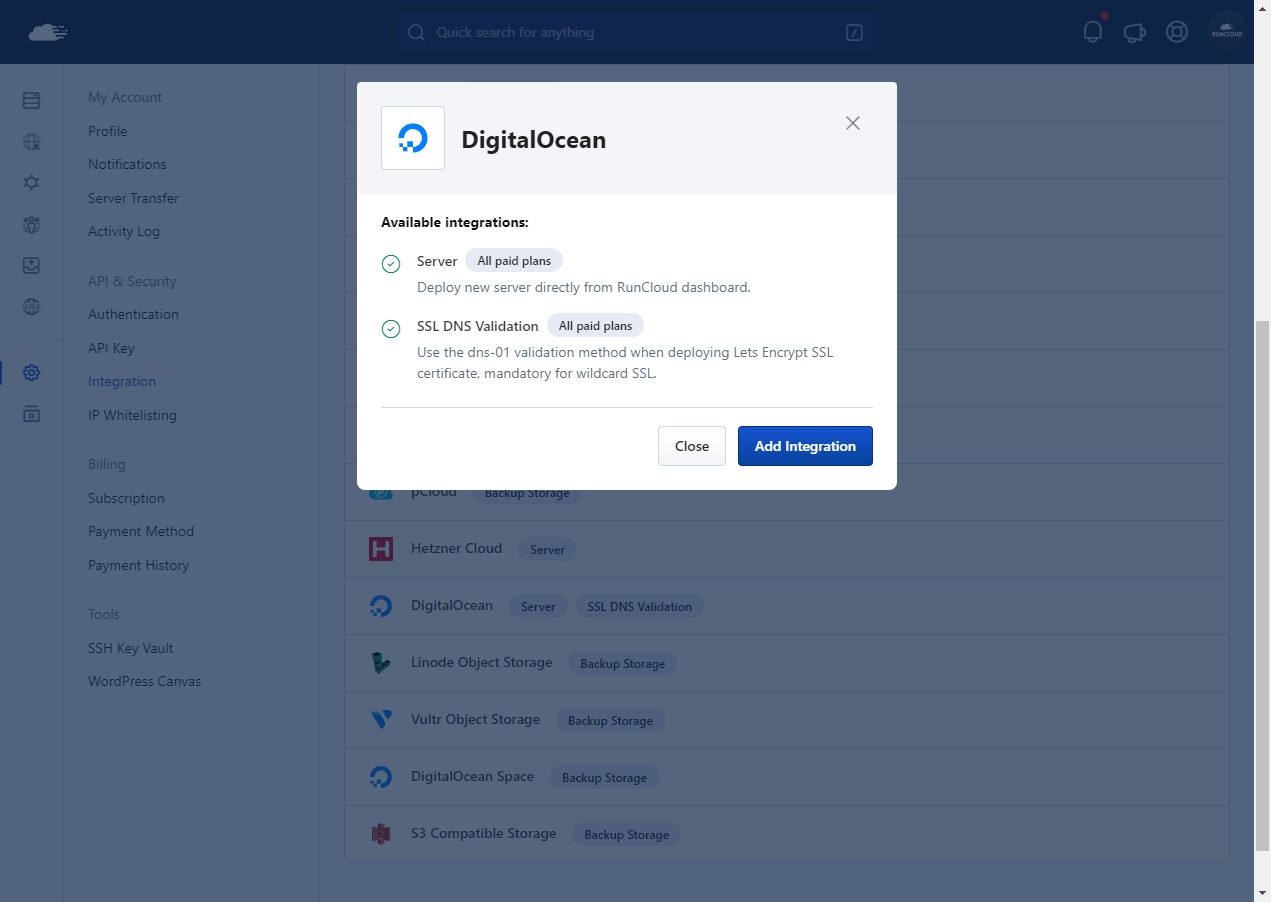
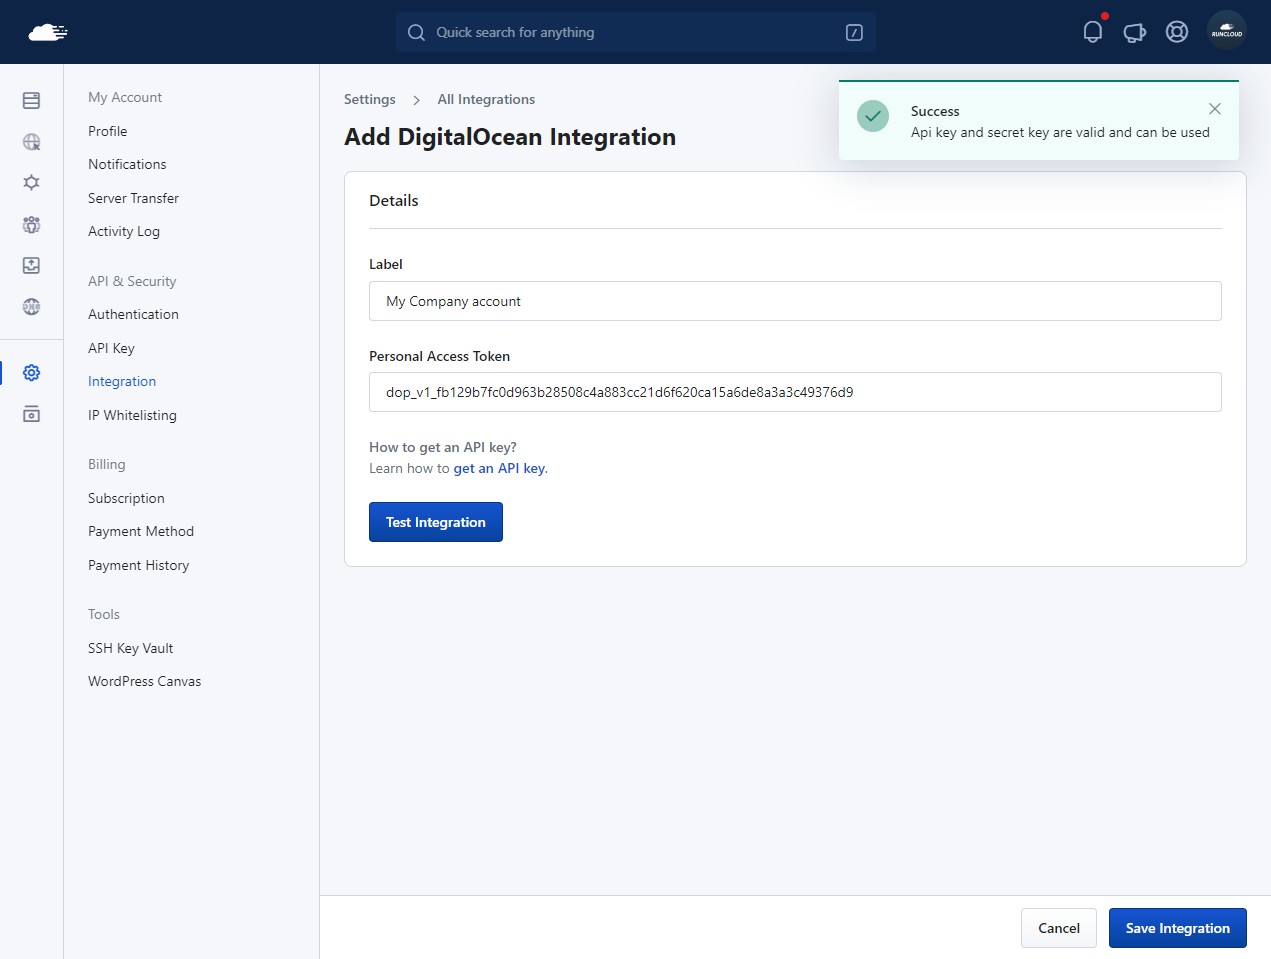
    After your key has been created, you’ll need to add this key to your RunCloud account to finish the integration process. Go to your account settings and open the “Integrations” tab. Look for the “DigitalOcean” option in the list, and click on it.

    Make sure you click on the right option to host the servers, and not the DigitalOcean Space option.

    On the next screen, you can add the name of your API key to distinguish it from the rest of the keys, and then paste the key that you copied from the DigitalOcean dashboard.

    After you have added the key, it’s a good idea to test the integration by clicking on the “Test Integration” button. If you follow the steps correctly, you should get a success message. Click on the “Save Integration” button to save the changes.

    Deploying A Server Using RunCloud

    Once you have successfully integrated RunCloud with DigitalOcean, you can start using RunCloud’s automated deployment feature to launch and delete servers automatically.

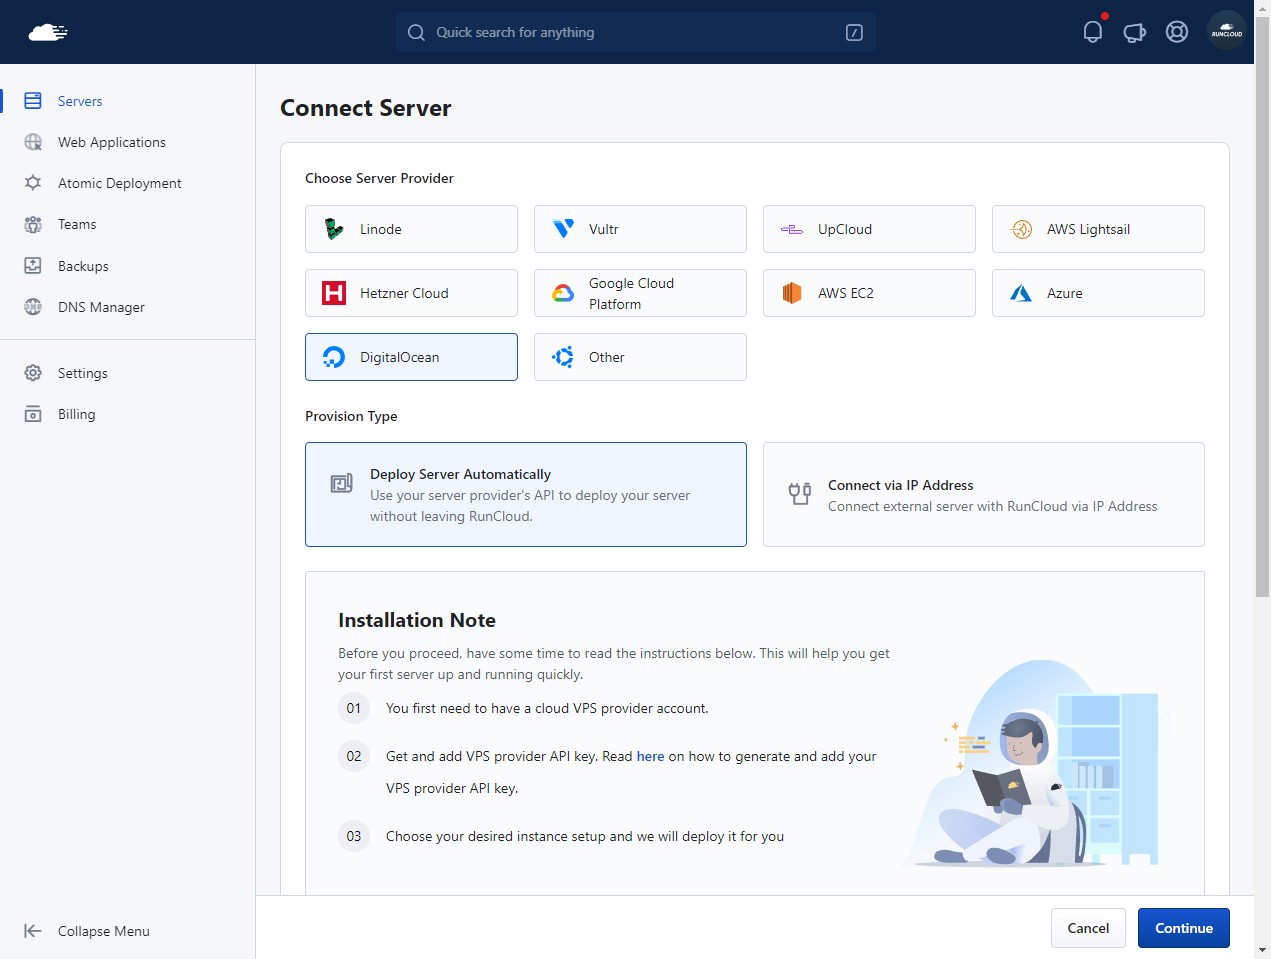
    To deploy a new server simply go to your RunCloud dashboard and click on “Connect a New Server”. On the next screen, choose DigitalOcean from the list of available cloud providers and click on “Deploy Server Automatically”.

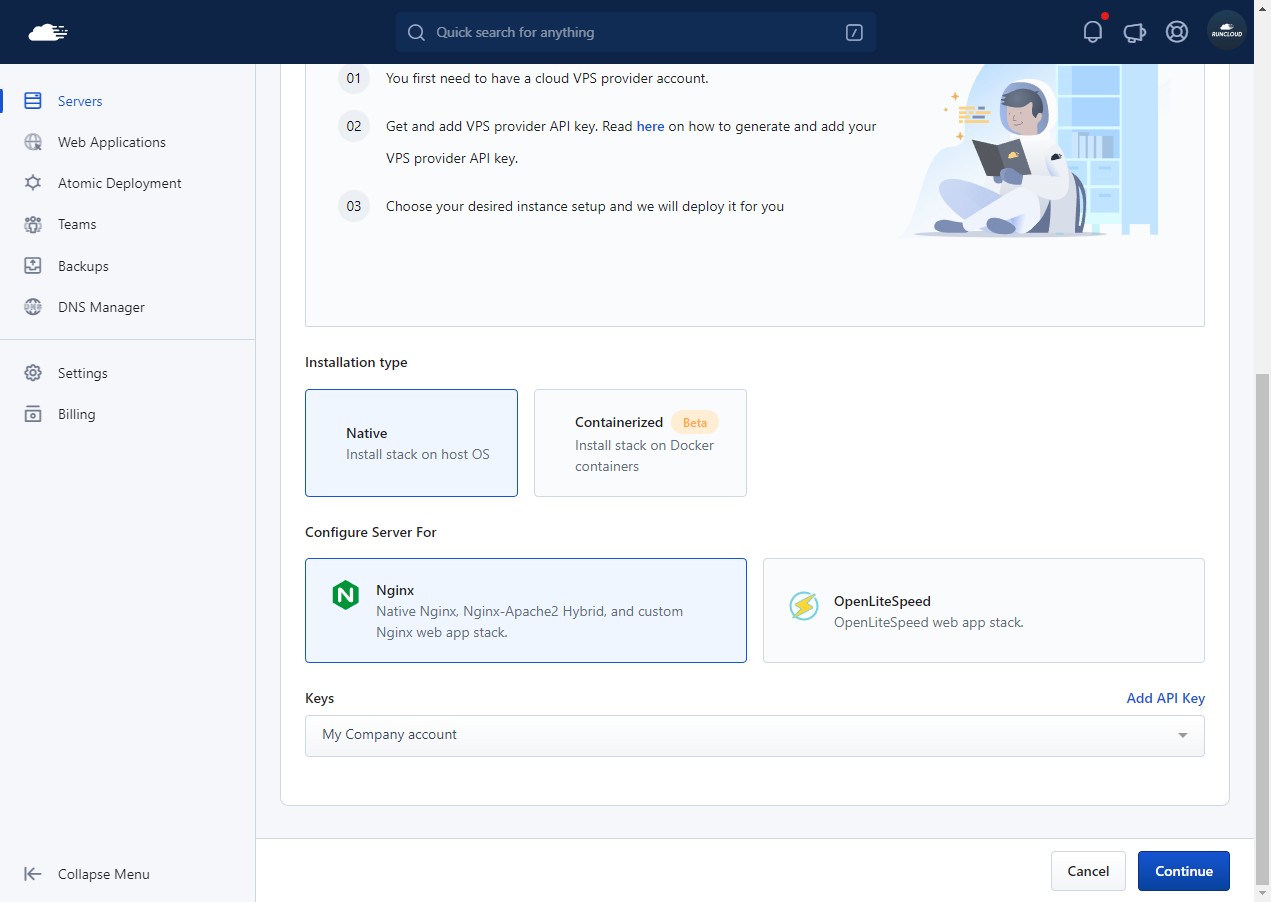
    Now scroll down to the bottom of the screen and select the installation type. There are two installation options available – you can either choose a native installation or containerized. Read our blog post on containerized architecture to learn more.

    Next, you can pick the server stack that you want to use. In this example we will just use the Nginx servers. Now you need to select the API key from the drop down menu – pick the API key that we just created and then click on “Continue”.

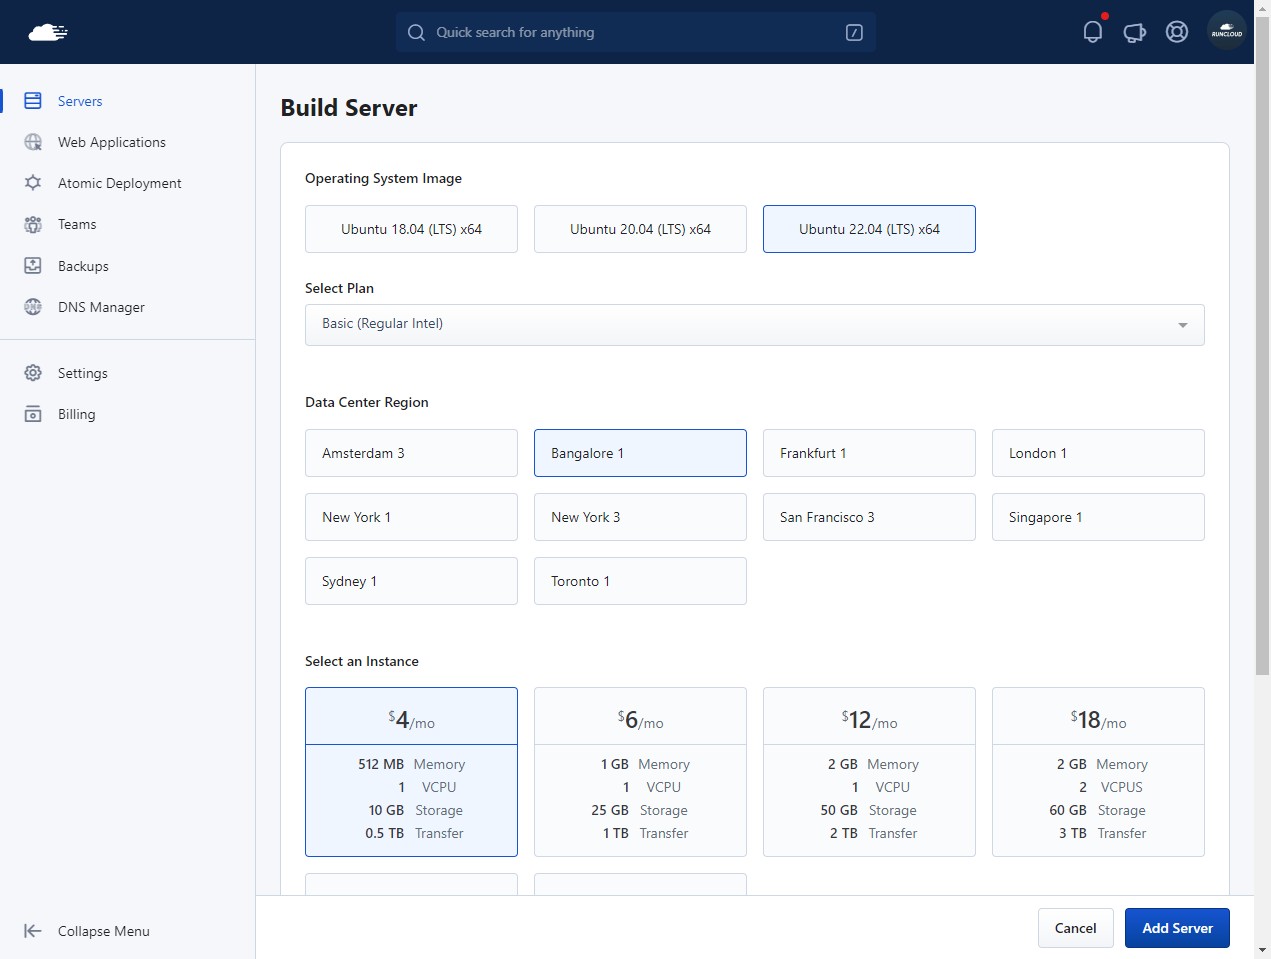
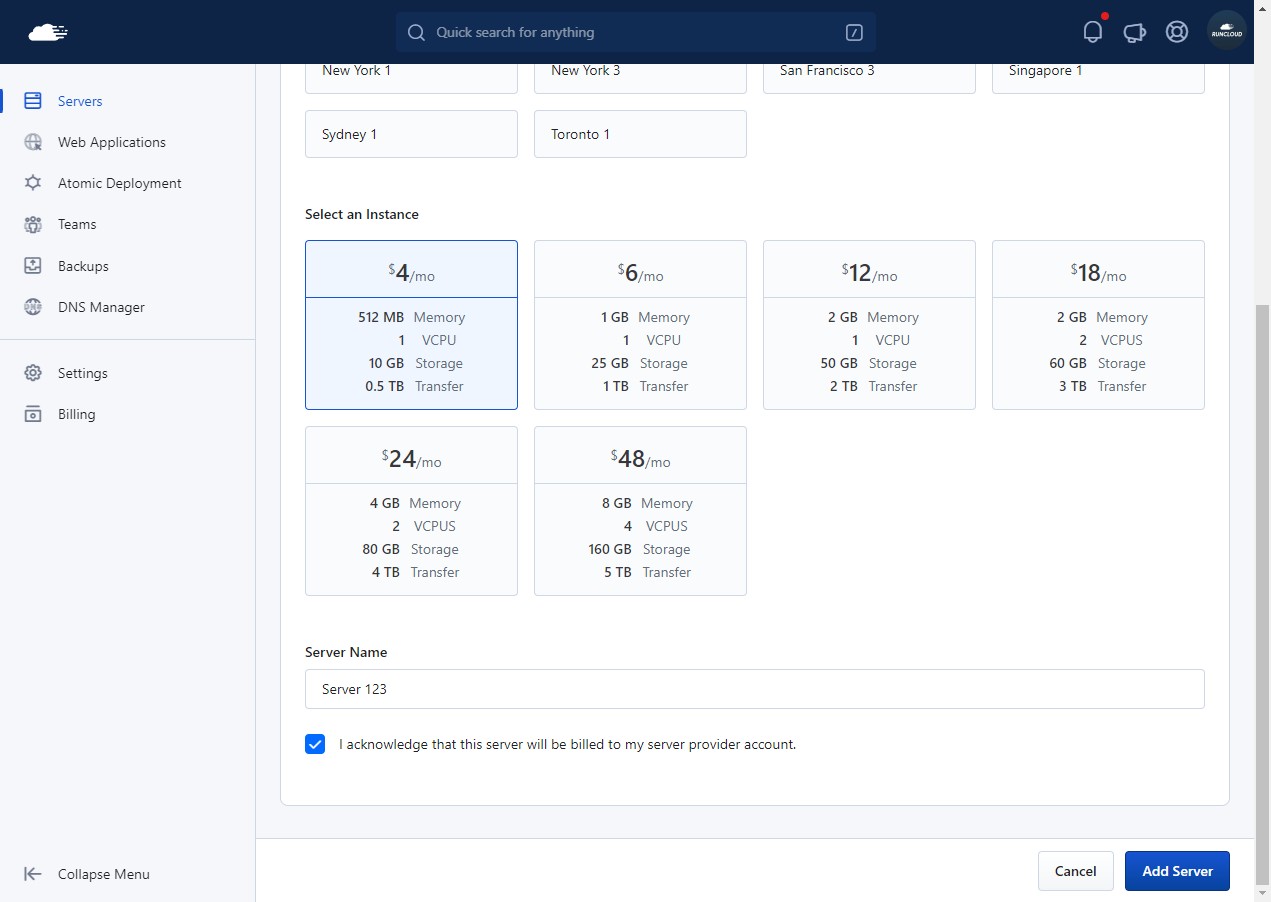
    On the next screen, you will get the option to select the operating system and other server details. Pick the latest version of the cloud image available, and then select the cloud plan that you want to use. There are multiple cloud plans available with varying costs – pick the one that meets your needs best.

    Next, select the instance size depending upon your workload. In this example, we have used the basic plan to deploy a $4 per month server in the Bangalore region.

    After you have selected the cloud instance, scroll down to the bottom of the page and give your server a suitable name. Don’t forget to check the box to acknowledge that you understand you will be billed for this cloud instance, and then click on the “Add Server” button to deploy the server.

    After you have created the server, RunCloud will automatically deploy a new server on your behalf in your DigitalOcean account, and then install all the necessary dependencies and other software needed to run web applications.

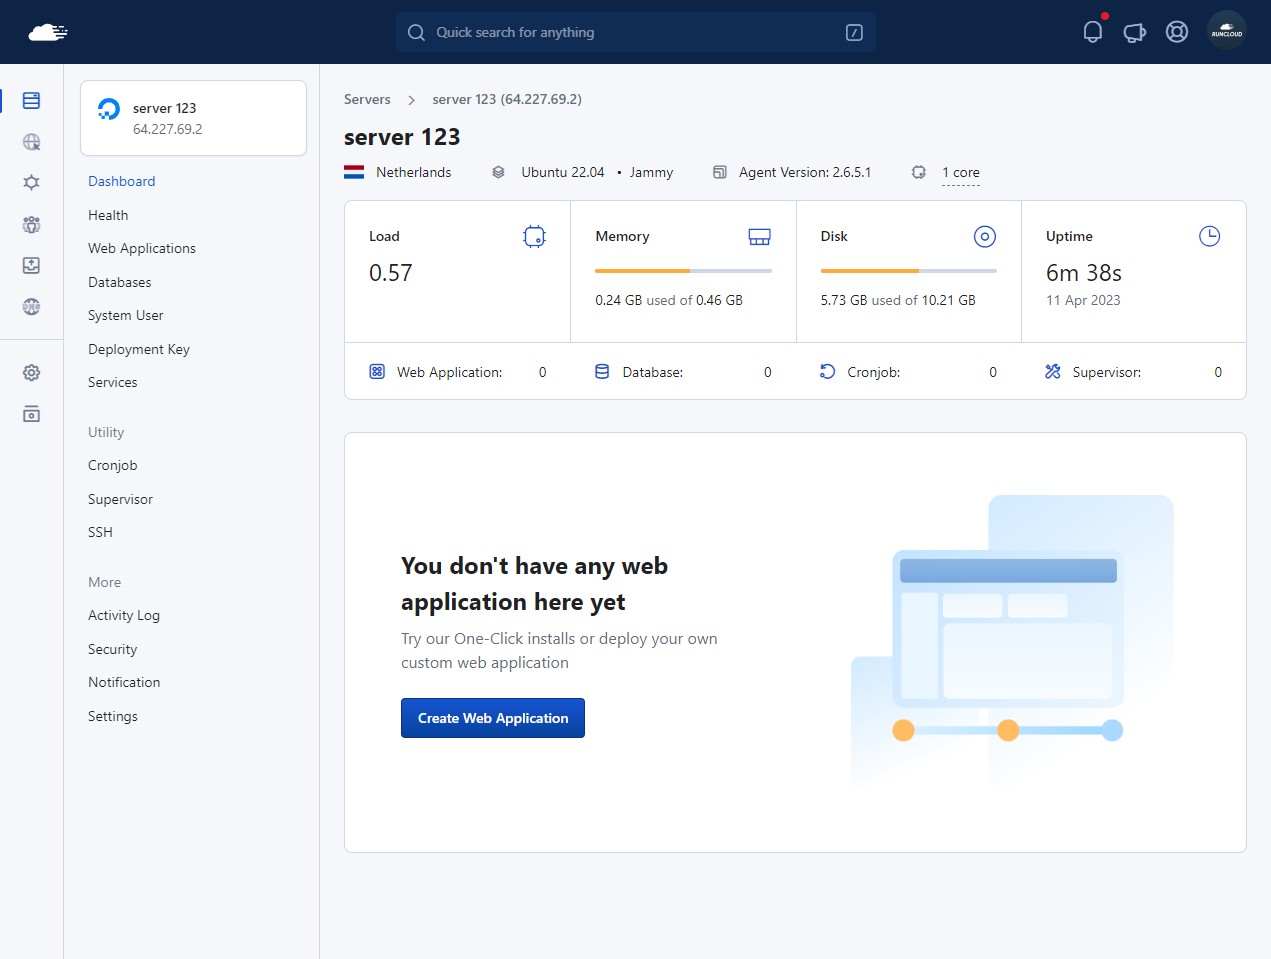
    This usually takes five to ten minutes, there is no additional input required from you at this point – just sit back and wait for the installation to complete.

    Once the installation has completed, you should see the following screen in your dashboard:

    Deploying A Server Using RunCloud One-Click Droplet

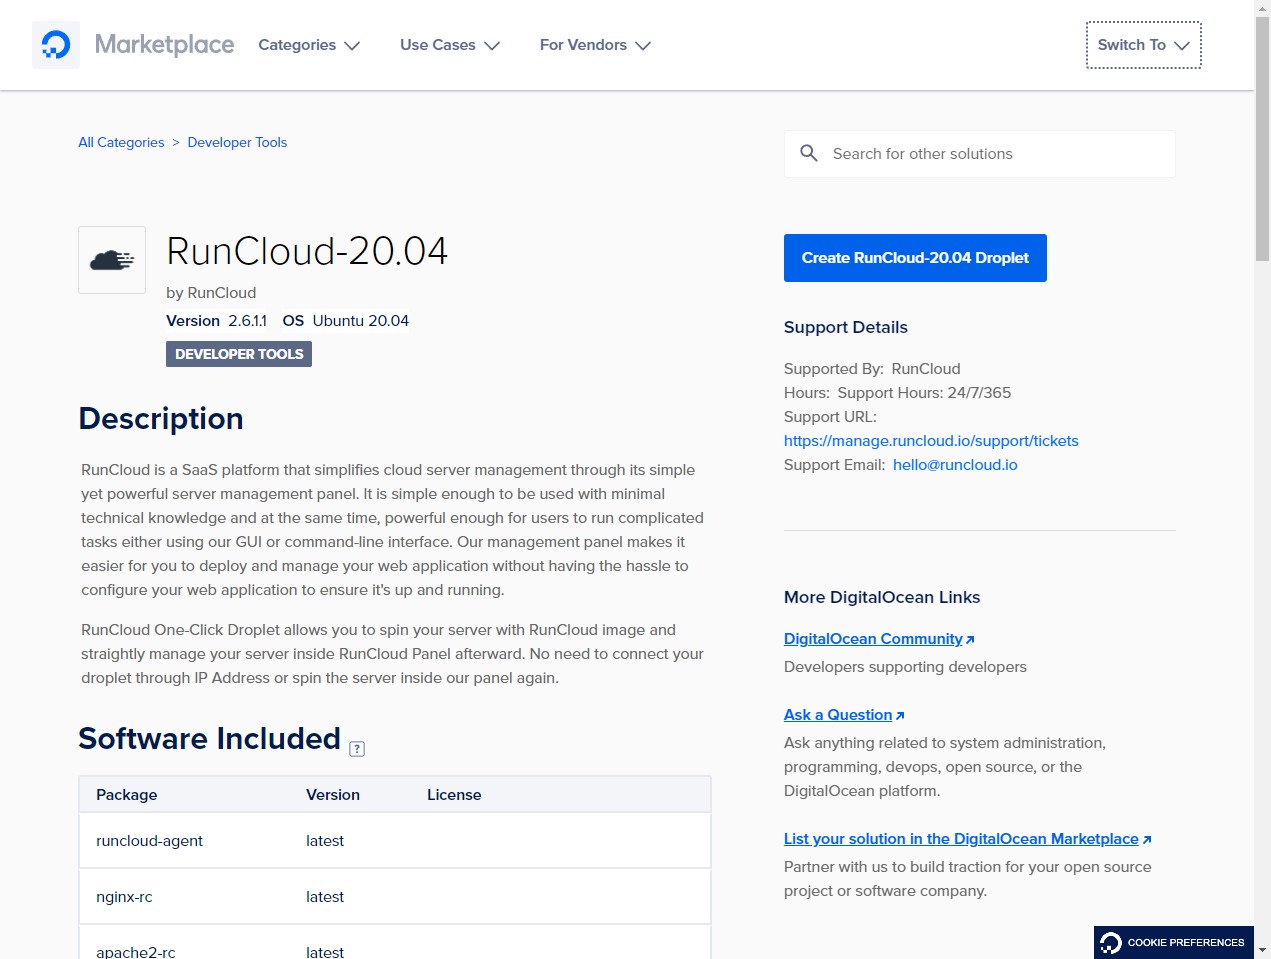
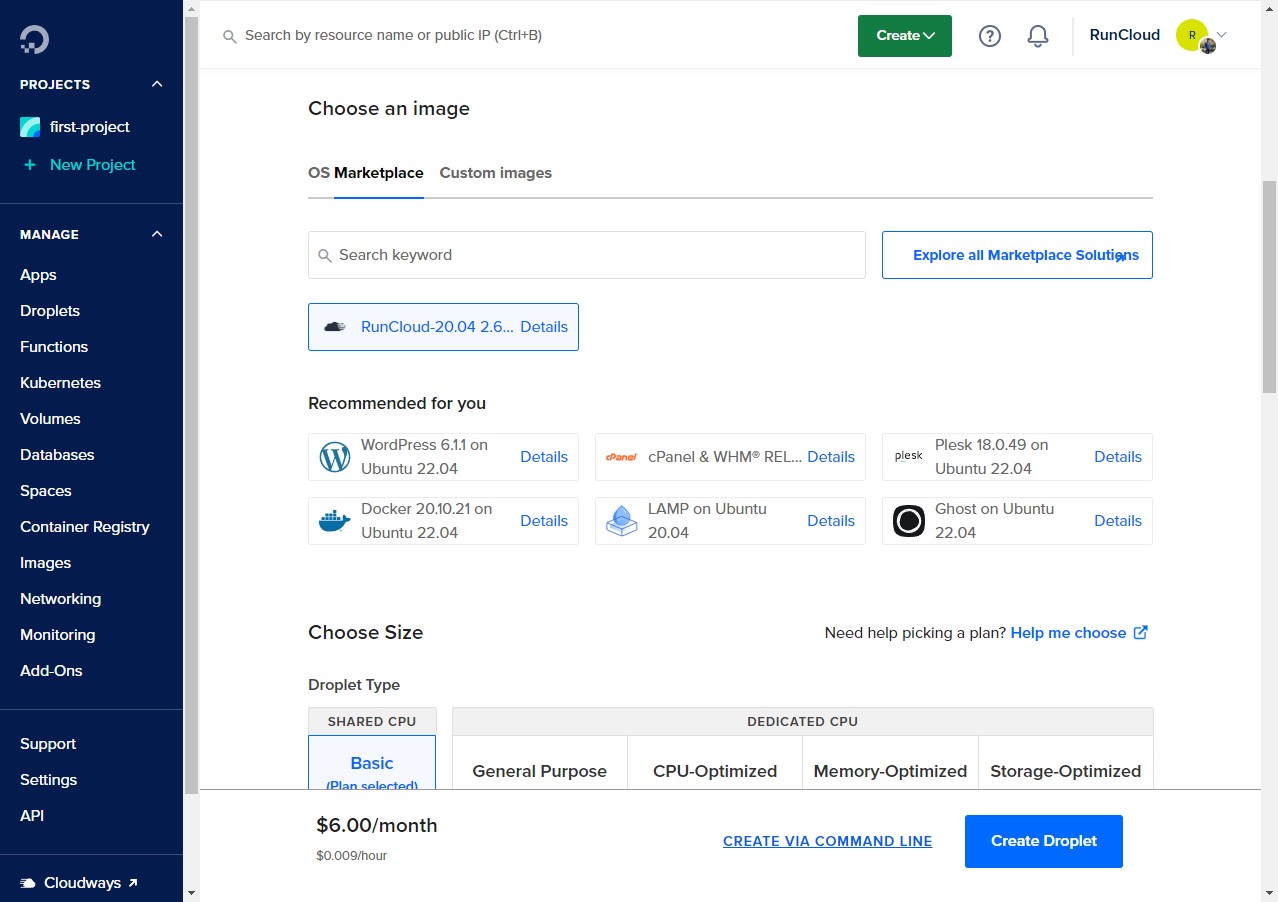
    RunCloud has pre-built images on the DigitalOcean marketplace that can be used to launch new servers quickly. Go to DigitalOcean marketplace.

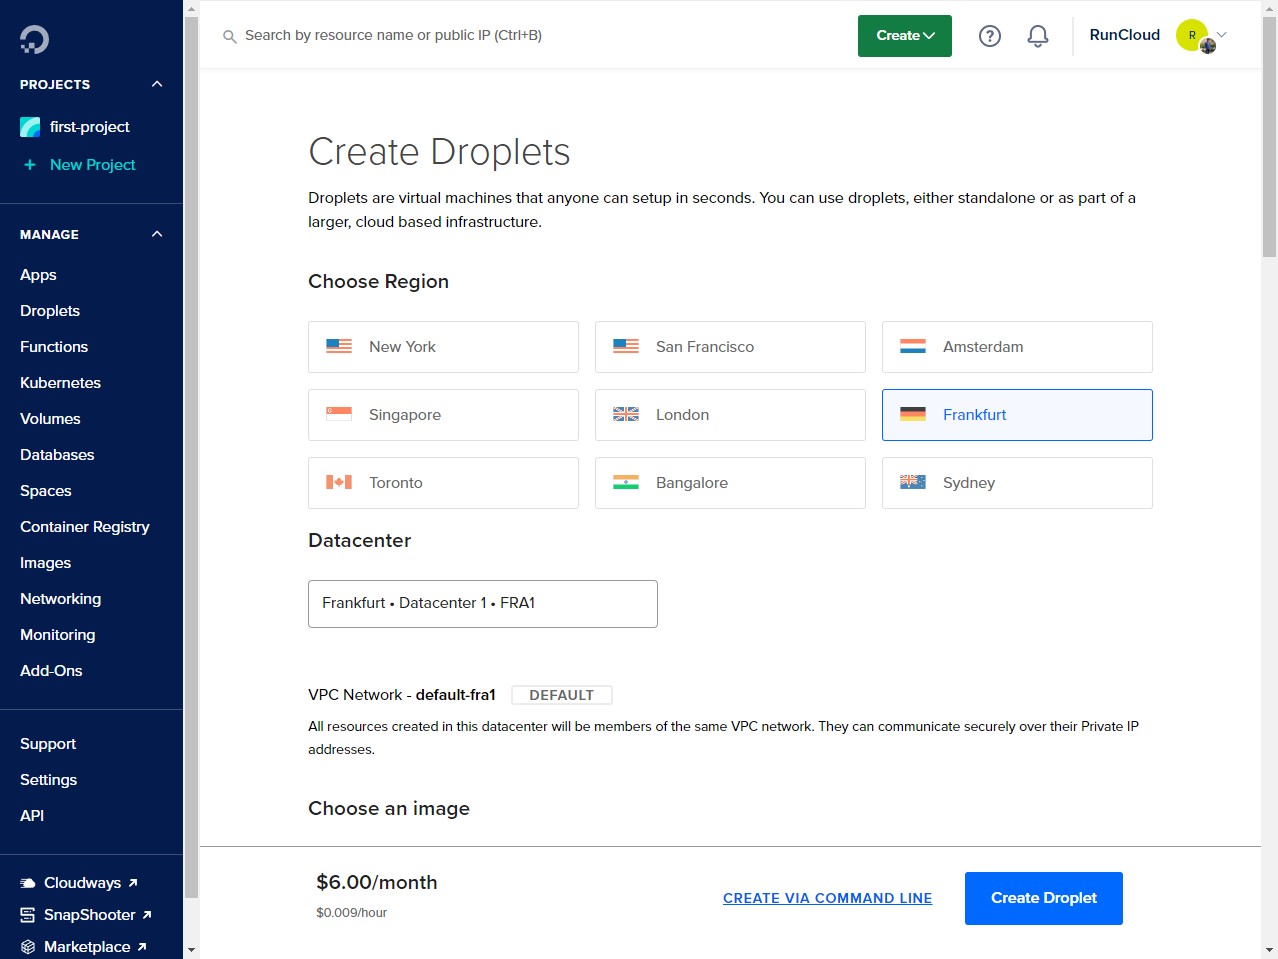
    Click on the “Create RunCloud Droplet” to create a new server. This will take you to the DigitalOcean dashboard. In this dashboard, select your desired datacenter region, and server size.

    In the image section, make sure that RunCloud’s pre-built image is selected.

    Tip: You can also search for RunCloud’s other images in the marketplace search box.

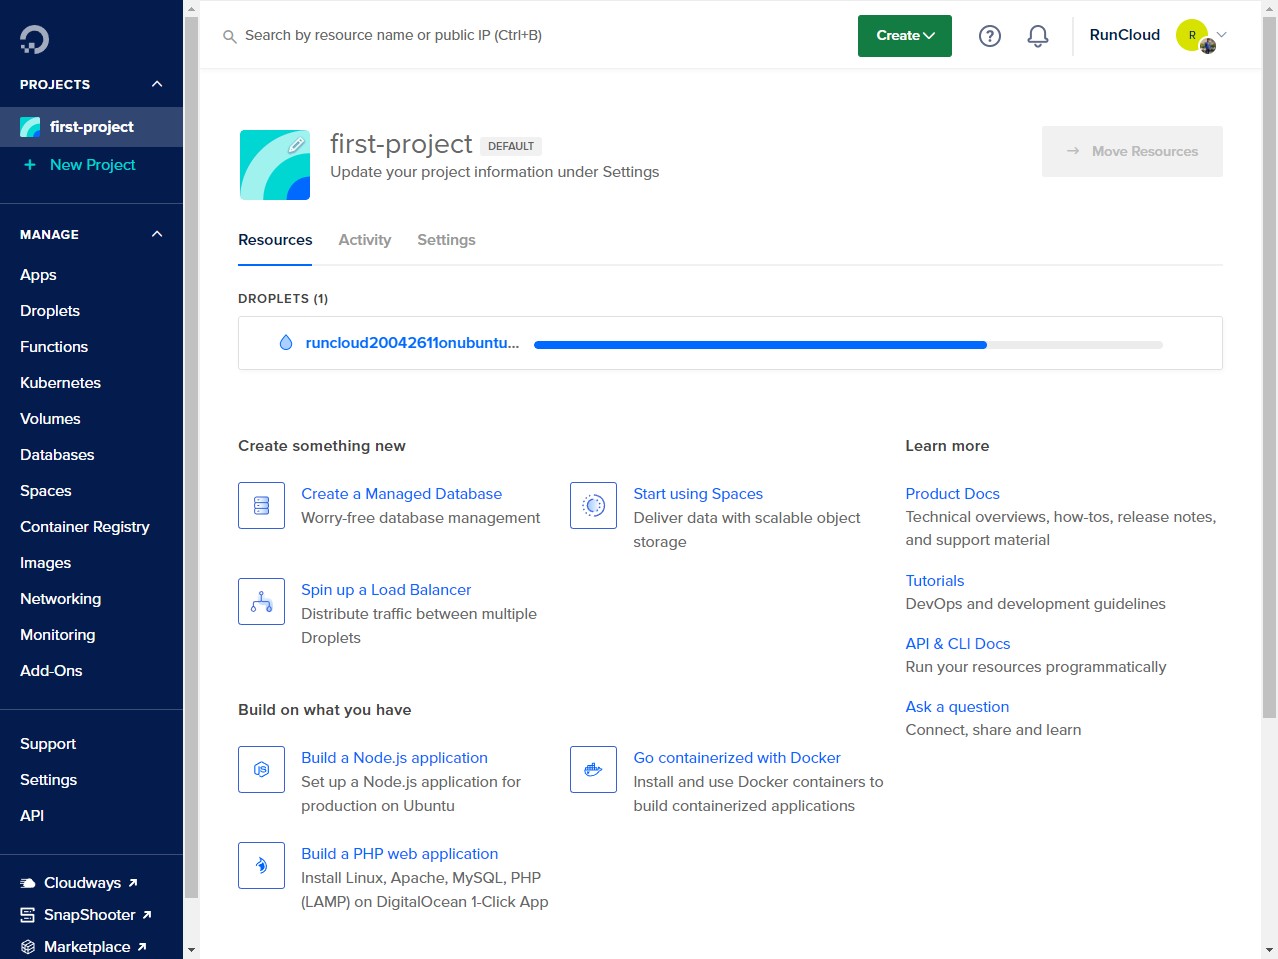
    After you have configured all the necessary settings, click on “Create Droplet” to deploy the server. This should only take a few minutes.

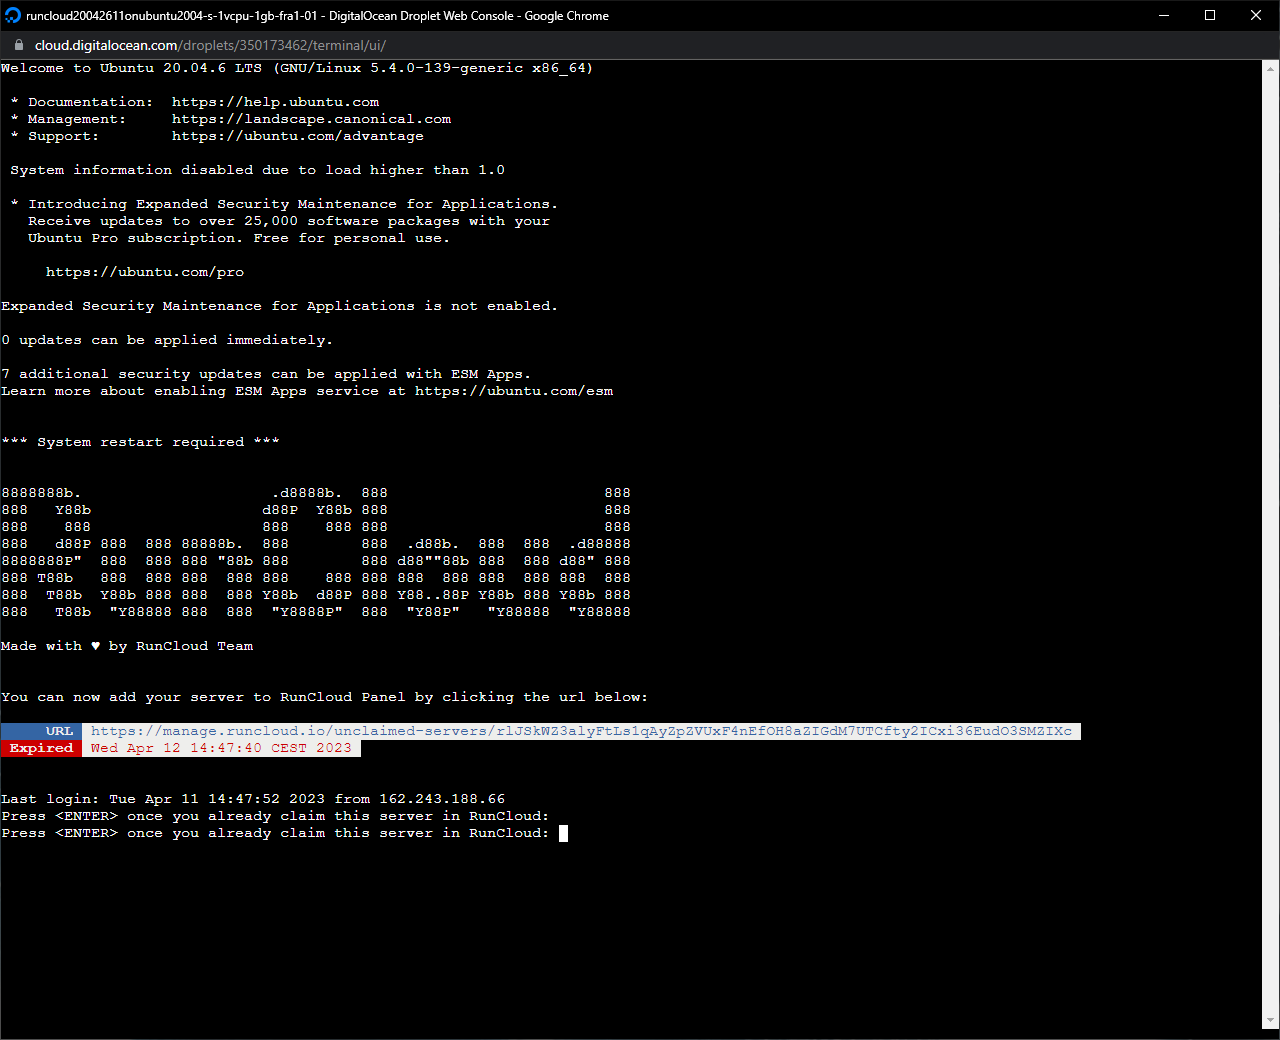
    Once your server is up and running, log into it using SSH. You can use DigitalOcean’s in-built SSH feature for this. After logging into the server, click on the URL displayed to connect this server to your RunCloud account.

    If clicking the URL doesn’t work, you can copy and paste the URL into your browser. You will be asked to enter the name of the server and that’s it! You can now manage this server directly from the RunCloud dashboard.

    Securing Your Droplet with a DigitalOcean Cloud Firewall for RunCloud

    DigitalOcean’s Cloud Firewall protects your RunCloud server from unauthorized access. In this section, we will explain to you how to create and apply a firewall with the necessary rules.

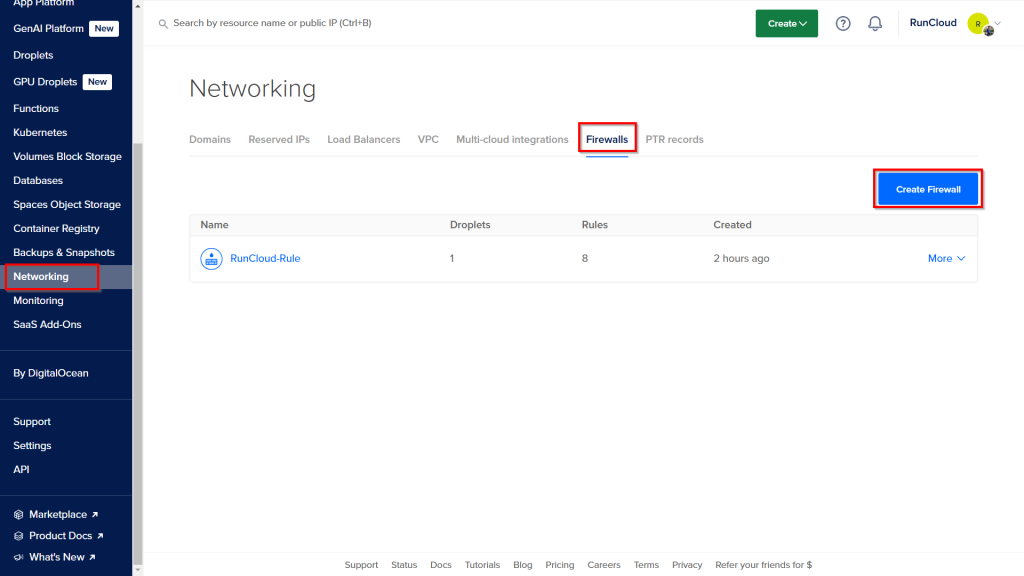
    First, you need to log in to your DigitalOcean dashboard and then click on the Networking button in the main navigation menu on the left side of the screen. From there, select the Firewalls tab to access the firewall control panel.

    On the Firewalls page, click the Create Firewall button to start the configuration process. You will first be prompted to provide a descriptive name for your new firewall. It is good practice to choose a name that clearly identifies its purpose, such as “runcloud-webserver-firewall,” which will help you manage it easily later on.

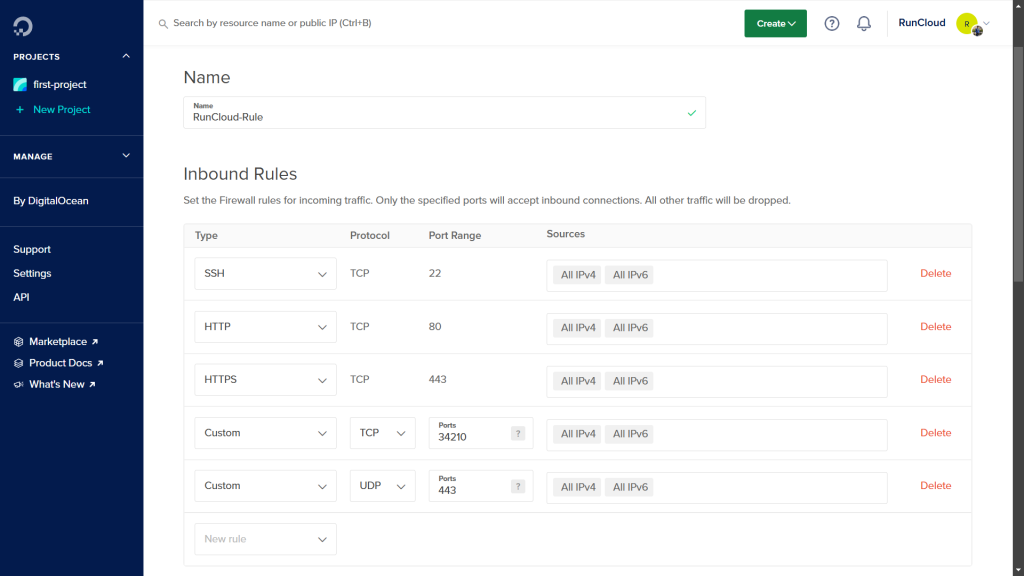
    Next, you will define the specific rules for incoming traffic. You must create a set of “allow” rules to permit connections for essential services. On the firewall creation page, add the following Inbound Rules:

    • HTTP (TCP port 80): Add a rule to allow HTTP traffic from all IPv4 and all IPv6 addresses to enable standard, unencrypted web traffic to your sites.
    • HTTPS (TCP port 443): Create a rule for HTTPS to permit secure, encrypted web traffic from all IPv4 and all IPv6 sources.
    • HTTP/3 (UDP port 443): You can optionally add a custom UDP rule for port 443 from all sources to support the newer HTTP/3 protocol and improve performance.
    • RunCloud Agent (TCP port 34210): Add a custom TCP rule to allow traffic on port 34210 from all sources, as this port is required for your server to communicate with the RunCloud dashboard.
    • SSH (TCP port 22): Optionally, you can create a rule to allow SSH connections from all IPv4 and all IPv6 addresses, which is necessary for remote server administration. We recommend deleting this rule if you only manage your server via the RunCloud dashboard and don’t plan to connect to your server via SSH.

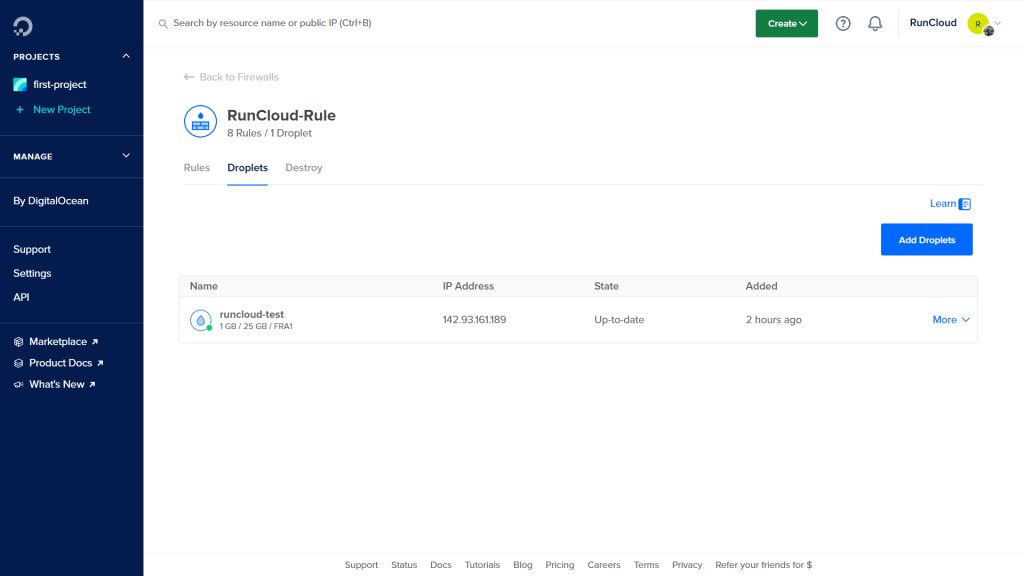
    After defining the rules, you need to apply this firewall to your server, which DigitalOcean refers to as a Droplet.

    On DigitalOcean, a single firewall can be used to multiple Droplets. In the “Apply to Droplets” section on the same page, you can search for and select your RunCloud server from the text area to immediately apply this set of rules to it. Later on, if you deploy new servers or decommission old ones, you can easily return to this firewall’s settings to add or remove it from those Droplets.

    Finally, once you have named your firewall, configured all the necessary inbound rules, and applied it to the correct Droplet(s), click the Create Firewall button at the bottom of the page. All the changes will take place immediately, and the new firewall configuration will protect your server.

    After Action Report

    DigitalOcean is one of the top choices to host your websites in the cloud. You can set up your DigitalOcean servers easily using RunCloud’s automatic integration, as well as using a marketplace image.

    If you’re tired of managing your own servers – you should switch to RunCloud. RunCloud is built for developers that want to focus on shipping great work, not on managing their infrastructure. We provide a painless server configuration experience, so you don’t need to spend hours figuring it out.

    Get started with RunCloud today, and get up and running in minutes.

  • How To Install WordPress With RunCloud

    How To Install WordPress With RunCloud

    By far the most popular content management system, WordPress powers more than 40% of the web, and of all websites globally that use a content management system, over 65% of them are powered by WordPress.

    Combine RunCloud’s powerful server management capabilities with the #1 CMS in the world, and you have a winning formula. Fortunately, RunCloud’s server management console makes it extremely quick and simple to install WordPress on your server. With a one-click install, you can be up and running with a new site in just moments.

    In this guide, we’re going to give you a comprehensive, step-by-step overview of how to install WordPress with RunCloud. Let’s get started!

    How to Install WordPress with RunCloud

    Here are the steps you need to follow to install WordPress with RunCloud.

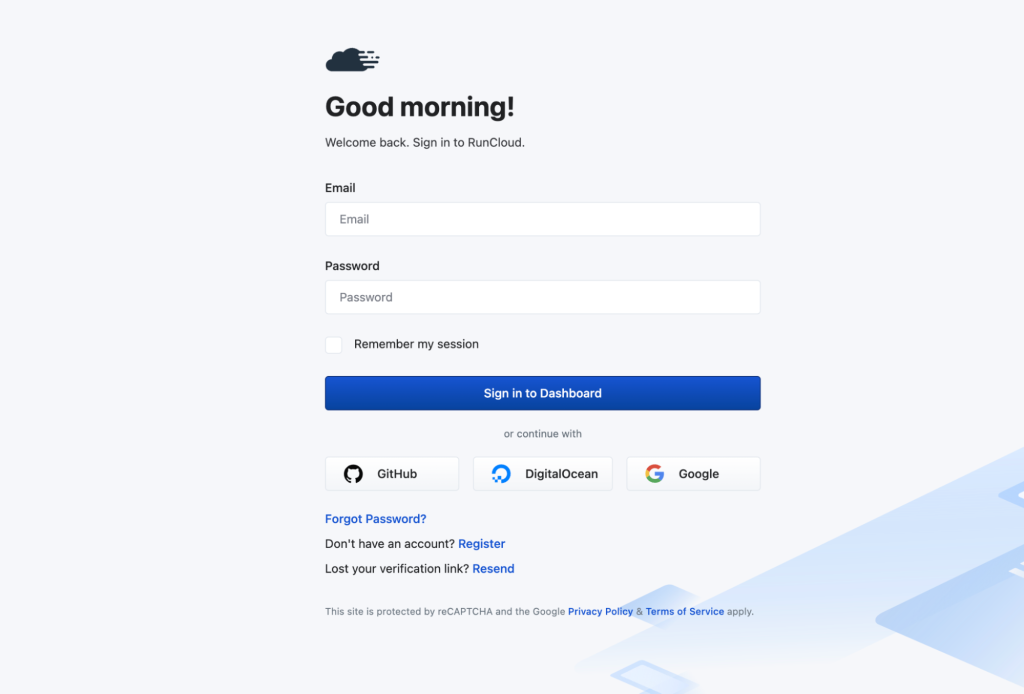
    1. Log into RunCloud

    To begin with, you’ll need to log into RunCloud:

    log into RunCloud

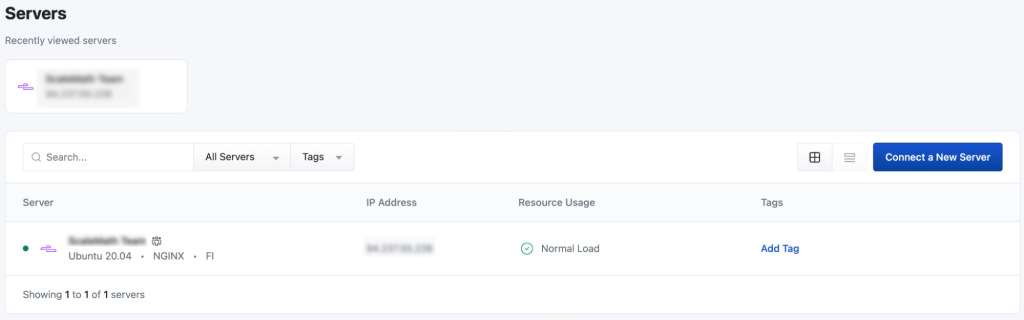
    Once you’re logged in, head to the Servers page, where you’ll be able to see all the connected servers:

    runclouds servers page

    You can perform a one-click install of WordPress on any listed server.

    2. Deploy New Web App

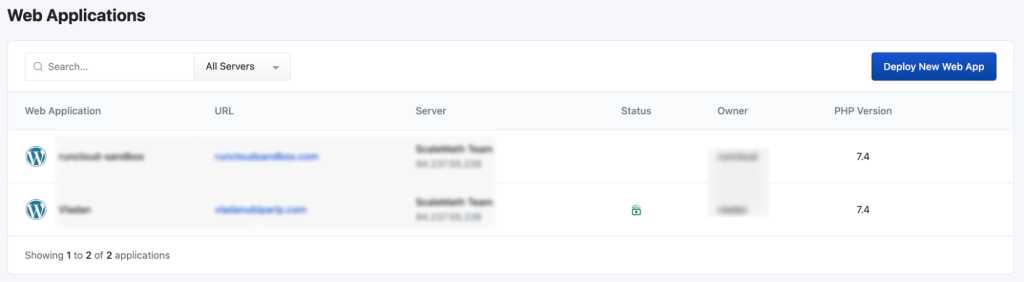
    If you click on Web Applications in the left sidebar, you’ll be able to see a list of all current web apps (such as WordPress) running on your servers. For instance, in the screenshot below, you can see that two WordPress installations are running on the same server:

    runclouds web applications panel

    To launch a new installation of WordPress, just click on Deploy New Web App. You’ll be prompted to select a server. Select the server you wish to deploy WordPress on, and click the Deploy Web App button.

    3. Configure Your WordPress Installation

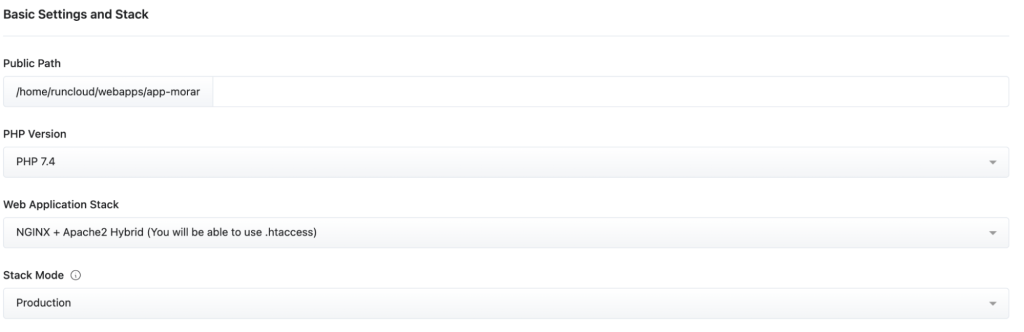
    RunCloud gives you considerable flexibility when launching a new WordPress installation. For instance, you can choose the web application stack you want to use, as well as the PHP version that you wish to launch with.

    RunCloud supports PHP 7.2 to PHP 8.1, and you have three options when selecting the web application stack:

    • NGINX + Apache2 Hybrid (you can use .htaccess)
    • Native NGINX (faster, but no .htaccess)
    • Native NGINX + custom configuration (manual NGINX implementation, ideally for advanced users)
    configuring wordpress installation, path, php version, web app stack and stack mode

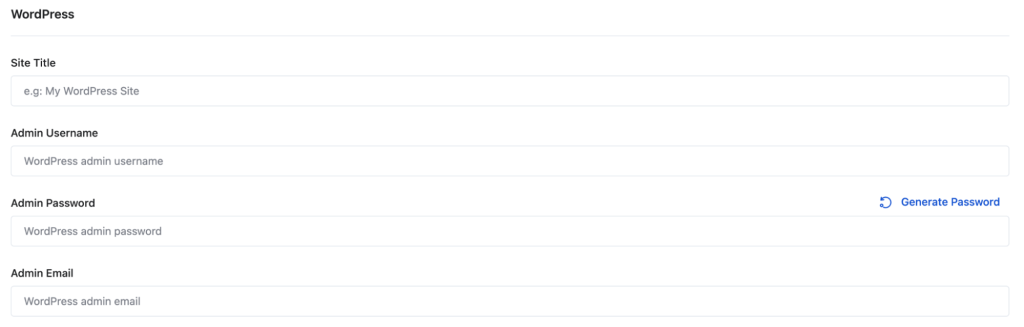
    During this process you can also select the site title, and set an admin username, password, and email:

    configuring wordpress site title, admin username, password and email

    4. Map Domain and Install the SSL

    Security will almost certainly be a consideration, and this can also be selected during this process. RunCloud lets you install the SSL certificate before the site is launched, and you also have the option to use one SSL for all domains, or a different one for each:

    installing the ssl

    Alternatively, you can enable AutoSSL, which deploys a new Let’s Encrypt SSL certificate for all new domains.

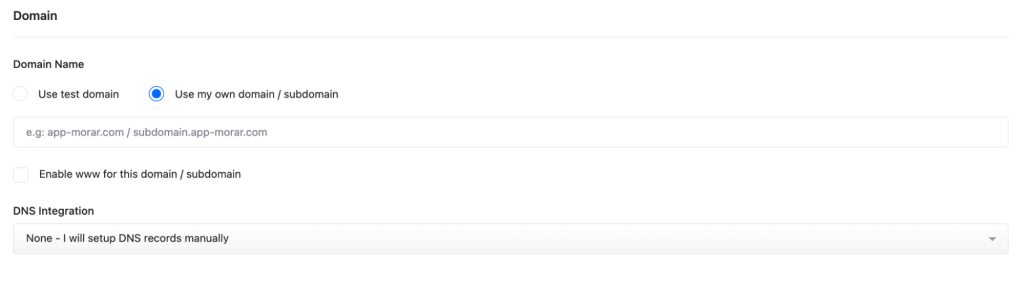
    Once you’re done, the next step is to map the domain. You can either use a test domain from RunCloud, or use your own:

    mapping the domain

    RunCloud also gives you the option to set your DNS records manually (through your host) or use Cloudflare. Once you’ve selected your preference, just click on Deploy Web App (in the bottom-right).

    5. Review Your Newly Deployed WordPress Install

    reviewing newly deployed wordpress installation

    Within a few moments your new site will be installed and running, and you will be able to view traffic stats and information about your newly deployed WordPress installation within your RunCloud dashboard.

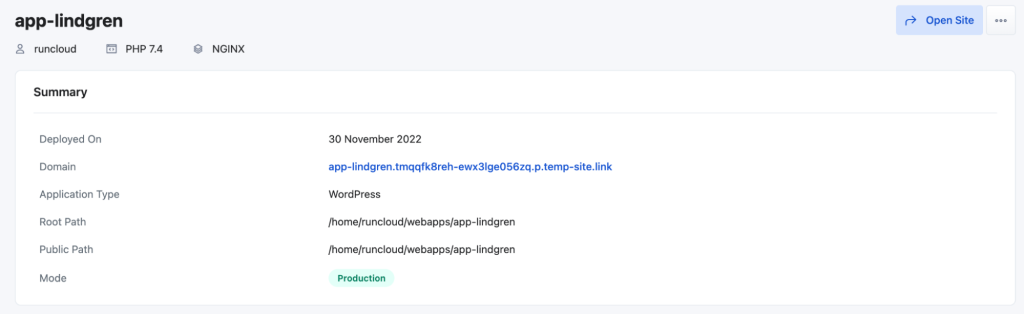
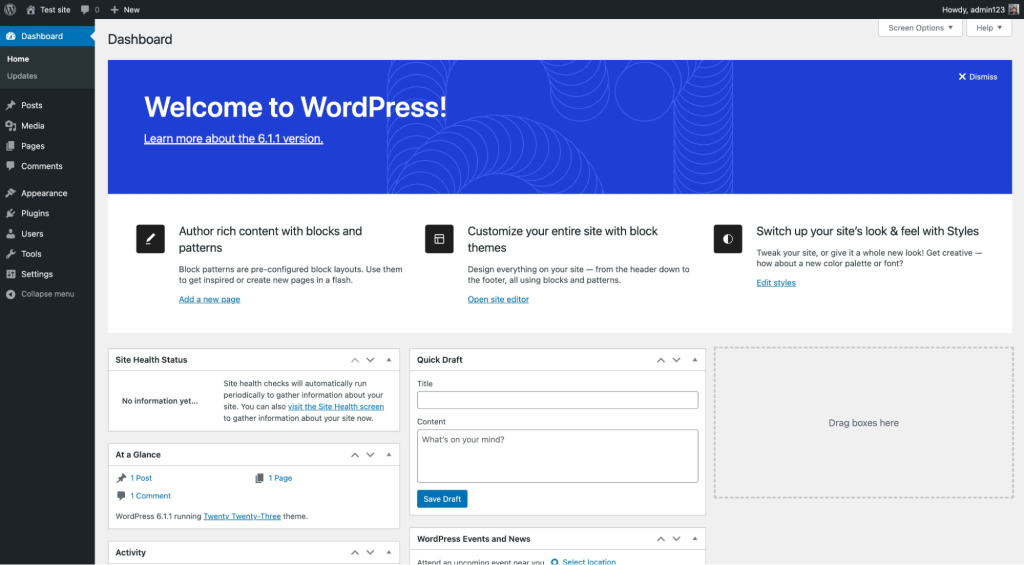
    To view this information, click on Open Site from the top right of your RunCloud page to log into the WordPress dashboard automatically, as shown below:

    new wordpress dashboard

    The new WordPress installation will also appear in your Web Applications tab:

    new wp installation in web applications tab

    That’s it! You’ve successfully launched a new installation of WordPress using RunCloud!

    After Action Report — RunCloud Makes Server Management Incredibly Easy

    With RunCloud, launching a new web app, such as WordPress, is incredibly easy. RunCloud offers a 14-day money back guarantee, so you can try it out without a long-term commitment.

    Have anything else to share? Join the conversation by sending us a Tweet! 💬

  • How To Speed Up DNS Propagation

    How To Speed Up DNS Propagation

    Are you perplexed by the complexities of the DNS system? Don’t worry, you are not alone! Even though the DNS standard was established in 1986, countless memes on the internet suggest that it still baffles people, and even the tech titans like Meta find it tricky to work with.

    In this article, we will discuss what DNS propagation is, how it affects your website and how you can speed it up. Let’s dive right in!

    What is DNS Propagation

    DNS propagation is the time it takes for changes made to a domain’s DNS records to take effect across the internet. When you make a change to a domain’s DNS settings, it can take some time for that change to be reflected everywhere on the internet. This is because DNS records are cached on different servers all over the world, and it takes time for those servers to update their records.

    Why Should I Care About DNS Propagation?

    You might not need to worry about DNS propagation if you’re just a casual internet user. But if you’re responsible for managing a website or domain, then it’s important to understand how DNS propagation works, because it can affect how quickly your changes take effect.

    For example, if you’re transferring a domain to a new web hosting provider, it’s important to be aware of how long the DNS propagation will take, so that you can plan accordingly. If you’re not aware of DNS propagation, you might assume that the changes you’ve made to your domain’s DNS settings will have taken effect immediately, when in reality it could take several hours – or even longer – for the changes to be fully propagated across the internet. This can lead to confusion, and potentially cause problems for your website or domain.

    How To Propagate Changes Faster

    Method 1: Reduce time-to-live (TTL) Value

    The best way to speed up DNS propagation is to reduce the time-to-live (TTL) value for your DNS records. This tells DNS resolvers how long to cache your DNS records, so reducing the TTL value will ensure that DNS resolvers refresh your records more often, which can speed up the propagation process.

    However, this comes with a few downsides:

    • If the DNS records for your website expire quickly, it can cause your site to appear slow to visitors, because their browsers will have to fetch new records more frequently, which takes time. This can be frustrating for users, and make them less likely to continue using your site.
    • It can lead to an increase in the number of requests sent to your DNS authoritative resolver. If you maintain your own servers, this can put additional strain on your system, potentially increasing hosting costs and server charges.

    If you plan ahead of time, you can avoid this by temporarily reducing the TTL values of your DNS record one day before you plan to make changes. This will ensure that all the records will expire quickly when you want them to.

    For example, if your DNS records have the TTL value of 1 day, then you can change it to 5 minutes the day before. On the next day, you can change the DNS records to point to new servers. This will ensure that all the new visitors will be sent to your new server within 5 minutes of making the changes. Once you are satisfied that everything works as expected, you can increase the TTL value back to 1 day.

    Method 2: Request DNS Resolvers To Flush Cache

    If you didn’t plan ahead of time, and you need to update your DNS records immediately, then you can request DNS resolvers to flush cache values of your records, and update them with new existing values. Here are the links for some of the major DNS providers:

    Although flushing the cache from these servers will update the records for the vast majority of users on the internet, many technology enthusiasts and enterprise clients who have the time and resources to maintain their own DNS servers will still have a stale copy of your DNS records until it expires.

    Check If DNS Records Were Updated Successfully

    Method 1: Use A DNS Propagation Checker

    You can use a DNS propagation checker to monitor the progress of your DNS changes. These tools can help you track when your changes have been picked up by different DNS resolvers around the world, so you can see how quickly the propagation process is progressing.

    We recommend using Site24x7’s DNS Propagation Checker which checks the DNS records of a given address against multiple nameservers from different parts of the world.

    Method 2: Use DiG Command

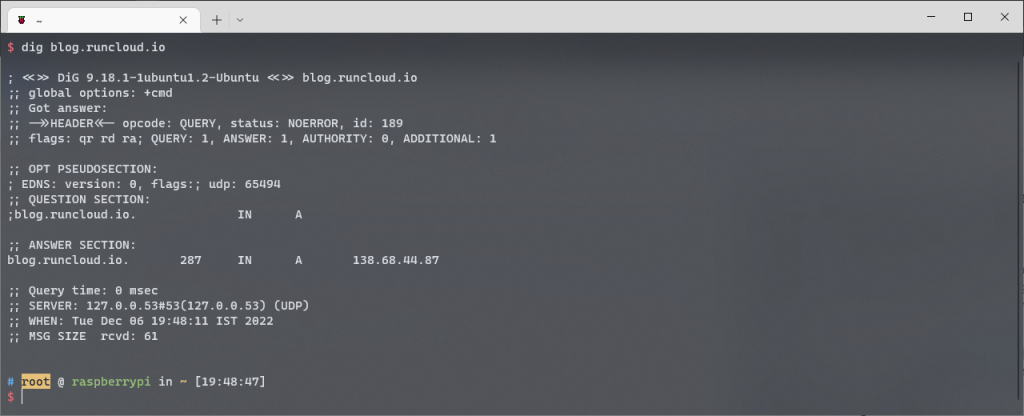
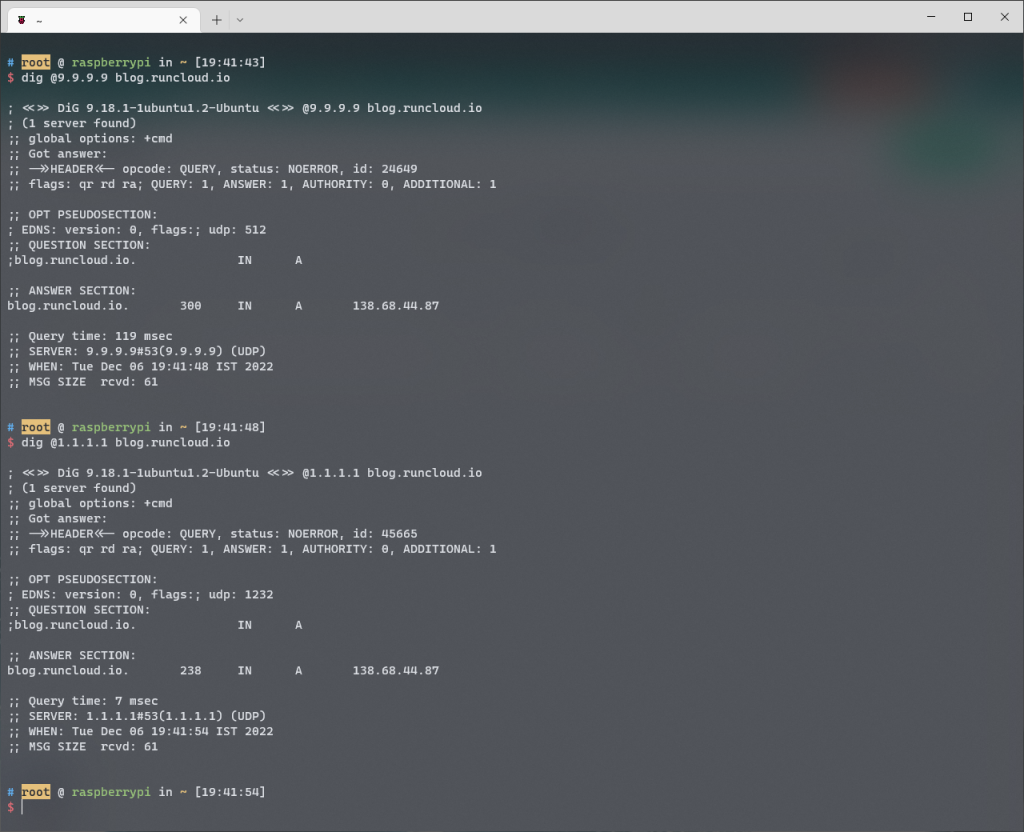
    If you know your way around the command line, and would rather use a terminal instead of a third party service – then you are in luck. Almost all Linux distributions have the ‘dig’ tool preinstalled; you can use it to check records for any website by using the following command:

    $ dig blog.runcloud.io
    using dig command variation 1

    You can also query the records from a particular nameserver instead of using the default DNS resolver by specifying the IP address of the server:

    $ dig @1.1.1.1 blog.runcloud.io
    using dig command variation 2

    Summary

    Making DNS changes (and them taking longer than usual) can be annoying to have to wrap your head around but as long you factor in changes taking time, you should be able to avoid any potential problems. If you already use RunCloud, you’ll likely know that we encourage using Cloudflare which is also what we use for all of our own systems and provides fast, global DNS propagation. Still considering making the switch? Get started with your 5-day free trial today.

  • What Are Docker Logs And How To Use Them

    What Are Docker Logs And How To Use Them

    Docker is one of the most popular tools used by software developers, as it makes it easy to create, deploy, and run applications by using containers.

    By using containers, developers can package up an application with all of the parts it needs, such as libraries and other dependencies, and ship it all out as one package.

    That way, the application will run quickly and reliably from one computing environment to another. First released in 2013, Docker has quickly become a vital tool in any developer’s arsenal.

    One way to keep track of development is to review Docker logs regularly. In this post, we’re going to discuss what Docker logs are and how you can use them.

    What Are Docker Logs?

    Docker logs are files that contain information about the activities that have taken place within a container. This information can be helpful for debugging purposes or for gathering performance data.

    By default, Docker logs are stored in JSON (JavaScript Object Notation) format. However, you can also configure Docker to store logs in other formats, such as GELF (Graylog Extended Format) or Syslog.

    Docker containers generate two types of logs: container logs and daemon logs. Container logs are generated by the application running in the container. Daemon logs, on the other hand, are generated by the Docker engine itself and include information about things such as container startup and shutdown, as well as errors that occur during container execution.

    Docker logs are important because they can help you troubleshoot issues with your containers.

    For example, if you notice that your container is taking longer than usual to start up, you can check the logs to see if there’s any information about what’s causing the delay.

    Additionally, if you’re having problems with your application crashing or otherwise not working properly, the logs can be helpful for debugging purposes.

    Where To Find Container Logs

    Container logs can be found in the /var/lib/docker/containers directory on Linux hosts and in C:\ProgramData\docker\containers on Windows hosts. Each container has its own log file; the name of the file is {container_id}.log. 

    Container logs include information about stdout (standard output) and stderr (standard error) output from the application or service running inside the container. They also include any information logged by the application itself.

    Where To Find Daemon Logs

    Daemon logs can be found in /var/log/docker.log on Linux hosts and in C:\ProgramData\docker\log\docker.log on Windows hosts. Host logs include information about events that occur on the host, such as when a container is created or destroyed. They also include any errors or warnings generated by the Docker daemon itself.

    How To Use Docker Logs

    Now that we know what Docker logs are and where to find them let’s take a look at how to use them effectively.

    The most common way to access Docker logs is through the command line interface (CLI). You can execute the docker logs command to access the logs. 

    This command allows you to view the logs for a specific container. For example, let’s say you want to view the logs for a container with the ID “abc123”. You would use the following command: 

    $ docker logs --tail 50 abc123 

    This command would return the 50 most recent log entries for the container with the ID “abc123”.

    This command essentially retrieves logs in batches that were available at the time of execution.

    How to Clear the Docker Log File

    There might be times when you want to get rid of old logs. You can use a simple command to do this. By default, the log file is located at /var/lib/docker/containers/<container_id>/<container_id>-json.log on Linux machines. 

    You can also view the contents of the log file by running the following command:

    sudo docker logs <container_id> 

    If you want to delete the logs file entirely, you can use the rm command. Be warned, however, that this will permanently delete the file, and there is no way to recover it. 

    sudo rm /var/lib/docker/containers/<container_id>/<container_id>-json.log 

    If you want to keep the log file but just clear its contents, you can do so by running the following command:

    sudo truncate -s 0 /var/lib/docker/containers/<container_id>/<container_id>-json.log 

    This will leave an empty log file that Docker will continue to write to as new events occur in your containers.

    If you’re on Windows, Docker uses a virtual machine known as MobyLinuxVM. Logs are generally stored in the file path: /var/lib/docker, though you need a container with full root access to delete the log files. 

    To do this, first, run the following command:

    Find /var/lib/docker/containers/ -type f -name “[name].log” -delete

    This will delete the specific log file on Windows.

    After Action Report – Keeping On Top of Docker Logs

    Docker logs can provide much-needed insights about events in your containers and can also help you trace any errors.

    As your development workflow grows, you’ll want more granular control over your servers. RunCloud lets you manage your cloud servers, and deploy websites and web apps, all through a secure management panel.

    Have any tips or tricks to share? Join the conversation by commenting below, or send us a Tweet about how you use Docker logs!

  • How To Resolve The “Email Address is not Verified” Error With AWS SES

    How To Resolve The “Email Address is not Verified” Error With AWS SES

    Amazon Simple Email Service, also known as AWS SES, is an email marketing platform that you can use to send and receive emails through your own addresses and domains.

    AWS SES can be used to send transactional emails, including any personalized emails or for newsletter campaigns. It’s a highly modular platform that you can use to create email marketing campaigns, set up autoresponders, and even use it for live ticketing support.

    However, if you’re getting the “Email address is not verified error”, this post will guide you on how to solve it.

    What is the “Email Address is not verified” Error?

    When you start Amazon SES, it launches in a sandbox environment before you can switch it to production. Once you sign up, Amazon will verify whether you actually own the email address and the domain.

    The error usually arises when you try to send emails from an entity, such an email address or a domain, that hasn’t been verified in Amazon SES. Here’s how you can fix this error.

    How to Fix the “Email Address is not verified” Error

    Here’s a brief guide on how to fix this error:

    Verify if Your SES Account is Still in Sandbox Mode, and Request Production Access

    This is easy to do. Just open your SES console in the region by selecting “Account dashboard”. SES is region-locked, so you’ll need access for each region that you plan on sending emails from.

    If you’re in Sandbox mode still, simply click on “Request production access”. You’ll have to submit a form to AWS, and it may take up to a few days (usually a few hours) to get approval.

    Once you get production access to AWS SES, you’ll be able to send emails freely from any of the verified identities.

    Check Your Verified Identities

    Before you start sending emails, make sure you look in the left sidebar menu to ensure that the email address or domain that you’re using to send emails from is verified.

    Whenever you add a new email address, you’ll receive a confirmation email with a link to verify. As soon as you click that link, its status will change.

    Similarly, when adding a domain, you’ll have to add the record that you receive with the registrar in your DNS records. It may take up to 48 hours for DNS records to propagate, but once they’re done, the status of your domain will also change to verified.

    After Action Report — Getting Started with AWS SES is Easy

    That’s it! Fixing the “Email address is not verified error” is quite easy with AWS SES. Once you fix the issue, you’ll be able to send emails freely through the platform. Have you experienced this issue before? Let us know how you fixed it, and join the conversion in the comments (or by Tweeting @RunCloud_io)!

  • How To Use Autoptimize WordPress Plugin To Optimize Your Sites

    How To Use Autoptimize WordPress Plugin To Optimize Your Sites

    Autoptimize is a popular WordPress plugin to optimize your WordPress sites with more than 1 million active installs and around 1,200 five stars reviews at WordPress.org.

    In this post, we’ll discuss how to use Autoptimize to improve the performance of your WordPress websites.

    Who needs Autoptimize?

    If you use lightweight WordPress theme/plugins in your WordPress site, you probably do not need any extra optimization. You only need to use a cloud server, and your WordPress will be fast. In this case, adding server-side page caching like RunCloud Hub is more than enough to improve WordPress performance.

    But when you use a WordPress theme and some plugins that add extra JavaScript and CSS files to your site, you will probably need Autoptimize to improve your site performance.

    Autoptimize + RunCloud Hub

    Can we combine Autoptimize and RunCloud Hub?

    Short answer, YES!

    In fact, Autoptimize and RunCloud Hub are a perfect combination to optimize your WordPress site.

    Autoptimize works on the WordPress side to optimize your JavaScript / CSS / HTML files on your web page, and RunCloud Hub works on the server-side to cache the optimized version web page.

    JavaScript Optimization 

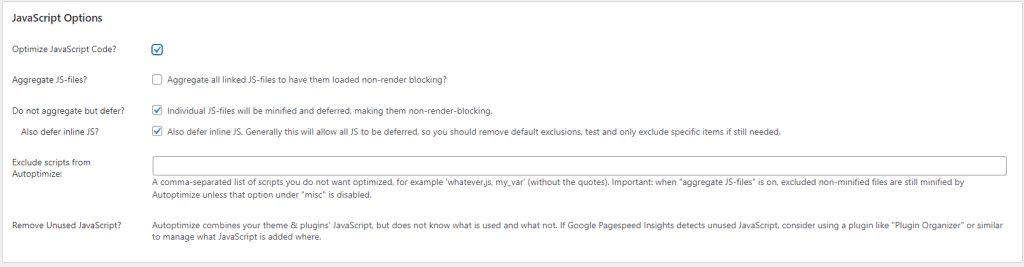
    Autoptimize comes with some options to optimize JavaScript files on your web page. These JavaScript files come from WordPress core, theme, and active plugins. When you enable the “Optimize JavaScript Code?” option, JavaScript files will be minified and compressed to reduce the file size. A smaller JavaScript file size will make your web page more lightweight.

    javascript options on autoptimize

    By default, the setting for JavaScript is “don’t aggregate but defer” and “also defer inline JS” and no exclusions. Aggregation is off by default since the number of HTTP requests aren’t as important with HTTP/2.

    These two default options are enough for many WordPress sites to both minify and combine JavaScript files.

    Please remember that these options work on your web page only if you have well-coded JavaScript codes. If you use a theme/plugin that has poorly coded JavaScript codes, these options can break some features in your web page that rely on JavaScript.

    If these options work nicely on your site, then you can stop here or explore other JavaScript optimization features. You can also add a list of scripts that you do not want to optimize.

    CSS Optimization

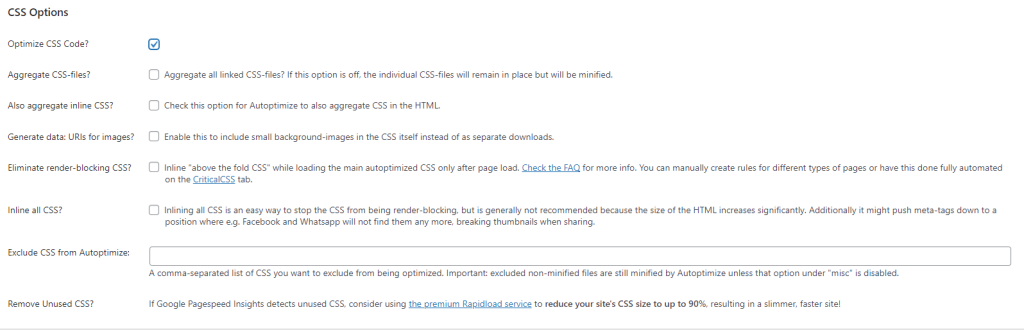
    Autoptimize comes with some options to optimize CSS files on your web page. The main CSS files come from your active WordPress theme that controls the visual presentation of your web page. Other CSS files can come from your active WordPress plugins.

    CSS aggregation is off by default, though you can enable it with a click. Please remember that these options work on your web page only if you have well-coded CSS codes. It’s off by default to prevent any major issues.

    If you use a theme/plugin that has poorly coded CSS codes, these options can break your web page layout.

    css options on autoptimize

    If these options work nicely on your site, you can try to enable the “Also aggregate inline CSS?” option. Autoptimize will aggregate CSS in the HTML.

    HTML Optimization

    HTML optimization is a bonus after you optimize JavaScript and CSS files in your site.

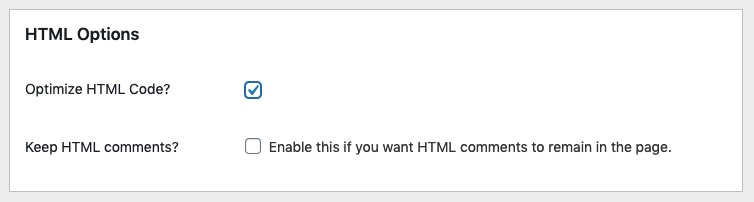
    html options on autoptimize

    Enabling the “Optimize HTML Code?” option will minify the HTML output of your web page. It will make the HTML output code not easily readable, but the file size will be smaller.

    Extra Optimization

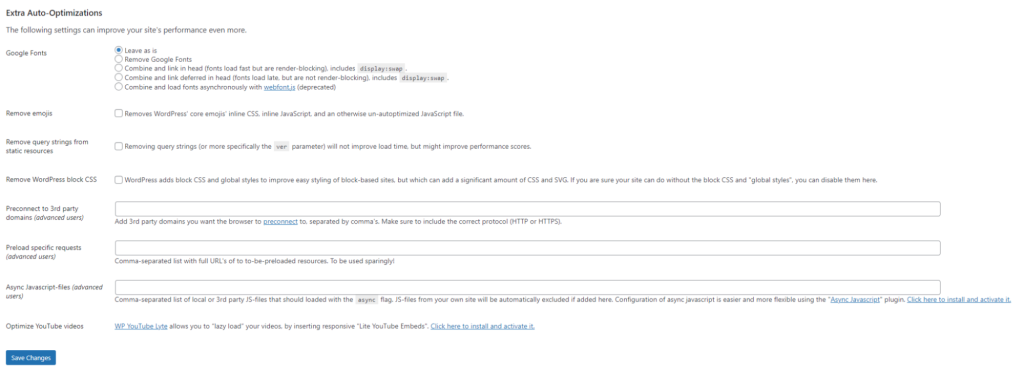
    Autoptimize has some extra auto-optimization options under the Extra tab.

    Google Fonts Optimization

    You can use this option to optimize Google font loading on your website.

    We recommend using either the “Combine and link in head” or “Combine and link deferred in head” option. Please test to see which one works best on your site.

    If your website caters to visitors from the European Economic Area, you may want to learn how to stay GDPR compliant while using Google Fonts.

    Remove emojis

    You can enable this option to remove WordPress core emoji’s inline CSS and inline JavaScript, except you use this emoji feature on your website.

    Remove query strings from static resources

    If you enable JavaScript and CSS optimization, this option is no longer needed.

    But if you disable JavaScript and CSS optimization, you can try to enable this option.

    Please remember that this option will not improve your web loading time and performance, but it might improve performance scores when you test your website using any page speed testing tool.

    extra auto optimizations on autoptimize

    Remove global styles

    Introduced with WordPress 5.9, global styles often add CSS & scalable vector graphics (SVG) to your pages automatically. An option is now available to remove global styles.

    Critical CSS / Above-the-fold CSS

    The CSS optimization in Autoptimize is enough to optimize your CSS files on your site. The optimized CSS file is loaded in the head with render-blocking. You probably know that Google Page Speed Insight complains about render-blocking CSS on your site. If you really want to optimize your website for Google Page Speed Insight, you will probably need above-the-fold CSS.

    The idea is simple. Above-the-fold is all the content you see on page load, before scrolling. Above-the-fold CSS or critical CSS will be loaded inline on the head to render the content to your user as soon as possible. Other CSS files will be loaded later in non-render blocking after page load.

    YES, critical  CSS is part of CSS optimization, but not everyone needs it.

    There are two ways to use critical CSS in your site using Autoptimize.

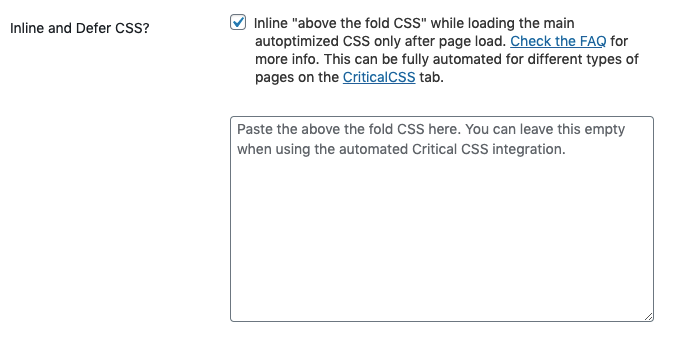
    Same critical CSS for all pages

    If you think you can use the same critical CSS for all pages, you can use the “Inline & defer CSS” option under the CSS Optimization section.

    incline and defer css on autoptimize

    You can check this list of tools to generate critical CSS for your website.

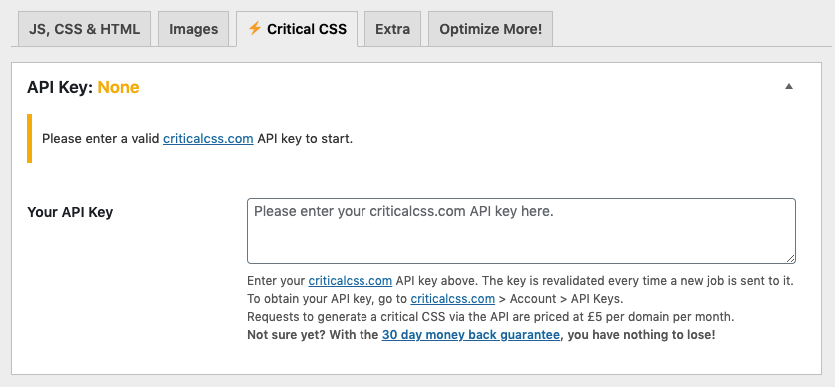
    Different critical CSS for different pages

    In this case, you will need to sign up for a premium service criticalcss.com to generate different critical CSS for each page on your site automatically.

    critical css on autopimize

    Rules Panel

    rules on autoptimize

    A rules panel is now available to help users create manual rules, even if you do not have a Critical CSS API key.

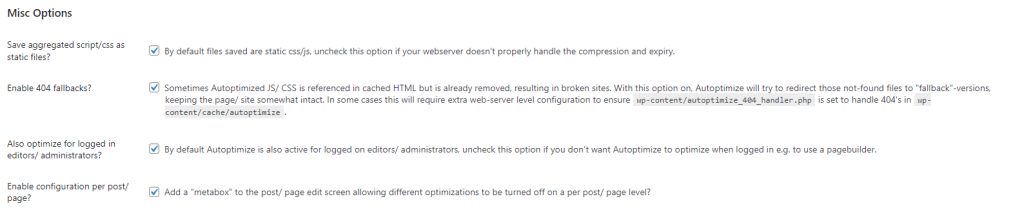
    Misc Options

    You will probably see some options in the “Misc Options” section. If needed, you can enable all of these options.

    The “Save aggregated script/css as static files?” option is very important to cache the optimized JavaScript/CSS files as static files.

    This is why you will see the “Autoptimize – Delete Cache” option on the admin bar to allow you to remove the optimized JavaScript/CSS files, and it will be regenerated again.

    misc options on autoptimize

    If you use RunCloud Hub and Autoptimize combo, when you click “Delete Cache” on Autoptimize, it will automatically clear RunCloud Hub caches. And when you click “Clear All Cache” on RunCloud Hub, it will also automatically clear Autoptimize caches.

    You can now “Enable configuration per post/page?” to change settings per page, or per post, which is ideal for optimizing Largest Contentful Paint for your site.

    After Action Report — Autoptimize Helps Boost Site Performance

    Autoptimize is a popular WordPress plugin to optimize JavaScript / CSS / HTML output of your web page to improve your WordPress performance. With its latest string of new features introduced in version 3.0.3, Autoptimize is a fantastic choice if you have additional CSS and Javascript files on your site. Do you use RunCloud’s server-side caching & are considering pairing it with Autoptimize? Awesome, feel free to join the conversation below to share your experience. 💬

  • How To Optimize Laravel for Performance (8 Expert Tips)

    How To Optimize Laravel for Performance (8 Expert Tips)

    With over a million websites powered by Laravel, Google pushing the importance of website speed, and users less & less accepting of anything other than an incredibly smooth user experience – some are giving PHP & frameworks like Laravel the reputation of being less performant than other frameworks. While there very well may be truth to this, that doesn’t mean there isn’t anything you can do about it – so, in this guide, we’ll dive deep into how you can optimize Laravel for performance.

    Expert Tips on Optimizing Laravel

    This article will go over several important tips, each with step-by-step guides to optimize your Laravel website. While some of the steps may sound technical, the steps will be easy to follow and recreate on your own screen.

    Using Artisan Commands

    Although Artisan commands are commonly listed as part of the optimization tips, it’s not really a hack. Artisan is just a Laravel command line interface that helps you execute instructions through simple commands. We’ll be using a lot of these commands later on.

    Artisan Optimize Command

    A quick search online will reveal many articles recommending the use of the Artisan Optimize Command. While this used to help, with much improved PHP op-code caching it’s no longer relevant. It was deprecated in Laravel 5.5, and since 5.6 it’s been removed completely. So don’t go looking for this solution as it will no longer exist!

    Config Caching

    Any web developer today will certainly agree that caching your files is a great way to save on loading time and increase website performance. By generating a ready, easy-to-read template of your website that your servers read instead of all your web files every time someone loads your site, loading times are cut dramatically.

    The only problem with caching is that it sets your website to a semi-permanent state. If you plan on making changes anytime soon, you’ll have to undo the cache before configuring your website and then redo it when you’re done.

    Aside from that, caching with Laravel is considerably easier than other frameworks because you can do so through caching engines that don’t involve coding.

    If you’re ready to cache your website, simply type this in the Artisan command line:

    php artisan config:cache

    Remember, any changes you make on your site after this won’t have any effect because of your cache. If you want to refresh the cache config, simply type the command again. Otherwise, you can also clear the cache by typing in:

    php artisan config:clear

    There are multiple ways you can cache with Laravel, but these two basic commands are enough to get you started.

    Route Caching

    A route cache is a collection of routes around your website that helps load your pages faster. This works by avoiding the taxing and sometimes slow process of mapping your routes from scratch. With route caching, Laravel can temporarily load the routes from a pre-compiled cache instead of starting from scratch for every new user. The cache lasts only until the user exits out of your website.

    Just like config caching, any changes you make to your website after the cache will not have any effect until you update the route cache. It’s important to remember to update the cache after making any changes to your website’s structure.

    Here’s the command that you have to run to start the route cache:

    php artisan route:cache

    To clear the cache, you use a similar command:

    php artisan route:clear

    Route caching is a simple way to make your website feel snappier and load faster.

    Use Queues

    Laravel queues work like your CPU. Whenever your computer processes a task, it does so in the most efficient way possible that doesn’t degrade the quality of the user’s experience. This means that when you’re rendering a file or doing something resource intensive, your CPU makes sure that you still have processing power left for your other tasks until its limit is reached.

    The way this works is that your CPU queues tasks after each other, with no strict adherence to order. If you’re rendering a file, then opening a browser window, your CPU will insert the browser process earlier to make sure it opens without delay. Just like a CPU, Laravel can also improve web performance by offloading time-consuming processes to a queue.

    Simple examples of this are:

    • Sending emails
    • Downloading files
    • Uploading files

    These tasks don’t need to be seen by the user and can be done as a background process.

    Queues are an in-depth trick though and we, unfortunately, don’t have the space to cover it fully within this article. Instead, you can check out the official Laravel documentation for this. If you’re curious about what the basic commands look like, here are some examples from Artisan:

    php artisan queue:work
    SendEmailJob::dispatch($to, $body);
    

    Laravel also has several queue driver support documentations and offers unique solutions for each, such as Horizon, a dashboard that monitors your queue system.

    Use Eager Loading

    Eager loading is a way of coding rather than a simple command that you can run via Artisan.

    Eager loading is the process of sending a larger, nested data structure with more than enough information for the query. Although sending a larger query might require more memory or data, since the internet is already at blazing fast speeds, several more kilobytes or even megabytes will be barely noticeable for most users. These larger data queries are better for the server since it means sending one large query, rather than processing several hundred queries just to look for the user’s data.

    The opposite of this is lazy loading, which might be what your website is utilizing by default, where single items of data are retrieved individually as and when required, resulting in many more server requests. Here’s what the query for that looks like:

    $books = App\Book::all();
    Foreach ($books as $book) {
    Echo $book->author->name;}
    

    Eager loading on the other hand looks like this:

    $books = App\Book::with(‘author’)->get();
    Foreach ($books as $book) {
    Echo $book->author->name;}
    

    A simple example where this is used is in games. Most games use eager loading when preparing levels or discrete phases. Whenever you’re loading into a map, the game loads everything in advance so that you have all the assets you need — even if you don’t explore or use all the objects inside that map.

    The main downside to eager loading has always been the amount of information users would need to download or prepare to access your site. Each query would mean sending a file that’s larger than technically necessary. However, with mobile data and home Wi-Fi fast becoming near-gigabit speeds, file sizes have gone down the priority list when it comes to optimization.

    Clear Up Unused Service

    Another tip that involves how your code is clearing up any services that are unused by the user.

    It’s common to add and start a service when your website loads, but unused services can add unnecessary burdens on your system and strain your server speed. This is especially apparent when handling larger amounts of visitors. You may even have services that were utilized at the beginning of your development process but are no longer used today.

    You can open the Laravel app and go to:

    config/app.php.

    This will show a list of all the services installed on your server. Simply comment out the services that are unused.

    NOTE: be careful with the services you’re trying to disable. You may accidentally disable a service that plays a huge role in your site, causing certain parts of your website to malfunction or not start at all.

    Run tests and check the services manually on staging machines first before disabling services you aren’t sure about.

    Remove Dev Dependencies

    Dev dependencies are often injected into your system by default when installing Laravel or a composer for the first time. While these dependencies do aid in building your website, you don’t need these dependencies when your site is up and running.

    You can input this simple command through Artisan to remove those dependencies:

    composer install --prefer-dist --no-dev -o

    After running this command a package or directory will be created (possibly a zip file or similar) which you can then use to install the release. The command specifies only to retrieve and package the official distribution, without dependencies.

    NOTE: Dev dependencies are different from dependencies that are required at runtime. Don’t delete runtime dependencies as this may affect your website’s performance or even crash certain parts of your site.

    General Web Optimization Tips

    There are also several optimization hacks that you can do for your website outside of Laravel. If you’re looking to polish every aspect of your site and increase its performance and rankings on Google, then here’s what you should do next.

    Use a Fast Host

    A fast host is undeniably the first thing you should start looking at. Is your host fast enough and can it handle the number of visitors that your website is currently receiving, or which you anticipate will be visiting following your business’s growth? This is an essential question to ask at the moment with Google actively punishing websites which it deems too slow (including speed responses measured in milliseconds).

    Going for a dedicated 3rd-party host is always the best option. Shared hosts are too slow and hosting physical servers yourself is expensive and hard to scale. 3rd-party hosts on the other hand will cost you between $25 to $150 per month on average and will provide you with blazing fast speeds, secure connections, and website optimization tools.

    Minify CSS and JS Files

    Your CSS and JS files are laid out to be easily read by default. This means your files have spaces, indentations, and other formatting that make it easy to read for us. However, your website doesn’t care about these visual syntax practices and can easily read your files without them.

    Minifying your CSS and JS files means removing all of the unnecessary spaces, indentations, and other characters that take up valuable server space. Depending on the size of your website, this can make a significant difference in server response times. Just remember to keep a separate copy of the CSS and JS files that aren’t minified, in case you ever need to edit or review your code.

    This process can be carried out very quickly by using any one of the many online CSS and JS minifiers available for free.

    Compress Your Images

    Images are one of the biggest performance leaks in websites that aren’t optimized. This is especially true for those who upload 1920×1080 images only display it in a 540×300 format. It may be that you upload an image at the largest size you think you’ll ever need, and then just have it rendered down to the actual size in the browser, but this is hugely damaging to response times, and having multiple image files set at all of the needed resolutions is far better.

    Compressing your images will not only reduce the sizes of your image files by more than half, it will also retain the quality pretty well. Typically, you’ll have to compress the images before uploading them to your website, but there are several plug-ins and online services that will compress all the images on your site for you. From our experience, a lot of these will need to be paid for.

    As either an alternative or additional solution we often recommend clients use a CDN (Content Delivery Network) which helps boost server response times too.

    Reduce the Number of HTTP Requests

    Another major performance issue is when websites make multiple HTTP requests from the server whenever a visitor loads a web page. Typically this can involve many separate calls from JavaScript files, CSS files, and images.

    HTTP requests are basically your computer asking your website for information. Each block of information, whether that’s an image, a link, or any kind of content, will require its own separate HTTP request. Larger files will mean longer request times and many files will mean more HTTP requests.

    To find out the number of HTTP requests your website needs, you can use Google Chrome’s Network panel. You should ideally aim for a number between 10 to 30 files per page. For reference, the average number of requests is typically around 60 to 75 requests.

    With Laravel, you can reduce the number of individual HTTP requests easily by using the CodeSleeve/asset-pipeline. What this will do is to combine all of your separate assets (such as JavaScript files and CSS scripts) and combine them all into one single file. This reduces the HTTP requests down to one. Not only that, but it will also minify the code (something we mentioned earlier), which will help speed up the page loading time dramatically.

    Use a CDN (Content Delivery Network)

    If your website is hosted in the US, then it may be that visitors from across most of the US will benefit from good response times, but potentially there can be significant delays for those accessing your site from other areas around the world.

    One solution to this is to use a Content Delivery Service (CDN). These provide a cached version of either your whole site, part of your site, or assets such as images/videos/audio files on various alternate servers around the world.

    When a visitor’s browser requests to load a page from your site, the CDN determines their geographic location, and serves them the page, or assets, from the server that is located closest to them, or which provides the fastest response times.

    Getting a CDN used to mean subscribing to another 3rd-party CDN service. However, most 3rd-party website hosts already offer CDNs as part of their basic packages. To reduce the number of payments and have your website set up more conveniently, we recommend looking for a host with CDN features instead of finding a 3rd-party CDN service.

    Conclusion – Optimize Laravel for Performance

    Laravel has made its name around the web-development scene because of how easy it is to use. It’s straightforward and is fast by default. However, Laravel isn’t immune to bloat and can benefit a great deal from general maintenance and optimization tips.

    By using any of the top optimization tips we’ve included here you can combine the fantastic advantages of Laravel with the ever-growing need to keep your website fast and responsive, keeping Google (and your website visitors & users!) very happy. Do you have any specific questions about Laravel? Or think we’ve missed a top optimization tip? Join the conversation by leaving a comment below. 💬

  • How to Easily Fix The “SSL_ERROR_NO_CYPHER_OVERLAP” in Firefox

    How to Easily Fix The “SSL_ERROR_NO_CYPHER_OVERLAP” in Firefox

    Currently experiencing an “SSL_ERROR_NO_CYPHER_OVERLAP” error code in the Mozilla Firefox web browser?

    You’ve come to the right place – in this guide, we’ll show you exactly how to fix it.

    What Is The “SSL_ERROR_NO_CYPHER_OVERLAP” Error?

    The “SSL_ERROR_NO_CYPHER_OVERLAP” error occurs when your browser is unable to obtain the security data for a website you’re trying to access. Unlike other browser errors, the SSL_ERROR_NO_CYPHER_OVERLAP error happens specifically with Firefox. Google Chrome has a similar but slightly different version of it, with its message reading “ERR_SSL_VERSION_OR_CIPHER_MISMATCH“.

    SSL_ERROR_NO_CYPHER_OVERLAP Error code

    SSL stands for Secure Sockets Layer and is responsible for providing privacy, authentication, and integrity to internet communications. The “SSL_ERROR_NO_CYPHER_OVERLAP” error typically occurs when Firefox fails to get the proper security information from the website your browser is attempting to establish a connection with. This can happen for a variety of reasons…

    What Causes the SSL_ERROR_NO_CYPHER_OVERLAP Error in Firefox?

    It may be due to the website itself (something server-side) or a locally misconfigured setting in your Firefox browser. If many different websites give you the same error, it is far more likely to be your own Firefox browser settings.

    An outdated version of Firefox is also a potential cause of Firefox error “SSL_ERROR_NO_CYPHER_OVERLAP” appearing. In any case, it’s best to always keep Firefox up-to-date to avoid errors like this in the future.

    3 Ways to Fix SSL_ERROR_NO_CYPHER_OVERLAP Error

    Coming across errors is never a great experience, and we try our best to make it a learning one. With each problem, there’s bound to be a solution. The “SSL_ERROR_NO_CYPHER_OVERLAP” error is no exception.

    So, without further ado, let’s dive right in and fix this error…

    1. Update Firefox Browser

    Update your Firefox Web Browser. An outdated Firefox version is prone to the “SSL_ERROR_NO_CYPHER_OVERLAP” error appearing This is because older Firefox versions might support outdated cypher suites and obsolete TLS versions, which are kept up-to-date for a reason.

    Installing the latest update for your Firefox web browser is a fairly simple task.

    To update Firefox – open your browser, and:

    1. Select the Menu button at the top-right corner of your screen. This is the icon with three lines.
    2. Click Help and select About Firefox.
    3. The About Mozilla Firefox window opens. Firefox will check for updates and download them automatically.
    Firefox error code SSL_ERROR_NO_CYPHER_OVERLAP
    1. When the download is complete, select Restart to update Firefox.
    screenshot of firefox updating

    Note: As mentioned in the official Firefox support website, if you had any problems with updating, simply download the latest version of Firefox. You can do so by heading to the Systems & Languages page or you can also use their official download page.

    2. Reset SSL3 and TLS Settings

    If you’re already using the latest version of Firefox or updating didn’t help, the next step is resetting your SSL3 and TLS settings. Not all websites require these protocols to make a connection, but some do. Therefore, if these settings in your Firefox browser are disabled, it might be the reason you’re running into the “SSL_ERROR_NO_CYPHER_OVERLAP” error.

    To reset your SSL3 & TLS Settings:

    1. Open a new tab in your Firefox browser and type “about:config” in the address bar. You may see a message saying, “This might void your warranty!” or “Proceed with Caution”.

    This warning is Firefox’s way of preventing users, such as yourself, from accidentally making critical changes to your browser’s settings. But we know what we’re doing, so click on Accept the Risk and Continue to proceed.

    1. The “Advanced Preferences” screen should appear. In the search bar, type “tls”.
    advanced preferences error code solution

    This generates the list of all your TLS configurations.

    1. Values that are bolded indicate that they have been changed. Right-click on them and select Reset to restore them to the default settings.
    2. Afterward, repeat the same process for SSL3. Type “ssl3” in the search bar, and reset any changed value.
    how to fix error code SSL_ERROR_NO_CYPHER_OVERLAP

    Additionally, make sure that the following two items are set to false.

    • security.ssl3.dhe_rsa_aes_128_sha
    • security.ssl3.dhe_rsa_aes_256_sha

    Setting these to false disables Firefox from using these low-encryption cyphers. This is essential for security purposes.

    3. Bypass Security Protocols and Configurations of Your Browser

    It’s generally not recommended to bypass browser security protocols as their job is to keep you from accessing unsafe websites. That being said, if you know the site you’re trying to access is secure, manually entering a cypher validation should help bypass this error.

    To bypass browser security protocols:

    1. Navigate again to the “about:config” screen of your Firefox browser and type “tls” into the search bar.
    2. From the list, navigate to “security.tls.version.min”.
    1. Select the pencil icon on the far right to edit the item, then input “0” as the value. Next, repeat the same process for ”security.tls.version.fallback-limit”.

    Another way to bypass encryption protocols in your browser is by changing your browser’s privacy settings.

    To change your Firefox Privacy & Security Settings::

    1. Open your Firefox menu, then navigate to Options and then Privacy & Security.
    privacy setting firefox
    1. Under the Security section, deselect ”Block dangerous and deceptive content”.

    If the error still hasn’t been resolved, chances are it’s a server-related issue. Most often, this happens when a site is using the RC4-only cipher suite.

    Some ciphers, such as the RC4, are no longer supported by major browsers due to vulnerabilities. You can run an SSL check to verify that your SSL certificate isn’t using outdated ciphers.

    To perform an SSL Check, you can use the free SSL check tool Qualys SSL Labs. Here’s a link to the SSL Check tool to get you started.

    ssl server test

    Enter your domain into the Hostname field then click on “Submit”. You also have the option to hide public results if that’s what you prefer. It could take a minute or two to scan the site’s SSL/TLS configuration on your web server.

    qualys ssl report

    Once scanned, SSL Labs will assign you an SSL server rating, any grade from an A to an F. You should always be aiming for an A. This means both the SSL and intermediate certificates are set up correctly. It also shows that the webserver host, like WordPress, that you might be using is up to current specifications.

    If you click on the IP address, you’ll be shown a brief summary of that server’s rating.

    ssl error code report

    For more information on SSL Labs SSL checks, their official guide can be found here.

    That’s about it in bypassing encryption protocols through your privacy settings. Generally, if you aren’t the site owner, the only other course of action is to contact them to let them know about the problem you’ve experienced on their site – and, helping them get to the bottom of it by sharing this guide with them. 😊

    You might also be interested in SSL/TLS certificate errors.

    Check If It’s A Server Side Problem

    In the case that the error is only appearing on one website, this is likely a server-side issue. Only the server admin can resolve this issue.

    Usually, this only happens when a website is still using RC4-Only Cipher Suite, and the settings with the server “security.tls.unrestricted_rc4_fallback” preference is toggled to false.

    Frequently Asked Questions (You Might Also Ask)

    What does error code SSL_error_no_cypher_overlap mean?

    The “SSL_ERROR_NO_CYPHER_OVERLAP” is an error code unique to Firefox. Other browsers have these errors as well but typically use different codes. This error happens when Firefox fails to get the proper security information from the website you tried to connect to. This can happen for reasons of an outdated browser version, misconfigured SSL3 and TLS web browser settings, or it could be completely server-sided.

    What does Pr_end_of_file_error mean?

    The PR_END_OF_FILE_ERROR (Secure Connection Failed) appears when some Mozilla Firefox users attempt to visit a certain website. This error essentially means that the browser wasn’t able to establish a secure connection because all cypher suites failed.

    What is a cypher mismatch?

    This issue means that your browser cannot establish a secure connection with a web server that uses HTTPS and SSL.

    How do I bypass “secure connection failed”?

    To fix this, you need to visit the settings option of whichever security software that you are using and locate the SSL scanning feature of the software. 

    Once you find it, uncheck the box that indicates if it is enabled. Once the feature is disabled on your security software, you should try revisiting the website.

    What causes “secure connection failed”?

    Sometimes the ‘Secure Connection Failed’ error may occur on Firefox if Firefox finds the website to be dangerous or untrustworthy. That is why Firefox browser testing is so critical. If Firefox approves the website, it means that there’s a problem with the SSL connection.

    Sometimes the ‘Secure Connection Failed’ error may occur on Firefox if Firefox finds the website to be dangerous or untrustworthy. A website that uses HTTPS:// at the start of its URL indicates that it is a secure website. When Firefox doesn’t find a website secure, it will trigger an error displaying “Secure Connection Failed”.

    What is “secure connection failed”?

    Secure Connection Failed error is typically related to the security certificate (otherwise known as SSL) not being valid, expired, or simply missing. This notification quite often has merit, as the browser tries to warn that the connection is not secure, and you might suffer from serious issues if you proceed.

    How do you solve not connecting a potential security problem?

    To fix the “Secure Connection Failed” error in Mozilla Firefox:

    1. Select “Continue With an Insecure Connection”.
    2. Add the site to your List of Trusted Sites.
    3. Temporarily disable your Antivirus and Firewall.
    4. Clear the SSL State.
    5. Clear Your Browsing History.
    6. Permit Firefox to Trust Root Authorities.
    7. Change Your Security Settings.


    Summary – Easily Managing SSL Certificates & Resolving Errors

    Running into issues especially with SSL certificate validation is not something anyone enjoys waking up to especially because getting to the bottom of what’s causing it can take some time. Fortunately, since you made it to the end of this guide – you should have been able to confidently ensure that you & your website visitors no longer encounter this error.

    Here at RunCloud, we’re on a mission to make server management and deployments easier. Part of this, of course, naturally has to include SSL certificates. That’s why we offer AutoSSL to automatically handle deploying new SSL certificates for new domains that are added to your web applications (perfect for WaaS or SaaS businesses).

    Have any additional questions about fixing this SSL error or just want to join the conversation? Leave a comment below or Tweet at us (we’re @runcloud) 💬