Category: Server Management

  • How to Set Up an Amazon Lightsail Server with RunCloud

    How to Set Up an Amazon Lightsail Server with RunCloud

    Amazon Lightsail is an easy-to-use cloud service from Amazon Web Services (AWS) that offers you everything needed to build an application or website, and comes with predictable pricing.

    It’s one of the top choices to host your website. If you want to host your site using the AWS infrastructure without having to deal with the complexity of Amazon Elastic Cloud Compute (Adobe EC2), then Amazon Lightsail is the answer for you.

    Amazon Lightsail has a very simple pricing plan, which makes it a direct competitor to Digital Ocean, Linode, Vultr, and UpCloud – with a similar pricing range and included resources.

    Amazon has many data centers spread across different regions, including:

    1. Ohio
    2. Virginia
    3. Montreal
    4. Oregon
    5. Ireland
    6. London
    7. Paris
    8. Frankfurt
    9. Tokyo
    10. Sydney
    11. Seoul
    12. Mumbai
    13. Singapore.

    This gives you the flexibility to either choose a server location that is geographically close to your customers, or a server that’s in a remote location and which is cheaper to run.

    In this post, we will discuss how to set up an Amazon Lightsail server to host your websites with the help of RunCloud.

    Let’s get started!

    Why Use RunCloud?

    You don’t need to be a Linux expert to build and manage a website with RunCloud. Here are some of major reasons people use RunCloud:

    If you don’t have a RunCloud account, You can register for a 7-day free trial – no credit required.

    Connecting Amazon Lightsail Server via RunCloud Integration

    With our server provisioning feature, you can set up a server in Amazon Lightsail directly from the RunCloud dashboard by providing an API key from Amazon Lightsail to RunCloud.

    You’ll only need to leave the RunCloud dashboard once to get this key and add it to RunCloud 3rd Party API Key Settings.

    Within the RunCloud dashboard, for any future server creations, you’ll be able to add new servers without having to leave your dashboard.

    Creating an Amazon Lightsail API Key

    To use RunCloud with Amazon, you’ll need to integrate AWS by adding the necessary API keys to your account. You can generate these keys from your AWS dashboard.

    We strongly recommend you don’t use the root account to create your API keys. It’s a good idea to create a separate user account just for RunCloud, and limit its access to your infrastructure.

    Log into your AWS Console with a user account and open the security credentials page. You can either search for it in the search bar on the top, or use this link which will redirect you to the necessary page. Once there, scroll down to the “Access Keys” section.
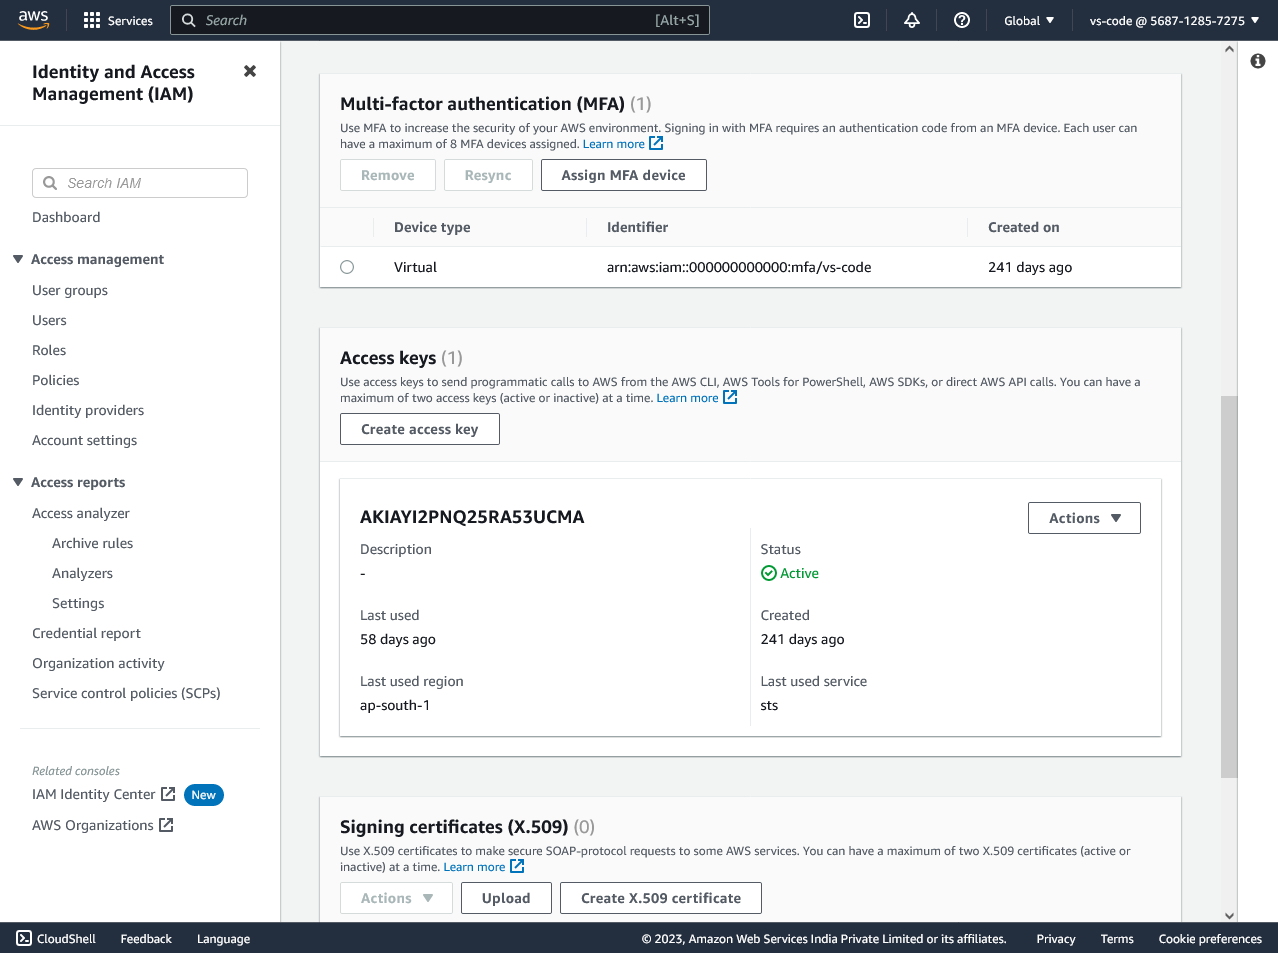
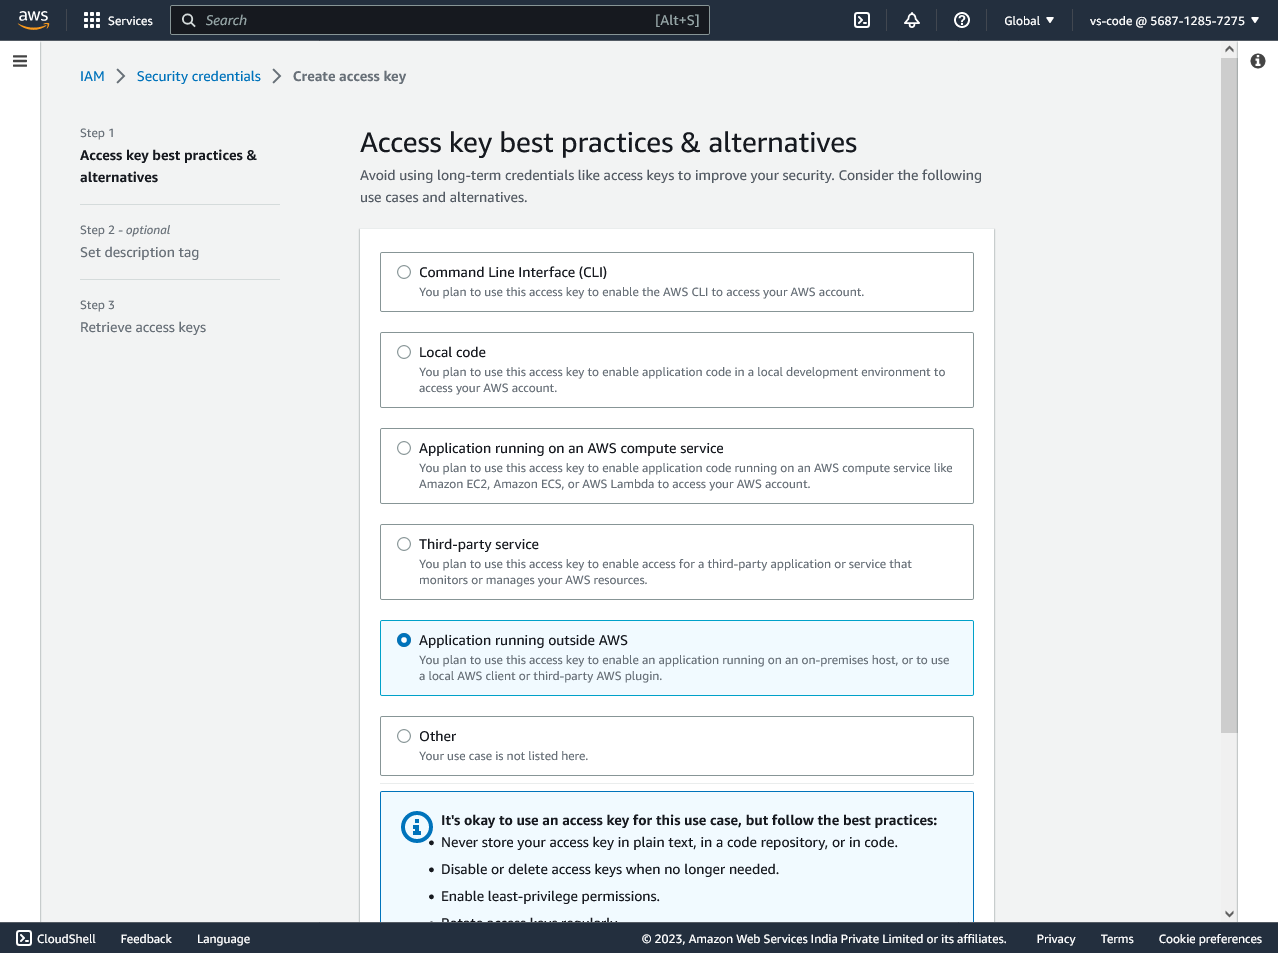
    Click on the “Create access key” button to generate your keys. On the next screen, select “Application running outside AWS” and proceed.
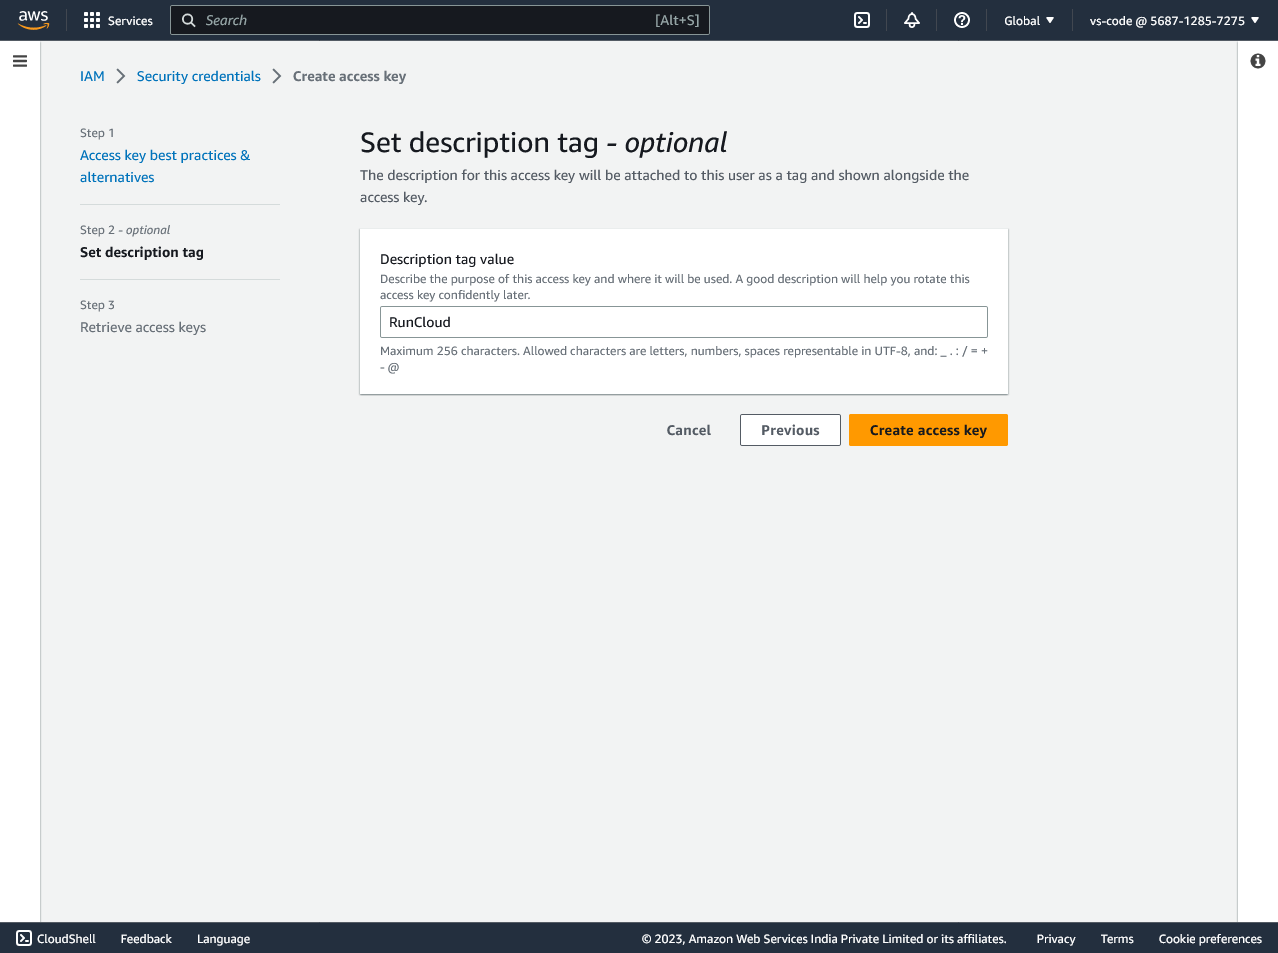
    Give your API key a descriptive name so that it is easy to identify later on and click “Create”.
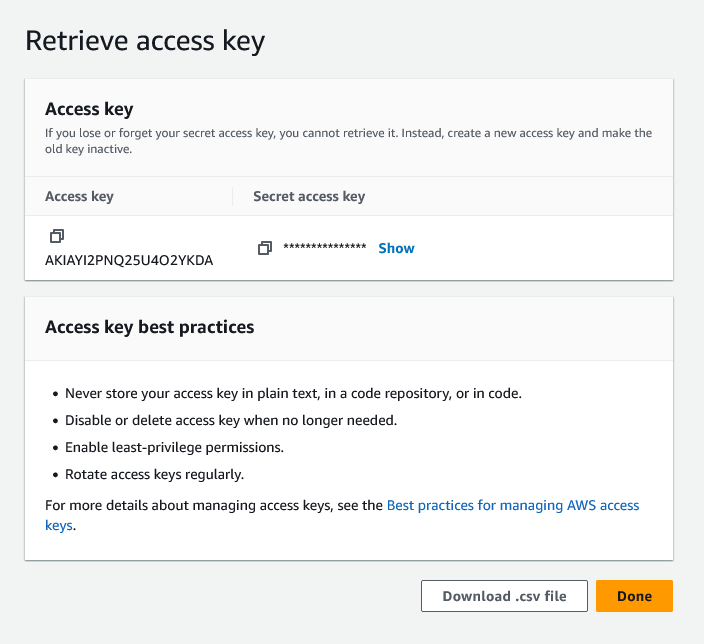
    Once you create your keys, they will only be displayed once – do not close this tab. Open the RunCloud dashboard in a new browser window to continue the integration process.
    To ensure RunCloud can fully connect to and manage your AWS Lightsail server, the AWS IAM user associated with the credentials you provide must have the necessary permissions. A missing permission can prevent specific RunCloud features from working correctly. To manage your server via the RunCloud dashboard, please make sure the IAM policy grants the following permissions on all Lightsail resources (*).

    "lightsail:GetOperations",
    "lightsail:GetBlueprints",
    "lightsail:GetInstances",
    "lightsail:GetKeyPair",
    "lightsail:DeleteKeyPair",
    "lightsail:CreateInstances",
    "lightsail:GetInstance",
    "lightsail:DeleteInstance",
    "lightsail:CreateKeyPair",
    "lightsail:ImportKeyPair",
    "lightsail:PutInstancePublicPorts",
    "lightsail:GetInstancePortStates",
    "lightsail:AttachStaticIp",
    "lightsail:GetRegions",
    "lightsail:GetOperation",
    "lightsail:GetBundles",
    "lightsail:GetKeyPairs",
    "lightsail:AllocateStaticIp"

    Adding the Amazon API Key to RunCloud

    Once you have created the API keys, you shouldn’t store them anywhere on your computer. You won’t need them again after you have added them to your RunCloud account and the integration is complete.

    To add an API key, go to your RunCloud dashboard. Open the Account Settings and switch to the Integrations tab. Once there, click on “AWS Lightsail” and then “Add Integration”.
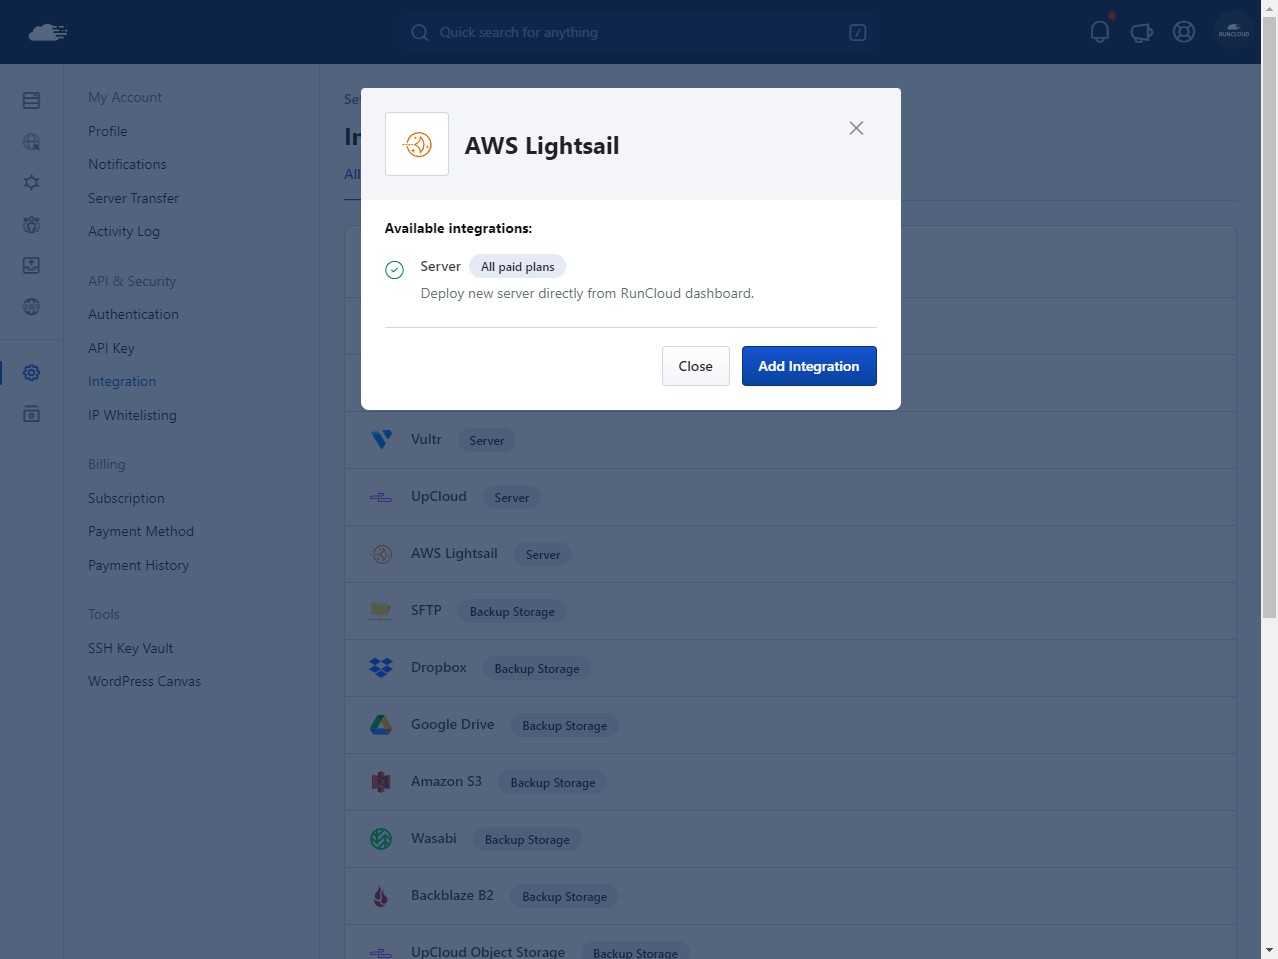
    Now, you will be presented with the following screen. Give a descriptive label to your API key, if you have more than one AWS account, this label will be helpful to distinguish between them.

    Once you’ve done that, copy and paste the “Access Key ID” as well as the “Secret Access Key” that we just generated in the creating an API key step.
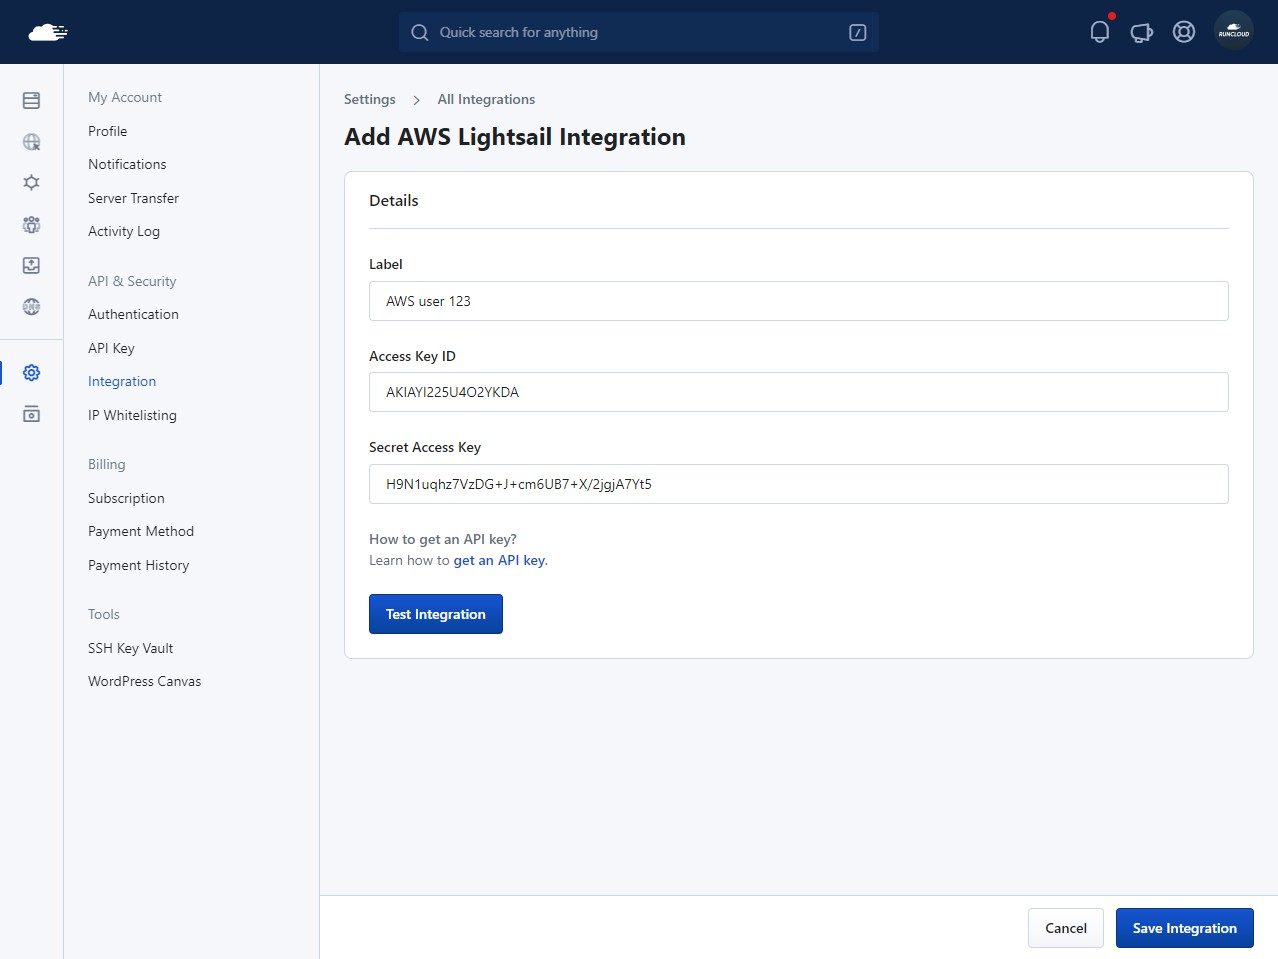
    After adding the key, you can test the integration using the “Test” button. If you get a success message, you can click “Save Integration” to save the changes. Once your key is integrated, you can close the AWS tab as well.

    Deploying Amazon Lightsail Server on RunCloud

    To get started, click on the “Connect a Server” button to set up your first server.

    A screen will pop up showing you a list of available server providers. Select Amazon Lightsail from the list, and then click the “Deploy Server Automatically” provision type to use RunCloud’s automatic integration.
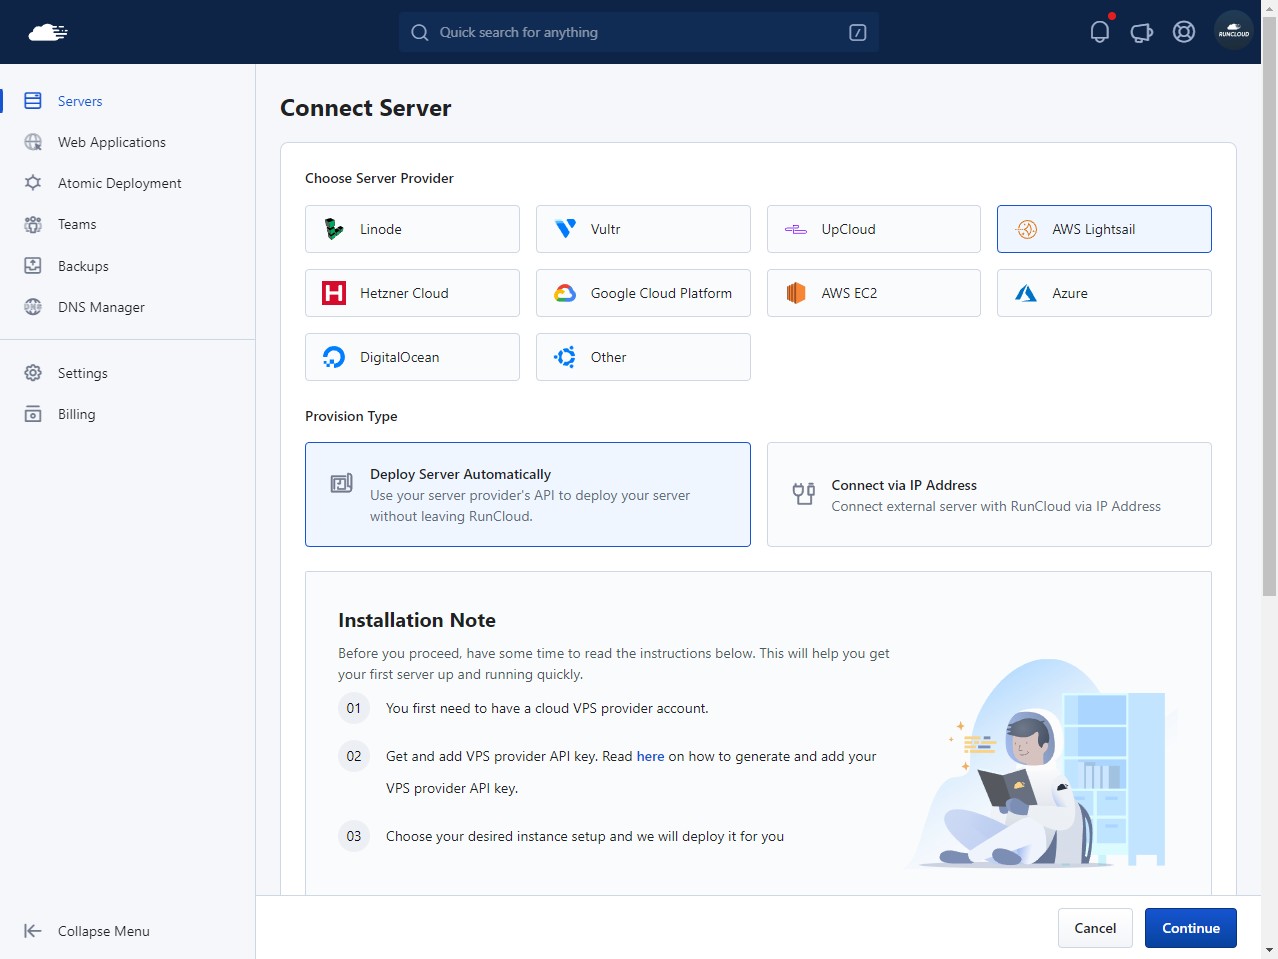
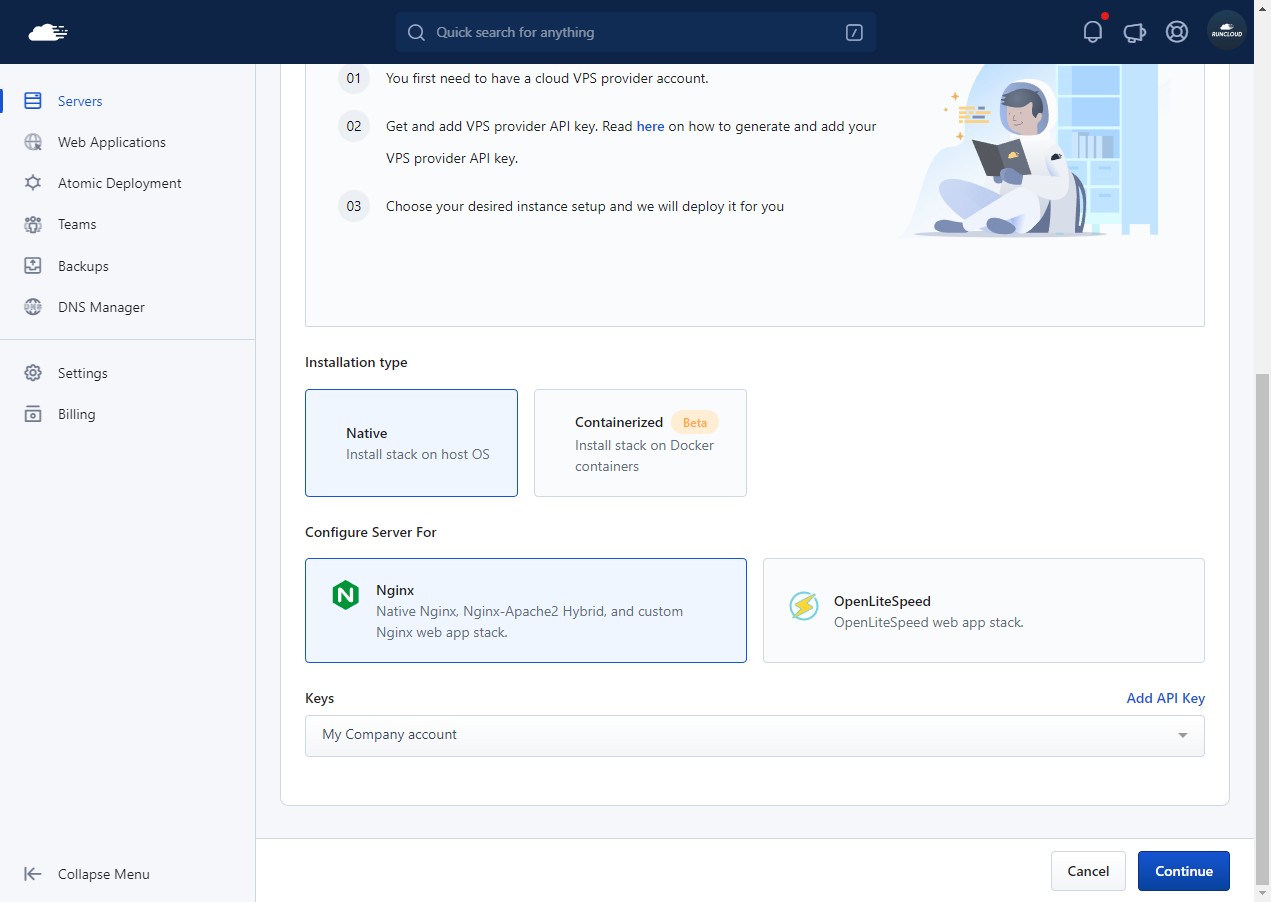
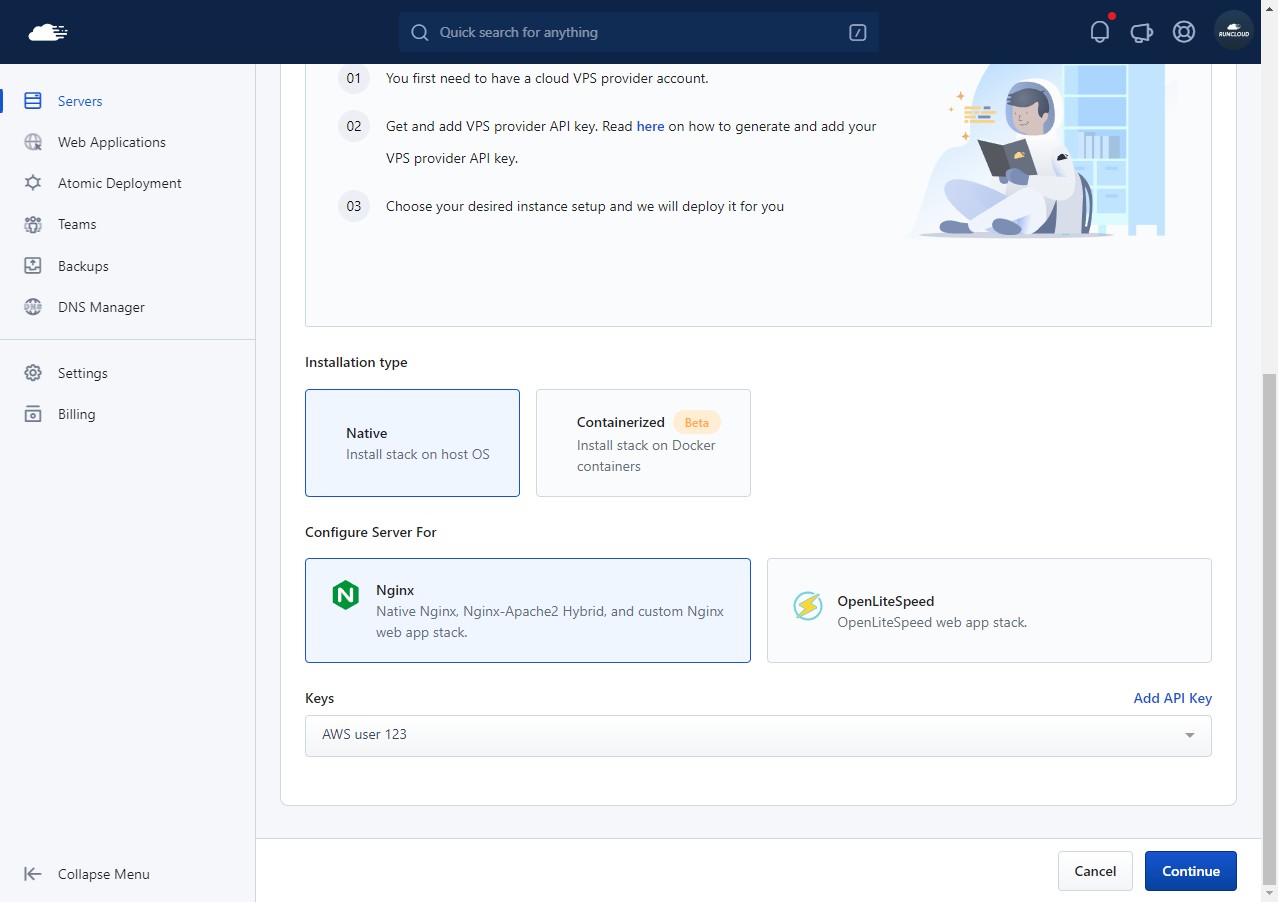
    Now, scroll down to the bottom half of the page and select the installation type as well as your desired server infrastructure. Then select the API key from the dropdown, and click “Continue”.

    Note: At the time of writing, RunCloud users will not be able to connect servers running Ubuntu 24 using AWS Lightsail to their RunCloud dashboard.
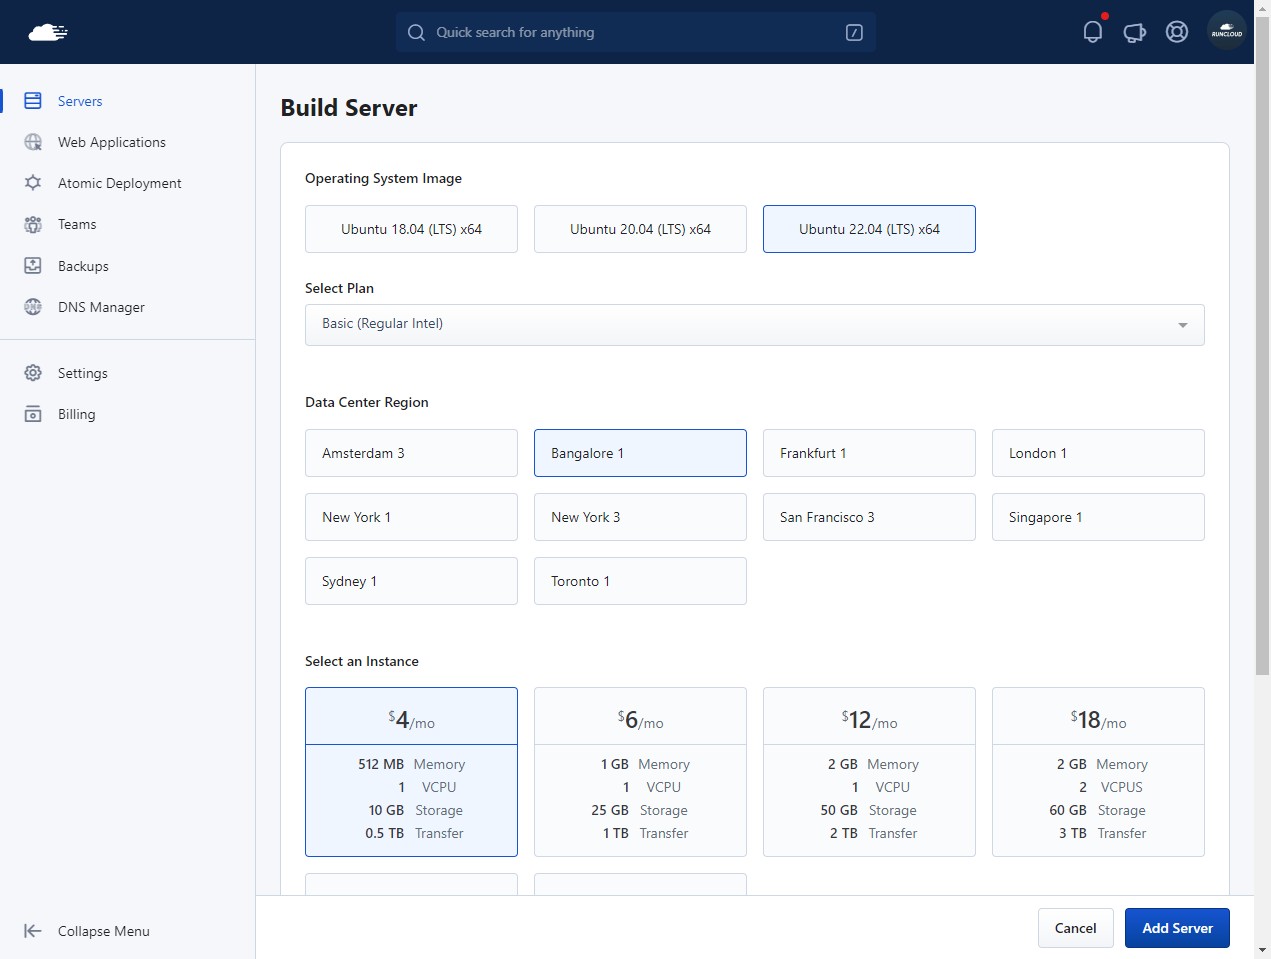
    On the next screen, you will need to specify the operating system, datacenter region and the instance type of your server. Just click on the choice you want, and it will be highlighted.
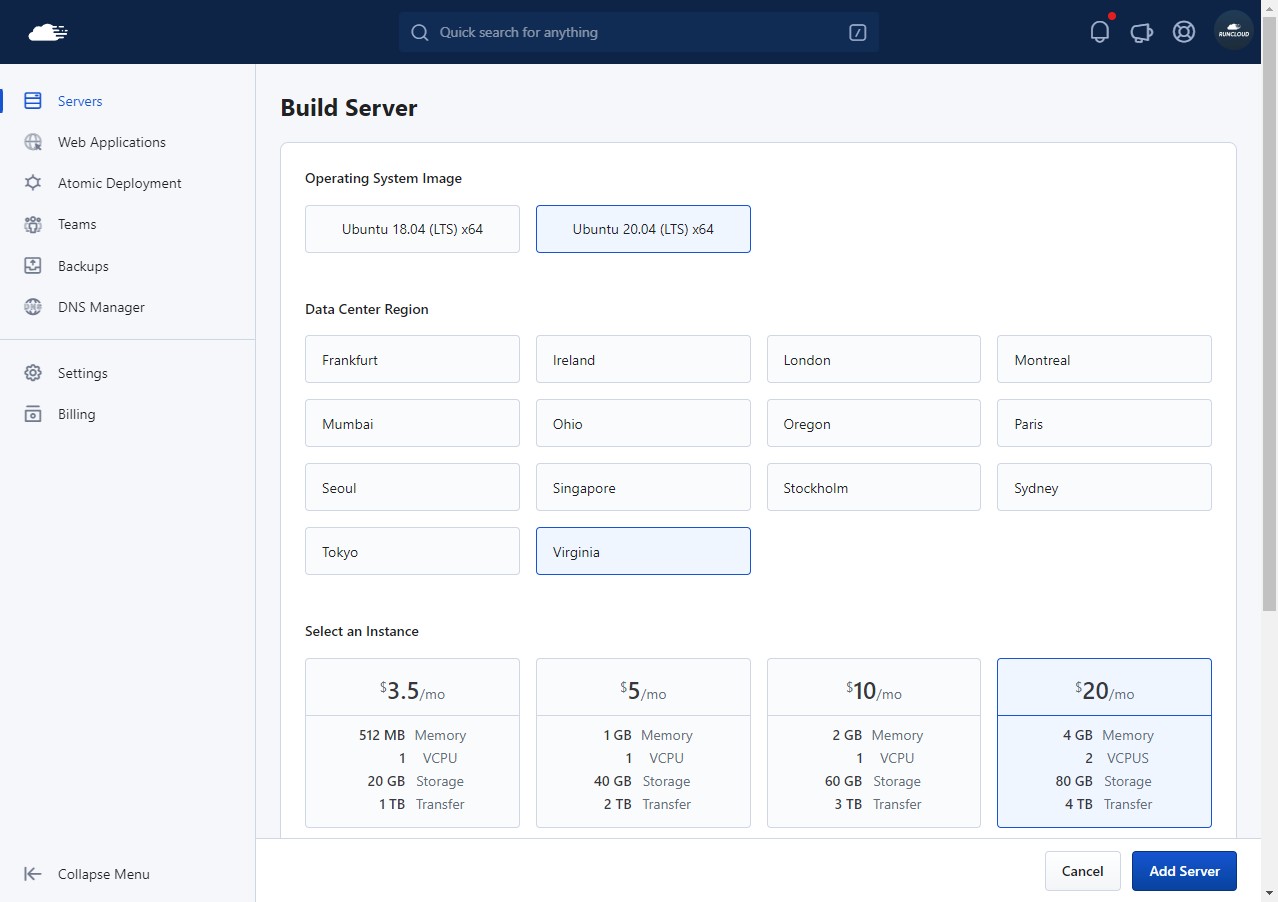
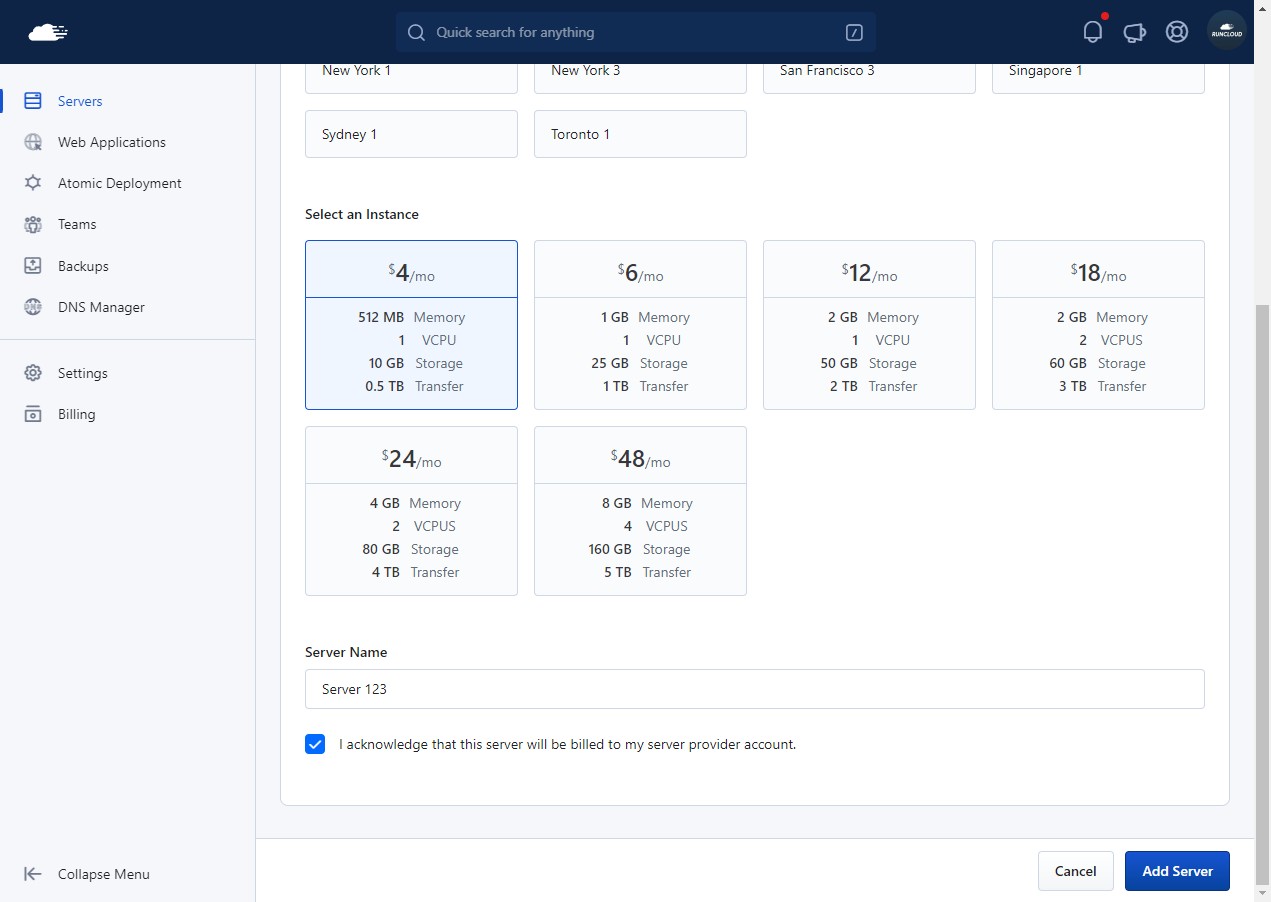
    Now scroll down to the bottom of the page, where you will be asked to provide a name for your server. Give it a suitable name, and check the box to acknowledge that you understand you will be billed for this server. Then click “Add Server”.
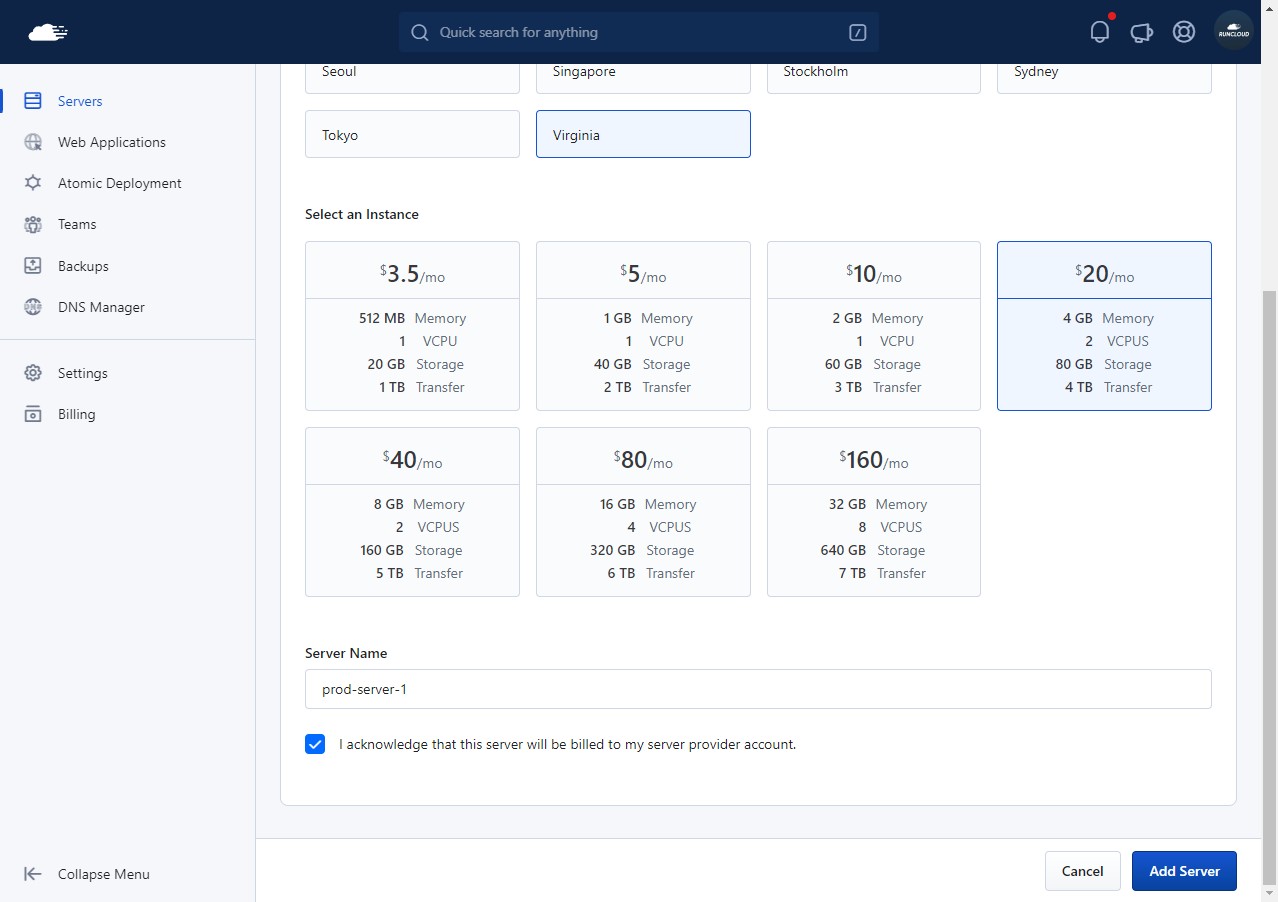
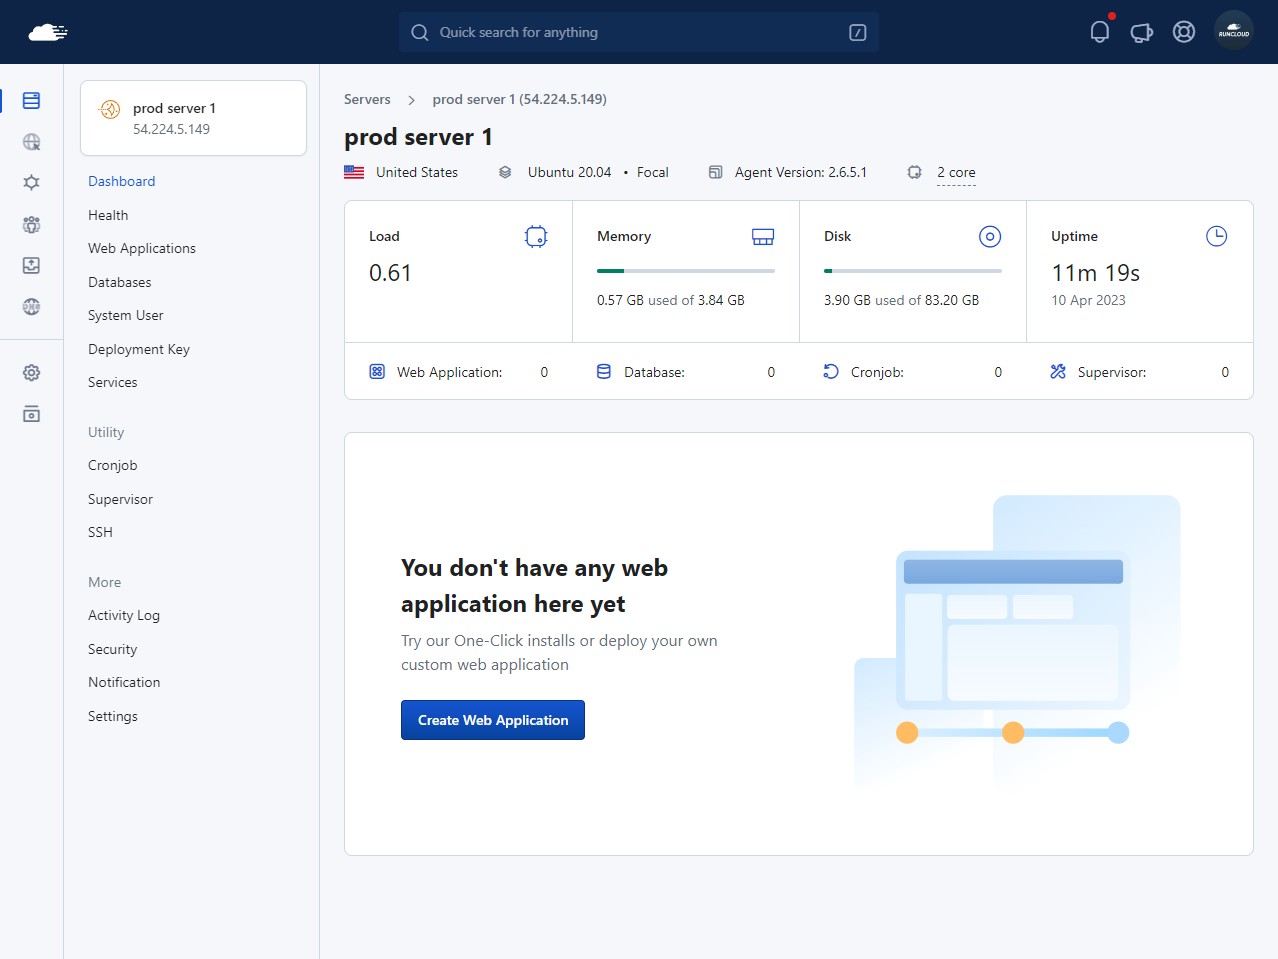
    After adding the server, RunCloud will take a few minutes to install the necessary software and dependencies on your server. You don’t need to do anything at this point, just sit back and wait for the installation to finish.

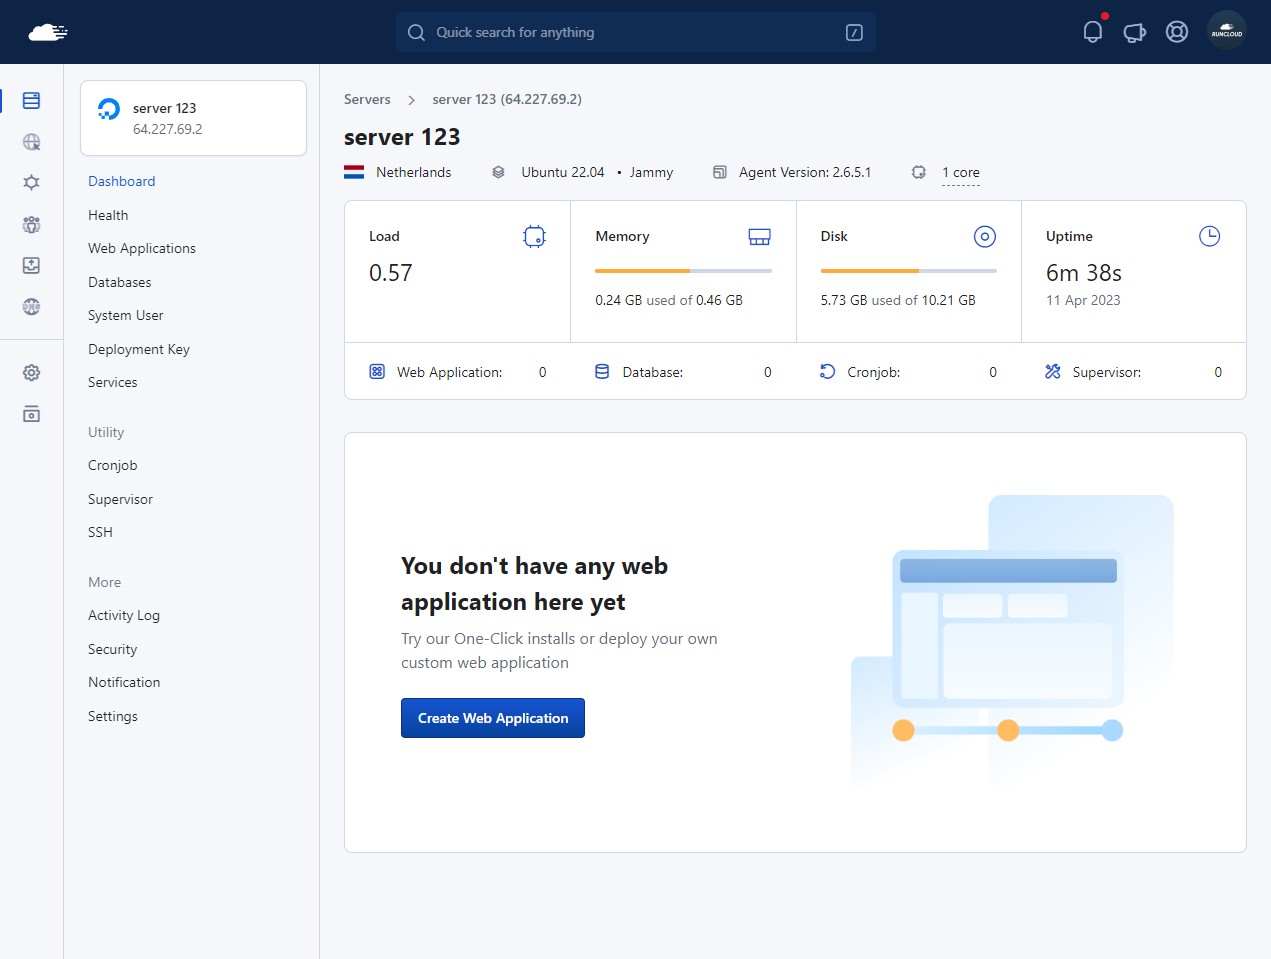
    Once finished, you will be redirected to the following screen:
    Tips – Create a Static IP Address For Amazon Lightsail

    When creating an Amazon Lightsail instance, you will get a private IP and public IP for each server. You can use the public IP to connect to your instance from the Internet, including setting up your server using RunCloud.

    Unfortunately, it’s not a static IP address. This means that this public IP will be changed automatically when you stop and restart your Amazon Lightsail server.

    If you use Amazon Lightsail to host your website, it’s highly recommended that you use the static IP address for your server. This static IP is dedicated to you, and will not be changed when you stop and restart your server. However, you will be charged $0.005 USD/hour fee for static IPs not attached to an instance.

    To reserve a static IP, go to your AWS console and open the AWS Lightsail dashboard. Once there, locate the server that you just created via RunCloud.
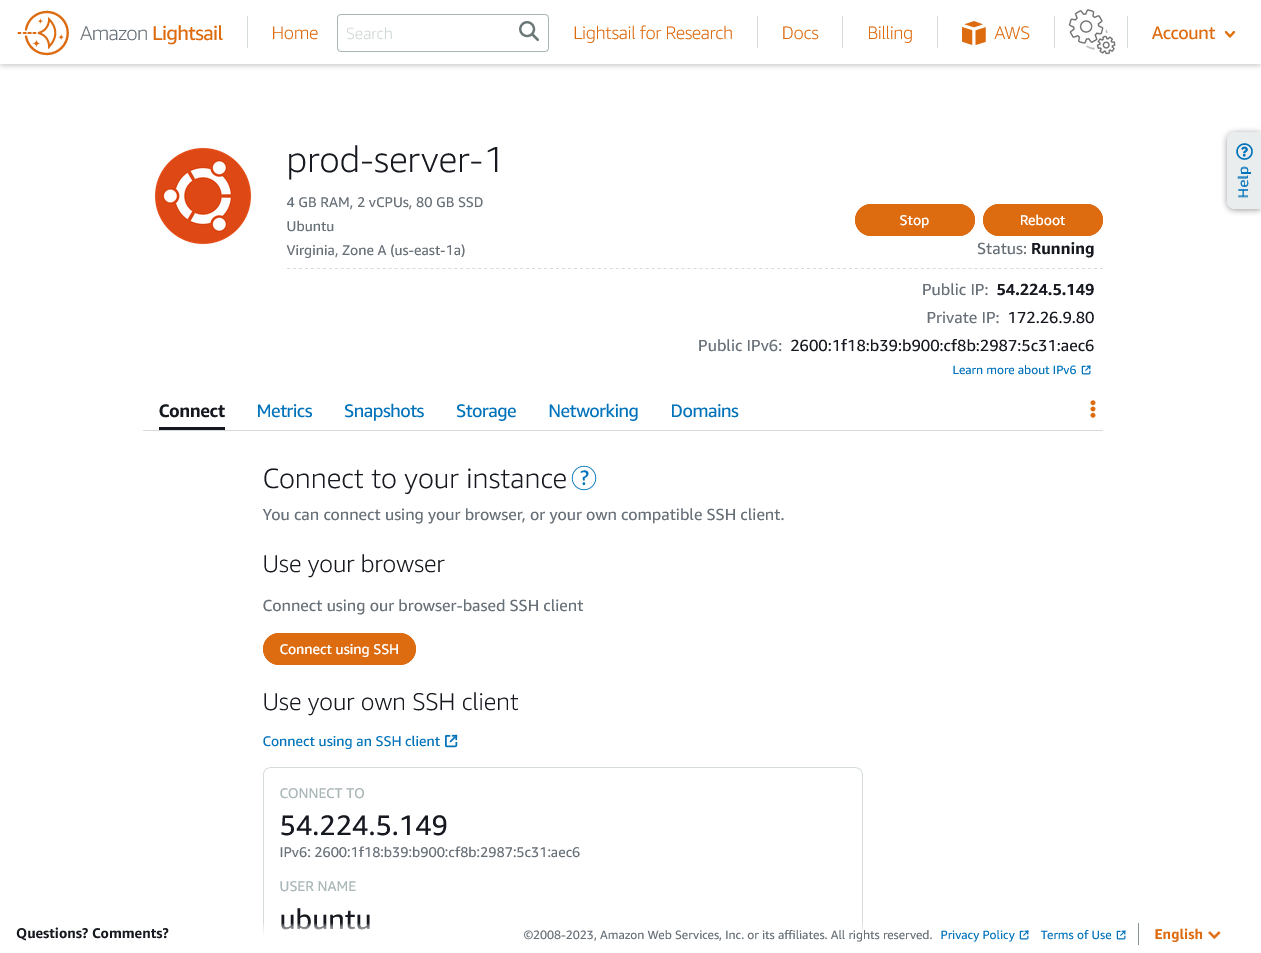
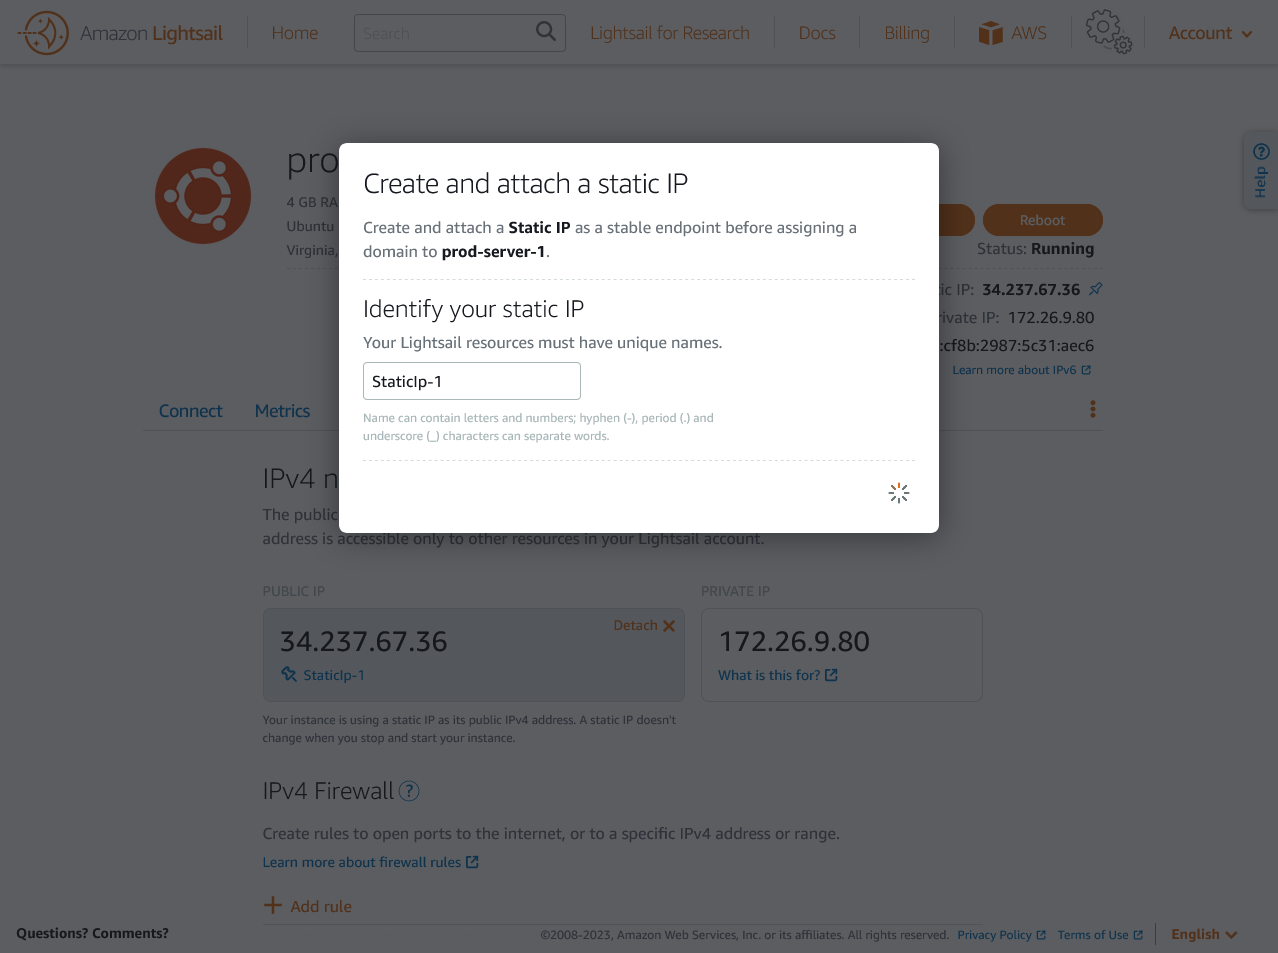
    Go to the Networking tab and click on “Attach static IP” to reserve a static IP address. Follow the instructions to create a new IP address, and save it.
    Amazon Lightsail

    After you have added the new IP address to your AWS Lightsail server, it might change from the one you have previously. If your new IP address is different from your current IP address, you will need to configure RunCloud to use this new address.

    Go to your RunCloud dashboard and click on your server. It should give you a message saying “Server information is not available”. If not, just wait for a few minutes and refresh the page. Once RunCloud is no longer able to connect your server, it will ask you to troubleshoot the issue.

    Click on the “Update IP address” button to add a new IP address. A prompt will appear asking you to enter the new address. Add the new IP address, and click “Save”.
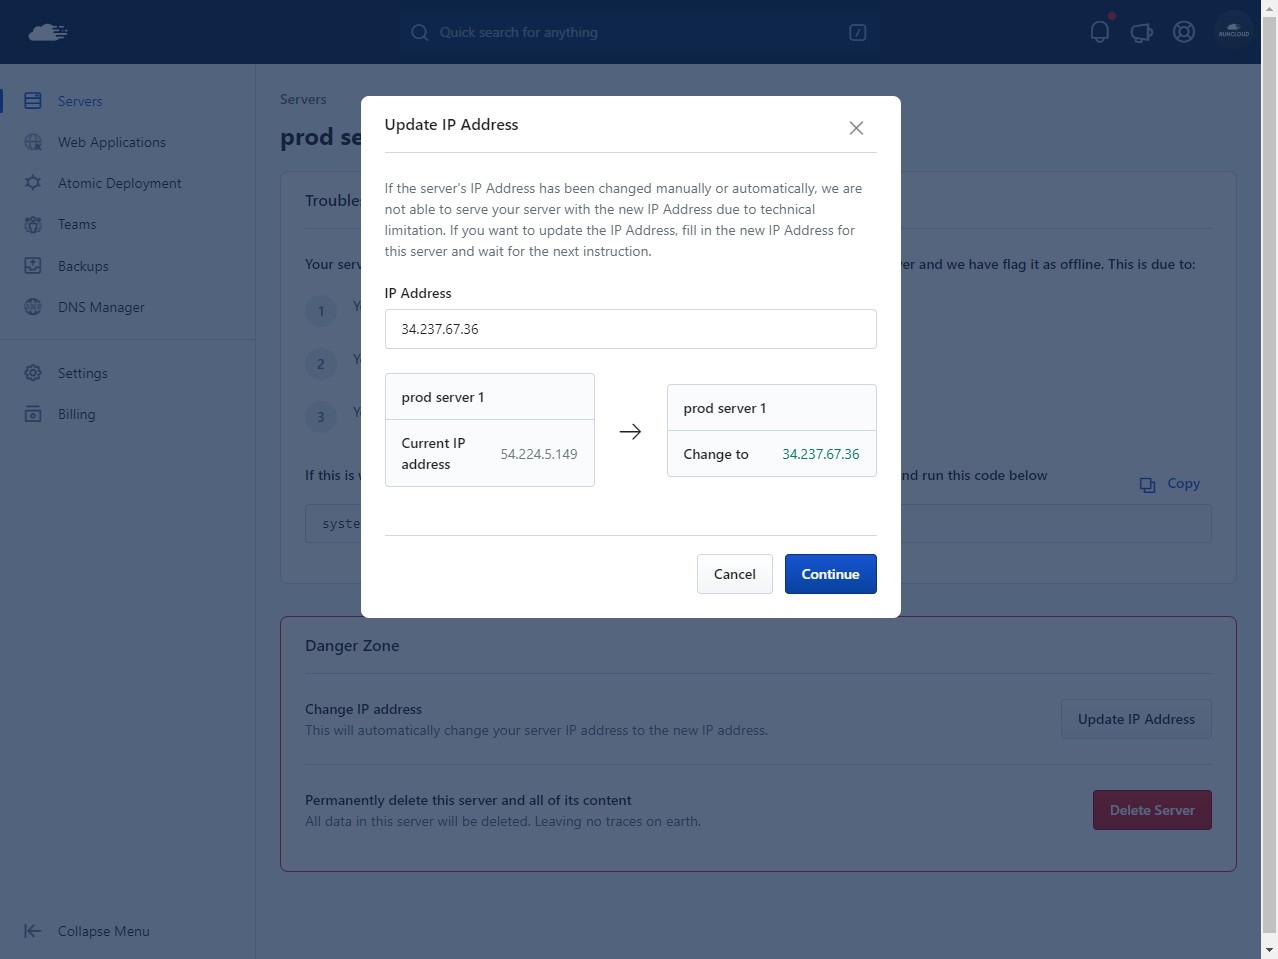
    Next, you will need to run a script in your AWS server. Go to your AWS Lightsail dashboard and click on “Connect using SSH”. This will open an SSH connection in a new browser window. Copy and paste the script from RunCloud into this window and press “Enter”.

    Please check the video below to learn how to set up a static IP address for your Amazon Lightsail server:

    Now that RunCloud should be able to connect to your server again, refresh your dashboard. If everything is still working as expected, then you can close the SSH session.

    Managing Firewall Rules for Your Lightsail Server

    When you provision a new Amazon Lightsail server directly through the RunCloud dashboard, RunCloud streamlines the setup process by automatically creating the necessary firewall rules. These initial rules are designed to secure your server while allowing essential services to function, such as traffic for SSH (port 22), HTTP (port 80), HTTPS (port 443), and the RunCloud agent communication.

    However, if your application has specific requirements, or you need to open additional ports, you can modify these rules at your own risk.

    To do so, you’ll need to leave the RunCloud dashboard and manage the settings directly within your AWS Lightsail account. Navigate to your Lightsail dashboard, select the server instance you wish to configure, and click on the “Networking” tab. Within this section, you will find the firewall configuration area where you can create new rules or edit existing ones.
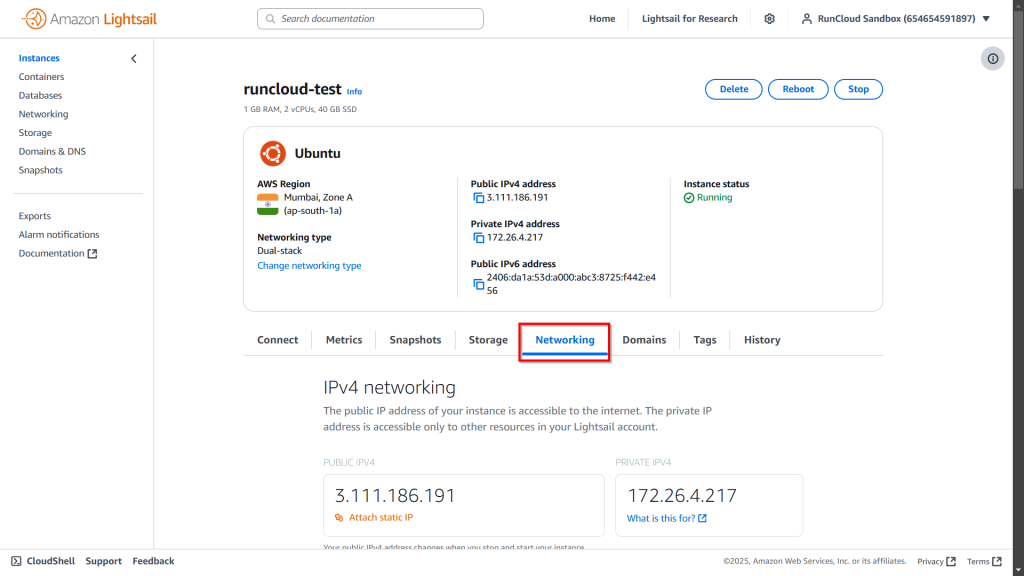
    While editing the rules, you should remember that Lightsail requires you to create separate rules for both IPv4 and IPv6 traffic. For any custom rule you add, you must create an identical version for each protocol if you want the rule to apply universally.
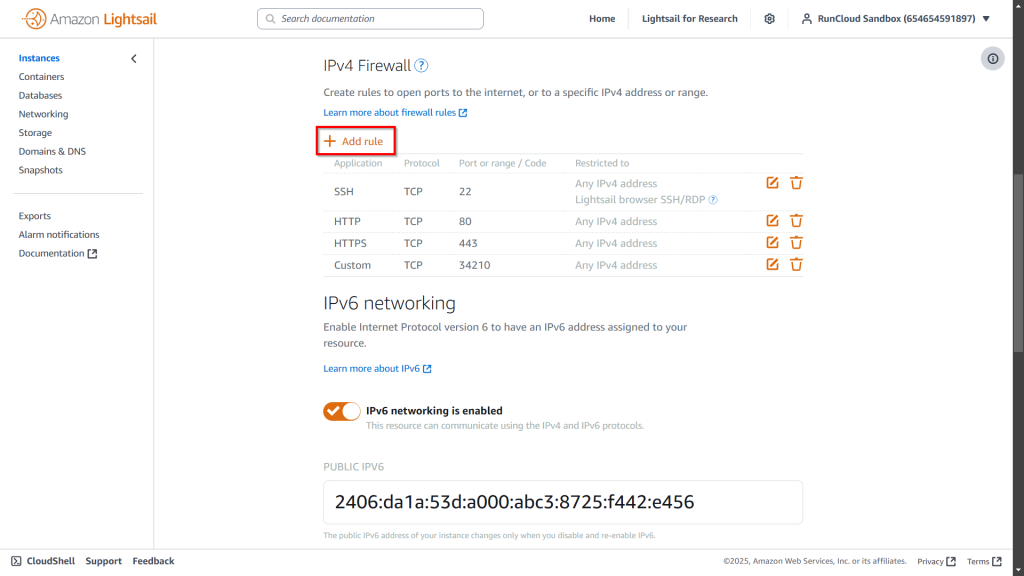
    For example, if you want to enable the performance benefits of HTTP/3 on your server, you must create a new firewall rule to allow incoming UDP traffic on port 443 for your server’s IPv4 address. To copy this rule to IPv6, you can just select the checkbox next to “Duplicate rule for IPv6”, and AWS will automatically create another rule for you.
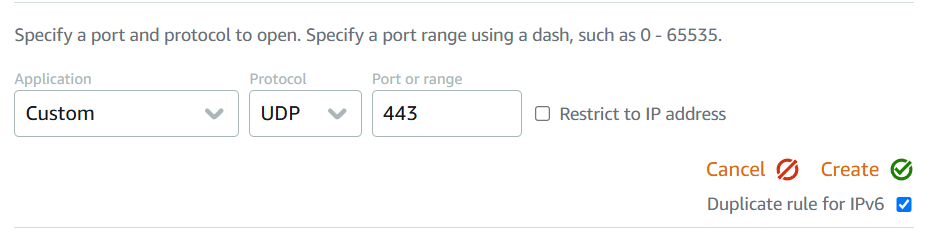
    After clicking “Create“, the new firewall rules will be applied to your server immediately.

    After Action Report

    Amazon Lightsail is the easiest way to get started with the Amazon Web Service infrastructure for developers who need a simple virtual private server (VPS) solution with predictable pricing, starting from $3.50 / month.

    RunCloud’s integration for AWS makes it easy to manage servers across multiple AWS accounts. After setting up your server, you can learn How To Install WordPress With RunCloud using our step-by-step guide.

    RunCloud is built for developers that want to focus on shipping great work, not on managing their infrastructure. Experience a painless server configuration so you don’t need to spend hours figuring it out.

    Get started with RunCloud today & get up and running in minutes.
  • How To Monitor Your Web App’s RAM & CPU Usage with Netdata

    How To Monitor Your Web App’s RAM & CPU Usage with Netdata

    Netdata is a powerful tool that can help you monitor your servers with ease and efficiency. It’s a distributed, real-time, performance, and health monitoring platform that can collect and display thousands of metrics from your servers, hardware, containers, and applications, including RAM and CPU usage.

    Netdata has many features and benefits that make it a great choice for server monitoring, such as:

    • Real-time data collection and visualization: Netdata collects metrics every second, and displays them on interactive charts that update every second as well. This means you can see exactly what’s happening on your servers without any delays.
    • Infinite scalability: Netdata can scale to any number of servers and metrics without compromising performance or accuracy. It stores the data locally on each server, which means it doesn’t need a central database or a query engine. You can also use Netdata Cloud to view metrics from multiple servers in one dashboard, with secure streaming and encryption.
    • Flexible and modular architecture: Netdata can monitor any system, service, or application that exposes metrics with the help of its modular architecture and hundreds of integrations. You can also extend Netdata with custom collectors, plugins, dashboards, alarms, notifications, and more. Netdata is open-source and community-driven, so you can always find new features and improvements.
    • Zero configuration: Netdata is designed to work out of the box, without any need for configuration. It can auto-detect metrics from your servers and applications, and display them on preconfigured dashboards with meaningful visualizations and health alarms.

    Netdata is compatible with RunCloud, so you can use it alongside our platform to manage your web applications.

    How to Install Netdata on RunCloud Servers

    If you want to install Netdata on your RunCloud server, you can follow these simple steps:

    1. Sign up for Netdata: To use Netdata Cloud, you’ll need to sign up for a free account on their website. Netdata Cloud will allow you to view metrics from multiple servers in one dashboard, and access other features such as Metric Correlations and War Rooms.
    2. SSH into your RunCloud server: To install Netdata on your server, you’ll need to access it via SSH. If you don’t know how to do this, you can read our post on how to connect to your RunCloud server using SSH. You will need your server’s IP address, username, and password or SSH key.
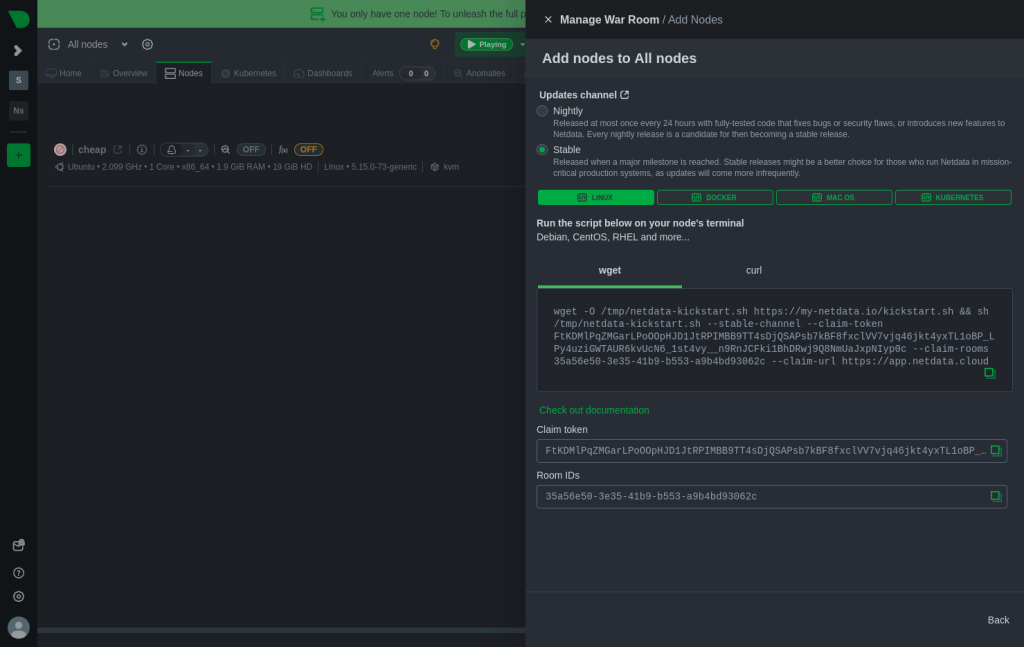
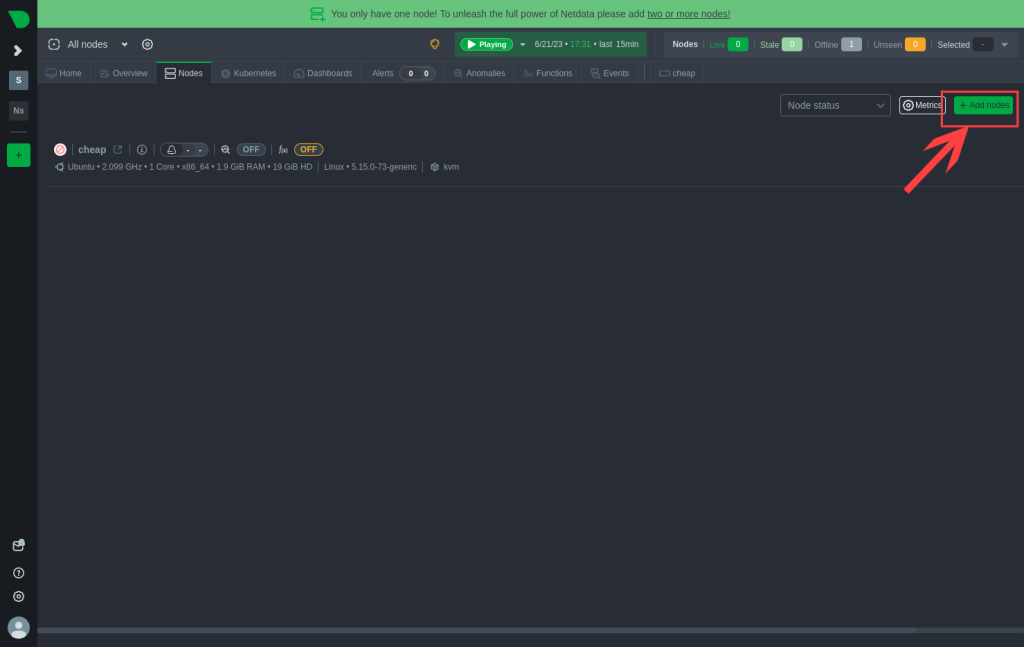
    3. Open Installation Script: Once you have logged into your server via SSH, go to the Netdata dashboard and go to the “All Nodes” tab. Once there, click on “+ Add Node” button to view the installation script.
    Netdata dashboard view existing nodes.
    1. Execute the given command: You can install Netdata on your server with a single kickstart command. Change the update channel to “Stable“, and then copy the given installation command.
    Netdata Installation script.

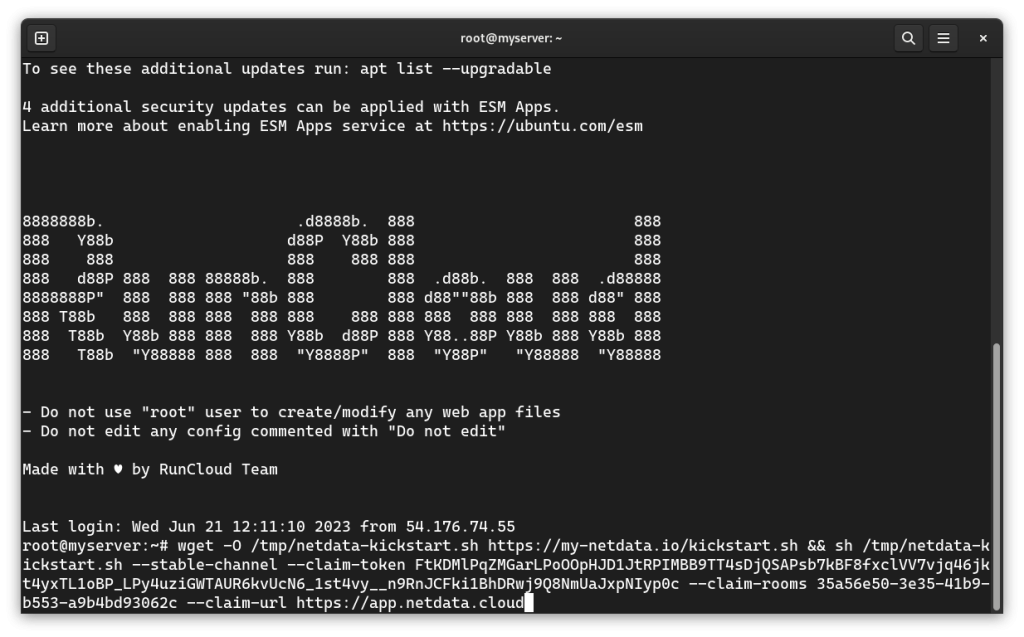
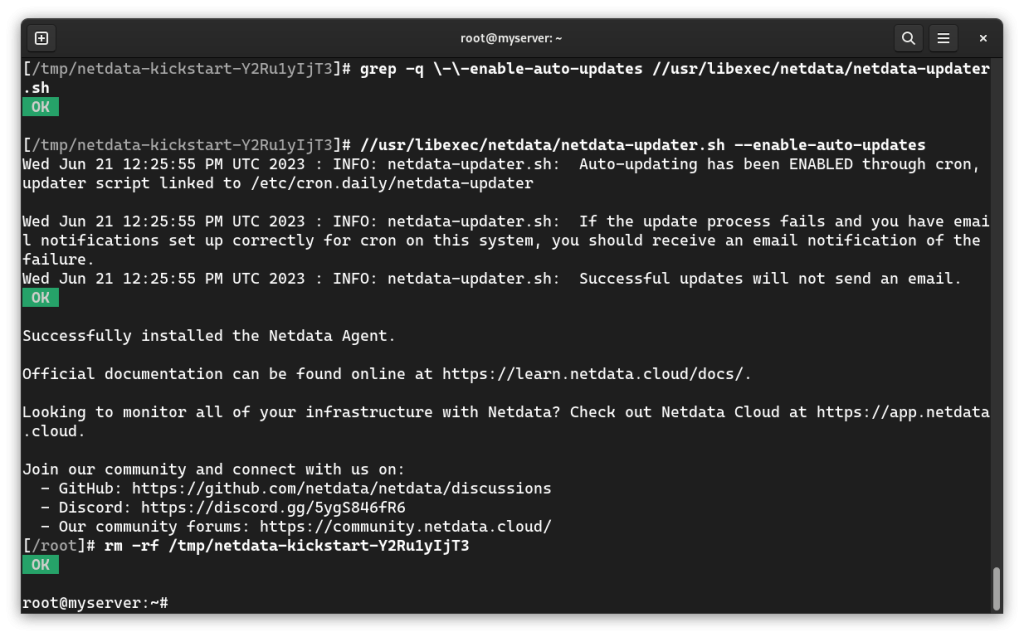
    Upon execution, the above command will download and run a script that will install Netdata and its dependencies on your server. Go back to your SSH terminal, paste the given command, and then press ‘Enter’.

    Executing Netdata installation script on RunCloud

    During installation, it will ask you some questions about automatic updates, release channels, anonymous statistics, and Netdata Cloud connection. Press ‘Y’ to confirm the installation and then press ‘Enter’.

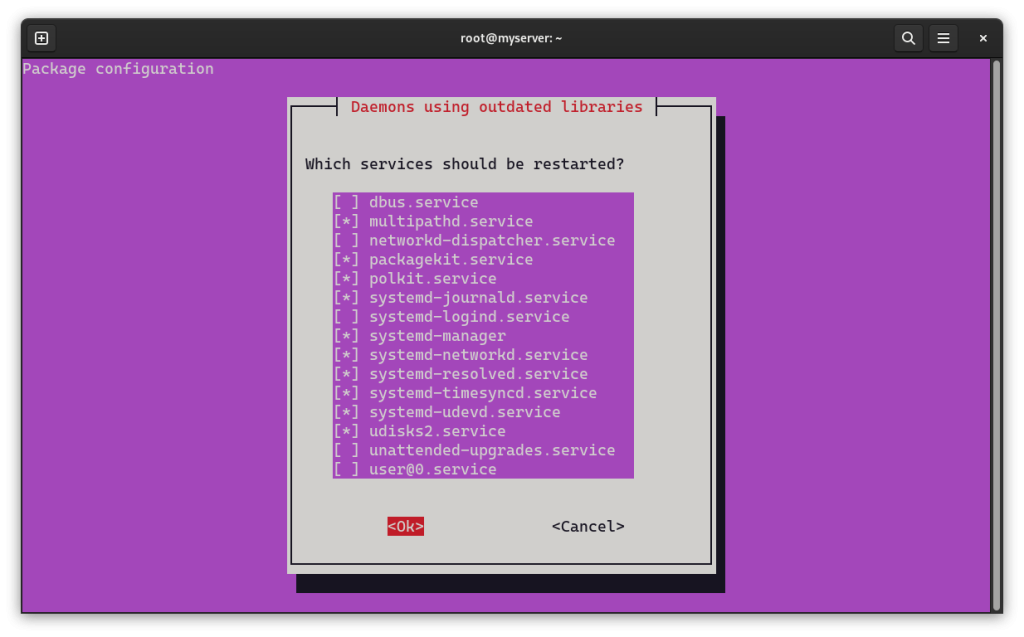
    After this, the installation daemon will ask you which services should be restarted. You can use the arrow keys to navigate up/down and press the spacebar to select/deselect options if you want to do so.

    Restarting services via CLI after installation

    In most cases, default selection is right choice for most people. Press the ‘Tab’ key on your keyboard – this will move cursor to the next position. Make sure that the ‘Ok’ is highlighted, and then press ‘Enter‘ to continue the installation.

    You will be asked to confirm the installation once again, press ‘Y’ to confirm, and then press ‘Enter‘.

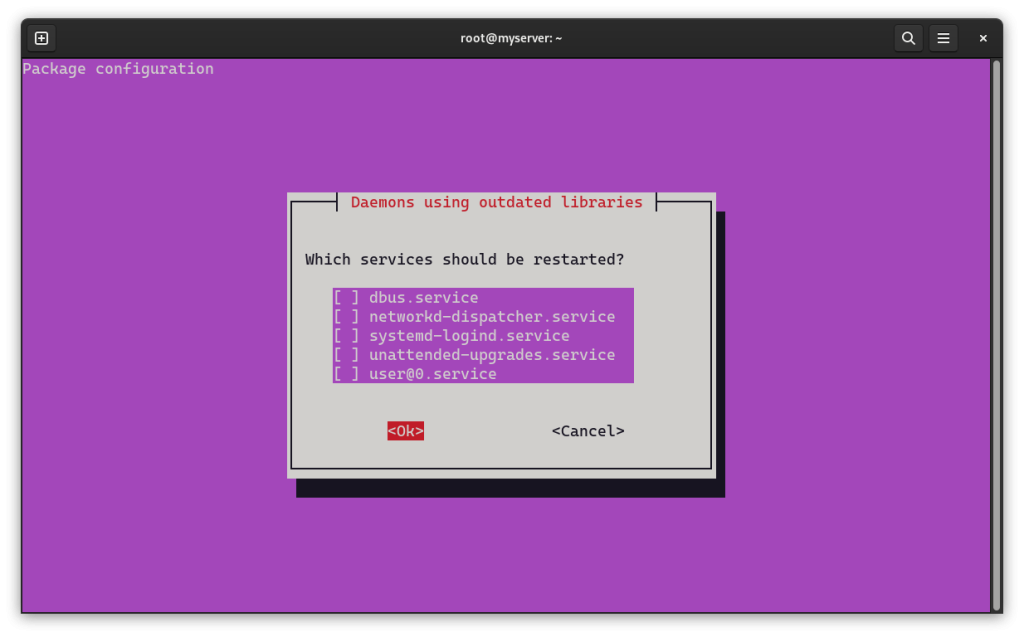
    Daemon using outdated libraries on RunCloud.

    After this, the installation script will once again ask you which services should be restarted – leave these settings to default. Press ‘Tab‘ to highlight the ‘Ok’ button, and press ‘Enter‘ to finish the installation.

    Netdata installation completed successfully.

    That’s it! You have successfully installed Netdata on your RunCloud server. You can now access the Netdata web interface by visiting your Netdata dashboard.

    How to View Server Metrics

    To see the RAM and CPU usage of different servers, you can use either Netdata’s web interface or Netdata Cloud. Both options will show you interactive charts that update every second with real-time metrics.

    Using Netdata’s Web Interface

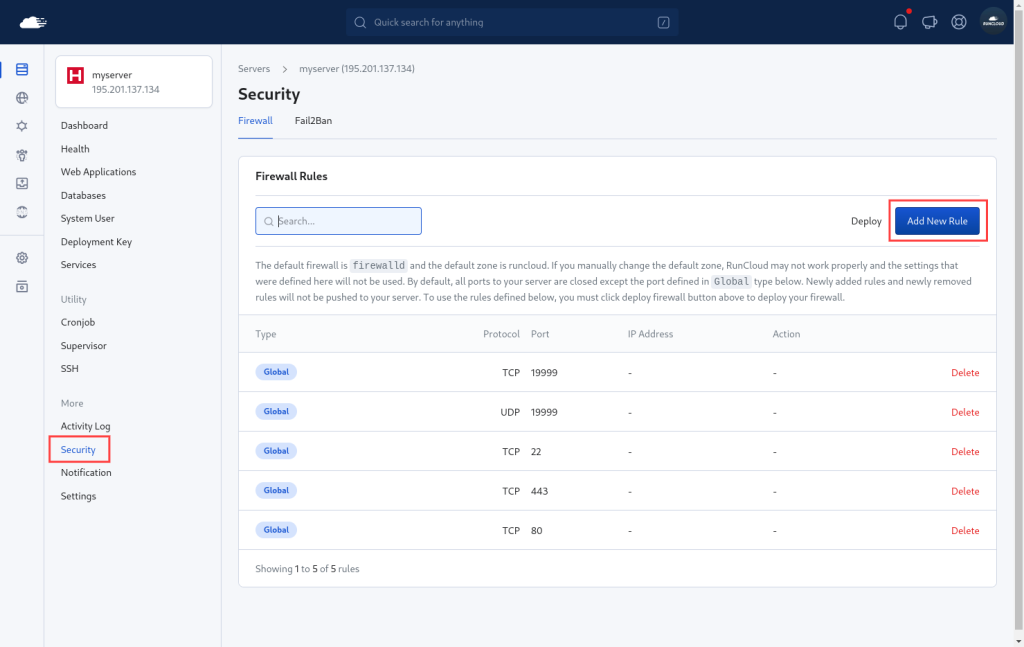
    Netdata hosts a dashboard on your server, which you can view by visiting port 19999 of your server. You can change this port by editing the Netdata configuration file. By default, RunCloud blocks all non-standard ports. Therefore, you’ll need to either connect to your server via a VPN, or open up the ports to visit the dashboard.

    To open up ports, go to your RunCloud dashboard and open the “Security” tab of the server. Click on “Add New Rule” and create a new rule to open up the specified ports on TCP and UDP. Once you have created all of the rules, you’ll need to click “Deploy” to save the changes.

    Open Firewall ports RunCloud

    Once you have opened up the firewall, anyone on the internet can view your Netdata Dashboard by visiting http://<ip address>:19999.

    Note: this will allow you to view the dashboard only for this particular server – if you have more than one server, you must repeat this step for all of them.

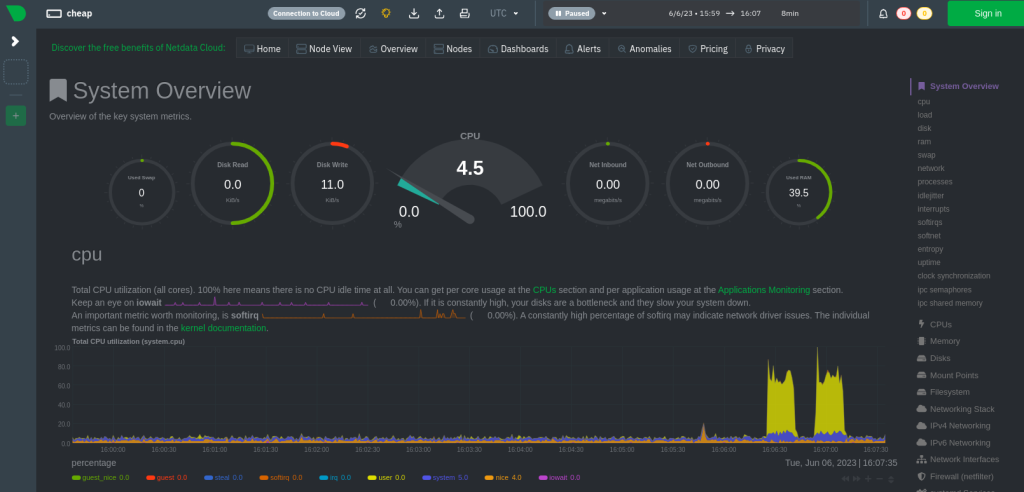
    This option presents a simplified user interface that displays all metrics of the selected server. This is useful if you don’t want to log into your Netdata Cloud account to view the metrics. However, you won’t be able to make any changes in this dashboard; for that, you will still need to log into your account.

    Netdata Local Dashboard depicting CPU, RAM, and Disk usage

    Using Netdata Cloud Dashboard

    Once you have connected a node to your cloud account, you can see it in your dashboard. One cloud account can connect to many servers, so you’ll need to navigate the dashboard and search for the server that you want to view.

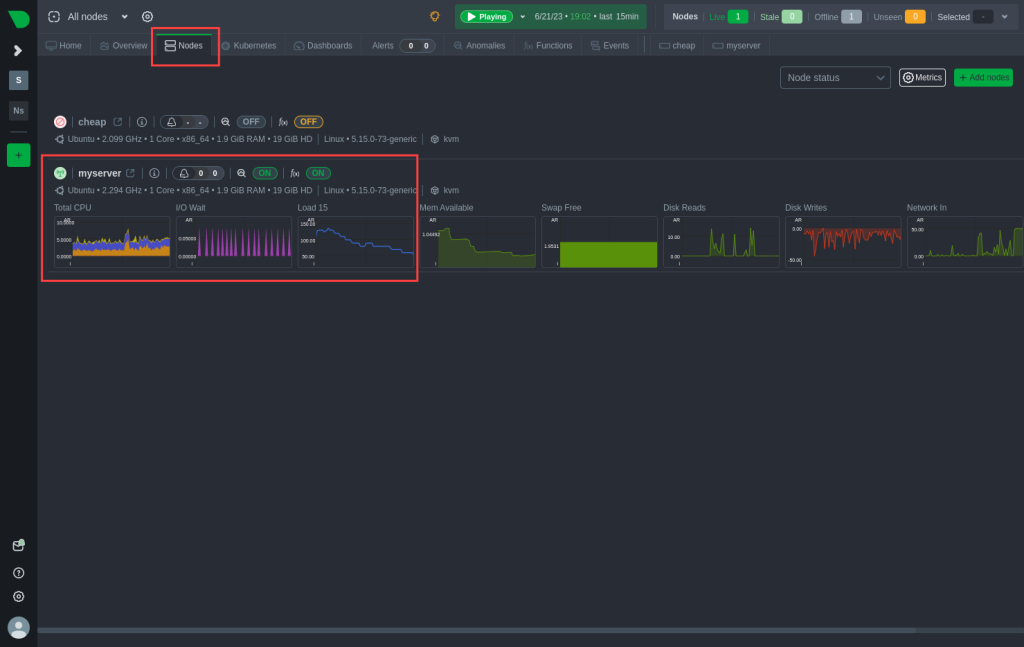
    To view all available nodes connected to your account, navigate to the “All Nodes” page, and switch to the “Nodes” tab to view all connected nodes.

    Connected nodes on Netdata cloud dashboard

    In the above screenshot, we can see two nodes are connected to our Netdata account. The first node is inactive, and the second node is posting metrics to the cloud. You can click on this node to view detailed metrics.

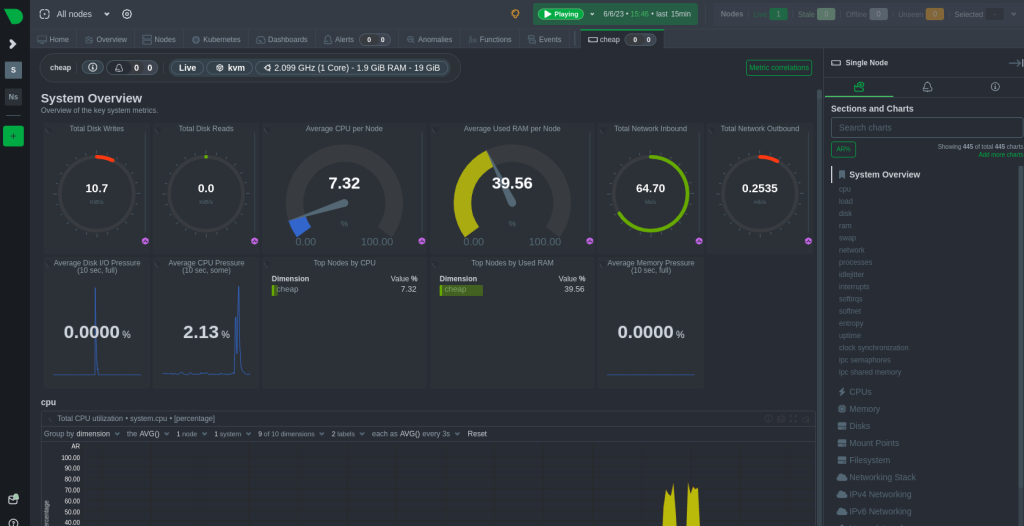
    Netdata dashboard showing system metrics on RunCloud

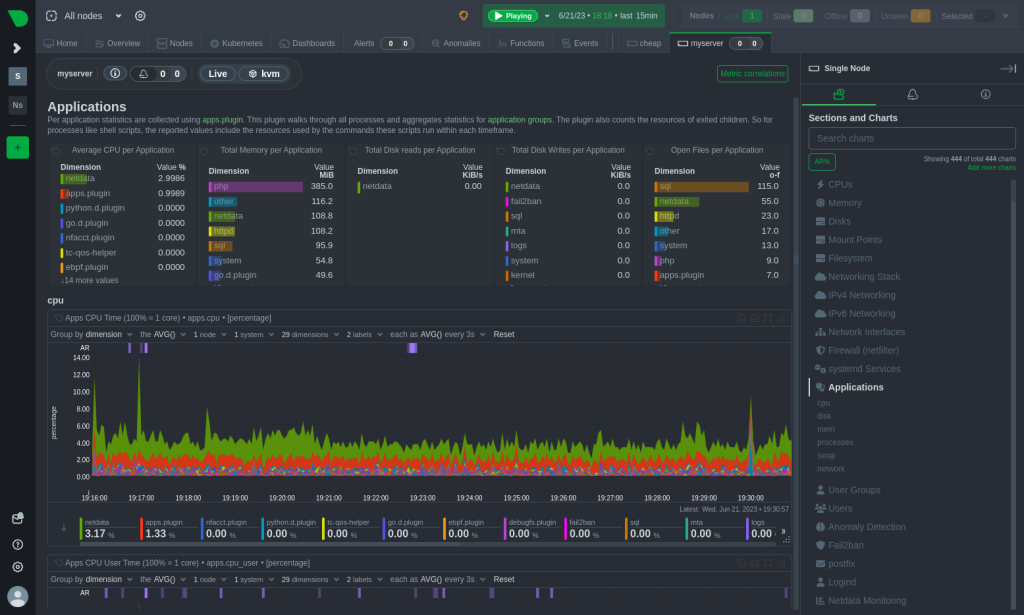
    The above screenshot shows the overview of the system metrics. To view detailed metrics such as disk, memory, CPU usage, etc. for a particular application, click on the “Applications” button in the tab on the right of the screen.

    Netdata application monitoring metrics.

    Besides monitoring, you can also use this dashboard to invite new users and collaborate with them. 

    Final Thoughts

    Netdata is a powerful and easy-to-use tool that provides real-time insights into your server’s performance and health. You can use Netdata to visualize and analyze various metrics such as memory usage, CPU load, disk I/O, network traffic, and more. You can also set up alerts and notifications to get notified when something goes wrong with your web app.

    By using Netdata on RunCloud, you can benefit from the seamless integration and compatibility between the two platforms. If you have any questions or feedback, please feel free to leave a comment below.

    If you’re tired of managing your own servers – you might want to check out RunCloud (yep, that’s us!). RunCloud is built for developers that want to focus on shipping great work, not on managing their infrastructure. We provide painless server configuration so you don’t need to spend hours figuring it out – get started with RunCloud today & get up and running in minutes.
  • How to Test WordPress 6 — and Every Subsequent Release

    How to Test WordPress 6 — and Every Subsequent Release

    Is your website losing potential customers? Shocking statistics reveal that 64% of visitors abandon slow and glitchy sites!

    It’s vital that you test your websites thoroughly to provide your users with a first-rate browsing experience if you want to stand any chance of increasing your sales.

    In this article, we will detail the steps you need to follow for setting up a WordPress staging environment and will demonstrate exactly how it can be used to test your website’s updates.

    Our step-by-step guide will ensure your site is always running smoothly and keeping customers happy.

    Let’s get started!

    Understanding New WordPress Releases

    At the time of writing, WordPress 6.2 is the latest release of WordPress (with 6.3 due to be released around August of 2023). This current release includes several major changes and enhancements that make web development easier.

    For instance, the new default theme, Twenty-Twenty-Three, now includes ten style variations – which gives you a lot of flexibility in developing your new site.

    One of the key highlights released is the enhancements in Query Loop blocks functionality. In addition to this there have been improvements in block placeholders which provide better consistency and control, and more responsive text with fluid typography.

    You can track the latest release of WordPress on the new releases page.

    Although new features make life easier, they sometimes cause compatibility issues with the existing site, especially if your site uses plugins or themes that have not been tested with the latest version. It’s a good idea to test that everything works before upgrading your website.

    That’s where a solid staging environment comes in.

    What is WordPress Staging?

    A staging environment is a duplicate copy of your website where you can try out and thoroughly test any changes – without affecting the original site.

    It’s often used to test and preview the changes to themes and plugins before making them live on the actual website. This way, website owners can test changes without any risk of disrupting users’ experiences on the live site.

    Why Do You Need to Test WordPress?

    Running and maintaining a staging site alongside your production site might seem like double the effort. However, doing this can save countless hours in debugging. Here are a few scenarios where it’s especially useful:

    1. A staging site allows developers to work more efficiently as they don’t need to worry about the potential repercussions from any failure. If you’re making changes to a live site, you’ll take regular backups and carefully inspect everything before making each change. If your site is being actively developed, this can take a lot of time. Having a sandbox environment to test and refine changes makes the development process faster.
    2. By testing the changes on a test site you can catch and fix issues before they go live. The ability to identify and proactively fix the issues even before they show up in your live environment makes it immensely valuable for businesses that cannot afford downtime.
    3. Multiple developers can work simultaneously on the staging site without worrying about clashes and overwriting each other’s work. This can speed up the development time and reduce miscommunications.

    When Should You Use WordPress Staging?

    There are many scenarios where using a test environment is helpful. Here are some of the common examples:

    1. Updating WordPress core, themes, or plugins: With WordPress, plugins can conflict with each other, leading to errors or crashes. With staging websites you can test new plugins, or updates to existing plugins, without risking the stability of the live site.
    2. Design changes: Website owners can experiment with different design changes, such as a new color scheme, layout, or font, all without affecting the live site. This is much more useful than having a mockup of the design, because the staging site can be viewed on different devices to test both responsiveness and accessibility.
    3. E-commerce changes: For e-commerce websites staging is especially useful when testing new payment gateways, product listings, or other updates that could affect the checkout process.

    Setting Up a Test Environment

    Step 1: Back Up Your Site

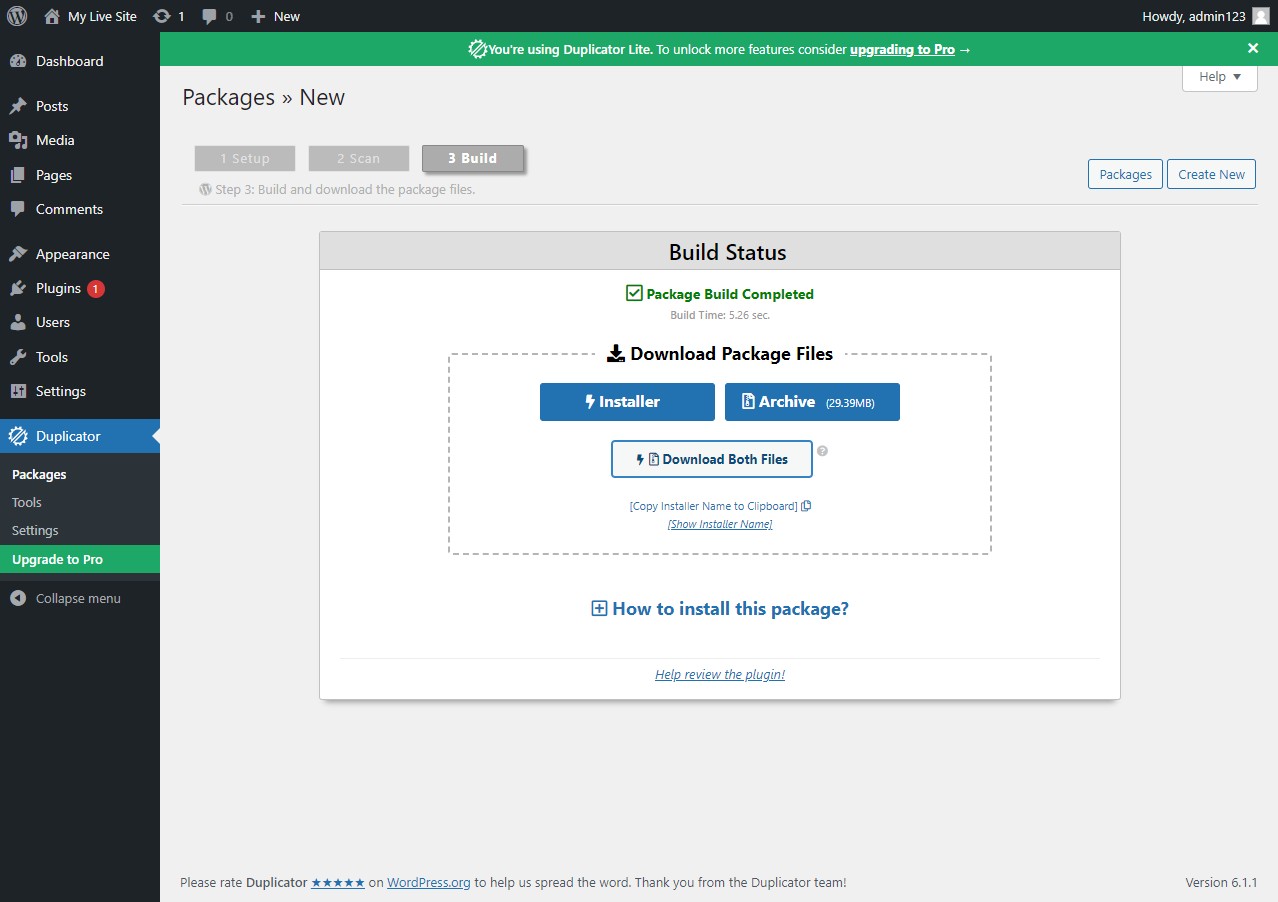
    Ensure that you have a working backup of your site. If you don’t have a recent copy, you can use RunCloud’s automated backup functionality to quickly create a snapshot of your site. If you’re not using RunCloud to manage your servers yet, you can use a WordPress plugin such as WP Migrate Lite, or Duplicator to make a copy of your site.

    create staging site using LocalWP

    Step 2: Setup A Test Environment

    You need to create a consistent testing environment that closely resembles your actual hosting environment. This means you should use the same operating system, PHP version, and libraries in your staging environment. Ideally your test environment should not have anything running except your test site so that it’s isolated from all potential problems.

    If you don’t have a fresh virtual machine then you can use tools such as Vagrant for building and managing virtual machine environments. It’s a customizable and scalable solution for advanced users who require more control over their development environment.

    In this tutorial, we’ll be working with Local, a WordPress development environment. It’s specifically designed for testing WordPress sites. Start by downloading the Local binary on your computer and execute it.

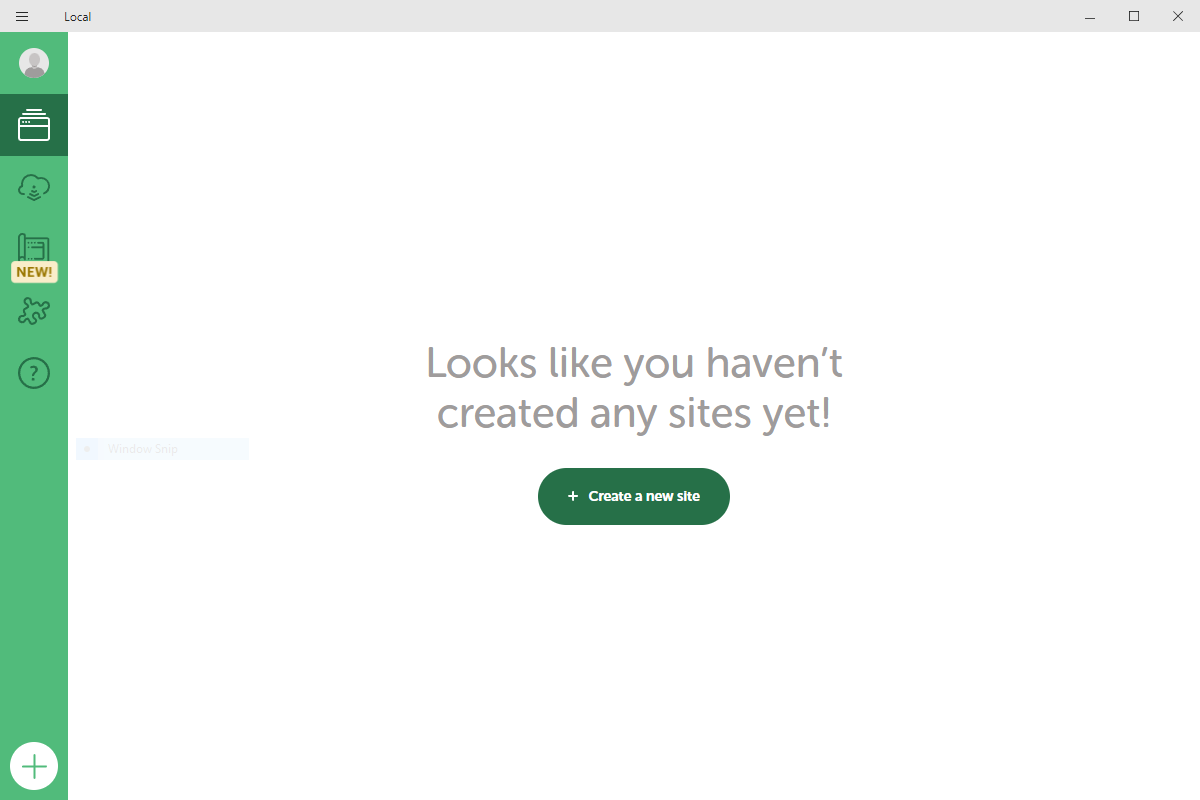
    The binary file will automatically download and install the necessary packages for your computer. Once you’re done, you should see a screen that looks something like this:

    LocalWP empty screen

    Step 3: Import Your Backup Into The Test Environment

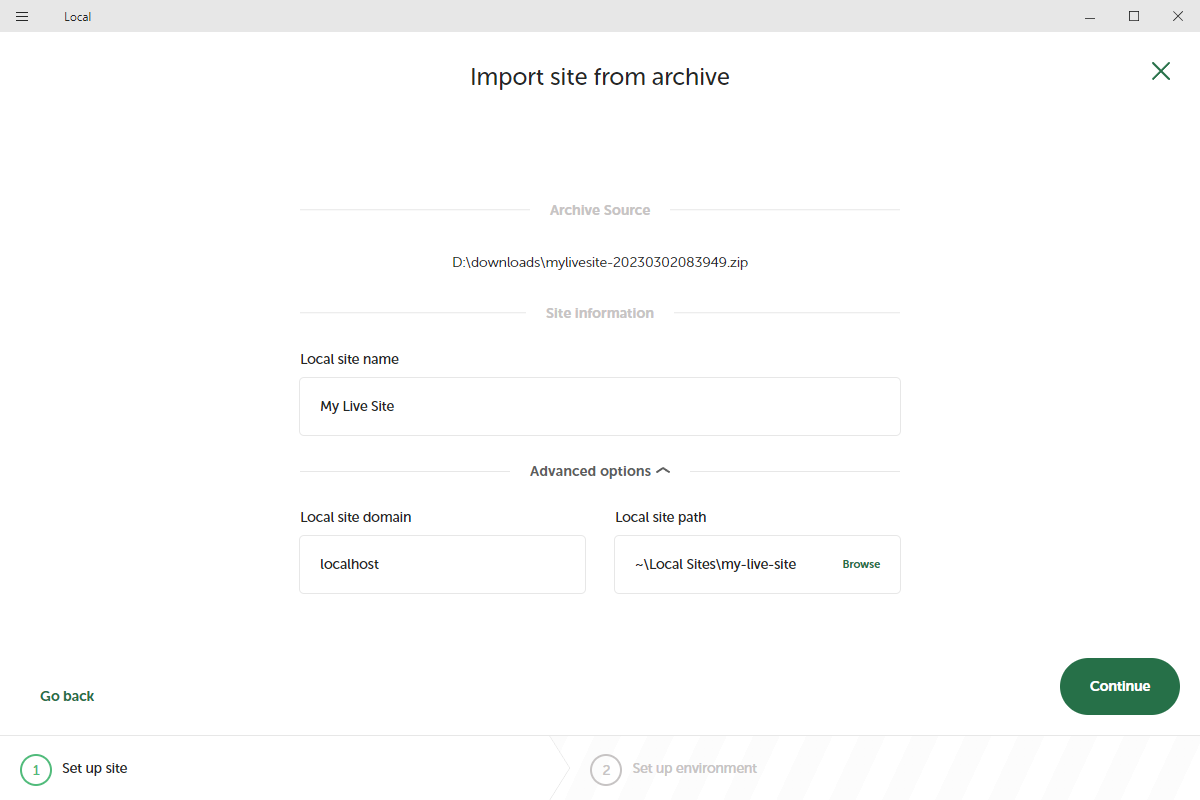
    Click on “Create a new site” and select the option to use an existing zip file. Locate the backup of your live website, and use that backup to create a new site.

    Import Archive LocalWP

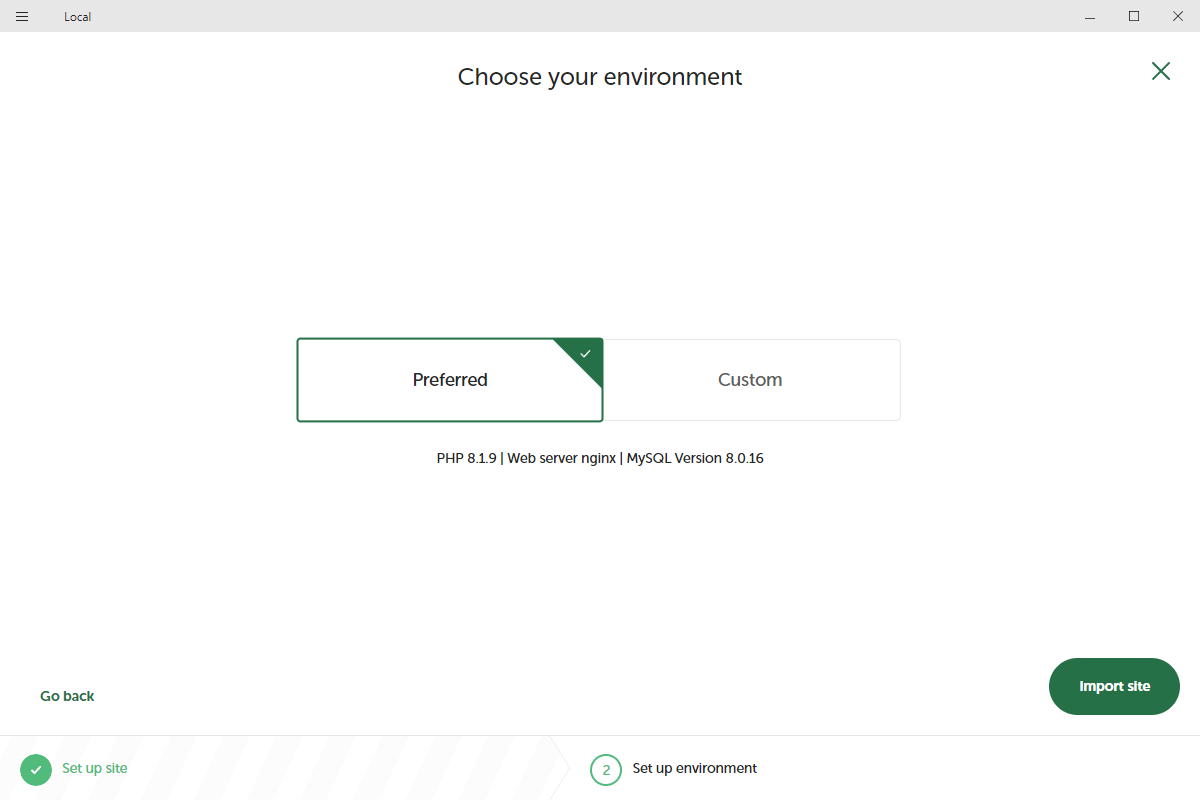
    Use the preferred settings for a seamless experience, and click “Import site”. Your firewall might prompt you to allow network access, so make sure you grant this access for a smooth installation.

    choose environment WordPress

    Step 4: Make The Changes To The Staging Site

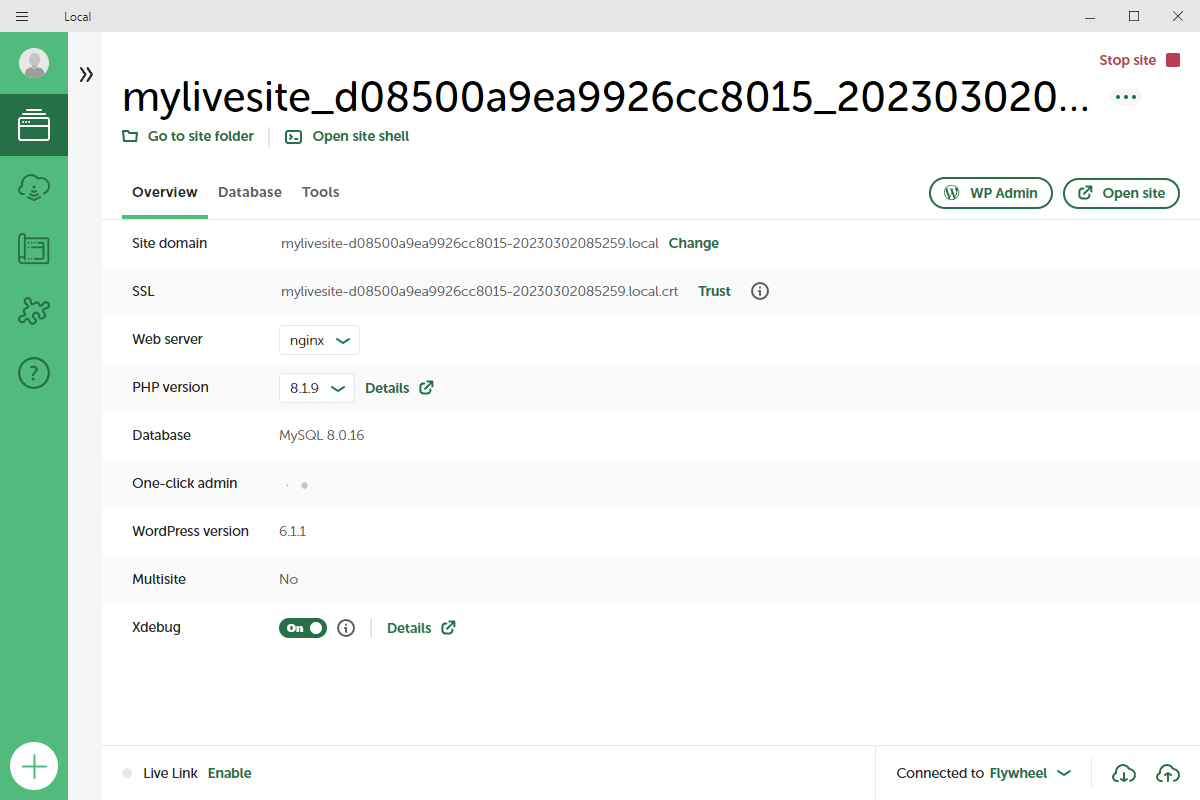
    Once your site has been imported, click on the “Open site” button on the top right to view your staging site. Now you can log into your admin dashboard as you normally would, with the same credentials that you use for your live site.

    LocalWP dashboard staging

    Once you have the site up and running, you can access it on your local network and collaborate with other team members – all completely without affecting the live site.

    After you have thoroughly tested the compatibility of your plugins and themes, you can make those changes on your live site without worrying about unexpected repercussions.

    If you only made a few minor edits to your staging site, such as changing some text or colors, you can post these changes to your live site by manually implementing them. For example, you can edit the same file or setting on your live site, and then copy-paste the changes from your staging site. In this way, you can avoid overwriting your entire live site and preserve any user-generated data.

    However, if you made a complex operation on your staging site, such as installing a new plugin or theme, adding custom code, or modifying the database, it may be wise to take a backup of your staging site – and overwrite your existing live site with it. This way, you can ensure that your live site matches your staging site exactly, and avoid any compatibility issues or errors. Before you do this, however, make sure you have a backup of your live site as well in case something goes wrong.

    Creating A Staging Site on RunCloud

    If you’re using RunCloud to manage your servers, then you can create a staging site with just a few clicks. RunCloud can automatically clone entire WordPress sites without requiring you to download anything.

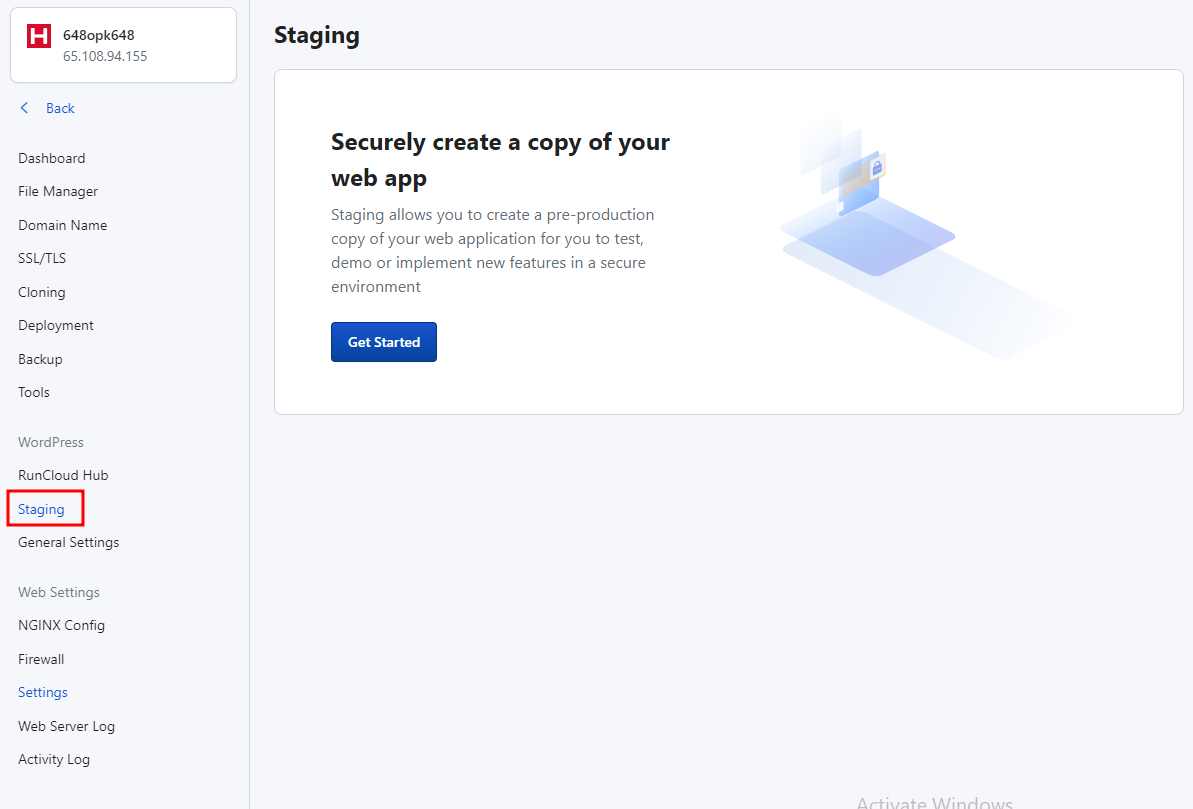
    To use RunCloud’s staging feature, go to your dashboard and open the “Staging” menu to set up a test environment. Click on the “Get Started” button to begin the process.

    RunCloud dashboard staging WordPress

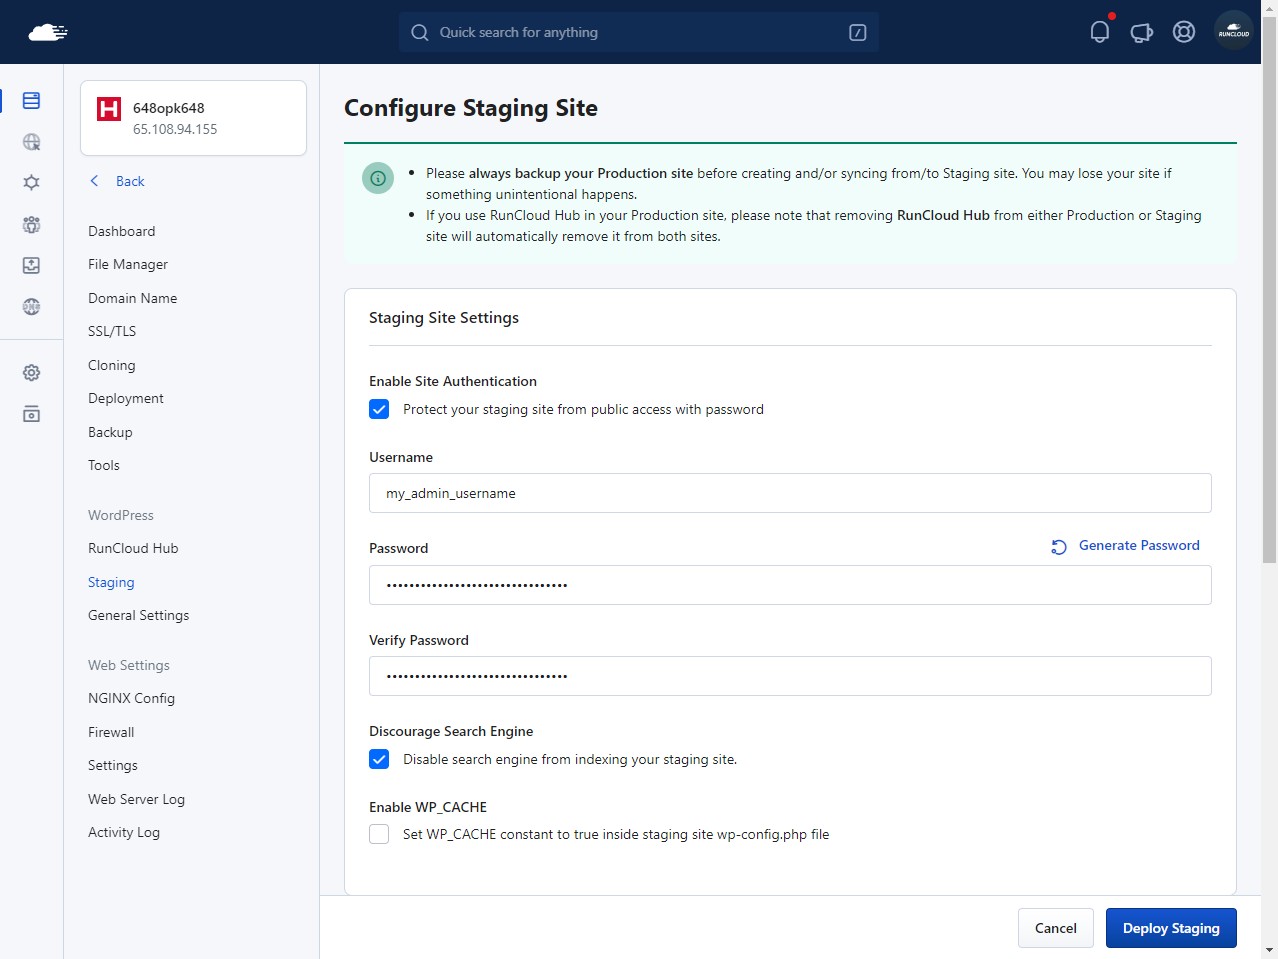
    RunCloud will now ask you to enter the username and password that visitors will need to enter for browsing this site. This is not your WordPress admin dashboard password – your staging site will have the same login credentials as your production site.

    You can turn off this option if you like. However, we recommend you keep this on as making the test site publicly available might potentially reveal some confidential information.

    configure staging environment WordPress

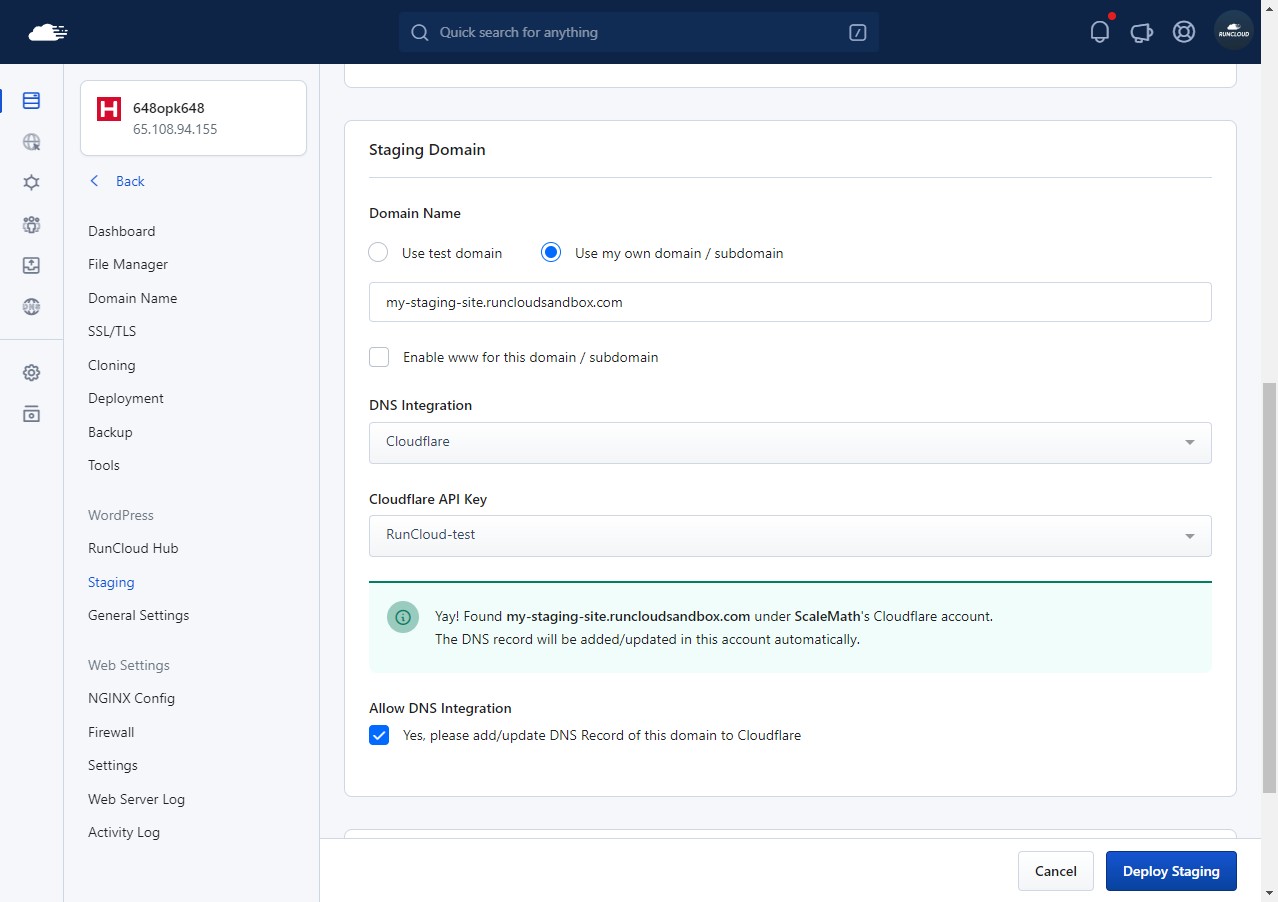
    After configuring the access control of your site, you can configure the domain that you want to use. You can either use a different subdomain of your original site, or use a test domain.

    Configure staging domain RunCloud WordPress

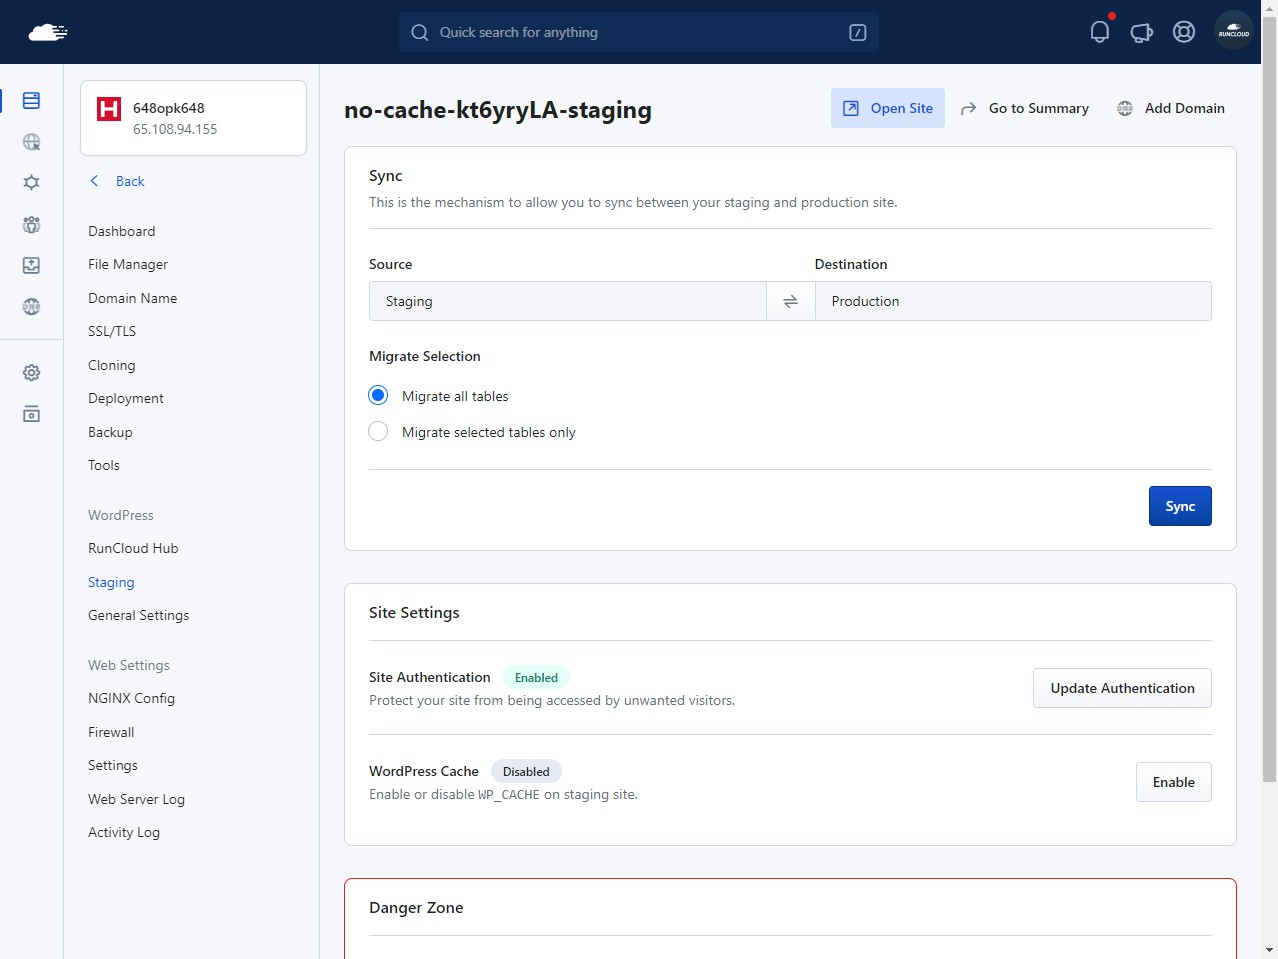
    After configuring the necessary settings, deploy the app by clicking the “Deploy Staging” button. Once deployed, you should see the following screen. Click on the “Open Site” button in the top right corner of the screen to browse your staging site.

    staging WordPress settings RunCLoud

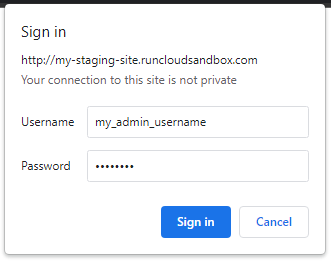
    After opening the site, you should see an alert asking you for login credentials. Enter the username and password that you just created. You should now be able to browse your site and make changes to it without affecting your main site.

    HTTP authentication RunCloud WordPress

    After making the changes, you can go back to the staging dashboard and click on the “Sync” button to push changes from the test environment to the production.

    WordPress Staging Plugins

    Many WordPress backup and migration plugins also provide the option to create a staging environment. Here are some of the best WordPress staging plugins.

    1. WP StageCoach
      WP Stagecoach provides the ability to easily create sandbox sites. It has some advantages over importing a backed-up copy of your test site, as it merges the database rather than overwriting the existing one. There are also some advanced features, such as protecting staging sites via a password, or offering the ability to revert changes instantly.
    2. WP Staging
      The WP STAGING plugin for WordPress allows users to create backups, staging sites, and clones of their website. Some advanced features included are support for multisite networks, and migration to another host or domain – although these are locked behind a paywall. The staging environment can quickly test updates and restore backups if necessary, making it a good choice for managing your staging environment.
    3. BlogVault Staging
      BlogVault is a WordPress backup plugin that also provides a staging environment. It can perform incremental automatic backups, and can revert to previous versions easily. This quick backup and recovery process allows you to speed up your development, as you’ll spend more time testing and less time waiting for backups.

    The staging site runs on a separate server instead of running alongside your live site. This allows you to load-test the staging site without worrying about any possible performance impact on your live site.

    After Action Report

    It is essential to test any changes before pushing them to your live site. This is even more important if you’re running a business that relies on a website for its core services. Staging environments are a great way to test your site in a sandbox environment without worrying about compatibility issues.

    We strongly encourage all WordPress site owners to test new releases and stay up to date with the latest software updates. This not only ensures that your site is functioning optimally but it also helps to ensure your site is secure. Outdated software can leave your site vulnerable to security threats, which can have serious consequences for your business.

    If you’re tired of managing your own servers – you might want to check out RunCloud (yep, that’s us!). RunCloud is built for website owners that want to focus on their customers, not on managing their infrastructure. Experience painless server configuration, backups, and worry-free staging environment migration, without the need to spend hours figuring it out – get started with RunCloud today and get up and running in minutes. Get started with RunCloud today and get up and running in minutes.
  • Upgrading Your Server’s Operating System on RunCloud

    Upgrading Your Server’s Operating System on RunCloud

    If you’re still using Ubuntu 18.04 LTS (Bionic Beaver), it’s time to start thinking about upgrading.

    As of May 31, 2023, Ubuntu 18.04 will reach its End of Standard Support (EOSS) date, meaning that it will no longer receive security updates, bug fixes, or technical support from Canonical.

    In this article, we’ll discuss the importance of upgrading from Ubuntu 18.04, the risks of staying on an unsupported system, and how to make the transition to a newer, supported version of Ubuntu.

    Effective June 1st, 2023: We will be discontinuing support for connections made using TLS 1.0. This decision aligns with industry standards and best practices to maintain a secure environment for all of our users. Learn more.

    What Is An EOL Version Of Ubuntu?

    EOL stands for end of life and is a tag given to all the releases of Ubuntu that are no longer being supported by Canonical, the company behind Ubuntu. This means that it will no longer receive any security updates, bug fixes, or new features.

    Running an EOL version of Ubuntu exposes your system to potential vulnerabilities, compatibility issues, and performance degradation.

    Using an EOL version poses several risks, such as:

    1. Vulnerabilities: An EOL version may have unpatched security flaws that can be exploited by hackers or malware. This can compromise your data, privacy, and system integrity.
    2. Compatibility: An EOL version may not be compatible with newer hardware, software, or standards. This can cause errors, crashes, or performance issues.
    3. Support: An EOL version will not include any technical support from the developer or vendor. This means that you’re on your own if you encounter any problems, or need help.

    You can see the list of all Ubuntu releases and their respective end-of-life dates on Ubuntu Wiki.

    What is LTS?

    LTS stands for Long-Term Support and is a tag given to Ubuntu releases with an even version number. For example, 18, 20, 22, and so on.

    LTS versions receive security updates and bug fixes for five years from their release date. This is much longer than ordinary releases that are typically supported for less than a year.

    Is Ubuntu 18.04 reaching EOL?

    No, Ubuntu 18.04 is an LTS release and it will reach the end of standard support on May 31, 2023 – it’s different from End of Life.

    Although it’s highly recommended to move to a newer version of Ubuntu, it might not be possible for everyone to do this before June 2023. Ubuntu 18.04 servers that are subscribed to Ubuntu Pro or Canonical Embedding Programme will continue to receive essential updates for another 5 years and will reach its End of Life in April of 2028.

    How To Identify Your Ubuntu Version

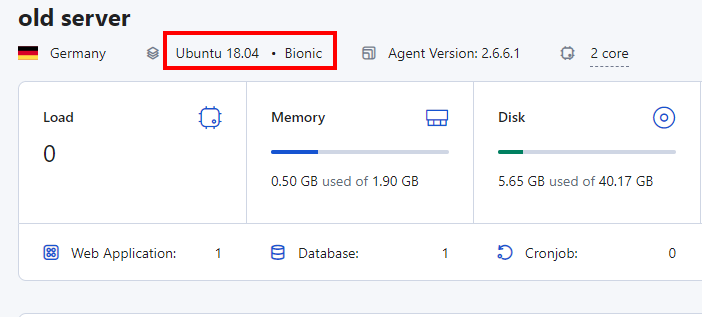
    You can check whether you are using the latest version of Ubuntu in the RunCloud dashboard. Open your server page, and at the top, you will see the current version of Ubuntu that’s running.

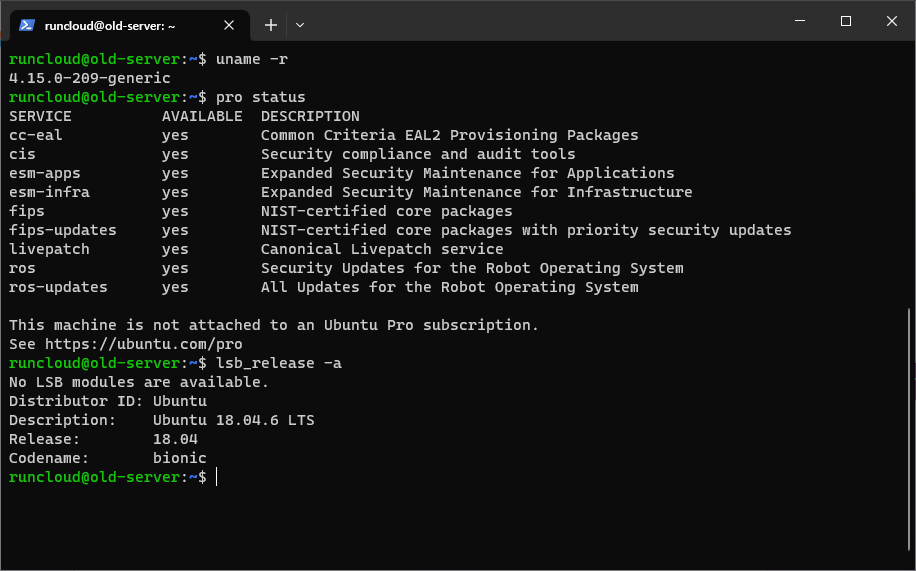
    You can also check the status of your Ubuntu Pro subscription and the current Ubuntu version from the terminal. Log into your server using SSH, and execute the following commands:

    uname -r # Check Kernel version
    pro status # Check Ubuntu Pro status
    lsb_release -a # Check Ubuntu version

    How To Upgrade Ubuntu To The Latest Version On RunCloud

    RunCloud strongly recommends you avoid upgrading your existing server. Instead, you should create a new server and migrate to it.

    There are several advantages of doing this:

    • Upgrading existing servers may cause compatibility issues with the software or hardware.
    • Upgrading existing servers may overwrite some of the existing configuration, security, or device settings.
    • Creating new servers and migrating to them allows us to take advantage of new technology or better services that may not be available on the old servers.

    We recommend you follow the following steps to move to a newer version of Ubuntu.

    Note: Before you back up and upgrade your server, you need to make sure that your app is compatible with a higher PHP version. Ubuntu 18.04 supports PHP 7.0 and 7.1, but Ubuntu 20.04 only supports PHP 7.2 and above. Therefore, you need to move your app to at least PHP 7.2 before you proceed with the backup and upgrade process. You can use RunCloud’s dashboard to change the PHP version for your web application. This step is not required for containerized servers, as they use their own container images for PHP.

    Backup Your Existing Applications

    We have written an extensive blog article outlining how to perform backups. Here’s a quick summary.

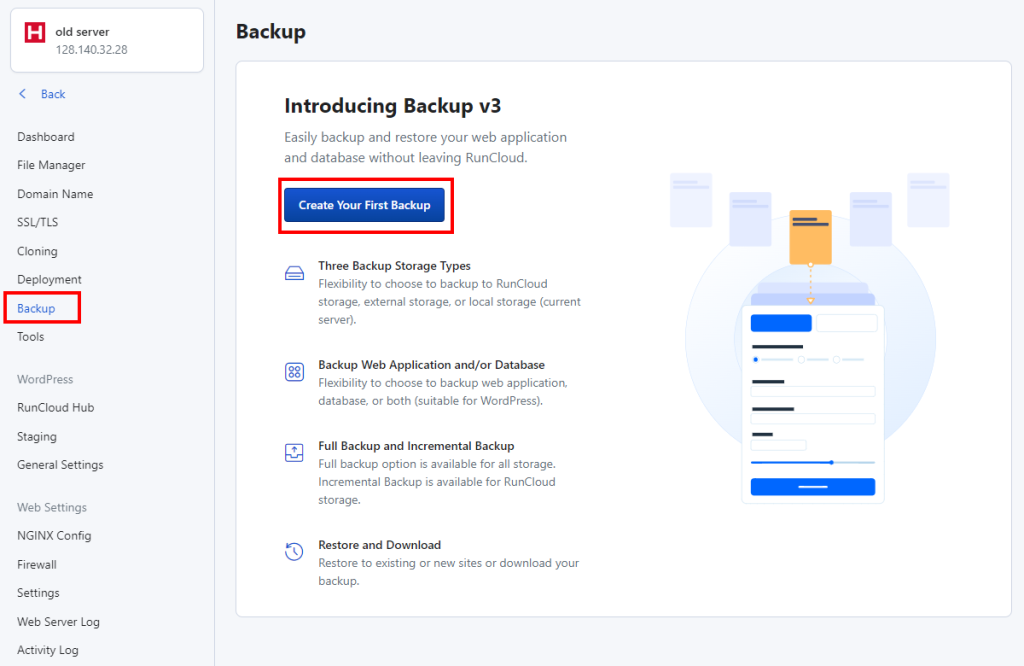
    Start by opening the web application in the RunCloud dashboard, and then go to the “Backups” tab.

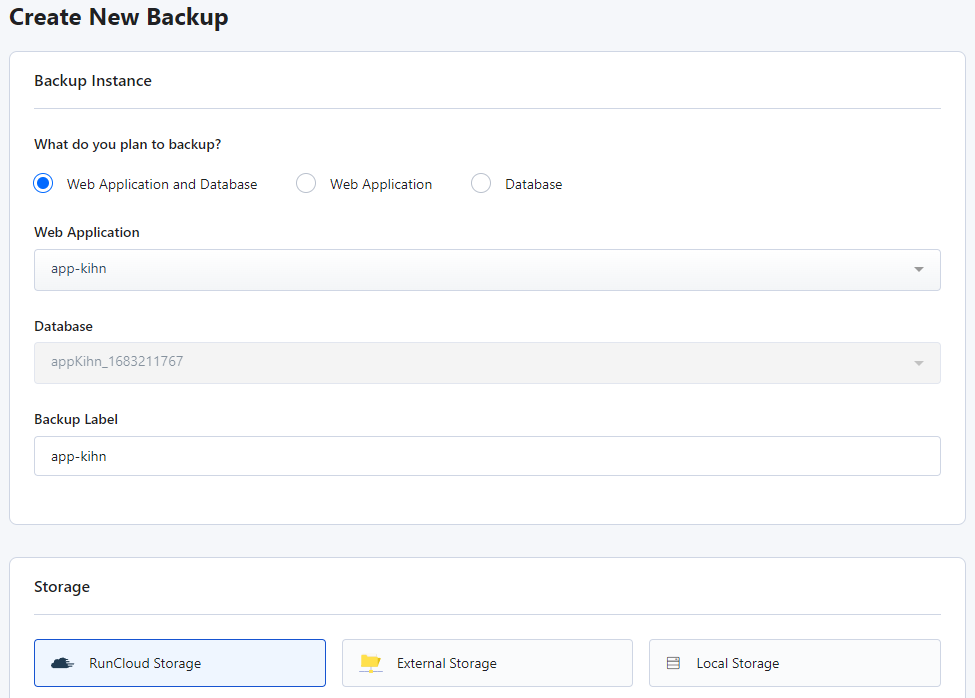
    While creating the backup, make sure you select the “Web Application and Database” option. After that, select your desired storage option, and configure other basic settings.

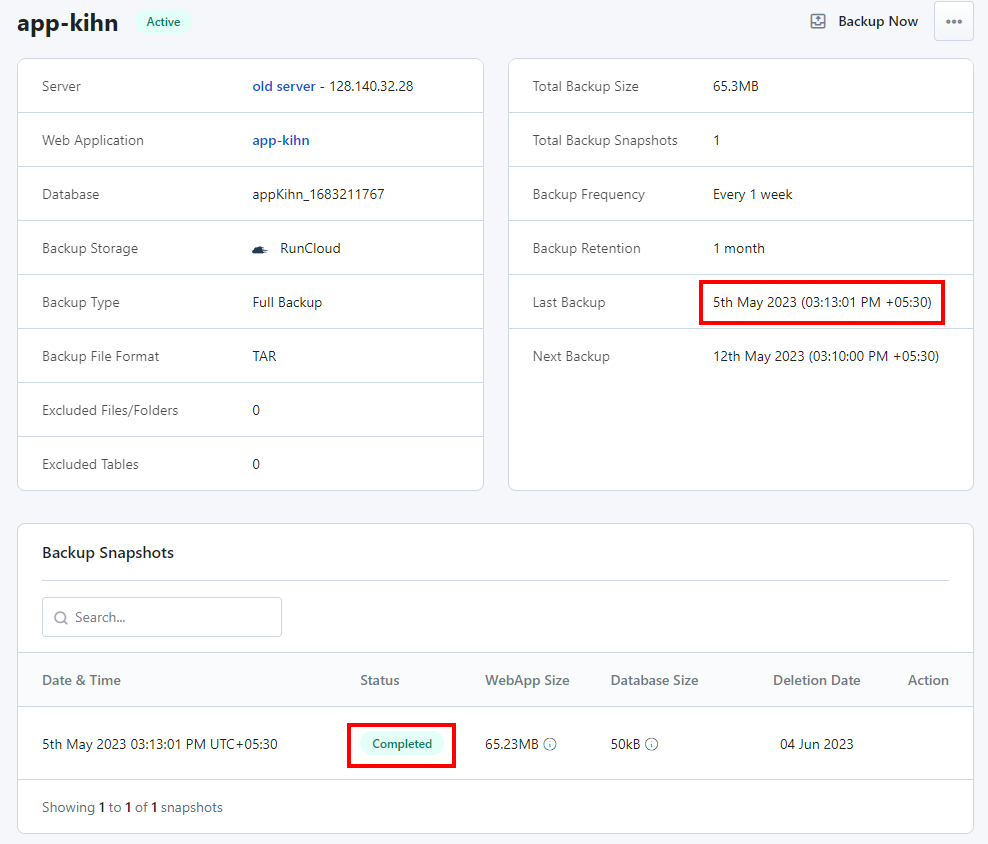
    Once your backup is completed, you will see a “Completed” status next to it.

    Provision A New Server

    While the backup is in process, you can provision a new server. We have an in-depth knowledge base article that explains how to connect a server to RunCloud.

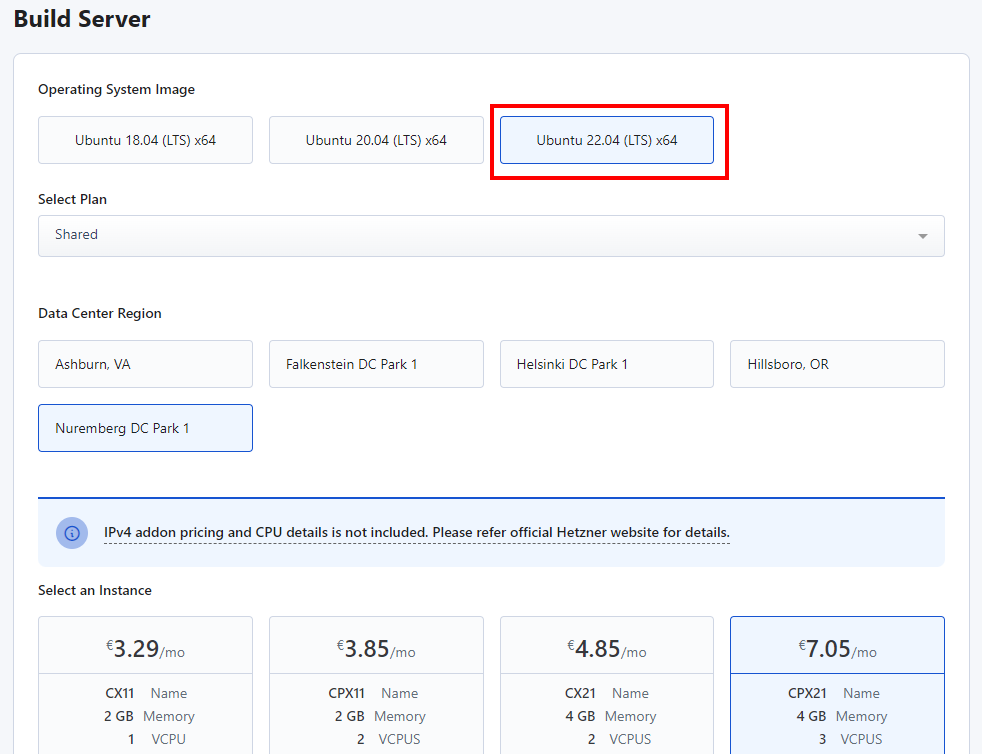
    You can read it and follow along, but just make sure that you select the latest version of Ubuntu, 22.04 LTS, while creating the new server.

    Migrating Applications

    Provisioning a server and creating backups takes just a few minutes. Once both are complete, you can begin migrating your application. We strongly recommend you do this at a time when you don’t get a lot of traffic to your site in order to minimize potential disruptions.

    We have an in-depth knowledgebase article that explains How to clone a web application to another server, but here’s a quick summary.

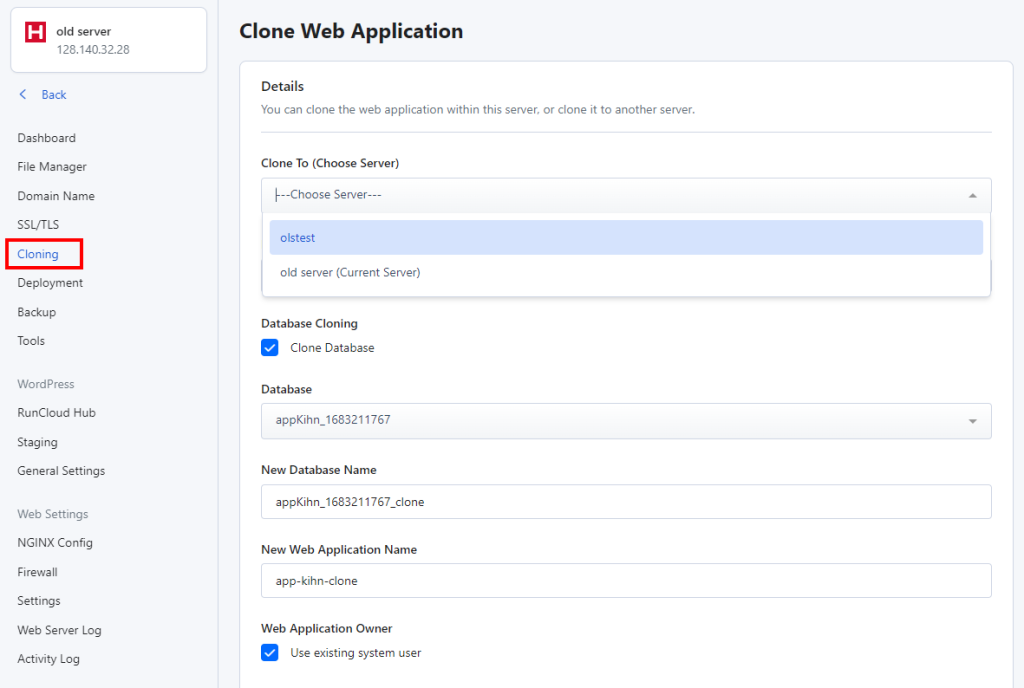
    Open the “Web Application” dashboard in RunCloud, and click on “Cloning”.

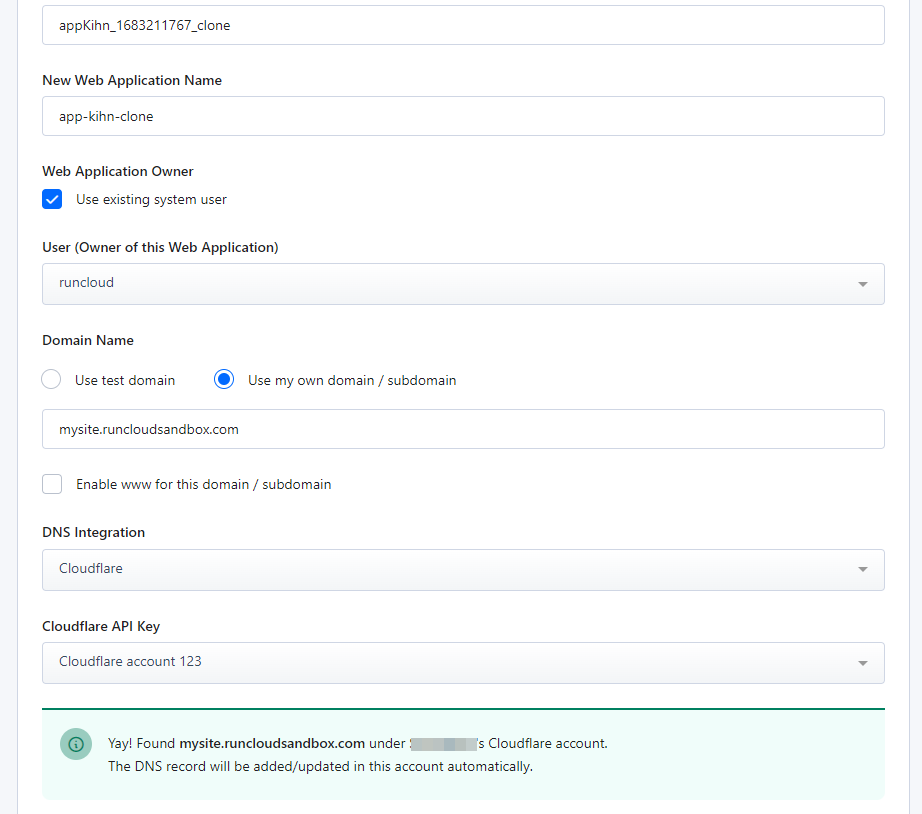
    Select the newly created server, and provide the new names for both the web application and database which will be used on the new server.

    After that, if you’re using RunCloud’s Cloudflare integration, your DNS records will be updated automatically.

    However, if you wish to update your records manually, you might want to read our guide on How To Speed Up DNS Propagation first.

    That’s it!

    Your application should be up and running on the new server. If you have multiple applications, you’ll need to perform the above steps for each application.

    Testing The Migration

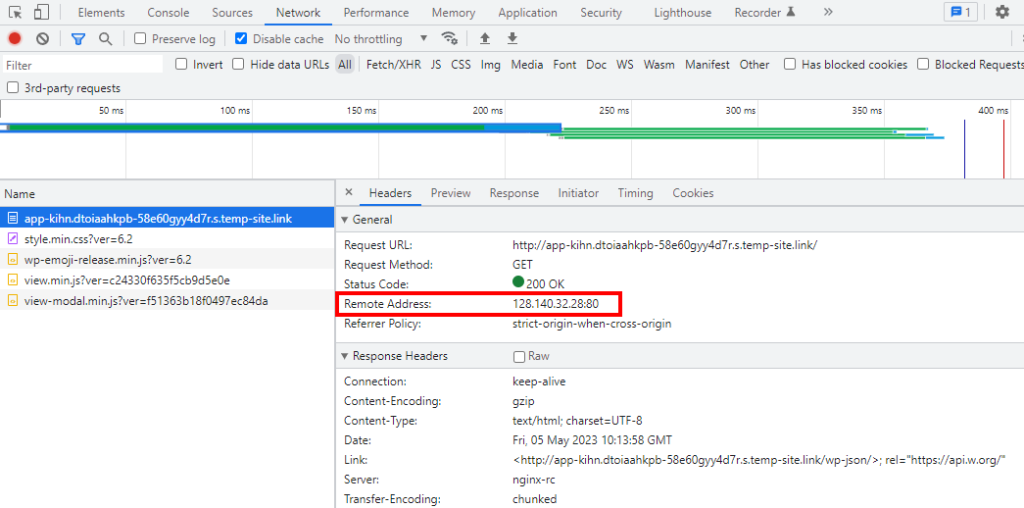
    Once you have completed the migration, you can visit the website and check its IP address in the DevTools menu. The remote address field should show you the IP address of the new server. If you’re still seeing the old IP address, clear your browser cache and retry after a few minutes.

    Once your new site is up and running, we recommend keeping the old server alive for a few days while you perform tests on the new server. Ideally, you should test every user sign-up form and checkout process to make sure everything is working properly.

    TLS 1.0 Support Will Be Discontinued

    As of June 1st, 2023, RunCloud will no longer accept connections made using TLS 1.0. This decision aligns with industry standards and best practices to maintain a secure environment for all of our users.

    Why Is TLS 1.0 Being Deprecated?

    TLS 1.0 is an outdated encryption protocol that has been found to have security vulnerabilities and weaknesses. By discontinuing support for TLS 1.0, we are prioritizing your data security and protecting it from potential threats.

    What action do you need to take?
    To ensure uninterrupted access to the RunCloud panel, we kindly ask you to take the following actions before the deprecation date:

    1. Update your browser: Ensure that you are using a modern web browser that supports TLS 1.1 or higher. Popular browsers like Google Chrome, Mozilla Firefox, Microsoft Edge, and Safari have already dropped support for TLS 1.0 and offer more secure versions.
    2. Verify server compatibility: Check if your server environment supports TLS 1.1 or higher. Most modern server configurations already have the necessary protocols enabled. If you are unsure or need assistance, please reach out to our support team, and we will be happy to help.
    3. Upgrade your application: If you are using any third-party applications or integrations that communicate with the RunCloud panel, ensure they support TLS 1.1 or higher. If necessary, update those applications to ensure compatibility.

    We understand that this change may require some adjustments on your end, but it is necessary to maintain a secure environment for all our users. We apologize for any inconvenience caused and appreciate your cooperation in this matter.

    If you have any questions or need further assistance, please don’t hesitate to contact our support team. We are here to guide you through this transition and address any concerns you may have. Thank you for being a valued RunCloud customer. We remain committed to providing you with a secure and reliable hosting experience.

    After Action Report

    It’s clear that upgrading to the latest version has several benefits such as improved security, performance, support, compatibility, and features. In this article, we also highlighted the risks of using unsupported versions of Ubuntu, such as vulnerabilities, compatibility issues, lack of support, and missing out on new features.

    If you follow the steps outlined in this article, you’ll be able to migrate to the latest version of Ubuntu with minimal disruptions.

    After the upgrade is complete, it’s a good idea to install a monitoring agent, such as New Relic, to check for errors on your server. Read our blog post that explains How To Install New Relic Monitoring on RunCloud.

    RunCloud is built for developers that want to focus on shipping great work, not on managing their infrastructure. We provide painless server configuration so you don’t need to spend hours figuring it out – get started with RunCloud today and get up and running in minutes.
  • How to Install and Setup A WordPress Multisite Network

    How to Install and Setup A WordPress Multisite Network

    Are you tired of managing multiple WordPress sites individually? Then say ‘goodbye’ to the hassle and ‘hello’ to efficiency with WordPress Multisite Network!

    Discover how you can manage all your sites from one dashboard with ease using this game-changing feature.

    In this guide, we’ll walk through what a WordPress multisite network is and discuss whether you should use one. We will also cover the benefits of using a multisite network and then explain how to set up a WordPress multisite network correctly.

    Let’s get started!

    What Is WordPress Multisite Network?

    WordPress multisite is a feature in WordPress that allows you to run multiple websites on just one WordPress installation. This is different from running multiple WordPress engines on the same server. In a multisite network, the network admin has access to all of the sites in the network.

    The WordPress multisite feature is often used by large organizations that need multiple websites for different units, departments, or entities within their overall structure.

    For example, if a university wants to give all its professors their own blog column on the university website, they can do so using WordPress’s multisite feature. Similarly, a large newspaper agency might have one common site for all articles, but have different WordPress sites for each of its categories, such as sports, finance, politics, etc – with each of these websites being operated and maintained by the respective departments.

    Benefits Of Using A Multisite Network

    • Instead of managing multiple sites separately, you can access and control everything from one dashboard, which simplifies management.
    • When running multiple WordPress sites, you might need to maintain multiple servers. In addition to the hosting cost, it will also cost you more to maintain and upgrade these servers. Having one bigger server with multiple sites reduces server cost to some extent.
    • Launching a new site is quick and easy. You can simply go to the dashboard and with the click of a few buttons, your site will be up and running in less than ten seconds.
    • Running a multisite network makes it easier to enforce security policies and manage everything. The network admin can manage plugins, themes, and users for all sites from one dashboard.
    • Multisite networks make it easier to maintain a consistent brand identity across multiple sites.
    • If you use different servers for each of your sites, then you’ll need to monitor the traffic on them separately. This means you’ll need to upscale and downscale each server if traffic spikes or dips momentarily. On a multisite network, if you are using a bigger server to handle all your traffic, it will provide you better resilience to unforeseen traffic spikes.

    Domain-based vs. Path-based Multisite Networks

    WordPress provides two types of multisite network installations, so you can pick the one that suits your needs best.

    Domain-Based Multisite Network

    This option provides a separate domain name for each of your websites. This is especially useful for large organizations which might want to move one of the websites to a different server in the future. Having a separate domain gives you the freedom to manage each site independently in the future.

    While this option does provide some flexibility, it comes with a few caveats. Most notably, you will need to manage a lot of domain names if you have a number of sub-sites. Domain names are infamous for being difficult to manage, and having multiple subdomains will only make the job harder. Moreover, unless you are using a wildcard SSL, you will need separate SSL certificates for each of your domains.

    Path-Based Multisite Network

    If you are happy with all of your sites running on the same domain, then this is the right option for you. It is ideal for bloggers and small businesses that need the additional functionality of multisite networks without all the hassle of managing DNS records.

    Installing A WordPress Multisite Network

    RunCloud makes it really easy to set up and install a multisite network. If you aren’t already using RunCloud for managing your servers, sign up to RunCloud today and follow along.

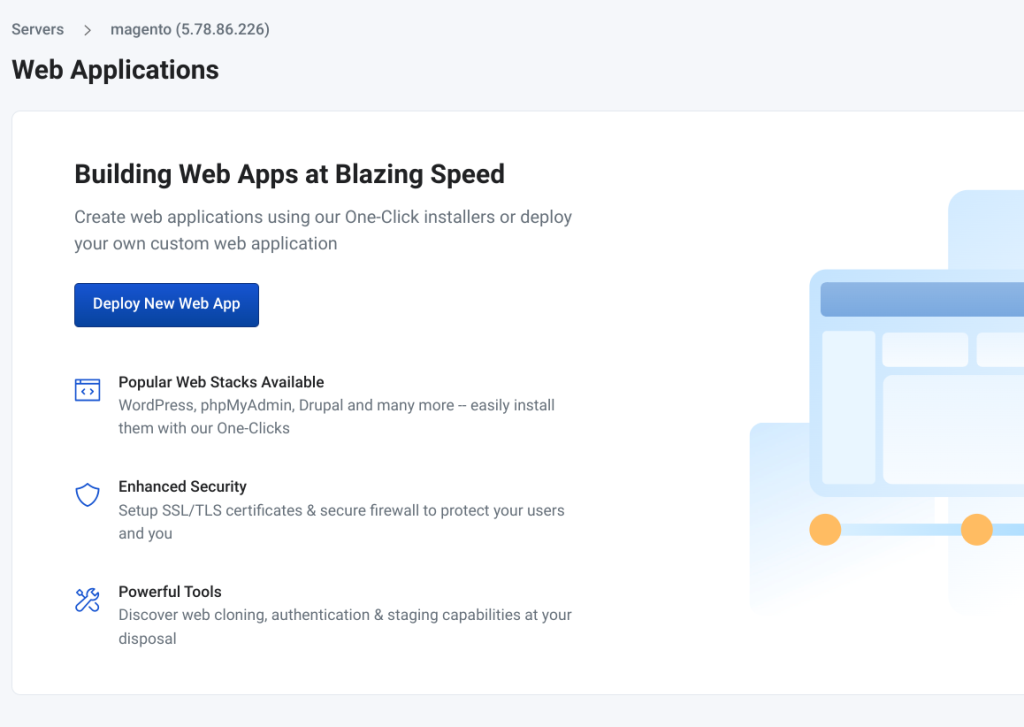
    1. Log in to your RunCloud dashboard and select the server that you want to use. If you already have a server with some spare capacity connected to your RunCloud account, you can use that. If not, you can connect to a new server. Once connected, click “Deploy New Web App”.
    1. On the “One-Click” installation tab, select “WordPress” and give a descriptive name to your application. This name will not be displayed to your visitors.
    1. In the ‘Domain’ section, add the domain that you want to use – this will generate the DNS records for your site. RunCloud’s Cloudflare integration makes it easy to set up DNS records – just select the API key and everything works magically. However, if you are not using RunCloud’s Cloudflare integration you can manually add the DNS records to your nameserver. Usually, the nameserver is managed by your domain registrar.
    1. Next, you will need to configure the SSL/TLS settings for your site. We recommend enabling AutoSSL.
    1. Set the name and other details of your WordPress site. Be sure to use a strong password, and check everything carefully.
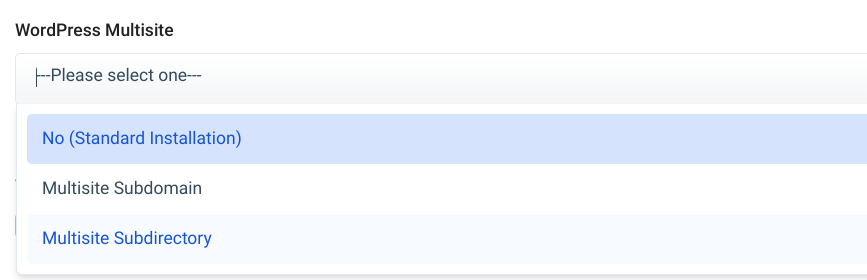
    1. From the dropdown menu, select the type of multisite network that best suits your needs.
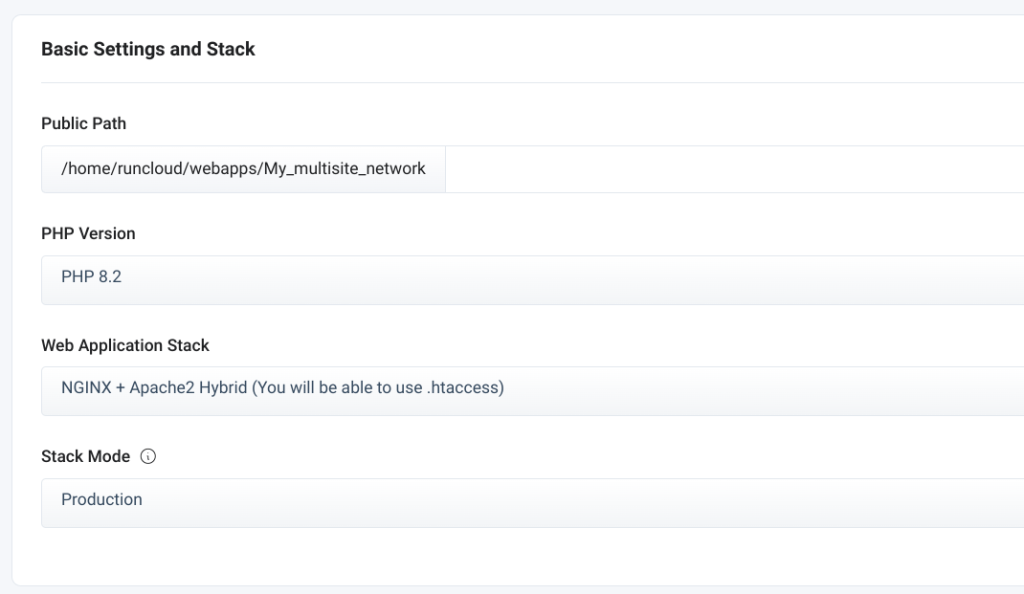
    1. Once you have configured your WordPress settings, continue setting up your application. Enable backup to automatically backup your website at set intervals, and choose the latest version of PHP to take advantage of up-to-date security upgrades.
    1. Once you have configured all of the settings, click the “Deploy My Site” button at the bottom right of your screen to launch the application.

    Adding Sites to the Network

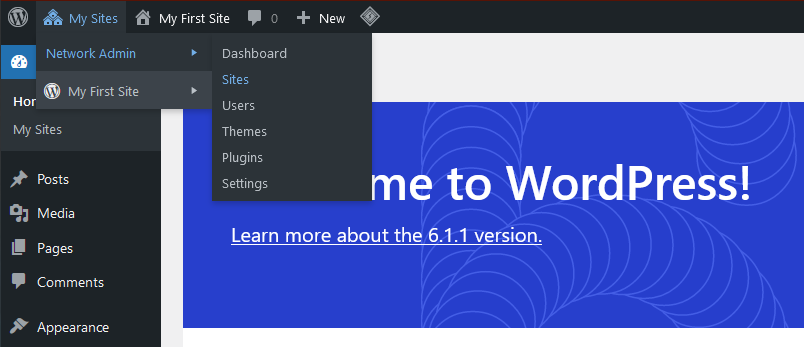
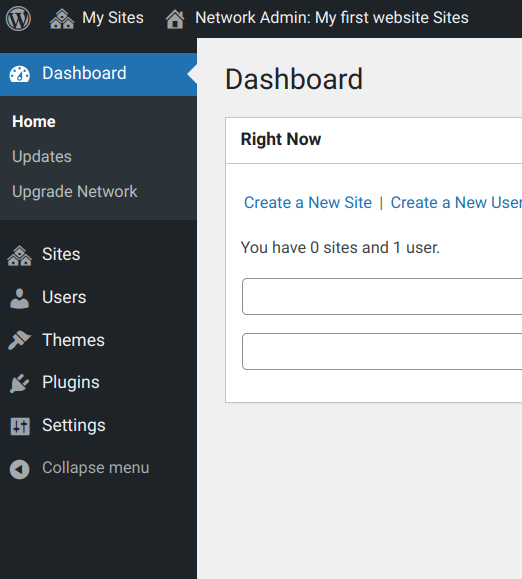
    1. Once you have deployed your main site from the RunCloud dashboard, you no longer need to open RunCloud to deploy additional sites. Log in to WordPress and open the Network Admin dashboard.
    1. Navigate to the “Sites” tab and click on “Add New” to create a new site.
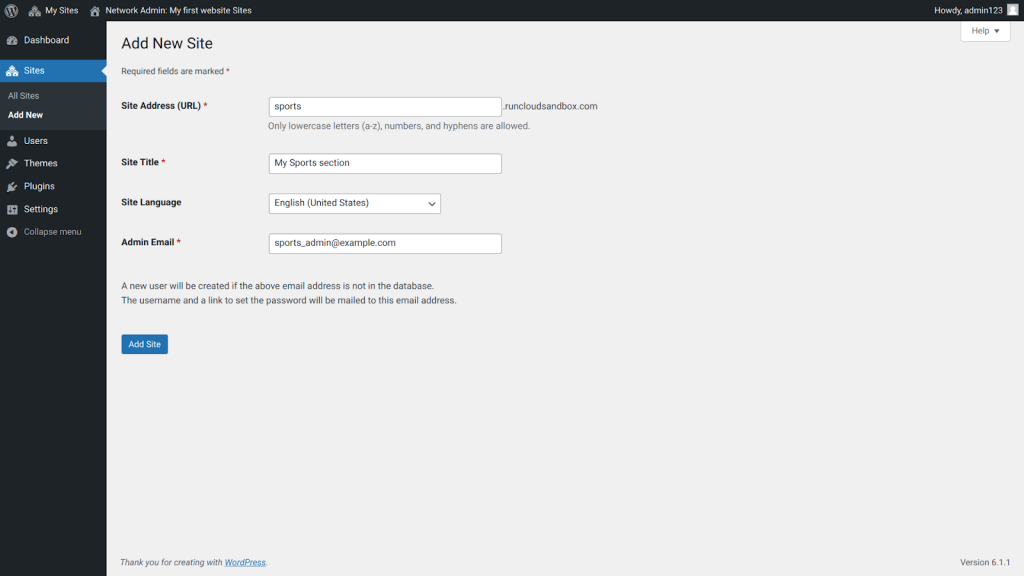
    1. Add the site address, title, and the admin email in the respective text boxes, and then click “Add Site”. If you are using a subdirectory based network, the URL of the site will be different, but the process is essentially the same.
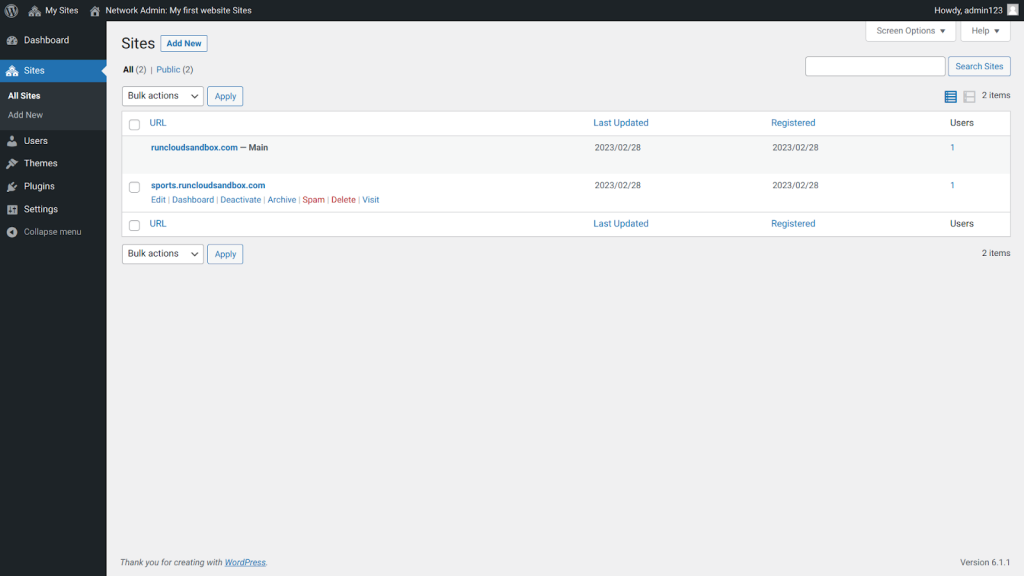
    1. Once you have added the site it should be visible in the Network Admin dashboard. Repeat the last step to create additional sites.
    1. This step is only applicable to domain-based site networks; if you are using the path-based multisite network, you can skip this step.

    After you have created a site on a new domain, you need to add DNS records so people on the internet will know where the site is hosted.

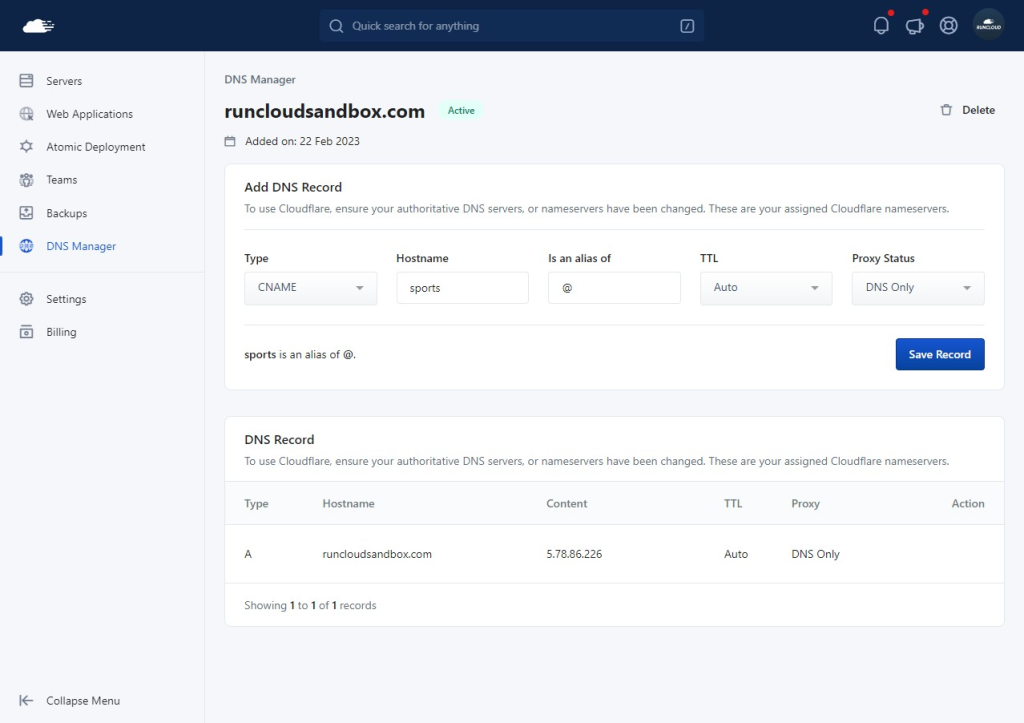
    You can add “A records” for each individual subdomain if you like. However, a simpler option would be to just use CNAME records that point to your root domain. This way, if you switch servers in the future, you will only need to update one value.

    The exact steps needed to add a DNS record will vary from one provider to another, but the record values remain the same. Simply look for the CNAME record option, and enter the subdomain prefix that you created in the WordPress dashboard (in the “name” field). Next, add “@” in the value/target field to point this record to your root domain and then save it.

    1. In the dashboard, hover on the site name to reveal additional options for the site. You can click on the “Dashboard” link to open the dashboard of the new site. If you are not able to view your site immediately, wait for a few minutes for the DNS setting to propagate through the internet.

    Managing the Network

    Managing Users

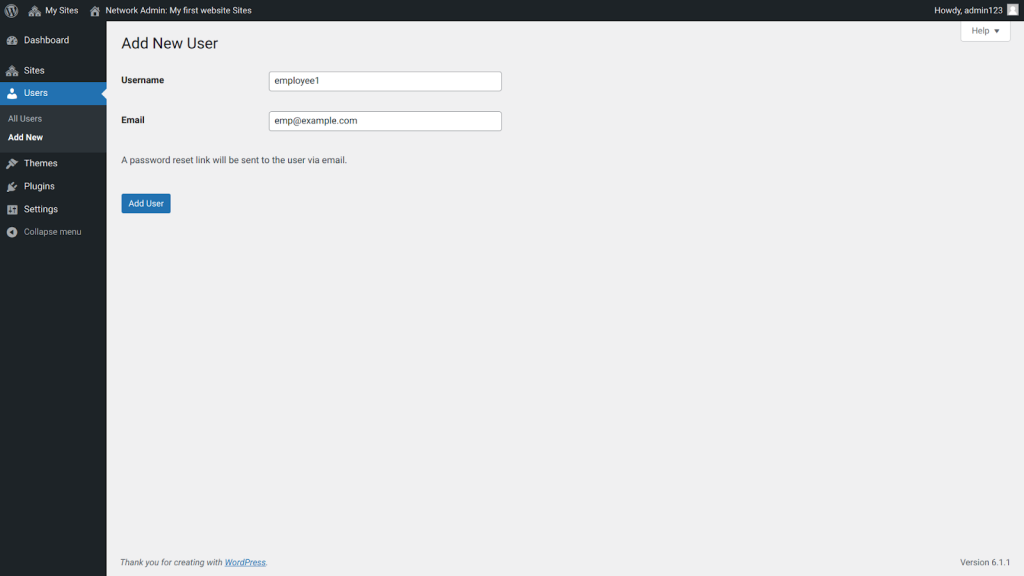
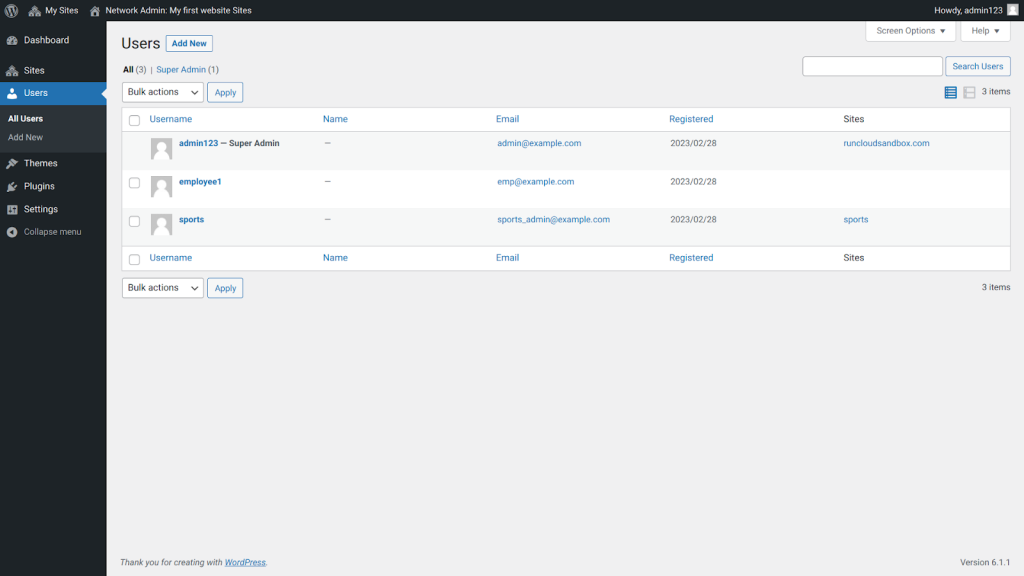
    1. In the Network Admin dashboard, open the Users tab to manage users. Click on “Add New” to add a new user, and then add any necessary details to create the new user.
    1. Once the user has been added, you can go to the Users submenu to view all active user accounts, edit account privileges, or delete user accounts.

    Managing Plugins

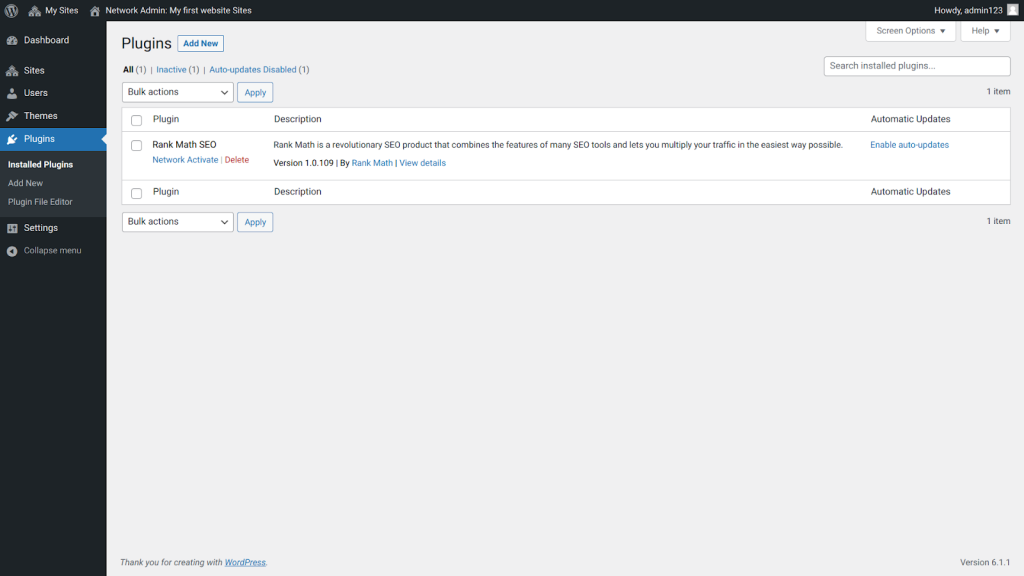
    You can also add plugins to your WordPress multisite network from the plugins panel in the admin dashboard.

    1. Click on “Add New” to open the WordPress plugins directory. From there, you can search for new plugins, and add them just as you normally would.
    2. Once the plugin is installed, you can enable it across the network, i.e., install it for all the sites on the network. Similarly, you can also either upgrade or delete it for all sites.

    Managing Themes

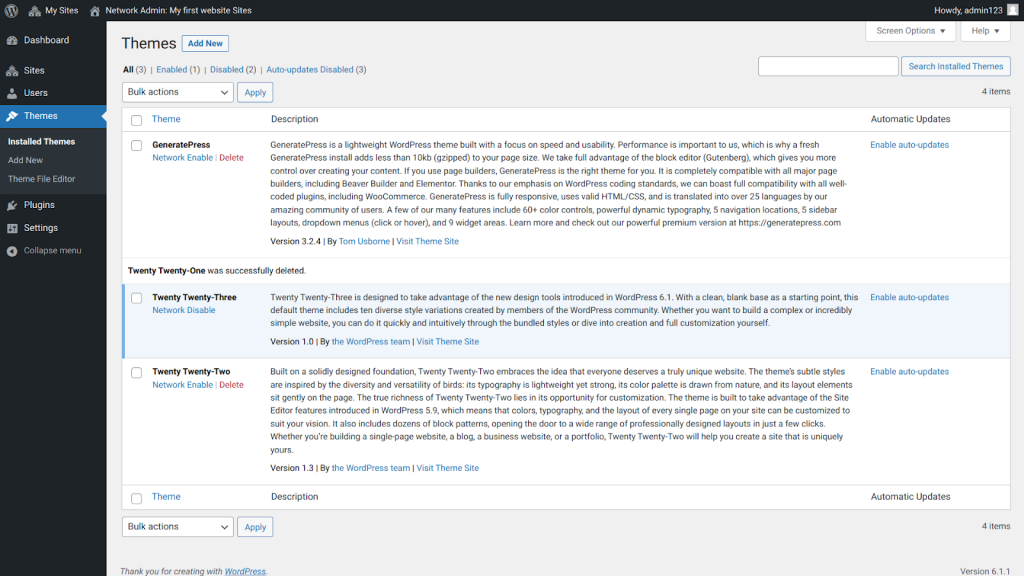
    1. On your WordPress multisite installation, open the Network Admin dashboard. There you can find the “Installed Themes” submenu.
    1. In the Theme menu, you can add, remove, or upgrade themes for all sites across the network. Many people find this option very useful, as having a consistent theme across all sites provides a better user experience.

    After Action Report

    Managing a multisite network can be challenging, but with the right tools and knowledge, it can be very useful for your organization.

    Maintaining a multisite network has several advantages over running individual sites. The most prominent advantage is the ability to manage all the sites, users, plugins, and themes from a single dashboard, thereby saving both time and server resources.

    For a seamless experience, sign up for RunCloud, the leading server management platform. We’ve made it easy to manage WordPress multisite networks. Learn more about WordPress Multisite in the context of WaaS platforms in our blog post here.

  • How to Send Email from PHP (With Guided Walkthrough)

    How to Send Email from PHP (With Guided Walkthrough)

    In most cases, we normally recommend using transactional email services such as Mailgun, Amazon SES, or Mandrill rather than sending emails from your own service. But if you are feeling enthusiastic you can even set up your own server too.

    That’s what we’re going to cover in this article.

    Take your tech skills to the next level with our easy-to-follow guide on how to send emails from PHP! No need to worry about complicated code – our step-by-step walkthrough makes it a breeze. This guide will guide you through setting up your own mailing service on your Ubuntu server or other similar Debian distros.

    Ways to Send Email From PHP

    There are multiple ways of sending emails from PHP, but the two most basic ones are:

    • Using the mail() function: This is the built-in PHP function for sending email. It is a simple and easy-to-use option for sending basic emails.
    • Using a library or framework: Several libraries and frameworks are available for PHP that make it easier to send emails. Some popular options include PHPMailer and SwiftMailer.

    Using external mail packages such as SwiftMailer or PHPMailer is generally recommended over PHP’s built-in mail function because they offer more advanced features and functionality. While the mail function can be useful for sending basic emails, it has very limited capabilities.

    One major limitation of the mail function is that it doesn’t allow you to add attachments to your emails. This can be a significant issue if you need to send files or documents as part of your communication.

    In addition, using the mail function can make it difficult to meet industry standards, and build trust with Google and other email providers. Establishing trust and following best practices are both crucial for ensuring that your emails are recognized as safe and secure. This can be challenging with the mail function, as it doesn’t provide the necessary tools and capabilities to meet these standards.

    These are two of the most compelling reasons to use external mail packages such as SwiftMailer or PHPMailer instead of PHP’s built-in mail function. However, if you are still interested in learning how to send emails from a PHP web server, you are in the right place! While it may not be the most efficient or effective option, there is still significant value in understanding how to use the mail function and other methods for sending emails from PHP.

    How to Send Email With PHP From Web Server in 5 Steps

    The process of sending an email with PHP from your web server is fairly simple, so we’re going to break it down into five steps.

    1. Install Dependencies

    Installing dependencies is the first step in setting up your PHP application to send email. Dependencies are external libraries or packages that your application requires to function properly.

    First, we will install Sendmail and GNU Mailutils on the server. To install these tools, enter this command:

    sudo apt update && sudo apt install mailutils sendmail-base

    2. Update The sendmail_path Inside php.ini

    You will need to update the php.ini file to let PHP know where sendmail is located. This file can be located at either “/etc/php74rc/php.ini” or “/etc/php/7.4/apache2/php.ini”. If you are using a later version of PHP then run php -v to find out what version you are using, and update the path accordingly.

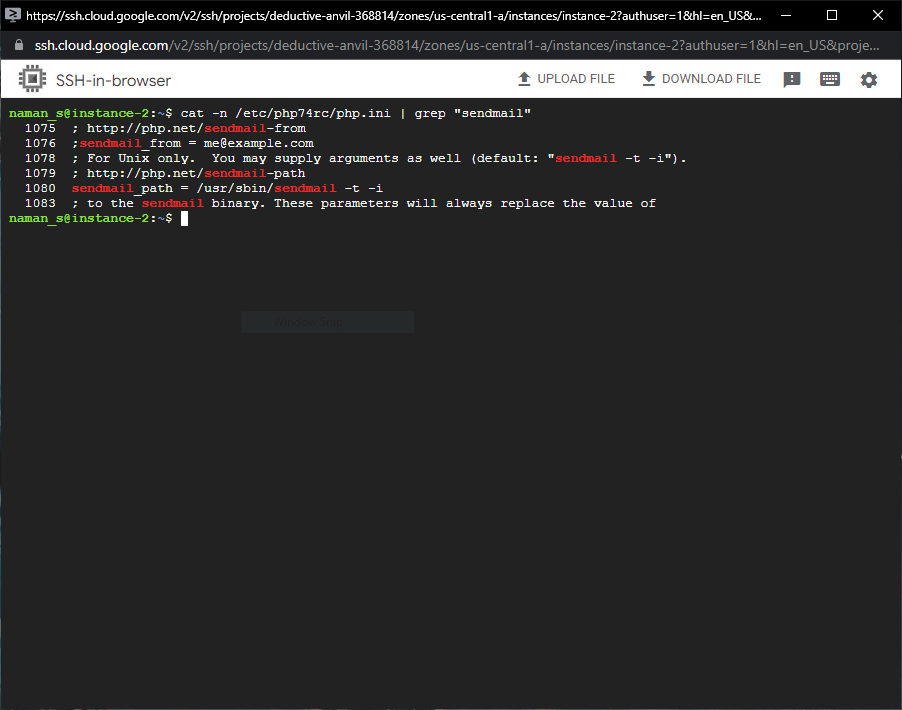
    The php.ini file is pretty big, and it’s hard to parse all the information in a terminal editor. We will use the following command to find out the exact line number of the setting so we can jump directly there:

    cat -n /etc/php74rc/php.ini | grep "sendmail"

    Note down the line numbers displayed on the left of the text. Next, we will edit the /etc/php74rc/php.ini file. You can use your favorite terminal editor, or simply paste the following command to open the nano editor.

    sudo nano /etc/php74rc/php.ini

    Scroll down to the line number we noted, and search for “sendmail_path =”. It should look something like this:

    ; For Unix only.  You may supply arguments as well (default: "sendmail -t -i").
    ; http://php.net/sendmail-path
    ;sendmail_path =

    Uncomment the sendmail_path by removing the ; and add the sendmail path. The default value is “/usr/sbin/sendmail -t -i”. You should have something like this:

    ; For Unix only.  You may supply arguments as well (default: "sendmail -t -i").
    ; http://php.net/sendmail-path
    sendmail_path = /usr/sbin/sendmail -t -i

    Now press Ctrl + O to save the file. Press Enter to confirm the filename and location, and press Ctrl + X to exit the editor. Now when you run the ‘cat -n /etc/php74rc/php.ini | grep “sendmail”’ command, you should see the updated path.

    Now restart the php service with:

    systemctl restart php74rc-fpm

    3. Change hostname

    Now we will edit the server hostname. You can find the hosts file at /etc/hosts. Update the localhost address as shown below.

    # Old Value

    127.0.0.1      localhost.localdomain localhost 

    # New Value

    127.0.0.1      test.runcloud.me test

    And then we change the hostname on the fly with:

    hostname test.runcloud.me

    4. Configure sendmail

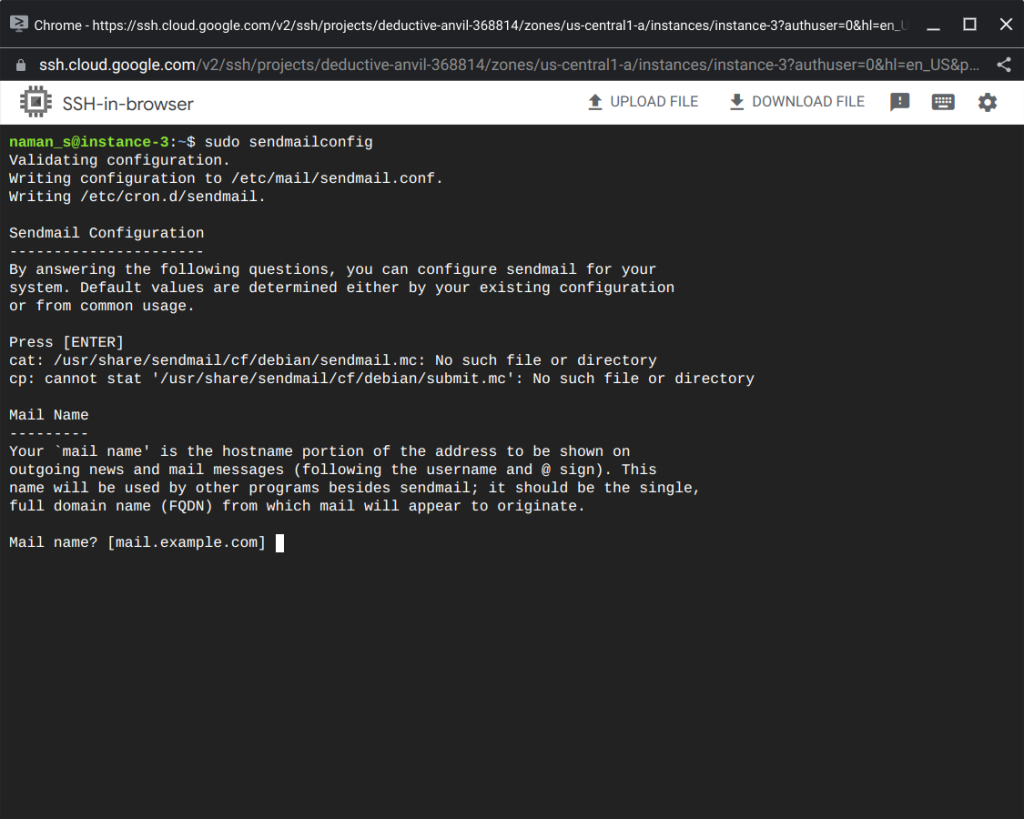
    Now we need to configure the sendmail CLI. We can do this by running the following command, and entering the necessary details:

    sendmailconfig

    5. The Basics of PHP Mail Function

    You can use the following PHP code to use the inbuilt PHP mail function:

    mail($to, $subject, $message, $headers)

    That is the basic way to start sending email from your server. Here’s an example of real-world usage:

    <?php
    $to = 'youremail@gmail.com';
    $subject = 'This is a test email';
    $message = 'Hello john!';
    $from = 'jane@runcloud.me';
    $headers = sprintf("From: %s\r\nReply-To: %s", $from, $from);
    mail($to, $subject, $message, $headers);

    Now add the mail.php inside your web application. Make sure you have replaced the $from variable to your own email address.

    It is important to keep in mind that simply sending an email from your PHP web application doesn’t guarantee that it will be delivered to the recipient’s inbox. There are many factors that can influence whether an email is delivered, and it’s not uncommon for emails to be caught by spam or security filters.

    For example, Google has many filters in place to identify and block potentially malicious or spammy emails. For your emails to pass these filters and reach the recipient’s inbox, they need to meet certain security and quality standards.

    By following the steps to send email from PHP, you will have the basic ability to send emails from your web application. However, to ensure that your emails are delivered effectively and avoid being caught by filters, you will need to focus on security attributes and other factors that can help your emails pass spam and security checks. This may require additional effort and attention to detail, but is essential for ensuring that your emails are delivered safely and successfully.

    How To Make Sure Your Email Sent From PHP Will Be Delivered

    Although you’re now set up to send emails from PHP, the next task is to ensure that your emails include certain standards and attributes to pass spam checks, and actually end up in the inbox of your recipients.

    In this section, we will go through the process of testing your email for deliverability using services such as mail-tester and mailook which help identify the probability of your email getting flagged as possible spam.

    Testing Your Email Deliverability.

    Open up either of the mail testing websites, and you should get an email address to send it to. Add this email to your $to variable, and you should get something like this:

    <?php
    $to = 'web-ovl78@mail-tester.com';
    $subject = 'This is a test email';
    $message = 'Hello john!';
    $from = 'jane@runcloud.me';
    $headers = sprintf("From: %s\r\nReply-To: %s", $from, $from);
    mail($to, $subject, $message, $headers);

    Now visit the mail.php again inside your browser; this should execute the code again and send another email. Check the score of this mail from the Mail Tester. This is our result:

    With this score, your email will never reach any inbox! This is expected and we will configure a few settings, which will increase the score dramatically.

    Setting SPF Records

    Sender Policy Framework (SPF) is the TXT-based DNS record that you can add to your DNS as a policy for sending emails. Your server hostname needs to be verified as an email sender.

    You can use SPF Wizard to generate your SPF record. We are using the following records for our test domain (runcloud.me).

    runcloud.me. IN TXT "v=spf1 a:test.runcloud.me -all"
    test.runcloud.me. IN TXT "v=spf1 ip4:45.118.132.8 -all"

    Don’t forget to change your a:<your own domain> and ip4:<your server IP>

    This is how it looks like when you query the DNS records from Cloudflare.

    Let’s break this down line-by-line to get a better understanding. In the given configuration, the first line tells the internet that test.runcloud.me can send email on behalf of runcloud.me. So your outgoing emails will look like jane@runcloud.me even though our actual domain is test.runcloud.me.

    The second record tells the internet that the mail server for test.runcloud.me is located at the given IP address(es). The ~all bit at the end of each record tells everyone that they should ignore all the emails which do not originate from the given server.

    Having done that, we sent the email to the Mail Tester as before and then checked the score.

    This is a significant improvement. However, some inboxes might still refuse the email.

    Setting MX Records

    Mail servers also check for MX records, and the domain (runcloud.me) doesn’t have any MX records. Because of this, it gets a penalty. We will add an MX record to improve it further, and check the score again after adding this.

    This time we 9/10 which is much better. If you are not getting the same score, wait for a few hours so that modified TXT records are propagated across the servers. Learn more about How to speed up DNS propagation.

    Setting PTR Record

    Your server reverse IP lookup should return your server hostname (test.runcloud.me). You can do this from the Digital Ocean or Linode panel if you are using their service. Alternatively, any IaaS-based company that provides VPS/Server will always give you access to modify your PTR record.

    Setting DKIM Record

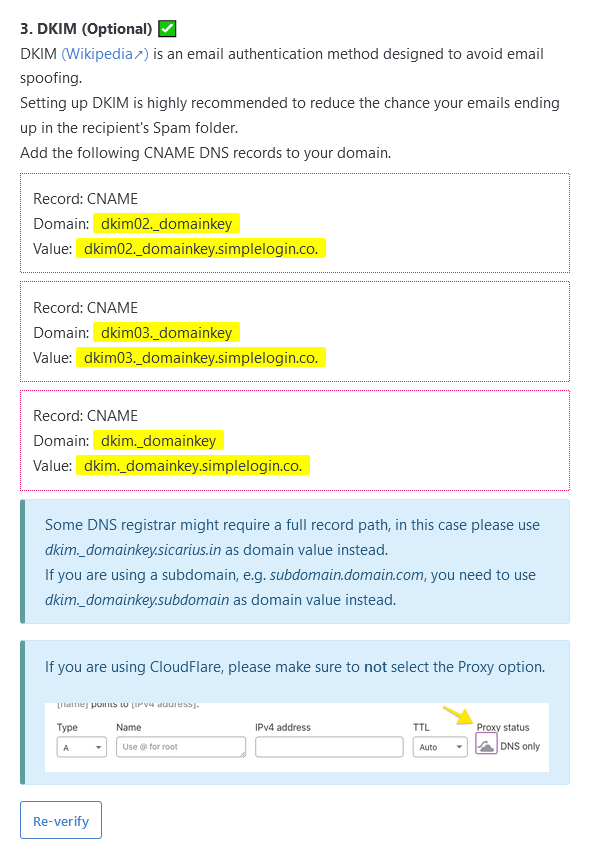
    DomainKeys Identified Mail (DKIM) is a digital signature that verifies the authenticity of a given email and checks whether it was authorized by the owner of the domain. Learn more about why your mail server needs a DKIM record.

    All modern email service providers support DKIM, simply create new CNAME records with the given values, and it should work automatically.

    Setting DMARC Record

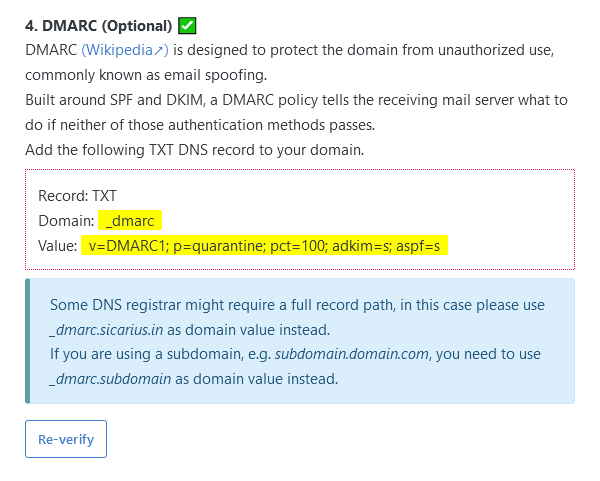
    Domain-based Message Authentication, Reporting & Conformance (DMARC) is a validation system that makes it harder for malicious actors to spoof your domain and send emails on your behalf. Although it is optional, it is recommended to use it if your email provider supports it.

    You can create a new DNS record with values provided by your email server to use it.

    After creating all the records, our score has significantly improved. It is very close to a perfect score, but it is not there yet. In our testing, we used a shared email server that was flagged as spam in the past 28 days. This is expected, and it should not matter to most of the people.

    However, if this is unacceptable, you can rent a private IP address and use it to send emails. If you don’t send spam messages, it will slowly build the reputation of your IP address, and your emails will get closer to a perfect score.

    Using SSL/TLS To Connect Securely

    You should be connecting SSL/TLS. Failing to do so will result in Gmail blocking your email, as you can see in Google’s help documentation.

    If you encounter any errors, you can check the /var/log/maillog or var/log/mail.log file on your terminal to see the mail server logs. This is particularly handy for fetching information about postfix, smtpd, and other email-related services running on your server.

    You can simply run the following command to view a continuous stream of logs in your terminal.

    tail -f /var/log/mail.log

    After adding all of these certificates and policies, and making your web server fully compliant with industry standards, you should be able to send emails using PHP from your webserver without deliverability issues.

    Conclusion

    In conclusion, sending emails from PHP is viable, but using external email packages such as SwiftMailer or PHPMailer is generally recommended. These packages offer more advanced features, and better reliability, and can save you time, money, and effort. Additionally, using an external email package can increase your chances of successful email delivery.

    If you do choose to send emails from your web server using PHP, it is important to follow this guide carefully and pay attention to factors such as deliverability, security, and industry standards. This may require additional effort, but it is necessary to ensure that your emails are delivered safely and effectively.

    To make the process of sending email from PHP even easier and more reliable, consider using a platform like RunCloud. With RunCloud, you can easily set up and manage your PHP web server, install dependencies, and send email without the hassle. Start using RunCloud today!

  • How to Set Up a DigitalOcean Server with RunCloud

    How to Set Up a DigitalOcean Server with RunCloud

    DigitalOcean is a well-known cloud server provider that aims to simplify cloud computing so that developers and their teams can spend more time building software that changes the world. It’s designed for developers, and provides an intuitive control panel, predictable pricing, team accounts, and more.

    DigitalOcean has many different plans, including Basic (Standard), General Purpose, Memory Optimized, and CPU Optimized.

    Currently, DigitalOcean has 10 worldwide data centers spread across 8 regions:

    1. New York
    2. San Francisco
    3. Amsterdam
    4. London
    5. Frankfurt
    6. Toronto
    7. Bangalore
    8. Singapore.

    You can choose the server location that is close to you or your customers to get lower latency.

    In this post, we will show you how to set up the DigitalOcean server to host your websites on RunCloud.

    Let’s get started!

    Adding DigitalOcean API Keys to RunCloud

    With RunCloud’s server provisioning feature, you can set up a server in DigitalOcean directly from the RunCloud dashboard by providing an API key from DigitalOcean to RunCloud.

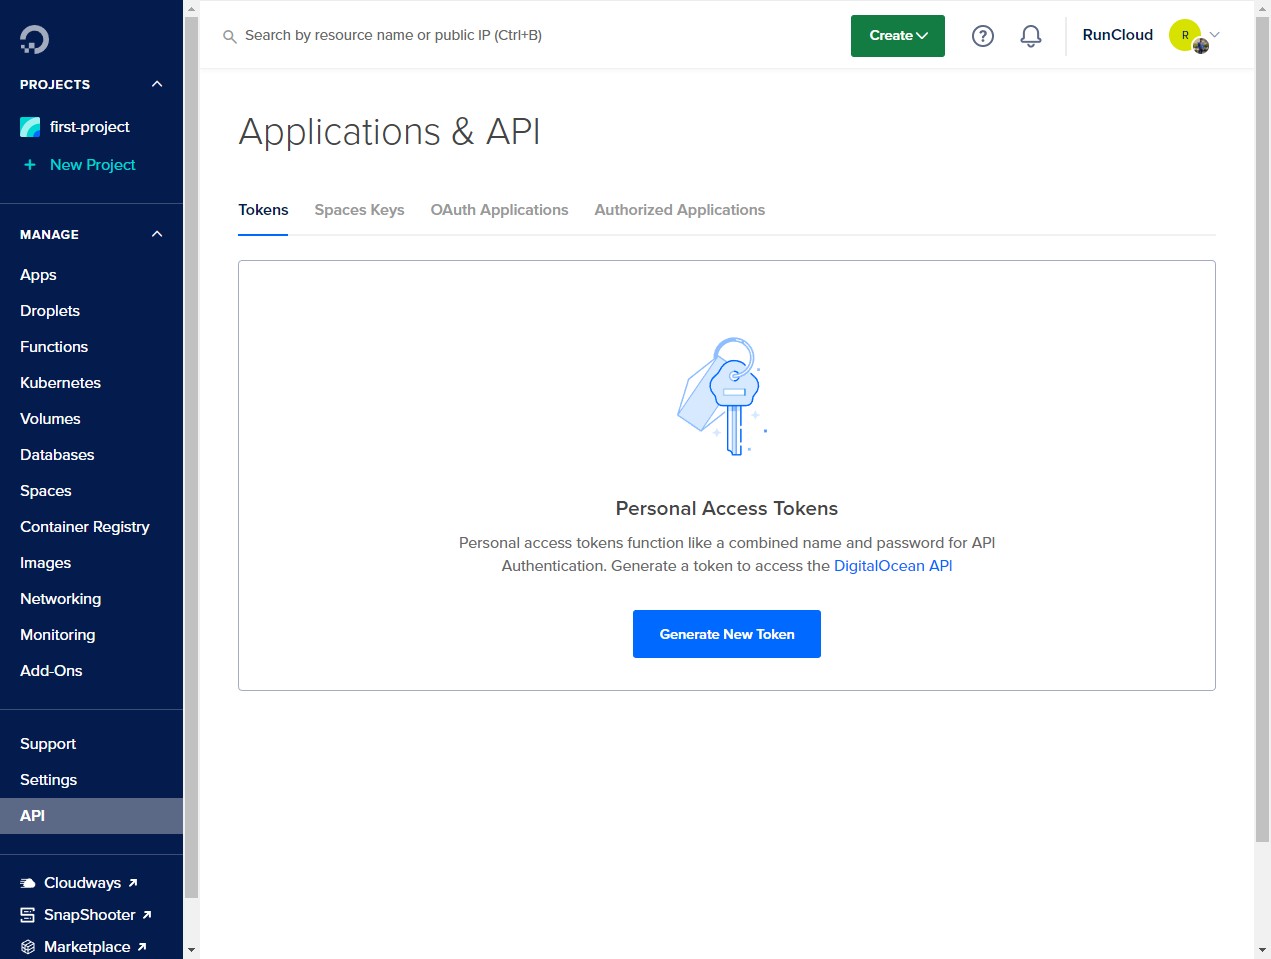
    To start the integration process, open your DigitalOcean dashboard and navigate to the “API” tab on the lower left of your screen.

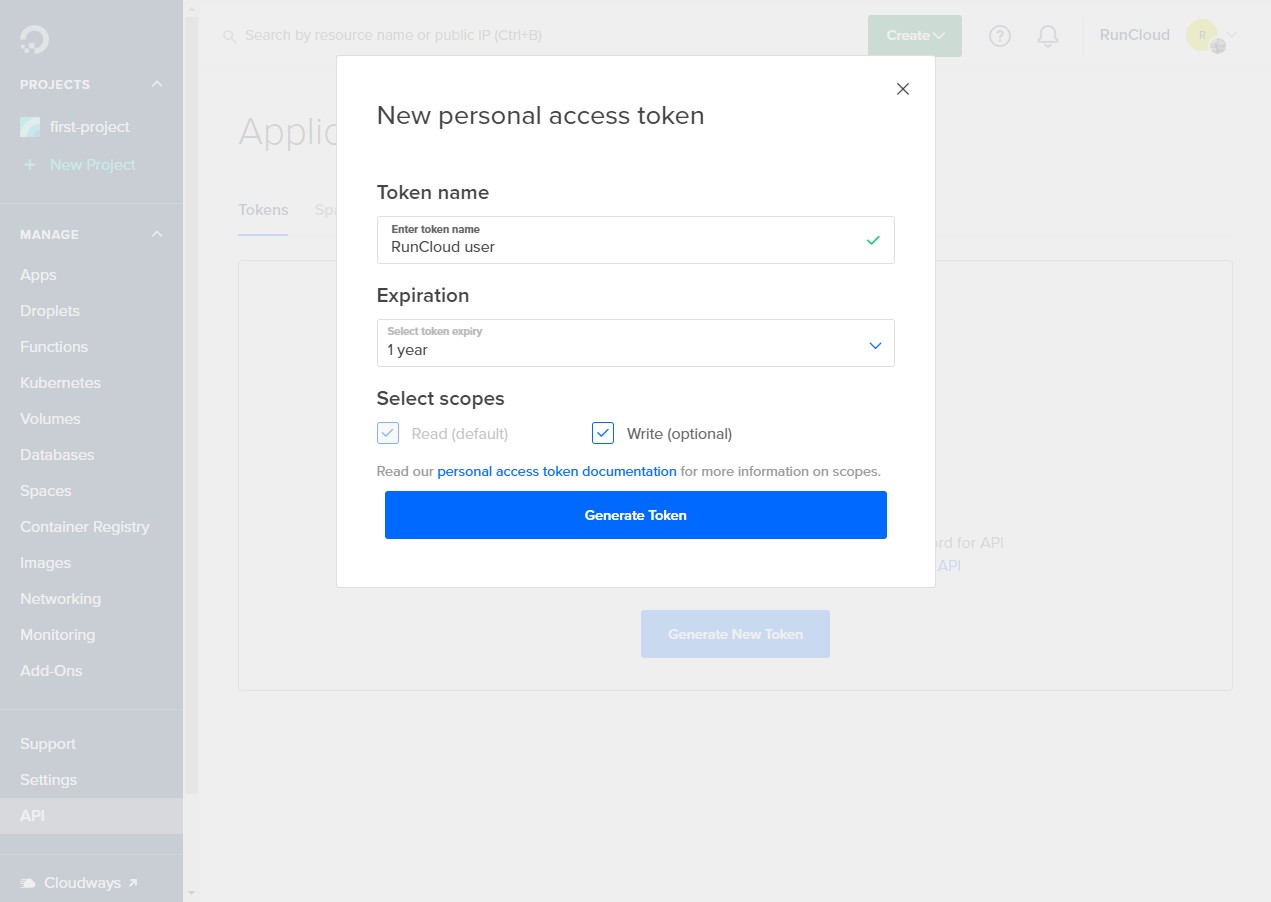
    In the “Applications & API” menu, make sure that you are on the tokens tab, and click on the “Generate New Token” button to create a new key.

    On the next screen, give a suitable name to your key and set the expiration date of the key. Choose the expiration period carefully, because if your key expires, you will need to integrate your server with RunCloud again.

    Make sure you have granted the “Write permission”, and then click “Generate Token” to create the token.

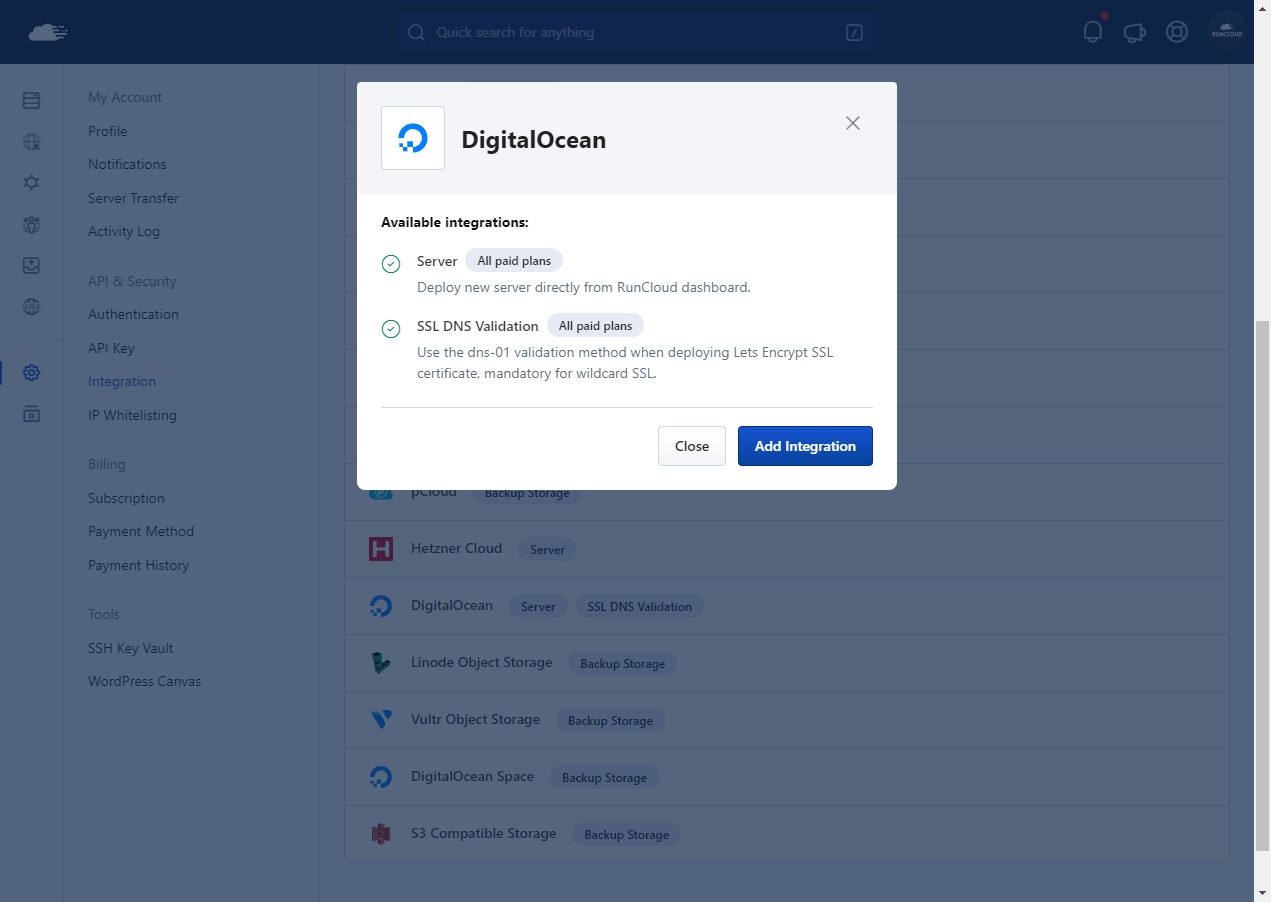
    After your key has been created, you’ll need to add this key to your RunCloud account to finish the integration process. Go to your account settings and open the “Integrations” tab. Look for the “DigitalOcean” option in the list, and click on it.

    Make sure you click on the right option to host the servers, and not the DigitalOcean Space option.

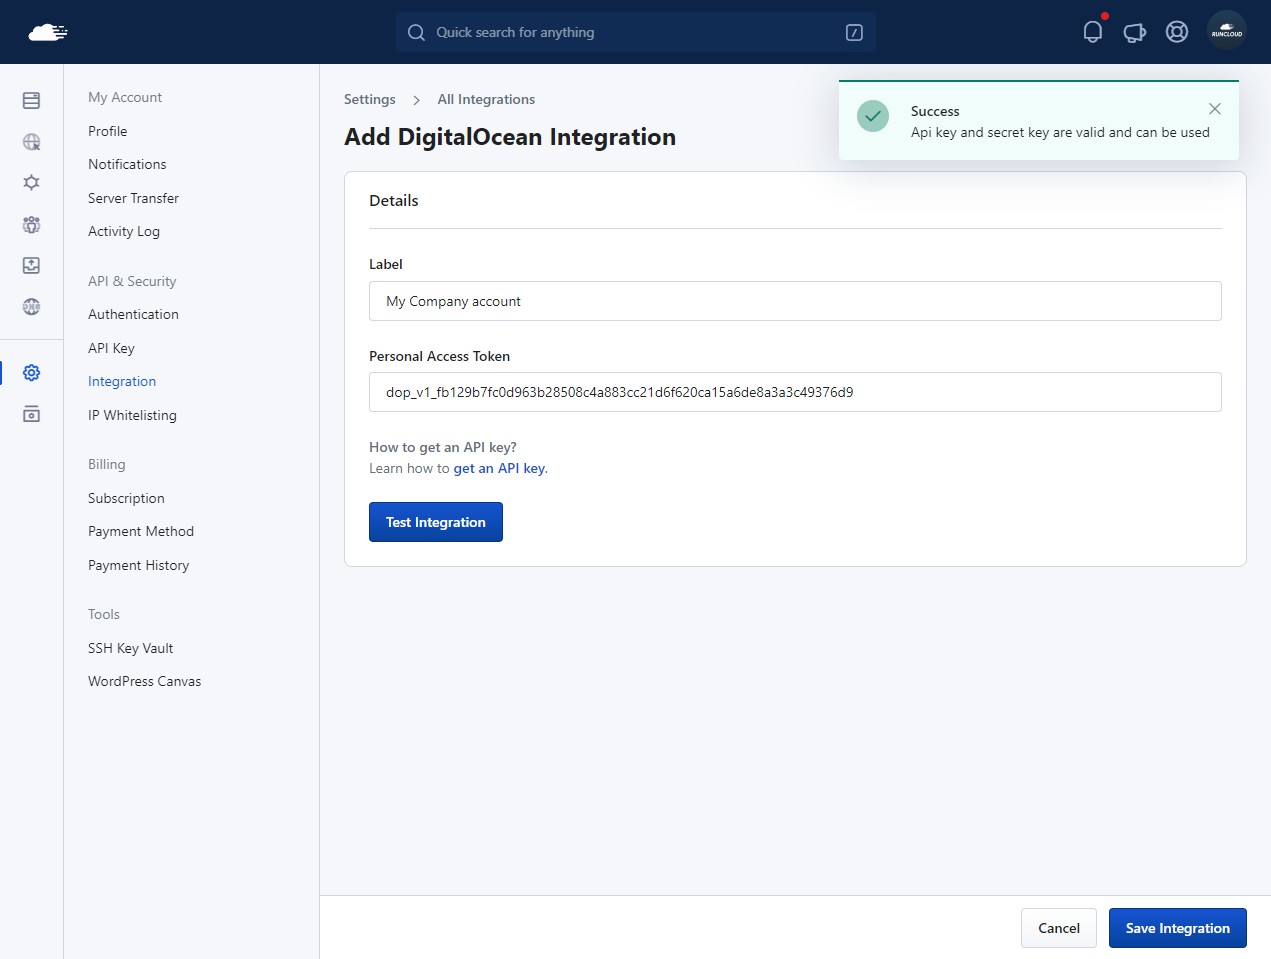
    On the next screen, you can add the name of your API key to distinguish it from the rest of the keys, and then paste the key that you copied from the DigitalOcean dashboard.

    After you have added the key, it’s a good idea to test the integration by clicking on the “Test Integration” button. If you follow the steps correctly, you should get a success message. Click on the “Save Integration” button to save the changes.

    Deploying A Server Using RunCloud

    Once you have successfully integrated RunCloud with DigitalOcean, you can start using RunCloud’s automated deployment feature to launch and delete servers automatically.

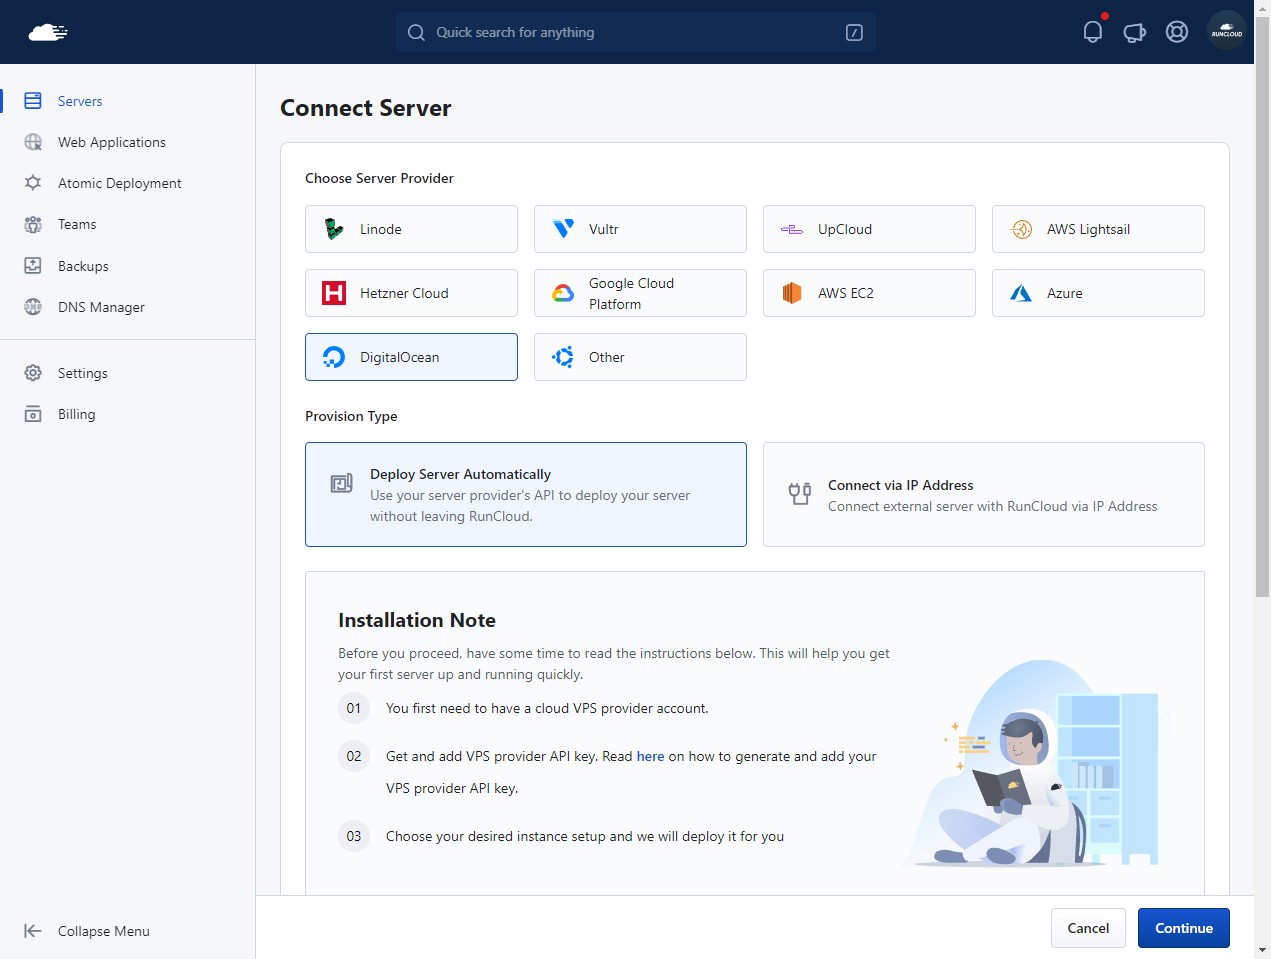
    To deploy a new server simply go to your RunCloud dashboard and click on “Connect a New Server”. On the next screen, choose DigitalOcean from the list of available cloud providers and click on “Deploy Server Automatically”.

    Now scroll down to the bottom of the screen and select the installation type. There are two installation options available – you can either choose a native installation or containerized. Read our blog post on containerized architecture to learn more.

    Next, you can pick the server stack that you want to use. In this example we will just use the Nginx servers. Now you need to select the API key from the drop down menu – pick the API key that we just created and then click on “Continue”.

    On the next screen, you will get the option to select the operating system and other server details. Pick the latest version of the cloud image available, and then select the cloud plan that you want to use. There are multiple cloud plans available with varying costs – pick the one that meets your needs best.

    Next, select the instance size depending upon your workload. In this example, we have used the basic plan to deploy a $4 per month server in the Bangalore region.

    After you have selected the cloud instance, scroll down to the bottom of the page and give your server a suitable name. Don’t forget to check the box to acknowledge that you understand you will be billed for this cloud instance, and then click on the “Add Server” button to deploy the server.

    After you have created the server, RunCloud will automatically deploy a new server on your behalf in your DigitalOcean account, and then install all the necessary dependencies and other software needed to run web applications.

    This usually takes five to ten minutes, there is no additional input required from you at this point – just sit back and wait for the installation to complete.

    Once the installation has completed, you should see the following screen in your dashboard:

    Deploying A Server Using RunCloud One-Click Droplet

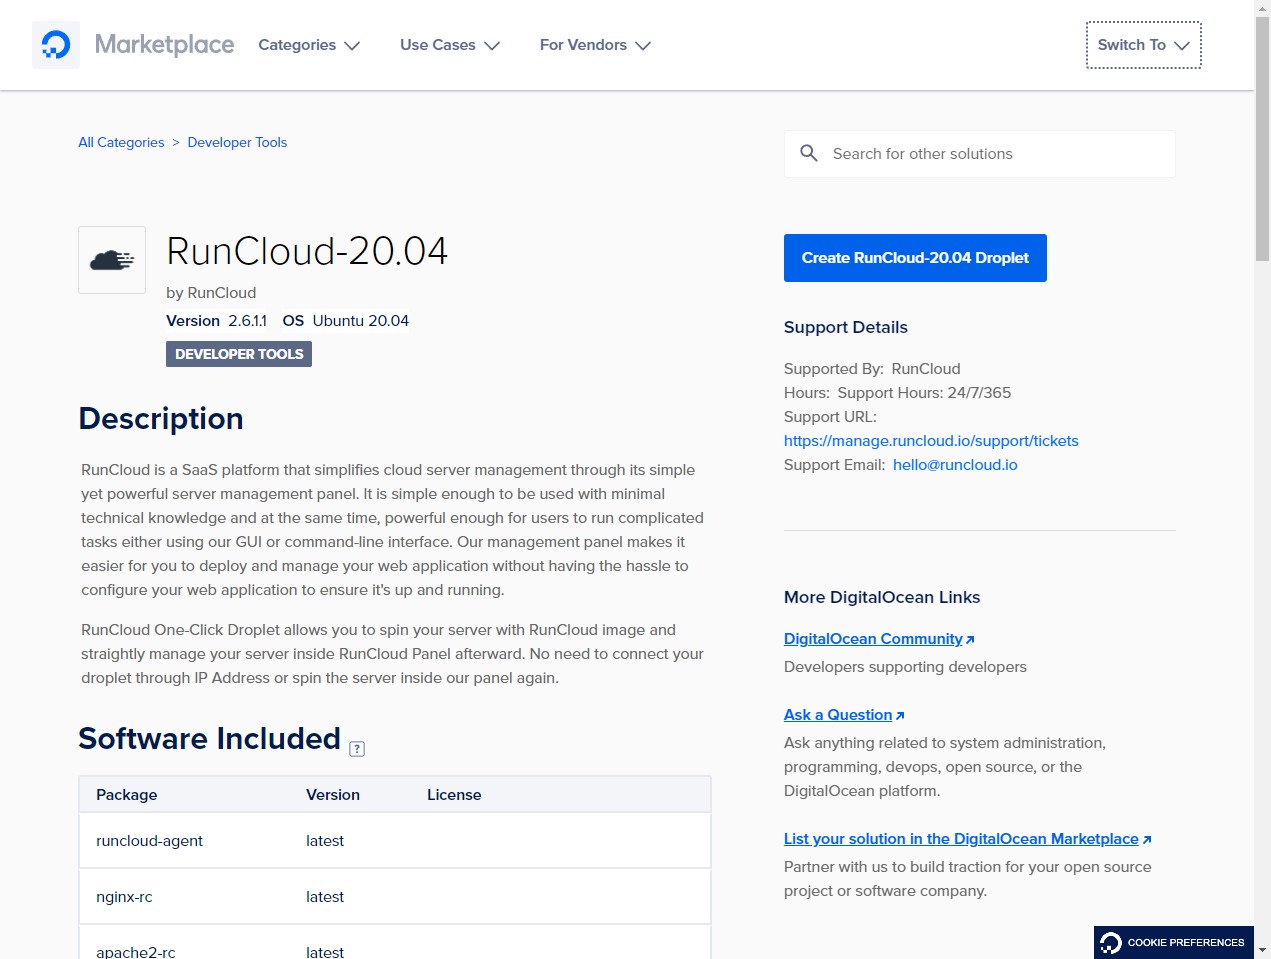
    RunCloud has pre-built images on the DigitalOcean marketplace that can be used to launch new servers quickly. Go to DigitalOcean marketplace.

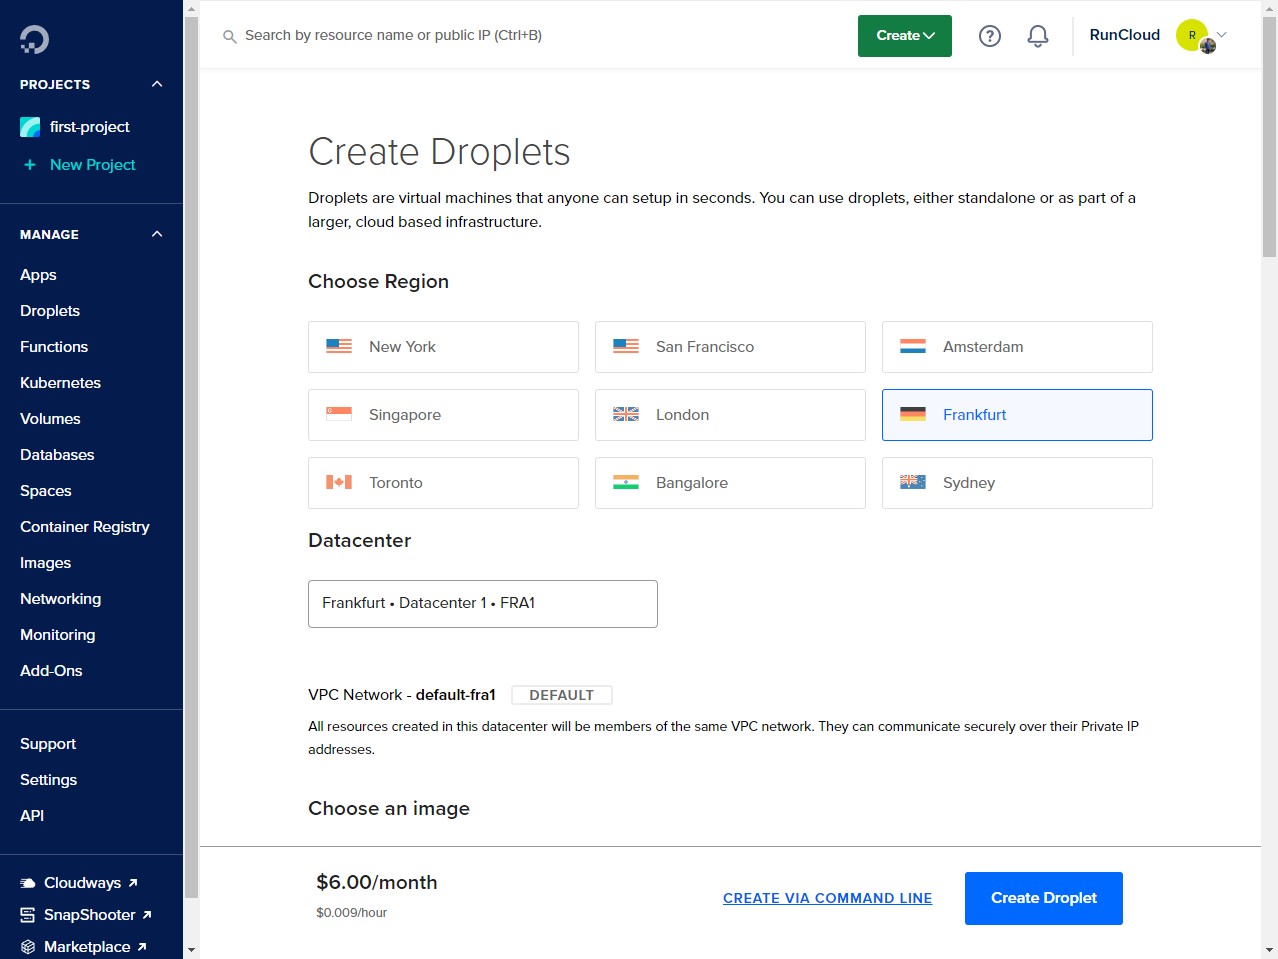
    Click on the “Create RunCloud Droplet” to create a new server. This will take you to the DigitalOcean dashboard. In this dashboard, select your desired datacenter region, and server size.

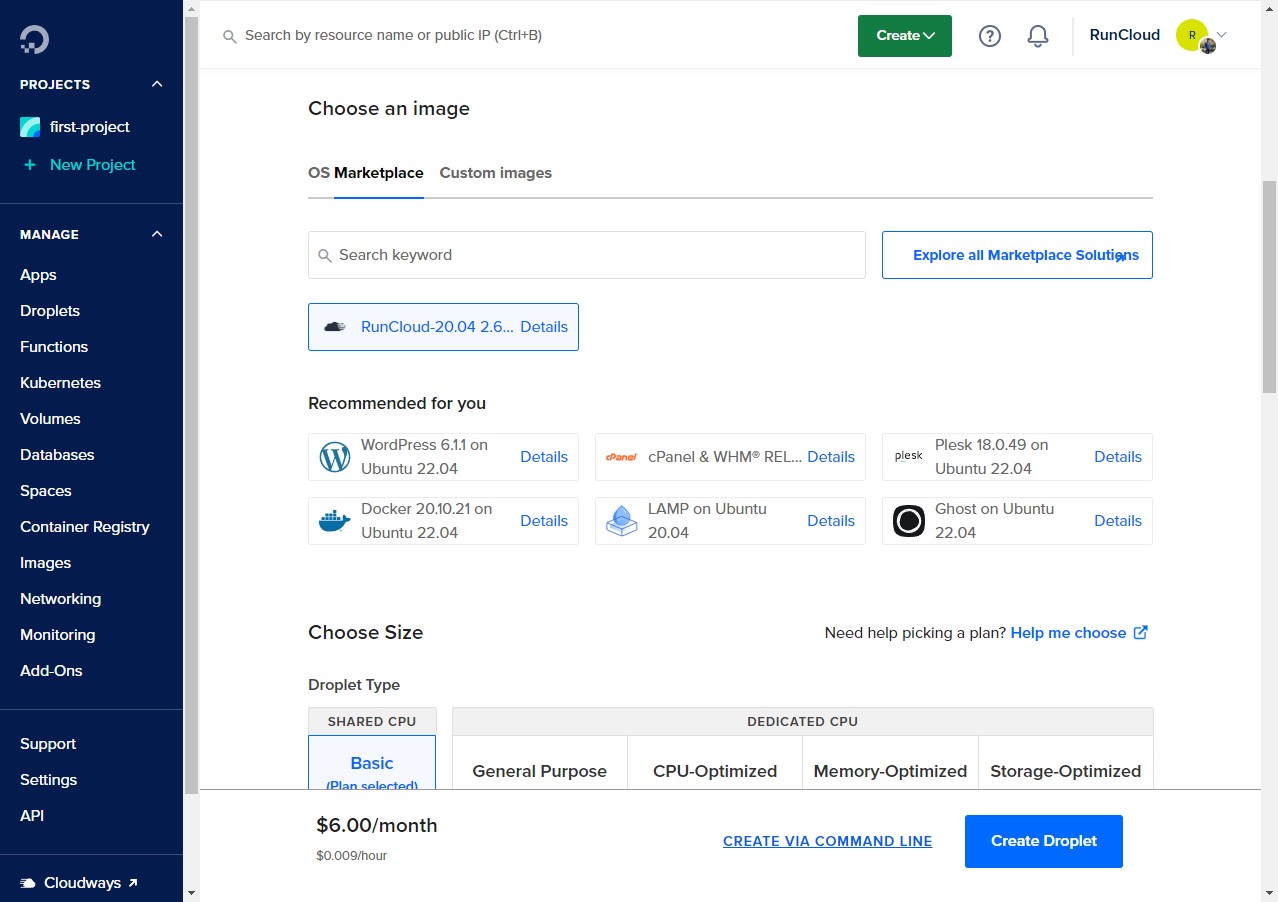
    In the image section, make sure that RunCloud’s pre-built image is selected.

    Tip: You can also search for RunCloud’s other images in the marketplace search box.

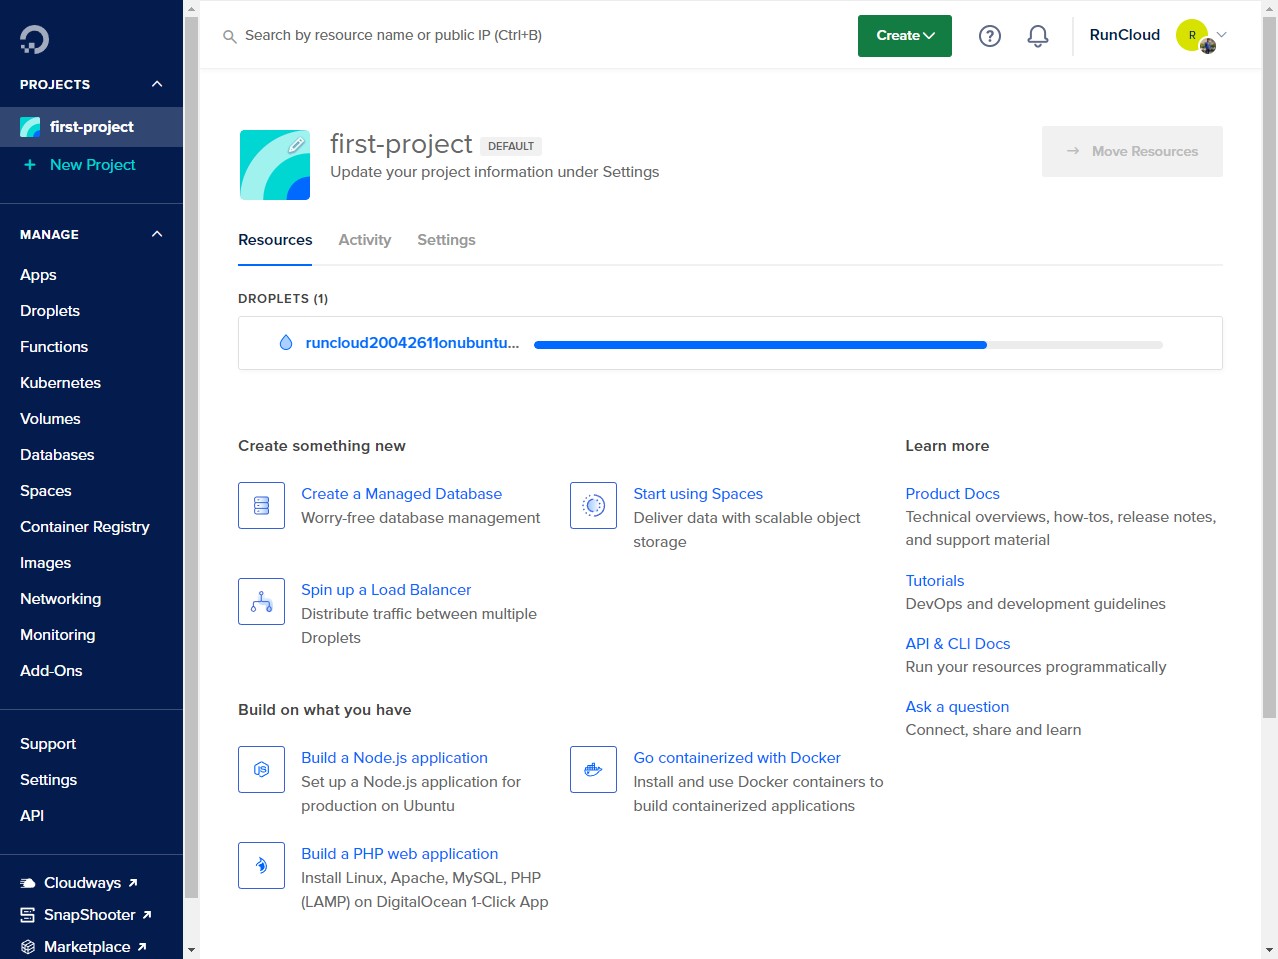
    After you have configured all the necessary settings, click on “Create Droplet” to deploy the server. This should only take a few minutes.

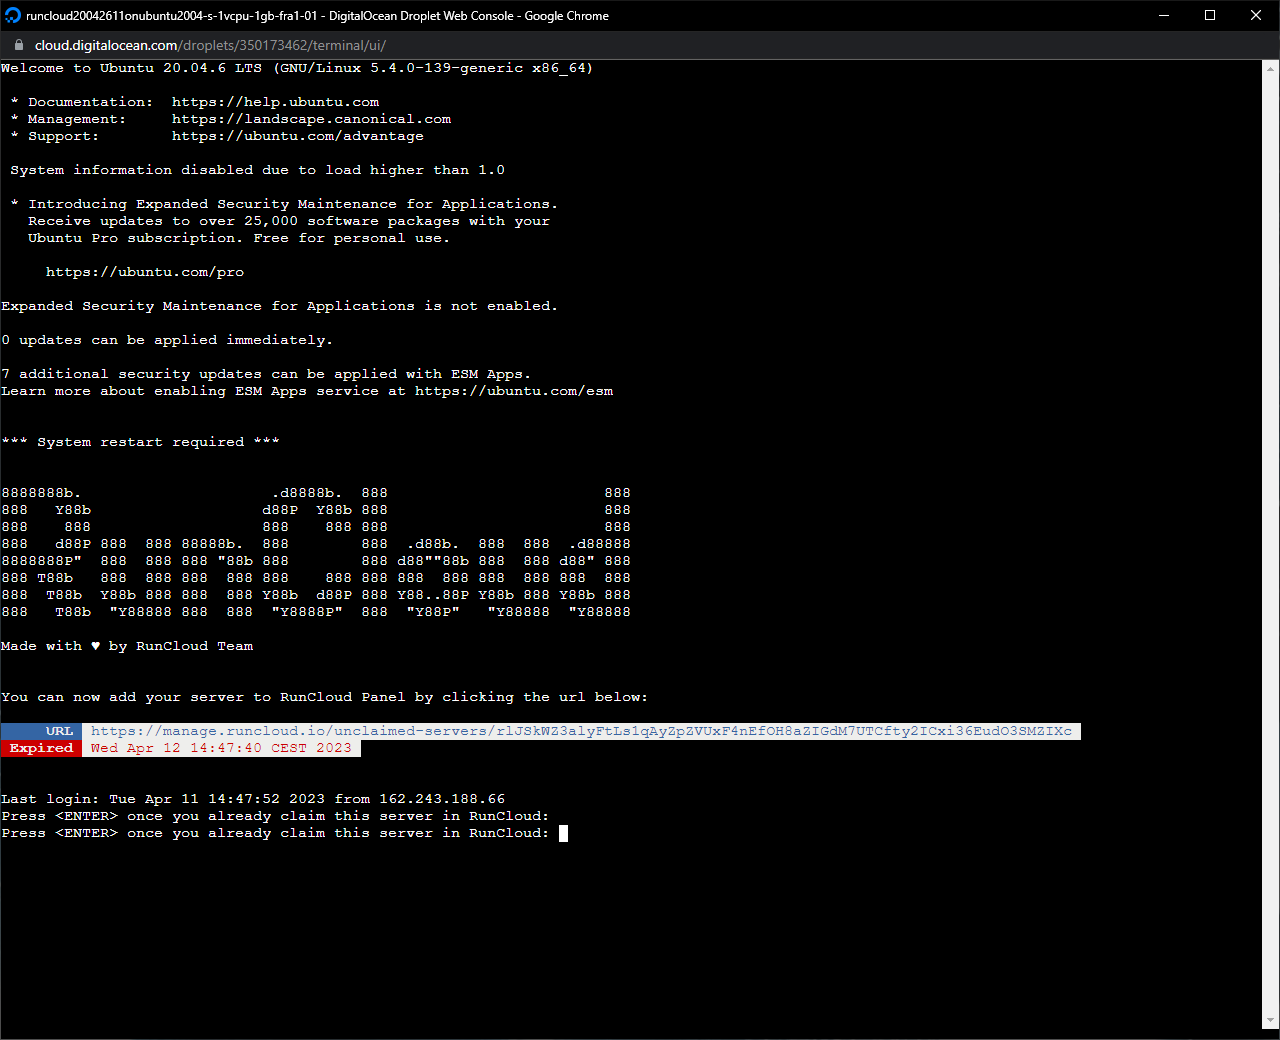
    Once your server is up and running, log into it using SSH. You can use DigitalOcean’s in-built SSH feature for this. After logging into the server, click on the URL displayed to connect this server to your RunCloud account.

    If clicking the URL doesn’t work, you can copy and paste the URL into your browser. You will be asked to enter the name of the server and that’s it! You can now manage this server directly from the RunCloud dashboard.

    Securing Your Droplet with a DigitalOcean Cloud Firewall for RunCloud

    DigitalOcean’s Cloud Firewall protects your RunCloud server from unauthorized access. In this section, we will explain to you how to create and apply a firewall with the necessary rules.

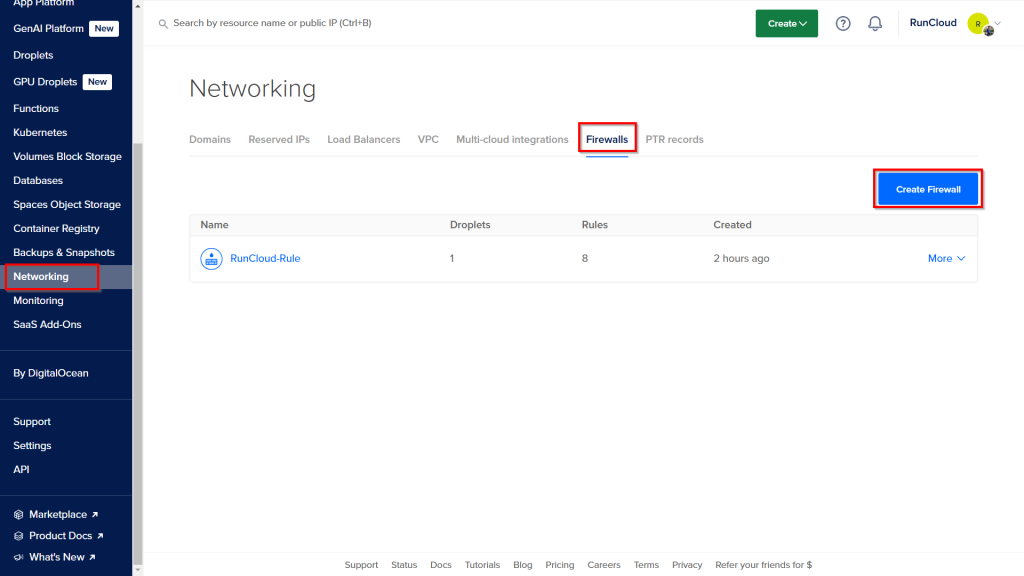
    First, you need to log in to your DigitalOcean dashboard and then click on the Networking button in the main navigation menu on the left side of the screen. From there, select the Firewalls tab to access the firewall control panel.

    On the Firewalls page, click the Create Firewall button to start the configuration process. You will first be prompted to provide a descriptive name for your new firewall. It is good practice to choose a name that clearly identifies its purpose, such as “runcloud-webserver-firewall,” which will help you manage it easily later on.

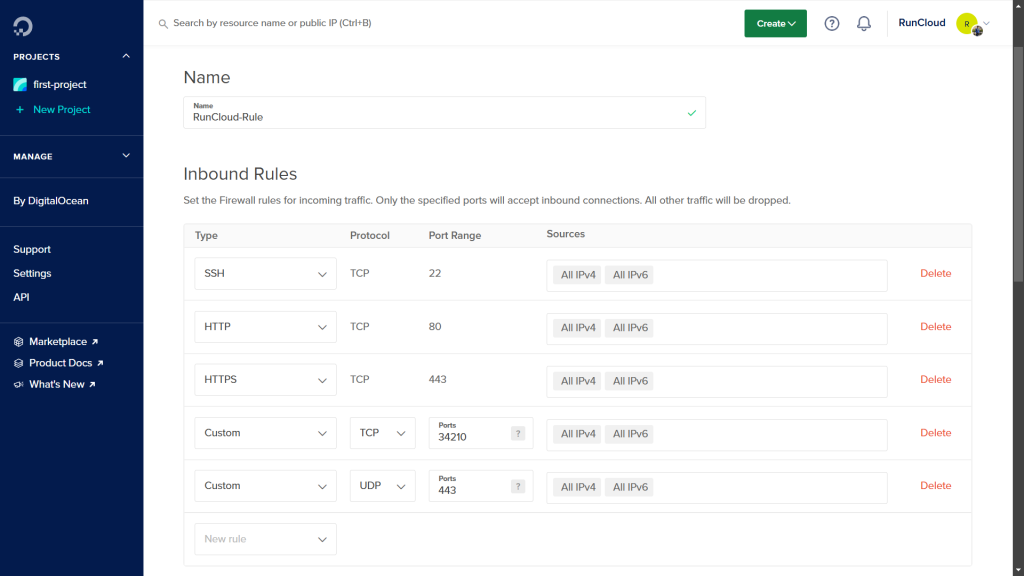
    Next, you will define the specific rules for incoming traffic. You must create a set of “allow” rules to permit connections for essential services. On the firewall creation page, add the following Inbound Rules:

    • HTTP (TCP port 80): Add a rule to allow HTTP traffic from all IPv4 and all IPv6 addresses to enable standard, unencrypted web traffic to your sites.
    • HTTPS (TCP port 443): Create a rule for HTTPS to permit secure, encrypted web traffic from all IPv4 and all IPv6 sources.
    • HTTP/3 (UDP port 443): You can optionally add a custom UDP rule for port 443 from all sources to support the newer HTTP/3 protocol and improve performance.
    • RunCloud Agent (TCP port 34210): Add a custom TCP rule to allow traffic on port 34210 from all sources, as this port is required for your server to communicate with the RunCloud dashboard.
    • SSH (TCP port 22): Optionally, you can create a rule to allow SSH connections from all IPv4 and all IPv6 addresses, which is necessary for remote server administration. We recommend deleting this rule if you only manage your server via the RunCloud dashboard and don’t plan to connect to your server via SSH.

    After defining the rules, you need to apply this firewall to your server, which DigitalOcean refers to as a Droplet.

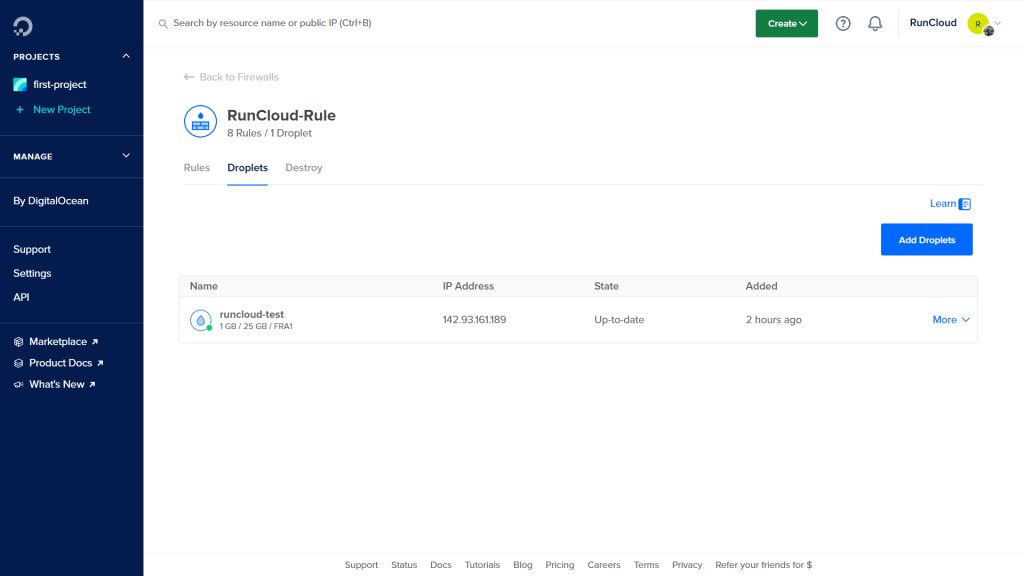
    On DigitalOcean, a single firewall can be used to multiple Droplets. In the “Apply to Droplets” section on the same page, you can search for and select your RunCloud server from the text area to immediately apply this set of rules to it. Later on, if you deploy new servers or decommission old ones, you can easily return to this firewall’s settings to add or remove it from those Droplets.

    Finally, once you have named your firewall, configured all the necessary inbound rules, and applied it to the correct Droplet(s), click the Create Firewall button at the bottom of the page. All the changes will take place immediately, and the new firewall configuration will protect your server.

    After Action Report

    DigitalOcean is one of the top choices to host your websites in the cloud. You can set up your DigitalOcean servers easily using RunCloud’s automatic integration, as well as using a marketplace image.

    If you’re tired of managing your own servers – you should switch to RunCloud. RunCloud is built for developers that want to focus on shipping great work, not on managing their infrastructure. We provide a painless server configuration experience, so you don’t need to spend hours figuring it out.

    Get started with RunCloud today, and get up and running in minutes.
  • OpenLiteSpeed vs. NGINX vs. Apache – Which is the Fastest Web Server?

    OpenLiteSpeed vs. NGINX vs. Apache – Which is the Fastest Web Server?

    Are you wondering how OpenLiteSpeed stacks up against NGINX and Apache? In this article, we’ll be tackling a question our team gets asked frequently: How does OpenLiteSpeed compare to NGINX and Apache?

    With our recent launch of OpenLiteSpeed support for everyone using RunCloud to manage their cloud infrastructure, deploying WordPress on OpenLiteSpeed is now just as easy as deploying on NGINX servers. But, how do you choose the best option for your specific needs?

    Don’t worry, we’ve got you covered. In this in-depth discussion, we’ll be taking a closer look at each server stack, including benchmark and testing data, and sharing our thoughts on their performance and resource usage. And while all of these server stacks have established themselves as reliable options in terms of support and security, the real deciding factor comes down to speed and performance at scale. So, let’s get started and see which server comes out on top!

    TL;DR – OpenLiteSpeed vs. NGINX vs. Apache

    When it comes to performance & scalability – NGINX and OpenLitespeed are both considerably better than Apache as has already been proven by countless performance tests.

    So stay tuned, in this detailed breakdown – we’ll be focusing on comparing the OpenLiteSpeed and NGINX stacks running two identical versions of a website on a virtual private server on Google Cloud Platform in the exact same location with identical configuration.

    What is a Web Server?

    A web server is a software that receives HTTP requests from clients (such as web browsers) and sends back the corresponding HTML pages or other resources. It is responsible for hosting and serving web pages and files to users over the internet or intranet.

    Just like a computer, a web server has both software and hardware components working together. Fortunately, thanks to companies like UpCloud, Hetzner, Vultr, Linode & more – the hardware is taken care of for us – while still having the flexibility and freedom to customize your server to suit your needs if you’re deploying with a platform like RunCloud.

    What Are The Most Widely-Used Server Stacks?

    Apache HTTP Server

    Since its introduction in 1995, Apache has cemented itself as the most reliable open-source web server. In fact, nearly 33% of websites around the world run on Apache because of the advantages it offers, which include stability and flexibility. Most developers still use Apache servers up to this day in implementing older applications.

    NGINX

    As the number of web users continuously increased over the years, various web servers also emerged. Among them was NGINX, which was introduced in 2004. NGINX’s high performance has led many developers to ditch Apache in favor of it. At present, 34% percent of websites around the world use NGINX.

    Compared to Apache, NGINX is lighter and better at handling concurrent connections. Furthermore, it allows websites to run faster, which helps them achieve higher rankings on Google.

    OpenLiteSpeed Web Server

    Another web server that was introduced in 2003 is LiteSpeed. A free version called OpenLiteSpeed was just recently made available to the public for both personal and commercial use. What makes this web server popular is its implementation of a powerful cache engine that optimizes websites at a remarkable rate.

    OpenLiteSpeed has some similarities with Apache in terms of its usability. It also uses many of the features that Apache users are already familiar with, such as .htaccess. As for the performance, OpenLiteSpeed resembles the asynchronous event-driven approach of NGINX, so it’s also fast.

    Although OpenLiteSpeed is new to the market, it is quickly catching up to Apache and giving NGINX a run for their money. 

    Our Testing Environment

    All of our tests were run using the standard, VPS server on Google Cloud that features:

    • Ubuntu 22.4 LTS
    • 2 CPU Core
    • 25 GB of Storage
    • 4 GB of RAM
    • US Central Location

    Before we get into the test, it’s already worth mentioning that – when running, on average – OpenLiteSpeed had lower memory usage and slightly lower disk usage for the same web application compared to NGINX.

    OpenLiteSpeed Environment

    The OpenLiteSpeed test site was running LiteSpeed’s official caching plugin for WordPress and was an otherwise standard, regularly deployed site with no further optimizations.

    OpenLiteSpeed Environment

    NGINX Environment

    The NGINX test site was running RunCloud Hub with FastCGI Caching enabled.

    configuring runcloud hub with nginx

    NGINX vs. OpenLiteSpeed – Core Web Vitals

    In case you’ve missed the news, Core Web Vitals are Google’s new performance metrics aiming to truly evaluate the user experience of websites beyond technical metrics. GTmetrix now uses some of the new Core Web Vitals metrics (as well as non-core web vital).

    This distills down to the three primary performance metrics:

    1. Largest Contentful Paint (LCP) which measures loading performance. In order to provide what is considered a good user experience, LCP should occur within 2.5 seconds of when the page first starts loading.
    2. Total Blocking Time (TBT) which is a non-Core Web Vital that measures the total time in milliseconds between the First Contentful Paint (FCP) and Time to Interactive (TTI) where the main thread is blocked long enough to make it unresponsive to user input.

    Cumulative Layout Shift (CLS) which measures visual stability. To provide a good user experience pages should maintain a CLS of 0.1 or less.

    three primary performance metrics openlitespeed vs nginx vs apache

    As you might have guessed & is only reasonable for performance metrics aiming to evaluate true performance for users, these are heavily dependent on the sites themselves as opposed to just the technical responses from a server. This also forms a part of why these tests were performed with the help of one of our customers so that we wouldn’t be using some demo site that isn’t truly indicative of a real business’s website hosted on a server managed by RunCloud.

    NGINX & OpenLiteSpeed – GTmetrix Performance Test

    In the GTmetrix performance tests, NGINX and OpenLiteSpeed had relatively similar performance. With both performing well, having the same total blocking time, and negligible difference in cumulative layout shift score – the key difference being the largest contentful paint being significantly lower/better (-75ms+) for OpenLiteSpeed.

    NGINX & OpenLiteSpeed – GTmetrix Performance Test

    In other web vitals like First Contentful Paint, Speed Index, Connection Duration, etc. OpenLiteSpeed generally performed better than NGINX across the board. NGINX comes on top in only two metrics – Connection Duration and Fully Loaded Time.

    gtmetrics results nginx vs openlitespeed

    NGINX vs. OpenLiteSpeed – Load Testing

    For this next test, we ran a website load test. The purpose of which is to evaluate website performance at scale – i.e. what happens to performance as the number of requests scales.

    Learn more about website load testing & how to perform your own tests here.

    For these website load tests, we really pushed the limits of the servers. We launched 40 bots from north-america-7 location, playing a testing script, ramping up naturally for 1 minute, then continuing at peak load for 3 minutes, then ramping down naturally for 1 minute with no iteration limit per bot and no iteration limit total.

    We also ran a load test using K6 to see if there was a difference in performance when requests come from the local network instead of the internet.

    Results For OpenLiteSpeed

    OpenLiteSpeed had the mean response time of 0.154s and the 90th percentile time of 0.180s – achieving an average throughput of 26748 hits during the first test.

    nginx vs openlitespeed load testing Results For nginx

    During this test, the response time slightly fluctuated, but OpenLiteSpeed got the overall 99th percentile time of 0.248s which is pretty good.

    response time percentiles results

    In our second test, OpenLiteSpeed completed 149474 requests with 0 errors, thereby achieving a throughput of 496.5 requests/second.

    openlitespeed requests results

    Results For NGINX

    NGINX on the other hand had the average response time of 0.142s and the 90th percentile time of 0.165s. It achieved an average throughput of 26880 hits during the first test.

    nginx vs openlitespeed load testing Results For OpenLiteSpeed

    We see a slight bump in the response time percentiles but except that, the graph looks pretty flat. This is good as it means almost all requests took roughly the same amount of time to finish.

    response time percentiles results for nginx

    In the second test, Nginx was able to serve 149216 requests which resulted in a throughput of 495.7 requests/second.

    nginx requests and errors results

    Which One Is Better?

    In our two tests, OpenLiteSpeed lost one round by a margin of 0.49% and won another round by a margin of 0.17%. The difference in measurements is insignificant and the fluctuations can be attributed to randomness in the environment. After analyzing the results, there is no clear winner. Enabling the FastCGI Caching on Nginx makes it just as performant as OpenLiteSpeed.

    OpenLiteSpeedNginxDifference
    TEST 12674826880-0.491%
    TEST 21494741492160.172%

    Other Factors To Consider

    There are many other factors to consider besides raw performance and benchmark numbers before deciding which server to use.

    1. Stability and reliability: NGINX and Apache have been around for a long time, and are known for their stability and reliability. They have a large user base and a proven track record of handling high traffic and large numbers of concurrent connections.
    2. Community and support: Both NGINX and Apache have large and active communities of users and developers. This means that if you run into issues or have questions, there is a wealth of information and support available.
    3. Compatibility: Both NGINX and Apache have large support for multiple web applications and frameworks, which means that they are compatible with a wide range of software, making it easy to integrate with other tools in your stack.

    NGINX vs. OpenLiteSpeed vs Apache – Frequently Asked Questions

    What does a web server store?

    A web server generally stores all the resources of a website, such as HTML files, CSS, images, JavaScript files, and other assets. 

    What’s the fastest web server for WordPress?

    According to various performance tests, OpenLiteSpeed and NGINX compete neck and neck. Both are high-performing and a go-to solution for hosting WordPress websites.
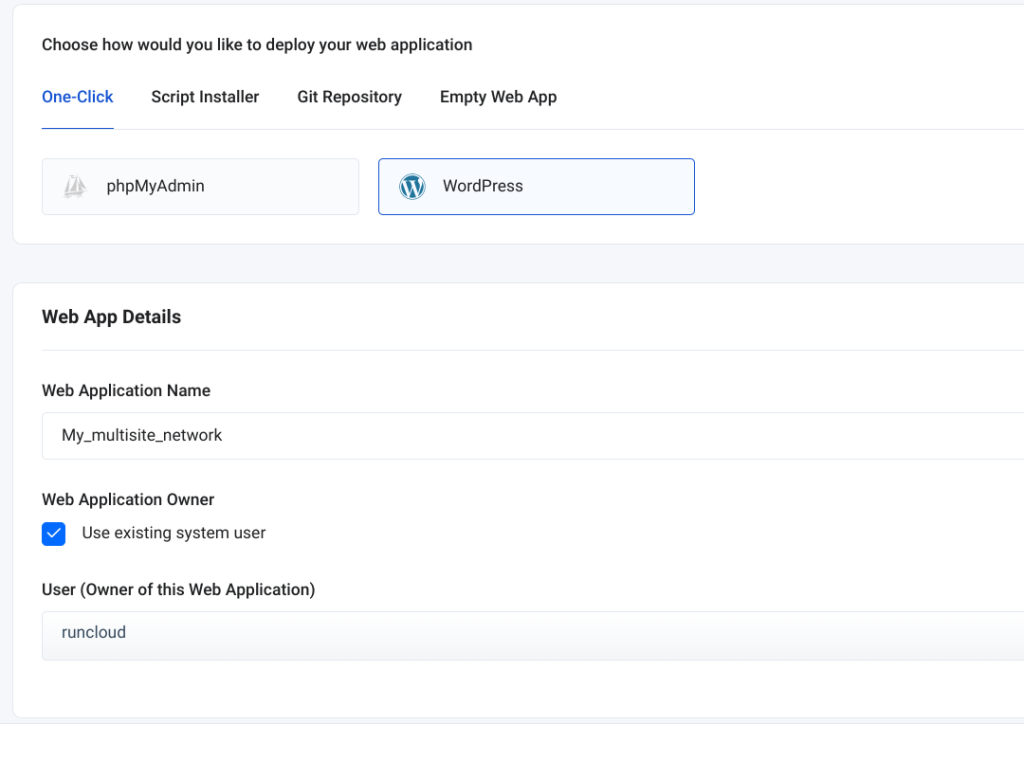
    Is Apache still used?

    While Apache is now considered archaic, many developers still use it because of its wide community and support. Apache is the easiest to configure among its contemporaries in a variety of usage scenarios. 

    Is NGINX better than Apache for WordPress?

    Based on all performance testing data available from our own tests as well as other tests performed by people in the industry, NGINX came out on top, yes. 
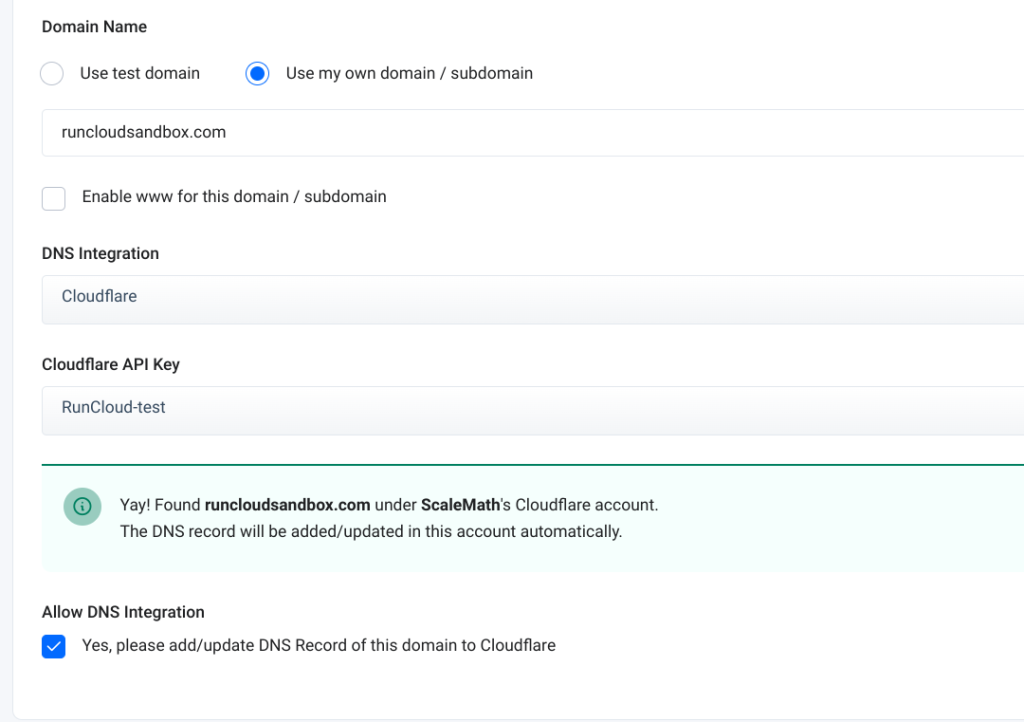
    Is OpenLiteSpeed better than NGINX?

    Based on all performance testing data available from our own tests as well as other tests performed by people in the industry, OpenLiteSpeed and NGINX perform equally well. Both are incredibly performant stacks, and can handle large amounts of traffic easily.

    After Action Report – Finding The Best Server Stack For You

    OpenLiteSpeed has a better TTFB & Largest Contentful Paint (LCP) and has demonstrated a clear ability to handle a very high number of concurrent users. NGINX has been around for longer and has a more mature ecosystem but requires additional configuration to setup caching and achieve desired performance. Not enabling the cache would impact the performance severely – a difference which could equate to infrastructure savings on a large scale.
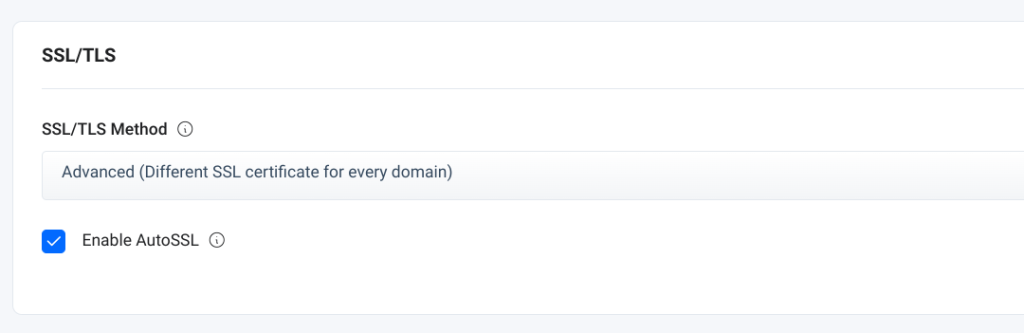
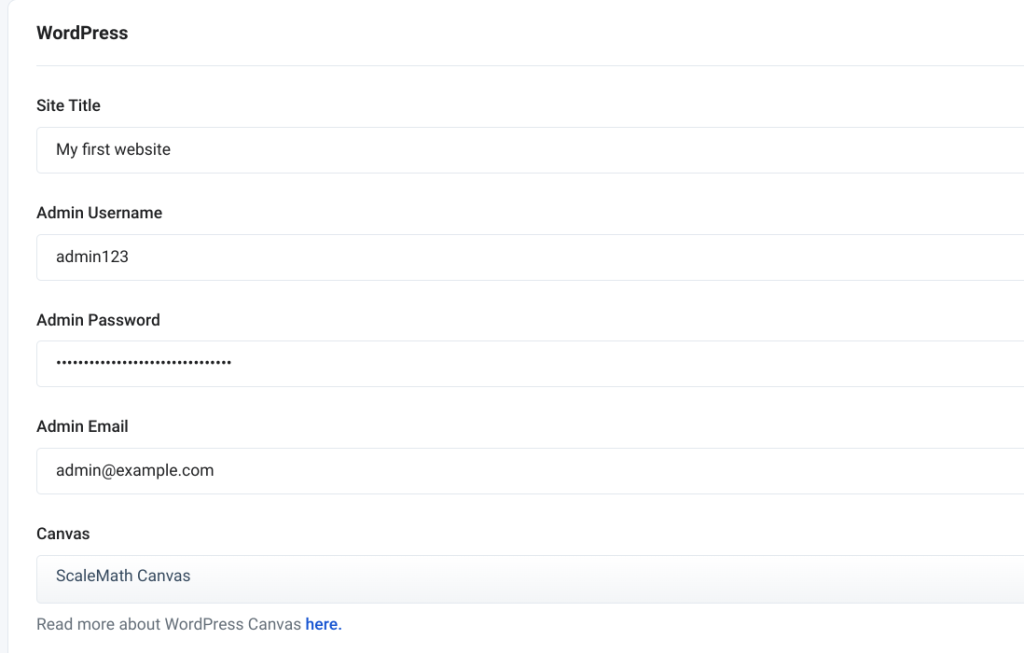
    And that’s not all – there are tons of other reasons you may prefer OpenLiteSpeed over NGINX:

    • Performance out of the box (very little configuration needed to get excellent results)
    • Free powerful, extremely well-maintained WordPress caching plugin
    • Understands Apache rewrite rules
    • Lower server costs (thanks to OpenLiteSpeed’s event-driven architecture)

    All in all, if you want to know for certain – our best advice is always to test for yourself! And fortunately, deploying an additional server with the help of RunCloud and cloning your existing site onto the new server is a piece of cake. Sign up for a free trial of RunCloud today.

    If you have any other questions about how NGINX compares to OpenLiteSpeed and how to make your choice – feel free to leave a comment below & join the conversation.

  • Bringing Containerization to RunCloud’s Cloud Architecture

    Bringing Containerization to RunCloud’s Cloud Architecture

    With a quarter of all businesses relying on Docker (according to this Datadog study) and over 20% of web hosts running it – Docker’s containerization architecture is tried, tested, and relied upon from startup to enterprise.

    At RunCloud, we’re pleased to announce that we are now rolling out support for Docker, making it easier for its users to deploy and manage their web applications (powered by Docker containerization architecture).

    In this article, we’re going to cover exactly what this means and what you will now be able to do with the combined power of RunCloud and Docker.

    Why Containerization – What Led Us Here

    Firstly, a very brief bit of history.

    What came before Docker, and why was Docker needed?

    Most enterprise companies, by default, usually treat all users as untrusted and try to limit their access to services even if they are performing just a simple action. One technology that is commonly used for this purpose is chroot jail. This is a way of isolating a single process and its children from the rest of the system. It’s often used within VMs, resulting in a Dedicated → VM → chroot structure.

    The problem with chroot jail is that it requires copying or mounting all necessary files from the host to the jail – which can be difficult to manage if multiple jails are needed.

    Additionally, many applications only support a single jail, making it difficult to provide each user with their own jail. Overall, jailing users can be messy and requires careful tracking of shared objects and binaries within the jail.

    When jailing users became difficult to manage, several major companies sought to create a new technology that would make it easier. This led to the development of Linux Containers (LXC), which offered a VM-like solution without the need to create a virtual machine. However, LXC was difficult for many people to use, as it required creating your own image rather than using pre-made solutions. This limited the adoption of LXC, despite its powerful capabilities.
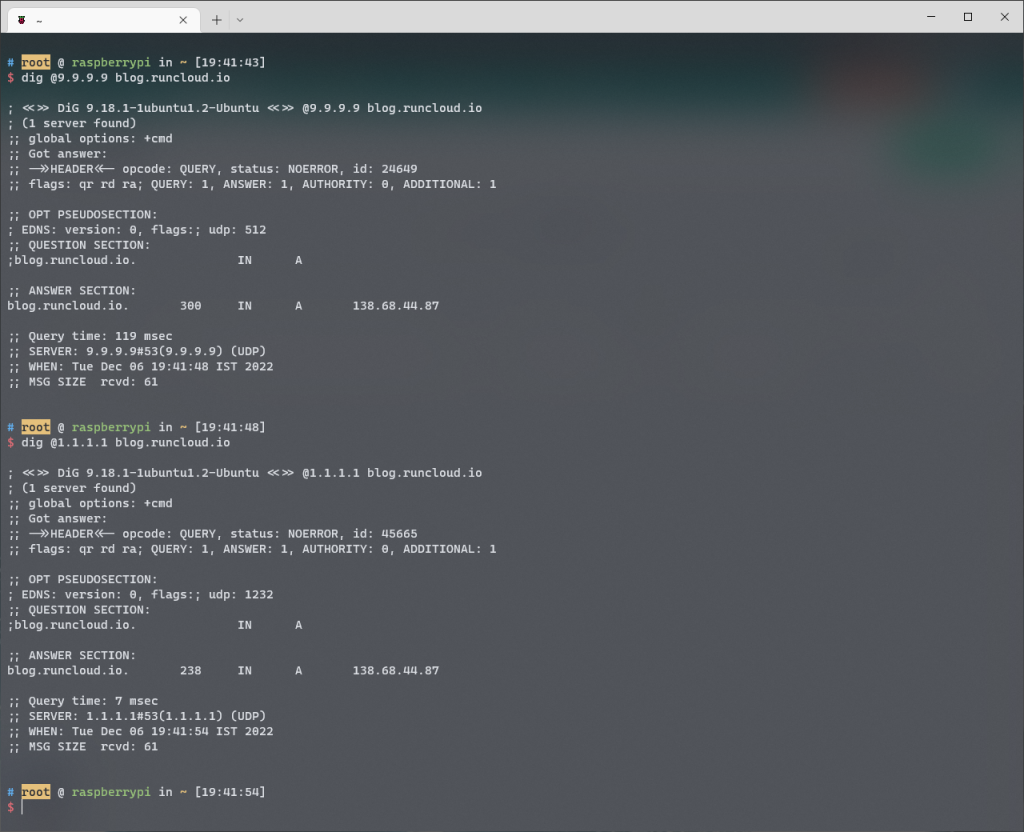
    In contrast to VMs, container images are read-only and faster to start up. This led to the creation of Docker, which was developed by Docker Inc. with a focus on security, ease of use, and portability. Docker has become one of the most popular tools in the world of DevOps and allows for easy sandboxing of servers. In 2015, Docker launched the Open Container Initiative (OCI) to provide a standard for OS-level virtualization.

    The Benefits of Docker Containerization with RunCloud

    1. Enhanced Security

    If your web app gets hacked while running natively on RunCloud, hackers may well be able to gain access to the root shell if the server isn’t hardened properly. This is clearly bad news, as once the root user gets compromised, hackers gain access to everything on the server.

    But in Docker, if your site gets compromised, you just need to clean up your web app and then restart the Docker container to roll everything back to how it should be quickly, easily, and relatively painlessly.

    Using Docker allows us to better implement the rule of least privilege. Everyone with access to your server is treated as if you don’t know what their intention or capabilities are. Someone accessing your server may just want to do their job, perhaps they have bad intentions, or maybe they are a complete beginner who may inadvertently run a command that could make your server crash.

    With Docker running inside RunCloud, we have `rc-shell` (RunCloud Shell) that will jail users inside their own container. Anything they do will only affect their data and their container – leaving the rest of the server unscathed.

    2. Improved Performance

    Although Docker may look like a virtual machine, it’s actually very different from that concept. Deleting old Docker containers and launching a fresh one takes only a couple of seconds. By using Docker to run your server, you can expect near-native performance, with improved performance when used in production at scale (as a result of isolation).

    3. Better Server Management

    Using containers for your server makes it much easier to manage your servers.

    Firstly, since you are not installing services directly on the operating system, your server will be much cleaner, and you will encounter fewer problems in server management.

    Secondly, suppose you need to use an older version of PHP on your site in the future. It will be much easier to do so with a containerized server since the version of the operating system running on the server might drop support for older PHP versions in the future.

    Finally, upgrading your server will be much simpler because you won’t have to worry about compatibility issues with shared libraries or other potential causes of server crashes.

    4. Same Dashboard/No Learning Curve

    RunCloud aims to provide an easy-to-use interface for managing containerized servers – users migrating from native RunCloud installations will find the transition to using containers to be smooth and straightforward.

    Additionally, users don’t need to have any knowledge of Docker to use RunCloud, as they won’t need to use any Docker commands. The learning curve for using Docker with RunCloud is relatively shallow, with only a few new concepts for users to learn in order to get started. Overall, using Docker inside RunCloud offers a more user-friendly experience for managing your server.

    What’s New?

    There are a lot of new features coming to RunCloud. Here are some of the most exciting ones.

    Add Individual Services

    In a native installation of RunCloud, all necessary software such as NGINX, PHP, MariaDB, Redis, and Beanstalkd are installed and can be started or stopped as needed.

    In a containerized server, you now have the option to run each of these components individually – and can even choose not to run any of them if desired. Additionally, if a necessary image is not present on the server, it can automatically be downloaded from Docker Hub to ensure that everything is up to date and ready to run.

    adding individual services in runcloud

    Quick and Easy Upgrades

    With a native installation of RunCloud, some software, such as Redis and Beanstalkd may not be automatically updated after being installed. In order to enable automatic updates for these components, you may need to use third-party software, which can sometimes cause update failures and lead to issues such as agents not updating to the latest version.

    In contrast, a containerized server automatically checks for the latest versions of all necessary components every 3 hours, ensuring that your software is always up to date and avoiding potential update & security issues.

    Selectively Upgrade Services

    MariaDB and Beanstalkd use exclusive locks, which means that during an upgrade, they can each cause a few seconds of downtime, as the running container must be stopped in order to start a new one. While the process of starting a new container is instantaneous, the health check process may cause a delay in reporting the status of the running service. Because of this, we have provided the option to enable or disable automatic updates for MariaDB and Beanstalkd.

    However, it is generally recommended to avoid automatically updating critical software and instead has updates performed by a professional. With Docker, however, updates can be performed more easily and with minimal downtime. By default, MariaDB and Beanstalkd will not be automatically updated, but users can change this behavior if desired.

    With native installations of RunCloud, updates to the agent software can sometimes result in new versions of other software being automatically installed on the server, even if the user doesn’t need or want them. For example, if an update to the agent brings PHP 8.0 to the server, it will be automatically installed whether the user wants it or not.

    However, in a containerized server, the user has the ability to choose which versions of software they want to use and can easily remove any unnecessary components from the server stack. This allows for greater control over which software is installed and used on the server.

    Easily Restore Passwords

    In a native installation of RunCloud, the password for the MariaDB root user is stored in the /etc/mysql/conf.d/root.cnf file. If this password is accidentally changed, it must be updated in the file in order to access the MariaDB server, and it can be difficult to regain access to the server if the password isn’t known.

    In a containerized server, if the password in the /etc/mysql/conf.d/root.cnf file is changed, the MariaDB server will automatically reset the root password to match the new password specified in the file, allowing you to easily regain access to the server.

    Automatic Network Management

    In a containerized server, the values localhost and 127.0.0.1 no longer refer to the server itself but instead indicate the location of the current container. This can cause issues when installing software, such as WordPress, that expects these values to refer to the server.

    To address this, RunCloud uses the host to indicate the host machine rather than the current container. This can be used in the DB_HOST setting when installing WordPress, for example, to ensure that the database connection is established with the host machine rather than the PHP container. Additionally, the values mariadb and redis can be used to connect to the MariaDB and Redis containers, respectively, within your application.

    Isolate Users

    Docker is designed to run as a privileged user, such as the root, or a user with sudo access. In RunCloud, creating a system user does not automatically grant that user privileged access. Since PHP is not installed natively on the server, users will not be able to run PHP-related commands.

    To overcome this limitation, RunCloud is introducing rc-shell, a jailed shell that allows users to run commands within a Docker container. Whenever a user connects to the server via SSH or SFTP, a new container is created, and the user is logged in to that container. This provides a secure environment where the user can only access their own files and has access to all necessary commands.

    The only limitation is that each user can only choose one PHP version to use as their PHP command-line interface (CLI). However, users can choose whether to use the same PHP CLI version as the server or a different version for their own user account.

    Run Different Versions of The Same Command

    With a native installation of RunCloud, the php command refers to the PHP command-line interface (CLI) that is installed on the server. In a containerized server, this behavior is the same, and the php command refers to the default PHP CLI version that is installed on the server.

    If a user wants to use a different PHP CLI version, they can use the /RunCloud/Packages/<php version>/bin/php command, where <php version> is the version of PHP they want to use.

    In a containerized server, users can also use commands such as php72rc, php73rc, php74rc, etc., to run a specific PHP CLI version. However, the composer and wp commands will always use the default PHP CLI version and cannot be changed at this time. This applies to both native and containerized installations of RunCloud.

    When the root user runs the php, wp, or composer command within a user’s directory, such as /home/user/webapps/mysite, these commands will automatically be run as if they were being executed by the user. This means that the root user does not need to switch to the other user in order to run these commands.

    For example, if the root user runs the command composer install within /home/amir/webapps/mysite, it will be executed as if the amir user had run the command themselves. This provides a convenient and user-friendly way to manage these commands within a user’s directory.

    “Run as” / Emulate / Mock User

    Due to the limitations described above, cron and supervisor may not be able to run the php, composer, and wp commands as a specific user. To overcome this, RunCloud provides a feature called “fake run as” for use with cron and supervisor.

    When using this feature, the specified command will be run as the root user, but it will be executed as if it were being run by the user specified in the “fake run as” field. This only applies to the php, composer, and wp commands and should not be used for any other commands. Using this feature allows cron and supervisor to run these commands as if they were being executed by a specific user, even though they are actually being run by the root user.

    Restart Services Selectively

    In a native installation of RunCloud, the systemctl command can be used to reload PHP-FPM for a specific PHP version. For example, to reload PHP-FPM for PHP 7.4, you can use the command systemctl reload php74rc-fpm.

    In a containerized server, the <phpversion> reload command can be used instead, where <phpversion> is the specific PHP version you want to reload. For example, to reload PHP-FPM for PHP 7.4, you can use the command php74rc reload. The nginx-rc reload command can also be used to reload Nginx in a containerized server. This provides a convenient and user-friendly way to manage and reload PHP-FPM and Nginx on a containerized server.

    How To Use Docker On RunCloud

    It is fairly straightforward to use Docker on RunCloud.

    1. Create a fresh Ubuntu server on your favorite public cloud, and click “Connect a New Server” in your RunCloud dashboard. Pick the “Containerized” option and complete the necessary fields.
    creating containerized server in runcloud
    1. Having done that, you can either continue via direct installation, or choose to install manually as you normally would.
    manual installation of containerized server on runcloud

    Summary

    The infrastructure improvements that Docker containerization allow us to deliver are incredibly powerful, and – in some ways – we’ve only really scratched the surface of what’s possible.

    By rolling out support for Docker, we’re making it easier for users to deploy and manage web applications, including testing in consistent, isolated environments – also playing a role in preparing our architecture for further improvements planned in 2023 and beyond. This is an important step for RunCloud and all of our users.

    With RunCloud, you don’t need to be a system administrator or Linux expert to manage your cloud infrastructure. With everything from backups, staging, cloning, atomic deployments, and more – RunCloud makes it truly enjoyable to manage your own production-grade infrastructure. Learn more & get started today.

  • How To Speed Up DNS Propagation

    How To Speed Up DNS Propagation

    Are you perplexed by the complexities of the DNS system? Don’t worry, you are not alone! Even though the DNS standard was established in 1986, countless memes on the internet suggest that it still baffles people, and even the tech titans like Meta find it tricky to work with.

    In this article, we will discuss what DNS propagation is, how it affects your website and how you can speed it up. Let’s dive right in!

    What is DNS Propagation

    DNS propagation is the time it takes for changes made to a domain’s DNS records to take effect across the internet. When you make a change to a domain’s DNS settings, it can take some time for that change to be reflected everywhere on the internet. This is because DNS records are cached on different servers all over the world, and it takes time for those servers to update their records.

    Why Should I Care About DNS Propagation?

    You might not need to worry about DNS propagation if you’re just a casual internet user. But if you’re responsible for managing a website or domain, then it’s important to understand how DNS propagation works, because it can affect how quickly your changes take effect.

    For example, if you’re transferring a domain to a new web hosting provider, it’s important to be aware of how long the DNS propagation will take, so that you can plan accordingly. If you’re not aware of DNS propagation, you might assume that the changes you’ve made to your domain’s DNS settings will have taken effect immediately, when in reality it could take several hours – or even longer – for the changes to be fully propagated across the internet. This can lead to confusion, and potentially cause problems for your website or domain.

    How To Propagate Changes Faster

    Method 1: Reduce time-to-live (TTL) Value

    The best way to speed up DNS propagation is to reduce the time-to-live (TTL) value for your DNS records. This tells DNS resolvers how long to cache your DNS records, so reducing the TTL value will ensure that DNS resolvers refresh your records more often, which can speed up the propagation process.

    However, this comes with a few downsides:

    • If the DNS records for your website expire quickly, it can cause your site to appear slow to visitors, because their browsers will have to fetch new records more frequently, which takes time. This can be frustrating for users, and make them less likely to continue using your site.
    • It can lead to an increase in the number of requests sent to your DNS authoritative resolver. If you maintain your own servers, this can put additional strain on your system, potentially increasing hosting costs and server charges.

    If you plan ahead of time, you can avoid this by temporarily reducing the TTL values of your DNS record one day before you plan to make changes. This will ensure that all the records will expire quickly when you want them to.

    For example, if your DNS records have the TTL value of 1 day, then you can change it to 5 minutes the day before. On the next day, you can change the DNS records to point to new servers. This will ensure that all the new visitors will be sent to your new server within 5 minutes of making the changes. Once you are satisfied that everything works as expected, you can increase the TTL value back to 1 day.

    Method 2: Request DNS Resolvers To Flush Cache

    If you didn’t plan ahead of time, and you need to update your DNS records immediately, then you can request DNS resolvers to flush cache values of your records, and update them with new existing values. Here are the links for some of the major DNS providers:

    Although flushing the cache from these servers will update the records for the vast majority of users on the internet, many technology enthusiasts and enterprise clients who have the time and resources to maintain their own DNS servers will still have a stale copy of your DNS records until it expires.

    Check If DNS Records Were Updated Successfully

    Method 1: Use A DNS Propagation Checker

    You can use a DNS propagation checker to monitor the progress of your DNS changes. These tools can help you track when your changes have been picked up by different DNS resolvers around the world, so you can see how quickly the propagation process is progressing.

    We recommend using Site24x7’s DNS Propagation Checker which checks the DNS records of a given address against multiple nameservers from different parts of the world.

    Method 2: Use DiG Command

    If you know your way around the command line, and would rather use a terminal instead of a third party service – then you are in luck. Almost all Linux distributions have the ‘dig’ tool preinstalled; you can use it to check records for any website by using the following command:

    $ dig blog.runcloud.io
    using dig command variation 1

    You can also query the records from a particular nameserver instead of using the default DNS resolver by specifying the IP address of the server:

    $ dig @1.1.1.1 blog.runcloud.io
    using dig command variation 2

    Summary

    Making DNS changes (and them taking longer than usual) can be annoying to have to wrap your head around but as long you factor in changes taking time, you should be able to avoid any potential problems. If you already use RunCloud, you’ll likely know that we encourage using Cloudflare which is also what we use for all of our own systems and provides fast, global DNS propagation. Still considering making the switch? Get started with your 5-day free trial today.