Category: Server Management

  • How To Host Multiple Websites on One Server

    How To Host Multiple Websites on One Server

    Hosting multiple websites on a cloud server is an excellent way to save some money, especially if your sites aren’t too resource-intensive. And, if you’re on a cloud server, it’s also much easier to scale resources as needed.

    If you’re managing multiple sites and wish to host them on one server, you can use Virtual Server to do this. It’s a configuration setting that allows your webserver, such as Apache, to load the site from the same server. 

    In the following guide, we are going to look at how you can host multiple websites on one server using two methods: the standard configuration method (which requires some technical understanding), and how RunCloud lets you do it.

    Hosting Multiple Websites on One Server by Configuring Apache

    Apache lets you configure the virtual host. The conf subdirectory in Apache is what you can use to make configuration changes. 

    To log into your Apache HTTP server, just connect to your server using your FTP client, and navigate to the conf subdirectory. It’s generally found in /etc/httpd/conf/httpd.conf.

    Before you begin, it’s always wise to create a backup of this file. Once you have that, log into the server using an SSH client (Terminal for macOS or PuTTY for Windows).

    You’ll have to enter your login credentials for the root account for the server. Now that you are in, let’s assume that you want to host two sites on the server, example1.com, and example2.com.

    Before you begin, run the following command to create a root directory for both sites:

    mkdir /var/www/html/example1.commkdir /var/www/html/example2.com

    Next, you need to create an index.html file for both of these sites. You can do that by using the following command for each of the websites:

    nano /var/www/html/example1.com/index.html

    Now, add the following text:

    <html><title>example1.com</title><h1>Welcome to this basic site</h1><p>This is just to show you how to host multiple sites on one server</p></html>

    Do this for both of the sites (swap out the URL in the command for each), and then run the following command for both to change the ownership of their directory:

    chown -R www-data:www-data /var/www/html/example1.comchown -R www-data:www-data /var/www/html/example2.com

    Now, you’ll need to create the virtual host configuration file on Apache for each of these websites. This is possible by running the following command for each:

    nano /etc/apache2/sites-available/example1.com.conf

    You’ll also need to add the following code to create the Virtual Host:

    <VirtualHost *:80>
    ServerAdmin admin@example1.com
    ServerName example1.com
    DocumentRoot /var/www/html/example1.com
    DirectoryIndex index.htmlErrorLog ${APACHE_LOG_DIR}/example1.com_error.logCustomLog ${APACHE_LOG_DIR}/example1.com_access.log combined
    </VirtualHost>
    

    Again, you’ll need to do this for both of your sites by swapping out the URLs and replacing them with the sites you want to host.

    Once you’re done, you need to enable Virtual Host with the following command:

    a2ensite example1.com
    a2ensite example1.com
    

    That’s it! You have now configured Apache to serve both sites from the same server. You can now test them by simply typing the URL for each site in your browser!

    How to Host Multiple Websites on One Server Using RunCloud

    RunCloud makes it easy for you to gain complete control over your server. Once you have connected RunCloud to your servers, it’s incredibly easy to host multiple websites, and you don’t even need any coding expertise.

    Here’s how to do it.

    1. Log into Your RunCloud Dashboard

    The first step is to log into your RunCloud dashboard. When you log in, you’ll see an overview of the servers you’ve connected. Here’s how it looks:

    connected servers overview in runcloud dashboard

    Now, just click on the server, and you’ll see details about any running web apps, server memory, disk consumption, load, and uptime.

    server details in runcloud dashboard

    2. Deploy a New Web App

    The next step is to deploy a new web app on your server. Simply click on the Deploy New Web App button in your dashboard, as shown below:

    delopying a new web app on your server

    Now, you’ll be asked to enter the details of the app you want to launch. RunCloud supports one-click installs of WordPress and phpMyAdmin, but you can also install a script, connect a Git repository, or launch an empty web app. 

    In this example, we are using WordPress.

    3. Map Your Domain

    Now, you’ll have to provide information associated with the web app and map a domain. 
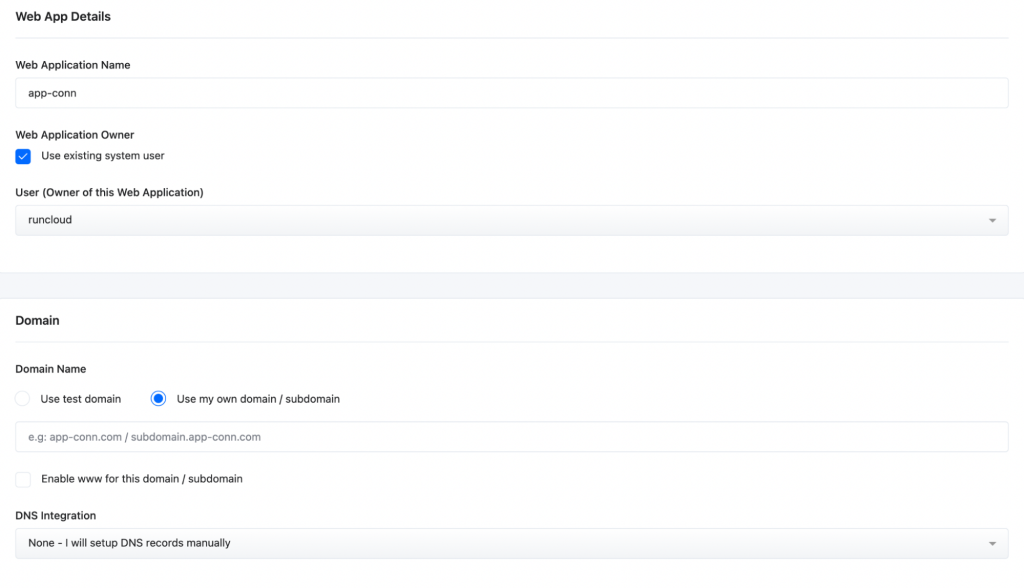
    provide information associated with the web app and map a domain

    You can choose to set up DNS records manually or use Cloudflare DNS with RunCloud. Simply enter your domain name and move to the next step, where you have to provide the admin details and add an SSL certificate.
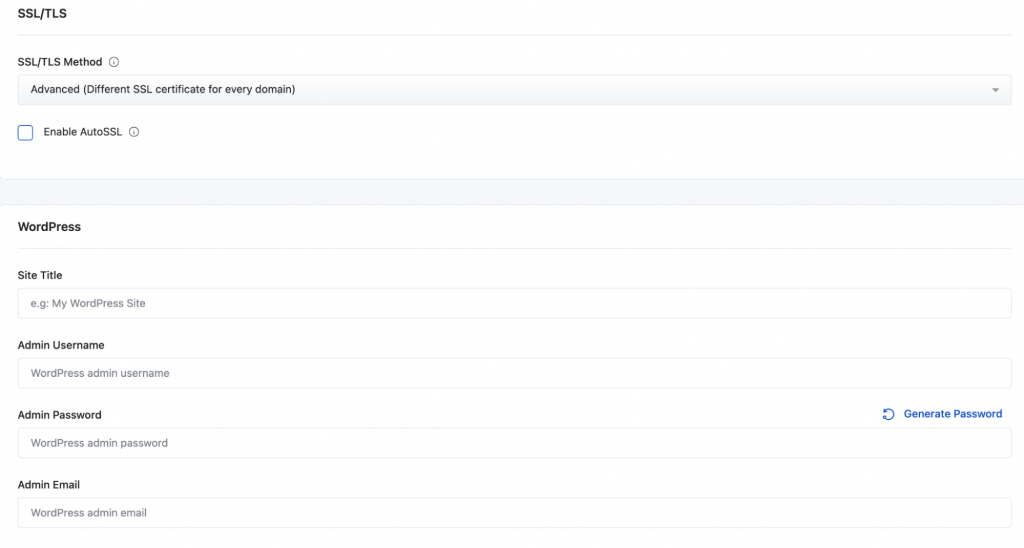
    choose to set up DNS records manually or use Cloudflare DNS with RunCloud

    Once you add that in, RunCloud lets you connect to a database and even choose the web application stack that you prefer. In this instance, we are going with NGINX and Apache2 Hybrid, and PHP 7.4, as shown below:
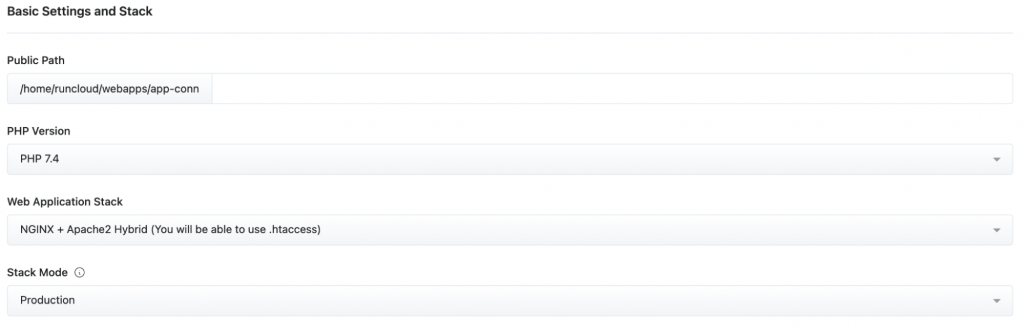
    choose the web application stack that you prefer

    Once you’re done, just deploy the web app on your server, and it’ll appear as shown below:

    deploy the web app on your server

    That’s it! You’ve now successfully hosted multiple websites on the same server! 

    After Action Report – Hosting Multiple Websites on One Server is Easy with RunCloud

    RunCloud makes it incredibly easy to host multiple websites on the same server, and you don’t even need any coding expertise.

    Let us know what method you use to host multiple websites on one server by commenting below, or join the conversation on Twitter by Tweeting @RunCloud_io)! 💬
  • Load Balancing For WordPress — What It Is & How It Works

    Load Balancing For WordPress — What It Is & How It Works

    Many users often have strong opinions about load balancing. Should you use it with your WordPress site, or is it overkill?

    A load balanced WordPress site will have increased uptime and performance, as well as enhanced security. However, despite what you will hear some people claiming, it’s not always necessary.

    In this article, we’ll discuss what load balancing is, how it works, and weigh up the benefits of using load balancing for WordPress.

    How Load Balancing Works

    load balancing wordpress how it works

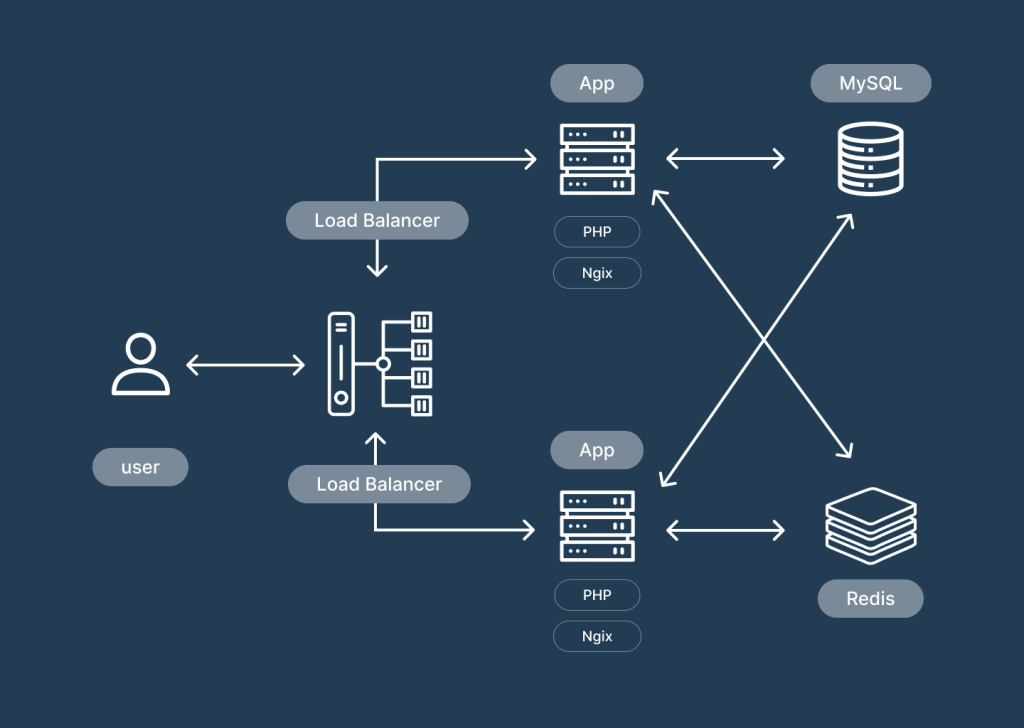
    Load balancing improves site performance by distributing traffic evenly across a network of devices. This ensures that no single resource is overloaded and prevents bottlenecks. When traffic increases, more resources can be added to the network to accommodate the extra load.

    As traffic decreases, the extra assigned resources can be removed. For WordPress websites, load balancing can help distribute traffic evenly across a cluster of servers so that no single server is overloaded and your website remains accessible even during peak traffic periods.

    There are two main types of load balancing: hardware-based and software-based. Hardware-based load balancers use dedicated hardware devices to distribute traffic among a group of servers. Software-based load balancers, on the other hand, use software running on a general-purpose server to perform much the same task.

    However, there are quite a few misconceptions about load balancing for WordPress. Before we discuss whether load balancing is really necessary, let’s briefly cover the most common misconceptions.

    Common Misconceptions Around Load Balancing

    Many think that load balancing will automatically improve their site’s performance, but that’s not always the case. Here’s a look at some of the reasons why it may not always be the best choice.

    Increased Complexity

    One of the main downsides of load balancing is that it can increase the complexity of a system. When you add an extra layer of infrastructure to a system, it inevitably makes that system more complex and more difficult to manage. This can lead to increased costs and longer deployment times for new features or updates.

    Single Point of Failure

    Another potential downside of load balancing is that it can create a single point of failure. If the load balancer itself goes down, then all traffic will be routed to a single server which could quickly become overloaded.

    To mitigate this risk, it’s important to have redundant load balancers in place so that there is always a backup available if one fails.

    Limited Scalability

    Finally, another potential downside of load balancing is that it can limit scalability. In some cases, the load balancer itself can become a bottleneck as traffic increases.

    This can be alleviated by using a more powerful load balancer or by distributing traffic across multiple load balancers – but it’s something to keep in mind if you’re expecting a lot of growth in web traffic.

    Aligning Expectations

    Many believe that load balancing will instantly improve performance, but that’s not always the case. The thing is, when you spread services across numerous servers, it actually increases latency on the network.

    The information has to travel across several connections, which can have an adverse impact on performance. For load balancing to actually work effectively, your original server setup needs to be maxed out.

    So, if the current server load is around 30%, and you have load balancing active, it’s actually likely to have a negative impact on response times due to network latency.

    Furthermore, it’s important to understand that load balancing isn’t the same thing as auto scaling, which is when your server infrastructure scales according to the number of requests.

    Instead, load balancing runs parallel to auto scaling (you’ll need both set up to see the benefits). It’s important to align expectations here because if you think that installing a load balancer will allow your server infrastructure to scale automatically, that’s not going to happen.

    Benefits of Load Balancing

    Before we focus on whether you should start using a load balancer, let’s first outline the benefits of using one.

    Maintain Performance During Peak Traffic

    Some people believe that only websites with millions of daily visitors need to worry about load balancing. However, this simply isn’t true. Any website that experiences spikes in traffic can benefit from load balancing.

    For example, a small website might only receive a few hundred visitors per day on average but could experience a sudden influx of traffic due to a viral news article or social media post. In such cases, load balancing can help ensure that the website doesn’t crash under sudden strain.

    It’s Quite Versatile

    While it’s true that load balancing is often used to balance traffic between multiple servers, there are other uses for load balancing as well.

    For example, some organizations use load balancers to route traffic between different types of devices (such as computers and mobile devices), different geographical locations (using different data centers), or even different network segments (such as different Wi-Fi networks).

    When Should You Implement Load Balancing?

    There are a few key scenarios where load balancing makes sense. If you’re expecting a spike in traffic – say, because of a sale or a new product launch – then load balancing can help ensure that your site can handle the increased demand without going down.

    Similarly, if you have a global audience, load balancing can help ensure that users around the world have a good experience by connecting them to the server that’s closest to them.

    Finally, if you have multiple servers running different components of your site or application (like a database, application server, and web server), then load balancing can help ensure that traffic is distributed evenly across all of your servers.

    Is Load Balancing Always a Good Thing?

    As mentioned above, load balancing isn’t always a good thing. In most situations, you could simply scale your infrastructure horizontally. For instance, porting your database on a separate server might help.

    Similarly, if you serve images on your site, you should consider using a CDN. As long as you can reduce the load from your web server by allocating components that require more resources, you won’t need to worry about load balancing.

    Are you planning on using load balancing? Or do you have any queries? Let us know, and join the conversation by commenting below! 💬

  • The Best WHMCS Alternatives (Free, Open Source & Premium)

    The Best WHMCS Alternatives (Free, Open Source & Premium)

    WHMCS is an acronym for Web Host Manager Complete Solution, which is a common automation and billing tool that’s used by digital agencies to manage hosting solutions for their clients. This tool lets agencies set up a range of automated actions, allowing them to manage their hosting needs, automate billing, or send regular invoices.

    WHMCS also lets you set up a ticketing system, and can automatically shut down a client’s account when they don’t pay, making it a suitable choice for hosting service providers.

    However, while WHMCS is a popular choice, there are various alternatives available that you can use instead.

    The 8 Best WHMCS Alternatives Available in 2022

    In the following article, we are going to compare eight of the best WHMCS alternatives available today.

    1. HostBill (Premium)

    hostbill homepage

    HostBill is a premium WHMCS alternative that you can use to automate large parts of your hosting business, including billing, support, and client account management.

    HostBill offers support for multiple currencies, so you can expand your business globally. It also supports automated payments and lets you set up ticketing support.

    One of the areas where HostBill really shines is its integrations: you can connect it to more than 500 different control panels and apps to create a custom solution that’s tailored to meet your business needs.

    Since you can integrate all of these apps into one platform, you don’t have to worry about accessing multiple applications to tinker with settings. You can customize everything straight through HostBill.

    HostBill lets you provision resources automatically, and it also takes care of lifecycle management, including suspensions, upgrades, or terminations as necessary. You can also define custom automation rules for specific clients.

    2. RackNap (Premium)

    racknap homepage

    RackNap is a subscription billing software that’s ideal for companies selling cloud hosting to their customers.

    RackNap is great for taking charge of the end-to-end customer lifecycle, including setting up billing plans for customers, automating renewals, and even giving customers some element of control over their accounts by allowing them to upgrade or downgrade their connection.

    You can even set up discounts or tier-based pricing for customers. RackNap lets you automate service provision from various cloud providers, including:

    • Microsoft Office 365
    • Acronis
    • AAWS
    • Microsoft Azure

    It even offers dedicated dashboards for the CEO, CFO, and CTO, enabling them to make data-driven decisions and use these insights to fuel business growth.

    And, like other WHMCS alternatives on this list, RackNap integrates seamlessly with popular third-party apps and payment gateways, so you can easily charge your clients and keep things running efficiently.

    3. Blesta (Open Source, Premium)

    blesta homepage

    Blesta is a popular billing platform designed for hosting providers that offer an excellent array of features, making it a suitable choice for those who want a reliable alternative to WHMCS.

    A significant chunk of Blesta’s source code is available for everyone, making it partially open-source. However, the company does keep three files encoded, which means you’ll need to purchase a license if you want to use Blesta.

    Blesta is relatively popular and integrates seamlessly with different tools like cPanel, 2Checkout, and others. The company also has a dedicated team of developers who regularly check the source code for bugs or security flaws.

    Blesta lets you create client pages to allow for self-management, making it easy for them to review their billing and invoices or upgrade or downgrade their connections.

    More importantly, Blesta also has a dedicated ticketing system, allowing your customers to open support tickets.

    The interface is clean and very user-friendly, allowing you to see what services each client is using, how much they are paying, any open tickets, and other relevant information about their subscription.

    Blesta even lets you create a knowledge base, so you can develop guides for your clients to follow, which no doubt helps improve customer satisfaction.

    The platform supports multiple currencies, and you can even add credits to each customer’s account if required. Since it integrates with all major payment gateways, it’s quite easy to accept payments via credit cards. It also lets you offer coupon codes to customers for discounts.

    Blesta offers a 30-day free trial and an online demo. On top of that, it even provides multi-company support for users that are running several hosting companies.

    4. Clientexec (Premium)

    clientexec homepage

    Clientexec is a great WHMCS alternative for businesses that are looking to introduce automation into their workflows. It works seamlessly with different plugins and domain registrars, payment processors, and third-party hosting providers, allowing you to customize it however you prefer.

    Clientexec offers a range of services to companies, including client account management, invoice automation, and billing integrations. It also supports automated provisioning for popular domain registrars like OpenSRS, NameCheap, and NameSilo, making it incredibly easy to set up.

    Since it integrates seamlessly with different payment gateways, you can easily expand your customer base worldwide too. The platform features basic invoicing and reporting, so you’ll have all the information you need about business performance, including taxes, reminders, subscription payments, and discounts.

    It’s also great for boosting your support quality, as Clientexec comes with a knowledge base, ticketing system, email, and live chat support, all built-in.

    One of the best things about Clientexec is its reporting capabilities. From tracking your revenues to new clients or even tracking how your KB articles help clients, Clientexec makes it easy for you to gauge exactly how your business is performing.

    5. WISECP

    wisecp homepage

    WISECP is a direct competitor to WHMCS and offers excellent value for the price you pay. Their hosting automation platform offers various services for free that you’d have to pay for with WHMCS, including:

    • Client blacklisting
    • Browser, IP, or location-based authentication
    • Blocking VPN or proxy users
    • Protection against brute force attacks

    WISECP makes it easy for businesses to sell custom hosting plans and even integrates with domain registrars, so you can also offer domain names through your platform. It supports automatic invoicing and lets you accept payments by integrating with all major payment gateways.

    WISECP also offers support for tax systems in different countries, including EU taxation. There’s a ticketing system with AJAX support, letting you view replies from clients in real time, so you don’t have to refresh the page each time.

    You can also create canned responses, assign tickets to different team members, add notes to each ticket, and change their status accordingly. The platform is very developer-friendly and supports various third-party control panels and plugins.

    6. BillingServ (Premium)

    billingserv homepage

    If you need an excellent hosting automation platform that’s focused on improving your client billing and subscription process, BillingServ is a great choice.

    Like all other WHMCS alternatives on this list, BillingServ works seamlessly with major payment gateways and control panels. It lets you create automated payment reminders, automate client accounts, and offers extensive reporting features.

    It’s a fully cloud-based solution, so you don’t have to worry about hosting or installing anything. Customer management is easy, allowing you to set up ticketing support or email support.

    It also comes with DDoS protection built-in and integrates with major control panels like Plesk or cPanel. You can also integrate it with any SSL provider or domain registrar.

    If you’re looking for a highly scalable solution for your hosting business, BillingServ has everything that you’ll require. The team behind BillingServ is highly dedicated, and they regularly release security updates and patches.

    7. Ubersmith (Premium)

    ubersmith homepage

    Ubersmith markets itself toward larger hosting providers, especially companies that offer cloud hosting. This is different from WHMCS, which mainly targets small to medium-sized businesses.

    However, if you need an automated billing solution to manage your client’s accounts, Ubersmith is a great choice. It lets you create custom quotes and track reports and has a built-in ticketing system that lets you improve customer support too.

    Self-management options are available, where you can create an account for each client, letting them track their invoices and account history, and even see any support tickets that they’ve opened in the past.

    Ubersmith integrates with all major domain registrars, and you can easily pair it with any of the popular payment gateways to accept payments in multiple currencies.

    8. RunCloud (Premium)

    RunCloud homepage

    RunCloud (hey, that’s us!) is designed to make managing your server infrastructure incredibly easy. While, at this time, we may not have all the features offered elsewhere, such as billing clients and setting resource limitations – many of our customers use RunCloud to handle the deployment & manage the entire process (with some manual input). 

    RunCloud works seamlessly with any cloud provider, letting you connect your servers, review performance and server health, and host sites. If you’re running a web hosting company and need an excellent server management platform, RunCloud is a solid choice.

    It offers team management, on-demand backups, instantaneous deployment, and a dashboard that’s been meticulously designed to improve performance and give you the information you need to make key decisions.

    After Action Report – Use RunCloud with a WHMCS Alternative to Sell Web Hosting

    You can use any of these WHMCS alternatives with RunCloud, which allows you to optimize server management without requiring any kind of command-line experience. You can reduce your server configuration times and offer a better standard of service to your customers!

    Already using any of these WHMCS alternatives with RunCloud? Or, have any queries? Let us know, and join the conversation by commenting below! 💬

  • How To Resolve The “Email Address is not Verified” Error With AWS SES

    How To Resolve The “Email Address is not Verified” Error With AWS SES

    Amazon Simple Email Service, also known as AWS SES, is an email marketing platform that you can use to send and receive emails through your own addresses and domains.

    AWS SES can be used to send transactional emails, including any personalized emails or for newsletter campaigns. It’s a highly modular platform that you can use to create email marketing campaigns, set up autoresponders, and even use it for live ticketing support.

    However, if you’re getting the “Email address is not verified error”, this post will guide you on how to solve it.

    What is the “Email Address is not verified” Error?

    When you start Amazon SES, it launches in a sandbox environment before you can switch it to production. Once you sign up, Amazon will verify whether you actually own the email address and the domain.

    The error usually arises when you try to send emails from an entity, such an email address or a domain, that hasn’t been verified in Amazon SES. Here’s how you can fix this error.

    How to Fix the “Email Address is not verified” Error

    Here’s a brief guide on how to fix this error:

    Verify if Your SES Account is Still in Sandbox Mode, and Request Production Access

    This is easy to do. Just open your SES console in the region by selecting “Account dashboard”. SES is region-locked, so you’ll need access for each region that you plan on sending emails from.

    If you’re in Sandbox mode still, simply click on “Request production access”. You’ll have to submit a form to AWS, and it may take up to a few days (usually a few hours) to get approval.

    Once you get production access to AWS SES, you’ll be able to send emails freely from any of the verified identities.

    Check Your Verified Identities

    Before you start sending emails, make sure you look in the left sidebar menu to ensure that the email address or domain that you’re using to send emails from is verified.

    Whenever you add a new email address, you’ll receive a confirmation email with a link to verify. As soon as you click that link, its status will change.

    Similarly, when adding a domain, you’ll have to add the record that you receive with the registrar in your DNS records. It may take up to 48 hours for DNS records to propagate, but once they’re done, the status of your domain will also change to verified.

    After Action Report — Getting Started with AWS SES is Easy

    That’s it! Fixing the “Email address is not verified error” is quite easy with AWS SES. Once you fix the issue, you’ll be able to send emails freely through the platform. Have you experienced this issue before? Let us know how you fixed it, and join the conversion in the comments (or by Tweeting @RunCloud_io)!

  • GitHub vs. GitLab vs. Bitbucket – How Are They Different?

    GitHub vs. GitLab vs. Bitbucket – How Are They Different?

    Teamwork is an important part of software development. In most cases, teams often work together and use the code written by their colleagues to incrementally improve and build new software.

    But with constant changes, it can be difficult to know how the code has evolved over time. That’s where version control systems come into play. Version control systems allow users to document changes to existing code, amend it, and upload new versions for others to tinker with.

    Project hosting services like GitHub, GitLab, or Bitbucket allow companies to work on code, create multiple versions, and track its development over time.

    In this article, we are going to talk about the most popular version control systems out there, including GitHub, GitLab, and Bitbucket, and see what sets them apart.

    GitHub, GitLab, Bitbucket — What Are They?

    Before we go into the differences, let’s talk about what each of these platforms really are, and what they do.

    GitHub

    github homepage

    GitHub is the most popular version control system in the world. It’s a Git-based version control platform that hosts 83 million developers, and more than 200+ million project repositories. It’s widely used in the open-source community for tracking changes to code.

    GitHub is popular because of its simplistic user interface, and it also allows developers to work seamlessly with Git-based algorithms. Its speed and efficiency are two major reasons why so many developers prefer working with GitHub.

    As far as cost is concerned, GitHub is free to use for the average user, but for larger corporations that need access to private repositories, the price differs based on the number of users.

    (For more information read our article “What is GitHub & How Does It Work?”)

    GitLab

    gitlab homepage

    Gitlab was founded as a competitor to GitHub in 2011 and rose to popularity because of its simplistic user interface. Many teams have started switching to GitLab more recently as it offers support for containerization platforms such as Docker and integrated CI.

    Bitbucket

    bitbucket homepage

    Then you have Bitbucket. It launched in 2008, but in the beginning, it was only compatible with Mercurial Projects – another version control system. In 2011, Bitbucket was acquired by Atlassian and transitioned to using Git instead.

    Bitbucket is just one of many tools in Atlassian’s arsenal since they also own other software-focused tools like Confluence and Jira. As you can imagine, Bitbucket integrates neatly with other Atlassian tools.

    GitHub vs. GitLab vs. Bitbucket — The Main Differences

    So let’s now take a close look at the main differences between GitHub, GitLab, and Bitbucket.

    FeaturesGitHubGitLabBitbucket
    Free private repositoriesYesYesYes
    Free public repositoriesYesYesYes
    Merge Request/Issue TemplatesYesYesNo
    Integrated CINoYesYes
    Open-sourceNoYesNo
    File storageYesYesYes
    IntegrationsYesYesYes
    AnalyticsNoYesYes

    GitHub’s Main Features

    Some of the main reasons why GitHub is so popular is because it offers repository branching and forking, lets you clone an entire codebase, and use both pull and merge requests.

    Ownership

    Development on GitHub started in 2007. It was originally launched by three software developers as a flat organization with no middle management whatsoever. It was a fully bootstrapped company.

    By 2012, Microsoft was hosting most of its projects on GitHub, including some of its biggest open-source projects such as .NET Core, MSBuild, PowerShell, and Visual Studio Code. In 2018, the company decided to purchase GitHub for $7.5 billion.

    Speed

    It’s also incredibly fast, resolving requests quickly, and allowing developers to upload files to different repositories. GitHub is free to use for all personal accounts, and they made private repositories free for unlimited collaborators too.

    Simplified Project Management

    GitHub offers support for kanban boards to help you structure and streamline your software development workflow. It also lets developers quickly synchronize merged versions, resolve issues, and track changes more conveniently.

    Integrations and Language Support

    Currently, GitHub supports more than 200 programming languages, and because it’s so popular in the developer community, it also has dedicated integrations available for popular platforms such as Google Cloud, Windows Azure, Asana, AWS, and others.

    Popularity

    GitHub is by far the most popular version control system in use today. It has certain features that you won’t find in BitBucket, such as syntax highlighting, and GitHub Pages, which lets you host sites on GitHub only.

    Support

    Again, owing to its popularity, support from the GitHub community is massive. You can find guides, tutorials, and extensive documentation about virtually anything you’d want to know about the platform.

    GitLab

    Now, let’s talk about GitLab and how it sets itself apart from the competition.

    Ownership

    GitLab was founded by alumni from the Winter 2015 batch of the Y Combinator seed programme. It was built around the software project of the same name and was originally launched by two developers in Ukraine.

    The company raised seed funding from Khosla Ventures $4 million in September 2015. Another $20 million followed from August Capital in the subsequent year. And, in 2021, GitLab Inc., its parent company, had its IPO on NASDAQ.

    Compliance Control

    One of the major benefits of using GitLab is that it comes with compliance control built in. It runs security scans automatically and has compliance pipelines to ensure that standards are imposed on the entire codebase.

    Managing Permissions

    GitLab lets you define and modify permissions for individuals based on their roles. You can also attach files to specific issues, which isn’t possible with GitHub.

    Issue Tracking

    GitLab’s administration solutions are designed to help software developers trace issues throughout the lifecycle of the project. Users can create new issues using the Issue Board, and assign them to team members.

    GitLab Flow

    GitLab Flow is a Continuous Integration (CI) tool that lets users automate code testing using various tools. It’s a great way to ensure that your code remains free of any bugs or major issues.

    Bitbucket

    Bitbutcket is the oldest tool on this list and is used by many software development companies. Here are some key differentiators.

    Ownership

    Bitbucket was launched as an independent company in 2008, working primarily with Mercurial Projects. In 2010 however, Atlassian acquired the company. Today, Bitbucket is a key part of Atlassian’s software offering.

    Integrations

    One of the things that sets Bitbucket apart from the rest is how seamlessly it integrates with tools like Jira, an issue-tracking software. This was also developed by Atlassian, and so unsurprisingly Bitbucket integrates perfectly with Jira to improve version control and bug tracking.

    Code Review

    When you send a pull request in Bitbucket, it shows the test results of security scans directly in a visual format, making it easier for users to analyze the code. Everything’s presented on one page, which reduces back-and-forth.

    Source Control

    Developers can easily track changes to the source files of a project, which makes it easy to determine what stage of the project the team is at. This also makes it easier for distributed teams to collaborate with others.

    REST APIs

    Bitbucket offers REST APIs that make it easy for developers to start building third-party apps using different programming languages.

    Code Snippets

    Developers can share code snippets and files with each other, allowing them to quickly get feedback and resolve issues.

    After Action Report — Which Version Control System Do You Use?

    These are three of the most popular version control systems available today. Most companies generally prefer using GitHub because it’s easy to use and lets users create their portfolios.

    However, some organizations also prefer GitLab and Bitbucket, especially those which use Jira and other Atlassian products.

    Which version control system do you use? Let us know & join the conversation by leaving a comment below!💬

  • How Long Does a DigitalOcean Snapshot Take?

    How Long Does a DigitalOcean Snapshot Take?

    DigitalOcean is a cloud IaaS (Infrastructure-as-a-Service) provider that offers affordable cloud hosting solutions. It uses Droplets, which are essentially Linux-based VMs (virtual machines) that are layered atop virtualized hardware.

    Think of each Droplet as a new server, which can work discretely, or as part of a larger infrastructure. Creating backups on DigitalOcean is very important to secure your data, and the company refers to each backup as a “snapshot”.

    In this article, we’re going to talk about how long each DigitalOcean snapshot takes.

    digital ocean homepage

    What are Snapshots?

    DigitalOcean refers to snapshots as on-demand backups or disk images of Droplets and all associated volumes that are saved to your account. You can use these to replicate new volumes or create a new Droplet using similar content, and there’s no limit to the number of snapshots you can take.

    How Long Does Each DigitalOcean Snapshot Take?

    In general, each DigitalOcean snapshot takes between one and three minutes for each GB of disk space used on the Droplet. To put this into perspective, a Droplet that uses 5 GB of disk space will take between 5-15 minutes.

    Therefore, the more disk space your server uses, the longer each snapshot’s going to take. Ideally, you’ll want to make sure that you regularly back up your Droplets. You can create snapshots from the control panel or with the API, and they become available for viewing immediately.

    Keep in mind that there are going to be some instances where the snapshots may take longer, primarily depending on the volume of data, the disk space, and the load on each server. For instance, if the write load on your server is high, the Snapshots will take longer.

    If you’re using RunCloud, you can back up your data pertaining to all web applications and databases (for further information about this, read our article on how to properly back up your website for disaster recovery).

    You can also automate DigitalOcean Droplet snapshots using SimpleBackups, a third-party tool that creates backups and automates Droplet and Volume snapshots.

    After Action Report — Backing Up Your Servers is Critically Important

    The last thing you want is to lose any important data due to an oversight. That’s the reason why DigitalOcean snapshots can make it easy for you to back up your Droplets and volumes.

    And if you have any important files, you can easily replicate them by creating additional Droplets.Are you backing up your servers frequently? Let us know the frequency you prefer, and any tips you think are essential in managing disaster recovery effectively by joining in the conversation in the comments (or by Tweeting @RunCloud_io). 💬

  • Cron Jobs – The Complete Guide & How To Schedule Tasks

    Cron Jobs – The Complete Guide & How To Schedule Tasks

    Cron jobs are a type of scheduling system that can be used to automate your business processes. A cron job is a command or program that runs at a specified time or period. The purpose of these jobs is to run tasks automatically, meaning you don’t need to log into the system every time you want something done. This article will cover everything from what cron jobs are and how can they help your business, all the way through setting up and using them.

    What Are Cron Jobs?

    Cron jobs are built into Unix-like operating systems and are used to schedule system tasks that need to be performed at a specific time. While they’re not something most users will ever have to configure or manage directly, they’re a valuable tool for administrators and software developers who need to automate routine tasks.

    They can be used to automate repetitive tasks, like sending out a daily newsletter or running commands on a server. Cron jobs can be scheduled to run once every minute, or once an hour – or even once every day.

    ‘Cron’ is an abbreviation of chronometer, and it basically means “timekeeper”. A cron job runs at pre-defined times or intervals. For example, you can schedule a database backup to run every day at 5 pm.

    What Can Cron Jobs Be Used For?

    Cron jobs are used to schedule tasks on a periodic basis. For example, you may have a cron job that runs every day to carry out a data backup, archive old files, or have a cron job that runs every day at 7:30 PM that emails reports to your clients.

    What Are The Benefits Of Using A Cron Job Scheduler?

    Cron jobs are a great way to free up your time and save money. Instead of having to spend your time manually scheduling tasks, cron jobs can be set up to automatically run at specific times or intervals. This means that you don’t have to worry about missing an important task, such as sending out marketing emails or updating an image on your website.

    Cron jobs also save you money by reducing the amount of time spent on tedious tasks like updating social media, performing backups, or monitoring websites for changes in traffic. With a cron job scheduler, all this work will be done for you automatically when scheduled so that it doesn’t eat up any more of your precious development time!

    How To Set Up A Cron Job Scheduler

    A cron job scheduler is a tool that allows you to schedule tasks to be performed at specified times or intervals. You can even use them on your own computer or on other computers. They are incredibly useful for automating many different kinds of tasks, including updating your website and backing up files from other devices in your network.

    There are two operating systems that support cron job scheduling: Linux and Unix-like systems (such as Mac OS X), which have the more traditional root access method; and Windows 10 Pro (which has an added feature called Task Scheduler). There will be some slight differences between these methods depending on what operating system you use, but all of them will allow you to set up automated tasks!

    The process for creating a basic Cron Job is pretty simple: Open up the terminal window by clicking ‘Show Hidden Icons’ → ‘View’ → ‘All View Options’ → Click on “Show Developer Tools” and finally click on “CMD Prompt(Admin).” Once inside this new window type in “crontab -e” without quotes at the command prompt then hit Enter! This will open up Nano – the default text editor.

    How To Schedule Tasks On Windows

    • Firstly, make sure that you are logged on as an administrator, or that you have the same access as an administrator.
    • Go to Start->Control Panel->System and Security->Administrative Tools->Task Scheduler

    Action->Create Basic Task->Type a name for the scheduled job, and click ‘Next’

    • Follow through the wizard to select the tasks and times you wish.

    Your cron jobs will now run automatically at their specified intervals as per your settings, just like any other Windows task or scheduled event

    How To Schedule Tasks On Mac OSX

    To schedule tasks on Mac OSX:

    • Click on the Applications folder in Finder and search for the Terminal app.
    • Open the app by double-clicking it, or by pressing Command + Spacebar and typing ‘Terminal’ into Spotlight Search (which will open a new tab in Safari).
    • Type in the following command: sudo crontab -e
    • In the “Cron” window that opens up, type in your desired command to schedule a task (see example above). You can also add multiple commands here if you prefer!
    • Hit Enter when finished typing out your command(s), then close out of Terminal by clicking File > Close tab at the top left corner of the window or hitting Command + Q

    How To Schedule Tasks On Linux

    When it comes to configuring Linux cron jobs, there are a few things you need to know. First, you can create and schedule tasks with the help of the crontab utility. The syntax for this command is as follows:

    [user]@[hostname]:~$ sudo crontab -e

    Where user is your username on the host machine and the hostname is either the IP address or hostname of your server (you don’t have to enter both). The tilde symbol (~) represents your home directory on Linux systems, so if your username is “John Doe” then ~ would refer to /home/john/. When running this command on Ubuntu 18.04 Bionic Beaver (which comes with Python 3) you’ll see:

    ```python2
    John Doe's Desktop 2 [21/08/2018 09:54]$ sudo crontab -e
    ```

    Crontabs are stored in /var/spool/cron/. You can edit them with any text editor like vim or nano.

    10 Examples Of Cron Jobs To Improve Business Efficiency

    In a business setting, there are many tasks that need to be done routinely. These tasks can be done manually, but they’re often repetitive or time-sensitive. For example, you might want to run a report every month or send an email reminder to your employees every week. In these cases, using cron jobs to automate these processes will save time and make them more efficient. Here are 10 examples of how you can use cron jobs in your business:

    1. Email Reminders

    Email reminders are a great way to remind customers of upcoming events or deadlines. For example, you could schedule an email to be sent when a customer’s event is coming up so that they know what to expect and can prepare accordingly.

    The following code will send an email reminder one week before your birthday:

    crontab -e * * * 2 # 0 0 1 * – name: Send Birthday Reminder email: me@example.com

    If you want to only receive the reminder on specific days of the week, use one of the following lines in place for “0 0 1 *” above:

    • Sunday (Sun) at 12am
    • Monday (Mon) at 12am
    • Tuesday (Tue) at 12am
    • Wednesday (Wed) at 12am
    • Thursday (Thu) at 12am
    • Friday (Fri) at 12am
    • Saturday (Sat) at 12am

    2. Database Backups

    You can set up a cron job to run database backups – and restore them. You can also automate database backups with a cron job, so that they’re run at night or on weekends when there are fewer users on the system.

    3. Archiving Old Data

    If your business is like most, you have lots of data that gets stored and forgotten about. This is a problem because as time goes on, the older files are more likely to become lost if something happens to your hard drives or server.

    To ensure that this doesn’t happen, you should set up a schedule for archiving old data. Cron jobs are the perfect tool for scheduling archiving because they’re easy to set up and run automatically in the background without any intervention from users.

    4. Monitoring And Alerting

    Alerting is a process that monitors the status of a system or application, and notifies the appropriate personnel when an event occurs that requires attention. Alerts can be triggered by events such as a change in CPU usage, file modification, or a network connection.

    The most common type of alert is an email message sent to someone (or multiple people) who must attend to it immediately. This is useful for ensuring security breaches are detected as soon as possible so they can be stopped before causing more damage or being noticed by others outside your company. There are many different types of alerts available – some examples include:

    • Email notifications
    • SMS/text messages
    • Phone calls

    5. Data Analytics Or Reporting

    If you’re looking for examples of analytics or reporting tasks that can be run from cron jobs, there are many out there. The most popular one is probably Google Analytics, which allows users to import their site’s traffic data into an app and then schedule reports in the time they want them sent on any given day.

    If you have employees working remotely (or even if they’re not), it’s important that they know what their daily tasks are and when they need to complete them before setting up a cron job with email alerts. This will ensure that all employees follow through with their responsibilities and get work done on time without having to ask anyone else where they should start or what exactly needs doing today!

    Knowing that every team member understands what tasks need completing can help eliminate any confusion about how much time is left before an important deadline arrives – which could mean less stress for everyone involved at work!

    6. Running Inventory Scripts

    Inventory scripts are used to track the inventory of a product. For example, if you have a product that is sold in stores and warehouses, you can use an inventory script to ensure that your store has enough products for customers. You can also use this type of script to track how much stock is in each warehouse location and determine which locations are running out faster than others.

    7. Syncing Files Between Systems

    It’s possible to create a cron job that will sync files between systems.

    For example, if you are using a file synchronization tool like https://www.rsync.net and have both the source and destination servers set up correctly, then it’s possible to use the rsync command line utility to perform this task automatically.

    8. Checking For Software Updates

    You can check for software updates using the following command:

    apt-get update

    To install an update, run this command:

    apt-get upgrade -y

    To schedule a software update to happen automatically at a specific time, add the following cron job to your system’s crontab file (which you can find by typing “sudo nano /etc/cron.d/”):

    * */5 * * * root apt-get upgrade -y

    If you want to rollback an installed update, run this command:

    apt-update && apt-full dist-upgrade -reinstall --auto-remove && reboot

    9. Calling APIs At Regular Intervals

    There are a number of popular APIs that you can use to automate some tasks within your business. For example, you could make a cron job that calls the Google Calendar API every hour, and creates events based on whether or not there are any meetings scheduled for the next day. This would ensure that the calendar stays up-to-date at all times, and it would also prevent employees from having to manually update their calendars after meetings have been canceled or rescheduled.

    For example:

    • Google Calendar API – A “personal” type of web service where users can maintain their own calendars as well as share them with other people.
    • Upwork API – An “enterprise” type of web service where companies can hire freelancers with different skillsets at reasonable rates (compared to what they would pay in-house).

    10. Running Security Scans Or Vulnerability Assessment Tools.

    Security scanning tools scan your network for vulnerabilities and can be used to identify weaknesses in your software, operating systems, and applications that are open to hackers. Vulnerability assessment tools help you test the security of your hardware devices (such as printers) by checking whether they have been configured correctly. These tools allow you to improve business efficiency by ensuring that all of your devices are protected against cyber attacks. Setting up cron jobs to automate these scans, and send email alerts or reports if necessary offers another great advantage.

    Cron Job Terminology

    Cron

    Cron is a time-based job scheduler that runs in the background on a server. Cron jobs are scripts or programs which are automatically executed at specific intervals for routine tasks such as sending out email notifications, refreshing analytics data, etc.

    Cron jobs can be set up to run once, daily, weekly, and monthly. Most cron implementations allow users to set up jobs to run at any particular time of day or day of the week (or week). A cron job will be queued until its scheduled execution time arrives then executed at that time.

    Cron Jobs

    The actual events that are scheduled using Cron with a specific time interval and command.

    Cron jobs can be scheduled to run at a specific time, or at a specific time of day.

    • *At a specific time.* The cron job will run at the specified date and time.
    • *At a specific time of day.* The cron job will run during the specified hour (0-23).

    A cron job has three parts: an interval, a command, and the name of a user who will run the command.

    The cron daemon is a time-based job scheduler that runs on Unix and Unix-like operating systems that allows you to schedule commands to run at specific times or intervals.

    Crontab

    A configuration file containing all the scheduled cron jobs.

    Crontab is a configuration file that contains the list of jobs to be run at specified times. It usually resides in /etc/cron.d and is edited using the crontab editor.

    Crontab Editor

    A tool that allows you to edit your crontab file easily, without having to use any coding.

    Conclusion

    Hopefully, by now you’re convinced that cron jobs are a useful tool to help automate your business processes. They have many benefits and can save you time in the long run. However, they do require some setting up before they work properly so make sure that you know what your needs are before getting started!

  • Cheat Sheet To All Bash Shortcuts You Should Know

    Cheat Sheet To All Bash Shortcuts You Should Know

    The Linux Bash is commonly used by developers, though it may seem fairly difficult to navigate at first. The use of arrow keys to navigate between commands is obviously a hassle and often becomes a major challenge.

    However, in general, Bash is quite easy to use. If you’re going to use it on a VPS, it’s important that you know about the different shortcuts that Bash has to offer. Here’s a full list of different Bash shortcuts that you can use, divided in separate categories.

    Editing

    The following list of shortcuts will allow you to easily edit commands. 

    ShortcutAction
    CTRL + x, CTRL + eEdit the current command in $EDITOR
    CTRL + _Undo
    ALT + DELDelete word before the cursor
    ALT + dDelete word after the cursor
    CTRL+ yPaste the last item
    CTRL + dDelete character below the cursor
    CTRL + hDelete character before the cursor
    CTRL + wCut the word just before the cursor to clipboard
    CTRL + dCut the word after the cursor to clipboard
    CTRL + uCut the line before the cursor to clipboard
    CTRL + kCut the line after the cursor to clipboard

    Navigation

    These are the shortcuts that you can use to navigate Bash.

    ShortcutAction
    CTRL + eGo to the end of the line
    CTRL + aGo to the start of the line
    CTRL + xToggle between the current position of the cursor or to the start of the line
    CTRL + fMove cursor forward by one character
    CTRL + bMove cursor back by one character
    ALT + fMove cursor forward by one word
    ALT + bMove cursor back by one word

    History

    You can use these shortcuts to check your history or bring up a history search.

    ShortcutAction
    CTRL + gExit history search
    CTRL + rOpen history search
    CTRL + pSee previous commands
    CTRL + nSee the next commands in history

    Control

    These are commands that you can use to control processes in Bash.

    ShortcutAction
    CTRL + lClear your entire screen
    CTRL + zSuspend currently running processes and move them in the background
    CTRL + cKill currently running processes
    CTRL + dExit current shell
    EnterExit a suspended SSH session

    After Action Report – Use These Commands to Simplify Bash

    These are some of the many commands that you can use to simplify your use of Bash and move between commands more easily.

    Already using Bash on your VPS? Let us know if you have any other commands to add, and join the conversation by leaving a comment below! 💬

  • Understanding Linux File Permissions – Read, Write & Change

    Understanding Linux File Permissions – Read, Write & Change

    Linux permissions allow you to set security levels for different users. Linux allows you to define access levels for individual files, specify attributes, and tighten security. This way you can provide granular permission levels and improve file security.

    Linux lets you choose from different file permissions for each type of user, but they can generally include a combination of:

    • Read
    • Write
    • Execute

    Before we talk about Linux file permissions, let’s talk about the different types of users.

    Linux Users

    The three types of users include:

    • Owners
    • Groups
    • Others

    Owner

    The owners include those who create the file.

    Group

    Groups generally include different users with the same Linux permissions. For instance, the owner can provide read information to a specific group instead of manually granting permission to each user.

    Others

    This includes any other user who can access the file. These are generally users who haven’t created the file, nor are part of a group with specific permissions. So, if you’ve set permissions for “others”, they will apply to this group.

    Understanding Linux Permissions

    Now, as mentioned above, each file or directory can be assigned any of the three permissions discussed below.

    Read (r)

    The Read permission gives users the ability to open and read a file. If the Read permission is assigned to a directory, users will be able to list all of its contents.

    Write (w)

    The Write permission lets users modify the contents of a directory or a file. This allows a user to add, remove, rename, or modify the file however they see fit.

    For instance, if you have to write permissions for a file, but not for the directory, you won’t be able to rename or remove the file from the directory. You’ll only be able to make changes to the contents of the file itself.

    Execute (x)

    This allows the user to execute the file. Essentially, with this permission, you can run the file.

    Example of Linux Permissions

    For instance, if the file name is:

    Ls -l example_file

    The first character tells you about the type of file. It could either be a directory (d), a regular file (-), or a symbolic link (l). The output of this file provides the following permissions:

    -rw-w-r- 

    In the first part, you can see that the file owner has both the read and write permissions. Then, the group only has write permission, and all others have just read permission.

    How to Change Linux File Permissions

    The chmod command is commonly used to change Linux file permissions. Any user with sudo privileges, the root, and the file owner are capable of changing the file permissions. When using the symbolic format, here’s the format that you can use to change the file permission:

    chmod [OPTIONS] [ugoa] [-+=] perms...[,...] filename...

    In this format, the first set of flags simply denotes the user classes for which you want to change the permissions. These include:

    • The owner (u)
    • Group (g)
    • Other users (o)
    • All users (a)

    The next set of flags defines whether to add (+), remove (-), or change the existing permissions to specific permissions (=).

    For example, if the command is:

    chmod -r o-x example_file  

    It will remove the execute permission for all other users.

    Absolute Mode

    Also known as the numeric mode, file permissions in this mode are represented by a three-digit number instead of a series of characters. Here are the numerical values for your understanding:

    0 = No permission

    1 = Execute

    2 = Write

    3 = Execute and Write

    4 = Read

    5 = Read + Execute

    6 = Read + Write

    7 = Read + Write + Execute

    So, if you were to use the following command:

    chmod 754 example_file

    You’ll essentially be changing the file permissions to the following:

    • Owner: Read, write, and execute (7)
    • Group: Read and execute) (5)
    • All others: Can read) (4)

    Conclusion

    We hope you find this simple guide for Linux permissions helpful. Keep in mind that the chmod command lets you change permissions, as long as you’ve sudo privileges or are the file owner. Any questions about Linux you’d like to see us cover in a future guide? Feel free to join the conversation by dropping a comment below or Tweeting at us! 💬

  • The Best WordPress Caching Plugins To Speed Up Your Site

    The Best WordPress Caching Plugins To Speed Up Your Site

    WordPress caching is one of the most important ways in which you can significantly improve your website’s performance and speeds. Caching plugins simply store data that’s frequently accessed in temporary storage for more rapid retrieval.

    This improves loading times whenever a person visits your site, as these elements can load up quicker straight from the cache. This works because in most cases, the posts or pages on your site aren’t going to change much after they’re published.

    WordPress caching significantly reduces data transmissions from the user’s browser to the WordPress database and the server, which ultimately results in faster page load times.

    If you aren’t already using a WordPress caching plugin, installing one could significantly improve your website’s performance, and result in a slew of other benefits.

    Why Use a WordPress Caching Plugin?

    Keep in mind that most browsers store a cache of your website’s page, so some form of caching is still active, even if you don’t use a plugin. However, with a caching plugin, you can significantly improve the process.

    A WordPress caching plugin offers the following advantages:

    • Greater control over types of server-side caching, including an object or page caching
    • Additional features such as minifying JavaScript or CSS files
    • Improved SEO performance
    • Greater visitor engagement, which can result in a significantly reduced bounce rate
    • Improvement in your site’s Core Web Vitals and PageSpeed scores

    The 8 Best WordPress Caching Plugins

    Now, here are the eight best WordPress caching plugins that you can use to speed up your website’s performance.

    1. WP Rocket

    WP Rocket caching plugin homepage

    WP Rocket is widely regarded as one of the best plugins for improving your website’s performance, and for good reason.

    WP Rocket offers control over both page caching and browser-side caching, and you can even set up Gzip compression so that web pages can be compressed on the server, and decompressed in the user’s browser.

    What makes WP Rocket the top pick is simply the fact that, right after installation, many of the settings are preconfigured. This means that you will notice a significant uptick in performance without even tinkering with any key settings.

    From delaying JavaScript scripts to lazy-loading media files, WP Rocket offers everything in a nifty, lightweight plugin. You can even integrate your CDN into WP Rocket’s dashboard or use their proprietary RocketCDN.

    Key Features

    • WP Rocket supports a range of add-ons, such as Cloudflare, Varnish Cache, and Sucuri
    • Compatible with all the popular themes and plugins
    • Automatic eCommerce customization that removes sensitive pages from being cached
    • Extensive range of settings and options that offer granular control over how your website performs

    2. Autoptimize

    autoptimize caching plugin homepage

    Autoptimize isn’t really a caching plugin, per se, but it does the job exceptionally well. Most caching plugins even recommend that you use Autoptimize along with them!

    At its core, Autoptimize is a plugin that’s designed for minifying and aggregating scripts to improve your website’s performance. You can determine which scripts to load or completely ban, which results in a significant performance boost.

    Another reason why Autoptimize is so popular is that it’s incredibly easy to use; the interface is very simple and presents you with all the options you need with brief descriptions.

    The plugin itself is free to use, though the team charges an amount for setting it up and customizing it for your site, which is definitely worth it.

    Key Features

    • Helps you fully optimize all scripts on your site
    • Has a free version
    • Quite simple for beginners, but also has advanced features that make it a suitable choice for technical professionals

    3. W3 Total Cache

    w3 total cache caching plugin homepage

    Third on the list is W3 Total Cache, a lightweight plugin that offers plenty of caching options. It offers optimized progressive rendering, which improves page load times and allows visitors to interact with them much faster.

    W3 Total Cache offers support for the Secure Socket Layer and also lets you minify your HTML, CSS, and JS files, reducing bandwidth consumption significantly. More importantly, it also lets you cache feeds, on CDN, or on the disk.

    Apart from that, you can choose to cache database objects, fragments in memory, search result pages, and a lot more. With this plugin, you can easily defer non-critical JS or CSS scripts to render pages faster.

    It also offers comprehensive stats to help users better understand the impact of each setting they change.

    Key Features

    • Offers reverse proxy integration using Varnish or Nginx
    • Lets you minify virtually all JavaScript, CSS, and other elements
    • Offers WP-CLI support for purging the cache

    4. WP Super Cache

    wp super cache caching plugin homepage

    Automattic, the company behind WordPress itself, offers WP Super Cache as a fairly simple caching plugin. It generates static HTML files to reduce load times significantly, serving these instead of loading data dynamically.

    It uses the Apache mod_rewrite module to bypass PHP, improving speeds dramatically. There are three options available:

    • Expert
    • Simple
    • WP-Cache caching

    Each of these differs in terms of speed, with Expert being the fastest. If you need a reliable caching plugin that’s designed for optimizing website performance, you can’t go wrong with WP Super Cache.

    Key Features

    • Has a Preload Mode that lets you preload as many posts as you want
    • Automatically deletes old files from the cache directory
    • Comes pre-configured with recommended settings

    5. WP Fastest Cache

    wp fastest cache caching plugin homepage

    Popular amongst developers, WP Fastest Cache offers all the features that you need to quickly set up caching on your site. When you install it, the plugin automatically modifies your .htaccess file, so you don’t have to do much.

    It deletes cache files when posts or pages are published, which keeps things running smoothly. Like WP Total Cache, it also lets you purge your cache using the command line interface.

    You can easily enable or disable the cache option for users that have already logged in, or those on mobile devices. It also lets you disable emoji inline CSS, and lets you combine your CSS and JS scripts.

    Key Features

    • Has both a free and a paid version
    • Lets you optimize all images on your site to reduce data consumption, while also offering an in-built WebP image converter
    • Lets you select elements to lazy load to further boost page load times

    6. Swift Performance

    swift performance caching plugin homepage

    Swift Performance has both a free and a pro version (with the former known as Swift Performance Lite). It’s a fairly comprehensive WordPress caching plugin that automatically optimizes page caching once you activate the plugin.

    It works seamlessly with WooCommerce, bbPress, Varnish Cache, Cloudflare, and several others. Furthermore, it lets you minify JS and CSS scripts, combining them to load simultaneously.

    It also offers Gzip compression and has a built-in optimizer for cleaning databases. It automatically detects duplicate metadata and removes it. The Pro version also lets you schedule a time for optimizing your database.

    Key Features

    • Supports WP Multisite for optimizing several sites
    • Offers browser caching right out of the box
    • Can automatically generate critical CSS to prioritize content in specific folds

    7. WP-Optimize

    wp-optimize caching plugin homepage

    WP-Optimize was originally developed as a database optimizer, but since then the team behind the tool has added lots of new features to turn it into a plugin that offers full-scale caching.

    It lets you cache, optimize, and significantly compress elements such as images on your site to improve loading times. There’s a free version, but to fully unlock all of its features, you’ll probably want to invest in the Pro plan.

    That unlocks additional features such as Multisite support and more caching options. But, if you run a simple site and need a plugin to minify JS and CSS files and improve page load times, WP-Optimize is a good choice.

    Key Features

    • Includes database optimization, image compression, and caching options
    • Improves website performance once you activate it automatically by optimizing common settings
    • Very responsive team of developers

    8. LiteSpeed Cache

    litespeed cache caching plugin homepage

    If you need a reliable caching solution, LiteSpeed Cache is a great choice. LiteSpeed Cache works well with web servers like (unsurprisingly) LiteSpeed, Nginx, Apache, and others.

    If your website’s hosting stack features LiteSpeed, this is a good plugin to use. It offers object caching support, HTTP/2 push for both CSS and JS files, Cloudflare API, and multisite support.

    The interface is intuitive, letting you choose whether to lazy load images, optimize PageSpeed scores, support for WP-CLI, schedule cache purges, and more.

    Support for LiteSpeed Cache is excellent, with a dedicated Slack community, detailed documentation, and a huge support community. There’s an API for the themes and plugins that aren’t directly compatible with LSCache, making it a great choice all around.

    Key Features

    • Has a built-in database optimizer
    • Supports both basic and advanced setting views
    • Multisite support is available

    Using a WordPress Caching Plugin is Essential to Boost Performance

    WordPress caching plugins aren’t just an “added bonus”. If your website has a lot of content and you intend to scale it in the future, you should use a caching plugin.

    Without a caching plugin, you’d have to tweak every setting manually, which is obviously quite complicated. While there are quite a few caching plugins out there, these are some of the best choices, and most others usually offer similar features.

    Let us know in the comments below if you have any questions or any recommendations for plugins that aren’t on the list, or the ones you prefer using!