Category: Tips & Tricks

  • How to Remove WordPress Default Image Sizes? (EASY GUIDE)

    How to Remove WordPress Default Image Sizes? (EASY GUIDE)

    Is your WordPress site bloated with unnecessary image sizes, slowing down your performance and hogging precious server space?

    WordPress automatically creates multiple default image sizes when you upload images. These default WordPress image sizes can quickly become a burden if you have a lot of media files on your server.

    This guide will teach you how to remove default image sizes using code snippets in your functions.php file and convenient plugins.

    What are WordPress’s Default Image Sizes?

    WordPress automatically generates several sizes of each image you upload to your media library by default. This allows the WordPress engine to use a custom image with appropriate image quality to cater to various display scenarios across your website. Different use cases often have vastly different image quality requirements. For example, you can get away with serving users low-quality thumbnail images on mobile devices, but if you are displaying a photo album on a large screen, then you would most likely want to use a higher-resolution image.

    WordPress automatically creates default size formats for different scenarios, which act as pre-defined variations of the original image. This approach allows WordPress to serve the most appropriate version based on the context, such as thumbnails, featured images, or larger displays within the content.

    Suggested read: How To Install ImageMagick PHP Extension (Imagick)

    While this system is designed to be helpful, it can sometimes create unnecessary image files, especially if your theme or website design doesn’t use all of these default sizes. This problem is exacerbated if you have a great many images on your website.

    List of Default Image Sizes in WordPress:

    In your WordPress dashboard, navigate to “Settings” > “Media” to view the current media settings configured on your WordPress website.
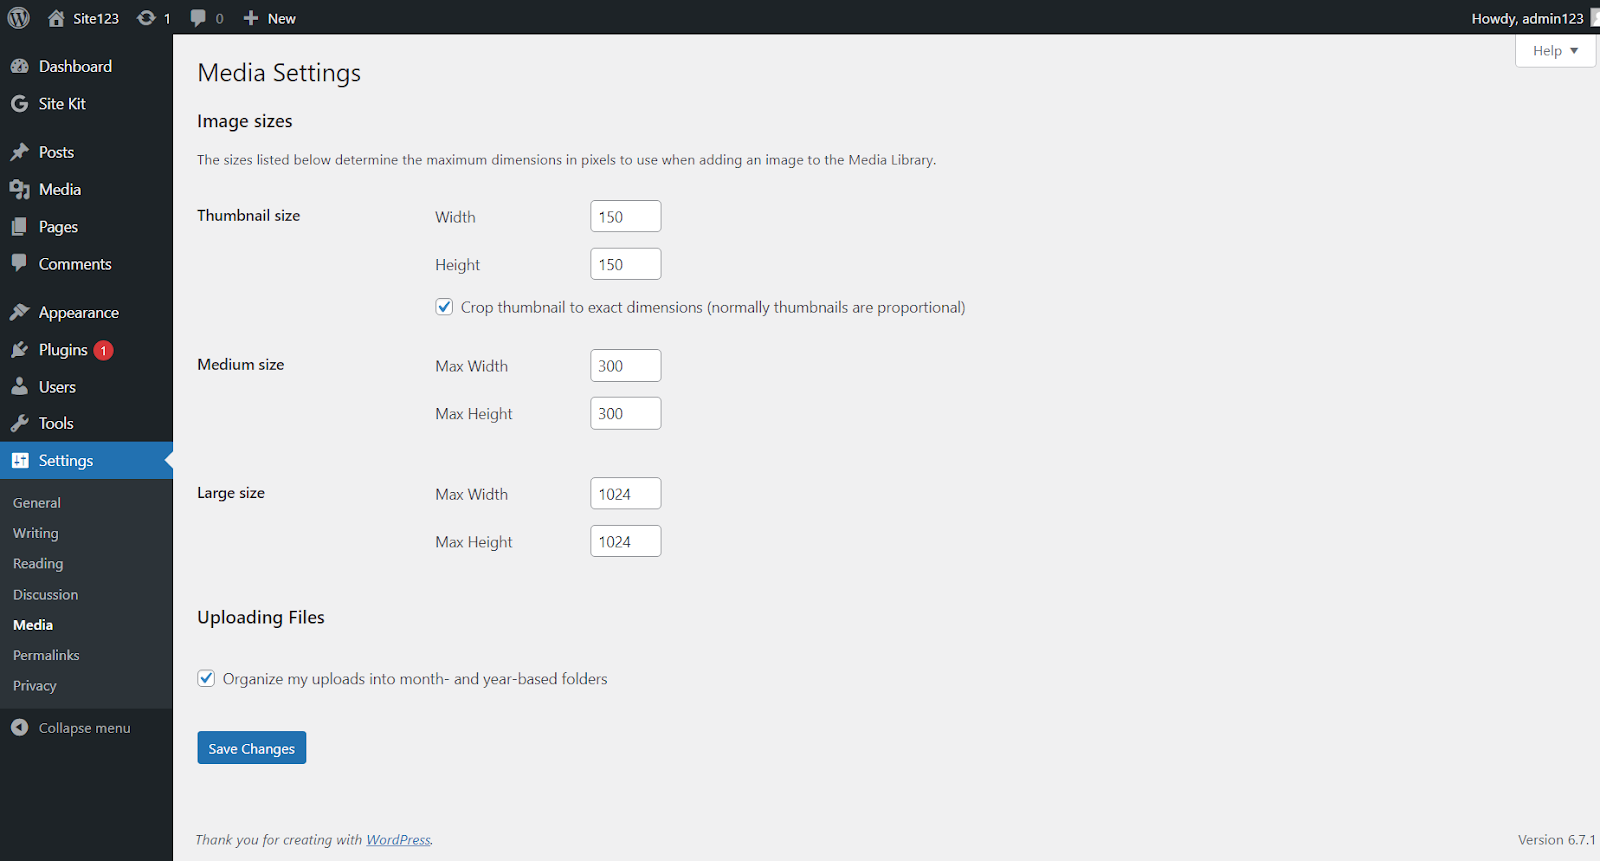
    media image size in WordPress
    • Thumbnail: Typically, a square image (default is 150×150 pixels) is intended for use in galleries, widgets, and other small display areas.
    • Medium: A mid-sized image (default maximum width and height are 300 pixels) is used in content areas where a larger thumbnail is needed.
    • Large: A larger image size (default maximum width and height are 1024 pixels) is suitable for displaying images within articles or pages requiring more detail.
    • Full Size: The dimensions of the original uploaded image. This is not technically a “default size” in the same sense as the others, as WordPress doesn’t resize the original upload, but it’s always available.

    In addition to the above-mentioned image sizes, themes and plugins can register their own custom image sizes, which can further increase the number of images generated when uploading.
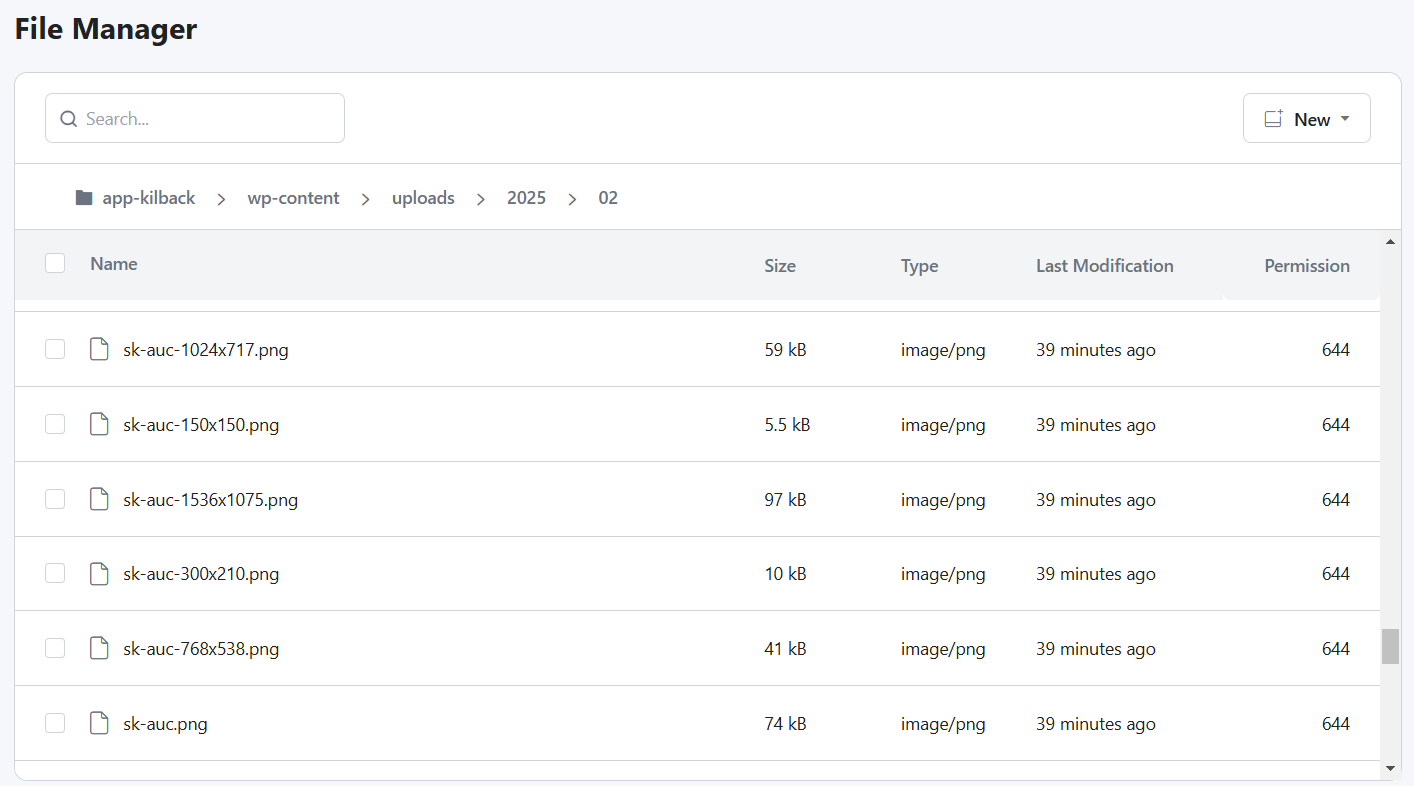
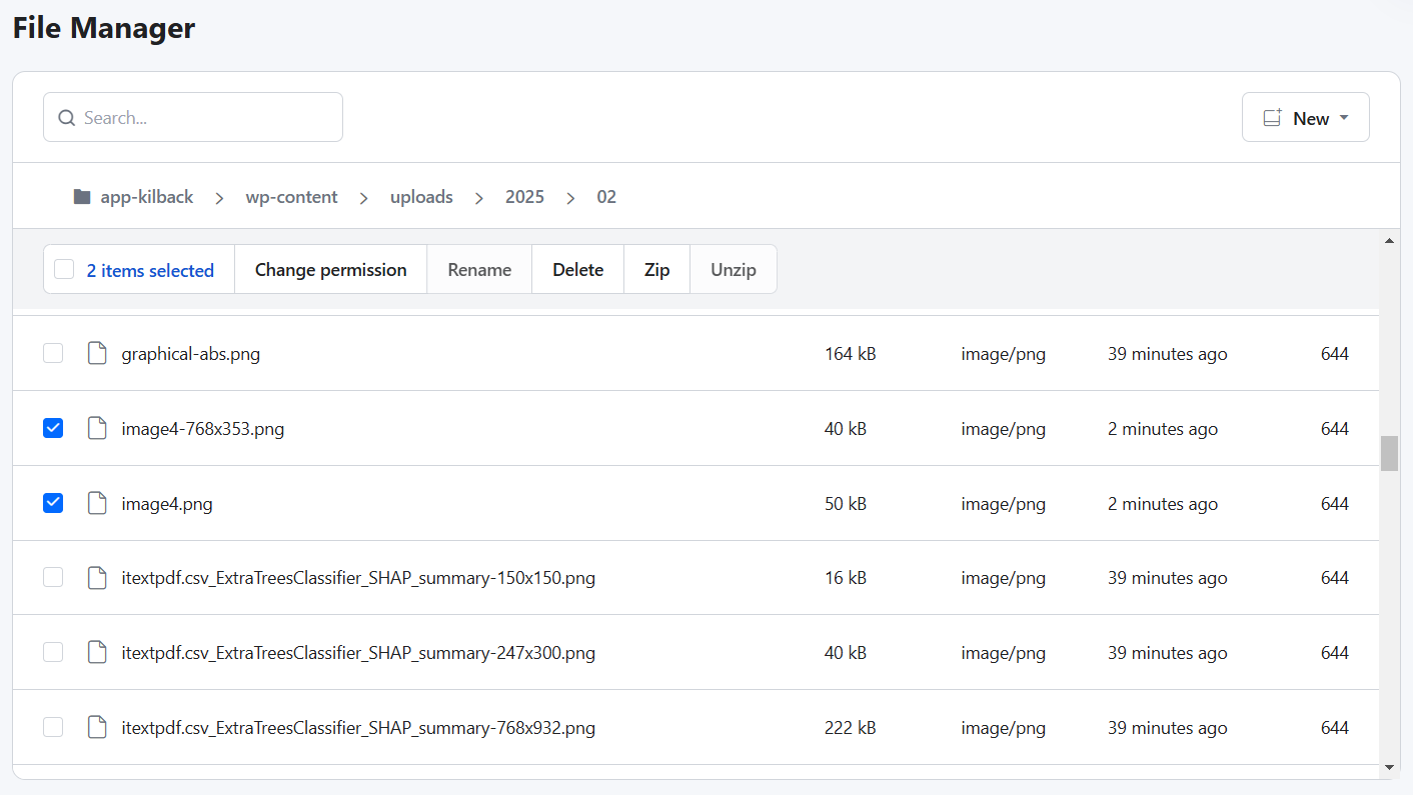
    In the above screenshot, we can see multiple copies of the same image stored in the wp-content folder, each with a different resolution.

    Suggested read: What Are Docker Images And How To Use Them

    Why Remove Default Image Sizes?

    While the automatic creation of multiple image sizes is helpful for most people, there are several compelling reasons to remove or disable some of the default sizes in WordPress.

    The primary reasons are to reduce server storage consumption and improve website performance. Each image uploaded results in multiple saved versions, which can quickly fill up valuable disk space, especially for sites with an extensive media library or frequent image uploads. This excessive storage usage can impact server performance and increase hosting costs, especially with providers that charge based on storage usage.

    Additionally, generating unnecessary image sizes can negatively affect website loading times. Even though WordPress only serves the appropriate-sized image, the server still has to process and create all the various sizes during the upload process, which can consume valuable server resources. Less efficient hosting setups exacerbate this slowdown.

    Moreover, if your theme or design doesn’t use all of these default sizes, you’re essentially creating files that are never used, adding unnecessary weight to your website and potentially impacting user experience.

    By removing unused default image sizes, you can conserve storage space, improve website speed, and enhance overall performance, directly leading to a better experience for visitors and website administrators.

    Suggested read: 10 Best WordPress Management Tools To Easily Manage Multiple Websites

    How to Remove Default Image Sizes in WordPress

    There are primarily two methods for removing default image sizes in WordPress: using plugin settings (if available) or code snippets within your theme’s functions.php file. The code snippet method offers more granular control but requires a basic understanding of PHP and should be approached with caution.

    From WP Admin Settings (Plugin Method)

    The simplest way to remove default image sizes is through a plugin. Many plugins offer this functionality directly within their settings panel; if you’re unsure which plugin to pick, we recommend reading a deep dive into image optimization plugins written by security experts at Patchstack.

    We will use the EWWW Image Optimizer for this tutorial to show you how to do this. Follow the instructions below to change the default image generation behavior of WordPress:

    1. Install and Activate the Plugin: Search for the “EWWW Image Optimizer” plugin and install it through your WordPress admin dashboard.
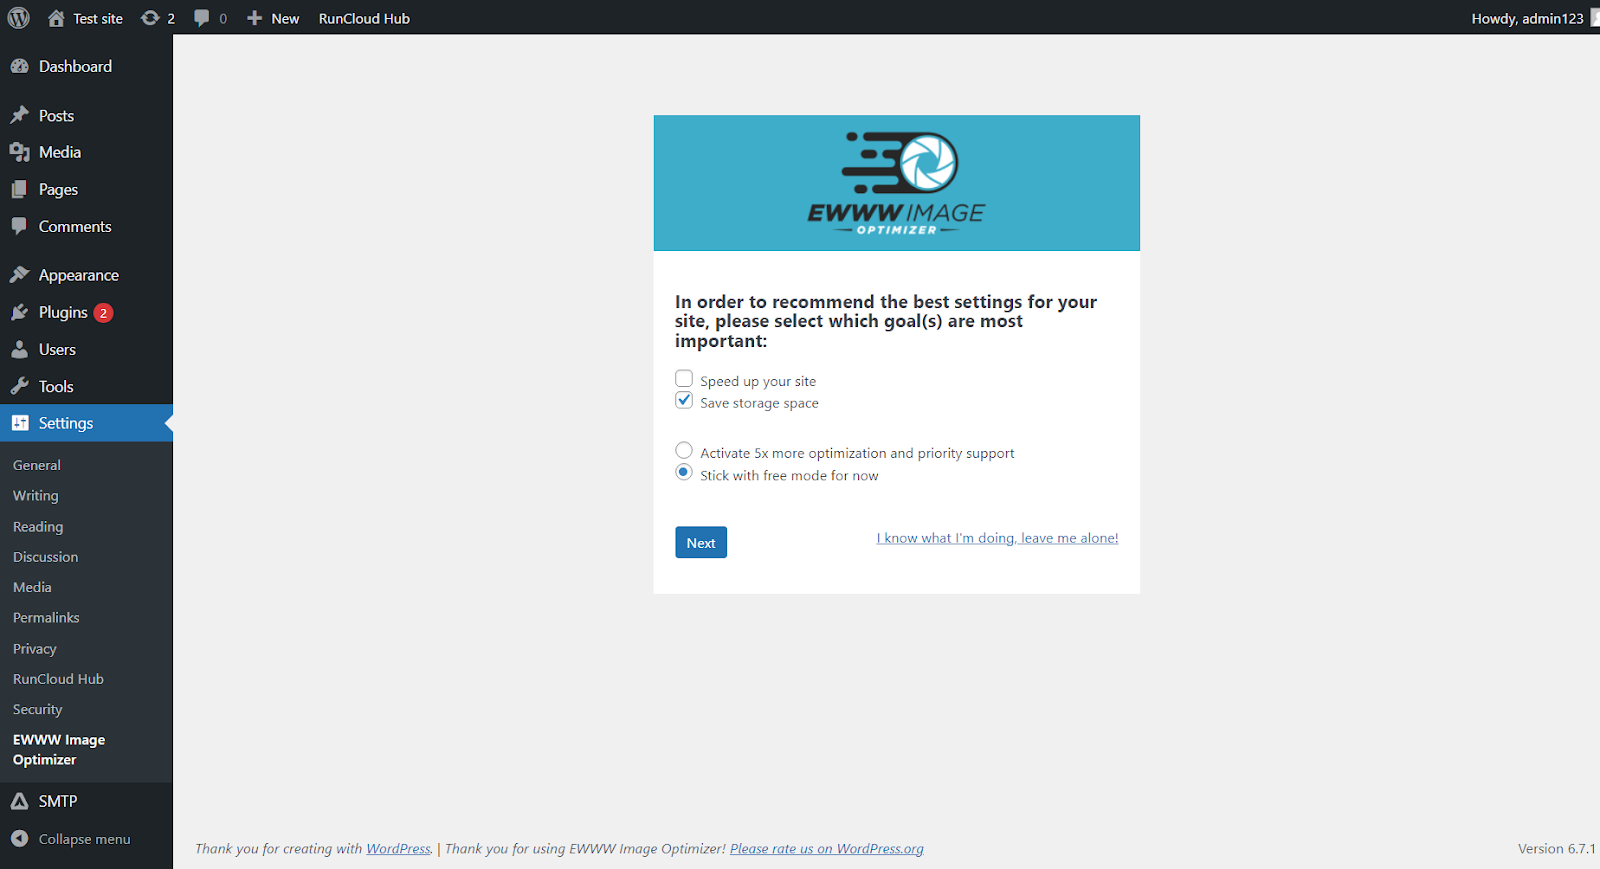
    2. Access Plugin Settings: In the WordPress admin panel, navigate to the plugin’s settings page and select “Save storage space” during initial installation.
    Suggested read: WordPress.com vs. WordPress.org – The Differences & Which To Choose

    1. Configure Plugin: On the next screen, you will be asked to configure the basic settings for this plugin. Leave these settings to their default value and click “Save Settings”.
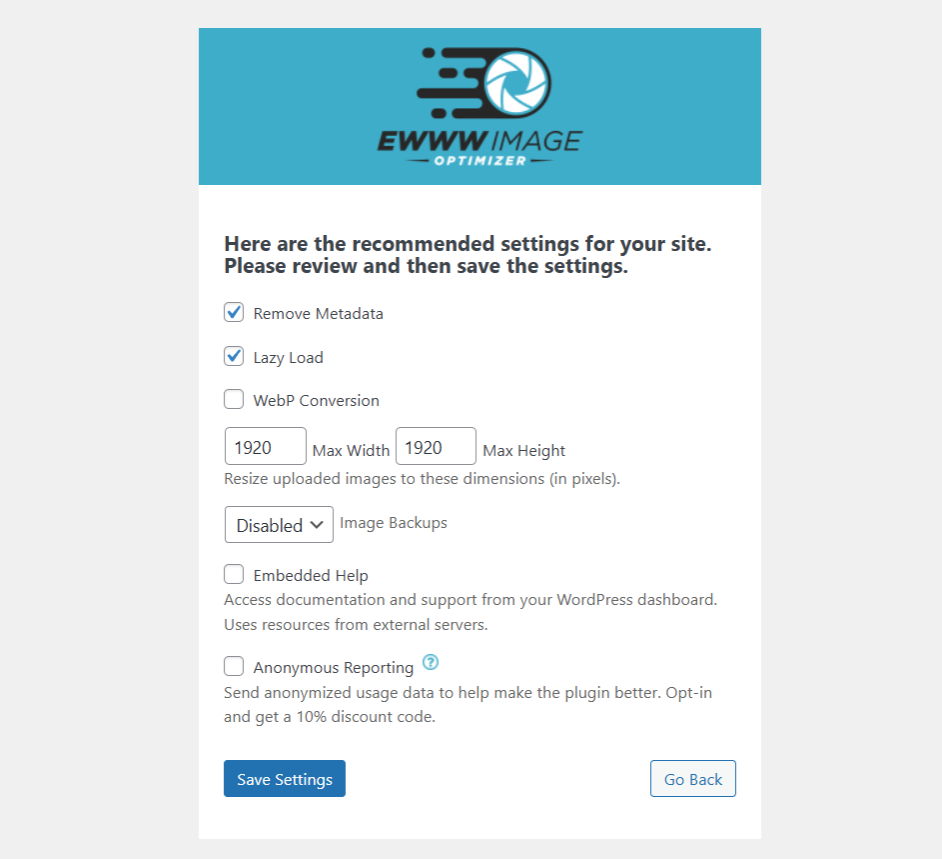
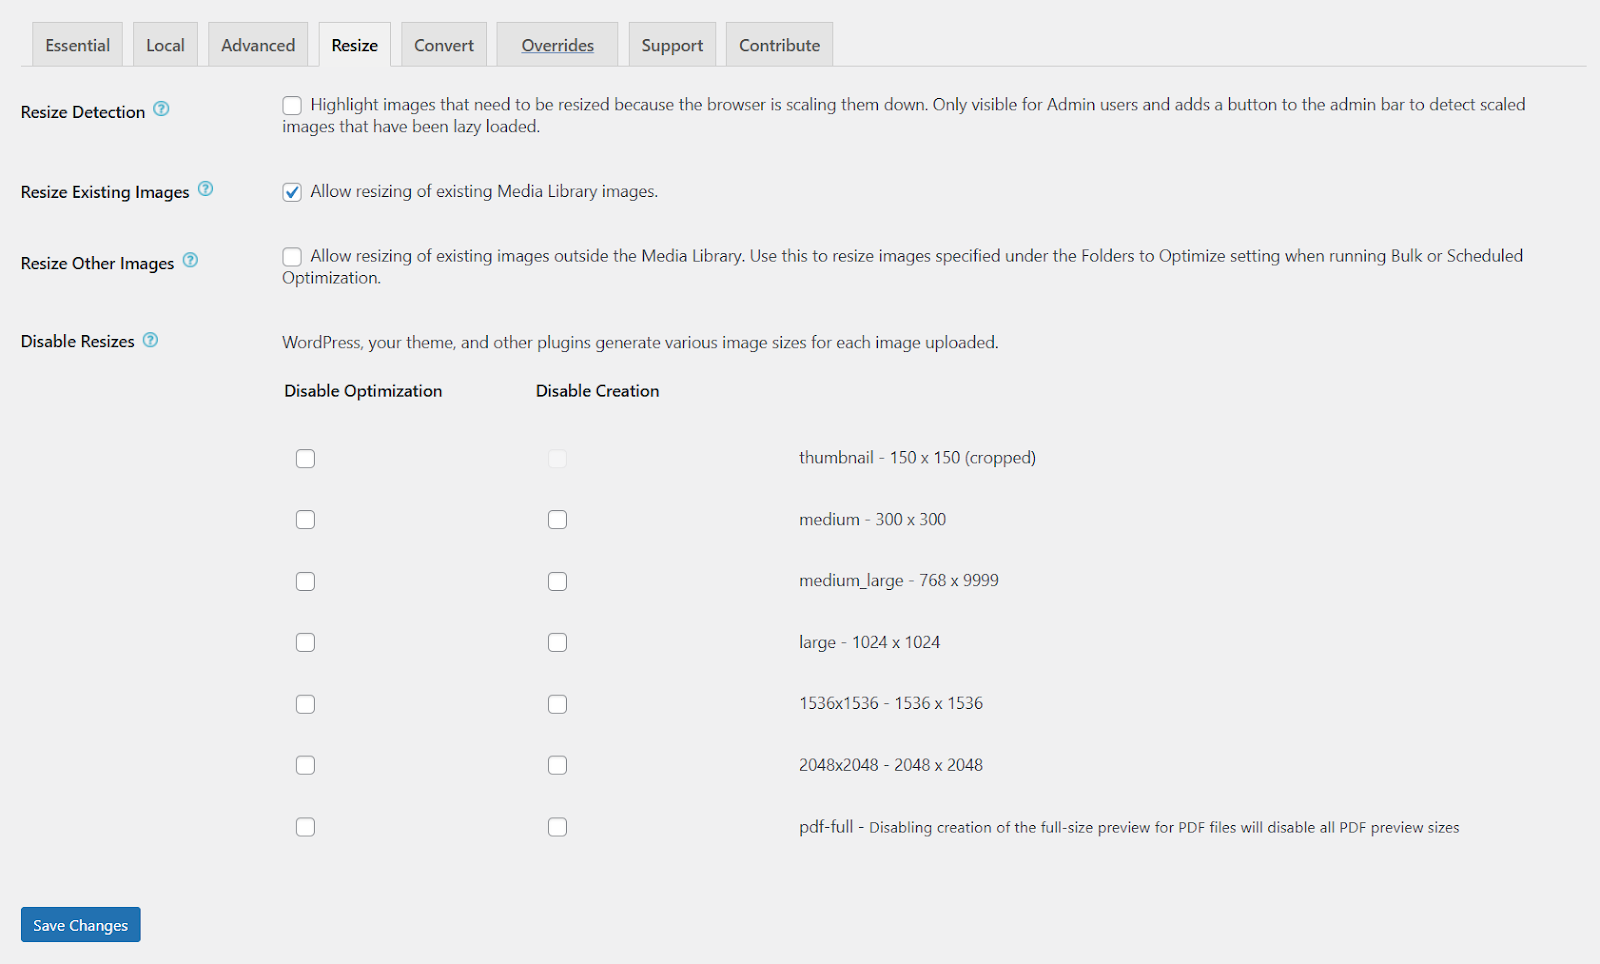
    1. Disable Unwanted Sizes: After configuring the plugin, navigate to the “Resize” tab in the plugin’s interface. On this screen, simply uncheck the boxes next to the sizes you wish to disable.
    Suggested read: 3 Free Ways To Migrate WordPress From Shared Hosting To Cloud Server

    1. Save Changes: Save the changes to apply the new settings. From this point forward, WordPress will no longer generate the disabled image sizes upon uploading new images.

    Using Code Snippets (functions.php Method)

    This method involves adding code directly to your theme’s functions.php file.

    We strongly recommend using a child theme to prevent these changes from being overwritten during theme updates. Also, incorrect code can break your site, so proceed cautiously and always back up your functions.php file.

    1. Access your functions.php file: Access this file through your WordPress admin panel by going to Appearance > Theme File Editor. Alternatively, you can access the file directly using an FTP client or “File Manager” from your RunCloud dashboard.
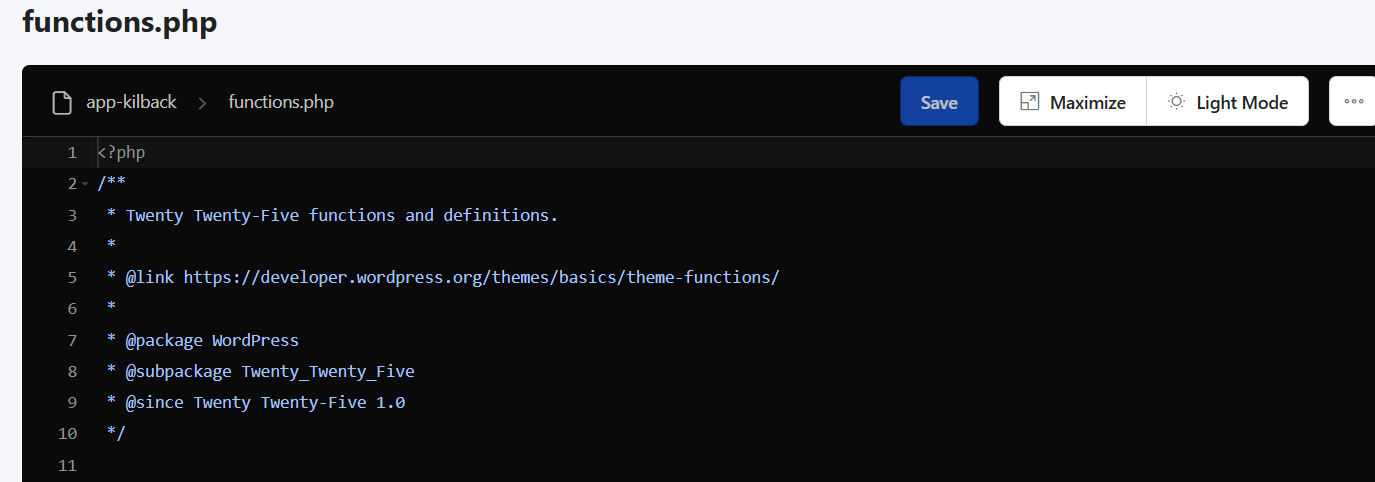
    1. Add code to remove image sizes: To remove specific default image sizes, add the following code snippets to your functions.php file:
    function remove_default_image_sizes( $sizes ) {
        unset( $sizes['thumbnail'] );   // Remove thumbnail size
        unset( $sizes['medium'] );      // Remove medium size
        unset( $sizes['large'] );       // Remove large size
        return $sizes;
    }
    add_filter( 'intermediate_image_sizes_advanced', 'remove_default_image_sizes' );
    1. Save the functions.php file: After adding the code, save the changes to your functions.php file. This will prevent WordPress from generating the specified image sizes for future uploads. In the following screenshot, we can see that WordPress only created one copy of the image (as we configured) – no additional copies of the image were created.
    Suggested read: The Complete WordPress Speed Optimization Guide

    Best Practices After Removing Default Image Sizes

    After removing default image sizes, following these best practices is recommended to ensure your website displays correctly and remains optimized.

    1. Regenerating Thumbnails: Removing default image sizes only affects future image uploads. Existing images will still have the previously generated sizes. You must regenerate thumbnails to clean up your media library and reclaim storage space.
    2. Checking for Broken Images: After removing image sizes and regenerating thumbnails, it’s recommended to thoroughly check your website for broken images.
    3. Manually Review Pages: Visit your website’s pages and posts, paying close attention to areas where images are displayed, such as galleries, featured images, and within content.
    4. Use a Broken Link Checker: Consider using a broken link checker plugin or online tool to scan your website for broken image links. These tools can identify images that are no longer accessible due to the removal of their corresponding sizes.
    5. Address Broken Images: If you find broken images, replace them with correctly sized versions or adjust your theme’s code to use the appropriate image sizes. WordPress may automatically try to use a similar image size in some cases, so you may not notice broken images unless the appropriate sizes have been completely removed.

    Suggested read: The Best WordPress Caching Plugins To Speed Up Your Site (2025)

    Final Thoughts

    Optimizing your WordPress image handling is a powerful way to improve your website’s performance and user experience. Understanding the default image sizes can significantly reduce server load, conserve storage space, and deliver a faster, more responsive website to your visitors.

    Managing and optimizing a WordPress website can feel overwhelming, but that’s where RunCloud comes in.

    We offer a powerful, intuitive platform to simplify WordPress hosting and unlock peak performance. Forget about complex server configurations and technical headaches. RunCloud empowers you with easy-to-use tools to deploy, manage, and scale your WordPress sites on the cloud infrastructure of your choice.

    We handle the server-side optimizations so you can focus on what matters most: creating amazing content and growing your audience.

    With RunCloud, you get:

    • Blazing-Fast Performance: Optimized server stacks, built-in caching, and easy Cloudflare integration.
    • Simplified Server Management: Our intuitive control panel allows you to easily manage your servers and WordPress sites.
    • Automatic Backups: Rest easy, knowing your website is safe and secure with automated backups.
    • Enhanced Security: Robust security features protect your website from threats, including firewalls and malware scanning.

    Sign up for RunCloud today!

    FAQs on Removing WordPress Default Image Sizes

    Why should I remove default image sizes?

    WordPress generates multiple image sizes by default, bloating your server space and slowing down your website. Removing unused sizes streamlines your media library, leading to faster loading times.

    Will removing default sizes affect my existing images?

    Removing default image sizes only prevents future uploads from generating those specific sizes. Your already uploaded images will remain untouched.

    How can I restore default image sizes if needed?

    You can restore default image sizes by re-enabling the corresponding code in your functions.php file (if you used that method) or deactivating/reactivating the plugin that removed them.

    What plugins can help with image size management?

    Several plugins, like “ThumbPress” or “Disable Generate Thumbnails”, offer user-friendly interfaces for managing and disabling default WordPress image sizes.

    Is it safe to modify the functions.php file?

    Modifying the functions.php file is generally safe if done correctly and carefully. Always back up your functions.php file or use a child theme before making changes. Incorrect code can break your site, so proceed with caution.

    How do I know which image sizes to keep?

    Analyze your theme’s code and website’s layout to identify which image sizes are used in your design. Only keep the image sizes actively displayed on your pages; this will ensure the best performance when delivering images to users.

    What is the impact on SEO when removing image sizes?

    Removing unnecessary image sizes can positively impact SEO by improving your website’s page speed, a key ranking factor for search engines. Faster loading times enhance user experience and reduce bounce rates, potentially boosting your search engine rankings.

  • 10 Best WordPress Management Tools To Easily Manage Multiple Websites

    10 Best WordPress Management Tools To Easily Manage Multiple Websites

    Ever wondered how to make managing multiple WordPress websites easy – whether that involves a handful of sites or many hundreds? You’ve come to the right place.

    The answer is simple, and two-fold:

    1. Use a solution such as RunCloud, which makes it extremely easy to deploy and manage your production-grade cloud infrastructure across cloud providers of your choice, all from a single, centralized dashboard. 
    2. Pair your industry-leading hosting setup with a WordPress management tool.

    In this post, we’ll focus on #2. After all, if you’re reading this post on the RunCloud blog, you already know why RunCloud is the leading way to build your cloud infrastructure.

    Why Should You Use WordPress Management Tools?

    Although managing WordPress websites is becoming significantly easier with the introduction of automatic updates as a part of WordPress core, if you manage multiple websites (even just a couple), the benefits of using a proper WordPress management solution will become clear as you begin to adopt it as a part of your workflow.

    Consider a typical scenario: a web development agency managing 20 client websites, each requiring weekly updates, security checks, and regular backups. Without a management tool, this could consume up to 20 hours per week of manual work – logging in to each site individually, checking for updates, running backups, and monitoring security.

    A WordPress management tool can accomplish these same tasks in under an hour by automating processes and allowing you to perform actions in bulk on multiple sites.

    This dramatic time saving directly translates to improved profitability and the ability to scale operations without being forced to proportionally increase your company headcount.

    And this is just the beginning.

    The benefits of WordPress management tools extend far beyond simple time savings.

    Take, for example, the critical aspect of security monitoring. When a major vulnerability is discovered in a popular plugin, time is of the essence. A management tool can identify all affected sites instantly and apply updates across the entire portfolio within minutes – a process that could take hours or even days if done manually.

    In short: the ROI of WordPress management tools cannot be understated. By combining automation, a better workflow, security, and everything else a good WordPress management solution offers, you can streamline your operation to maintain the sites under your management with less time and fewer people on your team.

    WordPress Multisite vs WordPress Management Tools

    You might wonder why you should use a WordPress management service when WordPress already has built-in multisite network functionality. It’s easy to confuse them since WordPress does allow you to manage multiple sites, but there is one key distinction.

    The multisite network only allows you to manage sub-sites of a single WordPress installation. This means that you can’t use it to manage the websites of different clients, as all the websites in a multisite network belong to a single organization. On the other hand, a WordPress management tool has no such restrictions and can be used with any WordPress site.

    What Are The Best WordPress Management Tools?

    Let’s take a look at some of the best WordPress management tools.

    1. MainWP

    MainWP WordPress management tool

    MainWP is a self-hosted WordPress management solution that allows administrators to handle multiple WordPress sites. It offers a centralized dashboard where users can efficiently manage unlimited WordPress installations, making it invaluable for agencies, developers, and site managers.

    It also has a comprehensive update management system that allows users to update WordPress cores, themes, and plugins across all sites with a single click. What sets MainWP apart is its robust security features, including automated security checks, abandoned update notifications, and proactive monitoring – all while maintaining complete data ownership since it’s self-hosted.

    The pricing structure is particularly attractive. It offers a feature-rich free version and a Pro version starting at $199 yearly or a one-time payment of $599 for lifetime access, making it a cost-effective solution regardless of how many sites you manage.

    While the initial setup and configuration process may require some time investment, the long-term benefits in efficiency and control are substantial. Users can benefit from features such as scheduled automated updates, security scanning, uptime monitoring, and client report generation. It also includes valuable capabilities such as staging site creation, content cloning between sites, and maintenance mode management.

    2. InfiniteWP

    InfiniteWP WordPress management tool

    InfiniteWP is a powerful WordPress management solution that efficiently changes how administrators handle multiple WordPress sites. It offers a robust free version with essential features such as 1-click admin access, updates, and backup/restore capabilities.

    It provides multiple subscription options, ranging from the Starter plan ($147/year for ten sites) to the Enterprise level ($647/year for unlimited sites). It includes essential tools such as malware scanning, uptime monitoring, Google Analytics integration, and client reporting capabilities, which makes it particularly valuable for freelancers and agencies.

    Users can perform bulk actions such as managing users, handling WordPress maintenance, monitoring WordFence security, and simultaneously publishing content across multiple sites.

    It also offers some site monitoring features such as plugin branding, broken link checking, Google PageSpeed monitoring, and integration with various security tools, including iThemes Security and Duo Security 2-Factor Authentication.

    3. ManageWP

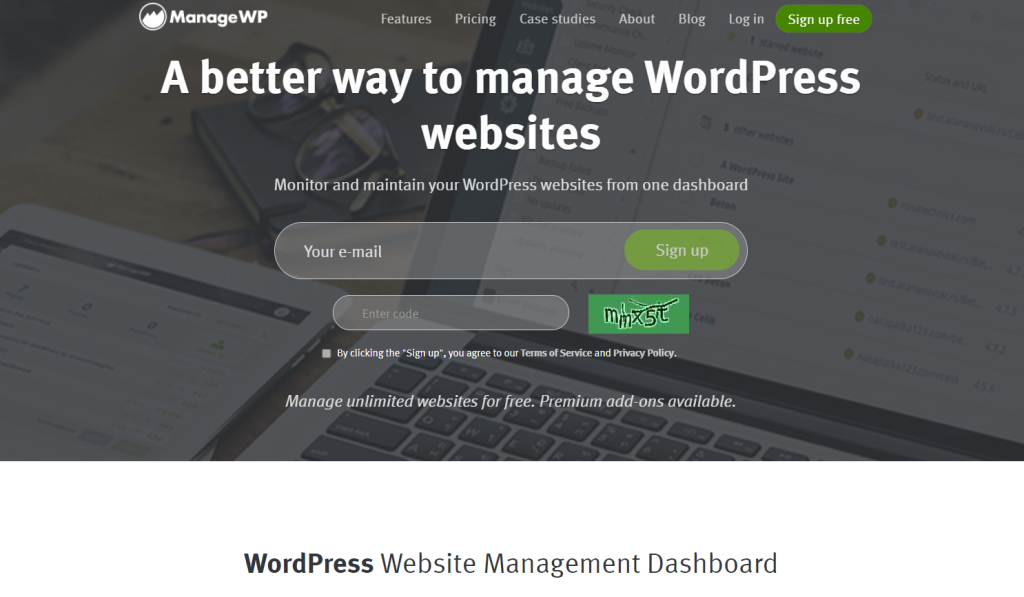
    ManageWP is a versatile WordPress management solution that offers tools for managing multiple WordPress websites from a single dashboard. Its free tier includes essential features such as plugin and theme update management, monthly cloud backup, one-click login functionality, and basic security and performance checks.

    What makes ManageWP particularly appealing is its flexible pricing structure, allowing users to start with unlimited websites at no cost and gradually add premium features as needed. ManageWP’s core functionality includes collaboration tools, analytics integration, comment management, code snippet implementation, maintenance mode controls, and vulnerability updates, making it suitable for freelancers, agencies, and WordPress professionals managing multiple sites.

    You can purchase premium add-ons to enhance its capabilities with specialized features priced on a per-website basis at $1-$2 monthly. These premium features include advanced backup solutions, white-label options for agencies, SEO ranking tools, uptime monitoring, automated security and performance checks, and link monitoring.

    ManageWP employs a transparent pricing model. Users only pay for the add-ons they actually use, with payments processed at the beginning of the following month. For larger agencies managing over 25 websites, bundle options provide fixed monthly fees for up to 100 websites.

    4. WP Umbrella

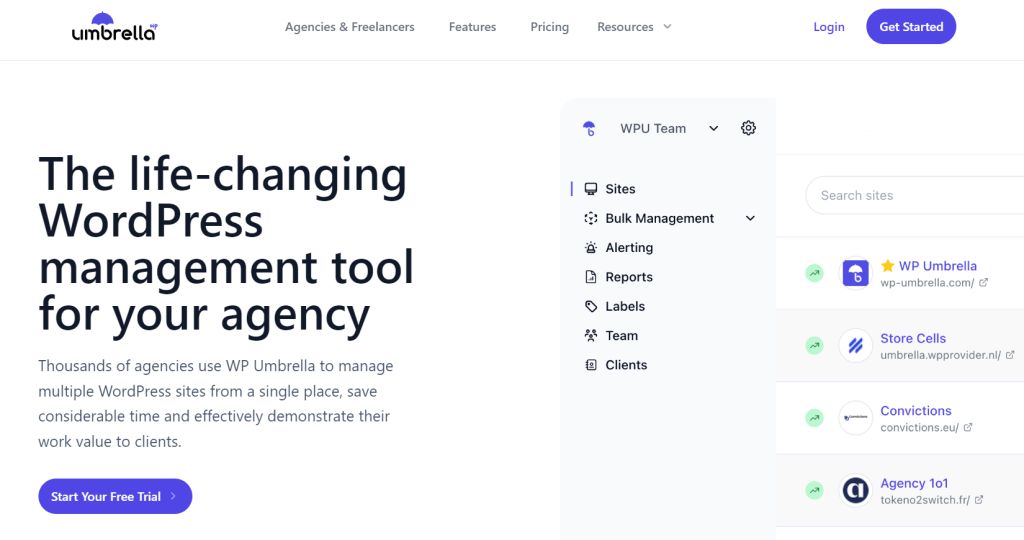
    WP Umbrella is a relatively new and affordable WordPress management solution that offers a comprehensive suite of features at a transparent price point of $1.99 per site per month. It provides essential tools for WordPress maintenance businesses without the complexity of tiered pricing or feature restrictions.

    You can use it to manage and maintain critical aspects of WordPress. For example, it includes a centralized dashboard for monitoring multiple sites, secure bulk updates for WordPress core, plugins, and themes, and robust security features, including vulnerability monitoring and automatic cloud backups.

    Like many other management tools, it offers uptime tracking, Google PageSpeed analysis, and PHP error detection. Its integration capabilities with services such as Slack and Google Analytics make it useful for professional users.

    WP Umbrella’s focus on automation and client management features makes it particularly effective for agencies and freelancers. It provides the functionality to produce maintenance reports, one-click access to all managed sites, and a complete white-label solution that allows agencies to maintain their branding.

    5. WP Remote

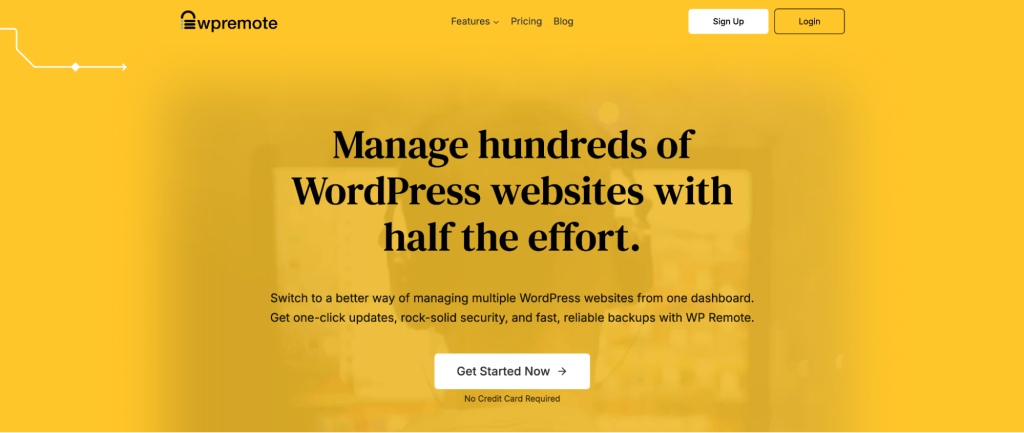
    WP Remote offers a WordPress management solution that can streamline the management process of multiple WordPress websites through a unified platform. It offers three distinct plans (Basic at $29, Plus at $49, and Pro at $99 – all monthly for up to five sites) that cater to different management needs.

    WP Remote excels in providing essential management tools, including daily automatic backups, single sign-on capabilities, uptime monitoring, performance checks, and automated updates across all managed sites. Additionally, it combines the functionality of multiple WordPress plugins, making it a one-stop solution. For example, it offers security features such as malware scanning and real-time firewall protection with practical maintenance tools, including visual regression testing and white-label reporting options.

    You can take advantage of its customizable add-on system, which allows users to tailor their management capabilities to specific needs. These add-ons include real-time backups ($10/site/month), more frequent backup and security scans (from $5/site/month for 12-hour intervals), and additional staging sites ($10/site/month).

    Larger agencies and advanced users can sign up for its custom enterprise subscription, which provides API access. Additionally, its comprehensive approach to website management is complemented by its focus on security and reliability, as it offers features like bot protection, vulnerability scans, and activity logs in higher-tier plans.

    6. Solid Central

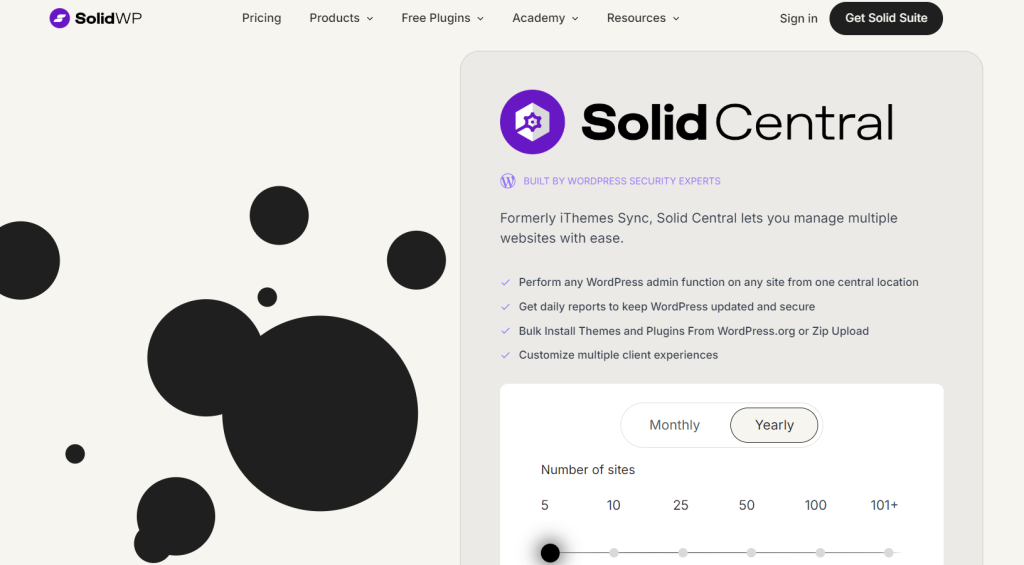
    Solid Central (formerly iThemes Sync) is one of the most popular WordPress multi-site management solutions that can easily handle 100+ websites from a single, centralized dashboard. Rather than logging in to multiple WordPress installations individually, administrators can perform critical tasks across all their sites simultaneously, including bulk updates, plugin installations, and security monitoring.

    It offers reporting capabilities that help maintain transparency with clients by generating insights and updates about site performance, security status, and maintenance activities. It also offers essential features such as uptime monitoring, performance tracking, and detailed activity timelines that provide real-time visibility into site operations and potential issues.

    If you are part of the broader SolidWP ecosystem, you will appreciate the way Solid Central integrates with other powerful tools, such as Solid Security and Solid Backups, to provide a complete website management solution. This integration enables users to monitor security threats, manage backups, and restore sites remotely, all from the same interface.

    7. Glow

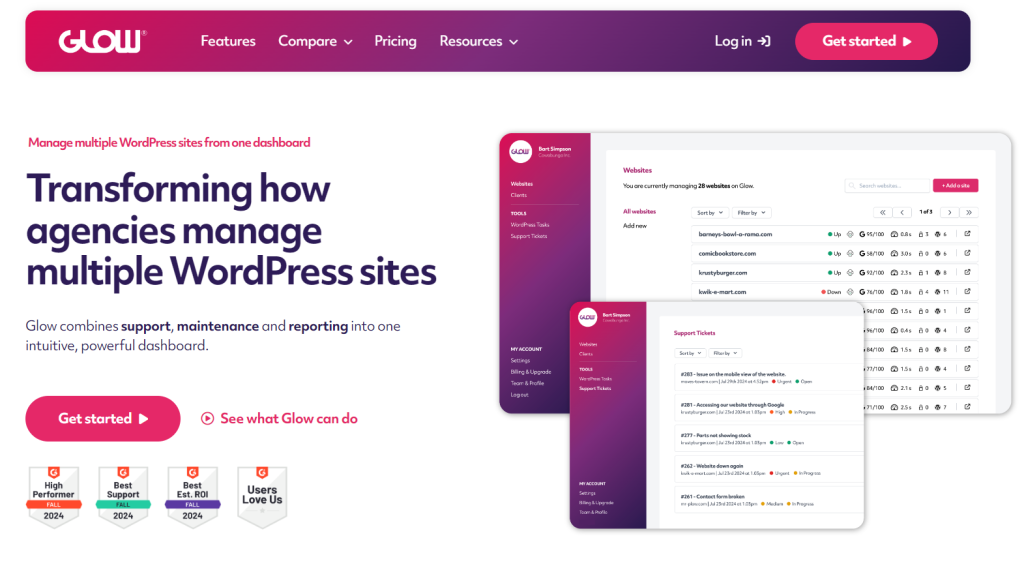
    Glow is a lesser-known WordPress management solution launched in 2020. It allows agencies and developers to efficiently manage 20-100+ WordPress websites and offers critical features such as plugin management, automated backups, and performance monitoring.

    Glow’s integrated support ticket system and time-tracking capabilities set it apart. These enable teams to manage client communications and track work hours directly within the same interface they use for website maintenance. Glow also offers a special two-way core update functionality that allows users to either manually update WordPress sites from their WordPress admin dashboard, or update them all at once.

    If you are working with a team, you will enjoy its collaboration and client reporting tools. Glow offers customizable and automated client reports that display time spent on activities, unlimited client team members, and the ability to run the dashboard under an agency’s own branding.

    Glow offers a flexible pricing structure, including pay-as-you-go options for additional websites, making it accessible to agencies of all sizes. This makes it a great tool for both hobbyists and professionals.

    8. iControlWP

    iControlWP is a powerful tool for managing multiple WordPress websites. It allows users to streamline various essential tasks, saving time and effort. It provides a centralized dashboard for complete visibility and control over all your WordPress sites, eliminating the need for individual logins.

    You can use it to manage plugins and theme updates across your network, ensuring consistent functionality and security. Additionally, you can proactively safeguard your sites with integrated vulnerability scanning and malware detection, and be assured your data is secure with automatic daily backups stored off-site.

    iControlWP goes beyond traditional multi-site management tools, offering advanced features such as:

    • Database Cleanup and Optimization: Maintain optimal website performance by cleaning up and optimizing databases across your network.
    • Mobile Push Notifications: Receive instant alerts on critical updates, security threats, and site performance issues directly to your mobile device.
    • Bulk Management: Perform actions across multiple sites simultaneously, such as updating plugins or resetting passwords, saving you valuable time.

    If you run an agency, you can generate professional reports for your clients showcasing website performance metrics and activity, and customize the platform with your branding for a seamless white-labeled client experience.

    9. WP Central

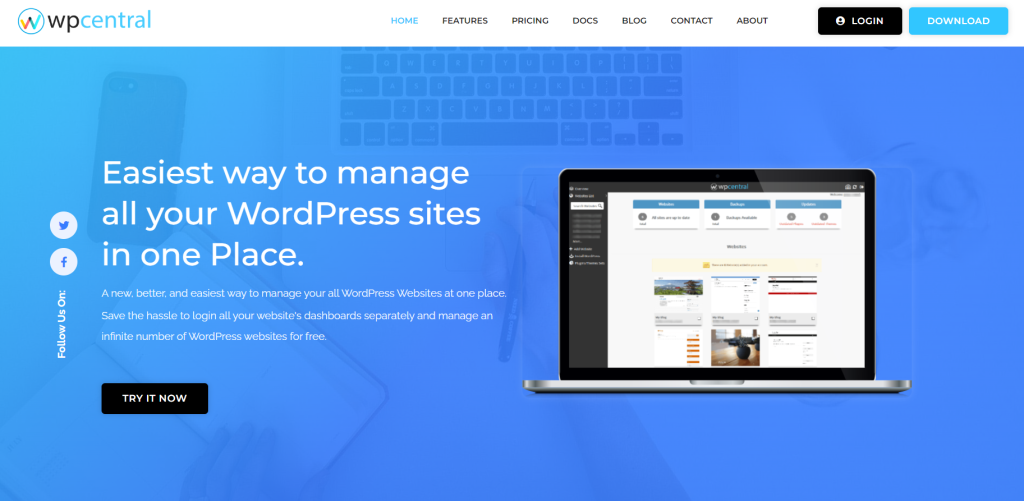
    WPCentral is a powerful tool designed to simplify the management of multiple WordPress websites. WPCentral provides a centralized dashboard where you can oversee all your sites from one location. This means that you don’t need to individually log in to each one of your WordPress websites to manage plugins and themes.

    You can easily use it to perform local and remote backups and even create pre-configured plugins and themes to apply to new sites. It offers a user-friendly interface and intuitive design, making maintaining consistent functionality and security across your WordPress portfolio much easier.

    WPCentral offers various pricing plans to suit different needs, from a free plan perfect for beginners to a corporate plan for businesses with a large number of sites. The free plan offers essential features, including plugin and theme management, local backups, remote backups, plugin sets, theme sets, and automated backups. Each paid plan offers increased website limits, making it ideal for agencies, freelancers, and businesses managing multiple websites.

    10. Modular DS

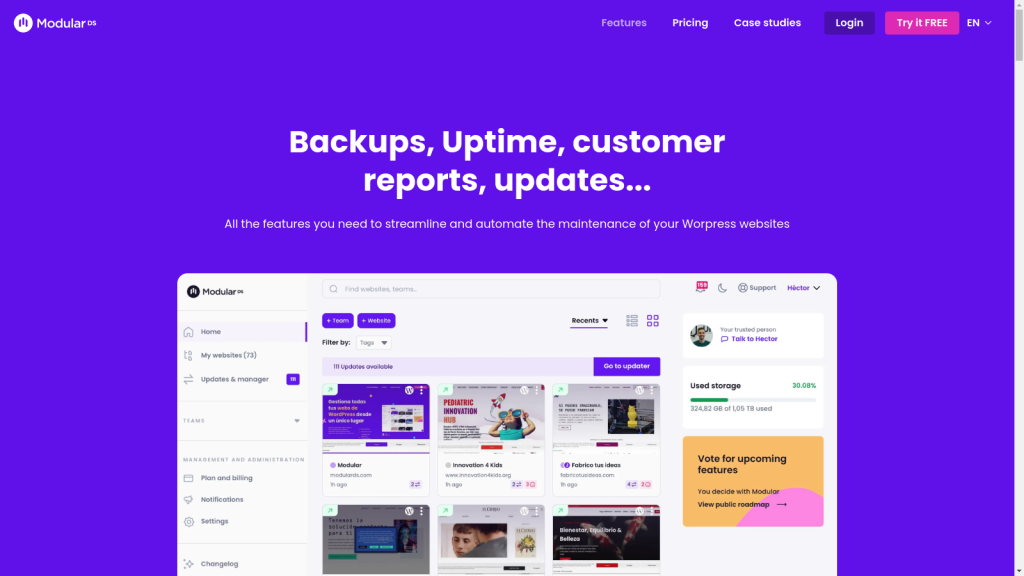
    Modular DS is a comprehensive WordPress management solution that streamlines the complex task of maintaining multiple WordPress websites. Its intuitive approach to automation and maintenance makes life easier for developers by combining essential features such as automated backups, bulk updates, and uptime monitoring into a single, user-friendly dashboard.

    This tool effectively transforms hours of repetitive maintenance tasks for agencies and WordPress professionals managing multiple sites into simple one-click operations.

    The bulk management capabilities are particularly handy when you simultaneously update plugins, themes, and WordPress core across multiple sites. What’s especially noteworthy is Modular DS’s holistic approach to website health monitoring, which actively scans for potential issues such as outdated PHP versions, deactivated plugins, and server configuration problems, enabling proactive maintenance rather than reactive problem-solving.

    Perhaps one of Modular DS’s most valuable aspects is its client reporting system. The platform automatically generates professional reports that showcase the maintenance work performed, including uptime statistics, Google Analytics integration, and Core Web Vitals performance metrics. This feature helps justify the value of maintenance services to clients and streamlines client communication through automated report delivery.

    After Action Report – Choosing The Best WordPress Management Software For Your Business

    In this article we have covered a number of excellent tools designed to let you manage multiple WordPress sites in a single place. These ten WordPress management tools are available for all user levels and needs.

    Many tools offer a free basic plan for managing your sites. Professional users can buy selected add-ons or subscribe to a paid plan for all advanced features.

    If you’re looking for a simple, hosted solution that’s easy to get up and running, we’d recommend looking into ManageWP and WP Umbrella. ManageWP has a generous free tier, and WP Umbrella, as a newer solution, has an incredibly motivated team that actively ships improvements to the product every month (the same, sadly, cannot be said about ManageWP).

    If you’d prefer self-hosted WordPress management tools, MainWP is the most affordable tool (nothing beats free). It offers additional features via extensions, supports many popular WordPress plugins, and has good community support.

    Which WordPress management tool are you using now, and how many sites do you manage? Let us know & join the conversation by Tweeting @RunCloud! 💬

    Now that we’ve narrowed down the list of WordPress management tools to consider for your business – we’d love to help you make the second component of managing WordPress websites the best it can possibly be for your business:

    Looking to build your own production-grade infrastructure? Try RunCloud.

    • Pick your cloud provider: Deploy directly to your AWS, GCP, Vultr, UpCloud, and Hetzner platform all directly from your RunCloud dashboard.
    • Easy Cloudflare DNS Integration: Manage your DNS records directly in your RunCloud dashboard and automatically connect domains when spinning up your new web applications.
    • One-Click Staging Environments: Spin up staging environments directly from your dashboard in just a few clicks.
    • Redis Object Caching: Easily enable Redis object caching for as many sites on your server as you’d like (secure by design using Redis ACLs, which have not been properly implemented by the majority of other hosting providers).

    Frequently Asked Questions About WordPress Multi-Site Management

    How do I keep track of plugin updates across all my WordPress sites?

    Managing updates across multiple WordPress sites can be time-consuming and overwhelming. Logging in to each site individually to check for updates is inefficient and risks missing critical security updates. WordPress management tools can easily update and manage multiple WordPress sites.

    What happens if one of my clients’ websites gets hacked or crashes?

    Without a proper backup system, a hacked or crashed website can mean hours or days of lost work and potential loss of business for your clients. Regular automated backups help in quick recovery and give peace of mind.

    How can I manage different client logins and passwords securely?

    Keeping track of multiple WordPress admin credentials for different sites can be a security risk, especially when written down or stored in unsecured documents. Many WordPress management tools have a centralized dashboard with secure single-sign-on capabilities, eliminating this risk.

    How do I prove to my clients that I’m actively maintaining their websites?

    Many WordPress professionals struggle to demonstrate the value of their maintenance work to clients. Automated reporting systems that track updates, security measures, and performance metrics can help justify your services.

    What if I need to install the same plugin across multiple websites?

    Manually installing and configuring the same plugins across multiple WordPress sites is repetitive and time-consuming. WordPress management tools offer bulk installation and configuration functionality, saving work hours and ensuring consistency.

    How can I manage WordPress core updates without breaking my clients’ sites?

    WordPress core updates can sometimes cause compatibility issues with themes and plugins. Modern WordPress Management tools allow testing updates and offer quick rollbacks, which helps maintain site stability.

    What’s the best way to monitor the performance of multiple WordPress sites?

    Tracking performance metrics such as page speed and Core Web Vitals across multiple sites can be challenging when done manually. WordPress management tools offer an integrated performance monitoring system that helps identify and address issues before they impact user experience.

    What if my team needs to collaborate on managing multiple WordPress sites?

    Managing access levels and coordinating maintenance tasks among team members can be complex. WordPress management tools provide a centralized dashboard with team permissions, and activity logging helps maintain security and accountability.

  • How to Install & Set Up Ghost (NGINX and OpenLiteSpeed)

    How to Install & Set Up Ghost (NGINX and OpenLiteSpeed)

    Ghost is a free and open-source blogging platform built with Node.js. As a fast, modern WordPress alternative, Ghost is focused completely on professional publishing. If you only want to publish content on the web and don’t need the additional features offered by WordPress, then Ghost is a great choice.

    In this post, we will discuss how to install Ghost using RunCloud.

    Let’s get started!

    Create A New User

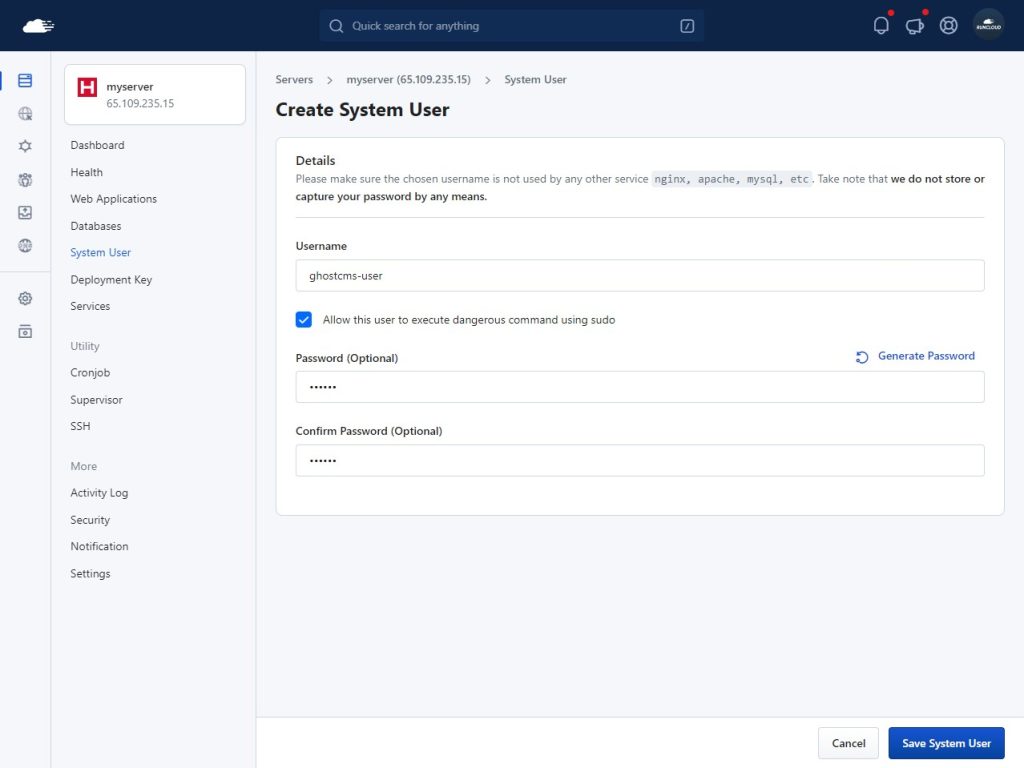
    Ghost CLI needs sudo privileges, so instead of running your site as a root user, we recommend creating a new user with these sudo privileges. This can be done by running commands in the terminal, but it’s much easier to do within the RunCloud dashboard.

    To create a new user, go to the RunCloud dashboard and open the “System User” menu.

    Once opened, click “Add New System User” to create a new user. Give it a descriptive name and a secure password. Make sure to check the box to allow the execution of privileged commands.After this, click “Save System User” and continue the installation process.

    Create A New Database

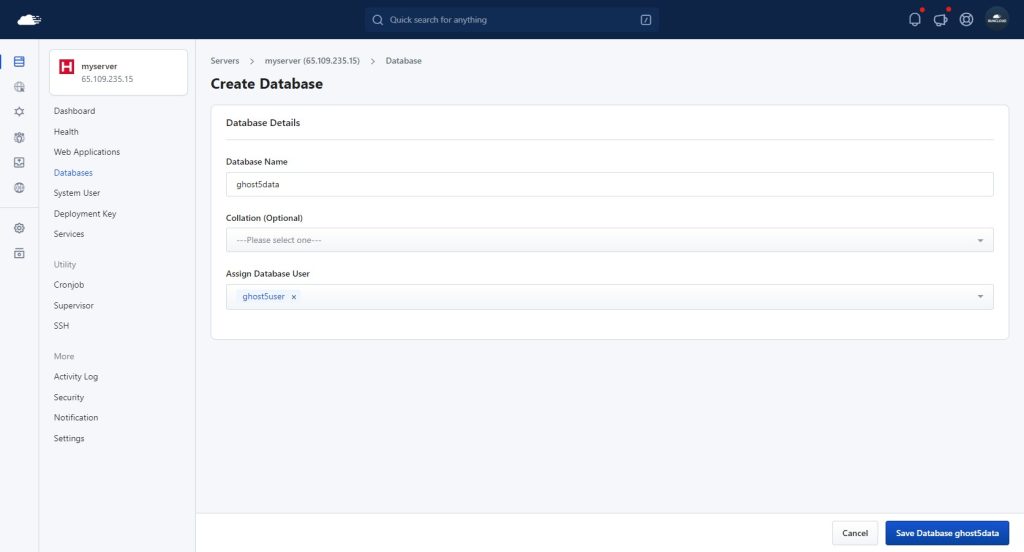
    After creating the system user, the next step is to create a new database and database user. To do this, go to the “Database” menu under your server in the RunCloud Dashboard to create a new database user. Give this database user a suitable name and a secure password, and note these credentials, as they will be needed later during the installation.

    After creating the database user, create a new database and grant permission to the user we just created. Save the changes before proceeding to the next step.

    Create An Empty Web App

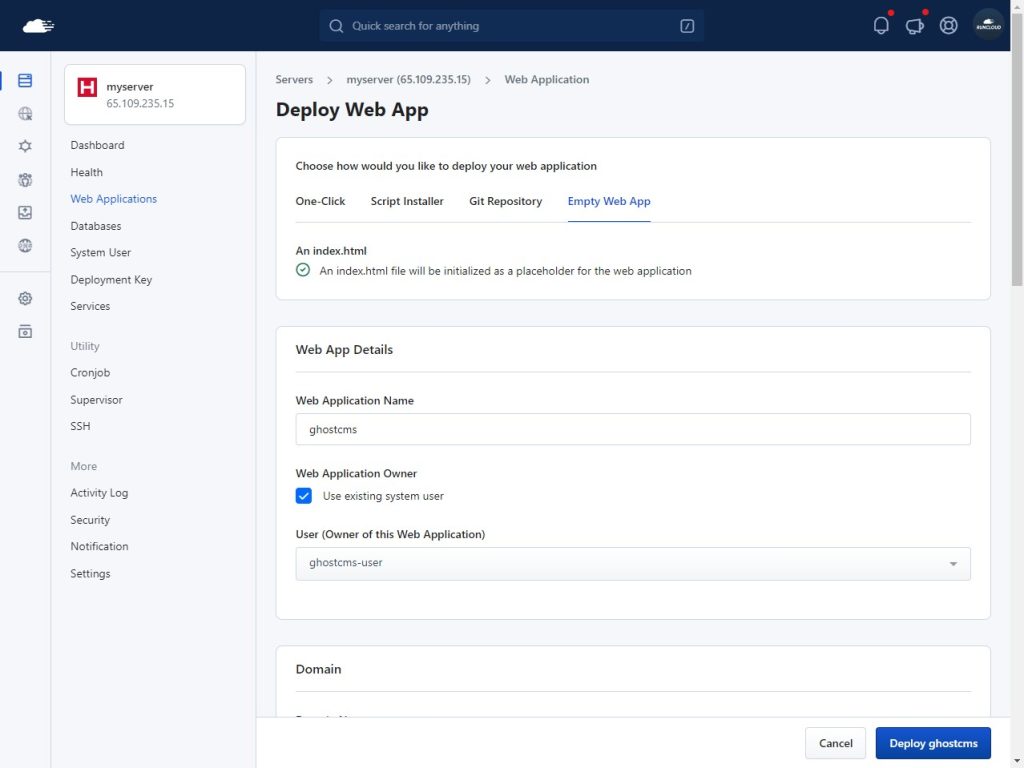
    After you have created the user, go to the “Web Applications” tab and create a new web application on your server.

    Choose the “Empty Web App” option and give your application a suitable name. Don’t forget to change the application’s owner. Instead of using the default RunCloud user, we will create the user account we just created as the owner of the web application.

    After configuring the application owner, you can manually set up the domain and configure the DNS records on your DNS registrar’s site.

    If you are using RunCloud’s Cloudflare integration, you can take advantage of the automatic DNS update functionality.

    It is also possible to install Ghost using RunCloud’s test domain. If you want to follow this tutorial without setting up your domain or subdomain, use the RunCloud test domain.

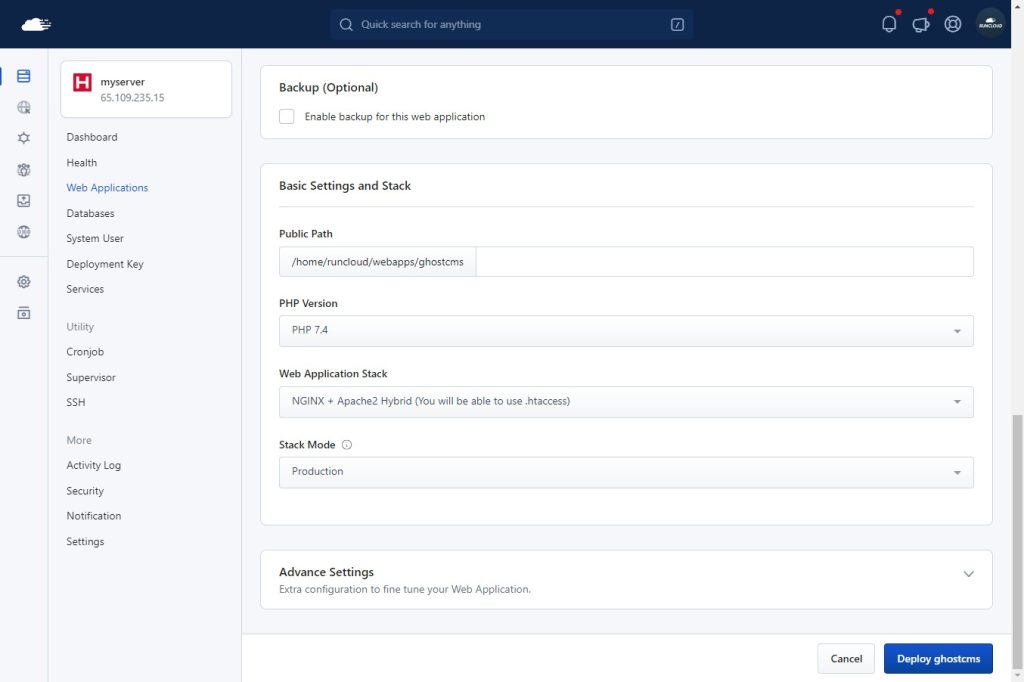
    For “Web Application Stack”, we recommend choosing “Native NGINX + Custom Config” to install Ghost CMS and then clicking “Deploy” to finish the set-up process.

    If your server runs on OpenLiteSpeed, we’ve included notes on different steps in this guide.

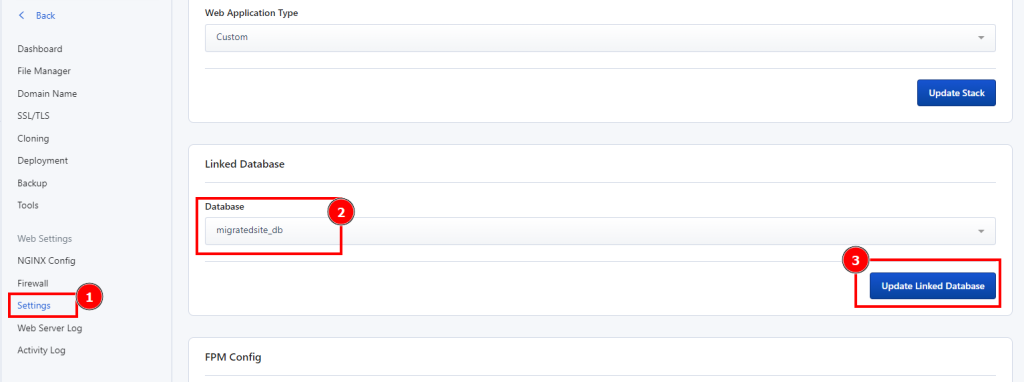
    After creating the app, go to the settings page and scroll down to the “Linked Database” section. From the dropdown menu, select the database we just created. Remember to click “Update Linked Database” to save the changes.

    Installing Ghost-CLI (for NGINX and OLS servers)

    Note: If you want to install GhostCMS on a Docker server, skip this section and jump to the Docker installation instructions.

    In the previous step, we created a dummy web application in the RunCloud dashboard, which helps us perform administrative tasks such as monitoring the logs from the RunCloud dashboard. Now, we will use Ghost-CLI, a command-line tool, to install and configure Ghost CMS and replace that dummy application.

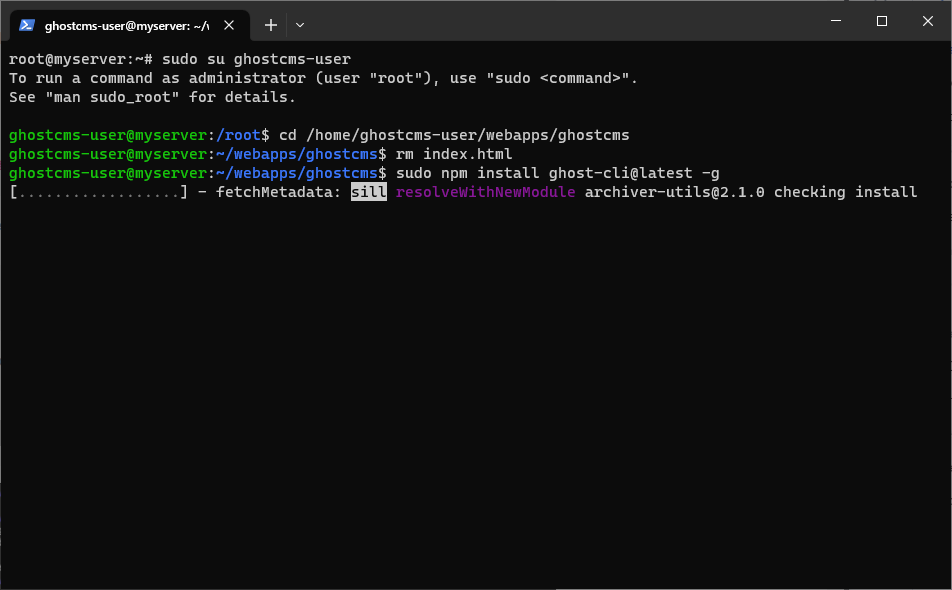
    To avoid permission conflicts, we will install the Ghost-CLI as the web application’s owner. To do this, log in to your server as the system user assigned to the web application – you can either do this via SSH or use the su (switch user) command.

    # Method 1
    ssh ghostcms-user@<youripaddress>
    # Method 2
    ssh root@<youripaddress>
    sudo su ghostcms-user

    After logging in to the server, navigate to the root directory of your web application using the following command. Replace the “<path to root>” with your path – you can find this in the RunCloud dashboard:

    cd <path to root>

    Once in the correct directory, you can run the following commands to remove the default “index.html” file and begin the installation:

    rm index.html
    sudo npm install ghost-cli@latest -g

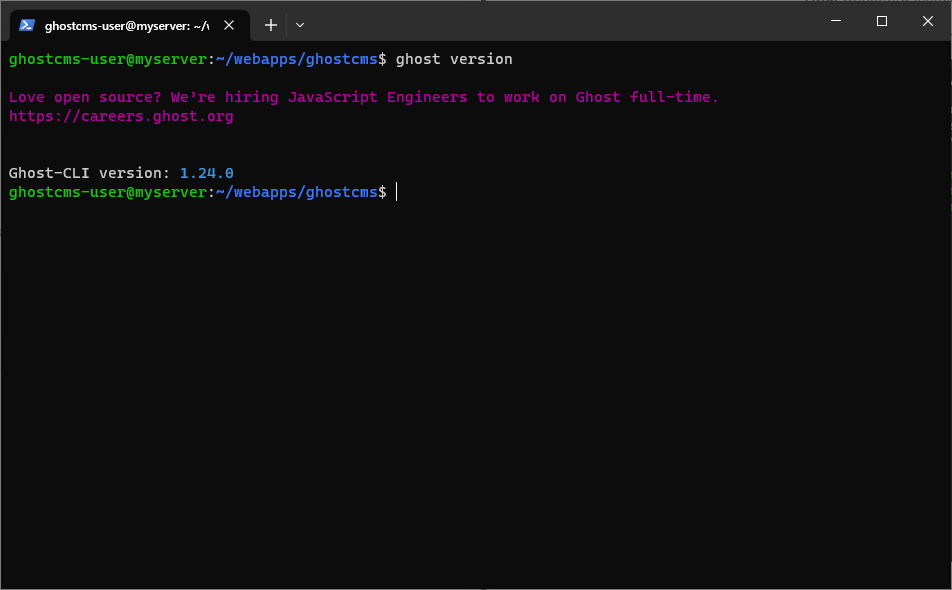
    After the installation is complete, you can run “ghost version” on your terminal to check the version of Ghost-CLI and ensure that the CLI works as expected.

    Checking Node.js version

    Ghost CMS needs Node.js to function properly. At the time of writing, the recommended node version was 18; refer to the official website to see the recommended node version.

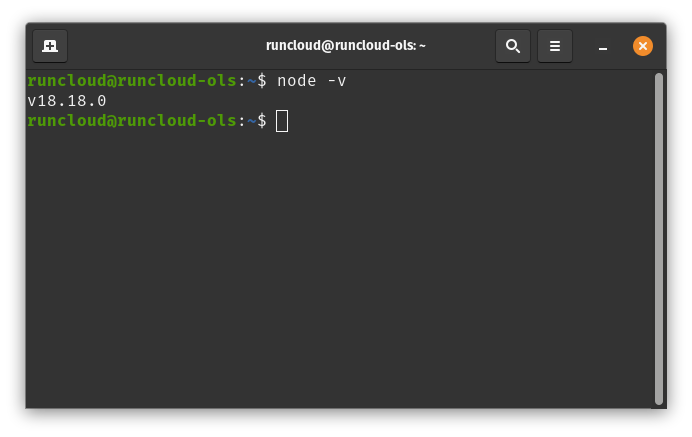
    Execute the following command to see the version of the node installed on your server:

    node -v

    In the above screenshot, the first number in v18.18.0 indicates the major version number of the software. The major version number reflects the software’s level of compatibility and functionality. The other numbers after the dot (.) are minor version numbers or patch numbers. They do not affect the compatibility or functionality of the software as much as the major version number. Therefore, they can be ignored if you are only interested in the major version number.

    Note: If you created your server before 27 September 2023, you might need to update the node version manually. Refer to our guide for updating the node on your RunCloud server to learn how to do this.

    Installing Ghost CMS

    After installing Ghost-CLI, you can run the following command to start the Ghost CMS installation:

    ghost install

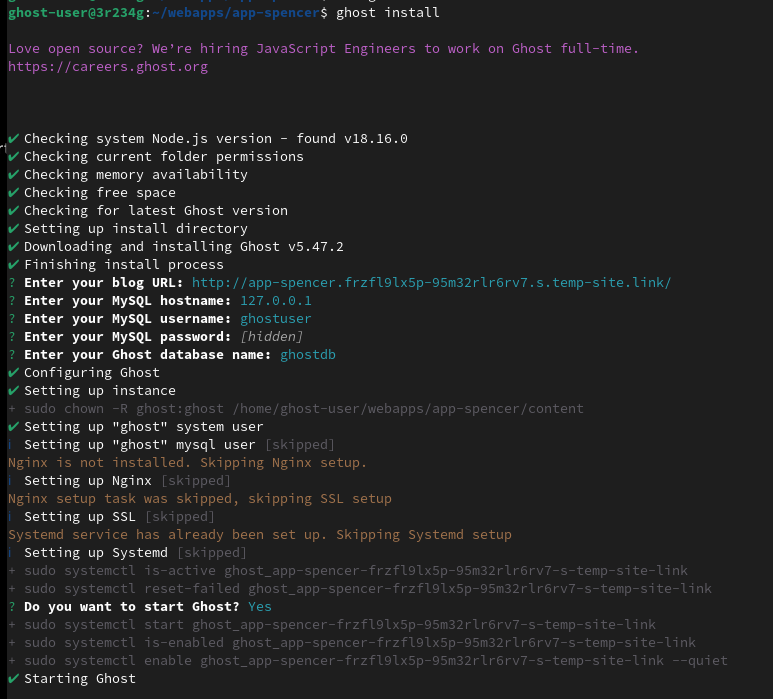
    During the installation, follow the instructions on the screen and enter the necessary information to proceed.

    When asked for the hostname, enter 127.0.0.1. Using the default value causes the Ghost CMS to use the IPv6 address, which leads to an ECONNREFUSED::1:3306 error at a later stage in the installation.

    When asked, “Do you wish to set up Systemd?” please enter “Y”, and when prompted, “Do you wish to start Ghost”, enter “Y” again.

    If you follow the instructions correctly you will get a message that the installation was successful. However, when you visit your site you will see a 404 error message. This is because we skipped the NGINX setup during installation. We can configure this manually to fix it.

    Before we set up the server proxy, we need to know which port Ghost will use for this website. Run the following command to get the details of your web application:

    ghost ls 

    The above command will show an output that looks like this:

    In the example above, the port number is 2368. Note down this port number.

    Installation on Docker

    In addition to installing Ghost directly on an NGINX or OpenLiteSpeed server, you can also deploy Ghost using Docker. This allows you to take advantage of the consistency and portability of containerized applications.

    To deploy Ghost on a Docker server, you must first set up an empty web application on your RunCloud server by following the steps described above. Once that is done, follow these steps:

    1. Log in to the server via SSH: Connect to your RunCloud server using SSH to access the terminal and run Docker commands.
    2. Create a Docker Compose file: Create a docker-compose.yml file that defines the Ghost container. This file should include the necessary environment variables for your database connection and the URL for your Ghost installation.

    Here’s an example docker-compose.yml file:

    services:
      ghost:
        image: ghost:5-alpine
        restart: always
        ports:
          - 8080:2368
        environment:
          database__client: mysql
          database__connection__host: host
          database__connection__user: ghost_user
          database__connection__password: asd123456
          database__connection__database: ghost_db
          url: http://ghost.example.com
        volumes:
          - ghost:/var/lib/ghost/content
        extra_hosts:
          - 'host:host-gateway'
    volumes:
      ghost:
    1. Modify Dockerfile: After creating the above file, you must edit certain sections to ensure your application runs correctly. First, if deploying more than one Ghost container, you must replace 8080 with a unique port number for each container. Next, you must replace http://ghost.example.com with the URL of the web application you deployed earlier.
    2. Create a custom NGINX proxy: Next, create a custom NGINX proxy for your RunCloud app to the custom port you defined in the Docker Compose file (in this case, 8080). You can use the same NGINX configuration as you would for a Ghost non-Docker installation (described below in this tutorial).
    3. Start the Docker container: Finally, run docker-compose up -d in the directory containing the docker-compose.yml file to start the Ghost container.

    Setting Up A Proxy

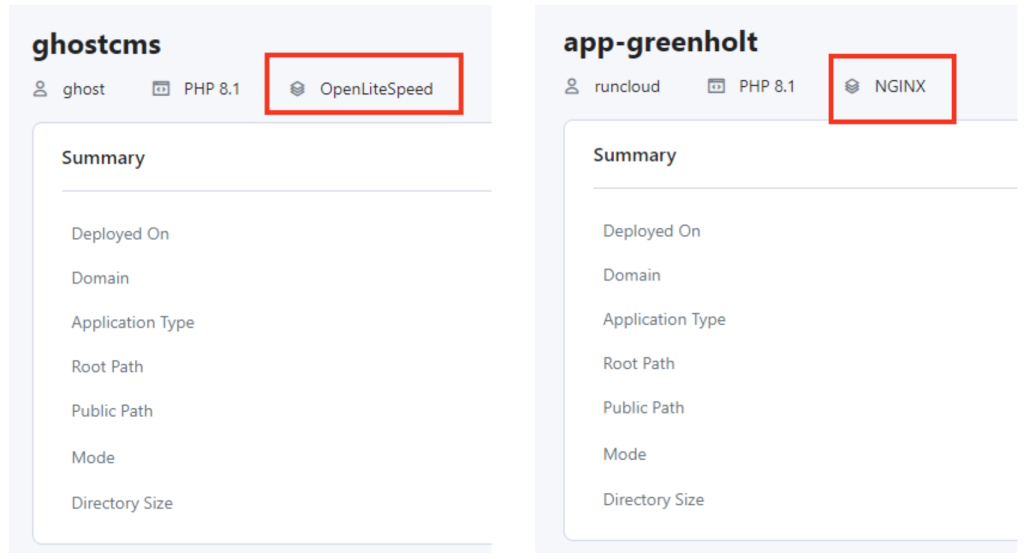
    You need to configure your server to redirect all the incoming traffic to the given port. This step is different for NGINX and OpenLiteSpeed servers. If you are not sure which server is installed on your machine, you can check this in the RunCloud dashboard and then follow along the instructions corresponding to your server.

    For NGINX

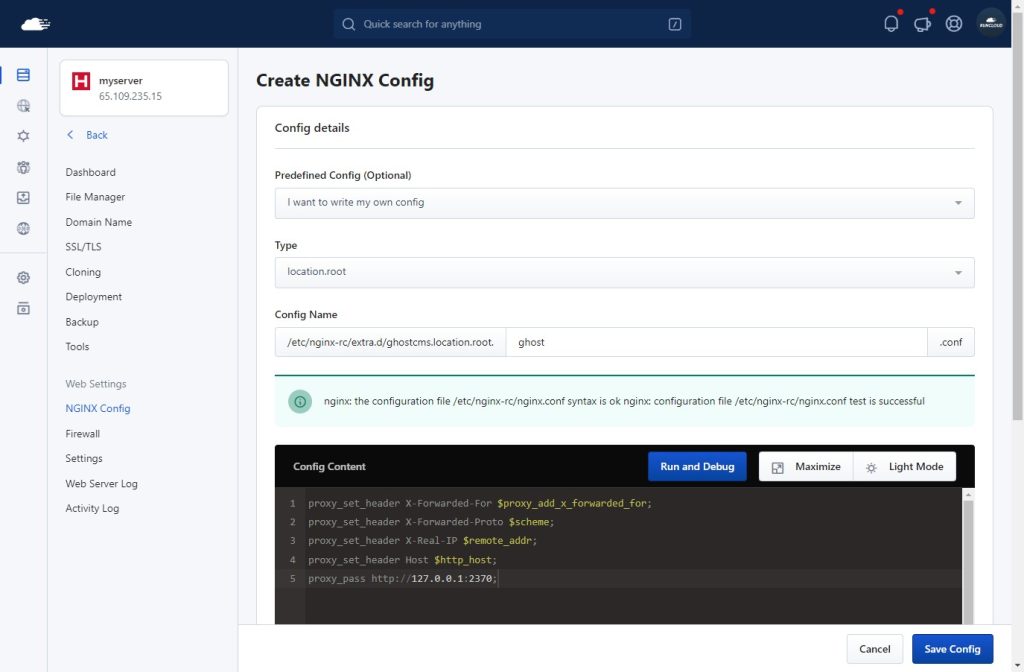
    Return to the RunCloud dashboard, open your web application, and go to the NGINX Config menu. Click the “Create Config” button and follow the steps below.

    • For the “Type” option, select the value “location.root”.
    • For the “Config Name” option, you can use the value “ghost”.
    • Copy and paste the text below into the “ConfigContent” text area. Make sure to change XXXX to the port number we noted earlier:
    proxy_set_header X-Forwarded-For $proxy_add_x_forwarded_for;
    proxy_set_header X-Forwarded-Proto $scheme;
    proxy_set_header X-Real-IP $remote_addr;
    proxy_set_header Host $http_host;
    proxy_pass http://127.0.0.1:XXXX;

    You can click “Run and Debug” to see if this custom config has any issues. Then, click the “Add Config” button to finish it.

    For OpenLiteSpeed

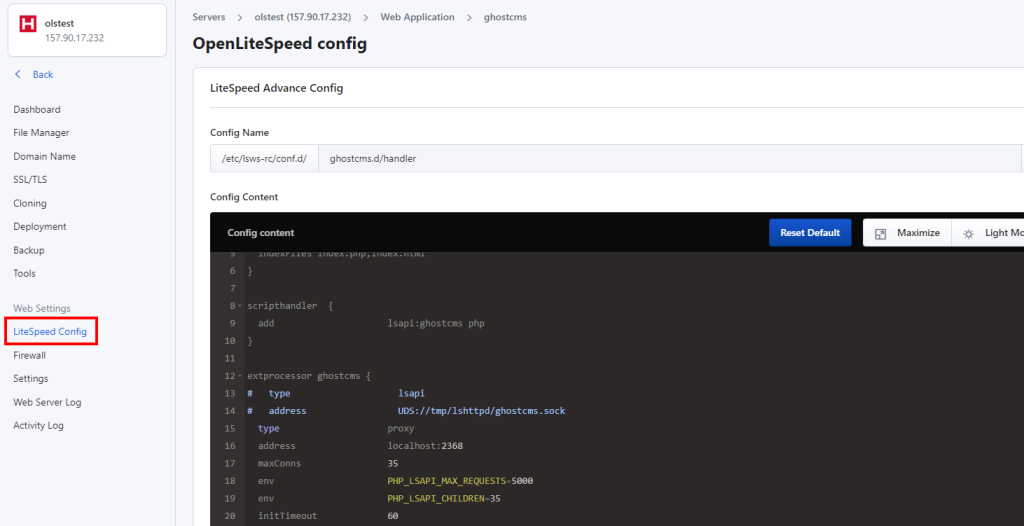
    In the RunCloud dashboard, open the empty web application created in the Create An Empty Web App step and look for the “LiteSpeed Config” in the side menu to open the configuration file.

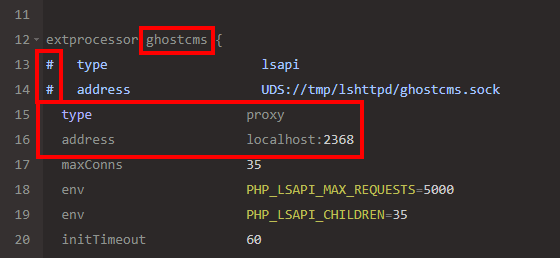
    We need to edit a few lines in this file. Firstly, note down the name of the extprocessor – we will use this later.

    Next, disable the existing configuration by adding # before the type and address line.

    After that, add the following lines below the commented lines. Don’t forget to change xxxx to the port number we noted earlier.

    type                    proxy
    address                 localhost:xxxx

    At this stage, your configuration file should look like this:

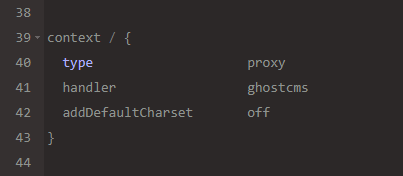
    Next, scroll down and add the following code snippet to your configuration file. Be careful not to paste it in the middle of an existing config block. Replace the <my-ghost> with the name of the extprocessor that we noted down earlier.

    context / {
      type                    proxy
      handler                 <my-ghost>
      addDefaultCharset       off
    }

    At this point, your config file will look something like this:

    Click on “Update Config” to save the settings.
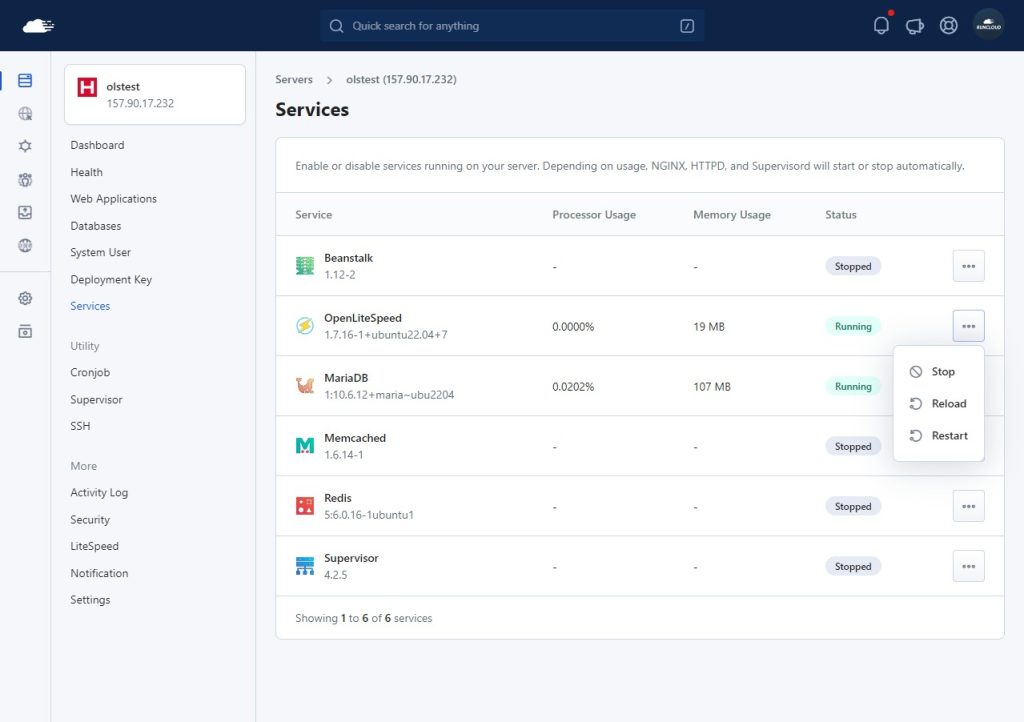
    Finally, we need to restart the OpenLiteSpeed service for the changes to take effect. Open the server page in your RunCloud dashboard and look for the “Services” option in the side menu. On that page, click the “…” button next to the OpenLiteSpeed server and “Restart”.

    Log In To Your Ghost Dashboard

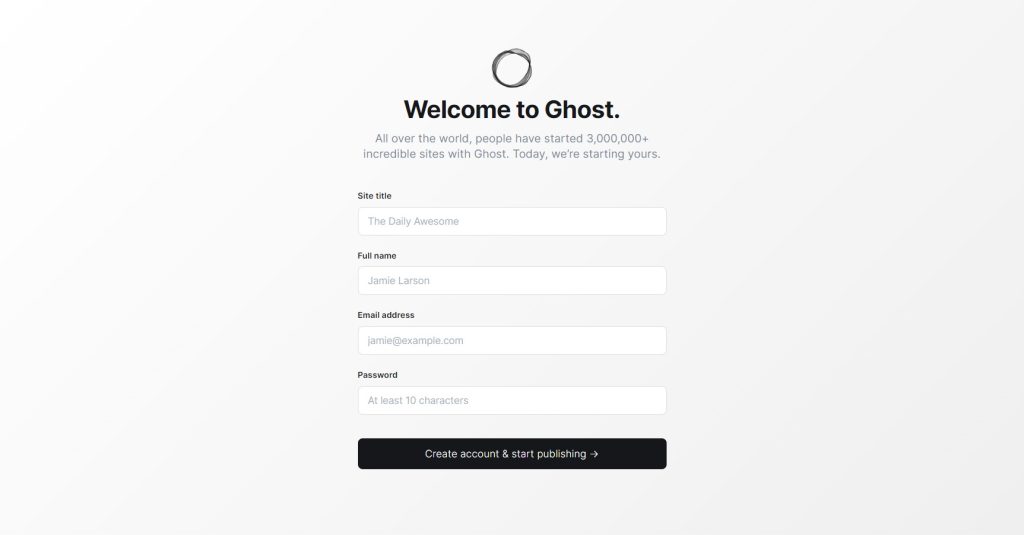
    After setting up the proxy config, you can visit your website. To configure the admin account, go to https://example.com/ghost. You must enter basic details on this page, such as the site name and admin login details.

    After setting up the admin account, you can log into the Ghost dashboard and start publishing.

    After Action Report

    Ghost CMS is an effective modern publishing platform powered by Node.js. RunCloud makes it easy to install and configure Ghost CMS. After following the steps mentioned in this article, you will be able to set up your own CMS and start publishing content.

    After installation, you can learn more about Ghost-CLI commands and tutorials to customize your Ghost blog.I

    f you’re tired of managing your own servers, check out RunCloud, a simple yet powerful control panel for cloud servers. RunCloud is built for developers who want to focus on shipping great work, not on managing their infrastructure. Discover painless server configuration and say goodbye to spending hours figuring it out – get started with RunCloud today to get up and running in minutes.

    Ghost Installation FAQs

    What is Ghost blog, and why should I use it?

    Ghost is a free and open-source blogging platform designed to be simple, elegant, and focused on writing. It is a great choice for users who want to create a professional-looking blog without the complexities of traditional content management systems such as WordPress.

    What are the requirements for installing Ghost?

    To install Ghost, you will need a web server running either NGINX or OpenLiteSpeed, Node.js, MySQL, or SQLite. You will also need to configure your server’s domain name and SSL/TLS certificate.

    How do I install Ghost on an NGINX server?

    To install Ghost on an NGINX server, you must first install Node.js and MySQL, then download and install the Ghost NPM package. Next, you will need to configure NGINX to serve the Ghost application and set up the database connection. Finally, you will need to start the Ghost service and configure any additional settings.

    How do I install Ghost on an OpenLiteSpeed server?

    Installing Ghost on an OpenLiteSpeed server is similar to the NGINX process but with a few key differences. First, you must install Node.js and MySQL, then download and extract the Ghost files. Next, you will need to configure OpenLiteSpeed to serve the Ghost application and set up the database connection. Finally, you will need to start the Ghost service and configure any additional settings.
    What are some common issues that can arise when installing Ghost?

    Some common issues that can arise when installing Ghost include problems with the Node.js or MySQL installation, difficulty configuring the web server, and issues with the database connection. It’s important to carefully follow the installation instructions and troubleshoot any errors.

    How do I customize the appearance of my Ghost blog?

    Ghost offers a wide range of themes and customization options, allowing you to easily change the look and feel of your blog. You can install pre-built themes or create custom themes using Ghost’s theme development tools.

    What are the best practices for securing a Ghost blog?

    To secure your Ghost blog, keep your software up-to-date, use strong passwords, and configure your web server with appropriate security settings. You should also consider enabling two-factor authentication and monitoring your blog for suspicious activity.

    How do I integrate my Ghost blog with other tools and services?

    Ghost offers many integrations, allowing you to connect your blog to other tools and services, such as social media platforms, email marketing providers, and analytics tools. You can also use Ghost’s API to build custom integrations and extend your blog’s functionality.

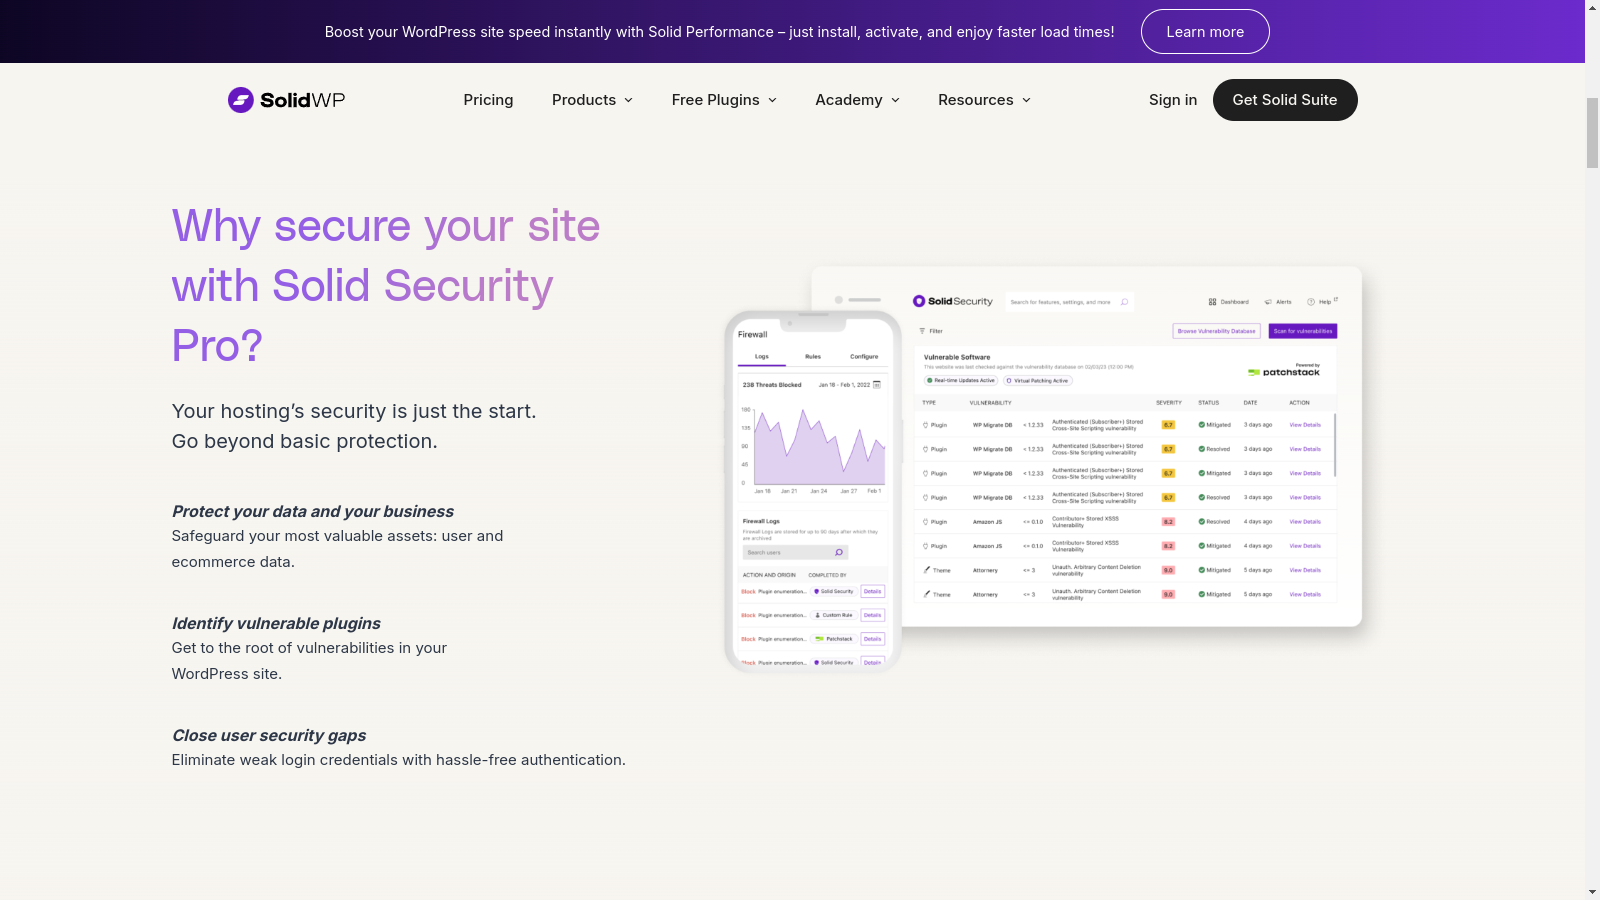
  • The 5 Best WordPress Security Plugins (2025)

    The 5 Best WordPress Security Plugins (2025)

    • Of the top ten million websites, over 41% use WordPress.
    • Every single minute, there are 90,000 attacks on WordPress sites.
    • Every single week Google blacklists 70,000 websites due to security issues.

    If you’re running a WordPress website, these statistics make startling reading and underline just how critical it is to take WordPress security seriously and keep up to date with the latest advice.

    Fortunately, that’s what we’re going to do right now.

    Securing your WordPress website is essential, but how can you achieve this effectively? This is where WordPress security plugins come in.

    There are several WordPress security plugins that you can install to help you protect your website from online threats. Choosing a good plugin will keep your WordPress website safe and protect it from spammers and malware.

    Let’s examine why it is crucial to secure your WordPress site, what you can do to keep it safe, and six of the best WordPress security plugins that will keep your site safe.

    Do You Need To Secure Your WordPress Site?

    No matter what the size of your site is: yes.

    Keeping your website secure is vital. Spammers don’t see whether your site is big or small – they’re just looking for a way to infect your site with viruses and malware. Weekly, about 18 million websites get infected with malware. While the WordPress core software is very secure (as long as you keep it fully up to date), the themes and plugins you use can leave your website vulnerable.

    If a virus, malware, or spammer successfully attacks your website, then it can:

    • Negatively impact your Google ranking
    • Access all your important and private information
    • Damage your website and brand reputation
    • Do severe damage to your online business

    But if you install a security plugin on your website, then not only will it protect your website and keep it safe, but it will also:

    • Keep all your confidential website files safe
    • Detect and inform you whenever there is a security threat
    • Block spam from contact form plugins
    • Protect your website from brutal virus attacks

    Suggested read: How to Unban IP Address in Fail2Ban? (Step-By-Step Guide)

    What Does A Good WordPress Security Plugin Do?

    A good WordPress security plugin should contain the following characteristics:

    • Real-time Malware Analysis: Google blacklists websites when its crawlers detect something harmful to the user, such as distributing malware. Many security plugins use heuristic analysis and signature-based detection to identify and eradicate malicious code.
    • Threat Monitoring: Security plugins should conduct continuous, unrestricted security scans and automated clean-up operations, periodically update their rules to adapt to evolving threats, and protect against cyber attacks.
    • Web Application Firewall (WAF): Many security plugins implement an intelligent traffic analysis system that checks HTTP/HTTPS requests in real time. Advanced plugins often use rule-based filtering and anomaly detection to preemptively block malicious payloads before interacting with WordPress.
    • Secure Login Authentication: Good WordPress security plugins deploy advanced brute force deterrence mechanisms, such as adaptive challenge-response systems (CAPTCHA) and configurable login attempt rate limiting. These configurations harden your website security and make it difficult for hackers to break in.
    • Single dashboard for Multi-site Security: WordPress sites often need maintenance and updates, which can take a great deal of time. When running multiple websites, there’s a possibility that you’ll be using a different combination of plugins and themes, which adds even more complexity to maintenance. Modern security plugins can track and update multiple WordPress websites from a single dashboard, which makes this task much more manageable.
    • Resource-Optimized Security Stack: This stack implements an event-driven architecture and asynchronous processing to deliver comprehensive protection with minimal computational overhead. It offers granular configuration options to fine-tune the balance between security depth and site performance.
    • Vulnerability Management: Good security plugins can execute automated vulnerability scans across the WordPress core, themes, and plugins. The scan findings are cross-referenced with real-time threat intelligence databases. If a vulnerability is detected, the plugin should notify the site administrator and take steps to prevent it from being exploited.

    Suggested read: Cloud Hosting vs VPS Hosting – Which One Should You Choose in 2024?

    The Top 5 WordPress Security Plugins

    Let’s take a deep dive and examine some of the best WordPress security plugins you should seriously consider for your website.

    Patchstack

    Patchstack is one of the most trusted WordPress security plugins. It sets itself apart by tackling vulnerabilities head-on rather than just reacting to malware. Patchstack actively tracks and maintains a database of vulnerabilities, keeping you one step ahead of hackers.

    One of its key strengths is its ability to detect and automatically fix vulnerabilities with “vPatches,” essentially patching vulnerabilities without requiring a plugin update. This is a game-changer for website owners as it eliminates the need to wait for developers to release updates and provides immediate protection.

    What sets Patchstack apart is its dedication to open-source security. It is trusted by reputable white hat hackers in the WordPress community, and it partners with leading security researchers, hosting companies, and developers to ensure the entire WordPress ecosystem remains secure.

    Patchstack also runs a managed Vulnerability Disclosure Program (mVDP), which helps developers comply with emerging security regulations and provides a standardized approach for handling vulnerability reports.

    Pricing:

    Patchstack offers three plans designed to cater to various user needs, from individual website owners to developers and businesses managing large website portfolios.

    The “Community” plan is a free plan that offers basic vulnerability monitoring with a 48-hour early warning. This lets users understand Patchstack’s capabilities and assess its value before committing to a paid plan. However, key features such as vPatches and instant mitigation require the pay-per-site protection add-on, which costs $5/website/mo.

    The “Developer” plan is priced at $89 per month (billed annually) and is specifically tailored for professionals building websites. It includes unlimited website protection, vulnerability detection, real-time protection, and software management, providing a robust and secure environment for development work.

    The “Business” tier, priced at $459 per month (billed annually), is best suited for businesses managing a large volume of websites. It offers protection for up to 500 websites and enhanced features like vulnerability detection, real-time protection, and software management. This tier is ideal for businesses that need to deploy security at scale and ensure consistent protection across their entire online presence.

    Sucuri

    Sucuri is one of the most popular security plugins for WordPress and is trusted by over 800,000 websites. It offers an advanced WAF that can easily protect websites from DDoS attacks and other malicious threats. Moreover, Sucuri’s WAF blocks attacks and optimizes your website’s performance by reducing load times and enhancing availability.

    It also features Security Activity Auditing, which meticulously tracks and logs significant security events and provides a detailed historical record of changes and potential threats. Additionally, you can use File Integrity Monitoring to ensure your website’s files remain untouched by unauthorized modifications. This can also alert you to potential malware or hacking attempts.

    Sucuri also implements effective security hardening and strengthens your WordPress site’s security by applying recommended configurations. Finally, in the unfortunate event of a security breach, Sucuri provides post-hack security actions and offers guidance and tools to help clean up your website and restore its integrity.

    Pricing:

    The Basic plan costs $199.99/year and is suitable for bloggers and small site owners who need occasional malware cleanup and continuous security scans. The pro plan costs $299.99/year and offers advanced support for SMBs.

    The Business Platform, priced at $499.99/year, prioritizes speed with rapid malware cleanup and frequent scans for vulnerability detection. Additionally, the Junior Dev subscription, priced at $999.98/year, caters to freelancers, web professionals, and agencies managing 2-5 websites.

    Suggested read: 8+ Security Tips to Secure VPS Server in 2024? [Ultimate Guide]

    Wordfence

    Wordfence is a robust and comprehensive security solution for WordPress websites. It has over 5 million active installs on WordPress.org and has earned its reputation as the most popular firewall and security scanner. It offers a robust firewall, malware scanner, and login security features, all powered by its Threat Defense Feed, which ensures constant updates for maximum protection.

    Wordfence offers advanced features such as real-time firewall rules and malware signatures, a real-time IP blocklist, and a powerful central management dashboard for multiple sites. With its user-friendly interface, detailed security assessments, and ongoing updates, Wordfence is an invaluable tool for any WordPress website owner seeking to safeguard their online presence.

    Pricing:

    Wordfence offers a free version that provides essential security features such as a firewall and malware scanner, but with a 30-day update delay. For enhanced protection, you can use the $119/year “Industry Leading Firewall” plan, which offers real-time updates, country blocking, a dynamically updated IP blocklist, and premium customer support.

    The $490/year “Real-Time Threat Intelligence” plan is suitable for busy business owners as it offers managed installation, configuration, optimization, and monitoring, including unlimited incident response. For mission-critical websites that demand the highest level of security, the $950/year plan provides 24/7 incident response with a 1-hour response time and a 24-hour resolution guarantee.

    Suggested read: PHP Security – Best Practices To Secure Your Web App in 2024

    All In One WP Security

    All-In-One Security (AIOS), is a user-friendly WordPress security plugin that packs a punch. It provides a comprehensive suite of features, many of which are free, making it accessible to a wide range of users.

    AIOS protects your website from brute force attacks and bots with its Login Security suite, while its Web Application Firewall shields you from malicious traffic and exploits. The plugin can enhance your site’s security by preventing spam comments and content theft through features such as iFrame prevention and copywriting protection.

    Its flexible Two-Factor Authentication (TFA) offers granular control for enhanced security. For example, you can configure TFA to be mandatory for specific user roles, require it after a set period, or adjust how often it’s needed for trusted devices. The plugin also incorporates anti-bot protection, allows you to customize the TFA design, and provides emergency codes for access when your device is lost.

    Additionally, AIOS Premium’s Smart 404 Blocking automatically and permanently blocks bots that generate excessive 404 errors, protecting your website from malicious activity. You can monitor these blocks through handy charts that provide insights into the frequency and origin of 404 errors.

    Pricing:

    As the name suggests, the free plan is completely free to use. However, you can opt for a premium plan, which starts at $70.00/year and offers protection for two websites.

    Solid Security

    Solid Security Pro is a robust WordPress security plugin that protects your site and business from common vulnerabilities. It offers a comprehensive suite of features such as enhanced login security, vulnerability scanning, and brute force attack prevention. The plugin allows you to set custom login requirements, enforce strong passwords, and enable two-factor authentication or passkeys to eliminate weak credentials.

    SolidWP Security goes beyond traditional two-factor authentication methods by embracing cutting-edge technologies for a more seamless and secure login experience. You can log in using Apple Face ID, Apple Touch ID, Windows Hello, or passkey technology (WebAuthn). This flexibility increases security and ensures a smooth login process across different devices.

    SolidWP also integrates with popular CAPTCHA providers such as Cloudflare Turnstile, Google reCAPTCHA, and hCaptcha to offer robust protection against automated attacks. You can even utilize YubiKeys or Trusted Platform Module (TPM) devices for enhanced physical security. This comprehensive approach to two-factor authentication ensures that your website remains secure while providing users with convenient and reliable access options.

    Pricing:

    Solid Security Pro starts at $99 per year for a single site. However, there are discounts for bulk purchases. You can choose a plan that suits your budget and the number of websites you need to protect.

    Which WordPress Security Plugin Is Right For You?

    It’s never going to be a one-solution-fits-all when it comes to security. But having said that, it doesn’t matter whether your website is a small business site run by you alone or a medium or even large business with hundreds of employees. Security is a non-negotiable must.

    A free plugin such as All-In-One Security or Wordfence might be sufficient for basic protection if you’re a small business owner or individual managing a single website. However, if you manage multiple websites or require more advanced features like real-time protection, vulnerability patching, and managed support, paid plugins such as Patchstack or Solid Security Pro offer comprehensive solutions.

    Ultimately, consider your website’s size, traffic volume, and the level of security you require to determine the ideal plugin for your needs.

    Let us know in the comments below if you have any questions or recommendations, and which security plugin you prefer!

    Final Thoughts

    We hope this guide has given you a clearer understanding of the various WordPress security plugins available and helped you identify the best fit for your website. Remember, choosing the right plugin is only the first step. Securing your WordPress website goes beyond a single plugin; it requires a holistic approach.

    One crucial element of WordPress security often overlooked is choosing a secure hosting provider.

    This is where RunCloud comes in!

    RunCloud is the best WordPress hosting provider because it offers advanced security features out of the box. When you manage your WordPress website with RunCloud, you can use robust solutions such as the ModSecurity firewall, Fail2ban, and access control lists in Redis without getting into technical details.

    Ready to take your WordPress security to the next level? Sign up for RunCloud today and experience the difference a genuinely secure hosting platform can make.

    FAQs on WordPress Plugin Security

    What are the top WordPress security plugins recommended for 2024?

    The top WordPress security plugins for 2024 include Patchstack, Sucuri, All In One WP Security. These plugins offer comprehensive security features and have consistently received positive reviews from users and experts.

    How do security plugins protect my WordPress site?

    Security plugins protect your WordPress site through various methods, including firewalls, login protection, and regular security audits. They also often provide features like two-factor authentication, file integrity monitoring, and protection against brute force attacks.

    Are security plugins compatible with the latest version of WordPress?

    Yes, reputable security plugins are regularly updated to maintain compatibility with the latest WordPress versions. It’s crucial to keep WordPress and your security plugins up-to-date to ensure optimal protection and compatibility.

    Do I need to use all six plugins, or is one sufficient for adequate security?

    Using one comprehensive security plugin is sufficient for adequate protection. Using multiple security plugins can lead to conflicts and potentially slow down your site, so choosing one robust solution that meets your specific needs is often better.

    Are there any free options among the best WordPress security plugins?

    Yes, many top WordPress security plugins offer free versions with basic features. For example, Patchstack, Sucuri, and All In One WP Security have free versions, though premium versions typically offer more advanced features.

    How often should I update these security plugins?

    You should update your security plugins as soon as new versions are released, typically every few weeks to months. Enabling automatic updates can protect you against the latest security threats.

    Can security plugins slow down my WordPress site’s performance?

    While security plugins can potentially impact site performance, most modern security plugins are optimized to minimize their impact. The slight performance trade-off generally outweighs the security benefits, but you can often adjust settings to balance security and performance needs.

  • How to Use Git Reset To Revert To Previous Commit

    How to Use Git Reset To Revert To Previous Commit

    Git gives you several ways to undo changes, but knowing which one to use can be confusing.

    You might need to revert a single commit, restore a previous version, or completely reset your repository to an earlier state. Each command handles this differently.

    This guide explains how git reset works, how it differs from git revert and git restore, and when to use each. It also walks you through the steps to safely return your repository to a previous commit using git reset.

    Understanding Git Reset

    Git reset is a versatile command that moves your current branch pointer to a different commit.

    This action can:

    • Undo recent changes or remove specific commits.
    • Adjust what’s staged for your next commit.
    • Update your working directory to match an earlier point in your project’s history.

    Because it can rewrite history, understanding how each reset mode behaves is critical before using it.

    Suggested read: GitHub vs. GitLab vs. Bitbucket – How Are They Different?

    Types of Git Reset

    Git provides several reset modes, each suited to different needs:

    1. --soft

    Moves HEAD to a specific commit but leaves both the staging area and working directory unchanged.

    • Useful for undoing a commit while keeping all changes staged.
    • Example: git reset --soft HEAD~1

    2. --mixed (default)

    Resets the index but not the working directory. Changes remain unstaged but intact.

    • Example: git reset --mixed HEAD~1

    3. --hard

    Resets both the index and working directory to match a commit, discarding all uncommitted changes.

    • Example: git reset --hard HEAD~1

    4. --merge

    Updates files in the index and working tree that differ between HEAD and the target commit, keeping local changes that aren’t staged.

    • Example: git reset --merge HEAD~1

    5. --keep

    Similar to --merge, but aborts if local changes would be lost.

    • Example: git reset --keep HEAD~1

    6. --recurse-submodules

    Resets submodules alongside the main project to ensure consistent versions.

    • Example: git reset --recurse-submodules HEAD~1

    Suggested read: Laravel With GIT Deployment The Right Way

    Git Reset vs Revert vs Restore

    Git provides several ways to undo or modify changes, but each command serves a distinct purpose.

    The table below highlights the differences between git reset, git revert, git restore, and git checkout, helping you choose the safest command for your situation.

    Git ResetGit RevertGit RestoreGit Checkout
    Primary Use CaseMove a branch back in time, effectively erasing commits from the local branch history.Create a new commit that reverses the changes from a previous commit.Discard uncommitted changes to files in your working directory or staging area.Switch branches or view files from a different commit/branch.
    Impact on HistoryRewrites branch history. The original commits are no longer on that branch.Preserves branch history. It adds a new commit to the timeline.No impact on history. Only affects uncommitted changes.No impact on history. It’s a read-only command that just moves your HEAD pointer.
    Safety on Shared Branches (e.g., main)🔴 UNSAFE. Rewriting history on a shared branch will cause major conflicts for your collaborators.✅ SAFE. This is the standard, team-friendly way to undo changes on a shared branch.✅ SAFE. It only affects your local, uncommitted work.✅ SAFE. It’s a fundamental navigation command.
    Scope of ChangeAffects commits, the staging area, and the working directory (depending on the mode: --soft, --mixed, --hard).Affects commits. It creates a new commit that changes files.Affects files in the staging area and/or the working directory.Affects the entire working directory by changing the HEAD pointer to a new branch or commit.
    Common Syntaxgit reset --hard <commit>
    git reset <commit>
    git reset --soft <commit>
    git revert <commit>git restore <file>
    git restore --staged <file>
    git checkout <branch-name>
    git checkout <commit> -- <file> (legacy file restore)

    Suggested read: The Easiest Way To Automate WordPress Deployments with Git

    How to Reset to a Previous Commit

    Follow these detailed steps to perform a Git reset and restore your project to a previous commit:

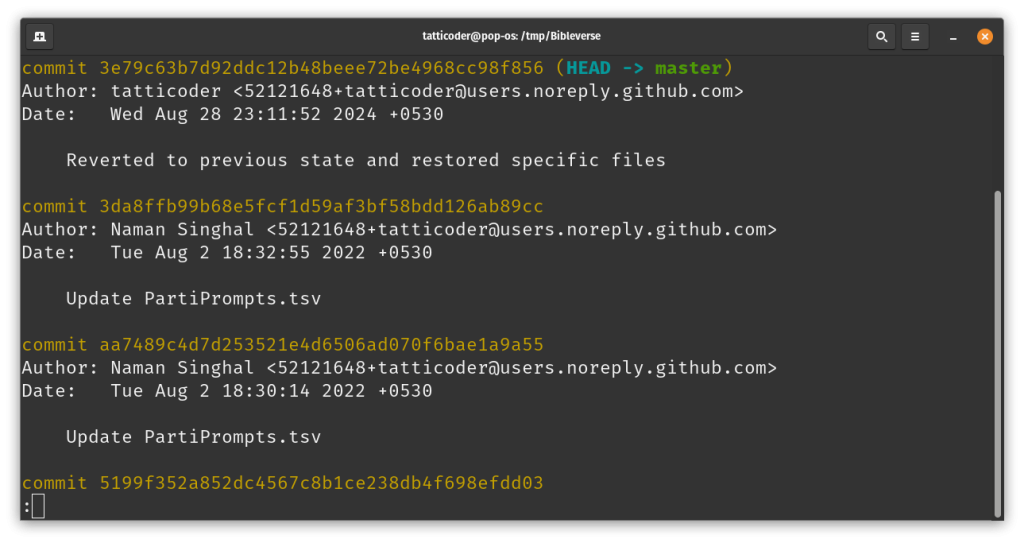
    Step 1: Find the Target Commit Hash with git log

    First, you need to find the commit hash of the point you want to reset to. Open your terminal or command prompt, navigate to your Git repository, and use the following command to view your commit history:

    git log
    git log status

    This command will display a list of commits, each with a unique hash, author information, date, and commit message.

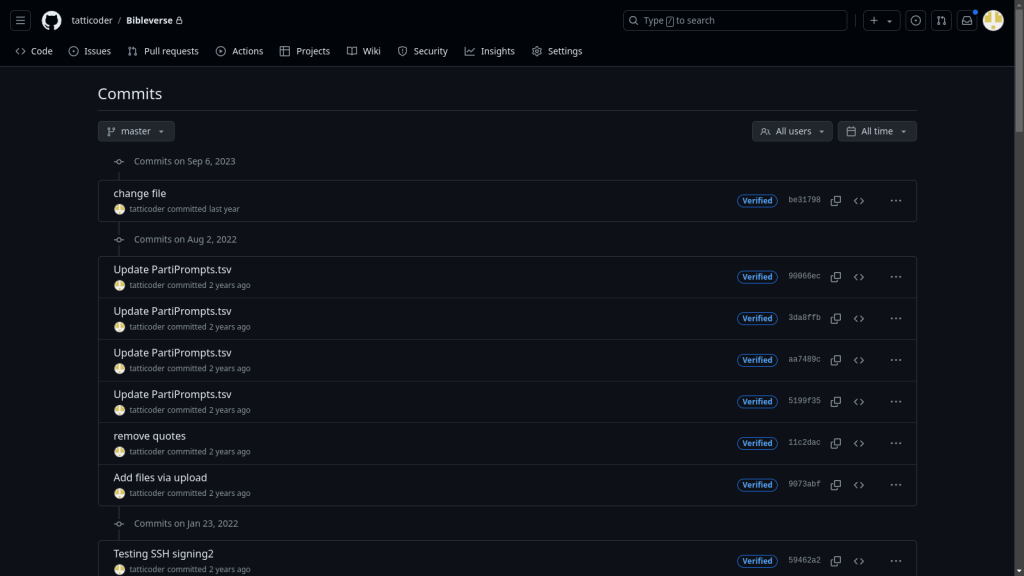
    Alternatively, you can view this commit history in your Git provider’s dashboard. Scroll through the list and find the commit you want to reset to. Note down the commit hash, which is a long string of letters and numbers.

    git commit history

    Step 2: Choose the Correct Reset Mode

    Git offers several reset modes, each with different effects on your working directory and staging area (see previous section).

    Choose the mode that fits your goal. In this example, a mixed reset (the default) is used to unstage changes while keeping them in your working directory for review.

    Step 3: Execute the git reset Command

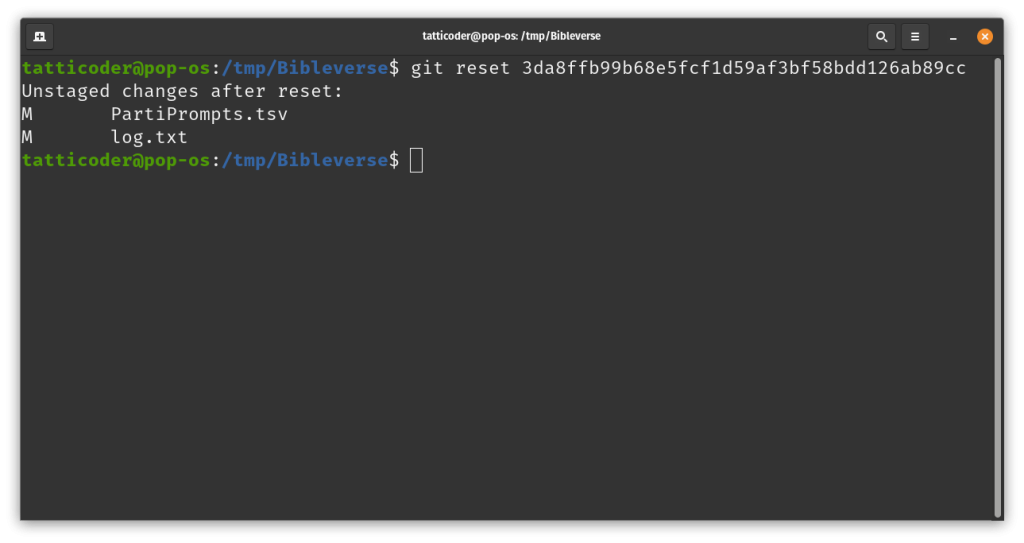
    Now that you’ve identified the commit and chosen the reset type, you can perform the reset. Use the following command, replacing <commit-hash> with the hash you noted earlier:

    git reset <commit-hash>
    git reset to revert changes

    This command will move your branch pointer to the specified commit and update your staging area. Your working directory will remain unchanged, allowing you to review the changes before committing them again.

    Step 4: Review the changes

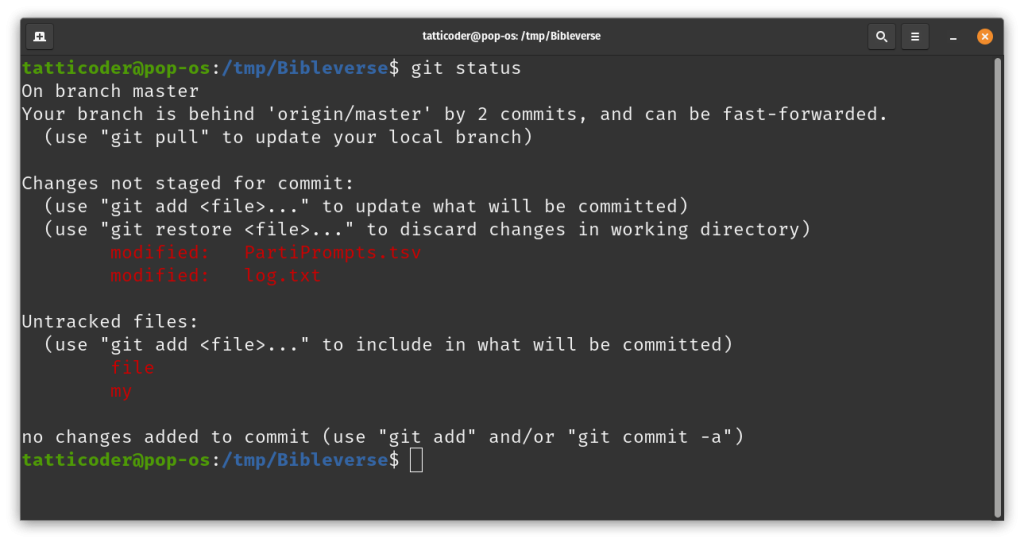
    After performing the reset, it’s important to review the changes. Use the following command to see the status of your working directory:

    git status
    git status

    This will show you which files have been modified, added, or deleted since the commit you reset to. You can also use git diff to see the specific changes in each file.

    Step 5: Commit the changes

    Once you have reverted the changes, you can make modifications and edits to the files as you normally would.

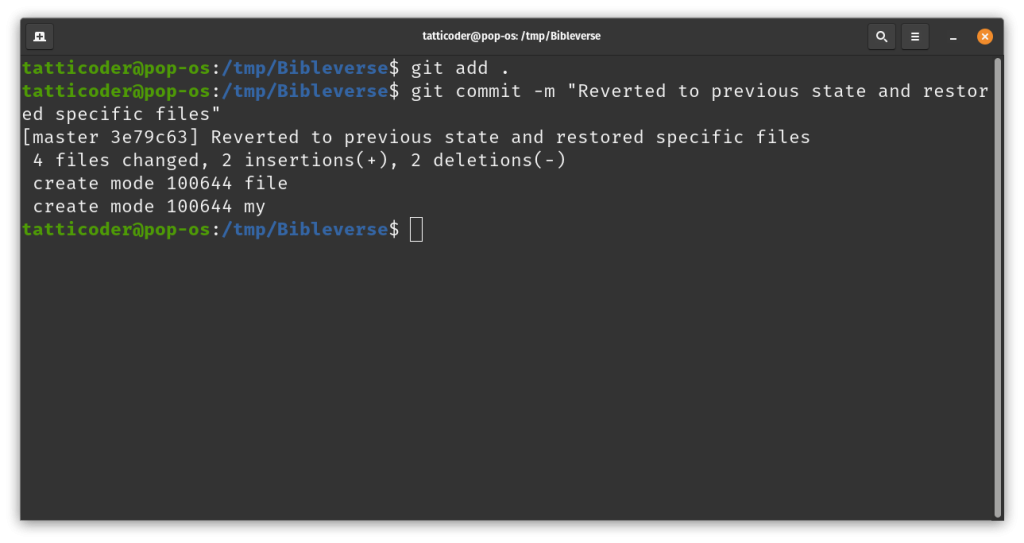
    If you’re satisfied with the reset and any restorations you’ve made, you can now commit these changes. First, add the files you want to include in the commit:

    git add .
    git commit -m "Reverted to previous state and restored specific files"
    Git add and commit

    Step 7: Push the changes (if working with a remote repository)

    If you’re working with a remote repository and want to update it with your reset changes, you’ll need to force push. Be cautious with this step, as it can overwrite the remote history:

    git push --force origin <branch-name>

    Replace <branch-name> with the name of your current branch (e.g., main or master).

    Suggested read: Understanding Continuous Integration vs. Continuous Deployment

    Final Thoughts

    Mastering Git reset gives you precise control over your project’s history — allowing you to cleanly adjust commits, recover from mistakes, and prepare your repository for deployment.

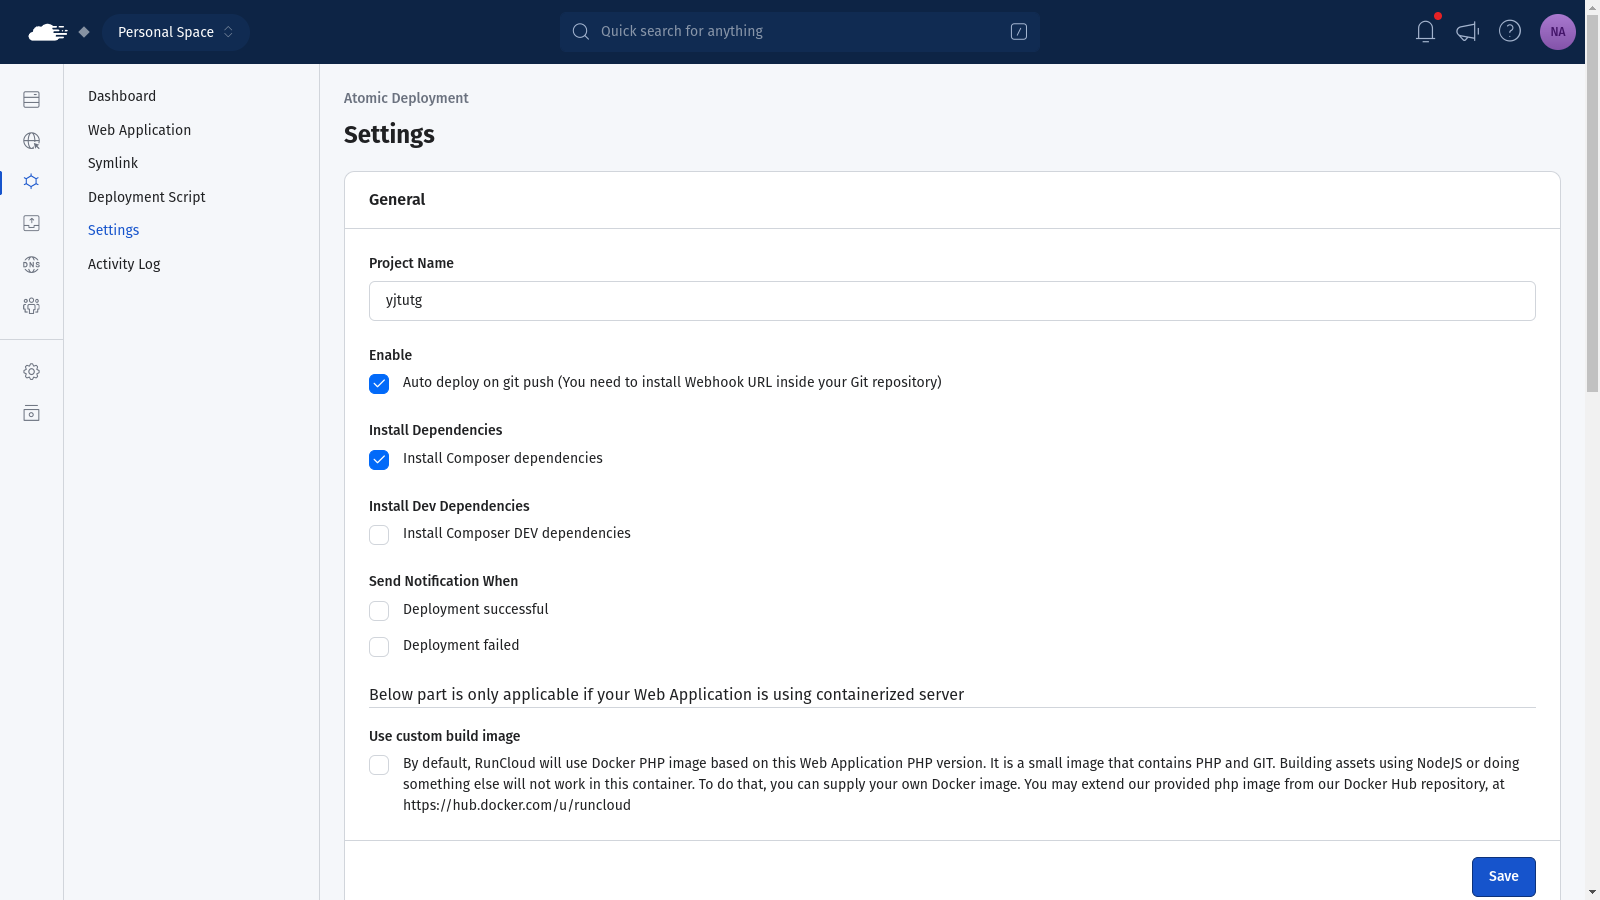
    RunCloud takes that same precision into production with Atomic Deployments.

    When you deploy through RunCloud, each release is packaged and deployed as a single, complete unit. If anything goes wrong, RunCloud automatically falls back to the previous version in seconds, protecting uptime and data integrity.

    RunCloud atomic deployment

    Combining Git proficiency with RunCloud’s Atomic Deployment system creates a seamless, reliable workflow: commit confidently, deploy instantly, and roll back safely whenever needed.

    Start your free RunCloud trial today and bring the best of Git and server automation together in one platform.

    Frequently Asked Questions About Git Reset

    Does git reset delete new files?

    No, git reset does not delete new files. It only affects tracked files and the staging area, leaving untracked files untouched.

    What is the difference between git reset and git restore?

    git reset moves your branch pointer and can modify commit history, the staging area, or both, depending on the reset mode used.
    git restore only affects files in your working directory or staging area. It restores file content to match a specific commit without changing the repository history.

    What is the difference between git reset and git reset hard?

    git reset can be used in several modes (–soft, –mixed, or –hard), each controlling how much of your work is reset.
    git reset –hard is the most destructive option as it resets your branch, staging area, and working directory to match the target commit, permanently discarding all uncommitted changes in tracked files.

    Is git reset local or remote?

    git reset is a local operation. It only affects your local repository and does not modify the remote branch until you push changes.
    To overwrite the remote history after a reset, you would need to use git push –force, but this should be done with caution on shared branches.

    Does git reset restore deleted files?

    Yes. If a deleted file was tracked by Git, running git reset to a commit where that file existed will restore it.
    However, untracked files deleted outside of Git cannot be recovered this way.

    What does git reset file do?

    git reset removes the specified file from the staging area (the index) but leaves your working directory unchanged.
    This is useful if you accidentally added a file with git add and want to unstage it before committing.

    Will git reset remove local changes?

    Yes, but only when using the –hard option.
    git reset --hard resets both your working directory and staging area to match the specified commit, permanently removing all uncommitted changes in tracked files.
    Using git reset without –hard (e.g., –soft or –mixed) will leave your working directory changes intact.

    Can I undo a git reset?

    Yes. You can recover from a reset using git reflog.
    Run git reflog to view recent branch movements and find the commit reference for the state you want to restore.
    Then reset back to it using:
    git reset --hard <commit-hash>

    Can I use git reset to remove commits from a remote repository?

    By default, git reset only affects your local branch.
    If you’ve already pushed those commits to a remote, you’ll need to force-push to update the remote branch:
    git push --force origin <branch-name>
    Use this with care, as it rewrites history for anyone else working on the same branch.

  • How to Deploy Next.js on a VPS Server (Step-by-Step Guide)

    How to Deploy Next.js on a VPS Server (Step-by-Step Guide)

    You might know how to build a Next.js application, but do you know how to deploy it on a server? If your answer is no, then you’ve come to the right place.

    Next.js allows you to build a fast website, but the big question is: where to deploy your Next.js app? There are lots of options out there for hosting, but in this guide, we’re going to focus on using a VPS (Virtual Private Server) as it gives you more control and flexibility.

    In this article, we’ll walk you through how to deploy your Next.js app on a VPS server. We’ll keep it simple and straightforward, perfect for when you’re ready to take your project live.

    Ready to get started? Let’s dive in and get your Next.js app online!

    How to Deploy Next.js on Custom VPS Server

    Prerequisites

    Before we dive into the nitty-gritty, let’s make sure you have all the necessary permissions for required services. You’ll need a RunCloud account to manage your server with ease, a VPS that’s already configured with RunCloud, and SSH access to your VPS.

    Creating Web Application

    There are multiple ways to deploy your web application to RunCloud servers, let’s take a look at each of them.

    Method 1: Creating an Empty Application

    First things first, we’ll create an empty web app where you can add your custom code and other assets for your website. Log into your RunCloud dashboard, navigate to the “Web Applications” section, and click on “Create Web Application“. Switch to the “Empty Web App” tab to create a blank application, give your web app a name that describes your project. You can configure other basic details such as domain name and tech stack or just leave them as default – you can always change them later.

    In the basic settings section, set the public folder to /build – this is where your website will be served from. If you are using a custom build directory in your project, you can replace this with the path of your directory. After configuring the app, you can click on “Deploy” to save the changes.

    Method 2: Deploy Using Git

    If you already have an existing NextJS application stored in a git repository, you can use Git Deployment to connect your existing app to RunCloud to directly deploy your own application instead of creating a blank application.

    The process of cloning a Git repository to RunCloud is exceedingly simple, just switch to the “Git Repository” tab and select your Git provider. In this example, we will be using GitHub. Enter a descriptive name for your web application and select a user account on your server. It is always recommended to create a new user account for maximum security.

    Next, you need to fill in the details about your Git Repository, enter the name of your repository and the branch that you want to deploy to this server. After that, you need to copy the provided deployment key from RunCloud dashboard and add it to your Git repository.

    On GitHub, you can add a deployment key by navigating to “Settings > Deploy Keys”. On this screen, you need to provide a suitable title for your deployment key and paste the key that you copied from RunCloud dashboard. Click on “Add Key” to save this key to your repository.

    Once you have added the deployment key to your Git repository, you can go back to your RunCloud dashboard and deploy your web application. Once your application is deployed, you will see a screen similar to the following screenshot. After you have configured the Git Deployment on your server, you can consider enabling Atomic deployment to automatically deploy new versions of your application when a new commit is published.

    Navigating to Root Directory of Web Application

    With our web app created, it’s time to access your server, open up your terminal or SSH client and connect to your VPS using SSH by typing ssh username@your_server_ip and pressing enter. If you need step by step instructions for this process, you can refer to our documentation which explains How To Connect to Your Server via SSH.

    Now that we’re on the server, you need to navigate to the root directory of your web application. Run cd <root-path> and replace <root-path> with the root path displayed in your RunCloud dashboard.

    Suggested read: How to install and set up a Ghost blog on RunCloud

    Installing Next.js Application Dependencies

    Before creating the app, we’ll switch to the web app user with su <username> command to ensure we have the right permissions. Don’t forget to replace <username> with the actual username of the system user displayed in your RunCloud dashboard. In the following example, the name of the user account is runcloud.

    If you have cloned your existing repository, then you can skip this step. Before we start building our Next.js app, we need to clear out the default web page created by RunCloud. You can run the pwd command to make sure that you are in the correct directory before deleting the files via terminal. If you are not sure, you can always use the RunCloud file manager to manually delete the files. To permanently delete the default files, run rm -rf ./* in the root of your web application. This command deletes the default index.html and any other files that might be created during application initialization.

    Once you have deleted the default files, you can start adding your custom code to this website. Run the npx create-next-app . command in your terminal to set up a new Next.js app in the current directory. RunCloud already comes with NodeJS pre-installed, however you have the option to install a custom version of Node JS if your application requires it.

    Creating Next.js application on VPS via RunCloud

    Finally, we need to install all the dependencies and build the app to create a production-ready app which optimizes the resources and compresses necessary dependencies. Run npm install command and npm run build to bundle everything into the build directory.

    Setting Up NGINX Reverse Proxy for Next.js

    After successfully setting up your Next.js application on your server with RunCloud, the final step is to make it accessible to the world through your domain. This can be done by setting up an NGINX reverse proxy.

    Here’s how to configure the reverse proxy in your RunCloud dashboard for your Next.js application:

    1. Navigate to Your Web Application: In your RunCloud dashboard, go to the “Web Application” section and select the application you created for your Next.js project.
    2. Change the Web Application Stack:
      • Go to the “Settings” page for your web application.
      • You need to change the Web Application Stack. By default, it might be set to a native NGINX stack. For a Next.js application, you need to change this to NGINX + Custom. This setting is important because it allows NGINX to properly route all incoming requests to your running Next.js application.
    1. Create the Reverse Proxy File:
      • After changing the stack, go back to your Web Application’s main screen and click on “NGINX Config”.
      • Create a new configuration file for your web application and select the pre-defined configuration for the reverse proxy from the dropdown menu.
    2. Edit the Configuration File: In the configuration file, uncomment the line containing proxy_pass directive by removing the # symbol before it. After that, replace the <port number of your app> with the actual port number of your application.
    3. Set the Correct Port for Next.js: By default, Next.js applications run on port 3000. If you have not changed this in your application’s configuration, then 3000 is the correct port to use. If you have configured your app to run on a different port, make sure you change 3000 to your custom port number.
    4. After adding the code to the configuration file, save your changes.

    Once the process is complete, open your web browser and navigate to your domain. If everything has been configured correctly, you should now see your Next.js application live.

    Wrapping Up

    If you find yourself facing any permission issues during this process, then you should double-check that you’re using the correct user for your web application. Additionally, if you don’t see your homepage when you visit your domain, then you can pop back into your RunCloud dashboard and verify that the public directory is set to the folder where your build files are stored.

    If you’re new to server management or just looking to simplify your workflow, you need to check out RunCloud – an all-in-one web management platform. From easily setting up new web apps to managing databases, SSL certificates, and server security, RunCloud puts the power of efficient server management at your fingertips.

    RunCloud takes the complexity out of server administration, allowing you to focus on what really matters – creating amazing web applications. Start using RunCloud today!

    FAQ on Next.js Deployment

    Is Next.js faster than React?

    Next.js is built on top of React and can offer performance improvements in certain scenarios:
    Server-side rendering (SSR) can lead to faster initial page loads
    Automatic code splitting reduces bundle sizes
    Built-in image optimization enhances loading speeds
    Static site generation (SSG) can dramatically improve performance for static content
    However, a well-optimized React app can also be very fast. The performance difference depends on the specific use case and implementation.

    Does Netflix use Next.js?

    Yes, Netflix uses Next.js for some of its web applications. They’ve publicly shared that they use Next.js for their marketing pages and some internal tools. However, it’s important to note that large companies like Netflix often use multiple technologies across their ecosystem.

    Is Next.js better for SEO than React?

    Next.js can offer SEO advantages over a standard React application:
    Server-side rendering provides fully rendered content for search engine crawlers
    Automatic static optimization can create static HTML for better indexing
    Built-in features like automatic sitemap generation and robots.txt support
    These features make it easier to implement SEO best practices, but a well-configured React app with proper SSR can also achieve good SEO results.

    Can you use Next.js without a server?

    Yes, you can use Next.js without a traditional server in several ways:
    Static site generation (SSG) allows you to pre-render pages at build time
    Export your Next.js app as static HTML files
    Deploy to serverless platforms that handle the server-side aspects for you
    However, some Next.js features (like API routes) require a Node.js runtime.

    Can Next.js run serverless?

    Yes, Next.js has excellent support for serverless deployment:
    Platforms like Vercel (created by the Next.js team) offer native serverless deployment
    AWS Lambda, Google Cloud Functions, and Azure Functions can host Next.js apps
    Serverless Next.js component for AWS CDK deployment
    Netlify and other JAMstack platforms support Next.js serverless functions
    Serverless deployments can offer benefits like automatic scaling and reduced operational overhead.

    What is Next.js not good for?

    While Next.js is versatile, there are scenarios where it might not be the best choice:
    Simple static websites (overkill for basic HTML/CSS sites)
    Applications requiring fine-grained control over the server (e.g., real-time apps with WebSockets)
    Projects with strict size limitations (Next.js adds some overhead)
    Electron or other desktop applications (though it can be used for parts of them)
    Always consider your specific project requirements when choosing a framework.

  • How to Check if TCP Port is Open, Closed or in Use on Linux?

    How to Check if TCP Port is Open, Closed or in Use on Linux?

    When working with networking services, you might encounter networking ports on Linux.

    In this post, we will explain everything you need to know about networking ports in Linux, including how different networking protocols (TCP and UDP) use these ports. We will also show you how to check if a TCP port is open, closed or in use on Linux. Where relevant, we also reference UDP ports to show how the same tools behave differently.

    What are Linux Networking Ports?

    In Linux, a networking port is a numbered endpoint that allows software applications to send and receive data over a network. While the IP address is used to identify the host in a network, the port number identifies a specific process or service running on that host. These ports are identified by port numbers, which range from 0 to 65,535 and are integral to how Linux machines communicate with other machines on the network.

    One simple way to think about this is that each application has its own numbered “mailbox” (port). Incoming data is delivered to the correct application by checking the port number.

    For example, in your RunCloud server, think of SSH, HTTP, and HTTPS as different apartments – port 22 is the mailbox for SSH, port 80 is for HTTP, and port 443 is for HTTPS. When data arrives, it knows which ‘apartment’ to go to based on these ‘mailbox numbers’.

    In much the same way that you can open, close, or check your mailbox, RunCloud allows you to manage these ‘mailboxes’ (ports) from the Security tab. You can also configure firewall settings to open a port to allow data in, or close a port to deny data.

    Types of Linux Transport Protocols

    Let’s continue with our apartment building analogy to explain the difference between UDP and TCP in the context of networking ports.

    UDP (User Datagram Protocol) is like a postman who delivers mail without waiting for you to confirm that you’ve received it – he simply drops the mail in your mailbox (port) and moves on. This makes UDP fast and efficient, but there’s no guarantee that the mail (data) will be received.

    TCP (Transmission Control Protocol), on the other hand, is like a courier service that requires you to sign for a package – the courier (TCP) establishes a connection with you (the software application), ensures you’re available to receive the package (data), and only then delivers it. This makes TCP reliable, but slower than UDP due to the time taken to establish the connection.

    Although TCP and UDP are different technologies, they can both be used for sending data over a network, and since they both have different advantages and disadvantages, they are often used simultaneously for different purposes.

    Common Networking Ports in Linux

    If you’re creating a networking application on Linux, then you’ll need to use a port to receive data. However, only one program can listen on a port at one time. If a port is already being listened to by another process, attempting to bind to it will result in an error.

    In this section, we’ll list a few well-known port numbers, which range from 0 to 1023 and are standardized across all operating systems as well as software applications. Here are some common networking ports used in Linux:

    1. Port 21 – File Transfer Protocol (FTP): FTP uses this port for transferring files between systems. For example, you might use FTP to upload a website’s files to its hosting server.
    2. Port 22 – Secure Shell (SSH): SSH is used for secure remote administration of systems. For example, a system administrator may use SSH to log in to a web server located in a different geographical location.
    3. Port 80 – Hypertext Transfer Protocol (HTTP): This port is used by web servers for non-encrypted communication. When you access a website using http://, your browser communicates with the web server on port 80.
    4. Port 443 – HTTP Secure (HTTPS): Port 443 is used for secure web communication encrypted with SSL/TLS. When you access a website using https://, your browser communicates with the web server on port 443.
    5. Port 3306 – MySQL Database System: MySQL, a popular database management system, listens on this port. Applications connect to this port to communicate with the database.

    To learn more about this, you can refer to the Internet Assigned Numbers Authority’s list of registered port numbers and protocols used by each application.

    How to Check if a Port is in Use on Linux

    On Linux, you can use built-in utility tools to check if a port is in use – let’s see how:

    Using the netstat Command

    In Linux, netstat (network statistics) is a command-line tool that displays network connections (both incoming and outgoing), routing tables, and a number of network interfaces.

    On many modern Linux distributions, netstat may not be installed by default. It’s used for finding problems in the network, and to determine the amount of traffic on the network as a performance measurement.

    Here’s a brief overview of some common uses of the netstat command:

    1. netstat: Running the command without any options will display a list of open sockets.
    2. netstat -a: This will display all connections and listening ports.
    3. netstat -t: Displays only TCP connections.
    4. netstat -u: Used to display only UDP connections.
    5. netstat -n: Shows numerical addresses instead of trying to determine symbolic host, port or user names.
    6. netstat -s: Shows statistics by protocol. By default, statistics are shown for TCP, UDP and IP; The -p option may be used to specify a subset of the default.
    7. netstat -r: This command is used to display the routing table.
    8. netstat -i: You can display the interfaces that are being used for network connections using this command.

    For example, if you want to check whether a service is running and listening on the expected ports, you might use netstat -tuln. This will list all TCP (-t) and UDP (-u) connections that are currently listening (-l) and display all addresses as numbers (-n).

    Using the ss Command

    In Linux, ss (socket statistics) is a command-line tool used to view socket statistics and other network information similar to netstat. Here’s a brief overview of some common uses of the ss command:

    1. ss: Running the command without any options will display a list of open sockets.
    2. ss -a: This command will display all active (listening and non-listening) sockets.
    3. ss -t: Display only TCP sockets.
    4. ss -u: Used to display only UDP sockets.
    5. ss -n: Shows numerical addresses instead of trying to determine symbolic host, port or user names.
    6. ss -l: Display only the listening sockets.

    For example, if you want to check whether a service is running and listening on the expected ports, you might use ss -tuln. This will list all TCP (-t) and UDP (-u) connections that are currently listening (-l) and display all addresses as numbers (-n).

    To check whether a specific port is listening, you can use the grep command in combination with ss. For example, ss -tuln | grep :<your-port-number>. Replace <your-port-number> with the port number you want to check. This command will filter out the output of the ss command to only show lines that include your specified port number.

    How to Check if a Port is Open on Linux?

    On Linux, nc (netcat) is a versatile command-line tool that can read and write data across network connections using TCP or UDP protocols, and it is often referred to as the “Swiss-army knife” for TCP/IP networking. To check whether a port is open or closed on your computer, you can use the following command:

    nc -zv <your-ip-address> <your-port-number>

    Here’s what each part does:

    • -z: This flag tells nc to scan for listening daemons, without sending any data to them.
    • -v: This flag makes nc give more verbose output – it will tell you more about what’s going on.
    • <your-ip-address>: This is the IP address of the machine you want to check the port on. You can replace this with localhost to check your own machine.
    • <your-port-number>: This is the port number you’re checking.

    For example, if you want to check whether a web server is running on your own machine, you might use nc -zv localhost 80. If the port is open, nc will return a success message such as localhost [127.0.0.1] 80 (http) open. If the port is closed, it will return a failure message.

    To check whether a port is open on a remote machine, you can replace localhost with the IP address of the remote machine. For example, nc -zv 1.1.1.1 53 will check if port 53 is open on the machine with IP address 1.1.1.1.

    How to Check if a Port is Closed on Linux?

    If a port is not in use or not open, it is closed. You can verify whether a port is open by using the nc command as described above – if the port is closed, the command will return a failure message.

    Wrapping Up: Linux Ports and RunCloud

    Managing ports is a crucial aspect of Linux system administration and checking which ports are open, closed, or in use can help maintain the security and efficiency of your system. We strongly recommend you close unnecessary ports and only keep those open that are required by your applications.

    RunCloud simplifies this process by providing a user-friendly dashboard that allows you to manage your Linux server and networking with just a few clicks.

    If you’re looking for a way to make managing your Linux server and its ports easier, consider signing up for RunCloud. It’s designed to streamline server management for Linux users.

    FAQs on Linux Ports

    How do I get a list of all ports?

    The Internet Assigned Numbers Authority maintains a port registry that ranges from 0-65,535. If you want to get a list of all ports which are currently in-use, then you can use the following netstat command on your Linux server.
    sudo netstat -plnt

    How to check port connectivity in Linux?

    To check port connectivity in Linux, you can use the nc (netcat) command as follows: nc -zv  
    Replace  and  with your IP address and the port number you want to check, respectively.

    How do I know if port 443 is open in Linux?

    To check if port 443 is open on Linux, you can use the nc (netcat) command as follows: nc -zv localhost 443

    How to list all open ports in Linux using netstat?

    To list all open ports in Linux using netstat, you can use the following command:
    netstat -tuln
    This command will list all TCP and UDP ports that are being listened to.

    How many ports does Linux have?

    Linux has a total of 65,536 ports, ranging from 0 to 65,535.

    Can you ping a port?

    While the term “ping a port” is not technically accurate, you can check if a specific port is open using the telnet or nc (netcat) command.

    Is port 22 SSH or SFTP?

    Port 22 is used for both SSH and SFTP – SFTP operates over port 22, using the underlying Secure Shell (SSH) protocol to establish a secure and encrypted connection for secure file transfers.

    What is port 80 in Linux?

    Port 80 in Linux is typically used for HTTP (Hypertext Transfer Protocol), which is used for transmitting hypertext over the internet.

    What port is SFTP?

    SFTP uses port 22, the same as SSH.

    What port is FTP?

    FTP (File Transfer Protocol) typically uses port 21 for control commands and port 20 for data transfer.

  • How to Fix DNS_PROBE_FINISHED_NXDOMAIN Error

    How to Fix DNS_PROBE_FINISHED_NXDOMAIN Error

    Are you tired of seeing the DNS_PROBE_FINISHED_NXDOMAIN error appear when you’re just trying to surf the web?

    In this post, we will share helpful tips for troubleshooting the DNS_PROBE_FINISHED_NXDOMAIN error and discuss some easy fixes. But first, let’s learn more about this cryptic error and why it occurs.

    What is the DNS_PROBE_FINISHED_NXDOMAIN Error?

    The DNS_PROBE_FINISHED_NXDOMAIN error is a common issue that users might encounter when trying to visit a website. This error is displayed when the Domain Name System (DNS), which is responsible for translating domain names into IP addresses, is unable to perform this function for a particular website.

    When you enter a website’s URL into your browser, a DNS query is sent to a DNS server to retrieve the IP address associated with that domain name. If the DNS server cannot find this IP address, it returns an NXDOMAIN response, indicating that the domain does not exist. This response is then relayed back to your browser, which displays the DNS_PROBE_FINISHED_NXDOMAIN error.

    screenshot of DNS_PROBE_FINISHED_NXDOMAIN error

    Most browsers these days use Chromium technology (the software developed by Google Chrome) and show the default, cryptic error message. However, other browsers such as Mozilla Firefox show a simple error message when you encounter “DNS_PROBE_FINISHED_NXDOMAIN”, with possible fixes.

    DNS_PROBE_FINISHED_NXDOMAIN on Firefox

    Similarly with the Safari browser, you will see a different error message which says “Safari Can’t Find the Server” instead of the error code described above.

    DNS_PROBE_FINISHED_NXDOMAIN

    What Causes the DNS_PROBE_FINISHED_NXDOMAIN Error?

    There are several common scenarios where you might see the DNS_PROBE_FINISHED_NXDOMAIN Error, and understanding these common causes can help in troubleshooting and resolving the issue faster. Let’s take a look at them one by one.

    DNS Server Outage

    If the DNS server that your system is using is experiencing issues or is down, then it may not be able to resolve domain names into IP addresses, leading to the DNS_PROBE_FINISHED_NXDOMAIN error.

    Incorrect DNS Settings on Your Computer

    If the DNS settings on your system or router are incorrect, your system may not be able to communicate with the DNS server properly. If you recently changed your router settings, then consider either reverting them to default or using a commercially available DNS provider such as Google, Cloudflare, or Quad9.

    Poorly Configured DNS Records

    When you set-up your DNS records for your domain, it can take up to 48 hours for the changes to propagate. If you incorrectly configure your DNS records, for example, if you write best.example.com instead of test.example.com then you are likely to face the DNS_PROBE_FINISHED_NXDOMAIN error, and you will have to wait for a couple of hours for the DNS changes to propagate.

    To make the process easier and less error-prone, use RunCloud’s built-in DNS management system that allows you to configure multiple domain names on a single website.

    In addition to automatically adding relevant records, RunCloud’s DNS manager also allows you to edit and delete your DNS records from one single dashboard.

    Non-Existent Domain

    If the website you’re trying to access does not exist, or the domain name has been entered incorrectly, the DNS server will not be able to find the corresponding IP address, resulting in the DNS_PROBE_FINISHED_NXDOMAIN error.

    If you’re using RunCloud to host your website, you can simply click on the “Open Site” button in your dashboard to visit the website. This will make sure that you’re visiting the correct URL, and not making mistakes such as typing 0 instead of O.

    To further troubleshoot the DNS_PROBE_FINISHED_NXDOMAIN issue, you can check the DNS records of the website on a public DNS service – simply go to any DNS provider’s website such as dns.google and enter the name of the website to view its actual DNS records. If the DNS records do not exist, then you can notify the website administrator to rectify the problem.

    Problems with Internet Connection

    If your internet connection is unstable or not working, your system may not be able to reach the DNS server to resolve the domain name, causing the DNS_PROBE_FINISHED_NXDOMAIN error.

    Firewall or Security Software Interference

    Sometimes, firewall settings or security software on your system can interfere with DNS operations and prevent your system from communicating with the DNS server. Additionally, many antivirus softwares hijack your computer’s DNS settings to block certain websites, so double check your security settings to make sure nothing is blocking your DNS requests.

    Browser Extensions

    Occasionally, the problem could be with the web browser itself – certain settings or extensions could interfere with the browser’s ability to resolve domain names. Update your browser and consider disabling ad-block extensions that filter DNS queries for blocking traffic.

    How to Fix the DNS_PROBE_FINISHED_NXDOMAIN Error

    In this section, we will provide some potential solutions to resolve the DNS_PROBE_FINISHED_NXDOMAIN error:

    Checking the Internet Connection

    Firstly, make sure that your internet connection is stable. You can do this by trying to access other websites or using online speed test tools.

    Method 1: Do a Ping Test

    If you’re not able to connect to a website, then a simple way to test your connection is by doing a ping test. Simply open a terminal (or command line on Windows) and execute the following command:

    Ping -c 4 runcloud.io

    In the above command, replace runcloud.io with the domain of the website that you are trying to test. After executing the command, if you don’t see an error message, then you can rest assured that your internet connection is working fine.

    Method 2: Check Other Websites

    If you don’t want to test your connectivity settings using a terminal, then you can simply use any browser app to open any popular website. If you are using a WiFi connection, then you can also consider opening the website on a different device connected to the same WiFi, which will make it easier for you to isolate the problem.

    Changing the DNS Server

    If your DNS service provider has crashed, then it might be a good idea to switch to a reputable DNS provider. We recommend using Cloudflare, Google, or Quad9’s DNS services to avoid disruptions in the future.

    Here is a brief overview of how to change your DNS settings on different systems:

    1. Windows: Go to Control Panel > Network and Internet > Network and Sharing Center > Change adapter settings. Right-click on your connection, select Properties, then select Internet Protocol Version 4. Click on Properties, then select “Use the following DNS server addresses” and input the new DNS addresses.
    2. macOS: Go to System Preferences > Network > Advanced > DNS, and then add the DNS server IP addresses.
    3. Linux: Edit the /etc/resolv.conf file and add the line “nameserver [DNS server IP address]”. If you’re using a graphical user interface, then you can also edit it using the network settings utility menu.

    Flushing the DNS Cache

    If you’re facing this problem on one particular device, then you can probably resolve it by flushing the cache. Doing so will remove all the stored DNS entries and force your computer to fetch new records from the authoritative server. Here’s how you can do this on different systems:

    1. Windows: Open Command Prompt as an administrator and type “ipconfig /flushdns”.
    2. macOS: Open Terminal and type “sudo killall -HUP mDNSResponder”.
    3. Linux: Open Terminal and type “/etc/init.d/nscd restart”.

    Resetting the Chrome Flag Settings

    If you’re using a custom built version of Chrome, or have enabled specific experimental flags, then you can expect some occasional abnormal behavior and errors. Reset your browser settings and turn off all experimental features to make sure your browser is not causing any issues.

    In Google Chrome, you can do this by going to chrome://flags/, and clicking on “Reset all to default”.

    Disable your VPN

    A VPN (Virtual Private Network) is a service that allows you to connect to the internet via a server run by a VPN provider. All data traveling between your device and the VPN server is encrypted so that only you and the server can see it.

    When you use a VPN, all your DNS queries travel along the encrypted tunnel between your device and the VPN server, offering greater privacy; however, this can sometimes cause errors such as DNS_PROBE_FINISHED_NXDOMAIN.

    For instance, if the VPN’s DNS server is not responding properly, or if there’s a mismatch between the VPN’s DNS server and your device’s DNS settings, you might see an error.

    To resolve this issue, you can check your VPN settings – look for any settings related to DNS and see if you can change them. For example, some VPNs allow you to choose between using their DNS servers or using the default DNS servers provided by your ISP.

    If changing these settings doesn’t resolve the issue, consider disabling the VPN temporarily to see if that fixes the problem. If the error disappears when the VPN is disabled, it’s likely that the VPN’s DNS servers were causing the issue.

    Conclusion

    In this article, we’ve covered the DNS_PROBE_FINISHED_NXDOMAIN error, a common issue that can occur when browsing the internet. This error is often related to DNS settings, and can be caused by various factors such as incorrect DNS configuration, network issues, or VPN settings.

    We’ve explored several solutions to the DNS_PROBE_FINISHED_NXDOMAIN problem, including checking your DNS settings, resetting your IP and DNS cache, and troubleshooting potential issues with your VPN.

    Managing websites and servers can be challenging, and dealing with cryptic error messages is certainly not fun.

    At RunCloud, we have made it our mission to make managing web servers easier so that our customers don’t encounter such problems in the future.

    Start using RunCloud today and discover how it can significantly speed up your workflow.

  • MariaDB vs MySQL – A Detailed Comparison & How You Should Choose

    MariaDB vs MySQL – A Detailed Comparison & How You Should Choose

    MariaDB and MySQL – which one should you choose?

    Both are widely used for different applications in web development, and so in this post we will provide a detailed analysis and comparison of both MySQL and MariaDB to help you decide which one is better suited for your needs.

    Let’s dive right in!

    What is MySQL?

    MySQL is a widely used open-source relational database management system (RDBMS) developed by MySQL AB, now owned by Oracle Corporation. It stores data in a structured format using rows and columns, making it easy for users to create, manage, and manipulate databases.

    MySQL is renowned for its reliability, scalability, and ease of use, as it is compatible with many programming languages, frameworks, and tools, offering connectors and APIs for popular languages such as PHP, Python, Java, and more.

    Suggested read: How to Change/Reset MySQL Root Password on Ubuntu Linux?

    Pros & Cons of MySQL

    Pros:

    • MySQL is a free and open-source database which means you don’t need to pay anything to use it.
    • MySQL is compatible with most operating systems and programming languages which makes it versatile.
    • MySQL has a simple syntax and is easy to use.
    • It is scalable and capable of handling millions of rows.

    Cons:

    • MySQL is not very efficient in handling extremely large databases and it can slow down as the database grows over time.
    • It doesn’t have as good a developing and debugging tool as compared to paid databases.
    • MySQL is prone to data corruption as it is inefficient in handling transactions.

    Who Uses MySQL?

    MySQL is widely used in the software industry, and to illustrate this, here are a few interesting insights from the 2023 Stack Overflow Developer Survey:

    • 41% of all respondents use MySQL, indicating its widespread adoption across different user categories.
    • 40.5% of professional developers use MySQL, highlighting its importance in the professional coding and development community.
    • Interestingly, 45% of those learning to code also use MySQL, suggesting its role as a fundamental tool for beginners in coding and database management.
    • Among those who have worked with MariaDB, another popular open-source database system, 5,290 respondents expressed a desire to work with MySQL.
    • MySQL is not only desired by 24% of respondents, but also admired by 50%, reflecting its reputation and popularity in the tech community.

    These statistics highlight MySQL’s significant role in both professional and learning environments, and its continued relevance in the ever-evolving tech landscape.

    Suggested Read: How To Properly Backup Your Website (Disaster Recovery) with RunCloud

    What is MariaDB?

    MariaDB is another popular open-source RDBMS developed by the original creators of MySQL due to concerns over its acquisition by Oracle Corporation. MariaDB is designed to maintain high compatibility with MySQL, allowing it to function as a drop-in replacement in many cases.

    It is part of most cloud offerings (including RunCloud) and is the default in most Linux distributions. MariaDB is known for its speed, scalability, and robustness, with a rich ecosystem of plugins and storage engines making it versatile for a wide variety of use cases.

    Pros & Cons of MariaDB

    Pros:

    • MariaDB is a free MySQL clone with improvements such as faster speed and better replication.
    • It is open-source, easy to install, and reliable for business critical workloads.
    • MariaDB offers better query execution and is great for large data sets.
    • Switching to MariaDB from MySQL is a simple task.
    • MariaDB supports more storage engines compared to MySQL.

    Cons:

    • While MariaDB strives to maintain compatibility with MySQL, new features are diverging, which might cause issues for some applications.
    • MariaDB has a relatively smaller community compared to MySQL

    Who Uses MariaDB?

    MariaDB is used by a diverse group of individuals and professionals. Here are some key insights from the Stack Overflow Developer Survey 2023:

    • 17.61% of all respondents in the survey reported using MariaDB.
    • Among professional developers, the usage of MariaDB is slightly higher at 17.69%.
    • For those who are learning to code, 12.34% reported using MariaDB.
    • 5,813 of the total respondents who worked with MySQL expressed a desire to work with MariaDB.
    • MariaDB is desired by 11%, and admired by 53% of respondents.

    These statistics highlight the widespread use and appreciation of MariaDB in the developer community.

    Difference Between MariaDB vs MySQL

    MariaDB and MySQL are both open-source relational database management systems (RDBMS) that store data in a tabular format. Let’s see how they both differ from each other:

    CriteriaMariaDBMySQL
    OwnershipMariaDB is entirely open-source.MySQL is owned and distributed by Oracle. It has one fully open-source version and one paid enterprise version.
    LicensingMariaDB is fully licensed under GPL v2.MySQL is available under GPL or proprietary license.
    PerformanceMariaDB is often considered to excel as it provides enhanced speed and efficiency compared to MySQL.MySQL’s performance may be slower compared to MariaDB on some large databases.
    CompatibilityMariaDB is designed to maintain high compatibility with MySQL.MySQL is compatible with a wide range of systems.
    A table showing difference Between MariaDB vs MySQL

    Suggested read: How To Install phpMyAdmin Easily Using RunCloud

    MySQL vs. MariaDB: Which One Should You Choose?

    When it comes to choosing between MySQL and MariaDB, both share a common ancestry. However, they have distinct features and characteristics that can influence your decision.

    Let’s take a look at the key differences and help you make an informed choice:

    1. Licensing:

    • MySQL: Follows a dual-license approach. While the community edition is open-source under the GNU General Public License (GPL), the commercial version has a different license.
    • MariaDB: MariaDB is fully GPL licensed, emphasizing openness and community-driven development.

    2. Performance:

    • MariaDB: In many scenarios, MariaDB offers improved performance compared to MySQL. Benchmarks have shown that MariaDB can handle certain workloads more efficiently.
    • MySQL: While MySQL is reliable, some users find MariaDB’s performance enhancements appealing.

    3. Storage Engines:

    • MariaDB: Supports a wide range of storage engines, including InnoDB, Aria, TokuDB, and MyRocks. This flexibility allows you to choose the most suitable engine for your specific use case.
    • MySQL: Also supports various engines, but its default storage engine is InnoDB.

    4. Ecosystem:

    • MySQL: Oracle Corporation, the owner of MySQL, provides official support and services, which can be a critical factor for enterprises. For example, the MySQL Database Service allows database administrators to leverage existing Oracle Cloud Infrastructure user identities and group memberships for authentication into MySQL database service instances
    • MariaDB: Some tools and features specifically created for MySQL may not be fully supported in MariaDB.

    Suggested read: SQLite vs MySQL vs PostgreSQL (Detailed Comparison)

    Final Thoughts

    It’s clear that MySQL has an extensive and well-established ecosystem which is backed by Oracle providing a sense of security and reliability for enterprises, while MariaDB offers a strong alternative with its own set of features and community support.

    • If you value openness, performance, and community-driven development, MariaDB is an excellent choice as it provides a seamless migration path from MySQL and offers additional features.
    • However, if you have specific requirements or are already invested in the MySQL ecosystem, MySQL remains a solid option.

    Managing your own server infrastructure can be tedious and time-consuming – why not leave it to the experts?

    With RunCloud, you can manage and deploy your web applications with a single click, without any hassle – you don’t need to be a Linux expert to manage your servers. RunCloud gives you the time to focus on what you do best, while we handle the server management for you.

    Start using RunCloud today and experience the ease of stress-free server management.

    FAQs – MariaDB vs MySQL

    Why is MySQL replaced by MariaDB?

    The original developers of MySQL created MariaDB to ensure the preservation of MySQL’s structure and features after it was acquired by Oracle Corporation.

    Which One to Use for WordPress MariaDB or MySQL?

    While both MariaDB and MySQL are suitable for WordPress, many WordPress hosting providers offer MariaDB as a database option by default as it includes many improvements and optimizations over MySQL, especially in performance and scalability.

    Do people still use MySQL?

    Yes, MySQL is still widely used by a wide range of websites and applications, including household brands such as Spotify, Netflix, Facebook, and Booking.com.

    Is there a workbench for MariaDB?

    Yes, MySQL Workbench, an application for database design, development, maintenance, and testing for several database systems, can also connect to MariaDB.

    How secure is MariaDB?

    MariaDB secures data at every layer – from encrypted communication and storage, to pluggable authentication and role-based access control. It also has an advanced database proxy with a built-in firewall to detect and prevent data breaches by blocking queries and masking sensitive data.

    Is MariaDB a NoSQL database?

    While MariaDB is primarily an SQL database, it does have some NoSQL capabilities, including the NoSQL protocol module that allows a MariaDB server or cluster to execute transactions for applications using MongoDB client libraries.

    Can I use MariaDB on Windows?

    Yes, MariaDB can be installed and used on Windows.

    Is MariaDB suitable for big data?

    Yes, MariaDB is suitable for big data as it supports various storage engines that enhance its performance compared to other databases for similar workloads.

    Why PostgreSQL over MySQL?

    PostgreSQL offers some advantages over MySQL, such as full compliance with the SQL standard, extensive support for NoSQL features such as JSON and hstore, and a powerful extension system that allows you to extend its functionality.

    Is MariaDB’s syntax the same as MySQL?

    Yes, MariaDB is a fork of MySQL, and was designed to be highly compatible with MySQL. It therefore uses the same SQL statements for querying and modifying data.

  • How to Open, Extract and Create RAR Files in Linux

    How to Open, Extract and Create RAR Files in Linux

    Do you want to download multiple files from a Linux server? Or maybe you want to store the logs to comply with regulations?

    In either case, you should compress the files into a RAR archive. In this post, we will show you how to create and extract RAR archives in Linux.

    But before we get started, let’s quickly understand what a RAR archive is.

    What are RAR Files?

    RAR is an acronym for Roshal Archive, which is a type of compressed file format used to reduce the size of files or groups of files. The RAR format offers several advantages over uncompressed files:

    1. Reduced Storage Space: Compressing files into a RAR archive can significantly decrease the amount of disk space they occupy.
    2. Faster Transfer Speeds: Smaller file sizes mean quicker upload and download times, especially over the internet.
    3. Improved Data Management: It’s easier to manage and organize a single RAR file than multiple smaller files.
    4. Data Integrity: RAR files can include error checking and recovery records to repair minor corruptions.
    5. Security: RAR files can be encrypted with passwords, providing an additional layer of security for sensitive data.

    It’s clear that RAR files can be pretty useful, so now let’s see how to use them via command line on Linux servers.

    Installing RAR Tools

    Before you can work with RAR files in Linux, you need to install the necessary tools. Here’s how you can do it:

    Step 1: Update System Repositories

    Connect to your server via SSH and enter the following command to update your system’s package list:

    sudo apt-get update

    This ensures that you have the latest information about available packages and their versions.

    Step 2: Install unrar & rar Packages

    To handle RAR files, you’ll need to install unrar for extracting RAR files, and rar for creating RAR files.

    Use the following command to install necessary packages:

    sudo apt-get install unrar rar -y

    After installation, you can start using these command line utilities to manage RAR archives.

    Working with RAR Files

    With the necessary tools installed, you can now create and extract RAR files using the following steps:

    Creating RAR Files

    Step 1: Navigate to the Directory

    Change to the directory containing the files you want to archive:

    cd /path/to/directory

    You can use the pwd command to check your current working directory and the ls command to see the list of all the files and directories present in the current directory.

    Step 2: RAR File Creation Command

    Once you are in the correct directory, use the rar command to create a new RAR archive:

    rar a archive_name.rar file1 file2 file3

    Replace archive_name.rar with your desired archive name, and file1 file2 file3 with the files you want to include. If you want to include all the files in current directory, then you can enter * instead of file names.

    viewing rar files in linux via command line

    In the above example, we can see that the rar utility created a new archive called myData.rar and added all the files listed that were specified in the command line arguments.

    Extracting RAR Files

    If you have downloaded a RAR file, then you can easily extract this file using the following steps:

    Step 1: Locate the RAR File

    Before we get started, make sure you know the exact path to the RAR file you wish to extract. You can either use the absolute path (from root) to the file, or the relative path (from the current location).

    For example, in the above screenshot, we have an archive in the current directory. For this file, the relative path would be myData.rar and the absolute path would be /tmp/test123/myData.rar.

    Step 2: Extraction Command

    After you have noted the path to your archive, you can extract its contents using the following command:

    unrar x archive_name.rar

    Replace archive_name.rar with the path of your RAR file.

    extracting rar files in linux via command line

    In the above example we can see that we are working in a different directory (test234) and used the absolute path of the archive to extract it into the current working directory.

    Step 3: Directory Structure Preservation

    By default, unrar preserves the directory structure of the archived files. If you want to extract the files to a specific directory, you can specify the new path as a command line argument:

    unrar x archive_name.rar /path/to/destination

    Replace /path/to/destination with your desired directory path.

    extracting rar archives

    In the above example, we can see that the /tmp/test345 directory is empty in the beginning. We use the unrar command to extract data from the archive in the specified directory. After this, we use the ls command once again to check the contents of the /tmp/test345 and confirm whether the file was extracted successfully.

    Advanced RAR Operations

    Listing Contents

    To view the contents of a RAR file without extracting them, you can use the following command:

    unrar l archive_name.rar

    This will list all the files and folders contained within the RAR archive.

    Adding Files to an Archive

    The process of adding files to an existing RAR archive is similar to creating a new archive. You can use the following command to add a file:

    rar a archive_name.rar file_to_add

    Replace file_to_add with the name of the file you wish to add to the archive_name.rar archive.

    creating rar archive

    Setting Passwords to RAR Archives

    If you are working with sensitive data, you can create a password-protected RAR file. To do this, you can use the -p option when creating the archive:

    rar a -p archive_name.rar file_to_archive

    After entering this command, you’ll be prompted to enter and verify a password for the archive. Keep in mind that when you type your password, it will not be displayed on the screen.

    Opening RAR Archives With A Password

    The process of opening a password protected archive is similar to opening a simple file. Just use the following command to open the archive and enter your password when prompted:

    unrar x archive_name.rar /path/to/destination

    After typing your password, press ‘Enter’. If your archive has more than one file, you will be prompted to enter a password for each file – simply press the ‘a’ key on your keyboard to use the same password for all files.

    Splitting RAR Archives

    When working with extremely large files you sometimes need to split them into multiple parts. This is useful when you want to copy them over a network or store them in a smaller storage space.

    To split a large RAR file into smaller parts, you can use the following command:

    rar a -vsize archive_name.rar file_to_archive

    Replace size with the maximum size for each split file (e.g., 10m for 10MB parts).

    In the above example, we can see that the -v10m parameter was used when creating the archive. This made sure that all the archive files were smaller than 10MB. On the other hand, if we had created a single archive, it would have resulted in a much larger file size.

    Conclusion

    Throughout this guide, we’ve explored the vast capabilities of RAR files within the Linux ecosystem. From creating and extracting archives to advanced operations such as encryption and splitting files. We encourage you to discover new ways to use these utilities and streamline your workflow.

    And if you’re looking to take your server management to the next level, consider using RunCloud.

    RunCloud simplifies server management tasks, saves you time, and lets you focus on what’s truly important – building great applications.

    With RunCloud, you can automate the tedious aspects of server management, ensuring that your Linux servers are running smoothly and efficiently.

    Start your journey with RunCloud today and experience the ease of managing servers like never before!