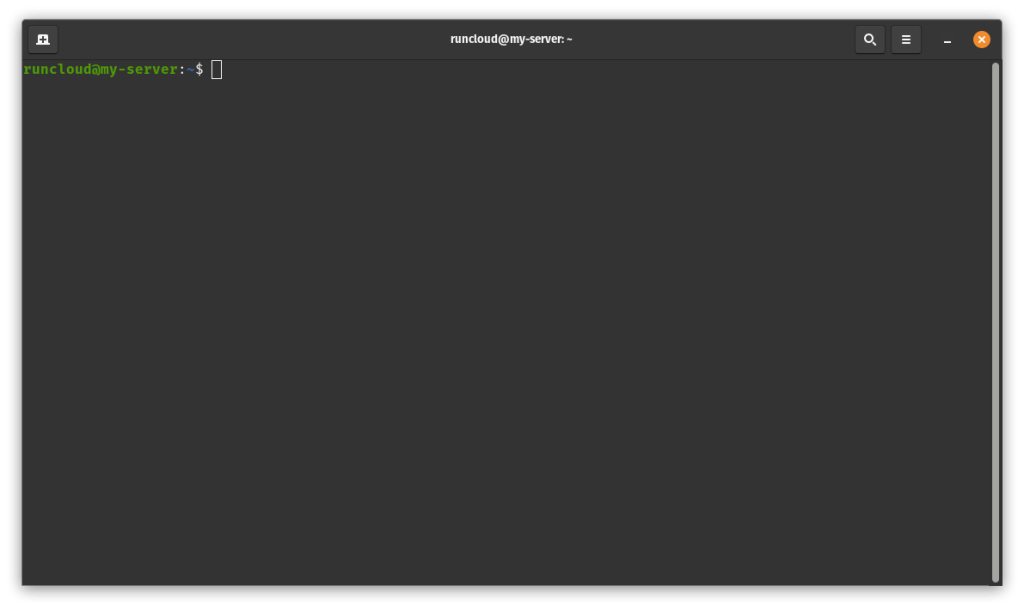
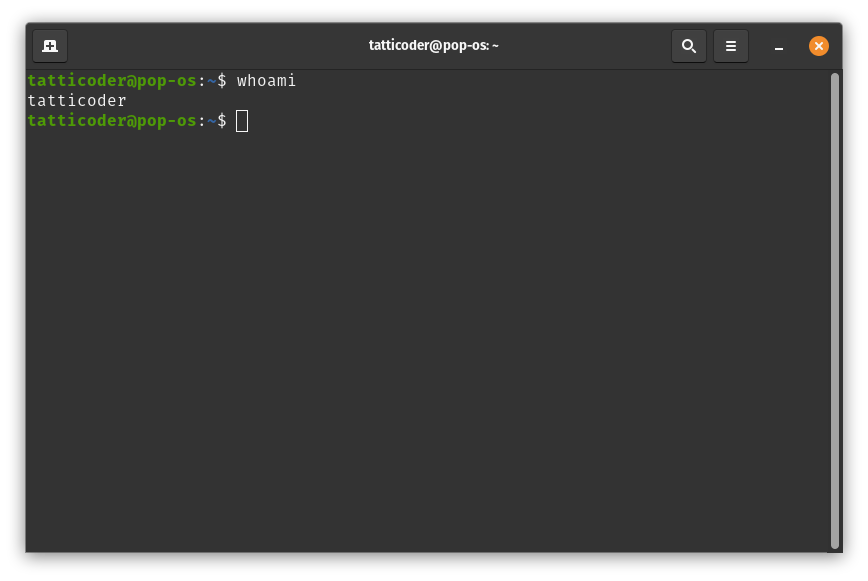
If you’ve ever used a command line interface to access a computer, then you may have noticed a name at the start of each line – the system hostname:
Have you ever wondered what it is, and why it’s there? If so then you’re in the right place. In this post, you will learn everything you need to know about hostnames in a Linux environment, and how to change them. But first, let’s understand what a hostname actually is.
What is a Hostname?
A hostname is a unique name that identifies a computer or device on a network. It can be used to communicate with other devices, access shared resources, or identify the owner or purpose of the device. A hostname can be any alphanumeric string – for example: laptop, server, or runcloud.io.
When accessing a resource over a network, it’s not immediately obvious what computer is being used. If you have a graphical user interface, you can make a good guess by looking at the wallpaper or the time of the device, but it is very difficult when using a command line interface – and this problem only gets worse as the number of computers increases in the network.
Having a hostname makes it possible to distinguish one computer from another. Here are some examples where hostname is useful:
When you connect to a wireless network, your device’s hostname may appear on the router’s client list or other devices on the same network. Changing the hostname to something more descriptive can help you identify your device easily and avoid confusion with other devices that may have similar default hostnames.
When you use remote access tools such as SSH or VNC to connect to your device from another computer, you may need to enter the hostname or IP address of your device. Changing the hostname to something more memorable can make it easier to remember and type the address, especially if your device has a dynamic IP address that changes frequently.
When you use file sharing or streaming services such as Samba or DLNA to share or access media files on your device, your device’s hostname may appear as the name of the server or the source of the files. Changing the hostname to something more meaningful can help you organize and find your files more quickly and conveniently.
How is Hostname Different from MAC Address and IP Address?
You may be wondering why we need hostnames when we already have MAC addresses, and IP addresses – both of which are different ways of identifying a device on a network. They serve different purposes and operate at different layers of the network – let’s see how.
What is a MAC Address?
A MAC address, also known as a hardware address, is a physical address that is assigned by the manufacturer of the network interface card (NIC) of the device. It is a 48-bit hexadecimal number that uniquely identifies the device at the data link layer (layer 2) of the network. It looks something like 00:E0:4C:18:89:3B and it is used by switches and other devices to forward data packets to the correct destination based on the MAC address of the sender and the receiver.
A MAC address cannot be changed easily and it doesn’t depend on the network configuration or location of the device. Moreover, if your computer has more than one way to connect to a network then it will have a separate MAC address for each of them. For example, many laptop computers can connect to a network via both Wi-Fi and wired connections.
What is an IP Address?
An IP address is a logical address that is assigned by the network administrator or the internet service provider (ISP) of the device. It is a 32-bit (IPv4) or 128-bit (IPv6) number that uniquely identifies the device at the network layer (layer 3) of the network. For example, 192.168.100.1 and fe80::1 are IPv4 and IPv6 addresses.
It is used by routers and other devices to route data packets to the correct network or subnet based on the IP address of the sender and the receiver. An IP address can be changed dynamically and it depends on the network configuration and location of the device.
How is the Hostname Different?
A hostname is a human-readable name that is assigned by the user or the system administrator of the device. A hostname can be changed easily and it doesn’t depend on the physical or logical address of the device. We need hostnames because they are easier to remember and use than MAC addresses or IP addresses, which are long and complex numbers.
Hostnames also allow us to access devices or websites using meaningful names rather than numerical addresses. For example, it is easier to type www.google.com than 172.217.160.78 in the browser. Hostnames also enable us to change the physical or logical address of the device without affecting the name of the device or the service it provides. For example, if a server crashes, you can immediately spin up a new server with the same hostname and if everything is configured correctly, nobody would notice the crash.
Is Hostname the Same as Domain Name?
A hostname and a domain name are both labels used to identify and locate resources on the internet, but they are not exactly the same. A hostname is a name assigned to a specific device or server on a network, while a domain name is a name assigned to a website or a group of servers.
Additionally, hostname is supposed to be unique in a network, but you can have more than one computer with the same hostname. However, domain names are globally unique, – you have to pay money to a domain registrar such as Namecheap or Cloudflare to register and use a domain name.
For example, www.example.com is a domain name that represents a website, and www is a hostname that identifies a specific server within the domain. A domain name can have multiple hostnames, but a hostname can only belong to one domain name. A hostname can also be a domain name if it is registered as such. For example, google.com is both a hostname and a domain name.
How to Check the Current Hostname on Linux
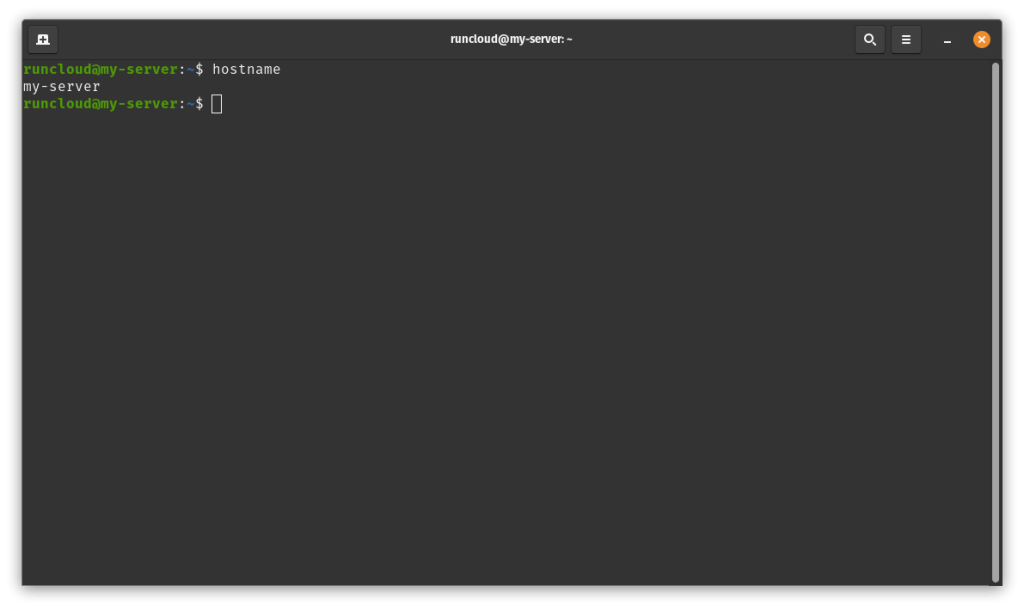
To check the current hostname, you can use the hostname command in the terminal. It will display the name of the device as configured in the system:
hostname
In the above example, we can see that my-server is the hostname of the computer.
How to Set or Change the Hostname Temporarily
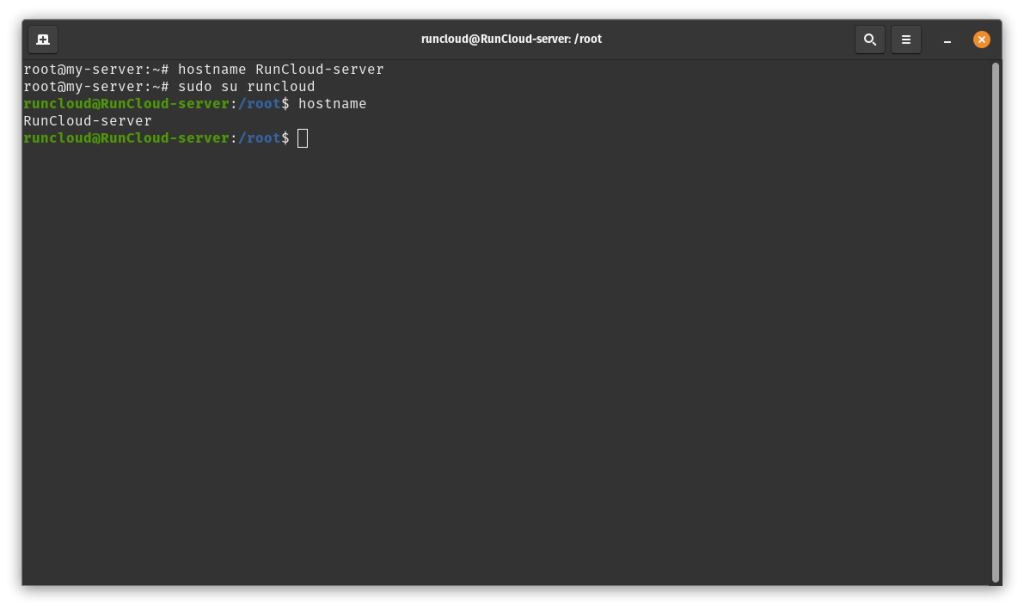
To set or change the hostname temporarily, you can use the hostname command with a new name as an argument. This will change the name of the device only for the current session, and it will not affect other devices on the network.
hostname newname
In the above example, we can see that when we execute the hostname command with superuser privileges, we can change the hostname of the computer.
How to Set or Change the Hostname Permanently
To set or change the hostname permanently, you need to edit two files: /etc/hostname and /etc/hosts. The /etc/hostname file contains the name of the device, and the /etc/hosts file contains the mapping between the name and the IP address of the device. You need to have root privileges to edit these files.
If you are not sure how to edit files via terminal, we recommend you read our in-depth post on editing files via Nano.
sudo nano /etc/hostname
# change the name to newname and save the file
sudo nano /etc/hosts
# change the line that starts with 127.0.0.1 to include newname and save the file
For example, if you change your hostname to runcloud-sandbox then your hosts file should look like this:
127.0.0.1 localhost runcloud-sandbox
Wrapping Up
In this post, we have learned how to set or change the system hostname in Linux. We have also learned what a hostname is, and how it differs from a MAC address and an IP address.
We have limited our discussion to Linux computers only. However, you should know that other devices such as Windows and Android phones also have hostnames, but they may use different methods to set or change them.
For example, Windows allows you to change the hostname from the System Properties dialog box, while Android requires you to use the terminal or edit the system files. Some devices may also have additional names or identifiers, such as Bluetooth name, device model, or network name, that are not the same as the hostname.
If you’re looking for a way to make managing servers much easier and save time, we recommend you take a look at RunCloud.
RunCloud is a cloud server management platform that allows you to deploy, configure, and manage your web applications on any cloud provider.
With RunCloud, you can easily set up your server, install your web stack, secure your server, monitor your performance, and automate your tasks. RunCloud supports various web applications such as WordPress, Laravel, Drupal, Joomla, and more. RunCloud also supports various cloud providers such as DigitalOcean, AWS, Google Cloud, Azure, and more.
In this article we’ll be explaining what these terms mean, why they’re important, and answering a common question – how to list Linux users and groups in Ubuntu with the command prompt.
It doesn’t take long once you’ve dived into Linux systems before you encounter words such as ‘root’ and ‘sudo’, which aren’t at first glance entirely easy to understand.
But first, let’s discuss the difference between root user, system user, and regular user on Linux.
What are the 3 types of users in Linux?
Most people are familiar with two types of user accounts on Linux, but did you know that there are actually three different types of users? Let’s see what each one of them does:
Root User: The root user, also known as the superuser, has the highest level of access to the system. This user can read, write, and execute any file, and can perform administrative tasks such as creating, deleting, or modifying accounts, changing ownership of files, and managing system-wide settings. For example, the root user can use the sudo command to execute commands with administrative privileges.
System Users: System users are created by the operating system during installation for running system processes and services. These users have fewer privileges than the root user and are typically used to run non-interactive or background processes. For instance, the www-data user in Ubuntu is a system user that runs the Apache web server.
Regular Users: Regular users are the standard users who use the system for daily tasks. They have the least privileges and can only read, write, or execute files in their home directory. These users can’t access other users’ files or system files without appropriate permissions. For example, a regular user can create and edit files in their home directory, but cannot modify system files located in /etc or /var.
What is the /etc/passwd File in Linux?
The /etc/passwd file is a key file in Linux that contains information about different user and system accounts present on that system. Each line in the /etc/passwd file represents a single user account and contains seven fields separated by colons (:). Here’s a brief overview of these fields:
Username: This is the name of the user. It should be unique and is used for logging in.
Password Indicator: In modern Linux distributions, this field is usually set to x. The actual hashed password is stored in the /etc/shadow file, which has stricter access controls.
User ID (UID): This is a unique numerical ID assigned to the user. The root user always has a UID of 0.
Group ID (GID): This is the numerical ID of the user’s primary group. The group details are stored in the /etc/group file.
Comment/Description/User Info: This field is optional and can contain extra information about the user, such as their full name.
Home Directory: This is the absolute path to the user’s home directory, where their personal files are stored.
Shell: This is the absolute path to the shell that is started whenever the user logs in.
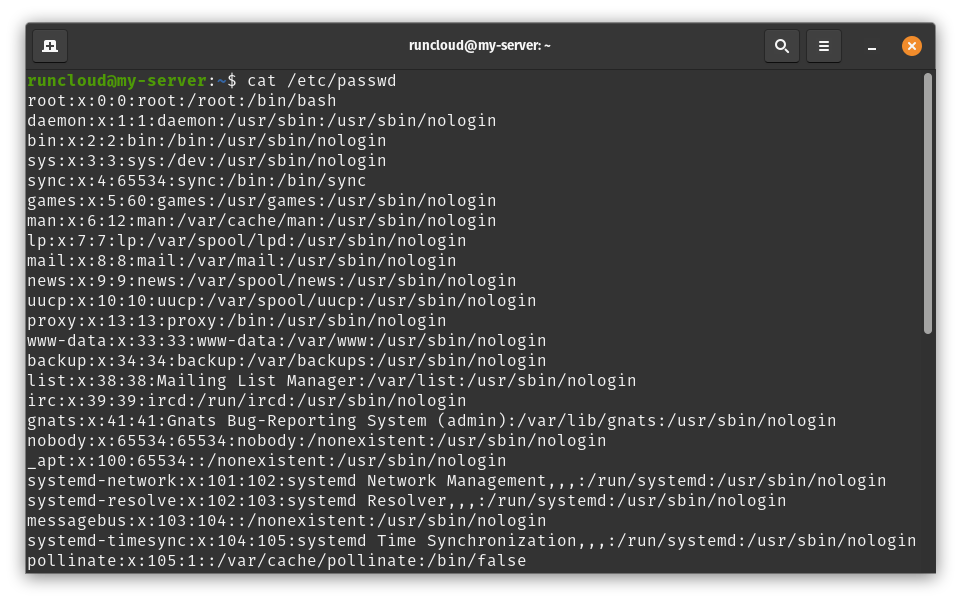
As we mentioned above, the /etc/passwd file contains a list of all the users on a Linux computer, and since this file can be read by any user, we can open it using various tools to see a list of all the users in Linux.
Method 1: List Users Using the cat Command
The cat command in Linux prints the entire contents of a file in the Linux terminal, and so you can use the following command to display the content of /etc/passwd file:
cat /etc/passwd
Method 2: List Users Using “less” or “more”
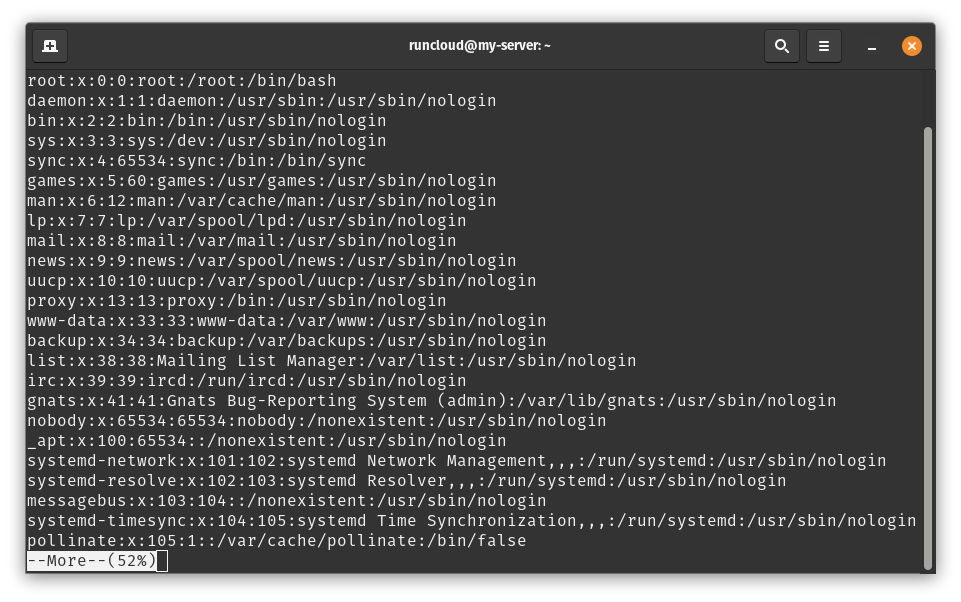
The “less” and “more” commands are very similar – they both allow you to peek inside a file without actually printing its contents in the terminal. If the list of users is long, you can use either the less or more command for easier navigation:
less /etc/passwd
more /etc/passwd
Method 3: How to List Users Using the awk Command
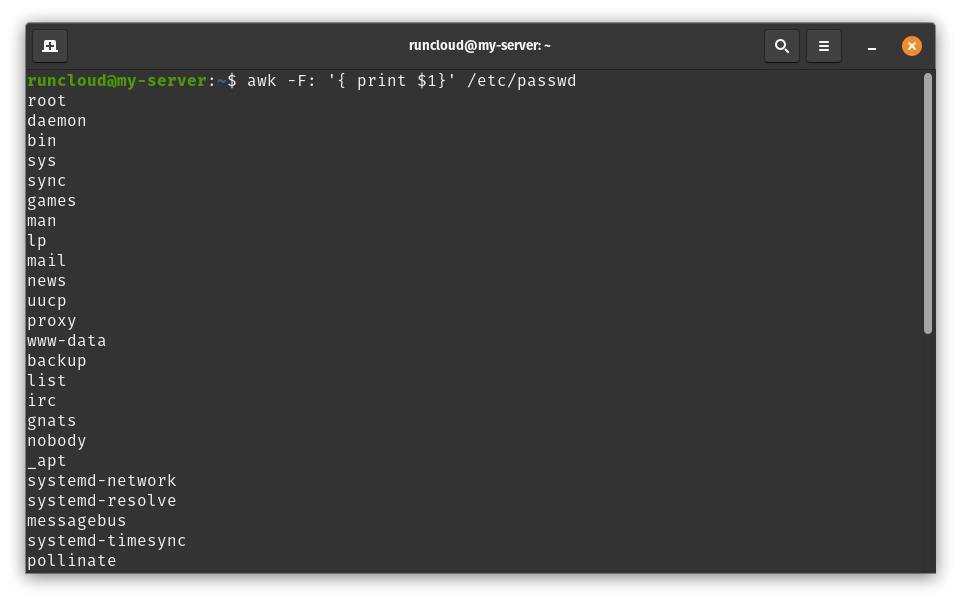
The awk command provides you with the option to perform pattern matching and processing on the specified file. You can use this utility to list users by filtering the /etc/passwd file using the following command:
awk -F: '{ print $1}' /etc/passwd
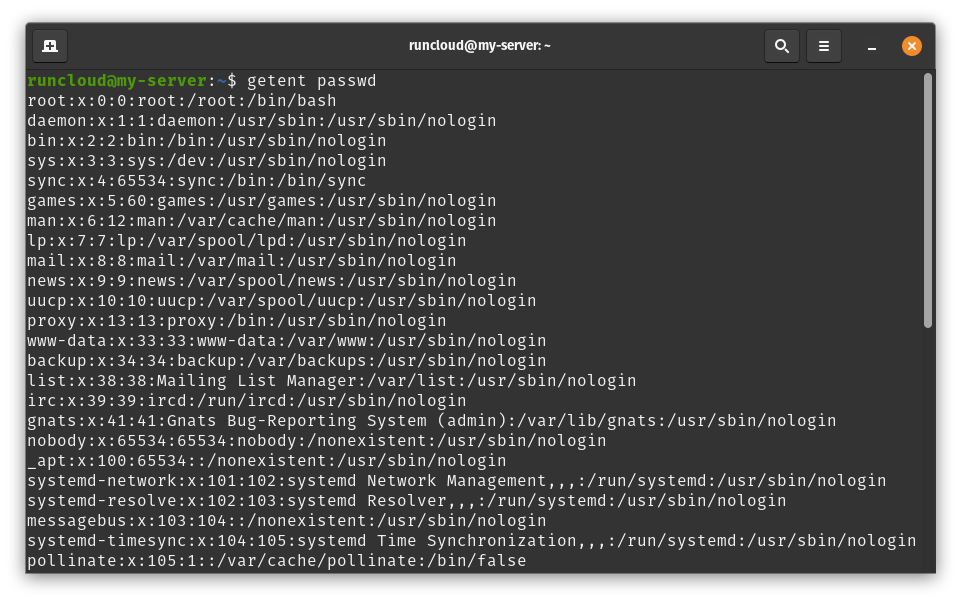
Method 4: List Users Using the getent Command
The getent command displays entries from databases configured in the /etc/nsswitch.conf file, including the passwd database which contains user information. To get a list of all users, you can use the following command:
Simply put, a group is a collection of Linux users that makes it easier to collectively manage the permissions and privileges for each user in the group.
In Linux, each user can belong to one or more groups, and when a user is part of a group, they inherit the permissions and privileges of that group. This system allows administrators to manage multiple users’ permissions simultaneously.
Let’s try to imagine a Linux system as a large office building to understand the concept of groups. In this building, there are different departments such as HR, Finance, Marketing, etc. Each department is like a group in Linux.
Now, each department will have employees working in it, and these employees correspond to a user in Linux. An employee can belong to multiple departments, just like a user can belong to multiple groups in Linux.
In this building, each department has its own resources and access permissions. For example, only HR employees can access HR files, only Finance employees can access financial data, and so on. This is similar to how file permissions work in Linux – when a user is part of a group, they inherit the permissions of that group.
This way, Linux groups help in managing permissions and access control efficiently, especially in environments where there are many users.
There are multiple ways to list groups in Linux, let’s take a look at each one of them:
Method 1: Use the groups Command
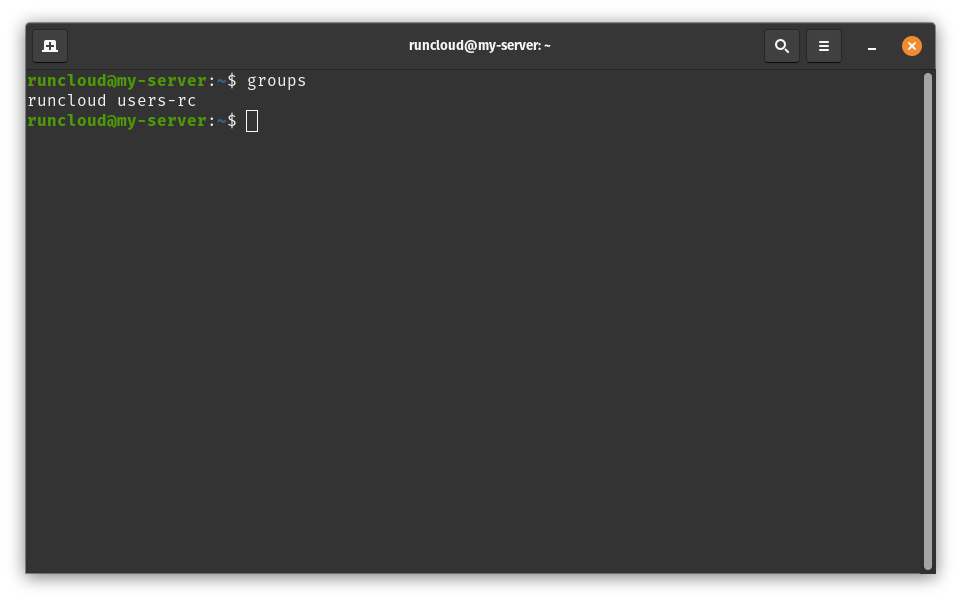
In Linux, you can list all the groups that the current user is a member of by simply using the groups command (without any options) as shown below.
groups
Method 2: List all Groups Using the /etc/group File
As the name describes, the /etc/group file contains information about all the groups on the system. You can use the cat command to display its content:
cat /etc/group
Method 3: List All Group Names Using The cut Command
The cut command in Linux provides simple tools to view and process certain sections of a text file and display its contents to the terminal. You can use the cut command to display only the group names from the /etc/group file:
cut -d: -f1 /etc/group
Method 4: List All Groups Using The getent Command
As we mentioned before, the getent command displays information from databases configured in /etc/nsswitch.conf file, including the group database which contains group information. To view a list of all the groups present on a Linux computer, you can use the following command:
In this post, we’ve explained how Linux users and groups work, as well as how organizing the accounts in a logical structure makes it easier for the administrators to manage and maintain the permissions.
While it is easy to grant permissions to any user on your system, it’s important to keep in mind that misuse of user privileges, especially the root user, can lead to system instability or security vulnerabilities. Therefore, we recommend you only grant the level of access necessary to perform a task.
While managing the accounts and permissions in Linux might sound complicated, you don’t need to be a Linux expert to do so. RunCloud simplifies the process, making it easy to manage your website and server with a single click.
To create a group, use the groupadd command followed by the name of the group. For example, to create a group named ‘developers’: sudo groupadd developers To delete a group, use the groupdel command followed by the name of the group. For example, to delete the ‘developers’ group: sudo groupdel developers
What is the chmod 777 command?
The chmod 777 command changes the permissions of a file or directory to be fully open to all users. The three digits represent the permissions for the owner, group, and others, respectively. Each digit is the sum of read (4), write (2), and execute (1) permissions. So, ‘7’ gives full permissions. chmod 777 filename
What is getent command in Linux?
The getent command in Linux is a tool that helps users retrieve entries from a number of important text files called databases; this includes the passwd and group databases, which store user information. Here are some examples of how to use the getent command: To fetch the list of user accounts on a Linux system (stored in a database known as passwd), you can use the command getent passwd. If you want to fetch details for a particular user, for example, a user called naman, then you can use the command getent passwd naman. If you want to fetch a list of group accounts on a Unix system (stored in a database called group), then you can use the command getent group.
Which command lists all users currently on the system in Linux?
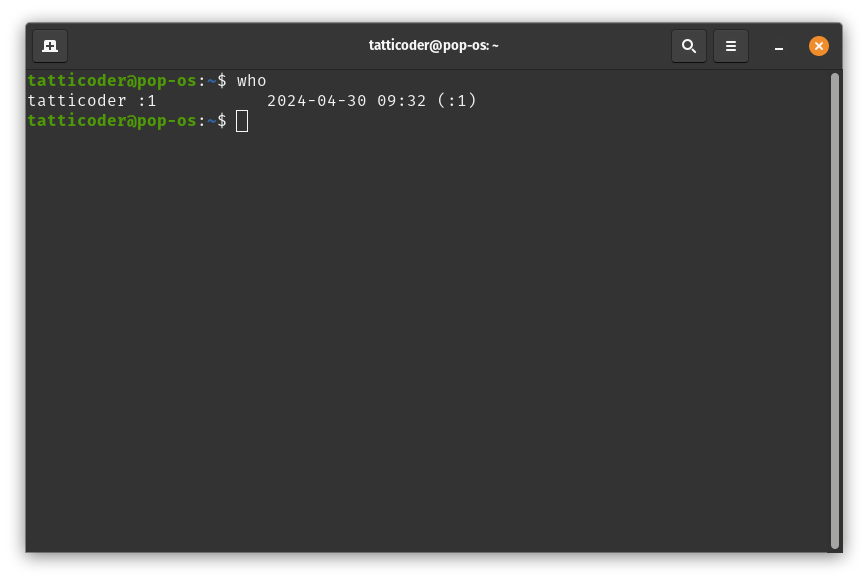
The who command can be used to list all users currently logged into the system: who
What are Linux system users?
In Linux, there are a few user accounts that are automatically created by the system to perform background tasks. These users don’t have a password and can’t log in to interact with the computer – they are only used to grant a specific set of privileges to a particular tool or process.
How do I know if I am a root user?
You can use the whoami command to check if you are the root user: whoami If the output is ‘root’, then you are the root user.
What is the sudo code?
In Linux, sudo is a command that allows users to run programs with the security privileges of another user (by default, the superuser). It stands for “superuser do”. For example, to run the ls command as superuser: sudo ls
According to a recent report by SiteLock, on average, websites are attacked 94 times a day, and are visited by bots 372 times a day.
While many of these bots are nothing to worry about, a percentage of them will be malicious, hunting out vulnerabilities, which is why it’s vital to remain vigilant where your website’s security is concerned, and in particular, we’re focusing today on PHP security.
The role of PHP, a widely embraced server-side scripting language, continues to become even more pronounced in shaping the robustness and reliability of web applications.
It’s worth noting that PHP isn’t just another player in this arena – it’s a formidable leader, accounting for a staggering 76.8% of all websites. Since PHP plays a critical role in web development, ensuring the safety and integrity of your web applications has never been more crucial.
According to the PHP introduction manual, PHP is designed specifically to be a more secure language for writing CGI programs than Perl or C, and with the correct selection of compile-time and runtime configuration options, and proper coding practices, it can give you exactly the combination of freedom and security you need.
In this article, you’ll discover the essential strategies and tactics to better protect your PHP web applications.
Let’s get started!
PHP Version Management
Always Use the Latest Version of PHP
Using a secure PHP version is vital in safeguarding your web application. The latest PHP releases offer not only a technological leap, but also security upgrades to protect against evolving security challenges. As a result, older versions of PHP are outdated – check the PHP docs to see if your PHP version has reached end of life.
You should occasionally check the PHP Supported Versions page to ensure that your PHP installation remains in sync with the latest offerings. By doing so, you’ll be taking a proactive stance against security breaches, and enhancing the overall resilience of your web application.
Use RunCloud Docker to Isolate Your Web Applications
If, for any valid reason, upgrading to the latest PHP version is not feasible, an alternative approach to bolster your web application’s security is to use RunCloud Docker. By isolating your older PHP application within a separate container, you effectively create an additional layer of security for your entire system.
This strategy ensures that your older application runs independently from the rest of your web applications. Even if the older PHP version may have certain vulnerabilities, confining it within a distinct container minimizes the risk of those vulnerabilities spreading to other applications in your environment. It essentially creates a protective barrier, allowing you to run legacy software without compromising the security of your newer, more up-to-date applications.
One of the quickest ways to enhance the security of your PHP web application is by disabling PHP execution in directories where it serves no functional purpose. This proactive measure prevents unauthorized access and uncontrolled code execution within your web application.
By restricting PHP execution in non-essential directories, you reduce the attack surface for potential threats. Hackers often seek out vulnerabilities that allow them to execute malicious PHP scripts on your server. By turning off PHP execution where unnecessary, you not only deny them the opportunity, but also ensure that your application functions securely.
Properly Configure the PHP.ini File and Other Requisites
When you are running a PHP application, you should properly configure your php.ini file. In this file, you have the power to fine-tune various PHP settings to align with your application’s security requirements.
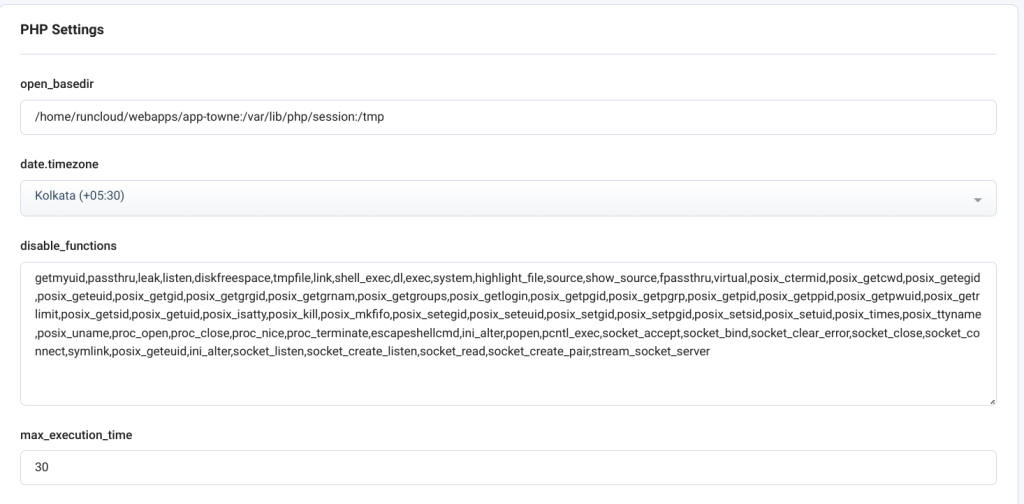
For instance, you can disable features that are not needed, reducing the potential attack vectors. Additionally, setting appropriate values for variables such as max_execution_time and memory_limit ensures that your application operates within secure constraints.
RunCloud simplifies this process by allowing you to manage these settings directly from its user-friendly dashboard, making it convenient to maintain the security and performance of your PHP web application.
Leveraging PHP Libraries
When it comes to protecting your web application, one effective strategy is to use established PHP libraries. These libraries serve as valuable resources for implementing common security functions such as authentication, authorization, and encryption. They have undergone rigorous testing and have proven their reliability over time.
By using these well-vetted libraries, you significantly reduce the likelihood of implementation errors in your application’s security measures. This approach not only streamlines the development process, but also enhances the overall security of your web application. It allows you to benefit from the collective knowledge and experience of the PHP community, providing robust solutions to common security challenges.
Dependency and Component Security
While it is recommended to use third party components, sometimes they can have security vulnerabilities that are addressed in newer versions. To ensure the security of your web application, it’s necessary to track the security of your code dependencies and third-party components.
Using outdated libraries and third-party components can leave your application vulnerable to exploits and security breaches. Cyber threats continually evolve, and older dependencies may not receive updates or patches to address newly discovered vulnerabilities.
By keeping your code dependencies up to date, you reduce the likelihood of attackers exploiting vulnerabilities in outdated components. Regular updates not only bolster your application’s security, but also contribute to its stability and performance, providing a safer and more reliable experience for your users.
Do Not Store Passwords
We cannot stress this point enough – when it comes to the security of user data in your web application, a fundamental principle is to store passwords securely.
Do not store passwords in plain text – ever!
It is essential to use strong, one-way hashing algorithms such as bcrypt.
Hashing is a process that transforms a user’s password into a unique string of characters, making it extremely difficult for anyone, including system administrators, to reverse the process and obtain the original password. This is crucial because it adds a layer of protection to user credentials, preventing unauthorized access even if your database is compromised.
On the other hand, storing passwords in plain text, or using reversible encryption techniques, poses a significant security risk. In these cases, if an attacker gains access to your database or security measures are breached, they can easily obtain and misuse user passwords, potentially causing significant harm to your users and your application’s reputation.
We recommend reading this article by Okta to understand bcrypt in more detail, and learn how to implement it securely.
Enhancing Application Security
Don’t Rely on Cookies for Security
While cookies play an integral role in session management and user experience on web applications, it’s essential to understand that they should not be the sole means of securing your application. Cookies, by themselves, are not foolproof safeguards against security threats. Instead, they should be viewed as just one layer of your security strategy.
To make a robust application, it’s crucial to implement additional security measures. This includes, but is not limited to, robust input validation and proper authentication mechanisms. These measures not only complement cookie-based session management, but also provide an extra layer of protection against various vulnerabilities and threats.
Validate User Input
When developing an application, you should never trust user input implicitly. User input can be a potential method for attacks such as SQL injection and cross-site scripting (XSS). To safeguard against these common vulnerabilities, you should always validate and sanitize user input.
By validating user input, you ensure that the data entered by users sticks to predefined criteria, and you can reject or sanitize any input that doesn’t meet these criteria. This is a fairly complex topic and if you don’t understand it fully then it can lead to security vulnerabilities. It’s advisable to use input validation libraries and functions that have been designed for this purpose.
Regular Security Checks
Safeguarding your web application is not a one-time effort but an ongoing commitment. Regular security audits are an essential part of maintaining a robust security application. Automated security scanners can be valuable in identifying potential vulnerabilities within your application.
However, for larger websites, it is advisable to take an extra step. It’s recommended to hire a team of white hat hackers who can perform thorough security testing. These ethical hackers simulate real-world attacks to find vulnerabilities and, if they succeed, they provide guidance on how to remedy these issues.
Final Thoughts
By following the best practices outlined in this guide, you are taking a significant step toward bolstering the security of your PHP web application. However, it’s crucial to recognize that security is not a one-time task – it’s a continuous commitment that requires vigilance.
If you’re unsure about where to start or want to simplify the process of securing your web applications, consider using RunCloud.
When you deploy & manage your servers using RunCloud – they’re equipped with sensible and secure default settings, but you retain complete access and control of your infrastructure.
RunCloud empowers you to implement these best practices effortlessly, ensuring that your PHP web application operates within a secure environment. So, why wait? Take the proactive step towards enhanced security – sign up for RunCloud today!
One of the most valuable benefits of having computers take charge of many aspects of our lives is the way they can complete tasks over and over again, following a defined schedule without complaint. How do they do this? The answer is something called “cron jobs”.
In this post, you’ll learn exactly what a cron job is, why people use them, and how you can use cron jobs yourself for automating mundane tasks on your server.
But even if you’re not a Linux expert then don’t worry, we will also share a novel method for novice Linux users to manage their system much more effectively using cron jobs.
Let’s get started!
What is a Cron Job?
A cron job is a command or a script that is executed by the cron daemon, a background service that runs on Linux systems and which checks for scheduled tasks. A cron job consists of two parts: a schedule and a command.
The schedule defines when and how often the command should run.
The command defines what should be executed.
Let’s take a look at each of them individually.
Understanding Cron Schedules
The schedule is specified using a special syntax that consists of five fields:
minute
hour
day of month
month
day of week.
Each field can have a single value, a range of values, a list of values, or a special character. The fields are separated by spaces or tabs.
Here is an example of a schedule:
30 10 * * 1-5
The above schedule means that the specified command should run at 10:30 AM on every weekday (Monday to Friday). The asterisk (*) means any value, and the dash (-) means a range of values. You can also use a comma (,) to separate multiple values, a slash (/) to specify increments, and predefined keywords, such as @reboot, @daily, @weekly.
You can use these predefined keywords to make your scripts more readable. For example, if you want to run something once a week then instead of writing 0 0 * * 0, you can simply write @weekly.
To learn more about creating cron schedules, we recommend you take a look at these useful articles:
The second part of the cron syntax defines a task that needs to be completed. It can be either any valid Linux command, or a path to a script that can be executed. The command can have arguments, redirections, pipes, etc. The output of the command is usually sent to the user’s email, unless it is redirected to a file or another command.
Here is an example of a command:
/usr/bin/backup.sh
This command runs a script that performs a backup operation. The script must have the executable permission, and the correct shebang line.
Why Use Cron Jobs?
Cron jobs are extremely valuable for automating repetitive or periodic tasks, such as backups, updates, notifications, etc. You can use these schedules for a variety of tasks such as:
Importing data from another system on a recurring basis
Making changes to properties in your CRM based on time and date (such as annually, monthly, or daily)
Running system management commands, such as clearing the cache, updating packages, checking disk space, etc.
Running scripts or programs that perform specific tasks, such as generating reports, sending emails, scraping websites, etc.
Scheduling backups of your files, databases, or websites
Many popular web platforms such as Magento and WordPress rely on cron jobs to perform various tasks related to their functionality and performance. Some of these tasks are: indexing databases, sending newsletters, processing orders, etc.
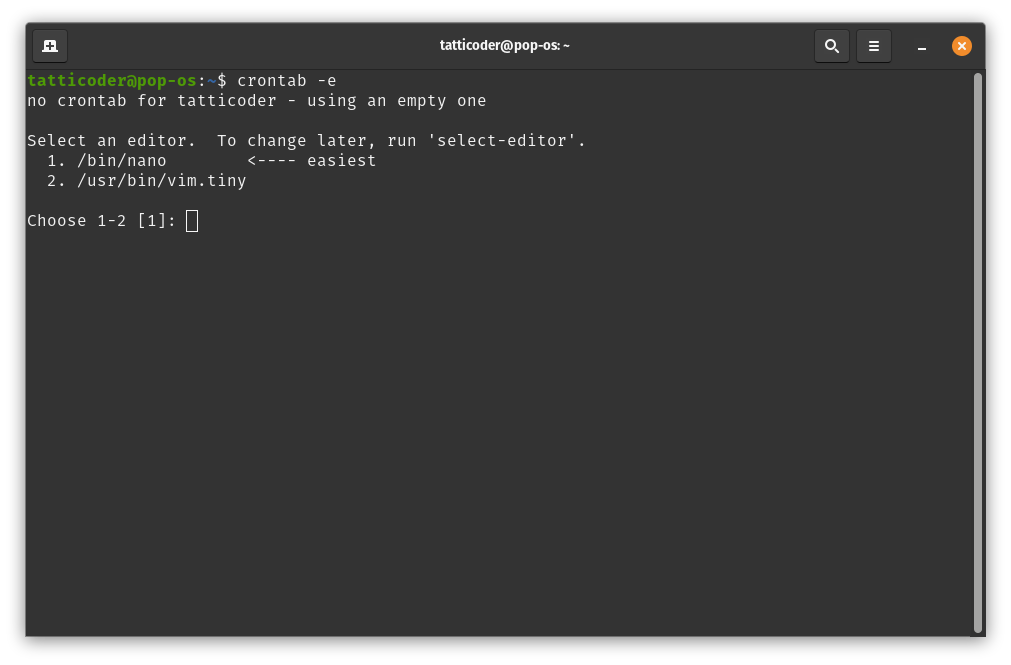
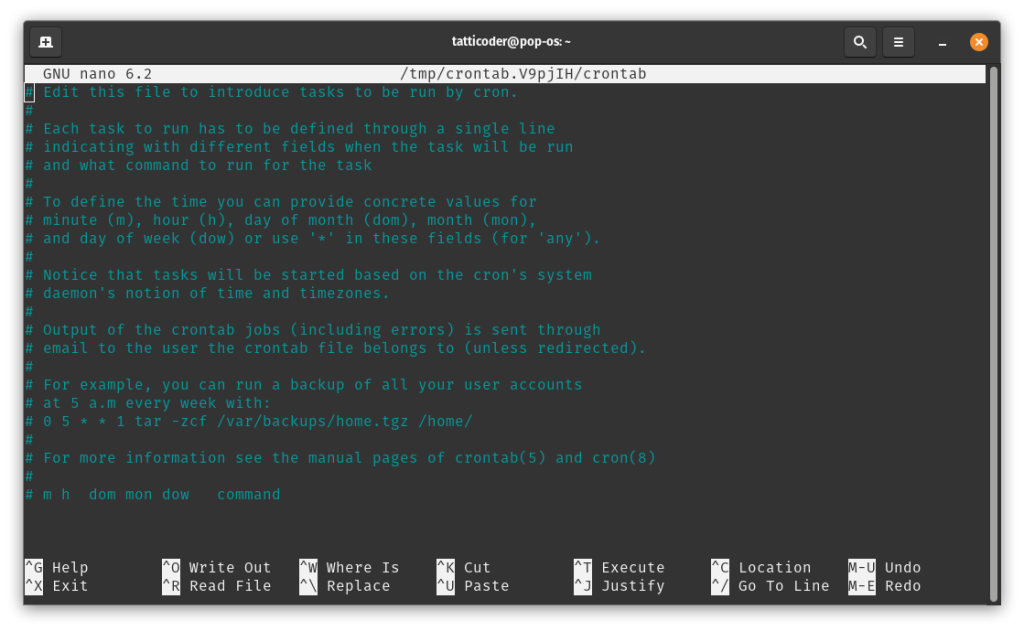
To create a cron job on Linux, you need to edit the crontab file. This is a text file that stores the cron jobs for a particular user account on the computer. You can use the crontab -e command to edit the crontab file using your default editor. If you are running the command for the first time, you may be asked to choose an editor, such as nano, vim, emacs, etc.
Select the number corresponding to your desired editor to use that one, or just press ‘Enter’ to use the default editor.
When working on the crontab file, you should keep following things in mind:
Lines starting with the hash (#) sign are comments, and are completely ignored by the computer
Blank lines are also ignored
All other lines represents an individual cron job
As noted previously, cron jobs follow the schedule command format. If we want to use the schedule and command described above, we will add the following line to the crontab file.
Note that at the end of the command, we have added a helpful comment that will make it easy to identify this cron task if we ever wish to make changes to it in the future.
30 10 * * 1-5 /usr/bin/backup.sh # Run backup.sh at 10:30 AM on weekdays
You can add, modify, or delete lines in the crontab file to create or update your cron jobs. After you save and exit the editor, the cron daemon will reload the crontab file and apply the changes. You can also use the crontab -l command to list the current crontab file, or the crontab -r command to remove the crontab file.
For more details on the cron schedule syntax, you can check the crontab man page.
How to Manage a Cron Job
Cron jobs are usually set and forget – there isn’t much that you usually need to do once it has been enabled. However, if you suspect that your jobs are not running properly, then you can use the following tips to manage and troubleshoot your cron jobs:
To disable a cron job temporarily, you can comment out the line in the crontab file by adding a hash sign # at the beginning of the line.
To enable a cron job, you can uncomment the line in the crontab file by removing the hash sign # at the beginning of the line.
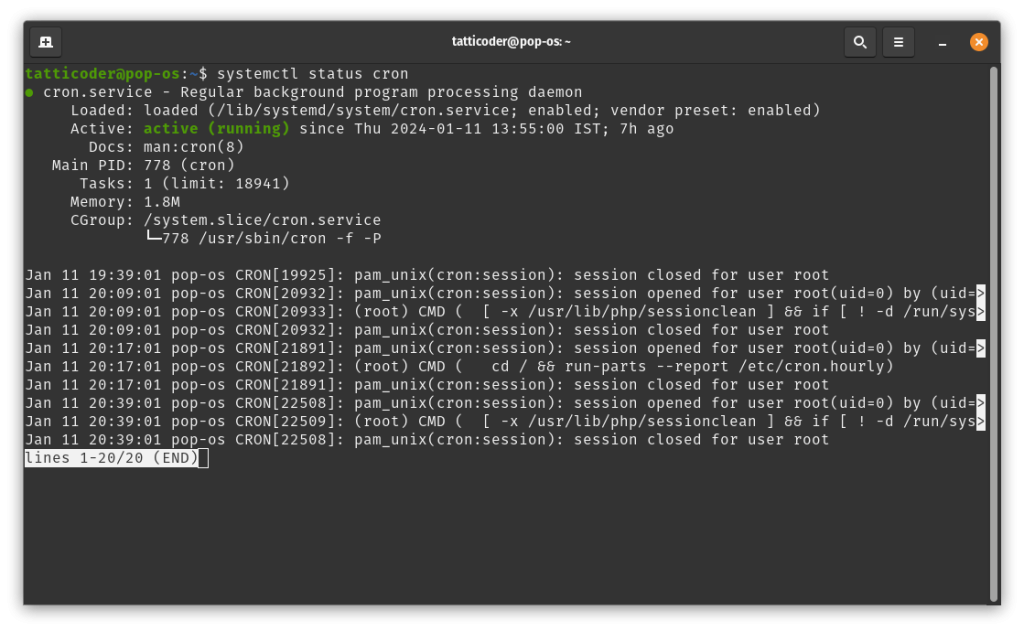
To view the status of the cron daemon, you can use the systemctl command or the service command, depending on your Linux distribution. For example, systemctl status cron or service cron status.
To restart the cron daemon, you can use the systemctl command or the service command, depending on your Linux distribution. For example, systemctl restart cron or service cron restart.
Creating Cron Jobs the Easy Way with RunCloud
Managing Linux can be hard and difficult, especially for beginners or non-technical users. Linux commands and scripts can be complex and error-prone, and require a lot of knowledge and experience to use them effectively. This is why we built RunCloud!
RunCloud is a cloud server management panel that simplifies and automates the process of creating and managing cron jobs on Linux servers.
We provide a feature-rich GUI that helps you create and edit cron jobs right from the dashboard, without the need to use the terminal or edit the crontab file manually.
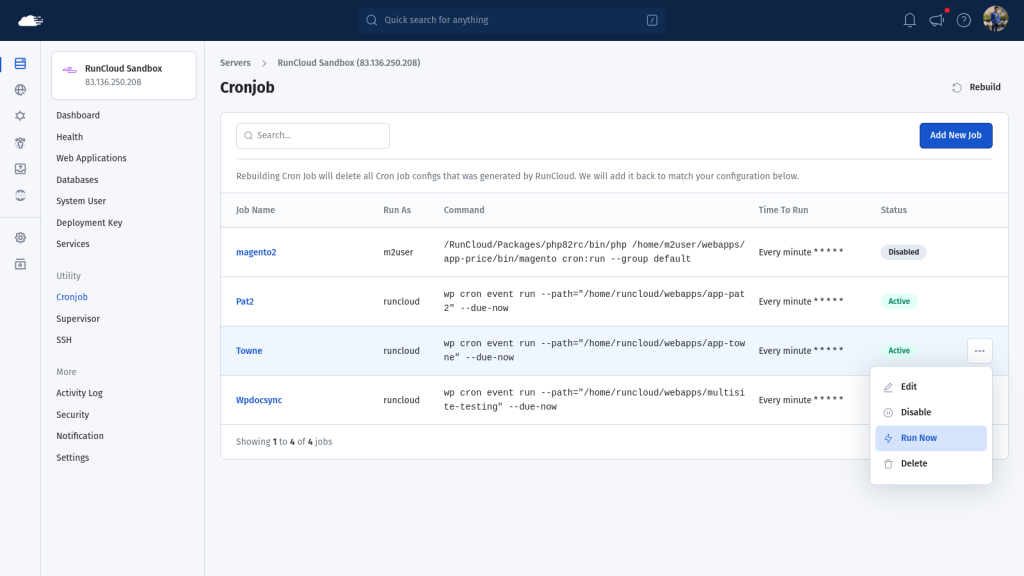
To create a new job on your server, simply open your RunCloud dashboard and click on the “Cronjob” tab in the left menu.
On the next screen, just click on “Add New Job” to get started.
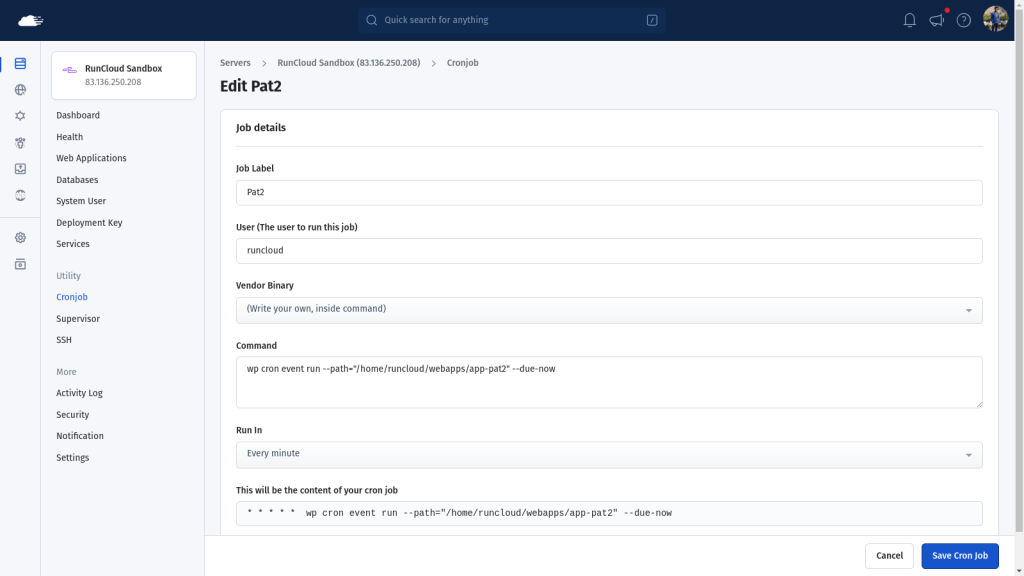
When creating a new job, simply fill in the basic information, such as the name of the job and the command that you want to execute – everything else will be pre-filled for you.
The above screenshot shows an example of a cron job created using RunCloud. This cron job will run the WordPress cron events for the app-pat2 web application every minute, using the runcloud user and the wp-cli tool.
Let’s take a look at each of the settings that you can modify.
Job Label: This is a name or description for the cron job, which can help you identify and organize your cron jobs.
User: This is the system user that will execute the cron job. You can choose any user that has the permission to run the command or script.
Vendor Binary: This is the binary or interpreter that will run the command or script. You can choose from a list of vendor binaries provided by RunCloud, such as /bin/bash, /usr/bin/php, etc. or you can write your own binary inside the command field.
Command: This field contains the actual command or script that will be executed by the cron job. You can write any valid Linux command or a path to a script that can be executed. In this case, the command is using the wp-cli tool to run the WordPress cron events for the app-pat2 web application.
Run In: This is the schedule or frequency of the cron job. You can choose from a list of predefined settings, such as every minute, every hour, every day, etc., or you can use the custom settings to specify your own schedule using the cron syntax.
Why Use RunCloud?
RunCloud’s cron job feature is more powerful than the traditional way of creating and managing cron jobs on Linux systems, because it offers the following advantages:
It has a user-friendly and intuitive GUI that makes it easy to create and edit cron jobs, without the need to use the terminal or edit the crontab file manually.
It provides predefined settings and custom settings for scheduling your cron jobs, which can save you time and avoid errors in writing the cron syntax.
It provides a list of vendor binaries that you can use to run your commands or scripts, which can simplify your commands and ensure compatibility with your server environment.
It allows you to choose any system user that has the permission to run the command or script, which can enhance the security and flexibility of your cron jobs.
It allows you to quickly Activate or Disable individual cron jobs without ever needing to log in to your server.
It enables you to run cron jobs on demand right from your RunCloud dashboard.
Conclusion
In this article, we have shown you how to create and manage cron jobs on Linux using the crontab command and the cron daemon. Cron jobs are a powerful and convenient way to automate tasks on Linux systems. We hope you have found this article useful and informative. If you have any questions or feedback, please feel free to leave a comment below.
If you are looking for a simple and powerful way to create and manage cron jobs on Linux servers, you should try RunCloud.
RunCloud is a cloud server management panel that simplifies and automates the process of managing Linux servers.
RunCloud is more than just a cron job manager. It is a complete solution for managing your web applications, databases, backups, security, and performance on Linux servers. You can use RunCloud to deploy, configure, and optimize your web applications using any PHP version and web server stack.
RunCloud is compatible with any cloud provider, such as AWS, Google Cloud, DigitalOcean, Linode, Vultr, etc. If you want to experience the power and simplicity of RunCloud, you can sign up for a RunCloud account today!
Are you working on a bash script that needs to be executed without any human inputs? Do your scripts fail when the process of copying files encounters a problem?
If you answered “yes” to either of these questions then you’re in the right place.
In this post, we will take a quick look at the cp command in Linux, and examine how it can be used in different scenarios.
How to Copy Files in Linux CLI
Copying files is one of the simplest actions that you can perform on a computer. To copy files via the command line you can use the cp command, which stands for ‘copy’. The general syntax for the cp command is:
cp [OPTIONS] SOURCE(s)... DESTINATION
The SOURCE(s) can be one or more files or directories, and the DESTINATION can be a single file or directory. If you’ve passed more than two parameters to the command, then the last one is always considered the destination, and all other parameters before it are considered the source(s).
If the DESTINATION is a directory, the SOURCEfiles or directories are copied into it.
If the DESTINATION is a file, the SOURCEfile is copied and renamed as the DESTINATION file.
Here is a simple example of how to copy a file named file.txt from the current directory to another directory named backup:
cp file.txt backup/
This will copy the file file.txt to the backup directory with the same name. If you want to copy the file with a different name, you can specify the new name after the backup directory:
cp file.txt backup/new_file.txt
This will copy the file file.txt to the backup directory as new_file.txt.
How to Overwrite Existing Files
By default, cp will overwrite any existing files in the destination without asking for confirmation. However, this behavior can be changed by using different flags or options with the cp command. Here are some of the common flags that can affect how cp handles overwriting:
-f or --force: This option will force cp to overwrite any existing files in the destination, even if they cannot be opened or removed. This option will also ignore any -n option that is used before it.
For example, cp -f source.txt destination.txt will overwrite destination.txt with source.txt, regardless of any permissions or errors.
-i or --interactive: This option will make cp prompt the user before overwriting any existing files in the destination. You can choose to overwrite or skip the file by typing y or n and then pressing Enter.
If you’re copying multiple files at once, you will be prompted for each file separately. If you don’t type anything and press Enter then the file will not be overwritten.
This option will also override any -n option that is used before it. For example, cp -i source.txt destination.txt will ask the user if they want to overwrite destination.txt with source.txt, and proceed accordingly.
-n or --no-clobber: This option will prevent cp from overwriting any existing files in the destination. If the destination file already exists, cp will skip it and move on to the next file. This option will also override any -i option that is used before it.
For example, cp -n source.txt destination.txt will not overwrite destination.txt with source.txt, if destination.txt already exists.
-u or --update: This option will make cp copy only when the source file is newer than the destination file, or when the destination file does not exist. This can be useful for updating or synchronizing files between different locations.
For example, cp -u source.txt destination.txt will overwrite destination.txt with source.txt, only if source.txt is newer or destination.txt does not exist.
Note that these flags can be combined to achieve different effects. For example, cp -uf source.txt destination.txt will force cp to overwrite destination.txt with source.txt, only if source.txt is newer or destination.txt does not exist.
Changing the Default Behavior
On some computers, the default behavior of the cp command can be affected by an alias. An alias is a way of creating a shortcut or a new name for a command, with some predefined options.
For example, some Linux distributions come with the following alias pre-defined in their code:
alias cp='cp -i'
This means that whenever the user types cp, the shell will actually run cp -i, which will prompt the user before overwriting any files.
Checking For An Existing Alias
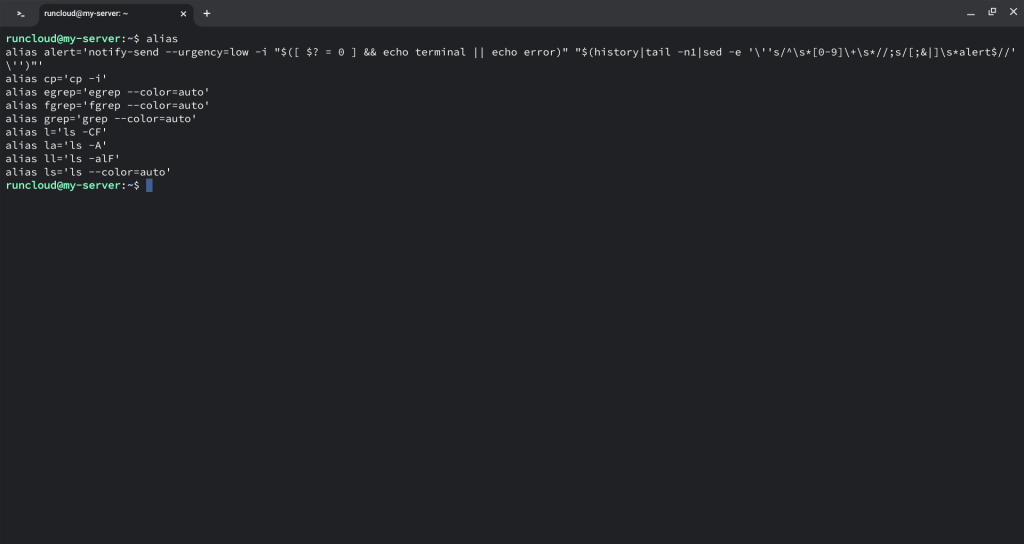
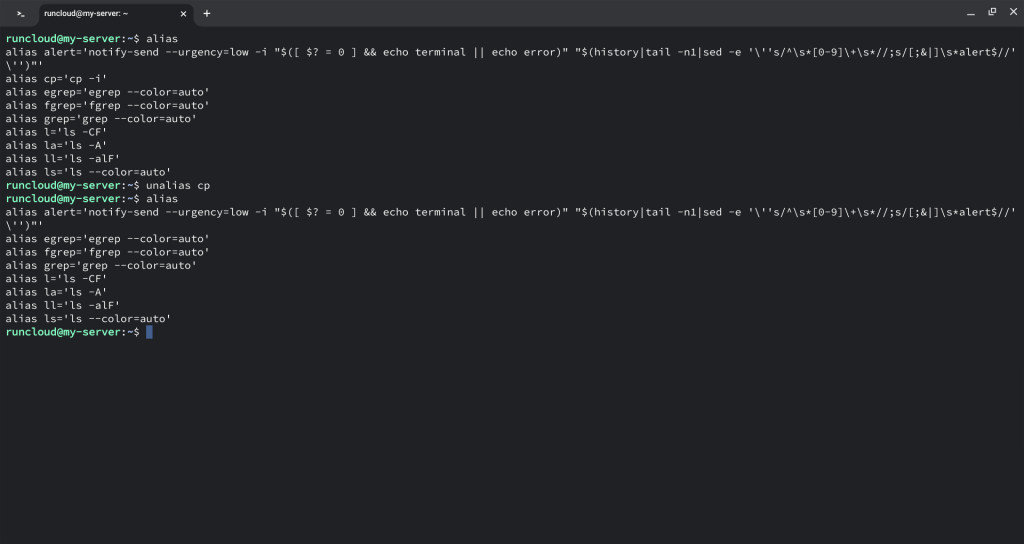
If you’re not sure whether your computer has a predefined alias, then you can run the following command to list all aliases, and then look to see whether the cp is present in the output:
alias
Removing An Alias
To remove the alias for cp, you can run the command unalias cp, which will restore the default behavior of cp.
In the above example, we can see that an alias was defined for the cp command. After executing the unalias command, the alias entry was removed from the list.
Temporarily Bypass An Alias
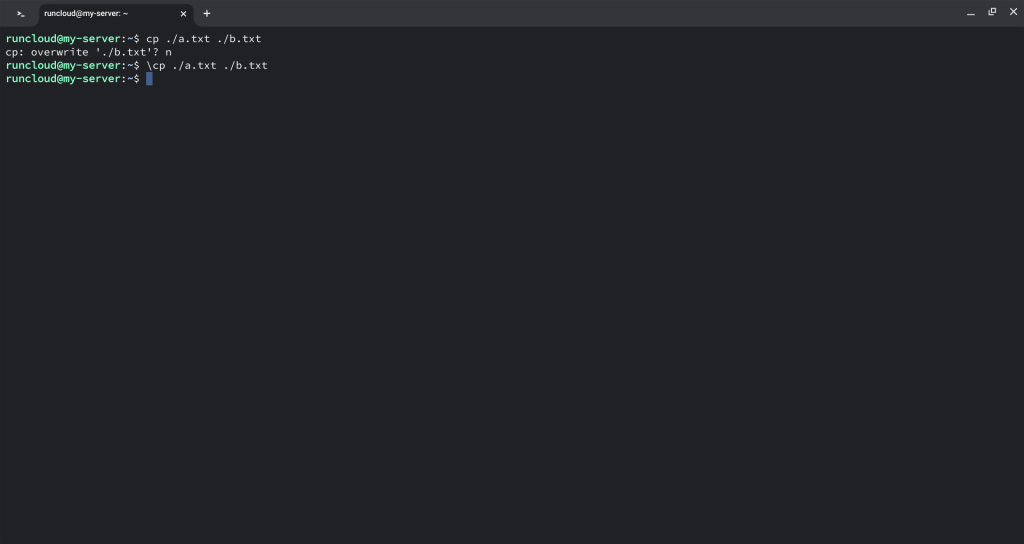
If you don’t want to permanently remove the alias, you have an option to use a backslash before the cp command to bypass the alias and run the original command. For example, \cp source.txt destination.txt will overwrite destination.txt with source.txt, without prompting the user.
In the above example, we can see that the user was prompted for input when executing the copy operation, but not when the command was prefixed with the \ character.
Automatically Accepting All Prompts
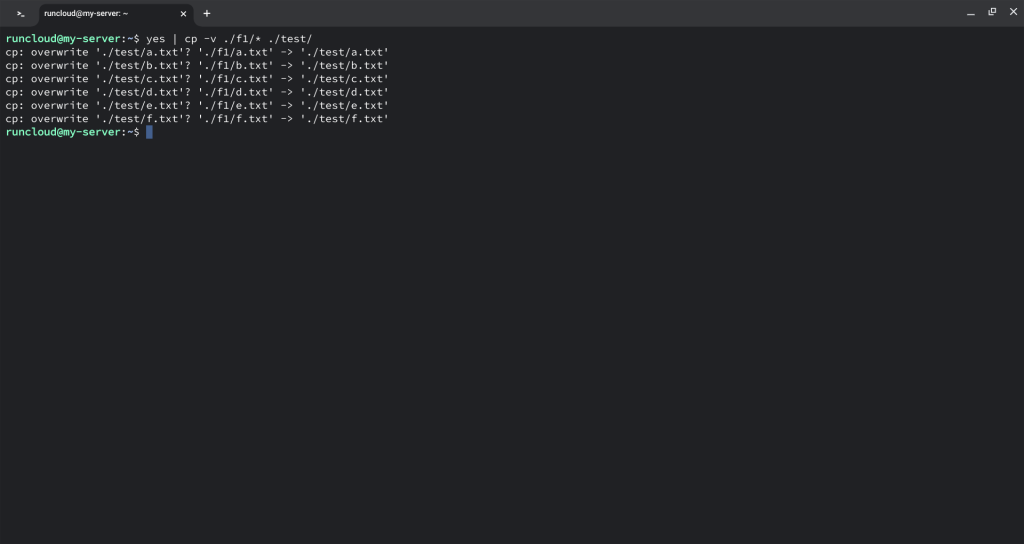
In Linux there are multiple ways to do the same thing using different methods. If you don’t want to use the in-built -f option to overwrite files then you can use the copy command in conjunction with the yes command to automatically respond with y to all prompts.
yes | cp -v source destination
In the above example, we can see that the copy command prompted us for input before replacing each file, but the yes command responded ‘yes’ to each and every single one of them nearly instantaneously.
Wrapping Up
In this article, we have discussed how to copy files and directories in Linux via the command line. We have also explained different options and features of the copy command that are helpful in day-to-day usage.
If you’re learning Linux to better manage your servers, we wish you all the best! However, you don’t need to be a Linux expert to host websites on the internet. RunCloud makes it extremely easy to deploy and manage websites using a user-friendly dashboard, and provides complete freedom to tinker under the hood.
Whether you’re a beginner or a seasoned professional with decades of experience, sooner or later everyone makes a configuration change that completely renders websites useless. RunCloud has idiot-proofed many complex operations such as updating server configurations, installing SSL certificates, deleting applications, etc. – all of which makes it difficult for novice users to crash their website, and provides an extra set of guide-rails to advanced users.
RunCloud is a versatile and reliable tool that can help you manage your server on your own, without the hassle and cost of hiring a system administrator. Don’t miss this opportunity to take your server management to the next level. Sign up for RunCloud today and enjoy the benefits of a cloud-based server management platform that is fast, secure, and easy to use.
Do you find yourself frequently copying the output on the terminal and pasting it into different bash commands?
If you answered “Yes”, then you should definitely start using the Pipes and xargs command in Linux.
These are extremely helpful Linux utilities that will save you time and effort when working with the command line. Using these opens up so many possibilities for manipulating and processing data in the command line.
If you want to perform complex actions in the Linux terminal and grow your Linux skills past the basic level, you will definitely need to learn how to use these commands.
In this article, you will learn exactly what xargs is, how it is different from pipes, and when to use which tool.
Let’s get started!
What Are Pipes in Linux?
Pipes are a way of connecting the standard output of one command to the standard input of another command in Linux. This allows you to chain commands together and process data in a stream.
To understand pipes, imagine two people talking on a ‘tin can telephone’. Here the first person is passing some information and the second person can only hear the information being passed. In this example, the telephone is acting as a pipe and the second person cannot jump to the end of the conversation without listening to the entire conversation first.
Similarly, pipes allow you to pass along information between processes and help you manipulate and process data in various ways. The syntax of pipes in pretty simple, just put a | sign between two commands.
first | second
In the above example, the output of the first will be used as the input for the second. This is pretty useful when working in the CLI.
For example, if you want to count the number of files and directories in the current directory, you can use a pipe like this:
ls | wc -l
This command will list all files and directories in the current directory, and then pipe the output to the wc command, which will count the number of lines. The pipe character | is used to redirect the output of command to the other. The command on the left side of the pipe sends its output to the command on the right side of the pipe, which receives it as its input.
Pipes are useful for performing operations on multiple items of data without having to write a loop or a script. You can also use multiple pipes to create a pipeline of commands, such as:
find . -name "*.txt" | grep "hello" | wc -l
The above command will find all files in the current directory and its subdirectories that have the “.txt” extension, and then pass them to the grep command, which will filter only the files that contain the word “hello”. The output of the grep command will then be piped to the wc command, which will count the number of lines. The result of this command is the number of files that have the “.txt” extension and the word “hello” in them.
What is the xargs Command?
The xargs utility in Linux reads data from standard input and converts it into command line arguments for another command. This allows you to perform operations on large amounts of data without having to write a loop or a script.
For most part, this is pretty similar to the pipe operator that we discussed above, but with one major difference. The pipe operator redirects its output to the standard input of the second command, whereas the xargs utility will create a list of all the data and then pass it as command line arguments to the second command.
To understand this, imagine the same person from above writing the information on a piece of paper and then passing it along to the second person. In this example, the paper is the xargs utility and the second person can see all the information at once.
Having the ability to pass along information via the command line arguments opens up many possibilities. For example, if you want to delete all files that have the word “temp” in their name, you can use xargs like this:
find . -name "*temp*" | xargs rm
This command will find all files in the current directory and its subdirectories that have “temp” in their name, and then pass them as arguments to the rm command, which will delete them.
Xargs or Pipes: Which One to Use?
You may have already spotted that these two commands are basically the same apart from one key detail – pipes are useful for processing data in a stream.
The main difference between pipes and xargs is that pipespass data as standard input, while xargspasses data as command line arguments.
This means that pipes will only work with commands that accept standard input, while xargs can only work with commands that accept command line arguments.
What Are Standard Input and Command Line Arguments?
Standard input and command line arguments are two different ways of passing data to a program in Linux.
Standard input is a stream of data that the program reads from its standard input file descriptor, usually the keyboard or a pipe.
Command line arguments are strings of text that the program receives as parameters when it is invoked from the shell.
For example, if you run the command ls -l /home, the program ls will receive two command line arguments: -l and /home. The program can access these arguments using the argc and argv variables in C, or equivalent mechanisms in other languages.
Although many software tools accept both command line arguments and standard input, not all do. As a software user, we often do not have the option to change how the program processes input.
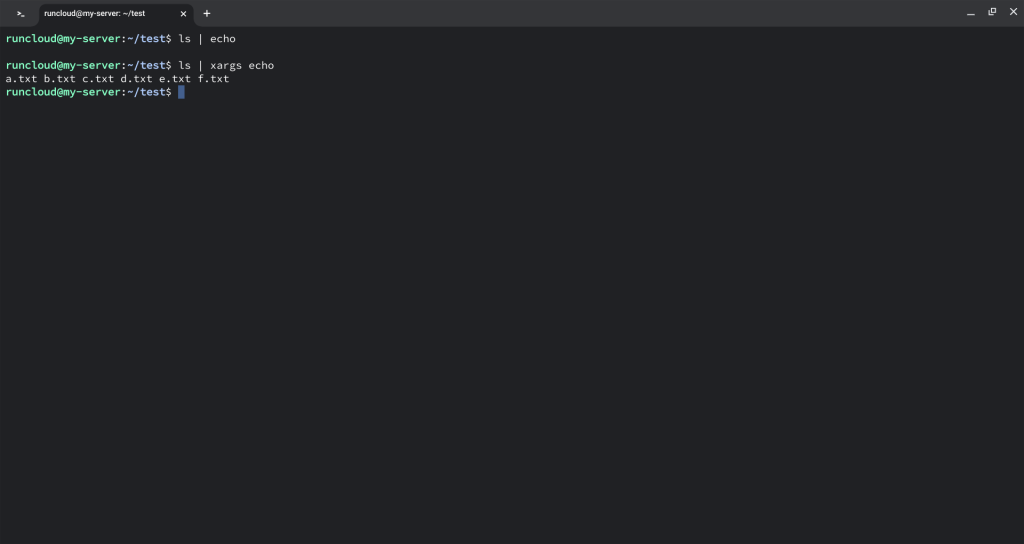
For example, the command echo will print whatever you type after it, but it will not read from standard input. If you try to pipe the output of ls to echo, you will get nothing:
ls | echo
This is where xargs comes in handy – xargs will take the data from standard input and convert it into arguments for the command you specify. For example, if you want to print the names of all files and directories in the current directory, you can use xargs with echo like this:
ls | xargs echo
This command will list all files and directories in the current directory, and then pass them as arguments to the echo command, which will print them.
The choice of using pipes or xargs depends on the situation and the commands you want to use. In general, pipes are more efficient and elegant, as they avoid creating intermediate files or processes.
However, xargs can be more flexible and powerful, as it allows you to customize the arguments and options for the command you want to execute. It also has many options that allow you to handle different scenarios, such as limiting the number of arguments, replacing placeholders, prompting the user, or dealing with filenames that contain spaces or special characters. Let’s see some of these use cases in the next section.
How to Use xargs like a Pro in Linux
xargs has many options that allow you to customize its behavior and handle different situations. Here are some of the most common and useful ones:
Limit the Number of Arguments
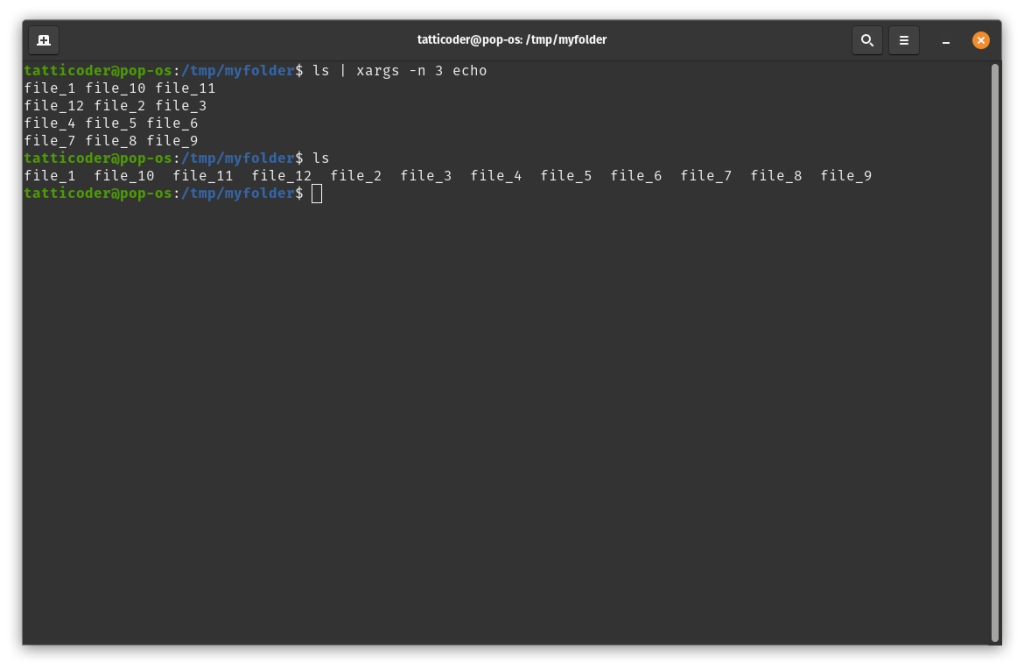
The -n option specifies the maximum number of arguments to pass to each invocation of the command. For example, if you want to print the names of all files and directories in the current directory in groups of three, you can use xargs with -n 3 like this:
ls | xargs -n 3 echo
This command will list all files and directories in the current directory, and then pass them as arguments to the echo command in groups of three. Then the echo command will be executed multiple times, once for each group of three arguments that it received.
Replace Placeholder Text
When working in the command line, you will often encounter cases where you need to run many simple commands, each with a tiny change. The -I option allows you to specify a placeholder that will be replaced by each argument in the command.
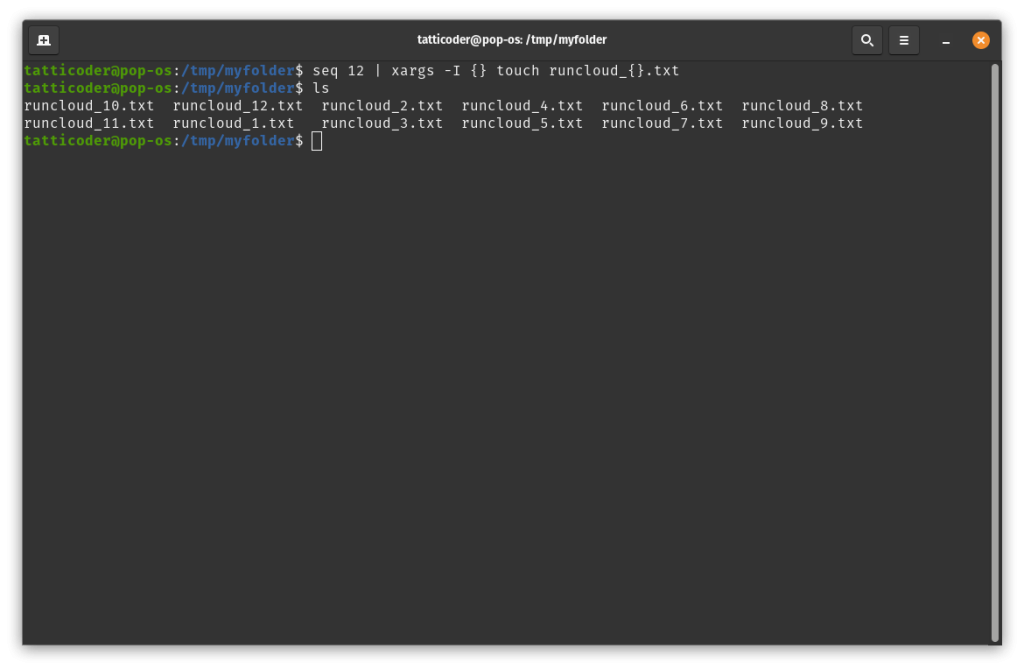
For example, if you want to create many files in your server which follow a common pattern, then you can use xargs with -I {} like this:
seq 12 | xargs -I {} touch runcloud_{}.txt
The above command will create a sequence of twelve numbers, then use those numbers to create twelve files that follow the pattern runcloud_#.txt.
Prompt User For Confirmation
When generating commands on the fly, it is pretty easy to do irreversible damage to your server. The smart way to use xargs is by letting it generate all the commands and then manually confirming it before it can be executed.
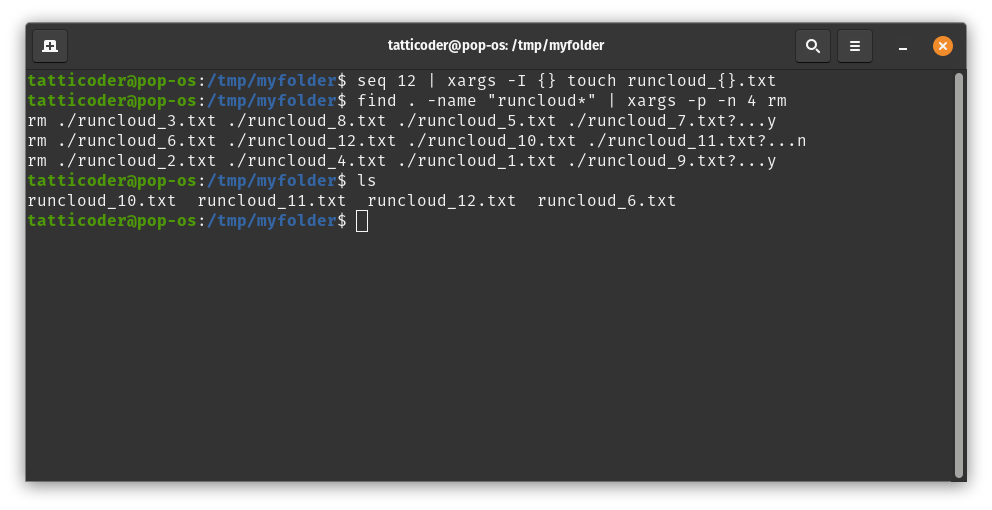
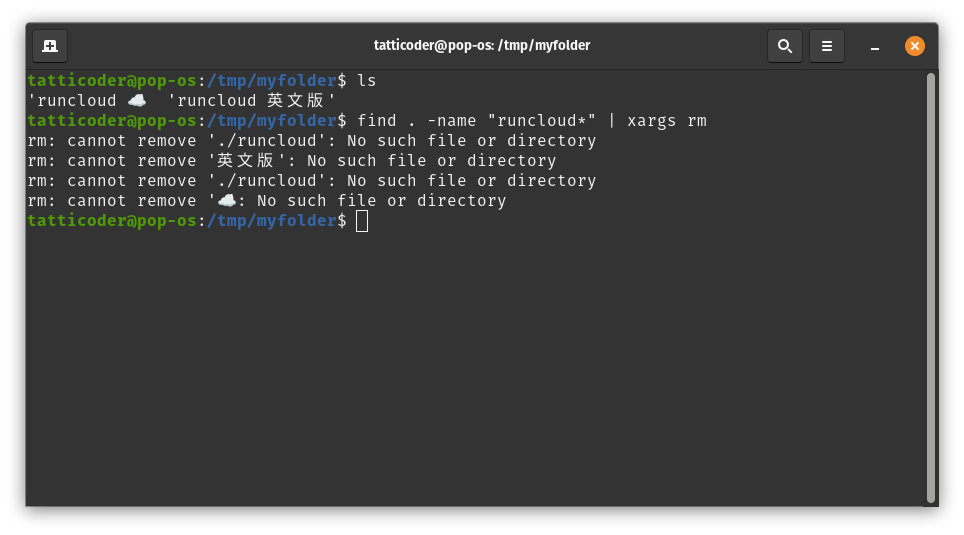
To do this, use the -p flag which prompts the user before executing each command and waits for confirmation. For example, if you want to delete all files that start with the word “runcloud”, but you want to confirm each deletion in batches of four, you can use xargs with -p like this:
find . -name "runcloud*" | xargs -p -n 4 rm
This command will find all files in the current directory and its subdirectories that have “runcloud” in their name, and then pass them as arguments to the rm command, which will prompt the user before deleting each file and wait for a “yes” or “no” answer.
In the above example, we can see that first we created twelve files. Then we used the find function to find any files that match our criteria and then passed them along in batches of four. The resulting rm command is displayed in the terminal and we can press y or n to confirm or reject the action.
After the command has been executed, we can see that the files in the second batch of deletion remain untouched because we pressed n when we were asked to confirm the deletion, whereas all the other files that matched the criteria were removed.
Process Files with Weird Names
The xargs utility is not secure, because it can execute arbitrary commands if the input contains malicious or unexpected data. For example, if the input contains spaces, quotes, or other special characters, xargs may interpret them as part of the command or the arguments, and cause unwanted or harmful effects.
If you’re working with data that contains spaces, special characters, or even foreign language text, then it is always a good idea to terminate the output of a line using null characters to avoid unexpected output.
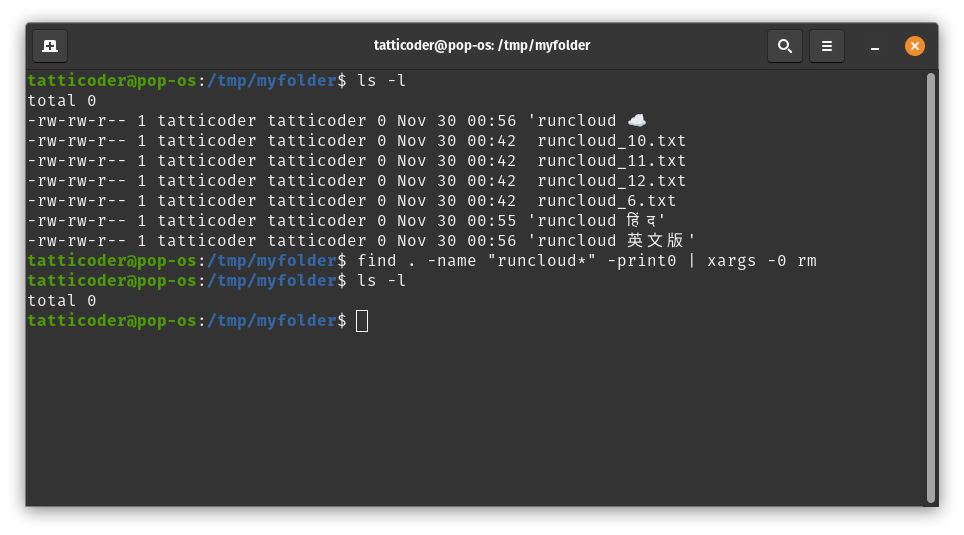
The -0 or –null flag expects the input to be null-terminated, meaning that each argument is separated by a null character instead of a space or a newline. For example, if you want to delete all files that have the word “temp” in their name, but some of them have spaces in their name, you can use xargs with -0 like this:
find . -name "runcloud*" -print0 | xargs -0 rm
This command will find all files in the current directory and its subdirectories that start with “runcloud” and then print them with a null character after each name. xargs will then read the input as null-terminated and pass them as arguments to the rm command, which will delete them.
In the above example, we can see that terminating the output with a null character allows the program to gracefully execute the given command. If we had omitted the null termination step, we would have encountered different errors.
After Action Report
Both pipe and xargs are powerful and versatile utilities that can help you perform different operations on data in the command line. There is a character limit to xargs, but it depends on the system and the options used.
By default, it tries to pass as many arguments as possible to the command, without exceeding the maximum length of the command line. To see the limits of xargs on your system, you can use the --show-limits option.
Normally, xargs runs the second command once, even if there is no input (output from the first command). This option is useful to avoid errors or unwanted actions when the input is empty. To suppress this, you can specify --no-run-if-empty option.
These are just some of the options that xargs offers. You can find more information and examples by typing man xargs or xargs --help in the command line.
It is clear that xargs is a must-learn tool for any Linux user who wants to go beyond the basics and explore the possibilities of the command line.
However, if you don’t want to become a master in Linux command line utilities, but still want to manage your Linux server yourself, then you should check out RunCloud.
RunCloud is a cloud-based server management platform that lets you deploy, configure, and monitor your web applications with ease. If you’re an advanced user, you can take advantage of the CLI and API, as RunCloud gives you full control over your server.
If you’re not comfortable with using the CLI or the API, don’t worry. RunCloud also offers an easy to navigate dashboard that can deploy applications in a breeze. You can also use RunCloud to set up SSL certificates, domains, cron jobs, firewalls, and more.
RunCloud is a versatile and reliable tool that can help you manage your server on your own, without the hassle and cost of hiring a system administrator. Don’t miss this opportunity to take your server management to the next level. Sign up for RunCloud today and enjoy the benefits of a cloud-based server management platform that is fast, secure, and easy to use.
The echo command is one of the most basic and frequently used commands in Linux. It’s used to print text, variables, and special characters to the standard output, which is usually the terminal.
However, the echo command can do much more than just printing text.
It can also be used to create files and directories, test and debug scripts and commands, format and display messages, and generate output for other commands or programs.
In this article we’ll show you how to use the echo command in Linux with some practical examples. We will cover the basic syntax of the echo command, as well as some of its options and features.
By the end of this article, you will have a better understanding of how to use the echo command in Linux effectively and efficiently.
Table of Contents
What is the echo Command?
The echo command is a way to communicate with your Linux terminal. It allows you to send text, variables, and special characters to the standard output, which is usually the terminal screen.
The echo command is like a messenger that delivers your words to the terminal. It’s a simple but powerful tool that can be used for various purposes, such as:
Printing text, variables, and special characters to the standard output (e.g., terminal, file, or pipe).
Creating files and directories with specific content.
Testing and debugging scripts and commands.
Formatting and displaying messages, prompts, and menus.
Generating output for other commands or programs.
How to Use the echo Command
Here are some ways of using the echo command in Linux.
Hello World!
To send a text message to the standard output stream, use the echo command with a string argument enclosed in double quotes.
For example, echo “Hello, world!” will write the string “Hello, world!” followed by a newline character to the standard output.
Display Variable
The command echo “$variable” is used to print the value of a variable to the standard output. A variable is a name that represents some data stored in the memory. The $ symbol is used to access the value of a variable.
For example, $USER is a predefined variable that holds the name of the current user. To print the value of $USER, use echo “$USER”. This will display the current user name on the terminal screen.
Print Special Characters
The command echo “\n” is used to print a special character to the standard output. A special character is a non-printable character that has some effect on the output, such as moving the cursor, clearing the screen, or making a sound.
The \ symbol is used to escape the special character, which means to treat it as a literal character instead of its usual meaning. For example, \n is a special character that represents a newline, which moves the cursor to the next line. To print a newline character, use echo “\n”. This will output a blank line on the terminal screen.
There are many other special characters that can be printed with the echo command, such as:
\t: A horizontal tab, which moves the cursor to the next tab stop.
\v: A vertical tab, which moves the cursor down one line and to the same column.
\a: An alert, which makes a beep sound.
\b: A backspace, which moves the cursor back one space.
\r: A carriage return, which moves the cursor to the beginning of the line.
\c: A control character, which suppresses any further output.
You can see the full list of special characters by running man echo on your terminal.
Writing to a File
One of the lesser known functionalities of the echo command is redirecting the output from terminal into files. You can use the echo “content” > file command to create a file with some content to the standard output.
The > symbol is used to redirect the output of the echo command to a file instead of the terminal screen. The file is the name of the file to be created or overwritten. The content is the text to be written to the file.
For example, echo “This is a test file” > test.txt will create a file named “test.txt” with the text “This is a test file”. If the file already exists, it will be replaced by the new content. If the file does not exist, it will be created.
If you want to append content to the end of an existing file, you can use the >> symbol instead of the > symbol. The >> symbol will redirect the output of the echo command to the end of the file without deleting the previous content.
For example, echo “This is another line” >> test.txt will add the text “This is another line” to the end of the test.txt file, without erasing the text “This is a test file”. This way, you can add more content to a file without losing the original content.
Writing to Both Terminal and File
You might encounter cases where you need to display content in the terminal and store it in a file as well. In this case, you can use the echo “content” | tee file command to create a file with some content to the standard output.
The | symbol is used to pipe the output of the echo command to another command, which is tee in this case. The tee command is used to write the input to both the standard output and a file or files. The file is the path of the file to be created or overwritten. The content is the text to be written to the file and displayed on the terminal screen.
Debug Dynamic Commands
If you are executing dangerous commands in the terminal, then it can go very bad, very quickly.
The rm -rf * command will delete all files and directories in the current working directory recursively and forcefully with a single key press. This is a very dangerous command that can cause irreversible data loss.
By using echo before the command, you can see what files and directories will be deleted without actually deleting them.
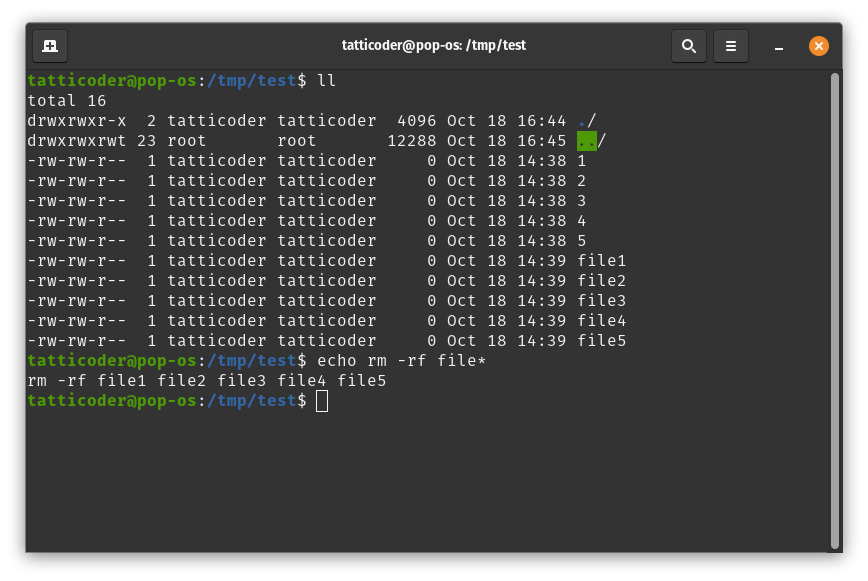
The command echo rm -rf * is a way to check how the command rm -rf * will be composed without actually executing it. The echo command will print the command or script to the standard output, which is usually the terminal screen. This can help you avoid mistakes and errors.
For example, if you want to delete all the files in the current directory that start with a certain prefix, you can do so using the following command.
echo rm -rf <prefix>*
In the above example we can see that our current directory has a total of 10 files, but since we used a prefix, only the files which matched the pattern were listed in the output. Once you are sure that this is the command that you want to execute, you can remove the echo from the beginning of the command and execute it as you normally would.
Show Formatted Text
The echo command is often considered a boring and simple command that only prints plain text to the terminal. However, this is not true. You can jazz up your output with a dash of color and style by using some special characters and options.
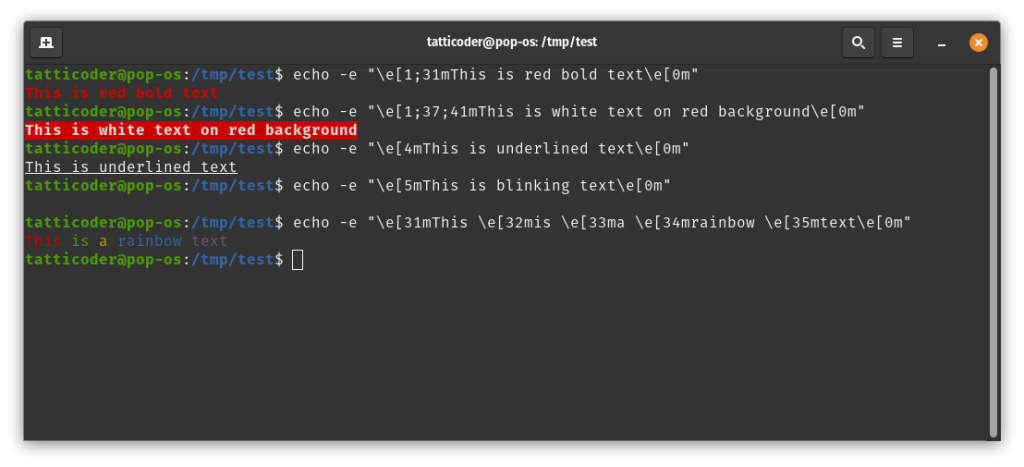
Let’s see how to make your terminal more colorful and attractive with the echo command with the help of an example:
The -e flag in echo is used to enable the interpretation of special characters, such as \e, which are used to create colors and effects.
The \e[1;37;41m part is used to set the style, color, and background of the text. The \e symbol indicates the start of an escape sequence, which is a way to control the terminal behavior. The [ symbol indicates the start of a parameter list, which consists of numbers separated by semicolons. The m symbol indicates the end of the escape sequence. The numbers in the parameter list have different meanings, such as:
1: This means to make the text bold.
37: This means to set the foreground color (the color of the text) to white. The color codes range from 30 to 37 for standard colors, and from 90 to 97 for bright colors.
41: This means to set the background color (the color behind the text) to red. The background color codes range from 40 to 47 for standard colors, and from 100 to 107 for bright colors.
After this, you can enter the text to be printed with the specified style, color, and background.
The \e[0m part is used to reset the style, color, and background of the text to the default values. The \e symbol indicates the start of an escape sequence, and the [0m part indicates the end of the escape sequence with a parameter of zero, which means to reset all attributes.
Therefore, the command echo -e "\e[1;37;41mThis is white text on red background\e[0m" will print “This is white text on red background” in bold white letters on a red background, and then reset the terminal settings to normal.
Some more ideas of displaying pretty output in terminal with the echo command are:
To display a message with an underline, use \e[4m. For example, echo -e "\e[4mThis is underlined text\e[0m" will print “This is underlined text” with an underline.
To display a message with a blinking effect, use \e[5m. For example, echo -e "\e[5mThis is blinking text\e[0m" will print “This is blinking text” with a blinking effect.
To display a message with different colors on each word, use \e[colorm before each word. For example, echo -e "\e[31mThis \e[32mis \e[33ma \e[34mrainbow \e[35mtext\e[0m" will print “This is a rainbow text” with different colors for each word.
You can combine different styles and colors to create more interesting and attractive output in your terminal. However, you should also be aware that not all terminals support these features, and some may display them differently.
You can see the list of available colors and styles by running man console_codes on your terminal.
Execute Other Commands
In a previous section, we discussed how echo can be used to debug commands without executing them. Now let’s see how it can be used to execute commands in bash.
We know that the date command is a Linux utility that displays the current date and time. We can use it along with the echo command to print the output of the date command as a string, and format it accordingly.
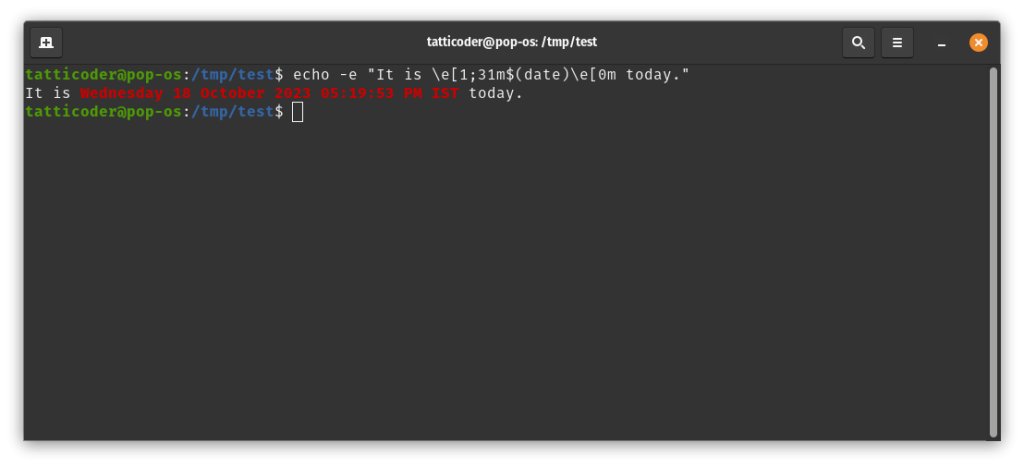
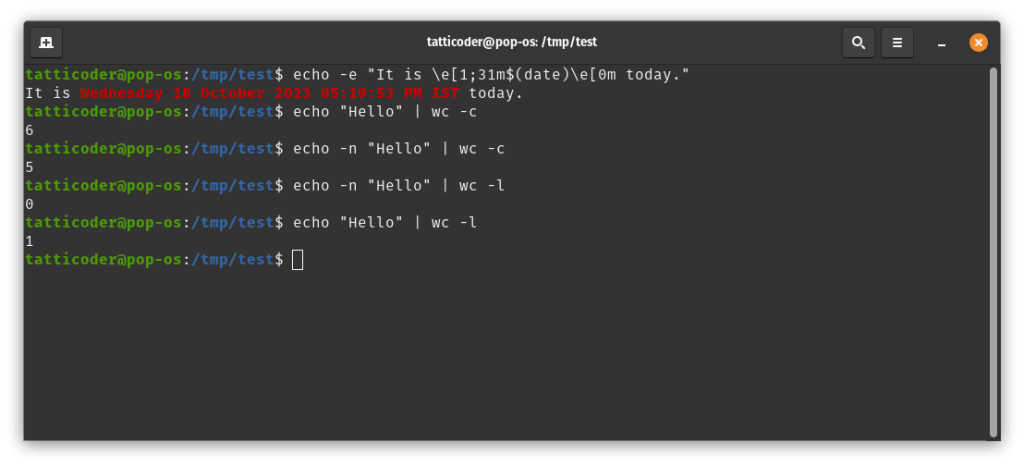
The command echo $(date) will print the current date and time to the standard output. The $(date) part is an example of command substitution, which is a way to execute a command and replace it with its output. For example, if you run echo -e "It is \e[1;31m$(date)\e[0m today.", you might see something like this:
We already briefly mentioned in one of the previous sections that the | operator can be used to redirect output from the first command to the other.
For example, the echo "Hello" | wc -c command can be used to print the number of characters in “Hello” to the standard output. The “Hello” part is a string argument for the echo command. The | symbol is used to pipe the output of the echo command to another command, which is wc -c in this case.
The wc -c command is used to count the number of bytes in the input. The echo command will send the string “Hello” to the standard input of the wc -c command, which will count the number of bytes in “Hello” and print it as a number. Note that the number 6 includes the newline character that the echo command adds by default. If you want to exclude the newline character, you can use the -n option for the echo command, which will suppress the newline. For example, if you run echo -n "Hello" | wc -c, you will see something like this:
As you can see, using the echo command with command substitution or pipes can help you generate output for other commands or programs that can process or display it. You can use this technique to create dynamic and interactive output in your terminal.
When Not to Use the echo Command
The echo command is a great tool for printing simple text messages to the terminal, but it has its limitations. Sometimes, you may need to print data that is more complex, structured, binary, or more sensitive than plain text. In these cases, the echo command may not be suitable, and you may want to use other tools that are more specialized and secure.
Here are some examples of such cases, and the tools you can use instead of the echo command:
If you need to print complex or structured data, such as JSON, XML, or tables, the echo command may not be able to preserve the formatting and indentation of the data. You may want to use tools such as jq, xmllint, or column, which can parse and pretty-print JSON, XML, or tabular data respectively.
If you need to print binary data, such as images, audio, or video, the echo command may not be able to display them properly in the terminal. You may want to use tools such as cat, hexdump, or base64, which can output binary data as raw bytes, hexadecimal numbers, or base64-encoded strings respectively.
If you need to print sensitive or confidential information, such as passwords, keys, or tokens, the echo command may not be able to protect them from being exposed or intercepted. You may want to use tools such as gpg or openssl, which can encrypt and decrypt data using various algorithms and keys.
As you can see, there are many alternatives to the echo command that can handle different types of data more effectively and securely. You can choose the best tool for your needs depending on the nature and format of your data.
After Action Report
We hope you enjoyed this article and learned something new about the echo command in Linux. The echo command is a versatile and useful tool that can help you create and communicate with your Linux environment. Feel free to experiment with it and discover its potential!
We would love to hear from you about your own use cases of the echo command. How do you use it in your daily tasks? What are some of the creative and fun ways you have used it? Please share your thoughts and experiences in the comment section below. We appreciate your feedback and suggestions!
We understand that Linux can be intimidating for some people, especially if they are not familiar with the terminal. That’s why we recommend RunCloud as the best platform to manage your Linux servers. RunCloud provides a helpful dashboard that lets you easily deploy and manage your servers, applications, and websites without messing with the terminal.
However, if you want to tinker under the hood, RunCloud also gives you the freedom and flexibility to access and customize your server settings via SSH or SFTP. RunCloud is the perfect solution for both beginners and experts who want to get the most out of their Linux servers.
If you want to experience RunCloud for yourself, you can sign up for RunCloud and enjoy a 14-day, risk-free trial.
According to StatCounter, Google dominates the search engine market with an overwhelming 93.37% share, leaving its closest competitor, Bing, with just 2.81%. This market dominance highlights the critical importance for developers to optimize their sites for Google’s ranking algorithms.
To rank websites Google employs a variety of methods, including the most recent and crucial method – Core Web Vitals, which began rolling out in June 2021.
It is therefore vital for any website developer to understand how these web vitals are measured, and what they can do to optimize their site to boost both their performance, and their position in the SERPs. In this article, we will identify exactly what Google’s Web Vitals are, how they impact your site, and how you can improve your site’s score.
Let’s get started!
Table of Contents
Understanding Google’s Core Web Vitals
Google’s Core Web Vitals consists of a set of specific website performance metrics that are used to determine the overall user experience of a website.
It is a combination of three main parameters that measure specific aspects of page speed and responsiveness. These metrics include:
Visual load, measured by largest contentful paint (LCP)
Visual stability of web pages, measured by Cumulative Layout Shift (CLS)
Interactivity, which is measured by First Input Delay (FID)
The Core Web Vitals are part of Google’s Page Experience Ranking Signals, which also include factors such as mobile friendliness, browsing safety, HTTPS, and Intrusive Interstitials (or popups).
A study from Google found that when a site meets the optimal thresholds for the three Core Web Vitals metrics, users were 24% less likely to abandon page loads. On top of that, they found a 22% decrease in news site abandonments and 24% fewer abandonments of shopping sites.
The Two Types Of Data Used For Core Web Vitals
Before we get into the optimization of sites, it is necessary to understand the kinds of data processed for measuring Core Web Vitals metrics. The two main types of data are:
Field Data
Field Data is generated from the Chrome User Experience Report (CrUX) and includes real user metrics. Google collects information from Chrome users who have opted to share information, such as browsing history, and uses the data to compute the three Core Web Vitals metrics. The aim is to understand how real-world Chrome users experience the web.
You can see a summarized view of your site’s Core Web Vitals under the Google Search Console, and your page-level metrics in PageSpeed Insights under the Field Data category. However, you should note that this data is based on a rolling 28-day average, which means that any change in your site won’t be reflected in your Field Data report for around 28 days. This is where Lab Test Data comes to the rescue.
Lab Test Data
Lab Test Data is generated by tools that are designed to run tests consistently under the same conditions. Because of factors such as internet speed and geographical location this data does not reflect real-world data. You can view your site’s Lab data with the Lighthouse Chrome extension.
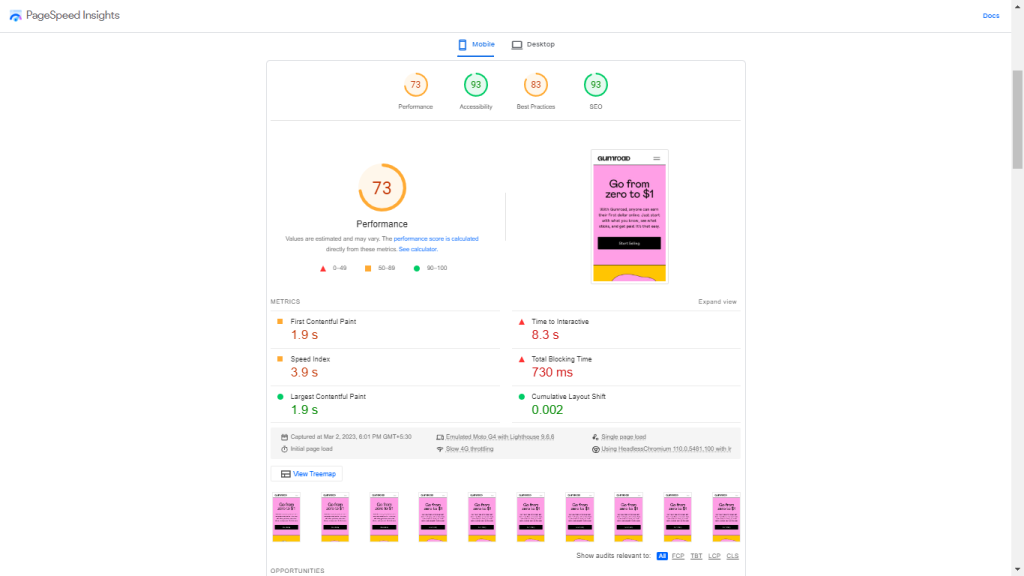
The metrics are assessed at the 75th percentile of users. For example, if we look at the Page Speed Insights for the Gumroad site we will see that all Core Web Vitals metrics have greater than 75% results, so the site passes the Core Web Vitals assessment. If one or more metrics have less than 75% positive loads, it does not pass the Core Web Vitals assessment.
Another thing to note is that metrics are measured by device type, meaning that mobile Core Web Vitals will be assessed separately from desktop ones.
Before analyzing and optimizing the Core Web Vitals, it’s essential to assess the other basics of Google’s page experience signals, such as mobile friendliness and the use of HTTPS. We must remember that the Core Web Vitals are just a part of Google’s page experience signals.
You need to take care of basic optimizations for page speed, such as having good hosting, compressing your images, caching your content, and setting up a Content Delivery Network (CDN). All of these things will inevitably contribute to improving your site’s Core Web Vitals.
Core Web Vitals Metrics
Largest Contentful Paint (LCP)
Largest Contentful Paint tells us about the visual loading performance of a website. It measures the time it takes for the web page’s main content to load. LCP is simply the single largest visible element loaded in the viewport, which is the area of a web page visible to a user. You should aim to minimize this metric as much as possible – the recommended target is to have your LCP under 2.5 seconds.
Cumulative Layout Shift (CLS)
Cumulative Layout Shift measures the visual stability of a web page. CLS looks at how much visible elements have shifted in the viewport as remaining elements are loaded, and measures the distance the affected elements were shifted. In some web pages pop-up ads and videos appear out of nowhere and shift the content, which is annoying and results in a bad user experience.
Previously, CLS was recorded continually to measure stability even after the page had loaded. But recently Google has revised the way CLS is measured; it is now calculated in terms of 5-second sessions. The metric that is reported is the 5-second timeframe in which the most shifting occurred. The recommended threshold by Google is to have a score of less than 0.1.
First Input Delay (FID)
First Input Delay measures interactivity. The purpose of this metric is to gain an understanding of a user’s first impression of a site’s interactivity and responsiveness. It measures the time from when a user first interacts with a page to the time when the browser is able to respond to that interaction.
Different types of interaction will include clicking a link or a button, inputting text into a blank Field, selecting a drop-down menu, etc. The recommended speed for First Input Delay is anything under 100 milliseconds.
Measuring Your Website’s Core Web Vitals
A variety of browser extensions, tests, and reports are avaiLable that will help you analyze your site’s Core Web Vitals. Here are some of the most important ones.
Core Web Vitals Assessment in Google’s PageSpeed Insights
PageSpeed Insights is a tool developed by Google that reports on the user experience of a page on both mobile and desktop devices, and provides suggestions on how that page may be improved. It has two sections:
Core Web Vitals assessment lets you discover what your real-world users are experiencing
PageSpeed Insights score helps you diagnose performance issues with the help of Lab data
This Core Web Vitals assessment is part of the Field Data report. The Diagnostics section in PageSpeed Insights also provides useful information about elements that affect each of the three Core Web Vitals metrics.
PageSpeed Insights uses Lab data in addition to real user metrics to calculate the overall optimization score, and also provides suggestions for improvements.
You should note that in some cases PageSpeed Insights doesn’t provide a Field summary. This usually happens for small websites because the Chrome User Experience Report cannot collect enough Field data. Fortunately there are other sources that will provide you with Field data.
Core Web Vitals Report In Google’s Search Console
Google’s Search Console Tools is a web service by Google that allows users to measure a site’s traffic and performance, fix common issues, and make the page perform better in Google search results.
Google Search Console has two Core Web Vitals reports, tailored for both mobile and desktop versions. Each of these reports provides you with the Field data for a group of URLs, and offers insight into their performance. These reports are beneficial for finding common issues and similar errors across a group of URLs. This ensures you get information about the entire site – instead of just information on one page at a time.
For example, if you have many product pages where the largest element is an image or a banner, the Largest Contentful Paint (LCP) metric will be similar for all of them. In such a case, Google Search Console finds LCP issues across all of these identical product pages.
In the console you can alert Google after resolving any Core Web Vitals problem by clicking on Validate Fix.
Using the Core Web Vitals Chrome Extension
Chrome’s Core Web Vitals extension offers a quick way to check your Core Web Vitals. This extension automatically gives you a brief audit of Largest Contentful Paint, Cumulative Layout Shift, and First Input Delay. It can audit the website’s performance for other users compared with its performance on your own device.
Using Chrome User Experience Report For Extracting Field Data
Gaining access to the Chrome User Experience Report (CrUX) requires more time and effort than simply running your site through PageSpeed Insights or Google Search Console. However, going through this report also provides more ways to organize and visualize your site’s Field data.
There are two main ways to directly access the CrUX dataset:
BigQuery: This method requires a Google Cloud project and SQL expertise
The Chrome UX Report API: This method requires some developer experience with both JavaScript and JSON
If you can afford the time and possess the technical expertise, it is worth experimenting with both methods above.
Optimizing Your Site For Core Web Vitals
After measuring your site’s Core Web Vitals, the next step is to optimize it for them. You need to keep in mind that every website is built differently, and we can’t possibly fix every potential problem. Below we’ll discuss several tried and tested techniques for improving web performance.
It is important to keep in mind that your site’s performance can also be affected by factors that aren’t discussed here. You always need to examine your specific problems before implementing any optimizations.
Analyzing and Optimizing Largest Contentful Paint (LCP)
As discussed above, Largest Contentful Paint (LCP) measures the time it takes for the largest element in the viewport to load. Anything below 2.5s is considered to be a good LCP score. If the largest viewport element loads faster than that for 75% of all recorded page loads, the web page passes the LCP assessment.
A quick and easy way to check which element triggers the LCP metric is to run the page through PageSpeed Insights. In the dashboard, scroll down to the Diagnostics section and click on the Largest Contentful Paint element.
The same can be done with Chrome’s DevTools. For this, open the page you want to inspect in Chrome, right-click and select Inspect, then go to Performance. Now, click on the Reload button, and wait for the browser to examine the page.
You’ll be able to locate a small LCP icon in the Timings section. When you hover your cursor over it, the largest element of the page will be highlighted with a blue shade.
For additional insight you can use a waterfall chart to see how many resources were loaded before the LCP. Here’s how the waterfall chart looks for our example website, Gumroad, created using GTmetrix:
Tips To Improve LCP Time
Here are a few measures you can take to improve your LCP load time:
Optimize your images: Inefficiently formatted and very large images are often the biggest reason for slow websites. For faster loading, images must be properly converted to the right format, compressed, and resized. Lossless compression maintains roughly the same image quality while reducing the size of the image file.
Preload hero images: Hero images are usually the most prominent above-the-fold elements, so loading them quicker is crucial for a fast and responsive user experience. This tells the browser to prioritize the specific hero images when rendering the web page.
Preloading significantly improves LCP, especially on pages where hero images are loaded with JavaScript and the background-image property in CSS. Browsers usually discover these images later, so using link rel=preload helps improve both actual and perceived performance.
Find a better hosting plan: Using a cheap, shared hosting plan will always lead to slow execution times because of the slow host server. Upgrade your hosting plan to have a fast server response time, and both stabilize and speed up your site.
If you are looking for a new hosting solution, consider using RunCloud for managing your servers.
Implement Critical CSS:Critical CSS is a technique that extracts the viewport content in order to render content to the user as quickly as possible. Critical CSS finds the CSS necessary to load above-the-fold content and inline it in the <head> tag. Doing so improves both actual and perceived performance.
Use a Content Delivery Network (CDN): Using a CDN splits the load by hosting assets on servers that are geographically closer to the users, thus greatly improving a site’s performance.
Analyzing And Optimizing Cumulative Layout Shift (CLS)
We already know that Cumulative Layout Shift measures the effect of unexpected layout alterations in a web page that occurs when content moves around the page without user input. A visually stable page maintains a CLS score of 0.1, and if that’s true for the 75th percentile of recorded page loads, the web page passes the CLS assessment.
Google computes the CLS score by measuring how much of the viewport the layout shift affected, and how far the elements moved from their original position during the shift. The final CLS score is calculated as the total of all individual unexpected layout shift scores.
Chrome’s DevTools can help detect unexpected layout shifts. You need to right-click on the page you want to analyze and select Inspect. Navigate to More Tools and click on Rendering. At the bottom of the Inspect console you’ll see a Layout Shift Regions option with a checkbox on the left. Click on the checkbox to ensure it’s selected.
Now every time the layout of the page shifts, the shifted area will be highlighted in blue.
This CLS generator tool is also great for discovering layout shifts. it computes your overall CLS score and shows shifting areas.
Fixing Common CLS Issues
Here are a few tips for improving your layout shifts.
Add width and height attributes to images and videos: Adding attributes of height and width in the HTML markup enables the browser to allocate the correct amount of space for each element in advance. This renders a blank element in place of the image, and replaces the element with the actual image when it is loaded. This drastically reduces layout shift issues.
Optimize Font Delivery: Unoptimized web font delivery can cause huge layout shifts. Using font-display: optional in combination with link rel: “preload” for the site’s most prominent fonts is typically considered the best practice. The optional value avoids causing a re-layout when the web font is ready, and this ensures a layout shift does not happen.
Don’t insert ads and pop-ups on top of other content: Adding intrusive ads and pop-ups are the most common ways to ruin your CLS score. Many elements can cause this issue, including ads, promotional banners, search bars, etc. If you must place such elements on your page, implement them in a way such that it does not negatively impact the user experience.
Reserve space for iFrames, ads, and dynamic content: These elements can cause significant layout shifts if they don’t have reserved space, just like images and videos. You need to use containers with proper dimensions and use the overflow: hidden property to make sure larger content doesn’t overflow its container.
Make interactions faster: Make sure user interactions are completely executed within 500 milliseconds of the input trigger. Lightening up page loads by using OS fonts, compressing and preloading visual content, and using proper containers all prove to be helpful in making interactions faster.
Analyzing and Optimizing First Input Delay (FID)
We have already discussed that First Input Delay measures the time it takes for the browser to begin processing the first user interaction on a web page. However, scrolls and zooms don’t affect FID; this metric only keeps track of distinct actions such as clicks or taps. A low FID is crucial because first impressions leave a mark on the users, and most users instantly leave and, in most cases, never return if a website irritates them on their first visit.
A web page’s FID should be less than 100 milliseconds for 75% of all recorded page loads for it to pass the FID test.
The main culprit of FID issues is usually JavaScript. Excessive usage of JavaScript leads to Long Tasks. These are periods of time when the UI is unresponsive to user interaction. If the main thread is blocked for more than 50 milliseconds it is considered a Long Task.
To find Long Tasks on your web page, open the page, right-click, and select Inspect. From the Inspect console, open the Performance panel and reload the web page. Now, you must click Main and select the Bottom-up analysis button.
You will find the Long Tasks in the Main section. These tasks are usually painted in gray with a red overlay. The Bottom-Up analysis also lets you group files by URL, and helps you pinpoint what causes delays. In the above example, the first script alone takes more than 400 milliseconds, which is far too long.
As you dive deeper into the Bottom-Up analysis, you’ll find that a few longer functions contribute to most of the delay. In some other cases, functions might be running quickly – but adding too many of them together in a single task converts into a Long Task.
WebPageTest is another useful tool that provides an in-depth processing breakdown, helping you to find problem areas. It provides a detailed page summary which provides insight into the site’s performance, and helps you by providing information that allows you to tweak your site for a better Core Web VItals ranking.
Fixing Common FID Issues
There are multiple ways to minimize your First Input Delay. Some of the most popular ones include:
Compress or minify code files: Removing unnecessary parts from the code such as whitespaces and line breaks (minification), and modifying and compressing code files to make them smaller helps significantly reduce FID.
Minimizing third-party JavaScript requests for analytics, social media widgets, discussion forums, etc., that quickly mount up to several megabytes of JavaScript also helps with FID issues. There are some hosting services and CDN providers that implement these features by default, making the process easier for users.
Break up Long Tasks: This is arguably the most effective way to reduce FID, as Long Tasks block the main thread from responding to user interactions quickly. By dividing them into smaller parts you can significantly improve the performance of your website. You can take advantage of JavaScript features such as requestCallback, setTimeout, and requestAnimationFrame to break long-running JavaScript tasks into a series of smaller tasks.
Use web workers:Web workers enable web content to run scripts in background threads without affecting the main thread. It is generally considered a good practice to move non-UI operations to a background thread. Additionally, you can use asynchronous, deferred, or ESS module JavaScript to run some scripts later.
Remove or delay non-critical third-party scripts: Sometimes third-party scripts can prevent your own scripts from executing on time. You need to prioritize the scripts according to their importance and rearrange their execution pattern. For example, if you are showing ads on your website, or if you are tracking user interactions, you should defer executing those scripts until the website is loaded.
Optimize CSS: While JavaScript is the root cause of most FID issues, CSS is also render-blocking by default. Excessive CSS hurts the user experience, and you need to make sure you avoid expensive CSS properties such as box-shadow and filter. Besides implementing Critical CSS and minifying and compressing CSS files, it is also important to get rid of all unnecessary CSS on your site.
After Action Report
Google’s introduction of the Core Web Vitals was a major step in the right direction toward making the web better for everyone. The Core Web Vitals are important for all websites as part of Google’s page ranking algorithm.
That is why it has become necessary to continuously monitor these metrics, even if you don’t notice any major issues right now.
Going forward, here is a quick checklist of things that you need to remember:
You should run a test at least once a month.
Prioritize Field data over Lab test data, as the former accurately represents how actual users experience your site.
Make use of Google’s Search Console to find issues across a set of web pages.
Use PageSpeed Insights to understand and monitor how your site performs.
For a deeper understanding of your site’s performance and for further customization, extract data from the CrUX and gain additional control over your Field data.
If you are looking for an easy and painless way to manage your web servers then you should start using RunCloud. RunCloud makes it easy to deploy new servers, update DNS records, deploy new WordPress sites, manage database users, monitor NGINX logs, and more. Start using RunCloud today!
Or, that Google penalizes slow sites in its search rankings?
These are just some of the consequences of having a poorly performing WordPress site. And one of the main factors that affects your site’s performance is the amount of RAM and number of CPU cores that your hosting plan provides.
But what are RAM and CPU cores, and how do they relate to WordPress hosting?
How can you tell if your site needs more or less of them? And how can you scale them up or down to optimize your site’s performance?
In this article, we’ll answer all of these questions, and more. We will explain what RAM and CPU cores are, how they work, and why they matter for your WordPress site. We will also give you some examples of WordPress sites that require high RAM and CPU resources, and how to scale them accordingly. Finally, we will share some tips and best practices to improve your site’s performance, and avoid wasting resources.
If you want to learn how to make your WordPress site faster, smoother, and more reliable, read on!
Why Do Sites Need RAM and CPU?
RAM and CPU are the main components of your hosting server that determine how fast and reliable your WordPress site is. Let’s see what they do and why they matter.
What is RAM?
RAM stands for Random Access Memory, and is the temporary storage space that your WordPress site uses to load and process data. Every time someone visits your site, WordPress needs to access the database, load the files, and execute the code. All these operations require RAM to store the data temporarily.
RAM is typically measured in Megabytes and Gigabytes. Most cloud providers allow you to configure the amount of RAM available on your server. The more RAM you have, the more data your site can handle at once. This means your site can load faster, handle more traffic, and run more plugins – without crashing or slowing down.
What is a CPU?
CPU stands for Central Processing Unit, and is the “brain” of your WordPress site that executes commands and calculations. Every time someone visits your site, WordPress needs to perform some logic and calculations to generate the output. For example, it needs to check the user’s permissions, apply the theme’s settings, run the plugins’ functions, and so on. All these operations require a CPU to process the commands.
The CPU is measured in the number of cores. The more CPU cores you have, the more commands your site can execute at once. This means your site can perform faster, handle more complex tasks, and run more plugins without errors or delays.
As you can see, both RAM and CPU are essential for your WordPress site to function properly.
However, they also have limits.
The more RAM and CPU cores you have, the more processes you can run simultaneously, and the faster your site can respond to visitors. If your site receives a lot of traffic or runs complex tasks, it might need more RAM and CPU resources than are available on your current hosting plan. This can result in slow loading times, errors, or even crashes.
That’s why you need to choose a hosting plan that provides enough RAM and CPU resources for your WordPress site. You also need to monitor your site’s performance and usage regularly, and scale your resources up or down as needed. In this way, you can ensure that your WordPress site runs smoothly and efficiently at all times.
Which Sites Benefit From More RAM and CPU?
Not all WordPress sites need the same amount of RAM and CPU resources. Some sites are more demanding and complex than others, and they can benefit from having more RAM and CPU resources to run smoothly and efficiently.
Some examples of WordPress sites that require high RAM and CPU resources are:
E-commerce sites that handle a lot of transactions and inventory. These sites need to load and process a lot of data, such as product details, prices, images, reviews, cart items, payment methods, and so on. They also need to handle a lot of user requests, such as adding items to the cart, checking out, updating orders, etc. All these operations require a lot of server resources to avoid slow loading times, errors, or crashes.
Membership sites that have a lot of users and content. These sites need to store and manage a lot of user data, such as profiles, preferences, subscriptions, activities, etc. They also need to load and display a lot of content, such as posts, pages, videos, podcasts, courses, etc. A large amount of traffic will put additional strain on a server’s resources.
Media sites that stream or download large files. These sites need to handle a lot of bandwidth and storage for the media files, such as images, audio, video, etc. They also need to encode and decode the files for different formats and devices. All these operations require a lot of RAM and CPU resources to deliver high-quality media without buffering, lagging, or breaking.
Multisite networks that run multiple WordPress sites on one server. These sites need to share the same server resources for all of the sub-sites in the network. This means that each sub-site needs to have enough RAM and CPU resources to function properly without affecting the other sub-sites. Running multiple sites requires a large amount of server resources.
If your site experiences a sudden surge in traffic, such as during a launch, promotion, or viral event, you might need to scale up your RAM and CPU resources to handle the increased load. In this way, you can avoid slow loading times, errors, or crashes that can frustrate your users and hurt your conversions.
If your site runs complex plugins or tasks, you might need to scale up your RAM and CPU resources to run them smoothly and efficiently. In this way, you can avoid performance issues, bugs, or conflicts that can affect your site’s functionality and user experience.
Measuring Performance Gains
It’s widely believed that “a bigger server will obviously outperform a smaller server”.
To put this to test, we created 3 identical websites on 3 fresh servers using WordPress 6.2. All of the servers had identical configurations – except the CPU and RAM.
We ran load testing benchmarks using Grafana k6 to stress test the performance of our website, and measure the impact in 95 percentile response times. Since the purpose of this test is to put strain on CPU and RAM, we didn’t use any optimization techniques such as caching that are used in real world applications.
1v CPU 2 GB RAM
Our smallest server used the cheapest hosting plan offered by the cloud provider. It consisted of only 1 virtual CPU and 2 GB of RAM. Despite this, it was able to serve nearly 20 requests per second and had a p95 response time of 815ms. This is not bad considering it only costs <$5 to run. Most users will be able to afford it and will be satisfied with it – as long as the site doesn’t get too much traffic.
2v CPU and 8 GB RAM
Our second server was moderately priced, this one consisted of 2 virtual CPU cores and 8GB of RAM. This server size is probably unnecessary if you’re running a hobby site, but if you use your site for critical business transactions, then you should consider this.
Just by slightly increasing the resources, we were able to see a massive jump in the performance. The server completed nearly 36 requests every second with a p95 response time of 104ms. These numbers suggest that our server was limited by the number of resources during our first test. Let’s crank it up further and see if the numbers scale proportionally.
8v CPU 32 GB RAM
Our third server was the most expensive of the three, it contained 8 virtual CPUs and a whopping 32 GB of RAM. However, when we look at the numbers, they tell a different story. The number of requests per second metric saw only a minor bump from 36 to 39; furthermore, the p95 response time metric didn’t improve.
Trade Offs to Consider While Scaling RAM and CPU
You also need to be aware of the potential drawbacks or challenges of scaling RAM and CPU cores.
Unexpected Crashes
Scaling RAM and CPU cores might cause some unexpected issues or conflicts that can break your site.
For example, you might encounter compatibility problems with some plugins or themes that are not optimized for the new resources. Or you might face some server errors or configuration issues that prevent your site from loading properly.
These issues or conflicts can make your site inaccessible or unusable until you fix them, or revert to the previous state.
Planned Downtime
Furthermore, many hosting providers require you to shut down your server before you can increase or decrease your server’s RAM and CPU.
This means that your site will be offline for the duration of the upgrade. Although most providers will be able to scale up your server within a few minutes, this does vary from vendor to vendor, and depends on availability.
Increase in Hosting Costs
Finally, scaling RAM and CPU cores can also affect the price of your hosting plan. Some providers and plans might offer flexible or scalable pricing that adjusts to your resource usage. Others might charge you a fixed or flat rate regardless of your resource usage. And others might have different tiers or levels of pricing that correspond to different amounts of resources.
You need to weigh the costs and benefits of scaling, and find the best balance for your site’s budget and needs.
You need to consider how much scaling will improve your site’s performance and user experience, and how much it will increase your hosting expenses. You should also compare different providers and plans to find the one that offers the best value and quality for your site.
More Resources Might Not Benefit the Site
Simply adding more RAM and CPU cores does not guarantee better performance if there are other limiting factors such as network speed, disk speed, or PHP workers.
PHP workers are processes that handle PHP requests on your WordPress site. Some hosting providers limit the number of PHP workers available on your server. If you have too few PHP workers, your site may become slow or unresponsive when there are many concurrent visitors or complex tasks. If you have too many PHP workers, they may consume too much RAM and CPU resources, and cause your server to crash.
Final Thoughts – Thinking Beyond RAM and CPU
It’s clear that you can’t keep scaling up the hardware and expect proportional increase in performance.
Throwing money at the problem only works up to a point.
Beyond that, you need to fine tune your application to consume fewer resources, and find the optimal balance between RAM, CPU cores, and PHP workers for your WordPress site based on your traffic, content, and plugins. There are several ways to do this:
You can use caching, a technique that can improve your WordPress performance by storing frequently accessed data in memory or on disk, and serving it faster to visitors without invoking PHP workers.
There are different types of caching such as page caching, object caching, edge caching, etc. You need to choose the right caching solution for your WordPress site, depending on your needs and preferences.
If you’re tired of managing your own servers, you might want to check out RunCloud (yep, that’s us!).
RunCloud is built for developers that want to focus on shipping great work, not on managing their infrastructure. Experience what a painless server configuration feels like – get started with RunCloud today, and get up and running in minutes.
Did you know that a large number of PHP applications are encoded with ionCube?
If you want to use any of these applications on your web server, you need to install ionCube Loader – a PHP extension that allows you to run ionCube-encoded PHP files. But how do you install ionCube Loader on your web server? Is it easy or complicated? Do you need any technical skills or experience?
In this article, we will show you how to install ionCube Loader in less than 10 minutes with our step-by-step tutorial. You will learn:
• How to download the right Loader package • How to extract and copy the Loader file • How to edit the php.ini file • How to restart your web server.
By the end of this article, you will be able to run any ionCube-encoded PHP application on your web server without any hassle. Sounds good? Then let’s get started.
Table of Contents
What is ionCube Loader?
The ionCube Loader is a PHP extension that allows you to run ionCube-encoded PHP files on your web server. ionCube-encoded PHP files are files that have been protected with the ionCube PHP Encoder – a widely used tool that allows developers to encrypt their PHP code and add security features such as license management, malware protection, and code optimization.
The loader is supplied as a PHP extension module for Windows, Linux, and macOS, and can be installed into a PHP installation. It is also freely redistributable. By installing ionCube Loader on your web server, you can benefit from the following advantages:
You can use third-party PHP applications that are encoded with ionCube, such as WordPress plugins, e-commerce platforms, or CMS systems.
You can protect your own PHP code from being stolen, modified, or reverse engineered by encoding it with ionCube PHP Encoder and running it with ionCube Loader.
You can improve the performance and reliability of your PHP code by using the ionCube PHP Encoder’s features such as code compression, error reporting, and vulnerability protection.
If you are using PHP 7.4 on the OpenLiteSpeed server, ioncube Loader should be enabled by default. You can check it using the instructions provided at the end of this article. If it is not installed, you can quickly install it by running apt install lsphp74-ioncube for PHP 7.4 and apt install lsphp81-ioncube for PHP 8.1.
Before you begin installing the ionCube Loader you’ll need to know which PHP version your website is running on. At RunCloud, we offer multiple versions of PHP, from 7.0 right up to the latest 8.2 release. If you’re not sure which PHP version your website is on, log in to your dashboard, and head over to ‘Settings’ on the left:
So, as an example, if you find that your website is currently running PHP version 7.4, then you’ll need to make sure you install the 7.4 version of ionCube.
On Containerized Servers
If you are running a Containerized server on RunCloud, you can quickly install ionCube Loader with a few clicks. Go to the “Services” tab of your server and scroll down to the PHP images. Here you can see the PHP images that are available for your server.
You need to install ionCube Loader on each PHP version separately. If an image is already “in use”, click on the “…” next to it and select “Change Environment Variables“. If the image is not being used on your server, you can click on “Add to stack“.
This will open a pop-up window on your screen. Under the third party extensions menu, make sure to Check the box next to ionCube.
Next, click on “Update Environment Variables” or “Add to Stack“, depending upon your setup.
You need to perform the above step for each PHP version that needs ionCube Loader.
After making the necessary changes, scroll back to the top of the services page and click on “Deploy” to save the changes. This will create new container images on your server, and all the existing (as well as new) applications on your server will be able to use the ionCube Loader.
On OpenLiteSpeed Servers
If you are using OpenLiteSpeed servers, you will need to log in to your server via SSH. After logging in to your server, you need to download the ionCube Loader archive from the official website, and extract it. To do this, you can run the following commands:
cd /tmp/
wget https://downloads.ioncube.com/loader_downloads/ioncube_loaders_lin_x86-64.tar.gz
tar -zxvf ioncube_loaders_lin_x86-64.tar.gz
The previous command should show an output similar to the above screenshot. After extracting the archive, it will be available in the /tmp directory. However, we need to install it in our PHP environment.
In this section, we have provided the instructions to install ionCube Loader on PHP 8.1, but the steps are similar for any other version of PHP.
To install ionCube, you need to copy the relevant shared library file in the PHP’s directory. Change into the installation directory of PHP 8.1 using the following command:
cd /usr/local/lsws/lsphp81/lib/php
ls
After navigating to the correct directory, you can browse its contents. In the above screenshot, we can see it has two folders, one named 20210902 and the other is named 8.1.
Execute the following commands to copy the shared library file of ionCube Loader for PHP 8.1 into the folder named 20210902. These commands will also create an entry in the mods-available directory to load the ionCube Loader next time PHP is reloaded.
If you want to install the loader for multiple PHP versions, you need to perform the above step for each version. Finally, you need to restart the PHP environments for the changes to take effect – run the following commands to do this:
# For OpenLiteSpeed servers
systemctl restart lsws-rc
killall lsphp
On Nginx Servers
Similar for OpenLiteSpeed servers, to install ionCube Loader on Nginx servers, you need to log in to your web server as root, and run the following commands to download and extract the archive:
cd /tmp/
wget https://downloads.ioncube.com/loader_downloads/ioncube_loaders_lin_x86-64.tar.gz
tar -zxvf ioncube_loaders_lin_x86-64.tar.gz
Once you’ve extracted the archive, you’re ready to install the ionCube Loader. Execute the following commands to copy the shared library files in the correct location, update the relevant configuration, and to restart the PHP-fpm:
(Again, we have only provided the commands for PHP 8.1 but the process is similar for all versions of PHP. )
Once you’ve installed ionCube, you may want to verify that it’s installed properly and that everything is running correctly. To do this you simply need to run one line of code, which will vary depending on your PHP version, as shown below:
The above command will use the specified version of PHP to list out all the installed modules and display all the lines that contain the word ionCube. If your installation was successful, you will see the following output:
For All PHP Versions and Server Stacks
If you don’t want to check the installed modules via the command line, you can also do it using the web interface. This method will work on all the PHP versions, regardless of your server stack.
After installing the module, make sure you have restarted your web server. Next, go to your RunCloud dashboard and select the application where you want to use ionCube Loader. Click on the “File Manager” tab on the left, and then create a new PHP file. You can name it anything – for example abcd.php.
Next, click on the newly created file, which will open up a text editor in a new window. You need to edit this file by pasting in the following code, and saving it:
<?php phpinfo(); ?>
Open this file in your browser. For example, if the URL of your site is www.example.com, you need to visit www.example.com/abcd.php to open it. You should see something like the screenshot below. Scroll down to find the version of ionCube Loader.
In the above screenshot, we can see that the ionCube Loader is being displayed, therefore it was installed correctly. If the page fails to load or the entry is missing, then it was not installed correctly.
After checking the installation, we strongly recommend deleting this configuration file. It reveals sensitive information about your server to the internet that can be used by hackers to target you.
Backwards Compatibility And Limitations
If you’re upgrading your version of PHP, it may not always be necessary to remove ionCube and install a newer version.
Encoded files can, in general, run on versions of PHP equal to or greater than the source language of the Encoder used to produce them.
So a file produced by the Encoder for PHP 7.2 can be run by the Loaders for PHP 7.2, 7.3, and 7.4, but not 7.1. This means that the Loaders offer good backwards compatibility. However, there are the following limitations:
The Loader for PHP 8.1 can only run files produced by the version 12 Encoder for PHP 8.1.
The Loaders for PHP 7.1 through 7.4 can only run files produced by the Encoders for PHP 7.
The Loader for PHP 7.0 can only run files produced by the Encoder for PHP 5.6.
Conclusion
ionCube’s tools are hugely valuable in both protecting and optimizing your PHP code. By encrypting and obfuscating your code, you are guarding it from prying eyes, and protecting your intellectual property from being used without permission, or in any way you don’t approve of.
By using the ionCube tools your PHP code will no longer be able to be reverse engineered, copied, or stolen. But as well as this, it will also help speed up your code.
It achieves this by compressing the code before sending it back to the clients requesting that particular resource. This compression results in faster load times for end users who are trying to view or interact with your application from their browser, making for a more enjoyable user experiences overall.