Category: Server Management

  • How to Set Up an UpCloud Server with RunCloud

    UpCloud is a popular European cloud server provider that offers affordable cloud hosting services across the globe. What makes it especially striking is that UpCloud gives you a 100% Uptime SLA – which makes it one of the top choices for hosting your websites.

    UpCloud uses its own proprietary MaxIOPS storage technology to deliver industry-leading performance and reliability. It’s claimed to be faster than SSD – built on enterprise-grade SSDs, but up to 2x faster compared to industry-standard cloud servers.

    UpCloud offers a very simple pricing plan. The cheapest plan costs only €7/month, which includes 1GB Memory, 1 CPU Core, 25GB SSD, and 1 TB Transfer.

    UpCloud has 12 worldwide data centers, including digital hubs such as:

    1. Amsterdam
    2. Chicago
    3. Frankfurt
    4. Helsinki
    5. New York City
    6. London
    7. San Jose
    8. Singapore.

    This gives you the flexibility to deploy your applications close to your customers and reduce latency.

    In this post, we will show you how to set up an UpCloud server to host your websites with the help of RunCloud.

    Why Choose RunCloud to Setup Your UpCloud Server?

    RunCloud simplifies server management, allowing you to manage multiple servers and web applications with ease. You can easily change web application stacks and PHP versions, clone web applications, and secure them with SSL/TLS.

    RunCloud supports a range of web applications, including WordPress and Laravel, and offers features such as Git deployment and custom NGINX configuration. The Team feature is useful for agencies assigning different members to different servers with separate permissions. 

    Professional WordPress developers can use the one-click WordPress Staging feature to create a staging version of your website easily. If you don’t have a RunCloud account, you can sign up for a 5-day free trial, with no credit card required.

    Method 1 – UpCloud Server Provisioning (Recommended)

    With our server provisioning feature, you can set up a server in UpCloud directly from the RunCloud dashboard by connecting to UpCloud using their API in RunCloud.

    Video Tutorial: Setup UpCloud Server

    Create UpCloud API Key

    In UpCloud, your API key is in the form of the username and password of your UpCloud account. You only need to enable the “Allow API connection” option from your UpCloud account settings.

    It is NOT a good practice to use your main UpCloud username and password for the API key. We strongly recommend you create a dedicated subaccount that you can use for the API key.

    You can create a subaccount in UpCloud from the People tab within the account settings.
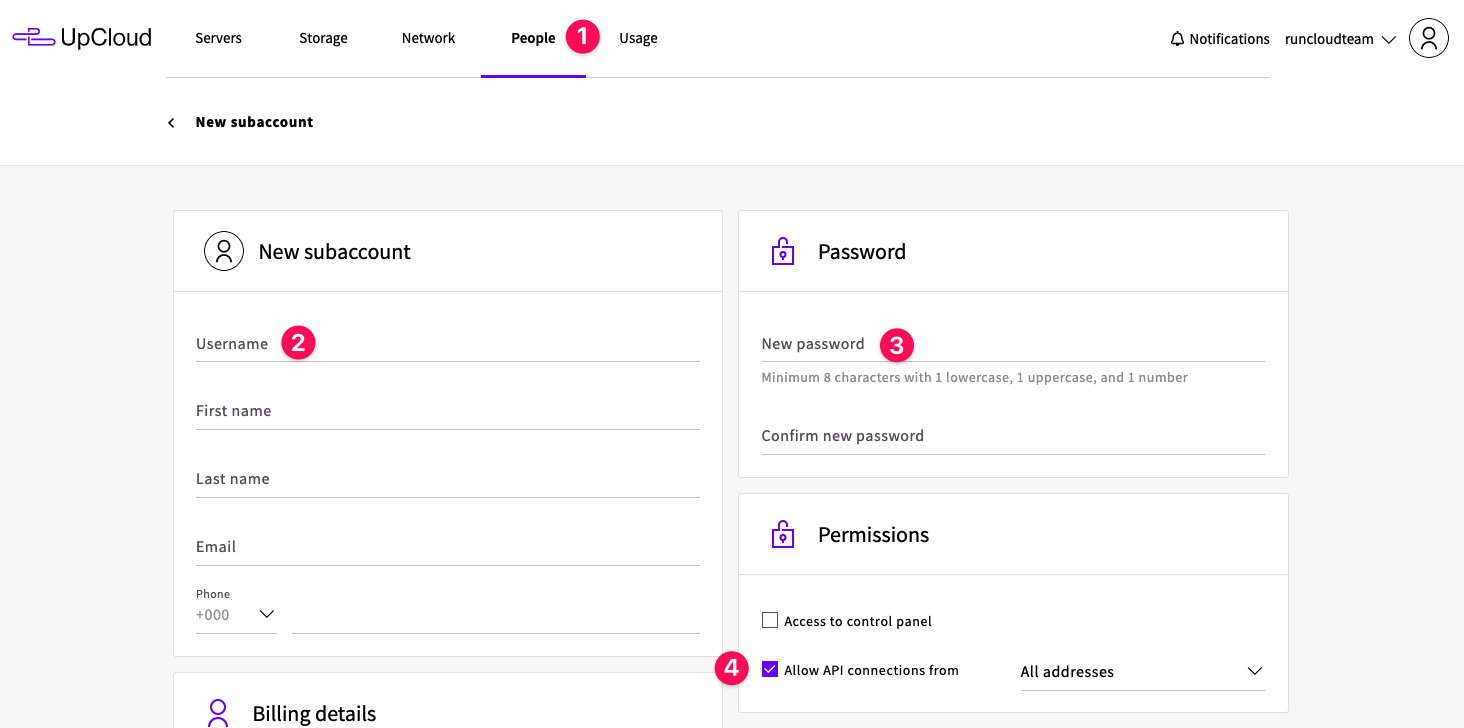
    creating API key

    For this subaccount permission, uncheck the “Access to control panel” option, and only enable the “Allow API connection” option. This subaccount will be dedicated to API connections only and can’t be used to access your UpCloud control panel.
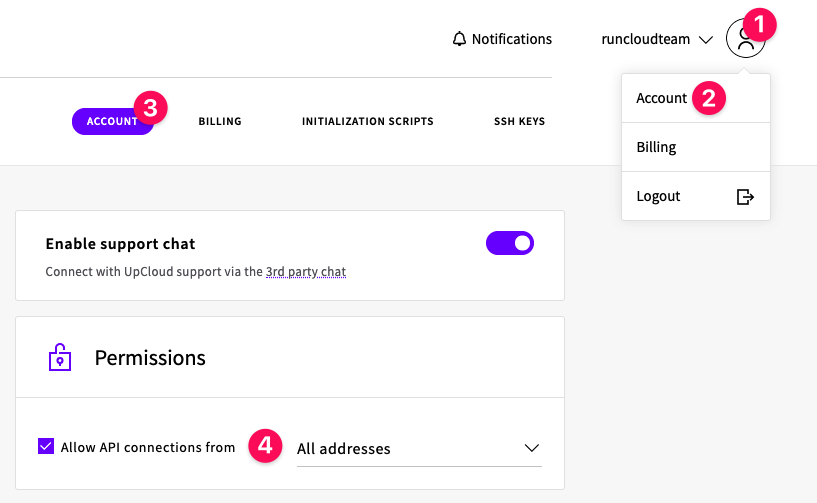
    Upcloud API key

    Add UpCloud API Key to RunCloud

    After creating the key, you need to add it to RunCloud. You can either use the “Add a new key” shortcut when building a new server using RunCloud, or you can go to the “3rd Party API Key” menu by clicking your profile (top right), then clicking the Settings menu. There you will see the list of all server provider API keys that you have added to RunCloud.
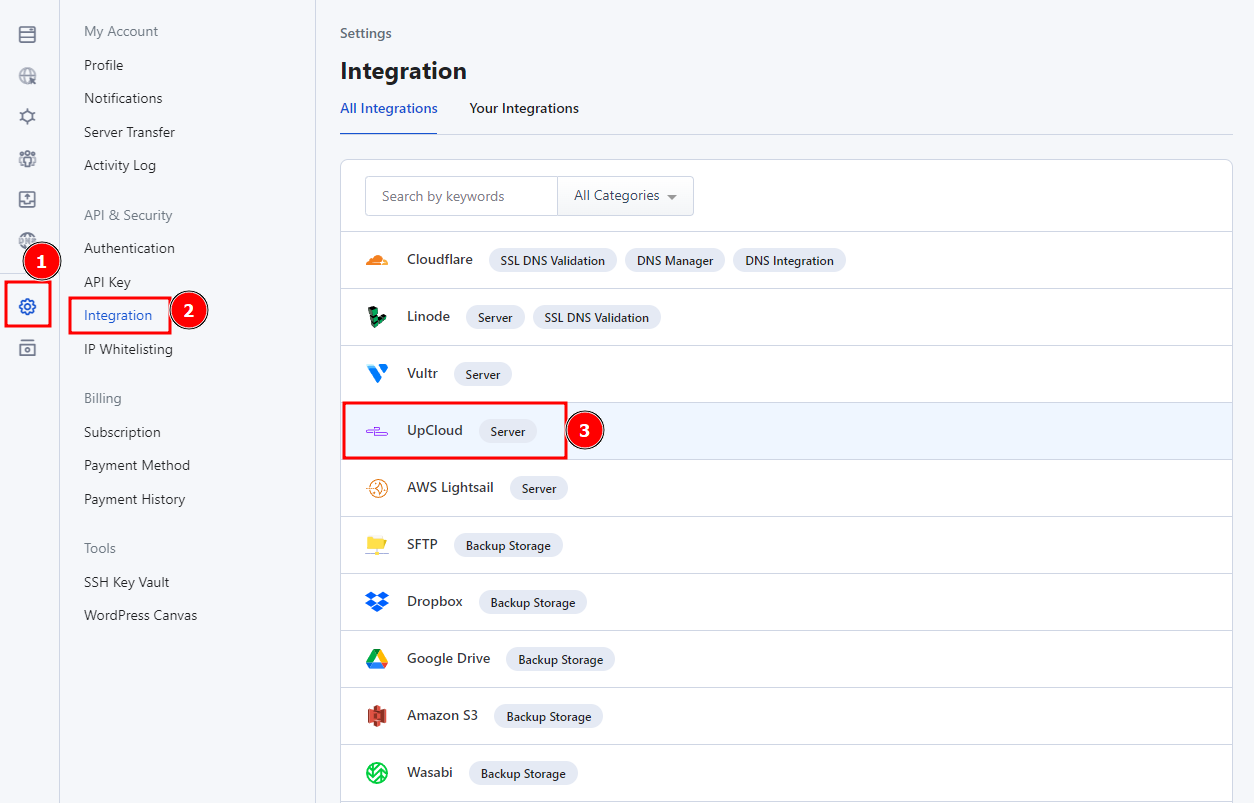
    Upcloud Integration

    Click on UpCloud and add the login credentials of the new account that we just created. Once you have added your API key, you can start building the UpCloud server directly from the RunCloud dashboard.
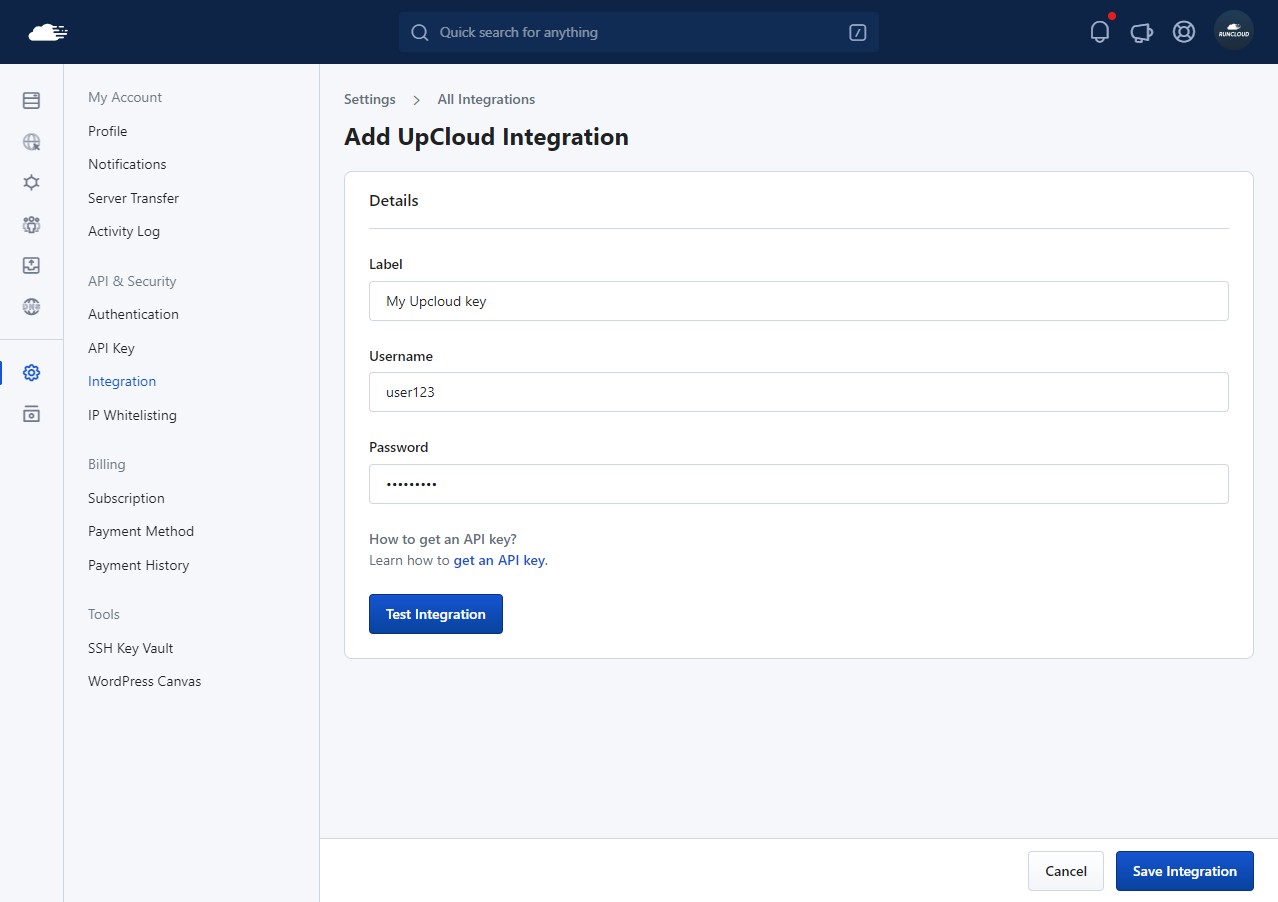
    ADD upcloud integration

    Deploying Your UpCloud Server

    To get started, go to your RunCloud dashboard and click on the “Connect a Server” button to set up your first server.
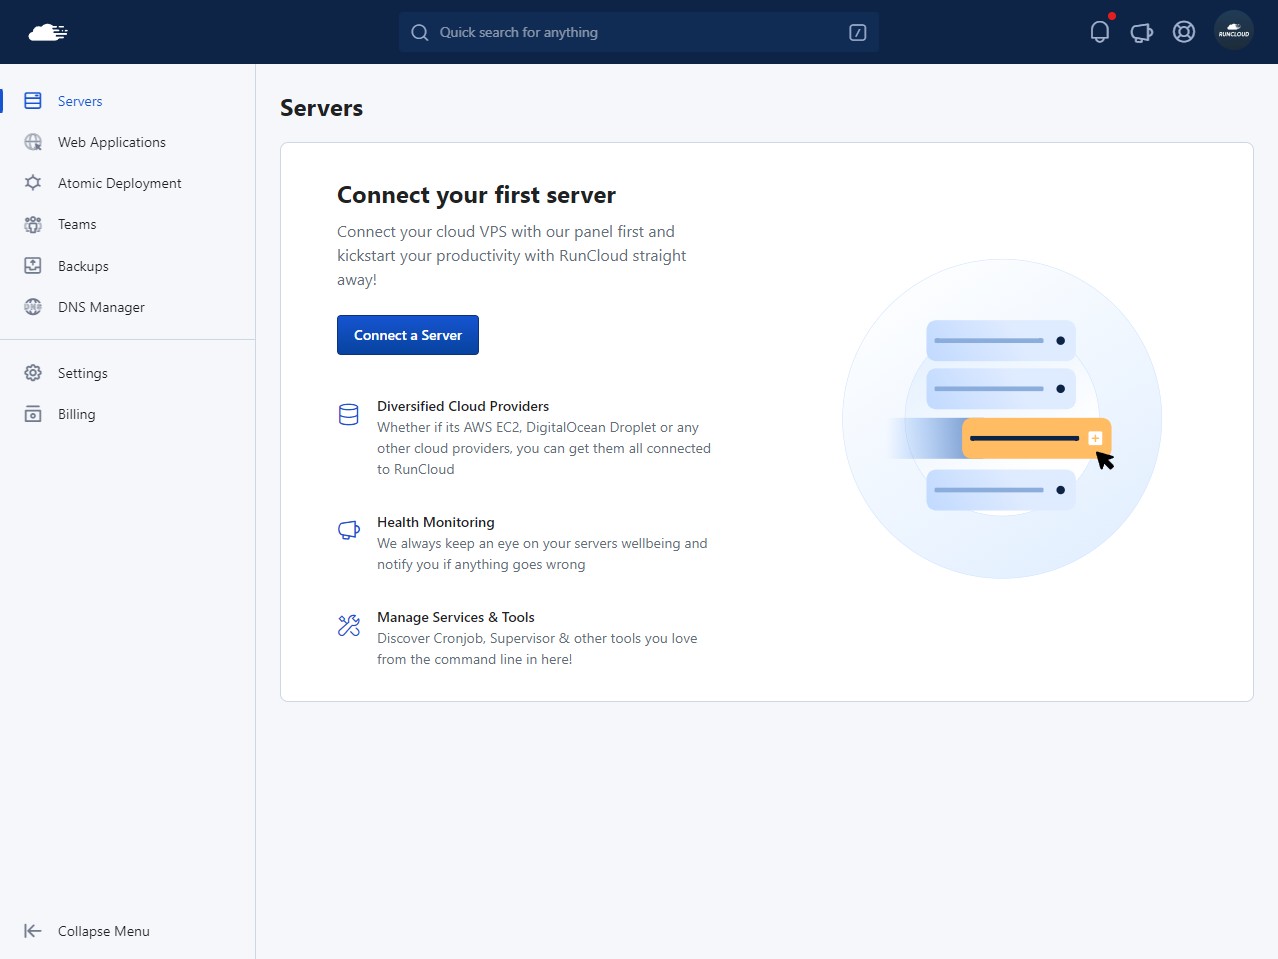
    runcloud connect first server

    A screen will pop up showing you a list of available server providers – select UpCloud and click the “Deploy Server Automatically” option.

    Scroll down to the bottom of the page and give your server a suitable name, select the API key from the list, then click “Continue”.
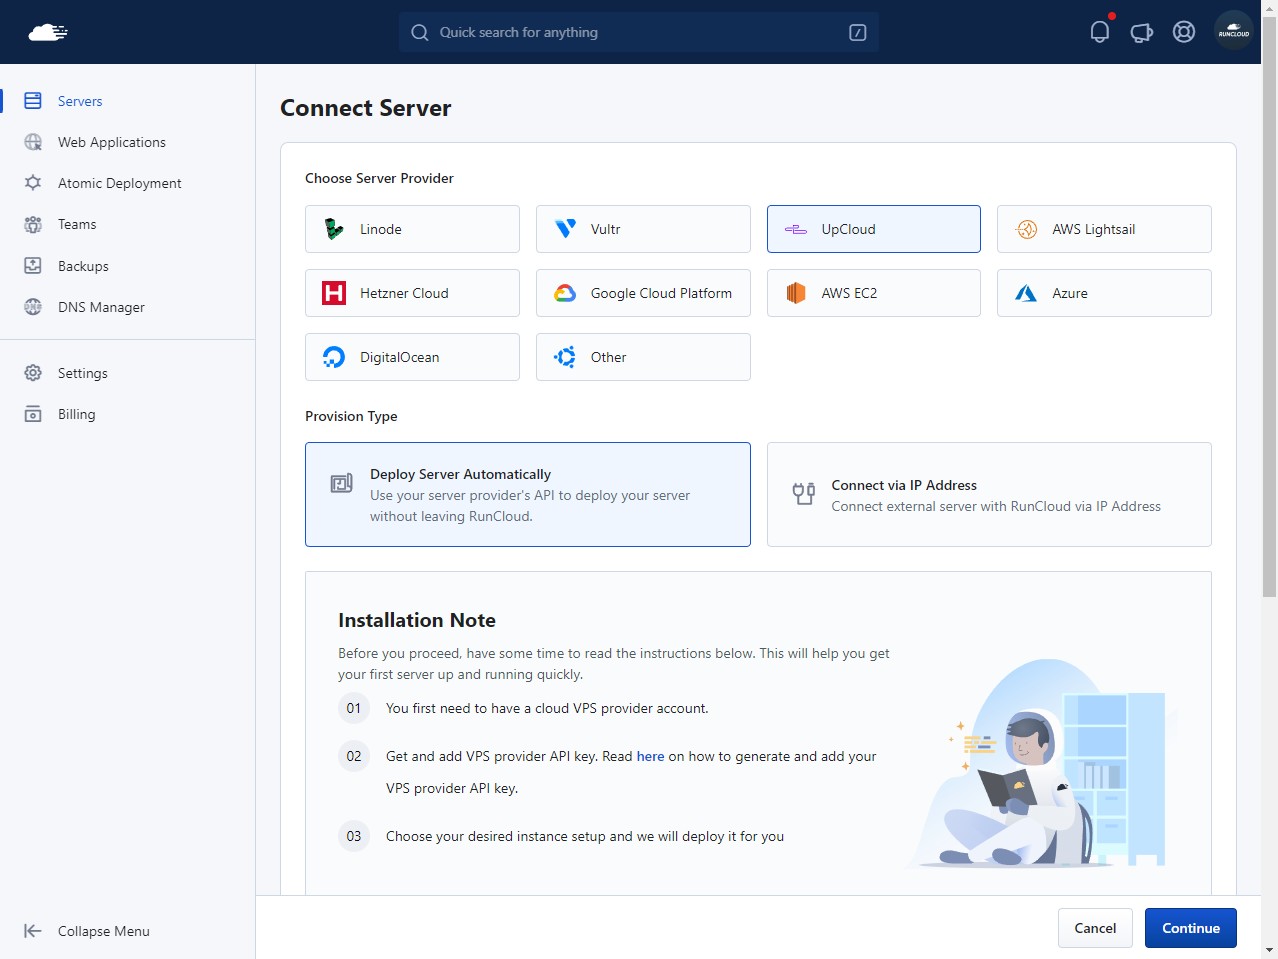
    Upcloud create server

    On the next screen, you can pick your desired operating system, data center region and instance type according to your requirements. After this, you can deploy your server by clicking the “Add This Server” button – RunCloud will begin provisioning your server automatically.

    This step usually takes 5-10 minutes. Once the provision is complete, you will be returned to the RunCloud dashboard.

    Method 2 – Connect UpCloud With Direct Server Installation

    You can also use the direct server installation method to connect a server to RunCloud. To do this, go to your UpCloud dashboard and create a new server using either the Ubuntu 20, 22, or 24 LTS OS image in your desired datacenter.
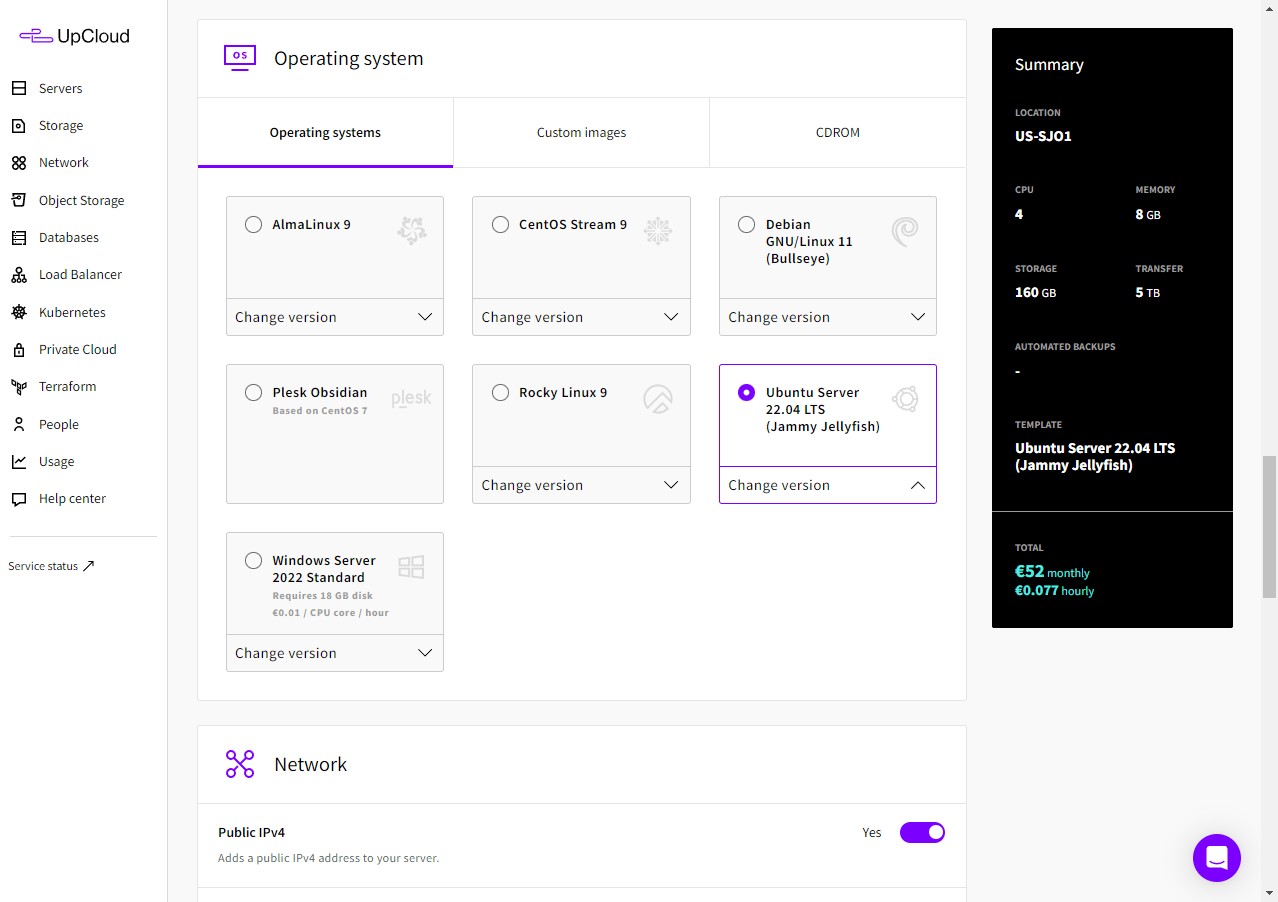
    Upcloud dashboard create Server

    Next, configure any other settings that you want to change, such as adding SSH keys or updating your server’s name. The RunCloud agent requires TCP traffic on ports 80, 443, and 34210 to function properly, and we will explain how to do this later in the article.
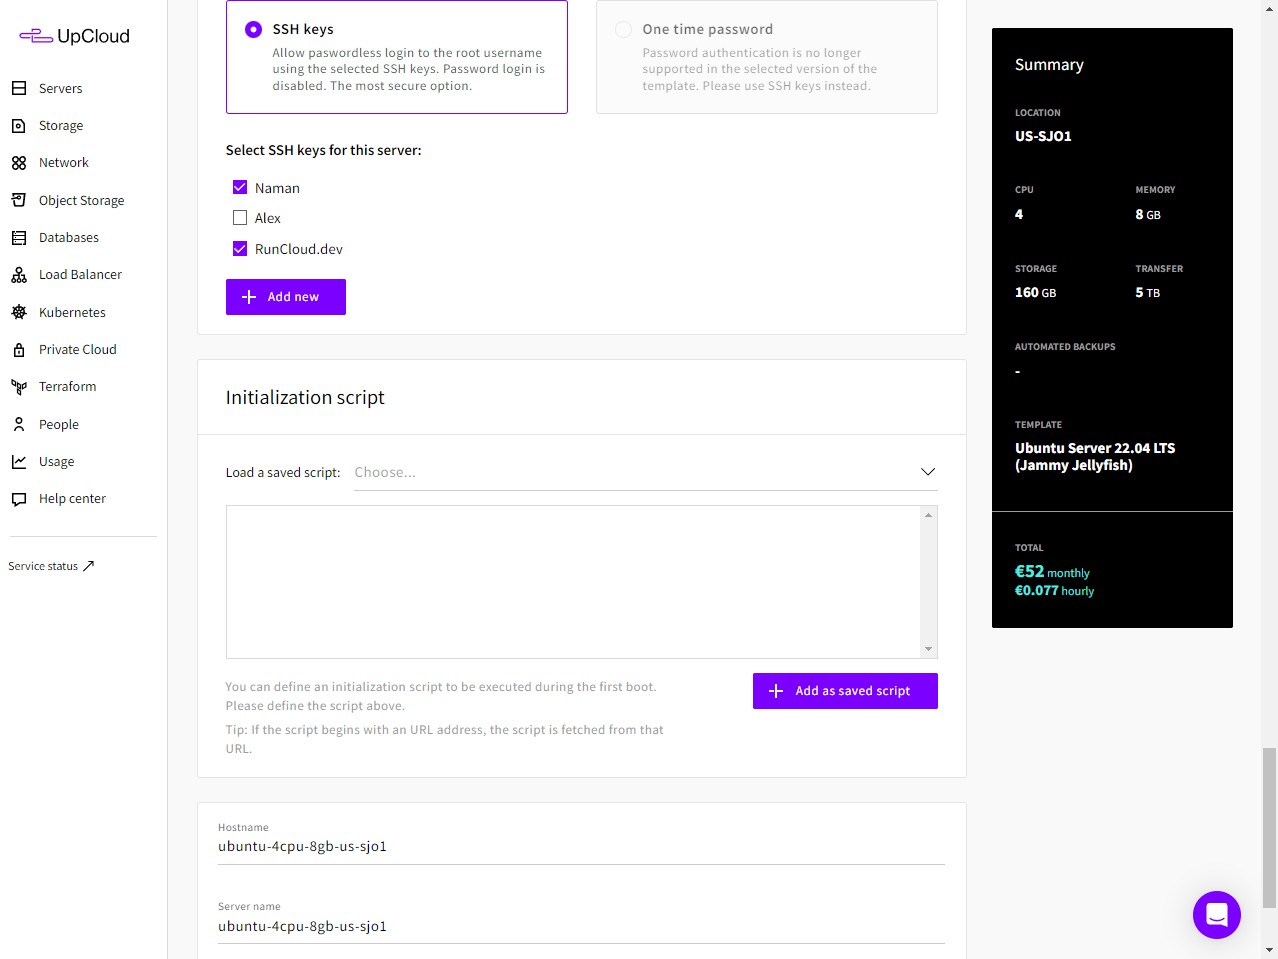
    Upcloud SSH keys

    After creating your server, it should be visible in your UpCloud dashboard. Wait for the server to finish provisioning. Once it has, log into it using SSH.
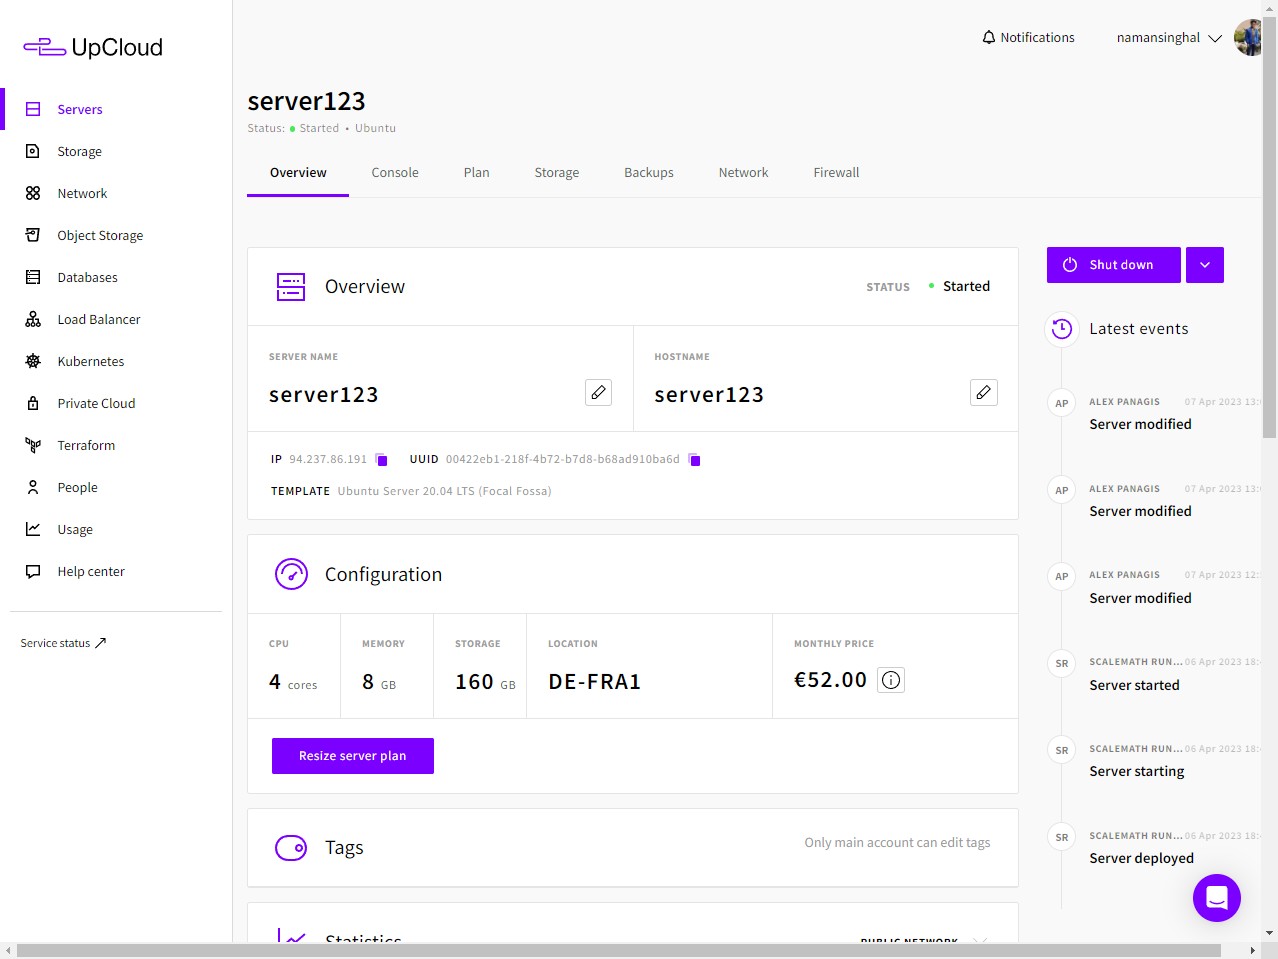
    server summary upcloud

    After logging in to your server, go to the RunCloud dashboard and click on “Connect a Server”. In this method, instead of using “Direct installation” select “Connect via IP Address”.

    On the next screen, you will see a bash command. Copy this command and paste it in your SSH terminal. You’ll need to execute this command as the root user, so make sure you have the necessary permissions to do so.

    This will install all the necessary dependencies on your server that are required to run websites. After the installation is complete, you can close the terminal, and manage your server from the RunCloud dashboard.
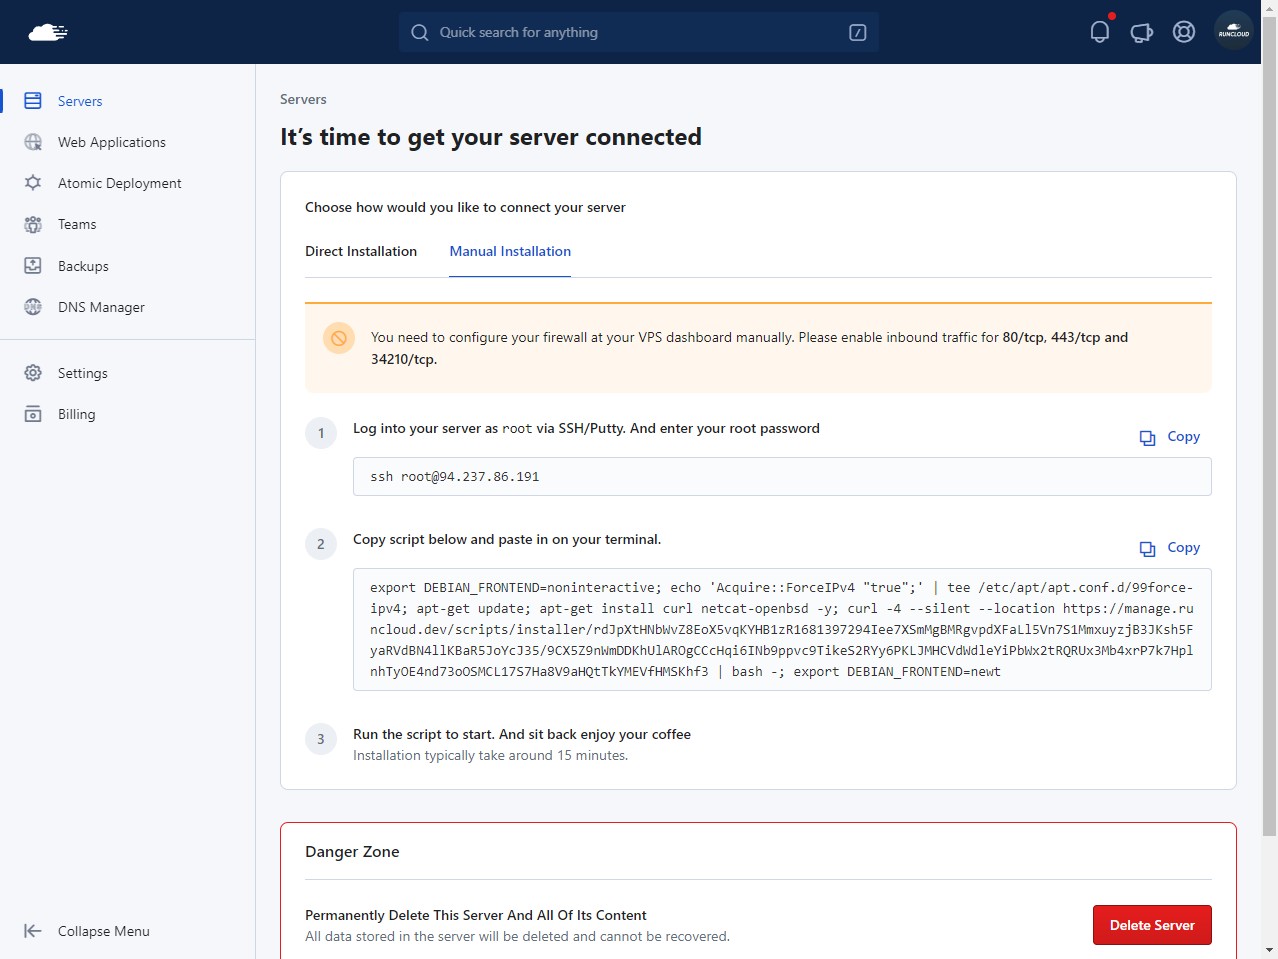
    connect server manually RUnCloud

    Configuring the UpCloud Firewall for RunCloud

    After connecting your server to RunCloud, it is recommended that you configure a firewall. UpCloud provides a straightforward, network-level firewall that you can manage directly from your control panel. This section will guide you through setting up the necessary rules to ensure your server can communicate with RunCloud and serve web traffic securely while blocking all other unauthorized access.

    First, you need to access the firewall management interface for your server. To do this, log in to your UpCloud control panel and navigate to the details page of the server you intend to use with RunCloud. Once you are on the server’s overview screen, click on the Firewall tab to proceed.
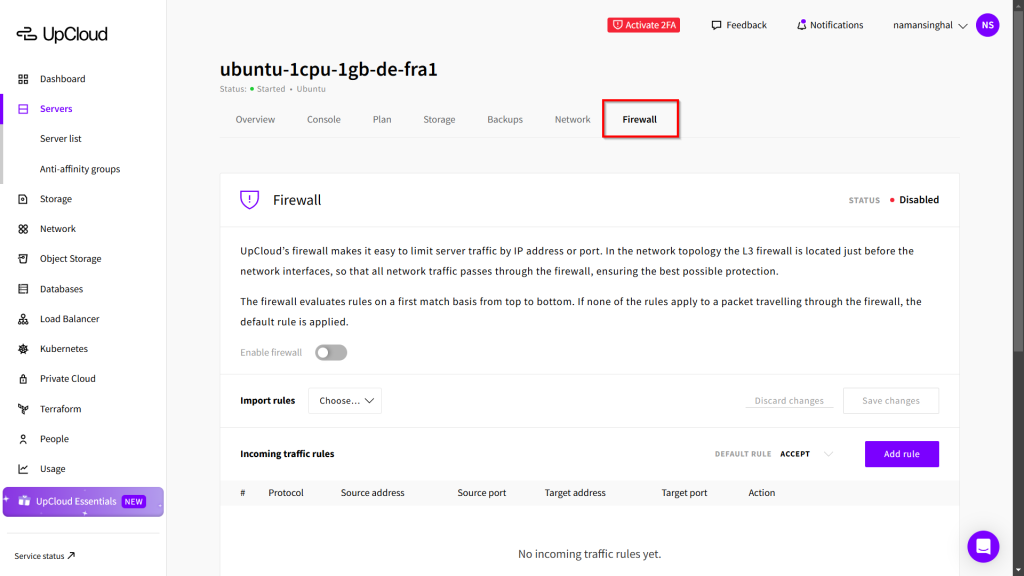
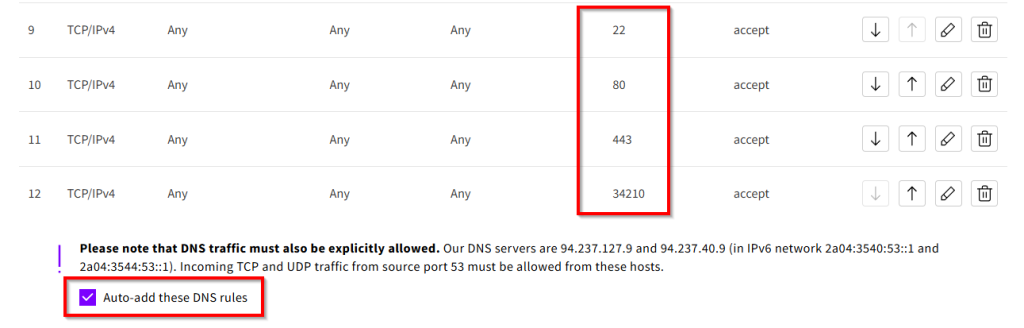
    Next, you will add a series of rules to allow specific types of incoming traffic required for RunCloud and standard web hosting to function correctly. You will need to create a new rule for each of the following services:

    • Create a rule to allow standard HTTP traffic by permitting incoming connections on TCP port 80.
    • Add another rule for secure HTTPS traffic by allowing incoming connections on TCP port 443.
    • Optionally, to support the modern HTTP/3 protocol, you can add a rule that allows incoming traffic on UDP port 443.
    • Next, you must create a rule to allow the RunCloud agent to communicate with your server. Add a rule to permit incoming connections on TCP port 34210.
    • To allow yourself to connect to the server via SSH, create a rule for TCP port 22. For enhanced security, it is highly recommended that you disable or remove this rule if you don’t plan to connect to your server via SSH.

    Please note that when creating these firewall rules for incoming services, you must specify the port value at the target port on your server, not the source port. This is because you are defining which port on your server is “listening” for a connection. The source port of the connecting client is typically dynamic and unpredictable, so we leave its value to “All Ports” and create rules for the known service port (80, 443, 34210, etc.) on your end.
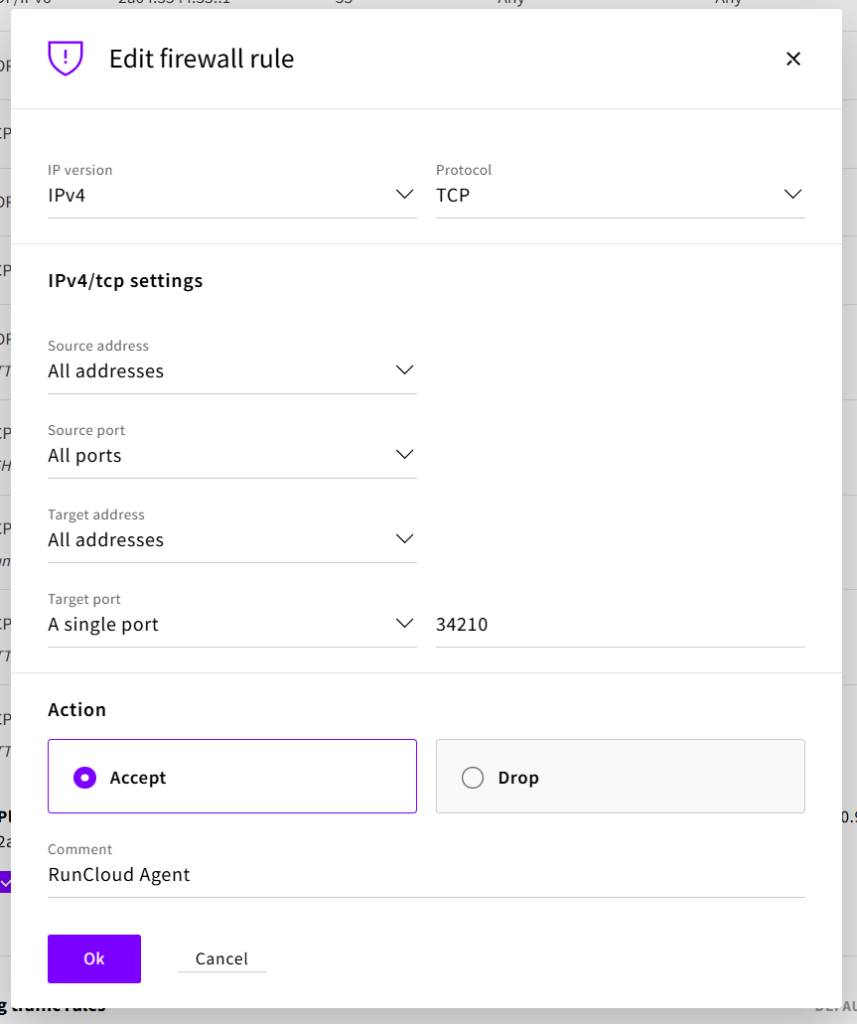
    After setting up the above rules, you must also allow traffic from UpCloud’s DNS servers. You need to add rules that permit incoming TCP and UDP traffic that originates from source port 53 from UpCloud’s specified DNS servers. You can simply create the necessary rules by clicking on the corresponding. checkbox.
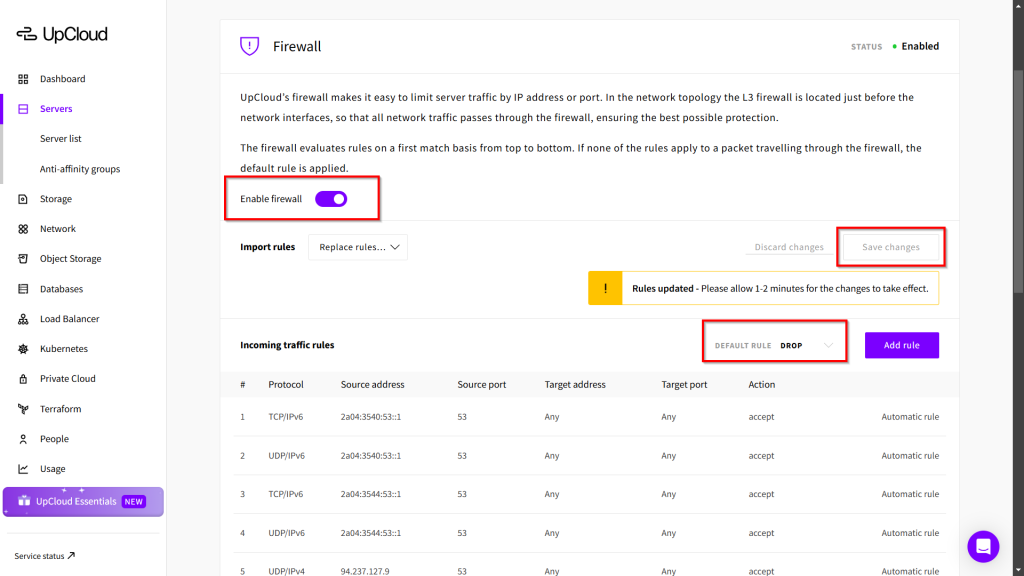
    With all the necessary “allow” rules in place, you must now set the default policy for all other traffic. For a secure configuration, the default incoming traffic rule should be set to Drop. You can easily do this by selecting “drop” from the drop-down menu at the top. This ensures that any traffic not explicitly permitted by the rules you just created will be blocked, which will effectively secure your server from unsolicited connections.

    Finally, once you have added all the required rules and set the default policy to Drop, you can click on the “Save Changes” button on the top right. Next, you can flip the master switch to activate the firewall ruleset for your server and turn it on. Your server is now protected by the UpCloud firewall and correctly configured to communicate with the RunCloud platform.
    For a comprehensive guide and to learn more about advanced firewall features, please read the official UpCloud firewall documentation.

    After Action Report

    If you’re looking for a reliable and high-performing hosting option for your website, UpCloud is an excellent choice. Their enterprise-grade hardware and MaxIOPS storage technology provide consistent and fast performance, with an astonishing 100% Uptime SLA. Furthermore, their plans start as low as €7 per month, making it an affordable option for both businesses and individuals alike.

    To take your hosting experience to the next level, start using RunCloud alongside your UpCloud server. With RunCloud, you can easily manage your server and web applications from a single dashboard, even if you’re not an expert in Linux. Register for RunCloud and streamline your server management experience.

  • A Step-by-Step Guide to Connect a Microsoft Azure Server to RunCloud

    A Step-by-Step Guide to Connect a Microsoft Azure Server to RunCloud

    Managing servers through the command line can be tedious. Many cloud management platforms add to the friction by restricting functionality or locking you into their ecosystem.

    RunCloud was built to solve this exact problem.

    It is a flexible VPS management platform that works with any cloud platform, supports multiple server stacks, and supports both x86 and ARM CPU architectures.

    In this blog, we will show you how to combine the power and reliability of Microsoft’s Azure cloud with the simplicity and efficiency of the RunCloud server management panel.

    By the end of this guide, you’ll have a brand-new, optimized server ready to host your websites and applications.

    This guide is perfect for anyone, from hobbyists launching their first project to developers looking for a streamlined workflow.

    Important Note: RunCloud is designed to work on a fresh, clean server. This process will not work on an existing server with websites or other software (workloads) running on it. You must start with a brand-new server, which we’ll create together in the steps below.

    Let’s get started!

    Part 1: Creating Your Virtual Machine in Microsoft Azure

    First things first, we need a server. In Azure, a server is called a “Virtual Machine“ or VM.

    Step 1: Log in to Your Azure Portal and Create a VM

    1. Head over to the Microsoft Azure portal and log in.
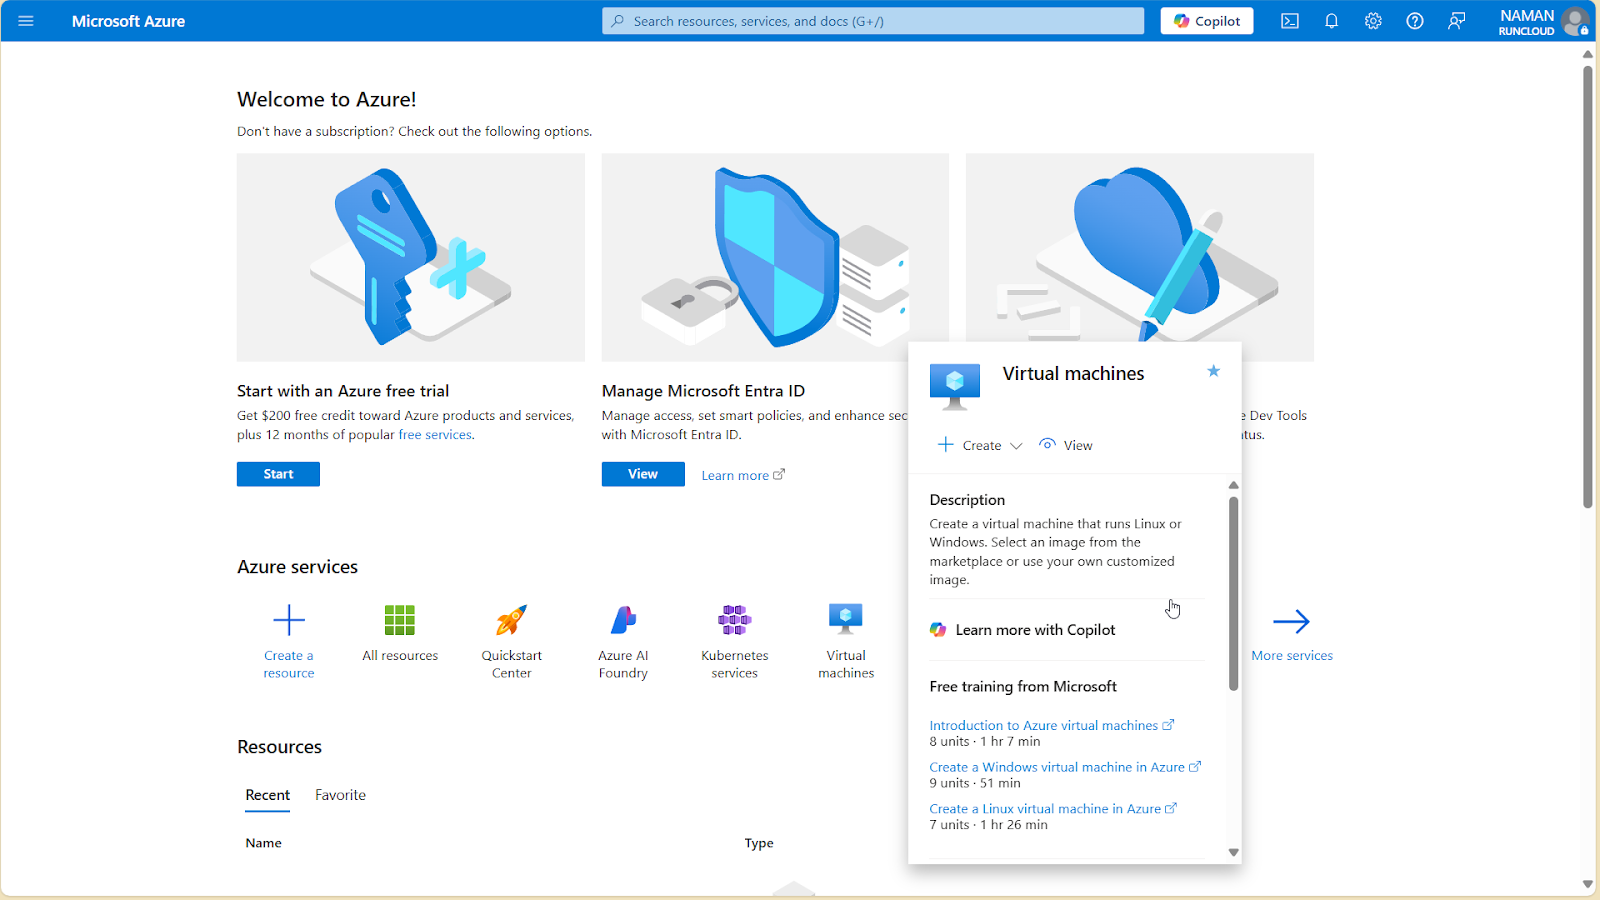
    2. In the main dashboard, click on “Create a resource“.
    3. Search for “Virtual machine“ and select it, then click “Create“.
    Microsoft Azure dashboard

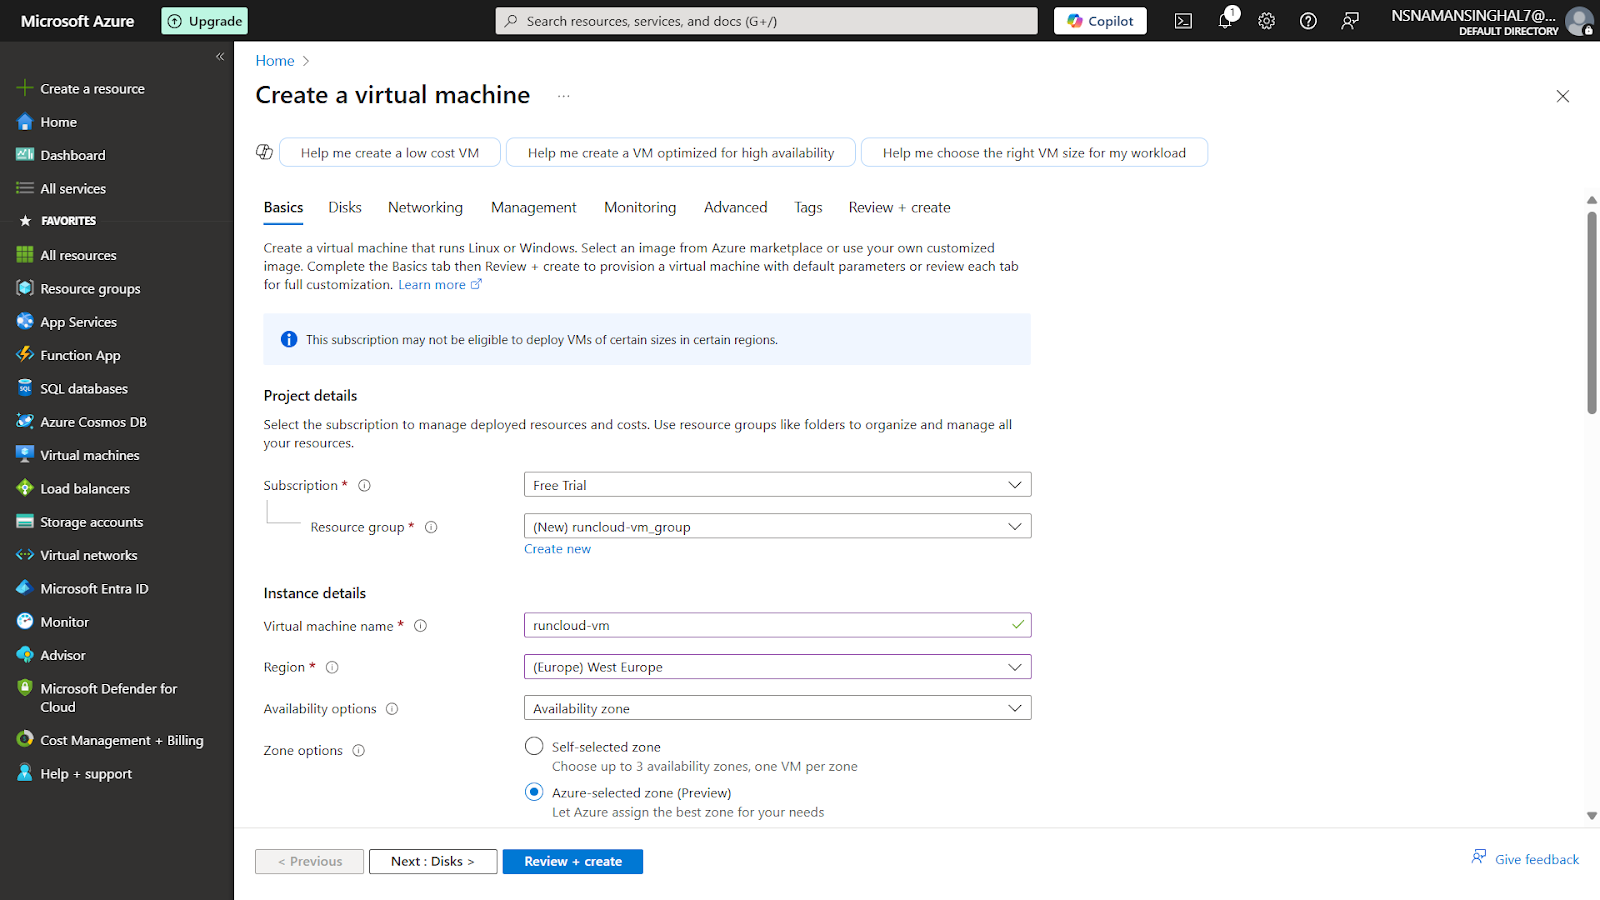
    Step 2: Configure the Basics

    Now you’ll see a screen with several options. Let’s fill them in.

    Project Details: Select your Azure Subscription and Resource Group. You can create a new resource group if you don’t have one. Think of it as a folder that holds all related resources for a specific project.

    Instance Details:

    • Virtual machine name: Give your server a memorable name, like runcloud-server.
    • Region: This is the physical location of your server. For the best performance, pick the region closest to most of your website visitors.
    • Availability options: You can leave this as the default for now.
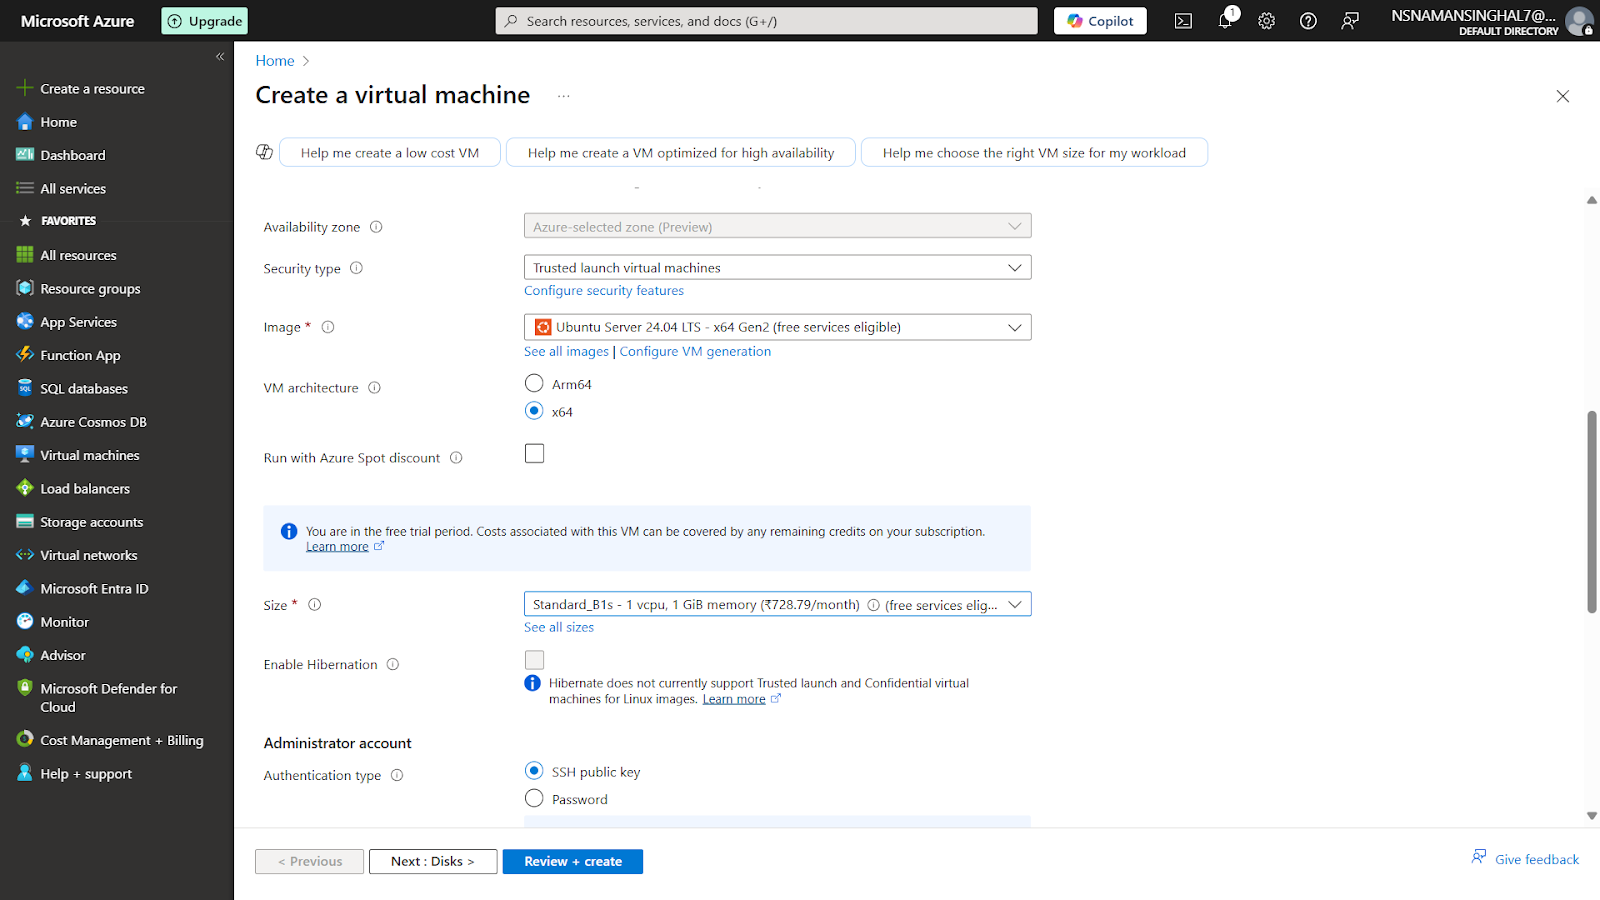
    • Image: This is your server’s operating system. RunCloud works best with Ubuntu. Select the latest Ubuntu Server LTS version (e.g., Ubuntu Server 22.04 LTS).
    • VM architecture: RunCloud supports both x64 and Arm64. Unless you have a specific reason for using Arm64, x64 is the more widely compatible option.

    Step 3: Choose Your Server Size

    This setting determines how much power (CPU) and memory (RAM) your server has. We recommend starting small if you’re just starting out or hosting a small hobby project. Azure’s free plan often includes a B1s-size instance with one vCPU and 1 GB of memory. This is a great, cost-effective way to begin.

    You can always resize your server later if your website grows! However, when you resize your server, it will be rebooted, so you should be aware that your applications will be unavailable for a few moments.

    Step 4: Set Up Your Authentication Method

    This is how you (and RunCloud) will access the server for the initial setup. You have two choices:

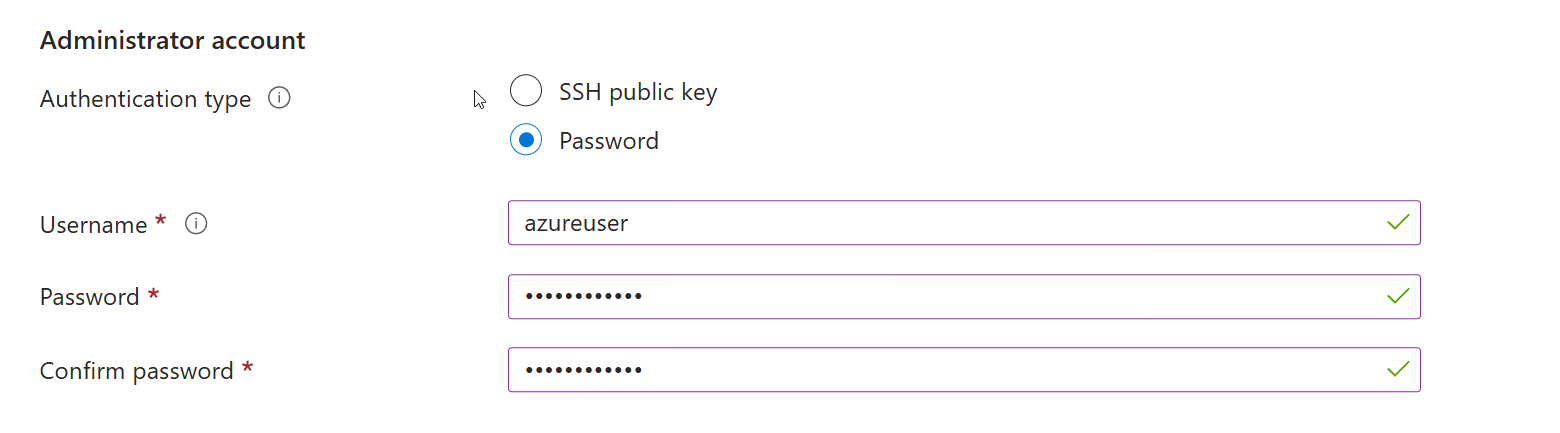
    Option A: Password (The Simpler Route)

    This is the easiest option if you don’t plan on regularly logging in to your server’s command line.

    1. Select “Password“ as the authentication type.
    2. Choose a username. Azure sets the default username to azureuser, but you can choose any name you prefer.
    3. Create a strong password and confirm it.

    Security Note: While password authentication is generally less secure for long-term server access, it’s perfectly fine for our setup. Once RunCloud is connected, it manages your server, and you can disable direct SSH password login later if you don’t plan to use it.

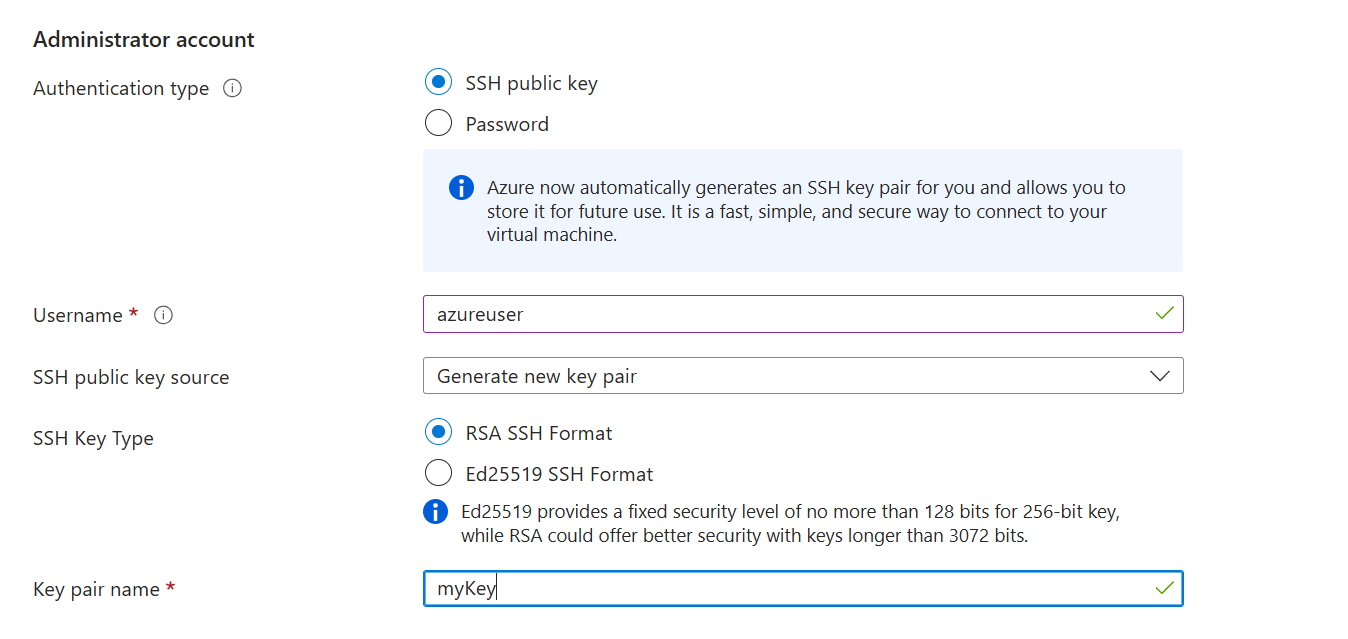
    Option B: SSH Public Key (The More Secure Route)

    If you’re comfortable with the command line and want a more secure way to log in, choose this option.

    1. Select “SSH public key“.
    2. Azure can generate a new key pair for you. A key pair is made of two parts: a private key that you keep safe on your computer, and a public key that lives on the server.
    3. Select “Generate new key pair“ and give it a name.
    4. When you create the server, Azure will automatically download the private key (a .pem file) to your computer. Save this file in a secure location. Anyone with access to the private key can log in to your server.

    Step 5: Configure Inbound Ports and Firewall

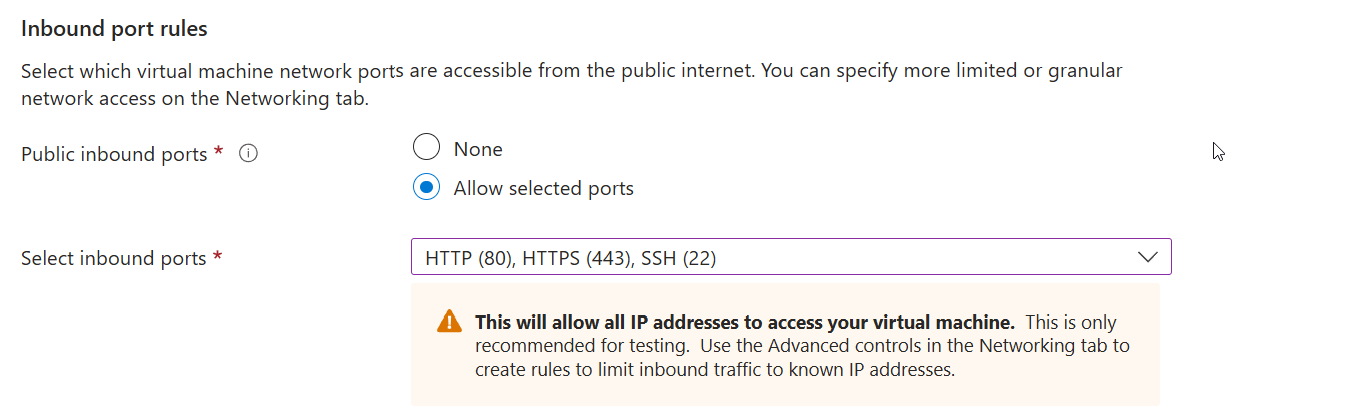
    Under “Inbound port rules“, check the boxes to allow selected ports. From the dropdown, select:

    1. HTTP (80)
    2. HTTPS (443)
    3. SSH (22)

    These settings open 3 of the 4 required ports for RunCloud. We’ll manually add the final one (34210) in the next step.

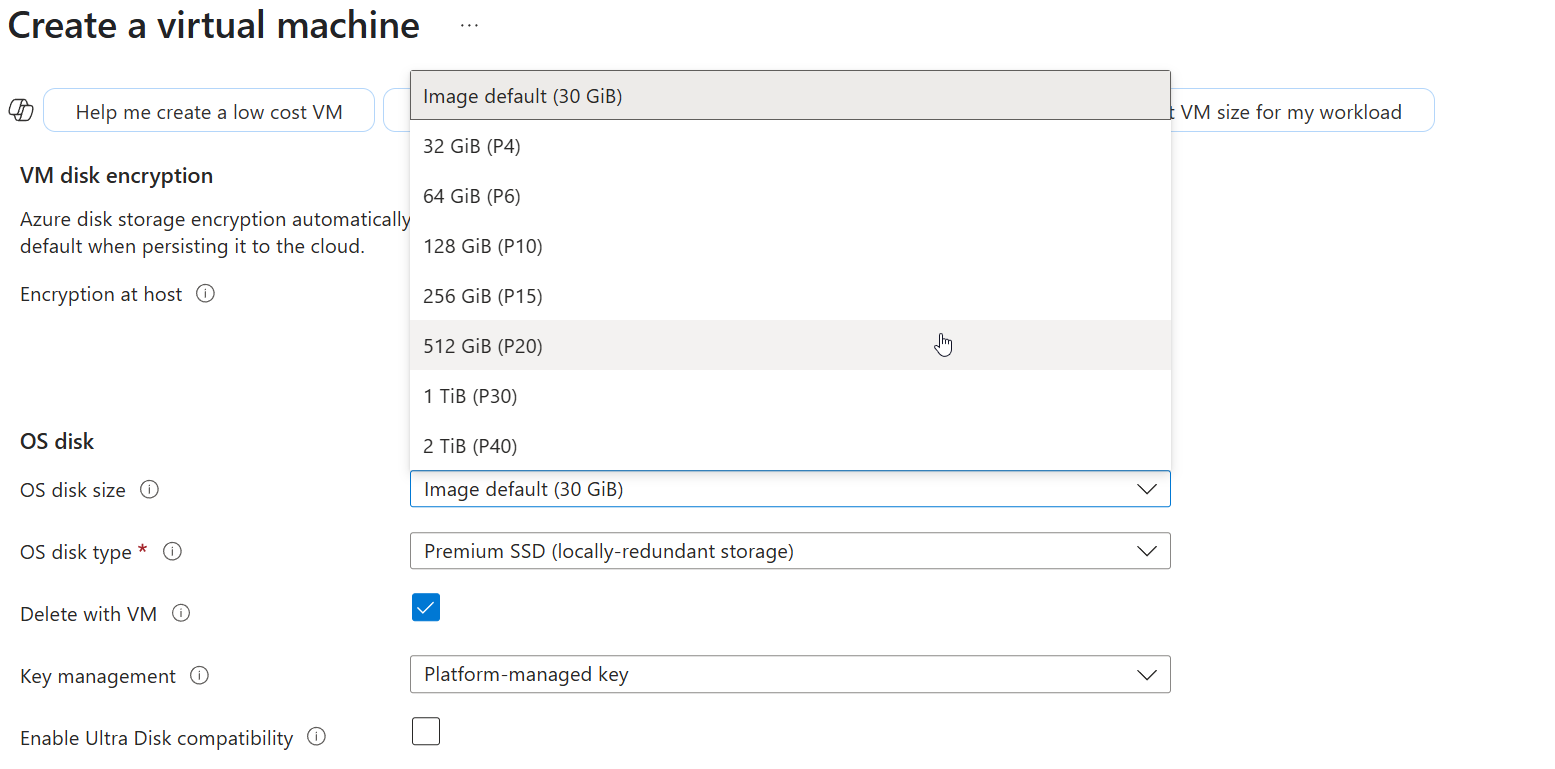
    Step 6: Configure Disk Storage

    After configuring the above settings, you can move to the “Disks“ tab. Here, you can set the size of your VM’s disk.

    Step 7: Review and Deploy

    After this, you can click the “Review + Create“ button. Azure will validate your settings. If everything looks good, click “Create“.

    Your server will now be deployed, which usually takes a few minutes. If you chose the SSH key option, you will be prompted to download your private key file now.

    Part 2: Configuring Your Server’s Firewall

    Once your server is deployed, we need to configure one more networking setting. RunCloud uses a specific port to communicate securely with your server, and we need to open it.

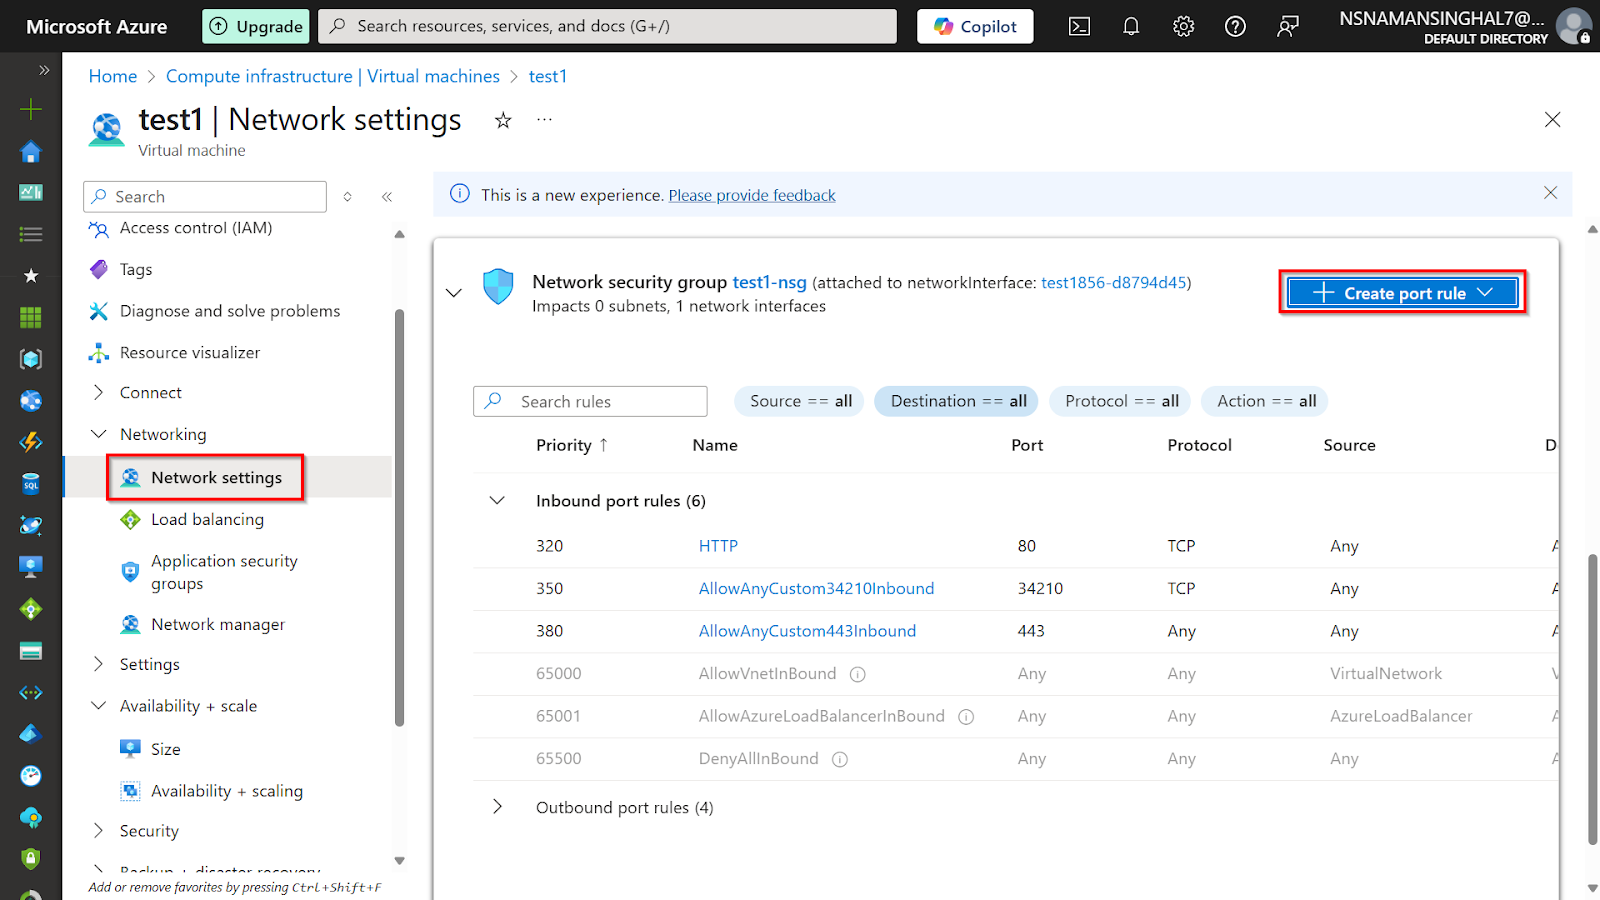
    1. From your Azure dashboard, go to the resource page for your newly created virtual machine.
    2. On the left-hand menu, navigate to “Networking“ > “Network Settings“.
    3. Scroll down until you see a list of “Inbound port rules“. Click the “Create port rule“ button and create a new inbound port rule.
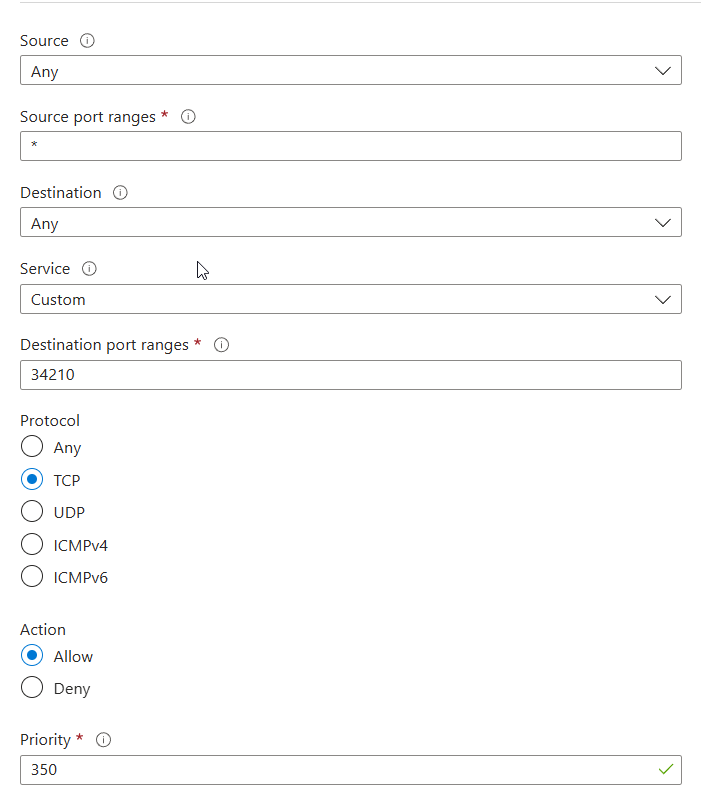
    1. A new panel will slide out. Fill in the following details:
      • Source: Any
      • Source port ranges: *
      • Destination: Any
      • Service: Custom
      • Destination port ranges: 34210
      • Protocol: TCP
      • Action: Allow
      • Priority: You can leave this as the default.
      • Name: Give it a clear name, like Allow_RunCloud_Agent.
    2. Click “Add“ to save this rule in your firewall. Once the rule is added to the firewall, it will be immediately enabled and applied to all the servers using this network security group.

    You might worry that opening a port to “Any“ IP address is risky. Don’t be! RunCloud has built-in security to protect this port. Our agent uses a double authentication mechanism. First, it verifies that the connection is coming from a legitimate RunCloud IP address. Second, it uses a unique server ID and key to validate every request. No one can access the agent without passing both of these checks.

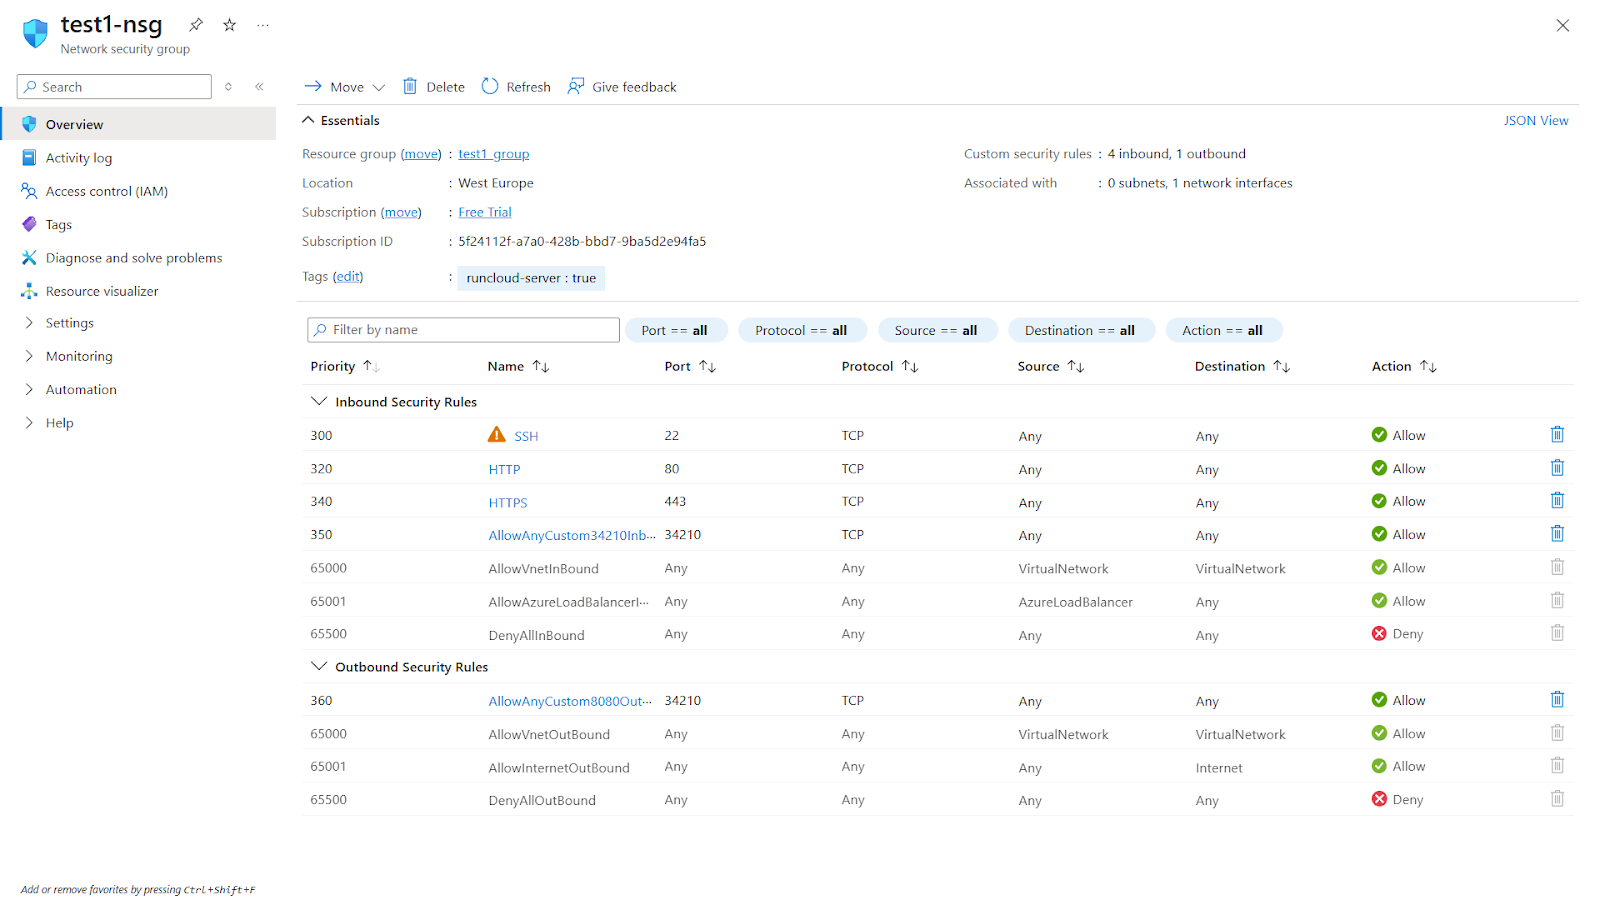
    Your final firewall rules should look like this:

    • Port 22 (SSH): Allows you to connect via command line.
    • Port 80 (HTTP): Allows standard web traffic.
    • Port 443 (HTTPS): Allows secure web traffic (including UDP for HTTP/3).
    • Port 34210 (RunCloud Agent): Allows RunCloud to manage your server.

    Part 3: Connecting the Server to Your RunCloud Dashboard

    If you followed all the steps above, you can now connect this new server to your RunCloud account.

    1. Log in to your RunCloud Dashboard.
    2. Click “Connect a New Server“.
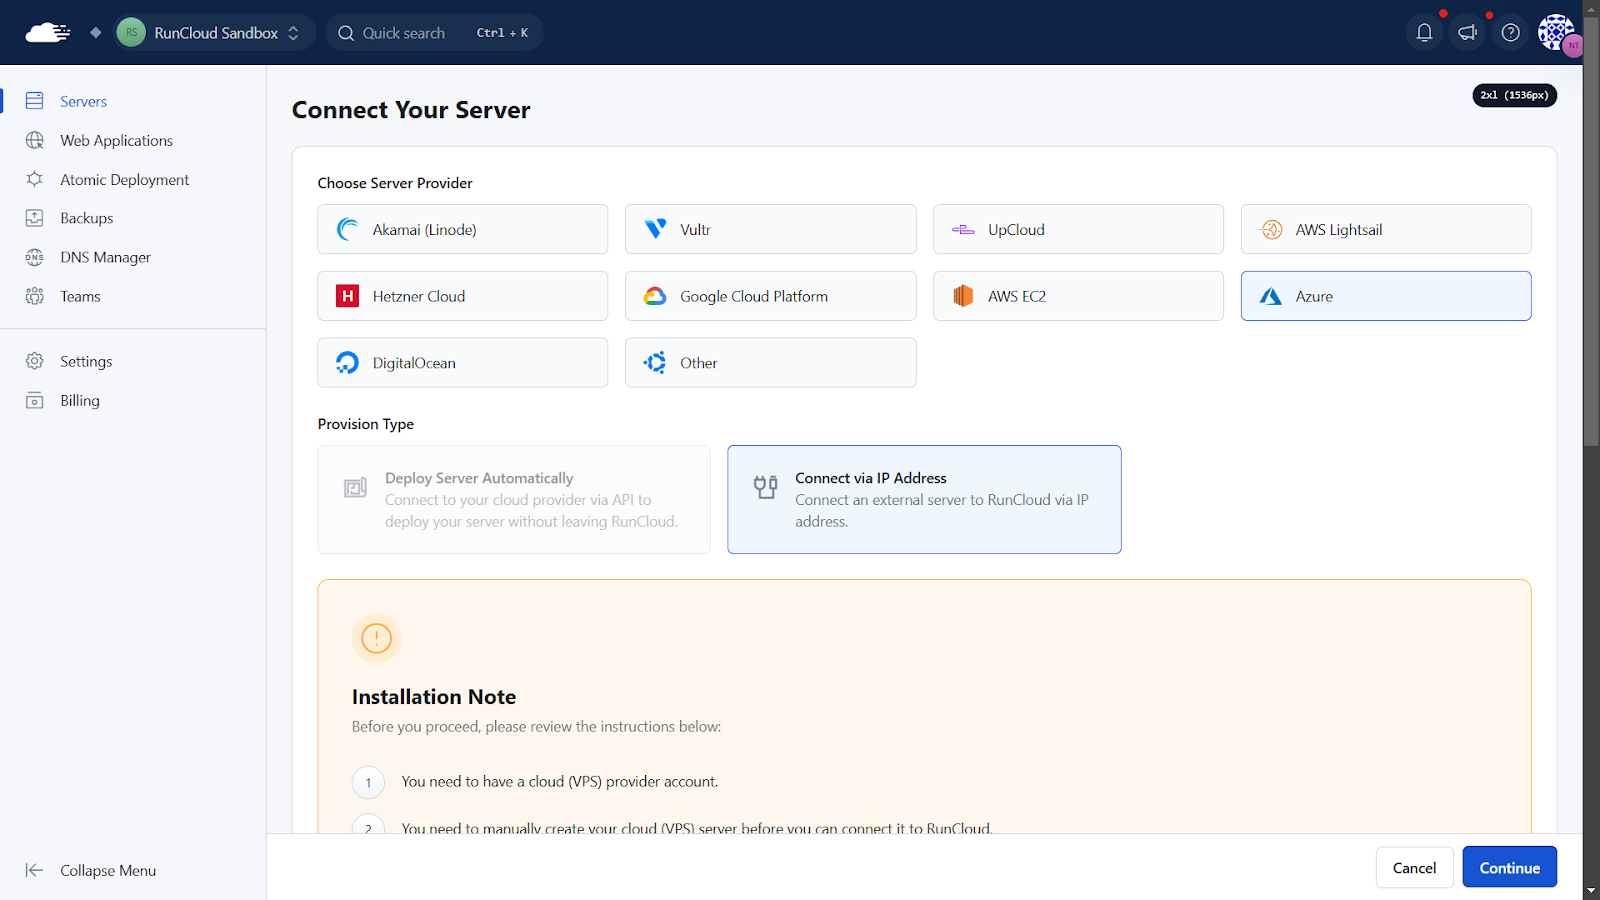
    3. Select “Microsoft Azure“ as your server provider, then choose the “Connect via IP Address“ method.
    1. After this, you will be required to configure the following details:
      • Server Stack: Choose your preferred stack. If you are unsure, you can leave these settings to their default value.
      • Server Name: Give your server a friendly name you’ll recognize in the dashboard.
      • IP Address: Copy the “Public IP address“ from your Azure VM’s overview page and paste it here.
    2. Click “Continue“.

    RunCloud will generate a custom installation script for your server. How you run it depends on the authentication method you chose in Azure.

    If you opted for Password Authentication:

    This is the easy part! RunCloud will simply ask for the server’s password. Enter this password into the RunCloud dashboard. The setup will continue automatically from there.

    Alternatively, you can also use the following command in your terminal to connect to the server manually via SSH. Before you execute the following command, make sure to replace the Azure user with the name of your user account and your_server_ip with the public IP address of your server:

    ssh azureuser@your_server_ip

    If you opted for SSH Key Authentication:

    You’ll need to log in to your server using a terminal and your downloaded .pem key file. We have already written an in-depth article that explains how to use SSH keys with PuTTY on RunCloud, but if you are in a hurry, then you can follow the steps below:

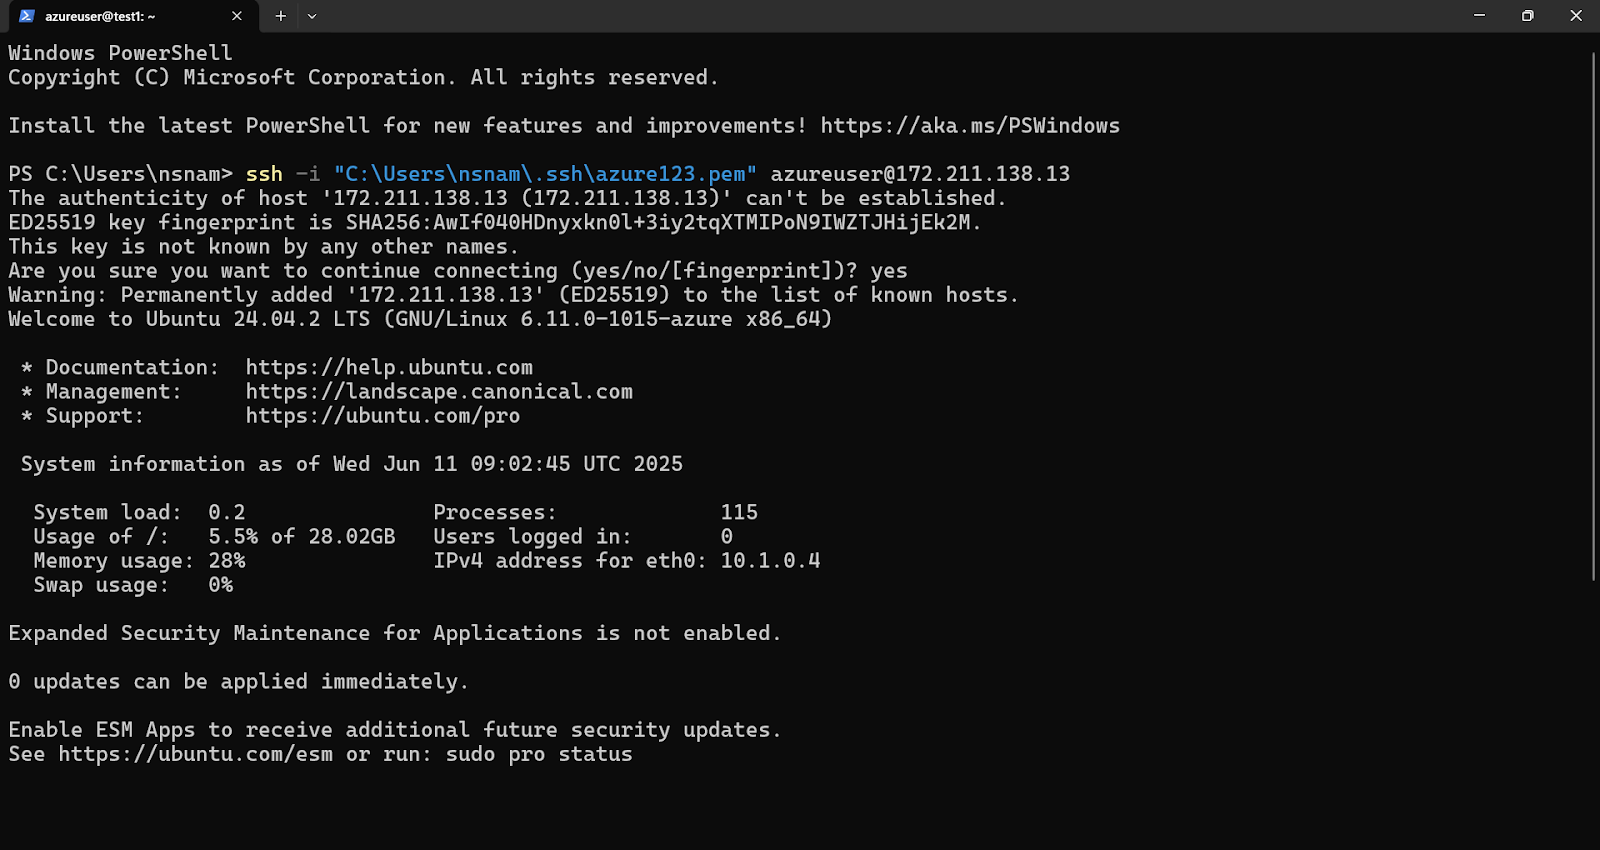
    1. Open a terminal (on Windows, you can use PowerShell or Command Prompt; on Mac/Linux, use the Terminal app). Use the following command format to connect to your server. Replace the file path and IP address with your own:
    ssh -i "C:\path\to\your\azure-key.pem" azureuser@your_server_ip

    Breakdown of the command:

    • "C:\path\to\your\azure-key.pem" is the path to your private key.
    • azureuser is your Azure username.
    • your_server_ip is your VM’s public IP.
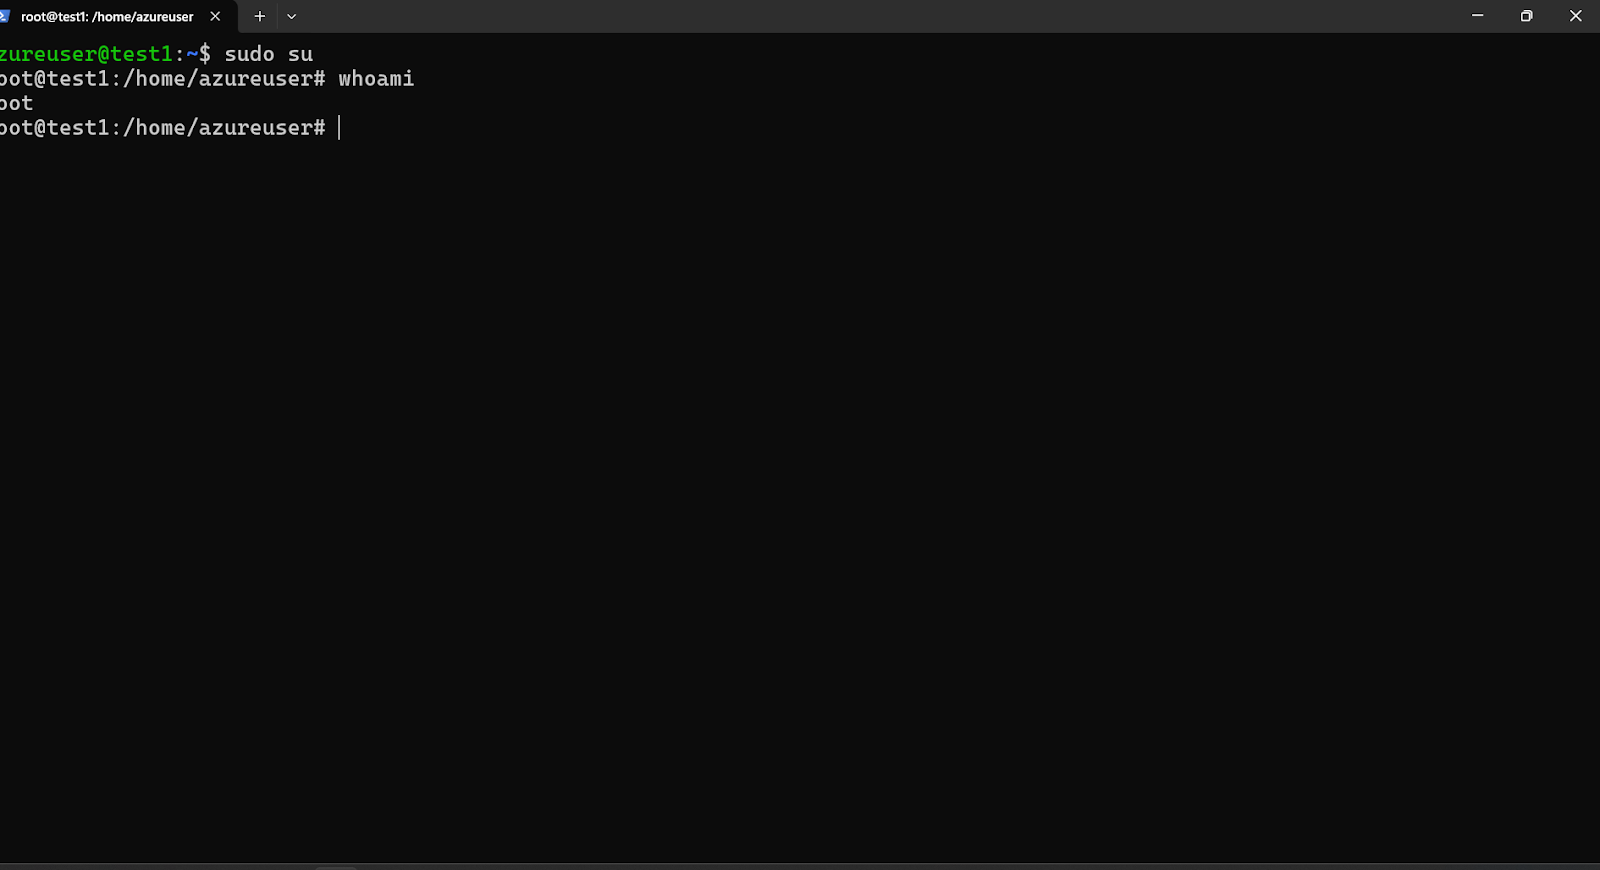
    1. Once logged in, type sudo su to log in to the user account. RunCloud needs this user account to install the necessary software on your server. If you are unsure what user account you are using, you can run the whoami command to see your username.
    1. After logging in as the root user, copy the installation script from the RunCloud dashboard, paste it into your terminal, and press “Enter”.

    The installation will now begin; it typically takes 10-15 minutes for the script to install and optimize NGINX, PHP, MariaDB, Redis, and other essential tools for you.

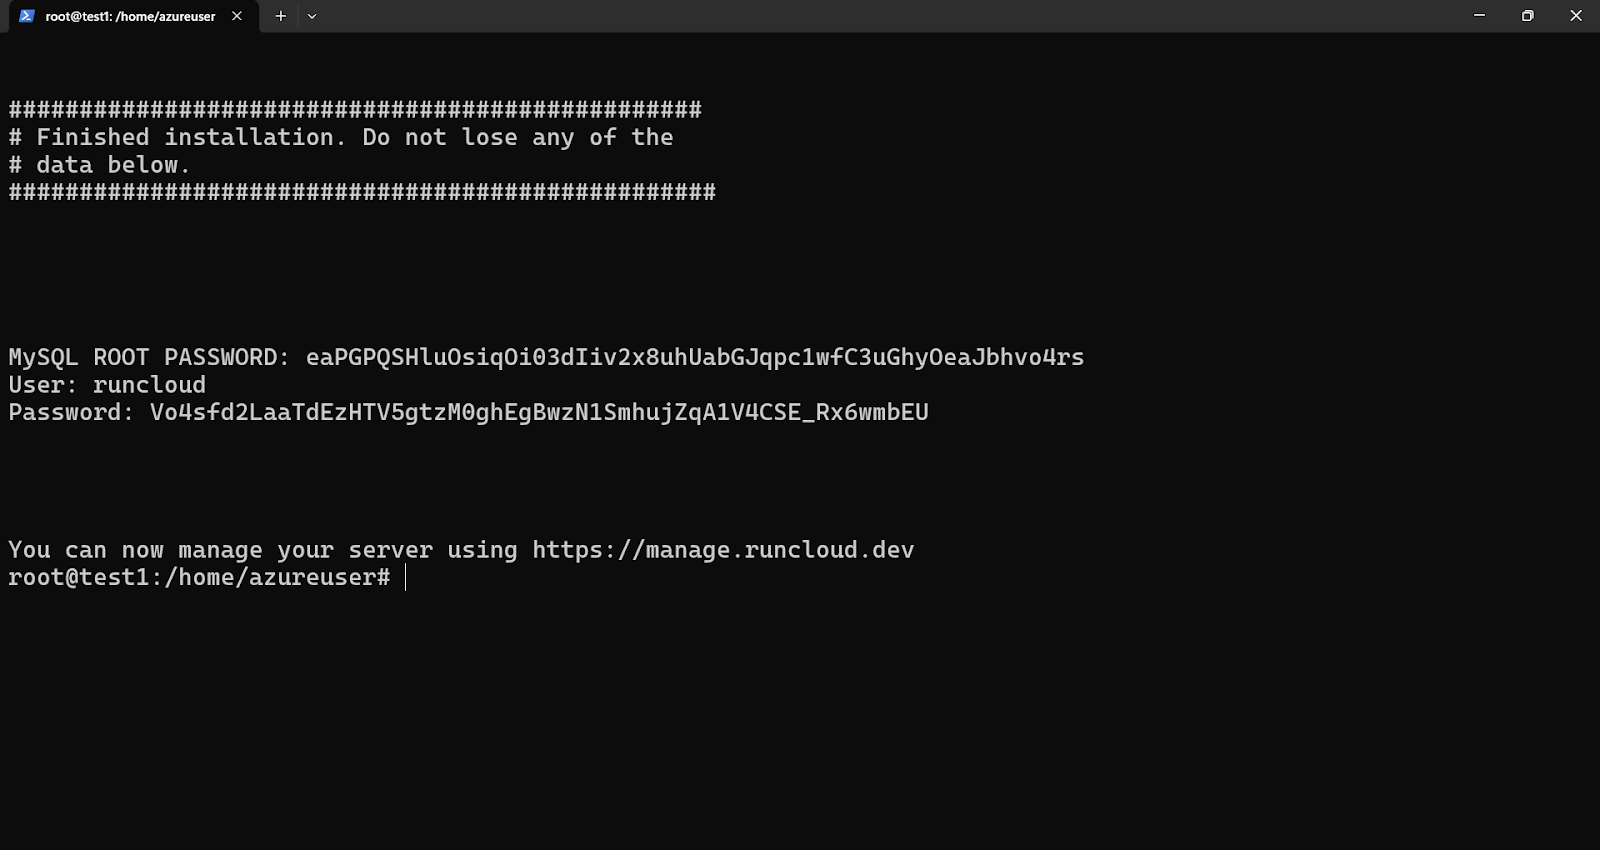
    Once completed, you will see a success message on your screen with important information, such as your database root password and server details. We recommend saving this information in a secure password manager.

    Part 3: Experiencing the RunCloud Dashboard

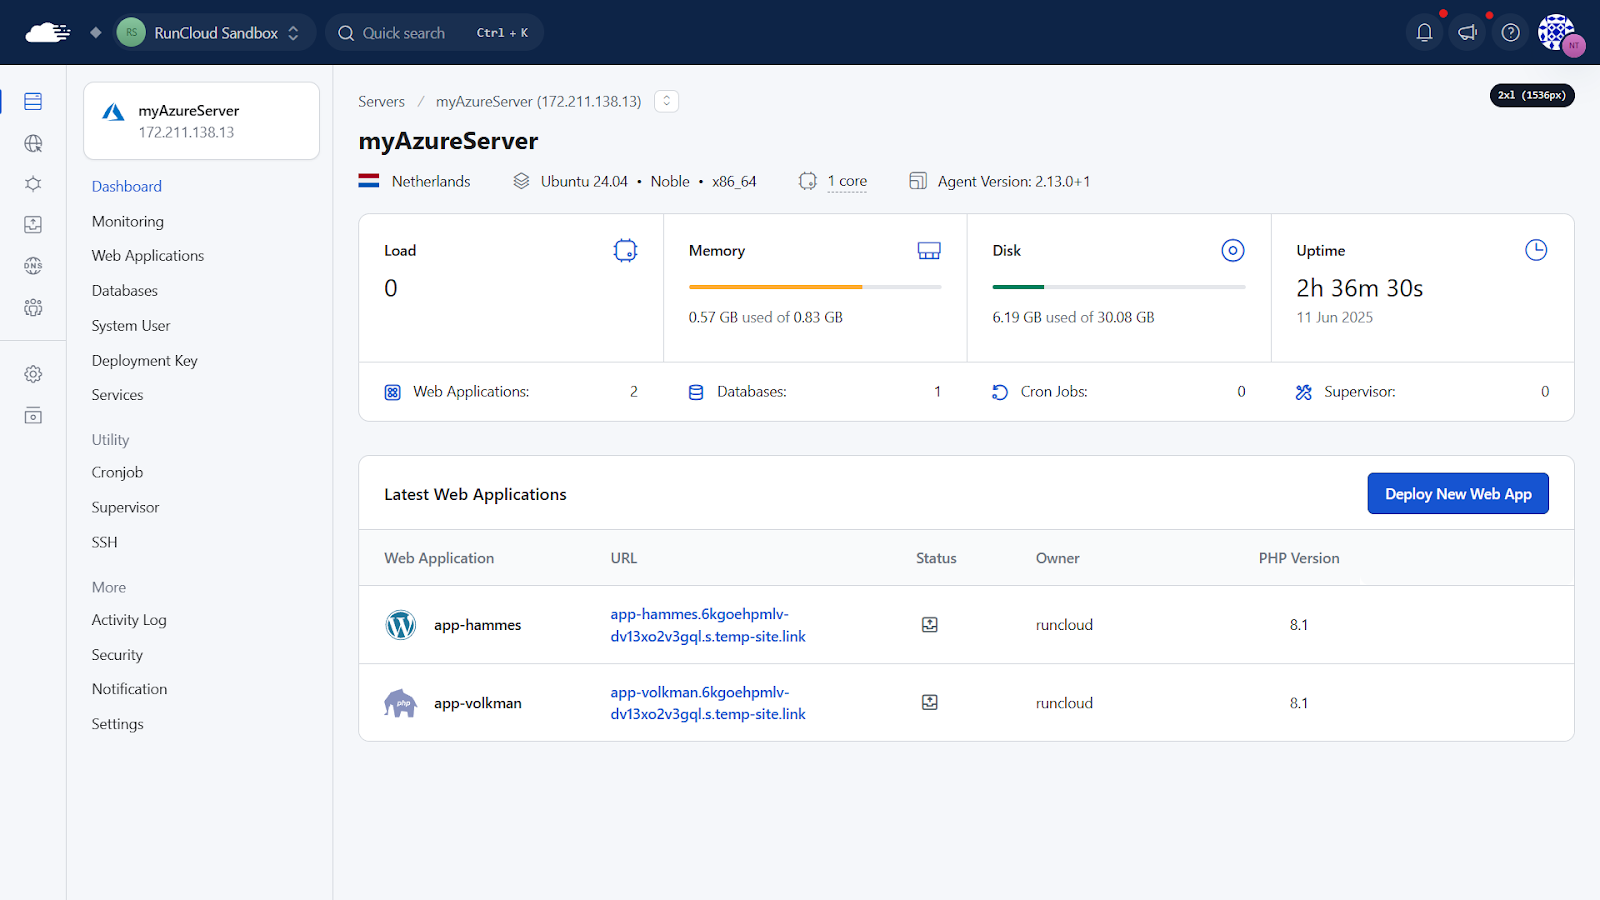
    Once your server installation is finished, you can return to your RunCloud dashboard. Your new Azure server is listed, fully configured, and ready for action. You can now:

    Part 4: Disabling SSH Access

    Before you dive in, we suggest deploying a quick test web application to see RunCloud in action and confirm everything is running smoothly. Once you’re happy with the setup, we recommend taking one final step to enhance your server’s security.

    Since you’ll manage your server through the RunCloud dashboard, you can safely close the SSH port (22) we opened for the initial connection. Follow these steps below to disable SSH access to your server:

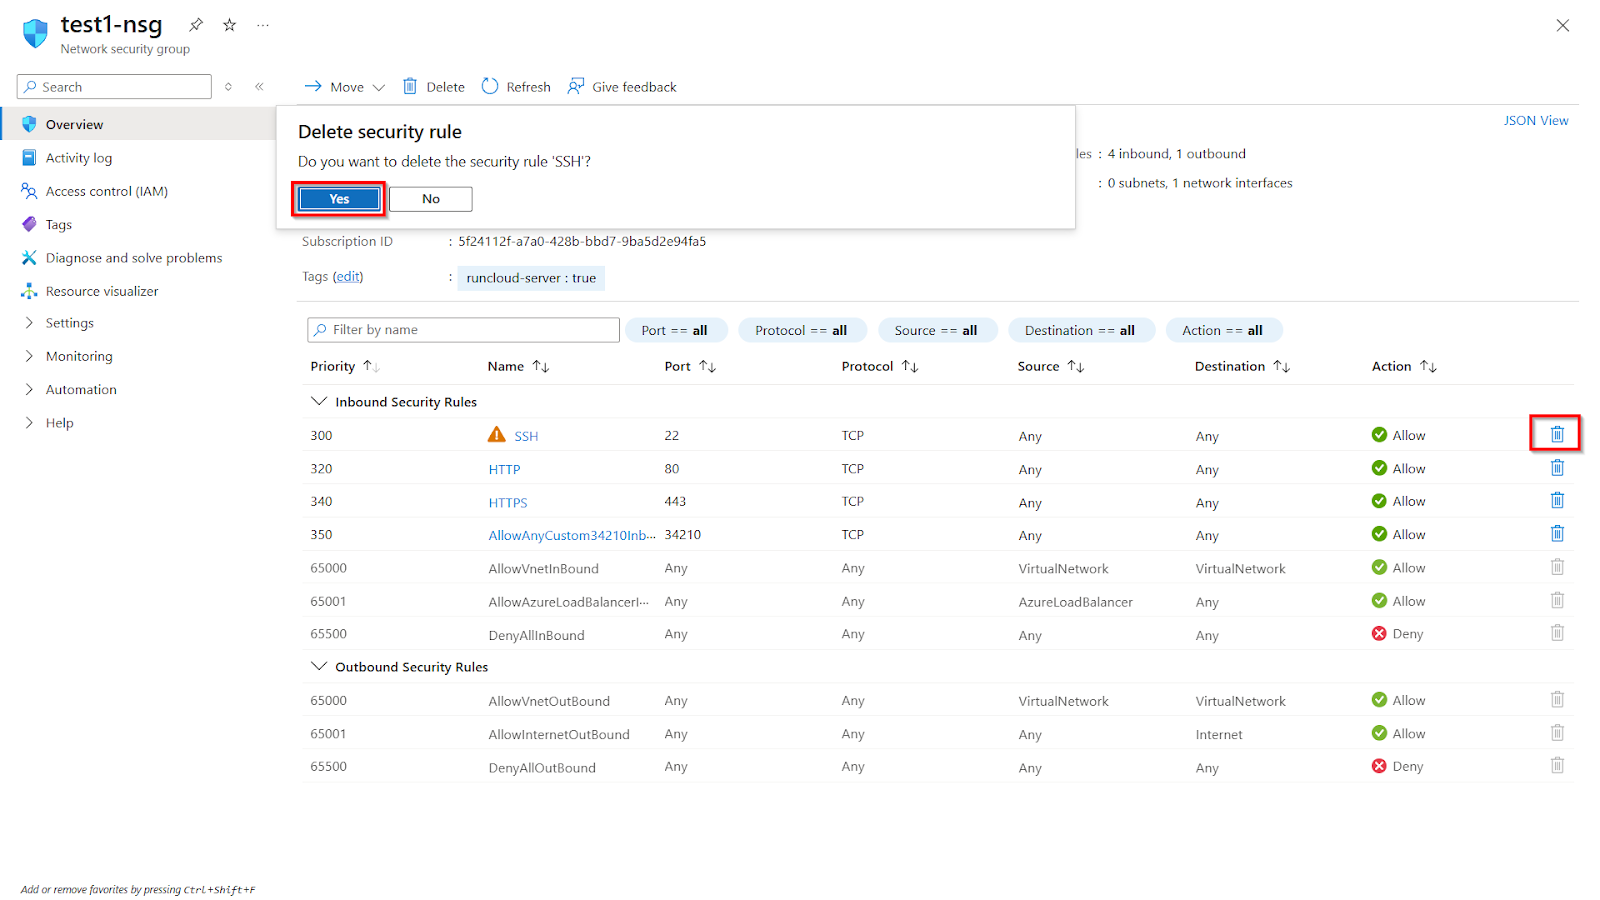
    1. Return to the “Network security group“ settings for your virtual machine in the Azure portal.
    2. Find the inbound rule for port 22 (SSH) in the list.
    3. On the far right of that rule, click the trash can icon.
    4. Confirm the deletion when prompted.

    Deleting this rule will block all SSH access to the server, preventing remote login attempts. You can now continue to use the RunCloud dashboard with the peace of mind that your server is safely managed.

    Final Thoughts

    This guide explains the process for connecting a new Microsoft Azure virtual machine to a RunCloud account. We covered the necessary steps, from creating the server and configuring its firewall rules in Azure to completing the connection through the RunCloud dashboard.

    Once setup is complete, you can manage your server entirely through the RunCloud dashboard. This allows for a more streamlined workflow for tasks such as deploying web applications, managing databases, and monitoring server health.

    While this guide covers the initial setup, RunCloud also offers a suite of tools for users with more advanced development workflows. Once you are comfortable with the basics, you may want to explore features such as:

    • One-Click Staging Environments: Create a safe copy of your live site to test updates, plugins, and code changes before pushing them to production.
    • WordPress Canvas: Define a master template with your preferred theme and plugins to deploy multiple, identical WordPress sites quickly and consistently.
    • Git & Atomic Deployments: Connect your repository from services like GitHub, Bitbucket, or GitLab for automated, seamless, and zero-downtime application deployments.

    These features help simplify and speed up both development and server management tasks.

    Sign up for RunCloud and join thousands of developers, agencies, and business owners who trust RunCloud to simplify their workflow and keep their websites running smoothly.

  • How to Fix WordPress High CPU Usage (10 Instant Solutions)

    How to Fix WordPress High CPU Usage (10 Instant Solutions)

    Is your WordPress site running slow, timing out, or crashing altogether? High CPU usage is often the cause.

    In this guide, you’ll learn how to identify what’s putting pressure on your server – and how to fix it.

    From bloated plugins to inefficient queries, we’ll cover 10 practical solutions that can quickly reduce CPU load and boost performance.

    We’ll also show how RunCloud helps you monitor, manage, and optimize your server more effectively.

    What Causes High CPU Usage in WordPress?

    If your WordPress site is consuming too much CPU, inefficient plugins or poorly coded themes could be the reason.

    For instance, a plugin performing complex database queries on every page load, like some related posts plugins without proper caching, or a feature-rich theme with numerous dynamic elements that aren’t optimized, can significantly strain the server’s processor.

    Even WordPress core features, such as the built-in CRON job (wp-cron.php), which executes a job on every visit, can contribute to this overhead for busy sites.

    External traffic and background processes are other major contributors to high CPU usage. A sudden surge in legitimate traffic from a viral post can naturally increase CPU load, but so can attacks from bots trying to brute-force logins, scrape content, or exploit vulnerabilities. These bots generate a high volume of requests and force WordPress to execute PHP scripts and database queries repeatedly. Malware infections can also run hidden processes and consume CPU for nefarious purposes like sending spam or participating in DDoS attacks.

    Finally, the underlying server environment and its configuration also play an important role. An underpowered hosting plan, especially shared hosting with limited resources, can quickly hit CPU limits even with moderate traffic. Outdated software versions, particularly older PHP versions, which are significantly slower and less efficient than modern counterparts (like PHP 8.x), can also be a contributing factor.

    Furthermore, a lack of proper caching mechanisms, both at the WordPress level (object cache, page cache) and server-level (like NGINX FastCGI cache or Varnish), forces WordPress to regenerate content dynamically for every request, a highly CPU-intensive operation.

    📖 Suggested read: WordPress Performance FAQs

    Quick Fixes to Instantly Reduce WordPress CPU Usage

    Let’s explore 10 different ways to bring down CPU utilization on servers:

    #1 – Remove or Replace High-CPU Plugins and Themes

    Using process monitoring tools, identify resource-intensive plugins or themes to lower CPU usage. Once found, replace them with more lightweight alternatives or remove them if they are no longer required.

    RunCloud’s server monitoring graphs make it visibly clear when a specific plugin or theme activation is causing CPU spikes, helping you pinpoint the culprit efficiently.

    Poorly coded plugins are notorious for causing high CPU load due to inefficient database queries, excessive background tasks, or unoptimized code execution on every page load. Similarly, themes packed with heavy JavaScript, numerous dynamic elements, or unoptimized built-in features can overwhelm your server’s processor.

    With RunCloud, you get detailed insights into your server’s performance, including slow scripts and slow queries. By observing these metrics before and after deactivating a suspected plugin or switching themes, you can confirm its impact.

    📖 Suggested read: How do you check Linux CPU usage or utilization? (5 Ways)

    #2 – Update WordPress Core, Plugins, and Themes

    After removing unnecessary plugins, ensure that your WordPress core, all plugins, and your theme are updated to their latest versions. Updates often include performance improvements and bug fixes that can reduce CPU load. Outdated software can contain inefficiencies or vulnerabilities that lead to increased resource consumption.

    RunCloud ensures your underlying server stack (like PHP runtime) is easily upgradable with just a few clicks. This provides an optimized and secure foundation that allows your updated WordPress site to perform at its best.

    📖 Suggested read: The Complete WordPress Speed Optimization Guide

    #3 – Optimize Your Database and Clean Up Junk

    If you manage a very large website, you should consider optimizing your WordPress database by cleaning out unnecessary data like post revisions, spam comments, and orphaned metadata, which can bloat tables and slow down queries.

    Using a database optimization plugin or tools such as phpMyAdmin (which RunCloud can help you install and manage) can significantly improve query speed and reduce CPU strain.

    RunCloud simplifies database management by allowing you to easily access and manage your MariaDB/MySQL databases.

    #4 – Set Up Effective Caching (Object, Page, CDN)

    If your WordPress website gets a decent amount of traffic, you should consider implementing caching at multiple levels: object caching (like Redis or Memcached) for database queries, page caching for static HTML versions of your pages, and a CDN to offload assets.

    Caching works by storing frequently accessed data or pre-rendered page content, so the server doesn’t have to generate it from scratch for every visitor.

    • Object caching stores the results of complex database queries
    • Page caching serves full static HTML pages
    • Browser caching tells visitors’ browsers to store local copies of assets.

    Each of these layers helps reduce the direct load on your server’s CPU and PHP processes.

    📖 Suggested read: Best Practices for Caching WooCommerce with RunCloud Hub

    Additionally, a CDN caches copies of your website’s static files on a global network of servers. When a user visits your site, these files are served from the CDN server closest to them, rather than directly from your main hosting server. This drastically reduces the load on your origin server, as it no longer has to serve every single image, CSS, or JavaScript file to every visitor. This dramatically reduces the PHP and database operations needed to serve a page, directly cutting CPU usage.

    RunCloud offers one-click installations for Redis and Memcached and supports server-level page caching like NGINX FastCGI cache, making setup incredibly straightforward.

    #5 – Limit or Disable wp-cron Jobs

    The default wp-cron.php is triggered whenever someone visits your site, and if you have many scheduled tasks or high traffic, it can fire frequently, consuming CPU resources. For example, if multiple visitors hit your site simultaneously, wp-cron.php might try to run multiple times, leading to unnecessary load. Disabling it and using a server cron means tasks run at specific, controlled intervals (e.g., every 2 minutes).

    You should disable the default WordPress cron and replace it with a server-side cron job scheduled at reasonable intervals. This ensures planned tasks run efficiently without impacting user experience or overloading the server during peak traffic.

    RunCloud provides a user-friendly Cron Job manager in its dashboard, allowing you to set up server-level cron jobs with only a few clicks.

    #6 – Block Bad Bots and Malware

    It’s no surprise that malicious bots constantly crawl sites, look for vulnerabilities, brute-force login pages, and scrape content. All of this triggers unnecessary PHP executions and database queries, driving up CPU usage.

    If malware makes it onto your server, it can run hidden scripts, send spam, or launch DDoS attacks – each of which puts a heavy load on your CPU.

    To prevent this, block bad bots and scan regularly for malware. Left unchecked, these threats can waste server resources and slow your site to a crawl.

    RunCloud increases your security by facilitating the setup of Fail2Ban, which automatically blocks IPs showing malicious behavior. While RunCloud is not a WAF, it allows easy integration with services like Cloudflare (including a WAF).

    📖 Suggested read: Best nine htop Alternatives for Linux, Mac & Windows in 2025

    #7 – Optimize Images and Media Files

    Large, unoptimized images slow down your site and increase server load, especially if your theme or plugins resize them on the fly.

    Compressing and resizing images reduces file size without sacrificing quality. This speeds up page loads, cuts bandwidth use, and eases the strain on your server.

    Ideally, you should handle image optimization before upload. Use tools like TinyPNG, Squoosh, or ImageOptim to compress files. For dynamic sites, consider a plugin or CDN that handles responsive image delivery and WebP conversion automatically. The less work your server has to do at runtime, the faster your site will load.

    Advanced Solutions for Persistent High CPU Usage

    When the quick fixes don’t work and your WordPress site is still struggling, you might need to roll up your sleeves and implement more advanced solutions.

    #8 – Switch to LiteSpeed or NGINX Hosting.

    If you regularly encounter issues, consider migrating your WordPress site to a server stack powered by NGINX or LiteSpeed. These web servers are renowned for their superior performance and efficiency in handling concurrent connections compared to traditional Apache.

    NGINX excels at rapidly serving static content and acts as a highly efficient reverse proxy. At the same time, LiteSpeed (especially LiteSpeed Enterprise with LSCache) offers built-in, advanced caching specifically designed for WordPress, often outperforming plugin-based caching solutions. Both options significantly reduce PHP and database processing overhead.

    Their event-driven architecture allows them to manage many requests with lower resource consumption, directly translating to reduced CPU load, especially during traffic spikes.

    RunCloud configures and optimizes an NGINX stack for your WordPress sites by default, providing a high-performance foundation out of the box. If this interests you, then you should learn more about how to migrate your existing web applications to RunCloud.

    📖 Suggested read: How to Install WordPress with RunCloud | Step-by-Step Guide

    #9 – Upgrade Your Hosting Plan or Server Resources

    Sometimes, despite all optimizations, your website’s legitimate traffic, complex functionalities, or sheer size simply demand more processing power, RAM, or faster I/O than your current hosting plan provides.

    If monitoring tools consistently show your server hitting its CPU limits even after thorough optimization, it’s a clear sign you’ve outgrown your current resources. You will need to upgrade to a VPS with more CPU cores, increased RAM, and faster NVMe SSDs.

    Read our “What is the Right Server Size?” documentation guide to learn more.

    #10 – Use Advanced Firewall Rules to Block Malicious Traffic

    If your server sees a sudden uptick in traffic, it may be attacked by malicious traffic. This can range from distributed denial-of-service (DDoS) attacks overwhelming your server with requests, to constant brute-force attempts on your login pages, or automated bots scanning for vulnerabilities.

    Each activity forces WordPress and your server to process unnecessary requests, significantly draining CPU resources. If you regularly face these attacks, you should consider implementing an advanced firewall strategy, encompassing both Web Application Firewalls (WAFs) at the network edge and server-level tools to filter this harmful traffic before it can execute PHP scripts or query your database.

    RunCloud makes it easy to protect your server against these threats.

    For instance, with just a few clicks within the RunCloud dashboard, you can configure Fail2Ban. This powerful tool monitors server logs for suspicious activities, such as repeated failed login attempts or patterns indicative of comment spam bots, and automatically blocks the offending IP addresses.

    Explore strategies like those discussed in “How to Block WordPress Spam Comment Bots With Fail2ban Rate Limiting” to learn more about how to use Fail2Ban specifically for security, including integrating it with Cloudflare or setting up rate limiting to block WordPress spam comment bots.

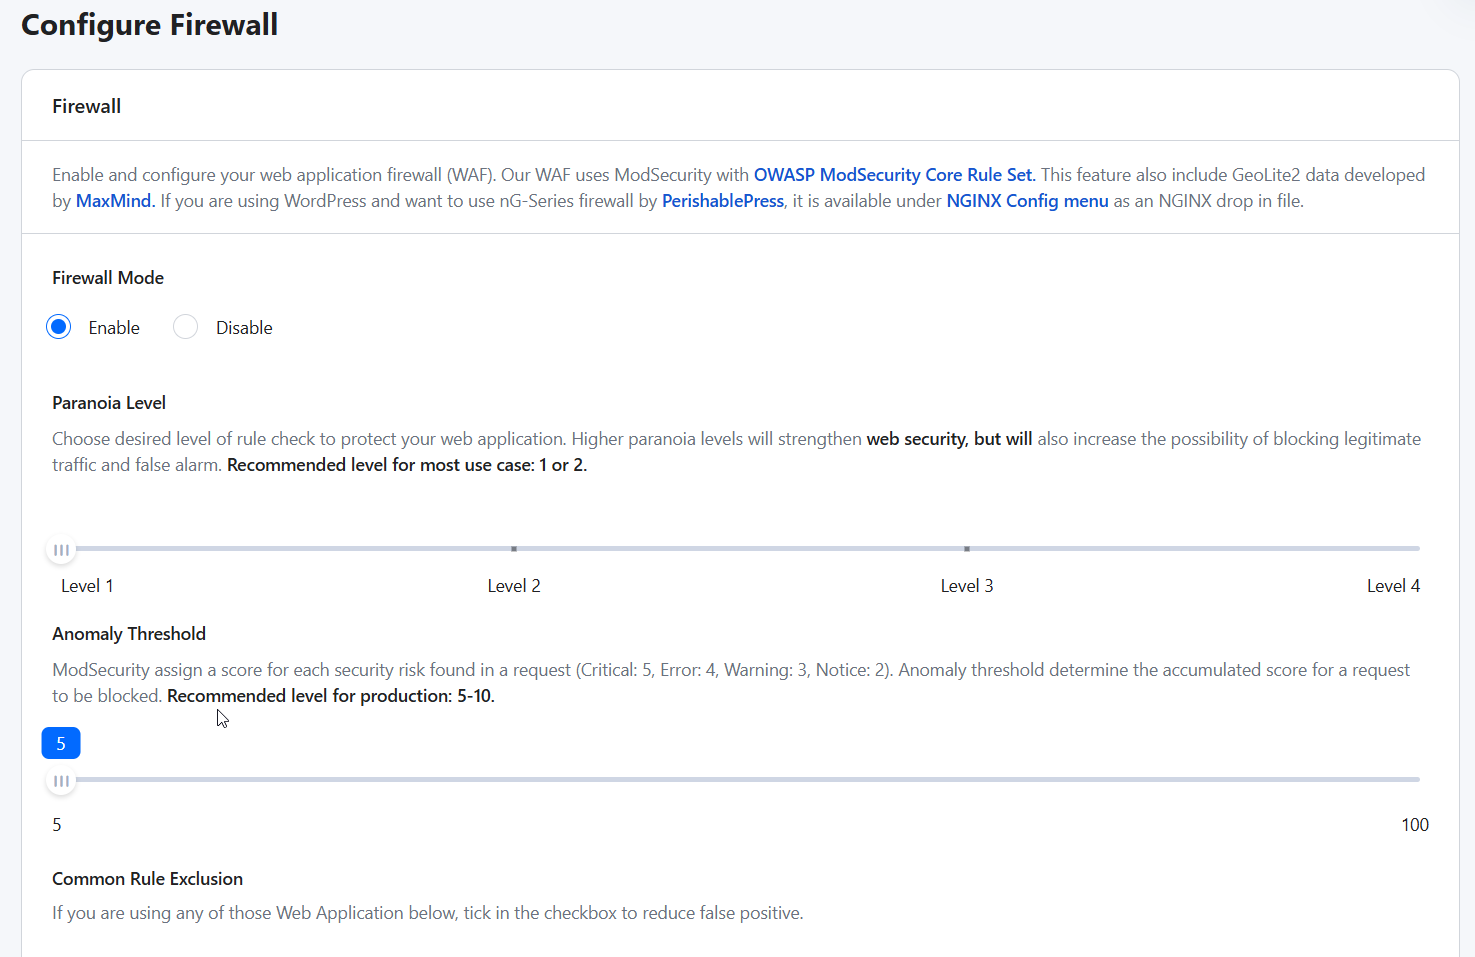
    RunCloud also supports ModSecurity, an open-source WAF that can provide an additional layer of protection directly on your server.

    RunCloud-managed servers integrate seamlessly with cloud-based WAF solutions like Cloudflare for a more comprehensive, edge-level defense. This combination is particularly effective in securing WordPress login pages using Cloudflare Zero Trust policies.

    Wrapping Up: Who Should Prioritize Fixing High CPU Usage in WordPress?

    Fixing the high CPU usage in WordPress is important for anyone running a serious website.

    • E-commerce store owners can lose direct revenue from slow checkouts or site unavailability.
    • High-traffic bloggers and content publishers risk losing readers and ad impressions due to poor performance.
    • Businesses relying on their website for leads will see conversion rates plummet if their site is sluggish.

    Even agencies and developers managing multiple client sites must proactively address CPU issues to maintain client satisfaction and site stability, as a poorly performing site reflects badly on their services. If your website’s speed, uptime, and user experience are important to you, then monitoring and optimizing CPU usage should be a top priority.

    This is where a robust server management panel like RunCloud becomes indispensable.

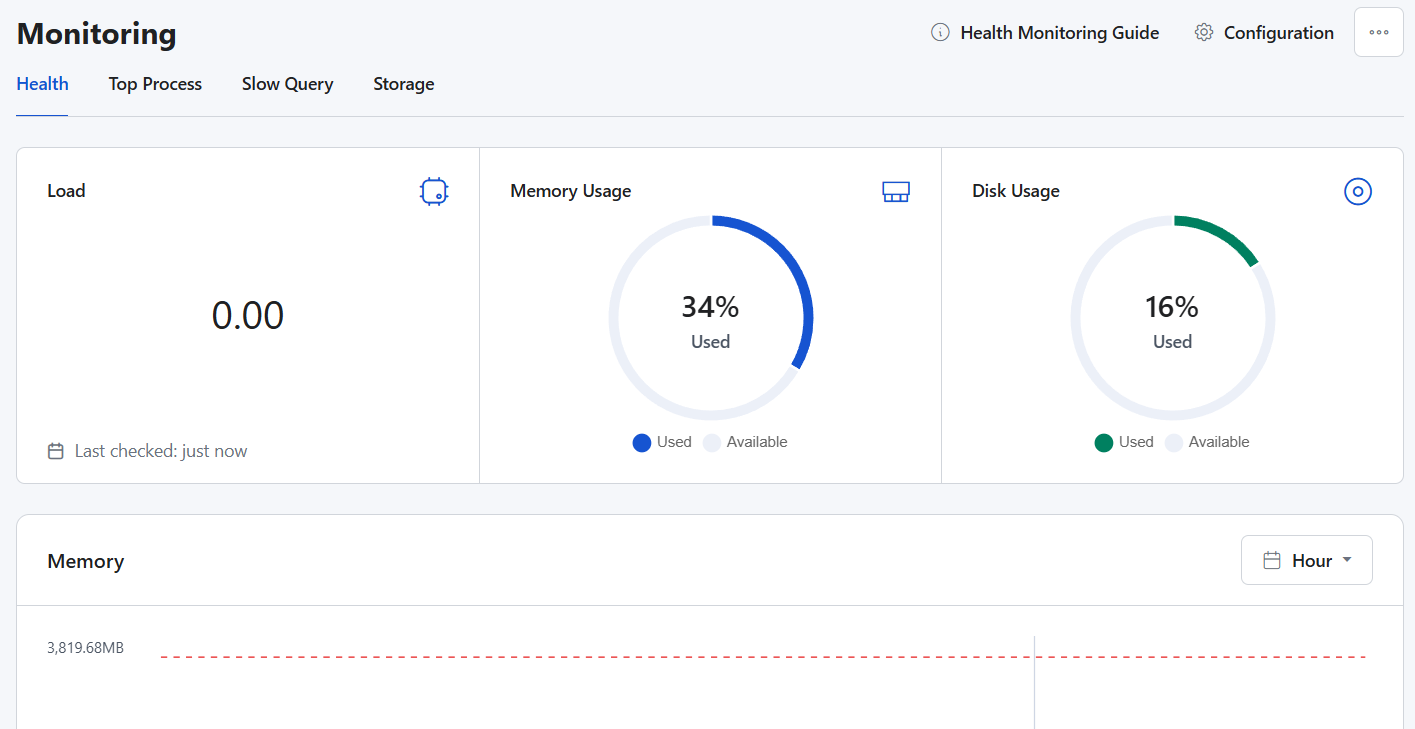
    RunCloud provides you with the Server Health Overview for your specific server. Here, you see live, at-a-glance metrics: CPU Usage, RAM Usage, Disk Space, and even Current Load Average.

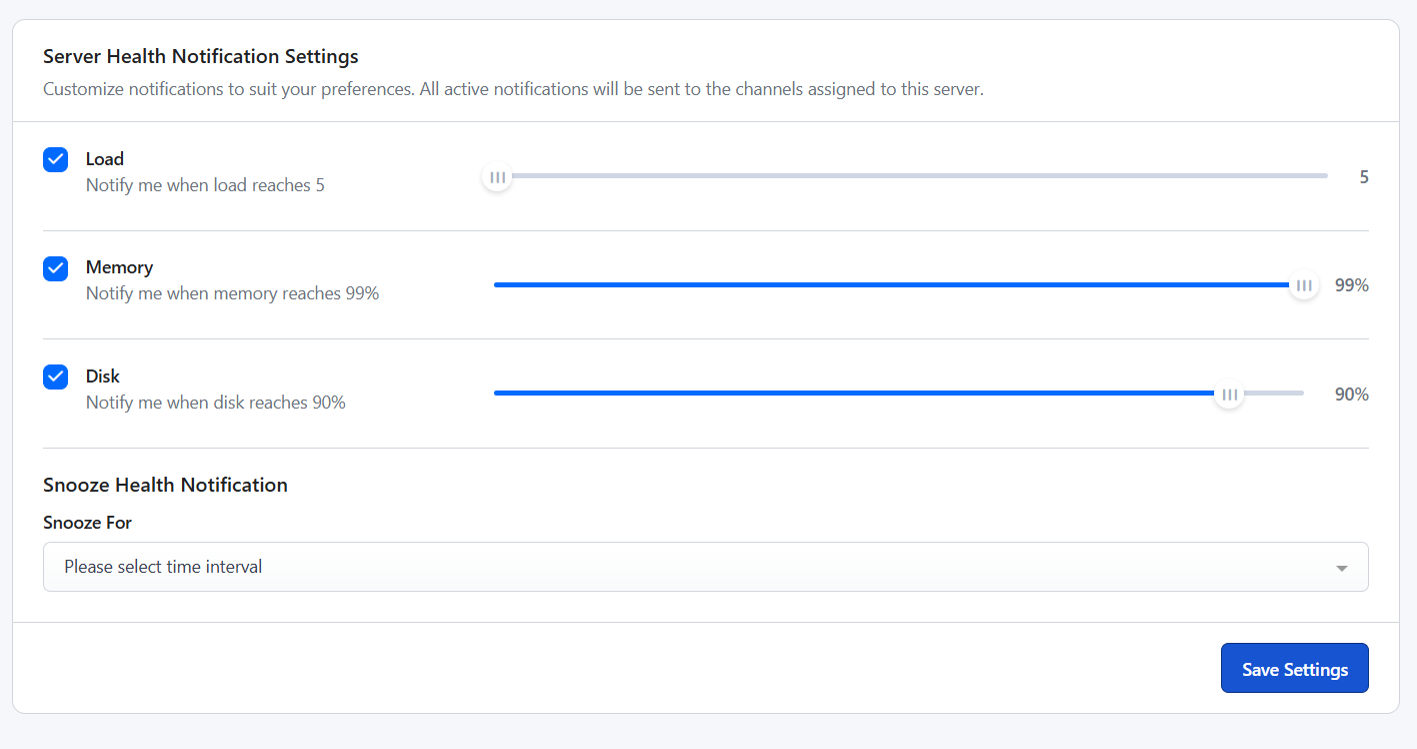
    Within RunCloud’s settings, you’ll find a Notifications section. Here, you can configure thresholds for CPU usage (e.g., send an alert if CPU is above 80% for 5 minutes). This proactive notification means RunCloud often tells you there’s a problem before your users even notice, allowing you to investigate using the detailed graphs.

    Why RunCloud is a Better Option Than Limited Hosting

    The key advantage of using RunCloud to manage your own VPS is control. Unlike shared hosting, or simply upgrading to a more expensive plan, you get full visibility into what’s happening on your server – along with the tools to act on it.

    With shared hosting, if you hit a CPU limit, your only option is usually to upgrade, often without knowing if it will even fix the underlying issue. With RunCloud managing your VPS, you have the power to:

    1. Implement server-level caching (NGINX FastCGI, Redis, Memcached) with a few clicks.
    2. Easily switch PHP versions or configure PHP settings.
    3. Manage server-level cron jobs.
    4. Install security tools like Fail2Ban.
    5. Fine-tune your web server (NGINX) configuration.

    Switch to RunCloud and start solving performance issues properly.

    FAQs on Fixing WordPress High CPU Usage

    Why is my WordPress site using so much CPU?

    High CPU usage on your WordPress site is often caused by poorly coded plugins, an unoptimized theme, or excessive background tasks like frequent cron jobs. RunCloud provides excellent monitoring features that allow you to pinpoint resource-hungry processes.

    How do I reduce CPU usage in WordPress?

    Start by identifying problematic plugins or themes using monitoring tools to reduce CPU usage. Then consider optimizing images, implementing robust caching (server-level is great!), and ensuring your database is clean. RunCloud’s monitoring can help track the impact of these changes, and its alerts will notify you if usage spikes again.

    Should I switch hosting providers to fix CPU issues?

    Switching hosts can help if your current plan is underpowered, but before you do, make sure you’ve optimized your WordPress site and server configuration. If you’re on shared hosting with limited control, upgrading to a VPS and managing it with RunCloud gives you more resources, better visibility, and the tools to properly diagnose and fix CPU issues.

    Does using a CDN help with CPU usage?

    Yes, a Content Delivery Network (CDN) significantly helps reduce CPU usage by offloading static assets (images, CSS, JS) from your origin server to the CDN’s distributed network. This means your server handles fewer requests, directly lowering its CPU load, an effect you can clearly observe with RunCloud’s server monitoring.

    How do bots and malware increase CPU usage?

    Malicious bots can hammer your site with requests, attempting brute-force logins or scraping content. Malware might also execute hidden scripts or processes, both of which consume significant CPU resources.

    How often should I optimize my WordPress site for CPU?

    You should perform a review and optimization at least quarterly, or whenever you notice performance degradation, make significant site changes, or receive high usage alerts from your monitoring system. RunCloud’s monitoring provides a continuous overview, helping you decide when proactive optimization is needed based on usage trends.

    Can caching plugins cause high CPU usage?

    Ironically, caching plugins can cause high CPU usage if they are poorly configured, conflict with other plugins, or have an overly aggressive cache generation process on a busy site. This is why at RunCloud, we offer server-level caching, which can be more efficient and stable.

  • How to Set Up a Hetzner Server with RunCloud

    How to Set Up a Hetzner Server with RunCloud

    Setting up a cloud server to host your website can be a daunting task, especially if you are not experienced in server management. However, with the right cloud provider and management tools, the process can be made significantly easier.

    RunCloud supports many different cloud providers, including Hetzner, a well-known cloud provider that offers reliable, affordable, and flexible cloud solutions. In this article, we will guide you on how to set up your Hetzner cloud server to host your website with the help of RunCloud, a server management platform that simplifies server management experience.
    How To Deploy A Server Automatically

    Configuring The Settings

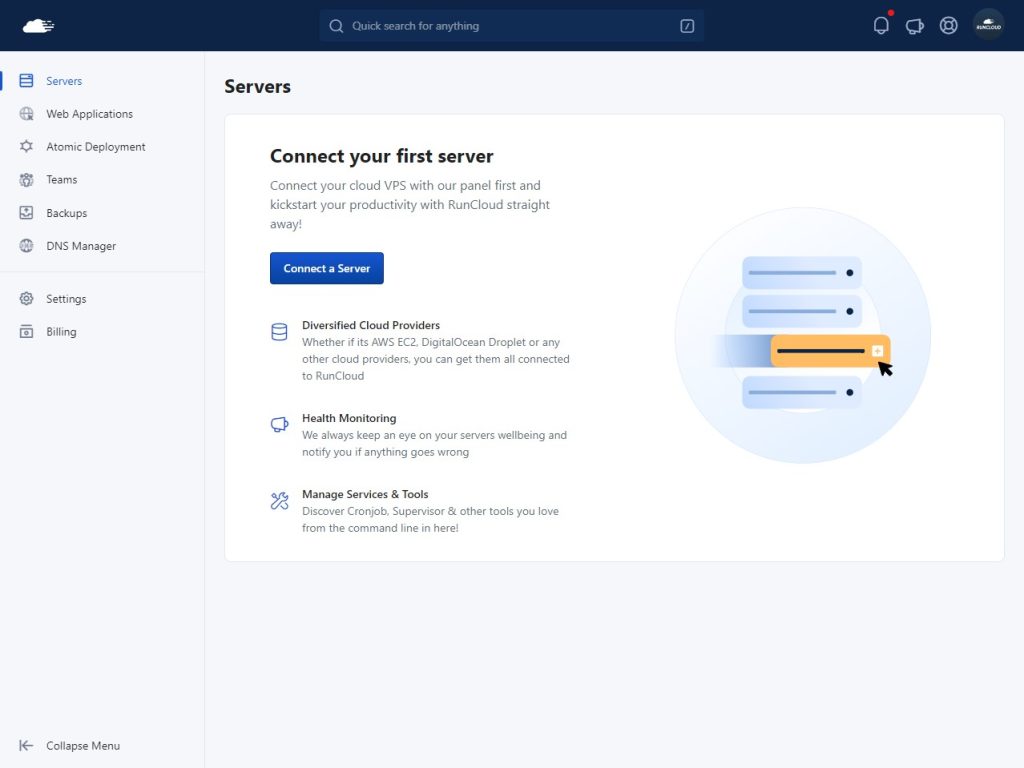
    Step 1: Start by opening your RunCloud dashboard and open the ‘Servers’ tab. Click on the “Connect a Server” button to deploy a new server.

    RunCloud Dashboard Connect Your First Server

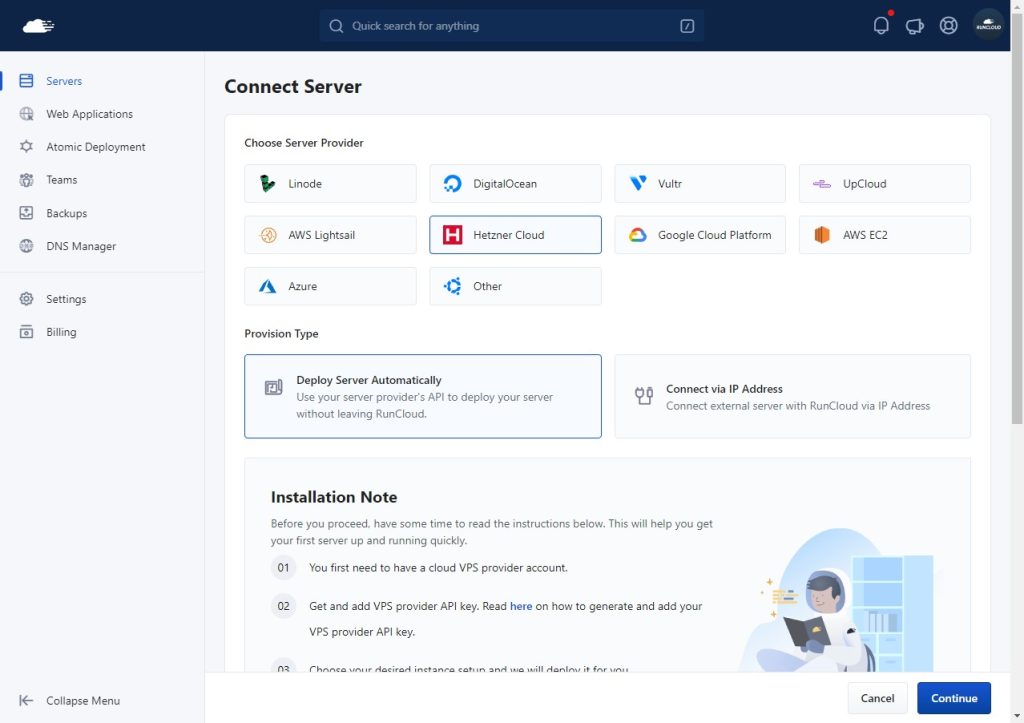
    Step 2: From the list of cloud providers, select Hetzner Cloud. Next, select the “Deploy Server Automatically” to create a new server.

    Selecting Cloud Provider RunCloud

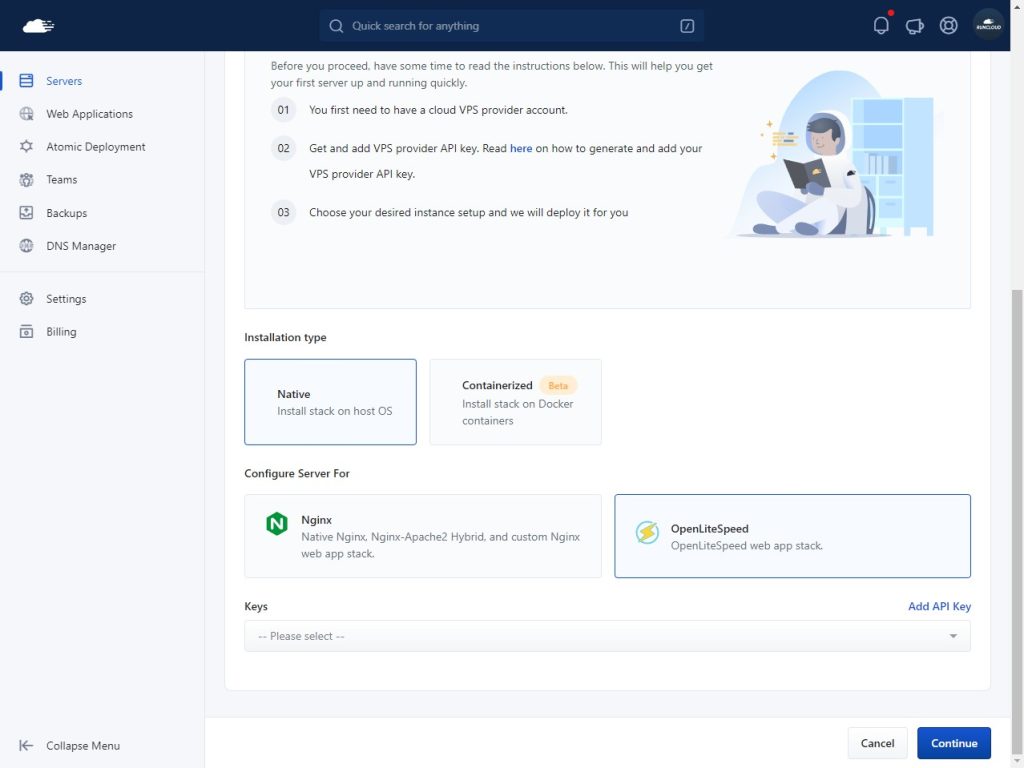
    Step 3: Select your preferred installation type, native or containerized.

    Next, you need to select whether you want to use NGINX or OpenLiteSpeed. If you are unsure, pick Native installation with OpenLiteSpeed stack. 

    Learn more about containerization on RunCloud, OpenLiteSpeed vs. NGINX.

    Selecting tech stack on RunCloud

    Integrating Hetzner Account With RunCloud Dashboard

    You only need to do this step once. If you have already added your Hetzner API key to your RunCloud dashboard then you can skip this step.

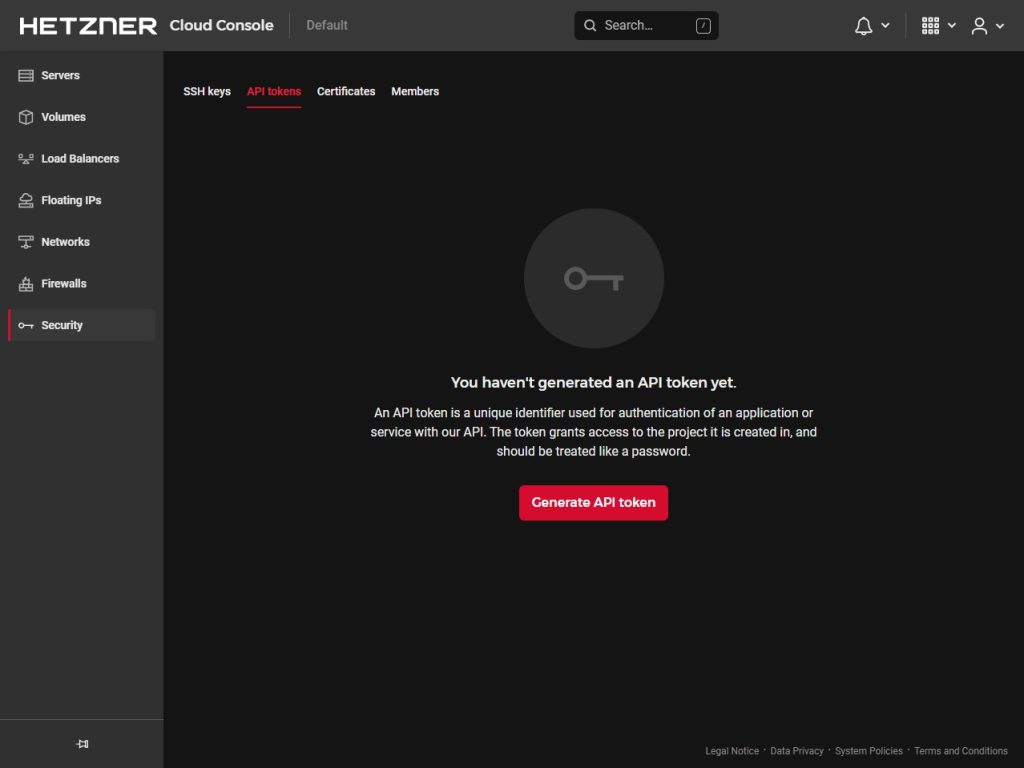
    Step 1: Open your Hetzner Cloud dashboard in a new browser tab and select the project that you want to use. Now navigate to the “Security” submenu and open the “API tokens” tab.

    Creating API token On Hetzner

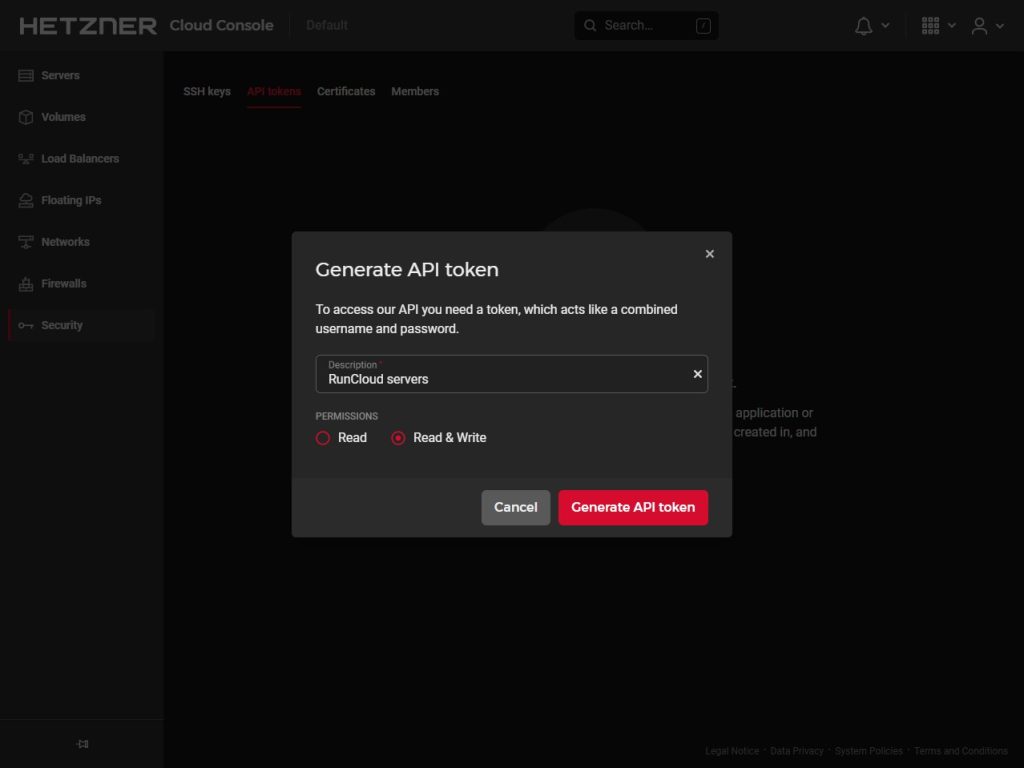
    Step 2: Click on “Generate API token” to make a fresh key. Give it a suitable description for your reference.
    Make sure to select the “Read & Write” option while creating the key.

    Finally click on the “Generate API token” to create the key.

    Generating an API token on Hetzner

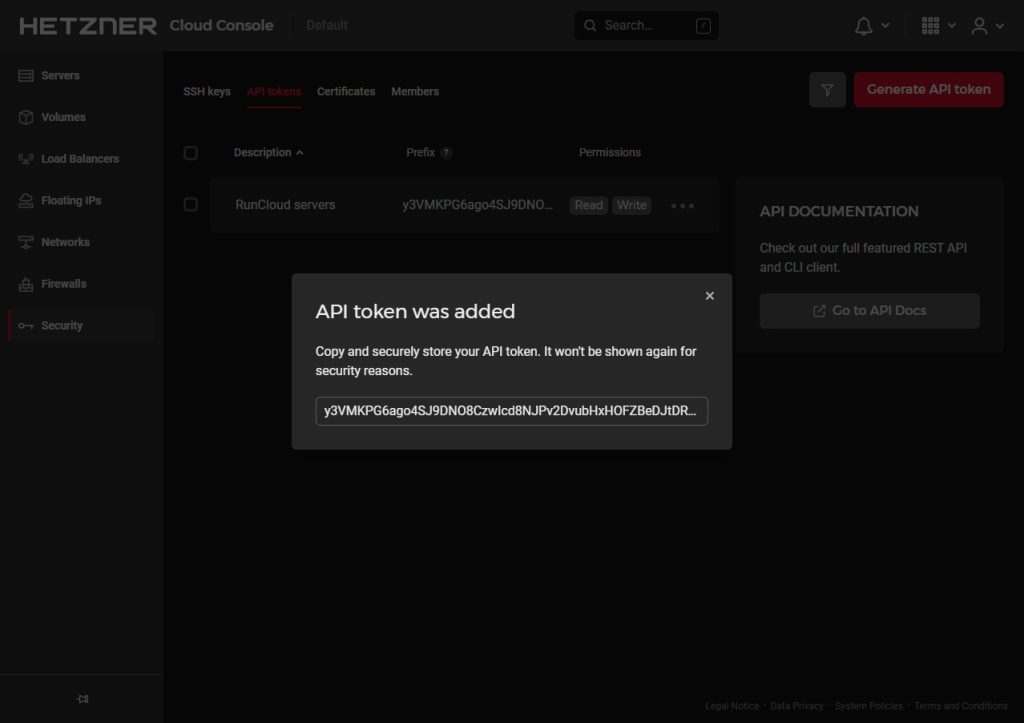
    Step 3: After the key is created, it will only be displayed once. Make sure to copy it and add it to RunCloud before closing the dialog box. If you have accidentally closed the box, then you’ll need to delete the existing key and create another one.
    For security reasons, it is NOT recommended to save the keys in a text file.

    Successful creation of API token on Hetzne

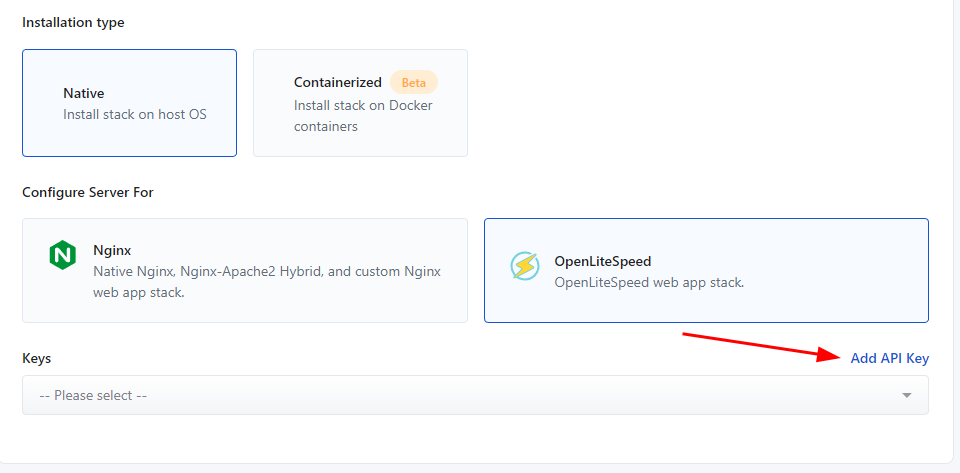
    Step 3: After copying the key, go back to the RunCloud dashboard and click on “Add API Key“.

    Adding an API key on RunCloud

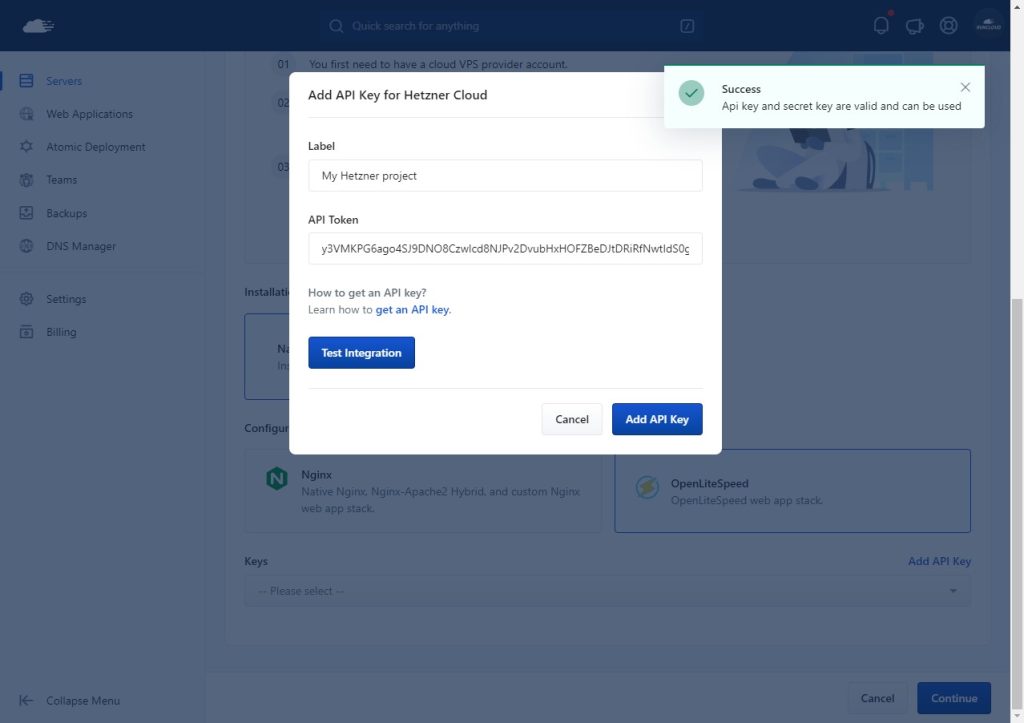
    Step 4: Paste your API token and give it a descriptive label. Click on the “Test Integration” button to check your connection. If you did everything correctly then you should see a Success pop-up.

    Now you can click on “Add API Key” to complete the integration.

    Successful testing of API key on RunCloud

    Deploying The Server

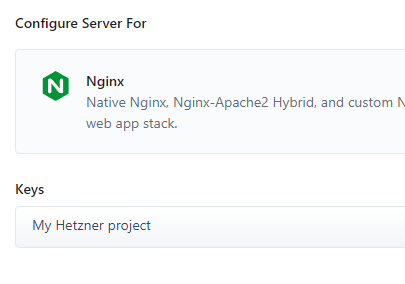
    Step 1: Now you should be able to use the key that we just added to create a server automatically. If you can’t see the new key in the drop-down menu then try refreshing the page. Select the key and click “Next”.

    Selecting the API Key on RunCloud

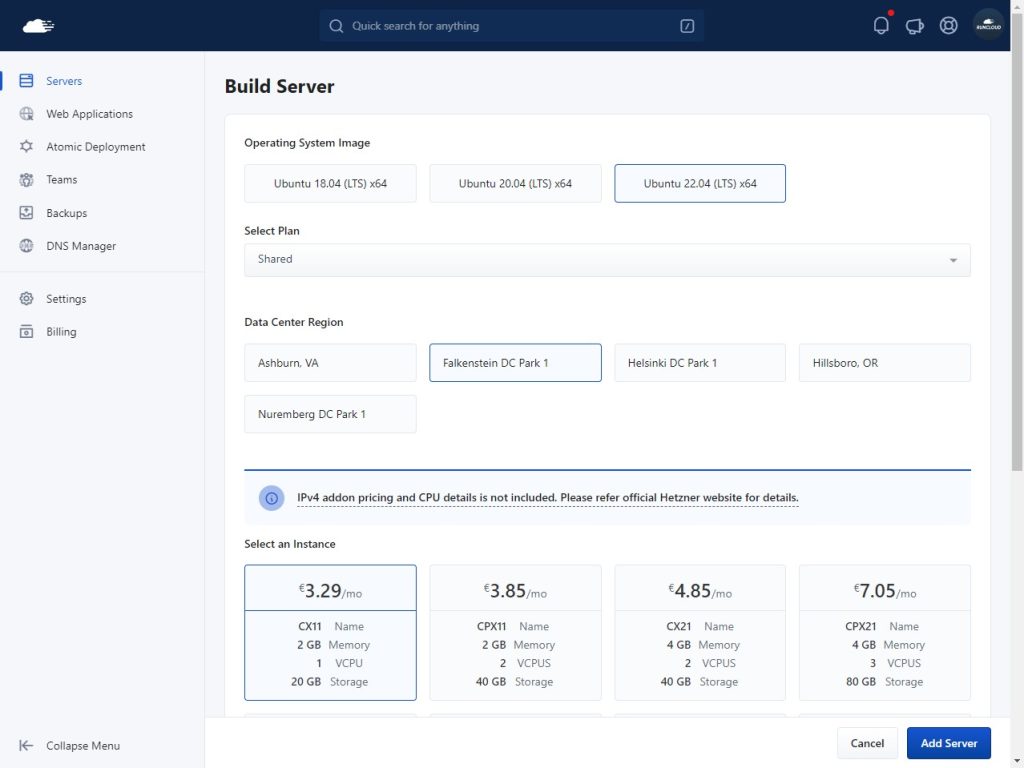
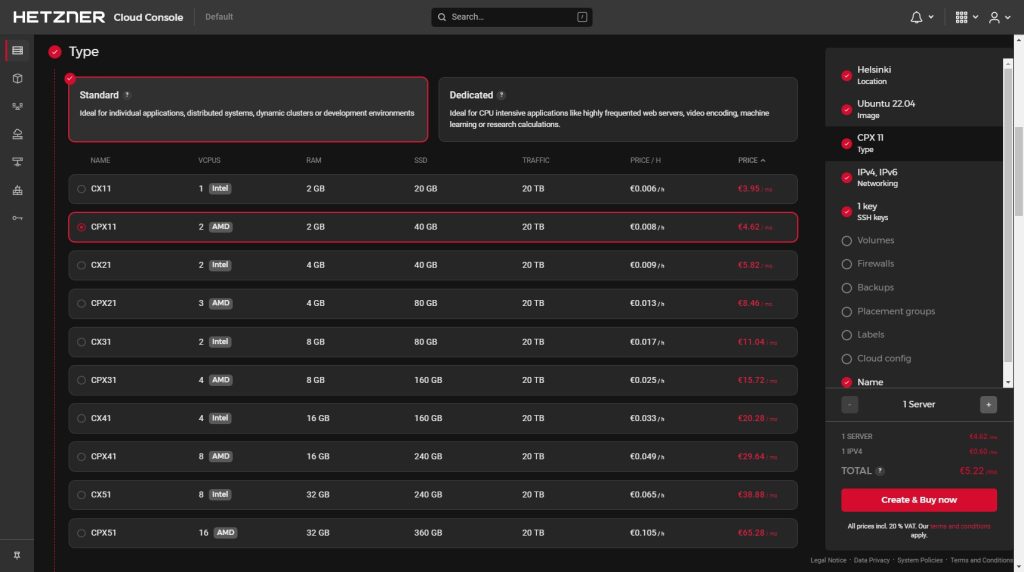
    Step 2: Next you need to specify your Operating system, region, and instance type. RunCloud recommends using Ubuntu 22.04 LTS in the region closest to most of your customers.

    Now pick the instance type based on your needs. If this is your first time creating a website, we recommend using the cheapest option.

    Selecting Pricing plans on Hetzner

    Step 3: Now scroll down to the bottom and give a suitable name to this server. You also need to acknowledge that Hetzner will bill you directly for any resources that you use. After this you can click on the “Add Server” button to deploy your server.

    This step usually takes 5-10 minutes as RunCloud creates a new server, runs a preliminary inspection, and installs basic tools and dependencies on the server before it can be used to host a web application.

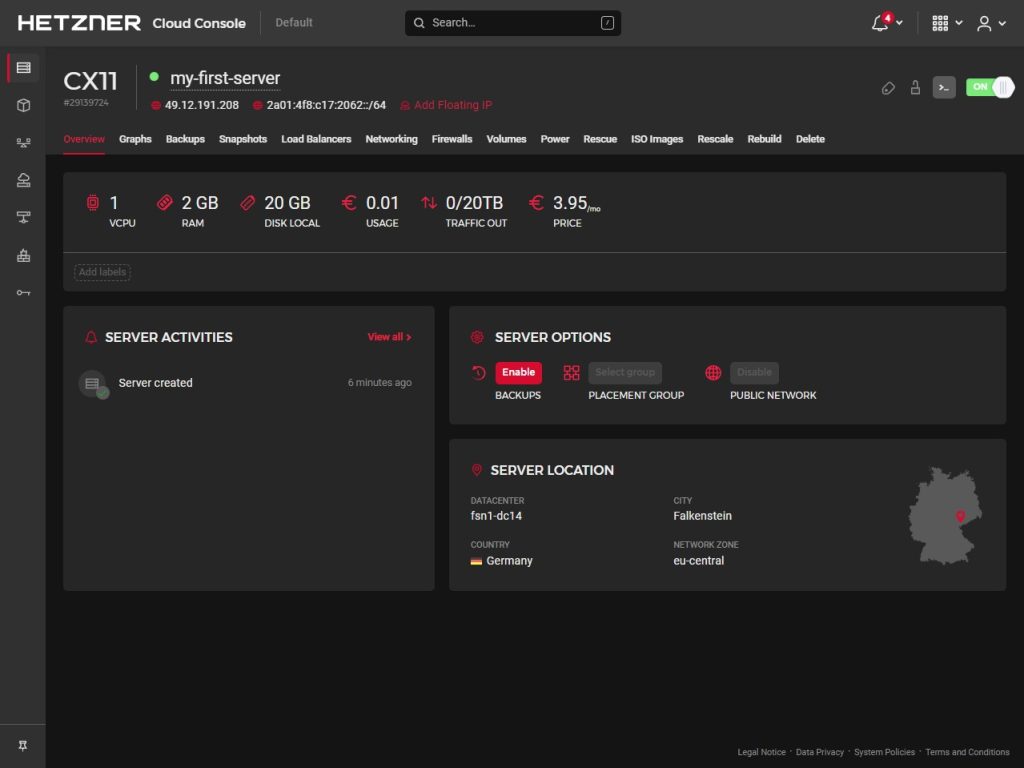
    Optionally, you can go back to your Hetzner dashboard to confirm that this created a new server with desired configuration in your account.

    Note: Hetzner charges extra for public IPv4 addresses, and you might be billed for an amount slightly higher than what is shown in RunCloud dashboard. The prices shown here should only be treated as an approximation, and you should refer to Hetzner Cloud pricing plans for updated information.

    Hetzner dashboard server overview

    After you have finished setting up your server, you can move on to Installing WordPress with RunCloud.

    You should note that RunCloud will not automatically manage the server’s firewall when deploying a server via the RunCloud API with the Docker stack. This means that you are responsible for securing your server’s network ports and configuring firewall rules. So, you will need to configure the firewall manually and make sure you configure the firewall rules as explained in the steps listed below to protect your server from unauthorized access.

    Deleting the Server

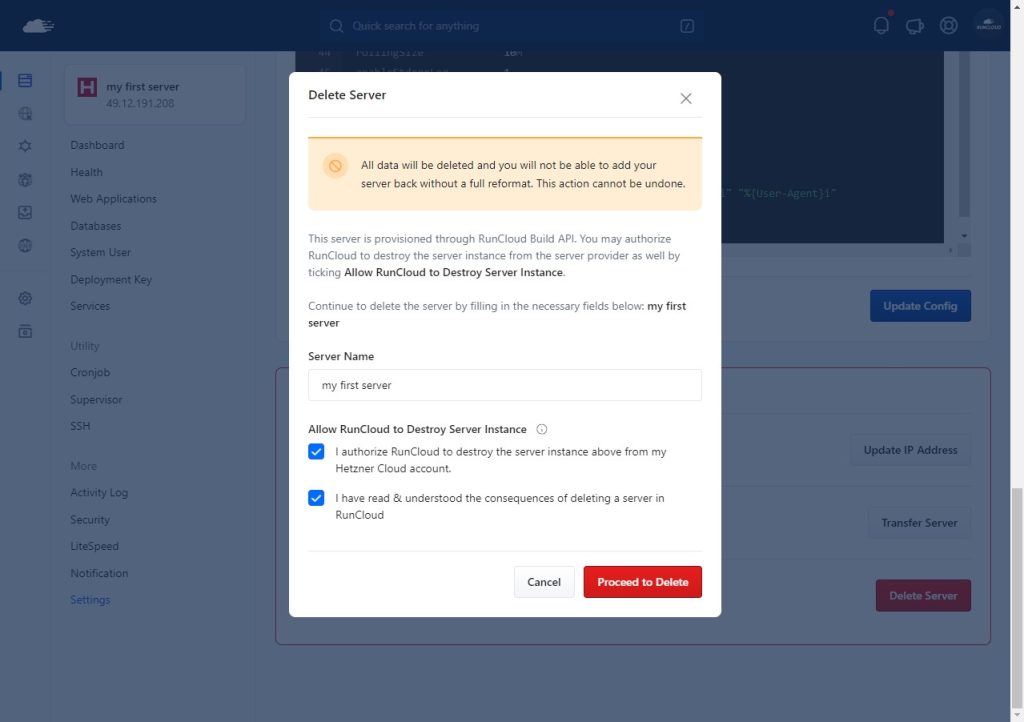
    If you no longer want to use the server, then you should delete it to avoid unnecessary charges. Scroll down to the bottom of the Server Settings page and click on the “Delete Server” button. Confirm that you want to delete the server by specifying its name and click “Proceed to Delete”.

    This will permanently delete the server along with any web applications that were deployed on it, and Hetzner will no longer bill you for this server.

    Deleting RunCloud Server via API

    How To Deploy A Server Manually

    Creating An SSH Key

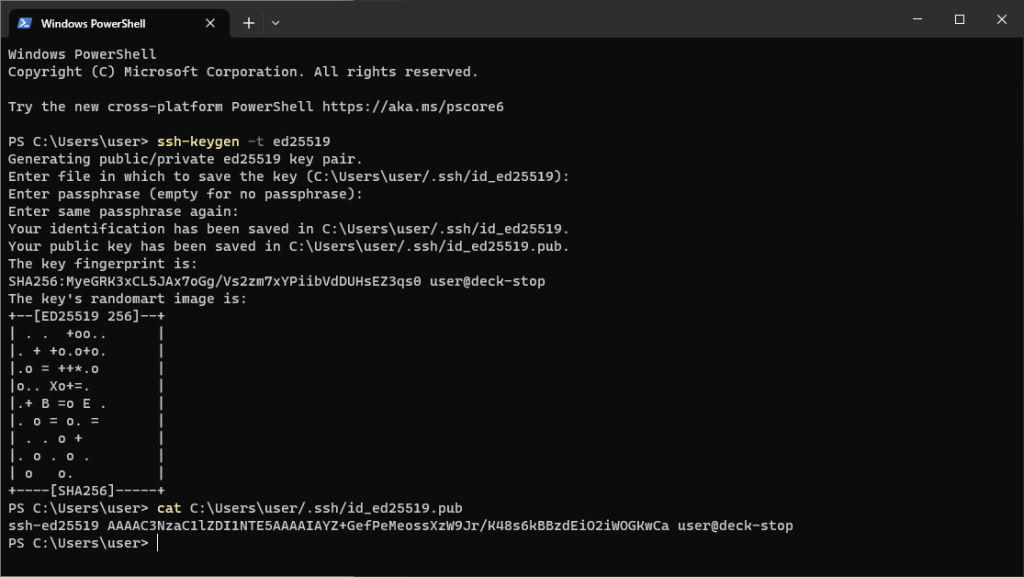
    We need to add an SSH key to our Hetzner account to access the servers. If you have an existing key, you can use that, or you can create a new key-pair by running the following command in Windows PowerShell:

    ssh-keygen -t ed25519

    You will be asked to specify the location of the key, and enter a passphrase. Press ‘Enter‘ to select the default settings and store your key without any password.

    Creating SSH key in Powershell

    During the key creation process, two new files will be created – a public key and a private key. After you have created the key, you will get a message saying “Your public key has been saved in …” In the above example, our key was saved in “C:\Users\user/.ssh/id_ed25519.pub“.

    You can use your favorite text editor to view the public key; we used the cat command to view the contents of the key. We will use the private key to connect to the server via SSH. In the above example, our public ssh key is:

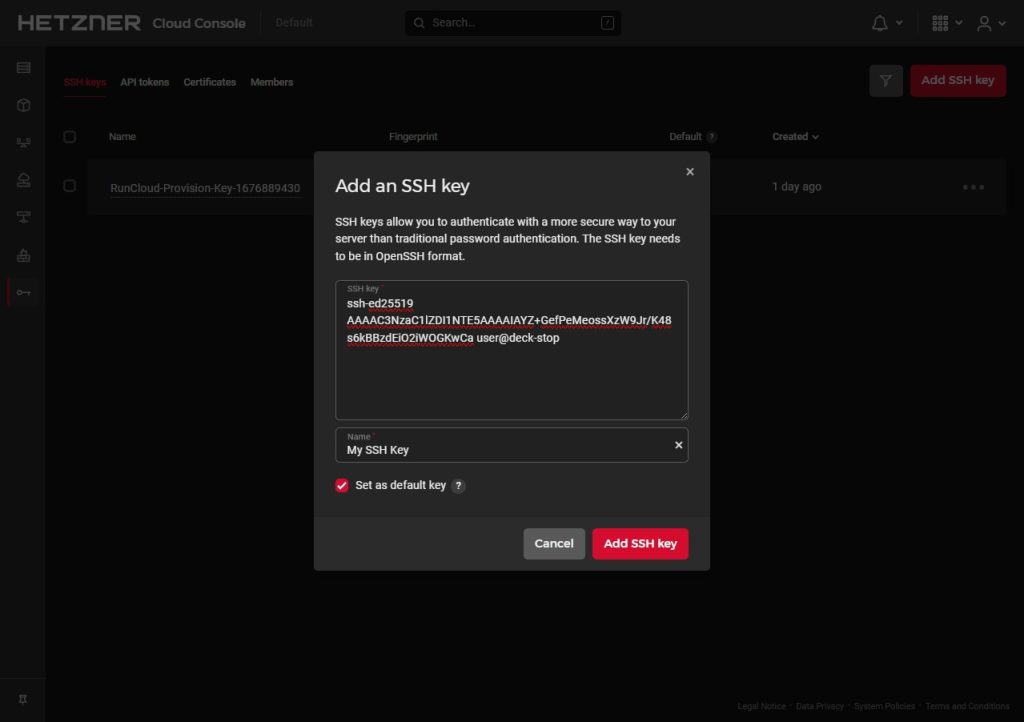
    ssh-ed25519 AAAAC3NzaC1lZDI1NTE5AAAAIAYZ+GefPeMeossXzW9Jr/K48s6kBBzdEiO2iWOGKwCa user@deck-stop

    Copy the public key and open the Hetzner dashboard. Open a project and head over to the Security sub-menu. Click on the “Add SSH key” button to add a new key.

    Adding SSH key on Hetzner

    Paste your key, give it a descriptive name, and set it as the default key. Finally, click on “Add SSH key” to save the changes.

    Creating A Firewall Rule

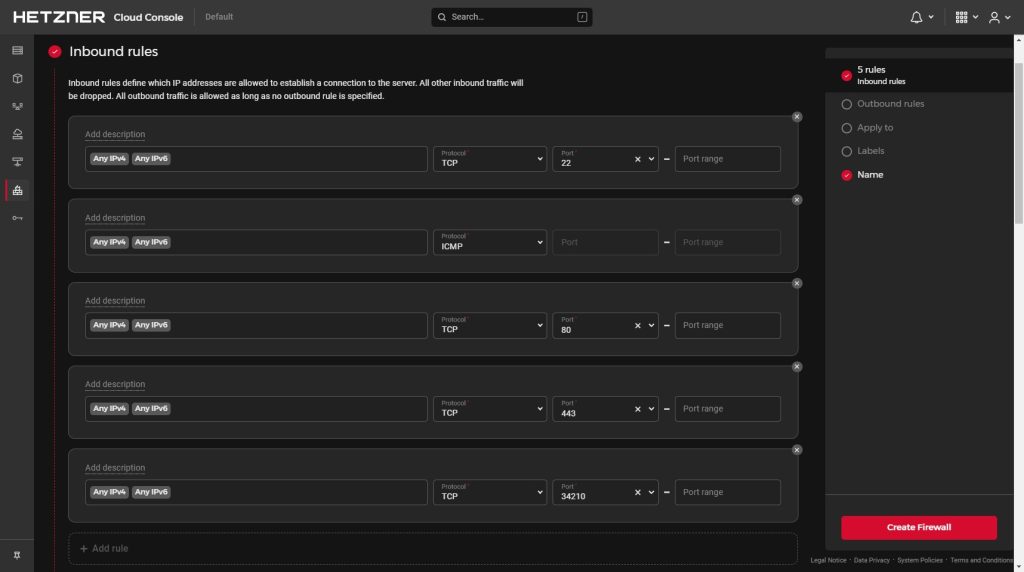
    We need to create a firewall rule that allows TCP traffic on ports 80, 443, and 34210 so that RunCloud can communicate with the server properly. Additionally, you can also allow incoming UDP traffic on port 443 to enable HTTP3 traffic.

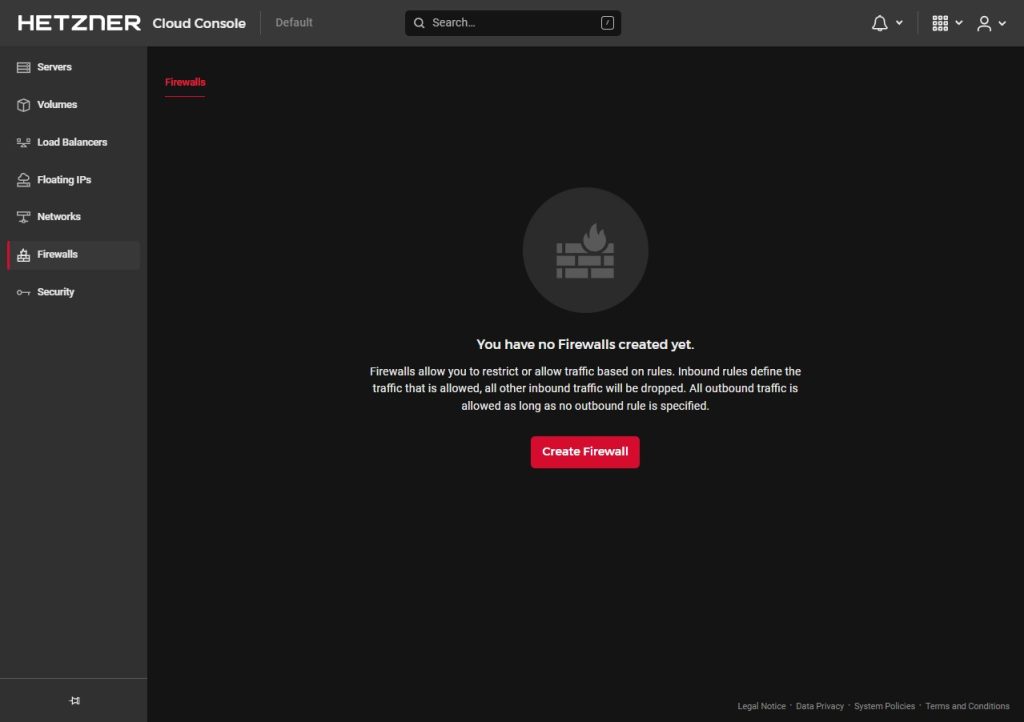
    Head over to the Firewalls tab and click on “Create Firewall”.

    Creating a Firewall Rule on Hetzner

    Add new rules to allow incoming TCP connections on ports 80, 443, and 34210. We will be connecting to our server via SSH to set it up.

    Add another rule to allow TCP connections on port 22 – you can delete this rule later if you like.

    Adding new firewall rules for RunCloud

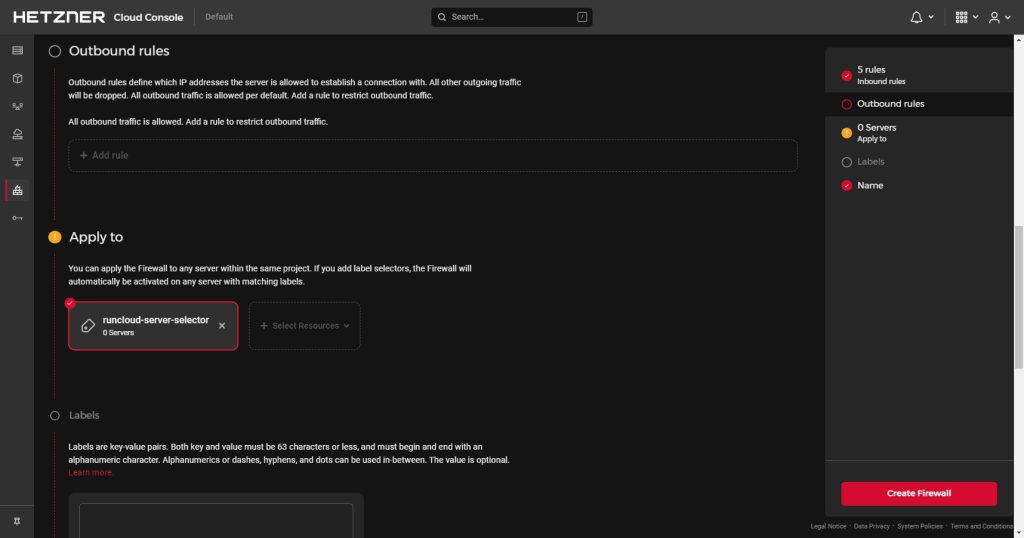
    Leave the Outbound rules unchanged to allow all outgoing traffic. In the “Apply to” section, create a new selector. We will use this selector to mark our servers so that this firewall rule is applied to them.

    Configuring firewall selector on RunCloud

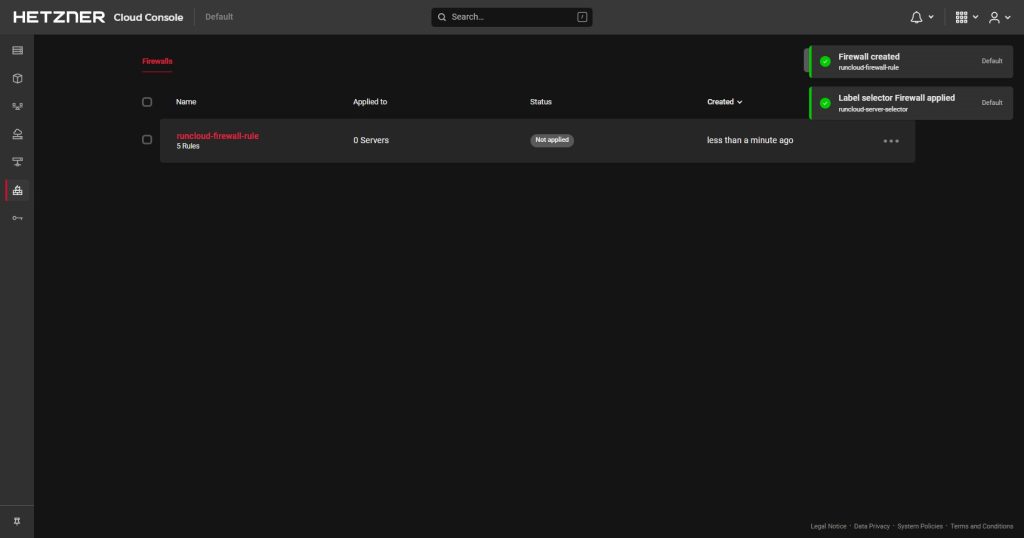
    Give a suitable name to your firewall rule and click “Create Firewall“.

    successful creation of firewall rule on Hetzner

    Creating A New Hetzner Cloud Server

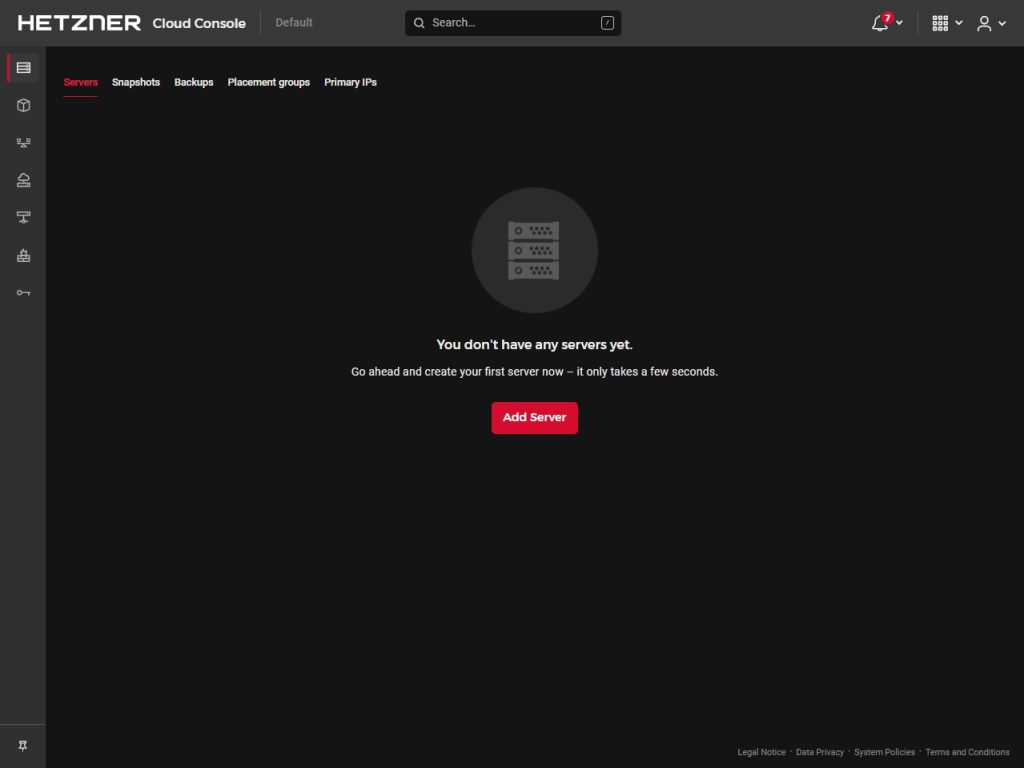
    Go to the Servers submenu and click on “Add Server” to create a new server.

    Adding a server on Hetzner Cloud

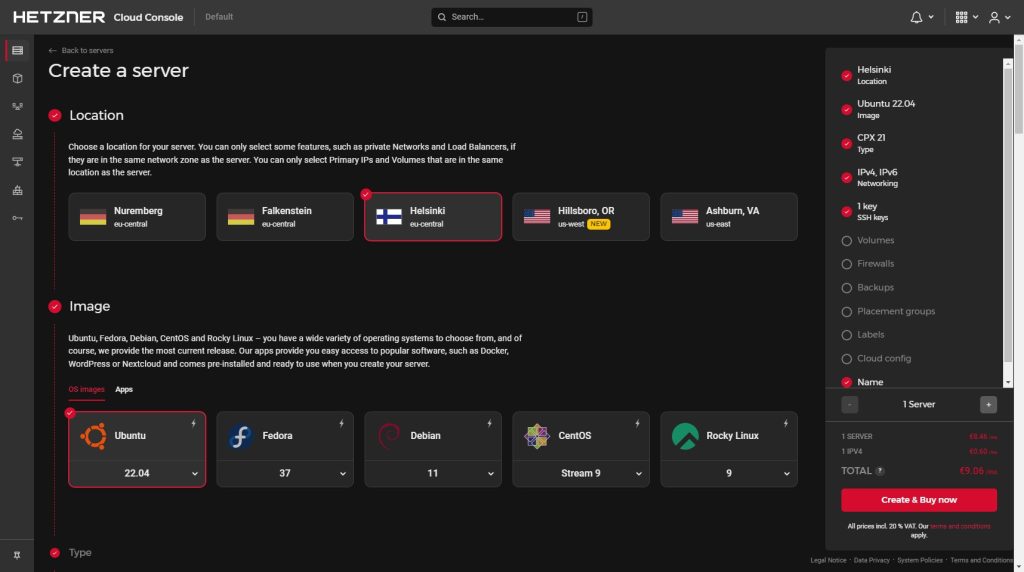
    Pick the location of your server and select the OS image that you want to use. RunCloud recommends using Ubuntu 22.04.

    Selecting Operating System on Hetzner Cloud

    Select the server size – more powerful servers cost more. We recommend starting with cheap servers to avoid unexpected costs.

    Selecting Machine size on Hetzner Cloud

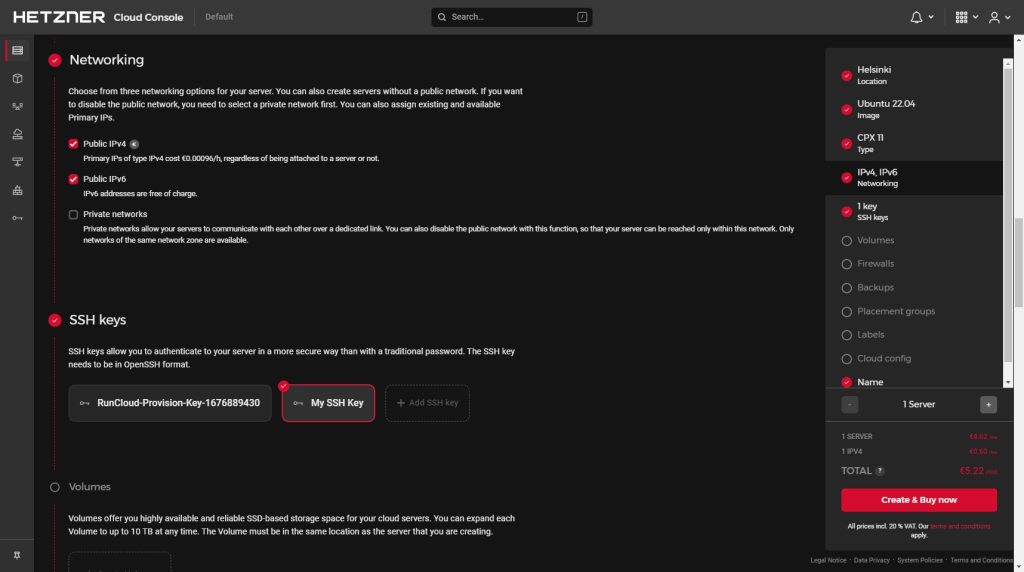
    We plan to host a website on this server which will be accessible from the internet, and so we will need an IP address to do so. Our desired settings are already selected, so we left the network settings unchanged.

    We also note that the SSH key which we just created in the Creating A SSH Key step was selected by default.

    Configuring SSH key on Hetzner Cloud

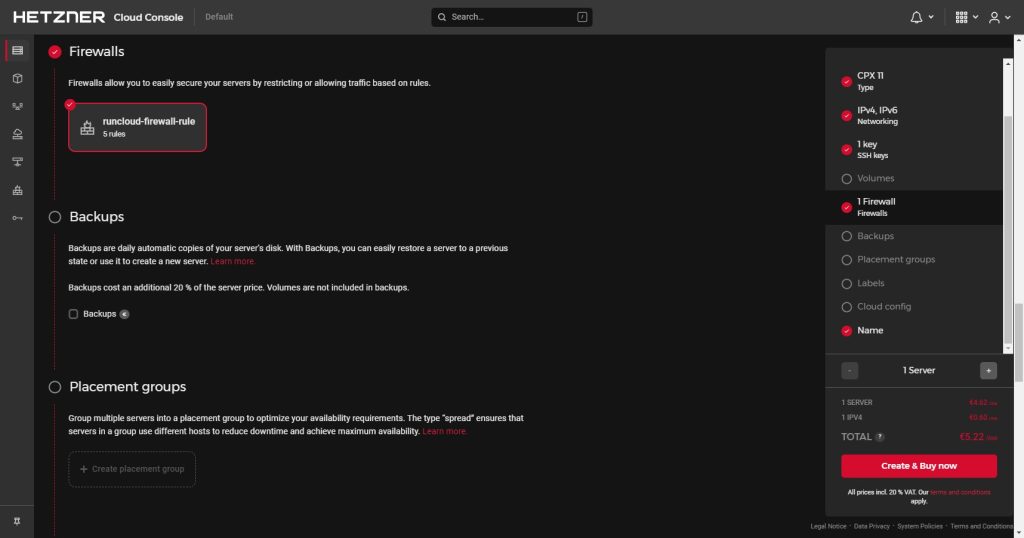
    Next we will select the firewall rule that we created in the Creating A Firewall Rule step.

    Setting RunCloud Firewall Rule

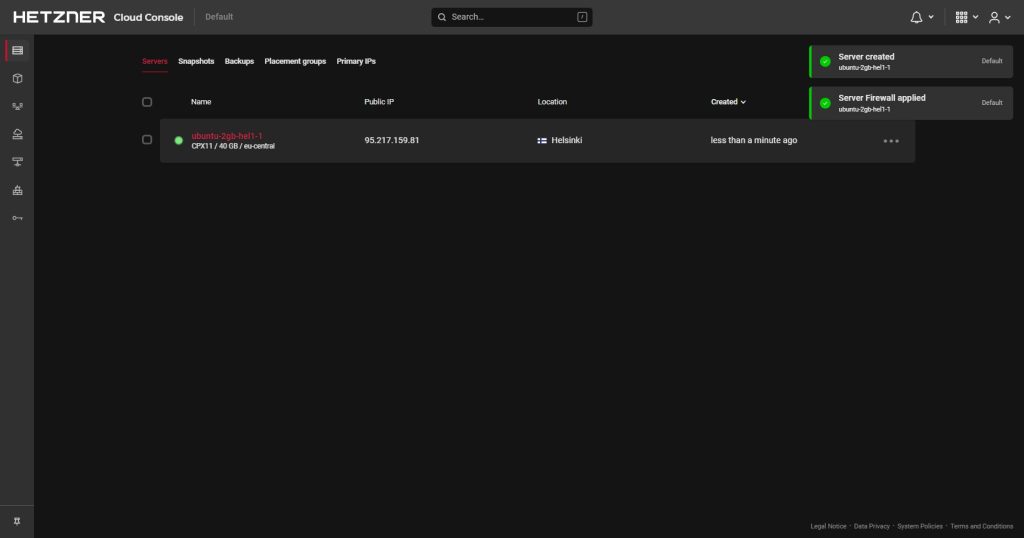
    Give a suitable name to your machine, verify all the settings, and click “Create” to deploy the server. After the server is created, note down the Public IP address of the server.

    Successful Creation of new Server on Hetzner

    Connecting The Hetzner Cloud Server To RunCloud

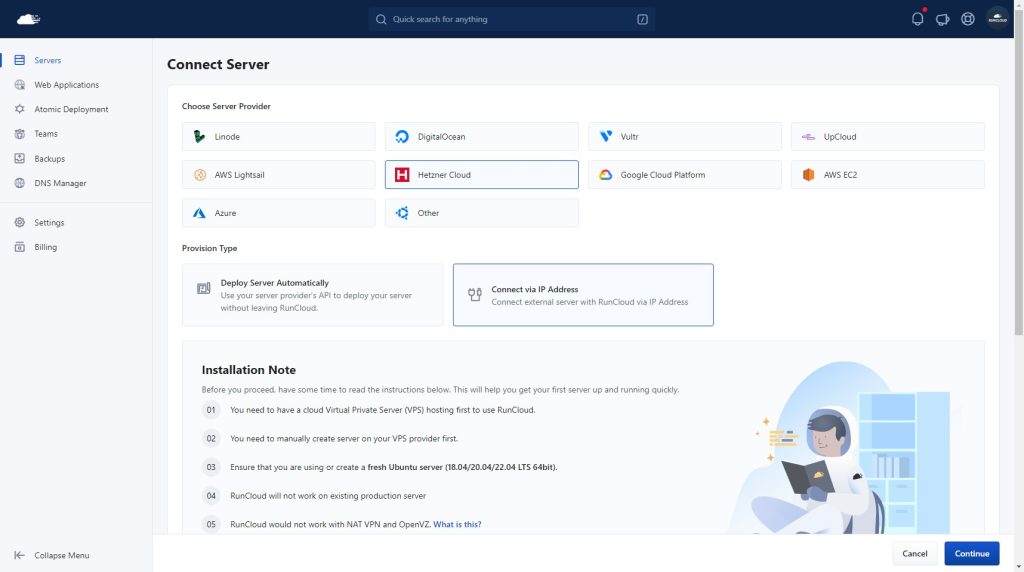
    Go to your RunCloud dashboard and click “Connect a Server”. Pick Hetzner Cloud and select “Connect via IP Address” to add the server manually.

    Connecting a Server in RunCloud via IP address

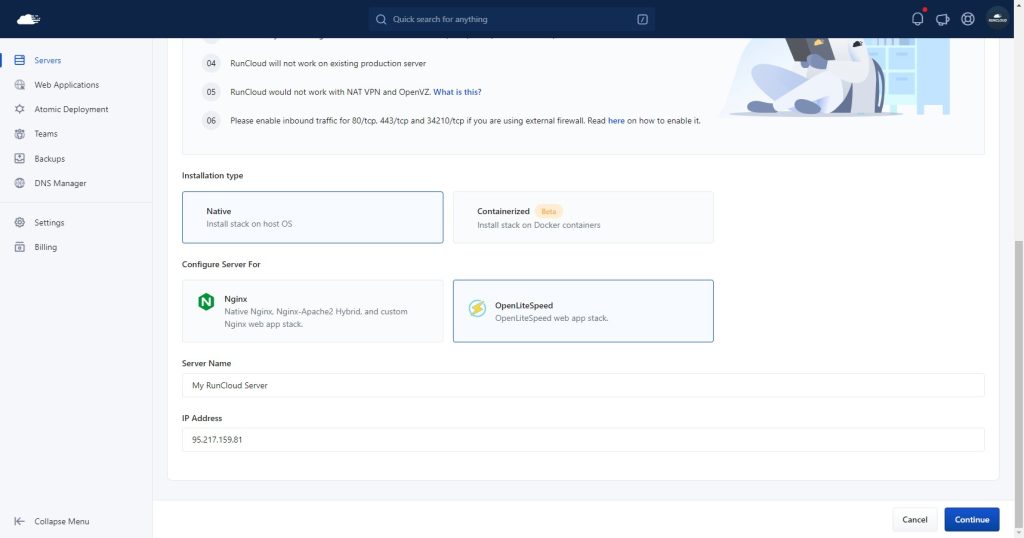
    Select the installation type and pick the server stack that you want to use. Enter a suitable name for your server and provide its IP address. You can find this address in the Hetzner dashboard.

    Setting IP address of Hetzner Server

    Connecting To The Server via SSH

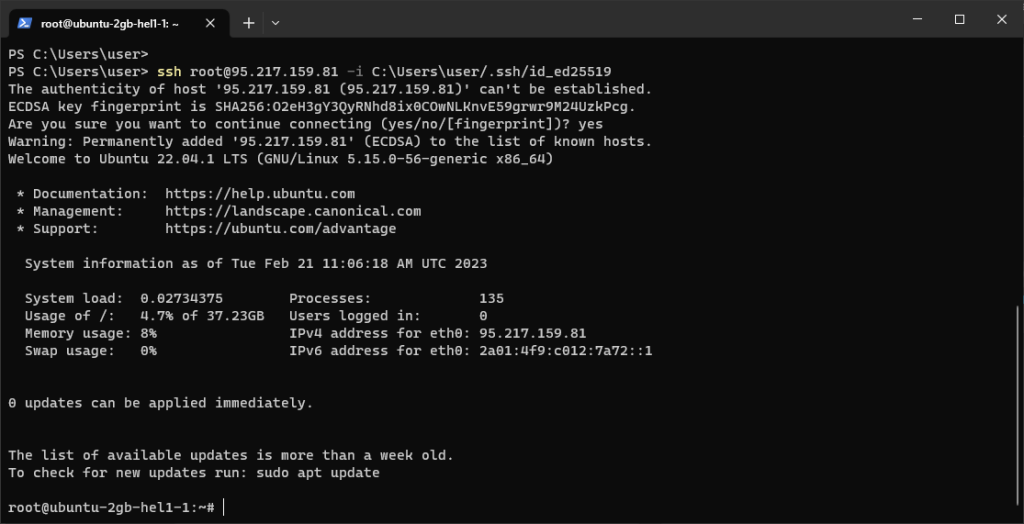
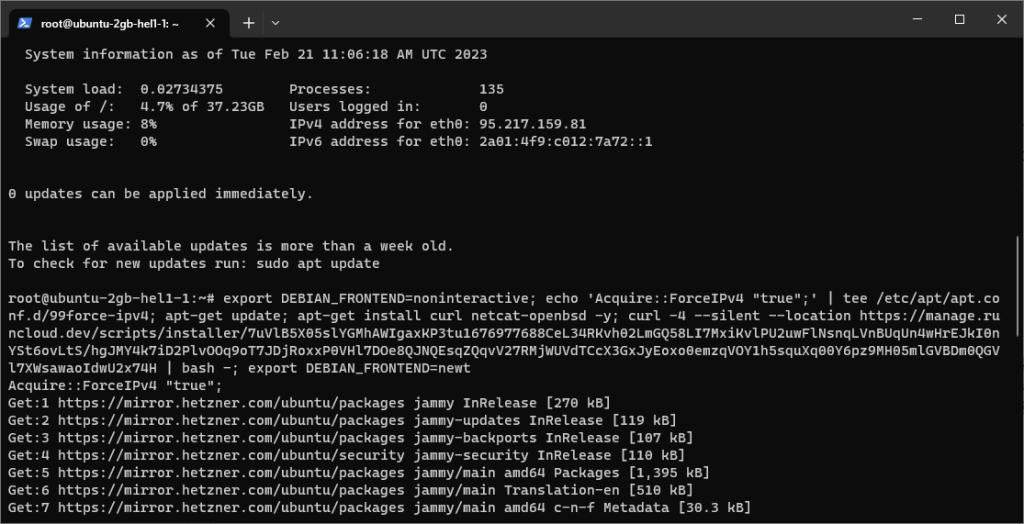
    Now we need to log into the server to install the RunCloud agent. We use the following SSH command in Windows PowerShell to log in:

    ssh root@<ip address> -i <identity file>

    In the above command, replace the <ip address> with the IP address of your server, and <identity file> with the path to your identity file.

    Connecting to server via SSH

    In the above example, our SSH command was:

    ssh root@95.217.159.81 -i C:\Users\user/.ssh/id_ed25519

    If you are connecting to the server for the first time, you will be prompted to verify the fingerprint of the address. Type ‘yes’ and press ‘Enter‘.

    Installing the RunCloud Agent

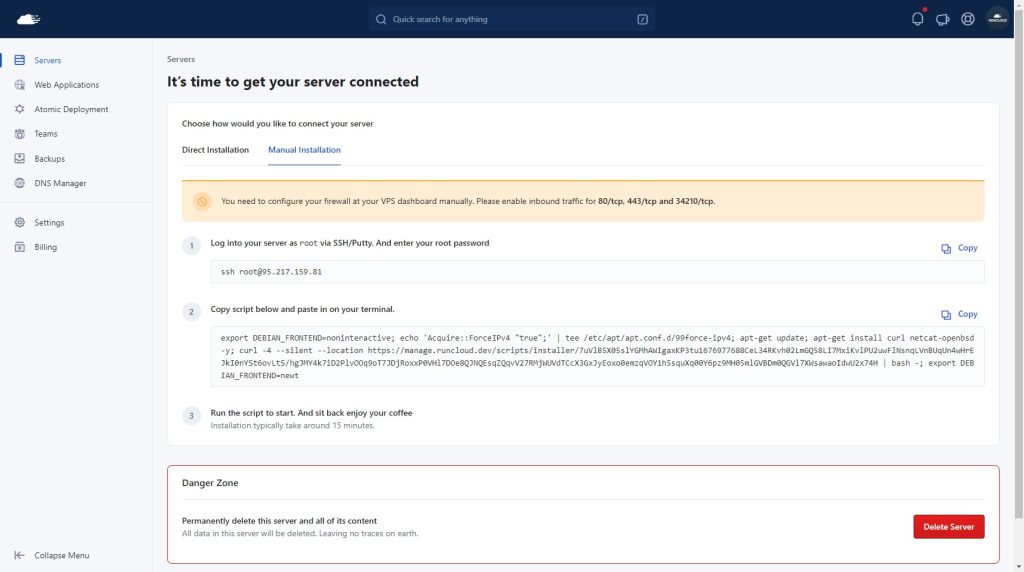
    After logging into the server, we can install the RunCloud agent. Go back to the RunCloud setup process and switch to the “Manual Installation” tab.

    Installing RunCloud Agent

    Copy the given command and paste it in your PowerShell window, then press ‘Enter‘ to run it on the Hetzner server. This step takes 10-15 minutes to complete.

    Executing installation script

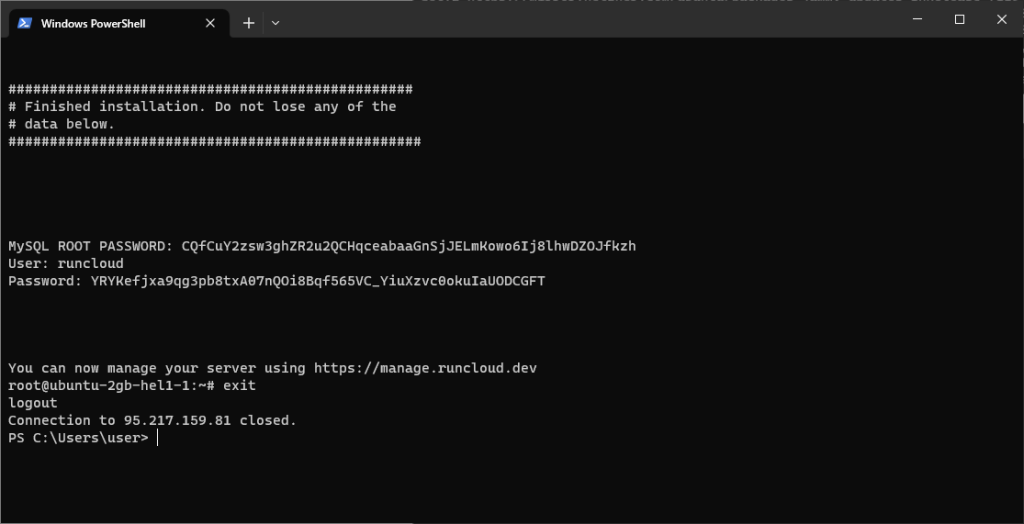
    After the installation is complete, you can type ‘exit‘ in PowerShell to close the connection to the server. You can type ‘exit’ again to close the PowerShell window as well.

    Successful installation of RunCloud Agent

    Deleting Your Server

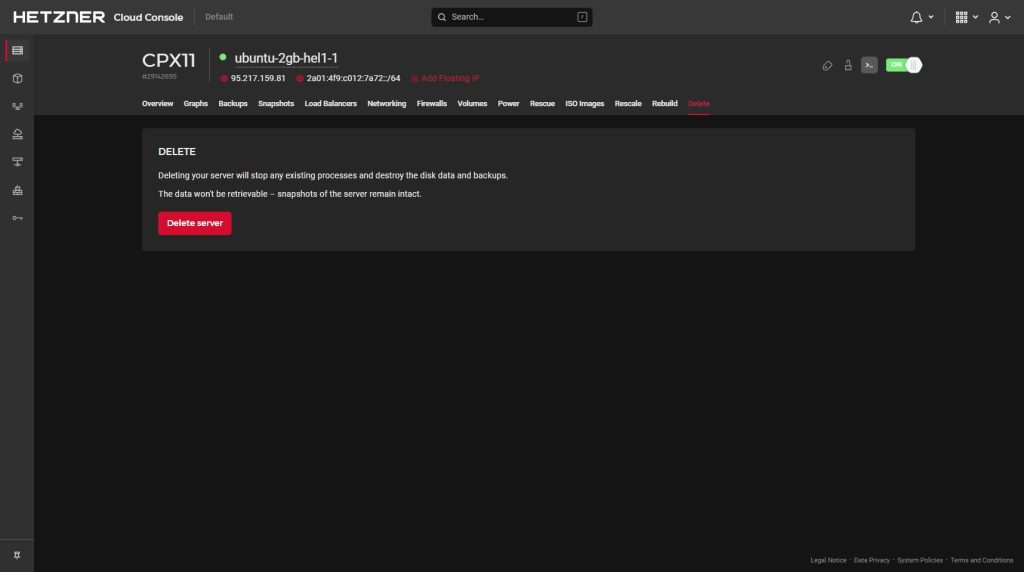
    If you have created a server manually, you will need to delete it manually, both from Hetzner and RunCloud.

    Go to the Hetzner Cloud dashboard, open the server that you want to delete, and go to the “Delete” tab. Click on the “Delete Server” button and confirm your action by entering the name of the server.

    After you have deleted the server, you will no longer be able to access its contents – be sure to make any backups beforehand.

    Deleting Hetzner Server

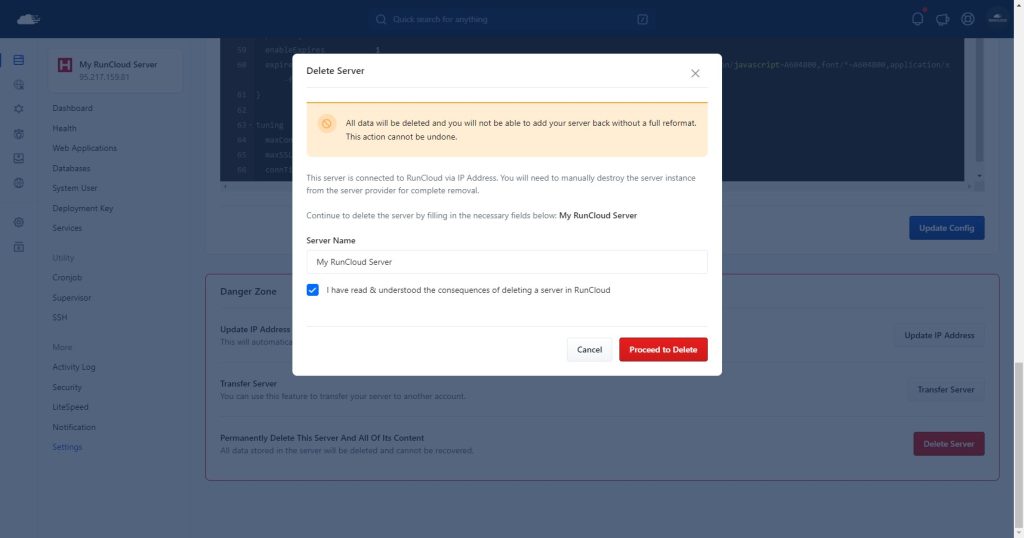
    After deleting the server from Hetzner, we need to delete it from the RunCloud as well. Go to the settings menu of the server and scroll down to the bottom. Click on “Delete Server”, confirm by entering the name of the server, and click “Proceed to Delete”.

    Deleting server manually on RunCloud

    Video Tutorial – Setup Hetzner Server With RunCloud

    Next Steps

    Using Hetzner and RunCloud as your cloud provider and server management platform respectively is a wise choice. After the initial setup, new servers can be launched with only a few clicks.
    If you are not already using RunCloud to manage your servers, you can start doing so today. Sign up for our free trial and see how it makes server management more effective and easy.

    After you have finished setting up our server, you should read about How To Install WordPress and How To Install Magento with RunCloud.

  • How to Block WordPress Spam Comment Bots With Fail2ban Rate Limiting

    How to Block WordPress Spam Comment Bots With Fail2ban Rate Limiting

    Is your website drowning in WordPress comment spam? If you’re battling endless waves of bot-generated junk, you’ve likely tried the usual suspects…

    • Perhaps you’ve implemented CAPTCHAs, only to find they frustrate legitimate users, can still be bypassed by sophisticated bots, and potentially slow down page loads.
    • Maybe you’ve installed anti-spam plugins but worry about their impact on site performance, potential conflicts they introduce, or recurring subscription fees.

    Do you ever wish there was a different, more fundamental way to tackle this?

    Fortunately, there is.

    This guide will walk you through the process of setting up Fail2Ban on your server (specifically tailored for a RunCloud environment, but it is easily adaptable on any other server) to automatically block the IP addresses of bots or individuals who attempt to post comments too frequently on your WordPress sites.

    Instead of analyzing the content of the comment, which can be complex and resource-intensive, this method focuses purely on the frequency of comment submission attempts.

    We will configure Fail2Ban to monitor your web server’s access logs for POST requests to the wp-comments-post.php file. If any single IP address makes more than five such requests within a one-hour period, Fail2Ban will automatically block that IP address at the firewall level for an initial period, with subsequent blocks increasing in duration for repeat offenders.
    Why Use Fail2Ban for Blocking Spam Comments

    We have already written a detailed guide on how to protect your WordPress login page using Fail2Ban. However, you can also use Fail2Ban to reduce spam comments on your site.

    The core idea here is simple: legitimate users rarely post multiple comments in rapid succession across different posts within a short timeframe. Automated bots, however, often hit the wp-comments-post.php endpoint repeatedly as they crawl sites looking for comment forms.

    By setting maxretry = 5 and findtime = 1h, we are telling Fail2Ban: “If you see the same IP address making a sixth attempt (or more) to post a comment via wp-comments-post.php within any 60-minute window, block that IP address.” The first five attempts are allowed, but the sixth triggers the ban.

    Benefits of Using Fail2Ban for Rate Limiting WordPress Comments

    • Server-Wide Protection: This single Fail2Ban rule protects all WordPress sites hosted on the same server that log to the specified NGINX log directory, without needing configuration on each site. If a bot attempts to spam comments across multiple websites hosted on your server simultaneously, its IP address will be quickly blocked based on the cumulative activity seen in the logs. 
    • Protection across the entire website: It doesn’t just stop users from posting comments, it completely blocks the user from even opening the site or accessing it via API for the defined duration. This is much stronger than blocking a spam comment.
    • More Robust Than User/Email Blocking: Spammers frequently cycle through fake or stolen usernames and email addresses, making blocks based on that data less effective; however, obtaining and rotating unique IP addresses at scale is significantly harder and more expensive for them.
    • Protects from Trusted user accounts: Even if a normally trusted (moderated) user account is compromised or a bot inadvertently slips through initial approval, this Fail2Ban rate limit ensures that the user can only submit a handful of comments before their excessive posting frequency triggers an automatic IP block.
    • No Plugin Bloat: This method avoids installing additional WordPress plugins, keeping your site’s codebase leaner and reducing potential third-party code conflicts or vulnerabilities.
    • Firewall-Level Efficiency: The IP blocking is handled by the server’s firewall (like iptables or nftables), which is highly efficient and prevents the spam traffic from even reaching WordPress or PHP, reducing server load compared to application-level filtering.
    • Adjustable Thresholds: You can easily modify the maxretry (attempts allowed) and findtime (time window) parameters in the Fail2Ban jail configuration to make the blocking more or less aggressive based on your observations.

    Drawbacks of Using Fail2Ban for Rate Limiting WordPress Comments

    • Doesn’t Stop Initial Spam: This method is reactive based on frequency. It will not prevent the first one or two spam comments from a new IP address from being submitted; the block only occurs after the threshold (maxretry) is exceeded within the findtime. You still need WordPress-level tools (like Akismet, moderation queues, or disabling comments) to handle those initial attempts.

    📖 Suggested read: 11 Alternatives to reCAPTCHA to Protect Your Site from Spam

    Step-by-Step Instructions for Rate Limiting WordPress Comments Without CAPTCHA

    This section will walk you through the steps for configuring your Fail2Ban client to block spam comments automatically. But before we go ahead, make sure you satisfy the following requirements:

    Prerequisites

    • You will need SSH access to your server with sudo privileges.
    • You need to ensure that Fail2Ban is installed and running on your server. If you are using RunCloud, you don’t need to do anything, as RunCloud includes Fail2Ban out of the box.

    📖 Suggested read: DKIM – What Is It & Why Your Emails Need It

    Step 1: Locate Web Server Logs

    Fail2Ban monitors server logs to block and restrict server access. Therefore, the first step is to identify the location of the NGINX access log files that record incoming requests to your WordPress sites, as Fail2Ban needs to monitor these files for comment submission attempts.

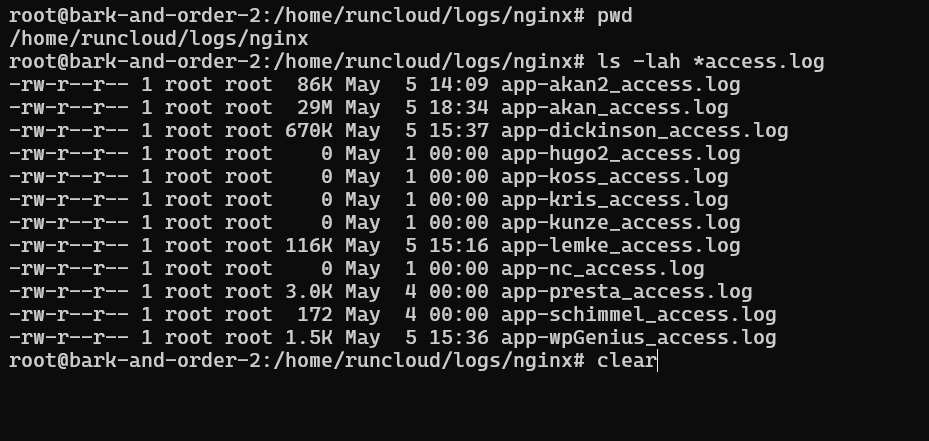
    On servers managed by RunCloud, NGINX stores separate access logs for each web application you’ve created within the /home/<username>/logs/nginx/ directory, named following a pattern like your-app-name_access.log.

    Since you might have multiple WordPress sites (web applications) on the same server and want Fail2Ban to protect all of them with this rule, you need to ensure the logpath directive we configure later correctly points to all relevant access logs.

    Viewing logs for fail2ban access

    📖 Suggested read: 10 Security Tips to Secure a VPS Server in 2025 [Ultimate Guide]

    Step 2: Create the Fail2Ban Filter Definition

    After locating the log files, we need to tell Fail2Ban what pattern to look for in the log files. We’ll create a filter configuration file specifically for WordPress comment posts.

    Open or create the filter file using a text editor like nano:

    sudo nano /etc/fail2ban/filter.d/wordpress-comment.conf

    Paste the following content into the file:

    # Fail2Ban filter for WordPress comment posting attempts
    # This filter looks for POST requests to wp-comments-post.php
    [Definition]
    failregex = ^<HOST> .* "POST /wp-comments-post.php HTTP.*

    Let’s understand this code snippet bit by bit.

    • [Definition]: This standard section header is required for Fail2Ban filters.
    • failregex: This line defines the regular expression to match:
      • ^<HOST>: Matches the client’s IP address (Fail2Ban automatically replaces <HOST> with the IP pattern) at the beginning of the log line.
      • .*: Matches any characters between the IP address and the specific request string.
      • "POST /wp-comments-post.php HTTP.*: Matches the literal string indicating a POST request being made to the WordPress comment processing script.

    After editing the file, save it and exit the editor (in nano, press Ctrl+X, Y, then Enter).

    Step 3: Test the Regular Expression (Optional but Recommended)

    Before enabling the rule, it’s wise to test your failregex against one of your actual NGINX access logs to ensure it correctly identifies comment posting attempts.

    Run the fail2ban-regex command, replacing your-app-name_access.log with the actual name of one of your application’s access log files:

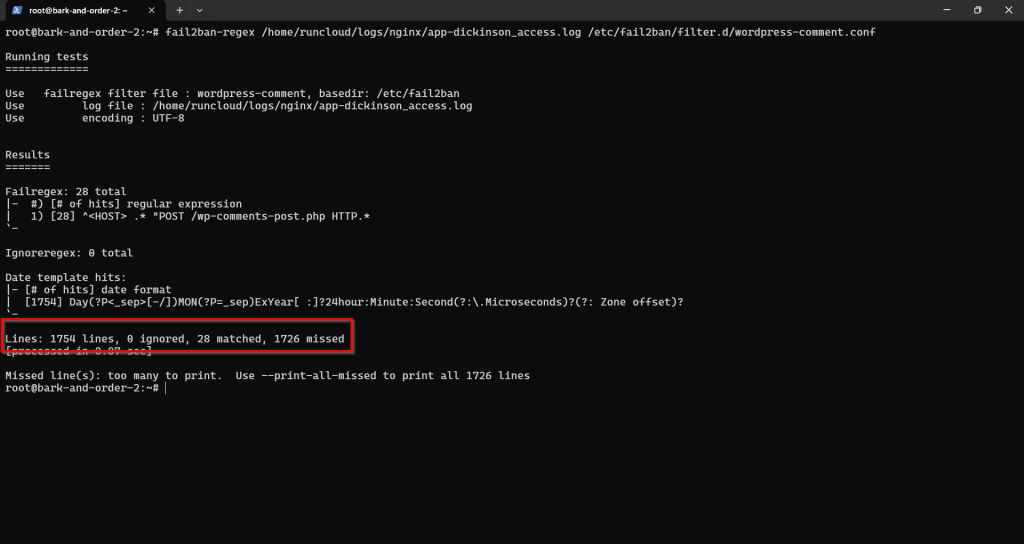
    sudo fail2ban-regex /home/runcloud/logs/nginx/your-app-name_access.log /etc/fail2ban/filter.d/wordpress-comment.conf
    fail2ban regex matching for blocking SPAM comments

    Analyze the provided output. Fail2Ban will report the following metrics:

    1. Lines matched by failregex.
    2. Lines ignored by ignoreregex (should be 0).
    3. Total lines read.

    You should see a positive number of matches if your log file contains recent comment posting attempts (legitimate or spam). It will also list the actual log lines that matched, allowing you to verify. If you don’t see any matched entries, then you will need to troubleshoot your fail-regex before moving forward.

    📖 Suggested read: The 6 Best WordPress Security Plugins (2022)

    Step 4: Create the Fail2Ban Jail Configuration

    Now, we define a “jail” that uses the filter we created and specifies the conditions for banning (like maxretry, findtime) and the ban duration (bantime). It’s important to add this configuration to jail.local to avoid it being overwritten by package updates.

    Open /etc/fail2ban/jail.local with your text editor. If this file doesn’t exist, you can create a new one. By default, Fail2Ban reads from /etc/fail2ban/jail.conf, and it’s best practice to copy jail.conf to jail.local and make your customizations there.

    sudo nano /etc/fail2ban/jail.local

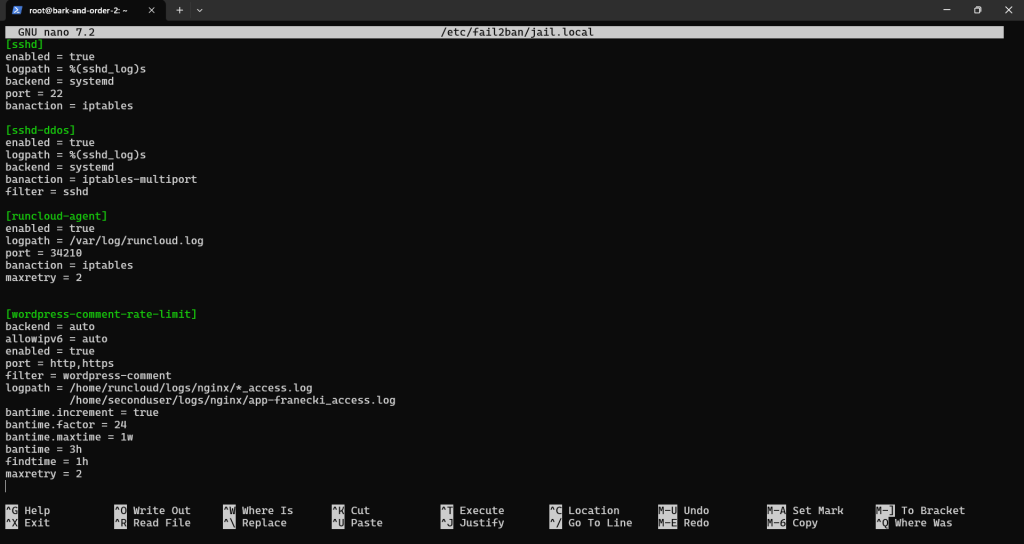
    Scroll to the end of the file and add the following jail definition:

    [wordpress-comment-rate-limit]
    backend = auto
    allowipv6 = auto
    enabled = true
    port = http,https
    filter = wordpress-comment
    logpath = /home/runcloud/logs/nginx/*_access.log
    bantime.increment = true
    bantime.factor = 6
    bantime.maxtime = 1w
    bantime = 3h
    findtime = 1h
    maxretry = 5

    We have already written a detailed Guide to Configuring Fail2Ban, but let’s quickly break down these parameters to understand what they do:

    • [wordpress-comment-rate-limit]: A unique name for this specific jail configuration.
    • enabled = true: Activates this jail. Set to false to disable it without deleting the configuration.
    • port = http,https: Specifies the ports Fail2Ban should block traffic on for the banned IP. Blocking web traffic is appropriate here.
    • filter = wordpress-comment: Tells Fail2Ban to use the filter definition we created in Step 1 (referencing the filename wordpress-comment.conf without the .conf extension).
    • logpath = /home/runcloud/logs/nginx/*_access.log: Specifies the log file(s) to monitor. The wildcard * ensures it monitors the NGINX access logs for all applications managed by RunCloud in the standard location. Adjust this path if your logs are stored elsewhere.
    • maxretry = 5: The number of matches (comment posts) allowed from a single IP before triggering a ban. A value of 2 means the third attempt will trigger the ban.
    • findtime = 1h: The time window within which the maxretry count must occur. If an IP posts more than 5 times within any 1-hour period, it gets banned.
    • bantime = 3h: The initial duration for which the IP address will be banned (3 hours).
    • bantime.increment = true: Enables escalating ban times for repeat offenders.
    • bantime.factor = 6: Multiplier for the ban time. Each subsequent ban for the same IP will be multiplied by this factor (e.g., 2nd ban = 3h * 6 = 18 hours).
    • bantime.maxtime = 1w: The maximum duration an IP can be banned for (1 week). Even with the factor, bans won’t exceed this length.

    If you want to monitor multiple websites using the single configuration, then you can either individually list out the log file for each of the application in its separate line (as shown above) or you can use a wildcard to read all the log files in a directory (/home/runcloud/logs/nginx/*_access.log).

    After making the necessary changes, you can save the file and exit the editor (Ctrl+X, Y, Enter in nano).

    📖 Suggested read: How to Use ModSecurity and OWASP CRS for Web App Firewall (WAF) to Secure Your Website

    Step 5: Reload Fail2Ban Configuration

    For the new filter and jail to take effect, you must reload the Fail2Ban service. To do this, you can simply execute the following command in your terminal:

    sudo systemctl reload fail2ban
    sudo systemctl status fail2ban

    Fail2Ban will now start monitoring the specified NGINX logs using your new rule. Now, whenever someone tries to repeatedly post several comments in a short period, your firewall will completely block that IP address for the defined period. 

    If you accidentally block yourself, read our guide on How to Unban an IP Address in Fail2Ban.

    Step 6: Monitor Fail2Ban (Optional but Recommended)

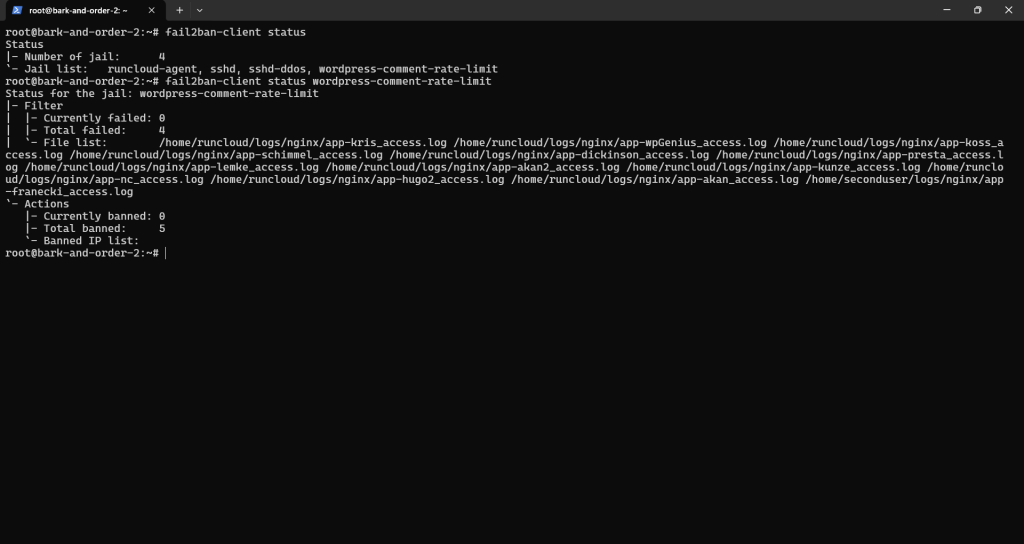
    After enabling the jail, you can check the status of Fail2Ban and see if your new jail is active and if any IPs have been banned. Check the overall status and list active jails:

    sudo fail2ban-client status

    Additionally, you can also get detailed status for your specific jail using the following command:

    sudo fail2ban-client status wordpress-comment-rate-limit

    The above command will show if the jail is running, the filter being used, the log paths, and, importantly, a list of IP addresses currently banned by this specific jail.

    📖 Suggested read: PHP Security – Best Practices To Secure Your Web App in 2025

    Final Thoughts

    This guide has explored an effective, server-level technique to mitigate WordPress comment spam by implementing Fail2Ban rate limiting. This method tackles the problem from a different angle, focusing on the frequency of posting attempts rather than just the content. It provides a powerful layer of defense against automated bots hammering your wp-comments-post.php endpoint.

    What makes this approach particularly effective and distinct from standard WordPress anti-spam plugins is its server-wide application. A single Fail2Ban rule protects all the WordPress sites hosted on your RunCloud server, efficiently blocking malicious IP addresses at the firewall level before they can strain your web application resources. This is usually unachievable with site-specific plugins alone.

    By using Fail2Ban, you gain efficient, low-overhead protection that complements your existing WordPress security practices. This highlights the power of RunCloud: it provides an intuitive platform for managing your servers and applications while still granting you the full underlying access and control necessary to implement advanced, custom security measures like this Fail2Ban configuration.

    Ready to experience powerful, flexible server management that doesn’t lock you out? Sign up for RunCloud today and take control of your web hosting environment.

    FAQs on Stopping WordPress Comment Spam

    Does disabling comments improve site security?

    Yes, disabling comments entirely reduces your site’s attack surface by removing a primary vector for user-submitted content and potential code injection attempts. Although it is not a complete security solution, it eliminates comment-specific vulnerabilities and simplifies security management. But it also removes the way you interact with your users.

    Can comment spam hurt my SEO?

    Absolutely. Excessive spam comments filled with low-quality or malicious links can dilute your page quality, negatively impact user experience, and potentially lead to search engine penalties. They also consume crawl budget and server resources that could be better used on legitimate content.

    Is it safe to allow comments from registered users only?

    It’s safer than allowing anonymous comments, significantly reducing bot spam, but it doesn’t eliminate the threat entirely, as bots can automate registration. To stop fake user signups, you should also implement strong registration security, like email verification and reCAPTCHA on registration forms.

  • The Best Docker Alternatives for Containerization in 2025

    The Best Docker Alternatives for Containerization in 2025

    Docker has changed software development and application deployment through containerization. Its intuitive command-line interface, tools such as Docker Desktop, and the vast Docker Hub ecosystem have all made creating, sharing images, and running containerized applications incredibly accessible.

    But many people don’t realise that the Docker engine isn’t the only containerization technology available.

    This post will discuss some of the best alternatives to Docker and compare powerful options that adhere to the Open Container Initiative (OCI) standards.

    Whether you’re concerned about security, optimizing for Kubernetes clusters, managing container images across different container registries, or simply seeking improvements in your container management strategy, by the end of this article, you will be able to find the best containerization platform for your specific needs.

    Let’s get started!

    What is Containerization?

    Containerization is a new way to deploy applications on a remote server. Traditionally, we’ve been copying the application’s source code and executing it on the remote server.

    However, containerization technology allows us to bundle an application’s code and all its necessary dependencies, libraries, configuration files, and binaries, into a single, isolated unit called a container. This container image is a self-sufficient package that can run consistently across different computing environments, from a developer’s laptop to production servers in the cloud or on-premises data centers.

    In Linux, containerization uses operating system-level virtualization features, such as namespaces and control groups (cgroups). Unlike traditional virtual machines (VMs) that require a full guest operating system for each instance, containers share the host system’s OS kernel. This makes containers very lightweight, faster to start, and less resource-intensive than VMs. This allows developers to deploy multiple containers on a single VM for higher density and more efficient use of underlying hardware resources.

    📖 Suggested read: 20 Essential Docker Commands You Should Know

    Best Docker Alternatives for Containerization

    Docker is by far the most popular container runtime available. So much so that many people use the terms ‘Docker’ and ‘containers’ interchangeably – but it isn’t the only containerization technology.

    Let’s take a look at alternative container runtimes that you can use instead of Docker:

    S No.NameVisit Website
    1Podman https://podman.io/
    2Linux Containers https://linuxcontainers.org/
    3Red Hat OpenShift https://www.redhat.com/en/technologies/cloud-computing/openshift
    4Apptainer/Singularityhttps://apptainer.org/
    5Containerd https://containerd.io/
    6Cri-ohttps://cri-o.io/
    7Mirantis Container Runtime https://www.mirantis.com/software/mirantis-container-runtime/

    Podman

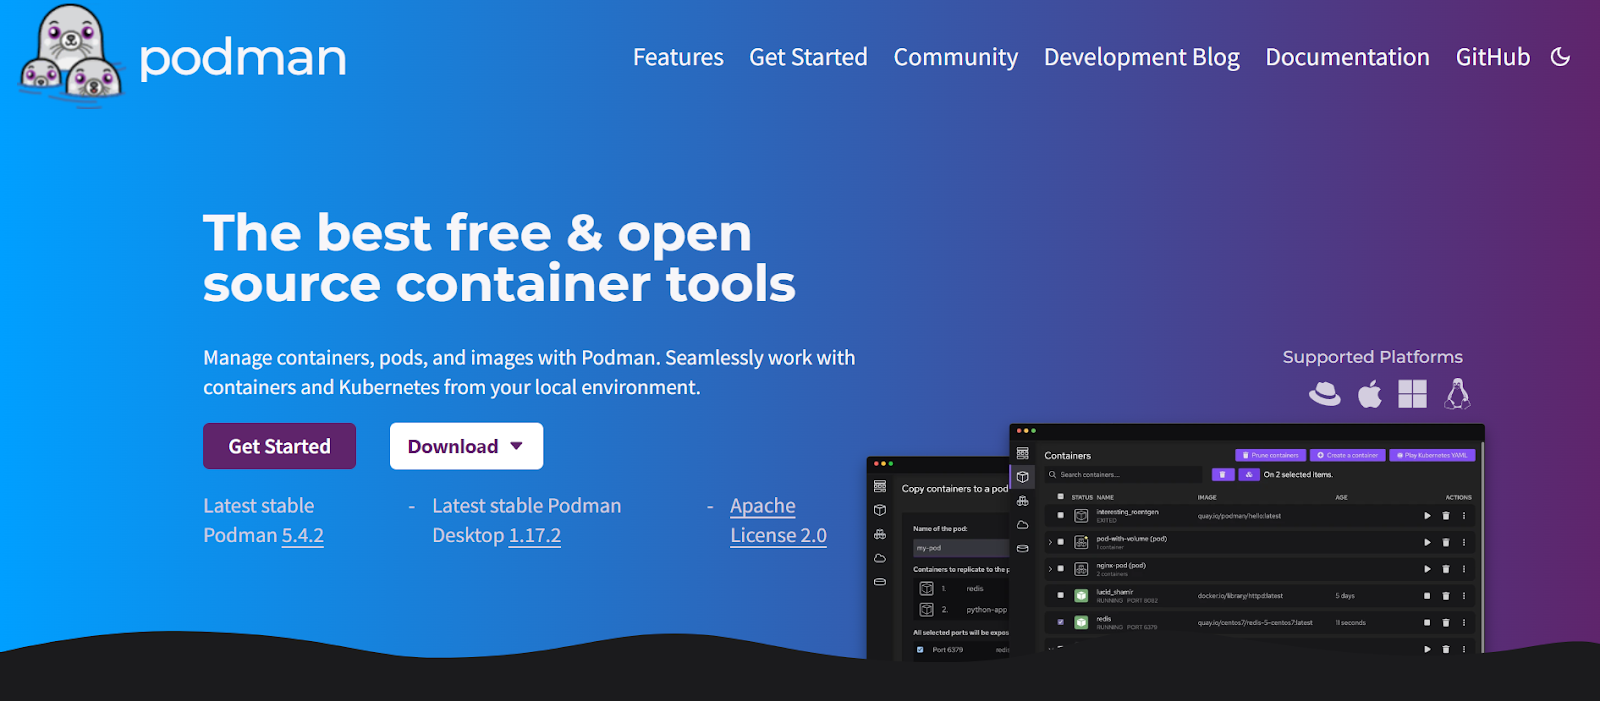
    Podman is a helpful tool for anyone working with software containers. It lets you easily find, download, run, build, and share containers using straightforward commands like search, pull, run, build, and push. One special thing about Podman is its ability to group related containers into ‘pods’, which makes it easier to manage applications where different parts need to work closely, similar to how bigger systems like Kubernetes operate.

    If you prefer using a visual interface instead of typing commands, you can use the Podman Desktop application on Windows, macOS, and Linux. This app gives you a single screen to manage your containers, even if they were created with other tools such as Docker.

    Podman Desktop makes building new container images simple, as well as getting images from online repositories, grouping containers into pods, and checking logs. It even helps you prepare and move your container applications to run on Kubernetes.

    📖 Suggested read: How to Create a Docker Image for Your Application

    Linux Containers

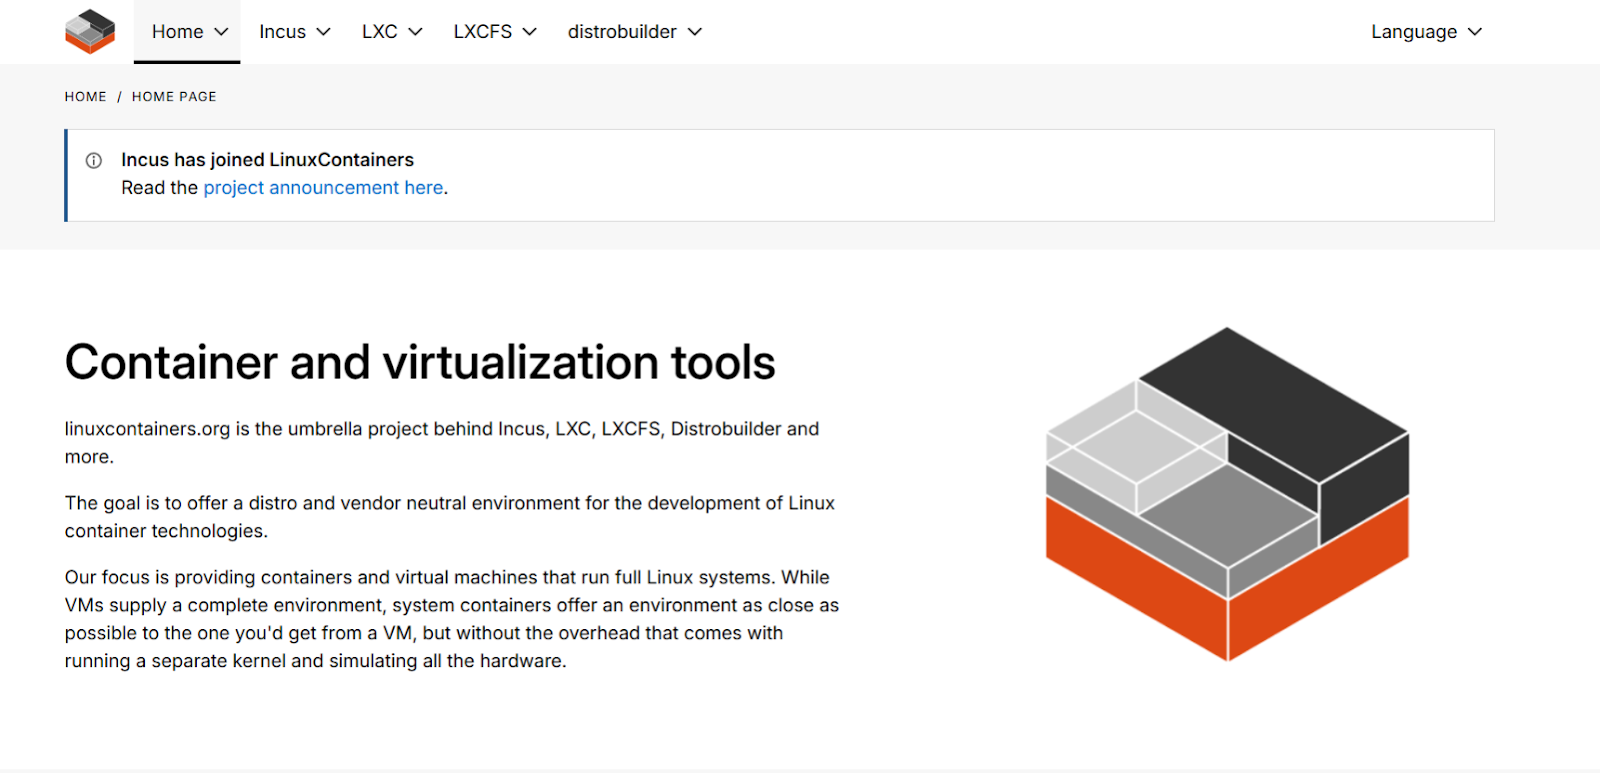
    Linux Containers, often abbreviated as LXC, are one of the longest-standing options built directly on the Linux kernel and include features such as namespaces and groups. LXC aims to create environments close to a standard Linux installation but without a separate kernel. This differs slightly from Docker, which typically focuses on packaging a single application and its dependencies.

    LXC is geared more towards running a ‘system container’ – a lightweight virtual machine that can run multiple services or a full init system inside. This ‘system container’ approach might not be a drop-in replacement for your Docker workflow and may require you to configure how you deploy applications.

    LXC uses powerful Linux features and offers management tools and libraries (like liblxc). It mimics a full OS environment, which might be more than most people need for simple application isolation. LXC could be great if you needed to replicate a traditional server setup within a container, but if you are just looking to run your apps, it might introduce unnecessary complexity.

    📖 Suggested read: Docker Security: Best Practices to Secure a Docker Container

    Red Hat OpenShift

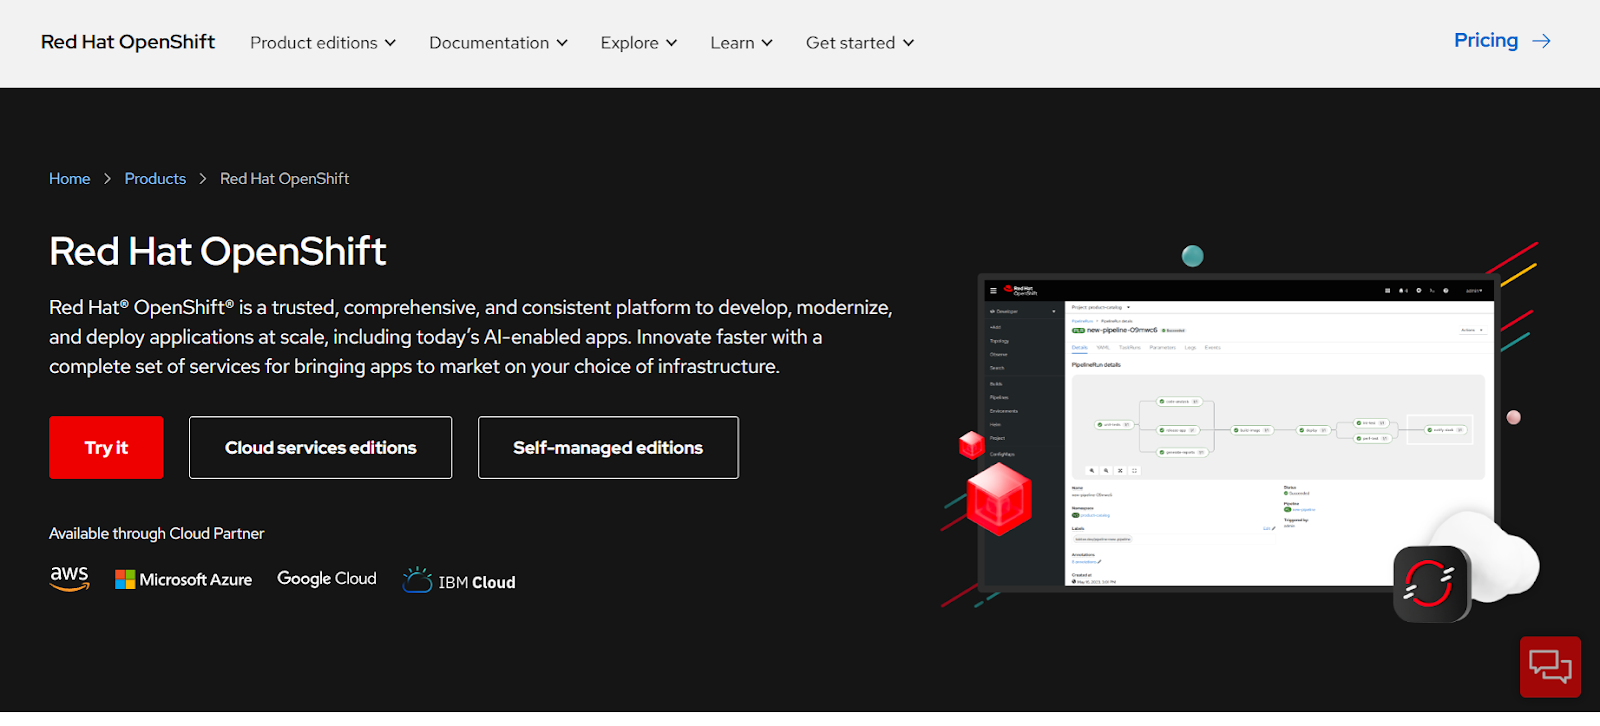
    Red Hat OpenShift is much more than just a container runtime. It is a full-fledged application platform built on Kubernetes designed to handle the entire lifecycle of applications, from development and building to deployment and management at scale, even across different cloud environments or on your own servers.

    If you just want to build and run containers, this might not be the right tool for you. Red Hat OpenShift is designed to provide a consistent environment with integrated tools for building, automating deployments (like CI/CD pipelines), and managing applications, not just basic container orchestration.

    The platform offers different ways to use it, either as a managed service on clouds like AWS or Azure, where Red Hat handles the underlying infrastructure, or as a self-managed service for more control. It also has built-in security, developer tools, and the ability to manage virtual machines alongside containers.

    While Red Hat OpenShift is a powerful tool, especially for larger teams or complex applications that need this robust management and security, it is also more complex than just using Docker. Therefore, you must weigh whether the comprehensive features justify the potential learning curve and operational overhead for your needs.

    📖 Suggested read: How to Install WordPress on Docker in 2025 [Step-By-Step Guide]

    Apptainer

    Apptainer, which used to be called Singularity, is another tool for packaging and running software inside containers, similar to how Docker works. It’s open-source software, now part of the Linux Foundation, and designed to be straightforward, quick, and safe. Apptainer is particularly popular in environments where many people share the same computer systems, like university computing clusters or research labs, and for running software that needs a lot of computing power.

    It primarily focuses on performance-intensive applications commonly found in High-Performance Computing (HPC), scientific research, and AI/ML workloads. It is designed for environments where maximizing computational performance, managing complex software stacks, ensuring reproducibility, and handling specialized hardware like GPUs is very important.

    Apptainer is different in handling containers and interacting with the computer it’s running on. It packs everything into a single file, making the container easy to copy, move between computers, or share with others. Apptainer also lets the software inside the container easily use special hardware on the host machine, like powerful graphics cards (GPUs) or fast network connections, which is important for scientific computing.

    Its security approach is also quite simple: by default, you have the same permissions inside the container as you do outside, which helps prevent users from accidentally gaining extra privileges on the system.

    📖 Suggested read: What Are Docker Logs And How To Use Them

    Containerd

    Containerd is a core container runtime focused on managing the complete container lifecycle. This includes tasks like image transfer and storage, container execution and supervision, low-level storage, and network attachments.

    It might surprise you that Docker uses containerd under the hood (or components derived from it), meaning containerd isn’t necessarily a replacement for the entire Docker developer experience, but rather the engine component that does the heavy lifting.

    However, it is much lower-level than the Docker run command, as it exposes the distinct stages of container creation and execution. Rather than providing developers with a simple, all-in-one command-line interface, it’s designed more for integration into larger systems or for users who need fine-grained control.

    It has well-established documentation, API, and client libraries, particularly for the Go client for programmatic control. You can easily use this client to connect to the daemon, pull images, create OCI specs, manage snapshots (container filesystems), and much more.

    While containerd is a crucial piece of the container ecosystem and the standard runtime interface (CRI) implementation for Kubernetes, it doesn’t directly replace the user-facing Docker command-line tool and its associated build/compose functionalities out of the box. Instead, it replaces the runtime part that Docker traditionally managed.

    If you are looking for just the runtime component, containerd is the go-to option. However, replicating the full Docker developer workflow requires other tools (such as nerdctl for a Docker-compatible CLI or build tools like BuildKit).

    📖 Suggested read: Bringing Containerization to RunCloud’s Cloud Architecture

    Cri-o

    If you are working with Kubernetes, you might already be familiar with CRI-O. It is a lightweight Kubernetes Container Runtime Interface (CRI) implementation. This means its primary purpose isn’t to be a general-purpose container engine like Docker, but rather to provide exactly what Kubernetes needs to manage container lifecycles (pods) efficiently and reliably, using standard OCI-compliant runtimes like runc underneath.

    CRI-O acts as the bridge between the Kubernetes kubelet and the low-level container operations. It handles pulling images from any OCI-compliant registry, managing container storage, generating the OCI runtime spec, launching the actual runtime (like runc), setting up networking via CNI, and using conmon for monitoring. Concentrating only on these Kubernetes-essential tasks, it aims to be more stable and resource-efficient within a cluster than a more feature-rich daemon like Docker’s.

    If you are thinking of replacing Docker, you can use CRI-O to replace the runtime component on the Kubernetes nodes. However, you should note that it doesn’t offer a direct replacement for the Docker command-line interface or tools such as Docker Compose for local development workflows.

    Mirantis Container Runtime

    Mirantis Container Runtime (MCR) is similar to ‘Docker Engine – Enterprise’. It is designed to be compatible with the core Docker API and commands you might already know. The main goal of MCR is to provide this familiar Docker Engine functionality, but specifically tailored for enterprise needs, along with commercial support (like 24×7 options) and enhanced security features, which might be necessary if your organization has stricter requirements than those that standard open-source Docker offers.

    MCR heavily emphasizes security aspects often required by large organizations or regulated industries. For example, it uses FIPS 140-2 validated cryptography, has secure default configurations, and offers capabilities like enforcing the use of digitally signed images to secure the software supply chain.

    It has broad capability as it supports both Linux and Windows containers. It can run in standalone mode, as part of a Kubernetes deployment, or in Docker Swarm clusters. This means you can use it in various infrastructure setups without demanding a complete overhaul of orchestration strategies.

    Wrapping Up

    Choosing the right container runtime is a critical decision that depends heavily on your team’s needs, your infrastructure, and the type of applications you’re building. While Docker has been the default choice for years, it’s clear that the container landscape in 2025 offers powerful alternatives such as Podman, LXC, containerd, CRI-O, and OpenShift, each with unique strengths.

    If you manage large Kubernetes clusters, CRI-O or containerd might make sense. If you need a daemon-less solution with strong security principles, Podman is a compelling option. And if you operate in highly regulated enterprise environments, Mirantis Container Runtime brings Docker compatibility with hardened security features.

    However, while choosing the right containerization platform is critical, managing your servers and deployments effectively is equally important – and that’s where RunCloud comes in.

    RunCloud simplifies server management for developers and teams working with containerized or traditional PHP-based applications. Whether you’re using Docker, containerd, or another runtime under the hood, RunCloud helps you:

    • Deploy web applications faster
    • Set up automated backups
    • Manage server security with best practices baked in
    • Monitor performance from a unified dashboard
    • Scale projects effortlessly as your infrastructure grows

    Instead of worrying about the underlying complexities of servers and deployments, you can focus entirely on building and shipping better software.

    If you’re ready to streamline your application deployments and server management, no matter what container runtime you use, sign up for RunCloud today.

    Thousands of developers and businesses already trust RunCloud to manage their mission-critical projects. Discover a simpler, faster, more scalable way to run your applications.

    FAQs on Docker Alternatives for Containerization

    Is Podman better than Docker?

    Podman isn’t inherently ‘better’, but it offers advantages such as a daemonless architecture for enhanced security and rootless container execution. Docker has a more mature ecosystem and wider initial adoption, which makes it a strong choice for many workflows.

    Do I need Kubernetes if I use Docker?

    No, you don’t automatically need Kubernetes just for using Docker, as Docker excels at managing containers on a single host. Kubernetes becomes necessary to orchestrate, scale, and manage containerized applications across multiple hosts or clusters.

    Is LXC faster than Docker?

    LXC can exhibit slightly better performance in certain benchmarks due to operating at a lower level, closer to the kernel, often termed ‘system containers’. However, for typical application container workloads managed by Docker, the performance difference is usually negligible and less critical than Docker’s developer-focused tooling. The choice often depends on whether you must run full OS-like environments (LXC) or isolated applications (Docker).

    What is the best containerization platform?

    There is no single ‘best’ containerization platform; the ideal choice depends on your specific use case, team expertise, and requirements. Docker remains extremely popular for its ease of use and rich ecosystem, while Podman is favored for security-focused or daemonless environments.

    What is the difference between Docker and Kubernetes?

    Docker primarily focuses on building, shipping, and running individual containerized applications, often on a single machine. On the other hand, Kubernetes is a container orchestration platform designed to automate the deployment, scaling, and management of containerized applications across clusters of machines. Simply put, Docker creates the containers, and Kubernetes manages them at scale in production environments.

    Are Docker alternatives suitable for high-traffic applications?

    Docker alternatives like Podman, containerd, and CRI-O are suitable and commonly used for high-traffic, production-grade applications. The ability to handle high traffic effectively relies heavily on the orchestration layer (like Kubernetes) and the application architecture.

    What is the difference between containerization and virtualization?

    Virtualization creates virtual machines (VMs), each running a complete operating system instance with its own kernel on top of a hypervisor. Containerization packages an application and its dependencies, isolating them at the process level while sharing the host OS kernel. Therefore, containers are much lighter, faster to start, and consume fewer resources than VMs.

  • How to Build a CI/CD Pipeline with GitHub Actions and Docker

    How to Build a CI/CD Pipeline with GitHub Actions and Docker

    Are you tired of manually building, testing, and deploying your applications?

    Modern Continuous Integration (CI) and Continuous Deployment (CD) approaches can automatically trigger a deployment pipeline to build your Docker image, run tests, push it to a container registry like GHCR or Docker Hub, and deploy it to your server.

    The best part is that you can complete all of this in less than a minute after pushing code to your GitHub repository.

    By combining Docker with the automation capabilities of GitHub Actions, you can create a fast and effective DevOps pipeline. Docker ensures your application runs the same way everywhere by packaging it with its dependencies in a portable Docker container based on instructions in your Dockerfile. GitHub Actions then automates the build and push steps, securely manages secrets like access tokens, and handles the final deployment to your infrastructure.

    In this guide, we’ll walk you through configuring your GitHub Actions workflow step-by-step, from publishing a container to deploying it on your server without third-party tools or subscriptions.

    By the end of this tutorial, you will be able to configure a deployment pipeline that updates your live server in under a minute after you push changes to it.

    Let’s get started!

    What are GitHub Actions?

    GitHub Actions is a powerful automation tool built directly into the GitHub platform. It listens for specific events happening in your repository, like someone pushing new code, creating a pull request, or even on a set schedule, and then automatically performs tasks you’ve defined. These tasks form a workflow, which is essentially a sequence of steps designed to achieve a specific goal. You can use this functionality to create a Continuous Integration (CI) and Continuous Deployment (CD) pipeline.

    This means you can automate the entire process of building your software, running tests to ensure quality, and even deploying it to servers (perhaps managed through tools such as RunCloud) without manual intervention.

    Key Features of GitHub Actions

    GitHub Actions has several useful features that make it a compelling choice for automation. Firstly, its event-driven nature allows workflows to trigger automatically in response to a wide variety of GitHub events. Secondly, matrix builds let you efficiently test your code across different environments simultaneously; you can define combinations of operating systems (like Linux, macOS, and Windows), software versions (like different Node.js or Python versions), or other variables, and GitHub Actions will run a job for each combination.

    Furthermore, GitHub provides hosted runners, which are virtual machines managed by GitHub that can execute your workflow jobs without requiring you to manage any infrastructure. If you have very specific needs, then you can also consider using self-hosted runners on your own servers or cloud infrastructure.

    All the actions and workflows on GitHub can be reused. You can even configure pre-built steps created by the community (available in the GitHub Marketplace) and save significant development time. Lastly, GitHub Actions includes integrated secrets management for securely handling sensitive information like API keys and passwords. It provides live logs for monitoring workflow progress in real time and the ability to store artifacts like build outputs or test reports.

    📖 Suggested read: What is Docker And How Does it Work

    Steps to Deploy Docker Container with GitHub Actions for CI/CD

    Let’s walk through the steps to automate building your application’s Docker image, pushing it to a registry, and then deploying it to your server every time you push changes to your repository.

    Prerequisites:

    • GitHub Repository: You need a GitHub repository containing all your application code. Make sure you have committed and pushed your latest code changes to GitHub.
    • Dockerfile: You must have a Dockerfile in the root of your repository. This file contains the step-by-step instructions Docker uses to build an image of your application. The specific commands inside the Dockerfile depend heavily on your application’s language, framework, and dependencies (e.g., installing packages, copying code, setting entry points), so we assume you have already created a functional Dockerfile.

    Step 1: Connect to Linux Server via SSH

    First, ensure you can connect to the target Linux server where your Docker container will run. You’ll need SSH access for this.

    ssh your_server_user@your_server_ip

    In the above command, replace your_server_user with your username and your_server_ip with the server’s IP address. If you manage your server with RunCloud, you can use the simplified SSH key management to store SSH keys. We recommend reading the RunCloud documentation to learn how to easily create and manage SSH keys for secure server access.

    📖 Suggested read: What Are Docker Images And How To Use Them

    Step 2: Verify Docker Installation on the Server

    Once connected to your server via SSH, you need to confirm that Docker is installed and running correctly. The Docker Command Line Interface (CLI) is required to pull images and run containers. You can test this by running the standard Docker test image:

    docker run hello-world

    If Docker is installed and working, you will see a message starting with “Hello from Docker!”. This message indicates that your installation appears to be working correctly.

    If the command fails or Docker is not found, you must install Docker Engine on your Linux server before proceeding. Follow the official Docker installation documentation specific to your server’s Linux distribution (e.g., Ubuntu, RHEL).

    📖 Suggested read: How To Create a Docker Image For Your Application

    Step 3: Add GitHub Action Secrets for SSH Access

    To allow your GitHub Actions workflow to securely log in to your server and execute deployment commands, you must store your server’s connection details as encrypted secrets in your GitHub repository. You should never hardcode sensitive information directly into your workflow file – we recommend using GitHub’s built-in secret management system for this.

    Navigate to your GitHub repository > Settings > Secrets and variables > Actions. Click “New repository secret” for each of the following:

    1. SERVER_IP: The public IP address of your Linux server.
    2. SERVER_PORT: The SSH port for your server (usually 22, but might be different if customized).
    3. SERVER_USER: The username you use to log in to your server via SSH. We strongly recommend creating a new user account specifically for this deployment step and giving it appropriate permissions for better security.
    4. SERVER_PRIVATE_SSH_KEY: The entire content of the private SSH key file that corresponds to a public key authorized on your server. Your private SSH key should look something like this:
    -----BEGIN OPENSSH PRIVATE KEY-----
    b3BlbnNzaC1rZXktdjEAAAAABG5vbmUAAAAEbm9uZQAAAAAAAAABAAABlwAAAAdzc2gtcn
    ...
    UV7ErwUhELMZFrAAAAE3RhdHRpY29kZXJAc3Rhcmx1c3QBAgMEBQYH
    -----END OPENSSH PRIVATE KEY-----

    Using secrets prevents exposing your server credentials in your codebase. The workflow will reference these secrets securely during execution. We strongly recommend creating a dedicated SSH key pair specifically for automation.

    Again, consulting the RunCloud documentation can be very helpful in generating and managing SSH keys securely, especially regarding best practices for SSH security.

    📖 Suggested read: Understanding Docker Services | RunCloud Docs

    Step 4: Configure GitHub Actions Workflow

    Now, define the CI/CD pipeline using a GitHub Actions workflow file. This file tells GitHub what steps to perform when triggered (e.g., on a push to your main branch).

    Create a YAML file named docker-publish.yml inside your repository’s .github/workflows/ directory. You can create this directory and file directly via the GitHub web interface or in your local repository using a text editor, and then commit and push the changes.

    Storing secrets for GitHub Actions

    Paste the following code into .github/workflows/docker-publish.yml:

    name: Publish & Deploy Docker container
    
    # This workflow uses actions that are not certified by GitHub.
    # They are provided by a third-party and are governed by
    # separate terms of service, privacy policy, and support
    # documentation.
    
    
    on:
      push:
        # Adjust branch name if needed (e.g., master, production)
        branches: [ "main" ]
        # Publish semver tags as releases.
        tags: [ 'v*.*.*' ]
    env:
      # Use docker.io for Docker Hub if empty
      REGISTRY: ghcr.io
      # github.repository as <account>/<repo>
      IMAGE_NAME: ${{ github.repository }}
    jobs:
      build:
        runs-on: ubuntu-latest
        permissions:
          contents: read
          packages: write
          # This is used to complete the identity challenge
          # with sigstore/fulcio when running outside of PRs.
          id-token: write
    
    
        steps:
          - name: Checkout repository
            uses: actions/checkout@v4
    
    
          # Install the cosign tool except on PR
          # https://github.com/sigstore/cosign-installer
          - name: Install cosign
            if: github.event_name != 'pull_request'
            uses: sigstore/cosign-installer@59acb6260d9c0ba8f4a2f9d9b48431a222b68e20 #v3.5.0
            with:
              cosign-release: 'v2.2.4'
    
    
          # Set up BuildKit Docker container builder to be able to build
          # multi-platform images and export cache
          # https://github.com/docker/setup-buildx-action
          - name: Set up Docker Buildx
            uses: docker/setup-buildx-action@f95db51fddba0c2d1ec667646a06c2ce06100226 # v3.0.0
    
    
          # Login against a Docker registry except on PR
          # https://github.com/docker/login-action
          - name: Log into registry ${{ env.REGISTRY }}
            if: github.event_name != 'pull_request'
            uses: docker/login-action@343f7c4344506bcbf9b4de18042ae17996df046d # v3.0.0
            with:
              registry: ${{ env.REGISTRY }}
              username: ${{ github.actor }}
              password: ${{ secrets.GITHUB_TOKEN }}
    
    
          # Extract metadata (tags, labels) for Docker
          # https://github.com/docker/metadata-action
          - name: Extract Docker metadata
            id: meta
            uses: docker/metadata-action@96383f45573cb7f253c731d3b3ab81c87ef81934 # v5.0.0
            with:
              images: ${{ env.REGISTRY }}/${{ env.IMAGE_NAME }}
    
    
          # Build and push Docker image with Buildx (don't push on PR)
          # https://github.com/docker/build-push-action
          - name: Build and push Docker image
            id: build-and-push
            uses: docker/build-push-action@0565240e2d4ab88bba5387d719585280857ece09 # v5.0.0
            with:
              context: .
              push: ${{ github.event_name != 'pull_request' }}
              tags: ${{ steps.meta.outputs.tags }}
              labels: ${{ steps.meta.outputs.labels }}
              cache-from: type=gha
              cache-to: type=gha,mode=max
    
    
          # Sign the resulting Docker image digest except on PRs.
          # This will only write to the public Rekor transparency log when the Docker
          # repository is public to avoid leaking data.  If you would like to publish
          # transparency data even for private images, pass --force to cosign below.
          # https://github.com/sigstore/cosign
          - name: Sign the published Docker image
            if: ${{ github.event_name != 'pull_request' }}
            env:
              # https://docs.github.com/en/actions/security-guides/security-hardening-for-github-actions#using-an-intermediate-environment-variable
              TAGS: ${{ steps.meta.outputs.tags }}
              DIGEST: ${{ steps.build-and-push.outputs.digest }}
            # This step uses the identity token to provision an ephemeral certificate
            # against the sigstore community Fulcio instance.
            run: echo "${TAGS}" | xargs -I {} cosign sign --yes {}@${DIGEST}
    
    
      deploy:
        needs: build
        runs-on: ubuntu-latest
        steps:
          - name: SSH and Deploy to Server
            uses: appleboy/ssh-action@v1
            with:
              host: ${{ secrets.SERVER_IP }}
              username: ${{ secrets.SERVER_USER }}
              key: ${{ secrets.SERVER_PRIVATE_SSH_KEY }}
              port: ${{ secrets.SERVER_PORT }}
              script: |
                echo ${{ secrets.GITHUB_TOKEN }} | docker login ${{ env.REGISTRY }} -u ${{ github.actor }} --password-stdin
                echo "--- Pulling latest Docker image ---"
                docker pull ghcr.io/tatticoder/terraform-get-time:main
                echo "--- Stopping existing container (if running) ---"
                docker stop my_container 
                echo "--- Removing existing container ---"
                docker rm my_container 
                echo "--- Starting new container ---"
               # Adjust ports (-p host:container) 
               # Add any necessary environment variables (-e)
                docker run -d --name my_container -p 3000:80 ghcr.io/tatticoder/terraform-get-time:main

    Let’s understand the important sections of the above code snippet:

    • name: Sets the display name for your workflow in the GitHub Actions tab.
    • on: push: branches: [ main ]: This triggers the workflow every time code is pushed to the main branch. You can change main to your default or production branch name (e.g., master).
    • Build Job: This section handles the process of creating and publishing the Docker container.
      • Checkout code: Uses the standard actions/checkout action to get your repository code onto the runner.
      • Log in to GHCR: Uses docker/login-action to authenticate with GitHub Container Registry using the automatically generated GITHUB_TOKEN.
      • Build and push: Uses docker/build-push-action.
    • Deploy via SSH Job: This job uses the popular SSH Remote Commands action to connect to your server using the secrets you configured and execute commands.
      • host, username, key, port: These fields use the secrets you created in Step 3.
      • script: This block contains the shell commands which will be executed on your target server.

        ❗Very Important – please read the following points very carefully:
        • The first command logs into GHCR on the server. Pulling public GHCR images might not require login. For private images, you can just use the provided command without any modifications.
        • The subsequent command pulls the latest tagged image from GHCR. Make sure to edit this command and replace ghcr.io/tatticoder/terraform-get-time:main with the name of your container image and its corresponding tag.
        • The subsequent command stops and removes any container with the name ‘my_container’ to avoid conflicts. Make sure to temporarily remove these commands to prevent the workflow from failing if the container doesn’t exist yet.
        • The final command runs a new container in detached mode (-d) using the pulled image. Make sure to replace the image’s name with the one you want to use and configure any additional parameters as per your requirements.

    ⚠️ Warning: The deployment script uses docker stop and docker rm before docker run. This means there will be a brief moment of downtime while the container is replaced. For zero-downtime deployments, more advanced strategies like blue-green deployments or using orchestration tools like Kubernetes are needed, which are beyond this basic setup.

    To minimize the impact of downtime, you can consider deploying once a day on weekdays outside of peak hours. This schedule can be configured easily using the GitHub action itself.

    📖 Suggested read: Docker Security: Best Practices to Secure a Docker Container

    Step 5: Commit Workflow and Trigger Deployment

    Finally, save the docker-publish.yml file. If you created it locally, commit it and push it to your GitHub repository using the following commands:

    git add .github/workflows/docker-publish.yml
    git commit -m "Add GitHub Actions workflow for Docker build and deploy"
    git push 
    Deploying and running a GitHub Actions for CI/CD

    Once you push this commit (or any future code changes) to the specified branch (main in this example), GitHub Actions will automatically detect the workflow file and start executing the defined steps.

    You can monitor the progress by going to the “Actions” tab in your GitHub repository. If all steps succeed, your code will be built into a Docker image, pushed to GHCR, and then pulled and run as a container on your designated Linux server.

    Once you have published your Dockerfile to GHCR, you will see a new tab in the bottom right of your GitHub dashboard. You can click on the name of your package to view your recently published packages.

    Step 6: Remove Unused Docker Resources (Optional)

    When you use a CI/CD pipeline, you will quickly end up with a large number of old obsolete containers on your server. These containers are often not needed and can slowly fill your disk space. If you are running low on disk space, then you can add an optional cleanup step to your deployment script to prevent your server’s disk space from filling up with old, unused Docker images, containers, and ‘build cache’.

    The following command will automatically remove any Docker resources (like stopped containers and images not associated with a running container) that haven’t been used in the last 24 hours without requiring confirmation. Running this periodically helps maintain server health and efficiently reclaim storage:

    docker system prune --filter "until=24h" --force

    If your deployment process takes a long time, consider optimizing the build stage of your container by using a caching layer within Docker to cache dependencies.

    Wrapping Up: Who Should Use Docker with GitHub Actions for CI/CD?

    Whether you’re a solo developer or part of a large team, automating builds and deployments saves invaluable time and reduces the potential for human error inherent in manual processes.

    While GitHub Actions handles the automation of building your Docker images and triggering deployment scripts, manually configuring, securing, monitoring, and updating servers can be complex and time-consuming.

    RunCloud provides a clean, efficient way to manage servers without the usual hassle. From provisioning and security hardening to database setup and app deployment, it streamlines the tasks that slow developers down. You stay in control of your infrastructure, but without getting buried in configuration files or command-line firefighting.

    That means more time building, testing, and shipping better software.

    Ready to take the work out of server management? Start with RunCloud today.

    FAQs on Docker with GitHub Actions for CI/CD

    What are the advantages of using Docker for CI/CD?

    Docker ensures consistent environments from development through production. It provides process isolation and ensures that builds and tests don’t interfere with each other or the host system dependencies. 

    How do I secure my Docker images in GitHub Actions?

    Start by scanning your images for vulnerabilities using container scanning tools directly within your GitHub Actions workflow. To reduce the attack surface, use minimal, trusted base images and avoid installing unnecessary packages. Always configure containers to run as non-root users and manage secrets securely using GitHub Secrets, never embedding them in the image layers.

    Can I use Docker Compose with GitHub Actions?

    Yes, Docker Compose can be effectively used within GitHub Actions workflows to manage multi-container setups. You simply need to ensure Docker Compose is installed on the runner, then use standard docker-compose commands to build images or spin up services like databases for integration testing.

    What is the best way to manage secrets in GitHub Actions?

    The most secure and recommended method is using GitHub Actions encrypted secrets, which are configured at the repository or organization level. These secrets can then be safely accessed within your workflow as environment variables or passed to specific actions needing credentials. Never hardcode sensitive information directly in your workflow files or application code checked into version control.

    Is Docker necessary for CI/CD?

    While not strictly mandatory, Docker offers substantial benefits that make it a highly popular choice for modern CI/CD pipelines. While alternative options are available, Docker provides reproducible and isolated build/test environments that are useful for reliable continuous integration and delivery.

    How does Docker improve CI/CD pipelines?

    Docker drastically improves CI/CD pipelines by guaranteeing environment consistency across all stages, from developer laptops to production servers. Its containerization isolates dependencies, preventing conflicts and simplifying the configuration of build agents. 

    Can I use self-hosted runners with Docker in GitHub Actions?

    You can absolutely use self-hosted runners with Docker in GitHub Actions. This approach gives you complete control over the build environment and resources.

    What is the difference between Docker and Kubernetes for CI/CD?

    Docker is primarily used within the CI/CD pipeline to build application images, run tests in isolated containerized environments, and consistently package dependencies. Kubernetes is a container orchestrator typically acting as the deployment target after the CI pipeline, responsible for managing the runtime, scaling, and health of containers in a cluster. Docker creates the portable application packages used in CI, while Kubernetes manages fleets of those packages in production or staging environments (CD).

  • The Best 5 WordPress Vulnerability Scanners in 2025 (Compared)

    The Best 5 WordPress Vulnerability Scanners in 2025 (Compared)

    Protecting your WordPress site from vulnerabilities isn’t optional – it’s essential.

    With WordPress powering over 40% of the web, it’s a prime target for attackers looking to exploit security flaws.

    While themes and plugins offer great functionality, they can sometimes open the door to malware, data breaches, and other security threats.

    That’s why using a reliable WordPress vulnerability scanner is critical. These tools help you detect weaknesses before hackers do, keeping your site secure and your data protected. But with so many options available – from free tools to comprehensive premium solutions – finding the best WordPress vulnerability scanner can feel overwhelming.

    To make your choice easier, we’ve put together a list of the best WordPress vulnerability scanners for 2025. Whether you’re looking for a budget-friendly option or a feature-rich powerhouse, you’ll find something that fits your needs. Plus, we’ll guide you on how to use these scanners effectively to stay one step ahead of potential threats.

    Let’s dive in.

    Top Vulnerability Scanners for WordPress

    Here’s a look at the top WordPress vulnerability scanners for 2025. These tools help you detect security flaws before they turn into serious problems, giving you peace of mind and a secure site.

    Patchstack

    Patchstack is a specialized WordPress security solution focusing on proactive vulnerability detection and mitigation, particularly within plugins and themes. It protects WordPress websites by identifying potential exploits early and blocking attacks before they can cause damage. Patchstack users get a 48-hour early warning and virtual patching, which means your website will be protected from vulnerabilities 48 hours before the public is notified. The best part is that Patchstack will protect your site even if the plugin developer hasn’t released a patch.

    Key Features

    • Virtual Patching: Applies rapid mitigation rules to block exploits without altering plugin code or breaking site functionality.
    • Early Protection: Provides vulnerability patches and protection up to 48 hours before public disclosure.
    • Advanced Vulnerability Intelligence: Leverages extensive vulnerability data, including exclusive intel, for automatic detection.
    • Remote Management: Allows for remote software updates and security hardening configuration across managed sites.
    • API Integration: Enables connecting Patchstack data and functions to existing development or management workflows.
    Patchstack Vulnerability Scanners

    Pricing and Plans

    Patchstack caters primarily to professionals managing multiple sites and larger enterprises. The Developer plan is ideal for agencies, starting at $89 monthly (billed annually) for 50 sites, including core protection, remote management, and API access, with a 30-day trial available. The Enterprise plan offers custom solutions and pricing upon request for businesses needing unlimited scalability, advanced compliance (SLA/DPA), and dedicated support.

    📖 Suggested read: Docker Security: Best Practices to Secure a Docker Container

    MalCare

    MalCare offers complete WordPress security, combining vulnerability scanning with powerful malware detection and removal. It continuously monitors your plugins and themes, alerting you to risks from outdated or compromised components. Its “Safe Updates” feature minimizes the risk of site issues when applying patches, giving you a reliable way to keep your site secure.

    Key Features

    • Vulnerability Scanning: Performs daily automatic checks against a maintained database of known vulnerabilities.
    • Personalized Email Alerts: Notifies users promptly via email when a vulnerable plugin or theme is detected on their site.
    • Safe Auto-Updates: Offers an option to automatically update vulnerable plugins while performing visual regression tests to ensure site stability.

    Pricing and Plans

    The entry-level Plus plan costs $149 per year for one website and includes essential features such as daily malware and vulnerability scanning, instant malware removal, and a real-time firewall.

    Higher tiers like Prime at $199 per year, Pro at $299 per year, and Max at $499 per year for a single site build upon this foundation, offering progressively more frequent scanning and backups, faster expert support response times, performance monitoring, advanced staging options, and API access for the top tiers.

    📖 Suggested read: Difference between DoS vs DDoS vs DrDoS (With Comparison Table)

    Wordfence Security

    Wordfence Security is a widely recognized name in WordPress protection. It offers both a popular security plugin and a distinct, powerful threat intelligence platform known as Wordfence Intelligence. This platform is a core component of their vulnerability management strategy, as it provides a comprehensive and actively maintained database that focuses specifically on WordPress core, theme, and plugin vulnerabilities.
    Key Features

    • Real-Time Webhooks: Provides instant vulnerability notifications through Slack, Discord, or custom HTTP integrations, free of charge.
    • Threat Intelligence Dashboard: Displays real-time attack data, trends, top attacking IPs, and targeted vulnerabilities across their network.
    • Wordfence CLI Integration: Allows the vulnerability database to be used for high-performance, server-level scanning via the command line.
    • User-Friendly Search Interface: Enables robust searching and filtering within the vulnerability database.

    Pricing and Plans

    Wordfence sets itself apart by offering its core vulnerability intelligence platform, Wordfence Intelligence, entirely for free. You get access to an extensive database of vulnerabilities, integration via API, and real-time webhook alerts – at no cost, whether for personal or commercial use.

    Wordfence also offers paid premium versions of its security plugin (Wordfence Premium), which start at $149$ per year and can go as high as $1250 per year.

    📖 Suggested read: The 6 Best WordPress Security Plugins (2022)

    WPScan

    In the past decade, WPScan has established itself as a foundational tool in WordPress security. It focuses on identifying vulnerabilities within WordPress core, plugins, and themes. Its core strength lies in maintaining one of the most extensive and meticulously curated vulnerability databases available, updated constantly by dedicated security professionals. This database powers its various tools and integrations to provide timely and accurate threat information.

    Key Features

    • Extensive Vulnerability Database: Catalogues over 60,000 WordPress core, plugin, and theme vulnerabilities.
    • Manual Vetting: All vulnerability data is manually reviewed and verified by experienced WordPress security experts.
    • Constant Updates: The database is continuously updated as new threats and vulnerabilities are discovered.
    • CLI Security Scanner: Offers a command-line interface tool for security professionals and developers to perform scans.

    Pricing and Plans

    WPScan offers flexible access tiers for different needs. Large organizations can opt for the Enterprise plan, which includes advanced API access and real-time webhook alerts, with custom pricing upon request. Security researchers can use the CLI tool and API for free (capped at 25 calls per day for non-commercial use). Smaller site owners can use the Jetpack Protect plugin, which leverages WPScan’s data for vulnerability alerts, with upgrade options for enhanced security.

    📖 Suggested read: 10 Security Tips to Secure VPS Server in 2025 [Ultimate Guide]

    Sucuri

    Sucuri offers a comprehensive website security platform focused on incident response, malware removal, and ongoing protection. It advertises itself as a full-service security partner that provides cleanup services with preventative measures like a robust Web Application Firewall (WAF) and performance enhancements via its Content Delivery Network (CDN). A key aspect of its offering is the guaranteed malware removal service provided by its 24/7 security team.

    Key Features

    • Guaranteed Malware Removal: Offers unlimited cleanups by security experts within the plan duration, with varying response time SLAs.
    • Performance Optimization: Includes a global CDN with caching options to improve website speed and availability.
    • Security Scanning & Monitoring: Provides regular scanning for malware, blocklist status, and SSL certificate issues (frequency varies by plan).
    • 24/7 Security Team Support: Access to security analysts for cleanup and support.

    Pricing and Plans

    Sucuri provides several annual security plans that vary mainly by how fast they guarantee malware removal and how frequently they scan your site. Their Basic plan for one website costs $229 per year and includes their main security tools with a promise to clean up malware within 30 hours. If you need faster help, the Pro plan at $339 per year reduces that cleanup time to 12 hours, and the Business plan at $549 per year offers the fastest response, aiming for 6 hours, along with more frequent scans.

    📖 Suggested read: PHP Security – Best Practices To Secure Your Web App in 2025

    How to Use a WordPress Vulnerability Scanner

    Using a WordPress vulnerability scanner is essential, but it can be daunting if you’re new to it. Here’s a simple guide to setting up and using a vulnerability scanner effectively on your site.

    Step 1: Choose and Install Your Scanner

    • Plugin-Based Scanners: Many popular options like Patchstack are available as WordPress plugins. Install them directly from your WordPress dashboard (Plugins > Add New), search for the scanner, click Install Now, and then Activate.
    • External Scanners: Some services (like Sucuri SiteCheck or WPScan’s web interface) scan your site remotely. You just need to enter your website’s URL on their website. No installation is needed, but they might offer less depth than installed plugins.
    • CLI Tools: For more technical users, tools like the WPScan CLI (Command Line Interface) tool can be run from a server terminal. This requires SSH access and familiarity with command-line operations but offers powerful scanning capabilities.

    For this tutorial, we’ll demonstrate how to scan for vulnerabilities on your WordPress site using Patchstack.

    📖 Suggested read: How To Create Custom NGINX Configuration Easily Using RunCloud

    Step 2: Configure Basic Settings (If Applicable)

    • After activating a plugin scanner, navigate to its settings page within your WordPress dashboard.
    • You might need to enter an API key (especially for premium features or tools like WPScan that connect to a central database). Follow the scanner’s instructions to obtain and save the key.
    • Configure notification settings (where alerts should be sent) and automatic scan schedules (daily or weekly is recommended).

    📖 Suggested read: 10 Best WordPress Management Tools To Easily Manage Multiple Websites

    Step 3: Run an Initial Scan

    • Most website scanners automatically scan your website, but if you see a “Scan Now,” “Start Scan,” or similar button within the scanner’s interface in your WordPress dashboard or on the external scanner’s website, press it and wait for the scan to finish.
    • The vulnerability scanning tool will check your WordPress core, installed plugin, and theme versions against its database of known vulnerabilities (identified by CVE numbers or internal IDs). It may also check for basic security misconfigurations.

    📖 Suggested read: How to Use Cloudflare Firewall Rules to Protect Your Web Application

    Step 4: Analyze the Scan Results

    • Once the scan is completed, review the report carefully. It will list any detected issues, typically categorized by severity (e.g., Low, Medium, High, Critical).
    • Look for items flagged as vulnerable, noting the component name, the affected version range, and, ideally, the version number containing the fix.
    • Pay attention to any configuration warnings, such as publicly accessible, sensitive files (wp-config.php backup), or directory listing being enabled.

    Step 5: Remediate Found Vulnerabilities

    • Backup First: Start by backing up your site. Make a complete copy of your website files and database before making any changes to ensure you can restore it if needed.
    • Update: The most common fix is to update the vulnerable component. Go to Dashboard > Updates or the Plugins/Themes pages in WordPress and update any plugins, themes, or the WordPress core identified in the scan report.
    • Patch or Use Virtual Patching: If an update isn’t available for a vulnerable plugin/theme, check if your scanner or WAF (Web Application Firewall) offers “virtual patching”. This blocks exploitation attempts without changing the code.
    • Remove or Replace: If no update or virtual patch is available, and the component isn’t essential, consider deactivating and deleting the vulnerable plugin or theme and finding a secure alternative.
    • Fix Configurations: Address any configuration issues reported, such as adjusting file permissions via FTP/SFTP or adding security rules to your .htaccess file (do this carefully).

    Step 6: Re-Scan and Maintain

    • After applying fixes, rerun the vulnerability scan to confirm that the reported issues are resolved.
    • Ensure automated scans are scheduled to run regularly (at least weekly) to catch newly discovered vulnerabilities promptly. Security is an ongoing process, not a one-time task.

    Wrapping Up: Why Every WordPress Site Needs a Vulnerability Scanner

    A WordPress vulnerability scanner is essential for keeping your site secure. Ignoring vulnerabilities leaves your site exposed to attacks. These scanners proactively search for security flaws, like outdated plugins or weak themes, before hackers exploit them. It’s your first line of defense in maintaining a safe online presence.
    But just using a vulnerability scanner isn’t enough. Solid hosting and server management are foundational layers of security. Platforms like RunCloud significantly bolster your defenses right out of the box.

    RunCloud provides optimized server stacks (like NGINX or OpenLiteSpeed), easy SSL certificate deployment, and user isolation, and includes server-level firewall protection (via tools like ModSecurity and Fail2Ban) and security hardening options by default on server configurations. This setup blocks many common brute-force attacks and malicious requests before they even reach WordPress.

    However, it’s important to understand that RunCloud’s server-level protection and hardening are not substitutes for an application-level vulnerability scanner. RunCloud’s defenses block many common attacks based on known malicious patterns or excessive attempts. Still, they won’t necessarily know if a specific plugin version you’re running has a newly discovered flaw exploitable via a legitimate-looking request. A dedicated WordPress vulnerability scanner inspects your specific WordPress components against vast, constantly updated databases of known issues – a task server firewalls aren’t designed for.

    RunCloud provides a high-performance, secure environment optimized for WordPress, simplifying server management and security configurations. You get speed benefits from fine-tuned stacks, caching, and that critical layer of server defense. Imagine easily configuring your server-level firewall or applying security hardening with just a few clicks.

    Easily manage server-level WAF rules within RunCloud.

    Pairing a dedicated WordPress vulnerability scanner with the secure, optimized hosting environment managed by RunCloud creates a powerful, multi-layered security strategy. You get the best of both worlds: a hardened server deflecting broad attacks and a specialized scanner pinpointing application-specific weaknesses.

    Ready to experience how simple, secure, high-speed WordPress hosting can be?

    Try RunCloud Today and See the Difference

    FAQs on WordPress Vulnerability Scanners

    What is the best free vulnerability scanner for WordPress?

    Several reputable free options exist, including the WPScan CLI tool and free versions of security plugins like Wordfence or Sucuri SiteCheck. The most suitable choice depends on your specific requirements and technical expertise.

    How often should I scan my WordPress site?

    Regular scanning is important for protecting against attacks; you should aim for at least weekly scans for most WordPress websites to catch issues early. High-traffic or e-commerce sites benefit from daily scans to minimize risk exposure between checks.

    Can vulnerability scanners prevent attacks?

    Vulnerability scanners primarily detect weaknesses rather than directly prevent attacks; they act like an early warning system. Preventing attacks requires you to act on the scan results by patching vulnerabilities, using firewalls, and maintaining secure configurations on reliable hosting, like that managed with RunCloud.

    What should I do if a vulnerability is found?

    If a vulnerability is found, assess its severity and understand the recommended fix, typically updating the affected theme, plugin, or core WordPress files. Apply the patch and then re-scan to confirm the issue is resolved, ensuring you have reliable backups before making changes.

    Are premium scanners worth the investment?

    Premium scanners often justify their cost for business or high-traffic sites by offering more frequent updates, deeper scanning capabilities, and dedicated support. These advanced features can detect vulnerabilities faster and more accurately than many free options, making them valuable in your security strategy.

    How do vulnerability scanners differ from malware scanners?

    Vulnerability scanners proactively search for potential weaknesses that attackers might exploit, such as outdated plugins or configuration flaws. Malware scanners reactively look for existing malicious code or infections that have already compromised your site, addressing different stages of security risk.

    Can I use multiple scanners on the same site?

    You can use multiple scanners, potentially increasing detection coverage as tools vary in their databases and methods. However, running several simultaneously, especially active plugins, can impact site performance, so consider a balanced approach like one main tool plus occasional checks with another.

    What is the average cost of a premium vulnerability scanner?

    The cost for premium WordPress vulnerability scanners varies widely, from approximately $50 to over $300 per site annually. Pricing depends heavily on the depth of features offered, the number of sites included, and the level of support provided by the security service.

  • How to Restrict Access to WordPress Files Using the .htaccess File

    How to Restrict Access to WordPress Files Using the .htaccess File

    Is your WordPress website silently vulnerable to attackers? While you focus on creating content and growing your audience, critical files and directories might be exposing your site to serious security threats.

    The humble .htaccess file is your first line of defense – a powerful but often overlooked security tool sitting right in your WordPress installation.

    This guide will walk you through using .htaccess to lock down sensitive components including your wp-config.php file, wp-admin directory, and even control access to your media files and other assets.

    Whether you’re a WordPress developer seeking advanced security implementations or a site owner looking for straightforward protection, you’ll find actionable techniques to fortify your website against unauthorized access and common attack vectors.

    By the end of this guide, you’ll have implemented robust security measures that work silently in the background, protecting your site without affecting legitimate users.

    Ready to secure your WordPress site properly? Let’s dive in.

    What is .htaccess?

    .htaccess (which stands for “hypertext access”) is a configuration file that sits within specific directories on your web server (running Apache). It allows you to configure settings for that directory and any subdirectories underneath it. Instead of modifying the main Apache server configuration (which usually requires higher-level access), you can use .htaccess files to make changes on a per-directory basis.

    These changes can include things like setting up redirects, password-protecting areas, controlling caching, and, importantly for us, restricting access to files and folders.

    Unlike main configuration changes, the beauty of .htaccess is that its changes take effect immediately without requiring a server restart. It is read on every request that hits the server for the directory in which it is located, so its directives are applied instantly.

    📖 Suggested read: Protect Your WordPress Login pages with Cloudflare Zero Trust

    Why Restrict Access to WordPress Files?

    WordPress, like any complex web application, has a specific directory structure. Some files are meant to be publicly accessible (like your theme’s CSS and JavaScript files and images), while others are crucial to the functioning of WordPress and should never be directly accessed by the public. These sensitive files include:

    • wp-config.php: This is the crown jewel. It contains your database credentials (username, password, database name), secret keys used for security, and other vital configuration settings. If a malicious actor gets hold of this, they could compromise your entire site.
    • wp-includes/: This directory contains core WordPress files and libraries. Direct access to these files could expose vulnerabilities or allow attackers to inject malicious code.
    • .htaccess itself: You certainly don’t want someone modifying your security rules!
    • Other sensitive, non-web readable files, Such as backups, logs, or readme.html

    Allowing direct access to these files is like leaving your front door unlocked and putting a sign on it saying, “Valuables inside!”

    We restrict access to protect your WordPress site’s core functionality and sensitive data from being exploited.

    Importance of Securing WordPress Files

    Securing these files is paramount for several reasons:

    1. Preventing Database Compromise: As mentioned, wp-config.php holds your database credentials. Leaking these means attackers could gain full control of your database, allowing them to steal data, inject malicious content, or even delete everything.

    2. Blocking Code Injection: Direct access to core files (wp-includes/) could allow attackers to inject malicious PHP code. Your server could then execute this code, potentially creating backdoors, stealing user data, or defacing your website.

    3. Preventing Information Disclosure: Even if a file doesn’t contain directly exploitable code, it might reveal information about your WordPress installation, such as the version number or the plugins you use. This information can help attackers identify known vulnerabilities.

    4. Maintaining Website Integrity: By restricting access, you ensure that only WordPress itself, through its intended mechanisms, can interact with these critical files. This helps prevent accidental or malicious modifications that could break your website.

    📖 Suggested read: The 6 Best WordPress Security Plugins (2022)

    How to Restrict Access to WordPress Files Using .htaccess: Step-by-Step Guide

    This guide will walk you through securing your WordPress files by modifying your .htaccess file. We’ll use RunCloud’s file manager for ease of access, but the principles apply regardless of how you edit the file (FTP, cPanel, etc.).

    Step 1: Accessing Your .htaccess File (Using RunCloud File Manager)

    1. Select Your Server: Access your RunCloud dashboard and choose the server where your WordPress website is hosted.
    2. Select Your Web Application: Locate the web application corresponding to your WordPress site and click on it.
    3. Open File Manager: In the web application’s details, you’ll find a “File Manager” tab or button. Click on it to open the File Manager.
    1. Locate .htaccess: When you open RunCloud’s File Manager, you’ll land in your application’s root directory (typically located at webapps/<your-app-name>/). The .htaccess file should be visible among your WordPress core files. Don’t worry if you can’t see it immediately – some WordPress installations don’t have one by default, or it might be hidden.

    If you need to create a new .htaccess file, simply right-click in the File Manager and select “Create New File.” Remember that the filename must begin with a period followed by “htaccess” with no file extension (.htaccess). This naming convention identifies it as a special configuration file that Apache will recognize and process when handling requests to your site.

    editing .htaccess

    Note: Files starting with a dot are often hidden by default in many file systems. If you are not using the RunCloud file manager, you might need to enable “Show Hidden Files” in your file manager’s settings.

    Step 2: Adding Rules to Restrict Access

    Always create a backup of your .htaccess file before making any modifications. This critical step cannot be overstated – even a minor syntax error can render your entire website inaccessible. The server reads this file for every page request, so any mistake will immediately affect your site.

    To create a backup in RunCloud:

    1. Right-click on the .htaccess file
    2. Select “Download” to save a local copy, or
    3. Choose “Duplicate” to create a .htaccess.bak file directly on the server

    Once you’ve secured a backup, you can safely edit the file by double-clicking it in RunCloud’s File Manager, which will open the built-in text editor.

    Below are several common security scenarios and the corresponding .htaccess rules you can implement. Each addresses specific vulnerabilities in a standard WordPress installation:

    Use Case 1: Restrict Access to wp-config.php

    As explained above, you should protect your wp-config.php file from unauthorized access. This directive denies access to the wp-config.php file from all sources.

    <Files wp-config.php>
        Order allow, deny
        Deny from all
    </Files>

    📖 Suggested read: 10 Security Tips to Secure VPS Server in 2025 [Ultimate Guide]

    Use Case 2: Limit Access to the wp-admin Area by IP Address

    This is useful if you want to restrict access to your WordPress admin area to only specific IP addresses (e.g., your office or home network). Replace YOUR_IP_ADDRESS with your actual IP address. You can add multiple Allow from lines for additional IPs.

    <IfModule mod_authz_core.c>
    <Location /wp-admin>
            Require ip YOUR_IP_ADDRESS
            # Require ip ANOTHER_IP_ADDRESS  (Add more lines as needed)
    </Location>
    </IfModule>
    <IfModule !mod_authz_core.c>
    <Location /wp-admin>
           Order deny, allow
           Deny from all
           Allow from YOUR_IP_ADDRESS
           # Allow from ANOTHER_IP_ADDRESS  (Add more lines as needed)
    </Location>
    </IfModule>

    In the above code snippet, the Location /wp-admin directive applies the rules specifically to the /wp-admin directory.

    Note: The syntax of these commands might vary slightly depending on the Apache version you are using. Refer to the official documentation for the latest syntax.

    📖 Suggested read: How to Restrict WordPress Admin Access by IP Address? (EASY GUIDE)

    Use Case 3: Protect Media Files from Direct Access (but allow them to be displayed on your site)

    This prevents direct access to files in your wp-content/uploads directory (where images and other media are stored) unless the request is coming from your own website. This helps prevent “hotlinking” (other sites using your images directly, consuming your bandwidth). Replace runcloud.example.com with your actual domain.

    RewriteEngine on
    RewriteCond %{HTTP_REFERER} !^$
    RewriteCond %{HTTP_REFERER} !^http(s)?://(www\.)?RunCloud.example.com [NC]
    RewriteRule \.(jpg|jpeg|png|gif)$ - [NC,F,L]

    Let’s break down the above commands and try to understand them one by one:

    • RewriteEngine on: Enables the rewrite engine, which is used for URL manipulation.

    • RewriteCond %{HTTP_REFERER} !^$: This condition checks if the HTTP_REFERER header is not empty. The HTTP_REFERER header indicates the page that is linked to the requested resource.

    • RewriteCond %{HTTP_REFERER} !^http(s)?://(www\.)?runcloud.example.com [NC]: This condition checks if the HTTP_REFERER does not start with your domain name (with or without www and with either http or https). [NC] means case-insensitive.

    • RewriteRule \.(jpg|jpeg|png|gif)$ - [NC, F, L]: This rule gets applied if both of the above conditions are true. It matches any file ending in .jpg, .jpeg, .png, or .gif. The – means no substitution is performed. [NC, F, L] flags: NC means case-insensitive, F means Forbidden (return a 403 error), and L means this is the last rule to be processed.

    Use Case 4: Block XML-RPC to Prevent DDoS Attacks

    XML-RPC is a WordPress feature that allows remote access to your site. It can be a target for DDoS attacks. If you don’t need it, it’s best to block it. The security experts at Patchstack have written a great article that explains why blocking XML-RPC is a great idea.

    <Files xmlrpc.php>
        Order allow, deny
        Deny from all
    </Files>

    📖 Suggested read: How to Block IP Address Using WordPress .htaccess File to Stop Bad Visitors

    Use Case 5: Restrict Access to Sensitive File Types for Enhanced Security

    Many crawlers and automated robots try to access files directly from the server, even if they aren’t indexed. In our previous post, we explained that robots.txt is merely a suggestion and not enforceable. Therefore, you should always block direct access to various potentially sensitive file types.

    Use the following command to block sensitive files that will never be accessed over the web:

    <FilesMatch "\.(sql|md|log|txt|backup|bak|conf|dist|fla|psd|ini|sh|inc|swp|aspx)$">
        Order allow, deny
        Deny from all
    </FilesMatch>

    In the above directive:

    • <FilesMatch ...>: uses a regular expression to match multiple file extensions.

    • \.(sql|md|log|txt|backup|bak|conf|dist|fla|psd|ini|sh|inc|swp|aspx)$ It will deny access to the listed file extension. You should carefully review this list of extensions and modify it depending on your use case.

    📖 Suggested read: Redirect to HTTPS Using htaccess Behind NGINX Proxy

    Use Case 6: Control Access to Configuration Files by Specific IPs

    Similar to limiting access to wp-admin, you can restrict access to other configuration files (or any file/directory) to specific IP addresses. This example shows how to protect a hypothetical config.ini file:

    <Files config.ini>
    <IfModule mod_authz_core.c>
               Require ip YOUR_IP_ADDRESS
               # Require ip ANOTHER_IP_ADDRESS
    </IfModule>
    <IfModule !mod_authz_core.c>
            Order deny, allow
            Deny from all
            Allow from YOUR_IP_ADDRESS
            # Allow from ANOTHER_IP_ADDRESS
    </IfModule>
    </Files>

    📖 Suggested read: How to Fix a 403 Forbidden Error on Your Site

    Use Case 7: Disable Directory Browsing

    Your WordPress site’s file structure is a treasure map for attackers. When directory listing is enabled, anyone who navigates to a folder without an index file can see a complete inventory of its contents. This exposes your site’s architecture, plugin versions, themes, and potential vulnerabilities – all valuable intelligence for malicious actors.

    Automated scanning bots constantly probe websites for these open directories, looking for paths to exploit. Once they discover unprotected directories, attackers can identify outdated components, locate configuration files, or find other security weaknesses to target.

    By disabling directory browsing, you force these requests to return a “403 Forbidden” error instead of displaying your folder contents. This simple change significantly strengthens your security posture by keeping your site’s internal structure hidden from prying eyes.

    Options -Indexes

    📖 Suggested read: How to Fix the HTTP Error 503 Service Unavailable in 2025 [SOLVED]

    Use Case 8: Restrict Access to the .htaccess File to Protect Configuration Settings

    Your .htaccess file is not just a security tool – it’s also a potential security liability. If attackers can access this file, they gain valuable intelligence about your specific protection measures, allowing them to craft precisely targeted attacks that circumvent your defenses.

    Think of your .htaccess as the blueprint for your security system. When exposed, it reveals exactly which files you’re protecting, which directories you’ve restricted, and what specific countermeasures you’ve implemented. Armed with this information, attackers can methodically test for weaknesses or exceptions in your ruleset.

    To prevent this risk, you should explicitly block access to the .htaccess file itself. This creates a security loop where the very rules that protect your site also protect themselves from being discovered. By implementing this protection, you ensure that your defense strategies remain confidential, significantly reducing the attack surface available to potential intruders.

    <Files ~ "^\.ht">
        Order allow, deny
        Deny from all
        Satisfy All
    </Files>

    Step 4: Testing Your Configuration

    After saving your changes to .htaccess, it’s essential to test them thoroughly:

    1. Clear Your Browser Cache: Your browser might cache old versions of files or responses. Clear your cache to ensure you’re seeing the effects of your changes.

    2. Try Accessing Restricted Files: Attempt to directly access files you’ve restricted (e.g., runcloud.example.com/wp-config.php) in your browser. You should receive a 403 Forbidden error.

    3. Verify Website Functionality: Browse your website thoroughly to make sure everything is still working as expected. Pay close attention to areas that might be affected by your changes (e.g., the admin area and image display).

    4. Check for Errors: If anything is broken, check your browser’s developer console (usually accessed by pressing F12) for error messages. These messages can provide clues about what might be wrong.

    5. Revert if Necessary: If you encounter problems, immediately restore your .htaccess file from the backup you made in Step 2.

    Final Thoughts: Securing Your WordPress Site with RunCloud and .htaccess

    Throughout this guide, we’ve explained the role of the .htaccess file in securing your WordPress installation, focusing on restricting access to sensitive files and directories. While the concepts might seem technical at first, implementing these security measures is significantly easier with a hosting provider like RunCloud.

    RunCloud’s platform is built with performance and security in mind. It’s designed to make server management accessible to anyone, even non-server administrators.

    Let’s recap how RunCloud streamlines the process and enhances security:

    • Easy File Management: RunCloud’s built-in File Manager provides a user-friendly interface for accessing, editing, and managing your .htaccess file directly without needing to use SSH or FTP. This significantly simplifies the process of implementing the security measures we’ve discussed. You can easily create backups, edit the file, and revert changes if needed, all within your RunCloud dashboard.

    • NGINX and Apache Hybrid Options: RunCloud allows you to choose between NGINX or an Apache hybrid configuration. NGINX is known for its speed and efficiency, especially in handling static content. While NGINX doesn’t natively use .htaccess files, RunCloud cleverly handles configurations through its interface, translating many .htaccess-like directives into NGINX-compatible rules.

    • Built-in Security Features: Beyond .htaccess management, RunCloud offers a comprehensive suite of security features:

      • Web Application Firewall (WAF): RunCloud’s WAF helps protect your site from common web attacks, such as cross-site scripting (XSS) and SQL injection. The WAF also handles many of the protections we achieve with .htaccess (like blocking malicious requests) at a higher level.

      • Server-Level Security: RunCloud automatically configures your server with security best practices, including firewall rules, intrusion detection, and regular security updates.

      • SSL/TLS Certificates: RunCloud makes installing and managing free Let’s Encrypt SSL/TLS certificates incredibly easy, ensuring secure communication between your website and its visitors.

    • Git Deployment: By deploying with Git, you eliminate the need for FTP, a very insecure protocol.

    While understanding the power of .htaccess (and its equivalent configurations in NGINX) is valuable, RunCloud simplifies many of these tasks, allowing you to focus on building your website rather than getting bogged down in complex server configurations.

    Start using RunCloud today →

    FAQs on Restricting Access to WordPress Files Using .htaccess

    What is the difference between .htaccess and wp-config.php?

    The .htaccess file is an Apache web server configuration file that controls access and behavior for its directory and subdirectories. It allows for per-directory settings without modifying the main server configuration.
    wp-config.php, on the other hand, is a core WordPress file containing your database credentials, security keys, and other crucial WordPress-specific settings. RunCloud simplifies managing both, allowing easy access and editing via its file manager.

    Can I restrict access to specific users?

    .htaccess primarily restricts access based on IP addresses, not individual WordPress user accounts. You can allow specific IP addresses to access certain areas (like wp-admin), effectively limiting access to users coming from those locations. You’ll need to use WordPress’s built-in roles and capabilities system or a dedicated security plugin for user-level restrictions within WordPress.

    What happens if I break my .htaccess file?

    A broken .htaccess file, usually due to syntax errors, can cause a 500 Internal Server Error, making your entire website (or parts of it) inaccessible. Always back up your .htaccess file before making changes. RunCloud’s file manager makes it easy to create backups and revert to previous versions if something goes wrong.

    How can I restore my .htaccess file?

    Before making any changes, always download a copy of your .htaccess file or create a copy within your file manager (e.g., .htaccess.bak). If you encounter issues, simply replace the broken .htaccess file with your backup copy using RunCloud’s file manager, FTP, or any other file access method. This will quickly restore your site’s functionality.

    Are there plugins that can help with .htaccess?

    Several WordPress security plugins (like Wordfence, Sucuri Security, and iThemes Security) offer features to manage and modify your .htaccess file, often with a user-friendly interface. However, it’s crucial to understand the changes these plugins make, as incorrect configurations can still cause problems. With RunCloud, you can use plugins or manually edit your .htaccess.

    Is it necessary to restrict access to WordPress files?

    Restricting access to sensitive WordPress files like wp-config.php and core directories is a highly recommended security practice. It prevents unauthorized access, protects your database credentials, and reduces the risk of code injection and other attacks. RunCloud, combined with proper .htaccess rules, provides a strong foundation for WordPress security.

    Can I restrict access to media files in WordPress?

    Yes, you can use .htaccess to control access to media files (images, videos, etc.) in your wp-content/uploads directory. This is commonly used to prevent hotlinking (other websites directly linking to your images and using your bandwidth). RunCloud’s easy file management allows you to implement these restrictions.

    How do I know if my .htaccess rules are working?

    After saving your .htaccess changes, clear your browser cache and try to access the files or directories you’ve restricted directly. You should receive a 403 Forbidden error if the rules are working correctly. Also, thoroughly browse your website to ensure all intended functionality remains unaffected.

  • How to Partition and Format Disk Drives on Linux? (Detailed Guide)

    How to Partition and Format Disk Drives on Linux? (Detailed Guide)

    Disk, partitions, ext4, mkfs, /dev/sda, filesystem – these are common keywords when working with Linux servers, but what do they really mean?

    Managing storage is a fundamental aspect of server administration, and it can initially seem intimidating. Terms like formatting, mounting, partition table (GPT, MBR), and choosing the right file system type (NTFS, FAT32, exFAT) can quickly become overwhelming.

    This guide explains the essential concepts of disk partitioning and disk formatting in Linux. We’ll start by explaining what disk partitioning and disk formatting are – and why they’re necessary. Then, we’ll explore different types of file systems and help you understand their strengths and weaknesses. Finally, we’ll provide step-by-step instructions for both partitioning and formatting your disk on Linux systems.

    So let’s get started!

    What is a Disk Drive?

    A disk drive, also known as a storage drive, is a non-volatile storage device for a computer. This device retains data even when the system loses power. The drive stores the operating system, applications, and user data, and the computer uses it to both read and write data.

    Suggested read: 9 Best Linux Distros in 2024

    What is a disk drive

    Types of Disk Drives

    Disk drives come in all shapes and sizes, each with its own speed and storage capabilities. Knowing their differences can help you pick the right one for your needs.

    • Hard Disk Drives (HDDs): HDDs store data on spinning magnetic platters and use a read/write head that moves across the surface. They are a cost-effective option for large storage capacities, but their mechanical nature results in slower access times.
    • Solid-State Drives (SSDs): SSDs use flash memory to store data, eliminating moving parts and providing significantly faster read/write speeds than HDDs. This results in faster boot times, application loading, and overall system responsiveness, although typically at a higher cost per gigabyte.
    • NVMe SSDs (Non-Volatile Memory Express SSDs): NVMe SSDs are a type of SSD that uses a high-speed PCIe interface. They deliver even greater performance than standard SATA SSDs. This interface allows for much higher bandwidth and lower latency, making them ideal for demanding workloads.

    Suggested read: How to Check Running Processes in Linux Using ps, top, htop, and atop Commands

    What is Disk Partitioning?

    Disk partitioning is a fundamental aspect of storage management that divides a physical hard drive (or other storage device such as an SSD) into multiple logical sections. System administrators perform this division to organize data, isolate operating systems, or improve system performance.

    Each partition functions as an independent unit, almost as if it were a separate physical disk. The operating system then treats each partition as a distinct volume. This separation allows multiple file systems and operating systems to coexist on a single physical drive and simplifies backup and recovery processes.

    Suggested read: How to Kill a Process in Linux From the Command Line

    How to Partition Disk Drive on Linux

    Here’s a step-by-step guide to partitioning a disk drive on Linux:

    Step 1: Identify the Disk

    Before partitioning a disk, you need to identify the correct device name. Use the lsblk command in your terminal to list all block devices (disks and partitions) connected to your system.

    After executing the command, carefully examine the output and pay attention to the NAME, SIZE, TYPE, and MOUNTPOINT columns.

    You’re looking for a disk (indicated by TYPE being “disk”) that is not currently mounted (has no MOUNTPOINT) or is a disk you are sure you want to repartition (which results in losing all data stored on it). The NAME will typically be something like /dev/sda, /dev/sdb, /dev/nvme0n1, etc.

    Be absolutely certain you have the correct device name – partitioning the wrong disk will result in data loss.

    If in doubt, do not proceed!

    To minimize risk, disconnect any non-essential external drives.

    Step 2: Choose a Partitioning Tool

    Linux offers several tools for partitioning disks, each with its own strengths. For command-line interaction, fdisk and parted are popular choices. fdisk is a classic, menu-driven utility suitable for most tasks, especially on disks using the older MBR partition scheme. On the other hand, parted supports both MBR and the newer GPT (GUID Partition Table) scheme and is often preferred for disks larger than 2TB.

    The cfdisk utility offers a text-based interface that provides a middle ground between fdisk’s simplicity and parted’s power. GParted is a widely used and user-friendly option for a graphical interface, but it is not useful for Linux servers as they don’t have a GUI.

    We’ll focus on using parted for this guide due to its versatility. To start the interactive partitioning session, we’ll use parted /dev/sdX (replacing /dev/sdX with the actual disk name).

    Step 3: Create a New Partition

    Once you’ve started parted with the correct disk (e.g., sudo parted /dev/sdb), you’ll be at the parted prompt. First, print the current partition table using the print command to double-check the device.

    • Select Partition Table Type (if needed): If the disk is brand new or you want to change the partition table type, use the mklabel command. For example, (parted) mklabel GPT.
    • Create the Partition: Use the mkpart command. You’ll be prompted to enter the following:
      • Partition type: primary, extended (only on MBR), or logical (only within an extended partition). With GPT, you’ll almost always choose the primary.
      • File system type: This is a hint for later formatting; it doesn’t actually format the partition. Choose ext4, fat32, ntfs, etc., as appropriate.
      • Start: Specify the partition’s starting point, either in megabytes (MB) or gigabytes (GB) or as a percentage of the disk (e.g., 0%).
      • End: Specify the partition’s ending point using the same units as the start (e.g., 100GB or 100%).
      • Example: (parted) mkpart primary ext4 0% 100% (creates a primary partition using the ext4 formatting that takes the entire disk).
    • Repeat (if needed): Repeat the mkpart command for each additional partition you want to create.

    Step 4: Verify the Partition

    After creating the partition(s), you can verify the changes using the print command within the parted prompt. This command displays the current partition table, showing the partition number, start and end points, size, file system type (hint), and any flags. Carefully review this output to ensure the partitions are as you intended.

    If anything looks incorrect, you can use rm <number> (e.g., rm 1 to remove partition number 1) to delete a partition within parted and recreate it.

    Once satisfied, type quit to exit parted and save the changes to the disk.

    What is Disk Formatting?

    Disk formatting prepares a storage device (the whole disk or a partition) for use by an operating system. This process creates a specific file system – a structured method for organizing and storing files. The operating system uses this file system to manage data on the device. Formatting lays the groundwork that defines how the operating system will track files, directories, and free space.

    Suggested read: How to Check Linux CPU Usage or Utilization? (5 Ways)

    What is a File System?

    A file system is the underlying structure that an operating system uses to manage data on a storage device. It determines how files are named, stored, organized, and accessed. Think of it as the librarian of your hard drive, keeping track of where everything is located and how to retrieve it. Without a file system, a storage device would just be a collection of unorganized data.

    There are multiple popular file system formats:

    • ext4 (Fourth Extended Filesystem): The ext4 file system is the standard and most widely used file system for Linux distributions. It’s a journaling file system that records changes before they are written to disk. This improves reliability and reduces the risk of data corruption in case of power failures or system crashes. ext4 offers excellent performance, supports large files and volumes, and is generally the best choice for Linux server environments. It also includes delayed and multiblock allocation features to enhance write performance.
    • NTFS (New Technology File System): NTFS is the primary file system used by Windows operating systems. Like ext4, it’s a journaling file system with improved reliability and data recovery capabilities. NTFS supports features such as file permissions, encryption (BitLocker), disk quotas, and shadow copies (for backups and restoring previous versions of files). It also supports much larger file and partition sizes than older FAT systems.
    • FAT32 (File Allocation Table 32): FAT32 is an older file system known for its broad compatibility. It’s commonly used on USB flash drives and SD cards because it can be read and written by virtually any operating system, including Windows, macOS, and Linux. However, FAT32 has significant limitations: it supports a maximum file size of only 4GB and a practical maximum volume size of 2TB. This makes it unsuitable for storing large files like modern video files.
    • exFAT (Extended File Allocation Table): exFAT is a Microsoft-developed file system designed to overcome the limitations of FAT32 while maintaining good cross-platform compatibility. It supports very large file and partition sizes, making it suitable for storing large media files and using large external drives. exFAT is often used on SDXC cards and large USB drives when compatibility with Windows and macOS is needed. It is often the preferred filesystem for USB thumb drives.

    Suggested read: How do you check if the TCP port is open, closed, or in use on Linux?

    How to Format a Disk Drive on Linux

    Here’s a step-by-step guide to formatting a disk drive (or, more accurately, a partition) on Linux:

    Step 1: Identify the Partition to Format

    Before formatting, you must know the exact device name of the partition you want to format. Formatting the wrong partition will result in irreversible data loss.

    Use the lsblk command in your terminal to list all block devices and their partitions. Carefully examine the output, paying attention to the NAME, SIZE, TYPE, and MOUNTPOINT columns.

    You’re looking for the specific partition (e.g., /dev/sda1, /dev/sdb2, /dev/nvme0n1p1 – the “p” and number indicate a partition, not the whole disk). The TYPE column will show “part” for partitions. Double-check the SIZE to ensure it matches the partition you intend to format.

    Step 2: Unmount the Partition

    If the partition you intend to format is currently mounted (meaning it’s accessible as a directory), you must unmount it before formatting. Use the umount command followed by either the device name or the mount point. For example:

    • sudo umount /dev/sdX1 (replace /dev/sdX1 with the actual partition name)
    • sudo umount /mnt/mydirectory (if the partition is mounted at /mnt/mydirectory)

    If the umount command reports that the device is busy, it means a process is still using the partition. You must identify and stop that process before you can unmount it.

    Step 3: Format the Partition

    Use the mkfs command (make file system) with the appropriate option for your chosen file system. The general format is: sudo mkfs -t [filesystem type] [options] /dev/sdX1. The -t option specifies the filesystem type. Here are the specific commands:

    • For ext4: sudo mkfs -t ext4 /dev/sdX1
    • For FAT32: sudo mkfs -t vfat -F 32 /dev/sdX1 (the -F 32 specifies FAT32; you can also use -F 16 for FAT16, but this is rarely needed)
    • For NTFS: sudo mkfs -t ntfs /dev/sdX1
    • For exFAT: sudo mkfs -t exfat /dev/sdX1

    Remember to replace /dev/sdX1 with the actual partition name in the above examples.

    Step 5: Verify the Format

    After formatting the partition, you can verify the result using several methods:

    • lsblk -f: This command shows each partition’s file system type (FSTYPE) and UUID. Check that the FSTYPE matches what you intended.
    • blkid /dev/sdX1: This command specifically shows the specified partition’s UUID and TYPE (file system).
    • Mount and check: Mount the partition (e.g., sudo mount /dev/sdX1 /mnt) and then use df -h to check the disk space and file system type. This confirms that the partition is usable. After testing, you can unmount the partition with the command sudo umount /dev/sdX1 or sudo umount /mnt if that is where it is mounted.

    Suggested read: How to Find Most Used Disk Space Directories and Files in Linux

    Wrapping Up: Disk Partitioning and Formatting

    Understanding the different file systems, choosing the right tools, and, most importantly, double-checking every command before execution are critical for maintaining data integrity and system stability. Remember to always back up important data before making any changes to partitions.

    Managing Linux servers, especially tasks like disk partitioning and monitoring, can seem daunting. However, with tools such as RunCloud, the process becomes significantly easier and more streamlined.

    RunCloud provides a user-friendly web interface that simplifies server management tasks, including monitoring disk usage, managing services, and deploying applications. Instead of wrestling with the command line for every operation, you can use RunCloud’s intuitive dashboard to oversee your server’s health and performance. This allows you to focus on your applications and websites rather than getting bogged down in the complexities of server administration.

    Ready to experience the ease of Linux server management? Start your free trial with RunCloud today!

    FAQs on Partitioning and Formatting Disk Drives on Linux

    What is the difference between partitioning and formatting?

    Partitioning divides a physical hard drive or storage device into logical sections. Each section, a partition, functions like an independent disk. On the other hand, formatting prepares a partition (or an entire unpartitioned disk) by creating a specific file system (e.g., ext4, NTFS, FAT32). This file system allows an operating system (such as Linux or Windows) to organize, store, and retrieve files. Partitioning divides the disk while formatting prepares a partition for data.

    How do I know which file system to choose?

    The best file system depends on system compatibility and your specific needs. Ext4 is generally recommended for Linux servers due to its performance, reliability, and features. If you require compatibility with Windows, NTFS or exFAT are good choices, especially for USB drives. FAT32 offers broad compatibility but has limitations on maximum file size and max volume size. Consider factors like journaling (for data recovery) and support for large files when selecting.

    Can I resize partitions without losing data?

    Yes, but it’s risky and requires careful planning. Tools like parted, GParted, and GNOME Disks allow resizing, but always back up your data first. Shrinking a partition is generally safer than expanding it, especially if the partition being expanded is at the end of the disk. If free space isn’t directly adjacent to the partition you’re expanding, data movement is required, increasing the risk of data loss if interrupted.

    What tools are recommended for disk management on Linux?

    For command line (CLI) use, fdisk, parted, and cfdisk are powerful for partitioning.
    mkfs (e.g., mkfs.ext4, mkfs.vfat) is used for formatting.
    For a GUI, GParted and GNOME Disks offer user-friendly interfaces for both partitioning and formatting.
    lsblk displays information about block devices (disks and partitions).
    blkid shows UUIDs and file system types.
    df helps monitor disk space usage.

    Is it safe to format a disk drive?

    Formatting is safe for the drive but permanently erases all data on the selected partition or disk. Always double-check that you’ve selected the correct partition (using lsblk, for example) before formatting. Ensure you have backups of any important data.

    How do I recover data from a formatted drive?

    Data recovery after formatting is possible but not guaranteed, and it becomes increasingly difficult the more the drive is used after formatting. Specialized data recovery software (often commercial) attempts to reconstruct file system structures. To maximize recovery chances, immediately stop using the drive after accidental formatting. Professional data recovery services are often the best option for critical data.

    What are primary, extended, and logical partitions?

    These terms relate to the older MBR (MS-DOS) partition table scheme. An MBR disk can have a maximum of four primary partitions. To overcome this limitation, one primary partition can be designated as an extended partition, which can then be subdivided into multiple logical partitions. GPT (GUID Partition Table), the modern standard, doesn’t have these limitations and supports many more partitions directly.

    How do I check disk space usage on Linux?

    The df (disk free) command is the primary tool. df -h displays usage in human-readable format (e.g., GB, MB). You can also use du (disk usage) to see the size of specific directories and files. GNOME Disks provides a graphical view of disk space.

    Can you partition a drive without formatting?

    Yes, you can. Partitioning simply creates the divisions on the disk. Formatting is a separate step that creates a file system within a partition to make it usable by an operating system. You might partition a disk and leave some partitions unformatted for later use or different purposes.