Category: Server Management

  • How to Restrict WordPress Admin Access by IP Address (Easy Guide)

    How to Restrict WordPress Admin Access by IP Address (Easy Guide)

    Open access to your wp-admin directory and wp-login.php makes it a prime target for brute-force attacks and unauthorized access.

    By whitelisting specific IP addresses and implementing WordPress admin access control, you can effectively stop hackers, block automated bots, and significantly reduce failed login attempts.

    This WordPress tutorial will show you how to restrict WordPress admin access by IP address by either editing the .htaccess file directly, applying NGINX configurations, or using a security plugin.

    Whether you use NGINX, Apache, or rely on a managed server provider, this guide will teach you how to whitelist (and blacklist) specific IP addresses.

    Let’s get started!

    What is IP Address Restriction?

    IP Address Restriction, also known as IP whitelisting, is a security measure that limits access to a specific resource, such as your WordPress admin area (/wp-admin), to only a pre-approved list of IP addresses.

    Simply put, it is like a digital security guard that allows only those with the correct “address” to enter. It says, “Only connections from these specific IP addresses are allowed to access this website area”.

    Why Restrict Admin Access by IP Address?

    Restricting admin access by IP address adds another layer of security to your WordPress site. By default, the admin login page is accessible to anyone on the internet, which makes it a prime target for malicious actors.

    IP restriction makes it exponentially more difficult for attackers to access the WordPress backend. Even if an attacker obtains valid login credentials (through phishing, malware, or other means), they will still be blocked if their IP address is not on the approved list. This is especially useful if you and your team work from fixed locations with static IPs.

    Additionally, brute force attacks involve repeatedly attempting to guess login credentials. Limiting access to only trusted IP addresses reduces the possibility of brute-force attacks originating from other locations. Although you can also use security plugins to stop brute force attempts, IP restriction stops them before they even start. If rate limiting is in place, this significantly reduces the load on your server and prevents potential account lockouts for legitimate users.

    Suggested Read: How to Unban IP Address in Fail2Ban? (Step-By-Step Guide)

    How To Restrict WordPress Admin Access by IP Address

    There are several ways to restrict access to your WordPress admin area, each with advantages and disadvantages. Here are three common methods:

    Method 1: Using .htaccess File

    The .htaccess file is a configuration file used by Apache web servers. You can directly edit it to restrict access based on IP addresses. Follow the steps below to do this:

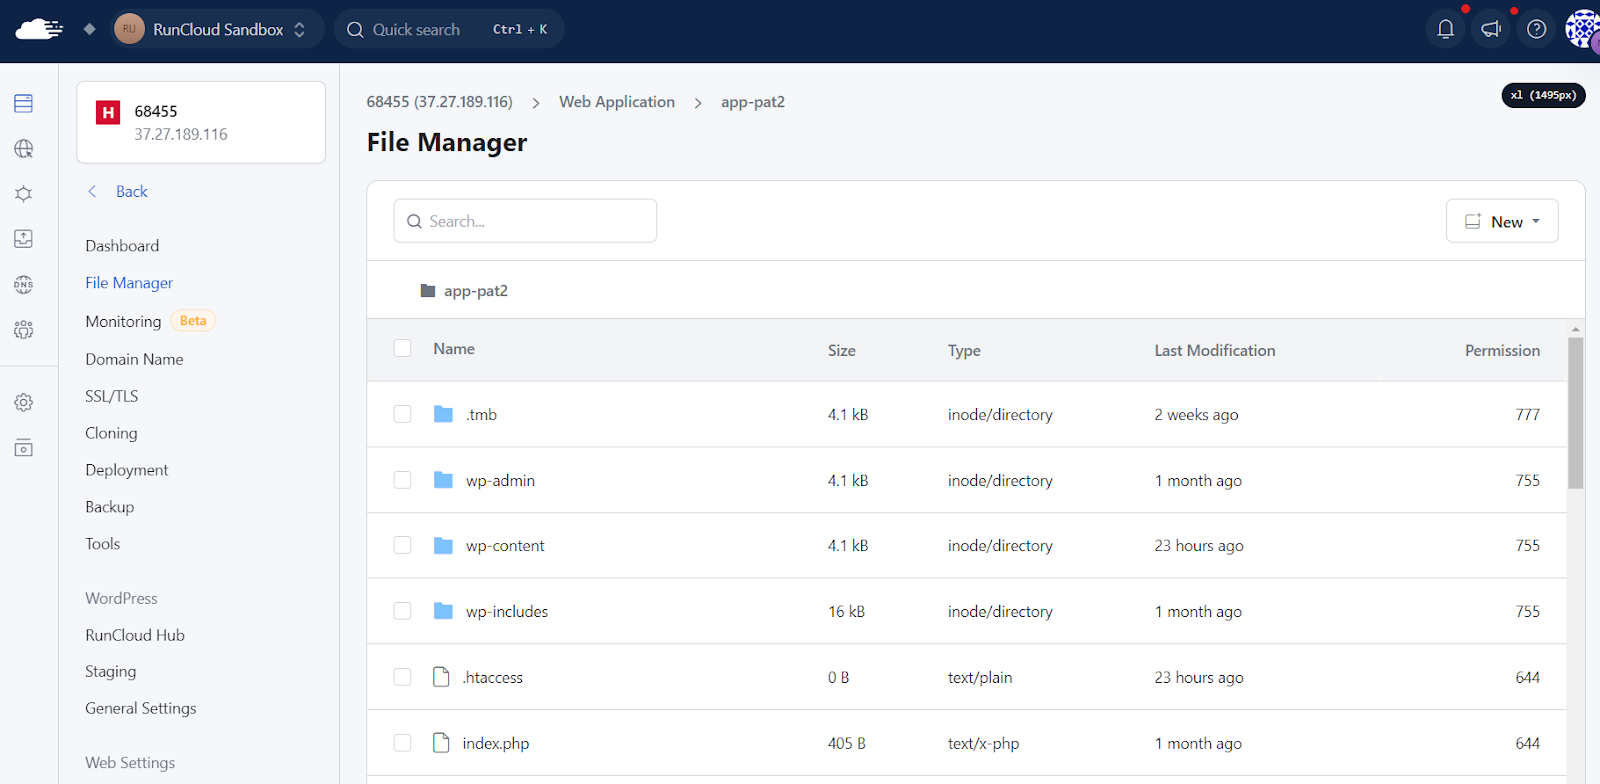
    1. Access the .htaccess file: The .htaccess file is usually located in the root directory of your WordPress installation (the same directory where wp-config.php resides). RunCloud provides convenient access to your server’s filesystem. Log in to your RunCloud dashboard, select your server, and then the web application you want to modify. Here, you’ll find a “File Manager” in the left menu that you can use to edit files.
    1. Edit the .htaccess file:

    Important: Before making any changes, always download a copy of your .htaccess file to your computer and make a backup.

    • In the RunCloud File Manager, click on the .htaccess file to open the file in a text editor.
    • Add the following code block to the beginning of the file but after the “# BEGIN WordPress” section (if it exists). If there is no WordPress section, place it at the beginning:
    <Files wp-login.php>
        order deny,allow
        deny from all
        allow from YOUR_IP_ADDRESS
        allow from ANOTHER_IP_ADDRESS
    </Files>
    <Directory /wp-admin>
        order deny,allow
        deny from all
        allow from YOUR_IP_ADDRESS
        allow from ANOTHER_IP_ADDRESS
    </Directory>
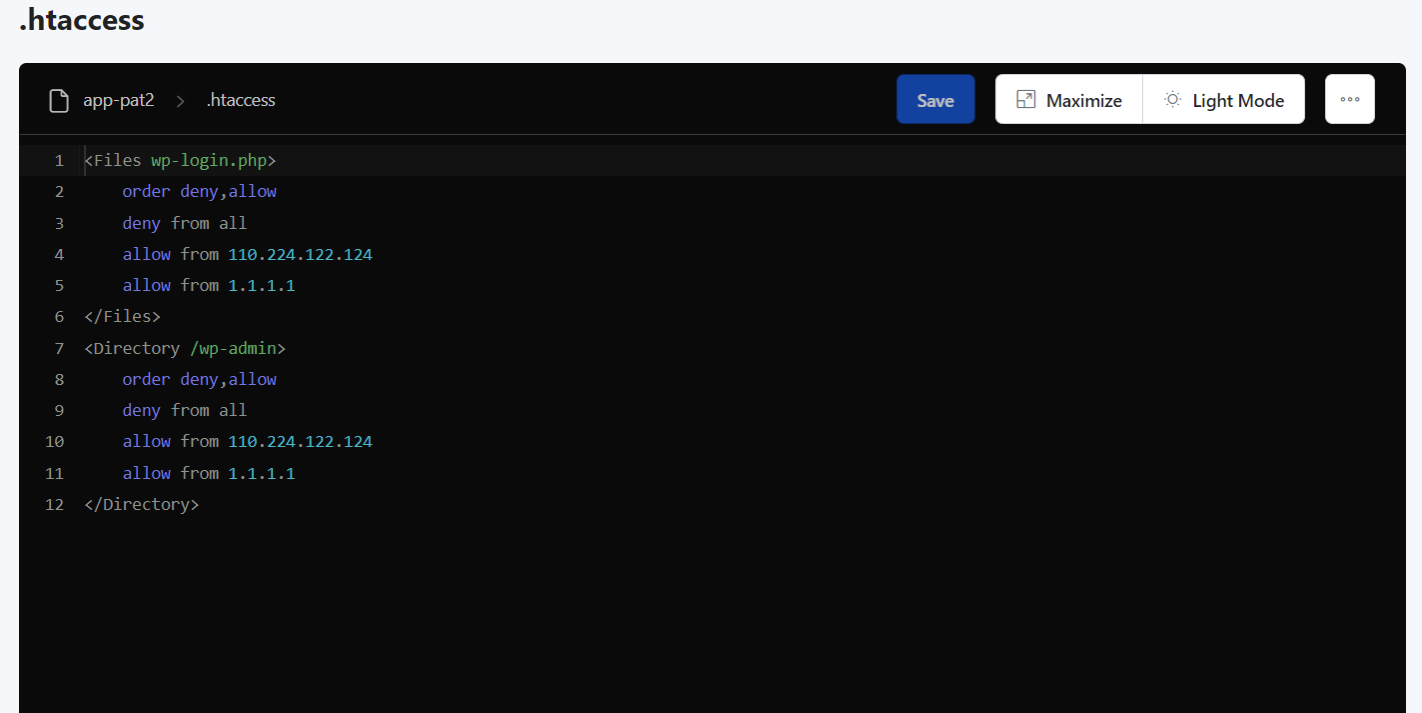
    Replace YOUR_IP_ADDRESS and ANOTHER_IP_ADDRESS with the actual IP addresses from which you want to allow access. You can add as many ‘allow from‘ lines as needed. Place the <Files …> section above the <Directory> section if you have no WordPress section.

    1. Save and Upload: Save the changes to the .htaccess file by clicking the Save button on the top right.
    2. Test: Try accessing /wp-admin or /wp-login.php from an IP address on the allowed list. You should be able to log in. After that, try accessing it from an IP address not on the list. You should be denied access.

    Suggested Read: How to Block IP Address Using WordPress .htaccess File to Stop Bad Visitors

    Method 2: Using NGINX Config

    If you use an NGINX web server, you’ll need to modify the NGINX configuration file instead of using .htaccess. RunCloud significantly simplifies this process.

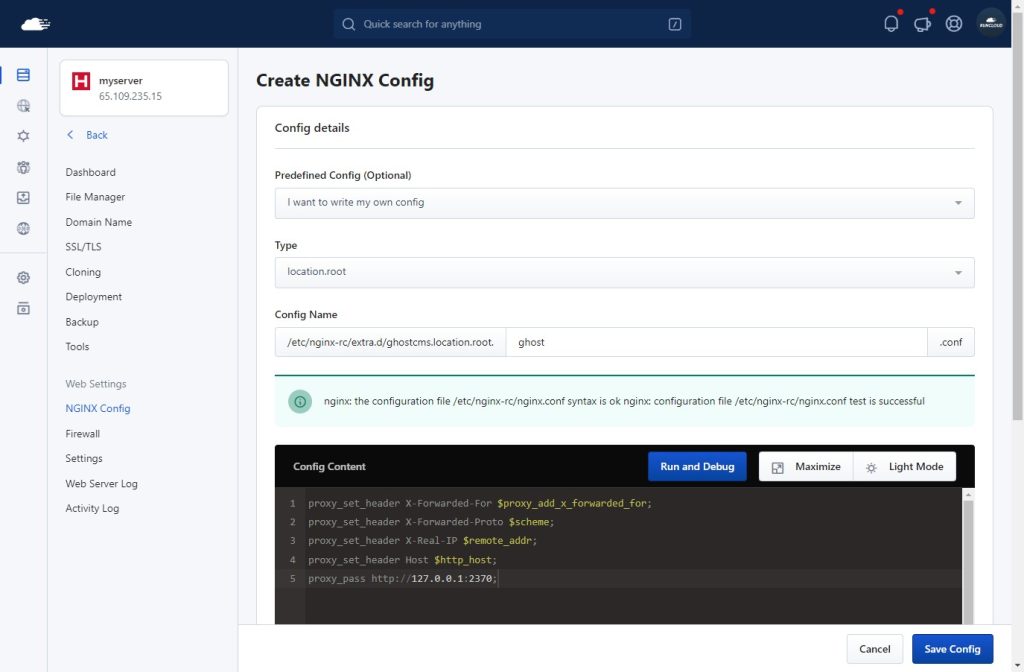
    1. Access the NGINX Configuration: Log in to your RunCloud dashboard, select your server, and then the web application you want to modify. You should see “NGINX Config” in the left menu on this screen.
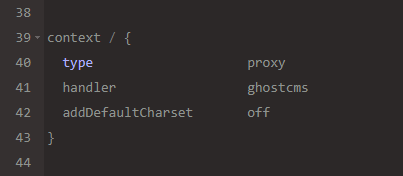
    2. Edit the NGINX Configuration: RunCloud provides a user-friendly interface for editing NGINX configurations, eliminating the need for SSH access and manual configuration. On the next screen, click “Create a New Configuration”, and select “Block XML-RPC” from the dropdown menu. This predefined configuration isn’t necessary, but it is recommended as it automatically fills most fields and makes it harder for novice users to make mistakes.

    1. Add configuration: Copy the code snippet below and paste it into the text field in your RunCloud dashboard. Replace YOUR_IP_ADDRESS and ANOTHER_IP_ADDRESS with the actual IP addresses you want to allow. You can add multiple allow lines as needed. The deny all line ensures that any IP address not explicitly allowed is blocked.
    location /wp-admin/ {
        allow YOUR_IP_ADDRESS;
        allow ANOTHER_IP_ADDRESS;
        deny all;
    }
    location /wp-login.php {
        allow YOUR_IP_ADDRESS;
        allow ANOTHER_IP_ADDRESS;
        deny all;
    }
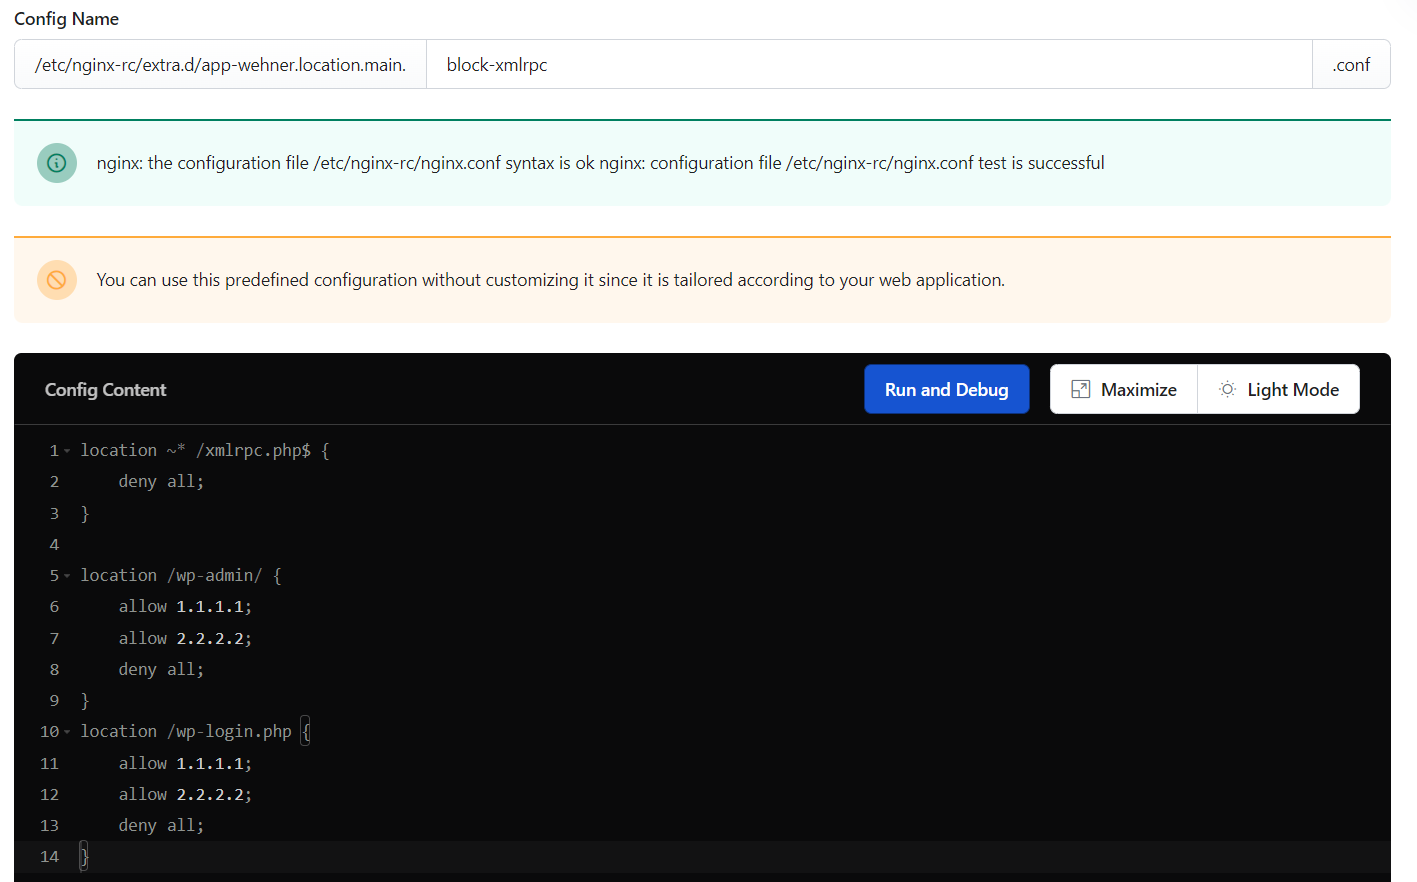
    1. Save and Apply: In RunCloud, simply save the changes you’ve made to the NGINX configuration within the editor. RunCloud automatically checks the configuration for errors before applying it, preventing common mistakes that could break your website.
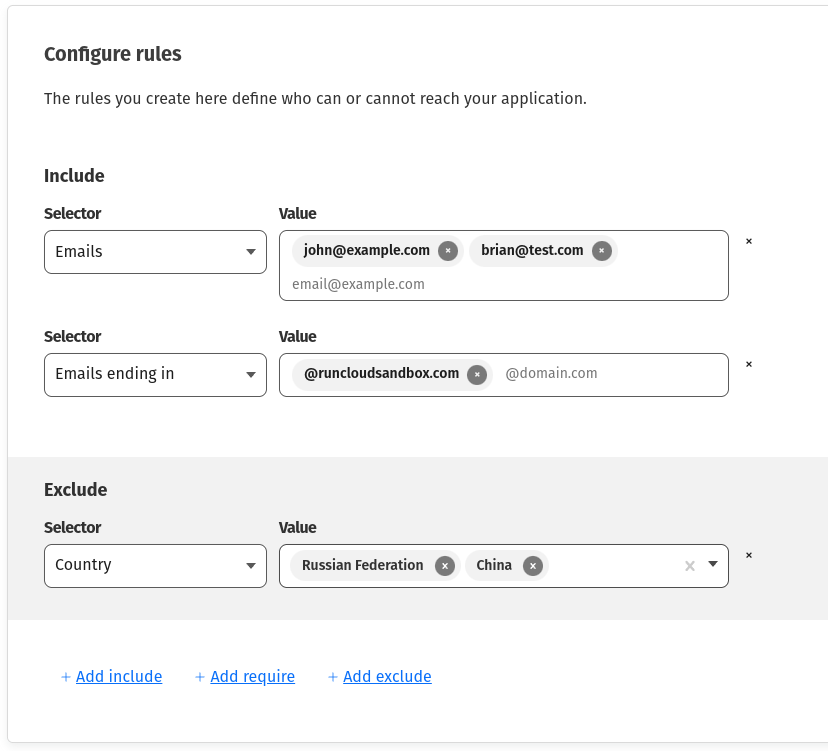
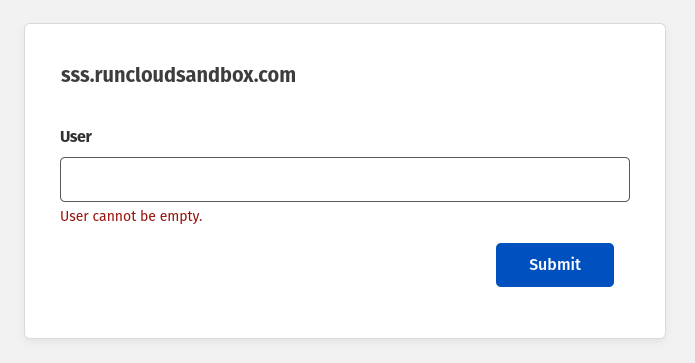
    2. Test: As with the .htaccess method, test access from both allowed and disallowed IP addresses to ensure it works correctly. Any attempt to access the website from a disallowed IP address should result in the following message being displayed:

    Suggested Read: What is DNS & How Does It Work? Everything you need to know.

    Method 3: Using a WordPress Security Plugin

    Several WordPress security plugins offer IP address restriction features. This is often the easiest method for those less comfortable with server configuration files. In this tutorial, we will explain how to block IP addresses using Patchstack.

    1. Install and Activate Patchstack: Install and activate the Patchstack security plugin from the WordPress plugin repository. You can do this directly through your WordPress dashboard by navigating to “Plugins” > “Add New“, searching for “Patchstack“, and clicking “Install Now“, followed by “Activate“.
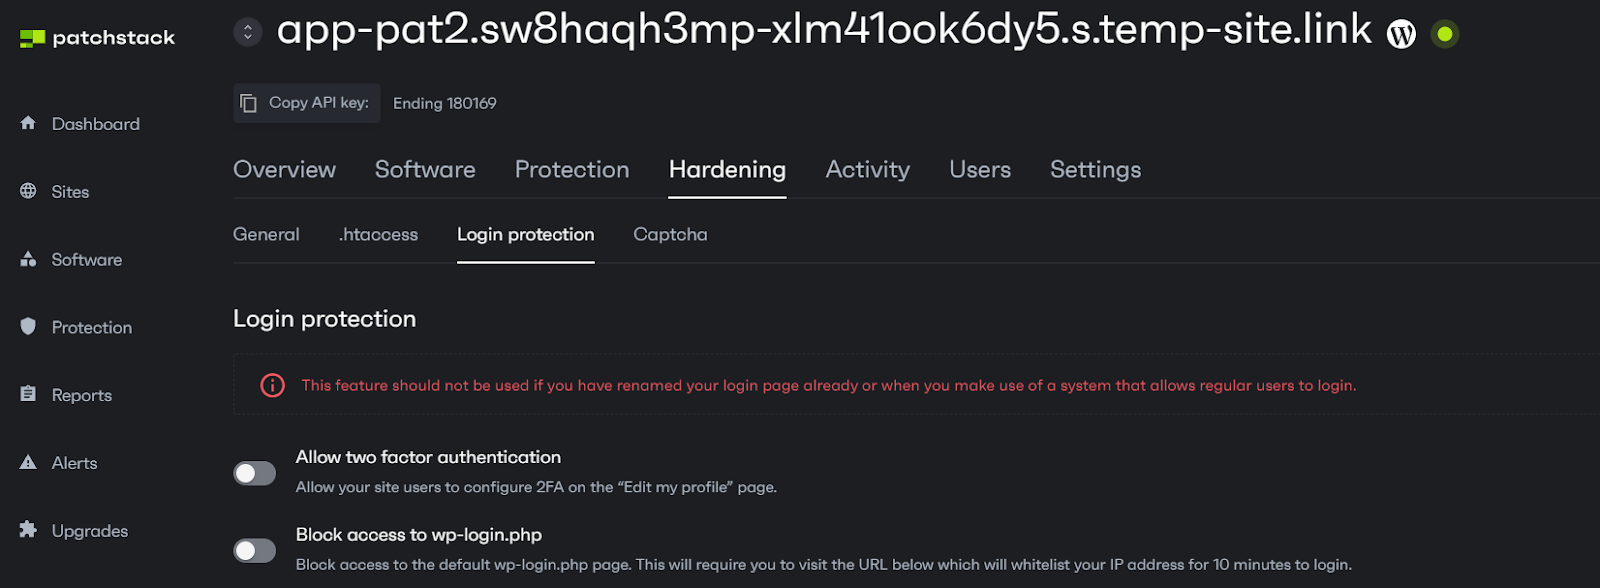
    2. Access Patchstack Options: Once activated, you must integrate your WordPress website with your Patchstack account. In your Patchstack dashboard you can access the Patchstack configuration options by navigating to “Hardening” > “Login Protection” within your Patchstack dashboard. This section provides various settings related to login security, including the IP whitelisting feature.
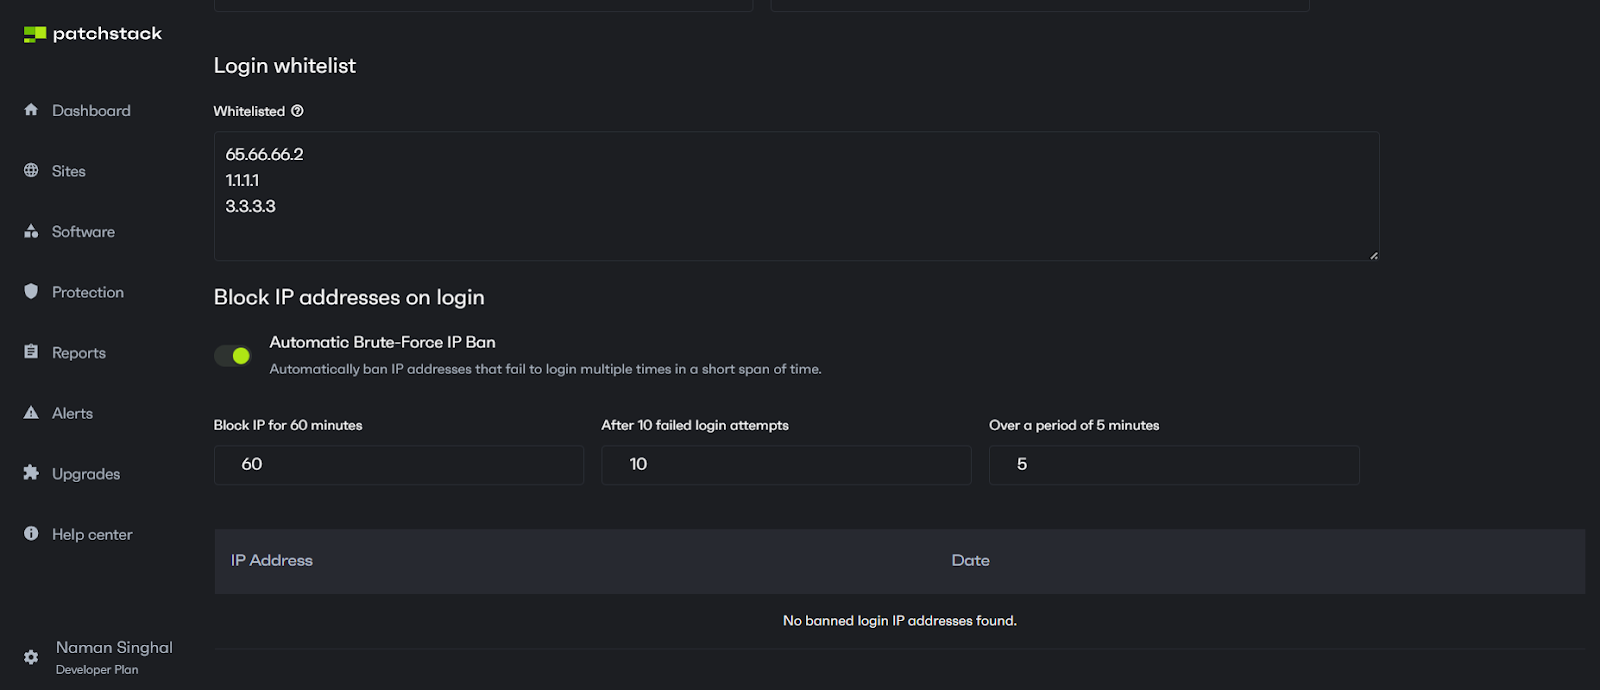
    1. Add IP Addresses to Whitelist: Within the “Login Protection” settings, locate the section dedicated to whitelisting IP addresses. Here, you can enter the IP addresses you wish to allow access to your WordPress admin area, ensuring they are never blocked due to failed login attempts or other security measures. Each IP address must be entered on its own line, and Patchstack supports several formats for defining IP ranges.
      The following formats are accepted:
      • 127.0.0.1: A specific IP address.
      • 127.0.0.*: A wildcard, allowing all IP addresses within the 127.0.0 range.
      • 127.0.0.0/24: CIDR notation specifies a range of IP addresses (in this case, 127.0.0.1 to 127.0.0.255).
      • 127.0.0.0-127.0.0.19: An IP range using a hyphen to define the start and end of the range.
    2. Save Changes: After adding the desired IP addresses to the whitelist, click the “Save Changes” button at the bottom of the page. This action will save your configurations and activate the IP whitelisting, ensuring that only the specified IP addresses can access your WordPress admin area without being subject to blocking rules.
    Suggested Read: How to Set or Change System Hostname in Linux

    Wrapping Up: Who Should Restrict Admin Access by IP Address?

    The short answer: nearly everyone running a WordPress site should strongly consider restricting admin access by IP address. While it might seem like an advanced security measure, the risk of leaving your admin area wide open to brute-force attacks and unauthorized logins far outweighs the perceived complexity.

    Protecting your WordPress backend is very important whether you’re a small business owner, a blogger, or a large enterprise.

    RunCloud’s intuitive interface significantly simplifies blocking unwanted IPs and managing server configurations. Editing your .htaccess file (for Apache servers) or your NGINX configuration becomes a breeze within the RunCloud panel.

    Compared to restrictive hosting panels, RunCloud offers limitless flexibility. You have complete control over your server environment, and RunCloud allows you to optimize your WordPress site for maximum security and performance.

    Speaking of performance, RunCloud’s optimized server configurations, combined with the added security of IP restriction, can lead to a faster, more responsive website. By blocking malicious traffic before it even reaches your server, you reduce the load on your resources, which improves page load times and enhances the overall user experience.

    Sign up for RunCloud today.

    FAQs on Restricting WordPress Admin Access by IP Address

    Can I restrict access to multiple IP addresses?

    You can restrict access to the WordPress admin area (/wp-admin) to multiple specific IP addresses by adding multiple Allow from lines in your .htaccess file. This allows trusted team members or developers from different locations to access the backend. RunCloud’s robust server management features and built-in web firewalls can complement this by providing additional layers of security beyond IP restrictions.

    What happens if my IP address changes?

    If your IP address changes, you will be locked out of your WordPress admin area. You’ll need to update the .htaccess file with your new IP address. Consider using a static IP address or a dynamic DNS service if your IP changes frequently to avoid constant updates.

    Is it safe to edit the .htaccess file?

    Editing the .htaccess file can be risky if done incorrectly, as it can potentially cause website errors or make it inaccessible entirely.

    What security plugins work best for IP restriction?

    Patchstack provides a user-friendly interface and additional security features beyond simple IP restrictions. These features work well with RunCloud’s server-level security and built-in firewalls.

    How do I know if my site is secure after making changes?

    After implementing IP restrictions, test the configuration by attempting to access the WordPress admin area from an IP address that is not allowed. If you are blocked, the restriction is working correctly.

    What are the risks of not restricting admin access?

    Failing to restrict access to your WordPress admin area significantly increases the risk of brute-force attacks, unauthorized access, and potential website compromise. Hackers can exploit vulnerabilities or use stolen credentials to gain control of your site, leading to data breaches, malware injection, and reputational damage. RunCloud’s web application firewall helps mitigate some of these risks, but IP restriction adds a crucial layer of defense.

    How can I temporarily allow access from another location?

    To temporarily allow access from another location, you can add appropriate rules to whitelist the new IP address in the .htaccess file. Remember to remove it when access is no longer needed to maintain security.

  • SQLite vs MySQL vs PostgreSQL – The Search For The “Best” Relational Database Management System

    SQLite vs MySQL vs PostgreSQL – The Search For The “Best” Relational Database Management System

    Choosing the right relational database management system (RDBMS) is like picking the foundation for a skyscraper: get it wrong, and your entire application could wobble under pressure.

    Buzzwords such as SQLite, MySQL, and PostgreSQL are dominating the open-source RDBMS communities, but many developers want to know one simple thing:

    Which one aligns with their project’s scale, security, and performance needs?

    This guide discusses these three database management systems to help you make an informed decision. You’ll explore their advantages and disadvantages, from SQLite’s serverless architecture for embedded applications to MySQL’s client-server model powering multi-user web applications and PostgreSQL’s ACID-compliant engine built for complex queries and enterprise-grade scalability.

    By the end, you’ll understand:

    1. When to leverage SQLite’s lightweight portability vs. MySQL’s replication or PostgreSQL’s extensibility.
    2. How security features such as user authentication vary across platforms.
    3. Why scalability demands differ: horizontal scaling vs. cluster.

    Let’s get started!

    What Is SQLite?

    SQLite is a serverless, self-contained RDBMS designed for simplicity and portability. Unlike traditional databases, SQLite operates differently from conventional databases you might be familiar with. Instead of running as a separate service that your application talks to, SQLite integrates directly into your application’s code. Its lightweight architecture makes it ideal for scenarios where minimal setup and resource usage are critical.

    When building a mobile app, SQLite becomes part of your application package, requiring no additional installation or configuration steps for your users.

    Let’s explore what makes SQLite unique through a real-world scenario. Imagine you’re developing a note-taking app. With SQLite, you can create a database that’s just a single file on the user’s device. Here’s how you might initialize a connection:

    import sqlite3
    # Creates a new database file or connects to existing one
    conn = sqlite3.connect('notes.db')
    # Create a table for storing notes
    conn.execute('''
        CREATE TABLE IF NOT EXISTS notes (
            id INTEGER PRIMARY KEY,
            title TEXT NOT NULL,
            content TEXT,
            created_at TIMESTAMP DEFAULT CURRENT_TIMESTAMP
        )

    Advantages of SQLite

    SQLite solves several problems that junior developers commonly encounter. Its ACID compliance ensures your data remains consistent even if your application crashes unexpectedly. This means if your user is saving a note and their battery dies, they won’t lose their data.

    The database is incredibly portable – it’s just a single file that you can copy, back up, or move between devices. This makes development and testing straightforward. You can even email the entire database to a colleague for debugging!

    Finally, the best part is that you don’t need to configure anything. Once you integrate the library into your application code, you can start using it without needing to start a separate database daemon.

    Suggested read: How to Connect a MySQL Database to PHP (A Developer’s Guide)

    Disadvantages of SQLite

    SQLite is a great tool, but it isn’t suitable for every scenario. It can become a bottleneck when multiple users need to write to the database simultaneously. This is because it implements database-level locking rather than table – or row-level locking.

    For example, if you’re building a multi-user chat application where hundreds of messages might be written per second, SQLite would struggle because it can only handle one write operation at a time. In such cases, a client-server database like PostgreSQL would be more appropriate.

    SQLite’s lack of built-in user management means you’ll need to handle authentication and authorization at the application level rather than relying on database-level security features. This security model relies entirely on file system permissions, which means anyone with access to the database file can potentially read or modify its contents without any authentication.

    Regarding scalability, SQLite starts showing its limitations once your dataset grows beyond a few gigabytes or when you need to handle multiple concurrent users making frequent write operations. The single-file architecture that makes SQLite so portable becomes a bottleneck in complex environments where multiple users need to perform simultaneous write operations, as the entire database file gets locked during writes.

    When to Use SQLite?

    SQLite excels in specific scenarios that you’ll often encounter as a developer. It’s perfect for:

    • Creating local data stores in mobile applications where you need to cache data for offline use. Consider how video games store your game progress offline – SQLite would be ideal.
    • Developing prototypes or proof of concepts where you need a quick database setup without infrastructure overhead. You can later migrate to a more robust solution if required.
    • Building embedded applications where installing and maintaining a separate database server would be impractical or impossible. Think of IoT devices or desktop applications that need to store structured data locally.

    Suggested read: How to Change/Reset MySQL Root Password on Ubuntu Linux?

    What Is MySQL?

    MySQL is an open-source RDBMS renowned for its speed, reliability, and ease of use. For these reasons, it has become the backbone of modern web applications and powers many websites and applications you use daily.

    MySQL operates on a client-server architecture, which means it runs as a separate service that your applications connect to rather than being embedded within them. This architecture creates a clear separation between your application and the database, allowing multiple applications to access the same data source securely.

    To help you visualize this, imagine a restaurant where waiters (your applications) take customer orders and communicate with the kitchen (MySQL server) to store and retrieve information.

    Here’s an example of how you might connect to MySQL in a Python application:

    import mysql.connector
    # Establish connection to MySQL server
    connection = mysql.connector.connect(
        host="localhost",
        user="your_username",
        password="your_password",
        database="your_database"
    )
    # Create a cursor to execute queries
    cursor = connection.cursor()
    # Create a table for storing user data
    cursor.execute('''
        CREATE TABLE IF NOT EXISTS users (
            id INT AUTO_INCREMENT PRIMARY KEY,
            username VARCHAR(50) NOT NULL UNIQUE,
            email VARCHAR(100) NOT NULL,
            created_at TIMESTAMP DEFAULT CURRENT_TIMESTAMP
        )
    ''')

    Advantages of MySQL

    MySQL’s strength lies in its ability to handle complex data relationships while maintaining impressive performance. When building a web application, MySQL’s transactional support ensures that your data remains consistent even during high-traffic periods. For instance, in an e-commerce system, MySQL can handle thousands of simultaneous orders while ensuring that product inventory stays accurate and customer data remains secure.

    MySQL provides a rich set of data types that help you store information efficiently. These data types are specialized containers: you wouldn’t store soup in a shopping bag or groceries in a thermos. Similarly, MySQL offers specific data types for different kinds of information. For numerical data, you have options like INT for whole numbers and DECIMAL for precise financial calculations. VARCHAR allows for flexible strings for text, while TEXT handles larger documents.

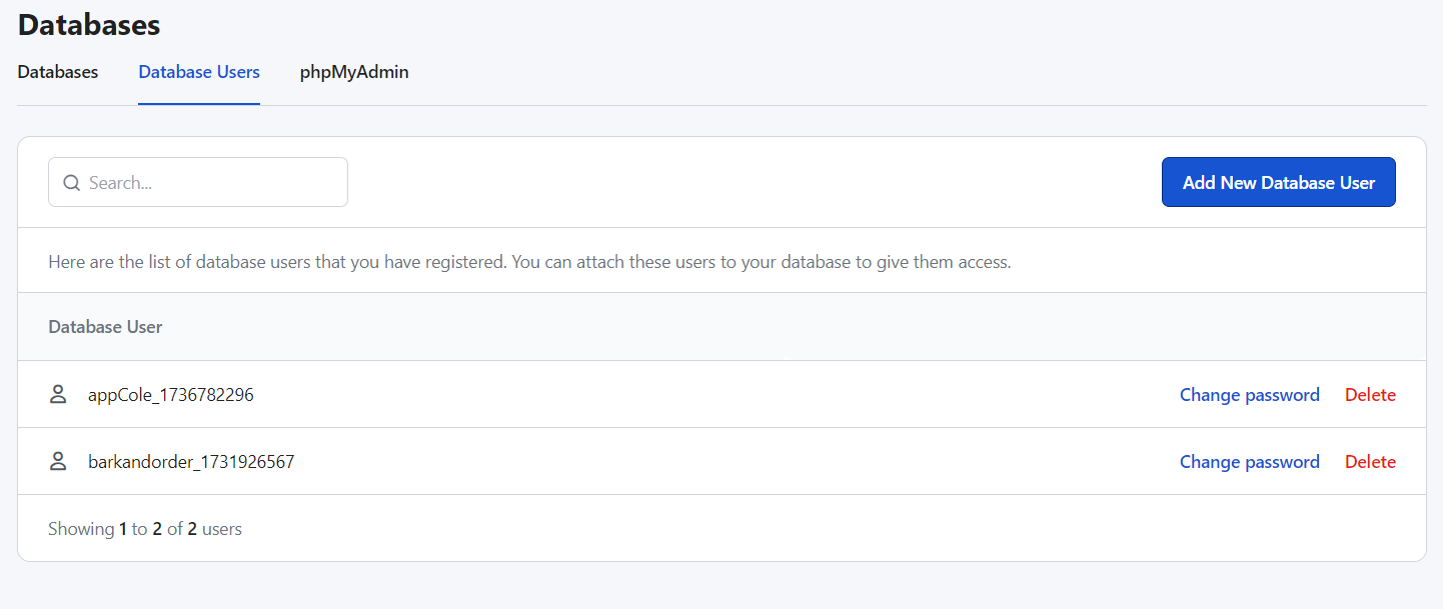
    Security is another strong point of MySQL’s design. Unlike simpler databases, MySQL implements a sophisticated user management system that lets you control exactly who can access what data. You can grant specific permissions to different users, much like how a building’s security system might give different access cards to employees based on their roles.

    MySQL database credentials in RunCloud dashboard

    Disadvantages of MySQL

    Unlike other database systems that strictly follow SQL standards, MySQL takes a more flexible approach that can sometimes create unexpected challenges. For example, if you’re writing a query that works perfectly in PostgreSQL, you might find that the same query fails or behaves differently in MySQL because it handles certain SQL functions and features uniquely. This becomes particularly important when you’re working on projects that might need to switch database systems in the future, as you’ll need to review and potentially rewrite your queries to ensure compatibility carefully.

    Furthermore, while you can scale MySQL server vertically by adding more resources such as RAM or CPU to your existing server, it faces challenges when you need to scale horizontally by adding more servers.

    If you’re building an application that needs to store and query complex JSON documents, you’ll find that MySQL’s JSON support, while improved in recent versions, still lacks some of the powerful features you might find in MongoDB or PostgreSQL. Similarly, if you’re working with location-based services, MySQL’s GIS capabilities might require additional workarounds or external tools to achieve what other databases offer out of the box.

    Suggested read: MariaDB vs MySQL – A Detailed Comparison in 2024

    When to Use MySQL

    MySQL shines brightest in scenarios where you need a reliable, well-supported database for web applications. It’s particularly well-suited for:

    • Building content management systems where you need to handle multiple users accessing and modifying content simultaneously. Consider how a news website manages numerous editors updating articles while thousands of readers access the content.
    • Maintaining transactional integrity through its robust ACID compliance. This becomes particularly valuable in scenarios like financial systems or e-commerce platforms, where MySQL can maintain a reliable audit trail of all transactions while guaranteeing that related operations (like deducting money from one account and adding it to another) remain consistent even if system failures occur during the process.

    Pro Tip: Use RunCloud to simplify MySQL or PostgreSQL management. Our platform offers one-click PHPMyAdmin installation, automated backups, and real-time monitoring (ideal for WordPress sites and high-traffic apps). Explore RunCloud’s database tools to streamline your workflow.

    What Is PostgreSQL?

    PostgreSQL, often called Postgres, is an open-source object-relational database management system (ORDBMS) that provides relational database principles and object-oriented features. This means you can store data in traditional tables while also defining custom data types, operators, and functions tailored to your application’s needs. For example, a logistics app might create a location data type to natively handle latitude and longitude coordinates.

    PostgreSQL is renowned for its extensibility and strict adherence to SQL standards, making it one of the best choices for applications demanding precision and scalability. It offers advanced features such as multi-version concurrency control (MVCC), which allows multiple users to read and write data simultaneously without locking conflicts.

    This feature is immensely useful for large e-commerce platforms where hundreds of users browse products while admins update inventory. Additionally, its support for JSONB (a binary JSON format) enables efficient querying of unstructured data, such as user profiles with varying attributes.

    Suggested read: How To Install phpMyAdmin Easily Using RunCloud

    Advantages of PostgreSQL

    PostgreSQL provides unmatched flexibility and performance for complex workloads. It supports advanced data types, such as geometric shapes for mapping apps, network addresses for IP management, and JSONB for semi-structured data. This allows developers to model diverse datasets without workarounds. For instance, a ride-sharing app can store and query GPS coordinates directly using PostgreSQL’s POINT data type.

    Unlike some databases that sacrifice consistency for speed, PostgreSQL maintains reliability even during high concurrency. Developers can also use its extensible catalog system, which stores metadata about tables, functions, and data types to build customizations and modify default behavior. For example, you could build a custom indexing method to optimize search queries for a niche use case.

    Furthermore, PostgreSQL is part of a thriving open-source community that provides extensive documentation and plugins. This ecosystem allows teams to implement features like real-time analytics or full-text search without relying on external tools.

    Disadvantages of PostgreSQL

    While PostgreSQL is powerful, it does have its own set of trade-offs. Its memory usage can challenge resource-constrained environments as each connection allocates ~10 MB of RAM. For example, a server with 1 GB of memory might struggle with over 100 concurrent connections. In these cases, scaling vertically (upgrading hardware) often becomes necessary, which can increase costs.

    Additionally, newcomers may find PostgreSQL’s advanced features overwhelming. Setting up replication or configuring write-ahead logging (WAL) requires deeper expertise than MySQL’s more straightforward replication tools. Furthermore, while cloud providers such as AWS and Google Cloud offer managed PostgreSQL services, these options are fewer than MySQL’s widespread integrations, potentially complicating DevOps workflows.

    Suggested read: How to Install WordPress with Apache on Ubuntu (2025)

    When to Use PostgreSQL

    PostgreSQL is often not recommended for beginner-friendly projects. You should choose PostgreSQL when your project demands rigorous data integrity, complex queries, or specialized data types. Consider using PostgreSQL if you plan to use one of its advanced features, such as:

    1. Data Analytics: Use window functions or JSONB aggregation for business intelligence tools.
    2. Geospatial Applications: Leverage PostGIS to manage location data for mapping services.
    3. Enterprise Systems: Ensure ACID compliance for banking or healthcare software where audit trails are mandatory.

    SQLite vs. MySQL vs. PostgreSQL: Detailed Comparison Table

    FeatureSQLiteMySQLPostgreSQL
    ArchitectureServerless, embeddedClient-serverClient-server
    ConcurrencySingle-writerRow-level lockingMVCC for high concurrency
    ScalabilityLimited to local useVertical scalingHorizontal/vertical scaling
    SecurityFile system-dependentAdvanced user roles, SSL supportRow-level security, Transparent Data Encryption options
    Data TypesBasic (TEXT, INTEGER, BLOB)Standard + extensionsAdvanced (JSONB, UUID, Geometry, etc.)
    Use CaseEmbedded apps, testingWeb apps, CMSEnterprise systems, analytics

    Wrapping Up: Which One Should You Choose?

    This guide has provided an overview of the most popular database management tools available. If you are in a rush, you should just note the following:

    • SQLite excels in simplicity for small projects or environments with limited resources.
    • MySQL strikes a balance for web apps needing speed and ease of management.
    • PostgreSQL shines in complex, data-intensive applications requiring flexibility and compliance.

    If you need a modern web hosting platform for your business, you should look no further than RunCloud.

    RunCloud simplifies MySQL and PostgreSQL management with intuitive dashboards, security hardening, and automated backups. Learn how to connect MySQL to PHP or install WordPress with Apache seamlessly.

    Start using RunCloud today

    FAQs on SQLite vs. MySQL vs. PostgreSQL

    Why is SQLite so popular?

    SQLite’s serverless design and portability are perfect for embedded systems and lightweight apps. It is ACID compliant and requires zero-configuration setup, which reduces development overhead, especially for mobile or IoT projects.

    Can SQLite replace MySQL?

    Yes, but only for small-scale, single-user applications. SQLite lacks MySQL’s concurrency and security features, which makes it unsuitable for web apps or high-traffic environments.

    What are the limitations of SQLite?

    SQLite struggles with multi-user access, large datasets (>1 TB), and concurrent write operations. Additionally, it doesn’t handle security, and access control depends entirely on file system permissions.

    Is PostgreSQL better than MySQL for data analysis?

    Yes. PostgreSQL supports advanced JSONB queries, window functions, and custom aggregates. This makes it superior for analytics. MySQL focuses on transactional speed rather than complex analytics.

    Which database is best for scalability?

    PostgreSQL leads with horizontal scaling via partitioning and sharding. MySQL requires tools like NDB Cluster for similar scalability, while SQLite is not designed for distributed setups.

  • How to Set Up & Manage WordPress Cron Jobs

    How to Set Up & Manage WordPress Cron Jobs

    Is your WordPress site sluggish? Are scheduled tasks failing silently, leaving your content stale and updates incomplete?

    If you answered yes to any of the above questions, then you need to look into your WordPress cron job schedule.

    This post will provide a clear and concise explanation of WP-Cron – the built-in scheduling system for WordPress. We’ll break down how it works, highlighting its strengths and weaknesses, as well as how to disable it.

    You’ll also learn why relying solely on the default WP-Cron can lead to performance issues and missed scheduled tasks, and how it can impact everything from post-publishing to plugin updates.

    Finally, we will provide practical, step-by-step instructions on setting up robust server-side cron jobs.

    Let’s get started!

    What Is WordPress Cron?

    WordPress Cron (sometimes referred to as WP-Cron) is a specialized PHP-based scheduling system uniquely designed to manage background tasks within the WordPress ecosystem.

    Traditional UNIX cron jobs execute background tasks with precise system-scheduled timings; however, WP-Cron uses a more dynamic and WordPress-specific approach to task management. Although it has a similar name, it fundamentally differs from traditional cron jobs in its execution methodology. This provides a more flexible (potentially less reliable) task scheduling mechanism tailored specifically to the WordPress platform’s architectural requirements.

    Why Do We Need WordPress Cron?

    The primary purpose of WordPress Cron is to automate repetitive background tasks without requiring manual intervention.

    For example, websites require numerous periodic tasks to be executed for proper functioning, such as:

    • Publishing scheduled posts
    • Checking for software updates
    • Performing routine maintenance
    • Sending automated emails
    • Synchronizing external services

    WordPress Cron ensures these critical background processes occur automatically on a pre-defined schedule.

    Automating these mundane tasks reduces administrative overhead and maintains the smooth functioning of WordPress websites without constant human oversight.

    How Does WordPress Cron Work?

    WordPress provides several default time intervals for scheduling tasks. These default scheduling intervals allow website administrators to configure tasks with varying frequencies:

    1. Hourly Tasks: Executed approximately every 60 minutes
    2. Twice Daily Tasks: Performed two times within a 24-hour period
    3. Daily Tasks: Executed once every 24 hours
    4. Weekly Tasks: Performed once every seven days

    This interval-based approach provides flexibility in managing background processes while maintaining a relatively lightweight scheduling mechanism that doesn’t require extensive server resources.

    Although cron jobs are scheduled to be executed at a given frequency, they don’t always get executed at the correct time. The WP-Cron mechanism triggers scheduled tasks during website page loads, which means the execution of background processes is intrinsically linked to user traffic and website interactions.

    When a user visits a WordPress website, the system checks for any pending scheduled tasks and attempts to execute them during that page load. This creates a dynamic scheduling mechanism that is dependent on website traffic.

    Limitations of WordPress Cron

    Despite its innovative design, WP-Cron has a few limitations that can impact website performance and reliability.

    Visitor-Dependent Execution

    The most critical drawback of WP-Cron is its complete dependence on website visitors. Unlike traditional cron jobs that run at predetermined times regardless of website traffic, WP-Cron only gets triggered when a webpage loads. Scheduled tasks are not guaranteed to execute precisely at their intended times, which can be problematic for time-sensitive operations like publishing content, sending notifications, or performing critical maintenance tasks.

    This means websites experiencing low traffic might encounter missed or delayed scheduled tasks. If a low-traffic website remains inactive for an extended period, it can result in missing critical security updates and fixes, leading to a security breach.

    Performance Considerations

    The WP-Cron mechanism can marginally increase page load times, as each page request requires checking and potentially executing scheduled tasks. This additional processing might create minor performance bottlenecks on high-traffic websites, especially if multiple complex tasks are scheduled simultaneously.

    How to Set Up A WordPress Cron Job

    Due to the limitations above, many experienced website administrators and developers prefer replacing WordPress cron with server-level cron jobs. These traditional cron jobs offer more reliable, precise, and predictable task scheduling, independent of website traffic and page load dynamics.

    There are multiple ways to do this – here are a few alternative methods.

    Setting Up WordPress Cron Jobs in RunCloud

    Setting up a WordPress cron job through the RunCloud dashboard is straightforward and allows you to efficiently manage your website’s background tasks.

    Before you begin, ensure you have access to your RunCloud dashboard and know the specific details of the web application where you’ll be implementing the cron job.

    Start by logging in to your RunCloud dashboard and navigating to the server hosting your WordPress website.

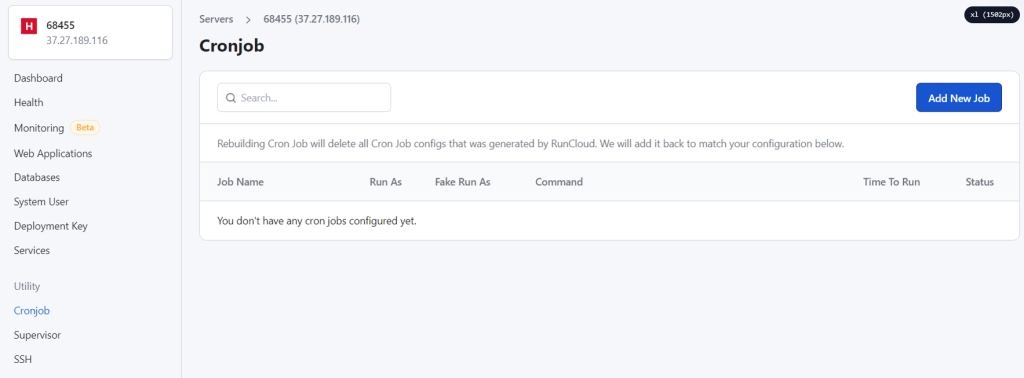
    Look for the sidebar menu and select the Cronjob option. This will open the cron job configuration interface, where you’ll set up your scheduled task.

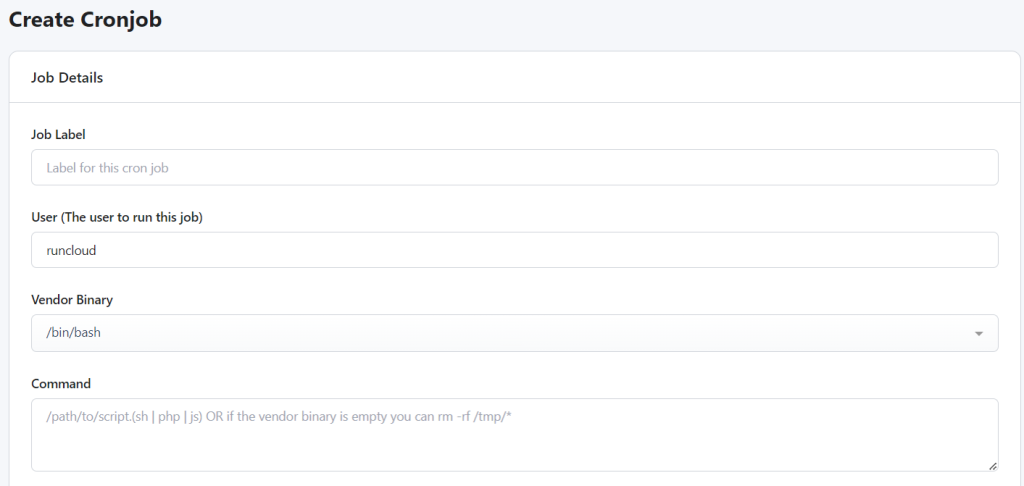
    Click on Add New Job. This will take you to a new screen where you’ll first need to provide a descriptive label that helps you identify the task’s purpose. Choose a name that clearly indicates the job’s function, such as “WordPress Scheduled Tasks” or “Daily Content Sync.”

    Next, select the system user responsible for running the cron job, which is typically the web application’s owner.

    creating cron jobs in RunCloud

    For most WordPress cron jobs, you’ll want to use WP-CLI, which provides the most flexible approach to managing scheduled tasks. Select the option to write your command in the Vendor Binary dropdown. Depending on your WordPress installation type, you’ll use a specific command:

    For Single-Site WordPress Installations

    Use the following command, replacing “/path/to/wordpress/root” with your actual WordPress root directory:

    wp cron event run --path="/path/to/wordpress/root" --due-now

    For Multisite WordPress Installations

    Use a more advanced command that handles multiple sites:

    wp_path="/path/to/wordpress/root" ; wp site list --field=url --deleted=0 --archived=0 --path=$wp_path | xargs -I {} wp cron event run --due-now --url="{}" --quiet --path=$wp_path

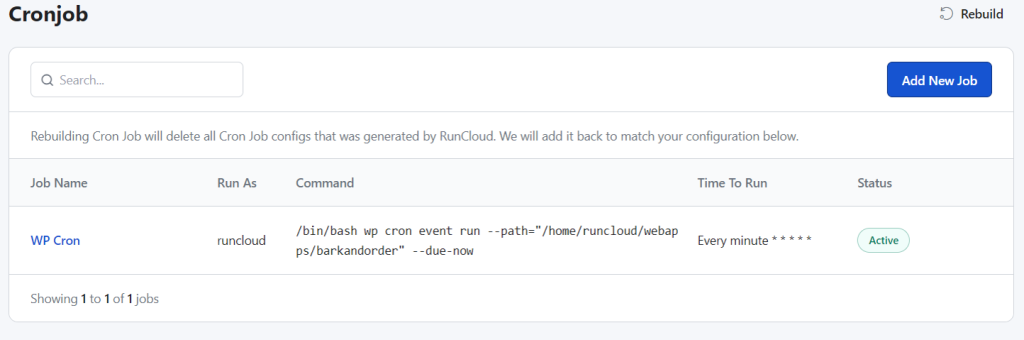
    After this, determine how often you want the cron job to run. For most WordPress websites, setting the job to run every 5-10 minutes provides a good balance between responsiveness and server resource usage. Use the frequency dropdown to select your preferred interval, then hit Save to enable the cron job.

    how to create WordPress cron jobs in Linux

    Suggested read: How To Create Custom NGINX Configuration Easily Using RunCloud

    How To Set Up Server-Side WordPress Cron Events in cPanel

    If you are not using RunCloud (yet!) to manage and deploy your web applications, here’s how to set up server-side cron jobs in cPanel. Begin by logging in to your cPanel account with administrative credentials. Navigate to the Advanced section and locate the Cron Jobs management tool. This interface allows you to create and manage scheduled tasks that run independently of website traffic.

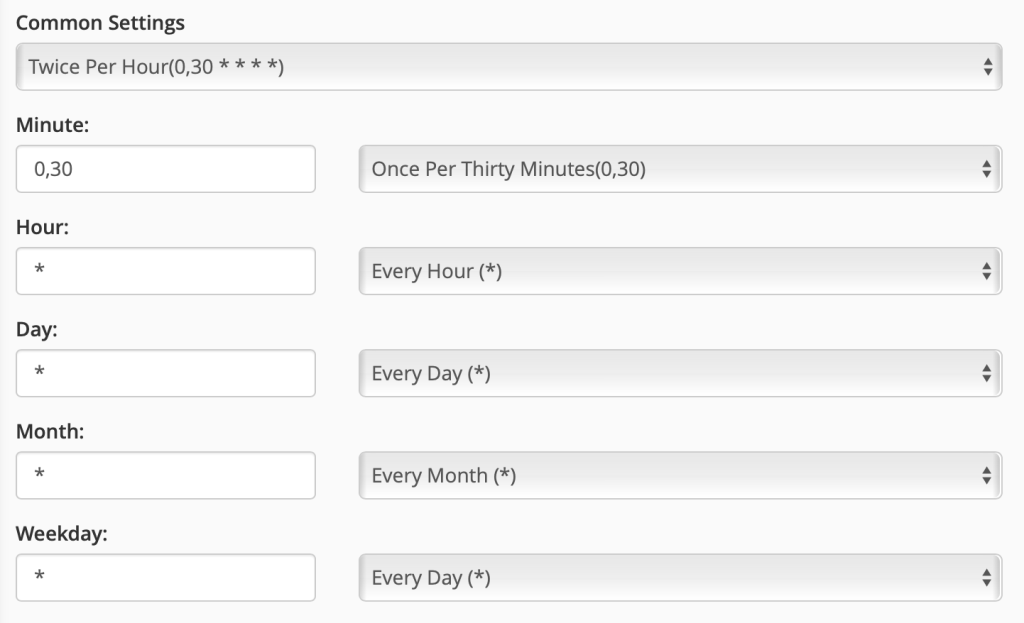
    In the Add New Cron Job section, you’ll encounter an interval configuration interface. The Common Settings dropdown offers predefined scheduling options that are good enough to meet most task requirements. Selecting ‘Once every 5 minutes’ for most WordPress websites provides an optimal balance between task frequency and server resource utilization.

    After this, replace the domain.com with the domain name of your website, and enter the following script in the provided text box in your cPanel dashboard:

    wget -q -O - https://domain.com/wp-cron.php?doing_wp_cron >/dev/null 2>&1

    This command performs several critical functions:

    • Triggers the WordPress cron process
    • Silently executes the wp-cron.php file
    • Suppresses email notifications with the >/dev/null 2>&1 directive

    After configuring the necessary fields, you can click Save to activate the cron job on your WordPress website.

    Disabling Default WordPress Cron

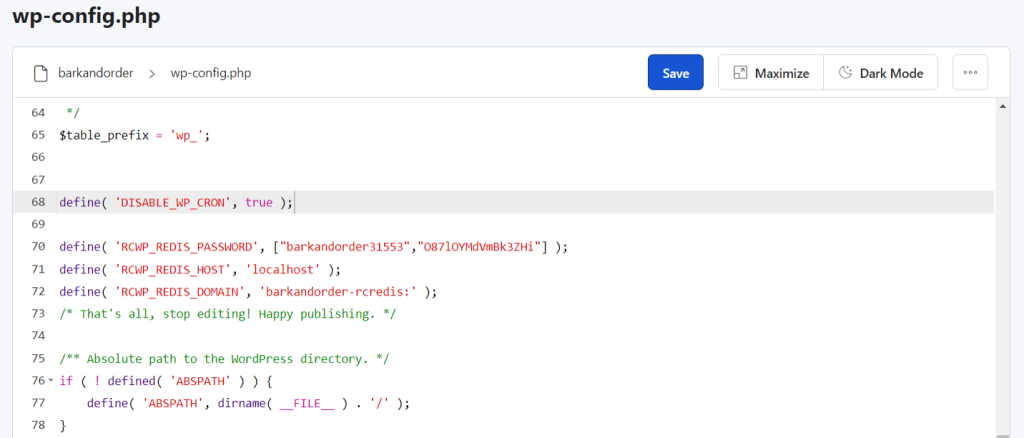
    After setting up your server-side cron job, disable WordPress’s default page-load-triggered cron mechanism to avoid duplicate cron executions. You can do this easily by editing your wp-config.php file and adding the following line:

    define( 'DISABLE_WP_CRON', true );

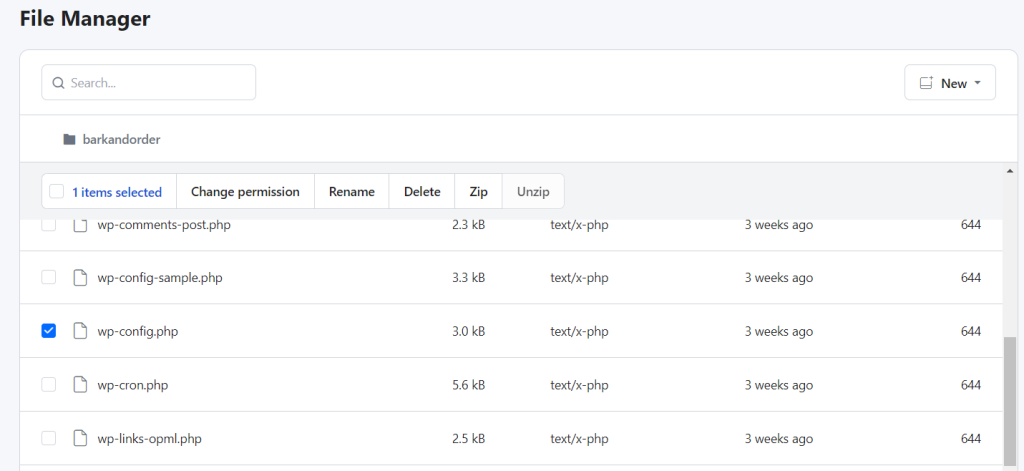
    The exact steps to edit your wp-config.php file will vary depending on your server architecture. However, if you are using RunCloud, you can easily edit your website configuration using the built-in file manager.

    Simply click on the File Manager button in the left menu and select the file that needs to be edited. This will open a new browser tab where you can make the necessary changes and save the file. Once the file is saved, the changes will be implemented immediately on your WordPress website.

    Final Thoughts

    Configuring and enabling cron jobs can be cumbersome and require some technical expertise, but RunCloud makes it easy and painless.

    RunCloud revolutionizes WordPress website management by providing a comprehensive, user-friendly platform that addresses many of the challenges WordPress administrators face. What sets RunCloud apart is its holistic approach to web hosting and management. The platform provides powerful features designed specifically for WordPress users, including atomic deployments, easy staging environments, one-click backups, and advanced user management.

    These tools solve the WP-Cron challenges and address broader website management needs, making them ideal solutions for small businesses and enterprise-level websites seeking reliable, scalable hosting infrastructure.

    With advanced cron job handling, seamless deployments, and robust server management, you’ll wonder how you ever managed without it.

    Don’t let technical complexities hold you back – sign up for RunCloud today and unlock your website’s full potential.

    WordPress WP-Cron FAQs

    What triggers WP-Cron?

    WP-Cron is a WordPress background task scheduling system that typically activates on each page load. However, this default mechanism can cause performance issues on high-traffic websites or sites with limited PHP workers, potentially leaving scheduled tasks in a waiting state.

    Where are WordPress cron jobs stored?

    WordPress cron jobs are stored in the website’s database within the wp_options table, specifically under the ‘cron’ option name. Developers can retrieve these scheduled tasks using PHP functions like get_cron_array() or get_option('cron').

    How do you test if WP-Cron is working?

    To test WP-Cron functionality, first check your wp-config.php file to ensure the DISABLE_WP_CRON constant is not set to true.

    How often should I run WP-Cron?

    Most WordPress sites function optimally with WP-Cron running approximately every 15 minutes. For more frequent scheduled tasks, you may need to adjust the interval to match your specific website requirements.

    Is WP-Cron enabled by default?

    Yes, WP-Cron is enabled by default in WordPress, as many core features depend on its scheduled job execution. You can manually enable or disable it by modifying the wp-config.php file with the DISABLE_WP_CRON constant.

    Can I delete WP-Cron?

    You cannot completely delete WP-Cron as it’s a built-in WordPress system. However, you can disable it and use alternative cron solutions.

  • How To Use Fail2ban With WordPress And Cloudflare Proxy

    How To Use Fail2ban With WordPress And Cloudflare Proxy

    According to financesonline.com, more than 80% of website breaches through hacking involved either brute force, or the use of lost or stolen credentials.

    If you’re running a website, it’s an almost certainty that your website is constantly being bombarded with login attempts. Unauthorized access is a matter of when, not if.

    To ensure your website is secure, and fully protected from this kind of attempted hack, it’s vital to start using a solution such as Fail2ban.

    Fail2ban is a software tool that automatically blocks suspicious IP addresses and prevents them from connecting to your server.

    In this article, we will explain exactly how to make sure that your website is fully protected the right way by showing you how to install and configure IP blocking for your WordPress website using Fail2ban.

    What Is Fail2ban?

    Fail2ban is an open-source software product that monitors log files for suspicious activity. It can be configured to take the action needed to prevent further attacks. This method is widely used to protect web servers, applications, and other network services from brute-force attacks and DDOS attacks.

    Fail2ban is configured by default on RunCloud for SSH logins. If you try to log in to your server via SSH with incorrect credentials, your own IP address will be temporarily banned and you will get the following error:

    ssh: connect to host example.com port 22: Connection timed out

    By configuring a few settings, this protection can also be applied to your WordPress login form.

    Configuring Fail2ban for WordPress

    Start by logging in to your server via SSH – make sure that you have superuser access.

    Locate Log Files

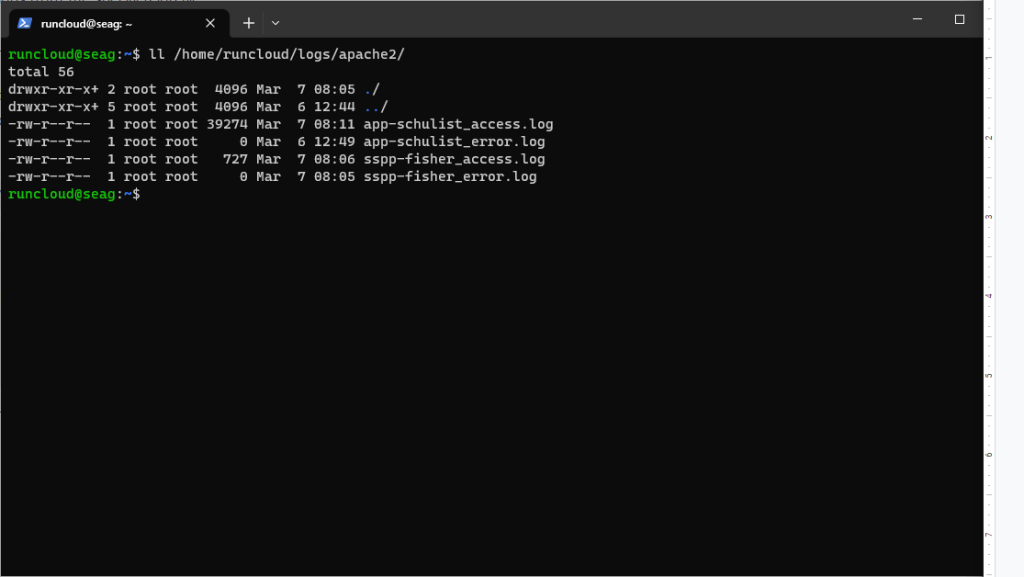
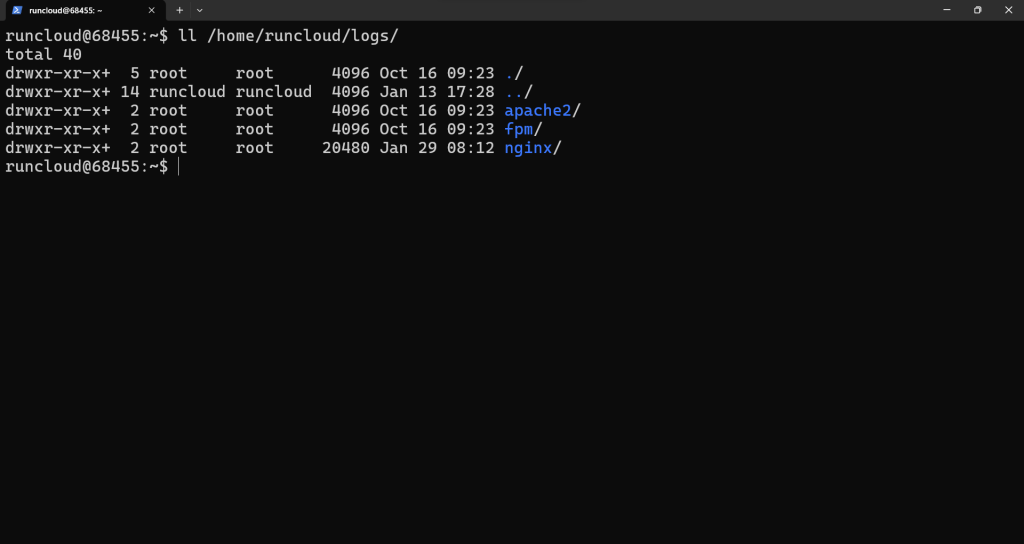
    On NGINX servers, RunCloud stores the log files in /home/runcloud/logs/apache2/ and /home/runcloud/logs/nginx/ – along with the name of each web application. Use the following command to see all available log files of Apache2:

    ll /home/runcloud/logs/apache2/

    In the above example we can see that there are two web applications running on the server, and each of those applications generate both an access log and an error log.

    If you are using RunCloud Docker servers, then you should note that the log processing for RunCloud Docker server is slightly different, even though it uses the RunCloud NGINX environment under the hood. On RunCloud Docker, you can find the NGINX log files in the /home/runcloud/logs/nginx/ directory.

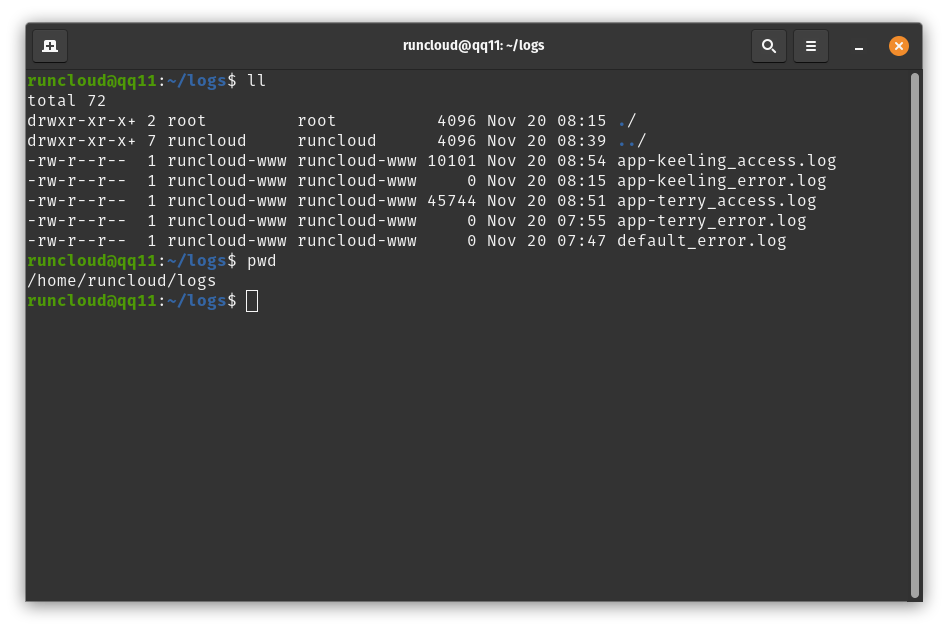
    On OpenLiteSpeed servers, these logs are stored at /home/runcloud/logs. Use the following command to view the logs stored on your server:

    ls -lah /home/runcloud/logs

    Let’s say we want to configure the Fail2ban for the “app-schulist” application.

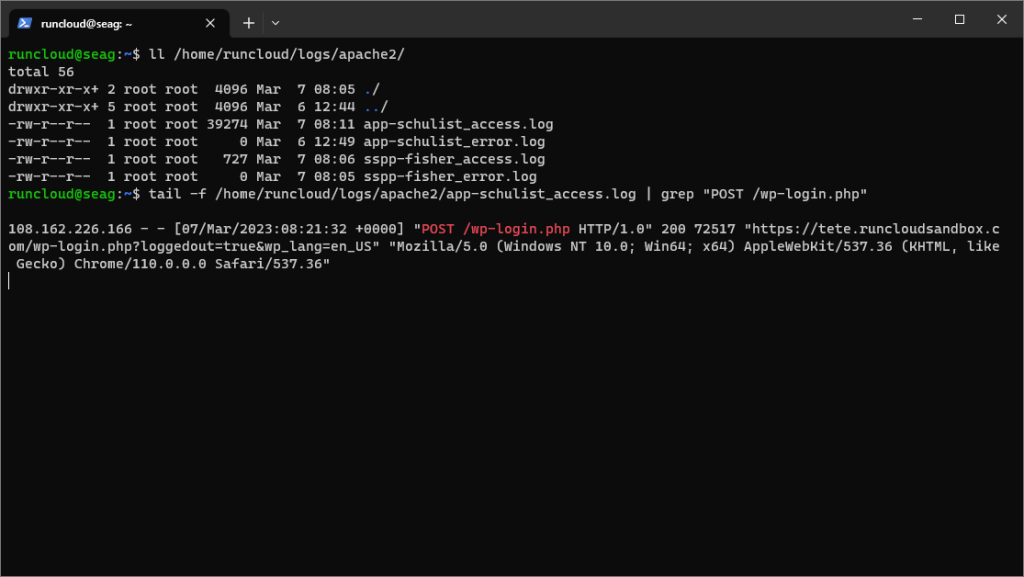
    We will begin by verifying whether the /home/runcloud/logs/apache2/app-schulist_access.log file is the correct log file to watch for failed login attempts. To do this, run the following command in your terminal to get notified about failed login attempts, (don’t forget to replace “app-schulist” with the name of your application):

    tail -f /home/runcloud/logs/apache2/app-schulist_access.log | grep "POST /wp-login.php"   

    After running the command, go to your WordPress dashboard and try logging in with invalid credentials. You should see a log message in your terminal for each failed login attempt.

    terminal screenshot of logs

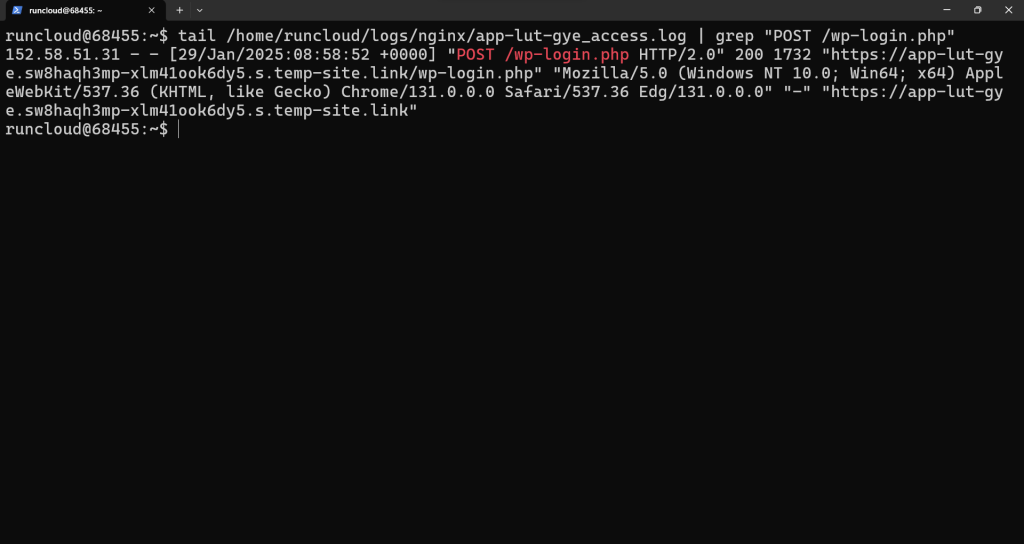
    Similarly, on RunCloud Docker, you can execute the following command to see recent login requests on your website, (don’t forget to replace “app-lut-gye” with the name of your application):

    tail /home/runcloud/logs/nginx/app-lut-gye_access.log | grep "POST /wp-login.php"

    In the above example, we can see that logs show one POST request was made to the /wp-login.php endpoint of the given website.

    If you are using OpenLiteSpeed servers, just change the path of the log file in the above command. It should look something like following example:

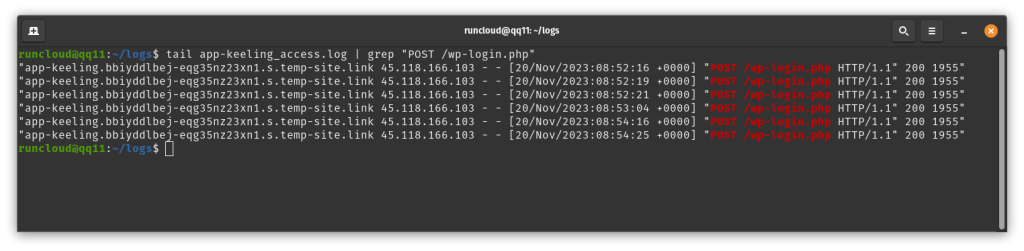
    tail -f /home/runcloud/logs/app-keeling_access.log | grep "POST /wp-login.php"

    Once you have verified the log file, press Ctrl + C in your terminal to stop monitoring for new log entries. Make sure to take a note of the location of this log file.

    Configuring Fail2ban Jail for NGINX and OpenLiteSpeed

    Fail2ban comes with a default configuration file that comes with sensible defaults. It is recommended to leave the default configuration files untouched. If you want to make any changes, you should create another configuration file that overrides the default configuration.

    Run the following command with root privileges in your terminal to create a new file and open it in a text editor:

    cp /etc/fail2ban/jail.{conf,local}
    nano /etc/fail2ban/jail.local

    Once you have opened the file, scroll down to the “jails” section using the arrow keys on your keyboard, and then paste the following code to create a new entry. (Once again, make sure to replace the name of the log file with the name that you noted in the last step.)

    [wordpress-auths]
    enabled = true
    port = http,https
    filter = wordpress-auth
    logpath = /home/runcloud/logs/apache2/app-schulist_access.log

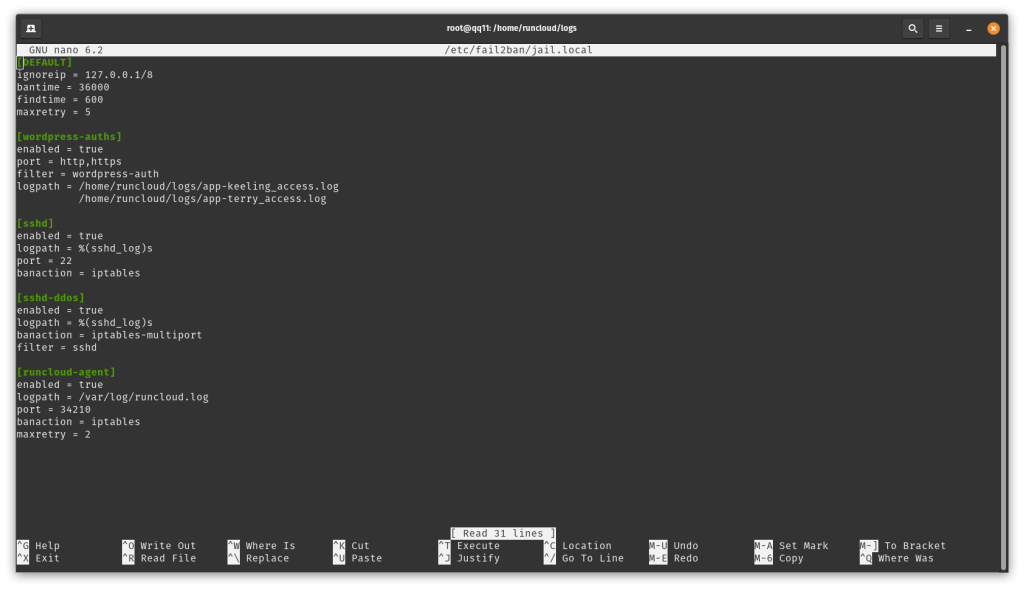
    If you have more than one WordPress website on your server, you can append more entries to the logpath variable (as shown above). This will ensure that all of the specified log files will be monitored for the given criteria.

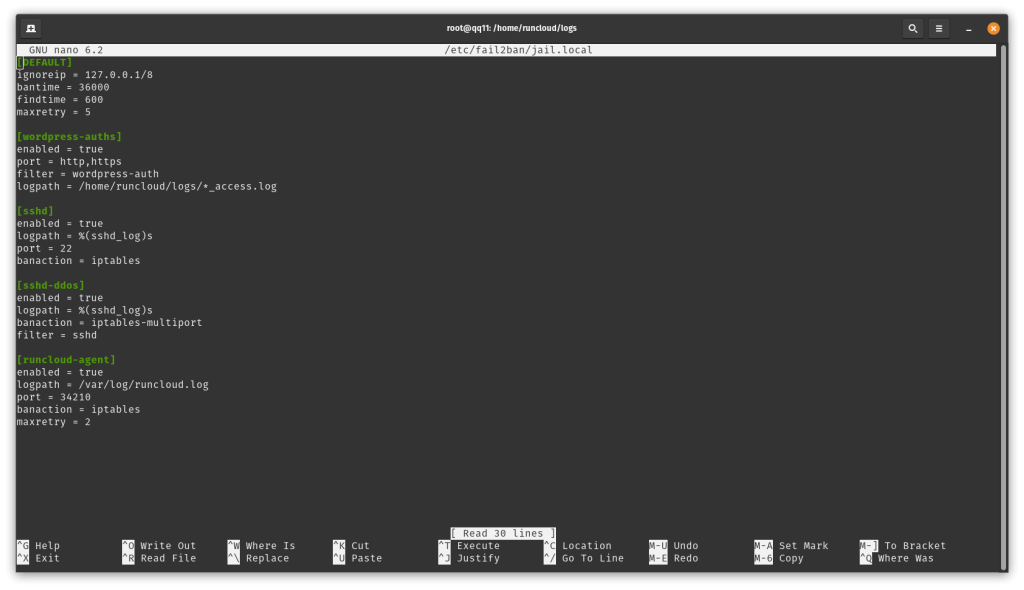
    If you don’t want to constantly add or remove the log path in the configuration file, you can replace the name of the application with * as shown below. This will ensure that all the log files in the given folder (and hence all the application on your server) are being monitored.

    However, you will need to reload Fail2ban after you deploy a new application on your server. You can do this easily, directly from the RunCloud dashboard, by creating a cron job with the appropriate command and running it manually when required.

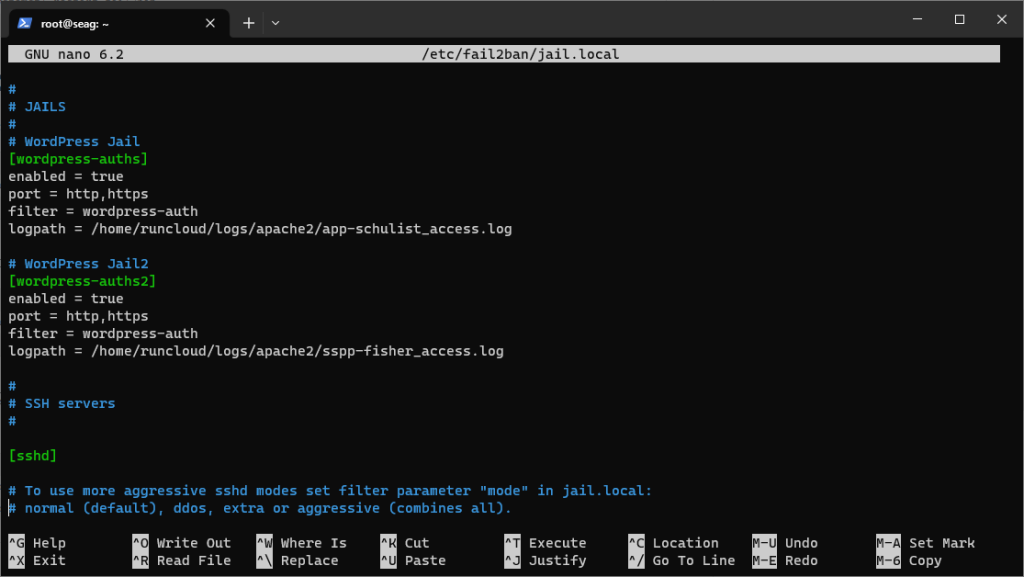
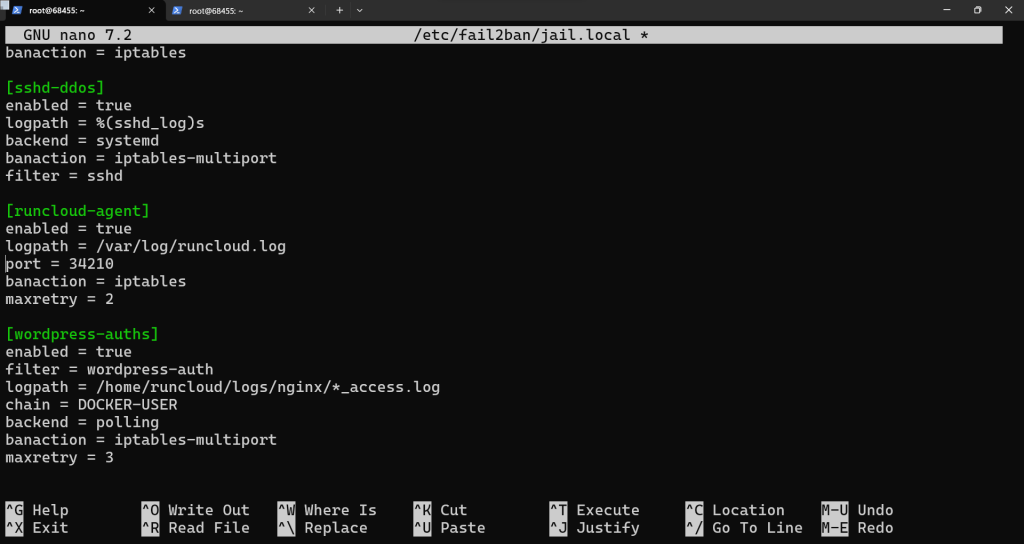
    If you want to have different settings for each web app, you can create a separate jail for each web application as shown below. Just make sure to specify the correct log files – and give each entry its own unique name (written in green).

    Fail2ban Config file

    After adding the necessary content, press Ctrl + O to save the file and press “Enter” to confirm it. Then press Ctrl + X to exit the text editor.

    Configuring Fail2ban Jail on Docker

    A standard Fail2Ban configuration is insufficient when you deploy Fail2Ban to protect services running inside Docker containers. You will discover that Fail2Ban doesn’t effectively block malicious traffic, even if your jail settings appear correct. That’s because Docker’s networking architecture requires a specific configuration tweak within Fail2Ban.

    By default, Fail2Ban inserts its blocking rules into the INPUT chain of iptables. However, Docker maintains its own set of iptables rules, and the traffic destined for containers bypasses the standard INPUT chain. Therefore, Fail2Ban’s rules, placed in the INPUT chain, are ignored when protecting Dockerized applications.

    To solve this issue, modify your settings to use the DOCKER-USER chain.

    This special chain allows for user-defined rules to be applied before Docker’s internal rules take effect. You can do this by adding chain = DOCKER-USER to your jail configuration.

    The above settings work for default RunCloud servers, but some servers might require you to explicitly define the banaction and backend directives to avoid unforeseen edge cases. To fix this, you should add the snippet banaction = iptables-multiport into your configuration file. This configuration allows you to block multiple ports with a single iptables rule.

    Next, you should add the backend = polling code snippet to configure how Fail2ban periodically polls the log files (i.e., check them at regular intervals) to see if new lines have been added. This is the simplest and most broadly compatible backend. After modifying the configuration, your jail configuration should look something like this:

    [wordpress-auths]
    enabled = true
    filter = wordpress-auth
    logpath = /home/runcloud/logs/nginx/*_access.log
    chain = DOCKER-USER
    backend = polling
    banaction = iptables-multiport
    maxretry = 3

    Creating a Fail2ban Filter

    Once you have created a jail, you’ll need to create the corresponding filter that tells Fail2ban which clients to ban in case of a malicious login attempt. Run the following command to create a new filter named wordpress-auth:

    nano /etc/fail2ban/filter.d/wordpress-auth.conf

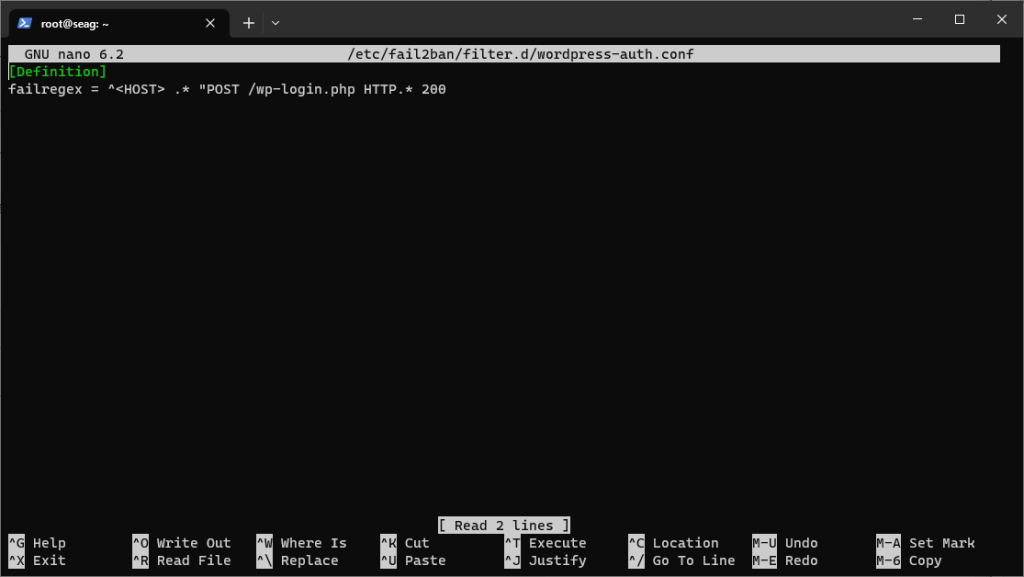
    Then paste the following text snippet to filter the failed login attempts on NGINX and Docker servers:

    [Definition]
    failregex = ^<HOST> .* "POST /wp-login.php HTTP.* 200
    fail2ban jail file

    For OpenLiteSpeed servers, the regex pattern is slightly different due to a difference in the log format.

    [Definition]
    failregex = .+ <HOST> .+POST \/wp-login\.php .*200

    Once again, press Ctrl + O to save the file and press “Enter” to confirm it. Then press Ctrl + X to exit the text editor.

    Testing The Fail2ban Filter (Optional)

    If you are making changes to the production environment, it’s advisable to test out the settings before applying the new ones. You can use the following command to check if a filter is working correctly:

    fail2ban-regex <path to log file> <path to filter>

    For example, the full command would look something like this:

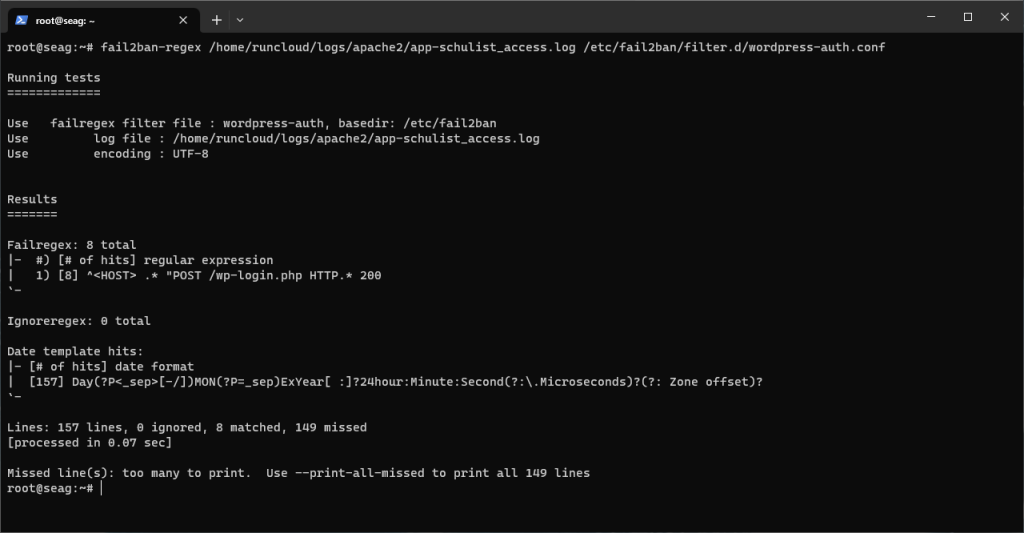
    fail2ban-regex /home/runcloud/logs/apache2/app-schulist_access.log /etc/fail2ban/filter.d/wordpress-auth.conf

    In the above message, “Failregex: 8 total” shows that 8 entries in our log file matched with the filter that we provided. This means that our Regex filter is working correctly. If you want to see which log entries are being matched, you can include --print-all-matched flag before the path of the log file. For example:

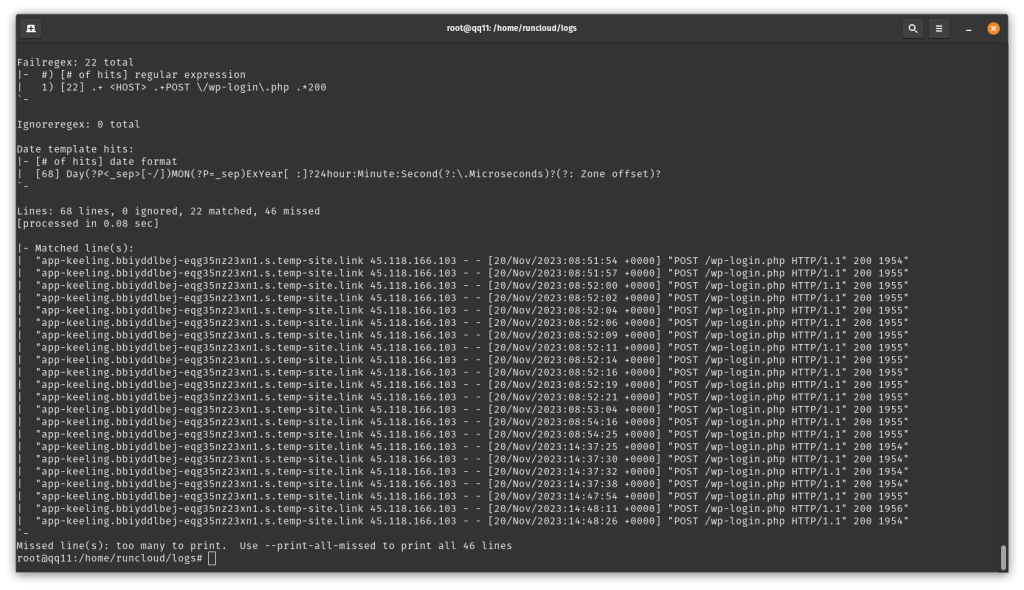
    fail2ban-regex --print-all-matched ./app-keeling_access.log /etc/fail2ban/filter.d/wordpress-auth.conf

    In the above example, we can see that our regex pattern matched 22 entries in the given log file, and then listed out each entry which would have triggered a violation.

    Apply the Changes to Fail2ban

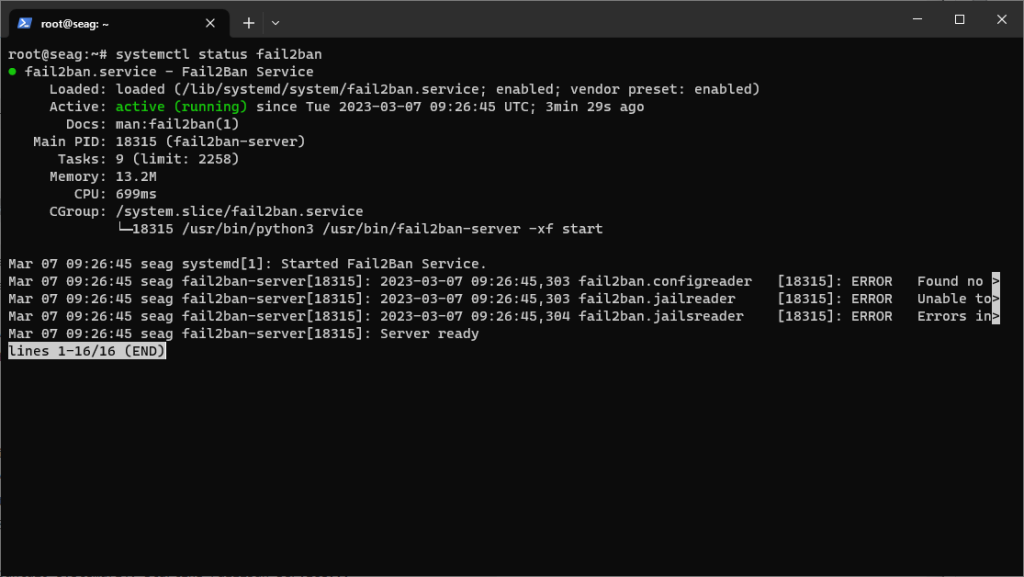
    To apply the new changes, you’ll need to restart the Fail2ban service. You can restart the service and check its status by running the following commands:

    systemctl restart fail2ban
    systemctl status fail2ban

    In the above example, we didn’t encounter any errors, and Fail2ban was able to restart successfully. If you do face any errors, run the following command to troubleshoot the issue:

    fail2ban-client -x start

    Check Running Jails

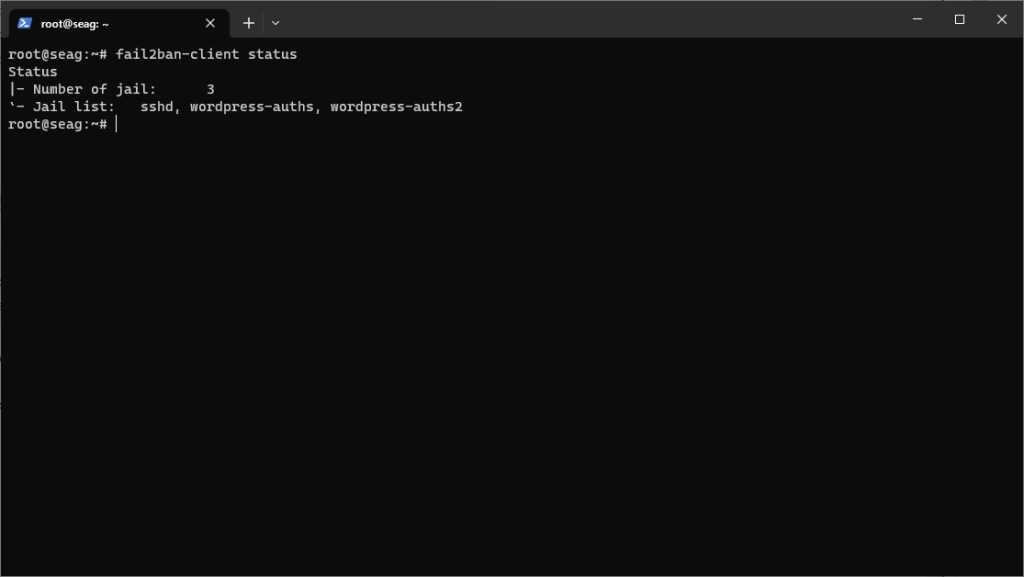
    Once you have restarted the service, you can check if your changes were applied correctly. Run the following command to see all of the jails currently configured on your server:

    fail2ban-client status

    Check Banned IPs

    To check where the malicious IP addresses are being banned, try repeatedly logging in to your WordPress dashboard with incorrect credentials.

    By default, if you make five unsuccessful login attempts within ten minutes, your IP address will be blocked for ten minutes. This setting can be configured in the /etc/fail2ban/jail.local file.

    To get detailed information about a particular jail, use the following command, (make sure to replace “wordpress-auths” with the name of your jail):

    fail2ban-client status wordpress-auths

    If you have multiple websites running on your server, the malicious actor will not be able to access any of them due to being listed as a banned IP address. This includes even those sites that are not being monitored by Fail2ban.

    However, if you are using the Cloudflare proxy, this won’t work. Let’s see why.

    Using Fail2ban With Cloudflare

    When you are using Cloudflare proxy to serve your web requests, the IP address used to connect to your server belongs to Cloudflare. Therefore, when you block the IP address after repeated failed login attempts, it blocks Cloudflare’s own IP address – which results in the following error:

    Blocking Cloudflare’s IP address makes it think that the website has crashed – and all visitors from the blocked region will get a 520 error.

    This is obviously unacceptable as blocking one IP address can make your website inaccessible to all users in a country. To fix this we will need to block the malicious traffic before it reaches Cloudflare.

    Restoring Real Visitor IP Addresses with Cloudflare and RunCloud

    Without the real IP, Fail2ban would end up blocking Cloudflare, effectively taking your site offline! To fix this, we need to configure NGINX (your web server) to “restore” the original visitor’s IP address from the information Cloudflare sends. RunCloud makes this incredibly easy with a pre-defined configuration:

    1. Navigate to NGINX Settings: Within your RunCloud dashboard, go to the “Web Application” page for the specific website you’re configuring. Then, find the “NGINX Config” section.
    2. Create a New Configuration: Click on “Create NGINX Configuration”.
    3. Choose the Pre-defined Config: From the “Predefined Config (Optional)” dropdown menu, select “Cloudflare – Restore visitor IP“. This option is specifically designed for this purpose.
    4. Configuration Details (No Changes Needed): RunCloud will automatically fetch the list of IPv4 and IPv6 addresses from Cloudflare’s website and populate the necessary settings.
    5. Save. Save the NGINX configuration.

    Important: You do not need to modify the configuration file itself. The pre-defined configuration is already set up to correctly extract the real IP address from the relevant headers that Cloudflare includes in its requests.

    By following these steps, NGINX will now correctly identify the visitor’s real IP address. Now you can use this information with Fail2ban (and other IP-based security tools) to block offending IP addresses, even behind Cloudflare’s proxy.

    Using Cloudflare Actions to Ban IPs

    To do this we will create a list of bad users who have too many failed login attempts, and then give this list to Cloudflare so that it can block the traffic.

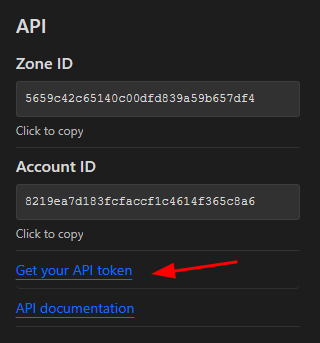
    Go to your Cloudflare Dashboard and generate your API token.

    Once you have opened the API token menu, scroll down to the “Global API Key” menu and view the token. Run the following command in your terminal to open the configuration file:

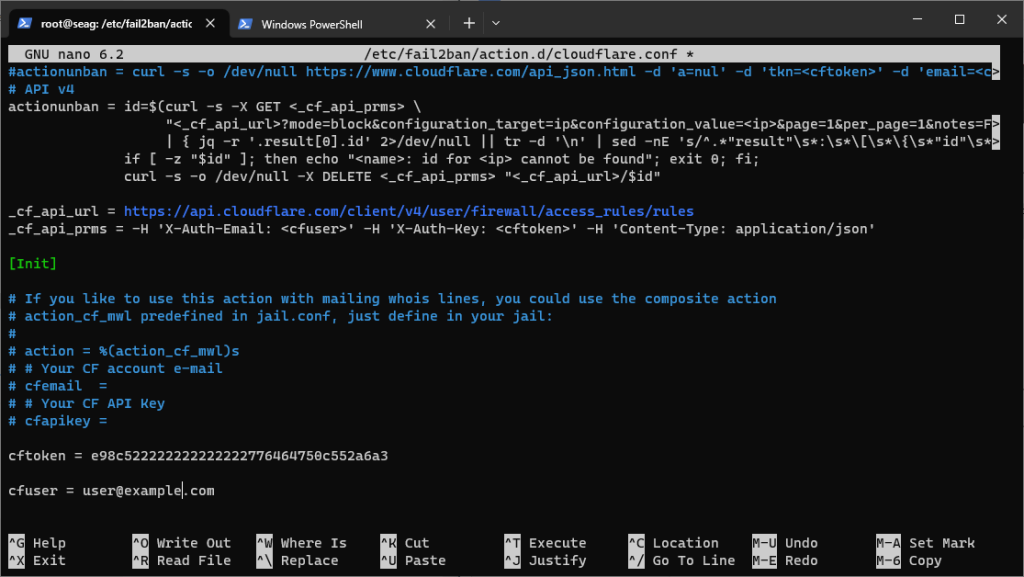
    nano /etc/fail2ban/action.d/cloudflare.conf

    Scroll down to the bottom of the file using your keyboard arrows, and paste your API key as shown above.

    Next, enter the email address you used to register your Cloudflare account, and then save and exit the file.

    Having done that, you’ll need to edit the /etc/fail2ban/jail.local file to make sure that it uses our newly created action. Scroll down to the jail corresponding to the website that uses the Cloudflare proxy to serve traffic, and add the following line to it:

    action = cloudflare
    iptables-allports

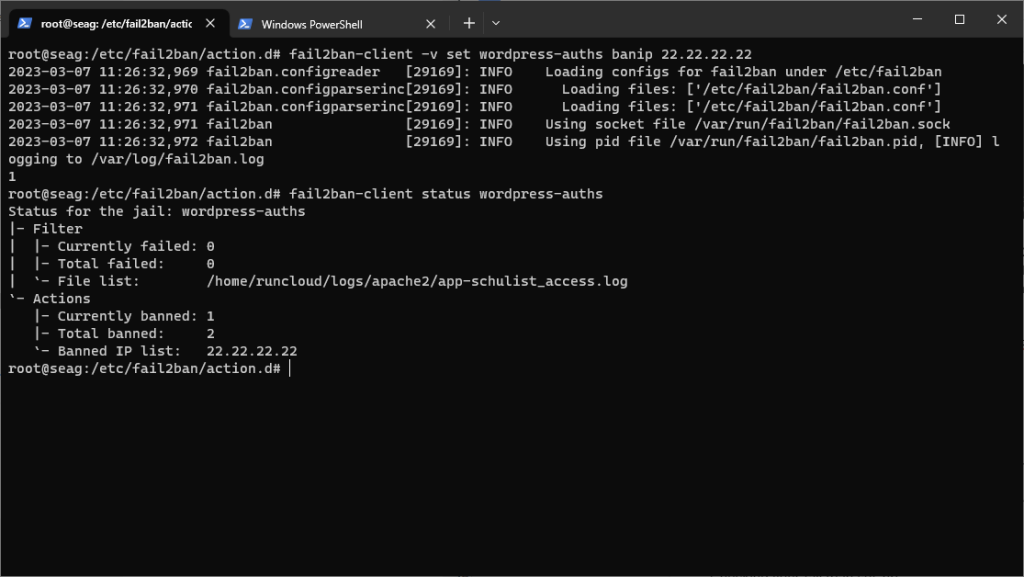
    Save and exit the file. After saving, restart the Fail2ban client to apply the changes. You can run the following command to restart the service, ban a dummy IP address, and check its status. Just make sure to replace “wordpress-auths” with the name of your jail:

    systemctl restart fail2ban
    fail2ban-client -v set wordpress-auths banip 22.22.22.22
    fail2ban-client status wordpress-auths

    Suggested read: How to Unban IP address in Fail2ban

    Conclusion

    Using Fail2ban with WordPress can greatly enhance the security of your website by protecting it against brute force attacks and other malicious activity. By following the steps outlined in this article, you can easily set up Fail2ban on your WordPress site and start enjoying the benefits of increased security.

    If you’re tired of managing your own servers – you might want to check out RunCloud (yep, that’s us!). RunCloud is built for developers that want to focus on shipping great work, not on managing their infrastructure.

    Discover what a painless server configuration feels like, allowing you to avoid having to spend hours figuring it out. Get started with RunCloud today, and get up and running in minutes.

  • How to Fix DNS Server Not Responding (Windows & Mac)

    How to Fix DNS Server Not Responding (Windows & Mac)

    Encountering a “DNS Server Not Responding” error can be frustrating. DNS is one of the primary components needed to browse the web, and if your DNS is not working, then a vast majority of your internet traffic will come to a halt.

    DNS is notoriously infamous for being poorly designed, as it was developed in 1983 when only a handful of computers were connected to the internet. Since then, the internet (and networking problems) have grown exponentially. This is portrayed perfectly by this XKCD comic:

    This guide will help you diagnose and resolve DNS connectivity issues across various devices and operating systems. Whether you’re using Windows or Mac, or facing router-related challenges, we’ll provide systematic solutions to restore your internet access efficiently.

    Following this guide, you’ll learn how to identify DNS server errors, implement targeted solutions, and prevent future connectivity disruptions. We’ll explore troubleshooting techniques for Windows and Mac systems, and general network configurations to ensure you have a comprehensive toolkit to address DNS server challenges.

    Let’s get started!

    What Causes A ‘DNS Server Not Responding’ Error?

    DNS reliability has become such a notorious challenge that it spawned a popular tech community meme: the “It’s ALWAYS DNS” flowchart by Tales of a Tech Rule, which humorously captures the frustrating reality that most network issues ultimately trace back to DNS configuration or resolution problems.

    The “DNS server not responding” error typically occurs due to several simple network connectivity and configuration problems. When your computer cannot successfully communicate with the designated DNS server, or receive a proper IP address translation, you will see a “DNS Server Not Responding” error message.

    Technical misconfigurations, such as incorrect DNS server settings, network interface issues, or temporary service interruptions, can all interrupt the domain name resolution process. This can also be caused by outdated network adapter drivers, misconfigured network settings, internet service provider (ISP) DNS server problems, firewall interference, or temporary DNS cache corruption.

    Router misconfigurations, network malware infections, or unstable internet connections can also disrupt DNS resolution, causing domain name translation failures and affecting network connectivity.

    Suggested read: How To Flush DNS Cache — A Full Guide

    11 Ways to Fix ‘DNS Server Not Responding’ on Mac & Windows

    As is clear already, many things can cause a DNS server to malfunction. Let’s look at common troubleshooting steps to help you resolve these issues.

    #1 – Try Using A Different Browser

    When you encounter a DNS server problem, switching browsers can help diagnose whether the issue is browser-specific or a broader network problem. If your primary browser shows a “DNS Server Not Responding” error, try opening the same website using Chrome, Firefox, Safari, or Edge.

    This quick test helps determine if the problem is isolated to a single browser or represents a more complex network configuration challenge. Sometimes browser-specific settings, cached data, or temporary glitches can interfere with domain name resolution, making browser switching an effective first troubleshooting step.

    If the website loads successfully in an alternative browser, consider clearing your original browser’s cache, resetting browser settings, or updating to the latest version. These actions can resolve browser-specific DNS resolution complications and restore your internet browsing experience.

    Suggested read: How to Fix DNS_PROBE_FINISHED_NXDOMAIN Error

    #2 – Check The Site From A Different Device

    Another quick and easy way to diagnose DNS issues is by testing website accessibility from another device such as a smartphone, tablet, or a secondary computer. If the problematic website loads correctly on another device connected to the same network, the problem likely resides with your original device’s network configuration. This approach helps isolate whether the “DNS Server Not Responding” error is device-specific or is caused by a broader network-level misconfiguration.

    When performing this test, ensure both devices use the same network connection (either Wi-Fi or ethernet) to maintain consistent testing conditions. Pay attention to whether the website loads normally on the alternative device, indicating a localized issue with your primary device’s DNS settings or network adapter. If the site remains inaccessible across multiple devices, the problem might involve your router, internet service provider, or the website’s server infrastructure.

    Suggested read: What is DNS & How Does It Work? Everything You Need To Know.

    #3 – Restart Your Computer to Resolve DNS Server

    Restarting your computer might be the simplest way to resolve DNS server connectivity problems. This action clears temporary network configurations, refreshes system memory, and resets network adapters, potentially eliminating temporary issues preventing successful domain name resolution. A full restart ensures that all background processes are terminated and reinitialized, which can clear cached network settings and restore proper DNS functionality.

    When restarting, choose a complete shutdown rather than a quick restart option. Allow your computer to power down completely for about 30 seconds before turning it back on. This approach ensures a more thorough reset of network interfaces and system configurations. After restarting, you can attempt to access the previously problematic website to verify whether the DNS server issue has been resolved.

    Suggested read: How To Speed Up DNS Propagation | Ultimate Guide

    #4 – Restart Your Computer In Safe Mode

    Booting your computer in Safe Mode provides a controlled environment to diagnose potential DNS server problems caused by third-party software, drivers, or system conflicts. Safe Mode loads only essential system processes and drivers, which can help isolate whether external applications or drivers are interfering with your network connectivity. This allows you to isolate potential software-related misconfigurations that might be disrupting DNS resolution.

    To enter Safe Mode, you must restart your computer and use specific key combinations depending on your operating system. If you are using Windows, press F8, or hold the Shift key during a Mac restart.

    Once in Safe Mode, you can attempt to access websites and observe whether DNS resolution functions correctly. If internet browsing works smoothly in Safe Mode, it suggests that a third-party application, recently installed software, or conflicting driver might be causing your DNS server issues. You can then systematically investigate and uninstall or update potential problematic software to restore normal network functionality.

    Suggested read: Amazon Route 53 vs. Cloudflare DNS – Which Is Better?

    #5 – Turn Off Antivirus Software And/Or Your Firewall

    Antivirus programs and firewalls can sometimes interfere with network connectivity, resulting in DNS resolution problems. These security tools might mistakenly block legitimate network connections or interrupt DNS lookup processes. To troubleshoot this issue, you can temporarily disable your antivirus software and firewall to determine if they’re causing the DNS server to not respond to an error.

    When disabling the security software, you should proceed cautiously and only temporarily. Access your antivirus or firewall settings through the control panel or system tray icon, and look for options to disable protection briefly. After turning off these programs, try accessing the problematic website. If the site loads successfully, you’ll know your security software was blocking the connection. In this case, consider updating your antivirus or adjusting its network settings to prevent future DNS resolution interruptions.

    Suggested read: Cloudflare DNS for RunCloud (Security & Performance)

    #6 – Disconnect From Your VPN

    Virtual Private Networks (VPNs) can sometimes cause DNS server connectivity issues by routing your Internet traffic through alternative servers or creating network configuration conflicts. If you’re experiencing persistent DNS problems, temporarily disconnecting from your VPN can help isolate the source of the issue.

    Open your VPN application and select the option to disconnect or turn off the VPN connection. Once disconnected, attempt to access the website that was previously unavailable. If the site loads normally, your VPN might be causing DNS resolution problems. Consider switching VPN servers, updating your VPN client, or checking your VPN’s DNS settings to ensure compatible network configuration.

    Suggested read: Hostname vs Domain Name: What’s the Difference? [With Examples]

    #7 – Flush DNS Cache to Clear Out Corrupted DNS Records

    Your computer stores DNS lookup information in a local cache to improve internet browsing speed. However, this cache can become corrupted or contain outdated records, leading to the “DNS Server Not Responding” errors. Flushing the DNS cache clears these stored records, forcing your computer to request fresh DNS information from servers. This process can resolve many temporary DNS resolution issues.

    The process differs slightly between operating systems:

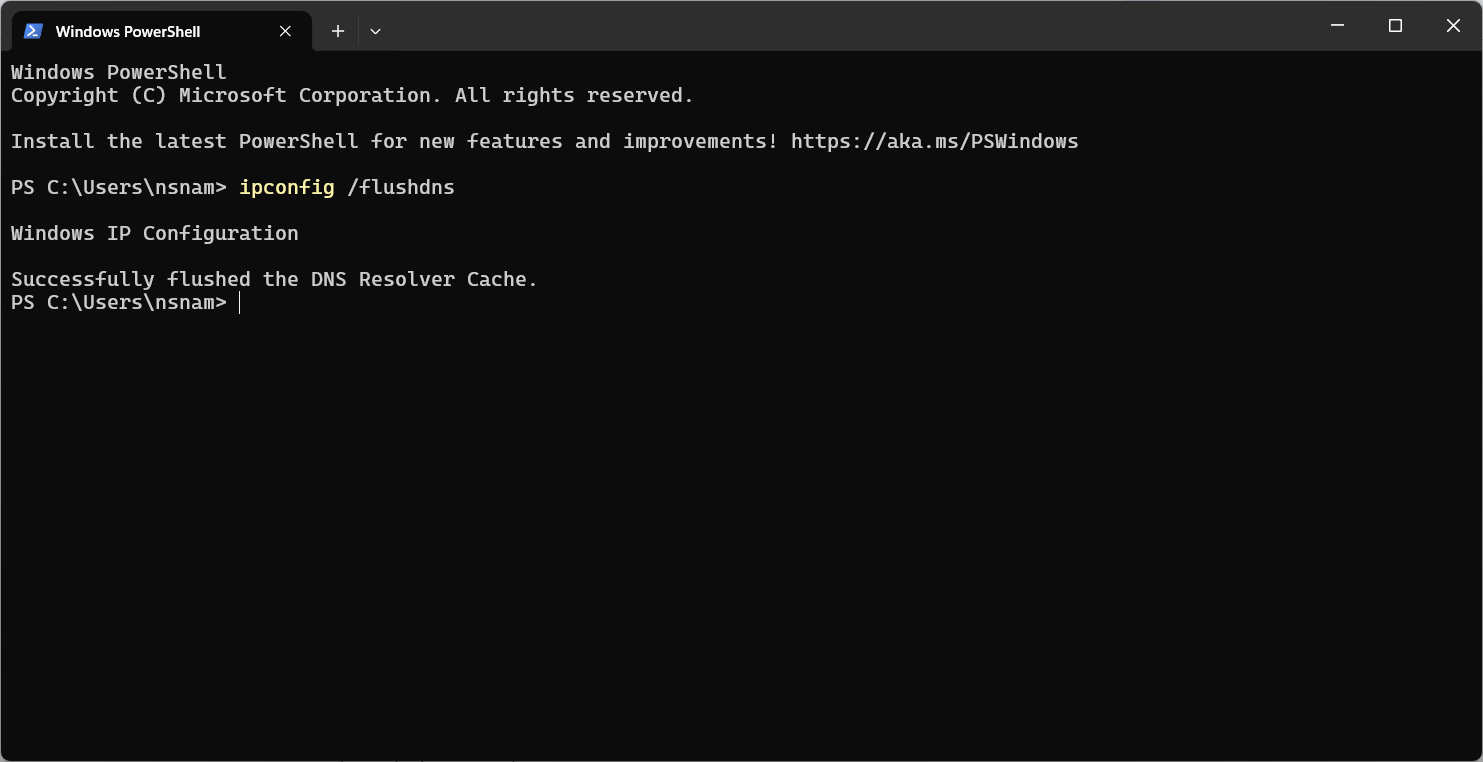
    • Windows: Open Command Prompt, type “ipconfig /flushdns” and press Enter.
    • Mac: Open Terminal, type “sudo killall -HUP mDNSResponder” and press Enter.
    • Linux: Use “sudo systemd-resolve –flush-caches” or distribution-specific commands.
    Flush DNS cache to fix DNS server not responding error

    After flushing the DNS cache, restart your web browser and attempt to access the previously problematic website. This simple maintenance task often resolves unexpected DNS connectivity problems.

    #8 – Restart Your Router to fix DNS Errors

    Routers can experience temporary glitches that disrupt network connectivity and DNS resolution. Restarting your router clears its internal memory, reestablishes internet connections, and often resolves intermittent network problems. This straightforward troubleshooting technique can quickly restore your internet connection and resolve DNS server issues.

    To restart your router:

    1. Unplug the power cable from the router
    2. Wait at least 30 seconds to fully discharge the device
    3. Plug the power cable back in
    4. Wait 2-3 minutes for the router to fully restart and reconnect to your internet service provider.

    During the restart process, all connected devices will temporarily lose internet access. Once the router’s lights stabilize, check your internet connection and attempt to access websites.

    #9 – Disable IPv6

    IPv6 is a relatively newer internet protocol, and it can sometimes cause DNS resolution problems as many services and software are not configured for it. Disabling IPv6 might resolve connectivity issues.

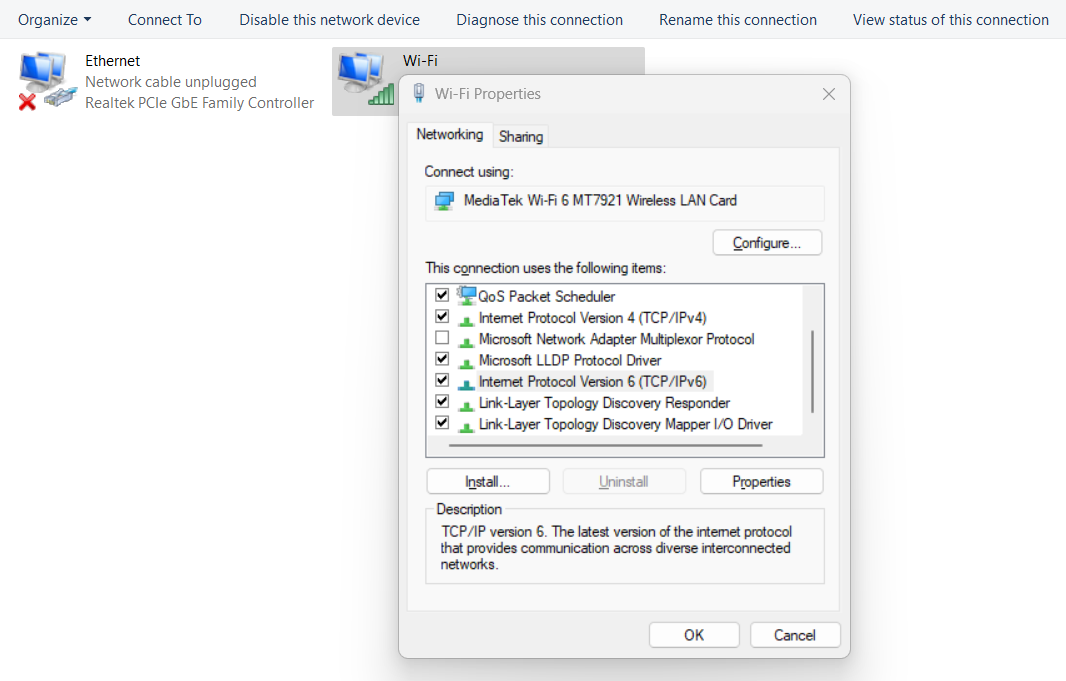
    To disable IPv6 on Windows, open Network Connections, right-click your network adapter, select Properties, and uncheck the IPv6 protocol box.

    update IPV6 settings in windows to fix DNS errors

    On Mac, you can go to System Preferences, select Network, choose your connection, and uncheck IPv6 in the TCP/IP tab.

    After disabling IPv6, restart your computer and test your internet connection. This step can help eliminate potential conflicts causing the “DNS Server Not Responding” errors, especially if your network or internet service provider has incomplete IPv6 support.

    #10 – Change The Default DNS Server to Improve Website Access

    Your internet service provider’s default DNS servers might be slow or unreliable. Switching to public DNS servers such as Google (8.8.8.8 and 8.8.4.4) or Cloudflare (1.1.1.1 and 1.0.0.1) can improve internet speed and reliability.

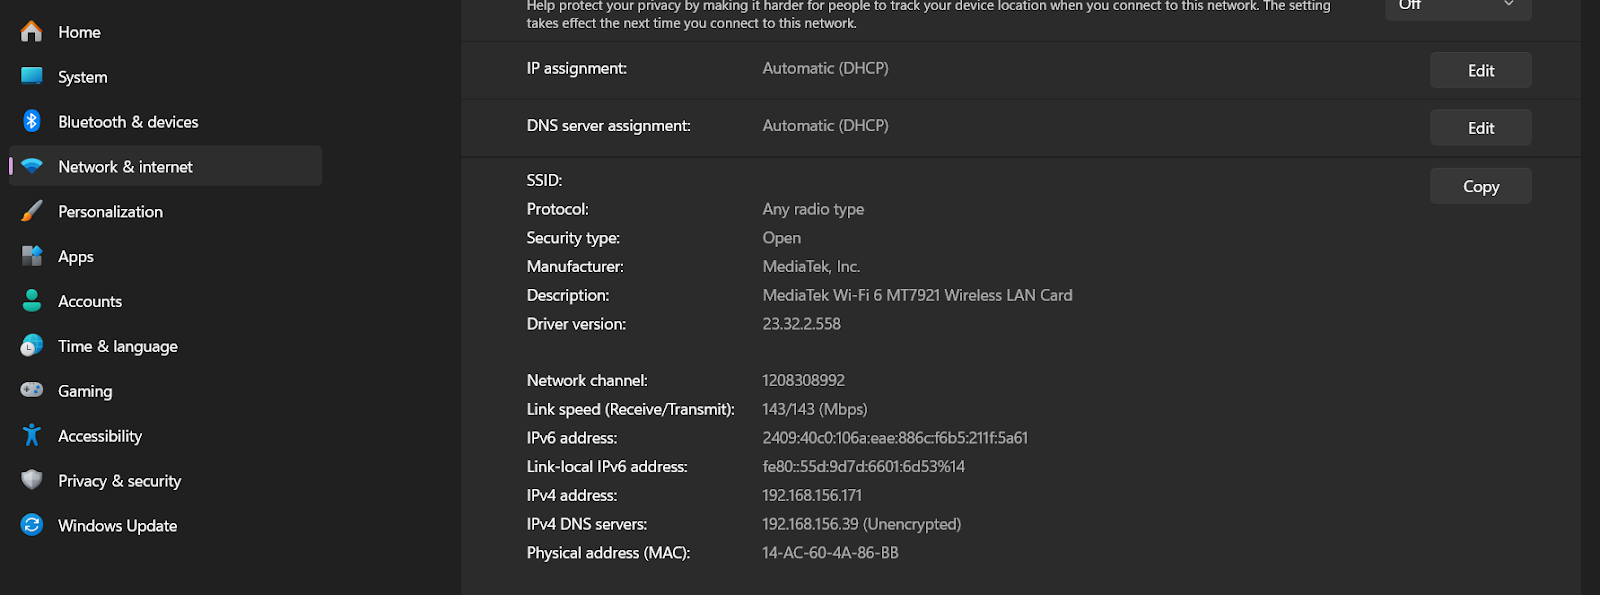
    You can change your DNS server on Windows by navigating to Network Connection and clicking Edit next to the DNS Server Assignment option.

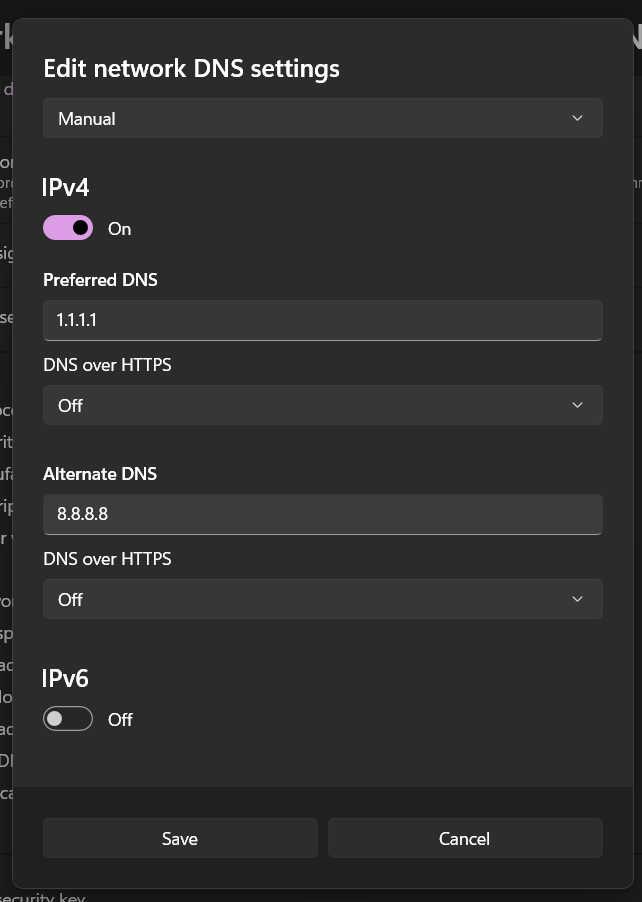
    This will open a pop-up menu. Here, you can select the IPv4 option and manually enter alternative DNS server addresses. We recommend using 1.1.1.1 and 8.8.8.8 as your DNS servers. These public DNS servers are typically faster and more secure and can help resolve persistent DNS server issues.

    #11 – Update Network Adapter Drivers

    Outdated or corrupted network adapter drivers can cause DNS server connectivity problems. You can try updating or reinstalling your network adapter drivers to fix the corrupted files.

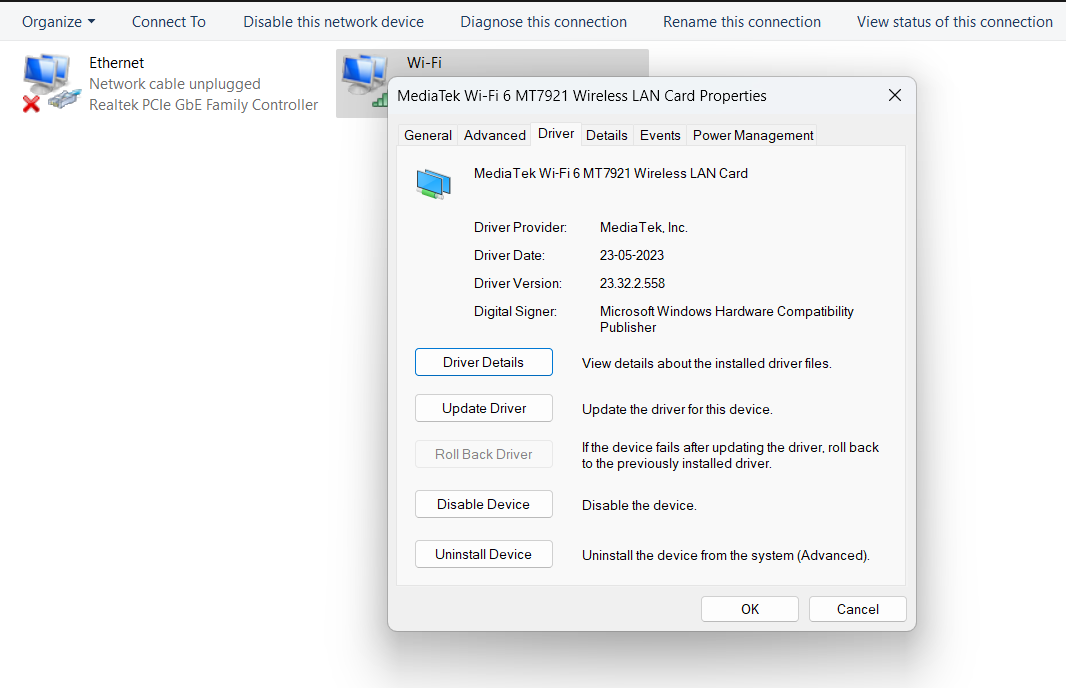
    To update drivers on Windows, open Device Manager, expand Network Adapters, right-click your adapter, and select Update Driver. Choose the automatic update option to ensure you have the latest compatible drivers.

    For Mac users, system updates typically handle driver updates automatically. To ensure your operating system is current, check System Preferences > Software Update.

    Wrapping Up

    DNS server issues can be complex technical challenges that require systematic and strategic approaches. By understanding the underlying network mechanisms and applying targeted troubleshooting techniques, you can easily diagnose and resolve connectivity problems.

    New protocols and technologies constantly evolve, and maintaining websites requires staying updated with the latest networking trends, security protocols, and troubleshooting techniques.

    If you are a website developer, you can avoid half of the problems with your DNS servers by simply using RunCloud’s automated DNS manager.

    RunCloud works with Cloudflare to automatically update your DNS records worldwide whenever you deploy a new web application.

    You can also take advantage of its one-click WordPress install and one-click staging site functionality to build and deploy websites without ever needing to log in to a terminal.

    Get started with RunCloud.

    DNS Server Error FAQs

    Will resetting the router fix DNS issues?

    Resetting your router can often resolve DNS problems by clearing temporary network configurations and reestablishing internet connections. This simple troubleshooting step refreshes network settings and can fix intermittent DNS resolution errors.

    How do I fix DNS issues on the router?

    Restart the router by unplugging it for 30 seconds, then reconnect to clear cached data and reset network configurations. If issues persist, update the router firmware, check connection settings, or contact your internet service provider for further assistance.

    Why is my internet blocking DNS?

    DNS can be blocked due to firewall settings, antivirus software interference, incorrect network configurations, or potential security protocols preventing domain name resolution. Checking and adjusting these settings can typically resolve such blockages.

    Is it safe to reset DNS?

    Resetting DNS is generally safe and can resolve connectivity issues without compromising network security. Always use official methods provided by your operating system or network administrator to ensure proper DNS cache and configuration management.

    How do I fix the DNS on my Internet?

    Fixing DNS involves several steps: flushing the DNS cache, changing DNS server settings to public alternatives such as Google (8.8.8.8), restarting your router and computer, and updating network adapter drivers. These actions can resolve the most common DNS connectivity problems.

    How long does it take to fix a DNS server?

    DNS server issues typically resolve within 5-10 minutes through basic troubleshooting such as a router restart, DNS cache flush, or changing DNS servers. Complex issues might require additional time or professional technical support.

    How do I manually set the DNS server?

    To manually set DNS servers, access network adapter settings in your operating system, select IPv4 properties, and input alternative DNS server addresses such as Google (8.8.8.8 and 8.8.4.4) or Cloudflare (1.1.1.1 and 1.0.0.1).

  • ARM64 vs X64 – Everything you need to know

    ARM64 vs X64 – Everything you need to know

    In the rapidly changing world of technology, choosing the right processor architecture can significantly affect performance, efficiency, and cost.

    At RunCloud, we’ve witnessed the impact of CPU architecture choices, particularly in server environments where performance and efficiency directly affect business costs. While consumers might be exploring ARM processors for personal computing, our focus is on the server-side revolution: how different CPU architectures are affecting cloud infrastructure, application performance, and operational efficiency.

    In this comprehensive RunCloud guide, we explore the differences between ARM and x86 architecture. Whether you’re looking to optimize your server fleet or understand the latest computing trends, we’ll provide the insights you need to make informed decisions.

    From performance benchmarks to practical implications, we’ll break down everything you need to know about ARM and x86 architectures in the context of modern computing and cloud infrastructure.

    Let’s get started!

    What is CPU Architecture?

    CPU architecture is the fundamental design and operational blueprint of a computer’s central processing unit. It defines how it processes, manages, and executes instructions at the most elemental hardware level. It dictates the core structural elements that determine how a processor:

    • Interprets machine instructions
    • Manages data flow
    • Handles computational tasks
    • Allocates and uses registers
    • Manages memory interactions

    To understand this, you can think of CPU architecture as the engine design in a car, software as the driver’s instructions, and the operating system as the dashboard and control mechanisms that coordinate everything.

    How is CPU Architecture Different from Software?

    Software operates as an abstract layer on top of the CPU architecture. It is basically a set of instructions translated into machine-level commands. It depends on the underlying architecture for execution and can be compiled or interpreted to match specific CPU instructions.

    How is CPU Architecture Different From The Operating System?

    Operating systems manage hardware resources and provide an interface between other software and the computer’s hardware. Through specialized kernels and drivers, an operating system can support multiple CPU architectures.

    However, this is only possible if the developer creates a specialized version of the operating system for a particular architecture. For example, Windows has a special version of its operating system for Windows on ARM devices.

    Aspect

    CPU Architecture

    Software/OS

    Level of Operation

    Hardware-level

    Logical/Functional level

    Modification Complexity

    Requires physical redesign

    Can be updated/replaced easily

    Dependence

    Direct hardware capabilities

    Dependent on an underlying architecture

    ARM Server Architecture

    ARM64 refers to the 64-bit ARM processor architecture, also known as ARMv8-A. It is a RISC (Reduced Instruction Set Computer) design that provides significant improvements over the previous 32-bit ARM architecture.

    ARM64 processors are widely used in various devices, including smartphones, tablets, laptops, and servers. They are also used in nearly all modern mobile devices, where power efficiency is crucial. Although it still has some rough edges, ARM64 is gaining traction in the embedded system design and cloud computing domains, where its performance and scalability are valuable assets.

    There are two primary reasons why people use the ARM CPUs:

    1. Improved performance: Compared to 32-bit ARM processors, ARM64 processors have a more efficient instruction pipeline and can execute more instructions per clock cycle.
    2. Power efficiency: The ARM64 architecture is designed for low power consumption, making it well-suited for mobile, embedded, and IoT (Internet of Things) applications.

    X86 Server Architecture

    The X64 architecture, also known as AMD64 or Intel 64, is a 64-bit extension of the x86 architecture. It was developed by AMD and later adopted by Intel to develop CPUs. Now, it has become the predominant 64-bit processor architecture for desktop and server computers.

    X86 architecture was predominantly used in the early days of computing, but it was later replaced by X64 architecture for several reasons:

    1. 64-bit registers and address space: X64 processors support 64-bit integer and floating-point data types, allowing them to access significantly more memory (up to 16 exabytes) compared to the 32-bit x86 architecture.
    2. Expanded instruction set: X64 introduces additional instructions and registers that enhance performance for 64-bit applications. This includes support for more general-purpose registers, which can improve the efficiency of arithmetic and logical operations.
    3. Backward compatibility: X64 processors maintain compatibility with the 32-bit x86 instruction set, ensuring that existing software designed for 32-bit systems can run seamlessly on 64-bit platforms.

    ARM vs x64(x86) Server Architecture Comparison Guide

    RunCloud supports both ARM and AMD64 CPU architecture for your servers, but if you are looking to pick between ARM and x86 architecture, then there are several things that you should know:

    Core Architectural Comparison

    The ARM and x86 architectures are two fundamentally different approaches to CPU design, primarily distinguished by their instruction set architectures (ISA).

    • ARM follows a Reduced Instruction Set Computing (RISC) model, which is a simpler, more streamlined instruction that can be executed quickly and with lower power consumption.
    • In contrast, x86 uses a Complex Instruction Set Computing (CISC) approach, which supports more complex, multi-step instructions that can perform sophisticated operations with fewer lines of code.

    While these architectures cannot directly run each other’s machine-level code due to their distinct instruction sets, modern programming languages provide a critical abstraction layer. Compilers can translate high-level code into architecture-specific machine instructions, allowing the same source code to be compiled for both ARM and x86 processors.

    This means a Python, Java, or C++ program can be compiled to generate native instructions specific to ARM or x86 architectures, enabling software portability across different CPU types while maintaining optimal performance for each platform.

    Feature

    ARM Architecture

    x86 Architecture

    Instruction Set

    RISC (Reduced Instruction Set Computing)

    CISC (Complex Instruction Set Computing)

    Power Efficiency

    Typically 30-50% better power efficiency

    Higher power consumption but improving with newer generations

    Cost Structure

    Lower licensing costs, emerging ecosystem

    Mature ecosystem, competitive pricing due to scale

    Market Maturity

    Growing rapidly, especially with AWS Graviton

    Dominant market position, extensive vendor support

    Software Compatibility

    Software compatibility between ARM and x86 architectures has significantly improved, with most modern programming languages and frameworks offering native support for both platforms through cross-compilation techniques.

    Major platforms such as Linux, Windows, and macOS now provide robust toolchains that enable developers to build applications that can be easily recompiled for different CPU architectures.

    While some specialized software and low-level system utilities may still require architecture-specific modifications, the vast majority of high-level applications can now be seamlessly adapted between ARM and x86 with minimal additional engineering effort.

    Software Type

    ARM Support

    x86 Support

    Linux Distributions

    Full support in major distros (Ubuntu, RHEL, etc.)

    Universal support

    Container Support

    Native Docker support, growing ecosystem

    Comprehensive support

    Web Servers

    nginx, Apache, Lighttpd

    All web servers supported

    Databases

    MySQL, PostgreSQL, MongoDB

    All major databases

    Programming Languages

    Most languages supported natively

    Universal support

    Cost Considerations

    ARM-based server architecture is considered a cost-effective alternative to traditional x86 systems, primarily due to its inherently lower power consumption and more efficient chip design. The fundamental energy efficiency of ARM processors allows data centers to significantly reduce electricity costs.

    This reduction in operational expenses is why major cloud providers and enterprise data centers are gradually shifting their infrastructure towards ARM-based solutions.

    But the cost advantages extend beyond just power consumption.

    ARM’s design allows for more compact and thermally efficient chip manufacturing, resulting in lower hardware production costs and the ability to create denser server configurations. This economic incentive is particularly compelling for hyperscale cloud providers and large-scale computing environments that operate thousands of servers simultaneously.

    Factor

    ARM

    x86

    Hardware Costs

    Lower initial investment

    Variable, competitive at scale

    Operating Costs

    Lower power consumption

    Higher power costs

    Support Costs

    It may require specialized knowledge

    Widely available expertise

    Benchmarks: ARM vs x86 Server Performance

    We designed a controlled testing environment that minimized variables and provided a fair assessment of ARM versus x86 server performance.

    We deployed two identical server configurations within the same cloud provider and region, carefully matching specifications including vCPU count, memory allocation, and network parameters.

    After that, we created a standard WordPress installation with 20 blog posts for our performance evaluation.

    We used k6 for load testing and Grafana for performance visualization to execute a 5-minute load test with 20 concurrent virtual users. During our tests, we tracked critical performance metrics, including requests per second, response times, and HTTP failure rates.

    Metric

    ARM

    x86

    Requests Made

    8.8k

    5.7k

    HTTP Failures

    0

    0

    Peak Requests per Second (RPS)

    32

    21.67

    P95 Response Time

    383ms

    893ms

    arm64 vs x64 benchmarks

    The benchmark results show notable performance advantages for ARM-based servers in this specific test scenario. Key observations include:

    1. Request Volume: ARM servers processed approximately 54% more requests compared to x86 servers, indicating a significant throughput improvement.
    2. Request Efficiency: The peak requests per second for ARM servers (32 RPS) substantially outperform x86 servers (21.67 RPS), which shows enhanced computational efficiency.
    3. Latency Performance: The P95 response time for ARM servers (383ms) is markedly lower than that for x86 servers (893ms), representing a dramatic reduction in latency that could improve user experience.

    By maintaining strict control over testing variables and using industry-standard performance analysis tools, we created a transparent and reproducible benchmark methodology. Our goal was not to declare a definitive winner but to provide an objective, data-driven perspective on the current performance capabilities of ARM and x86 server architectures.

    While these benchmarks highlight ARM’s impressive performance, it’s important to understand that server architecture selection is nuanced. x86 server architecture is a robust, mature technology with:

    • Extensive ecosystem support
    • Proven reliability
    • Widespread enterprise adoption
    • Significant ongoing development and optimization

    The results should be interpreted as a demonstration of ARM’s emerging capabilities rather than a wholesale replacement recommendation. When considering architectural transitions, you should evaluate their specific workload requirements, existing infrastructure, compatibility needs, and total cost of ownership.

    Final Thoughts: Navigating Server Architectures with Flexibility

    Throughout this article, we have discussed the different nuances of ARM and x86 architectures, as well as each platform’s strengths and considerations.

    However, the choice between ARM and x86 is no longer a binary decision but a strategic consideration dependent on specific workload requirements, cost structures, and performance needs.

    If you manage a fleet of servers, balancing ARM and x86 environments can quickly become a logistical nightmare. Deployment, optimization, and consistent performance management across different server types demand significant technical expertise – RunCloud is designed to eliminate these complexities.

    RunCloud provides comprehensive support for both ARM and x86 server environments. Whether you’re exploring performance optimizations or scaling your infrastructure, RunCloud ensures seamless deployment, monitoring, and control across different server architectures.

    Learn more about how RunCloud can help you manage your servers.

  • How to Install & Set Up Ghost (NGINX and OpenLiteSpeed)

    How to Install & Set Up Ghost (NGINX and OpenLiteSpeed)

    Ghost is a free and open-source blogging platform built with Node.js. As a fast, modern WordPress alternative, Ghost is focused completely on professional publishing. If you only want to publish content on the web and don’t need the additional features offered by WordPress, then Ghost is a great choice.

    In this post, we will discuss how to install Ghost using RunCloud.

    Let’s get started!

    Create A New User

    Ghost CLI needs sudo privileges, so instead of running your site as a root user, we recommend creating a new user with these sudo privileges. This can be done by running commands in the terminal, but it’s much easier to do within the RunCloud dashboard.

    To create a new user, go to the RunCloud dashboard and open the “System User” menu.

    Once opened, click “Add New System User” to create a new user. Give it a descriptive name and a secure password. Make sure to check the box to allow the execution of privileged commands.After this, click “Save System User” and continue the installation process.

    Create A New Database

    After creating the system user, the next step is to create a new database and database user. To do this, go to the “Database” menu under your server in the RunCloud Dashboard to create a new database user. Give this database user a suitable name and a secure password, and note these credentials, as they will be needed later during the installation.

    After creating the database user, create a new database and grant permission to the user we just created. Save the changes before proceeding to the next step.

    Create An Empty Web App

    After you have created the user, go to the “Web Applications” tab and create a new web application on your server.

    Choose the “Empty Web App” option and give your application a suitable name. Don’t forget to change the application’s owner. Instead of using the default RunCloud user, we will create the user account we just created as the owner of the web application.

    After configuring the application owner, you can manually set up the domain and configure the DNS records on your DNS registrar’s site.

    If you are using RunCloud’s Cloudflare integration, you can take advantage of the automatic DNS update functionality.

    It is also possible to install Ghost using RunCloud’s test domain. If you want to follow this tutorial without setting up your domain or subdomain, use the RunCloud test domain.

    For “Web Application Stack”, we recommend choosing “Native NGINX + Custom Config” to install Ghost CMS and then clicking “Deploy” to finish the set-up process.

    If your server runs on OpenLiteSpeed, we’ve included notes on different steps in this guide.

    After creating the app, go to the settings page and scroll down to the “Linked Database” section. From the dropdown menu, select the database we just created. Remember to click “Update Linked Database” to save the changes.

    Installing Ghost-CLI (for NGINX and OLS servers)

    Note: If you want to install GhostCMS on a Docker server, skip this section and jump to the Docker installation instructions.

    In the previous step, we created a dummy web application in the RunCloud dashboard, which helps us perform administrative tasks such as monitoring the logs from the RunCloud dashboard. Now, we will use Ghost-CLI, a command-line tool, to install and configure Ghost CMS and replace that dummy application.

    To avoid permission conflicts, we will install the Ghost-CLI as the web application’s owner. To do this, log in to your server as the system user assigned to the web application – you can either do this via SSH or use the su (switch user) command.

    # Method 1
    ssh ghostcms-user@<youripaddress>
    # Method 2
    ssh root@<youripaddress>
    sudo su ghostcms-user

    After logging in to the server, navigate to the root directory of your web application using the following command. Replace the “<path to root>” with your path – you can find this in the RunCloud dashboard:

    cd <path to root>

    Once in the correct directory, you can run the following commands to remove the default “index.html” file and begin the installation:

    rm index.html
    sudo npm install ghost-cli@latest -g

    After the installation is complete, you can run “ghost version” on your terminal to check the version of Ghost-CLI and ensure that the CLI works as expected.

    Checking Node.js version

    Ghost CMS needs Node.js to function properly. At the time of writing, the recommended node version was 18; refer to the official website to see the recommended node version.

    Execute the following command to see the version of the node installed on your server:

    node -v

    In the above screenshot, the first number in v18.18.0 indicates the major version number of the software. The major version number reflects the software’s level of compatibility and functionality. The other numbers after the dot (.) are minor version numbers or patch numbers. They do not affect the compatibility or functionality of the software as much as the major version number. Therefore, they can be ignored if you are only interested in the major version number.

    Note: If you created your server before 27 September 2023, you might need to update the node version manually. Refer to our guide for updating the node on your RunCloud server to learn how to do this.

    Installing Ghost CMS

    After installing Ghost-CLI, you can run the following command to start the Ghost CMS installation:

    ghost install

    During the installation, follow the instructions on the screen and enter the necessary information to proceed.

    When asked for the hostname, enter 127.0.0.1. Using the default value causes the Ghost CMS to use the IPv6 address, which leads to an ECONNREFUSED::1:3306 error at a later stage in the installation.

    When asked, “Do you wish to set up Systemd?” please enter “Y”, and when prompted, “Do you wish to start Ghost”, enter “Y” again.

    If you follow the instructions correctly you will get a message that the installation was successful. However, when you visit your site you will see a 404 error message. This is because we skipped the NGINX setup during installation. We can configure this manually to fix it.

    Before we set up the server proxy, we need to know which port Ghost will use for this website. Run the following command to get the details of your web application:

    ghost ls 

    The above command will show an output that looks like this:

    In the example above, the port number is 2368. Note down this port number.

    Installation on Docker

    In addition to installing Ghost directly on an NGINX or OpenLiteSpeed server, you can also deploy Ghost using Docker. This allows you to take advantage of the consistency and portability of containerized applications.

    To deploy Ghost on a Docker server, you must first set up an empty web application on your RunCloud server by following the steps described above. Once that is done, follow these steps:

    1. Log in to the server via SSH: Connect to your RunCloud server using SSH to access the terminal and run Docker commands.
    2. Create a Docker Compose file: Create a docker-compose.yml file that defines the Ghost container. This file should include the necessary environment variables for your database connection and the URL for your Ghost installation.

    Here’s an example docker-compose.yml file:

    services:
      ghost:
        image: ghost:5-alpine
        restart: always
        ports:
          - 8080:2368
        environment:
          database__client: mysql
          database__connection__host: host
          database__connection__user: ghost_user
          database__connection__password: asd123456
          database__connection__database: ghost_db
          url: http://ghost.example.com
        volumes:
          - ghost:/var/lib/ghost/content
        extra_hosts:
          - 'host:host-gateway'
    volumes:
      ghost:
    1. Modify Dockerfile: After creating the above file, you must edit certain sections to ensure your application runs correctly. First, if deploying more than one Ghost container, you must replace 8080 with a unique port number for each container. Next, you must replace http://ghost.example.com with the URL of the web application you deployed earlier.
    2. Create a custom NGINX proxy: Next, create a custom NGINX proxy for your RunCloud app to the custom port you defined in the Docker Compose file (in this case, 8080). You can use the same NGINX configuration as you would for a Ghost non-Docker installation (described below in this tutorial).
    3. Start the Docker container: Finally, run docker-compose up -d in the directory containing the docker-compose.yml file to start the Ghost container.

    Setting Up A Proxy

    You need to configure your server to redirect all the incoming traffic to the given port. This step is different for NGINX and OpenLiteSpeed servers. If you are not sure which server is installed on your machine, you can check this in the RunCloud dashboard and then follow along the instructions corresponding to your server.

    For NGINX

    Return to the RunCloud dashboard, open your web application, and go to the NGINX Config menu. Click the “Create Config” button and follow the steps below.

    • For the “Type” option, select the value “location.root”.
    • For the “Config Name” option, you can use the value “ghost”.
    • Copy and paste the text below into the “ConfigContent” text area. Make sure to change XXXX to the port number we noted earlier:
    proxy_set_header X-Forwarded-For $proxy_add_x_forwarded_for;
    proxy_set_header X-Forwarded-Proto $scheme;
    proxy_set_header X-Real-IP $remote_addr;
    proxy_set_header Host $http_host;
    proxy_pass http://127.0.0.1:XXXX;

    You can click “Run and Debug” to see if this custom config has any issues. Then, click the “Add Config” button to finish it.

    For OpenLiteSpeed

    In the RunCloud dashboard, open the empty web application created in the Create An Empty Web App step and look for the “LiteSpeed Config” in the side menu to open the configuration file.

    We need to edit a few lines in this file. Firstly, note down the name of the extprocessor – we will use this later.

    Next, disable the existing configuration by adding # before the type and address line.

    After that, add the following lines below the commented lines. Don’t forget to change xxxx to the port number we noted earlier.

    type                    proxy
    address                 localhost:xxxx

    At this stage, your configuration file should look like this:

    Next, scroll down and add the following code snippet to your configuration file. Be careful not to paste it in the middle of an existing config block. Replace the <my-ghost> with the name of the extprocessor that we noted down earlier.

    context / {
      type                    proxy
      handler                 <my-ghost>
      addDefaultCharset       off
    }

    At this point, your config file will look something like this:

    Click on “Update Config” to save the settings.

    Finally, we need to restart the OpenLiteSpeed service for the changes to take effect. Open the server page in your RunCloud dashboard and look for the “Services” option in the side menu. On that page, click the “…” button next to the OpenLiteSpeed server and “Restart”.

    Log In To Your Ghost Dashboard

    After setting up the proxy config, you can visit your website. To configure the admin account, go to https://example.com/ghost. You must enter basic details on this page, such as the site name and admin login details.

    After setting up the admin account, you can log into the Ghost dashboard and start publishing.

    After Action Report

    Ghost CMS is an effective modern publishing platform powered by Node.js. RunCloud makes it easy to install and configure Ghost CMS. After following the steps mentioned in this article, you will be able to set up your own CMS and start publishing content.

    After installation, you can learn more about Ghost-CLI commands and tutorials to customize your Ghost blog.I

    f you’re tired of managing your own servers, check out RunCloud, a simple yet powerful control panel for cloud servers. RunCloud is built for developers who want to focus on shipping great work, not on managing their infrastructure. Discover painless server configuration and say goodbye to spending hours figuring it out – get started with RunCloud today to get up and running in minutes.

    Ghost Installation FAQs

    What is Ghost blog, and why should I use it?

    Ghost is a free and open-source blogging platform designed to be simple, elegant, and focused on writing. It is a great choice for users who want to create a professional-looking blog without the complexities of traditional content management systems such as WordPress.

    What are the requirements for installing Ghost?

    To install Ghost, you will need a web server running either NGINX or OpenLiteSpeed, Node.js, MySQL, or SQLite. You will also need to configure your server’s domain name and SSL/TLS certificate.

    How do I install Ghost on an NGINX server?

    To install Ghost on an NGINX server, you must first install Node.js and MySQL, then download and install the Ghost NPM package. Next, you will need to configure NGINX to serve the Ghost application and set up the database connection. Finally, you will need to start the Ghost service and configure any additional settings.

    How do I install Ghost on an OpenLiteSpeed server?

    Installing Ghost on an OpenLiteSpeed server is similar to the NGINX process but with a few key differences. First, you must install Node.js and MySQL, then download and extract the Ghost files. Next, you will need to configure OpenLiteSpeed to serve the Ghost application and set up the database connection. Finally, you will need to start the Ghost service and configure any additional settings.

    What are some common issues that can arise when installing Ghost?

    Some common issues that can arise when installing Ghost include problems with the Node.js or MySQL installation, difficulty configuring the web server, and issues with the database connection. It’s important to carefully follow the installation instructions and troubleshoot any errors.

    How do I customize the appearance of my Ghost blog?

    Ghost offers a wide range of themes and customization options, allowing you to easily change the look and feel of your blog. You can install pre-built themes or create custom themes using Ghost’s theme development tools.

    What are the best practices for securing a Ghost blog?

    To secure your Ghost blog, keep your software up-to-date, use strong passwords, and configure your web server with appropriate security settings. You should also consider enabling two-factor authentication and monitoring your blog for suspicious activity.

    How do I integrate my Ghost blog with other tools and services?

    Ghost offers many integrations, allowing you to connect your blog to other tools and services, such as social media platforms, email marketing providers, and analytics tools. You can also use Ghost’s API to build custom integrations and extend your blog’s functionality.

  • How To Install Elasticsearch On RunCloud

    How To Install Elasticsearch On RunCloud

    Elasticsearch is a powerful, open-source search engine and analytics platform for storing, searching, and analyzing large volumes of data in real time.

    It’s critical for many modern applications and services that require fast, efficient search and analytics capabilities.

    Although it is a helpful tool for analytics, Elasticsearch is not installed by default on RunCloud servers because most RunCloud users don’t need it, and having it preinstalled would simply consume resources unnecessarily if not needed.

    But installing Elasticsearch on your server is easy. This article provides a step-by-step guide for installing Elasticsearch on a server managed by RunCloud.

    Let’s get started!

    Connect To Server via SSH

    Before installing Elasticsearch, you should have a server connected to RunCloud. If you don’t have a server, you can follow our tutorial on how to set up a Vultr or AWS server on RunCloud.

    Once your server is up and running, you must log in via SSH to install Elasticsearch. If you already know how to do this, jump to the RunCloud section to install Elasticsearch.

    How To Add Your SSH Key To RunCloud Server

    Once your server is connected to RunCloud, you can create new users and grant them access to log in to the server directly from the dashboard. First, go to the account settings and open your SSH key vault.

    In the key vault, you need to add your public SSH key. You can either use your existing key or generate a new one using the following command:

    ssh-keygen -t rsa
    

    After you add the key, it will appear in the key vault. You can create a new user or add this SSH key to an existing user account on your server.

    We will create a new user account to avoid disturbing files or settings in the existing user’s account. To do this, go to your server settings and open the “System User” tab. In this tab, create a new user with sudo privileges.

    After creating the user, go to your server’s SSH tab and click on the “Add New SSH Key” button to use the key we just added to the vault.

    On the next screen, use the saved key from the SSH key vault and select the user we just created.

    After adding the SSH key, log in to your server by running the following command in your terminal. Before executing the command, add the username, IP address, and path to the private key:

    ssh <username>@<ip address> -i <path to private key>

    Installing Elasticsearch on RunCloud

    When you log in to your server, you will see a large banner saying “RunCloud.” This confirms that your login attempt was successful. All the commands executed in this terminal will run on your server.

    Installing elasticsearch via command line in Linux

    Once you log in to the server, you can copy and paste the following commands into your terminal to import the Elasticsearch PGP Key and install it from the APT repository:

    wget -qO - https://artifacts.elastic.co/GPG-KEY-elasticsearch | sudo gpg --dearmor -o /usr/share/keyrings/elasticsearch-keyring.gpg
    sudo apt-get install apt-transport-https
    echo "deb [signed-by=/usr/share/keyrings/elasticsearch-keyring.gpg] https://artifacts.elastic.co/packages/8.x/apt stable main" | sudo tee /etc/apt/sources.list.d/elastic-8.x.list
    sudo apt-get update && sudo apt-get install elasticsearch
    

    A lot of people use Elasticsearch with Kibana, an open source visualization tool. If you want to install Kibana on your system, you can run the following command as well:

    sudo apt-get install kibana

    After the installation is complete, pay close attention to the output displayed. The screen displays the default password for the Elasticsearch account. In the above example, the password is 8RF65T*6cB*Y_rjUDedn.

    If you accidentally closed the screen, you can generate a new password using the following command:

    sudo /usr/share/elasticsearch/bin/elasticsearch-reset-password -u elastic
    

    Now, you can configure the Elasticsearch service to start automatically when the server reboots, and then start it using the following commands. You can optionally run the fourth command in the following block to check whether the service is up and running correctly:

    sudo systemctl daemon-reload
    sudo systemctl enable elasticsearch.service
    sudo systemctl start elasticsearch.service
    sudo systemctl status elasticsearch.service # Check status

    If you see active (running) status, then your service is configured correctly and you can start using it.

    Testing Elasticsearch

    After installing Elasticsearch you can test the installation by running the following command. If you receive an output similar to the screenshot attached below, then your Elasticsearch installation is working correctly.

    sudo curl --cacert /etc/elasticsearch/certs/http_ca.crt -u elastic https://localhost:9200 
    

    Configuring SSL Certificates For Elasticsearch

    When we tested the Elasticsearch instance, as shown in the above example, we connected using the default certificate which is generated automatically. The connection is encrypted using the http_ca.crt certificate file stored in the /etc/elasticsearch/certs/ directory.

    If you’re not working in a production environment, you can turn off the TLS/SSL on the HTTP networking layer by editing the /etc/elasticsearch/elasticsearch.yml file and setting the xpack.security.http.ssl.enabled to false.

    Generating Certificate Signing Requests for Elasticsearch

    If you are using Elasticsearch in a production environment, there is a good chance that many people will connect to your server, so using a self-signed certificate is not a good idea in such cases.

    If you are part of a large organization, you might already have a certification authority (CA) trusted by all the computers, or you might want to use a commercially available certificate authority. Having a CSR file will make issuing certificates much more manageable in both cases.

    Use the following command to create a certificate signing request. The CLI tool will ask you for basic information, such as your domain name and IP address. Fill out all the necessary fields and optionally secure the certificate with a password:

    sudo /usr/share/elasticsearch/bin/elasticsearch-certutil http

    If you didn’t change the default path of the output file, then your elasticsearch-ssl-http.zip file will be stored in the /usr/share/elasticsearch/ directory.

    Use the following commands to unzip the file and view your certificate signing request. (Don’t forget to update the name of the .csr file to match the filename):

    sudo unzip /usr/share/elasticsearch/elasticsearch-ssl-http.zip
    sudo cat /usr/share/elasticsearch/elasticsearch/<mydomain>.csr

    The above command will show you your certificate request document. You can use this to generate certificates – usually these are .pem or .cer files.

    After you get your certificate from your CA, you can put the certificate and the keys (from the zip folder generated above) in the /etc/elasticsearch/certs/ and update the /etc/elasticsearch/elasticsearch.yml to use your new certificate.

    If you configured a password during the key creation, you must add that to the key vault. You can use the following command to do so:

    sudo /usr/share/elasticsearch/bin/elasticsearch-keystore add xpack.security.http.ssl.keystore.secure_password

    For more information, refer to the Elasticsearch documentation.

    Configuring Kibana

    After installing and configuring Elasticsearch, we can start configuring Kibana on your server. First, we’ll ensure Kibana starts automatically after the system reboots and is running. Run the following commands to start the Kibana service and verify that it is running correctly:

    # Start Kibana service
    systemctl start kibana.service
    # Enable Kibana to start on boot
    systemctl enable kibana.service
    # Verify Kibana service status
    systemctl status kibana.service

    In the above example, we can see that the service is up and running correctly. Once you are sure that the service is running as expected, you can start the basic configuration by navigating to the Kibana configuration directory using the following command:

    cd /etc/kibana

    Next, you need to edit the kibana.yml configuration file. If you need help with this, refer to our previous article, in which we explained how to edit files via SSH. Run the following command to open the nano text editor:

    sudo nano /etc/kibana/kibana.yml

    After opening the configuration file, you need to add or modify these essential configurations:

    server.host: "0.0.0.0"
    # Define the port Kibana listens on
    server.port: 5601
    server.publicBaseUrl: "https://kibana.yourdomain.com"

    In this configuration, note the port number you used, as we will need it later. Once you add the configuration, you can save and close the configuration file by pressing Ctrl + X and Enter.

    Next, you need to navigate to the Elasticsearch directory and generate a Kibana enrollment token:

    systemctl restart kibana.service
    cd /usr/share/elasticsearch
    bin/elasticsearch-create-enrollment-token -s kibana

    The above command will produce a long string of text in your terminal; copy it and paste it into a notepad somewhere, as you will need it later. After that, you can execute the following commands to generate a verification code:

    cd /usr/share/kibana
    bin/kibana-verification-code

    The above command will generate a 6-digit code. Write it down, as you will need it in the next step.

    Configure a Proxy service

    After configuring the above settings, you can access your Kibana server by navigating to your server’s IP address on the specified port. However, if you want it to be accessible via a simple domain name, you can configure a Nginx reverse proxy from the RunCloud dashboard.

    We have already written a documentation post about setting up a Proxy from the RunCloud dashboard. When following this guide, edit the pre-populated fields to enter the port number you saved earlier. Once you save the Nginx config, you can access your Kibana dashboard via a URL. After configuring this, you can also consider setting up an SSL certificate for your dashboard.

    Accessing Kibana Dashboard

    Navigate to your web application’s specific URL. If you follow this guide correctly, you will be greeted with a Kibana welcome screen.

    On this screen, you will be asked to enter the authentication token and the six-digit verification code you saved earlier. Once you enter them, Kibana will take a minute or so to initialize everything.

    After your installation is complete, you will be asked to enter the login credentials for the dashboard. You must enter the credentials created during the “Installing Elasticsearch” step. For example, in this tutorial, the username is “elastic” and the password (which was automatically generated) is “8RF65T*6cB*Y_rjUDedn”.

    After entering the login credentials, you should be able to access your Kibana dashboard.

    After Action Report

    Elasticsearch is an essential tool for anyone who needs to store, search, and analyze large volumes of data. By following the article’s step-by-step guide, you can quickly and easily set up Elasticsearch on your RunCloud-managed server and take advantage of its powerful capabilities.

    If you’re tired of managing your own servers – check out RunCloud’s fast, efficient, and visual cloud server management service. RunCloud is built for developers who want to focus on shipping great work, not managing their infrastructure.

    With RunCloud’s user-friendly interface and powerful features, managing your server has never been easier. It offers a painless server configuration, so you don’t need to spend hours figuring it out.

    Get started with RunCloud today and get up and running in minutes.

  • Enable Zero-Trust SSH with Cloudflare on Windows, Mac, Linux, and ChromeOS

    Enable Zero-Trust SSH with Cloudflare on Windows, Mac, Linux, and ChromeOS

    In today’s internet landscape, securing your server from constant threats is vital. It’s inevitable that servers will be frequently targeted by automated systems searching for vulnerabilities to exploit. These attacks often go unnoticed, but they still pose a significant risk to the security and integrity of your data.

    In this guide, we will explore the zero-trust security model and demonstrate how you can implement it to enhance the protection of your server.

    By the end of this article, you’ll know how to establish a secure SSH tunnel and effectively safeguard your server from unauthorized access.

    Let’s begin.

    Explanation of the Zero Trust Security Model

    The Zero Trust security model is a framework for securing IT systems that assumes no one inside or outside the network should be trusted unless their identity is verified.

    The model operates on the principle of continuous verification of every connection and interaction, regardless of where they originate or where they are going.

    The zero trust model is based on the following key concepts:

    • Identify and protect the protected surface: This is the data, applications, assets, and services (DAAS) that are critical for the organization and need to be secured.
    • Divide the network into segments: This is done to limit the access and movement of users and devices within the network and prevent attackers’ lateral movement.
    • Create a single source of trust: This is a centralized system that collects and analyzes data from multiple sources, such as identity providers, endpoints, workloads, and network devices, to establish trust levels and enforce policies.
    • Use dynamic policies: These are policies that adapt to the context and risk level of each connection and interaction, such as user location, device type, application sensitivity, and threat intelligence.
    • Monitor and audit everything: This is done to detect and respond to anomalies and incidents and to measure and improve the effectiveness of the security controls.

    What is Zero Trust SSH Access?

    Zero-trust SSH access secures remote access to devices through the command line without opening inbound ports on the server. It relies on the principle of never trusting, always verifying, and requiring users to authenticate themselves at every access point.

    On the other hand, traditional SSH access allows users to move freely within a network once they have passed the initial authentication or authorization stage. This creates a security perimeter vulnerable to insider threats and misuse from privileged users.

    Why Zero Trust is Essential for SSH Access

    SSH (Secure Shell) is a protocol that allows secure remote access to servers and other devices. It is essential for many IT operations, such as administration, maintenance, configuration, and troubleshooting. However, if not properly managed and secured, SSH access also poses significant security risks.

    SSH access should follow the zero-trust security model to address these challenges and threats. This means that every SSH connection should be verified and authorized based on the identity and security posture of the user and device, as well as the context and risk level of the request. Additionally, SSH access should be limited to the minimum required privileges and resources, monitored for anomalies and incidents, and audited for compliance and improvement.

    Some of the benefits of applying zero trust to SSH access are:

    • Reduced attack surface: By limiting SSH access to only authorized users and devices and only necessary resources, the attack surface is reduced, and the potential impact of a breach is minimized.
    • Improved visibility: Monitoring and auditing every SSH connection and activity enhances visibility into the network, and anomalies and incidents can be detected and responded to faster.
    • Enhanced compliance: Enforcing dynamic policies based on trust levels and risk factors can enhance compliance with internal and external regulations and standards.

    How to Implement Zero Trust SSH Access

    Creating a Cloudflare Tunnel

    This section will explain how to establish a Cloudflare Tunnel. This tunnel lets you connect securely to your server without publicly exposing its ports.

    Before going into the setup, it’s essential to understand why you might want to use a Cloudflare Tunnel:

    • Enhanced Security: Cloudflare Tunnel eliminates the need for traditional port forwarding, meaning you don’t have to open up ports on your router directly to the internet. This drastically reduces the attack surface for potential malicious hackers.
    • Cloudflare’s Protection: Routing traffic through Cloudflare’s network provides benefits such as DDoS protection, which helps safeguard your server from distributed denial-of-service attacks.
    • Simplified Access: With Cloudflare Tunnel, you can access your services using a user-friendly domain name, removing the hassle of dealing with static IPs or complex network configurations.

    Steps to Create a Cloudflare Tunnel

    Before we proceed, you must have a domain name connected to your Cloudflare account. In this guide, we will use runcloudsandbox.com.

    1. Navigate to Cloudflare Zero Trust: Log in to your Cloudflare account and go to the Zero Trust dashboard.
    2. Create a New Tunnel: Within the Zero Trust dashboard, locate and click on “Network > Tunnels“, then select “Add a tunnel“.
    Cloudflare zero trust tunnel
    1. Select Tunnel type: Select the “Cloudflared” method and click “Next”.
    1. Name Your Tunnel: Provide a descriptive name for your tunnel (e.g., “MyHomeServerTunnel”).
    1. Install the Tunnel Connector: After providing the name, you must install the Cloudflare binary on your server to establish a tunnel connection. You can do this easily by logging in to your server via SSH and executing the command on the screen.
    1. Verify Tunnel Connection: After executing the command on your server, return to the Cloudflare Zero Trust dashboard. Your newly created tunnel should be listed at the bottom of the screen (as shown in the above screenshot), and its status should show as “Connected“.

    Setting Up Zero Trust SSH Using Cloudflare

    Once you’ve successfully established a Cloudflare Tunnel, you can securely access your server via SSH through Cloudflare’s robust network.

    This section will provide step-by-step instructions on enabling zero trust SSH access to your server through a web browser using Cloudflare Tunnel and Cloudflare Zero Trust.

    Step 1: Add a New Public Hostname in Cloudflare Zero Trust

    • Log in to your Cloudflare dashboard and navigate to the Zero Trust section.
    • Go to “Tunnels” and select the tunnel you want for this setup.
    • Within the tunnel settings, go to “Public Hostname” and click “Add a new public hostname“.
    RunCloud zero trust tunnels
    • Next, you need to enter your desired subdomain. This can be anything you like. For example, you can use something as simple as “ssh” or something a bit complex like “ssh-for-test-server.” Afterward, you must select your domain name from the dropdown menu.
    • Under “Type,” choose “SSH” from the dropdown menu.
    • In the “URL” field, input your server’s IP address and save your changes.

    Step 2: Create an Access Policy for SSH

    • While still in Cloudflare Zero Trust, navigate to the “Access” tab and click “Add an application“.
    • Select “Self-hosted” and provide a name for your application (e.g., “SSH”).
    • In the “Application domain” field, enter the subdomain and domain name you set up in the previous step (e.g., “ssh.example.com”).
    Adding application to cloudflare zero trust SSH
    • Next, scroll down to the “Identity Providers” section. Cloudflare supports multiple identity providers, and this section allows you to choose your preferred authentication method if you have configured it in your Zero Trust dashboard. In this tutorial, we will use the “One-time Pin“, the simplest authentication method.
    • On the bottom of the page, click “Next” and define a policy name (e.g., “SSH”).
    • Here, you have the option to set a session duration. This specifies how long the authentication remains valid. If you are unsure, you can leave it to its default value.
    • Next, you need to specify which users will have access to this SSH tunnel. You can scroll down to the “Configure rules” section to include or exclude users. In the following example, we have created three rules:
    • Our first rule grants access to two people, namely john@example.com and brian@test.com
    • Our second rule allows access to anyone who is using an email address that ends in @runcloudsandbox.com
    • Our third rule blocks visitors from specific countries (Russian Federation and China) from accessing the server.
    • After you have configured the rules, you can scroll to the bottom and click “Next“. This will take you to the setup page.
    • On this screen, scroll down to the bottom, and under “Browser rendering,” select the “SSH” option to allow SSH access through the web browser.
    • Finally, click on Add the Application to complete the configuration.

    Step 3: Authentication and Access

    • Open a new browser window or an incognito window to ensure you are logged out of Cloudflare.
    • In the address bar, type the domain name you set up for SSH access (e.g., “ssh.example.com”). You’ll be redirected to the Cloudflare authentication page.
    • Log in using your designated method on this page, which might involve a password, a hardware key, or any other configured authentication factor. In this example, we have configured a One-Time password, so we will enter the email address configured in the previous step and provide the OTP received at the email address.
    • Upon successful authentication, you’ll be directed to the SSH interface in your web browser, where you can log in to your server.

    Step 4: Connecting to Your Server

    • On the next screen, enter your server’s username in the provided field on the SSH interface. For example, if you log in to SSH using the ssh runcloud-user@1270.0.01 command, then you need to enter runcloud-user in this field.
    • If you are using RunCloud, you can easily find the list of system users on your server from the RunCloud dashboard.
    • After entering the username, you must enter this user account’s password on your server. However, we strongly recommend using SSH keys instead of passwords for enhanced security, as passwords are vulnerable to brute-force attacks.
    • If you haven’t already, you can configure SSH keys for your server by adding the public key to your server. Using RunCloud, you can add public SSH keys to your server from the RunCloud dashboard.
    • Once you have added the public key to your server, you can switch to the private key tab and paste your server’s private key to log in securely.

    Note: The password field in the Private key tab is meant to be the SSH password. Here, you need to enter the password that you configured when you generated the SSH key. You can leave this field blank if you did not configure your SSH key password.

    • After entering your password or the private key, click on “Submit” to log in to your server via SSH.

    Step 5: Closing the SSH Port (Important)

    Once you can SSH into your server via Cloudflare Tunnels, you can close the default SSH port to keep your server secure.

    If you don’t close the default SSH port of your server, then all of this effort to set up a secure tunnel would be futile as the hackers would still have a way to access your server.

    The exact steps to close the server port vary depending on the cloud provider. However, using RunCloud, you can easily open or close the ports directly from the RunCloud dashboard. To do this, simply navigate to the security section of your server, delete the firewall rule corresponding to your SSH port (22 by default), and then hit “Deploy”.

    Once you have deleted the firewall rule, wait a few minutes and try logging in to your server via the old method. If you receive an error, then you executed this step correctly. In the following example, the SSH command fails:

    Alternatively, when you connect your server via Cloudflare Tunnel, you will see that the IP address used to log in to your server is the same as your server’s IP address.

    This happens because the Cloudflare Tunnel creates a secure connection between your local network and Cloudflare’s servers, eliminating the need for traditional port forwarding. By configuring a public hostname specifically for SSH and setting up an access policy, you direct traffic from your chosen domain to your server via the tunnel.

    Final Thoughts on Zero Trust SSH Access

    In this guide, we have explained the importance of using a zero-trust architecture and provided steps to route all your traffic through Cloudflare’s network to leverage Cloudflare’s authentication measures. This significantly reduces the risk of unauthorized access.

    While setting up Zero Trust SSH access significantly enhances your server security, managing web applications and configurations can still be complex. This is where RunCloud comes into play.

    RunCloud offers a solution that complements your security efforts while simplifying server management.

    Why Choose RunCloud?

    1. Ease of Use: RunCloud provides an intuitive interface for managing your web servers, making tasks that once required extensive command-line knowledge accessible through a user-friendly dashboard.
    2. Built-in Security: RunCloud comes with built-in security features, including firewall configuration, SSL/TLS setup, and regular security updates.
    3. Scalability: As your needs grow, RunCloud makes it easy to manage multiple servers and applications from a single interface without compromising on security.
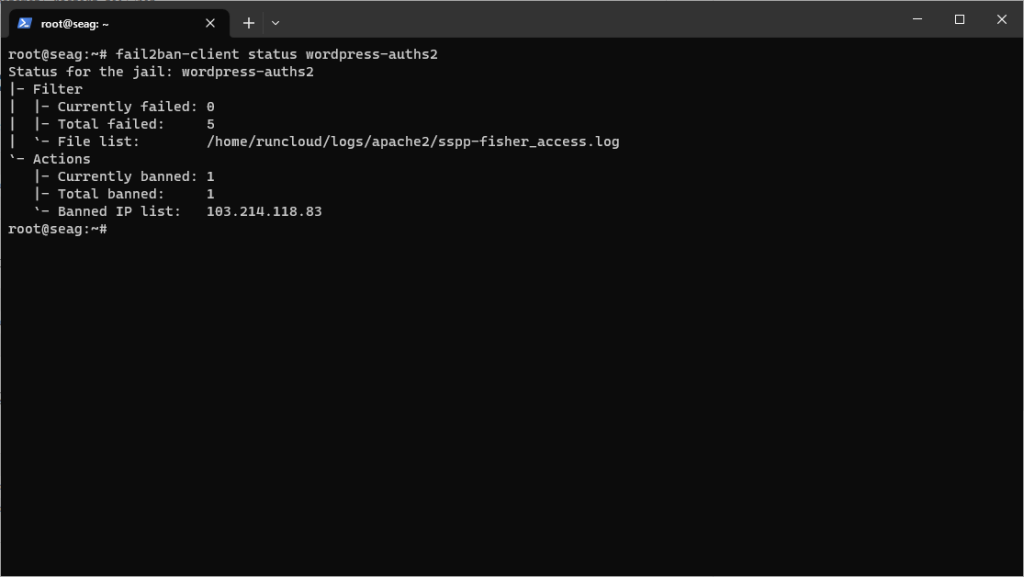
    4. Time-Saving Automation: Many routine tasks are automated in RunCloud, from backups to CI/CD application deployment, allowing you to focus on developing your applications rather than managing infrastructure.

    Take the next step in your web hosting journey by signing up for RunCloud today.

  • 10 Best Self-Hosted Email Server Platforms to Use in 2025

    10 Best Self-Hosted Email Server Platforms to Use in 2025

    Finding the perfect email hosting or newsletter tool can be overwhelming, especially when juggling performance, privacy, scalability, and cost.

    With so many options, from open-source solutions to enterprise-grade platforms, how do you know which is right?

    In this guide, we’ve curated the top self-hosted email tools available to streamline your email experience so you can focus on what truly matters – building your business and engaging your audience.

    But before going there, let’s first discuss the pros and cons of hosting your own email servers…

    What Are Email Servers?

    Email servers are specialized computer systems that send, receive, and store email messages. They act as digital post offices, managing the flow of electronic mail between users and implementing protocols such as SMTP, IMAP, and POP3 to ensure efficient message delivery and retrieval.

    Email servers can be self-hosted or provided by third-party services.

    Suggested read: 15 Best Email Hosting For Small Business (2024)

    Pros of Hosting Your Own Email Server

    Self-hosting email servers offer significant cost savings, especially for organizations with many users or high storage needs. It provides unparalleled flexibility, allowing you to create unlimited email accounts and allocate storage as needed.

    Additionally, you can send as many emails as you want without facing restrictions or extra charges, which is particularly beneficial for businesses with high email volume requirements.

    Suggested read: Best SMTP Servers for Marketing Emails in 2024 [Detailed Comparison]

    Cons of Hosting Your Own Email Server

    Despite the advantages, self-hosted email servers face challenges in email deliverability, with messages often at risk of being marked as spam by recipient servers.

    Maintaining and developing the server infrastructure requires substantial technical expertise and ongoing effort. Furthermore, you’ll need to constantly update and manage spam filters and blocklists to protect against unwanted incoming emails, adding to the complexity of server management.

    Suggested read: How To Resolve The “Email Address is Not Verified” Error With AWS SES

    Best 10 Self-Hosted Email Servers Platforms

    Here are the best self-hosted email solutions that you should consider in 2024:

    1. Mailcow Email Server

    mailcow is an open-source email server solution that uses Docker containers to provide a robust and feature-rich email infrastructure. It combines well-established components such as Dovecot, Postfix, and SOGo to create a cohesive system. This allows it to offer various functionalities, including IMAP/POP3 services, spam filtering, antivirus scanning, and webmail access.

    One of mailcow’s key strengths is its user-friendly web interface, the mailcow UI, which simplifies email server management tasks. This interface allows administrators to easily configure domains, create email accounts, manage spam settings, and handle more complex functions such as DKIM key generation and ARC support.If you want to see the UI, you can log in to the demo mailcow server using the provided credentials.

    Mailcow also incorporates security features such as two-factor authentication, fail2ban-like protection, and automatic Let’s Encrypt certificate generation, making it a compelling choice for organizations seeking a secure, full-featured email solution that’s relatively easy to deploy and maintain.

    Suggested read: Using Mailgun To Send Transactional Email From WordPress

    2. Modoboa

    Modoboa is an open-source email server designed to simplify setting up and managing a personal or organizational email infrastructure. It offers users an alternative to commercial email services and complex self-hosted solutions by providing a user-friendly platform that can be installed in less than 10 minutes.

    Modoboa integrates various open-source tools into a single interface, which allows users to create and manage multiple domains, mailboxes, and aliases without the limitations often imposed by traditional email providers.

    If you are not tech-savvy, you might also enjoy the installation and configuration services Modoboa provides. Although most free tools offer the software and expect you to run it independently, Modoboa has official (paid) support plans to help you resolve your queries.

    Additionally, Modoboa offers a range of functionalities typically found in professional email hosting services, including webmail access, calendar and address book management, email filtering rules, and administrative tools, making it a comprehensive solution for those seeking independence from commercial email providers.

    Suggested read: How to Send Email from PHP (With Guided Walkthrough)

    3. Mailu: Insular Email Distribution

    Mailu is another popular open-source mail server solution that uses Docker containers to provide an easily deployable email infrastructure.

    It is designed with simplicity and functionality in mind, and offers a full-featured mail server that doesn’t rely on proprietary software or include unnecessary features often found in more extensive groupware solutions.

    It supports IMAP, IMAP+, and SMTP protocols and includes auto-configuration profiles for email clients. The system offers web-based access through multiple webmail options and an administration interface.

    Suggested read: DKIM – What Is It & Why Your Emails Need It

    4. Poste.io

    Poste.io is a great email server solution designed for quick and easy deployment. It offers a full suite of email services, including SMTP, IMAP, and POP3 protocols and antispam and antivirus protection. One of its key features is the ability to set up a fully functional mail server in approximately five minutes, which makes it an attractive option for users who need a robust email infrastructure without the complexity of manual configuration.

    The system includes a web-based administration interface and webmail client, which provide convenient management and access to emails from any device with a web browser. It also contains built-in spam filtering using RSPAMD and antivirus protection with ClamAV. The system prioritizes encryption, using SSL/TLS for all communications to protect sensitive data.

    Additionally, Poste.io offers features such as email redirection, auto-reply capabilities, and quota management, all of which can be controlled through its web interface. Its container-based Docker architecture isolates it from other applications, enhancing overall security and simplifying deployment and management.

    If you want to test this out for yourself, you can view the official demo of Poste.io.

    Suggested read: How to Install Ubuntu Mail Server? [Step By Step Guide]

    5. iRedAdmin-Pro

    iRedMail is a powerful email server solution offering a free, open-source edition (OSE) and a premium version called iRedAdmin-Pro. It provides comprehensive features for managing email domains, users, and security settings through a user-friendly web interface.

    The free version of iRedMail allows users to set up and manage unlimited mail domains and user accounts. It includes basic features such as mailbox quota control, mailing list management, and a localized web interface in multiple languages.

    The open-source edition is suitable for users who need a simple, no-cost solution for their email server needs.

    iRedAdmin-Pro, the premium version, significantly expands on the capabilities of the free edition. It offers advanced domain and user management features, including domain-level admins, per-user service control, and self-service options for end-users. The Pro version also includes robust security features such as spam and virus quarantining, detailed throttling controls, and integration with Fail2ban for enhanced protection against malicious activities.

    Additionally, iRedAdmin-Pro provides advanced searching capabilities, logging of admin activities, and the ability to export account statistics, making it ideal for organizations that require more control and security in their email infrastructure.

    If interested, you should check out the demo website to get a feel for the iRedAdmin-Pro dashboard.

    Suggested read: 8 Best Linux Mail Transfer Agents in 2024 (Our Top Picks)

    6. Mail-in-a-Box

    Mail-in-a-Box is a user-friendly, open-source email server solution that allows individuals to become mail service providers. In just a few easy steps, it can turn a fresh cloud computer running Ubuntu 22.04 into a fully functional mail server.

    It provides comprehensive features, including webmail access through Roundcube, IMAP/SMTP server support for mobile devices and desktop mail software, and contacts and calendar synchronization via Nextcloud. It also incorporates essential email functionalities such as spam protection, mail filter rules, and automated backups to services like Amazon S3.

    One of Mail-in-a-Box’s strengths is its automatic DNS configuration. When users allow it to become their nameserver, it sets up important DNS records for mail deliverability and security, including SPF, DKIM, DMARC, and MTA-STS. The system also supports DNSSEC for enhanced protection against active attacks.

    Suggested read: The 19 Best & Most Reliable Transactional Email Services 2023

    7. Apache James

    James (Java Apache Mail Enterprise Server) is a versatile and modular email server solution built on the Java Virtual Machine (JVM). It offers a comprehensive set of components that allow users to create customized email processing systems. James supports many email protocols, including SMTP, LMTP, POP3, IMAP, ManageSieve, and JMAP, making it a flexible choice for various email server needs.

    James self hosted email server

    One of James’ key strengths is its modular architecture, which allows users to assemble only the necessary components for their specific use case. This flexibility extends to its storage options, supporting various databases such as Cassandra, PostgreSQL, HSQLDB, MySQL, and OpenSearch.

    James also provides a Mailet Container, which enables users to customize filtering and routing rules, enhancing its adaptability. The portable software runs on Java RE 11 and offers multiple administration interfaces, including JMX, REST, and Command-Line.

    8. Dovecot or Dovecot Pro | Open-Xchange

    Dovecot Pro is designed to deliver unparalleled performance, scalability, and security for large-scale email service providers, such as Telcos, ISPs, and hosting companies. It is an open-source solution that comes in both free and professional versions, with Dovecot Pro offering advanced features tailored to meet the needs of enterprises.

    Dovecot Pro supports dynamic scalability and offers efficient hardware utilization, enabling it to manage millions of users across multiple physical sites. Its stateless architecture provides flexibility, allowing components to be deployed on dedicated nodes for seamless scaling.

    Dovecot Pro supports all major email standards, including IMAP, POP3, LMTP, and Manage Sieve protocols, to ensure smooth mail delivery and retrieval. Advanced security features, such as full encryption of data at rest, OAuth authentication, and integration with OX Abuse Shield, are also supported and offer robust protection against login abuse.

    9. WildDuck Mail Server

    WildDuck Mail Server is a developer-first email server solution designed for scalability, Unicode support, and API control. It is ideal for large deployments with over 1,000 email accounts.

    WildDuck is stateless, which enables seamless integration of additional application servers behind a TCP load balancer. This significantly increases throughput without worrying about user-to-server assignment.

    Unlike traditional setups, WildDuck doesn’t use the file system for storage; instead, it separates email content from attachments. This allows it to offer efficient data management by leveraging cost-effective storage solutions such as SATA for attachments and faster SSDs for critical data.

    WildDuck Mail Server

    It is written in a memory-safe language and operates without root privileges, eliminating common security risks. Additionally, WildDuck supports multi-factor authentication, application-specific passwords, and user-configured GPG public keys for encrypted storage.

    Moreover, its API-driven architecture allows granular control over everything, from mail account settings to server-side filtering and auto-replies, which provides flexibility and ease of management.

    10. Keila

    Keila is an open-source email hosting server designed to simplify the management and execution of personalized newsletter campaigns. Keila offers users a versatile platform that caters to developers and non-technical users. Its drag-and-drop Block Editor allows for easy visual customization of newsletters, while advanced users can build their designs using MJML or Markdown.

    Keila ensures compatibility across devices and clients such as Gmail, Outlook, and Thunderbird, so your emails always look professional, whether recipients are using mobile or desktop devices. The platform also offers privacy-focused robust analytics without unnecessary data collection and even allows users to turn off tracking for maximum privacy.

    Keila self hosted email server

    With Keila’s Form Builder, users can create sign-up forms customized with additional fields and stay protected from bots using captcha checks and double opt-in processes. As a 100% open-source solution, Keila ensures no vendor lock-in, making it a highly customizable and scalable alternative to proprietary tools such as Mailchimp and Brevo.

    Should You Self-Host Email Servers?

    Many email experts strongly advise against self-hosting email servers for primary communication, especially for businesses or organizations that rely heavily on email. The complexities of maintaining a secure, reliable, and spam-free email server often outweigh the potential benefits of self-hosting. Instead, it is recommended to use established email service providers with the resources and expertise to handle email delivery and security intricacies.

    However, there is a growing consensus that self-hosting can be a viable option for sending transactional and other notification emails. These emails are typically system-generated and don’t require the same level of inbox placement and deliverability as regular correspondence. Self-hosting in this context can provide more control over the sending process and potentially reduce costs for high-volume senders.

    Ultimately, the decision to self-host should be based on carefully assessing your technical capabilities, resources, and specific needs.

    Suppose you do self-host for transactional emails. In that case, experts recommend implementing robust security measures, regularly updating your server software, and closely monitoring your server’s reputation to ensure your emails continue to be delivered successfully.

    Wrapping up

    In this post, we’ve provided a comprehensive list of some of the best email hosting and newsletter tools available today, each tailored to meet various needs. Whether you’re looking for open-source flexibility or enterprise-grade performance, these tools should help you make an informed decision.

    Managing your email servers can be time-consuming and complex. Instead of getting bogged down with server management, focus on scaling your operations and leave the technical hassles to the professionals.

    If you’re ready to simplify server management and accelerate your business, try RunCloud.

    RunCloud makes it easy to manage your servers with just a few clicks, so you can concentrate on what matters most – your business.

    Sign up for RunCloud today and experience the convenience of automated server management!

    FAQs on Self-Hosting Email Servers

    How much does it cost to host your email server?

    The cost of hosting your own email server can vary widely depending on your setup and requirements. Generally, you can expect to spend anywhere from $5 to $50 monthly for a basic virtual private server (VPS) to run your email server. Additional costs may include domain registration, SSL certificates, and any premium software or services you use.

    What is the cheapest email provider?

    For those not looking to self-host, some of the most affordable email providers include Zoho Mail, which offers a free plan for up to five users, and Google Workspace (formerly G Suite), starting at $6 per monthly user. Other budget-friendly options include Bluehost and HostGator, which often include email hosting with their web hosting packages.

    What is the most secure self-hosting email?

    For secure self-hosted email, many experts recommend using a combination of Postfix (SMTP server), Dovecot (IMAP/POP3 server), and SpamAssassin (spam filter). When properly configured with solid encryption and security measures, this setup can provide a highly secure email environment. Some also advocate for using encrypted email services such as ProtonMail for added security.
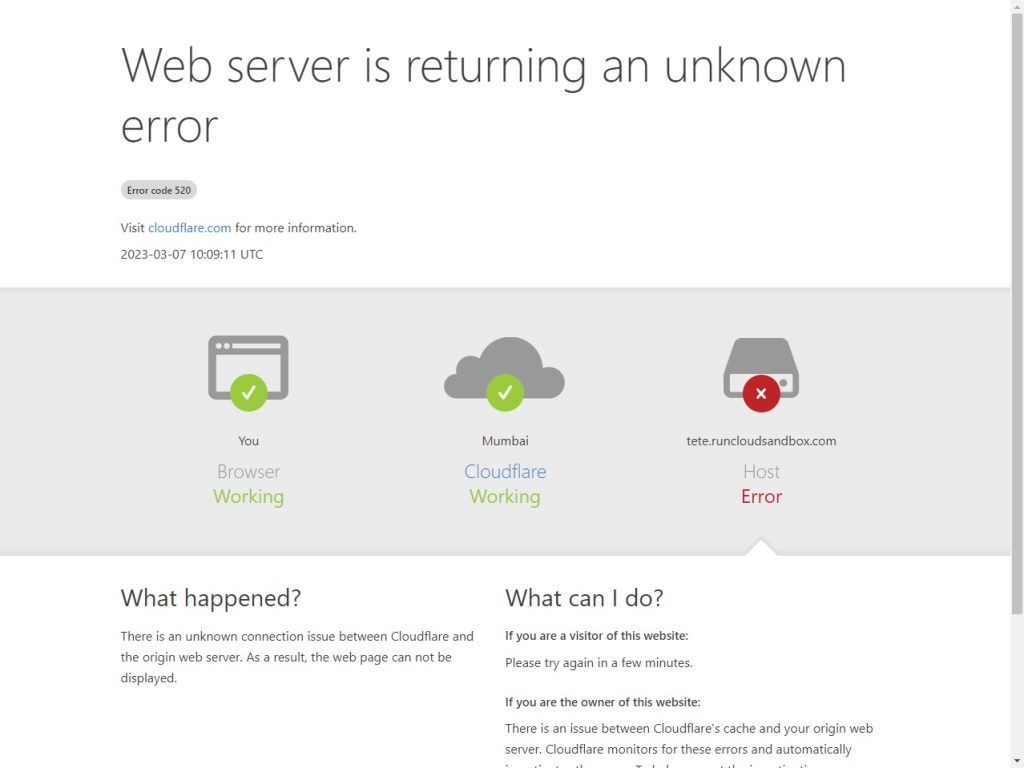
    How do I create my own email server for free?

    Creating a free email server is possible using open-source software on a home computer or a free-tier cloud service. You can use software such as iRedMail or Mail-in-a-Box, which automates much of the setup process. However, keep in mind that while the software may be free, you’ll likely still incur costs for domain registration and possibly for a static IP address.

    What is the best email provider for personal use?

    The “best” email provider for personal use depends on individual needs. Still, Gmail is often considered top-tier due to its robust features, ample storage, and integration with other Google services. Other popular options include Outlook.com (formerly Hotmail) and ProtonMail for those prioritizing privacy and security.
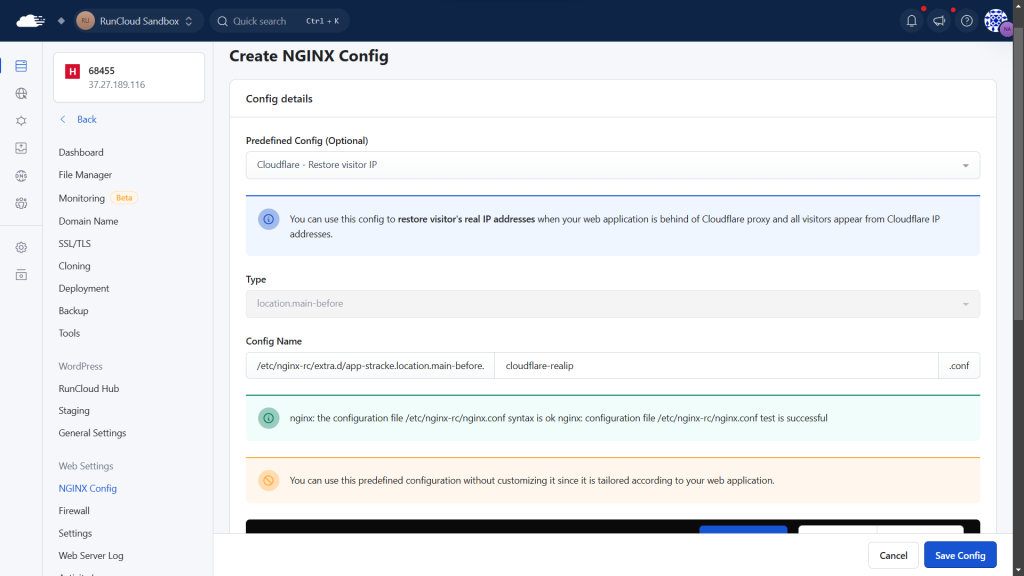
    Can I create my own SMTP server?

    Yes, you can create your own SMTP (Simple Mail Transfer Protocol) server using open-source software such as Postfix or Exim on a Linux system. However, setting up and maintaining an SMTP server requires technical knowledge and ongoing management to ensure proper functionality and security.